Embed Size (px)
Citation preview

Owner's Manual
TB110MW9DTV Digital to Analog Converter(Set Top Box)
© 2008 Funai Electric Co., Ltd.
THANK YOU FOR CHOOSING MAGNAVOX.NEED HELP FAST?
READ YOUR OWNER'S MANUAL FIRST FOR QUICK TIPS THAT MAKE USING YOUR MAGNAVOX PRODUCT MORE ENJOYABLE.
IF YOU HAVE READ YOUR INSTRUCTIONS AND STILL NEED ASSISTANCE, YOU MAY ACCESS OUR ONLINE HELP AT HTTP://WWW.FUNAI-CORP.COM
OR CALL 1-800-605-8610 WHILE WITH YOUR PRODUCT.
INSTRUCCIONES EN ESPAÑOL INCLUIDAS.
X6043UD_TB110MW.indd 1X6043UD_TB110MW.indd 1 2008/05/29 14:28:252008/05/29 14:28:25
2EN
Before Using
1. Read instructions - All the safety and operating instructions should be read before the appliance is operated.
2. Retain Instructions - The safety and operating instructions should be retained for future reference.
3. Heed Warnings - All warnings on the appliance and in the operating instructions should be adhered to.
4. Follow Instructions - All operating and use instructions should be followed.
5. Cleaning - Unplug this product from the wall outlet before cleaning. Do not use liquid cleaners or aerosol cleaners. Use a damp cloth for cleaning.EXCEPTION: A product that is meant for uninterrupted service and, that for some specifi c reason, such as the possibility of the loss of an authorization code for a CATV converter, is not intended to be unplugged by the user for cleaning or any other purpose, may exclude the reference to unplugging the appliance in the cleaning description otherwise required in item 5.
6. Attachments - Do not use attachments not recommended by this product manufacturer as they may cause hazards.
7. Water and Moisture - Do not use this product near water-for example, near a bath tub, wash bowl, kitchen sink, or laundry tub, in a wet basement, or near a swimming pool, and the like.
8. Accessories - Do not place this product on an unstable cart, stand, tripod, bracket, or table. This product may fall, causing serious injury to someone, and serious damage to the appliance. Use only with a cart, stand, tripod, bracket, or table recommended by the manufacturer, or sold with this product. Any mounting of the appliance should follow the manufacturer’s instructions and should use a mounting accessory recommended by the manufacturer. An appliance and cart combination should be moved with care. Quick stops, excessive force, and uneven surfaces may cause the appliance and cart combination to overturn.
AMEUBLES - Cet appareil ne doit être placé que sur un meuble (avec ou sans roulettes) recommandé par le fabricant. Si vous l’installez sur un meuble à roulettes,
WARNING: TO REDUCE THE RISK OF FIRE OR ELECTRIC SHOCK, DO NOT EXPOSE THIS APPLIANCE TO RAIN OR MOISTURE.
The caution marking is located on the bottom of the cabinet.
CAUTIONRISK OF ELECTRIC SHOCK
DO NOT OPENCAUTION: TO REDUCE THE RISK OF ELECTRIC SHOCK, DO NOT REMOVE COVER (OR BACK). NO USER SERVICEABLE PARTS INSIDE. REFER SERVICING TO QUALIFIED SERVICE PERSONNEL.
THIS SYMBOL INDICATES THAT DANGEROUS VOLTAGE CONSTITUTING A RISK OF ELECTRIC SHOCK IS PRESENT WITHIN THIS UNIT.
THIS SYMBOL INDICATES THAT THERE ARE IMPORTANT OPERATING AND MAINTENANCE INSTRUCTIONS IN THE LITERATURE ACCOMPANYING THE APPLIANCE.
Important Safeguardsdéplacez les deux ensembles avec précaution. Un arrêt brusque, l’utilisation d’une force excessive et des surfaces irrégulières risquent de déstabiliser l’ensemble et de le renverser.
9. Ventilation - Slots and openings in the cabinet and the back or bottom are provided for ventilation and to ensure reliable operation of this product and to protect it from overheating, and these openings must not be blocked or covered. The openings should never be blocked by placing this product on a bed, sofa, rug, or other similar surface. This product should never be placed near or over a radiator or heat register. This product should not be placed in a built-in installation such as a bookcase or rack unless proper ventilation is provided or the manufacturer’s instructions have been adhered to.
10. Power Sources - This product should be operated only from the type of power source indicated on the marking label. If you are not sure of the type of power supply to your home, consult your appliance dealer or local power company. For this products intended to operate from battery power, or other sources, refer to the operating instructions.
11. Grounding or Polarization - This product is equipped with a polarized alternating-current line plug(a plug having one blade wider than the other). This plug will fi t into the power outlet only one way. This is a safety feature. If you are unable to insert the plug fully into the outlet, try reversing the plug. If the plug should still fail to fi t, contact your electrician to replace your obsolete outlet. Do not defeat the safety purpose of the polarized plug.
12. Power-Cord Protection - Power-supply cords should be routed so that they are not likely to be walked on or pinched by items placed upon or against them, paying particular attention to cords at plugs, convenience receptacles, and the point where they exit from the appliance.
13. Outdoor Antenna grounding - If an outside antenna or cable system is connected to this product, be sure the antenna or cable system is grounded so as to provide some protection against voltage surges and built-up static charges. Article 810 of the National Electrical Code, ANSI/NFPA No. 70, provides information with respect to proper grounding of the mast and supporting structure, grounding of the lead-in wire to an antenna discharge unit, size of grounding
X6043UD_TB110MW.indd 2X6043UD_TB110MW.indd 2 2008/05/29 14:28:282008/05/29 14:28:28
3EN
Before Using
conductors, location of antenna-discharge unit, connection to grounding electrodes, and requirements for the grounding electrode. (Fig. A)
14. Lightning - For added protection for this product receiver during a lightning storm, or when it is left unattended and unused for long periods of time, unplug it from the wall outlet and disconnect the antenna or cable system. This will prevent damage to this product due to lightning and power-line surges.
15. Power Lines - An outside antenna system should not be located in the vicinity of overhead power lines or other electric light or power circuits, or where it can fall into such power lines or circuits. When installing an outside antenna system, extreme care should be taken to keep from touching such power lines or circuits as contact with them might be fatal.
16. Overloading - Do not overload wall outlets and extension cords as this can result in a risk of fi re or electric shock.
17. Object and Liquid Entry - Never push objects of any kind into this product through openings as they may touch dangerous voltage points or short out parts that could result in a fi re or electric shock. Never spill liquid of any kind on this product.
18. Servicing - Do not attempt to service this product yourself as opening or removing covers may expose you to dangerous voltage or other hazards. Refer all servicing to qualifi ed service personnel.
19. Damage Requiring Service - Unplug this product from the wall outlet and refer servicing to qualifi ed service personnel under the following conditions:
a. When the power-supply cord or plug is damaged or frayed.
b. If liquid has been spilled, or objects have fallen into this product.
c. If this product has been exposed to rain or water.d. If this product does not operate normally by
following the operating instructions. Adjust only those controls that are covered by the operating instructions, as improper adjustment of other controls may result in damage and will often require extensive work by a qualifi ed technician to restore this product to its normal operation.
e. If this product has been dropped or damaged in any way.
f. When this product exhibits a distinct change in performance-this indicates a need for service.
20. Replacement Parts - When replacement parts are required, be sure the service technician has used replacement parts specifi ed by the manufacturer that have the same characteristics as the original part. Unauthorized substitutions may result in fi re, electric shock, injury to persons or other hazards.
21. Safety Check - Upon completion of any service or repairs to this product, ask the service technician to perform routine safety checks to determine that this product is in proper operating condition.
22. Heat - This product should be situated away from heat sources such as radiators, heat registers, stoves, or other products (including amplifi ers) that produce heat.
GROUND CLAMPS
NEC - NATIONAL ELECTRICAL CODE
FIGURE AEXAMPLE OF ANTENNA GROUNDING AS PER
NATIONAL ELECTRICAL CODE
GROUNDING CONDUCTORS (NEC SECTION 810-21)
ANTENNA LEAD IN WIRE
ANTENNA DISCHARGE UNIT (NEC SECTION 810-20)
POWER SERVICE GROUNDING ELECTRODE SYSTEM (NEC ART 250, PART H)
GROUND CLAMP
ELECTRIC SERVICE EQUIPMENT
The serial number of this product may be found on the bottom of the unit. You should record the number and other vital information here and retain this book as a permanent record. Serial numbers are not kept on fi le.
Date of Purchase Dealer Phone No.Dealer Purchase from Model No.Dealer Address Serial No.
CAUTION: TO PREVENT ELECTRIC SHOCK, MATCH WIDE BLADE OF PLUG TO WIDE SLOT, FULLY INSERT.
ATTENTION: POUR ÉVITER LES CHOCS ÉLECTRIQUES, INTRODUIRE LA LAME LA PLUS LARGE DE LA FICHE DANS LA BORNE CORRESPONDANTE DE LA PRISE ET POUSSER JUSQU’AU FOND.
Do not place the unit on the furniture that is capable of being tilted by a child and an adult leaning, pulling, standing or climbing on it. A falling unit can cause serious injury or even death.
X6043UD_TB110MW.indd 3X6043UD_TB110MW.indd 3 2008/05/29 14:28:292008/05/29 14:28:29
4EN
Before Using
LocationFor safe operation and satisfactory performance of this product, keep the following in mind when selecting a place for its installation:
Shield it from direct sunlight and keep it away from sources of intense heat.Avoid dusty or humid places.Avoid places with insufficient ventilation for proper heat dissipation. Do not block the ventilation holes at the top and bottom of the product. Do not place the product on a carpet because this will block the ventilation holes.Install the product in a horizontal position.Avoid locations subject to strong vibration.Do not place this product near strong magnetic fields.Avoid moving this product to locations where temperature differences are extreme.
Avoid the Hazards of Electrical Shock and Fire
Do not handle the power cord with wet hands.Do not pull on the power cord when disconnecting it from an AC wall outlet. Grasp it by the plug.If by accident, water is spilled on your the product, unplug the power cord immediately and take the product to our Authorized Service Center for servicing.Do not place anything directly on top of the product.
A Note about RecyclingThis product’s packaging materials are recyclable and can be reused. Please dispose of any materials in accordance with your local recycling regulations.Batteries should never be thrown away or incinerated but disposed of in accordance with your local regulations concerning chemical wastes.
•
••
•••
•
••
•
•
Important Copyright InformationUnauthorized recording or use of broadcast television programming, video tape, fi lm or other copyrighted material may violate applicable copyright laws. We assume no responsibility for the unauthorized duplication, use or other acts which infringe upon the rights of copyright owners.
FCC WARNING - This equipment may generate or use radio frequency energy. Changes or modifi cations to this equipment may cause harmful interference unless the modifi cations are expressly approved in the instruction manual. The user could lose the authority to operate this equipment if an unauthorized change or modifi cation is made.
Precautions
X6043UD_TB110MW.indd 4X6043UD_TB110MW.indd 4 2008/05/29 14:28:292008/05/29 14:28:29
5EN
Before Using
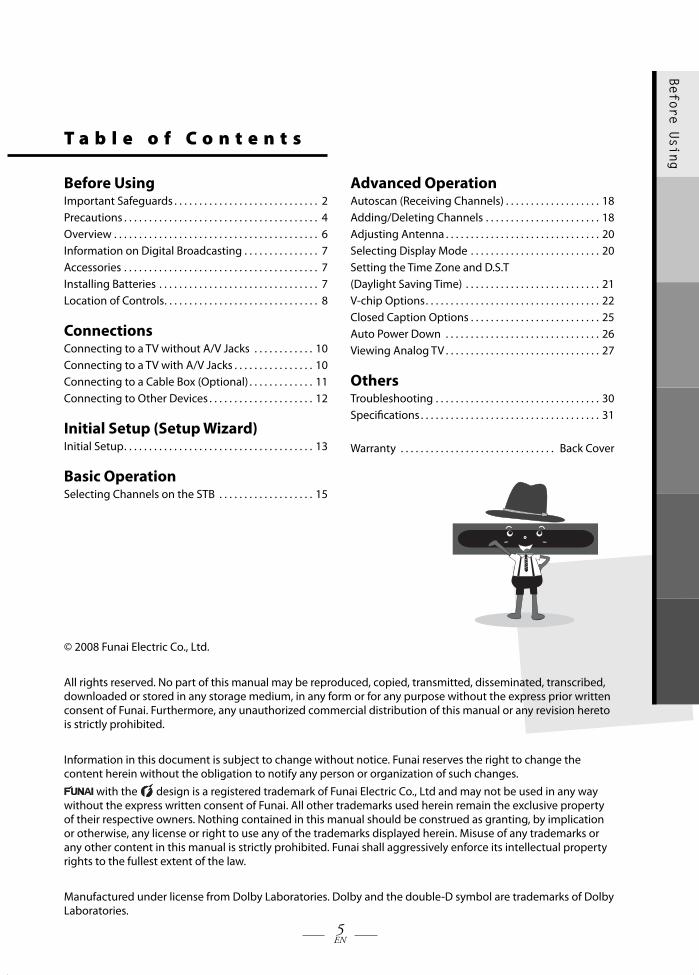
T a b l e o f C o n t e n t s
Before UsingImportant Safeguards . . . . . . . . . . . . . . . . . . . . . . . . . . . . . 2Precautions . . . . . . . . . . . . . . . . . . . . . . . . . . . . . . . . . . . . . . . 4Overview . . . . . . . . . . . . . . . . . . . . . . . . . . . . . . . . . . . . . . . . . 6Information on Digital Broadcasting . . . . . . . . . . . . . . . 7Accessories . . . . . . . . . . . . . . . . . . . . . . . . . . . . . . . . . . . . . . . 7Installing Batteries . . . . . . . . . . . . . . . . . . . . . . . . . . . . . . . . 7Location of Controls . . . . . . . . . . . . . . . . . . . . . . . . . . . . . . . 8
ConnectionsConnecting to a TV without A/V Jacks . . . . . . . . . . . . 10Connecting to a TV with A/V Jacks . . . . . . . . . . . . . . . . 10Connecting to a Cable Box (Optional) . . . . . . . . . . . . . 11Connecting to Other Devices . . . . . . . . . . . . . . . . . . . . . 12
Initial Setup (Setup Wizard)Initial Setup . . . . . . . . . . . . . . . . . . . . . . . . . . . . . . . . . . . . . . 13
Basic OperationSelecting Channels on the STB . . . . . . . . . . . . . . . . . . . 15
Advanced OperationAutoscan (Receiving Channels) . . . . . . . . . . . . . . . . . . . 18Adding/Deleting Channels . . . . . . . . . . . . . . . . . . . . . . . 18Adjusting Antenna . . . . . . . . . . . . . . . . . . . . . . . . . . . . . . . 20Selecting Display Mode . . . . . . . . . . . . . . . . . . . . . . . . . . 20Setting the Time Zone and D.S.T (Daylight Saving Time) . . . . . . . . . . . . . . . . . . . . . . . . . . . 21V-chip Options . . . . . . . . . . . . . . . . . . . . . . . . . . . . . . . . . . . 22Closed Caption Options . . . . . . . . . . . . . . . . . . . . . . . . . . 25Auto Power Down . . . . . . . . . . . . . . . . . . . . . . . . . . . . . . . 26Viewing Analog TV . . . . . . . . . . . . . . . . . . . . . . . . . . . . . . . 27
OthersTroubleshooting . . . . . . . . . . . . . . . . . . . . . . . . . . . . . . . . . 30Specifi cations . . . . . . . . . . . . . . . . . . . . . . . . . . . . . . . . . . . . 31
Warranty . . . . . . . . . . . . . . . . . . . . . . . . . . . . . . . Back Cover
© 2008 Funai Electric Co., Ltd.
All rights reserved. No part of this manual may be reproduced, copied, transmitted, disseminated, transcribed, downloaded or stored in any storage medium, in any form or for any purpose without the express prior written consent of Funai. Furthermore, any unauthorized commercial distribution of this manual or any revision hereto is strictly prohibited.
Information in this document is subject to change without notice. Funai reserves the right to change the content herein without the obligation to notify any person or organization of such changes.
with the design is a registered trademark of Funai Electric Co., Ltd and may not be used in any way without the express written consent of Funai. All other trademarks used herein remain the exclusive property of their respective owners. Nothing contained in this manual should be construed as granting, by implication or otherwise, any license or right to use any of the trademarks displayed herein. Misuse of any trademarks or any other content in this manual is strictly prohibited. Funai shall aggressively enforce its intellectual property rights to the fullest extent of the law.
Manufactured under license from Dolby Laboratories. Dolby and the double-D symbol are trademarks of Dolby Laboratories.
X6043UD_TB110MW.indd 5X6043UD_TB110MW.indd 5 2008/05/29 14:28:292008/05/29 14:28:29
6EN
Before Using
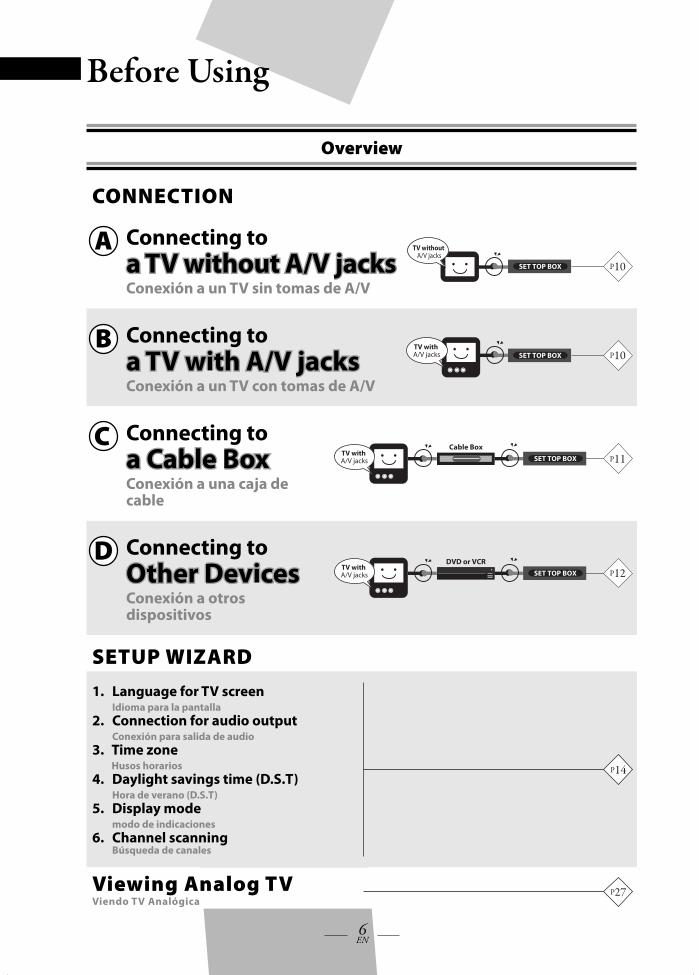
Overview
CONNECTION
A Connecting to a TV without A/V jacksa TV without A/V jacksConexión a un TV sin tomas de A/V
P10
TV without A/V jacks
SET TOP BOX
B Connecting to a TV with A/V jacksa TV with A/V jacksConexión a un TV con tomas de A/V
P10TV with
A/V jacks SET TOP BOX
C Connecting to a Cable Boxa Cable BoxConexión a una caja de cable
P11Cable Box
TV with A/V jacks SET TOP BOX
D Connecting to Other DevicesOther DevicesConexión a otros dispositivos
P12DVD or VCR
TV with A/V jacks SET TOP BOX
SETUP WIZARD1. Language for TV screen
Idioma para la pantalla2. Connection for audio output
Conexión para salida de audio3. Time zone
Husos horarios4. Daylight savings time (D.S.T)
Hora de verano (D.S.T)5. Display mode
modo de indicaciones6. Channel scanning
Búsqueda de canales
P14
Viewing Analog TVViendo TV Analógica
P27
X6043UD_TB110MW.indd 6X6043UD_TB110MW.indd 6 2008/05/29 14:28:302008/05/29 14:28:30
7EN
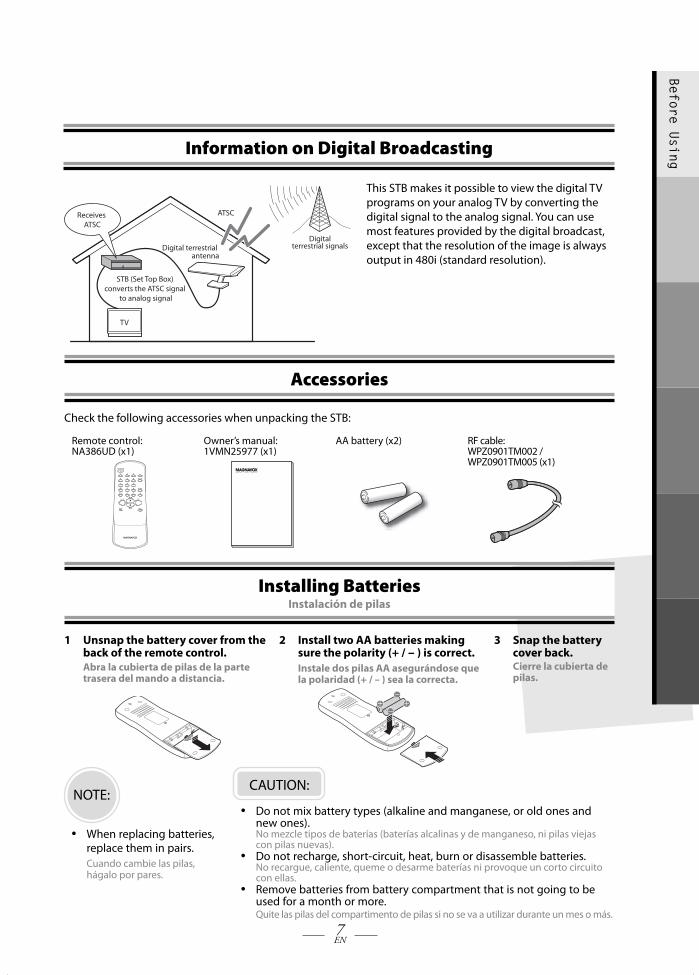
Before UsingInformation on Digital Broadcasting
Digital terrestrial antenna
Digitalterrestrial signals
STB (Set Top Box) converts the ATSC signal
to analog signal
TV
Receives ATSC
ATSC
This STB makes it possible to view the digital TV programs on your analog TV by converting the digital signal to the analog signal. You can use most features provided by the digital broadcast, except that the resolution of the image is always output in 480i (standard resolution).
Accessories
Check the following accessories when unpacking the STB:
Remote control: NA386UD (x1)
Owner’s manual: 1VMN25977 (x1)
AA battery (x2) RF cable: WPZ0901TM002 / WPZ0901TM005 (x1)
Installing BatteriesInstalación de pilas
1 Unsnap the battery cover from the back of the remote control.
Abra la cubierta de pilas de la parte trasera del mando a distancia.
2 Install two AA batteries making sure the polarity (+ / - ) is correct.
Instale dos pilas AA asegurándose que la polaridad (+ / - ) sea la correcta.
3 Snap the battery cover back.
Cierre la cubierta de pilas.
CAUTION:
Do not mix battery types (alkaline and manganese, or old ones and new ones).No mezcle tipos de baterías (baterías alcalinas y de manganeso, ni pilas viejas con pilas nuevas).Do not recharge, short-circuit, heat, burn or disassemble batteries.No recargue, caliente, queme o desarme baterías ni provoque un corto circuito con ellas.Remove batteries from battery compartment that is not going to be used for a month or more.Quite las pilas del compartimento de pilas si no se va a utilizar durante un mes o más.
•
•
•
NOTE:
When replacing batteries, replace them in pairs.Cuando cambie las pilas, hágalo por pares.
•
X6043UD_TB110MW.indd 7X6043UD_TB110MW.indd 7 2008/05/29 14:28:312008/05/29 14:28:31
8EN
Before Using
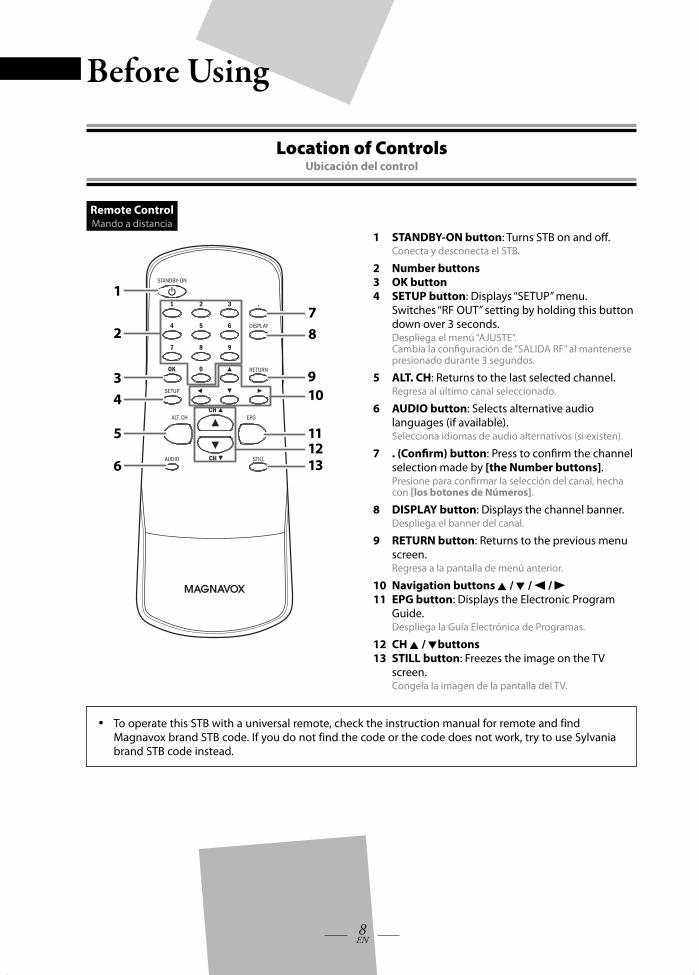
Location of ControlsUbicación del control
Remote ControlMando a distancia
9
1
2
43
6
5
78
10
11
1312
1 STANDBY-ON button: Turns STB on and off . Conecta y desconecta el STB.
2 Number buttons3 OK button4 SETUP button: Displays “SETUP” menu. Switches “RF OUT” setting by holding this button
down over 3 seconds. Despliega el menú “AJUSTE”. Cambia la confi guración de “SALIDA RF” al mantenerse
presionado durante 3 segundos.
5 ALT. CH: Returns to the last selected channel. Regresa al último canal seleccionado.
6 AUDIO button: Selects alternative audio languages (if available).
Selecciona idiomas de audio alternativos (si existen).
7 . (Confi rm) button: Press to confi rm the channel selection made by [the Number buttons].
Presione para confi rmar la selección del canal, hecha con [los botones de Números].
8 DISPLAY button: Displays the channel banner. Despliega el banner del canal.
9 RETURN button: Returns to the previous menu screen.
Regresa a la pantalla de menú anterior.
10 Navigation buttons K / L / s / B
11 EPG button: Displays the Electronic Program Guide.
Despliega la Guía Electrónica de Programas.
12 CH K / Lbuttons13 STILL button: Freezes the image on the TV
screen. Congela la imagen de la pantalla del TV.
To operate this STB with a universal remote, check the instruction manual for remote and find Magnavox brand STB code. If you do not find the code or the code does not work, try to use Sylvania brand STB code instead.
•
X6043UD_TB110MW.indd 8X6043UD_TB110MW.indd 8 2008/05/29 14:28:322008/05/29 14:28:32
9EN
Before Using
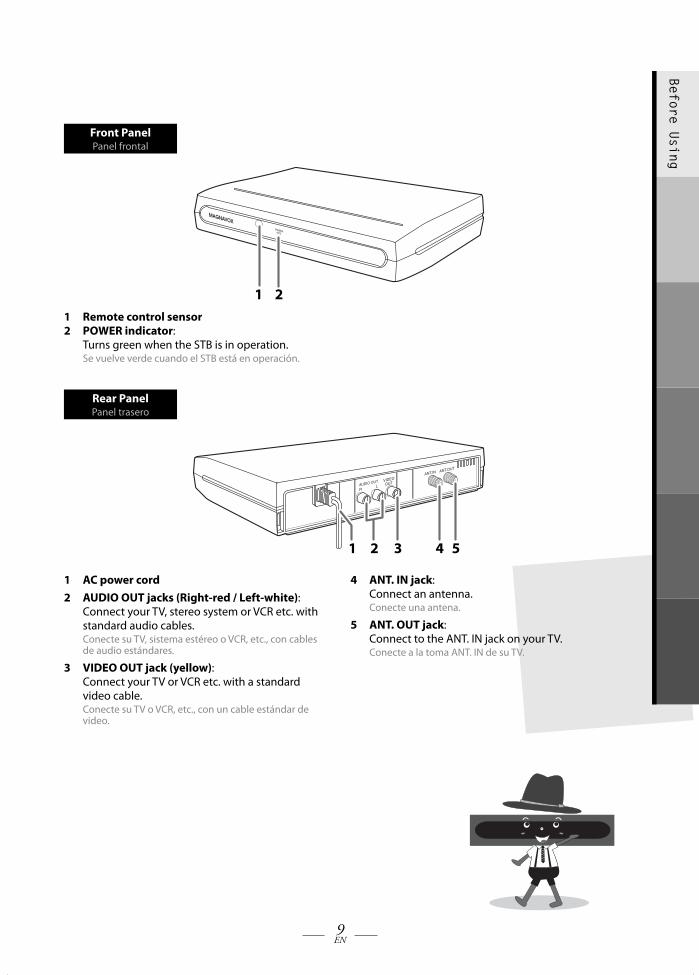
Front PanelPanel frontal
1 21 Remote control sensor2 POWER indicator:
Turns green when the STB is in operation. Se vuelve verde cuando el STB está en operación.
Rear PanelPanel trasero
21 3 4 5
1 AC power cord2 AUDIO OUT jacks (Right-red / Left-white):
Connect your TV, stereo system or VCR etc. with standard audio cables.
Conecte su TV, sistema estéreo o VCR, etc., con cables de audio estándares.
3 VIDEO OUT jack (yellow): Connect your TV or VCR etc. with a standard video cable.
Conecte su TV o VCR, etc., con un cable estándar de video.
4 ANT. IN jack: Connect an antenna. Conecte una antena.
5 ANT. OUT jack: Connect to the ANT. IN jack on your TV.
Conecte a la toma ANT. IN de su TV.
X6043UD_TB110MW.indd 9X6043UD_TB110MW.indd 9 2008/05/29 14:28:322008/05/29 14:28:32
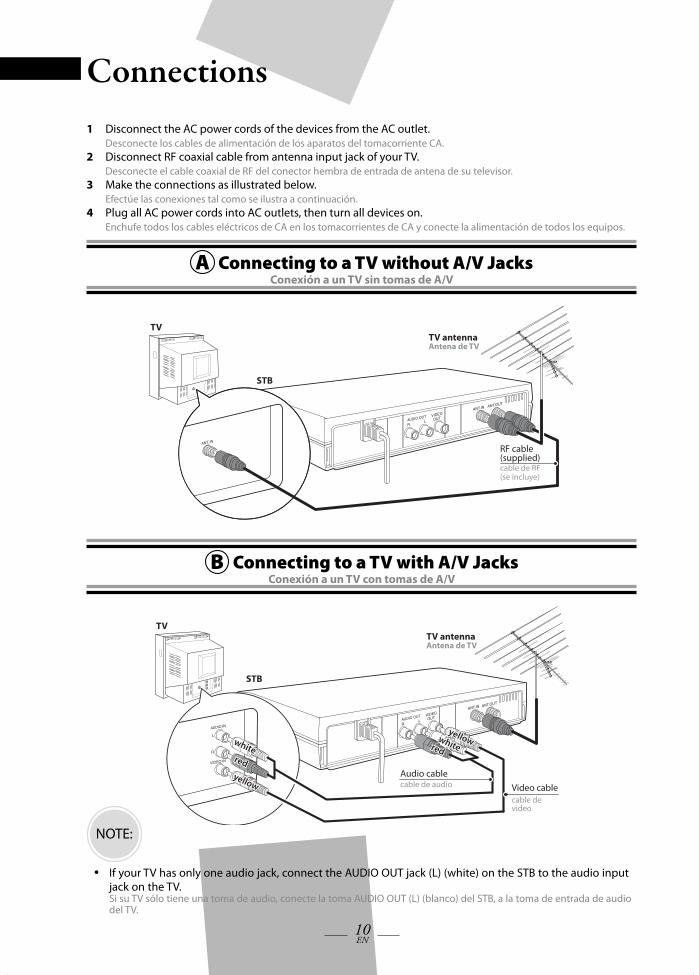
10EN
Connections1 Disconnect the AC power cords of the devices from the AC outlet.
Desconecte los cables de alimentación de los aparatos del tomacorriente CA.2 Disconnect RF coaxial cable from antenna input jack of your TV.
Desconecte el cable coaxial de RF del conector hembra de entrada de antena de su televisor.3 Make the connections as illustrated below.
Efectúe las conexiones tal como se ilustra a continuación.4 Plug all AC power cords into AC outlets, then turn all devices on.
Enchufe todos los cables eléctricos de CA en los tomacorrientes de CA y conecte la alimentación de todos los equipos.
A Connecting to a TV without A/V JacksConexión a un TV sin tomas de A/V
RF cable (supplied)cable de RF(se incluye)
STB
TV antennaAntena de TV
TV
B Connecting to a TV with A/V JacksConexión a un TV con tomas de A/V
TV
STB
TV antennaAntena de TV
Audio cablecable de audio Video cable
cable de video
yellowyellowyellow
yellowyellowyellowwhite
whitewhite
whitewhitewhite
redredred
redredred
NOTE:
If your TV has only one audio jack, connect the AUDIO OUT jack (L) (white) on the STB to the audio input jack on the TV.Si su TV sólo tiene una toma de audio, conecte la toma AUDIO OUT (L) (blanco) del STB, a la toma de entrada de audio del TV.
•
X6043UD_TB110MW.indd 10X6043UD_TB110MW.indd 10 2008/05/29 14:28:322008/05/29 14:28:32
11EN
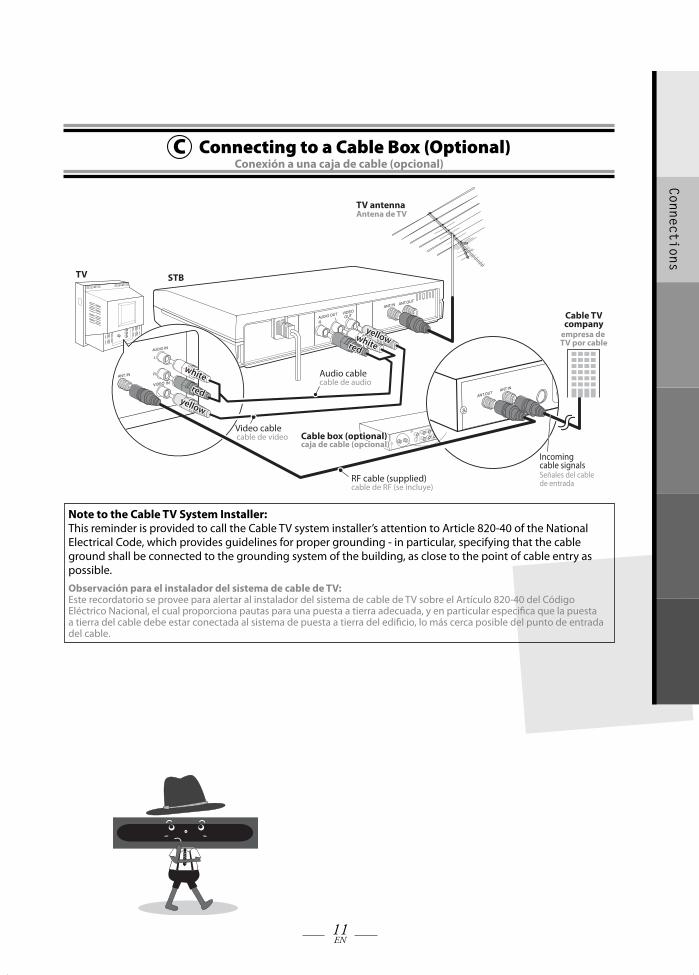
Connections
C Connecting to a Cable Box (Optional)Conexión a una caja de cable (opcional)
TV STB
Incomingcable signalsSeñales del cablede entrada
Cable box (optional)Cable box (optional)Cable box (optional)caja de cable (opcional)caja de cable (opcional)caja de cable (opcional)
cable de RF (se incluye)
cable de video
TV antennaAntena de TV
cable de audio
RF cable (supplied)
Video cable
Audio cable
empresa de TV por cable
Cable TVcompany
yellowyellowyellow
whitewhitewhiteredredred
yellowyellowyellowwhite
whitewhiteredredred
Note to the Cable TV System Installer: This reminder is provided to call the Cable TV system installer’s attention to Article 820-40 of the National Electrical Code, which provides guidelines for proper grounding - in particular, specifying that the cable ground shall be connected to the grounding system of the building, as close to the point of cable entry as possible.Observación para el instalador del sistema de cable de TV:Este recordatorio se provee para alertar al instalador del sistema de cable de TV sobre el Artículo 820-40 del Código Eléctrico Nacional, el cual proporciona pautas para una puesta a tierra adecuada, y en particular especifi ca que la puesta a tierra del cable debe estar conectada al sistema de puesta a tierra del edifi cio, lo más cerca posible del punto de entrada del cable.
X6043UD_TB110MW.indd 11X6043UD_TB110MW.indd 11 2008/05/29 14:28:332008/05/29 14:28:33
12EN
Connections
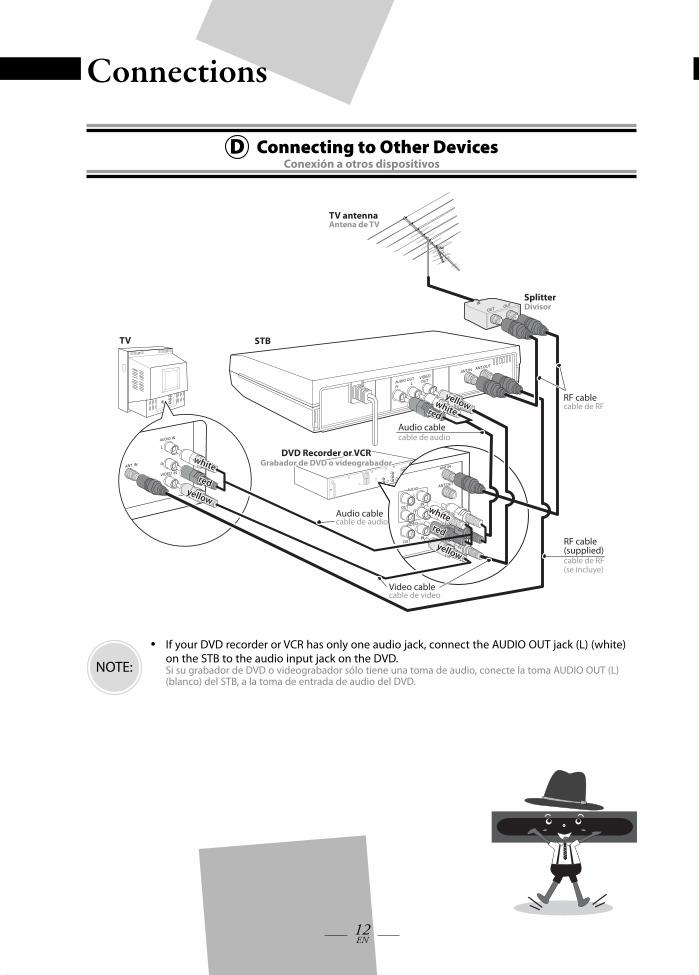
D Connecting to Other DevicesConexión a otros dispositivos
TV STB
TV antennaAntena de TV
DVD Recorder or VCRDVD Recorder or VCRDVD Recorder or VCRGrabador de DVD o videograbadorGrabador de DVD o videograbadorGrabador de DVD o videograbador
RF cablecable de RF
RF cable (supplied)cable de RF(se incluye)
Audio cablecable de audio
Video cablecable de video
cable de audioAudio cable
yellowyellowyellow
whitewhitewhiteredredred
yellowyellowyellowwhite
whitewhiteredredred
yellowyellowyellow
whitewhitewhiteredredred
SplitterDivisor
NOTE:
If your DVD recorder or VCR has only one audio jack, connect the AUDIO OUT jack (L) (white) on the STB to the audio input jack on the DVD.Si su grabador de DVD o videograbador sólo tiene una toma de audio, conecte la toma AUDIO OUT (L) (blanco) del STB, a la toma de entrada de audio del DVD.
•
X6043UD_TB110MW.indd 12X6043UD_TB110MW.indd 12 2008/05/29 14:28:332008/05/29 14:28:33
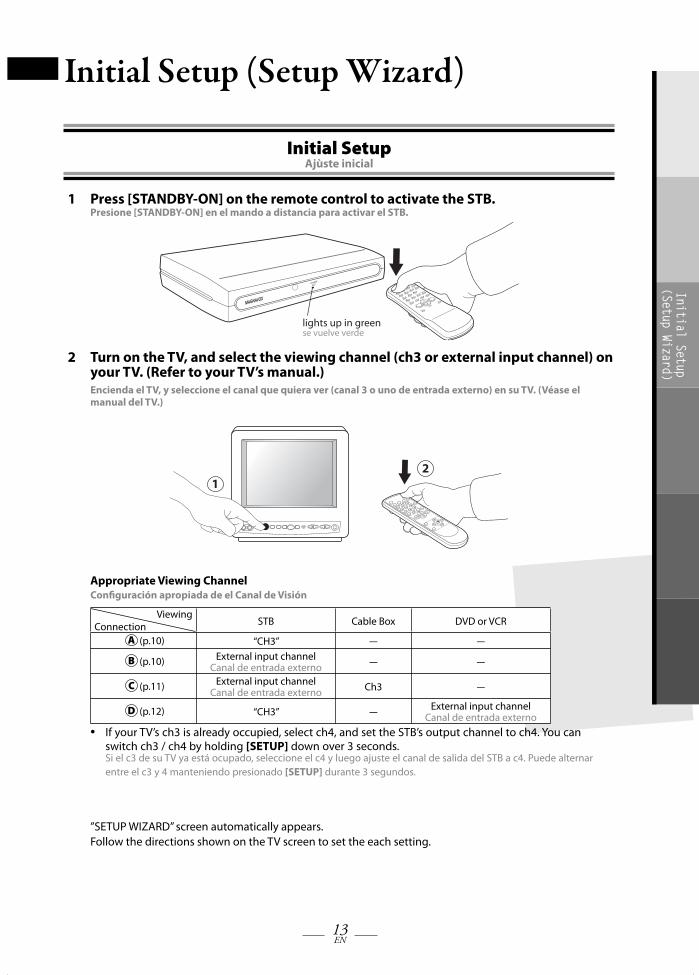
13EN
Initial Setup (Setup Wizard)
Initial Setup (Setup Wizard)
Initial SetupAjùste inicial
1 Press [STANDBY-ON] on the remote control to activate the STB.Presione [STANDBY-ON] en el mando a distancia para activar el STB.
lights up in greense vuelve verde
2 Turn on the TV, and select the viewing channel (ch3 or external input channel) on your TV. (Refer to your TV’s manual.)Encienda el TV, y seleccione el canal que quiera ver (canal 3 o uno de entrada externo) en su TV. (Véase el manual del TV.)
12
3
45
6
CH.
CH.
78
9
0
12
Appropriate Viewing ChannelConfi guración apropiada de el Canal de Visión
ViewingConnection STB Cable Box DVD or VCR
A (p.10) “CH3” - -
B (p.10) External input channelCanal de entrada externo - -
C (p.11) External input channelCanal de entrada externo Ch3 -
D (p.12) “CH3” - External input channelCanal de entrada externo
If your TV’s ch3 is already occupied, select ch4, and set the STB’s output channel to ch4. You can switch ch3 / ch4 by holding [SETUP] down over 3 seconds.Si el c3 de su TV ya está ocupado, seleccione el c4 y luego ajuste el canal de salida del STB a c4. Puede alternar entre el c3 y 4 manteniendo presionado [SETUP] durante 3 segundos.
”SETUP WIZARD” screen automatically appears.Follow the directions shown on the TV screen to set the each setting.
•
X6043UD_TB110MW.indd 13X6043UD_TB110MW.indd 13 2008/05/29 14:28:342008/05/29 14:28:34
14EN
Initial Setup (Setup Wizard)3 Select “CONTINUE” using [ s / B ],
then press [OK].Seleccione “CONTINÚE” utilizando [s / B] y presione [OK].
“CONTINUE”:“CANCEL ”:
CONTINUECANCEL
To continue setupTo cancel to leave pre-arrangedsetup
This SETUP WIZARD will help you with the initial setup on your own.
4 Select the language using [ K / L ], then press [OK].Seleccione el idioma utilizando [K / L] y presione [OK].
Select the language for setup display.
Elija idioma de preparación.
Sélectionner langue écran config.
ESPAÑOL
ENGLISH
FRANÇAIS
5 Select the connection for audio output using [ s / B ], then press [OK].Seleccione la conexión para salida de audio mediante [s / B] y luego presione [OK].
AUDIO OUT :
RF OUT :
Connecting STB and TV via AUDIOCable
Connecting STB and TV via RFCable
AUDIO OUT RF OUT
Select the connection for Audio output.
Select “AUDIO OUT” if...- you are using the standard audio cable to
connect the STB to your TV. (Connection B or C on pages 10 and 11.)
Seleccione “AUDIO FUERA” si...- está utilizando el cable de audio normal para
conectar el STB a su TV. (conexión B o C en las páginas 10 y 11.)
Select “RF OUT” if...- you are using the RF cable to connect the STB
to your TV. (Connection A or D on pages 10 and 12.)
Seleccione “RF FUERA” si...- está utilizando el cable RF para conectar el STB a su
TV. (conexión A o D en las páginas 10 y 12.)
6 Select your time zone using [ K / L ], then press [OK].Seleccione su huso horario con [K / L] y presione [OK].
Select Time Zone.
ATLANTIC
CENTRALMOUNTAINPACIFICALASKAHAWAII
EASTERN
7 Select “ON” or “OFF” for Daylight Saving Time (D.S.T) using [ s / B ], then press [OK].Seleccione “ON” u “OFF” para la hora de verano. (D.S.T) utilizando [s / B] y presione [OK].
Select Daylight Saving Time.
NOTE:2:00AM of the second Sunday inMarch until 2:00AM of the firstSunday in November.
OFFON
8 Select the desired display mode using [ K / L ], then press [OK] (refer to page 20).Seleccione el modo de indicación deseado utilizando [K / L] y presione [OK].
Select display mode.
ZOOM
FULL
LETTERBOX
9 Select “AUTOSCAN” using [ K / L ], then press [OK].Seleccione “AUTOEXPLO.” mediante [K / L] y luego presione [OK].
AUTOSCAN will rescan all channels. This may take a while to complete.
EXIT
AUTOSCAN
The system is now scanning.
12% Channel Found
EXIT
STB starts receiving available digital channels and stores them in the channel map. When the scanning is complete, “AUTOSCAN COMPLETED” will be indicated. After autoscan is complete, use [CH K / L ] to verify whether STB is receiving channels properly.
The “SETUP WIZARD” is now complete.El “ASISTENTE DE PREP.” ahora ha fi nalizado.
To cancel during scanning: Press [SETUP] or [OK].Para cancelar durante la exploración: Presione [SETUP] o [OK].
If autoscan is canceled, some channels not yet scanned may not be received. We recommend completing autoscan.You can do autoscan and adding / deleting channel later. Refer to page 18.
•
•
•
•
•
X6043UD_TB110MW.indd 14X6043UD_TB110MW.indd 14 2008/05/29 14:28:352008/05/29 14:28:35
15EN
Basic OperationBasic Operation
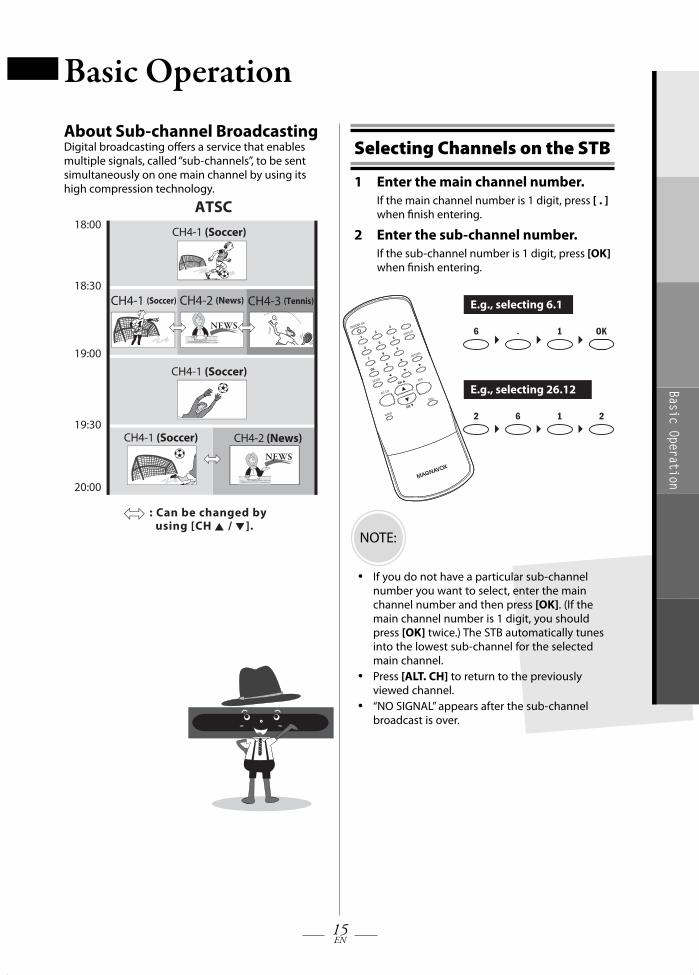
About Sub-channel BroadcastingDigital broadcasting off ers a service that enables multiple signals, called “sub-channels”, to be sent simultaneously on one main channel by using its high compression technology.
ATSC18:00
18:30
19:00
19:30
20:00
CH4-1 (Soccer) CH4-2 (News)
CH4-2 (News)
CH4-3 (Tennis)
CH4-1 (Soccer)
CH4-1 (Soccer)
CH4-1 (Soccer)
: Can be changed by using [CH K / L].
Selecting Channels on the STB
1 Enter the main channel number.If the main channel number is 1 digit, press [ . ] when fi nish entering.
2 Enter the sub-channel number.If the sub-channel number is 1 digit, press [OK] when fi nish entering.
E.g., selecting 6.1
E.g., selecting 26.12
NOTE:
If you do not have a particular sub-channel number you want to select, enter the main channel number and then press [OK]. (If the main channel number is 1 digit, you should press [OK] twice.) The STB automatically tunes into the lowest sub-channel for the selected main channel.Press [ALT. CH] to return to the previously viewed channel.“NO SIGNAL” appears after the sub-channel broadcast is over.
•
•
•
X6043UD_TB110MW.indd 15X6043UD_TB110MW.indd 15 2008/05/29 14:28:362008/05/29 14:28:36
16EN
Basic Operation
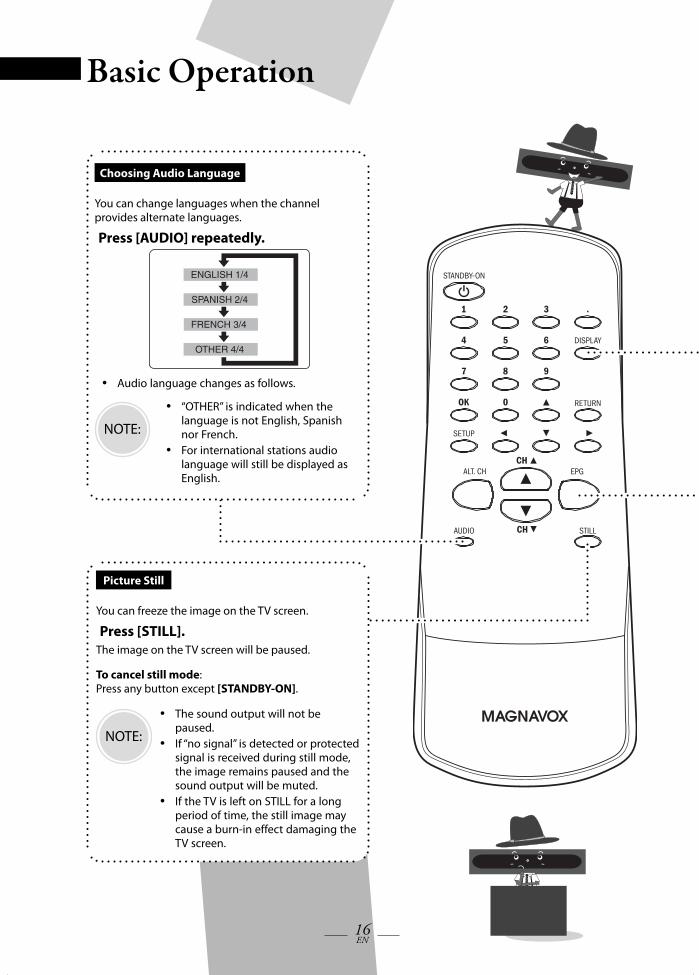
Choosing Audio Language
You can change languages when the channel provides alternate languages.
Press [AUDIO] repeatedly.
ENGLISH 1/4
OTHER 4/4
SPANISH 2/4
FRENCH 3/4
Audio language changes as follows.
NOTE:
“OTHER” is indicated when the language is not English, Spanish nor French. For international stations audio language will still be displayed as English.
•
•
•
Picture Still
You can freeze the image on the TV screen.
Press [STILL].The image on the TV screen will be paused.
To cancel still mode: Press any button except [STANDBY-ON].
NOTE:
The sound output will not be paused.If “no signal” is detected or protected signal is received during still mode, the image remains paused and the sound output will be muted.If the TV is left on STILL for a long period of time, the still image may cause a burn-in effect damaging the TV screen.
•
•
•
X6043UD_TB110MW.indd 16X6043UD_TB110MW.indd 16 2008/05/29 14:28:372008/05/29 14:28:37
17EN
Basic Operation
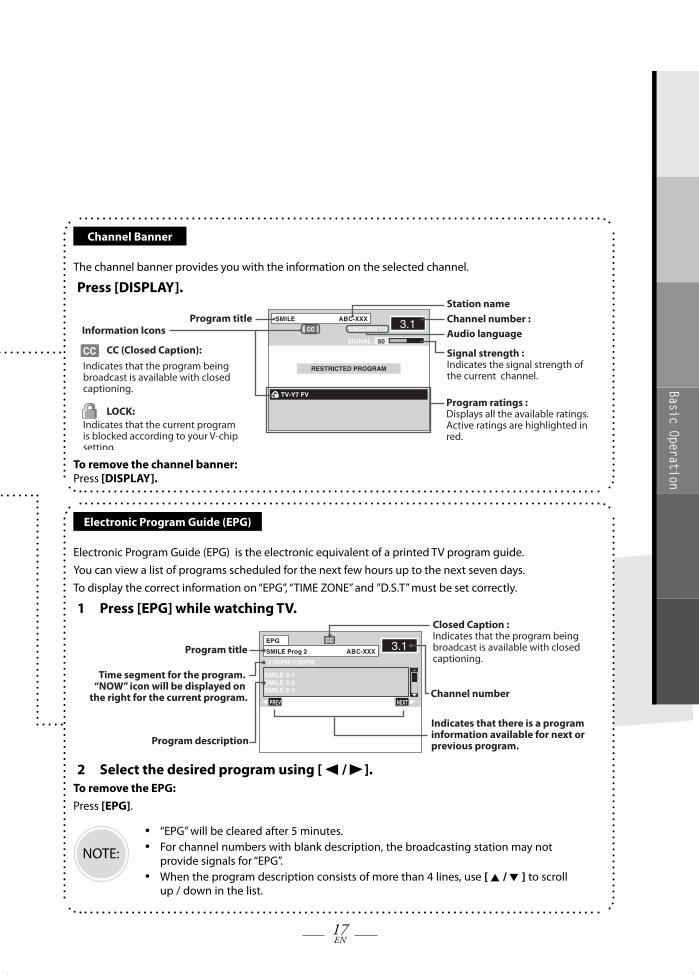
Channel Banner
The channel banner provides you with the information on the selected channel.
Press [DISPLAY].
CC 3.150SIGNAL
ENGLISH 1/2
TV-Y7 FV
SMILE ABC-XXX
RESTRICTED PROGRAM
TV-Y7 FV
Program title Channel number : Audio language
Station name
Signal strength :Indicates the signal strength of the current channel.
Program ratings :Displays all the available ratings. Active ratings are highlighted in red.
Information Icons
LOCK:Indicates that the current program is blocked according to your V-chip setting.
Indicates that the program being broadcast is available with closed captioning.
CC (Closed Caption):
To remove the channel banner: Press [DISPLAY].
Electronic Program Guide (EPG)
Electronic Program Guide (EPG) is the electronic equivalent of a printed TV program guide.You can view a list of programs scheduled for the next few hours up to the next seven days.To display the correct information on “EPG”, “TIME ZONE” and ”D.S.T” must be set correctly.
1 Press [EPG] while watching TV.
CC
PREV NEXT
SMILE 2-1 SMILE 2-2 SMILE 2-3
12:00PM-1:00PM
3.1EPG
SMILE Prog 2 ABC-XXX
Closed Caption :Indicates that the program being broadcast is available with closed captioning.
Channel number
Program title
Time segment for the program. “NOW” icon will be displayed on
the right for the current program.
Program description
Indicates that there is a program information available for next or previous program.
2 Select the desired program using [ s / B ].To remove the EPG: Press [EPG].
NOTE:
“EPG” will be cleared after 5 minutes.For channel numbers with blank description, the broadcasting station may not provide signals for “EPG”.When the program description consists of more than 4 lines, use [ K / L ] to scroll up / down in the list.
••
•
X6043UD_TB110MW.indd 17X6043UD_TB110MW.indd 17 2008/05/29 14:28:372008/05/29 14:28:37
18EN
Advanced Operation
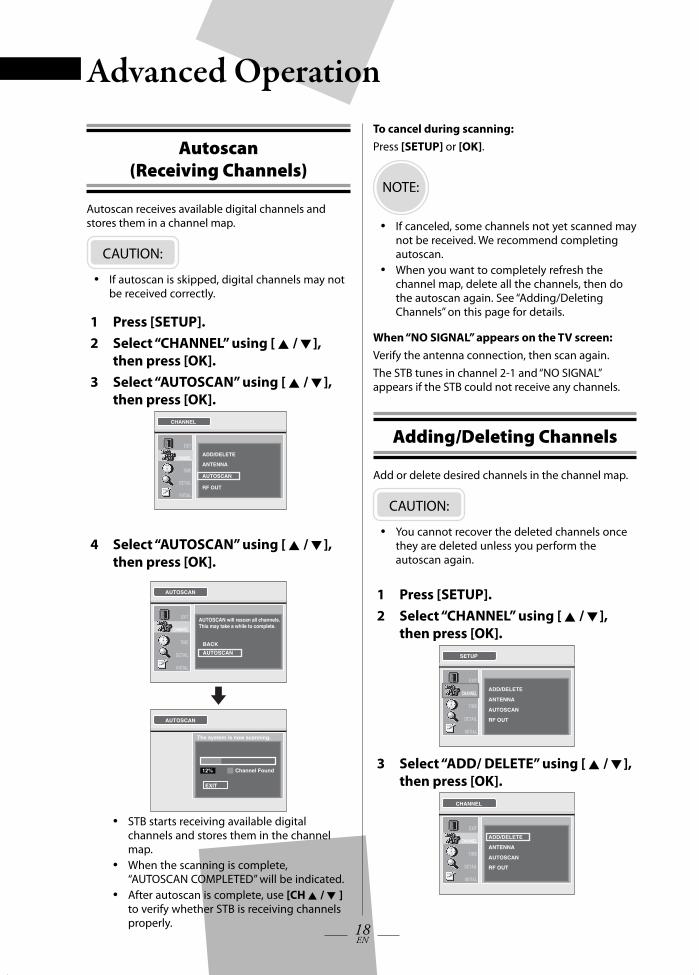
Autoscan (Receiving Channels)
Autoscan receives available digital channels and stores them in a channel map.
CAUTION:
If autoscan is skipped, digital channels may not be received correctly.
•
1 Press [SETUP].2 Select “CHANNEL” using [ K / L ],
then press [OK].3 Select “AUTOSCAN” using [ K / L ],
then press [OK].CHANNEL
EXIT
CHANNEL
TIME
DETAIL
INITIAL
ADD/DELETE
ANTENNA
AUTOSCAN
RF OUT
4 Select “AUTOSCAN” using [ K / L ], then press [OK].
AUTOSCAN
EXIT
CHANNEL
TIME
DETAIL
INITIAL
AUTOSCAN will rescan all channels. This may take a while to complete.
BACK
AUTOSCAN
AUTOSCAN
The system is now scanning.
12% Channel Found
EXIT
STB starts receiving available digital channels and stores them in the channel map.When the scanning is complete, “AUTOSCAN COMPLETED” will be indicated.After autoscan is complete, use [CH K / L ] to verify whether STB is receiving channels properly.
•
•
•
To cancel during scanning:Press [SETUP] or [OK].
NOTE:
If canceled, some channels not yet scanned may not be received. We recommend completing autoscan.When you want to completely refresh the channel map, delete all the channels, then do the autoscan again. See “Adding/Deleting Channels” on this page for details.
•
•
When “NO SIGNAL” appears on the TV screen:Verify the antenna connection, then scan again.The STB tunes in channel 2-1 and “NO SIGNAL” appears if the STB could not receive any channels.
Adding/Deleting Channels
Add or delete desired channels in the channel map.
CAUTION:
You cannot recover the deleted channels once they are deleted unless you perform the autoscan again.
•
1 Press [SETUP].2 Select “CHANNEL” using [ K / L ],
then press [OK].SETUP
EXIT
CHANNEL
TIME
DETAIL
INITIAL
ADD/DELETE
ANTENNA
AUTOSCAN
RF OUT
3 Select “ADD/ DELETE” using [ K / L ], then press [OK].
CHANNEL
EXIT
CHANNEL
TIME
DETAIL
INITIAL
ADD/DELETE
ANTENNA
AUTOSCAN
RF OUT
X6043UD_TB110MW.indd 18X6043UD_TB110MW.indd 18 2008/05/29 14:28:372008/05/29 14:28:37
19EN
Advanced Operation
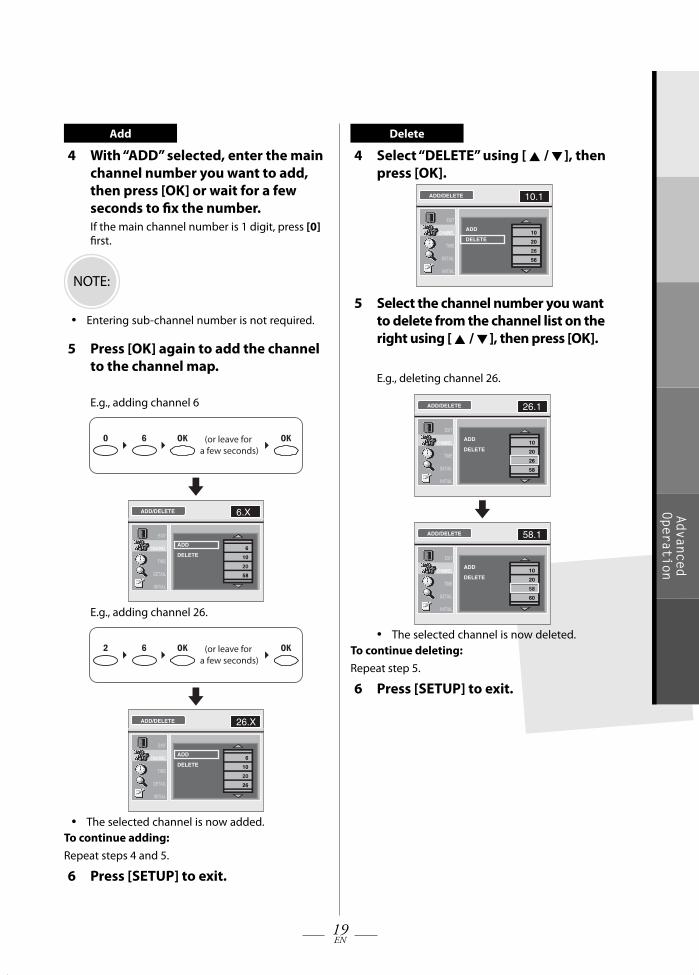
Add
4 With “ADD” selected, enter the main channel number you want to add, then press [OK] or wait for a few seconds to fi x the number.If the main channel number is 1 digit, press [0] fi rst.
NOTE:
Entering sub-channel number is not required.•
5 Press [OK] again to add the channel to the channel map.
E.g., adding channel 6
(or leave for a few seconds)
ADD/DELETE
6
10
20
58
EXIT
CHANNEL
TIME
DETAIL
INITIAL
ADD
DELETE
6.X
E.g., adding channel 26.
(or leave for a few seconds)
ADD/DELETE
6
10
20
26
EXIT
CHANNEL
TIME
DETAIL
INITIAL
ADD
DELETE
26.X
The selected channel is now added.To continue adding:Repeat steps 4 and 5.
6 Press [SETUP] to exit.
•
Delete
4 Select “DELETE” using [ K / L ], then press [OK].
ADD/DELETE
10
20
26
56
EXIT
CHANNEL
TIME
DETAIL
INITIAL
ADD
DELETE
10.1
5 Select the channel number you want to delete from the channel list on the right using [ K / L ], then press [OK].
E.g., deleting channel 26.
ADD/DELETE
10
20
26
58
EXIT
CHANNEL
TIME
DETAIL
INITIAL
ADD
DELETE
26.1
ADD/DELETE
10
20
58
60
EXIT
CHANNEL
TIME
DETAIL
INITIAL
ADD
DELETE
58.1
The selected channel is now deleted.To continue deleting:Repeat step 5.
6 Press [SETUP] to exit.
•
X6043UD_TB110MW.indd 19X6043UD_TB110MW.indd 19 2008/05/29 14:28:382008/05/29 14:28:38
20EN
Advanced Operation
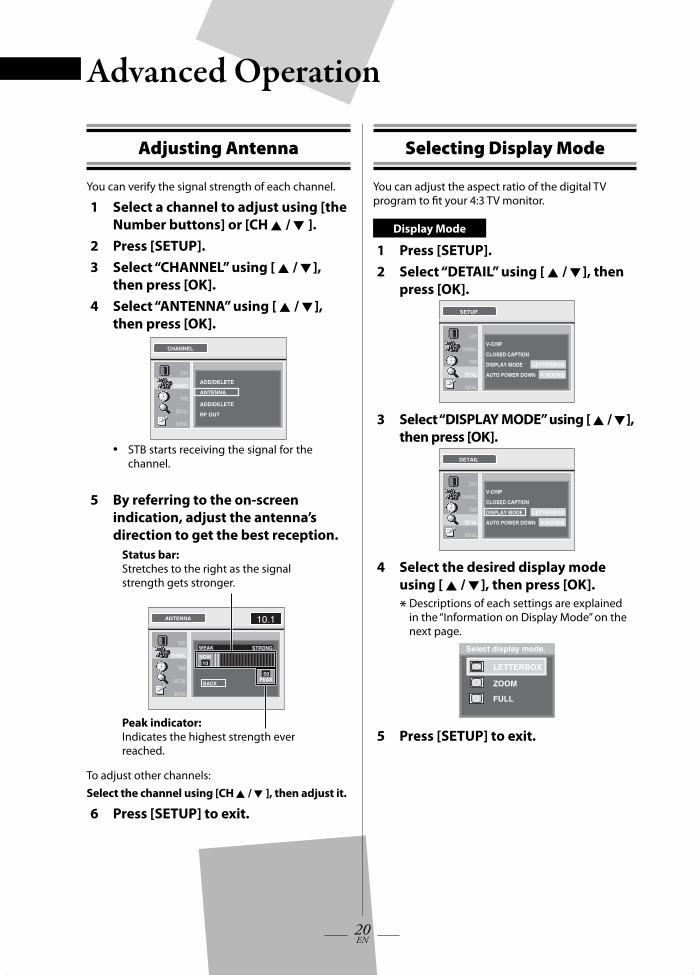
Adjusting Antenna
You can verify the signal strength of each channel.
1 Select a channel to adjust using [the Number buttons] or [CH K / L ].
2 Press [SETUP].3 Select “CHANNEL” using [ K / L ],
then press [OK].4 Select “ANTENNA” using [ K / L ],
then press [OK].CHANNEL
EXIT
CHANNEL
TIME
DETAIL
INITIAL
ADD/DELETE
ANTENNA
ADD/DELETE
RF OUT
STB starts receiving the signal for the channel.
5 By referring to the on-screen indication, adjust the antenna’s direction to get the best reception.
WEAK STRONG
NOW10
PEAK50
ANTENNA
EXIT
CHANNEL
TIME
DETAIL
INITIAL
10.1
BACK
Status bar:Stretches to the right as the signal strength gets stronger.
Peak indicator: Indicates the highest strength ever reached.
To adjust other channels:Select the channel using [CH K / L ], then adjust it.
6 Press [SETUP] to exit.
•
Selecting Display Mode
You can adjust the aspect ratio of the digital TV program to fi t your 4:3 TV monitor.
Display Mode
1 Press [SETUP].2 Select “DETAIL” using [ K / L ], then
press [OK].SETUP
EXIT
CHANNEL
TIME
DETAIL
INITIAL
CLOSED CAPTION
DISPLAY MODE
AUTO POWER DOWN
V-CHIP
4 HOURS
LETTERBOX
3 Select “DISPLAY MODE” using [ K / L ], then press [OK].
DETAIL
EXIT
CHANNEL
TIME
DETAIL
INITIAL
CLOSED CAPTION
DISPLAY MODE
AUTO POWER DOWN 4 HOURS
LETTERBOX
V-CHIP
4 Select the desired display mode using [ K / L ], then press [OK].
* Descriptions of each settings are explained in the “Information on Display Mode” on the next page.
Select display mode.
ZOOM
FULL
LETTERBOX
5 Press [SETUP] to exit.
X6043UD_TB110MW.indd 20X6043UD_TB110MW.indd 20 2008/05/29 14:28:402008/05/29 14:28:40
21EN
Advanced Operation
Information on Display ModeLETTERBOX
16:9 picture is scaled down until the both sides of the picture fi ts the 4:3 TV. Black bars appear on top and bottom of the TV screen.
ZOOMDisplays the 16:9 image with the top and the bottom of the picture fi t to the 4:3 TV screen. Both sides of the picture are cut off .
FULL16:9 image is squeezed into the 4:3 TV screen. No parts are cropped, but the picture gets distorted.
CAUTION:
If the TV is left in LETTER BOX mode for a long period of time, the black bars may cause a permanent burn-in eff ect.
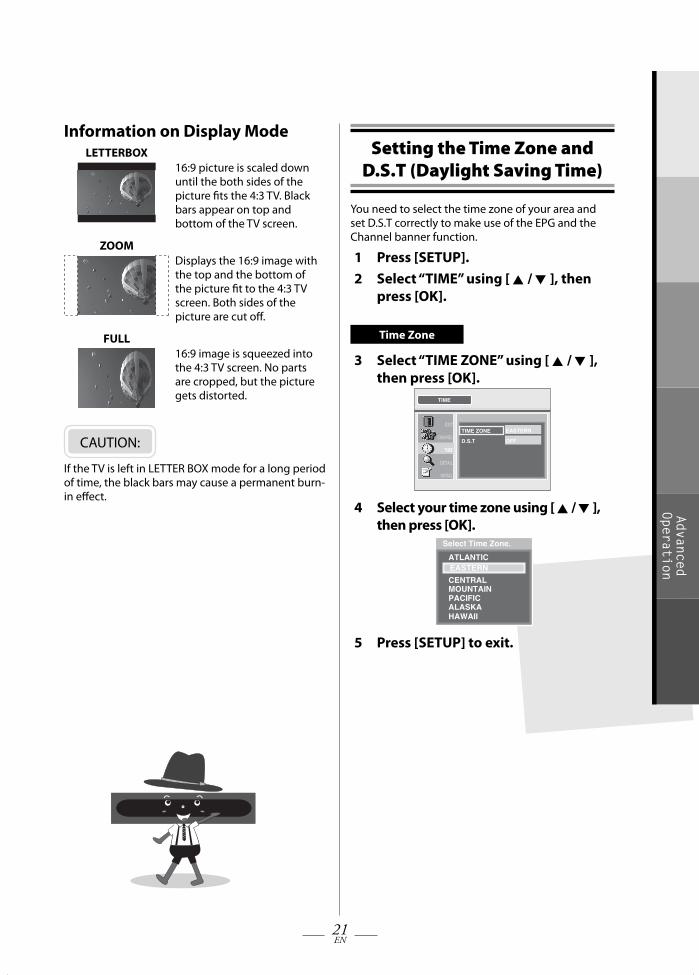
Setting the Time Zone and D.S.T (Daylight Saving Time)
You need to select the time zone of your area and set D.S.T correctly to make use of the EPG and the Channel banner function.
1 Press [SETUP].2 Select “TIME” using [ K / L ], then
press [OK].
Time Zone
3 Select “TIME ZONE” using [ K / L ], then press [OK].
TIME
EXIT
CHANNEL
TIME
DETAIL
INITIAL
TIME ZONE
D.S.T
EASTERN
OFF
4 Select your time zone using [ K / L ], then press [OK].
Select Time Zone.
ATLANTIC
CENTRALMOUNTAINPACIFICALASKAHAWAII
EASTERN
5 Press [SETUP] to exit.
X6043UD_TB110MW.indd 21X6043UD_TB110MW.indd 21 2008/05/29 14:28:402008/05/29 14:28:40
22EN
Advanced OperationD.S.T (Daylight Saving Time)
3 Select “D.S.T” using [ K / L ], then press [OK].
TIME
EXIT
CHANNEL
TIME
DETAIL
INITIAL
TIME ZONE
D.S.T
EASTERN
ON
4 Select “ON” or “OFF” using [ s / B ], then press [OK].
D.S.T
EXIT
CHANNEL
TIME
DETAIL
INITIAL
Select Daylight Saving Time.
NOTE:2:00AM of the second Sunday inMarch until 2:00AM of the first Sunday in November.
OFFON
5 Press [SETUP] to exit.
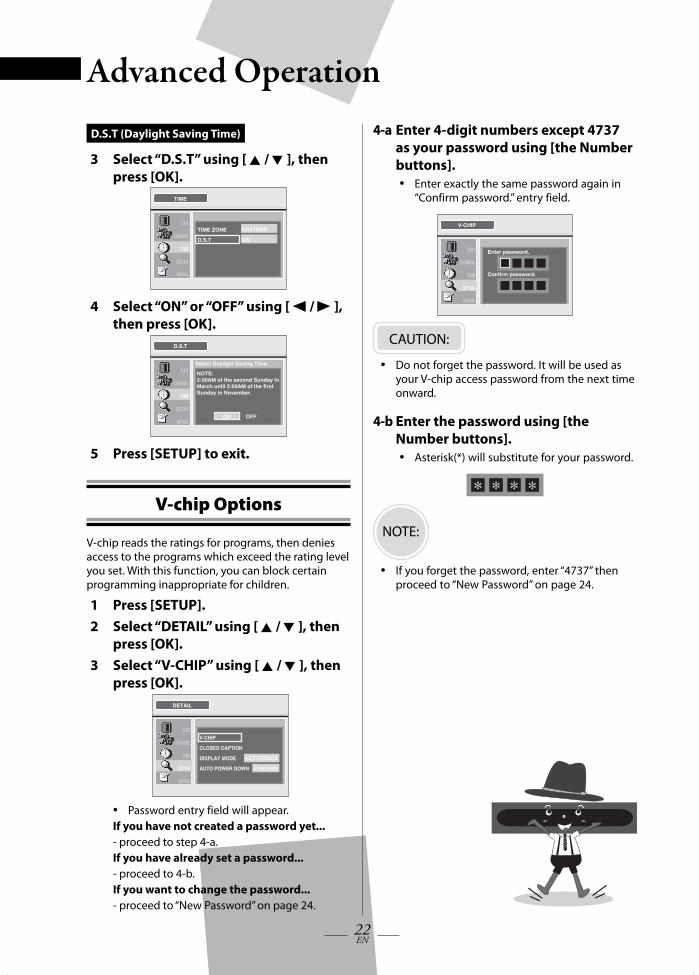
V-chip Options
V-chip reads the ratings for programs, then denies access to the programs which exceed the rating level you set. With this function, you can block certain programming inappropriate for children.
1 Press [SETUP].2 Select “DETAIL” using [ K / L ], then
press [OK].3 Select “V-CHIP” using [ K / L ], then
press [OK].DETAIL
EXIT
CHANNEL
TIME
DETAIL
INITIAL
CLOSED CAPTION
DISPLAY MODE
V-CHIP
AUTO POWER DOWN 4 HOURS
LETTERBOX
Password entry field will appear.If you have not created a password yet...- proceed to step 4-a.If you have already set a password...- proceed to 4-b.If you want to change the password...- proceed to “New Password” on page 24.
•
4-a Enter 4-digit numbers except 4737 as your password using [the Number buttons].
Enter exactly the same password again in “Confirm password.” entry field.
V-CHIP
EXIT
CHANNEL
TIME
DETAIL
INITIAL
Enter password.
Confirm password.
CAUTION:
Do not forget the password. It will be used as your V-chip access password from the next time onward.
•
4-b Enter the password using [the Number buttons].
Asterisk(*) will substitute for your password.
* * * *
NOTE:
If you forget the password, enter “4737” then proceed to “New Password” on page 24.
•
•
•
X6043UD_TB110MW.indd 22X6043UD_TB110MW.indd 22 2008/05/29 14:28:422008/05/29 14:28:42
23EN
Advanced Operation
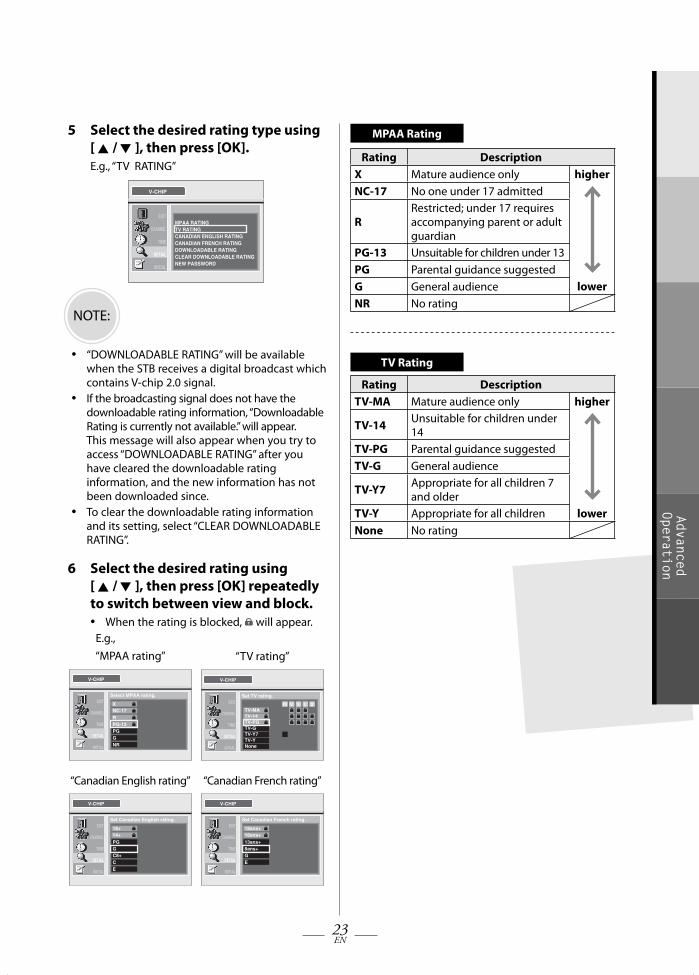
5 Select the desired rating type using[ K / L ], then press [OK].E.g., “TV RATING”
V-CHIP
EXIT
CHANNEL
TIME
DETAIL
INITIAL
MPAA RATINGTV RATING
DOWNLOADABLE RATING
CANADIAN ENGLISH RATINGCANADIAN FRENCH RATING
CLEAR DOWNLOADABLE RATINGNEW PASSWORD
NOTE:
“DOWNLOADABLE RATING” will be available when the STB receives a digital broadcast which contains V-chip 2.0 signal.If the broadcasting signal does not have the downloadable rating information, “Downloadable Rating is currently not available.” will appear.This message will also appear when you try to access “DOWNLOADABLE RATING” after you have cleared the downloadable rating information, and the new information has not been downloaded since.To clear the downloadable rating information and its setting, select “CLEAR DOWNLOADABLE RATING”.
•
•
•
6 Select the desired rating using [ K / L ], then press [OK] repeatedly to switch between view and block.
When the rating is blocked, will appear.E.g.,“MPAA rating” “TV rating”
V-CHIP
EXIT
CHANNEL
TIME
DETAIL
INITIAL
Select MPAA rating.
X
RPG-13PGGNR
NC-17
V-CHIP
EXIT
CHANNEL
TIME
DETAIL
INITIAL
Set TV rating.
TV-PGTV-GTV-Y7TV-YNone
TV-14
FV V S L DTV-MA
“Canadian English rating” “Canadian French rating”
V-CHIP
EXIT
CHANNEL
TIME
DETAIL
INITIAL
Set Canadian English rating.
18+
PGGC8+CE
14+
V-CHIP
EXIT
CHANNEL
TIME
DETAIL
INITIAL
Set Canadian French rating.
18ans+
13ans+8ans+GE
16ans+
•
MPAA Rating
Rating DescriptionX Mature audience only higherNC-17 No one under 17 admitted
RRestricted; under 17 requires accompanying parent or adult guardian
PG-13 Unsuitable for children under 13PG Parental guidance suggestedG General audience lowerNR No rating
TV Rating
Rating DescriptionTV-MA Mature audience only higher
TV-14 Unsuitable for children under 14
TV-PG Parental guidance suggestedTV-G General audience
TV-Y7 Appropriate for all children 7 and older
TV-Y Appropriate for all children lowerNone No rating
X6043UD_TB110MW.indd 23X6043UD_TB110MW.indd 23 2008/05/29 14:28:432008/05/29 14:28:43
24EN
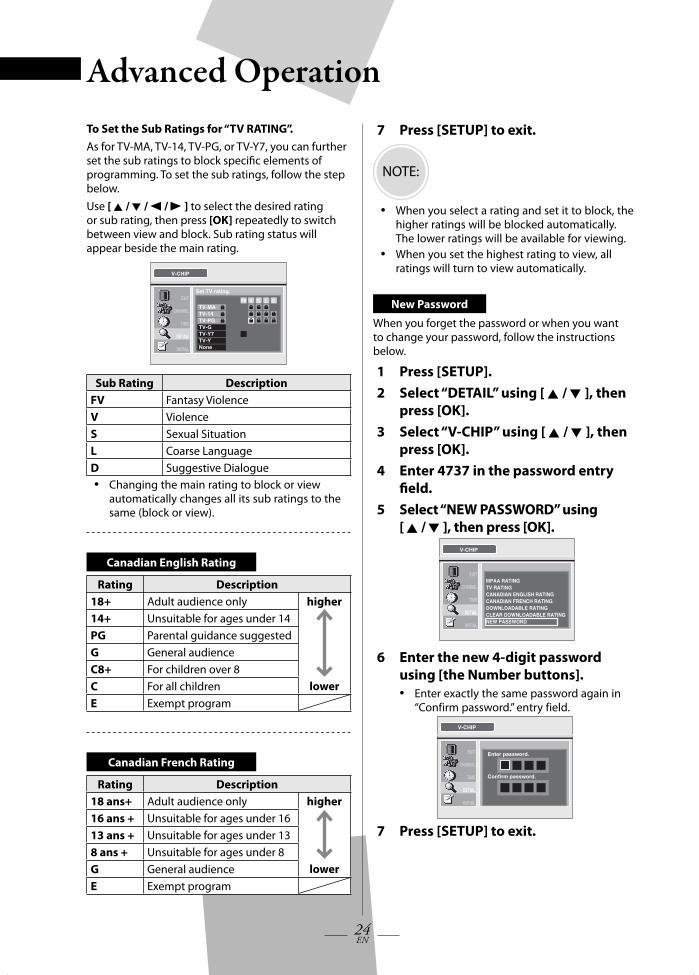
Advanced OperationTo Set the Sub Ratings for “TV RATING”.As for TV-MA, TV-14, TV-PG, or TV-Y7, you can further set the sub ratings to block specifi c elements of programming. To set the sub ratings, follow the step below.Use [ K / L / s / B ] to select the desired rating or sub rating, then press [OK] repeatedly to switch between view and block. Sub rating status will appear beside the main rating.
V-CHIP
EXIT
CHANNEL
TIME
DETAIL
INITIAL
Set TV rating.
TV-PGTV-GTV-Y7TV-YNone
TV-14
FV V S L DTV-MA
Sub Rating DescriptionFV Fantasy ViolenceV ViolenceS Sexual SituationL Coarse LanguageD Suggestive Dialogue
Changing the main rating to block or view automatically changes all its sub ratings to the same (block or view).
Canadian English Rating
Rating Description18+ Adult audience only higher14+ Unsuitable for ages under 14PG Parental guidance suggestedG General audienceC8+ For children over 8C For all children lowerE Exempt program
Canadian French Rating
Rating Description18 ans+ Adult audience only higher16 ans + Unsuitable for ages under 1613 ans + Unsuitable for ages under 138 ans + Unsuitable for ages under 8G General audience lowerE Exempt program
•
7 Press [SETUP] to exit.
NOTE:
When you select a rating and set it to block, the higher ratings will be blocked automatically. The lower ratings will be available for viewing.When you set the highest rating to view, all ratings will turn to view automatically.
•
•
New Password
When you forget the password or when you want to change your password, follow the instructions below.
1 Press [SETUP].2 Select “DETAIL” using [ K / L ], then
press [OK].3 Select “V-CHIP” using [ K / L ], then
press [OK].4 Enter 4737 in the password entry
fi eld.5 Select “NEW PASSWORD” using
[ K / L ], then press [OK].V-CHIP
EXIT
CHANNEL
TIME
DETAIL
INITIAL
MPAA RATINGTV RATING
DOWNLOADABLE RATING
CANADIAN ENGLISH RATINGCANADIAN FRENCH RATING
CLEAR DOWNLOADABLE RATINGNEW PASSWORD
6 Enter the new 4-digit password using [the Number buttons].
Enter exactly the same password again in “Confirm password.” entry field.
V-CHIP
EXIT
CHANNEL
TIME
DETAIL
INITIAL
Enter password.
Confirm password.
7 Press [SETUP] to exit.
•
X6043UD_TB110MW.indd 24X6043UD_TB110MW.indd 24 2008/05/29 14:28:442008/05/29 14:28:44
25EN
Advanced Operation
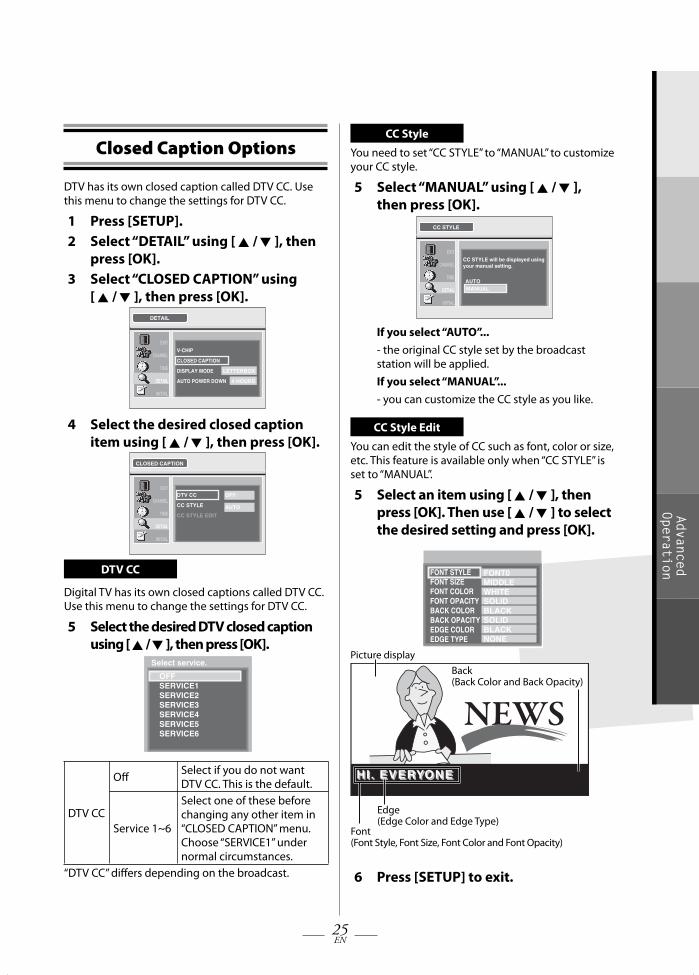
Closed Caption Options
DTV has its own closed caption called DTV CC. Use this menu to change the settings for DTV CC.
1 Press [SETUP].2 Select “DETAIL” using [ K / L ], then
press [OK].3 Select “CLOSED CAPTION” using
[ K / L ], then press [OK].DETAIL
EXIT
CHANNEL
TIME
DETAIL
INITIAL
CLOSED CAPTION
DISPLAY MODE
V-CHIP
AUTO POWER DOWN 4 HOURS
LETTERBOX
4 Select the desired closed caption item using [ K / L ], then press [OK].
CLOSED CAPTION
EXIT
CHANNEL
TIME
DETAIL
INITIAL
DTV CC
CC STYLE
CC STYLE EDIT
OFF
AUTO
DTV CC
Digital TV has its own closed captions called DTV CC. Use this menu to change the settings for DTV CC.
5 Select the desired DTV closed caption using [ K / L ], then press [OK].
Select service.
SERVICE2SERVICE3SERVICE4SERVICE5SERVICE6
SERVICE1OFF
DTV CC
Off Select if you do not want DTV CC. This is the default.
Service 1~6
Select one of these before changing any other item in “CLOSED CAPTION” menu. Choose “SERVICE1” under normal circumstances.
“DTV CC” diff ers depending on the broadcast.
CC Style
You need to set “CC STYLE” to “MANUAL” to customize your CC style.
5 Select “MANUAL” using [ K / L ], then press [OK].
CC STYLE
EXIT
CHANNEL
TIME
DETAIL
INITIAL
CC STYLE will be displayed using your manual setting.
AUTOMANUAL
If you select “AUTO”...- the original CC style set by the broadcast station will be applied.If you select “MANUAL”...- you can customize the CC style as you like.
CC Style Edit
You can edit the style of CC such as font, color or size, etc. This feature is available only when “CC STYLE” is set to “MANUAL”.
5 Select an item using [ K / L ], then press [OK]. Then use [ K / L ] to select the desired setting and press [OK].
SERVICE1
ON
FONT STYLEFONT SIZEFONT COLORFONT OPACITYBACK COLORBACK OPACITYEDGE COLOREDGE TYPE
FONT0MIDDLEWHITESOLIDBLACKSOLIDBLACKNONE
HI. EVERYONEHI. EVERYONE
Picture display
Edge (Edge Color and Edge Type)
Font (Font Style, Font Size, Font Color and Font Opacity)
Back (Back Color and Back Opacity)
6 Press [SETUP] to exit.
X6043UD_TB110MW.indd 25X6043UD_TB110MW.indd 25 2008/05/29 14:28:442008/05/29 14:28:44
26EN
Advanced Operation
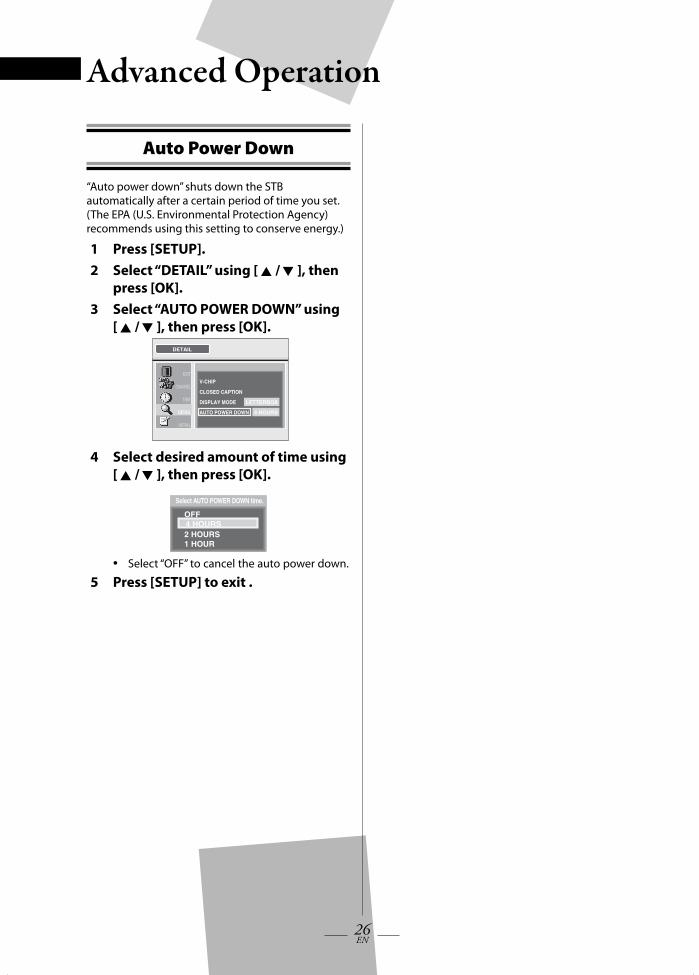
Auto Power Down
“Auto power down” shuts down the STB automatically after a certain period of time you set. (The EPA (U.S. Environmental Protection Agency) recommends using this setting to conserve energy.)
1 Press [SETUP].2 Select “DETAIL” using [ K / L ], then
press [OK].3 Select “AUTO POWER DOWN” using
[ K / L ], then press [OK].DETAIL
EXIT
CHANNEL
TIME
DETAIL
INITIAL
CLOSED CAPTION
DISPLAY MODE
V-CHIP
AUTO POWER DOWN 4 HOURS
LETTERBOX
4 Select desired amount of time using [ K / L ], then press [OK].
Select AUTO POWER DOWN time.
OFF
2 HOURS1 HOUR
4 HOURS
Select “OFF” to cancel the auto power down.
5 Press [SETUP] to exit .•
X6043UD_TB110MW.indd 26X6043UD_TB110MW.indd 26 2008/05/29 14:28:452008/05/29 14:28:45
27EN
Advanced Operation
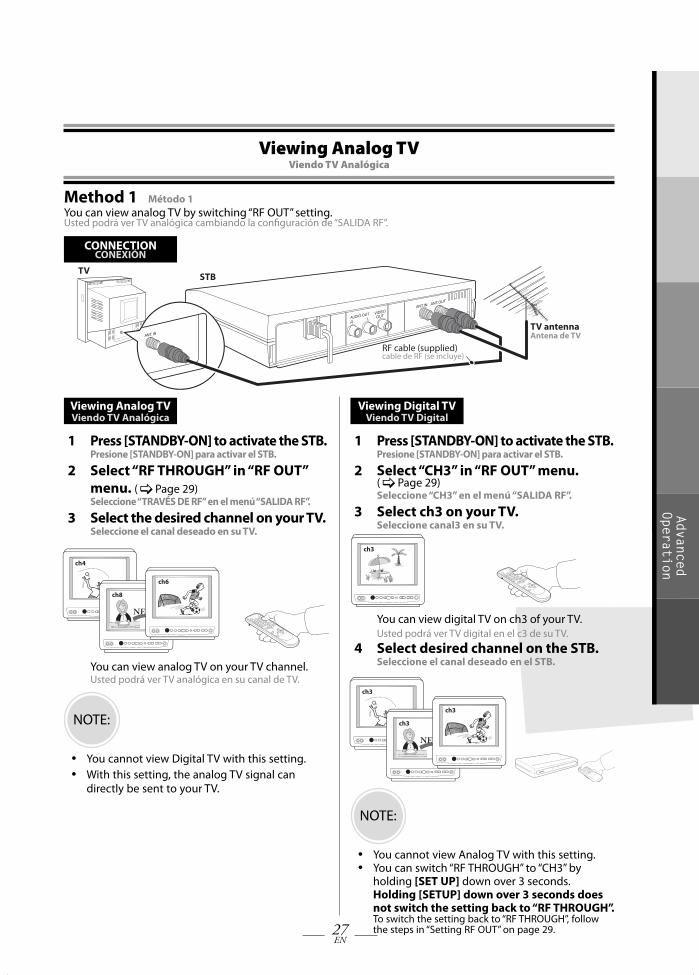
Viewing Analog TVViendo TV Analógica
Method 1 Método 1You can view analog TV by switching “RF OUT” setting. Usted podrá ver TV analógica cambiando la confi guración de “SALIDA RF”.
CONNECTIONCONEXIÓN
RF cable (supplied)cable de RF (se incluye)
STB
TV antennaAntena de TV
TV
Viewing Digital TVViendo TV Digital
1 Press [STANDBY-ON] to activate the STB. Presione [STANDBY-ON] para activar el STB.
2 Select “CH3” in “RF OUT” menu. ( Page 29)Seleccione “CH3” en el menú “SALIDA RF”.
3 Select ch3 on your TV.Seleccione canal3 en su TV.
12
3
45
6
CH.
CH.
78
9
0
ch3
You can view digital TV on ch3 of your TV.Usted podrá ver TV digital en el c3 de su TV.
4 Select desired channel on the STB. Seleccione el canal deseado en el STB.
ch3
ch3
ch3
NOTE:
You cannot view Analog TV with this setting.You can switch “RF THROUGH” to “CH3” by holding [SET UP] down over 3 seconds. Holding [SETUP] down over 3 seconds does not switch the setting back to “RF THROUGH”. To switch the setting back to “RF THROUGH”, follow the steps in “Setting RF OUT” on page 29.
••
Viewing Analog TVViendo TV Analógica
1 Press [STANDBY-ON] to activate the STB. Presione [STANDBY-ON] para activar el STB.
2 Select “RF THROUGH” in “RF OUT” menu. ( Page 29)Seleccione “TRAVÉS DE RF” en el menú “SALIDA RF”.
3 Select the desired channel on your TV.Seleccione el canal deseado en su TV.
ch4
12
3
45
6
CH.
CH.
78
9
0
ch6
ch8
You can view analog TV on your TV channel.Usted podrá ver TV analógica en su canal de TV.
NOTE:
You cannot view Digital TV with this setting.With this setting, the analog TV signal can directly be sent to your TV.
••
X6043UD_TB110MW.indd 27X6043UD_TB110MW.indd 27 2008/05/29 14:28:452008/05/29 14:28:45
28EN
Advanced OperationMethod 2 Método 2You can view analog TV without switching “RF OUT” setting.Usted podrá ver TV analógica sin cambiar la confi guración de “SALIDA RF”.
CONNECTION
TV STB
cable de RF (se incluye)
cable de video
TV antennaAntena de TV
cable de audio
RF cable (supplied)
Video cableAudio cable
yellowyellowyellow
whitewhitewhiteredredred
yellowyellowyellowwhite
whitewhiteredredred
Viewing Digital TVViendo TV Digital
1 Press [STANDBY-ON] to activate the STB. Presione [STANDBY-ON] para activar el STB.
lights up in greense vuelve verde
2 Select external input channel on your TV.Seleccione el canal de entrada externo en su TV.
12
3
45
6
CH.
CH.
78
9
0
AUX
You can view digital TV on external input channel of your TV.Usted podrá ver TV digital en el canal de entrada externo de su TV.
3 Select desired channel on the STB. Seleccione el canal deseado en el STB.
AUX
AUX
AUX
Viewing Analog TVViendo TV Analógica
1 Press [STANDBY-ON] to activate the STB. Presione [STANDBY-ON] para activar el STB.
lights up in greense vuelve verde
2 Select “RF THROUGH” in “RF OUT” menu. ( Page 29)Seleccione “TRAVÉS DE RF” en el menú “SALIDA RF”.
3 Select the desired channel on your TV.Seleccione el canal deseado en su TV.
ch4
12
3
45
6
CH.
CH.
78
9
0
ch6
ch8
You can view analog TV on your TV channel.Usted podrá ver TV analógica en su canal de TV.
X6043UD_TB110MW.indd 28X6043UD_TB110MW.indd 28 2008/05/29 14:28:462008/05/29 14:28:46
29EN
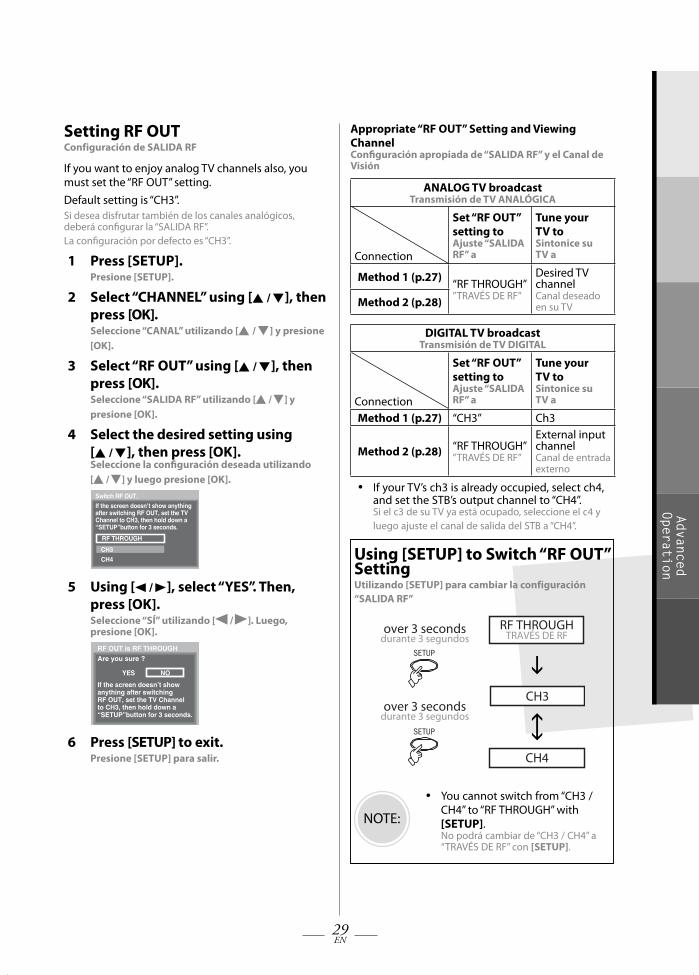
Advanced Operation
Setting RF OUTConfiguración de SALIDA RF
If you want to enjoy analog TV channels also, you must set the “RF OUT” setting.Default setting is “CH3”.Si desea disfrutar también de los canales analógicos, deberá confi gurar la “SALIDA RF”.La confi guración por defecto es “CH3”.
1 Press [SETUP].Presione [SETUP].
2 Select “CHANNEL” using [K / L], then press [OK].Seleccione “CANAL” utilizando [K / L] y presione [OK].
3 Select “RF OUT” using [K / L], then press [OK].Seleccione “SALIDA RF” utilizando [K / L] y presione [OK].
4 Select the desired setting using [K / L], then press [OK]. Seleccione la confi guración deseada utilizando [K / L] y luego presione [OK].
Switch RF OUT.
If the screen doesn’t show anything after switching RF OUT, set the TV Channel to CH3, then hold down a “SETUP”button for 3 seconds.
CH3
RF THROUGH
CH4
5 Using [s / B], select “YES”. Then, press [OK].Seleccione “SÍ” utilizando [s / B]. Luego, presione [OK].
RF OUT is RF THROUGH
Are you sure ?
YES NO
If the screen doesn’t showanything after switching RF OUT, set the TV Channel to CH3, then hold down a “SETUP”button for 3 seconds.
6 Press [SETUP] to exit.Presione [SETUP] para salir.
Appropriate “RF OUT” Setting and Viewing ChannelConfi guración apropiada de “SALIDA RF” y el Canal de Visión
ANALOG TV broadcastTransmisión de TV ANALÓGICA
Connection
Set “RF OUT” setting toAjuste “SALIDA RF” a
Tune your TV toSintonice su TV a
Method 1 (p.27) “RF THROUGH””TRAVÉS DE RF”
Desired TV channelCanal deseado en su TVMethod 2 (p.28)
DIGITAL TV broadcastTransmisión de TV DIGITAL
Connection
Set “RF OUT” setting toAjuste “SALIDA RF” a
Tune your TV toSintonice su TV a
Method 1 (p.27) “CH3” Ch3
Method 2 (p.28) “RF THROUGH””TRAVÉS DE RF”
External input channelCanal de entrada externo
If your TV’s ch3 is already occupied, select ch4, and set the STB’s output channel to “CH4”.Si el c3 de su TV ya está ocupado, seleccione el c4 y luego ajuste el canal de salida del STB a “CH4”.
Using [SETUP] to Switch “RF OUT” SettingUtilizando [SETUP] para cambiar la configuración “SALIDA RF”
TRAVÉS DE RFRF THROUGH
CH3
CH4
over 3 secondsdurante 3 segundos
over 3 secondsdurante 3 segundos
NOTE:
You cannot switch from “CH3 / CH4” to “RF THROUGH” with [SETUP].No podrá cambiar de “CH3 / CH4” a “TRAVÉS DE RF” con [SETUP].
•
•
X6043UD_TB110MW.indd 29X6043UD_TB110MW.indd 29 2008/05/29 14:28:482008/05/29 14:28:48
30EN
Others
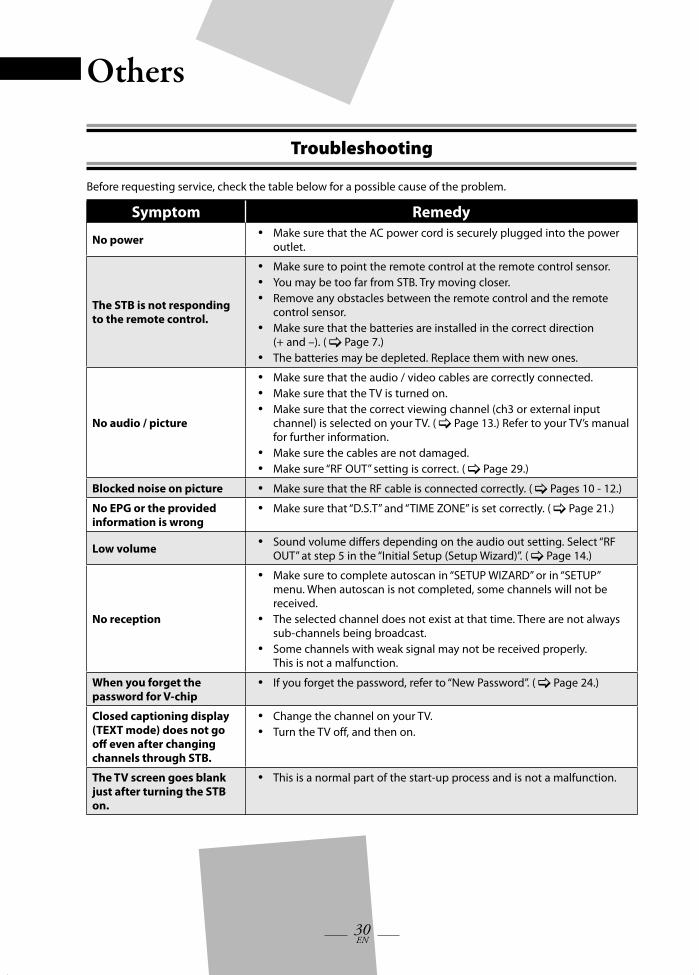
Troubleshooting
Before requesting service, check the table below for a possible cause of the problem.
Symptom Remedy
No power Make sure that the AC power cord is securely plugged into the power outlet.
•
The STB is not responding to the remote control.
Make sure to point the remote control at the remote control sensor.You may be too far from STB. Try moving closer.Remove any obstacles between the remote control and the remote control sensor.Make sure that the batteries are installed in the correct direction (+ and –). ( Page 7.)The batteries may be depleted. Replace them with new ones.
•••
•
•
No audio / picture
Make sure that the audio / video cables are correctly connected.Make sure that the TV is turned on.Make sure that the correct viewing channel (ch3 or external input channel) is selected on your TV. ( Page 13.) Refer to your TV’s manual for further information.Make sure the cables are not damaged.Make sure “RF OUT” setting is correct. ( Page 29.)
•••
••
Blocked noise on picture Make sure that the RF cable is connected correctly. ( Pages 10 - 12.)•No EPG or the provided information is wrong
Make sure that “D.S.T” and “TIME ZONE” is set correctly. ( Page 21.)•
Low volume Sound volume differs depending on the audio out setting. Select “RF OUT” at step 5 in the “Initial Setup (Setup Wizard)”. ( Page 14.)
•
No reception
Make sure to complete autoscan in “SETUP WIZARD” or in “SETUP” menu. When autoscan is not completed, some channels will not be received.The selected channel does not exist at that time. There are not always sub-channels being broadcast.Some channels with weak signal may not be received properly. This is not a malfunction.
•
•
•
When you forget the password for V-chip
If you forget the password, refer to “New Password”. ( Page 24.)•
Closed captioning display (TEXT mode) does not go off even after changing channels through STB.
Change the channel on your TV.Turn the TV off, and then on.
••
The TV screen goes blank just after turning the STB on.
This is a normal part of the start-up process and is not a malfunction.•
X6043UD_TB110MW.indd 30X6043UD_TB110MW.indd 30 2008/05/29 14:28:482008/05/29 14:28:48
31EN
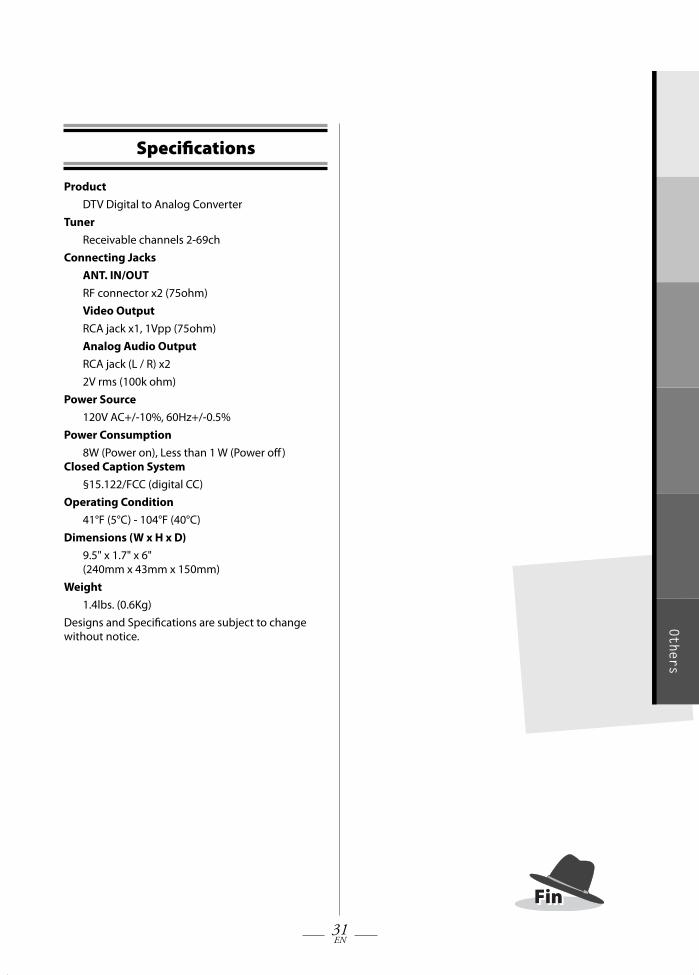
Others
FinFin
Specifi cations
Product DTV Digital to Analog ConverterTuner Receivable channels 2-69chConnecting Jacks ANT. IN/OUT RF connector x2 (75ohm) Video Output RCA jack x1, 1Vpp (75ohm) Analog Audio Output RCA jack (L / R) x2 2V rms (100k ohm)Power Source 120V AC+/-10%, 60Hz+/-0.5%Power Consumption 8W (Power on), Less than 1 W (Power off ) Closed Caption System §15.122/FCC (digital CC) Operating Condition 41°F (5°C) - 104°F (40°C)Dimensions (W x H x D) 9.5" x 1.7" x 6" (240mm x 43mm x 150mm)Weight 1.4lbs. (0.6Kg)Designs and Specifi cations are subject to change without notice.
X6043UD_TB110MW.indd 31X6043UD_TB110MW.indd 31 2008/05/29 14:28:482008/05/29 14:28:48
LIMITED WARRANTYFUNAI CORP. will repair this product, free of charge in the USA in the event of defect in materials or workmanship as follows:
DURATION:PARTS: FUNAI CORP. will provide parts to replace defective parts without charge for one (1) year from the date
of original retail purchase. Certain parts are excluded from this warranty.LABOR: FUNAI CORP. will provide the labor without charge for a period of ninety (90) days from the date of
original retail purchase.
LIMITS AND EXCLUSIONS:THIS WARRANTY IS EXTENDED ONLY TO THE ORIGINAL RETAIL PURCHASER. A PURCHASE RECEIPT OR OTHER PROOF OF ORIGINAL RETAIL PURCHASE WILL BE REQUIRED TOGETHER WITH THE PRODUCT TO OBTAIN SERVICE UNDER THIS WARRANTY.This warranty shall not be extended to any other person or transferee.This warranty is void and of no effect if any serial numbers on the product are altered, replaced, defaced, missing or if service was attempted by an unauthorized service center. This limited warranty does not apply to any product not purchased and used in the United States.This warranty only covers failures due to defects in material or workmanship which occur during normal use. It does not cover damage which occurs in shipment, or failures which are caused by repairs, alterations or products not supplied by FUNAI CORP., or damage, which results from accident, misuse, abuse, mishandling, misapplication, alteration, faulty installation, improper maintenance, commercial use such as hotel, rental or office use of this product, or damage which results from fire, flood, lightning or other acts of God.THIS WARRANTY DOES NOT COVER PACKING MATERIALS, ANY ACCESSORIES (EXCEPT REMOTE CONTROL), ANY COSMETIC PARTS, COMPLETE ASSEMBLY PARTS, DEMO OR FLOOR MODELS.FUNAI CORP. AND ITS REPRESENTATIVES OR AGENTS SHALL IN NO EVENT BE LIABLE FOR ANY GENERAL, INDIRECT OR CONSEQUENTIAL DAMAGES ARISING OUT OF OR OCCASIONED BY THE USE OF OR THE INABILITY TO USE THIS PRODUCT. THIS WARRANTY IS MADE IN LIEU OF ALL OTHER WARRANTIES, EXPRESS OR IMPLIED, AND OF ALL OTHER LIABILITIES ON THE PART OF FUNAI, ALL OTHER WARRANTIES INCLUDING THE WARRANTY OF MERCHANTABILITY AND FITNESS FOR A PARTICULAR PURPOSE, ARE HEREBY DISCLAIMED BY FUNAI AND ITS REPRESENTATIVES IN THE UNITED STATES.ALL WARRANTY INSPECTIONS AND REPAIRS MUST BE PERFORMED BY AN AUTHORIZED SERVICE CENTER.THIS WARRANTY IS ONLY VALID WHEN THE UNIT IS CARRIED-IN TO AN AUTHORIZED SERVICE CENTER.THE PRODUCT MUST BE ACCOMPANIED BY A COPY OF THE ORIGINAL RETAIL PURCHASE RECEIPT. IF NO PROOF OF PURCHASE IS ATTACHED, THE WARRANTY WILL NOT BE HONORED AND REPAIR COSTS WILL BE CHARGED.
IMPORTANT:THIS LIMITED WARRANTY GIVES YOU SPECIFIC LEGAL RIGHTS. YOU MAY HAVE OTHER RIGHTS THAT VARY FROM STATE TO STATE. IF, AT ANY TIME DURING THE WARRANTY PERIOD, YOU ARE UNABLE TO OBTAIN SATISFACTION WITH THE REPAIR OF THIS PRODUCT, PLEASE CONTACT FUNAI CORP.
ATTENTION:FUNAI CORP. RESERVES THE RIGHT TO MODIFY ANY DESIGN OF THIS PRODUCT WITHOUT PRIOR NOTICE.
WARRANTY STATEMENT REGARDING NON AUTHORIZED REPAIRS:To obtain warranty service, you must take the product, or deliver the product freight prepaid, in either its original packaging or packaging affording an equal degree of protection, to any AUTHORIZED SERVICE CENTER. FUNAI CORP. will not reimburse you for any service done by unauthorized service providers without prior written approval.
To locate your nearest AUTHORIZED SERVICE CENTER or for general service inquiries, please contact us at:
FUNAI SERVICE CORPORATIONCustomer Service
Tel: 1-800-605-8610 http://www.funai-corp.com
5653 Creekside Parkway, Suite A, Lockbourne, OH 43137
Printed in China X6043UD1VMN25977 ★★★★★
X6043UD_TB110MW.indd 32X6043UD_TB110MW.indd 32 2008/05/30 11:35:312008/05/30 11:35:31