Embed Size (px)
Citation preview

Owner’s manualManual del propietarioManuel du propriétaire
1 866 341 3738
www.magnavox.com/support/
1 866 341 3738
www.magnavox.com/support/
1 866 341 3738
www.magnavox.com/support/
55MV387Y50MV387Y
Contents
1 Notice ....................................................................... 5
2 Getting started ...................................................... 8
Features 8Included accessories 8Symbols used in this Owner’s manual 8Attaching the base 9Installing the remote control batteries 9Remote control 10Control panel 11Terminals 11Connecting Antenna or cable / satellite / IPTV set-topbox 12Plugging in the AC power cord 12Selecting your connection quality 13Connecting your devices 13Initial setup 17
3 Use your TV ........................................................... 19
Switching on your TV and putting it in standby mode 19Adjusting volume 19Switching channels 19Watching channels from an external device 20Access the Home menu 20Create a list of favorite channels 21Changing Picture format 21TV screen information 23Using options menu 23USB 24
4 Getting more from your TV .............................. 27
Picture setup 28TV settings 28
Picture 28Sound 30Features 31Installation 31Accessibility 34
Search for channels 36Install channels 36
Channel settings 36Channel installation 36Child lock 37Change PIN 38Digital audio language 38Mono/Stereo 38
Connect to network 39Wireless setting 39Wired setting 39
Network settings 40Manual network settings 40Connection test 42Setting status 42Home network 43Wake-on-LAN(DIAL) 43Apps 43Samba interactive TV settings 43Reset network settings 43
Update software 44Preparing for the software upgrade 44Downloading the software 44USB upgrade 44Network updates 45
Software settings 45Software 45Wireless Screencasting 46View photos, play music and watch videos usinghome network 46Apps 49PandoraN operations 50
5 Useful tips ............................................................. 51
FAQ 51Troubleshooting tips 52
6 Information .......................................................... 54
Glossary 54Maintenance 54
7 Specifications ...................................................... 55
8 Warranty ............................................................... 56
License ...................................................... end of book
● Displays and illustrations may differ depending on the product you purchase.
2 .English
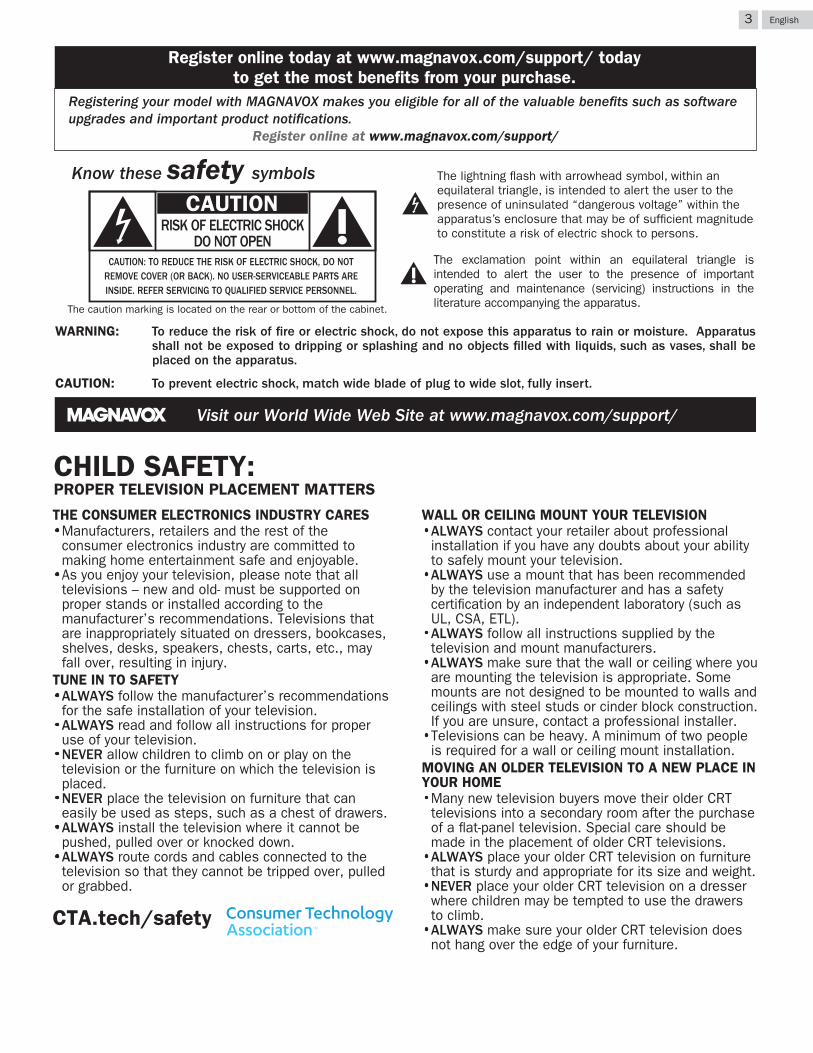
Know these safety symbols The lightning flash with arrowhead symbol, within an equilateral triangle, is intended to alert the user to the presence of uninsulated “dangerous voltage” within the apparatus’s enclosure that may be of sufficient magnitude to constitute a risk of electric shock to persons.
The exclamation point within an equilateral triangle is intended to alert the user to the presence of important operating and maintenance (servicing) instructions in the literature accompanying the apparatus.
CAUTION: TO REDUCE THE RISK OF ELECTRIC SHOCK, DO NOTREMOVE COVER (OR BACK). NO USER-SERVICEABLE PARTS AREINSIDE. REFER SERVICING TO QUALIFIED SERVICE PERSONNEL.
RISK OF ELECTRIC SHOCKDO NOT OPEN
The caution marking is located on the rear or bottom of the cabinet.
CAUTION
Register online today at www.magnavox.com/support/ today
to get the most benefits from your purchase.
Visit our World Wide Web Site at www.magnavox.com/support/
WARNING: To reduce the risk of fire or electric shock, do not expose this apparatus to rain or moisture. Apparatus shall not be exposed to dripping or splashing and no objects filled with liquids, such as vases, shall be placed on the apparatus.
CAUTION: To prevent electric shock, match wide blade of plug to wide slot, fully insert.
Registering your model with MAGNAVOX makes you eligible for all of the valuable benefits such as software upgrades and important product notifications.
Register online at www.magnavox.com/support/
CHILD SAFETY:CHILD SAFETY:PROPER TELPROPER TELEVISION PVISION PLACEMENT MCEMENT MATTERSTERS
THE CONSUMER ELECTRONICS INDUSTRY CARESTHE CONSUMER ELECTRONICS INDUSTRY CARES• Manufacturers, retailers and the rest of the Manufacturers, retailers and the rest of the
consumer electronics industry are committed to consumer electronics industry are committed to making home entertainment safe and enjoyable.making home entertainment safe and enjoyable.
• As you enjoy your television, please note that all As you enjoy your television, please note that all televisions – new and old- must be supported on televisions – new and old- must be supported on proper stands or installed according to the proper stands or installed according to the manufacturer’s recommendations. Televisions that manufacturer’s recommendations. Televisions that are inappropriately situated on dressers, bookcases, are inappropriately situated on dressers, bookcases, shelves, desks, speakers, chests, carts, etc., may shelves, desks, speakers, chests, carts, etc., may fall over, resulting in injury.fall over, resulting in injury.
TUNE IN TO SAFETYTUNE IN TO SAFETY• ALWAYSALWAYS follow the manufacturer’s recommendations follow the manufacturer’s recommendations
for the safe installation of your television.for the safe installation of your television.• ALWAYSALWAYS read and follow all instructions for proper read and follow all instructions for proper
use of your television.use of your television.• NEVERNEVER allow children to climb on or play on the allow children to climb on or play on the
television or the furniture on which the television is television or the furniture on which the television is placed.placed.
• NEVERNEVER place the television on furniture that can place the television on furniture that can easily be used as steps, such as a chest of drawers.easily be used as steps, such as a chest of drawers.
• ALWAYSALWAYS install the television where it cannot be install the television where it cannot be pushed, pulled over or knocked down.pushed, pulled over or knocked down.
• ALWAYSALWAYS route cords and cables connected to the route cords and cables connected to the television so that they cannot be tripped over, pulled television so that they cannot be tripped over, pulled or grabbed.or grabbed.
WALL OR CEILING MOUNT YOUR TELEVISIONWALL OR CEILING MOUNT YOUR TELEVISION• ALWAYSALWAYS contact your retailer about professional contact your retailer about professional
installation if you have any doubts about your ability installation if you have any doubts about your ability to safely mount your television.to safely mount your television.
•ALWAYSALWAYS use a mount that has been recommended use a mount that has been recommended by the television manufacturer and has a safety by the television manufacturer and has a safety certification by an independent laboratory (such as certification by an independent laboratory (such as UL, CSA, ETL).UL, CSA, ETL).
• ALWAYSALWAYS follow all instructions supplied by the follow all instructions supplied by the television and mount manufacturers.television and mount manufacturers.
• ALWAYSALWAYS make sure that the wall or ceiling where you make sure that the wall or ceiling where you are mounting the television is appropriate. Some are mounting the television is appropriate. Some mounts are not designed to be mounted to walls and mounts are not designed to be mounted to walls and ceilings with steel studs or cinder block construction. ceilings with steel studs or cinder block construction. If you are unsure, contact a professional installer.If you are unsure, contact a professional installer.
• Televisions can be heavy. A minimum of two people Televisions can be heavy. A minimum of two people is required for a wall or ceiling mount installation.is required for a wall or ceiling mount installation.
MOVING AN OLDER TELEVISION TO A NEW PLACE IN MOVING AN OLDER TELEVISION TO A NEW PLACE IN YOUR HOMEYOUR HOME• Many new television buyers move their older CRT Many new television buyers move their older CRT
televisions into a secondary room after the purchase televisions into a secondary room after the purchase of a flat-panel television. Special care should be of a flat-panel television. Special care should be made in the placement of older CRT televisions.made in the placement of older CRT televisions.
• ALWAYSALWAYS place your older CRT television on furniture place your older CRT television on furniture that is sturdy and appropriate for its size and weight.that is sturdy and appropriate for its size and weight.
• NEVERNEVER place your older CRT television on a dresser place your older CRT television on a dresser where children may be tempted to use the drawers where children may be tempted to use the drawers to climb.to climb.
• ALWAYSALWAYS make sure your older CRT television does make sure your older CRT television does not hang over the edge of your furniture.not hang over the edge of your furniture.
CTA.tech/safetyCTA.tech/safety
3 .English

Important safety instructionsRead these instructions.Keep these instructions.Heed all warnings.Follow all instructions.Do not use this apparatus near water.Clean only with dry cloth.Do not block any ventilation openings. Install in accordance with the manufacturer’s instructions.Do not install near any heat sources such as radiators, heat registers, stoves, or other apparatus (including amplifiers) that produce heat.Do not defeat the safety purpose of the polarized or grounding-type plug. A polarized plug has two blades with one wider than the other. A grounding type plug has two blades and a third grounding prong. The wide blade or the third prong are provided for your safety. If the provided plug does not fit into your outlet, consult an electrician for replacement of the obsolete outlet.Protect the power cord from being walked on or pinched particularly at plugs, convenience receptacles, and the point where they exit from the apparatus.Only use attachments / accessories specified by the manufacturer.Use only with the cart, stand, tripod, bracket, or table specified by the manufacturer, or sold with the apparatus. When a cart is used, use caution when moving the cart / apparatus combination to avoid injury from tip-over.
Unplug this apparatus during lightning storms or when unused for long periods of time.Refer all servicing to qualified service personnel. Servicing is required when the apparatus has been damaged in any way, such as power-supply cord or plug is damaged, liquid has been spilled or objects have fallen into the apparatus, the apparatus has been exposed to rain or moisture, does not operate normally, or has been dropped.
13.
14.
Note to the CATV system installer:This reminder is provided to call the CATV system installer’s attention to Article 820-40 of the NEC that provides guidelines for proper grounding and, in particular, specifies that the cable ground shall be connected to the grounding system of the building, as close to the point of cable entry as practical.
Example of antenna grounding as per NEC - National Electric Code
ANTENNA LEAD IN WIREGROUND CLAMP
ANTENNA DISCHARGE UNIT (NEC SECTION 810-20)
ELECTRIC SERVICE EQUIPMENT
GROUNDING CONDUCTORS (NEC SECTION 810-21)
POWER SERVICE GROUNDING ELECTRODE SYSTEM (NEC ART 250, PART H)
GROUND CLAMPS
1. 2. 3. 4. 5. 6. 7.
8.
9.
10.
11.
12.
Wall mount bracket kitBrand Model # Screw dimension
55MV387Y50MV387Y SANUS F80b M6 x 1.378” (35mm)
● Your TV meets the VESA standard for wall mounting. Consultwith your local dealer for a wall mount bracket which iscompatible with your TV model.
● The recommended wall mount bracket kit (sold separately)allows the mounting of the TV on the wall.
● For detailed information on installing the wall mount, refer tothe wall mount Instruction book.
● Funai is not responsible for any damage to the product or injuryto yourself or others if you elect to install the TV wall mountbracket or mount the TV onto the bracket on your own.
● The wall mount bracket must be installed by experts.
Funai is not liable for these types of accidents or injuries notedbelow.● Install the wall mount bracket on a sturdy vertical wall.● If installed onto a ceiling or slanted wall, the TV and wall mount
bracket may fall which could result in a severe injury.● Do not use screws that are longer or shorter than their
specified length. If screws too long are used this may causemechanical or electrical damage inside the TV set. If screwstoo short are used this may cause the TV set to fall.
● Do not fasten the screws by excessive force. This may damagethe product or cause the product to fall, leading to an injury.
● For safety reasons use 2 people to mount the TV onto a wallmounting bracket.
● Do not mount the TV onto the wall mounting bracket while yourTV is plugged in or turned on. It may result in an electrical shockinjury.
When installing the unit on the wall, allow this much space.Top : 11.8 inches (30cm)
Left and right side : 5.9 inches (15cm)
Bottom : 3.9 inches (10cm)
4 .English
1 Notice
MAGNAVOX and SMART. VERY SMART. are registered trademarksof Koninklijke Philips N.V. and are used under license fromKoninklijke Philips N.V.Funai reserves the right to change products at any time withoutbeing obliged to adjust earlier supplies accordingly.The material in this Owner’s manual is believed adequate for theintended use of the system. If the product or its individual modulesor procedures are used for purposes other than those specifiedherein, confirmation of their validity and suitability must beobtained. Funai warrants that the material itself does not infringeany United States patents. No further warranty is expressed orimplied.Funai cannot be held responsible neither for any errors in thecontent of this document nor for any problems as a result of thecontent in this document. Errors reported to Funai will be adaptedand published on the Funai support website as soon as possible.
Pixel characteristicsThis LCD product has a high number of color pixels. Although ithas effective pixels of 99.999% or more, black dots or brightpoints of light (red, green or blue) may appear constantly on thescreen. This is a structural property of the display (within commonindustry standards) and is not a malfunction.
WarrantyNo components are user serviceable. Do not open or removecovers to the inside of the product. Repairs may only be done byservice centers and official repair shops. Failure to do so shall voidany warranty, stated or implied.Any operation expressly prohibited in this Owner’s manual, anyadjustments or assembly procedures not recommended orauthorized in this Owner’s manual shall void the warranty.
Federal communications commission noticeThis equipment has been tested and found to comply with thelimits for a Class B digital device, pursuant to part 15 of the FCCRules. These limits are designed to provide reasonable protectionagainst harmful interference in a residential installation. Thisequipment generates, uses and can radiate radio frequency energyand, if not installed and used in accordance with the instructions,may cause harmful interference to radio communications.However, there is no guarantee that interference will not occur ina particular installation. If this equipment does cause harmfulinterference to radio or television reception, which can bedetermined by turning the equipment off and on, the user isencouraged to try to correct the interference by one or more of thefollowing measures:● Reorient or relocate the receiving antenna.● Increase the separation between the equipment and the
receiver.● Connect the equipment into an outlet on a circuit different from
that to which the receiver is connected.● Consult the dealer or an experienced radio or television
technician for help.
Declaration of conformityTrade name : MAGNAVOXResponsible party : FUNAI CORPORATION, Inc.Model : 55MV387Y, 50MV387YAddress : 19900 Van Ness Avenue, Torrance, CA
90501 U.S.A.Telephone number : 1 866 341 3738
ModificationsThis apparatus may generate or use radio frequency energy.Changes or modifications to this apparatus may cause harmfulinterference.Any modifications to the apparatus must be approved by Funai.The user could lose the authority to operate this apparatus if anunauthorized change or modification is made.
CablesConnections to this device must be made with shielded cableswith metallic RFI / EMI connector hoods to maintain compliancewith FCC Rules and regulations.
Canadian noticeCAN ICES-3 (B)/NMB-3 (B)Analog and digital television receiving apparatus, Canada BETS-7 /NTMR-7.
The following FCC/IC RSS applies to the wireless LANadapter included in this product.FCC caution: Any changes or modifications not expresslyapproved by the party responsible for compliance could voidthe user’s authority to operate this equipment.
This transmitter must not be co-located or operating inconjunction with any other antenna or transmitter.
Country code statementFor product available in the USA market, only channel 1~11can be operated. Selection of other channels is not possible.To maintain compliance with FCC RF exposure requirements,use only belt-clips, holsters or similar accessories that do notcontain metallic components in its assembly. The use ofaccessories that do not satisfy these requirements may notcomply with FCC RF exposure requirements and should beavoided.
This device complies with Part 15 of FCC Rules and IndustryCanada licence-exempt RSS standard(s). Operation issubject to the following two conditions: (1) this device maynot cause interference, and (2) this device must accept anyinterference, including interference that may causeundesired operation of this device.
5150-5250 MHz band is restricted to indoor operationsonly.
High-power radars are allocated as primary users (i.e.priority users) of the bands 5250-5350 MHz and 5650-5850MHz and that these radars could cause interference and/ordamage to LE-LAN devices.
Compliance with IC requirement RSS-210 A9.4.4Data transmission is always initiated by software, which isthe passed down through the MAC, through the digital andanalog baseband, and finally to the RF chip. Several specialpackets are initiated by the MAC. These are the only waysthe digital baseband portion will turn on the RF transmitter,which it then turns off at the end of the packet. Therefore,the transmitter will be on only while one of theaforementioned packets is being transmitted. In otherwords, this device automatically discontinue transmissionin case of either absence of information to transmit oroperational failure.
5 .English
Positioning the TV● Large screen TVs are heavy. 2 people are required to carry and
handle a large screen TV.● Make sure to hold the upper and bottom
frames of the unit firmly as illustrated.● Install the unit in a horizontal and stable
position.● Do not install the unit in direct sunlight or
in a place subject to dust or strongvibration.
● Depending on the environment, thetemperature of this unit may increase slightly. This is not amalfunction.
● When installing this unit in a temperate environment, avoid aplace with rapid temperature changes.– Operating temperature: 41°F (5°C) to 104°F (40°C)
● This unit should not be used in a tropical environment as it hasnot been evaluated under such conditions.
● No objects should be placed directly on or under this unit,especially lighted candles or other flaming objects.
● Depending on your external devices, noise or disturbance of thepicture and / or sound may be generated if the unit is placedtoo close to them. In this case, please ensure enough spacebetween the external devices and the unit.
● Do not insert the AC power cord into the power socket outletbefore all the connections are made.
● Ensure that you always have easy access to the AC power cordand outlet to disconnect the TV from the AC outlet.
● Before you move the TV, disconnect attached cables to preventdamage to connectors, especially the TV tuner.
● Be sure to unplug the AC power plug from the AC outlet beforemoving or carrying the unit.
● When moving the TV and then setting it down, please be carefulnot to pinch the AC power cord under the unit.
● Do not place this unit in an area where it may be exposed towater, oil or grease such as:near a bathtub, basin, kitchen sink, washing tub, swimmingpool, kitchen exhaust fan, etc., or in a damp basement.
Regulatory noticesWARNING : To prevent injury, this apparatus must be securely
attached to the furniture / wall in accordance withthe instructions. Tipping, shaking or rocking the unitmay cause injury / death.
WARNING : Never place a TV in an unstable location. A TV mayfall, causing serious personal injury or death. Manyinjuries, particularly to children, can be avoided bytaking simple precautions such as:
– Using cabinets or stands recommended by themanufacturer of the TV.
– Only using furniture that can safely support theTV.
– Ensuring the TV is not overhanging the edge ofthe supporting furniture.
– Not placing the TV on tall furniture (for example,cupboards or bookcases) without anchoringboth the furniture and the TV to a suitablesupport.
– Not placing the TV on cloth or other materialsthat may be located between the TV andsupporting furniture.
– Educating the children about the dangers ofclimbing on furniture to reach the TV or itscontrols.
If your existing TV is being retained and relocated, the sameconsiderations as above should be applied.
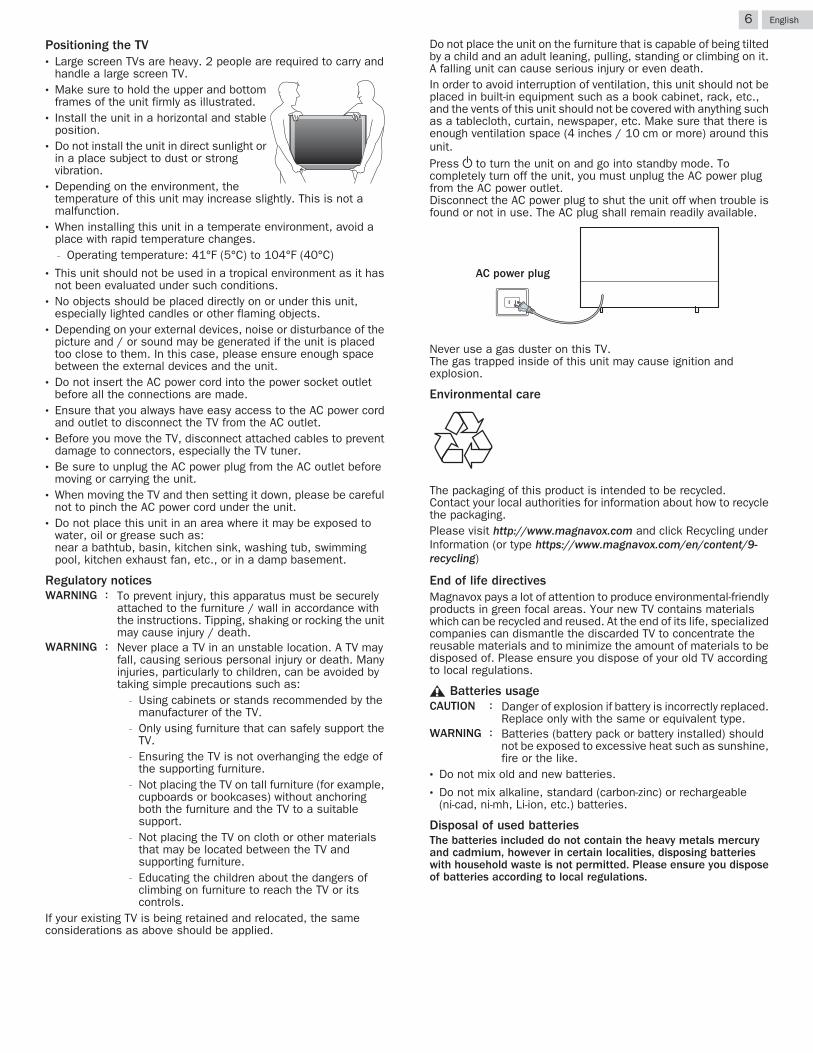
Do not place the unit on the furniture that is capable of being tiltedby a child and an adult leaning, pulling, standing or climbing on it.A falling unit can cause serious injury or even death.In order to avoid interruption of ventilation, this unit should not beplaced in built-in equipment such as a book cabinet, rack, etc.,and the vents of this unit should not be covered with anything suchas a tablecloth, curtain, newspaper, etc. Make sure that there isenough ventilation space (4 inches / 10 cm or more) around thisunit.Press B to turn the unit on and go into standby mode. Tocompletely turn off the unit, you must unplug the AC power plugfrom the AC power outlet.Disconnect the AC power plug to shut the unit off when trouble isfound or not in use. The AC plug shall remain readily available.
AC power plug
Never use a gas duster on this TV.The gas trapped inside of this unit may cause ignition andexplosion.
Environmental care
The packaging of this product is intended to be recycled.Contact your local authorities for information about how to recyclethe packaging.Please visit http://www.magnavox.com and click Recycling underInformation (or type https://www.magnavox.com/en/content/9-recycling)
End of life directivesMagnavox pays a lot of attention to produce environmental-friendlyproducts in green focal areas. Your new TV contains materialswhich can be recycled and reused. At the end of its life, specializedcompanies can dismantle the discarded TV to concentrate thereusable materials and to minimize the amount of materials to bedisposed of. Please ensure you dispose of your old TV accordingto local regulations.
# Batteries usageCAUTION : Danger of explosion if battery is incorrectly replaced.
Replace only with the same or equivalent type.WARNING : Batteries (battery pack or battery installed) should
not be exposed to excessive heat such as sunshine,fire or the like.
● Do not mix old and new batteries.● Do not mix alkaline, standard (carbon-zinc) or rechargeable
(ni-cad, ni-mh, Li-ion, etc.) batteries.
Disposal of used batteriesThe batteries included do not contain the heavy metals mercuryand cadmium, however in certain localities, disposing batterieswith household waste is not permitted. Please ensure you disposeof batteries according to local regulations.
6 .English

Preparing to move / ship the unitPlease pack the unit properly by following the diagram on thecarton (as noted below).
● To avoid damage to the screen, do not pack the stand on thesame side as the TV screen, refer to the illustration above.
CopyrightAll other registered and unregistered trademarks are the propertyof their respective owners.
The terms HDMI and HDMI High-Definition Multimedia Interface,and the HDMI Logo are trademarksor registered trademarks of HDMILicensing Administrator, Inc. in theUnited States and other countries.
Manufactured under license fromDolby Laboratories. Dolby, DolbyAudio, and the double-D symbol aretrademarks of Dolby Laboratories.
Sonic Emotion and the SonicEmotion logo symbol are registeredtrademarks of sonic emotion ag.
Netflix is available in certaincountries. Streaming membershiprequired. More information atwww.netflix.com.
VUDU™ is a trademark of VUDU,Inc.
YouTube and the YouTube logo aretrademarks of Google Inc.
PANDORA, the PANDORA logo, andthe Pandora trade dress aretrademarks or registeredtrademarks of Pandora Media, Inc.Used with permission.
Hotlist, Samba, Samba TV andassociated logos are trademarks ofFree Stream Media Corp.
Portions of this software are copyright © The FreeType Project(www.freetype.org).
The American Academy of Pediatrics discourages televisionviewing for children younger than two years of age.
FUNAI CORPORATION, Inc. does not warrant access to the portalor to any of the services, content, software and advertising. FUNAICORPORATION, Inc. or third party content/service providers may,in their sole discretion, add or remove access to any specificservices, content, software and advertising at any time. AlthoughFUNAI CORPORATION, Inc. will strive to provide a good selection ofservices, content or software, FUNAI CORPORATION, Inc. does notwarrant continued access to any specific services, and content orsoftware.
FUNAI CORPORATION, Inc. does not warrant WirelessScreencasting compatibility with all source devices such assmartphones, tablets, laptops, etc. due to large variability inhardware, firmware, drivers, software and implementation ofwireless casting applications on these source devices. AlthoughFUNAI CORPORATION, Inc. will strive to enhance compatibility andperformance across a range of source devices, FUNAICORPORATION, Inc. does not warrant compatibility with specificsource devices.
© 2017 Funai Electric Co., Ltd. All rights reserved.No part of this Owner’s manual may be reproduced, transmitted,disseminated or transcribed, in any form or for any purposewithout the express prior written consent of Funai. Furthermore,any unauthorized commercial distribution of this Owner’s manualor any revision hereto is strictly prohibited.
7 .English
2 Getting started
Features● DTV / Analog TV / CATV
You can use your remote control to select channels which are broadcast in digitalformat and conventional analog format. Also, cable and satellite subscribers canaccess their TV channels.
● Information displayYou can display on the TV screen the title, contents (DTV only) and otherinformation on the current program.
● AutoprogramThis unit automatically scans and memorizes channels available in your area,eliminating difficult setup procedures.
● AppsThis unit lets you enjoy internet services. Use the remote control to browse theApps pages. You can play movies and much more, all from your TV screen.
● Child lockThis feature allows you to block children’s access to inappropriate programs.
● Closed caption decoderBuilt-in closed caption decoder displays text for closed caption supportedprograms.
● MTS / SAP tunerAudio can be selected from the remote control.
● Auto standbyIf there is no input signal and no operation for 15 minutes, the unit will go intostandby mode automatically.
● Sleep timerYou can set the unit to go into standby mode after a specific amount of time.
● Choices for on-screen languageSelect your on-screen language: English, Spanish or French.
● Stereo sound function● PLL frequency synthesized tuning
Provides free and easy channel selection and lets you tune directly to any channelusing the number and decimal point “•” keys on the remote control.
● Various adjustments for picture and soundCustomizes picture quality suitable for your room and sets your sound preference.
● HDMI-CEC via HDMI linkHDMI-CEC allows your other HDMI link devices to be controlled by the HDMI cableconnected to your TV.
● HDMI input● HDMI-DVI input
If your video device has a DVI output jack, use an HDMI-DVI conversion cable toconnect the unit.
● Component video input● AV input
Audio and video input from an external device.
● USB terminalThe picture, music and video files stored on a USB memory stick can be playedback on this unit.
● Digital audio output● Headphone audio output
Headphone 3.5mm stereo jack for personal listening.
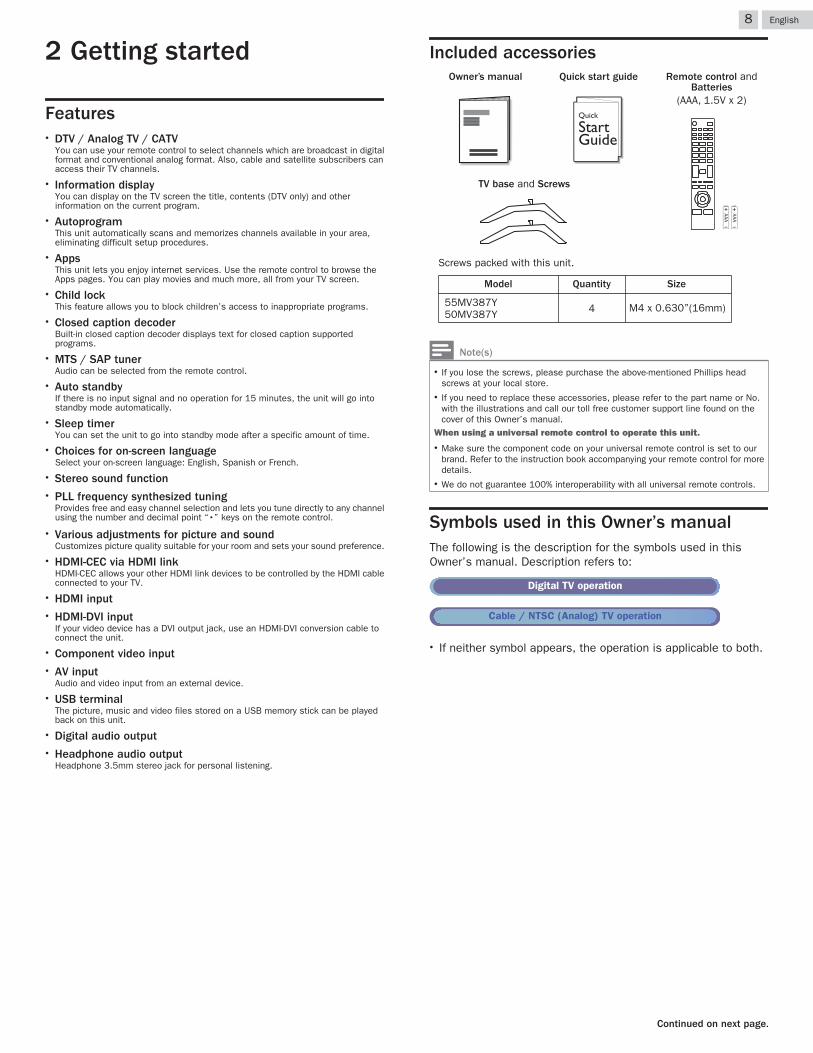
Included accessories
AAA
AAA
455MV387Y50MV387Y
TV base and Screws
Quick start guide
(AAA, 1.5V x 2)
Remote control and Batteries
Owner’s manual
SizeQuantityModel
Screws packed with this unit.
M4 x 0.630”(16mm)
Note(s)
● If you lose the screws, please purchase the above-mentioned Phillips headscrews at your local store.
● If you need to replace these accessories, please refer to the part name or No.with the illustrations and call our toll free customer support line found on thecover of this Owner’s manual.
When using a universal remote control to operate this unit.● Make sure the component code on your universal remote control is set to our
brand. Refer to the instruction book accompanying your remote control for moredetails.
● We do not guarantee 100% interoperability with all universal remote controls.
Symbols used in this Owner’s manualThe following is the description for the symbols used in thisOwner’s manual. Description refers to:
Digital TV operation
Cable / NTSC (Analog) TV operation
● If neither symbol appears, the operation is applicable to both.
8 .English
Continued on next page.
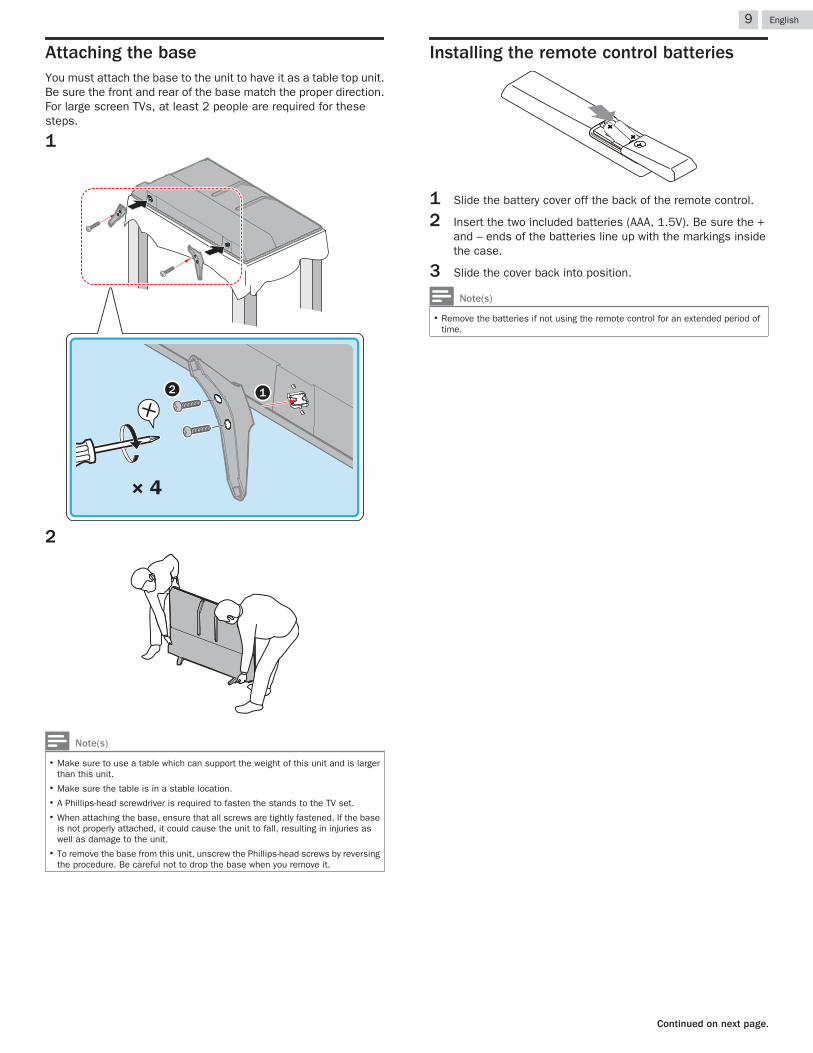
Attaching the baseYou must attach the base to the unit to have it as a table top unit.Be sure the front and rear of the base match the proper direction.For large screen TVs, at least 2 people are required for thesesteps.
1
12
× 4
2
Note(s)
● Make sure to use a table which can support the weight of this unit and is largerthan this unit.
● Make sure the table is in a stable location.● A Phillips-head screwdriver is required to fasten the stands to the TV set.● When attaching the base, ensure that all screws are tightly fastened. If the base
is not properly attached, it could cause the unit to fall, resulting in injuries aswell as damage to the unit.
● To remove the base from this unit, unscrew the Phillips-head screws by reversingthe procedure. Be careful not to drop the base when you remove it.
Installing the remote control batteries
1 Slide the battery cover off the back of the remote control.
2 Insert the two included batteries (AAA, 1.5V). Be sure the +and – ends of the batteries line up with the markings insidethe case.
3 Slide the cover back into position.
Note(s)
● Remove the batteries if not using the remote control for an extended period oftime.
9 .English
Continued on next page.

Remote control
c
a
b
d
f
g
e
j
h
l
k
m
o
q
n
i
p
a B (POWER)Turns the TV on from standby or off to standby mode.
b SAPSelects audio mode (MONO / STEREO / SAP) / audiolanguage.
c 0 - 9 (NUMBER keys)Used to enter a channel / program number.• (DOT) : Use with 0-9 to select digital channels.
For example, to enter 2.1, press
PREV.CH : Returns to the previously viewed channel.CH + / – : Selects a channel in the memorized channel
ring(low to high or high to low).
d VOL + / –Adjusts the volume.
e D (MUTE)Turns the sound on and off.
f BACKReturns to the previous menu operation.
g H I J K (NAVIGATION keys) / OKMoves the cursor, selects the on-screen menu items.
h SOURCESelects connected devices.
i CCSelects closed caption settings (Off, On, CC w/mute).
j PICTURE SIZE AAdjusts the picture size on the TV screen.
k INFODisplays information about the current program.
l fun-Link keys
H / G : Skips backward or forward chapters, titles ortracks on a disc.
E / D : Searches backward or forward through the disc.OPTIONS : Displays a list of menu items applicable to the
highlighted object or screen.C(Stop) : Stops the disc playback.
t(Pause) : Pauses the disc playback.
K(Play) : Begins or restarts the disc playback.
Note(s)
● You must set on in the device ( L p. 33) and HDMI-CEC Control ( L p. 23)menu's to operate the above functions.
● Pause may not work properly on some devices even if they are complied withHDMI-CEC.
m COLOR keysUse these keys according to the directions on-screen.
n Z (Home)Opens the main on-screen menu.
o YouTubeAccess directly to YouTube.
p NETFLIXAccess directly to Netflix.
q VUDUAccess directly to VUDU.
10 .English
Continued on next page.

Control panel
f
c d e
a
b
a Remote control sensorReceives IR signal from remote control.
b CH + / –Selects a channel. In the menu screen, moves the cursorup (+) / down (–).
c B (POWER)Turns the TV on or switches the TV into standby mode.
d MENUOpens the main on-screen menu.
e SOURCESelects connected devices.
f VOL + / –Adjusts the volume. In the menu screen, moves the cursorleft (+) / right (–).VOL + : Volume up
VOL – : Volume down
Terminals
m
n
g
k
h
j
l
i
g 75 ohm Cable / Antenna connectionSignal input from an antenna or cable / satellite set-topboxes.
h Analog audio (L/R) input jacksConnect analog audio signals from;– HDMI-DVI / Analog audio (L/R) jacks signal– Component video / Analog audio (L/R) jacks signal– Composite video / Analog audio (L/R) jacks signal– PC connection / Analog audio (L/R) jacks signal with stereo
mini 3.5mm plug audio cable on PCi Digital audio output jack
Digital audio (S/PDIF) output to home theaters and otherdigital audio systems.
j Component (Y/Pb/Pr) / Composite video (VIDEO) input jack(s)for VIDEOComposite video input (VIDEO) jack is a shared jack withcomponent video input (Y) jack. Green / Yellow colororientation depends on model.
k Ethernet portFor internet connection using an Ethernet cable with an RJ-45connector.
l HDMI input jack(s)Digital audio and video input from high definition digitaldevices such as DVD / Blu-ray Disc™ players, cable / satelliteset-top boxes, PC’s, etc.* For HDMI 2 only
In addition to normal HDMI and HDMI-DVI functionality, itoutputs TV audio to an HDMI-ARC-compliant device, suchas a home theater system.
m Headphone audio output jackHeadphone 3.5mm stereo jack for personal listening.
n USB terminalData input from USB memory stick only.Do not connect any device to this terminal such as digitalcamera, keyboard, mouse, etc.
11 .English
Continued on next page.
Connecting Antenna or cable / satellite /IPTV set-top boxBe sure your antenna or another device is connected properlybefore plugging in the AC power cord.
If connecting to an antenna through an RF cableAny DTV programs that are broadcast in your area can be receivedfor free through an antenna connection.
INININOUTOUTOUT
RF cableRF cableRF cable
AntennaAntennaAntenna
CableCableCable
If connecting cable / satellite / IPTV set-top box using an RFcableIf the TV is connected to a cable or set-top box via a coaxialconnection, set the TV to channel 3/4 or the channel specified bythe service provider.
INININAntennaAntennaAntenna
Set-top boxSet-top boxSet-top box
RF cableRF cableRF cable
OUTOUTOUTINININ
RF cableRF cableRF cable
If connecting cable / satellite / IPTV set-top box using anHDMI cableIf the TV is connected to a cable / satellite set-top box via an HDMIcable, make sure you select the correct source by using SOURCE.
IN
INININ
OUT
Set-top box
RF cableHDMI cableHDMI cableHDMI cable
If connecting cable / satellite / IPTV set-top box usingcomponent video inputIf the TV is connected to a cable / satellite set-top box viacomponent video input, make sure you select the correctcomponent video source by using SOURCE.
Set-top boxSet-top boxSet-top box
INININ
RF cableRF cableRF cableOUTOUTOUT
Component (Y/Pb/Pr) video cables
Component (Y/Pb/Pr) video cables
Component (Y/Pb/Pr) video cables
INININ
OUTOUTOUT
Audio (L/R) cablesAudio (L/R) cablesAudio (L/R) cables
INININ
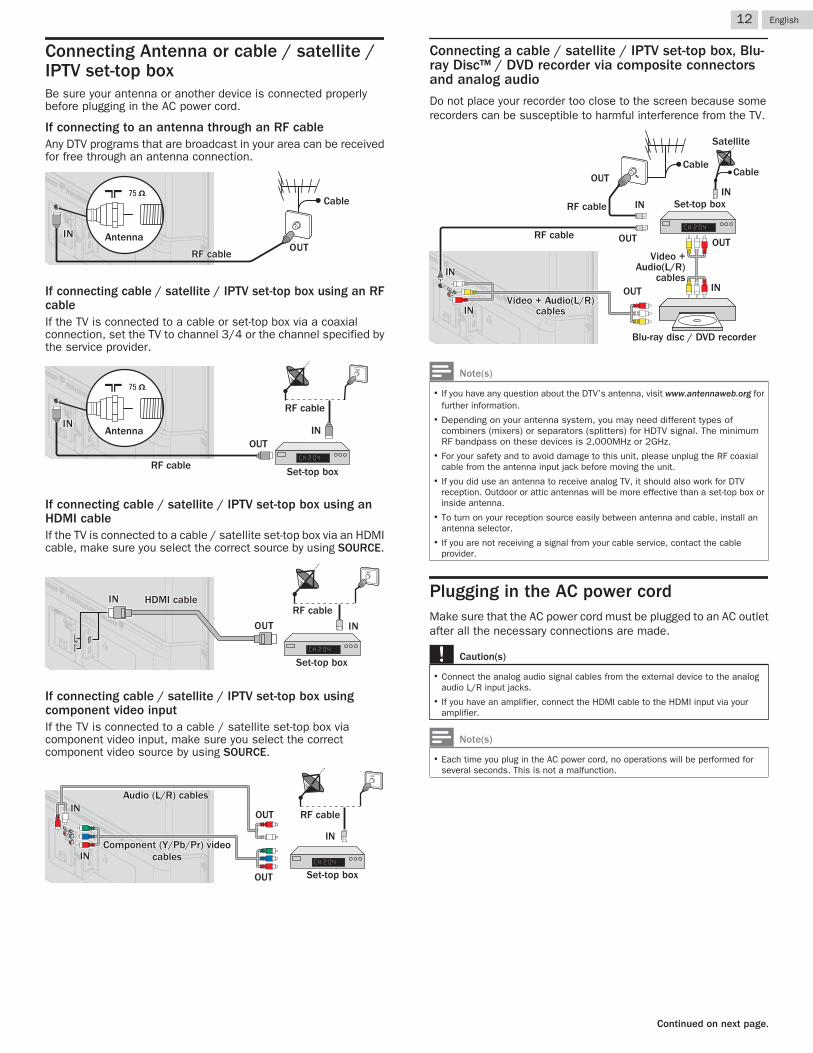
Connecting a cable / satellite / IPTV set-top box, Blu-ray Disc™ / DVD recorder via composite connectorsand analog audio
Do not place your recorder too close to the screen because somerecorders can be susceptible to harmful interference from the TV.
Cable
OUTRF cable
INININ
OUT
INOUT
INININ
OUTOUT
RF cable IN
Satellite
IN
Cable
Video + Audio(L/R)
cables
Video + Audio(L/R) cables
Video + Audio(L/R) cables
Video + Audio(L/R) cables
Blu-ray disc / DVD recorder
Set-top box
Note(s)
● If you have any question about the DTV’s antenna, visit www.antennaweb.org forfurther information.
● Depending on your antenna system, you may need different types ofcombiners (mixers) or separators (splitters) for HDTV signal. The minimumRF bandpass on these devices is 2,000MHz or 2GHz.
● For your safety and to avoid damage to this unit, please unplug the RF coaxialcable from the antenna input jack before moving the unit.
● If you did use an antenna to receive analog TV, it should also work for DTVreception. Outdoor or attic antennas will be more effective than a set-top box orinside antenna.
● To turn on your reception source easily between antenna and cable, install anantenna selector.
● If you are not receiving a signal from your cable service, contact the cableprovider.
Plugging in the AC power cordMake sure that the AC power cord must be plugged to an AC outletafter all the necessary connections are made.
Caution(s)
● Connect the analog audio signal cables from the external device to the analogaudio L/R input jacks.
● If you have an amplifier, connect the HDMI cable to the HDMI input via youramplifier.
Note(s)
● Each time you plug in the AC power cord, no operations will be performed forseveral seconds. This is not a malfunction.
12 .English
Continued on next page.
No included cables are used with these connections:● Please purchase the necessary cables at your local store.
Before you connect the AC power cord:
Be sure other devices are connected properly before plugging inthe AC power cord.
Selecting your connection quality
HDMI - Highest quality
Supports high-definition digital signals and gives highest pictureand sound quality. Video and audio signals are combined in onecable. You must use HDMI for full high-definition video and toenable HDMI-CEC.
Note(s)
● MAGNAVOX HDMI supports HDCP (High-bandwidth Digital Contents Protection). HDCPis a form of digital rights management that protects high-definition content in Blu-rayDisc™ or DVDs.
● The HDMI-ARC connector on the TV features HDMI-ARC functionality. This allowsoutput of TV audio to an HDMI-ARC-compliant device.
Component (Y Pb Pr) - High quality
Supports high-definition analog signals but gives lower picturequality than HDMI. Component (Y/Pb/Pr) video cables combinered / green / blue video cables with red / white audio (L/R) cables.Match the cable colors when you connect to the TV.
Composite - Basic quality
For analog connections. Composite video / Audio analog cableusually combine a yellow video cable with red / white audio (L/R)cables. With this unit, yellow cable must be connected to Y (green)jack on the component video input jacks.
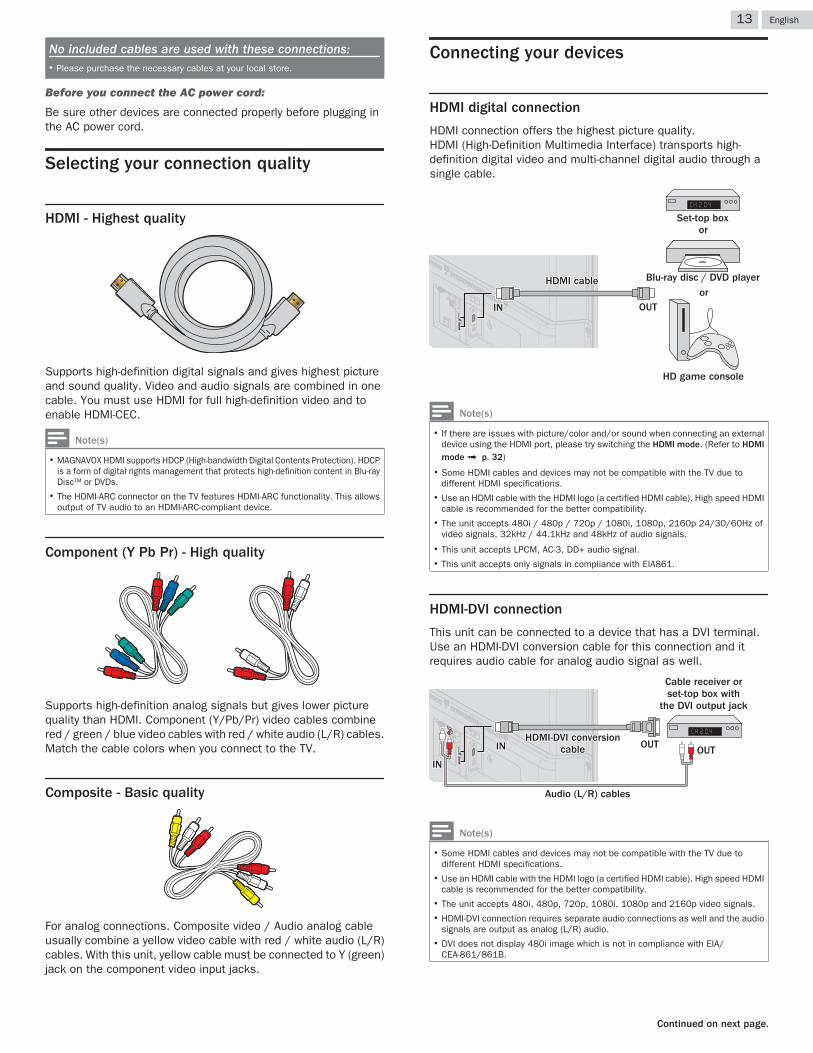
Connecting your devices
HDMI digital connection
HDMI connection offers the highest picture quality.HDMI (High-Definition Multimedia Interface) transports high-definition digital video and multi-channel digital audio through asingle cable.
HD game console
or
Blu-ray disc / DVD playeror
Set-top box
OUTINININ
HDMI cableHDMI cableHDMI cable
Note(s)
● If there are issues with picture/color and/or sound when connecting an externaldevice using the HDMI port, please try switching the HDMI mode. (Refer to HDMImode L p. 32)
● Some HDMI cables and devices may not be compatible with the TV due todifferent HDMI specifications.
● Use an HDMI cable with the HDMI logo (a certified HDMI cable). High speed HDMIcable is recommended for the better compatibility.
● The unit accepts 480i / 480p / 720p / 1080i, 1080p, 2160p 24/30/60Hz ofvideo signals, 32kHz / 44.1kHz and 48kHz of audio signals.
● This unit accepts LPCM, AC-3, DD+ audio signal.● This unit accepts only signals in compliance with EIA861.
HDMI-DVI connection
This unit can be connected to a device that has a DVI terminal.Use an HDMI-DVI conversion cable for this connection and itrequires audio cable for analog audio signal as well.
Cable receiver or set-top box with
the DVI output jack
OUTHDMI-DVI conversion
cableHDMI-DVI conversion
cableHDMI-DVI conversion
cableINININ
OUT
Audio (L/R) cables
INININ
Note(s)
● Some HDMI cables and devices may not be compatible with the TV due todifferent HDMI specifications.
● Use an HDMI cable with the HDMI logo (a certified HDMI cable). High speed HDMIcable is recommended for the better compatibility.
● The unit accepts 480i, 480p, 720p, 1080i, 1080p and 2160p video signals.● HDMI-DVI connection requires separate audio connections as well and the audio
signals are output as analog (L/R) audio.● DVI does not display 480i image which is not in compliance with EIA/
CEA-861/861B.
13 .English
Continued on next page.
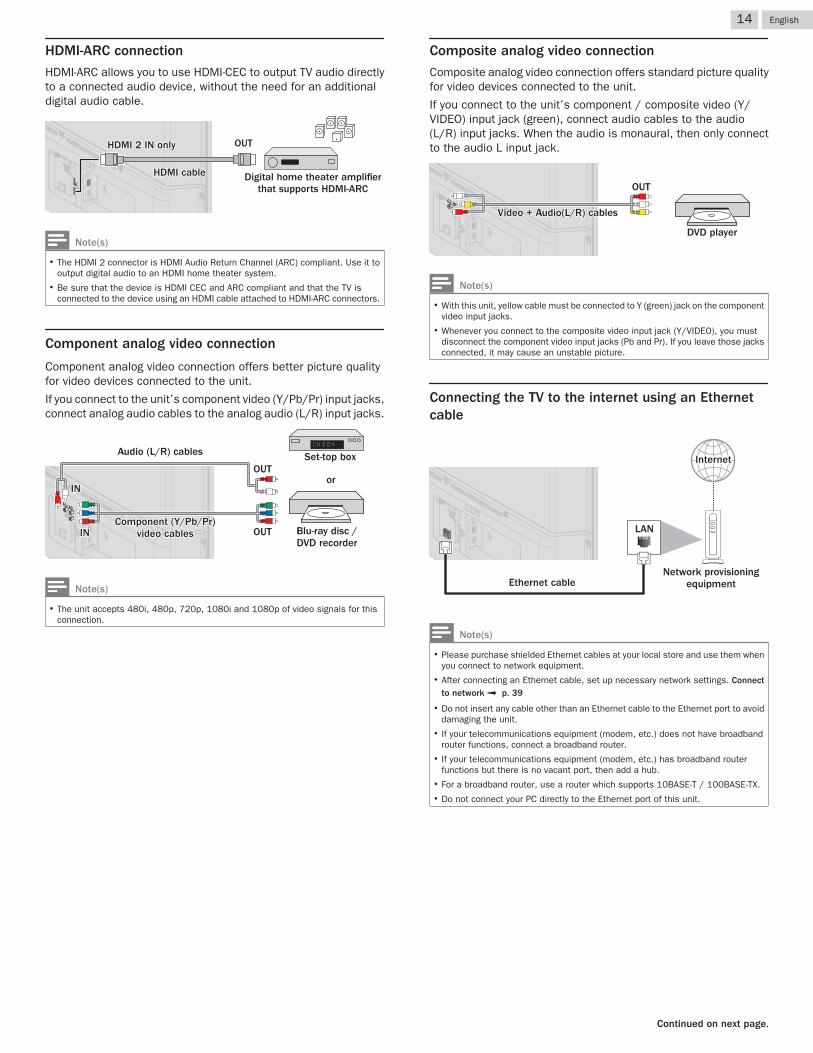
HDMI-ARC connection
HDMI-ARC allows you to use HDMI-CEC to output TV audio directlyto a connected audio device, without the need for an additionaldigital audio cable.
OUT
HDMI cableHDMI cableHDMI cable
HDMI 2 IN onlyHDMI 2 IN onlyHDMI 2 IN only
Digital home theater amplifier that supports HDMI-ARC
Note(s)
● The HDMI 2 connector is HDMI Audio Return Channel (ARC) compliant. Use it tooutput digital audio to an HDMI home theater system.
● Be sure that the device is HDMI CEC and ARC compliant and that the TV isconnected to the device using an HDMI cable attached to HDMI-ARC connectors.
Component analog video connection
Component analog video connection offers better picture qualityfor video devices connected to the unit.
If you connect to the unit’s component video (Y/Pb/Pr) input jacks,connect analog audio cables to the analog audio (L/R) input jacks.
Blu-ray disc / DVD recorderBlu-ray disc / DVD recorderBlu-ray disc / DVD recorder
ororor
Set-top boxSet-top boxSet-top box
OUTOUTOUTComponent (Y/Pb/Pr)
video cablesComponent (Y/Pb/Pr)
video cablesComponent (Y/Pb/Pr)
video cablesINININ
OUTOUTOUT
Audio (L/R) cablesAudio (L/R) cablesAudio (L/R) cables
INININ
Note(s)
● The unit accepts 480i, 480p, 720p, 1080i and 1080p of video signals for thisconnection.
Composite analog video connection
Composite analog video connection offers standard picture qualityfor video devices connected to the unit.
If you connect to the unit’s component / composite video (Y/VIDEO) input jack (green), connect audio cables to the audio(L/R) input jacks. When the audio is monaural, then only connectto the audio L input jack.
DVD playerDVD playerDVD player
OUTOUTOUT
Video + Audio(L/R) cablesVideo + Audio(L/R) cablesVideo + Audio(L/R) cables
Note(s)
● With this unit, yellow cable must be connected to Y (green) jack on the componentvideo input jacks.
● Whenever you connect to the composite video input jack (Y/VIDEO), you mustdisconnect the component video input jacks (Pb and Pr). If you leave those jacksconnected, it may cause an unstable picture.
Connecting the TV to the internet using an Ethernetcable
LAN
InternetInternetInternet
Network provisioning equipment
Network provisioning equipment
Network provisioning equipmentEthernet cableEthernet cableEthernet cable
Note(s)
● Please purchase shielded Ethernet cables at your local store and use them whenyou connect to network equipment.
● After connecting an Ethernet cable, set up necessary network settings. Connectto network L p. 39
● Do not insert any cable other than an Ethernet cable to the Ethernet port to avoiddamaging the unit.
● If your telecommunications equipment (modem, etc.) does not have broadbandrouter functions, connect a broadband router.
● If your telecommunications equipment (modem, etc.) has broadband routerfunctions but there is no vacant port, then add a hub.
● For a broadband router, use a router which supports 10BASE-T / 100BASE-TX.● Do not connect your PC directly to the Ethernet port of this unit.
14 .English
Continued on next page.
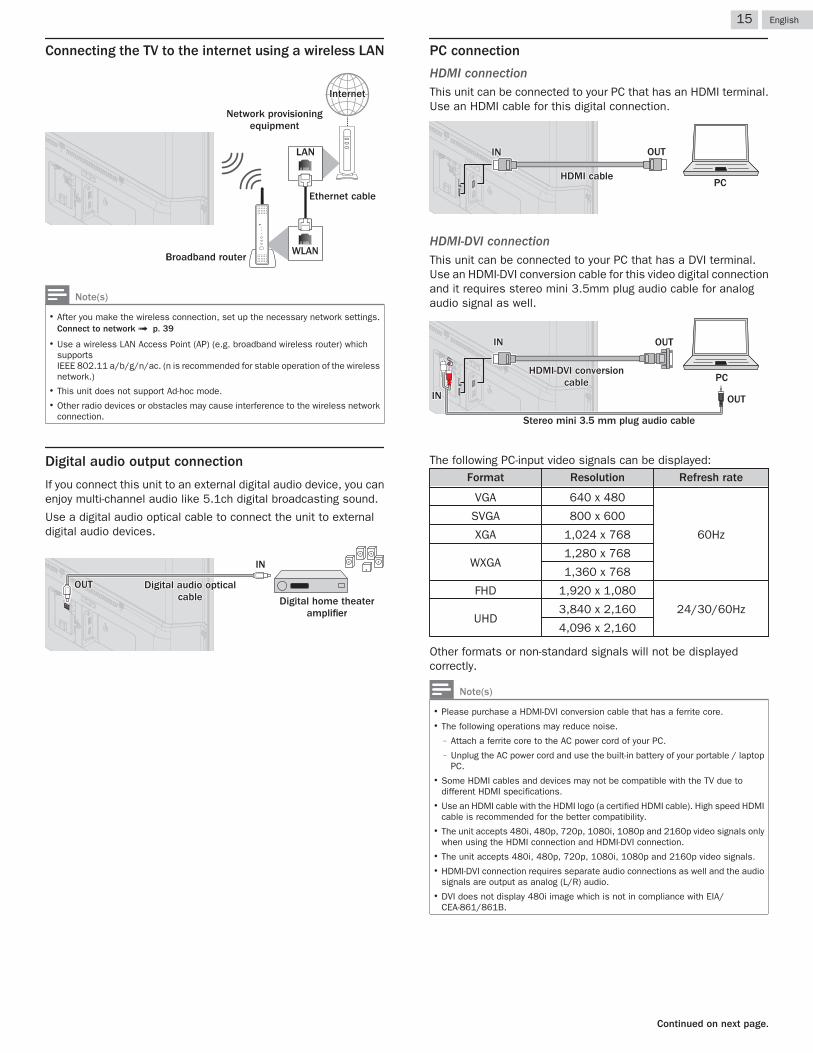
Connecting the TV to the internet using a wireless LAN
WLAN
LAN
Network provisioning equipment
Ethernet cable
Broadband routerBroadband routerBroadband router
InternetInternetInternet
Note(s)
● After you make the wireless connection, set up the necessary network settings.Connect to network L p. 39
● Use a wireless LAN Access Point (AP) (e.g. broadband wireless router) whichsupportsIEEE 802.11 a/b/g/n/ac. (n is recommended for stable operation of the wirelessnetwork.)
● This unit does not support Ad-hoc mode.● Other radio devices or obstacles may cause interference to the wireless network
connection.
Digital audio output connection
If you connect this unit to an external digital audio device, you canenjoy multi-channel audio like 5.1ch digital broadcasting sound.
Use a digital audio optical cable to connect the unit to externaldigital audio devices.
Digital home theater amplifier
OUTOUTOUT
INININ
Digital audio optical cable
Digital audio optical cable
Digital audio optical cable
PC connection
HDMI connectionThis unit can be connected to your PC that has an HDMI terminal.Use an HDMI cable for this digital connection.
PCPCPC
OUTOUTOUT
HDMI cableHDMI cableHDMI cable
INININ
HDMI-DVI connectionThis unit can be connected to your PC that has a DVI terminal.Use an HDMI-DVI conversion cable for this video digital connectionand it requires stereo mini 3.5mm plug audio cable for analogaudio signal as well.
PCPCPC
OUTOUTOUT
HDMI-DVI conversion cable
HDMI-DVI conversion cable
HDMI-DVI conversion cable
INININ
OUTOUTOUT
Stereo mini 3.5 mm plug audio cableStereo mini 3.5 mm plug audio cableStereo mini 3.5 mm plug audio cable
INININ
The following PC-input video signals can be displayed:Format Resolution Refresh rate
VGA 640 x 480
60Hz
SVGA 800 x 600
XGA 1,024 x 768
WXGA1,280 x 768
1,360 x 768
FHD 1,920 x 1,080
24/30/60HzUHD
3,840 x 2,160
4,096 x 2,160
Other formats or non-standard signals will not be displayedcorrectly.
Note(s)
● Please purchase a HDMI-DVI conversion cable that has a ferrite core.● The following operations may reduce noise.
– Attach a ferrite core to the AC power cord of your PC.– Unplug the AC power cord and use the built-in battery of your portable / laptop
PC.● Some HDMI cables and devices may not be compatible with the TV due to
different HDMI specifications.● Use an HDMI cable with the HDMI logo (a certified HDMI cable). High speed HDMI
cable is recommended for the better compatibility.● The unit accepts 480i, 480p, 720p, 1080i, 1080p and 2160p video signals only
when using the HDMI connection and HDMI-DVI connection.● The unit accepts 480i, 480p, 720p, 1080i, 1080p and 2160p video signals.● HDMI-DVI connection requires separate audio connections as well and the audio
signals are output as analog (L/R) audio.● DVI does not display 480i image which is not in compliance with EIA/
CEA-861/861B.
15 .English
Continued on next page.
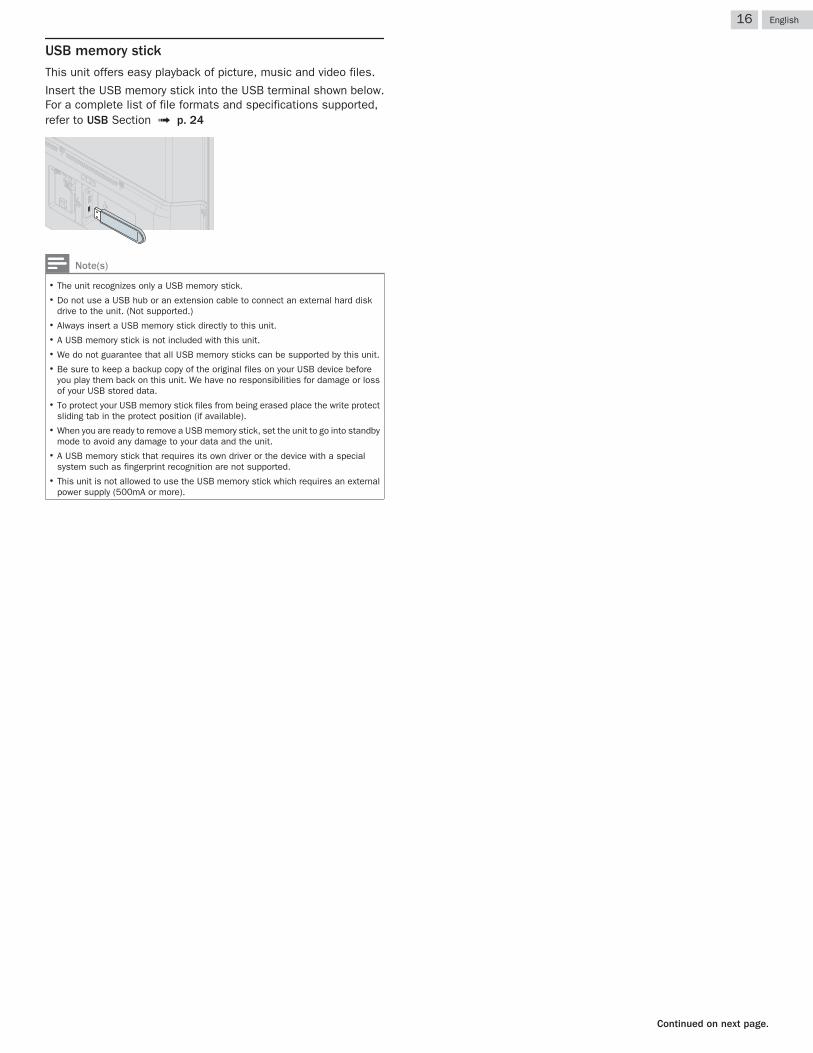
USB memory stick
This unit offers easy playback of picture, music and video files.
Insert the USB memory stick into the USB terminal shown below.For a complete list of file formats and specifications supported,refer to USB Section L p. 24
Note(s)
● The unit recognizes only a USB memory stick.● Do not use a USB hub or an extension cable to connect an external hard disk
drive to the unit. (Not supported.)● Always insert a USB memory stick directly to this unit.● A USB memory stick is not included with this unit.● We do not guarantee that all USB memory sticks can be supported by this unit.● Be sure to keep a backup copy of the original files on your USB device before
you play them back on this unit. We have no responsibilities for damage or lossof your USB stored data.
● To protect your USB memory stick files from being erased place the write protectsliding tab in the protect position (if available).
● When you are ready to remove a USB memory stick, set the unit to go into standbymode to avoid any damage to your data and the unit.
● A USB memory stick that requires its own driver or the device with a specialsystem such as fingerprint recognition are not supported.
● This unit is not allowed to use the USB memory stick which requires an externalpower supply (500mA or more).
16 .English
Continued on next page.
These operations are accessible by remote control.Some may also be accessible by the main unit's control panel.
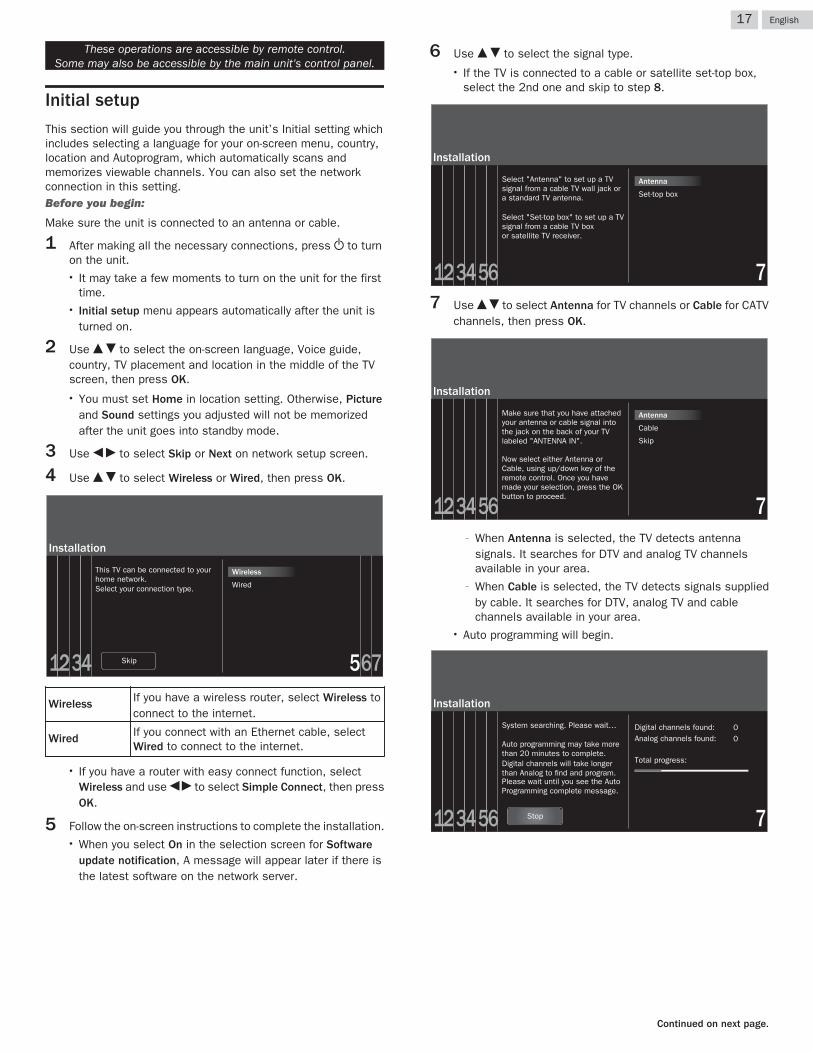
Initial setup
This section will guide you through the unit’s Initial setting whichincludes selecting a language for your on-screen menu, country,location and Autoprogram, which automatically scans andmemorizes viewable channels. You can also set the networkconnection in this setting.Before you begin:
Make sure the unit is connected to an antenna or cable.
1 After making all the necessary connections, press B to turnon the unit.● It may take a few moments to turn on the unit for the first
time.● Initial setup menu appears automatically after the unit is
turned on.
2 Use H I to select the on-screen language, Voice guide,country, TV placement and location in the middle of the TVscreen, then press OK.● You must set Home in location setting. Otherwise, Picture
and Sound settings you adjusted will not be memorizedafter the unit goes into standby mode.
3 Use J K to select Skip or Next on network setup screen.
4 Use H I to select Wireless or Wired, then press OK.
1234 756Skip
Wired
Wireless
Installation
Select your connection type.
This TV can be connected to your home network.
Wireless If you have a wireless router, select Wireless toconnect to the internet.
Wired If you connect with an Ethernet cable, selectWired to connect to the internet.
● If you have a router with easy connect function, selectWireless and use J K to select Simple Connect, then pressOK.
5 Follow the on-screen instructions to complete the installation.● When you select On in the selection screen for Software
update notification, A message will appear later if there isthe latest software on the network server.
6 Use H I to select the signal type.● If the TV is connected to a cable or satellite set-top box,
select the 2nd one and skip to step 8.
1234 756
Installation
Set-top box
Select "Set-top box" to set up a TV signal from a cable TV box or satellite TV receiver.
AntennaSelect "Antenna" to set up a TV signal from a cable TV wall jack or a standard TV antenna.
7 Use H I to select Antenna for TV channels or Cable for CATVchannels, then press OK.
1234 756
Installation
Skip
Cable
Antenna
Now select either Antenna or Cable, using up/down key of the remote control. Once you have made your selection, press the OK button to proceed.
Make sure that you have attached your antenna or cable signal into the jack on the back of your TV labeled "ANTENNA IN".
– When Antenna is selected, the TV detects antennasignals. It searches for DTV and analog TV channelsavailable in your area.
– When Cable is selected, the TV detects signals suppliedby cable. It searches for DTV, analog TV and cablechannels available in your area.
● Auto programming will begin.
00
1234 756
Installation
Stop
Total progress:
Analog channels found:Digital channels found:
Please wait until you see the Auto Programming complete message.
Digital channels will take longer than Analog to find and program.
Auto programming may take more than 20 minutes to complete.
System searching. Please wait…
17 .English
Continued on next page.
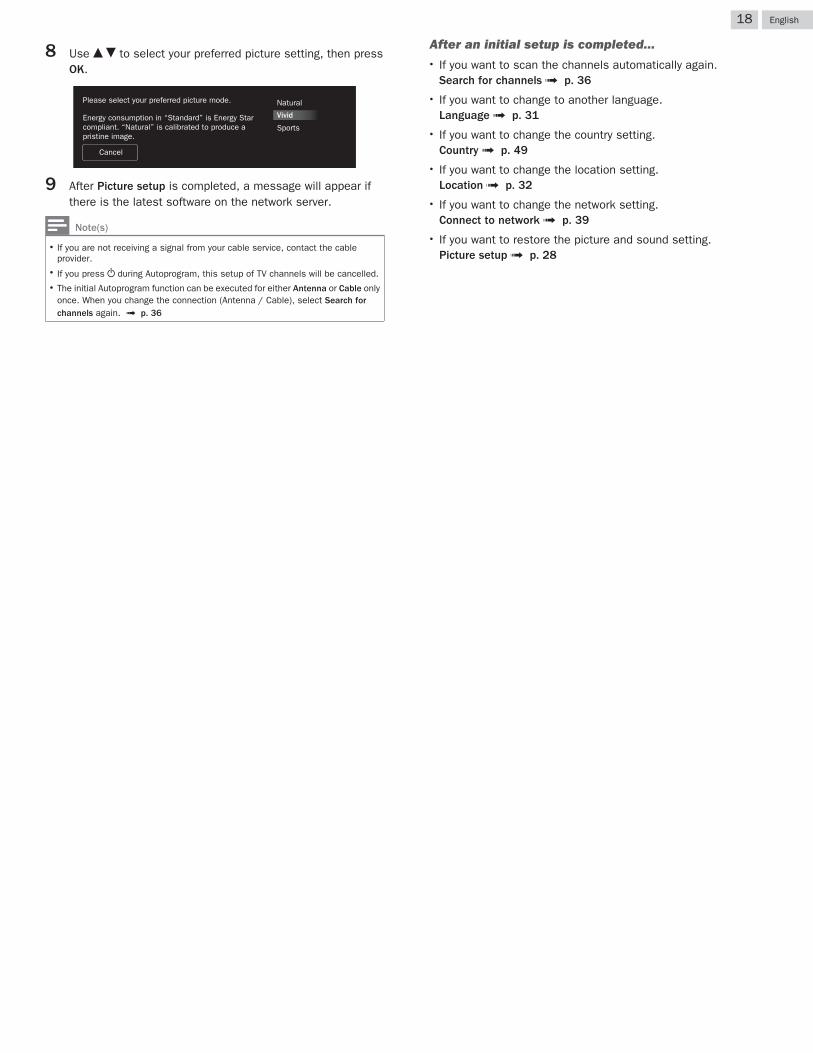
8 Use H I to select your preferred picture setting, then pressOK.
Sports
Vivid
Please select your preferred picture mode.
Cancel
Natural
Energy consumption in “Standard” is Energy Star compliant. “Natural” is calibrated to produce a pristine image.
9 After Picture setup is completed, a message will appear ifthere is the latest software on the network server.
Note(s)
● If you are not receiving a signal from your cable service, contact the cableprovider.
● If you press B during Autoprogram, this setup of TV channels will be cancelled.● The initial Autoprogram function can be executed for either Antenna or Cable only
once. When you change the connection (Antenna / Cable), select Search forchannels again. L p. 36
After an initial setup is completed...● If you want to scan the channels automatically again.
Search for channels L p. 36● If you want to change to another language.
Language L p. 31● If you want to change the country setting.
Country L p. 49● If you want to change the location setting.
Location L p. 32● If you want to change the network setting.
Connect to network L p. 39● If you want to restore the picture and sound setting.
Picture setup L p. 28
18 .English
3 Use your TV
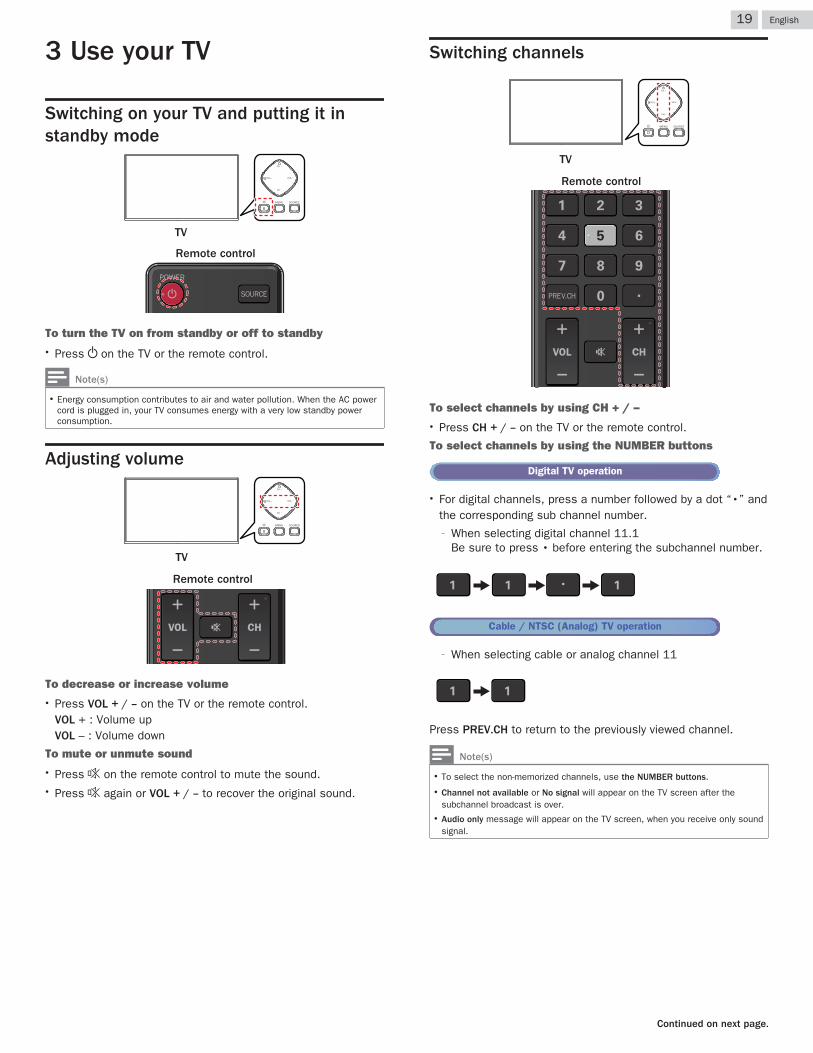
Switching on your TV and putting it instandby mode
Remote control
TV
To turn the TV on from standby or off to standby● Press B on the TV or the remote control.
Note(s)
● Energy consumption contributes to air and water pollution. When the AC powercord is plugged in, your TV consumes energy with a very low standby powerconsumption.
Adjusting volume
Remote control
TV
To decrease or increase volume● Press VOL + / – on the TV or the remote control.
VOL + : Volume upVOL – : Volume down
To mute or unmute sound● Press D on the remote control to mute the sound.● Press D again or VOL + / – to recover the original sound.
Switching channels
TV
Remote control
To select channels by using CH + / –● Press CH + / – on the TV or the remote control.
To select channels by using the NUMBER buttons
Digital TV operation
● For digital channels, press a number followed by a dot “•” andthe corresponding sub channel number.– When selecting digital channel 11.1
Be sure to press • before entering the subchannel number.
Cable / NTSC (Analog) TV operation
– When selecting cable or analog channel 11
Press PREV.CH to return to the previously viewed channel.
Note(s)
● To select the non-memorized channels, use the NUMBER buttons.
● Channel not available or No signal will appear on the TV screen after thesubchannel broadcast is over.
● Audio only message will appear on the TV screen, when you receive only soundsignal.
19 .English
Continued on next page.

Watching channels from an external device
Switching each input mode can easily switch with the remotecontrol between TV and external devices when they are connectedto the unit.
1 Turn on the set-top box or the connected device.
① Press SOURCE and use J K to select the set-top box or theconnected device and wait a few seconds till the pictureappears.
USBHDMI2HDMI1
Watch TVVideo
② Use the remote control of the set-top box or the connecteddevice to select channels.
Access the Home menu1 Press Z.
Guide to Home menu
SetupSource Home Network AppsWatch TV
Wireless Screencasting
a Watch TV : Switches back to the TV source ifanother source is selected.
b Source : To select connected devices.
c Home Network : Accesses Home network menus.
d Apps : Accesses Apps menus.
e Wireless Screencasting : Accesses WirelessScreencasting menus.
f Setup : Accesses menus that allow youto change picture, sound andother TV settings.
Lock or unlock your device from the Home menu
This section describes how to lock or unlock specified device.
1 Press SOURCE on the remote control.
2 Use J K to select a device to lock or unlock.
3 Press OPTIONS on the remote control.
4 Use H I to select Lock or Unlock, then press OK.● If device lock is unlocked, Lock will be displayed. If device
lock is locked, Unlock will be displayed at the top right ofthe device icons.
5 Enter your PIN. Change PIN L p. 38
Changing device type
You can change device icons displayed in the source list.
1 Press SOURCE on the remote control.
2 Use J K to select the desired device.
3 Press red button on the remote control.
4 Use H I to select the desired type, then press OK.
To reset the type● Press OPTIONS on the remote control at step 3, then select
Original icon.
Scan connections
You can rescan TV connections and update the source list.Before you begin:
You must set On in fun-Link control. L p. 33
1 Press SOURCE on the remote control.
2 Use J K to move the cursor to any device.
3 Press OPTIONS on the remote control.
4 Use H I to select Scan connections, then press OK.
20 .English
Continued on next page.
Create a list of favorite channelsYou can create lists of your preferred TV channels so that you canfind those channels easily.
1 Press OK while viewing a TV program.
2 Use H I J K to select the desired channel, then press yellowbutton.
3 Use H I to select the desired favorite list (Favorites 1 -Favorites 4), then press OK to add or remove on the list offavorite channels.● G indicates that the channel is added.● E indicates that the channel is removed.● The channel will be marked with g icon.
Display the list of favorite channels
1 Press OK while viewing a TV program.
2 Use H I J K to select Favorites.
To change the favorite list
1 Press blue button.
2 Use H I to select the desired favorite list (Favorites 1 -Favorites 4).
To remove a channel from the favorite list
1 Select the desired channel, then press yellow button.
2 Use J K to select Yes, then press OK.
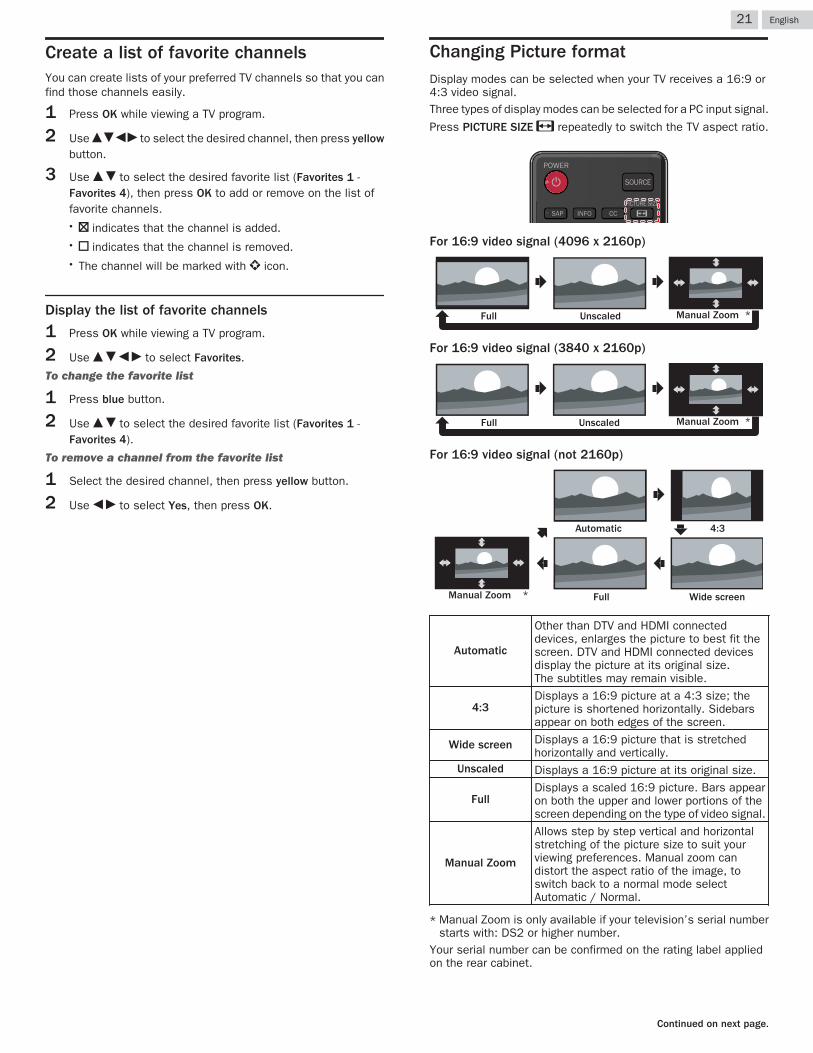
Changing Picture formatDisplay modes can be selected when your TV receives a 16:9 or4:3 video signal.Three types of display modes can be selected for a PC input signal.
Press PICTURE SIZE A repeatedly to switch the TV aspect ratio.
For 16:9 video signal (4096 x 2160p)
Full Unscaled Manual Zoom *
For 16:9 video signal (3840 x 2160p)
Full Unscaled Manual Zoom *
For 16:9 video signal (not 2160p)
Wide screen
4:3Automatic
FullManual Zoom *
Automatic
Other than DTV and HDMI connecteddevices, enlarges the picture to best fit thescreen. DTV and HDMI connected devicesdisplay the picture at its original size.The subtitles may remain visible.
4:3Displays a 16:9 picture at a 4:3 size; thepicture is shortened horizontally. Sidebarsappear on both edges of the screen.
Wide screen Displays a 16:9 picture that is stretchedhorizontally and vertically.
Unscaled Displays a 16:9 picture at its original size.
FullDisplays a scaled 16:9 picture. Bars appearon both the upper and lower portions of thescreen depending on the type of video signal.
Manual Zoom
Allows step by step vertical and horizontalstretching of the picture size to suit yourviewing preferences. Manual zoom candistort the aspect ratio of the image, toswitch back to a normal mode selectAutomatic / Normal.
* Manual Zoom is only available if your television’s serial numberstarts with: DS2 or higher number.
Your serial number can be confirmed on the rating label appliedon the rear cabinet.
21 .English
Continued on next page.
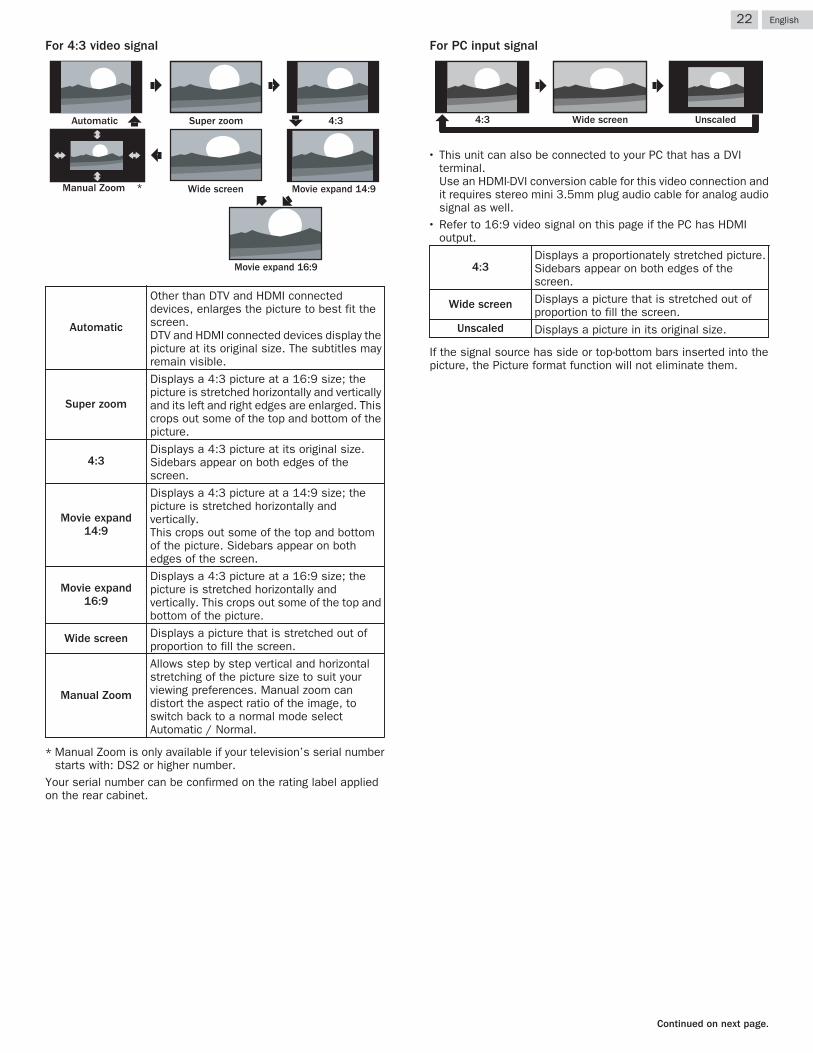
For 4:3 video signal
Wide screen
Movie expand 16:9
Movie expand 14:9
4:3Super zoomAutomatic
Manual Zoom *
Automatic
Other than DTV and HDMI connecteddevices, enlarges the picture to best fit thescreen.DTV and HDMI connected devices display thepicture at its original size. The subtitles mayremain visible.
Super zoom
Displays a 4:3 picture at a 16:9 size; thepicture is stretched horizontally and verticallyand its left and right edges are enlarged. Thiscrops out some of the top and bottom of thepicture.
4:3Displays a 4:3 picture at its original size.Sidebars appear on both edges of thescreen.
Movie expand14:9
Displays a 4:3 picture at a 14:9 size; thepicture is stretched horizontally andvertically.This crops out some of the top and bottomof the picture. Sidebars appear on bothedges of the screen.
Movie expand16:9
Displays a 4:3 picture at a 16:9 size; thepicture is stretched horizontally andvertically. This crops out some of the top andbottom of the picture.
Wide screen Displays a picture that is stretched out ofproportion to fill the screen.
Manual Zoom
Allows step by step vertical and horizontalstretching of the picture size to suit yourviewing preferences. Manual zoom candistort the aspect ratio of the image, toswitch back to a normal mode selectAutomatic / Normal.
* Manual Zoom is only available if your television’s serial numberstarts with: DS2 or higher number.
Your serial number can be confirmed on the rating label appliedon the rear cabinet.
For PC input signal
UnscaledWide screen4:3
● This unit can also be connected to your PC that has a DVIterminal.Use an HDMI-DVI conversion cable for this video connection andit requires stereo mini 3.5mm plug audio cable for analog audiosignal as well.
● Refer to 16:9 video signal on this page if the PC has HDMIoutput.
4:3Displays a proportionately stretched picture.Sidebars appear on both edges of thescreen.
Wide screen Displays a picture that is stretched out ofproportion to fill the screen.
Unscaled Displays a picture in its original size.
If the signal source has side or top-bottom bars inserted into thepicture, the Picture format function will not eliminate them.
22 .English
Continued on next page.
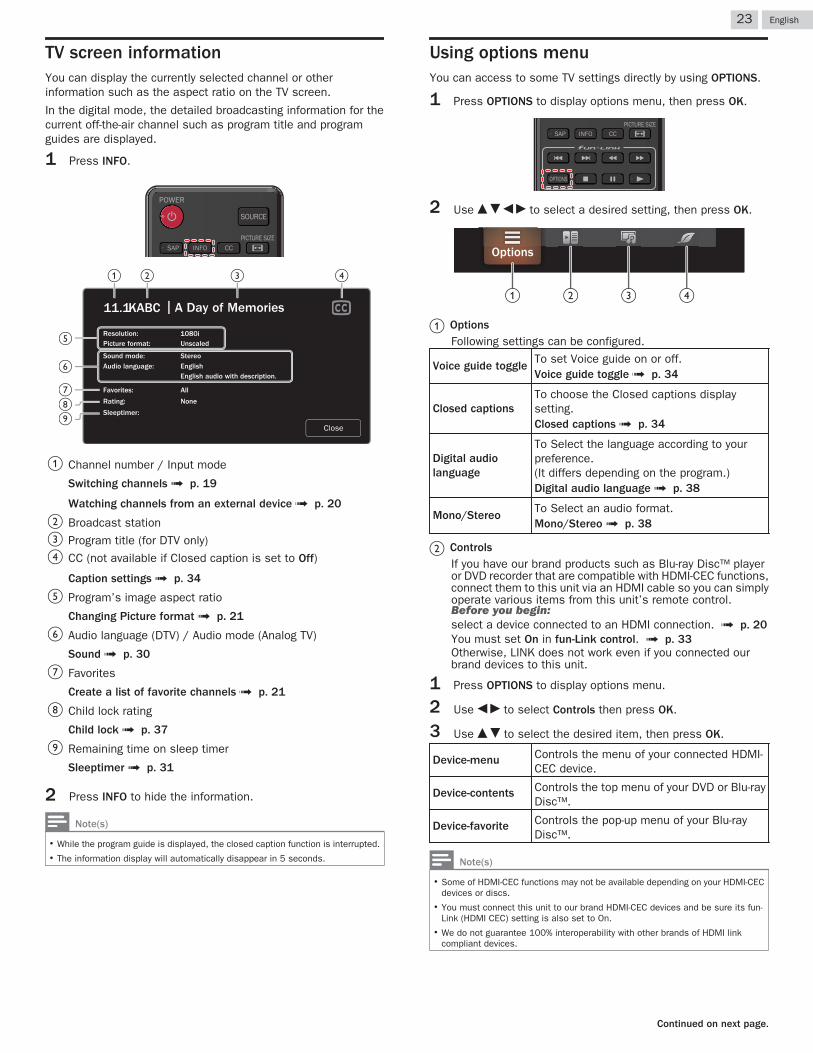
TV screen informationYou can display the currently selected channel or otherinformation such as the aspect ratio on the TV screen.
In the digital mode, the detailed broadcasting information for thecurrent off-the-air channel such as program title and programguides are displayed.
1 Press INFO.
e
f
g
ih
ba c d
11.1KABC A Day of Memories
1080i
None
All
EnglishStereo
Sleeptimer:
Rating:
Favorites:
Audio language:Sound mode:
Picture format:Resolution:
English audio with description.
Close
Unscaled
a Channel number / Input mode
Switching channels L p. 19
Watching channels from an external device L p. 20
b Broadcast stationc Program title (for DTV only)d CC (not available if Closed caption is set to Off)
Caption settings L p. 34
e Program’s image aspect ratio
Changing Picture format L p. 21
f Audio language (DTV) / Audio mode (Analog TV)
Sound L p. 30
g Favorites
Create a list of favorite channels L p. 21
h Child lock rating
Child lock L p. 37
i Remaining time on sleep timer
Sleeptimer L p. 31
2 Press INFO to hide the information.
Note(s)
● While the program guide is displayed, the closed caption function is interrupted.● The information display will automatically disappear in 5 seconds.
Using options menuYou can access to some TV settings directly by using OPTIONS.
1 Press OPTIONS to display options menu, then press OK.
2 Use H I J K to select a desired setting, then press OK.
a b c d
Options
a OptionsFollowing settings can be configured.
Voice guide toggleTo set Voice guide on or off.Voice guide toggle L p. 34
Closed captionsTo choose the Closed captions displaysetting.Closed captions L p. 34
Digital audiolanguage
To Select the language according to yourpreference.(It differs depending on the program.)Digital audio language L p. 38
Mono/StereoTo Select an audio format.Mono/Stereo L p. 38
b ControlsIf you have our brand products such as Blu-ray Disc™ playeror DVD recorder that are compatible with HDMI-CEC functions,connect them to this unit via an HDMI cable so you can simplyoperate various items from this unit’s remote control.Before you begin:select a device connected to an HDMI connection. L p. 20You must set On in fun-Link control. L p. 33Otherwise, LINK does not work even if you connected ourbrand devices to this unit.
1 Press OPTIONS to display options menu.
2 Use J K to select Controls then press OK.
3 Use H I to select the desired item, then press OK.
Device-menu Controls the menu of your connected HDMI-CEC device.
Device-contents Controls the top menu of your DVD or Blu-rayDisc™.
Device-favorite Controls the pop-up menu of your Blu-rayDisc™.
Note(s)
● Some of HDMI-CEC functions may not be available depending on your HDMI-CECdevices or discs.
● You must connect this unit to our brand HDMI-CEC devices and be sure its fun-Link (HDMI CEC) setting is also set to On.
● We do not guarantee 100% interoperability with other brands of HDMI linkcompliant devices.
23 .English
Continued on next page.
c Picture and soundFollowing settings can be configured.
Auto pictureTo set predefined picture mode.Picture L p. 28
Auto soundTo set predefined sound mode.Sound L p. 30
Headphonevolume
To adjust headphone volume.Sound L p. 30
TV speakersTo Select the audio output from the unit’sspeakers or not.Sound L p. 30
Picture formatTo switch the TV aspect ratio.Changing Picture format L p. 21
Setup To display setup menu.
d ECO settingsFollowing settings can be configured.
Switch off timer
You can turn off the unit automatically whenthere is no operation for specified time. Inspite of this setting, the unit goes intostandby mode automatically if there is nosignal input and no user operation for 15minutes.
Press H repeatedly to change the amount oftime (increases the time by 30 minutes up to240 minutes).
Each press of I will decrease the time by 30minutes.
To cancel the timer, press I repeatedly until“0” is displayed.
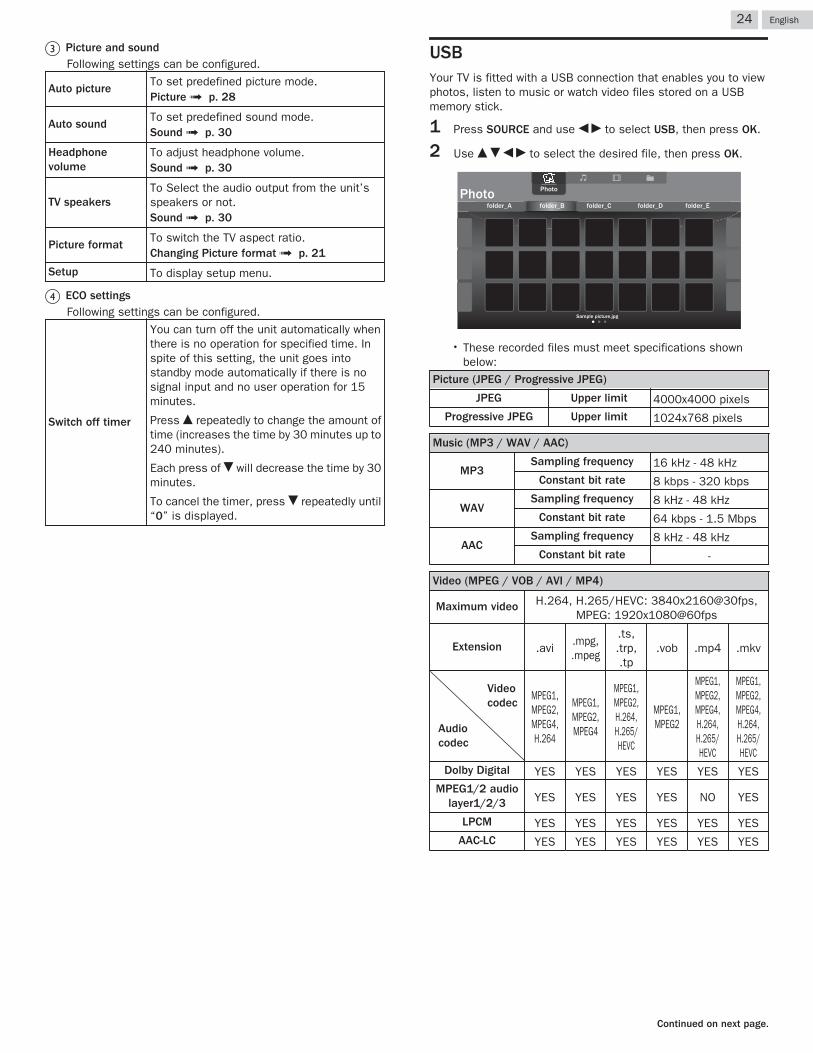
USBYour TV is fitted with a USB connection that enables you to viewphotos, listen to music or watch video files stored on a USBmemory stick.
1 Press SOURCE and use J K to select USB, then press OK.
2 Use H I J K to select the desired file, then press OK.
Sample picture.jpg
folder_A folder_B folder_C folder_D folder_E
PhotoPhoto
● These recorded files must meet specifications shownbelow:
Picture (JPEG / Progressive JPEG)
JPEG Upper limit 4000x4000 pixelsProgressive JPEG Upper limit 1024x768 pixels
Music (MP3 / WAV / AAC)
MP3Sampling frequency 16 kHz - 48 kHz
Constant bit rate 8 kbps - 320 kbps
WAVSampling frequency 8 kHz - 48 kHz
Constant bit rate 64 kbps - 1.5 Mbps
AACSampling frequency 8 kHz - 48 kHz
Constant bit rate -
Video (MPEG / VOB / AVI / MP4)
Maximum video H.264, H.265/HEVC: 3840x2160@30fps,MPEG: 1920x1080@60fps
Extension .avi.mpg,.mpeg
.ts,.trp,.tp
.vob .mp4 .mkv
Videocodec
Audiocodec
MPEG1,MPEG2,MPEG4,H.264
MPEG1,MPEG2,MPEG4
MPEG1,MPEG2,H.264,H.265/HEVC
MPEG1,MPEG2
MPEG1,MPEG2,MPEG4,H.264,H.265/HEVC
MPEG1,MPEG2,MPEG4,H.264,H.265/HEVC
Dolby Digital YES YES YES YES YES YESMPEG1/2 audio
layer1/2/3 YES YES YES YES NO YES
LPCM YES YES YES YES YES YESAAC-LC YES YES YES YES YES YES
24 .English
Continued on next page.
Note(s)
● This unit accepts USB memory stick only. Other storage devices such as externalHDD by USB bus power will not work.
● Do not use an extension cord and/or USB hub to connect devices to this unit.Always directly insert the USB flash memory stick to this unit directly.
● We cannot be held responsible if your USB memory stick is not supported, norwill we accept any liability for damage or loss of stored data.
● The USB memory stick is not included with this TV.● A maximum of 1,023 folders or files can be recognized.● A file name exceeding 256 characters or contains a dot character is not
supported on this TV.● A USB memory stick that required its own driver or the device with a special
system such as fingerprint recognition are not supported.● Be sure to keep a backup copy of the original files on your USB device before
you play them back on this unit. We have no responsibilities for damage or lossof your USB stored data.
● To avoid damaging the USB memory stick and the unit always turn off the unitbefore you remove the USB memory stick.
● This unit is not allowed to use the USB memory stick which requires externalpower supply (500 mA or more).
● This unit does not support MTP (Media Transfer Protocol) or the file other thanFAT16 and FAT32 file system. If the file is not supported, an error messageappears.
● When the unit does not recognize the USB memory stick, try reconnecting it.● Playing the files recorded with high bit rates, the images can be interrupted in
some occasions.● This unit does not support external subtitles.● This unit cannot play back a file which goes over the limit of file restriction limit.
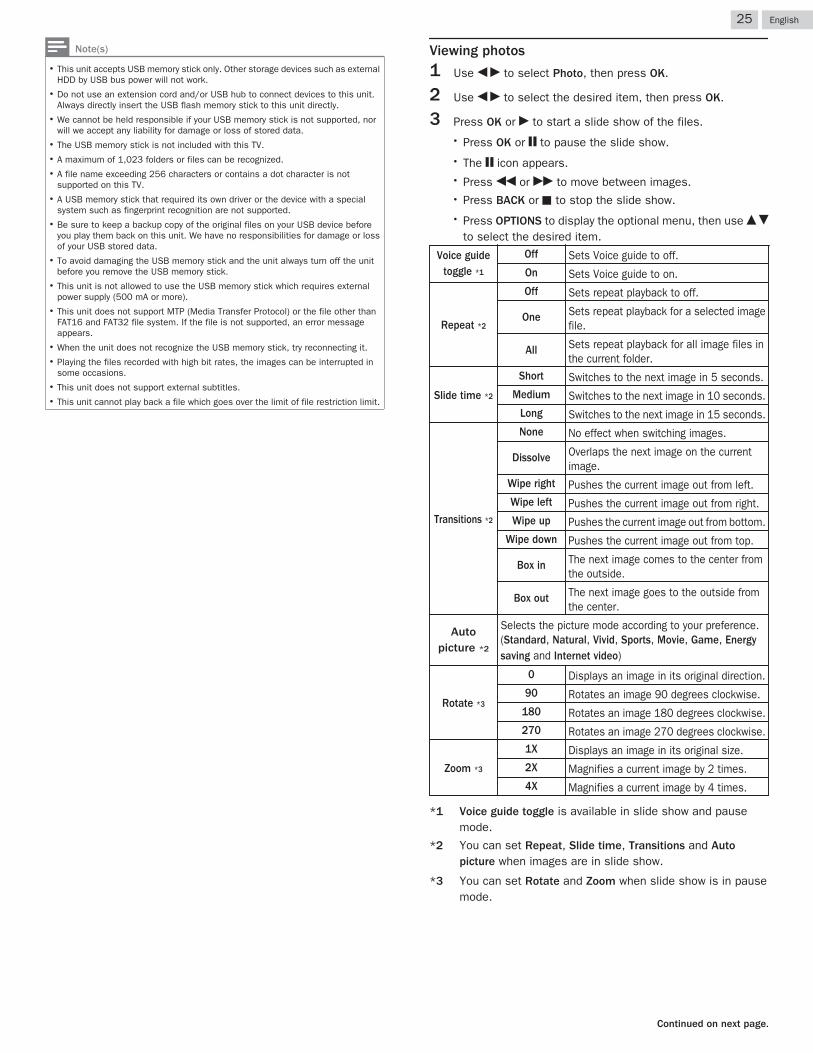
Viewing photos
1 Use J K to select Photo, then press OK.
2 Use J K to select the desired item, then press OK.
3 Press OK or K to start a slide show of the files.● Press OK or t to pause the slide show.● The t icon appears.● Press JJ or KK to move between images.● Press BACK or C to stop the slide show.● Press OPTIONS to display the optional menu, then use H I
to select the desired item.
Voice guidetoggle *1
Off Sets Voice guide to off.On Sets Voice guide to on.
Repeat *2
Off Sets repeat playback to off.
One Sets repeat playback for a selected imagefile.
All Sets repeat playback for all image files inthe current folder.
Slide time *2
Short Switches to the next image in 5 seconds.Medium Switches to the next image in 10 seconds.
Long Switches to the next image in 15 seconds.
Transitions *2
None No effect when switching images.
Dissolve Overlaps the next image on the currentimage.
Wipe right Pushes the current image out from left.Wipe left Pushes the current image out from right.Wipe up Pushes the current image out from bottom.
Wipe down Pushes the current image out from top.
Box in The next image comes to the center fromthe outside.
Box out The next image goes to the outside fromthe center.
Autopicture *2
Selects the picture mode according to your preference.(Standard, Natural, Vivid, Sports, Movie, Game, Energysaving and Internet video)
Rotate *3
0 Displays an image in its original direction.90 Rotates an image 90 degrees clockwise.
180 Rotates an image 180 degrees clockwise.270 Rotates an image 270 degrees clockwise.
Zoom *3
1X Displays an image in its original size.2X Magnifies a current image by 2 times.4X Magnifies a current image by 4 times.
*1 Voice guide toggle is available in slide show and pausemode.
*2 You can set Repeat, Slide time, Transitions and Autopicture when images are in slide show.
*3 You can set Rotate and Zoom when slide show is in pausemode.
25 .English
Continued on next page.
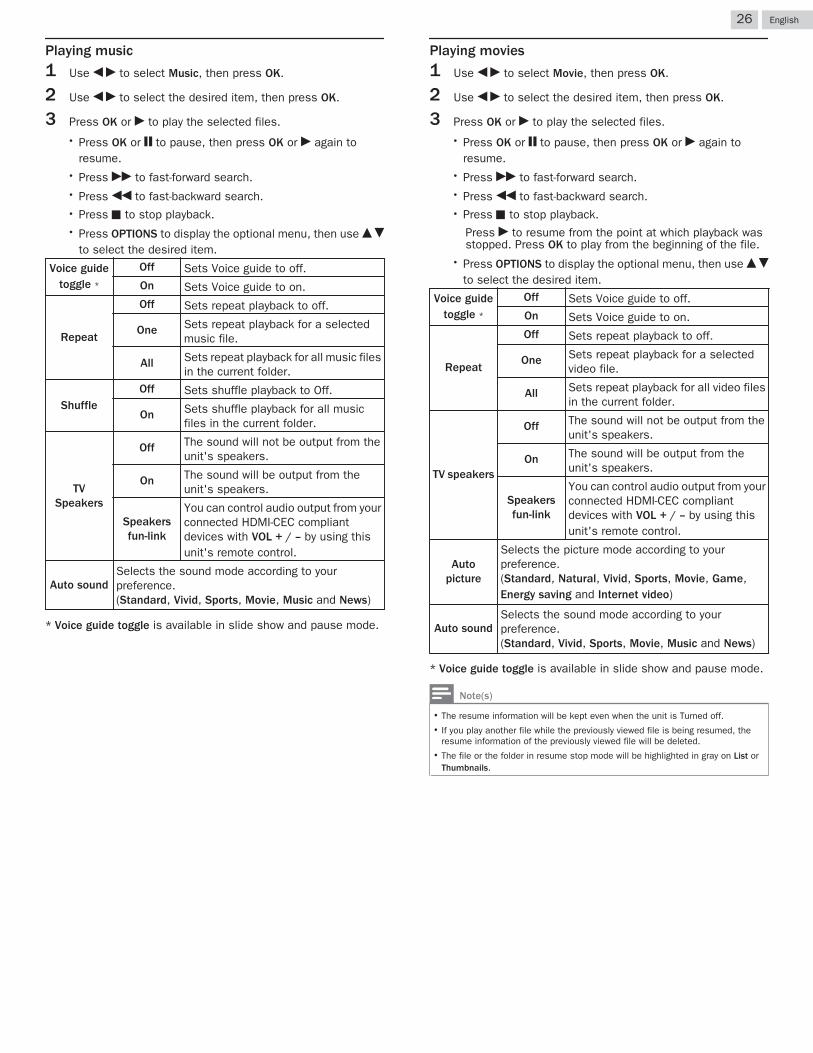
Playing music
1 Use J K to select Music, then press OK.
2 Use J K to select the desired item, then press OK.
3 Press OK or K to play the selected files.● Press OK or t to pause, then press OK or K again to
resume.● Press KK to fast-forward search.● Press JJ to fast-backward search.● Press C to stop playback.● Press OPTIONS to display the optional menu, then use H I
to select the desired item.
Voice guidetoggle *
Off Sets Voice guide to off.On Sets Voice guide to on.
Repeat
Off Sets repeat playback to off.
One Sets repeat playback for a selectedmusic file.
All Sets repeat playback for all music filesin the current folder.
ShuffleOff Sets shuffle playback to Off.
On Sets shuffle playback for all musicfiles in the current folder.
TVSpeakers
Off The sound will not be output from theunit's speakers.
On The sound will be output from theunit's speakers.
Speakersfun-link
You can control audio output from yourconnected HDMI-CEC compliantdevices with VOL + / – by using thisunit's remote control.
Auto soundSelects the sound mode according to yourpreference.(Standard, Vivid, Sports, Movie, Music and News)
* Voice guide toggle is available in slide show and pause mode.
Playing movies
1 Use J K to select Movie, then press OK.
2 Use J K to select the desired item, then press OK.
3 Press OK or K to play the selected files.● Press OK or t to pause, then press OK or K again to
resume.● Press KK to fast-forward search.● Press JJ to fast-backward search.● Press C to stop playback.
Press K to resume from the point at which playback wasstopped. Press OK to play from the beginning of the file.
● Press OPTIONS to display the optional menu, then use H Ito select the desired item.
Voice guidetoggle *
Off Sets Voice guide to off.On Sets Voice guide to on.
Repeat
Off Sets repeat playback to off.
One Sets repeat playback for a selectedvideo file.
All Sets repeat playback for all video filesin the current folder.
TV speakers
Off The sound will not be output from theunit's speakers.
On The sound will be output from theunit's speakers.
Speakersfun-link
You can control audio output from yourconnected HDMI-CEC compliantdevices with VOL + / – by using thisunit's remote control.
Autopicture
Selects the picture mode according to yourpreference.(Standard, Natural, Vivid, Sports, Movie, Game,Energy saving and Internet video)
Auto soundSelects the sound mode according to yourpreference.(Standard, Vivid, Sports, Movie, Music and News)
* Voice guide toggle is available in slide show and pause mode.
Note(s)
● The resume information will be kept even when the unit is Turned off.● If you play another file while the previously viewed file is being resumed, the
resume information of the previously viewed file will be deleted.● The file or the folder in resume stop mode will be highlighted in gray on List or
Thumbnails.
26 .English

4 Getting more from your TV
This section describes the overview of the Setup menu displayedwhen you press Z and use J K to Select Setup.The Setup menu consists of the function setting items below.
1 Press Z to display the Home menu.
2 Use J K to select Setup, then press OK.
SetupSource Home Network AppsTV Wireless
Screencasting
3 Use H I J K to select the desired menu and an item, thenpress OK.
Software settings
Network settings
Channel settings
TV settings
Update software
Connect to network
Search for channels
Picture setup
Picture setup L p. 28
Guides you to get the best picture and sound settings.
TV settings L p. 28
Accesses menus that allow you to change picture,sound and TV usage settings.
Search for channels L p. 36
Guides you through channel installation.
Channel settings L p. 36
Accesses menus that allow you to change channelsettings.
Connect to network L p. 39
Guides you through network installation.
Network settings L p. 40
Accesses menus that allow you to network settings.
Update software L p. 44
Guides you through an update of the TV software.
Software settings L p. 45
Accesses menus that allow you to change softwaresettings.
27 .English
Continued on next page.
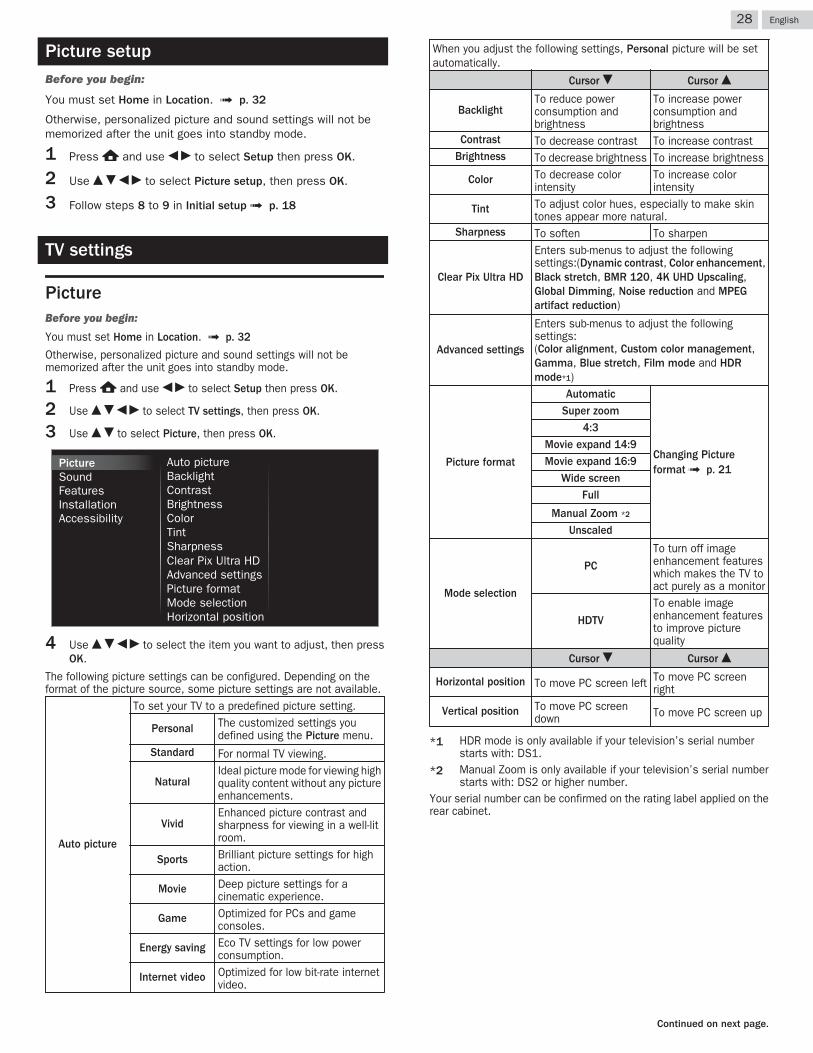
Picture setupBefore you begin:
You must set Home in Location. L p. 32
Otherwise, personalized picture and sound settings will not bememorized after the unit goes into standby mode.
1 Press Z and use J K to select Setup then press OK.
2 Use H I J K to select Picture setup, then press OK.
3 Follow steps 8 to 9 in Initial setup L p. 18
TV settings
PictureBefore you begin:
You must set Home in Location. L p. 32
Otherwise, personalized picture and sound settings will not bememorized after the unit goes into standby mode.
1 Press Z and use J K to select Setup then press OK.
2 Use H I J K to select TV settings, then press OK.
3 Use H I to select Picture, then press OK.
Mode selection
Advanced settings
SharpnessTintColor
Clear Pix Ultra HD
BrightnessContrastBacklightAuto picture
Picture format
AccessibilityInstallationFeaturesSoundPicture
Horizontal position
4 Use H I J K to select the item you want to adjust, then pressOK.
The following picture settings can be configured. Depending on theformat of the picture source, some picture settings are not available.
Auto picture
To set your TV to a predefined picture setting.
Personal The customized settings youdefined using the Picture menu.
Standard For normal TV viewing.
NaturalIdeal picture mode for viewing highquality content without any pictureenhancements.
VividEnhanced picture contrast andsharpness for viewing in a well-litroom.
Sports Brilliant picture settings for highaction.
Movie Deep picture settings for acinematic experience.
Game Optimized for PCs and gameconsoles.
Energy saving Eco TV settings for low powerconsumption.
Internet video Optimized for low bit-rate internetvideo.
When you adjust the following settings, Personal picture will be setautomatically.
Cursor I Cursor H
BacklightTo reduce powerconsumption andbrightness
To increase powerconsumption andbrightness
Contrast To decrease contrast To increase contrastBrightness To decrease brightness To increase brightness
Color To decrease colorintensity
To increase colorintensity
Tint To adjust color hues, especially to make skintones appear more natural.
Sharpness To soften To sharpen
Clear Pix Ultra HD
Enters sub-menus to adjust the followingsettings:(Dynamic contrast, Color enhancement,Black stretch, BMR 120, 4K UHD Upscaling,Global Dimming, Noise reduction and MPEGartifact reduction)
Advanced settings
Enters sub-menus to adjust the followingsettings:(Color alignment, Custom color management,Gamma, Blue stretch, Film mode and HDRmode*1)
Picture format
Automatic
Changing Pictureformat L p. 21
Super zoom4:3
Movie expand 14:9Movie expand 16:9
Wide screenFull
Manual Zoom *2
Unscaled
Mode selection
PC
To turn off imageenhancement featureswhich makes the TV toact purely as a monitor
HDTV
To enable imageenhancement featuresto improve picturequality
Cursor I Cursor H
Horizontal position To move PC screen left To move PC screenright
Vertical position To move PC screendown To move PC screen up
*1 HDR mode is only available if your television’s serial numberstarts with: DS1.
*2 Manual Zoom is only available if your television’s serial numberstarts with: DS2 or higher number.
Your serial number can be confirmed on the rating label applied on therear cabinet.
28 .English
Continued on next page.
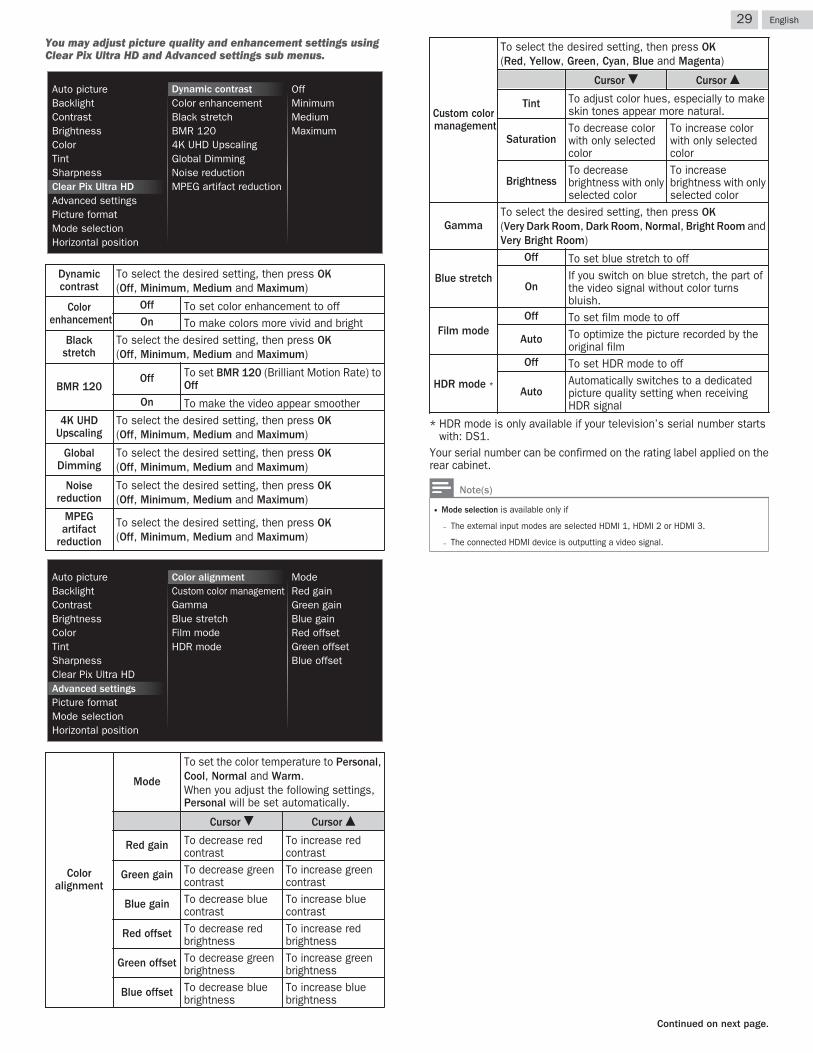
You may adjust picture quality and enhancement settings usingClear Pix Ultra HD and Advanced settings sub menus.
Color enhancement
MPEG artifact reduction
4K UHD Upscaling
Noise reduction
Dynamic contrast
Black stretch
Mode selectionPicture formatAdvanced settings
SharpnessTintColorBrightnessContrastBacklightAuto picture
Clear Pix Ultra HD
MaximumMediumMinimumOff
Horizontal position
Global Dimming
BMR 120
Dynamiccontrast
To select the desired setting, then press OK(Off, Minimum, Medium and Maximum)
Colorenhancement
Off To set color enhancement to offOn To make colors more vivid and bright
Blackstretch
To select the desired setting, then press OK(Off, Minimum, Medium and Maximum)
BMR 120Off To set BMR 120 (Brilliant Motion Rate) to
OffOn To make the video appear smoother
4K UHDUpscaling
To select the desired setting, then press OK(Off, Minimum, Medium and Maximum)
GlobalDimming
To select the desired setting, then press OK(Off, Minimum, Medium and Maximum)
Noisereduction
To select the desired setting, then press OK(Off, Minimum, Medium and Maximum)
MPEGartifact
reduction
To select the desired setting, then press OK(Off, Minimum, Medium and Maximum)
Blue offsetGreen offsetRed offsetBlue gainGreen gainRed gainMode
Film mode
Custom color managementGamma
Color alignment
Mode selectionPicture formatAdvanced settings
SharpnessTintColorBrightnessContrastBacklightAuto picture
Clear Pix Ultra HD
Blue stretch
Horizontal position
HDR mode
Coloralignment
Mode
To set the color temperature to Personal,Cool, Normal and Warm.When you adjust the following settings,Personal will be set automatically.
Cursor I Cursor H
Red gain To decrease redcontrast
To increase redcontrast
Green gain To decrease greencontrast
To increase greencontrast
Blue gain To decrease bluecontrast
To increase bluecontrast
Red offset To decrease redbrightness
To increase redbrightness
Green offset To decrease greenbrightness
To increase greenbrightness
Blue offset To decrease bluebrightness
To increase bluebrightness
Custom colormanagement
To select the desired setting, then press OK(Red, Yellow, Green, Cyan, Blue and Magenta)
Cursor I Cursor H
Tint To adjust color hues, especially to makeskin tones appear more natural.
SaturationTo decrease colorwith only selectedcolor
To increase colorwith only selectedcolor
BrightnessTo decreasebrightness with onlyselected color
To increasebrightness with onlyselected color
GammaTo select the desired setting, then press OK(Very Dark Room, Dark Room, Normal, Bright Room andVery Bright Room)
Blue stretch
Off To set blue stretch to off
OnIf you switch on blue stretch, the part ofthe video signal without color turnsbluish.
Film modeOff To set film mode to off
Auto To optimize the picture recorded by theoriginal film
HDR mode *
Off To set HDR mode to off
AutoAutomatically switches to a dedicatedpicture quality setting when receivingHDR signal
* HDR mode is only available if your television’s serial number startswith: DS1.
Your serial number can be confirmed on the rating label applied on therear cabinet.
Note(s)
● Mode selection is available only if
– The external input modes are selected HDMI 1, HDMI 2 or HDMI 3.
– The connected HDMI device is outputting a video signal.
29 .English
Continued on next page.
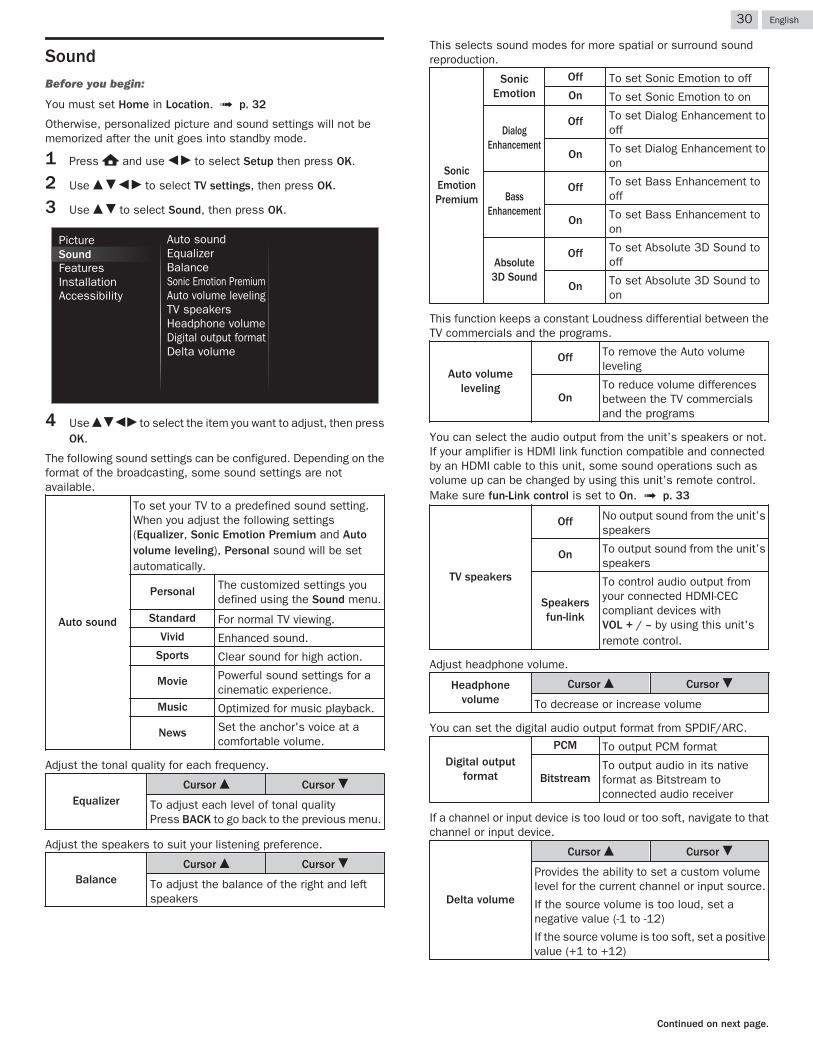
SoundBefore you begin:
You must set Home in Location. L p. 32
Otherwise, personalized picture and sound settings will not bememorized after the unit goes into standby mode.
1 Press Z and use J K to select Setup then press OK.
2 Use H I J K to select TV settings, then press OK.
3 Use H I to select Sound, then press OK.
Delta volumeDigital output formatHeadphone volumeTV speakersAuto volume levelingSonic Emotion PremiumBalanceEqualizerAuto sound
InstallationFeaturesSoundPicture
Accessibility
4 Use H I J K to select the item you want to adjust, then pressOK.
The following sound settings can be configured. Depending on theformat of the broadcasting, some sound settings are notavailable.
Auto sound
To set your TV to a predefined sound setting.When you adjust the following settings(Equalizer, Sonic Emotion Premium and Autovolume leveling), Personal sound will be setautomatically.
Personal The customized settings youdefined using the Sound menu.
Standard For normal TV viewing.Vivid Enhanced sound.
Sports Clear sound for high action.
Movie Powerful sound settings for acinematic experience.
Music Optimized for music playback.
News Set the anchor's voice at acomfortable volume.
Adjust the tonal quality for each frequency.
EqualizerCursor H Cursor I
To adjust each level of tonal qualityPress BACK to go back to the previous menu.
Adjust the speakers to suit your listening preference.
BalanceCursor H Cursor I
To adjust the balance of the right and leftspeakers
This selects sound modes for more spatial or surround soundreproduction.
SonicEmotionPremium
SonicEmotion
Off To set Sonic Emotion to offOn To set Sonic Emotion to on
DialogEnhancement
Off To set Dialog Enhancement tooff
On To set Dialog Enhancement toon
BassEnhancement
Off To set Bass Enhancement tooff
On To set Bass Enhancement toon
Absolute3D Sound
Off To set Absolute 3D Sound tooff
On To set Absolute 3D Sound toon
This function keeps a constant Loudness differential between theTV commercials and the programs.
Auto volumeleveling
Off To remove the Auto volumeleveling
OnTo reduce volume differencesbetween the TV commercialsand the programs
You can select the audio output from the unit’s speakers or not.If your amplifier is HDMI link function compatible and connectedby an HDMI cable to this unit, some sound operations such asvolume up can be changed by using this unit’s remote control.Make sure fun-Link control is set to On. L p. 33
TV speakers
Off No output sound from the unit’sspeakers
On To output sound from the unit’sspeakers
Speakersfun-link
To control audio output fromyour connected HDMI-CECcompliant devices withVOL + / – by using this unit'sremote control.
Adjust headphone volume.
Headphonevolume
Cursor H Cursor I
To decrease or increase volume
You can set the digital audio output format from SPDIF/ARC.
Digital outputformat
PCM To output PCM format
BitstreamTo output audio in its nativeformat as Bitstream toconnected audio receiver
If a channel or input device is too loud or too soft, navigate to thatchannel or input device.
Delta volume
Cursor H Cursor I
Provides the ability to set a custom volumelevel for the current channel or input source.
If the source volume is too loud, set anegative value (-1 to -12)
If the source volume is too soft, set a positivevalue (+1 to +12)
30 .English
Continued on next page.

Features
1 Press Z and use J K to select Setup then press OK.
2 Use H I J K to select TV settings, then press OK.
3 Use H I to select Features, then press OK.
Sleeptimer
InstallationFeaturesSoundPicture
Accessibility
4 Adjust the following items.
Sleeptimer
Sleep timer can set the unit to go into standby mode after anincremental period of time.
1 Use H I to select Sleeptimer, then press OK.
2 Use H repeatedly to change the amount of time(increases the time by 5 minutes up to 180 minutes).● Each press of I will decrease the time by 5 minutes.● Press INFO once to call up the display for checking the
remaining time.● To cancel the sleep timer, press H I repeatedly until “0”
is displayed.
Installation
1 Press Z and use J K to select Setup then press OK.
2 Use H I J K to select TV settings, then press OK.
3 Use H I to select Installation, then press OK.
InstallationFeaturesSoundPicture
Restore default settingsPreferencesLanguage
Accessibility
4 Adjust the following items.
LanguageYou can set the language for the on-screen display.
1 Use H I to select Language, then press OK.
InstallationFeaturesSoundPicture
EspañolFrançaisEnglish
Restore default settingsPreferencesLanguage
Accessibility
2 Use H I to select English, Español or Français, then pressOK.
Note(s)
● If you need the English menu instead of the Spanish or French menu’s, pressZ.Use J K to select Configuración or Configuration, then press OK.Use H I J K to select Ajustes de TV or Réglages de la télévision, then pressOK.Use H I to select Instalación or Installation, then press OK.Use H I to select Idioma or Langue, then press OK.Use H I to select English, then press OK.Press Z to exit the Home menu.
31 .English
Continued on next page.
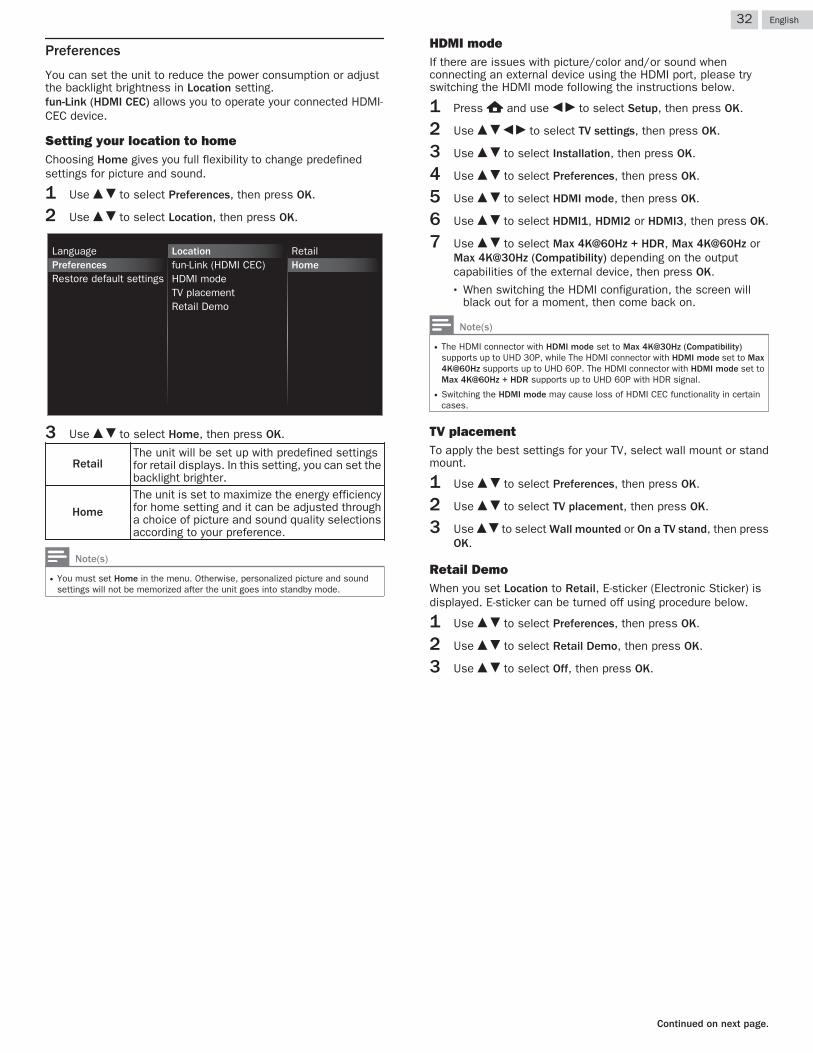
Preferences
You can set the unit to reduce the power consumption or adjustthe backlight brightness in Location setting.fun-Link (HDMI CEC) allows you to operate your connected HDMI-CEC device.
Setting your location to homeChoosing Home gives you full flexibility to change predefinedsettings for picture and sound.
1 Use H I to select Preferences, then press OK.
2 Use H I to select Location, then press OK.
TV placement
Location
HDMI modeHomeRetail
Restore default settingsPreferencesLanguage
Retail Demo
fun-Link (HDMI CEC)
3 Use H I to select Home, then press OK.
RetailThe unit will be set up with predefined settingsfor retail displays. In this setting, you can set thebacklight brighter.
Home
The unit is set to maximize the energy efficiencyfor home setting and it can be adjusted througha choice of picture and sound quality selectionsaccording to your preference.
Note(s)
● You must set Home in the menu. Otherwise, personalized picture and soundsettings will not be memorized after the unit goes into standby mode.
HDMI modeIf there are issues with picture/color and/or sound whenconnecting an external device using the HDMI port, please tryswitching the HDMI mode following the instructions below.
1 Press Z and use J K to select Setup, then press OK.
2 Use H I J K to select TV settings, then press OK.
3 Use H I to select Installation, then press OK.
4 Use H I to select Preferences, then press OK.
5 Use H I to select HDMI mode, then press OK.
6 Use H I to select HDMI1, HDMI2 or HDMI3, then press OK.
7 Use H I to select Max 4K@60Hz + HDR, Max 4K@60Hz orMax 4K@30Hz (Compatibility) depending on the outputcapabilities of the external device, then press OK.● When switching the HDMI configuration, the screen will
black out for a moment, then come back on.
Note(s)
● The HDMI connector with HDMI mode set to Max 4K@30Hz (Compatibility)supports up to UHD 30P, while The HDMI connector with HDMI mode set to Max4K@60Hz supports up to UHD 60P. The HDMI connector with HDMI mode set toMax 4K@60Hz + HDR supports up to UHD 60P with HDR signal.
● Switching the HDMI mode may cause loss of HDMI CEC functionality in certaincases.
TV placementTo apply the best settings for your TV, select wall mount or standmount.
1 Use H I to select Preferences, then press OK.
2 Use H I to select TV placement, then press OK.
3 Use H I to select Wall mounted or On a TV stand, then pressOK.
Retail DemoWhen you set Location to Retail, E-sticker (Electronic Sticker) isdisplayed. E-sticker can be turned off using procedure below.
1 Use H I to select Preferences, then press OK.
2 Use H I to select Retail Demo, then press OK.
3 Use H I to select Off, then press OK.
32 .English
Continued on next page.
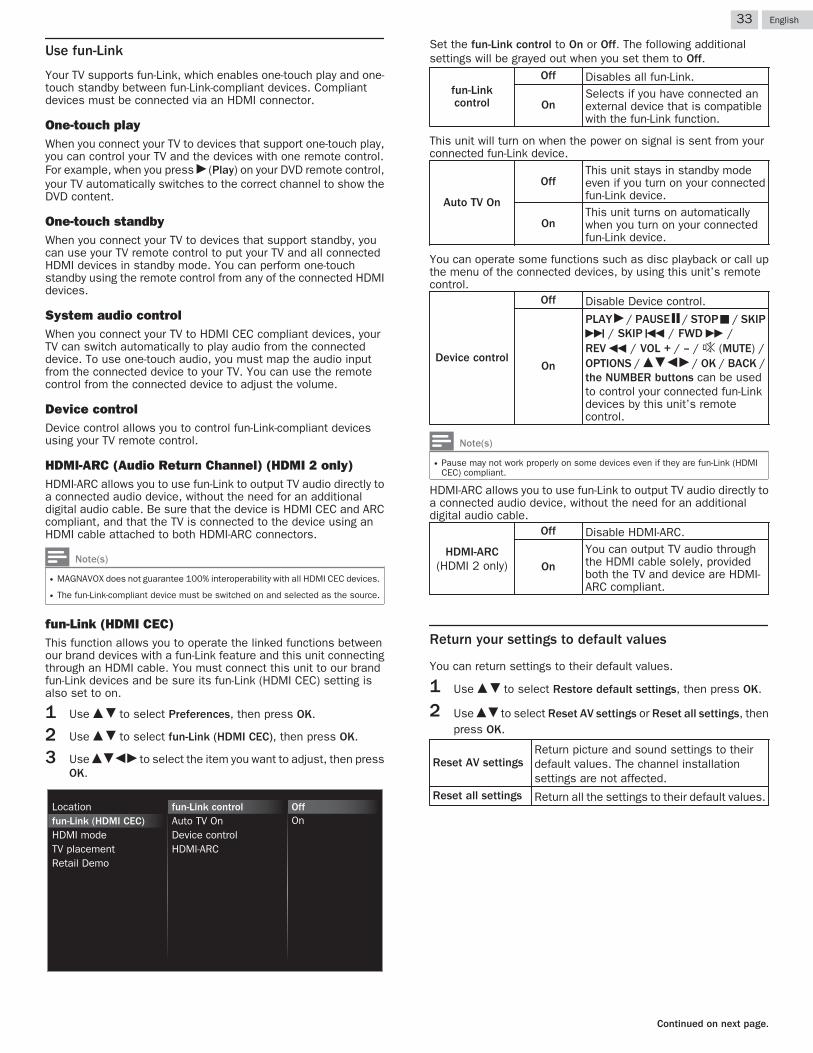
Use fun-Link
Your TV supports fun-Link, which enables one-touch play and one-touch standby between fun-Link-compliant devices. Compliantdevices must be connected via an HDMI connector.
One-touch playWhen you connect your TV to devices that support one-touch play,you can control your TV and the devices with one remote control.For example, when you press K (Play) on your DVD remote control,your TV automatically switches to the correct channel to show theDVD content.
One-touch standbyWhen you connect your TV to devices that support standby, youcan use your TV remote control to put your TV and all connectedHDMI devices in standby mode. You can perform one-touchstandby using the remote control from any of the connected HDMIdevices.
System audio controlWhen you connect your TV to HDMI CEC compliant devices, yourTV can switch automatically to play audio from the connecteddevice. To use one-touch audio, you must map the audio inputfrom the connected device to your TV. You can use the remotecontrol from the connected device to adjust the volume.
Device controlDevice control allows you to control fun-Link-compliant devicesusing your TV remote control.
HDMI-ARC (Audio Return Channel) (HDMI 2 only)HDMI-ARC allows you to use fun-Link to output TV audio directly toa connected audio device, without the need for an additionaldigital audio cable. Be sure that the device is HDMI CEC and ARCcompliant, and that the TV is connected to the device using anHDMI cable attached to both HDMI-ARC connectors.
Note(s)
● MAGNAVOX does not guarantee 100% interoperability with all HDMI CEC devices.
● The fun-Link-compliant device must be switched on and selected as the source.
fun-Link (HDMI CEC)This function allows you to operate the linked functions betweenour brand devices with a fun-Link feature and this unit connectingthrough an HDMI cable. You must connect this unit to our brandfun-Link devices and be sure its fun-Link (HDMI CEC) setting isalso set to on.
1 Use H I to select Preferences, then press OK.
2 Use H I to select fun-Link (HDMI CEC), then press OK.
3 Use H I J K to select the item you want to adjust, then pressOK.
OnOff
HDMI-ARC
Auto TV On
TV placement
Location
HDMI mode
fun-Link controlfun-Link (HDMI CEC)
Device control
Retail Demo
Set the fun-Link control to On or Off. The following additionalsettings will be grayed out when you set them to Off.
fun-Linkcontrol
Off Disables all fun-Link.
OnSelects if you have connected anexternal device that is compatiblewith the fun-Link function.
This unit will turn on when the power on signal is sent from yourconnected fun-Link device.
Auto TV On
OffThis unit stays in standby modeeven if you turn on your connectedfun-Link device.
OnThis unit turns on automaticallywhen you turn on your connectedfun-Link device.
You can operate some functions such as disc playback or call upthe menu of the connected devices, by using this unit’s remotecontrol.
Device control
Off Disable Device control.
On
PLAY K / PAUSE t / STOP C / SKIPG / SKIP H / FWD D /REV E / VOL + / – / D (MUTE) /OPTIONS / H I J K / OK / BACK /the NUMBER buttons can be usedto control your connected fun-Linkdevices by this unit’s remotecontrol.
Note(s)
● Pause may not work properly on some devices even if they are fun-Link (HDMICEC) compliant.
HDMI-ARC allows you to use fun-Link to output TV audio directly toa connected audio device, without the need for an additionaldigital audio cable.
HDMI-ARC(HDMI 2 only)
Off Disable HDMI-ARC.
On
You can output TV audio throughthe HDMI cable solely, providedboth the TV and device are HDMI-ARC compliant.
Return your settings to default values
You can return settings to their default values.
1 Use H I to select Restore default settings, then press OK.
2 Use H I to select Reset AV settings or Reset all settings, thenpress OK.
Reset AV settingsReturn picture and sound settings to theirdefault values. The channel installationsettings are not affected.
Reset all settings Return all the settings to their default values.
33 .English
Continued on next page.
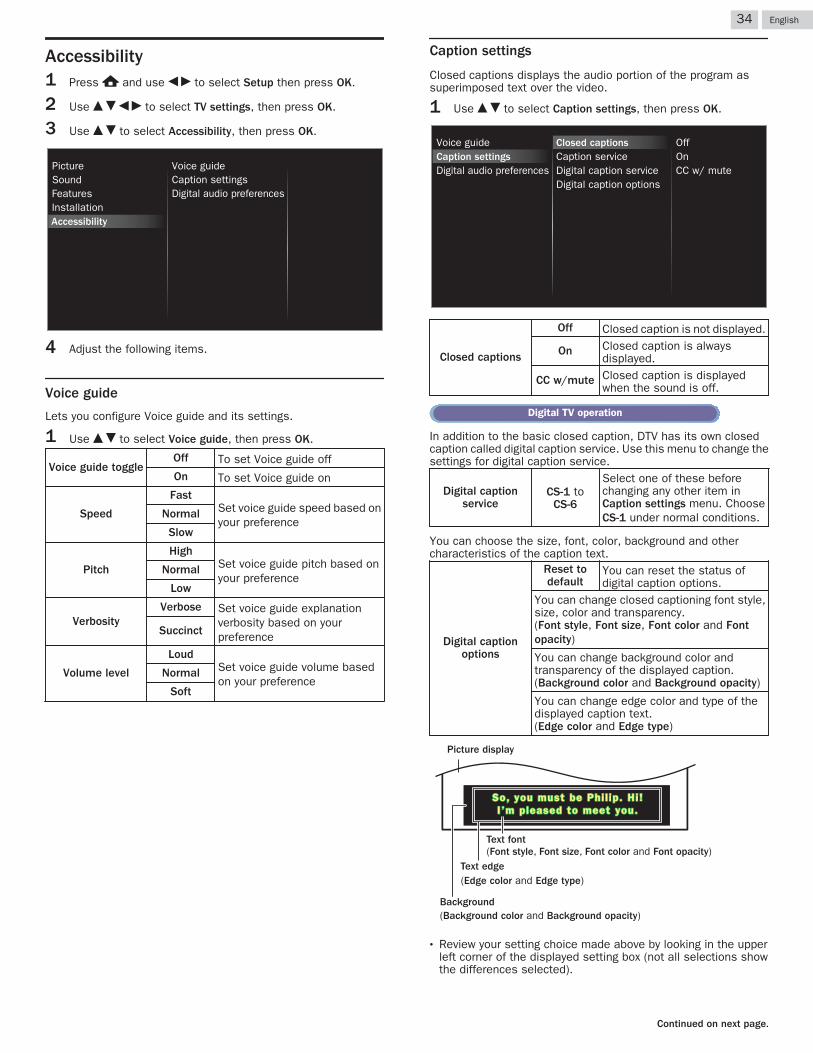
Accessibility1 Press Z and use J K to select Setup then press OK.
2 Use H I J K to select TV settings, then press OK.
3 Use H I to select Accessibility, then press OK.
SoundPicture
Digital audio preferencesCaption settings
InstallationFeatures
Accessibility
Voice guide
4 Adjust the following items.
Voice guide
Lets you configure Voice guide and its settings.
1 Use H I to select Voice guide, then press OK.
Voice guide toggleOff To set Voice guide offOn To set Voice guide on
Speed
FastSet voice guide speed based onyour preference
Normal
Slow
Pitch
HighSet voice guide pitch based onyour preference
Normal
Low
VerbosityVerbose Set voice guide explanation
verbosity based on yourpreferenceSuccinct
Volume level
LoudSet voice guide volume basedon your preference
Normal
Soft
Caption settings
Closed captions displays the audio portion of the program assuperimposed text over the video.
1 Use H I to select Caption settings, then press OK.
CC w/ muteOnOff
Digital caption optionsDigital caption serviceCaption serviceClosed captions
Digital audio preferencesCaption settingsVoice guide
Closed captions
Off Closed caption is not displayed.
On Closed caption is alwaysdisplayed.
CC w/mute Closed caption is displayedwhen the sound is off.
Digital TV operation
In addition to the basic closed caption, DTV has its own closedcaption called digital caption service. Use this menu to change thesettings for digital caption service.
Digital captionservice
CS-1 toCS-6
Select one of these beforechanging any other item inCaption settings menu. ChooseCS-1 under normal conditions.
You can choose the size, font, color, background and othercharacteristics of the caption text.
Digital captionoptions
Reset todefault
You can reset the status ofdigital caption options.
You can change closed captioning font style,size, color and transparency.(Font style, Font size, Font color and Fontopacity)
You can change background color andtransparency of the displayed caption.(Background color and Background opacity)
You can change edge color and type of thedisplayed caption text.(Edge color and Edge type)
So, you must be Phil ip. Hi!So, you must be Phil ip. Hi!I’m pleased to meet you.I’m pleased to meet you.
So, you must be Phil ip. Hi!I’m pleased to meet you.
(Background color and Background opacity)Background
(Edge color and Edge type)Text edge
(Font style, Font size, Font color and Font opacity)Text font
Picture display
● Review your setting choice made above by looking in the upperleft corner of the displayed setting box (not all selections showthe differences selected).
34 .English
Continued on next page.
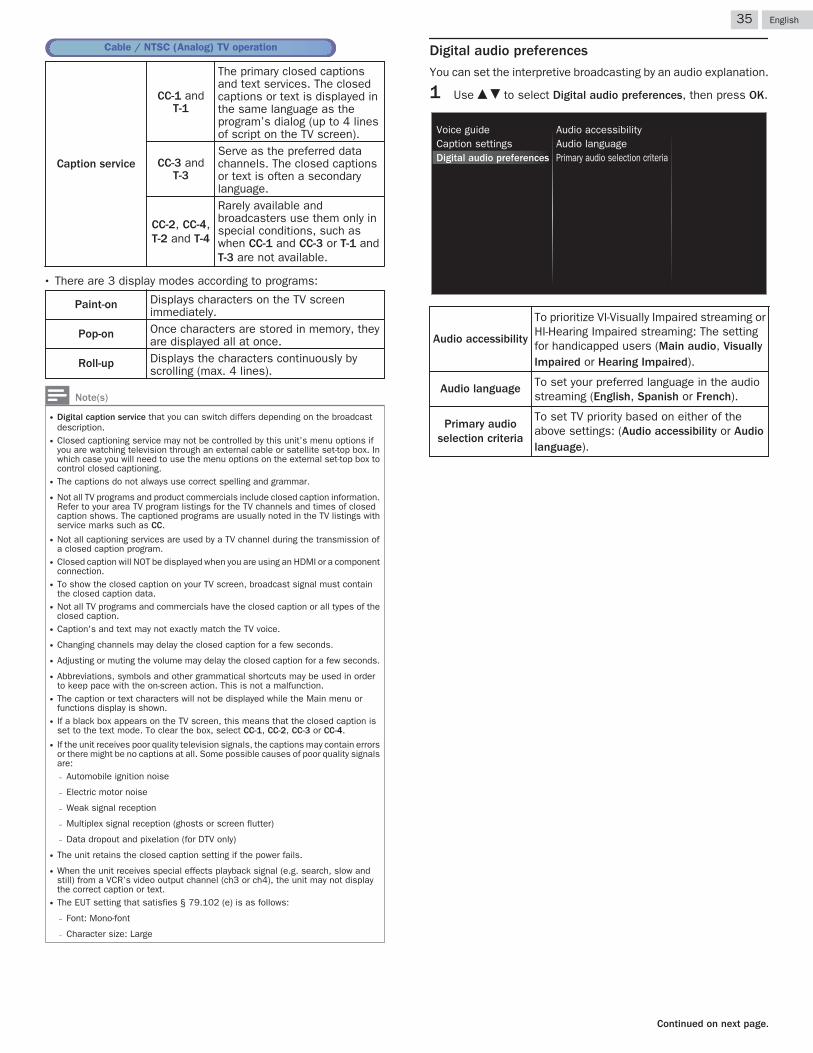
Cable / NTSC (Analog) TV operation
Caption service
CC-1 andT-1
The primary closed captionsand text services. The closedcaptions or text is displayed inthe same language as theprogram’s dialog (up to 4 linesof script on the TV screen).
CC-3 andT-3
Serve as the preferred datachannels. The closed captionsor text is often a secondarylanguage.
CC-2, CC-4,T-2 and T-4
Rarely available andbroadcasters use them only inspecial conditions, such aswhen CC-1 and CC-3 or T-1 andT-3 are not available.
● There are 3 display modes according to programs:
Paint-on Displays characters on the TV screenimmediately.
Pop-on Once characters are stored in memory, theyare displayed all at once.
Roll-up Displays the characters continuously byscrolling (max. 4 lines).
Note(s)
● Digital caption service that you can switch differs depending on the broadcastdescription.
● Closed captioning service may not be controlled by this unit’s menu options ifyou are watching television through an external cable or satellite set-top box. Inwhich case you will need to use the menu options on the external set-top box tocontrol closed captioning.
● The captions do not always use correct spelling and grammar.
● Not all TV programs and product commercials include closed caption information.Refer to your area TV program listings for the TV channels and times of closedcaption shows. The captioned programs are usually noted in the TV listings withservice marks such as CC.
● Not all captioning services are used by a TV channel during the transmission ofa closed caption program.
● Closed caption will NOT be displayed when you are using an HDMI or a componentconnection.
● To show the closed caption on your TV screen, broadcast signal must containthe closed caption data.
● Not all TV programs and commercials have the closed caption or all types of theclosed caption.
● Caption's and text may not exactly match the TV voice.
● Changing channels may delay the closed caption for a few seconds.
● Adjusting or muting the volume may delay the closed caption for a few seconds.
● Abbreviations, symbols and other grammatical shortcuts may be used in orderto keep pace with the on-screen action. This is not a malfunction.
● The caption or text characters will not be displayed while the Main menu orfunctions display is shown.
● If a black box appears on the TV screen, this means that the closed caption isset to the text mode. To clear the box, select CC-1, CC-2, CC-3 or CC-4.
● If the unit receives poor quality television signals, the captions may contain errorsor there might be no captions at all. Some possible causes of poor quality signalsare:– Automobile ignition noise
– Electric motor noise
– Weak signal reception
– Multiplex signal reception (ghosts or screen flutter)
– Data dropout and pixelation (for DTV only)
● The unit retains the closed caption setting if the power fails.
● When the unit receives special effects playback signal (e.g. search, slow andstill) from a VCR’s video output channel (ch3 or ch4), the unit may not displaythe correct caption or text.
● The EUT setting that satisfies § 79.102 (e) is as follows:
– Font: Mono-font
– Character size: Large
Digital audio preferences
You can set the interpretive broadcasting by an audio explanation.
1 Use H I to select Digital audio preferences, then press OK.
Primary audio selection criteriaAudio languageAudio accessibility
Digital audio preferencesCaption settingsVoice guide
Audio accessibility
To prioritize VI-Visually Impaired streaming orHI-Hearing Impaired streaming: The settingfor handicapped users (Main audio, VisuallyImpaired or Hearing Impaired).
Audio language To set your preferred language in the audiostreaming (English, Spanish or French).
Primary audioselection criteria
To set TV priority based on either of theabove settings: (Audio accessibility or Audiolanguage).
35 .English
Continued on next page.
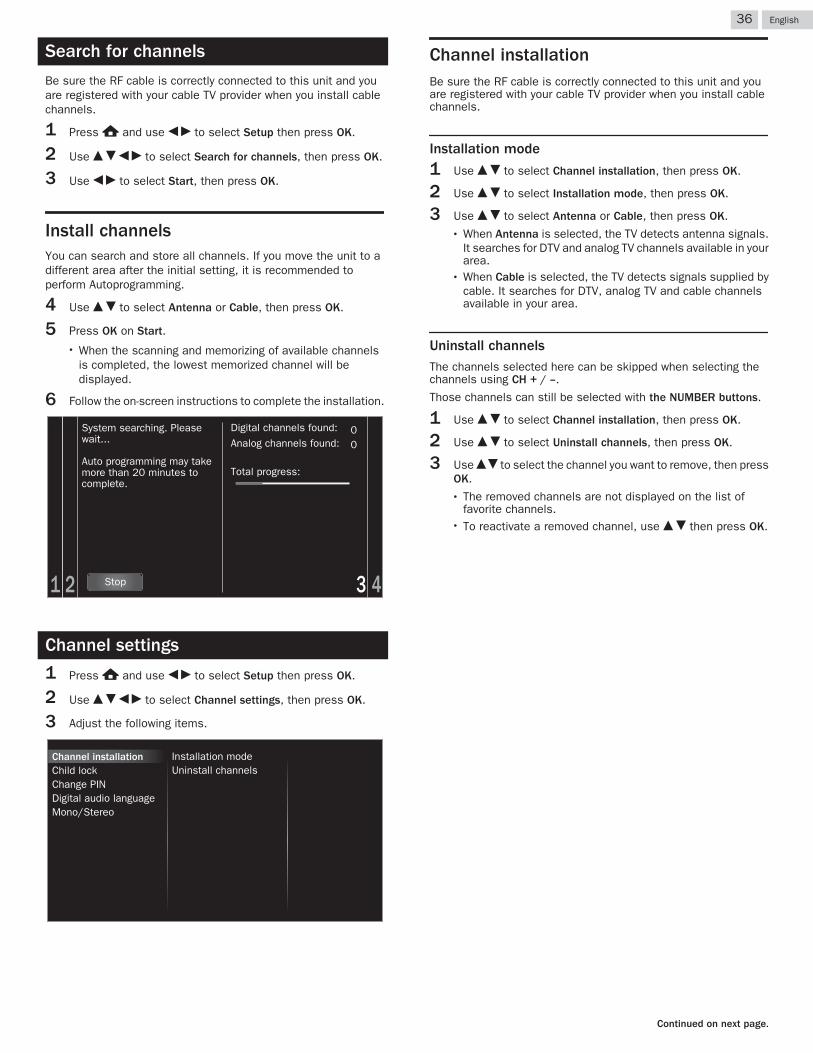
Search for channels
Be sure the RF cable is correctly connected to this unit and youare registered with your cable TV provider when you install cablechannels.
1 Press Z and use J K to select Setup then press OK.
2 Use H I J K to select Search for channels, then press OK.
3 Use J K to select Start, then press OK.
Install channelsYou can search and store all channels. If you move the unit to adifferent area after the initial setting, it is recommended toperform Autoprogramming.
4 Use H I to select Antenna or Cable, then press OK.
5 Press OK on Start.● When the scanning and memorizing of available channels
is completed, the lowest memorized channel will bedisplayed.
6 Follow the on-screen instructions to complete the installation.
00
1 2 3 4Stop
Total progress:
Analog channels found:
Digital channels found:
complete.more than 20 minutes toAuto programming may take wait...System searching. Please
Channel settings
1 Press Z and use J K to select Setup then press OK.
2 Use H I J K to select Channel settings, then press OK.
3 Adjust the following items.
Uninstall channelsInstallation mode
Mono/StereoDigital audio languageChange PINChild lockChannel installation
Channel installationBe sure the RF cable is correctly connected to this unit and youare registered with your cable TV provider when you install cablechannels.
Installation mode
1 Use H I to select Channel installation, then press OK.
2 Use H I to select Installation mode, then press OK.
3 Use H I to select Antenna or Cable, then press OK.● When Antenna is selected, the TV detects antenna signals.
It searches for DTV and analog TV channels available in yourarea.
● When Cable is selected, the TV detects signals supplied bycable. It searches for DTV, analog TV and cable channelsavailable in your area.
Uninstall channelsThe channels selected here can be skipped when selecting thechannels using CH + / –.
Those channels can still be selected with the NUMBER buttons.
1 Use H I to select Channel installation, then press OK.
2 Use H I to select Uninstall channels, then press OK.
3 Use H I to select the channel you want to remove, then pressOK.● The removed channels are not displayed on the list of
favorite channels.● To reactivate a removed channel, use H I then press OK.
36 .English
Continued on next page.
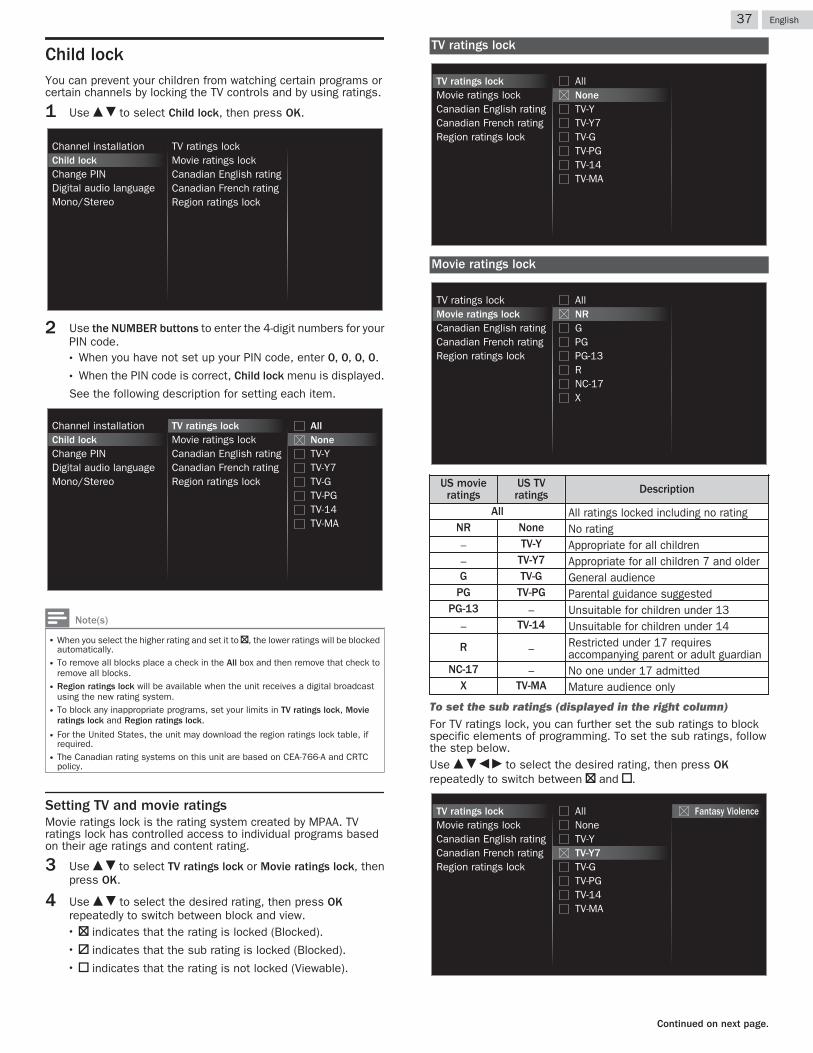
Child lockYou can prevent your children from watching certain programs orcertain channels by locking the TV controls and by using ratings.
1 Use H I to select Child lock, then press OK.
Mono/StereoDigital audio languageChange PINChild lockChannel installation
Region ratings lockCanadian French ratingCanadian English ratingMovie ratings lockTV ratings lock
2 Use the NUMBER buttons to enter the 4-digit numbers for yourPIN code.● When you have not set up your PIN code, enter 0, 0, 0, 0.● When the PIN code is correct, Child lock menu is displayed.
See the following description for setting each item.
TV-MATV-14TV-PGTV-GTV-Y7TV-YNoneAll
Region ratings lockCanadian French ratingCanadian English ratingMovie ratings lockTV ratings lock
Mono/StereoDigital audio languageChange PINChild lockChannel installation
Note(s)
● When you select the higher rating and set it to G, the lower ratings will be blockedautomatically.
● To remove all blocks place a check in the All box and then remove that check toremove all blocks.
● Region ratings lock will be available when the unit receives a digital broadcastusing the new rating system.
● To block any inappropriate programs, set your limits in TV ratings lock, Movieratings lock and Region ratings lock.
● For the United States, the unit may download the region ratings lock table, ifrequired.
● The Canadian rating systems on this unit are based on CEA-766-A and CRTCpolicy.
Setting TV and movie ratingsMovie ratings lock is the rating system created by MPAA. TVratings lock has controlled access to individual programs basedon their age ratings and content rating.
3 Use H I to select TV ratings lock or Movie ratings lock, thenpress OK.
4 Use H I to select the desired rating, then press OKrepeatedly to switch between block and view.● G indicates that the rating is locked (Blocked).● F indicates that the sub rating is locked (Blocked).● E indicates that the rating is not locked (Viewable).
TV ratings lock
TV-MATV-14TV-PGTV-GTV-Y7TV-YNoneAll
Region ratings lockCanadian French ratingCanadian English ratingMovie ratings lockTV ratings lock
Movie ratings lock
Region ratings lockCanadian French ratingCanadian English ratingMovie ratings lockTV ratings lock
XNC-17RPG-13PGGNRAll
US movieratings
US TVratings Description
All All ratings locked including no ratingNR None No rating– TV-Y Appropriate for all children– TV-Y7 Appropriate for all children 7 and olderG TV-G General audience
PG TV-PG Parental guidance suggestedPG-13 – Unsuitable for children under 13
– TV-14 Unsuitable for children under 14
R – Restricted under 17 requiresaccompanying parent or adult guardian
NC-17 – No one under 17 admittedX TV-MA Mature audience only
To set the sub ratings (displayed in the right column)For TV ratings lock, you can further set the sub ratings to blockspecific elements of programming. To set the sub ratings, followthe step below.Use H I J K to select the desired rating, then press OKrepeatedly to switch between G and E.
TV-MATV-14TV-PGTV-GTV-Y7TV-YNoneAll
Region ratings lockCanadian French ratingCanadian English ratingMovie ratings lockTV ratings lock Fantasy Violence
37 .English
Continued on next page.
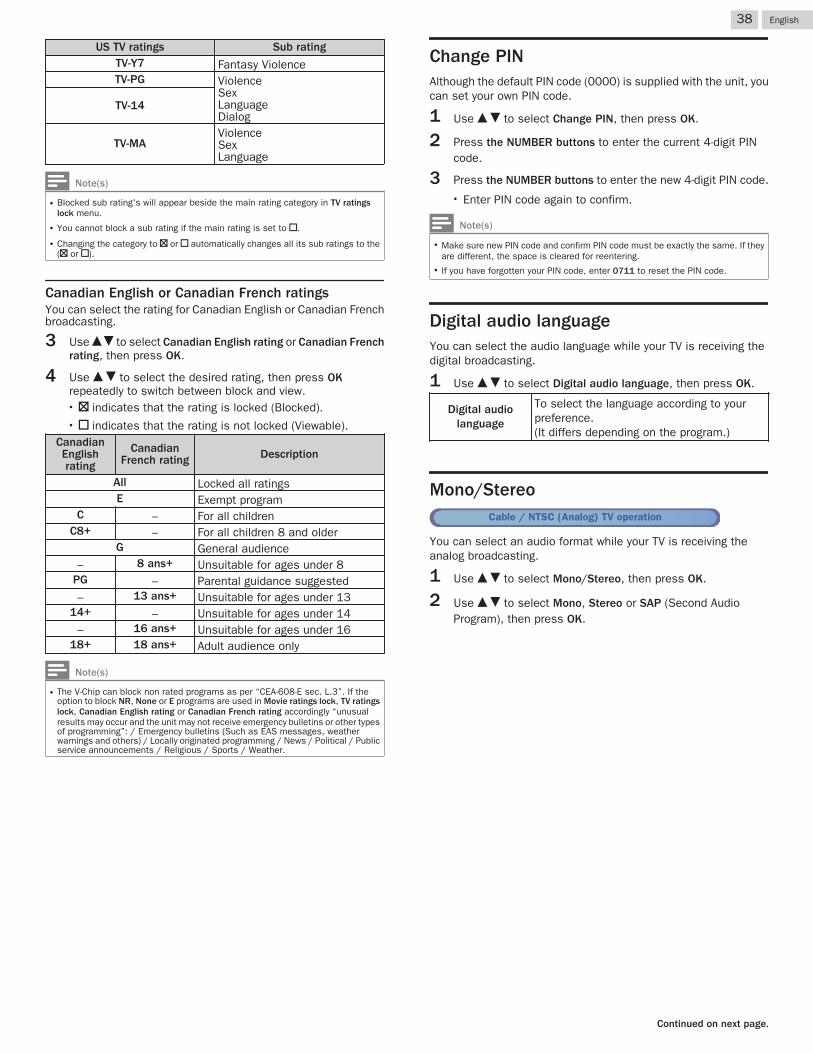
US TV ratings Sub ratingTV-Y7 Fantasy ViolenceTV-PG Violence
SexLanguageDialog
TV-14
TV-MAViolenceSexLanguage
Note(s)
● Blocked sub rating's will appear beside the main rating category in TV ratingslock menu.
● You cannot block a sub rating if the main rating is set to E.
● Changing the category to G or E automatically changes all its sub ratings to the(G or E).
Canadian English or Canadian French ratingsYou can select the rating for Canadian English or Canadian Frenchbroadcasting.
3 Use H I to select Canadian English rating or Canadian Frenchrating, then press OK.
4 Use H I to select the desired rating, then press OKrepeatedly to switch between block and view.● G indicates that the rating is locked (Blocked).● E indicates that the rating is not locked (Viewable).
CanadianEnglishrating
CanadianFrench rating Description
All Locked all ratingsE Exempt program
C – For all childrenC8+ – For all children 8 and older
G General audience– 8 ans+ Unsuitable for ages under 8
PG – Parental guidance suggested– 13 ans+ Unsuitable for ages under 13
14+ – Unsuitable for ages under 14– 16 ans+ Unsuitable for ages under 16
18+ 18 ans+ Adult audience only
Note(s)
● The V-Chip can block non rated programs as per “CEA-608-E sec. L.3”. If theoption to block NR, None or E programs are used in Movie ratings lock, TV ratingslock, Canadian English rating or Canadian French rating accordingly “unusualresults may occur and the unit may not receive emergency bulletins or other typesof programming”: / Emergency bulletins (Such as EAS messages, weatherwarnings and others) / Locally originated programming / News / Political / Publicservice announcements / Religious / Sports / Weather.
Change PINAlthough the default PIN code (0000) is supplied with the unit, youcan set your own PIN code.
1 Use H I to select Change PIN, then press OK.
2 Press the NUMBER buttons to enter the current 4-digit PINcode.
3 Press the NUMBER buttons to enter the new 4-digit PIN code.● Enter PIN code again to confirm.
Note(s)
● Make sure new PIN code and confirm PIN code must be exactly the same. If theyare different, the space is cleared for reentering.
● If you have forgotten your PIN code, enter 0711 to reset the PIN code.
Digital audio languageYou can select the audio language while your TV is receiving thedigital broadcasting.
1 Use H I to select Digital audio language, then press OK.
Digital audiolanguage
To select the language according to yourpreference.(It differs depending on the program.)
Mono/StereoCable / NTSC (Analog) TV operation
You can select an audio format while your TV is receiving theanalog broadcasting.
1 Use H I to select Mono/Stereo, then press OK.
2 Use H I to select Mono, Stereo or SAP (Second AudioProgram), then press OK.
38 .English
Continued on next page.
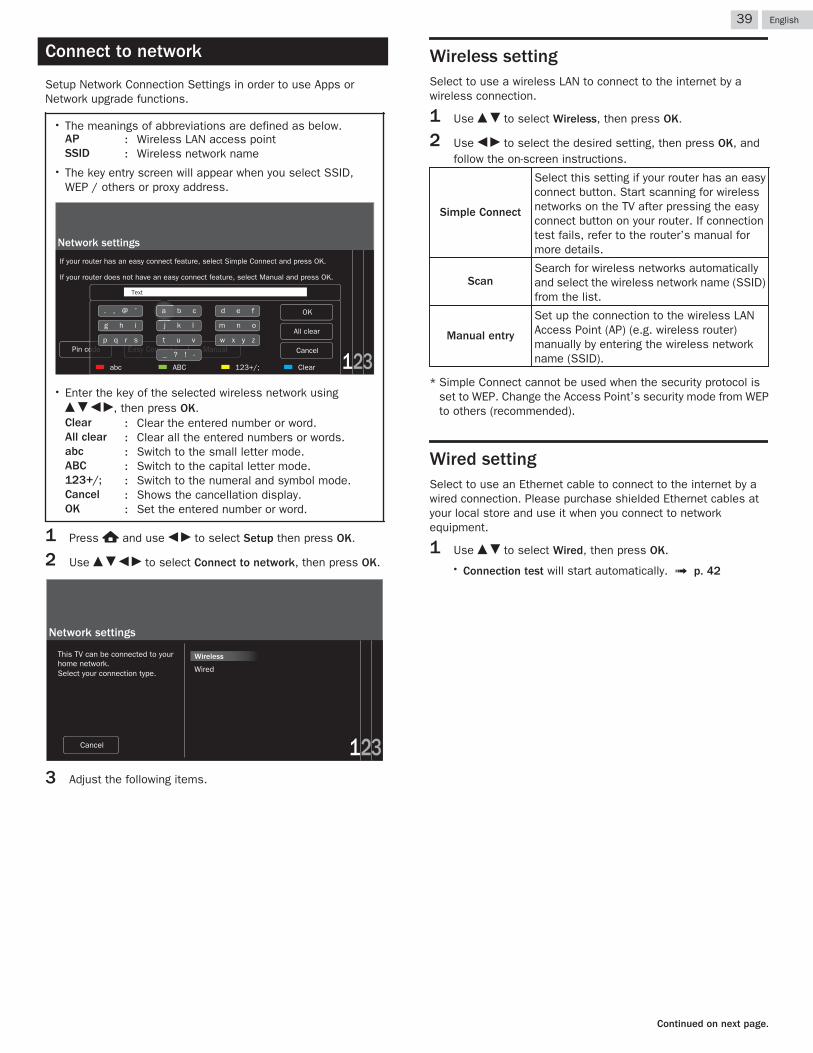
Connect to network
Setup Network Connection Settings in order to use Apps orNetwork upgrade functions.
● The meanings of abbreviations are defined as below.AP : Wireless LAN access pointSSID : Wireless network name
● The key entry screen will appear when you select SSID,WEP / others or proxy address.
312ManualEasy ConnectPin code
If your router has an easy connect feature, select Simple Connect and press OK.
If your router does not have an easy connect feature, select Manual and press OK.
ManualEasy Connectodeo Cancel
All clear
OK
Text
. , @ ’
g h i
p q r s
a b c
j k l
t u v
_ ? ! -
d e f
m n o
w x y z
abc ABC 123+/; Clear
Network settings
● Enter the key of the selected wireless network usingH I J K, then press OK.Clear : Clear the entered number or word.All clear : Clear all the entered numbers or words.abc : Switch to the small letter mode.ABC : Switch to the capital letter mode.123+/; : Switch to the numeral and symbol mode.Cancel : Shows the cancellation display.OK : Set the entered number or word.
1 Press Z and use J K to select Setup then press OK.
2 Use H I J K to select Connect to network, then press OK.
312Cancel
Wired
Wireless
Network settings
Select your connection type.
This TV can be connected to your home network.
3 Adjust the following items.
Wireless settingSelect to use a wireless LAN to connect to the internet by awireless connection.
1 Use H I to select Wireless, then press OK.
2 Use J K to select the desired setting, then press OK, andfollow the on-screen instructions.
Simple Connect
Select this setting if your router has an easyconnect button. Start scanning for wirelessnetworks on the TV after pressing the easyconnect button on your router. If connectiontest fails, refer to the router’s manual formore details.
ScanSearch for wireless networks automaticallyand select the wireless network name (SSID)from the list.
Manual entry
Set up the connection to the wireless LANAccess Point (AP) (e.g. wireless router)manually by entering the wireless networkname (SSID).
* Simple Connect cannot be used when the security protocol isset to WEP. Change the Access Point’s security mode from WEPto others (recommended).
Wired settingSelect to use an Ethernet cable to connect to the internet by awired connection. Please purchase shielded Ethernet cables atyour local store and use it when you connect to networkequipment.
1 Use H I to select Wired, then press OK.● Connection test will start automatically. L p. 42
39 .English
Continued on next page.
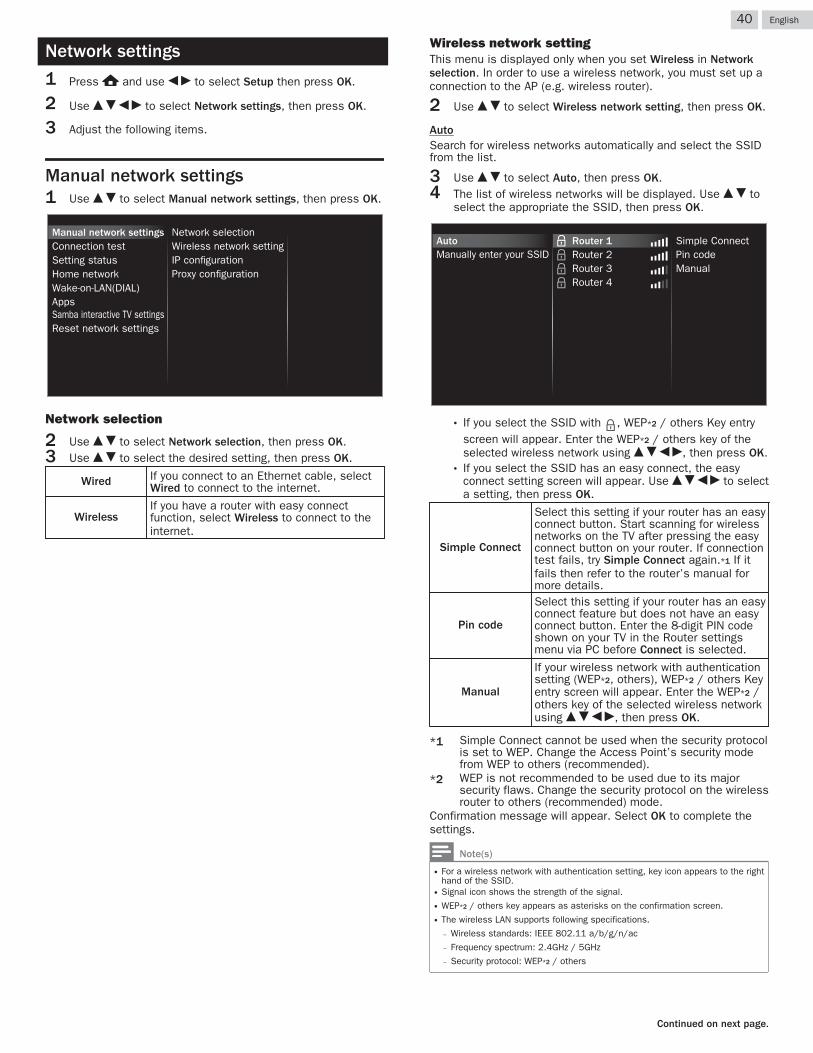
Network settings
1 Press Z and use J K to select Setup then press OK.
2 Use H I J K to select Network settings, then press OK.
3 Adjust the following items.
Manual network settings1 Use H I to select Manual network settings, then press OK.
Proxy configurationIP configurationWireless network settingNetwork selection
AppsWake-on-LAN(DIAL)
Reset network settingsSamba interactive TV settings
Home networkSetting statusConnection testManual network settings
Network selection
2 Use H I to select Network selection, then press OK.3 Use H I to select the desired setting, then press OK.
Wired If you connect to an Ethernet cable, selectWired to connect to the internet.
WirelessIf you have a router with easy connectfunction, select Wireless to connect to theinternet.
Wireless network settingThis menu is displayed only when you set Wireless in Networkselection. In order to use a wireless network, you must set up aconnection to the AP (e.g. wireless router).
2 Use H I to select Wireless network setting, then press OK.
AutoSearch for wireless networks automatically and select the SSIDfrom the list.
3 Use H I to select Auto, then press OK.4 The list of wireless networks will be displayed. Use H I to
select the appropriate the SSID, then press OK.
Manually enter your SSIDAuto
Router 4Router 3Router 2Router 1
Manual
Simple ConnectPin code
● If you select the SSID with , WEP*2 / others Key entryscreen will appear. Enter the WEP*2 / others key of theselected wireless network using H I J K, then press OK.
● If you select the SSID has an easy connect, the easyconnect setting screen will appear. Use H I J K to selecta setting, then press OK.
Simple Connect
Select this setting if your router has an easyconnect button. Start scanning for wirelessnetworks on the TV after pressing the easyconnect button on your router. If connectiontest fails, try Simple Connect again.*1 If itfails then refer to the router’s manual formore details.
Pin code
Select this setting if your router has an easyconnect feature but does not have an easyconnect button. Enter the 8-digit PIN codeshown on your TV in the Router settingsmenu via PC before Connect is selected.
Manual
If your wireless network with authenticationsetting (WEP*2, others), WEP*2 / others Keyentry screen will appear. Enter the WEP*2 /others key of the selected wireless networkusing H I J K, then press OK.
*1 Simple Connect cannot be used when the security protocolis set to WEP. Change the Access Point’s security modefrom WEP to others (recommended).
*2 WEP is not recommended to be used due to its majorsecurity flaws. Change the security protocol on the wirelessrouter to others (recommended) mode.
Confirmation message will appear. Select OK to complete thesettings.
Note(s)
● For a wireless network with authentication setting, key icon appears to the righthand of the SSID.
● Signal icon shows the strength of the signal.● WEP*2 / others key appears as asterisks on the confirmation screen.● The wireless LAN supports following specifications.
– Wireless standards: IEEE 802.11 a/b/g/n/ac
– Frequency spectrum: 2.4GHz / 5GHz
– Security protocol: WEP*2 / others
40 .English
Continued on next page.
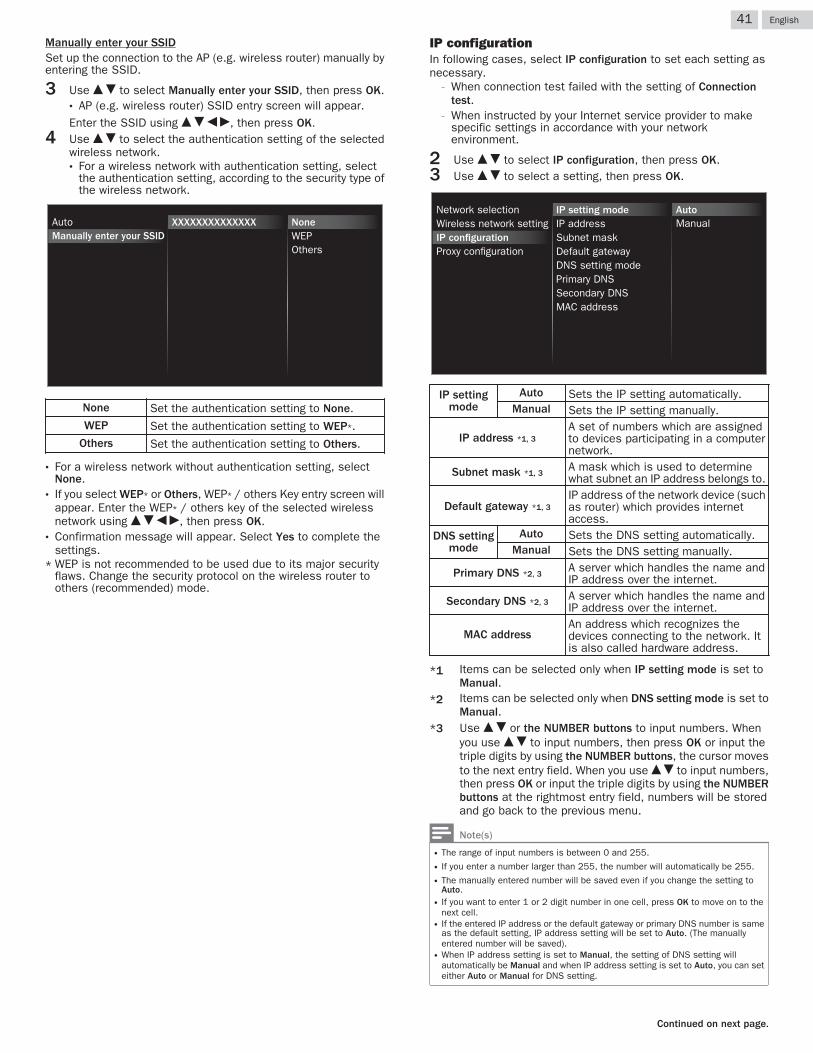
Manually enter your SSIDSet up the connection to the AP (e.g. wireless router) manually byentering the SSID.
3 Use H I to select Manually enter your SSID, then press OK.● AP (e.g. wireless router) SSID entry screen will appear.Enter the SSID using H I J K, then press OK.
4 Use H I to select the authentication setting of the selectedwireless network.● For a wireless network with authentication setting, select
the authentication setting, according to the security type ofthe wireless network.
XXXXXXXXXXXXXXWEPNone
Manually enter your SSIDAuto
Others
None Set the authentication setting to None.WEP Set the authentication setting to WEP*.
Others Set the authentication setting to Others.
● For a wireless network without authentication setting, selectNone.
● If you select WEP* or Others, WEP* / others Key entry screen willappear. Enter the WEP* / others key of the selected wirelessnetwork using H I J K, then press OK.
● Confirmation message will appear. Select Yes to complete thesettings.
* WEP is not recommended to be used due to its major securityflaws. Change the security protocol on the wireless router toothers (recommended) mode.
IP configurationIn following cases, select IP configuration to set each setting asnecessary.
– When connection test failed with the setting of Connectiontest.
– When instructed by your Internet service provider to makespecific settings in accordance with your networkenvironment.
2 Use H I to select IP configuration, then press OK.3 Use H I to select a setting, then press OK.
ManualAuto
MAC addressSecondary DNSPrimary DNSDNS setting modeDefault gatewaySubnet maskIP addressIP setting mode
Proxy configurationIP configurationWireless network settingNetwork selection
IP settingmode
Auto Sets the IP setting automatically.Manual Sets the IP setting manually.
IP address *1, 3A set of numbers which are assignedto devices participating in a computernetwork.
Subnet mask *1, 3A mask which is used to determinewhat subnet an IP address belongs to.
Default gateway *1, 3IP address of the network device (suchas router) which provides internetaccess.
DNS settingmode
Auto Sets the DNS setting automatically.Manual Sets the DNS setting manually.
Primary DNS *2, 3A server which handles the name andIP address over the internet.
Secondary DNS *2, 3A server which handles the name andIP address over the internet.
MAC addressAn address which recognizes thedevices connecting to the network. Itis also called hardware address.
*1 Items can be selected only when IP setting mode is set toManual.
*2 Items can be selected only when DNS setting mode is set toManual.
*3 Use H I or the NUMBER buttons to input numbers. Whenyou use H I to input numbers, then press OK or input thetriple digits by using the NUMBER buttons, the cursor movesto the next entry field. When you use H I to input numbers,then press OK or input the triple digits by using the NUMBERbuttons at the rightmost entry field, numbers will be storedand go back to the previous menu.
Note(s)
● The range of input numbers is between 0 and 255.● If you enter a number larger than 255, the number will automatically be 255.● The manually entered number will be saved even if you change the setting to
Auto.● If you want to enter 1 or 2 digit number in one cell, press OK to move on to the
next cell.● If the entered IP address or the default gateway or primary DNS number is same
as the default setting, IP address setting will be set to Auto. (The manuallyentered number will be saved).
● When IP address setting is set to Manual, the setting of DNS setting willautomatically be Manual and when IP address setting is set to Auto, you can seteither Auto or Manual for DNS setting.
41 .English
Continued on next page.

Proxy configuration
2 Use H I to select Proxy configuration, then press OK.3 Use H I to select a setting, then press OK.
Do not useProxy setting
Proxy configurationIP configurationWireless network settingNetwork selection
UseProxy portProxy address
● Do not use is selected for default settings.● If you need to change the proxy setting as instructed by your
internet service provider to set the designated proxyaddress and port, select Use.
Proxy settingDo not use Does not use the proxy server.
Use Uses the proxy server.
Proxy address * Selects the number or word byusing H I J K, then press OK.
Proxy port * Use H I or the NUMBERbuttons to input numbers.
* Items can be selected only when Proxy setting is set to Use.
Note(s)
● The range of input numbers for the port number is between 0 and 65535. (If youenter a number larger than 65535, it will be regarded as 65535.)
● For proxy port, the selected ports may be blocked and not be able to usedepending on your network environment.
● If the proxy address is entered with blank only, proxy server setting will be set toDo not use.
Connection testPerform the following steps to test your internet connection afteryou have connected an Ethernet cable or entered network settingssuch as IP address, DNS settings, etc. manually.
1 Use H I to select Connection test, then press OK.● Connection test will start automatically and the test result
for home network and internet will appear right after theconnection test finishes.
● “Testing…” is displayed while the connection test is inprogress.
Home network Internet Description
Pass Pass Connection test is successfullycompleted.
Fail -Connection test for homenetwork failed. Check theconnection settings.
Pass FailConnection test for internetfailed.Check the connection settings.
● If the connection test for internet passes, speed test willstart automatically.
2 Press OK to go to the list on network status confirmationscreen.
Note(s)
● If the connection test for both home network and internet pass, you are ready touse Apps or network upgrade functions using the internet without making anyadditional settings.
● If the connection test fails, check if the Ethernet cable is connected to this TVproperly or if you have entered all the required details for the wireless LANconnection properly.
Setting statusYou can check the status of network settings.
1 Use H I to select Setting status, then press OK.● Network setting list will be displayed.● MAC address of this unit will be displayed in the list.
42 .English
Continued on next page.
Home networkYou can turn your TV into a Digital Media Renderer (DMR), whichcan play video, music and photo files stored on certified homemedia servers connected to your home network.
1 Use H I to select Home network, then press OK.
2 Use H I J K to select the item you want to adjust, then pressOK.
RendererOff Disable DMR.
On Enable this unit to play filesusing DMC.
Renderer name Change the display name of this TV to otherdevices on the home network.
Wake-on-LAN(DIAL)You can turn your TV on when you use remote control via IP.
1 Use H I to select Wake-on-LAN(DIAL), then press OK.
2 Use H I to select On or Off, then press OK.
Off To set Wake-on-LAN(DIAL) to off.
On To set Wake-on-LAN(DIAL) to on.
AppsDisplays the deactivation settings for Apps, Netflix ESN and Netflixsoftware version.
Netflix deactivation
Displays the deactivation setting for Netflix.
1 Use H I to select Apps, then press OK.
2 Use H I to select Deactivation, then press OK.
3 Use H I to select Netflix, then press OK.
4 Use J K to select the desired option, then press OK.
Yes Deactivate the connection to Netflix.No Activate the connection to Netflix.
VUDU deactivation
Displays the deactivation setting for VUDU.
1 Use H I to select Apps, then press OK.
2 Use H I to select Deactivation, then press OK.
3 Use H I to select VUDU, then press OK.
4 Use J K to select the desired option, then press OK.
Yes Deactivate the connection to VUDU.No Activate the connection to VUDU.
YouTube deactivation
Displays the deactivation setting for YouTube.
1 Use H I to select Apps, then press OK.
2 Use H I to select Deactivation, then press OK.
3 Use H I to select YouTube, then press OK.
4 Use J K to select the desired option, then press OK.
Yes Deactivate the connection to YouTube.No Activate the connection to YouTube.
Netflix ESN
Displays the ESN information.
1 Use H I to select Apps, then press OK.
2 Use H I to select Netflix ESN, then press OK.● Displays the ESN (Electronic Serial Number) to get any
services from Netflix.
Netflix software version
Displays the Netflix version.
1 Use H I to select Apps, then press OK.
2 Use H I to select Netflix software version, then press OK.
Samba interactive TV settingsDisplays the setting for Samba TV.
To learn more about Samba TV, please visithttps://www.samba.tv/
1 Use H I to select Samba interactive TV settings, then pressOK.
2 Use H I J K to select the desired option, then press OK.
Note(s)
● Samba interactive TV settings item is displayed only when the country setting isUSA.
Reset network settingsYou can reset the status of network settings.
1 Use H I to select Reset network settings, then press OK.
2 Use J K to select the desired option, then press OK.
43 .English
Continued on next page.
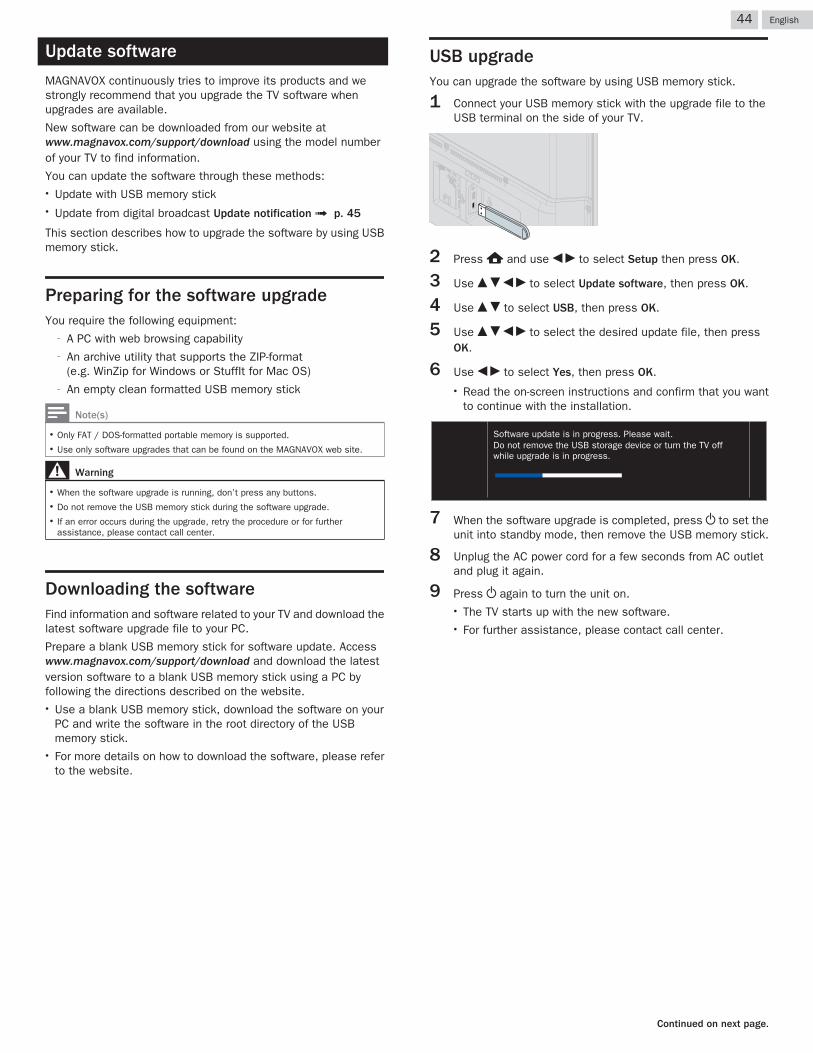
Update software
MAGNAVOX continuously tries to improve its products and westrongly recommend that you upgrade the TV software whenupgrades are available.
New software can be downloaded from our website atwww.magnavox.com/support/download using the model numberof your TV to find information.
You can update the software through these methods:● Update with USB memory stick● Update from digital broadcast Update notification L p. 45
This section describes how to upgrade the software by using USBmemory stick.
Preparing for the software upgradeYou require the following equipment:
– A PC with web browsing capability– An archive utility that supports the ZIP-format
(e.g. WinZip for Windows or StuffIt for Mac OS)– An empty clean formatted USB memory stick
Note(s)
● Only FAT / DOS-formatted portable memory is supported.● Use only software upgrades that can be found on the MAGNAVOX web site.
Warning
● When the software upgrade is running, don’t press any buttons.● Do not remove the USB memory stick during the software upgrade.● If an error occurs during the upgrade, retry the procedure or for further
assistance, please contact call center.
Downloading the softwareFind information and software related to your TV and download thelatest software upgrade file to your PC.
Prepare a blank USB memory stick for software update. Accesswww.magnavox.com/support/download and download the latestversion software to a blank USB memory stick using a PC byfollowing the directions described on the website.● Use a blank USB memory stick, download the software on your
PC and write the software in the root directory of the USBmemory stick.
● For more details on how to download the software, please referto the website.
USB upgradeYou can upgrade the software by using USB memory stick.
1 Connect your USB memory stick with the upgrade file to theUSB terminal on the side of your TV.
2 Press Z and use J K to select Setup then press OK.
3 Use H I J K to select Update software, then press OK.
4 Use H I to select USB, then press OK.
5 Use H I J K to select the desired update file, then pressOK.
6 Use J K to select Yes, then press OK.● Read the on-screen instructions and confirm that you want
to continue with the installation.
Do not remove the USB storage device or turn the TV off while upgrade is in progress.
Software update is in progress. Please wait.
7 When the software upgrade is completed, press B to set theunit into standby mode, then remove the USB memory stick.
8 Unplug the AC power cord for a few seconds from AC outletand plug it again.
9 Press B again to turn the unit on.● The TV starts up with the new software.● For further assistance, please contact call center.
44 .English
Continued on next page.
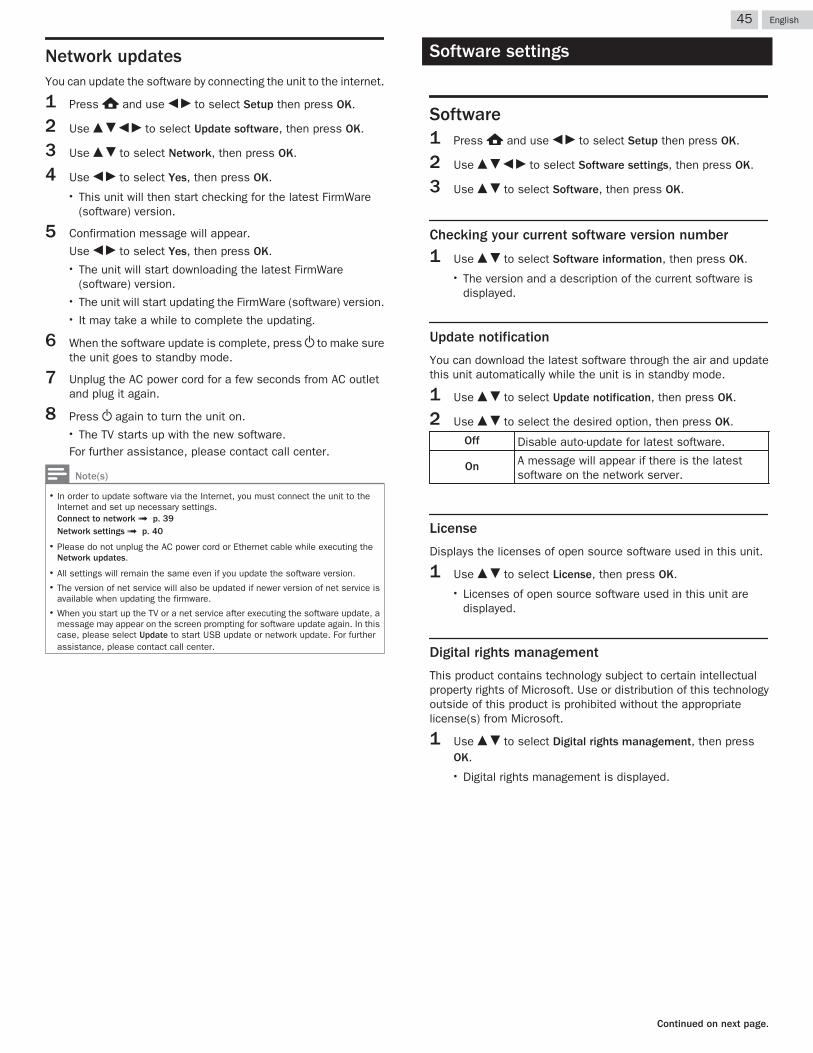
Network updatesYou can update the software by connecting the unit to the internet.
1 Press Z and use J K to select Setup then press OK.
2 Use H I J K to select Update software, then press OK.
3 Use H I to select Network, then press OK.
4 Use J K to select Yes, then press OK.● This unit will then start checking for the latest FirmWare
(software) version.
5 Confirmation message will appear.
Use J K to select Yes, then press OK.● The unit will start downloading the latest FirmWare
(software) version.● The unit will start updating the FirmWare (software) version.● It may take a while to complete the updating.
6 When the software update is complete, press B to make surethe unit goes to standby mode.
7 Unplug the AC power cord for a few seconds from AC outletand plug it again.
8 Press B again to turn the unit on.● The TV starts up with the new software.For further assistance, please contact call center.
Note(s)
● In order to update software via the Internet, you must connect the unit to theInternet and set up necessary settings.Connect to network L p. 39Network settings L p. 40
● Please do not unplug the AC power cord or Ethernet cable while executing theNetwork updates.
● All settings will remain the same even if you update the software version.● The version of net service will also be updated if newer version of net service is
available when updating the firmware.● When you start up the TV or a net service after executing the software update, a
message may appear on the screen prompting for software update again. In thiscase, please select Update to start USB update or network update. For furtherassistance, please contact call center.
Software settings
Software1 Press Z and use J K to select Setup then press OK.
2 Use H I J K to select Software settings, then press OK.
3 Use H I to select Software, then press OK.
Checking your current software version number
1 Use H I to select Software information, then press OK.● The version and a description of the current software is
displayed.
Update notification
You can download the latest software through the air and updatethis unit automatically while the unit is in standby mode.
1 Use H I to select Update notification, then press OK.
2 Use H I to select the desired option, then press OK.
Off Disable auto-update for latest software.
On A message will appear if there is the latestsoftware on the network server.
License
Displays the licenses of open source software used in this unit.
1 Use H I to select License, then press OK.● Licenses of open source software used in this unit are
displayed.
Digital rights management
This product contains technology subject to certain intellectualproperty rights of Microsoft. Use or distribution of this technologyoutside of this product is prohibited without the appropriatelicense(s) from Microsoft.
1 Use H I to select Digital rights management, then pressOK.● Digital rights management is displayed.
45 .English
Continued on next page.

Wireless ScreencastingYou can wirelessly cast or mirror the screen of your Smartphone,Tablet or PC to the TV directly using Wireless Screencasting.
Using Wireless Screencasting
1 Press Q and use J K to select Wireless Screencasting, thenpress OK.● Wireless Screencasting mode screen appears.
MAGNAVOX Smart TV
If you want to manage connected device history, please press "OPTIONS".If you want to exit, please press "BACK" key.
Your TV name
The TV is now ready to accept a connection from your source device.
2 Activate Wireless Screencasting feature on your device.● For the operation of your device, please check the
instruction manual of the device.● Select Your TV name on your device if needed.● If PIN code is required on your device, please enter the 8-
digit code appearing in the left-hand side of the TV screen.
3 Once connected, the screen of your device will appear on yourTV screen.● Press INFO to display your device name at the bottom of TV
screen.● Press t or OK to pause playback. Press K or OK again to
resume playback.
Using Wireless Screencasting device list
In Wireless Screencasting device list, you can find the connecteddevices.
1 Press OPTIONS on remote when Wireless Screencastingmode is on the TV screen.● Only the connected device names are listed.● It will be sorted from newest connection to oldest
connection. A maximum of 64 connections can berecognized.
● If you would like to delete a listed connection, press H Ito select the device name, then press OK first. Once theconfirmation message appears, please use J K to selectYes, then press OK.
Note(s)
● FUNAI CORPORATION, Inc. does not warrant Wireless Screencasting compatibilitywith all source devices such as smartphones, tablets, laptops, etc. due to largevariability in hardware, firmware, drivers, software and implementation ofwireless casting applications on these source devices. Although FUNAICORPORATION, Inc. will strive to enhance compatibility and performance acrossa range of source devices, FUNAI CORPORATION, Inc. does not warrantcompatibility with specific source devices.
View photos, play music and watch videosusing home networkOn your TV you can play video, music and photo files stored onhome network certified home media servers connected to yourhome network. In order to use this feature, you must connect thisunit to the internet.It is recommended that files to be played back in this unit arerecorded under the following specifications:
Picture (JPEG / Progressive JPEG)
JPEG Upper limit 4000x4000 pixelsProgressive JPEG Upper limit 1024x768 pixels
Music (MP3 / WAV / AAC)
MP3Sampling frequency 16 kHz - 48 kHz
Constant bit rate 8 kbps - 320 kbps
WAVSampling frequency 8 kHz - 48 kHz
Constant bit rate 64 kbps - 1.5 Mbps
AACSampling frequency 8 kHz - 48 kHz
Constant bit rate -
Video (MPEG / VOB / AVI / MP4)
Maximum video H.264, H.265/HEVC: 3840x2160@30fps,MPEG: 1920x1080@60fps
Extension .avi .mpg,.mpeg
.ts,.trp,.tp
.vob .mp4 .mkv
Videocodec
Audiocodec
MPEG1,MPEG2,MPEG4,H.264
MPEG1,MPEG2,MPEG4
MPEG1,MPEG2,H.264,H.265/HEVC
MPEG1,MPEG2
MPEG1,MPEG2,MPEG4,H.264,H.265/HEVC
MPEG1,MPEG2,MPEG4,H.264,H.265/HEVC
Dolby Digital YES YES YES YES YES YESMPEG1/2 audio
layer1/2/3 YES YES YES YES NO YES
LPCM YES YES YES YES YES YESAAC-LC YES YES YES YES YES YES
Note(s)
● A maximum of 1,023 folders or files can be recognized.
● For the home server list, maximum of 16 servers can be displayed.
● The 10th and deeper hierarchies cannot be displayed.
● Unplayable files in the home server will not be displayed in the file list.
● For some files, playback is not available even if displayed in the file list.
● In order to play back the contents in home servers, the player and the serversmust be connected to the same access point.
● Compatibility and available playback function may differ depending on the homeserver.
● Video files with unsupported audio format will be skipped.
● The quality of the playback picture or audio differs depending on your networkcondition
46 .English
Continued on next page.
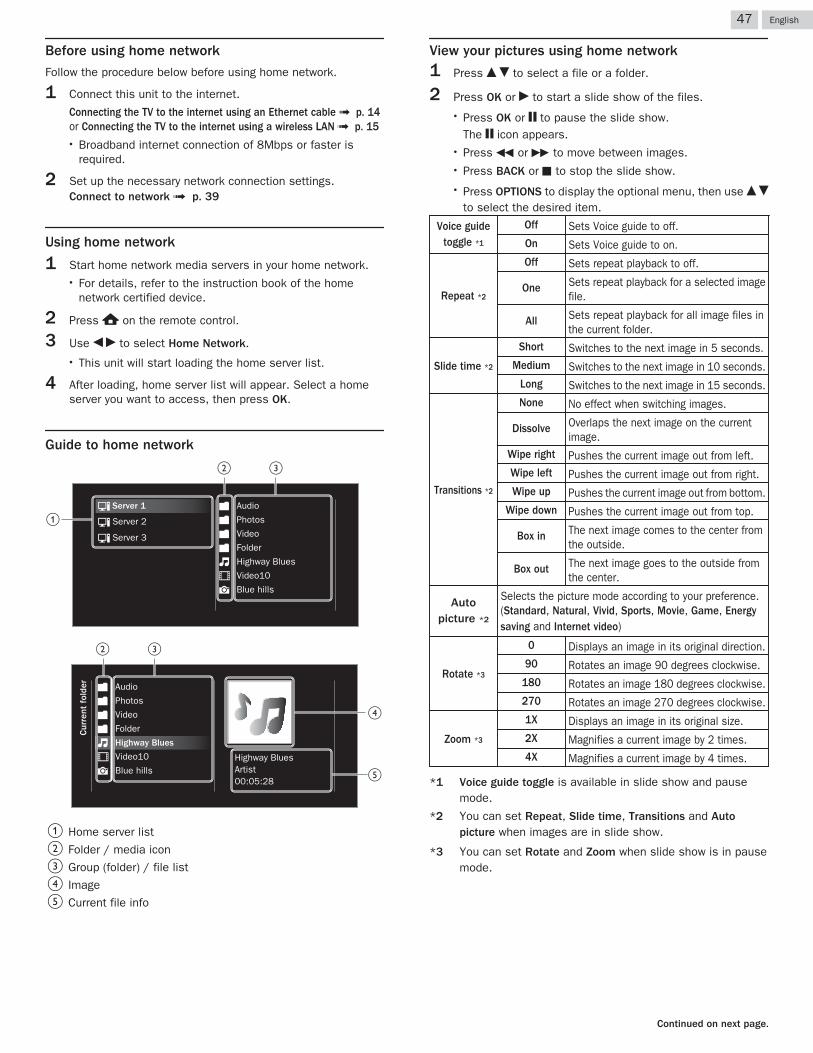
Before using home network
Follow the procedure below before using home network.
1 Connect this unit to the internet.
Connecting the TV to the internet using an Ethernet cable L p. 14or Connecting the TV to the internet using a wireless LAN L p. 15● Broadband internet connection of 8Mbps or faster is
required.
2 Set up the necessary network connection settings.Connect to network L p. 39
Using home network
1 Start home network media servers in your home network.● For details, refer to the instruction book of the home
network certified device.
2 Press Z on the remote control.
3 Use J K to select Home Network.● This unit will start loading the home server list.
4 After loading, home server list will appear. Select a homeserver you want to access, then press OK.
Guide to home network
a
b c
Blue hills
Video10
Highway Blues
Folder
Video
Photos
Audio
Server 3
Server 2
Server 1
00:05:28
d
e
b c
Blue hills
Video10
Highway Blues
Highway BluesArtist
Cur
rent
fol
der
Folder
Video
Photos
Audio
a Home server listb Folder / media iconc Group (folder) / file listd Imagee Current file info
View your pictures using home network
1 Press H I to select a file or a folder.
2 Press OK or K to start a slide show of the files.● Press OK or t to pause the slide show.
The t icon appears.● Press E or D to move between images.● Press BACK or C to stop the slide show.● Press OPTIONS to display the optional menu, then use H I
to select the desired item.
Voice guidetoggle *1
Off Sets Voice guide to off.On Sets Voice guide to on.
Repeat *2
Off Sets repeat playback to off.
One Sets repeat playback for a selected imagefile.
All Sets repeat playback for all image files inthe current folder.
Slide time *2
Short Switches to the next image in 5 seconds.Medium Switches to the next image in 10 seconds.
Long Switches to the next image in 15 seconds.
Transitions *2
None No effect when switching images.
Dissolve Overlaps the next image on the currentimage.
Wipe right Pushes the current image out from left.Wipe left Pushes the current image out from right.Wipe up Pushes the current image out from bottom.
Wipe down Pushes the current image out from top.
Box in The next image comes to the center fromthe outside.
Box out The next image goes to the outside fromthe center.
Autopicture *2
Selects the picture mode according to your preference.(Standard, Natural, Vivid, Sports, Movie, Game, Energysaving and Internet video)
Rotate *3
0 Displays an image in its original direction.90 Rotates an image 90 degrees clockwise.
180 Rotates an image 180 degrees clockwise.270 Rotates an image 270 degrees clockwise.
Zoom *3
1X Displays an image in its original size.2X Magnifies a current image by 2 times.4X Magnifies a current image by 4 times.
*1 Voice guide toggle is available in slide show and pausemode.
*2 You can set Repeat, Slide time, Transitions and Autopicture when images are in slide show.
*3 You can set Rotate and Zoom when slide show is in pausemode.
47 .English
Continued on next page.
Listen to music using home network
1 Press H I to select a file or a folder.
2 Press OK or K to play the selected files.● Press OK or t to pause, then press OK or K again to
resume.● Press D to skip up the next file.● Press E to skip down the previous file.● Press C to stop playback.● Press OPTIONS to display the optional menu, then use H I
to select the desired item.Voice guide
toggle *Off Sets Voice guide to off.On Sets Voice guide to on.
Repeat
Off Sets repeat playback to off.
One Sets repeat playback for a selectedmusic file.
All Sets repeat playback for all music filesin the current folder.
ShuffleOff Sets shuffle playback to Off.
On Sets shuffle playback for all musicfiles in the current folder.
TVSpeakers
Off The sound will not be output from theunit's speakers.
On The sound will be output from theunit's speakers.
Speakersfun-link
You can control audio output from yourconnected fun-Link compliant deviceswith VOL + / – by using this unit'sremote control.
Auto soundSelects the sound mode according to yourpreference.(Standard, Vivid, Sports, Movie, Music and News)
* Voice guide toggle is available in slide show and pause mode.
Watch videos using home network
1 Press H I to select a file or a folder.
2 Press OK or K to play the selected files.● Press OK or t to pause, then press OK or K again to
resume.● Press D to fast-forward search.● Press E to fast-backward search.● Press C to stop playback.● Press K to resume from the point at which playback was
stopped. Press OK to play from the beginning of the file atwhich playback was stopped.
● Press CH + to play the next file.● Press CH - to play the current file at the beginning.
Press CH - twice within 5 seconds to play the previous file.● Press OPTIONS to display the optional menu, then use H I
to select the desired item.Voice guide
toggle *Off Sets Voice guide to off.On Sets Voice guide to on.
Repeat
Off Sets repeat playback to off.
One Sets repeat playback for a selectedvideo file.
All Sets repeat playback for all video filesin the current folder.
TV speakers
Off The sound will not be output from theunit's speakers.
On The sound will be output from theunit's speakers.
Speakersfun-link
You can control audio output from yourconnected fun-Link compliant deviceswith VOL + / – by using this unit'sremote control.
Autopicture
Selects the picture mode according to yourpreference.(Standard, Natural, Vivid, Sports, Movie, Game,Energy saving and Internet video)
Auto soundSelects the sound mode according to yourpreference.(Standard, Vivid, Sports, Movie, Music and News)
* Voice guide toggle is available in slide show and pause mode.
Note(s)
● The resume information will be kept even when the unit is Turned off.
● If you play another file while the previously viewed file is being resumed, theresume information of the previously viewed file will be deleted.
● The file or the folder in resume stop mode will be highlighted in gray on List orThumbnails.
48 .English
Continued on next page.
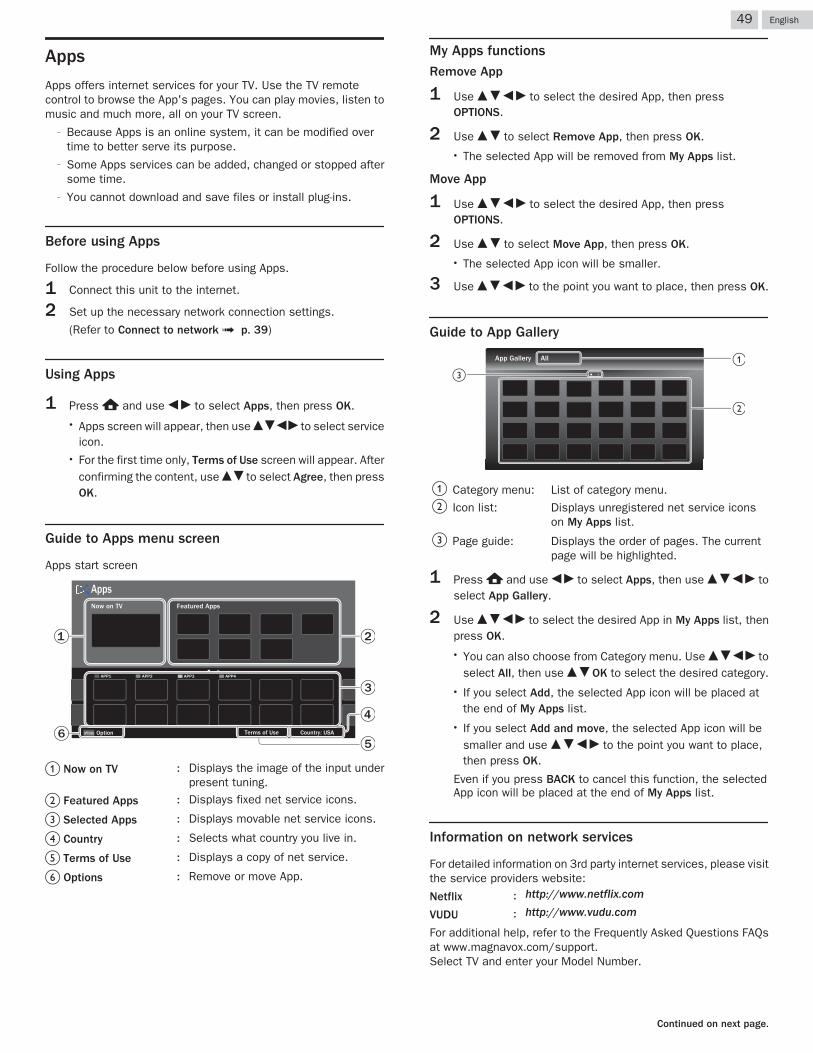
Apps
Apps offers internet services for your TV. Use the TV remotecontrol to browse the App's pages. You can play movies, listen tomusic and much more, all on your TV screen.
– Because Apps is an online system, it can be modified overtime to better serve its purpose.
– Some Apps services can be added, changed or stopped aftersome time.
– You cannot download and save files or install plug-ins.
Before using Apps
Follow the procedure below before using Apps.
1 Connect this unit to the internet.
2 Set up the necessary network connection settings.
(Refer to Connect to network L p. 39)
Using Apps
1 Press Z and use J K to select Apps, then press OK.● Apps screen will appear, then use H I J K to select service
icon.● For the first time only, Terms of Use screen will appear. After
confirming the content, use H I to select Agree, then pressOK.
Guide to Apps menu screen
Apps start screen
OPTIONS Country: USATerms of Use
APP4APP3APP2APP1
Featured AppsNow on TV
Apps
Option
4
3
21
65
a Now on TV : Displays the image of the input underpresent tuning.
b Featured Apps : Displays fixed net service icons.
c Selected Apps : Displays movable net service icons.
d Country : Selects what country you live in.
e Terms of Use : Displays a copy of net service.
f Options : Remove or move App.
My Apps functionsRemove App
1 Use H I J K to select the desired App, then pressOPTIONS.
2 Use H I to select Remove App, then press OK.● The selected App will be removed from My Apps list.
Move App
1 Use H I J K to select the desired App, then pressOPTIONS.
2 Use H I to select Move App, then press OK.● The selected App icon will be smaller.
3 Use H I J K to the point you want to place, then press OK.
Guide to App Gallery
a
b
c
AllApp Gallery
a Category menu: List of category menu.b Icon list: Displays unregistered net service icons
on My Apps list.
c Page guide: Displays the order of pages. The currentpage will be highlighted.
1 Press Z and use J K to select Apps, then use H I J K toselect App Gallery.
2 Use H I J K to select the desired App in My Apps list, thenpress OK.● You can also choose from Category menu. Use H I J K to
select All, then use H I OK to select the desired category.● If you select Add, the selected App icon will be placed at
the end of My Apps list.● If you select Add and move, the selected App icon will be
smaller and use H I J K to the point you want to place,then press OK.
Even if you press BACK to cancel this function, the selectedApp icon will be placed at the end of My Apps list.
Information on network services
For detailed information on 3rd party internet services, please visitthe service providers website:
Netflix : http://www.netflix.com
VUDU : http://www.vudu.com
For additional help, refer to the Frequently Asked Questions FAQsat www.magnavox.com/support.Select TV and enter your Model Number.
49 .English
Continued on next page.
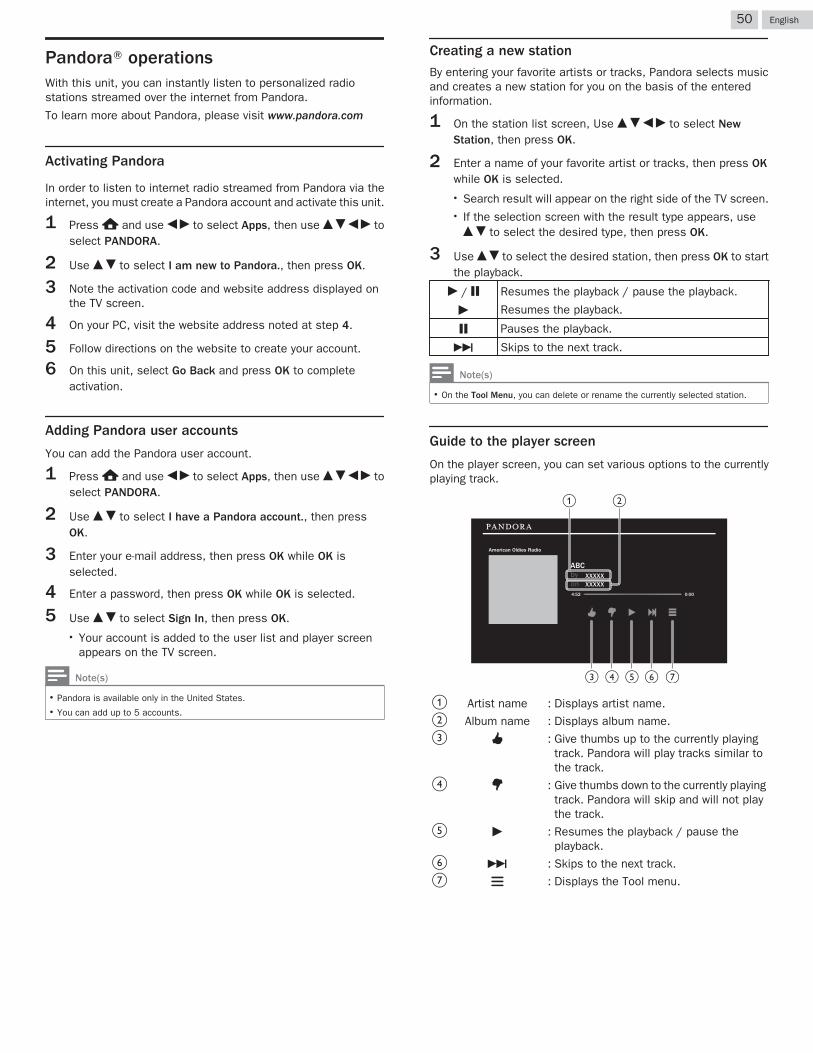
PandoraN operationsWith this unit, you can instantly listen to personalized radiostations streamed over the internet from Pandora.
To learn more about Pandora, please visit www.pandora.com
Activating Pandora
In order to listen to internet radio streamed from Pandora via theinternet, you must create a Pandora account and activate this unit.
1 Press Z and use J K to select Apps, then use H I J K toselect PANDORA.
2 Use H I to select I am new to Pandora., then press OK.
3 Note the activation code and website address displayed onthe TV screen.
4 On your PC, visit the website address noted at step 4.
5 Follow directions on the website to create your account.
6 On this unit, select Go Back and press OK to completeactivation.
Adding Pandora user accounts
You can add the Pandora user account.
1 Press Z and use J K to select Apps, then use H I J K toselect PANDORA.
2 Use H I to select I have a Pandora account., then pressOK.
3 Enter your e-mail address, then press OK while OK isselected.
4 Enter a password, then press OK while OK is selected.
5 Use H I to select Sign In, then press OK.● Your account is added to the user list and player screen
appears on the TV screen.
Note(s)
● Pandora is available only in the United States.● You can add up to 5 accounts.
Creating a new station
By entering your favorite artists or tracks, Pandora selects musicand creates a new station for you on the basis of the enteredinformation.
1 On the station list screen, Use H I J K to select NewStation, then press OK.
2 Enter a name of your favorite artist or tracks, then press OKwhile OK is selected.● Search result will appear on the right side of the TV screen.● If the selection screen with the result type appears, useH I to select the desired type, then press OK.
3 Use H I to select the desired station, then press OK to startthe playback.
K / t
K
Resumes the playback / pause the playback.
Resumes the playback.
t Pauses the playback.
G Skips to the next track.
Note(s)
● On the Tool Menu, you can delete or rename the currently selected station.
Guide to the player screen
On the player screen, you can set various options to the currentlyplaying track.
XXXXX XXXXX
ABC
American Oldies Radio
4:52 0:00
onby
c
ba
d e f g
a Artist name : Displays artist name.b Album name : Displays album name.c h : Give thumbs up to the currently playing
track. Pandora will play tracks similar tothe track.
d i : Give thumbs down to the currently playingtrack. Pandora will skip and will not playthe track.
e K : Resumes the playback / pause theplayback.
f G : Skips to the next track.g j : Displays the Tool menu.
50 .English
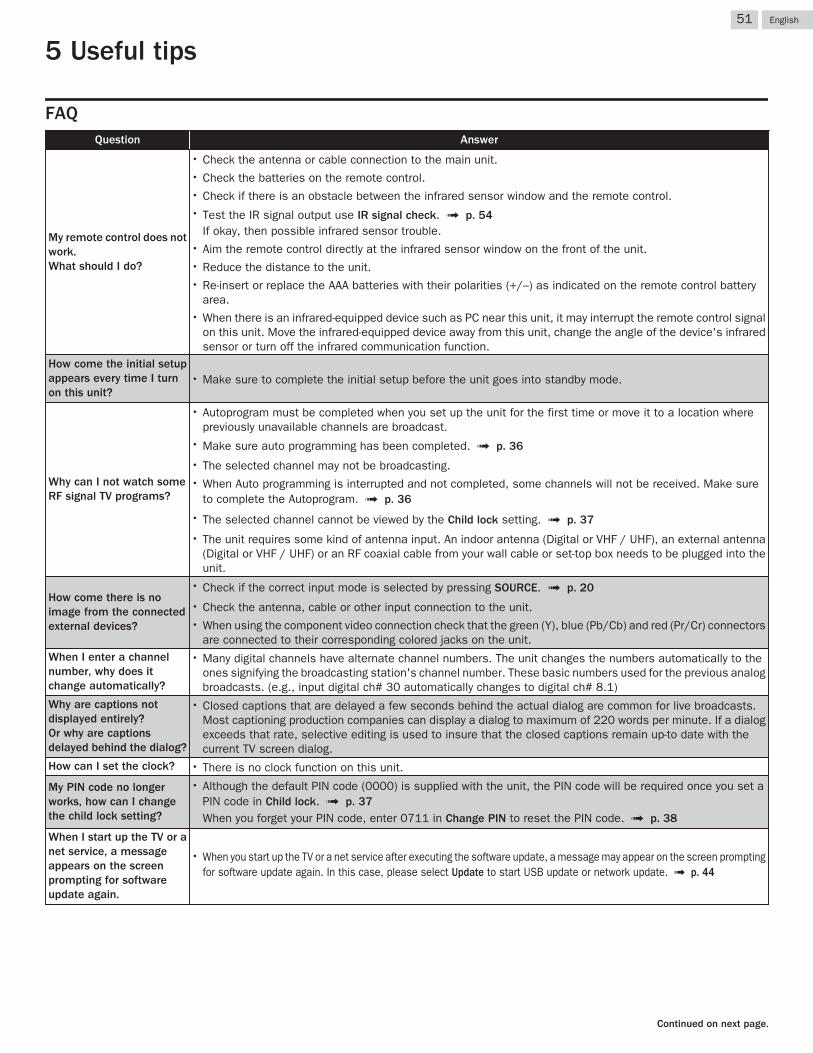
5 Useful tips
FAQQuestion Answer
My remote control does notwork.What should I do?
● Check the antenna or cable connection to the main unit.● Check the batteries on the remote control.● Check if there is an obstacle between the infrared sensor window and the remote control.● Test the IR signal output use IR signal check. L p. 54
If okay, then possible infrared sensor trouble.● Aim the remote control directly at the infrared sensor window on the front of the unit.● Reduce the distance to the unit.● Re-insert or replace the AAA batteries with their polarities (+/–) as indicated on the remote control battery
area.● When there is an infrared-equipped device such as PC near this unit, it may interrupt the remote control signal
on this unit. Move the infrared-equipped device away from this unit, change the angle of the device's infraredsensor or turn off the infrared communication function.
How come the initial setupappears every time I turnon this unit?
● Make sure to complete the initial setup before the unit goes into standby mode.
Why can I not watch someRF signal TV programs?
● Autoprogram must be completed when you set up the unit for the first time or move it to a location wherepreviously unavailable channels are broadcast.
● Make sure auto programming has been completed. L p. 36● The selected channel may not be broadcasting.● When Auto programming is interrupted and not completed, some channels will not be received. Make sure
to complete the Autoprogram. L p. 36● The selected channel cannot be viewed by the Child lock setting. L p. 37● The unit requires some kind of antenna input. An indoor antenna (Digital or VHF / UHF), an external antenna
(Digital or VHF / UHF) or an RF coaxial cable from your wall cable or set-top box needs to be plugged into theunit.
How come there is noimage from the connectedexternal devices?
● Check if the correct input mode is selected by pressing SOURCE. L p. 20● Check the antenna, cable or other input connection to the unit.● When using the component video connection check that the green (Y), blue (Pb/Cb) and red (Pr/Cr) connectors
are connected to their corresponding colored jacks on the unit.When I enter a channelnumber, why does itchange automatically?
● Many digital channels have alternate channel numbers. The unit changes the numbers automatically to theones signifying the broadcasting station's channel number. These basic numbers used for the previous analogbroadcasts. (e.g., input digital ch# 30 automatically changes to digital ch# 8.1)
Why are captions notdisplayed entirely?Or why are captionsdelayed behind the dialog?
● Closed captions that are delayed a few seconds behind the actual dialog are common for live broadcasts.Most captioning production companies can display a dialog to maximum of 220 words per minute. If a dialogexceeds that rate, selective editing is used to insure that the closed captions remain up-to date with thecurrent TV screen dialog.
How can I set the clock? ● There is no clock function on this unit.
My PIN code no longerworks, how can I changethe child lock setting?
● Although the default PIN code (0000) is supplied with the unit, the PIN code will be required once you set aPIN code in Child lock. L p. 37When you forget your PIN code, enter 0711 in Change PIN to reset the PIN code. L p. 38
When I start up the TV or anet service, a messageappears on the screenprompting for softwareupdate again.
● When you start up the TV or a net service after executing the software update, a message may appear on the screen promptingfor software update again. In this case, please select Update to start USB update or network update. L p. 44
51 .English
Continued on next page.
Troubleshooting tipsIf the unit does not perform properly when operated as instructed in this manual,Please check the following Troubleshooting tips and all connections once before calling for service.
PowerNo power● Make sure the AC power cord is plugged in.● Make sure that the AC outlet supplies the proper voltage, plug another
electrical appliance into the AC outlet to ensure that the AC outletoperates normally.
● If a power failure occurs, unplug the AC power cord for 1 minute toallow the unit to reset itself.
RemoteControl buttons do not work.● Do NOT press more than one button at the same time.● Ensure that no buttons on the remote control are depressed and move
freely.Universal remote control does not work properly.● Refer to the Owner’s manual of the universal remote control for the
MAGNAVOX code.
PicturePower is on but no screen image.● Check whether the connection for the antenna, cable or set-top box is
connected correctly.● Check whether all the cables to the unit are connected to the correct
output jack on your separate device like Blu-ray Disc™ / DVD recorder.● Make sure that the selected input mode is connected to the working
input jack.● Check if your computer is NOT in sleep mode when the input mode on
this unit is in PC mode. Tap any key on the computer keyboard to wakeit up.
● Check if the correct input mode is selected by pressing SOURCE.No color● View other TV channels. The problem might be limited to the
broadcasting station.● Adjust Color in Picture settings. L p. 28Picture poor● Adjust Contrast and Brightness in Picture settings. L p. 28● For the best picture quality, watch “High Definition” wide screen
programs. If the HD content is not available, watch “StandardDefinition” programs instead.
You see pixelation on the screen.● When the capabilities of the unit exceed the capabilities of the digital
broadcasting, the signal will be increased to match the capabilities ofthe display on the unit. This may cause pixelation, noise or trash.
Unusual picture appears and the TV does not operate.● Press the power button first. If it does not solve, follow the procedure
below.① Press the buttons on the remote control in the order shown below.K L H L I L B
② Unplug the AC power cord, then wait for 1 minute, and then plug it in again.
SoundNo sound is heard when using the HDMI digital connection.● Some HDMI cables and devices may not be compatible with the TV
due to different HDMI specifications.No sound, distorted sound or incorrect audio sound is heard when usingthe HDMI-DVI connections.● Make sure that the analog audio signals from the HDMI-DVI device are
connected to the analog audio input L/R jacks.● When using Component analog video, Composite analog video or
HDMI-DVI video, make sure that the analog audio (L/R) connectors aremounted into the audio (L/R) input jacks.
Sound intermittent or no sound.● Check if the audio cable is connected into the unit correctly.You switch to a different input and the volume changes.● This unit will memorize the volume level from the last time you
adjusted it.● If the volume of the sound from another device is higher or lower, then
the loudness will change.● Make sure Auto volume leveling is set to On. L p. 30
Picture & SoundNo sound with distorted picture occurs when using the HDMI digitalconnection.● Some HDMI cables and devices may not be compatible with the TV
due to different HDMI specifications.No picture or sound● Check if the power is on.● Check whether all the cables to the unit are connected to the correct
output jack on your separate device like Blu-ray Disc™ / DVD recorder.● View other TV channels. The problem might be limited to the
broadcasting station or weak signal strength.● Unplug the AC power cord and wait for about 1 minute, then plug the
AC power cord and turn on the unit again.● Check whether the connection of the antenna or cable / satellite set-
top box is connected correctly.● Make sure that the selected input mode is connected to the working
input jack.● Check if your computer is NOT in sleep mode when the input mode of
this unit is in PC mode. Tap any key on the keyboard to wake up yourcomputer.
● Make sure that the sound is not muted. Press D so that the volumebar and current volume level will appear on the TV screen.
● Make sure that the volume is NOT set to 0 or D. If so, use VOL + / –to adjust to the desired volume.
● Make sure that the headphone is NOT connected to the headphoneaudio output jack.
● Make sure that the TV speakers is NOT set to Off.Adjusted Picture or Sound settings are not effective every time the unit
is turned on.● You must set Home in Location. L p. 32 (Otherwise, the settings
you adjusted will not be memorized after the unit goes into standbymode.)
You see a distorted picture or hear an unusual sound. (Analog TV - NTSCsignal)● You may be getting NTSC (Analog) TV signal (not HDTV signal)
interference from electrical appliances, automobiles, motorcycles orfluorescent lights.
● Try moving the unit to another location to see if this is the cause ofthe problem.
Ghosts, lines or streaks in picture.● Electrical interference from nearby appliances may affect picture quality.● View other TV channels. The problem might be limited to the
broadcasting station or weak signal strength.Picture poor, sound intermittent or no sound● View other TV channels. The problem might be limited to the
broadcasting station or weak signal strength.
Child and rating lockForgotten PIN code.● Enter “0711” to clear your password.
ScreenYou switch to a different input and the screen size changes.● This unit will memorize the viewing mode from the last time you used
the particular input modes.The display image does not cover the entire screen.● If you are using the unit as a PC monitor, make sure that Horizontal
position and Vertical position in Picture are set correctly. L p. 28● If you are watching TV or using the composite video, component video
or HDMI with 480i input, press PICTURE SIZE A repeatedly to switchto various screen modes.
Different color marks on the TV screen● View other TV channels. The problem might be limited to the
broadcasting station, missing data or pixelation due to weak signalstrength.
52 .English
Continued on next page.
Closed captionsClosed captions are displayed as a white box. No closed captions aredisplayed in the closed captions-supported program.● Interference from buildings or weather conditions may cause closed
captions to be incomplete if watching analog TV signals.● Broadcasting station may shorten the program to insert
advertisements.The closed caption decoder cannot read the information of theshortened program.
Black box is displayed on the TV screen.● The text mode is selected for caption. Select CC-1, CC-2, CC-3 or
CC-4.
Software updateA message appears on the screen prompting for software update again.● When you start up the TV or a net service after executing the software
update, a message may appear on the screen prompting for softwareupdate again. In this case, please select Update to start USB updateor network update. L p. 44
NetworkCannot connect to the network.● Check if the Ethernet cable connection is properly made. Turn on the
broadband router and/or modem.● Check the network settings.● Check if the broadband router and/or modem is correctly connected.Sometimes video quality is poor when using the wireless LAN.● The wireless network connection quality varies depending on the
distance or obstacles (e.g. wall, basement, 2nd floor) between the TVwireless LAN adapter and the wireless router (access point), fromother wireless networks, and brand and type of the wireless router(access point). When using the wireless LAN of the TV, it is suggestedto place the wireless router as close as possible to the television.
Wireless LAN connection fails or wireless connection is poor.● Check the installation location of the TV and wireless router (access
point). Signal quality may be affected for the following reasons.– Interference of other wireless devices, microwaves, fluorescent
lights, etc., are placed nearby.– There are floors or walls between the wireless router and TV.– If the problems continue even after checking the above, try making
a wired LAN connection.Cannot use the wireless connection.● Check if the wireless LAN Access Point (AP) (e.g. wireless router) is
oriented properly or not placed too close between them.● Once you have activated the wireless connection please wait 30
seconds for the connection to be established after turning on the unit,before trying to access network features such as Apps.
Cannot use Netflix feature.● Check if the network connection is properly made.● Visit http://www.netflix.com on your PC and become a Netflix member.● Some network services may not be available in your country.Cannot add movies or TV episodes to the Instant Queue.● Visit www.netflix.com on your PC.Even though the speed of the internet connection improves duringplayback, the picture quality of Netflix streaming movie does notimprove.● The picture quality does not change during playback. It differs
depending on the speed of internet connection at the time of loading.Cannot use VUDU feature.● VUDU is available only in the United States and Mexico.● Check if the network connection is properly made.Cannot rent or buy movies / TV episodes on VUDU.● You need to activate the VUDU account. For detailed information,
please visit the service providers website at http://www.vudu.com● Log into your account at http://my.vudu.com and check your payment
information.The picture quality of a streaming movie (Netflix or VUDU) is poor.● Check the speed of your internet connection. You need speeds of at
least 8 Mbps to this player for high quality uninterrupted playback.
Streaming movie (Netflix or VUDU) often stops or starts buffering duringplayback.● Contact your internet service provider to troubleshoot your internet
connection for speed and line quality. Consistent line quality andspeed are very important for internet video playback.
Cannot connect to the network while my PC is connected to the network.● Check the content of your internet service contract to see if your
internet service provider prevents multiple terminals connecting at thesame time.
Cannot use Simple Connect to connect to the access point.● Connect the unit to the access point using scan or manual entry mode.
If the access point’s security mode is set to WEP*, change the settingto others (recommended), then try Simple Connect again. (For accesspoint configuration, please consult its user manual or manufacturer.)* WEP is not recommended to be used due to its major security flaws. Change
the security protocol on the wireless router to others (recommended) mode.Folder or files stored on home network media server are not displayedin the file list or cannot be played back.● Check the setting on your home media server. (Refer to the user
manual of the home media server.)● Check the network connection and settings.Cannot use Pandora feature.● Check if the network connection is properly made.● Pandora is available only in the United States.● You must create a Pandora account and activate this unit.
Activating Pandora L p. 50Wireless Screencasting● Connectivity with all Wireless Screencasting compatible devices is not
guaranteed.● Devices that do not comply with Wireless Screencasting standards
may have compatibility issues.
Note(s)● The LCD screen is manufactured to provide many years of useful life.
Occasionally a few non active pixels may appear as a fixed point ofblue, green or red.This is not to be considered a defect in the LCD screen.
● Some functions are not available in specific modes, but this is not amalfunction. Read the description in this manual for more details oncorrect operations.
For additional troubleshooting, refer to the Frequently AskedQuestions or FAQs on www.magnavox.com/support.
53 .English
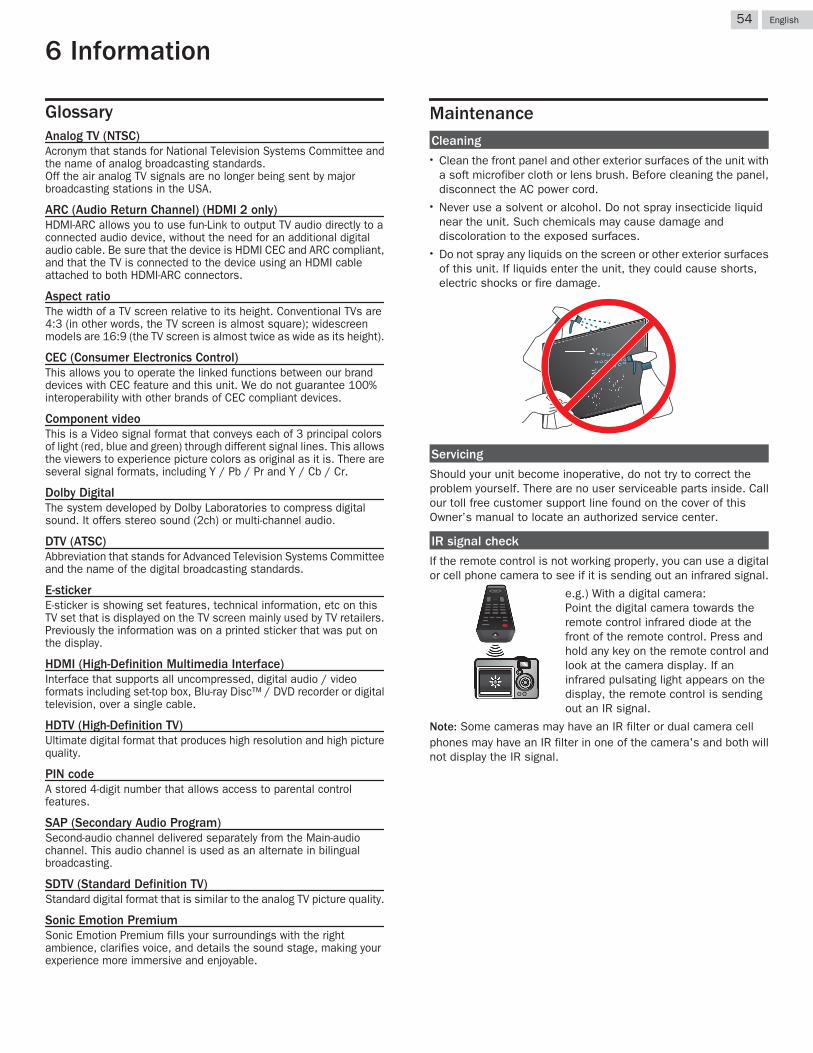
6 Information
GlossaryAnalog TV (NTSC)Acronym that stands for National Television Systems Committee andthe name of analog broadcasting standards.Off the air analog TV signals are no longer being sent by majorbroadcasting stations in the USA.
ARC (Audio Return Channel) (HDMI 2 only)HDMI-ARC allows you to use fun-Link to output TV audio directly to aconnected audio device, without the need for an additional digitalaudio cable. Be sure that the device is HDMI CEC and ARC compliant,and that the TV is connected to the device using an HDMI cableattached to both HDMI-ARC connectors.
Aspect ratioThe width of a TV screen relative to its height. Conventional TVs are4:3 (in other words, the TV screen is almost square); widescreenmodels are 16:9 (the TV screen is almost twice as wide as its height).
CEC (Consumer Electronics Control)This allows you to operate the linked functions between our branddevices with CEC feature and this unit. We do not guarantee 100%interoperability with other brands of CEC compliant devices.
Component videoThis is a Video signal format that conveys each of 3 principal colorsof light (red, blue and green) through different signal lines. This allowsthe viewers to experience picture colors as original as it is. There areseveral signal formats, including Y / Pb / Pr and Y / Cb / Cr.
Dolby DigitalThe system developed by Dolby Laboratories to compress digitalsound. It offers stereo sound (2ch) or multi-channel audio.
DTV (ATSC)Abbreviation that stands for Advanced Television Systems Committeeand the name of the digital broadcasting standards.
E-stickerE-sticker is showing set features, technical information, etc on thisTV set that is displayed on the TV screen mainly used by TV retailers.Previously the information was on a printed sticker that was put onthe display.
HDMI (High-Definition Multimedia Interface)Interface that supports all uncompressed, digital audio / videoformats including set-top box, Blu-ray Disc™ / DVD recorder or digitaltelevision, over a single cable.
HDTV (High-Definition TV)Ultimate digital format that produces high resolution and high picturequality.
PIN codeA stored 4-digit number that allows access to parental controlfeatures.
SAP (Secondary Audio Program)Second-audio channel delivered separately from the Main-audiochannel. This audio channel is used as an alternate in bilingualbroadcasting.
SDTV (Standard Definition TV)Standard digital format that is similar to the analog TV picture quality.
Sonic Emotion PremiumSonic Emotion Premium fills your surroundings with the rightambience, clarifies voice, and details the sound stage, making yourexperience more immersive and enjoyable.
MaintenanceCleaning● Clean the front panel and other exterior surfaces of the unit with
a soft microfiber cloth or lens brush. Before cleaning the panel,disconnect the AC power cord.
● Never use a solvent or alcohol. Do not spray insecticide liquidnear the unit. Such chemicals may cause damage anddiscoloration to the exposed surfaces.
● Do not spray any liquids on the screen or other exterior surfacesof this unit. If liquids enter the unit, they could cause shorts,electric shocks or fire damage.
Servicing
Should your unit become inoperative, do not try to correct theproblem yourself. There are no user serviceable parts inside. Callour toll free customer support line found on the cover of thisOwner’s manual to locate an authorized service center.
IR signal check
If the remote control is not working properly, you can use a digitalor cell phone camera to see if it is sending out an infrared signal.
e.g.) With a digital camera:Point the digital camera towards theremote control infrared diode at thefront of the remote control. Press andhold any key on the remote control andlook at the camera display. If aninfrared pulsating light appears on thedisplay, the remote control is sendingout an IR signal.
Note: Some cameras may have an IR filter or dual camera cellphones may have an IR filter in one of the camera's and both willnot display the IR signal.
54 .English
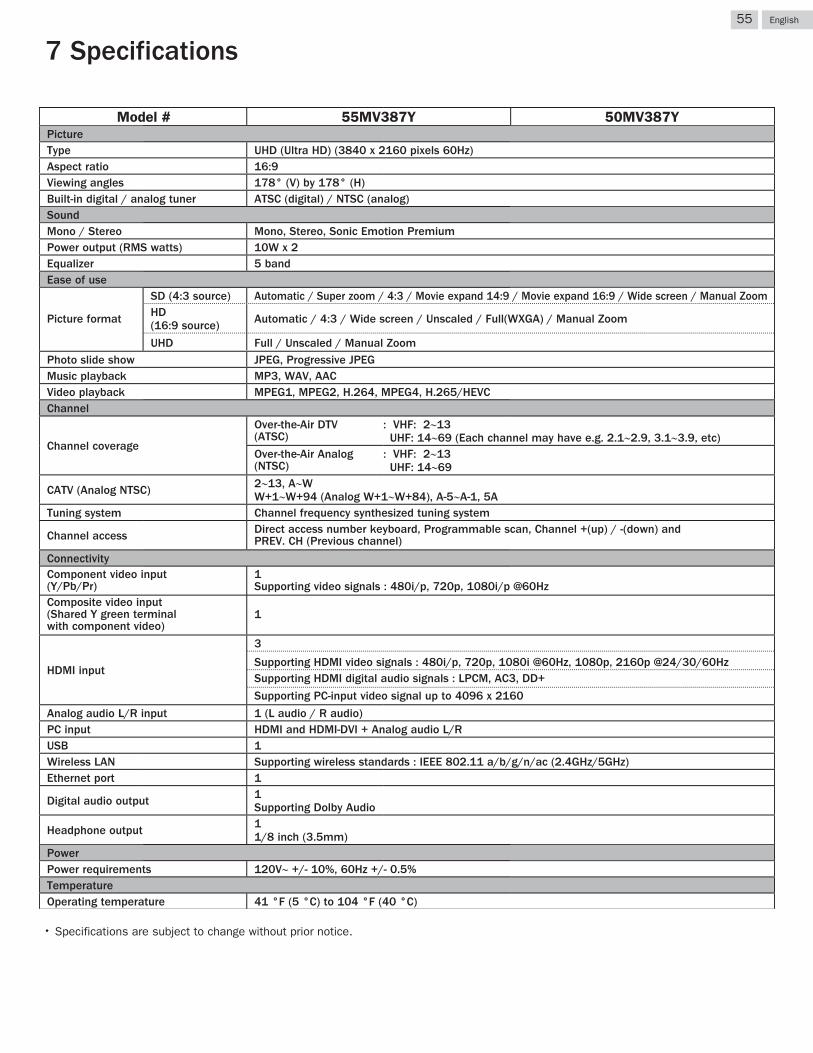
7 Specifications
Model # 55MV387Y 50MV387YPictureTypeAspect ratio 16:9Viewing angles 178° (V) by 178° (H) Built-in digital / analog tuner ATSC (digital) / NTSC (analog)SoundMono / Stereo Mono, Stereo, Sonic Emotion PremiumPower output (RMS watts)Equalizer 5 bandEase of use
SD (4:3 source) Automatic / Super zoom / 4:3 / Movie expand 14:9 / Movie expand 16:9 / Wide screen / Manual ZoomHD(16:9 source) Automatic / 4:3 / Wide screen / Unscaled / Full(WXGA) / Manual Zoom
Photo slide show JPEG, Progressive JPEGMusic playback MP3, WAV, AACVideo playback MPEG1, MPEG2, H.264, MPEG4, H.265/HEVCChannel
Channel coverage
Over-the-Air DTV (ATSC)
: VHF: 2∼13UHF: 14∼69 (Each channel may have e.g. 2.1∼2.9, 3.1∼3.9, etc)
Over-the-Air Analog (NTSC)
: VHF: 2∼13UHF: 14∼69
CATV (Analog NTSC) 2∼13, A∼WW+1∼W+94 (Analog W+1∼W+84), A-5∼A-1, 5A
Tuning system Channel frequency synthesized tuning system
Channel access Direct access number keyboard, Programmable scan, Channel +(up) / -(down) and PREV. CH (Previous channel)
ConnectivityComponent video input(Y/Pb/Pr)Composite video input(Shared Y green terminal with component video)
1
10W x 2
HDMI input
3
1
Supporting PC-input video signal up to 4096 x 2160
Supporting HDMI video signals : 480i/p, 720p, 1080i @60Hz, 1080p, 2160p @24/30/60Hz
Supporting video signals : 480i/p, 720p, 1080i/p @60Hz
Supporting HDMI digital audio signals : LPCM, AC3, DD+
Analog audio L/R input 1 (L audio / R audio)PC input HDMI and HDMI-DVI + Analog audio L/RUSB 1Wireless LAN Supporting wireless standards : IEEE 802.11 a/b/g/n/ac (2.4GHz/5GHz)Ethernet port 1
Digital audio output 1Supporting Dolby Audio
Headphone output 11/8 inch (3.5mm)
PowerPower requirements 120V∼ +/- 10%, 60Hz +/- 0.5%TemperatureOperating temperature 41 °F (5 °C) to 104 °F (40 °C)
UHD (Ultra HD) (3840 x 2160 pixels 60Hz)
UHD Full / Unscaled / Manual Zoom
Picture format
● Specifications are subject to change without prior notice.
55 .English
8 Warranty
WARRANTY COVERAGE:This warranty obligation is limited to the terms as set forth below.
WHO IS COVERED:This product warranty is issued to the original purchaser or the person receiving the product as a gift against defects in materials and workmanship as based on the date of original purchase (“Warranty Period”) from an Authorized Dealer. The original sales receipt showing the product name and the purchase date from an authorized retailer is considered such proof.
WHAT IS COVERED:This warranty covers new products if a defect in material or workmanship occurs and a valid claim is received within the Warranty Period. At its option, the company will either (1) repair the product at no charge, using new or refurbished replacement parts, or (2) exchange the product with a new or refurbished product at company’s option.Replacement products or parts provided under this warranty are covered against defects in materials and workmanship from the date of the replacement or repair for ninety (90) days or for the remaining portion of the original product’s warranty, whichever provides longer coverage for you. When a product or part is exchanged, any replacement item becomes your property and the replaced item becomes company property. When a refund is given, your product becomes company property.Note: Any product sold and identified as refurbished or renewed carries a ninety (90) day limited warranty.
Replacement product can only be sent if all warranty requirements are met. Failure to follow all requirements can result in delay.
WHAT IS NOT COVERED - EXCLUSIONS AND LIMITATIONS:This Limited Warranty applies only to new company manufactured products that can be identified by the trademark, trade name, or logo affixed to it. This Limited Warranty does not apply to any hardware product or any software, even if packaged or sold with the product, as manufacturers, suppliers, or publishers may provide a separate warranty for their own products packaged with the bundled product.
The company is not liable for any damage to or loss of any programs, data, or other information stored on any media contained within the product, or other additional product or part not covered by this warranty. Recovery or reinstallation of programs, data or other information is not covered under this Limited Warranty.
This warranty does not apply (a) to damage caused by accident, abuse, misuse, neglect, misapplication, or non-supplied product, (b) to damage caused by service performed by anyone other than company approved Authorized Service Location, (c) to a product or a part that has been modified without written company permission, or (d) if any serial number has been removed or defaced, or (e) product, accessories or consumables sold “AS IS” without warranty of any kind by including refurbished product sold “AS IS” by some retailers.
This Limited Warranty does not cover:• Shipping costs for returning defective product. • Labor charges for installation or setup of the product,
adjustment of customer controls on the product, and installation or repair of antenna/signal source systems outside of the product.
• Product repair and/or part replacement because of improper installation or maintenance, connections to improper voltage supply, power line surge, lightning damage, retained images or screen markings resulting from viewing fixed stationary content for extended periods, product cosmetic appearance items due to normal wear and tear, unauthorized repair or other cause not within the control of the company.
• Damage or claims for products not being available for use, or for lost data or lost software.
• Damage from mishandled shipments or transit accidents when returning product.
• A product that requires modification or adaptation to enable it to operate in any country other than the country for which it was designed, manufactured, approved and/or authorized, or repair of products damaged by these modifications.
• A product used for commercial or institutional purposes (including but not limited to rental purposes).
• Product lost in shipment and no signature verification receipt can be provided.
• Failure to operate per Owner’s Manual.
TO OBTAIN ASSISTANCE…Contact the Customer Care Center at:
1 866 341 3738
REPAIR OR REPLACEMENT AS PROVIDED UNDER THIS WARRANTY IS THE EXCLUSIVE REMEDY FOR THE CONSUMER, WITH THE ISSUING COMPANY NOT LIABLE FOR ANY INCIDENTAL OR CONSEQUENTIAL DAMAGES FOR BREACH OF ANY EXPRESS OR IMPLIED WARRANTY ON THIS PRODUCT. EXCEPT TO THE EXTENT PROHIBITED BY APPLICABLE LAW, ANY IMPLIED WARRANTY OF MERCHANTABILITY OR FITNESS FOR A PARTICULAR PURPOSE ON THIS PRODUCT IS LIMITED IN DURATION TO THE DURATION OF THIS WARRANTY.
Some states do not allow the exclusions or limitation of incidental or consequential damages, or allow limitations on how long an implied warranty lasts, so the above limitations or exclusions may not apply to you.
This warranty gives you specific legal rights. You may have other rights which vary from state/province to state/province.
FUNAI CORPORATION, Inc. 19900 Van Ness Avenue, Torrance, CA 90501
LIMITED WARRANTYONE (1) YEAR PARTS AND LABOR
56 .English
License
FUNAI CORPORATION, Inc. hereby offers to deliver, upon request,a copy of the complete corresponding source code for thecopyrighted open source code packages, on an “AS IS” basis,used in this product for which such offer is requested by therespective licenses. This offer is valid up to three years after theproduct purchase to anyone in receipt of this information. Toobtain source code, please contact FUNAI SERVICECORPORATION.You should write to
FUNAI SERVICE CORPORATION2425 Spiegel Drive, Groveport, OH [email protected].
FUNAI CORPORATION, Inc. disclaims any and all warranties andrepresentations with respect to such software and related sourcecode including quality, reliability, usability, and accuracy, andfurther disclaim all express, implied, statutory or otherwise,including without limitation, any implied warranties of title, non-infringement, merchantability, or fitness for a particular purpose.FUNAI CORPORATION, Inc. shall not be liable to make anycorrections to the open source software or source code or toprovide any support or assistance with respect to it. FUNAICORPORATION, Inc. disclaims any and all liability arising out of orin connection with the use of this software and/or source code.
57 .English

FUNAI CORPORATION, Inc.19900 Van Ness Avenue, Torrance, CA 90501
AA7REUH-55UL / AA7R0UH-55UL / AA7UFUH-50UX / AA7U0UH-50UX★★★★