Embed Size (px)
Citation preview

User Guide
MapRoad 2.3 Install Guide
Windows 7
MapRoad 2.3 Install Guide Page 2 of 29
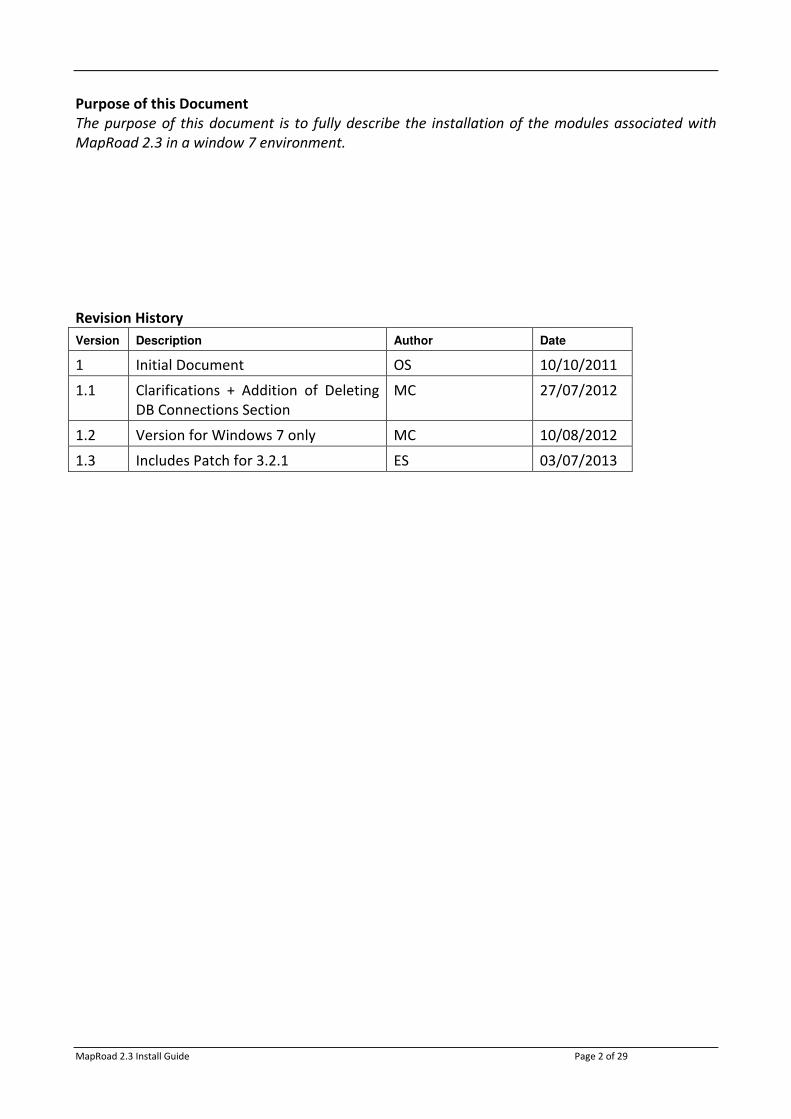
Purpose of this Document
The purpose of this document is to fully describe the installation of the modules associated with
MapRoad 2.3 in a window 7 environment.
Revision History
Version Description Author Date
1 Initial Document OS 10/10/2011
1.1 Clarifications + Addition of Deleting
DB Connections Section
MC 27/07/2012
1.2 Version for Windows 7 only MC 10/08/2012
1.3 Includes Patch for 3.2.1 ES 03/07/2013
MapRoad 2.3 Install Guide Page 3 of 29
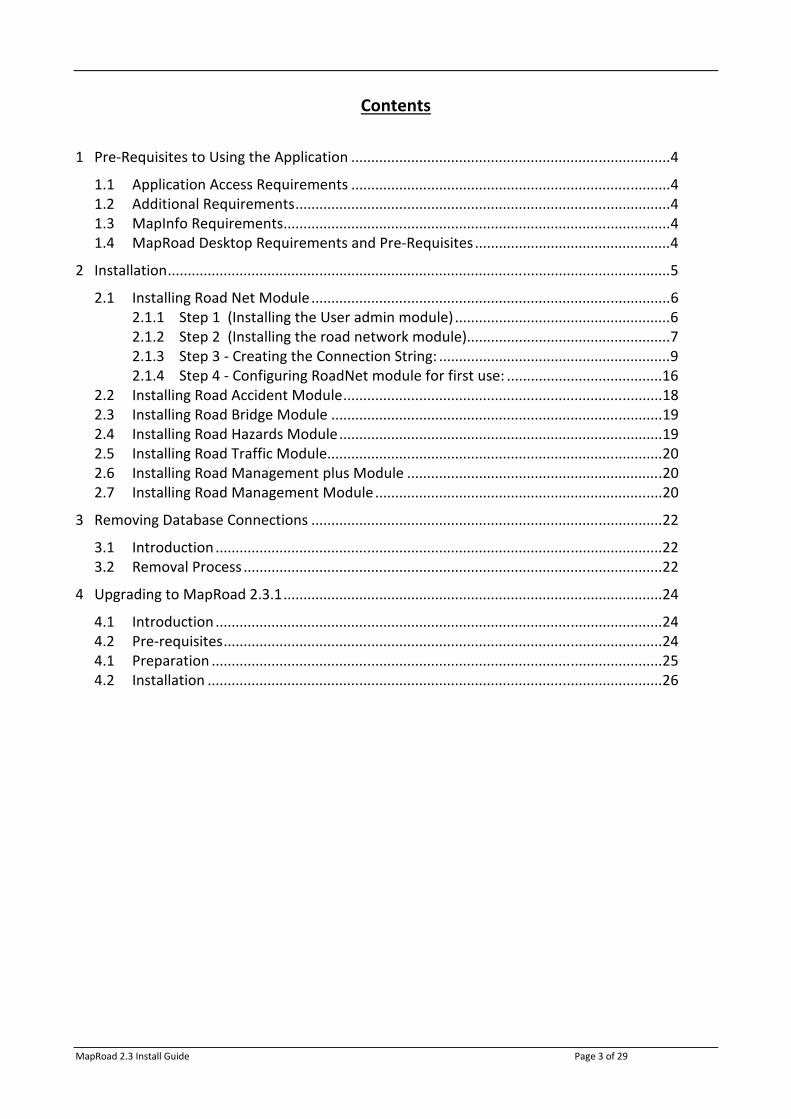
Contents
1 Pre-Requisites to Using the Application ................................................................................ 4
1.1 Application Access Requirements ................................................................................ 4
1.2 Additional Requirements .............................................................................................. 4
1.3 MapInfo Requirements ................................................................................................. 4
1.4 MapRoad Desktop Requirements and Pre-Requisites ................................................. 4
2 Installation .............................................................................................................................. 5
2.1 Installing Road Net Module .......................................................................................... 6
2.1.1 Step 1 (Installing the User admin module) ...................................................... 6
2.1.2 Step 2 (Installing the road network module)................................................... 7
2.1.3 Step 3 - Creating the Connection String: .......................................................... 9
2.1.4 Step 4 - Configuring RoadNet module for first use: ....................................... 16
2.2 Installing Road Accident Module ................................................................................ 18
2.3 Installing Road Bridge Module ................................................................................... 19
2.4 Installing Road Hazards Module ................................................................................. 19
2.5 Installing Road Traffic Module.................................................................................... 20
2.6 Installing Road Management plus Module ................................................................ 20
2.7 Installing Road Management Module ........................................................................ 20
3 Removing Database Connections ........................................................................................ 22
3.1 Introduction ................................................................................................................ 22
3.2 Removal Process ......................................................................................................... 22
4 Upgrading to MapRoad 2.3.1 ............................................................................................... 24
4.1 Introduction ................................................................................................................ 24
4.2 Pre-requisites .............................................................................................................. 24
4.1 Preparation ................................................................................................................. 25
4.2 Installation .................................................................................................................. 26
MapRoad 2.3 Install Guide Page 4 of 29
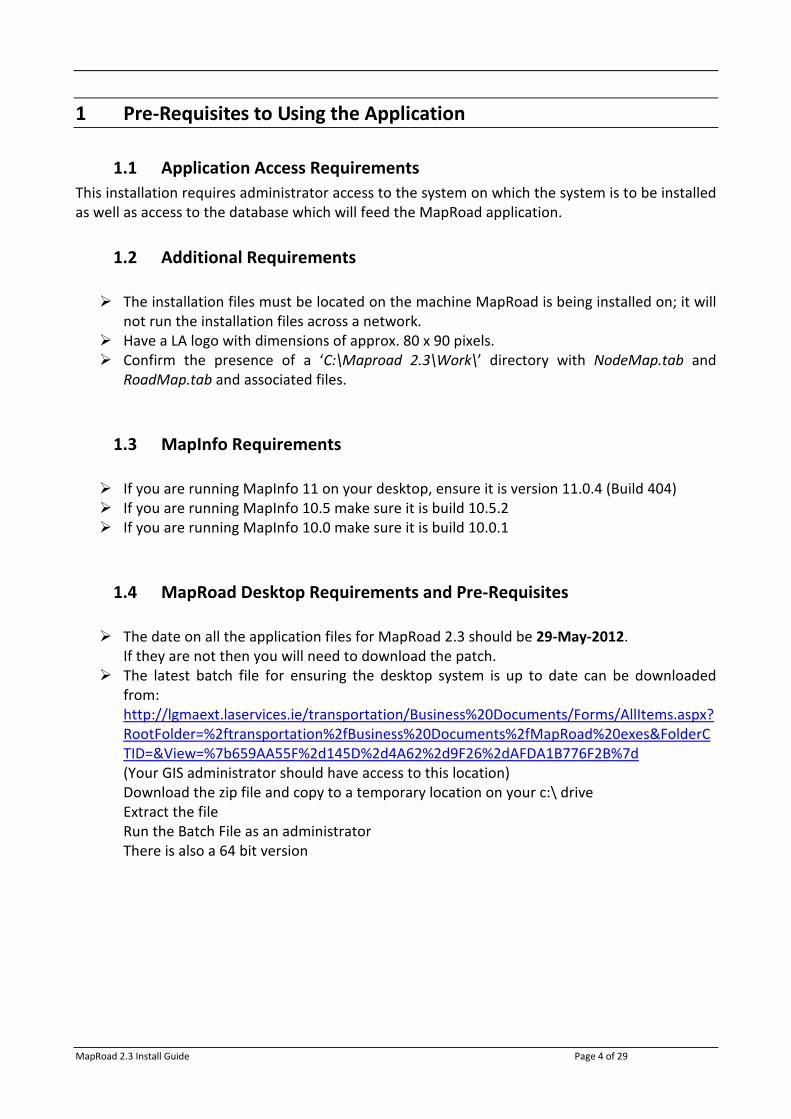
1 Pre-Requisites to Using the Application
1.1 Application Access Requirements
This installation requires administrator access to the system on which the system is to be installed
as well as access to the database which will feed the MapRoad application.
1.2 Additional Requirements
� The installation files must be located on the machine MapRoad is being installed on; it will
not run the installation files across a network.
� Have a LA logo with dimensions of approx. 80 x 90 pixels.
� Confirm the presence of a ‘C:\Maproad 2.3\Work\’ directory with NodeMap.tab and
RoadMap.tab and associated files.
1.3 MapInfo Requirements
� If you are running MapInfo 11 on your desktop, ensure it is version 11.0.4 (Build 404)
� If you are running MapInfo 10.5 make sure it is build 10.5.2
� If you are running MapInfo 10.0 make sure it is build 10.0.1
1.4 MapRoad Desktop Requirements and Pre-Requisites
� The date on all the application files for MapRoad 2.3 should be 29-May-2012.
If they are not then you will need to download the patch.
� The latest batch file for ensuring the desktop system is up to date can be downloaded
from:
http://lgmaext.laservices.ie/transportation/Business%20Documents/Forms/AllItems.aspx?
RootFolder=%2ftransportation%2fBusiness%20Documents%2fMapRoad%20exes&FolderC
TID=&View=%7b659AA55F%2d145D%2d4A62%2d9F26%2dAFDA1B776F2B%7d
(Your GIS administrator should have access to this location)
Download the zip file and copy to a temporary location on your c:\ drive
Extract the file
Run the Batch File as an administrator
There is also a 64 bit version
MapRoad 2.3 Install Guide Page 5 of 29
2 Installation
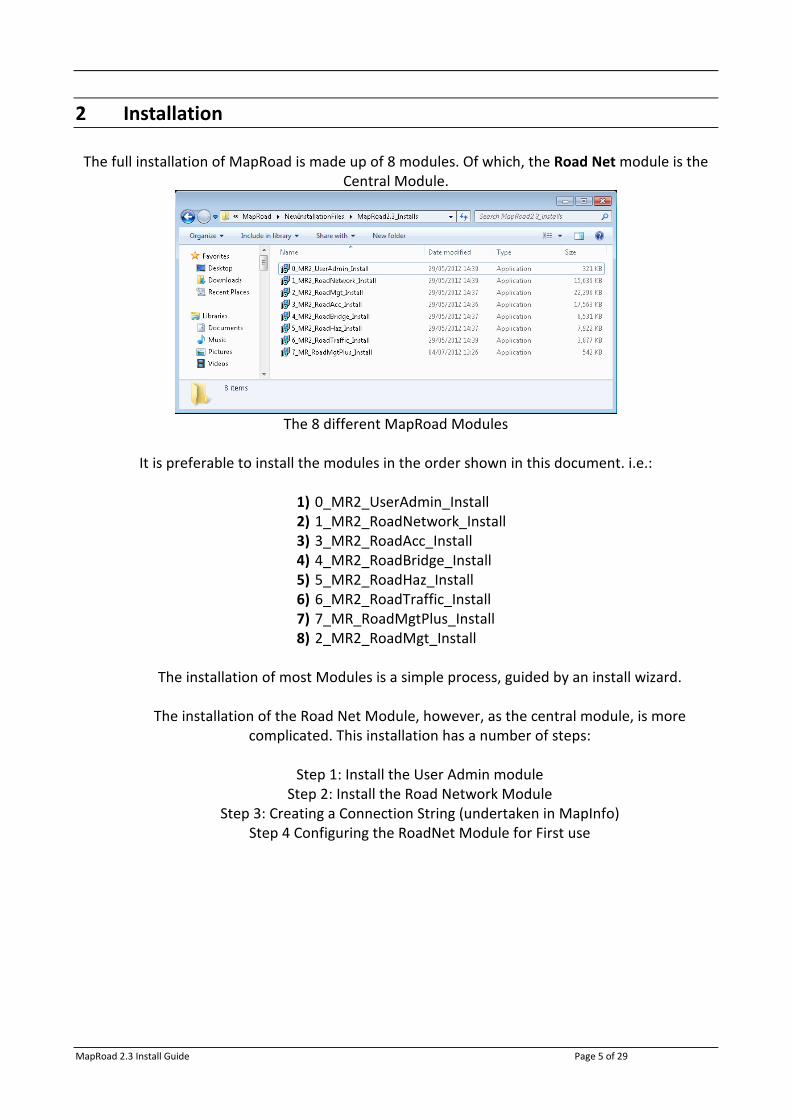
The full installation of MapRoad is made up of 8 modules. Of which, the Road Net module is the
Central Module.
The 8 different MapRoad Modules
It is preferable to install the modules in the order shown in this document. i.e.:
1) 0_MR2_UserAdmin_Install
2) 1_MR2_RoadNetwork_Install
3) 3_MR2_RoadAcc_Install
4) 4_MR2_RoadBridge_Install
5) 5_MR2_RoadHaz_Install
6) 6_MR2_RoadTraffic_Install
7) 7_MR_RoadMgtPlus_Install
8) 2_MR2_RoadMgt_Install
The installation of most Modules is a simple process, guided by an install wizard.
The installation of the Road Net Module, however, as the central module, is more
complicated. This installation has a number of steps:
Step 1: Install the User Admin module
Step 2: Install the Road Network Module
Step 3: Creating a Connection String (undertaken in MapInfo)
Step 4 Configuring the RoadNet Module for First use
MapRoad 2.3 Install Guide Page 6 of 29
2.1 Installing Road Net Module
2.1.1 Step 1
(Installing the User admin module 0_MR2_UserAdmin_Install.exe):
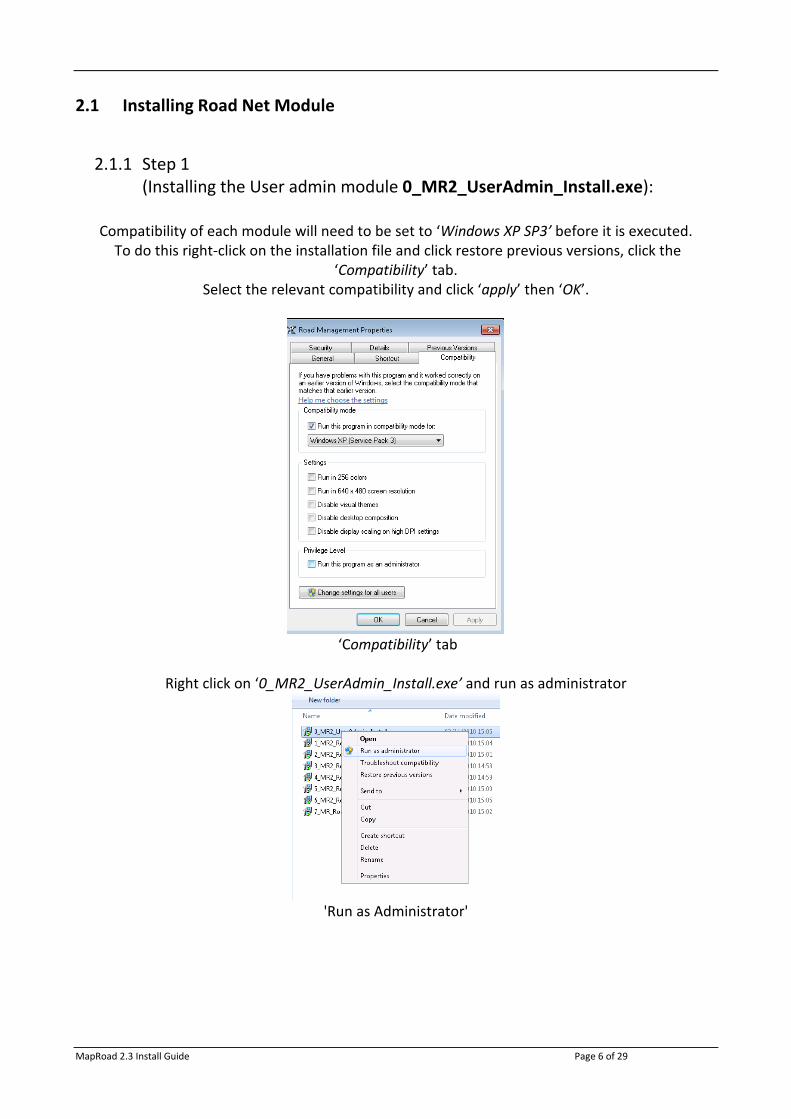
Compatibility of each module will need to be set to ‘Windows XP SP3’ before it is executed.
To do this right-click on the installation file and click restore previous versions, click the
‘Compatibility’ tab.
Select the relevant compatibility and click ‘apply’ then ‘OK’.
‘Compatibility’ tab
Right click on ‘0_MR2_UserAdmin_Install.exe’ and run as administrator
'Run as Administrator'
MapRoad 2.3 Install Guide Page 7 of 29
Run the installation without altering the default values.
Windows 7 (64 bit)
If installing on a 64 bit machine please install in the following folder:
(To find out what version of windows you are using visit: http://support.microsoft.com/kb/827218)
User Admin Setup Wizard
Once installed, the MapRoad 2.3 login dialogue box will appear. The user will be prompted to
login, however for the moment this dialogue box can be closed.
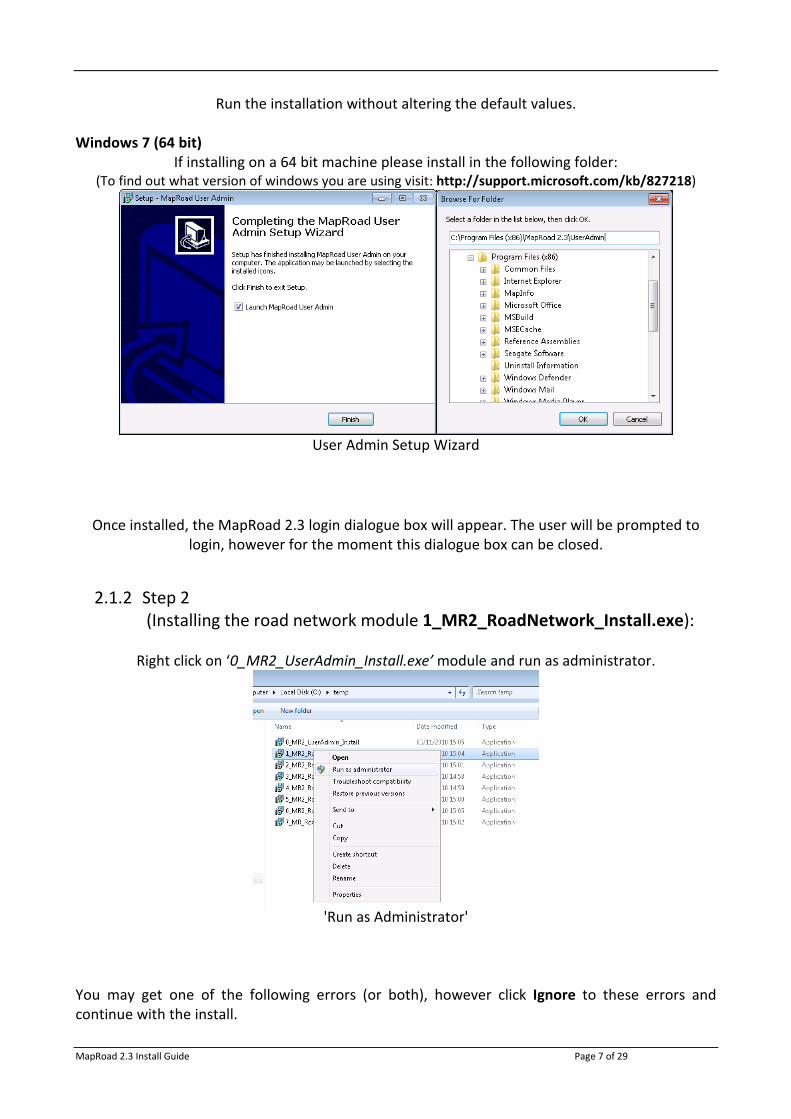
2.1.2 Step 2
(Installing the road network module 1_MR2_RoadNetwork_Install.exe):
Right click on ‘0_MR2_UserAdmin_Install.exe’ module and run as administrator.
'Run as Administrator'
You may get one of the following errors (or both), however click Ignore to these errors and
continue with the install.

MapRoad 2.3 Install Guide Page 8 of 29
Possible errors (Ignore)
After the installation of RoadNet, Permissions need to be set on the ‘MapRoad 2.3’ folder in
‘Program Files’. Right click on the relevant folder, (either ‘C:\Program Files (x86)\MapRoad 2.3’ or
‘C:\Program Files\MapRoad 2.3’) and right click, select ‘Properties’ then ‘Security’.
MapRoad User Properties
Highlight Users and check ‘Write’ under ‘Allow’ in the Permissions for Users dialogue. To get this
dialogue box in Windows 7 click ‘edit’ first then ‘Apply’ and ‘OK’.
MapRoad 2.3 Install Guide Page 9 of 29
2.1.3 Step 3 - Creating the Connection String:
Open MapInfo and click the ‘Open DBMS Table’ (this icon may be docked at the top of the
MapInfo window).
‘Open DBMS Table’ tool
In the ‘Select Data Source’ dialogue box choose ‘Machine Data Source’, and choose ‘New’.
'Select Machine Data Source'
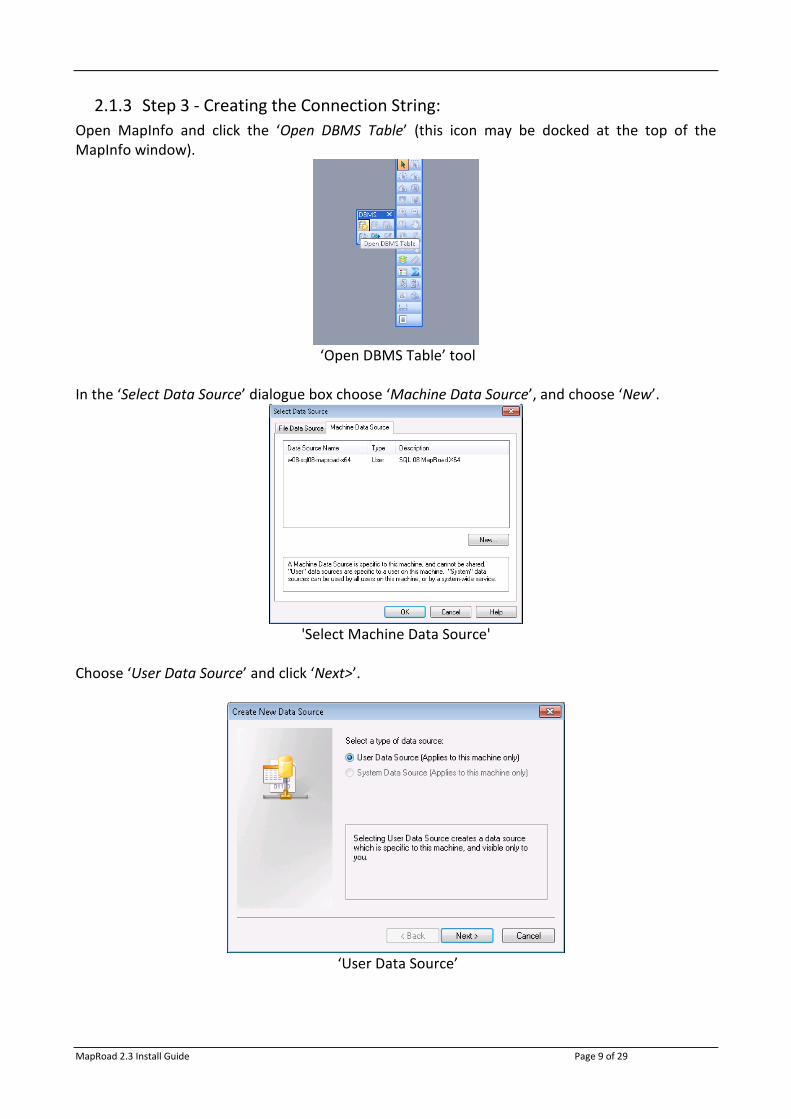
Choose ‘User Data Source’ and click ‘Next>’.
‘User Data Source’
MapRoad 2.3 Install Guide Page 10 of 29
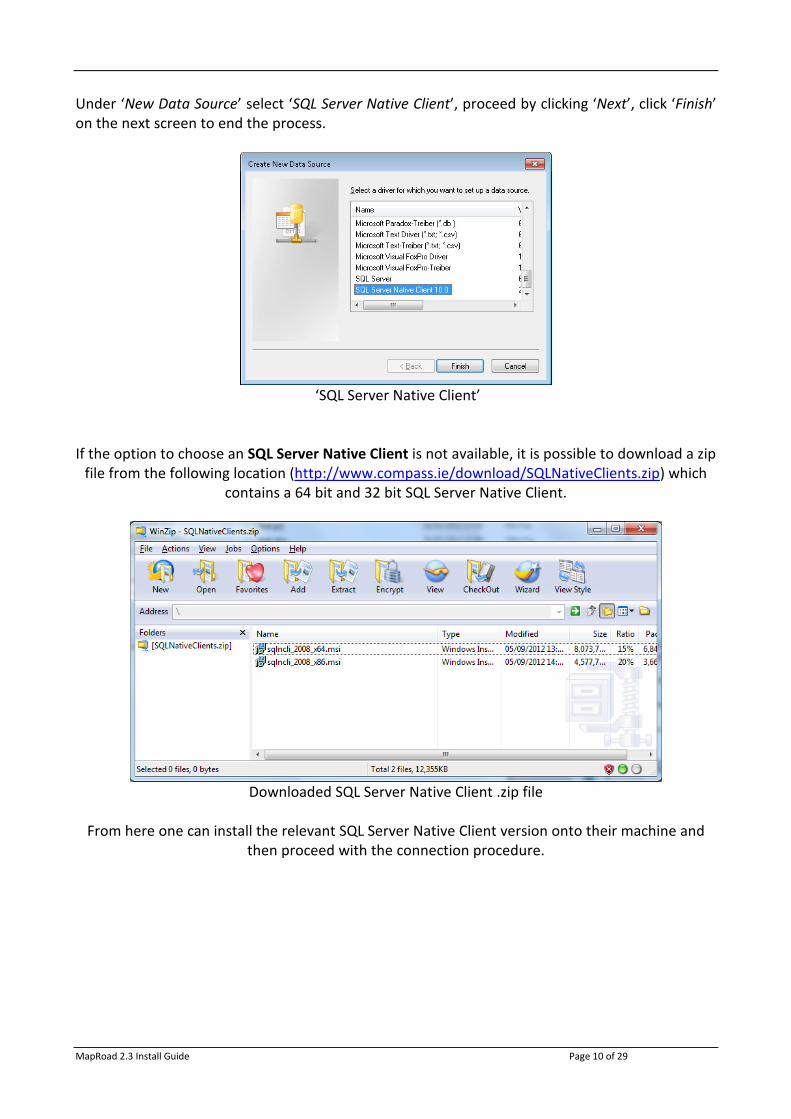
Under ‘New Data Source’ select ‘SQL Server Native Client’, proceed by clicking ‘Next’, click ‘Finish’
on the next screen to end the process.
‘SQL Server Native Client’
If the option to choose an SQL Server Native Client is not available, it is possible to download a zip
file from the following location (http://www.compass.ie/download/SQLNativeClients.zip) which
contains a 64 bit and 32 bit SQL Server Native Client.
Downloaded SQL Server Native Client .zip file
From here one can install the relevant SQL Server Native Client version onto their machine and
then proceed with the connection procedure.

MapRoad 2.3 Install Guide Page 11 of 29
Choose a name for the data source, add a description (for your info only) and choose the server
where the database is located, and click ‘Next’.
Naming DBMS Source in Windows 7
Choose ‘With SQL Server authentication…..’, by default the Login ID is ‘maproad’ and the password
is ‘maproad’, and click ‘Next’.
SQL Authentication in Windows 7
Change the default database to the correct MapRoad database on the database server, and click
‘Next’.
Select correct MapRoad database in Windows 7
MapRoad 2.3 Install Guide Page 12 of 29
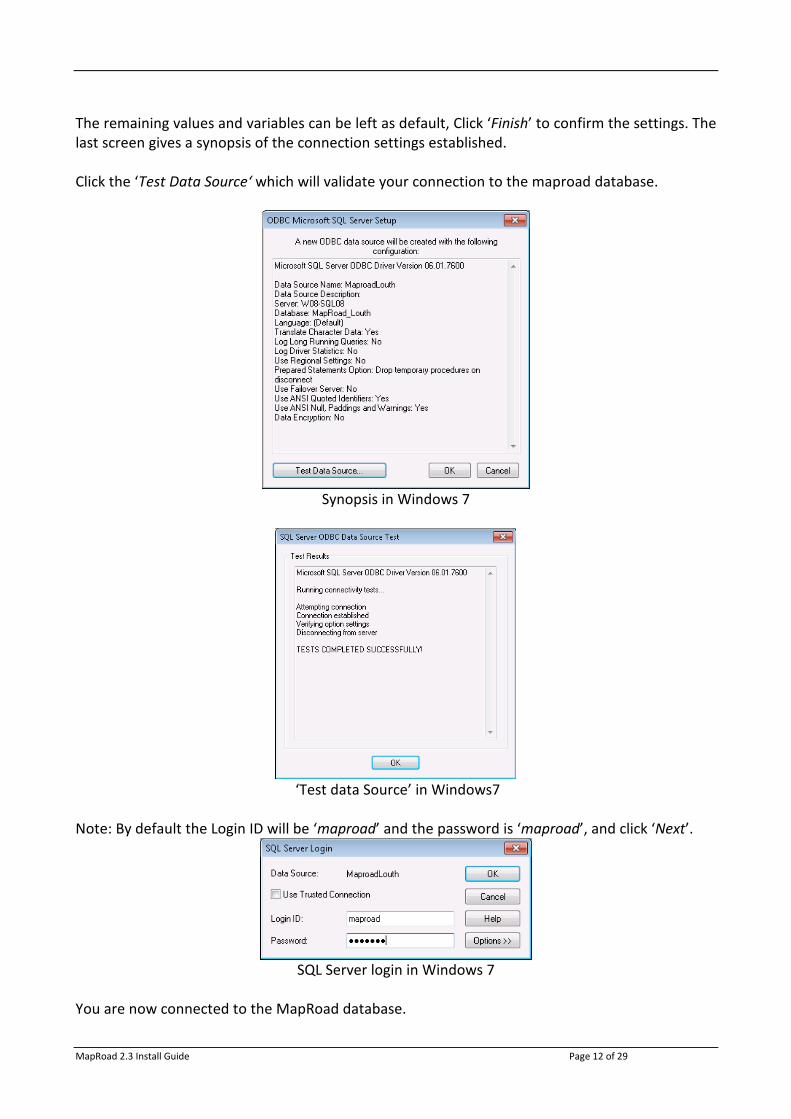
The remaining values and variables can be left as default, Click ‘Finish’ to confirm the settings. The
last screen gives a synopsis of the connection settings established.
Click the ‘Test Data Source‘ which will validate your connection to the maproad database.
Synopsis in Windows 7
‘Test data Source’ in Windows7
Note: By default the Login ID will be ‘maproad’ and the password is ‘maproad’, and click ‘Next’.
SQL Server login in Windows 7
You are now connected to the MapRoad database.
MapRoad 2.3 Install Guide Page 13 of 29
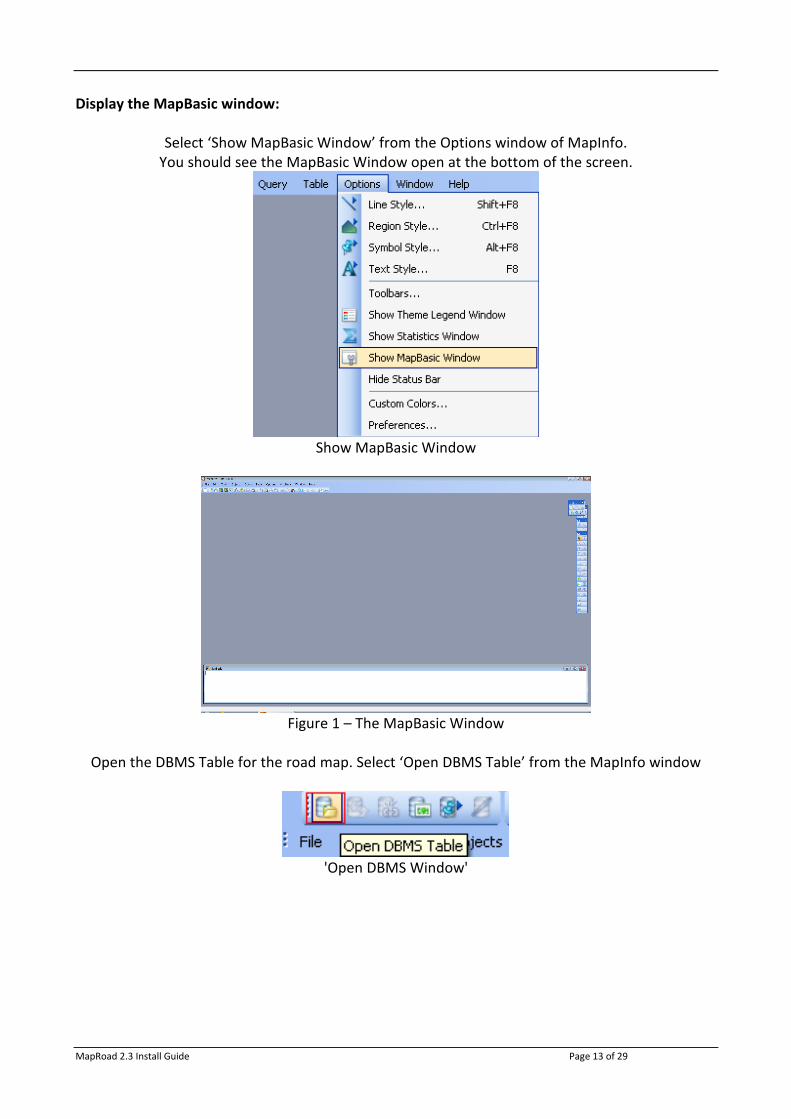
Display the MapBasic window:
Select ‘Show MapBasic Window’ from the Options window of MapInfo.
You should see the MapBasic Window open at the bottom of the screen.
Show MapBasic Window
Figure 1 – The MapBasic Window
Open the DBMS Table for the road map. Select ‘Open DBMS Table’ from the MapInfo window
'Open DBMS Window'
MapRoad 2.3 Install Guide Page 14 of 29
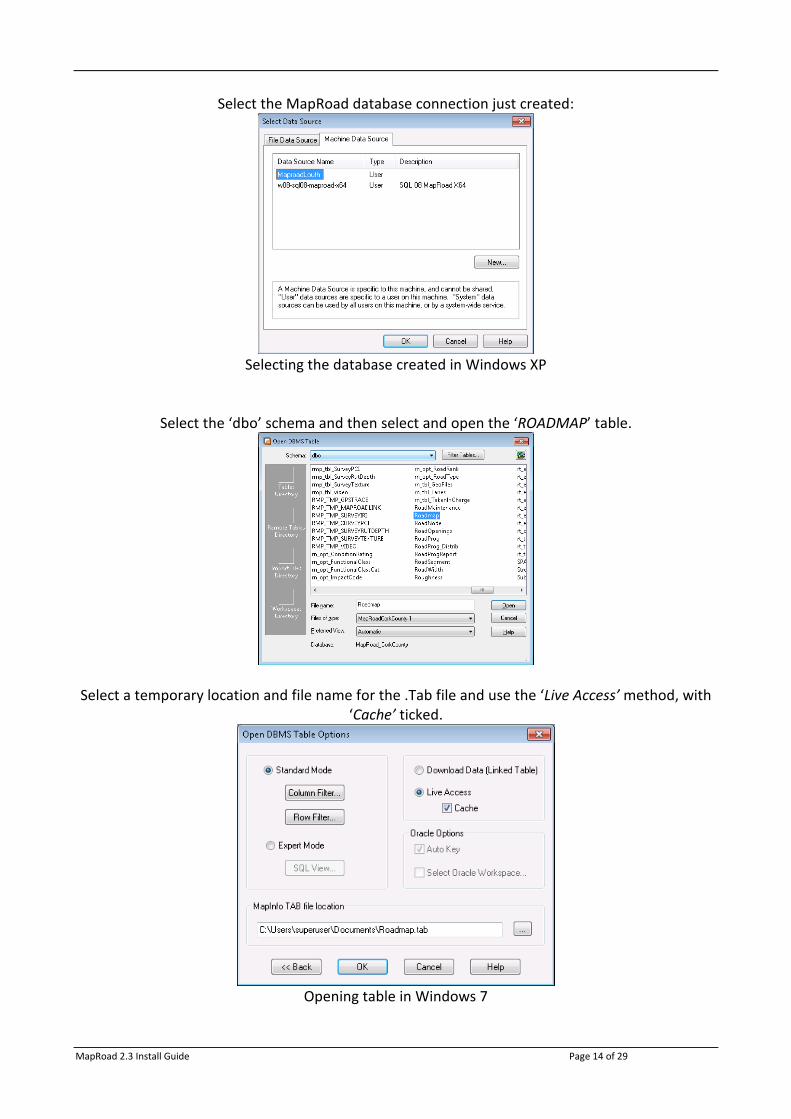
Select the MapRoad database connection just created:
Selecting the database created in Windows XP
Select the ‘dbo’ schema and then select and open the ‘ROADMAP’ table.
Select a temporary location and file name for the .Tab file and use the ‘Live Access’ method, with
‘Cache’ ticked.
Opening table in Windows 7

MapRoad 2.3 Install Guide Page 15 of 29
When you click ‘OK’, the ROADMAP table will load, and the MapBasic commands for opening and
registering the ROADMAP table are displayed in the MapBasic window. The part of interest is the
‘CONNECTION’ element.
The ‘Connection’ String
Copy the text shown in red above to a plain text file using Notepad.
To complete the spatial connection string, one must append the following:
MARS_Connection=Yes;
The complete Spatial Connection String is as follows:
‘DSN=w08-
sql08_MapRoad_TestDeployment;UID=maproad;PWD=maproad;Trusted_Connection=Yes;APP=Ma
pInfo Professional®;WSID=4THDIMENSION;DATABASE=MapRoad_TestDeployment;
MARS_Connection=Yes;’
Note the ; character is of particular importance, be sure to include this.
Save the plain text file where this is located.
MapInfo can now be closed without saving.
MapRoad 2.3 Install Guide Page 16 of 29
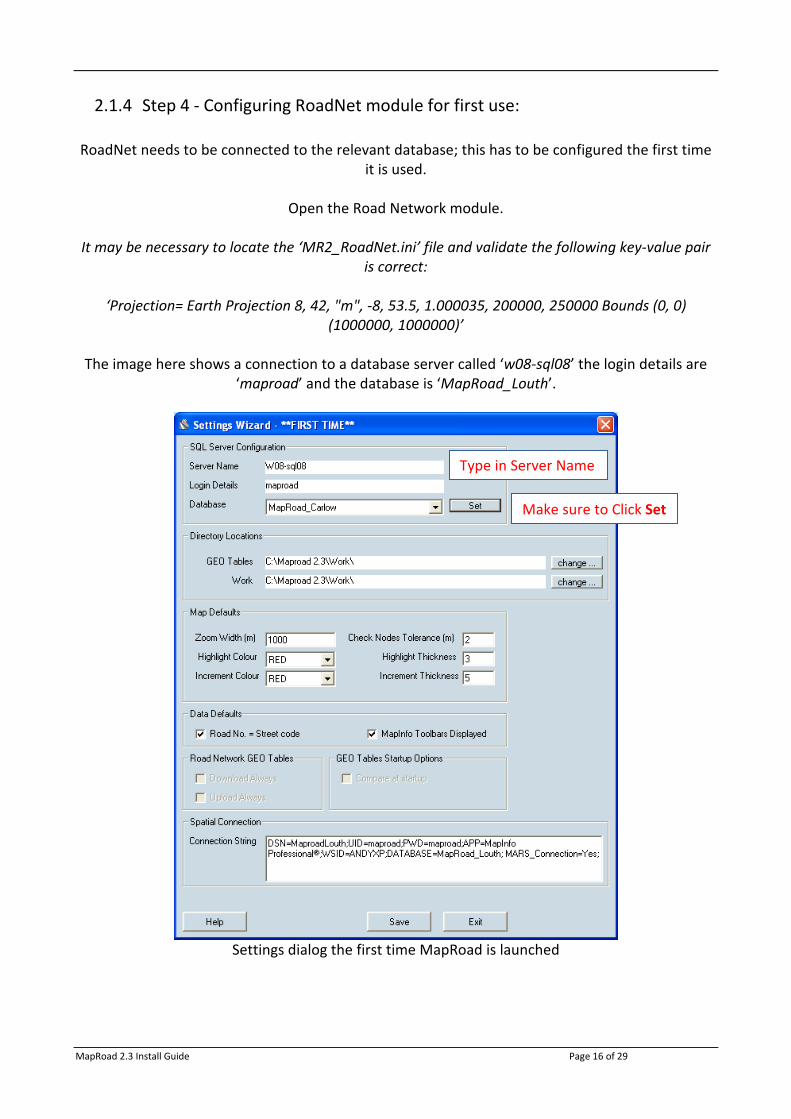
2.1.4 Step 4 - Configuring RoadNet module for first use:
RoadNet needs to be connected to the relevant database; this has to be configured the first time
it is used.
Open the Road Network module.
It may be necessary to locate the ‘MR2_RoadNet.ini’ file and validate the following key-value pair
is correct:
‘Projection= Earth Projection 8, 42, "m", -8, 53.5, 1.000035, 200000, 250000 Bounds (0, 0)
(1000000, 1000000)’
The image here shows a connection to a database server called ‘w08-sql08’ the login details are
‘maproad’ and the database is ‘MapRoad_Louth’.
Settings dialog the first time MapRoad is launched
Type in Server Name
Make sure to Click Set

MapRoad 2.3 Install Guide Page 17 of 29
Set the Geo Tables directory to; ‘C:\MapRoad 2.3\Work\’.
Set the Work directory to ‘C:\MapRoad 2.3\Work\’.
Input the connection string generated previously.
Click ‘Save’ then ‘Continue’.
Enter the MapRoad password provided by your system administrator and the Road Network
application will open.
MapRoad 2.3 Install Guide Page 18 of 29
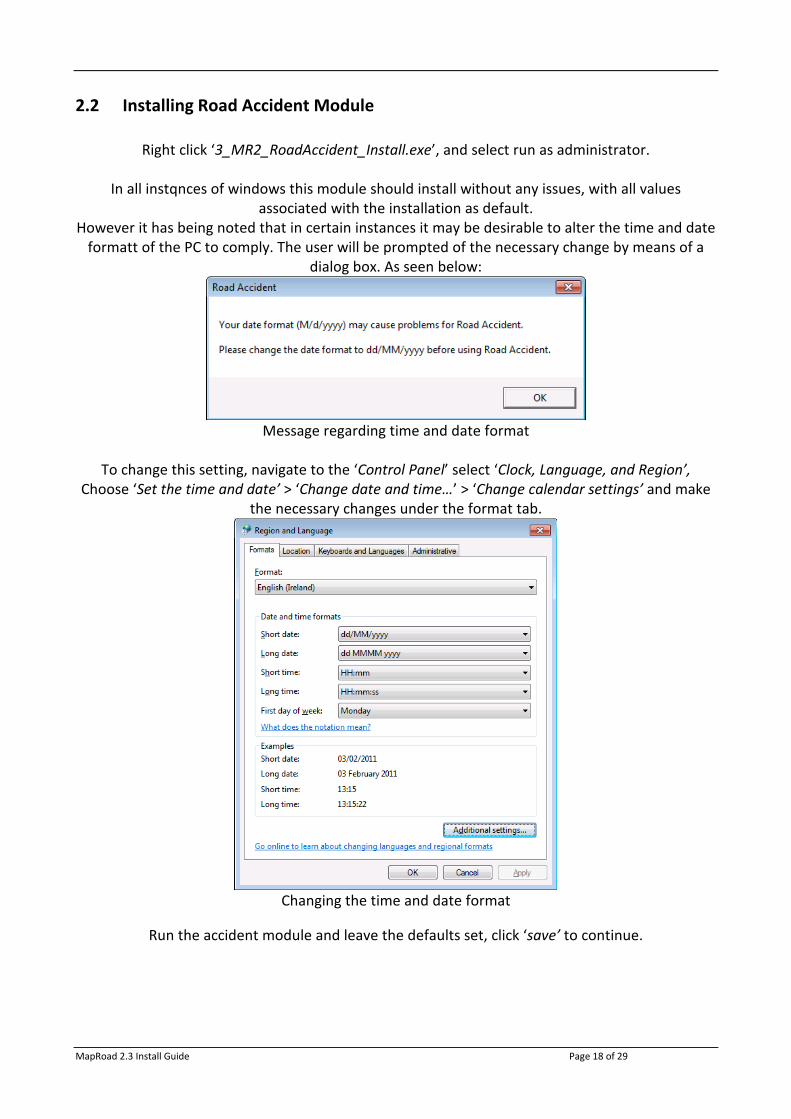
2.2 Installing Road Accident Module
Right click ‘3_MR2_RoadAccident_Install.exe’, and select run as administrator.
In all instqnces of windows this module should install without any issues, with all values
associated with the installation as default.
However it has being noted that in certain instances it may be desirable to alter the time and date
formatt of the PC to comply. The user will be prompted of the necessary change by means of a
dialog box. As seen below:
Message regarding time and date format
To change this setting, navigate to the ‘Control Panel’ select ‘Clock, Language, and Region’,
Choose ‘Set the time and date’ > ‘Change date and time…’ > ‘Change calendar settings’ and make
the necessary changes under the format tab.
Changing the time and date format
Run the accident module and leave the defaults set, click ‘save’ to continue.
MapRoad 2.3 Install Guide Page 19 of 29
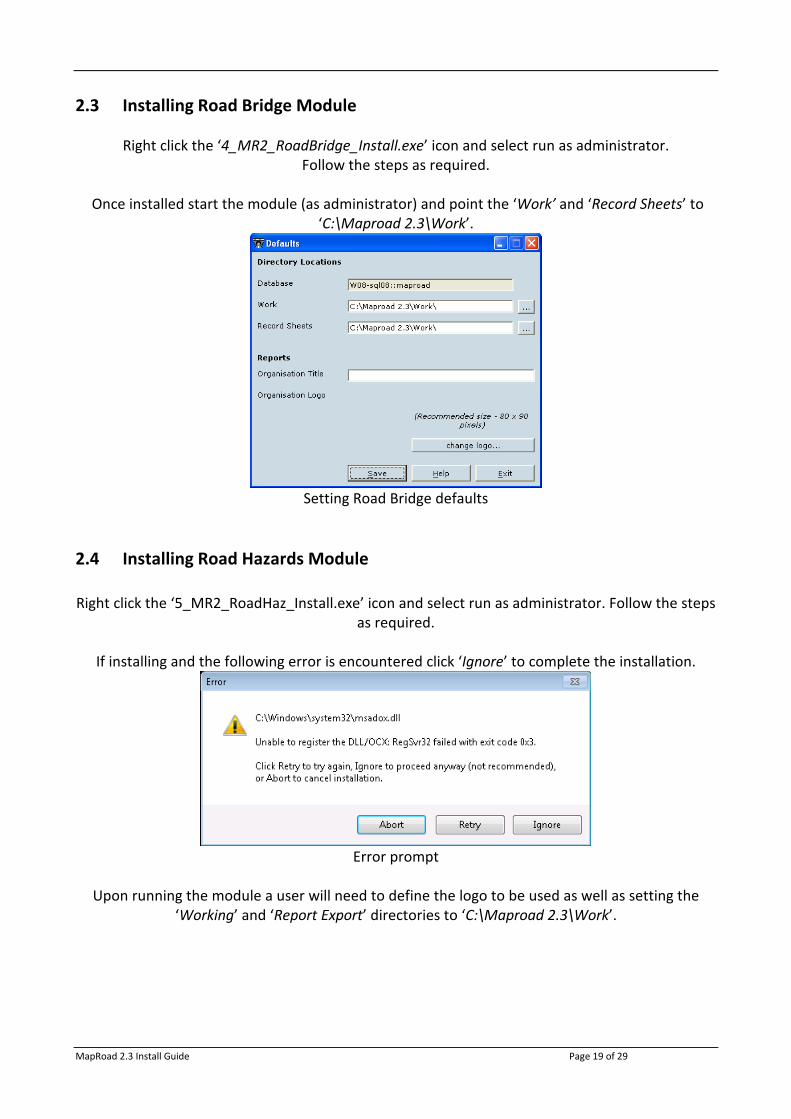
2.3 Installing Road Bridge Module
Right click the ‘4_MR2_RoadBridge_Install.exe’ icon and select run as administrator.
Follow the steps as required.
Once installed start the module (as administrator) and point the ‘Work’ and ‘Record Sheets’ to
‘C:\Maproad 2.3\Work’.
Setting Road Bridge defaults
2.4 Installing Road Hazards Module
Right click the ‘5_MR2_RoadHaz_Install.exe’ icon and select run as administrator. Follow the steps
as required.
If installing and the following error is encountered click ‘Ignore’ to complete the installation.
Error prompt
Upon running the module a user will need to define the logo to be used as well as setting the
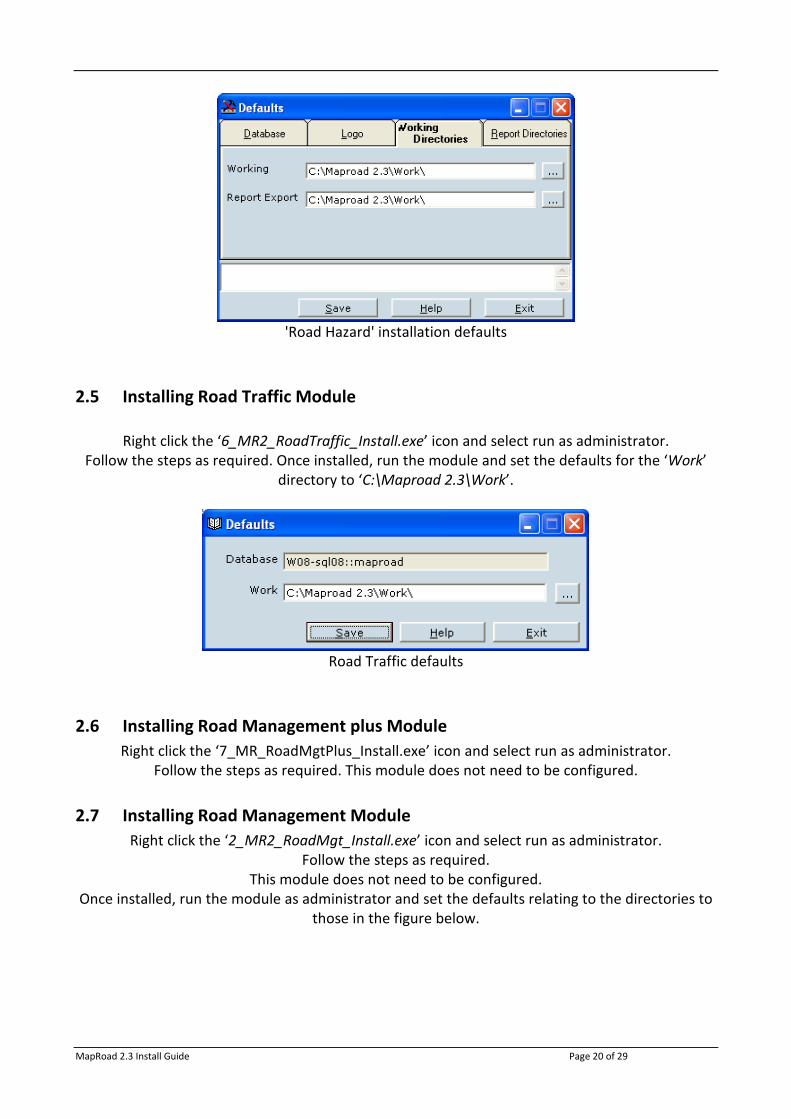
‘Working’ and ‘Report Export’ directories to ‘C:\Maproad 2.3\Work’.
MapRoad 2.3 Install Guide Page 20 of 29
'Road Hazard' installation defaults
2.5 Installing Road Traffic Module
Right click the ‘6_MR2_RoadTraffic_Install.exe’ icon and select run as administrator.
Follow the steps as required. Once installed, run the module and set the defaults for the ‘Work’
directory to ‘C:\Maproad 2.3\Work’.
Road Traffic defaults
2.6 Installing Road Management plus Module
Right click the ‘7_MR_RoadMgtPlus_Install.exe’ icon and select run as administrator.
Follow the steps as required. This module does not need to be configured.
2.7 Installing Road Management Module
Right click the ‘2_MR2_RoadMgt_Install.exe’ icon and select run as administrator.
Follow the steps as required.
This module does not need to be configured.
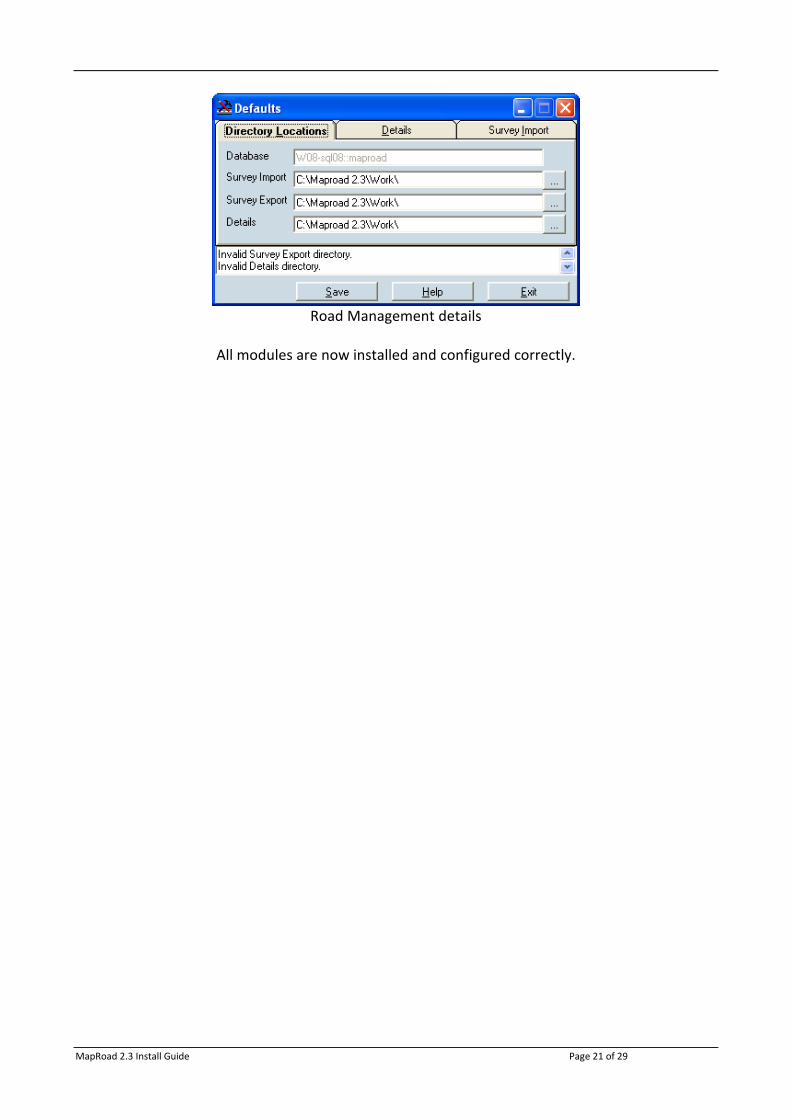
Once installed, run the module as administrator and set the defaults relating to the directories to
those in the figure below.
MapRoad 2.3 Install Guide Page 21 of 29
Road Management details
All modules are now installed and configured correctly.
MapRoad 2.3 Install Guide Page 22 of 29
3 Removing Database Connections
3.1 Introduction
From time to time the user may wish to remove existing database connections. Perhaps due to a
need to remove incorrect connections or simply to remove connections which are no longer
needed
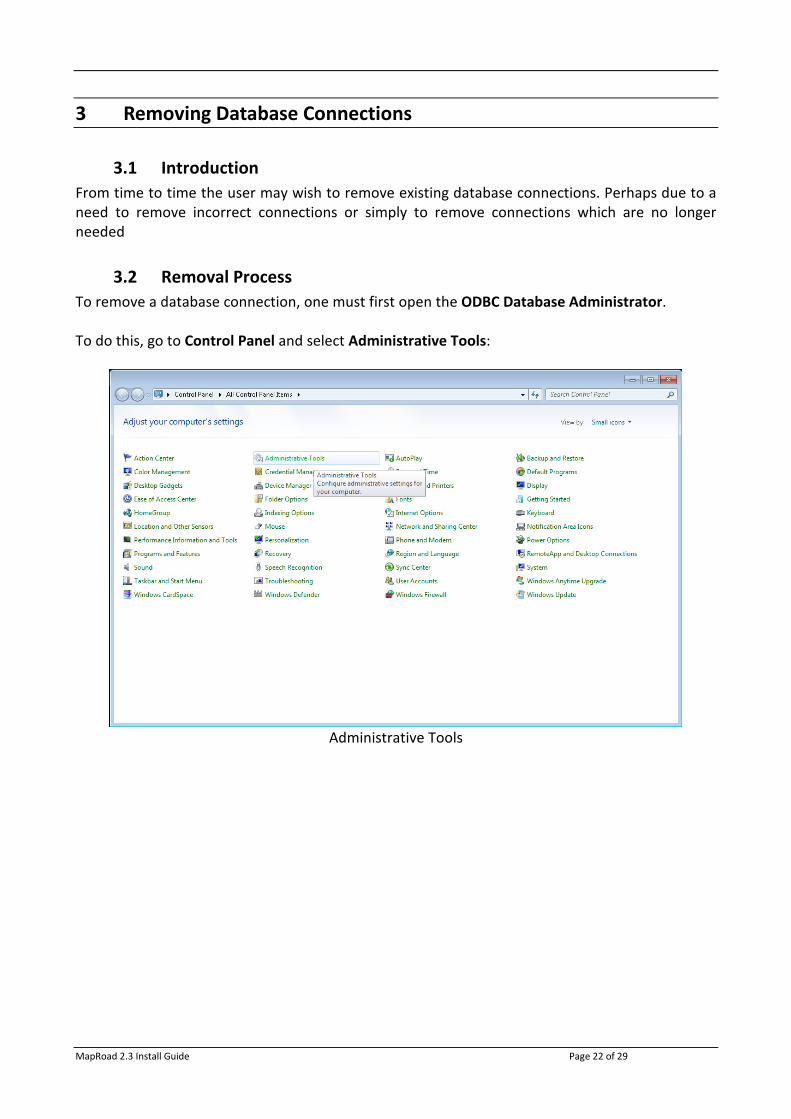
3.2 Removal Process
To remove a database connection, one must first open the ODBC Database Administrator.
To do this, go to Control Panel and select Administrative Tools:
Administrative Tools
MapRoad 2.3 Install Guide Page 23 of 29
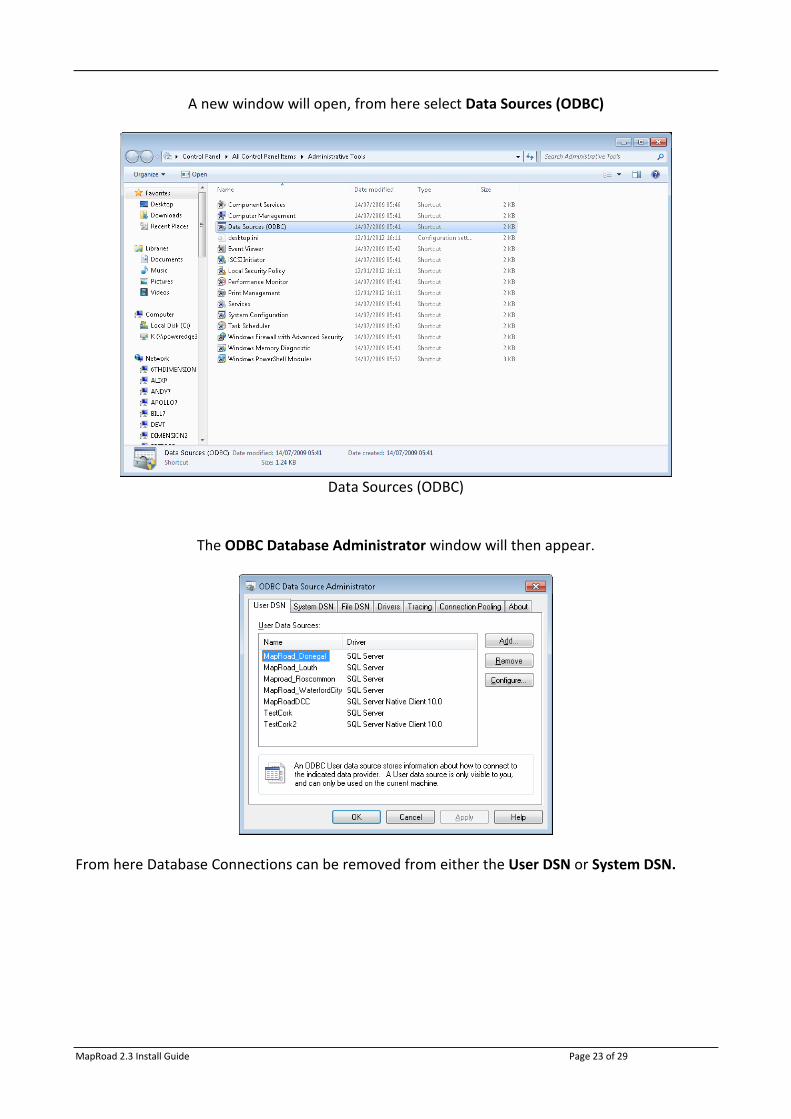
A new window will open, from here select Data Sources (ODBC)
Data Sources (ODBC)
The ODBC Database Administrator window will then appear.
From here Database Connections can be removed from either the User DSN or System DSN.
MapRoad 2.3 Install Guide Page 24 of 29
4 Upgrading to MapRoad 2.3.1
4.1 Introduction
MapRoad can be upgraded to v2.3.1 with a release maintenance patch. This patch fixes
performance problems as well as some specific errors, other than that there are no new features
in the application.
4.2 Pre-requisites
In order to proceed with the upgrade, it is necessary that,
• MapRoad 2.3 is installed and correctly running. This includes any of the modules that the
user may utilize normally (ie. RoadNet, RoadAccident, etc.).
• The date of file of C:\Program Files\MapRoad 2.3\RoadNet\mr2_roadnet.exe must be
29/05/2012.
• The user has administrator rights on the PC.
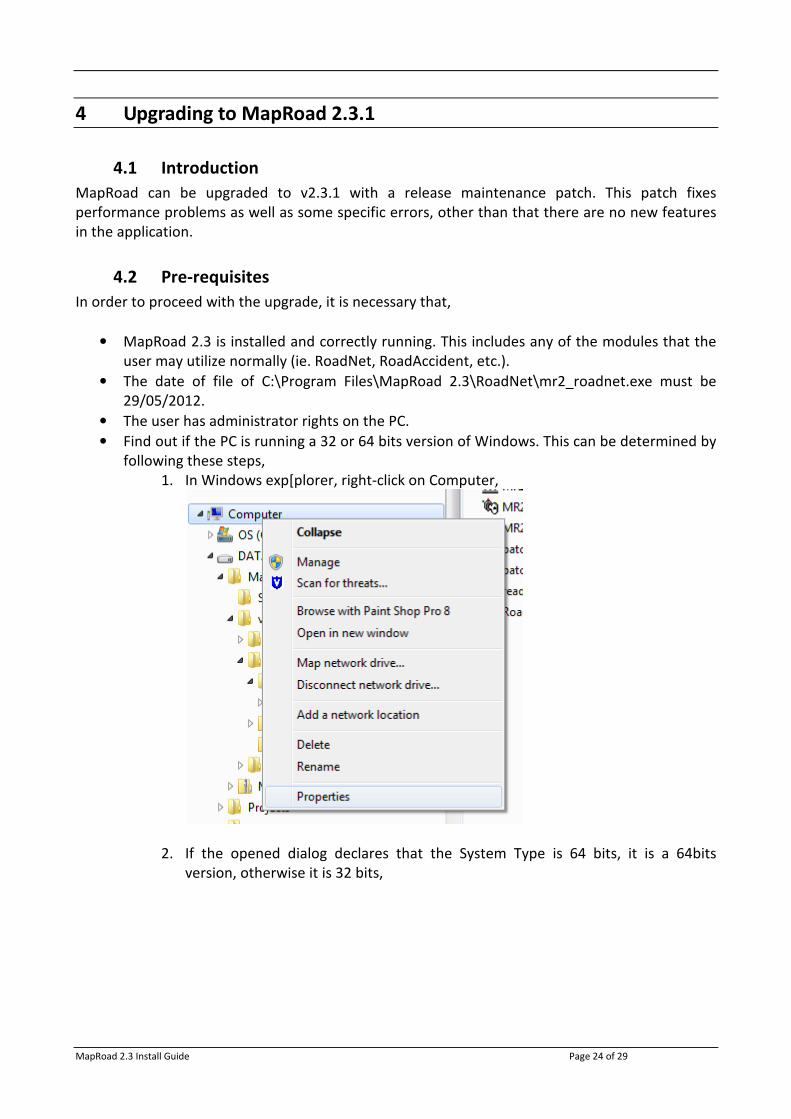
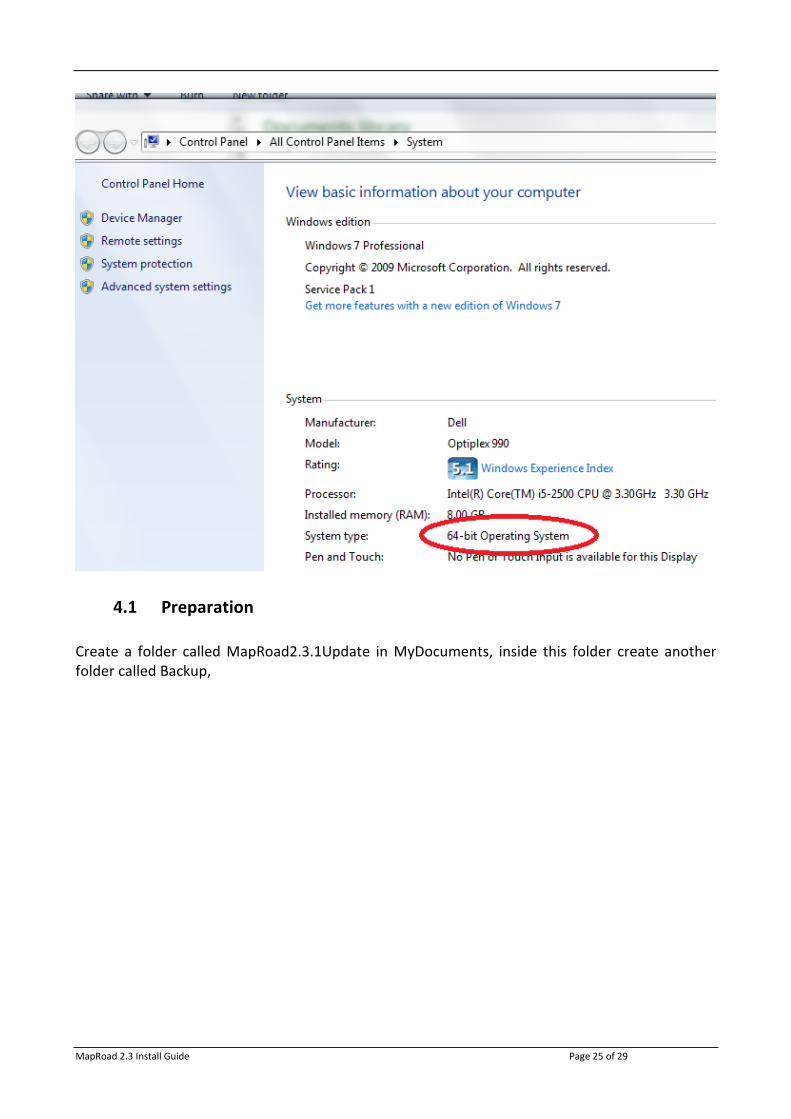
• Find out if the PC is running a 32 or 64 bits version of Windows. This can be determined by
following these steps,
1. In Windows exp[plorer, right-click on Computer,
2. If the opened dialog declares that the System Type is 64 bits, it is a 64bits
version, otherwise it is 32 bits,
MapRoad 2.3 Install Guide Page 25 of 29
4.1 Preparation
Create a folder called MapRoad2.3.1Update in MyDocuments, inside this folder create another
folder called Backup,

MapRoad 2.3 Install Guide Page 26 of 29
Prior to installing the patch, the existing installation of MapRoad should be backed up. The
following folders must be copied to MyDocuments\MapRoad2.3.1Update\Backup,
• C:\Program Files\MapRoad 2.3.
• If there is a folder C:\Program Files (x86)\MapRoad 2.3, this must be copied as well.
• C:\Windows\system32\mr2_userlogin.dll
• C:\Maproad2.3\Work. This is the standard work directory, however sometimes uses a
different directory, in these cases the appropriate directory must be backed up.
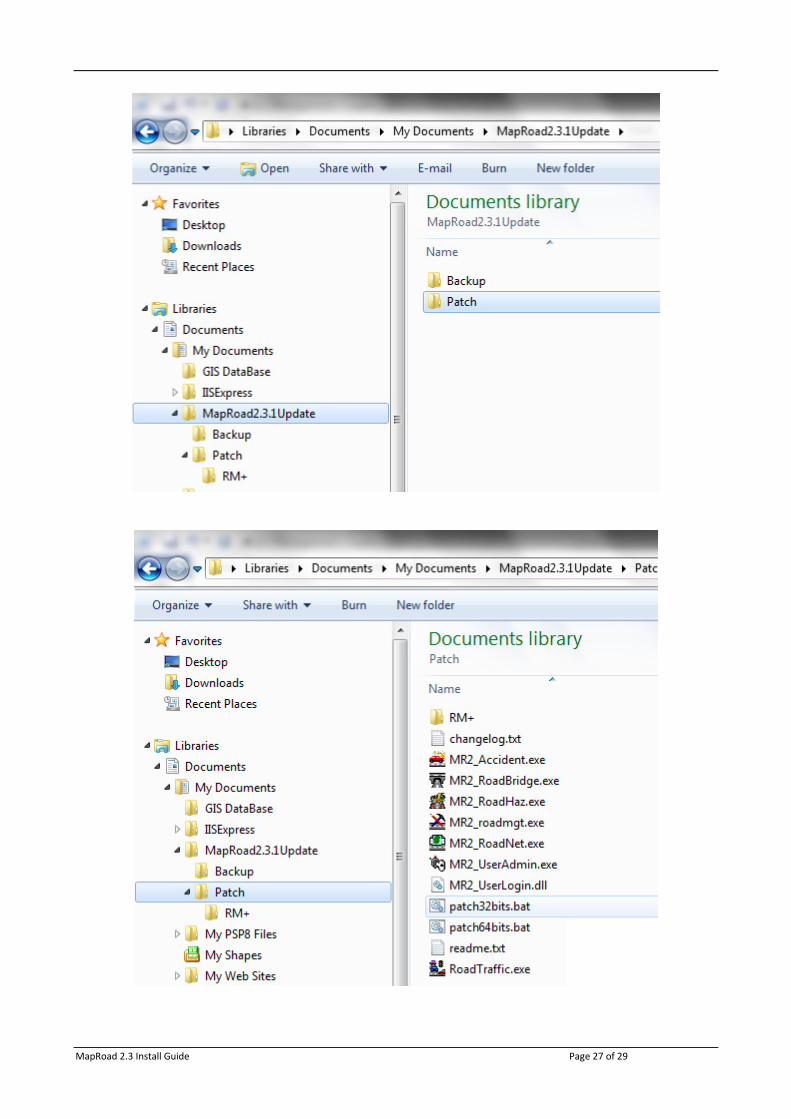
4.2 Installation
1. Extract the contents of MapRoad2.3.1Update.zip in a
MyDocuments\MapRoad2.3.1Update\,
MapRoad 2.3 Install Guide Page 27 of 29
MapRoad 2.3 Install Guide Page 28 of 29
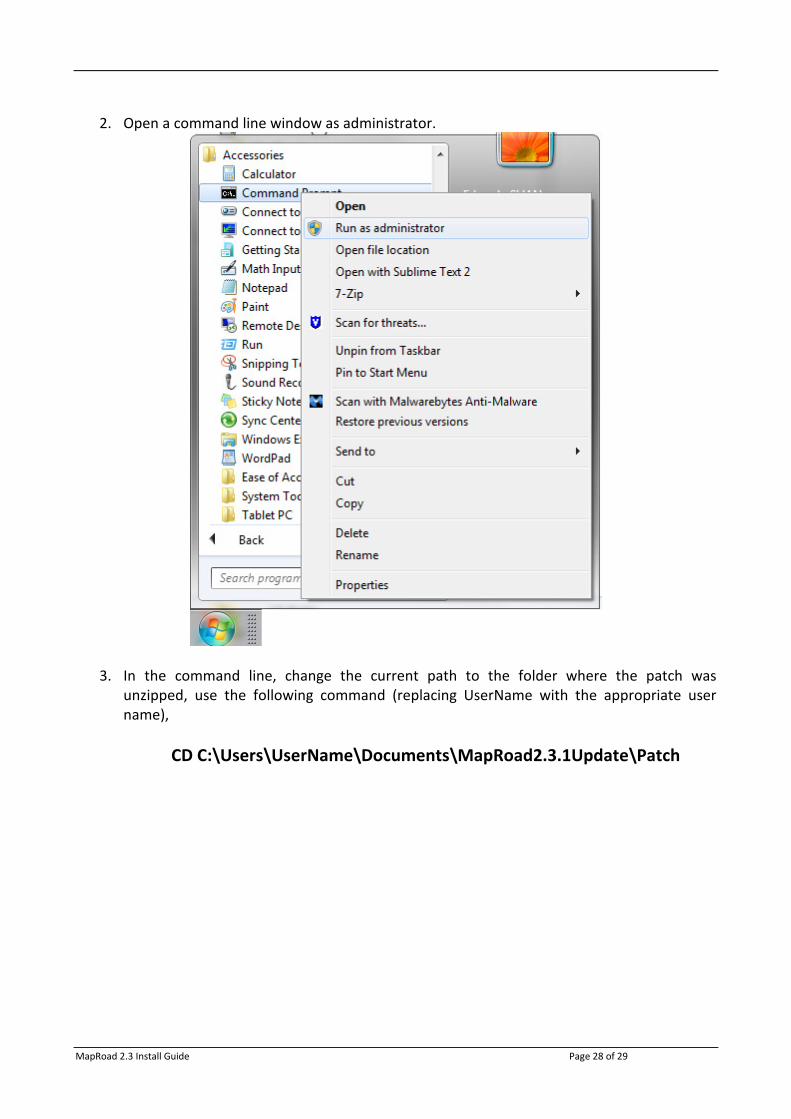
2. Open a command line window as administrator.
3. In the command line, change the current path to the folder where the patch was
unzipped, use the following command (replacing UserName with the appropriate user
name),
CD C:\Users\UserName\Documents\MapRoad2.3.1Update\Patch
MapRoad 2.3 Install Guide Page 29 of 29
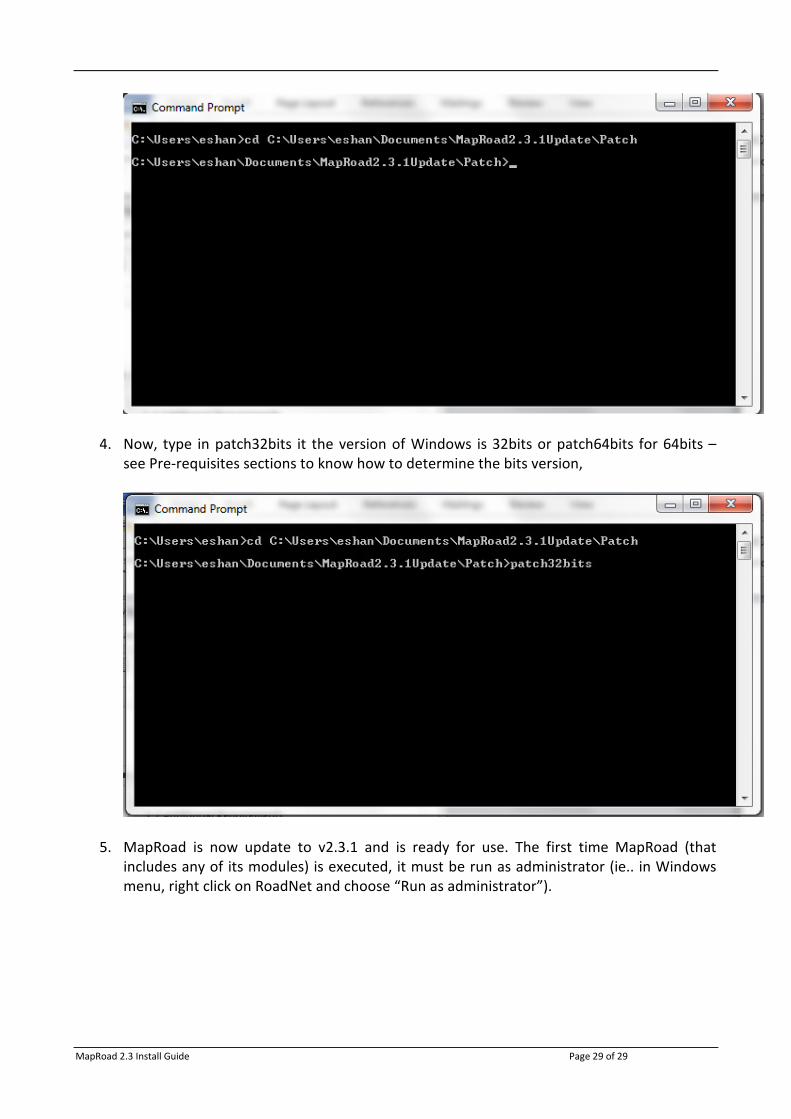
4. Now, type in patch32bits it the version of Windows is 32bits or patch64bits for 64bits –
see Pre-requisites sections to know how to determine the bits version,
5. MapRoad is now update to v2.3.1 and is ready for use. The first time MapRoad (that
includes any of its modules) is executed, it must be run as administrator (ie.. in Windows
menu, right click on RoadNet and choose “Run as administrator”).