Embed Size (px)
Citation preview
Mastering Heuristics Series Handbook for discerning parents
Spatial Visualisation
A Problem-solving Tool for Challenging Problems in Area and Perimeter (Primary 5 & 6)
Sunny Tan Maths Heuristics Private Limited
ISBN: 978-981-07-8948-0 Printed in Singapore February 2014
Copyrights © Sunny Tan Published by Maths Heuristics Private Limited Edited by Karen Ralls-Tan of RE: TEAM Communications Distributed by Maths Heuristics Private Limited
195A Thomson Road, Goldhill Centre, Singapore 307634 www.mathsHeuristics.com Tel: 6255 5941
For orders and enquiries: Email: [email protected]
All rights reserved. No parts of this publication may be reproduced, stored in any retrieval system, or transmitted via any retrieval system or by any means, electronic, mechanical, photocopying, recording, or otherwise, without the prior permission of the copyright owner. No parts of this publication may be used in the conducting of classes, commercial or otherwise, without the prior permission of the copyright owner. Every effort has been made to contact the holders of any copyright materials found herein. Should there be any oversight, the publisher will be pleased to make any necessary amendment at the first opportunity. No patent liability is assumed with respect to the use of information contained herein. The publisher, author and editor of this publication have taken all reasonable care to ensure that the content herein is error free. However, some typographical, factual or calculation oversights still elude us. We sincerely apologise for these, and would greatly appreciate it if you could highlight these to us via email at [email protected]. From time to time, we do provide addenda and errata, in order to ensure appropriate updates to this publication. These may be found at www.mathsheuristics.com/?page_id=472

CONTENTS 4 Preface 5 How to Use This Book 7 Before You Begin 10 Chapter 1 Rearranging Parts: Non-circles 23 Chapter 2* Rearranging Parts: Circles (For Primary 6 only) 39 Chapter 3** Drawing Lines 57 Chapter 4 Overlapping Parts 71 Chapter 5** Difference in Area 82 Chapter 6** Ratio (Unit Method) 93 Chapter 7** Visual Clues 105 Answers 105 Chapter 1 Rearranging Parts: Non-Circles 105 Chapter 2* Rearranging Parts: Circles (For Primary 6 only) 106 Chapter 3** Drawing Lines 106 Chapter 4 Overlapping Parts 107 Chapter 5** Difference in Areas 107 Chapter 6** Ratio (Unit Method) 108 Chapter 7** Visual Clues
* Chapter 2 Completely involves Circles Scenarios,
hence entire chapter is for Primary 6 only. ** Chapters 3, 5, 6 and 7 Problems in Examples and Let’s Apply sections
are grouped into Non-Circles and Circles Scenarios.

PREFACE Heuristics in Primary Maths Syllabus Heuristics is a specialised mathematical problem-solving concept. Mastering it facilitates efficiency in solving regular as well as challenging mathematical problems. The Ministry of Education in Singapore has incorporated 11 Problem-solving Heuristics into all primary-level mathematics syllabuses. Learning Heuristics Effectively However, the 11 Problem-solving Heuristics are not taught systematically; they have been dispersed into the regular curriculum. This not only makes it difficult for students to pick up Heuristics skills, but can also make mathematics confusing for them. For us parents, it is difficult to put aside the regular-syllabus mathematical concepts we were brought up on to re-learn Heuristics, much less teach our own children this new concept. Take the Heuristic technique of Algebraic Equations, for instance. Parents and educators may attempt to teach their children to solve complex mathematical questions using Algebraic Equations. This will only confuse their children as many are too young to grasp the abstract concept. Instead, other Heuristics techniques should be used, according to current primary-level mathematics syllabus. These and other challenges were what I observed firsthand during my years as a mathematics teacher, and provided me the impetus for my post-graduate studies, mathsHeuristics™ programmes and the Mastering Heuristics Series of guidebooks. About Mastering Heuristics Series This series of books is a culmination of my systematic thinking and experience, supported by professional instructional writing and editing, to facilitate understanding and mastery of Heuristics. I have neatly packaged Heuristics into main techniques (series of guidebooks) and mathematical scenarios (chapters within each guidebook). For each mathematical scenario, I offer several examples, showing how a particular heuristics technique may be applied, and then explaining the application in easy-to-follow steps and illustrations – without skipping a beat. This particular guidebook in the series deals specifically with Spatial Visualisation Techniques for Area and Perimeter – the use of the mind’s eye to manipulate given shapes to solve problems in Area and Perimeter. Mastery of this technique is necessary for solving especially-complex problems involving composite shapes. Spatial Visualisation is a very powerful problem-solving technique because it helps students literally see the solution to the problem posed. The Mastering Heuristics Series provides a comprehensive guide to Heuristics. While each guidebook introduces parents to how Heuristics works, students have the opportunity to see the technique applied in different scenarios and to get in some practice. For students enrolled in
mathsHeuristics programmes, each guidebook serves as a great companion, while keeping parents well-informed of what their children are learning.
Sunny Tan February 2014

HOW TO USE THIS BOOK
:BEFORE YOU BEGIN: This chapter instills basic but important steps and truths in the heuristics technique that must be applied across every question in the guidebook. This helps to standardise the given information for easy application of the technique being taught. In this guidebook on Spatial Visualisation, the steps include being familiar with parts and formulae of basic and derivative shapes.
:CHAPTERS AND SECTIONS: Various scenarios are neatly separated into different chapters and sections. This allows the heuristics technique to be learnt and applied in a focused manner.
:EXAMPLES: Each example of heuristics application comes with “Working” and “Explanation”, and includes “Confusion Alert” and “Alternative” boxes. In some chapters, the examples are grouped as follows: Non-circles Scenarios (for Primary 5 and Primary 6) Circles Scenarios (for Primary 6 only).
WORKING: “Working” shows heuristics application in action (how quick it is to solve a question).

EXPLANATION: “Explanation” shows the thought process (the detailed steps) behind the heuristics application. It takes readers through the solution in the following manner: step-by-step method so readers
can follow what happens at every stage. systematic approach so readers begin to see
a pattern in applying the technique. easy-to-follow steps so readers can quickly
understand the technique minus the frustration. For Spatial Visualisation, readers will see that its application always involves: identifying basic shapes, derivative shapes
and parts of shapes, analysing how these are inter-related, and
how these may be manipulated to arrive at the answer, and
the application of formulae (as listed in the “Before You Begin” Chapter) to carry out the actual solution.
This quickly helps readers see and understand how to approach each question, including picking out hints often provided in the questions.
“Confusion Alert” boxes highlight areas where students are likely to falter or make mistakes in. It also gives the rationale to help clarify their doubts. “Alternative” boxes show other approaches to the solution process. This acknowledges the different views that students may have to the problem.
:LET’S APPLY: Learning is only effective with practice. Hence, at the end of each chapter/section is a list of questions to hone readers’ skills in the heuristics technique. Where applicable, questions are grouped as follows: Non-circles Scenarios (for Primary 5 and Primary 6) Circles Scenarios (for Primary 6 only).
:ADDITIONAL TIPS: For on-going sharing and discussions on the use of Spatial Visualisation, visit: www.facebook.com/mathsheuristics For detailed workings to all the Spatial Visualisation “Let’s Apply” sections, visit: www.mathsheuristics.com/?page_id=472

BEFORE YOU BEGIN
:THINGS TO NOTE: 1. Where applicable, problems are grouped into Non-circles and Circles Scenarios.
Non-circles Scenarios are for Primary 5 and Primary 6. Circles Scenarios are for Primary 6 only.
Chapter 2 Completely involves Circles Scenarios,
hence entire chapter is for Primary 6 only. Chapters 3, 5, 6 and 7 Problems in Examples and Let’s Apply sections
are grouped into Non-Circles and Circles Scenarios.
2. You need to be familiar with the various formulae for different basic shapes – rectangle, square, triangle, circle. However, the topic on circles is only covered at Primary 6.
3. These formulae will also be needed when working with
derivative shapes – semi-circle (half circle), quadrant (quarter circle), etc. 4. Challenging higher-order questions involve a combination of shapes.
The combination sometimes forms a larger composite shape.
Examples of combination of shapes.
A semi-circle, a 41 circle and
a triangle within a square. A square within a circle.
Examples of composite shape. 2 triangles, forming a square. Various squares and rectangles
of different sizes, forming a square.

4. Basic shapes and their formulae.
a) Rectangle
Area = Length x Breadth = L x B Perimeter = 2 Length + 2 Breadth = 2L + 2B = 2 (L + B)
b) Square
Length = Breadth Area = Length x Length = L x L Perimeter = 4 x Length = 4 x L
c) Triangle
Area =
21 x Base x Height
= 21 x b x h
Perimeter = Sum of 3 sides
(
21 bh)

d) Circle
Diameter = 2 x radius Circumference = x diameter = 2 x x radius Area = x radius x radius
(2r) (d) (2r) (r2)
can assume various forms. Read the question carefully
to determine which form of to apply. = 3.14 =
722
Calculator

CHAPTER 1 REARRANGING PARTS: NON-CIRCLES
:EXAMPLES:
1. In the figure below, AB = BC = CD = DE = EF = FA. The area of the whole figure is 120 cm². Find the area of the shaded part.
:WORKING #1:
6 parts = 120
2 parts shaded = 62 x 120
= 31 x 120
= 40 Area of the shaded part is 40cm2.
:WORKING #2:
6 parts = 120
2 parts shaded = 62 x 120
= 31 x 120
= 40 Area of the shaded part is 40cm2.

:EXPLANATION #1:
Draw lines as shown. 6 identical triangles are formed. 6 identical triangles = 120
2 identical triangles shaded = 62 x 120
= 31 x 120
= 40 Area of the shaded part is 40 cm2.
:EXPLANATION #2:
Draw lines as shown. Looking at the newly-drawn lines, 6 identical segment triangles are formed.
Pay attention to the 2 parts shaded pink. Each pink-shaded part has a matching unshaded part. Switch the corresponding parts.

2 of the 6 identical segment triangles are shaded. 6 identical triangles = 120
2 identical triangles shaded = 62 x 120
= 31 x 120
= 40 Area of the shaded part is 40 cm2.

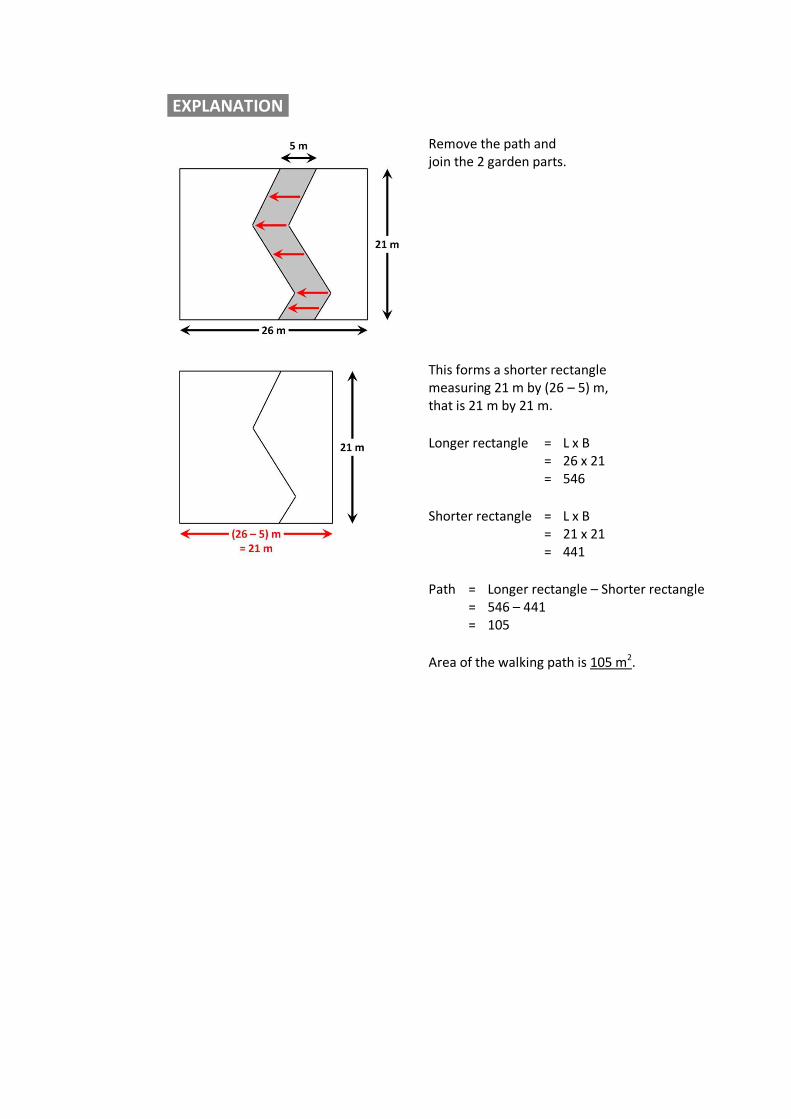
2. A rectangular garden measuring 21 m by 26 m has a 5-m walking path running through it. Find the area of the walking path.
:WORKING:
Garden and path = L x B = 26 x 21 = 546 Garden only = L x B = (26 – 5) x 21 = 21 x 21 = 441 Path = 546 – 441 = 105 Area of the walking path is 105 m2
:EXPLANATION:
Remove the path and join the 2 garden parts.
This forms a shorter rectangle measuring 21 m by (26 – 5) m, that is 21 m by 21 m. Longer rectangle = L x B = 26 x 21 = 546 Shorter rectangle = L x B = 21 x 21 = 441 Path = Longer rectangle – Shorter rectangle = 546 – 441 = 105 Area of the walking path is 105 m2.

3. Find the area of the trapezium shown in the figure below.
:WORKING:
The 2 triangles
= 21 x B x H
= 21 x 6 x 8
= 24
Base of the 2 triangles together = 20 – 10 = 10 = Base of rectangle Rectangle = 2 x The 2 triangle = 2 x 24 = 48
Trapezium = The 2 triangles
+ Rectangle = 24 + 48 = 72 Area of the trapezium is 72 cm2.

:EXPLANATION:
Draw lines as shown. Separate the rectangle, and join the 2 triangles.
There are now 2 figures – the rectangle and a larger triangle.
Let’s work on the larger triangle. In the larger triangle, the angle at the top is 180o – 53o – 37o, that is 90o. So, B = 6 and H = 8. Larger triangle
= 21 x B x H
= 21 x 6 x 8
= 24
Let’s work on the rectangle.
Larger triangle = 21 x B x H
= 21 x 10 x h
= 5 x h We already know that the larger triangle is 24 cm2. 5 x h = 24 h = 24 ÷ 5 = 4.8 Rectangle = B x H = 10 x 4.8 = 48
Let’s combine. Trapezium = Larger triangle + Rectangle = 24 + 48 = 72 Area of the trapezium is 72 cm2.
ALTERNATIVE Length of the rectangle = Base of the larger triangle = 10 Breadth of the rectangle = Height of the larger triangle = h
Larger triangle = 21 x B x H
= 21 x 10 x h
Rectangle = L x B = 10 x h So, rectangle = 2 x Larger triangle = 2 x 24 = 48

CHAPTER 2 REARRANGING PARTS: CIRCLES (For Primary 6 only)
:EXAMPLES: 1. The figure below shows a square, a quadrant and a semi-circle.
The area of the square is 240 cm². Find the area of the shaded parts.
(Take = 3.14)
:WORKING:
4
3 square = 4
3 x 240
= 180 Area of the shaded parts is 180 cm².

:EXPLANATION:
HINT Clues are always in the question itself. Focus only on shapes mentioned in the question. In this example, we can see triangles. However, since the question does not mention anything about triangles, we ignore the triangles. Instead, we focus on the square, quadrant and semi-circle which are mentioned in the question.
Draw half a diagonal line as shown.
Pay attention to the 2 parts shaded pink. Each pink-shaded part has a mirror unshaded part. Switch the corresponding parts.
This is what you will get.

Extend the half diagonal into a full diagonal. The square is now cut into 4 equal parts. 3 parts are shaded, while 1 part is unshaded.
4
3 of the square is shaded.
Whole square = 240
4
3 square = 4
3 x 240
= 180 Area of the shaded parts is 180 cm².
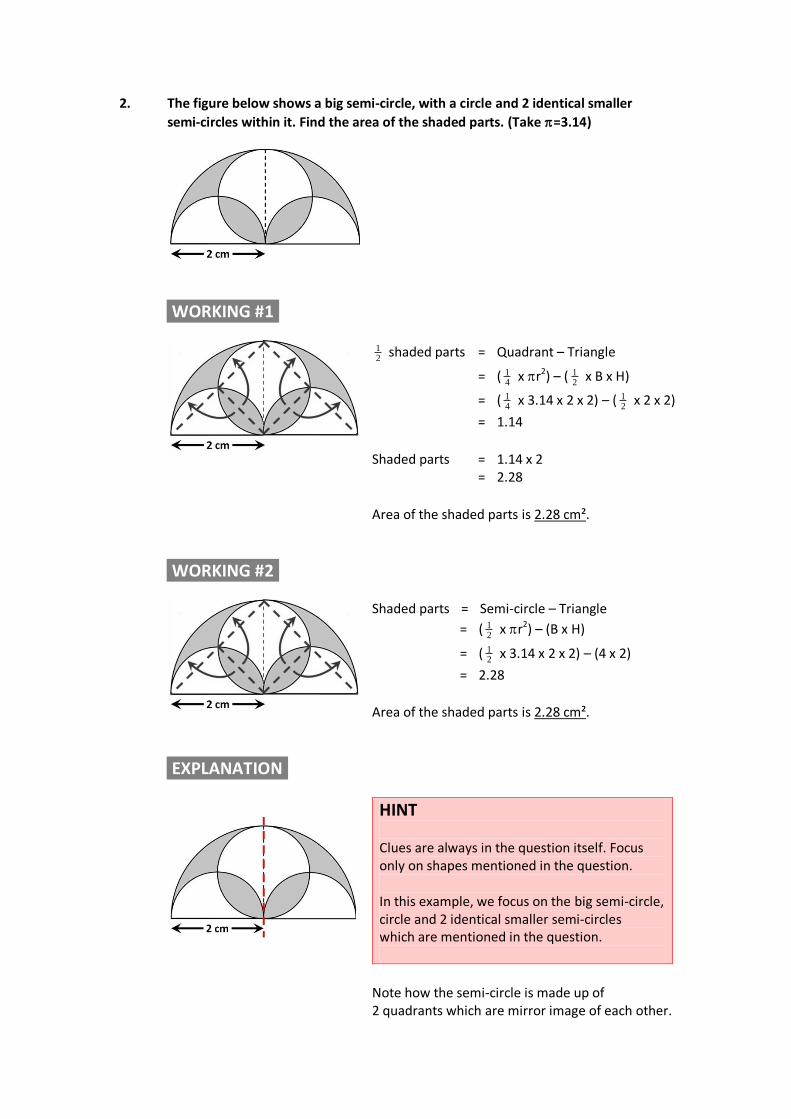
2. The figure below shows a big semi-circle, with a circle and 2 identical smaller
semi-circles within it. Find the area of the shaded parts. (Take =3.14)
:WORKING #1:
21 shaded parts = Quadrant – Triangle
= (41 x r2) – (
21 x B x H)
= (41 x 3.14 x 2 x 2) – (
21 x 2 x 2)
= 1.14 Shaded parts = 1.14 x 2 = 2.28 Area of the shaded parts is 2.28 cm².
:WORKING #2:
Shaded parts = Semi-circle – Triangle
= (21 x r2) – (B x H)
= (21 x 3.14 x 2 x 2) – (4 x 2)
= 2.28 Area of the shaded parts is 2.28 cm².
:EXPLANATION:
HINT Clues are always in the question itself. Focus only on shapes mentioned in the question. In this example, we focus on the big semi-circle, circle and 2 identical smaller semi-circles which are mentioned in the question.
Note how the semi-circle is made up of 2 quadrants which are mirror image of each other.

Let’s look at one of the quadrants. Draw lines as shown.
Pay attention to the 2 parts shaded pink. Each pink-shaded part has a matching unshaded part. Switch the corresponding parts.
This is what you will get. Shaded parts = Quadrant – Triangle
= (41 x r2) – (
21 x B x H)
= (41 x 3.14 x 2 x 2) – (
21 x 2 x 2)
= 1.14
Remember there are 2 identical quadrants. Total shaded parts = 1.14 x 2 = 2.28
ALTERNATIVE Shaded parts = Semi-circle – Triangle
= (21 x r2) – (B x H)
= (21 x 3.14 x 2 x 2) – (4 x 2)
= 2.28
Area of the shaded parts is 2.28 cm².

3. The diagram below shows an isosceles triangle ABC with 2 semi-circles within it. The semi-circles have a radius of 15 cm. Find the area of the shaded part.
(Take as 3.14)
:WORKING:
Square = L x B = 30 x 30 = 900 Circle = r2 = (3.14 x 15 x 15) = 706.5 4 corners = Square – Circle = 900 – 706.50 = 193.50
1 corner = 41 x 193.50
= 48.375 The shaded area is 48.475 cm2.

:EXPLANATION:
HINT Clues are always in the question itself. Focus only on shapes mentioned in the question. In this example, we focus on the triangle and 2 semi-circles which are mentioned in the question.
Note how the triangle is made up of 2 smaller triangles which are mirror image of each other.
Rotate the left smaller triangle clockwise on Point A, until Point B touches Point C.
This is what you will get. Square = L x B = 30 x 30 = 900 Circle = r2 = (3.14 x 15 x 15) = 706.5 4 corners = Square – Circle = 900 – 706.50 = 193.50
1 corner = 41 x 193.50
= 48.375 The shaded area is 48.475 cm2.
CHAPTER 3 DRAWING LINES
:EXAMPLES:
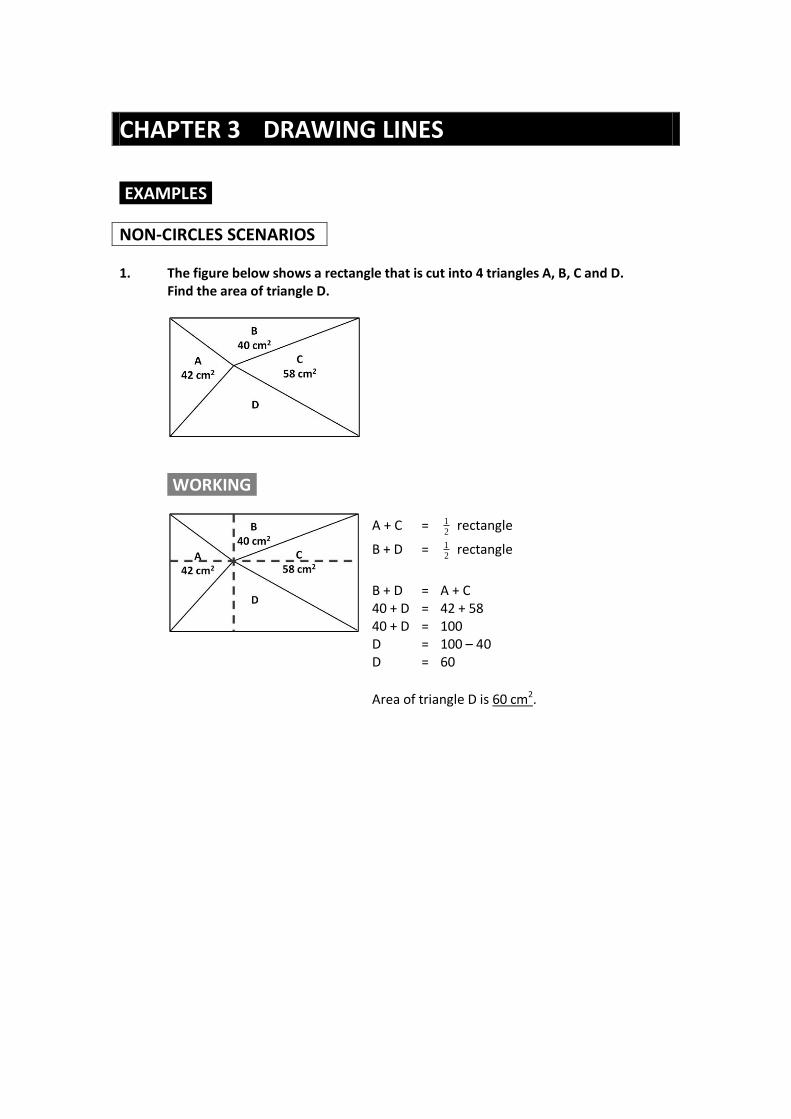
NON-CIRCLES SCENARIOS 1. The figure below shows a rectangle that is cut into 4 triangles A, B, C and D.
Find the area of triangle D.
:WORKING:
A + C = 21 rectangle
B + D = 21 rectangle
B + D = A + C 40 + D = 42 + 58 40 + D = 100 D = 100 – 40 D = 60 Area of triangle D is 60 cm2.

:EXPLANATION #1:
A + C = (21 x B x H1) + (
21 x B x H2)
= 21 x B x (H1 + H2)
= 21 x B x H Since H = H1 + H2
= 21 rectangle
B + D = (21 x B x H1) + (
21 x B x H2)
= 21 x B x (H1 + H2)
= 21 x B x H Since H = H1 + H2
= 21 rectangle
That means B + D = A + C
40 + D = 42 + 58 40 + D = 100 D = 100 – 40 D = 60 Area of triangle D is 60 cm2.

:EXPLANATION #2:
Draw lines as shown. The rectangle is divided into 4 small rectangles of different sizes. Within each small rectangle is a diagonal line. Each diagonal line cuts its respective small rectangle into 2 equal parts.
That means, any 1 part is 21 its
respective small rectangle.
Logically, if we take 21 of every small rectangle and
combine those areas, we get 21 the rectangle.
You can take 21 of every small rectangle as follows.
A + C = 21 rectangle
B + D = 21 rectangle
That means B + D = A + C 40 + D = 42 + 58 40 + D = 100 D = 100 – 40 D = 60 Area of triangle D is 60 cm2.
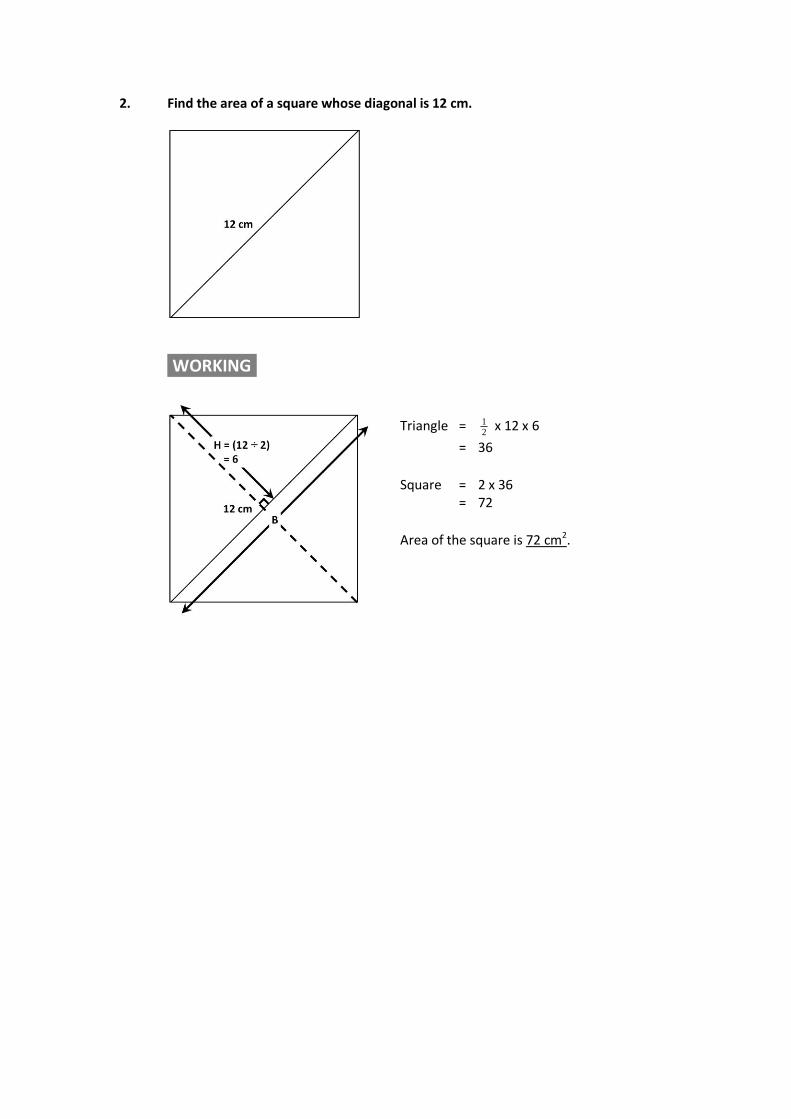
2. Find the area of a square whose diagonal is 12 cm.
:WORKING:
Triangle = 21 x 12 x 6
= 36 Square = 2 x 36 = 72 Area of the square is 72 cm2.

:EXPLANATION:
The diagonal divides the square into 2 identical triangles. Draw line as shown. This line is also a diagonal of the square, measuring 12 cm.
Let’s look at one of the triangles.
Height of triangle = 21 diagonal
= 12 ÷ 2 = 6
Triangle = 21 x B x H
= 21 x 12 x 6
= 36 Square = 2 x Triangles = 2 x 36 = 72 Area of the square is 72 cm2.

CHAPTER 5 DIFFERENCE IN AREA
:EXAMPLES:
NON-CIRCLES SCENARIOS 1. The figure below shows a square and a triangle overlapping each other partially.
The area of the square and triangle is 90cm² and 65cm² respectively. Find the difference between the two shaded areas.
:WORKING:
The difference between the two shaded areas is 25 cm2.

:EXPLANATION:
Label the parts as shown.
Using the model method, draw all the information.
Square: A + B = 90
Triangle: A + C = 65
Visually, it is obvious that we can find out what is (B – C), which is what we want – the difference between B and C.
ALTERNATIVE Square: A + B = 90 Triangle: A + C = 65 Square – Triangle: (A + B) – (A + C) = (90 – 65) B – C = 25
The difference between the two shaded areas is 25 cm2.

CIRCLES SCENARIOS (For Primary 6 only) 2. The figure is formed by a circle of diameter 20 cm and a right-angled isosceles
triangle. Find the difference in the area between the two shaded parts.
(Take = 3.14)
:WORKING:
A + B = 2
1 x B x H
= 2
1 x 20 x 20
= 200
A + C = 2
1 x 3.14 x 10 x 10
= 157
The difference between the two shaded areas is 43 cm2.
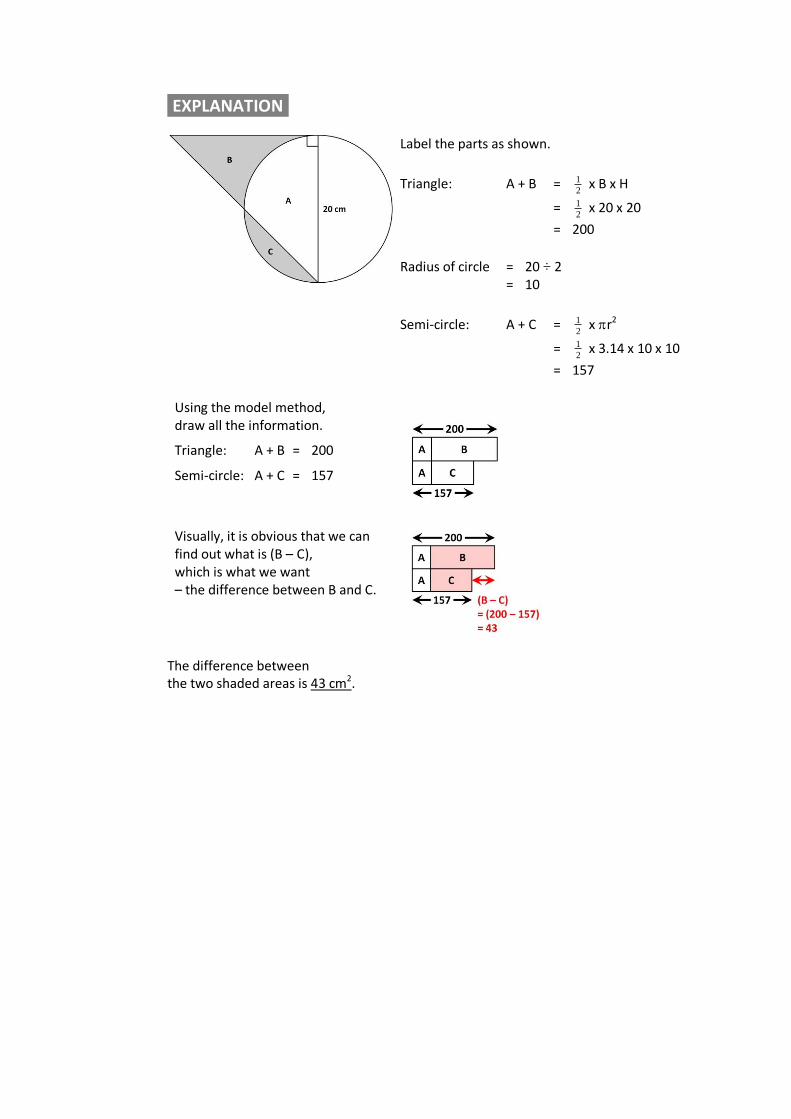
:EXPLANATION:
Label the parts as shown.
Triangle: A + B = 2
1 x B x H
= 2
1 x 20 x 20
= 200 Radius of circle = 20 ÷ 2 = 10
Semi-circle: A + C = 2
1 x r2
= 2
1 x 3.14 x 10 x 10
= 157
Using the model method, draw all the information.
Triangle: A + B = 200
Semi-circle: A + C = 157
Visually, it is obvious that we can find out what is (B – C), which is what we want – the difference between B and C.
The difference between the two shaded areas is 43 cm2.

CHAPTER 7 VISUAL CLUES
:EXAMPLES:
NON-CIRCLES SCENARIOS 1. The diagram below shows 4 right-angled triangles arranged to form a big square.
Each triangle has a base of 5 cm and height of 12 cm. Find the perimeter of the big square.
:WORKING:
4 triangles: 4 x (2
1 x 5 x 12) = 120
Small square: 7 x 7 = 49 Big square: 120 + 49 = 169 L x L = 169 If L = 12 12 x 12 = 144 If L = 13 13 x 13 = 169 Hence, L = 13. Perimeter of big square = 4 x L = 4 x 13 = 52 Perimeter of the big square if 52 cm.
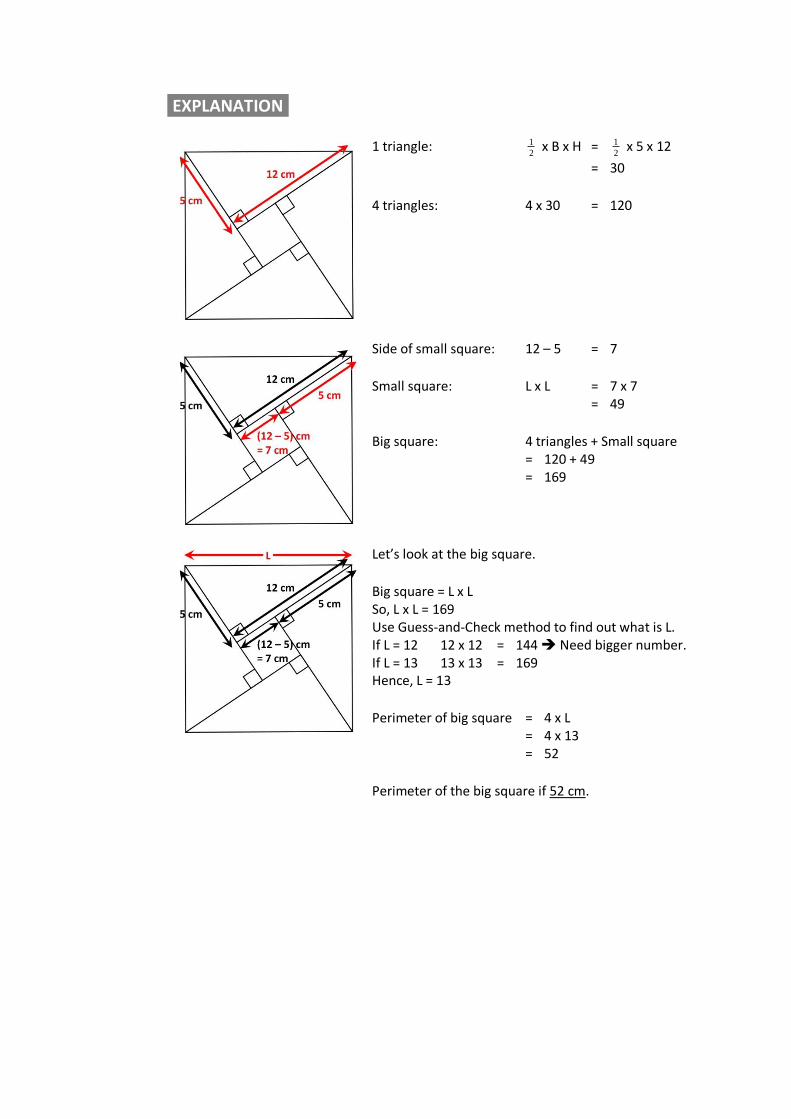
:EXPLANATION:
1 triangle: 2
1 x B x H = 2
1 x 5 x 12
= 30 4 triangles: 4 x 30 = 120
Side of small square: 12 – 5 = 7 Small square: L x L = 7 x 7 = 49 Big square: 4 triangles + Small square = 120 + 49 = 169
Let’s look at the big square. Big square = L x L So, L x L = 169 Use Guess-and-Check method to find out what is L. If L = 12 12 x 12 = 144 Need bigger number. If L = 13 13 x 13 = 169 Hence, L = 13 Perimeter of big square = 4 x L = 4 x 13 = 52 Perimeter of the big square if 52 cm.