Embed Size (px)
Citation preview
Z© 2012 Herman Miller, Inc. Zeeland, Michigan. Printed in the U.S.A.® Y, Z, Setu are among the registered trademarks of Herman Miller, Inc.TM Sense, Setu, and Tu are among the trademarks of Herman Miller, Inc.
Illustrations and specifications are based on the latest product information available at the time of publication. The right is reserved to make changes in design and specifications at any time, without notice, and also to discontinue products.
Part no. 1b5vn8 rev B.
1
Y Setu® Disassembly for Recycling
Tools Required:
Power Driver Small Flathead Screwdriver
Safety GlassesT-27 Torx Bit(2.75” or longer)
2 lbs Hammer
Utility Knife Rubber Mallet
T-20 Torx Driver
Materials Identification and Segregation:
Disassembly Steps:
Where possible, plastic components are marked with ASTM recycling codes. Use these codes to identify material type for recycling. Non marked components should be treated as mixed plastic. Ferrous metals can be identified using a small magnet for recycling. Non-ferrous metals should be separated and recycled separately.
2.1 Grasp and pull to remove Casters from the Base.
1.1 Lay chair on back.
Caster
Z© 2012 Herman Miller, Inc. Zeeland, Michigan. Printed in the U.S.A.® Y, Z, Setu are among the registered trademarks of Herman Miller, Inc.TM Sense, Setu, and Tu are among the trademarks of Herman Miller, Inc.
Illustrations and specifications are based on the latest product information available at the time of publication. The right is reserved to make changes in design and specifications at any time, without notice, and also to discontinue products.
Part no. 1b5vn8 rev B.
2
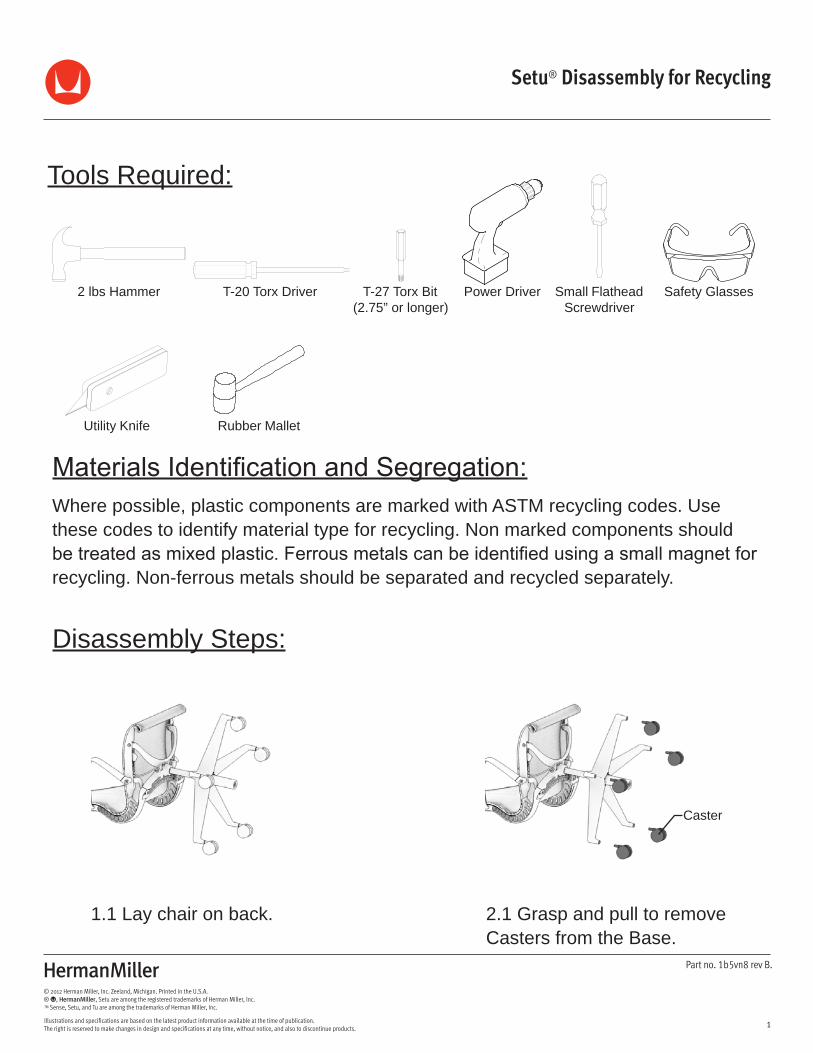
5.1 Use small Flathead Screwdriver to disengage black plastic connector of Height Adjustment Cable from top of Cylinder.
6.1 Use small Flathead Screwdriver to disengage ball of Height AdjustmentCable from top of Cylinder.
3.1 Hold Base legs firmly and strike the bottom of cylinder with rubber mallet until Base comes loose.Caution: Do not strike cylinder directly with metal hammer, use rubber mallet only!
Height AdjustmentCable
Screwdriver
Rubber Mallet
4.1 Remove Base.

Z© 2012 Herman Miller, Inc. Zeeland, Michigan. Printed in the U.S.A.® Y, Z, Setu are among the registered trademarks of Herman Miller, Inc.TM Sense, Setu, and Tu are among the trademarks of Herman Miller, Inc.
Illustrations and specifications are based on the latest product information available at the time of publication. The right is reserved to make changes in design and specifications at any time, without notice, and also to discontinue products.
Part no. 1b5vn8 rev B.
3
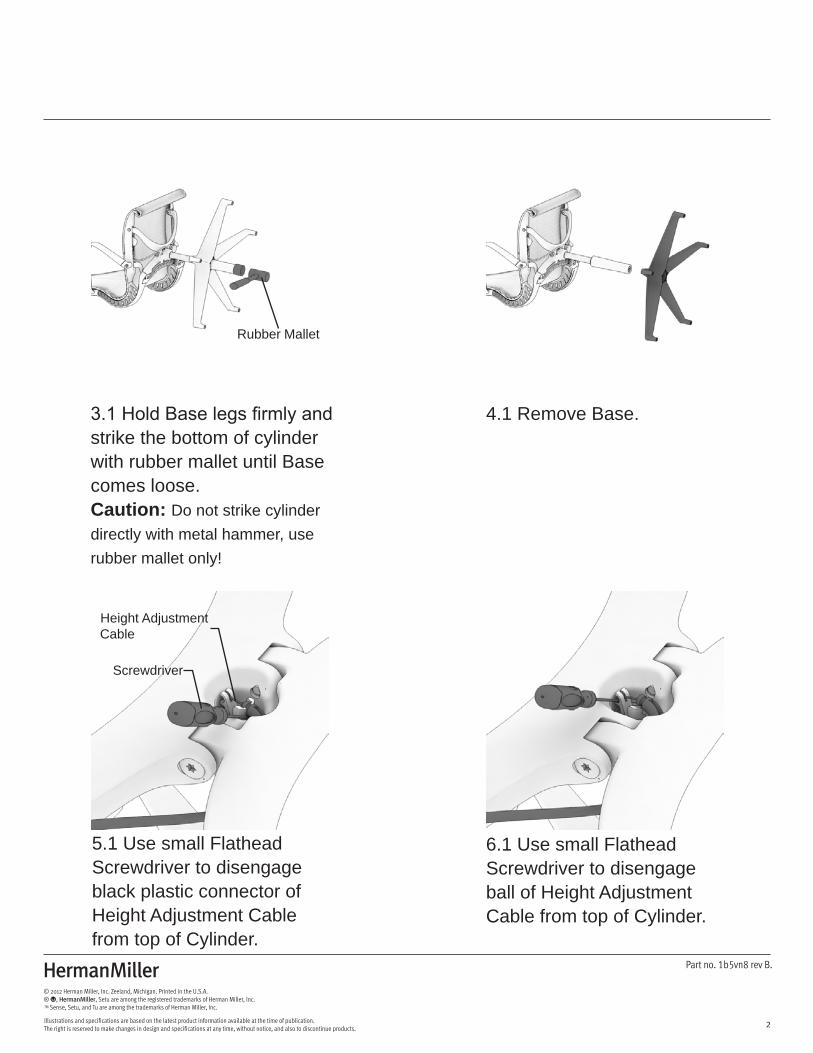
9.1 Use a T-20 Torx Driver to remove screws.
10.1 Remove Height Adjustment Assembly.
7.1 Place one hand on can ofCylinder and hit the bottom of the chair with hammer until Cylinder seperates from chair.
8.1 Remove Cylinder.
Hit hammer here
T-20 Torx Driver

Z© 2012 Herman Miller, Inc. Zeeland, Michigan. Printed in the U.S.A.® Y, Z, Setu are among the registered trademarks of Herman Miller, Inc.TM Sense, Setu, and Tu are among the trademarks of Herman Miller, Inc.
Illustrations and specifications are based on the latest product information available at the time of publication. The right is reserved to make changes in design and specifications at any time, without notice, and also to discontinue products.
Part no. 1b5vn8 rev B.
4
12.2 Remove Shoulder Bolts.
12.1 Using a Power Driver with a T-27 bit, remove Shoulder Bolts.
11.1 Using a Utility Knife cut Seat Fabric in half.
Power Driver

Z© 2012 Herman Miller, Inc. Zeeland, Michigan. Printed in the U.S.A.® Y, Z, Setu are among the registered trademarks of Herman Miller, Inc.TM Sense, Setu, and Tu are among the trademarks of Herman Miller, Inc.
Illustrations and specifications are based on the latest product information available at the time of publication. The right is reserved to make changes in design and specifications at any time, without notice, and also to discontinue products.
Part no. 1b5vn8 rev B.
5
13.1 Using a Power Driver with a T-27 bit, remove Bolts.
14.1 Remove Arms. 15.1 Remove Inner Bushing.

Z© 2012 Herman Miller, Inc. Zeeland, Michigan. Printed in the U.S.A.® Y, Z, Setu are among the registered trademarks of Herman Miller, Inc.TM Sense, Setu, and Tu are among the trademarks of Herman Miller, Inc.
Illustrations and specifications are based on the latest product information available at the time of publication. The right is reserved to make changes in design and specifications at any time, without notice, and also to discontinue products.
Part no. 1b5vn8 rev B.
6
18.1 Remove T-Nut from No Arm Plug.
16.1 Remove T-Nut from Arm. 17.1 Remove No Arm Plug from opening in Beam.
Z© 2012 Herman Miller, Inc. Zeeland, Michigan. Printed in the U.S.A.® Y, Z, Setu are among the registered trademarks of Herman Miller, Inc.TM Sense, Setu, and Tu are among the trademarks of Herman Miller, Inc.
Illustrations and specifications are based on the latest product information available at the time of publication. The right is reserved to make changes in design and specifications at any time, without notice, and also to discontinue products.
Part no. 1b5vn8 rev B.
7
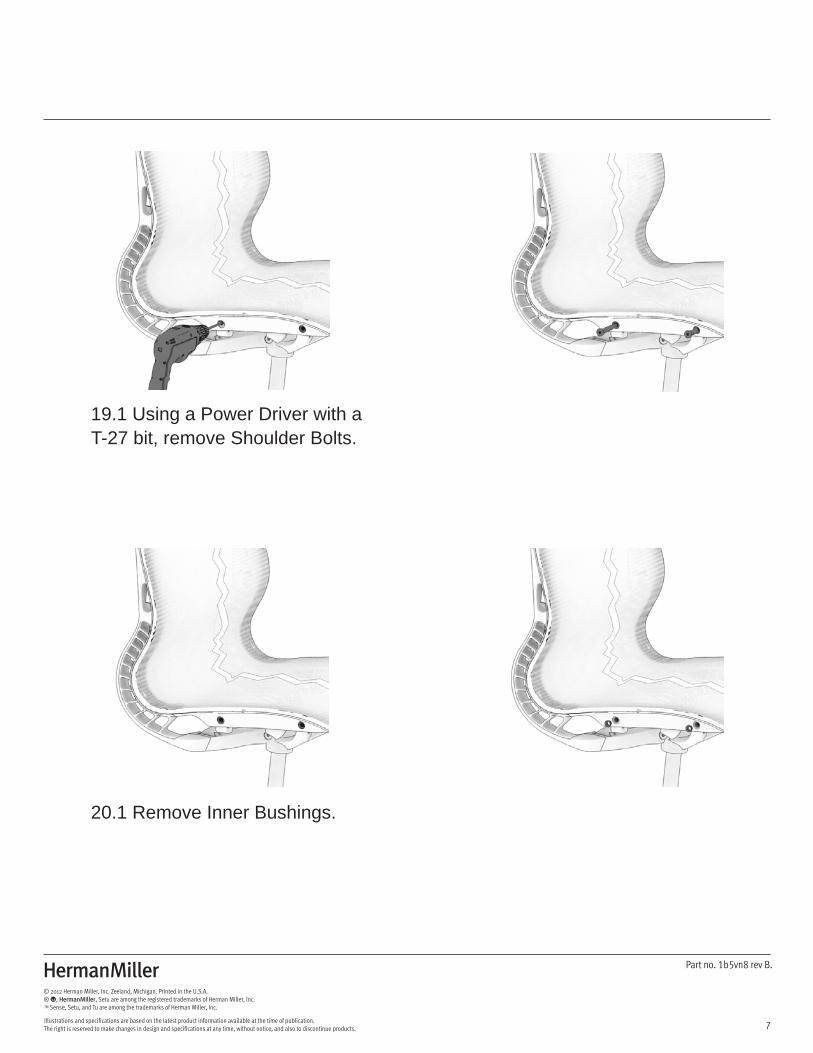
20.1 Remove Inner Bushings.
19.1 Using a Power Driver with a T-27 bit, remove Shoulder Bolts.
Z© 2012 Herman Miller, Inc. Zeeland, Michigan. Printed in the U.S.A.® Y, Z, Setu are among the registered trademarks of Herman Miller, Inc.TM Sense, Setu, and Tu are among the trademarks of Herman Miller, Inc.
Illustrations and specifications are based on the latest product information available at the time of publication. The right is reserved to make changes in design and specifications at any time, without notice, and also to discontinue products.
Part no. 1b5vn8 rev B.
8
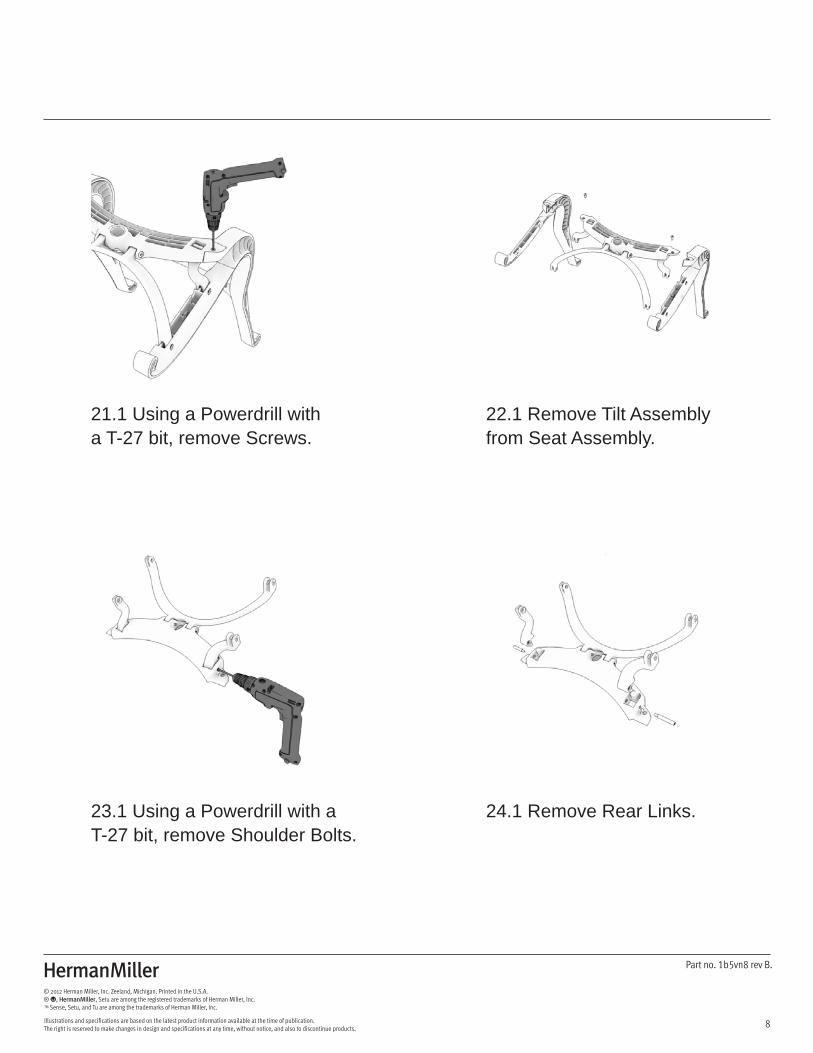
23.1 Using a Powerdrill with a T-27 bit, remove Shoulder Bolts.
24.1 Remove Rear Links.
21.1 Using a Powerdrill with a T-27 bit, remove Screws.
22.1 Remove Tilt Assembly from Seat Assembly.
Z© 2012 Herman Miller, Inc. Zeeland, Michigan. Printed in the U.S.A.® Y, Z, Setu are among the registered trademarks of Herman Miller, Inc.TM Sense, Setu, and Tu are among the trademarks of Herman Miller, Inc.
Illustrations and specifications are based on the latest product information available at the time of publication. The right is reserved to make changes in design and specifications at any time, without notice, and also to discontinue products.
Part no. 1b5vn8 rev B.
9
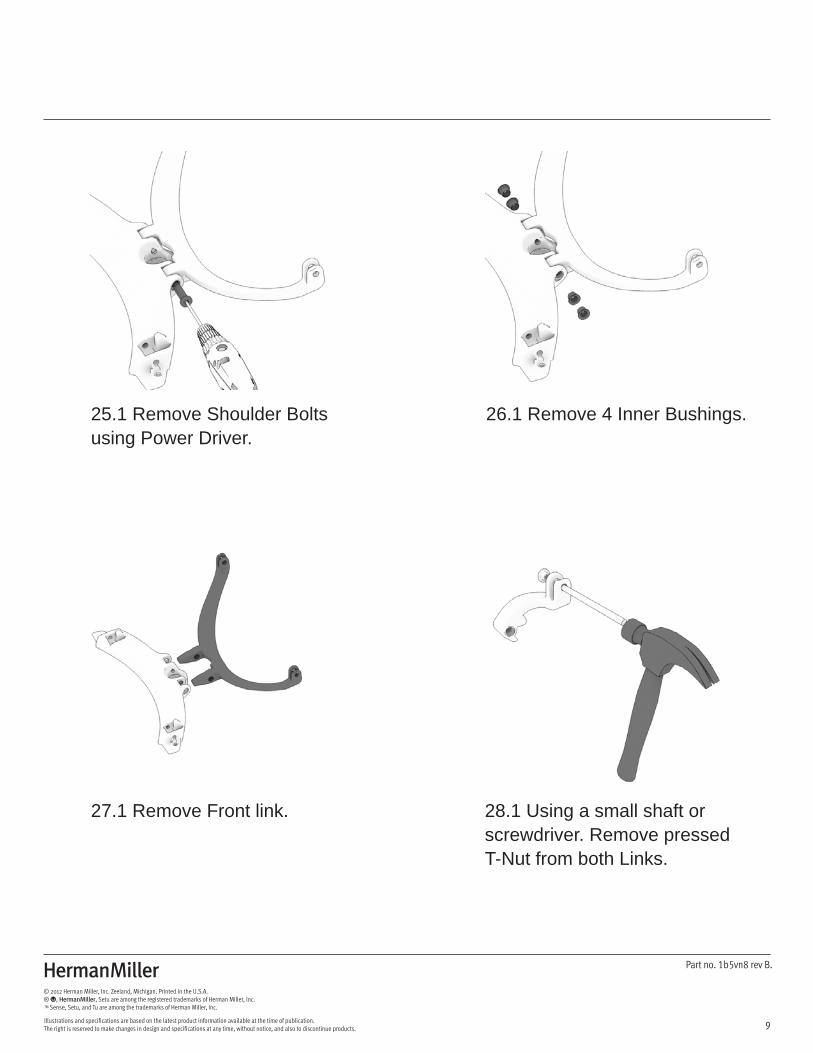
28.1 Using a small shaft or screwdriver. Remove pressed T-Nut from both Links.
27.1 Remove Front link.
25.1 Remove Shoulder Bolts using Power Driver.
26.1 Remove 4 Inner Bushings.
Z© 2012 Herman Miller, Inc. Zeeland, Michigan. Printed in the U.S.A.® Y, Z, Setu are among the registered trademarks of Herman Miller, Inc.TM Sense, Setu, and Tu are among the trademarks of Herman Miller, Inc.
Illustrations and specifications are based on the latest product information available at the time of publication. The right is reserved to make changes in design and specifications at any time, without notice, and also to discontinue products.
Part no. 1b5vn8 rev B.
10
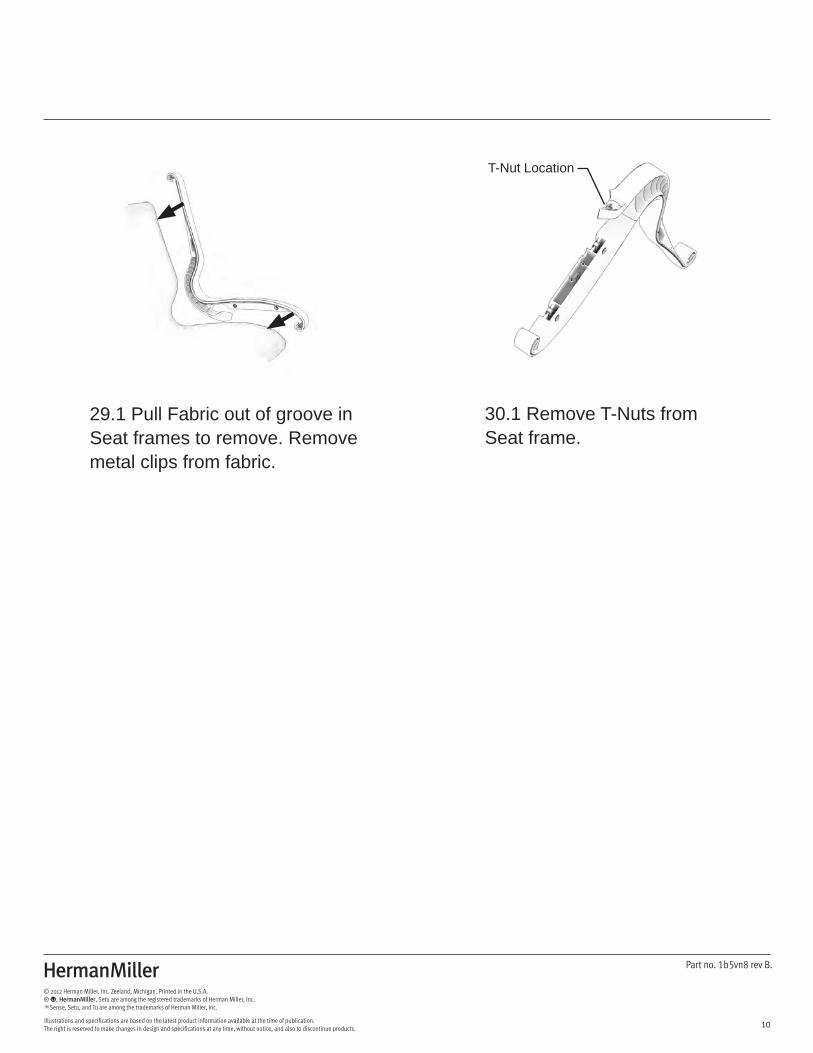
30.1 Remove T-Nuts from Seat frame.
29.1 Pull Fabric out of groove in Seat frames to remove. Remove metal clips from fabric.
T-Nut Location