Embed Size (px)
Citation preview
© SkillPatha division of the Graceland College Center for Professional Development and Lifelong Learning, Inc.All rights reserved, including the right to reproduce this material or any part thereof in any manner.
Maximizing the Power of
Excel®
With Macros and Modules
V536_101618 2
MAXIMIZING THE POWER OF EXCEL® WITH MACROS AND MODULES
If you’ve done a lot of work in Excel®, you’ve probably heard about macros, modules or VBA. Learning how to use them will help you do your work much faster!
Macros, modules and VBA are the ingredients used to create custom Excel® commands and shortcuts.
Maximizing the Power of Excel® With Macros and Modules will show you how to automate most of the work you perform manually and save you tons of time on documents and reports you use regularly.
You could learn by trial and error, but that can be a slow, arduous process. In this session, you’ll learn steps for creating, using and programming macros.
Course Overview
Often, we inherit macro-enabled workbooks that contain “secret codes” that cause the workbook to perform commands outside the realm of built-in Excel® commands.
In this session, you’ll learn the essentials of working with macros and modules—building blocks of custom Excel® features for you and co-workers.
When macros work well, you’re happy. When they stop working, you’re perplexed and frustrated. In this lesson, you’ll also earn how to troubleshoot and debug those pesky macros.
This workbook contains many images of user interface elements that you’ll work with while performing tasks in Excel® on a Windows computer. Depending on your screen resolution or program window width, the Excel® ribbon on your screen might look different from that shown in this workbook. (If you turn on Touch mode, the ribbon
displays significantly fewer commands than in Mouse mode.)
As a result, SkillSteps that involve the ribbon might require a bit of adaptation.
If differences between your display settings and ours cause a button to appear differently on your screen than it does in this workbook’s illustration, you can easily adapt the steps to locate the command.
Learning Objectives
• Macros … explained in plain English
• Understand modules and their unique role in programming
• How to create loops to repeat commands multiple times
• Learn when to use macros and when to use VBA (Visual Basic® for Applications)
Notes to Readers
Throughout this workbook you’ll see study aids that will help you master Microsoft® Excel®.
• SkillSteps: The fundamental steps to get to a feature
• SkillTips: Special guidelines for becoming a power user
• Strategies: Techniques for mastering Microsoft® Excel®
Introduction
V536_1016183
PARTICIPANT NOTEBOOK
Macros … Explained in Plain English
A macro is a pre-written or recorded sequence of commands that can be replayed or triggered to issue those commands as needed.
While Excel® comes with dozens of built-in commands that are triggered by buttons on a ribbon, there may be times when the command you need is too specific to be part of the program’s standard collection.
For that reason, you need to know the Excel® Visual Basic® for Applications programming environment so that you can:
• Understand and repair macros that are built on VBA code
• Build your own VBA commands for Excel® from scratch
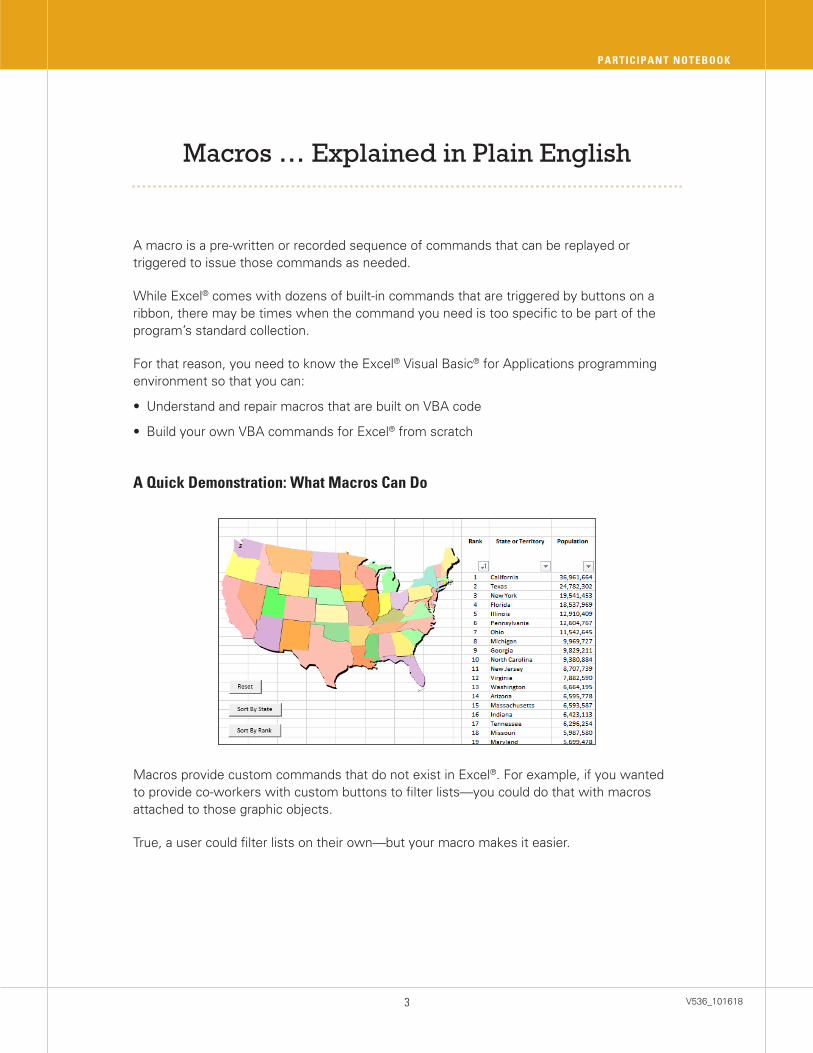
A Quick Demonstration: What Macros Can Do
Macros provide custom commands that do not exist in Excel®. For example, if you wanted to provide co-workers with custom buttons to filter lists—you could do that with macros attached to those graphic objects.
True, a user could filter lists on their own—but your macro makes it easier.
V536_101618 4
MAXIMIZING THE POWER OF EXCEL® WITH MACROS AND MODULES
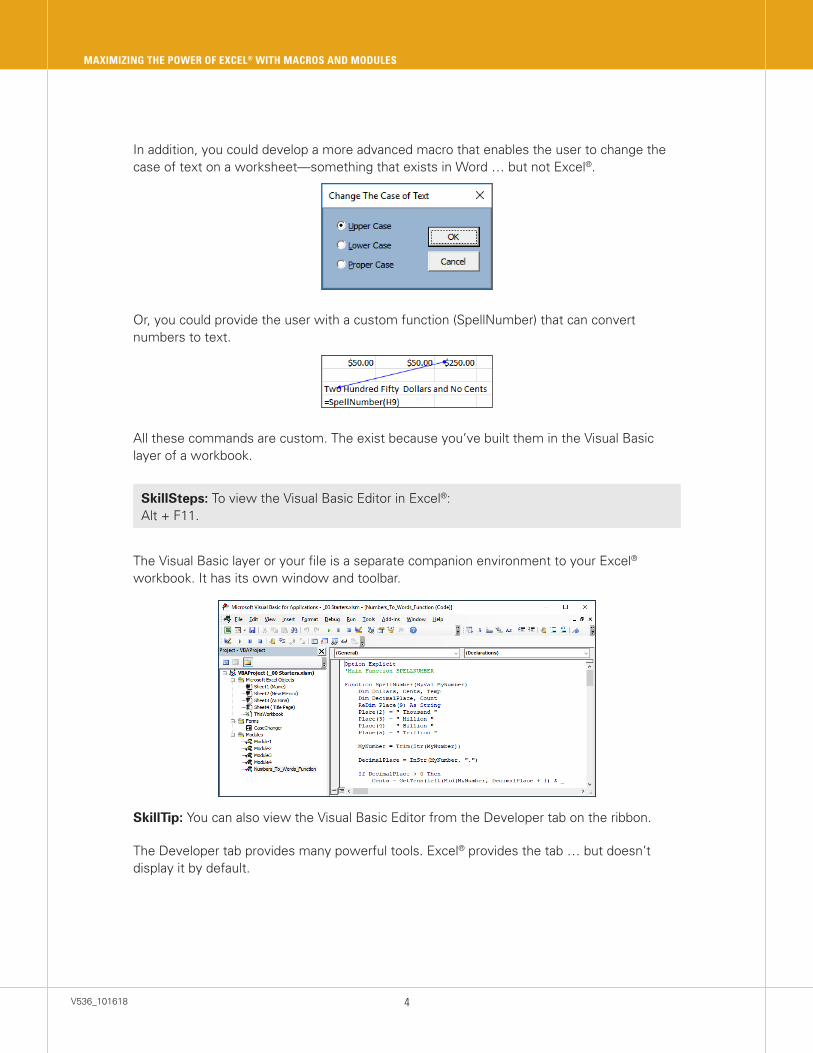
In addition, you could develop a more advanced macro that enables the user to change the case of text on a worksheet—something that exists in Word … but not Excel®.
Or, you could provide the user with a custom function (SpellNumber) that can convert numbers to text.
All these commands are custom. The exist because you’ve built them in the Visual Basic layer of a workbook.
SkillSteps: To view the Visual Basic Editor in Excel®: Alt + F11.
The Visual Basic layer or your file is a separate companion environment to your Excel® workbook. It has its own window and toolbar.
SkillTip: You can also view the Visual Basic Editor from the Developer tab on the ribbon.
The Developer tab provides many powerful tools. Excel® provides the tab … but doesn’t display it by default.
V536_1016185
PARTICIPANT NOTEBOOK
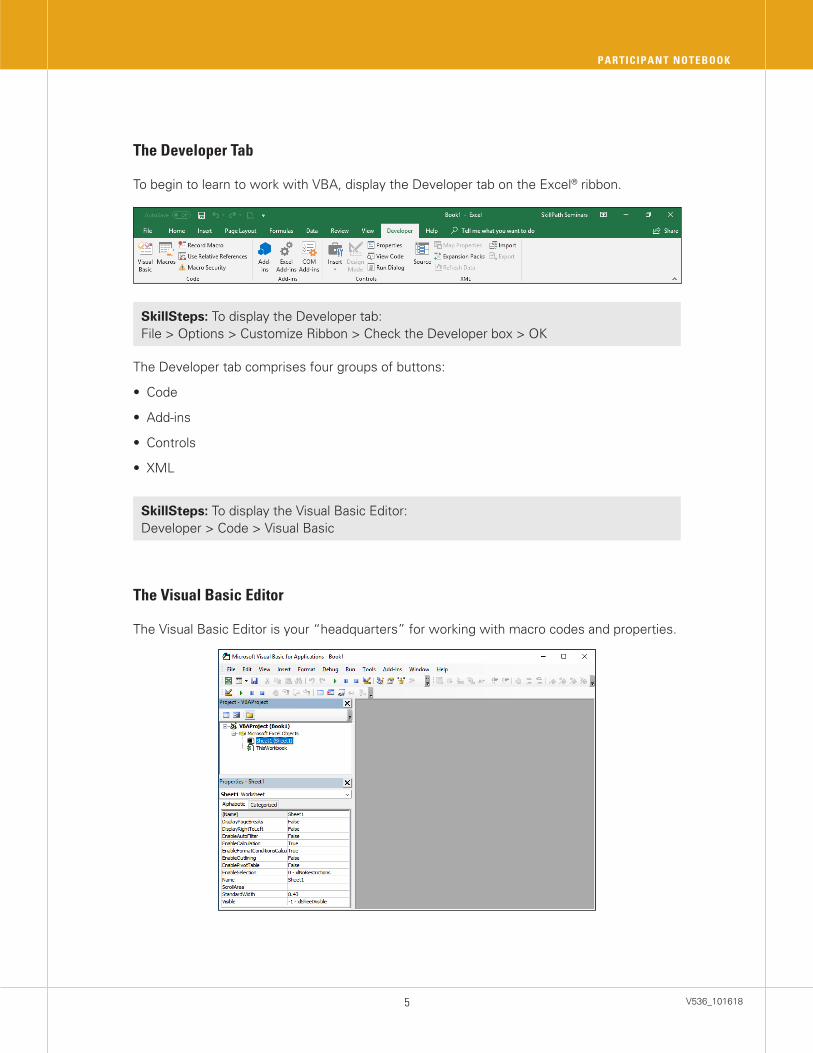
The Developer Tab
To begin to learn to work with VBA, display the Developer tab on the Excel® ribbon.
SkillSteps: To display the Developer tab: File > Options > Customize Ribbon > Check the Developer box > OK
The Developer tab comprises four groups of buttons:
• Code
• Add-ins
• Controls
• XML
SkillSteps: To display the Visual Basic Editor: Developer > Code > Visual Basic
The Visual Basic Editor
The Visual Basic Editor is your “headquarters” for working with macro codes and properties.
V536_101618 6
MAXIMIZING THE POWER OF EXCEL® WITH MACROS AND MODULES
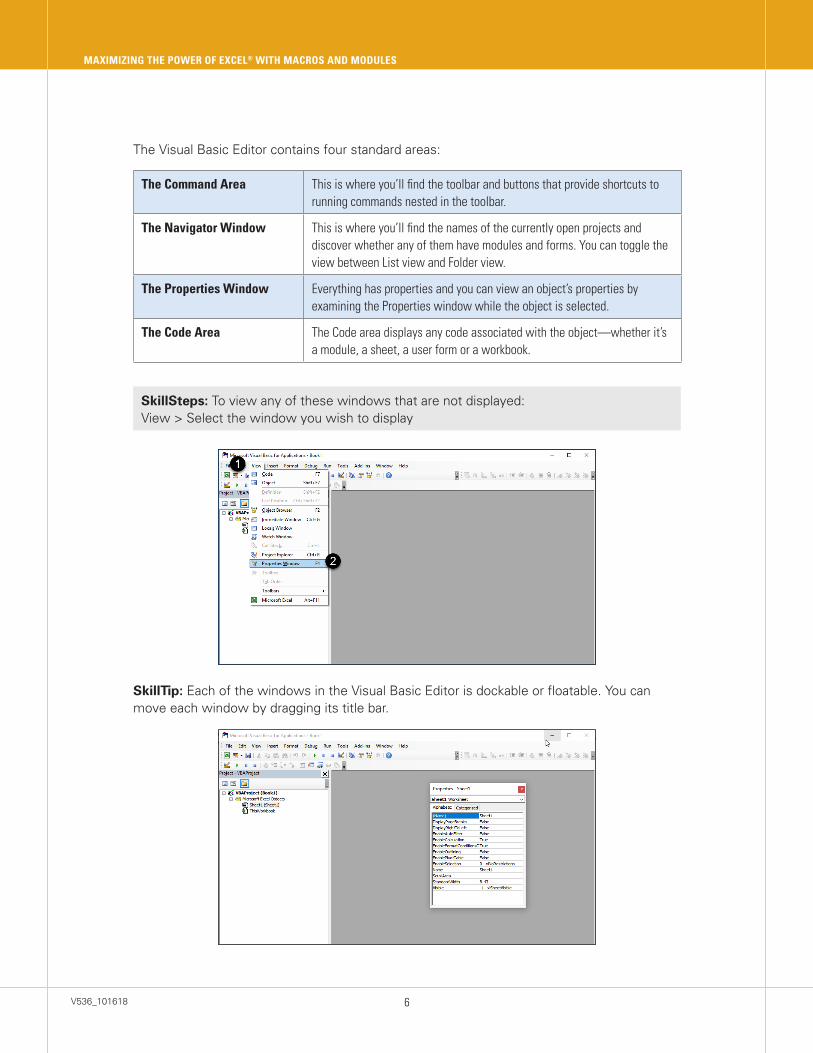
The Visual Basic Editor contains four standard areas:
The Command Area This is where you’ll find the toolbar and buttons that provide shortcuts to running commands nested in the toolbar.
The Navigator Window This is where you’ll find the names of the currently open projects and discover whether any of them have modules and forms. You can toggle the view between List view and Folder view.
The Properties Window Everything has properties and you can view an object’s properties by examining the Properties window while the object is selected.
The Code Area The Code area displays any code associated with the object—whether it’s a module, a sheet, a user form or a workbook.
SkillSteps: To view any of these windows that are not displayed: View > Select the window you wish to display
SkillTip: Each of the windows in the Visual Basic Editor is dockable or floatable. You can move each window by dragging its title bar.
V536_1016187
PARTICIPANT NOTEBOOK
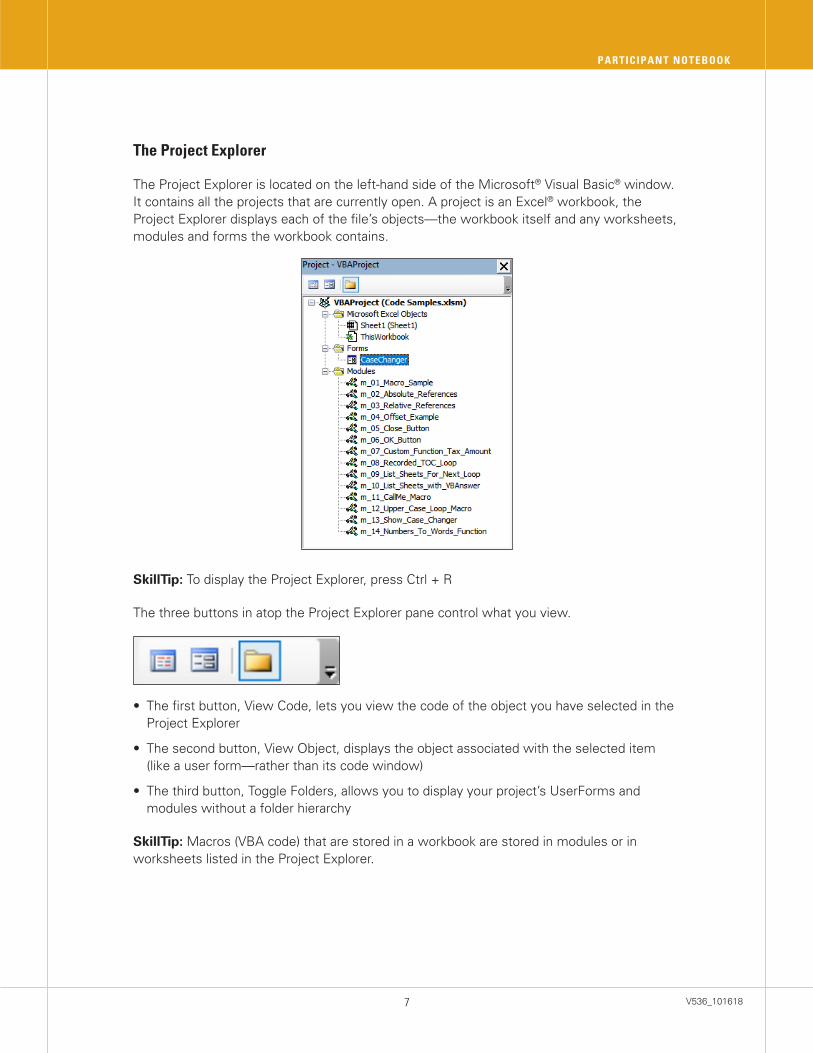
The Project Explorer
The Project Explorer is located on the left-hand side of the Microsoft® Visual Basic® window. It contains all the projects that are currently open. A project is an Excel® workbook, the Project Explorer displays each of the file’s objects—the workbook itself and any worksheets, modules and forms the workbook contains.
SkillTip: To display the Project Explorer, press Ctrl + R
The three buttons in atop the Project Explorer pane control what you view.
• The first button, View Code, lets you view the code of the object you have selected in the Project Explorer
• The second button, View Object, displays the object associated with the selected item (like a user form—rather than its code window)
• The third button, Toggle Folders, allows you to display your project’s UserForms and modules without a folder hierarchy
SkillTip: Macros (VBA code) that are stored in a workbook are stored in modules or in worksheets listed in the Project Explorer.
V536_101618 8
MAXIMIZING THE POWER OF EXCEL® WITH MACROS AND MODULES
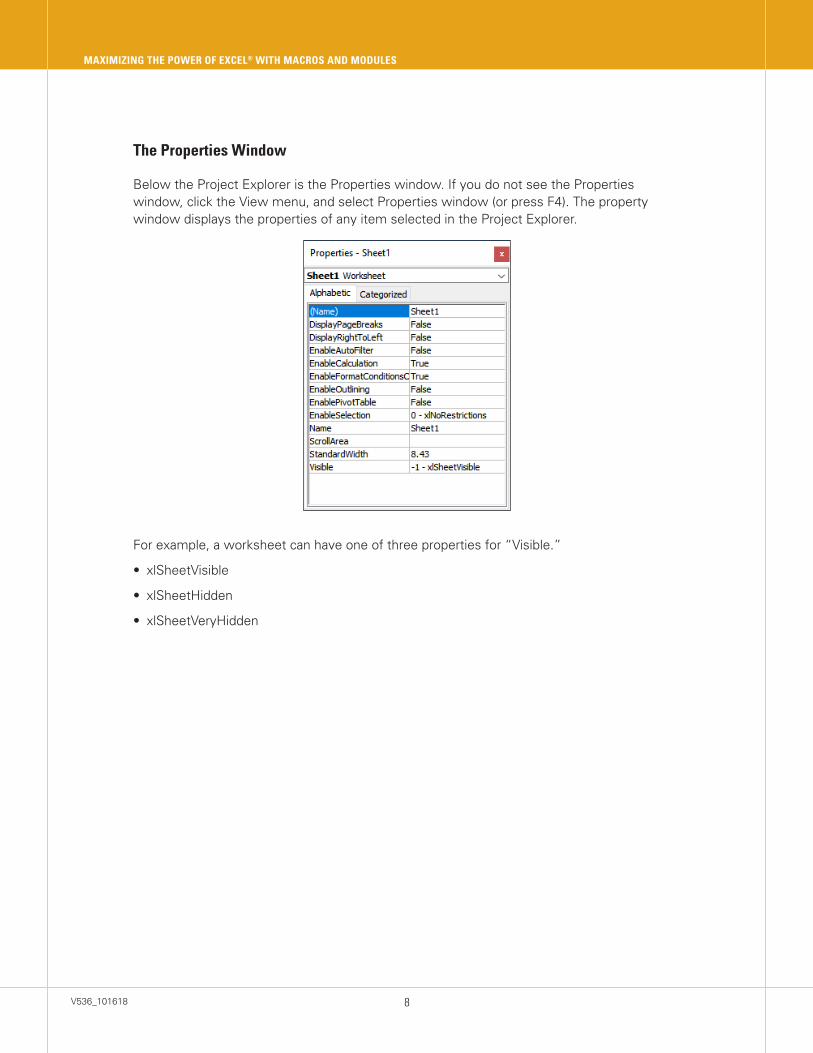
The Properties Window
Below the Project Explorer is the Properties window. If you do not see the Properties window, click the View menu, and select Properties window (or press F4). The property window displays the properties of any item selected in the Project Explorer.
For example, a worksheet can have one of three properties for “Visible.”
• xlSheetVisible
• xlSheetHidden
• xlSheetVeryHidden
V536_1016189
PARTICIPANT NOTEBOOK
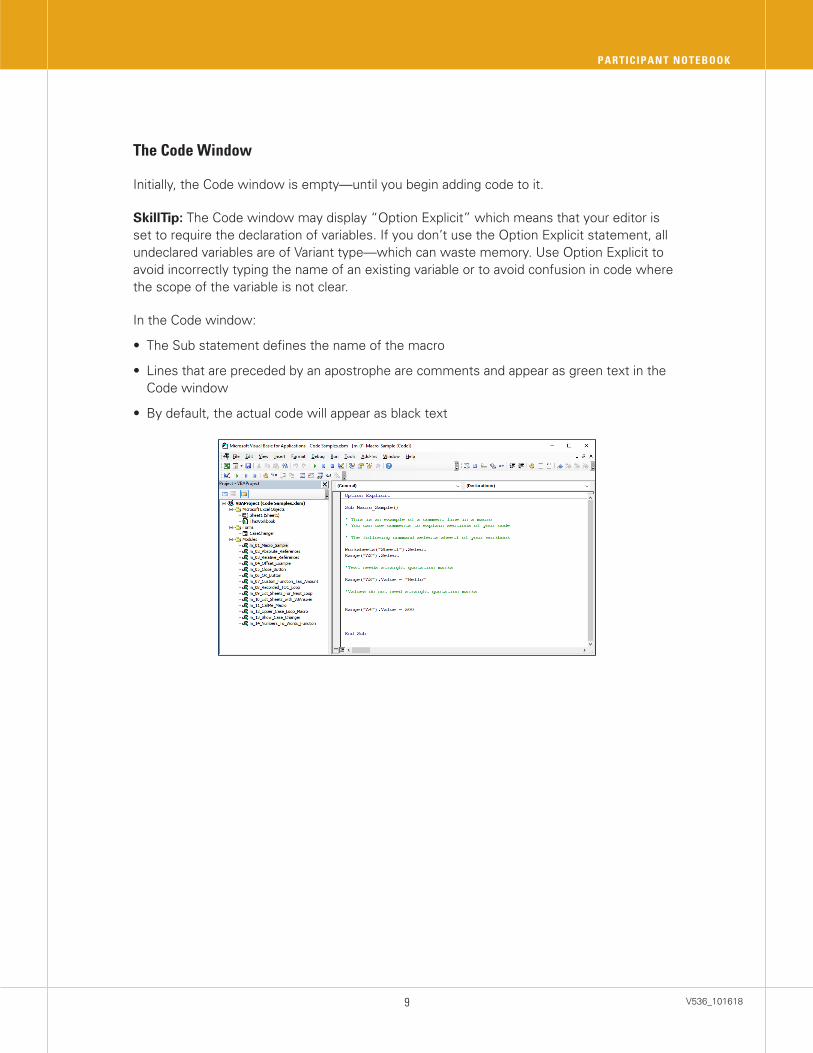
The Code Window
Initially, the Code window is empty—until you begin adding code to it.
SkillTip: The Code window may display “Option Explicit” which means that your editor is set to require the declaration of variables. If you don’t use the Option Explicit statement, all undeclared variables are of Variant type—which can waste memory. Use Option Explicit to avoid incorrectly typing the name of an existing variable or to avoid confusion in code where the scope of the variable is not clear.
In the Code window:
• The Sub statement defines the name of the macro
• Lines that are preceded by an apostrophe are comments and appear as green text in the Code window
• By default, the actual code will appear as black text
V536_101618 10
MAXIMIZING THE POWER OF EXCEL® WITH MACROS AND MODULES
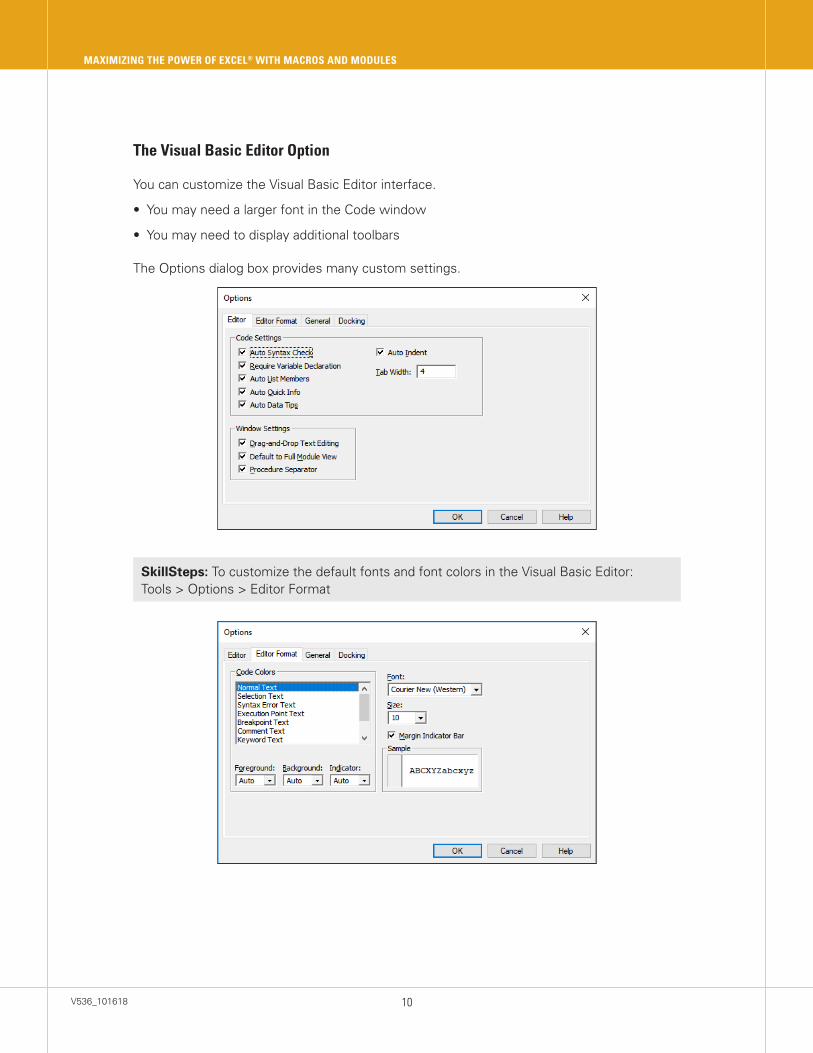
The Visual Basic Editor Option
You can customize the Visual Basic Editor interface.
• You may need a larger font in the Code window
• You may need to display additional toolbars
The Options dialog box provides many custom settings.
SkillSteps: To customize the default fonts and font colors in the Visual Basic Editor: Tools > Options > Editor Format

V536_10161811
PARTICIPANT NOTEBOOK
Strategy: Auto List Members—AKA IntelliSense
IntelliSense is the general term for many features: List Members, Parameter Info, Quick Info and Complete Word. These features help you to learn more about the code you are using, keep track of the parameters you are typing and display properties and methods with a minimum of keystrokes.
In the VBA Editor, when you enable Auto List Members, VBA displays an IntelliSense list that contains information that would logically complete the statement at the current insertion point.
For example:
• If you type, “Application” followed by a period, you’ll get a drop-down list of all the properties and methods for the Application object
• If you’re working in a code module for a UserForm and need to remember the name of an object located on the UserForm (such as a ListBox), type. “Me” followed by a period to get an auto list of all the properties, methods and objects for the UserForm.
• If you type, “VBA,” followed by a period, the VBA Editor will display a list of VBA statements, functions and constants
Then you can simply select from the list.
This feature is useful because it:
• Reduces typing
• Eliminates spelling errors
• Prompts you with properties and methods you may not even know about
SkillSteps: To see or set IntelliSense options: Tools > Options > Editor > Code Settings
SkillTip: Ctrl + Spacebar is the command completion “character” in the Visual Basic Editor.

V536_101618 12
MAXIMIZING THE POWER OF EXCEL® WITH MACROS AND MODULES
Toolbars
The Visual Basic Editor normally displays the Standard toolbar which can be very helpful …but it’s not the only toolbar.
You can display additional convenient toolbars:
• Debug
• Edit
• UserForm
SkillSteps: To display additional toolbars: View > Toolbars
When you’re working primarily in the Code window, it can be helpful to display the Editor toolbar.
When you’re debugging faulty code, it can be helpful to display the Debug toolbar.
The UserForm toolbar comes into play when you are designing forms.
Each of the images represent a different command. If you hover over any of the buttons, the command’s name will appear in a tooltip.

V536_10161813
PARTICIPANT NOTEBOOK
The Macro Recorder
Now that you’ve learned about macros in plain English, let’s look at how the recorder can help you produce macros faster.
The limitation of macro recording is that it is strictly a playback-oriented feature. It records the steps you take to carry out a process and allows you to repeat them as desired with a short combination of keystrokes or even by running the desired macro.
SkillTip: Keep in mind the recorder has limitations and liabilities. You can’t record everything and what you record may be more verbose than what you could have written.
SkillSteps: To launch the recorder: View > Macros > Record Macro …
The recorder records your actions in one of two styles—either absolute or relative. Before you start recording, you need to understand the implications.
Understand Modules and Their Unique Role in Programming
V536_101618 14
MAXIMIZING THE POWER OF EXCEL® WITH MACROS AND MODULES
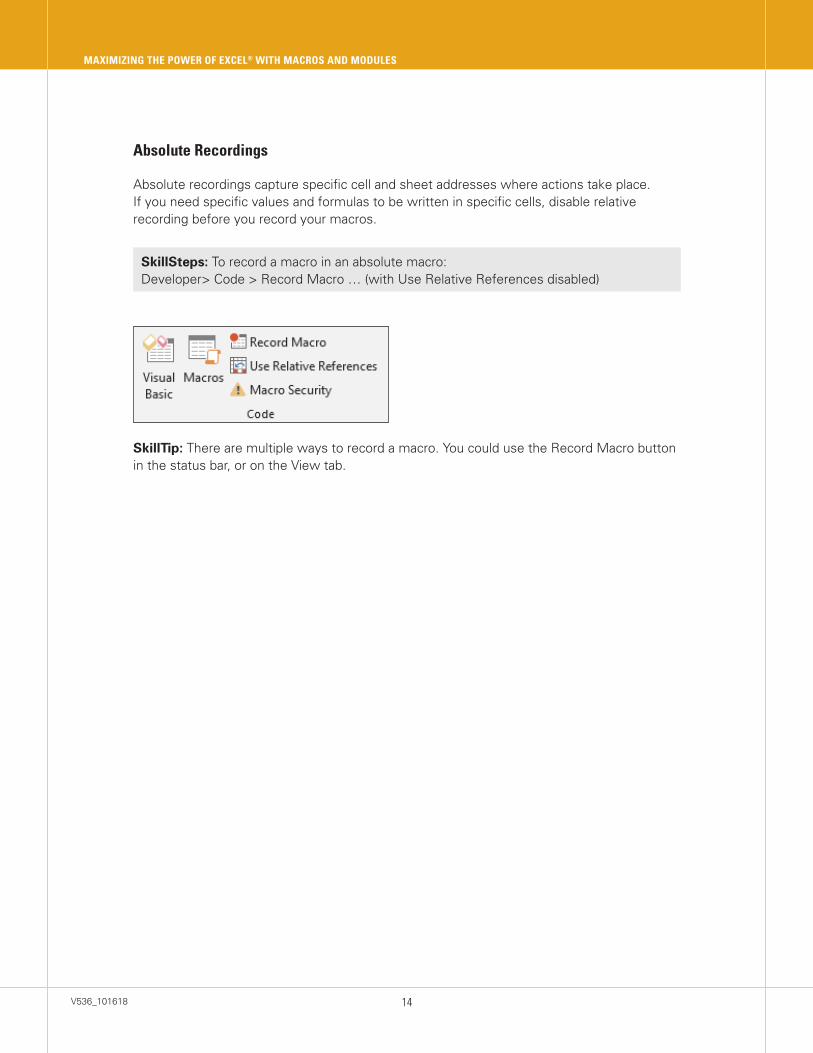
Absolute Recordings
Absolute recordings capture specific cell and sheet addresses where actions take place. If you need specific values and formulas to be written in specific cells, disable relative recording before you record your macros.
SkillSteps: To record a macro in an absolute macro: Developer> Code > Record Macro … (with Use Relative References disabled)
SkillTip: There are multiple ways to record a macro. You could use the Record Macro button in the status bar, or on the View tab.
V536_10161815
PARTICIPANT NOTEBOOK
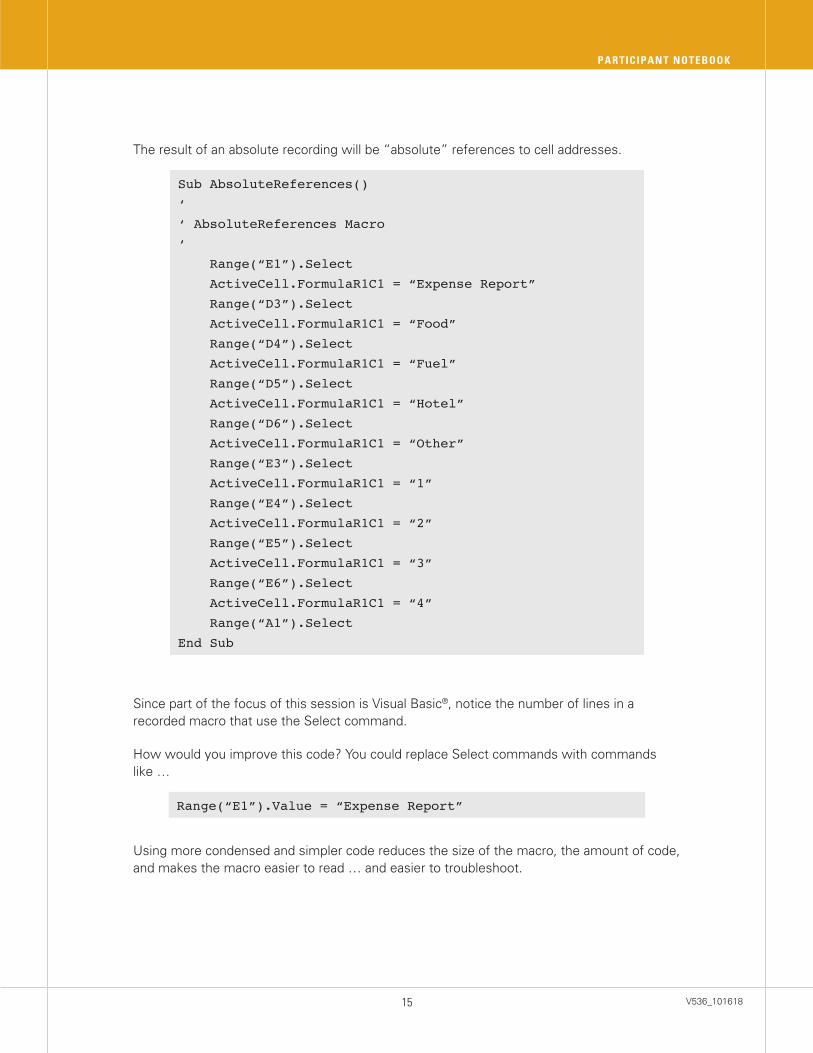
The result of an absolute recording will be “absolute” references to cell addresses.
Sub AbsoluteReferences()
‘
‘ AbsoluteReferences Macro
‘
Range(“E1”).Select
ActiveCell.FormulaR1C1 = “Expense Report”
Range(“D3”).Select
ActiveCell.FormulaR1C1 = “Food”
Range(“D4”).Select
ActiveCell.FormulaR1C1 = “Fuel”
Range(“D5”).Select
ActiveCell.FormulaR1C1 = “Hotel”
Range(“D6”).Select
ActiveCell.FormulaR1C1 = “Other”
Range(“E3”).Select
ActiveCell.FormulaR1C1 = “1”
Range(“E4”).Select
ActiveCell.FormulaR1C1 = “2”
Range(“E5”).Select
ActiveCell.FormulaR1C1 = “3”
Range(“E6”).Select
ActiveCell.FormulaR1C1 = “4”
Range(“A1”).Select
End Sub
Since part of the focus of this session is Visual Basic®, notice the number of lines in a recorded macro that use the Select command.
How would you improve this code? You could replace Select commands with commands like …
Range(“E1”).Value = “Expense Report”
Using more condensed and simpler code reduces the size of the macro, the amount of code, and makes the macro easier to read … and easier to troubleshoot.
V536_101618 16
MAXIMIZING THE POWER OF EXCEL® WITH MACROS AND MODULES
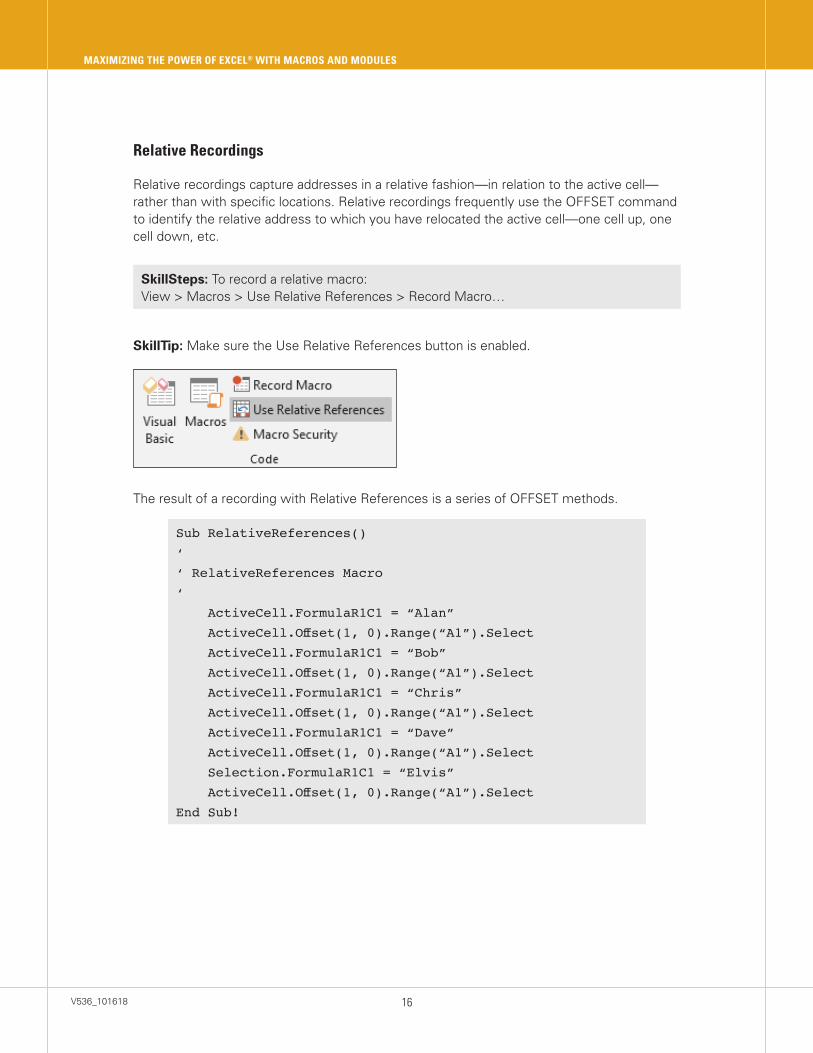
Relative Recordings
Relative recordings capture addresses in a relative fashion—in relation to the active cell—rather than with specific locations. Relative recordings frequently use the OFFSET command to identify the relative address to which you have relocated the active cell—one cell up, one cell down, etc.
SkillSteps: To record a relative macro: View > Macros > Use Relative References > Record Macro…
SkillTip: Make sure the Use Relative References button is enabled.
The result of a recording with Relative References is a series of OFFSET methods.
Sub RelativeReferences()
‘
‘ RelativeReferences Macro
‘
ActiveCell.FormulaR1C1 = “Alan”
ActiveCell.Offset(1, 0).Range(“A1”).Select
ActiveCell.FormulaR1C1 = “Bob”
ActiveCell.Offset(1, 0).Range(“A1”).Select
ActiveCell.FormulaR1C1 = “Chris”
ActiveCell.Offset(1, 0).Range(“A1”).Select
ActiveCell.FormulaR1C1 = “Dave”
ActiveCell.Offset(1, 0).Range(“A1”).Select
Selection.FormulaR1C1 = “Elvis”
ActiveCell.Offset(1, 0).Range(“A1”).Select
End Sub!
V536_10161817
PARTICIPANT NOTEBOOK
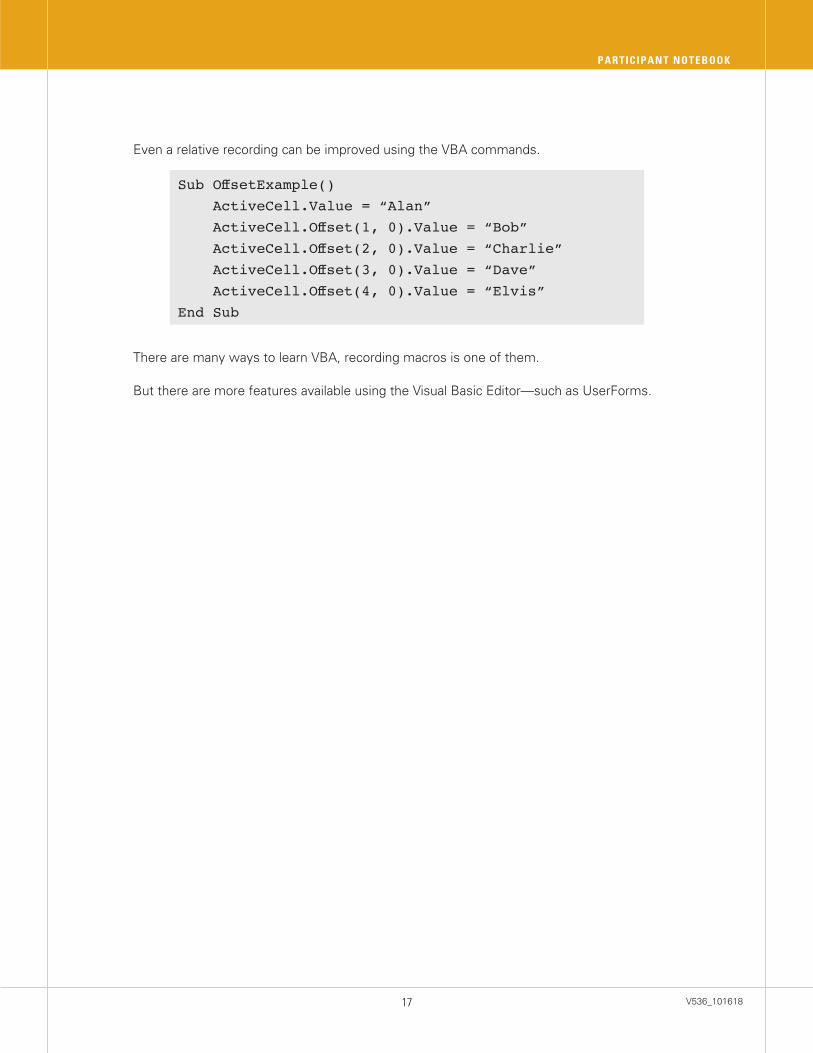
Even a relative recording can be improved using the VBA commands.
Sub OffsetExample()
ActiveCell.Value = “Alan”
ActiveCell.Offset(1, 0).Value = “Bob”
ActiveCell.Offset(2, 0).Value = “Charlie”
ActiveCell.Offset(3, 0).Value = “Dave”
ActiveCell.Offset(4, 0).Value = “Elvis”
End Sub
There are many ways to learn VBA, recording macros is one of them.
But there are more features available using the Visual Basic Editor—such as UserForms.
V536_101618 18
MAXIMIZING THE POWER OF EXCEL® WITH MACROS AND MODULES
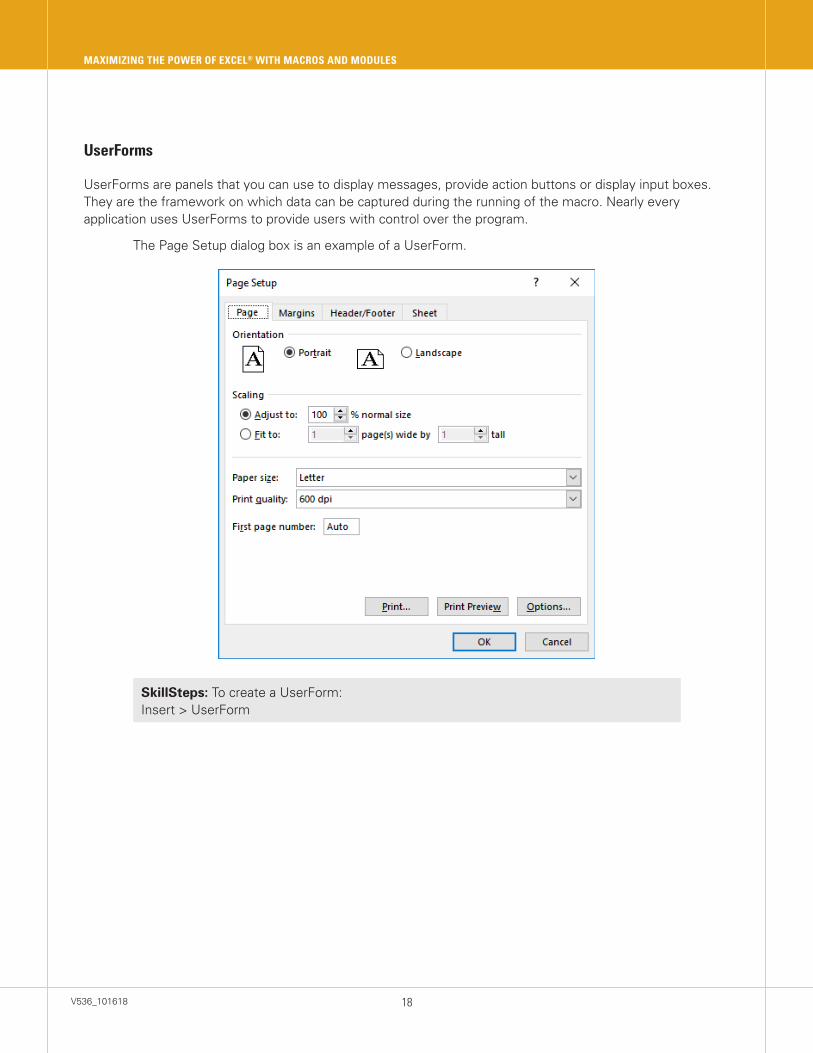
The Page Setup dialog box is an example of a UserForm.
SkillSteps: To create a UserForm: Insert > UserForm
UserForms
UserForms are panels that you can use to display messages, provide action buttons or display input boxes. They are the framework on which data can be captured during the running of the macro. Nearly every application uses UserForms to provide users with control over the program.
V536_10161819
PARTICIPANT NOTEBOOK
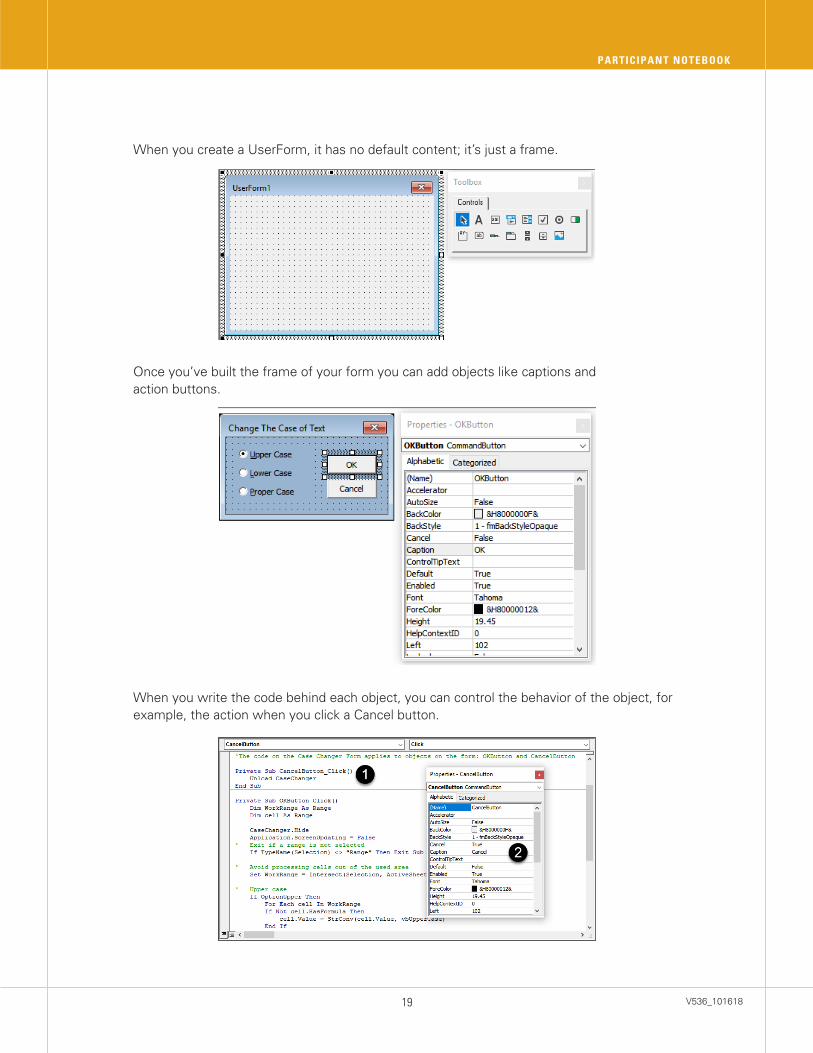
When you create a UserForm, it has no default content; it’s just a frame.
Once you’ve built the frame of your form you can add objects like captions and action buttons.
When you write the code behind each object, you can control the behavior of the object, for example, the action when you click a Cancel button.
V536_101618 20
MAXIMIZING THE POWER OF EXCEL® WITH MACROS AND MODULES
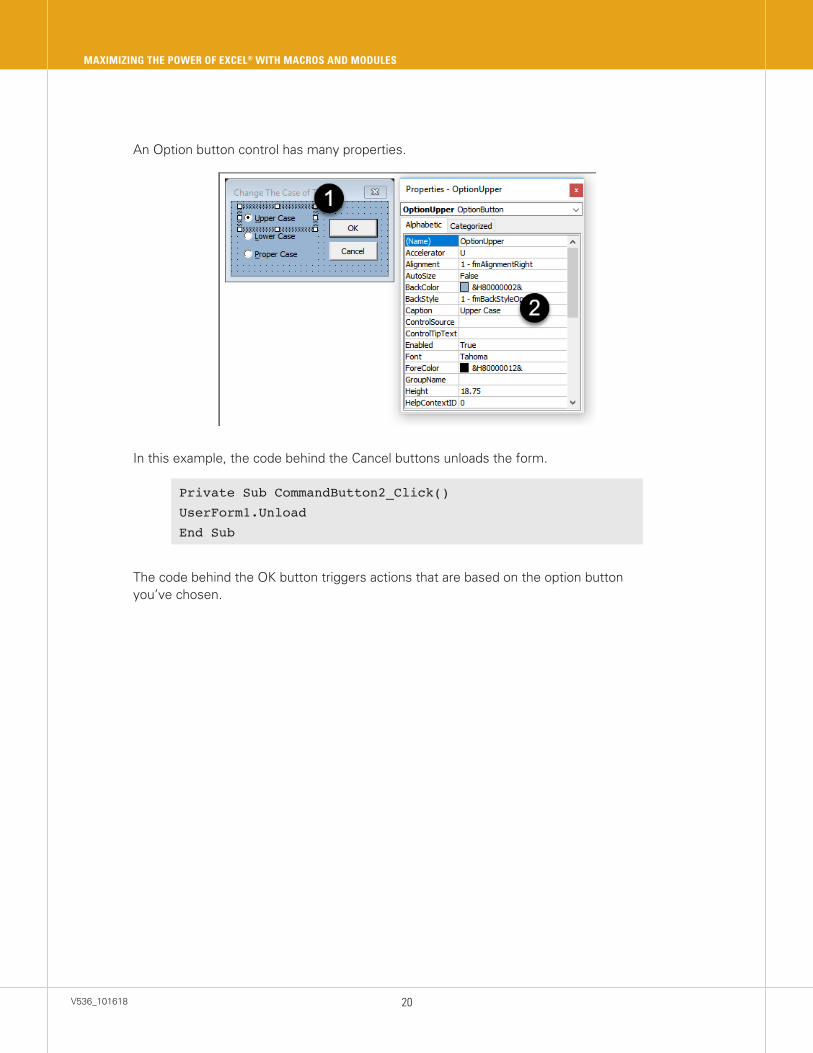
An Option button control has many properties.
In this example, the code behind the Cancel buttons unloads the form.
Private Sub CommandButton2_Click()
UserForm1.Unload
End Sub
The code behind the OK button triggers actions that are based on the option button you’ve chosen.
V536_10161821
PARTICIPANT NOTEBOOK
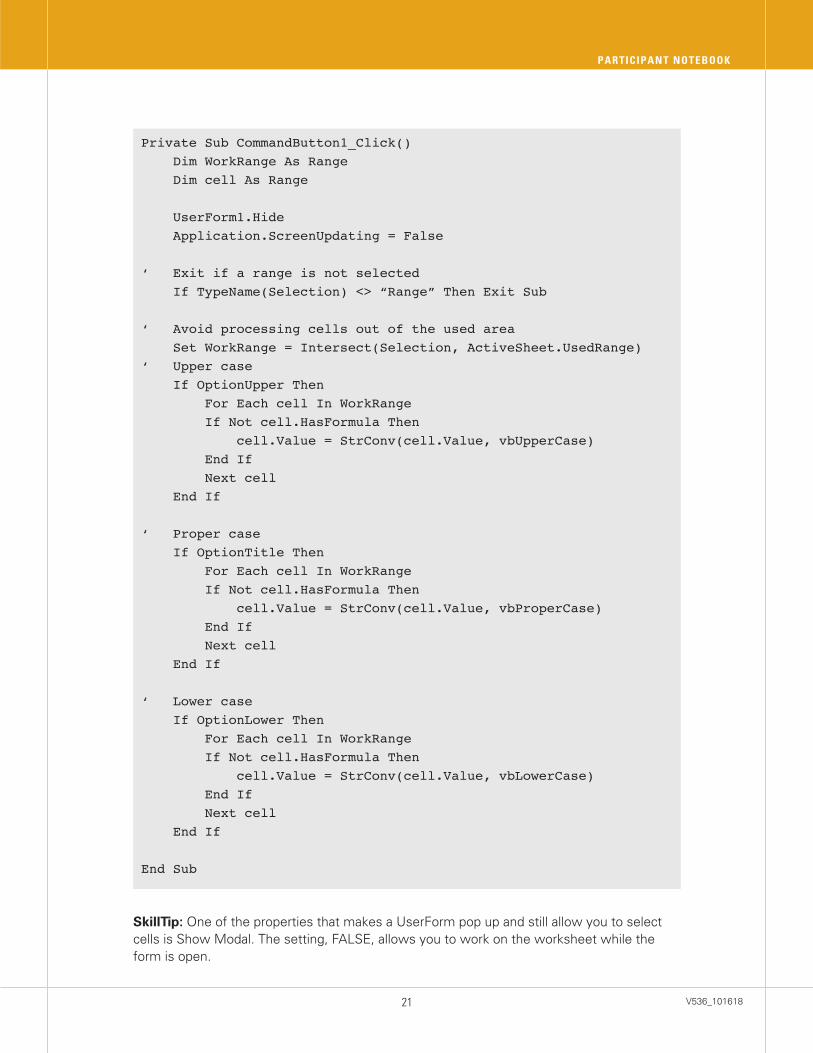
Private Sub CommandButton1_Click() Dim WorkRange As Range Dim cell As Range UserForm1.Hide Application.ScreenUpdating = False ‘ Exit if a range is not selected If TypeName(Selection) <> “Range” Then Exit Sub ‘ Avoid processing cells out of the used area Set WorkRange = Intersect(Selection, ActiveSheet.UsedRange)‘ Upper case If OptionUpper Then For Each cell In WorkRange If Not cell.HasFormula Then cell.Value = StrConv(cell.Value, vbUpperCase) End If Next cell End If ‘ Proper case If OptionTitle Then For Each cell In WorkRange If Not cell.HasFormula Then cell.Value = StrConv(cell.Value, vbProperCase) End If Next cell End If ‘ Lower case If OptionLower Then For Each cell In WorkRange If Not cell.HasFormula Then cell.Value = StrConv(cell.Value, vbLowerCase) End If Next cell End If End Sub
SkillTip: One of the properties that makes a UserForm pop up and still allow you to select cells is Show Modal. The setting, FALSE, allows you to work on the worksheet while the form is open.
V536_101618 22
MAXIMIZING THE POWER OF EXCEL® WITH MACROS AND MODULES
Custom Functions
Custom functions are also stored on modules.
Custom functions are like macros because they are written in Visual Basic®. However, custom functions complement the built-in functions that come with Excel®. Of course, Excel® has many essential functions like SUM and AVERAGE and INDEX … but you can develop your own.
For example, a custom function can calculate a tax amount—depending on the amount of income specified.
Function TaxAmount(Income As Single)
Select Case income
Case Is <= 2500
TaxAmount = 0
Case Is <= 5000
TaxAmount = (5000 - 2500) * 0.05
‘in this case it is 125
Case Else
TaxAmount = (Income - 5000) * 0.1 + 125
End Select
End Function
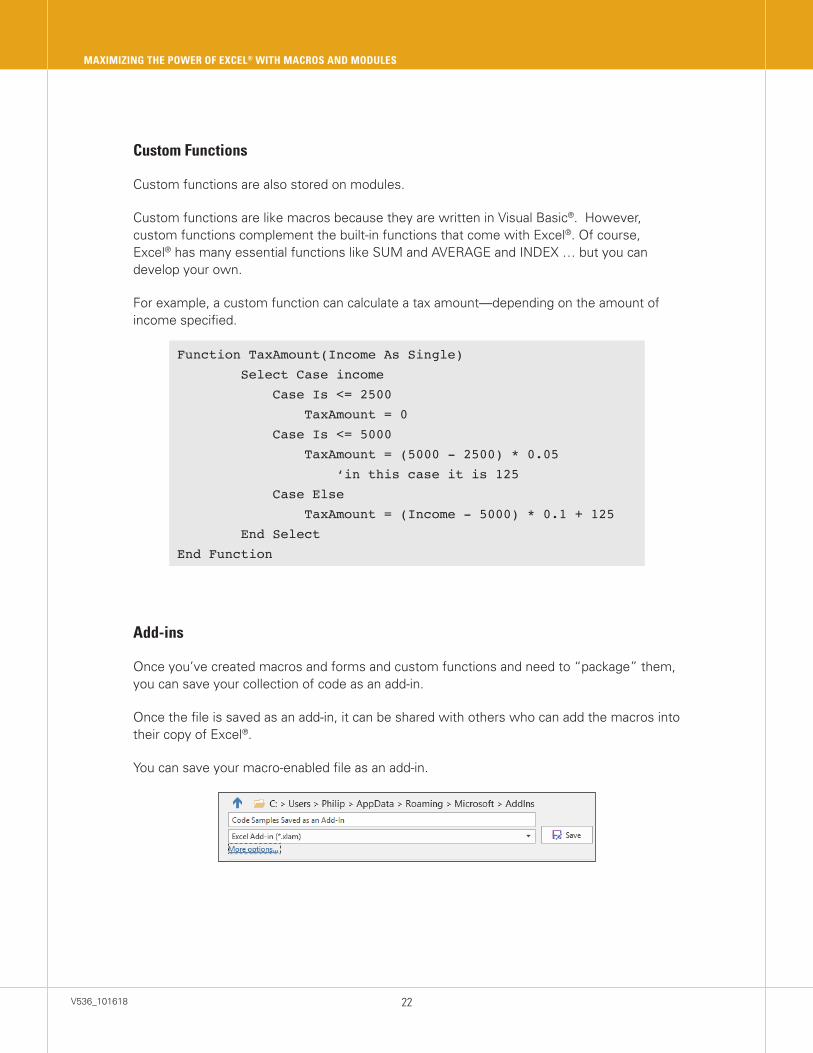
Add-ins
Once you’ve created macros and forms and custom functions and need to “package” them, you can save your collection of code as an add-in.
Once the file is saved as an add-in, it can be shared with others who can add the macros into their copy of Excel®.
You can save your macro-enabled file as an add-in.
V536_10161823
PARTICIPANT NOTEBOOK
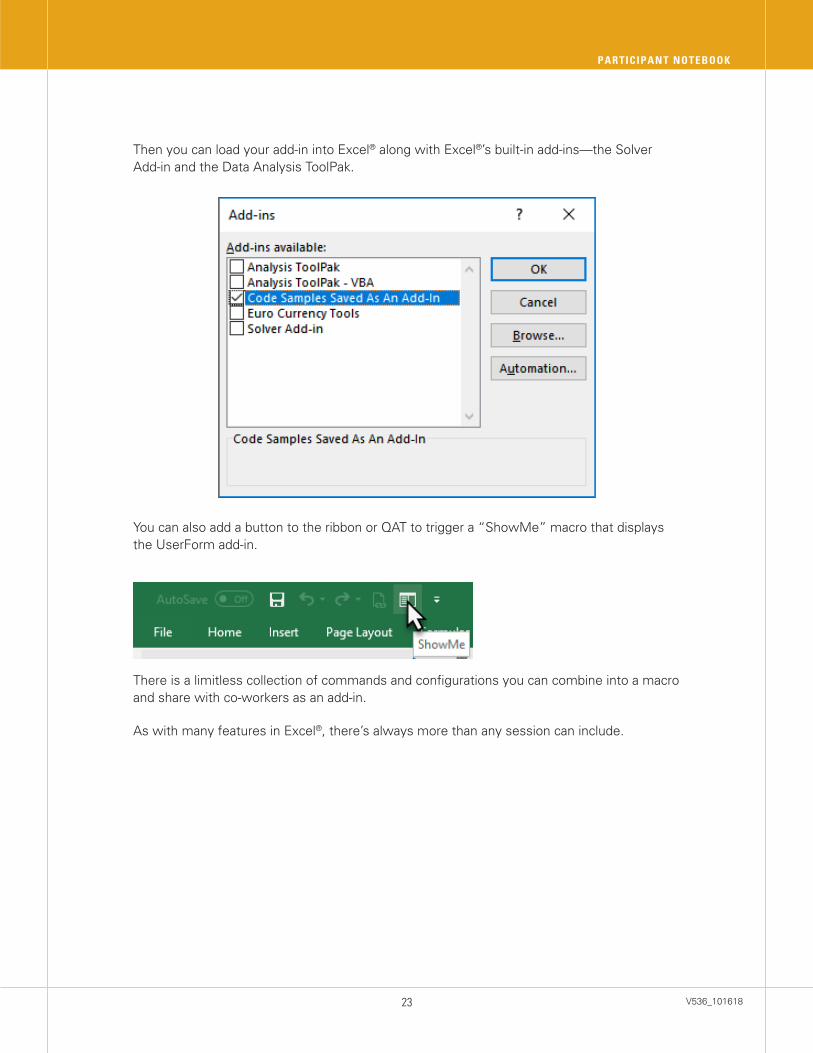
Then you can load your add-in into Excel® along with Excel®’s built-in add-ins—the Solver Add-in and the Data Analysis ToolPak.
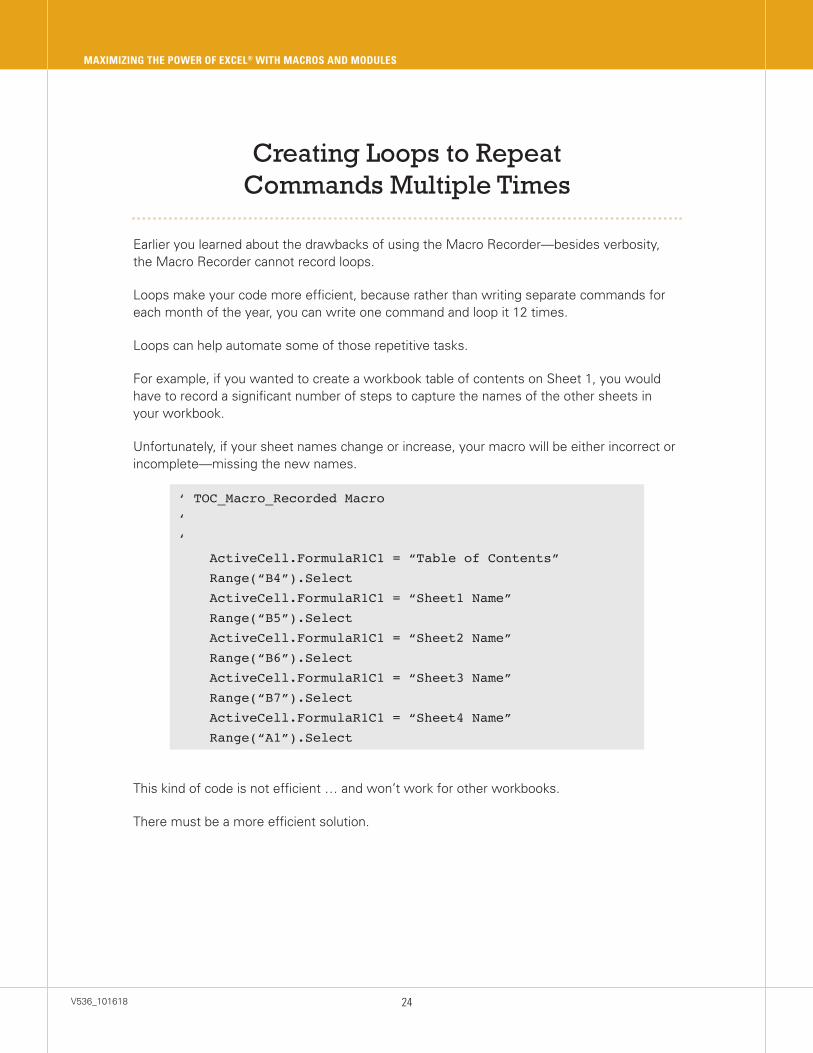
You can also add a button to the ribbon or QAT to trigger a “ShowMe” macro that displays the UserForm add-in.
There is a limitless collection of commands and configurations you can combine into a macro and share with co-workers as an add-in.
As with many features in Excel®, there’s always more than any session can include.
V536_101618 24
MAXIMIZING THE POWER OF EXCEL® WITH MACROS AND MODULES
Earlier you learned about the drawbacks of using the Macro Recorder—besides verbosity, the Macro Recorder cannot record loops.
Loops make your code more efficient, because rather than writing separate commands for each month of the year, you can write one command and loop it 12 times.
Loops can help automate some of those repetitive tasks.
For example, if you wanted to create a workbook table of contents on Sheet 1, you would have to record a significant number of steps to capture the names of the other sheets in your workbook.
Unfortunately, if your sheet names change or increase, your macro will be either incorrect or incomplete—missing the new names.
‘ TOC_Macro_Recorded Macro
‘
‘
ActiveCell.FormulaR1C1 = “Table of Contents”
Range(“B4”).Select
ActiveCell.FormulaR1C1 = “Sheet1 Name”
Range(“B5”).Select
ActiveCell.FormulaR1C1 = “Sheet2 Name”
Range(“B6”).Select
ActiveCell.FormulaR1C1 = “Sheet3 Name”
Range(“B7”).Select
ActiveCell.FormulaR1C1 = “Sheet4 Name”
Range(“A1”).Select
This kind of code is not efficient … and won’t work for other workbooks.
There must be a more efficient solution.
Creating Loops to Repeat Commands Multiple Times
V536_10161825
PARTICIPANT NOTEBOOK
For … Next … Loop
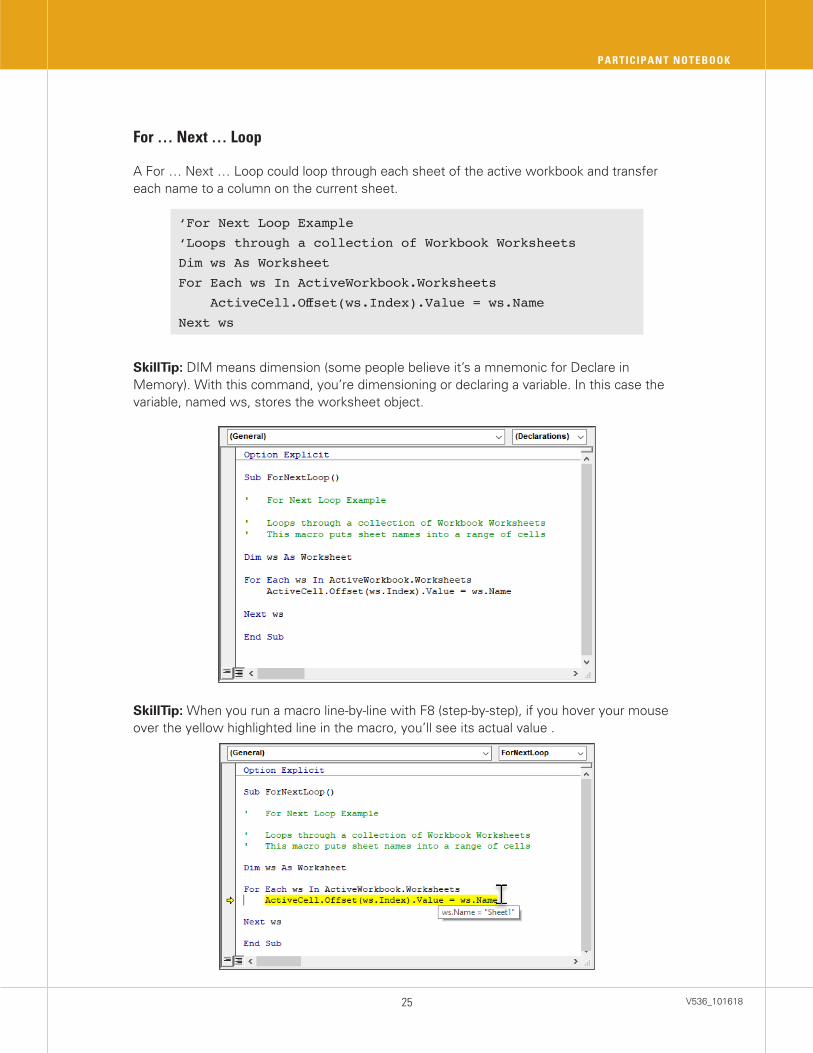
A For … Next … Loop could loop through each sheet of the active workbook and transfer each name to a column on the current sheet.
‘For Next Loop Example
‘Loops through a collection of Workbook Worksheets
Dim ws As Worksheet
For Each ws In ActiveWorkbook.Worksheets
ActiveCell.Offset(ws.Index).Value = ws.Name
Next ws
SkillTip: DIM means dimension (some people believe it’s a mnemonic for Declare in Memory). With this command, you’re dimensioning or declaring a variable. In this case the variable, named ws, stores the worksheet object.
SkillTip: When you run a macro line-by-line with F8 (step-by-step), if you hover your mouse over the yellow highlighted line in the macro, you’ll see its actual value .
V536_101618 26
MAXIMIZING THE POWER OF EXCEL® WITH MACROS AND MODULES
Loop Until
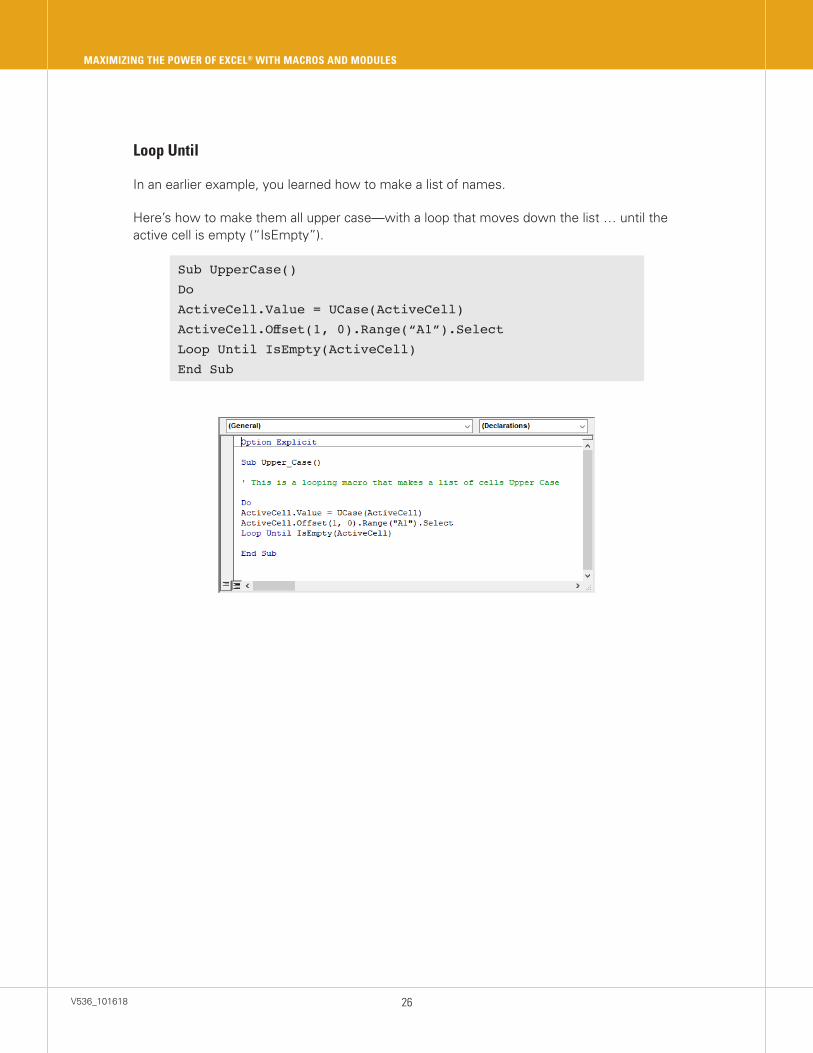
In an earlier example, you learned how to make a list of names.
Here’s how to make them all upper case—with a loop that moves down the list … until the active cell is empty (“IsEmpty”).
Sub UpperCase()
Do
ActiveCell.Value = UCase(ActiveCell)
ActiveCell.Offset(1, 0).Range(“A1”).Select
Loop Until IsEmpty(ActiveCell)
End Sub
V536_10161827
PARTICIPANT NOTEBOOK
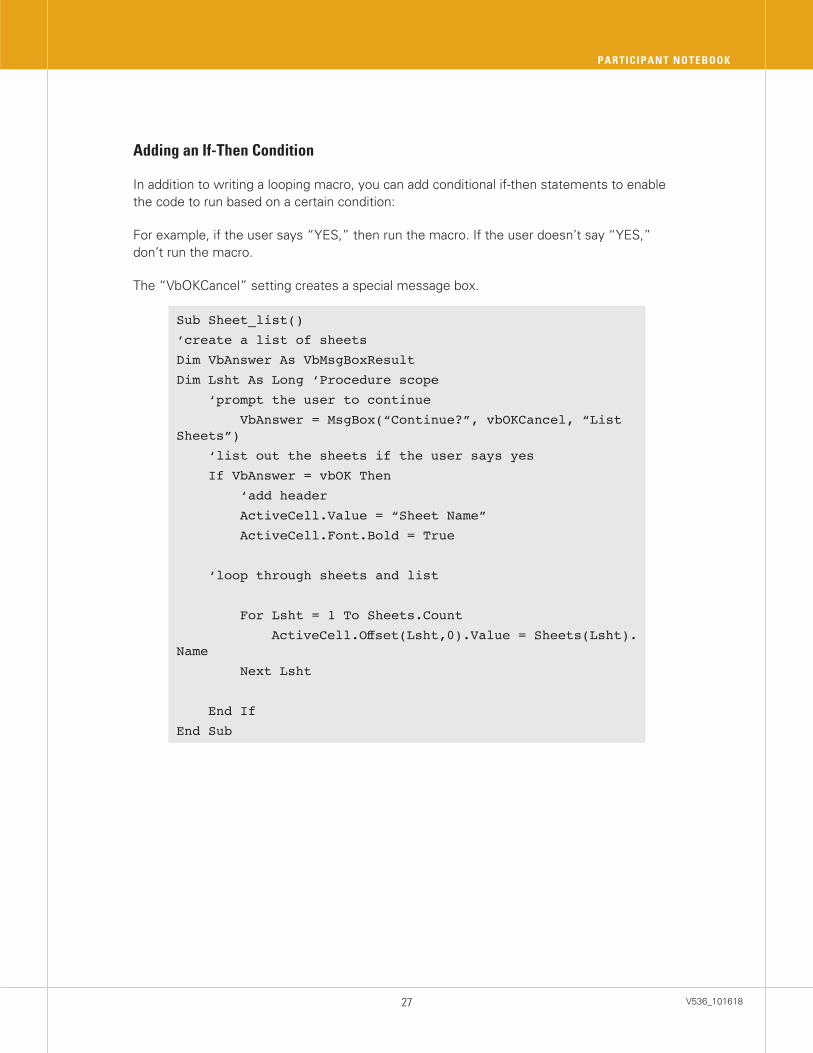
Adding an If-Then Condition
In addition to writing a looping macro, you can add conditional if-then statements to enable the code to run based on a certain condition:
For example, if the user says “YES,” then run the macro. If the user doesn’t say “YES,” don’t run the macro.
The “VbOKCancel” setting creates a special message box.
Sub Sheet_list()
‘create a list of sheets
Dim VbAnswer As VbMsgBoxResult
Dim Lsht As Long ‘Procedure scope
‘prompt the user to continue
VbAnswer = MsgBox(“Continue?”, vbOKCancel, “List Sheets”)
‘list out the sheets if the user says yes
If VbAnswer = vbOK Then
‘add header
ActiveCell.Value = “Sheet Name”
ActiveCell.Font.Bold = True
‘loop through sheets and list
For Lsht = 1 To Sheets.Count
ActiveCell.Offset(Lsht,0).Value = Sheets(Lsht).Name
Next Lsht
End If
End Sub
V536_101618 28
MAXIMIZING THE POWER OF EXCEL® WITH MACROS AND MODULES
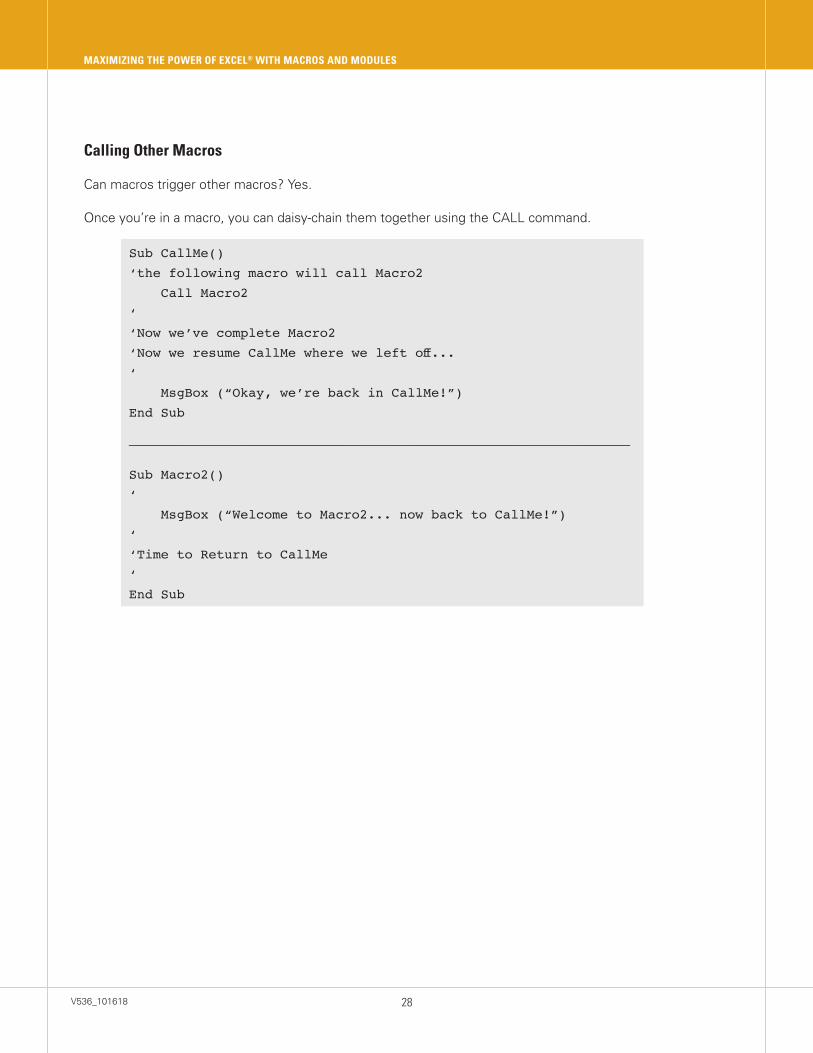
Sub CallMe()
‘the following macro will call Macro2
Call Macro2
‘
‘Now we’ve complete Macro2
‘Now we resume CallMe where we left off...
‘
MsgBox (“Okay, we’re back in CallMe!”)
End Sub
_______________________________________________________________
Sub Macro2()
‘
MsgBox (“Welcome to Macro2... now back to CallMe!”)
‘
‘Time to Return to CallMe
‘
End Sub
Calling Other Macros
Can macros trigger other macros? Yes.
Once you’re in a macro, you can daisy-chain them together using the CALL command.
V536_10161829
PARTICIPANT NOTEBOOK
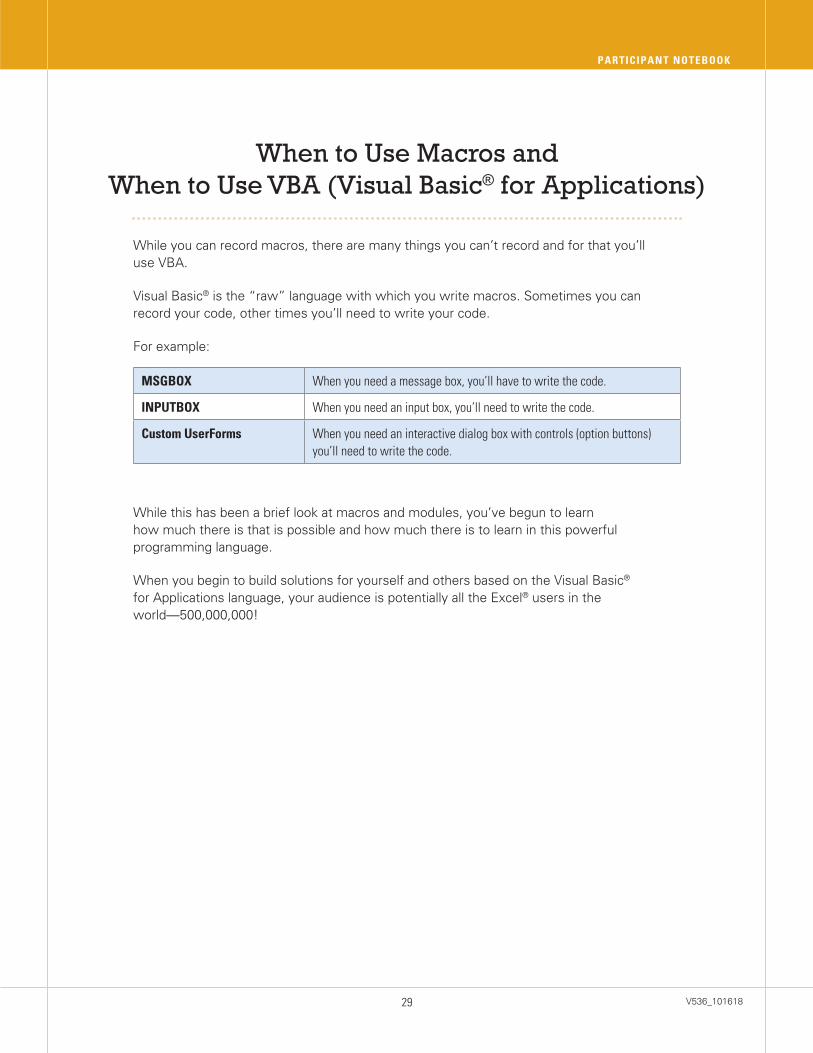
While you can record macros, there are many things you can’t record and for that you’ll use VBA.
Visual Basic® is the “raw” language with which you write macros. Sometimes you can record your code, other times you’ll need to write your code.
For example:
MSGBOX When you need a message box, you’ll have to write the code.
INPUTBOX When you need an input box, you’ll need to write the code.
Custom UserForms When you need an interactive dialog box with controls (option buttons) you’ll need to write the code.
While this has been a brief look at macros and modules, you’ve begun to learn how much there is that is possible and how much there is to learn in this powerful programming language.
When you begin to build solutions for yourself and others based on the Visual Basic® for Applications language, your audience is potentially all the Excel® users in the world—500,000,000!
When to Use Macros and When to Use VBA (Visual Basic® for Applications)
V536_101618 30
MAXIMIZING THE POWER OF EXCEL® WITH MACROS AND MODULES
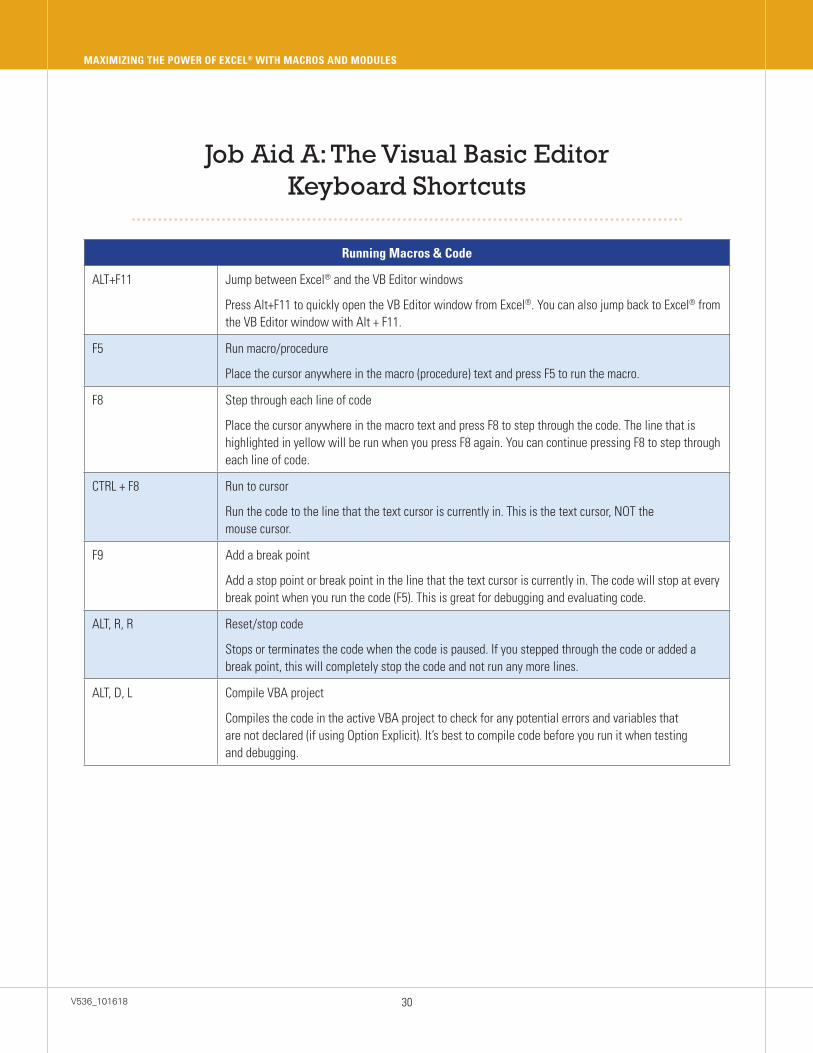
Job Aid A: The Visual Basic Editor Keyboard Shortcuts
Running Macros & Code
ALT+F11 Jump between Excel® and the VB Editor windows
Press Alt+F11 to quickly open the VB Editor window from Excel®. You can also jump back to Excel® from the VB Editor window with Alt + F11.
F5 Run macro/procedure
Place the cursor anywhere in the macro (procedure) text and press F5 to run the macro.
F8 Step through each line of code
Place the cursor anywhere in the macro text and press F8 to step through the code. The line that is highlighted in yellow will be run when you press F8 again. You can continue pressing F8 to step through each line of code.
CTRL + F8 Run to cursor
Run the code to the line that the text cursor is currently in. This is the text cursor, NOT the mouse cursor.
F9 Add a break point
Add a stop point or break point in the line that the text cursor is currently in. The code will stop at every break point when you run the code (F5). This is great for debugging and evaluating code.
ALT, R, R Reset/stop code
Stops or terminates the code when the code is paused. If you stepped through the code or added a break point, this will completely stop the code and not run any more lines.
ALT, D, L Compile VBA project
Compiles the code in the active VBA project to check for any potential errors and variables that are not declared (if using Option Explicit). It’s best to compile code before you run it when testing and debugging.
V536_10161831
PARTICIPANT NOTEBOOK
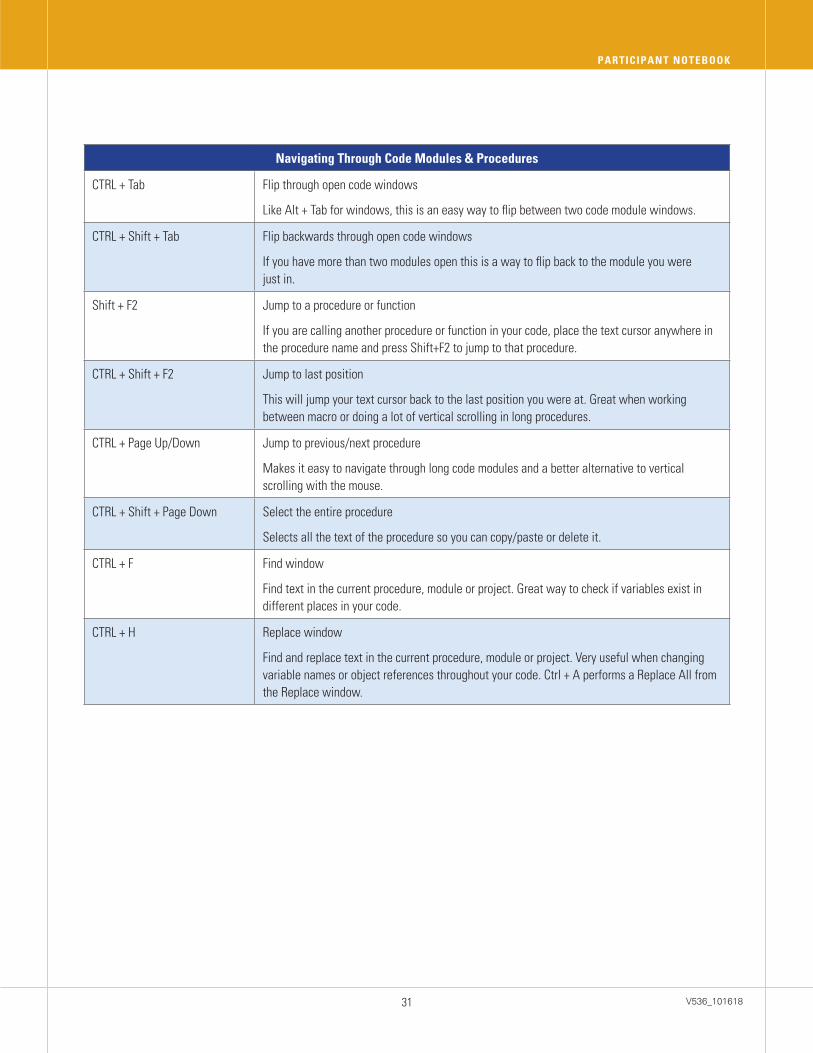
Navigating Through Code Modules & Procedures
CTRL + Tab Flip through open code windows
Like Alt + Tab for windows, this is an easy way to flip between two code module windows.
CTRL + Shift + Tab Flip backwards through open code windows
If you have more than two modules open this is a way to flip back to the module you were just in.
Shift + F2 Jump to a procedure or function
If you are calling another procedure or function in your code, place the text cursor anywhere in the procedure name and press Shift+F2 to jump to that procedure.
CTRL + Shift + F2 Jump to last position
This will jump your text cursor back to the last position you were at. Great when working between macro or doing a lot of vertical scrolling in long procedures.
CTRL + Page Up/Down Jump to previous/next procedure
Makes it easy to navigate through long code modules and a better alternative to vertical scrolling with the mouse.
CTRL + Shift + Page Down Select the entire procedure
Selects all the text of the procedure so you can copy/paste or delete it.
CTRL + F Find window
Find text in the current procedure, module or project. Great way to check if variables exist in different places in your code.
CTRL + H Replace window
Find and replace text in the current procedure, module or project. Very useful when changing variable names or object references throughout your code. Ctrl + A performs a Replace All from the Replace window.
V536_101618 32
MAXIMIZING THE POWER OF EXCEL® WITH MACROS AND MODULES
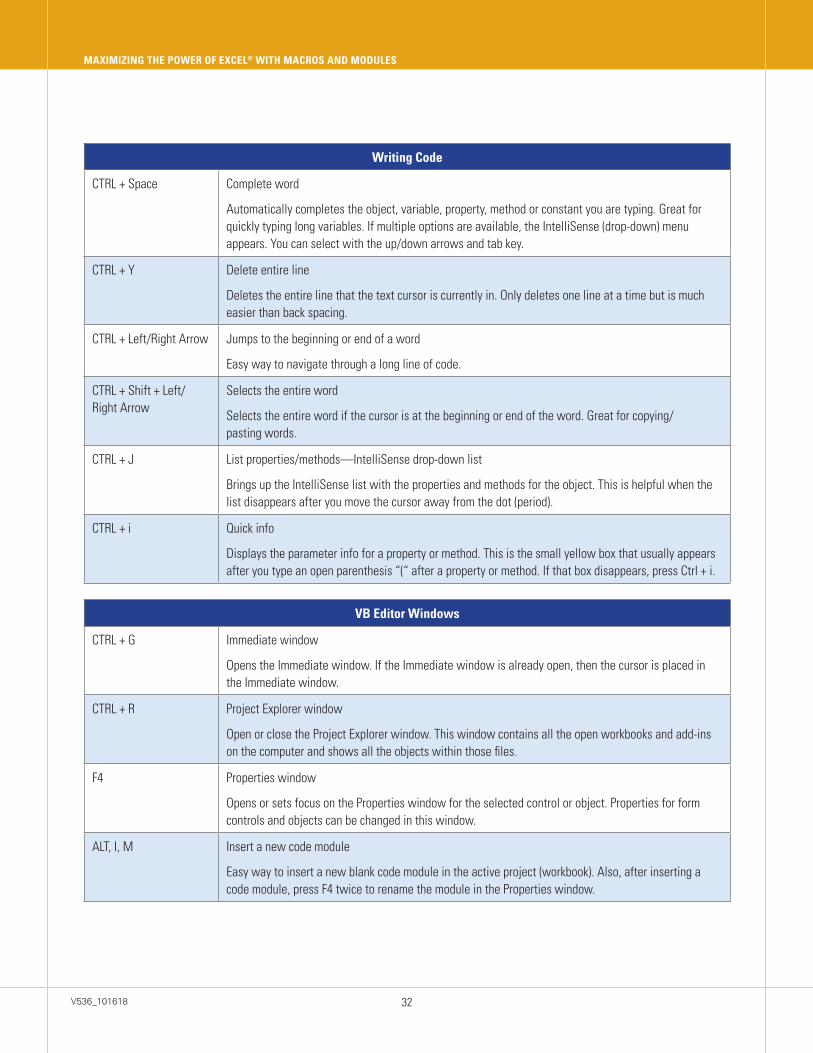
Writing Code
CTRL + Space Complete word
Automatically completes the object, variable, property, method or constant you are typing. Great for quickly typing long variables. If multiple options are available, the IntelliSense (drop-down) menu appears. You can select with the up/down arrows and tab key.
CTRL + Y Delete entire line
Deletes the entire line that the text cursor is currently in. Only deletes one line at a time but is much easier than back spacing.
CTRL + Left/Right Arrow Jumps to the beginning or end of a word
Easy way to navigate through a long line of code.
CTRL + Shift + Left/Right Arrow
Selects the entire word
Selects the entire word if the cursor is at the beginning or end of the word. Great for copying/pasting words.
CTRL + J List properties/methods—IntelliSense drop-down list
Brings up the IntelliSense list with the properties and methods for the object. This is helpful when the list disappears after you move the cursor away from the dot (period).
CTRL + i Quick info
Displays the parameter info for a property or method. This is the small yellow box that usually appears after you type an open parenthesis “(“ after a property or method. If that box disappears, press Ctrl + i.
VB Editor Windows
CTRL + G Immediate window
Opens the Immediate window. If the Immediate window is already open, then the cursor is placed in the Immediate window.
CTRL + R Project Explorer window
Open or close the Project Explorer window. This window contains all the open workbooks and add-ins on the computer and shows all the objects within those files.
F4 Properties window
Opens or sets focus on the Properties window for the selected control or object. Properties for form controls and objects can be changed in this window.
ALT, I, M Insert a new code module
Easy way to insert a new blank code module in the active project (workbook). Also, after inserting a code module, press F4 twice to rename the module in the Properties window.
Technical training only from our bookstore ...Training is our only business. That’s why our books and videos are uniquely focused on boosting your skills, expanding your capabilities and growing your career.
Our expert authors and presenters are professional trainers who don’t get bogged down in hype and fluff. They know how to zero in on the essentials, simplify complex subjects and not waste your time.
As a seminar participant, you always get the lowest price and fastest service because our resources are not sold through middlemen at discount stores, local booksellers or commercial Web sites.
B O O K S + S O F T W A R E + D V D S
Contact us: U.S./Canada 800-873-7545 • UK 0800 328 1140 • AUS 1800 145 231 • NZ 0800 447 301 Or visit us on the Web at www.ourbookstore.com
STAR12 is 365 DAYS of …
n Peace of mind
n Job help
n Knowledge-packed seminars
n Career development
n Informative Webinars
n Résumé boosters
n Convenient online learning
n Skill building
U N L I M I T E D T R A I N I N G Know that you have the resources and tools you need to achieve career success 365 days a year when you enroll in STAR12. With STAR12, you’ll get unlimited access to seminars, Webinars and online courses to help you do your job more effectively and efficiently. Put career success in your hands year round. Talk to your trainer to receive a special discount on STAR12, and enroll today!
VISIT JOINSTAR12.COM OR CALL 1-800-258-7246 FOR MORE INFORMATION