Embed Size (px)
Citation preview
Media Control System © Copyright 2010 Autonomic Controls, Inc.
- 1 - Revision 6, Build 1306 www.autonomichome.com
© Copyright 2010 Autonomic Controls, Inc
Media Control SystemMedia Control SystemMedia Control SystemMedia Control System Integration GuideIntegration GuideIntegration GuideIntegration Guide for Crestron for Crestron for Crestron for Crestron SystemBuilderSystemBuilderSystemBuilderSystemBuilder
Version 2.5
Media Control System © Copyright 2010 Autonomic Controls, Inc.
- 2 - Revision 6, Build 1306 www.autonomichome.com
© Copyright 2010 Autonomic Controls, Inc
Table of Contents
Overview .................................................................................................................................... 3 Setting up MCS for Crestron Control. ................................................................................... 4
Requirements. ..................................................................................................................................... 4
Preparation. ......................................................................................................................................... 4
Adding the MCS to your SystemBuilder ............................................................................................ 5
The MCS Parameters: ....................................................................................................................... 15
Troubleshooting ...................................................................................................................... 16 Cannot establish a connection with the Media Control Server. ........................................................ 16
No Album Art is displayed. .............................................................................................................. 16
Objects not automatically programmed. ........................................................................................... 17

Media Control System © Copyright 2010 Autonomic Controls, Inc.
- 3 - Revision 6, Build 1306 www.autonomichome.com
© Copyright 2010 Autonomic Controls, Inc
Overview This document describes how to install integrate the Mirage Media Control System (MCS)
and Grand Concerto into a Crestron control system installation using SystemBuilder.
For instructions on setting up the MCS, please refer to the Getting Started document included
with the MCS installation. You’ll find it in the Start menu of the host computer, under
Autonomic Controls.
MCS and the associated Crestron module offer a ready-to-use solution for IP control of
iTunes, and Media Player playback. The control service allows the Crestron Control System
to interactively access the MCS’ functionality and will display feedback for those actions.
Media Control System © Copyright 2010 Autonomic Controls, Inc.
- 4 - Revision 6, Build 1306 www.autonomichome.com
© Copyright 2010 Autonomic Controls, Inc
Setting up MCS for Crestron Control.
Requirements.
The Media Control System module requires a Crestron 2 series processor. In order to browse
music by album cover and see now playing graphics, your touch panel must be capable of
displaying dynamic graphics. Visit www.crestron.com to determine which touch panels
support this feature.
If your touch panel does not support dynamic graphics, you can still use the MCS module,
however, only text information will be available.
Preparation.
Download the Crestron control module from www.autonomic-controls.com/support.htm. The
control module downloads with two VT-Pro-e touch-panel layouts for X-Panel at common
Crestron touch panel resolutions. These layouts are compatible with any Crestron touch panel
which supports dynamic graphics. The pages can be copied directly into your touch panel
project.
For your convenience, we have created several specific VT-Pro-e touch panel projects for the
more popular Crestron touch panels. These are available as a separate download from our
support page.
Once you have downloaded the control module and required touch panel files, un-zip the files
into a new directory on your hard drive.
You will find the following files:
1. Autonomic Controls MCS SystemBuilder.umc. This is the primary SystemBuilder
module. This file must be placed in your SIMPL user modules directory. 2. Autonomic Controls MCS v2.5.umc. This is the Autonomic Controls MCS Crestron
control module. This file must be placed in your SIMPL user modules directory. 3. Autonomic Controls MCS IP Processor v2.5.usp. This is the Autonomic Controls
SIMPL+ module which is responsible for IP communications with the server. This
file must be placed in your user SIMPL+ modules directory. 4. Autonomic Controls Keyboard Controller v2.3.usp. This module is responsible for
keyboard entry to the MCS. This file must be placed in your user SIMPL+ modules
directory. 5. SB Menu Driver v1.1. This module is responsible for handling SystemBuilder
related menu browsing. This file must be placed in your user SIMPL+ modules
directory.
Media Control System © Copyright 2010 Autonomic Controls, Inc.
Revision 6, Build 1306
© Copyright 2010
Adding the MCS to your SystemBuilder
Open SystemBuilder and create a new
Select Blank system for the purposes of the
Autonomic Controls, Inc.
- 5 - www.autonomichome.com
Copyright 2010 Autonomic Controls, Inc
to your SystemBuilder
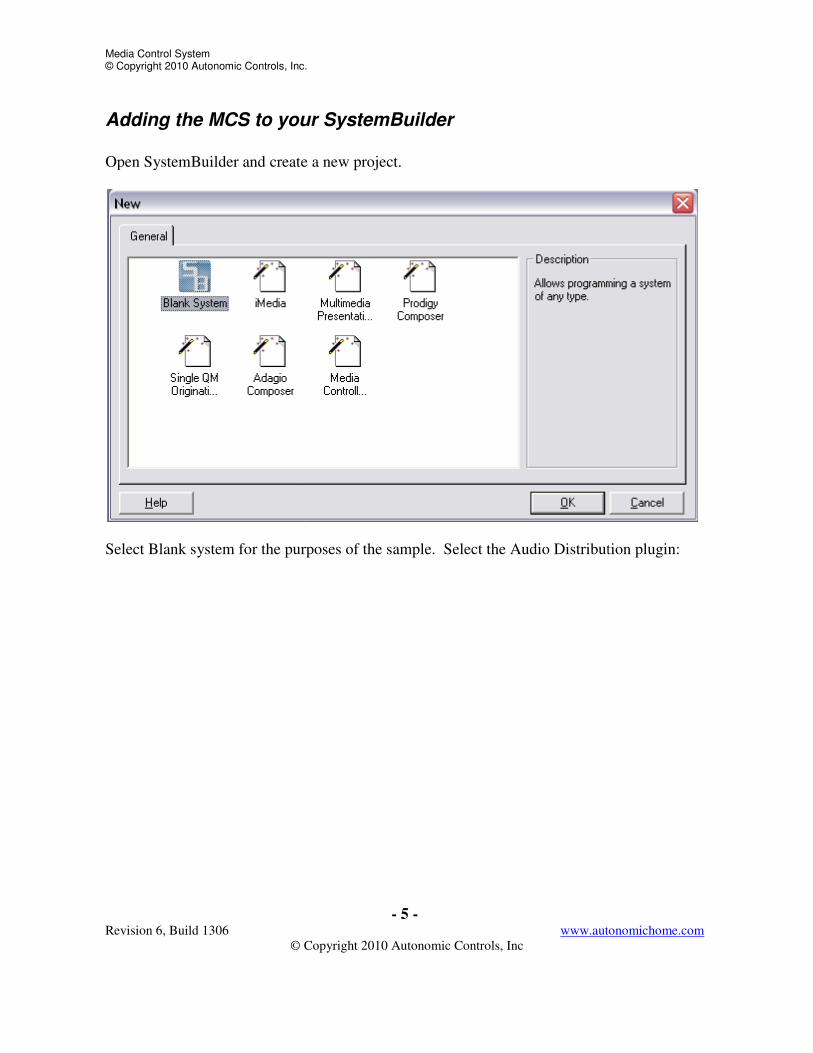
Open SystemBuilder and create a new project.
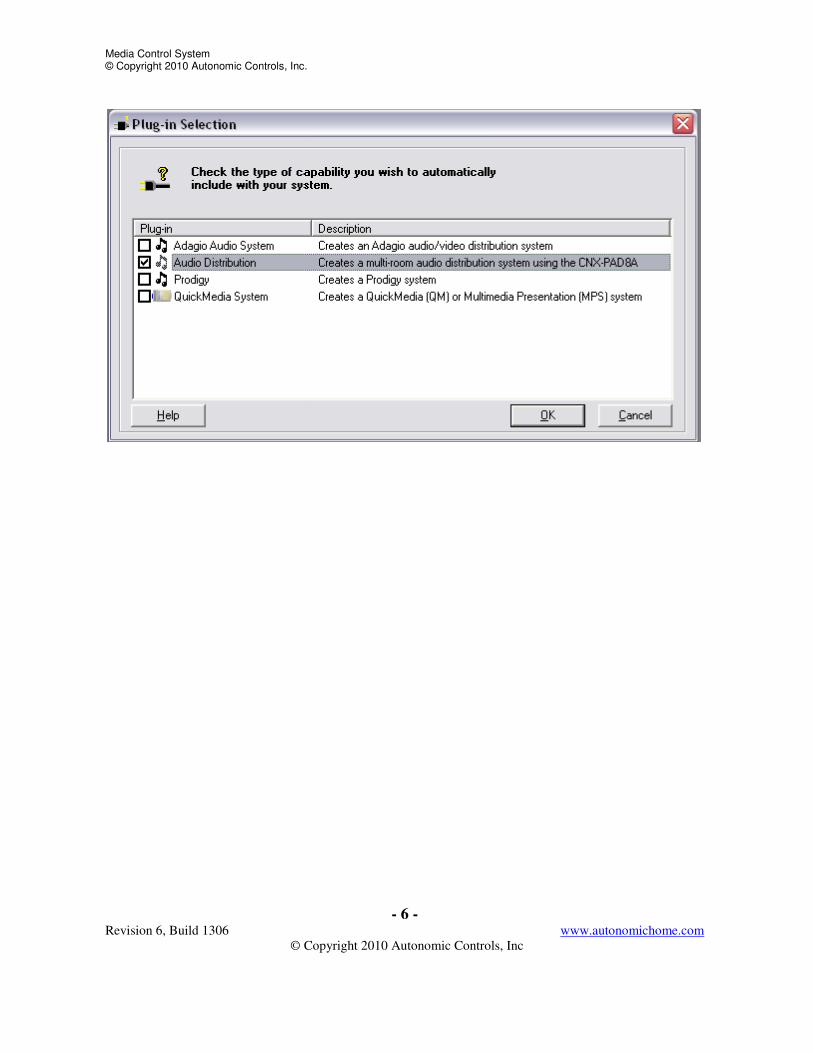
Select Blank system for the purposes of the sample. Select the Audio Distribution plugin:
www.autonomichome.com
Select the Audio Distribution plugin:
Media Control System © Copyright 2010 Autonomic Controls, Inc.
Revision 6, Build 1306
© Copyright 2010
Autonomic Controls, Inc.
- 6 - www.autonomichome.com
Copyright 2010 Autonomic Controls, Inc
www.autonomichome.com
Media Control System © Copyright 2010 Autonomic Controls, Inc.
Revision 6, Build 1306
© Copyright 2010
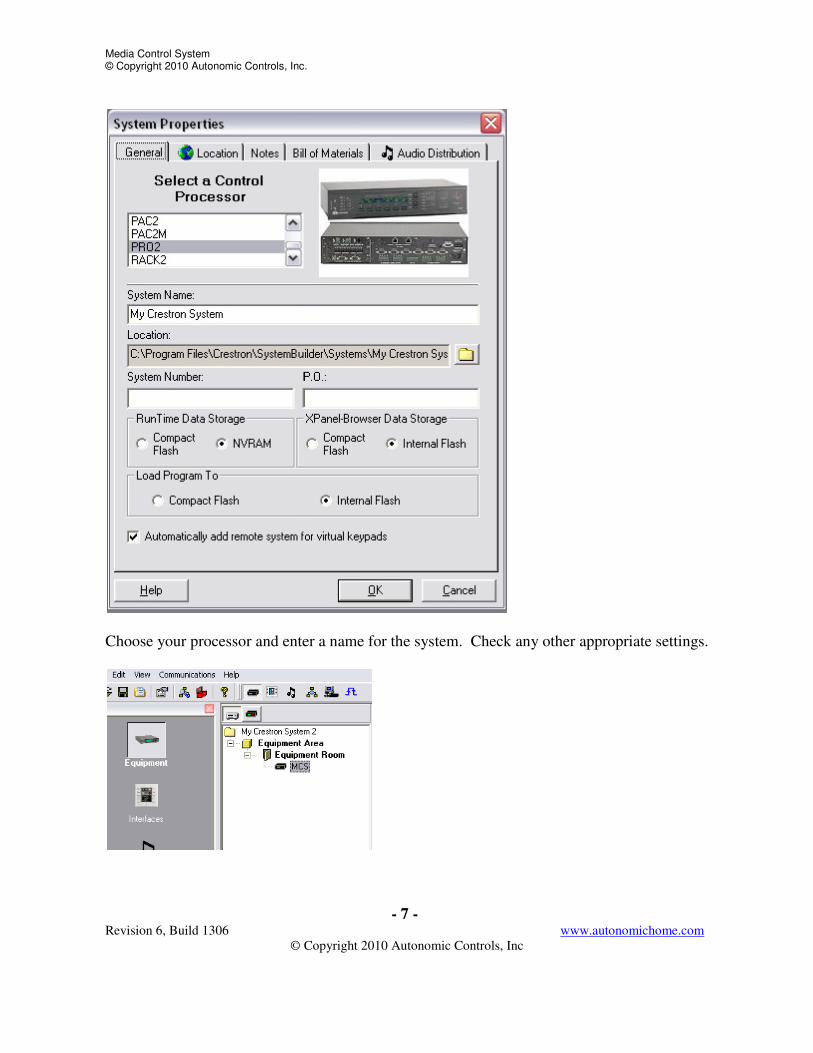
Choose your processor and enter a name for the system. Check any other appropriate settings.
Autonomic Controls, Inc.
- 7 - www.autonomichome.com
Copyright 2010 Autonomic Controls, Inc
Choose your processor and enter a name for the system. Check any other appropriate settings.
www.autonomichome.com
Choose your processor and enter a name for the system. Check any other appropriate settings.
Media Control System © Copyright 2010 Autonomic Controls, Inc.
Revision 6, Build 1306
© Copyright 2010
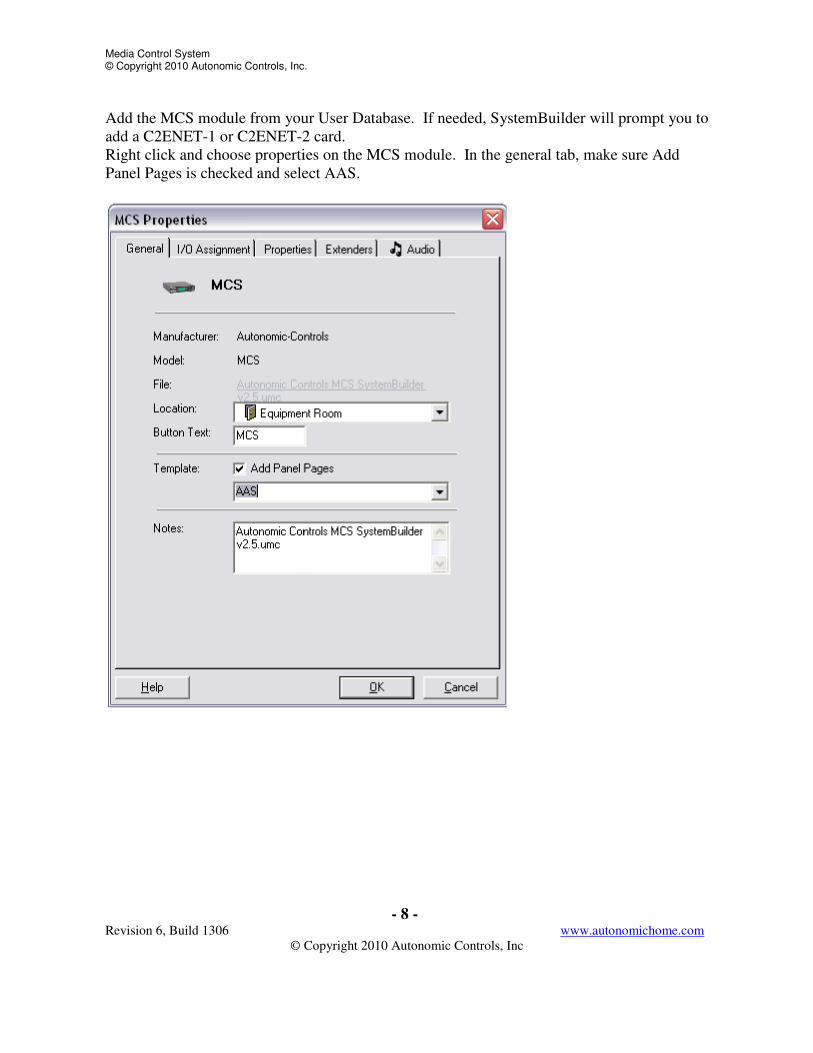
Add the MCS module from your User Data
add a C2ENET-1 or C2ENET-2 card.
Right click and choose properties on the
Panel Pages is checked and select AAS.
Autonomic Controls, Inc.
- 8 - www.autonomichome.com
Copyright 2010 Autonomic Controls, Inc
module from your User Database. If needed, SystemBuilder will prompt you to
2 card.
Right click and choose properties on the MCS module. In the general tab, make sure
ed and select AAS.
www.autonomichome.com
base. If needed, SystemBuilder will prompt you to
n the general tab, make sure Add
Media Control System © Copyright 2010 Autonomic Controls, Inc.
Revision 6, Build 1306
© Copyright 2010
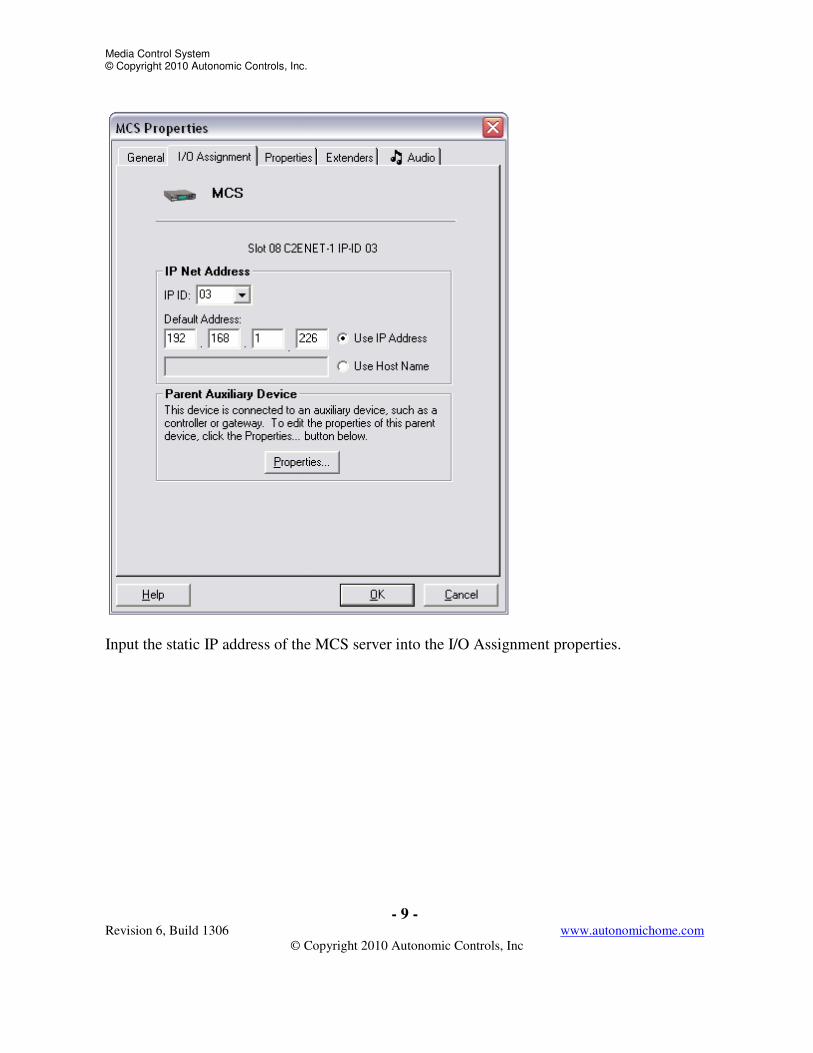
Input the static IP address of the
Autonomic Controls, Inc.
- 9 - www.autonomichome.com
Copyright 2010 Autonomic Controls, Inc
Input the static IP address of the MCS server into the I/O Assignment properties.
www.autonomichome.com
server into the I/O Assignment properties.
Media Control System © Copyright 2010 Autonomic Controls, Inc.
Revision 6, Build 1306
© Copyright 2010
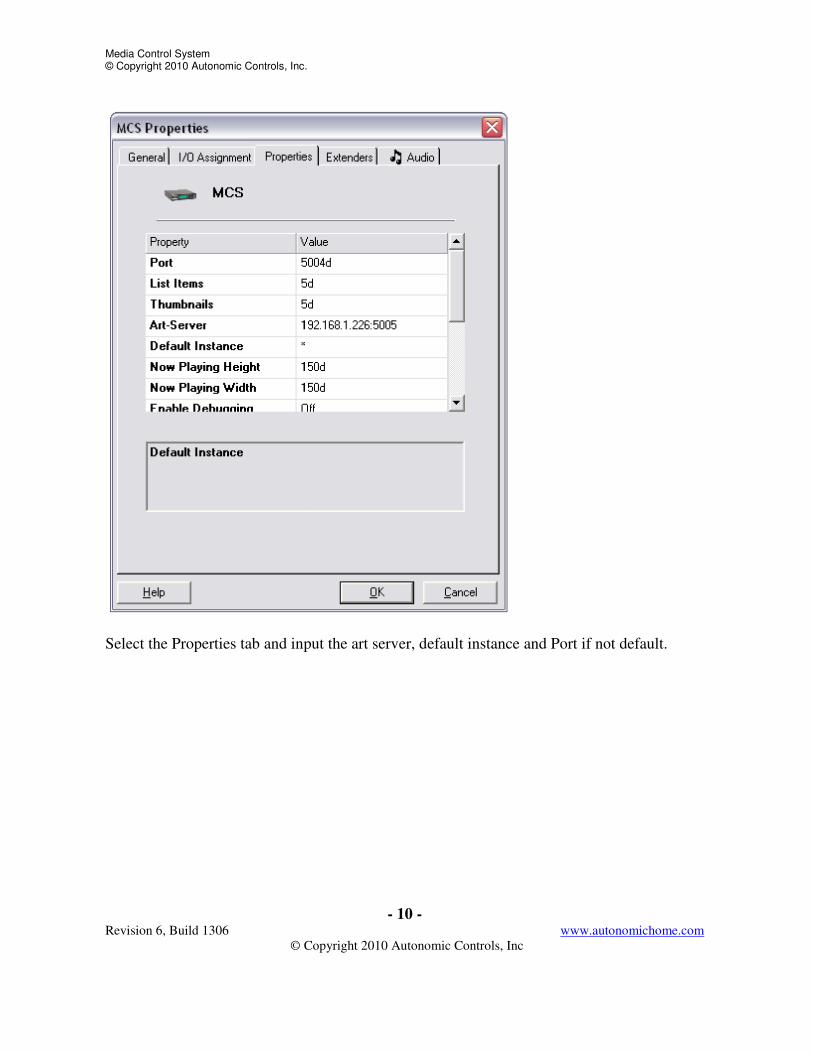
Select the Properties tab and input the art server, default instance and Port if not default.
Autonomic Controls, Inc.
- 10 - www.autonomichome.com
Copyright 2010 Autonomic Controls, Inc
Select the Properties tab and input the art server, default instance and Port if not default.
www.autonomichome.com
Select the Properties tab and input the art server, default instance and Port if not default.
Media Control System © Copyright 2010 Autonomic Controls, Inc.
Revision 6, Build 1306
© Copyright 2010
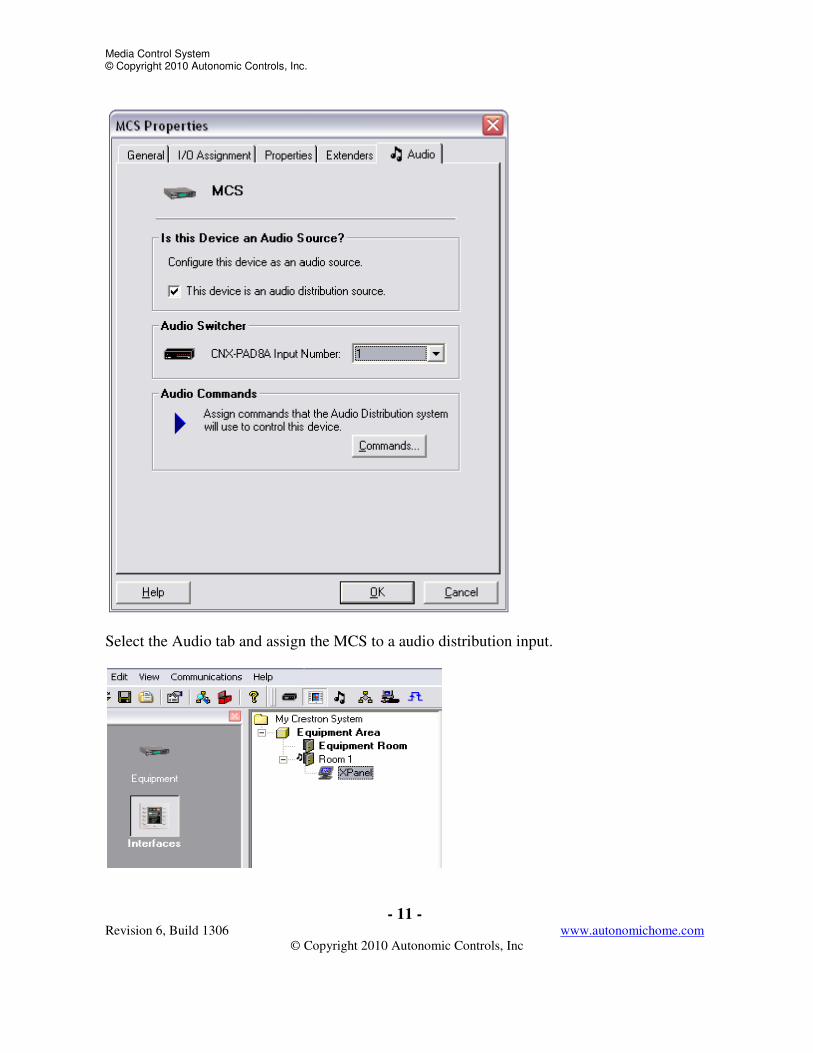
Select the Audio tab and assign the
Autonomic Controls, Inc.
- 11 - www.autonomichome.com
Copyright 2010 Autonomic Controls, Inc
Select the Audio tab and assign the MCS to a audio distribution input.
www.autonomichome.com
Media Control System © Copyright 2010 Autonomic Controls, Inc.
Revision 6, Build 1306
© Copyright 2010
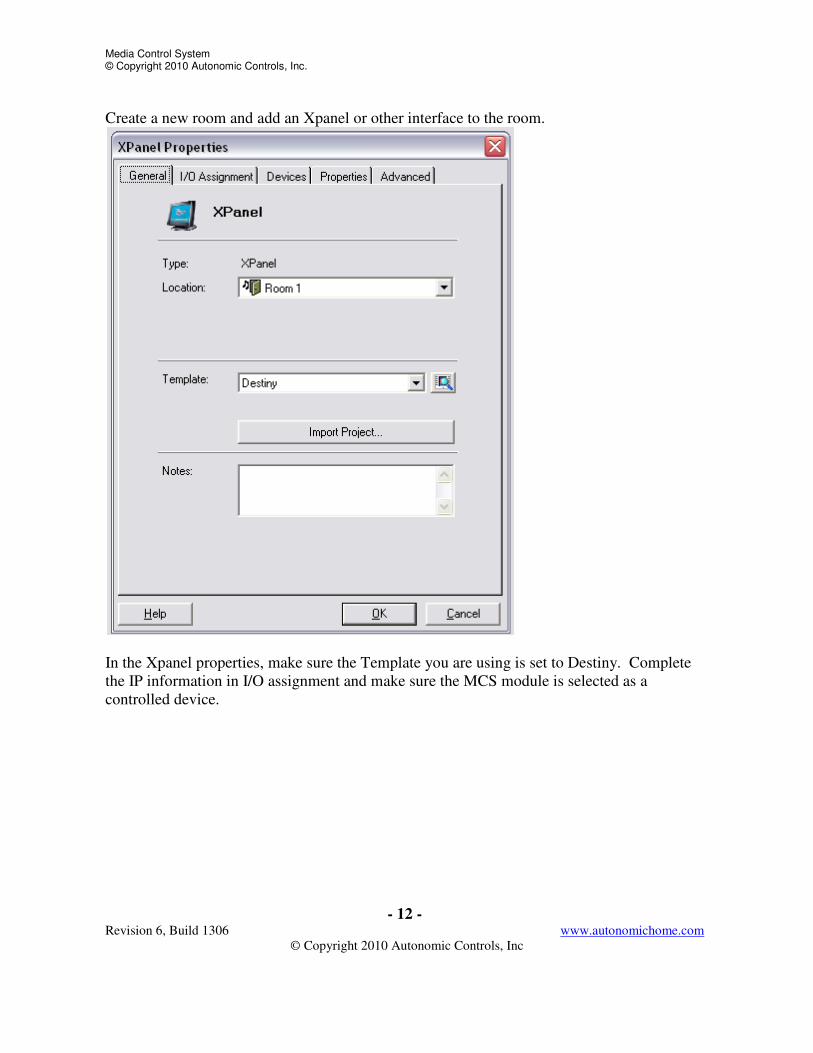
Create a new room and add an Xpanel or other interface to the room.
In the Xpanel properties, make sure the Template you are using is set to Destiny. Complete
the IP information in I/O assignment
controlled device.
Autonomic Controls, Inc.
- 12 - www.autonomichome.com
Copyright 2010 Autonomic Controls, Inc
Create a new room and add an Xpanel or other interface to the room.
In the Xpanel properties, make sure the Template you are using is set to Destiny. Complete
the IP information in I/O assignment and make sure the MCS module is selected as a
www.autonomichome.com
In the Xpanel properties, make sure the Template you are using is set to Destiny. Complete
module is selected as a
Media Control System © Copyright 2010 Autonomic Controls, Inc.
Revision 6, Build 1306
© Copyright 2010
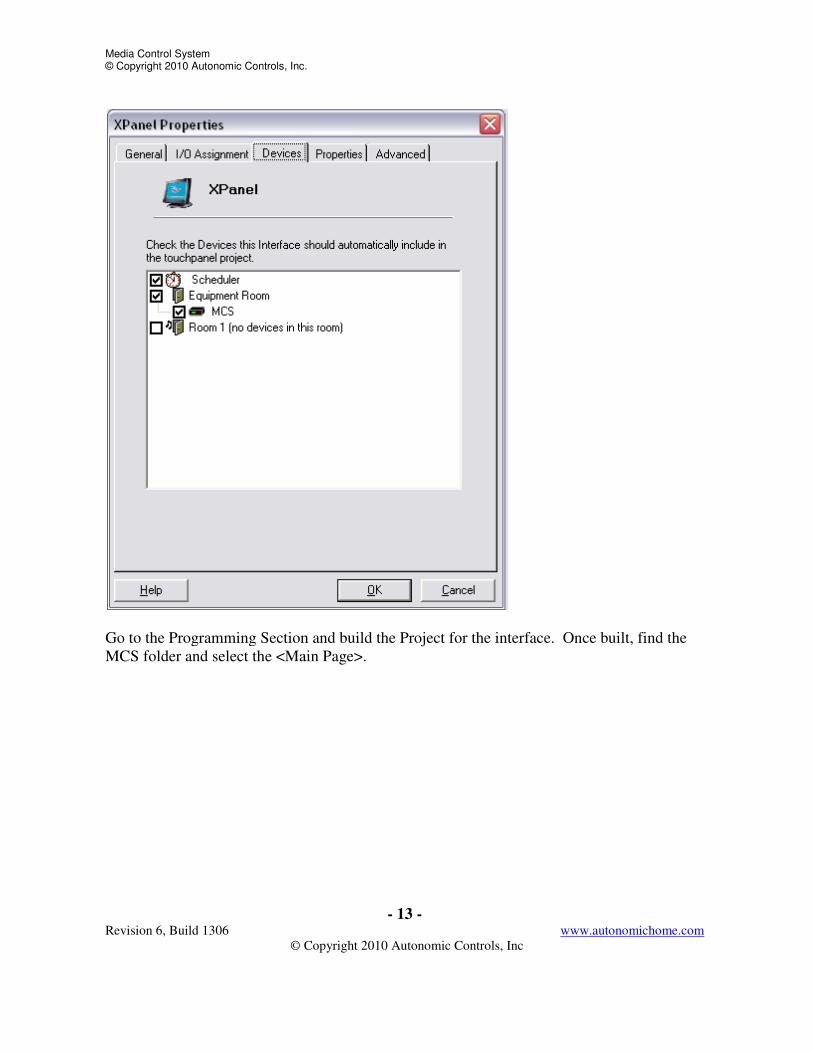
Go to the Programming Section and
MCS folder and select the <Main Page>.
Autonomic Controls, Inc.
- 13 - www.autonomichome.com
Copyright 2010 Autonomic Controls, Inc
Go to the Programming Section and build the Project for the interface. Once built, find the
folder and select the <Main Page>.
www.autonomichome.com
rface. Once built, find the
Media Control System © Copyright 2010 Autonomic Controls, Inc.
Revision 6, Build 1306
© Copyright 2010
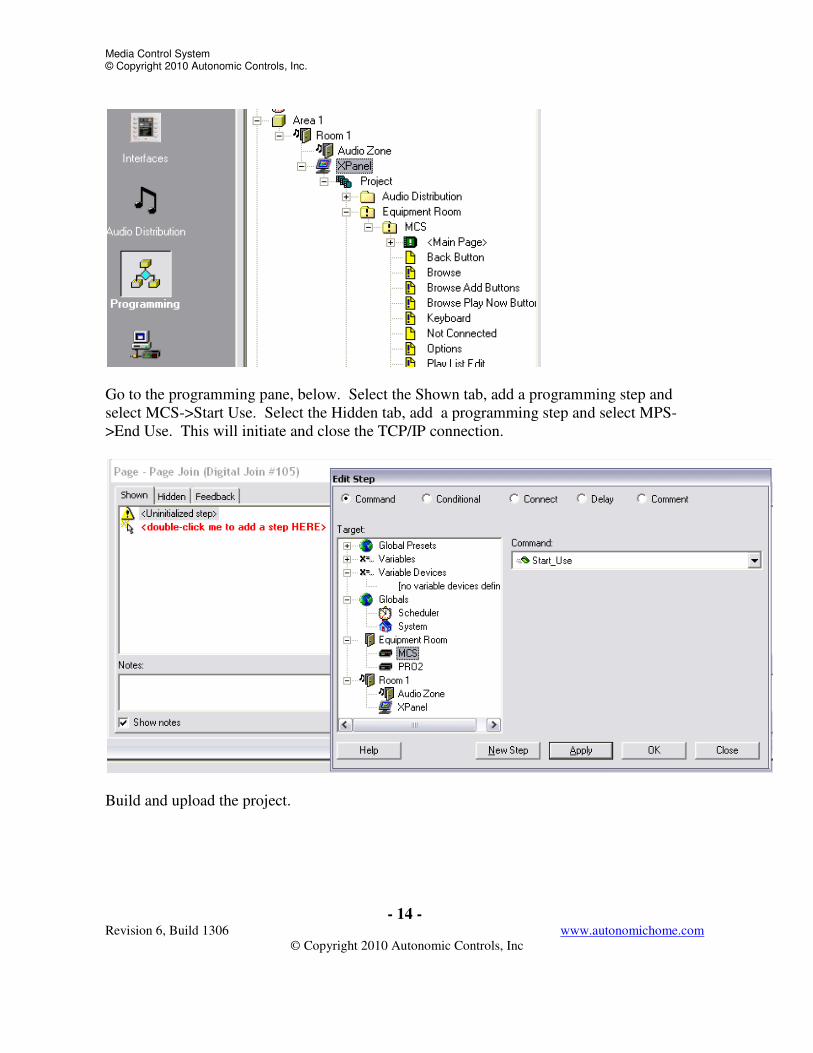
Go to the programming pane, be
select MCS->Start Use. Select the Hidden tab, ad
>End Use. This will initiate and close the TCP/IP connection.
Build and upload the project.
Autonomic Controls, Inc.
- 14 - www.autonomichome.com
Copyright 2010 Autonomic Controls, Inc
Go to the programming pane, below. Select the Shown tab, add a programming step and
>Start Use. Select the Hidden tab, add a programming step and select M
>End Use. This will initiate and close the TCP/IP connection.
www.autonomichome.com
t the Shown tab, add a programming step and
d a programming step and select MPS-
Media Control System © Copyright 2010 Autonomic Controls, Inc.
- 15 - Revision 6, Build 1306 www.autonomichome.com
© Copyright 2010 Autonomic Controls, Inc
The MCS Parameters:
Port – The TCP/IP port used for communication with the Music Port Server. Default is
5004d.
ListItems – This tells the module how many list items appear in your VT-Pro project. If you
modify the included interface files, set this parameter to the number of text list items in your
project. This value does not need to be changed for the sample program.
Thumbnails – This parameter specifies how many thumbnails appear in your VT-Pro project.
If you modify the included interface files, set this parameter to the number of thumbnail list
items in your project. This value does not need to be changed for the sample program.
Art-Server – This is the full address and port number of the Autonomic Controls web server
which is responsible for serving album art to the touch panel. By default this value is 5005,
but it is also configurable in the server configuration tool.
It should be set to the IP address of your server, a colon (:), and then the art port, (default 5005). Default Instance – Each default instance parameter should have the MCS source name
entered as a parameter. Using an asterisk (‘*’) indicates that the default instance is the first
instance configured in the MCS Configuration software.
Now Playing Art Height and Width – Input the height and width in pixels for your now
playing art graphic. For best results, these values should match the height and width of the
dynamic graphic object in VT-Pro.
Enable Debugging – Set to On to see verbose activity messages in Text Console or Simpl
Debugger. Defaults to Off.
Media Control System © Copyright 2010 Autonomic Controls, Inc.
- 16 - Revision 6, Build 1306 www.autonomichome.com
© Copyright 2010 Autonomic Controls, Inc
Troubleshooting
Cannot establish a connection with the Media Control Server.
• Check Server Status in configuration application (step 1). Stop and restart server if
necessary. Refer to Autonomic Controls if the server will not report “Running” or if
the problem persists after reboot.
• Check Licensing Status – rule out expired demo. Validate full time connection to the
internet if running in demo mode.
• Check Firewall status. Determine if the PC has third party firewall software such as
Norton Antivirus. May need to manually make port exceptions in those cases.
• Insure Control Server Port matches Port setting in TCP/IP connection on the
processor.
• Validate connection on local host and remote network PC using telnet to rule out
networking problem. Ping the Crestron Processor from the host to insure connectivity
between them.
• Insure IP Table is properly populated on the Crestron.
No Album Art is displayed.
• Check the Art Server parameter in the Autonomic Controls MCS symbol in SIMPL.
Make sure the parameter is in the format IPADDRESS:PORT where the IP address
matches the host computer and the port matches the Web Server port setting in the
MCS configuration application.
• Check Firewall status in the MCS configuration application. Determine if the PC has
third party firewall software such as Norton Antivirus. If so, you may need to
manually make port exceptions in those cases.
• Establish a baseline with the Sample VT Pro-e file. Validate that the analog and
dynamic art joins have not changed on the thumbnail objects on the VT Pro pages.
• Isolate the problem by typing http://[host_name]:5005/getart into a browser
window. (Replace host-name with the server’s host name or IP address). If album art
for the currently playing media is displayed in the browser, use the Crestron debugger
to determine what URL the MCE-Now-Playing-Art$ signal is using.
Media Control System © Copyright 2010 Autonomic Controls, Inc.
- 17 - Revision 6, Build 1306 www.autonomichome.com
© Copyright 2010 Autonomic Controls, Inc
Objects not automatically programmed.
Using the default Destiny template for the AAS, nearly all functionality of the MCS will be
pre-programmed when building the program. However, there are some elements that are
either not supported by our module that exist in the template or not implemented in the same
way. These elements will need to be manually added in the Programming section of
SystemBuilder. Below is a overview of such elements.
Now Playing page:
• Next Up: Not supported by our module
• Track number information: Change to a serial field and tie to MCS track output serial.
• Selection: Not supported
• Duration: Change to an serial field and tie to MCS track duration output.
• Genre: Not used as Metadata by MCS.
Queue:
• In Queue: Not supported.


![Science, Engineering and Technology Building Crestron ... · Science, Engineering and Technology Building — Crestron Touch Screen [Publication : í9 ì] 2 The Projector Video Mute](https://img.pdfslide.net/doc/110x75/5e7590b127764c12045dd8a7/science-engineering-and-technology-building-crestron-science-engineering-and.jpg)