Embed Size (px)
Citation preview
Contact Zone
Quick Start Guide
Melissa Data Corporation
Copyright
Companies, names, and data used in examples herein are fictitious unless otherwise noted. No part of this document may be reproduced or
transmitted in any form or by any means, electronic or mechanical, for
any purpose, without the express written permission of Melissa Data Corporation. This document and the software it describes are furnished
under a license agreement, and may be used or copied only in accordance
with the terms of the license agreement.
Copyright © 2012 by Melissa Data Corporation. All rights reserved.
Copyright © 2007 - 2012 Pentaho Corporation. All rights reserved.
Originally developed by Pentaho Corporation provided under the terms of the GNU Lesser General Public License (LGPL), Version 2.1 or any
later version. You may not use this file except in compliance with the
license. If you need a copy of the license, please go to http://
www.gnu.org/licenses/lgpl.txt. The initial Developer is Pentaho Corporation.
Software distributed under the GNU Lesser General Public License is
distributed on an “AS IS” basis, WITHOUT WARRANTY OF ANY KIND, either express or implied. Please refer to the license for the
specific language governing your rights and limitations.
Information in this document is subject to change without notice. Melissa Data Corporation assumes no responsibility or liability for any
errors, omissions, or inaccuracies that may appear in this document.
Trademarks
SmartMover and Contact Zone are registered trademarks of Melissa
Data Corp. Windows is a registered trademark of Microsoft Corp.
The following are registered trademarks of the United States Postal
Service®: United States Postal Service; USPS; SuiteLink; First-Class
Standard Mail; CASS; ZIP + 4.
All other brands and products are trademarks of their respective
holder(s).
Melissa Data Corporation
22382 Avenida EmpresaRancho Santa Margarita; CA 92688-2112
Phone: 1-800-MELISSA (1-800-635-4772)
Fax: 949-589-5211
E-mail: [email protected]
Internet: www.MelissaData.com
For the most recent version of this document, visithttp://www.melissadata.com/czqsg
Document Code: DQTENTCZQSG
Revision Number: 24042012.12
Contact Zone
i
Table of Contents
Overview . . . . . . . . . . . . . . . . . . . . . . . . . . . . 1Contact Zone . . . . . . . . . . . . . . . . . . . . . . . . . . . . .1System Requirements . . . . . . . . . . . . . . . . . . . . . .2License and Demo Information . . . . . . . . . . . . . .2
Functionality Overview . . . . . . . . . . . . . . . . . . 3
Advanced Capabilities . . . . . . . . . . . . . . . . . . . 4Field Mapping . . . . . . . . . . . . . . . . . . . . . . . . . . . . .4Save Configuration Settings . . . . . . . . . . . . . . . . .4Filtering . . . . . . . . . . . . . . . . . . . . . . . . . . . . . . . . . .4
Getting Started . . . . . . . . . . . . . . . . . . . . . . . . 5Installation . . . . . . . . . . . . . . . . . . . . . . . . . . . . . . .5Repository and Files . . . . . . . . . . . . . . . . . . . . . . . .5Quick Start . . . . . . . . . . . . . . . . . . . . . . . . . . . . . . .5
Tutorials . . . . . . . . . . . . . . . . . . . . . . . . . . . . . 6Basics and Terminology . . . . . . . . . . . . . . . . . . . .6Workspace . . . . . . . . . . . . . . . . . . . . . . . . . . . . . . .7
Contact Verify Transform . . . . . . . . . . . . . . . . . 8Excel Input . . . . . . . . . . . . . . . . . . . . . . . . . . . . . . .8Contact Verify Component . . . . . . . . . . . . . . . . . .9Excel Output . . . . . . . . . . . . . . . . . . . . . . . . . . . . .11Run the Transformation . . . . . . . . . . . . . . . . . . . .12
SmartMover Transform . . . . . . . . . . . . . . . . . 14CSV Input . . . . . . . . . . . . . . . . . . . . . . . . . . . . . . .14SmartMover Component . . . . . . . . . . . . . . . . . . .15Excel Output . . . . . . . . . . . . . . . . . . . . . . . . . . . . .17Run the Transformation . . . . . . . . . . . . . . . . . . . .18
Overview
Overview
Contact ZoneContact Zone is a data quality program with a uniquely simple graphical user interface (GUI) that enables the seamless integration and cleansing of your customer data without having to write a single line of code. Contact Zone allows you to:
• Parse, validate & standardize U.S. and Canadian addresses, phone numbers, email addresses, and full names.
• Update the addresses of U.S. and Canadian customers who have moved in the last 48 months.
• Presort for First-Class™ and Standard Mail® for maximum postage discounts.
• Eliminate duplicate records and/or match records for a sin-gle, accurate view of contacts.
• Add rooftop latitude and longitude coordinates to records, and append Census tract and block numbers, county names and FIPS.
Contact Zone connects to virtually any database, including Microsoft Access, Excel, SQL Server, Oracle Database, IBM DB2, Salesforce, SAP, XML, and many others, operating as the central hub for all your data cleansing needs.
1
Contact Zone
System Requirements
Minimum Requirements
• 32-Bit Windows XP, 2003, 2008, Vista, 7
• Java JDK 1.6 or above
• 6 GB hard-disk space
Recommended Requirements
• 64-Bit Windows XP, 2003, 2008, Vista, 7
• Java JDK 1.6 or above
• 6 GB hard-disk space
License and Demo InformationCustomers who have purchased Contact Zone or any trials of the product will be issued a License String by a Melissa Data sales representative. To contact a sales representative, please call 1-800-MELISSA, opt. 3.
2
Functionality Overview
Functionality Overview
Address Verification:• Validate and correct U.S. and Canadian addresses
• Append suite/apt numbers using proprietary AddressPlus technology
• Determine delivery type as business or residential
• Validate and correct non-USPS® addresses
SmartMover:• Update addresses of people or businesses that have moved
• Access USPS 48-month NCOALink® and Canada Post 72-month NCOA® data
• Meet USPS Move-Update requirements for discounts
Postal Presorting:• Presort for First-Class and Standard Mail
• Work with any CASS™ processed list with ZIP + 4® codes
• Generate Qualification Reports and Postage Statements
Geocoding (Spatial Processing):• Assign latitude and longitude to the rooftop
• Append Census tract/block numbers, county names and FIPS
• Link to Census CBSA information
MatchUp Deduplication:• Create your own matching rules (matchcodes)
• Identify multiple records at the same address
• Enable a single, accurate view of contacts
Name Parsing:• Parse and genderize names and multiple names
• Detect vulgarities and suspicious words in name fields
• Detect and standardize companies in the name fields
3
Contact Zone
Phone Verification:• Verify U.S. and Canadian phones to 7-10 digits
• Determine Telco Switch location
• Detect landline, cellular, or VOIP
• Detect residential, business, or SOHO
Email Validation:• Validate and correct email domains
• Detect mobile domains (restricted from email by FCC)
• Detect bad mailbox names (spam, noreply…)
• Correct common misspellings and syntax errors
Advanced Capabilities
Field MappingMap output to existing fields or automatically create new output field names.
Save Configuration SettingsAll Contact Zone components allow you to save configuration settings of the current project for future use. This allows power users to run packages developed in a Development environment in Test or Production without any configuration changes. This feature allows the user to provide saved configuration data for deployment with multiple packages to distribute verification processing.
FilteringAdvanced filtering allows decision-makers to decide what constitutes a good or bad record. Choose from common or recommended filters or build your own using the powerful rules builder.
4
Getting Started
5
Getting Started
Installation To install, simply place the installation disc into the DVD drive and run setup.exe on the root of the DVD. The license string may be inserted during the Setup process for all purchased components, or individually, upon first use of each component.
Repository and FilesIn Contact Zone you build Jobs and Transformations. There are two methods to save them:
• Database repository
• Files
If you choose the database repository method, the repository must be created the first time you execute Contact Zone. If you choose the files method, the Jobs are saved with the .kjb extension and the Transformations are saved with the .ktr extension. This quick start guide will work with the files method.
Quick StartStart Contact Zone by executing ContactZone.bat within the install folder. Execute ContactZone.sh on Unix-like operating systems. As soon as Contact Zone starts, a dialog window will appear asking for the repository connection data. Click the Cancel button.Following this, you will see a tip window. Close this. Now you will be in the main Contact Zone interface. Go to the Tools menu and click Options.... A window will open that enables you to change various general and visual characteristics. If anything is changed, it will be necessary to restart Contact Zone in order to see the changes applied.
Contact Zone
Tutorials
The following tutorials will guide you through two transformations utilizing multiple steps. Excel Input, CSV Input, Excel Output, Contact Verify Component, and SmartMover Component will all be covered.For a more comprehensive and in-depth guide, please visit the Melissa Data website where you will find the most up-to-date documentation for your software.
Basics and TerminologyContact Zone is a powerful tool to help you cleanse and parse your data. A basic knowledge of the terminology and structure used will be of great benefit before proceeding to the tutorials.
TransformationA transform takes data, transforms it, and outputs it. Therefore, a transformation is made of steps and components linked by hops.
StepA step is either input or output. The input is the file that you want cleansed and parsed. The output is the resultant file with the newly cleansed and parsed data in it. Contact Zone can accept many different formats as input, and output to various formats.
ComponentA component is the real workhorse of a transformation. This is the part of the transformation that really transforms your data, cleansing and parsing it. Some components of Contact Zone are: SmartMover; Contact Verify; and MatchUp.
HopA hop is the connection between steps and components. This is how a component reads an input file, and how it writes an output file.
6
Tutorials
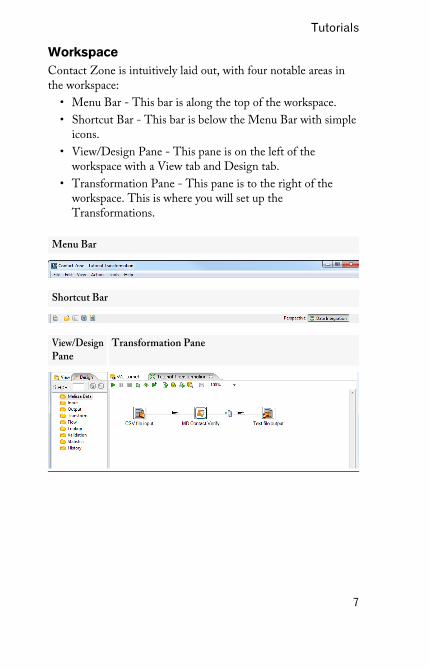
WorkspaceContact Zone is intuitively laid out, with four notable areas in the workspace:
• Menu Bar - This bar is along the top of the workspace.
• Shortcut Bar - This bar is below the Menu Bar with simple icons.
• View/Design Pane - This pane is on the left of the workspace with a View tab and Design tab.
• Transformation Pane - This pane is to the right of the workspace. This is where you will set up the Transformations.
Menu Bar
Shortcut Bar
View/Design
Pane
Transformation Pane
7

Contact Zone
Contact Verify Transform
This transform will cover the Excel input step, Contact Verify component, and the Excel output step. You will take an Excel file, verify and cleanse the data, then output the cleansed data into an Excel file.For this transform, use the included SampleData.xls file located under: root(C:)\ContactZone\samples\Contact Verify\Please note that setup of the steps and components will change depending on the data.
Excel InputLeft-click drag and drop the Excel input from the View/Design Pane, Design tab, Input folder to the Transformation Pane.
Configuration1. Double-click the Excel Input step.
2. The Excel Input window will open. Setup:
Files tab
• File or directory - Link this Step with the input data file.
• Click the Browse... button and navigate to the desired data file. In this case, SampleData.xls, in ContactZone\sam-ples\Contact Verify\
• Click Open.
• Click Add to add the file to the Selected files: list.
!Sheets tab
• Click Get sheetname(s)... The Enter list window will open.
• Click > to add the desired sheets to Your selection. In this case, add SampleData. Click OK.
!Fields tab
• Click Get fields from header row....
8
Contact Verify Transform
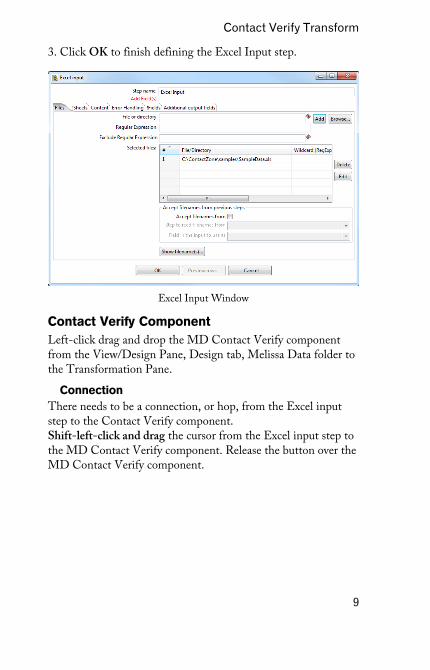
3. Click OK to finish defining the Excel Input step.
Excel Input Window
Contact Verify ComponentLeft-click drag and drop the MD Contact Verify component from the View/Design Pane, Design tab, Melissa Data folder to the Transformation Pane.
ConnectionThere needs to be a connection, or hop, from the Excel input step to the Contact Verify component.Shift-left-click and drag the cursor from the Excel input step to the MD Contact Verify component. Release the button over the MD Contact Verify component.
9
Contact Zone
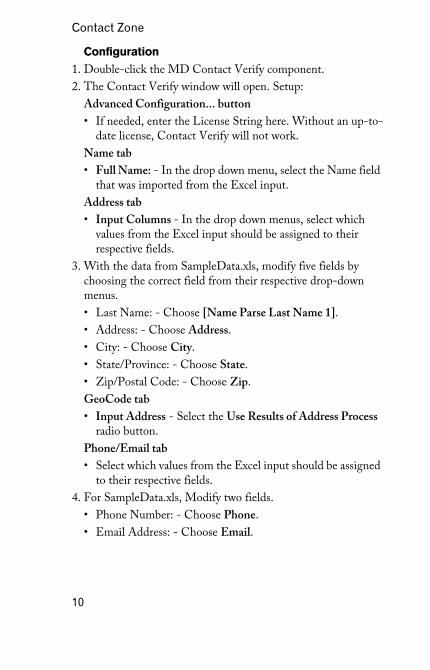
Configuration1. Double-click the MD Contact Verify component.
2. The Contact Verify window will open. Setup:
Advanced Configuration... button
• If needed, enter the License String here. Without an up-to-date license, Contact Verify will not work.
Name tab
• Full Name: - In the drop down menu, select the Name field that was imported from the Excel input.
Address tab
• Input Columns - In the drop down menus, select which values from the Excel input should be assigned to their respective fields.
3. With the data from SampleData.xls, modify five fields by choosing the correct field from their respective drop-down menus.
• Last Name: - Choose [Name Parse Last Name 1].
• Address: - Choose Address.
• City: - Choose City.
• State/Province: - Choose State.
• Zip/Postal Code: - Choose Zip.
GeoCode tab
• Input Address - Select the Use Results of Address Process radio button.
Phone/Email tab
• Select which values from the Excel input should be assigned to their respective fields.
4. For SampleData.xls, Modify two fields.
• Phone Number: - Choose Phone.
• Email Address: - Choose Email.
10
Contact Verify Transform
Pass-Through Columns tab
• Click the Get Fields button to populate the Pass-Through column.
Reporting tab
• Check Generate Report.
5. Click OK to finish defining the MD Contact Verify component.
MD Contact Verify Component Window
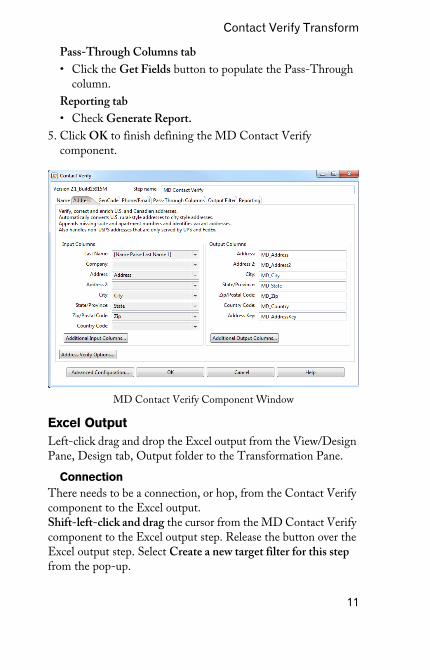
Excel OutputLeft-click drag and drop the Excel output from the View/Design Pane, Design tab, Output folder to the Transformation Pane.
ConnectionThere needs to be a connection, or hop, from the Contact Verify component to the Excel output.Shift-left-click and drag the cursor from the MD Contact Verify component to the Excel output step. Release the button over the Excel output step. Select Create a new target filter for this step from the pop-up.
11
Contact Zone
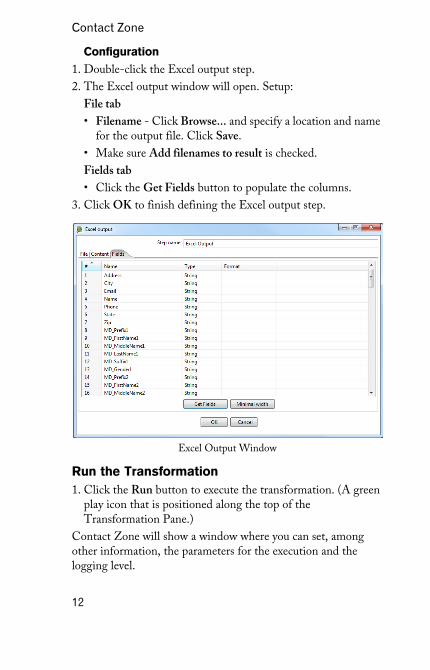
Configuration1. Double-click the Excel output step.
2. The Excel output window will open. Setup:
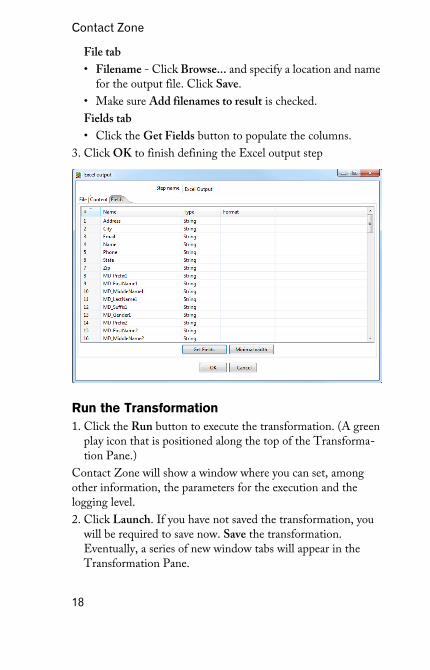
File tab
• Filename - Click Browse... and specify a location and name for the output file. Click Save.
• Make sure Add filenames to result is checked.
Fields tab
• Click the Get Fields button to populate the columns.
3. Click OK to finish defining the Excel output step.
Excel Output Window
Run the Transformation1. Click the Run button to execute the transformation. (A green
play icon that is positioned along the top of the Transformation Pane.)
Contact Zone will show a window where you can set, among other information, the parameters for the execution and the logging level.
12
Contact Verify Transform
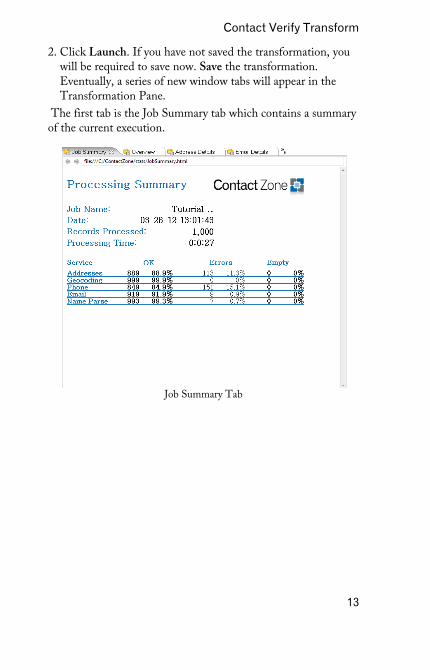
2. Click Launch. If you have not saved the transformation, you will be required to save now. Save the transformation. Eventually, a series of new window tabs will appear in the Transformation Pane.
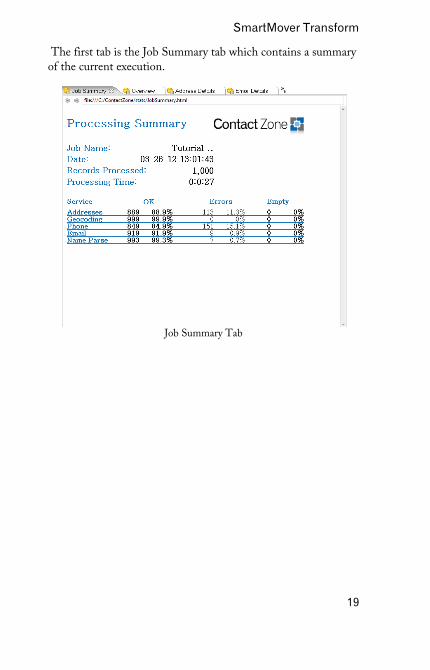
The first tab is the Job Summary tab which contains a summary of the current execution.
Job Summary Tab
13
Contact Zone
SmartMover Transform
This transform will cover the CSV input step, SmartMover component, and the Excel output step. You will take a CSV file, parse and cleanse the data, then output the cleansed data into an Excel file.For this transform, use the included SampleData.txt file located under: root(C:)\ContactZone\samples\SmartMover\Please note that setup of the steps and components will change depending on the data.
CSV InputLeft-click drag and drop the CSV file input from the View/Design Pane, Design tab, Input folder to the Transformation Pane.
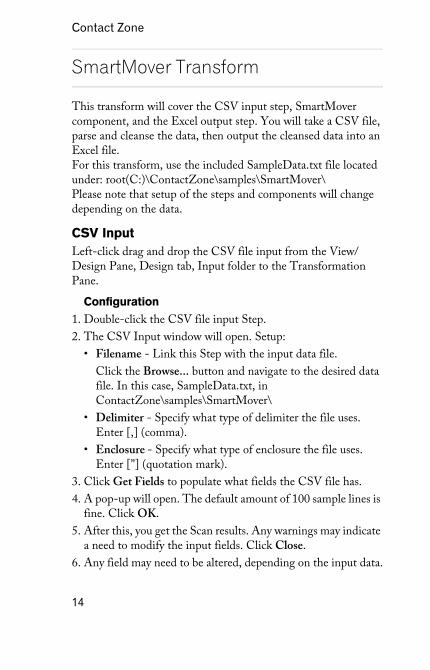
Configuration1. Double-click the CSV file input Step.
2. The CSV Input window will open. Setup:
• Filename - Link this Step with the input data file.
Click the Browse... button and navigate to the desired data file. In this case, SampleData.txt, in ContactZone\samples\SmartMover\
• Delimiter - Specify what type of delimiter the file uses. Enter [,] (comma).
• Enclosure - Specify what type of enclosure the file uses. Enter [”] (quotation mark).
3. Click Get Fields to populate what fields the CSV file has.
4. A pop-up will open. The default amount of 100 sample lines is fine. Click OK.
5. After this, you get the Scan results. Any warnings may indicate a need to modify the input fields. Click Close.
6. Any field may need to be altered, depending on the input data.
14
SmartMover Transform
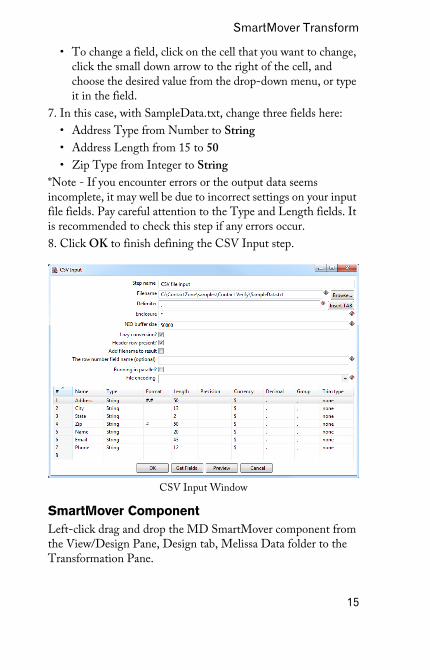
• To change a field, click on the cell that you want to change, click the small down arrow to the right of the cell, and choose the desired value from the drop-down menu, or type it in the field.
7. In this case, with SampleData.txt, change three fields here:
• Address Type from Number to String
• Address Length from 15 to 50
• Zip Type from Integer to String
*Note - If you encounter errors or the output data seems incomplete, it may well be due to incorrect settings on your input file fields. Pay careful attention to the Type and Length fields. It is recommended to check this step if any errors occur.
8. Click OK to finish defining the CSV Input step.
CSV Input Window
SmartMover ComponentLeft-click drag and drop the MD SmartMover component from the View/Design Pane, Design tab, Melissa Data folder to the Transformation Pane.
15
Contact Zone
ConnectionThere needs to be a connection, or hop, from the CSV file to the SmartMover component.Shift-left-click and drag the cursor from the CSV file input step to the MD SmartMover component. Release the button over the MD SmartMover component. Select Main Output of Step from the pop-up.
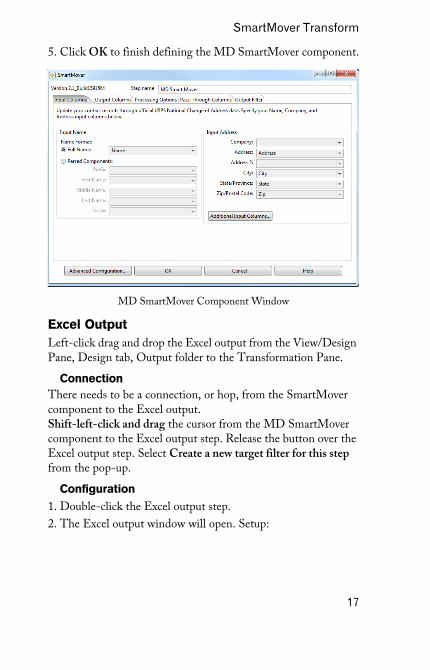
Configuration1. Double-click the MD SmartMover component.
2. The SmartMover window will open. Setup:
Advanced Configuration... button
• If needed, enter the License String here. Without an up-to-date license, SmartMover will not work.
Input Columns tab
• In the drop-down menus, select which values from the CSV files should be assigned to their respective fields.
3. With the data from SampleData.txt, modify five fields by choosing the correct field from their respective drop-down menus.
• Full Name: - Choose Name
• Address: - Choose Address
• City: - Choose City
• State/Province: - Choose State
• Zip/Postal Code: - Choose Zip
Pass-Through Columns tab
4. Click Get Fields.
16
SmartMover Transform
5. Click OK to finish defining the MD SmartMover component.
MD SmartMover Component Window
Excel OutputLeft-click drag and drop the Excel output from the View/Design Pane, Design tab, Output folder to the Transformation Pane.
ConnectionThere needs to be a connection, or hop, from the SmartMover component to the Excel output.Shift-left-click and drag the cursor from the MD SmartMover component to the Excel output step. Release the button over the Excel output step. Select Create a new target filter for this step from the pop-up.
Configuration1. Double-click the Excel output step.
2. The Excel output window will open. Setup:
17
Contact Zone
File tab
• Filename - Click Browse... and specify a location and name for the output file. Click Save.
• Make sure Add filenames to result is checked.
Fields tab
• Click the Get Fields button to populate the columns.
3. Click OK to finish defining the Excel output step
Run the Transformation1. Click the Run button to execute the transformation. (A green
play icon that is positioned along the top of the Transforma-tion Pane.)
Contact Zone will show a window where you can set, among other information, the parameters for the execution and the logging level.
2. Click Launch. If you have not saved the transformation, you will be required to save now. Save the transformation. Eventually, a series of new window tabs will appear in the Transformation Pane.
18
SmartMover Transform
The first tab is the Job Summary tab which contains a summary of the current execution.
Job Summary Tab
19