Embed Size (px)
Citation preview

Mellanox WinOF for WindowsInstallation Guide
Rev 2.00 GA
Mellanox Technologies

2
© Copyright 2008. Mellanox Technologies, Inc. All Rights Reserved.
Mellanox, ConnectX, InfiniBlast, InfiniBridge, InfiniHost, InfiniRISC, InfiniScale, and InfiniPCI are regis-tered trademarks of Mellanox Technologies, Ltd. Virtual Protocol Interconnect is a trademark of Mellanox Technologies, Ltd.
Mellanox WinOF for Windows Installation Guide
Document Number: 2956
Mellanox Technologies, Inc. 350 Oakmead Parkway Sunnyvale, CA 94086 U.S.A. www.mellanox.com
Tel: (408) 970-3400 Fax: (408) 970-3403
Mellanox Technologies Ltd P.O. Box 586 Hermon-Building Yokneam 20692 Israel
Tel: +972-4-909-7200 Fax: +972-4-959-3245
Mellanox Technologies

Mellanox WinOF for Windows Installation Guide3
1 OverviewThis document describes how to install and test Mellanox WinOF for Windows on a single host machine with Mellanox InfiniBand hardware installed. The document includes the following sections:
• This overview• “Web Page and Documentation” (page 3)• “Hardware and Software Requirements” (page 3)• “Identifying Mellanox HCAs on Your Machine” (page 4)• “Downloading Mellanox WinOF” (page 6)• “Installing Mellanox WinOF” (page 6)• “Installation Results” (page 17)• “Assigning IP to IPoIB Adapters After Installation” (page 18)• “Modifying Configuration After Installation” (page 21)• “Updating Firmware After Installation” (page 22)• “Uninstalling Mellanox WinOF” (page 24)
2 Web Page and DocumentationPlease visit the Mellanox WinOF Web page at http://www.mellanox.com/products/MLNX_WinOF.php to download the package and to reference documentation such as release notes, user manuals, FAQ, trouble-shooting, and archive. After installing Mellanox WinOF (see “Installing Mellanox WinOF” below), you will find release notes and user manuals under “Program Files\Mellanox\MLNX_WinOF\Documenta-tion”.
3 Hardware and Software Requirements
3.1 Hardware Requirements
Required Disk Space for Installation
• 100MB
Platforms
Any computer system with an x86 or x64 CPU architecture, and with a PCI adapter card based on one of the following Mellanox Technologies’ InfiniBand HCA devices:
• ConnectX® (firmware: fw-25408 v2.5.000 or later)
• InfiniHost® III Ex (firmware: fw-25218 v5.3.000 or later for Mem-Free cards, and fw-25208 v4.8.200 or later for cards with memory)
• InfiniHost® III Lx (firmware: fw-25204 v1.2.000 or later)
• InfiniHost® (firmware: fw-23108 v3.5.000 or later)
Note: For the list of supported architecture platforms, please refer to the Mellanox WinOF for Windows Release Notes file under the “Documentation” folder.
Mellanox Technologies
Identifying Mellanox HCAs on Your Machine4
3.2 Software Requirements
Installer Privileges
The installation requires administrator privileges on the target machine.
Operating Systems
• Windows XP• Windows Server 2003• Windows Server 2008
Note: For the list of supported operating system distributions and kernels, please refer to the Mellanox WinOF for Windows Release Notes file under the “Documenta-tion” folder.
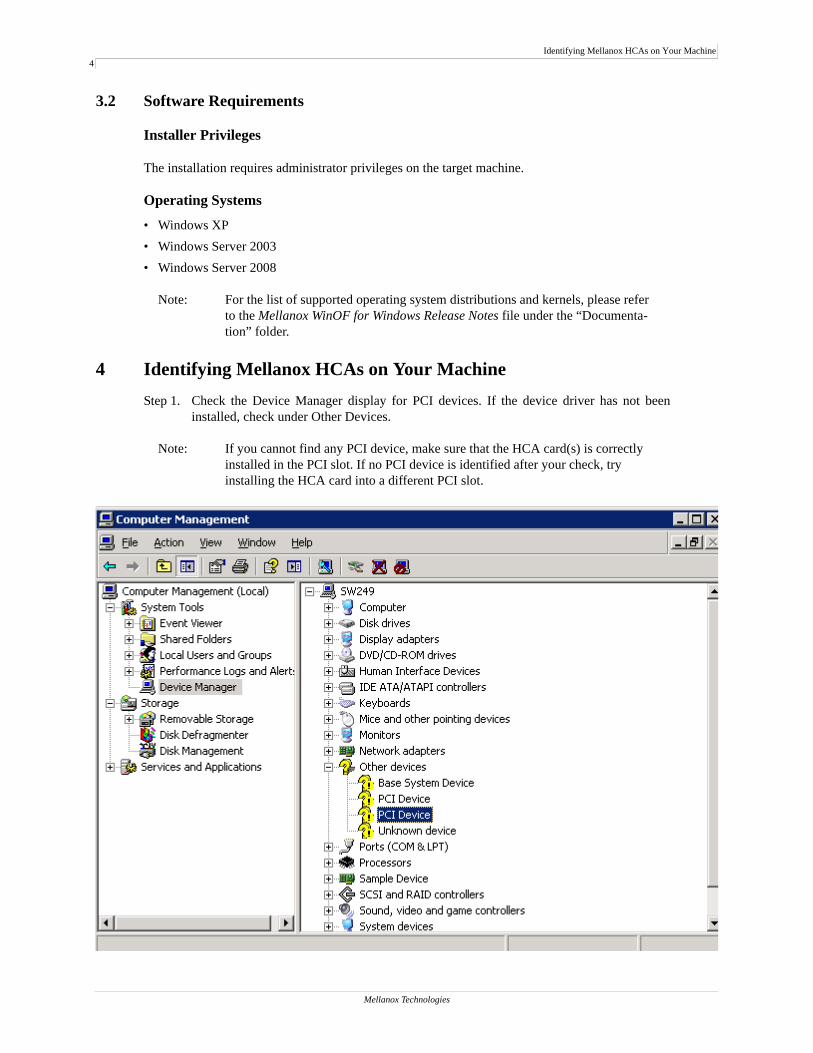
4 Identifying Mellanox HCAs on Your MachineStep 1. Check the Device Manager display for PCI devices. If the device driver has not been
installed, check under Other Devices.
Note: If you cannot find any PCI device, make sure that the HCA card(s) is correctly installed in the PCI slot. If no PCI device is identified after your check, try installing the HCA card into a different PCI slot.
Mellanox Technologies
Mellanox WinOF for Windows Installation Guide5
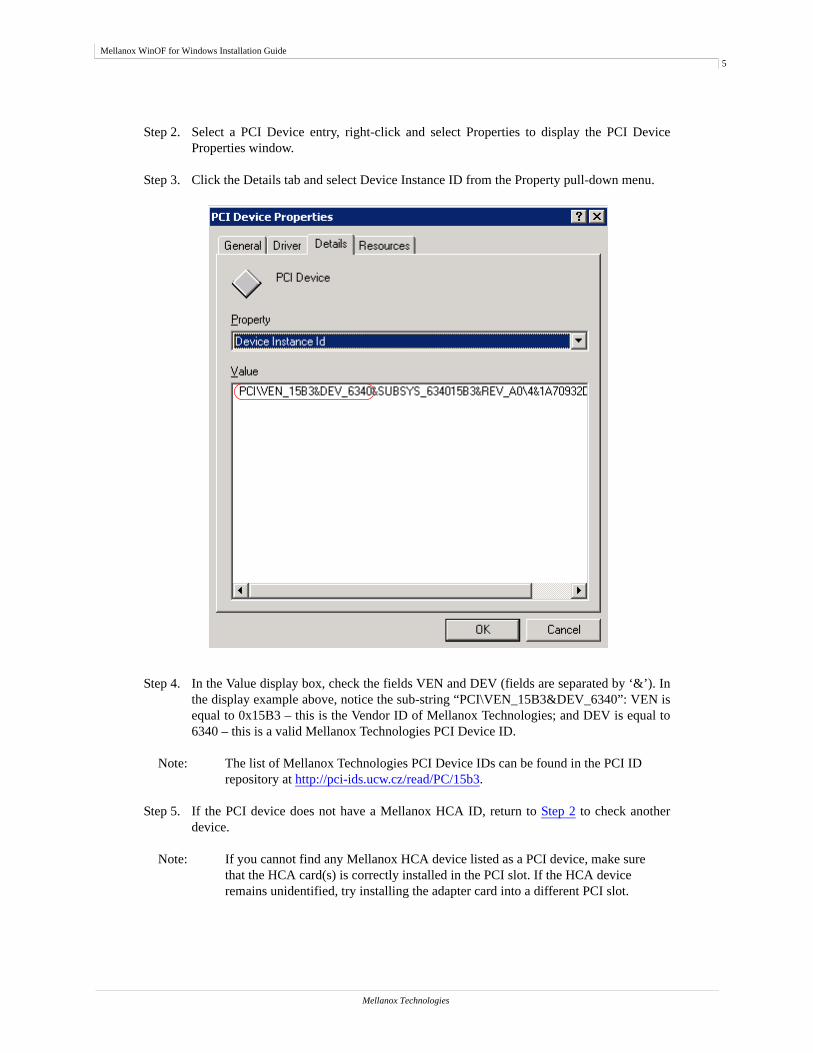
Step 2. Select a PCI Device entry, right-click and select Properties to display the PCI Device Properties window.
Step 3. Click the Details tab and select Device Instance ID from the Property pull-down menu.
Step 4. In the Value display box, check the fields VEN and DEV (fields are separated by ‘&’). In the display example above, notice the sub-string “PCI\VEN_15B3&DEV_6340”: VEN is equal to 0x15B3 – this is the Vendor ID of Mellanox Technologies; and DEV is equal to 6340 – this is a valid Mellanox Technologies PCI Device ID.
Note: The list of Mellanox Technologies PCI Device IDs can be found in the PCI ID repository at http://pci-ids.ucw.cz/read/PC/15b3.
Step 5. If the PCI device does not have a Mellanox HCA ID, return to Step 2 to check another device.
Note: If you cannot find any Mellanox HCA device listed as a PCI device, make sure that the HCA card(s) is correctly installed in the PCI slot. If the HCA device remains unidentified, try installing the adapter card into a different PCI slot.
Mellanox Technologies
Downloading Mellanox WinOF6
5 Downloading Mellanox WinOFDownload the appropriate MSI to your host from the Mellanox WinOF Web page at http://www.mellanox.com/products/MLNX_WinOF.php.
The MSI’s name has the format MLNX_WinOF_<arch>_<version>.msi, where arch can be either x86 or x64.
6 Installing Mellanox WinOFThis sections provides instructions for two types of installation:
• “Attended Installation” on page 6An attended installation is an installation procedure that requires frequent user intervention.
• “Unattended Installation” on page 11An unattended installation is an automated installation procedure that requires no user intervention.
• “WDS Installation” on page 12A WDS installation is intended for Windows HPC Server 2008 clusters.
6.1 Attended Installation
Note: The installation requires administrator privileges on the target machine.
For operating systems other than Windows 2008, double click the MSI and follow the GUI instructions to install Mellanox WinOF.
For Windows 2008, install the MSI by opening a CMD console (click Start-->Run and enter ‘cmd’) and entering the following command:
> msiexec.exe /i MLNX_WinOF_<arch>_<version>.msi
The following is an example of a Mellanox WinOF x64 installation session.
Mellanox Technologies
Mellanox WinOF for Windows Installation Guide7
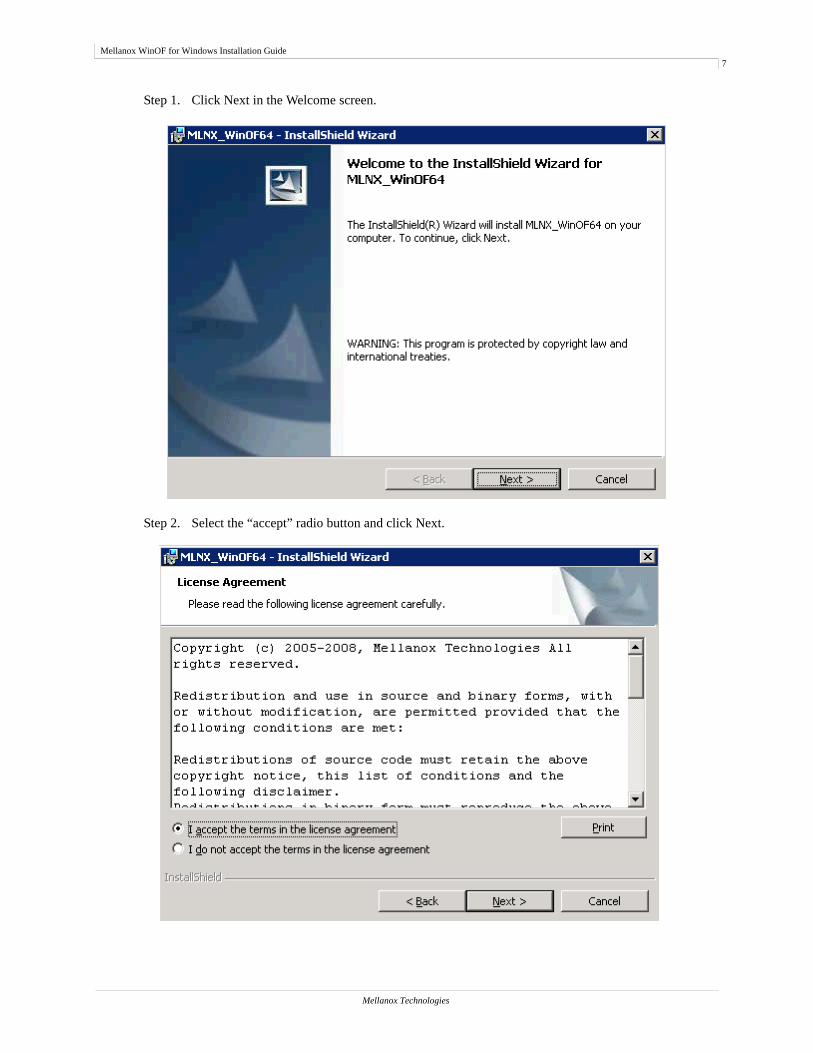
Step 1. Click Next in the Welcome screen.
Step 2. Select the “accept” radio button and click Next.
Mellanox Technologies
Installing Mellanox WinOF8
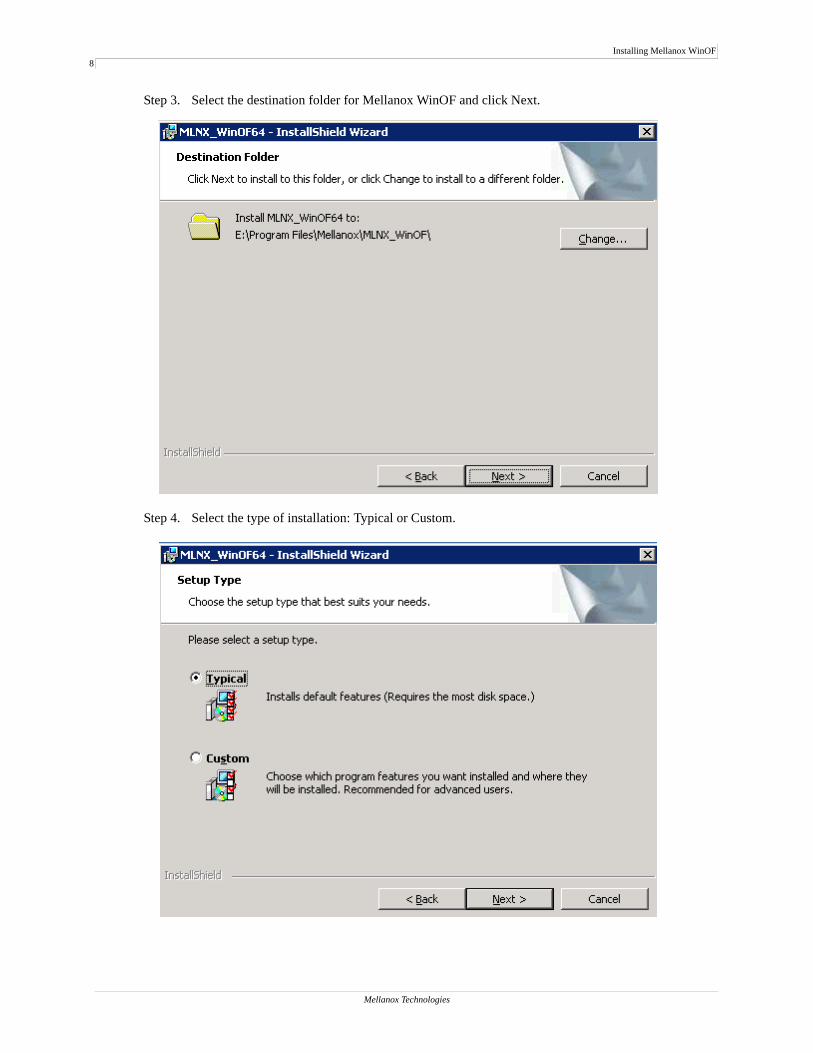
Step 3. Select the destination folder for Mellanox WinOF and click Next.
Step 4. Select the type of installation: Typical or Custom.
Mellanox Technologies

Mellanox WinOF for Windows Installation Guide9
If you select Typical, click Next and advance to the next step.
If you select Custom, click Next and you will get the screen below. To install/remove a com-ponent, left-click the component and enable/disable it for installation.
To continue, click Next and advance to the next step.
Mellanox Technologies
Installing Mellanox WinOF10
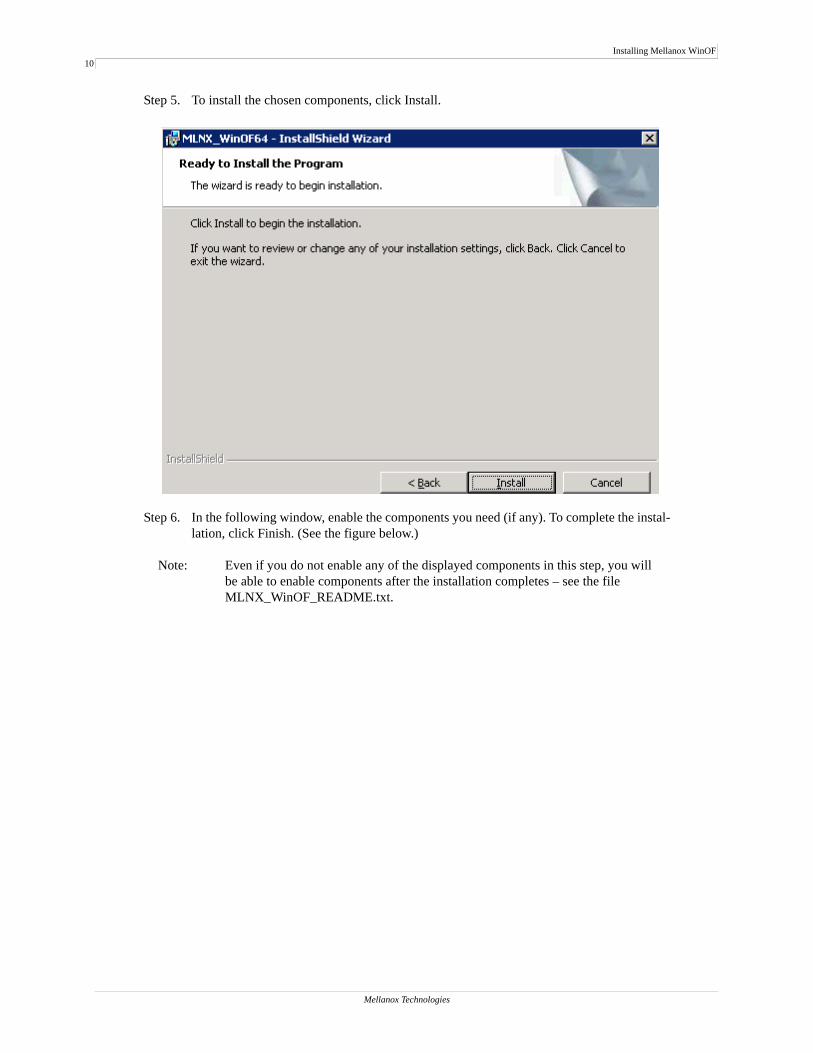
Step 5. To install the chosen components, click Install.
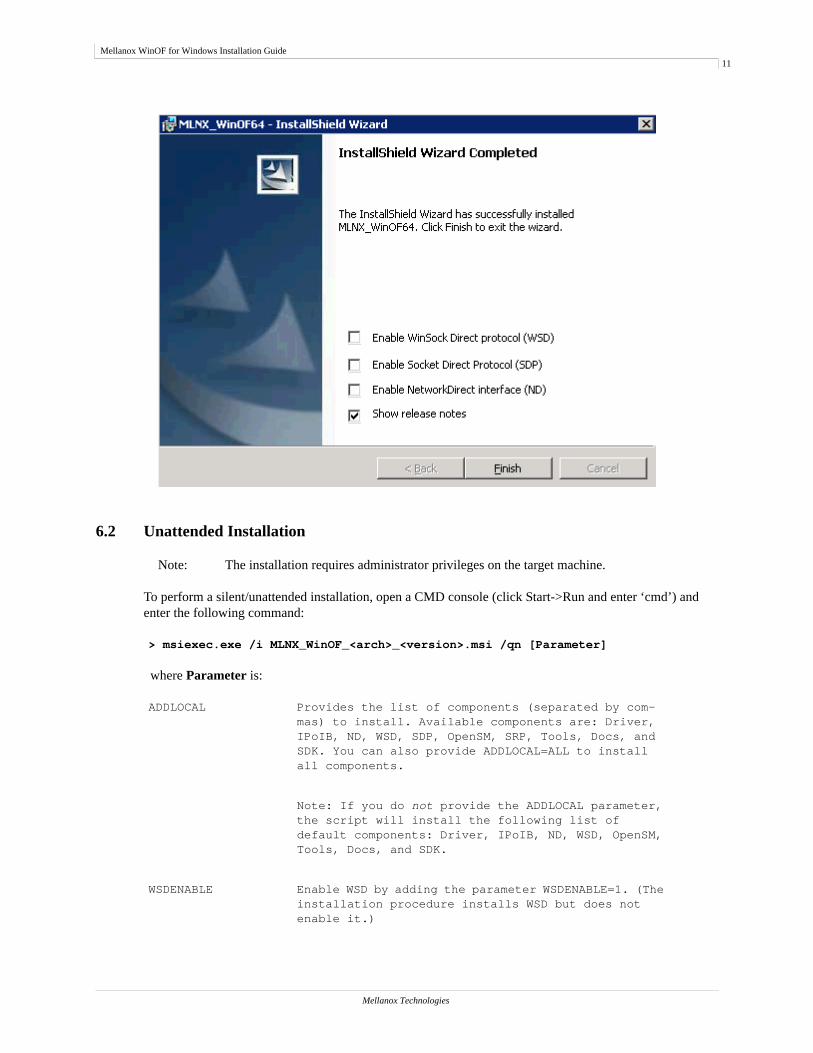
Step 6. In the following window, enable the components you need (if any). To complete the instal-lation, click Finish. (See the figure below.)
Note: Even if you do not enable any of the displayed components in this step, you will be able to enable components after the installation completes – see the file MLNX_WinOF_README.txt.
Mellanox Technologies
Mellanox WinOF for Windows Installation Guide11
6.2 Unattended Installation
Note: The installation requires administrator privileges on the target machine.
To perform a silent/unattended installation, open a CMD console (click Start->Run and enter ‘cmd’) and enter the following command:
> msiexec.exe /i MLNX_WinOF_<arch>_<version>.msi /qn [Parameter]
where Parameter is:
ADDLOCAL Provides the list of components (separated by com-mas) to install. Available components are: Driver, IPoIB, ND, WSD, SDP, OpenSM, SRP, Tools, Docs, and SDK. You can also provide ADDLOCAL=ALL to install all components.
Note: If you do not provide the ADDLOCAL parameter, the script will install the following list of default components: Driver, IPoIB, ND, WSD, OpenSM, Tools, Docs, and SDK.
WSDENABLE Enable WSD by adding the parameter WSDENABLE=1. (The installation procedure installs WSD but does not enable it.)
Mellanox Technologies
Installing Mellanox WinOF12
NDENABLE Enable ND by adding the parameter NDENABLE=1. (The installation procedure installs ND as part of the IPoIB component but does not enable it.)
Note: For all command options, enter ‘msiexec.exe /?’.
Usage Examples• The following command installs MLNX_WinOF in the default configuration:> msiexec /i MLNX_WinOF_x86_<ver>.msi /qn
• The following command installs MLNX_WinOF with all the available components:> msiexec /i MLNX_WinOF_x86_<ver>.msi /qn ADDLOCAL=ALL
• The following command installs MLNX_WinOF with the default components plus SRP:> msiexec /i MLNX_WinOF_x86_<ver>.msi /qn \
ADDLOCAL=Driver,IPoIB,ND,WSD,OpenSM,SRP,Tools,Docs,SDK
• The following command installs MLNX_WinOF in the default configuration and enables WSD:> msiexec /i MLNX_WinOF_x86_<ver>.msi /qn WSDENABLE=1
6.3 WDS Installation
To perform a WDS installation for a Windows HPC Server 2008 cluster, follow the steps below.
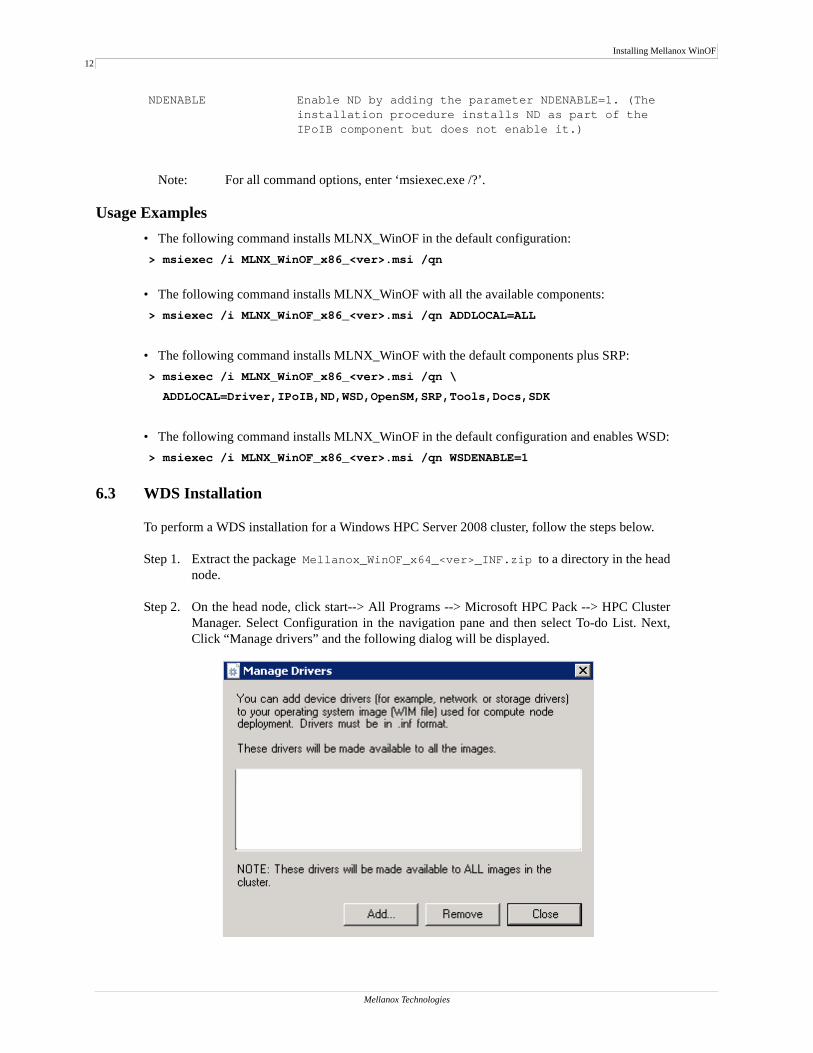
Step 1. Extract the package Mellanox_WinOF_x64_<ver>_INF.zip to a directory in the head node.
Step 2. On the head node, click start--> All Programs --> Microsoft HPC Pack --> HPC Cluster Manager. Select Configuration in the navigation pane and then select To-do List. Next, Click “Manage drivers” and the following dialog will be displayed.
Mellanox Technologies
Mellanox WinOF for Windows Installation Guide13
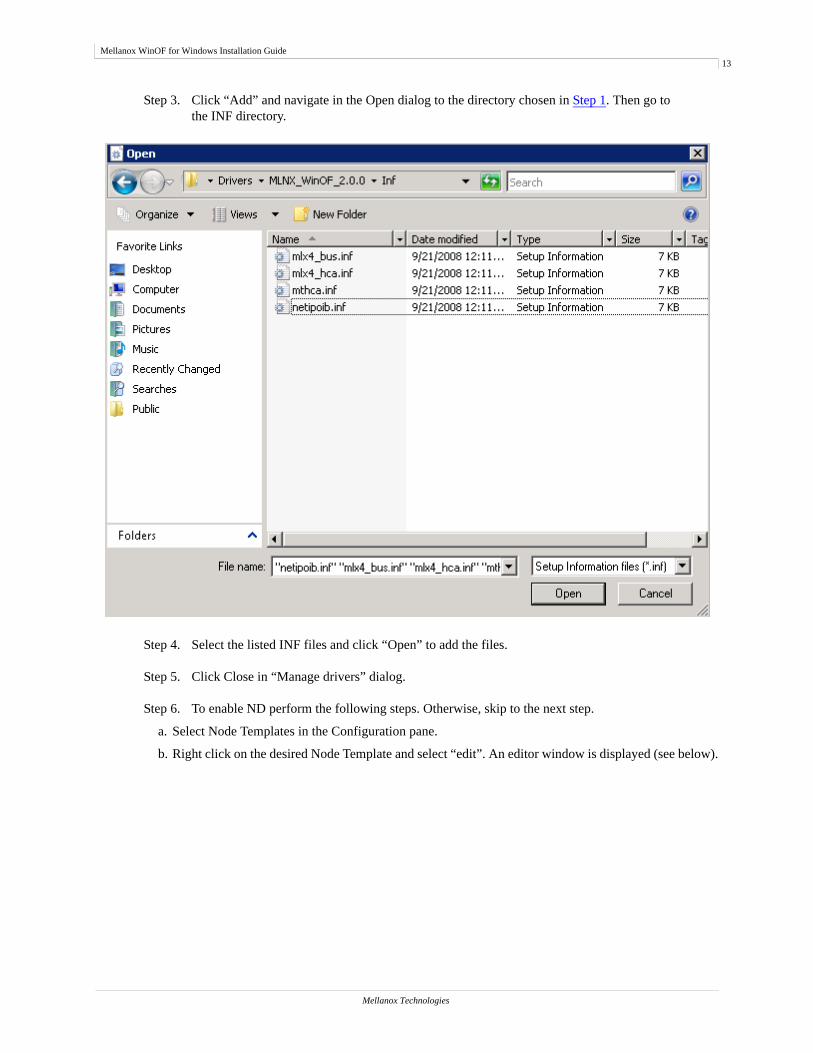
Step 3. Click “Add” and navigate in the Open dialog to the directory chosen in Step 1. Then go to the INF directory.
Step 4. Select the listed INF files and click “Open” to add the files.
Step 5. Click Close in “Manage drivers” dialog.
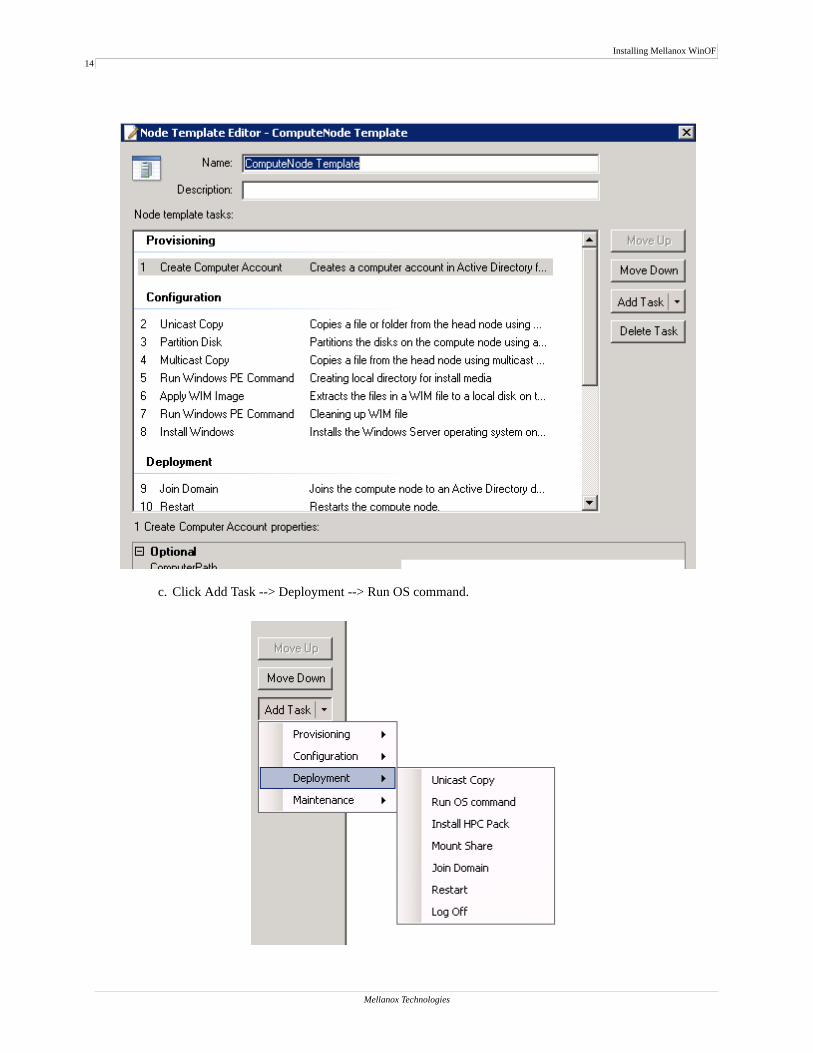
Step 6. To enable ND perform the following steps. Otherwise, skip to the next step.
a. Select Node Templates in the Configuration pane.
b. Right click on the desired Node Template and select “edit”. An editor window is displayed (see below).
Mellanox Technologies
Installing Mellanox WinOF14
c. Click Add Task --> Deployment --> Run OS command.
Mellanox Technologies
Mellanox WinOF for Windows Installation Guide15
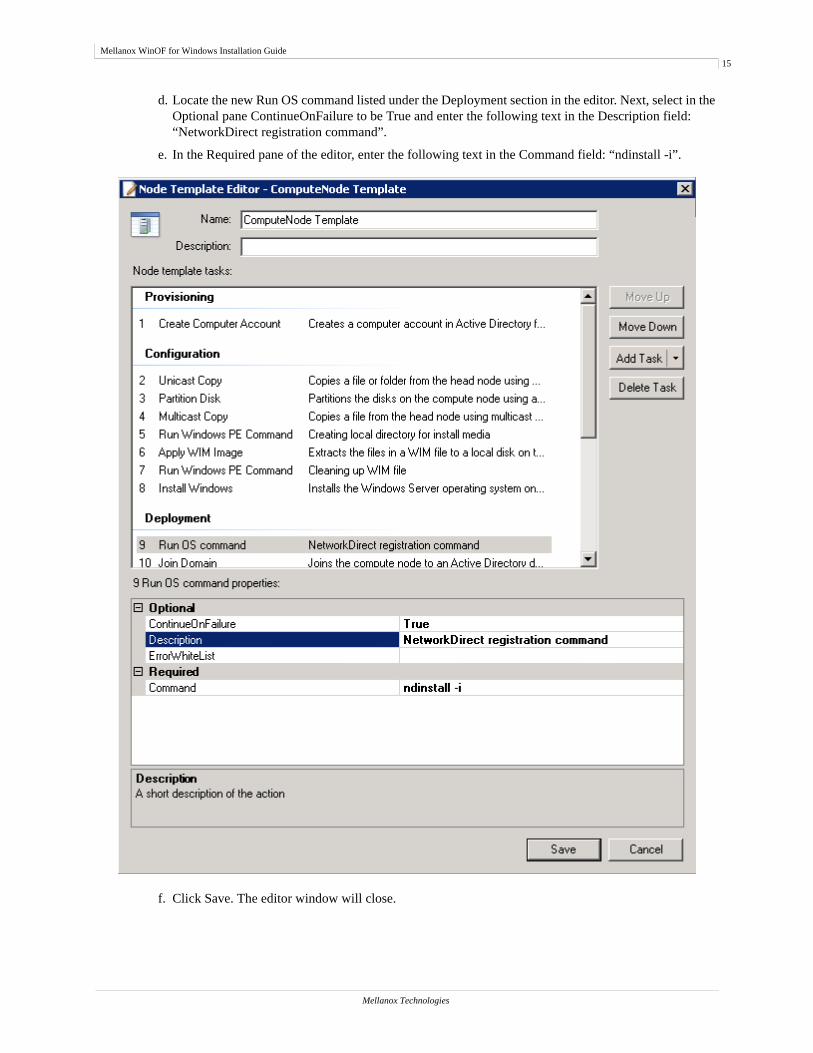
d. Locate the new Run OS command listed under the Deployment section in the editor. Next, select in the Optional pane ContinueOnFailure to be True and enter the following text in the Description field: “NetworkDirect registration command”.
e. In the Required pane of the editor, enter the following text in the Command field: “ndinstall -i”.
f. Click Save. The editor window will close.
Mellanox Technologies
Installing Mellanox WinOF16
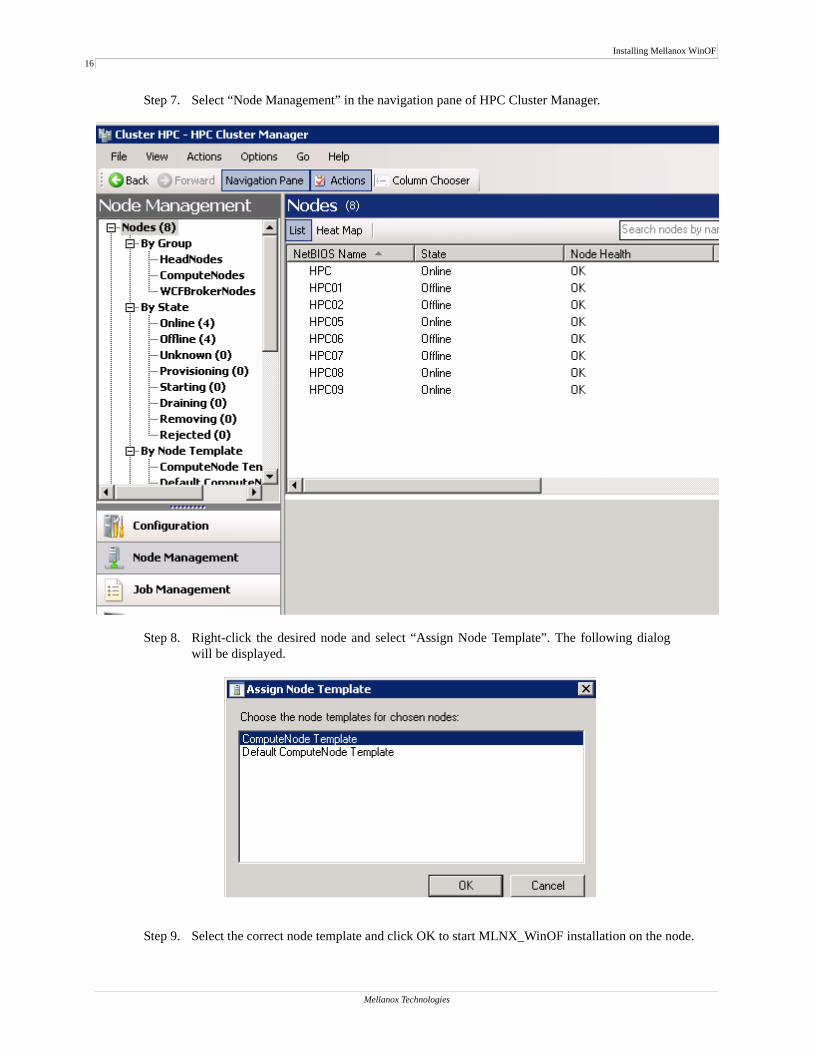
Step 7. Select “Node Management” in the navigation pane of HPC Cluster Manager.
Step 8. Right-click the desired node and select “Assign Node Template”. The following dialog will be displayed.
Step 9. Select the correct node template and click OK to start MLNX_WinOF installation on the node.
Mellanox Technologies
Mellanox WinOF for Windows Installation Guide17
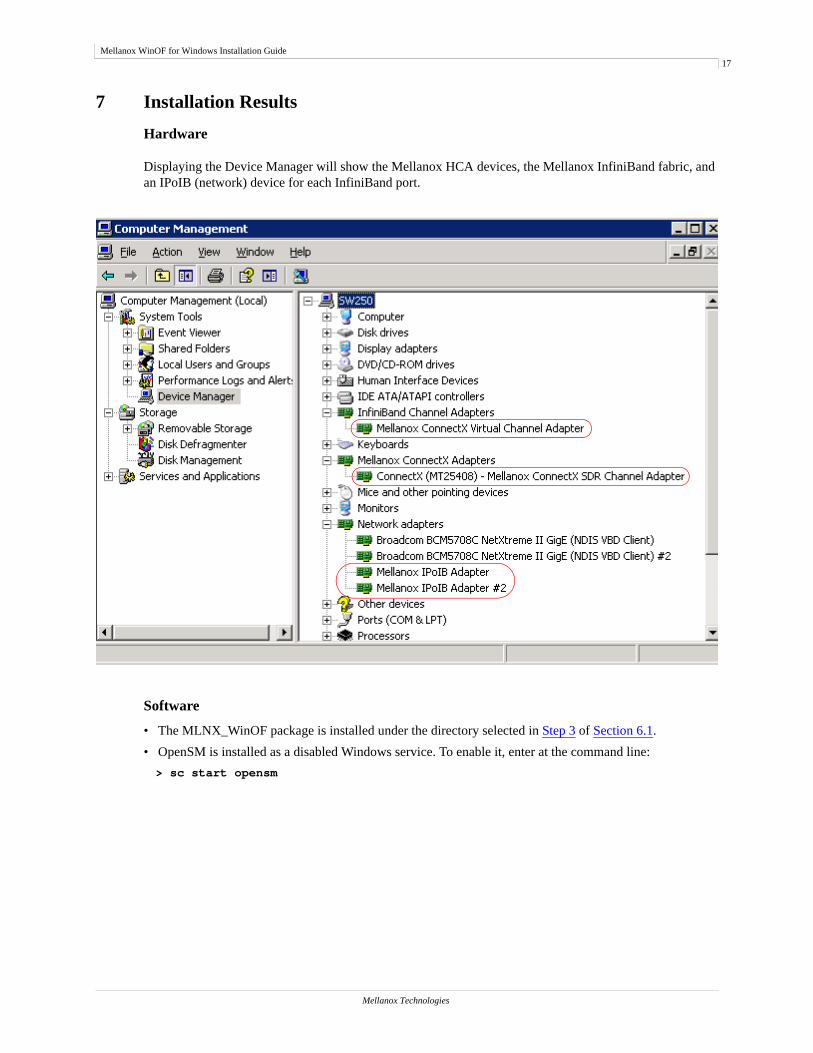
7 Installation Results
Hardware
Displaying the Device Manager will show the Mellanox HCA devices, the Mellanox InfiniBand fabric, and an IPoIB (network) device for each InfiniBand port.
Software
• The MLNX_WinOF package is installed under the directory selected in Step 3 of Section 6.1.• OpenSM is installed as a disabled Windows service. To enable it, enter at the command line: > sc start opensm
Mellanox Technologies
Assigning IP to IPoIB Adapters After Installation18
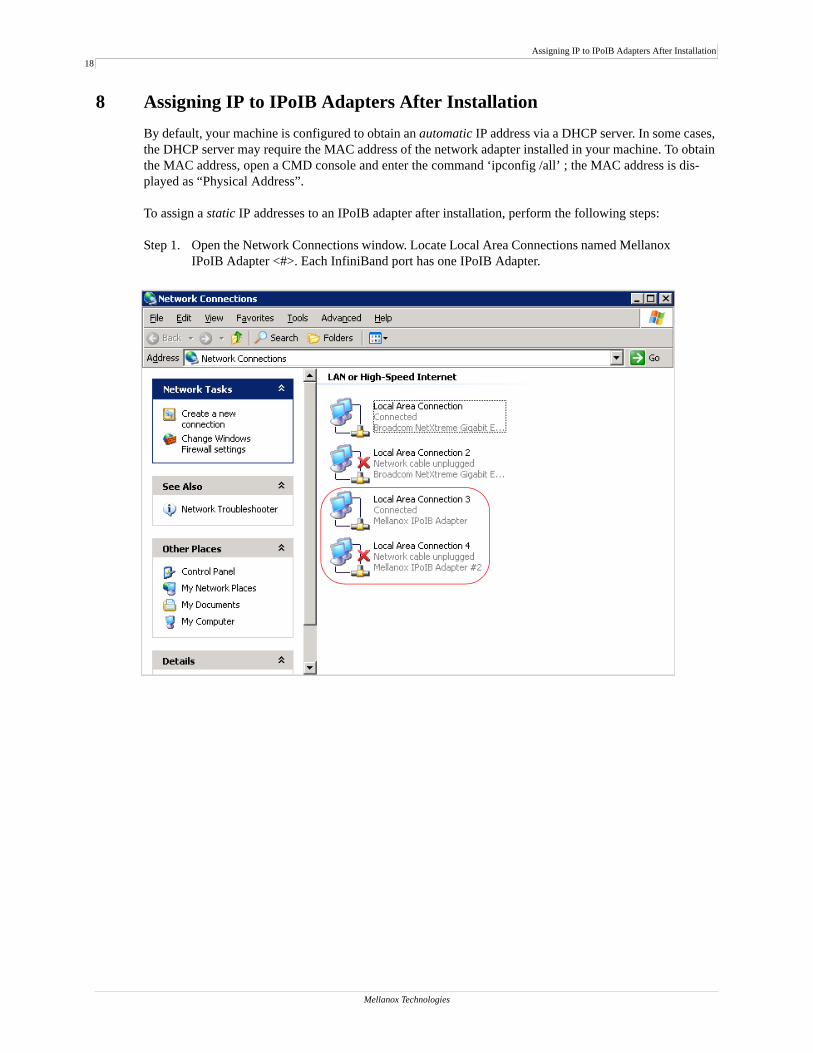
8 Assigning IP to IPoIB Adapters After InstallationBy default, your machine is configured to obtain an automatic IP address via a DHCP server. In some cases, the DHCP server may require the MAC address of the network adapter installed in your machine. To obtain the MAC address, open a CMD console and enter the command ‘ipconfig /all’ ; the MAC address is dis-played as “Physical Address”.
To assign a static IP addresses to an IPoIB adapter after installation, perform the following steps:
Step 1. Open the Network Connections window. Locate Local Area Connections named Mellanox IPoIB Adapter <#>. Each InfiniBand port has one IPoIB Adapter.
Mellanox Technologies
Mellanox WinOF for Windows Installation Guide19
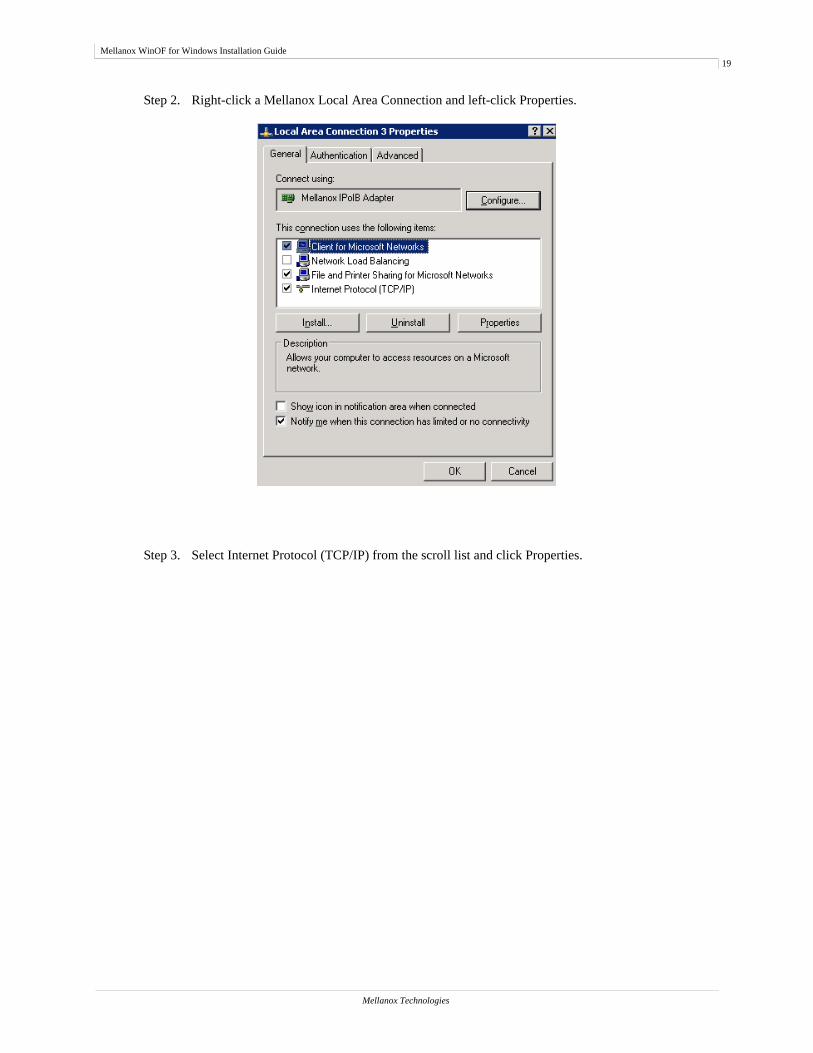
Step 2. Right-click a Mellanox Local Area Connection and left-click Properties.
Step 3. Select Internet Protocol (TCP/IP) from the scroll list and click Properties.
Mellanox Technologies
Assigning IP to IPoIB Adapters After Installation20
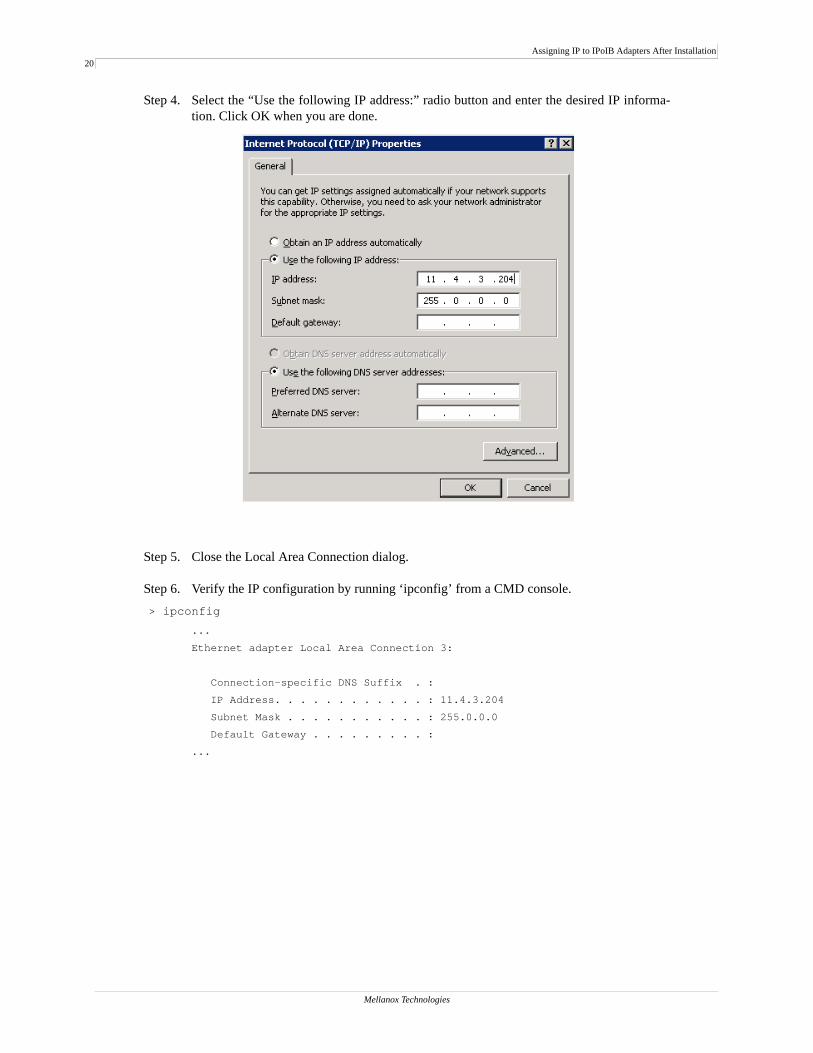
Step 4. Select the “Use the following IP address:” radio button and enter the desired IP informa-tion. Click OK when you are done.
Step 5. Close the Local Area Connection dialog.
Step 6. Verify the IP configuration by running ‘ipconfig’ from a CMD console.> ipconfig
...
Ethernet adapter Local Area Connection 3:
Connection-specific DNS Suffix . :
IP Address. . . . . . . . . . . . : 11.4.3.204
Subnet Mask . . . . . . . . . . . : 255.0.0.0
Default Gateway . . . . . . . . . :
...
Mellanox Technologies

Mellanox WinOF for Windows Installation Guide21
9 Modifying Configuration After Installation
9.1 Modifying Mellanox HCA Configuration
To modify HCA configuration after installation, perform the following steps:
a. Open the Registry editor by clicking Start->Run and entering ‘regedit’.
b. In the navigation pane, expand HKEY_LOCAL_MACHINE->SYSTEM->CurrentControlSet->Ser-vices.
c. Expand (in the navigation pane) the HCA driver service entry:
- ‘mtcha’ for the InfiniHost family- ‘mlx4_hca’ and ‘mlx4_bus’ for the ConnectX family
d. Click the Parameters entry in the expanded driver service entry to display HCA parameters.
e. Double click the desired HCA parameter and modify it. Repeat this step for all the parameters you wish to modify.
f. Close the Registry editor after completing all modifications.
g. Open Device Manager and expand the correct InfiniBand Channel Adapters entry (i.e., the adapter with modified parameters).
h. Right click the expanded HCA entry and left-click Disable. This disables the device.
i. Right click the expanded HCA entry and left-click Enable. This re-enables the device.
Note: For the changes to take effect, you must disable and re-enable the HCA (steps h and i above).
9.2 Modifying IPoIB Configuration
To modify the IPoIB configuration after installation, perform the following steps:
a. Open Device Manager and expand Network Adapters in the device display pane.
b. Right-click the Mellanox IPoIB Adapter entry and left-click Properties.
c. Click the Advanced tab and modify the desired properties.
Note: The IPoIB network interface is automatically restarted once you finish modifying IPoIB parameters.
Note: You need to restart opensm after modifying IPoIB configuration.
Mellanox Technologies
Updating Firmware After Installation22
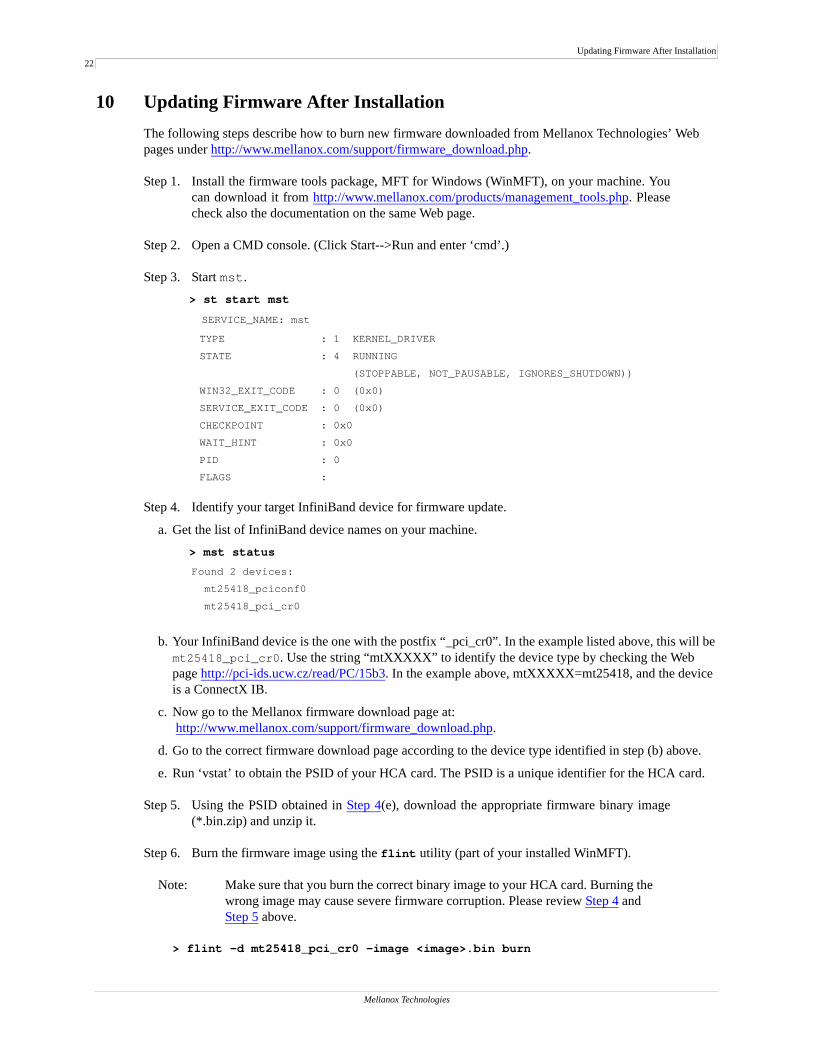
10 Updating Firmware After InstallationThe following steps describe how to burn new firmware downloaded from Mellanox Technologies’ Web pages under http://www.mellanox.com/support/firmware_download.php.
Step 1. Install the firmware tools package, MFT for Windows (WinMFT), on your machine. You can download it from http://www.mellanox.com/products/management_tools.php. Please check also the documentation on the same Web page.
Step 2. Open a CMD console. (Click Start-->Run and enter ‘cmd’.)
Step 3. Start mst. > st start mst
SERVICE_NAME: mst
TYPE : 1 KERNEL_DRIVER
STATE : 4 RUNNING
(STOPPABLE, NOT_PAUSABLE, IGNORES_SHUTDOWN))
WIN32_EXIT_CODE : 0 (0x0)
SERVICE_EXIT_CODE : 0 (0x0)
CHECKPOINT : 0x0
WAIT_HINT : 0x0
PID : 0
FLAGS :
Step 4. Identify your target InfiniBand device for firmware update.
a. Get the list of InfiniBand device names on your machine.
> mst status
Found 2 devices:
mt25418_pciconf0
mt25418_pci_cr0
b. Your InfiniBand device is the one with the postfix “_pci_cr0”. In the example listed above, this will be mt25418_pci_cr0. Use the string “mtXXXXX” to identify the device type by checking the Web page http://pci-ids.ucw.cz/read/PC/15b3. In the example above, mtXXXXX=mt25418, and the device is a ConnectX IB.
c. Now go to the Mellanox firmware download page at: http://www.mellanox.com/support/firmware_download.php.
d. Go to the correct firmware download page according to the device type identified in step (b) above.
e. Run ‘vstat’ to obtain the PSID of your HCA card. The PSID is a unique identifier for the HCA card.
Step 5. Using the PSID obtained in Step 4(e), download the appropriate firmware binary image (*.bin.zip) and unzip it.
Step 6. Burn the firmware image using the flint utility (part of your installed WinMFT).
Note: Make sure that you burn the correct binary image to your HCA card. Burning the wrong image may cause severe firmware corruption. Please review Step 4 and Step 5 above.
> flint -d mt25418_pci_cr0 -image <image>.bin burn
Mellanox Technologies

Mellanox WinOF for Windows Installation Guide23
Note: You may need to run ‘unzip’ on the downloaded firmware image prior to the burn operation.
Step 7. Reboot your machine after the firmware burning is completed.
Mellanox Technologies
Uninstalling Mellanox WinOF24
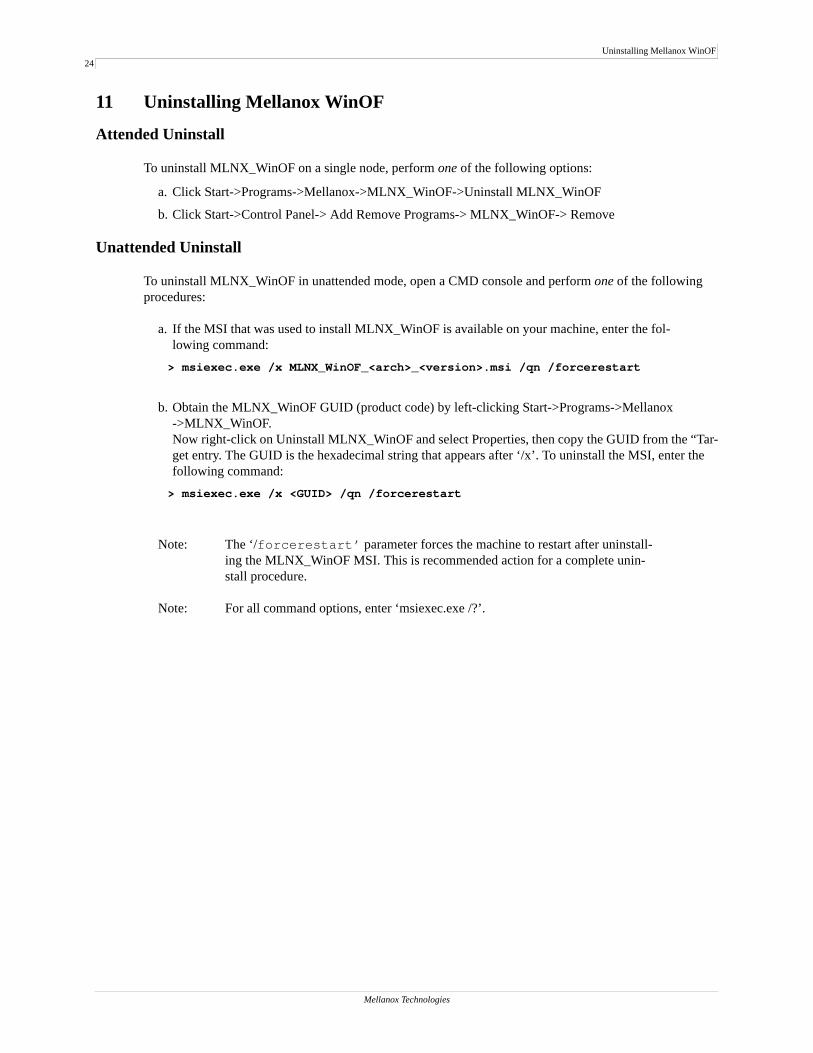
11 Uninstalling Mellanox WinOF
Attended Uninstall
To uninstall MLNX_WinOF on a single node, perform one of the following options:
a. Click Start->Programs->Mellanox->MLNX_WinOF->Uninstall MLNX_WinOF
b. Click Start->Control Panel-> Add Remove Programs-> MLNX_WinOF-> Remove
Unattended Uninstall
To uninstall MLNX_WinOF in unattended mode, open a CMD console and perform one of the following procedures:
a. If the MSI that was used to install MLNX_WinOF is available on your machine, enter the fol-lowing command: > msiexec.exe /x MLNX_WinOF_<arch>_<version>.msi /qn /forcerestart
b. Obtain the MLNX_WinOF GUID (product code) by left-clicking Start->Programs->Mellanox ->MLNX_WinOF. Now right-click on Uninstall MLNX_WinOF and select Properties, then copy the GUID from the “Tar-get entry. The GUID is the hexadecimal string that appears after ‘/x’. To uninstall the MSI, enter the following command:> msiexec.exe /x <GUID> /qn /forcerestart
Note: The ‘/forcerestart’ parameter forces the machine to restart after uninstall-ing the MLNX_WinOF MSI. This is recommended action for a complete unin-stall procedure.
Note: For all command options, enter ‘msiexec.exe /?’.
Mellanox Technologies