Embed Size (px)
Citation preview
Messenger Installation and Configuration Guide
Manual Version 21
January 9 2004
Content
FURTHER INFORMATION AND SUPPORT 4
1 INTRODUCTION 5
11 ABOUT PONTON XP 5 12 ARCHITECTURE OVERVIEW6 13 FEATURES 6
2 DOWNLOADING PONTON XP 21 8
21 COMPONENTS8 3 INSTALLING PONTON XP 219
31 MINIMUM SYSTEM REQUIREMENTS9 32 INSTALLATION PROCEDURE 10 33 FOLDERS AND FILES 11
4 QUICK-STARTING THE SOFTWARE12
41 LOGGING IN 12 42 STOPPING THE MESSENGER 13 43 MINIMAL CONFIGURATION 13 44 CHECK IF ADAPTERS ARE RUNNING 16 45 EXCHANGE DOCUMENTS USING THE TEST ADAPTER 17 46 CHECK THE STATUS OF YOUR MESSAGES 18
5 CONFIGURATION OPTIONS 20
51 MESSENGER CONFIGURATION 20 52 PARTNER CONFIGURATION 30 53 CERTIFICATE MANAGEMENT 35 54 CONFIGURE THE HOT FOLDER ADAPTER 39 55 PONTON XE ndash THE XML EDITOR 42 56 DISPLAY SCHEMA CONFIGURATION 47 57 USER ADMINISTRATION 48
Ponton XP 21 ndash Installation and Configuration Guide 2
6 ADVANCED CONFIGURATION 49
61 XML SCHEMA CONFIGURATION 49 62 ADVANCED DATABASE CONFIGURATION 50 63 ADVANCED MESSAGE MONITOR CONFIGURATION 51 64 TOMCAT SSL INSTALLATION 52 65 DISTRIBUTED INSTALLATION 54 66 PORT CONFIGURATION 57
Ponton XP 21 ndash Installation and Configuration Guide 3
Introduction
Further Information and Support
Technical SupportHelpdesk
Email xp-helpdeskponton-consultingde
Phone +494069213-344
Ponton Consulting
wwwponton-consultingde
xpponton-consultingde
XML Information Pages
wwww3org (World Wide Web Consortium)
xmlcoverpagesorg (XML Cover Pages)
wwwxmlorg (XML Industry Portal)
wwwebxmlorg (all about ebXML)
wwwxmlsoftwarecom (software products for XML processing)
Ponton XP 21 ndash Installation and Configuration Guide 4
1 Introduction
11 About Ponton XP Ponton XP is the ebXML compliant Message Service developed by Ponton Consulting It ensures encrypted signed compressed validated archived and guaranteed transfer of XML documents between business partners
Ponton XP is packaged with an embedded HSQL database and webserver so that the installation process only requires a few configuration steps
The Message Service also includes use of the Ponton Certificate Authority which is integrated into the Messenger network Business partners may thus kick-start their integration within minutes If users of Ponton XP prefer migration to third-party certificate authorities such as VeriSignreg Thawtereg or GlobalSignreg this can easily be done just by requesting and installing the corresponding certificate
Moreover Ponton XP allows for flexible back-end integration based on a large range of adapters from Ponton Consulting or third parties
The Ponton X Series
Apart from Ponton XP the X Series comprises two other tools Ponton XE is the form-based XML Editor to easily create papiNet documents or
any other document that is based on XML Schema Find more information on Ponton XE at httpwwwponton-consultingdeenglishxehtml
Ponton XD is a database adapter that is used for direct exportimport of documents to and from application data It is being used both with standard ERP systems like SAP R3 or JD Edwards and with home-grown application software Find more information at httpwwwponton-consultingdeenglishxdhtml
DB
ERPSystem
Ponton
Ponton
PontonXP
User
ApplicationBusin
ess
Partn
er
Ponton X Series
XE
XDXML
Document
Ponton XP 21 ndash Installation and Configuration Guide 5
Introduction
12 Architecture Overview Ponton XP consists of the following main modules
1 Messenger ndash This is the core of Ponton XP It transforms Messages received from the back-end (user or ERP system) into a standards conforming ebXML message Several processing steps are performed before the ebXML message is sent to the receiver
2 Listener ndash This optional module is usually located in the DMZ to receive message from the outside and to forward them to the Messenger within the secure zone of an organization No further processing takes place by the Listener No Listeners are required if Messengers are installed within the DMZ or if they are used for internal integration
3 Adaptors ndash The are many ways to integrate the Messenger with the application software in the back-end An adapter helps bridging this gap To name some of the adapters Ponton XD is a Database Adapter that maps XML payload content directly to and from a database The Hot Folder Adapter frequently scans outbox folders and transfers these documents to the Messenger Vice-versa messages received from a business partner will be dropped into an inbox folder
Messenger
Listener
Listener
ebXML Message
ebXML Acknowledgement
Gen
eric
Ada
pter
Gen
eric
Ada
pter
Test
Ada
pter
Hot
Fol
der
Ada
pter
ERP
Generic
Adapter
Generic
Adapter
TestA
dapterH
ot FolderA
dapter ERP
Messenger
13 Features
Platform independence In productive use under Windows (from NT to XP) Linux Solaris AIX HPUX
Supports ebXML 20 the vendor independent messaging standard
Encryption of documents
Validation of documents against XML Schemas
Electronic signatures based on the PKCS and XML Signature standards
Compression of documents to less than 10 of their original size
Archiving of documents signatures certificates etc
Comprehensive logging and notification services
Synchronous or asynchronous data transmission ndash supporting transmission via HTTP HTTPS SMTP or SMIME
Ponton XP 21 ndash Installation and Configuration Guide 6
Introduction
Simple installation of electronic keys and certificates
Use of the built-in Ponton CA or third-party certification authorities
Set-up configuration and monitoring via Web interface
Support for SOAP messaging services
Extension of the processing pipeline by means of supplementary modules
Partner specific configuration of communication and security functions
Simple installation ndash just 5 clicks
Bundled with Ponton XE ndash the visual XML Editor developed by Ponton Consulting to easily create and send papiNet PurchaseOrders or any other XML documents based on XML Schema
Backward compatibility with EPC Messenger 203
Validation of documents against all papiNet document types ndash 10 11 20 and 21 (all based on XML Schemas)
Comes with a complete preinstalled set of papiNet Schemas and XML stylesheets
Guaranteed delivery of documents by using ebXML message acknowledgement
Configuration of different users and access rights
Archiving of all information papiNet documents ebXML envelopes PKCS objects certificates back-end envelope etc
Extended and enriched Adapter API with access to ebXML acknowledgement data
Easy installation of electronic keys and certificates ndash from Ponton or from third parties
Extensive testing facilities ndash including Pontonrsquos preinstalled PAPITEST server to test external document transfer (httppapitestponton-consultingde8080pontonxp)
Extended processing pipeline with software development framework for custom filters (ie an extended archiving components alternate signing modules etc)
A set of useful pre-packaged adapters Test Adapter Stress Test Adapter and the SimpleAdapter
In-depth product documentation providing a look ldquounder the hoodrdquo
Can be integrated with Ponton XD ndash the Database Adapter for direct data exchange between XML documents and your database (see httpwwwponton-consultingdeenglishxdhtml)
Ponton XP 21 ndash Installation and Configuration Guide 7
2 Downloading Ponton XP 21 The software can be downloaded from the product page of Ponton Consulting
httpwwwponton-consultingdeenglishxpdownloadsphp
Please go the the XP download page and fill in the request form You will receive an email containing a hotlink for access to the installation file
21 Components You will find the following components in the installation package
Ponton XP Messenger ndash the core component for guaranteed secure delivery of XML messages
Ponton XP Hot Folder Adapter ndash allows easy connection of the Messenger to your application software
HTTP Adapter ndash allows HTTP-based back-end integration with your ERP system(s)
HTTP Listener ndash a lightweight process to receive XML documents via HTTP and forward them to your Messenger over the firewall
EMail Listener ndash another lightweight process that polls your mail server for new messages
Ponton XE ndash the form-based XML editor which can be used as a simple tool to manually create and display business documents
Ponton XP 21 ndash Installation and Configuration Guide 8
Installing Ponton XP 21
3 Installing Ponton XP 21
31 Minimum System Requirements
Hardware
Disk space 100 MB
Memory space 256 MB
Processor Pentium III 500 MHz
Depending on the number of XML Schema files and the corresponding XSL stylesheets that are pre-loaded by your Messenger you should extend your main memory in the following way
5-8 Schemas 512 MB
8-20 Schemas 1024 MB
This avoids unnecessary swapping overhead
Operating systems
Windows NT4 Service Pack 6 (Workstation or Server)
Windows 2000 Service Pack 2 (Workstation or Server)
Windows XP Home or Professional Service Pack 1
In general any platform supporting Java Runtime Environment 14
Databases
HSQL ndash an open source database bundled with the distributed configuration of Ponton XP
Oracle 815 and higher
SAP DB 73 and up
MS SQL Server 2000
MySQL
Or any other database with support for JDBC 2
Ponton XP 21 ndash Installation and Configuration Guide 9
Installing Ponton XP 21
32 Installation Procedure The software is installed using a self-extracting executable which guides the user through the installation process If only standard options are chosen the whole installation should not take more than 10 minutes
Start the installation by double-clicking the PontonXP-21 setup file and go through the following six installation screens
Introduction A short explanation of the product features and version number This screen will contain license terms as well No user choice is needed simply click the Next button
Choose Install Folder Select the installation root folder either by typing it in or by choosing it from the directory and then click the Next button
Choose Shortcut Folder Determine how the startup icons and shortcuts will be stored ndash in a new or existing Program Group in the Start Menu on the Desktop or in the Quick Launch bar Select the appropriate radio button and then click the Next button
Pre-Installation Summary This screen lists the product name and repeats the choices made above It also compares the disk space available to the space needed for the installation
Installing Gives a progress bar to indicate how far the actual installation has proceeded
Ponton XP 21 ndash Installation and Configuration Guide 10
Installing Ponton XP 21
Install Complete The installation is now complete After pressing the Done button the user can skip to section 4 to start testing
33 Folders and Files For the following part of this documentation we assume that you have installed Ponton XP in the directory
Cpontonxp
or in a UNIX environment on
pontonxp
This will be referred to as the installation root
The created directories will look like this
Ponton XP 21 ndash Installation and Configuration Guide 11
Quick-starting the software
4 Quick-starting the software You can start the Messenger either via the Windows Start menu or by executing startupbat in the installation root directory If you have not started the Messenger from a command shell but via the Windows interface this will open an output window
Please wait until the webserver has fully initialized all the software components When the initialization is finished the following text should be shown near the bottom of the output window Messenger 21 is initialized URL of Messenger Administration Tool
If any errors occur during startup this will be indicated in the output window and logged in the file
[installation root]xmlpipewebrootWEB-INFlogbootlog
Please note that the Messengerrsquos processing log file
[installation root]xmlpipewebrootWEB-INFlogMessengerlog
does not come into play until the Messenger has initialized successfully
41 Logging in Now the Messenger is ready for use open your web browser and enter the URL httplocalhost8080pontonxp
This will bring up the login screen of the webserver The first thing to do is to log in to the administration front-end of the software The defaults set per installation are
User xpadmin
Password xppass
Please make sure you change these values in the Admin tool as soon as possible
In addition to the administrative user xpadmin a default user without administration privileges is installed
User xpuser
Password xppass
Please note If you log in without administration privileges you will not see the configuration menu in the Ponton XP window
Ponton XP 21 ndash Installation and Configuration Guide 12
Quick-starting the software
Note Click on the folder icons in the menu panel to open and close the folders Click on the page labels to display the corresponding pages
42 Stopping the Messenger If you started the software from the start menu (or if it was installed as a Windows service) you can stop the Messenger by selecting Stop Ponton XP from the start menu Alternatively you can execute the shutdownbat in the installation root directory
If you started the Messenger from a command shell you may also enter CTRL-C to stop the process
43 Minimal Configuration Hint If you want to set up an initial test installation it is often easier to install two Messengers on separate PCs within your local environment to avoid firewall restrictions If you want to immediately test with an external partner please ensure with your technical administration staff that your firewall is configured to allow the necessary connections
The following steps describe a minimal configuration for test purposes
Ponton XP 21 ndash Installation and Configuration Guide 13
Quick-starting the software
Define yourself as a partner
Open the Configuration menu in the left frame and click on Partners to open the screen Configuration rarr Partners
Type in a local ID for yourself and enable the self checkbox then click Create New Partner
Choose a Party ID for yourself ndash this ID is the one used in your backend system to reference yourself
Select the Party ID Type PontonCertificate in order to test the use of the Ponton Certificate Authority
Then press OK ndash this new partner is now displayed in the left frame
Ponton XP 21 ndash Installation and Configuration Guide 14
Quick-starting the software
You should now request a certificate from the Ponton CA (See section 53) and install it for your partner in the Install Certificate menu
For test purposes it may be helpful to switch off encryption and signing in your Partner configuration in the Processing menu
In any case your partner configurations must be set up so that the encryption and signing options match the settings chosen by the respective partner
Ponton XP 21 ndash Installation and Configuration Guide 15
Quick-starting the software
Define another partner
On a different host follow the steps described above
For test purposes switch off encryption and signing as described above
To test your Messenger configuration Ponton Consulting offers a test server called xptestponton-consultingde This server is pre-configured in your Messenger set-up Before integrating with you business partners you can start out using this test server as your messaging partner to experiment with different messages configuration options etc
Hint To check if your partnerrsquos Messenger is up and running open your browser and go to the URL
httpltyourpartnersdomainnamegtltport-numbergtpontonxpSoapListener
The URL for the test server at Ponton Consulting for example is
httpxptestponton-consultingde8080pontonxpSoapListener
44 Check if Adapters are running To check whether your Adapters are running go to Adapter Monitor in the main menu If no built-in adapter was used before (Test Adapter or Hot Folder Adapter) and no external adapter has connected to the Messenger the Adapter Monitor will indicate No adapter info availablehellip
Ponton XP 21 ndash Installation and Configuration Guide 16
Quick-starting the software
Now start the Test Adaptor and go back to the Adapter Monitor It should indicate Test Adapter ready to receive messageshellip
45 Exchange documents using the Test Adapter Call up the Test Adapter from the main menu of Ponton XP
Ponton XP 21 ndash Installation and Configuration Guide 17
Quick-starting the software
1 Select a sending partner
2 Select a receiving partner
3 Select a document (filename)
4 For test purposes activate the ldquoTest Messagerdquo checkbox
5 Send the document by clicking ldquoSend Messagerdquo
Your Test Adapter will now send the document to the Messenger The document will then be processed by the Messenger according to your settings and filters (encryption archiving etc) and finally the document will be sent to the specified receiver party
46 Check the status of your messages The status of messages can be monitored in the Message Monitor window which you can select from the main menu of Ponton XP
In the Message Monitor click the ldquoSearchrdquo button (located below the filter settings on the left) and check if your message was properly transferred to the receiver This is shown in the ldquoResultrdquo column (located in the message overview in the upper right panel)
Ponton XP 21 ndash Installation and Configuration Guide 18
Quick-starting the software
The following color codes are used to indicate the transferprocessing status
Green checkmark ndash the transfer was successful
Red cross ndash something went wrong (in this case the complete entry is highlighted red)
Question mark ndash the message is still unconfirmed (in this case the entry is highlighted yellow)
To check for details click on the MessageID and look at the log information (in the lower right panel) Each processing step carried out by your Messenger is displayed here As long as no errors occurred the log entries are highlighted green
The right-hand columns show How the message was transferred from your test adapter to the Messenger
Which Messenger filters were applied to the message
How the document was transferred to the receiver
You may experiment with the Test Adapter and the Message Monitor and send other documents Please also ask your test partner to send documents to your Messenger
The results shown in the Message Monitor indicate the processing sequence A Senderrsquos Adapter
M Senderrsquos Messenger
L Senderrsquos Listener
Net NetworkTransmission
L Receiverrsquos Listener
M Receiverrsquos Messenger
A Receiverrsquos Adapter
Ponton XP 21 ndash Installation and Configuration Guide 19
Configuration Options
5 Configuration Options The overall configuration of Ponton XP breaks down into the following sections
Messenger configuration This section focuses on your local setting for the Messenger This includes database connections default filter settings communication protocol selection etc
Partner configuration Per partner several setting are required Partner identification filter activation (which overrides the default setting) communication settings etc
Certificate management For own partners key pairs may be created and certificates requested For certificate authorities as well as for each individual partner certificates can be installed Certificates may be requested for signing and encryption for SSL and for SMIME
Hot folder configuration The Hot Folder Adapter is tightly integrated with the Messenger and can therefore be configured through the same interface It supports the definition of multiple hot folders for sending and receiving documents as well as dedicated folders for business partners
51 Messenger Configuration
Set Up Messenger Database
The Messenger stores log entries in a database By default the log database is pre-configured as an HSQL database HSQL is an open source database implementation written entirely in Java If there is no requirement to store log data in an existing database in your organization you may continue with HSQL
It is also possible to configure the Messenger to use a different database system for example
Oracle (version 815 or higher)
MS SQL Server 70
MySQL (version 32 or higher)
SAPdb (version 73)
The log database is accessed via JDBC connection Configuration scripts to set up the tables for an Oracle database are included with Ponton XP You can refer to these scripts as examples to create scripts for your own database system
If you do not yet have a database system with JDBC support in use you can download the setup files for MySQL from httpwwwmysqlcomdownloadsmysql-323html
Ponton XP 21 ndash Installation and Configuration Guide 20
Configuration Options
To configure the Messenger database the following set-up needs to be performed
1 Go to Configuration rarr Messenger rarr Database
2 Enter the driver class name and the URL for the JDBC connection to your database
3 Enter the user name and password for the connection if required
4 Click Test to test the connection
5 Important Donrsquot click OK unless the connection test was successful
Note The connection to the standard HSQL database supplied with the Messenger requires a ldquotruncatedrdquo URL that does contain the database name (as shown above) If you get a ldquoconnection brokenrdquo message when testing the connection to the standard database (as specified above) try deleting ltDATABASEgt from the URL and testing the connection again
Ponton XP 21 ndash Installation and Configuration Guide 21
Configuration Options
Set Logging Level
To specify the logging level go to Configuration rarr Messenger rarr Logging and select the desired settings for Messenger and JDBC logging
There is a range of settings available
OFF turns logging off completely
hellip
DEBUG logs all the messages output by the system
Note Please keep in mind that the chosen logging level can have an effect on the performance of your system In particular it is advisable to use DEBUG logging only in connection with error tracking and analysis
Ponton XP 21 ndash Installation and Configuration Guide 22
Configuration Options
Set Message Queue Scan Interval
Under Configuration rarr Messenger rarr Message Queues you can specify the interval to scan the (inbound and outbound) message queues
The default setting is 5000 msec To boost the message throughput on a faster system you can increase the scan frequency by setting this interval to a lower (ie shorter) value
Ponton XP 21 ndash Installation and Configuration Guide 23
Configuration Options
Select Messaging Pipeline
The Messenger allows you to configure different filter pipelines The standard configuration comes with two pipelines
1 Messenger 203 compatibility pipeline This allows you to maintain backward compatibility with users of the previous Messenger version
2 Messenger 21 pipeline This is to communicate with partners that are also using Messenger version 21 or any EbXML 20 compliant software
For each pipeline a range of filters can be set in particular
Validation
Signing
Compression
Encryption
The Messenger configuration can be used for standard filters (validation signing compression and encryption) for inbound and outbound messages Custom filters are configured in a dedicated section
Developers may extend the Messenger with additional filters For example one may think of a ldquoBusiness Validatorrdquo that checks message content against business rules Or existing filters could be Instead of ldquosoft signingrdquo a document smart card access may be integrated
Ponton XP 21 ndash Installation and Configuration Guide 24
Configuration Options
Outbound Email Connection
This connection is used for email messages sent by your Messenger to your business partners The following data needs to be configured
From ndash the senderrsquos address to be used for your emails
SMTP ndash the outgoing mail server to be contacted by your Messenger in order to submit the email
Username password ndash must be entered if your mail server requires authentication for outgoing emails in this case enter the settings to be used by the Messenger to log in on the mail server
To test the email connection enter a receiver email address (in the ldquoTordquo field) and click the ldquoTestrdquo button
Ponton XP 21 ndash Installation and Configuration Guide 25
Configuration Options
Inbound Email Connection
You can enable your Messenger to receive email messages by setting up a POPIMAP connection with the following entries
Protocol ndash set to pop3 IMAP (depending on the type of mail server)
Server ndash the hostname or IP address of your mail server
Interval ndash the frequency for accessing the server for mail download
Username password ndash must be properly set to authenticate the Messenger on the mail server
Ponton XP 21 ndash Installation and Configuration Guide 26
Configuration Options
Email Notification
You can use the notification service to send emails to specified addresses whenever certain events occur For example you might want to notify your system administrator whenever certain errors are encountered
To specify an address go to Messenger rarr eMail Notification and click New Receiver Enter the email address for this receiver in the text field and select the events for which this receiver is to be notified You can use CTRL-click to activate multiple entries in the list
Ponton XP 21 ndash Installation and Configuration Guide 27
Configuration Options
Communication Settings
On this screen you can specify URI of each partnerrsquos Messenger Service ndash for example
httppartnerserver8080pontonxpSoapListener where partne server refers to the hostname or IP address of the machine the Messenger is installed on
r
Acknowledgment Requests ndash you can use this setting to determine whether outbound messages to this partner require acknowledgements To differentiate per message you can deactivate this checkbox and use the TransmissionMode attribute in the BackendEnvelope In the context of ebXML 20 transmissions you can additionally request signed acknowledgements for increased security
Retransmission Handling ndash you can use this setting to specify the number of retransmission attempts and the interval (in seconds) between attempts If a message cannot be transmitted successfully in the specified number of retries the Messenger will give up and mark the message as ldquofailedrdquo
Ponton XP 21 ndash Installation and Configuration Guide 28
Configuration Options
Configure Archiving Filter
The archiving filter stores the following information in a dedicated directory
Backend Envelope
ebXML Envelope
Payload ndash this is the actual business document
Certificate
Signature
Each part is stored in a separate file
The Archive Folder setting can be used to indicate the location of the archiving folder This can be expressed as
An absolute path to the required folder
A relative path beginning with $CONTEXT ndash this placeholder refers to the folder [installation root]xmlpipewebroot
The Maximum Age setting specifies how long the files will be archived ndash expressed in days
Ponton XP 21 ndash Installation and Configuration Guide 29
Configuration Options
52 Partner Configuration For each partner the following data may be configured
Partner identification (internal and external)
Communication Settings
URI of the partnerrsquos Messenger
Create Delete a Partner Entry
To create a new partner entry specify an identifier for the partner (this is the local identifier for your configuration) and indicate whether this partner entry is for
An internal partner (with the ldquoselfrdquo option activated) ndash this might be a department of your organization
An external partner ndash these entries refer to your business partners for example customers suppliers carriers warehouse operators etc
A message is always sent by your Messenger from an internal to an external partner and received from an external partner to an internal one
Internal partners are distinguished because for encryption and signing the certificates of each internal partner will be used on a per-partner basis
For further information please check the Ponton XP Architecture Overview
Ponton XP 21 ndash Installation and Configuration Guide 30
Configuration Options
Set the Partner Identification
Local Partner Name This identifier is valid within you local configuration ie you may choose any value as long as it is unique among all local partner names
Disable Although configured as a partner individual partners may be disabled In this case the Messenger rejects any message received from this partner
PartyID PartyID Type PartyIDs are used to identify partners externally To avoid name clashes and duplication well-known naming schemas exist to identify partners eg DUNS codes VAT numbers IANA codes etc For this reason trading partners should agree on an minimal set of identification types (like DUNS numbers and IANA codes) that is to be used by all partners
More than one PartyID can be defined per partner The limit is given by the number of PartyID types These are configured separately please check Section ldquoAdvanced Configurationrdquo)
Hint Please also check the Ponton XP Architecture Overview document for a detailed explanation of ebXML codes and partner identification
Ponton XP 21 ndash Installation and Configuration Guide 31
Configuration Options
Partner Communication Configuration
For each partner the following configuration options may be set URI of Partnerrsquos Messenger Service ndash enter the address of the partnerrsquos
Messenger for example httppartnerserver8080pontonxpSoapListener
Request Acknowledge ndash every message to this partner needs to be acknowledged
Request Signed Acknowledge ndash to specify signing of acknowledgements received from this partner
Retries ndash the number of retries in case of unsuccessful message transmission
Retry Interval ndash the number of seconds to wait until the next retry
Ponton XP 21 ndash Installation and Configuration Guide 32
Configuration Options
Processing Configuration
The following options can be set
Default Adapter ndash enter the name of the adapter to be used by default
Processing Pipeline ndash specify the processing pipeline to be used for this profile
Schema Sets ndash choose which Schema set(s) are to be supported
Use XML Signature ndash indicate whether to use XML Signature
Use default message settings (specified under Configuration rarr Messenger rarr Processing) or define a specific processing filter for this partner
Ponton XP 21 ndash Installation and Configuration Guide 33
Configuration Options
Install Partner Certificates
There are different ways of distributing certificates to business partners One is to send the certificate per email and have the partner cut amp paste the certificate code into the partner configuration
Note It is important to cut amp paste the complete certificate code including the lines ldquo----- Begin Certificate -----rdquo and ldquo----- End Certificate -----rdquo
Important A partner certificate will only be accepted if the certificate of the issuing CA (certificate authority) was pre-installed Otherwise the trust relationship between the partner and the CA cannot be traced
One may select to install a general certificate or a SMIME certificate Please determine what kind of certificate you received from your partner before installing it
Ponton XP 21 ndash Installation and Configuration Guide 34
Configuration Options
53 Certificate Management Certificate management comprises the following initial steps
Configure your default CA This is usually properly pre-configured in the installation files
Install the root certificate of the default CA This needs to be installed manually if 3rd-party CAs are to be used
Request a certificate for your own Messenger This includes creating a publicprivate key pair and sending a certificate request to the CA
Optionally you can request and install a SMIME certificate to be used for SMIME based communication via email
Default CA Configuration
On this screen you specify the settings for receiving certificates from your default certificate authority (CA) CA email address ndash enter the email address to be used to request a certificate
from your (default) CA
Ponton XP 21 ndash Installation and Configuration Guide 35
Configuration Options
CA download URL ndash enter the URL at your CA from which to download certificates for your Messenger installation Please note that you can only install certificates for partners you have already defined in your partner configuration
Download interval ndash specify the interval to wait between automatic certificate downloads
To download the available certificates immediately click the Download button
Request and Install Your Own Certificate
To request a certificate from your (default) CA go to Configuration rarr Certificates rarr Request Certificate Please enter data for all the fields on this form If any entries are missing you will get an error message
After completing the form click OK to send the certificate request to your CA You will get a message indicating that the request has been sent
Ponton XP 21 ndash Installation and Configuration Guide 36
Configuration Options
Once you receive the requested certificate from your CA you can install it in your own partner configuration (ie the internal partner you will use to sendreceive messages) Go to Configuration rarr Partners rarr ltYour Partner Namegt rarr Install Certificate and paste the certificate text including the hellip into the text field
Then enter the password you used when you requested the certificate and click OK to complete the installation of the certificate You will see the result above the text field containing the certificate
Ponton XP 21 ndash Installation and Configuration Guide 37
Configuration Options
Install Partner Certificates
Install a certificate issued by the CA for the requesting partner This was already described in the Partner Configuration section for normal standard certificates
Note In case of SMIME certificates an additional password may be needed to allow the Messenger to access the certificate in the local certificate store
Install a CA Certificate
To install the certificate for your CA go to Configuration rarr Certificates rarr CA rarr Install Certificate and paste your CArsquos certificate into the text field This is the certificate that authorizes the CA as a signing authority for other certificates
Ponton XP 21 ndash Installation and Configuration Guide 38
Configuration Options
54 Configure the Hot Folder Adapter
General Configuration
Address Port ndash the Hot Folder Adapter (HFA) is addressed as a separate process that communicates with the Messenger via HTTP Therefore the hostname and port number need to be set up for the Messenger If the HFA is co-located with the Messenger on the same machine use ldquolocalhostrdquo for the IP address In this case the HFA does not run as a separate Java process but will be hosted on the same Tomcat server
Path ndash the HFA needs to know the Adapter communication path of the Messenger By default it is pontonxpAdapterService
Console File Log Level ndash the HFA provides log output to the console and to log files Both can be configured regarding the level of detail The console log is only useful if the HFA is running as a standalone application so you can safely leave it disabled in the default configuration
Ponton XP 21 ndash Installation and Configuration Guide 39
Configuration Options
Create Delete a HFA
Several HFAs may be created Each registers under a different ID at the Messenger HFAs may be created for individual partners If this is the case messages exchanged with the rest of the partners will be stored with the default HFA
Configure a HFA
Each HFA requires several directories to be defined
Inbox ndash a document will be stored in the Inbox whenever it was received from a partner
Outbox ndash documents to be sent to the business partner are dropped here The HFA grabs them in a defined frequency
Failed ndash if a document could not be sent to a partner and all retries failed it will be stored in this folder
Work ndash if a document transfer is in progress or all attempts to send the document have not yet been tried the document will remain here After a final failure it will be transferred to the Failed folder
Ponton XP 21 ndash Installation and Configuration Guide 40
Configuration Options
The following settings are also supported
Port ndash the port to be used by the HFA (optional)
Receiver format ndash standard format is XML
Save Backend envelope ndash the Backend envelope is retained for incoming messages
Support attachments ndash the HFA will save any files attached to an incoming message to the selected inbox folder
Scan Interval ndash the interval to wait (in seconds) between checking the outbox
Number of receiving threads ndash specifies the maximum number of receiving threads the adapter can process
Use partner subfolders ndash if this is set this HFA will create inbox and outbox folders for all remote partners Inbound messages will automatically be sorted into the according folder depending on the sender Outbound messages need to be placed into the receiving partnerrsquos outbox folder The backend message is not used in this mode and is ignored if it exists
Use Acknowledgement for ERP ndash with this option activated the ERP application receives an acknowledgement from the receiving Messenger on the partnerrsquos side This acknowledgement will be provided via the specified Inbox
Ponton XP 21 ndash Installation and Configuration Guide 41
Configuration Options
55 Ponton XE ndash The XML Editor Ponton XE is a separate Ponton product It is packaged with Ponton XP for free use only by papiNet users It allows to enter papiNet document data directly via a graphical user interface and to send the document via the hot folder adapter to the business partners
Ponton XE is fully documented in a separate manual Hence only the Messaging Plug-in will be described here
You can experiment with the XML Editor and check out all the features and options without using the Ponton XP connection To start with you may want to begin with the following steps
Create a new papiNet Purchase Order
Fill out the forms and use optional XML Elements by right-clicking the Plus-icons in the layout tree
Create an HTML file by choosing Document Export to HTML from the menu
Save the document to an XML file and re-load it again
Ponton XP 21 ndash Installation and Configuration Guide 42
Configuration Options
Interface between Ponton XE and Ponton XP
The two software applications communicate via hot folders as illustrated in the following figure
Message Plug-in
Outbox Inbox AckInboxImport
Ponton XP Ponton XE
XMLXML XMLXML XMLXML XMLXML
Hot Folder Adapter
The XML Editor is connected to the Messenger via the Hot Folder Adapter All these folder settings need to be synchronized for a proper data exchange
Configuration of the Messaging Plug-in
The Messaging Plug-in can be flexibly installed and de-installed with the remaining part of Ponton XE If the file messengerjar is removed from the plugins directory it will automatically disappear from the Ponton XE menu bar as soon as the software is started again
Before transferring messages out of Ponton XE you need to preset the following information
Default values for the sending and receiving partners ndash these values may be overridden for an individual transfer
Folder locations of the Hot Folder Adapter ndash the Inbox Outbox and AckInbox need to be set for document exchange with Ponton XP
Default setting for Test Message flag ndash this can be overridden for the actual document transfer
Import Directory ndash Ponton XE will automatically scan the Inbox folder and import received documents to the given folder for local processing
Ponton XP 21 ndash Installation and Configuration Guide 43
Configuration Options
Open Messages after Import ndash if this option is activated messages received from the Inbox will automatically be displayed in Ponton XE
Delete message in Inbox ndash to always remove received messages from the HFA Inbox this option needs to be activated otherwise a copy will remain in the Inbox folder
Ponton XP 21 ndash Installation and Configuration Guide 44
Configuration Options
Ponton XP 21 ndash Installation and Configuration Guide 45
Configuration Options
Using Ponton XE
After setting the configuration and creating a document you can transfer the document to your business partner This is done by means of the following steps
Choose the menu item ldquoMessenger rarr Transfer rarr Send Messagerdquo
Select a sending and receiving partner
Override the settings for the HFA folders
Tick the checkbox to qualify this message as a test message
After transferring the document to the Messenger Ponton XE will wait for a response This is recognised as an acknowledge file which is dropped into the AckInbox folder of the HFA As soon as this has been received a successful transfer in indicated
You may check with the Message Monitor to determine how the document was forwarded by the Messenger to the receiver or whether any errors occurred
Ponton XP 21 ndash Installation and Configuration Guide 46
Configuration Options
56 Display Schema Configuration The schema sets to be supported for each partner are defined in the partner configuration The standard sets available with the installation are shown under Configuration rarr Schemata
Ponton XP 21 ndash Installation and Configuration Guide 47
Configuration Options
57 User Administration Two types of users are distinguished
Administrators ndash these users have full access to the Messengerrsquos configuration interface
Operators ndash these users only have access to the Adapter Monitor the Message Monitor and the Test Adapter The other options in the Messenger menu are not available
Please note the following points in connection with the Messengerrsquos standard user administration
This is a very simple user administration based on the Tomcat implementation If you want to integrate the Messenger with another user administration such as LDAP please contact Ponton Consulting for support
A userrsquos access rights (administratoroperator) are defined when the user account is created ndash they cannot be changed subsequently
User accounts can only be created or deleted by administrators
Ponton XP 21 ndash Installation and Configuration Guide 48
Advanced Configuration
6 Advanced Configuration
61 XML Schema Configuration Important The Messenger distinguishes between available schema set and activated schema sets Just inserting entries in the schema configuration as described in this section does not activate the schema sets or the corresponding schemas for use by the Messenger In order to make use of the schemas in a schema set you have to activate the schema set in the relevant partner configuration To view or modify the activated schema sets in a partner configuration go to
Configuration rarr Partners rarr ltpartner namegt rarr Processing
and activatedeactivate the relevant checkboxes
In the Messengerrsquos configuration interface you can activate and deactivate schema sets for specific partner configurations It is not possible however to modify the contents and specifications of the individual schema sets Any necessary changes have to be made in the configuration file
[installation root]xmlpipewebrootWEB-INFconfigschemataxml
The configuration entries in this file are structured as follows
ltSchemaSet Name=papinet21gt
ltSchemaName=httpwwwpapinetorgdataAvailabilityV2R10xsd MessageType=Availability MessageVersion=V2R10gt
ltNamespacegtltNamespacegt
ltDisplayNamegtAvailability 21ltDisplayNamegt
ltSchemaFilegtAvailabilityV2R10xsdltSchemaFilegt
ltXSLFilegtltXSLFilegt
ltSchemagt
ltSchema Name=yourSchema MessageType=yourMsgType MessageVersion=yourMsgVersgt
ltNamespacegtyourNamespaceltNamespacegt
ltDisplayNamegtYour Display NameltDisplayNamegt
ltSchemaFilegtyourSchemaFileltSchemaFilegt
ltXSLFilegtyourStylesheetltXSLFilegt
ltSchemagt
hellip
ltSchemaFoldergtpapinet210ltSchemaFoldergt
ltXSLFoldergtpapinet210ltXSLFoldergt
ltSchemaSetgt
Ponton XP 21 ndash Installation and Configuration Guide 49
Advanced Configuration
You can add a schema to an existing schema set in this file by inserting a ltSchemagt block (just copy and paste one of the existing blocks and modify the configuration as required) Please ensure that your new schema specification includes correct settings for the attributes of the Schema element
Name= This attribute corresponds with the ebXML Schema Location of incoming messages When an ebXML message is received the Messenger looks for a schema configuration where the Schema Name attribute matches the Schema Location specified in the ebXML envelope
MessageType= This attribute corresponds with the attribute MessageMetaDataDocumentInfoMessageName in the backend envelope of outgoing messages
MessageVersion= This attribute corresponds with the element MessageMe aDataDocumentInfoDTDVersionNumber in the backend envelope of outgoing messages
t
Note The specification of MessageType and MessageVersion must be used together for outgoing messages as they are combined to form an identifier for the message schema
You also have the option of adding a new schema set with your own schema definitions to the schema configuration In this case you would insert a ltSchemaSetgt block with subordinate ltSchemagt blocks Your added schema set will automatically be inserted in the list of available schema sets on the Messenger configuration pages
62 Advanced Database Configuration Important Since the Messenger database is used for essential message processing and tracking purposes you should not experiment with the database configuration on a ldquoliverdquo system For test and debugging purposes you are advised to set up a trial system
Installation with other Databases
This section describes the main steps required to install a different database system on the Messenger for example an Oracle database
1 Install database driver Copy the database driver to
[installation root]xmlpipewebrootWEB-INFlib
Note Please note that only drivers with the extension jar are loaded by the Tomcat servlet engine If the JDBC driver you want to use is a zip file you will have to rename the file to jar The JDBC driver for Oracle 9i is the file ojdbc14jar
Ponton XP 21 ndash Installation and Configuration Guide 50
Advanced Configuration
2 Create database and tables Ponton XP is supplied with SQL scripts for HSQL and for Oracle that can be used to create the tables for the Messenger database If you are using another database you may need to modify these scripts to work correctly with your database system
The SQL scripts are located in the subfolders under [installation root]sql
Once the database tables are in place you will also need to carry out the SQL script that inserts the log messages into the database ie
[installation root]sqlinsert_log_messagessql
3 Set up database connection The configuration of database connections is described in the section Set Up Messenger Database beginning on page 20 To connect with a different database choose ldquootherrdquo from the list of database drivers and enter the configuration for your database on the next page
The entries for the Oracle 9i JDBC driver are
Driver oraclejdbcdriverOracleDriver
URL jdbcoraclethinlthostgtltportgtltdatabasegt
63 Advanced Message Monitor Configuration In the configuration directory ldquoxmlpipewebrootWEB-INFconfigrdquo there is a file messagemonitorxml which can be used to change the selection and ordering of the Message overview window in the Message Monitor The default setting is displayed in the following picture
Ponton XP 21 ndash Installation and Configuration Guide 51
Advanced Configuration
Here the number of line items per page can be set If a high resolution screen is used (beyond 1024 x 768 pixel) one may increase the number of lines
Further a mapping table defines which database column is to be displayed in which monitor column The number of columns again depends on the screen resolution
Finally if main memory size allows caching of XSL stylesheet definitions helps accelerating processing speed for XSL transformations
64 Tomcat SSL Installation
Generate a key
One minor problem with Tomcat or any other webserver that uses the internal Java symmetric key architecture is that you are not allowed to export or import private keys For this reason it is not possible to use the existing key-pair installed with the Messenger software You will have to generate a new key-pair and send a certificate request to the Ponton certificate authority (or other certification authority) to receive a valid certificate
To generate a new key-pair open a command prompt and go to the tomcat-4118 directory The keystore used for a Tomcat SSL installation is located in the Tomcat root directory and is called ssl-keystore The Tomcat installation already contains a certificate for lsquolocalhostrsquo so you can test the HTTPS access with a web browser
Before you can create a new Tomcat certificate you will have to delete the installed certificate Note that the default password for the Tomcat keystore is ldquochangeitrdquo keytool -delete -alias tomcat ndashkeystore ssl-keystore
Now use the following command to create a new key-pair Please note that you need to specify the Listener hostname (eg listenermyserverde) when the keytool asks for lsquofirst and last namersquo keytool -genkey -alias tomcat -keyalg RSA ndashkeystore ssl-keystore
After generating the new key the next step is to export a certificate request with the following command keytool ndashcertreq ndashalias tomcat ndashfile myservercsr ndashkeystore ssl-keystore
This will generate the file myservercsr in the current directory Send this file via email to xp-certponton-consultingde It will be signed and sent back to you The reply will contain a file with the certificate
Finally you have to re-import this signed certificate into the Tomcat SSL keystore Please note that the import may take some time keytool ndashimport ndashalias tomcat ndashfile myservercer ndashkeystore ssl-keystore
If you have any problems starting the keytool make sure you have the javahomebin directory specified in your PATH environment variable Of course you can also change to the javahomebin directory and start the keytool there
Ponton XP 21 ndash Installation and Configuration Guide 52
Advanced Configuration
Update Tomcat configuration
SSL is already activated in the Tomcat configuration packaged in the distribution However you might want to change the specified SSL port (by default the SSL port is set to 8443) You can change the port by editing the file
[tomcat installation]confserverconf
The following section configures the SSL parameters
lt-- Define a SSL Coyote HTTP11 Connector on port 8443 --gt
ltConnector className=orgapachecoyotetomcat4CoyoteConnector
port=8443
minProcessors=5
maxProcessors=75
enableLookups=true
acceptCount=100
debug=0
scheme=https
secure=true
useURIValidationHack=false
disableUploadTimeout=truegt
ltFactory className=orgapachecoyotetomcat4CoyoteServerSocketFactory
clientAuth=false
keystoreFile=ssl-keystore
protocol=TLS gt
ltConnectorgt
Verify setup
To verify if everything is working correctly start the Tomcat webserver as usual and connect to the webserver with your browser
Go to httpsyourserveraddress ndash initially you might get a warning window if the root certificate authority is not known to the browser If you continue by clicking OK you should see the usual Ponton XP start page
If everything comes up correctly you can use SSL to receive messages with the Ponton XP Software
Ponton XP 21 ndash Installation and Configuration Guide 53
Advanced Configuration
65 Distributed Installation If the Messenger is installed on a server that cannot be reached from the Internet you will need to install the Listener as well The purpose of the Listener is to pick up incoming connections and forward them to the Messenger (across the firewall) The firewall rules must be set up to allow this connection between the Listener and the Messenger When a message is received the Listener notifies the Messenger and the Messenger then picks up the message
You also have the option of subsequently installing the Listener as a service under Windows ndash this service can then be configured to start automatically when the system starts up
Note If you are going to run the Messenger in combination with the Listener your partners will have to enter the URI of your Listener in their configurations (under Configuration rarr Partners rarr ltpartner namegt rarr URI of Partners Messenger Service)
Listener Installation and Configuration
The Listener is installed by running the installer program (eg PontonXP-21-setuplistener-windowsexe) on the relevant system You are asked to specify an installation folder and also have the option of creating a desktop or menu shortcut Thatrsquos it
-
The settings for the Listener are contained in the configuration file listenerproperties which is located in the folder [Listener root folder]config To modify these settings you will have to edit the configuration file directly Access via the Messengerrsquos configuration interface is not possible
The file contains the following settings
HttpPort = Port number (for external HTTP connections)
HttpsPort = Port number (for external HTTPS connections)
LogLevel = DEBUG | INFO | WARN | ERROR | FATAL | OFF
The following settings specify the host and port of the Messenger for forwarding connections (HTTPHTTPS) The forwarding connection mode is activated by entering the relevant host and port addresses and removing the hash marks (used to mark ldquocomment linesrdquo in Java property files)
HttpServer = server1port1 (HTTP forwarding connection to the Messenger)
HttpsServer = server1port1 (HTTPS forwarding connection to the Messenger)
Ponton XP 21 ndash Installation and Configuration Guide 54
Advanced Configuration
The following settings specify the Listenerrsquos port for callback connections (HTTPHTTPS) with the Messenger As with the forwarding connection the callback connection mode is activated by entering the relevant port addresses and removing the hash marks (Obviously it makes no sense to have both connections activated at the same time)
HttpServicePort = Port number (for internal HTTP connections to the Listener)
HttpsServicePort = Port number (for internal HTTPS connections to the Listener)
Starting the Listener
To start the Listener open a command prompt and start the class
depontonconsultingxmlpipeListener
with the classpath
-cp libcommons-logging-api-103jarlibcommonutilsjarlibxp_listenerjarconfig
You can also use the installed batch file [Listener root folder]startListenerbat
Callback Mode
Details of the communication flow
When the Messenger starts up it searches for the Listener
Note The Listener should start up first so that it can be found by the Messenger
If the search is successful a permanent connection is established between the Messenger and the Listener The Messenger uses the following settings in the configuration to establish the connection with the Listener
Configuration rarr Messenger rarr Listener rarr HTTP[S] rarr Hostname
Configuration rarr Messenger rarr Listener rarr HTTP[S] rarr Internal Listener Port
Ponton XP 21 ndash Installation and Configuration Guide 55
Advanced Configuration
When the Listener receives an incoming message (or rather an HTTPHTTPS request) it informs the Messenger ndash by way of the permanent connection ndash about the arrival of the new request indicating which port the Messenger can use to pick up the connection
Note This port number is randomly selected by the Listener and cannot be configured
The Messenger picks up the connection on the Listenerrsquos specified port and redirects it to its own local port for further processing
This local port corresponds to the setting for
Configuration rarr Messenger rarr Listener rarr HTTP[S] rarr Internal Messenger Port
in the configuration GUI
Forwarding Mode
Details of the communication flow
In forwarding mode no permanent connection is established between the Messenger and the Listener
When the Listener receives an incoming HTTPHTTPS request it simply forwards the request to the Messenger using the address specified in listenerproperties (HttpServerHttpsServer)
Note To allow this forwarding connection the firewall has to be configured so that the Listener is permitted to access the Messenger on the specified port(s)
Ponton XP 21 ndash Installation and Configuration Guide 56
Advanced Configuration
66 Port Configuration The Messengerrsquos standard configuration uses port 8080 for HTTP connections and port 8443 for secure (HTTPS) connections This section describes how to set up the messenger to use a non-standard port configuration This involves making manual changes to several configuration files in particular the Tomcat serverxml and the Messengerrsquos adapter configuration files
Tomcat Settings
The port setting for the Messengerrsquos HTTP and HTTPS connections are specified in the Tomcat configuration file
[installation root]tomcat-xxxconfserverxml
This file defines the connections (Connectors) for the Messenger as follows
lt-- Define a non-SSL Coyote HTTP11 Connector on port 8080 --gt
ltConnector className=orgapachecoyotetomcat4CoyoteConnector
port=yourMessengerPort minProcessors=5 maxProcessors=75
enableLookups=true redirectPort=yourRed rectPort i acceptCount=100 debug=0 connectionTimeout=20000
useURIValidationHack=false disableUploadTimeout=true gt
lt-- Define a SSL Coyote HTTP11 Connector on port 8443 --gt
ltConnector className=orgapachecoyotetomcat4CoyoteConnector
port=yourSSLPort minProcessors=5 maxProcessors=75
enableLookups=true
acceptCount=100 debug=0 scheme=https secure=true
useURIValidationHack=false disableUploadTimeout=truegt
ltFactory className=orgapachecoyotetomcat4CoyoteServerSocketFactory
clientAuth=false keystoreFile=ssl-keystore protocol=TLS gt
ltConnectorgt
The standard settings for the Messenger ports are
HTTP 8080
SSL 8443
To modify your connections you will need to enter the relevant port numbers indicated above as yourMessengerPort yourRedirectPort (which normally points to the SSL connection) and yourSSLPort
Ponton XP 21 ndash Installation and Configuration Guide 57
Advanced Configuration
Adapter Settings
The settings for the Messenger adapters are contained in the relevant XML files under
[installation root]xmlpipewebrootWEB-INFconfig
In particular a standard installation includes the files testadap erxml and hotfolderxml Each of these configuration files contains a block specifying the connection to the messenger
t
ltMessengergt
ltAddressgtyourMessengerHostltAddressgt
ltPortNumbergtyourMessengerPortltPortNumbergt
ltPathgthellipltPathgt
ltMessengergt
If you have configured the Messenger to run on a different port (see above) you will need to enter the relevant port number here
Ponton XP 21 ndash Installation and Configuration Guide 58
Introduction
Further Information and Support
Technical SupportHelpdesk
Email xp-helpdeskponton-consultingde
Phone +494069213-344
Ponton Consulting
wwwponton-consultingde
xpponton-consultingde
XML Information Pages
wwww3org (World Wide Web Consortium)
xmlcoverpagesorg (XML Cover Pages)
wwwxmlorg (XML Industry Portal)
wwwebxmlorg (all about ebXML)
wwwxmlsoftwarecom (software products for XML processing)
Ponton XP 21 ndash Installation and Configuration Guide 4
1 Introduction
11 About Ponton XP Ponton XP is the ebXML compliant Message Service developed by Ponton Consulting It ensures encrypted signed compressed validated archived and guaranteed transfer of XML documents between business partners
Ponton XP is packaged with an embedded HSQL database and webserver so that the installation process only requires a few configuration steps
The Message Service also includes use of the Ponton Certificate Authority which is integrated into the Messenger network Business partners may thus kick-start their integration within minutes If users of Ponton XP prefer migration to third-party certificate authorities such as VeriSignreg Thawtereg or GlobalSignreg this can easily be done just by requesting and installing the corresponding certificate
Moreover Ponton XP allows for flexible back-end integration based on a large range of adapters from Ponton Consulting or third parties
The Ponton X Series
Apart from Ponton XP the X Series comprises two other tools Ponton XE is the form-based XML Editor to easily create papiNet documents or
any other document that is based on XML Schema Find more information on Ponton XE at httpwwwponton-consultingdeenglishxehtml
Ponton XD is a database adapter that is used for direct exportimport of documents to and from application data It is being used both with standard ERP systems like SAP R3 or JD Edwards and with home-grown application software Find more information at httpwwwponton-consultingdeenglishxdhtml
DB
ERPSystem
Ponton
Ponton
PontonXP
User
ApplicationBusin
ess
Partn
er
Ponton X Series
XE
XDXML
Document
Ponton XP 21 ndash Installation and Configuration Guide 5
Introduction
12 Architecture Overview Ponton XP consists of the following main modules
1 Messenger ndash This is the core of Ponton XP It transforms Messages received from the back-end (user or ERP system) into a standards conforming ebXML message Several processing steps are performed before the ebXML message is sent to the receiver
2 Listener ndash This optional module is usually located in the DMZ to receive message from the outside and to forward them to the Messenger within the secure zone of an organization No further processing takes place by the Listener No Listeners are required if Messengers are installed within the DMZ or if they are used for internal integration
3 Adaptors ndash The are many ways to integrate the Messenger with the application software in the back-end An adapter helps bridging this gap To name some of the adapters Ponton XD is a Database Adapter that maps XML payload content directly to and from a database The Hot Folder Adapter frequently scans outbox folders and transfers these documents to the Messenger Vice-versa messages received from a business partner will be dropped into an inbox folder
Messenger
Listener
Listener
ebXML Message
ebXML Acknowledgement
Gen
eric
Ada
pter
Gen
eric
Ada
pter
Test
Ada
pter
Hot
Fol
der
Ada
pter
ERP
Generic
Adapter
Generic
Adapter
TestA
dapterH
ot FolderA
dapter ERP
Messenger
13 Features
Platform independence In productive use under Windows (from NT to XP) Linux Solaris AIX HPUX
Supports ebXML 20 the vendor independent messaging standard
Encryption of documents
Validation of documents against XML Schemas
Electronic signatures based on the PKCS and XML Signature standards
Compression of documents to less than 10 of their original size
Archiving of documents signatures certificates etc
Comprehensive logging and notification services
Synchronous or asynchronous data transmission ndash supporting transmission via HTTP HTTPS SMTP or SMIME
Ponton XP 21 ndash Installation and Configuration Guide 6
Introduction
Simple installation of electronic keys and certificates
Use of the built-in Ponton CA or third-party certification authorities
Set-up configuration and monitoring via Web interface
Support for SOAP messaging services
Extension of the processing pipeline by means of supplementary modules
Partner specific configuration of communication and security functions
Simple installation ndash just 5 clicks
Bundled with Ponton XE ndash the visual XML Editor developed by Ponton Consulting to easily create and send papiNet PurchaseOrders or any other XML documents based on XML Schema
Backward compatibility with EPC Messenger 203
Validation of documents against all papiNet document types ndash 10 11 20 and 21 (all based on XML Schemas)
Comes with a complete preinstalled set of papiNet Schemas and XML stylesheets
Guaranteed delivery of documents by using ebXML message acknowledgement
Configuration of different users and access rights
Archiving of all information papiNet documents ebXML envelopes PKCS objects certificates back-end envelope etc
Extended and enriched Adapter API with access to ebXML acknowledgement data
Easy installation of electronic keys and certificates ndash from Ponton or from third parties
Extensive testing facilities ndash including Pontonrsquos preinstalled PAPITEST server to test external document transfer (httppapitestponton-consultingde8080pontonxp)
Extended processing pipeline with software development framework for custom filters (ie an extended archiving components alternate signing modules etc)
A set of useful pre-packaged adapters Test Adapter Stress Test Adapter and the SimpleAdapter
In-depth product documentation providing a look ldquounder the hoodrdquo
Can be integrated with Ponton XD ndash the Database Adapter for direct data exchange between XML documents and your database (see httpwwwponton-consultingdeenglishxdhtml)
Ponton XP 21 ndash Installation and Configuration Guide 7
2 Downloading Ponton XP 21 The software can be downloaded from the product page of Ponton Consulting
httpwwwponton-consultingdeenglishxpdownloadsphp
Please go the the XP download page and fill in the request form You will receive an email containing a hotlink for access to the installation file
21 Components You will find the following components in the installation package
Ponton XP Messenger ndash the core component for guaranteed secure delivery of XML messages
Ponton XP Hot Folder Adapter ndash allows easy connection of the Messenger to your application software
HTTP Adapter ndash allows HTTP-based back-end integration with your ERP system(s)
HTTP Listener ndash a lightweight process to receive XML documents via HTTP and forward them to your Messenger over the firewall
EMail Listener ndash another lightweight process that polls your mail server for new messages
Ponton XE ndash the form-based XML editor which can be used as a simple tool to manually create and display business documents
Ponton XP 21 ndash Installation and Configuration Guide 8
Installing Ponton XP 21
3 Installing Ponton XP 21
31 Minimum System Requirements
Hardware
Disk space 100 MB
Memory space 256 MB
Processor Pentium III 500 MHz
Depending on the number of XML Schema files and the corresponding XSL stylesheets that are pre-loaded by your Messenger you should extend your main memory in the following way
5-8 Schemas 512 MB
8-20 Schemas 1024 MB
This avoids unnecessary swapping overhead
Operating systems
Windows NT4 Service Pack 6 (Workstation or Server)
Windows 2000 Service Pack 2 (Workstation or Server)
Windows XP Home or Professional Service Pack 1
In general any platform supporting Java Runtime Environment 14
Databases
HSQL ndash an open source database bundled with the distributed configuration of Ponton XP
Oracle 815 and higher
SAP DB 73 and up
MS SQL Server 2000
MySQL
Or any other database with support for JDBC 2
Ponton XP 21 ndash Installation and Configuration Guide 9
Installing Ponton XP 21
32 Installation Procedure The software is installed using a self-extracting executable which guides the user through the installation process If only standard options are chosen the whole installation should not take more than 10 minutes
Start the installation by double-clicking the PontonXP-21 setup file and go through the following six installation screens
Introduction A short explanation of the product features and version number This screen will contain license terms as well No user choice is needed simply click the Next button
Choose Install Folder Select the installation root folder either by typing it in or by choosing it from the directory and then click the Next button
Choose Shortcut Folder Determine how the startup icons and shortcuts will be stored ndash in a new or existing Program Group in the Start Menu on the Desktop or in the Quick Launch bar Select the appropriate radio button and then click the Next button
Pre-Installation Summary This screen lists the product name and repeats the choices made above It also compares the disk space available to the space needed for the installation
Installing Gives a progress bar to indicate how far the actual installation has proceeded
Ponton XP 21 ndash Installation and Configuration Guide 10
Installing Ponton XP 21
Install Complete The installation is now complete After pressing the Done button the user can skip to section 4 to start testing
33 Folders and Files For the following part of this documentation we assume that you have installed Ponton XP in the directory
Cpontonxp
or in a UNIX environment on
pontonxp
This will be referred to as the installation root
The created directories will look like this
Ponton XP 21 ndash Installation and Configuration Guide 11
Quick-starting the software
4 Quick-starting the software You can start the Messenger either via the Windows Start menu or by executing startupbat in the installation root directory If you have not started the Messenger from a command shell but via the Windows interface this will open an output window
Please wait until the webserver has fully initialized all the software components When the initialization is finished the following text should be shown near the bottom of the output window Messenger 21 is initialized URL of Messenger Administration Tool
If any errors occur during startup this will be indicated in the output window and logged in the file
[installation root]xmlpipewebrootWEB-INFlogbootlog
Please note that the Messengerrsquos processing log file
[installation root]xmlpipewebrootWEB-INFlogMessengerlog
does not come into play until the Messenger has initialized successfully
41 Logging in Now the Messenger is ready for use open your web browser and enter the URL httplocalhost8080pontonxp
This will bring up the login screen of the webserver The first thing to do is to log in to the administration front-end of the software The defaults set per installation are
User xpadmin
Password xppass
Please make sure you change these values in the Admin tool as soon as possible
In addition to the administrative user xpadmin a default user without administration privileges is installed
User xpuser
Password xppass
Please note If you log in without administration privileges you will not see the configuration menu in the Ponton XP window
Ponton XP 21 ndash Installation and Configuration Guide 12
Quick-starting the software
Note Click on the folder icons in the menu panel to open and close the folders Click on the page labels to display the corresponding pages
42 Stopping the Messenger If you started the software from the start menu (or if it was installed as a Windows service) you can stop the Messenger by selecting Stop Ponton XP from the start menu Alternatively you can execute the shutdownbat in the installation root directory
If you started the Messenger from a command shell you may also enter CTRL-C to stop the process
43 Minimal Configuration Hint If you want to set up an initial test installation it is often easier to install two Messengers on separate PCs within your local environment to avoid firewall restrictions If you want to immediately test with an external partner please ensure with your technical administration staff that your firewall is configured to allow the necessary connections
The following steps describe a minimal configuration for test purposes
Ponton XP 21 ndash Installation and Configuration Guide 13
Quick-starting the software
Define yourself as a partner
Open the Configuration menu in the left frame and click on Partners to open the screen Configuration rarr Partners
Type in a local ID for yourself and enable the self checkbox then click Create New Partner
Choose a Party ID for yourself ndash this ID is the one used in your backend system to reference yourself
Select the Party ID Type PontonCertificate in order to test the use of the Ponton Certificate Authority
Then press OK ndash this new partner is now displayed in the left frame
Ponton XP 21 ndash Installation and Configuration Guide 14
Quick-starting the software
You should now request a certificate from the Ponton CA (See section 53) and install it for your partner in the Install Certificate menu
For test purposes it may be helpful to switch off encryption and signing in your Partner configuration in the Processing menu
In any case your partner configurations must be set up so that the encryption and signing options match the settings chosen by the respective partner
Ponton XP 21 ndash Installation and Configuration Guide 15
Quick-starting the software
Define another partner
On a different host follow the steps described above
For test purposes switch off encryption and signing as described above
To test your Messenger configuration Ponton Consulting offers a test server called xptestponton-consultingde This server is pre-configured in your Messenger set-up Before integrating with you business partners you can start out using this test server as your messaging partner to experiment with different messages configuration options etc
Hint To check if your partnerrsquos Messenger is up and running open your browser and go to the URL
httpltyourpartnersdomainnamegtltport-numbergtpontonxpSoapListener
The URL for the test server at Ponton Consulting for example is
httpxptestponton-consultingde8080pontonxpSoapListener
44 Check if Adapters are running To check whether your Adapters are running go to Adapter Monitor in the main menu If no built-in adapter was used before (Test Adapter or Hot Folder Adapter) and no external adapter has connected to the Messenger the Adapter Monitor will indicate No adapter info availablehellip
Ponton XP 21 ndash Installation and Configuration Guide 16
Quick-starting the software
Now start the Test Adaptor and go back to the Adapter Monitor It should indicate Test Adapter ready to receive messageshellip
45 Exchange documents using the Test Adapter Call up the Test Adapter from the main menu of Ponton XP
Ponton XP 21 ndash Installation and Configuration Guide 17
Quick-starting the software
1 Select a sending partner
2 Select a receiving partner
3 Select a document (filename)
4 For test purposes activate the ldquoTest Messagerdquo checkbox
5 Send the document by clicking ldquoSend Messagerdquo
Your Test Adapter will now send the document to the Messenger The document will then be processed by the Messenger according to your settings and filters (encryption archiving etc) and finally the document will be sent to the specified receiver party
46 Check the status of your messages The status of messages can be monitored in the Message Monitor window which you can select from the main menu of Ponton XP
In the Message Monitor click the ldquoSearchrdquo button (located below the filter settings on the left) and check if your message was properly transferred to the receiver This is shown in the ldquoResultrdquo column (located in the message overview in the upper right panel)
Ponton XP 21 ndash Installation and Configuration Guide 18
Quick-starting the software
The following color codes are used to indicate the transferprocessing status
Green checkmark ndash the transfer was successful
Red cross ndash something went wrong (in this case the complete entry is highlighted red)
Question mark ndash the message is still unconfirmed (in this case the entry is highlighted yellow)
To check for details click on the MessageID and look at the log information (in the lower right panel) Each processing step carried out by your Messenger is displayed here As long as no errors occurred the log entries are highlighted green
The right-hand columns show How the message was transferred from your test adapter to the Messenger
Which Messenger filters were applied to the message
How the document was transferred to the receiver
You may experiment with the Test Adapter and the Message Monitor and send other documents Please also ask your test partner to send documents to your Messenger
The results shown in the Message Monitor indicate the processing sequence A Senderrsquos Adapter
M Senderrsquos Messenger
L Senderrsquos Listener
Net NetworkTransmission
L Receiverrsquos Listener
M Receiverrsquos Messenger
A Receiverrsquos Adapter
Ponton XP 21 ndash Installation and Configuration Guide 19
Configuration Options
5 Configuration Options The overall configuration of Ponton XP breaks down into the following sections
Messenger configuration This section focuses on your local setting for the Messenger This includes database connections default filter settings communication protocol selection etc
Partner configuration Per partner several setting are required Partner identification filter activation (which overrides the default setting) communication settings etc
Certificate management For own partners key pairs may be created and certificates requested For certificate authorities as well as for each individual partner certificates can be installed Certificates may be requested for signing and encryption for SSL and for SMIME
Hot folder configuration The Hot Folder Adapter is tightly integrated with the Messenger and can therefore be configured through the same interface It supports the definition of multiple hot folders for sending and receiving documents as well as dedicated folders for business partners
51 Messenger Configuration
Set Up Messenger Database
The Messenger stores log entries in a database By default the log database is pre-configured as an HSQL database HSQL is an open source database implementation written entirely in Java If there is no requirement to store log data in an existing database in your organization you may continue with HSQL
It is also possible to configure the Messenger to use a different database system for example
Oracle (version 815 or higher)
MS SQL Server 70
MySQL (version 32 or higher)
SAPdb (version 73)
The log database is accessed via JDBC connection Configuration scripts to set up the tables for an Oracle database are included with Ponton XP You can refer to these scripts as examples to create scripts for your own database system
If you do not yet have a database system with JDBC support in use you can download the setup files for MySQL from httpwwwmysqlcomdownloadsmysql-323html
Ponton XP 21 ndash Installation and Configuration Guide 20
Configuration Options
To configure the Messenger database the following set-up needs to be performed
1 Go to Configuration rarr Messenger rarr Database
2 Enter the driver class name and the URL for the JDBC connection to your database
3 Enter the user name and password for the connection if required
4 Click Test to test the connection
5 Important Donrsquot click OK unless the connection test was successful
Note The connection to the standard HSQL database supplied with the Messenger requires a ldquotruncatedrdquo URL that does contain the database name (as shown above) If you get a ldquoconnection brokenrdquo message when testing the connection to the standard database (as specified above) try deleting ltDATABASEgt from the URL and testing the connection again
Ponton XP 21 ndash Installation and Configuration Guide 21
Configuration Options
Set Logging Level
To specify the logging level go to Configuration rarr Messenger rarr Logging and select the desired settings for Messenger and JDBC logging
There is a range of settings available
OFF turns logging off completely
hellip
DEBUG logs all the messages output by the system
Note Please keep in mind that the chosen logging level can have an effect on the performance of your system In particular it is advisable to use DEBUG logging only in connection with error tracking and analysis
Ponton XP 21 ndash Installation and Configuration Guide 22
Configuration Options
Set Message Queue Scan Interval
Under Configuration rarr Messenger rarr Message Queues you can specify the interval to scan the (inbound and outbound) message queues
The default setting is 5000 msec To boost the message throughput on a faster system you can increase the scan frequency by setting this interval to a lower (ie shorter) value
Ponton XP 21 ndash Installation and Configuration Guide 23
Configuration Options
Select Messaging Pipeline
The Messenger allows you to configure different filter pipelines The standard configuration comes with two pipelines
1 Messenger 203 compatibility pipeline This allows you to maintain backward compatibility with users of the previous Messenger version
2 Messenger 21 pipeline This is to communicate with partners that are also using Messenger version 21 or any EbXML 20 compliant software
For each pipeline a range of filters can be set in particular
Validation
Signing
Compression
Encryption
The Messenger configuration can be used for standard filters (validation signing compression and encryption) for inbound and outbound messages Custom filters are configured in a dedicated section
Developers may extend the Messenger with additional filters For example one may think of a ldquoBusiness Validatorrdquo that checks message content against business rules Or existing filters could be Instead of ldquosoft signingrdquo a document smart card access may be integrated
Ponton XP 21 ndash Installation and Configuration Guide 24
Configuration Options
Outbound Email Connection
This connection is used for email messages sent by your Messenger to your business partners The following data needs to be configured
From ndash the senderrsquos address to be used for your emails
SMTP ndash the outgoing mail server to be contacted by your Messenger in order to submit the email
Username password ndash must be entered if your mail server requires authentication for outgoing emails in this case enter the settings to be used by the Messenger to log in on the mail server
To test the email connection enter a receiver email address (in the ldquoTordquo field) and click the ldquoTestrdquo button
Ponton XP 21 ndash Installation and Configuration Guide 25
Configuration Options
Inbound Email Connection
You can enable your Messenger to receive email messages by setting up a POPIMAP connection with the following entries
Protocol ndash set to pop3 IMAP (depending on the type of mail server)
Server ndash the hostname or IP address of your mail server
Interval ndash the frequency for accessing the server for mail download
Username password ndash must be properly set to authenticate the Messenger on the mail server
Ponton XP 21 ndash Installation and Configuration Guide 26
Configuration Options
Email Notification
You can use the notification service to send emails to specified addresses whenever certain events occur For example you might want to notify your system administrator whenever certain errors are encountered
To specify an address go to Messenger rarr eMail Notification and click New Receiver Enter the email address for this receiver in the text field and select the events for which this receiver is to be notified You can use CTRL-click to activate multiple entries in the list
Ponton XP 21 ndash Installation and Configuration Guide 27
Configuration Options
Communication Settings
On this screen you can specify URI of each partnerrsquos Messenger Service ndash for example
httppartnerserver8080pontonxpSoapListener where partne server refers to the hostname or IP address of the machine the Messenger is installed on
r
Acknowledgment Requests ndash you can use this setting to determine whether outbound messages to this partner require acknowledgements To differentiate per message you can deactivate this checkbox and use the TransmissionMode attribute in the BackendEnvelope In the context of ebXML 20 transmissions you can additionally request signed acknowledgements for increased security
Retransmission Handling ndash you can use this setting to specify the number of retransmission attempts and the interval (in seconds) between attempts If a message cannot be transmitted successfully in the specified number of retries the Messenger will give up and mark the message as ldquofailedrdquo
Ponton XP 21 ndash Installation and Configuration Guide 28
Configuration Options
Configure Archiving Filter
The archiving filter stores the following information in a dedicated directory
Backend Envelope
ebXML Envelope
Payload ndash this is the actual business document
Certificate
Signature
Each part is stored in a separate file
The Archive Folder setting can be used to indicate the location of the archiving folder This can be expressed as
An absolute path to the required folder
A relative path beginning with $CONTEXT ndash this placeholder refers to the folder [installation root]xmlpipewebroot
The Maximum Age setting specifies how long the files will be archived ndash expressed in days
Ponton XP 21 ndash Installation and Configuration Guide 29
Configuration Options
52 Partner Configuration For each partner the following data may be configured
Partner identification (internal and external)
Communication Settings
URI of the partnerrsquos Messenger
Create Delete a Partner Entry
To create a new partner entry specify an identifier for the partner (this is the local identifier for your configuration) and indicate whether this partner entry is for
An internal partner (with the ldquoselfrdquo option activated) ndash this might be a department of your organization
An external partner ndash these entries refer to your business partners for example customers suppliers carriers warehouse operators etc
A message is always sent by your Messenger from an internal to an external partner and received from an external partner to an internal one
Internal partners are distinguished because for encryption and signing the certificates of each internal partner will be used on a per-partner basis
For further information please check the Ponton XP Architecture Overview
Ponton XP 21 ndash Installation and Configuration Guide 30
Configuration Options
Set the Partner Identification
Local Partner Name This identifier is valid within you local configuration ie you may choose any value as long as it is unique among all local partner names
Disable Although configured as a partner individual partners may be disabled In this case the Messenger rejects any message received from this partner
PartyID PartyID Type PartyIDs are used to identify partners externally To avoid name clashes and duplication well-known naming schemas exist to identify partners eg DUNS codes VAT numbers IANA codes etc For this reason trading partners should agree on an minimal set of identification types (like DUNS numbers and IANA codes) that is to be used by all partners
More than one PartyID can be defined per partner The limit is given by the number of PartyID types These are configured separately please check Section ldquoAdvanced Configurationrdquo)
Hint Please also check the Ponton XP Architecture Overview document for a detailed explanation of ebXML codes and partner identification
Ponton XP 21 ndash Installation and Configuration Guide 31
Configuration Options
Partner Communication Configuration
For each partner the following configuration options may be set URI of Partnerrsquos Messenger Service ndash enter the address of the partnerrsquos
Messenger for example httppartnerserver8080pontonxpSoapListener
Request Acknowledge ndash every message to this partner needs to be acknowledged
Request Signed Acknowledge ndash to specify signing of acknowledgements received from this partner
Retries ndash the number of retries in case of unsuccessful message transmission
Retry Interval ndash the number of seconds to wait until the next retry
Ponton XP 21 ndash Installation and Configuration Guide 32
Configuration Options
Processing Configuration
The following options can be set
Default Adapter ndash enter the name of the adapter to be used by default
Processing Pipeline ndash specify the processing pipeline to be used for this profile
Schema Sets ndash choose which Schema set(s) are to be supported
Use XML Signature ndash indicate whether to use XML Signature
Use default message settings (specified under Configuration rarr Messenger rarr Processing) or define a specific processing filter for this partner
Ponton XP 21 ndash Installation and Configuration Guide 33
Configuration Options
Install Partner Certificates
There are different ways of distributing certificates to business partners One is to send the certificate per email and have the partner cut amp paste the certificate code into the partner configuration
Note It is important to cut amp paste the complete certificate code including the lines ldquo----- Begin Certificate -----rdquo and ldquo----- End Certificate -----rdquo
Important A partner certificate will only be accepted if the certificate of the issuing CA (certificate authority) was pre-installed Otherwise the trust relationship between the partner and the CA cannot be traced
One may select to install a general certificate or a SMIME certificate Please determine what kind of certificate you received from your partner before installing it
Ponton XP 21 ndash Installation and Configuration Guide 34
Configuration Options
53 Certificate Management Certificate management comprises the following initial steps
Configure your default CA This is usually properly pre-configured in the installation files
Install the root certificate of the default CA This needs to be installed manually if 3rd-party CAs are to be used
Request a certificate for your own Messenger This includes creating a publicprivate key pair and sending a certificate request to the CA
Optionally you can request and install a SMIME certificate to be used for SMIME based communication via email
Default CA Configuration
On this screen you specify the settings for receiving certificates from your default certificate authority (CA) CA email address ndash enter the email address to be used to request a certificate
from your (default) CA
Ponton XP 21 ndash Installation and Configuration Guide 35
Configuration Options
CA download URL ndash enter the URL at your CA from which to download certificates for your Messenger installation Please note that you can only install certificates for partners you have already defined in your partner configuration
Download interval ndash specify the interval to wait between automatic certificate downloads
To download the available certificates immediately click the Download button
Request and Install Your Own Certificate
To request a certificate from your (default) CA go to Configuration rarr Certificates rarr Request Certificate Please enter data for all the fields on this form If any entries are missing you will get an error message
After completing the form click OK to send the certificate request to your CA You will get a message indicating that the request has been sent
Ponton XP 21 ndash Installation and Configuration Guide 36
Configuration Options
Once you receive the requested certificate from your CA you can install it in your own partner configuration (ie the internal partner you will use to sendreceive messages) Go to Configuration rarr Partners rarr ltYour Partner Namegt rarr Install Certificate and paste the certificate text including the hellip into the text field
Then enter the password you used when you requested the certificate and click OK to complete the installation of the certificate You will see the result above the text field containing the certificate
Ponton XP 21 ndash Installation and Configuration Guide 37
Configuration Options
Install Partner Certificates
Install a certificate issued by the CA for the requesting partner This was already described in the Partner Configuration section for normal standard certificates
Note In case of SMIME certificates an additional password may be needed to allow the Messenger to access the certificate in the local certificate store
Install a CA Certificate
To install the certificate for your CA go to Configuration rarr Certificates rarr CA rarr Install Certificate and paste your CArsquos certificate into the text field This is the certificate that authorizes the CA as a signing authority for other certificates
Ponton XP 21 ndash Installation and Configuration Guide 38
Configuration Options
54 Configure the Hot Folder Adapter
General Configuration
Address Port ndash the Hot Folder Adapter (HFA) is addressed as a separate process that communicates with the Messenger via HTTP Therefore the hostname and port number need to be set up for the Messenger If the HFA is co-located with the Messenger on the same machine use ldquolocalhostrdquo for the IP address In this case the HFA does not run as a separate Java process but will be hosted on the same Tomcat server
Path ndash the HFA needs to know the Adapter communication path of the Messenger By default it is pontonxpAdapterService
Console File Log Level ndash the HFA provides log output to the console and to log files Both can be configured regarding the level of detail The console log is only useful if the HFA is running as a standalone application so you can safely leave it disabled in the default configuration
Ponton XP 21 ndash Installation and Configuration Guide 39
Configuration Options
Create Delete a HFA
Several HFAs may be created Each registers under a different ID at the Messenger HFAs may be created for individual partners If this is the case messages exchanged with the rest of the partners will be stored with the default HFA
Configure a HFA
Each HFA requires several directories to be defined
Inbox ndash a document will be stored in the Inbox whenever it was received from a partner
Outbox ndash documents to be sent to the business partner are dropped here The HFA grabs them in a defined frequency
Failed ndash if a document could not be sent to a partner and all retries failed it will be stored in this folder
Work ndash if a document transfer is in progress or all attempts to send the document have not yet been tried the document will remain here After a final failure it will be transferred to the Failed folder
Ponton XP 21 ndash Installation and Configuration Guide 40
Configuration Options
The following settings are also supported
Port ndash the port to be used by the HFA (optional)
Receiver format ndash standard format is XML
Save Backend envelope ndash the Backend envelope is retained for incoming messages
Support attachments ndash the HFA will save any files attached to an incoming message to the selected inbox folder
Scan Interval ndash the interval to wait (in seconds) between checking the outbox
Number of receiving threads ndash specifies the maximum number of receiving threads the adapter can process
Use partner subfolders ndash if this is set this HFA will create inbox and outbox folders for all remote partners Inbound messages will automatically be sorted into the according folder depending on the sender Outbound messages need to be placed into the receiving partnerrsquos outbox folder The backend message is not used in this mode and is ignored if it exists
Use Acknowledgement for ERP ndash with this option activated the ERP application receives an acknowledgement from the receiving Messenger on the partnerrsquos side This acknowledgement will be provided via the specified Inbox
Ponton XP 21 ndash Installation and Configuration Guide 41
Configuration Options
55 Ponton XE ndash The XML Editor Ponton XE is a separate Ponton product It is packaged with Ponton XP for free use only by papiNet users It allows to enter papiNet document data directly via a graphical user interface and to send the document via the hot folder adapter to the business partners
Ponton XE is fully documented in a separate manual Hence only the Messaging Plug-in will be described here
You can experiment with the XML Editor and check out all the features and options without using the Ponton XP connection To start with you may want to begin with the following steps
Create a new papiNet Purchase Order
Fill out the forms and use optional XML Elements by right-clicking the Plus-icons in the layout tree
Create an HTML file by choosing Document Export to HTML from the menu
Save the document to an XML file and re-load it again
Ponton XP 21 ndash Installation and Configuration Guide 42
Configuration Options
Interface between Ponton XE and Ponton XP
The two software applications communicate via hot folders as illustrated in the following figure
Message Plug-in
Outbox Inbox AckInboxImport
Ponton XP Ponton XE
XMLXML XMLXML XMLXML XMLXML
Hot Folder Adapter
The XML Editor is connected to the Messenger via the Hot Folder Adapter All these folder settings need to be synchronized for a proper data exchange
Configuration of the Messaging Plug-in
The Messaging Plug-in can be flexibly installed and de-installed with the remaining part of Ponton XE If the file messengerjar is removed from the plugins directory it will automatically disappear from the Ponton XE menu bar as soon as the software is started again
Before transferring messages out of Ponton XE you need to preset the following information
Default values for the sending and receiving partners ndash these values may be overridden for an individual transfer
Folder locations of the Hot Folder Adapter ndash the Inbox Outbox and AckInbox need to be set for document exchange with Ponton XP
Default setting for Test Message flag ndash this can be overridden for the actual document transfer
Import Directory ndash Ponton XE will automatically scan the Inbox folder and import received documents to the given folder for local processing
Ponton XP 21 ndash Installation and Configuration Guide 43
Configuration Options
Open Messages after Import ndash if this option is activated messages received from the Inbox will automatically be displayed in Ponton XE
Delete message in Inbox ndash to always remove received messages from the HFA Inbox this option needs to be activated otherwise a copy will remain in the Inbox folder
Ponton XP 21 ndash Installation and Configuration Guide 44
Configuration Options
Ponton XP 21 ndash Installation and Configuration Guide 45
Configuration Options
Using Ponton XE
After setting the configuration and creating a document you can transfer the document to your business partner This is done by means of the following steps
Choose the menu item ldquoMessenger rarr Transfer rarr Send Messagerdquo
Select a sending and receiving partner
Override the settings for the HFA folders
Tick the checkbox to qualify this message as a test message
After transferring the document to the Messenger Ponton XE will wait for a response This is recognised as an acknowledge file which is dropped into the AckInbox folder of the HFA As soon as this has been received a successful transfer in indicated
You may check with the Message Monitor to determine how the document was forwarded by the Messenger to the receiver or whether any errors occurred
Ponton XP 21 ndash Installation and Configuration Guide 46
Configuration Options
56 Display Schema Configuration The schema sets to be supported for each partner are defined in the partner configuration The standard sets available with the installation are shown under Configuration rarr Schemata
Ponton XP 21 ndash Installation and Configuration Guide 47
Configuration Options
57 User Administration Two types of users are distinguished
Administrators ndash these users have full access to the Messengerrsquos configuration interface
Operators ndash these users only have access to the Adapter Monitor the Message Monitor and the Test Adapter The other options in the Messenger menu are not available
Please note the following points in connection with the Messengerrsquos standard user administration
This is a very simple user administration based on the Tomcat implementation If you want to integrate the Messenger with another user administration such as LDAP please contact Ponton Consulting for support
A userrsquos access rights (administratoroperator) are defined when the user account is created ndash they cannot be changed subsequently
User accounts can only be created or deleted by administrators
Ponton XP 21 ndash Installation and Configuration Guide 48
Advanced Configuration
6 Advanced Configuration
61 XML Schema Configuration Important The Messenger distinguishes between available schema set and activated schema sets Just inserting entries in the schema configuration as described in this section does not activate the schema sets or the corresponding schemas for use by the Messenger In order to make use of the schemas in a schema set you have to activate the schema set in the relevant partner configuration To view or modify the activated schema sets in a partner configuration go to
Configuration rarr Partners rarr ltpartner namegt rarr Processing
and activatedeactivate the relevant checkboxes
In the Messengerrsquos configuration interface you can activate and deactivate schema sets for specific partner configurations It is not possible however to modify the contents and specifications of the individual schema sets Any necessary changes have to be made in the configuration file
[installation root]xmlpipewebrootWEB-INFconfigschemataxml
The configuration entries in this file are structured as follows
ltSchemaSet Name=papinet21gt
ltSchemaName=httpwwwpapinetorgdataAvailabilityV2R10xsd MessageType=Availability MessageVersion=V2R10gt
ltNamespacegtltNamespacegt
ltDisplayNamegtAvailability 21ltDisplayNamegt
ltSchemaFilegtAvailabilityV2R10xsdltSchemaFilegt
ltXSLFilegtltXSLFilegt
ltSchemagt
ltSchema Name=yourSchema MessageType=yourMsgType MessageVersion=yourMsgVersgt
ltNamespacegtyourNamespaceltNamespacegt
ltDisplayNamegtYour Display NameltDisplayNamegt
ltSchemaFilegtyourSchemaFileltSchemaFilegt
ltXSLFilegtyourStylesheetltXSLFilegt
ltSchemagt
hellip
ltSchemaFoldergtpapinet210ltSchemaFoldergt
ltXSLFoldergtpapinet210ltXSLFoldergt
ltSchemaSetgt
Ponton XP 21 ndash Installation and Configuration Guide 49
Advanced Configuration
You can add a schema to an existing schema set in this file by inserting a ltSchemagt block (just copy and paste one of the existing blocks and modify the configuration as required) Please ensure that your new schema specification includes correct settings for the attributes of the Schema element
Name= This attribute corresponds with the ebXML Schema Location of incoming messages When an ebXML message is received the Messenger looks for a schema configuration where the Schema Name attribute matches the Schema Location specified in the ebXML envelope
MessageType= This attribute corresponds with the attribute MessageMetaDataDocumentInfoMessageName in the backend envelope of outgoing messages
MessageVersion= This attribute corresponds with the element MessageMe aDataDocumentInfoDTDVersionNumber in the backend envelope of outgoing messages
t
Note The specification of MessageType and MessageVersion must be used together for outgoing messages as they are combined to form an identifier for the message schema
You also have the option of adding a new schema set with your own schema definitions to the schema configuration In this case you would insert a ltSchemaSetgt block with subordinate ltSchemagt blocks Your added schema set will automatically be inserted in the list of available schema sets on the Messenger configuration pages
62 Advanced Database Configuration Important Since the Messenger database is used for essential message processing and tracking purposes you should not experiment with the database configuration on a ldquoliverdquo system For test and debugging purposes you are advised to set up a trial system
Installation with other Databases
This section describes the main steps required to install a different database system on the Messenger for example an Oracle database
1 Install database driver Copy the database driver to
[installation root]xmlpipewebrootWEB-INFlib
Note Please note that only drivers with the extension jar are loaded by the Tomcat servlet engine If the JDBC driver you want to use is a zip file you will have to rename the file to jar The JDBC driver for Oracle 9i is the file ojdbc14jar
Ponton XP 21 ndash Installation and Configuration Guide 50
Advanced Configuration
2 Create database and tables Ponton XP is supplied with SQL scripts for HSQL and for Oracle that can be used to create the tables for the Messenger database If you are using another database you may need to modify these scripts to work correctly with your database system
The SQL scripts are located in the subfolders under [installation root]sql
Once the database tables are in place you will also need to carry out the SQL script that inserts the log messages into the database ie
[installation root]sqlinsert_log_messagessql
3 Set up database connection The configuration of database connections is described in the section Set Up Messenger Database beginning on page 20 To connect with a different database choose ldquootherrdquo from the list of database drivers and enter the configuration for your database on the next page
The entries for the Oracle 9i JDBC driver are
Driver oraclejdbcdriverOracleDriver
URL jdbcoraclethinlthostgtltportgtltdatabasegt
63 Advanced Message Monitor Configuration In the configuration directory ldquoxmlpipewebrootWEB-INFconfigrdquo there is a file messagemonitorxml which can be used to change the selection and ordering of the Message overview window in the Message Monitor The default setting is displayed in the following picture
Ponton XP 21 ndash Installation and Configuration Guide 51
Advanced Configuration
Here the number of line items per page can be set If a high resolution screen is used (beyond 1024 x 768 pixel) one may increase the number of lines
Further a mapping table defines which database column is to be displayed in which monitor column The number of columns again depends on the screen resolution
Finally if main memory size allows caching of XSL stylesheet definitions helps accelerating processing speed for XSL transformations
64 Tomcat SSL Installation
Generate a key
One minor problem with Tomcat or any other webserver that uses the internal Java symmetric key architecture is that you are not allowed to export or import private keys For this reason it is not possible to use the existing key-pair installed with the Messenger software You will have to generate a new key-pair and send a certificate request to the Ponton certificate authority (or other certification authority) to receive a valid certificate
To generate a new key-pair open a command prompt and go to the tomcat-4118 directory The keystore used for a Tomcat SSL installation is located in the Tomcat root directory and is called ssl-keystore The Tomcat installation already contains a certificate for lsquolocalhostrsquo so you can test the HTTPS access with a web browser
Before you can create a new Tomcat certificate you will have to delete the installed certificate Note that the default password for the Tomcat keystore is ldquochangeitrdquo keytool -delete -alias tomcat ndashkeystore ssl-keystore
Now use the following command to create a new key-pair Please note that you need to specify the Listener hostname (eg listenermyserverde) when the keytool asks for lsquofirst and last namersquo keytool -genkey -alias tomcat -keyalg RSA ndashkeystore ssl-keystore
After generating the new key the next step is to export a certificate request with the following command keytool ndashcertreq ndashalias tomcat ndashfile myservercsr ndashkeystore ssl-keystore
This will generate the file myservercsr in the current directory Send this file via email to xp-certponton-consultingde It will be signed and sent back to you The reply will contain a file with the certificate
Finally you have to re-import this signed certificate into the Tomcat SSL keystore Please note that the import may take some time keytool ndashimport ndashalias tomcat ndashfile myservercer ndashkeystore ssl-keystore
If you have any problems starting the keytool make sure you have the javahomebin directory specified in your PATH environment variable Of course you can also change to the javahomebin directory and start the keytool there
Ponton XP 21 ndash Installation and Configuration Guide 52
Advanced Configuration
Update Tomcat configuration
SSL is already activated in the Tomcat configuration packaged in the distribution However you might want to change the specified SSL port (by default the SSL port is set to 8443) You can change the port by editing the file
[tomcat installation]confserverconf
The following section configures the SSL parameters
lt-- Define a SSL Coyote HTTP11 Connector on port 8443 --gt
ltConnector className=orgapachecoyotetomcat4CoyoteConnector
port=8443
minProcessors=5
maxProcessors=75
enableLookups=true
acceptCount=100
debug=0
scheme=https
secure=true
useURIValidationHack=false
disableUploadTimeout=truegt
ltFactory className=orgapachecoyotetomcat4CoyoteServerSocketFactory
clientAuth=false
keystoreFile=ssl-keystore
protocol=TLS gt
ltConnectorgt
Verify setup
To verify if everything is working correctly start the Tomcat webserver as usual and connect to the webserver with your browser
Go to httpsyourserveraddress ndash initially you might get a warning window if the root certificate authority is not known to the browser If you continue by clicking OK you should see the usual Ponton XP start page
If everything comes up correctly you can use SSL to receive messages with the Ponton XP Software
Ponton XP 21 ndash Installation and Configuration Guide 53
Advanced Configuration
65 Distributed Installation If the Messenger is installed on a server that cannot be reached from the Internet you will need to install the Listener as well The purpose of the Listener is to pick up incoming connections and forward them to the Messenger (across the firewall) The firewall rules must be set up to allow this connection between the Listener and the Messenger When a message is received the Listener notifies the Messenger and the Messenger then picks up the message
You also have the option of subsequently installing the Listener as a service under Windows ndash this service can then be configured to start automatically when the system starts up
Note If you are going to run the Messenger in combination with the Listener your partners will have to enter the URI of your Listener in their configurations (under Configuration rarr Partners rarr ltpartner namegt rarr URI of Partners Messenger Service)
Listener Installation and Configuration
The Listener is installed by running the installer program (eg PontonXP-21-setuplistener-windowsexe) on the relevant system You are asked to specify an installation folder and also have the option of creating a desktop or menu shortcut Thatrsquos it
-
The settings for the Listener are contained in the configuration file listenerproperties which is located in the folder [Listener root folder]config To modify these settings you will have to edit the configuration file directly Access via the Messengerrsquos configuration interface is not possible
The file contains the following settings
HttpPort = Port number (for external HTTP connections)
HttpsPort = Port number (for external HTTPS connections)
LogLevel = DEBUG | INFO | WARN | ERROR | FATAL | OFF
The following settings specify the host and port of the Messenger for forwarding connections (HTTPHTTPS) The forwarding connection mode is activated by entering the relevant host and port addresses and removing the hash marks (used to mark ldquocomment linesrdquo in Java property files)
HttpServer = server1port1 (HTTP forwarding connection to the Messenger)
HttpsServer = server1port1 (HTTPS forwarding connection to the Messenger)
Ponton XP 21 ndash Installation and Configuration Guide 54
Advanced Configuration
The following settings specify the Listenerrsquos port for callback connections (HTTPHTTPS) with the Messenger As with the forwarding connection the callback connection mode is activated by entering the relevant port addresses and removing the hash marks (Obviously it makes no sense to have both connections activated at the same time)
HttpServicePort = Port number (for internal HTTP connections to the Listener)
HttpsServicePort = Port number (for internal HTTPS connections to the Listener)
Starting the Listener
To start the Listener open a command prompt and start the class
depontonconsultingxmlpipeListener
with the classpath
-cp libcommons-logging-api-103jarlibcommonutilsjarlibxp_listenerjarconfig
You can also use the installed batch file [Listener root folder]startListenerbat
Callback Mode
Details of the communication flow
When the Messenger starts up it searches for the Listener
Note The Listener should start up first so that it can be found by the Messenger
If the search is successful a permanent connection is established between the Messenger and the Listener The Messenger uses the following settings in the configuration to establish the connection with the Listener
Configuration rarr Messenger rarr Listener rarr HTTP[S] rarr Hostname
Configuration rarr Messenger rarr Listener rarr HTTP[S] rarr Internal Listener Port
Ponton XP 21 ndash Installation and Configuration Guide 55
Advanced Configuration
When the Listener receives an incoming message (or rather an HTTPHTTPS request) it informs the Messenger ndash by way of the permanent connection ndash about the arrival of the new request indicating which port the Messenger can use to pick up the connection
Note This port number is randomly selected by the Listener and cannot be configured
The Messenger picks up the connection on the Listenerrsquos specified port and redirects it to its own local port for further processing
This local port corresponds to the setting for
Configuration rarr Messenger rarr Listener rarr HTTP[S] rarr Internal Messenger Port
in the configuration GUI
Forwarding Mode
Details of the communication flow
In forwarding mode no permanent connection is established between the Messenger and the Listener
When the Listener receives an incoming HTTPHTTPS request it simply forwards the request to the Messenger using the address specified in listenerproperties (HttpServerHttpsServer)
Note To allow this forwarding connection the firewall has to be configured so that the Listener is permitted to access the Messenger on the specified port(s)
Ponton XP 21 ndash Installation and Configuration Guide 56
Advanced Configuration
66 Port Configuration The Messengerrsquos standard configuration uses port 8080 for HTTP connections and port 8443 for secure (HTTPS) connections This section describes how to set up the messenger to use a non-standard port configuration This involves making manual changes to several configuration files in particular the Tomcat serverxml and the Messengerrsquos adapter configuration files
Tomcat Settings
The port setting for the Messengerrsquos HTTP and HTTPS connections are specified in the Tomcat configuration file
[installation root]tomcat-xxxconfserverxml
This file defines the connections (Connectors) for the Messenger as follows
lt-- Define a non-SSL Coyote HTTP11 Connector on port 8080 --gt
ltConnector className=orgapachecoyotetomcat4CoyoteConnector
port=yourMessengerPort minProcessors=5 maxProcessors=75
enableLookups=true redirectPort=yourRed rectPort i acceptCount=100 debug=0 connectionTimeout=20000
useURIValidationHack=false disableUploadTimeout=true gt
lt-- Define a SSL Coyote HTTP11 Connector on port 8443 --gt
ltConnector className=orgapachecoyotetomcat4CoyoteConnector
port=yourSSLPort minProcessors=5 maxProcessors=75
enableLookups=true
acceptCount=100 debug=0 scheme=https secure=true
useURIValidationHack=false disableUploadTimeout=truegt
ltFactory className=orgapachecoyotetomcat4CoyoteServerSocketFactory
clientAuth=false keystoreFile=ssl-keystore protocol=TLS gt
ltConnectorgt
The standard settings for the Messenger ports are
HTTP 8080
SSL 8443
To modify your connections you will need to enter the relevant port numbers indicated above as yourMessengerPort yourRedirectPort (which normally points to the SSL connection) and yourSSLPort
Ponton XP 21 ndash Installation and Configuration Guide 57
Advanced Configuration
Adapter Settings
The settings for the Messenger adapters are contained in the relevant XML files under
[installation root]xmlpipewebrootWEB-INFconfig
In particular a standard installation includes the files testadap erxml and hotfolderxml Each of these configuration files contains a block specifying the connection to the messenger
t
ltMessengergt
ltAddressgtyourMessengerHostltAddressgt
ltPortNumbergtyourMessengerPortltPortNumbergt
ltPathgthellipltPathgt
ltMessengergt
If you have configured the Messenger to run on a different port (see above) you will need to enter the relevant port number here
Ponton XP 21 ndash Installation and Configuration Guide 58
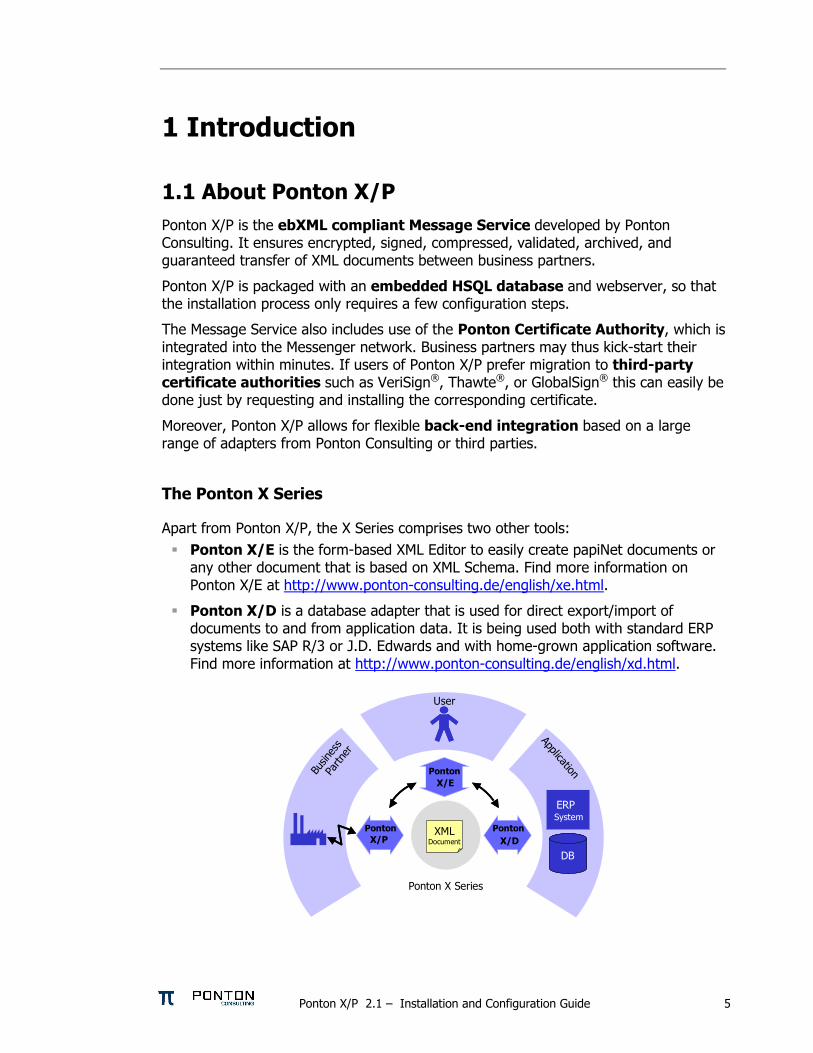
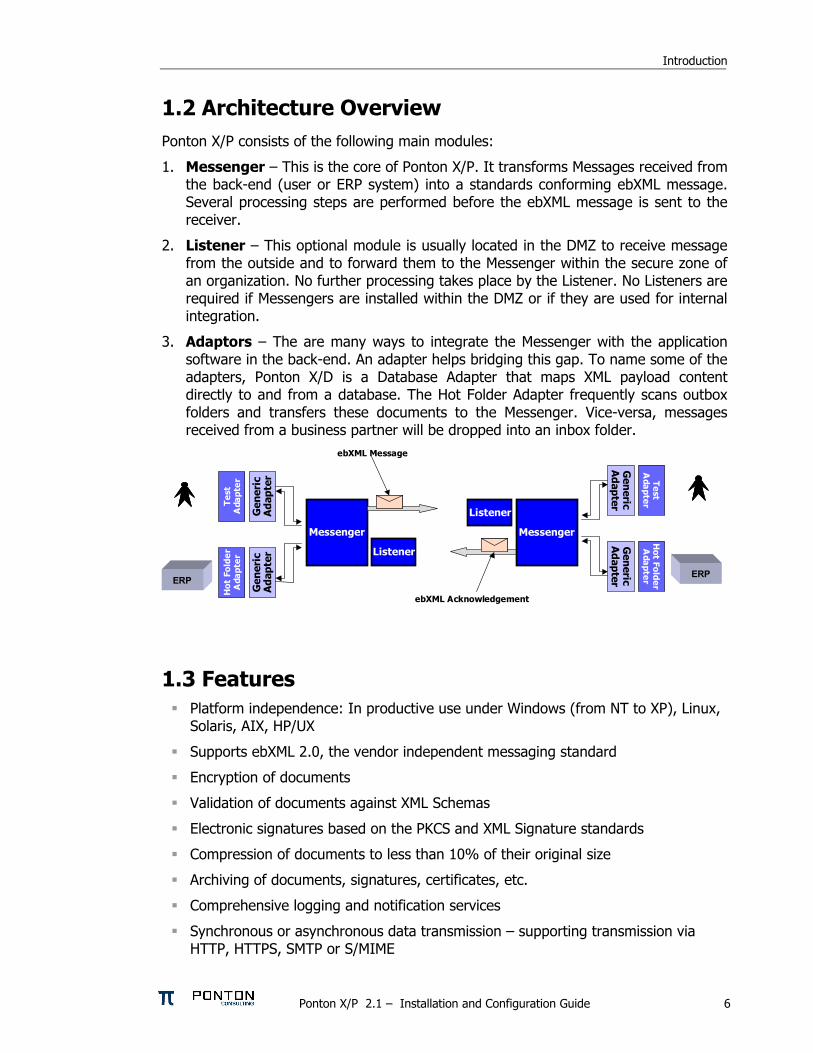
Introduction
12 Architecture Overview Ponton XP consists of the following main modules
1 Messenger ndash This is the core of Ponton XP It transforms Messages received from the back-end (user or ERP system) into a standards conforming ebXML message Several processing steps are performed before the ebXML message is sent to the receiver
2 Listener ndash This optional module is usually located in the DMZ to receive message from the outside and to forward them to the Messenger within the secure zone of an organization No further processing takes place by the Listener No Listeners are required if Messengers are installed within the DMZ or if they are used for internal integration
3 Adaptors ndash The are many ways to integrate the Messenger with the application software in the back-end An adapter helps bridging this gap To name some of the adapters Ponton XD is a Database Adapter that maps XML payload content directly to and from a database The Hot Folder Adapter frequently scans outbox folders and transfers these documents to the Messenger Vice-versa messages received from a business partner will be dropped into an inbox folder
Messenger
Listener
Listener
ebXML Message
ebXML Acknowledgement
Gen
eric
Ada
pter
Gen
eric
Ada
pter
Test
Ada
pter
Hot
Fol
der
Ada
pter
ERP
Generic
Adapter
Generic
Adapter
TestA
dapterH
ot FolderA
dapter ERP
Messenger
13 Features
Platform independence In productive use under Windows (from NT to XP) Linux Solaris AIX HPUX
Supports ebXML 20 the vendor independent messaging standard
Encryption of documents
Validation of documents against XML Schemas
Electronic signatures based on the PKCS and XML Signature standards
Compression of documents to less than 10 of their original size
Archiving of documents signatures certificates etc
Comprehensive logging and notification services
Synchronous or asynchronous data transmission ndash supporting transmission via HTTP HTTPS SMTP or SMIME
Ponton XP 21 ndash Installation and Configuration Guide 6
Introduction
Simple installation of electronic keys and certificates
Use of the built-in Ponton CA or third-party certification authorities
Set-up configuration and monitoring via Web interface
Support for SOAP messaging services
Extension of the processing pipeline by means of supplementary modules
Partner specific configuration of communication and security functions
Simple installation ndash just 5 clicks
Bundled with Ponton XE ndash the visual XML Editor developed by Ponton Consulting to easily create and send papiNet PurchaseOrders or any other XML documents based on XML Schema
Backward compatibility with EPC Messenger 203
Validation of documents against all papiNet document types ndash 10 11 20 and 21 (all based on XML Schemas)
Comes with a complete preinstalled set of papiNet Schemas and XML stylesheets
Guaranteed delivery of documents by using ebXML message acknowledgement
Configuration of different users and access rights
Archiving of all information papiNet documents ebXML envelopes PKCS objects certificates back-end envelope etc
Extended and enriched Adapter API with access to ebXML acknowledgement data
Easy installation of electronic keys and certificates ndash from Ponton or from third parties
Extensive testing facilities ndash including Pontonrsquos preinstalled PAPITEST server to test external document transfer (httppapitestponton-consultingde8080pontonxp)
Extended processing pipeline with software development framework for custom filters (ie an extended archiving components alternate signing modules etc)
A set of useful pre-packaged adapters Test Adapter Stress Test Adapter and the SimpleAdapter
In-depth product documentation providing a look ldquounder the hoodrdquo
Can be integrated with Ponton XD ndash the Database Adapter for direct data exchange between XML documents and your database (see httpwwwponton-consultingdeenglishxdhtml)
Ponton XP 21 ndash Installation and Configuration Guide 7
2 Downloading Ponton XP 21 The software can be downloaded from the product page of Ponton Consulting
httpwwwponton-consultingdeenglishxpdownloadsphp
Please go the the XP download page and fill in the request form You will receive an email containing a hotlink for access to the installation file
21 Components You will find the following components in the installation package
Ponton XP Messenger ndash the core component for guaranteed secure delivery of XML messages
Ponton XP Hot Folder Adapter ndash allows easy connection of the Messenger to your application software
HTTP Adapter ndash allows HTTP-based back-end integration with your ERP system(s)
HTTP Listener ndash a lightweight process to receive XML documents via HTTP and forward them to your Messenger over the firewall
EMail Listener ndash another lightweight process that polls your mail server for new messages
Ponton XE ndash the form-based XML editor which can be used as a simple tool to manually create and display business documents
Ponton XP 21 ndash Installation and Configuration Guide 8
Installing Ponton XP 21
3 Installing Ponton XP 21
31 Minimum System Requirements
Hardware
Disk space 100 MB
Memory space 256 MB
Processor Pentium III 500 MHz
Depending on the number of XML Schema files and the corresponding XSL stylesheets that are pre-loaded by your Messenger you should extend your main memory in the following way
5-8 Schemas 512 MB
8-20 Schemas 1024 MB
This avoids unnecessary swapping overhead
Operating systems
Windows NT4 Service Pack 6 (Workstation or Server)
Windows 2000 Service Pack 2 (Workstation or Server)
Windows XP Home or Professional Service Pack 1
In general any platform supporting Java Runtime Environment 14
Databases
HSQL ndash an open source database bundled with the distributed configuration of Ponton XP
Oracle 815 and higher
SAP DB 73 and up
MS SQL Server 2000
MySQL
Or any other database with support for JDBC 2
Ponton XP 21 ndash Installation and Configuration Guide 9
Installing Ponton XP 21
32 Installation Procedure The software is installed using a self-extracting executable which guides the user through the installation process If only standard options are chosen the whole installation should not take more than 10 minutes
Start the installation by double-clicking the PontonXP-21 setup file and go through the following six installation screens
Introduction A short explanation of the product features and version number This screen will contain license terms as well No user choice is needed simply click the Next button
Choose Install Folder Select the installation root folder either by typing it in or by choosing it from the directory and then click the Next button
Choose Shortcut Folder Determine how the startup icons and shortcuts will be stored ndash in a new or existing Program Group in the Start Menu on the Desktop or in the Quick Launch bar Select the appropriate radio button and then click the Next button
Pre-Installation Summary This screen lists the product name and repeats the choices made above It also compares the disk space available to the space needed for the installation
Installing Gives a progress bar to indicate how far the actual installation has proceeded
Ponton XP 21 ndash Installation and Configuration Guide 10
Installing Ponton XP 21
Install Complete The installation is now complete After pressing the Done button the user can skip to section 4 to start testing
33 Folders and Files For the following part of this documentation we assume that you have installed Ponton XP in the directory
Cpontonxp
or in a UNIX environment on
pontonxp
This will be referred to as the installation root
The created directories will look like this
Ponton XP 21 ndash Installation and Configuration Guide 11
Quick-starting the software
4 Quick-starting the software You can start the Messenger either via the Windows Start menu or by executing startupbat in the installation root directory If you have not started the Messenger from a command shell but via the Windows interface this will open an output window
Please wait until the webserver has fully initialized all the software components When the initialization is finished the following text should be shown near the bottom of the output window Messenger 21 is initialized URL of Messenger Administration Tool
If any errors occur during startup this will be indicated in the output window and logged in the file
[installation root]xmlpipewebrootWEB-INFlogbootlog
Please note that the Messengerrsquos processing log file
[installation root]xmlpipewebrootWEB-INFlogMessengerlog
does not come into play until the Messenger has initialized successfully
41 Logging in Now the Messenger is ready for use open your web browser and enter the URL httplocalhost8080pontonxp
This will bring up the login screen of the webserver The first thing to do is to log in to the administration front-end of the software The defaults set per installation are
User xpadmin
Password xppass
Please make sure you change these values in the Admin tool as soon as possible
In addition to the administrative user xpadmin a default user without administration privileges is installed
User xpuser
Password xppass
Please note If you log in without administration privileges you will not see the configuration menu in the Ponton XP window
Ponton XP 21 ndash Installation and Configuration Guide 12
Quick-starting the software
Note Click on the folder icons in the menu panel to open and close the folders Click on the page labels to display the corresponding pages
42 Stopping the Messenger If you started the software from the start menu (or if it was installed as a Windows service) you can stop the Messenger by selecting Stop Ponton XP from the start menu Alternatively you can execute the shutdownbat in the installation root directory
If you started the Messenger from a command shell you may also enter CTRL-C to stop the process
43 Minimal Configuration Hint If you want to set up an initial test installation it is often easier to install two Messengers on separate PCs within your local environment to avoid firewall restrictions If you want to immediately test with an external partner please ensure with your technical administration staff that your firewall is configured to allow the necessary connections
The following steps describe a minimal configuration for test purposes
Ponton XP 21 ndash Installation and Configuration Guide 13
Quick-starting the software
Define yourself as a partner
Open the Configuration menu in the left frame and click on Partners to open the screen Configuration rarr Partners
Type in a local ID for yourself and enable the self checkbox then click Create New Partner
Choose a Party ID for yourself ndash this ID is the one used in your backend system to reference yourself
Select the Party ID Type PontonCertificate in order to test the use of the Ponton Certificate Authority
Then press OK ndash this new partner is now displayed in the left frame
Ponton XP 21 ndash Installation and Configuration Guide 14
Quick-starting the software
You should now request a certificate from the Ponton CA (See section 53) and install it for your partner in the Install Certificate menu
For test purposes it may be helpful to switch off encryption and signing in your Partner configuration in the Processing menu
In any case your partner configurations must be set up so that the encryption and signing options match the settings chosen by the respective partner
Ponton XP 21 ndash Installation and Configuration Guide 15
Quick-starting the software
Define another partner
On a different host follow the steps described above
For test purposes switch off encryption and signing as described above
To test your Messenger configuration Ponton Consulting offers a test server called xptestponton-consultingde This server is pre-configured in your Messenger set-up Before integrating with you business partners you can start out using this test server as your messaging partner to experiment with different messages configuration options etc
Hint To check if your partnerrsquos Messenger is up and running open your browser and go to the URL
httpltyourpartnersdomainnamegtltport-numbergtpontonxpSoapListener
The URL for the test server at Ponton Consulting for example is
httpxptestponton-consultingde8080pontonxpSoapListener
44 Check if Adapters are running To check whether your Adapters are running go to Adapter Monitor in the main menu If no built-in adapter was used before (Test Adapter or Hot Folder Adapter) and no external adapter has connected to the Messenger the Adapter Monitor will indicate No adapter info availablehellip
Ponton XP 21 ndash Installation and Configuration Guide 16
Quick-starting the software
Now start the Test Adaptor and go back to the Adapter Monitor It should indicate Test Adapter ready to receive messageshellip
45 Exchange documents using the Test Adapter Call up the Test Adapter from the main menu of Ponton XP
Ponton XP 21 ndash Installation and Configuration Guide 17
Quick-starting the software
1 Select a sending partner
2 Select a receiving partner
3 Select a document (filename)
4 For test purposes activate the ldquoTest Messagerdquo checkbox
5 Send the document by clicking ldquoSend Messagerdquo
Your Test Adapter will now send the document to the Messenger The document will then be processed by the Messenger according to your settings and filters (encryption archiving etc) and finally the document will be sent to the specified receiver party
46 Check the status of your messages The status of messages can be monitored in the Message Monitor window which you can select from the main menu of Ponton XP
In the Message Monitor click the ldquoSearchrdquo button (located below the filter settings on the left) and check if your message was properly transferred to the receiver This is shown in the ldquoResultrdquo column (located in the message overview in the upper right panel)
Ponton XP 21 ndash Installation and Configuration Guide 18
Quick-starting the software
The following color codes are used to indicate the transferprocessing status
Green checkmark ndash the transfer was successful
Red cross ndash something went wrong (in this case the complete entry is highlighted red)
Question mark ndash the message is still unconfirmed (in this case the entry is highlighted yellow)
To check for details click on the MessageID and look at the log information (in the lower right panel) Each processing step carried out by your Messenger is displayed here As long as no errors occurred the log entries are highlighted green
The right-hand columns show How the message was transferred from your test adapter to the Messenger
Which Messenger filters were applied to the message
How the document was transferred to the receiver
You may experiment with the Test Adapter and the Message Monitor and send other documents Please also ask your test partner to send documents to your Messenger
The results shown in the Message Monitor indicate the processing sequence A Senderrsquos Adapter
M Senderrsquos Messenger
L Senderrsquos Listener
Net NetworkTransmission
L Receiverrsquos Listener
M Receiverrsquos Messenger
A Receiverrsquos Adapter
Ponton XP 21 ndash Installation and Configuration Guide 19
Configuration Options
5 Configuration Options The overall configuration of Ponton XP breaks down into the following sections
Messenger configuration This section focuses on your local setting for the Messenger This includes database connections default filter settings communication protocol selection etc
Partner configuration Per partner several setting are required Partner identification filter activation (which overrides the default setting) communication settings etc
Certificate management For own partners key pairs may be created and certificates requested For certificate authorities as well as for each individual partner certificates can be installed Certificates may be requested for signing and encryption for SSL and for SMIME
Hot folder configuration The Hot Folder Adapter is tightly integrated with the Messenger and can therefore be configured through the same interface It supports the definition of multiple hot folders for sending and receiving documents as well as dedicated folders for business partners
51 Messenger Configuration
Set Up Messenger Database
The Messenger stores log entries in a database By default the log database is pre-configured as an HSQL database HSQL is an open source database implementation written entirely in Java If there is no requirement to store log data in an existing database in your organization you may continue with HSQL
It is also possible to configure the Messenger to use a different database system for example
Oracle (version 815 or higher)
MS SQL Server 70
MySQL (version 32 or higher)
SAPdb (version 73)
The log database is accessed via JDBC connection Configuration scripts to set up the tables for an Oracle database are included with Ponton XP You can refer to these scripts as examples to create scripts for your own database system
If you do not yet have a database system with JDBC support in use you can download the setup files for MySQL from httpwwwmysqlcomdownloadsmysql-323html
Ponton XP 21 ndash Installation and Configuration Guide 20
Configuration Options
To configure the Messenger database the following set-up needs to be performed
1 Go to Configuration rarr Messenger rarr Database
2 Enter the driver class name and the URL for the JDBC connection to your database
3 Enter the user name and password for the connection if required
4 Click Test to test the connection
5 Important Donrsquot click OK unless the connection test was successful
Note The connection to the standard HSQL database supplied with the Messenger requires a ldquotruncatedrdquo URL that does contain the database name (as shown above) If you get a ldquoconnection brokenrdquo message when testing the connection to the standard database (as specified above) try deleting ltDATABASEgt from the URL and testing the connection again
Ponton XP 21 ndash Installation and Configuration Guide 21
Configuration Options
Set Logging Level
To specify the logging level go to Configuration rarr Messenger rarr Logging and select the desired settings for Messenger and JDBC logging
There is a range of settings available
OFF turns logging off completely
hellip
DEBUG logs all the messages output by the system
Note Please keep in mind that the chosen logging level can have an effect on the performance of your system In particular it is advisable to use DEBUG logging only in connection with error tracking and analysis
Ponton XP 21 ndash Installation and Configuration Guide 22
Configuration Options
Set Message Queue Scan Interval
Under Configuration rarr Messenger rarr Message Queues you can specify the interval to scan the (inbound and outbound) message queues
The default setting is 5000 msec To boost the message throughput on a faster system you can increase the scan frequency by setting this interval to a lower (ie shorter) value
Ponton XP 21 ndash Installation and Configuration Guide 23
Configuration Options
Select Messaging Pipeline
The Messenger allows you to configure different filter pipelines The standard configuration comes with two pipelines
1 Messenger 203 compatibility pipeline This allows you to maintain backward compatibility with users of the previous Messenger version
2 Messenger 21 pipeline This is to communicate with partners that are also using Messenger version 21 or any EbXML 20 compliant software
For each pipeline a range of filters can be set in particular
Validation
Signing
Compression
Encryption
The Messenger configuration can be used for standard filters (validation signing compression and encryption) for inbound and outbound messages Custom filters are configured in a dedicated section
Developers may extend the Messenger with additional filters For example one may think of a ldquoBusiness Validatorrdquo that checks message content against business rules Or existing filters could be Instead of ldquosoft signingrdquo a document smart card access may be integrated
Ponton XP 21 ndash Installation and Configuration Guide 24
Configuration Options
Outbound Email Connection
This connection is used for email messages sent by your Messenger to your business partners The following data needs to be configured
From ndash the senderrsquos address to be used for your emails
SMTP ndash the outgoing mail server to be contacted by your Messenger in order to submit the email
Username password ndash must be entered if your mail server requires authentication for outgoing emails in this case enter the settings to be used by the Messenger to log in on the mail server
To test the email connection enter a receiver email address (in the ldquoTordquo field) and click the ldquoTestrdquo button
Ponton XP 21 ndash Installation and Configuration Guide 25
Configuration Options
Inbound Email Connection
You can enable your Messenger to receive email messages by setting up a POPIMAP connection with the following entries
Protocol ndash set to pop3 IMAP (depending on the type of mail server)
Server ndash the hostname or IP address of your mail server
Interval ndash the frequency for accessing the server for mail download
Username password ndash must be properly set to authenticate the Messenger on the mail server
Ponton XP 21 ndash Installation and Configuration Guide 26
Configuration Options
Email Notification
You can use the notification service to send emails to specified addresses whenever certain events occur For example you might want to notify your system administrator whenever certain errors are encountered
To specify an address go to Messenger rarr eMail Notification and click New Receiver Enter the email address for this receiver in the text field and select the events for which this receiver is to be notified You can use CTRL-click to activate multiple entries in the list
Ponton XP 21 ndash Installation and Configuration Guide 27
Configuration Options
Communication Settings
On this screen you can specify URI of each partnerrsquos Messenger Service ndash for example
httppartnerserver8080pontonxpSoapListener where partne server refers to the hostname or IP address of the machine the Messenger is installed on
r
Acknowledgment Requests ndash you can use this setting to determine whether outbound messages to this partner require acknowledgements To differentiate per message you can deactivate this checkbox and use the TransmissionMode attribute in the BackendEnvelope In the context of ebXML 20 transmissions you can additionally request signed acknowledgements for increased security
Retransmission Handling ndash you can use this setting to specify the number of retransmission attempts and the interval (in seconds) between attempts If a message cannot be transmitted successfully in the specified number of retries the Messenger will give up and mark the message as ldquofailedrdquo
Ponton XP 21 ndash Installation and Configuration Guide 28
Configuration Options
Configure Archiving Filter
The archiving filter stores the following information in a dedicated directory
Backend Envelope
ebXML Envelope
Payload ndash this is the actual business document
Certificate
Signature
Each part is stored in a separate file
The Archive Folder setting can be used to indicate the location of the archiving folder This can be expressed as
An absolute path to the required folder
A relative path beginning with $CONTEXT ndash this placeholder refers to the folder [installation root]xmlpipewebroot
The Maximum Age setting specifies how long the files will be archived ndash expressed in days
Ponton XP 21 ndash Installation and Configuration Guide 29
Configuration Options
52 Partner Configuration For each partner the following data may be configured
Partner identification (internal and external)
Communication Settings
URI of the partnerrsquos Messenger
Create Delete a Partner Entry
To create a new partner entry specify an identifier for the partner (this is the local identifier for your configuration) and indicate whether this partner entry is for
An internal partner (with the ldquoselfrdquo option activated) ndash this might be a department of your organization
An external partner ndash these entries refer to your business partners for example customers suppliers carriers warehouse operators etc
A message is always sent by your Messenger from an internal to an external partner and received from an external partner to an internal one
Internal partners are distinguished because for encryption and signing the certificates of each internal partner will be used on a per-partner basis
For further information please check the Ponton XP Architecture Overview
Ponton XP 21 ndash Installation and Configuration Guide 30
Configuration Options
Set the Partner Identification
Local Partner Name This identifier is valid within you local configuration ie you may choose any value as long as it is unique among all local partner names
Disable Although configured as a partner individual partners may be disabled In this case the Messenger rejects any message received from this partner
PartyID PartyID Type PartyIDs are used to identify partners externally To avoid name clashes and duplication well-known naming schemas exist to identify partners eg DUNS codes VAT numbers IANA codes etc For this reason trading partners should agree on an minimal set of identification types (like DUNS numbers and IANA codes) that is to be used by all partners
More than one PartyID can be defined per partner The limit is given by the number of PartyID types These are configured separately please check Section ldquoAdvanced Configurationrdquo)
Hint Please also check the Ponton XP Architecture Overview document for a detailed explanation of ebXML codes and partner identification
Ponton XP 21 ndash Installation and Configuration Guide 31
Configuration Options
Partner Communication Configuration
For each partner the following configuration options may be set URI of Partnerrsquos Messenger Service ndash enter the address of the partnerrsquos
Messenger for example httppartnerserver8080pontonxpSoapListener
Request Acknowledge ndash every message to this partner needs to be acknowledged
Request Signed Acknowledge ndash to specify signing of acknowledgements received from this partner
Retries ndash the number of retries in case of unsuccessful message transmission
Retry Interval ndash the number of seconds to wait until the next retry
Ponton XP 21 ndash Installation and Configuration Guide 32
Configuration Options
Processing Configuration
The following options can be set
Default Adapter ndash enter the name of the adapter to be used by default
Processing Pipeline ndash specify the processing pipeline to be used for this profile
Schema Sets ndash choose which Schema set(s) are to be supported
Use XML Signature ndash indicate whether to use XML Signature
Use default message settings (specified under Configuration rarr Messenger rarr Processing) or define a specific processing filter for this partner
Ponton XP 21 ndash Installation and Configuration Guide 33
Configuration Options
Install Partner Certificates
There are different ways of distributing certificates to business partners One is to send the certificate per email and have the partner cut amp paste the certificate code into the partner configuration
Note It is important to cut amp paste the complete certificate code including the lines ldquo----- Begin Certificate -----rdquo and ldquo----- End Certificate -----rdquo
Important A partner certificate will only be accepted if the certificate of the issuing CA (certificate authority) was pre-installed Otherwise the trust relationship between the partner and the CA cannot be traced
One may select to install a general certificate or a SMIME certificate Please determine what kind of certificate you received from your partner before installing it
Ponton XP 21 ndash Installation and Configuration Guide 34
Configuration Options
53 Certificate Management Certificate management comprises the following initial steps
Configure your default CA This is usually properly pre-configured in the installation files
Install the root certificate of the default CA This needs to be installed manually if 3rd-party CAs are to be used
Request a certificate for your own Messenger This includes creating a publicprivate key pair and sending a certificate request to the CA
Optionally you can request and install a SMIME certificate to be used for SMIME based communication via email
Default CA Configuration
On this screen you specify the settings for receiving certificates from your default certificate authority (CA) CA email address ndash enter the email address to be used to request a certificate
from your (default) CA
Ponton XP 21 ndash Installation and Configuration Guide 35
Configuration Options
CA download URL ndash enter the URL at your CA from which to download certificates for your Messenger installation Please note that you can only install certificates for partners you have already defined in your partner configuration
Download interval ndash specify the interval to wait between automatic certificate downloads
To download the available certificates immediately click the Download button
Request and Install Your Own Certificate
To request a certificate from your (default) CA go to Configuration rarr Certificates rarr Request Certificate Please enter data for all the fields on this form If any entries are missing you will get an error message
After completing the form click OK to send the certificate request to your CA You will get a message indicating that the request has been sent
Ponton XP 21 ndash Installation and Configuration Guide 36
Configuration Options
Once you receive the requested certificate from your CA you can install it in your own partner configuration (ie the internal partner you will use to sendreceive messages) Go to Configuration rarr Partners rarr ltYour Partner Namegt rarr Install Certificate and paste the certificate text including the hellip into the text field
Then enter the password you used when you requested the certificate and click OK to complete the installation of the certificate You will see the result above the text field containing the certificate
Ponton XP 21 ndash Installation and Configuration Guide 37
Configuration Options
Install Partner Certificates
Install a certificate issued by the CA for the requesting partner This was already described in the Partner Configuration section for normal standard certificates
Note In case of SMIME certificates an additional password may be needed to allow the Messenger to access the certificate in the local certificate store
Install a CA Certificate
To install the certificate for your CA go to Configuration rarr Certificates rarr CA rarr Install Certificate and paste your CArsquos certificate into the text field This is the certificate that authorizes the CA as a signing authority for other certificates
Ponton XP 21 ndash Installation and Configuration Guide 38
Configuration Options
54 Configure the Hot Folder Adapter
General Configuration
Address Port ndash the Hot Folder Adapter (HFA) is addressed as a separate process that communicates with the Messenger via HTTP Therefore the hostname and port number need to be set up for the Messenger If the HFA is co-located with the Messenger on the same machine use ldquolocalhostrdquo for the IP address In this case the HFA does not run as a separate Java process but will be hosted on the same Tomcat server
Path ndash the HFA needs to know the Adapter communication path of the Messenger By default it is pontonxpAdapterService
Console File Log Level ndash the HFA provides log output to the console and to log files Both can be configured regarding the level of detail The console log is only useful if the HFA is running as a standalone application so you can safely leave it disabled in the default configuration
Ponton XP 21 ndash Installation and Configuration Guide 39
Configuration Options
Create Delete a HFA
Several HFAs may be created Each registers under a different ID at the Messenger HFAs may be created for individual partners If this is the case messages exchanged with the rest of the partners will be stored with the default HFA
Configure a HFA
Each HFA requires several directories to be defined
Inbox ndash a document will be stored in the Inbox whenever it was received from a partner
Outbox ndash documents to be sent to the business partner are dropped here The HFA grabs them in a defined frequency
Failed ndash if a document could not be sent to a partner and all retries failed it will be stored in this folder
Work ndash if a document transfer is in progress or all attempts to send the document have not yet been tried the document will remain here After a final failure it will be transferred to the Failed folder
Ponton XP 21 ndash Installation and Configuration Guide 40
Configuration Options
The following settings are also supported
Port ndash the port to be used by the HFA (optional)
Receiver format ndash standard format is XML
Save Backend envelope ndash the Backend envelope is retained for incoming messages
Support attachments ndash the HFA will save any files attached to an incoming message to the selected inbox folder
Scan Interval ndash the interval to wait (in seconds) between checking the outbox
Number of receiving threads ndash specifies the maximum number of receiving threads the adapter can process
Use partner subfolders ndash if this is set this HFA will create inbox and outbox folders for all remote partners Inbound messages will automatically be sorted into the according folder depending on the sender Outbound messages need to be placed into the receiving partnerrsquos outbox folder The backend message is not used in this mode and is ignored if it exists
Use Acknowledgement for ERP ndash with this option activated the ERP application receives an acknowledgement from the receiving Messenger on the partnerrsquos side This acknowledgement will be provided via the specified Inbox
Ponton XP 21 ndash Installation and Configuration Guide 41
Configuration Options
55 Ponton XE ndash The XML Editor Ponton XE is a separate Ponton product It is packaged with Ponton XP for free use only by papiNet users It allows to enter papiNet document data directly via a graphical user interface and to send the document via the hot folder adapter to the business partners
Ponton XE is fully documented in a separate manual Hence only the Messaging Plug-in will be described here
You can experiment with the XML Editor and check out all the features and options without using the Ponton XP connection To start with you may want to begin with the following steps
Create a new papiNet Purchase Order
Fill out the forms and use optional XML Elements by right-clicking the Plus-icons in the layout tree
Create an HTML file by choosing Document Export to HTML from the menu
Save the document to an XML file and re-load it again
Ponton XP 21 ndash Installation and Configuration Guide 42
Configuration Options
Interface between Ponton XE and Ponton XP
The two software applications communicate via hot folders as illustrated in the following figure
Message Plug-in
Outbox Inbox AckInboxImport
Ponton XP Ponton XE
XMLXML XMLXML XMLXML XMLXML
Hot Folder Adapter
The XML Editor is connected to the Messenger via the Hot Folder Adapter All these folder settings need to be synchronized for a proper data exchange
Configuration of the Messaging Plug-in
The Messaging Plug-in can be flexibly installed and de-installed with the remaining part of Ponton XE If the file messengerjar is removed from the plugins directory it will automatically disappear from the Ponton XE menu bar as soon as the software is started again
Before transferring messages out of Ponton XE you need to preset the following information
Default values for the sending and receiving partners ndash these values may be overridden for an individual transfer
Folder locations of the Hot Folder Adapter ndash the Inbox Outbox and AckInbox need to be set for document exchange with Ponton XP
Default setting for Test Message flag ndash this can be overridden for the actual document transfer
Import Directory ndash Ponton XE will automatically scan the Inbox folder and import received documents to the given folder for local processing
Ponton XP 21 ndash Installation and Configuration Guide 43
Configuration Options
Open Messages after Import ndash if this option is activated messages received from the Inbox will automatically be displayed in Ponton XE
Delete message in Inbox ndash to always remove received messages from the HFA Inbox this option needs to be activated otherwise a copy will remain in the Inbox folder
Ponton XP 21 ndash Installation and Configuration Guide 44
Configuration Options
Ponton XP 21 ndash Installation and Configuration Guide 45
Configuration Options
Using Ponton XE
After setting the configuration and creating a document you can transfer the document to your business partner This is done by means of the following steps
Choose the menu item ldquoMessenger rarr Transfer rarr Send Messagerdquo
Select a sending and receiving partner
Override the settings for the HFA folders
Tick the checkbox to qualify this message as a test message
After transferring the document to the Messenger Ponton XE will wait for a response This is recognised as an acknowledge file which is dropped into the AckInbox folder of the HFA As soon as this has been received a successful transfer in indicated
You may check with the Message Monitor to determine how the document was forwarded by the Messenger to the receiver or whether any errors occurred
Ponton XP 21 ndash Installation and Configuration Guide 46
Configuration Options
56 Display Schema Configuration The schema sets to be supported for each partner are defined in the partner configuration The standard sets available with the installation are shown under Configuration rarr Schemata
Ponton XP 21 ndash Installation and Configuration Guide 47
Configuration Options
57 User Administration Two types of users are distinguished
Administrators ndash these users have full access to the Messengerrsquos configuration interface
Operators ndash these users only have access to the Adapter Monitor the Message Monitor and the Test Adapter The other options in the Messenger menu are not available
Please note the following points in connection with the Messengerrsquos standard user administration
This is a very simple user administration based on the Tomcat implementation If you want to integrate the Messenger with another user administration such as LDAP please contact Ponton Consulting for support
A userrsquos access rights (administratoroperator) are defined when the user account is created ndash they cannot be changed subsequently
User accounts can only be created or deleted by administrators
Ponton XP 21 ndash Installation and Configuration Guide 48
Advanced Configuration
6 Advanced Configuration
61 XML Schema Configuration Important The Messenger distinguishes between available schema set and activated schema sets Just inserting entries in the schema configuration as described in this section does not activate the schema sets or the corresponding schemas for use by the Messenger In order to make use of the schemas in a schema set you have to activate the schema set in the relevant partner configuration To view or modify the activated schema sets in a partner configuration go to
Configuration rarr Partners rarr ltpartner namegt rarr Processing
and activatedeactivate the relevant checkboxes
In the Messengerrsquos configuration interface you can activate and deactivate schema sets for specific partner configurations It is not possible however to modify the contents and specifications of the individual schema sets Any necessary changes have to be made in the configuration file
[installation root]xmlpipewebrootWEB-INFconfigschemataxml
The configuration entries in this file are structured as follows
ltSchemaSet Name=papinet21gt
ltSchemaName=httpwwwpapinetorgdataAvailabilityV2R10xsd MessageType=Availability MessageVersion=V2R10gt
ltNamespacegtltNamespacegt
ltDisplayNamegtAvailability 21ltDisplayNamegt
ltSchemaFilegtAvailabilityV2R10xsdltSchemaFilegt
ltXSLFilegtltXSLFilegt
ltSchemagt
ltSchema Name=yourSchema MessageType=yourMsgType MessageVersion=yourMsgVersgt
ltNamespacegtyourNamespaceltNamespacegt
ltDisplayNamegtYour Display NameltDisplayNamegt
ltSchemaFilegtyourSchemaFileltSchemaFilegt
ltXSLFilegtyourStylesheetltXSLFilegt
ltSchemagt
hellip
ltSchemaFoldergtpapinet210ltSchemaFoldergt
ltXSLFoldergtpapinet210ltXSLFoldergt
ltSchemaSetgt
Ponton XP 21 ndash Installation and Configuration Guide 49
Advanced Configuration
You can add a schema to an existing schema set in this file by inserting a ltSchemagt block (just copy and paste one of the existing blocks and modify the configuration as required) Please ensure that your new schema specification includes correct settings for the attributes of the Schema element
Name= This attribute corresponds with the ebXML Schema Location of incoming messages When an ebXML message is received the Messenger looks for a schema configuration where the Schema Name attribute matches the Schema Location specified in the ebXML envelope
MessageType= This attribute corresponds with the attribute MessageMetaDataDocumentInfoMessageName in the backend envelope of outgoing messages
MessageVersion= This attribute corresponds with the element MessageMe aDataDocumentInfoDTDVersionNumber in the backend envelope of outgoing messages
t
Note The specification of MessageType and MessageVersion must be used together for outgoing messages as they are combined to form an identifier for the message schema
You also have the option of adding a new schema set with your own schema definitions to the schema configuration In this case you would insert a ltSchemaSetgt block with subordinate ltSchemagt blocks Your added schema set will automatically be inserted in the list of available schema sets on the Messenger configuration pages
62 Advanced Database Configuration Important Since the Messenger database is used for essential message processing and tracking purposes you should not experiment with the database configuration on a ldquoliverdquo system For test and debugging purposes you are advised to set up a trial system
Installation with other Databases
This section describes the main steps required to install a different database system on the Messenger for example an Oracle database
1 Install database driver Copy the database driver to
[installation root]xmlpipewebrootWEB-INFlib
Note Please note that only drivers with the extension jar are loaded by the Tomcat servlet engine If the JDBC driver you want to use is a zip file you will have to rename the file to jar The JDBC driver for Oracle 9i is the file ojdbc14jar
Ponton XP 21 ndash Installation and Configuration Guide 50
Advanced Configuration
2 Create database and tables Ponton XP is supplied with SQL scripts for HSQL and for Oracle that can be used to create the tables for the Messenger database If you are using another database you may need to modify these scripts to work correctly with your database system
The SQL scripts are located in the subfolders under [installation root]sql
Once the database tables are in place you will also need to carry out the SQL script that inserts the log messages into the database ie
[installation root]sqlinsert_log_messagessql
3 Set up database connection The configuration of database connections is described in the section Set Up Messenger Database beginning on page 20 To connect with a different database choose ldquootherrdquo from the list of database drivers and enter the configuration for your database on the next page
The entries for the Oracle 9i JDBC driver are
Driver oraclejdbcdriverOracleDriver
URL jdbcoraclethinlthostgtltportgtltdatabasegt
63 Advanced Message Monitor Configuration In the configuration directory ldquoxmlpipewebrootWEB-INFconfigrdquo there is a file messagemonitorxml which can be used to change the selection and ordering of the Message overview window in the Message Monitor The default setting is displayed in the following picture
Ponton XP 21 ndash Installation and Configuration Guide 51
Advanced Configuration
Here the number of line items per page can be set If a high resolution screen is used (beyond 1024 x 768 pixel) one may increase the number of lines
Further a mapping table defines which database column is to be displayed in which monitor column The number of columns again depends on the screen resolution
Finally if main memory size allows caching of XSL stylesheet definitions helps accelerating processing speed for XSL transformations
64 Tomcat SSL Installation
Generate a key
One minor problem with Tomcat or any other webserver that uses the internal Java symmetric key architecture is that you are not allowed to export or import private keys For this reason it is not possible to use the existing key-pair installed with the Messenger software You will have to generate a new key-pair and send a certificate request to the Ponton certificate authority (or other certification authority) to receive a valid certificate
To generate a new key-pair open a command prompt and go to the tomcat-4118 directory The keystore used for a Tomcat SSL installation is located in the Tomcat root directory and is called ssl-keystore The Tomcat installation already contains a certificate for lsquolocalhostrsquo so you can test the HTTPS access with a web browser
Before you can create a new Tomcat certificate you will have to delete the installed certificate Note that the default password for the Tomcat keystore is ldquochangeitrdquo keytool -delete -alias tomcat ndashkeystore ssl-keystore
Now use the following command to create a new key-pair Please note that you need to specify the Listener hostname (eg listenermyserverde) when the keytool asks for lsquofirst and last namersquo keytool -genkey -alias tomcat -keyalg RSA ndashkeystore ssl-keystore
After generating the new key the next step is to export a certificate request with the following command keytool ndashcertreq ndashalias tomcat ndashfile myservercsr ndashkeystore ssl-keystore
This will generate the file myservercsr in the current directory Send this file via email to xp-certponton-consultingde It will be signed and sent back to you The reply will contain a file with the certificate
Finally you have to re-import this signed certificate into the Tomcat SSL keystore Please note that the import may take some time keytool ndashimport ndashalias tomcat ndashfile myservercer ndashkeystore ssl-keystore
If you have any problems starting the keytool make sure you have the javahomebin directory specified in your PATH environment variable Of course you can also change to the javahomebin directory and start the keytool there
Ponton XP 21 ndash Installation and Configuration Guide 52
Advanced Configuration
Update Tomcat configuration
SSL is already activated in the Tomcat configuration packaged in the distribution However you might want to change the specified SSL port (by default the SSL port is set to 8443) You can change the port by editing the file
[tomcat installation]confserverconf
The following section configures the SSL parameters
lt-- Define a SSL Coyote HTTP11 Connector on port 8443 --gt
ltConnector className=orgapachecoyotetomcat4CoyoteConnector
port=8443
minProcessors=5
maxProcessors=75
enableLookups=true
acceptCount=100
debug=0
scheme=https
secure=true
useURIValidationHack=false
disableUploadTimeout=truegt
ltFactory className=orgapachecoyotetomcat4CoyoteServerSocketFactory
clientAuth=false
keystoreFile=ssl-keystore
protocol=TLS gt
ltConnectorgt
Verify setup
To verify if everything is working correctly start the Tomcat webserver as usual and connect to the webserver with your browser
Go to httpsyourserveraddress ndash initially you might get a warning window if the root certificate authority is not known to the browser If you continue by clicking OK you should see the usual Ponton XP start page
If everything comes up correctly you can use SSL to receive messages with the Ponton XP Software
Ponton XP 21 ndash Installation and Configuration Guide 53
Advanced Configuration
65 Distributed Installation If the Messenger is installed on a server that cannot be reached from the Internet you will need to install the Listener as well The purpose of the Listener is to pick up incoming connections and forward them to the Messenger (across the firewall) The firewall rules must be set up to allow this connection between the Listener and the Messenger When a message is received the Listener notifies the Messenger and the Messenger then picks up the message
You also have the option of subsequently installing the Listener as a service under Windows ndash this service can then be configured to start automatically when the system starts up
Note If you are going to run the Messenger in combination with the Listener your partners will have to enter the URI of your Listener in their configurations (under Configuration rarr Partners rarr ltpartner namegt rarr URI of Partners Messenger Service)
Listener Installation and Configuration
The Listener is installed by running the installer program (eg PontonXP-21-setuplistener-windowsexe) on the relevant system You are asked to specify an installation folder and also have the option of creating a desktop or menu shortcut Thatrsquos it
-
The settings for the Listener are contained in the configuration file listenerproperties which is located in the folder [Listener root folder]config To modify these settings you will have to edit the configuration file directly Access via the Messengerrsquos configuration interface is not possible
The file contains the following settings
HttpPort = Port number (for external HTTP connections)
HttpsPort = Port number (for external HTTPS connections)
LogLevel = DEBUG | INFO | WARN | ERROR | FATAL | OFF
The following settings specify the host and port of the Messenger for forwarding connections (HTTPHTTPS) The forwarding connection mode is activated by entering the relevant host and port addresses and removing the hash marks (used to mark ldquocomment linesrdquo in Java property files)
HttpServer = server1port1 (HTTP forwarding connection to the Messenger)
HttpsServer = server1port1 (HTTPS forwarding connection to the Messenger)
Ponton XP 21 ndash Installation and Configuration Guide 54
Advanced Configuration
The following settings specify the Listenerrsquos port for callback connections (HTTPHTTPS) with the Messenger As with the forwarding connection the callback connection mode is activated by entering the relevant port addresses and removing the hash marks (Obviously it makes no sense to have both connections activated at the same time)
HttpServicePort = Port number (for internal HTTP connections to the Listener)
HttpsServicePort = Port number (for internal HTTPS connections to the Listener)
Starting the Listener
To start the Listener open a command prompt and start the class
depontonconsultingxmlpipeListener
with the classpath
-cp libcommons-logging-api-103jarlibcommonutilsjarlibxp_listenerjarconfig
You can also use the installed batch file [Listener root folder]startListenerbat
Callback Mode
Details of the communication flow
When the Messenger starts up it searches for the Listener
Note The Listener should start up first so that it can be found by the Messenger
If the search is successful a permanent connection is established between the Messenger and the Listener The Messenger uses the following settings in the configuration to establish the connection with the Listener
Configuration rarr Messenger rarr Listener rarr HTTP[S] rarr Hostname
Configuration rarr Messenger rarr Listener rarr HTTP[S] rarr Internal Listener Port
Ponton XP 21 ndash Installation and Configuration Guide 55
Advanced Configuration
When the Listener receives an incoming message (or rather an HTTPHTTPS request) it informs the Messenger ndash by way of the permanent connection ndash about the arrival of the new request indicating which port the Messenger can use to pick up the connection
Note This port number is randomly selected by the Listener and cannot be configured
The Messenger picks up the connection on the Listenerrsquos specified port and redirects it to its own local port for further processing
This local port corresponds to the setting for
Configuration rarr Messenger rarr Listener rarr HTTP[S] rarr Internal Messenger Port
in the configuration GUI
Forwarding Mode
Details of the communication flow
In forwarding mode no permanent connection is established between the Messenger and the Listener
When the Listener receives an incoming HTTPHTTPS request it simply forwards the request to the Messenger using the address specified in listenerproperties (HttpServerHttpsServer)
Note To allow this forwarding connection the firewall has to be configured so that the Listener is permitted to access the Messenger on the specified port(s)
Ponton XP 21 ndash Installation and Configuration Guide 56
Advanced Configuration
66 Port Configuration The Messengerrsquos standard configuration uses port 8080 for HTTP connections and port 8443 for secure (HTTPS) connections This section describes how to set up the messenger to use a non-standard port configuration This involves making manual changes to several configuration files in particular the Tomcat serverxml and the Messengerrsquos adapter configuration files
Tomcat Settings
The port setting for the Messengerrsquos HTTP and HTTPS connections are specified in the Tomcat configuration file
[installation root]tomcat-xxxconfserverxml
This file defines the connections (Connectors) for the Messenger as follows
lt-- Define a non-SSL Coyote HTTP11 Connector on port 8080 --gt
ltConnector className=orgapachecoyotetomcat4CoyoteConnector
port=yourMessengerPort minProcessors=5 maxProcessors=75
enableLookups=true redirectPort=yourRed rectPort i acceptCount=100 debug=0 connectionTimeout=20000
useURIValidationHack=false disableUploadTimeout=true gt
lt-- Define a SSL Coyote HTTP11 Connector on port 8443 --gt
ltConnector className=orgapachecoyotetomcat4CoyoteConnector
port=yourSSLPort minProcessors=5 maxProcessors=75
enableLookups=true
acceptCount=100 debug=0 scheme=https secure=true
useURIValidationHack=false disableUploadTimeout=truegt
ltFactory className=orgapachecoyotetomcat4CoyoteServerSocketFactory
clientAuth=false keystoreFile=ssl-keystore protocol=TLS gt
ltConnectorgt
The standard settings for the Messenger ports are
HTTP 8080
SSL 8443
To modify your connections you will need to enter the relevant port numbers indicated above as yourMessengerPort yourRedirectPort (which normally points to the SSL connection) and yourSSLPort
Ponton XP 21 ndash Installation and Configuration Guide 57
Advanced Configuration
Adapter Settings
The settings for the Messenger adapters are contained in the relevant XML files under
[installation root]xmlpipewebrootWEB-INFconfig
In particular a standard installation includes the files testadap erxml and hotfolderxml Each of these configuration files contains a block specifying the connection to the messenger
t
ltMessengergt
ltAddressgtyourMessengerHostltAddressgt
ltPortNumbergtyourMessengerPortltPortNumbergt
ltPathgthellipltPathgt
ltMessengergt
If you have configured the Messenger to run on a different port (see above) you will need to enter the relevant port number here
Ponton XP 21 ndash Installation and Configuration Guide 58
Installing Ponton XP 21
3 Installing Ponton XP 21
31 Minimum System Requirements
Hardware
Disk space 100 MB
Memory space 256 MB
Processor Pentium III 500 MHz
Depending on the number of XML Schema files and the corresponding XSL stylesheets that are pre-loaded by your Messenger you should extend your main memory in the following way
5-8 Schemas 512 MB
8-20 Schemas 1024 MB
This avoids unnecessary swapping overhead
Operating systems
Windows NT4 Service Pack 6 (Workstation or Server)
Windows 2000 Service Pack 2 (Workstation or Server)
Windows XP Home or Professional Service Pack 1
In general any platform supporting Java Runtime Environment 14
Databases
HSQL ndash an open source database bundled with the distributed configuration of Ponton XP
Oracle 815 and higher
SAP DB 73 and up
MS SQL Server 2000
MySQL
Or any other database with support for JDBC 2
Ponton XP 21 ndash Installation and Configuration Guide 9
Installing Ponton XP 21
32 Installation Procedure The software is installed using a self-extracting executable which guides the user through the installation process If only standard options are chosen the whole installation should not take more than 10 minutes
Start the installation by double-clicking the PontonXP-21 setup file and go through the following six installation screens
Introduction A short explanation of the product features and version number This screen will contain license terms as well No user choice is needed simply click the Next button
Choose Install Folder Select the installation root folder either by typing it in or by choosing it from the directory and then click the Next button
Choose Shortcut Folder Determine how the startup icons and shortcuts will be stored ndash in a new or existing Program Group in the Start Menu on the Desktop or in the Quick Launch bar Select the appropriate radio button and then click the Next button
Pre-Installation Summary This screen lists the product name and repeats the choices made above It also compares the disk space available to the space needed for the installation
Installing Gives a progress bar to indicate how far the actual installation has proceeded
Ponton XP 21 ndash Installation and Configuration Guide 10
Installing Ponton XP 21
Install Complete The installation is now complete After pressing the Done button the user can skip to section 4 to start testing
33 Folders and Files For the following part of this documentation we assume that you have installed Ponton XP in the directory
Cpontonxp
or in a UNIX environment on
pontonxp
This will be referred to as the installation root
The created directories will look like this
Ponton XP 21 ndash Installation and Configuration Guide 11
Quick-starting the software
4 Quick-starting the software You can start the Messenger either via the Windows Start menu or by executing startupbat in the installation root directory If you have not started the Messenger from a command shell but via the Windows interface this will open an output window
Please wait until the webserver has fully initialized all the software components When the initialization is finished the following text should be shown near the bottom of the output window Messenger 21 is initialized URL of Messenger Administration Tool
If any errors occur during startup this will be indicated in the output window and logged in the file
[installation root]xmlpipewebrootWEB-INFlogbootlog
Please note that the Messengerrsquos processing log file
[installation root]xmlpipewebrootWEB-INFlogMessengerlog
does not come into play until the Messenger has initialized successfully
41 Logging in Now the Messenger is ready for use open your web browser and enter the URL httplocalhost8080pontonxp
This will bring up the login screen of the webserver The first thing to do is to log in to the administration front-end of the software The defaults set per installation are
User xpadmin
Password xppass
Please make sure you change these values in the Admin tool as soon as possible
In addition to the administrative user xpadmin a default user without administration privileges is installed
User xpuser
Password xppass
Please note If you log in without administration privileges you will not see the configuration menu in the Ponton XP window
Ponton XP 21 ndash Installation and Configuration Guide 12
Quick-starting the software
Note Click on the folder icons in the menu panel to open and close the folders Click on the page labels to display the corresponding pages
42 Stopping the Messenger If you started the software from the start menu (or if it was installed as a Windows service) you can stop the Messenger by selecting Stop Ponton XP from the start menu Alternatively you can execute the shutdownbat in the installation root directory
If you started the Messenger from a command shell you may also enter CTRL-C to stop the process
43 Minimal Configuration Hint If you want to set up an initial test installation it is often easier to install two Messengers on separate PCs within your local environment to avoid firewall restrictions If you want to immediately test with an external partner please ensure with your technical administration staff that your firewall is configured to allow the necessary connections
The following steps describe a minimal configuration for test purposes
Ponton XP 21 ndash Installation and Configuration Guide 13
Quick-starting the software
Define yourself as a partner
Open the Configuration menu in the left frame and click on Partners to open the screen Configuration rarr Partners
Type in a local ID for yourself and enable the self checkbox then click Create New Partner
Choose a Party ID for yourself ndash this ID is the one used in your backend system to reference yourself
Select the Party ID Type PontonCertificate in order to test the use of the Ponton Certificate Authority
Then press OK ndash this new partner is now displayed in the left frame
Ponton XP 21 ndash Installation and Configuration Guide 14
Quick-starting the software
You should now request a certificate from the Ponton CA (See section 53) and install it for your partner in the Install Certificate menu
For test purposes it may be helpful to switch off encryption and signing in your Partner configuration in the Processing menu
In any case your partner configurations must be set up so that the encryption and signing options match the settings chosen by the respective partner
Ponton XP 21 ndash Installation and Configuration Guide 15
Quick-starting the software
Define another partner
On a different host follow the steps described above
For test purposes switch off encryption and signing as described above
To test your Messenger configuration Ponton Consulting offers a test server called xptestponton-consultingde This server is pre-configured in your Messenger set-up Before integrating with you business partners you can start out using this test server as your messaging partner to experiment with different messages configuration options etc
Hint To check if your partnerrsquos Messenger is up and running open your browser and go to the URL
httpltyourpartnersdomainnamegtltport-numbergtpontonxpSoapListener
The URL for the test server at Ponton Consulting for example is
httpxptestponton-consultingde8080pontonxpSoapListener
44 Check if Adapters are running To check whether your Adapters are running go to Adapter Monitor in the main menu If no built-in adapter was used before (Test Adapter or Hot Folder Adapter) and no external adapter has connected to the Messenger the Adapter Monitor will indicate No adapter info availablehellip
Ponton XP 21 ndash Installation and Configuration Guide 16
Quick-starting the software
Now start the Test Adaptor and go back to the Adapter Monitor It should indicate Test Adapter ready to receive messageshellip
45 Exchange documents using the Test Adapter Call up the Test Adapter from the main menu of Ponton XP
Ponton XP 21 ndash Installation and Configuration Guide 17
Quick-starting the software
1 Select a sending partner
2 Select a receiving partner
3 Select a document (filename)
4 For test purposes activate the ldquoTest Messagerdquo checkbox
5 Send the document by clicking ldquoSend Messagerdquo
Your Test Adapter will now send the document to the Messenger The document will then be processed by the Messenger according to your settings and filters (encryption archiving etc) and finally the document will be sent to the specified receiver party
46 Check the status of your messages The status of messages can be monitored in the Message Monitor window which you can select from the main menu of Ponton XP
In the Message Monitor click the ldquoSearchrdquo button (located below the filter settings on the left) and check if your message was properly transferred to the receiver This is shown in the ldquoResultrdquo column (located in the message overview in the upper right panel)
Ponton XP 21 ndash Installation and Configuration Guide 18
Quick-starting the software
The following color codes are used to indicate the transferprocessing status
Green checkmark ndash the transfer was successful
Red cross ndash something went wrong (in this case the complete entry is highlighted red)
Question mark ndash the message is still unconfirmed (in this case the entry is highlighted yellow)
To check for details click on the MessageID and look at the log information (in the lower right panel) Each processing step carried out by your Messenger is displayed here As long as no errors occurred the log entries are highlighted green
The right-hand columns show How the message was transferred from your test adapter to the Messenger
Which Messenger filters were applied to the message
How the document was transferred to the receiver
You may experiment with the Test Adapter and the Message Monitor and send other documents Please also ask your test partner to send documents to your Messenger
The results shown in the Message Monitor indicate the processing sequence A Senderrsquos Adapter
M Senderrsquos Messenger
L Senderrsquos Listener
Net NetworkTransmission
L Receiverrsquos Listener
M Receiverrsquos Messenger
A Receiverrsquos Adapter
Ponton XP 21 ndash Installation and Configuration Guide 19
Configuration Options
5 Configuration Options The overall configuration of Ponton XP breaks down into the following sections
Messenger configuration This section focuses on your local setting for the Messenger This includes database connections default filter settings communication protocol selection etc
Partner configuration Per partner several setting are required Partner identification filter activation (which overrides the default setting) communication settings etc
Certificate management For own partners key pairs may be created and certificates requested For certificate authorities as well as for each individual partner certificates can be installed Certificates may be requested for signing and encryption for SSL and for SMIME
Hot folder configuration The Hot Folder Adapter is tightly integrated with the Messenger and can therefore be configured through the same interface It supports the definition of multiple hot folders for sending and receiving documents as well as dedicated folders for business partners
51 Messenger Configuration
Set Up Messenger Database
The Messenger stores log entries in a database By default the log database is pre-configured as an HSQL database HSQL is an open source database implementation written entirely in Java If there is no requirement to store log data in an existing database in your organization you may continue with HSQL
It is also possible to configure the Messenger to use a different database system for example
Oracle (version 815 or higher)
MS SQL Server 70
MySQL (version 32 or higher)
SAPdb (version 73)
The log database is accessed via JDBC connection Configuration scripts to set up the tables for an Oracle database are included with Ponton XP You can refer to these scripts as examples to create scripts for your own database system
If you do not yet have a database system with JDBC support in use you can download the setup files for MySQL from httpwwwmysqlcomdownloadsmysql-323html
Ponton XP 21 ndash Installation and Configuration Guide 20
Configuration Options
To configure the Messenger database the following set-up needs to be performed
1 Go to Configuration rarr Messenger rarr Database
2 Enter the driver class name and the URL for the JDBC connection to your database
3 Enter the user name and password for the connection if required
4 Click Test to test the connection
5 Important Donrsquot click OK unless the connection test was successful
Note The connection to the standard HSQL database supplied with the Messenger requires a ldquotruncatedrdquo URL that does contain the database name (as shown above) If you get a ldquoconnection brokenrdquo message when testing the connection to the standard database (as specified above) try deleting ltDATABASEgt from the URL and testing the connection again
Ponton XP 21 ndash Installation and Configuration Guide 21
Configuration Options
Set Logging Level
To specify the logging level go to Configuration rarr Messenger rarr Logging and select the desired settings for Messenger and JDBC logging
There is a range of settings available
OFF turns logging off completely
hellip
DEBUG logs all the messages output by the system
Note Please keep in mind that the chosen logging level can have an effect on the performance of your system In particular it is advisable to use DEBUG logging only in connection with error tracking and analysis
Ponton XP 21 ndash Installation and Configuration Guide 22
Configuration Options
Set Message Queue Scan Interval
Under Configuration rarr Messenger rarr Message Queues you can specify the interval to scan the (inbound and outbound) message queues
The default setting is 5000 msec To boost the message throughput on a faster system you can increase the scan frequency by setting this interval to a lower (ie shorter) value
Ponton XP 21 ndash Installation and Configuration Guide 23
Configuration Options
Select Messaging Pipeline
The Messenger allows you to configure different filter pipelines The standard configuration comes with two pipelines
1 Messenger 203 compatibility pipeline This allows you to maintain backward compatibility with users of the previous Messenger version
2 Messenger 21 pipeline This is to communicate with partners that are also using Messenger version 21 or any EbXML 20 compliant software
For each pipeline a range of filters can be set in particular
Validation
Signing
Compression
Encryption
The Messenger configuration can be used for standard filters (validation signing compression and encryption) for inbound and outbound messages Custom filters are configured in a dedicated section
Developers may extend the Messenger with additional filters For example one may think of a ldquoBusiness Validatorrdquo that checks message content against business rules Or existing filters could be Instead of ldquosoft signingrdquo a document smart card access may be integrated
Ponton XP 21 ndash Installation and Configuration Guide 24
Configuration Options
Outbound Email Connection
This connection is used for email messages sent by your Messenger to your business partners The following data needs to be configured
From ndash the senderrsquos address to be used for your emails
SMTP ndash the outgoing mail server to be contacted by your Messenger in order to submit the email
Username password ndash must be entered if your mail server requires authentication for outgoing emails in this case enter the settings to be used by the Messenger to log in on the mail server
To test the email connection enter a receiver email address (in the ldquoTordquo field) and click the ldquoTestrdquo button
Ponton XP 21 ndash Installation and Configuration Guide 25
Configuration Options
Inbound Email Connection
You can enable your Messenger to receive email messages by setting up a POPIMAP connection with the following entries
Protocol ndash set to pop3 IMAP (depending on the type of mail server)
Server ndash the hostname or IP address of your mail server
Interval ndash the frequency for accessing the server for mail download
Username password ndash must be properly set to authenticate the Messenger on the mail server
Ponton XP 21 ndash Installation and Configuration Guide 26
Configuration Options
Email Notification
You can use the notification service to send emails to specified addresses whenever certain events occur For example you might want to notify your system administrator whenever certain errors are encountered
To specify an address go to Messenger rarr eMail Notification and click New Receiver Enter the email address for this receiver in the text field and select the events for which this receiver is to be notified You can use CTRL-click to activate multiple entries in the list
Ponton XP 21 ndash Installation and Configuration Guide 27
Configuration Options
Communication Settings
On this screen you can specify URI of each partnerrsquos Messenger Service ndash for example
httppartnerserver8080pontonxpSoapListener where partne server refers to the hostname or IP address of the machine the Messenger is installed on
r
Acknowledgment Requests ndash you can use this setting to determine whether outbound messages to this partner require acknowledgements To differentiate per message you can deactivate this checkbox and use the TransmissionMode attribute in the BackendEnvelope In the context of ebXML 20 transmissions you can additionally request signed acknowledgements for increased security
Retransmission Handling ndash you can use this setting to specify the number of retransmission attempts and the interval (in seconds) between attempts If a message cannot be transmitted successfully in the specified number of retries the Messenger will give up and mark the message as ldquofailedrdquo
Ponton XP 21 ndash Installation and Configuration Guide 28
Configuration Options
Configure Archiving Filter
The archiving filter stores the following information in a dedicated directory
Backend Envelope
ebXML Envelope
Payload ndash this is the actual business document
Certificate
Signature
Each part is stored in a separate file
The Archive Folder setting can be used to indicate the location of the archiving folder This can be expressed as
An absolute path to the required folder
A relative path beginning with $CONTEXT ndash this placeholder refers to the folder [installation root]xmlpipewebroot
The Maximum Age setting specifies how long the files will be archived ndash expressed in days
Ponton XP 21 ndash Installation and Configuration Guide 29
Configuration Options
52 Partner Configuration For each partner the following data may be configured
Partner identification (internal and external)
Communication Settings
URI of the partnerrsquos Messenger
Create Delete a Partner Entry
To create a new partner entry specify an identifier for the partner (this is the local identifier for your configuration) and indicate whether this partner entry is for
An internal partner (with the ldquoselfrdquo option activated) ndash this might be a department of your organization
An external partner ndash these entries refer to your business partners for example customers suppliers carriers warehouse operators etc
A message is always sent by your Messenger from an internal to an external partner and received from an external partner to an internal one
Internal partners are distinguished because for encryption and signing the certificates of each internal partner will be used on a per-partner basis
For further information please check the Ponton XP Architecture Overview
Ponton XP 21 ndash Installation and Configuration Guide 30
Configuration Options
Set the Partner Identification
Local Partner Name This identifier is valid within you local configuration ie you may choose any value as long as it is unique among all local partner names
Disable Although configured as a partner individual partners may be disabled In this case the Messenger rejects any message received from this partner
PartyID PartyID Type PartyIDs are used to identify partners externally To avoid name clashes and duplication well-known naming schemas exist to identify partners eg DUNS codes VAT numbers IANA codes etc For this reason trading partners should agree on an minimal set of identification types (like DUNS numbers and IANA codes) that is to be used by all partners
More than one PartyID can be defined per partner The limit is given by the number of PartyID types These are configured separately please check Section ldquoAdvanced Configurationrdquo)
Hint Please also check the Ponton XP Architecture Overview document for a detailed explanation of ebXML codes and partner identification
Ponton XP 21 ndash Installation and Configuration Guide 31
Configuration Options
Partner Communication Configuration
For each partner the following configuration options may be set URI of Partnerrsquos Messenger Service ndash enter the address of the partnerrsquos
Messenger for example httppartnerserver8080pontonxpSoapListener
Request Acknowledge ndash every message to this partner needs to be acknowledged
Request Signed Acknowledge ndash to specify signing of acknowledgements received from this partner
Retries ndash the number of retries in case of unsuccessful message transmission
Retry Interval ndash the number of seconds to wait until the next retry
Ponton XP 21 ndash Installation and Configuration Guide 32
Configuration Options
Processing Configuration
The following options can be set
Default Adapter ndash enter the name of the adapter to be used by default
Processing Pipeline ndash specify the processing pipeline to be used for this profile
Schema Sets ndash choose which Schema set(s) are to be supported
Use XML Signature ndash indicate whether to use XML Signature
Use default message settings (specified under Configuration rarr Messenger rarr Processing) or define a specific processing filter for this partner
Ponton XP 21 ndash Installation and Configuration Guide 33
Configuration Options
Install Partner Certificates
There are different ways of distributing certificates to business partners One is to send the certificate per email and have the partner cut amp paste the certificate code into the partner configuration
Note It is important to cut amp paste the complete certificate code including the lines ldquo----- Begin Certificate -----rdquo and ldquo----- End Certificate -----rdquo
Important A partner certificate will only be accepted if the certificate of the issuing CA (certificate authority) was pre-installed Otherwise the trust relationship between the partner and the CA cannot be traced
One may select to install a general certificate or a SMIME certificate Please determine what kind of certificate you received from your partner before installing it
Ponton XP 21 ndash Installation and Configuration Guide 34
Configuration Options
53 Certificate Management Certificate management comprises the following initial steps
Configure your default CA This is usually properly pre-configured in the installation files
Install the root certificate of the default CA This needs to be installed manually if 3rd-party CAs are to be used
Request a certificate for your own Messenger This includes creating a publicprivate key pair and sending a certificate request to the CA
Optionally you can request and install a SMIME certificate to be used for SMIME based communication via email
Default CA Configuration
On this screen you specify the settings for receiving certificates from your default certificate authority (CA) CA email address ndash enter the email address to be used to request a certificate
from your (default) CA
Ponton XP 21 ndash Installation and Configuration Guide 35
Configuration Options
CA download URL ndash enter the URL at your CA from which to download certificates for your Messenger installation Please note that you can only install certificates for partners you have already defined in your partner configuration
Download interval ndash specify the interval to wait between automatic certificate downloads
To download the available certificates immediately click the Download button
Request and Install Your Own Certificate
To request a certificate from your (default) CA go to Configuration rarr Certificates rarr Request Certificate Please enter data for all the fields on this form If any entries are missing you will get an error message
After completing the form click OK to send the certificate request to your CA You will get a message indicating that the request has been sent
Ponton XP 21 ndash Installation and Configuration Guide 36
Configuration Options
Once you receive the requested certificate from your CA you can install it in your own partner configuration (ie the internal partner you will use to sendreceive messages) Go to Configuration rarr Partners rarr ltYour Partner Namegt rarr Install Certificate and paste the certificate text including the hellip into the text field
Then enter the password you used when you requested the certificate and click OK to complete the installation of the certificate You will see the result above the text field containing the certificate
Ponton XP 21 ndash Installation and Configuration Guide 37
Configuration Options
Install Partner Certificates
Install a certificate issued by the CA for the requesting partner This was already described in the Partner Configuration section for normal standard certificates
Note In case of SMIME certificates an additional password may be needed to allow the Messenger to access the certificate in the local certificate store
Install a CA Certificate
To install the certificate for your CA go to Configuration rarr Certificates rarr CA rarr Install Certificate and paste your CArsquos certificate into the text field This is the certificate that authorizes the CA as a signing authority for other certificates
Ponton XP 21 ndash Installation and Configuration Guide 38
Configuration Options
54 Configure the Hot Folder Adapter
General Configuration
Address Port ndash the Hot Folder Adapter (HFA) is addressed as a separate process that communicates with the Messenger via HTTP Therefore the hostname and port number need to be set up for the Messenger If the HFA is co-located with the Messenger on the same machine use ldquolocalhostrdquo for the IP address In this case the HFA does not run as a separate Java process but will be hosted on the same Tomcat server
Path ndash the HFA needs to know the Adapter communication path of the Messenger By default it is pontonxpAdapterService
Console File Log Level ndash the HFA provides log output to the console and to log files Both can be configured regarding the level of detail The console log is only useful if the HFA is running as a standalone application so you can safely leave it disabled in the default configuration
Ponton XP 21 ndash Installation and Configuration Guide 39
Configuration Options
Create Delete a HFA
Several HFAs may be created Each registers under a different ID at the Messenger HFAs may be created for individual partners If this is the case messages exchanged with the rest of the partners will be stored with the default HFA
Configure a HFA
Each HFA requires several directories to be defined
Inbox ndash a document will be stored in the Inbox whenever it was received from a partner
Outbox ndash documents to be sent to the business partner are dropped here The HFA grabs them in a defined frequency
Failed ndash if a document could not be sent to a partner and all retries failed it will be stored in this folder
Work ndash if a document transfer is in progress or all attempts to send the document have not yet been tried the document will remain here After a final failure it will be transferred to the Failed folder
Ponton XP 21 ndash Installation and Configuration Guide 40
Configuration Options
The following settings are also supported
Port ndash the port to be used by the HFA (optional)
Receiver format ndash standard format is XML
Save Backend envelope ndash the Backend envelope is retained for incoming messages
Support attachments ndash the HFA will save any files attached to an incoming message to the selected inbox folder
Scan Interval ndash the interval to wait (in seconds) between checking the outbox
Number of receiving threads ndash specifies the maximum number of receiving threads the adapter can process
Use partner subfolders ndash if this is set this HFA will create inbox and outbox folders for all remote partners Inbound messages will automatically be sorted into the according folder depending on the sender Outbound messages need to be placed into the receiving partnerrsquos outbox folder The backend message is not used in this mode and is ignored if it exists
Use Acknowledgement for ERP ndash with this option activated the ERP application receives an acknowledgement from the receiving Messenger on the partnerrsquos side This acknowledgement will be provided via the specified Inbox
Ponton XP 21 ndash Installation and Configuration Guide 41
Configuration Options
55 Ponton XE ndash The XML Editor Ponton XE is a separate Ponton product It is packaged with Ponton XP for free use only by papiNet users It allows to enter papiNet document data directly via a graphical user interface and to send the document via the hot folder adapter to the business partners
Ponton XE is fully documented in a separate manual Hence only the Messaging Plug-in will be described here
You can experiment with the XML Editor and check out all the features and options without using the Ponton XP connection To start with you may want to begin with the following steps
Create a new papiNet Purchase Order
Fill out the forms and use optional XML Elements by right-clicking the Plus-icons in the layout tree
Create an HTML file by choosing Document Export to HTML from the menu
Save the document to an XML file and re-load it again
Ponton XP 21 ndash Installation and Configuration Guide 42
Configuration Options
Interface between Ponton XE and Ponton XP
The two software applications communicate via hot folders as illustrated in the following figure
Message Plug-in
Outbox Inbox AckInboxImport
Ponton XP Ponton XE
XMLXML XMLXML XMLXML XMLXML
Hot Folder Adapter
The XML Editor is connected to the Messenger via the Hot Folder Adapter All these folder settings need to be synchronized for a proper data exchange
Configuration of the Messaging Plug-in
The Messaging Plug-in can be flexibly installed and de-installed with the remaining part of Ponton XE If the file messengerjar is removed from the plugins directory it will automatically disappear from the Ponton XE menu bar as soon as the software is started again
Before transferring messages out of Ponton XE you need to preset the following information
Default values for the sending and receiving partners ndash these values may be overridden for an individual transfer
Folder locations of the Hot Folder Adapter ndash the Inbox Outbox and AckInbox need to be set for document exchange with Ponton XP
Default setting for Test Message flag ndash this can be overridden for the actual document transfer
Import Directory ndash Ponton XE will automatically scan the Inbox folder and import received documents to the given folder for local processing
Ponton XP 21 ndash Installation and Configuration Guide 43
Configuration Options
Open Messages after Import ndash if this option is activated messages received from the Inbox will automatically be displayed in Ponton XE
Delete message in Inbox ndash to always remove received messages from the HFA Inbox this option needs to be activated otherwise a copy will remain in the Inbox folder
Ponton XP 21 ndash Installation and Configuration Guide 44
Configuration Options
Ponton XP 21 ndash Installation and Configuration Guide 45
Configuration Options
Using Ponton XE
After setting the configuration and creating a document you can transfer the document to your business partner This is done by means of the following steps
Choose the menu item ldquoMessenger rarr Transfer rarr Send Messagerdquo
Select a sending and receiving partner
Override the settings for the HFA folders
Tick the checkbox to qualify this message as a test message
After transferring the document to the Messenger Ponton XE will wait for a response This is recognised as an acknowledge file which is dropped into the AckInbox folder of the HFA As soon as this has been received a successful transfer in indicated
You may check with the Message Monitor to determine how the document was forwarded by the Messenger to the receiver or whether any errors occurred
Ponton XP 21 ndash Installation and Configuration Guide 46
Configuration Options
56 Display Schema Configuration The schema sets to be supported for each partner are defined in the partner configuration The standard sets available with the installation are shown under Configuration rarr Schemata
Ponton XP 21 ndash Installation and Configuration Guide 47
Configuration Options
57 User Administration Two types of users are distinguished
Administrators ndash these users have full access to the Messengerrsquos configuration interface
Operators ndash these users only have access to the Adapter Monitor the Message Monitor and the Test Adapter The other options in the Messenger menu are not available
Please note the following points in connection with the Messengerrsquos standard user administration
This is a very simple user administration based on the Tomcat implementation If you want to integrate the Messenger with another user administration such as LDAP please contact Ponton Consulting for support
A userrsquos access rights (administratoroperator) are defined when the user account is created ndash they cannot be changed subsequently
User accounts can only be created or deleted by administrators
Ponton XP 21 ndash Installation and Configuration Guide 48
Advanced Configuration
6 Advanced Configuration
61 XML Schema Configuration Important The Messenger distinguishes between available schema set and activated schema sets Just inserting entries in the schema configuration as described in this section does not activate the schema sets or the corresponding schemas for use by the Messenger In order to make use of the schemas in a schema set you have to activate the schema set in the relevant partner configuration To view or modify the activated schema sets in a partner configuration go to
Configuration rarr Partners rarr ltpartner namegt rarr Processing
and activatedeactivate the relevant checkboxes
In the Messengerrsquos configuration interface you can activate and deactivate schema sets for specific partner configurations It is not possible however to modify the contents and specifications of the individual schema sets Any necessary changes have to be made in the configuration file
[installation root]xmlpipewebrootWEB-INFconfigschemataxml
The configuration entries in this file are structured as follows
ltSchemaSet Name=papinet21gt
ltSchemaName=httpwwwpapinetorgdataAvailabilityV2R10xsd MessageType=Availability MessageVersion=V2R10gt
ltNamespacegtltNamespacegt
ltDisplayNamegtAvailability 21ltDisplayNamegt
ltSchemaFilegtAvailabilityV2R10xsdltSchemaFilegt
ltXSLFilegtltXSLFilegt
ltSchemagt
ltSchema Name=yourSchema MessageType=yourMsgType MessageVersion=yourMsgVersgt
ltNamespacegtyourNamespaceltNamespacegt
ltDisplayNamegtYour Display NameltDisplayNamegt
ltSchemaFilegtyourSchemaFileltSchemaFilegt
ltXSLFilegtyourStylesheetltXSLFilegt
ltSchemagt
hellip
ltSchemaFoldergtpapinet210ltSchemaFoldergt
ltXSLFoldergtpapinet210ltXSLFoldergt
ltSchemaSetgt
Ponton XP 21 ndash Installation and Configuration Guide 49
Advanced Configuration
You can add a schema to an existing schema set in this file by inserting a ltSchemagt block (just copy and paste one of the existing blocks and modify the configuration as required) Please ensure that your new schema specification includes correct settings for the attributes of the Schema element
Name= This attribute corresponds with the ebXML Schema Location of incoming messages When an ebXML message is received the Messenger looks for a schema configuration where the Schema Name attribute matches the Schema Location specified in the ebXML envelope
MessageType= This attribute corresponds with the attribute MessageMetaDataDocumentInfoMessageName in the backend envelope of outgoing messages
MessageVersion= This attribute corresponds with the element MessageMe aDataDocumentInfoDTDVersionNumber in the backend envelope of outgoing messages
t
Note The specification of MessageType and MessageVersion must be used together for outgoing messages as they are combined to form an identifier for the message schema
You also have the option of adding a new schema set with your own schema definitions to the schema configuration In this case you would insert a ltSchemaSetgt block with subordinate ltSchemagt blocks Your added schema set will automatically be inserted in the list of available schema sets on the Messenger configuration pages
62 Advanced Database Configuration Important Since the Messenger database is used for essential message processing and tracking purposes you should not experiment with the database configuration on a ldquoliverdquo system For test and debugging purposes you are advised to set up a trial system
Installation with other Databases
This section describes the main steps required to install a different database system on the Messenger for example an Oracle database
1 Install database driver Copy the database driver to
[installation root]xmlpipewebrootWEB-INFlib
Note Please note that only drivers with the extension jar are loaded by the Tomcat servlet engine If the JDBC driver you want to use is a zip file you will have to rename the file to jar The JDBC driver for Oracle 9i is the file ojdbc14jar
Ponton XP 21 ndash Installation and Configuration Guide 50
Advanced Configuration
2 Create database and tables Ponton XP is supplied with SQL scripts for HSQL and for Oracle that can be used to create the tables for the Messenger database If you are using another database you may need to modify these scripts to work correctly with your database system
The SQL scripts are located in the subfolders under [installation root]sql
Once the database tables are in place you will also need to carry out the SQL script that inserts the log messages into the database ie
[installation root]sqlinsert_log_messagessql
3 Set up database connection The configuration of database connections is described in the section Set Up Messenger Database beginning on page 20 To connect with a different database choose ldquootherrdquo from the list of database drivers and enter the configuration for your database on the next page
The entries for the Oracle 9i JDBC driver are
Driver oraclejdbcdriverOracleDriver
URL jdbcoraclethinlthostgtltportgtltdatabasegt
63 Advanced Message Monitor Configuration In the configuration directory ldquoxmlpipewebrootWEB-INFconfigrdquo there is a file messagemonitorxml which can be used to change the selection and ordering of the Message overview window in the Message Monitor The default setting is displayed in the following picture
Ponton XP 21 ndash Installation and Configuration Guide 51
Advanced Configuration
Here the number of line items per page can be set If a high resolution screen is used (beyond 1024 x 768 pixel) one may increase the number of lines
Further a mapping table defines which database column is to be displayed in which monitor column The number of columns again depends on the screen resolution
Finally if main memory size allows caching of XSL stylesheet definitions helps accelerating processing speed for XSL transformations
64 Tomcat SSL Installation
Generate a key
One minor problem with Tomcat or any other webserver that uses the internal Java symmetric key architecture is that you are not allowed to export or import private keys For this reason it is not possible to use the existing key-pair installed with the Messenger software You will have to generate a new key-pair and send a certificate request to the Ponton certificate authority (or other certification authority) to receive a valid certificate
To generate a new key-pair open a command prompt and go to the tomcat-4118 directory The keystore used for a Tomcat SSL installation is located in the Tomcat root directory and is called ssl-keystore The Tomcat installation already contains a certificate for lsquolocalhostrsquo so you can test the HTTPS access with a web browser
Before you can create a new Tomcat certificate you will have to delete the installed certificate Note that the default password for the Tomcat keystore is ldquochangeitrdquo keytool -delete -alias tomcat ndashkeystore ssl-keystore
Now use the following command to create a new key-pair Please note that you need to specify the Listener hostname (eg listenermyserverde) when the keytool asks for lsquofirst and last namersquo keytool -genkey -alias tomcat -keyalg RSA ndashkeystore ssl-keystore
After generating the new key the next step is to export a certificate request with the following command keytool ndashcertreq ndashalias tomcat ndashfile myservercsr ndashkeystore ssl-keystore
This will generate the file myservercsr in the current directory Send this file via email to xp-certponton-consultingde It will be signed and sent back to you The reply will contain a file with the certificate
Finally you have to re-import this signed certificate into the Tomcat SSL keystore Please note that the import may take some time keytool ndashimport ndashalias tomcat ndashfile myservercer ndashkeystore ssl-keystore
If you have any problems starting the keytool make sure you have the javahomebin directory specified in your PATH environment variable Of course you can also change to the javahomebin directory and start the keytool there
Ponton XP 21 ndash Installation and Configuration Guide 52
Advanced Configuration
Update Tomcat configuration
SSL is already activated in the Tomcat configuration packaged in the distribution However you might want to change the specified SSL port (by default the SSL port is set to 8443) You can change the port by editing the file
[tomcat installation]confserverconf
The following section configures the SSL parameters
lt-- Define a SSL Coyote HTTP11 Connector on port 8443 --gt
ltConnector className=orgapachecoyotetomcat4CoyoteConnector
port=8443
minProcessors=5
maxProcessors=75
enableLookups=true
acceptCount=100
debug=0
scheme=https
secure=true
useURIValidationHack=false
disableUploadTimeout=truegt
ltFactory className=orgapachecoyotetomcat4CoyoteServerSocketFactory
clientAuth=false
keystoreFile=ssl-keystore
protocol=TLS gt
ltConnectorgt
Verify setup
To verify if everything is working correctly start the Tomcat webserver as usual and connect to the webserver with your browser
Go to httpsyourserveraddress ndash initially you might get a warning window if the root certificate authority is not known to the browser If you continue by clicking OK you should see the usual Ponton XP start page
If everything comes up correctly you can use SSL to receive messages with the Ponton XP Software
Ponton XP 21 ndash Installation and Configuration Guide 53
Advanced Configuration
65 Distributed Installation If the Messenger is installed on a server that cannot be reached from the Internet you will need to install the Listener as well The purpose of the Listener is to pick up incoming connections and forward them to the Messenger (across the firewall) The firewall rules must be set up to allow this connection between the Listener and the Messenger When a message is received the Listener notifies the Messenger and the Messenger then picks up the message
You also have the option of subsequently installing the Listener as a service under Windows ndash this service can then be configured to start automatically when the system starts up
Note If you are going to run the Messenger in combination with the Listener your partners will have to enter the URI of your Listener in their configurations (under Configuration rarr Partners rarr ltpartner namegt rarr URI of Partners Messenger Service)
Listener Installation and Configuration
The Listener is installed by running the installer program (eg PontonXP-21-setuplistener-windowsexe) on the relevant system You are asked to specify an installation folder and also have the option of creating a desktop or menu shortcut Thatrsquos it
-
The settings for the Listener are contained in the configuration file listenerproperties which is located in the folder [Listener root folder]config To modify these settings you will have to edit the configuration file directly Access via the Messengerrsquos configuration interface is not possible
The file contains the following settings
HttpPort = Port number (for external HTTP connections)
HttpsPort = Port number (for external HTTPS connections)
LogLevel = DEBUG | INFO | WARN | ERROR | FATAL | OFF
The following settings specify the host and port of the Messenger for forwarding connections (HTTPHTTPS) The forwarding connection mode is activated by entering the relevant host and port addresses and removing the hash marks (used to mark ldquocomment linesrdquo in Java property files)
HttpServer = server1port1 (HTTP forwarding connection to the Messenger)
HttpsServer = server1port1 (HTTPS forwarding connection to the Messenger)
Ponton XP 21 ndash Installation and Configuration Guide 54
Advanced Configuration
The following settings specify the Listenerrsquos port for callback connections (HTTPHTTPS) with the Messenger As with the forwarding connection the callback connection mode is activated by entering the relevant port addresses and removing the hash marks (Obviously it makes no sense to have both connections activated at the same time)
HttpServicePort = Port number (for internal HTTP connections to the Listener)
HttpsServicePort = Port number (for internal HTTPS connections to the Listener)
Starting the Listener
To start the Listener open a command prompt and start the class
depontonconsultingxmlpipeListener
with the classpath
-cp libcommons-logging-api-103jarlibcommonutilsjarlibxp_listenerjarconfig
You can also use the installed batch file [Listener root folder]startListenerbat
Callback Mode
Details of the communication flow
When the Messenger starts up it searches for the Listener
Note The Listener should start up first so that it can be found by the Messenger
If the search is successful a permanent connection is established between the Messenger and the Listener The Messenger uses the following settings in the configuration to establish the connection with the Listener
Configuration rarr Messenger rarr Listener rarr HTTP[S] rarr Hostname
Configuration rarr Messenger rarr Listener rarr HTTP[S] rarr Internal Listener Port
Ponton XP 21 ndash Installation and Configuration Guide 55
Advanced Configuration
When the Listener receives an incoming message (or rather an HTTPHTTPS request) it informs the Messenger ndash by way of the permanent connection ndash about the arrival of the new request indicating which port the Messenger can use to pick up the connection
Note This port number is randomly selected by the Listener and cannot be configured
The Messenger picks up the connection on the Listenerrsquos specified port and redirects it to its own local port for further processing
This local port corresponds to the setting for
Configuration rarr Messenger rarr Listener rarr HTTP[S] rarr Internal Messenger Port
in the configuration GUI
Forwarding Mode
Details of the communication flow
In forwarding mode no permanent connection is established between the Messenger and the Listener
When the Listener receives an incoming HTTPHTTPS request it simply forwards the request to the Messenger using the address specified in listenerproperties (HttpServerHttpsServer)
Note To allow this forwarding connection the firewall has to be configured so that the Listener is permitted to access the Messenger on the specified port(s)
Ponton XP 21 ndash Installation and Configuration Guide 56
Advanced Configuration
66 Port Configuration The Messengerrsquos standard configuration uses port 8080 for HTTP connections and port 8443 for secure (HTTPS) connections This section describes how to set up the messenger to use a non-standard port configuration This involves making manual changes to several configuration files in particular the Tomcat serverxml and the Messengerrsquos adapter configuration files
Tomcat Settings
The port setting for the Messengerrsquos HTTP and HTTPS connections are specified in the Tomcat configuration file
[installation root]tomcat-xxxconfserverxml
This file defines the connections (Connectors) for the Messenger as follows
lt-- Define a non-SSL Coyote HTTP11 Connector on port 8080 --gt
ltConnector className=orgapachecoyotetomcat4CoyoteConnector
port=yourMessengerPort minProcessors=5 maxProcessors=75
enableLookups=true redirectPort=yourRed rectPort i acceptCount=100 debug=0 connectionTimeout=20000
useURIValidationHack=false disableUploadTimeout=true gt
lt-- Define a SSL Coyote HTTP11 Connector on port 8443 --gt
ltConnector className=orgapachecoyotetomcat4CoyoteConnector
port=yourSSLPort minProcessors=5 maxProcessors=75
enableLookups=true
acceptCount=100 debug=0 scheme=https secure=true
useURIValidationHack=false disableUploadTimeout=truegt
ltFactory className=orgapachecoyotetomcat4CoyoteServerSocketFactory
clientAuth=false keystoreFile=ssl-keystore protocol=TLS gt
ltConnectorgt
The standard settings for the Messenger ports are
HTTP 8080
SSL 8443
To modify your connections you will need to enter the relevant port numbers indicated above as yourMessengerPort yourRedirectPort (which normally points to the SSL connection) and yourSSLPort
Ponton XP 21 ndash Installation and Configuration Guide 57
Advanced Configuration
Adapter Settings
The settings for the Messenger adapters are contained in the relevant XML files under
[installation root]xmlpipewebrootWEB-INFconfig
In particular a standard installation includes the files testadap erxml and hotfolderxml Each of these configuration files contains a block specifying the connection to the messenger
t
ltMessengergt
ltAddressgtyourMessengerHostltAddressgt
ltPortNumbergtyourMessengerPortltPortNumbergt
ltPathgthellipltPathgt
ltMessengergt
If you have configured the Messenger to run on a different port (see above) you will need to enter the relevant port number here
Ponton XP 21 ndash Installation and Configuration Guide 58
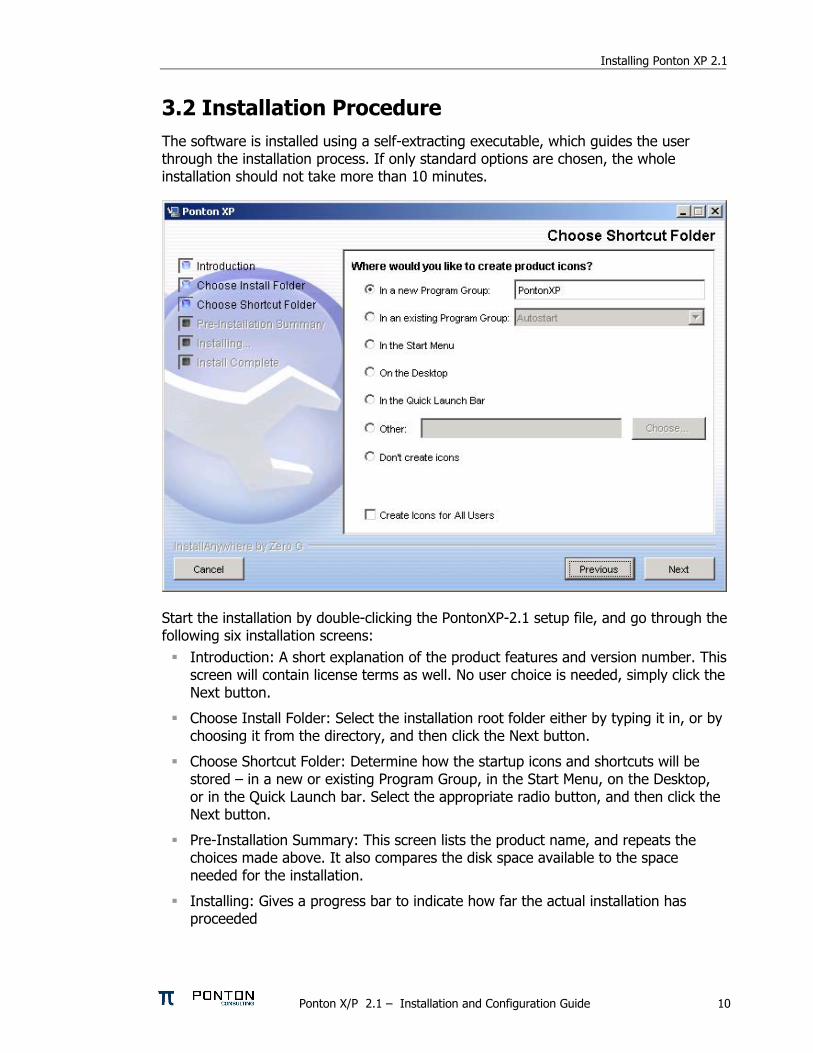
Installing Ponton XP 21
32 Installation Procedure The software is installed using a self-extracting executable which guides the user through the installation process If only standard options are chosen the whole installation should not take more than 10 minutes
Start the installation by double-clicking the PontonXP-21 setup file and go through the following six installation screens
Introduction A short explanation of the product features and version number This screen will contain license terms as well No user choice is needed simply click the Next button
Choose Install Folder Select the installation root folder either by typing it in or by choosing it from the directory and then click the Next button
Choose Shortcut Folder Determine how the startup icons and shortcuts will be stored ndash in a new or existing Program Group in the Start Menu on the Desktop or in the Quick Launch bar Select the appropriate radio button and then click the Next button
Pre-Installation Summary This screen lists the product name and repeats the choices made above It also compares the disk space available to the space needed for the installation
Installing Gives a progress bar to indicate how far the actual installation has proceeded
Ponton XP 21 ndash Installation and Configuration Guide 10
Installing Ponton XP 21
Install Complete The installation is now complete After pressing the Done button the user can skip to section 4 to start testing
33 Folders and Files For the following part of this documentation we assume that you have installed Ponton XP in the directory
Cpontonxp
or in a UNIX environment on
pontonxp
This will be referred to as the installation root
The created directories will look like this
Ponton XP 21 ndash Installation and Configuration Guide 11
Quick-starting the software
4 Quick-starting the software You can start the Messenger either via the Windows Start menu or by executing startupbat in the installation root directory If you have not started the Messenger from a command shell but via the Windows interface this will open an output window
Please wait until the webserver has fully initialized all the software components When the initialization is finished the following text should be shown near the bottom of the output window Messenger 21 is initialized URL of Messenger Administration Tool
If any errors occur during startup this will be indicated in the output window and logged in the file
[installation root]xmlpipewebrootWEB-INFlogbootlog
Please note that the Messengerrsquos processing log file
[installation root]xmlpipewebrootWEB-INFlogMessengerlog
does not come into play until the Messenger has initialized successfully
41 Logging in Now the Messenger is ready for use open your web browser and enter the URL httplocalhost8080pontonxp
This will bring up the login screen of the webserver The first thing to do is to log in to the administration front-end of the software The defaults set per installation are
User xpadmin
Password xppass
Please make sure you change these values in the Admin tool as soon as possible
In addition to the administrative user xpadmin a default user without administration privileges is installed
User xpuser
Password xppass
Please note If you log in without administration privileges you will not see the configuration menu in the Ponton XP window
Ponton XP 21 ndash Installation and Configuration Guide 12
Quick-starting the software
Note Click on the folder icons in the menu panel to open and close the folders Click on the page labels to display the corresponding pages
42 Stopping the Messenger If you started the software from the start menu (or if it was installed as a Windows service) you can stop the Messenger by selecting Stop Ponton XP from the start menu Alternatively you can execute the shutdownbat in the installation root directory
If you started the Messenger from a command shell you may also enter CTRL-C to stop the process
43 Minimal Configuration Hint If you want to set up an initial test installation it is often easier to install two Messengers on separate PCs within your local environment to avoid firewall restrictions If you want to immediately test with an external partner please ensure with your technical administration staff that your firewall is configured to allow the necessary connections
The following steps describe a minimal configuration for test purposes
Ponton XP 21 ndash Installation and Configuration Guide 13
Quick-starting the software
Define yourself as a partner
Open the Configuration menu in the left frame and click on Partners to open the screen Configuration rarr Partners
Type in a local ID for yourself and enable the self checkbox then click Create New Partner
Choose a Party ID for yourself ndash this ID is the one used in your backend system to reference yourself
Select the Party ID Type PontonCertificate in order to test the use of the Ponton Certificate Authority
Then press OK ndash this new partner is now displayed in the left frame
Ponton XP 21 ndash Installation and Configuration Guide 14
Quick-starting the software
You should now request a certificate from the Ponton CA (See section 53) and install it for your partner in the Install Certificate menu
For test purposes it may be helpful to switch off encryption and signing in your Partner configuration in the Processing menu
In any case your partner configurations must be set up so that the encryption and signing options match the settings chosen by the respective partner
Ponton XP 21 ndash Installation and Configuration Guide 15
Quick-starting the software
Define another partner
On a different host follow the steps described above
For test purposes switch off encryption and signing as described above
To test your Messenger configuration Ponton Consulting offers a test server called xptestponton-consultingde This server is pre-configured in your Messenger set-up Before integrating with you business partners you can start out using this test server as your messaging partner to experiment with different messages configuration options etc
Hint To check if your partnerrsquos Messenger is up and running open your browser and go to the URL
httpltyourpartnersdomainnamegtltport-numbergtpontonxpSoapListener
The URL for the test server at Ponton Consulting for example is
httpxptestponton-consultingde8080pontonxpSoapListener
44 Check if Adapters are running To check whether your Adapters are running go to Adapter Monitor in the main menu If no built-in adapter was used before (Test Adapter or Hot Folder Adapter) and no external adapter has connected to the Messenger the Adapter Monitor will indicate No adapter info availablehellip
Ponton XP 21 ndash Installation and Configuration Guide 16
Quick-starting the software
Now start the Test Adaptor and go back to the Adapter Monitor It should indicate Test Adapter ready to receive messageshellip
45 Exchange documents using the Test Adapter Call up the Test Adapter from the main menu of Ponton XP
Ponton XP 21 ndash Installation and Configuration Guide 17
Quick-starting the software
1 Select a sending partner
2 Select a receiving partner
3 Select a document (filename)
4 For test purposes activate the ldquoTest Messagerdquo checkbox
5 Send the document by clicking ldquoSend Messagerdquo
Your Test Adapter will now send the document to the Messenger The document will then be processed by the Messenger according to your settings and filters (encryption archiving etc) and finally the document will be sent to the specified receiver party
46 Check the status of your messages The status of messages can be monitored in the Message Monitor window which you can select from the main menu of Ponton XP
In the Message Monitor click the ldquoSearchrdquo button (located below the filter settings on the left) and check if your message was properly transferred to the receiver This is shown in the ldquoResultrdquo column (located in the message overview in the upper right panel)
Ponton XP 21 ndash Installation and Configuration Guide 18
Quick-starting the software
The following color codes are used to indicate the transferprocessing status
Green checkmark ndash the transfer was successful
Red cross ndash something went wrong (in this case the complete entry is highlighted red)
Question mark ndash the message is still unconfirmed (in this case the entry is highlighted yellow)
To check for details click on the MessageID and look at the log information (in the lower right panel) Each processing step carried out by your Messenger is displayed here As long as no errors occurred the log entries are highlighted green
The right-hand columns show How the message was transferred from your test adapter to the Messenger
Which Messenger filters were applied to the message
How the document was transferred to the receiver
You may experiment with the Test Adapter and the Message Monitor and send other documents Please also ask your test partner to send documents to your Messenger
The results shown in the Message Monitor indicate the processing sequence A Senderrsquos Adapter
M Senderrsquos Messenger
L Senderrsquos Listener
Net NetworkTransmission
L Receiverrsquos Listener
M Receiverrsquos Messenger
A Receiverrsquos Adapter
Ponton XP 21 ndash Installation and Configuration Guide 19
Configuration Options
5 Configuration Options The overall configuration of Ponton XP breaks down into the following sections
Messenger configuration This section focuses on your local setting for the Messenger This includes database connections default filter settings communication protocol selection etc
Partner configuration Per partner several setting are required Partner identification filter activation (which overrides the default setting) communication settings etc
Certificate management For own partners key pairs may be created and certificates requested For certificate authorities as well as for each individual partner certificates can be installed Certificates may be requested for signing and encryption for SSL and for SMIME
Hot folder configuration The Hot Folder Adapter is tightly integrated with the Messenger and can therefore be configured through the same interface It supports the definition of multiple hot folders for sending and receiving documents as well as dedicated folders for business partners
51 Messenger Configuration
Set Up Messenger Database
The Messenger stores log entries in a database By default the log database is pre-configured as an HSQL database HSQL is an open source database implementation written entirely in Java If there is no requirement to store log data in an existing database in your organization you may continue with HSQL
It is also possible to configure the Messenger to use a different database system for example
Oracle (version 815 or higher)
MS SQL Server 70
MySQL (version 32 or higher)
SAPdb (version 73)
The log database is accessed via JDBC connection Configuration scripts to set up the tables for an Oracle database are included with Ponton XP You can refer to these scripts as examples to create scripts for your own database system
If you do not yet have a database system with JDBC support in use you can download the setup files for MySQL from httpwwwmysqlcomdownloadsmysql-323html
Ponton XP 21 ndash Installation and Configuration Guide 20
Configuration Options
To configure the Messenger database the following set-up needs to be performed
1 Go to Configuration rarr Messenger rarr Database
2 Enter the driver class name and the URL for the JDBC connection to your database
3 Enter the user name and password for the connection if required
4 Click Test to test the connection
5 Important Donrsquot click OK unless the connection test was successful
Note The connection to the standard HSQL database supplied with the Messenger requires a ldquotruncatedrdquo URL that does contain the database name (as shown above) If you get a ldquoconnection brokenrdquo message when testing the connection to the standard database (as specified above) try deleting ltDATABASEgt from the URL and testing the connection again
Ponton XP 21 ndash Installation and Configuration Guide 21
Configuration Options
Set Logging Level
To specify the logging level go to Configuration rarr Messenger rarr Logging and select the desired settings for Messenger and JDBC logging
There is a range of settings available
OFF turns logging off completely
hellip
DEBUG logs all the messages output by the system
Note Please keep in mind that the chosen logging level can have an effect on the performance of your system In particular it is advisable to use DEBUG logging only in connection with error tracking and analysis
Ponton XP 21 ndash Installation and Configuration Guide 22
Configuration Options
Set Message Queue Scan Interval
Under Configuration rarr Messenger rarr Message Queues you can specify the interval to scan the (inbound and outbound) message queues
The default setting is 5000 msec To boost the message throughput on a faster system you can increase the scan frequency by setting this interval to a lower (ie shorter) value
Ponton XP 21 ndash Installation and Configuration Guide 23
Configuration Options
Select Messaging Pipeline
The Messenger allows you to configure different filter pipelines The standard configuration comes with two pipelines
1 Messenger 203 compatibility pipeline This allows you to maintain backward compatibility with users of the previous Messenger version
2 Messenger 21 pipeline This is to communicate with partners that are also using Messenger version 21 or any EbXML 20 compliant software
For each pipeline a range of filters can be set in particular
Validation
Signing
Compression
Encryption
The Messenger configuration can be used for standard filters (validation signing compression and encryption) for inbound and outbound messages Custom filters are configured in a dedicated section
Developers may extend the Messenger with additional filters For example one may think of a ldquoBusiness Validatorrdquo that checks message content against business rules Or existing filters could be Instead of ldquosoft signingrdquo a document smart card access may be integrated
Ponton XP 21 ndash Installation and Configuration Guide 24
Configuration Options
Outbound Email Connection
This connection is used for email messages sent by your Messenger to your business partners The following data needs to be configured
From ndash the senderrsquos address to be used for your emails
SMTP ndash the outgoing mail server to be contacted by your Messenger in order to submit the email
Username password ndash must be entered if your mail server requires authentication for outgoing emails in this case enter the settings to be used by the Messenger to log in on the mail server
To test the email connection enter a receiver email address (in the ldquoTordquo field) and click the ldquoTestrdquo button
Ponton XP 21 ndash Installation and Configuration Guide 25
Configuration Options
Inbound Email Connection
You can enable your Messenger to receive email messages by setting up a POPIMAP connection with the following entries
Protocol ndash set to pop3 IMAP (depending on the type of mail server)
Server ndash the hostname or IP address of your mail server
Interval ndash the frequency for accessing the server for mail download
Username password ndash must be properly set to authenticate the Messenger on the mail server
Ponton XP 21 ndash Installation and Configuration Guide 26
Configuration Options
Email Notification
You can use the notification service to send emails to specified addresses whenever certain events occur For example you might want to notify your system administrator whenever certain errors are encountered
To specify an address go to Messenger rarr eMail Notification and click New Receiver Enter the email address for this receiver in the text field and select the events for which this receiver is to be notified You can use CTRL-click to activate multiple entries in the list
Ponton XP 21 ndash Installation and Configuration Guide 27
Configuration Options
Communication Settings
On this screen you can specify URI of each partnerrsquos Messenger Service ndash for example
httppartnerserver8080pontonxpSoapListener where partne server refers to the hostname or IP address of the machine the Messenger is installed on
r
Acknowledgment Requests ndash you can use this setting to determine whether outbound messages to this partner require acknowledgements To differentiate per message you can deactivate this checkbox and use the TransmissionMode attribute in the BackendEnvelope In the context of ebXML 20 transmissions you can additionally request signed acknowledgements for increased security
Retransmission Handling ndash you can use this setting to specify the number of retransmission attempts and the interval (in seconds) between attempts If a message cannot be transmitted successfully in the specified number of retries the Messenger will give up and mark the message as ldquofailedrdquo
Ponton XP 21 ndash Installation and Configuration Guide 28
Configuration Options
Configure Archiving Filter
The archiving filter stores the following information in a dedicated directory
Backend Envelope
ebXML Envelope
Payload ndash this is the actual business document
Certificate
Signature
Each part is stored in a separate file
The Archive Folder setting can be used to indicate the location of the archiving folder This can be expressed as
An absolute path to the required folder
A relative path beginning with $CONTEXT ndash this placeholder refers to the folder [installation root]xmlpipewebroot
The Maximum Age setting specifies how long the files will be archived ndash expressed in days
Ponton XP 21 ndash Installation and Configuration Guide 29
Configuration Options
52 Partner Configuration For each partner the following data may be configured
Partner identification (internal and external)
Communication Settings
URI of the partnerrsquos Messenger
Create Delete a Partner Entry
To create a new partner entry specify an identifier for the partner (this is the local identifier for your configuration) and indicate whether this partner entry is for
An internal partner (with the ldquoselfrdquo option activated) ndash this might be a department of your organization
An external partner ndash these entries refer to your business partners for example customers suppliers carriers warehouse operators etc
A message is always sent by your Messenger from an internal to an external partner and received from an external partner to an internal one
Internal partners are distinguished because for encryption and signing the certificates of each internal partner will be used on a per-partner basis
For further information please check the Ponton XP Architecture Overview
Ponton XP 21 ndash Installation and Configuration Guide 30
Configuration Options
Set the Partner Identification
Local Partner Name This identifier is valid within you local configuration ie you may choose any value as long as it is unique among all local partner names
Disable Although configured as a partner individual partners may be disabled In this case the Messenger rejects any message received from this partner
PartyID PartyID Type PartyIDs are used to identify partners externally To avoid name clashes and duplication well-known naming schemas exist to identify partners eg DUNS codes VAT numbers IANA codes etc For this reason trading partners should agree on an minimal set of identification types (like DUNS numbers and IANA codes) that is to be used by all partners
More than one PartyID can be defined per partner The limit is given by the number of PartyID types These are configured separately please check Section ldquoAdvanced Configurationrdquo)
Hint Please also check the Ponton XP Architecture Overview document for a detailed explanation of ebXML codes and partner identification
Ponton XP 21 ndash Installation and Configuration Guide 31
Configuration Options
Partner Communication Configuration
For each partner the following configuration options may be set URI of Partnerrsquos Messenger Service ndash enter the address of the partnerrsquos
Messenger for example httppartnerserver8080pontonxpSoapListener
Request Acknowledge ndash every message to this partner needs to be acknowledged
Request Signed Acknowledge ndash to specify signing of acknowledgements received from this partner
Retries ndash the number of retries in case of unsuccessful message transmission
Retry Interval ndash the number of seconds to wait until the next retry
Ponton XP 21 ndash Installation and Configuration Guide 32
Configuration Options
Processing Configuration
The following options can be set
Default Adapter ndash enter the name of the adapter to be used by default
Processing Pipeline ndash specify the processing pipeline to be used for this profile
Schema Sets ndash choose which Schema set(s) are to be supported
Use XML Signature ndash indicate whether to use XML Signature
Use default message settings (specified under Configuration rarr Messenger rarr Processing) or define a specific processing filter for this partner
Ponton XP 21 ndash Installation and Configuration Guide 33
Configuration Options
Install Partner Certificates
There are different ways of distributing certificates to business partners One is to send the certificate per email and have the partner cut amp paste the certificate code into the partner configuration
Note It is important to cut amp paste the complete certificate code including the lines ldquo----- Begin Certificate -----rdquo and ldquo----- End Certificate -----rdquo
Important A partner certificate will only be accepted if the certificate of the issuing CA (certificate authority) was pre-installed Otherwise the trust relationship between the partner and the CA cannot be traced
One may select to install a general certificate or a SMIME certificate Please determine what kind of certificate you received from your partner before installing it
Ponton XP 21 ndash Installation and Configuration Guide 34
Configuration Options
53 Certificate Management Certificate management comprises the following initial steps
Configure your default CA This is usually properly pre-configured in the installation files
Install the root certificate of the default CA This needs to be installed manually if 3rd-party CAs are to be used
Request a certificate for your own Messenger This includes creating a publicprivate key pair and sending a certificate request to the CA
Optionally you can request and install a SMIME certificate to be used for SMIME based communication via email
Default CA Configuration
On this screen you specify the settings for receiving certificates from your default certificate authority (CA) CA email address ndash enter the email address to be used to request a certificate
from your (default) CA
Ponton XP 21 ndash Installation and Configuration Guide 35
Configuration Options
CA download URL ndash enter the URL at your CA from which to download certificates for your Messenger installation Please note that you can only install certificates for partners you have already defined in your partner configuration
Download interval ndash specify the interval to wait between automatic certificate downloads
To download the available certificates immediately click the Download button
Request and Install Your Own Certificate
To request a certificate from your (default) CA go to Configuration rarr Certificates rarr Request Certificate Please enter data for all the fields on this form If any entries are missing you will get an error message
After completing the form click OK to send the certificate request to your CA You will get a message indicating that the request has been sent
Ponton XP 21 ndash Installation and Configuration Guide 36
Configuration Options
Once you receive the requested certificate from your CA you can install it in your own partner configuration (ie the internal partner you will use to sendreceive messages) Go to Configuration rarr Partners rarr ltYour Partner Namegt rarr Install Certificate and paste the certificate text including the hellip into the text field
Then enter the password you used when you requested the certificate and click OK to complete the installation of the certificate You will see the result above the text field containing the certificate
Ponton XP 21 ndash Installation and Configuration Guide 37
Configuration Options
Install Partner Certificates
Install a certificate issued by the CA for the requesting partner This was already described in the Partner Configuration section for normal standard certificates
Note In case of SMIME certificates an additional password may be needed to allow the Messenger to access the certificate in the local certificate store
Install a CA Certificate
To install the certificate for your CA go to Configuration rarr Certificates rarr CA rarr Install Certificate and paste your CArsquos certificate into the text field This is the certificate that authorizes the CA as a signing authority for other certificates
Ponton XP 21 ndash Installation and Configuration Guide 38
Configuration Options
54 Configure the Hot Folder Adapter
General Configuration
Address Port ndash the Hot Folder Adapter (HFA) is addressed as a separate process that communicates with the Messenger via HTTP Therefore the hostname and port number need to be set up for the Messenger If the HFA is co-located with the Messenger on the same machine use ldquolocalhostrdquo for the IP address In this case the HFA does not run as a separate Java process but will be hosted on the same Tomcat server
Path ndash the HFA needs to know the Adapter communication path of the Messenger By default it is pontonxpAdapterService
Console File Log Level ndash the HFA provides log output to the console and to log files Both can be configured regarding the level of detail The console log is only useful if the HFA is running as a standalone application so you can safely leave it disabled in the default configuration
Ponton XP 21 ndash Installation and Configuration Guide 39
Configuration Options
Create Delete a HFA
Several HFAs may be created Each registers under a different ID at the Messenger HFAs may be created for individual partners If this is the case messages exchanged with the rest of the partners will be stored with the default HFA
Configure a HFA
Each HFA requires several directories to be defined
Inbox ndash a document will be stored in the Inbox whenever it was received from a partner
Outbox ndash documents to be sent to the business partner are dropped here The HFA grabs them in a defined frequency
Failed ndash if a document could not be sent to a partner and all retries failed it will be stored in this folder
Work ndash if a document transfer is in progress or all attempts to send the document have not yet been tried the document will remain here After a final failure it will be transferred to the Failed folder
Ponton XP 21 ndash Installation and Configuration Guide 40
Configuration Options
The following settings are also supported
Port ndash the port to be used by the HFA (optional)
Receiver format ndash standard format is XML
Save Backend envelope ndash the Backend envelope is retained for incoming messages
Support attachments ndash the HFA will save any files attached to an incoming message to the selected inbox folder
Scan Interval ndash the interval to wait (in seconds) between checking the outbox
Number of receiving threads ndash specifies the maximum number of receiving threads the adapter can process
Use partner subfolders ndash if this is set this HFA will create inbox and outbox folders for all remote partners Inbound messages will automatically be sorted into the according folder depending on the sender Outbound messages need to be placed into the receiving partnerrsquos outbox folder The backend message is not used in this mode and is ignored if it exists
Use Acknowledgement for ERP ndash with this option activated the ERP application receives an acknowledgement from the receiving Messenger on the partnerrsquos side This acknowledgement will be provided via the specified Inbox
Ponton XP 21 ndash Installation and Configuration Guide 41
Configuration Options
55 Ponton XE ndash The XML Editor Ponton XE is a separate Ponton product It is packaged with Ponton XP for free use only by papiNet users It allows to enter papiNet document data directly via a graphical user interface and to send the document via the hot folder adapter to the business partners
Ponton XE is fully documented in a separate manual Hence only the Messaging Plug-in will be described here
You can experiment with the XML Editor and check out all the features and options without using the Ponton XP connection To start with you may want to begin with the following steps
Create a new papiNet Purchase Order
Fill out the forms and use optional XML Elements by right-clicking the Plus-icons in the layout tree
Create an HTML file by choosing Document Export to HTML from the menu
Save the document to an XML file and re-load it again
Ponton XP 21 ndash Installation and Configuration Guide 42
Configuration Options
Interface between Ponton XE and Ponton XP
The two software applications communicate via hot folders as illustrated in the following figure
Message Plug-in
Outbox Inbox AckInboxImport
Ponton XP Ponton XE
XMLXML XMLXML XMLXML XMLXML
Hot Folder Adapter
The XML Editor is connected to the Messenger via the Hot Folder Adapter All these folder settings need to be synchronized for a proper data exchange
Configuration of the Messaging Plug-in
The Messaging Plug-in can be flexibly installed and de-installed with the remaining part of Ponton XE If the file messengerjar is removed from the plugins directory it will automatically disappear from the Ponton XE menu bar as soon as the software is started again
Before transferring messages out of Ponton XE you need to preset the following information
Default values for the sending and receiving partners ndash these values may be overridden for an individual transfer
Folder locations of the Hot Folder Adapter ndash the Inbox Outbox and AckInbox need to be set for document exchange with Ponton XP
Default setting for Test Message flag ndash this can be overridden for the actual document transfer
Import Directory ndash Ponton XE will automatically scan the Inbox folder and import received documents to the given folder for local processing
Ponton XP 21 ndash Installation and Configuration Guide 43
Configuration Options
Open Messages after Import ndash if this option is activated messages received from the Inbox will automatically be displayed in Ponton XE
Delete message in Inbox ndash to always remove received messages from the HFA Inbox this option needs to be activated otherwise a copy will remain in the Inbox folder
Ponton XP 21 ndash Installation and Configuration Guide 44
Configuration Options
Ponton XP 21 ndash Installation and Configuration Guide 45
Configuration Options
Using Ponton XE
After setting the configuration and creating a document you can transfer the document to your business partner This is done by means of the following steps
Choose the menu item ldquoMessenger rarr Transfer rarr Send Messagerdquo
Select a sending and receiving partner
Override the settings for the HFA folders
Tick the checkbox to qualify this message as a test message
After transferring the document to the Messenger Ponton XE will wait for a response This is recognised as an acknowledge file which is dropped into the AckInbox folder of the HFA As soon as this has been received a successful transfer in indicated
You may check with the Message Monitor to determine how the document was forwarded by the Messenger to the receiver or whether any errors occurred
Ponton XP 21 ndash Installation and Configuration Guide 46
Configuration Options
56 Display Schema Configuration The schema sets to be supported for each partner are defined in the partner configuration The standard sets available with the installation are shown under Configuration rarr Schemata
Ponton XP 21 ndash Installation and Configuration Guide 47
Configuration Options
57 User Administration Two types of users are distinguished
Administrators ndash these users have full access to the Messengerrsquos configuration interface
Operators ndash these users only have access to the Adapter Monitor the Message Monitor and the Test Adapter The other options in the Messenger menu are not available
Please note the following points in connection with the Messengerrsquos standard user administration
This is a very simple user administration based on the Tomcat implementation If you want to integrate the Messenger with another user administration such as LDAP please contact Ponton Consulting for support
A userrsquos access rights (administratoroperator) are defined when the user account is created ndash they cannot be changed subsequently
User accounts can only be created or deleted by administrators
Ponton XP 21 ndash Installation and Configuration Guide 48
Advanced Configuration
6 Advanced Configuration
61 XML Schema Configuration Important The Messenger distinguishes between available schema set and activated schema sets Just inserting entries in the schema configuration as described in this section does not activate the schema sets or the corresponding schemas for use by the Messenger In order to make use of the schemas in a schema set you have to activate the schema set in the relevant partner configuration To view or modify the activated schema sets in a partner configuration go to
Configuration rarr Partners rarr ltpartner namegt rarr Processing
and activatedeactivate the relevant checkboxes
In the Messengerrsquos configuration interface you can activate and deactivate schema sets for specific partner configurations It is not possible however to modify the contents and specifications of the individual schema sets Any necessary changes have to be made in the configuration file
[installation root]xmlpipewebrootWEB-INFconfigschemataxml
The configuration entries in this file are structured as follows
ltSchemaSet Name=papinet21gt
ltSchemaName=httpwwwpapinetorgdataAvailabilityV2R10xsd MessageType=Availability MessageVersion=V2R10gt
ltNamespacegtltNamespacegt
ltDisplayNamegtAvailability 21ltDisplayNamegt
ltSchemaFilegtAvailabilityV2R10xsdltSchemaFilegt
ltXSLFilegtltXSLFilegt
ltSchemagt
ltSchema Name=yourSchema MessageType=yourMsgType MessageVersion=yourMsgVersgt
ltNamespacegtyourNamespaceltNamespacegt
ltDisplayNamegtYour Display NameltDisplayNamegt
ltSchemaFilegtyourSchemaFileltSchemaFilegt
ltXSLFilegtyourStylesheetltXSLFilegt
ltSchemagt
hellip
ltSchemaFoldergtpapinet210ltSchemaFoldergt
ltXSLFoldergtpapinet210ltXSLFoldergt
ltSchemaSetgt
Ponton XP 21 ndash Installation and Configuration Guide 49
Advanced Configuration
You can add a schema to an existing schema set in this file by inserting a ltSchemagt block (just copy and paste one of the existing blocks and modify the configuration as required) Please ensure that your new schema specification includes correct settings for the attributes of the Schema element
Name= This attribute corresponds with the ebXML Schema Location of incoming messages When an ebXML message is received the Messenger looks for a schema configuration where the Schema Name attribute matches the Schema Location specified in the ebXML envelope
MessageType= This attribute corresponds with the attribute MessageMetaDataDocumentInfoMessageName in the backend envelope of outgoing messages
MessageVersion= This attribute corresponds with the element MessageMe aDataDocumentInfoDTDVersionNumber in the backend envelope of outgoing messages
t
Note The specification of MessageType and MessageVersion must be used together for outgoing messages as they are combined to form an identifier for the message schema
You also have the option of adding a new schema set with your own schema definitions to the schema configuration In this case you would insert a ltSchemaSetgt block with subordinate ltSchemagt blocks Your added schema set will automatically be inserted in the list of available schema sets on the Messenger configuration pages
62 Advanced Database Configuration Important Since the Messenger database is used for essential message processing and tracking purposes you should not experiment with the database configuration on a ldquoliverdquo system For test and debugging purposes you are advised to set up a trial system
Installation with other Databases
This section describes the main steps required to install a different database system on the Messenger for example an Oracle database
1 Install database driver Copy the database driver to
[installation root]xmlpipewebrootWEB-INFlib
Note Please note that only drivers with the extension jar are loaded by the Tomcat servlet engine If the JDBC driver you want to use is a zip file you will have to rename the file to jar The JDBC driver for Oracle 9i is the file ojdbc14jar
Ponton XP 21 ndash Installation and Configuration Guide 50
Advanced Configuration
2 Create database and tables Ponton XP is supplied with SQL scripts for HSQL and for Oracle that can be used to create the tables for the Messenger database If you are using another database you may need to modify these scripts to work correctly with your database system
The SQL scripts are located in the subfolders under [installation root]sql
Once the database tables are in place you will also need to carry out the SQL script that inserts the log messages into the database ie
[installation root]sqlinsert_log_messagessql
3 Set up database connection The configuration of database connections is described in the section Set Up Messenger Database beginning on page 20 To connect with a different database choose ldquootherrdquo from the list of database drivers and enter the configuration for your database on the next page
The entries for the Oracle 9i JDBC driver are
Driver oraclejdbcdriverOracleDriver
URL jdbcoraclethinlthostgtltportgtltdatabasegt
63 Advanced Message Monitor Configuration In the configuration directory ldquoxmlpipewebrootWEB-INFconfigrdquo there is a file messagemonitorxml which can be used to change the selection and ordering of the Message overview window in the Message Monitor The default setting is displayed in the following picture
Ponton XP 21 ndash Installation and Configuration Guide 51
Advanced Configuration
Here the number of line items per page can be set If a high resolution screen is used (beyond 1024 x 768 pixel) one may increase the number of lines
Further a mapping table defines which database column is to be displayed in which monitor column The number of columns again depends on the screen resolution
Finally if main memory size allows caching of XSL stylesheet definitions helps accelerating processing speed for XSL transformations
64 Tomcat SSL Installation
Generate a key
One minor problem with Tomcat or any other webserver that uses the internal Java symmetric key architecture is that you are not allowed to export or import private keys For this reason it is not possible to use the existing key-pair installed with the Messenger software You will have to generate a new key-pair and send a certificate request to the Ponton certificate authority (or other certification authority) to receive a valid certificate
To generate a new key-pair open a command prompt and go to the tomcat-4118 directory The keystore used for a Tomcat SSL installation is located in the Tomcat root directory and is called ssl-keystore The Tomcat installation already contains a certificate for lsquolocalhostrsquo so you can test the HTTPS access with a web browser
Before you can create a new Tomcat certificate you will have to delete the installed certificate Note that the default password for the Tomcat keystore is ldquochangeitrdquo keytool -delete -alias tomcat ndashkeystore ssl-keystore
Now use the following command to create a new key-pair Please note that you need to specify the Listener hostname (eg listenermyserverde) when the keytool asks for lsquofirst and last namersquo keytool -genkey -alias tomcat -keyalg RSA ndashkeystore ssl-keystore
After generating the new key the next step is to export a certificate request with the following command keytool ndashcertreq ndashalias tomcat ndashfile myservercsr ndashkeystore ssl-keystore
This will generate the file myservercsr in the current directory Send this file via email to xp-certponton-consultingde It will be signed and sent back to you The reply will contain a file with the certificate
Finally you have to re-import this signed certificate into the Tomcat SSL keystore Please note that the import may take some time keytool ndashimport ndashalias tomcat ndashfile myservercer ndashkeystore ssl-keystore
If you have any problems starting the keytool make sure you have the javahomebin directory specified in your PATH environment variable Of course you can also change to the javahomebin directory and start the keytool there
Ponton XP 21 ndash Installation and Configuration Guide 52
Advanced Configuration
Update Tomcat configuration
SSL is already activated in the Tomcat configuration packaged in the distribution However you might want to change the specified SSL port (by default the SSL port is set to 8443) You can change the port by editing the file
[tomcat installation]confserverconf
The following section configures the SSL parameters
lt-- Define a SSL Coyote HTTP11 Connector on port 8443 --gt
ltConnector className=orgapachecoyotetomcat4CoyoteConnector
port=8443
minProcessors=5
maxProcessors=75
enableLookups=true
acceptCount=100
debug=0
scheme=https
secure=true
useURIValidationHack=false
disableUploadTimeout=truegt
ltFactory className=orgapachecoyotetomcat4CoyoteServerSocketFactory
clientAuth=false
keystoreFile=ssl-keystore
protocol=TLS gt
ltConnectorgt
Verify setup
To verify if everything is working correctly start the Tomcat webserver as usual and connect to the webserver with your browser
Go to httpsyourserveraddress ndash initially you might get a warning window if the root certificate authority is not known to the browser If you continue by clicking OK you should see the usual Ponton XP start page
If everything comes up correctly you can use SSL to receive messages with the Ponton XP Software
Ponton XP 21 ndash Installation and Configuration Guide 53
Advanced Configuration
65 Distributed Installation If the Messenger is installed on a server that cannot be reached from the Internet you will need to install the Listener as well The purpose of the Listener is to pick up incoming connections and forward them to the Messenger (across the firewall) The firewall rules must be set up to allow this connection between the Listener and the Messenger When a message is received the Listener notifies the Messenger and the Messenger then picks up the message
You also have the option of subsequently installing the Listener as a service under Windows ndash this service can then be configured to start automatically when the system starts up
Note If you are going to run the Messenger in combination with the Listener your partners will have to enter the URI of your Listener in their configurations (under Configuration rarr Partners rarr ltpartner namegt rarr URI of Partners Messenger Service)
Listener Installation and Configuration
The Listener is installed by running the installer program (eg PontonXP-21-setuplistener-windowsexe) on the relevant system You are asked to specify an installation folder and also have the option of creating a desktop or menu shortcut Thatrsquos it
-
The settings for the Listener are contained in the configuration file listenerproperties which is located in the folder [Listener root folder]config To modify these settings you will have to edit the configuration file directly Access via the Messengerrsquos configuration interface is not possible
The file contains the following settings
HttpPort = Port number (for external HTTP connections)
HttpsPort = Port number (for external HTTPS connections)
LogLevel = DEBUG | INFO | WARN | ERROR | FATAL | OFF
The following settings specify the host and port of the Messenger for forwarding connections (HTTPHTTPS) The forwarding connection mode is activated by entering the relevant host and port addresses and removing the hash marks (used to mark ldquocomment linesrdquo in Java property files)
HttpServer = server1port1 (HTTP forwarding connection to the Messenger)
HttpsServer = server1port1 (HTTPS forwarding connection to the Messenger)
Ponton XP 21 ndash Installation and Configuration Guide 54
Advanced Configuration
The following settings specify the Listenerrsquos port for callback connections (HTTPHTTPS) with the Messenger As with the forwarding connection the callback connection mode is activated by entering the relevant port addresses and removing the hash marks (Obviously it makes no sense to have both connections activated at the same time)
HttpServicePort = Port number (for internal HTTP connections to the Listener)
HttpsServicePort = Port number (for internal HTTPS connections to the Listener)
Starting the Listener
To start the Listener open a command prompt and start the class
depontonconsultingxmlpipeListener
with the classpath
-cp libcommons-logging-api-103jarlibcommonutilsjarlibxp_listenerjarconfig
You can also use the installed batch file [Listener root folder]startListenerbat
Callback Mode
Details of the communication flow
When the Messenger starts up it searches for the Listener
Note The Listener should start up first so that it can be found by the Messenger
If the search is successful a permanent connection is established between the Messenger and the Listener The Messenger uses the following settings in the configuration to establish the connection with the Listener
Configuration rarr Messenger rarr Listener rarr HTTP[S] rarr Hostname
Configuration rarr Messenger rarr Listener rarr HTTP[S] rarr Internal Listener Port
Ponton XP 21 ndash Installation and Configuration Guide 55
Advanced Configuration
When the Listener receives an incoming message (or rather an HTTPHTTPS request) it informs the Messenger ndash by way of the permanent connection ndash about the arrival of the new request indicating which port the Messenger can use to pick up the connection
Note This port number is randomly selected by the Listener and cannot be configured
The Messenger picks up the connection on the Listenerrsquos specified port and redirects it to its own local port for further processing
This local port corresponds to the setting for
Configuration rarr Messenger rarr Listener rarr HTTP[S] rarr Internal Messenger Port
in the configuration GUI
Forwarding Mode
Details of the communication flow
In forwarding mode no permanent connection is established between the Messenger and the Listener
When the Listener receives an incoming HTTPHTTPS request it simply forwards the request to the Messenger using the address specified in listenerproperties (HttpServerHttpsServer)
Note To allow this forwarding connection the firewall has to be configured so that the Listener is permitted to access the Messenger on the specified port(s)
Ponton XP 21 ndash Installation and Configuration Guide 56
Advanced Configuration
66 Port Configuration The Messengerrsquos standard configuration uses port 8080 for HTTP connections and port 8443 for secure (HTTPS) connections This section describes how to set up the messenger to use a non-standard port configuration This involves making manual changes to several configuration files in particular the Tomcat serverxml and the Messengerrsquos adapter configuration files
Tomcat Settings
The port setting for the Messengerrsquos HTTP and HTTPS connections are specified in the Tomcat configuration file
[installation root]tomcat-xxxconfserverxml
This file defines the connections (Connectors) for the Messenger as follows
lt-- Define a non-SSL Coyote HTTP11 Connector on port 8080 --gt
ltConnector className=orgapachecoyotetomcat4CoyoteConnector
port=yourMessengerPort minProcessors=5 maxProcessors=75
enableLookups=true redirectPort=yourRed rectPort i acceptCount=100 debug=0 connectionTimeout=20000
useURIValidationHack=false disableUploadTimeout=true gt
lt-- Define a SSL Coyote HTTP11 Connector on port 8443 --gt
ltConnector className=orgapachecoyotetomcat4CoyoteConnector
port=yourSSLPort minProcessors=5 maxProcessors=75
enableLookups=true
acceptCount=100 debug=0 scheme=https secure=true
useURIValidationHack=false disableUploadTimeout=truegt
ltFactory className=orgapachecoyotetomcat4CoyoteServerSocketFactory
clientAuth=false keystoreFile=ssl-keystore protocol=TLS gt
ltConnectorgt
The standard settings for the Messenger ports are
HTTP 8080
SSL 8443
To modify your connections you will need to enter the relevant port numbers indicated above as yourMessengerPort yourRedirectPort (which normally points to the SSL connection) and yourSSLPort
Ponton XP 21 ndash Installation and Configuration Guide 57
Advanced Configuration
Adapter Settings
The settings for the Messenger adapters are contained in the relevant XML files under
[installation root]xmlpipewebrootWEB-INFconfig
In particular a standard installation includes the files testadap erxml and hotfolderxml Each of these configuration files contains a block specifying the connection to the messenger
t
ltMessengergt
ltAddressgtyourMessengerHostltAddressgt
ltPortNumbergtyourMessengerPortltPortNumbergt
ltPathgthellipltPathgt
ltMessengergt
If you have configured the Messenger to run on a different port (see above) you will need to enter the relevant port number here
Ponton XP 21 ndash Installation and Configuration Guide 58
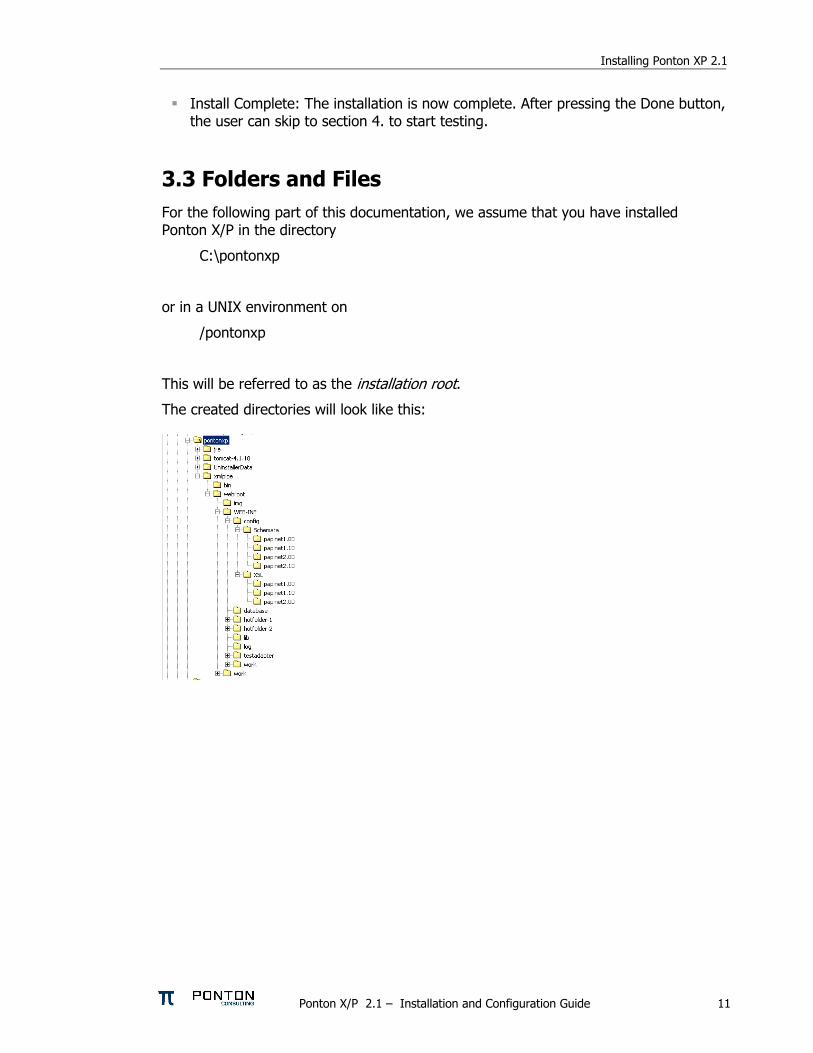
Installing Ponton XP 21
Install Complete The installation is now complete After pressing the Done button the user can skip to section 4 to start testing
33 Folders and Files For the following part of this documentation we assume that you have installed Ponton XP in the directory
Cpontonxp
or in a UNIX environment on
pontonxp
This will be referred to as the installation root
The created directories will look like this
Ponton XP 21 ndash Installation and Configuration Guide 11
Quick-starting the software
4 Quick-starting the software You can start the Messenger either via the Windows Start menu or by executing startupbat in the installation root directory If you have not started the Messenger from a command shell but via the Windows interface this will open an output window
Please wait until the webserver has fully initialized all the software components When the initialization is finished the following text should be shown near the bottom of the output window Messenger 21 is initialized URL of Messenger Administration Tool
If any errors occur during startup this will be indicated in the output window and logged in the file
[installation root]xmlpipewebrootWEB-INFlogbootlog
Please note that the Messengerrsquos processing log file
[installation root]xmlpipewebrootWEB-INFlogMessengerlog
does not come into play until the Messenger has initialized successfully
41 Logging in Now the Messenger is ready for use open your web browser and enter the URL httplocalhost8080pontonxp
This will bring up the login screen of the webserver The first thing to do is to log in to the administration front-end of the software The defaults set per installation are
User xpadmin
Password xppass
Please make sure you change these values in the Admin tool as soon as possible
In addition to the administrative user xpadmin a default user without administration privileges is installed
User xpuser
Password xppass
Please note If you log in without administration privileges you will not see the configuration menu in the Ponton XP window
Ponton XP 21 ndash Installation and Configuration Guide 12
Quick-starting the software
Note Click on the folder icons in the menu panel to open and close the folders Click on the page labels to display the corresponding pages
42 Stopping the Messenger If you started the software from the start menu (or if it was installed as a Windows service) you can stop the Messenger by selecting Stop Ponton XP from the start menu Alternatively you can execute the shutdownbat in the installation root directory
If you started the Messenger from a command shell you may also enter CTRL-C to stop the process
43 Minimal Configuration Hint If you want to set up an initial test installation it is often easier to install two Messengers on separate PCs within your local environment to avoid firewall restrictions If you want to immediately test with an external partner please ensure with your technical administration staff that your firewall is configured to allow the necessary connections
The following steps describe a minimal configuration for test purposes
Ponton XP 21 ndash Installation and Configuration Guide 13
Quick-starting the software
Define yourself as a partner
Open the Configuration menu in the left frame and click on Partners to open the screen Configuration rarr Partners
Type in a local ID for yourself and enable the self checkbox then click Create New Partner
Choose a Party ID for yourself ndash this ID is the one used in your backend system to reference yourself
Select the Party ID Type PontonCertificate in order to test the use of the Ponton Certificate Authority
Then press OK ndash this new partner is now displayed in the left frame
Ponton XP 21 ndash Installation and Configuration Guide 14
Quick-starting the software
You should now request a certificate from the Ponton CA (See section 53) and install it for your partner in the Install Certificate menu
For test purposes it may be helpful to switch off encryption and signing in your Partner configuration in the Processing menu
In any case your partner configurations must be set up so that the encryption and signing options match the settings chosen by the respective partner
Ponton XP 21 ndash Installation and Configuration Guide 15
Quick-starting the software
Define another partner
On a different host follow the steps described above
For test purposes switch off encryption and signing as described above
To test your Messenger configuration Ponton Consulting offers a test server called xptestponton-consultingde This server is pre-configured in your Messenger set-up Before integrating with you business partners you can start out using this test server as your messaging partner to experiment with different messages configuration options etc
Hint To check if your partnerrsquos Messenger is up and running open your browser and go to the URL
httpltyourpartnersdomainnamegtltport-numbergtpontonxpSoapListener
The URL for the test server at Ponton Consulting for example is
httpxptestponton-consultingde8080pontonxpSoapListener
44 Check if Adapters are running To check whether your Adapters are running go to Adapter Monitor in the main menu If no built-in adapter was used before (Test Adapter or Hot Folder Adapter) and no external adapter has connected to the Messenger the Adapter Monitor will indicate No adapter info availablehellip
Ponton XP 21 ndash Installation and Configuration Guide 16
Quick-starting the software
Now start the Test Adaptor and go back to the Adapter Monitor It should indicate Test Adapter ready to receive messageshellip
45 Exchange documents using the Test Adapter Call up the Test Adapter from the main menu of Ponton XP
Ponton XP 21 ndash Installation and Configuration Guide 17
Quick-starting the software
1 Select a sending partner
2 Select a receiving partner
3 Select a document (filename)
4 For test purposes activate the ldquoTest Messagerdquo checkbox
5 Send the document by clicking ldquoSend Messagerdquo
Your Test Adapter will now send the document to the Messenger The document will then be processed by the Messenger according to your settings and filters (encryption archiving etc) and finally the document will be sent to the specified receiver party
46 Check the status of your messages The status of messages can be monitored in the Message Monitor window which you can select from the main menu of Ponton XP
In the Message Monitor click the ldquoSearchrdquo button (located below the filter settings on the left) and check if your message was properly transferred to the receiver This is shown in the ldquoResultrdquo column (located in the message overview in the upper right panel)
Ponton XP 21 ndash Installation and Configuration Guide 18
Quick-starting the software
The following color codes are used to indicate the transferprocessing status
Green checkmark ndash the transfer was successful
Red cross ndash something went wrong (in this case the complete entry is highlighted red)
Question mark ndash the message is still unconfirmed (in this case the entry is highlighted yellow)
To check for details click on the MessageID and look at the log information (in the lower right panel) Each processing step carried out by your Messenger is displayed here As long as no errors occurred the log entries are highlighted green
The right-hand columns show How the message was transferred from your test adapter to the Messenger
Which Messenger filters were applied to the message
How the document was transferred to the receiver
You may experiment with the Test Adapter and the Message Monitor and send other documents Please also ask your test partner to send documents to your Messenger
The results shown in the Message Monitor indicate the processing sequence A Senderrsquos Adapter
M Senderrsquos Messenger
L Senderrsquos Listener
Net NetworkTransmission
L Receiverrsquos Listener
M Receiverrsquos Messenger
A Receiverrsquos Adapter
Ponton XP 21 ndash Installation and Configuration Guide 19
Configuration Options
5 Configuration Options The overall configuration of Ponton XP breaks down into the following sections
Messenger configuration This section focuses on your local setting for the Messenger This includes database connections default filter settings communication protocol selection etc
Partner configuration Per partner several setting are required Partner identification filter activation (which overrides the default setting) communication settings etc
Certificate management For own partners key pairs may be created and certificates requested For certificate authorities as well as for each individual partner certificates can be installed Certificates may be requested for signing and encryption for SSL and for SMIME
Hot folder configuration The Hot Folder Adapter is tightly integrated with the Messenger and can therefore be configured through the same interface It supports the definition of multiple hot folders for sending and receiving documents as well as dedicated folders for business partners
51 Messenger Configuration
Set Up Messenger Database
The Messenger stores log entries in a database By default the log database is pre-configured as an HSQL database HSQL is an open source database implementation written entirely in Java If there is no requirement to store log data in an existing database in your organization you may continue with HSQL
It is also possible to configure the Messenger to use a different database system for example
Oracle (version 815 or higher)
MS SQL Server 70
MySQL (version 32 or higher)
SAPdb (version 73)
The log database is accessed via JDBC connection Configuration scripts to set up the tables for an Oracle database are included with Ponton XP You can refer to these scripts as examples to create scripts for your own database system
If you do not yet have a database system with JDBC support in use you can download the setup files for MySQL from httpwwwmysqlcomdownloadsmysql-323html
Ponton XP 21 ndash Installation and Configuration Guide 20
Configuration Options
To configure the Messenger database the following set-up needs to be performed
1 Go to Configuration rarr Messenger rarr Database
2 Enter the driver class name and the URL for the JDBC connection to your database
3 Enter the user name and password for the connection if required
4 Click Test to test the connection
5 Important Donrsquot click OK unless the connection test was successful
Note The connection to the standard HSQL database supplied with the Messenger requires a ldquotruncatedrdquo URL that does contain the database name (as shown above) If you get a ldquoconnection brokenrdquo message when testing the connection to the standard database (as specified above) try deleting ltDATABASEgt from the URL and testing the connection again
Ponton XP 21 ndash Installation and Configuration Guide 21
Configuration Options
Set Logging Level
To specify the logging level go to Configuration rarr Messenger rarr Logging and select the desired settings for Messenger and JDBC logging
There is a range of settings available
OFF turns logging off completely
hellip
DEBUG logs all the messages output by the system
Note Please keep in mind that the chosen logging level can have an effect on the performance of your system In particular it is advisable to use DEBUG logging only in connection with error tracking and analysis
Ponton XP 21 ndash Installation and Configuration Guide 22
Configuration Options
Set Message Queue Scan Interval
Under Configuration rarr Messenger rarr Message Queues you can specify the interval to scan the (inbound and outbound) message queues
The default setting is 5000 msec To boost the message throughput on a faster system you can increase the scan frequency by setting this interval to a lower (ie shorter) value
Ponton XP 21 ndash Installation and Configuration Guide 23
Configuration Options
Select Messaging Pipeline
The Messenger allows you to configure different filter pipelines The standard configuration comes with two pipelines
1 Messenger 203 compatibility pipeline This allows you to maintain backward compatibility with users of the previous Messenger version
2 Messenger 21 pipeline This is to communicate with partners that are also using Messenger version 21 or any EbXML 20 compliant software
For each pipeline a range of filters can be set in particular
Validation
Signing
Compression
Encryption
The Messenger configuration can be used for standard filters (validation signing compression and encryption) for inbound and outbound messages Custom filters are configured in a dedicated section
Developers may extend the Messenger with additional filters For example one may think of a ldquoBusiness Validatorrdquo that checks message content against business rules Or existing filters could be Instead of ldquosoft signingrdquo a document smart card access may be integrated
Ponton XP 21 ndash Installation and Configuration Guide 24
Configuration Options
Outbound Email Connection
This connection is used for email messages sent by your Messenger to your business partners The following data needs to be configured
From ndash the senderrsquos address to be used for your emails
SMTP ndash the outgoing mail server to be contacted by your Messenger in order to submit the email
Username password ndash must be entered if your mail server requires authentication for outgoing emails in this case enter the settings to be used by the Messenger to log in on the mail server
To test the email connection enter a receiver email address (in the ldquoTordquo field) and click the ldquoTestrdquo button
Ponton XP 21 ndash Installation and Configuration Guide 25
Configuration Options
Inbound Email Connection
You can enable your Messenger to receive email messages by setting up a POPIMAP connection with the following entries
Protocol ndash set to pop3 IMAP (depending on the type of mail server)
Server ndash the hostname or IP address of your mail server
Interval ndash the frequency for accessing the server for mail download
Username password ndash must be properly set to authenticate the Messenger on the mail server
Ponton XP 21 ndash Installation and Configuration Guide 26
Configuration Options
Email Notification
You can use the notification service to send emails to specified addresses whenever certain events occur For example you might want to notify your system administrator whenever certain errors are encountered
To specify an address go to Messenger rarr eMail Notification and click New Receiver Enter the email address for this receiver in the text field and select the events for which this receiver is to be notified You can use CTRL-click to activate multiple entries in the list
Ponton XP 21 ndash Installation and Configuration Guide 27
Configuration Options
Communication Settings
On this screen you can specify URI of each partnerrsquos Messenger Service ndash for example
httppartnerserver8080pontonxpSoapListener where partne server refers to the hostname or IP address of the machine the Messenger is installed on
r
Acknowledgment Requests ndash you can use this setting to determine whether outbound messages to this partner require acknowledgements To differentiate per message you can deactivate this checkbox and use the TransmissionMode attribute in the BackendEnvelope In the context of ebXML 20 transmissions you can additionally request signed acknowledgements for increased security
Retransmission Handling ndash you can use this setting to specify the number of retransmission attempts and the interval (in seconds) between attempts If a message cannot be transmitted successfully in the specified number of retries the Messenger will give up and mark the message as ldquofailedrdquo
Ponton XP 21 ndash Installation and Configuration Guide 28
Configuration Options
Configure Archiving Filter
The archiving filter stores the following information in a dedicated directory
Backend Envelope
ebXML Envelope
Payload ndash this is the actual business document
Certificate
Signature
Each part is stored in a separate file
The Archive Folder setting can be used to indicate the location of the archiving folder This can be expressed as
An absolute path to the required folder
A relative path beginning with $CONTEXT ndash this placeholder refers to the folder [installation root]xmlpipewebroot
The Maximum Age setting specifies how long the files will be archived ndash expressed in days
Ponton XP 21 ndash Installation and Configuration Guide 29
Configuration Options
52 Partner Configuration For each partner the following data may be configured
Partner identification (internal and external)
Communication Settings
URI of the partnerrsquos Messenger
Create Delete a Partner Entry
To create a new partner entry specify an identifier for the partner (this is the local identifier for your configuration) and indicate whether this partner entry is for
An internal partner (with the ldquoselfrdquo option activated) ndash this might be a department of your organization
An external partner ndash these entries refer to your business partners for example customers suppliers carriers warehouse operators etc
A message is always sent by your Messenger from an internal to an external partner and received from an external partner to an internal one
Internal partners are distinguished because for encryption and signing the certificates of each internal partner will be used on a per-partner basis
For further information please check the Ponton XP Architecture Overview
Ponton XP 21 ndash Installation and Configuration Guide 30
Configuration Options
Set the Partner Identification
Local Partner Name This identifier is valid within you local configuration ie you may choose any value as long as it is unique among all local partner names
Disable Although configured as a partner individual partners may be disabled In this case the Messenger rejects any message received from this partner
PartyID PartyID Type PartyIDs are used to identify partners externally To avoid name clashes and duplication well-known naming schemas exist to identify partners eg DUNS codes VAT numbers IANA codes etc For this reason trading partners should agree on an minimal set of identification types (like DUNS numbers and IANA codes) that is to be used by all partners
More than one PartyID can be defined per partner The limit is given by the number of PartyID types These are configured separately please check Section ldquoAdvanced Configurationrdquo)
Hint Please also check the Ponton XP Architecture Overview document for a detailed explanation of ebXML codes and partner identification
Ponton XP 21 ndash Installation and Configuration Guide 31
Configuration Options
Partner Communication Configuration
For each partner the following configuration options may be set URI of Partnerrsquos Messenger Service ndash enter the address of the partnerrsquos
Messenger for example httppartnerserver8080pontonxpSoapListener
Request Acknowledge ndash every message to this partner needs to be acknowledged
Request Signed Acknowledge ndash to specify signing of acknowledgements received from this partner
Retries ndash the number of retries in case of unsuccessful message transmission
Retry Interval ndash the number of seconds to wait until the next retry
Ponton XP 21 ndash Installation and Configuration Guide 32
Configuration Options
Processing Configuration
The following options can be set
Default Adapter ndash enter the name of the adapter to be used by default
Processing Pipeline ndash specify the processing pipeline to be used for this profile
Schema Sets ndash choose which Schema set(s) are to be supported
Use XML Signature ndash indicate whether to use XML Signature
Use default message settings (specified under Configuration rarr Messenger rarr Processing) or define a specific processing filter for this partner
Ponton XP 21 ndash Installation and Configuration Guide 33
Configuration Options
Install Partner Certificates
There are different ways of distributing certificates to business partners One is to send the certificate per email and have the partner cut amp paste the certificate code into the partner configuration
Note It is important to cut amp paste the complete certificate code including the lines ldquo----- Begin Certificate -----rdquo and ldquo----- End Certificate -----rdquo
Important A partner certificate will only be accepted if the certificate of the issuing CA (certificate authority) was pre-installed Otherwise the trust relationship between the partner and the CA cannot be traced
One may select to install a general certificate or a SMIME certificate Please determine what kind of certificate you received from your partner before installing it
Ponton XP 21 ndash Installation and Configuration Guide 34
Configuration Options
53 Certificate Management Certificate management comprises the following initial steps
Configure your default CA This is usually properly pre-configured in the installation files
Install the root certificate of the default CA This needs to be installed manually if 3rd-party CAs are to be used
Request a certificate for your own Messenger This includes creating a publicprivate key pair and sending a certificate request to the CA
Optionally you can request and install a SMIME certificate to be used for SMIME based communication via email
Default CA Configuration
On this screen you specify the settings for receiving certificates from your default certificate authority (CA) CA email address ndash enter the email address to be used to request a certificate
from your (default) CA
Ponton XP 21 ndash Installation and Configuration Guide 35
Configuration Options
CA download URL ndash enter the URL at your CA from which to download certificates for your Messenger installation Please note that you can only install certificates for partners you have already defined in your partner configuration
Download interval ndash specify the interval to wait between automatic certificate downloads
To download the available certificates immediately click the Download button
Request and Install Your Own Certificate
To request a certificate from your (default) CA go to Configuration rarr Certificates rarr Request Certificate Please enter data for all the fields on this form If any entries are missing you will get an error message
After completing the form click OK to send the certificate request to your CA You will get a message indicating that the request has been sent
Ponton XP 21 ndash Installation and Configuration Guide 36
Configuration Options
Once you receive the requested certificate from your CA you can install it in your own partner configuration (ie the internal partner you will use to sendreceive messages) Go to Configuration rarr Partners rarr ltYour Partner Namegt rarr Install Certificate and paste the certificate text including the hellip into the text field
Then enter the password you used when you requested the certificate and click OK to complete the installation of the certificate You will see the result above the text field containing the certificate
Ponton XP 21 ndash Installation and Configuration Guide 37
Configuration Options
Install Partner Certificates
Install a certificate issued by the CA for the requesting partner This was already described in the Partner Configuration section for normal standard certificates
Note In case of SMIME certificates an additional password may be needed to allow the Messenger to access the certificate in the local certificate store
Install a CA Certificate
To install the certificate for your CA go to Configuration rarr Certificates rarr CA rarr Install Certificate and paste your CArsquos certificate into the text field This is the certificate that authorizes the CA as a signing authority for other certificates
Ponton XP 21 ndash Installation and Configuration Guide 38
Configuration Options
54 Configure the Hot Folder Adapter
General Configuration
Address Port ndash the Hot Folder Adapter (HFA) is addressed as a separate process that communicates with the Messenger via HTTP Therefore the hostname and port number need to be set up for the Messenger If the HFA is co-located with the Messenger on the same machine use ldquolocalhostrdquo for the IP address In this case the HFA does not run as a separate Java process but will be hosted on the same Tomcat server
Path ndash the HFA needs to know the Adapter communication path of the Messenger By default it is pontonxpAdapterService
Console File Log Level ndash the HFA provides log output to the console and to log files Both can be configured regarding the level of detail The console log is only useful if the HFA is running as a standalone application so you can safely leave it disabled in the default configuration
Ponton XP 21 ndash Installation and Configuration Guide 39
Configuration Options
Create Delete a HFA
Several HFAs may be created Each registers under a different ID at the Messenger HFAs may be created for individual partners If this is the case messages exchanged with the rest of the partners will be stored with the default HFA
Configure a HFA
Each HFA requires several directories to be defined
Inbox ndash a document will be stored in the Inbox whenever it was received from a partner
Outbox ndash documents to be sent to the business partner are dropped here The HFA grabs them in a defined frequency
Failed ndash if a document could not be sent to a partner and all retries failed it will be stored in this folder
Work ndash if a document transfer is in progress or all attempts to send the document have not yet been tried the document will remain here After a final failure it will be transferred to the Failed folder
Ponton XP 21 ndash Installation and Configuration Guide 40
Configuration Options
The following settings are also supported
Port ndash the port to be used by the HFA (optional)
Receiver format ndash standard format is XML
Save Backend envelope ndash the Backend envelope is retained for incoming messages
Support attachments ndash the HFA will save any files attached to an incoming message to the selected inbox folder
Scan Interval ndash the interval to wait (in seconds) between checking the outbox
Number of receiving threads ndash specifies the maximum number of receiving threads the adapter can process
Use partner subfolders ndash if this is set this HFA will create inbox and outbox folders for all remote partners Inbound messages will automatically be sorted into the according folder depending on the sender Outbound messages need to be placed into the receiving partnerrsquos outbox folder The backend message is not used in this mode and is ignored if it exists
Use Acknowledgement for ERP ndash with this option activated the ERP application receives an acknowledgement from the receiving Messenger on the partnerrsquos side This acknowledgement will be provided via the specified Inbox
Ponton XP 21 ndash Installation and Configuration Guide 41
Configuration Options
55 Ponton XE ndash The XML Editor Ponton XE is a separate Ponton product It is packaged with Ponton XP for free use only by papiNet users It allows to enter papiNet document data directly via a graphical user interface and to send the document via the hot folder adapter to the business partners
Ponton XE is fully documented in a separate manual Hence only the Messaging Plug-in will be described here
You can experiment with the XML Editor and check out all the features and options without using the Ponton XP connection To start with you may want to begin with the following steps
Create a new papiNet Purchase Order
Fill out the forms and use optional XML Elements by right-clicking the Plus-icons in the layout tree
Create an HTML file by choosing Document Export to HTML from the menu
Save the document to an XML file and re-load it again
Ponton XP 21 ndash Installation and Configuration Guide 42
Configuration Options
Interface between Ponton XE and Ponton XP
The two software applications communicate via hot folders as illustrated in the following figure
Message Plug-in
Outbox Inbox AckInboxImport
Ponton XP Ponton XE
XMLXML XMLXML XMLXML XMLXML
Hot Folder Adapter
The XML Editor is connected to the Messenger via the Hot Folder Adapter All these folder settings need to be synchronized for a proper data exchange
Configuration of the Messaging Plug-in
The Messaging Plug-in can be flexibly installed and de-installed with the remaining part of Ponton XE If the file messengerjar is removed from the plugins directory it will automatically disappear from the Ponton XE menu bar as soon as the software is started again
Before transferring messages out of Ponton XE you need to preset the following information
Default values for the sending and receiving partners ndash these values may be overridden for an individual transfer
Folder locations of the Hot Folder Adapter ndash the Inbox Outbox and AckInbox need to be set for document exchange with Ponton XP
Default setting for Test Message flag ndash this can be overridden for the actual document transfer
Import Directory ndash Ponton XE will automatically scan the Inbox folder and import received documents to the given folder for local processing
Ponton XP 21 ndash Installation and Configuration Guide 43
Configuration Options
Open Messages after Import ndash if this option is activated messages received from the Inbox will automatically be displayed in Ponton XE
Delete message in Inbox ndash to always remove received messages from the HFA Inbox this option needs to be activated otherwise a copy will remain in the Inbox folder
Ponton XP 21 ndash Installation and Configuration Guide 44
Configuration Options
Ponton XP 21 ndash Installation and Configuration Guide 45
Configuration Options
Using Ponton XE
After setting the configuration and creating a document you can transfer the document to your business partner This is done by means of the following steps
Choose the menu item ldquoMessenger rarr Transfer rarr Send Messagerdquo
Select a sending and receiving partner
Override the settings for the HFA folders
Tick the checkbox to qualify this message as a test message
After transferring the document to the Messenger Ponton XE will wait for a response This is recognised as an acknowledge file which is dropped into the AckInbox folder of the HFA As soon as this has been received a successful transfer in indicated
You may check with the Message Monitor to determine how the document was forwarded by the Messenger to the receiver or whether any errors occurred
Ponton XP 21 ndash Installation and Configuration Guide 46
Configuration Options
56 Display Schema Configuration The schema sets to be supported for each partner are defined in the partner configuration The standard sets available with the installation are shown under Configuration rarr Schemata
Ponton XP 21 ndash Installation and Configuration Guide 47
Configuration Options
57 User Administration Two types of users are distinguished
Administrators ndash these users have full access to the Messengerrsquos configuration interface
Operators ndash these users only have access to the Adapter Monitor the Message Monitor and the Test Adapter The other options in the Messenger menu are not available
Please note the following points in connection with the Messengerrsquos standard user administration
This is a very simple user administration based on the Tomcat implementation If you want to integrate the Messenger with another user administration such as LDAP please contact Ponton Consulting for support
A userrsquos access rights (administratoroperator) are defined when the user account is created ndash they cannot be changed subsequently
User accounts can only be created or deleted by administrators
Ponton XP 21 ndash Installation and Configuration Guide 48
Advanced Configuration
6 Advanced Configuration
61 XML Schema Configuration Important The Messenger distinguishes between available schema set and activated schema sets Just inserting entries in the schema configuration as described in this section does not activate the schema sets or the corresponding schemas for use by the Messenger In order to make use of the schemas in a schema set you have to activate the schema set in the relevant partner configuration To view or modify the activated schema sets in a partner configuration go to
Configuration rarr Partners rarr ltpartner namegt rarr Processing
and activatedeactivate the relevant checkboxes
In the Messengerrsquos configuration interface you can activate and deactivate schema sets for specific partner configurations It is not possible however to modify the contents and specifications of the individual schema sets Any necessary changes have to be made in the configuration file
[installation root]xmlpipewebrootWEB-INFconfigschemataxml
The configuration entries in this file are structured as follows
ltSchemaSet Name=papinet21gt
ltSchemaName=httpwwwpapinetorgdataAvailabilityV2R10xsd MessageType=Availability MessageVersion=V2R10gt
ltNamespacegtltNamespacegt
ltDisplayNamegtAvailability 21ltDisplayNamegt
ltSchemaFilegtAvailabilityV2R10xsdltSchemaFilegt
ltXSLFilegtltXSLFilegt
ltSchemagt
ltSchema Name=yourSchema MessageType=yourMsgType MessageVersion=yourMsgVersgt
ltNamespacegtyourNamespaceltNamespacegt
ltDisplayNamegtYour Display NameltDisplayNamegt
ltSchemaFilegtyourSchemaFileltSchemaFilegt
ltXSLFilegtyourStylesheetltXSLFilegt
ltSchemagt
hellip
ltSchemaFoldergtpapinet210ltSchemaFoldergt
ltXSLFoldergtpapinet210ltXSLFoldergt
ltSchemaSetgt
Ponton XP 21 ndash Installation and Configuration Guide 49
Advanced Configuration
You can add a schema to an existing schema set in this file by inserting a ltSchemagt block (just copy and paste one of the existing blocks and modify the configuration as required) Please ensure that your new schema specification includes correct settings for the attributes of the Schema element
Name= This attribute corresponds with the ebXML Schema Location of incoming messages When an ebXML message is received the Messenger looks for a schema configuration where the Schema Name attribute matches the Schema Location specified in the ebXML envelope
MessageType= This attribute corresponds with the attribute MessageMetaDataDocumentInfoMessageName in the backend envelope of outgoing messages
MessageVersion= This attribute corresponds with the element MessageMe aDataDocumentInfoDTDVersionNumber in the backend envelope of outgoing messages
t
Note The specification of MessageType and MessageVersion must be used together for outgoing messages as they are combined to form an identifier for the message schema
You also have the option of adding a new schema set with your own schema definitions to the schema configuration In this case you would insert a ltSchemaSetgt block with subordinate ltSchemagt blocks Your added schema set will automatically be inserted in the list of available schema sets on the Messenger configuration pages
62 Advanced Database Configuration Important Since the Messenger database is used for essential message processing and tracking purposes you should not experiment with the database configuration on a ldquoliverdquo system For test and debugging purposes you are advised to set up a trial system
Installation with other Databases
This section describes the main steps required to install a different database system on the Messenger for example an Oracle database
1 Install database driver Copy the database driver to
[installation root]xmlpipewebrootWEB-INFlib
Note Please note that only drivers with the extension jar are loaded by the Tomcat servlet engine If the JDBC driver you want to use is a zip file you will have to rename the file to jar The JDBC driver for Oracle 9i is the file ojdbc14jar
Ponton XP 21 ndash Installation and Configuration Guide 50
Advanced Configuration
2 Create database and tables Ponton XP is supplied with SQL scripts for HSQL and for Oracle that can be used to create the tables for the Messenger database If you are using another database you may need to modify these scripts to work correctly with your database system
The SQL scripts are located in the subfolders under [installation root]sql
Once the database tables are in place you will also need to carry out the SQL script that inserts the log messages into the database ie
[installation root]sqlinsert_log_messagessql
3 Set up database connection The configuration of database connections is described in the section Set Up Messenger Database beginning on page 20 To connect with a different database choose ldquootherrdquo from the list of database drivers and enter the configuration for your database on the next page
The entries for the Oracle 9i JDBC driver are
Driver oraclejdbcdriverOracleDriver
URL jdbcoraclethinlthostgtltportgtltdatabasegt
63 Advanced Message Monitor Configuration In the configuration directory ldquoxmlpipewebrootWEB-INFconfigrdquo there is a file messagemonitorxml which can be used to change the selection and ordering of the Message overview window in the Message Monitor The default setting is displayed in the following picture
Ponton XP 21 ndash Installation and Configuration Guide 51
Advanced Configuration
Here the number of line items per page can be set If a high resolution screen is used (beyond 1024 x 768 pixel) one may increase the number of lines
Further a mapping table defines which database column is to be displayed in which monitor column The number of columns again depends on the screen resolution
Finally if main memory size allows caching of XSL stylesheet definitions helps accelerating processing speed for XSL transformations
64 Tomcat SSL Installation
Generate a key
One minor problem with Tomcat or any other webserver that uses the internal Java symmetric key architecture is that you are not allowed to export or import private keys For this reason it is not possible to use the existing key-pair installed with the Messenger software You will have to generate a new key-pair and send a certificate request to the Ponton certificate authority (or other certification authority) to receive a valid certificate
To generate a new key-pair open a command prompt and go to the tomcat-4118 directory The keystore used for a Tomcat SSL installation is located in the Tomcat root directory and is called ssl-keystore The Tomcat installation already contains a certificate for lsquolocalhostrsquo so you can test the HTTPS access with a web browser
Before you can create a new Tomcat certificate you will have to delete the installed certificate Note that the default password for the Tomcat keystore is ldquochangeitrdquo keytool -delete -alias tomcat ndashkeystore ssl-keystore
Now use the following command to create a new key-pair Please note that you need to specify the Listener hostname (eg listenermyserverde) when the keytool asks for lsquofirst and last namersquo keytool -genkey -alias tomcat -keyalg RSA ndashkeystore ssl-keystore
After generating the new key the next step is to export a certificate request with the following command keytool ndashcertreq ndashalias tomcat ndashfile myservercsr ndashkeystore ssl-keystore
This will generate the file myservercsr in the current directory Send this file via email to xp-certponton-consultingde It will be signed and sent back to you The reply will contain a file with the certificate
Finally you have to re-import this signed certificate into the Tomcat SSL keystore Please note that the import may take some time keytool ndashimport ndashalias tomcat ndashfile myservercer ndashkeystore ssl-keystore
If you have any problems starting the keytool make sure you have the javahomebin directory specified in your PATH environment variable Of course you can also change to the javahomebin directory and start the keytool there
Ponton XP 21 ndash Installation and Configuration Guide 52
Advanced Configuration
Update Tomcat configuration
SSL is already activated in the Tomcat configuration packaged in the distribution However you might want to change the specified SSL port (by default the SSL port is set to 8443) You can change the port by editing the file
[tomcat installation]confserverconf
The following section configures the SSL parameters
lt-- Define a SSL Coyote HTTP11 Connector on port 8443 --gt
ltConnector className=orgapachecoyotetomcat4CoyoteConnector
port=8443
minProcessors=5
maxProcessors=75
enableLookups=true
acceptCount=100
debug=0
scheme=https
secure=true
useURIValidationHack=false
disableUploadTimeout=truegt
ltFactory className=orgapachecoyotetomcat4CoyoteServerSocketFactory
clientAuth=false
keystoreFile=ssl-keystore
protocol=TLS gt
ltConnectorgt
Verify setup
To verify if everything is working correctly start the Tomcat webserver as usual and connect to the webserver with your browser
Go to httpsyourserveraddress ndash initially you might get a warning window if the root certificate authority is not known to the browser If you continue by clicking OK you should see the usual Ponton XP start page
If everything comes up correctly you can use SSL to receive messages with the Ponton XP Software
Ponton XP 21 ndash Installation and Configuration Guide 53
Advanced Configuration
65 Distributed Installation If the Messenger is installed on a server that cannot be reached from the Internet you will need to install the Listener as well The purpose of the Listener is to pick up incoming connections and forward them to the Messenger (across the firewall) The firewall rules must be set up to allow this connection between the Listener and the Messenger When a message is received the Listener notifies the Messenger and the Messenger then picks up the message
You also have the option of subsequently installing the Listener as a service under Windows ndash this service can then be configured to start automatically when the system starts up
Note If you are going to run the Messenger in combination with the Listener your partners will have to enter the URI of your Listener in their configurations (under Configuration rarr Partners rarr ltpartner namegt rarr URI of Partners Messenger Service)
Listener Installation and Configuration
The Listener is installed by running the installer program (eg PontonXP-21-setuplistener-windowsexe) on the relevant system You are asked to specify an installation folder and also have the option of creating a desktop or menu shortcut Thatrsquos it
-
The settings for the Listener are contained in the configuration file listenerproperties which is located in the folder [Listener root folder]config To modify these settings you will have to edit the configuration file directly Access via the Messengerrsquos configuration interface is not possible
The file contains the following settings
HttpPort = Port number (for external HTTP connections)
HttpsPort = Port number (for external HTTPS connections)
LogLevel = DEBUG | INFO | WARN | ERROR | FATAL | OFF
The following settings specify the host and port of the Messenger for forwarding connections (HTTPHTTPS) The forwarding connection mode is activated by entering the relevant host and port addresses and removing the hash marks (used to mark ldquocomment linesrdquo in Java property files)
HttpServer = server1port1 (HTTP forwarding connection to the Messenger)
HttpsServer = server1port1 (HTTPS forwarding connection to the Messenger)
Ponton XP 21 ndash Installation and Configuration Guide 54
Advanced Configuration
The following settings specify the Listenerrsquos port for callback connections (HTTPHTTPS) with the Messenger As with the forwarding connection the callback connection mode is activated by entering the relevant port addresses and removing the hash marks (Obviously it makes no sense to have both connections activated at the same time)
HttpServicePort = Port number (for internal HTTP connections to the Listener)
HttpsServicePort = Port number (for internal HTTPS connections to the Listener)
Starting the Listener
To start the Listener open a command prompt and start the class
depontonconsultingxmlpipeListener
with the classpath
-cp libcommons-logging-api-103jarlibcommonutilsjarlibxp_listenerjarconfig
You can also use the installed batch file [Listener root folder]startListenerbat
Callback Mode
Details of the communication flow
When the Messenger starts up it searches for the Listener
Note The Listener should start up first so that it can be found by the Messenger
If the search is successful a permanent connection is established between the Messenger and the Listener The Messenger uses the following settings in the configuration to establish the connection with the Listener
Configuration rarr Messenger rarr Listener rarr HTTP[S] rarr Hostname
Configuration rarr Messenger rarr Listener rarr HTTP[S] rarr Internal Listener Port
Ponton XP 21 ndash Installation and Configuration Guide 55
Advanced Configuration
When the Listener receives an incoming message (or rather an HTTPHTTPS request) it informs the Messenger ndash by way of the permanent connection ndash about the arrival of the new request indicating which port the Messenger can use to pick up the connection
Note This port number is randomly selected by the Listener and cannot be configured
The Messenger picks up the connection on the Listenerrsquos specified port and redirects it to its own local port for further processing
This local port corresponds to the setting for
Configuration rarr Messenger rarr Listener rarr HTTP[S] rarr Internal Messenger Port
in the configuration GUI
Forwarding Mode
Details of the communication flow
In forwarding mode no permanent connection is established between the Messenger and the Listener
When the Listener receives an incoming HTTPHTTPS request it simply forwards the request to the Messenger using the address specified in listenerproperties (HttpServerHttpsServer)
Note To allow this forwarding connection the firewall has to be configured so that the Listener is permitted to access the Messenger on the specified port(s)
Ponton XP 21 ndash Installation and Configuration Guide 56
Advanced Configuration
66 Port Configuration The Messengerrsquos standard configuration uses port 8080 for HTTP connections and port 8443 for secure (HTTPS) connections This section describes how to set up the messenger to use a non-standard port configuration This involves making manual changes to several configuration files in particular the Tomcat serverxml and the Messengerrsquos adapter configuration files
Tomcat Settings
The port setting for the Messengerrsquos HTTP and HTTPS connections are specified in the Tomcat configuration file
[installation root]tomcat-xxxconfserverxml
This file defines the connections (Connectors) for the Messenger as follows
lt-- Define a non-SSL Coyote HTTP11 Connector on port 8080 --gt
ltConnector className=orgapachecoyotetomcat4CoyoteConnector
port=yourMessengerPort minProcessors=5 maxProcessors=75
enableLookups=true redirectPort=yourRed rectPort i acceptCount=100 debug=0 connectionTimeout=20000
useURIValidationHack=false disableUploadTimeout=true gt
lt-- Define a SSL Coyote HTTP11 Connector on port 8443 --gt
ltConnector className=orgapachecoyotetomcat4CoyoteConnector
port=yourSSLPort minProcessors=5 maxProcessors=75
enableLookups=true
acceptCount=100 debug=0 scheme=https secure=true
useURIValidationHack=false disableUploadTimeout=truegt
ltFactory className=orgapachecoyotetomcat4CoyoteServerSocketFactory
clientAuth=false keystoreFile=ssl-keystore protocol=TLS gt
ltConnectorgt
The standard settings for the Messenger ports are
HTTP 8080
SSL 8443
To modify your connections you will need to enter the relevant port numbers indicated above as yourMessengerPort yourRedirectPort (which normally points to the SSL connection) and yourSSLPort
Ponton XP 21 ndash Installation and Configuration Guide 57
Advanced Configuration
Adapter Settings
The settings for the Messenger adapters are contained in the relevant XML files under
[installation root]xmlpipewebrootWEB-INFconfig
In particular a standard installation includes the files testadap erxml and hotfolderxml Each of these configuration files contains a block specifying the connection to the messenger
t
ltMessengergt
ltAddressgtyourMessengerHostltAddressgt
ltPortNumbergtyourMessengerPortltPortNumbergt
ltPathgthellipltPathgt
ltMessengergt
If you have configured the Messenger to run on a different port (see above) you will need to enter the relevant port number here
Ponton XP 21 ndash Installation and Configuration Guide 58
Quick-starting the software
4 Quick-starting the software You can start the Messenger either via the Windows Start menu or by executing startupbat in the installation root directory If you have not started the Messenger from a command shell but via the Windows interface this will open an output window
Please wait until the webserver has fully initialized all the software components When the initialization is finished the following text should be shown near the bottom of the output window Messenger 21 is initialized URL of Messenger Administration Tool
If any errors occur during startup this will be indicated in the output window and logged in the file
[installation root]xmlpipewebrootWEB-INFlogbootlog
Please note that the Messengerrsquos processing log file
[installation root]xmlpipewebrootWEB-INFlogMessengerlog
does not come into play until the Messenger has initialized successfully
41 Logging in Now the Messenger is ready for use open your web browser and enter the URL httplocalhost8080pontonxp
This will bring up the login screen of the webserver The first thing to do is to log in to the administration front-end of the software The defaults set per installation are
User xpadmin
Password xppass
Please make sure you change these values in the Admin tool as soon as possible
In addition to the administrative user xpadmin a default user without administration privileges is installed
User xpuser
Password xppass
Please note If you log in without administration privileges you will not see the configuration menu in the Ponton XP window
Ponton XP 21 ndash Installation and Configuration Guide 12
Quick-starting the software
Note Click on the folder icons in the menu panel to open and close the folders Click on the page labels to display the corresponding pages
42 Stopping the Messenger If you started the software from the start menu (or if it was installed as a Windows service) you can stop the Messenger by selecting Stop Ponton XP from the start menu Alternatively you can execute the shutdownbat in the installation root directory
If you started the Messenger from a command shell you may also enter CTRL-C to stop the process
43 Minimal Configuration Hint If you want to set up an initial test installation it is often easier to install two Messengers on separate PCs within your local environment to avoid firewall restrictions If you want to immediately test with an external partner please ensure with your technical administration staff that your firewall is configured to allow the necessary connections
The following steps describe a minimal configuration for test purposes
Ponton XP 21 ndash Installation and Configuration Guide 13
Quick-starting the software
Define yourself as a partner
Open the Configuration menu in the left frame and click on Partners to open the screen Configuration rarr Partners
Type in a local ID for yourself and enable the self checkbox then click Create New Partner
Choose a Party ID for yourself ndash this ID is the one used in your backend system to reference yourself
Select the Party ID Type PontonCertificate in order to test the use of the Ponton Certificate Authority
Then press OK ndash this new partner is now displayed in the left frame
Ponton XP 21 ndash Installation and Configuration Guide 14
Quick-starting the software
You should now request a certificate from the Ponton CA (See section 53) and install it for your partner in the Install Certificate menu
For test purposes it may be helpful to switch off encryption and signing in your Partner configuration in the Processing menu
In any case your partner configurations must be set up so that the encryption and signing options match the settings chosen by the respective partner
Ponton XP 21 ndash Installation and Configuration Guide 15
Quick-starting the software
Define another partner
On a different host follow the steps described above
For test purposes switch off encryption and signing as described above
To test your Messenger configuration Ponton Consulting offers a test server called xptestponton-consultingde This server is pre-configured in your Messenger set-up Before integrating with you business partners you can start out using this test server as your messaging partner to experiment with different messages configuration options etc
Hint To check if your partnerrsquos Messenger is up and running open your browser and go to the URL
httpltyourpartnersdomainnamegtltport-numbergtpontonxpSoapListener
The URL for the test server at Ponton Consulting for example is
httpxptestponton-consultingde8080pontonxpSoapListener
44 Check if Adapters are running To check whether your Adapters are running go to Adapter Monitor in the main menu If no built-in adapter was used before (Test Adapter or Hot Folder Adapter) and no external adapter has connected to the Messenger the Adapter Monitor will indicate No adapter info availablehellip
Ponton XP 21 ndash Installation and Configuration Guide 16
Quick-starting the software
Now start the Test Adaptor and go back to the Adapter Monitor It should indicate Test Adapter ready to receive messageshellip
45 Exchange documents using the Test Adapter Call up the Test Adapter from the main menu of Ponton XP
Ponton XP 21 ndash Installation and Configuration Guide 17
Quick-starting the software
1 Select a sending partner
2 Select a receiving partner
3 Select a document (filename)
4 For test purposes activate the ldquoTest Messagerdquo checkbox
5 Send the document by clicking ldquoSend Messagerdquo
Your Test Adapter will now send the document to the Messenger The document will then be processed by the Messenger according to your settings and filters (encryption archiving etc) and finally the document will be sent to the specified receiver party
46 Check the status of your messages The status of messages can be monitored in the Message Monitor window which you can select from the main menu of Ponton XP
In the Message Monitor click the ldquoSearchrdquo button (located below the filter settings on the left) and check if your message was properly transferred to the receiver This is shown in the ldquoResultrdquo column (located in the message overview in the upper right panel)
Ponton XP 21 ndash Installation and Configuration Guide 18
Quick-starting the software
The following color codes are used to indicate the transferprocessing status
Green checkmark ndash the transfer was successful
Red cross ndash something went wrong (in this case the complete entry is highlighted red)
Question mark ndash the message is still unconfirmed (in this case the entry is highlighted yellow)
To check for details click on the MessageID and look at the log information (in the lower right panel) Each processing step carried out by your Messenger is displayed here As long as no errors occurred the log entries are highlighted green
The right-hand columns show How the message was transferred from your test adapter to the Messenger
Which Messenger filters were applied to the message
How the document was transferred to the receiver
You may experiment with the Test Adapter and the Message Monitor and send other documents Please also ask your test partner to send documents to your Messenger
The results shown in the Message Monitor indicate the processing sequence A Senderrsquos Adapter
M Senderrsquos Messenger
L Senderrsquos Listener
Net NetworkTransmission
L Receiverrsquos Listener
M Receiverrsquos Messenger
A Receiverrsquos Adapter
Ponton XP 21 ndash Installation and Configuration Guide 19
Configuration Options
5 Configuration Options The overall configuration of Ponton XP breaks down into the following sections
Messenger configuration This section focuses on your local setting for the Messenger This includes database connections default filter settings communication protocol selection etc
Partner configuration Per partner several setting are required Partner identification filter activation (which overrides the default setting) communication settings etc
Certificate management For own partners key pairs may be created and certificates requested For certificate authorities as well as for each individual partner certificates can be installed Certificates may be requested for signing and encryption for SSL and for SMIME
Hot folder configuration The Hot Folder Adapter is tightly integrated with the Messenger and can therefore be configured through the same interface It supports the definition of multiple hot folders for sending and receiving documents as well as dedicated folders for business partners
51 Messenger Configuration
Set Up Messenger Database
The Messenger stores log entries in a database By default the log database is pre-configured as an HSQL database HSQL is an open source database implementation written entirely in Java If there is no requirement to store log data in an existing database in your organization you may continue with HSQL
It is also possible to configure the Messenger to use a different database system for example
Oracle (version 815 or higher)
MS SQL Server 70
MySQL (version 32 or higher)
SAPdb (version 73)
The log database is accessed via JDBC connection Configuration scripts to set up the tables for an Oracle database are included with Ponton XP You can refer to these scripts as examples to create scripts for your own database system
If you do not yet have a database system with JDBC support in use you can download the setup files for MySQL from httpwwwmysqlcomdownloadsmysql-323html
Ponton XP 21 ndash Installation and Configuration Guide 20
Configuration Options
To configure the Messenger database the following set-up needs to be performed
1 Go to Configuration rarr Messenger rarr Database
2 Enter the driver class name and the URL for the JDBC connection to your database
3 Enter the user name and password for the connection if required
4 Click Test to test the connection
5 Important Donrsquot click OK unless the connection test was successful
Note The connection to the standard HSQL database supplied with the Messenger requires a ldquotruncatedrdquo URL that does contain the database name (as shown above) If you get a ldquoconnection brokenrdquo message when testing the connection to the standard database (as specified above) try deleting ltDATABASEgt from the URL and testing the connection again
Ponton XP 21 ndash Installation and Configuration Guide 21
Configuration Options
Set Logging Level
To specify the logging level go to Configuration rarr Messenger rarr Logging and select the desired settings for Messenger and JDBC logging
There is a range of settings available
OFF turns logging off completely
hellip
DEBUG logs all the messages output by the system
Note Please keep in mind that the chosen logging level can have an effect on the performance of your system In particular it is advisable to use DEBUG logging only in connection with error tracking and analysis
Ponton XP 21 ndash Installation and Configuration Guide 22
Configuration Options
Set Message Queue Scan Interval
Under Configuration rarr Messenger rarr Message Queues you can specify the interval to scan the (inbound and outbound) message queues
The default setting is 5000 msec To boost the message throughput on a faster system you can increase the scan frequency by setting this interval to a lower (ie shorter) value
Ponton XP 21 ndash Installation and Configuration Guide 23
Configuration Options
Select Messaging Pipeline
The Messenger allows you to configure different filter pipelines The standard configuration comes with two pipelines
1 Messenger 203 compatibility pipeline This allows you to maintain backward compatibility with users of the previous Messenger version
2 Messenger 21 pipeline This is to communicate with partners that are also using Messenger version 21 or any EbXML 20 compliant software
For each pipeline a range of filters can be set in particular
Validation
Signing
Compression
Encryption
The Messenger configuration can be used for standard filters (validation signing compression and encryption) for inbound and outbound messages Custom filters are configured in a dedicated section
Developers may extend the Messenger with additional filters For example one may think of a ldquoBusiness Validatorrdquo that checks message content against business rules Or existing filters could be Instead of ldquosoft signingrdquo a document smart card access may be integrated
Ponton XP 21 ndash Installation and Configuration Guide 24
Configuration Options
Outbound Email Connection
This connection is used for email messages sent by your Messenger to your business partners The following data needs to be configured
From ndash the senderrsquos address to be used for your emails
SMTP ndash the outgoing mail server to be contacted by your Messenger in order to submit the email
Username password ndash must be entered if your mail server requires authentication for outgoing emails in this case enter the settings to be used by the Messenger to log in on the mail server
To test the email connection enter a receiver email address (in the ldquoTordquo field) and click the ldquoTestrdquo button
Ponton XP 21 ndash Installation and Configuration Guide 25
Configuration Options
Inbound Email Connection
You can enable your Messenger to receive email messages by setting up a POPIMAP connection with the following entries
Protocol ndash set to pop3 IMAP (depending on the type of mail server)
Server ndash the hostname or IP address of your mail server
Interval ndash the frequency for accessing the server for mail download
Username password ndash must be properly set to authenticate the Messenger on the mail server
Ponton XP 21 ndash Installation and Configuration Guide 26
Configuration Options
Email Notification
You can use the notification service to send emails to specified addresses whenever certain events occur For example you might want to notify your system administrator whenever certain errors are encountered
To specify an address go to Messenger rarr eMail Notification and click New Receiver Enter the email address for this receiver in the text field and select the events for which this receiver is to be notified You can use CTRL-click to activate multiple entries in the list
Ponton XP 21 ndash Installation and Configuration Guide 27
Configuration Options
Communication Settings
On this screen you can specify URI of each partnerrsquos Messenger Service ndash for example
httppartnerserver8080pontonxpSoapListener where partne server refers to the hostname or IP address of the machine the Messenger is installed on
r
Acknowledgment Requests ndash you can use this setting to determine whether outbound messages to this partner require acknowledgements To differentiate per message you can deactivate this checkbox and use the TransmissionMode attribute in the BackendEnvelope In the context of ebXML 20 transmissions you can additionally request signed acknowledgements for increased security
Retransmission Handling ndash you can use this setting to specify the number of retransmission attempts and the interval (in seconds) between attempts If a message cannot be transmitted successfully in the specified number of retries the Messenger will give up and mark the message as ldquofailedrdquo
Ponton XP 21 ndash Installation and Configuration Guide 28
Configuration Options
Configure Archiving Filter
The archiving filter stores the following information in a dedicated directory
Backend Envelope
ebXML Envelope
Payload ndash this is the actual business document
Certificate
Signature
Each part is stored in a separate file
The Archive Folder setting can be used to indicate the location of the archiving folder This can be expressed as
An absolute path to the required folder
A relative path beginning with $CONTEXT ndash this placeholder refers to the folder [installation root]xmlpipewebroot
The Maximum Age setting specifies how long the files will be archived ndash expressed in days
Ponton XP 21 ndash Installation and Configuration Guide 29
Configuration Options
52 Partner Configuration For each partner the following data may be configured
Partner identification (internal and external)
Communication Settings
URI of the partnerrsquos Messenger
Create Delete a Partner Entry
To create a new partner entry specify an identifier for the partner (this is the local identifier for your configuration) and indicate whether this partner entry is for
An internal partner (with the ldquoselfrdquo option activated) ndash this might be a department of your organization
An external partner ndash these entries refer to your business partners for example customers suppliers carriers warehouse operators etc
A message is always sent by your Messenger from an internal to an external partner and received from an external partner to an internal one
Internal partners are distinguished because for encryption and signing the certificates of each internal partner will be used on a per-partner basis
For further information please check the Ponton XP Architecture Overview
Ponton XP 21 ndash Installation and Configuration Guide 30
Configuration Options
Set the Partner Identification
Local Partner Name This identifier is valid within you local configuration ie you may choose any value as long as it is unique among all local partner names
Disable Although configured as a partner individual partners may be disabled In this case the Messenger rejects any message received from this partner
PartyID PartyID Type PartyIDs are used to identify partners externally To avoid name clashes and duplication well-known naming schemas exist to identify partners eg DUNS codes VAT numbers IANA codes etc For this reason trading partners should agree on an minimal set of identification types (like DUNS numbers and IANA codes) that is to be used by all partners
More than one PartyID can be defined per partner The limit is given by the number of PartyID types These are configured separately please check Section ldquoAdvanced Configurationrdquo)
Hint Please also check the Ponton XP Architecture Overview document for a detailed explanation of ebXML codes and partner identification
Ponton XP 21 ndash Installation and Configuration Guide 31
Configuration Options
Partner Communication Configuration
For each partner the following configuration options may be set URI of Partnerrsquos Messenger Service ndash enter the address of the partnerrsquos
Messenger for example httppartnerserver8080pontonxpSoapListener
Request Acknowledge ndash every message to this partner needs to be acknowledged
Request Signed Acknowledge ndash to specify signing of acknowledgements received from this partner
Retries ndash the number of retries in case of unsuccessful message transmission
Retry Interval ndash the number of seconds to wait until the next retry
Ponton XP 21 ndash Installation and Configuration Guide 32
Configuration Options
Processing Configuration
The following options can be set
Default Adapter ndash enter the name of the adapter to be used by default
Processing Pipeline ndash specify the processing pipeline to be used for this profile
Schema Sets ndash choose which Schema set(s) are to be supported
Use XML Signature ndash indicate whether to use XML Signature
Use default message settings (specified under Configuration rarr Messenger rarr Processing) or define a specific processing filter for this partner
Ponton XP 21 ndash Installation and Configuration Guide 33
Configuration Options
Install Partner Certificates
There are different ways of distributing certificates to business partners One is to send the certificate per email and have the partner cut amp paste the certificate code into the partner configuration
Note It is important to cut amp paste the complete certificate code including the lines ldquo----- Begin Certificate -----rdquo and ldquo----- End Certificate -----rdquo
Important A partner certificate will only be accepted if the certificate of the issuing CA (certificate authority) was pre-installed Otherwise the trust relationship between the partner and the CA cannot be traced
One may select to install a general certificate or a SMIME certificate Please determine what kind of certificate you received from your partner before installing it
Ponton XP 21 ndash Installation and Configuration Guide 34
Configuration Options
53 Certificate Management Certificate management comprises the following initial steps
Configure your default CA This is usually properly pre-configured in the installation files
Install the root certificate of the default CA This needs to be installed manually if 3rd-party CAs are to be used
Request a certificate for your own Messenger This includes creating a publicprivate key pair and sending a certificate request to the CA
Optionally you can request and install a SMIME certificate to be used for SMIME based communication via email
Default CA Configuration
On this screen you specify the settings for receiving certificates from your default certificate authority (CA) CA email address ndash enter the email address to be used to request a certificate
from your (default) CA
Ponton XP 21 ndash Installation and Configuration Guide 35
Configuration Options
CA download URL ndash enter the URL at your CA from which to download certificates for your Messenger installation Please note that you can only install certificates for partners you have already defined in your partner configuration
Download interval ndash specify the interval to wait between automatic certificate downloads
To download the available certificates immediately click the Download button
Request and Install Your Own Certificate
To request a certificate from your (default) CA go to Configuration rarr Certificates rarr Request Certificate Please enter data for all the fields on this form If any entries are missing you will get an error message
After completing the form click OK to send the certificate request to your CA You will get a message indicating that the request has been sent
Ponton XP 21 ndash Installation and Configuration Guide 36
Configuration Options
Once you receive the requested certificate from your CA you can install it in your own partner configuration (ie the internal partner you will use to sendreceive messages) Go to Configuration rarr Partners rarr ltYour Partner Namegt rarr Install Certificate and paste the certificate text including the hellip into the text field
Then enter the password you used when you requested the certificate and click OK to complete the installation of the certificate You will see the result above the text field containing the certificate
Ponton XP 21 ndash Installation and Configuration Guide 37
Configuration Options
Install Partner Certificates
Install a certificate issued by the CA for the requesting partner This was already described in the Partner Configuration section for normal standard certificates
Note In case of SMIME certificates an additional password may be needed to allow the Messenger to access the certificate in the local certificate store
Install a CA Certificate
To install the certificate for your CA go to Configuration rarr Certificates rarr CA rarr Install Certificate and paste your CArsquos certificate into the text field This is the certificate that authorizes the CA as a signing authority for other certificates
Ponton XP 21 ndash Installation and Configuration Guide 38
Configuration Options
54 Configure the Hot Folder Adapter
General Configuration
Address Port ndash the Hot Folder Adapter (HFA) is addressed as a separate process that communicates with the Messenger via HTTP Therefore the hostname and port number need to be set up for the Messenger If the HFA is co-located with the Messenger on the same machine use ldquolocalhostrdquo for the IP address In this case the HFA does not run as a separate Java process but will be hosted on the same Tomcat server
Path ndash the HFA needs to know the Adapter communication path of the Messenger By default it is pontonxpAdapterService
Console File Log Level ndash the HFA provides log output to the console and to log files Both can be configured regarding the level of detail The console log is only useful if the HFA is running as a standalone application so you can safely leave it disabled in the default configuration
Ponton XP 21 ndash Installation and Configuration Guide 39
Configuration Options
Create Delete a HFA
Several HFAs may be created Each registers under a different ID at the Messenger HFAs may be created for individual partners If this is the case messages exchanged with the rest of the partners will be stored with the default HFA
Configure a HFA
Each HFA requires several directories to be defined
Inbox ndash a document will be stored in the Inbox whenever it was received from a partner
Outbox ndash documents to be sent to the business partner are dropped here The HFA grabs them in a defined frequency
Failed ndash if a document could not be sent to a partner and all retries failed it will be stored in this folder
Work ndash if a document transfer is in progress or all attempts to send the document have not yet been tried the document will remain here After a final failure it will be transferred to the Failed folder
Ponton XP 21 ndash Installation and Configuration Guide 40
Configuration Options
The following settings are also supported
Port ndash the port to be used by the HFA (optional)
Receiver format ndash standard format is XML
Save Backend envelope ndash the Backend envelope is retained for incoming messages
Support attachments ndash the HFA will save any files attached to an incoming message to the selected inbox folder
Scan Interval ndash the interval to wait (in seconds) between checking the outbox
Number of receiving threads ndash specifies the maximum number of receiving threads the adapter can process
Use partner subfolders ndash if this is set this HFA will create inbox and outbox folders for all remote partners Inbound messages will automatically be sorted into the according folder depending on the sender Outbound messages need to be placed into the receiving partnerrsquos outbox folder The backend message is not used in this mode and is ignored if it exists
Use Acknowledgement for ERP ndash with this option activated the ERP application receives an acknowledgement from the receiving Messenger on the partnerrsquos side This acknowledgement will be provided via the specified Inbox
Ponton XP 21 ndash Installation and Configuration Guide 41
Configuration Options
55 Ponton XE ndash The XML Editor Ponton XE is a separate Ponton product It is packaged with Ponton XP for free use only by papiNet users It allows to enter papiNet document data directly via a graphical user interface and to send the document via the hot folder adapter to the business partners
Ponton XE is fully documented in a separate manual Hence only the Messaging Plug-in will be described here
You can experiment with the XML Editor and check out all the features and options without using the Ponton XP connection To start with you may want to begin with the following steps
Create a new papiNet Purchase Order
Fill out the forms and use optional XML Elements by right-clicking the Plus-icons in the layout tree
Create an HTML file by choosing Document Export to HTML from the menu
Save the document to an XML file and re-load it again
Ponton XP 21 ndash Installation and Configuration Guide 42
Configuration Options
Interface between Ponton XE and Ponton XP
The two software applications communicate via hot folders as illustrated in the following figure
Message Plug-in
Outbox Inbox AckInboxImport
Ponton XP Ponton XE
XMLXML XMLXML XMLXML XMLXML
Hot Folder Adapter
The XML Editor is connected to the Messenger via the Hot Folder Adapter All these folder settings need to be synchronized for a proper data exchange
Configuration of the Messaging Plug-in
The Messaging Plug-in can be flexibly installed and de-installed with the remaining part of Ponton XE If the file messengerjar is removed from the plugins directory it will automatically disappear from the Ponton XE menu bar as soon as the software is started again
Before transferring messages out of Ponton XE you need to preset the following information
Default values for the sending and receiving partners ndash these values may be overridden for an individual transfer
Folder locations of the Hot Folder Adapter ndash the Inbox Outbox and AckInbox need to be set for document exchange with Ponton XP
Default setting for Test Message flag ndash this can be overridden for the actual document transfer
Import Directory ndash Ponton XE will automatically scan the Inbox folder and import received documents to the given folder for local processing
Ponton XP 21 ndash Installation and Configuration Guide 43
Configuration Options
Open Messages after Import ndash if this option is activated messages received from the Inbox will automatically be displayed in Ponton XE
Delete message in Inbox ndash to always remove received messages from the HFA Inbox this option needs to be activated otherwise a copy will remain in the Inbox folder
Ponton XP 21 ndash Installation and Configuration Guide 44
Configuration Options
Ponton XP 21 ndash Installation and Configuration Guide 45
Configuration Options
Using Ponton XE
After setting the configuration and creating a document you can transfer the document to your business partner This is done by means of the following steps
Choose the menu item ldquoMessenger rarr Transfer rarr Send Messagerdquo
Select a sending and receiving partner
Override the settings for the HFA folders
Tick the checkbox to qualify this message as a test message
After transferring the document to the Messenger Ponton XE will wait for a response This is recognised as an acknowledge file which is dropped into the AckInbox folder of the HFA As soon as this has been received a successful transfer in indicated
You may check with the Message Monitor to determine how the document was forwarded by the Messenger to the receiver or whether any errors occurred
Ponton XP 21 ndash Installation and Configuration Guide 46
Configuration Options
56 Display Schema Configuration The schema sets to be supported for each partner are defined in the partner configuration The standard sets available with the installation are shown under Configuration rarr Schemata
Ponton XP 21 ndash Installation and Configuration Guide 47
Configuration Options
57 User Administration Two types of users are distinguished
Administrators ndash these users have full access to the Messengerrsquos configuration interface
Operators ndash these users only have access to the Adapter Monitor the Message Monitor and the Test Adapter The other options in the Messenger menu are not available
Please note the following points in connection with the Messengerrsquos standard user administration
This is a very simple user administration based on the Tomcat implementation If you want to integrate the Messenger with another user administration such as LDAP please contact Ponton Consulting for support
A userrsquos access rights (administratoroperator) are defined when the user account is created ndash they cannot be changed subsequently
User accounts can only be created or deleted by administrators
Ponton XP 21 ndash Installation and Configuration Guide 48
Advanced Configuration
6 Advanced Configuration
61 XML Schema Configuration Important The Messenger distinguishes between available schema set and activated schema sets Just inserting entries in the schema configuration as described in this section does not activate the schema sets or the corresponding schemas for use by the Messenger In order to make use of the schemas in a schema set you have to activate the schema set in the relevant partner configuration To view or modify the activated schema sets in a partner configuration go to
Configuration rarr Partners rarr ltpartner namegt rarr Processing
and activatedeactivate the relevant checkboxes
In the Messengerrsquos configuration interface you can activate and deactivate schema sets for specific partner configurations It is not possible however to modify the contents and specifications of the individual schema sets Any necessary changes have to be made in the configuration file
[installation root]xmlpipewebrootWEB-INFconfigschemataxml
The configuration entries in this file are structured as follows
ltSchemaSet Name=papinet21gt
ltSchemaName=httpwwwpapinetorgdataAvailabilityV2R10xsd MessageType=Availability MessageVersion=V2R10gt
ltNamespacegtltNamespacegt
ltDisplayNamegtAvailability 21ltDisplayNamegt
ltSchemaFilegtAvailabilityV2R10xsdltSchemaFilegt
ltXSLFilegtltXSLFilegt
ltSchemagt
ltSchema Name=yourSchema MessageType=yourMsgType MessageVersion=yourMsgVersgt
ltNamespacegtyourNamespaceltNamespacegt
ltDisplayNamegtYour Display NameltDisplayNamegt
ltSchemaFilegtyourSchemaFileltSchemaFilegt
ltXSLFilegtyourStylesheetltXSLFilegt
ltSchemagt
hellip
ltSchemaFoldergtpapinet210ltSchemaFoldergt
ltXSLFoldergtpapinet210ltXSLFoldergt
ltSchemaSetgt
Ponton XP 21 ndash Installation and Configuration Guide 49
Advanced Configuration
You can add a schema to an existing schema set in this file by inserting a ltSchemagt block (just copy and paste one of the existing blocks and modify the configuration as required) Please ensure that your new schema specification includes correct settings for the attributes of the Schema element
Name= This attribute corresponds with the ebXML Schema Location of incoming messages When an ebXML message is received the Messenger looks for a schema configuration where the Schema Name attribute matches the Schema Location specified in the ebXML envelope
MessageType= This attribute corresponds with the attribute MessageMetaDataDocumentInfoMessageName in the backend envelope of outgoing messages
MessageVersion= This attribute corresponds with the element MessageMe aDataDocumentInfoDTDVersionNumber in the backend envelope of outgoing messages
t
Note The specification of MessageType and MessageVersion must be used together for outgoing messages as they are combined to form an identifier for the message schema
You also have the option of adding a new schema set with your own schema definitions to the schema configuration In this case you would insert a ltSchemaSetgt block with subordinate ltSchemagt blocks Your added schema set will automatically be inserted in the list of available schema sets on the Messenger configuration pages
62 Advanced Database Configuration Important Since the Messenger database is used for essential message processing and tracking purposes you should not experiment with the database configuration on a ldquoliverdquo system For test and debugging purposes you are advised to set up a trial system
Installation with other Databases
This section describes the main steps required to install a different database system on the Messenger for example an Oracle database
1 Install database driver Copy the database driver to
[installation root]xmlpipewebrootWEB-INFlib
Note Please note that only drivers with the extension jar are loaded by the Tomcat servlet engine If the JDBC driver you want to use is a zip file you will have to rename the file to jar The JDBC driver for Oracle 9i is the file ojdbc14jar
Ponton XP 21 ndash Installation and Configuration Guide 50
Advanced Configuration
2 Create database and tables Ponton XP is supplied with SQL scripts for HSQL and for Oracle that can be used to create the tables for the Messenger database If you are using another database you may need to modify these scripts to work correctly with your database system
The SQL scripts are located in the subfolders under [installation root]sql
Once the database tables are in place you will also need to carry out the SQL script that inserts the log messages into the database ie
[installation root]sqlinsert_log_messagessql
3 Set up database connection The configuration of database connections is described in the section Set Up Messenger Database beginning on page 20 To connect with a different database choose ldquootherrdquo from the list of database drivers and enter the configuration for your database on the next page
The entries for the Oracle 9i JDBC driver are
Driver oraclejdbcdriverOracleDriver
URL jdbcoraclethinlthostgtltportgtltdatabasegt
63 Advanced Message Monitor Configuration In the configuration directory ldquoxmlpipewebrootWEB-INFconfigrdquo there is a file messagemonitorxml which can be used to change the selection and ordering of the Message overview window in the Message Monitor The default setting is displayed in the following picture
Ponton XP 21 ndash Installation and Configuration Guide 51
Advanced Configuration
Here the number of line items per page can be set If a high resolution screen is used (beyond 1024 x 768 pixel) one may increase the number of lines
Further a mapping table defines which database column is to be displayed in which monitor column The number of columns again depends on the screen resolution
Finally if main memory size allows caching of XSL stylesheet definitions helps accelerating processing speed for XSL transformations
64 Tomcat SSL Installation
Generate a key
One minor problem with Tomcat or any other webserver that uses the internal Java symmetric key architecture is that you are not allowed to export or import private keys For this reason it is not possible to use the existing key-pair installed with the Messenger software You will have to generate a new key-pair and send a certificate request to the Ponton certificate authority (or other certification authority) to receive a valid certificate
To generate a new key-pair open a command prompt and go to the tomcat-4118 directory The keystore used for a Tomcat SSL installation is located in the Tomcat root directory and is called ssl-keystore The Tomcat installation already contains a certificate for lsquolocalhostrsquo so you can test the HTTPS access with a web browser
Before you can create a new Tomcat certificate you will have to delete the installed certificate Note that the default password for the Tomcat keystore is ldquochangeitrdquo keytool -delete -alias tomcat ndashkeystore ssl-keystore
Now use the following command to create a new key-pair Please note that you need to specify the Listener hostname (eg listenermyserverde) when the keytool asks for lsquofirst and last namersquo keytool -genkey -alias tomcat -keyalg RSA ndashkeystore ssl-keystore
After generating the new key the next step is to export a certificate request with the following command keytool ndashcertreq ndashalias tomcat ndashfile myservercsr ndashkeystore ssl-keystore
This will generate the file myservercsr in the current directory Send this file via email to xp-certponton-consultingde It will be signed and sent back to you The reply will contain a file with the certificate
Finally you have to re-import this signed certificate into the Tomcat SSL keystore Please note that the import may take some time keytool ndashimport ndashalias tomcat ndashfile myservercer ndashkeystore ssl-keystore
If you have any problems starting the keytool make sure you have the javahomebin directory specified in your PATH environment variable Of course you can also change to the javahomebin directory and start the keytool there
Ponton XP 21 ndash Installation and Configuration Guide 52
Advanced Configuration
Update Tomcat configuration
SSL is already activated in the Tomcat configuration packaged in the distribution However you might want to change the specified SSL port (by default the SSL port is set to 8443) You can change the port by editing the file
[tomcat installation]confserverconf
The following section configures the SSL parameters
lt-- Define a SSL Coyote HTTP11 Connector on port 8443 --gt
ltConnector className=orgapachecoyotetomcat4CoyoteConnector
port=8443
minProcessors=5
maxProcessors=75
enableLookups=true
acceptCount=100
debug=0
scheme=https
secure=true
useURIValidationHack=false
disableUploadTimeout=truegt
ltFactory className=orgapachecoyotetomcat4CoyoteServerSocketFactory
clientAuth=false
keystoreFile=ssl-keystore
protocol=TLS gt
ltConnectorgt
Verify setup
To verify if everything is working correctly start the Tomcat webserver as usual and connect to the webserver with your browser
Go to httpsyourserveraddress ndash initially you might get a warning window if the root certificate authority is not known to the browser If you continue by clicking OK you should see the usual Ponton XP start page
If everything comes up correctly you can use SSL to receive messages with the Ponton XP Software
Ponton XP 21 ndash Installation and Configuration Guide 53
Advanced Configuration
65 Distributed Installation If the Messenger is installed on a server that cannot be reached from the Internet you will need to install the Listener as well The purpose of the Listener is to pick up incoming connections and forward them to the Messenger (across the firewall) The firewall rules must be set up to allow this connection between the Listener and the Messenger When a message is received the Listener notifies the Messenger and the Messenger then picks up the message
You also have the option of subsequently installing the Listener as a service under Windows ndash this service can then be configured to start automatically when the system starts up
Note If you are going to run the Messenger in combination with the Listener your partners will have to enter the URI of your Listener in their configurations (under Configuration rarr Partners rarr ltpartner namegt rarr URI of Partners Messenger Service)
Listener Installation and Configuration
The Listener is installed by running the installer program (eg PontonXP-21-setuplistener-windowsexe) on the relevant system You are asked to specify an installation folder and also have the option of creating a desktop or menu shortcut Thatrsquos it
-
The settings for the Listener are contained in the configuration file listenerproperties which is located in the folder [Listener root folder]config To modify these settings you will have to edit the configuration file directly Access via the Messengerrsquos configuration interface is not possible
The file contains the following settings
HttpPort = Port number (for external HTTP connections)
HttpsPort = Port number (for external HTTPS connections)
LogLevel = DEBUG | INFO | WARN | ERROR | FATAL | OFF
The following settings specify the host and port of the Messenger for forwarding connections (HTTPHTTPS) The forwarding connection mode is activated by entering the relevant host and port addresses and removing the hash marks (used to mark ldquocomment linesrdquo in Java property files)
HttpServer = server1port1 (HTTP forwarding connection to the Messenger)
HttpsServer = server1port1 (HTTPS forwarding connection to the Messenger)
Ponton XP 21 ndash Installation and Configuration Guide 54
Advanced Configuration
The following settings specify the Listenerrsquos port for callback connections (HTTPHTTPS) with the Messenger As with the forwarding connection the callback connection mode is activated by entering the relevant port addresses and removing the hash marks (Obviously it makes no sense to have both connections activated at the same time)
HttpServicePort = Port number (for internal HTTP connections to the Listener)
HttpsServicePort = Port number (for internal HTTPS connections to the Listener)
Starting the Listener
To start the Listener open a command prompt and start the class
depontonconsultingxmlpipeListener
with the classpath
-cp libcommons-logging-api-103jarlibcommonutilsjarlibxp_listenerjarconfig
You can also use the installed batch file [Listener root folder]startListenerbat
Callback Mode
Details of the communication flow
When the Messenger starts up it searches for the Listener
Note The Listener should start up first so that it can be found by the Messenger
If the search is successful a permanent connection is established between the Messenger and the Listener The Messenger uses the following settings in the configuration to establish the connection with the Listener
Configuration rarr Messenger rarr Listener rarr HTTP[S] rarr Hostname
Configuration rarr Messenger rarr Listener rarr HTTP[S] rarr Internal Listener Port
Ponton XP 21 ndash Installation and Configuration Guide 55
Advanced Configuration
When the Listener receives an incoming message (or rather an HTTPHTTPS request) it informs the Messenger ndash by way of the permanent connection ndash about the arrival of the new request indicating which port the Messenger can use to pick up the connection
Note This port number is randomly selected by the Listener and cannot be configured
The Messenger picks up the connection on the Listenerrsquos specified port and redirects it to its own local port for further processing
This local port corresponds to the setting for
Configuration rarr Messenger rarr Listener rarr HTTP[S] rarr Internal Messenger Port
in the configuration GUI
Forwarding Mode
Details of the communication flow
In forwarding mode no permanent connection is established between the Messenger and the Listener
When the Listener receives an incoming HTTPHTTPS request it simply forwards the request to the Messenger using the address specified in listenerproperties (HttpServerHttpsServer)
Note To allow this forwarding connection the firewall has to be configured so that the Listener is permitted to access the Messenger on the specified port(s)
Ponton XP 21 ndash Installation and Configuration Guide 56
Advanced Configuration
66 Port Configuration The Messengerrsquos standard configuration uses port 8080 for HTTP connections and port 8443 for secure (HTTPS) connections This section describes how to set up the messenger to use a non-standard port configuration This involves making manual changes to several configuration files in particular the Tomcat serverxml and the Messengerrsquos adapter configuration files
Tomcat Settings
The port setting for the Messengerrsquos HTTP and HTTPS connections are specified in the Tomcat configuration file
[installation root]tomcat-xxxconfserverxml
This file defines the connections (Connectors) for the Messenger as follows
lt-- Define a non-SSL Coyote HTTP11 Connector on port 8080 --gt
ltConnector className=orgapachecoyotetomcat4CoyoteConnector
port=yourMessengerPort minProcessors=5 maxProcessors=75
enableLookups=true redirectPort=yourRed rectPort i acceptCount=100 debug=0 connectionTimeout=20000
useURIValidationHack=false disableUploadTimeout=true gt
lt-- Define a SSL Coyote HTTP11 Connector on port 8443 --gt
ltConnector className=orgapachecoyotetomcat4CoyoteConnector
port=yourSSLPort minProcessors=5 maxProcessors=75
enableLookups=true
acceptCount=100 debug=0 scheme=https secure=true
useURIValidationHack=false disableUploadTimeout=truegt
ltFactory className=orgapachecoyotetomcat4CoyoteServerSocketFactory
clientAuth=false keystoreFile=ssl-keystore protocol=TLS gt
ltConnectorgt
The standard settings for the Messenger ports are
HTTP 8080
SSL 8443
To modify your connections you will need to enter the relevant port numbers indicated above as yourMessengerPort yourRedirectPort (which normally points to the SSL connection) and yourSSLPort
Ponton XP 21 ndash Installation and Configuration Guide 57
Advanced Configuration
Adapter Settings
The settings for the Messenger adapters are contained in the relevant XML files under
[installation root]xmlpipewebrootWEB-INFconfig
In particular a standard installation includes the files testadap erxml and hotfolderxml Each of these configuration files contains a block specifying the connection to the messenger
t
ltMessengergt
ltAddressgtyourMessengerHostltAddressgt
ltPortNumbergtyourMessengerPortltPortNumbergt
ltPathgthellipltPathgt
ltMessengergt
If you have configured the Messenger to run on a different port (see above) you will need to enter the relevant port number here
Ponton XP 21 ndash Installation and Configuration Guide 58
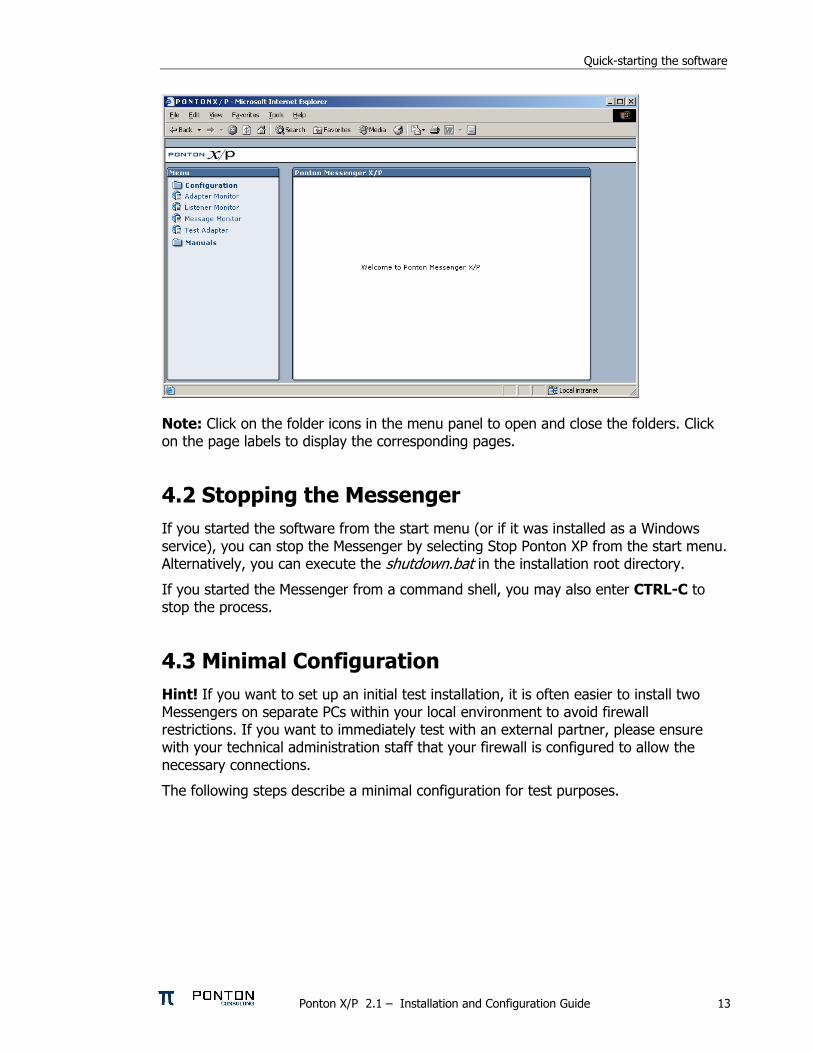
Quick-starting the software
Define yourself as a partner
Open the Configuration menu in the left frame and click on Partners to open the screen Configuration rarr Partners
Type in a local ID for yourself and enable the self checkbox then click Create New Partner
Choose a Party ID for yourself ndash this ID is the one used in your backend system to reference yourself
Select the Party ID Type PontonCertificate in order to test the use of the Ponton Certificate Authority
Then press OK ndash this new partner is now displayed in the left frame
Ponton XP 21 ndash Installation and Configuration Guide 14
Quick-starting the software
You should now request a certificate from the Ponton CA (See section 53) and install it for your partner in the Install Certificate menu
For test purposes it may be helpful to switch off encryption and signing in your Partner configuration in the Processing menu
In any case your partner configurations must be set up so that the encryption and signing options match the settings chosen by the respective partner
Ponton XP 21 ndash Installation and Configuration Guide 15
Quick-starting the software
Define another partner
On a different host follow the steps described above
For test purposes switch off encryption and signing as described above
To test your Messenger configuration Ponton Consulting offers a test server called xptestponton-consultingde This server is pre-configured in your Messenger set-up Before integrating with you business partners you can start out using this test server as your messaging partner to experiment with different messages configuration options etc
Hint To check if your partnerrsquos Messenger is up and running open your browser and go to the URL
httpltyourpartnersdomainnamegtltport-numbergtpontonxpSoapListener
The URL for the test server at Ponton Consulting for example is
httpxptestponton-consultingde8080pontonxpSoapListener
44 Check if Adapters are running To check whether your Adapters are running go to Adapter Monitor in the main menu If no built-in adapter was used before (Test Adapter or Hot Folder Adapter) and no external adapter has connected to the Messenger the Adapter Monitor will indicate No adapter info availablehellip
Ponton XP 21 ndash Installation and Configuration Guide 16
Quick-starting the software
Now start the Test Adaptor and go back to the Adapter Monitor It should indicate Test Adapter ready to receive messageshellip
45 Exchange documents using the Test Adapter Call up the Test Adapter from the main menu of Ponton XP
Ponton XP 21 ndash Installation and Configuration Guide 17
Quick-starting the software
1 Select a sending partner
2 Select a receiving partner
3 Select a document (filename)
4 For test purposes activate the ldquoTest Messagerdquo checkbox
5 Send the document by clicking ldquoSend Messagerdquo
Your Test Adapter will now send the document to the Messenger The document will then be processed by the Messenger according to your settings and filters (encryption archiving etc) and finally the document will be sent to the specified receiver party
46 Check the status of your messages The status of messages can be monitored in the Message Monitor window which you can select from the main menu of Ponton XP
In the Message Monitor click the ldquoSearchrdquo button (located below the filter settings on the left) and check if your message was properly transferred to the receiver This is shown in the ldquoResultrdquo column (located in the message overview in the upper right panel)
Ponton XP 21 ndash Installation and Configuration Guide 18
Quick-starting the software
The following color codes are used to indicate the transferprocessing status
Green checkmark ndash the transfer was successful
Red cross ndash something went wrong (in this case the complete entry is highlighted red)
Question mark ndash the message is still unconfirmed (in this case the entry is highlighted yellow)
To check for details click on the MessageID and look at the log information (in the lower right panel) Each processing step carried out by your Messenger is displayed here As long as no errors occurred the log entries are highlighted green
The right-hand columns show How the message was transferred from your test adapter to the Messenger
Which Messenger filters were applied to the message
How the document was transferred to the receiver
You may experiment with the Test Adapter and the Message Monitor and send other documents Please also ask your test partner to send documents to your Messenger
The results shown in the Message Monitor indicate the processing sequence A Senderrsquos Adapter
M Senderrsquos Messenger
L Senderrsquos Listener
Net NetworkTransmission
L Receiverrsquos Listener
M Receiverrsquos Messenger
A Receiverrsquos Adapter
Ponton XP 21 ndash Installation and Configuration Guide 19
Configuration Options
5 Configuration Options The overall configuration of Ponton XP breaks down into the following sections
Messenger configuration This section focuses on your local setting for the Messenger This includes database connections default filter settings communication protocol selection etc
Partner configuration Per partner several setting are required Partner identification filter activation (which overrides the default setting) communication settings etc
Certificate management For own partners key pairs may be created and certificates requested For certificate authorities as well as for each individual partner certificates can be installed Certificates may be requested for signing and encryption for SSL and for SMIME
Hot folder configuration The Hot Folder Adapter is tightly integrated with the Messenger and can therefore be configured through the same interface It supports the definition of multiple hot folders for sending and receiving documents as well as dedicated folders for business partners
51 Messenger Configuration
Set Up Messenger Database
The Messenger stores log entries in a database By default the log database is pre-configured as an HSQL database HSQL is an open source database implementation written entirely in Java If there is no requirement to store log data in an existing database in your organization you may continue with HSQL
It is also possible to configure the Messenger to use a different database system for example
Oracle (version 815 or higher)
MS SQL Server 70
MySQL (version 32 or higher)
SAPdb (version 73)
The log database is accessed via JDBC connection Configuration scripts to set up the tables for an Oracle database are included with Ponton XP You can refer to these scripts as examples to create scripts for your own database system
If you do not yet have a database system with JDBC support in use you can download the setup files for MySQL from httpwwwmysqlcomdownloadsmysql-323html
Ponton XP 21 ndash Installation and Configuration Guide 20
Configuration Options
To configure the Messenger database the following set-up needs to be performed
1 Go to Configuration rarr Messenger rarr Database
2 Enter the driver class name and the URL for the JDBC connection to your database
3 Enter the user name and password for the connection if required
4 Click Test to test the connection
5 Important Donrsquot click OK unless the connection test was successful
Note The connection to the standard HSQL database supplied with the Messenger requires a ldquotruncatedrdquo URL that does contain the database name (as shown above) If you get a ldquoconnection brokenrdquo message when testing the connection to the standard database (as specified above) try deleting ltDATABASEgt from the URL and testing the connection again
Ponton XP 21 ndash Installation and Configuration Guide 21
Configuration Options
Set Logging Level
To specify the logging level go to Configuration rarr Messenger rarr Logging and select the desired settings for Messenger and JDBC logging
There is a range of settings available
OFF turns logging off completely
hellip
DEBUG logs all the messages output by the system
Note Please keep in mind that the chosen logging level can have an effect on the performance of your system In particular it is advisable to use DEBUG logging only in connection with error tracking and analysis
Ponton XP 21 ndash Installation and Configuration Guide 22
Configuration Options
Set Message Queue Scan Interval
Under Configuration rarr Messenger rarr Message Queues you can specify the interval to scan the (inbound and outbound) message queues
The default setting is 5000 msec To boost the message throughput on a faster system you can increase the scan frequency by setting this interval to a lower (ie shorter) value
Ponton XP 21 ndash Installation and Configuration Guide 23
Configuration Options
Select Messaging Pipeline
The Messenger allows you to configure different filter pipelines The standard configuration comes with two pipelines
1 Messenger 203 compatibility pipeline This allows you to maintain backward compatibility with users of the previous Messenger version
2 Messenger 21 pipeline This is to communicate with partners that are also using Messenger version 21 or any EbXML 20 compliant software
For each pipeline a range of filters can be set in particular
Validation
Signing
Compression
Encryption
The Messenger configuration can be used for standard filters (validation signing compression and encryption) for inbound and outbound messages Custom filters are configured in a dedicated section
Developers may extend the Messenger with additional filters For example one may think of a ldquoBusiness Validatorrdquo that checks message content against business rules Or existing filters could be Instead of ldquosoft signingrdquo a document smart card access may be integrated
Ponton XP 21 ndash Installation and Configuration Guide 24
Configuration Options
Outbound Email Connection
This connection is used for email messages sent by your Messenger to your business partners The following data needs to be configured
From ndash the senderrsquos address to be used for your emails
SMTP ndash the outgoing mail server to be contacted by your Messenger in order to submit the email
Username password ndash must be entered if your mail server requires authentication for outgoing emails in this case enter the settings to be used by the Messenger to log in on the mail server
To test the email connection enter a receiver email address (in the ldquoTordquo field) and click the ldquoTestrdquo button
Ponton XP 21 ndash Installation and Configuration Guide 25
Configuration Options
Inbound Email Connection
You can enable your Messenger to receive email messages by setting up a POPIMAP connection with the following entries
Protocol ndash set to pop3 IMAP (depending on the type of mail server)
Server ndash the hostname or IP address of your mail server
Interval ndash the frequency for accessing the server for mail download
Username password ndash must be properly set to authenticate the Messenger on the mail server
Ponton XP 21 ndash Installation and Configuration Guide 26
Configuration Options
Email Notification
You can use the notification service to send emails to specified addresses whenever certain events occur For example you might want to notify your system administrator whenever certain errors are encountered
To specify an address go to Messenger rarr eMail Notification and click New Receiver Enter the email address for this receiver in the text field and select the events for which this receiver is to be notified You can use CTRL-click to activate multiple entries in the list
Ponton XP 21 ndash Installation and Configuration Guide 27
Configuration Options
Communication Settings
On this screen you can specify URI of each partnerrsquos Messenger Service ndash for example
httppartnerserver8080pontonxpSoapListener where partne server refers to the hostname or IP address of the machine the Messenger is installed on
r
Acknowledgment Requests ndash you can use this setting to determine whether outbound messages to this partner require acknowledgements To differentiate per message you can deactivate this checkbox and use the TransmissionMode attribute in the BackendEnvelope In the context of ebXML 20 transmissions you can additionally request signed acknowledgements for increased security
Retransmission Handling ndash you can use this setting to specify the number of retransmission attempts and the interval (in seconds) between attempts If a message cannot be transmitted successfully in the specified number of retries the Messenger will give up and mark the message as ldquofailedrdquo
Ponton XP 21 ndash Installation and Configuration Guide 28
Configuration Options
Configure Archiving Filter
The archiving filter stores the following information in a dedicated directory
Backend Envelope
ebXML Envelope
Payload ndash this is the actual business document
Certificate
Signature
Each part is stored in a separate file
The Archive Folder setting can be used to indicate the location of the archiving folder This can be expressed as
An absolute path to the required folder
A relative path beginning with $CONTEXT ndash this placeholder refers to the folder [installation root]xmlpipewebroot
The Maximum Age setting specifies how long the files will be archived ndash expressed in days
Ponton XP 21 ndash Installation and Configuration Guide 29
Configuration Options
52 Partner Configuration For each partner the following data may be configured
Partner identification (internal and external)
Communication Settings
URI of the partnerrsquos Messenger
Create Delete a Partner Entry
To create a new partner entry specify an identifier for the partner (this is the local identifier for your configuration) and indicate whether this partner entry is for
An internal partner (with the ldquoselfrdquo option activated) ndash this might be a department of your organization
An external partner ndash these entries refer to your business partners for example customers suppliers carriers warehouse operators etc
A message is always sent by your Messenger from an internal to an external partner and received from an external partner to an internal one
Internal partners are distinguished because for encryption and signing the certificates of each internal partner will be used on a per-partner basis
For further information please check the Ponton XP Architecture Overview
Ponton XP 21 ndash Installation and Configuration Guide 30
Configuration Options
Set the Partner Identification
Local Partner Name This identifier is valid within you local configuration ie you may choose any value as long as it is unique among all local partner names
Disable Although configured as a partner individual partners may be disabled In this case the Messenger rejects any message received from this partner
PartyID PartyID Type PartyIDs are used to identify partners externally To avoid name clashes and duplication well-known naming schemas exist to identify partners eg DUNS codes VAT numbers IANA codes etc For this reason trading partners should agree on an minimal set of identification types (like DUNS numbers and IANA codes) that is to be used by all partners
More than one PartyID can be defined per partner The limit is given by the number of PartyID types These are configured separately please check Section ldquoAdvanced Configurationrdquo)
Hint Please also check the Ponton XP Architecture Overview document for a detailed explanation of ebXML codes and partner identification
Ponton XP 21 ndash Installation and Configuration Guide 31
Configuration Options
Partner Communication Configuration
For each partner the following configuration options may be set URI of Partnerrsquos Messenger Service ndash enter the address of the partnerrsquos
Messenger for example httppartnerserver8080pontonxpSoapListener
Request Acknowledge ndash every message to this partner needs to be acknowledged
Request Signed Acknowledge ndash to specify signing of acknowledgements received from this partner
Retries ndash the number of retries in case of unsuccessful message transmission
Retry Interval ndash the number of seconds to wait until the next retry
Ponton XP 21 ndash Installation and Configuration Guide 32
Configuration Options
Processing Configuration
The following options can be set
Default Adapter ndash enter the name of the adapter to be used by default
Processing Pipeline ndash specify the processing pipeline to be used for this profile
Schema Sets ndash choose which Schema set(s) are to be supported
Use XML Signature ndash indicate whether to use XML Signature
Use default message settings (specified under Configuration rarr Messenger rarr Processing) or define a specific processing filter for this partner
Ponton XP 21 ndash Installation and Configuration Guide 33
Configuration Options
Install Partner Certificates
There are different ways of distributing certificates to business partners One is to send the certificate per email and have the partner cut amp paste the certificate code into the partner configuration
Note It is important to cut amp paste the complete certificate code including the lines ldquo----- Begin Certificate -----rdquo and ldquo----- End Certificate -----rdquo
Important A partner certificate will only be accepted if the certificate of the issuing CA (certificate authority) was pre-installed Otherwise the trust relationship between the partner and the CA cannot be traced
One may select to install a general certificate or a SMIME certificate Please determine what kind of certificate you received from your partner before installing it
Ponton XP 21 ndash Installation and Configuration Guide 34
Configuration Options
53 Certificate Management Certificate management comprises the following initial steps
Configure your default CA This is usually properly pre-configured in the installation files
Install the root certificate of the default CA This needs to be installed manually if 3rd-party CAs are to be used
Request a certificate for your own Messenger This includes creating a publicprivate key pair and sending a certificate request to the CA
Optionally you can request and install a SMIME certificate to be used for SMIME based communication via email
Default CA Configuration
On this screen you specify the settings for receiving certificates from your default certificate authority (CA) CA email address ndash enter the email address to be used to request a certificate
from your (default) CA
Ponton XP 21 ndash Installation and Configuration Guide 35
Configuration Options
CA download URL ndash enter the URL at your CA from which to download certificates for your Messenger installation Please note that you can only install certificates for partners you have already defined in your partner configuration
Download interval ndash specify the interval to wait between automatic certificate downloads
To download the available certificates immediately click the Download button
Request and Install Your Own Certificate
To request a certificate from your (default) CA go to Configuration rarr Certificates rarr Request Certificate Please enter data for all the fields on this form If any entries are missing you will get an error message
After completing the form click OK to send the certificate request to your CA You will get a message indicating that the request has been sent
Ponton XP 21 ndash Installation and Configuration Guide 36
Configuration Options
Once you receive the requested certificate from your CA you can install it in your own partner configuration (ie the internal partner you will use to sendreceive messages) Go to Configuration rarr Partners rarr ltYour Partner Namegt rarr Install Certificate and paste the certificate text including the hellip into the text field
Then enter the password you used when you requested the certificate and click OK to complete the installation of the certificate You will see the result above the text field containing the certificate
Ponton XP 21 ndash Installation and Configuration Guide 37
Configuration Options
Install Partner Certificates
Install a certificate issued by the CA for the requesting partner This was already described in the Partner Configuration section for normal standard certificates
Note In case of SMIME certificates an additional password may be needed to allow the Messenger to access the certificate in the local certificate store
Install a CA Certificate
To install the certificate for your CA go to Configuration rarr Certificates rarr CA rarr Install Certificate and paste your CArsquos certificate into the text field This is the certificate that authorizes the CA as a signing authority for other certificates
Ponton XP 21 ndash Installation and Configuration Guide 38
Configuration Options
54 Configure the Hot Folder Adapter
General Configuration
Address Port ndash the Hot Folder Adapter (HFA) is addressed as a separate process that communicates with the Messenger via HTTP Therefore the hostname and port number need to be set up for the Messenger If the HFA is co-located with the Messenger on the same machine use ldquolocalhostrdquo for the IP address In this case the HFA does not run as a separate Java process but will be hosted on the same Tomcat server
Path ndash the HFA needs to know the Adapter communication path of the Messenger By default it is pontonxpAdapterService
Console File Log Level ndash the HFA provides log output to the console and to log files Both can be configured regarding the level of detail The console log is only useful if the HFA is running as a standalone application so you can safely leave it disabled in the default configuration
Ponton XP 21 ndash Installation and Configuration Guide 39
Configuration Options
Create Delete a HFA
Several HFAs may be created Each registers under a different ID at the Messenger HFAs may be created for individual partners If this is the case messages exchanged with the rest of the partners will be stored with the default HFA
Configure a HFA
Each HFA requires several directories to be defined
Inbox ndash a document will be stored in the Inbox whenever it was received from a partner
Outbox ndash documents to be sent to the business partner are dropped here The HFA grabs them in a defined frequency
Failed ndash if a document could not be sent to a partner and all retries failed it will be stored in this folder
Work ndash if a document transfer is in progress or all attempts to send the document have not yet been tried the document will remain here After a final failure it will be transferred to the Failed folder
Ponton XP 21 ndash Installation and Configuration Guide 40
Configuration Options
The following settings are also supported
Port ndash the port to be used by the HFA (optional)
Receiver format ndash standard format is XML
Save Backend envelope ndash the Backend envelope is retained for incoming messages
Support attachments ndash the HFA will save any files attached to an incoming message to the selected inbox folder
Scan Interval ndash the interval to wait (in seconds) between checking the outbox
Number of receiving threads ndash specifies the maximum number of receiving threads the adapter can process
Use partner subfolders ndash if this is set this HFA will create inbox and outbox folders for all remote partners Inbound messages will automatically be sorted into the according folder depending on the sender Outbound messages need to be placed into the receiving partnerrsquos outbox folder The backend message is not used in this mode and is ignored if it exists
Use Acknowledgement for ERP ndash with this option activated the ERP application receives an acknowledgement from the receiving Messenger on the partnerrsquos side This acknowledgement will be provided via the specified Inbox
Ponton XP 21 ndash Installation and Configuration Guide 41
Configuration Options
55 Ponton XE ndash The XML Editor Ponton XE is a separate Ponton product It is packaged with Ponton XP for free use only by papiNet users It allows to enter papiNet document data directly via a graphical user interface and to send the document via the hot folder adapter to the business partners
Ponton XE is fully documented in a separate manual Hence only the Messaging Plug-in will be described here
You can experiment with the XML Editor and check out all the features and options without using the Ponton XP connection To start with you may want to begin with the following steps
Create a new papiNet Purchase Order
Fill out the forms and use optional XML Elements by right-clicking the Plus-icons in the layout tree
Create an HTML file by choosing Document Export to HTML from the menu
Save the document to an XML file and re-load it again
Ponton XP 21 ndash Installation and Configuration Guide 42
Configuration Options
Interface between Ponton XE and Ponton XP
The two software applications communicate via hot folders as illustrated in the following figure
Message Plug-in
Outbox Inbox AckInboxImport
Ponton XP Ponton XE
XMLXML XMLXML XMLXML XMLXML
Hot Folder Adapter
The XML Editor is connected to the Messenger via the Hot Folder Adapter All these folder settings need to be synchronized for a proper data exchange
Configuration of the Messaging Plug-in
The Messaging Plug-in can be flexibly installed and de-installed with the remaining part of Ponton XE If the file messengerjar is removed from the plugins directory it will automatically disappear from the Ponton XE menu bar as soon as the software is started again
Before transferring messages out of Ponton XE you need to preset the following information
Default values for the sending and receiving partners ndash these values may be overridden for an individual transfer
Folder locations of the Hot Folder Adapter ndash the Inbox Outbox and AckInbox need to be set for document exchange with Ponton XP
Default setting for Test Message flag ndash this can be overridden for the actual document transfer
Import Directory ndash Ponton XE will automatically scan the Inbox folder and import received documents to the given folder for local processing
Ponton XP 21 ndash Installation and Configuration Guide 43
Configuration Options
Open Messages after Import ndash if this option is activated messages received from the Inbox will automatically be displayed in Ponton XE
Delete message in Inbox ndash to always remove received messages from the HFA Inbox this option needs to be activated otherwise a copy will remain in the Inbox folder
Ponton XP 21 ndash Installation and Configuration Guide 44
Configuration Options
Ponton XP 21 ndash Installation and Configuration Guide 45
Configuration Options
Using Ponton XE
After setting the configuration and creating a document you can transfer the document to your business partner This is done by means of the following steps
Choose the menu item ldquoMessenger rarr Transfer rarr Send Messagerdquo
Select a sending and receiving partner
Override the settings for the HFA folders
Tick the checkbox to qualify this message as a test message
After transferring the document to the Messenger Ponton XE will wait for a response This is recognised as an acknowledge file which is dropped into the AckInbox folder of the HFA As soon as this has been received a successful transfer in indicated
You may check with the Message Monitor to determine how the document was forwarded by the Messenger to the receiver or whether any errors occurred
Ponton XP 21 ndash Installation and Configuration Guide 46
Configuration Options
56 Display Schema Configuration The schema sets to be supported for each partner are defined in the partner configuration The standard sets available with the installation are shown under Configuration rarr Schemata
Ponton XP 21 ndash Installation and Configuration Guide 47
Configuration Options
57 User Administration Two types of users are distinguished
Administrators ndash these users have full access to the Messengerrsquos configuration interface
Operators ndash these users only have access to the Adapter Monitor the Message Monitor and the Test Adapter The other options in the Messenger menu are not available
Please note the following points in connection with the Messengerrsquos standard user administration
This is a very simple user administration based on the Tomcat implementation If you want to integrate the Messenger with another user administration such as LDAP please contact Ponton Consulting for support
A userrsquos access rights (administratoroperator) are defined when the user account is created ndash they cannot be changed subsequently
User accounts can only be created or deleted by administrators
Ponton XP 21 ndash Installation and Configuration Guide 48
Advanced Configuration
6 Advanced Configuration
61 XML Schema Configuration Important The Messenger distinguishes between available schema set and activated schema sets Just inserting entries in the schema configuration as described in this section does not activate the schema sets or the corresponding schemas for use by the Messenger In order to make use of the schemas in a schema set you have to activate the schema set in the relevant partner configuration To view or modify the activated schema sets in a partner configuration go to
Configuration rarr Partners rarr ltpartner namegt rarr Processing
and activatedeactivate the relevant checkboxes
In the Messengerrsquos configuration interface you can activate and deactivate schema sets for specific partner configurations It is not possible however to modify the contents and specifications of the individual schema sets Any necessary changes have to be made in the configuration file
[installation root]xmlpipewebrootWEB-INFconfigschemataxml
The configuration entries in this file are structured as follows
ltSchemaSet Name=papinet21gt
ltSchemaName=httpwwwpapinetorgdataAvailabilityV2R10xsd MessageType=Availability MessageVersion=V2R10gt
ltNamespacegtltNamespacegt
ltDisplayNamegtAvailability 21ltDisplayNamegt
ltSchemaFilegtAvailabilityV2R10xsdltSchemaFilegt
ltXSLFilegtltXSLFilegt
ltSchemagt
ltSchema Name=yourSchema MessageType=yourMsgType MessageVersion=yourMsgVersgt
ltNamespacegtyourNamespaceltNamespacegt
ltDisplayNamegtYour Display NameltDisplayNamegt
ltSchemaFilegtyourSchemaFileltSchemaFilegt
ltXSLFilegtyourStylesheetltXSLFilegt
ltSchemagt
hellip
ltSchemaFoldergtpapinet210ltSchemaFoldergt
ltXSLFoldergtpapinet210ltXSLFoldergt
ltSchemaSetgt
Ponton XP 21 ndash Installation and Configuration Guide 49
Advanced Configuration
You can add a schema to an existing schema set in this file by inserting a ltSchemagt block (just copy and paste one of the existing blocks and modify the configuration as required) Please ensure that your new schema specification includes correct settings for the attributes of the Schema element
Name= This attribute corresponds with the ebXML Schema Location of incoming messages When an ebXML message is received the Messenger looks for a schema configuration where the Schema Name attribute matches the Schema Location specified in the ebXML envelope
MessageType= This attribute corresponds with the attribute MessageMetaDataDocumentInfoMessageName in the backend envelope of outgoing messages
MessageVersion= This attribute corresponds with the element MessageMe aDataDocumentInfoDTDVersionNumber in the backend envelope of outgoing messages
t
Note The specification of MessageType and MessageVersion must be used together for outgoing messages as they are combined to form an identifier for the message schema
You also have the option of adding a new schema set with your own schema definitions to the schema configuration In this case you would insert a ltSchemaSetgt block with subordinate ltSchemagt blocks Your added schema set will automatically be inserted in the list of available schema sets on the Messenger configuration pages
62 Advanced Database Configuration Important Since the Messenger database is used for essential message processing and tracking purposes you should not experiment with the database configuration on a ldquoliverdquo system For test and debugging purposes you are advised to set up a trial system
Installation with other Databases
This section describes the main steps required to install a different database system on the Messenger for example an Oracle database
1 Install database driver Copy the database driver to
[installation root]xmlpipewebrootWEB-INFlib
Note Please note that only drivers with the extension jar are loaded by the Tomcat servlet engine If the JDBC driver you want to use is a zip file you will have to rename the file to jar The JDBC driver for Oracle 9i is the file ojdbc14jar
Ponton XP 21 ndash Installation and Configuration Guide 50
Advanced Configuration
2 Create database and tables Ponton XP is supplied with SQL scripts for HSQL and for Oracle that can be used to create the tables for the Messenger database If you are using another database you may need to modify these scripts to work correctly with your database system
The SQL scripts are located in the subfolders under [installation root]sql
Once the database tables are in place you will also need to carry out the SQL script that inserts the log messages into the database ie
[installation root]sqlinsert_log_messagessql
3 Set up database connection The configuration of database connections is described in the section Set Up Messenger Database beginning on page 20 To connect with a different database choose ldquootherrdquo from the list of database drivers and enter the configuration for your database on the next page
The entries for the Oracle 9i JDBC driver are
Driver oraclejdbcdriverOracleDriver
URL jdbcoraclethinlthostgtltportgtltdatabasegt
63 Advanced Message Monitor Configuration In the configuration directory ldquoxmlpipewebrootWEB-INFconfigrdquo there is a file messagemonitorxml which can be used to change the selection and ordering of the Message overview window in the Message Monitor The default setting is displayed in the following picture
Ponton XP 21 ndash Installation and Configuration Guide 51
Advanced Configuration
Here the number of line items per page can be set If a high resolution screen is used (beyond 1024 x 768 pixel) one may increase the number of lines
Further a mapping table defines which database column is to be displayed in which monitor column The number of columns again depends on the screen resolution
Finally if main memory size allows caching of XSL stylesheet definitions helps accelerating processing speed for XSL transformations
64 Tomcat SSL Installation
Generate a key
One minor problem with Tomcat or any other webserver that uses the internal Java symmetric key architecture is that you are not allowed to export or import private keys For this reason it is not possible to use the existing key-pair installed with the Messenger software You will have to generate a new key-pair and send a certificate request to the Ponton certificate authority (or other certification authority) to receive a valid certificate
To generate a new key-pair open a command prompt and go to the tomcat-4118 directory The keystore used for a Tomcat SSL installation is located in the Tomcat root directory and is called ssl-keystore The Tomcat installation already contains a certificate for lsquolocalhostrsquo so you can test the HTTPS access with a web browser
Before you can create a new Tomcat certificate you will have to delete the installed certificate Note that the default password for the Tomcat keystore is ldquochangeitrdquo keytool -delete -alias tomcat ndashkeystore ssl-keystore
Now use the following command to create a new key-pair Please note that you need to specify the Listener hostname (eg listenermyserverde) when the keytool asks for lsquofirst and last namersquo keytool -genkey -alias tomcat -keyalg RSA ndashkeystore ssl-keystore
After generating the new key the next step is to export a certificate request with the following command keytool ndashcertreq ndashalias tomcat ndashfile myservercsr ndashkeystore ssl-keystore
This will generate the file myservercsr in the current directory Send this file via email to xp-certponton-consultingde It will be signed and sent back to you The reply will contain a file with the certificate
Finally you have to re-import this signed certificate into the Tomcat SSL keystore Please note that the import may take some time keytool ndashimport ndashalias tomcat ndashfile myservercer ndashkeystore ssl-keystore
If you have any problems starting the keytool make sure you have the javahomebin directory specified in your PATH environment variable Of course you can also change to the javahomebin directory and start the keytool there
Ponton XP 21 ndash Installation and Configuration Guide 52
Advanced Configuration
Update Tomcat configuration
SSL is already activated in the Tomcat configuration packaged in the distribution However you might want to change the specified SSL port (by default the SSL port is set to 8443) You can change the port by editing the file
[tomcat installation]confserverconf
The following section configures the SSL parameters
lt-- Define a SSL Coyote HTTP11 Connector on port 8443 --gt
ltConnector className=orgapachecoyotetomcat4CoyoteConnector
port=8443
minProcessors=5
maxProcessors=75
enableLookups=true
acceptCount=100
debug=0
scheme=https
secure=true
useURIValidationHack=false
disableUploadTimeout=truegt
ltFactory className=orgapachecoyotetomcat4CoyoteServerSocketFactory
clientAuth=false
keystoreFile=ssl-keystore
protocol=TLS gt
ltConnectorgt
Verify setup
To verify if everything is working correctly start the Tomcat webserver as usual and connect to the webserver with your browser
Go to httpsyourserveraddress ndash initially you might get a warning window if the root certificate authority is not known to the browser If you continue by clicking OK you should see the usual Ponton XP start page
If everything comes up correctly you can use SSL to receive messages with the Ponton XP Software
Ponton XP 21 ndash Installation and Configuration Guide 53
Advanced Configuration
65 Distributed Installation If the Messenger is installed on a server that cannot be reached from the Internet you will need to install the Listener as well The purpose of the Listener is to pick up incoming connections and forward them to the Messenger (across the firewall) The firewall rules must be set up to allow this connection between the Listener and the Messenger When a message is received the Listener notifies the Messenger and the Messenger then picks up the message
You also have the option of subsequently installing the Listener as a service under Windows ndash this service can then be configured to start automatically when the system starts up
Note If you are going to run the Messenger in combination with the Listener your partners will have to enter the URI of your Listener in their configurations (under Configuration rarr Partners rarr ltpartner namegt rarr URI of Partners Messenger Service)
Listener Installation and Configuration
The Listener is installed by running the installer program (eg PontonXP-21-setuplistener-windowsexe) on the relevant system You are asked to specify an installation folder and also have the option of creating a desktop or menu shortcut Thatrsquos it
-
The settings for the Listener are contained in the configuration file listenerproperties which is located in the folder [Listener root folder]config To modify these settings you will have to edit the configuration file directly Access via the Messengerrsquos configuration interface is not possible
The file contains the following settings
HttpPort = Port number (for external HTTP connections)
HttpsPort = Port number (for external HTTPS connections)
LogLevel = DEBUG | INFO | WARN | ERROR | FATAL | OFF
The following settings specify the host and port of the Messenger for forwarding connections (HTTPHTTPS) The forwarding connection mode is activated by entering the relevant host and port addresses and removing the hash marks (used to mark ldquocomment linesrdquo in Java property files)
HttpServer = server1port1 (HTTP forwarding connection to the Messenger)
HttpsServer = server1port1 (HTTPS forwarding connection to the Messenger)
Ponton XP 21 ndash Installation and Configuration Guide 54
Advanced Configuration
The following settings specify the Listenerrsquos port for callback connections (HTTPHTTPS) with the Messenger As with the forwarding connection the callback connection mode is activated by entering the relevant port addresses and removing the hash marks (Obviously it makes no sense to have both connections activated at the same time)
HttpServicePort = Port number (for internal HTTP connections to the Listener)
HttpsServicePort = Port number (for internal HTTPS connections to the Listener)
Starting the Listener
To start the Listener open a command prompt and start the class
depontonconsultingxmlpipeListener
with the classpath
-cp libcommons-logging-api-103jarlibcommonutilsjarlibxp_listenerjarconfig
You can also use the installed batch file [Listener root folder]startListenerbat
Callback Mode
Details of the communication flow
When the Messenger starts up it searches for the Listener
Note The Listener should start up first so that it can be found by the Messenger
If the search is successful a permanent connection is established between the Messenger and the Listener The Messenger uses the following settings in the configuration to establish the connection with the Listener
Configuration rarr Messenger rarr Listener rarr HTTP[S] rarr Hostname
Configuration rarr Messenger rarr Listener rarr HTTP[S] rarr Internal Listener Port
Ponton XP 21 ndash Installation and Configuration Guide 55
Advanced Configuration
When the Listener receives an incoming message (or rather an HTTPHTTPS request) it informs the Messenger ndash by way of the permanent connection ndash about the arrival of the new request indicating which port the Messenger can use to pick up the connection
Note This port number is randomly selected by the Listener and cannot be configured
The Messenger picks up the connection on the Listenerrsquos specified port and redirects it to its own local port for further processing
This local port corresponds to the setting for
Configuration rarr Messenger rarr Listener rarr HTTP[S] rarr Internal Messenger Port
in the configuration GUI
Forwarding Mode
Details of the communication flow
In forwarding mode no permanent connection is established between the Messenger and the Listener
When the Listener receives an incoming HTTPHTTPS request it simply forwards the request to the Messenger using the address specified in listenerproperties (HttpServerHttpsServer)
Note To allow this forwarding connection the firewall has to be configured so that the Listener is permitted to access the Messenger on the specified port(s)
Ponton XP 21 ndash Installation and Configuration Guide 56
Advanced Configuration
66 Port Configuration The Messengerrsquos standard configuration uses port 8080 for HTTP connections and port 8443 for secure (HTTPS) connections This section describes how to set up the messenger to use a non-standard port configuration This involves making manual changes to several configuration files in particular the Tomcat serverxml and the Messengerrsquos adapter configuration files
Tomcat Settings
The port setting for the Messengerrsquos HTTP and HTTPS connections are specified in the Tomcat configuration file
[installation root]tomcat-xxxconfserverxml
This file defines the connections (Connectors) for the Messenger as follows
lt-- Define a non-SSL Coyote HTTP11 Connector on port 8080 --gt
ltConnector className=orgapachecoyotetomcat4CoyoteConnector
port=yourMessengerPort minProcessors=5 maxProcessors=75
enableLookups=true redirectPort=yourRed rectPort i acceptCount=100 debug=0 connectionTimeout=20000
useURIValidationHack=false disableUploadTimeout=true gt
lt-- Define a SSL Coyote HTTP11 Connector on port 8443 --gt
ltConnector className=orgapachecoyotetomcat4CoyoteConnector
port=yourSSLPort minProcessors=5 maxProcessors=75
enableLookups=true
acceptCount=100 debug=0 scheme=https secure=true
useURIValidationHack=false disableUploadTimeout=truegt
ltFactory className=orgapachecoyotetomcat4CoyoteServerSocketFactory
clientAuth=false keystoreFile=ssl-keystore protocol=TLS gt
ltConnectorgt
The standard settings for the Messenger ports are
HTTP 8080
SSL 8443
To modify your connections you will need to enter the relevant port numbers indicated above as yourMessengerPort yourRedirectPort (which normally points to the SSL connection) and yourSSLPort
Ponton XP 21 ndash Installation and Configuration Guide 57
Advanced Configuration
Adapter Settings
The settings for the Messenger adapters are contained in the relevant XML files under
[installation root]xmlpipewebrootWEB-INFconfig
In particular a standard installation includes the files testadap erxml and hotfolderxml Each of these configuration files contains a block specifying the connection to the messenger
t
ltMessengergt
ltAddressgtyourMessengerHostltAddressgt
ltPortNumbergtyourMessengerPortltPortNumbergt
ltPathgthellipltPathgt
ltMessengergt
If you have configured the Messenger to run on a different port (see above) you will need to enter the relevant port number here
Ponton XP 21 ndash Installation and Configuration Guide 58
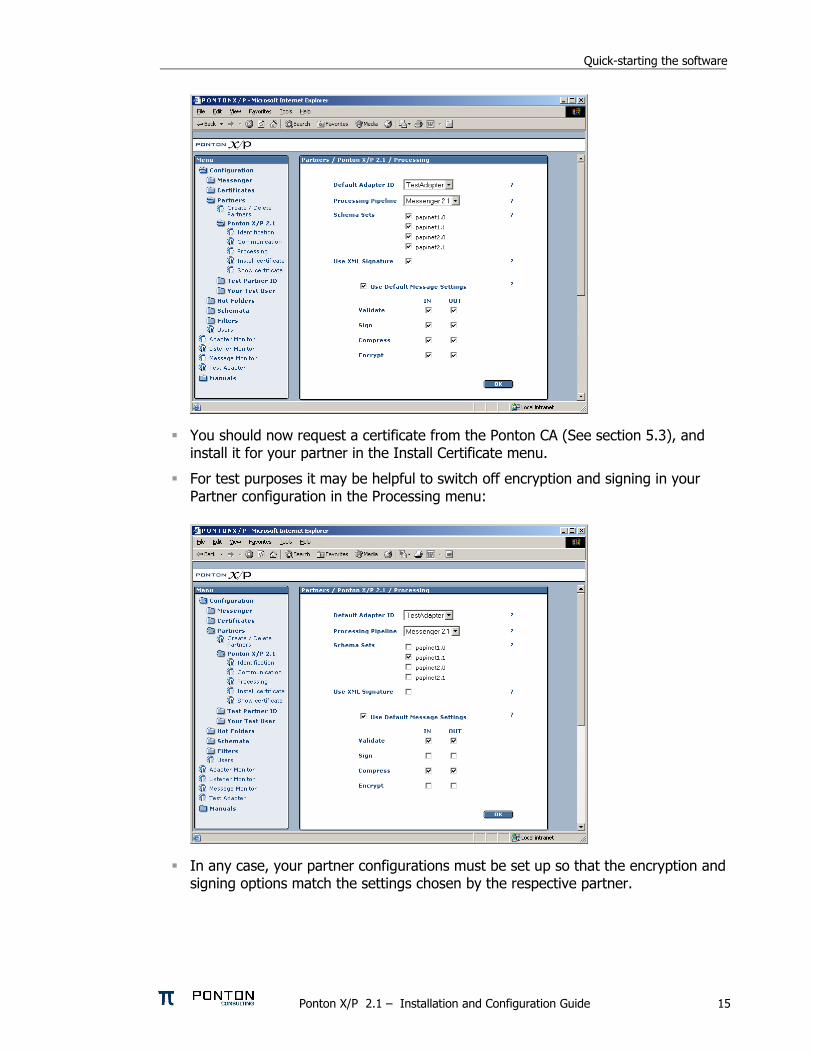
Quick-starting the software
You should now request a certificate from the Ponton CA (See section 53) and install it for your partner in the Install Certificate menu
For test purposes it may be helpful to switch off encryption and signing in your Partner configuration in the Processing menu
In any case your partner configurations must be set up so that the encryption and signing options match the settings chosen by the respective partner
Ponton XP 21 ndash Installation and Configuration Guide 15
Quick-starting the software
Define another partner
On a different host follow the steps described above
For test purposes switch off encryption and signing as described above
To test your Messenger configuration Ponton Consulting offers a test server called xptestponton-consultingde This server is pre-configured in your Messenger set-up Before integrating with you business partners you can start out using this test server as your messaging partner to experiment with different messages configuration options etc
Hint To check if your partnerrsquos Messenger is up and running open your browser and go to the URL
httpltyourpartnersdomainnamegtltport-numbergtpontonxpSoapListener
The URL for the test server at Ponton Consulting for example is
httpxptestponton-consultingde8080pontonxpSoapListener
44 Check if Adapters are running To check whether your Adapters are running go to Adapter Monitor in the main menu If no built-in adapter was used before (Test Adapter or Hot Folder Adapter) and no external adapter has connected to the Messenger the Adapter Monitor will indicate No adapter info availablehellip
Ponton XP 21 ndash Installation and Configuration Guide 16
Quick-starting the software
Now start the Test Adaptor and go back to the Adapter Monitor It should indicate Test Adapter ready to receive messageshellip
45 Exchange documents using the Test Adapter Call up the Test Adapter from the main menu of Ponton XP
Ponton XP 21 ndash Installation and Configuration Guide 17
Quick-starting the software
1 Select a sending partner
2 Select a receiving partner
3 Select a document (filename)
4 For test purposes activate the ldquoTest Messagerdquo checkbox
5 Send the document by clicking ldquoSend Messagerdquo
Your Test Adapter will now send the document to the Messenger The document will then be processed by the Messenger according to your settings and filters (encryption archiving etc) and finally the document will be sent to the specified receiver party
46 Check the status of your messages The status of messages can be monitored in the Message Monitor window which you can select from the main menu of Ponton XP
In the Message Monitor click the ldquoSearchrdquo button (located below the filter settings on the left) and check if your message was properly transferred to the receiver This is shown in the ldquoResultrdquo column (located in the message overview in the upper right panel)
Ponton XP 21 ndash Installation and Configuration Guide 18
Quick-starting the software
The following color codes are used to indicate the transferprocessing status
Green checkmark ndash the transfer was successful
Red cross ndash something went wrong (in this case the complete entry is highlighted red)
Question mark ndash the message is still unconfirmed (in this case the entry is highlighted yellow)
To check for details click on the MessageID and look at the log information (in the lower right panel) Each processing step carried out by your Messenger is displayed here As long as no errors occurred the log entries are highlighted green
The right-hand columns show How the message was transferred from your test adapter to the Messenger
Which Messenger filters were applied to the message
How the document was transferred to the receiver
You may experiment with the Test Adapter and the Message Monitor and send other documents Please also ask your test partner to send documents to your Messenger
The results shown in the Message Monitor indicate the processing sequence A Senderrsquos Adapter
M Senderrsquos Messenger
L Senderrsquos Listener
Net NetworkTransmission
L Receiverrsquos Listener
M Receiverrsquos Messenger
A Receiverrsquos Adapter
Ponton XP 21 ndash Installation and Configuration Guide 19
Configuration Options
5 Configuration Options The overall configuration of Ponton XP breaks down into the following sections
Messenger configuration This section focuses on your local setting for the Messenger This includes database connections default filter settings communication protocol selection etc
Partner configuration Per partner several setting are required Partner identification filter activation (which overrides the default setting) communication settings etc
Certificate management For own partners key pairs may be created and certificates requested For certificate authorities as well as for each individual partner certificates can be installed Certificates may be requested for signing and encryption for SSL and for SMIME
Hot folder configuration The Hot Folder Adapter is tightly integrated with the Messenger and can therefore be configured through the same interface It supports the definition of multiple hot folders for sending and receiving documents as well as dedicated folders for business partners
51 Messenger Configuration
Set Up Messenger Database
The Messenger stores log entries in a database By default the log database is pre-configured as an HSQL database HSQL is an open source database implementation written entirely in Java If there is no requirement to store log data in an existing database in your organization you may continue with HSQL
It is also possible to configure the Messenger to use a different database system for example
Oracle (version 815 or higher)
MS SQL Server 70
MySQL (version 32 or higher)
SAPdb (version 73)
The log database is accessed via JDBC connection Configuration scripts to set up the tables for an Oracle database are included with Ponton XP You can refer to these scripts as examples to create scripts for your own database system
If you do not yet have a database system with JDBC support in use you can download the setup files for MySQL from httpwwwmysqlcomdownloadsmysql-323html
Ponton XP 21 ndash Installation and Configuration Guide 20
Configuration Options
To configure the Messenger database the following set-up needs to be performed
1 Go to Configuration rarr Messenger rarr Database
2 Enter the driver class name and the URL for the JDBC connection to your database
3 Enter the user name and password for the connection if required
4 Click Test to test the connection
5 Important Donrsquot click OK unless the connection test was successful
Note The connection to the standard HSQL database supplied with the Messenger requires a ldquotruncatedrdquo URL that does contain the database name (as shown above) If you get a ldquoconnection brokenrdquo message when testing the connection to the standard database (as specified above) try deleting ltDATABASEgt from the URL and testing the connection again
Ponton XP 21 ndash Installation and Configuration Guide 21
Configuration Options
Set Logging Level
To specify the logging level go to Configuration rarr Messenger rarr Logging and select the desired settings for Messenger and JDBC logging
There is a range of settings available
OFF turns logging off completely
hellip
DEBUG logs all the messages output by the system
Note Please keep in mind that the chosen logging level can have an effect on the performance of your system In particular it is advisable to use DEBUG logging only in connection with error tracking and analysis
Ponton XP 21 ndash Installation and Configuration Guide 22
Configuration Options
Set Message Queue Scan Interval
Under Configuration rarr Messenger rarr Message Queues you can specify the interval to scan the (inbound and outbound) message queues
The default setting is 5000 msec To boost the message throughput on a faster system you can increase the scan frequency by setting this interval to a lower (ie shorter) value
Ponton XP 21 ndash Installation and Configuration Guide 23
Configuration Options
Select Messaging Pipeline
The Messenger allows you to configure different filter pipelines The standard configuration comes with two pipelines
1 Messenger 203 compatibility pipeline This allows you to maintain backward compatibility with users of the previous Messenger version
2 Messenger 21 pipeline This is to communicate with partners that are also using Messenger version 21 or any EbXML 20 compliant software
For each pipeline a range of filters can be set in particular
Validation
Signing
Compression
Encryption
The Messenger configuration can be used for standard filters (validation signing compression and encryption) for inbound and outbound messages Custom filters are configured in a dedicated section
Developers may extend the Messenger with additional filters For example one may think of a ldquoBusiness Validatorrdquo that checks message content against business rules Or existing filters could be Instead of ldquosoft signingrdquo a document smart card access may be integrated
Ponton XP 21 ndash Installation and Configuration Guide 24
Configuration Options
Outbound Email Connection
This connection is used for email messages sent by your Messenger to your business partners The following data needs to be configured
From ndash the senderrsquos address to be used for your emails
SMTP ndash the outgoing mail server to be contacted by your Messenger in order to submit the email
Username password ndash must be entered if your mail server requires authentication for outgoing emails in this case enter the settings to be used by the Messenger to log in on the mail server
To test the email connection enter a receiver email address (in the ldquoTordquo field) and click the ldquoTestrdquo button
Ponton XP 21 ndash Installation and Configuration Guide 25
Configuration Options
Inbound Email Connection
You can enable your Messenger to receive email messages by setting up a POPIMAP connection with the following entries
Protocol ndash set to pop3 IMAP (depending on the type of mail server)
Server ndash the hostname or IP address of your mail server
Interval ndash the frequency for accessing the server for mail download
Username password ndash must be properly set to authenticate the Messenger on the mail server
Ponton XP 21 ndash Installation and Configuration Guide 26
Configuration Options
Email Notification
You can use the notification service to send emails to specified addresses whenever certain events occur For example you might want to notify your system administrator whenever certain errors are encountered
To specify an address go to Messenger rarr eMail Notification and click New Receiver Enter the email address for this receiver in the text field and select the events for which this receiver is to be notified You can use CTRL-click to activate multiple entries in the list
Ponton XP 21 ndash Installation and Configuration Guide 27
Configuration Options
Communication Settings
On this screen you can specify URI of each partnerrsquos Messenger Service ndash for example
httppartnerserver8080pontonxpSoapListener where partne server refers to the hostname or IP address of the machine the Messenger is installed on
r
Acknowledgment Requests ndash you can use this setting to determine whether outbound messages to this partner require acknowledgements To differentiate per message you can deactivate this checkbox and use the TransmissionMode attribute in the BackendEnvelope In the context of ebXML 20 transmissions you can additionally request signed acknowledgements for increased security
Retransmission Handling ndash you can use this setting to specify the number of retransmission attempts and the interval (in seconds) between attempts If a message cannot be transmitted successfully in the specified number of retries the Messenger will give up and mark the message as ldquofailedrdquo
Ponton XP 21 ndash Installation and Configuration Guide 28
Configuration Options
Configure Archiving Filter
The archiving filter stores the following information in a dedicated directory
Backend Envelope
ebXML Envelope
Payload ndash this is the actual business document
Certificate
Signature
Each part is stored in a separate file
The Archive Folder setting can be used to indicate the location of the archiving folder This can be expressed as
An absolute path to the required folder
A relative path beginning with $CONTEXT ndash this placeholder refers to the folder [installation root]xmlpipewebroot
The Maximum Age setting specifies how long the files will be archived ndash expressed in days
Ponton XP 21 ndash Installation and Configuration Guide 29
Configuration Options
52 Partner Configuration For each partner the following data may be configured
Partner identification (internal and external)
Communication Settings
URI of the partnerrsquos Messenger
Create Delete a Partner Entry
To create a new partner entry specify an identifier for the partner (this is the local identifier for your configuration) and indicate whether this partner entry is for
An internal partner (with the ldquoselfrdquo option activated) ndash this might be a department of your organization
An external partner ndash these entries refer to your business partners for example customers suppliers carriers warehouse operators etc
A message is always sent by your Messenger from an internal to an external partner and received from an external partner to an internal one
Internal partners are distinguished because for encryption and signing the certificates of each internal partner will be used on a per-partner basis
For further information please check the Ponton XP Architecture Overview
Ponton XP 21 ndash Installation and Configuration Guide 30
Configuration Options
Set the Partner Identification
Local Partner Name This identifier is valid within you local configuration ie you may choose any value as long as it is unique among all local partner names
Disable Although configured as a partner individual partners may be disabled In this case the Messenger rejects any message received from this partner
PartyID PartyID Type PartyIDs are used to identify partners externally To avoid name clashes and duplication well-known naming schemas exist to identify partners eg DUNS codes VAT numbers IANA codes etc For this reason trading partners should agree on an minimal set of identification types (like DUNS numbers and IANA codes) that is to be used by all partners
More than one PartyID can be defined per partner The limit is given by the number of PartyID types These are configured separately please check Section ldquoAdvanced Configurationrdquo)
Hint Please also check the Ponton XP Architecture Overview document for a detailed explanation of ebXML codes and partner identification
Ponton XP 21 ndash Installation and Configuration Guide 31
Configuration Options
Partner Communication Configuration
For each partner the following configuration options may be set URI of Partnerrsquos Messenger Service ndash enter the address of the partnerrsquos
Messenger for example httppartnerserver8080pontonxpSoapListener
Request Acknowledge ndash every message to this partner needs to be acknowledged
Request Signed Acknowledge ndash to specify signing of acknowledgements received from this partner
Retries ndash the number of retries in case of unsuccessful message transmission
Retry Interval ndash the number of seconds to wait until the next retry
Ponton XP 21 ndash Installation and Configuration Guide 32
Configuration Options
Processing Configuration
The following options can be set
Default Adapter ndash enter the name of the adapter to be used by default
Processing Pipeline ndash specify the processing pipeline to be used for this profile
Schema Sets ndash choose which Schema set(s) are to be supported
Use XML Signature ndash indicate whether to use XML Signature
Use default message settings (specified under Configuration rarr Messenger rarr Processing) or define a specific processing filter for this partner
Ponton XP 21 ndash Installation and Configuration Guide 33
Configuration Options
Install Partner Certificates
There are different ways of distributing certificates to business partners One is to send the certificate per email and have the partner cut amp paste the certificate code into the partner configuration
Note It is important to cut amp paste the complete certificate code including the lines ldquo----- Begin Certificate -----rdquo and ldquo----- End Certificate -----rdquo
Important A partner certificate will only be accepted if the certificate of the issuing CA (certificate authority) was pre-installed Otherwise the trust relationship between the partner and the CA cannot be traced
One may select to install a general certificate or a SMIME certificate Please determine what kind of certificate you received from your partner before installing it
Ponton XP 21 ndash Installation and Configuration Guide 34
Configuration Options
53 Certificate Management Certificate management comprises the following initial steps
Configure your default CA This is usually properly pre-configured in the installation files
Install the root certificate of the default CA This needs to be installed manually if 3rd-party CAs are to be used
Request a certificate for your own Messenger This includes creating a publicprivate key pair and sending a certificate request to the CA
Optionally you can request and install a SMIME certificate to be used for SMIME based communication via email
Default CA Configuration
On this screen you specify the settings for receiving certificates from your default certificate authority (CA) CA email address ndash enter the email address to be used to request a certificate
from your (default) CA
Ponton XP 21 ndash Installation and Configuration Guide 35
Configuration Options
CA download URL ndash enter the URL at your CA from which to download certificates for your Messenger installation Please note that you can only install certificates for partners you have already defined in your partner configuration
Download interval ndash specify the interval to wait between automatic certificate downloads
To download the available certificates immediately click the Download button
Request and Install Your Own Certificate
To request a certificate from your (default) CA go to Configuration rarr Certificates rarr Request Certificate Please enter data for all the fields on this form If any entries are missing you will get an error message
After completing the form click OK to send the certificate request to your CA You will get a message indicating that the request has been sent
Ponton XP 21 ndash Installation and Configuration Guide 36
Configuration Options
Once you receive the requested certificate from your CA you can install it in your own partner configuration (ie the internal partner you will use to sendreceive messages) Go to Configuration rarr Partners rarr ltYour Partner Namegt rarr Install Certificate and paste the certificate text including the hellip into the text field
Then enter the password you used when you requested the certificate and click OK to complete the installation of the certificate You will see the result above the text field containing the certificate
Ponton XP 21 ndash Installation and Configuration Guide 37
Configuration Options
Install Partner Certificates
Install a certificate issued by the CA for the requesting partner This was already described in the Partner Configuration section for normal standard certificates
Note In case of SMIME certificates an additional password may be needed to allow the Messenger to access the certificate in the local certificate store
Install a CA Certificate
To install the certificate for your CA go to Configuration rarr Certificates rarr CA rarr Install Certificate and paste your CArsquos certificate into the text field This is the certificate that authorizes the CA as a signing authority for other certificates
Ponton XP 21 ndash Installation and Configuration Guide 38
Configuration Options
54 Configure the Hot Folder Adapter
General Configuration
Address Port ndash the Hot Folder Adapter (HFA) is addressed as a separate process that communicates with the Messenger via HTTP Therefore the hostname and port number need to be set up for the Messenger If the HFA is co-located with the Messenger on the same machine use ldquolocalhostrdquo for the IP address In this case the HFA does not run as a separate Java process but will be hosted on the same Tomcat server
Path ndash the HFA needs to know the Adapter communication path of the Messenger By default it is pontonxpAdapterService
Console File Log Level ndash the HFA provides log output to the console and to log files Both can be configured regarding the level of detail The console log is only useful if the HFA is running as a standalone application so you can safely leave it disabled in the default configuration
Ponton XP 21 ndash Installation and Configuration Guide 39
Configuration Options
Create Delete a HFA
Several HFAs may be created Each registers under a different ID at the Messenger HFAs may be created for individual partners If this is the case messages exchanged with the rest of the partners will be stored with the default HFA
Configure a HFA
Each HFA requires several directories to be defined
Inbox ndash a document will be stored in the Inbox whenever it was received from a partner
Outbox ndash documents to be sent to the business partner are dropped here The HFA grabs them in a defined frequency
Failed ndash if a document could not be sent to a partner and all retries failed it will be stored in this folder
Work ndash if a document transfer is in progress or all attempts to send the document have not yet been tried the document will remain here After a final failure it will be transferred to the Failed folder
Ponton XP 21 ndash Installation and Configuration Guide 40
Configuration Options
The following settings are also supported
Port ndash the port to be used by the HFA (optional)
Receiver format ndash standard format is XML
Save Backend envelope ndash the Backend envelope is retained for incoming messages
Support attachments ndash the HFA will save any files attached to an incoming message to the selected inbox folder
Scan Interval ndash the interval to wait (in seconds) between checking the outbox
Number of receiving threads ndash specifies the maximum number of receiving threads the adapter can process
Use partner subfolders ndash if this is set this HFA will create inbox and outbox folders for all remote partners Inbound messages will automatically be sorted into the according folder depending on the sender Outbound messages need to be placed into the receiving partnerrsquos outbox folder The backend message is not used in this mode and is ignored if it exists
Use Acknowledgement for ERP ndash with this option activated the ERP application receives an acknowledgement from the receiving Messenger on the partnerrsquos side This acknowledgement will be provided via the specified Inbox
Ponton XP 21 ndash Installation and Configuration Guide 41
Configuration Options
55 Ponton XE ndash The XML Editor Ponton XE is a separate Ponton product It is packaged with Ponton XP for free use only by papiNet users It allows to enter papiNet document data directly via a graphical user interface and to send the document via the hot folder adapter to the business partners
Ponton XE is fully documented in a separate manual Hence only the Messaging Plug-in will be described here
You can experiment with the XML Editor and check out all the features and options without using the Ponton XP connection To start with you may want to begin with the following steps
Create a new papiNet Purchase Order
Fill out the forms and use optional XML Elements by right-clicking the Plus-icons in the layout tree
Create an HTML file by choosing Document Export to HTML from the menu
Save the document to an XML file and re-load it again
Ponton XP 21 ndash Installation and Configuration Guide 42
Configuration Options
Interface between Ponton XE and Ponton XP
The two software applications communicate via hot folders as illustrated in the following figure
Message Plug-in
Outbox Inbox AckInboxImport
Ponton XP Ponton XE
XMLXML XMLXML XMLXML XMLXML
Hot Folder Adapter
The XML Editor is connected to the Messenger via the Hot Folder Adapter All these folder settings need to be synchronized for a proper data exchange
Configuration of the Messaging Plug-in
The Messaging Plug-in can be flexibly installed and de-installed with the remaining part of Ponton XE If the file messengerjar is removed from the plugins directory it will automatically disappear from the Ponton XE menu bar as soon as the software is started again
Before transferring messages out of Ponton XE you need to preset the following information
Default values for the sending and receiving partners ndash these values may be overridden for an individual transfer
Folder locations of the Hot Folder Adapter ndash the Inbox Outbox and AckInbox need to be set for document exchange with Ponton XP
Default setting for Test Message flag ndash this can be overridden for the actual document transfer
Import Directory ndash Ponton XE will automatically scan the Inbox folder and import received documents to the given folder for local processing
Ponton XP 21 ndash Installation and Configuration Guide 43
Configuration Options
Open Messages after Import ndash if this option is activated messages received from the Inbox will automatically be displayed in Ponton XE
Delete message in Inbox ndash to always remove received messages from the HFA Inbox this option needs to be activated otherwise a copy will remain in the Inbox folder
Ponton XP 21 ndash Installation and Configuration Guide 44
Configuration Options
Ponton XP 21 ndash Installation and Configuration Guide 45
Configuration Options
Using Ponton XE
After setting the configuration and creating a document you can transfer the document to your business partner This is done by means of the following steps
Choose the menu item ldquoMessenger rarr Transfer rarr Send Messagerdquo
Select a sending and receiving partner
Override the settings for the HFA folders
Tick the checkbox to qualify this message as a test message
After transferring the document to the Messenger Ponton XE will wait for a response This is recognised as an acknowledge file which is dropped into the AckInbox folder of the HFA As soon as this has been received a successful transfer in indicated
You may check with the Message Monitor to determine how the document was forwarded by the Messenger to the receiver or whether any errors occurred
Ponton XP 21 ndash Installation and Configuration Guide 46
Configuration Options
56 Display Schema Configuration The schema sets to be supported for each partner are defined in the partner configuration The standard sets available with the installation are shown under Configuration rarr Schemata
Ponton XP 21 ndash Installation and Configuration Guide 47
Configuration Options
57 User Administration Two types of users are distinguished
Administrators ndash these users have full access to the Messengerrsquos configuration interface
Operators ndash these users only have access to the Adapter Monitor the Message Monitor and the Test Adapter The other options in the Messenger menu are not available
Please note the following points in connection with the Messengerrsquos standard user administration
This is a very simple user administration based on the Tomcat implementation If you want to integrate the Messenger with another user administration such as LDAP please contact Ponton Consulting for support
A userrsquos access rights (administratoroperator) are defined when the user account is created ndash they cannot be changed subsequently
User accounts can only be created or deleted by administrators
Ponton XP 21 ndash Installation and Configuration Guide 48
Advanced Configuration
6 Advanced Configuration
61 XML Schema Configuration Important The Messenger distinguishes between available schema set and activated schema sets Just inserting entries in the schema configuration as described in this section does not activate the schema sets or the corresponding schemas for use by the Messenger In order to make use of the schemas in a schema set you have to activate the schema set in the relevant partner configuration To view or modify the activated schema sets in a partner configuration go to
Configuration rarr Partners rarr ltpartner namegt rarr Processing
and activatedeactivate the relevant checkboxes
In the Messengerrsquos configuration interface you can activate and deactivate schema sets for specific partner configurations It is not possible however to modify the contents and specifications of the individual schema sets Any necessary changes have to be made in the configuration file
[installation root]xmlpipewebrootWEB-INFconfigschemataxml
The configuration entries in this file are structured as follows
ltSchemaSet Name=papinet21gt
ltSchemaName=httpwwwpapinetorgdataAvailabilityV2R10xsd MessageType=Availability MessageVersion=V2R10gt
ltNamespacegtltNamespacegt
ltDisplayNamegtAvailability 21ltDisplayNamegt
ltSchemaFilegtAvailabilityV2R10xsdltSchemaFilegt
ltXSLFilegtltXSLFilegt
ltSchemagt
ltSchema Name=yourSchema MessageType=yourMsgType MessageVersion=yourMsgVersgt
ltNamespacegtyourNamespaceltNamespacegt
ltDisplayNamegtYour Display NameltDisplayNamegt
ltSchemaFilegtyourSchemaFileltSchemaFilegt
ltXSLFilegtyourStylesheetltXSLFilegt
ltSchemagt
hellip
ltSchemaFoldergtpapinet210ltSchemaFoldergt
ltXSLFoldergtpapinet210ltXSLFoldergt
ltSchemaSetgt
Ponton XP 21 ndash Installation and Configuration Guide 49
Advanced Configuration
You can add a schema to an existing schema set in this file by inserting a ltSchemagt block (just copy and paste one of the existing blocks and modify the configuration as required) Please ensure that your new schema specification includes correct settings for the attributes of the Schema element
Name= This attribute corresponds with the ebXML Schema Location of incoming messages When an ebXML message is received the Messenger looks for a schema configuration where the Schema Name attribute matches the Schema Location specified in the ebXML envelope
MessageType= This attribute corresponds with the attribute MessageMetaDataDocumentInfoMessageName in the backend envelope of outgoing messages
MessageVersion= This attribute corresponds with the element MessageMe aDataDocumentInfoDTDVersionNumber in the backend envelope of outgoing messages
t
Note The specification of MessageType and MessageVersion must be used together for outgoing messages as they are combined to form an identifier for the message schema
You also have the option of adding a new schema set with your own schema definitions to the schema configuration In this case you would insert a ltSchemaSetgt block with subordinate ltSchemagt blocks Your added schema set will automatically be inserted in the list of available schema sets on the Messenger configuration pages
62 Advanced Database Configuration Important Since the Messenger database is used for essential message processing and tracking purposes you should not experiment with the database configuration on a ldquoliverdquo system For test and debugging purposes you are advised to set up a trial system
Installation with other Databases
This section describes the main steps required to install a different database system on the Messenger for example an Oracle database
1 Install database driver Copy the database driver to
[installation root]xmlpipewebrootWEB-INFlib
Note Please note that only drivers with the extension jar are loaded by the Tomcat servlet engine If the JDBC driver you want to use is a zip file you will have to rename the file to jar The JDBC driver for Oracle 9i is the file ojdbc14jar
Ponton XP 21 ndash Installation and Configuration Guide 50
Advanced Configuration
2 Create database and tables Ponton XP is supplied with SQL scripts for HSQL and for Oracle that can be used to create the tables for the Messenger database If you are using another database you may need to modify these scripts to work correctly with your database system
The SQL scripts are located in the subfolders under [installation root]sql
Once the database tables are in place you will also need to carry out the SQL script that inserts the log messages into the database ie
[installation root]sqlinsert_log_messagessql
3 Set up database connection The configuration of database connections is described in the section Set Up Messenger Database beginning on page 20 To connect with a different database choose ldquootherrdquo from the list of database drivers and enter the configuration for your database on the next page
The entries for the Oracle 9i JDBC driver are
Driver oraclejdbcdriverOracleDriver
URL jdbcoraclethinlthostgtltportgtltdatabasegt
63 Advanced Message Monitor Configuration In the configuration directory ldquoxmlpipewebrootWEB-INFconfigrdquo there is a file messagemonitorxml which can be used to change the selection and ordering of the Message overview window in the Message Monitor The default setting is displayed in the following picture
Ponton XP 21 ndash Installation and Configuration Guide 51
Advanced Configuration
Here the number of line items per page can be set If a high resolution screen is used (beyond 1024 x 768 pixel) one may increase the number of lines
Further a mapping table defines which database column is to be displayed in which monitor column The number of columns again depends on the screen resolution
Finally if main memory size allows caching of XSL stylesheet definitions helps accelerating processing speed for XSL transformations
64 Tomcat SSL Installation
Generate a key
One minor problem with Tomcat or any other webserver that uses the internal Java symmetric key architecture is that you are not allowed to export or import private keys For this reason it is not possible to use the existing key-pair installed with the Messenger software You will have to generate a new key-pair and send a certificate request to the Ponton certificate authority (or other certification authority) to receive a valid certificate
To generate a new key-pair open a command prompt and go to the tomcat-4118 directory The keystore used for a Tomcat SSL installation is located in the Tomcat root directory and is called ssl-keystore The Tomcat installation already contains a certificate for lsquolocalhostrsquo so you can test the HTTPS access with a web browser
Before you can create a new Tomcat certificate you will have to delete the installed certificate Note that the default password for the Tomcat keystore is ldquochangeitrdquo keytool -delete -alias tomcat ndashkeystore ssl-keystore
Now use the following command to create a new key-pair Please note that you need to specify the Listener hostname (eg listenermyserverde) when the keytool asks for lsquofirst and last namersquo keytool -genkey -alias tomcat -keyalg RSA ndashkeystore ssl-keystore
After generating the new key the next step is to export a certificate request with the following command keytool ndashcertreq ndashalias tomcat ndashfile myservercsr ndashkeystore ssl-keystore
This will generate the file myservercsr in the current directory Send this file via email to xp-certponton-consultingde It will be signed and sent back to you The reply will contain a file with the certificate
Finally you have to re-import this signed certificate into the Tomcat SSL keystore Please note that the import may take some time keytool ndashimport ndashalias tomcat ndashfile myservercer ndashkeystore ssl-keystore
If you have any problems starting the keytool make sure you have the javahomebin directory specified in your PATH environment variable Of course you can also change to the javahomebin directory and start the keytool there
Ponton XP 21 ndash Installation and Configuration Guide 52
Advanced Configuration
Update Tomcat configuration
SSL is already activated in the Tomcat configuration packaged in the distribution However you might want to change the specified SSL port (by default the SSL port is set to 8443) You can change the port by editing the file
[tomcat installation]confserverconf
The following section configures the SSL parameters
lt-- Define a SSL Coyote HTTP11 Connector on port 8443 --gt
ltConnector className=orgapachecoyotetomcat4CoyoteConnector
port=8443
minProcessors=5
maxProcessors=75
enableLookups=true
acceptCount=100
debug=0
scheme=https
secure=true
useURIValidationHack=false
disableUploadTimeout=truegt
ltFactory className=orgapachecoyotetomcat4CoyoteServerSocketFactory
clientAuth=false
keystoreFile=ssl-keystore
protocol=TLS gt
ltConnectorgt
Verify setup
To verify if everything is working correctly start the Tomcat webserver as usual and connect to the webserver with your browser
Go to httpsyourserveraddress ndash initially you might get a warning window if the root certificate authority is not known to the browser If you continue by clicking OK you should see the usual Ponton XP start page
If everything comes up correctly you can use SSL to receive messages with the Ponton XP Software
Ponton XP 21 ndash Installation and Configuration Guide 53
Advanced Configuration
65 Distributed Installation If the Messenger is installed on a server that cannot be reached from the Internet you will need to install the Listener as well The purpose of the Listener is to pick up incoming connections and forward them to the Messenger (across the firewall) The firewall rules must be set up to allow this connection between the Listener and the Messenger When a message is received the Listener notifies the Messenger and the Messenger then picks up the message
You also have the option of subsequently installing the Listener as a service under Windows ndash this service can then be configured to start automatically when the system starts up
Note If you are going to run the Messenger in combination with the Listener your partners will have to enter the URI of your Listener in their configurations (under Configuration rarr Partners rarr ltpartner namegt rarr URI of Partners Messenger Service)
Listener Installation and Configuration
The Listener is installed by running the installer program (eg PontonXP-21-setuplistener-windowsexe) on the relevant system You are asked to specify an installation folder and also have the option of creating a desktop or menu shortcut Thatrsquos it
-
The settings for the Listener are contained in the configuration file listenerproperties which is located in the folder [Listener root folder]config To modify these settings you will have to edit the configuration file directly Access via the Messengerrsquos configuration interface is not possible
The file contains the following settings
HttpPort = Port number (for external HTTP connections)
HttpsPort = Port number (for external HTTPS connections)
LogLevel = DEBUG | INFO | WARN | ERROR | FATAL | OFF
The following settings specify the host and port of the Messenger for forwarding connections (HTTPHTTPS) The forwarding connection mode is activated by entering the relevant host and port addresses and removing the hash marks (used to mark ldquocomment linesrdquo in Java property files)
HttpServer = server1port1 (HTTP forwarding connection to the Messenger)
HttpsServer = server1port1 (HTTPS forwarding connection to the Messenger)
Ponton XP 21 ndash Installation and Configuration Guide 54
Advanced Configuration
The following settings specify the Listenerrsquos port for callback connections (HTTPHTTPS) with the Messenger As with the forwarding connection the callback connection mode is activated by entering the relevant port addresses and removing the hash marks (Obviously it makes no sense to have both connections activated at the same time)
HttpServicePort = Port number (for internal HTTP connections to the Listener)
HttpsServicePort = Port number (for internal HTTPS connections to the Listener)
Starting the Listener
To start the Listener open a command prompt and start the class
depontonconsultingxmlpipeListener
with the classpath
-cp libcommons-logging-api-103jarlibcommonutilsjarlibxp_listenerjarconfig
You can also use the installed batch file [Listener root folder]startListenerbat
Callback Mode
Details of the communication flow
When the Messenger starts up it searches for the Listener
Note The Listener should start up first so that it can be found by the Messenger
If the search is successful a permanent connection is established between the Messenger and the Listener The Messenger uses the following settings in the configuration to establish the connection with the Listener
Configuration rarr Messenger rarr Listener rarr HTTP[S] rarr Hostname
Configuration rarr Messenger rarr Listener rarr HTTP[S] rarr Internal Listener Port
Ponton XP 21 ndash Installation and Configuration Guide 55
Advanced Configuration
When the Listener receives an incoming message (or rather an HTTPHTTPS request) it informs the Messenger ndash by way of the permanent connection ndash about the arrival of the new request indicating which port the Messenger can use to pick up the connection
Note This port number is randomly selected by the Listener and cannot be configured
The Messenger picks up the connection on the Listenerrsquos specified port and redirects it to its own local port for further processing
This local port corresponds to the setting for
Configuration rarr Messenger rarr Listener rarr HTTP[S] rarr Internal Messenger Port
in the configuration GUI
Forwarding Mode
Details of the communication flow
In forwarding mode no permanent connection is established between the Messenger and the Listener
When the Listener receives an incoming HTTPHTTPS request it simply forwards the request to the Messenger using the address specified in listenerproperties (HttpServerHttpsServer)
Note To allow this forwarding connection the firewall has to be configured so that the Listener is permitted to access the Messenger on the specified port(s)
Ponton XP 21 ndash Installation and Configuration Guide 56
Advanced Configuration
66 Port Configuration The Messengerrsquos standard configuration uses port 8080 for HTTP connections and port 8443 for secure (HTTPS) connections This section describes how to set up the messenger to use a non-standard port configuration This involves making manual changes to several configuration files in particular the Tomcat serverxml and the Messengerrsquos adapter configuration files
Tomcat Settings
The port setting for the Messengerrsquos HTTP and HTTPS connections are specified in the Tomcat configuration file
[installation root]tomcat-xxxconfserverxml
This file defines the connections (Connectors) for the Messenger as follows
lt-- Define a non-SSL Coyote HTTP11 Connector on port 8080 --gt
ltConnector className=orgapachecoyotetomcat4CoyoteConnector
port=yourMessengerPort minProcessors=5 maxProcessors=75
enableLookups=true redirectPort=yourRed rectPort i acceptCount=100 debug=0 connectionTimeout=20000
useURIValidationHack=false disableUploadTimeout=true gt
lt-- Define a SSL Coyote HTTP11 Connector on port 8443 --gt
ltConnector className=orgapachecoyotetomcat4CoyoteConnector
port=yourSSLPort minProcessors=5 maxProcessors=75
enableLookups=true
acceptCount=100 debug=0 scheme=https secure=true
useURIValidationHack=false disableUploadTimeout=truegt
ltFactory className=orgapachecoyotetomcat4CoyoteServerSocketFactory
clientAuth=false keystoreFile=ssl-keystore protocol=TLS gt
ltConnectorgt
The standard settings for the Messenger ports are
HTTP 8080
SSL 8443
To modify your connections you will need to enter the relevant port numbers indicated above as yourMessengerPort yourRedirectPort (which normally points to the SSL connection) and yourSSLPort
Ponton XP 21 ndash Installation and Configuration Guide 57
Advanced Configuration
Adapter Settings
The settings for the Messenger adapters are contained in the relevant XML files under
[installation root]xmlpipewebrootWEB-INFconfig
In particular a standard installation includes the files testadap erxml and hotfolderxml Each of these configuration files contains a block specifying the connection to the messenger
t
ltMessengergt
ltAddressgtyourMessengerHostltAddressgt
ltPortNumbergtyourMessengerPortltPortNumbergt
ltPathgthellipltPathgt
ltMessengergt
If you have configured the Messenger to run on a different port (see above) you will need to enter the relevant port number here
Ponton XP 21 ndash Installation and Configuration Guide 58
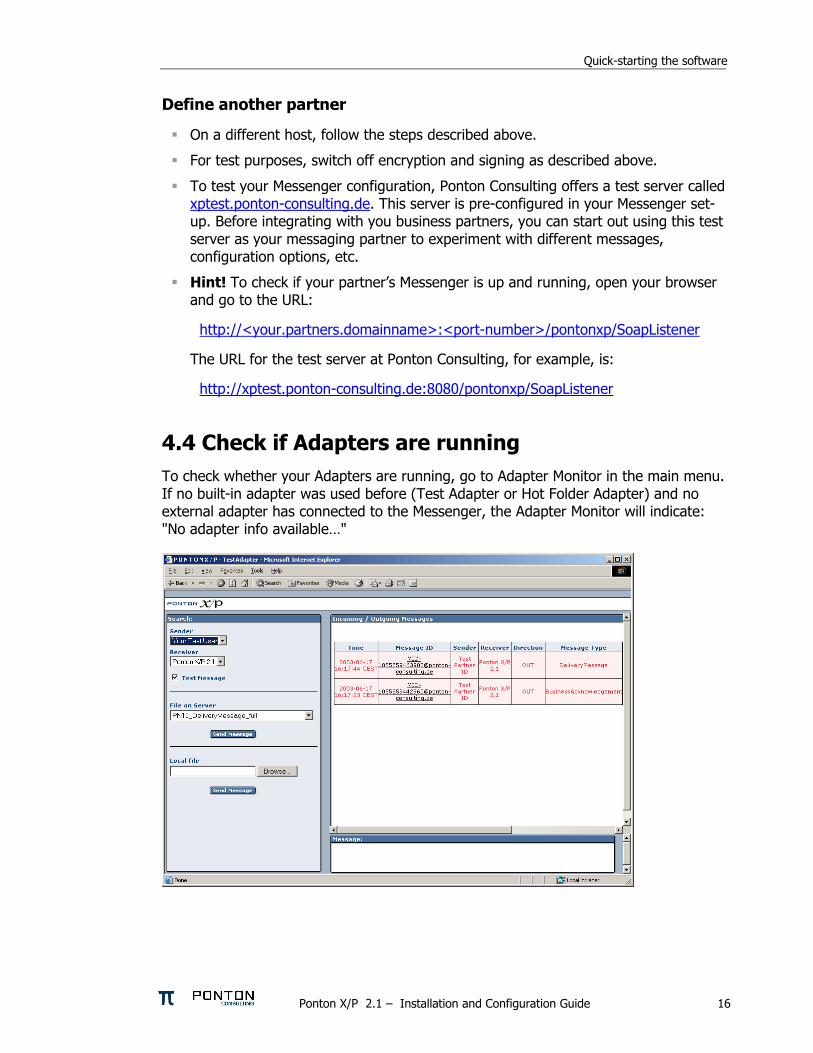
Quick-starting the software
Define another partner
On a different host follow the steps described above
For test purposes switch off encryption and signing as described above
To test your Messenger configuration Ponton Consulting offers a test server called xptestponton-consultingde This server is pre-configured in your Messenger set-up Before integrating with you business partners you can start out using this test server as your messaging partner to experiment with different messages configuration options etc
Hint To check if your partnerrsquos Messenger is up and running open your browser and go to the URL
httpltyourpartnersdomainnamegtltport-numbergtpontonxpSoapListener
The URL for the test server at Ponton Consulting for example is
httpxptestponton-consultingde8080pontonxpSoapListener
44 Check if Adapters are running To check whether your Adapters are running go to Adapter Monitor in the main menu If no built-in adapter was used before (Test Adapter or Hot Folder Adapter) and no external adapter has connected to the Messenger the Adapter Monitor will indicate No adapter info availablehellip
Ponton XP 21 ndash Installation and Configuration Guide 16
Quick-starting the software
Now start the Test Adaptor and go back to the Adapter Monitor It should indicate Test Adapter ready to receive messageshellip
45 Exchange documents using the Test Adapter Call up the Test Adapter from the main menu of Ponton XP
Ponton XP 21 ndash Installation and Configuration Guide 17
Quick-starting the software
1 Select a sending partner
2 Select a receiving partner
3 Select a document (filename)
4 For test purposes activate the ldquoTest Messagerdquo checkbox
5 Send the document by clicking ldquoSend Messagerdquo
Your Test Adapter will now send the document to the Messenger The document will then be processed by the Messenger according to your settings and filters (encryption archiving etc) and finally the document will be sent to the specified receiver party
46 Check the status of your messages The status of messages can be monitored in the Message Monitor window which you can select from the main menu of Ponton XP
In the Message Monitor click the ldquoSearchrdquo button (located below the filter settings on the left) and check if your message was properly transferred to the receiver This is shown in the ldquoResultrdquo column (located in the message overview in the upper right panel)
Ponton XP 21 ndash Installation and Configuration Guide 18
Quick-starting the software
The following color codes are used to indicate the transferprocessing status
Green checkmark ndash the transfer was successful
Red cross ndash something went wrong (in this case the complete entry is highlighted red)
Question mark ndash the message is still unconfirmed (in this case the entry is highlighted yellow)
To check for details click on the MessageID and look at the log information (in the lower right panel) Each processing step carried out by your Messenger is displayed here As long as no errors occurred the log entries are highlighted green
The right-hand columns show How the message was transferred from your test adapter to the Messenger
Which Messenger filters were applied to the message
How the document was transferred to the receiver
You may experiment with the Test Adapter and the Message Monitor and send other documents Please also ask your test partner to send documents to your Messenger
The results shown in the Message Monitor indicate the processing sequence A Senderrsquos Adapter
M Senderrsquos Messenger
L Senderrsquos Listener
Net NetworkTransmission
L Receiverrsquos Listener
M Receiverrsquos Messenger
A Receiverrsquos Adapter
Ponton XP 21 ndash Installation and Configuration Guide 19
Configuration Options
5 Configuration Options The overall configuration of Ponton XP breaks down into the following sections
Messenger configuration This section focuses on your local setting for the Messenger This includes database connections default filter settings communication protocol selection etc
Partner configuration Per partner several setting are required Partner identification filter activation (which overrides the default setting) communication settings etc
Certificate management For own partners key pairs may be created and certificates requested For certificate authorities as well as for each individual partner certificates can be installed Certificates may be requested for signing and encryption for SSL and for SMIME
Hot folder configuration The Hot Folder Adapter is tightly integrated with the Messenger and can therefore be configured through the same interface It supports the definition of multiple hot folders for sending and receiving documents as well as dedicated folders for business partners
51 Messenger Configuration
Set Up Messenger Database
The Messenger stores log entries in a database By default the log database is pre-configured as an HSQL database HSQL is an open source database implementation written entirely in Java If there is no requirement to store log data in an existing database in your organization you may continue with HSQL
It is also possible to configure the Messenger to use a different database system for example
Oracle (version 815 or higher)
MS SQL Server 70
MySQL (version 32 or higher)
SAPdb (version 73)
The log database is accessed via JDBC connection Configuration scripts to set up the tables for an Oracle database are included with Ponton XP You can refer to these scripts as examples to create scripts for your own database system
If you do not yet have a database system with JDBC support in use you can download the setup files for MySQL from httpwwwmysqlcomdownloadsmysql-323html
Ponton XP 21 ndash Installation and Configuration Guide 20
Configuration Options
To configure the Messenger database the following set-up needs to be performed
1 Go to Configuration rarr Messenger rarr Database
2 Enter the driver class name and the URL for the JDBC connection to your database
3 Enter the user name and password for the connection if required
4 Click Test to test the connection
5 Important Donrsquot click OK unless the connection test was successful
Note The connection to the standard HSQL database supplied with the Messenger requires a ldquotruncatedrdquo URL that does contain the database name (as shown above) If you get a ldquoconnection brokenrdquo message when testing the connection to the standard database (as specified above) try deleting ltDATABASEgt from the URL and testing the connection again
Ponton XP 21 ndash Installation and Configuration Guide 21
Configuration Options
Set Logging Level
To specify the logging level go to Configuration rarr Messenger rarr Logging and select the desired settings for Messenger and JDBC logging
There is a range of settings available
OFF turns logging off completely
hellip
DEBUG logs all the messages output by the system
Note Please keep in mind that the chosen logging level can have an effect on the performance of your system In particular it is advisable to use DEBUG logging only in connection with error tracking and analysis
Ponton XP 21 ndash Installation and Configuration Guide 22
Configuration Options
Set Message Queue Scan Interval
Under Configuration rarr Messenger rarr Message Queues you can specify the interval to scan the (inbound and outbound) message queues
The default setting is 5000 msec To boost the message throughput on a faster system you can increase the scan frequency by setting this interval to a lower (ie shorter) value
Ponton XP 21 ndash Installation and Configuration Guide 23
Configuration Options
Select Messaging Pipeline
The Messenger allows you to configure different filter pipelines The standard configuration comes with two pipelines
1 Messenger 203 compatibility pipeline This allows you to maintain backward compatibility with users of the previous Messenger version
2 Messenger 21 pipeline This is to communicate with partners that are also using Messenger version 21 or any EbXML 20 compliant software
For each pipeline a range of filters can be set in particular
Validation
Signing
Compression
Encryption
The Messenger configuration can be used for standard filters (validation signing compression and encryption) for inbound and outbound messages Custom filters are configured in a dedicated section
Developers may extend the Messenger with additional filters For example one may think of a ldquoBusiness Validatorrdquo that checks message content against business rules Or existing filters could be Instead of ldquosoft signingrdquo a document smart card access may be integrated
Ponton XP 21 ndash Installation and Configuration Guide 24
Configuration Options
Outbound Email Connection
This connection is used for email messages sent by your Messenger to your business partners The following data needs to be configured
From ndash the senderrsquos address to be used for your emails
SMTP ndash the outgoing mail server to be contacted by your Messenger in order to submit the email
Username password ndash must be entered if your mail server requires authentication for outgoing emails in this case enter the settings to be used by the Messenger to log in on the mail server
To test the email connection enter a receiver email address (in the ldquoTordquo field) and click the ldquoTestrdquo button
Ponton XP 21 ndash Installation and Configuration Guide 25
Configuration Options
Inbound Email Connection
You can enable your Messenger to receive email messages by setting up a POPIMAP connection with the following entries
Protocol ndash set to pop3 IMAP (depending on the type of mail server)
Server ndash the hostname or IP address of your mail server
Interval ndash the frequency for accessing the server for mail download
Username password ndash must be properly set to authenticate the Messenger on the mail server
Ponton XP 21 ndash Installation and Configuration Guide 26
Configuration Options
Email Notification
You can use the notification service to send emails to specified addresses whenever certain events occur For example you might want to notify your system administrator whenever certain errors are encountered
To specify an address go to Messenger rarr eMail Notification and click New Receiver Enter the email address for this receiver in the text field and select the events for which this receiver is to be notified You can use CTRL-click to activate multiple entries in the list
Ponton XP 21 ndash Installation and Configuration Guide 27
Configuration Options
Communication Settings
On this screen you can specify URI of each partnerrsquos Messenger Service ndash for example
httppartnerserver8080pontonxpSoapListener where partne server refers to the hostname or IP address of the machine the Messenger is installed on
r
Acknowledgment Requests ndash you can use this setting to determine whether outbound messages to this partner require acknowledgements To differentiate per message you can deactivate this checkbox and use the TransmissionMode attribute in the BackendEnvelope In the context of ebXML 20 transmissions you can additionally request signed acknowledgements for increased security
Retransmission Handling ndash you can use this setting to specify the number of retransmission attempts and the interval (in seconds) between attempts If a message cannot be transmitted successfully in the specified number of retries the Messenger will give up and mark the message as ldquofailedrdquo
Ponton XP 21 ndash Installation and Configuration Guide 28
Configuration Options
Configure Archiving Filter
The archiving filter stores the following information in a dedicated directory
Backend Envelope
ebXML Envelope
Payload ndash this is the actual business document
Certificate
Signature
Each part is stored in a separate file
The Archive Folder setting can be used to indicate the location of the archiving folder This can be expressed as
An absolute path to the required folder
A relative path beginning with $CONTEXT ndash this placeholder refers to the folder [installation root]xmlpipewebroot
The Maximum Age setting specifies how long the files will be archived ndash expressed in days
Ponton XP 21 ndash Installation and Configuration Guide 29
Configuration Options
52 Partner Configuration For each partner the following data may be configured
Partner identification (internal and external)
Communication Settings
URI of the partnerrsquos Messenger
Create Delete a Partner Entry
To create a new partner entry specify an identifier for the partner (this is the local identifier for your configuration) and indicate whether this partner entry is for
An internal partner (with the ldquoselfrdquo option activated) ndash this might be a department of your organization
An external partner ndash these entries refer to your business partners for example customers suppliers carriers warehouse operators etc
A message is always sent by your Messenger from an internal to an external partner and received from an external partner to an internal one
Internal partners are distinguished because for encryption and signing the certificates of each internal partner will be used on a per-partner basis
For further information please check the Ponton XP Architecture Overview
Ponton XP 21 ndash Installation and Configuration Guide 30
Configuration Options
Set the Partner Identification
Local Partner Name This identifier is valid within you local configuration ie you may choose any value as long as it is unique among all local partner names
Disable Although configured as a partner individual partners may be disabled In this case the Messenger rejects any message received from this partner
PartyID PartyID Type PartyIDs are used to identify partners externally To avoid name clashes and duplication well-known naming schemas exist to identify partners eg DUNS codes VAT numbers IANA codes etc For this reason trading partners should agree on an minimal set of identification types (like DUNS numbers and IANA codes) that is to be used by all partners
More than one PartyID can be defined per partner The limit is given by the number of PartyID types These are configured separately please check Section ldquoAdvanced Configurationrdquo)
Hint Please also check the Ponton XP Architecture Overview document for a detailed explanation of ebXML codes and partner identification
Ponton XP 21 ndash Installation and Configuration Guide 31
Configuration Options
Partner Communication Configuration
For each partner the following configuration options may be set URI of Partnerrsquos Messenger Service ndash enter the address of the partnerrsquos
Messenger for example httppartnerserver8080pontonxpSoapListener
Request Acknowledge ndash every message to this partner needs to be acknowledged
Request Signed Acknowledge ndash to specify signing of acknowledgements received from this partner
Retries ndash the number of retries in case of unsuccessful message transmission
Retry Interval ndash the number of seconds to wait until the next retry
Ponton XP 21 ndash Installation and Configuration Guide 32
Configuration Options
Processing Configuration
The following options can be set
Default Adapter ndash enter the name of the adapter to be used by default
Processing Pipeline ndash specify the processing pipeline to be used for this profile
Schema Sets ndash choose which Schema set(s) are to be supported
Use XML Signature ndash indicate whether to use XML Signature
Use default message settings (specified under Configuration rarr Messenger rarr Processing) or define a specific processing filter for this partner
Ponton XP 21 ndash Installation and Configuration Guide 33
Configuration Options
Install Partner Certificates
There are different ways of distributing certificates to business partners One is to send the certificate per email and have the partner cut amp paste the certificate code into the partner configuration
Note It is important to cut amp paste the complete certificate code including the lines ldquo----- Begin Certificate -----rdquo and ldquo----- End Certificate -----rdquo
Important A partner certificate will only be accepted if the certificate of the issuing CA (certificate authority) was pre-installed Otherwise the trust relationship between the partner and the CA cannot be traced
One may select to install a general certificate or a SMIME certificate Please determine what kind of certificate you received from your partner before installing it
Ponton XP 21 ndash Installation and Configuration Guide 34
Configuration Options
53 Certificate Management Certificate management comprises the following initial steps
Configure your default CA This is usually properly pre-configured in the installation files
Install the root certificate of the default CA This needs to be installed manually if 3rd-party CAs are to be used
Request a certificate for your own Messenger This includes creating a publicprivate key pair and sending a certificate request to the CA
Optionally you can request and install a SMIME certificate to be used for SMIME based communication via email
Default CA Configuration
On this screen you specify the settings for receiving certificates from your default certificate authority (CA) CA email address ndash enter the email address to be used to request a certificate
from your (default) CA
Ponton XP 21 ndash Installation and Configuration Guide 35
Configuration Options
CA download URL ndash enter the URL at your CA from which to download certificates for your Messenger installation Please note that you can only install certificates for partners you have already defined in your partner configuration
Download interval ndash specify the interval to wait between automatic certificate downloads
To download the available certificates immediately click the Download button
Request and Install Your Own Certificate
To request a certificate from your (default) CA go to Configuration rarr Certificates rarr Request Certificate Please enter data for all the fields on this form If any entries are missing you will get an error message
After completing the form click OK to send the certificate request to your CA You will get a message indicating that the request has been sent
Ponton XP 21 ndash Installation and Configuration Guide 36
Configuration Options
Once you receive the requested certificate from your CA you can install it in your own partner configuration (ie the internal partner you will use to sendreceive messages) Go to Configuration rarr Partners rarr ltYour Partner Namegt rarr Install Certificate and paste the certificate text including the hellip into the text field
Then enter the password you used when you requested the certificate and click OK to complete the installation of the certificate You will see the result above the text field containing the certificate
Ponton XP 21 ndash Installation and Configuration Guide 37
Configuration Options
Install Partner Certificates
Install a certificate issued by the CA for the requesting partner This was already described in the Partner Configuration section for normal standard certificates
Note In case of SMIME certificates an additional password may be needed to allow the Messenger to access the certificate in the local certificate store
Install a CA Certificate
To install the certificate for your CA go to Configuration rarr Certificates rarr CA rarr Install Certificate and paste your CArsquos certificate into the text field This is the certificate that authorizes the CA as a signing authority for other certificates
Ponton XP 21 ndash Installation and Configuration Guide 38
Configuration Options
54 Configure the Hot Folder Adapter
General Configuration
Address Port ndash the Hot Folder Adapter (HFA) is addressed as a separate process that communicates with the Messenger via HTTP Therefore the hostname and port number need to be set up for the Messenger If the HFA is co-located with the Messenger on the same machine use ldquolocalhostrdquo for the IP address In this case the HFA does not run as a separate Java process but will be hosted on the same Tomcat server
Path ndash the HFA needs to know the Adapter communication path of the Messenger By default it is pontonxpAdapterService
Console File Log Level ndash the HFA provides log output to the console and to log files Both can be configured regarding the level of detail The console log is only useful if the HFA is running as a standalone application so you can safely leave it disabled in the default configuration
Ponton XP 21 ndash Installation and Configuration Guide 39
Configuration Options
Create Delete a HFA
Several HFAs may be created Each registers under a different ID at the Messenger HFAs may be created for individual partners If this is the case messages exchanged with the rest of the partners will be stored with the default HFA
Configure a HFA
Each HFA requires several directories to be defined
Inbox ndash a document will be stored in the Inbox whenever it was received from a partner
Outbox ndash documents to be sent to the business partner are dropped here The HFA grabs them in a defined frequency
Failed ndash if a document could not be sent to a partner and all retries failed it will be stored in this folder
Work ndash if a document transfer is in progress or all attempts to send the document have not yet been tried the document will remain here After a final failure it will be transferred to the Failed folder
Ponton XP 21 ndash Installation and Configuration Guide 40
Configuration Options
The following settings are also supported
Port ndash the port to be used by the HFA (optional)
Receiver format ndash standard format is XML
Save Backend envelope ndash the Backend envelope is retained for incoming messages
Support attachments ndash the HFA will save any files attached to an incoming message to the selected inbox folder
Scan Interval ndash the interval to wait (in seconds) between checking the outbox
Number of receiving threads ndash specifies the maximum number of receiving threads the adapter can process
Use partner subfolders ndash if this is set this HFA will create inbox and outbox folders for all remote partners Inbound messages will automatically be sorted into the according folder depending on the sender Outbound messages need to be placed into the receiving partnerrsquos outbox folder The backend message is not used in this mode and is ignored if it exists
Use Acknowledgement for ERP ndash with this option activated the ERP application receives an acknowledgement from the receiving Messenger on the partnerrsquos side This acknowledgement will be provided via the specified Inbox
Ponton XP 21 ndash Installation and Configuration Guide 41
Configuration Options
55 Ponton XE ndash The XML Editor Ponton XE is a separate Ponton product It is packaged with Ponton XP for free use only by papiNet users It allows to enter papiNet document data directly via a graphical user interface and to send the document via the hot folder adapter to the business partners
Ponton XE is fully documented in a separate manual Hence only the Messaging Plug-in will be described here
You can experiment with the XML Editor and check out all the features and options without using the Ponton XP connection To start with you may want to begin with the following steps
Create a new papiNet Purchase Order
Fill out the forms and use optional XML Elements by right-clicking the Plus-icons in the layout tree
Create an HTML file by choosing Document Export to HTML from the menu
Save the document to an XML file and re-load it again
Ponton XP 21 ndash Installation and Configuration Guide 42
Configuration Options
Interface between Ponton XE and Ponton XP
The two software applications communicate via hot folders as illustrated in the following figure
Message Plug-in
Outbox Inbox AckInboxImport
Ponton XP Ponton XE
XMLXML XMLXML XMLXML XMLXML
Hot Folder Adapter
The XML Editor is connected to the Messenger via the Hot Folder Adapter All these folder settings need to be synchronized for a proper data exchange
Configuration of the Messaging Plug-in
The Messaging Plug-in can be flexibly installed and de-installed with the remaining part of Ponton XE If the file messengerjar is removed from the plugins directory it will automatically disappear from the Ponton XE menu bar as soon as the software is started again
Before transferring messages out of Ponton XE you need to preset the following information
Default values for the sending and receiving partners ndash these values may be overridden for an individual transfer
Folder locations of the Hot Folder Adapter ndash the Inbox Outbox and AckInbox need to be set for document exchange with Ponton XP
Default setting for Test Message flag ndash this can be overridden for the actual document transfer
Import Directory ndash Ponton XE will automatically scan the Inbox folder and import received documents to the given folder for local processing
Ponton XP 21 ndash Installation and Configuration Guide 43
Configuration Options
Open Messages after Import ndash if this option is activated messages received from the Inbox will automatically be displayed in Ponton XE
Delete message in Inbox ndash to always remove received messages from the HFA Inbox this option needs to be activated otherwise a copy will remain in the Inbox folder
Ponton XP 21 ndash Installation and Configuration Guide 44
Configuration Options
Ponton XP 21 ndash Installation and Configuration Guide 45
Configuration Options
Using Ponton XE
After setting the configuration and creating a document you can transfer the document to your business partner This is done by means of the following steps
Choose the menu item ldquoMessenger rarr Transfer rarr Send Messagerdquo
Select a sending and receiving partner
Override the settings for the HFA folders
Tick the checkbox to qualify this message as a test message
After transferring the document to the Messenger Ponton XE will wait for a response This is recognised as an acknowledge file which is dropped into the AckInbox folder of the HFA As soon as this has been received a successful transfer in indicated
You may check with the Message Monitor to determine how the document was forwarded by the Messenger to the receiver or whether any errors occurred
Ponton XP 21 ndash Installation and Configuration Guide 46
Configuration Options
56 Display Schema Configuration The schema sets to be supported for each partner are defined in the partner configuration The standard sets available with the installation are shown under Configuration rarr Schemata
Ponton XP 21 ndash Installation and Configuration Guide 47
Configuration Options
57 User Administration Two types of users are distinguished
Administrators ndash these users have full access to the Messengerrsquos configuration interface
Operators ndash these users only have access to the Adapter Monitor the Message Monitor and the Test Adapter The other options in the Messenger menu are not available
Please note the following points in connection with the Messengerrsquos standard user administration
This is a very simple user administration based on the Tomcat implementation If you want to integrate the Messenger with another user administration such as LDAP please contact Ponton Consulting for support
A userrsquos access rights (administratoroperator) are defined when the user account is created ndash they cannot be changed subsequently
User accounts can only be created or deleted by administrators
Ponton XP 21 ndash Installation and Configuration Guide 48
Advanced Configuration
6 Advanced Configuration
61 XML Schema Configuration Important The Messenger distinguishes between available schema set and activated schema sets Just inserting entries in the schema configuration as described in this section does not activate the schema sets or the corresponding schemas for use by the Messenger In order to make use of the schemas in a schema set you have to activate the schema set in the relevant partner configuration To view or modify the activated schema sets in a partner configuration go to
Configuration rarr Partners rarr ltpartner namegt rarr Processing
and activatedeactivate the relevant checkboxes
In the Messengerrsquos configuration interface you can activate and deactivate schema sets for specific partner configurations It is not possible however to modify the contents and specifications of the individual schema sets Any necessary changes have to be made in the configuration file
[installation root]xmlpipewebrootWEB-INFconfigschemataxml
The configuration entries in this file are structured as follows
ltSchemaSet Name=papinet21gt
ltSchemaName=httpwwwpapinetorgdataAvailabilityV2R10xsd MessageType=Availability MessageVersion=V2R10gt
ltNamespacegtltNamespacegt
ltDisplayNamegtAvailability 21ltDisplayNamegt
ltSchemaFilegtAvailabilityV2R10xsdltSchemaFilegt
ltXSLFilegtltXSLFilegt
ltSchemagt
ltSchema Name=yourSchema MessageType=yourMsgType MessageVersion=yourMsgVersgt
ltNamespacegtyourNamespaceltNamespacegt
ltDisplayNamegtYour Display NameltDisplayNamegt
ltSchemaFilegtyourSchemaFileltSchemaFilegt
ltXSLFilegtyourStylesheetltXSLFilegt
ltSchemagt
hellip
ltSchemaFoldergtpapinet210ltSchemaFoldergt
ltXSLFoldergtpapinet210ltXSLFoldergt
ltSchemaSetgt
Ponton XP 21 ndash Installation and Configuration Guide 49
Advanced Configuration
You can add a schema to an existing schema set in this file by inserting a ltSchemagt block (just copy and paste one of the existing blocks and modify the configuration as required) Please ensure that your new schema specification includes correct settings for the attributes of the Schema element
Name= This attribute corresponds with the ebXML Schema Location of incoming messages When an ebXML message is received the Messenger looks for a schema configuration where the Schema Name attribute matches the Schema Location specified in the ebXML envelope
MessageType= This attribute corresponds with the attribute MessageMetaDataDocumentInfoMessageName in the backend envelope of outgoing messages
MessageVersion= This attribute corresponds with the element MessageMe aDataDocumentInfoDTDVersionNumber in the backend envelope of outgoing messages
t
Note The specification of MessageType and MessageVersion must be used together for outgoing messages as they are combined to form an identifier for the message schema
You also have the option of adding a new schema set with your own schema definitions to the schema configuration In this case you would insert a ltSchemaSetgt block with subordinate ltSchemagt blocks Your added schema set will automatically be inserted in the list of available schema sets on the Messenger configuration pages
62 Advanced Database Configuration Important Since the Messenger database is used for essential message processing and tracking purposes you should not experiment with the database configuration on a ldquoliverdquo system For test and debugging purposes you are advised to set up a trial system
Installation with other Databases
This section describes the main steps required to install a different database system on the Messenger for example an Oracle database
1 Install database driver Copy the database driver to
[installation root]xmlpipewebrootWEB-INFlib
Note Please note that only drivers with the extension jar are loaded by the Tomcat servlet engine If the JDBC driver you want to use is a zip file you will have to rename the file to jar The JDBC driver for Oracle 9i is the file ojdbc14jar
Ponton XP 21 ndash Installation and Configuration Guide 50
Advanced Configuration
2 Create database and tables Ponton XP is supplied with SQL scripts for HSQL and for Oracle that can be used to create the tables for the Messenger database If you are using another database you may need to modify these scripts to work correctly with your database system
The SQL scripts are located in the subfolders under [installation root]sql
Once the database tables are in place you will also need to carry out the SQL script that inserts the log messages into the database ie
[installation root]sqlinsert_log_messagessql
3 Set up database connection The configuration of database connections is described in the section Set Up Messenger Database beginning on page 20 To connect with a different database choose ldquootherrdquo from the list of database drivers and enter the configuration for your database on the next page
The entries for the Oracle 9i JDBC driver are
Driver oraclejdbcdriverOracleDriver
URL jdbcoraclethinlthostgtltportgtltdatabasegt
63 Advanced Message Monitor Configuration In the configuration directory ldquoxmlpipewebrootWEB-INFconfigrdquo there is a file messagemonitorxml which can be used to change the selection and ordering of the Message overview window in the Message Monitor The default setting is displayed in the following picture
Ponton XP 21 ndash Installation and Configuration Guide 51
Advanced Configuration
Here the number of line items per page can be set If a high resolution screen is used (beyond 1024 x 768 pixel) one may increase the number of lines
Further a mapping table defines which database column is to be displayed in which monitor column The number of columns again depends on the screen resolution
Finally if main memory size allows caching of XSL stylesheet definitions helps accelerating processing speed for XSL transformations
64 Tomcat SSL Installation
Generate a key
One minor problem with Tomcat or any other webserver that uses the internal Java symmetric key architecture is that you are not allowed to export or import private keys For this reason it is not possible to use the existing key-pair installed with the Messenger software You will have to generate a new key-pair and send a certificate request to the Ponton certificate authority (or other certification authority) to receive a valid certificate
To generate a new key-pair open a command prompt and go to the tomcat-4118 directory The keystore used for a Tomcat SSL installation is located in the Tomcat root directory and is called ssl-keystore The Tomcat installation already contains a certificate for lsquolocalhostrsquo so you can test the HTTPS access with a web browser
Before you can create a new Tomcat certificate you will have to delete the installed certificate Note that the default password for the Tomcat keystore is ldquochangeitrdquo keytool -delete -alias tomcat ndashkeystore ssl-keystore
Now use the following command to create a new key-pair Please note that you need to specify the Listener hostname (eg listenermyserverde) when the keytool asks for lsquofirst and last namersquo keytool -genkey -alias tomcat -keyalg RSA ndashkeystore ssl-keystore
After generating the new key the next step is to export a certificate request with the following command keytool ndashcertreq ndashalias tomcat ndashfile myservercsr ndashkeystore ssl-keystore
This will generate the file myservercsr in the current directory Send this file via email to xp-certponton-consultingde It will be signed and sent back to you The reply will contain a file with the certificate
Finally you have to re-import this signed certificate into the Tomcat SSL keystore Please note that the import may take some time keytool ndashimport ndashalias tomcat ndashfile myservercer ndashkeystore ssl-keystore
If you have any problems starting the keytool make sure you have the javahomebin directory specified in your PATH environment variable Of course you can also change to the javahomebin directory and start the keytool there
Ponton XP 21 ndash Installation and Configuration Guide 52
Advanced Configuration
Update Tomcat configuration
SSL is already activated in the Tomcat configuration packaged in the distribution However you might want to change the specified SSL port (by default the SSL port is set to 8443) You can change the port by editing the file
[tomcat installation]confserverconf
The following section configures the SSL parameters
lt-- Define a SSL Coyote HTTP11 Connector on port 8443 --gt
ltConnector className=orgapachecoyotetomcat4CoyoteConnector
port=8443
minProcessors=5
maxProcessors=75
enableLookups=true
acceptCount=100
debug=0
scheme=https
secure=true
useURIValidationHack=false
disableUploadTimeout=truegt
ltFactory className=orgapachecoyotetomcat4CoyoteServerSocketFactory
clientAuth=false
keystoreFile=ssl-keystore
protocol=TLS gt
ltConnectorgt
Verify setup
To verify if everything is working correctly start the Tomcat webserver as usual and connect to the webserver with your browser
Go to httpsyourserveraddress ndash initially you might get a warning window if the root certificate authority is not known to the browser If you continue by clicking OK you should see the usual Ponton XP start page
If everything comes up correctly you can use SSL to receive messages with the Ponton XP Software
Ponton XP 21 ndash Installation and Configuration Guide 53
Advanced Configuration
65 Distributed Installation If the Messenger is installed on a server that cannot be reached from the Internet you will need to install the Listener as well The purpose of the Listener is to pick up incoming connections and forward them to the Messenger (across the firewall) The firewall rules must be set up to allow this connection between the Listener and the Messenger When a message is received the Listener notifies the Messenger and the Messenger then picks up the message
You also have the option of subsequently installing the Listener as a service under Windows ndash this service can then be configured to start automatically when the system starts up
Note If you are going to run the Messenger in combination with the Listener your partners will have to enter the URI of your Listener in their configurations (under Configuration rarr Partners rarr ltpartner namegt rarr URI of Partners Messenger Service)
Listener Installation and Configuration
The Listener is installed by running the installer program (eg PontonXP-21-setuplistener-windowsexe) on the relevant system You are asked to specify an installation folder and also have the option of creating a desktop or menu shortcut Thatrsquos it
-
The settings for the Listener are contained in the configuration file listenerproperties which is located in the folder [Listener root folder]config To modify these settings you will have to edit the configuration file directly Access via the Messengerrsquos configuration interface is not possible
The file contains the following settings
HttpPort = Port number (for external HTTP connections)
HttpsPort = Port number (for external HTTPS connections)
LogLevel = DEBUG | INFO | WARN | ERROR | FATAL | OFF
The following settings specify the host and port of the Messenger for forwarding connections (HTTPHTTPS) The forwarding connection mode is activated by entering the relevant host and port addresses and removing the hash marks (used to mark ldquocomment linesrdquo in Java property files)
HttpServer = server1port1 (HTTP forwarding connection to the Messenger)
HttpsServer = server1port1 (HTTPS forwarding connection to the Messenger)
Ponton XP 21 ndash Installation and Configuration Guide 54
Advanced Configuration
The following settings specify the Listenerrsquos port for callback connections (HTTPHTTPS) with the Messenger As with the forwarding connection the callback connection mode is activated by entering the relevant port addresses and removing the hash marks (Obviously it makes no sense to have both connections activated at the same time)
HttpServicePort = Port number (for internal HTTP connections to the Listener)
HttpsServicePort = Port number (for internal HTTPS connections to the Listener)
Starting the Listener
To start the Listener open a command prompt and start the class
depontonconsultingxmlpipeListener
with the classpath
-cp libcommons-logging-api-103jarlibcommonutilsjarlibxp_listenerjarconfig
You can also use the installed batch file [Listener root folder]startListenerbat
Callback Mode
Details of the communication flow
When the Messenger starts up it searches for the Listener
Note The Listener should start up first so that it can be found by the Messenger
If the search is successful a permanent connection is established between the Messenger and the Listener The Messenger uses the following settings in the configuration to establish the connection with the Listener
Configuration rarr Messenger rarr Listener rarr HTTP[S] rarr Hostname
Configuration rarr Messenger rarr Listener rarr HTTP[S] rarr Internal Listener Port
Ponton XP 21 ndash Installation and Configuration Guide 55
Advanced Configuration
When the Listener receives an incoming message (or rather an HTTPHTTPS request) it informs the Messenger ndash by way of the permanent connection ndash about the arrival of the new request indicating which port the Messenger can use to pick up the connection
Note This port number is randomly selected by the Listener and cannot be configured
The Messenger picks up the connection on the Listenerrsquos specified port and redirects it to its own local port for further processing
This local port corresponds to the setting for
Configuration rarr Messenger rarr Listener rarr HTTP[S] rarr Internal Messenger Port
in the configuration GUI
Forwarding Mode
Details of the communication flow
In forwarding mode no permanent connection is established between the Messenger and the Listener
When the Listener receives an incoming HTTPHTTPS request it simply forwards the request to the Messenger using the address specified in listenerproperties (HttpServerHttpsServer)
Note To allow this forwarding connection the firewall has to be configured so that the Listener is permitted to access the Messenger on the specified port(s)
Ponton XP 21 ndash Installation and Configuration Guide 56
Advanced Configuration
66 Port Configuration The Messengerrsquos standard configuration uses port 8080 for HTTP connections and port 8443 for secure (HTTPS) connections This section describes how to set up the messenger to use a non-standard port configuration This involves making manual changes to several configuration files in particular the Tomcat serverxml and the Messengerrsquos adapter configuration files
Tomcat Settings
The port setting for the Messengerrsquos HTTP and HTTPS connections are specified in the Tomcat configuration file
[installation root]tomcat-xxxconfserverxml
This file defines the connections (Connectors) for the Messenger as follows
lt-- Define a non-SSL Coyote HTTP11 Connector on port 8080 --gt
ltConnector className=orgapachecoyotetomcat4CoyoteConnector
port=yourMessengerPort minProcessors=5 maxProcessors=75
enableLookups=true redirectPort=yourRed rectPort i acceptCount=100 debug=0 connectionTimeout=20000
useURIValidationHack=false disableUploadTimeout=true gt
lt-- Define a SSL Coyote HTTP11 Connector on port 8443 --gt
ltConnector className=orgapachecoyotetomcat4CoyoteConnector
port=yourSSLPort minProcessors=5 maxProcessors=75
enableLookups=true
acceptCount=100 debug=0 scheme=https secure=true
useURIValidationHack=false disableUploadTimeout=truegt
ltFactory className=orgapachecoyotetomcat4CoyoteServerSocketFactory
clientAuth=false keystoreFile=ssl-keystore protocol=TLS gt
ltConnectorgt
The standard settings for the Messenger ports are
HTTP 8080
SSL 8443
To modify your connections you will need to enter the relevant port numbers indicated above as yourMessengerPort yourRedirectPort (which normally points to the SSL connection) and yourSSLPort
Ponton XP 21 ndash Installation and Configuration Guide 57
Advanced Configuration
Adapter Settings
The settings for the Messenger adapters are contained in the relevant XML files under
[installation root]xmlpipewebrootWEB-INFconfig
In particular a standard installation includes the files testadap erxml and hotfolderxml Each of these configuration files contains a block specifying the connection to the messenger
t
ltMessengergt
ltAddressgtyourMessengerHostltAddressgt
ltPortNumbergtyourMessengerPortltPortNumbergt
ltPathgthellipltPathgt
ltMessengergt
If you have configured the Messenger to run on a different port (see above) you will need to enter the relevant port number here
Ponton XP 21 ndash Installation and Configuration Guide 58
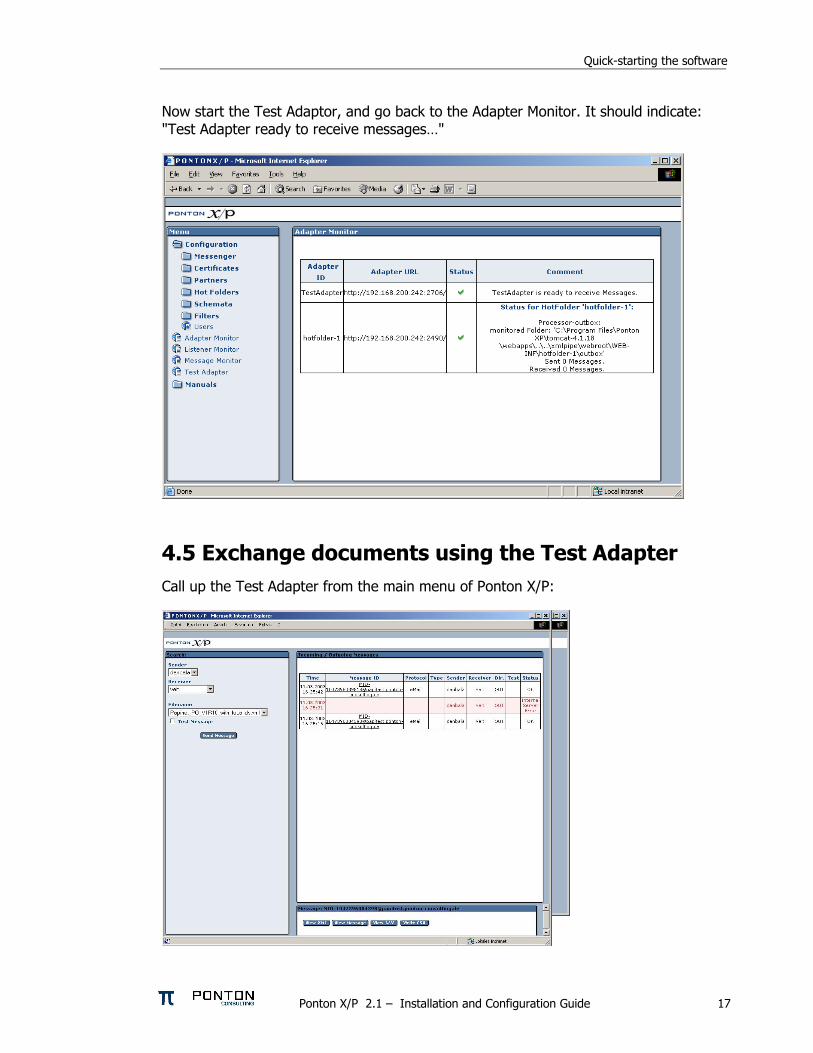
Quick-starting the software
Now start the Test Adaptor and go back to the Adapter Monitor It should indicate Test Adapter ready to receive messageshellip
45 Exchange documents using the Test Adapter Call up the Test Adapter from the main menu of Ponton XP
Ponton XP 21 ndash Installation and Configuration Guide 17
Quick-starting the software
1 Select a sending partner
2 Select a receiving partner
3 Select a document (filename)
4 For test purposes activate the ldquoTest Messagerdquo checkbox
5 Send the document by clicking ldquoSend Messagerdquo
Your Test Adapter will now send the document to the Messenger The document will then be processed by the Messenger according to your settings and filters (encryption archiving etc) and finally the document will be sent to the specified receiver party
46 Check the status of your messages The status of messages can be monitored in the Message Monitor window which you can select from the main menu of Ponton XP
In the Message Monitor click the ldquoSearchrdquo button (located below the filter settings on the left) and check if your message was properly transferred to the receiver This is shown in the ldquoResultrdquo column (located in the message overview in the upper right panel)
Ponton XP 21 ndash Installation and Configuration Guide 18
Quick-starting the software
The following color codes are used to indicate the transferprocessing status
Green checkmark ndash the transfer was successful
Red cross ndash something went wrong (in this case the complete entry is highlighted red)
Question mark ndash the message is still unconfirmed (in this case the entry is highlighted yellow)
To check for details click on the MessageID and look at the log information (in the lower right panel) Each processing step carried out by your Messenger is displayed here As long as no errors occurred the log entries are highlighted green
The right-hand columns show How the message was transferred from your test adapter to the Messenger
Which Messenger filters were applied to the message
How the document was transferred to the receiver
You may experiment with the Test Adapter and the Message Monitor and send other documents Please also ask your test partner to send documents to your Messenger
The results shown in the Message Monitor indicate the processing sequence A Senderrsquos Adapter
M Senderrsquos Messenger
L Senderrsquos Listener
Net NetworkTransmission
L Receiverrsquos Listener
M Receiverrsquos Messenger
A Receiverrsquos Adapter
Ponton XP 21 ndash Installation and Configuration Guide 19
Configuration Options
5 Configuration Options The overall configuration of Ponton XP breaks down into the following sections
Messenger configuration This section focuses on your local setting for the Messenger This includes database connections default filter settings communication protocol selection etc
Partner configuration Per partner several setting are required Partner identification filter activation (which overrides the default setting) communication settings etc
Certificate management For own partners key pairs may be created and certificates requested For certificate authorities as well as for each individual partner certificates can be installed Certificates may be requested for signing and encryption for SSL and for SMIME
Hot folder configuration The Hot Folder Adapter is tightly integrated with the Messenger and can therefore be configured through the same interface It supports the definition of multiple hot folders for sending and receiving documents as well as dedicated folders for business partners
51 Messenger Configuration
Set Up Messenger Database
The Messenger stores log entries in a database By default the log database is pre-configured as an HSQL database HSQL is an open source database implementation written entirely in Java If there is no requirement to store log data in an existing database in your organization you may continue with HSQL
It is also possible to configure the Messenger to use a different database system for example
Oracle (version 815 or higher)
MS SQL Server 70
MySQL (version 32 or higher)
SAPdb (version 73)
The log database is accessed via JDBC connection Configuration scripts to set up the tables for an Oracle database are included with Ponton XP You can refer to these scripts as examples to create scripts for your own database system
If you do not yet have a database system with JDBC support in use you can download the setup files for MySQL from httpwwwmysqlcomdownloadsmysql-323html
Ponton XP 21 ndash Installation and Configuration Guide 20
Configuration Options
To configure the Messenger database the following set-up needs to be performed
1 Go to Configuration rarr Messenger rarr Database
2 Enter the driver class name and the URL for the JDBC connection to your database
3 Enter the user name and password for the connection if required
4 Click Test to test the connection
5 Important Donrsquot click OK unless the connection test was successful
Note The connection to the standard HSQL database supplied with the Messenger requires a ldquotruncatedrdquo URL that does contain the database name (as shown above) If you get a ldquoconnection brokenrdquo message when testing the connection to the standard database (as specified above) try deleting ltDATABASEgt from the URL and testing the connection again
Ponton XP 21 ndash Installation and Configuration Guide 21
Configuration Options
Set Logging Level
To specify the logging level go to Configuration rarr Messenger rarr Logging and select the desired settings for Messenger and JDBC logging
There is a range of settings available
OFF turns logging off completely
hellip
DEBUG logs all the messages output by the system
Note Please keep in mind that the chosen logging level can have an effect on the performance of your system In particular it is advisable to use DEBUG logging only in connection with error tracking and analysis
Ponton XP 21 ndash Installation and Configuration Guide 22
Configuration Options
Set Message Queue Scan Interval
Under Configuration rarr Messenger rarr Message Queues you can specify the interval to scan the (inbound and outbound) message queues
The default setting is 5000 msec To boost the message throughput on a faster system you can increase the scan frequency by setting this interval to a lower (ie shorter) value
Ponton XP 21 ndash Installation and Configuration Guide 23
Configuration Options
Select Messaging Pipeline
The Messenger allows you to configure different filter pipelines The standard configuration comes with two pipelines
1 Messenger 203 compatibility pipeline This allows you to maintain backward compatibility with users of the previous Messenger version
2 Messenger 21 pipeline This is to communicate with partners that are also using Messenger version 21 or any EbXML 20 compliant software
For each pipeline a range of filters can be set in particular
Validation
Signing
Compression
Encryption
The Messenger configuration can be used for standard filters (validation signing compression and encryption) for inbound and outbound messages Custom filters are configured in a dedicated section
Developers may extend the Messenger with additional filters For example one may think of a ldquoBusiness Validatorrdquo that checks message content against business rules Or existing filters could be Instead of ldquosoft signingrdquo a document smart card access may be integrated
Ponton XP 21 ndash Installation and Configuration Guide 24
Configuration Options
Outbound Email Connection
This connection is used for email messages sent by your Messenger to your business partners The following data needs to be configured
From ndash the senderrsquos address to be used for your emails
SMTP ndash the outgoing mail server to be contacted by your Messenger in order to submit the email
Username password ndash must be entered if your mail server requires authentication for outgoing emails in this case enter the settings to be used by the Messenger to log in on the mail server
To test the email connection enter a receiver email address (in the ldquoTordquo field) and click the ldquoTestrdquo button
Ponton XP 21 ndash Installation and Configuration Guide 25
Configuration Options
Inbound Email Connection
You can enable your Messenger to receive email messages by setting up a POPIMAP connection with the following entries
Protocol ndash set to pop3 IMAP (depending on the type of mail server)
Server ndash the hostname or IP address of your mail server
Interval ndash the frequency for accessing the server for mail download
Username password ndash must be properly set to authenticate the Messenger on the mail server
Ponton XP 21 ndash Installation and Configuration Guide 26
Configuration Options
Email Notification
You can use the notification service to send emails to specified addresses whenever certain events occur For example you might want to notify your system administrator whenever certain errors are encountered
To specify an address go to Messenger rarr eMail Notification and click New Receiver Enter the email address for this receiver in the text field and select the events for which this receiver is to be notified You can use CTRL-click to activate multiple entries in the list
Ponton XP 21 ndash Installation and Configuration Guide 27
Configuration Options
Communication Settings
On this screen you can specify URI of each partnerrsquos Messenger Service ndash for example
httppartnerserver8080pontonxpSoapListener where partne server refers to the hostname or IP address of the machine the Messenger is installed on
r
Acknowledgment Requests ndash you can use this setting to determine whether outbound messages to this partner require acknowledgements To differentiate per message you can deactivate this checkbox and use the TransmissionMode attribute in the BackendEnvelope In the context of ebXML 20 transmissions you can additionally request signed acknowledgements for increased security
Retransmission Handling ndash you can use this setting to specify the number of retransmission attempts and the interval (in seconds) between attempts If a message cannot be transmitted successfully in the specified number of retries the Messenger will give up and mark the message as ldquofailedrdquo
Ponton XP 21 ndash Installation and Configuration Guide 28
Configuration Options
Configure Archiving Filter
The archiving filter stores the following information in a dedicated directory
Backend Envelope
ebXML Envelope
Payload ndash this is the actual business document
Certificate
Signature
Each part is stored in a separate file
The Archive Folder setting can be used to indicate the location of the archiving folder This can be expressed as
An absolute path to the required folder
A relative path beginning with $CONTEXT ndash this placeholder refers to the folder [installation root]xmlpipewebroot
The Maximum Age setting specifies how long the files will be archived ndash expressed in days
Ponton XP 21 ndash Installation and Configuration Guide 29
Configuration Options
52 Partner Configuration For each partner the following data may be configured
Partner identification (internal and external)
Communication Settings
URI of the partnerrsquos Messenger
Create Delete a Partner Entry
To create a new partner entry specify an identifier for the partner (this is the local identifier for your configuration) and indicate whether this partner entry is for
An internal partner (with the ldquoselfrdquo option activated) ndash this might be a department of your organization
An external partner ndash these entries refer to your business partners for example customers suppliers carriers warehouse operators etc
A message is always sent by your Messenger from an internal to an external partner and received from an external partner to an internal one
Internal partners are distinguished because for encryption and signing the certificates of each internal partner will be used on a per-partner basis
For further information please check the Ponton XP Architecture Overview
Ponton XP 21 ndash Installation and Configuration Guide 30
Configuration Options
Set the Partner Identification
Local Partner Name This identifier is valid within you local configuration ie you may choose any value as long as it is unique among all local partner names
Disable Although configured as a partner individual partners may be disabled In this case the Messenger rejects any message received from this partner
PartyID PartyID Type PartyIDs are used to identify partners externally To avoid name clashes and duplication well-known naming schemas exist to identify partners eg DUNS codes VAT numbers IANA codes etc For this reason trading partners should agree on an minimal set of identification types (like DUNS numbers and IANA codes) that is to be used by all partners
More than one PartyID can be defined per partner The limit is given by the number of PartyID types These are configured separately please check Section ldquoAdvanced Configurationrdquo)
Hint Please also check the Ponton XP Architecture Overview document for a detailed explanation of ebXML codes and partner identification
Ponton XP 21 ndash Installation and Configuration Guide 31
Configuration Options
Partner Communication Configuration
For each partner the following configuration options may be set URI of Partnerrsquos Messenger Service ndash enter the address of the partnerrsquos
Messenger for example httppartnerserver8080pontonxpSoapListener
Request Acknowledge ndash every message to this partner needs to be acknowledged
Request Signed Acknowledge ndash to specify signing of acknowledgements received from this partner
Retries ndash the number of retries in case of unsuccessful message transmission
Retry Interval ndash the number of seconds to wait until the next retry
Ponton XP 21 ndash Installation and Configuration Guide 32
Configuration Options
Processing Configuration
The following options can be set
Default Adapter ndash enter the name of the adapter to be used by default
Processing Pipeline ndash specify the processing pipeline to be used for this profile
Schema Sets ndash choose which Schema set(s) are to be supported
Use XML Signature ndash indicate whether to use XML Signature
Use default message settings (specified under Configuration rarr Messenger rarr Processing) or define a specific processing filter for this partner
Ponton XP 21 ndash Installation and Configuration Guide 33
Configuration Options
Install Partner Certificates
There are different ways of distributing certificates to business partners One is to send the certificate per email and have the partner cut amp paste the certificate code into the partner configuration
Note It is important to cut amp paste the complete certificate code including the lines ldquo----- Begin Certificate -----rdquo and ldquo----- End Certificate -----rdquo
Important A partner certificate will only be accepted if the certificate of the issuing CA (certificate authority) was pre-installed Otherwise the trust relationship between the partner and the CA cannot be traced
One may select to install a general certificate or a SMIME certificate Please determine what kind of certificate you received from your partner before installing it
Ponton XP 21 ndash Installation and Configuration Guide 34
Configuration Options
53 Certificate Management Certificate management comprises the following initial steps
Configure your default CA This is usually properly pre-configured in the installation files
Install the root certificate of the default CA This needs to be installed manually if 3rd-party CAs are to be used
Request a certificate for your own Messenger This includes creating a publicprivate key pair and sending a certificate request to the CA
Optionally you can request and install a SMIME certificate to be used for SMIME based communication via email
Default CA Configuration
On this screen you specify the settings for receiving certificates from your default certificate authority (CA) CA email address ndash enter the email address to be used to request a certificate
from your (default) CA
Ponton XP 21 ndash Installation and Configuration Guide 35
Configuration Options
CA download URL ndash enter the URL at your CA from which to download certificates for your Messenger installation Please note that you can only install certificates for partners you have already defined in your partner configuration
Download interval ndash specify the interval to wait between automatic certificate downloads
To download the available certificates immediately click the Download button
Request and Install Your Own Certificate
To request a certificate from your (default) CA go to Configuration rarr Certificates rarr Request Certificate Please enter data for all the fields on this form If any entries are missing you will get an error message
After completing the form click OK to send the certificate request to your CA You will get a message indicating that the request has been sent
Ponton XP 21 ndash Installation and Configuration Guide 36
Configuration Options
Once you receive the requested certificate from your CA you can install it in your own partner configuration (ie the internal partner you will use to sendreceive messages) Go to Configuration rarr Partners rarr ltYour Partner Namegt rarr Install Certificate and paste the certificate text including the hellip into the text field
Then enter the password you used when you requested the certificate and click OK to complete the installation of the certificate You will see the result above the text field containing the certificate
Ponton XP 21 ndash Installation and Configuration Guide 37
Configuration Options
Install Partner Certificates
Install a certificate issued by the CA for the requesting partner This was already described in the Partner Configuration section for normal standard certificates
Note In case of SMIME certificates an additional password may be needed to allow the Messenger to access the certificate in the local certificate store
Install a CA Certificate
To install the certificate for your CA go to Configuration rarr Certificates rarr CA rarr Install Certificate and paste your CArsquos certificate into the text field This is the certificate that authorizes the CA as a signing authority for other certificates
Ponton XP 21 ndash Installation and Configuration Guide 38
Configuration Options
54 Configure the Hot Folder Adapter
General Configuration
Address Port ndash the Hot Folder Adapter (HFA) is addressed as a separate process that communicates with the Messenger via HTTP Therefore the hostname and port number need to be set up for the Messenger If the HFA is co-located with the Messenger on the same machine use ldquolocalhostrdquo for the IP address In this case the HFA does not run as a separate Java process but will be hosted on the same Tomcat server
Path ndash the HFA needs to know the Adapter communication path of the Messenger By default it is pontonxpAdapterService
Console File Log Level ndash the HFA provides log output to the console and to log files Both can be configured regarding the level of detail The console log is only useful if the HFA is running as a standalone application so you can safely leave it disabled in the default configuration
Ponton XP 21 ndash Installation and Configuration Guide 39
Configuration Options
Create Delete a HFA
Several HFAs may be created Each registers under a different ID at the Messenger HFAs may be created for individual partners If this is the case messages exchanged with the rest of the partners will be stored with the default HFA
Configure a HFA
Each HFA requires several directories to be defined
Inbox ndash a document will be stored in the Inbox whenever it was received from a partner
Outbox ndash documents to be sent to the business partner are dropped here The HFA grabs them in a defined frequency
Failed ndash if a document could not be sent to a partner and all retries failed it will be stored in this folder
Work ndash if a document transfer is in progress or all attempts to send the document have not yet been tried the document will remain here After a final failure it will be transferred to the Failed folder
Ponton XP 21 ndash Installation and Configuration Guide 40
Configuration Options
The following settings are also supported
Port ndash the port to be used by the HFA (optional)
Receiver format ndash standard format is XML
Save Backend envelope ndash the Backend envelope is retained for incoming messages
Support attachments ndash the HFA will save any files attached to an incoming message to the selected inbox folder
Scan Interval ndash the interval to wait (in seconds) between checking the outbox
Number of receiving threads ndash specifies the maximum number of receiving threads the adapter can process
Use partner subfolders ndash if this is set this HFA will create inbox and outbox folders for all remote partners Inbound messages will automatically be sorted into the according folder depending on the sender Outbound messages need to be placed into the receiving partnerrsquos outbox folder The backend message is not used in this mode and is ignored if it exists
Use Acknowledgement for ERP ndash with this option activated the ERP application receives an acknowledgement from the receiving Messenger on the partnerrsquos side This acknowledgement will be provided via the specified Inbox
Ponton XP 21 ndash Installation and Configuration Guide 41
Configuration Options
55 Ponton XE ndash The XML Editor Ponton XE is a separate Ponton product It is packaged with Ponton XP for free use only by papiNet users It allows to enter papiNet document data directly via a graphical user interface and to send the document via the hot folder adapter to the business partners
Ponton XE is fully documented in a separate manual Hence only the Messaging Plug-in will be described here
You can experiment with the XML Editor and check out all the features and options without using the Ponton XP connection To start with you may want to begin with the following steps
Create a new papiNet Purchase Order
Fill out the forms and use optional XML Elements by right-clicking the Plus-icons in the layout tree
Create an HTML file by choosing Document Export to HTML from the menu
Save the document to an XML file and re-load it again
Ponton XP 21 ndash Installation and Configuration Guide 42
Configuration Options
Interface between Ponton XE and Ponton XP
The two software applications communicate via hot folders as illustrated in the following figure
Message Plug-in
Outbox Inbox AckInboxImport
Ponton XP Ponton XE
XMLXML XMLXML XMLXML XMLXML
Hot Folder Adapter
The XML Editor is connected to the Messenger via the Hot Folder Adapter All these folder settings need to be synchronized for a proper data exchange
Configuration of the Messaging Plug-in
The Messaging Plug-in can be flexibly installed and de-installed with the remaining part of Ponton XE If the file messengerjar is removed from the plugins directory it will automatically disappear from the Ponton XE menu bar as soon as the software is started again
Before transferring messages out of Ponton XE you need to preset the following information
Default values for the sending and receiving partners ndash these values may be overridden for an individual transfer
Folder locations of the Hot Folder Adapter ndash the Inbox Outbox and AckInbox need to be set for document exchange with Ponton XP
Default setting for Test Message flag ndash this can be overridden for the actual document transfer
Import Directory ndash Ponton XE will automatically scan the Inbox folder and import received documents to the given folder for local processing
Ponton XP 21 ndash Installation and Configuration Guide 43
Configuration Options
Open Messages after Import ndash if this option is activated messages received from the Inbox will automatically be displayed in Ponton XE
Delete message in Inbox ndash to always remove received messages from the HFA Inbox this option needs to be activated otherwise a copy will remain in the Inbox folder
Ponton XP 21 ndash Installation and Configuration Guide 44
Configuration Options
Ponton XP 21 ndash Installation and Configuration Guide 45
Configuration Options
Using Ponton XE
After setting the configuration and creating a document you can transfer the document to your business partner This is done by means of the following steps
Choose the menu item ldquoMessenger rarr Transfer rarr Send Messagerdquo
Select a sending and receiving partner
Override the settings for the HFA folders
Tick the checkbox to qualify this message as a test message
After transferring the document to the Messenger Ponton XE will wait for a response This is recognised as an acknowledge file which is dropped into the AckInbox folder of the HFA As soon as this has been received a successful transfer in indicated
You may check with the Message Monitor to determine how the document was forwarded by the Messenger to the receiver or whether any errors occurred
Ponton XP 21 ndash Installation and Configuration Guide 46
Configuration Options
56 Display Schema Configuration The schema sets to be supported for each partner are defined in the partner configuration The standard sets available with the installation are shown under Configuration rarr Schemata
Ponton XP 21 ndash Installation and Configuration Guide 47
Configuration Options
57 User Administration Two types of users are distinguished
Administrators ndash these users have full access to the Messengerrsquos configuration interface
Operators ndash these users only have access to the Adapter Monitor the Message Monitor and the Test Adapter The other options in the Messenger menu are not available
Please note the following points in connection with the Messengerrsquos standard user administration
This is a very simple user administration based on the Tomcat implementation If you want to integrate the Messenger with another user administration such as LDAP please contact Ponton Consulting for support
A userrsquos access rights (administratoroperator) are defined when the user account is created ndash they cannot be changed subsequently
User accounts can only be created or deleted by administrators
Ponton XP 21 ndash Installation and Configuration Guide 48
Advanced Configuration
6 Advanced Configuration
61 XML Schema Configuration Important The Messenger distinguishes between available schema set and activated schema sets Just inserting entries in the schema configuration as described in this section does not activate the schema sets or the corresponding schemas for use by the Messenger In order to make use of the schemas in a schema set you have to activate the schema set in the relevant partner configuration To view or modify the activated schema sets in a partner configuration go to
Configuration rarr Partners rarr ltpartner namegt rarr Processing
and activatedeactivate the relevant checkboxes
In the Messengerrsquos configuration interface you can activate and deactivate schema sets for specific partner configurations It is not possible however to modify the contents and specifications of the individual schema sets Any necessary changes have to be made in the configuration file
[installation root]xmlpipewebrootWEB-INFconfigschemataxml
The configuration entries in this file are structured as follows
ltSchemaSet Name=papinet21gt
ltSchemaName=httpwwwpapinetorgdataAvailabilityV2R10xsd MessageType=Availability MessageVersion=V2R10gt
ltNamespacegtltNamespacegt
ltDisplayNamegtAvailability 21ltDisplayNamegt
ltSchemaFilegtAvailabilityV2R10xsdltSchemaFilegt
ltXSLFilegtltXSLFilegt
ltSchemagt
ltSchema Name=yourSchema MessageType=yourMsgType MessageVersion=yourMsgVersgt
ltNamespacegtyourNamespaceltNamespacegt
ltDisplayNamegtYour Display NameltDisplayNamegt
ltSchemaFilegtyourSchemaFileltSchemaFilegt
ltXSLFilegtyourStylesheetltXSLFilegt
ltSchemagt
hellip
ltSchemaFoldergtpapinet210ltSchemaFoldergt
ltXSLFoldergtpapinet210ltXSLFoldergt
ltSchemaSetgt
Ponton XP 21 ndash Installation and Configuration Guide 49
Advanced Configuration
You can add a schema to an existing schema set in this file by inserting a ltSchemagt block (just copy and paste one of the existing blocks and modify the configuration as required) Please ensure that your new schema specification includes correct settings for the attributes of the Schema element
Name= This attribute corresponds with the ebXML Schema Location of incoming messages When an ebXML message is received the Messenger looks for a schema configuration where the Schema Name attribute matches the Schema Location specified in the ebXML envelope
MessageType= This attribute corresponds with the attribute MessageMetaDataDocumentInfoMessageName in the backend envelope of outgoing messages
MessageVersion= This attribute corresponds with the element MessageMe aDataDocumentInfoDTDVersionNumber in the backend envelope of outgoing messages
t
Note The specification of MessageType and MessageVersion must be used together for outgoing messages as they are combined to form an identifier for the message schema
You also have the option of adding a new schema set with your own schema definitions to the schema configuration In this case you would insert a ltSchemaSetgt block with subordinate ltSchemagt blocks Your added schema set will automatically be inserted in the list of available schema sets on the Messenger configuration pages
62 Advanced Database Configuration Important Since the Messenger database is used for essential message processing and tracking purposes you should not experiment with the database configuration on a ldquoliverdquo system For test and debugging purposes you are advised to set up a trial system
Installation with other Databases
This section describes the main steps required to install a different database system on the Messenger for example an Oracle database
1 Install database driver Copy the database driver to
[installation root]xmlpipewebrootWEB-INFlib
Note Please note that only drivers with the extension jar are loaded by the Tomcat servlet engine If the JDBC driver you want to use is a zip file you will have to rename the file to jar The JDBC driver for Oracle 9i is the file ojdbc14jar
Ponton XP 21 ndash Installation and Configuration Guide 50
Advanced Configuration
2 Create database and tables Ponton XP is supplied with SQL scripts for HSQL and for Oracle that can be used to create the tables for the Messenger database If you are using another database you may need to modify these scripts to work correctly with your database system
The SQL scripts are located in the subfolders under [installation root]sql
Once the database tables are in place you will also need to carry out the SQL script that inserts the log messages into the database ie
[installation root]sqlinsert_log_messagessql
3 Set up database connection The configuration of database connections is described in the section Set Up Messenger Database beginning on page 20 To connect with a different database choose ldquootherrdquo from the list of database drivers and enter the configuration for your database on the next page
The entries for the Oracle 9i JDBC driver are
Driver oraclejdbcdriverOracleDriver
URL jdbcoraclethinlthostgtltportgtltdatabasegt
63 Advanced Message Monitor Configuration In the configuration directory ldquoxmlpipewebrootWEB-INFconfigrdquo there is a file messagemonitorxml which can be used to change the selection and ordering of the Message overview window in the Message Monitor The default setting is displayed in the following picture
Ponton XP 21 ndash Installation and Configuration Guide 51
Advanced Configuration
Here the number of line items per page can be set If a high resolution screen is used (beyond 1024 x 768 pixel) one may increase the number of lines
Further a mapping table defines which database column is to be displayed in which monitor column The number of columns again depends on the screen resolution
Finally if main memory size allows caching of XSL stylesheet definitions helps accelerating processing speed for XSL transformations
64 Tomcat SSL Installation
Generate a key
One minor problem with Tomcat or any other webserver that uses the internal Java symmetric key architecture is that you are not allowed to export or import private keys For this reason it is not possible to use the existing key-pair installed with the Messenger software You will have to generate a new key-pair and send a certificate request to the Ponton certificate authority (or other certification authority) to receive a valid certificate
To generate a new key-pair open a command prompt and go to the tomcat-4118 directory The keystore used for a Tomcat SSL installation is located in the Tomcat root directory and is called ssl-keystore The Tomcat installation already contains a certificate for lsquolocalhostrsquo so you can test the HTTPS access with a web browser
Before you can create a new Tomcat certificate you will have to delete the installed certificate Note that the default password for the Tomcat keystore is ldquochangeitrdquo keytool -delete -alias tomcat ndashkeystore ssl-keystore
Now use the following command to create a new key-pair Please note that you need to specify the Listener hostname (eg listenermyserverde) when the keytool asks for lsquofirst and last namersquo keytool -genkey -alias tomcat -keyalg RSA ndashkeystore ssl-keystore
After generating the new key the next step is to export a certificate request with the following command keytool ndashcertreq ndashalias tomcat ndashfile myservercsr ndashkeystore ssl-keystore
This will generate the file myservercsr in the current directory Send this file via email to xp-certponton-consultingde It will be signed and sent back to you The reply will contain a file with the certificate
Finally you have to re-import this signed certificate into the Tomcat SSL keystore Please note that the import may take some time keytool ndashimport ndashalias tomcat ndashfile myservercer ndashkeystore ssl-keystore
If you have any problems starting the keytool make sure you have the javahomebin directory specified in your PATH environment variable Of course you can also change to the javahomebin directory and start the keytool there
Ponton XP 21 ndash Installation and Configuration Guide 52
Advanced Configuration
Update Tomcat configuration
SSL is already activated in the Tomcat configuration packaged in the distribution However you might want to change the specified SSL port (by default the SSL port is set to 8443) You can change the port by editing the file
[tomcat installation]confserverconf
The following section configures the SSL parameters
lt-- Define a SSL Coyote HTTP11 Connector on port 8443 --gt
ltConnector className=orgapachecoyotetomcat4CoyoteConnector
port=8443
minProcessors=5
maxProcessors=75
enableLookups=true
acceptCount=100
debug=0
scheme=https
secure=true
useURIValidationHack=false
disableUploadTimeout=truegt
ltFactory className=orgapachecoyotetomcat4CoyoteServerSocketFactory
clientAuth=false
keystoreFile=ssl-keystore
protocol=TLS gt
ltConnectorgt
Verify setup
To verify if everything is working correctly start the Tomcat webserver as usual and connect to the webserver with your browser
Go to httpsyourserveraddress ndash initially you might get a warning window if the root certificate authority is not known to the browser If you continue by clicking OK you should see the usual Ponton XP start page
If everything comes up correctly you can use SSL to receive messages with the Ponton XP Software
Ponton XP 21 ndash Installation and Configuration Guide 53
Advanced Configuration
65 Distributed Installation If the Messenger is installed on a server that cannot be reached from the Internet you will need to install the Listener as well The purpose of the Listener is to pick up incoming connections and forward them to the Messenger (across the firewall) The firewall rules must be set up to allow this connection between the Listener and the Messenger When a message is received the Listener notifies the Messenger and the Messenger then picks up the message
You also have the option of subsequently installing the Listener as a service under Windows ndash this service can then be configured to start automatically when the system starts up
Note If you are going to run the Messenger in combination with the Listener your partners will have to enter the URI of your Listener in their configurations (under Configuration rarr Partners rarr ltpartner namegt rarr URI of Partners Messenger Service)
Listener Installation and Configuration
The Listener is installed by running the installer program (eg PontonXP-21-setuplistener-windowsexe) on the relevant system You are asked to specify an installation folder and also have the option of creating a desktop or menu shortcut Thatrsquos it
-
The settings for the Listener are contained in the configuration file listenerproperties which is located in the folder [Listener root folder]config To modify these settings you will have to edit the configuration file directly Access via the Messengerrsquos configuration interface is not possible
The file contains the following settings
HttpPort = Port number (for external HTTP connections)
HttpsPort = Port number (for external HTTPS connections)
LogLevel = DEBUG | INFO | WARN | ERROR | FATAL | OFF
The following settings specify the host and port of the Messenger for forwarding connections (HTTPHTTPS) The forwarding connection mode is activated by entering the relevant host and port addresses and removing the hash marks (used to mark ldquocomment linesrdquo in Java property files)
HttpServer = server1port1 (HTTP forwarding connection to the Messenger)
HttpsServer = server1port1 (HTTPS forwarding connection to the Messenger)
Ponton XP 21 ndash Installation and Configuration Guide 54
Advanced Configuration
The following settings specify the Listenerrsquos port for callback connections (HTTPHTTPS) with the Messenger As with the forwarding connection the callback connection mode is activated by entering the relevant port addresses and removing the hash marks (Obviously it makes no sense to have both connections activated at the same time)
HttpServicePort = Port number (for internal HTTP connections to the Listener)
HttpsServicePort = Port number (for internal HTTPS connections to the Listener)
Starting the Listener
To start the Listener open a command prompt and start the class
depontonconsultingxmlpipeListener
with the classpath
-cp libcommons-logging-api-103jarlibcommonutilsjarlibxp_listenerjarconfig
You can also use the installed batch file [Listener root folder]startListenerbat
Callback Mode
Details of the communication flow
When the Messenger starts up it searches for the Listener
Note The Listener should start up first so that it can be found by the Messenger
If the search is successful a permanent connection is established between the Messenger and the Listener The Messenger uses the following settings in the configuration to establish the connection with the Listener
Configuration rarr Messenger rarr Listener rarr HTTP[S] rarr Hostname
Configuration rarr Messenger rarr Listener rarr HTTP[S] rarr Internal Listener Port
Ponton XP 21 ndash Installation and Configuration Guide 55
Advanced Configuration
When the Listener receives an incoming message (or rather an HTTPHTTPS request) it informs the Messenger ndash by way of the permanent connection ndash about the arrival of the new request indicating which port the Messenger can use to pick up the connection
Note This port number is randomly selected by the Listener and cannot be configured
The Messenger picks up the connection on the Listenerrsquos specified port and redirects it to its own local port for further processing
This local port corresponds to the setting for
Configuration rarr Messenger rarr Listener rarr HTTP[S] rarr Internal Messenger Port
in the configuration GUI
Forwarding Mode
Details of the communication flow
In forwarding mode no permanent connection is established between the Messenger and the Listener
When the Listener receives an incoming HTTPHTTPS request it simply forwards the request to the Messenger using the address specified in listenerproperties (HttpServerHttpsServer)
Note To allow this forwarding connection the firewall has to be configured so that the Listener is permitted to access the Messenger on the specified port(s)
Ponton XP 21 ndash Installation and Configuration Guide 56
Advanced Configuration
66 Port Configuration The Messengerrsquos standard configuration uses port 8080 for HTTP connections and port 8443 for secure (HTTPS) connections This section describes how to set up the messenger to use a non-standard port configuration This involves making manual changes to several configuration files in particular the Tomcat serverxml and the Messengerrsquos adapter configuration files
Tomcat Settings
The port setting for the Messengerrsquos HTTP and HTTPS connections are specified in the Tomcat configuration file
[installation root]tomcat-xxxconfserverxml
This file defines the connections (Connectors) for the Messenger as follows
lt-- Define a non-SSL Coyote HTTP11 Connector on port 8080 --gt
ltConnector className=orgapachecoyotetomcat4CoyoteConnector
port=yourMessengerPort minProcessors=5 maxProcessors=75
enableLookups=true redirectPort=yourRed rectPort i acceptCount=100 debug=0 connectionTimeout=20000
useURIValidationHack=false disableUploadTimeout=true gt
lt-- Define a SSL Coyote HTTP11 Connector on port 8443 --gt
ltConnector className=orgapachecoyotetomcat4CoyoteConnector
port=yourSSLPort minProcessors=5 maxProcessors=75
enableLookups=true
acceptCount=100 debug=0 scheme=https secure=true
useURIValidationHack=false disableUploadTimeout=truegt
ltFactory className=orgapachecoyotetomcat4CoyoteServerSocketFactory
clientAuth=false keystoreFile=ssl-keystore protocol=TLS gt
ltConnectorgt
The standard settings for the Messenger ports are
HTTP 8080
SSL 8443
To modify your connections you will need to enter the relevant port numbers indicated above as yourMessengerPort yourRedirectPort (which normally points to the SSL connection) and yourSSLPort
Ponton XP 21 ndash Installation and Configuration Guide 57
Advanced Configuration
Adapter Settings
The settings for the Messenger adapters are contained in the relevant XML files under
[installation root]xmlpipewebrootWEB-INFconfig
In particular a standard installation includes the files testadap erxml and hotfolderxml Each of these configuration files contains a block specifying the connection to the messenger
t
ltMessengergt
ltAddressgtyourMessengerHostltAddressgt
ltPortNumbergtyourMessengerPortltPortNumbergt
ltPathgthellipltPathgt
ltMessengergt
If you have configured the Messenger to run on a different port (see above) you will need to enter the relevant port number here
Ponton XP 21 ndash Installation and Configuration Guide 58
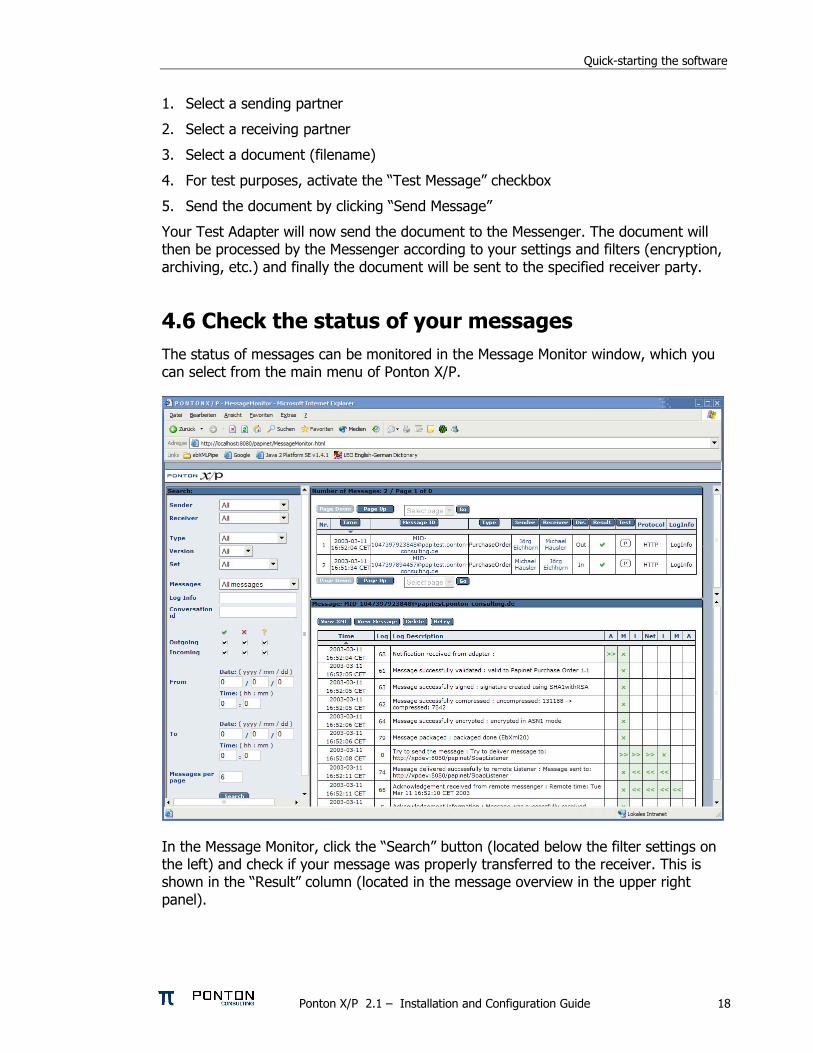
Quick-starting the software
1 Select a sending partner
2 Select a receiving partner
3 Select a document (filename)
4 For test purposes activate the ldquoTest Messagerdquo checkbox
5 Send the document by clicking ldquoSend Messagerdquo
Your Test Adapter will now send the document to the Messenger The document will then be processed by the Messenger according to your settings and filters (encryption archiving etc) and finally the document will be sent to the specified receiver party
46 Check the status of your messages The status of messages can be monitored in the Message Monitor window which you can select from the main menu of Ponton XP
In the Message Monitor click the ldquoSearchrdquo button (located below the filter settings on the left) and check if your message was properly transferred to the receiver This is shown in the ldquoResultrdquo column (located in the message overview in the upper right panel)
Ponton XP 21 ndash Installation and Configuration Guide 18
Quick-starting the software
The following color codes are used to indicate the transferprocessing status
Green checkmark ndash the transfer was successful
Red cross ndash something went wrong (in this case the complete entry is highlighted red)
Question mark ndash the message is still unconfirmed (in this case the entry is highlighted yellow)
To check for details click on the MessageID and look at the log information (in the lower right panel) Each processing step carried out by your Messenger is displayed here As long as no errors occurred the log entries are highlighted green
The right-hand columns show How the message was transferred from your test adapter to the Messenger
Which Messenger filters were applied to the message
How the document was transferred to the receiver
You may experiment with the Test Adapter and the Message Monitor and send other documents Please also ask your test partner to send documents to your Messenger
The results shown in the Message Monitor indicate the processing sequence A Senderrsquos Adapter
M Senderrsquos Messenger
L Senderrsquos Listener
Net NetworkTransmission
L Receiverrsquos Listener
M Receiverrsquos Messenger
A Receiverrsquos Adapter
Ponton XP 21 ndash Installation and Configuration Guide 19
Configuration Options
5 Configuration Options The overall configuration of Ponton XP breaks down into the following sections
Messenger configuration This section focuses on your local setting for the Messenger This includes database connections default filter settings communication protocol selection etc
Partner configuration Per partner several setting are required Partner identification filter activation (which overrides the default setting) communication settings etc
Certificate management For own partners key pairs may be created and certificates requested For certificate authorities as well as for each individual partner certificates can be installed Certificates may be requested for signing and encryption for SSL and for SMIME
Hot folder configuration The Hot Folder Adapter is tightly integrated with the Messenger and can therefore be configured through the same interface It supports the definition of multiple hot folders for sending and receiving documents as well as dedicated folders for business partners
51 Messenger Configuration
Set Up Messenger Database
The Messenger stores log entries in a database By default the log database is pre-configured as an HSQL database HSQL is an open source database implementation written entirely in Java If there is no requirement to store log data in an existing database in your organization you may continue with HSQL
It is also possible to configure the Messenger to use a different database system for example
Oracle (version 815 or higher)
MS SQL Server 70
MySQL (version 32 or higher)
SAPdb (version 73)
The log database is accessed via JDBC connection Configuration scripts to set up the tables for an Oracle database are included with Ponton XP You can refer to these scripts as examples to create scripts for your own database system
If you do not yet have a database system with JDBC support in use you can download the setup files for MySQL from httpwwwmysqlcomdownloadsmysql-323html
Ponton XP 21 ndash Installation and Configuration Guide 20
Configuration Options
To configure the Messenger database the following set-up needs to be performed
1 Go to Configuration rarr Messenger rarr Database
2 Enter the driver class name and the URL for the JDBC connection to your database
3 Enter the user name and password for the connection if required
4 Click Test to test the connection
5 Important Donrsquot click OK unless the connection test was successful
Note The connection to the standard HSQL database supplied with the Messenger requires a ldquotruncatedrdquo URL that does contain the database name (as shown above) If you get a ldquoconnection brokenrdquo message when testing the connection to the standard database (as specified above) try deleting ltDATABASEgt from the URL and testing the connection again
Ponton XP 21 ndash Installation and Configuration Guide 21
Configuration Options
Set Logging Level
To specify the logging level go to Configuration rarr Messenger rarr Logging and select the desired settings for Messenger and JDBC logging
There is a range of settings available
OFF turns logging off completely
hellip
DEBUG logs all the messages output by the system
Note Please keep in mind that the chosen logging level can have an effect on the performance of your system In particular it is advisable to use DEBUG logging only in connection with error tracking and analysis
Ponton XP 21 ndash Installation and Configuration Guide 22
Configuration Options
Set Message Queue Scan Interval
Under Configuration rarr Messenger rarr Message Queues you can specify the interval to scan the (inbound and outbound) message queues
The default setting is 5000 msec To boost the message throughput on a faster system you can increase the scan frequency by setting this interval to a lower (ie shorter) value
Ponton XP 21 ndash Installation and Configuration Guide 23
Configuration Options
Select Messaging Pipeline
The Messenger allows you to configure different filter pipelines The standard configuration comes with two pipelines
1 Messenger 203 compatibility pipeline This allows you to maintain backward compatibility with users of the previous Messenger version
2 Messenger 21 pipeline This is to communicate with partners that are also using Messenger version 21 or any EbXML 20 compliant software
For each pipeline a range of filters can be set in particular
Validation
Signing
Compression
Encryption
The Messenger configuration can be used for standard filters (validation signing compression and encryption) for inbound and outbound messages Custom filters are configured in a dedicated section
Developers may extend the Messenger with additional filters For example one may think of a ldquoBusiness Validatorrdquo that checks message content against business rules Or existing filters could be Instead of ldquosoft signingrdquo a document smart card access may be integrated
Ponton XP 21 ndash Installation and Configuration Guide 24
Configuration Options
Outbound Email Connection
This connection is used for email messages sent by your Messenger to your business partners The following data needs to be configured
From ndash the senderrsquos address to be used for your emails
SMTP ndash the outgoing mail server to be contacted by your Messenger in order to submit the email
Username password ndash must be entered if your mail server requires authentication for outgoing emails in this case enter the settings to be used by the Messenger to log in on the mail server
To test the email connection enter a receiver email address (in the ldquoTordquo field) and click the ldquoTestrdquo button
Ponton XP 21 ndash Installation and Configuration Guide 25
Configuration Options
Inbound Email Connection
You can enable your Messenger to receive email messages by setting up a POPIMAP connection with the following entries
Protocol ndash set to pop3 IMAP (depending on the type of mail server)
Server ndash the hostname or IP address of your mail server
Interval ndash the frequency for accessing the server for mail download
Username password ndash must be properly set to authenticate the Messenger on the mail server
Ponton XP 21 ndash Installation and Configuration Guide 26
Configuration Options
Email Notification
You can use the notification service to send emails to specified addresses whenever certain events occur For example you might want to notify your system administrator whenever certain errors are encountered
To specify an address go to Messenger rarr eMail Notification and click New Receiver Enter the email address for this receiver in the text field and select the events for which this receiver is to be notified You can use CTRL-click to activate multiple entries in the list
Ponton XP 21 ndash Installation and Configuration Guide 27
Configuration Options
Communication Settings
On this screen you can specify URI of each partnerrsquos Messenger Service ndash for example
httppartnerserver8080pontonxpSoapListener where partne server refers to the hostname or IP address of the machine the Messenger is installed on
r
Acknowledgment Requests ndash you can use this setting to determine whether outbound messages to this partner require acknowledgements To differentiate per message you can deactivate this checkbox and use the TransmissionMode attribute in the BackendEnvelope In the context of ebXML 20 transmissions you can additionally request signed acknowledgements for increased security
Retransmission Handling ndash you can use this setting to specify the number of retransmission attempts and the interval (in seconds) between attempts If a message cannot be transmitted successfully in the specified number of retries the Messenger will give up and mark the message as ldquofailedrdquo
Ponton XP 21 ndash Installation and Configuration Guide 28
Configuration Options
Configure Archiving Filter
The archiving filter stores the following information in a dedicated directory
Backend Envelope
ebXML Envelope
Payload ndash this is the actual business document
Certificate
Signature
Each part is stored in a separate file
The Archive Folder setting can be used to indicate the location of the archiving folder This can be expressed as
An absolute path to the required folder
A relative path beginning with $CONTEXT ndash this placeholder refers to the folder [installation root]xmlpipewebroot
The Maximum Age setting specifies how long the files will be archived ndash expressed in days
Ponton XP 21 ndash Installation and Configuration Guide 29
Configuration Options
52 Partner Configuration For each partner the following data may be configured
Partner identification (internal and external)
Communication Settings
URI of the partnerrsquos Messenger
Create Delete a Partner Entry
To create a new partner entry specify an identifier for the partner (this is the local identifier for your configuration) and indicate whether this partner entry is for
An internal partner (with the ldquoselfrdquo option activated) ndash this might be a department of your organization
An external partner ndash these entries refer to your business partners for example customers suppliers carriers warehouse operators etc
A message is always sent by your Messenger from an internal to an external partner and received from an external partner to an internal one
Internal partners are distinguished because for encryption and signing the certificates of each internal partner will be used on a per-partner basis
For further information please check the Ponton XP Architecture Overview
Ponton XP 21 ndash Installation and Configuration Guide 30
Configuration Options
Set the Partner Identification
Local Partner Name This identifier is valid within you local configuration ie you may choose any value as long as it is unique among all local partner names
Disable Although configured as a partner individual partners may be disabled In this case the Messenger rejects any message received from this partner
PartyID PartyID Type PartyIDs are used to identify partners externally To avoid name clashes and duplication well-known naming schemas exist to identify partners eg DUNS codes VAT numbers IANA codes etc For this reason trading partners should agree on an minimal set of identification types (like DUNS numbers and IANA codes) that is to be used by all partners
More than one PartyID can be defined per partner The limit is given by the number of PartyID types These are configured separately please check Section ldquoAdvanced Configurationrdquo)
Hint Please also check the Ponton XP Architecture Overview document for a detailed explanation of ebXML codes and partner identification
Ponton XP 21 ndash Installation and Configuration Guide 31
Configuration Options
Partner Communication Configuration
For each partner the following configuration options may be set URI of Partnerrsquos Messenger Service ndash enter the address of the partnerrsquos
Messenger for example httppartnerserver8080pontonxpSoapListener
Request Acknowledge ndash every message to this partner needs to be acknowledged
Request Signed Acknowledge ndash to specify signing of acknowledgements received from this partner
Retries ndash the number of retries in case of unsuccessful message transmission
Retry Interval ndash the number of seconds to wait until the next retry
Ponton XP 21 ndash Installation and Configuration Guide 32
Configuration Options
Processing Configuration
The following options can be set
Default Adapter ndash enter the name of the adapter to be used by default
Processing Pipeline ndash specify the processing pipeline to be used for this profile
Schema Sets ndash choose which Schema set(s) are to be supported
Use XML Signature ndash indicate whether to use XML Signature
Use default message settings (specified under Configuration rarr Messenger rarr Processing) or define a specific processing filter for this partner
Ponton XP 21 ndash Installation and Configuration Guide 33
Configuration Options
Install Partner Certificates
There are different ways of distributing certificates to business partners One is to send the certificate per email and have the partner cut amp paste the certificate code into the partner configuration
Note It is important to cut amp paste the complete certificate code including the lines ldquo----- Begin Certificate -----rdquo and ldquo----- End Certificate -----rdquo
Important A partner certificate will only be accepted if the certificate of the issuing CA (certificate authority) was pre-installed Otherwise the trust relationship between the partner and the CA cannot be traced
One may select to install a general certificate or a SMIME certificate Please determine what kind of certificate you received from your partner before installing it
Ponton XP 21 ndash Installation and Configuration Guide 34
Configuration Options
53 Certificate Management Certificate management comprises the following initial steps
Configure your default CA This is usually properly pre-configured in the installation files
Install the root certificate of the default CA This needs to be installed manually if 3rd-party CAs are to be used
Request a certificate for your own Messenger This includes creating a publicprivate key pair and sending a certificate request to the CA
Optionally you can request and install a SMIME certificate to be used for SMIME based communication via email
Default CA Configuration
On this screen you specify the settings for receiving certificates from your default certificate authority (CA) CA email address ndash enter the email address to be used to request a certificate
from your (default) CA
Ponton XP 21 ndash Installation and Configuration Guide 35
Configuration Options
CA download URL ndash enter the URL at your CA from which to download certificates for your Messenger installation Please note that you can only install certificates for partners you have already defined in your partner configuration
Download interval ndash specify the interval to wait between automatic certificate downloads
To download the available certificates immediately click the Download button
Request and Install Your Own Certificate
To request a certificate from your (default) CA go to Configuration rarr Certificates rarr Request Certificate Please enter data for all the fields on this form If any entries are missing you will get an error message
After completing the form click OK to send the certificate request to your CA You will get a message indicating that the request has been sent
Ponton XP 21 ndash Installation and Configuration Guide 36
Configuration Options
Once you receive the requested certificate from your CA you can install it in your own partner configuration (ie the internal partner you will use to sendreceive messages) Go to Configuration rarr Partners rarr ltYour Partner Namegt rarr Install Certificate and paste the certificate text including the hellip into the text field
Then enter the password you used when you requested the certificate and click OK to complete the installation of the certificate You will see the result above the text field containing the certificate
Ponton XP 21 ndash Installation and Configuration Guide 37
Configuration Options
Install Partner Certificates
Install a certificate issued by the CA for the requesting partner This was already described in the Partner Configuration section for normal standard certificates
Note In case of SMIME certificates an additional password may be needed to allow the Messenger to access the certificate in the local certificate store
Install a CA Certificate
To install the certificate for your CA go to Configuration rarr Certificates rarr CA rarr Install Certificate and paste your CArsquos certificate into the text field This is the certificate that authorizes the CA as a signing authority for other certificates
Ponton XP 21 ndash Installation and Configuration Guide 38
Configuration Options
54 Configure the Hot Folder Adapter
General Configuration
Address Port ndash the Hot Folder Adapter (HFA) is addressed as a separate process that communicates with the Messenger via HTTP Therefore the hostname and port number need to be set up for the Messenger If the HFA is co-located with the Messenger on the same machine use ldquolocalhostrdquo for the IP address In this case the HFA does not run as a separate Java process but will be hosted on the same Tomcat server
Path ndash the HFA needs to know the Adapter communication path of the Messenger By default it is pontonxpAdapterService
Console File Log Level ndash the HFA provides log output to the console and to log files Both can be configured regarding the level of detail The console log is only useful if the HFA is running as a standalone application so you can safely leave it disabled in the default configuration
Ponton XP 21 ndash Installation and Configuration Guide 39
Configuration Options
Create Delete a HFA
Several HFAs may be created Each registers under a different ID at the Messenger HFAs may be created for individual partners If this is the case messages exchanged with the rest of the partners will be stored with the default HFA
Configure a HFA
Each HFA requires several directories to be defined
Inbox ndash a document will be stored in the Inbox whenever it was received from a partner
Outbox ndash documents to be sent to the business partner are dropped here The HFA grabs them in a defined frequency
Failed ndash if a document could not be sent to a partner and all retries failed it will be stored in this folder
Work ndash if a document transfer is in progress or all attempts to send the document have not yet been tried the document will remain here After a final failure it will be transferred to the Failed folder
Ponton XP 21 ndash Installation and Configuration Guide 40
Configuration Options
The following settings are also supported
Port ndash the port to be used by the HFA (optional)
Receiver format ndash standard format is XML
Save Backend envelope ndash the Backend envelope is retained for incoming messages
Support attachments ndash the HFA will save any files attached to an incoming message to the selected inbox folder
Scan Interval ndash the interval to wait (in seconds) between checking the outbox
Number of receiving threads ndash specifies the maximum number of receiving threads the adapter can process
Use partner subfolders ndash if this is set this HFA will create inbox and outbox folders for all remote partners Inbound messages will automatically be sorted into the according folder depending on the sender Outbound messages need to be placed into the receiving partnerrsquos outbox folder The backend message is not used in this mode and is ignored if it exists
Use Acknowledgement for ERP ndash with this option activated the ERP application receives an acknowledgement from the receiving Messenger on the partnerrsquos side This acknowledgement will be provided via the specified Inbox
Ponton XP 21 ndash Installation and Configuration Guide 41
Configuration Options
55 Ponton XE ndash The XML Editor Ponton XE is a separate Ponton product It is packaged with Ponton XP for free use only by papiNet users It allows to enter papiNet document data directly via a graphical user interface and to send the document via the hot folder adapter to the business partners
Ponton XE is fully documented in a separate manual Hence only the Messaging Plug-in will be described here
You can experiment with the XML Editor and check out all the features and options without using the Ponton XP connection To start with you may want to begin with the following steps
Create a new papiNet Purchase Order
Fill out the forms and use optional XML Elements by right-clicking the Plus-icons in the layout tree
Create an HTML file by choosing Document Export to HTML from the menu
Save the document to an XML file and re-load it again
Ponton XP 21 ndash Installation and Configuration Guide 42
Configuration Options
Interface between Ponton XE and Ponton XP
The two software applications communicate via hot folders as illustrated in the following figure
Message Plug-in
Outbox Inbox AckInboxImport
Ponton XP Ponton XE
XMLXML XMLXML XMLXML XMLXML
Hot Folder Adapter
The XML Editor is connected to the Messenger via the Hot Folder Adapter All these folder settings need to be synchronized for a proper data exchange
Configuration of the Messaging Plug-in
The Messaging Plug-in can be flexibly installed and de-installed with the remaining part of Ponton XE If the file messengerjar is removed from the plugins directory it will automatically disappear from the Ponton XE menu bar as soon as the software is started again
Before transferring messages out of Ponton XE you need to preset the following information
Default values for the sending and receiving partners ndash these values may be overridden for an individual transfer
Folder locations of the Hot Folder Adapter ndash the Inbox Outbox and AckInbox need to be set for document exchange with Ponton XP
Default setting for Test Message flag ndash this can be overridden for the actual document transfer
Import Directory ndash Ponton XE will automatically scan the Inbox folder and import received documents to the given folder for local processing
Ponton XP 21 ndash Installation and Configuration Guide 43
Configuration Options
Open Messages after Import ndash if this option is activated messages received from the Inbox will automatically be displayed in Ponton XE
Delete message in Inbox ndash to always remove received messages from the HFA Inbox this option needs to be activated otherwise a copy will remain in the Inbox folder
Ponton XP 21 ndash Installation and Configuration Guide 44
Configuration Options
Ponton XP 21 ndash Installation and Configuration Guide 45
Configuration Options
Using Ponton XE
After setting the configuration and creating a document you can transfer the document to your business partner This is done by means of the following steps
Choose the menu item ldquoMessenger rarr Transfer rarr Send Messagerdquo
Select a sending and receiving partner
Override the settings for the HFA folders
Tick the checkbox to qualify this message as a test message
After transferring the document to the Messenger Ponton XE will wait for a response This is recognised as an acknowledge file which is dropped into the AckInbox folder of the HFA As soon as this has been received a successful transfer in indicated
You may check with the Message Monitor to determine how the document was forwarded by the Messenger to the receiver or whether any errors occurred
Ponton XP 21 ndash Installation and Configuration Guide 46
Configuration Options
56 Display Schema Configuration The schema sets to be supported for each partner are defined in the partner configuration The standard sets available with the installation are shown under Configuration rarr Schemata
Ponton XP 21 ndash Installation and Configuration Guide 47
Configuration Options
57 User Administration Two types of users are distinguished
Administrators ndash these users have full access to the Messengerrsquos configuration interface
Operators ndash these users only have access to the Adapter Monitor the Message Monitor and the Test Adapter The other options in the Messenger menu are not available
Please note the following points in connection with the Messengerrsquos standard user administration
This is a very simple user administration based on the Tomcat implementation If you want to integrate the Messenger with another user administration such as LDAP please contact Ponton Consulting for support
A userrsquos access rights (administratoroperator) are defined when the user account is created ndash they cannot be changed subsequently
User accounts can only be created or deleted by administrators
Ponton XP 21 ndash Installation and Configuration Guide 48
Advanced Configuration
6 Advanced Configuration
61 XML Schema Configuration Important The Messenger distinguishes between available schema set and activated schema sets Just inserting entries in the schema configuration as described in this section does not activate the schema sets or the corresponding schemas for use by the Messenger In order to make use of the schemas in a schema set you have to activate the schema set in the relevant partner configuration To view or modify the activated schema sets in a partner configuration go to
Configuration rarr Partners rarr ltpartner namegt rarr Processing
and activatedeactivate the relevant checkboxes
In the Messengerrsquos configuration interface you can activate and deactivate schema sets for specific partner configurations It is not possible however to modify the contents and specifications of the individual schema sets Any necessary changes have to be made in the configuration file
[installation root]xmlpipewebrootWEB-INFconfigschemataxml
The configuration entries in this file are structured as follows
ltSchemaSet Name=papinet21gt
ltSchemaName=httpwwwpapinetorgdataAvailabilityV2R10xsd MessageType=Availability MessageVersion=V2R10gt
ltNamespacegtltNamespacegt
ltDisplayNamegtAvailability 21ltDisplayNamegt
ltSchemaFilegtAvailabilityV2R10xsdltSchemaFilegt
ltXSLFilegtltXSLFilegt
ltSchemagt
ltSchema Name=yourSchema MessageType=yourMsgType MessageVersion=yourMsgVersgt
ltNamespacegtyourNamespaceltNamespacegt
ltDisplayNamegtYour Display NameltDisplayNamegt
ltSchemaFilegtyourSchemaFileltSchemaFilegt
ltXSLFilegtyourStylesheetltXSLFilegt
ltSchemagt
hellip
ltSchemaFoldergtpapinet210ltSchemaFoldergt
ltXSLFoldergtpapinet210ltXSLFoldergt
ltSchemaSetgt
Ponton XP 21 ndash Installation and Configuration Guide 49
Advanced Configuration
You can add a schema to an existing schema set in this file by inserting a ltSchemagt block (just copy and paste one of the existing blocks and modify the configuration as required) Please ensure that your new schema specification includes correct settings for the attributes of the Schema element
Name= This attribute corresponds with the ebXML Schema Location of incoming messages When an ebXML message is received the Messenger looks for a schema configuration where the Schema Name attribute matches the Schema Location specified in the ebXML envelope
MessageType= This attribute corresponds with the attribute MessageMetaDataDocumentInfoMessageName in the backend envelope of outgoing messages
MessageVersion= This attribute corresponds with the element MessageMe aDataDocumentInfoDTDVersionNumber in the backend envelope of outgoing messages
t
Note The specification of MessageType and MessageVersion must be used together for outgoing messages as they are combined to form an identifier for the message schema
You also have the option of adding a new schema set with your own schema definitions to the schema configuration In this case you would insert a ltSchemaSetgt block with subordinate ltSchemagt blocks Your added schema set will automatically be inserted in the list of available schema sets on the Messenger configuration pages
62 Advanced Database Configuration Important Since the Messenger database is used for essential message processing and tracking purposes you should not experiment with the database configuration on a ldquoliverdquo system For test and debugging purposes you are advised to set up a trial system
Installation with other Databases
This section describes the main steps required to install a different database system on the Messenger for example an Oracle database
1 Install database driver Copy the database driver to
[installation root]xmlpipewebrootWEB-INFlib
Note Please note that only drivers with the extension jar are loaded by the Tomcat servlet engine If the JDBC driver you want to use is a zip file you will have to rename the file to jar The JDBC driver for Oracle 9i is the file ojdbc14jar
Ponton XP 21 ndash Installation and Configuration Guide 50
Advanced Configuration
2 Create database and tables Ponton XP is supplied with SQL scripts for HSQL and for Oracle that can be used to create the tables for the Messenger database If you are using another database you may need to modify these scripts to work correctly with your database system
The SQL scripts are located in the subfolders under [installation root]sql
Once the database tables are in place you will also need to carry out the SQL script that inserts the log messages into the database ie
[installation root]sqlinsert_log_messagessql
3 Set up database connection The configuration of database connections is described in the section Set Up Messenger Database beginning on page 20 To connect with a different database choose ldquootherrdquo from the list of database drivers and enter the configuration for your database on the next page
The entries for the Oracle 9i JDBC driver are
Driver oraclejdbcdriverOracleDriver
URL jdbcoraclethinlthostgtltportgtltdatabasegt
63 Advanced Message Monitor Configuration In the configuration directory ldquoxmlpipewebrootWEB-INFconfigrdquo there is a file messagemonitorxml which can be used to change the selection and ordering of the Message overview window in the Message Monitor The default setting is displayed in the following picture
Ponton XP 21 ndash Installation and Configuration Guide 51
Advanced Configuration
Here the number of line items per page can be set If a high resolution screen is used (beyond 1024 x 768 pixel) one may increase the number of lines
Further a mapping table defines which database column is to be displayed in which monitor column The number of columns again depends on the screen resolution
Finally if main memory size allows caching of XSL stylesheet definitions helps accelerating processing speed for XSL transformations
64 Tomcat SSL Installation
Generate a key
One minor problem with Tomcat or any other webserver that uses the internal Java symmetric key architecture is that you are not allowed to export or import private keys For this reason it is not possible to use the existing key-pair installed with the Messenger software You will have to generate a new key-pair and send a certificate request to the Ponton certificate authority (or other certification authority) to receive a valid certificate
To generate a new key-pair open a command prompt and go to the tomcat-4118 directory The keystore used for a Tomcat SSL installation is located in the Tomcat root directory and is called ssl-keystore The Tomcat installation already contains a certificate for lsquolocalhostrsquo so you can test the HTTPS access with a web browser
Before you can create a new Tomcat certificate you will have to delete the installed certificate Note that the default password for the Tomcat keystore is ldquochangeitrdquo keytool -delete -alias tomcat ndashkeystore ssl-keystore
Now use the following command to create a new key-pair Please note that you need to specify the Listener hostname (eg listenermyserverde) when the keytool asks for lsquofirst and last namersquo keytool -genkey -alias tomcat -keyalg RSA ndashkeystore ssl-keystore
After generating the new key the next step is to export a certificate request with the following command keytool ndashcertreq ndashalias tomcat ndashfile myservercsr ndashkeystore ssl-keystore
This will generate the file myservercsr in the current directory Send this file via email to xp-certponton-consultingde It will be signed and sent back to you The reply will contain a file with the certificate
Finally you have to re-import this signed certificate into the Tomcat SSL keystore Please note that the import may take some time keytool ndashimport ndashalias tomcat ndashfile myservercer ndashkeystore ssl-keystore
If you have any problems starting the keytool make sure you have the javahomebin directory specified in your PATH environment variable Of course you can also change to the javahomebin directory and start the keytool there
Ponton XP 21 ndash Installation and Configuration Guide 52
Advanced Configuration
Update Tomcat configuration
SSL is already activated in the Tomcat configuration packaged in the distribution However you might want to change the specified SSL port (by default the SSL port is set to 8443) You can change the port by editing the file
[tomcat installation]confserverconf
The following section configures the SSL parameters
lt-- Define a SSL Coyote HTTP11 Connector on port 8443 --gt
ltConnector className=orgapachecoyotetomcat4CoyoteConnector
port=8443
minProcessors=5
maxProcessors=75
enableLookups=true
acceptCount=100
debug=0
scheme=https
secure=true
useURIValidationHack=false
disableUploadTimeout=truegt
ltFactory className=orgapachecoyotetomcat4CoyoteServerSocketFactory
clientAuth=false
keystoreFile=ssl-keystore
protocol=TLS gt
ltConnectorgt
Verify setup
To verify if everything is working correctly start the Tomcat webserver as usual and connect to the webserver with your browser
Go to httpsyourserveraddress ndash initially you might get a warning window if the root certificate authority is not known to the browser If you continue by clicking OK you should see the usual Ponton XP start page
If everything comes up correctly you can use SSL to receive messages with the Ponton XP Software
Ponton XP 21 ndash Installation and Configuration Guide 53
Advanced Configuration
65 Distributed Installation If the Messenger is installed on a server that cannot be reached from the Internet you will need to install the Listener as well The purpose of the Listener is to pick up incoming connections and forward them to the Messenger (across the firewall) The firewall rules must be set up to allow this connection between the Listener and the Messenger When a message is received the Listener notifies the Messenger and the Messenger then picks up the message
You also have the option of subsequently installing the Listener as a service under Windows ndash this service can then be configured to start automatically when the system starts up
Note If you are going to run the Messenger in combination with the Listener your partners will have to enter the URI of your Listener in their configurations (under Configuration rarr Partners rarr ltpartner namegt rarr URI of Partners Messenger Service)
Listener Installation and Configuration
The Listener is installed by running the installer program (eg PontonXP-21-setuplistener-windowsexe) on the relevant system You are asked to specify an installation folder and also have the option of creating a desktop or menu shortcut Thatrsquos it
-
The settings for the Listener are contained in the configuration file listenerproperties which is located in the folder [Listener root folder]config To modify these settings you will have to edit the configuration file directly Access via the Messengerrsquos configuration interface is not possible
The file contains the following settings
HttpPort = Port number (for external HTTP connections)
HttpsPort = Port number (for external HTTPS connections)
LogLevel = DEBUG | INFO | WARN | ERROR | FATAL | OFF
The following settings specify the host and port of the Messenger for forwarding connections (HTTPHTTPS) The forwarding connection mode is activated by entering the relevant host and port addresses and removing the hash marks (used to mark ldquocomment linesrdquo in Java property files)
HttpServer = server1port1 (HTTP forwarding connection to the Messenger)
HttpsServer = server1port1 (HTTPS forwarding connection to the Messenger)
Ponton XP 21 ndash Installation and Configuration Guide 54
Advanced Configuration
The following settings specify the Listenerrsquos port for callback connections (HTTPHTTPS) with the Messenger As with the forwarding connection the callback connection mode is activated by entering the relevant port addresses and removing the hash marks (Obviously it makes no sense to have both connections activated at the same time)
HttpServicePort = Port number (for internal HTTP connections to the Listener)
HttpsServicePort = Port number (for internal HTTPS connections to the Listener)
Starting the Listener
To start the Listener open a command prompt and start the class
depontonconsultingxmlpipeListener
with the classpath
-cp libcommons-logging-api-103jarlibcommonutilsjarlibxp_listenerjarconfig
You can also use the installed batch file [Listener root folder]startListenerbat
Callback Mode
Details of the communication flow
When the Messenger starts up it searches for the Listener
Note The Listener should start up first so that it can be found by the Messenger
If the search is successful a permanent connection is established between the Messenger and the Listener The Messenger uses the following settings in the configuration to establish the connection with the Listener
Configuration rarr Messenger rarr Listener rarr HTTP[S] rarr Hostname
Configuration rarr Messenger rarr Listener rarr HTTP[S] rarr Internal Listener Port
Ponton XP 21 ndash Installation and Configuration Guide 55
Advanced Configuration
When the Listener receives an incoming message (or rather an HTTPHTTPS request) it informs the Messenger ndash by way of the permanent connection ndash about the arrival of the new request indicating which port the Messenger can use to pick up the connection
Note This port number is randomly selected by the Listener and cannot be configured
The Messenger picks up the connection on the Listenerrsquos specified port and redirects it to its own local port for further processing
This local port corresponds to the setting for
Configuration rarr Messenger rarr Listener rarr HTTP[S] rarr Internal Messenger Port
in the configuration GUI
Forwarding Mode
Details of the communication flow
In forwarding mode no permanent connection is established between the Messenger and the Listener
When the Listener receives an incoming HTTPHTTPS request it simply forwards the request to the Messenger using the address specified in listenerproperties (HttpServerHttpsServer)
Note To allow this forwarding connection the firewall has to be configured so that the Listener is permitted to access the Messenger on the specified port(s)
Ponton XP 21 ndash Installation and Configuration Guide 56
Advanced Configuration
66 Port Configuration The Messengerrsquos standard configuration uses port 8080 for HTTP connections and port 8443 for secure (HTTPS) connections This section describes how to set up the messenger to use a non-standard port configuration This involves making manual changes to several configuration files in particular the Tomcat serverxml and the Messengerrsquos adapter configuration files
Tomcat Settings
The port setting for the Messengerrsquos HTTP and HTTPS connections are specified in the Tomcat configuration file
[installation root]tomcat-xxxconfserverxml
This file defines the connections (Connectors) for the Messenger as follows
lt-- Define a non-SSL Coyote HTTP11 Connector on port 8080 --gt
ltConnector className=orgapachecoyotetomcat4CoyoteConnector
port=yourMessengerPort minProcessors=5 maxProcessors=75
enableLookups=true redirectPort=yourRed rectPort i acceptCount=100 debug=0 connectionTimeout=20000
useURIValidationHack=false disableUploadTimeout=true gt
lt-- Define a SSL Coyote HTTP11 Connector on port 8443 --gt
ltConnector className=orgapachecoyotetomcat4CoyoteConnector
port=yourSSLPort minProcessors=5 maxProcessors=75
enableLookups=true
acceptCount=100 debug=0 scheme=https secure=true
useURIValidationHack=false disableUploadTimeout=truegt
ltFactory className=orgapachecoyotetomcat4CoyoteServerSocketFactory
clientAuth=false keystoreFile=ssl-keystore protocol=TLS gt
ltConnectorgt
The standard settings for the Messenger ports are
HTTP 8080
SSL 8443
To modify your connections you will need to enter the relevant port numbers indicated above as yourMessengerPort yourRedirectPort (which normally points to the SSL connection) and yourSSLPort
Ponton XP 21 ndash Installation and Configuration Guide 57
Advanced Configuration
Adapter Settings
The settings for the Messenger adapters are contained in the relevant XML files under
[installation root]xmlpipewebrootWEB-INFconfig
In particular a standard installation includes the files testadap erxml and hotfolderxml Each of these configuration files contains a block specifying the connection to the messenger
t
ltMessengergt
ltAddressgtyourMessengerHostltAddressgt
ltPortNumbergtyourMessengerPortltPortNumbergt
ltPathgthellipltPathgt
ltMessengergt
If you have configured the Messenger to run on a different port (see above) you will need to enter the relevant port number here
Ponton XP 21 ndash Installation and Configuration Guide 58
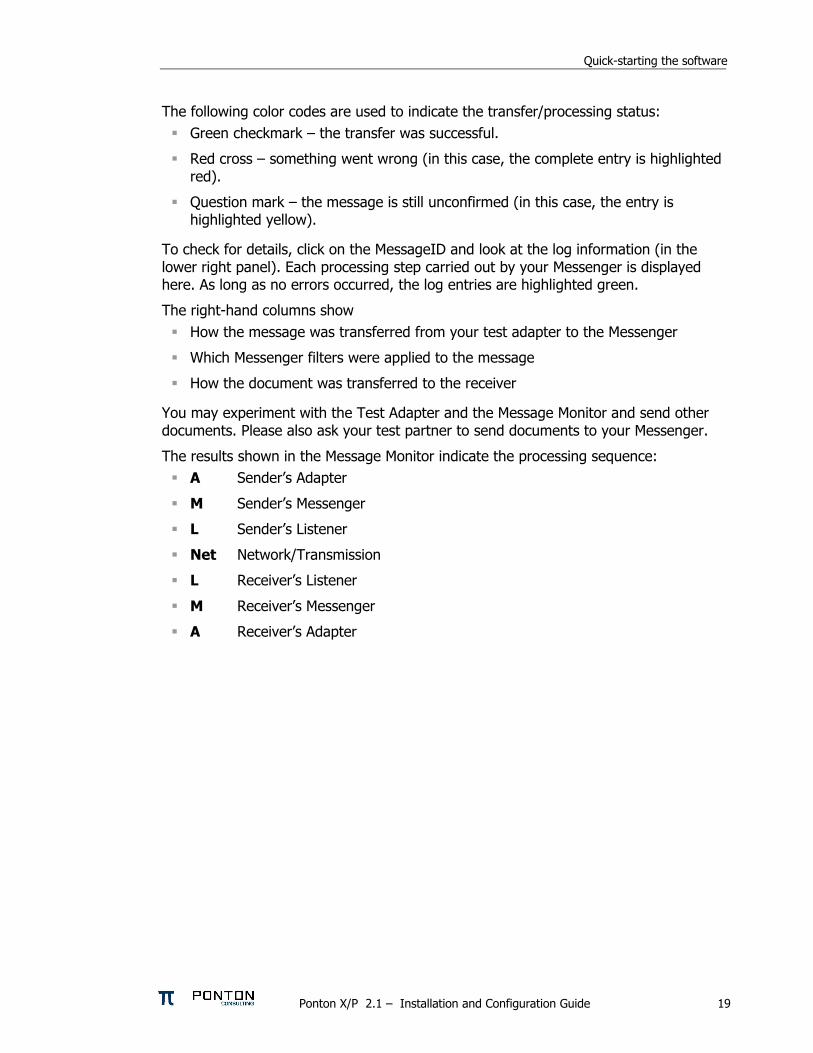
Quick-starting the software
The following color codes are used to indicate the transferprocessing status
Green checkmark ndash the transfer was successful
Red cross ndash something went wrong (in this case the complete entry is highlighted red)
Question mark ndash the message is still unconfirmed (in this case the entry is highlighted yellow)
To check for details click on the MessageID and look at the log information (in the lower right panel) Each processing step carried out by your Messenger is displayed here As long as no errors occurred the log entries are highlighted green
The right-hand columns show How the message was transferred from your test adapter to the Messenger
Which Messenger filters were applied to the message
How the document was transferred to the receiver
You may experiment with the Test Adapter and the Message Monitor and send other documents Please also ask your test partner to send documents to your Messenger
The results shown in the Message Monitor indicate the processing sequence A Senderrsquos Adapter
M Senderrsquos Messenger
L Senderrsquos Listener
Net NetworkTransmission
L Receiverrsquos Listener
M Receiverrsquos Messenger
A Receiverrsquos Adapter
Ponton XP 21 ndash Installation and Configuration Guide 19
Configuration Options
5 Configuration Options The overall configuration of Ponton XP breaks down into the following sections
Messenger configuration This section focuses on your local setting for the Messenger This includes database connections default filter settings communication protocol selection etc
Partner configuration Per partner several setting are required Partner identification filter activation (which overrides the default setting) communication settings etc
Certificate management For own partners key pairs may be created and certificates requested For certificate authorities as well as for each individual partner certificates can be installed Certificates may be requested for signing and encryption for SSL and for SMIME
Hot folder configuration The Hot Folder Adapter is tightly integrated with the Messenger and can therefore be configured through the same interface It supports the definition of multiple hot folders for sending and receiving documents as well as dedicated folders for business partners
51 Messenger Configuration
Set Up Messenger Database
The Messenger stores log entries in a database By default the log database is pre-configured as an HSQL database HSQL is an open source database implementation written entirely in Java If there is no requirement to store log data in an existing database in your organization you may continue with HSQL
It is also possible to configure the Messenger to use a different database system for example
Oracle (version 815 or higher)
MS SQL Server 70
MySQL (version 32 or higher)
SAPdb (version 73)
The log database is accessed via JDBC connection Configuration scripts to set up the tables for an Oracle database are included with Ponton XP You can refer to these scripts as examples to create scripts for your own database system
If you do not yet have a database system with JDBC support in use you can download the setup files for MySQL from httpwwwmysqlcomdownloadsmysql-323html
Ponton XP 21 ndash Installation and Configuration Guide 20
Configuration Options
To configure the Messenger database the following set-up needs to be performed
1 Go to Configuration rarr Messenger rarr Database
2 Enter the driver class name and the URL for the JDBC connection to your database
3 Enter the user name and password for the connection if required
4 Click Test to test the connection
5 Important Donrsquot click OK unless the connection test was successful
Note The connection to the standard HSQL database supplied with the Messenger requires a ldquotruncatedrdquo URL that does contain the database name (as shown above) If you get a ldquoconnection brokenrdquo message when testing the connection to the standard database (as specified above) try deleting ltDATABASEgt from the URL and testing the connection again
Ponton XP 21 ndash Installation and Configuration Guide 21
Configuration Options
Set Logging Level
To specify the logging level go to Configuration rarr Messenger rarr Logging and select the desired settings for Messenger and JDBC logging
There is a range of settings available
OFF turns logging off completely
hellip
DEBUG logs all the messages output by the system
Note Please keep in mind that the chosen logging level can have an effect on the performance of your system In particular it is advisable to use DEBUG logging only in connection with error tracking and analysis
Ponton XP 21 ndash Installation and Configuration Guide 22
Configuration Options
Set Message Queue Scan Interval
Under Configuration rarr Messenger rarr Message Queues you can specify the interval to scan the (inbound and outbound) message queues
The default setting is 5000 msec To boost the message throughput on a faster system you can increase the scan frequency by setting this interval to a lower (ie shorter) value
Ponton XP 21 ndash Installation and Configuration Guide 23
Configuration Options
Select Messaging Pipeline
The Messenger allows you to configure different filter pipelines The standard configuration comes with two pipelines
1 Messenger 203 compatibility pipeline This allows you to maintain backward compatibility with users of the previous Messenger version
2 Messenger 21 pipeline This is to communicate with partners that are also using Messenger version 21 or any EbXML 20 compliant software
For each pipeline a range of filters can be set in particular
Validation
Signing
Compression
Encryption
The Messenger configuration can be used for standard filters (validation signing compression and encryption) for inbound and outbound messages Custom filters are configured in a dedicated section
Developers may extend the Messenger with additional filters For example one may think of a ldquoBusiness Validatorrdquo that checks message content against business rules Or existing filters could be Instead of ldquosoft signingrdquo a document smart card access may be integrated
Ponton XP 21 ndash Installation and Configuration Guide 24
Configuration Options
Outbound Email Connection
This connection is used for email messages sent by your Messenger to your business partners The following data needs to be configured
From ndash the senderrsquos address to be used for your emails
SMTP ndash the outgoing mail server to be contacted by your Messenger in order to submit the email
Username password ndash must be entered if your mail server requires authentication for outgoing emails in this case enter the settings to be used by the Messenger to log in on the mail server
To test the email connection enter a receiver email address (in the ldquoTordquo field) and click the ldquoTestrdquo button
Ponton XP 21 ndash Installation and Configuration Guide 25
Configuration Options
Inbound Email Connection
You can enable your Messenger to receive email messages by setting up a POPIMAP connection with the following entries
Protocol ndash set to pop3 IMAP (depending on the type of mail server)
Server ndash the hostname or IP address of your mail server
Interval ndash the frequency for accessing the server for mail download
Username password ndash must be properly set to authenticate the Messenger on the mail server
Ponton XP 21 ndash Installation and Configuration Guide 26
Configuration Options
Email Notification
You can use the notification service to send emails to specified addresses whenever certain events occur For example you might want to notify your system administrator whenever certain errors are encountered
To specify an address go to Messenger rarr eMail Notification and click New Receiver Enter the email address for this receiver in the text field and select the events for which this receiver is to be notified You can use CTRL-click to activate multiple entries in the list
Ponton XP 21 ndash Installation and Configuration Guide 27
Configuration Options
Communication Settings
On this screen you can specify URI of each partnerrsquos Messenger Service ndash for example
httppartnerserver8080pontonxpSoapListener where partne server refers to the hostname or IP address of the machine the Messenger is installed on
r
Acknowledgment Requests ndash you can use this setting to determine whether outbound messages to this partner require acknowledgements To differentiate per message you can deactivate this checkbox and use the TransmissionMode attribute in the BackendEnvelope In the context of ebXML 20 transmissions you can additionally request signed acknowledgements for increased security
Retransmission Handling ndash you can use this setting to specify the number of retransmission attempts and the interval (in seconds) between attempts If a message cannot be transmitted successfully in the specified number of retries the Messenger will give up and mark the message as ldquofailedrdquo
Ponton XP 21 ndash Installation and Configuration Guide 28
Configuration Options
Configure Archiving Filter
The archiving filter stores the following information in a dedicated directory
Backend Envelope
ebXML Envelope
Payload ndash this is the actual business document
Certificate
Signature
Each part is stored in a separate file
The Archive Folder setting can be used to indicate the location of the archiving folder This can be expressed as
An absolute path to the required folder
A relative path beginning with $CONTEXT ndash this placeholder refers to the folder [installation root]xmlpipewebroot
The Maximum Age setting specifies how long the files will be archived ndash expressed in days
Ponton XP 21 ndash Installation and Configuration Guide 29
Configuration Options
52 Partner Configuration For each partner the following data may be configured
Partner identification (internal and external)
Communication Settings
URI of the partnerrsquos Messenger
Create Delete a Partner Entry
To create a new partner entry specify an identifier for the partner (this is the local identifier for your configuration) and indicate whether this partner entry is for
An internal partner (with the ldquoselfrdquo option activated) ndash this might be a department of your organization
An external partner ndash these entries refer to your business partners for example customers suppliers carriers warehouse operators etc
A message is always sent by your Messenger from an internal to an external partner and received from an external partner to an internal one
Internal partners are distinguished because for encryption and signing the certificates of each internal partner will be used on a per-partner basis
For further information please check the Ponton XP Architecture Overview
Ponton XP 21 ndash Installation and Configuration Guide 30
Configuration Options
Set the Partner Identification
Local Partner Name This identifier is valid within you local configuration ie you may choose any value as long as it is unique among all local partner names
Disable Although configured as a partner individual partners may be disabled In this case the Messenger rejects any message received from this partner
PartyID PartyID Type PartyIDs are used to identify partners externally To avoid name clashes and duplication well-known naming schemas exist to identify partners eg DUNS codes VAT numbers IANA codes etc For this reason trading partners should agree on an minimal set of identification types (like DUNS numbers and IANA codes) that is to be used by all partners
More than one PartyID can be defined per partner The limit is given by the number of PartyID types These are configured separately please check Section ldquoAdvanced Configurationrdquo)
Hint Please also check the Ponton XP Architecture Overview document for a detailed explanation of ebXML codes and partner identification
Ponton XP 21 ndash Installation and Configuration Guide 31
Configuration Options
Partner Communication Configuration
For each partner the following configuration options may be set URI of Partnerrsquos Messenger Service ndash enter the address of the partnerrsquos
Messenger for example httppartnerserver8080pontonxpSoapListener
Request Acknowledge ndash every message to this partner needs to be acknowledged
Request Signed Acknowledge ndash to specify signing of acknowledgements received from this partner
Retries ndash the number of retries in case of unsuccessful message transmission
Retry Interval ndash the number of seconds to wait until the next retry
Ponton XP 21 ndash Installation and Configuration Guide 32
Configuration Options
Processing Configuration
The following options can be set
Default Adapter ndash enter the name of the adapter to be used by default
Processing Pipeline ndash specify the processing pipeline to be used for this profile
Schema Sets ndash choose which Schema set(s) are to be supported
Use XML Signature ndash indicate whether to use XML Signature
Use default message settings (specified under Configuration rarr Messenger rarr Processing) or define a specific processing filter for this partner
Ponton XP 21 ndash Installation and Configuration Guide 33
Configuration Options
Install Partner Certificates
There are different ways of distributing certificates to business partners One is to send the certificate per email and have the partner cut amp paste the certificate code into the partner configuration
Note It is important to cut amp paste the complete certificate code including the lines ldquo----- Begin Certificate -----rdquo and ldquo----- End Certificate -----rdquo
Important A partner certificate will only be accepted if the certificate of the issuing CA (certificate authority) was pre-installed Otherwise the trust relationship between the partner and the CA cannot be traced
One may select to install a general certificate or a SMIME certificate Please determine what kind of certificate you received from your partner before installing it
Ponton XP 21 ndash Installation and Configuration Guide 34
Configuration Options
53 Certificate Management Certificate management comprises the following initial steps
Configure your default CA This is usually properly pre-configured in the installation files
Install the root certificate of the default CA This needs to be installed manually if 3rd-party CAs are to be used
Request a certificate for your own Messenger This includes creating a publicprivate key pair and sending a certificate request to the CA
Optionally you can request and install a SMIME certificate to be used for SMIME based communication via email
Default CA Configuration
On this screen you specify the settings for receiving certificates from your default certificate authority (CA) CA email address ndash enter the email address to be used to request a certificate
from your (default) CA
Ponton XP 21 ndash Installation and Configuration Guide 35
Configuration Options
CA download URL ndash enter the URL at your CA from which to download certificates for your Messenger installation Please note that you can only install certificates for partners you have already defined in your partner configuration
Download interval ndash specify the interval to wait between automatic certificate downloads
To download the available certificates immediately click the Download button
Request and Install Your Own Certificate
To request a certificate from your (default) CA go to Configuration rarr Certificates rarr Request Certificate Please enter data for all the fields on this form If any entries are missing you will get an error message
After completing the form click OK to send the certificate request to your CA You will get a message indicating that the request has been sent
Ponton XP 21 ndash Installation and Configuration Guide 36
Configuration Options
Once you receive the requested certificate from your CA you can install it in your own partner configuration (ie the internal partner you will use to sendreceive messages) Go to Configuration rarr Partners rarr ltYour Partner Namegt rarr Install Certificate and paste the certificate text including the hellip into the text field
Then enter the password you used when you requested the certificate and click OK to complete the installation of the certificate You will see the result above the text field containing the certificate
Ponton XP 21 ndash Installation and Configuration Guide 37
Configuration Options
Install Partner Certificates
Install a certificate issued by the CA for the requesting partner This was already described in the Partner Configuration section for normal standard certificates
Note In case of SMIME certificates an additional password may be needed to allow the Messenger to access the certificate in the local certificate store
Install a CA Certificate
To install the certificate for your CA go to Configuration rarr Certificates rarr CA rarr Install Certificate and paste your CArsquos certificate into the text field This is the certificate that authorizes the CA as a signing authority for other certificates
Ponton XP 21 ndash Installation and Configuration Guide 38
Configuration Options
54 Configure the Hot Folder Adapter
General Configuration
Address Port ndash the Hot Folder Adapter (HFA) is addressed as a separate process that communicates with the Messenger via HTTP Therefore the hostname and port number need to be set up for the Messenger If the HFA is co-located with the Messenger on the same machine use ldquolocalhostrdquo for the IP address In this case the HFA does not run as a separate Java process but will be hosted on the same Tomcat server
Path ndash the HFA needs to know the Adapter communication path of the Messenger By default it is pontonxpAdapterService
Console File Log Level ndash the HFA provides log output to the console and to log files Both can be configured regarding the level of detail The console log is only useful if the HFA is running as a standalone application so you can safely leave it disabled in the default configuration
Ponton XP 21 ndash Installation and Configuration Guide 39
Configuration Options
Create Delete a HFA
Several HFAs may be created Each registers under a different ID at the Messenger HFAs may be created for individual partners If this is the case messages exchanged with the rest of the partners will be stored with the default HFA
Configure a HFA
Each HFA requires several directories to be defined
Inbox ndash a document will be stored in the Inbox whenever it was received from a partner
Outbox ndash documents to be sent to the business partner are dropped here The HFA grabs them in a defined frequency
Failed ndash if a document could not be sent to a partner and all retries failed it will be stored in this folder
Work ndash if a document transfer is in progress or all attempts to send the document have not yet been tried the document will remain here After a final failure it will be transferred to the Failed folder
Ponton XP 21 ndash Installation and Configuration Guide 40
Configuration Options
The following settings are also supported
Port ndash the port to be used by the HFA (optional)
Receiver format ndash standard format is XML
Save Backend envelope ndash the Backend envelope is retained for incoming messages
Support attachments ndash the HFA will save any files attached to an incoming message to the selected inbox folder
Scan Interval ndash the interval to wait (in seconds) between checking the outbox
Number of receiving threads ndash specifies the maximum number of receiving threads the adapter can process
Use partner subfolders ndash if this is set this HFA will create inbox and outbox folders for all remote partners Inbound messages will automatically be sorted into the according folder depending on the sender Outbound messages need to be placed into the receiving partnerrsquos outbox folder The backend message is not used in this mode and is ignored if it exists
Use Acknowledgement for ERP ndash with this option activated the ERP application receives an acknowledgement from the receiving Messenger on the partnerrsquos side This acknowledgement will be provided via the specified Inbox
Ponton XP 21 ndash Installation and Configuration Guide 41
Configuration Options
55 Ponton XE ndash The XML Editor Ponton XE is a separate Ponton product It is packaged with Ponton XP for free use only by papiNet users It allows to enter papiNet document data directly via a graphical user interface and to send the document via the hot folder adapter to the business partners
Ponton XE is fully documented in a separate manual Hence only the Messaging Plug-in will be described here
You can experiment with the XML Editor and check out all the features and options without using the Ponton XP connection To start with you may want to begin with the following steps
Create a new papiNet Purchase Order
Fill out the forms and use optional XML Elements by right-clicking the Plus-icons in the layout tree
Create an HTML file by choosing Document Export to HTML from the menu
Save the document to an XML file and re-load it again
Ponton XP 21 ndash Installation and Configuration Guide 42
Configuration Options
Interface between Ponton XE and Ponton XP
The two software applications communicate via hot folders as illustrated in the following figure
Message Plug-in
Outbox Inbox AckInboxImport
Ponton XP Ponton XE
XMLXML XMLXML XMLXML XMLXML
Hot Folder Adapter
The XML Editor is connected to the Messenger via the Hot Folder Adapter All these folder settings need to be synchronized for a proper data exchange
Configuration of the Messaging Plug-in
The Messaging Plug-in can be flexibly installed and de-installed with the remaining part of Ponton XE If the file messengerjar is removed from the plugins directory it will automatically disappear from the Ponton XE menu bar as soon as the software is started again
Before transferring messages out of Ponton XE you need to preset the following information
Default values for the sending and receiving partners ndash these values may be overridden for an individual transfer
Folder locations of the Hot Folder Adapter ndash the Inbox Outbox and AckInbox need to be set for document exchange with Ponton XP
Default setting for Test Message flag ndash this can be overridden for the actual document transfer
Import Directory ndash Ponton XE will automatically scan the Inbox folder and import received documents to the given folder for local processing
Ponton XP 21 ndash Installation and Configuration Guide 43
Configuration Options
Open Messages after Import ndash if this option is activated messages received from the Inbox will automatically be displayed in Ponton XE
Delete message in Inbox ndash to always remove received messages from the HFA Inbox this option needs to be activated otherwise a copy will remain in the Inbox folder
Ponton XP 21 ndash Installation and Configuration Guide 44
Configuration Options
Ponton XP 21 ndash Installation and Configuration Guide 45
Configuration Options
Using Ponton XE
After setting the configuration and creating a document you can transfer the document to your business partner This is done by means of the following steps
Choose the menu item ldquoMessenger rarr Transfer rarr Send Messagerdquo
Select a sending and receiving partner
Override the settings for the HFA folders
Tick the checkbox to qualify this message as a test message
After transferring the document to the Messenger Ponton XE will wait for a response This is recognised as an acknowledge file which is dropped into the AckInbox folder of the HFA As soon as this has been received a successful transfer in indicated
You may check with the Message Monitor to determine how the document was forwarded by the Messenger to the receiver or whether any errors occurred
Ponton XP 21 ndash Installation and Configuration Guide 46
Configuration Options
56 Display Schema Configuration The schema sets to be supported for each partner are defined in the partner configuration The standard sets available with the installation are shown under Configuration rarr Schemata
Ponton XP 21 ndash Installation and Configuration Guide 47
Configuration Options
57 User Administration Two types of users are distinguished
Administrators ndash these users have full access to the Messengerrsquos configuration interface
Operators ndash these users only have access to the Adapter Monitor the Message Monitor and the Test Adapter The other options in the Messenger menu are not available
Please note the following points in connection with the Messengerrsquos standard user administration
This is a very simple user administration based on the Tomcat implementation If you want to integrate the Messenger with another user administration such as LDAP please contact Ponton Consulting for support
A userrsquos access rights (administratoroperator) are defined when the user account is created ndash they cannot be changed subsequently
User accounts can only be created or deleted by administrators
Ponton XP 21 ndash Installation and Configuration Guide 48
Advanced Configuration
6 Advanced Configuration
61 XML Schema Configuration Important The Messenger distinguishes between available schema set and activated schema sets Just inserting entries in the schema configuration as described in this section does not activate the schema sets or the corresponding schemas for use by the Messenger In order to make use of the schemas in a schema set you have to activate the schema set in the relevant partner configuration To view or modify the activated schema sets in a partner configuration go to
Configuration rarr Partners rarr ltpartner namegt rarr Processing
and activatedeactivate the relevant checkboxes
In the Messengerrsquos configuration interface you can activate and deactivate schema sets for specific partner configurations It is not possible however to modify the contents and specifications of the individual schema sets Any necessary changes have to be made in the configuration file
[installation root]xmlpipewebrootWEB-INFconfigschemataxml
The configuration entries in this file are structured as follows
ltSchemaSet Name=papinet21gt
ltSchemaName=httpwwwpapinetorgdataAvailabilityV2R10xsd MessageType=Availability MessageVersion=V2R10gt
ltNamespacegtltNamespacegt
ltDisplayNamegtAvailability 21ltDisplayNamegt
ltSchemaFilegtAvailabilityV2R10xsdltSchemaFilegt
ltXSLFilegtltXSLFilegt
ltSchemagt
ltSchema Name=yourSchema MessageType=yourMsgType MessageVersion=yourMsgVersgt
ltNamespacegtyourNamespaceltNamespacegt
ltDisplayNamegtYour Display NameltDisplayNamegt
ltSchemaFilegtyourSchemaFileltSchemaFilegt
ltXSLFilegtyourStylesheetltXSLFilegt
ltSchemagt
hellip
ltSchemaFoldergtpapinet210ltSchemaFoldergt
ltXSLFoldergtpapinet210ltXSLFoldergt
ltSchemaSetgt
Ponton XP 21 ndash Installation and Configuration Guide 49
Advanced Configuration
You can add a schema to an existing schema set in this file by inserting a ltSchemagt block (just copy and paste one of the existing blocks and modify the configuration as required) Please ensure that your new schema specification includes correct settings for the attributes of the Schema element
Name= This attribute corresponds with the ebXML Schema Location of incoming messages When an ebXML message is received the Messenger looks for a schema configuration where the Schema Name attribute matches the Schema Location specified in the ebXML envelope
MessageType= This attribute corresponds with the attribute MessageMetaDataDocumentInfoMessageName in the backend envelope of outgoing messages
MessageVersion= This attribute corresponds with the element MessageMe aDataDocumentInfoDTDVersionNumber in the backend envelope of outgoing messages
t
Note The specification of MessageType and MessageVersion must be used together for outgoing messages as they are combined to form an identifier for the message schema
You also have the option of adding a new schema set with your own schema definitions to the schema configuration In this case you would insert a ltSchemaSetgt block with subordinate ltSchemagt blocks Your added schema set will automatically be inserted in the list of available schema sets on the Messenger configuration pages
62 Advanced Database Configuration Important Since the Messenger database is used for essential message processing and tracking purposes you should not experiment with the database configuration on a ldquoliverdquo system For test and debugging purposes you are advised to set up a trial system
Installation with other Databases
This section describes the main steps required to install a different database system on the Messenger for example an Oracle database
1 Install database driver Copy the database driver to
[installation root]xmlpipewebrootWEB-INFlib
Note Please note that only drivers with the extension jar are loaded by the Tomcat servlet engine If the JDBC driver you want to use is a zip file you will have to rename the file to jar The JDBC driver for Oracle 9i is the file ojdbc14jar
Ponton XP 21 ndash Installation and Configuration Guide 50
Advanced Configuration
2 Create database and tables Ponton XP is supplied with SQL scripts for HSQL and for Oracle that can be used to create the tables for the Messenger database If you are using another database you may need to modify these scripts to work correctly with your database system
The SQL scripts are located in the subfolders under [installation root]sql
Once the database tables are in place you will also need to carry out the SQL script that inserts the log messages into the database ie
[installation root]sqlinsert_log_messagessql
3 Set up database connection The configuration of database connections is described in the section Set Up Messenger Database beginning on page 20 To connect with a different database choose ldquootherrdquo from the list of database drivers and enter the configuration for your database on the next page
The entries for the Oracle 9i JDBC driver are
Driver oraclejdbcdriverOracleDriver
URL jdbcoraclethinlthostgtltportgtltdatabasegt
63 Advanced Message Monitor Configuration In the configuration directory ldquoxmlpipewebrootWEB-INFconfigrdquo there is a file messagemonitorxml which can be used to change the selection and ordering of the Message overview window in the Message Monitor The default setting is displayed in the following picture
Ponton XP 21 ndash Installation and Configuration Guide 51
Advanced Configuration
Here the number of line items per page can be set If a high resolution screen is used (beyond 1024 x 768 pixel) one may increase the number of lines
Further a mapping table defines which database column is to be displayed in which monitor column The number of columns again depends on the screen resolution
Finally if main memory size allows caching of XSL stylesheet definitions helps accelerating processing speed for XSL transformations
64 Tomcat SSL Installation
Generate a key
One minor problem with Tomcat or any other webserver that uses the internal Java symmetric key architecture is that you are not allowed to export or import private keys For this reason it is not possible to use the existing key-pair installed with the Messenger software You will have to generate a new key-pair and send a certificate request to the Ponton certificate authority (or other certification authority) to receive a valid certificate
To generate a new key-pair open a command prompt and go to the tomcat-4118 directory The keystore used for a Tomcat SSL installation is located in the Tomcat root directory and is called ssl-keystore The Tomcat installation already contains a certificate for lsquolocalhostrsquo so you can test the HTTPS access with a web browser
Before you can create a new Tomcat certificate you will have to delete the installed certificate Note that the default password for the Tomcat keystore is ldquochangeitrdquo keytool -delete -alias tomcat ndashkeystore ssl-keystore
Now use the following command to create a new key-pair Please note that you need to specify the Listener hostname (eg listenermyserverde) when the keytool asks for lsquofirst and last namersquo keytool -genkey -alias tomcat -keyalg RSA ndashkeystore ssl-keystore
After generating the new key the next step is to export a certificate request with the following command keytool ndashcertreq ndashalias tomcat ndashfile myservercsr ndashkeystore ssl-keystore
This will generate the file myservercsr in the current directory Send this file via email to xp-certponton-consultingde It will be signed and sent back to you The reply will contain a file with the certificate
Finally you have to re-import this signed certificate into the Tomcat SSL keystore Please note that the import may take some time keytool ndashimport ndashalias tomcat ndashfile myservercer ndashkeystore ssl-keystore
If you have any problems starting the keytool make sure you have the javahomebin directory specified in your PATH environment variable Of course you can also change to the javahomebin directory and start the keytool there
Ponton XP 21 ndash Installation and Configuration Guide 52
Advanced Configuration
Update Tomcat configuration
SSL is already activated in the Tomcat configuration packaged in the distribution However you might want to change the specified SSL port (by default the SSL port is set to 8443) You can change the port by editing the file
[tomcat installation]confserverconf
The following section configures the SSL parameters
lt-- Define a SSL Coyote HTTP11 Connector on port 8443 --gt
ltConnector className=orgapachecoyotetomcat4CoyoteConnector
port=8443
minProcessors=5
maxProcessors=75
enableLookups=true
acceptCount=100
debug=0
scheme=https
secure=true
useURIValidationHack=false
disableUploadTimeout=truegt
ltFactory className=orgapachecoyotetomcat4CoyoteServerSocketFactory
clientAuth=false
keystoreFile=ssl-keystore
protocol=TLS gt
ltConnectorgt
Verify setup
To verify if everything is working correctly start the Tomcat webserver as usual and connect to the webserver with your browser
Go to httpsyourserveraddress ndash initially you might get a warning window if the root certificate authority is not known to the browser If you continue by clicking OK you should see the usual Ponton XP start page
If everything comes up correctly you can use SSL to receive messages with the Ponton XP Software
Ponton XP 21 ndash Installation and Configuration Guide 53
Advanced Configuration
65 Distributed Installation If the Messenger is installed on a server that cannot be reached from the Internet you will need to install the Listener as well The purpose of the Listener is to pick up incoming connections and forward them to the Messenger (across the firewall) The firewall rules must be set up to allow this connection between the Listener and the Messenger When a message is received the Listener notifies the Messenger and the Messenger then picks up the message
You also have the option of subsequently installing the Listener as a service under Windows ndash this service can then be configured to start automatically when the system starts up
Note If you are going to run the Messenger in combination with the Listener your partners will have to enter the URI of your Listener in their configurations (under Configuration rarr Partners rarr ltpartner namegt rarr URI of Partners Messenger Service)
Listener Installation and Configuration
The Listener is installed by running the installer program (eg PontonXP-21-setuplistener-windowsexe) on the relevant system You are asked to specify an installation folder and also have the option of creating a desktop or menu shortcut Thatrsquos it
-
The settings for the Listener are contained in the configuration file listenerproperties which is located in the folder [Listener root folder]config To modify these settings you will have to edit the configuration file directly Access via the Messengerrsquos configuration interface is not possible
The file contains the following settings
HttpPort = Port number (for external HTTP connections)
HttpsPort = Port number (for external HTTPS connections)
LogLevel = DEBUG | INFO | WARN | ERROR | FATAL | OFF
The following settings specify the host and port of the Messenger for forwarding connections (HTTPHTTPS) The forwarding connection mode is activated by entering the relevant host and port addresses and removing the hash marks (used to mark ldquocomment linesrdquo in Java property files)
HttpServer = server1port1 (HTTP forwarding connection to the Messenger)
HttpsServer = server1port1 (HTTPS forwarding connection to the Messenger)
Ponton XP 21 ndash Installation and Configuration Guide 54
Advanced Configuration
The following settings specify the Listenerrsquos port for callback connections (HTTPHTTPS) with the Messenger As with the forwarding connection the callback connection mode is activated by entering the relevant port addresses and removing the hash marks (Obviously it makes no sense to have both connections activated at the same time)
HttpServicePort = Port number (for internal HTTP connections to the Listener)
HttpsServicePort = Port number (for internal HTTPS connections to the Listener)
Starting the Listener
To start the Listener open a command prompt and start the class
depontonconsultingxmlpipeListener
with the classpath
-cp libcommons-logging-api-103jarlibcommonutilsjarlibxp_listenerjarconfig
You can also use the installed batch file [Listener root folder]startListenerbat
Callback Mode
Details of the communication flow
When the Messenger starts up it searches for the Listener
Note The Listener should start up first so that it can be found by the Messenger
If the search is successful a permanent connection is established between the Messenger and the Listener The Messenger uses the following settings in the configuration to establish the connection with the Listener
Configuration rarr Messenger rarr Listener rarr HTTP[S] rarr Hostname
Configuration rarr Messenger rarr Listener rarr HTTP[S] rarr Internal Listener Port
Ponton XP 21 ndash Installation and Configuration Guide 55
Advanced Configuration
When the Listener receives an incoming message (or rather an HTTPHTTPS request) it informs the Messenger ndash by way of the permanent connection ndash about the arrival of the new request indicating which port the Messenger can use to pick up the connection
Note This port number is randomly selected by the Listener and cannot be configured
The Messenger picks up the connection on the Listenerrsquos specified port and redirects it to its own local port for further processing
This local port corresponds to the setting for
Configuration rarr Messenger rarr Listener rarr HTTP[S] rarr Internal Messenger Port
in the configuration GUI
Forwarding Mode
Details of the communication flow
In forwarding mode no permanent connection is established between the Messenger and the Listener
When the Listener receives an incoming HTTPHTTPS request it simply forwards the request to the Messenger using the address specified in listenerproperties (HttpServerHttpsServer)
Note To allow this forwarding connection the firewall has to be configured so that the Listener is permitted to access the Messenger on the specified port(s)
Ponton XP 21 ndash Installation and Configuration Guide 56
Advanced Configuration
66 Port Configuration The Messengerrsquos standard configuration uses port 8080 for HTTP connections and port 8443 for secure (HTTPS) connections This section describes how to set up the messenger to use a non-standard port configuration This involves making manual changes to several configuration files in particular the Tomcat serverxml and the Messengerrsquos adapter configuration files
Tomcat Settings
The port setting for the Messengerrsquos HTTP and HTTPS connections are specified in the Tomcat configuration file
[installation root]tomcat-xxxconfserverxml
This file defines the connections (Connectors) for the Messenger as follows
lt-- Define a non-SSL Coyote HTTP11 Connector on port 8080 --gt
ltConnector className=orgapachecoyotetomcat4CoyoteConnector
port=yourMessengerPort minProcessors=5 maxProcessors=75
enableLookups=true redirectPort=yourRed rectPort i acceptCount=100 debug=0 connectionTimeout=20000
useURIValidationHack=false disableUploadTimeout=true gt
lt-- Define a SSL Coyote HTTP11 Connector on port 8443 --gt
ltConnector className=orgapachecoyotetomcat4CoyoteConnector
port=yourSSLPort minProcessors=5 maxProcessors=75
enableLookups=true
acceptCount=100 debug=0 scheme=https secure=true
useURIValidationHack=false disableUploadTimeout=truegt
ltFactory className=orgapachecoyotetomcat4CoyoteServerSocketFactory
clientAuth=false keystoreFile=ssl-keystore protocol=TLS gt
ltConnectorgt
The standard settings for the Messenger ports are
HTTP 8080
SSL 8443
To modify your connections you will need to enter the relevant port numbers indicated above as yourMessengerPort yourRedirectPort (which normally points to the SSL connection) and yourSSLPort
Ponton XP 21 ndash Installation and Configuration Guide 57
Advanced Configuration
Adapter Settings
The settings for the Messenger adapters are contained in the relevant XML files under
[installation root]xmlpipewebrootWEB-INFconfig
In particular a standard installation includes the files testadap erxml and hotfolderxml Each of these configuration files contains a block specifying the connection to the messenger
t
ltMessengergt
ltAddressgtyourMessengerHostltAddressgt
ltPortNumbergtyourMessengerPortltPortNumbergt
ltPathgthellipltPathgt
ltMessengergt
If you have configured the Messenger to run on a different port (see above) you will need to enter the relevant port number here
Ponton XP 21 ndash Installation and Configuration Guide 58
Configuration Options
5 Configuration Options The overall configuration of Ponton XP breaks down into the following sections
Messenger configuration This section focuses on your local setting for the Messenger This includes database connections default filter settings communication protocol selection etc
Partner configuration Per partner several setting are required Partner identification filter activation (which overrides the default setting) communication settings etc
Certificate management For own partners key pairs may be created and certificates requested For certificate authorities as well as for each individual partner certificates can be installed Certificates may be requested for signing and encryption for SSL and for SMIME
Hot folder configuration The Hot Folder Adapter is tightly integrated with the Messenger and can therefore be configured through the same interface It supports the definition of multiple hot folders for sending and receiving documents as well as dedicated folders for business partners
51 Messenger Configuration
Set Up Messenger Database
The Messenger stores log entries in a database By default the log database is pre-configured as an HSQL database HSQL is an open source database implementation written entirely in Java If there is no requirement to store log data in an existing database in your organization you may continue with HSQL
It is also possible to configure the Messenger to use a different database system for example
Oracle (version 815 or higher)
MS SQL Server 70
MySQL (version 32 or higher)
SAPdb (version 73)
The log database is accessed via JDBC connection Configuration scripts to set up the tables for an Oracle database are included with Ponton XP You can refer to these scripts as examples to create scripts for your own database system
If you do not yet have a database system with JDBC support in use you can download the setup files for MySQL from httpwwwmysqlcomdownloadsmysql-323html
Ponton XP 21 ndash Installation and Configuration Guide 20
Configuration Options
To configure the Messenger database the following set-up needs to be performed
1 Go to Configuration rarr Messenger rarr Database
2 Enter the driver class name and the URL for the JDBC connection to your database
3 Enter the user name and password for the connection if required
4 Click Test to test the connection
5 Important Donrsquot click OK unless the connection test was successful
Note The connection to the standard HSQL database supplied with the Messenger requires a ldquotruncatedrdquo URL that does contain the database name (as shown above) If you get a ldquoconnection brokenrdquo message when testing the connection to the standard database (as specified above) try deleting ltDATABASEgt from the URL and testing the connection again
Ponton XP 21 ndash Installation and Configuration Guide 21
Configuration Options
Set Logging Level
To specify the logging level go to Configuration rarr Messenger rarr Logging and select the desired settings for Messenger and JDBC logging
There is a range of settings available
OFF turns logging off completely
hellip
DEBUG logs all the messages output by the system
Note Please keep in mind that the chosen logging level can have an effect on the performance of your system In particular it is advisable to use DEBUG logging only in connection with error tracking and analysis
Ponton XP 21 ndash Installation and Configuration Guide 22
Configuration Options
Set Message Queue Scan Interval
Under Configuration rarr Messenger rarr Message Queues you can specify the interval to scan the (inbound and outbound) message queues
The default setting is 5000 msec To boost the message throughput on a faster system you can increase the scan frequency by setting this interval to a lower (ie shorter) value
Ponton XP 21 ndash Installation and Configuration Guide 23
Configuration Options
Select Messaging Pipeline
The Messenger allows you to configure different filter pipelines The standard configuration comes with two pipelines
1 Messenger 203 compatibility pipeline This allows you to maintain backward compatibility with users of the previous Messenger version
2 Messenger 21 pipeline This is to communicate with partners that are also using Messenger version 21 or any EbXML 20 compliant software
For each pipeline a range of filters can be set in particular
Validation
Signing
Compression
Encryption
The Messenger configuration can be used for standard filters (validation signing compression and encryption) for inbound and outbound messages Custom filters are configured in a dedicated section
Developers may extend the Messenger with additional filters For example one may think of a ldquoBusiness Validatorrdquo that checks message content against business rules Or existing filters could be Instead of ldquosoft signingrdquo a document smart card access may be integrated
Ponton XP 21 ndash Installation and Configuration Guide 24
Configuration Options
Outbound Email Connection
This connection is used for email messages sent by your Messenger to your business partners The following data needs to be configured
From ndash the senderrsquos address to be used for your emails
SMTP ndash the outgoing mail server to be contacted by your Messenger in order to submit the email
Username password ndash must be entered if your mail server requires authentication for outgoing emails in this case enter the settings to be used by the Messenger to log in on the mail server
To test the email connection enter a receiver email address (in the ldquoTordquo field) and click the ldquoTestrdquo button
Ponton XP 21 ndash Installation and Configuration Guide 25
Configuration Options
Inbound Email Connection
You can enable your Messenger to receive email messages by setting up a POPIMAP connection with the following entries
Protocol ndash set to pop3 IMAP (depending on the type of mail server)
Server ndash the hostname or IP address of your mail server
Interval ndash the frequency for accessing the server for mail download
Username password ndash must be properly set to authenticate the Messenger on the mail server
Ponton XP 21 ndash Installation and Configuration Guide 26
Configuration Options
Email Notification
You can use the notification service to send emails to specified addresses whenever certain events occur For example you might want to notify your system administrator whenever certain errors are encountered
To specify an address go to Messenger rarr eMail Notification and click New Receiver Enter the email address for this receiver in the text field and select the events for which this receiver is to be notified You can use CTRL-click to activate multiple entries in the list
Ponton XP 21 ndash Installation and Configuration Guide 27
Configuration Options
Communication Settings
On this screen you can specify URI of each partnerrsquos Messenger Service ndash for example
httppartnerserver8080pontonxpSoapListener where partne server refers to the hostname or IP address of the machine the Messenger is installed on
r
Acknowledgment Requests ndash you can use this setting to determine whether outbound messages to this partner require acknowledgements To differentiate per message you can deactivate this checkbox and use the TransmissionMode attribute in the BackendEnvelope In the context of ebXML 20 transmissions you can additionally request signed acknowledgements for increased security
Retransmission Handling ndash you can use this setting to specify the number of retransmission attempts and the interval (in seconds) between attempts If a message cannot be transmitted successfully in the specified number of retries the Messenger will give up and mark the message as ldquofailedrdquo
Ponton XP 21 ndash Installation and Configuration Guide 28
Configuration Options
Configure Archiving Filter
The archiving filter stores the following information in a dedicated directory
Backend Envelope
ebXML Envelope
Payload ndash this is the actual business document
Certificate
Signature
Each part is stored in a separate file
The Archive Folder setting can be used to indicate the location of the archiving folder This can be expressed as
An absolute path to the required folder
A relative path beginning with $CONTEXT ndash this placeholder refers to the folder [installation root]xmlpipewebroot
The Maximum Age setting specifies how long the files will be archived ndash expressed in days
Ponton XP 21 ndash Installation and Configuration Guide 29
Configuration Options
52 Partner Configuration For each partner the following data may be configured
Partner identification (internal and external)
Communication Settings
URI of the partnerrsquos Messenger
Create Delete a Partner Entry
To create a new partner entry specify an identifier for the partner (this is the local identifier for your configuration) and indicate whether this partner entry is for
An internal partner (with the ldquoselfrdquo option activated) ndash this might be a department of your organization
An external partner ndash these entries refer to your business partners for example customers suppliers carriers warehouse operators etc
A message is always sent by your Messenger from an internal to an external partner and received from an external partner to an internal one
Internal partners are distinguished because for encryption and signing the certificates of each internal partner will be used on a per-partner basis
For further information please check the Ponton XP Architecture Overview
Ponton XP 21 ndash Installation and Configuration Guide 30
Configuration Options
Set the Partner Identification
Local Partner Name This identifier is valid within you local configuration ie you may choose any value as long as it is unique among all local partner names
Disable Although configured as a partner individual partners may be disabled In this case the Messenger rejects any message received from this partner
PartyID PartyID Type PartyIDs are used to identify partners externally To avoid name clashes and duplication well-known naming schemas exist to identify partners eg DUNS codes VAT numbers IANA codes etc For this reason trading partners should agree on an minimal set of identification types (like DUNS numbers and IANA codes) that is to be used by all partners
More than one PartyID can be defined per partner The limit is given by the number of PartyID types These are configured separately please check Section ldquoAdvanced Configurationrdquo)
Hint Please also check the Ponton XP Architecture Overview document for a detailed explanation of ebXML codes and partner identification
Ponton XP 21 ndash Installation and Configuration Guide 31
Configuration Options
Partner Communication Configuration
For each partner the following configuration options may be set URI of Partnerrsquos Messenger Service ndash enter the address of the partnerrsquos
Messenger for example httppartnerserver8080pontonxpSoapListener
Request Acknowledge ndash every message to this partner needs to be acknowledged
Request Signed Acknowledge ndash to specify signing of acknowledgements received from this partner
Retries ndash the number of retries in case of unsuccessful message transmission
Retry Interval ndash the number of seconds to wait until the next retry
Ponton XP 21 ndash Installation and Configuration Guide 32
Configuration Options
Processing Configuration
The following options can be set
Default Adapter ndash enter the name of the adapter to be used by default
Processing Pipeline ndash specify the processing pipeline to be used for this profile
Schema Sets ndash choose which Schema set(s) are to be supported
Use XML Signature ndash indicate whether to use XML Signature
Use default message settings (specified under Configuration rarr Messenger rarr Processing) or define a specific processing filter for this partner
Ponton XP 21 ndash Installation and Configuration Guide 33
Configuration Options
Install Partner Certificates
There are different ways of distributing certificates to business partners One is to send the certificate per email and have the partner cut amp paste the certificate code into the partner configuration
Note It is important to cut amp paste the complete certificate code including the lines ldquo----- Begin Certificate -----rdquo and ldquo----- End Certificate -----rdquo
Important A partner certificate will only be accepted if the certificate of the issuing CA (certificate authority) was pre-installed Otherwise the trust relationship between the partner and the CA cannot be traced
One may select to install a general certificate or a SMIME certificate Please determine what kind of certificate you received from your partner before installing it
Ponton XP 21 ndash Installation and Configuration Guide 34
Configuration Options
53 Certificate Management Certificate management comprises the following initial steps
Configure your default CA This is usually properly pre-configured in the installation files
Install the root certificate of the default CA This needs to be installed manually if 3rd-party CAs are to be used
Request a certificate for your own Messenger This includes creating a publicprivate key pair and sending a certificate request to the CA
Optionally you can request and install a SMIME certificate to be used for SMIME based communication via email
Default CA Configuration
On this screen you specify the settings for receiving certificates from your default certificate authority (CA) CA email address ndash enter the email address to be used to request a certificate
from your (default) CA
Ponton XP 21 ndash Installation and Configuration Guide 35
Configuration Options
CA download URL ndash enter the URL at your CA from which to download certificates for your Messenger installation Please note that you can only install certificates for partners you have already defined in your partner configuration
Download interval ndash specify the interval to wait between automatic certificate downloads
To download the available certificates immediately click the Download button
Request and Install Your Own Certificate
To request a certificate from your (default) CA go to Configuration rarr Certificates rarr Request Certificate Please enter data for all the fields on this form If any entries are missing you will get an error message
After completing the form click OK to send the certificate request to your CA You will get a message indicating that the request has been sent
Ponton XP 21 ndash Installation and Configuration Guide 36
Configuration Options
Once you receive the requested certificate from your CA you can install it in your own partner configuration (ie the internal partner you will use to sendreceive messages) Go to Configuration rarr Partners rarr ltYour Partner Namegt rarr Install Certificate and paste the certificate text including the hellip into the text field
Then enter the password you used when you requested the certificate and click OK to complete the installation of the certificate You will see the result above the text field containing the certificate
Ponton XP 21 ndash Installation and Configuration Guide 37
Configuration Options
Install Partner Certificates
Install a certificate issued by the CA for the requesting partner This was already described in the Partner Configuration section for normal standard certificates
Note In case of SMIME certificates an additional password may be needed to allow the Messenger to access the certificate in the local certificate store
Install a CA Certificate
To install the certificate for your CA go to Configuration rarr Certificates rarr CA rarr Install Certificate and paste your CArsquos certificate into the text field This is the certificate that authorizes the CA as a signing authority for other certificates
Ponton XP 21 ndash Installation and Configuration Guide 38
Configuration Options
54 Configure the Hot Folder Adapter
General Configuration
Address Port ndash the Hot Folder Adapter (HFA) is addressed as a separate process that communicates with the Messenger via HTTP Therefore the hostname and port number need to be set up for the Messenger If the HFA is co-located with the Messenger on the same machine use ldquolocalhostrdquo for the IP address In this case the HFA does not run as a separate Java process but will be hosted on the same Tomcat server
Path ndash the HFA needs to know the Adapter communication path of the Messenger By default it is pontonxpAdapterService
Console File Log Level ndash the HFA provides log output to the console and to log files Both can be configured regarding the level of detail The console log is only useful if the HFA is running as a standalone application so you can safely leave it disabled in the default configuration
Ponton XP 21 ndash Installation and Configuration Guide 39
Configuration Options
Create Delete a HFA
Several HFAs may be created Each registers under a different ID at the Messenger HFAs may be created for individual partners If this is the case messages exchanged with the rest of the partners will be stored with the default HFA
Configure a HFA
Each HFA requires several directories to be defined
Inbox ndash a document will be stored in the Inbox whenever it was received from a partner
Outbox ndash documents to be sent to the business partner are dropped here The HFA grabs them in a defined frequency
Failed ndash if a document could not be sent to a partner and all retries failed it will be stored in this folder
Work ndash if a document transfer is in progress or all attempts to send the document have not yet been tried the document will remain here After a final failure it will be transferred to the Failed folder
Ponton XP 21 ndash Installation and Configuration Guide 40
Configuration Options
The following settings are also supported
Port ndash the port to be used by the HFA (optional)
Receiver format ndash standard format is XML
Save Backend envelope ndash the Backend envelope is retained for incoming messages
Support attachments ndash the HFA will save any files attached to an incoming message to the selected inbox folder
Scan Interval ndash the interval to wait (in seconds) between checking the outbox
Number of receiving threads ndash specifies the maximum number of receiving threads the adapter can process
Use partner subfolders ndash if this is set this HFA will create inbox and outbox folders for all remote partners Inbound messages will automatically be sorted into the according folder depending on the sender Outbound messages need to be placed into the receiving partnerrsquos outbox folder The backend message is not used in this mode and is ignored if it exists
Use Acknowledgement for ERP ndash with this option activated the ERP application receives an acknowledgement from the receiving Messenger on the partnerrsquos side This acknowledgement will be provided via the specified Inbox
Ponton XP 21 ndash Installation and Configuration Guide 41
Configuration Options
55 Ponton XE ndash The XML Editor Ponton XE is a separate Ponton product It is packaged with Ponton XP for free use only by papiNet users It allows to enter papiNet document data directly via a graphical user interface and to send the document via the hot folder adapter to the business partners
Ponton XE is fully documented in a separate manual Hence only the Messaging Plug-in will be described here
You can experiment with the XML Editor and check out all the features and options without using the Ponton XP connection To start with you may want to begin with the following steps
Create a new papiNet Purchase Order
Fill out the forms and use optional XML Elements by right-clicking the Plus-icons in the layout tree
Create an HTML file by choosing Document Export to HTML from the menu
Save the document to an XML file and re-load it again
Ponton XP 21 ndash Installation and Configuration Guide 42
Configuration Options
Interface between Ponton XE and Ponton XP
The two software applications communicate via hot folders as illustrated in the following figure
Message Plug-in
Outbox Inbox AckInboxImport
Ponton XP Ponton XE
XMLXML XMLXML XMLXML XMLXML
Hot Folder Adapter
The XML Editor is connected to the Messenger via the Hot Folder Adapter All these folder settings need to be synchronized for a proper data exchange
Configuration of the Messaging Plug-in
The Messaging Plug-in can be flexibly installed and de-installed with the remaining part of Ponton XE If the file messengerjar is removed from the plugins directory it will automatically disappear from the Ponton XE menu bar as soon as the software is started again
Before transferring messages out of Ponton XE you need to preset the following information
Default values for the sending and receiving partners ndash these values may be overridden for an individual transfer
Folder locations of the Hot Folder Adapter ndash the Inbox Outbox and AckInbox need to be set for document exchange with Ponton XP
Default setting for Test Message flag ndash this can be overridden for the actual document transfer
Import Directory ndash Ponton XE will automatically scan the Inbox folder and import received documents to the given folder for local processing
Ponton XP 21 ndash Installation and Configuration Guide 43
Configuration Options
Open Messages after Import ndash if this option is activated messages received from the Inbox will automatically be displayed in Ponton XE
Delete message in Inbox ndash to always remove received messages from the HFA Inbox this option needs to be activated otherwise a copy will remain in the Inbox folder
Ponton XP 21 ndash Installation and Configuration Guide 44
Configuration Options
Ponton XP 21 ndash Installation and Configuration Guide 45
Configuration Options
Using Ponton XE
After setting the configuration and creating a document you can transfer the document to your business partner This is done by means of the following steps
Choose the menu item ldquoMessenger rarr Transfer rarr Send Messagerdquo
Select a sending and receiving partner
Override the settings for the HFA folders
Tick the checkbox to qualify this message as a test message
After transferring the document to the Messenger Ponton XE will wait for a response This is recognised as an acknowledge file which is dropped into the AckInbox folder of the HFA As soon as this has been received a successful transfer in indicated
You may check with the Message Monitor to determine how the document was forwarded by the Messenger to the receiver or whether any errors occurred
Ponton XP 21 ndash Installation and Configuration Guide 46
Configuration Options
56 Display Schema Configuration The schema sets to be supported for each partner are defined in the partner configuration The standard sets available with the installation are shown under Configuration rarr Schemata
Ponton XP 21 ndash Installation and Configuration Guide 47
Configuration Options
57 User Administration Two types of users are distinguished
Administrators ndash these users have full access to the Messengerrsquos configuration interface
Operators ndash these users only have access to the Adapter Monitor the Message Monitor and the Test Adapter The other options in the Messenger menu are not available
Please note the following points in connection with the Messengerrsquos standard user administration
This is a very simple user administration based on the Tomcat implementation If you want to integrate the Messenger with another user administration such as LDAP please contact Ponton Consulting for support
A userrsquos access rights (administratoroperator) are defined when the user account is created ndash they cannot be changed subsequently
User accounts can only be created or deleted by administrators
Ponton XP 21 ndash Installation and Configuration Guide 48
Advanced Configuration
6 Advanced Configuration
61 XML Schema Configuration Important The Messenger distinguishes between available schema set and activated schema sets Just inserting entries in the schema configuration as described in this section does not activate the schema sets or the corresponding schemas for use by the Messenger In order to make use of the schemas in a schema set you have to activate the schema set in the relevant partner configuration To view or modify the activated schema sets in a partner configuration go to
Configuration rarr Partners rarr ltpartner namegt rarr Processing
and activatedeactivate the relevant checkboxes
In the Messengerrsquos configuration interface you can activate and deactivate schema sets for specific partner configurations It is not possible however to modify the contents and specifications of the individual schema sets Any necessary changes have to be made in the configuration file
[installation root]xmlpipewebrootWEB-INFconfigschemataxml
The configuration entries in this file are structured as follows
ltSchemaSet Name=papinet21gt
ltSchemaName=httpwwwpapinetorgdataAvailabilityV2R10xsd MessageType=Availability MessageVersion=V2R10gt
ltNamespacegtltNamespacegt
ltDisplayNamegtAvailability 21ltDisplayNamegt
ltSchemaFilegtAvailabilityV2R10xsdltSchemaFilegt
ltXSLFilegtltXSLFilegt
ltSchemagt
ltSchema Name=yourSchema MessageType=yourMsgType MessageVersion=yourMsgVersgt
ltNamespacegtyourNamespaceltNamespacegt
ltDisplayNamegtYour Display NameltDisplayNamegt
ltSchemaFilegtyourSchemaFileltSchemaFilegt
ltXSLFilegtyourStylesheetltXSLFilegt
ltSchemagt
hellip
ltSchemaFoldergtpapinet210ltSchemaFoldergt
ltXSLFoldergtpapinet210ltXSLFoldergt
ltSchemaSetgt
Ponton XP 21 ndash Installation and Configuration Guide 49
Advanced Configuration
You can add a schema to an existing schema set in this file by inserting a ltSchemagt block (just copy and paste one of the existing blocks and modify the configuration as required) Please ensure that your new schema specification includes correct settings for the attributes of the Schema element
Name= This attribute corresponds with the ebXML Schema Location of incoming messages When an ebXML message is received the Messenger looks for a schema configuration where the Schema Name attribute matches the Schema Location specified in the ebXML envelope
MessageType= This attribute corresponds with the attribute MessageMetaDataDocumentInfoMessageName in the backend envelope of outgoing messages
MessageVersion= This attribute corresponds with the element MessageMe aDataDocumentInfoDTDVersionNumber in the backend envelope of outgoing messages
t
Note The specification of MessageType and MessageVersion must be used together for outgoing messages as they are combined to form an identifier for the message schema
You also have the option of adding a new schema set with your own schema definitions to the schema configuration In this case you would insert a ltSchemaSetgt block with subordinate ltSchemagt blocks Your added schema set will automatically be inserted in the list of available schema sets on the Messenger configuration pages
62 Advanced Database Configuration Important Since the Messenger database is used for essential message processing and tracking purposes you should not experiment with the database configuration on a ldquoliverdquo system For test and debugging purposes you are advised to set up a trial system
Installation with other Databases
This section describes the main steps required to install a different database system on the Messenger for example an Oracle database
1 Install database driver Copy the database driver to
[installation root]xmlpipewebrootWEB-INFlib
Note Please note that only drivers with the extension jar are loaded by the Tomcat servlet engine If the JDBC driver you want to use is a zip file you will have to rename the file to jar The JDBC driver for Oracle 9i is the file ojdbc14jar
Ponton XP 21 ndash Installation and Configuration Guide 50
Advanced Configuration
2 Create database and tables Ponton XP is supplied with SQL scripts for HSQL and for Oracle that can be used to create the tables for the Messenger database If you are using another database you may need to modify these scripts to work correctly with your database system
The SQL scripts are located in the subfolders under [installation root]sql
Once the database tables are in place you will also need to carry out the SQL script that inserts the log messages into the database ie
[installation root]sqlinsert_log_messagessql
3 Set up database connection The configuration of database connections is described in the section Set Up Messenger Database beginning on page 20 To connect with a different database choose ldquootherrdquo from the list of database drivers and enter the configuration for your database on the next page
The entries for the Oracle 9i JDBC driver are
Driver oraclejdbcdriverOracleDriver
URL jdbcoraclethinlthostgtltportgtltdatabasegt
63 Advanced Message Monitor Configuration In the configuration directory ldquoxmlpipewebrootWEB-INFconfigrdquo there is a file messagemonitorxml which can be used to change the selection and ordering of the Message overview window in the Message Monitor The default setting is displayed in the following picture
Ponton XP 21 ndash Installation and Configuration Guide 51
Advanced Configuration
Here the number of line items per page can be set If a high resolution screen is used (beyond 1024 x 768 pixel) one may increase the number of lines
Further a mapping table defines which database column is to be displayed in which monitor column The number of columns again depends on the screen resolution
Finally if main memory size allows caching of XSL stylesheet definitions helps accelerating processing speed for XSL transformations
64 Tomcat SSL Installation
Generate a key
One minor problem with Tomcat or any other webserver that uses the internal Java symmetric key architecture is that you are not allowed to export or import private keys For this reason it is not possible to use the existing key-pair installed with the Messenger software You will have to generate a new key-pair and send a certificate request to the Ponton certificate authority (or other certification authority) to receive a valid certificate
To generate a new key-pair open a command prompt and go to the tomcat-4118 directory The keystore used for a Tomcat SSL installation is located in the Tomcat root directory and is called ssl-keystore The Tomcat installation already contains a certificate for lsquolocalhostrsquo so you can test the HTTPS access with a web browser
Before you can create a new Tomcat certificate you will have to delete the installed certificate Note that the default password for the Tomcat keystore is ldquochangeitrdquo keytool -delete -alias tomcat ndashkeystore ssl-keystore
Now use the following command to create a new key-pair Please note that you need to specify the Listener hostname (eg listenermyserverde) when the keytool asks for lsquofirst and last namersquo keytool -genkey -alias tomcat -keyalg RSA ndashkeystore ssl-keystore
After generating the new key the next step is to export a certificate request with the following command keytool ndashcertreq ndashalias tomcat ndashfile myservercsr ndashkeystore ssl-keystore
This will generate the file myservercsr in the current directory Send this file via email to xp-certponton-consultingde It will be signed and sent back to you The reply will contain a file with the certificate
Finally you have to re-import this signed certificate into the Tomcat SSL keystore Please note that the import may take some time keytool ndashimport ndashalias tomcat ndashfile myservercer ndashkeystore ssl-keystore
If you have any problems starting the keytool make sure you have the javahomebin directory specified in your PATH environment variable Of course you can also change to the javahomebin directory and start the keytool there
Ponton XP 21 ndash Installation and Configuration Guide 52
Advanced Configuration
Update Tomcat configuration
SSL is already activated in the Tomcat configuration packaged in the distribution However you might want to change the specified SSL port (by default the SSL port is set to 8443) You can change the port by editing the file
[tomcat installation]confserverconf
The following section configures the SSL parameters
lt-- Define a SSL Coyote HTTP11 Connector on port 8443 --gt
ltConnector className=orgapachecoyotetomcat4CoyoteConnector
port=8443
minProcessors=5
maxProcessors=75
enableLookups=true
acceptCount=100
debug=0
scheme=https
secure=true
useURIValidationHack=false
disableUploadTimeout=truegt
ltFactory className=orgapachecoyotetomcat4CoyoteServerSocketFactory
clientAuth=false
keystoreFile=ssl-keystore
protocol=TLS gt
ltConnectorgt
Verify setup
To verify if everything is working correctly start the Tomcat webserver as usual and connect to the webserver with your browser
Go to httpsyourserveraddress ndash initially you might get a warning window if the root certificate authority is not known to the browser If you continue by clicking OK you should see the usual Ponton XP start page
If everything comes up correctly you can use SSL to receive messages with the Ponton XP Software
Ponton XP 21 ndash Installation and Configuration Guide 53
Advanced Configuration
65 Distributed Installation If the Messenger is installed on a server that cannot be reached from the Internet you will need to install the Listener as well The purpose of the Listener is to pick up incoming connections and forward them to the Messenger (across the firewall) The firewall rules must be set up to allow this connection between the Listener and the Messenger When a message is received the Listener notifies the Messenger and the Messenger then picks up the message
You also have the option of subsequently installing the Listener as a service under Windows ndash this service can then be configured to start automatically when the system starts up
Note If you are going to run the Messenger in combination with the Listener your partners will have to enter the URI of your Listener in their configurations (under Configuration rarr Partners rarr ltpartner namegt rarr URI of Partners Messenger Service)
Listener Installation and Configuration
The Listener is installed by running the installer program (eg PontonXP-21-setuplistener-windowsexe) on the relevant system You are asked to specify an installation folder and also have the option of creating a desktop or menu shortcut Thatrsquos it
-
The settings for the Listener are contained in the configuration file listenerproperties which is located in the folder [Listener root folder]config To modify these settings you will have to edit the configuration file directly Access via the Messengerrsquos configuration interface is not possible
The file contains the following settings
HttpPort = Port number (for external HTTP connections)
HttpsPort = Port number (for external HTTPS connections)
LogLevel = DEBUG | INFO | WARN | ERROR | FATAL | OFF
The following settings specify the host and port of the Messenger for forwarding connections (HTTPHTTPS) The forwarding connection mode is activated by entering the relevant host and port addresses and removing the hash marks (used to mark ldquocomment linesrdquo in Java property files)
HttpServer = server1port1 (HTTP forwarding connection to the Messenger)
HttpsServer = server1port1 (HTTPS forwarding connection to the Messenger)
Ponton XP 21 ndash Installation and Configuration Guide 54
Advanced Configuration
The following settings specify the Listenerrsquos port for callback connections (HTTPHTTPS) with the Messenger As with the forwarding connection the callback connection mode is activated by entering the relevant port addresses and removing the hash marks (Obviously it makes no sense to have both connections activated at the same time)
HttpServicePort = Port number (for internal HTTP connections to the Listener)
HttpsServicePort = Port number (for internal HTTPS connections to the Listener)
Starting the Listener
To start the Listener open a command prompt and start the class
depontonconsultingxmlpipeListener
with the classpath
-cp libcommons-logging-api-103jarlibcommonutilsjarlibxp_listenerjarconfig
You can also use the installed batch file [Listener root folder]startListenerbat
Callback Mode
Details of the communication flow
When the Messenger starts up it searches for the Listener
Note The Listener should start up first so that it can be found by the Messenger
If the search is successful a permanent connection is established between the Messenger and the Listener The Messenger uses the following settings in the configuration to establish the connection with the Listener
Configuration rarr Messenger rarr Listener rarr HTTP[S] rarr Hostname
Configuration rarr Messenger rarr Listener rarr HTTP[S] rarr Internal Listener Port
Ponton XP 21 ndash Installation and Configuration Guide 55
Advanced Configuration
When the Listener receives an incoming message (or rather an HTTPHTTPS request) it informs the Messenger ndash by way of the permanent connection ndash about the arrival of the new request indicating which port the Messenger can use to pick up the connection
Note This port number is randomly selected by the Listener and cannot be configured
The Messenger picks up the connection on the Listenerrsquos specified port and redirects it to its own local port for further processing
This local port corresponds to the setting for
Configuration rarr Messenger rarr Listener rarr HTTP[S] rarr Internal Messenger Port
in the configuration GUI
Forwarding Mode
Details of the communication flow
In forwarding mode no permanent connection is established between the Messenger and the Listener
When the Listener receives an incoming HTTPHTTPS request it simply forwards the request to the Messenger using the address specified in listenerproperties (HttpServerHttpsServer)
Note To allow this forwarding connection the firewall has to be configured so that the Listener is permitted to access the Messenger on the specified port(s)
Ponton XP 21 ndash Installation and Configuration Guide 56
Advanced Configuration
66 Port Configuration The Messengerrsquos standard configuration uses port 8080 for HTTP connections and port 8443 for secure (HTTPS) connections This section describes how to set up the messenger to use a non-standard port configuration This involves making manual changes to several configuration files in particular the Tomcat serverxml and the Messengerrsquos adapter configuration files
Tomcat Settings
The port setting for the Messengerrsquos HTTP and HTTPS connections are specified in the Tomcat configuration file
[installation root]tomcat-xxxconfserverxml
This file defines the connections (Connectors) for the Messenger as follows
lt-- Define a non-SSL Coyote HTTP11 Connector on port 8080 --gt
ltConnector className=orgapachecoyotetomcat4CoyoteConnector
port=yourMessengerPort minProcessors=5 maxProcessors=75
enableLookups=true redirectPort=yourRed rectPort i acceptCount=100 debug=0 connectionTimeout=20000
useURIValidationHack=false disableUploadTimeout=true gt
lt-- Define a SSL Coyote HTTP11 Connector on port 8443 --gt
ltConnector className=orgapachecoyotetomcat4CoyoteConnector
port=yourSSLPort minProcessors=5 maxProcessors=75
enableLookups=true
acceptCount=100 debug=0 scheme=https secure=true
useURIValidationHack=false disableUploadTimeout=truegt
ltFactory className=orgapachecoyotetomcat4CoyoteServerSocketFactory
clientAuth=false keystoreFile=ssl-keystore protocol=TLS gt
ltConnectorgt
The standard settings for the Messenger ports are
HTTP 8080
SSL 8443
To modify your connections you will need to enter the relevant port numbers indicated above as yourMessengerPort yourRedirectPort (which normally points to the SSL connection) and yourSSLPort
Ponton XP 21 ndash Installation and Configuration Guide 57
Advanced Configuration
Adapter Settings
The settings for the Messenger adapters are contained in the relevant XML files under
[installation root]xmlpipewebrootWEB-INFconfig
In particular a standard installation includes the files testadap erxml and hotfolderxml Each of these configuration files contains a block specifying the connection to the messenger
t
ltMessengergt
ltAddressgtyourMessengerHostltAddressgt
ltPortNumbergtyourMessengerPortltPortNumbergt
ltPathgthellipltPathgt
ltMessengergt
If you have configured the Messenger to run on a different port (see above) you will need to enter the relevant port number here
Ponton XP 21 ndash Installation and Configuration Guide 58
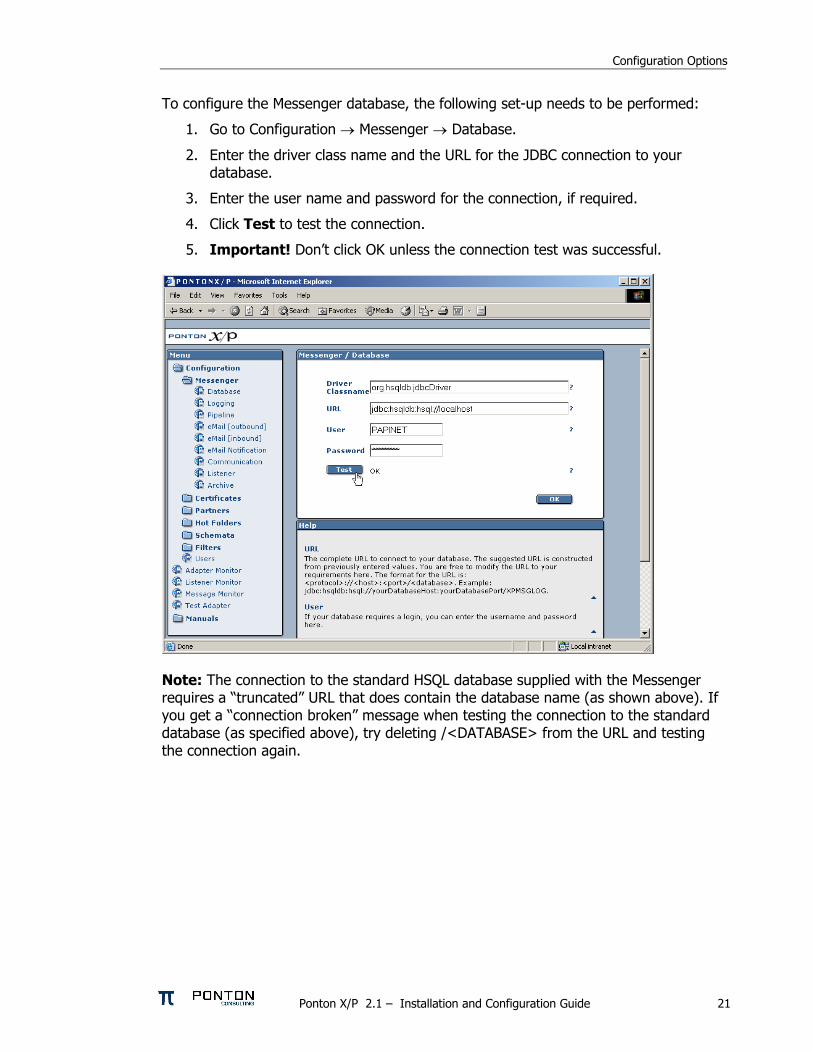
Configuration Options
To configure the Messenger database the following set-up needs to be performed
1 Go to Configuration rarr Messenger rarr Database
2 Enter the driver class name and the URL for the JDBC connection to your database
3 Enter the user name and password for the connection if required
4 Click Test to test the connection
5 Important Donrsquot click OK unless the connection test was successful
Note The connection to the standard HSQL database supplied with the Messenger requires a ldquotruncatedrdquo URL that does contain the database name (as shown above) If you get a ldquoconnection brokenrdquo message when testing the connection to the standard database (as specified above) try deleting ltDATABASEgt from the URL and testing the connection again
Ponton XP 21 ndash Installation and Configuration Guide 21
Configuration Options
Set Logging Level
To specify the logging level go to Configuration rarr Messenger rarr Logging and select the desired settings for Messenger and JDBC logging
There is a range of settings available
OFF turns logging off completely
hellip
DEBUG logs all the messages output by the system
Note Please keep in mind that the chosen logging level can have an effect on the performance of your system In particular it is advisable to use DEBUG logging only in connection with error tracking and analysis
Ponton XP 21 ndash Installation and Configuration Guide 22
Configuration Options
Set Message Queue Scan Interval
Under Configuration rarr Messenger rarr Message Queues you can specify the interval to scan the (inbound and outbound) message queues
The default setting is 5000 msec To boost the message throughput on a faster system you can increase the scan frequency by setting this interval to a lower (ie shorter) value
Ponton XP 21 ndash Installation and Configuration Guide 23
Configuration Options
Select Messaging Pipeline
The Messenger allows you to configure different filter pipelines The standard configuration comes with two pipelines
1 Messenger 203 compatibility pipeline This allows you to maintain backward compatibility with users of the previous Messenger version
2 Messenger 21 pipeline This is to communicate with partners that are also using Messenger version 21 or any EbXML 20 compliant software
For each pipeline a range of filters can be set in particular
Validation
Signing
Compression
Encryption
The Messenger configuration can be used for standard filters (validation signing compression and encryption) for inbound and outbound messages Custom filters are configured in a dedicated section
Developers may extend the Messenger with additional filters For example one may think of a ldquoBusiness Validatorrdquo that checks message content against business rules Or existing filters could be Instead of ldquosoft signingrdquo a document smart card access may be integrated
Ponton XP 21 ndash Installation and Configuration Guide 24
Configuration Options
Outbound Email Connection
This connection is used for email messages sent by your Messenger to your business partners The following data needs to be configured
From ndash the senderrsquos address to be used for your emails
SMTP ndash the outgoing mail server to be contacted by your Messenger in order to submit the email
Username password ndash must be entered if your mail server requires authentication for outgoing emails in this case enter the settings to be used by the Messenger to log in on the mail server
To test the email connection enter a receiver email address (in the ldquoTordquo field) and click the ldquoTestrdquo button
Ponton XP 21 ndash Installation and Configuration Guide 25
Configuration Options
Inbound Email Connection
You can enable your Messenger to receive email messages by setting up a POPIMAP connection with the following entries
Protocol ndash set to pop3 IMAP (depending on the type of mail server)
Server ndash the hostname or IP address of your mail server
Interval ndash the frequency for accessing the server for mail download
Username password ndash must be properly set to authenticate the Messenger on the mail server
Ponton XP 21 ndash Installation and Configuration Guide 26
Configuration Options
Email Notification
You can use the notification service to send emails to specified addresses whenever certain events occur For example you might want to notify your system administrator whenever certain errors are encountered
To specify an address go to Messenger rarr eMail Notification and click New Receiver Enter the email address for this receiver in the text field and select the events for which this receiver is to be notified You can use CTRL-click to activate multiple entries in the list
Ponton XP 21 ndash Installation and Configuration Guide 27
Configuration Options
Communication Settings
On this screen you can specify URI of each partnerrsquos Messenger Service ndash for example
httppartnerserver8080pontonxpSoapListener where partne server refers to the hostname or IP address of the machine the Messenger is installed on
r
Acknowledgment Requests ndash you can use this setting to determine whether outbound messages to this partner require acknowledgements To differentiate per message you can deactivate this checkbox and use the TransmissionMode attribute in the BackendEnvelope In the context of ebXML 20 transmissions you can additionally request signed acknowledgements for increased security
Retransmission Handling ndash you can use this setting to specify the number of retransmission attempts and the interval (in seconds) between attempts If a message cannot be transmitted successfully in the specified number of retries the Messenger will give up and mark the message as ldquofailedrdquo
Ponton XP 21 ndash Installation and Configuration Guide 28
Configuration Options
Configure Archiving Filter
The archiving filter stores the following information in a dedicated directory
Backend Envelope
ebXML Envelope
Payload ndash this is the actual business document
Certificate
Signature
Each part is stored in a separate file
The Archive Folder setting can be used to indicate the location of the archiving folder This can be expressed as
An absolute path to the required folder
A relative path beginning with $CONTEXT ndash this placeholder refers to the folder [installation root]xmlpipewebroot
The Maximum Age setting specifies how long the files will be archived ndash expressed in days
Ponton XP 21 ndash Installation and Configuration Guide 29
Configuration Options
52 Partner Configuration For each partner the following data may be configured
Partner identification (internal and external)
Communication Settings
URI of the partnerrsquos Messenger
Create Delete a Partner Entry
To create a new partner entry specify an identifier for the partner (this is the local identifier for your configuration) and indicate whether this partner entry is for
An internal partner (with the ldquoselfrdquo option activated) ndash this might be a department of your organization
An external partner ndash these entries refer to your business partners for example customers suppliers carriers warehouse operators etc
A message is always sent by your Messenger from an internal to an external partner and received from an external partner to an internal one
Internal partners are distinguished because for encryption and signing the certificates of each internal partner will be used on a per-partner basis
For further information please check the Ponton XP Architecture Overview
Ponton XP 21 ndash Installation and Configuration Guide 30
Configuration Options
Set the Partner Identification
Local Partner Name This identifier is valid within you local configuration ie you may choose any value as long as it is unique among all local partner names
Disable Although configured as a partner individual partners may be disabled In this case the Messenger rejects any message received from this partner
PartyID PartyID Type PartyIDs are used to identify partners externally To avoid name clashes and duplication well-known naming schemas exist to identify partners eg DUNS codes VAT numbers IANA codes etc For this reason trading partners should agree on an minimal set of identification types (like DUNS numbers and IANA codes) that is to be used by all partners
More than one PartyID can be defined per partner The limit is given by the number of PartyID types These are configured separately please check Section ldquoAdvanced Configurationrdquo)
Hint Please also check the Ponton XP Architecture Overview document for a detailed explanation of ebXML codes and partner identification
Ponton XP 21 ndash Installation and Configuration Guide 31
Configuration Options
Partner Communication Configuration
For each partner the following configuration options may be set URI of Partnerrsquos Messenger Service ndash enter the address of the partnerrsquos
Messenger for example httppartnerserver8080pontonxpSoapListener
Request Acknowledge ndash every message to this partner needs to be acknowledged
Request Signed Acknowledge ndash to specify signing of acknowledgements received from this partner
Retries ndash the number of retries in case of unsuccessful message transmission
Retry Interval ndash the number of seconds to wait until the next retry
Ponton XP 21 ndash Installation and Configuration Guide 32
Configuration Options
Processing Configuration
The following options can be set
Default Adapter ndash enter the name of the adapter to be used by default
Processing Pipeline ndash specify the processing pipeline to be used for this profile
Schema Sets ndash choose which Schema set(s) are to be supported
Use XML Signature ndash indicate whether to use XML Signature
Use default message settings (specified under Configuration rarr Messenger rarr Processing) or define a specific processing filter for this partner
Ponton XP 21 ndash Installation and Configuration Guide 33
Configuration Options
Install Partner Certificates
There are different ways of distributing certificates to business partners One is to send the certificate per email and have the partner cut amp paste the certificate code into the partner configuration
Note It is important to cut amp paste the complete certificate code including the lines ldquo----- Begin Certificate -----rdquo and ldquo----- End Certificate -----rdquo
Important A partner certificate will only be accepted if the certificate of the issuing CA (certificate authority) was pre-installed Otherwise the trust relationship between the partner and the CA cannot be traced
One may select to install a general certificate or a SMIME certificate Please determine what kind of certificate you received from your partner before installing it
Ponton XP 21 ndash Installation and Configuration Guide 34
Configuration Options
53 Certificate Management Certificate management comprises the following initial steps
Configure your default CA This is usually properly pre-configured in the installation files
Install the root certificate of the default CA This needs to be installed manually if 3rd-party CAs are to be used
Request a certificate for your own Messenger This includes creating a publicprivate key pair and sending a certificate request to the CA
Optionally you can request and install a SMIME certificate to be used for SMIME based communication via email
Default CA Configuration
On this screen you specify the settings for receiving certificates from your default certificate authority (CA) CA email address ndash enter the email address to be used to request a certificate
from your (default) CA
Ponton XP 21 ndash Installation and Configuration Guide 35
Configuration Options
CA download URL ndash enter the URL at your CA from which to download certificates for your Messenger installation Please note that you can only install certificates for partners you have already defined in your partner configuration
Download interval ndash specify the interval to wait between automatic certificate downloads
To download the available certificates immediately click the Download button
Request and Install Your Own Certificate
To request a certificate from your (default) CA go to Configuration rarr Certificates rarr Request Certificate Please enter data for all the fields on this form If any entries are missing you will get an error message
After completing the form click OK to send the certificate request to your CA You will get a message indicating that the request has been sent
Ponton XP 21 ndash Installation and Configuration Guide 36
Configuration Options
Once you receive the requested certificate from your CA you can install it in your own partner configuration (ie the internal partner you will use to sendreceive messages) Go to Configuration rarr Partners rarr ltYour Partner Namegt rarr Install Certificate and paste the certificate text including the hellip into the text field
Then enter the password you used when you requested the certificate and click OK to complete the installation of the certificate You will see the result above the text field containing the certificate
Ponton XP 21 ndash Installation and Configuration Guide 37
Configuration Options
Install Partner Certificates
Install a certificate issued by the CA for the requesting partner This was already described in the Partner Configuration section for normal standard certificates
Note In case of SMIME certificates an additional password may be needed to allow the Messenger to access the certificate in the local certificate store
Install a CA Certificate
To install the certificate for your CA go to Configuration rarr Certificates rarr CA rarr Install Certificate and paste your CArsquos certificate into the text field This is the certificate that authorizes the CA as a signing authority for other certificates
Ponton XP 21 ndash Installation and Configuration Guide 38
Configuration Options
54 Configure the Hot Folder Adapter
General Configuration
Address Port ndash the Hot Folder Adapter (HFA) is addressed as a separate process that communicates with the Messenger via HTTP Therefore the hostname and port number need to be set up for the Messenger If the HFA is co-located with the Messenger on the same machine use ldquolocalhostrdquo for the IP address In this case the HFA does not run as a separate Java process but will be hosted on the same Tomcat server
Path ndash the HFA needs to know the Adapter communication path of the Messenger By default it is pontonxpAdapterService
Console File Log Level ndash the HFA provides log output to the console and to log files Both can be configured regarding the level of detail The console log is only useful if the HFA is running as a standalone application so you can safely leave it disabled in the default configuration
Ponton XP 21 ndash Installation and Configuration Guide 39
Configuration Options
Create Delete a HFA
Several HFAs may be created Each registers under a different ID at the Messenger HFAs may be created for individual partners If this is the case messages exchanged with the rest of the partners will be stored with the default HFA
Configure a HFA
Each HFA requires several directories to be defined
Inbox ndash a document will be stored in the Inbox whenever it was received from a partner
Outbox ndash documents to be sent to the business partner are dropped here The HFA grabs them in a defined frequency
Failed ndash if a document could not be sent to a partner and all retries failed it will be stored in this folder
Work ndash if a document transfer is in progress or all attempts to send the document have not yet been tried the document will remain here After a final failure it will be transferred to the Failed folder
Ponton XP 21 ndash Installation and Configuration Guide 40
Configuration Options
The following settings are also supported
Port ndash the port to be used by the HFA (optional)
Receiver format ndash standard format is XML
Save Backend envelope ndash the Backend envelope is retained for incoming messages
Support attachments ndash the HFA will save any files attached to an incoming message to the selected inbox folder
Scan Interval ndash the interval to wait (in seconds) between checking the outbox
Number of receiving threads ndash specifies the maximum number of receiving threads the adapter can process
Use partner subfolders ndash if this is set this HFA will create inbox and outbox folders for all remote partners Inbound messages will automatically be sorted into the according folder depending on the sender Outbound messages need to be placed into the receiving partnerrsquos outbox folder The backend message is not used in this mode and is ignored if it exists
Use Acknowledgement for ERP ndash with this option activated the ERP application receives an acknowledgement from the receiving Messenger on the partnerrsquos side This acknowledgement will be provided via the specified Inbox
Ponton XP 21 ndash Installation and Configuration Guide 41
Configuration Options
55 Ponton XE ndash The XML Editor Ponton XE is a separate Ponton product It is packaged with Ponton XP for free use only by papiNet users It allows to enter papiNet document data directly via a graphical user interface and to send the document via the hot folder adapter to the business partners
Ponton XE is fully documented in a separate manual Hence only the Messaging Plug-in will be described here
You can experiment with the XML Editor and check out all the features and options without using the Ponton XP connection To start with you may want to begin with the following steps
Create a new papiNet Purchase Order
Fill out the forms and use optional XML Elements by right-clicking the Plus-icons in the layout tree
Create an HTML file by choosing Document Export to HTML from the menu
Save the document to an XML file and re-load it again
Ponton XP 21 ndash Installation and Configuration Guide 42
Configuration Options
Interface between Ponton XE and Ponton XP
The two software applications communicate via hot folders as illustrated in the following figure
Message Plug-in
Outbox Inbox AckInboxImport
Ponton XP Ponton XE
XMLXML XMLXML XMLXML XMLXML
Hot Folder Adapter
The XML Editor is connected to the Messenger via the Hot Folder Adapter All these folder settings need to be synchronized for a proper data exchange
Configuration of the Messaging Plug-in
The Messaging Plug-in can be flexibly installed and de-installed with the remaining part of Ponton XE If the file messengerjar is removed from the plugins directory it will automatically disappear from the Ponton XE menu bar as soon as the software is started again
Before transferring messages out of Ponton XE you need to preset the following information
Default values for the sending and receiving partners ndash these values may be overridden for an individual transfer
Folder locations of the Hot Folder Adapter ndash the Inbox Outbox and AckInbox need to be set for document exchange with Ponton XP
Default setting for Test Message flag ndash this can be overridden for the actual document transfer
Import Directory ndash Ponton XE will automatically scan the Inbox folder and import received documents to the given folder for local processing
Ponton XP 21 ndash Installation and Configuration Guide 43
Configuration Options
Open Messages after Import ndash if this option is activated messages received from the Inbox will automatically be displayed in Ponton XE
Delete message in Inbox ndash to always remove received messages from the HFA Inbox this option needs to be activated otherwise a copy will remain in the Inbox folder
Ponton XP 21 ndash Installation and Configuration Guide 44
Configuration Options
Ponton XP 21 ndash Installation and Configuration Guide 45
Configuration Options
Using Ponton XE
After setting the configuration and creating a document you can transfer the document to your business partner This is done by means of the following steps
Choose the menu item ldquoMessenger rarr Transfer rarr Send Messagerdquo
Select a sending and receiving partner
Override the settings for the HFA folders
Tick the checkbox to qualify this message as a test message
After transferring the document to the Messenger Ponton XE will wait for a response This is recognised as an acknowledge file which is dropped into the AckInbox folder of the HFA As soon as this has been received a successful transfer in indicated
You may check with the Message Monitor to determine how the document was forwarded by the Messenger to the receiver or whether any errors occurred
Ponton XP 21 ndash Installation and Configuration Guide 46
Configuration Options
56 Display Schema Configuration The schema sets to be supported for each partner are defined in the partner configuration The standard sets available with the installation are shown under Configuration rarr Schemata
Ponton XP 21 ndash Installation and Configuration Guide 47
Configuration Options
57 User Administration Two types of users are distinguished
Administrators ndash these users have full access to the Messengerrsquos configuration interface
Operators ndash these users only have access to the Adapter Monitor the Message Monitor and the Test Adapter The other options in the Messenger menu are not available
Please note the following points in connection with the Messengerrsquos standard user administration
This is a very simple user administration based on the Tomcat implementation If you want to integrate the Messenger with another user administration such as LDAP please contact Ponton Consulting for support
A userrsquos access rights (administratoroperator) are defined when the user account is created ndash they cannot be changed subsequently
User accounts can only be created or deleted by administrators
Ponton XP 21 ndash Installation and Configuration Guide 48
Advanced Configuration
6 Advanced Configuration
61 XML Schema Configuration Important The Messenger distinguishes between available schema set and activated schema sets Just inserting entries in the schema configuration as described in this section does not activate the schema sets or the corresponding schemas for use by the Messenger In order to make use of the schemas in a schema set you have to activate the schema set in the relevant partner configuration To view or modify the activated schema sets in a partner configuration go to
Configuration rarr Partners rarr ltpartner namegt rarr Processing
and activatedeactivate the relevant checkboxes
In the Messengerrsquos configuration interface you can activate and deactivate schema sets for specific partner configurations It is not possible however to modify the contents and specifications of the individual schema sets Any necessary changes have to be made in the configuration file
[installation root]xmlpipewebrootWEB-INFconfigschemataxml
The configuration entries in this file are structured as follows
ltSchemaSet Name=papinet21gt
ltSchemaName=httpwwwpapinetorgdataAvailabilityV2R10xsd MessageType=Availability MessageVersion=V2R10gt
ltNamespacegtltNamespacegt
ltDisplayNamegtAvailability 21ltDisplayNamegt
ltSchemaFilegtAvailabilityV2R10xsdltSchemaFilegt
ltXSLFilegtltXSLFilegt
ltSchemagt
ltSchema Name=yourSchema MessageType=yourMsgType MessageVersion=yourMsgVersgt
ltNamespacegtyourNamespaceltNamespacegt
ltDisplayNamegtYour Display NameltDisplayNamegt
ltSchemaFilegtyourSchemaFileltSchemaFilegt
ltXSLFilegtyourStylesheetltXSLFilegt
ltSchemagt
hellip
ltSchemaFoldergtpapinet210ltSchemaFoldergt
ltXSLFoldergtpapinet210ltXSLFoldergt
ltSchemaSetgt
Ponton XP 21 ndash Installation and Configuration Guide 49
Advanced Configuration
You can add a schema to an existing schema set in this file by inserting a ltSchemagt block (just copy and paste one of the existing blocks and modify the configuration as required) Please ensure that your new schema specification includes correct settings for the attributes of the Schema element
Name= This attribute corresponds with the ebXML Schema Location of incoming messages When an ebXML message is received the Messenger looks for a schema configuration where the Schema Name attribute matches the Schema Location specified in the ebXML envelope
MessageType= This attribute corresponds with the attribute MessageMetaDataDocumentInfoMessageName in the backend envelope of outgoing messages
MessageVersion= This attribute corresponds with the element MessageMe aDataDocumentInfoDTDVersionNumber in the backend envelope of outgoing messages
t
Note The specification of MessageType and MessageVersion must be used together for outgoing messages as they are combined to form an identifier for the message schema
You also have the option of adding a new schema set with your own schema definitions to the schema configuration In this case you would insert a ltSchemaSetgt block with subordinate ltSchemagt blocks Your added schema set will automatically be inserted in the list of available schema sets on the Messenger configuration pages
62 Advanced Database Configuration Important Since the Messenger database is used for essential message processing and tracking purposes you should not experiment with the database configuration on a ldquoliverdquo system For test and debugging purposes you are advised to set up a trial system
Installation with other Databases
This section describes the main steps required to install a different database system on the Messenger for example an Oracle database
1 Install database driver Copy the database driver to
[installation root]xmlpipewebrootWEB-INFlib
Note Please note that only drivers with the extension jar are loaded by the Tomcat servlet engine If the JDBC driver you want to use is a zip file you will have to rename the file to jar The JDBC driver for Oracle 9i is the file ojdbc14jar
Ponton XP 21 ndash Installation and Configuration Guide 50
Advanced Configuration
2 Create database and tables Ponton XP is supplied with SQL scripts for HSQL and for Oracle that can be used to create the tables for the Messenger database If you are using another database you may need to modify these scripts to work correctly with your database system
The SQL scripts are located in the subfolders under [installation root]sql
Once the database tables are in place you will also need to carry out the SQL script that inserts the log messages into the database ie
[installation root]sqlinsert_log_messagessql
3 Set up database connection The configuration of database connections is described in the section Set Up Messenger Database beginning on page 20 To connect with a different database choose ldquootherrdquo from the list of database drivers and enter the configuration for your database on the next page
The entries for the Oracle 9i JDBC driver are
Driver oraclejdbcdriverOracleDriver
URL jdbcoraclethinlthostgtltportgtltdatabasegt
63 Advanced Message Monitor Configuration In the configuration directory ldquoxmlpipewebrootWEB-INFconfigrdquo there is a file messagemonitorxml which can be used to change the selection and ordering of the Message overview window in the Message Monitor The default setting is displayed in the following picture
Ponton XP 21 ndash Installation and Configuration Guide 51
Advanced Configuration
Here the number of line items per page can be set If a high resolution screen is used (beyond 1024 x 768 pixel) one may increase the number of lines
Further a mapping table defines which database column is to be displayed in which monitor column The number of columns again depends on the screen resolution
Finally if main memory size allows caching of XSL stylesheet definitions helps accelerating processing speed for XSL transformations
64 Tomcat SSL Installation
Generate a key
One minor problem with Tomcat or any other webserver that uses the internal Java symmetric key architecture is that you are not allowed to export or import private keys For this reason it is not possible to use the existing key-pair installed with the Messenger software You will have to generate a new key-pair and send a certificate request to the Ponton certificate authority (or other certification authority) to receive a valid certificate
To generate a new key-pair open a command prompt and go to the tomcat-4118 directory The keystore used for a Tomcat SSL installation is located in the Tomcat root directory and is called ssl-keystore The Tomcat installation already contains a certificate for lsquolocalhostrsquo so you can test the HTTPS access with a web browser
Before you can create a new Tomcat certificate you will have to delete the installed certificate Note that the default password for the Tomcat keystore is ldquochangeitrdquo keytool -delete -alias tomcat ndashkeystore ssl-keystore
Now use the following command to create a new key-pair Please note that you need to specify the Listener hostname (eg listenermyserverde) when the keytool asks for lsquofirst and last namersquo keytool -genkey -alias tomcat -keyalg RSA ndashkeystore ssl-keystore
After generating the new key the next step is to export a certificate request with the following command keytool ndashcertreq ndashalias tomcat ndashfile myservercsr ndashkeystore ssl-keystore
This will generate the file myservercsr in the current directory Send this file via email to xp-certponton-consultingde It will be signed and sent back to you The reply will contain a file with the certificate
Finally you have to re-import this signed certificate into the Tomcat SSL keystore Please note that the import may take some time keytool ndashimport ndashalias tomcat ndashfile myservercer ndashkeystore ssl-keystore
If you have any problems starting the keytool make sure you have the javahomebin directory specified in your PATH environment variable Of course you can also change to the javahomebin directory and start the keytool there
Ponton XP 21 ndash Installation and Configuration Guide 52
Advanced Configuration
Update Tomcat configuration
SSL is already activated in the Tomcat configuration packaged in the distribution However you might want to change the specified SSL port (by default the SSL port is set to 8443) You can change the port by editing the file
[tomcat installation]confserverconf
The following section configures the SSL parameters
lt-- Define a SSL Coyote HTTP11 Connector on port 8443 --gt
ltConnector className=orgapachecoyotetomcat4CoyoteConnector
port=8443
minProcessors=5
maxProcessors=75
enableLookups=true
acceptCount=100
debug=0
scheme=https
secure=true
useURIValidationHack=false
disableUploadTimeout=truegt
ltFactory className=orgapachecoyotetomcat4CoyoteServerSocketFactory
clientAuth=false
keystoreFile=ssl-keystore
protocol=TLS gt
ltConnectorgt
Verify setup
To verify if everything is working correctly start the Tomcat webserver as usual and connect to the webserver with your browser
Go to httpsyourserveraddress ndash initially you might get a warning window if the root certificate authority is not known to the browser If you continue by clicking OK you should see the usual Ponton XP start page
If everything comes up correctly you can use SSL to receive messages with the Ponton XP Software
Ponton XP 21 ndash Installation and Configuration Guide 53
Advanced Configuration
65 Distributed Installation If the Messenger is installed on a server that cannot be reached from the Internet you will need to install the Listener as well The purpose of the Listener is to pick up incoming connections and forward them to the Messenger (across the firewall) The firewall rules must be set up to allow this connection between the Listener and the Messenger When a message is received the Listener notifies the Messenger and the Messenger then picks up the message
You also have the option of subsequently installing the Listener as a service under Windows ndash this service can then be configured to start automatically when the system starts up
Note If you are going to run the Messenger in combination with the Listener your partners will have to enter the URI of your Listener in their configurations (under Configuration rarr Partners rarr ltpartner namegt rarr URI of Partners Messenger Service)
Listener Installation and Configuration
The Listener is installed by running the installer program (eg PontonXP-21-setuplistener-windowsexe) on the relevant system You are asked to specify an installation folder and also have the option of creating a desktop or menu shortcut Thatrsquos it
-
The settings for the Listener are contained in the configuration file listenerproperties which is located in the folder [Listener root folder]config To modify these settings you will have to edit the configuration file directly Access via the Messengerrsquos configuration interface is not possible
The file contains the following settings
HttpPort = Port number (for external HTTP connections)
HttpsPort = Port number (for external HTTPS connections)
LogLevel = DEBUG | INFO | WARN | ERROR | FATAL | OFF
The following settings specify the host and port of the Messenger for forwarding connections (HTTPHTTPS) The forwarding connection mode is activated by entering the relevant host and port addresses and removing the hash marks (used to mark ldquocomment linesrdquo in Java property files)
HttpServer = server1port1 (HTTP forwarding connection to the Messenger)
HttpsServer = server1port1 (HTTPS forwarding connection to the Messenger)
Ponton XP 21 ndash Installation and Configuration Guide 54
Advanced Configuration
The following settings specify the Listenerrsquos port for callback connections (HTTPHTTPS) with the Messenger As with the forwarding connection the callback connection mode is activated by entering the relevant port addresses and removing the hash marks (Obviously it makes no sense to have both connections activated at the same time)
HttpServicePort = Port number (for internal HTTP connections to the Listener)
HttpsServicePort = Port number (for internal HTTPS connections to the Listener)
Starting the Listener
To start the Listener open a command prompt and start the class
depontonconsultingxmlpipeListener
with the classpath
-cp libcommons-logging-api-103jarlibcommonutilsjarlibxp_listenerjarconfig
You can also use the installed batch file [Listener root folder]startListenerbat
Callback Mode
Details of the communication flow
When the Messenger starts up it searches for the Listener
Note The Listener should start up first so that it can be found by the Messenger
If the search is successful a permanent connection is established between the Messenger and the Listener The Messenger uses the following settings in the configuration to establish the connection with the Listener
Configuration rarr Messenger rarr Listener rarr HTTP[S] rarr Hostname
Configuration rarr Messenger rarr Listener rarr HTTP[S] rarr Internal Listener Port
Ponton XP 21 ndash Installation and Configuration Guide 55
Advanced Configuration
When the Listener receives an incoming message (or rather an HTTPHTTPS request) it informs the Messenger ndash by way of the permanent connection ndash about the arrival of the new request indicating which port the Messenger can use to pick up the connection
Note This port number is randomly selected by the Listener and cannot be configured
The Messenger picks up the connection on the Listenerrsquos specified port and redirects it to its own local port for further processing
This local port corresponds to the setting for
Configuration rarr Messenger rarr Listener rarr HTTP[S] rarr Internal Messenger Port
in the configuration GUI
Forwarding Mode
Details of the communication flow
In forwarding mode no permanent connection is established between the Messenger and the Listener
When the Listener receives an incoming HTTPHTTPS request it simply forwards the request to the Messenger using the address specified in listenerproperties (HttpServerHttpsServer)
Note To allow this forwarding connection the firewall has to be configured so that the Listener is permitted to access the Messenger on the specified port(s)
Ponton XP 21 ndash Installation and Configuration Guide 56
Advanced Configuration
66 Port Configuration The Messengerrsquos standard configuration uses port 8080 for HTTP connections and port 8443 for secure (HTTPS) connections This section describes how to set up the messenger to use a non-standard port configuration This involves making manual changes to several configuration files in particular the Tomcat serverxml and the Messengerrsquos adapter configuration files
Tomcat Settings
The port setting for the Messengerrsquos HTTP and HTTPS connections are specified in the Tomcat configuration file
[installation root]tomcat-xxxconfserverxml
This file defines the connections (Connectors) for the Messenger as follows
lt-- Define a non-SSL Coyote HTTP11 Connector on port 8080 --gt
ltConnector className=orgapachecoyotetomcat4CoyoteConnector
port=yourMessengerPort minProcessors=5 maxProcessors=75
enableLookups=true redirectPort=yourRed rectPort i acceptCount=100 debug=0 connectionTimeout=20000
useURIValidationHack=false disableUploadTimeout=true gt
lt-- Define a SSL Coyote HTTP11 Connector on port 8443 --gt
ltConnector className=orgapachecoyotetomcat4CoyoteConnector
port=yourSSLPort minProcessors=5 maxProcessors=75
enableLookups=true
acceptCount=100 debug=0 scheme=https secure=true
useURIValidationHack=false disableUploadTimeout=truegt
ltFactory className=orgapachecoyotetomcat4CoyoteServerSocketFactory
clientAuth=false keystoreFile=ssl-keystore protocol=TLS gt
ltConnectorgt
The standard settings for the Messenger ports are
HTTP 8080
SSL 8443
To modify your connections you will need to enter the relevant port numbers indicated above as yourMessengerPort yourRedirectPort (which normally points to the SSL connection) and yourSSLPort
Ponton XP 21 ndash Installation and Configuration Guide 57
Advanced Configuration
Adapter Settings
The settings for the Messenger adapters are contained in the relevant XML files under
[installation root]xmlpipewebrootWEB-INFconfig
In particular a standard installation includes the files testadap erxml and hotfolderxml Each of these configuration files contains a block specifying the connection to the messenger
t
ltMessengergt
ltAddressgtyourMessengerHostltAddressgt
ltPortNumbergtyourMessengerPortltPortNumbergt
ltPathgthellipltPathgt
ltMessengergt
If you have configured the Messenger to run on a different port (see above) you will need to enter the relevant port number here
Ponton XP 21 ndash Installation and Configuration Guide 58
Configuration Options
Communication Settings
On this screen you can specify URI of each partnerrsquos Messenger Service ndash for example
httppartnerserver8080pontonxpSoapListener where partne server refers to the hostname or IP address of the machine the Messenger is installed on
r
Acknowledgment Requests ndash you can use this setting to determine whether outbound messages to this partner require acknowledgements To differentiate per message you can deactivate this checkbox and use the TransmissionMode attribute in the BackendEnvelope In the context of ebXML 20 transmissions you can additionally request signed acknowledgements for increased security
Retransmission Handling ndash you can use this setting to specify the number of retransmission attempts and the interval (in seconds) between attempts If a message cannot be transmitted successfully in the specified number of retries the Messenger will give up and mark the message as ldquofailedrdquo
Ponton XP 21 ndash Installation and Configuration Guide 28
Configuration Options
Configure Archiving Filter
The archiving filter stores the following information in a dedicated directory
Backend Envelope
ebXML Envelope
Payload ndash this is the actual business document
Certificate
Signature
Each part is stored in a separate file
The Archive Folder setting can be used to indicate the location of the archiving folder This can be expressed as
An absolute path to the required folder
A relative path beginning with $CONTEXT ndash this placeholder refers to the folder [installation root]xmlpipewebroot
The Maximum Age setting specifies how long the files will be archived ndash expressed in days
Ponton XP 21 ndash Installation and Configuration Guide 29
Configuration Options
52 Partner Configuration For each partner the following data may be configured
Partner identification (internal and external)
Communication Settings
URI of the partnerrsquos Messenger
Create Delete a Partner Entry
To create a new partner entry specify an identifier for the partner (this is the local identifier for your configuration) and indicate whether this partner entry is for
An internal partner (with the ldquoselfrdquo option activated) ndash this might be a department of your organization
An external partner ndash these entries refer to your business partners for example customers suppliers carriers warehouse operators etc
A message is always sent by your Messenger from an internal to an external partner and received from an external partner to an internal one
Internal partners are distinguished because for encryption and signing the certificates of each internal partner will be used on a per-partner basis
For further information please check the Ponton XP Architecture Overview
Ponton XP 21 ndash Installation and Configuration Guide 30
Configuration Options
Set the Partner Identification
Local Partner Name This identifier is valid within you local configuration ie you may choose any value as long as it is unique among all local partner names
Disable Although configured as a partner individual partners may be disabled In this case the Messenger rejects any message received from this partner
PartyID PartyID Type PartyIDs are used to identify partners externally To avoid name clashes and duplication well-known naming schemas exist to identify partners eg DUNS codes VAT numbers IANA codes etc For this reason trading partners should agree on an minimal set of identification types (like DUNS numbers and IANA codes) that is to be used by all partners
More than one PartyID can be defined per partner The limit is given by the number of PartyID types These are configured separately please check Section ldquoAdvanced Configurationrdquo)
Hint Please also check the Ponton XP Architecture Overview document for a detailed explanation of ebXML codes and partner identification
Ponton XP 21 ndash Installation and Configuration Guide 31
Configuration Options
Partner Communication Configuration
For each partner the following configuration options may be set URI of Partnerrsquos Messenger Service ndash enter the address of the partnerrsquos
Messenger for example httppartnerserver8080pontonxpSoapListener
Request Acknowledge ndash every message to this partner needs to be acknowledged
Request Signed Acknowledge ndash to specify signing of acknowledgements received from this partner
Retries ndash the number of retries in case of unsuccessful message transmission
Retry Interval ndash the number of seconds to wait until the next retry
Ponton XP 21 ndash Installation and Configuration Guide 32
Configuration Options
Processing Configuration
The following options can be set
Default Adapter ndash enter the name of the adapter to be used by default
Processing Pipeline ndash specify the processing pipeline to be used for this profile
Schema Sets ndash choose which Schema set(s) are to be supported
Use XML Signature ndash indicate whether to use XML Signature
Use default message settings (specified under Configuration rarr Messenger rarr Processing) or define a specific processing filter for this partner
Ponton XP 21 ndash Installation and Configuration Guide 33
Configuration Options
Install Partner Certificates
There are different ways of distributing certificates to business partners One is to send the certificate per email and have the partner cut amp paste the certificate code into the partner configuration
Note It is important to cut amp paste the complete certificate code including the lines ldquo----- Begin Certificate -----rdquo and ldquo----- End Certificate -----rdquo
Important A partner certificate will only be accepted if the certificate of the issuing CA (certificate authority) was pre-installed Otherwise the trust relationship between the partner and the CA cannot be traced
One may select to install a general certificate or a SMIME certificate Please determine what kind of certificate you received from your partner before installing it
Ponton XP 21 ndash Installation and Configuration Guide 34
Configuration Options
53 Certificate Management Certificate management comprises the following initial steps
Configure your default CA This is usually properly pre-configured in the installation files
Install the root certificate of the default CA This needs to be installed manually if 3rd-party CAs are to be used
Request a certificate for your own Messenger This includes creating a publicprivate key pair and sending a certificate request to the CA
Optionally you can request and install a SMIME certificate to be used for SMIME based communication via email
Default CA Configuration
On this screen you specify the settings for receiving certificates from your default certificate authority (CA) CA email address ndash enter the email address to be used to request a certificate
from your (default) CA
Ponton XP 21 ndash Installation and Configuration Guide 35
Configuration Options
CA download URL ndash enter the URL at your CA from which to download certificates for your Messenger installation Please note that you can only install certificates for partners you have already defined in your partner configuration
Download interval ndash specify the interval to wait between automatic certificate downloads
To download the available certificates immediately click the Download button
Request and Install Your Own Certificate
To request a certificate from your (default) CA go to Configuration rarr Certificates rarr Request Certificate Please enter data for all the fields on this form If any entries are missing you will get an error message
After completing the form click OK to send the certificate request to your CA You will get a message indicating that the request has been sent
Ponton XP 21 ndash Installation and Configuration Guide 36
Configuration Options
Once you receive the requested certificate from your CA you can install it in your own partner configuration (ie the internal partner you will use to sendreceive messages) Go to Configuration rarr Partners rarr ltYour Partner Namegt rarr Install Certificate and paste the certificate text including the hellip into the text field
Then enter the password you used when you requested the certificate and click OK to complete the installation of the certificate You will see the result above the text field containing the certificate
Ponton XP 21 ndash Installation and Configuration Guide 37
Configuration Options
Install Partner Certificates
Install a certificate issued by the CA for the requesting partner This was already described in the Partner Configuration section for normal standard certificates
Note In case of SMIME certificates an additional password may be needed to allow the Messenger to access the certificate in the local certificate store
Install a CA Certificate
To install the certificate for your CA go to Configuration rarr Certificates rarr CA rarr Install Certificate and paste your CArsquos certificate into the text field This is the certificate that authorizes the CA as a signing authority for other certificates
Ponton XP 21 ndash Installation and Configuration Guide 38
Configuration Options
54 Configure the Hot Folder Adapter
General Configuration
Address Port ndash the Hot Folder Adapter (HFA) is addressed as a separate process that communicates with the Messenger via HTTP Therefore the hostname and port number need to be set up for the Messenger If the HFA is co-located with the Messenger on the same machine use ldquolocalhostrdquo for the IP address In this case the HFA does not run as a separate Java process but will be hosted on the same Tomcat server
Path ndash the HFA needs to know the Adapter communication path of the Messenger By default it is pontonxpAdapterService
Console File Log Level ndash the HFA provides log output to the console and to log files Both can be configured regarding the level of detail The console log is only useful if the HFA is running as a standalone application so you can safely leave it disabled in the default configuration
Ponton XP 21 ndash Installation and Configuration Guide 39
Configuration Options
Create Delete a HFA
Several HFAs may be created Each registers under a different ID at the Messenger HFAs may be created for individual partners If this is the case messages exchanged with the rest of the partners will be stored with the default HFA
Configure a HFA
Each HFA requires several directories to be defined
Inbox ndash a document will be stored in the Inbox whenever it was received from a partner
Outbox ndash documents to be sent to the business partner are dropped here The HFA grabs them in a defined frequency
Failed ndash if a document could not be sent to a partner and all retries failed it will be stored in this folder
Work ndash if a document transfer is in progress or all attempts to send the document have not yet been tried the document will remain here After a final failure it will be transferred to the Failed folder
Ponton XP 21 ndash Installation and Configuration Guide 40
Configuration Options
The following settings are also supported
Port ndash the port to be used by the HFA (optional)
Receiver format ndash standard format is XML
Save Backend envelope ndash the Backend envelope is retained for incoming messages
Support attachments ndash the HFA will save any files attached to an incoming message to the selected inbox folder
Scan Interval ndash the interval to wait (in seconds) between checking the outbox
Number of receiving threads ndash specifies the maximum number of receiving threads the adapter can process
Use partner subfolders ndash if this is set this HFA will create inbox and outbox folders for all remote partners Inbound messages will automatically be sorted into the according folder depending on the sender Outbound messages need to be placed into the receiving partnerrsquos outbox folder The backend message is not used in this mode and is ignored if it exists
Use Acknowledgement for ERP ndash with this option activated the ERP application receives an acknowledgement from the receiving Messenger on the partnerrsquos side This acknowledgement will be provided via the specified Inbox
Ponton XP 21 ndash Installation and Configuration Guide 41
Configuration Options
55 Ponton XE ndash The XML Editor Ponton XE is a separate Ponton product It is packaged with Ponton XP for free use only by papiNet users It allows to enter papiNet document data directly via a graphical user interface and to send the document via the hot folder adapter to the business partners
Ponton XE is fully documented in a separate manual Hence only the Messaging Plug-in will be described here
You can experiment with the XML Editor and check out all the features and options without using the Ponton XP connection To start with you may want to begin with the following steps
Create a new papiNet Purchase Order
Fill out the forms and use optional XML Elements by right-clicking the Plus-icons in the layout tree
Create an HTML file by choosing Document Export to HTML from the menu
Save the document to an XML file and re-load it again
Ponton XP 21 ndash Installation and Configuration Guide 42
Configuration Options
Interface between Ponton XE and Ponton XP
The two software applications communicate via hot folders as illustrated in the following figure
Message Plug-in
Outbox Inbox AckInboxImport
Ponton XP Ponton XE
XMLXML XMLXML XMLXML XMLXML
Hot Folder Adapter
The XML Editor is connected to the Messenger via the Hot Folder Adapter All these folder settings need to be synchronized for a proper data exchange
Configuration of the Messaging Plug-in
The Messaging Plug-in can be flexibly installed and de-installed with the remaining part of Ponton XE If the file messengerjar is removed from the plugins directory it will automatically disappear from the Ponton XE menu bar as soon as the software is started again
Before transferring messages out of Ponton XE you need to preset the following information
Default values for the sending and receiving partners ndash these values may be overridden for an individual transfer
Folder locations of the Hot Folder Adapter ndash the Inbox Outbox and AckInbox need to be set for document exchange with Ponton XP
Default setting for Test Message flag ndash this can be overridden for the actual document transfer
Import Directory ndash Ponton XE will automatically scan the Inbox folder and import received documents to the given folder for local processing
Ponton XP 21 ndash Installation and Configuration Guide 43
Configuration Options
Open Messages after Import ndash if this option is activated messages received from the Inbox will automatically be displayed in Ponton XE
Delete message in Inbox ndash to always remove received messages from the HFA Inbox this option needs to be activated otherwise a copy will remain in the Inbox folder
Ponton XP 21 ndash Installation and Configuration Guide 44
Configuration Options
Ponton XP 21 ndash Installation and Configuration Guide 45
Configuration Options
Using Ponton XE
After setting the configuration and creating a document you can transfer the document to your business partner This is done by means of the following steps
Choose the menu item ldquoMessenger rarr Transfer rarr Send Messagerdquo
Select a sending and receiving partner
Override the settings for the HFA folders
Tick the checkbox to qualify this message as a test message
After transferring the document to the Messenger Ponton XE will wait for a response This is recognised as an acknowledge file which is dropped into the AckInbox folder of the HFA As soon as this has been received a successful transfer in indicated
You may check with the Message Monitor to determine how the document was forwarded by the Messenger to the receiver or whether any errors occurred
Ponton XP 21 ndash Installation and Configuration Guide 46
Configuration Options
56 Display Schema Configuration The schema sets to be supported for each partner are defined in the partner configuration The standard sets available with the installation are shown under Configuration rarr Schemata
Ponton XP 21 ndash Installation and Configuration Guide 47
Configuration Options
57 User Administration Two types of users are distinguished
Administrators ndash these users have full access to the Messengerrsquos configuration interface
Operators ndash these users only have access to the Adapter Monitor the Message Monitor and the Test Adapter The other options in the Messenger menu are not available
Please note the following points in connection with the Messengerrsquos standard user administration
This is a very simple user administration based on the Tomcat implementation If you want to integrate the Messenger with another user administration such as LDAP please contact Ponton Consulting for support
A userrsquos access rights (administratoroperator) are defined when the user account is created ndash they cannot be changed subsequently
User accounts can only be created or deleted by administrators
Ponton XP 21 ndash Installation and Configuration Guide 48
Advanced Configuration
6 Advanced Configuration
61 XML Schema Configuration Important The Messenger distinguishes between available schema set and activated schema sets Just inserting entries in the schema configuration as described in this section does not activate the schema sets or the corresponding schemas for use by the Messenger In order to make use of the schemas in a schema set you have to activate the schema set in the relevant partner configuration To view or modify the activated schema sets in a partner configuration go to
Configuration rarr Partners rarr ltpartner namegt rarr Processing
and activatedeactivate the relevant checkboxes
In the Messengerrsquos configuration interface you can activate and deactivate schema sets for specific partner configurations It is not possible however to modify the contents and specifications of the individual schema sets Any necessary changes have to be made in the configuration file
[installation root]xmlpipewebrootWEB-INFconfigschemataxml
The configuration entries in this file are structured as follows
ltSchemaSet Name=papinet21gt
ltSchemaName=httpwwwpapinetorgdataAvailabilityV2R10xsd MessageType=Availability MessageVersion=V2R10gt
ltNamespacegtltNamespacegt
ltDisplayNamegtAvailability 21ltDisplayNamegt
ltSchemaFilegtAvailabilityV2R10xsdltSchemaFilegt
ltXSLFilegtltXSLFilegt
ltSchemagt
ltSchema Name=yourSchema MessageType=yourMsgType MessageVersion=yourMsgVersgt
ltNamespacegtyourNamespaceltNamespacegt
ltDisplayNamegtYour Display NameltDisplayNamegt
ltSchemaFilegtyourSchemaFileltSchemaFilegt
ltXSLFilegtyourStylesheetltXSLFilegt
ltSchemagt
hellip
ltSchemaFoldergtpapinet210ltSchemaFoldergt
ltXSLFoldergtpapinet210ltXSLFoldergt
ltSchemaSetgt
Ponton XP 21 ndash Installation and Configuration Guide 49
Advanced Configuration
You can add a schema to an existing schema set in this file by inserting a ltSchemagt block (just copy and paste one of the existing blocks and modify the configuration as required) Please ensure that your new schema specification includes correct settings for the attributes of the Schema element
Name= This attribute corresponds with the ebXML Schema Location of incoming messages When an ebXML message is received the Messenger looks for a schema configuration where the Schema Name attribute matches the Schema Location specified in the ebXML envelope
MessageType= This attribute corresponds with the attribute MessageMetaDataDocumentInfoMessageName in the backend envelope of outgoing messages
MessageVersion= This attribute corresponds with the element MessageMe aDataDocumentInfoDTDVersionNumber in the backend envelope of outgoing messages
t
Note The specification of MessageType and MessageVersion must be used together for outgoing messages as they are combined to form an identifier for the message schema
You also have the option of adding a new schema set with your own schema definitions to the schema configuration In this case you would insert a ltSchemaSetgt block with subordinate ltSchemagt blocks Your added schema set will automatically be inserted in the list of available schema sets on the Messenger configuration pages
62 Advanced Database Configuration Important Since the Messenger database is used for essential message processing and tracking purposes you should not experiment with the database configuration on a ldquoliverdquo system For test and debugging purposes you are advised to set up a trial system
Installation with other Databases
This section describes the main steps required to install a different database system on the Messenger for example an Oracle database
1 Install database driver Copy the database driver to
[installation root]xmlpipewebrootWEB-INFlib
Note Please note that only drivers with the extension jar are loaded by the Tomcat servlet engine If the JDBC driver you want to use is a zip file you will have to rename the file to jar The JDBC driver for Oracle 9i is the file ojdbc14jar
Ponton XP 21 ndash Installation and Configuration Guide 50
Advanced Configuration
2 Create database and tables Ponton XP is supplied with SQL scripts for HSQL and for Oracle that can be used to create the tables for the Messenger database If you are using another database you may need to modify these scripts to work correctly with your database system
The SQL scripts are located in the subfolders under [installation root]sql
Once the database tables are in place you will also need to carry out the SQL script that inserts the log messages into the database ie
[installation root]sqlinsert_log_messagessql
3 Set up database connection The configuration of database connections is described in the section Set Up Messenger Database beginning on page 20 To connect with a different database choose ldquootherrdquo from the list of database drivers and enter the configuration for your database on the next page
The entries for the Oracle 9i JDBC driver are
Driver oraclejdbcdriverOracleDriver
URL jdbcoraclethinlthostgtltportgtltdatabasegt
63 Advanced Message Monitor Configuration In the configuration directory ldquoxmlpipewebrootWEB-INFconfigrdquo there is a file messagemonitorxml which can be used to change the selection and ordering of the Message overview window in the Message Monitor The default setting is displayed in the following picture
Ponton XP 21 ndash Installation and Configuration Guide 51
Advanced Configuration
Here the number of line items per page can be set If a high resolution screen is used (beyond 1024 x 768 pixel) one may increase the number of lines
Further a mapping table defines which database column is to be displayed in which monitor column The number of columns again depends on the screen resolution
Finally if main memory size allows caching of XSL stylesheet definitions helps accelerating processing speed for XSL transformations
64 Tomcat SSL Installation
Generate a key
One minor problem with Tomcat or any other webserver that uses the internal Java symmetric key architecture is that you are not allowed to export or import private keys For this reason it is not possible to use the existing key-pair installed with the Messenger software You will have to generate a new key-pair and send a certificate request to the Ponton certificate authority (or other certification authority) to receive a valid certificate
To generate a new key-pair open a command prompt and go to the tomcat-4118 directory The keystore used for a Tomcat SSL installation is located in the Tomcat root directory and is called ssl-keystore The Tomcat installation already contains a certificate for lsquolocalhostrsquo so you can test the HTTPS access with a web browser
Before you can create a new Tomcat certificate you will have to delete the installed certificate Note that the default password for the Tomcat keystore is ldquochangeitrdquo keytool -delete -alias tomcat ndashkeystore ssl-keystore
Now use the following command to create a new key-pair Please note that you need to specify the Listener hostname (eg listenermyserverde) when the keytool asks for lsquofirst and last namersquo keytool -genkey -alias tomcat -keyalg RSA ndashkeystore ssl-keystore
After generating the new key the next step is to export a certificate request with the following command keytool ndashcertreq ndashalias tomcat ndashfile myservercsr ndashkeystore ssl-keystore
This will generate the file myservercsr in the current directory Send this file via email to xp-certponton-consultingde It will be signed and sent back to you The reply will contain a file with the certificate
Finally you have to re-import this signed certificate into the Tomcat SSL keystore Please note that the import may take some time keytool ndashimport ndashalias tomcat ndashfile myservercer ndashkeystore ssl-keystore
If you have any problems starting the keytool make sure you have the javahomebin directory specified in your PATH environment variable Of course you can also change to the javahomebin directory and start the keytool there
Ponton XP 21 ndash Installation and Configuration Guide 52
Advanced Configuration
Update Tomcat configuration
SSL is already activated in the Tomcat configuration packaged in the distribution However you might want to change the specified SSL port (by default the SSL port is set to 8443) You can change the port by editing the file
[tomcat installation]confserverconf
The following section configures the SSL parameters
lt-- Define a SSL Coyote HTTP11 Connector on port 8443 --gt
ltConnector className=orgapachecoyotetomcat4CoyoteConnector
port=8443
minProcessors=5
maxProcessors=75
enableLookups=true
acceptCount=100
debug=0
scheme=https
secure=true
useURIValidationHack=false
disableUploadTimeout=truegt
ltFactory className=orgapachecoyotetomcat4CoyoteServerSocketFactory
clientAuth=false
keystoreFile=ssl-keystore
protocol=TLS gt
ltConnectorgt
Verify setup
To verify if everything is working correctly start the Tomcat webserver as usual and connect to the webserver with your browser
Go to httpsyourserveraddress ndash initially you might get a warning window if the root certificate authority is not known to the browser If you continue by clicking OK you should see the usual Ponton XP start page
If everything comes up correctly you can use SSL to receive messages with the Ponton XP Software
Ponton XP 21 ndash Installation and Configuration Guide 53
Advanced Configuration
65 Distributed Installation If the Messenger is installed on a server that cannot be reached from the Internet you will need to install the Listener as well The purpose of the Listener is to pick up incoming connections and forward them to the Messenger (across the firewall) The firewall rules must be set up to allow this connection between the Listener and the Messenger When a message is received the Listener notifies the Messenger and the Messenger then picks up the message
You also have the option of subsequently installing the Listener as a service under Windows ndash this service can then be configured to start automatically when the system starts up
Note If you are going to run the Messenger in combination with the Listener your partners will have to enter the URI of your Listener in their configurations (under Configuration rarr Partners rarr ltpartner namegt rarr URI of Partners Messenger Service)
Listener Installation and Configuration
The Listener is installed by running the installer program (eg PontonXP-21-setuplistener-windowsexe) on the relevant system You are asked to specify an installation folder and also have the option of creating a desktop or menu shortcut Thatrsquos it
-
The settings for the Listener are contained in the configuration file listenerproperties which is located in the folder [Listener root folder]config To modify these settings you will have to edit the configuration file directly Access via the Messengerrsquos configuration interface is not possible
The file contains the following settings
HttpPort = Port number (for external HTTP connections)
HttpsPort = Port number (for external HTTPS connections)
LogLevel = DEBUG | INFO | WARN | ERROR | FATAL | OFF
The following settings specify the host and port of the Messenger for forwarding connections (HTTPHTTPS) The forwarding connection mode is activated by entering the relevant host and port addresses and removing the hash marks (used to mark ldquocomment linesrdquo in Java property files)
HttpServer = server1port1 (HTTP forwarding connection to the Messenger)
HttpsServer = server1port1 (HTTPS forwarding connection to the Messenger)
Ponton XP 21 ndash Installation and Configuration Guide 54
Advanced Configuration
The following settings specify the Listenerrsquos port for callback connections (HTTPHTTPS) with the Messenger As with the forwarding connection the callback connection mode is activated by entering the relevant port addresses and removing the hash marks (Obviously it makes no sense to have both connections activated at the same time)
HttpServicePort = Port number (for internal HTTP connections to the Listener)
HttpsServicePort = Port number (for internal HTTPS connections to the Listener)
Starting the Listener
To start the Listener open a command prompt and start the class
depontonconsultingxmlpipeListener
with the classpath
-cp libcommons-logging-api-103jarlibcommonutilsjarlibxp_listenerjarconfig
You can also use the installed batch file [Listener root folder]startListenerbat
Callback Mode
Details of the communication flow
When the Messenger starts up it searches for the Listener
Note The Listener should start up first so that it can be found by the Messenger
If the search is successful a permanent connection is established between the Messenger and the Listener The Messenger uses the following settings in the configuration to establish the connection with the Listener
Configuration rarr Messenger rarr Listener rarr HTTP[S] rarr Hostname
Configuration rarr Messenger rarr Listener rarr HTTP[S] rarr Internal Listener Port
Ponton XP 21 ndash Installation and Configuration Guide 55
Advanced Configuration
When the Listener receives an incoming message (or rather an HTTPHTTPS request) it informs the Messenger ndash by way of the permanent connection ndash about the arrival of the new request indicating which port the Messenger can use to pick up the connection
Note This port number is randomly selected by the Listener and cannot be configured
The Messenger picks up the connection on the Listenerrsquos specified port and redirects it to its own local port for further processing
This local port corresponds to the setting for
Configuration rarr Messenger rarr Listener rarr HTTP[S] rarr Internal Messenger Port
in the configuration GUI
Forwarding Mode
Details of the communication flow
In forwarding mode no permanent connection is established between the Messenger and the Listener
When the Listener receives an incoming HTTPHTTPS request it simply forwards the request to the Messenger using the address specified in listenerproperties (HttpServerHttpsServer)
Note To allow this forwarding connection the firewall has to be configured so that the Listener is permitted to access the Messenger on the specified port(s)
Ponton XP 21 ndash Installation and Configuration Guide 56
Advanced Configuration
66 Port Configuration The Messengerrsquos standard configuration uses port 8080 for HTTP connections and port 8443 for secure (HTTPS) connections This section describes how to set up the messenger to use a non-standard port configuration This involves making manual changes to several configuration files in particular the Tomcat serverxml and the Messengerrsquos adapter configuration files
Tomcat Settings
The port setting for the Messengerrsquos HTTP and HTTPS connections are specified in the Tomcat configuration file
[installation root]tomcat-xxxconfserverxml
This file defines the connections (Connectors) for the Messenger as follows
lt-- Define a non-SSL Coyote HTTP11 Connector on port 8080 --gt
ltConnector className=orgapachecoyotetomcat4CoyoteConnector
port=yourMessengerPort minProcessors=5 maxProcessors=75
enableLookups=true redirectPort=yourRed rectPort i acceptCount=100 debug=0 connectionTimeout=20000
useURIValidationHack=false disableUploadTimeout=true gt
lt-- Define a SSL Coyote HTTP11 Connector on port 8443 --gt
ltConnector className=orgapachecoyotetomcat4CoyoteConnector
port=yourSSLPort minProcessors=5 maxProcessors=75
enableLookups=true
acceptCount=100 debug=0 scheme=https secure=true
useURIValidationHack=false disableUploadTimeout=truegt
ltFactory className=orgapachecoyotetomcat4CoyoteServerSocketFactory
clientAuth=false keystoreFile=ssl-keystore protocol=TLS gt
ltConnectorgt
The standard settings for the Messenger ports are
HTTP 8080
SSL 8443
To modify your connections you will need to enter the relevant port numbers indicated above as yourMessengerPort yourRedirectPort (which normally points to the SSL connection) and yourSSLPort
Ponton XP 21 ndash Installation and Configuration Guide 57
Advanced Configuration
Adapter Settings
The settings for the Messenger adapters are contained in the relevant XML files under
[installation root]xmlpipewebrootWEB-INFconfig
In particular a standard installation includes the files testadap erxml and hotfolderxml Each of these configuration files contains a block specifying the connection to the messenger
t
ltMessengergt
ltAddressgtyourMessengerHostltAddressgt
ltPortNumbergtyourMessengerPortltPortNumbergt
ltPathgthellipltPathgt
ltMessengergt
If you have configured the Messenger to run on a different port (see above) you will need to enter the relevant port number here
Ponton XP 21 ndash Installation and Configuration Guide 58
Configuration Options
Configure Archiving Filter
The archiving filter stores the following information in a dedicated directory
Backend Envelope
ebXML Envelope
Payload ndash this is the actual business document
Certificate
Signature
Each part is stored in a separate file
The Archive Folder setting can be used to indicate the location of the archiving folder This can be expressed as
An absolute path to the required folder
A relative path beginning with $CONTEXT ndash this placeholder refers to the folder [installation root]xmlpipewebroot
The Maximum Age setting specifies how long the files will be archived ndash expressed in days
Ponton XP 21 ndash Installation and Configuration Guide 29
Configuration Options
52 Partner Configuration For each partner the following data may be configured
Partner identification (internal and external)
Communication Settings
URI of the partnerrsquos Messenger
Create Delete a Partner Entry
To create a new partner entry specify an identifier for the partner (this is the local identifier for your configuration) and indicate whether this partner entry is for
An internal partner (with the ldquoselfrdquo option activated) ndash this might be a department of your organization
An external partner ndash these entries refer to your business partners for example customers suppliers carriers warehouse operators etc
A message is always sent by your Messenger from an internal to an external partner and received from an external partner to an internal one
Internal partners are distinguished because for encryption and signing the certificates of each internal partner will be used on a per-partner basis
For further information please check the Ponton XP Architecture Overview
Ponton XP 21 ndash Installation and Configuration Guide 30
Configuration Options
Set the Partner Identification
Local Partner Name This identifier is valid within you local configuration ie you may choose any value as long as it is unique among all local partner names
Disable Although configured as a partner individual partners may be disabled In this case the Messenger rejects any message received from this partner
PartyID PartyID Type PartyIDs are used to identify partners externally To avoid name clashes and duplication well-known naming schemas exist to identify partners eg DUNS codes VAT numbers IANA codes etc For this reason trading partners should agree on an minimal set of identification types (like DUNS numbers and IANA codes) that is to be used by all partners
More than one PartyID can be defined per partner The limit is given by the number of PartyID types These are configured separately please check Section ldquoAdvanced Configurationrdquo)
Hint Please also check the Ponton XP Architecture Overview document for a detailed explanation of ebXML codes and partner identification
Ponton XP 21 ndash Installation and Configuration Guide 31
Configuration Options
Partner Communication Configuration
For each partner the following configuration options may be set URI of Partnerrsquos Messenger Service ndash enter the address of the partnerrsquos
Messenger for example httppartnerserver8080pontonxpSoapListener
Request Acknowledge ndash every message to this partner needs to be acknowledged
Request Signed Acknowledge ndash to specify signing of acknowledgements received from this partner
Retries ndash the number of retries in case of unsuccessful message transmission
Retry Interval ndash the number of seconds to wait until the next retry
Ponton XP 21 ndash Installation and Configuration Guide 32
Configuration Options
Processing Configuration
The following options can be set
Default Adapter ndash enter the name of the adapter to be used by default
Processing Pipeline ndash specify the processing pipeline to be used for this profile
Schema Sets ndash choose which Schema set(s) are to be supported
Use XML Signature ndash indicate whether to use XML Signature
Use default message settings (specified under Configuration rarr Messenger rarr Processing) or define a specific processing filter for this partner
Ponton XP 21 ndash Installation and Configuration Guide 33
Configuration Options
Install Partner Certificates
There are different ways of distributing certificates to business partners One is to send the certificate per email and have the partner cut amp paste the certificate code into the partner configuration
Note It is important to cut amp paste the complete certificate code including the lines ldquo----- Begin Certificate -----rdquo and ldquo----- End Certificate -----rdquo
Important A partner certificate will only be accepted if the certificate of the issuing CA (certificate authority) was pre-installed Otherwise the trust relationship between the partner and the CA cannot be traced
One may select to install a general certificate or a SMIME certificate Please determine what kind of certificate you received from your partner before installing it
Ponton XP 21 ndash Installation and Configuration Guide 34
Configuration Options
53 Certificate Management Certificate management comprises the following initial steps
Configure your default CA This is usually properly pre-configured in the installation files
Install the root certificate of the default CA This needs to be installed manually if 3rd-party CAs are to be used
Request a certificate for your own Messenger This includes creating a publicprivate key pair and sending a certificate request to the CA
Optionally you can request and install a SMIME certificate to be used for SMIME based communication via email
Default CA Configuration
On this screen you specify the settings for receiving certificates from your default certificate authority (CA) CA email address ndash enter the email address to be used to request a certificate
from your (default) CA
Ponton XP 21 ndash Installation and Configuration Guide 35
Configuration Options
CA download URL ndash enter the URL at your CA from which to download certificates for your Messenger installation Please note that you can only install certificates for partners you have already defined in your partner configuration
Download interval ndash specify the interval to wait between automatic certificate downloads
To download the available certificates immediately click the Download button
Request and Install Your Own Certificate
To request a certificate from your (default) CA go to Configuration rarr Certificates rarr Request Certificate Please enter data for all the fields on this form If any entries are missing you will get an error message
After completing the form click OK to send the certificate request to your CA You will get a message indicating that the request has been sent
Ponton XP 21 ndash Installation and Configuration Guide 36
Configuration Options
Once you receive the requested certificate from your CA you can install it in your own partner configuration (ie the internal partner you will use to sendreceive messages) Go to Configuration rarr Partners rarr ltYour Partner Namegt rarr Install Certificate and paste the certificate text including the hellip into the text field
Then enter the password you used when you requested the certificate and click OK to complete the installation of the certificate You will see the result above the text field containing the certificate
Ponton XP 21 ndash Installation and Configuration Guide 37
Configuration Options
Install Partner Certificates
Install a certificate issued by the CA for the requesting partner This was already described in the Partner Configuration section for normal standard certificates
Note In case of SMIME certificates an additional password may be needed to allow the Messenger to access the certificate in the local certificate store
Install a CA Certificate
To install the certificate for your CA go to Configuration rarr Certificates rarr CA rarr Install Certificate and paste your CArsquos certificate into the text field This is the certificate that authorizes the CA as a signing authority for other certificates
Ponton XP 21 ndash Installation and Configuration Guide 38
Configuration Options
54 Configure the Hot Folder Adapter
General Configuration
Address Port ndash the Hot Folder Adapter (HFA) is addressed as a separate process that communicates with the Messenger via HTTP Therefore the hostname and port number need to be set up for the Messenger If the HFA is co-located with the Messenger on the same machine use ldquolocalhostrdquo for the IP address In this case the HFA does not run as a separate Java process but will be hosted on the same Tomcat server
Path ndash the HFA needs to know the Adapter communication path of the Messenger By default it is pontonxpAdapterService
Console File Log Level ndash the HFA provides log output to the console and to log files Both can be configured regarding the level of detail The console log is only useful if the HFA is running as a standalone application so you can safely leave it disabled in the default configuration
Ponton XP 21 ndash Installation and Configuration Guide 39
Configuration Options
Create Delete a HFA
Several HFAs may be created Each registers under a different ID at the Messenger HFAs may be created for individual partners If this is the case messages exchanged with the rest of the partners will be stored with the default HFA
Configure a HFA
Each HFA requires several directories to be defined
Inbox ndash a document will be stored in the Inbox whenever it was received from a partner
Outbox ndash documents to be sent to the business partner are dropped here The HFA grabs them in a defined frequency
Failed ndash if a document could not be sent to a partner and all retries failed it will be stored in this folder
Work ndash if a document transfer is in progress or all attempts to send the document have not yet been tried the document will remain here After a final failure it will be transferred to the Failed folder
Ponton XP 21 ndash Installation and Configuration Guide 40
Configuration Options
The following settings are also supported
Port ndash the port to be used by the HFA (optional)
Receiver format ndash standard format is XML
Save Backend envelope ndash the Backend envelope is retained for incoming messages
Support attachments ndash the HFA will save any files attached to an incoming message to the selected inbox folder
Scan Interval ndash the interval to wait (in seconds) between checking the outbox
Number of receiving threads ndash specifies the maximum number of receiving threads the adapter can process
Use partner subfolders ndash if this is set this HFA will create inbox and outbox folders for all remote partners Inbound messages will automatically be sorted into the according folder depending on the sender Outbound messages need to be placed into the receiving partnerrsquos outbox folder The backend message is not used in this mode and is ignored if it exists
Use Acknowledgement for ERP ndash with this option activated the ERP application receives an acknowledgement from the receiving Messenger on the partnerrsquos side This acknowledgement will be provided via the specified Inbox
Ponton XP 21 ndash Installation and Configuration Guide 41
Configuration Options
55 Ponton XE ndash The XML Editor Ponton XE is a separate Ponton product It is packaged with Ponton XP for free use only by papiNet users It allows to enter papiNet document data directly via a graphical user interface and to send the document via the hot folder adapter to the business partners
Ponton XE is fully documented in a separate manual Hence only the Messaging Plug-in will be described here
You can experiment with the XML Editor and check out all the features and options without using the Ponton XP connection To start with you may want to begin with the following steps
Create a new papiNet Purchase Order
Fill out the forms and use optional XML Elements by right-clicking the Plus-icons in the layout tree
Create an HTML file by choosing Document Export to HTML from the menu
Save the document to an XML file and re-load it again
Ponton XP 21 ndash Installation and Configuration Guide 42
Configuration Options
Interface between Ponton XE and Ponton XP
The two software applications communicate via hot folders as illustrated in the following figure
Message Plug-in
Outbox Inbox AckInboxImport
Ponton XP Ponton XE
XMLXML XMLXML XMLXML XMLXML
Hot Folder Adapter
The XML Editor is connected to the Messenger via the Hot Folder Adapter All these folder settings need to be synchronized for a proper data exchange
Configuration of the Messaging Plug-in
The Messaging Plug-in can be flexibly installed and de-installed with the remaining part of Ponton XE If the file messengerjar is removed from the plugins directory it will automatically disappear from the Ponton XE menu bar as soon as the software is started again
Before transferring messages out of Ponton XE you need to preset the following information
Default values for the sending and receiving partners ndash these values may be overridden for an individual transfer
Folder locations of the Hot Folder Adapter ndash the Inbox Outbox and AckInbox need to be set for document exchange with Ponton XP
Default setting for Test Message flag ndash this can be overridden for the actual document transfer
Import Directory ndash Ponton XE will automatically scan the Inbox folder and import received documents to the given folder for local processing
Ponton XP 21 ndash Installation and Configuration Guide 43
Configuration Options
Open Messages after Import ndash if this option is activated messages received from the Inbox will automatically be displayed in Ponton XE
Delete message in Inbox ndash to always remove received messages from the HFA Inbox this option needs to be activated otherwise a copy will remain in the Inbox folder
Ponton XP 21 ndash Installation and Configuration Guide 44
Configuration Options
Ponton XP 21 ndash Installation and Configuration Guide 45
Configuration Options
Using Ponton XE
After setting the configuration and creating a document you can transfer the document to your business partner This is done by means of the following steps
Choose the menu item ldquoMessenger rarr Transfer rarr Send Messagerdquo
Select a sending and receiving partner
Override the settings for the HFA folders
Tick the checkbox to qualify this message as a test message
After transferring the document to the Messenger Ponton XE will wait for a response This is recognised as an acknowledge file which is dropped into the AckInbox folder of the HFA As soon as this has been received a successful transfer in indicated
You may check with the Message Monitor to determine how the document was forwarded by the Messenger to the receiver or whether any errors occurred
Ponton XP 21 ndash Installation and Configuration Guide 46
Configuration Options
56 Display Schema Configuration The schema sets to be supported for each partner are defined in the partner configuration The standard sets available with the installation are shown under Configuration rarr Schemata
Ponton XP 21 ndash Installation and Configuration Guide 47
Configuration Options
57 User Administration Two types of users are distinguished
Administrators ndash these users have full access to the Messengerrsquos configuration interface
Operators ndash these users only have access to the Adapter Monitor the Message Monitor and the Test Adapter The other options in the Messenger menu are not available
Please note the following points in connection with the Messengerrsquos standard user administration
This is a very simple user administration based on the Tomcat implementation If you want to integrate the Messenger with another user administration such as LDAP please contact Ponton Consulting for support
A userrsquos access rights (administratoroperator) are defined when the user account is created ndash they cannot be changed subsequently
User accounts can only be created or deleted by administrators
Ponton XP 21 ndash Installation and Configuration Guide 48
Advanced Configuration
6 Advanced Configuration
61 XML Schema Configuration Important The Messenger distinguishes between available schema set and activated schema sets Just inserting entries in the schema configuration as described in this section does not activate the schema sets or the corresponding schemas for use by the Messenger In order to make use of the schemas in a schema set you have to activate the schema set in the relevant partner configuration To view or modify the activated schema sets in a partner configuration go to
Configuration rarr Partners rarr ltpartner namegt rarr Processing
and activatedeactivate the relevant checkboxes
In the Messengerrsquos configuration interface you can activate and deactivate schema sets for specific partner configurations It is not possible however to modify the contents and specifications of the individual schema sets Any necessary changes have to be made in the configuration file
[installation root]xmlpipewebrootWEB-INFconfigschemataxml
The configuration entries in this file are structured as follows
ltSchemaSet Name=papinet21gt
ltSchemaName=httpwwwpapinetorgdataAvailabilityV2R10xsd MessageType=Availability MessageVersion=V2R10gt
ltNamespacegtltNamespacegt
ltDisplayNamegtAvailability 21ltDisplayNamegt
ltSchemaFilegtAvailabilityV2R10xsdltSchemaFilegt
ltXSLFilegtltXSLFilegt
ltSchemagt
ltSchema Name=yourSchema MessageType=yourMsgType MessageVersion=yourMsgVersgt
ltNamespacegtyourNamespaceltNamespacegt
ltDisplayNamegtYour Display NameltDisplayNamegt
ltSchemaFilegtyourSchemaFileltSchemaFilegt
ltXSLFilegtyourStylesheetltXSLFilegt
ltSchemagt
hellip
ltSchemaFoldergtpapinet210ltSchemaFoldergt
ltXSLFoldergtpapinet210ltXSLFoldergt
ltSchemaSetgt
Ponton XP 21 ndash Installation and Configuration Guide 49
Advanced Configuration
You can add a schema to an existing schema set in this file by inserting a ltSchemagt block (just copy and paste one of the existing blocks and modify the configuration as required) Please ensure that your new schema specification includes correct settings for the attributes of the Schema element
Name= This attribute corresponds with the ebXML Schema Location of incoming messages When an ebXML message is received the Messenger looks for a schema configuration where the Schema Name attribute matches the Schema Location specified in the ebXML envelope
MessageType= This attribute corresponds with the attribute MessageMetaDataDocumentInfoMessageName in the backend envelope of outgoing messages
MessageVersion= This attribute corresponds with the element MessageMe aDataDocumentInfoDTDVersionNumber in the backend envelope of outgoing messages
t
Note The specification of MessageType and MessageVersion must be used together for outgoing messages as they are combined to form an identifier for the message schema
You also have the option of adding a new schema set with your own schema definitions to the schema configuration In this case you would insert a ltSchemaSetgt block with subordinate ltSchemagt blocks Your added schema set will automatically be inserted in the list of available schema sets on the Messenger configuration pages
62 Advanced Database Configuration Important Since the Messenger database is used for essential message processing and tracking purposes you should not experiment with the database configuration on a ldquoliverdquo system For test and debugging purposes you are advised to set up a trial system
Installation with other Databases
This section describes the main steps required to install a different database system on the Messenger for example an Oracle database
1 Install database driver Copy the database driver to
[installation root]xmlpipewebrootWEB-INFlib
Note Please note that only drivers with the extension jar are loaded by the Tomcat servlet engine If the JDBC driver you want to use is a zip file you will have to rename the file to jar The JDBC driver for Oracle 9i is the file ojdbc14jar
Ponton XP 21 ndash Installation and Configuration Guide 50
Advanced Configuration
2 Create database and tables Ponton XP is supplied with SQL scripts for HSQL and for Oracle that can be used to create the tables for the Messenger database If you are using another database you may need to modify these scripts to work correctly with your database system
The SQL scripts are located in the subfolders under [installation root]sql
Once the database tables are in place you will also need to carry out the SQL script that inserts the log messages into the database ie
[installation root]sqlinsert_log_messagessql
3 Set up database connection The configuration of database connections is described in the section Set Up Messenger Database beginning on page 20 To connect with a different database choose ldquootherrdquo from the list of database drivers and enter the configuration for your database on the next page
The entries for the Oracle 9i JDBC driver are
Driver oraclejdbcdriverOracleDriver
URL jdbcoraclethinlthostgtltportgtltdatabasegt
63 Advanced Message Monitor Configuration In the configuration directory ldquoxmlpipewebrootWEB-INFconfigrdquo there is a file messagemonitorxml which can be used to change the selection and ordering of the Message overview window in the Message Monitor The default setting is displayed in the following picture
Ponton XP 21 ndash Installation and Configuration Guide 51
Advanced Configuration
Here the number of line items per page can be set If a high resolution screen is used (beyond 1024 x 768 pixel) one may increase the number of lines
Further a mapping table defines which database column is to be displayed in which monitor column The number of columns again depends on the screen resolution
Finally if main memory size allows caching of XSL stylesheet definitions helps accelerating processing speed for XSL transformations
64 Tomcat SSL Installation
Generate a key
One minor problem with Tomcat or any other webserver that uses the internal Java symmetric key architecture is that you are not allowed to export or import private keys For this reason it is not possible to use the existing key-pair installed with the Messenger software You will have to generate a new key-pair and send a certificate request to the Ponton certificate authority (or other certification authority) to receive a valid certificate
To generate a new key-pair open a command prompt and go to the tomcat-4118 directory The keystore used for a Tomcat SSL installation is located in the Tomcat root directory and is called ssl-keystore The Tomcat installation already contains a certificate for lsquolocalhostrsquo so you can test the HTTPS access with a web browser
Before you can create a new Tomcat certificate you will have to delete the installed certificate Note that the default password for the Tomcat keystore is ldquochangeitrdquo keytool -delete -alias tomcat ndashkeystore ssl-keystore
Now use the following command to create a new key-pair Please note that you need to specify the Listener hostname (eg listenermyserverde) when the keytool asks for lsquofirst and last namersquo keytool -genkey -alias tomcat -keyalg RSA ndashkeystore ssl-keystore
After generating the new key the next step is to export a certificate request with the following command keytool ndashcertreq ndashalias tomcat ndashfile myservercsr ndashkeystore ssl-keystore
This will generate the file myservercsr in the current directory Send this file via email to xp-certponton-consultingde It will be signed and sent back to you The reply will contain a file with the certificate
Finally you have to re-import this signed certificate into the Tomcat SSL keystore Please note that the import may take some time keytool ndashimport ndashalias tomcat ndashfile myservercer ndashkeystore ssl-keystore
If you have any problems starting the keytool make sure you have the javahomebin directory specified in your PATH environment variable Of course you can also change to the javahomebin directory and start the keytool there
Ponton XP 21 ndash Installation and Configuration Guide 52
Advanced Configuration
Update Tomcat configuration
SSL is already activated in the Tomcat configuration packaged in the distribution However you might want to change the specified SSL port (by default the SSL port is set to 8443) You can change the port by editing the file
[tomcat installation]confserverconf
The following section configures the SSL parameters
lt-- Define a SSL Coyote HTTP11 Connector on port 8443 --gt
ltConnector className=orgapachecoyotetomcat4CoyoteConnector
port=8443
minProcessors=5
maxProcessors=75
enableLookups=true
acceptCount=100
debug=0
scheme=https
secure=true
useURIValidationHack=false
disableUploadTimeout=truegt
ltFactory className=orgapachecoyotetomcat4CoyoteServerSocketFactory
clientAuth=false
keystoreFile=ssl-keystore
protocol=TLS gt
ltConnectorgt
Verify setup
To verify if everything is working correctly start the Tomcat webserver as usual and connect to the webserver with your browser
Go to httpsyourserveraddress ndash initially you might get a warning window if the root certificate authority is not known to the browser If you continue by clicking OK you should see the usual Ponton XP start page
If everything comes up correctly you can use SSL to receive messages with the Ponton XP Software
Ponton XP 21 ndash Installation and Configuration Guide 53
Advanced Configuration
65 Distributed Installation If the Messenger is installed on a server that cannot be reached from the Internet you will need to install the Listener as well The purpose of the Listener is to pick up incoming connections and forward them to the Messenger (across the firewall) The firewall rules must be set up to allow this connection between the Listener and the Messenger When a message is received the Listener notifies the Messenger and the Messenger then picks up the message
You also have the option of subsequently installing the Listener as a service under Windows ndash this service can then be configured to start automatically when the system starts up
Note If you are going to run the Messenger in combination with the Listener your partners will have to enter the URI of your Listener in their configurations (under Configuration rarr Partners rarr ltpartner namegt rarr URI of Partners Messenger Service)
Listener Installation and Configuration
The Listener is installed by running the installer program (eg PontonXP-21-setuplistener-windowsexe) on the relevant system You are asked to specify an installation folder and also have the option of creating a desktop or menu shortcut Thatrsquos it
-
The settings for the Listener are contained in the configuration file listenerproperties which is located in the folder [Listener root folder]config To modify these settings you will have to edit the configuration file directly Access via the Messengerrsquos configuration interface is not possible
The file contains the following settings
HttpPort = Port number (for external HTTP connections)
HttpsPort = Port number (for external HTTPS connections)
LogLevel = DEBUG | INFO | WARN | ERROR | FATAL | OFF
The following settings specify the host and port of the Messenger for forwarding connections (HTTPHTTPS) The forwarding connection mode is activated by entering the relevant host and port addresses and removing the hash marks (used to mark ldquocomment linesrdquo in Java property files)
HttpServer = server1port1 (HTTP forwarding connection to the Messenger)
HttpsServer = server1port1 (HTTPS forwarding connection to the Messenger)
Ponton XP 21 ndash Installation and Configuration Guide 54
Advanced Configuration
The following settings specify the Listenerrsquos port for callback connections (HTTPHTTPS) with the Messenger As with the forwarding connection the callback connection mode is activated by entering the relevant port addresses and removing the hash marks (Obviously it makes no sense to have both connections activated at the same time)
HttpServicePort = Port number (for internal HTTP connections to the Listener)
HttpsServicePort = Port number (for internal HTTPS connections to the Listener)
Starting the Listener
To start the Listener open a command prompt and start the class
depontonconsultingxmlpipeListener
with the classpath
-cp libcommons-logging-api-103jarlibcommonutilsjarlibxp_listenerjarconfig
You can also use the installed batch file [Listener root folder]startListenerbat
Callback Mode
Details of the communication flow
When the Messenger starts up it searches for the Listener
Note The Listener should start up first so that it can be found by the Messenger
If the search is successful a permanent connection is established between the Messenger and the Listener The Messenger uses the following settings in the configuration to establish the connection with the Listener
Configuration rarr Messenger rarr Listener rarr HTTP[S] rarr Hostname
Configuration rarr Messenger rarr Listener rarr HTTP[S] rarr Internal Listener Port
Ponton XP 21 ndash Installation and Configuration Guide 55
Advanced Configuration
When the Listener receives an incoming message (or rather an HTTPHTTPS request) it informs the Messenger ndash by way of the permanent connection ndash about the arrival of the new request indicating which port the Messenger can use to pick up the connection
Note This port number is randomly selected by the Listener and cannot be configured
The Messenger picks up the connection on the Listenerrsquos specified port and redirects it to its own local port for further processing
This local port corresponds to the setting for
Configuration rarr Messenger rarr Listener rarr HTTP[S] rarr Internal Messenger Port
in the configuration GUI
Forwarding Mode
Details of the communication flow
In forwarding mode no permanent connection is established between the Messenger and the Listener
When the Listener receives an incoming HTTPHTTPS request it simply forwards the request to the Messenger using the address specified in listenerproperties (HttpServerHttpsServer)
Note To allow this forwarding connection the firewall has to be configured so that the Listener is permitted to access the Messenger on the specified port(s)
Ponton XP 21 ndash Installation and Configuration Guide 56
Advanced Configuration
66 Port Configuration The Messengerrsquos standard configuration uses port 8080 for HTTP connections and port 8443 for secure (HTTPS) connections This section describes how to set up the messenger to use a non-standard port configuration This involves making manual changes to several configuration files in particular the Tomcat serverxml and the Messengerrsquos adapter configuration files
Tomcat Settings
The port setting for the Messengerrsquos HTTP and HTTPS connections are specified in the Tomcat configuration file
[installation root]tomcat-xxxconfserverxml
This file defines the connections (Connectors) for the Messenger as follows
lt-- Define a non-SSL Coyote HTTP11 Connector on port 8080 --gt
ltConnector className=orgapachecoyotetomcat4CoyoteConnector
port=yourMessengerPort minProcessors=5 maxProcessors=75
enableLookups=true redirectPort=yourRed rectPort i acceptCount=100 debug=0 connectionTimeout=20000
useURIValidationHack=false disableUploadTimeout=true gt
lt-- Define a SSL Coyote HTTP11 Connector on port 8443 --gt
ltConnector className=orgapachecoyotetomcat4CoyoteConnector
port=yourSSLPort minProcessors=5 maxProcessors=75
enableLookups=true
acceptCount=100 debug=0 scheme=https secure=true
useURIValidationHack=false disableUploadTimeout=truegt
ltFactory className=orgapachecoyotetomcat4CoyoteServerSocketFactory
clientAuth=false keystoreFile=ssl-keystore protocol=TLS gt
ltConnectorgt
The standard settings for the Messenger ports are
HTTP 8080
SSL 8443
To modify your connections you will need to enter the relevant port numbers indicated above as yourMessengerPort yourRedirectPort (which normally points to the SSL connection) and yourSSLPort
Ponton XP 21 ndash Installation and Configuration Guide 57
Advanced Configuration
Adapter Settings
The settings for the Messenger adapters are contained in the relevant XML files under
[installation root]xmlpipewebrootWEB-INFconfig
In particular a standard installation includes the files testadap erxml and hotfolderxml Each of these configuration files contains a block specifying the connection to the messenger
t
ltMessengergt
ltAddressgtyourMessengerHostltAddressgt
ltPortNumbergtyourMessengerPortltPortNumbergt
ltPathgthellipltPathgt
ltMessengergt
If you have configured the Messenger to run on a different port (see above) you will need to enter the relevant port number here
Ponton XP 21 ndash Installation and Configuration Guide 58
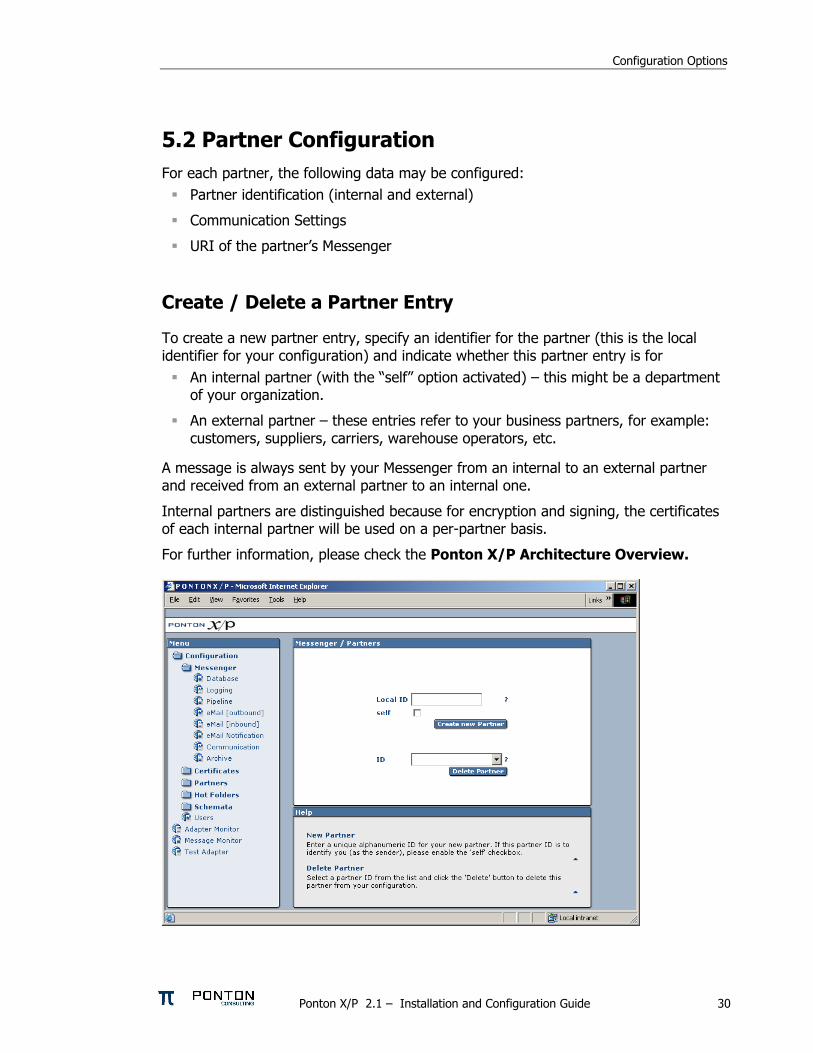
Configuration Options
52 Partner Configuration For each partner the following data may be configured
Partner identification (internal and external)
Communication Settings
URI of the partnerrsquos Messenger
Create Delete a Partner Entry
To create a new partner entry specify an identifier for the partner (this is the local identifier for your configuration) and indicate whether this partner entry is for
An internal partner (with the ldquoselfrdquo option activated) ndash this might be a department of your organization
An external partner ndash these entries refer to your business partners for example customers suppliers carriers warehouse operators etc
A message is always sent by your Messenger from an internal to an external partner and received from an external partner to an internal one
Internal partners are distinguished because for encryption and signing the certificates of each internal partner will be used on a per-partner basis
For further information please check the Ponton XP Architecture Overview
Ponton XP 21 ndash Installation and Configuration Guide 30
Configuration Options
Set the Partner Identification
Local Partner Name This identifier is valid within you local configuration ie you may choose any value as long as it is unique among all local partner names
Disable Although configured as a partner individual partners may be disabled In this case the Messenger rejects any message received from this partner
PartyID PartyID Type PartyIDs are used to identify partners externally To avoid name clashes and duplication well-known naming schemas exist to identify partners eg DUNS codes VAT numbers IANA codes etc For this reason trading partners should agree on an minimal set of identification types (like DUNS numbers and IANA codes) that is to be used by all partners
More than one PartyID can be defined per partner The limit is given by the number of PartyID types These are configured separately please check Section ldquoAdvanced Configurationrdquo)
Hint Please also check the Ponton XP Architecture Overview document for a detailed explanation of ebXML codes and partner identification
Ponton XP 21 ndash Installation and Configuration Guide 31
Configuration Options
Partner Communication Configuration
For each partner the following configuration options may be set URI of Partnerrsquos Messenger Service ndash enter the address of the partnerrsquos
Messenger for example httppartnerserver8080pontonxpSoapListener
Request Acknowledge ndash every message to this partner needs to be acknowledged
Request Signed Acknowledge ndash to specify signing of acknowledgements received from this partner
Retries ndash the number of retries in case of unsuccessful message transmission
Retry Interval ndash the number of seconds to wait until the next retry
Ponton XP 21 ndash Installation and Configuration Guide 32
Configuration Options
Processing Configuration
The following options can be set
Default Adapter ndash enter the name of the adapter to be used by default
Processing Pipeline ndash specify the processing pipeline to be used for this profile
Schema Sets ndash choose which Schema set(s) are to be supported
Use XML Signature ndash indicate whether to use XML Signature
Use default message settings (specified under Configuration rarr Messenger rarr Processing) or define a specific processing filter for this partner
Ponton XP 21 ndash Installation and Configuration Guide 33
Configuration Options
Install Partner Certificates
There are different ways of distributing certificates to business partners One is to send the certificate per email and have the partner cut amp paste the certificate code into the partner configuration
Note It is important to cut amp paste the complete certificate code including the lines ldquo----- Begin Certificate -----rdquo and ldquo----- End Certificate -----rdquo
Important A partner certificate will only be accepted if the certificate of the issuing CA (certificate authority) was pre-installed Otherwise the trust relationship between the partner and the CA cannot be traced
One may select to install a general certificate or a SMIME certificate Please determine what kind of certificate you received from your partner before installing it
Ponton XP 21 ndash Installation and Configuration Guide 34
Configuration Options
53 Certificate Management Certificate management comprises the following initial steps
Configure your default CA This is usually properly pre-configured in the installation files
Install the root certificate of the default CA This needs to be installed manually if 3rd-party CAs are to be used
Request a certificate for your own Messenger This includes creating a publicprivate key pair and sending a certificate request to the CA
Optionally you can request and install a SMIME certificate to be used for SMIME based communication via email
Default CA Configuration
On this screen you specify the settings for receiving certificates from your default certificate authority (CA) CA email address ndash enter the email address to be used to request a certificate
from your (default) CA
Ponton XP 21 ndash Installation and Configuration Guide 35
Configuration Options
CA download URL ndash enter the URL at your CA from which to download certificates for your Messenger installation Please note that you can only install certificates for partners you have already defined in your partner configuration
Download interval ndash specify the interval to wait between automatic certificate downloads
To download the available certificates immediately click the Download button
Request and Install Your Own Certificate
To request a certificate from your (default) CA go to Configuration rarr Certificates rarr Request Certificate Please enter data for all the fields on this form If any entries are missing you will get an error message
After completing the form click OK to send the certificate request to your CA You will get a message indicating that the request has been sent
Ponton XP 21 ndash Installation and Configuration Guide 36
Configuration Options
Once you receive the requested certificate from your CA you can install it in your own partner configuration (ie the internal partner you will use to sendreceive messages) Go to Configuration rarr Partners rarr ltYour Partner Namegt rarr Install Certificate and paste the certificate text including the hellip into the text field
Then enter the password you used when you requested the certificate and click OK to complete the installation of the certificate You will see the result above the text field containing the certificate
Ponton XP 21 ndash Installation and Configuration Guide 37
Configuration Options
Install Partner Certificates
Install a certificate issued by the CA for the requesting partner This was already described in the Partner Configuration section for normal standard certificates
Note In case of SMIME certificates an additional password may be needed to allow the Messenger to access the certificate in the local certificate store
Install a CA Certificate
To install the certificate for your CA go to Configuration rarr Certificates rarr CA rarr Install Certificate and paste your CArsquos certificate into the text field This is the certificate that authorizes the CA as a signing authority for other certificates
Ponton XP 21 ndash Installation and Configuration Guide 38
Configuration Options
54 Configure the Hot Folder Adapter
General Configuration
Address Port ndash the Hot Folder Adapter (HFA) is addressed as a separate process that communicates with the Messenger via HTTP Therefore the hostname and port number need to be set up for the Messenger If the HFA is co-located with the Messenger on the same machine use ldquolocalhostrdquo for the IP address In this case the HFA does not run as a separate Java process but will be hosted on the same Tomcat server
Path ndash the HFA needs to know the Adapter communication path of the Messenger By default it is pontonxpAdapterService
Console File Log Level ndash the HFA provides log output to the console and to log files Both can be configured regarding the level of detail The console log is only useful if the HFA is running as a standalone application so you can safely leave it disabled in the default configuration
Ponton XP 21 ndash Installation and Configuration Guide 39
Configuration Options
Create Delete a HFA
Several HFAs may be created Each registers under a different ID at the Messenger HFAs may be created for individual partners If this is the case messages exchanged with the rest of the partners will be stored with the default HFA
Configure a HFA
Each HFA requires several directories to be defined
Inbox ndash a document will be stored in the Inbox whenever it was received from a partner
Outbox ndash documents to be sent to the business partner are dropped here The HFA grabs them in a defined frequency
Failed ndash if a document could not be sent to a partner and all retries failed it will be stored in this folder
Work ndash if a document transfer is in progress or all attempts to send the document have not yet been tried the document will remain here After a final failure it will be transferred to the Failed folder
Ponton XP 21 ndash Installation and Configuration Guide 40
Configuration Options
The following settings are also supported
Port ndash the port to be used by the HFA (optional)
Receiver format ndash standard format is XML
Save Backend envelope ndash the Backend envelope is retained for incoming messages
Support attachments ndash the HFA will save any files attached to an incoming message to the selected inbox folder
Scan Interval ndash the interval to wait (in seconds) between checking the outbox
Number of receiving threads ndash specifies the maximum number of receiving threads the adapter can process
Use partner subfolders ndash if this is set this HFA will create inbox and outbox folders for all remote partners Inbound messages will automatically be sorted into the according folder depending on the sender Outbound messages need to be placed into the receiving partnerrsquos outbox folder The backend message is not used in this mode and is ignored if it exists
Use Acknowledgement for ERP ndash with this option activated the ERP application receives an acknowledgement from the receiving Messenger on the partnerrsquos side This acknowledgement will be provided via the specified Inbox
Ponton XP 21 ndash Installation and Configuration Guide 41
Configuration Options
55 Ponton XE ndash The XML Editor Ponton XE is a separate Ponton product It is packaged with Ponton XP for free use only by papiNet users It allows to enter papiNet document data directly via a graphical user interface and to send the document via the hot folder adapter to the business partners
Ponton XE is fully documented in a separate manual Hence only the Messaging Plug-in will be described here
You can experiment with the XML Editor and check out all the features and options without using the Ponton XP connection To start with you may want to begin with the following steps
Create a new papiNet Purchase Order
Fill out the forms and use optional XML Elements by right-clicking the Plus-icons in the layout tree
Create an HTML file by choosing Document Export to HTML from the menu
Save the document to an XML file and re-load it again
Ponton XP 21 ndash Installation and Configuration Guide 42
Configuration Options
Interface between Ponton XE and Ponton XP
The two software applications communicate via hot folders as illustrated in the following figure
Message Plug-in
Outbox Inbox AckInboxImport
Ponton XP Ponton XE
XMLXML XMLXML XMLXML XMLXML
Hot Folder Adapter
The XML Editor is connected to the Messenger via the Hot Folder Adapter All these folder settings need to be synchronized for a proper data exchange
Configuration of the Messaging Plug-in
The Messaging Plug-in can be flexibly installed and de-installed with the remaining part of Ponton XE If the file messengerjar is removed from the plugins directory it will automatically disappear from the Ponton XE menu bar as soon as the software is started again
Before transferring messages out of Ponton XE you need to preset the following information
Default values for the sending and receiving partners ndash these values may be overridden for an individual transfer
Folder locations of the Hot Folder Adapter ndash the Inbox Outbox and AckInbox need to be set for document exchange with Ponton XP
Default setting for Test Message flag ndash this can be overridden for the actual document transfer
Import Directory ndash Ponton XE will automatically scan the Inbox folder and import received documents to the given folder for local processing
Ponton XP 21 ndash Installation and Configuration Guide 43
Configuration Options
Open Messages after Import ndash if this option is activated messages received from the Inbox will automatically be displayed in Ponton XE
Delete message in Inbox ndash to always remove received messages from the HFA Inbox this option needs to be activated otherwise a copy will remain in the Inbox folder
Ponton XP 21 ndash Installation and Configuration Guide 44
Configuration Options
Ponton XP 21 ndash Installation and Configuration Guide 45
Configuration Options
Using Ponton XE
After setting the configuration and creating a document you can transfer the document to your business partner This is done by means of the following steps
Choose the menu item ldquoMessenger rarr Transfer rarr Send Messagerdquo
Select a sending and receiving partner
Override the settings for the HFA folders
Tick the checkbox to qualify this message as a test message
After transferring the document to the Messenger Ponton XE will wait for a response This is recognised as an acknowledge file which is dropped into the AckInbox folder of the HFA As soon as this has been received a successful transfer in indicated
You may check with the Message Monitor to determine how the document was forwarded by the Messenger to the receiver or whether any errors occurred
Ponton XP 21 ndash Installation and Configuration Guide 46
Configuration Options
56 Display Schema Configuration The schema sets to be supported for each partner are defined in the partner configuration The standard sets available with the installation are shown under Configuration rarr Schemata
Ponton XP 21 ndash Installation and Configuration Guide 47
Configuration Options
57 User Administration Two types of users are distinguished
Administrators ndash these users have full access to the Messengerrsquos configuration interface
Operators ndash these users only have access to the Adapter Monitor the Message Monitor and the Test Adapter The other options in the Messenger menu are not available
Please note the following points in connection with the Messengerrsquos standard user administration
This is a very simple user administration based on the Tomcat implementation If you want to integrate the Messenger with another user administration such as LDAP please contact Ponton Consulting for support
A userrsquos access rights (administratoroperator) are defined when the user account is created ndash they cannot be changed subsequently
User accounts can only be created or deleted by administrators
Ponton XP 21 ndash Installation and Configuration Guide 48
Advanced Configuration
6 Advanced Configuration
61 XML Schema Configuration Important The Messenger distinguishes between available schema set and activated schema sets Just inserting entries in the schema configuration as described in this section does not activate the schema sets or the corresponding schemas for use by the Messenger In order to make use of the schemas in a schema set you have to activate the schema set in the relevant partner configuration To view or modify the activated schema sets in a partner configuration go to
Configuration rarr Partners rarr ltpartner namegt rarr Processing
and activatedeactivate the relevant checkboxes
In the Messengerrsquos configuration interface you can activate and deactivate schema sets for specific partner configurations It is not possible however to modify the contents and specifications of the individual schema sets Any necessary changes have to be made in the configuration file
[installation root]xmlpipewebrootWEB-INFconfigschemataxml
The configuration entries in this file are structured as follows
ltSchemaSet Name=papinet21gt
ltSchemaName=httpwwwpapinetorgdataAvailabilityV2R10xsd MessageType=Availability MessageVersion=V2R10gt
ltNamespacegtltNamespacegt
ltDisplayNamegtAvailability 21ltDisplayNamegt
ltSchemaFilegtAvailabilityV2R10xsdltSchemaFilegt
ltXSLFilegtltXSLFilegt
ltSchemagt
ltSchema Name=yourSchema MessageType=yourMsgType MessageVersion=yourMsgVersgt
ltNamespacegtyourNamespaceltNamespacegt
ltDisplayNamegtYour Display NameltDisplayNamegt
ltSchemaFilegtyourSchemaFileltSchemaFilegt
ltXSLFilegtyourStylesheetltXSLFilegt
ltSchemagt
hellip
ltSchemaFoldergtpapinet210ltSchemaFoldergt
ltXSLFoldergtpapinet210ltXSLFoldergt
ltSchemaSetgt
Ponton XP 21 ndash Installation and Configuration Guide 49
Advanced Configuration
You can add a schema to an existing schema set in this file by inserting a ltSchemagt block (just copy and paste one of the existing blocks and modify the configuration as required) Please ensure that your new schema specification includes correct settings for the attributes of the Schema element
Name= This attribute corresponds with the ebXML Schema Location of incoming messages When an ebXML message is received the Messenger looks for a schema configuration where the Schema Name attribute matches the Schema Location specified in the ebXML envelope
MessageType= This attribute corresponds with the attribute MessageMetaDataDocumentInfoMessageName in the backend envelope of outgoing messages
MessageVersion= This attribute corresponds with the element MessageMe aDataDocumentInfoDTDVersionNumber in the backend envelope of outgoing messages
t
Note The specification of MessageType and MessageVersion must be used together for outgoing messages as they are combined to form an identifier for the message schema
You also have the option of adding a new schema set with your own schema definitions to the schema configuration In this case you would insert a ltSchemaSetgt block with subordinate ltSchemagt blocks Your added schema set will automatically be inserted in the list of available schema sets on the Messenger configuration pages
62 Advanced Database Configuration Important Since the Messenger database is used for essential message processing and tracking purposes you should not experiment with the database configuration on a ldquoliverdquo system For test and debugging purposes you are advised to set up a trial system
Installation with other Databases
This section describes the main steps required to install a different database system on the Messenger for example an Oracle database
1 Install database driver Copy the database driver to
[installation root]xmlpipewebrootWEB-INFlib
Note Please note that only drivers with the extension jar are loaded by the Tomcat servlet engine If the JDBC driver you want to use is a zip file you will have to rename the file to jar The JDBC driver for Oracle 9i is the file ojdbc14jar
Ponton XP 21 ndash Installation and Configuration Guide 50
Advanced Configuration
2 Create database and tables Ponton XP is supplied with SQL scripts for HSQL and for Oracle that can be used to create the tables for the Messenger database If you are using another database you may need to modify these scripts to work correctly with your database system
The SQL scripts are located in the subfolders under [installation root]sql
Once the database tables are in place you will also need to carry out the SQL script that inserts the log messages into the database ie
[installation root]sqlinsert_log_messagessql
3 Set up database connection The configuration of database connections is described in the section Set Up Messenger Database beginning on page 20 To connect with a different database choose ldquootherrdquo from the list of database drivers and enter the configuration for your database on the next page
The entries for the Oracle 9i JDBC driver are
Driver oraclejdbcdriverOracleDriver
URL jdbcoraclethinlthostgtltportgtltdatabasegt
63 Advanced Message Monitor Configuration In the configuration directory ldquoxmlpipewebrootWEB-INFconfigrdquo there is a file messagemonitorxml which can be used to change the selection and ordering of the Message overview window in the Message Monitor The default setting is displayed in the following picture
Ponton XP 21 ndash Installation and Configuration Guide 51
Advanced Configuration
Here the number of line items per page can be set If a high resolution screen is used (beyond 1024 x 768 pixel) one may increase the number of lines
Further a mapping table defines which database column is to be displayed in which monitor column The number of columns again depends on the screen resolution
Finally if main memory size allows caching of XSL stylesheet definitions helps accelerating processing speed for XSL transformations
64 Tomcat SSL Installation
Generate a key
One minor problem with Tomcat or any other webserver that uses the internal Java symmetric key architecture is that you are not allowed to export or import private keys For this reason it is not possible to use the existing key-pair installed with the Messenger software You will have to generate a new key-pair and send a certificate request to the Ponton certificate authority (or other certification authority) to receive a valid certificate
To generate a new key-pair open a command prompt and go to the tomcat-4118 directory The keystore used for a Tomcat SSL installation is located in the Tomcat root directory and is called ssl-keystore The Tomcat installation already contains a certificate for lsquolocalhostrsquo so you can test the HTTPS access with a web browser
Before you can create a new Tomcat certificate you will have to delete the installed certificate Note that the default password for the Tomcat keystore is ldquochangeitrdquo keytool -delete -alias tomcat ndashkeystore ssl-keystore
Now use the following command to create a new key-pair Please note that you need to specify the Listener hostname (eg listenermyserverde) when the keytool asks for lsquofirst and last namersquo keytool -genkey -alias tomcat -keyalg RSA ndashkeystore ssl-keystore
After generating the new key the next step is to export a certificate request with the following command keytool ndashcertreq ndashalias tomcat ndashfile myservercsr ndashkeystore ssl-keystore
This will generate the file myservercsr in the current directory Send this file via email to xp-certponton-consultingde It will be signed and sent back to you The reply will contain a file with the certificate
Finally you have to re-import this signed certificate into the Tomcat SSL keystore Please note that the import may take some time keytool ndashimport ndashalias tomcat ndashfile myservercer ndashkeystore ssl-keystore
If you have any problems starting the keytool make sure you have the javahomebin directory specified in your PATH environment variable Of course you can also change to the javahomebin directory and start the keytool there
Ponton XP 21 ndash Installation and Configuration Guide 52
Advanced Configuration
Update Tomcat configuration
SSL is already activated in the Tomcat configuration packaged in the distribution However you might want to change the specified SSL port (by default the SSL port is set to 8443) You can change the port by editing the file
[tomcat installation]confserverconf
The following section configures the SSL parameters
lt-- Define a SSL Coyote HTTP11 Connector on port 8443 --gt
ltConnector className=orgapachecoyotetomcat4CoyoteConnector
port=8443
minProcessors=5
maxProcessors=75
enableLookups=true
acceptCount=100
debug=0
scheme=https
secure=true
useURIValidationHack=false
disableUploadTimeout=truegt
ltFactory className=orgapachecoyotetomcat4CoyoteServerSocketFactory
clientAuth=false
keystoreFile=ssl-keystore
protocol=TLS gt
ltConnectorgt
Verify setup
To verify if everything is working correctly start the Tomcat webserver as usual and connect to the webserver with your browser
Go to httpsyourserveraddress ndash initially you might get a warning window if the root certificate authority is not known to the browser If you continue by clicking OK you should see the usual Ponton XP start page
If everything comes up correctly you can use SSL to receive messages with the Ponton XP Software
Ponton XP 21 ndash Installation and Configuration Guide 53
Advanced Configuration
65 Distributed Installation If the Messenger is installed on a server that cannot be reached from the Internet you will need to install the Listener as well The purpose of the Listener is to pick up incoming connections and forward them to the Messenger (across the firewall) The firewall rules must be set up to allow this connection between the Listener and the Messenger When a message is received the Listener notifies the Messenger and the Messenger then picks up the message
You also have the option of subsequently installing the Listener as a service under Windows ndash this service can then be configured to start automatically when the system starts up
Note If you are going to run the Messenger in combination with the Listener your partners will have to enter the URI of your Listener in their configurations (under Configuration rarr Partners rarr ltpartner namegt rarr URI of Partners Messenger Service)
Listener Installation and Configuration
The Listener is installed by running the installer program (eg PontonXP-21-setuplistener-windowsexe) on the relevant system You are asked to specify an installation folder and also have the option of creating a desktop or menu shortcut Thatrsquos it
-
The settings for the Listener are contained in the configuration file listenerproperties which is located in the folder [Listener root folder]config To modify these settings you will have to edit the configuration file directly Access via the Messengerrsquos configuration interface is not possible
The file contains the following settings
HttpPort = Port number (for external HTTP connections)
HttpsPort = Port number (for external HTTPS connections)
LogLevel = DEBUG | INFO | WARN | ERROR | FATAL | OFF
The following settings specify the host and port of the Messenger for forwarding connections (HTTPHTTPS) The forwarding connection mode is activated by entering the relevant host and port addresses and removing the hash marks (used to mark ldquocomment linesrdquo in Java property files)
HttpServer = server1port1 (HTTP forwarding connection to the Messenger)
HttpsServer = server1port1 (HTTPS forwarding connection to the Messenger)
Ponton XP 21 ndash Installation and Configuration Guide 54
Advanced Configuration
The following settings specify the Listenerrsquos port for callback connections (HTTPHTTPS) with the Messenger As with the forwarding connection the callback connection mode is activated by entering the relevant port addresses and removing the hash marks (Obviously it makes no sense to have both connections activated at the same time)
HttpServicePort = Port number (for internal HTTP connections to the Listener)
HttpsServicePort = Port number (for internal HTTPS connections to the Listener)
Starting the Listener
To start the Listener open a command prompt and start the class
depontonconsultingxmlpipeListener
with the classpath
-cp libcommons-logging-api-103jarlibcommonutilsjarlibxp_listenerjarconfig
You can also use the installed batch file [Listener root folder]startListenerbat
Callback Mode
Details of the communication flow
When the Messenger starts up it searches for the Listener
Note The Listener should start up first so that it can be found by the Messenger
If the search is successful a permanent connection is established between the Messenger and the Listener The Messenger uses the following settings in the configuration to establish the connection with the Listener
Configuration rarr Messenger rarr Listener rarr HTTP[S] rarr Hostname
Configuration rarr Messenger rarr Listener rarr HTTP[S] rarr Internal Listener Port
Ponton XP 21 ndash Installation and Configuration Guide 55
Advanced Configuration
When the Listener receives an incoming message (or rather an HTTPHTTPS request) it informs the Messenger ndash by way of the permanent connection ndash about the arrival of the new request indicating which port the Messenger can use to pick up the connection
Note This port number is randomly selected by the Listener and cannot be configured
The Messenger picks up the connection on the Listenerrsquos specified port and redirects it to its own local port for further processing
This local port corresponds to the setting for
Configuration rarr Messenger rarr Listener rarr HTTP[S] rarr Internal Messenger Port
in the configuration GUI
Forwarding Mode
Details of the communication flow
In forwarding mode no permanent connection is established between the Messenger and the Listener
When the Listener receives an incoming HTTPHTTPS request it simply forwards the request to the Messenger using the address specified in listenerproperties (HttpServerHttpsServer)
Note To allow this forwarding connection the firewall has to be configured so that the Listener is permitted to access the Messenger on the specified port(s)
Ponton XP 21 ndash Installation and Configuration Guide 56
Advanced Configuration
66 Port Configuration The Messengerrsquos standard configuration uses port 8080 for HTTP connections and port 8443 for secure (HTTPS) connections This section describes how to set up the messenger to use a non-standard port configuration This involves making manual changes to several configuration files in particular the Tomcat serverxml and the Messengerrsquos adapter configuration files
Tomcat Settings
The port setting for the Messengerrsquos HTTP and HTTPS connections are specified in the Tomcat configuration file
[installation root]tomcat-xxxconfserverxml
This file defines the connections (Connectors) for the Messenger as follows
lt-- Define a non-SSL Coyote HTTP11 Connector on port 8080 --gt
ltConnector className=orgapachecoyotetomcat4CoyoteConnector
port=yourMessengerPort minProcessors=5 maxProcessors=75
enableLookups=true redirectPort=yourRed rectPort i acceptCount=100 debug=0 connectionTimeout=20000
useURIValidationHack=false disableUploadTimeout=true gt
lt-- Define a SSL Coyote HTTP11 Connector on port 8443 --gt
ltConnector className=orgapachecoyotetomcat4CoyoteConnector
port=yourSSLPort minProcessors=5 maxProcessors=75
enableLookups=true
acceptCount=100 debug=0 scheme=https secure=true
useURIValidationHack=false disableUploadTimeout=truegt
ltFactory className=orgapachecoyotetomcat4CoyoteServerSocketFactory
clientAuth=false keystoreFile=ssl-keystore protocol=TLS gt
ltConnectorgt
The standard settings for the Messenger ports are
HTTP 8080
SSL 8443
To modify your connections you will need to enter the relevant port numbers indicated above as yourMessengerPort yourRedirectPort (which normally points to the SSL connection) and yourSSLPort
Ponton XP 21 ndash Installation and Configuration Guide 57
Advanced Configuration
Adapter Settings
The settings for the Messenger adapters are contained in the relevant XML files under
[installation root]xmlpipewebrootWEB-INFconfig
In particular a standard installation includes the files testadap erxml and hotfolderxml Each of these configuration files contains a block specifying the connection to the messenger
t
ltMessengergt
ltAddressgtyourMessengerHostltAddressgt
ltPortNumbergtyourMessengerPortltPortNumbergt
ltPathgthellipltPathgt
ltMessengergt
If you have configured the Messenger to run on a different port (see above) you will need to enter the relevant port number here
Ponton XP 21 ndash Installation and Configuration Guide 58
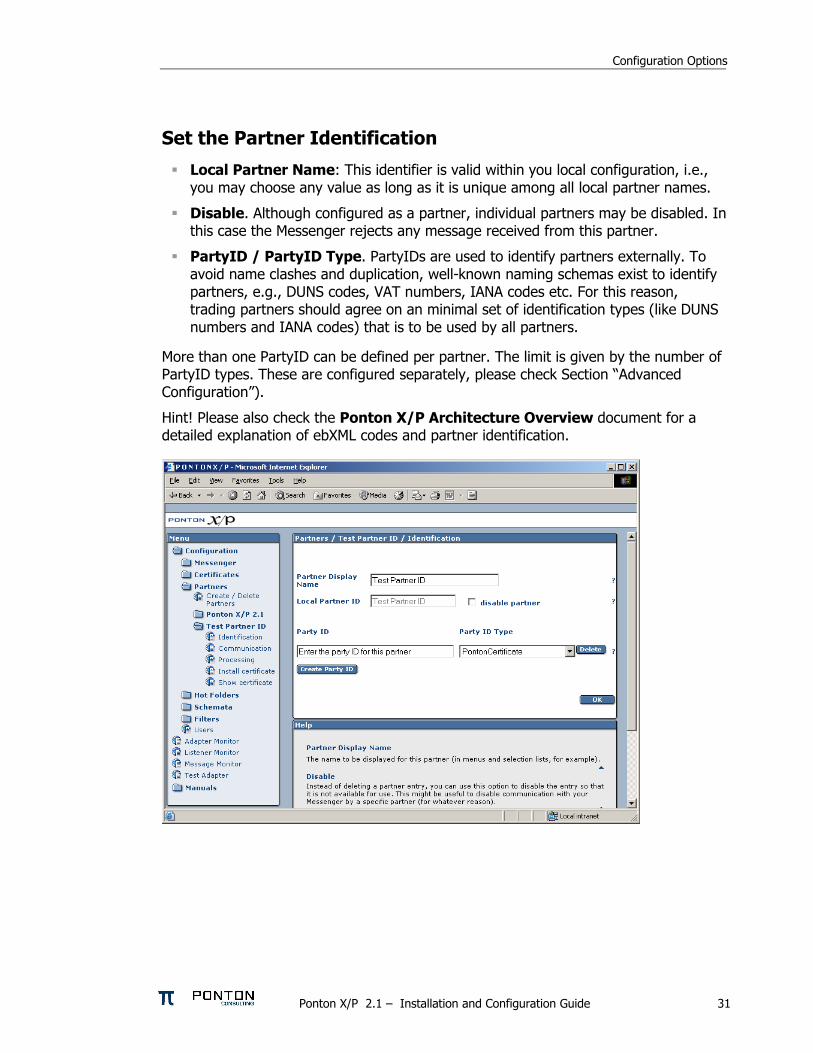
Configuration Options
Set the Partner Identification
Local Partner Name This identifier is valid within you local configuration ie you may choose any value as long as it is unique among all local partner names
Disable Although configured as a partner individual partners may be disabled In this case the Messenger rejects any message received from this partner
PartyID PartyID Type PartyIDs are used to identify partners externally To avoid name clashes and duplication well-known naming schemas exist to identify partners eg DUNS codes VAT numbers IANA codes etc For this reason trading partners should agree on an minimal set of identification types (like DUNS numbers and IANA codes) that is to be used by all partners
More than one PartyID can be defined per partner The limit is given by the number of PartyID types These are configured separately please check Section ldquoAdvanced Configurationrdquo)
Hint Please also check the Ponton XP Architecture Overview document for a detailed explanation of ebXML codes and partner identification
Ponton XP 21 ndash Installation and Configuration Guide 31
Configuration Options
Partner Communication Configuration
For each partner the following configuration options may be set URI of Partnerrsquos Messenger Service ndash enter the address of the partnerrsquos
Messenger for example httppartnerserver8080pontonxpSoapListener
Request Acknowledge ndash every message to this partner needs to be acknowledged
Request Signed Acknowledge ndash to specify signing of acknowledgements received from this partner
Retries ndash the number of retries in case of unsuccessful message transmission
Retry Interval ndash the number of seconds to wait until the next retry
Ponton XP 21 ndash Installation and Configuration Guide 32
Configuration Options
Processing Configuration
The following options can be set
Default Adapter ndash enter the name of the adapter to be used by default
Processing Pipeline ndash specify the processing pipeline to be used for this profile
Schema Sets ndash choose which Schema set(s) are to be supported
Use XML Signature ndash indicate whether to use XML Signature
Use default message settings (specified under Configuration rarr Messenger rarr Processing) or define a specific processing filter for this partner
Ponton XP 21 ndash Installation and Configuration Guide 33
Configuration Options
Install Partner Certificates
There are different ways of distributing certificates to business partners One is to send the certificate per email and have the partner cut amp paste the certificate code into the partner configuration
Note It is important to cut amp paste the complete certificate code including the lines ldquo----- Begin Certificate -----rdquo and ldquo----- End Certificate -----rdquo
Important A partner certificate will only be accepted if the certificate of the issuing CA (certificate authority) was pre-installed Otherwise the trust relationship between the partner and the CA cannot be traced
One may select to install a general certificate or a SMIME certificate Please determine what kind of certificate you received from your partner before installing it
Ponton XP 21 ndash Installation and Configuration Guide 34
Configuration Options
53 Certificate Management Certificate management comprises the following initial steps
Configure your default CA This is usually properly pre-configured in the installation files
Install the root certificate of the default CA This needs to be installed manually if 3rd-party CAs are to be used
Request a certificate for your own Messenger This includes creating a publicprivate key pair and sending a certificate request to the CA
Optionally you can request and install a SMIME certificate to be used for SMIME based communication via email
Default CA Configuration
On this screen you specify the settings for receiving certificates from your default certificate authority (CA) CA email address ndash enter the email address to be used to request a certificate
from your (default) CA
Ponton XP 21 ndash Installation and Configuration Guide 35
Configuration Options
CA download URL ndash enter the URL at your CA from which to download certificates for your Messenger installation Please note that you can only install certificates for partners you have already defined in your partner configuration
Download interval ndash specify the interval to wait between automatic certificate downloads
To download the available certificates immediately click the Download button
Request and Install Your Own Certificate
To request a certificate from your (default) CA go to Configuration rarr Certificates rarr Request Certificate Please enter data for all the fields on this form If any entries are missing you will get an error message
After completing the form click OK to send the certificate request to your CA You will get a message indicating that the request has been sent
Ponton XP 21 ndash Installation and Configuration Guide 36
Configuration Options
Once you receive the requested certificate from your CA you can install it in your own partner configuration (ie the internal partner you will use to sendreceive messages) Go to Configuration rarr Partners rarr ltYour Partner Namegt rarr Install Certificate and paste the certificate text including the hellip into the text field
Then enter the password you used when you requested the certificate and click OK to complete the installation of the certificate You will see the result above the text field containing the certificate
Ponton XP 21 ndash Installation and Configuration Guide 37
Configuration Options
Install Partner Certificates
Install a certificate issued by the CA for the requesting partner This was already described in the Partner Configuration section for normal standard certificates
Note In case of SMIME certificates an additional password may be needed to allow the Messenger to access the certificate in the local certificate store
Install a CA Certificate
To install the certificate for your CA go to Configuration rarr Certificates rarr CA rarr Install Certificate and paste your CArsquos certificate into the text field This is the certificate that authorizes the CA as a signing authority for other certificates
Ponton XP 21 ndash Installation and Configuration Guide 38
Configuration Options
54 Configure the Hot Folder Adapter
General Configuration
Address Port ndash the Hot Folder Adapter (HFA) is addressed as a separate process that communicates with the Messenger via HTTP Therefore the hostname and port number need to be set up for the Messenger If the HFA is co-located with the Messenger on the same machine use ldquolocalhostrdquo for the IP address In this case the HFA does not run as a separate Java process but will be hosted on the same Tomcat server
Path ndash the HFA needs to know the Adapter communication path of the Messenger By default it is pontonxpAdapterService
Console File Log Level ndash the HFA provides log output to the console and to log files Both can be configured regarding the level of detail The console log is only useful if the HFA is running as a standalone application so you can safely leave it disabled in the default configuration
Ponton XP 21 ndash Installation and Configuration Guide 39
Configuration Options
Create Delete a HFA
Several HFAs may be created Each registers under a different ID at the Messenger HFAs may be created for individual partners If this is the case messages exchanged with the rest of the partners will be stored with the default HFA
Configure a HFA
Each HFA requires several directories to be defined
Inbox ndash a document will be stored in the Inbox whenever it was received from a partner
Outbox ndash documents to be sent to the business partner are dropped here The HFA grabs them in a defined frequency
Failed ndash if a document could not be sent to a partner and all retries failed it will be stored in this folder
Work ndash if a document transfer is in progress or all attempts to send the document have not yet been tried the document will remain here After a final failure it will be transferred to the Failed folder
Ponton XP 21 ndash Installation and Configuration Guide 40
Configuration Options
The following settings are also supported
Port ndash the port to be used by the HFA (optional)
Receiver format ndash standard format is XML
Save Backend envelope ndash the Backend envelope is retained for incoming messages
Support attachments ndash the HFA will save any files attached to an incoming message to the selected inbox folder
Scan Interval ndash the interval to wait (in seconds) between checking the outbox
Number of receiving threads ndash specifies the maximum number of receiving threads the adapter can process
Use partner subfolders ndash if this is set this HFA will create inbox and outbox folders for all remote partners Inbound messages will automatically be sorted into the according folder depending on the sender Outbound messages need to be placed into the receiving partnerrsquos outbox folder The backend message is not used in this mode and is ignored if it exists
Use Acknowledgement for ERP ndash with this option activated the ERP application receives an acknowledgement from the receiving Messenger on the partnerrsquos side This acknowledgement will be provided via the specified Inbox
Ponton XP 21 ndash Installation and Configuration Guide 41
Configuration Options
55 Ponton XE ndash The XML Editor Ponton XE is a separate Ponton product It is packaged with Ponton XP for free use only by papiNet users It allows to enter papiNet document data directly via a graphical user interface and to send the document via the hot folder adapter to the business partners
Ponton XE is fully documented in a separate manual Hence only the Messaging Plug-in will be described here
You can experiment with the XML Editor and check out all the features and options without using the Ponton XP connection To start with you may want to begin with the following steps
Create a new papiNet Purchase Order
Fill out the forms and use optional XML Elements by right-clicking the Plus-icons in the layout tree
Create an HTML file by choosing Document Export to HTML from the menu
Save the document to an XML file and re-load it again
Ponton XP 21 ndash Installation and Configuration Guide 42
Configuration Options
Interface between Ponton XE and Ponton XP
The two software applications communicate via hot folders as illustrated in the following figure
Message Plug-in
Outbox Inbox AckInboxImport
Ponton XP Ponton XE
XMLXML XMLXML XMLXML XMLXML
Hot Folder Adapter
The XML Editor is connected to the Messenger via the Hot Folder Adapter All these folder settings need to be synchronized for a proper data exchange
Configuration of the Messaging Plug-in
The Messaging Plug-in can be flexibly installed and de-installed with the remaining part of Ponton XE If the file messengerjar is removed from the plugins directory it will automatically disappear from the Ponton XE menu bar as soon as the software is started again
Before transferring messages out of Ponton XE you need to preset the following information
Default values for the sending and receiving partners ndash these values may be overridden for an individual transfer
Folder locations of the Hot Folder Adapter ndash the Inbox Outbox and AckInbox need to be set for document exchange with Ponton XP
Default setting for Test Message flag ndash this can be overridden for the actual document transfer
Import Directory ndash Ponton XE will automatically scan the Inbox folder and import received documents to the given folder for local processing
Ponton XP 21 ndash Installation and Configuration Guide 43
Configuration Options
Open Messages after Import ndash if this option is activated messages received from the Inbox will automatically be displayed in Ponton XE
Delete message in Inbox ndash to always remove received messages from the HFA Inbox this option needs to be activated otherwise a copy will remain in the Inbox folder
Ponton XP 21 ndash Installation and Configuration Guide 44
Configuration Options
Ponton XP 21 ndash Installation and Configuration Guide 45
Configuration Options
Using Ponton XE
After setting the configuration and creating a document you can transfer the document to your business partner This is done by means of the following steps
Choose the menu item ldquoMessenger rarr Transfer rarr Send Messagerdquo
Select a sending and receiving partner
Override the settings for the HFA folders
Tick the checkbox to qualify this message as a test message
After transferring the document to the Messenger Ponton XE will wait for a response This is recognised as an acknowledge file which is dropped into the AckInbox folder of the HFA As soon as this has been received a successful transfer in indicated
You may check with the Message Monitor to determine how the document was forwarded by the Messenger to the receiver or whether any errors occurred
Ponton XP 21 ndash Installation and Configuration Guide 46
Configuration Options
56 Display Schema Configuration The schema sets to be supported for each partner are defined in the partner configuration The standard sets available with the installation are shown under Configuration rarr Schemata
Ponton XP 21 ndash Installation and Configuration Guide 47
Configuration Options
57 User Administration Two types of users are distinguished
Administrators ndash these users have full access to the Messengerrsquos configuration interface
Operators ndash these users only have access to the Adapter Monitor the Message Monitor and the Test Adapter The other options in the Messenger menu are not available
Please note the following points in connection with the Messengerrsquos standard user administration
This is a very simple user administration based on the Tomcat implementation If you want to integrate the Messenger with another user administration such as LDAP please contact Ponton Consulting for support
A userrsquos access rights (administratoroperator) are defined when the user account is created ndash they cannot be changed subsequently
User accounts can only be created or deleted by administrators
Ponton XP 21 ndash Installation and Configuration Guide 48
Advanced Configuration
6 Advanced Configuration
61 XML Schema Configuration Important The Messenger distinguishes between available schema set and activated schema sets Just inserting entries in the schema configuration as described in this section does not activate the schema sets or the corresponding schemas for use by the Messenger In order to make use of the schemas in a schema set you have to activate the schema set in the relevant partner configuration To view or modify the activated schema sets in a partner configuration go to
Configuration rarr Partners rarr ltpartner namegt rarr Processing
and activatedeactivate the relevant checkboxes
In the Messengerrsquos configuration interface you can activate and deactivate schema sets for specific partner configurations It is not possible however to modify the contents and specifications of the individual schema sets Any necessary changes have to be made in the configuration file
[installation root]xmlpipewebrootWEB-INFconfigschemataxml
The configuration entries in this file are structured as follows
ltSchemaSet Name=papinet21gt
ltSchemaName=httpwwwpapinetorgdataAvailabilityV2R10xsd MessageType=Availability MessageVersion=V2R10gt
ltNamespacegtltNamespacegt
ltDisplayNamegtAvailability 21ltDisplayNamegt
ltSchemaFilegtAvailabilityV2R10xsdltSchemaFilegt
ltXSLFilegtltXSLFilegt
ltSchemagt
ltSchema Name=yourSchema MessageType=yourMsgType MessageVersion=yourMsgVersgt
ltNamespacegtyourNamespaceltNamespacegt
ltDisplayNamegtYour Display NameltDisplayNamegt
ltSchemaFilegtyourSchemaFileltSchemaFilegt
ltXSLFilegtyourStylesheetltXSLFilegt
ltSchemagt
hellip
ltSchemaFoldergtpapinet210ltSchemaFoldergt
ltXSLFoldergtpapinet210ltXSLFoldergt
ltSchemaSetgt
Ponton XP 21 ndash Installation and Configuration Guide 49
Advanced Configuration
You can add a schema to an existing schema set in this file by inserting a ltSchemagt block (just copy and paste one of the existing blocks and modify the configuration as required) Please ensure that your new schema specification includes correct settings for the attributes of the Schema element
Name= This attribute corresponds with the ebXML Schema Location of incoming messages When an ebXML message is received the Messenger looks for a schema configuration where the Schema Name attribute matches the Schema Location specified in the ebXML envelope
MessageType= This attribute corresponds with the attribute MessageMetaDataDocumentInfoMessageName in the backend envelope of outgoing messages
MessageVersion= This attribute corresponds with the element MessageMe aDataDocumentInfoDTDVersionNumber in the backend envelope of outgoing messages
t
Note The specification of MessageType and MessageVersion must be used together for outgoing messages as they are combined to form an identifier for the message schema
You also have the option of adding a new schema set with your own schema definitions to the schema configuration In this case you would insert a ltSchemaSetgt block with subordinate ltSchemagt blocks Your added schema set will automatically be inserted in the list of available schema sets on the Messenger configuration pages
62 Advanced Database Configuration Important Since the Messenger database is used for essential message processing and tracking purposes you should not experiment with the database configuration on a ldquoliverdquo system For test and debugging purposes you are advised to set up a trial system
Installation with other Databases
This section describes the main steps required to install a different database system on the Messenger for example an Oracle database
1 Install database driver Copy the database driver to
[installation root]xmlpipewebrootWEB-INFlib
Note Please note that only drivers with the extension jar are loaded by the Tomcat servlet engine If the JDBC driver you want to use is a zip file you will have to rename the file to jar The JDBC driver for Oracle 9i is the file ojdbc14jar
Ponton XP 21 ndash Installation and Configuration Guide 50
Advanced Configuration
2 Create database and tables Ponton XP is supplied with SQL scripts for HSQL and for Oracle that can be used to create the tables for the Messenger database If you are using another database you may need to modify these scripts to work correctly with your database system
The SQL scripts are located in the subfolders under [installation root]sql
Once the database tables are in place you will also need to carry out the SQL script that inserts the log messages into the database ie
[installation root]sqlinsert_log_messagessql
3 Set up database connection The configuration of database connections is described in the section Set Up Messenger Database beginning on page 20 To connect with a different database choose ldquootherrdquo from the list of database drivers and enter the configuration for your database on the next page
The entries for the Oracle 9i JDBC driver are
Driver oraclejdbcdriverOracleDriver
URL jdbcoraclethinlthostgtltportgtltdatabasegt
63 Advanced Message Monitor Configuration In the configuration directory ldquoxmlpipewebrootWEB-INFconfigrdquo there is a file messagemonitorxml which can be used to change the selection and ordering of the Message overview window in the Message Monitor The default setting is displayed in the following picture
Ponton XP 21 ndash Installation and Configuration Guide 51
Advanced Configuration
Here the number of line items per page can be set If a high resolution screen is used (beyond 1024 x 768 pixel) one may increase the number of lines
Further a mapping table defines which database column is to be displayed in which monitor column The number of columns again depends on the screen resolution
Finally if main memory size allows caching of XSL stylesheet definitions helps accelerating processing speed for XSL transformations
64 Tomcat SSL Installation
Generate a key
One minor problem with Tomcat or any other webserver that uses the internal Java symmetric key architecture is that you are not allowed to export or import private keys For this reason it is not possible to use the existing key-pair installed with the Messenger software You will have to generate a new key-pair and send a certificate request to the Ponton certificate authority (or other certification authority) to receive a valid certificate
To generate a new key-pair open a command prompt and go to the tomcat-4118 directory The keystore used for a Tomcat SSL installation is located in the Tomcat root directory and is called ssl-keystore The Tomcat installation already contains a certificate for lsquolocalhostrsquo so you can test the HTTPS access with a web browser
Before you can create a new Tomcat certificate you will have to delete the installed certificate Note that the default password for the Tomcat keystore is ldquochangeitrdquo keytool -delete -alias tomcat ndashkeystore ssl-keystore
Now use the following command to create a new key-pair Please note that you need to specify the Listener hostname (eg listenermyserverde) when the keytool asks for lsquofirst and last namersquo keytool -genkey -alias tomcat -keyalg RSA ndashkeystore ssl-keystore
After generating the new key the next step is to export a certificate request with the following command keytool ndashcertreq ndashalias tomcat ndashfile myservercsr ndashkeystore ssl-keystore
This will generate the file myservercsr in the current directory Send this file via email to xp-certponton-consultingde It will be signed and sent back to you The reply will contain a file with the certificate
Finally you have to re-import this signed certificate into the Tomcat SSL keystore Please note that the import may take some time keytool ndashimport ndashalias tomcat ndashfile myservercer ndashkeystore ssl-keystore
If you have any problems starting the keytool make sure you have the javahomebin directory specified in your PATH environment variable Of course you can also change to the javahomebin directory and start the keytool there
Ponton XP 21 ndash Installation and Configuration Guide 52
Advanced Configuration
Update Tomcat configuration
SSL is already activated in the Tomcat configuration packaged in the distribution However you might want to change the specified SSL port (by default the SSL port is set to 8443) You can change the port by editing the file
[tomcat installation]confserverconf
The following section configures the SSL parameters
lt-- Define a SSL Coyote HTTP11 Connector on port 8443 --gt
ltConnector className=orgapachecoyotetomcat4CoyoteConnector
port=8443
minProcessors=5
maxProcessors=75
enableLookups=true
acceptCount=100
debug=0
scheme=https
secure=true
useURIValidationHack=false
disableUploadTimeout=truegt
ltFactory className=orgapachecoyotetomcat4CoyoteServerSocketFactory
clientAuth=false
keystoreFile=ssl-keystore
protocol=TLS gt
ltConnectorgt
Verify setup
To verify if everything is working correctly start the Tomcat webserver as usual and connect to the webserver with your browser
Go to httpsyourserveraddress ndash initially you might get a warning window if the root certificate authority is not known to the browser If you continue by clicking OK you should see the usual Ponton XP start page
If everything comes up correctly you can use SSL to receive messages with the Ponton XP Software
Ponton XP 21 ndash Installation and Configuration Guide 53
Advanced Configuration
65 Distributed Installation If the Messenger is installed on a server that cannot be reached from the Internet you will need to install the Listener as well The purpose of the Listener is to pick up incoming connections and forward them to the Messenger (across the firewall) The firewall rules must be set up to allow this connection between the Listener and the Messenger When a message is received the Listener notifies the Messenger and the Messenger then picks up the message
You also have the option of subsequently installing the Listener as a service under Windows ndash this service can then be configured to start automatically when the system starts up
Note If you are going to run the Messenger in combination with the Listener your partners will have to enter the URI of your Listener in their configurations (under Configuration rarr Partners rarr ltpartner namegt rarr URI of Partners Messenger Service)
Listener Installation and Configuration
The Listener is installed by running the installer program (eg PontonXP-21-setuplistener-windowsexe) on the relevant system You are asked to specify an installation folder and also have the option of creating a desktop or menu shortcut Thatrsquos it
-
The settings for the Listener are contained in the configuration file listenerproperties which is located in the folder [Listener root folder]config To modify these settings you will have to edit the configuration file directly Access via the Messengerrsquos configuration interface is not possible
The file contains the following settings
HttpPort = Port number (for external HTTP connections)
HttpsPort = Port number (for external HTTPS connections)
LogLevel = DEBUG | INFO | WARN | ERROR | FATAL | OFF
The following settings specify the host and port of the Messenger for forwarding connections (HTTPHTTPS) The forwarding connection mode is activated by entering the relevant host and port addresses and removing the hash marks (used to mark ldquocomment linesrdquo in Java property files)
HttpServer = server1port1 (HTTP forwarding connection to the Messenger)
HttpsServer = server1port1 (HTTPS forwarding connection to the Messenger)
Ponton XP 21 ndash Installation and Configuration Guide 54
Advanced Configuration
The following settings specify the Listenerrsquos port for callback connections (HTTPHTTPS) with the Messenger As with the forwarding connection the callback connection mode is activated by entering the relevant port addresses and removing the hash marks (Obviously it makes no sense to have both connections activated at the same time)
HttpServicePort = Port number (for internal HTTP connections to the Listener)
HttpsServicePort = Port number (for internal HTTPS connections to the Listener)
Starting the Listener
To start the Listener open a command prompt and start the class
depontonconsultingxmlpipeListener
with the classpath
-cp libcommons-logging-api-103jarlibcommonutilsjarlibxp_listenerjarconfig
You can also use the installed batch file [Listener root folder]startListenerbat
Callback Mode
Details of the communication flow
When the Messenger starts up it searches for the Listener
Note The Listener should start up first so that it can be found by the Messenger
If the search is successful a permanent connection is established between the Messenger and the Listener The Messenger uses the following settings in the configuration to establish the connection with the Listener
Configuration rarr Messenger rarr Listener rarr HTTP[S] rarr Hostname
Configuration rarr Messenger rarr Listener rarr HTTP[S] rarr Internal Listener Port
Ponton XP 21 ndash Installation and Configuration Guide 55
Advanced Configuration
When the Listener receives an incoming message (or rather an HTTPHTTPS request) it informs the Messenger ndash by way of the permanent connection ndash about the arrival of the new request indicating which port the Messenger can use to pick up the connection
Note This port number is randomly selected by the Listener and cannot be configured
The Messenger picks up the connection on the Listenerrsquos specified port and redirects it to its own local port for further processing
This local port corresponds to the setting for
Configuration rarr Messenger rarr Listener rarr HTTP[S] rarr Internal Messenger Port
in the configuration GUI
Forwarding Mode
Details of the communication flow
In forwarding mode no permanent connection is established between the Messenger and the Listener
When the Listener receives an incoming HTTPHTTPS request it simply forwards the request to the Messenger using the address specified in listenerproperties (HttpServerHttpsServer)
Note To allow this forwarding connection the firewall has to be configured so that the Listener is permitted to access the Messenger on the specified port(s)
Ponton XP 21 ndash Installation and Configuration Guide 56
Advanced Configuration
66 Port Configuration The Messengerrsquos standard configuration uses port 8080 for HTTP connections and port 8443 for secure (HTTPS) connections This section describes how to set up the messenger to use a non-standard port configuration This involves making manual changes to several configuration files in particular the Tomcat serverxml and the Messengerrsquos adapter configuration files
Tomcat Settings
The port setting for the Messengerrsquos HTTP and HTTPS connections are specified in the Tomcat configuration file
[installation root]tomcat-xxxconfserverxml
This file defines the connections (Connectors) for the Messenger as follows
lt-- Define a non-SSL Coyote HTTP11 Connector on port 8080 --gt
ltConnector className=orgapachecoyotetomcat4CoyoteConnector
port=yourMessengerPort minProcessors=5 maxProcessors=75
enableLookups=true redirectPort=yourRed rectPort i acceptCount=100 debug=0 connectionTimeout=20000
useURIValidationHack=false disableUploadTimeout=true gt
lt-- Define a SSL Coyote HTTP11 Connector on port 8443 --gt
ltConnector className=orgapachecoyotetomcat4CoyoteConnector
port=yourSSLPort minProcessors=5 maxProcessors=75
enableLookups=true
acceptCount=100 debug=0 scheme=https secure=true
useURIValidationHack=false disableUploadTimeout=truegt
ltFactory className=orgapachecoyotetomcat4CoyoteServerSocketFactory
clientAuth=false keystoreFile=ssl-keystore protocol=TLS gt
ltConnectorgt
The standard settings for the Messenger ports are
HTTP 8080
SSL 8443
To modify your connections you will need to enter the relevant port numbers indicated above as yourMessengerPort yourRedirectPort (which normally points to the SSL connection) and yourSSLPort
Ponton XP 21 ndash Installation and Configuration Guide 57
Advanced Configuration
Adapter Settings
The settings for the Messenger adapters are contained in the relevant XML files under
[installation root]xmlpipewebrootWEB-INFconfig
In particular a standard installation includes the files testadap erxml and hotfolderxml Each of these configuration files contains a block specifying the connection to the messenger
t
ltMessengergt
ltAddressgtyourMessengerHostltAddressgt
ltPortNumbergtyourMessengerPortltPortNumbergt
ltPathgthellipltPathgt
ltMessengergt
If you have configured the Messenger to run on a different port (see above) you will need to enter the relevant port number here
Ponton XP 21 ndash Installation and Configuration Guide 58
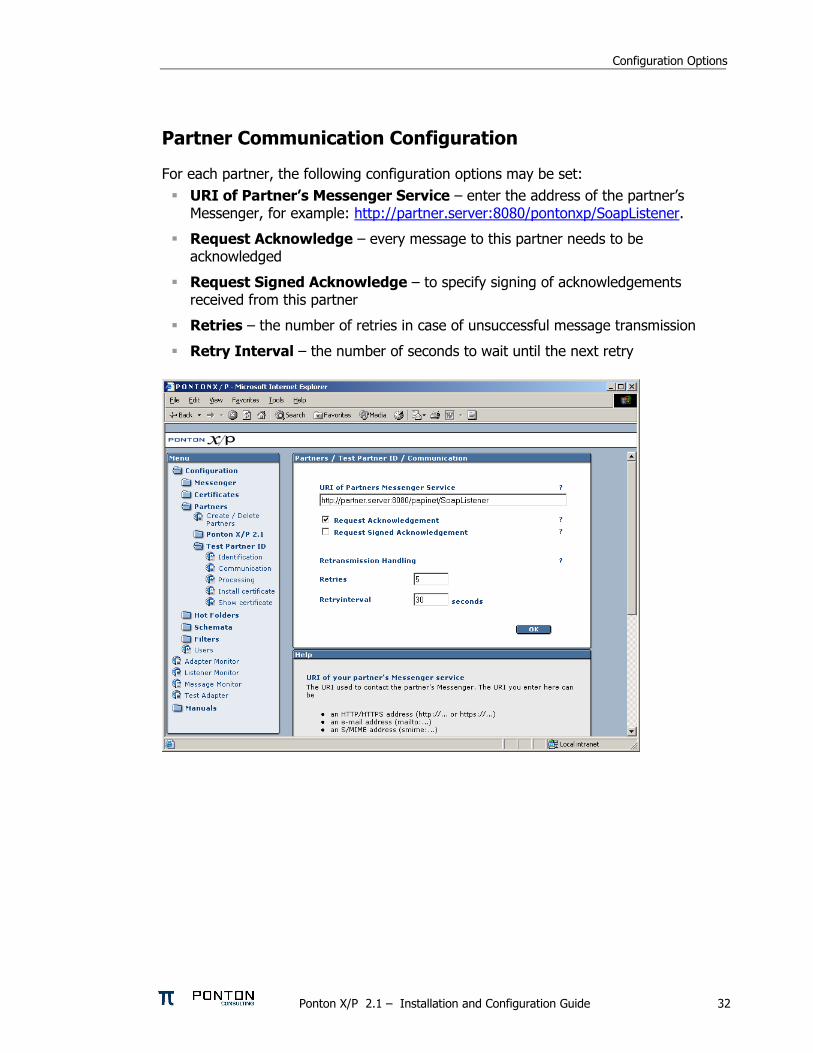
Configuration Options
Partner Communication Configuration
For each partner the following configuration options may be set URI of Partnerrsquos Messenger Service ndash enter the address of the partnerrsquos
Messenger for example httppartnerserver8080pontonxpSoapListener
Request Acknowledge ndash every message to this partner needs to be acknowledged
Request Signed Acknowledge ndash to specify signing of acknowledgements received from this partner
Retries ndash the number of retries in case of unsuccessful message transmission
Retry Interval ndash the number of seconds to wait until the next retry
Ponton XP 21 ndash Installation and Configuration Guide 32
Configuration Options
Processing Configuration
The following options can be set
Default Adapter ndash enter the name of the adapter to be used by default
Processing Pipeline ndash specify the processing pipeline to be used for this profile
Schema Sets ndash choose which Schema set(s) are to be supported
Use XML Signature ndash indicate whether to use XML Signature
Use default message settings (specified under Configuration rarr Messenger rarr Processing) or define a specific processing filter for this partner
Ponton XP 21 ndash Installation and Configuration Guide 33
Configuration Options
Install Partner Certificates
There are different ways of distributing certificates to business partners One is to send the certificate per email and have the partner cut amp paste the certificate code into the partner configuration
Note It is important to cut amp paste the complete certificate code including the lines ldquo----- Begin Certificate -----rdquo and ldquo----- End Certificate -----rdquo
Important A partner certificate will only be accepted if the certificate of the issuing CA (certificate authority) was pre-installed Otherwise the trust relationship between the partner and the CA cannot be traced
One may select to install a general certificate or a SMIME certificate Please determine what kind of certificate you received from your partner before installing it
Ponton XP 21 ndash Installation and Configuration Guide 34
Configuration Options
53 Certificate Management Certificate management comprises the following initial steps
Configure your default CA This is usually properly pre-configured in the installation files
Install the root certificate of the default CA This needs to be installed manually if 3rd-party CAs are to be used
Request a certificate for your own Messenger This includes creating a publicprivate key pair and sending a certificate request to the CA
Optionally you can request and install a SMIME certificate to be used for SMIME based communication via email
Default CA Configuration
On this screen you specify the settings for receiving certificates from your default certificate authority (CA) CA email address ndash enter the email address to be used to request a certificate
from your (default) CA
Ponton XP 21 ndash Installation and Configuration Guide 35
Configuration Options
CA download URL ndash enter the URL at your CA from which to download certificates for your Messenger installation Please note that you can only install certificates for partners you have already defined in your partner configuration
Download interval ndash specify the interval to wait between automatic certificate downloads
To download the available certificates immediately click the Download button
Request and Install Your Own Certificate
To request a certificate from your (default) CA go to Configuration rarr Certificates rarr Request Certificate Please enter data for all the fields on this form If any entries are missing you will get an error message
After completing the form click OK to send the certificate request to your CA You will get a message indicating that the request has been sent
Ponton XP 21 ndash Installation and Configuration Guide 36
Configuration Options
Once you receive the requested certificate from your CA you can install it in your own partner configuration (ie the internal partner you will use to sendreceive messages) Go to Configuration rarr Partners rarr ltYour Partner Namegt rarr Install Certificate and paste the certificate text including the hellip into the text field
Then enter the password you used when you requested the certificate and click OK to complete the installation of the certificate You will see the result above the text field containing the certificate
Ponton XP 21 ndash Installation and Configuration Guide 37
Configuration Options
Install Partner Certificates
Install a certificate issued by the CA for the requesting partner This was already described in the Partner Configuration section for normal standard certificates
Note In case of SMIME certificates an additional password may be needed to allow the Messenger to access the certificate in the local certificate store
Install a CA Certificate
To install the certificate for your CA go to Configuration rarr Certificates rarr CA rarr Install Certificate and paste your CArsquos certificate into the text field This is the certificate that authorizes the CA as a signing authority for other certificates
Ponton XP 21 ndash Installation and Configuration Guide 38
Configuration Options
54 Configure the Hot Folder Adapter
General Configuration
Address Port ndash the Hot Folder Adapter (HFA) is addressed as a separate process that communicates with the Messenger via HTTP Therefore the hostname and port number need to be set up for the Messenger If the HFA is co-located with the Messenger on the same machine use ldquolocalhostrdquo for the IP address In this case the HFA does not run as a separate Java process but will be hosted on the same Tomcat server
Path ndash the HFA needs to know the Adapter communication path of the Messenger By default it is pontonxpAdapterService
Console File Log Level ndash the HFA provides log output to the console and to log files Both can be configured regarding the level of detail The console log is only useful if the HFA is running as a standalone application so you can safely leave it disabled in the default configuration
Ponton XP 21 ndash Installation and Configuration Guide 39
Configuration Options
Create Delete a HFA
Several HFAs may be created Each registers under a different ID at the Messenger HFAs may be created for individual partners If this is the case messages exchanged with the rest of the partners will be stored with the default HFA
Configure a HFA
Each HFA requires several directories to be defined
Inbox ndash a document will be stored in the Inbox whenever it was received from a partner
Outbox ndash documents to be sent to the business partner are dropped here The HFA grabs them in a defined frequency
Failed ndash if a document could not be sent to a partner and all retries failed it will be stored in this folder
Work ndash if a document transfer is in progress or all attempts to send the document have not yet been tried the document will remain here After a final failure it will be transferred to the Failed folder
Ponton XP 21 ndash Installation and Configuration Guide 40
Configuration Options
The following settings are also supported
Port ndash the port to be used by the HFA (optional)
Receiver format ndash standard format is XML
Save Backend envelope ndash the Backend envelope is retained for incoming messages
Support attachments ndash the HFA will save any files attached to an incoming message to the selected inbox folder
Scan Interval ndash the interval to wait (in seconds) between checking the outbox
Number of receiving threads ndash specifies the maximum number of receiving threads the adapter can process
Use partner subfolders ndash if this is set this HFA will create inbox and outbox folders for all remote partners Inbound messages will automatically be sorted into the according folder depending on the sender Outbound messages need to be placed into the receiving partnerrsquos outbox folder The backend message is not used in this mode and is ignored if it exists
Use Acknowledgement for ERP ndash with this option activated the ERP application receives an acknowledgement from the receiving Messenger on the partnerrsquos side This acknowledgement will be provided via the specified Inbox
Ponton XP 21 ndash Installation and Configuration Guide 41
Configuration Options
55 Ponton XE ndash The XML Editor Ponton XE is a separate Ponton product It is packaged with Ponton XP for free use only by papiNet users It allows to enter papiNet document data directly via a graphical user interface and to send the document via the hot folder adapter to the business partners
Ponton XE is fully documented in a separate manual Hence only the Messaging Plug-in will be described here
You can experiment with the XML Editor and check out all the features and options without using the Ponton XP connection To start with you may want to begin with the following steps
Create a new papiNet Purchase Order
Fill out the forms and use optional XML Elements by right-clicking the Plus-icons in the layout tree
Create an HTML file by choosing Document Export to HTML from the menu
Save the document to an XML file and re-load it again
Ponton XP 21 ndash Installation and Configuration Guide 42
Configuration Options
Interface between Ponton XE and Ponton XP
The two software applications communicate via hot folders as illustrated in the following figure
Message Plug-in
Outbox Inbox AckInboxImport
Ponton XP Ponton XE
XMLXML XMLXML XMLXML XMLXML
Hot Folder Adapter
The XML Editor is connected to the Messenger via the Hot Folder Adapter All these folder settings need to be synchronized for a proper data exchange
Configuration of the Messaging Plug-in
The Messaging Plug-in can be flexibly installed and de-installed with the remaining part of Ponton XE If the file messengerjar is removed from the plugins directory it will automatically disappear from the Ponton XE menu bar as soon as the software is started again
Before transferring messages out of Ponton XE you need to preset the following information
Default values for the sending and receiving partners ndash these values may be overridden for an individual transfer
Folder locations of the Hot Folder Adapter ndash the Inbox Outbox and AckInbox need to be set for document exchange with Ponton XP
Default setting for Test Message flag ndash this can be overridden for the actual document transfer
Import Directory ndash Ponton XE will automatically scan the Inbox folder and import received documents to the given folder for local processing
Ponton XP 21 ndash Installation and Configuration Guide 43
Configuration Options
Open Messages after Import ndash if this option is activated messages received from the Inbox will automatically be displayed in Ponton XE
Delete message in Inbox ndash to always remove received messages from the HFA Inbox this option needs to be activated otherwise a copy will remain in the Inbox folder
Ponton XP 21 ndash Installation and Configuration Guide 44
Configuration Options
Ponton XP 21 ndash Installation and Configuration Guide 45
Configuration Options
Using Ponton XE
After setting the configuration and creating a document you can transfer the document to your business partner This is done by means of the following steps
Choose the menu item ldquoMessenger rarr Transfer rarr Send Messagerdquo
Select a sending and receiving partner
Override the settings for the HFA folders
Tick the checkbox to qualify this message as a test message
After transferring the document to the Messenger Ponton XE will wait for a response This is recognised as an acknowledge file which is dropped into the AckInbox folder of the HFA As soon as this has been received a successful transfer in indicated
You may check with the Message Monitor to determine how the document was forwarded by the Messenger to the receiver or whether any errors occurred
Ponton XP 21 ndash Installation and Configuration Guide 46
Configuration Options
56 Display Schema Configuration The schema sets to be supported for each partner are defined in the partner configuration The standard sets available with the installation are shown under Configuration rarr Schemata
Ponton XP 21 ndash Installation and Configuration Guide 47
Configuration Options
57 User Administration Two types of users are distinguished
Administrators ndash these users have full access to the Messengerrsquos configuration interface
Operators ndash these users only have access to the Adapter Monitor the Message Monitor and the Test Adapter The other options in the Messenger menu are not available
Please note the following points in connection with the Messengerrsquos standard user administration
This is a very simple user administration based on the Tomcat implementation If you want to integrate the Messenger with another user administration such as LDAP please contact Ponton Consulting for support
A userrsquos access rights (administratoroperator) are defined when the user account is created ndash they cannot be changed subsequently
User accounts can only be created or deleted by administrators
Ponton XP 21 ndash Installation and Configuration Guide 48
Advanced Configuration
6 Advanced Configuration
61 XML Schema Configuration Important The Messenger distinguishes between available schema set and activated schema sets Just inserting entries in the schema configuration as described in this section does not activate the schema sets or the corresponding schemas for use by the Messenger In order to make use of the schemas in a schema set you have to activate the schema set in the relevant partner configuration To view or modify the activated schema sets in a partner configuration go to
Configuration rarr Partners rarr ltpartner namegt rarr Processing
and activatedeactivate the relevant checkboxes
In the Messengerrsquos configuration interface you can activate and deactivate schema sets for specific partner configurations It is not possible however to modify the contents and specifications of the individual schema sets Any necessary changes have to be made in the configuration file
[installation root]xmlpipewebrootWEB-INFconfigschemataxml
The configuration entries in this file are structured as follows
ltSchemaSet Name=papinet21gt
ltSchemaName=httpwwwpapinetorgdataAvailabilityV2R10xsd MessageType=Availability MessageVersion=V2R10gt
ltNamespacegtltNamespacegt
ltDisplayNamegtAvailability 21ltDisplayNamegt
ltSchemaFilegtAvailabilityV2R10xsdltSchemaFilegt
ltXSLFilegtltXSLFilegt
ltSchemagt
ltSchema Name=yourSchema MessageType=yourMsgType MessageVersion=yourMsgVersgt
ltNamespacegtyourNamespaceltNamespacegt
ltDisplayNamegtYour Display NameltDisplayNamegt
ltSchemaFilegtyourSchemaFileltSchemaFilegt
ltXSLFilegtyourStylesheetltXSLFilegt
ltSchemagt
hellip
ltSchemaFoldergtpapinet210ltSchemaFoldergt
ltXSLFoldergtpapinet210ltXSLFoldergt
ltSchemaSetgt
Ponton XP 21 ndash Installation and Configuration Guide 49
Advanced Configuration
You can add a schema to an existing schema set in this file by inserting a ltSchemagt block (just copy and paste one of the existing blocks and modify the configuration as required) Please ensure that your new schema specification includes correct settings for the attributes of the Schema element
Name= This attribute corresponds with the ebXML Schema Location of incoming messages When an ebXML message is received the Messenger looks for a schema configuration where the Schema Name attribute matches the Schema Location specified in the ebXML envelope
MessageType= This attribute corresponds with the attribute MessageMetaDataDocumentInfoMessageName in the backend envelope of outgoing messages
MessageVersion= This attribute corresponds with the element MessageMe aDataDocumentInfoDTDVersionNumber in the backend envelope of outgoing messages
t
Note The specification of MessageType and MessageVersion must be used together for outgoing messages as they are combined to form an identifier for the message schema
You also have the option of adding a new schema set with your own schema definitions to the schema configuration In this case you would insert a ltSchemaSetgt block with subordinate ltSchemagt blocks Your added schema set will automatically be inserted in the list of available schema sets on the Messenger configuration pages
62 Advanced Database Configuration Important Since the Messenger database is used for essential message processing and tracking purposes you should not experiment with the database configuration on a ldquoliverdquo system For test and debugging purposes you are advised to set up a trial system
Installation with other Databases
This section describes the main steps required to install a different database system on the Messenger for example an Oracle database
1 Install database driver Copy the database driver to
[installation root]xmlpipewebrootWEB-INFlib
Note Please note that only drivers with the extension jar are loaded by the Tomcat servlet engine If the JDBC driver you want to use is a zip file you will have to rename the file to jar The JDBC driver for Oracle 9i is the file ojdbc14jar
Ponton XP 21 ndash Installation and Configuration Guide 50
Advanced Configuration
2 Create database and tables Ponton XP is supplied with SQL scripts for HSQL and for Oracle that can be used to create the tables for the Messenger database If you are using another database you may need to modify these scripts to work correctly with your database system
The SQL scripts are located in the subfolders under [installation root]sql
Once the database tables are in place you will also need to carry out the SQL script that inserts the log messages into the database ie
[installation root]sqlinsert_log_messagessql
3 Set up database connection The configuration of database connections is described in the section Set Up Messenger Database beginning on page 20 To connect with a different database choose ldquootherrdquo from the list of database drivers and enter the configuration for your database on the next page
The entries for the Oracle 9i JDBC driver are
Driver oraclejdbcdriverOracleDriver
URL jdbcoraclethinlthostgtltportgtltdatabasegt
63 Advanced Message Monitor Configuration In the configuration directory ldquoxmlpipewebrootWEB-INFconfigrdquo there is a file messagemonitorxml which can be used to change the selection and ordering of the Message overview window in the Message Monitor The default setting is displayed in the following picture
Ponton XP 21 ndash Installation and Configuration Guide 51
Advanced Configuration
Here the number of line items per page can be set If a high resolution screen is used (beyond 1024 x 768 pixel) one may increase the number of lines
Further a mapping table defines which database column is to be displayed in which monitor column The number of columns again depends on the screen resolution
Finally if main memory size allows caching of XSL stylesheet definitions helps accelerating processing speed for XSL transformations
64 Tomcat SSL Installation
Generate a key
One minor problem with Tomcat or any other webserver that uses the internal Java symmetric key architecture is that you are not allowed to export or import private keys For this reason it is not possible to use the existing key-pair installed with the Messenger software You will have to generate a new key-pair and send a certificate request to the Ponton certificate authority (or other certification authority) to receive a valid certificate
To generate a new key-pair open a command prompt and go to the tomcat-4118 directory The keystore used for a Tomcat SSL installation is located in the Tomcat root directory and is called ssl-keystore The Tomcat installation already contains a certificate for lsquolocalhostrsquo so you can test the HTTPS access with a web browser
Before you can create a new Tomcat certificate you will have to delete the installed certificate Note that the default password for the Tomcat keystore is ldquochangeitrdquo keytool -delete -alias tomcat ndashkeystore ssl-keystore
Now use the following command to create a new key-pair Please note that you need to specify the Listener hostname (eg listenermyserverde) when the keytool asks for lsquofirst and last namersquo keytool -genkey -alias tomcat -keyalg RSA ndashkeystore ssl-keystore
After generating the new key the next step is to export a certificate request with the following command keytool ndashcertreq ndashalias tomcat ndashfile myservercsr ndashkeystore ssl-keystore
This will generate the file myservercsr in the current directory Send this file via email to xp-certponton-consultingde It will be signed and sent back to you The reply will contain a file with the certificate
Finally you have to re-import this signed certificate into the Tomcat SSL keystore Please note that the import may take some time keytool ndashimport ndashalias tomcat ndashfile myservercer ndashkeystore ssl-keystore
If you have any problems starting the keytool make sure you have the javahomebin directory specified in your PATH environment variable Of course you can also change to the javahomebin directory and start the keytool there
Ponton XP 21 ndash Installation and Configuration Guide 52
Advanced Configuration
Update Tomcat configuration
SSL is already activated in the Tomcat configuration packaged in the distribution However you might want to change the specified SSL port (by default the SSL port is set to 8443) You can change the port by editing the file
[tomcat installation]confserverconf
The following section configures the SSL parameters
lt-- Define a SSL Coyote HTTP11 Connector on port 8443 --gt
ltConnector className=orgapachecoyotetomcat4CoyoteConnector
port=8443
minProcessors=5
maxProcessors=75
enableLookups=true
acceptCount=100
debug=0
scheme=https
secure=true
useURIValidationHack=false
disableUploadTimeout=truegt
ltFactory className=orgapachecoyotetomcat4CoyoteServerSocketFactory
clientAuth=false
keystoreFile=ssl-keystore
protocol=TLS gt
ltConnectorgt
Verify setup
To verify if everything is working correctly start the Tomcat webserver as usual and connect to the webserver with your browser
Go to httpsyourserveraddress ndash initially you might get a warning window if the root certificate authority is not known to the browser If you continue by clicking OK you should see the usual Ponton XP start page
If everything comes up correctly you can use SSL to receive messages with the Ponton XP Software
Ponton XP 21 ndash Installation and Configuration Guide 53
Advanced Configuration
65 Distributed Installation If the Messenger is installed on a server that cannot be reached from the Internet you will need to install the Listener as well The purpose of the Listener is to pick up incoming connections and forward them to the Messenger (across the firewall) The firewall rules must be set up to allow this connection between the Listener and the Messenger When a message is received the Listener notifies the Messenger and the Messenger then picks up the message
You also have the option of subsequently installing the Listener as a service under Windows ndash this service can then be configured to start automatically when the system starts up
Note If you are going to run the Messenger in combination with the Listener your partners will have to enter the URI of your Listener in their configurations (under Configuration rarr Partners rarr ltpartner namegt rarr URI of Partners Messenger Service)
Listener Installation and Configuration
The Listener is installed by running the installer program (eg PontonXP-21-setuplistener-windowsexe) on the relevant system You are asked to specify an installation folder and also have the option of creating a desktop or menu shortcut Thatrsquos it
-
The settings for the Listener are contained in the configuration file listenerproperties which is located in the folder [Listener root folder]config To modify these settings you will have to edit the configuration file directly Access via the Messengerrsquos configuration interface is not possible
The file contains the following settings
HttpPort = Port number (for external HTTP connections)
HttpsPort = Port number (for external HTTPS connections)
LogLevel = DEBUG | INFO | WARN | ERROR | FATAL | OFF
The following settings specify the host and port of the Messenger for forwarding connections (HTTPHTTPS) The forwarding connection mode is activated by entering the relevant host and port addresses and removing the hash marks (used to mark ldquocomment linesrdquo in Java property files)
HttpServer = server1port1 (HTTP forwarding connection to the Messenger)
HttpsServer = server1port1 (HTTPS forwarding connection to the Messenger)
Ponton XP 21 ndash Installation and Configuration Guide 54
Advanced Configuration
The following settings specify the Listenerrsquos port for callback connections (HTTPHTTPS) with the Messenger As with the forwarding connection the callback connection mode is activated by entering the relevant port addresses and removing the hash marks (Obviously it makes no sense to have both connections activated at the same time)
HttpServicePort = Port number (for internal HTTP connections to the Listener)
HttpsServicePort = Port number (for internal HTTPS connections to the Listener)
Starting the Listener
To start the Listener open a command prompt and start the class
depontonconsultingxmlpipeListener
with the classpath
-cp libcommons-logging-api-103jarlibcommonutilsjarlibxp_listenerjarconfig
You can also use the installed batch file [Listener root folder]startListenerbat
Callback Mode
Details of the communication flow
When the Messenger starts up it searches for the Listener
Note The Listener should start up first so that it can be found by the Messenger
If the search is successful a permanent connection is established between the Messenger and the Listener The Messenger uses the following settings in the configuration to establish the connection with the Listener
Configuration rarr Messenger rarr Listener rarr HTTP[S] rarr Hostname
Configuration rarr Messenger rarr Listener rarr HTTP[S] rarr Internal Listener Port
Ponton XP 21 ndash Installation and Configuration Guide 55
Advanced Configuration
When the Listener receives an incoming message (or rather an HTTPHTTPS request) it informs the Messenger ndash by way of the permanent connection ndash about the arrival of the new request indicating which port the Messenger can use to pick up the connection
Note This port number is randomly selected by the Listener and cannot be configured
The Messenger picks up the connection on the Listenerrsquos specified port and redirects it to its own local port for further processing
This local port corresponds to the setting for
Configuration rarr Messenger rarr Listener rarr HTTP[S] rarr Internal Messenger Port
in the configuration GUI
Forwarding Mode
Details of the communication flow
In forwarding mode no permanent connection is established between the Messenger and the Listener
When the Listener receives an incoming HTTPHTTPS request it simply forwards the request to the Messenger using the address specified in listenerproperties (HttpServerHttpsServer)
Note To allow this forwarding connection the firewall has to be configured so that the Listener is permitted to access the Messenger on the specified port(s)
Ponton XP 21 ndash Installation and Configuration Guide 56
Advanced Configuration
66 Port Configuration The Messengerrsquos standard configuration uses port 8080 for HTTP connections and port 8443 for secure (HTTPS) connections This section describes how to set up the messenger to use a non-standard port configuration This involves making manual changes to several configuration files in particular the Tomcat serverxml and the Messengerrsquos adapter configuration files
Tomcat Settings
The port setting for the Messengerrsquos HTTP and HTTPS connections are specified in the Tomcat configuration file
[installation root]tomcat-xxxconfserverxml
This file defines the connections (Connectors) for the Messenger as follows
lt-- Define a non-SSL Coyote HTTP11 Connector on port 8080 --gt
ltConnector className=orgapachecoyotetomcat4CoyoteConnector
port=yourMessengerPort minProcessors=5 maxProcessors=75
enableLookups=true redirectPort=yourRed rectPort i acceptCount=100 debug=0 connectionTimeout=20000
useURIValidationHack=false disableUploadTimeout=true gt
lt-- Define a SSL Coyote HTTP11 Connector on port 8443 --gt
ltConnector className=orgapachecoyotetomcat4CoyoteConnector
port=yourSSLPort minProcessors=5 maxProcessors=75
enableLookups=true
acceptCount=100 debug=0 scheme=https secure=true
useURIValidationHack=false disableUploadTimeout=truegt
ltFactory className=orgapachecoyotetomcat4CoyoteServerSocketFactory
clientAuth=false keystoreFile=ssl-keystore protocol=TLS gt
ltConnectorgt
The standard settings for the Messenger ports are
HTTP 8080
SSL 8443
To modify your connections you will need to enter the relevant port numbers indicated above as yourMessengerPort yourRedirectPort (which normally points to the SSL connection) and yourSSLPort
Ponton XP 21 ndash Installation and Configuration Guide 57
Advanced Configuration
Adapter Settings
The settings for the Messenger adapters are contained in the relevant XML files under
[installation root]xmlpipewebrootWEB-INFconfig
In particular a standard installation includes the files testadap erxml and hotfolderxml Each of these configuration files contains a block specifying the connection to the messenger
t
ltMessengergt
ltAddressgtyourMessengerHostltAddressgt
ltPortNumbergtyourMessengerPortltPortNumbergt
ltPathgthellipltPathgt
ltMessengergt
If you have configured the Messenger to run on a different port (see above) you will need to enter the relevant port number here
Ponton XP 21 ndash Installation and Configuration Guide 58
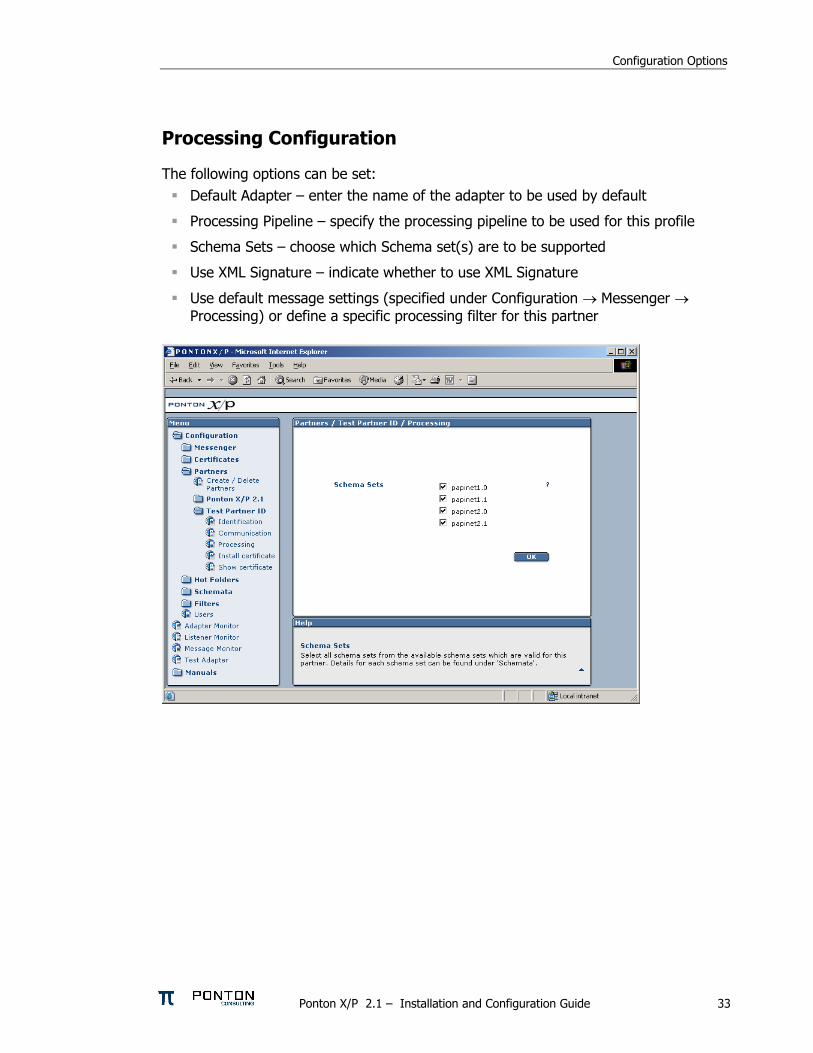
Configuration Options
Processing Configuration
The following options can be set
Default Adapter ndash enter the name of the adapter to be used by default
Processing Pipeline ndash specify the processing pipeline to be used for this profile
Schema Sets ndash choose which Schema set(s) are to be supported
Use XML Signature ndash indicate whether to use XML Signature
Use default message settings (specified under Configuration rarr Messenger rarr Processing) or define a specific processing filter for this partner
Ponton XP 21 ndash Installation and Configuration Guide 33
Configuration Options
Install Partner Certificates
There are different ways of distributing certificates to business partners One is to send the certificate per email and have the partner cut amp paste the certificate code into the partner configuration
Note It is important to cut amp paste the complete certificate code including the lines ldquo----- Begin Certificate -----rdquo and ldquo----- End Certificate -----rdquo
Important A partner certificate will only be accepted if the certificate of the issuing CA (certificate authority) was pre-installed Otherwise the trust relationship between the partner and the CA cannot be traced
One may select to install a general certificate or a SMIME certificate Please determine what kind of certificate you received from your partner before installing it
Ponton XP 21 ndash Installation and Configuration Guide 34
Configuration Options
53 Certificate Management Certificate management comprises the following initial steps
Configure your default CA This is usually properly pre-configured in the installation files
Install the root certificate of the default CA This needs to be installed manually if 3rd-party CAs are to be used
Request a certificate for your own Messenger This includes creating a publicprivate key pair and sending a certificate request to the CA
Optionally you can request and install a SMIME certificate to be used for SMIME based communication via email
Default CA Configuration
On this screen you specify the settings for receiving certificates from your default certificate authority (CA) CA email address ndash enter the email address to be used to request a certificate
from your (default) CA
Ponton XP 21 ndash Installation and Configuration Guide 35
Configuration Options
CA download URL ndash enter the URL at your CA from which to download certificates for your Messenger installation Please note that you can only install certificates for partners you have already defined in your partner configuration
Download interval ndash specify the interval to wait between automatic certificate downloads
To download the available certificates immediately click the Download button
Request and Install Your Own Certificate
To request a certificate from your (default) CA go to Configuration rarr Certificates rarr Request Certificate Please enter data for all the fields on this form If any entries are missing you will get an error message
After completing the form click OK to send the certificate request to your CA You will get a message indicating that the request has been sent
Ponton XP 21 ndash Installation and Configuration Guide 36
Configuration Options
Once you receive the requested certificate from your CA you can install it in your own partner configuration (ie the internal partner you will use to sendreceive messages) Go to Configuration rarr Partners rarr ltYour Partner Namegt rarr Install Certificate and paste the certificate text including the hellip into the text field
Then enter the password you used when you requested the certificate and click OK to complete the installation of the certificate You will see the result above the text field containing the certificate
Ponton XP 21 ndash Installation and Configuration Guide 37
Configuration Options
Install Partner Certificates
Install a certificate issued by the CA for the requesting partner This was already described in the Partner Configuration section for normal standard certificates
Note In case of SMIME certificates an additional password may be needed to allow the Messenger to access the certificate in the local certificate store
Install a CA Certificate
To install the certificate for your CA go to Configuration rarr Certificates rarr CA rarr Install Certificate and paste your CArsquos certificate into the text field This is the certificate that authorizes the CA as a signing authority for other certificates
Ponton XP 21 ndash Installation and Configuration Guide 38
Configuration Options
54 Configure the Hot Folder Adapter
General Configuration
Address Port ndash the Hot Folder Adapter (HFA) is addressed as a separate process that communicates with the Messenger via HTTP Therefore the hostname and port number need to be set up for the Messenger If the HFA is co-located with the Messenger on the same machine use ldquolocalhostrdquo for the IP address In this case the HFA does not run as a separate Java process but will be hosted on the same Tomcat server
Path ndash the HFA needs to know the Adapter communication path of the Messenger By default it is pontonxpAdapterService
Console File Log Level ndash the HFA provides log output to the console and to log files Both can be configured regarding the level of detail The console log is only useful if the HFA is running as a standalone application so you can safely leave it disabled in the default configuration
Ponton XP 21 ndash Installation and Configuration Guide 39
Configuration Options
Create Delete a HFA
Several HFAs may be created Each registers under a different ID at the Messenger HFAs may be created for individual partners If this is the case messages exchanged with the rest of the partners will be stored with the default HFA
Configure a HFA
Each HFA requires several directories to be defined
Inbox ndash a document will be stored in the Inbox whenever it was received from a partner
Outbox ndash documents to be sent to the business partner are dropped here The HFA grabs them in a defined frequency
Failed ndash if a document could not be sent to a partner and all retries failed it will be stored in this folder
Work ndash if a document transfer is in progress or all attempts to send the document have not yet been tried the document will remain here After a final failure it will be transferred to the Failed folder
Ponton XP 21 ndash Installation and Configuration Guide 40
Configuration Options
The following settings are also supported
Port ndash the port to be used by the HFA (optional)
Receiver format ndash standard format is XML
Save Backend envelope ndash the Backend envelope is retained for incoming messages
Support attachments ndash the HFA will save any files attached to an incoming message to the selected inbox folder
Scan Interval ndash the interval to wait (in seconds) between checking the outbox
Number of receiving threads ndash specifies the maximum number of receiving threads the adapter can process
Use partner subfolders ndash if this is set this HFA will create inbox and outbox folders for all remote partners Inbound messages will automatically be sorted into the according folder depending on the sender Outbound messages need to be placed into the receiving partnerrsquos outbox folder The backend message is not used in this mode and is ignored if it exists
Use Acknowledgement for ERP ndash with this option activated the ERP application receives an acknowledgement from the receiving Messenger on the partnerrsquos side This acknowledgement will be provided via the specified Inbox
Ponton XP 21 ndash Installation and Configuration Guide 41
Configuration Options
55 Ponton XE ndash The XML Editor Ponton XE is a separate Ponton product It is packaged with Ponton XP for free use only by papiNet users It allows to enter papiNet document data directly via a graphical user interface and to send the document via the hot folder adapter to the business partners
Ponton XE is fully documented in a separate manual Hence only the Messaging Plug-in will be described here
You can experiment with the XML Editor and check out all the features and options without using the Ponton XP connection To start with you may want to begin with the following steps
Create a new papiNet Purchase Order
Fill out the forms and use optional XML Elements by right-clicking the Plus-icons in the layout tree
Create an HTML file by choosing Document Export to HTML from the menu
Save the document to an XML file and re-load it again
Ponton XP 21 ndash Installation and Configuration Guide 42
Configuration Options
Interface between Ponton XE and Ponton XP
The two software applications communicate via hot folders as illustrated in the following figure
Message Plug-in
Outbox Inbox AckInboxImport
Ponton XP Ponton XE
XMLXML XMLXML XMLXML XMLXML
Hot Folder Adapter
The XML Editor is connected to the Messenger via the Hot Folder Adapter All these folder settings need to be synchronized for a proper data exchange
Configuration of the Messaging Plug-in
The Messaging Plug-in can be flexibly installed and de-installed with the remaining part of Ponton XE If the file messengerjar is removed from the plugins directory it will automatically disappear from the Ponton XE menu bar as soon as the software is started again
Before transferring messages out of Ponton XE you need to preset the following information
Default values for the sending and receiving partners ndash these values may be overridden for an individual transfer
Folder locations of the Hot Folder Adapter ndash the Inbox Outbox and AckInbox need to be set for document exchange with Ponton XP
Default setting for Test Message flag ndash this can be overridden for the actual document transfer
Import Directory ndash Ponton XE will automatically scan the Inbox folder and import received documents to the given folder for local processing
Ponton XP 21 ndash Installation and Configuration Guide 43
Configuration Options
Open Messages after Import ndash if this option is activated messages received from the Inbox will automatically be displayed in Ponton XE
Delete message in Inbox ndash to always remove received messages from the HFA Inbox this option needs to be activated otherwise a copy will remain in the Inbox folder
Ponton XP 21 ndash Installation and Configuration Guide 44
Configuration Options
Ponton XP 21 ndash Installation and Configuration Guide 45
Configuration Options
Using Ponton XE
After setting the configuration and creating a document you can transfer the document to your business partner This is done by means of the following steps
Choose the menu item ldquoMessenger rarr Transfer rarr Send Messagerdquo
Select a sending and receiving partner
Override the settings for the HFA folders
Tick the checkbox to qualify this message as a test message
After transferring the document to the Messenger Ponton XE will wait for a response This is recognised as an acknowledge file which is dropped into the AckInbox folder of the HFA As soon as this has been received a successful transfer in indicated
You may check with the Message Monitor to determine how the document was forwarded by the Messenger to the receiver or whether any errors occurred
Ponton XP 21 ndash Installation and Configuration Guide 46
Configuration Options
56 Display Schema Configuration The schema sets to be supported for each partner are defined in the partner configuration The standard sets available with the installation are shown under Configuration rarr Schemata
Ponton XP 21 ndash Installation and Configuration Guide 47
Configuration Options
57 User Administration Two types of users are distinguished
Administrators ndash these users have full access to the Messengerrsquos configuration interface
Operators ndash these users only have access to the Adapter Monitor the Message Monitor and the Test Adapter The other options in the Messenger menu are not available
Please note the following points in connection with the Messengerrsquos standard user administration
This is a very simple user administration based on the Tomcat implementation If you want to integrate the Messenger with another user administration such as LDAP please contact Ponton Consulting for support
A userrsquos access rights (administratoroperator) are defined when the user account is created ndash they cannot be changed subsequently
User accounts can only be created or deleted by administrators
Ponton XP 21 ndash Installation and Configuration Guide 48
Advanced Configuration
6 Advanced Configuration
61 XML Schema Configuration Important The Messenger distinguishes between available schema set and activated schema sets Just inserting entries in the schema configuration as described in this section does not activate the schema sets or the corresponding schemas for use by the Messenger In order to make use of the schemas in a schema set you have to activate the schema set in the relevant partner configuration To view or modify the activated schema sets in a partner configuration go to
Configuration rarr Partners rarr ltpartner namegt rarr Processing
and activatedeactivate the relevant checkboxes
In the Messengerrsquos configuration interface you can activate and deactivate schema sets for specific partner configurations It is not possible however to modify the contents and specifications of the individual schema sets Any necessary changes have to be made in the configuration file
[installation root]xmlpipewebrootWEB-INFconfigschemataxml
The configuration entries in this file are structured as follows
ltSchemaSet Name=papinet21gt
ltSchemaName=httpwwwpapinetorgdataAvailabilityV2R10xsd MessageType=Availability MessageVersion=V2R10gt
ltNamespacegtltNamespacegt
ltDisplayNamegtAvailability 21ltDisplayNamegt
ltSchemaFilegtAvailabilityV2R10xsdltSchemaFilegt
ltXSLFilegtltXSLFilegt
ltSchemagt
ltSchema Name=yourSchema MessageType=yourMsgType MessageVersion=yourMsgVersgt
ltNamespacegtyourNamespaceltNamespacegt
ltDisplayNamegtYour Display NameltDisplayNamegt
ltSchemaFilegtyourSchemaFileltSchemaFilegt
ltXSLFilegtyourStylesheetltXSLFilegt
ltSchemagt
hellip
ltSchemaFoldergtpapinet210ltSchemaFoldergt
ltXSLFoldergtpapinet210ltXSLFoldergt
ltSchemaSetgt
Ponton XP 21 ndash Installation and Configuration Guide 49
Advanced Configuration
You can add a schema to an existing schema set in this file by inserting a ltSchemagt block (just copy and paste one of the existing blocks and modify the configuration as required) Please ensure that your new schema specification includes correct settings for the attributes of the Schema element
Name= This attribute corresponds with the ebXML Schema Location of incoming messages When an ebXML message is received the Messenger looks for a schema configuration where the Schema Name attribute matches the Schema Location specified in the ebXML envelope
MessageType= This attribute corresponds with the attribute MessageMetaDataDocumentInfoMessageName in the backend envelope of outgoing messages
MessageVersion= This attribute corresponds with the element MessageMe aDataDocumentInfoDTDVersionNumber in the backend envelope of outgoing messages
t
Note The specification of MessageType and MessageVersion must be used together for outgoing messages as they are combined to form an identifier for the message schema
You also have the option of adding a new schema set with your own schema definitions to the schema configuration In this case you would insert a ltSchemaSetgt block with subordinate ltSchemagt blocks Your added schema set will automatically be inserted in the list of available schema sets on the Messenger configuration pages
62 Advanced Database Configuration Important Since the Messenger database is used for essential message processing and tracking purposes you should not experiment with the database configuration on a ldquoliverdquo system For test and debugging purposes you are advised to set up a trial system
Installation with other Databases
This section describes the main steps required to install a different database system on the Messenger for example an Oracle database
1 Install database driver Copy the database driver to
[installation root]xmlpipewebrootWEB-INFlib
Note Please note that only drivers with the extension jar are loaded by the Tomcat servlet engine If the JDBC driver you want to use is a zip file you will have to rename the file to jar The JDBC driver for Oracle 9i is the file ojdbc14jar
Ponton XP 21 ndash Installation and Configuration Guide 50
Advanced Configuration
2 Create database and tables Ponton XP is supplied with SQL scripts for HSQL and for Oracle that can be used to create the tables for the Messenger database If you are using another database you may need to modify these scripts to work correctly with your database system
The SQL scripts are located in the subfolders under [installation root]sql
Once the database tables are in place you will also need to carry out the SQL script that inserts the log messages into the database ie
[installation root]sqlinsert_log_messagessql
3 Set up database connection The configuration of database connections is described in the section Set Up Messenger Database beginning on page 20 To connect with a different database choose ldquootherrdquo from the list of database drivers and enter the configuration for your database on the next page
The entries for the Oracle 9i JDBC driver are
Driver oraclejdbcdriverOracleDriver
URL jdbcoraclethinlthostgtltportgtltdatabasegt
63 Advanced Message Monitor Configuration In the configuration directory ldquoxmlpipewebrootWEB-INFconfigrdquo there is a file messagemonitorxml which can be used to change the selection and ordering of the Message overview window in the Message Monitor The default setting is displayed in the following picture
Ponton XP 21 ndash Installation and Configuration Guide 51
Advanced Configuration
Here the number of line items per page can be set If a high resolution screen is used (beyond 1024 x 768 pixel) one may increase the number of lines
Further a mapping table defines which database column is to be displayed in which monitor column The number of columns again depends on the screen resolution
Finally if main memory size allows caching of XSL stylesheet definitions helps accelerating processing speed for XSL transformations
64 Tomcat SSL Installation
Generate a key
One minor problem with Tomcat or any other webserver that uses the internal Java symmetric key architecture is that you are not allowed to export or import private keys For this reason it is not possible to use the existing key-pair installed with the Messenger software You will have to generate a new key-pair and send a certificate request to the Ponton certificate authority (or other certification authority) to receive a valid certificate
To generate a new key-pair open a command prompt and go to the tomcat-4118 directory The keystore used for a Tomcat SSL installation is located in the Tomcat root directory and is called ssl-keystore The Tomcat installation already contains a certificate for lsquolocalhostrsquo so you can test the HTTPS access with a web browser
Before you can create a new Tomcat certificate you will have to delete the installed certificate Note that the default password for the Tomcat keystore is ldquochangeitrdquo keytool -delete -alias tomcat ndashkeystore ssl-keystore
Now use the following command to create a new key-pair Please note that you need to specify the Listener hostname (eg listenermyserverde) when the keytool asks for lsquofirst and last namersquo keytool -genkey -alias tomcat -keyalg RSA ndashkeystore ssl-keystore
After generating the new key the next step is to export a certificate request with the following command keytool ndashcertreq ndashalias tomcat ndashfile myservercsr ndashkeystore ssl-keystore
This will generate the file myservercsr in the current directory Send this file via email to xp-certponton-consultingde It will be signed and sent back to you The reply will contain a file with the certificate
Finally you have to re-import this signed certificate into the Tomcat SSL keystore Please note that the import may take some time keytool ndashimport ndashalias tomcat ndashfile myservercer ndashkeystore ssl-keystore
If you have any problems starting the keytool make sure you have the javahomebin directory specified in your PATH environment variable Of course you can also change to the javahomebin directory and start the keytool there
Ponton XP 21 ndash Installation and Configuration Guide 52
Advanced Configuration
Update Tomcat configuration
SSL is already activated in the Tomcat configuration packaged in the distribution However you might want to change the specified SSL port (by default the SSL port is set to 8443) You can change the port by editing the file
[tomcat installation]confserverconf
The following section configures the SSL parameters
lt-- Define a SSL Coyote HTTP11 Connector on port 8443 --gt
ltConnector className=orgapachecoyotetomcat4CoyoteConnector
port=8443
minProcessors=5
maxProcessors=75
enableLookups=true
acceptCount=100
debug=0
scheme=https
secure=true
useURIValidationHack=false
disableUploadTimeout=truegt
ltFactory className=orgapachecoyotetomcat4CoyoteServerSocketFactory
clientAuth=false
keystoreFile=ssl-keystore
protocol=TLS gt
ltConnectorgt
Verify setup
To verify if everything is working correctly start the Tomcat webserver as usual and connect to the webserver with your browser
Go to httpsyourserveraddress ndash initially you might get a warning window if the root certificate authority is not known to the browser If you continue by clicking OK you should see the usual Ponton XP start page
If everything comes up correctly you can use SSL to receive messages with the Ponton XP Software
Ponton XP 21 ndash Installation and Configuration Guide 53
Advanced Configuration
65 Distributed Installation If the Messenger is installed on a server that cannot be reached from the Internet you will need to install the Listener as well The purpose of the Listener is to pick up incoming connections and forward them to the Messenger (across the firewall) The firewall rules must be set up to allow this connection between the Listener and the Messenger When a message is received the Listener notifies the Messenger and the Messenger then picks up the message
You also have the option of subsequently installing the Listener as a service under Windows ndash this service can then be configured to start automatically when the system starts up
Note If you are going to run the Messenger in combination with the Listener your partners will have to enter the URI of your Listener in their configurations (under Configuration rarr Partners rarr ltpartner namegt rarr URI of Partners Messenger Service)
Listener Installation and Configuration
The Listener is installed by running the installer program (eg PontonXP-21-setuplistener-windowsexe) on the relevant system You are asked to specify an installation folder and also have the option of creating a desktop or menu shortcut Thatrsquos it
-
The settings for the Listener are contained in the configuration file listenerproperties which is located in the folder [Listener root folder]config To modify these settings you will have to edit the configuration file directly Access via the Messengerrsquos configuration interface is not possible
The file contains the following settings
HttpPort = Port number (for external HTTP connections)
HttpsPort = Port number (for external HTTPS connections)
LogLevel = DEBUG | INFO | WARN | ERROR | FATAL | OFF
The following settings specify the host and port of the Messenger for forwarding connections (HTTPHTTPS) The forwarding connection mode is activated by entering the relevant host and port addresses and removing the hash marks (used to mark ldquocomment linesrdquo in Java property files)
HttpServer = server1port1 (HTTP forwarding connection to the Messenger)
HttpsServer = server1port1 (HTTPS forwarding connection to the Messenger)
Ponton XP 21 ndash Installation and Configuration Guide 54
Advanced Configuration
The following settings specify the Listenerrsquos port for callback connections (HTTPHTTPS) with the Messenger As with the forwarding connection the callback connection mode is activated by entering the relevant port addresses and removing the hash marks (Obviously it makes no sense to have both connections activated at the same time)
HttpServicePort = Port number (for internal HTTP connections to the Listener)
HttpsServicePort = Port number (for internal HTTPS connections to the Listener)
Starting the Listener
To start the Listener open a command prompt and start the class
depontonconsultingxmlpipeListener
with the classpath
-cp libcommons-logging-api-103jarlibcommonutilsjarlibxp_listenerjarconfig
You can also use the installed batch file [Listener root folder]startListenerbat
Callback Mode
Details of the communication flow
When the Messenger starts up it searches for the Listener
Note The Listener should start up first so that it can be found by the Messenger
If the search is successful a permanent connection is established between the Messenger and the Listener The Messenger uses the following settings in the configuration to establish the connection with the Listener
Configuration rarr Messenger rarr Listener rarr HTTP[S] rarr Hostname
Configuration rarr Messenger rarr Listener rarr HTTP[S] rarr Internal Listener Port
Ponton XP 21 ndash Installation and Configuration Guide 55
Advanced Configuration
When the Listener receives an incoming message (or rather an HTTPHTTPS request) it informs the Messenger ndash by way of the permanent connection ndash about the arrival of the new request indicating which port the Messenger can use to pick up the connection
Note This port number is randomly selected by the Listener and cannot be configured
The Messenger picks up the connection on the Listenerrsquos specified port and redirects it to its own local port for further processing
This local port corresponds to the setting for
Configuration rarr Messenger rarr Listener rarr HTTP[S] rarr Internal Messenger Port
in the configuration GUI
Forwarding Mode
Details of the communication flow
In forwarding mode no permanent connection is established between the Messenger and the Listener
When the Listener receives an incoming HTTPHTTPS request it simply forwards the request to the Messenger using the address specified in listenerproperties (HttpServerHttpsServer)
Note To allow this forwarding connection the firewall has to be configured so that the Listener is permitted to access the Messenger on the specified port(s)
Ponton XP 21 ndash Installation and Configuration Guide 56
Advanced Configuration
66 Port Configuration The Messengerrsquos standard configuration uses port 8080 for HTTP connections and port 8443 for secure (HTTPS) connections This section describes how to set up the messenger to use a non-standard port configuration This involves making manual changes to several configuration files in particular the Tomcat serverxml and the Messengerrsquos adapter configuration files
Tomcat Settings
The port setting for the Messengerrsquos HTTP and HTTPS connections are specified in the Tomcat configuration file
[installation root]tomcat-xxxconfserverxml
This file defines the connections (Connectors) for the Messenger as follows
lt-- Define a non-SSL Coyote HTTP11 Connector on port 8080 --gt
ltConnector className=orgapachecoyotetomcat4CoyoteConnector
port=yourMessengerPort minProcessors=5 maxProcessors=75
enableLookups=true redirectPort=yourRed rectPort i acceptCount=100 debug=0 connectionTimeout=20000
useURIValidationHack=false disableUploadTimeout=true gt
lt-- Define a SSL Coyote HTTP11 Connector on port 8443 --gt
ltConnector className=orgapachecoyotetomcat4CoyoteConnector
port=yourSSLPort minProcessors=5 maxProcessors=75
enableLookups=true
acceptCount=100 debug=0 scheme=https secure=true
useURIValidationHack=false disableUploadTimeout=truegt
ltFactory className=orgapachecoyotetomcat4CoyoteServerSocketFactory
clientAuth=false keystoreFile=ssl-keystore protocol=TLS gt
ltConnectorgt
The standard settings for the Messenger ports are
HTTP 8080
SSL 8443
To modify your connections you will need to enter the relevant port numbers indicated above as yourMessengerPort yourRedirectPort (which normally points to the SSL connection) and yourSSLPort
Ponton XP 21 ndash Installation and Configuration Guide 57
Advanced Configuration
Adapter Settings
The settings for the Messenger adapters are contained in the relevant XML files under
[installation root]xmlpipewebrootWEB-INFconfig
In particular a standard installation includes the files testadap erxml and hotfolderxml Each of these configuration files contains a block specifying the connection to the messenger
t
ltMessengergt
ltAddressgtyourMessengerHostltAddressgt
ltPortNumbergtyourMessengerPortltPortNumbergt
ltPathgthellipltPathgt
ltMessengergt
If you have configured the Messenger to run on a different port (see above) you will need to enter the relevant port number here
Ponton XP 21 ndash Installation and Configuration Guide 58
Configuration Options
Install Partner Certificates
There are different ways of distributing certificates to business partners One is to send the certificate per email and have the partner cut amp paste the certificate code into the partner configuration
Note It is important to cut amp paste the complete certificate code including the lines ldquo----- Begin Certificate -----rdquo and ldquo----- End Certificate -----rdquo
Important A partner certificate will only be accepted if the certificate of the issuing CA (certificate authority) was pre-installed Otherwise the trust relationship between the partner and the CA cannot be traced
One may select to install a general certificate or a SMIME certificate Please determine what kind of certificate you received from your partner before installing it
Ponton XP 21 ndash Installation and Configuration Guide 34
Configuration Options
53 Certificate Management Certificate management comprises the following initial steps
Configure your default CA This is usually properly pre-configured in the installation files
Install the root certificate of the default CA This needs to be installed manually if 3rd-party CAs are to be used
Request a certificate for your own Messenger This includes creating a publicprivate key pair and sending a certificate request to the CA
Optionally you can request and install a SMIME certificate to be used for SMIME based communication via email
Default CA Configuration
On this screen you specify the settings for receiving certificates from your default certificate authority (CA) CA email address ndash enter the email address to be used to request a certificate
from your (default) CA
Ponton XP 21 ndash Installation and Configuration Guide 35
Configuration Options
CA download URL ndash enter the URL at your CA from which to download certificates for your Messenger installation Please note that you can only install certificates for partners you have already defined in your partner configuration
Download interval ndash specify the interval to wait between automatic certificate downloads
To download the available certificates immediately click the Download button
Request and Install Your Own Certificate
To request a certificate from your (default) CA go to Configuration rarr Certificates rarr Request Certificate Please enter data for all the fields on this form If any entries are missing you will get an error message
After completing the form click OK to send the certificate request to your CA You will get a message indicating that the request has been sent
Ponton XP 21 ndash Installation and Configuration Guide 36
Configuration Options
Once you receive the requested certificate from your CA you can install it in your own partner configuration (ie the internal partner you will use to sendreceive messages) Go to Configuration rarr Partners rarr ltYour Partner Namegt rarr Install Certificate and paste the certificate text including the hellip into the text field
Then enter the password you used when you requested the certificate and click OK to complete the installation of the certificate You will see the result above the text field containing the certificate
Ponton XP 21 ndash Installation and Configuration Guide 37
Configuration Options
Install Partner Certificates
Install a certificate issued by the CA for the requesting partner This was already described in the Partner Configuration section for normal standard certificates
Note In case of SMIME certificates an additional password may be needed to allow the Messenger to access the certificate in the local certificate store
Install a CA Certificate
To install the certificate for your CA go to Configuration rarr Certificates rarr CA rarr Install Certificate and paste your CArsquos certificate into the text field This is the certificate that authorizes the CA as a signing authority for other certificates
Ponton XP 21 ndash Installation and Configuration Guide 38
Configuration Options
54 Configure the Hot Folder Adapter
General Configuration
Address Port ndash the Hot Folder Adapter (HFA) is addressed as a separate process that communicates with the Messenger via HTTP Therefore the hostname and port number need to be set up for the Messenger If the HFA is co-located with the Messenger on the same machine use ldquolocalhostrdquo for the IP address In this case the HFA does not run as a separate Java process but will be hosted on the same Tomcat server
Path ndash the HFA needs to know the Adapter communication path of the Messenger By default it is pontonxpAdapterService
Console File Log Level ndash the HFA provides log output to the console and to log files Both can be configured regarding the level of detail The console log is only useful if the HFA is running as a standalone application so you can safely leave it disabled in the default configuration
Ponton XP 21 ndash Installation and Configuration Guide 39
Configuration Options
Create Delete a HFA
Several HFAs may be created Each registers under a different ID at the Messenger HFAs may be created for individual partners If this is the case messages exchanged with the rest of the partners will be stored with the default HFA
Configure a HFA
Each HFA requires several directories to be defined
Inbox ndash a document will be stored in the Inbox whenever it was received from a partner
Outbox ndash documents to be sent to the business partner are dropped here The HFA grabs them in a defined frequency
Failed ndash if a document could not be sent to a partner and all retries failed it will be stored in this folder
Work ndash if a document transfer is in progress or all attempts to send the document have not yet been tried the document will remain here After a final failure it will be transferred to the Failed folder
Ponton XP 21 ndash Installation and Configuration Guide 40
Configuration Options
The following settings are also supported
Port ndash the port to be used by the HFA (optional)
Receiver format ndash standard format is XML
Save Backend envelope ndash the Backend envelope is retained for incoming messages
Support attachments ndash the HFA will save any files attached to an incoming message to the selected inbox folder
Scan Interval ndash the interval to wait (in seconds) between checking the outbox
Number of receiving threads ndash specifies the maximum number of receiving threads the adapter can process
Use partner subfolders ndash if this is set this HFA will create inbox and outbox folders for all remote partners Inbound messages will automatically be sorted into the according folder depending on the sender Outbound messages need to be placed into the receiving partnerrsquos outbox folder The backend message is not used in this mode and is ignored if it exists
Use Acknowledgement for ERP ndash with this option activated the ERP application receives an acknowledgement from the receiving Messenger on the partnerrsquos side This acknowledgement will be provided via the specified Inbox
Ponton XP 21 ndash Installation and Configuration Guide 41
Configuration Options
55 Ponton XE ndash The XML Editor Ponton XE is a separate Ponton product It is packaged with Ponton XP for free use only by papiNet users It allows to enter papiNet document data directly via a graphical user interface and to send the document via the hot folder adapter to the business partners
Ponton XE is fully documented in a separate manual Hence only the Messaging Plug-in will be described here
You can experiment with the XML Editor and check out all the features and options without using the Ponton XP connection To start with you may want to begin with the following steps
Create a new papiNet Purchase Order
Fill out the forms and use optional XML Elements by right-clicking the Plus-icons in the layout tree
Create an HTML file by choosing Document Export to HTML from the menu
Save the document to an XML file and re-load it again
Ponton XP 21 ndash Installation and Configuration Guide 42
Configuration Options
Interface between Ponton XE and Ponton XP
The two software applications communicate via hot folders as illustrated in the following figure
Message Plug-in
Outbox Inbox AckInboxImport
Ponton XP Ponton XE
XMLXML XMLXML XMLXML XMLXML
Hot Folder Adapter
The XML Editor is connected to the Messenger via the Hot Folder Adapter All these folder settings need to be synchronized for a proper data exchange
Configuration of the Messaging Plug-in
The Messaging Plug-in can be flexibly installed and de-installed with the remaining part of Ponton XE If the file messengerjar is removed from the plugins directory it will automatically disappear from the Ponton XE menu bar as soon as the software is started again
Before transferring messages out of Ponton XE you need to preset the following information
Default values for the sending and receiving partners ndash these values may be overridden for an individual transfer
Folder locations of the Hot Folder Adapter ndash the Inbox Outbox and AckInbox need to be set for document exchange with Ponton XP
Default setting for Test Message flag ndash this can be overridden for the actual document transfer
Import Directory ndash Ponton XE will automatically scan the Inbox folder and import received documents to the given folder for local processing
Ponton XP 21 ndash Installation and Configuration Guide 43
Configuration Options
Open Messages after Import ndash if this option is activated messages received from the Inbox will automatically be displayed in Ponton XE
Delete message in Inbox ndash to always remove received messages from the HFA Inbox this option needs to be activated otherwise a copy will remain in the Inbox folder
Ponton XP 21 ndash Installation and Configuration Guide 44
Configuration Options
Ponton XP 21 ndash Installation and Configuration Guide 45
Configuration Options
Using Ponton XE
After setting the configuration and creating a document you can transfer the document to your business partner This is done by means of the following steps
Choose the menu item ldquoMessenger rarr Transfer rarr Send Messagerdquo
Select a sending and receiving partner
Override the settings for the HFA folders
Tick the checkbox to qualify this message as a test message
After transferring the document to the Messenger Ponton XE will wait for a response This is recognised as an acknowledge file which is dropped into the AckInbox folder of the HFA As soon as this has been received a successful transfer in indicated
You may check with the Message Monitor to determine how the document was forwarded by the Messenger to the receiver or whether any errors occurred
Ponton XP 21 ndash Installation and Configuration Guide 46
Configuration Options
56 Display Schema Configuration The schema sets to be supported for each partner are defined in the partner configuration The standard sets available with the installation are shown under Configuration rarr Schemata
Ponton XP 21 ndash Installation and Configuration Guide 47
Configuration Options
57 User Administration Two types of users are distinguished
Administrators ndash these users have full access to the Messengerrsquos configuration interface
Operators ndash these users only have access to the Adapter Monitor the Message Monitor and the Test Adapter The other options in the Messenger menu are not available
Please note the following points in connection with the Messengerrsquos standard user administration
This is a very simple user administration based on the Tomcat implementation If you want to integrate the Messenger with another user administration such as LDAP please contact Ponton Consulting for support
A userrsquos access rights (administratoroperator) are defined when the user account is created ndash they cannot be changed subsequently
User accounts can only be created or deleted by administrators
Ponton XP 21 ndash Installation and Configuration Guide 48
Advanced Configuration
6 Advanced Configuration
61 XML Schema Configuration Important The Messenger distinguishes between available schema set and activated schema sets Just inserting entries in the schema configuration as described in this section does not activate the schema sets or the corresponding schemas for use by the Messenger In order to make use of the schemas in a schema set you have to activate the schema set in the relevant partner configuration To view or modify the activated schema sets in a partner configuration go to
Configuration rarr Partners rarr ltpartner namegt rarr Processing
and activatedeactivate the relevant checkboxes
In the Messengerrsquos configuration interface you can activate and deactivate schema sets for specific partner configurations It is not possible however to modify the contents and specifications of the individual schema sets Any necessary changes have to be made in the configuration file
[installation root]xmlpipewebrootWEB-INFconfigschemataxml
The configuration entries in this file are structured as follows
ltSchemaSet Name=papinet21gt
ltSchemaName=httpwwwpapinetorgdataAvailabilityV2R10xsd MessageType=Availability MessageVersion=V2R10gt
ltNamespacegtltNamespacegt
ltDisplayNamegtAvailability 21ltDisplayNamegt
ltSchemaFilegtAvailabilityV2R10xsdltSchemaFilegt
ltXSLFilegtltXSLFilegt
ltSchemagt
ltSchema Name=yourSchema MessageType=yourMsgType MessageVersion=yourMsgVersgt
ltNamespacegtyourNamespaceltNamespacegt
ltDisplayNamegtYour Display NameltDisplayNamegt
ltSchemaFilegtyourSchemaFileltSchemaFilegt
ltXSLFilegtyourStylesheetltXSLFilegt
ltSchemagt
hellip
ltSchemaFoldergtpapinet210ltSchemaFoldergt
ltXSLFoldergtpapinet210ltXSLFoldergt
ltSchemaSetgt
Ponton XP 21 ndash Installation and Configuration Guide 49
Advanced Configuration
You can add a schema to an existing schema set in this file by inserting a ltSchemagt block (just copy and paste one of the existing blocks and modify the configuration as required) Please ensure that your new schema specification includes correct settings for the attributes of the Schema element
Name= This attribute corresponds with the ebXML Schema Location of incoming messages When an ebXML message is received the Messenger looks for a schema configuration where the Schema Name attribute matches the Schema Location specified in the ebXML envelope
MessageType= This attribute corresponds with the attribute MessageMetaDataDocumentInfoMessageName in the backend envelope of outgoing messages
MessageVersion= This attribute corresponds with the element MessageMe aDataDocumentInfoDTDVersionNumber in the backend envelope of outgoing messages
t
Note The specification of MessageType and MessageVersion must be used together for outgoing messages as they are combined to form an identifier for the message schema
You also have the option of adding a new schema set with your own schema definitions to the schema configuration In this case you would insert a ltSchemaSetgt block with subordinate ltSchemagt blocks Your added schema set will automatically be inserted in the list of available schema sets on the Messenger configuration pages
62 Advanced Database Configuration Important Since the Messenger database is used for essential message processing and tracking purposes you should not experiment with the database configuration on a ldquoliverdquo system For test and debugging purposes you are advised to set up a trial system
Installation with other Databases
This section describes the main steps required to install a different database system on the Messenger for example an Oracle database
1 Install database driver Copy the database driver to
[installation root]xmlpipewebrootWEB-INFlib
Note Please note that only drivers with the extension jar are loaded by the Tomcat servlet engine If the JDBC driver you want to use is a zip file you will have to rename the file to jar The JDBC driver for Oracle 9i is the file ojdbc14jar
Ponton XP 21 ndash Installation and Configuration Guide 50
Advanced Configuration
2 Create database and tables Ponton XP is supplied with SQL scripts for HSQL and for Oracle that can be used to create the tables for the Messenger database If you are using another database you may need to modify these scripts to work correctly with your database system
The SQL scripts are located in the subfolders under [installation root]sql
Once the database tables are in place you will also need to carry out the SQL script that inserts the log messages into the database ie
[installation root]sqlinsert_log_messagessql
3 Set up database connection The configuration of database connections is described in the section Set Up Messenger Database beginning on page 20 To connect with a different database choose ldquootherrdquo from the list of database drivers and enter the configuration for your database on the next page
The entries for the Oracle 9i JDBC driver are
Driver oraclejdbcdriverOracleDriver
URL jdbcoraclethinlthostgtltportgtltdatabasegt
63 Advanced Message Monitor Configuration In the configuration directory ldquoxmlpipewebrootWEB-INFconfigrdquo there is a file messagemonitorxml which can be used to change the selection and ordering of the Message overview window in the Message Monitor The default setting is displayed in the following picture
Ponton XP 21 ndash Installation and Configuration Guide 51
Advanced Configuration
Here the number of line items per page can be set If a high resolution screen is used (beyond 1024 x 768 pixel) one may increase the number of lines
Further a mapping table defines which database column is to be displayed in which monitor column The number of columns again depends on the screen resolution
Finally if main memory size allows caching of XSL stylesheet definitions helps accelerating processing speed for XSL transformations
64 Tomcat SSL Installation
Generate a key
One minor problem with Tomcat or any other webserver that uses the internal Java symmetric key architecture is that you are not allowed to export or import private keys For this reason it is not possible to use the existing key-pair installed with the Messenger software You will have to generate a new key-pair and send a certificate request to the Ponton certificate authority (or other certification authority) to receive a valid certificate
To generate a new key-pair open a command prompt and go to the tomcat-4118 directory The keystore used for a Tomcat SSL installation is located in the Tomcat root directory and is called ssl-keystore The Tomcat installation already contains a certificate for lsquolocalhostrsquo so you can test the HTTPS access with a web browser
Before you can create a new Tomcat certificate you will have to delete the installed certificate Note that the default password for the Tomcat keystore is ldquochangeitrdquo keytool -delete -alias tomcat ndashkeystore ssl-keystore
Now use the following command to create a new key-pair Please note that you need to specify the Listener hostname (eg listenermyserverde) when the keytool asks for lsquofirst and last namersquo keytool -genkey -alias tomcat -keyalg RSA ndashkeystore ssl-keystore
After generating the new key the next step is to export a certificate request with the following command keytool ndashcertreq ndashalias tomcat ndashfile myservercsr ndashkeystore ssl-keystore
This will generate the file myservercsr in the current directory Send this file via email to xp-certponton-consultingde It will be signed and sent back to you The reply will contain a file with the certificate
Finally you have to re-import this signed certificate into the Tomcat SSL keystore Please note that the import may take some time keytool ndashimport ndashalias tomcat ndashfile myservercer ndashkeystore ssl-keystore
If you have any problems starting the keytool make sure you have the javahomebin directory specified in your PATH environment variable Of course you can also change to the javahomebin directory and start the keytool there
Ponton XP 21 ndash Installation and Configuration Guide 52
Advanced Configuration
Update Tomcat configuration
SSL is already activated in the Tomcat configuration packaged in the distribution However you might want to change the specified SSL port (by default the SSL port is set to 8443) You can change the port by editing the file
[tomcat installation]confserverconf
The following section configures the SSL parameters
lt-- Define a SSL Coyote HTTP11 Connector on port 8443 --gt
ltConnector className=orgapachecoyotetomcat4CoyoteConnector
port=8443
minProcessors=5
maxProcessors=75
enableLookups=true
acceptCount=100
debug=0
scheme=https
secure=true
useURIValidationHack=false
disableUploadTimeout=truegt
ltFactory className=orgapachecoyotetomcat4CoyoteServerSocketFactory
clientAuth=false
keystoreFile=ssl-keystore
protocol=TLS gt
ltConnectorgt
Verify setup
To verify if everything is working correctly start the Tomcat webserver as usual and connect to the webserver with your browser
Go to httpsyourserveraddress ndash initially you might get a warning window if the root certificate authority is not known to the browser If you continue by clicking OK you should see the usual Ponton XP start page
If everything comes up correctly you can use SSL to receive messages with the Ponton XP Software
Ponton XP 21 ndash Installation and Configuration Guide 53
Advanced Configuration
65 Distributed Installation If the Messenger is installed on a server that cannot be reached from the Internet you will need to install the Listener as well The purpose of the Listener is to pick up incoming connections and forward them to the Messenger (across the firewall) The firewall rules must be set up to allow this connection between the Listener and the Messenger When a message is received the Listener notifies the Messenger and the Messenger then picks up the message
You also have the option of subsequently installing the Listener as a service under Windows ndash this service can then be configured to start automatically when the system starts up
Note If you are going to run the Messenger in combination with the Listener your partners will have to enter the URI of your Listener in their configurations (under Configuration rarr Partners rarr ltpartner namegt rarr URI of Partners Messenger Service)
Listener Installation and Configuration
The Listener is installed by running the installer program (eg PontonXP-21-setuplistener-windowsexe) on the relevant system You are asked to specify an installation folder and also have the option of creating a desktop or menu shortcut Thatrsquos it
-
The settings for the Listener are contained in the configuration file listenerproperties which is located in the folder [Listener root folder]config To modify these settings you will have to edit the configuration file directly Access via the Messengerrsquos configuration interface is not possible
The file contains the following settings
HttpPort = Port number (for external HTTP connections)
HttpsPort = Port number (for external HTTPS connections)
LogLevel = DEBUG | INFO | WARN | ERROR | FATAL | OFF
The following settings specify the host and port of the Messenger for forwarding connections (HTTPHTTPS) The forwarding connection mode is activated by entering the relevant host and port addresses and removing the hash marks (used to mark ldquocomment linesrdquo in Java property files)
HttpServer = server1port1 (HTTP forwarding connection to the Messenger)
HttpsServer = server1port1 (HTTPS forwarding connection to the Messenger)
Ponton XP 21 ndash Installation and Configuration Guide 54
Advanced Configuration
The following settings specify the Listenerrsquos port for callback connections (HTTPHTTPS) with the Messenger As with the forwarding connection the callback connection mode is activated by entering the relevant port addresses and removing the hash marks (Obviously it makes no sense to have both connections activated at the same time)
HttpServicePort = Port number (for internal HTTP connections to the Listener)
HttpsServicePort = Port number (for internal HTTPS connections to the Listener)
Starting the Listener
To start the Listener open a command prompt and start the class
depontonconsultingxmlpipeListener
with the classpath
-cp libcommons-logging-api-103jarlibcommonutilsjarlibxp_listenerjarconfig
You can also use the installed batch file [Listener root folder]startListenerbat
Callback Mode
Details of the communication flow
When the Messenger starts up it searches for the Listener
Note The Listener should start up first so that it can be found by the Messenger
If the search is successful a permanent connection is established between the Messenger and the Listener The Messenger uses the following settings in the configuration to establish the connection with the Listener
Configuration rarr Messenger rarr Listener rarr HTTP[S] rarr Hostname
Configuration rarr Messenger rarr Listener rarr HTTP[S] rarr Internal Listener Port
Ponton XP 21 ndash Installation and Configuration Guide 55
Advanced Configuration
When the Listener receives an incoming message (or rather an HTTPHTTPS request) it informs the Messenger ndash by way of the permanent connection ndash about the arrival of the new request indicating which port the Messenger can use to pick up the connection
Note This port number is randomly selected by the Listener and cannot be configured
The Messenger picks up the connection on the Listenerrsquos specified port and redirects it to its own local port for further processing
This local port corresponds to the setting for
Configuration rarr Messenger rarr Listener rarr HTTP[S] rarr Internal Messenger Port
in the configuration GUI
Forwarding Mode
Details of the communication flow
In forwarding mode no permanent connection is established between the Messenger and the Listener
When the Listener receives an incoming HTTPHTTPS request it simply forwards the request to the Messenger using the address specified in listenerproperties (HttpServerHttpsServer)
Note To allow this forwarding connection the firewall has to be configured so that the Listener is permitted to access the Messenger on the specified port(s)
Ponton XP 21 ndash Installation and Configuration Guide 56
Advanced Configuration
66 Port Configuration The Messengerrsquos standard configuration uses port 8080 for HTTP connections and port 8443 for secure (HTTPS) connections This section describes how to set up the messenger to use a non-standard port configuration This involves making manual changes to several configuration files in particular the Tomcat serverxml and the Messengerrsquos adapter configuration files
Tomcat Settings
The port setting for the Messengerrsquos HTTP and HTTPS connections are specified in the Tomcat configuration file
[installation root]tomcat-xxxconfserverxml
This file defines the connections (Connectors) for the Messenger as follows
lt-- Define a non-SSL Coyote HTTP11 Connector on port 8080 --gt
ltConnector className=orgapachecoyotetomcat4CoyoteConnector
port=yourMessengerPort minProcessors=5 maxProcessors=75
enableLookups=true redirectPort=yourRed rectPort i acceptCount=100 debug=0 connectionTimeout=20000
useURIValidationHack=false disableUploadTimeout=true gt
lt-- Define a SSL Coyote HTTP11 Connector on port 8443 --gt
ltConnector className=orgapachecoyotetomcat4CoyoteConnector
port=yourSSLPort minProcessors=5 maxProcessors=75
enableLookups=true
acceptCount=100 debug=0 scheme=https secure=true
useURIValidationHack=false disableUploadTimeout=truegt
ltFactory className=orgapachecoyotetomcat4CoyoteServerSocketFactory
clientAuth=false keystoreFile=ssl-keystore protocol=TLS gt
ltConnectorgt
The standard settings for the Messenger ports are
HTTP 8080
SSL 8443
To modify your connections you will need to enter the relevant port numbers indicated above as yourMessengerPort yourRedirectPort (which normally points to the SSL connection) and yourSSLPort
Ponton XP 21 ndash Installation and Configuration Guide 57
Advanced Configuration
Adapter Settings
The settings for the Messenger adapters are contained in the relevant XML files under
[installation root]xmlpipewebrootWEB-INFconfig
In particular a standard installation includes the files testadap erxml and hotfolderxml Each of these configuration files contains a block specifying the connection to the messenger
t
ltMessengergt
ltAddressgtyourMessengerHostltAddressgt
ltPortNumbergtyourMessengerPortltPortNumbergt
ltPathgthellipltPathgt
ltMessengergt
If you have configured the Messenger to run on a different port (see above) you will need to enter the relevant port number here
Ponton XP 21 ndash Installation and Configuration Guide 58
Configuration Options
Once you receive the requested certificate from your CA you can install it in your own partner configuration (ie the internal partner you will use to sendreceive messages) Go to Configuration rarr Partners rarr ltYour Partner Namegt rarr Install Certificate and paste the certificate text including the hellip into the text field
Then enter the password you used when you requested the certificate and click OK to complete the installation of the certificate You will see the result above the text field containing the certificate
Ponton XP 21 ndash Installation and Configuration Guide 37
Configuration Options
Install Partner Certificates
Install a certificate issued by the CA for the requesting partner This was already described in the Partner Configuration section for normal standard certificates
Note In case of SMIME certificates an additional password may be needed to allow the Messenger to access the certificate in the local certificate store
Install a CA Certificate
To install the certificate for your CA go to Configuration rarr Certificates rarr CA rarr Install Certificate and paste your CArsquos certificate into the text field This is the certificate that authorizes the CA as a signing authority for other certificates
Ponton XP 21 ndash Installation and Configuration Guide 38
Configuration Options
54 Configure the Hot Folder Adapter
General Configuration
Address Port ndash the Hot Folder Adapter (HFA) is addressed as a separate process that communicates with the Messenger via HTTP Therefore the hostname and port number need to be set up for the Messenger If the HFA is co-located with the Messenger on the same machine use ldquolocalhostrdquo for the IP address In this case the HFA does not run as a separate Java process but will be hosted on the same Tomcat server
Path ndash the HFA needs to know the Adapter communication path of the Messenger By default it is pontonxpAdapterService
Console File Log Level ndash the HFA provides log output to the console and to log files Both can be configured regarding the level of detail The console log is only useful if the HFA is running as a standalone application so you can safely leave it disabled in the default configuration
Ponton XP 21 ndash Installation and Configuration Guide 39
Configuration Options
Create Delete a HFA
Several HFAs may be created Each registers under a different ID at the Messenger HFAs may be created for individual partners If this is the case messages exchanged with the rest of the partners will be stored with the default HFA
Configure a HFA
Each HFA requires several directories to be defined
Inbox ndash a document will be stored in the Inbox whenever it was received from a partner
Outbox ndash documents to be sent to the business partner are dropped here The HFA grabs them in a defined frequency
Failed ndash if a document could not be sent to a partner and all retries failed it will be stored in this folder
Work ndash if a document transfer is in progress or all attempts to send the document have not yet been tried the document will remain here After a final failure it will be transferred to the Failed folder
Ponton XP 21 ndash Installation and Configuration Guide 40
Configuration Options
The following settings are also supported
Port ndash the port to be used by the HFA (optional)
Receiver format ndash standard format is XML
Save Backend envelope ndash the Backend envelope is retained for incoming messages
Support attachments ndash the HFA will save any files attached to an incoming message to the selected inbox folder
Scan Interval ndash the interval to wait (in seconds) between checking the outbox
Number of receiving threads ndash specifies the maximum number of receiving threads the adapter can process
Use partner subfolders ndash if this is set this HFA will create inbox and outbox folders for all remote partners Inbound messages will automatically be sorted into the according folder depending on the sender Outbound messages need to be placed into the receiving partnerrsquos outbox folder The backend message is not used in this mode and is ignored if it exists
Use Acknowledgement for ERP ndash with this option activated the ERP application receives an acknowledgement from the receiving Messenger on the partnerrsquos side This acknowledgement will be provided via the specified Inbox
Ponton XP 21 ndash Installation and Configuration Guide 41
Configuration Options
55 Ponton XE ndash The XML Editor Ponton XE is a separate Ponton product It is packaged with Ponton XP for free use only by papiNet users It allows to enter papiNet document data directly via a graphical user interface and to send the document via the hot folder adapter to the business partners
Ponton XE is fully documented in a separate manual Hence only the Messaging Plug-in will be described here
You can experiment with the XML Editor and check out all the features and options without using the Ponton XP connection To start with you may want to begin with the following steps
Create a new papiNet Purchase Order
Fill out the forms and use optional XML Elements by right-clicking the Plus-icons in the layout tree
Create an HTML file by choosing Document Export to HTML from the menu
Save the document to an XML file and re-load it again
Ponton XP 21 ndash Installation and Configuration Guide 42
Configuration Options
Interface between Ponton XE and Ponton XP
The two software applications communicate via hot folders as illustrated in the following figure
Message Plug-in
Outbox Inbox AckInboxImport
Ponton XP Ponton XE
XMLXML XMLXML XMLXML XMLXML
Hot Folder Adapter
The XML Editor is connected to the Messenger via the Hot Folder Adapter All these folder settings need to be synchronized for a proper data exchange
Configuration of the Messaging Plug-in
The Messaging Plug-in can be flexibly installed and de-installed with the remaining part of Ponton XE If the file messengerjar is removed from the plugins directory it will automatically disappear from the Ponton XE menu bar as soon as the software is started again
Before transferring messages out of Ponton XE you need to preset the following information
Default values for the sending and receiving partners ndash these values may be overridden for an individual transfer
Folder locations of the Hot Folder Adapter ndash the Inbox Outbox and AckInbox need to be set for document exchange with Ponton XP
Default setting for Test Message flag ndash this can be overridden for the actual document transfer
Import Directory ndash Ponton XE will automatically scan the Inbox folder and import received documents to the given folder for local processing
Ponton XP 21 ndash Installation and Configuration Guide 43
Configuration Options
Open Messages after Import ndash if this option is activated messages received from the Inbox will automatically be displayed in Ponton XE
Delete message in Inbox ndash to always remove received messages from the HFA Inbox this option needs to be activated otherwise a copy will remain in the Inbox folder
Ponton XP 21 ndash Installation and Configuration Guide 44
Configuration Options
Ponton XP 21 ndash Installation and Configuration Guide 45
Configuration Options
Using Ponton XE
After setting the configuration and creating a document you can transfer the document to your business partner This is done by means of the following steps
Choose the menu item ldquoMessenger rarr Transfer rarr Send Messagerdquo
Select a sending and receiving partner
Override the settings for the HFA folders
Tick the checkbox to qualify this message as a test message
After transferring the document to the Messenger Ponton XE will wait for a response This is recognised as an acknowledge file which is dropped into the AckInbox folder of the HFA As soon as this has been received a successful transfer in indicated
You may check with the Message Monitor to determine how the document was forwarded by the Messenger to the receiver or whether any errors occurred
Ponton XP 21 ndash Installation and Configuration Guide 46
Configuration Options
56 Display Schema Configuration The schema sets to be supported for each partner are defined in the partner configuration The standard sets available with the installation are shown under Configuration rarr Schemata
Ponton XP 21 ndash Installation and Configuration Guide 47
Configuration Options
57 User Administration Two types of users are distinguished
Administrators ndash these users have full access to the Messengerrsquos configuration interface
Operators ndash these users only have access to the Adapter Monitor the Message Monitor and the Test Adapter The other options in the Messenger menu are not available
Please note the following points in connection with the Messengerrsquos standard user administration
This is a very simple user administration based on the Tomcat implementation If you want to integrate the Messenger with another user administration such as LDAP please contact Ponton Consulting for support
A userrsquos access rights (administratoroperator) are defined when the user account is created ndash they cannot be changed subsequently
User accounts can only be created or deleted by administrators
Ponton XP 21 ndash Installation and Configuration Guide 48
Advanced Configuration
6 Advanced Configuration
61 XML Schema Configuration Important The Messenger distinguishes between available schema set and activated schema sets Just inserting entries in the schema configuration as described in this section does not activate the schema sets or the corresponding schemas for use by the Messenger In order to make use of the schemas in a schema set you have to activate the schema set in the relevant partner configuration To view or modify the activated schema sets in a partner configuration go to
Configuration rarr Partners rarr ltpartner namegt rarr Processing
and activatedeactivate the relevant checkboxes
In the Messengerrsquos configuration interface you can activate and deactivate schema sets for specific partner configurations It is not possible however to modify the contents and specifications of the individual schema sets Any necessary changes have to be made in the configuration file
[installation root]xmlpipewebrootWEB-INFconfigschemataxml
The configuration entries in this file are structured as follows
ltSchemaSet Name=papinet21gt
ltSchemaName=httpwwwpapinetorgdataAvailabilityV2R10xsd MessageType=Availability MessageVersion=V2R10gt
ltNamespacegtltNamespacegt
ltDisplayNamegtAvailability 21ltDisplayNamegt
ltSchemaFilegtAvailabilityV2R10xsdltSchemaFilegt
ltXSLFilegtltXSLFilegt
ltSchemagt
ltSchema Name=yourSchema MessageType=yourMsgType MessageVersion=yourMsgVersgt
ltNamespacegtyourNamespaceltNamespacegt
ltDisplayNamegtYour Display NameltDisplayNamegt
ltSchemaFilegtyourSchemaFileltSchemaFilegt
ltXSLFilegtyourStylesheetltXSLFilegt
ltSchemagt
hellip
ltSchemaFoldergtpapinet210ltSchemaFoldergt
ltXSLFoldergtpapinet210ltXSLFoldergt
ltSchemaSetgt
Ponton XP 21 ndash Installation and Configuration Guide 49
Advanced Configuration
You can add a schema to an existing schema set in this file by inserting a ltSchemagt block (just copy and paste one of the existing blocks and modify the configuration as required) Please ensure that your new schema specification includes correct settings for the attributes of the Schema element
Name= This attribute corresponds with the ebXML Schema Location of incoming messages When an ebXML message is received the Messenger looks for a schema configuration where the Schema Name attribute matches the Schema Location specified in the ebXML envelope
MessageType= This attribute corresponds with the attribute MessageMetaDataDocumentInfoMessageName in the backend envelope of outgoing messages
MessageVersion= This attribute corresponds with the element MessageMe aDataDocumentInfoDTDVersionNumber in the backend envelope of outgoing messages
t
Note The specification of MessageType and MessageVersion must be used together for outgoing messages as they are combined to form an identifier for the message schema
You also have the option of adding a new schema set with your own schema definitions to the schema configuration In this case you would insert a ltSchemaSetgt block with subordinate ltSchemagt blocks Your added schema set will automatically be inserted in the list of available schema sets on the Messenger configuration pages
62 Advanced Database Configuration Important Since the Messenger database is used for essential message processing and tracking purposes you should not experiment with the database configuration on a ldquoliverdquo system For test and debugging purposes you are advised to set up a trial system
Installation with other Databases
This section describes the main steps required to install a different database system on the Messenger for example an Oracle database
1 Install database driver Copy the database driver to
[installation root]xmlpipewebrootWEB-INFlib
Note Please note that only drivers with the extension jar are loaded by the Tomcat servlet engine If the JDBC driver you want to use is a zip file you will have to rename the file to jar The JDBC driver for Oracle 9i is the file ojdbc14jar
Ponton XP 21 ndash Installation and Configuration Guide 50
Advanced Configuration
2 Create database and tables Ponton XP is supplied with SQL scripts for HSQL and for Oracle that can be used to create the tables for the Messenger database If you are using another database you may need to modify these scripts to work correctly with your database system
The SQL scripts are located in the subfolders under [installation root]sql
Once the database tables are in place you will also need to carry out the SQL script that inserts the log messages into the database ie
[installation root]sqlinsert_log_messagessql
3 Set up database connection The configuration of database connections is described in the section Set Up Messenger Database beginning on page 20 To connect with a different database choose ldquootherrdquo from the list of database drivers and enter the configuration for your database on the next page
The entries for the Oracle 9i JDBC driver are
Driver oraclejdbcdriverOracleDriver
URL jdbcoraclethinlthostgtltportgtltdatabasegt
63 Advanced Message Monitor Configuration In the configuration directory ldquoxmlpipewebrootWEB-INFconfigrdquo there is a file messagemonitorxml which can be used to change the selection and ordering of the Message overview window in the Message Monitor The default setting is displayed in the following picture
Ponton XP 21 ndash Installation and Configuration Guide 51
Advanced Configuration
Here the number of line items per page can be set If a high resolution screen is used (beyond 1024 x 768 pixel) one may increase the number of lines
Further a mapping table defines which database column is to be displayed in which monitor column The number of columns again depends on the screen resolution
Finally if main memory size allows caching of XSL stylesheet definitions helps accelerating processing speed for XSL transformations
64 Tomcat SSL Installation
Generate a key
One minor problem with Tomcat or any other webserver that uses the internal Java symmetric key architecture is that you are not allowed to export or import private keys For this reason it is not possible to use the existing key-pair installed with the Messenger software You will have to generate a new key-pair and send a certificate request to the Ponton certificate authority (or other certification authority) to receive a valid certificate
To generate a new key-pair open a command prompt and go to the tomcat-4118 directory The keystore used for a Tomcat SSL installation is located in the Tomcat root directory and is called ssl-keystore The Tomcat installation already contains a certificate for lsquolocalhostrsquo so you can test the HTTPS access with a web browser
Before you can create a new Tomcat certificate you will have to delete the installed certificate Note that the default password for the Tomcat keystore is ldquochangeitrdquo keytool -delete -alias tomcat ndashkeystore ssl-keystore
Now use the following command to create a new key-pair Please note that you need to specify the Listener hostname (eg listenermyserverde) when the keytool asks for lsquofirst and last namersquo keytool -genkey -alias tomcat -keyalg RSA ndashkeystore ssl-keystore
After generating the new key the next step is to export a certificate request with the following command keytool ndashcertreq ndashalias tomcat ndashfile myservercsr ndashkeystore ssl-keystore
This will generate the file myservercsr in the current directory Send this file via email to xp-certponton-consultingde It will be signed and sent back to you The reply will contain a file with the certificate
Finally you have to re-import this signed certificate into the Tomcat SSL keystore Please note that the import may take some time keytool ndashimport ndashalias tomcat ndashfile myservercer ndashkeystore ssl-keystore
If you have any problems starting the keytool make sure you have the javahomebin directory specified in your PATH environment variable Of course you can also change to the javahomebin directory and start the keytool there
Ponton XP 21 ndash Installation and Configuration Guide 52
Advanced Configuration
Update Tomcat configuration
SSL is already activated in the Tomcat configuration packaged in the distribution However you might want to change the specified SSL port (by default the SSL port is set to 8443) You can change the port by editing the file
[tomcat installation]confserverconf
The following section configures the SSL parameters
lt-- Define a SSL Coyote HTTP11 Connector on port 8443 --gt
ltConnector className=orgapachecoyotetomcat4CoyoteConnector
port=8443
minProcessors=5
maxProcessors=75
enableLookups=true
acceptCount=100
debug=0
scheme=https
secure=true
useURIValidationHack=false
disableUploadTimeout=truegt
ltFactory className=orgapachecoyotetomcat4CoyoteServerSocketFactory
clientAuth=false
keystoreFile=ssl-keystore
protocol=TLS gt
ltConnectorgt
Verify setup
To verify if everything is working correctly start the Tomcat webserver as usual and connect to the webserver with your browser
Go to httpsyourserveraddress ndash initially you might get a warning window if the root certificate authority is not known to the browser If you continue by clicking OK you should see the usual Ponton XP start page
If everything comes up correctly you can use SSL to receive messages with the Ponton XP Software
Ponton XP 21 ndash Installation and Configuration Guide 53
Advanced Configuration
65 Distributed Installation If the Messenger is installed on a server that cannot be reached from the Internet you will need to install the Listener as well The purpose of the Listener is to pick up incoming connections and forward them to the Messenger (across the firewall) The firewall rules must be set up to allow this connection between the Listener and the Messenger When a message is received the Listener notifies the Messenger and the Messenger then picks up the message
You also have the option of subsequently installing the Listener as a service under Windows ndash this service can then be configured to start automatically when the system starts up
Note If you are going to run the Messenger in combination with the Listener your partners will have to enter the URI of your Listener in their configurations (under Configuration rarr Partners rarr ltpartner namegt rarr URI of Partners Messenger Service)
Listener Installation and Configuration
The Listener is installed by running the installer program (eg PontonXP-21-setuplistener-windowsexe) on the relevant system You are asked to specify an installation folder and also have the option of creating a desktop or menu shortcut Thatrsquos it
-
The settings for the Listener are contained in the configuration file listenerproperties which is located in the folder [Listener root folder]config To modify these settings you will have to edit the configuration file directly Access via the Messengerrsquos configuration interface is not possible
The file contains the following settings
HttpPort = Port number (for external HTTP connections)
HttpsPort = Port number (for external HTTPS connections)
LogLevel = DEBUG | INFO | WARN | ERROR | FATAL | OFF
The following settings specify the host and port of the Messenger for forwarding connections (HTTPHTTPS) The forwarding connection mode is activated by entering the relevant host and port addresses and removing the hash marks (used to mark ldquocomment linesrdquo in Java property files)
HttpServer = server1port1 (HTTP forwarding connection to the Messenger)
HttpsServer = server1port1 (HTTPS forwarding connection to the Messenger)
Ponton XP 21 ndash Installation and Configuration Guide 54
Advanced Configuration
The following settings specify the Listenerrsquos port for callback connections (HTTPHTTPS) with the Messenger As with the forwarding connection the callback connection mode is activated by entering the relevant port addresses and removing the hash marks (Obviously it makes no sense to have both connections activated at the same time)
HttpServicePort = Port number (for internal HTTP connections to the Listener)
HttpsServicePort = Port number (for internal HTTPS connections to the Listener)
Starting the Listener
To start the Listener open a command prompt and start the class
depontonconsultingxmlpipeListener
with the classpath
-cp libcommons-logging-api-103jarlibcommonutilsjarlibxp_listenerjarconfig
You can also use the installed batch file [Listener root folder]startListenerbat
Callback Mode
Details of the communication flow
When the Messenger starts up it searches for the Listener
Note The Listener should start up first so that it can be found by the Messenger
If the search is successful a permanent connection is established between the Messenger and the Listener The Messenger uses the following settings in the configuration to establish the connection with the Listener
Configuration rarr Messenger rarr Listener rarr HTTP[S] rarr Hostname
Configuration rarr Messenger rarr Listener rarr HTTP[S] rarr Internal Listener Port
Ponton XP 21 ndash Installation and Configuration Guide 55
Advanced Configuration
When the Listener receives an incoming message (or rather an HTTPHTTPS request) it informs the Messenger ndash by way of the permanent connection ndash about the arrival of the new request indicating which port the Messenger can use to pick up the connection
Note This port number is randomly selected by the Listener and cannot be configured
The Messenger picks up the connection on the Listenerrsquos specified port and redirects it to its own local port for further processing
This local port corresponds to the setting for
Configuration rarr Messenger rarr Listener rarr HTTP[S] rarr Internal Messenger Port
in the configuration GUI
Forwarding Mode
Details of the communication flow
In forwarding mode no permanent connection is established between the Messenger and the Listener
When the Listener receives an incoming HTTPHTTPS request it simply forwards the request to the Messenger using the address specified in listenerproperties (HttpServerHttpsServer)
Note To allow this forwarding connection the firewall has to be configured so that the Listener is permitted to access the Messenger on the specified port(s)
Ponton XP 21 ndash Installation and Configuration Guide 56
Advanced Configuration
66 Port Configuration The Messengerrsquos standard configuration uses port 8080 for HTTP connections and port 8443 for secure (HTTPS) connections This section describes how to set up the messenger to use a non-standard port configuration This involves making manual changes to several configuration files in particular the Tomcat serverxml and the Messengerrsquos adapter configuration files
Tomcat Settings
The port setting for the Messengerrsquos HTTP and HTTPS connections are specified in the Tomcat configuration file
[installation root]tomcat-xxxconfserverxml
This file defines the connections (Connectors) for the Messenger as follows
lt-- Define a non-SSL Coyote HTTP11 Connector on port 8080 --gt
ltConnector className=orgapachecoyotetomcat4CoyoteConnector
port=yourMessengerPort minProcessors=5 maxProcessors=75
enableLookups=true redirectPort=yourRed rectPort i acceptCount=100 debug=0 connectionTimeout=20000
useURIValidationHack=false disableUploadTimeout=true gt
lt-- Define a SSL Coyote HTTP11 Connector on port 8443 --gt
ltConnector className=orgapachecoyotetomcat4CoyoteConnector
port=yourSSLPort minProcessors=5 maxProcessors=75
enableLookups=true
acceptCount=100 debug=0 scheme=https secure=true
useURIValidationHack=false disableUploadTimeout=truegt
ltFactory className=orgapachecoyotetomcat4CoyoteServerSocketFactory
clientAuth=false keystoreFile=ssl-keystore protocol=TLS gt
ltConnectorgt
The standard settings for the Messenger ports are
HTTP 8080
SSL 8443
To modify your connections you will need to enter the relevant port numbers indicated above as yourMessengerPort yourRedirectPort (which normally points to the SSL connection) and yourSSLPort
Ponton XP 21 ndash Installation and Configuration Guide 57
Advanced Configuration
Adapter Settings
The settings for the Messenger adapters are contained in the relevant XML files under
[installation root]xmlpipewebrootWEB-INFconfig
In particular a standard installation includes the files testadap erxml and hotfolderxml Each of these configuration files contains a block specifying the connection to the messenger
t
ltMessengergt
ltAddressgtyourMessengerHostltAddressgt
ltPortNumbergtyourMessengerPortltPortNumbergt
ltPathgthellipltPathgt
ltMessengergt
If you have configured the Messenger to run on a different port (see above) you will need to enter the relevant port number here
Ponton XP 21 ndash Installation and Configuration Guide 58
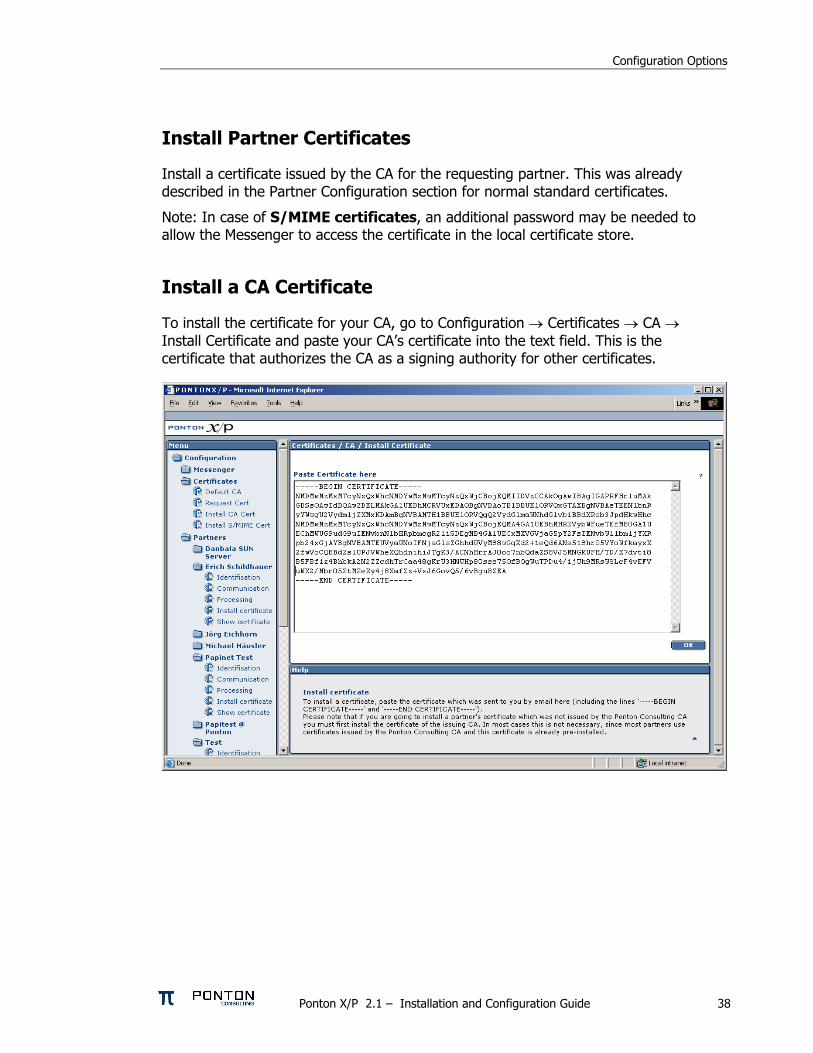
Configuration Options
Install Partner Certificates
Install a certificate issued by the CA for the requesting partner This was already described in the Partner Configuration section for normal standard certificates
Note In case of SMIME certificates an additional password may be needed to allow the Messenger to access the certificate in the local certificate store
Install a CA Certificate
To install the certificate for your CA go to Configuration rarr Certificates rarr CA rarr Install Certificate and paste your CArsquos certificate into the text field This is the certificate that authorizes the CA as a signing authority for other certificates
Ponton XP 21 ndash Installation and Configuration Guide 38
Configuration Options
54 Configure the Hot Folder Adapter
General Configuration
Address Port ndash the Hot Folder Adapter (HFA) is addressed as a separate process that communicates with the Messenger via HTTP Therefore the hostname and port number need to be set up for the Messenger If the HFA is co-located with the Messenger on the same machine use ldquolocalhostrdquo for the IP address In this case the HFA does not run as a separate Java process but will be hosted on the same Tomcat server
Path ndash the HFA needs to know the Adapter communication path of the Messenger By default it is pontonxpAdapterService
Console File Log Level ndash the HFA provides log output to the console and to log files Both can be configured regarding the level of detail The console log is only useful if the HFA is running as a standalone application so you can safely leave it disabled in the default configuration
Ponton XP 21 ndash Installation and Configuration Guide 39
Configuration Options
Create Delete a HFA
Several HFAs may be created Each registers under a different ID at the Messenger HFAs may be created for individual partners If this is the case messages exchanged with the rest of the partners will be stored with the default HFA
Configure a HFA
Each HFA requires several directories to be defined
Inbox ndash a document will be stored in the Inbox whenever it was received from a partner
Outbox ndash documents to be sent to the business partner are dropped here The HFA grabs them in a defined frequency
Failed ndash if a document could not be sent to a partner and all retries failed it will be stored in this folder
Work ndash if a document transfer is in progress or all attempts to send the document have not yet been tried the document will remain here After a final failure it will be transferred to the Failed folder
Ponton XP 21 ndash Installation and Configuration Guide 40
Configuration Options
The following settings are also supported
Port ndash the port to be used by the HFA (optional)
Receiver format ndash standard format is XML
Save Backend envelope ndash the Backend envelope is retained for incoming messages
Support attachments ndash the HFA will save any files attached to an incoming message to the selected inbox folder
Scan Interval ndash the interval to wait (in seconds) between checking the outbox
Number of receiving threads ndash specifies the maximum number of receiving threads the adapter can process
Use partner subfolders ndash if this is set this HFA will create inbox and outbox folders for all remote partners Inbound messages will automatically be sorted into the according folder depending on the sender Outbound messages need to be placed into the receiving partnerrsquos outbox folder The backend message is not used in this mode and is ignored if it exists
Use Acknowledgement for ERP ndash with this option activated the ERP application receives an acknowledgement from the receiving Messenger on the partnerrsquos side This acknowledgement will be provided via the specified Inbox
Ponton XP 21 ndash Installation and Configuration Guide 41
Configuration Options
55 Ponton XE ndash The XML Editor Ponton XE is a separate Ponton product It is packaged with Ponton XP for free use only by papiNet users It allows to enter papiNet document data directly via a graphical user interface and to send the document via the hot folder adapter to the business partners
Ponton XE is fully documented in a separate manual Hence only the Messaging Plug-in will be described here
You can experiment with the XML Editor and check out all the features and options without using the Ponton XP connection To start with you may want to begin with the following steps
Create a new papiNet Purchase Order
Fill out the forms and use optional XML Elements by right-clicking the Plus-icons in the layout tree
Create an HTML file by choosing Document Export to HTML from the menu
Save the document to an XML file and re-load it again
Ponton XP 21 ndash Installation and Configuration Guide 42
Configuration Options
Interface between Ponton XE and Ponton XP
The two software applications communicate via hot folders as illustrated in the following figure
Message Plug-in
Outbox Inbox AckInboxImport
Ponton XP Ponton XE
XMLXML XMLXML XMLXML XMLXML
Hot Folder Adapter
The XML Editor is connected to the Messenger via the Hot Folder Adapter All these folder settings need to be synchronized for a proper data exchange
Configuration of the Messaging Plug-in
The Messaging Plug-in can be flexibly installed and de-installed with the remaining part of Ponton XE If the file messengerjar is removed from the plugins directory it will automatically disappear from the Ponton XE menu bar as soon as the software is started again
Before transferring messages out of Ponton XE you need to preset the following information
Default values for the sending and receiving partners ndash these values may be overridden for an individual transfer
Folder locations of the Hot Folder Adapter ndash the Inbox Outbox and AckInbox need to be set for document exchange with Ponton XP
Default setting for Test Message flag ndash this can be overridden for the actual document transfer
Import Directory ndash Ponton XE will automatically scan the Inbox folder and import received documents to the given folder for local processing
Ponton XP 21 ndash Installation and Configuration Guide 43
Configuration Options
Open Messages after Import ndash if this option is activated messages received from the Inbox will automatically be displayed in Ponton XE
Delete message in Inbox ndash to always remove received messages from the HFA Inbox this option needs to be activated otherwise a copy will remain in the Inbox folder
Ponton XP 21 ndash Installation and Configuration Guide 44
Configuration Options
Ponton XP 21 ndash Installation and Configuration Guide 45
Configuration Options
Using Ponton XE
After setting the configuration and creating a document you can transfer the document to your business partner This is done by means of the following steps
Choose the menu item ldquoMessenger rarr Transfer rarr Send Messagerdquo
Select a sending and receiving partner
Override the settings for the HFA folders
Tick the checkbox to qualify this message as a test message
After transferring the document to the Messenger Ponton XE will wait for a response This is recognised as an acknowledge file which is dropped into the AckInbox folder of the HFA As soon as this has been received a successful transfer in indicated
You may check with the Message Monitor to determine how the document was forwarded by the Messenger to the receiver or whether any errors occurred
Ponton XP 21 ndash Installation and Configuration Guide 46
Configuration Options
56 Display Schema Configuration The schema sets to be supported for each partner are defined in the partner configuration The standard sets available with the installation are shown under Configuration rarr Schemata
Ponton XP 21 ndash Installation and Configuration Guide 47
Configuration Options
57 User Administration Two types of users are distinguished
Administrators ndash these users have full access to the Messengerrsquos configuration interface
Operators ndash these users only have access to the Adapter Monitor the Message Monitor and the Test Adapter The other options in the Messenger menu are not available
Please note the following points in connection with the Messengerrsquos standard user administration
This is a very simple user administration based on the Tomcat implementation If you want to integrate the Messenger with another user administration such as LDAP please contact Ponton Consulting for support
A userrsquos access rights (administratoroperator) are defined when the user account is created ndash they cannot be changed subsequently
User accounts can only be created or deleted by administrators
Ponton XP 21 ndash Installation and Configuration Guide 48
Advanced Configuration
6 Advanced Configuration
61 XML Schema Configuration Important The Messenger distinguishes between available schema set and activated schema sets Just inserting entries in the schema configuration as described in this section does not activate the schema sets or the corresponding schemas for use by the Messenger In order to make use of the schemas in a schema set you have to activate the schema set in the relevant partner configuration To view or modify the activated schema sets in a partner configuration go to
Configuration rarr Partners rarr ltpartner namegt rarr Processing
and activatedeactivate the relevant checkboxes
In the Messengerrsquos configuration interface you can activate and deactivate schema sets for specific partner configurations It is not possible however to modify the contents and specifications of the individual schema sets Any necessary changes have to be made in the configuration file
[installation root]xmlpipewebrootWEB-INFconfigschemataxml
The configuration entries in this file are structured as follows
ltSchemaSet Name=papinet21gt
ltSchemaName=httpwwwpapinetorgdataAvailabilityV2R10xsd MessageType=Availability MessageVersion=V2R10gt
ltNamespacegtltNamespacegt
ltDisplayNamegtAvailability 21ltDisplayNamegt
ltSchemaFilegtAvailabilityV2R10xsdltSchemaFilegt
ltXSLFilegtltXSLFilegt
ltSchemagt
ltSchema Name=yourSchema MessageType=yourMsgType MessageVersion=yourMsgVersgt
ltNamespacegtyourNamespaceltNamespacegt
ltDisplayNamegtYour Display NameltDisplayNamegt
ltSchemaFilegtyourSchemaFileltSchemaFilegt
ltXSLFilegtyourStylesheetltXSLFilegt
ltSchemagt
hellip
ltSchemaFoldergtpapinet210ltSchemaFoldergt
ltXSLFoldergtpapinet210ltXSLFoldergt
ltSchemaSetgt
Ponton XP 21 ndash Installation and Configuration Guide 49
Advanced Configuration
You can add a schema to an existing schema set in this file by inserting a ltSchemagt block (just copy and paste one of the existing blocks and modify the configuration as required) Please ensure that your new schema specification includes correct settings for the attributes of the Schema element
Name= This attribute corresponds with the ebXML Schema Location of incoming messages When an ebXML message is received the Messenger looks for a schema configuration where the Schema Name attribute matches the Schema Location specified in the ebXML envelope
MessageType= This attribute corresponds with the attribute MessageMetaDataDocumentInfoMessageName in the backend envelope of outgoing messages
MessageVersion= This attribute corresponds with the element MessageMe aDataDocumentInfoDTDVersionNumber in the backend envelope of outgoing messages
t
Note The specification of MessageType and MessageVersion must be used together for outgoing messages as they are combined to form an identifier for the message schema
You also have the option of adding a new schema set with your own schema definitions to the schema configuration In this case you would insert a ltSchemaSetgt block with subordinate ltSchemagt blocks Your added schema set will automatically be inserted in the list of available schema sets on the Messenger configuration pages
62 Advanced Database Configuration Important Since the Messenger database is used for essential message processing and tracking purposes you should not experiment with the database configuration on a ldquoliverdquo system For test and debugging purposes you are advised to set up a trial system
Installation with other Databases
This section describes the main steps required to install a different database system on the Messenger for example an Oracle database
1 Install database driver Copy the database driver to
[installation root]xmlpipewebrootWEB-INFlib
Note Please note that only drivers with the extension jar are loaded by the Tomcat servlet engine If the JDBC driver you want to use is a zip file you will have to rename the file to jar The JDBC driver for Oracle 9i is the file ojdbc14jar
Ponton XP 21 ndash Installation and Configuration Guide 50
Advanced Configuration
2 Create database and tables Ponton XP is supplied with SQL scripts for HSQL and for Oracle that can be used to create the tables for the Messenger database If you are using another database you may need to modify these scripts to work correctly with your database system
The SQL scripts are located in the subfolders under [installation root]sql
Once the database tables are in place you will also need to carry out the SQL script that inserts the log messages into the database ie
[installation root]sqlinsert_log_messagessql
3 Set up database connection The configuration of database connections is described in the section Set Up Messenger Database beginning on page 20 To connect with a different database choose ldquootherrdquo from the list of database drivers and enter the configuration for your database on the next page
The entries for the Oracle 9i JDBC driver are
Driver oraclejdbcdriverOracleDriver
URL jdbcoraclethinlthostgtltportgtltdatabasegt
63 Advanced Message Monitor Configuration In the configuration directory ldquoxmlpipewebrootWEB-INFconfigrdquo there is a file messagemonitorxml which can be used to change the selection and ordering of the Message overview window in the Message Monitor The default setting is displayed in the following picture
Ponton XP 21 ndash Installation and Configuration Guide 51
Advanced Configuration
Here the number of line items per page can be set If a high resolution screen is used (beyond 1024 x 768 pixel) one may increase the number of lines
Further a mapping table defines which database column is to be displayed in which monitor column The number of columns again depends on the screen resolution
Finally if main memory size allows caching of XSL stylesheet definitions helps accelerating processing speed for XSL transformations
64 Tomcat SSL Installation
Generate a key
One minor problem with Tomcat or any other webserver that uses the internal Java symmetric key architecture is that you are not allowed to export or import private keys For this reason it is not possible to use the existing key-pair installed with the Messenger software You will have to generate a new key-pair and send a certificate request to the Ponton certificate authority (or other certification authority) to receive a valid certificate
To generate a new key-pair open a command prompt and go to the tomcat-4118 directory The keystore used for a Tomcat SSL installation is located in the Tomcat root directory and is called ssl-keystore The Tomcat installation already contains a certificate for lsquolocalhostrsquo so you can test the HTTPS access with a web browser
Before you can create a new Tomcat certificate you will have to delete the installed certificate Note that the default password for the Tomcat keystore is ldquochangeitrdquo keytool -delete -alias tomcat ndashkeystore ssl-keystore
Now use the following command to create a new key-pair Please note that you need to specify the Listener hostname (eg listenermyserverde) when the keytool asks for lsquofirst and last namersquo keytool -genkey -alias tomcat -keyalg RSA ndashkeystore ssl-keystore
After generating the new key the next step is to export a certificate request with the following command keytool ndashcertreq ndashalias tomcat ndashfile myservercsr ndashkeystore ssl-keystore
This will generate the file myservercsr in the current directory Send this file via email to xp-certponton-consultingde It will be signed and sent back to you The reply will contain a file with the certificate
Finally you have to re-import this signed certificate into the Tomcat SSL keystore Please note that the import may take some time keytool ndashimport ndashalias tomcat ndashfile myservercer ndashkeystore ssl-keystore
If you have any problems starting the keytool make sure you have the javahomebin directory specified in your PATH environment variable Of course you can also change to the javahomebin directory and start the keytool there
Ponton XP 21 ndash Installation and Configuration Guide 52
Advanced Configuration
Update Tomcat configuration
SSL is already activated in the Tomcat configuration packaged in the distribution However you might want to change the specified SSL port (by default the SSL port is set to 8443) You can change the port by editing the file
[tomcat installation]confserverconf
The following section configures the SSL parameters
lt-- Define a SSL Coyote HTTP11 Connector on port 8443 --gt
ltConnector className=orgapachecoyotetomcat4CoyoteConnector
port=8443
minProcessors=5
maxProcessors=75
enableLookups=true
acceptCount=100
debug=0
scheme=https
secure=true
useURIValidationHack=false
disableUploadTimeout=truegt
ltFactory className=orgapachecoyotetomcat4CoyoteServerSocketFactory
clientAuth=false
keystoreFile=ssl-keystore
protocol=TLS gt
ltConnectorgt
Verify setup
To verify if everything is working correctly start the Tomcat webserver as usual and connect to the webserver with your browser
Go to httpsyourserveraddress ndash initially you might get a warning window if the root certificate authority is not known to the browser If you continue by clicking OK you should see the usual Ponton XP start page
If everything comes up correctly you can use SSL to receive messages with the Ponton XP Software
Ponton XP 21 ndash Installation and Configuration Guide 53
Advanced Configuration
65 Distributed Installation If the Messenger is installed on a server that cannot be reached from the Internet you will need to install the Listener as well The purpose of the Listener is to pick up incoming connections and forward them to the Messenger (across the firewall) The firewall rules must be set up to allow this connection between the Listener and the Messenger When a message is received the Listener notifies the Messenger and the Messenger then picks up the message
You also have the option of subsequently installing the Listener as a service under Windows ndash this service can then be configured to start automatically when the system starts up
Note If you are going to run the Messenger in combination with the Listener your partners will have to enter the URI of your Listener in their configurations (under Configuration rarr Partners rarr ltpartner namegt rarr URI of Partners Messenger Service)
Listener Installation and Configuration
The Listener is installed by running the installer program (eg PontonXP-21-setuplistener-windowsexe) on the relevant system You are asked to specify an installation folder and also have the option of creating a desktop or menu shortcut Thatrsquos it
-
The settings for the Listener are contained in the configuration file listenerproperties which is located in the folder [Listener root folder]config To modify these settings you will have to edit the configuration file directly Access via the Messengerrsquos configuration interface is not possible
The file contains the following settings
HttpPort = Port number (for external HTTP connections)
HttpsPort = Port number (for external HTTPS connections)
LogLevel = DEBUG | INFO | WARN | ERROR | FATAL | OFF
The following settings specify the host and port of the Messenger for forwarding connections (HTTPHTTPS) The forwarding connection mode is activated by entering the relevant host and port addresses and removing the hash marks (used to mark ldquocomment linesrdquo in Java property files)
HttpServer = server1port1 (HTTP forwarding connection to the Messenger)
HttpsServer = server1port1 (HTTPS forwarding connection to the Messenger)
Ponton XP 21 ndash Installation and Configuration Guide 54
Advanced Configuration
The following settings specify the Listenerrsquos port for callback connections (HTTPHTTPS) with the Messenger As with the forwarding connection the callback connection mode is activated by entering the relevant port addresses and removing the hash marks (Obviously it makes no sense to have both connections activated at the same time)
HttpServicePort = Port number (for internal HTTP connections to the Listener)
HttpsServicePort = Port number (for internal HTTPS connections to the Listener)
Starting the Listener
To start the Listener open a command prompt and start the class
depontonconsultingxmlpipeListener
with the classpath
-cp libcommons-logging-api-103jarlibcommonutilsjarlibxp_listenerjarconfig
You can also use the installed batch file [Listener root folder]startListenerbat
Callback Mode
Details of the communication flow
When the Messenger starts up it searches for the Listener
Note The Listener should start up first so that it can be found by the Messenger
If the search is successful a permanent connection is established between the Messenger and the Listener The Messenger uses the following settings in the configuration to establish the connection with the Listener
Configuration rarr Messenger rarr Listener rarr HTTP[S] rarr Hostname
Configuration rarr Messenger rarr Listener rarr HTTP[S] rarr Internal Listener Port
Ponton XP 21 ndash Installation and Configuration Guide 55
Advanced Configuration
When the Listener receives an incoming message (or rather an HTTPHTTPS request) it informs the Messenger ndash by way of the permanent connection ndash about the arrival of the new request indicating which port the Messenger can use to pick up the connection
Note This port number is randomly selected by the Listener and cannot be configured
The Messenger picks up the connection on the Listenerrsquos specified port and redirects it to its own local port for further processing
This local port corresponds to the setting for
Configuration rarr Messenger rarr Listener rarr HTTP[S] rarr Internal Messenger Port
in the configuration GUI
Forwarding Mode
Details of the communication flow
In forwarding mode no permanent connection is established between the Messenger and the Listener
When the Listener receives an incoming HTTPHTTPS request it simply forwards the request to the Messenger using the address specified in listenerproperties (HttpServerHttpsServer)
Note To allow this forwarding connection the firewall has to be configured so that the Listener is permitted to access the Messenger on the specified port(s)
Ponton XP 21 ndash Installation and Configuration Guide 56
Advanced Configuration
66 Port Configuration The Messengerrsquos standard configuration uses port 8080 for HTTP connections and port 8443 for secure (HTTPS) connections This section describes how to set up the messenger to use a non-standard port configuration This involves making manual changes to several configuration files in particular the Tomcat serverxml and the Messengerrsquos adapter configuration files
Tomcat Settings
The port setting for the Messengerrsquos HTTP and HTTPS connections are specified in the Tomcat configuration file
[installation root]tomcat-xxxconfserverxml
This file defines the connections (Connectors) for the Messenger as follows
lt-- Define a non-SSL Coyote HTTP11 Connector on port 8080 --gt
ltConnector className=orgapachecoyotetomcat4CoyoteConnector
port=yourMessengerPort minProcessors=5 maxProcessors=75
enableLookups=true redirectPort=yourRed rectPort i acceptCount=100 debug=0 connectionTimeout=20000
useURIValidationHack=false disableUploadTimeout=true gt
lt-- Define a SSL Coyote HTTP11 Connector on port 8443 --gt
ltConnector className=orgapachecoyotetomcat4CoyoteConnector
port=yourSSLPort minProcessors=5 maxProcessors=75
enableLookups=true
acceptCount=100 debug=0 scheme=https secure=true
useURIValidationHack=false disableUploadTimeout=truegt
ltFactory className=orgapachecoyotetomcat4CoyoteServerSocketFactory
clientAuth=false keystoreFile=ssl-keystore protocol=TLS gt
ltConnectorgt
The standard settings for the Messenger ports are
HTTP 8080
SSL 8443
To modify your connections you will need to enter the relevant port numbers indicated above as yourMessengerPort yourRedirectPort (which normally points to the SSL connection) and yourSSLPort
Ponton XP 21 ndash Installation and Configuration Guide 57
Advanced Configuration
Adapter Settings
The settings for the Messenger adapters are contained in the relevant XML files under
[installation root]xmlpipewebrootWEB-INFconfig
In particular a standard installation includes the files testadap erxml and hotfolderxml Each of these configuration files contains a block specifying the connection to the messenger
t
ltMessengergt
ltAddressgtyourMessengerHostltAddressgt
ltPortNumbergtyourMessengerPortltPortNumbergt
ltPathgthellipltPathgt
ltMessengergt
If you have configured the Messenger to run on a different port (see above) you will need to enter the relevant port number here
Ponton XP 21 ndash Installation and Configuration Guide 58
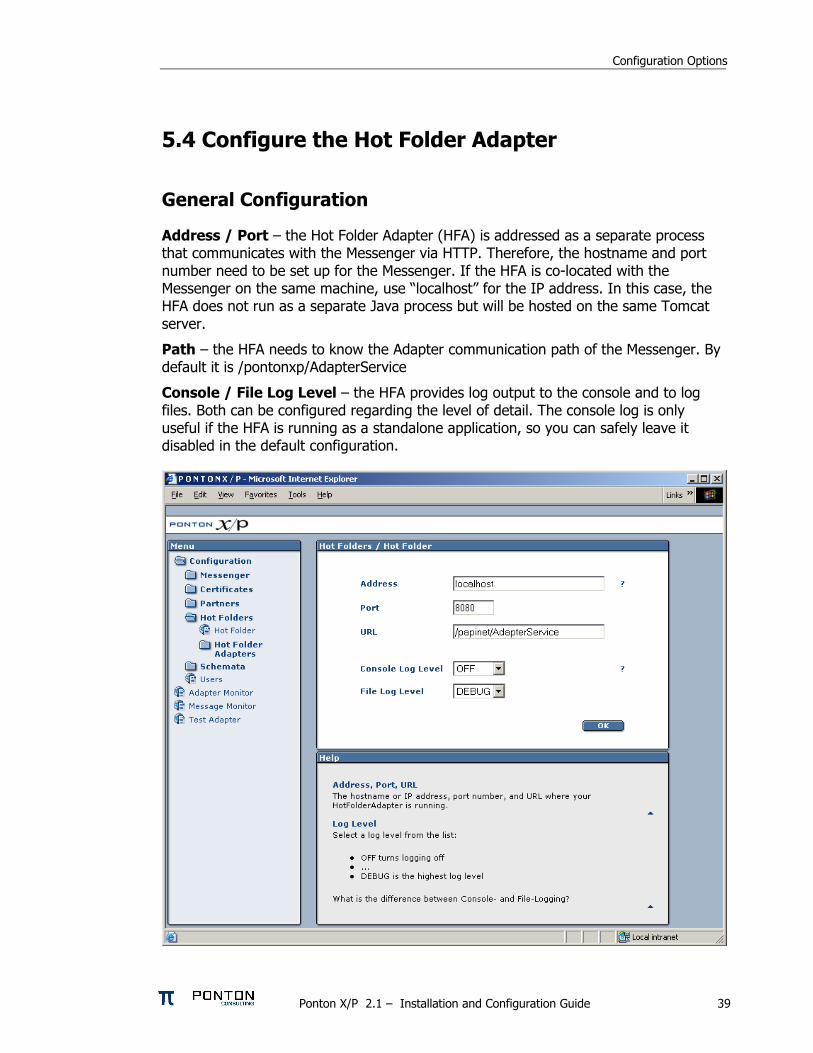
Configuration Options
54 Configure the Hot Folder Adapter
General Configuration
Address Port ndash the Hot Folder Adapter (HFA) is addressed as a separate process that communicates with the Messenger via HTTP Therefore the hostname and port number need to be set up for the Messenger If the HFA is co-located with the Messenger on the same machine use ldquolocalhostrdquo for the IP address In this case the HFA does not run as a separate Java process but will be hosted on the same Tomcat server
Path ndash the HFA needs to know the Adapter communication path of the Messenger By default it is pontonxpAdapterService
Console File Log Level ndash the HFA provides log output to the console and to log files Both can be configured regarding the level of detail The console log is only useful if the HFA is running as a standalone application so you can safely leave it disabled in the default configuration
Ponton XP 21 ndash Installation and Configuration Guide 39
Configuration Options
Create Delete a HFA
Several HFAs may be created Each registers under a different ID at the Messenger HFAs may be created for individual partners If this is the case messages exchanged with the rest of the partners will be stored with the default HFA
Configure a HFA
Each HFA requires several directories to be defined
Inbox ndash a document will be stored in the Inbox whenever it was received from a partner
Outbox ndash documents to be sent to the business partner are dropped here The HFA grabs them in a defined frequency
Failed ndash if a document could not be sent to a partner and all retries failed it will be stored in this folder
Work ndash if a document transfer is in progress or all attempts to send the document have not yet been tried the document will remain here After a final failure it will be transferred to the Failed folder
Ponton XP 21 ndash Installation and Configuration Guide 40
Configuration Options
The following settings are also supported
Port ndash the port to be used by the HFA (optional)
Receiver format ndash standard format is XML
Save Backend envelope ndash the Backend envelope is retained for incoming messages
Support attachments ndash the HFA will save any files attached to an incoming message to the selected inbox folder
Scan Interval ndash the interval to wait (in seconds) between checking the outbox
Number of receiving threads ndash specifies the maximum number of receiving threads the adapter can process
Use partner subfolders ndash if this is set this HFA will create inbox and outbox folders for all remote partners Inbound messages will automatically be sorted into the according folder depending on the sender Outbound messages need to be placed into the receiving partnerrsquos outbox folder The backend message is not used in this mode and is ignored if it exists
Use Acknowledgement for ERP ndash with this option activated the ERP application receives an acknowledgement from the receiving Messenger on the partnerrsquos side This acknowledgement will be provided via the specified Inbox
Ponton XP 21 ndash Installation and Configuration Guide 41
Configuration Options
55 Ponton XE ndash The XML Editor Ponton XE is a separate Ponton product It is packaged with Ponton XP for free use only by papiNet users It allows to enter papiNet document data directly via a graphical user interface and to send the document via the hot folder adapter to the business partners
Ponton XE is fully documented in a separate manual Hence only the Messaging Plug-in will be described here
You can experiment with the XML Editor and check out all the features and options without using the Ponton XP connection To start with you may want to begin with the following steps
Create a new papiNet Purchase Order
Fill out the forms and use optional XML Elements by right-clicking the Plus-icons in the layout tree
Create an HTML file by choosing Document Export to HTML from the menu
Save the document to an XML file and re-load it again
Ponton XP 21 ndash Installation and Configuration Guide 42
Configuration Options
Interface between Ponton XE and Ponton XP
The two software applications communicate via hot folders as illustrated in the following figure
Message Plug-in
Outbox Inbox AckInboxImport
Ponton XP Ponton XE
XMLXML XMLXML XMLXML XMLXML
Hot Folder Adapter
The XML Editor is connected to the Messenger via the Hot Folder Adapter All these folder settings need to be synchronized for a proper data exchange
Configuration of the Messaging Plug-in
The Messaging Plug-in can be flexibly installed and de-installed with the remaining part of Ponton XE If the file messengerjar is removed from the plugins directory it will automatically disappear from the Ponton XE menu bar as soon as the software is started again
Before transferring messages out of Ponton XE you need to preset the following information
Default values for the sending and receiving partners ndash these values may be overridden for an individual transfer
Folder locations of the Hot Folder Adapter ndash the Inbox Outbox and AckInbox need to be set for document exchange with Ponton XP
Default setting for Test Message flag ndash this can be overridden for the actual document transfer
Import Directory ndash Ponton XE will automatically scan the Inbox folder and import received documents to the given folder for local processing
Ponton XP 21 ndash Installation and Configuration Guide 43
Configuration Options
Open Messages after Import ndash if this option is activated messages received from the Inbox will automatically be displayed in Ponton XE
Delete message in Inbox ndash to always remove received messages from the HFA Inbox this option needs to be activated otherwise a copy will remain in the Inbox folder
Ponton XP 21 ndash Installation and Configuration Guide 44
Configuration Options
Ponton XP 21 ndash Installation and Configuration Guide 45
Configuration Options
Using Ponton XE
After setting the configuration and creating a document you can transfer the document to your business partner This is done by means of the following steps
Choose the menu item ldquoMessenger rarr Transfer rarr Send Messagerdquo
Select a sending and receiving partner
Override the settings for the HFA folders
Tick the checkbox to qualify this message as a test message
After transferring the document to the Messenger Ponton XE will wait for a response This is recognised as an acknowledge file which is dropped into the AckInbox folder of the HFA As soon as this has been received a successful transfer in indicated
You may check with the Message Monitor to determine how the document was forwarded by the Messenger to the receiver or whether any errors occurred
Ponton XP 21 ndash Installation and Configuration Guide 46
Configuration Options
56 Display Schema Configuration The schema sets to be supported for each partner are defined in the partner configuration The standard sets available with the installation are shown under Configuration rarr Schemata
Ponton XP 21 ndash Installation and Configuration Guide 47
Configuration Options
57 User Administration Two types of users are distinguished
Administrators ndash these users have full access to the Messengerrsquos configuration interface
Operators ndash these users only have access to the Adapter Monitor the Message Monitor and the Test Adapter The other options in the Messenger menu are not available
Please note the following points in connection with the Messengerrsquos standard user administration
This is a very simple user administration based on the Tomcat implementation If you want to integrate the Messenger with another user administration such as LDAP please contact Ponton Consulting for support
A userrsquos access rights (administratoroperator) are defined when the user account is created ndash they cannot be changed subsequently
User accounts can only be created or deleted by administrators
Ponton XP 21 ndash Installation and Configuration Guide 48
Advanced Configuration
6 Advanced Configuration
61 XML Schema Configuration Important The Messenger distinguishes between available schema set and activated schema sets Just inserting entries in the schema configuration as described in this section does not activate the schema sets or the corresponding schemas for use by the Messenger In order to make use of the schemas in a schema set you have to activate the schema set in the relevant partner configuration To view or modify the activated schema sets in a partner configuration go to
Configuration rarr Partners rarr ltpartner namegt rarr Processing
and activatedeactivate the relevant checkboxes
In the Messengerrsquos configuration interface you can activate and deactivate schema sets for specific partner configurations It is not possible however to modify the contents and specifications of the individual schema sets Any necessary changes have to be made in the configuration file
[installation root]xmlpipewebrootWEB-INFconfigschemataxml
The configuration entries in this file are structured as follows
ltSchemaSet Name=papinet21gt
ltSchemaName=httpwwwpapinetorgdataAvailabilityV2R10xsd MessageType=Availability MessageVersion=V2R10gt
ltNamespacegtltNamespacegt
ltDisplayNamegtAvailability 21ltDisplayNamegt
ltSchemaFilegtAvailabilityV2R10xsdltSchemaFilegt
ltXSLFilegtltXSLFilegt
ltSchemagt
ltSchema Name=yourSchema MessageType=yourMsgType MessageVersion=yourMsgVersgt
ltNamespacegtyourNamespaceltNamespacegt
ltDisplayNamegtYour Display NameltDisplayNamegt
ltSchemaFilegtyourSchemaFileltSchemaFilegt
ltXSLFilegtyourStylesheetltXSLFilegt
ltSchemagt
hellip
ltSchemaFoldergtpapinet210ltSchemaFoldergt
ltXSLFoldergtpapinet210ltXSLFoldergt
ltSchemaSetgt
Ponton XP 21 ndash Installation and Configuration Guide 49
Advanced Configuration
You can add a schema to an existing schema set in this file by inserting a ltSchemagt block (just copy and paste one of the existing blocks and modify the configuration as required) Please ensure that your new schema specification includes correct settings for the attributes of the Schema element
Name= This attribute corresponds with the ebXML Schema Location of incoming messages When an ebXML message is received the Messenger looks for a schema configuration where the Schema Name attribute matches the Schema Location specified in the ebXML envelope
MessageType= This attribute corresponds with the attribute MessageMetaDataDocumentInfoMessageName in the backend envelope of outgoing messages
MessageVersion= This attribute corresponds with the element MessageMe aDataDocumentInfoDTDVersionNumber in the backend envelope of outgoing messages
t
Note The specification of MessageType and MessageVersion must be used together for outgoing messages as they are combined to form an identifier for the message schema
You also have the option of adding a new schema set with your own schema definitions to the schema configuration In this case you would insert a ltSchemaSetgt block with subordinate ltSchemagt blocks Your added schema set will automatically be inserted in the list of available schema sets on the Messenger configuration pages
62 Advanced Database Configuration Important Since the Messenger database is used for essential message processing and tracking purposes you should not experiment with the database configuration on a ldquoliverdquo system For test and debugging purposes you are advised to set up a trial system
Installation with other Databases
This section describes the main steps required to install a different database system on the Messenger for example an Oracle database
1 Install database driver Copy the database driver to
[installation root]xmlpipewebrootWEB-INFlib
Note Please note that only drivers with the extension jar are loaded by the Tomcat servlet engine If the JDBC driver you want to use is a zip file you will have to rename the file to jar The JDBC driver for Oracle 9i is the file ojdbc14jar
Ponton XP 21 ndash Installation and Configuration Guide 50
Advanced Configuration
2 Create database and tables Ponton XP is supplied with SQL scripts for HSQL and for Oracle that can be used to create the tables for the Messenger database If you are using another database you may need to modify these scripts to work correctly with your database system
The SQL scripts are located in the subfolders under [installation root]sql
Once the database tables are in place you will also need to carry out the SQL script that inserts the log messages into the database ie
[installation root]sqlinsert_log_messagessql
3 Set up database connection The configuration of database connections is described in the section Set Up Messenger Database beginning on page 20 To connect with a different database choose ldquootherrdquo from the list of database drivers and enter the configuration for your database on the next page
The entries for the Oracle 9i JDBC driver are
Driver oraclejdbcdriverOracleDriver
URL jdbcoraclethinlthostgtltportgtltdatabasegt
63 Advanced Message Monitor Configuration In the configuration directory ldquoxmlpipewebrootWEB-INFconfigrdquo there is a file messagemonitorxml which can be used to change the selection and ordering of the Message overview window in the Message Monitor The default setting is displayed in the following picture
Ponton XP 21 ndash Installation and Configuration Guide 51
Advanced Configuration
Here the number of line items per page can be set If a high resolution screen is used (beyond 1024 x 768 pixel) one may increase the number of lines
Further a mapping table defines which database column is to be displayed in which monitor column The number of columns again depends on the screen resolution
Finally if main memory size allows caching of XSL stylesheet definitions helps accelerating processing speed for XSL transformations
64 Tomcat SSL Installation
Generate a key
One minor problem with Tomcat or any other webserver that uses the internal Java symmetric key architecture is that you are not allowed to export or import private keys For this reason it is not possible to use the existing key-pair installed with the Messenger software You will have to generate a new key-pair and send a certificate request to the Ponton certificate authority (or other certification authority) to receive a valid certificate
To generate a new key-pair open a command prompt and go to the tomcat-4118 directory The keystore used for a Tomcat SSL installation is located in the Tomcat root directory and is called ssl-keystore The Tomcat installation already contains a certificate for lsquolocalhostrsquo so you can test the HTTPS access with a web browser
Before you can create a new Tomcat certificate you will have to delete the installed certificate Note that the default password for the Tomcat keystore is ldquochangeitrdquo keytool -delete -alias tomcat ndashkeystore ssl-keystore
Now use the following command to create a new key-pair Please note that you need to specify the Listener hostname (eg listenermyserverde) when the keytool asks for lsquofirst and last namersquo keytool -genkey -alias tomcat -keyalg RSA ndashkeystore ssl-keystore
After generating the new key the next step is to export a certificate request with the following command keytool ndashcertreq ndashalias tomcat ndashfile myservercsr ndashkeystore ssl-keystore
This will generate the file myservercsr in the current directory Send this file via email to xp-certponton-consultingde It will be signed and sent back to you The reply will contain a file with the certificate
Finally you have to re-import this signed certificate into the Tomcat SSL keystore Please note that the import may take some time keytool ndashimport ndashalias tomcat ndashfile myservercer ndashkeystore ssl-keystore
If you have any problems starting the keytool make sure you have the javahomebin directory specified in your PATH environment variable Of course you can also change to the javahomebin directory and start the keytool there
Ponton XP 21 ndash Installation and Configuration Guide 52
Advanced Configuration
Update Tomcat configuration
SSL is already activated in the Tomcat configuration packaged in the distribution However you might want to change the specified SSL port (by default the SSL port is set to 8443) You can change the port by editing the file
[tomcat installation]confserverconf
The following section configures the SSL parameters
lt-- Define a SSL Coyote HTTP11 Connector on port 8443 --gt
ltConnector className=orgapachecoyotetomcat4CoyoteConnector
port=8443
minProcessors=5
maxProcessors=75
enableLookups=true
acceptCount=100
debug=0
scheme=https
secure=true
useURIValidationHack=false
disableUploadTimeout=truegt
ltFactory className=orgapachecoyotetomcat4CoyoteServerSocketFactory
clientAuth=false
keystoreFile=ssl-keystore
protocol=TLS gt
ltConnectorgt
Verify setup
To verify if everything is working correctly start the Tomcat webserver as usual and connect to the webserver with your browser
Go to httpsyourserveraddress ndash initially you might get a warning window if the root certificate authority is not known to the browser If you continue by clicking OK you should see the usual Ponton XP start page
If everything comes up correctly you can use SSL to receive messages with the Ponton XP Software
Ponton XP 21 ndash Installation and Configuration Guide 53
Advanced Configuration
65 Distributed Installation If the Messenger is installed on a server that cannot be reached from the Internet you will need to install the Listener as well The purpose of the Listener is to pick up incoming connections and forward them to the Messenger (across the firewall) The firewall rules must be set up to allow this connection between the Listener and the Messenger When a message is received the Listener notifies the Messenger and the Messenger then picks up the message
You also have the option of subsequently installing the Listener as a service under Windows ndash this service can then be configured to start automatically when the system starts up
Note If you are going to run the Messenger in combination with the Listener your partners will have to enter the URI of your Listener in their configurations (under Configuration rarr Partners rarr ltpartner namegt rarr URI of Partners Messenger Service)
Listener Installation and Configuration
The Listener is installed by running the installer program (eg PontonXP-21-setuplistener-windowsexe) on the relevant system You are asked to specify an installation folder and also have the option of creating a desktop or menu shortcut Thatrsquos it
-
The settings for the Listener are contained in the configuration file listenerproperties which is located in the folder [Listener root folder]config To modify these settings you will have to edit the configuration file directly Access via the Messengerrsquos configuration interface is not possible
The file contains the following settings
HttpPort = Port number (for external HTTP connections)
HttpsPort = Port number (for external HTTPS connections)
LogLevel = DEBUG | INFO | WARN | ERROR | FATAL | OFF
The following settings specify the host and port of the Messenger for forwarding connections (HTTPHTTPS) The forwarding connection mode is activated by entering the relevant host and port addresses and removing the hash marks (used to mark ldquocomment linesrdquo in Java property files)
HttpServer = server1port1 (HTTP forwarding connection to the Messenger)
HttpsServer = server1port1 (HTTPS forwarding connection to the Messenger)
Ponton XP 21 ndash Installation and Configuration Guide 54
Advanced Configuration
The following settings specify the Listenerrsquos port for callback connections (HTTPHTTPS) with the Messenger As with the forwarding connection the callback connection mode is activated by entering the relevant port addresses and removing the hash marks (Obviously it makes no sense to have both connections activated at the same time)
HttpServicePort = Port number (for internal HTTP connections to the Listener)
HttpsServicePort = Port number (for internal HTTPS connections to the Listener)
Starting the Listener
To start the Listener open a command prompt and start the class
depontonconsultingxmlpipeListener
with the classpath
-cp libcommons-logging-api-103jarlibcommonutilsjarlibxp_listenerjarconfig
You can also use the installed batch file [Listener root folder]startListenerbat
Callback Mode
Details of the communication flow
When the Messenger starts up it searches for the Listener
Note The Listener should start up first so that it can be found by the Messenger
If the search is successful a permanent connection is established between the Messenger and the Listener The Messenger uses the following settings in the configuration to establish the connection with the Listener
Configuration rarr Messenger rarr Listener rarr HTTP[S] rarr Hostname
Configuration rarr Messenger rarr Listener rarr HTTP[S] rarr Internal Listener Port
Ponton XP 21 ndash Installation and Configuration Guide 55
Advanced Configuration
When the Listener receives an incoming message (or rather an HTTPHTTPS request) it informs the Messenger ndash by way of the permanent connection ndash about the arrival of the new request indicating which port the Messenger can use to pick up the connection
Note This port number is randomly selected by the Listener and cannot be configured
The Messenger picks up the connection on the Listenerrsquos specified port and redirects it to its own local port for further processing
This local port corresponds to the setting for
Configuration rarr Messenger rarr Listener rarr HTTP[S] rarr Internal Messenger Port
in the configuration GUI
Forwarding Mode
Details of the communication flow
In forwarding mode no permanent connection is established between the Messenger and the Listener
When the Listener receives an incoming HTTPHTTPS request it simply forwards the request to the Messenger using the address specified in listenerproperties (HttpServerHttpsServer)
Note To allow this forwarding connection the firewall has to be configured so that the Listener is permitted to access the Messenger on the specified port(s)
Ponton XP 21 ndash Installation and Configuration Guide 56
Advanced Configuration
66 Port Configuration The Messengerrsquos standard configuration uses port 8080 for HTTP connections and port 8443 for secure (HTTPS) connections This section describes how to set up the messenger to use a non-standard port configuration This involves making manual changes to several configuration files in particular the Tomcat serverxml and the Messengerrsquos adapter configuration files
Tomcat Settings
The port setting for the Messengerrsquos HTTP and HTTPS connections are specified in the Tomcat configuration file
[installation root]tomcat-xxxconfserverxml
This file defines the connections (Connectors) for the Messenger as follows
lt-- Define a non-SSL Coyote HTTP11 Connector on port 8080 --gt
ltConnector className=orgapachecoyotetomcat4CoyoteConnector
port=yourMessengerPort minProcessors=5 maxProcessors=75
enableLookups=true redirectPort=yourRed rectPort i acceptCount=100 debug=0 connectionTimeout=20000
useURIValidationHack=false disableUploadTimeout=true gt
lt-- Define a SSL Coyote HTTP11 Connector on port 8443 --gt
ltConnector className=orgapachecoyotetomcat4CoyoteConnector
port=yourSSLPort minProcessors=5 maxProcessors=75
enableLookups=true
acceptCount=100 debug=0 scheme=https secure=true
useURIValidationHack=false disableUploadTimeout=truegt
ltFactory className=orgapachecoyotetomcat4CoyoteServerSocketFactory
clientAuth=false keystoreFile=ssl-keystore protocol=TLS gt
ltConnectorgt
The standard settings for the Messenger ports are
HTTP 8080
SSL 8443
To modify your connections you will need to enter the relevant port numbers indicated above as yourMessengerPort yourRedirectPort (which normally points to the SSL connection) and yourSSLPort
Ponton XP 21 ndash Installation and Configuration Guide 57
Advanced Configuration
Adapter Settings
The settings for the Messenger adapters are contained in the relevant XML files under
[installation root]xmlpipewebrootWEB-INFconfig
In particular a standard installation includes the files testadap erxml and hotfolderxml Each of these configuration files contains a block specifying the connection to the messenger
t
ltMessengergt
ltAddressgtyourMessengerHostltAddressgt
ltPortNumbergtyourMessengerPortltPortNumbergt
ltPathgthellipltPathgt
ltMessengergt
If you have configured the Messenger to run on a different port (see above) you will need to enter the relevant port number here
Ponton XP 21 ndash Installation and Configuration Guide 58
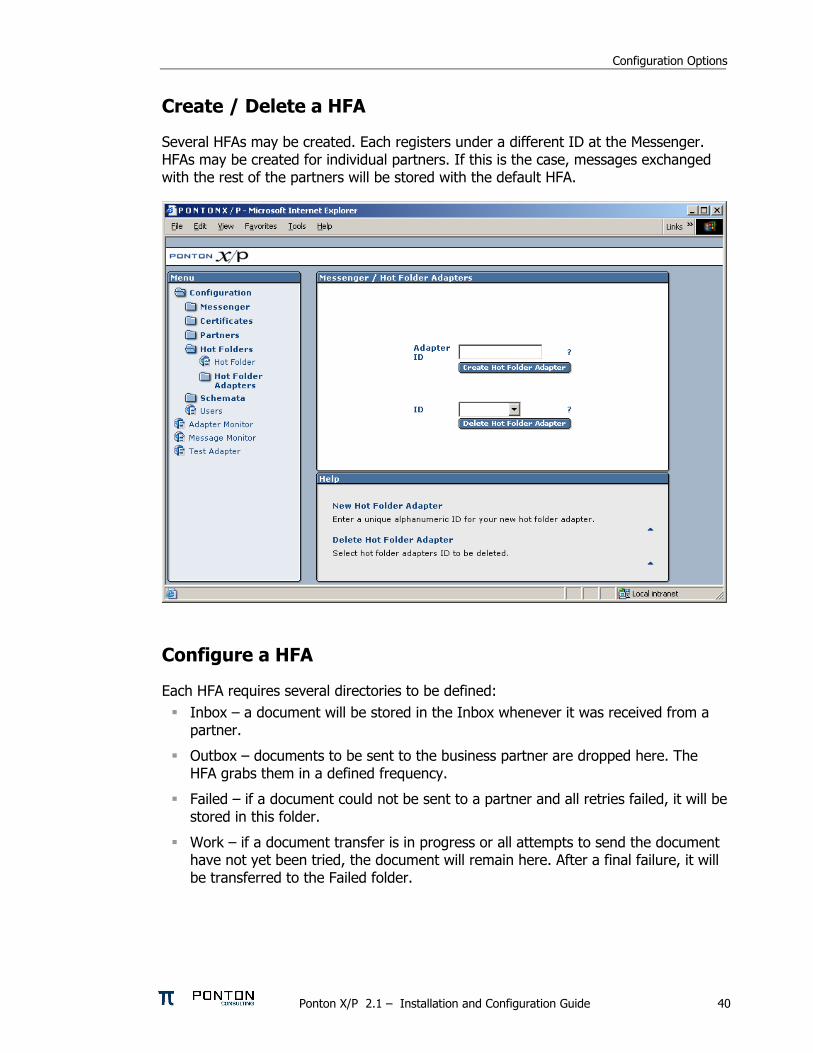
Configuration Options
Create Delete a HFA
Several HFAs may be created Each registers under a different ID at the Messenger HFAs may be created for individual partners If this is the case messages exchanged with the rest of the partners will be stored with the default HFA
Configure a HFA
Each HFA requires several directories to be defined
Inbox ndash a document will be stored in the Inbox whenever it was received from a partner
Outbox ndash documents to be sent to the business partner are dropped here The HFA grabs them in a defined frequency
Failed ndash if a document could not be sent to a partner and all retries failed it will be stored in this folder
Work ndash if a document transfer is in progress or all attempts to send the document have not yet been tried the document will remain here After a final failure it will be transferred to the Failed folder
Ponton XP 21 ndash Installation and Configuration Guide 40
Configuration Options
The following settings are also supported
Port ndash the port to be used by the HFA (optional)
Receiver format ndash standard format is XML
Save Backend envelope ndash the Backend envelope is retained for incoming messages
Support attachments ndash the HFA will save any files attached to an incoming message to the selected inbox folder
Scan Interval ndash the interval to wait (in seconds) between checking the outbox
Number of receiving threads ndash specifies the maximum number of receiving threads the adapter can process
Use partner subfolders ndash if this is set this HFA will create inbox and outbox folders for all remote partners Inbound messages will automatically be sorted into the according folder depending on the sender Outbound messages need to be placed into the receiving partnerrsquos outbox folder The backend message is not used in this mode and is ignored if it exists
Use Acknowledgement for ERP ndash with this option activated the ERP application receives an acknowledgement from the receiving Messenger on the partnerrsquos side This acknowledgement will be provided via the specified Inbox
Ponton XP 21 ndash Installation and Configuration Guide 41
Configuration Options
55 Ponton XE ndash The XML Editor Ponton XE is a separate Ponton product It is packaged with Ponton XP for free use only by papiNet users It allows to enter papiNet document data directly via a graphical user interface and to send the document via the hot folder adapter to the business partners
Ponton XE is fully documented in a separate manual Hence only the Messaging Plug-in will be described here
You can experiment with the XML Editor and check out all the features and options without using the Ponton XP connection To start with you may want to begin with the following steps
Create a new papiNet Purchase Order
Fill out the forms and use optional XML Elements by right-clicking the Plus-icons in the layout tree
Create an HTML file by choosing Document Export to HTML from the menu
Save the document to an XML file and re-load it again
Ponton XP 21 ndash Installation and Configuration Guide 42
Configuration Options
Interface between Ponton XE and Ponton XP
The two software applications communicate via hot folders as illustrated in the following figure
Message Plug-in
Outbox Inbox AckInboxImport
Ponton XP Ponton XE
XMLXML XMLXML XMLXML XMLXML
Hot Folder Adapter
The XML Editor is connected to the Messenger via the Hot Folder Adapter All these folder settings need to be synchronized for a proper data exchange
Configuration of the Messaging Plug-in
The Messaging Plug-in can be flexibly installed and de-installed with the remaining part of Ponton XE If the file messengerjar is removed from the plugins directory it will automatically disappear from the Ponton XE menu bar as soon as the software is started again
Before transferring messages out of Ponton XE you need to preset the following information
Default values for the sending and receiving partners ndash these values may be overridden for an individual transfer
Folder locations of the Hot Folder Adapter ndash the Inbox Outbox and AckInbox need to be set for document exchange with Ponton XP
Default setting for Test Message flag ndash this can be overridden for the actual document transfer
Import Directory ndash Ponton XE will automatically scan the Inbox folder and import received documents to the given folder for local processing
Ponton XP 21 ndash Installation and Configuration Guide 43
Configuration Options
Open Messages after Import ndash if this option is activated messages received from the Inbox will automatically be displayed in Ponton XE
Delete message in Inbox ndash to always remove received messages from the HFA Inbox this option needs to be activated otherwise a copy will remain in the Inbox folder
Ponton XP 21 ndash Installation and Configuration Guide 44
Configuration Options
Ponton XP 21 ndash Installation and Configuration Guide 45
Configuration Options
Using Ponton XE
After setting the configuration and creating a document you can transfer the document to your business partner This is done by means of the following steps
Choose the menu item ldquoMessenger rarr Transfer rarr Send Messagerdquo
Select a sending and receiving partner
Override the settings for the HFA folders
Tick the checkbox to qualify this message as a test message
After transferring the document to the Messenger Ponton XE will wait for a response This is recognised as an acknowledge file which is dropped into the AckInbox folder of the HFA As soon as this has been received a successful transfer in indicated
You may check with the Message Monitor to determine how the document was forwarded by the Messenger to the receiver or whether any errors occurred
Ponton XP 21 ndash Installation and Configuration Guide 46
Configuration Options
56 Display Schema Configuration The schema sets to be supported for each partner are defined in the partner configuration The standard sets available with the installation are shown under Configuration rarr Schemata
Ponton XP 21 ndash Installation and Configuration Guide 47
Configuration Options
57 User Administration Two types of users are distinguished
Administrators ndash these users have full access to the Messengerrsquos configuration interface
Operators ndash these users only have access to the Adapter Monitor the Message Monitor and the Test Adapter The other options in the Messenger menu are not available
Please note the following points in connection with the Messengerrsquos standard user administration
This is a very simple user administration based on the Tomcat implementation If you want to integrate the Messenger with another user administration such as LDAP please contact Ponton Consulting for support
A userrsquos access rights (administratoroperator) are defined when the user account is created ndash they cannot be changed subsequently
User accounts can only be created or deleted by administrators
Ponton XP 21 ndash Installation and Configuration Guide 48
Advanced Configuration
6 Advanced Configuration
61 XML Schema Configuration Important The Messenger distinguishes between available schema set and activated schema sets Just inserting entries in the schema configuration as described in this section does not activate the schema sets or the corresponding schemas for use by the Messenger In order to make use of the schemas in a schema set you have to activate the schema set in the relevant partner configuration To view or modify the activated schema sets in a partner configuration go to
Configuration rarr Partners rarr ltpartner namegt rarr Processing
and activatedeactivate the relevant checkboxes
In the Messengerrsquos configuration interface you can activate and deactivate schema sets for specific partner configurations It is not possible however to modify the contents and specifications of the individual schema sets Any necessary changes have to be made in the configuration file
[installation root]xmlpipewebrootWEB-INFconfigschemataxml
The configuration entries in this file are structured as follows
ltSchemaSet Name=papinet21gt
ltSchemaName=httpwwwpapinetorgdataAvailabilityV2R10xsd MessageType=Availability MessageVersion=V2R10gt
ltNamespacegtltNamespacegt
ltDisplayNamegtAvailability 21ltDisplayNamegt
ltSchemaFilegtAvailabilityV2R10xsdltSchemaFilegt
ltXSLFilegtltXSLFilegt
ltSchemagt
ltSchema Name=yourSchema MessageType=yourMsgType MessageVersion=yourMsgVersgt
ltNamespacegtyourNamespaceltNamespacegt
ltDisplayNamegtYour Display NameltDisplayNamegt
ltSchemaFilegtyourSchemaFileltSchemaFilegt
ltXSLFilegtyourStylesheetltXSLFilegt
ltSchemagt
hellip
ltSchemaFoldergtpapinet210ltSchemaFoldergt
ltXSLFoldergtpapinet210ltXSLFoldergt
ltSchemaSetgt
Ponton XP 21 ndash Installation and Configuration Guide 49
Advanced Configuration
You can add a schema to an existing schema set in this file by inserting a ltSchemagt block (just copy and paste one of the existing blocks and modify the configuration as required) Please ensure that your new schema specification includes correct settings for the attributes of the Schema element
Name= This attribute corresponds with the ebXML Schema Location of incoming messages When an ebXML message is received the Messenger looks for a schema configuration where the Schema Name attribute matches the Schema Location specified in the ebXML envelope
MessageType= This attribute corresponds with the attribute MessageMetaDataDocumentInfoMessageName in the backend envelope of outgoing messages
MessageVersion= This attribute corresponds with the element MessageMe aDataDocumentInfoDTDVersionNumber in the backend envelope of outgoing messages
t
Note The specification of MessageType and MessageVersion must be used together for outgoing messages as they are combined to form an identifier for the message schema
You also have the option of adding a new schema set with your own schema definitions to the schema configuration In this case you would insert a ltSchemaSetgt block with subordinate ltSchemagt blocks Your added schema set will automatically be inserted in the list of available schema sets on the Messenger configuration pages
62 Advanced Database Configuration Important Since the Messenger database is used for essential message processing and tracking purposes you should not experiment with the database configuration on a ldquoliverdquo system For test and debugging purposes you are advised to set up a trial system
Installation with other Databases
This section describes the main steps required to install a different database system on the Messenger for example an Oracle database
1 Install database driver Copy the database driver to
[installation root]xmlpipewebrootWEB-INFlib
Note Please note that only drivers with the extension jar are loaded by the Tomcat servlet engine If the JDBC driver you want to use is a zip file you will have to rename the file to jar The JDBC driver for Oracle 9i is the file ojdbc14jar
Ponton XP 21 ndash Installation and Configuration Guide 50
Advanced Configuration
2 Create database and tables Ponton XP is supplied with SQL scripts for HSQL and for Oracle that can be used to create the tables for the Messenger database If you are using another database you may need to modify these scripts to work correctly with your database system
The SQL scripts are located in the subfolders under [installation root]sql
Once the database tables are in place you will also need to carry out the SQL script that inserts the log messages into the database ie
[installation root]sqlinsert_log_messagessql
3 Set up database connection The configuration of database connections is described in the section Set Up Messenger Database beginning on page 20 To connect with a different database choose ldquootherrdquo from the list of database drivers and enter the configuration for your database on the next page
The entries for the Oracle 9i JDBC driver are
Driver oraclejdbcdriverOracleDriver
URL jdbcoraclethinlthostgtltportgtltdatabasegt
63 Advanced Message Monitor Configuration In the configuration directory ldquoxmlpipewebrootWEB-INFconfigrdquo there is a file messagemonitorxml which can be used to change the selection and ordering of the Message overview window in the Message Monitor The default setting is displayed in the following picture
Ponton XP 21 ndash Installation and Configuration Guide 51
Advanced Configuration
Here the number of line items per page can be set If a high resolution screen is used (beyond 1024 x 768 pixel) one may increase the number of lines
Further a mapping table defines which database column is to be displayed in which monitor column The number of columns again depends on the screen resolution
Finally if main memory size allows caching of XSL stylesheet definitions helps accelerating processing speed for XSL transformations
64 Tomcat SSL Installation
Generate a key
One minor problem with Tomcat or any other webserver that uses the internal Java symmetric key architecture is that you are not allowed to export or import private keys For this reason it is not possible to use the existing key-pair installed with the Messenger software You will have to generate a new key-pair and send a certificate request to the Ponton certificate authority (or other certification authority) to receive a valid certificate
To generate a new key-pair open a command prompt and go to the tomcat-4118 directory The keystore used for a Tomcat SSL installation is located in the Tomcat root directory and is called ssl-keystore The Tomcat installation already contains a certificate for lsquolocalhostrsquo so you can test the HTTPS access with a web browser
Before you can create a new Tomcat certificate you will have to delete the installed certificate Note that the default password for the Tomcat keystore is ldquochangeitrdquo keytool -delete -alias tomcat ndashkeystore ssl-keystore
Now use the following command to create a new key-pair Please note that you need to specify the Listener hostname (eg listenermyserverde) when the keytool asks for lsquofirst and last namersquo keytool -genkey -alias tomcat -keyalg RSA ndashkeystore ssl-keystore
After generating the new key the next step is to export a certificate request with the following command keytool ndashcertreq ndashalias tomcat ndashfile myservercsr ndashkeystore ssl-keystore
This will generate the file myservercsr in the current directory Send this file via email to xp-certponton-consultingde It will be signed and sent back to you The reply will contain a file with the certificate
Finally you have to re-import this signed certificate into the Tomcat SSL keystore Please note that the import may take some time keytool ndashimport ndashalias tomcat ndashfile myservercer ndashkeystore ssl-keystore
If you have any problems starting the keytool make sure you have the javahomebin directory specified in your PATH environment variable Of course you can also change to the javahomebin directory and start the keytool there
Ponton XP 21 ndash Installation and Configuration Guide 52
Advanced Configuration
Update Tomcat configuration
SSL is already activated in the Tomcat configuration packaged in the distribution However you might want to change the specified SSL port (by default the SSL port is set to 8443) You can change the port by editing the file
[tomcat installation]confserverconf
The following section configures the SSL parameters
lt-- Define a SSL Coyote HTTP11 Connector on port 8443 --gt
ltConnector className=orgapachecoyotetomcat4CoyoteConnector
port=8443
minProcessors=5
maxProcessors=75
enableLookups=true
acceptCount=100
debug=0
scheme=https
secure=true
useURIValidationHack=false
disableUploadTimeout=truegt
ltFactory className=orgapachecoyotetomcat4CoyoteServerSocketFactory
clientAuth=false
keystoreFile=ssl-keystore
protocol=TLS gt
ltConnectorgt
Verify setup
To verify if everything is working correctly start the Tomcat webserver as usual and connect to the webserver with your browser
Go to httpsyourserveraddress ndash initially you might get a warning window if the root certificate authority is not known to the browser If you continue by clicking OK you should see the usual Ponton XP start page
If everything comes up correctly you can use SSL to receive messages with the Ponton XP Software
Ponton XP 21 ndash Installation and Configuration Guide 53
Advanced Configuration
65 Distributed Installation If the Messenger is installed on a server that cannot be reached from the Internet you will need to install the Listener as well The purpose of the Listener is to pick up incoming connections and forward them to the Messenger (across the firewall) The firewall rules must be set up to allow this connection between the Listener and the Messenger When a message is received the Listener notifies the Messenger and the Messenger then picks up the message
You also have the option of subsequently installing the Listener as a service under Windows ndash this service can then be configured to start automatically when the system starts up
Note If you are going to run the Messenger in combination with the Listener your partners will have to enter the URI of your Listener in their configurations (under Configuration rarr Partners rarr ltpartner namegt rarr URI of Partners Messenger Service)
Listener Installation and Configuration
The Listener is installed by running the installer program (eg PontonXP-21-setuplistener-windowsexe) on the relevant system You are asked to specify an installation folder and also have the option of creating a desktop or menu shortcut Thatrsquos it
-
The settings for the Listener are contained in the configuration file listenerproperties which is located in the folder [Listener root folder]config To modify these settings you will have to edit the configuration file directly Access via the Messengerrsquos configuration interface is not possible
The file contains the following settings
HttpPort = Port number (for external HTTP connections)
HttpsPort = Port number (for external HTTPS connections)
LogLevel = DEBUG | INFO | WARN | ERROR | FATAL | OFF
The following settings specify the host and port of the Messenger for forwarding connections (HTTPHTTPS) The forwarding connection mode is activated by entering the relevant host and port addresses and removing the hash marks (used to mark ldquocomment linesrdquo in Java property files)
HttpServer = server1port1 (HTTP forwarding connection to the Messenger)
HttpsServer = server1port1 (HTTPS forwarding connection to the Messenger)
Ponton XP 21 ndash Installation and Configuration Guide 54
Advanced Configuration
The following settings specify the Listenerrsquos port for callback connections (HTTPHTTPS) with the Messenger As with the forwarding connection the callback connection mode is activated by entering the relevant port addresses and removing the hash marks (Obviously it makes no sense to have both connections activated at the same time)
HttpServicePort = Port number (for internal HTTP connections to the Listener)
HttpsServicePort = Port number (for internal HTTPS connections to the Listener)
Starting the Listener
To start the Listener open a command prompt and start the class
depontonconsultingxmlpipeListener
with the classpath
-cp libcommons-logging-api-103jarlibcommonutilsjarlibxp_listenerjarconfig
You can also use the installed batch file [Listener root folder]startListenerbat
Callback Mode
Details of the communication flow
When the Messenger starts up it searches for the Listener
Note The Listener should start up first so that it can be found by the Messenger
If the search is successful a permanent connection is established between the Messenger and the Listener The Messenger uses the following settings in the configuration to establish the connection with the Listener
Configuration rarr Messenger rarr Listener rarr HTTP[S] rarr Hostname
Configuration rarr Messenger rarr Listener rarr HTTP[S] rarr Internal Listener Port
Ponton XP 21 ndash Installation and Configuration Guide 55
Advanced Configuration
When the Listener receives an incoming message (or rather an HTTPHTTPS request) it informs the Messenger ndash by way of the permanent connection ndash about the arrival of the new request indicating which port the Messenger can use to pick up the connection
Note This port number is randomly selected by the Listener and cannot be configured
The Messenger picks up the connection on the Listenerrsquos specified port and redirects it to its own local port for further processing
This local port corresponds to the setting for
Configuration rarr Messenger rarr Listener rarr HTTP[S] rarr Internal Messenger Port
in the configuration GUI
Forwarding Mode
Details of the communication flow
In forwarding mode no permanent connection is established between the Messenger and the Listener
When the Listener receives an incoming HTTPHTTPS request it simply forwards the request to the Messenger using the address specified in listenerproperties (HttpServerHttpsServer)
Note To allow this forwarding connection the firewall has to be configured so that the Listener is permitted to access the Messenger on the specified port(s)
Ponton XP 21 ndash Installation and Configuration Guide 56
Advanced Configuration
66 Port Configuration The Messengerrsquos standard configuration uses port 8080 for HTTP connections and port 8443 for secure (HTTPS) connections This section describes how to set up the messenger to use a non-standard port configuration This involves making manual changes to several configuration files in particular the Tomcat serverxml and the Messengerrsquos adapter configuration files
Tomcat Settings
The port setting for the Messengerrsquos HTTP and HTTPS connections are specified in the Tomcat configuration file
[installation root]tomcat-xxxconfserverxml
This file defines the connections (Connectors) for the Messenger as follows
lt-- Define a non-SSL Coyote HTTP11 Connector on port 8080 --gt
ltConnector className=orgapachecoyotetomcat4CoyoteConnector
port=yourMessengerPort minProcessors=5 maxProcessors=75
enableLookups=true redirectPort=yourRed rectPort i acceptCount=100 debug=0 connectionTimeout=20000
useURIValidationHack=false disableUploadTimeout=true gt
lt-- Define a SSL Coyote HTTP11 Connector on port 8443 --gt
ltConnector className=orgapachecoyotetomcat4CoyoteConnector
port=yourSSLPort minProcessors=5 maxProcessors=75
enableLookups=true
acceptCount=100 debug=0 scheme=https secure=true
useURIValidationHack=false disableUploadTimeout=truegt
ltFactory className=orgapachecoyotetomcat4CoyoteServerSocketFactory
clientAuth=false keystoreFile=ssl-keystore protocol=TLS gt
ltConnectorgt
The standard settings for the Messenger ports are
HTTP 8080
SSL 8443
To modify your connections you will need to enter the relevant port numbers indicated above as yourMessengerPort yourRedirectPort (which normally points to the SSL connection) and yourSSLPort
Ponton XP 21 ndash Installation and Configuration Guide 57
Advanced Configuration
Adapter Settings
The settings for the Messenger adapters are contained in the relevant XML files under
[installation root]xmlpipewebrootWEB-INFconfig
In particular a standard installation includes the files testadap erxml and hotfolderxml Each of these configuration files contains a block specifying the connection to the messenger
t
ltMessengergt
ltAddressgtyourMessengerHostltAddressgt
ltPortNumbergtyourMessengerPortltPortNumbergt
ltPathgthellipltPathgt
ltMessengergt
If you have configured the Messenger to run on a different port (see above) you will need to enter the relevant port number here
Ponton XP 21 ndash Installation and Configuration Guide 58
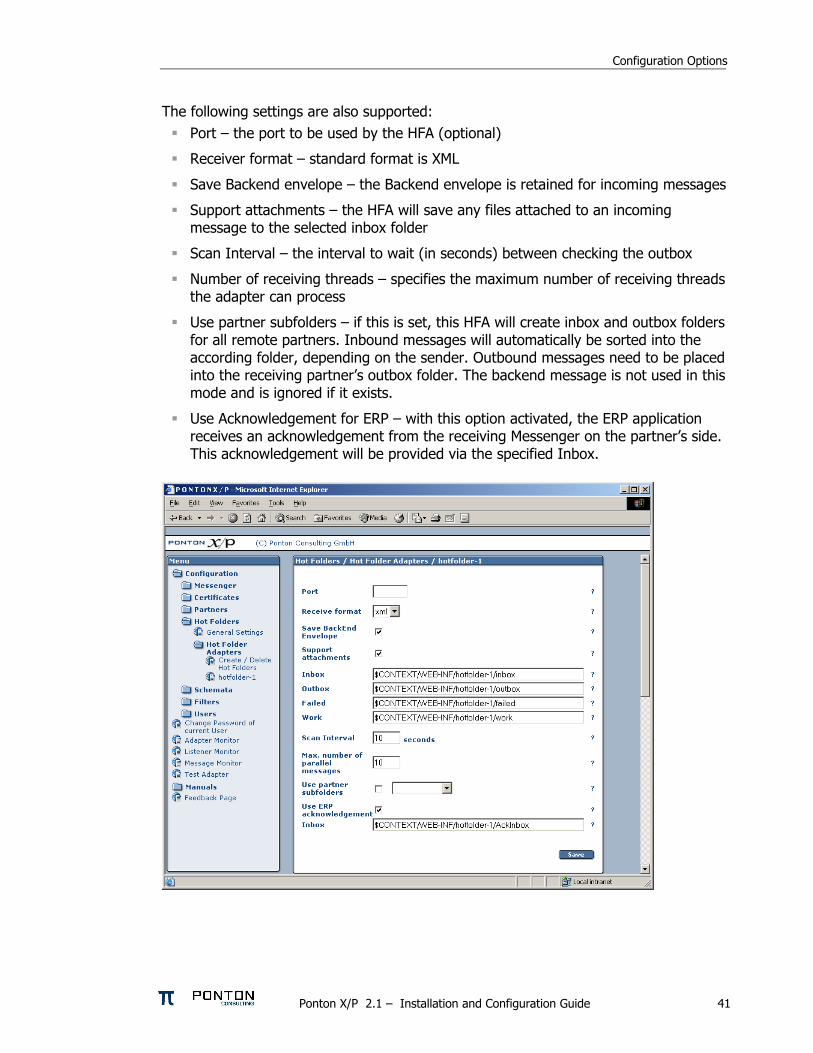
Configuration Options
55 Ponton XE ndash The XML Editor Ponton XE is a separate Ponton product It is packaged with Ponton XP for free use only by papiNet users It allows to enter papiNet document data directly via a graphical user interface and to send the document via the hot folder adapter to the business partners
Ponton XE is fully documented in a separate manual Hence only the Messaging Plug-in will be described here
You can experiment with the XML Editor and check out all the features and options without using the Ponton XP connection To start with you may want to begin with the following steps
Create a new papiNet Purchase Order
Fill out the forms and use optional XML Elements by right-clicking the Plus-icons in the layout tree
Create an HTML file by choosing Document Export to HTML from the menu
Save the document to an XML file and re-load it again
Ponton XP 21 ndash Installation and Configuration Guide 42
Configuration Options
Interface between Ponton XE and Ponton XP
The two software applications communicate via hot folders as illustrated in the following figure
Message Plug-in
Outbox Inbox AckInboxImport
Ponton XP Ponton XE
XMLXML XMLXML XMLXML XMLXML
Hot Folder Adapter
The XML Editor is connected to the Messenger via the Hot Folder Adapter All these folder settings need to be synchronized for a proper data exchange
Configuration of the Messaging Plug-in
The Messaging Plug-in can be flexibly installed and de-installed with the remaining part of Ponton XE If the file messengerjar is removed from the plugins directory it will automatically disappear from the Ponton XE menu bar as soon as the software is started again
Before transferring messages out of Ponton XE you need to preset the following information
Default values for the sending and receiving partners ndash these values may be overridden for an individual transfer
Folder locations of the Hot Folder Adapter ndash the Inbox Outbox and AckInbox need to be set for document exchange with Ponton XP
Default setting for Test Message flag ndash this can be overridden for the actual document transfer
Import Directory ndash Ponton XE will automatically scan the Inbox folder and import received documents to the given folder for local processing
Ponton XP 21 ndash Installation and Configuration Guide 43
Configuration Options
Open Messages after Import ndash if this option is activated messages received from the Inbox will automatically be displayed in Ponton XE
Delete message in Inbox ndash to always remove received messages from the HFA Inbox this option needs to be activated otherwise a copy will remain in the Inbox folder
Ponton XP 21 ndash Installation and Configuration Guide 44
Configuration Options
Ponton XP 21 ndash Installation and Configuration Guide 45
Configuration Options
Using Ponton XE
After setting the configuration and creating a document you can transfer the document to your business partner This is done by means of the following steps
Choose the menu item ldquoMessenger rarr Transfer rarr Send Messagerdquo
Select a sending and receiving partner
Override the settings for the HFA folders
Tick the checkbox to qualify this message as a test message
After transferring the document to the Messenger Ponton XE will wait for a response This is recognised as an acknowledge file which is dropped into the AckInbox folder of the HFA As soon as this has been received a successful transfer in indicated
You may check with the Message Monitor to determine how the document was forwarded by the Messenger to the receiver or whether any errors occurred
Ponton XP 21 ndash Installation and Configuration Guide 46
Configuration Options
56 Display Schema Configuration The schema sets to be supported for each partner are defined in the partner configuration The standard sets available with the installation are shown under Configuration rarr Schemata
Ponton XP 21 ndash Installation and Configuration Guide 47
Configuration Options
57 User Administration Two types of users are distinguished
Administrators ndash these users have full access to the Messengerrsquos configuration interface
Operators ndash these users only have access to the Adapter Monitor the Message Monitor and the Test Adapter The other options in the Messenger menu are not available
Please note the following points in connection with the Messengerrsquos standard user administration
This is a very simple user administration based on the Tomcat implementation If you want to integrate the Messenger with another user administration such as LDAP please contact Ponton Consulting for support
A userrsquos access rights (administratoroperator) are defined when the user account is created ndash they cannot be changed subsequently
User accounts can only be created or deleted by administrators
Ponton XP 21 ndash Installation and Configuration Guide 48
Advanced Configuration
6 Advanced Configuration
61 XML Schema Configuration Important The Messenger distinguishes between available schema set and activated schema sets Just inserting entries in the schema configuration as described in this section does not activate the schema sets or the corresponding schemas for use by the Messenger In order to make use of the schemas in a schema set you have to activate the schema set in the relevant partner configuration To view or modify the activated schema sets in a partner configuration go to
Configuration rarr Partners rarr ltpartner namegt rarr Processing
and activatedeactivate the relevant checkboxes
In the Messengerrsquos configuration interface you can activate and deactivate schema sets for specific partner configurations It is not possible however to modify the contents and specifications of the individual schema sets Any necessary changes have to be made in the configuration file
[installation root]xmlpipewebrootWEB-INFconfigschemataxml
The configuration entries in this file are structured as follows
ltSchemaSet Name=papinet21gt
ltSchemaName=httpwwwpapinetorgdataAvailabilityV2R10xsd MessageType=Availability MessageVersion=V2R10gt
ltNamespacegtltNamespacegt
ltDisplayNamegtAvailability 21ltDisplayNamegt
ltSchemaFilegtAvailabilityV2R10xsdltSchemaFilegt
ltXSLFilegtltXSLFilegt
ltSchemagt
ltSchema Name=yourSchema MessageType=yourMsgType MessageVersion=yourMsgVersgt
ltNamespacegtyourNamespaceltNamespacegt
ltDisplayNamegtYour Display NameltDisplayNamegt
ltSchemaFilegtyourSchemaFileltSchemaFilegt
ltXSLFilegtyourStylesheetltXSLFilegt
ltSchemagt
hellip
ltSchemaFoldergtpapinet210ltSchemaFoldergt
ltXSLFoldergtpapinet210ltXSLFoldergt
ltSchemaSetgt
Ponton XP 21 ndash Installation and Configuration Guide 49
Advanced Configuration
You can add a schema to an existing schema set in this file by inserting a ltSchemagt block (just copy and paste one of the existing blocks and modify the configuration as required) Please ensure that your new schema specification includes correct settings for the attributes of the Schema element
Name= This attribute corresponds with the ebXML Schema Location of incoming messages When an ebXML message is received the Messenger looks for a schema configuration where the Schema Name attribute matches the Schema Location specified in the ebXML envelope
MessageType= This attribute corresponds with the attribute MessageMetaDataDocumentInfoMessageName in the backend envelope of outgoing messages
MessageVersion= This attribute corresponds with the element MessageMe aDataDocumentInfoDTDVersionNumber in the backend envelope of outgoing messages
t
Note The specification of MessageType and MessageVersion must be used together for outgoing messages as they are combined to form an identifier for the message schema
You also have the option of adding a new schema set with your own schema definitions to the schema configuration In this case you would insert a ltSchemaSetgt block with subordinate ltSchemagt blocks Your added schema set will automatically be inserted in the list of available schema sets on the Messenger configuration pages
62 Advanced Database Configuration Important Since the Messenger database is used for essential message processing and tracking purposes you should not experiment with the database configuration on a ldquoliverdquo system For test and debugging purposes you are advised to set up a trial system
Installation with other Databases
This section describes the main steps required to install a different database system on the Messenger for example an Oracle database
1 Install database driver Copy the database driver to
[installation root]xmlpipewebrootWEB-INFlib
Note Please note that only drivers with the extension jar are loaded by the Tomcat servlet engine If the JDBC driver you want to use is a zip file you will have to rename the file to jar The JDBC driver for Oracle 9i is the file ojdbc14jar
Ponton XP 21 ndash Installation and Configuration Guide 50
Advanced Configuration
2 Create database and tables Ponton XP is supplied with SQL scripts for HSQL and for Oracle that can be used to create the tables for the Messenger database If you are using another database you may need to modify these scripts to work correctly with your database system
The SQL scripts are located in the subfolders under [installation root]sql
Once the database tables are in place you will also need to carry out the SQL script that inserts the log messages into the database ie
[installation root]sqlinsert_log_messagessql
3 Set up database connection The configuration of database connections is described in the section Set Up Messenger Database beginning on page 20 To connect with a different database choose ldquootherrdquo from the list of database drivers and enter the configuration for your database on the next page
The entries for the Oracle 9i JDBC driver are
Driver oraclejdbcdriverOracleDriver
URL jdbcoraclethinlthostgtltportgtltdatabasegt
63 Advanced Message Monitor Configuration In the configuration directory ldquoxmlpipewebrootWEB-INFconfigrdquo there is a file messagemonitorxml which can be used to change the selection and ordering of the Message overview window in the Message Monitor The default setting is displayed in the following picture
Ponton XP 21 ndash Installation and Configuration Guide 51
Advanced Configuration
Here the number of line items per page can be set If a high resolution screen is used (beyond 1024 x 768 pixel) one may increase the number of lines
Further a mapping table defines which database column is to be displayed in which monitor column The number of columns again depends on the screen resolution
Finally if main memory size allows caching of XSL stylesheet definitions helps accelerating processing speed for XSL transformations
64 Tomcat SSL Installation
Generate a key
One minor problem with Tomcat or any other webserver that uses the internal Java symmetric key architecture is that you are not allowed to export or import private keys For this reason it is not possible to use the existing key-pair installed with the Messenger software You will have to generate a new key-pair and send a certificate request to the Ponton certificate authority (or other certification authority) to receive a valid certificate
To generate a new key-pair open a command prompt and go to the tomcat-4118 directory The keystore used for a Tomcat SSL installation is located in the Tomcat root directory and is called ssl-keystore The Tomcat installation already contains a certificate for lsquolocalhostrsquo so you can test the HTTPS access with a web browser
Before you can create a new Tomcat certificate you will have to delete the installed certificate Note that the default password for the Tomcat keystore is ldquochangeitrdquo keytool -delete -alias tomcat ndashkeystore ssl-keystore
Now use the following command to create a new key-pair Please note that you need to specify the Listener hostname (eg listenermyserverde) when the keytool asks for lsquofirst and last namersquo keytool -genkey -alias tomcat -keyalg RSA ndashkeystore ssl-keystore
After generating the new key the next step is to export a certificate request with the following command keytool ndashcertreq ndashalias tomcat ndashfile myservercsr ndashkeystore ssl-keystore
This will generate the file myservercsr in the current directory Send this file via email to xp-certponton-consultingde It will be signed and sent back to you The reply will contain a file with the certificate
Finally you have to re-import this signed certificate into the Tomcat SSL keystore Please note that the import may take some time keytool ndashimport ndashalias tomcat ndashfile myservercer ndashkeystore ssl-keystore
If you have any problems starting the keytool make sure you have the javahomebin directory specified in your PATH environment variable Of course you can also change to the javahomebin directory and start the keytool there
Ponton XP 21 ndash Installation and Configuration Guide 52
Advanced Configuration
Update Tomcat configuration
SSL is already activated in the Tomcat configuration packaged in the distribution However you might want to change the specified SSL port (by default the SSL port is set to 8443) You can change the port by editing the file
[tomcat installation]confserverconf
The following section configures the SSL parameters
lt-- Define a SSL Coyote HTTP11 Connector on port 8443 --gt
ltConnector className=orgapachecoyotetomcat4CoyoteConnector
port=8443
minProcessors=5
maxProcessors=75
enableLookups=true
acceptCount=100
debug=0
scheme=https
secure=true
useURIValidationHack=false
disableUploadTimeout=truegt
ltFactory className=orgapachecoyotetomcat4CoyoteServerSocketFactory
clientAuth=false
keystoreFile=ssl-keystore
protocol=TLS gt
ltConnectorgt
Verify setup
To verify if everything is working correctly start the Tomcat webserver as usual and connect to the webserver with your browser
Go to httpsyourserveraddress ndash initially you might get a warning window if the root certificate authority is not known to the browser If you continue by clicking OK you should see the usual Ponton XP start page
If everything comes up correctly you can use SSL to receive messages with the Ponton XP Software
Ponton XP 21 ndash Installation and Configuration Guide 53
Advanced Configuration
65 Distributed Installation If the Messenger is installed on a server that cannot be reached from the Internet you will need to install the Listener as well The purpose of the Listener is to pick up incoming connections and forward them to the Messenger (across the firewall) The firewall rules must be set up to allow this connection between the Listener and the Messenger When a message is received the Listener notifies the Messenger and the Messenger then picks up the message
You also have the option of subsequently installing the Listener as a service under Windows ndash this service can then be configured to start automatically when the system starts up
Note If you are going to run the Messenger in combination with the Listener your partners will have to enter the URI of your Listener in their configurations (under Configuration rarr Partners rarr ltpartner namegt rarr URI of Partners Messenger Service)
Listener Installation and Configuration
The Listener is installed by running the installer program (eg PontonXP-21-setuplistener-windowsexe) on the relevant system You are asked to specify an installation folder and also have the option of creating a desktop or menu shortcut Thatrsquos it
-
The settings for the Listener are contained in the configuration file listenerproperties which is located in the folder [Listener root folder]config To modify these settings you will have to edit the configuration file directly Access via the Messengerrsquos configuration interface is not possible
The file contains the following settings
HttpPort = Port number (for external HTTP connections)
HttpsPort = Port number (for external HTTPS connections)
LogLevel = DEBUG | INFO | WARN | ERROR | FATAL | OFF
The following settings specify the host and port of the Messenger for forwarding connections (HTTPHTTPS) The forwarding connection mode is activated by entering the relevant host and port addresses and removing the hash marks (used to mark ldquocomment linesrdquo in Java property files)
HttpServer = server1port1 (HTTP forwarding connection to the Messenger)
HttpsServer = server1port1 (HTTPS forwarding connection to the Messenger)
Ponton XP 21 ndash Installation and Configuration Guide 54
Advanced Configuration
The following settings specify the Listenerrsquos port for callback connections (HTTPHTTPS) with the Messenger As with the forwarding connection the callback connection mode is activated by entering the relevant port addresses and removing the hash marks (Obviously it makes no sense to have both connections activated at the same time)
HttpServicePort = Port number (for internal HTTP connections to the Listener)
HttpsServicePort = Port number (for internal HTTPS connections to the Listener)
Starting the Listener
To start the Listener open a command prompt and start the class
depontonconsultingxmlpipeListener
with the classpath
-cp libcommons-logging-api-103jarlibcommonutilsjarlibxp_listenerjarconfig
You can also use the installed batch file [Listener root folder]startListenerbat
Callback Mode
Details of the communication flow
When the Messenger starts up it searches for the Listener
Note The Listener should start up first so that it can be found by the Messenger
If the search is successful a permanent connection is established between the Messenger and the Listener The Messenger uses the following settings in the configuration to establish the connection with the Listener
Configuration rarr Messenger rarr Listener rarr HTTP[S] rarr Hostname
Configuration rarr Messenger rarr Listener rarr HTTP[S] rarr Internal Listener Port
Ponton XP 21 ndash Installation and Configuration Guide 55
Advanced Configuration
When the Listener receives an incoming message (or rather an HTTPHTTPS request) it informs the Messenger ndash by way of the permanent connection ndash about the arrival of the new request indicating which port the Messenger can use to pick up the connection
Note This port number is randomly selected by the Listener and cannot be configured
The Messenger picks up the connection on the Listenerrsquos specified port and redirects it to its own local port for further processing
This local port corresponds to the setting for
Configuration rarr Messenger rarr Listener rarr HTTP[S] rarr Internal Messenger Port
in the configuration GUI
Forwarding Mode
Details of the communication flow
In forwarding mode no permanent connection is established between the Messenger and the Listener
When the Listener receives an incoming HTTPHTTPS request it simply forwards the request to the Messenger using the address specified in listenerproperties (HttpServerHttpsServer)
Note To allow this forwarding connection the firewall has to be configured so that the Listener is permitted to access the Messenger on the specified port(s)
Ponton XP 21 ndash Installation and Configuration Guide 56
Advanced Configuration
66 Port Configuration The Messengerrsquos standard configuration uses port 8080 for HTTP connections and port 8443 for secure (HTTPS) connections This section describes how to set up the messenger to use a non-standard port configuration This involves making manual changes to several configuration files in particular the Tomcat serverxml and the Messengerrsquos adapter configuration files
Tomcat Settings
The port setting for the Messengerrsquos HTTP and HTTPS connections are specified in the Tomcat configuration file
[installation root]tomcat-xxxconfserverxml
This file defines the connections (Connectors) for the Messenger as follows
lt-- Define a non-SSL Coyote HTTP11 Connector on port 8080 --gt
ltConnector className=orgapachecoyotetomcat4CoyoteConnector
port=yourMessengerPort minProcessors=5 maxProcessors=75
enableLookups=true redirectPort=yourRed rectPort i acceptCount=100 debug=0 connectionTimeout=20000
useURIValidationHack=false disableUploadTimeout=true gt
lt-- Define a SSL Coyote HTTP11 Connector on port 8443 --gt
ltConnector className=orgapachecoyotetomcat4CoyoteConnector
port=yourSSLPort minProcessors=5 maxProcessors=75
enableLookups=true
acceptCount=100 debug=0 scheme=https secure=true
useURIValidationHack=false disableUploadTimeout=truegt
ltFactory className=orgapachecoyotetomcat4CoyoteServerSocketFactory
clientAuth=false keystoreFile=ssl-keystore protocol=TLS gt
ltConnectorgt
The standard settings for the Messenger ports are
HTTP 8080
SSL 8443
To modify your connections you will need to enter the relevant port numbers indicated above as yourMessengerPort yourRedirectPort (which normally points to the SSL connection) and yourSSLPort
Ponton XP 21 ndash Installation and Configuration Guide 57
Advanced Configuration
Adapter Settings
The settings for the Messenger adapters are contained in the relevant XML files under
[installation root]xmlpipewebrootWEB-INFconfig
In particular a standard installation includes the files testadap erxml and hotfolderxml Each of these configuration files contains a block specifying the connection to the messenger
t
ltMessengergt
ltAddressgtyourMessengerHostltAddressgt
ltPortNumbergtyourMessengerPortltPortNumbergt
ltPathgthellipltPathgt
ltMessengergt
If you have configured the Messenger to run on a different port (see above) you will need to enter the relevant port number here
Ponton XP 21 ndash Installation and Configuration Guide 58
Configuration Options
Using Ponton XE
After setting the configuration and creating a document you can transfer the document to your business partner This is done by means of the following steps
Choose the menu item ldquoMessenger rarr Transfer rarr Send Messagerdquo
Select a sending and receiving partner
Override the settings for the HFA folders
Tick the checkbox to qualify this message as a test message
After transferring the document to the Messenger Ponton XE will wait for a response This is recognised as an acknowledge file which is dropped into the AckInbox folder of the HFA As soon as this has been received a successful transfer in indicated
You may check with the Message Monitor to determine how the document was forwarded by the Messenger to the receiver or whether any errors occurred
Ponton XP 21 ndash Installation and Configuration Guide 46
Configuration Options
56 Display Schema Configuration The schema sets to be supported for each partner are defined in the partner configuration The standard sets available with the installation are shown under Configuration rarr Schemata
Ponton XP 21 ndash Installation and Configuration Guide 47
Configuration Options
57 User Administration Two types of users are distinguished
Administrators ndash these users have full access to the Messengerrsquos configuration interface
Operators ndash these users only have access to the Adapter Monitor the Message Monitor and the Test Adapter The other options in the Messenger menu are not available
Please note the following points in connection with the Messengerrsquos standard user administration
This is a very simple user administration based on the Tomcat implementation If you want to integrate the Messenger with another user administration such as LDAP please contact Ponton Consulting for support
A userrsquos access rights (administratoroperator) are defined when the user account is created ndash they cannot be changed subsequently
User accounts can only be created or deleted by administrators
Ponton XP 21 ndash Installation and Configuration Guide 48
Advanced Configuration
6 Advanced Configuration
61 XML Schema Configuration Important The Messenger distinguishes between available schema set and activated schema sets Just inserting entries in the schema configuration as described in this section does not activate the schema sets or the corresponding schemas for use by the Messenger In order to make use of the schemas in a schema set you have to activate the schema set in the relevant partner configuration To view or modify the activated schema sets in a partner configuration go to
Configuration rarr Partners rarr ltpartner namegt rarr Processing
and activatedeactivate the relevant checkboxes
In the Messengerrsquos configuration interface you can activate and deactivate schema sets for specific partner configurations It is not possible however to modify the contents and specifications of the individual schema sets Any necessary changes have to be made in the configuration file
[installation root]xmlpipewebrootWEB-INFconfigschemataxml
The configuration entries in this file are structured as follows
ltSchemaSet Name=papinet21gt
ltSchemaName=httpwwwpapinetorgdataAvailabilityV2R10xsd MessageType=Availability MessageVersion=V2R10gt
ltNamespacegtltNamespacegt
ltDisplayNamegtAvailability 21ltDisplayNamegt
ltSchemaFilegtAvailabilityV2R10xsdltSchemaFilegt
ltXSLFilegtltXSLFilegt
ltSchemagt
ltSchema Name=yourSchema MessageType=yourMsgType MessageVersion=yourMsgVersgt
ltNamespacegtyourNamespaceltNamespacegt
ltDisplayNamegtYour Display NameltDisplayNamegt
ltSchemaFilegtyourSchemaFileltSchemaFilegt
ltXSLFilegtyourStylesheetltXSLFilegt
ltSchemagt
hellip
ltSchemaFoldergtpapinet210ltSchemaFoldergt
ltXSLFoldergtpapinet210ltXSLFoldergt
ltSchemaSetgt
Ponton XP 21 ndash Installation and Configuration Guide 49
Advanced Configuration
You can add a schema to an existing schema set in this file by inserting a ltSchemagt block (just copy and paste one of the existing blocks and modify the configuration as required) Please ensure that your new schema specification includes correct settings for the attributes of the Schema element
Name= This attribute corresponds with the ebXML Schema Location of incoming messages When an ebXML message is received the Messenger looks for a schema configuration where the Schema Name attribute matches the Schema Location specified in the ebXML envelope
MessageType= This attribute corresponds with the attribute MessageMetaDataDocumentInfoMessageName in the backend envelope of outgoing messages
MessageVersion= This attribute corresponds with the element MessageMe aDataDocumentInfoDTDVersionNumber in the backend envelope of outgoing messages
t
Note The specification of MessageType and MessageVersion must be used together for outgoing messages as they are combined to form an identifier for the message schema
You also have the option of adding a new schema set with your own schema definitions to the schema configuration In this case you would insert a ltSchemaSetgt block with subordinate ltSchemagt blocks Your added schema set will automatically be inserted in the list of available schema sets on the Messenger configuration pages
62 Advanced Database Configuration Important Since the Messenger database is used for essential message processing and tracking purposes you should not experiment with the database configuration on a ldquoliverdquo system For test and debugging purposes you are advised to set up a trial system
Installation with other Databases
This section describes the main steps required to install a different database system on the Messenger for example an Oracle database
1 Install database driver Copy the database driver to
[installation root]xmlpipewebrootWEB-INFlib
Note Please note that only drivers with the extension jar are loaded by the Tomcat servlet engine If the JDBC driver you want to use is a zip file you will have to rename the file to jar The JDBC driver for Oracle 9i is the file ojdbc14jar
Ponton XP 21 ndash Installation and Configuration Guide 50
Advanced Configuration
2 Create database and tables Ponton XP is supplied with SQL scripts for HSQL and for Oracle that can be used to create the tables for the Messenger database If you are using another database you may need to modify these scripts to work correctly with your database system
The SQL scripts are located in the subfolders under [installation root]sql
Once the database tables are in place you will also need to carry out the SQL script that inserts the log messages into the database ie
[installation root]sqlinsert_log_messagessql
3 Set up database connection The configuration of database connections is described in the section Set Up Messenger Database beginning on page 20 To connect with a different database choose ldquootherrdquo from the list of database drivers and enter the configuration for your database on the next page
The entries for the Oracle 9i JDBC driver are
Driver oraclejdbcdriverOracleDriver
URL jdbcoraclethinlthostgtltportgtltdatabasegt
63 Advanced Message Monitor Configuration In the configuration directory ldquoxmlpipewebrootWEB-INFconfigrdquo there is a file messagemonitorxml which can be used to change the selection and ordering of the Message overview window in the Message Monitor The default setting is displayed in the following picture
Ponton XP 21 ndash Installation and Configuration Guide 51
Advanced Configuration
Here the number of line items per page can be set If a high resolution screen is used (beyond 1024 x 768 pixel) one may increase the number of lines
Further a mapping table defines which database column is to be displayed in which monitor column The number of columns again depends on the screen resolution
Finally if main memory size allows caching of XSL stylesheet definitions helps accelerating processing speed for XSL transformations
64 Tomcat SSL Installation
Generate a key
One minor problem with Tomcat or any other webserver that uses the internal Java symmetric key architecture is that you are not allowed to export or import private keys For this reason it is not possible to use the existing key-pair installed with the Messenger software You will have to generate a new key-pair and send a certificate request to the Ponton certificate authority (or other certification authority) to receive a valid certificate
To generate a new key-pair open a command prompt and go to the tomcat-4118 directory The keystore used for a Tomcat SSL installation is located in the Tomcat root directory and is called ssl-keystore The Tomcat installation already contains a certificate for lsquolocalhostrsquo so you can test the HTTPS access with a web browser
Before you can create a new Tomcat certificate you will have to delete the installed certificate Note that the default password for the Tomcat keystore is ldquochangeitrdquo keytool -delete -alias tomcat ndashkeystore ssl-keystore
Now use the following command to create a new key-pair Please note that you need to specify the Listener hostname (eg listenermyserverde) when the keytool asks for lsquofirst and last namersquo keytool -genkey -alias tomcat -keyalg RSA ndashkeystore ssl-keystore
After generating the new key the next step is to export a certificate request with the following command keytool ndashcertreq ndashalias tomcat ndashfile myservercsr ndashkeystore ssl-keystore
This will generate the file myservercsr in the current directory Send this file via email to xp-certponton-consultingde It will be signed and sent back to you The reply will contain a file with the certificate
Finally you have to re-import this signed certificate into the Tomcat SSL keystore Please note that the import may take some time keytool ndashimport ndashalias tomcat ndashfile myservercer ndashkeystore ssl-keystore
If you have any problems starting the keytool make sure you have the javahomebin directory specified in your PATH environment variable Of course you can also change to the javahomebin directory and start the keytool there
Ponton XP 21 ndash Installation and Configuration Guide 52
Advanced Configuration
Update Tomcat configuration
SSL is already activated in the Tomcat configuration packaged in the distribution However you might want to change the specified SSL port (by default the SSL port is set to 8443) You can change the port by editing the file
[tomcat installation]confserverconf
The following section configures the SSL parameters
lt-- Define a SSL Coyote HTTP11 Connector on port 8443 --gt
ltConnector className=orgapachecoyotetomcat4CoyoteConnector
port=8443
minProcessors=5
maxProcessors=75
enableLookups=true
acceptCount=100
debug=0
scheme=https
secure=true
useURIValidationHack=false
disableUploadTimeout=truegt
ltFactory className=orgapachecoyotetomcat4CoyoteServerSocketFactory
clientAuth=false
keystoreFile=ssl-keystore
protocol=TLS gt
ltConnectorgt
Verify setup
To verify if everything is working correctly start the Tomcat webserver as usual and connect to the webserver with your browser
Go to httpsyourserveraddress ndash initially you might get a warning window if the root certificate authority is not known to the browser If you continue by clicking OK you should see the usual Ponton XP start page
If everything comes up correctly you can use SSL to receive messages with the Ponton XP Software
Ponton XP 21 ndash Installation and Configuration Guide 53
Advanced Configuration
65 Distributed Installation If the Messenger is installed on a server that cannot be reached from the Internet you will need to install the Listener as well The purpose of the Listener is to pick up incoming connections and forward them to the Messenger (across the firewall) The firewall rules must be set up to allow this connection between the Listener and the Messenger When a message is received the Listener notifies the Messenger and the Messenger then picks up the message
You also have the option of subsequently installing the Listener as a service under Windows ndash this service can then be configured to start automatically when the system starts up
Note If you are going to run the Messenger in combination with the Listener your partners will have to enter the URI of your Listener in their configurations (under Configuration rarr Partners rarr ltpartner namegt rarr URI of Partners Messenger Service)
Listener Installation and Configuration
The Listener is installed by running the installer program (eg PontonXP-21-setuplistener-windowsexe) on the relevant system You are asked to specify an installation folder and also have the option of creating a desktop or menu shortcut Thatrsquos it
-
The settings for the Listener are contained in the configuration file listenerproperties which is located in the folder [Listener root folder]config To modify these settings you will have to edit the configuration file directly Access via the Messengerrsquos configuration interface is not possible
The file contains the following settings
HttpPort = Port number (for external HTTP connections)
HttpsPort = Port number (for external HTTPS connections)
LogLevel = DEBUG | INFO | WARN | ERROR | FATAL | OFF
The following settings specify the host and port of the Messenger for forwarding connections (HTTPHTTPS) The forwarding connection mode is activated by entering the relevant host and port addresses and removing the hash marks (used to mark ldquocomment linesrdquo in Java property files)
HttpServer = server1port1 (HTTP forwarding connection to the Messenger)
HttpsServer = server1port1 (HTTPS forwarding connection to the Messenger)
Ponton XP 21 ndash Installation and Configuration Guide 54
Advanced Configuration
The following settings specify the Listenerrsquos port for callback connections (HTTPHTTPS) with the Messenger As with the forwarding connection the callback connection mode is activated by entering the relevant port addresses and removing the hash marks (Obviously it makes no sense to have both connections activated at the same time)
HttpServicePort = Port number (for internal HTTP connections to the Listener)
HttpsServicePort = Port number (for internal HTTPS connections to the Listener)
Starting the Listener
To start the Listener open a command prompt and start the class
depontonconsultingxmlpipeListener
with the classpath
-cp libcommons-logging-api-103jarlibcommonutilsjarlibxp_listenerjarconfig
You can also use the installed batch file [Listener root folder]startListenerbat
Callback Mode
Details of the communication flow
When the Messenger starts up it searches for the Listener
Note The Listener should start up first so that it can be found by the Messenger
If the search is successful a permanent connection is established between the Messenger and the Listener The Messenger uses the following settings in the configuration to establish the connection with the Listener
Configuration rarr Messenger rarr Listener rarr HTTP[S] rarr Hostname
Configuration rarr Messenger rarr Listener rarr HTTP[S] rarr Internal Listener Port
Ponton XP 21 ndash Installation and Configuration Guide 55
Advanced Configuration
When the Listener receives an incoming message (or rather an HTTPHTTPS request) it informs the Messenger ndash by way of the permanent connection ndash about the arrival of the new request indicating which port the Messenger can use to pick up the connection
Note This port number is randomly selected by the Listener and cannot be configured
The Messenger picks up the connection on the Listenerrsquos specified port and redirects it to its own local port for further processing
This local port corresponds to the setting for
Configuration rarr Messenger rarr Listener rarr HTTP[S] rarr Internal Messenger Port
in the configuration GUI
Forwarding Mode
Details of the communication flow
In forwarding mode no permanent connection is established between the Messenger and the Listener
When the Listener receives an incoming HTTPHTTPS request it simply forwards the request to the Messenger using the address specified in listenerproperties (HttpServerHttpsServer)
Note To allow this forwarding connection the firewall has to be configured so that the Listener is permitted to access the Messenger on the specified port(s)
Ponton XP 21 ndash Installation and Configuration Guide 56
Advanced Configuration
66 Port Configuration The Messengerrsquos standard configuration uses port 8080 for HTTP connections and port 8443 for secure (HTTPS) connections This section describes how to set up the messenger to use a non-standard port configuration This involves making manual changes to several configuration files in particular the Tomcat serverxml and the Messengerrsquos adapter configuration files
Tomcat Settings
The port setting for the Messengerrsquos HTTP and HTTPS connections are specified in the Tomcat configuration file
[installation root]tomcat-xxxconfserverxml
This file defines the connections (Connectors) for the Messenger as follows
lt-- Define a non-SSL Coyote HTTP11 Connector on port 8080 --gt
ltConnector className=orgapachecoyotetomcat4CoyoteConnector
port=yourMessengerPort minProcessors=5 maxProcessors=75
enableLookups=true redirectPort=yourRed rectPort i acceptCount=100 debug=0 connectionTimeout=20000
useURIValidationHack=false disableUploadTimeout=true gt
lt-- Define a SSL Coyote HTTP11 Connector on port 8443 --gt
ltConnector className=orgapachecoyotetomcat4CoyoteConnector
port=yourSSLPort minProcessors=5 maxProcessors=75
enableLookups=true
acceptCount=100 debug=0 scheme=https secure=true
useURIValidationHack=false disableUploadTimeout=truegt
ltFactory className=orgapachecoyotetomcat4CoyoteServerSocketFactory
clientAuth=false keystoreFile=ssl-keystore protocol=TLS gt
ltConnectorgt
The standard settings for the Messenger ports are
HTTP 8080
SSL 8443
To modify your connections you will need to enter the relevant port numbers indicated above as yourMessengerPort yourRedirectPort (which normally points to the SSL connection) and yourSSLPort
Ponton XP 21 ndash Installation and Configuration Guide 57
Advanced Configuration
Adapter Settings
The settings for the Messenger adapters are contained in the relevant XML files under
[installation root]xmlpipewebrootWEB-INFconfig
In particular a standard installation includes the files testadap erxml and hotfolderxml Each of these configuration files contains a block specifying the connection to the messenger
t
ltMessengergt
ltAddressgtyourMessengerHostltAddressgt
ltPortNumbergtyourMessengerPortltPortNumbergt
ltPathgthellipltPathgt
ltMessengergt
If you have configured the Messenger to run on a different port (see above) you will need to enter the relevant port number here
Ponton XP 21 ndash Installation and Configuration Guide 58
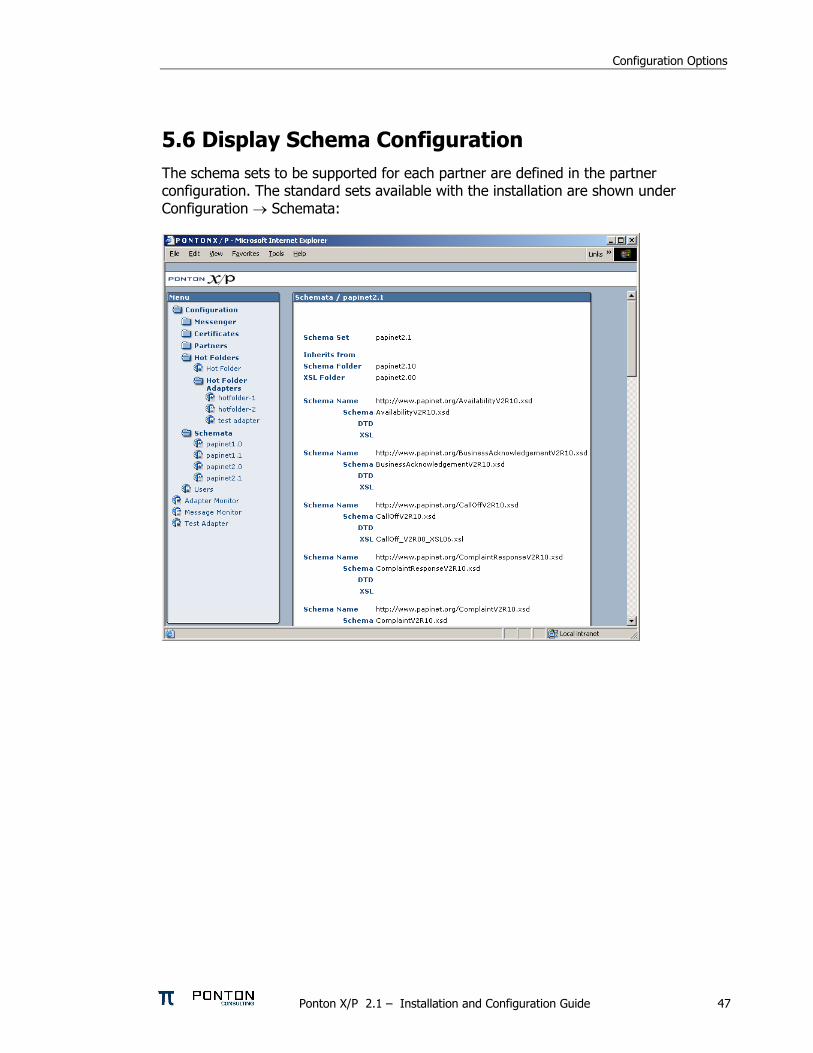
Configuration Options
56 Display Schema Configuration The schema sets to be supported for each partner are defined in the partner configuration The standard sets available with the installation are shown under Configuration rarr Schemata
Ponton XP 21 ndash Installation and Configuration Guide 47
Configuration Options
57 User Administration Two types of users are distinguished
Administrators ndash these users have full access to the Messengerrsquos configuration interface
Operators ndash these users only have access to the Adapter Monitor the Message Monitor and the Test Adapter The other options in the Messenger menu are not available
Please note the following points in connection with the Messengerrsquos standard user administration
This is a very simple user administration based on the Tomcat implementation If you want to integrate the Messenger with another user administration such as LDAP please contact Ponton Consulting for support
A userrsquos access rights (administratoroperator) are defined when the user account is created ndash they cannot be changed subsequently
User accounts can only be created or deleted by administrators
Ponton XP 21 ndash Installation and Configuration Guide 48
Advanced Configuration
6 Advanced Configuration
61 XML Schema Configuration Important The Messenger distinguishes between available schema set and activated schema sets Just inserting entries in the schema configuration as described in this section does not activate the schema sets or the corresponding schemas for use by the Messenger In order to make use of the schemas in a schema set you have to activate the schema set in the relevant partner configuration To view or modify the activated schema sets in a partner configuration go to
Configuration rarr Partners rarr ltpartner namegt rarr Processing
and activatedeactivate the relevant checkboxes
In the Messengerrsquos configuration interface you can activate and deactivate schema sets for specific partner configurations It is not possible however to modify the contents and specifications of the individual schema sets Any necessary changes have to be made in the configuration file
[installation root]xmlpipewebrootWEB-INFconfigschemataxml
The configuration entries in this file are structured as follows
ltSchemaSet Name=papinet21gt
ltSchemaName=httpwwwpapinetorgdataAvailabilityV2R10xsd MessageType=Availability MessageVersion=V2R10gt
ltNamespacegtltNamespacegt
ltDisplayNamegtAvailability 21ltDisplayNamegt
ltSchemaFilegtAvailabilityV2R10xsdltSchemaFilegt
ltXSLFilegtltXSLFilegt
ltSchemagt
ltSchema Name=yourSchema MessageType=yourMsgType MessageVersion=yourMsgVersgt
ltNamespacegtyourNamespaceltNamespacegt
ltDisplayNamegtYour Display NameltDisplayNamegt
ltSchemaFilegtyourSchemaFileltSchemaFilegt
ltXSLFilegtyourStylesheetltXSLFilegt
ltSchemagt
hellip
ltSchemaFoldergtpapinet210ltSchemaFoldergt
ltXSLFoldergtpapinet210ltXSLFoldergt
ltSchemaSetgt
Ponton XP 21 ndash Installation and Configuration Guide 49
Advanced Configuration
You can add a schema to an existing schema set in this file by inserting a ltSchemagt block (just copy and paste one of the existing blocks and modify the configuration as required) Please ensure that your new schema specification includes correct settings for the attributes of the Schema element
Name= This attribute corresponds with the ebXML Schema Location of incoming messages When an ebXML message is received the Messenger looks for a schema configuration where the Schema Name attribute matches the Schema Location specified in the ebXML envelope
MessageType= This attribute corresponds with the attribute MessageMetaDataDocumentInfoMessageName in the backend envelope of outgoing messages
MessageVersion= This attribute corresponds with the element MessageMe aDataDocumentInfoDTDVersionNumber in the backend envelope of outgoing messages
t
Note The specification of MessageType and MessageVersion must be used together for outgoing messages as they are combined to form an identifier for the message schema
You also have the option of adding a new schema set with your own schema definitions to the schema configuration In this case you would insert a ltSchemaSetgt block with subordinate ltSchemagt blocks Your added schema set will automatically be inserted in the list of available schema sets on the Messenger configuration pages
62 Advanced Database Configuration Important Since the Messenger database is used for essential message processing and tracking purposes you should not experiment with the database configuration on a ldquoliverdquo system For test and debugging purposes you are advised to set up a trial system
Installation with other Databases
This section describes the main steps required to install a different database system on the Messenger for example an Oracle database
1 Install database driver Copy the database driver to
[installation root]xmlpipewebrootWEB-INFlib
Note Please note that only drivers with the extension jar are loaded by the Tomcat servlet engine If the JDBC driver you want to use is a zip file you will have to rename the file to jar The JDBC driver for Oracle 9i is the file ojdbc14jar
Ponton XP 21 ndash Installation and Configuration Guide 50
Advanced Configuration
2 Create database and tables Ponton XP is supplied with SQL scripts for HSQL and for Oracle that can be used to create the tables for the Messenger database If you are using another database you may need to modify these scripts to work correctly with your database system
The SQL scripts are located in the subfolders under [installation root]sql
Once the database tables are in place you will also need to carry out the SQL script that inserts the log messages into the database ie
[installation root]sqlinsert_log_messagessql
3 Set up database connection The configuration of database connections is described in the section Set Up Messenger Database beginning on page 20 To connect with a different database choose ldquootherrdquo from the list of database drivers and enter the configuration for your database on the next page
The entries for the Oracle 9i JDBC driver are
Driver oraclejdbcdriverOracleDriver
URL jdbcoraclethinlthostgtltportgtltdatabasegt
63 Advanced Message Monitor Configuration In the configuration directory ldquoxmlpipewebrootWEB-INFconfigrdquo there is a file messagemonitorxml which can be used to change the selection and ordering of the Message overview window in the Message Monitor The default setting is displayed in the following picture
Ponton XP 21 ndash Installation and Configuration Guide 51
Advanced Configuration
Here the number of line items per page can be set If a high resolution screen is used (beyond 1024 x 768 pixel) one may increase the number of lines
Further a mapping table defines which database column is to be displayed in which monitor column The number of columns again depends on the screen resolution
Finally if main memory size allows caching of XSL stylesheet definitions helps accelerating processing speed for XSL transformations
64 Tomcat SSL Installation
Generate a key
One minor problem with Tomcat or any other webserver that uses the internal Java symmetric key architecture is that you are not allowed to export or import private keys For this reason it is not possible to use the existing key-pair installed with the Messenger software You will have to generate a new key-pair and send a certificate request to the Ponton certificate authority (or other certification authority) to receive a valid certificate
To generate a new key-pair open a command prompt and go to the tomcat-4118 directory The keystore used for a Tomcat SSL installation is located in the Tomcat root directory and is called ssl-keystore The Tomcat installation already contains a certificate for lsquolocalhostrsquo so you can test the HTTPS access with a web browser
Before you can create a new Tomcat certificate you will have to delete the installed certificate Note that the default password for the Tomcat keystore is ldquochangeitrdquo keytool -delete -alias tomcat ndashkeystore ssl-keystore
Now use the following command to create a new key-pair Please note that you need to specify the Listener hostname (eg listenermyserverde) when the keytool asks for lsquofirst and last namersquo keytool -genkey -alias tomcat -keyalg RSA ndashkeystore ssl-keystore
After generating the new key the next step is to export a certificate request with the following command keytool ndashcertreq ndashalias tomcat ndashfile myservercsr ndashkeystore ssl-keystore
This will generate the file myservercsr in the current directory Send this file via email to xp-certponton-consultingde It will be signed and sent back to you The reply will contain a file with the certificate
Finally you have to re-import this signed certificate into the Tomcat SSL keystore Please note that the import may take some time keytool ndashimport ndashalias tomcat ndashfile myservercer ndashkeystore ssl-keystore
If you have any problems starting the keytool make sure you have the javahomebin directory specified in your PATH environment variable Of course you can also change to the javahomebin directory and start the keytool there
Ponton XP 21 ndash Installation and Configuration Guide 52
Advanced Configuration
Update Tomcat configuration
SSL is already activated in the Tomcat configuration packaged in the distribution However you might want to change the specified SSL port (by default the SSL port is set to 8443) You can change the port by editing the file
[tomcat installation]confserverconf
The following section configures the SSL parameters
lt-- Define a SSL Coyote HTTP11 Connector on port 8443 --gt
ltConnector className=orgapachecoyotetomcat4CoyoteConnector
port=8443
minProcessors=5
maxProcessors=75
enableLookups=true
acceptCount=100
debug=0
scheme=https
secure=true
useURIValidationHack=false
disableUploadTimeout=truegt
ltFactory className=orgapachecoyotetomcat4CoyoteServerSocketFactory
clientAuth=false
keystoreFile=ssl-keystore
protocol=TLS gt
ltConnectorgt
Verify setup
To verify if everything is working correctly start the Tomcat webserver as usual and connect to the webserver with your browser
Go to httpsyourserveraddress ndash initially you might get a warning window if the root certificate authority is not known to the browser If you continue by clicking OK you should see the usual Ponton XP start page
If everything comes up correctly you can use SSL to receive messages with the Ponton XP Software
Ponton XP 21 ndash Installation and Configuration Guide 53
Advanced Configuration
65 Distributed Installation If the Messenger is installed on a server that cannot be reached from the Internet you will need to install the Listener as well The purpose of the Listener is to pick up incoming connections and forward them to the Messenger (across the firewall) The firewall rules must be set up to allow this connection between the Listener and the Messenger When a message is received the Listener notifies the Messenger and the Messenger then picks up the message
You also have the option of subsequently installing the Listener as a service under Windows ndash this service can then be configured to start automatically when the system starts up
Note If you are going to run the Messenger in combination with the Listener your partners will have to enter the URI of your Listener in their configurations (under Configuration rarr Partners rarr ltpartner namegt rarr URI of Partners Messenger Service)
Listener Installation and Configuration
The Listener is installed by running the installer program (eg PontonXP-21-setuplistener-windowsexe) on the relevant system You are asked to specify an installation folder and also have the option of creating a desktop or menu shortcut Thatrsquos it
-
The settings for the Listener are contained in the configuration file listenerproperties which is located in the folder [Listener root folder]config To modify these settings you will have to edit the configuration file directly Access via the Messengerrsquos configuration interface is not possible
The file contains the following settings
HttpPort = Port number (for external HTTP connections)
HttpsPort = Port number (for external HTTPS connections)
LogLevel = DEBUG | INFO | WARN | ERROR | FATAL | OFF
The following settings specify the host and port of the Messenger for forwarding connections (HTTPHTTPS) The forwarding connection mode is activated by entering the relevant host and port addresses and removing the hash marks (used to mark ldquocomment linesrdquo in Java property files)
HttpServer = server1port1 (HTTP forwarding connection to the Messenger)
HttpsServer = server1port1 (HTTPS forwarding connection to the Messenger)
Ponton XP 21 ndash Installation and Configuration Guide 54
Advanced Configuration
The following settings specify the Listenerrsquos port for callback connections (HTTPHTTPS) with the Messenger As with the forwarding connection the callback connection mode is activated by entering the relevant port addresses and removing the hash marks (Obviously it makes no sense to have both connections activated at the same time)
HttpServicePort = Port number (for internal HTTP connections to the Listener)
HttpsServicePort = Port number (for internal HTTPS connections to the Listener)
Starting the Listener
To start the Listener open a command prompt and start the class
depontonconsultingxmlpipeListener
with the classpath
-cp libcommons-logging-api-103jarlibcommonutilsjarlibxp_listenerjarconfig
You can also use the installed batch file [Listener root folder]startListenerbat
Callback Mode
Details of the communication flow
When the Messenger starts up it searches for the Listener
Note The Listener should start up first so that it can be found by the Messenger
If the search is successful a permanent connection is established between the Messenger and the Listener The Messenger uses the following settings in the configuration to establish the connection with the Listener
Configuration rarr Messenger rarr Listener rarr HTTP[S] rarr Hostname
Configuration rarr Messenger rarr Listener rarr HTTP[S] rarr Internal Listener Port
Ponton XP 21 ndash Installation and Configuration Guide 55
Advanced Configuration
When the Listener receives an incoming message (or rather an HTTPHTTPS request) it informs the Messenger ndash by way of the permanent connection ndash about the arrival of the new request indicating which port the Messenger can use to pick up the connection
Note This port number is randomly selected by the Listener and cannot be configured
The Messenger picks up the connection on the Listenerrsquos specified port and redirects it to its own local port for further processing
This local port corresponds to the setting for
Configuration rarr Messenger rarr Listener rarr HTTP[S] rarr Internal Messenger Port
in the configuration GUI
Forwarding Mode
Details of the communication flow
In forwarding mode no permanent connection is established between the Messenger and the Listener
When the Listener receives an incoming HTTPHTTPS request it simply forwards the request to the Messenger using the address specified in listenerproperties (HttpServerHttpsServer)
Note To allow this forwarding connection the firewall has to be configured so that the Listener is permitted to access the Messenger on the specified port(s)
Ponton XP 21 ndash Installation and Configuration Guide 56
Advanced Configuration
66 Port Configuration The Messengerrsquos standard configuration uses port 8080 for HTTP connections and port 8443 for secure (HTTPS) connections This section describes how to set up the messenger to use a non-standard port configuration This involves making manual changes to several configuration files in particular the Tomcat serverxml and the Messengerrsquos adapter configuration files
Tomcat Settings
The port setting for the Messengerrsquos HTTP and HTTPS connections are specified in the Tomcat configuration file
[installation root]tomcat-xxxconfserverxml
This file defines the connections (Connectors) for the Messenger as follows
lt-- Define a non-SSL Coyote HTTP11 Connector on port 8080 --gt
ltConnector className=orgapachecoyotetomcat4CoyoteConnector
port=yourMessengerPort minProcessors=5 maxProcessors=75
enableLookups=true redirectPort=yourRed rectPort i acceptCount=100 debug=0 connectionTimeout=20000
useURIValidationHack=false disableUploadTimeout=true gt
lt-- Define a SSL Coyote HTTP11 Connector on port 8443 --gt
ltConnector className=orgapachecoyotetomcat4CoyoteConnector
port=yourSSLPort minProcessors=5 maxProcessors=75
enableLookups=true
acceptCount=100 debug=0 scheme=https secure=true
useURIValidationHack=false disableUploadTimeout=truegt
ltFactory className=orgapachecoyotetomcat4CoyoteServerSocketFactory
clientAuth=false keystoreFile=ssl-keystore protocol=TLS gt
ltConnectorgt
The standard settings for the Messenger ports are
HTTP 8080
SSL 8443
To modify your connections you will need to enter the relevant port numbers indicated above as yourMessengerPort yourRedirectPort (which normally points to the SSL connection) and yourSSLPort
Ponton XP 21 ndash Installation and Configuration Guide 57
Advanced Configuration
Adapter Settings
The settings for the Messenger adapters are contained in the relevant XML files under
[installation root]xmlpipewebrootWEB-INFconfig
In particular a standard installation includes the files testadap erxml and hotfolderxml Each of these configuration files contains a block specifying the connection to the messenger
t
ltMessengergt
ltAddressgtyourMessengerHostltAddressgt
ltPortNumbergtyourMessengerPortltPortNumbergt
ltPathgthellipltPathgt
ltMessengergt
If you have configured the Messenger to run on a different port (see above) you will need to enter the relevant port number here
Ponton XP 21 ndash Installation and Configuration Guide 58
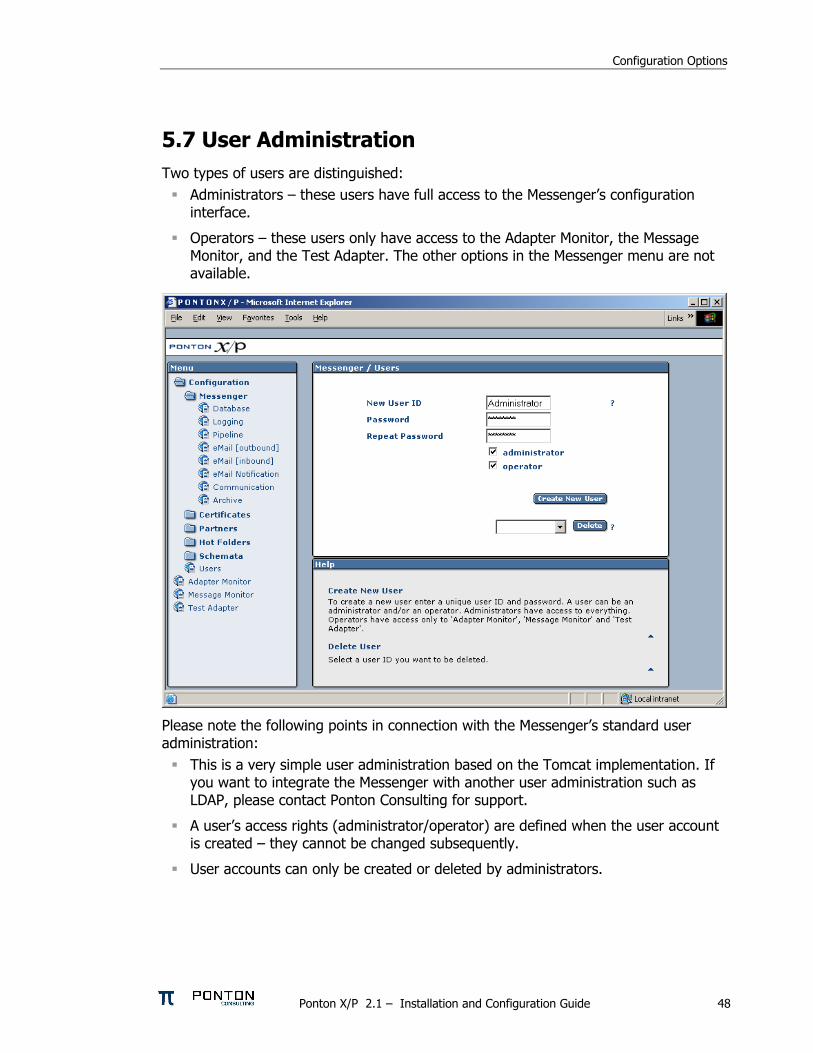
Configuration Options
57 User Administration Two types of users are distinguished
Administrators ndash these users have full access to the Messengerrsquos configuration interface
Operators ndash these users only have access to the Adapter Monitor the Message Monitor and the Test Adapter The other options in the Messenger menu are not available
Please note the following points in connection with the Messengerrsquos standard user administration
This is a very simple user administration based on the Tomcat implementation If you want to integrate the Messenger with another user administration such as LDAP please contact Ponton Consulting for support
A userrsquos access rights (administratoroperator) are defined when the user account is created ndash they cannot be changed subsequently
User accounts can only be created or deleted by administrators
Ponton XP 21 ndash Installation and Configuration Guide 48
Advanced Configuration
6 Advanced Configuration
61 XML Schema Configuration Important The Messenger distinguishes between available schema set and activated schema sets Just inserting entries in the schema configuration as described in this section does not activate the schema sets or the corresponding schemas for use by the Messenger In order to make use of the schemas in a schema set you have to activate the schema set in the relevant partner configuration To view or modify the activated schema sets in a partner configuration go to
Configuration rarr Partners rarr ltpartner namegt rarr Processing
and activatedeactivate the relevant checkboxes
In the Messengerrsquos configuration interface you can activate and deactivate schema sets for specific partner configurations It is not possible however to modify the contents and specifications of the individual schema sets Any necessary changes have to be made in the configuration file
[installation root]xmlpipewebrootWEB-INFconfigschemataxml
The configuration entries in this file are structured as follows
ltSchemaSet Name=papinet21gt
ltSchemaName=httpwwwpapinetorgdataAvailabilityV2R10xsd MessageType=Availability MessageVersion=V2R10gt
ltNamespacegtltNamespacegt
ltDisplayNamegtAvailability 21ltDisplayNamegt
ltSchemaFilegtAvailabilityV2R10xsdltSchemaFilegt
ltXSLFilegtltXSLFilegt
ltSchemagt
ltSchema Name=yourSchema MessageType=yourMsgType MessageVersion=yourMsgVersgt
ltNamespacegtyourNamespaceltNamespacegt
ltDisplayNamegtYour Display NameltDisplayNamegt
ltSchemaFilegtyourSchemaFileltSchemaFilegt
ltXSLFilegtyourStylesheetltXSLFilegt
ltSchemagt
hellip
ltSchemaFoldergtpapinet210ltSchemaFoldergt
ltXSLFoldergtpapinet210ltXSLFoldergt
ltSchemaSetgt
Ponton XP 21 ndash Installation and Configuration Guide 49
Advanced Configuration
You can add a schema to an existing schema set in this file by inserting a ltSchemagt block (just copy and paste one of the existing blocks and modify the configuration as required) Please ensure that your new schema specification includes correct settings for the attributes of the Schema element
Name= This attribute corresponds with the ebXML Schema Location of incoming messages When an ebXML message is received the Messenger looks for a schema configuration where the Schema Name attribute matches the Schema Location specified in the ebXML envelope
MessageType= This attribute corresponds with the attribute MessageMetaDataDocumentInfoMessageName in the backend envelope of outgoing messages
MessageVersion= This attribute corresponds with the element MessageMe aDataDocumentInfoDTDVersionNumber in the backend envelope of outgoing messages
t
Note The specification of MessageType and MessageVersion must be used together for outgoing messages as they are combined to form an identifier for the message schema
You also have the option of adding a new schema set with your own schema definitions to the schema configuration In this case you would insert a ltSchemaSetgt block with subordinate ltSchemagt blocks Your added schema set will automatically be inserted in the list of available schema sets on the Messenger configuration pages
62 Advanced Database Configuration Important Since the Messenger database is used for essential message processing and tracking purposes you should not experiment with the database configuration on a ldquoliverdquo system For test and debugging purposes you are advised to set up a trial system
Installation with other Databases
This section describes the main steps required to install a different database system on the Messenger for example an Oracle database
1 Install database driver Copy the database driver to
[installation root]xmlpipewebrootWEB-INFlib
Note Please note that only drivers with the extension jar are loaded by the Tomcat servlet engine If the JDBC driver you want to use is a zip file you will have to rename the file to jar The JDBC driver for Oracle 9i is the file ojdbc14jar
Ponton XP 21 ndash Installation and Configuration Guide 50
Advanced Configuration
2 Create database and tables Ponton XP is supplied with SQL scripts for HSQL and for Oracle that can be used to create the tables for the Messenger database If you are using another database you may need to modify these scripts to work correctly with your database system
The SQL scripts are located in the subfolders under [installation root]sql
Once the database tables are in place you will also need to carry out the SQL script that inserts the log messages into the database ie
[installation root]sqlinsert_log_messagessql
3 Set up database connection The configuration of database connections is described in the section Set Up Messenger Database beginning on page 20 To connect with a different database choose ldquootherrdquo from the list of database drivers and enter the configuration for your database on the next page
The entries for the Oracle 9i JDBC driver are
Driver oraclejdbcdriverOracleDriver
URL jdbcoraclethinlthostgtltportgtltdatabasegt
63 Advanced Message Monitor Configuration In the configuration directory ldquoxmlpipewebrootWEB-INFconfigrdquo there is a file messagemonitorxml which can be used to change the selection and ordering of the Message overview window in the Message Monitor The default setting is displayed in the following picture
Ponton XP 21 ndash Installation and Configuration Guide 51
Advanced Configuration
Here the number of line items per page can be set If a high resolution screen is used (beyond 1024 x 768 pixel) one may increase the number of lines
Further a mapping table defines which database column is to be displayed in which monitor column The number of columns again depends on the screen resolution
Finally if main memory size allows caching of XSL stylesheet definitions helps accelerating processing speed for XSL transformations
64 Tomcat SSL Installation
Generate a key
One minor problem with Tomcat or any other webserver that uses the internal Java symmetric key architecture is that you are not allowed to export or import private keys For this reason it is not possible to use the existing key-pair installed with the Messenger software You will have to generate a new key-pair and send a certificate request to the Ponton certificate authority (or other certification authority) to receive a valid certificate
To generate a new key-pair open a command prompt and go to the tomcat-4118 directory The keystore used for a Tomcat SSL installation is located in the Tomcat root directory and is called ssl-keystore The Tomcat installation already contains a certificate for lsquolocalhostrsquo so you can test the HTTPS access with a web browser
Before you can create a new Tomcat certificate you will have to delete the installed certificate Note that the default password for the Tomcat keystore is ldquochangeitrdquo keytool -delete -alias tomcat ndashkeystore ssl-keystore
Now use the following command to create a new key-pair Please note that you need to specify the Listener hostname (eg listenermyserverde) when the keytool asks for lsquofirst and last namersquo keytool -genkey -alias tomcat -keyalg RSA ndashkeystore ssl-keystore
After generating the new key the next step is to export a certificate request with the following command keytool ndashcertreq ndashalias tomcat ndashfile myservercsr ndashkeystore ssl-keystore
This will generate the file myservercsr in the current directory Send this file via email to xp-certponton-consultingde It will be signed and sent back to you The reply will contain a file with the certificate
Finally you have to re-import this signed certificate into the Tomcat SSL keystore Please note that the import may take some time keytool ndashimport ndashalias tomcat ndashfile myservercer ndashkeystore ssl-keystore
If you have any problems starting the keytool make sure you have the javahomebin directory specified in your PATH environment variable Of course you can also change to the javahomebin directory and start the keytool there
Ponton XP 21 ndash Installation and Configuration Guide 52
Advanced Configuration
Update Tomcat configuration
SSL is already activated in the Tomcat configuration packaged in the distribution However you might want to change the specified SSL port (by default the SSL port is set to 8443) You can change the port by editing the file
[tomcat installation]confserverconf
The following section configures the SSL parameters
lt-- Define a SSL Coyote HTTP11 Connector on port 8443 --gt
ltConnector className=orgapachecoyotetomcat4CoyoteConnector
port=8443
minProcessors=5
maxProcessors=75
enableLookups=true
acceptCount=100
debug=0
scheme=https
secure=true
useURIValidationHack=false
disableUploadTimeout=truegt
ltFactory className=orgapachecoyotetomcat4CoyoteServerSocketFactory
clientAuth=false
keystoreFile=ssl-keystore
protocol=TLS gt
ltConnectorgt
Verify setup
To verify if everything is working correctly start the Tomcat webserver as usual and connect to the webserver with your browser
Go to httpsyourserveraddress ndash initially you might get a warning window if the root certificate authority is not known to the browser If you continue by clicking OK you should see the usual Ponton XP start page
If everything comes up correctly you can use SSL to receive messages with the Ponton XP Software
Ponton XP 21 ndash Installation and Configuration Guide 53
Advanced Configuration
65 Distributed Installation If the Messenger is installed on a server that cannot be reached from the Internet you will need to install the Listener as well The purpose of the Listener is to pick up incoming connections and forward them to the Messenger (across the firewall) The firewall rules must be set up to allow this connection between the Listener and the Messenger When a message is received the Listener notifies the Messenger and the Messenger then picks up the message
You also have the option of subsequently installing the Listener as a service under Windows ndash this service can then be configured to start automatically when the system starts up
Note If you are going to run the Messenger in combination with the Listener your partners will have to enter the URI of your Listener in their configurations (under Configuration rarr Partners rarr ltpartner namegt rarr URI of Partners Messenger Service)
Listener Installation and Configuration
The Listener is installed by running the installer program (eg PontonXP-21-setuplistener-windowsexe) on the relevant system You are asked to specify an installation folder and also have the option of creating a desktop or menu shortcut Thatrsquos it
-
The settings for the Listener are contained in the configuration file listenerproperties which is located in the folder [Listener root folder]config To modify these settings you will have to edit the configuration file directly Access via the Messengerrsquos configuration interface is not possible
The file contains the following settings
HttpPort = Port number (for external HTTP connections)
HttpsPort = Port number (for external HTTPS connections)
LogLevel = DEBUG | INFO | WARN | ERROR | FATAL | OFF
The following settings specify the host and port of the Messenger for forwarding connections (HTTPHTTPS) The forwarding connection mode is activated by entering the relevant host and port addresses and removing the hash marks (used to mark ldquocomment linesrdquo in Java property files)
HttpServer = server1port1 (HTTP forwarding connection to the Messenger)
HttpsServer = server1port1 (HTTPS forwarding connection to the Messenger)
Ponton XP 21 ndash Installation and Configuration Guide 54
Advanced Configuration
The following settings specify the Listenerrsquos port for callback connections (HTTPHTTPS) with the Messenger As with the forwarding connection the callback connection mode is activated by entering the relevant port addresses and removing the hash marks (Obviously it makes no sense to have both connections activated at the same time)
HttpServicePort = Port number (for internal HTTP connections to the Listener)
HttpsServicePort = Port number (for internal HTTPS connections to the Listener)
Starting the Listener
To start the Listener open a command prompt and start the class
depontonconsultingxmlpipeListener
with the classpath
-cp libcommons-logging-api-103jarlibcommonutilsjarlibxp_listenerjarconfig
You can also use the installed batch file [Listener root folder]startListenerbat
Callback Mode
Details of the communication flow
When the Messenger starts up it searches for the Listener
Note The Listener should start up first so that it can be found by the Messenger
If the search is successful a permanent connection is established between the Messenger and the Listener The Messenger uses the following settings in the configuration to establish the connection with the Listener
Configuration rarr Messenger rarr Listener rarr HTTP[S] rarr Hostname
Configuration rarr Messenger rarr Listener rarr HTTP[S] rarr Internal Listener Port
Ponton XP 21 ndash Installation and Configuration Guide 55
Advanced Configuration
When the Listener receives an incoming message (or rather an HTTPHTTPS request) it informs the Messenger ndash by way of the permanent connection ndash about the arrival of the new request indicating which port the Messenger can use to pick up the connection
Note This port number is randomly selected by the Listener and cannot be configured
The Messenger picks up the connection on the Listenerrsquos specified port and redirects it to its own local port for further processing
This local port corresponds to the setting for
Configuration rarr Messenger rarr Listener rarr HTTP[S] rarr Internal Messenger Port
in the configuration GUI
Forwarding Mode
Details of the communication flow
In forwarding mode no permanent connection is established between the Messenger and the Listener
When the Listener receives an incoming HTTPHTTPS request it simply forwards the request to the Messenger using the address specified in listenerproperties (HttpServerHttpsServer)
Note To allow this forwarding connection the firewall has to be configured so that the Listener is permitted to access the Messenger on the specified port(s)
Ponton XP 21 ndash Installation and Configuration Guide 56
Advanced Configuration
66 Port Configuration The Messengerrsquos standard configuration uses port 8080 for HTTP connections and port 8443 for secure (HTTPS) connections This section describes how to set up the messenger to use a non-standard port configuration This involves making manual changes to several configuration files in particular the Tomcat serverxml and the Messengerrsquos adapter configuration files
Tomcat Settings
The port setting for the Messengerrsquos HTTP and HTTPS connections are specified in the Tomcat configuration file
[installation root]tomcat-xxxconfserverxml
This file defines the connections (Connectors) for the Messenger as follows
lt-- Define a non-SSL Coyote HTTP11 Connector on port 8080 --gt
ltConnector className=orgapachecoyotetomcat4CoyoteConnector
port=yourMessengerPort minProcessors=5 maxProcessors=75
enableLookups=true redirectPort=yourRed rectPort i acceptCount=100 debug=0 connectionTimeout=20000
useURIValidationHack=false disableUploadTimeout=true gt
lt-- Define a SSL Coyote HTTP11 Connector on port 8443 --gt
ltConnector className=orgapachecoyotetomcat4CoyoteConnector
port=yourSSLPort minProcessors=5 maxProcessors=75
enableLookups=true
acceptCount=100 debug=0 scheme=https secure=true
useURIValidationHack=false disableUploadTimeout=truegt
ltFactory className=orgapachecoyotetomcat4CoyoteServerSocketFactory
clientAuth=false keystoreFile=ssl-keystore protocol=TLS gt
ltConnectorgt
The standard settings for the Messenger ports are
HTTP 8080
SSL 8443
To modify your connections you will need to enter the relevant port numbers indicated above as yourMessengerPort yourRedirectPort (which normally points to the SSL connection) and yourSSLPort
Ponton XP 21 ndash Installation and Configuration Guide 57
Advanced Configuration
Adapter Settings
The settings for the Messenger adapters are contained in the relevant XML files under
[installation root]xmlpipewebrootWEB-INFconfig
In particular a standard installation includes the files testadap erxml and hotfolderxml Each of these configuration files contains a block specifying the connection to the messenger
t
ltMessengergt
ltAddressgtyourMessengerHostltAddressgt
ltPortNumbergtyourMessengerPortltPortNumbergt
ltPathgthellipltPathgt
ltMessengergt
If you have configured the Messenger to run on a different port (see above) you will need to enter the relevant port number here
Ponton XP 21 ndash Installation and Configuration Guide 58
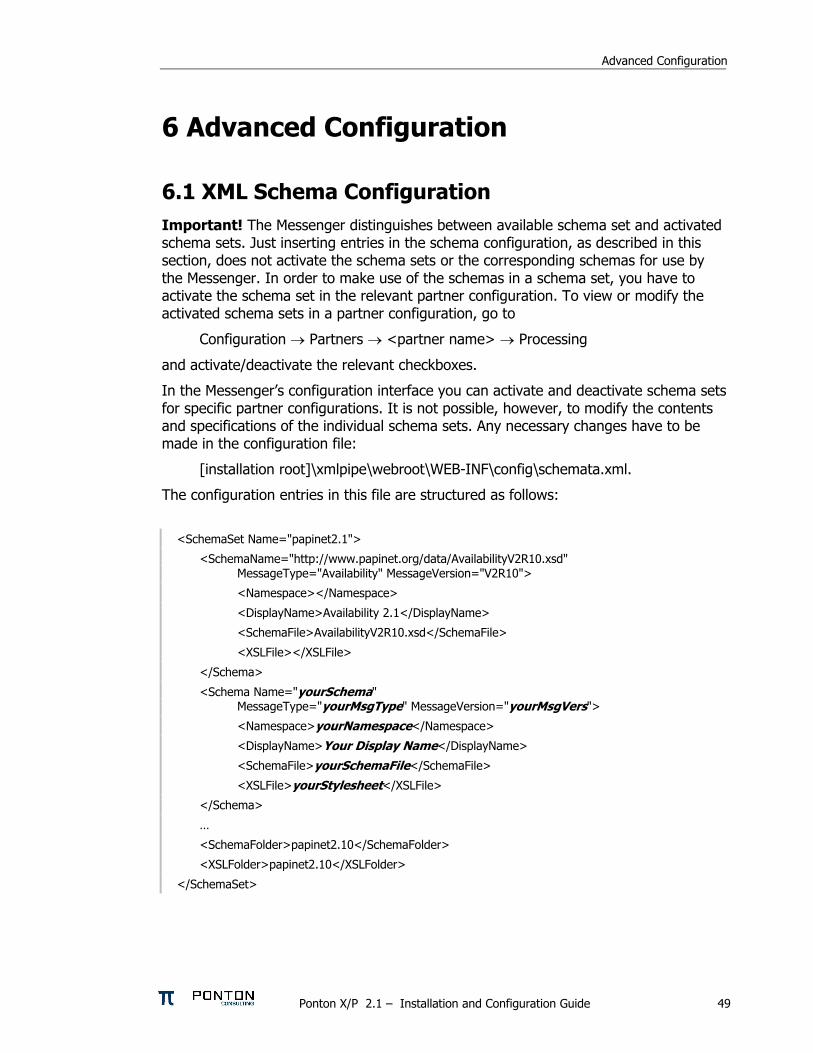
Advanced Configuration
6 Advanced Configuration
61 XML Schema Configuration Important The Messenger distinguishes between available schema set and activated schema sets Just inserting entries in the schema configuration as described in this section does not activate the schema sets or the corresponding schemas for use by the Messenger In order to make use of the schemas in a schema set you have to activate the schema set in the relevant partner configuration To view or modify the activated schema sets in a partner configuration go to
Configuration rarr Partners rarr ltpartner namegt rarr Processing
and activatedeactivate the relevant checkboxes
In the Messengerrsquos configuration interface you can activate and deactivate schema sets for specific partner configurations It is not possible however to modify the contents and specifications of the individual schema sets Any necessary changes have to be made in the configuration file
[installation root]xmlpipewebrootWEB-INFconfigschemataxml
The configuration entries in this file are structured as follows
ltSchemaSet Name=papinet21gt
ltSchemaName=httpwwwpapinetorgdataAvailabilityV2R10xsd MessageType=Availability MessageVersion=V2R10gt
ltNamespacegtltNamespacegt
ltDisplayNamegtAvailability 21ltDisplayNamegt
ltSchemaFilegtAvailabilityV2R10xsdltSchemaFilegt
ltXSLFilegtltXSLFilegt
ltSchemagt
ltSchema Name=yourSchema MessageType=yourMsgType MessageVersion=yourMsgVersgt
ltNamespacegtyourNamespaceltNamespacegt
ltDisplayNamegtYour Display NameltDisplayNamegt
ltSchemaFilegtyourSchemaFileltSchemaFilegt
ltXSLFilegtyourStylesheetltXSLFilegt
ltSchemagt
hellip
ltSchemaFoldergtpapinet210ltSchemaFoldergt
ltXSLFoldergtpapinet210ltXSLFoldergt
ltSchemaSetgt
Ponton XP 21 ndash Installation and Configuration Guide 49
Advanced Configuration
You can add a schema to an existing schema set in this file by inserting a ltSchemagt block (just copy and paste one of the existing blocks and modify the configuration as required) Please ensure that your new schema specification includes correct settings for the attributes of the Schema element
Name= This attribute corresponds with the ebXML Schema Location of incoming messages When an ebXML message is received the Messenger looks for a schema configuration where the Schema Name attribute matches the Schema Location specified in the ebXML envelope
MessageType= This attribute corresponds with the attribute MessageMetaDataDocumentInfoMessageName in the backend envelope of outgoing messages
MessageVersion= This attribute corresponds with the element MessageMe aDataDocumentInfoDTDVersionNumber in the backend envelope of outgoing messages
t
Note The specification of MessageType and MessageVersion must be used together for outgoing messages as they are combined to form an identifier for the message schema
You also have the option of adding a new schema set with your own schema definitions to the schema configuration In this case you would insert a ltSchemaSetgt block with subordinate ltSchemagt blocks Your added schema set will automatically be inserted in the list of available schema sets on the Messenger configuration pages
62 Advanced Database Configuration Important Since the Messenger database is used for essential message processing and tracking purposes you should not experiment with the database configuration on a ldquoliverdquo system For test and debugging purposes you are advised to set up a trial system
Installation with other Databases
This section describes the main steps required to install a different database system on the Messenger for example an Oracle database
1 Install database driver Copy the database driver to
[installation root]xmlpipewebrootWEB-INFlib
Note Please note that only drivers with the extension jar are loaded by the Tomcat servlet engine If the JDBC driver you want to use is a zip file you will have to rename the file to jar The JDBC driver for Oracle 9i is the file ojdbc14jar
Ponton XP 21 ndash Installation and Configuration Guide 50
Advanced Configuration
2 Create database and tables Ponton XP is supplied with SQL scripts for HSQL and for Oracle that can be used to create the tables for the Messenger database If you are using another database you may need to modify these scripts to work correctly with your database system
The SQL scripts are located in the subfolders under [installation root]sql
Once the database tables are in place you will also need to carry out the SQL script that inserts the log messages into the database ie
[installation root]sqlinsert_log_messagessql
3 Set up database connection The configuration of database connections is described in the section Set Up Messenger Database beginning on page 20 To connect with a different database choose ldquootherrdquo from the list of database drivers and enter the configuration for your database on the next page
The entries for the Oracle 9i JDBC driver are
Driver oraclejdbcdriverOracleDriver
URL jdbcoraclethinlthostgtltportgtltdatabasegt
63 Advanced Message Monitor Configuration In the configuration directory ldquoxmlpipewebrootWEB-INFconfigrdquo there is a file messagemonitorxml which can be used to change the selection and ordering of the Message overview window in the Message Monitor The default setting is displayed in the following picture
Ponton XP 21 ndash Installation and Configuration Guide 51
Advanced Configuration
Here the number of line items per page can be set If a high resolution screen is used (beyond 1024 x 768 pixel) one may increase the number of lines
Further a mapping table defines which database column is to be displayed in which monitor column The number of columns again depends on the screen resolution
Finally if main memory size allows caching of XSL stylesheet definitions helps accelerating processing speed for XSL transformations
64 Tomcat SSL Installation
Generate a key
One minor problem with Tomcat or any other webserver that uses the internal Java symmetric key architecture is that you are not allowed to export or import private keys For this reason it is not possible to use the existing key-pair installed with the Messenger software You will have to generate a new key-pair and send a certificate request to the Ponton certificate authority (or other certification authority) to receive a valid certificate
To generate a new key-pair open a command prompt and go to the tomcat-4118 directory The keystore used for a Tomcat SSL installation is located in the Tomcat root directory and is called ssl-keystore The Tomcat installation already contains a certificate for lsquolocalhostrsquo so you can test the HTTPS access with a web browser
Before you can create a new Tomcat certificate you will have to delete the installed certificate Note that the default password for the Tomcat keystore is ldquochangeitrdquo keytool -delete -alias tomcat ndashkeystore ssl-keystore
Now use the following command to create a new key-pair Please note that you need to specify the Listener hostname (eg listenermyserverde) when the keytool asks for lsquofirst and last namersquo keytool -genkey -alias tomcat -keyalg RSA ndashkeystore ssl-keystore
After generating the new key the next step is to export a certificate request with the following command keytool ndashcertreq ndashalias tomcat ndashfile myservercsr ndashkeystore ssl-keystore
This will generate the file myservercsr in the current directory Send this file via email to xp-certponton-consultingde It will be signed and sent back to you The reply will contain a file with the certificate
Finally you have to re-import this signed certificate into the Tomcat SSL keystore Please note that the import may take some time keytool ndashimport ndashalias tomcat ndashfile myservercer ndashkeystore ssl-keystore
If you have any problems starting the keytool make sure you have the javahomebin directory specified in your PATH environment variable Of course you can also change to the javahomebin directory and start the keytool there
Ponton XP 21 ndash Installation and Configuration Guide 52
Advanced Configuration
Update Tomcat configuration
SSL is already activated in the Tomcat configuration packaged in the distribution However you might want to change the specified SSL port (by default the SSL port is set to 8443) You can change the port by editing the file
[tomcat installation]confserverconf
The following section configures the SSL parameters
lt-- Define a SSL Coyote HTTP11 Connector on port 8443 --gt
ltConnector className=orgapachecoyotetomcat4CoyoteConnector
port=8443
minProcessors=5
maxProcessors=75
enableLookups=true
acceptCount=100
debug=0
scheme=https
secure=true
useURIValidationHack=false
disableUploadTimeout=truegt
ltFactory className=orgapachecoyotetomcat4CoyoteServerSocketFactory
clientAuth=false
keystoreFile=ssl-keystore
protocol=TLS gt
ltConnectorgt
Verify setup
To verify if everything is working correctly start the Tomcat webserver as usual and connect to the webserver with your browser
Go to httpsyourserveraddress ndash initially you might get a warning window if the root certificate authority is not known to the browser If you continue by clicking OK you should see the usual Ponton XP start page
If everything comes up correctly you can use SSL to receive messages with the Ponton XP Software
Ponton XP 21 ndash Installation and Configuration Guide 53
Advanced Configuration
65 Distributed Installation If the Messenger is installed on a server that cannot be reached from the Internet you will need to install the Listener as well The purpose of the Listener is to pick up incoming connections and forward them to the Messenger (across the firewall) The firewall rules must be set up to allow this connection between the Listener and the Messenger When a message is received the Listener notifies the Messenger and the Messenger then picks up the message
You also have the option of subsequently installing the Listener as a service under Windows ndash this service can then be configured to start automatically when the system starts up
Note If you are going to run the Messenger in combination with the Listener your partners will have to enter the URI of your Listener in their configurations (under Configuration rarr Partners rarr ltpartner namegt rarr URI of Partners Messenger Service)
Listener Installation and Configuration
The Listener is installed by running the installer program (eg PontonXP-21-setuplistener-windowsexe) on the relevant system You are asked to specify an installation folder and also have the option of creating a desktop or menu shortcut Thatrsquos it
-
The settings for the Listener are contained in the configuration file listenerproperties which is located in the folder [Listener root folder]config To modify these settings you will have to edit the configuration file directly Access via the Messengerrsquos configuration interface is not possible
The file contains the following settings
HttpPort = Port number (for external HTTP connections)
HttpsPort = Port number (for external HTTPS connections)
LogLevel = DEBUG | INFO | WARN | ERROR | FATAL | OFF
The following settings specify the host and port of the Messenger for forwarding connections (HTTPHTTPS) The forwarding connection mode is activated by entering the relevant host and port addresses and removing the hash marks (used to mark ldquocomment linesrdquo in Java property files)
HttpServer = server1port1 (HTTP forwarding connection to the Messenger)
HttpsServer = server1port1 (HTTPS forwarding connection to the Messenger)
Ponton XP 21 ndash Installation and Configuration Guide 54
Advanced Configuration
The following settings specify the Listenerrsquos port for callback connections (HTTPHTTPS) with the Messenger As with the forwarding connection the callback connection mode is activated by entering the relevant port addresses and removing the hash marks (Obviously it makes no sense to have both connections activated at the same time)
HttpServicePort = Port number (for internal HTTP connections to the Listener)
HttpsServicePort = Port number (for internal HTTPS connections to the Listener)
Starting the Listener
To start the Listener open a command prompt and start the class
depontonconsultingxmlpipeListener
with the classpath
-cp libcommons-logging-api-103jarlibcommonutilsjarlibxp_listenerjarconfig
You can also use the installed batch file [Listener root folder]startListenerbat
Callback Mode
Details of the communication flow
When the Messenger starts up it searches for the Listener
Note The Listener should start up first so that it can be found by the Messenger
If the search is successful a permanent connection is established between the Messenger and the Listener The Messenger uses the following settings in the configuration to establish the connection with the Listener
Configuration rarr Messenger rarr Listener rarr HTTP[S] rarr Hostname
Configuration rarr Messenger rarr Listener rarr HTTP[S] rarr Internal Listener Port
Ponton XP 21 ndash Installation and Configuration Guide 55
Advanced Configuration
When the Listener receives an incoming message (or rather an HTTPHTTPS request) it informs the Messenger ndash by way of the permanent connection ndash about the arrival of the new request indicating which port the Messenger can use to pick up the connection
Note This port number is randomly selected by the Listener and cannot be configured
The Messenger picks up the connection on the Listenerrsquos specified port and redirects it to its own local port for further processing
This local port corresponds to the setting for
Configuration rarr Messenger rarr Listener rarr HTTP[S] rarr Internal Messenger Port
in the configuration GUI
Forwarding Mode
Details of the communication flow
In forwarding mode no permanent connection is established between the Messenger and the Listener
When the Listener receives an incoming HTTPHTTPS request it simply forwards the request to the Messenger using the address specified in listenerproperties (HttpServerHttpsServer)
Note To allow this forwarding connection the firewall has to be configured so that the Listener is permitted to access the Messenger on the specified port(s)
Ponton XP 21 ndash Installation and Configuration Guide 56
Advanced Configuration
66 Port Configuration The Messengerrsquos standard configuration uses port 8080 for HTTP connections and port 8443 for secure (HTTPS) connections This section describes how to set up the messenger to use a non-standard port configuration This involves making manual changes to several configuration files in particular the Tomcat serverxml and the Messengerrsquos adapter configuration files
Tomcat Settings
The port setting for the Messengerrsquos HTTP and HTTPS connections are specified in the Tomcat configuration file
[installation root]tomcat-xxxconfserverxml
This file defines the connections (Connectors) for the Messenger as follows
lt-- Define a non-SSL Coyote HTTP11 Connector on port 8080 --gt
ltConnector className=orgapachecoyotetomcat4CoyoteConnector
port=yourMessengerPort minProcessors=5 maxProcessors=75
enableLookups=true redirectPort=yourRed rectPort i acceptCount=100 debug=0 connectionTimeout=20000
useURIValidationHack=false disableUploadTimeout=true gt
lt-- Define a SSL Coyote HTTP11 Connector on port 8443 --gt
ltConnector className=orgapachecoyotetomcat4CoyoteConnector
port=yourSSLPort minProcessors=5 maxProcessors=75
enableLookups=true
acceptCount=100 debug=0 scheme=https secure=true
useURIValidationHack=false disableUploadTimeout=truegt
ltFactory className=orgapachecoyotetomcat4CoyoteServerSocketFactory
clientAuth=false keystoreFile=ssl-keystore protocol=TLS gt
ltConnectorgt
The standard settings for the Messenger ports are
HTTP 8080
SSL 8443
To modify your connections you will need to enter the relevant port numbers indicated above as yourMessengerPort yourRedirectPort (which normally points to the SSL connection) and yourSSLPort
Ponton XP 21 ndash Installation and Configuration Guide 57
Advanced Configuration
Adapter Settings
The settings for the Messenger adapters are contained in the relevant XML files under
[installation root]xmlpipewebrootWEB-INFconfig
In particular a standard installation includes the files testadap erxml and hotfolderxml Each of these configuration files contains a block specifying the connection to the messenger
t
ltMessengergt
ltAddressgtyourMessengerHostltAddressgt
ltPortNumbergtyourMessengerPortltPortNumbergt
ltPathgthellipltPathgt
ltMessengergt
If you have configured the Messenger to run on a different port (see above) you will need to enter the relevant port number here
Ponton XP 21 ndash Installation and Configuration Guide 58
Advanced Configuration
You can add a schema to an existing schema set in this file by inserting a ltSchemagt block (just copy and paste one of the existing blocks and modify the configuration as required) Please ensure that your new schema specification includes correct settings for the attributes of the Schema element
Name= This attribute corresponds with the ebXML Schema Location of incoming messages When an ebXML message is received the Messenger looks for a schema configuration where the Schema Name attribute matches the Schema Location specified in the ebXML envelope
MessageType= This attribute corresponds with the attribute MessageMetaDataDocumentInfoMessageName in the backend envelope of outgoing messages
MessageVersion= This attribute corresponds with the element MessageMe aDataDocumentInfoDTDVersionNumber in the backend envelope of outgoing messages
t
Note The specification of MessageType and MessageVersion must be used together for outgoing messages as they are combined to form an identifier for the message schema
You also have the option of adding a new schema set with your own schema definitions to the schema configuration In this case you would insert a ltSchemaSetgt block with subordinate ltSchemagt blocks Your added schema set will automatically be inserted in the list of available schema sets on the Messenger configuration pages
62 Advanced Database Configuration Important Since the Messenger database is used for essential message processing and tracking purposes you should not experiment with the database configuration on a ldquoliverdquo system For test and debugging purposes you are advised to set up a trial system
Installation with other Databases
This section describes the main steps required to install a different database system on the Messenger for example an Oracle database
1 Install database driver Copy the database driver to
[installation root]xmlpipewebrootWEB-INFlib
Note Please note that only drivers with the extension jar are loaded by the Tomcat servlet engine If the JDBC driver you want to use is a zip file you will have to rename the file to jar The JDBC driver for Oracle 9i is the file ojdbc14jar
Ponton XP 21 ndash Installation and Configuration Guide 50
Advanced Configuration
2 Create database and tables Ponton XP is supplied with SQL scripts for HSQL and for Oracle that can be used to create the tables for the Messenger database If you are using another database you may need to modify these scripts to work correctly with your database system
The SQL scripts are located in the subfolders under [installation root]sql
Once the database tables are in place you will also need to carry out the SQL script that inserts the log messages into the database ie
[installation root]sqlinsert_log_messagessql
3 Set up database connection The configuration of database connections is described in the section Set Up Messenger Database beginning on page 20 To connect with a different database choose ldquootherrdquo from the list of database drivers and enter the configuration for your database on the next page
The entries for the Oracle 9i JDBC driver are
Driver oraclejdbcdriverOracleDriver
URL jdbcoraclethinlthostgtltportgtltdatabasegt
63 Advanced Message Monitor Configuration In the configuration directory ldquoxmlpipewebrootWEB-INFconfigrdquo there is a file messagemonitorxml which can be used to change the selection and ordering of the Message overview window in the Message Monitor The default setting is displayed in the following picture
Ponton XP 21 ndash Installation and Configuration Guide 51
Advanced Configuration
Here the number of line items per page can be set If a high resolution screen is used (beyond 1024 x 768 pixel) one may increase the number of lines
Further a mapping table defines which database column is to be displayed in which monitor column The number of columns again depends on the screen resolution
Finally if main memory size allows caching of XSL stylesheet definitions helps accelerating processing speed for XSL transformations
64 Tomcat SSL Installation
Generate a key
One minor problem with Tomcat or any other webserver that uses the internal Java symmetric key architecture is that you are not allowed to export or import private keys For this reason it is not possible to use the existing key-pair installed with the Messenger software You will have to generate a new key-pair and send a certificate request to the Ponton certificate authority (or other certification authority) to receive a valid certificate
To generate a new key-pair open a command prompt and go to the tomcat-4118 directory The keystore used for a Tomcat SSL installation is located in the Tomcat root directory and is called ssl-keystore The Tomcat installation already contains a certificate for lsquolocalhostrsquo so you can test the HTTPS access with a web browser
Before you can create a new Tomcat certificate you will have to delete the installed certificate Note that the default password for the Tomcat keystore is ldquochangeitrdquo keytool -delete -alias tomcat ndashkeystore ssl-keystore
Now use the following command to create a new key-pair Please note that you need to specify the Listener hostname (eg listenermyserverde) when the keytool asks for lsquofirst and last namersquo keytool -genkey -alias tomcat -keyalg RSA ndashkeystore ssl-keystore
After generating the new key the next step is to export a certificate request with the following command keytool ndashcertreq ndashalias tomcat ndashfile myservercsr ndashkeystore ssl-keystore
This will generate the file myservercsr in the current directory Send this file via email to xp-certponton-consultingde It will be signed and sent back to you The reply will contain a file with the certificate
Finally you have to re-import this signed certificate into the Tomcat SSL keystore Please note that the import may take some time keytool ndashimport ndashalias tomcat ndashfile myservercer ndashkeystore ssl-keystore
If you have any problems starting the keytool make sure you have the javahomebin directory specified in your PATH environment variable Of course you can also change to the javahomebin directory and start the keytool there
Ponton XP 21 ndash Installation and Configuration Guide 52
Advanced Configuration
Update Tomcat configuration
SSL is already activated in the Tomcat configuration packaged in the distribution However you might want to change the specified SSL port (by default the SSL port is set to 8443) You can change the port by editing the file
[tomcat installation]confserverconf
The following section configures the SSL parameters
lt-- Define a SSL Coyote HTTP11 Connector on port 8443 --gt
ltConnector className=orgapachecoyotetomcat4CoyoteConnector
port=8443
minProcessors=5
maxProcessors=75
enableLookups=true
acceptCount=100
debug=0
scheme=https
secure=true
useURIValidationHack=false
disableUploadTimeout=truegt
ltFactory className=orgapachecoyotetomcat4CoyoteServerSocketFactory
clientAuth=false
keystoreFile=ssl-keystore
protocol=TLS gt
ltConnectorgt
Verify setup
To verify if everything is working correctly start the Tomcat webserver as usual and connect to the webserver with your browser
Go to httpsyourserveraddress ndash initially you might get a warning window if the root certificate authority is not known to the browser If you continue by clicking OK you should see the usual Ponton XP start page
If everything comes up correctly you can use SSL to receive messages with the Ponton XP Software
Ponton XP 21 ndash Installation and Configuration Guide 53
Advanced Configuration
65 Distributed Installation If the Messenger is installed on a server that cannot be reached from the Internet you will need to install the Listener as well The purpose of the Listener is to pick up incoming connections and forward them to the Messenger (across the firewall) The firewall rules must be set up to allow this connection between the Listener and the Messenger When a message is received the Listener notifies the Messenger and the Messenger then picks up the message
You also have the option of subsequently installing the Listener as a service under Windows ndash this service can then be configured to start automatically when the system starts up
Note If you are going to run the Messenger in combination with the Listener your partners will have to enter the URI of your Listener in their configurations (under Configuration rarr Partners rarr ltpartner namegt rarr URI of Partners Messenger Service)
Listener Installation and Configuration
The Listener is installed by running the installer program (eg PontonXP-21-setuplistener-windowsexe) on the relevant system You are asked to specify an installation folder and also have the option of creating a desktop or menu shortcut Thatrsquos it
-
The settings for the Listener are contained in the configuration file listenerproperties which is located in the folder [Listener root folder]config To modify these settings you will have to edit the configuration file directly Access via the Messengerrsquos configuration interface is not possible
The file contains the following settings
HttpPort = Port number (for external HTTP connections)
HttpsPort = Port number (for external HTTPS connections)
LogLevel = DEBUG | INFO | WARN | ERROR | FATAL | OFF
The following settings specify the host and port of the Messenger for forwarding connections (HTTPHTTPS) The forwarding connection mode is activated by entering the relevant host and port addresses and removing the hash marks (used to mark ldquocomment linesrdquo in Java property files)
HttpServer = server1port1 (HTTP forwarding connection to the Messenger)
HttpsServer = server1port1 (HTTPS forwarding connection to the Messenger)
Ponton XP 21 ndash Installation and Configuration Guide 54
Advanced Configuration
The following settings specify the Listenerrsquos port for callback connections (HTTPHTTPS) with the Messenger As with the forwarding connection the callback connection mode is activated by entering the relevant port addresses and removing the hash marks (Obviously it makes no sense to have both connections activated at the same time)
HttpServicePort = Port number (for internal HTTP connections to the Listener)
HttpsServicePort = Port number (for internal HTTPS connections to the Listener)
Starting the Listener
To start the Listener open a command prompt and start the class
depontonconsultingxmlpipeListener
with the classpath
-cp libcommons-logging-api-103jarlibcommonutilsjarlibxp_listenerjarconfig
You can also use the installed batch file [Listener root folder]startListenerbat
Callback Mode
Details of the communication flow
When the Messenger starts up it searches for the Listener
Note The Listener should start up first so that it can be found by the Messenger
If the search is successful a permanent connection is established between the Messenger and the Listener The Messenger uses the following settings in the configuration to establish the connection with the Listener
Configuration rarr Messenger rarr Listener rarr HTTP[S] rarr Hostname
Configuration rarr Messenger rarr Listener rarr HTTP[S] rarr Internal Listener Port
Ponton XP 21 ndash Installation and Configuration Guide 55
Advanced Configuration
When the Listener receives an incoming message (or rather an HTTPHTTPS request) it informs the Messenger ndash by way of the permanent connection ndash about the arrival of the new request indicating which port the Messenger can use to pick up the connection
Note This port number is randomly selected by the Listener and cannot be configured
The Messenger picks up the connection on the Listenerrsquos specified port and redirects it to its own local port for further processing
This local port corresponds to the setting for
Configuration rarr Messenger rarr Listener rarr HTTP[S] rarr Internal Messenger Port
in the configuration GUI
Forwarding Mode
Details of the communication flow
In forwarding mode no permanent connection is established between the Messenger and the Listener
When the Listener receives an incoming HTTPHTTPS request it simply forwards the request to the Messenger using the address specified in listenerproperties (HttpServerHttpsServer)
Note To allow this forwarding connection the firewall has to be configured so that the Listener is permitted to access the Messenger on the specified port(s)
Ponton XP 21 ndash Installation and Configuration Guide 56
Advanced Configuration
66 Port Configuration The Messengerrsquos standard configuration uses port 8080 for HTTP connections and port 8443 for secure (HTTPS) connections This section describes how to set up the messenger to use a non-standard port configuration This involves making manual changes to several configuration files in particular the Tomcat serverxml and the Messengerrsquos adapter configuration files
Tomcat Settings
The port setting for the Messengerrsquos HTTP and HTTPS connections are specified in the Tomcat configuration file
[installation root]tomcat-xxxconfserverxml
This file defines the connections (Connectors) for the Messenger as follows
lt-- Define a non-SSL Coyote HTTP11 Connector on port 8080 --gt
ltConnector className=orgapachecoyotetomcat4CoyoteConnector
port=yourMessengerPort minProcessors=5 maxProcessors=75
enableLookups=true redirectPort=yourRed rectPort i acceptCount=100 debug=0 connectionTimeout=20000
useURIValidationHack=false disableUploadTimeout=true gt
lt-- Define a SSL Coyote HTTP11 Connector on port 8443 --gt
ltConnector className=orgapachecoyotetomcat4CoyoteConnector
port=yourSSLPort minProcessors=5 maxProcessors=75
enableLookups=true
acceptCount=100 debug=0 scheme=https secure=true
useURIValidationHack=false disableUploadTimeout=truegt
ltFactory className=orgapachecoyotetomcat4CoyoteServerSocketFactory
clientAuth=false keystoreFile=ssl-keystore protocol=TLS gt
ltConnectorgt
The standard settings for the Messenger ports are
HTTP 8080
SSL 8443
To modify your connections you will need to enter the relevant port numbers indicated above as yourMessengerPort yourRedirectPort (which normally points to the SSL connection) and yourSSLPort
Ponton XP 21 ndash Installation and Configuration Guide 57
Advanced Configuration
Adapter Settings
The settings for the Messenger adapters are contained in the relevant XML files under
[installation root]xmlpipewebrootWEB-INFconfig
In particular a standard installation includes the files testadap erxml and hotfolderxml Each of these configuration files contains a block specifying the connection to the messenger
t
ltMessengergt
ltAddressgtyourMessengerHostltAddressgt
ltPortNumbergtyourMessengerPortltPortNumbergt
ltPathgthellipltPathgt
ltMessengergt
If you have configured the Messenger to run on a different port (see above) you will need to enter the relevant port number here
Ponton XP 21 ndash Installation and Configuration Guide 58
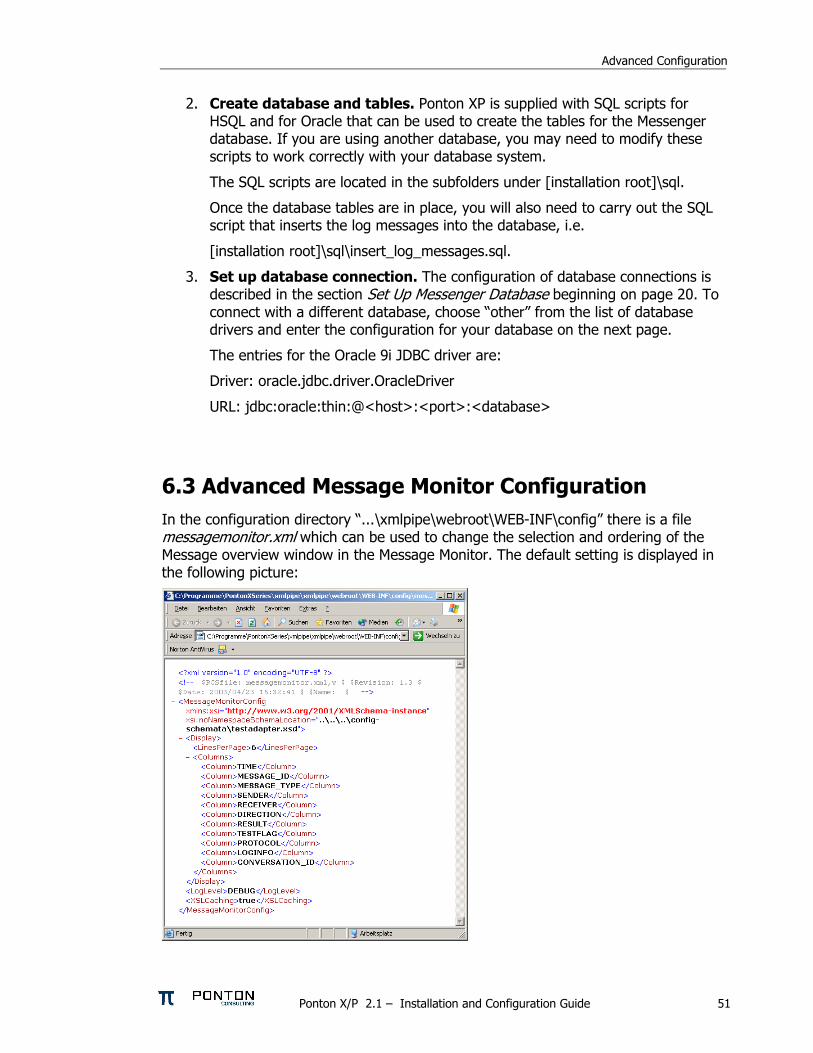
Advanced Configuration
2 Create database and tables Ponton XP is supplied with SQL scripts for HSQL and for Oracle that can be used to create the tables for the Messenger database If you are using another database you may need to modify these scripts to work correctly with your database system
The SQL scripts are located in the subfolders under [installation root]sql
Once the database tables are in place you will also need to carry out the SQL script that inserts the log messages into the database ie
[installation root]sqlinsert_log_messagessql
3 Set up database connection The configuration of database connections is described in the section Set Up Messenger Database beginning on page 20 To connect with a different database choose ldquootherrdquo from the list of database drivers and enter the configuration for your database on the next page
The entries for the Oracle 9i JDBC driver are
Driver oraclejdbcdriverOracleDriver
URL jdbcoraclethinlthostgtltportgtltdatabasegt
63 Advanced Message Monitor Configuration In the configuration directory ldquoxmlpipewebrootWEB-INFconfigrdquo there is a file messagemonitorxml which can be used to change the selection and ordering of the Message overview window in the Message Monitor The default setting is displayed in the following picture
Ponton XP 21 ndash Installation and Configuration Guide 51
Advanced Configuration
Here the number of line items per page can be set If a high resolution screen is used (beyond 1024 x 768 pixel) one may increase the number of lines
Further a mapping table defines which database column is to be displayed in which monitor column The number of columns again depends on the screen resolution
Finally if main memory size allows caching of XSL stylesheet definitions helps accelerating processing speed for XSL transformations
64 Tomcat SSL Installation
Generate a key
One minor problem with Tomcat or any other webserver that uses the internal Java symmetric key architecture is that you are not allowed to export or import private keys For this reason it is not possible to use the existing key-pair installed with the Messenger software You will have to generate a new key-pair and send a certificate request to the Ponton certificate authority (or other certification authority) to receive a valid certificate
To generate a new key-pair open a command prompt and go to the tomcat-4118 directory The keystore used for a Tomcat SSL installation is located in the Tomcat root directory and is called ssl-keystore The Tomcat installation already contains a certificate for lsquolocalhostrsquo so you can test the HTTPS access with a web browser
Before you can create a new Tomcat certificate you will have to delete the installed certificate Note that the default password for the Tomcat keystore is ldquochangeitrdquo keytool -delete -alias tomcat ndashkeystore ssl-keystore
Now use the following command to create a new key-pair Please note that you need to specify the Listener hostname (eg listenermyserverde) when the keytool asks for lsquofirst and last namersquo keytool -genkey -alias tomcat -keyalg RSA ndashkeystore ssl-keystore
After generating the new key the next step is to export a certificate request with the following command keytool ndashcertreq ndashalias tomcat ndashfile myservercsr ndashkeystore ssl-keystore
This will generate the file myservercsr in the current directory Send this file via email to xp-certponton-consultingde It will be signed and sent back to you The reply will contain a file with the certificate
Finally you have to re-import this signed certificate into the Tomcat SSL keystore Please note that the import may take some time keytool ndashimport ndashalias tomcat ndashfile myservercer ndashkeystore ssl-keystore
If you have any problems starting the keytool make sure you have the javahomebin directory specified in your PATH environment variable Of course you can also change to the javahomebin directory and start the keytool there
Ponton XP 21 ndash Installation and Configuration Guide 52
Advanced Configuration
Update Tomcat configuration
SSL is already activated in the Tomcat configuration packaged in the distribution However you might want to change the specified SSL port (by default the SSL port is set to 8443) You can change the port by editing the file
[tomcat installation]confserverconf
The following section configures the SSL parameters
lt-- Define a SSL Coyote HTTP11 Connector on port 8443 --gt
ltConnector className=orgapachecoyotetomcat4CoyoteConnector
port=8443
minProcessors=5
maxProcessors=75
enableLookups=true
acceptCount=100
debug=0
scheme=https
secure=true
useURIValidationHack=false
disableUploadTimeout=truegt
ltFactory className=orgapachecoyotetomcat4CoyoteServerSocketFactory
clientAuth=false
keystoreFile=ssl-keystore
protocol=TLS gt
ltConnectorgt
Verify setup
To verify if everything is working correctly start the Tomcat webserver as usual and connect to the webserver with your browser
Go to httpsyourserveraddress ndash initially you might get a warning window if the root certificate authority is not known to the browser If you continue by clicking OK you should see the usual Ponton XP start page
If everything comes up correctly you can use SSL to receive messages with the Ponton XP Software
Ponton XP 21 ndash Installation and Configuration Guide 53
Advanced Configuration
65 Distributed Installation If the Messenger is installed on a server that cannot be reached from the Internet you will need to install the Listener as well The purpose of the Listener is to pick up incoming connections and forward them to the Messenger (across the firewall) The firewall rules must be set up to allow this connection between the Listener and the Messenger When a message is received the Listener notifies the Messenger and the Messenger then picks up the message
You also have the option of subsequently installing the Listener as a service under Windows ndash this service can then be configured to start automatically when the system starts up
Note If you are going to run the Messenger in combination with the Listener your partners will have to enter the URI of your Listener in their configurations (under Configuration rarr Partners rarr ltpartner namegt rarr URI of Partners Messenger Service)
Listener Installation and Configuration
The Listener is installed by running the installer program (eg PontonXP-21-setuplistener-windowsexe) on the relevant system You are asked to specify an installation folder and also have the option of creating a desktop or menu shortcut Thatrsquos it
-
The settings for the Listener are contained in the configuration file listenerproperties which is located in the folder [Listener root folder]config To modify these settings you will have to edit the configuration file directly Access via the Messengerrsquos configuration interface is not possible
The file contains the following settings
HttpPort = Port number (for external HTTP connections)
HttpsPort = Port number (for external HTTPS connections)
LogLevel = DEBUG | INFO | WARN | ERROR | FATAL | OFF
The following settings specify the host and port of the Messenger for forwarding connections (HTTPHTTPS) The forwarding connection mode is activated by entering the relevant host and port addresses and removing the hash marks (used to mark ldquocomment linesrdquo in Java property files)
HttpServer = server1port1 (HTTP forwarding connection to the Messenger)
HttpsServer = server1port1 (HTTPS forwarding connection to the Messenger)
Ponton XP 21 ndash Installation and Configuration Guide 54
Advanced Configuration
The following settings specify the Listenerrsquos port for callback connections (HTTPHTTPS) with the Messenger As with the forwarding connection the callback connection mode is activated by entering the relevant port addresses and removing the hash marks (Obviously it makes no sense to have both connections activated at the same time)
HttpServicePort = Port number (for internal HTTP connections to the Listener)
HttpsServicePort = Port number (for internal HTTPS connections to the Listener)
Starting the Listener
To start the Listener open a command prompt and start the class
depontonconsultingxmlpipeListener
with the classpath
-cp libcommons-logging-api-103jarlibcommonutilsjarlibxp_listenerjarconfig
You can also use the installed batch file [Listener root folder]startListenerbat
Callback Mode
Details of the communication flow
When the Messenger starts up it searches for the Listener
Note The Listener should start up first so that it can be found by the Messenger
If the search is successful a permanent connection is established between the Messenger and the Listener The Messenger uses the following settings in the configuration to establish the connection with the Listener
Configuration rarr Messenger rarr Listener rarr HTTP[S] rarr Hostname
Configuration rarr Messenger rarr Listener rarr HTTP[S] rarr Internal Listener Port
Ponton XP 21 ndash Installation and Configuration Guide 55
Advanced Configuration
When the Listener receives an incoming message (or rather an HTTPHTTPS request) it informs the Messenger ndash by way of the permanent connection ndash about the arrival of the new request indicating which port the Messenger can use to pick up the connection
Note This port number is randomly selected by the Listener and cannot be configured
The Messenger picks up the connection on the Listenerrsquos specified port and redirects it to its own local port for further processing
This local port corresponds to the setting for
Configuration rarr Messenger rarr Listener rarr HTTP[S] rarr Internal Messenger Port
in the configuration GUI
Forwarding Mode
Details of the communication flow
In forwarding mode no permanent connection is established between the Messenger and the Listener
When the Listener receives an incoming HTTPHTTPS request it simply forwards the request to the Messenger using the address specified in listenerproperties (HttpServerHttpsServer)
Note To allow this forwarding connection the firewall has to be configured so that the Listener is permitted to access the Messenger on the specified port(s)
Ponton XP 21 ndash Installation and Configuration Guide 56
Advanced Configuration
66 Port Configuration The Messengerrsquos standard configuration uses port 8080 for HTTP connections and port 8443 for secure (HTTPS) connections This section describes how to set up the messenger to use a non-standard port configuration This involves making manual changes to several configuration files in particular the Tomcat serverxml and the Messengerrsquos adapter configuration files
Tomcat Settings
The port setting for the Messengerrsquos HTTP and HTTPS connections are specified in the Tomcat configuration file
[installation root]tomcat-xxxconfserverxml
This file defines the connections (Connectors) for the Messenger as follows
lt-- Define a non-SSL Coyote HTTP11 Connector on port 8080 --gt
ltConnector className=orgapachecoyotetomcat4CoyoteConnector
port=yourMessengerPort minProcessors=5 maxProcessors=75
enableLookups=true redirectPort=yourRed rectPort i acceptCount=100 debug=0 connectionTimeout=20000
useURIValidationHack=false disableUploadTimeout=true gt
lt-- Define a SSL Coyote HTTP11 Connector on port 8443 --gt
ltConnector className=orgapachecoyotetomcat4CoyoteConnector
port=yourSSLPort minProcessors=5 maxProcessors=75
enableLookups=true
acceptCount=100 debug=0 scheme=https secure=true
useURIValidationHack=false disableUploadTimeout=truegt
ltFactory className=orgapachecoyotetomcat4CoyoteServerSocketFactory
clientAuth=false keystoreFile=ssl-keystore protocol=TLS gt
ltConnectorgt
The standard settings for the Messenger ports are
HTTP 8080
SSL 8443
To modify your connections you will need to enter the relevant port numbers indicated above as yourMessengerPort yourRedirectPort (which normally points to the SSL connection) and yourSSLPort
Ponton XP 21 ndash Installation and Configuration Guide 57
Advanced Configuration
Adapter Settings
The settings for the Messenger adapters are contained in the relevant XML files under
[installation root]xmlpipewebrootWEB-INFconfig
In particular a standard installation includes the files testadap erxml and hotfolderxml Each of these configuration files contains a block specifying the connection to the messenger
t
ltMessengergt
ltAddressgtyourMessengerHostltAddressgt
ltPortNumbergtyourMessengerPortltPortNumbergt
ltPathgthellipltPathgt
ltMessengergt
If you have configured the Messenger to run on a different port (see above) you will need to enter the relevant port number here
Ponton XP 21 ndash Installation and Configuration Guide 58
Advanced Configuration
Here the number of line items per page can be set If a high resolution screen is used (beyond 1024 x 768 pixel) one may increase the number of lines
Further a mapping table defines which database column is to be displayed in which monitor column The number of columns again depends on the screen resolution
Finally if main memory size allows caching of XSL stylesheet definitions helps accelerating processing speed for XSL transformations
64 Tomcat SSL Installation
Generate a key
One minor problem with Tomcat or any other webserver that uses the internal Java symmetric key architecture is that you are not allowed to export or import private keys For this reason it is not possible to use the existing key-pair installed with the Messenger software You will have to generate a new key-pair and send a certificate request to the Ponton certificate authority (or other certification authority) to receive a valid certificate
To generate a new key-pair open a command prompt and go to the tomcat-4118 directory The keystore used for a Tomcat SSL installation is located in the Tomcat root directory and is called ssl-keystore The Tomcat installation already contains a certificate for lsquolocalhostrsquo so you can test the HTTPS access with a web browser
Before you can create a new Tomcat certificate you will have to delete the installed certificate Note that the default password for the Tomcat keystore is ldquochangeitrdquo keytool -delete -alias tomcat ndashkeystore ssl-keystore
Now use the following command to create a new key-pair Please note that you need to specify the Listener hostname (eg listenermyserverde) when the keytool asks for lsquofirst and last namersquo keytool -genkey -alias tomcat -keyalg RSA ndashkeystore ssl-keystore
After generating the new key the next step is to export a certificate request with the following command keytool ndashcertreq ndashalias tomcat ndashfile myservercsr ndashkeystore ssl-keystore
This will generate the file myservercsr in the current directory Send this file via email to xp-certponton-consultingde It will be signed and sent back to you The reply will contain a file with the certificate
Finally you have to re-import this signed certificate into the Tomcat SSL keystore Please note that the import may take some time keytool ndashimport ndashalias tomcat ndashfile myservercer ndashkeystore ssl-keystore
If you have any problems starting the keytool make sure you have the javahomebin directory specified in your PATH environment variable Of course you can also change to the javahomebin directory and start the keytool there
Ponton XP 21 ndash Installation and Configuration Guide 52
Advanced Configuration
Update Tomcat configuration
SSL is already activated in the Tomcat configuration packaged in the distribution However you might want to change the specified SSL port (by default the SSL port is set to 8443) You can change the port by editing the file
[tomcat installation]confserverconf
The following section configures the SSL parameters
lt-- Define a SSL Coyote HTTP11 Connector on port 8443 --gt
ltConnector className=orgapachecoyotetomcat4CoyoteConnector
port=8443
minProcessors=5
maxProcessors=75
enableLookups=true
acceptCount=100
debug=0
scheme=https
secure=true
useURIValidationHack=false
disableUploadTimeout=truegt
ltFactory className=orgapachecoyotetomcat4CoyoteServerSocketFactory
clientAuth=false
keystoreFile=ssl-keystore
protocol=TLS gt
ltConnectorgt
Verify setup
To verify if everything is working correctly start the Tomcat webserver as usual and connect to the webserver with your browser
Go to httpsyourserveraddress ndash initially you might get a warning window if the root certificate authority is not known to the browser If you continue by clicking OK you should see the usual Ponton XP start page
If everything comes up correctly you can use SSL to receive messages with the Ponton XP Software
Ponton XP 21 ndash Installation and Configuration Guide 53
Advanced Configuration
65 Distributed Installation If the Messenger is installed on a server that cannot be reached from the Internet you will need to install the Listener as well The purpose of the Listener is to pick up incoming connections and forward them to the Messenger (across the firewall) The firewall rules must be set up to allow this connection between the Listener and the Messenger When a message is received the Listener notifies the Messenger and the Messenger then picks up the message
You also have the option of subsequently installing the Listener as a service under Windows ndash this service can then be configured to start automatically when the system starts up
Note If you are going to run the Messenger in combination with the Listener your partners will have to enter the URI of your Listener in their configurations (under Configuration rarr Partners rarr ltpartner namegt rarr URI of Partners Messenger Service)
Listener Installation and Configuration
The Listener is installed by running the installer program (eg PontonXP-21-setuplistener-windowsexe) on the relevant system You are asked to specify an installation folder and also have the option of creating a desktop or menu shortcut Thatrsquos it
-
The settings for the Listener are contained in the configuration file listenerproperties which is located in the folder [Listener root folder]config To modify these settings you will have to edit the configuration file directly Access via the Messengerrsquos configuration interface is not possible
The file contains the following settings
HttpPort = Port number (for external HTTP connections)
HttpsPort = Port number (for external HTTPS connections)
LogLevel = DEBUG | INFO | WARN | ERROR | FATAL | OFF
The following settings specify the host and port of the Messenger for forwarding connections (HTTPHTTPS) The forwarding connection mode is activated by entering the relevant host and port addresses and removing the hash marks (used to mark ldquocomment linesrdquo in Java property files)
HttpServer = server1port1 (HTTP forwarding connection to the Messenger)
HttpsServer = server1port1 (HTTPS forwarding connection to the Messenger)
Ponton XP 21 ndash Installation and Configuration Guide 54
Advanced Configuration
The following settings specify the Listenerrsquos port for callback connections (HTTPHTTPS) with the Messenger As with the forwarding connection the callback connection mode is activated by entering the relevant port addresses and removing the hash marks (Obviously it makes no sense to have both connections activated at the same time)
HttpServicePort = Port number (for internal HTTP connections to the Listener)
HttpsServicePort = Port number (for internal HTTPS connections to the Listener)
Starting the Listener
To start the Listener open a command prompt and start the class
depontonconsultingxmlpipeListener
with the classpath
-cp libcommons-logging-api-103jarlibcommonutilsjarlibxp_listenerjarconfig
You can also use the installed batch file [Listener root folder]startListenerbat
Callback Mode
Details of the communication flow
When the Messenger starts up it searches for the Listener
Note The Listener should start up first so that it can be found by the Messenger
If the search is successful a permanent connection is established between the Messenger and the Listener The Messenger uses the following settings in the configuration to establish the connection with the Listener
Configuration rarr Messenger rarr Listener rarr HTTP[S] rarr Hostname
Configuration rarr Messenger rarr Listener rarr HTTP[S] rarr Internal Listener Port
Ponton XP 21 ndash Installation and Configuration Guide 55
Advanced Configuration
When the Listener receives an incoming message (or rather an HTTPHTTPS request) it informs the Messenger ndash by way of the permanent connection ndash about the arrival of the new request indicating which port the Messenger can use to pick up the connection
Note This port number is randomly selected by the Listener and cannot be configured
The Messenger picks up the connection on the Listenerrsquos specified port and redirects it to its own local port for further processing
This local port corresponds to the setting for
Configuration rarr Messenger rarr Listener rarr HTTP[S] rarr Internal Messenger Port
in the configuration GUI
Forwarding Mode
Details of the communication flow
In forwarding mode no permanent connection is established between the Messenger and the Listener
When the Listener receives an incoming HTTPHTTPS request it simply forwards the request to the Messenger using the address specified in listenerproperties (HttpServerHttpsServer)
Note To allow this forwarding connection the firewall has to be configured so that the Listener is permitted to access the Messenger on the specified port(s)
Ponton XP 21 ndash Installation and Configuration Guide 56
Advanced Configuration
66 Port Configuration The Messengerrsquos standard configuration uses port 8080 for HTTP connections and port 8443 for secure (HTTPS) connections This section describes how to set up the messenger to use a non-standard port configuration This involves making manual changes to several configuration files in particular the Tomcat serverxml and the Messengerrsquos adapter configuration files
Tomcat Settings
The port setting for the Messengerrsquos HTTP and HTTPS connections are specified in the Tomcat configuration file
[installation root]tomcat-xxxconfserverxml
This file defines the connections (Connectors) for the Messenger as follows
lt-- Define a non-SSL Coyote HTTP11 Connector on port 8080 --gt
ltConnector className=orgapachecoyotetomcat4CoyoteConnector
port=yourMessengerPort minProcessors=5 maxProcessors=75
enableLookups=true redirectPort=yourRed rectPort i acceptCount=100 debug=0 connectionTimeout=20000
useURIValidationHack=false disableUploadTimeout=true gt
lt-- Define a SSL Coyote HTTP11 Connector on port 8443 --gt
ltConnector className=orgapachecoyotetomcat4CoyoteConnector
port=yourSSLPort minProcessors=5 maxProcessors=75
enableLookups=true
acceptCount=100 debug=0 scheme=https secure=true
useURIValidationHack=false disableUploadTimeout=truegt
ltFactory className=orgapachecoyotetomcat4CoyoteServerSocketFactory
clientAuth=false keystoreFile=ssl-keystore protocol=TLS gt
ltConnectorgt
The standard settings for the Messenger ports are
HTTP 8080
SSL 8443
To modify your connections you will need to enter the relevant port numbers indicated above as yourMessengerPort yourRedirectPort (which normally points to the SSL connection) and yourSSLPort
Ponton XP 21 ndash Installation and Configuration Guide 57
Advanced Configuration
Adapter Settings
The settings for the Messenger adapters are contained in the relevant XML files under
[installation root]xmlpipewebrootWEB-INFconfig
In particular a standard installation includes the files testadap erxml and hotfolderxml Each of these configuration files contains a block specifying the connection to the messenger
t
ltMessengergt
ltAddressgtyourMessengerHostltAddressgt
ltPortNumbergtyourMessengerPortltPortNumbergt
ltPathgthellipltPathgt
ltMessengergt
If you have configured the Messenger to run on a different port (see above) you will need to enter the relevant port number here
Ponton XP 21 ndash Installation and Configuration Guide 58
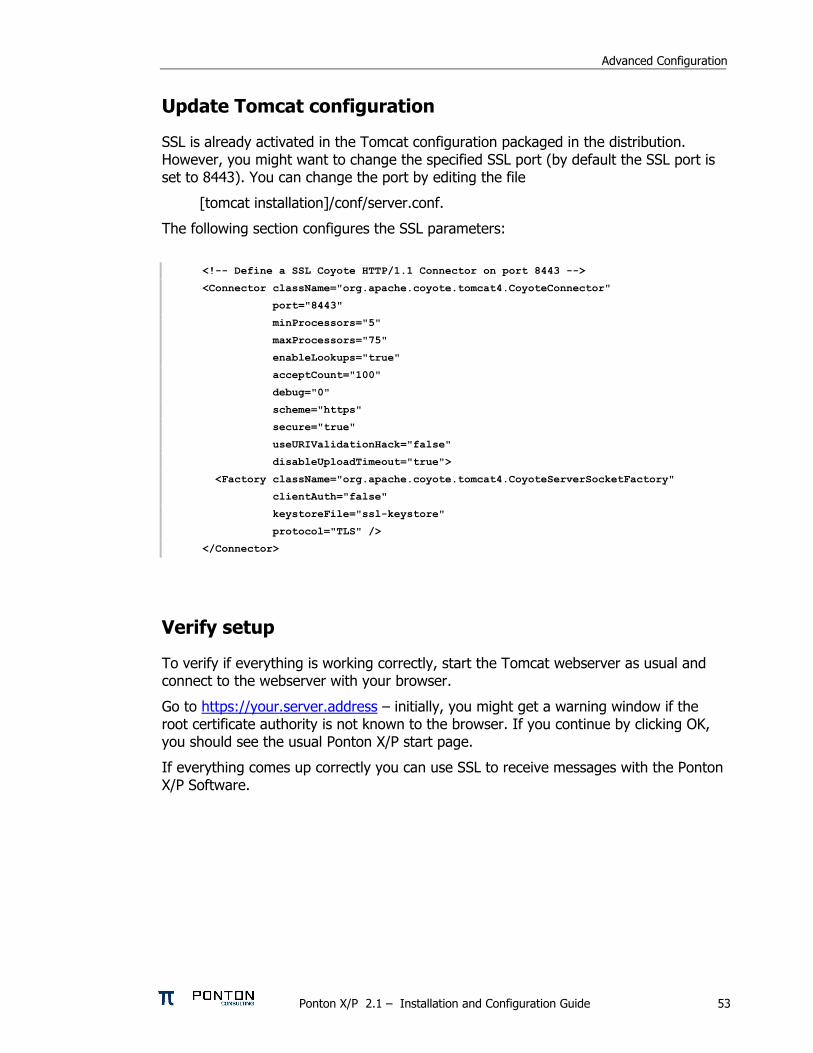
Advanced Configuration
Update Tomcat configuration
SSL is already activated in the Tomcat configuration packaged in the distribution However you might want to change the specified SSL port (by default the SSL port is set to 8443) You can change the port by editing the file
[tomcat installation]confserverconf
The following section configures the SSL parameters
lt-- Define a SSL Coyote HTTP11 Connector on port 8443 --gt
ltConnector className=orgapachecoyotetomcat4CoyoteConnector
port=8443
minProcessors=5
maxProcessors=75
enableLookups=true
acceptCount=100
debug=0
scheme=https
secure=true
useURIValidationHack=false
disableUploadTimeout=truegt
ltFactory className=orgapachecoyotetomcat4CoyoteServerSocketFactory
clientAuth=false
keystoreFile=ssl-keystore
protocol=TLS gt
ltConnectorgt
Verify setup
To verify if everything is working correctly start the Tomcat webserver as usual and connect to the webserver with your browser
Go to httpsyourserveraddress ndash initially you might get a warning window if the root certificate authority is not known to the browser If you continue by clicking OK you should see the usual Ponton XP start page
If everything comes up correctly you can use SSL to receive messages with the Ponton XP Software
Ponton XP 21 ndash Installation and Configuration Guide 53
Advanced Configuration
65 Distributed Installation If the Messenger is installed on a server that cannot be reached from the Internet you will need to install the Listener as well The purpose of the Listener is to pick up incoming connections and forward them to the Messenger (across the firewall) The firewall rules must be set up to allow this connection between the Listener and the Messenger When a message is received the Listener notifies the Messenger and the Messenger then picks up the message
You also have the option of subsequently installing the Listener as a service under Windows ndash this service can then be configured to start automatically when the system starts up
Note If you are going to run the Messenger in combination with the Listener your partners will have to enter the URI of your Listener in their configurations (under Configuration rarr Partners rarr ltpartner namegt rarr URI of Partners Messenger Service)
Listener Installation and Configuration
The Listener is installed by running the installer program (eg PontonXP-21-setuplistener-windowsexe) on the relevant system You are asked to specify an installation folder and also have the option of creating a desktop or menu shortcut Thatrsquos it
-
The settings for the Listener are contained in the configuration file listenerproperties which is located in the folder [Listener root folder]config To modify these settings you will have to edit the configuration file directly Access via the Messengerrsquos configuration interface is not possible
The file contains the following settings
HttpPort = Port number (for external HTTP connections)
HttpsPort = Port number (for external HTTPS connections)
LogLevel = DEBUG | INFO | WARN | ERROR | FATAL | OFF
The following settings specify the host and port of the Messenger for forwarding connections (HTTPHTTPS) The forwarding connection mode is activated by entering the relevant host and port addresses and removing the hash marks (used to mark ldquocomment linesrdquo in Java property files)
HttpServer = server1port1 (HTTP forwarding connection to the Messenger)
HttpsServer = server1port1 (HTTPS forwarding connection to the Messenger)
Ponton XP 21 ndash Installation and Configuration Guide 54
Advanced Configuration
The following settings specify the Listenerrsquos port for callback connections (HTTPHTTPS) with the Messenger As with the forwarding connection the callback connection mode is activated by entering the relevant port addresses and removing the hash marks (Obviously it makes no sense to have both connections activated at the same time)
HttpServicePort = Port number (for internal HTTP connections to the Listener)
HttpsServicePort = Port number (for internal HTTPS connections to the Listener)
Starting the Listener
To start the Listener open a command prompt and start the class
depontonconsultingxmlpipeListener
with the classpath
-cp libcommons-logging-api-103jarlibcommonutilsjarlibxp_listenerjarconfig
You can also use the installed batch file [Listener root folder]startListenerbat
Callback Mode
Details of the communication flow
When the Messenger starts up it searches for the Listener
Note The Listener should start up first so that it can be found by the Messenger
If the search is successful a permanent connection is established between the Messenger and the Listener The Messenger uses the following settings in the configuration to establish the connection with the Listener
Configuration rarr Messenger rarr Listener rarr HTTP[S] rarr Hostname
Configuration rarr Messenger rarr Listener rarr HTTP[S] rarr Internal Listener Port
Ponton XP 21 ndash Installation and Configuration Guide 55
Advanced Configuration
When the Listener receives an incoming message (or rather an HTTPHTTPS request) it informs the Messenger ndash by way of the permanent connection ndash about the arrival of the new request indicating which port the Messenger can use to pick up the connection
Note This port number is randomly selected by the Listener and cannot be configured
The Messenger picks up the connection on the Listenerrsquos specified port and redirects it to its own local port for further processing
This local port corresponds to the setting for
Configuration rarr Messenger rarr Listener rarr HTTP[S] rarr Internal Messenger Port
in the configuration GUI
Forwarding Mode
Details of the communication flow
In forwarding mode no permanent connection is established between the Messenger and the Listener
When the Listener receives an incoming HTTPHTTPS request it simply forwards the request to the Messenger using the address specified in listenerproperties (HttpServerHttpsServer)
Note To allow this forwarding connection the firewall has to be configured so that the Listener is permitted to access the Messenger on the specified port(s)
Ponton XP 21 ndash Installation and Configuration Guide 56
Advanced Configuration
66 Port Configuration The Messengerrsquos standard configuration uses port 8080 for HTTP connections and port 8443 for secure (HTTPS) connections This section describes how to set up the messenger to use a non-standard port configuration This involves making manual changes to several configuration files in particular the Tomcat serverxml and the Messengerrsquos adapter configuration files
Tomcat Settings
The port setting for the Messengerrsquos HTTP and HTTPS connections are specified in the Tomcat configuration file
[installation root]tomcat-xxxconfserverxml
This file defines the connections (Connectors) for the Messenger as follows
lt-- Define a non-SSL Coyote HTTP11 Connector on port 8080 --gt
ltConnector className=orgapachecoyotetomcat4CoyoteConnector
port=yourMessengerPort minProcessors=5 maxProcessors=75
enableLookups=true redirectPort=yourRed rectPort i acceptCount=100 debug=0 connectionTimeout=20000
useURIValidationHack=false disableUploadTimeout=true gt
lt-- Define a SSL Coyote HTTP11 Connector on port 8443 --gt
ltConnector className=orgapachecoyotetomcat4CoyoteConnector
port=yourSSLPort minProcessors=5 maxProcessors=75
enableLookups=true
acceptCount=100 debug=0 scheme=https secure=true
useURIValidationHack=false disableUploadTimeout=truegt
ltFactory className=orgapachecoyotetomcat4CoyoteServerSocketFactory
clientAuth=false keystoreFile=ssl-keystore protocol=TLS gt
ltConnectorgt
The standard settings for the Messenger ports are
HTTP 8080
SSL 8443
To modify your connections you will need to enter the relevant port numbers indicated above as yourMessengerPort yourRedirectPort (which normally points to the SSL connection) and yourSSLPort
Ponton XP 21 ndash Installation and Configuration Guide 57
Advanced Configuration
Adapter Settings
The settings for the Messenger adapters are contained in the relevant XML files under
[installation root]xmlpipewebrootWEB-INFconfig
In particular a standard installation includes the files testadap erxml and hotfolderxml Each of these configuration files contains a block specifying the connection to the messenger
t
ltMessengergt
ltAddressgtyourMessengerHostltAddressgt
ltPortNumbergtyourMessengerPortltPortNumbergt
ltPathgthellipltPathgt
ltMessengergt
If you have configured the Messenger to run on a different port (see above) you will need to enter the relevant port number here
Ponton XP 21 ndash Installation and Configuration Guide 58
Advanced Configuration
Adapter Settings
The settings for the Messenger adapters are contained in the relevant XML files under
[installation root]xmlpipewebrootWEB-INFconfig
In particular a standard installation includes the files testadap erxml and hotfolderxml Each of these configuration files contains a block specifying the connection to the messenger
t
ltMessengergt
ltAddressgtyourMessengerHostltAddressgt
ltPortNumbergtyourMessengerPortltPortNumbergt
ltPathgthellipltPathgt
ltMessengergt
If you have configured the Messenger to run on a different port (see above) you will need to enter the relevant port number here
Ponton XP 21 ndash Installation and Configuration Guide 58