Embed Size (px)
DESCRIPTION
https://www.uponor.de/~/media/countryspecific/central-europe/downloadcenter-ce/mi_mounting-instructions/ce-gesamt/mi_uponor-fluvia-t-control-kit-push-12-quick-gb-installation-guide_0_12_2014.pdf?version=1
Citation preview
A
C
E
G
B
D
F
H
Description
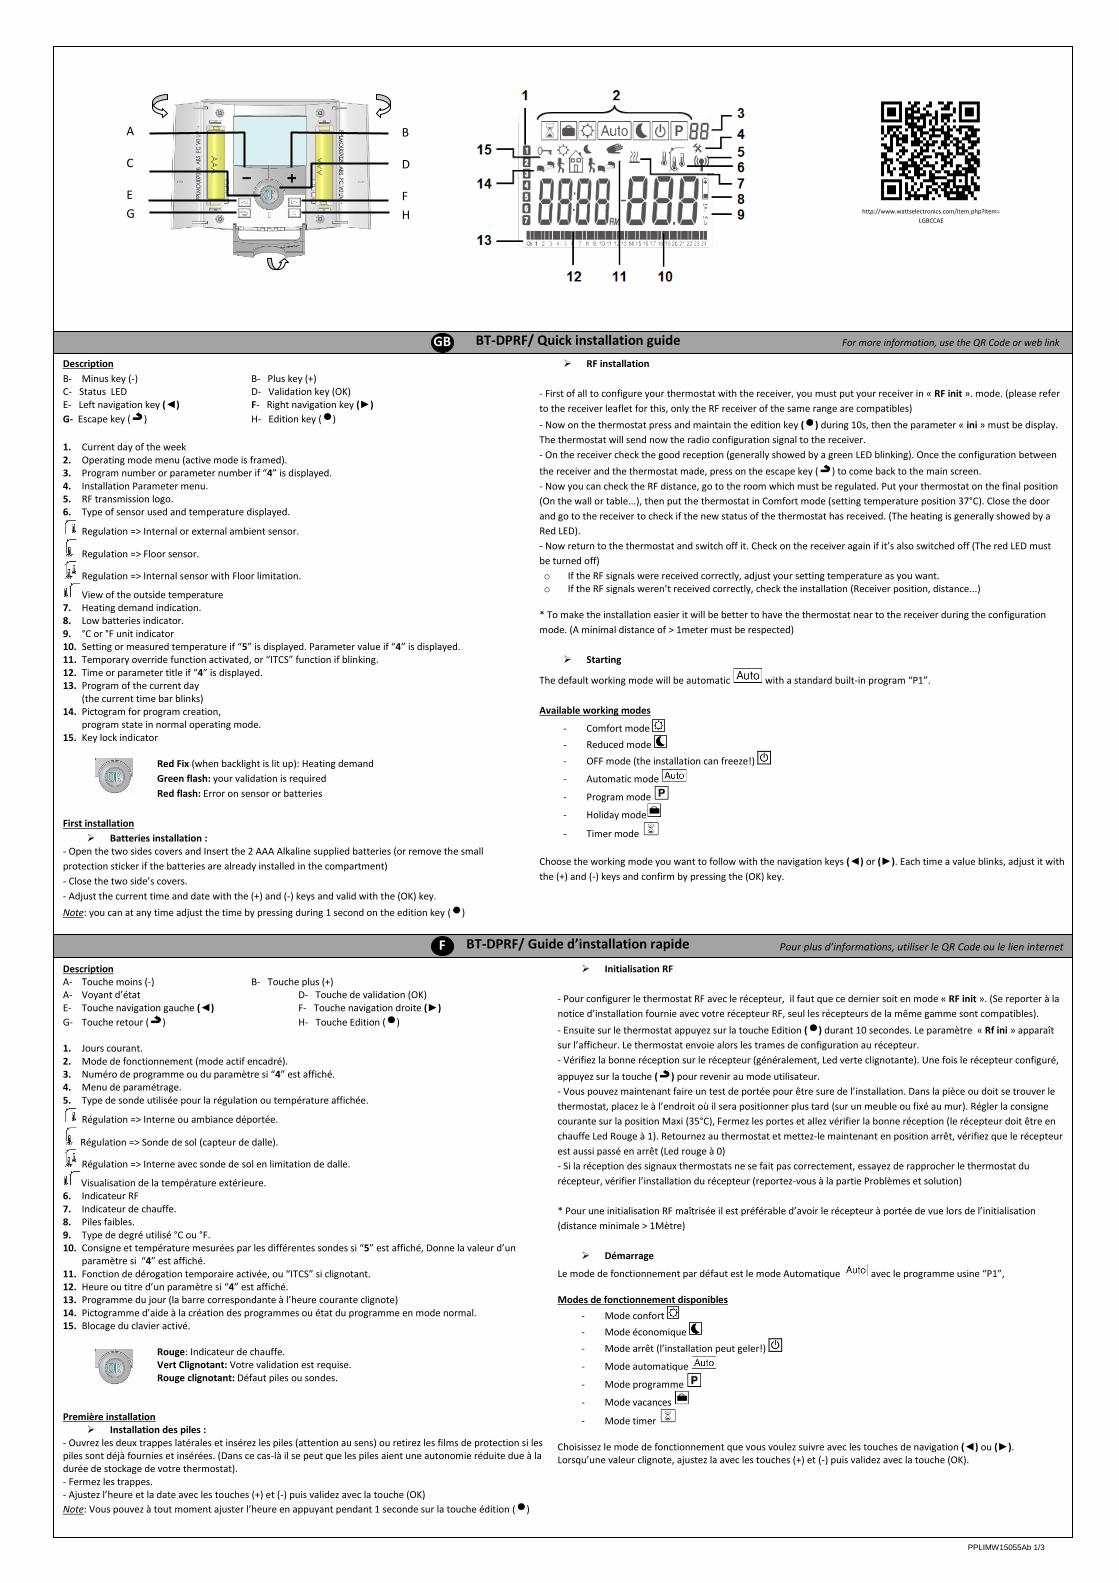
B- Minus key (-) B- Plus key (+) C- Status LED D- Validation key (OK) E- Left navigation key (◄) F- Right navigation key (►)
G- Escape key ( ) H- Edition key ( )
1. Current day of the week 2. Operating mode menu (active mode is framed). 3. Program number or parameter number if “4” is displayed. 4. Installation Parameter menu. 5. RF transmission logo. 6. Type of sensor used and temperature displayed.
Regulation => Internal or external ambient sensor.
Regulation => Floor sensor.
Regulation => Internal sensor with Floor limitation.
View of the outside temperature 7. Heating demand indication. 8. Low batteries indicator. 9. °C or °F unit indicator 10. Setting or measured temperature if “5” is displayed. Parameter value if “4” is displayed. 11. Temporary override function activated, or “ITCS” function if blinking. 12. Time or parameter title if “4” is displayed. 13. Program of the current day
(the current time bar blinks) 14. Pictogram for program creation,
program state in normal operating mode. 15. Key lock indicator
Red Fix (when backlight is lit up): Heating demand
Green flash: your validation is required
Red flash: Error on sensor or batteries
First installation
Batteries installation : - Open the two sides covers and Insert the 2 AAA Alkaline supplied batteries (or remove the small
protection sticker if the batteries are already installed in the compartment)
- Close the two side’s covers.
- Adjust the current time and date with the (+) and (-) keys and valid with the (OK) key.
Note: you can at any time adjust the time by pressing during 1 second on the edition key ( )
RF installation
- First of all to configure your thermostat with the receiver, you must put your receiver in « RF init ». mode. (please refer
to the receiver leaflet for this, only the RF receiver of the same range are compatibles)
- Now on the thermostat press and maintain the edition key ( ) during 10s, then the parameter « ini » must be display.
The thermostat will send now the radio configuration signal to the receiver.
- On the receiver check the good reception (generally showed by a green LED blinking). Once the configuration between
the receiver and the thermostat made, press on the escape key ( ) to come back to the main screen.
- Now you can check the RF distance, go to the room which must be regulated. Put your thermostat on the final position
(On the wall or table...), then put the thermostat in Comfort mode (setting temperature position 37°C). Close the door
and go to the receiver to check if the new status of the thermostat has received. (The heating is generally showed by a
Red LED).
- Now return to the thermostat and switch off it. Check on the receiver again if it’s also switched off (The red LED must
be turned off)
o If the RF signals were received correctly, adjust your setting temperature as you want. o If the RF signals weren’t received correctly, check the installation (Receiver position, distance...)
* To make the installation easier it will be better to have the thermostat near to the receiver during the configuration
mode. (A minimal distance of > 1meter must be respected)
Starting
The default working mode will be automatic with a standard built-in program “P1”.
Available working modes
- Comfort mode
- Reduced mode
- OFF mode (the installation can freeze!)
- Automatic mode
- Program mode
- Holiday mode
- Timer mode
Choose the working mode you want to follow with the navigation keys (◄) or (►). Each time a value blinks, adjust it with
the (+) and (-) keys and confirm by pressing the (OK) key.
BT-DPRF/ Quick installation guide GB
Description A- Touche moins (-) B- Touche plus (+) A- Voyant d’état D- Touche de validation (OK) E- Touche navigation gauche (◄) F- Touche navigation droite (►)
G- Touche retour ( ) H- Touche Edition ( ) 1. Jours courant. 2. Mode de fonctionnement (mode actif encadré). 3. Numéro de programme ou du paramètre si “4” est affiché. 4. Menu de paramétrage. 5. Type de sonde utilisée pour la régulation ou température affichée.
Régulation => Interne ou ambiance déportée.
Régulation => Sonde de sol (capteur de dalle).
Régulation => Interne avec sonde de sol en limitation de dalle.
Visualisation de la température extérieure. 6. Indicateur RF 7. Indicateur de chauffe. 8. Piles faibles. 9. Type de degré utilisé °C ou °F. 10. Consigne et température mesurées par les différentes sondes si “5” est affiché, Donne la valeur d’un
paramètre si “4” est affiché. 11. Fonction de dérogation temporaire activée, ou “ITCS” si clignotant. 12. Heure ou titre d’un paramètre si “4” est affiché. 13. Programme du jour (la barre correspondante à l’heure courante clignote) 14. Pictogramme d’aide à la création des programmes ou état du programme en mode normal. 15. Blocage du clavier activé.
Rouge: Indicateur de chauffe. Vert Clignotant: Votre validation est requise. Rouge clignotant: Défaut piles ou sondes.
Première installation
Installation des piles : - Ouvrez les deux trappes latérales et insérez les piles (attention au sens) ou retirez les films de protection si les piles sont déjà fournies et insérées. (Dans ce cas-là il se peut que les piles aient une autonomie réduite due à la durée de stockage de votre thermostat). - Fermez les trappes. - Ajustez l’heure et la date avec les touches (+) et (-) puis validez avec la touche (OK)
Note: Vous pouvez à tout moment ajuster l’heure en appuyant pendant 1 seconde sur la touche édition ( )
Initialisation RF
- Pour configurer le thermostat RF avec le récepteur, il faut que ce dernier soit en mode « RF init ». (Se reporter à la
notice d’installation fournie avec votre récepteur RF, seul les récepteurs de la même gamme sont compatibles).
- Ensuite sur le thermostat appuyez sur la touche Edition ( ) durant 10 secondes. Le paramètre « Rf ini » apparaît
sur l’afficheur. Le thermostat envoie alors les trames de configuration au récepteur.
- Vérifiez la bonne réception sur le récepteur (généralement, Led verte clignotante). Une fois le récepteur configuré,
appuyez sur la touche ( ) pour revenir au mode utilisateur.
- Vous pouvez maintenant faire un test de portée pour être sure de l’installation. Dans la pièce ou doit se trouver le
thermostat, placez le à l’endroit où il sera positionner plus tard (sur un meuble ou fixé au mur). Régler la consigne
courante sur la position Maxi (35°C), Fermez les portes et allez vérifier la bonne réception (le récepteur doit être en
chauffe Led Rouge à 1). Retournez au thermostat et mettez-le maintenant en position arrêt, vérifiez que le récepteur
est aussi passé en arrêt (Led rouge à 0)
- Si la réception des signaux thermostats ne se fait pas correctement, essayez de rapprocher le thermostat du
récepteur, vérifier l’installation du récepteur (reportez-vous à la partie Problèmes et solution)
* Pour une initialisation RF maîtrisée il est préférable d’avoir le récepteur à portée de vue lors de l’initialisation
(distance minimale > 1Mètre)
Démarrage
Le mode de fonctionnement par défaut est le mode Automatique avec le programme usine “P1”, Modes de fonctionnement disponibles
- Mode confort
- Mode économique
- Mode arrêt (l’installation peut geler!)
- Mode automatique
- Mode programme
- Mode vacances
- Mode timer Choisissez le mode de fonctionnement que vous voulez suivre avec les touches de navigation (◄) ou (►). Lorsqu’une valeur clignote, ajustez la avec les touches (+) et (-) puis validez avec la touche (OK).
BT-DPRF/ Guide d’installation rapide F
PPLIMW15055Ab 1/3
For more information, use the QR Code or web link
Pour plus d’informations, utiliser le QR Code ou le lien internet
http://www.wattselectronics.com/item.php?item=
LGBCCAE
Presentación A- Tecla Menos (-) B- Tecla Más (+) C- LED de estado D- Tecla de validación (OK) E- Tecla de navegación izquierda (◄)
F- Tecla de navegación derecha (►) G- Tecla Escape ( ) H- Tecla de edición ( )
1. Día actual de la semana 2. Menú del modo de funcionamiento (el modo activo se muestra en un recuadro). 3. Número de programa o número de parámetro si se muestra “4”. 4. Menú de parámetros de instalación. 5. Logotipo de transmisión RF 6. Tipo de sensor utilizado y temperatura mostrada.
Regulación => Sensor ambiental interno o externo.
Regulación => Sensor de suelo.
Regulación => Sensor interno con limitación de suelo.
Vista de la temperatura exterior 7. Indicación de demanda de calefacción. 8. Indicador de nivel bajo de pilas. 9. Indicador de unidades °C o °F 10. Temperatura de ajuste o medida si se muestra “5”. Valor de parámetro si se muestra “4”. 11. Función de neutralización de control activada o función "ITCS" si parpadea. 12. Tiempo o nombre del parámetro si se muestra “4”. 13. Programa del día actual (la barra de tiempo actual parpadea) 14. Pictograma para creación de programa, estado del programa en modo de funcionamiento normal. 15. Indicador de candado
Color rojo permanente (cuando la retroiluminación está encendida): Demanda de calefacción Color verde parpadeante: se requiere su validación Color rojo parpadeante: Error en sensor o pilas
Primera instalación Instalación de las pilas
- Abra las dos cubiertas laterales e introduzca las 2 pilas alcalinas AAA suministradas (o retire la pequeña tira adhesiva de protección si las pilas ya se encuentran en el compartimento) - Cierre las dos cubiertas laterales. - Ajustar la hora y la fecha con las (+) y - claves y válidos con la tecla (OK).
Nota: se puede ajustar en cualquier momento la hora pulsando durante 1 segundo la tecla de edición ( )
Beschreibung A- Minus Taste (-) B- Plus Taste (+) C- Status LED D- Bestätigung (OK) E- Navigationstaste nach links(◄)
F- Navigationstaste nach rechts (►) G- Escape key ( ) H- Bearbeitungstaste ( )
1. Aktueller Wochentag 2. Betriebsarten-Menü (Die aktive Betriebsart ist eingerahmt.) 3. Programmnummer bzw. Parameternummer, falls „4“ angezeigt wird 4. Menü der Einrichtungsparameter 5. Symbol für Funkübertragung 6. Anzeige des verwendeten Sensortyps und der Temperatur
Regelung => interner oder externer Umgebungssensor
Regelung => Fußbodensensor
Regelung => interner Sensor mit Bodensensor zur Temperaturbegrenzung
Anzeige der Außentemperatur 7. Anzeige Heizbedarf 8. Anzeige für niedrige Batteriespannung 9. Einheitenanzeige °C/°F 10. Eingestellte Solltemperatur bzw. gemessene Temperatur, falls „5“ angezeigt wird. Parameterwert, falls „4“
angezeigt wird. 11. Programm wurde vorübergehend manuell geändert (bzw. bei blinkender Anzeige Funktion „ITCS“ aktiviert). 12. Uhrzeit oder Parameterbezeichnung, falls „4“ angezeigt wird. 13. Programm für den aktuellen Tag (Die aktuelle Zeitleiste blinkt.) 14. Piktogramm für Programmierung, zeigt im normalen Betrieb den Programmstatus an. 15. Anzeige für Tastensperre
Rotes Dauerlicht (bei eingeschalteter Hintergrundbeleuchtung): Heizbedarf Grünes Blinken: Bestätigung erforderlich Rotes Blinken: Sensor- oder Batteriefehler
Erstinstallation Batterien einlegen:
- Öffnen Sie die beiden seitlichen Abdeckungen und legen Sie die 2 mitgelieferten alkalischen Micro-Batterien (AAA) ein. (Falls sich die Batterien bereits im Batteriefach befinden, entfernen Sie den kleinen Schutzaufkleber. - Schließen Sie die beiden Seitenabdeckungen. - Stellen Sie die aktuelle Uhrzeit und das Datum mit den (+) und (-) Tasten und gültig mit der Taste (OK).
Notiz: Sie können jederzeit die Zeit einstellen, indem Sie während 1 Sekunde auf die Edition-Taste ( )
Funkverbindung einrichten
- Um die Verbindung zwischen Thermostat und Empfänger zu konfigurieren, müssen Sie zunächst Ihren Empfänger in den Modus
RF init für die Funkinitialisierung versetzen. (Sehen Sie hierzu bitte in den Unterlagen zum Funkempfänger nach. Nur
Funkempfänger der gleichen Baureihe sind kompatibel.)
- Halten Sie nun die Bearbeitungstaste des Thermostats ( ) 10 Sekunden lang gedrückt. Daraufhin muss der Parameter « ini »
angezeigt werden.
Der Thermostat sendet nun das Funkkonfigurationssignal an den Empfänger.
- Überprüfen Sie die Empfangsqualität am Empfänger (wird in der Regel durch eine grün blinkende LED angezeigt). Nachdem die
Verbindung zwischen Empfänger und Thermostat konfiguriert ist, drücken Sie die Escape-Taste ( ), um wieder zur
Hauptanzeige zurückzugelangen.
- Sie können nun die Funkdistanz prüfen, indem Sie in den Raum gehen, dessen Temperatur reguliert werden soll. Bringen Sie
den Thermostat in seine endgültige Position (an der Wand oder auf einem Tisch ...), und stellen Sie am Thermostat die
Betriebsart „Komfort“ (Temperatur von 37°C) ein. Schließen Sie die Tür, und überprüfen Sie am Empfänger, ob dieser den neuen
Status des Thermostats empfangen hat (Der Heizvorgang wird in der Regel durch eine rot leuchtende LED angezeigt).
- Gehen Sie nun wieder zum Thermostat, und schalten Sie ihn aus. Überprüfen Sie wieder am Empfänger, ob dieser ebenfalls
abgeschaltet hat. (Die rote LED muss aus sein.)
o Wenn die Funksignale korrekt empfangen warden, legen Sie sie gewünschte Solltemperatur fest. o Wenn die Funksignale nicht korrekt empfangen wurden, überprüfen Sie die Installation (Position des Empfängers,
Distanz…) * Zur Erleichterung der Installation sollte sich der Thermostat, solange er im Konfigurationsmodus ist, nahe am Receiver
befinden. (Dabei ist ein Mindestabstand von ca.1 Meter einzuhalten.)
Einschalten
Standardbetriebsart ist der automatische Betrieb mit dem integrierten Standardprogramm „P1“. Verfügbare Betriebsarten
- Manuelle Betriebsart „Komfort“ - Manuelle Betriebsart „Absenkung“
- Betriebsart AUS (die Installation kann einfrieren!) - Automatischer Betrieb
- Programmiermodus - Betriebsart “Urlaub”
- Betriebsart „Timer“ Wählen Sie die Betriebsart, die Sie mit den Navigationstasten (◄) oder (►) folgen. Jedes Mal, wenn ein Wert blinkt, stellen Sie diese mit den (+) und (-) Tasten und bestätigen Sie durch Drücken der Taste (OK).
BT-DPRF/ Schnellinstallationsanleitung D
Instalación RF
- En primer lugar, para configurar su termostato con el receptor, debe fijar su receptor en modo « RF init ». (consulte el folleto del
receptor para ello, sólo son compatibles los receptores RF del mismo rango)
- Ahora, en el termostato mantenga pulsada la tecla de edición ( ) durante 10 s, a continuación debe mostrarse el parámetro «
ini ».
El termostato enviará ahora la señal de configuración de radio al receptor.
- En el receptor, compruebe la buena recepción (normalmente se muestra por una LED verde parpadeante). Una vez realizada la
configuración entre el receptor y el termostato, pulse la tecla Escape ( ) para regresar a la pantalla principal.
- Ahora puede comprobar la distancia RF, vaya a la sala que debe regularse. Coloque su termostato en la posición final (en la pared
o mesa...), luego fije el termostato en el modo Confort (posición de temperatura de ajuste 37° C). Cierre la puerta y vaya al
receptor para comprobar si se ha recibido el nuevo estado del termostato. (El calentamiento se indica normalmente con un LED
rojo).
- Ahora vuelva al termostato y apáguelo. Compruebe nuevamente el receptor para ver si también se ha apagado (el LED rojo debe
estar apagado)
o Si las señales RF se recibieron correctamente, ajuste como desee su temperatura de ajuste. o Si las señales RF no se recibieron correctamente, compruebe la instalación (posición del receptor, distancia...)
* Para simplificar la instalación será mejor tener el termostato cerca del receptor durante el modo de configuración. (Debe
respetarse una distancia mínima de > 1 metro)
Inicio
El modo de funcionamiento predeterminado será automatic con un programa estándar incorporado “P1”. modo de funcionamiento
- Modo manual Confort - Modo manual, Reducido
- Modo de DESCONEXIÓN (su instalación puede congelarse!)
- Modo automático - Modo de programa
- Modo Vacaciones - Modo Temporizador Elija el modo de trabajo que quiere seguir con las teclas de navegación (◄) o (►). Cada vez que un valor parpadea, ajustar con las (+) y (-) del teclado y confirme pulsando la tecla (OK).
BT-DPRF/ Guía de instalación rápida ES
Apresentação A- Tecla Menos (-) B- Tecla Mais (+) C- LED de estado D- Tecla de Validação (OK) E- Tecla de Navegação para a Esquerda (◄)
F- Tecla de Navegação para a Direita (►) G- Tecla Escape ( ) H- Tecla de edição ( )
1. Dia actual da semana 2. Menu de modo de funcionamento (o modo activo fica enquadrado). 3. Número de programa ou número de parâmetro, se for apresentado “4”. 4. Menu de Parâmetro de Instalação. 5. Logótipo de transmissão de RF. 6. São apresentados o tipo de sensor utilizado e a temperatura.
Regulação => Sensor ambiente interno ou externo.
Regulação => Sensor de chão.
Regulação => Sensor interno com limitação de chão.
Vista da temperatura exterior 7. Indicação de solicitação de aquecimento. 8. Indicador de pouca carga nas pilhas. 9. Indicador de unidades °C ou °F 10. Definição ou medição de temperatura, se for apresentado “5”. Valor de parâmetro, se for apresentado “4”. 11. Função de anulação temporária activada ou função “ITCS” se estiver a piscar. 12. Horas ou título de parâmetro, se for apresentado “4”. 13. Programa do dia actual (a barra das horas actuais pisca) 14. Pictograma para criação de programa, estado de programa no modo de funcionamento normal. 15. Indicador de bloqueio de teclas
Vermelho Fixo (quando a retro-iluminação está activa): Solicitação de aquecimento Flash verde: tem que ser validado pelo utilizador Flash vermelho: Erro no sensor ou nas pilhas
Primeira Instalação Instalação das pilhas:
- Abra as tampas dos dois lados e insira as duas pilhas alcalinas AAA fornecidas (ou retire o pequeno autocolante de protecção se as pilhas já estiverem instaladas no compartimento) - Feche as tampas dos dois lados. - Ajuste o tempo atual e data com os (+) e - teclas e válido com a tecla (OK).
Nota: você pode a qualquer momento ajustar o tempo pressionando durante 1 segundo na chave edição ( )
Instalação de RF
- Primeiro, configure o termostato com o receptor; o receptor tem que estar no modo « RF init ». (Consulte o folheto do receptor
para efectuar o receptor; apenas são compatíveis os receptores de RF da mesma gama)
- Agora, no termostato, prima e mantenha premida a tecla de edição ( ) durante 10 s; em seguida, é apresentado o parâmetro «
ini ».
Nesse momento, o termostato enviará o sinal de configuração de rádio para o receptor.
- No receptor, verifique se as condições de recepção são boas (de forma geral, indicado por um LED verde a piscar). Após efectuar
a configuração entre o receptor e o termostato, prima a tecla Escape ( ) para regressar ao ecrã principal.
- Agora, pode verificar a distância de RF; vá para o espaço interior onde pretende que a temperatura seja regulada. Coloque o
termostato na posição final (numa parede ou mesa...), seleccione o modo de Conforto no termostato (ajustando a posição de
temperatura em 37 °C). Feche a porta e dirija-se ao receptor para verificar se o novo estado do termostato foi recebido.
(Geralmente, o aquecimento é indicado por um LED vermelho).
- Em seguida, dirija-se ao termostato e desligue-o. Verifique novamente o receptor para ver se também está desligado (o LED
vermelho deverá estar apagado)
o Se os sinais de RF tiverem sido recebidos correctamente, ajuste a definição de temperatura como quiser. o Se os sinais de RF não tiverem sido recebidos correctamente, verifique a instalação (Posição e distância do receptor...)
* Para simplificar a instalação, é melhor colocar termostato perto do receptor durante o modo de configuração. (Tem que ser
respeitada uma distância mínima > 1 metro)
Iniciar
O modo de funcionamento predefinido será automático, com um programa incorporado standard “P1”. modo de funcionamento
- Modo manual, Conforto - Modo manual, Reduzida
- Modo DESLIGAR (a instalação pode congelar!) - Modo automático
- Modo de programa - Modo de Férias
- Modo de Temporizador Escolha o modo de trabalho que você quer seguir com as teclas de navegação (◄) ou (►). Cada vez que um piscar de valor, ajuste-o com o (+) e (-) teclas e confirmar pressionando a tecla (OK).
BT-DPRF/ Guia de instalação rápida PT
Für weitere Informationen, verwenden Sie den QR-Code oder Web-Link
Para obtener más información, utilice el código QR o enlace web
Para mais informações, use o QR Code ou link web
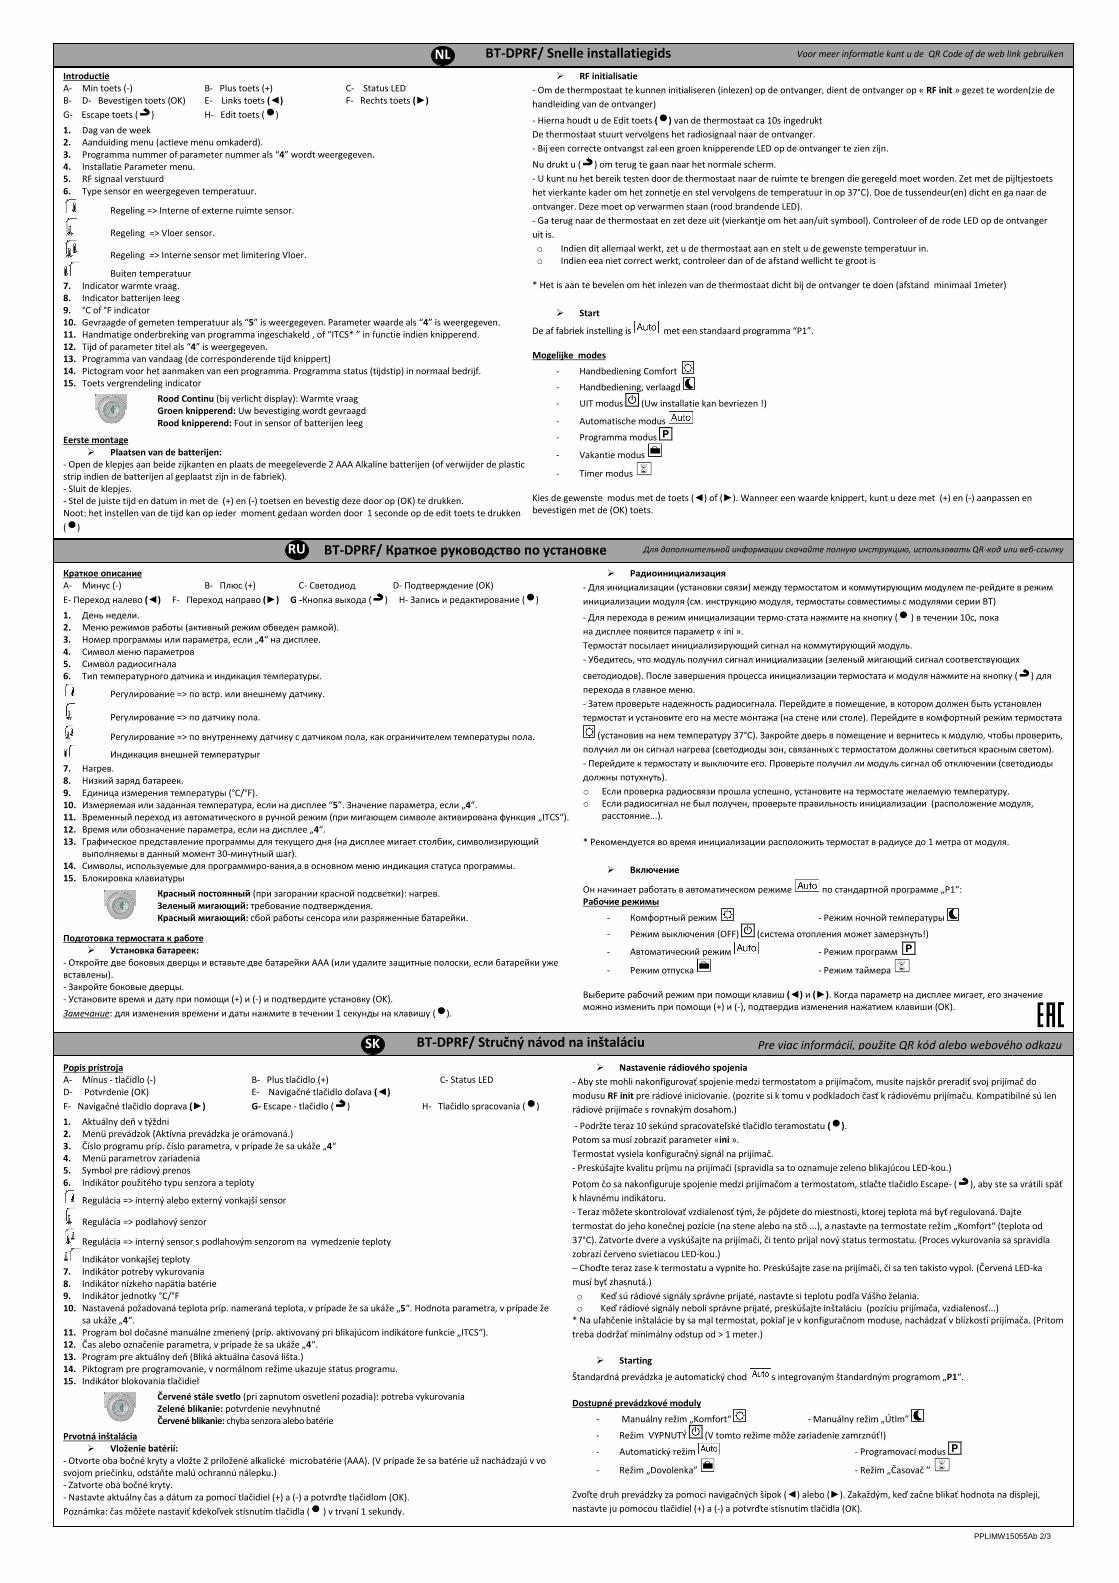
Introductie A- Min toets (-) B- Plus toets (+) C- Status LED B- D- Bevestigen toets (OK) E- Links toets (◄) F- Rechts toets (►)
G- Escape toets ( ) H- Edit toets ( )
1. Dag van de week 2. Aanduiding menu (actieve menu omkaderd). 3. Programma nummer of parameter nummer als “4” wordt weergegeven. 4. Installatie Parameter menu. 5. RF signaal verstuurd 6. Type sensor en weergegeven temperatuur.
Regeling => Interne of externe ruimte sensor.
Regeling => Vloer sensor.
Regeling => Interne sensor met limitering Vloer.
Buiten temperatuur 7. Indicator warmte vraag. 8. Indicator batterijen leeg 9. °C of °F indicator 10. Gevraagde of gemeten temperatuur als “5” is weergegeven. Parameter waarde als “4” is weergegeven. 11. Handmatige onderbreking van programma ingeschakeld , of “ITCS* ” in functie indien knipperend. 12. Tijd of parameter titel als “4” is weergegeven. 13. Programma van vandaag (de corresponderende tijd knippert) 14. Pictogram voor het aanmaken van een programma. Programma status (tijdstip) in normaal bedrijf. 15. Toets vergrendeling indicator
Rood Continu (bij verlicht display): Warmte vraag Groen knipperend: Uw bevestiging wordt gevraagd Rood knipperend: Fout in sensor of batterijen leeg
Eerste montage Plaatsen van de batterijen:
- Open de klepjes aan beide zijkanten en plaats de meegeleverde 2 AAA Alkaline batterijen (of verwijder de plastic strip indien de batterijen al geplaatst zijn in de fabriek). - Sluit de klepjes. - Stel de juiste tijd en datum in met de (+) en (-) toetsen en bevestig deze door op (OK) te drukken. Noot: het instellen van de tijd kan op ieder moment gedaan worden door 1 seconde op de edit toets te drukken
( )
RF initialisatie
- Om de thermpostaat te kunnen initialiseren (inlezen) op de ontvanger, dient de ontvanger op « RF init » gezet te worden(zie de
handleiding van de ontvanger)
- Hierna houdt u de Edit toets ( ) van de thermostaat ca 10s ingedrukt
De thermostaat stuurt vervolgens het radiosignaal naar de ontvanger.
- Bij een correcte ontvangst zal een groen knipperende LED op de ontvanger te zien zijn.
Nu drukt u ( ) om terug te gaan naar het normale scherm.
- U kunt nu het bereik testen door de thermostaat naar de ruimte te brengen die geregeld moet worden. Zet met de pijltjestoets
het vierkante kader om het zonnetje en stel vervolgens de temperatuur in op 37°C). Doe de tussendeur(en) dicht en ga naar de
ontvanger. Deze moet op verwarmen staan (rood brandende LED).
- Ga terug naar de thermostaat en zet deze uit (vierkantje om het aan/uit symbool). Controleer of de rode LED op de ontvanger
uit is.
o Indien dit allemaal werkt, zet u de thermostaat aan en stelt u de gewenste temperatuur in. o Indien eea niet correct werkt, controleer dan of de afstand wellicht te groot is
* Het is aan te bevelen om het inlezen van de thermostaat dicht bij de ontvanger te doen (afstand minimaal 1meter)
Start
De af fabriek instelling is met een standaard programma “P1”. Mogelijke modes
- Handbediening Comfort
- Handbediening, verlaagd
- UIT modus (Uw installatie kan bevriezen !)
- Automatische modus
- Programma modus
- Vakantie modus
- Timer modus Kies de gewenste modus met de toets (◄) of (►). Wanneer een waarde knippert, kunt u deze met (+) en (-) aanpassen en bevestigen met de (OK) toets.
BT-DPRF/ Snelle installatiegids NL
Краткое описание A- Минус (-) B- Плюс (+) C- Светодиод D- Подтверждение (OK)
E- Переход налево (◄) F- Переход направо (►) G -Кнопка выхода ( ) H- Запись и редактирование ( )
1. День недели. 2. Меню режимов работы (активный режим обведен рамкой). 3. Номер программы или параметра, если „4“ на дисплее. 4. Символ меню параметров 5. Символ радиосигнала 6. Тип температурного датчика и индикация температуры.
Регулирование => по встр. или внешнему датчику.
Регулирование => по датчику пола.
Регулирование => по внутреннему датчику с датчиком пола, как ограничителем температуры пола.
Индикация внешней температурыr
7. Нагрев. 8. Низкий заряд батареек. 9. Единица измерения температуры (°C/°F). 10. Измеряемая или заданная температура, если на дисплее “5”. Значение параметра, если „4“. 11. Временный переход из автоматического в ручной режим (при мигающем символе активирована функция „ITCS“). 12. Время или обозначение параметра, если на дисплее „4“. 13. Графическое представление программы для текущего дня (на дисплее мигает столбик, символизирующий
выполняемы в данный момент 30-минутный шаг). 14. Символы, используемые для программиро-вания,а в основном меню индикация статуса программы. 15. Блокировка клавиатуры
Красный постоянный (при загорании красной подсветки): нагрев. Зеленый мигающий: требование подтверждения. Красный мигающий: сбой работы сенсора или разряженные батарейки.
Подготовка термостата к работе Установка батареек:
- Откройте две боковых дверцы и вставьте две батарейки AAA (или удалите защитные полоски, если батарейки уже вставлены). - Закройте боковые дверцы. - Установите время и дату при помощи (+) и (-) и подтвердите установку (OK).
Замечание: для изменения времени и даты нажмите в течении 1 секунды на клавишу ( ).
Радиоинициализация
- Для инициализации (установки связи) между термостатом и коммутирующим модулем пе-рейдите в режим
инициализации модуля (см. инструкцию модуля, термостаты совместимы с модулями серии ВТ)
- Для перехода в режим инициализации термо-стата нажмите на кнопку ( ) в течении 10с, пока
на дисплее появится параметр « ini ».
Термостат посылает инициализирующий сигнал на коммутирующий модуль.
- Убедитесь, что модуль получил сигнал инициализации (зеленый мигающий сигнал соответствующих
светодиодов). После завершения процесса инициализации термостата и модуля нажмите на кнопку ( ) для
перехода в главное меню.
- Затем проверьте надежность радиосигнала. Перейдите в помещение, в котором должен быть установлен
термостат и установите его на месте монтажа (на стене или столе). Перейдите в комфортный режим термостата
(установив на нем температуру 37°C). Закройте дверь в помещение и вернитесь к модулю, чтобы проверить,
получил ли он сигнал нагрева (светодиоды зон, связанных с термостатом должны светиться красным светом).
- Перейдите к термостату и выключите его. Проверьте получил ли модуль сигнал об отключении (светодиоды
должны потухнуть).
o Если проверка радиосвязи прошла успешно, установите на термостате желаемую температуру. o Если радиосигнал не был получен, проверьте правильность инициализации (расположение модуля,
расстояние...).
* Рекомендуется во время инициализации расположить термостат в радиусе до 1 метра от модуля.
Включение
Он начинает работать в автоматическом режиме по стандартной программе „P1“: Рабочие режимы
- Комфортный режим - Режим ночной температуры
- Режим выключения (OFF) (система отопления может замерзнуть!)
- Автоматический режим - Режим программ
- Режим отпуска - Режим таймера Выберите рабочий режим при помощи клавиш (◄) и (►). Когда параметр на дисплее мигает, его значение можно изменить при помощи (+) и (-), подтвердив изменения нажатием клавиши (OK).
BT-DPRF/ Краткое руководство по установке RU
Popis prístroja A- Mínus - tlačidlo (-) B- Plus tlačidlo (+) C- Status LED D- Potvrdenie (OK) E- Navigačné tlačidlo doľava (◄)
F- Navigačné tlačidlo doprava (►) G- Escape - tlačidlo ( ) H- Tlačidlo spracovania ( )
1. Aktuálny deň v týždni 2. Menü prevádzok (Aktívna prevádzka je orámovaná.) 3. Číslo programu príp. číslo parametra, v prípade že sa ukáže „4“ 4. Menü parametrov zariadenia 5. Symbol pre rádiový prenos 6. Indikátor použitého typu senzora a teploty
Regulácia => interný alebo externý vonkajší sensor
Regulácia => podlahový senzor
Regulácia => interný sensor s podlahovým senzorom na vymedzenie teploty
Indikátor vonkajšej teploty 7. Indikátor potreby vykurovania 8. Indikátor nízkeho napätia batérie 9. Indikátor jednotky °C/°F 10. Nastavená požadovaná teplota príp. nameraná teplota, v prípade že sa ukáže „5“. Hodnota parametra, v prípade že
sa ukáže „4“. 11. Program bol dočasne manuálne zmenený (príp. aktivovaný pri blikajúcom indikátore funkcie „ITCS“). 12. Čas alebo označenie parametra, v prípade že sa ukáže „4“. 13. Program pre aktuálny deň (Bliká aktuálna časová lišta.) 14. Piktogram pre programovanie, v normálnom režime ukazuje status programu. 15. Indikátor blokovania tlačidiel
Červené stále svetlo (pri zapnutom osvetlení pozadia): potreba vykurovania Zelené blikanie: potvrdenie nevyhnutné Červené blikanie: chyba senzora alebo batérie
Prvotná inštalácia Vloženie batérií:
- Otvorte oba bočné kryty a vložte 2 priložené alkalické microbatérie (AAA). (V prípade že sa batérie už nachádzajú v vo svojom priečinku, odstáňte malú ochrannú nálepku.) - Zatvorte oba bočné kryty. - Nastavte aktuálny čas a dátum za pomocí tlačidiel (+) a (-) a potvrďte tlačidlom (OK).
Poznámka: čas môžete nastaviť kdekoľvek stisnutím tlačidla ( ) v trvaní 1 sekundy.
Nastavenie rádiového spojenia
- Aby ste mohli nakonfigurovať spojenie medzi termostatom a prijímačom, musíte najskôr preradiť svoj prijímač do
modusu RF init pre rádiové iniciovanie. (pozrite si k tomu v podkladoch časť k rádiovému prijímaču. Kompatibilné sú len
rádiové prijímače s rovnakým dosahom.)
- Podržte teraz 10 sekúnd spracovateľské tlačidlo teramostatu ( ).
Potom sa musí zobraziť parameter «ini ».
Termostat vysiela konfiguračný signál na prijímač.
- Preskúšajte kvalitu príjmu na prijímači (spravidla sa to oznamuje zeleno blikajúcou LED-kou.)
Potom čo sa nakonfiguruje spojenie medzi prijímačom a termostatom, stlačte tlačidlo Escape- ( ), aby ste sa vrátili späť
k hlavnému indikátoru.
- Teraz môžete skontrolovať vzdialenosť tým, že pôjdete do miestnosti, ktorej teplota má byť regulovaná. Dajte
termostat do jeho konečnej pozície (na stene alebo na stô ...), a nastavte na termostate režim „Komfort“ (teplota od
37°C). Zatvorte dvere a vyskúšajte na prijímači, či tento prijal nový status termostatu. (Proces vykurovania sa spravidla
zobrazí červeno svietiacou LED-kou.)
– Choďte teraz zase k termostatu a vypnite ho. Preskúšajte zase na prijímači, či sa ten takisto vypol. (Červená LED-ka
musí byť zhasnutá.)
o Keď sú rádiové signály správne prijaté, nastavte si teplotu podľa Vášho želania. o Keď rádiové signály neboli správne prijaté, preskúšajte inštaláciu (pozíciu prijímača, vzdialenosť...)
* Na uľahčenie inštalácie by sa mal termostat, pokiaľ je v konfiguračnom moduse, nachádzať v blízkosti prijímača. (Pritom
treba dodržať minimálny odstup od > 1 meter.)
Starting
Štandardná prevádzka je automatický chod s integrovaným štandardným programom „P1“.
Dostupné prevádzkové moduly
- Manuálny režim „Komfort“ - Manuálny režim „Útlm”
- Režim VYPNUTÝ (V tomto režime môže zariadenie zamrznúť!)
- Automatický režim - Programovací modus
- Režim „Dovolenka” - Režim „Časovač ” Zvoľte druh prevádzky za pomoci navigačných šípok (◄) alebo (►). Zakaždým, keď začne blikať hodnota na displeji,
nastavte ju pomocou tlačidiel (+) a (-) a potvrďte stisnutím tlačidla (OK).
BT-DPRF/ Stručný návod na inštaláciu SK
Voor meer informatie kunt u de QR Code of de web link gebruiken
Для дополнительной информации скачайте полную инструкцию, использовать QR-код или веб-ссылку
Pre viac informácií, použite QR kód alebo webového odkazu
PPLIMW15055Ab 2/3
Készülék leírása C- Minusz gomb (-) B- Plusz gomb (+) C- LED státusz D- Bestätigung (OK) E- Navigációs gomb balra (◄)
F- Navigációs gomb jobbra (►) G- Kilépés gomb ( ) H- Végrehajtó gomb ( ) 1. Aktuális nap 2. Üzemmód menü (Az aktív üzemmód bekeretezett) 3. Programszám ill. paraméterszám, ha a „4“ van a kijelzőn 4. Eszközök paramétereinek menüje 5. Rádiófrekvenciás adatátvitel szimbóluma 6. Csatlakoztatott érzékelő és hőmérséklet kijelzése
Szabályzás=> belső vagy külső érzékelő
Szabályzás => Padlóhőmérséklet-érzékelő
Szabályzás => belső érzékelő, padlóhőmérsékletérzékelővel, hőfokhatárolás
Külső hőmérséklet kijelzése 7. Fűtési igény kijelzése 8. Alacsony elemtöltöttség kijelzése 9. Mértékegység kijelzése °C/°F 10. Beállított illetve mért hőmérséklet, ha „5“-öt jelez ki. Paraméterérték, ha „4“-et jelez ki. 11. A program átmenetileg manuálisan megváltozott (illetve villogó kijelző esetén „ITCS“ funkció
aktíválódott). 12. Pontos idő vagy paramétermegjelölés, ha „4“-et jelez ki. 13. Aktuális nap programja (Az aktuális idővonal villog) 14. Piktogram a programozáshoz, normális üzemmódban a program állapotát mutatja 15. Billentyűzár kijelzése
Vörös fény (bekapcsolt háttérvilágítás esetén):Fűtési igény Villogó zöld fény:megerősítés kell Villogó vörös fény: érzékelő vagy elemhiba
Első üzembe helyezés
Elemek behelyezése - Nyissa ki mindkét oldalon a fedelet és helyezze be a 2 db csomagolásban található alkáli mikroelemet (AAA). (Ha az elemek már a helyükön volnának, akkor távolítsa el a védőmatricát!) - Csukja vissza mindkét fedelet! - Nastavte aktuálny čas a dátum za pomocí tlačidiel (+) a (-) a potvrďte tlačidlom (OK).
Poznámka: čas môžete nastaviť kdekoľvek stisnutím tlačidla ( ) v trvaní 1 sekundy.
Nastavenie rádiového spojenia
- Aby ste mohli nakonfigurovať spojenie medzi termostatom a prijímačom, musíte najskôr preradiť svoj prijímač do
modusu RF init pre rádiové iniciovanie. (pozrite si k tomu v podkladoch časť k rádiovému prijímaču. Kompatibilné sú len
rádiové prijímače s rovnakým dosahom.)
- Podržte teraz 10 sekúnd spracovateľské tlačidlo teramostatu ( ).
Potom sa musí zobraziť parameter «ini ».
Termostat vysiela konfiguračný signál na prijímač.
- Preskúšajte kvalitu príjmu na prijímači (spravidla sa to oznamuje zeleno blikajúcou LED-kou.)
Potom čo sa nakonfiguruje spojenie medzi prijímačom a termostatom, stlačte tlačidlo Escape- ( ), aby ste sa vrátili späť
k hlavnému indikátoru.
- Teraz môžete skontrolovať vzdialenosť tým, že pôjdete do miestnosti, ktorej teplota má byť regulovaná. Dajte
termostat do jeho konečnej pozície (na stene alebo na stô ...), a nastavte na termostate režim „Komfort“ (teplota od
37°C). Zatvorte dvere a vyskúšajte na prijímači, či tento prijal nový status termostatu. (Proces vykurovania sa spravidla
zobrazí červeno svietiacou LED-kou.)
– Choďte teraz zase k termostatu a vypnite ho. Preskúšajte zase na prijímači, či sa ten takisto vypol. (Červená LED-ka
musí byť zhasnutá.)
o Keď sú rádiové signály správne prijaté, nastavte si teplotu podľa Vášho želania. o Keď rádiové signály neboli správne prijaté, preskúšajte inštaláciu (pozíciu prijímača, vzdialenosť...)
* Na uľahčenie inštalácie by sa mal termostat, pokiaľ je v konfiguračnom moduse, nachádzať v blízkosti prijímača.
(Pritom treba dodržať minimálny odstup od > 1 meter.)
Bekapcsolás
Standard üzemmód az automatikus üzemmód gyárilag beépített alapprogram „P1“.
Dostupné prevádzkové moduly
- Manuális üzemmód “Komfort” - Man. üzemmód „Csökkentett”
- Kikapcsolás (Ebben az üzemmódban a készülék megfagyhat!)
- Automatikus üzemmód - Programozás
- “Szabadság” üzemmmód - “Időzítés” üzemmód Zvoľte druh prevádzky za pomoci navigačných šípok (◄) alebo (►). Zakaždým, keď začne blikať hodnota na displeji, nastavte ju pomocou tlačidiel (+) a (-) a potvrďte stisnutím tlačidla (OK).
BT-DPRF/ Stručný návod na inštaláciu H Pre viac informácií, použite QR kód alebo webového odkazu
Descrizione
A- Tasto meno (-) B- tasto più (+) C- Indicatore di stato D- Tasto conferma (OK) E- Tasto di navigazione Sinistra (◄) F- Tasto di navigazione Destra (►)
G- Tasto Ritorna ( ) H- Tasto Edita ( )
1. Giorno della settimana 2. Modalità di funzionamento (la modalità attiva è riquadrata). 3. Numero del programma oppure del parametro (quando è visualizzato “4”) 4. Menù di parametrizzazione. 5. Tipo di sonda utilizzata o tipo di temperatura visualizzata .
regolazione interna con sonda di limitazione della temperatura pavimento.
visualizzazione della temperatura esterna 6. Indicatore di radio-frequenza (RF) 7. Indicatore di richiesta calore. 8. Batterie scariche. 9. Unità di misura della temperatura °C o °F. 10. Temperatura impostata o misurata (quando è visualizzato “5”). In programmazione (quando è
visualizzato “4”) mostra il valore di un parametro. 11. Fisso funzione di sospensione temporanea Lampeggiante funzione ITCS(1) attiva. 12. Ora oppure nome parametro (quando è visualizzato“4” ). 13. Programma del giorno corrente (la barretta corrispondente all’ora corrente lampeggia). 14. Stato di programma oppure icona per la programmazione facilitata. 15. Blocco tastiera inserito.
Rosso: richiesta di calore Verde lampeggiante: è richiesta una conferma. Rosso lampeggiante: Batterie esaurite o Guasto sonde.
Prima installazione
Installazione delle batterie
- Aprire i due sportelli laterali ed inserire le batterie rispettando la polarità oppure, rimuovere le due
strisce protettive quanto il prodotto è fornito completo di batterie.
- Chiudere gli sportelli.
- Il display si accende ed il termostato richiede l’inserimento di data ed ora.
Nota: è possibile in qualsiasi momento modificare il tempo premendo per 1 secondo il tasto
edizione ( )
Configurazione Radio Frequenza
- per configurare il termostato RF con il ricevitore, è necessario portare il ricevitore in modalità
« RF init ». (fare riferimento al manuale di installazione fornito con il ricevitore RF. Sono compatibili solo ricevitori della
stessa gamma).
- Successivamente premere per 10 secondi il tasto di Edit ( )Sul display apparirà il parametro «rf ini ».
Il termostato invia al ricevitore il segnale di configurazione.
- Assicuratevi che la programmazione si a andata a buon fine (normalmente Led verde lampeggiante sul ricevitore).
Terminata l’operazione, premere il tasto per tornare alla pagina iniziale.
- è possibile ora eseguire un test di portata del segnale. Portare il termostato nella posizione in cui dovrà essere installato
(fissato a parete o, nell’apposito supporto appoggiato su di un mobile). Impostare la temperatura desiderata al massimo
(35°C), chiudete tutte le porte ed andate a verificare la ricezione del segnale (Led rosso sul ricevitore acceso ).
Tornare al termostato e spegnerlo, poi verificare la ricezione del segnale (Led rosso sul ricevitore spento).
- Qualora la trasmissione in radio frequenza non funzionasse correttamente, provare ad avvicinare il termostato al
ricevitore oppure verificare l’installazione del ricevitore (fare riferimento alla sezione”problemi e soluzioni”)
Nota: Per un’inizializzazione RF più agevole si consiglia di avvicinare il termostato al ricevitore durante la fase di
configurazione del segnale radio (mantenendo una distanza minima > 1 metro)
Inizio
La modalità di funzionamento di default è quella Automatica sul programma reimpostato “P1”.
Modalità di funzionamento
- Modalità COMFORT manuale
- Modalità RIDUZIONE notturna
- Modalità di arresto (In questa modalità il vostro impianto non sarà protetto contro il gelo!)
- Modalità Automatico
- Modalità Programma
- Modalità Vacanza
- Modalità Timer
Scegliere la modalità di lavoro che si desidera seguire con i tasti di navigazione (◄) o (►). Ogni volta che un valore
lampeggia, regolare con il (+) e (-) i tasti e confermare con il tasto (OK).
BT-DPRF/ Guida rapida di installazione IT Per ulteriori informazioni, utilizzare il codice QR o collegamento web

PPLIMW15055Ab 3/3