Embed Size (px)
Citation preview

Microsoft Word 2010
Creating a Business Letter with a Letterhead and Table
3
ObjectivesYou will have mastered the material in this chapter when you can:
Change margins•
Insert and format a shape•
Change text wrapping•
Insert and format a clip art image•
Insert a symbol•
Add a border to a paragraph•
Clear formatting•
Convert a hyperlink to regular text•
Create a fi le from an existing fi le•
Apply a Quick Style•
Set and use tab stops•
Insert the current date•
Create, insert, and modify a building • block
Insert a Word table, enter data in the • table, and format the table
Address and print an envelope•
1439078459_CH03.indd 1371439078459_CH03.indd 137 7/8/10 7:59:30 PM7/8/10 7:59:30 PM
Copyright 2010 Cengage Learning, Inc. All Rights Reserved. May not be copied, scanned, or duplicated, in whole or in part.

Microsoft Word 2010
WD 138
Creating a Business Letter with a Letterhead and Table
3
IntroductionIn a business environment, people use documents to communicate with others. Business documents can include letters, memos, newsletters, proposals, and resumes. An effective business document clearly and concisely conveys its message and has a professional, organized appearance. You can use your own creative skills to design and compose business documents. Using Word, for example, you can develop the content and decide on the location of each item in a business document.
Project — Business Letter with a Letterhead and TableAt some time, you will prepare some type of business letter. Contents of business letters include requests, inquiries, confi rmations, acknowledgements, recommendations, notifi cations, responses, invitations, offers, referrals, complaints, and more.
The project in this chapter follows generally accepted guidelines for writing letters and uses Word to create the business letter shown in Figure 3–1. This business letter to a potential advertiser (Wilcox Tractor Restorations) includes a custom letterhead, as well as all essential business letter components: date line, inside address, salutation, body, complimentary close, and signature block. To easily present the advertisement rates, this information appears in a table, and the discounts are in a bulleted list.
OverviewAs you read through this chapter, you will learn how to create the business letter in
Figure 3–1 by performing these general tasks:
Design and create a letterhead.• Compose a business letter.• Print the business letter.• Address and print an envelope.•
1439078459_CH03.indd 1381439078459_CH03.indd 138 7/8/10 7:59:33 PM7/8/10 7:59:33 PM
Copyright 2010 Cengage Learning, Inc. All Rights Reserved. May not be copied, scanned, or duplicated, in whole or in part.

Microsoft Word 2010
WD 139
bulleted list
complimentary close
date line
body, or message
inside address
signature block
salutation
business letter
Figure 3–1
letterhead
1439078459_CH03.indd 1391439078459_CH03.indd 139 7/8/10 7:59:33 PM7/8/10 7:59:33 PM
Copyright 2010 Cengage Learning, Inc. All Rights Reserved. May not be copied, scanned, or duplicated, in whole or in part.

WD 140 Word Chapter 3 Creating a Business Letter with a Letterhead and Table
General Project Guidelines When creating a Word document, the actions you perform and decisions you make will affect the appearance and characteristics of the fi nished document. As you create a business letter, such as the project shown in Figure 3–1 on the previous page, you should follow these general guidelines:
1. Determine how to create a letterhead. A letterhead is the section of a letter that identifi es an organization or individual. Often, the letterhead appears at the top of a letter. Although you can design and print a letterhead yourself, many businesses pay an outside fi rm to design and print their letterhead, usually on higher-quality paper. They then use the professionally preprinted paper for external business communications.
2. If you do not have preprinted letterhead paper, design a creative letterhead. Use text, graphics, formats, and colors that refl ect the organization or individual. Include the organization’s or individual’s name, postal mailing address, and telephone number. If the organization or individual has an e-mail address and Web address, you may include those as well.
3. Compose an effective business letter. A fi nished business letter should look like a symmetrically framed picture with evenly spaced margins, all balanced below an attractive letterhead. The letter should be well-written, properly formatted, logically organized, and use visuals where appropriate. The content of a letter should contain proper grammar, correct spelling, logically constructed sentences, fl owing paragraphs, and sound ideas. If possible, keep the length of a business letter to one page. Be sure to proofread the fi nished letter carefully.
When necessary, more specifi c details concerning the above guidelines are presented at appropriate points in the chapter. The chapter also will identify the actions performed and decisions made regarding these guidelines during the creation of the business letter shown in Figure 3–1.
Plan Ahead
To Start Word and Display Formatting Marks
If you are using a computer to step through the project in this chapter and you want your screens to match the fi gures in this book, you should change your screen’s resolution to 1024 × 768. For information about how to change a computer’s resolution, refer to the Offi ce 2010 and Windows 7 chapter at the beginning of this book.
The following steps start Word and display formatting marks.
Start Word. If necessary, maximize the Word window.
If the Print Layout button on the status bar is not selected (shown in Figure 3–2), click it so that your screen is in Print Layout view.
Change your zoom to 110% (or a percent where the document is large enough for you easily to see its contents).
If the Show/Hide ¶ button (Home tab | Paragraph group) is not selected already, click it to display formatting marks on the screen.
1
2
3
4
For an introduction to Windows 7 and instruction about how to perform basic Windows 7 tasks, read the Offi ce 2010 and Windows 7 chapter at the beginning of this book, where you can learn how to resize windows, change screen resolution, create folders, move and rename fi les, use Windows Help, and much more.
For an introduction to Offi ce 2010 and instruction about how to perform basic tasks in Offi ce 2010 programs, read the Offi ce 2010 and Windows 7 chapter at the beginning of this book, where you can learn how to start a program, use the Ribbon, save a fi le, open a fi le, quit a program, use Help, and much more.
1439078459_CH03.indd 1401439078459_CH03.indd 140 7/8/10 7:59:36 PM7/8/10 7:59:36 PM
Copyright 2010 Cengage Learning, Inc. All Rights Reserved. May not be copied, scanned, or duplicated, in whole or in part.

Creating a Business Letter with a Letterhead and Table Word Chapter 3 WD 141
Wo
rd C
hap
ter
3
To Change Theme Colors
Recall that Word provides document themes that contain a variety of color schemes to assist you in selecting complementary colors in a document. In a letter, select a color scheme that adequately refl ects the organization or person. The letter in this chapter uses the Executive color scheme. The following steps change theme colors.
Click the Change Styles button (Home tab | Styles group) to display the Change Styles menu and then point to Colors on the Change Styles menu to display the Colors gallery.
Click Executive in the Colors gallery to change the document theme colors to the selected color scheme.
1
2
To Change Margin Settings
Word is preset to use standard 8.5-by-11-inch paper, with 1-inch top, bottom, left, and right margins. If you change the default (preset) margin settings, the new margin settings affect every page in the document. If you wanted the margins to affect just a portion of the document, you would divide the document into sections (discussed in a later chapter), which enables you to specify different margin settings for each section.
The business letter in this chapter uses .75-inch left and right margins and 1-inch top and bottom margins, so that more text can fi t from left to right on the page. The following steps change margin settings.
Display the Page Layout tab.•
Click the Margins button • (Page Layout tab | Page Setup group) to display the Margins gallery (Figure 3–2).
1
Figure 3–2
Note: To help you locate screen elements that are referenced in the step instructions, such as buttons and commands, this book uses red boxes to point to these screen elements.
Margins button
Moderate margin setting
Page Layout tab
Print Layout button
Zoom button
Margins gallery
Page Setup group
current margin setting
Custom Margins command displays Margins tab in Page Setup dialog box
Click Moderate in the Margins • gallery to change the margins to the specifi ed settings.
What if the margin settings I want are not in the Margins gallery?
You can click Custom Margins in the Margins gallery and then enter your desired margin values in the top, bottom, left, and right text boxes in the dialog box.
2
1. Position mouse pointer on margin boundary on ruler; when mouse pointer changes to two-headed arrow, drag margin boundary on ruler
Other Ways
Q&
A
The Ribbon and Screen ResolutionWord may change how the groups and buttons within the groups appear on the Ribbon, depending on the computer’s screen resolution. Thus, your Ribbon may look different from the ones in this book if you are using a screen resolution other than 1024 × 768.
BTW
1439078459_CH03.indd 1411439078459_CH03.indd 141 7/8/10 7:59:36 PM7/8/10 7:59:36 PM
Copyright 2010 Cengage Learning, Inc. All Rights Reserved. May not be copied, scanned, or duplicated, in whole or in part.

WD 142 Word Chapter 3 Creating a Business Letter with a Letterhead and Table
Creating a LetterheadThe cost of preprinted letterhead can be high. Thus, an alternative is to create your own letterhead and save it in a fi le. When you want to create a letter at a later time using the letterhead, simply create a new document from the letterhead fi le. In this chapter, you create a letterhead and then save it in a fi le for future use.
Design a creative letterhead.A letterhead often is the fi rst section a reader notices on a letter. Thus, it is important the letterhead appropriately refl ect the essence of the business or individual (i.e., formal, technical, creative, etc.). The letterhead should leave ample room for the contents of the letter. When designing a letterhead, consider its contents, placement, and appearance.
Contents of letterhead. • A letterhead should contain these elements:
Complete legal name of the individual, group, or company•
Complete mailing address: street address including building, room, suite number, or • post offi ce box, along with city, state, and postal code
Telephone number(s) and fax number, if one exists•
Many letterheads also include a Web address, an e-mail address, and a logo or other image. If you use an image, select one that expresses your personality or goals.
Placement of elements in the letterhead. • Many letterheads center their elements across the top of the page. Others align some or all of the elements with the left or right margins. Sometimes, the elements are split between the top and bottom of the page. For example, a name and logo may be at the top of the page with the address at the bottom of the page.
Appearance of letterhead elements.• Use fonts that are easy to read. Give the organization or individual name impact by making its font size larger than the rest of the text in the letterhead. For additional emphasis, consider formatting the name in bold, italic, or a different color. Choose colors that complement each other and convey the goals of the organization or individual.
When fi nished designing the letterhead, determine if a divider line would help to visually separate the letterhead from the remainder of the letter.
Plan Ahead
The letterhead for the business letter in this chapter consists of the organization name, appropriate graphics, postal address, telephone number, and Web address. The name and graphics are enclosed in a rectangular shape (Figure 3–1 on page WD 139), and the contact information is below the shape. You will follow these general steps to create the letterhead for the business letter:
1. Insert and format a shape.2. Enter and format the organization name in the shape.3. Insert, format, and position the images in the shape.4. Enter the contact information below the shape.5. Add a border below the contact information.
To Insert a Shape
The fi rst step is in creating the letterhead in this chapter is to draw a rectangular shape. Word has a variety of predefi ned shapes, which are a type of drawing object, that you can insert in documents. A drawing object is a graphic that you create using Word. Examples of shape drawing objects include rectangles, circles, triangles, arrows, fl owcharting symbols, stars, banners, and callouts. The next steps insert a rounded rectangle shape.
1439078459_CH03.indd 1421439078459_CH03.indd 142 7/8/10 7:59:38 PM7/8/10 7:59:38 PM
Copyright 2010 Cengage Learning, Inc. All Rights Reserved. May not be copied, scanned, or duplicated, in whole or in part.

Creating a Business Letter with a Letterhead and Table Word Chapter 3 WD 143
Wo
rd C
hap
ter
3
Click the Rounded Rectangle shape • in the Rectangles area of the Shapes gallery, which removes the gallery and changes the mouse pointer to the shape of a crosshair.
Position the mouse pointer • (a crosshair) by the insertion point in the document window, as shown in Figure 3–4, which is the location for the upper-left corner of the desired shape.
What is the purpose of the crosshair mouse pointer?
In the document window, you will drag the crosshair mouse pointer from the upper-left corner to the lower-right corner to form the desired location and size of the shape.
2
Figure 3–3
Insert tab Shapes button
Shapes galleryIllustrations group
Rectangles area
Display the Insert tab.•
Click the Shapes button (Insert tab |• Illustrations group) to display the Shapes gallery (Figure 3–3).
1
Figure 3– 4
Q&
A
mouse pointer changes to crosshair while you draw shape
insertion point paragraph mark is displayed
because formatting marks are showing
Rounded Rectangle shape
1439078459_CH03.indd 1431439078459_CH03.indd 143 7/8/10 7:59:38 PM7/8/10 7:59:38 PM
Copyright 2010 Cengage Learning, Inc. All Rights Reserved. May not be copied, scanned, or duplicated, in whole or in part.

WD 144 Word Chapter 3 Creating a Business Letter with a Letterhead and Table
Release the mouse • button so that Word draws the shape according to your drawing in the document window.
Verify your shape is • the same approximate height and width as the one in this project by clicking the Size button (Drawing Tools Format tab |Size group) and then, if necessary, changing the values in the Shape Height box and Shape Widthboxes to 0.5"and7", respectively (Figure 3 – 6). When fi nished, click the Size button again to remove the Shape Height and Shape Width boxes.
What is the purpose of the rotate and adjustment handles?
When you drag an object’s rotate handle, which is the green circle, Word rotates the object in the direction you drag the mouse. When you drag an object’s adjustment handle, which is the yellow diamond, Word changes the object’s shape.
What if I wanted to delete a shape and start over?
With the shape selected, you would press the DELETE key.
4Shape Styles gallery
Shape Styles group
adjustment handle
sizing handles placed at each corner and middle location on selected shape
rotate handle
shape inserted and selected
Size button
More buttonShape Height box
Shape Width box
Figure 3–6
Drawing Tools Format tab automatically appears when shape is selected in document
To Apply a Shape Style
Word provides a Shape Styles gallery, allowing you to change the appearance of the shape. Because the organization in this project, Heartland Tractor Club, supports many different tractor manufacturers, its letterhead should use a color that is not commonly associated with a particular tractor manufacturer. The next steps apply a shape style that uses a shade of brown.
Q&
AQ
&A
Figure 3–5
proposed location and size of rectangle shape
mouse pointer remains as crosshair until you release mouse button
Drag the mouse • to the right and downward to form the boundaries of the shape, as shown in Figure 3–5. Do not release the mouse button.
3
1439078459_CH03.indd 1441439078459_CH03.indd 144 7/8/10 7:59:40 PM7/8/10 7:59:40 PM
Copyright 2010 Cengage Learning, Inc. All Rights Reserved. May not be copied, scanned, or duplicated, in whole or in part.

Creating a Business Letter with a Letterhead and Table Word Chapter 3 WD 145
Wo
rd C
hap
ter
3
To Add Text to a Shape
The next step is to add the organization name to the shape. The following steps add text to a shape.
With the shape still selected, • click the More button (shown in Figure 3–6) in the Shape Styles gallery (Drawing Tools Format tab | Shape Styles group) to expand the gallery.
What if my shape is no longer selected?
Click the shape to select it.
Point to Intense Effect - Brown, • Accent 4 in the Shape Styles gallery to display a live preview of that style applied to the shape in the document (Figure 3–7).
I Experiment
Point to various styles in the Shape • Styles gallery and watch the style of the shape change in the document.
Click Intense Effect - Brown, Accent • 4 in the Shape Styles gallery to apply the selected style to the shape.
1
2
Figure 3–7
expanded gallery
style format changes to Intense Effect - Brown, Accent 4, showing live preview of style to which you are pointing in expanded gallery
mouse pointer on Intense Effect - Brown, Accent 4 style
Q&
A
1. Click Format Shape Dialog Box Launcher (Drawing Tools Format tab | Shape Styles group), click Picture Color in left pane
(Format Shape dialog box), select desired colors, click Close button
2. Right-click shape, click Format Shape on
shortcut menu, click Picture Color in left pane (Format Shape dialog box), select desired colors, click Close button
Other Ways
Right-click the shape to display a • shortcut menu and the Mini toolbar (Figure 3–8).
1
Figure 3–8
Mini toolbar
shortcut menu
Add Text command
mouse pointer
1439078459_CH03.indd 1451439078459_CH03.indd 145 7/8/10 7:59:42 PM7/8/10 7:59:42 PM
Copyright 2010 Cengage Learning, Inc. All Rights Reserved. May not be copied, scanned, or duplicated, in whole or in part.

WD 146 Word Chapter 3 Creating a Business Letter with a Letterhead and Table
Drag through the organization • name in the shape to select the text to be formatted.
Display the Home tab.•
Repeatedly click the Grow Font • button (Home tab | Font group) until the Font Size box displays 22 to increase the font size of the selected text (Figure 3–10).
What if I click the Grow Font button (Home tab | Font group) too many times, causing the font size to be too big?
Click the Shrink Font button (Home tab | Font group) until the desired font size is displayed.
I Experiment
Repeatedly click the Grow Font and • Shrink Font buttons (Home tab | Font group) and watch the font size of the selected name change in the document window. When you are fi nished experimenting with these two buttons, set the font size to 22.
1
2
Click Add Text on • the shortcut menu to place an insertion point centered in the shape.
Type• HEARTLAND TRACTOR CLUB as the organization name in the shape (Figure 3–9).
2
text entered and automatically formatted according to the selected style
Figure 3–9
To Use the Grow Font Button to Increase Font Size
You want the font size of the organization name to be much larger in the shape. In previous chapters, you used the Font Size box arrow (Home tab | Font group) to change the font size of text. Word also provides a Grow Font button (Home tab | Font group), which increases the font size of selected text each time you click the button. The following steps use the Grow Font button to increase the font size of the organization name to 22 point.
1. Press CTRL+SHIFT+>
Other Ways
Q&
A
Figure 3–10
Home tabGrow Font button
Font box arrow
current font
Font group
Font Size box displays 22
selected text changed to 22 point
document text (paragraph mark) hidden behind shape because shape is formatted as In Front of Text
Shrink Fontbutton
1439078459_CH03.indd 1461439078459_CH03.indd 146 7/8/10 7:59:43 PM7/8/10 7:59:43 PM
Copyright 2010 Cengage Learning, Inc. All Rights Reserved. May not be copied, scanned, or duplicated, in whole or in part.

Creating a Business Letter with a Letterhead and Table Word Chapter 3 WD 147
Wo
rd C
hap
ter
3
To Change the Font of Selected Text
The font of the organization name currently is Calibri. To make the organization name stand out even more, change the font of the name in the letterhead to a font different from the rest of the letter. The following steps change the font of the selected text.
With the text selected, click the Font box arrow (Home tab | Font group) to display the Font gallery.
Scroll to and then click Segoe Script in the Font gallery to change the font of the selected text (shown in Figure 3–11 on the next page).
Click anywhere in the text in the shape to remove the selection and place the insertion point in the shape.
1
2
3
Floating versus Inline ObjectsWhen you insert an object, such as a shape, in a document, Word inserts it as
either an inline object or a fl oating object. An inline object is an object that is part of a paragraph. With inline objects, you change the location of the object by setting paragraph options, such as centered, right-aligned, and so on. A fl oating object is an object that can be positioned at a specifi c location in a document or in a layer over or behind text in a document. You have more fl exibility with fl oating objects because you can position a fl oating object anywhere on the page.
In addition to changing an object from inline to fl oating and vice versa, Word provides several fl oating options. All of these options affect how text wraps with the object. Table 3–1 lists the various text wrapping options and explains the function of each one.
Table 3–1 Text Wrapping Options
Text Wrapping Option Object Type How It Works
In Line with Text Inline Object positioned according to paragraph formatting; for example, if paragraph is centered, object will be centered with any text in the paragraph.
Square Floating Text wraps around object, with text forming a box around the object.
Tight Floating Text wraps around object, with text forming to shape of the object.
Through Floating Object appears at beginning, middle, or end of text. Moving object changes location of text.
Top and Bottom Floating Object appears above or below text. Moving object changes location of text.
Behind Text Floating Object appears behind text.
In Front of Text Floating Object appears in front of text and may cover the text.
Positioning ObjectsIf you want to use the Square text wrapping option, you can specify where the object should be positioned on the page. To specify the position, select the object, click the Object Position button (Picture Tools Format tab | Arrange group), and then click the desired location in the Object Position gallery.
BTW
1439078459_CH03.indd 1471439078459_CH03.indd 147 7/8/10 7:59:46 PM7/8/10 7:59:46 PM
Copyright 2010 Cengage Learning, Inc. All Rights Reserved. May not be copied, scanned, or duplicated, in whole or in part.

WD 148 Word Chapter 3 Creating a Business Letter with a Letterhead and Table
Click the edge of the • shape to select the shape.
Display the Drawing • Tools Format tab.
Click the Wrap Text • button (Drawing Tools Format tab | Arrange group) to display the Wrap Text gallery (Figure 3–11).
I Experiment
Point to various text • wrapping options in the Wrap Text gallery and watch the shape confi gure to the selected wrapping option, which in this case, moves the paragraph mark to different locations in the document.
Click Top and Bottom in the Wrap Text gallery so • that the object does not cover the document text.
1
2
To Insert Clip Art
Files containing graphical images, or graphics, are available from a variety of sources. In the Chapter 1 document, you inserted a digital picture taken with a camera phone. In this project, you insert clip art, which is a predefi ned graphic. In Microsoft Offi ce programs, clip art is located in the Clip Organizer, which contains a collection of clip art, photos, animations, sounds, and videos.
The letterhead in this project contains clip art of a tractor (Figure 3–1 on page WD 139). Thus, the next steps insert a clip art image on the line below the shape in the document.
To Change an Object’s Text Wrapping
When you insert a shape in a Word document, the default text wrapping is In Front of Text, which means the object will cover any text behind it. Because you want the letterhead above the contents of the letter, instead of covering the contents of the letter, you change the text wrapping for the shape to Top and Bottom. The following steps change a shape’s text wrapping.
Figure 3–11
shape selected
font changed to Segoe Script
current wrapping style
Arrange group
Drawing Tools Format tab
Wrap Text button
Wrap Text gallery
Top and Bottom command
1. Right-click object, point to Wrap Text on shortcut menu, click desired wrapping style
Other Ways
1439078459_CH03.indd 1481439078459_CH03.indd 148 7/8/10 7:59:46 PM7/8/10 7:59:46 PM
Copyright 2010 Cengage Learning, Inc. All Rights Reserved. May not be copied, scanned, or duplicated, in whole or in part.

Creating a Business Letter with a Letterhead and Table Word Chapter 3 WD 149
Wo
rd C
hap
ter
3
If the Search for text • box displays text, drag through the text to select it.
Type• tractor in the Search for text box to specify the search text, which in this case indicates the type of image you wish to locate.
Click the Go button • to display a list of clips that match the entered search text (Figure 3–13).
Why is my list of clips different from Figure 3–13?
If your Include Offi ce.com content check box is selected and you are connected to the Internet, the Clip Art pane displays clips from the Web as well as those installed on your hard disk.
2
Click the paragraph • mark below the shape to position the insertion point where you want to insert the clip art image.
Display the Insert • tab.
Click the Clip Art • button (Insert tab | Illustrations group) to display the Clip Art pane (Figure 3–12).
What is a pane?
Recall from the Offi ce 2010 and Windows 7 chapter at the beginning of this book that a pane, or task pane, is a separate window that enables you to carry out some Word tasks more effi ciently.
1 Insert tab
Clip Artbutton
Illustrationsgroup
clip art to be inserted at location of insertion point
Figure 3–12
Q&
AQ
&A
Figure 3–13
selected check box indicates clip art from the Web will be included in list
list of clips that match description
search text entered in Search for text box
Go button
Clip Art pane
your screen may or may not show clips in this area at this point
1439078459_CH03.indd 1491439078459_CH03.indd 149 7/8/10 7:59:47 PM7/8/10 7:59:47 PM
Copyright 2010 Cengage Learning, Inc. All Rights Reserved. May not be copied, scanned, or duplicated, in whole or in part.

WD 150 Word Chapter 3 Creating a Business Letter with a Letterhead and Table
With the graphic still selected, click the Advanced Layout: Size Dialog Box Launcher (Picture Tools Format tab | • Size group) to display the Layout dialog box.
What if the graphic is not selected or the Picture Tools Format tab is not on the Ribbon?
Click the graphic to select it or double-click the graphic to make the Picture Tools Format tab the active tab.
In the Scale area (Layout dialog • box), double-click the current value in the Height box to select it.
Type• 35 in the Height box and then press the TAB key to display the same percent value in the Width box (Figure 3–15).
1
2
Click the clip art of the • yellow tractor to insert this clip art image in the document at the location of the insertion point (Figure 3–14).
Click the Close button • on the Clip Art pane title bar to close the task pane.
3
clip art inserted and selected
Picture Tools Format tab automatically appears because clip art is selected in document window
clip art selected
Close button
box arrow is displayed when you click or point to clip art; clicking box arrow displays a menu
Figure 3–14
To Resize a Graphic to a Percent of the Original
In this project, the graphic is 35 percent of its original size. Instead of dragging a sizing handle to change the graphic’s size, as you learned in Chapter 1, you can set exact size percentages. The following steps resize a graphic to a percent of the original.
Figure 3–15
graphic selected
Lock aspect ratio causes height and width to match proportionally
Scale area value entered
in Height box
Size tab automatically selected in dialog box
Layout dialog box
Width box automatically changed to 35 % when you pressed TAB key
Size group
OK button
Advanced Layout: Size Dialog Box Launcher
Picture Tools Format tab
Q&
A
1439078459_CH03.indd 1501439078459_CH03.indd 150 7/8/10 7:59:49 PM7/8/10 7:59:49 PM
Copyright 2010 Cengage Learning, Inc. All Rights Reserved. May not be copied, scanned, or duplicated, in whole or in part.

Creating a Business Letter with a Letterhead and Table Word Chapter 3 WD 151
Wo
rd C
hap
ter
3
Why did Word automatically fi ll in the value in the Width box?
When the ‘Lock aspect ratio’ check box (Layout dialog box) is selected, Word automatically maintains the size proportions of the graphic.
How do I know to use 35 percent for the resized graphic?
The larger graphic consumed too much room on the page. Try various percentages to determine the size that works best in the letterhead design.
Click the OK button to • close the dialog box and resize the selected graphic (Figure 3–16).
3
Q&
AQ
&A
Figure 3–16
graphic selected and resized to 35% of its original size
1. Right-click graphic, click Size and Position on shortcut menu, enter
values (Layout dialog box), click OK button
Other Ways
To Change the Color of a Graphic
In Word, you can change the color of a graphic. The clip art currently consists of shades of yellow and brown. Because the clip art in this project will be placed in a rectangle shape, you prefer to use colors that blend better with the current color scheme. The following steps change the color of the graphic to a shade in the current color scheme that matches the color of the shape.
With the graphic still selected • (shown in Figure 3–16), click the Color button (Picture Tools Format tab | Adjust group) to display the Color gallery.
Point to Orange, Accent color 3 • Dark in the Color gallery (fourth color in second row) to display a live preview of that color applied to the selected graphic in the document (Figure 3–17).
I Experiment
Point to various colors in the Color • gallery and watch the color of the graphic change in the document.
Click Orange, Accent color 3 Dark in the Color gallery to change the color of the selected • graphic.
How would I change a graphic back to its original colors?
With the graphic selected, you would click No Recolor in the Color gallery (upper-left color).
1
2 Figure 3–17
Adjust group
Color button
Orange, Accent color 3 Dark to be selected
Picture Tools Format tab
Color gallery
clicking More Variations displays additional color choices
color changes to Orange, Accent color 3 Dark, showing live preview of color to which you are pointing in gallery
1. Right-click graphic, click Format Picture on shortcut menu, click Picture Color button in left pane (Format Picture dialog box), select color, click Close button
Other Ways
Q&
A
1439078459_CH03.indd 1511439078459_CH03.indd 151 7/8/10 7:59:52 PM7/8/10 7:59:52 PM
Copyright 2010 Cengage Learning, Inc. All Rights Reserved. May not be copied, scanned, or duplicated, in whole or in part.

WD 152 Word Chapter 3 Creating a Business Letter with a Letterhead and Table
Click the location in the graphic • where you want the color to be transparent (Figure 3–20).
What if I make the wrong color transparent?
Click the Undo button on the Quick Access Toolbar, or press CTRL+Z, and then repeat these steps.
3
Click Set Transparent Color in the • Color gallery to display a pen mouse pointer in the document window.
Position the pen mouse pointer in • the graphic where you want to make the color transparent (Figure 3–19).
Can I make multiple colors in a graphic transparent?
No, you can make only one color transparent.
2
To Set a Transparent Color in a Graphic
In Word, you can make one color in a graphic transparent, that is, remove the color. You would make a color transparent if you wanted to remove part of a graphic or see text or colors behind a graphic. In this project, you will remove the lighter brown from the edges of the tractor graphic so that when you move the graphic on the rectangular shape, the color of the shape can be seen in the transparent locations. The following steps set a transparent color in a graphic.
With the graphic still selected, click • the Color button (Picture Tools Format tab | Adjust group) to display the Color gallery (Figure 3–18).
1
Figure 3–18
Figure 3–19
Figure 3–20
Adjust group
graphic selected
Color button
Set Transparent Color command
Picture Tools Format tab
Color gallery
lighter shade of brown to be transparent
pen mouse pointer positioned where color should be transparent
Q&
AQ
&A
lighter shades of brown made transparent, showing white here because the page color behind the graphic is white
1439078459_CH03.indd 1521439078459_CH03.indd 152 7/8/10 7:59:53 PM7/8/10 7:59:53 PM
Copyright 2010 Cengage Learning, Inc. All Rights Reserved. May not be copied, scanned, or duplicated, in whole or in part.

Creating a Business Letter with a Letterhead and Table Word Chapter 3 WD 153
Wo
rd C
hap
ter
3
Click Brightness: • �20% Contrast: �20% in the Corrections gallery (second image in second row) to change the brightness and contrast of the selected graphic (Figure 3–22).
Can I remove all formatting applied to a graphic and start over?
Yes. With the graphic selected, you would click the Reset Picture button (Picture Tools Format tab | Adjust group).
2
To Adjust the Brightness and Contrast of a Graphic
In Word, you can adjust the lightness (brightness) of a graphic and also contrast, which is the difference between the lightest and darkest areas of the graphic. The following steps decrease the brightness and contrastof the tractor graphic, each by 20%.
With the graphic still selected • (shown in Figure 3–20), click the Corrections button (Picture Tools Format tab | Adjust group) to display the Corrections gallery (Figure 3–21).
Does live preview work in this gallery?
Yes, but the graphic is covered by the gallery in this case. To see the live preview, you would need to position the graphic so that you can see it while the gallery is displayed.
1
Figure 3–21
Figure 3–22
Adjust group
Corrections button
Brightness: -20% Contrast: -20% to be selected
Picture Tools Format tab
Corrections gallery
Q&
AQ
&A
brightness and contrast adjusted
Reset Picture button
1. Right-click graphic, click Format Picture on shortcut menu, click Picture Corrections button in left pane (Format Picture dialog box), adjust settings, click Close button
Other Ways
1439078459_CH03.indd 1531439078459_CH03.indd 153 7/8/10 7:59:55 PM7/8/10 7:59:55 PM
Copyright 2010 Cengage Learning, Inc. All Rights Reserved. May not be copied, scanned, or duplicated, in whole or in part.

WD 154 Word Chapter 3 Creating a Business Letter with a Letterhead and Table
Click the Picture Border button • arrow (Picture Tools Format tab |Picture Styles group) to display the Picture Border gallery.
Point to Brown, Accent 4, Darker 50% • (eighth theme color from left in the sixth row) in the Picture Border gallery to display a live preview of that border color around the picture (Figure 3–23).
I Experiment
Point to various colors in the Picture • Border gallery and watch the border color on the picture change in the document window.
Click Brown, Accent 4, Darker 50% • in the Picture Border gallery to change the picture border color.
How would I remove a border from a graphic?
With the graphic selected, you would click the No Outline in the Picture Border gallery.
1
2
To Change an Object’s Text Wrapping
The tractor graphic is to be positioned to the left of the organization name in the shape. Clip art, by default, is formatted as an inline graphic, which cannot be moved into a shape. To move the graphic in the shape so that it not covered by any text, you format it as a fl oating object with In Front of Text wrapping. The following steps change a graphic’s text wrapping.
To Change the Border Color on a Graphic
The tractor graphic currently has no border (outline). You would like the graphic to have a brown border. The following steps change the border color on a graphic.
Figure 3–23
Picture Tools Format tab
Picture Styles group
Picture Border button
border changes to Brown, Accent 4, Darker 50%, showing live preview of color to which you are pointing in gallery
No Outline removes border from graphic
Picture Border button arrow
Brown, Accent 4, Darker 50% to be selected
Picture Border gallery
Q&
A
If necessary, click the graphic to select it. If necessary, display the Picture Tools Format tab.
Click the Wrap Text button (Picture Tools Format tab | Arrange group) to display the Wrap Text gallery.
Do both the Picture Tools Format and Drawing Tools Format tabs have a Wrap Text button?
Yes. You can specify how to wrap text with both pictures and drawings.
Click In Front of Text in the Wrap Text gallery so that you can position the object on top of any item in the document, in this case, on top of the rectangular shape.
1
2
Q&
A
3
Clip OrganizerTo make a Web clip available on your hard disk, point to the clip in the Clip Art pane, click its box arrow, click Make Available Offl ine, select the collection to store the clip (Copy to Collection dialog box) or click the New button to defi ne a new collection, and then click the OK button. You can use the Clip Organizer to create, rename, or delete collections; add clips to a collection from the Web, a camera, or a scanner; delete, move, and copy clips; and search for existing clips. Start the Clip Organizer by clicking the Start button on the taskbar, clicking All Programs on the Start menu, clicking the Microsoft Offi ce folder to its contents, clicking the Microsoft Offi ce 2010 Tools folder to display its contents, and then clicking Microsoft Clip Organizer.
BTW
1439078459_CH03.indd 1541439078459_CH03.indd 154 7/8/10 7:59:58 PM7/8/10 7:59:58 PM
Copyright 2010 Cengage Learning, Inc. All Rights Reserved. May not be copied, scanned, or duplicated, in whole or in part.

Creating a Business Letter with a Letterhead and Table Word Chapter 3 WD 155
Wo
rd C
hap
ter
3
To Copy a Graphic
In this project, the same tractor graphic is to be placed to the right of the organization name in the shape. Instead of performing the same steps to insert and format another tractor graphic, you can copy the graphic to the Offi ce Clipboard, paste the graphic from the Offi ce Clipboard, and then move the graphic to the desired location.
You use the same steps to copy a graphic as you used in Chapter 2 to copy text. The following steps copy a graphic.
If necessary, click the graphic to select it.
Display the Home tab.
Click the Copy button, shown in Figure 3–26 on the next page, (Home tab | Clipboard group) to copy the selected item to the Offi ce Clipboard.
1
2
3
To Move a Graphic
The next step is to move the tractor graphic up so that it is positioned to the left of the text on the rectangle shape. The following steps move a graphic.
Position the mouse • pointer in the graphic so that the mouse pointer has a four-headed arrow attached to it (Figure 3–24).
1
Figure 3–24
Figure 3–25
when mouse pointer has a four-headed arrow attached to it, you can drag the fl oating graphic to any location in document
graphic moved to left of organization name
Drag the graphic to • the location shown in Figure 3–25.
What if I moved the graphic to the wrong location?
Repeat these steps. You can drag a fl oating graphic to any location in a document.
2
Q&
A
1439078459_CH03.indd 1551439078459_CH03.indd 155 7/8/10 8:00:00 PM7/8/10 8:00:00 PM
Copyright 2010 Cengage Learning, Inc. All Rights Reserved. May not be copied, scanned, or duplicated, in whole or in part.
WD 156 Word Chapter 3 Creating a Business Letter with a Letterhead and Table
To Move a Graphic
The next step is to move the second tractor graphic so that it is positioned to the right of the text in the rectangle shape. The following step moves a graphic.
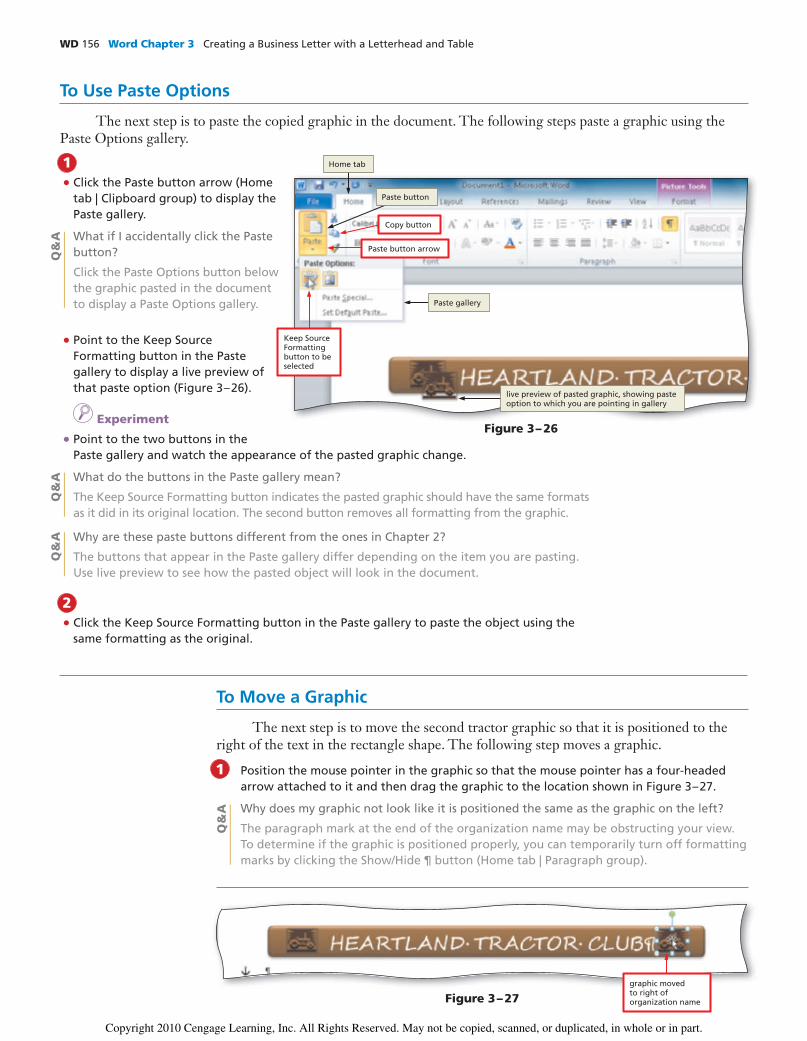
To Use Paste Options
The next step is to paste the copied graphic in the document. The following steps paste a graphic using the Paste Options gallery.
Click the Paste button arrow (Home • tab | Clipboard group) to display the Paste gallery.
What if I accidentally click the Paste button?
Click the Paste Options button below the graphic pasted in the document to display a Paste Options gallery.
Point to the Keep Source • Formatting button in the Paste gallery to display a live preview of that paste option (Figure 3–26).
I Experiment
Point to the two buttons in the • Paste gallery and watch the appearance of the pasted graphic change.
What do the buttons in the Paste gallery mean?
The Keep Source Formatting button indicates the pasted graphic should have the same formats as it did in its original location. The second button removes all formatting from the graphic.
Why are these paste buttons different from the ones in Chapter 2?
The buttons that appear in the Paste gallery differ depending on the item you are pasting. Use live preview to see how the pasted object will look in the document.
Click the Keep Source Formatting button in the Paste gallery to paste the object using the • same formatting as the original.
1
2
Figure 3–26
Home tab
Paste button
Paste gallery
live preview of pasted graphic, showing paste option to which you are pointing in gallery
Paste button arrow
Copy button
Keep Source Formatting button to be selected
Q&
AQ
&A
Q&
A
Q&
A
Position the mouse pointer in the graphic so that the mouse pointer has a four-headed arrow attached to it and then drag the graphic to the location shown in Figure 3–27.
Why does my graphic not look like it is positioned the same as the graphic on the left?
The paragraph mark at the end of the organization name may be obstructing your view. To determine if the graphic is positioned properly, you can temporarily turn off formatting marks by clicking the Show/Hide ¶ button (Home tab | Paragraph group).
1
Figure 3–27graphic moved to right of organization name
1439078459_CH03.indd 1561439078459_CH03.indd 156 7/8/10 8:00:02 PM7/8/10 8:00:02 PM
Copyright 2010 Cengage Learning, Inc. All Rights Reserved. May not be copied, scanned, or duplicated, in whole or in part.

Creating a Business Letter with a Letterhead and Table Word Chapter 3 WD 157
Wo
rd C
hap
ter
3
To Specify Formatting before Typing and Then Enter Text
The contact information for the organization in this project is located on the line below the organization name. The following steps format and then enter the postal address in the letterhead.
Figure 3–28
Position the insertion point on the line below the shape containing the organization name.
If necessary, display the Home tab. Click the Center button (Home tab | Paragraph group) to center the paragraph.
Click the Font Color button arrow (Home tab | Font group) to display the Font Color gallery and then click Orange, Accent 3, Darker 50% (seventh color in sixth row) in the Font Color gallery to change the font color.
Type 323 Pine Avenue, Graber, OK 74877 and then press the SPACEBAR (shown in Figure 3–29 on the next page).
1
2
3
4
To Flip a Graphic
The next step is to fl ip the clip art image on the right so that the tractor is facing the opposite direction. The following steps fl ip a graphic horizontally.
If necessary, display the Picture Tools • Format tab.
With the graphic still selected, click • the Rotate button (Picture Tools Format tab | Arrange group) to display the Rotate gallery.
Point to Flip Horizontal in the Rotate • gallery to display a live preview of the selected rotate option applied to the selected graphic (Figure 3–28).
I Experiment
Point to the rotate options in the • Rotate gallery and watch the picture rotate in the document window.
Click Flip Horizontal in the Rotate • gallery, so that Word fl ips the graphic to display its mirror image.
Can I fl ip a graphic vertically?
Yes, you would click Flip Vertical in the Rotate gallery. You also can rotate a graphic clockwise or counterclockwise by clicking the Rotate Right 90° and Rotate Left 90° commands, respectively, in the Rotate gallery.
1
2
Rotate button
Flip Horizontal command
Picture Tools Format tab
Arrange group
Rotate gallery
graphic fl ips horizontally, showing live preview of rotation to which you are pointing in gallery
Q&
A
Q&AsFor a complete list of the Q&As found in many of the step-by-step sequences in this book, visit the Word 2010 Q&A Web page (scsite.com/wd2010/qa).
BTW
1439078459_CH03.indd 1571439078459_CH03.indd 157 7/8/10 8:00:04 PM7/8/10 8:00:04 PM
Copyright 2010 Cengage Learning, Inc. All Rights Reserved. May not be copied, scanned, or duplicated, in whole or in part.

WD 158 Word Chapter 3 Creating a Business Letter with a Letterhead and Table
If necessary, position the insertion • point as shown in Figure 3–29.
Display the Insert tab.•
Click the Insert Symbol button • (Insert tab | Symbols group) to display the Insert Symbol gallery (Figure 3–29).
What if the symbol I want to insert already appears in the Symbol gallery?
You can click any symbol shown in the Symbol gallery to insert it in the document.
1
2Click More Symbols in the Insert • Symbol gallery to display the Symbol dialog box.
If the font in the Font box is not • (normal text), click the Font box arrow (Symbol dialog box) and then scroll to (normal text) and click it to select this font.
If the subset in the Subset box is • not General Punctuation, click the Subset box arrow and then scroll to General Punctuation and click it to select this subset.
In the list of symbols, if • necessary, scroll to the bullet symbol shown in Figure 3–30 and then click the symbol to select it.
Click the Insert button (Symbol dialog box) to place the selected symbol in the document • to the left of the insertion point (Figure 3–30).
Why is the Symbol dialog box still open?
The Symbol dialog box remains open, allowing you to insert additional symbols.
Click the Close button (Symbol dialog box) to close the dialog box. • 3
To Insert a Symbol from the Symbol Dialog Box
In the letterhead in this chapter, a small round dot separates the postal address and phone number, and the same type of dot separates the phone number and Web address information. This special symbol (the round dot) is not on the keyboard. Thus, Word provides a method of inserting dots and other symbols, such as letters in the Greek alphabet and mathematical characters.
The following steps insert a dot symbol, called a bullet symbol, between the postal address and phone number in the letterhead.
Figure 3–29
Figure 3–30
Q&
AQ
&A
Insert tab
text formatted and entered
Insert Symbol button
More Symbols command
Insert Symbol gallery shows recently used symbols – your list will differ
insertion point
Font box arrow Subset box arrow
bullet symbol selected
Insert button Close button
Symbol dialog box
list of symbols
when you insert a symbol, Word places it in Recently used symbols list – your list will differ
numeric value assigned to selected symbol
dot symbol inserted
Insert Symbol gallery
1439078459_CH03.indd 1581439078459_CH03.indd 158 7/8/10 8:00:05 PM7/8/10 8:00:05 PM
Copyright 2010 Cengage Learning, Inc. All Rights Reserved. May not be copied, scanned, or duplicated, in whole or in part.

Creating a Business Letter with a Letterhead and Table Word Chapter 3 WD 159
Wo
rd C
hap
ter
3
Press the • SPACEBAR, type Phone: (476) 555-9384 and then press the SPACEBAR.
Click the Insert Symbol button • (Insert tab | Symbols group) to display the Insert Symbol gallery (Figure 3–31).
Why is the bullet symbol now in the Insert Symbol gallery?
When you insert a symbol from the Symbol dialog box, Word automatically adds the symbol to the Insert Symbol gallery.
Click the bullet symbol in the Insert • Symbol gallery to insert the symbol at the location of the insertion point (shown in Figure 3–32).
1
2
3 Figure 3–31
To Insert a Symbol from the Symbol Gallery
In the letterhead, another bullet symbol separates the phone number from the Web address information. Once you insert a symbol using the Symbol dialog box, Word adds that symbol to the Symbol gallery so that it is more readily available. The following steps use the Symbol gallery to insert a bullet symbol between the phone number and Web address.
text entered
Insert Symbol button
bullet symbol to be selected
insertion point
Insert tab
Insert Symbol gallery
To Enter Text
The following steps enter the Web address in the letterhead.
Figure 3–32
insertion pointtext entered
symbol inserted
Press the SPACEBAR.
Type Web Address: www.hltclub.com to fi nish the text in the letterhead (Figure 3–32).
1
2
Q&
A
Inserting Special CharactersIn addition to symbols, you can insert a variety of special characters including dashes, hyphens, spaces, apostrophes, and quotation marks. Click the Special Characters tab in the Symbols dialog box (Figure 3–30), click the desired character in the Character list, click the Insert button, and then click the Close button.
BTW
1439078459_CH03.indd 1591439078459_CH03.indd 159 7/8/10 8:00:07 PM7/8/10 8:00:07 PM
Copyright 2010 Cengage Learning, Inc. All Rights Reserved. May not be copied, scanned, or duplicated, in whole or in part.
WD 160 Word Chapter 3 Creating a Business Letter with a Letterhead and Table
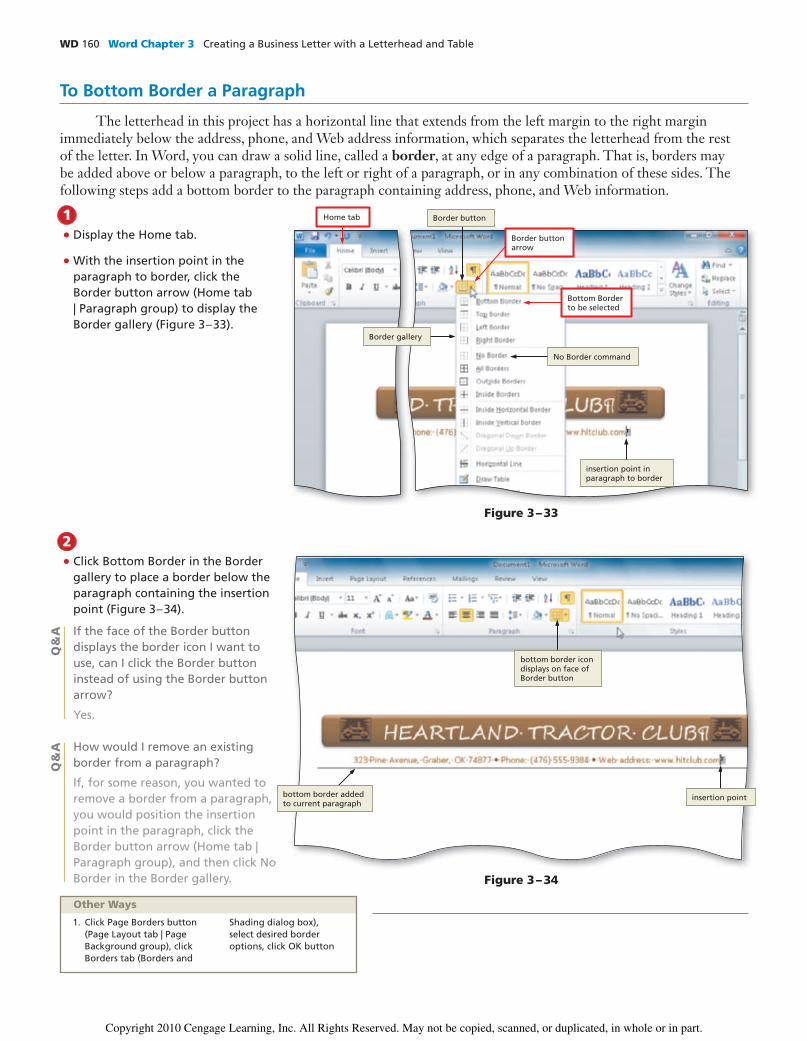
Click Bottom Border in the Border • gallery to place a border below the paragraph containing the insertion point (Figure 3–34).
If the face of the Border button displays the border icon I want to use, can I click the Border button instead of using the Border button arrow?
Yes.
How would I remove an existing border from a paragraph?
If, for some reason, you wanted to remove a border from a paragraph, you would position the insertion point in the paragraph, click the Border button arrow (Home tab | Paragraph group), and then click No Border in the Border gallery.
2
To Bottom Border a Paragraph
The letterhead in this project has a horizontal line that extends from the left margin to the right margin immediately below the address, phone, and Web address information, which separates the letterhead from the rest of the letter. In Word, you can draw a solid line, called a border, at any edge of a paragraph. That is, borders may be added above or below a paragraph, to the left or right of a paragraph, or in any combination of these sides. The following steps add a bottom border to the paragraph containing address, phone, and Web information.
Display the Home tab.•
With the insertion point in the • paragraph to border, click the Border button arrow (Home tab | Paragraph group) to display the Border gallery (Figure 3–33).
1
Figure 3–33
Figure 3–34
Bottom Border to be selected
Border button arrow
Home tab Border button
Border gallery
No Border command
insertion point in paragraph to border
Q&
AQ
&A
1. Click Page Borders button (Page Layout tab | Page Background group), click Borders tab (Borders and
Shading dialog box), select desired border options, click OK button
Other Ways
bottom border icon displays on face of Border button
bottom border added to current paragraph
insertion point
1439078459_CH03.indd 1601439078459_CH03.indd 160 7/8/10 8:00:10 PM7/8/10 8:00:10 PM
Copyright 2010 Cengage Learning, Inc. All Rights Reserved. May not be copied, scanned, or duplicated, in whole or in part.

Creating a Business Letter with a Letterhead and Table Word Chapter 3 WD 161
Wo
rd C
hap
ter
3
Figure 3–36
To Clear Formatting
The next step is to position the insertion point below the letterhead, so that you can type the contents of the letter. When you press the enter key at the end of a paragraph containing a border, Word moves the border forward to the next paragraph. The paragraph also retains all current settings, such as the center format. Instead, you want the paragraph and characters on the new line to use the Normal style: black font with no border.
In Word, the term, clear formatting, refers to returning the formatting to the Normal style. The following steps clear formatting at the location of the insertion point.
With the insertion • point between the Web address and paragraph mark at the end of the line (as shown in Figure 3–34), press the ENTER key to move the insertion point and paragraph to the next line (Figure 3–35).
1
Figure 3–35
Web address automatically formatted as hyperlink because you pressed ENTER key
paragraph mark is centered and border moved down — you want to clear paragraph and border formats
insertion point
Click the Clear • Formatting button (Home tab | Font group) to apply the Normal style to the location of the insertion point (Figure 3–36).
2 Home tab
Font group
Clear Formatting button
border moved up to original location
paragraph returned to Normal style
1. Click More button in Styles gallery (Home tab | Styles group), click Clear Formatting
2. Click Styles Dialog Box Launcher (Home tab |
Styles group), click Clear All in Styles task pane
3. Select text, press CTRL+SPACEBAR, press CTRL+Q
Other Ways
1439078459_CH03.indd 1611439078459_CH03.indd 161 7/8/10 8:00:12 PM7/8/10 8:00:12 PM
Copyright 2010 Cengage Learning, Inc. All Rights Reserved. May not be copied, scanned, or duplicated, in whole or in part.

WD 162 Word Chapter 3 Creating a Business Letter with a Letterhead and Table
AutoFormat as You TypeAs you type text in a document, Word automatically formats some of it for you.
For example, when you press the enter key or spacebar after typing an e-mail address or Web address, Word automatically formats the address as a hyperlink, that is, colored blue and underlined. In Figure 3–35 on the previous page, for example, Word formatted the Web address as a hyperlink because you pressed the enter key at the end of the line. Table 3–2 outlines commonly used AutoFormat As You Type options and their results.
Table 3–2 Commonly Used AutoFormat As You Type Options
Typed Text AutoFormat Feature Example
Quotation marks or apostrophes Changes straight quotation marks or apostrophes to curly ones
"the" becomes “the”
Text, a space, one hyphen, one or no spaces, text, space
Changes the hyphen to an en dash ages 20 - 45
becomes
ages 20 – 45
Text, two hyphens, text, space Changes the two hyphens to an em dash
Two types--yellow and red
becomes
Two types––yellow and red
Web or e-mail address followed by SPACEBAR or ENTER key
Formats Web or e-mail address as a hyperlink
www.scsite.com
becomes
www.scsite.com
Three hyphens, underscores, equal signs, asterisks, tildes, or number signs and then ENTER key
Places a border above a paragraph ---This line
becomes
This line
Number followed by a period, hyphen, right parenthesis, orgreater than sign and then a space or tab followed by text
Creates a numbered list 1. Word 2. PowerPoint
becomes
1. Word 2. PowerPoint
Asterisk, hyphen, or greater than sign and then a space or tab followed by text
Creates a bulleted list * Home tab* Insert tab
becomes
• Home tab • Insert tab
Fraction and then a space orhyphen
Condenses the fraction entry so that it consumes one space instead of three
1/2 becomes ½
Ordinal and then a space orhyphen
Makes part of the ordinal a superscript
3rd becomes 3rd
AutoFormat SettingsBefore you can use them, AutoFormat options must be enabled. To check if an AutoFormat option is enabled, click File on the Ribbon to open the Backstage view, click Options in the Backstage view, click Proofi ng in the left pane (Word Options dialog box), click the AutoCorrect Options button, click the AutoFormat As You Type tab, select the appropriate check boxes, and then click the OK button in each open dialog box.
BTW
1439078459_CH03.indd 1621439078459_CH03.indd 162 7/8/10 8:00:14 PM7/8/10 8:00:14 PM
Copyright 2010 Cengage Learning, Inc. All Rights Reserved. May not be copied, scanned, or duplicated, in whole or in part.

Creating a Business Letter with a Letterhead and Table Word Chapter 3 WD 163
Wo
rd C
hap
ter
3
Click Remove • Hyperlink on the shortcut menu to remove the hyperlink format from the text.
Position the insertion • point on the paragraph mark below the border because you are fi nished with the letterhead (Figure 3–38).
Could I have used the AutoCorrect Options button instead of the Remove Hyperlink command?
Yes. Alternatively, you could have pointed to the small blue box at the beginning of the hyperlink, clicked the AutoCorrect Options button, and then clicked Undo Hyperlink on the AutoCorrect Options menu.
2
To Convert a Hyperlink to Regular Text
The Web address in the letterhead should be formatted as regular text; that is, it should not be blue or underlined. Thus, the following steps remove the hyperlink format from the Web address in the letterhead.
Right-click the • hyperlink (in this case, the Web address) to display the Mini toolbar and a shortcut menu (Figure 3–37).
1
Figure 3–37
Mini toolbarinsertion point is displayed where you right-clicked — yours may be in a different location
Web address formatted as hyperlink
clicking blue box would display AutoCorrect Options button
shortcut menu
Remove Hyperlink command
Figure 3–38
hyperlink format removed from e-mail address
insertion point
Q&
A
1. With insertion point in hyperlink, click Hyperlink button (Insert tab | Links group), click Remove Link button
Other Ways
1439078459_CH03.indd 1631439078459_CH03.indd 163 7/8/10 8:00:14 PM7/8/10 8:00:14 PM
Copyright 2010 Cengage Learning, Inc. All Rights Reserved. May not be copied, scanned, or duplicated, in whole or in part.

WD 164 Word Chapter 3 Creating a Business Letter with a Letterhead and Table
To Change Document Properties, Then Save and Close a File
The letterhead now is complete. Thus, you should save it in a fi le. The following steps assume you already have created folders for storing your fi les, for example, a CIS 101 folder (for your class) that contains a Word folder (for your assignments). Thus, these steps change document properties, save the fi le in the Word folder in the CIS 101 folder on a USB fl ash drive using the fi le name, Heartland Letterhead, and then close the fi le.
Click File on the Ribbon to open the Backstage view and then, if necessary, select the Info tab. Display the Properties menu and then click Show Document Panel on the Properties menu to close the Backstage view and display the Document Information Panel in the Word document window.
Enter your name in the Author property, and enter your course and section in the Subject property. Close the Document Information Panel.
With a USB fl ash drive connected to one of the computer’s USB ports, click the Save button on the Quick Access Toolbar to display the Save As dialog box.
Type Heartland Letterhead in the File name text box to change the fi le name. Do not press the ENTER key after typing the fi le name because you do not want to close the dialog box at this time.
Navigate to the desired save location (in this case, the Word folder in the CIS 101 folder [or your class folder] on the USB fl ash drive).
Click the Save button (Save As dialog box) to save the fi le in the selected folder on the selected drive with the entered fi le name.
Click File on the Ribbon to open the Backstage view and then click Close in the Backstage view to close the document.
1
2
3
4
5
6
7
Break Point: If you wish to take a break, this is a good place to do so. To resume at a later time, start Word and continue following the steps from this location forward.
Creating a Business LetterYou have created a letterhead for the business letter. The next step is to compose the rest of the content in the business letter. The following pages use Word to create a business letter that contains a table and a bulleted list.
Compose an effective business letter.When composing a business letter, you need to be sure to include all essential elements and to decide which letter style to use.
Include all essential letter elements, properly spaced and sized.• All business letters contain the same basic elements, including the date line, inside address, message, and signature block (shown in Figure 3–1 on page WD 139). If a business letter does not use a letterhead, then the top of the letter should include return address information in a heading.
Use proper spacing and formats for the contents of the letter below the letterhead.• Use a font that is easy to read, in a size between 8 and 12 point. Add emphasis with bold, italic, and bullets where appropriate, and use tables to present numeric information. Paragraphs should be single-spaced, with double-spacing between paragraphs.
Determine which letter style to use.• You can follow many different styles when creating business letters. A letter style specifi es guidelines for the alignment and spacing of elements in the business letter.
Plan Ahead
Saving a TemplateAs an alternative to saving the letterhead as a Word document, you could save it as a template. To do so, click File on the Ribbon to open the Backstage view, click the Save & Send tab to display the Save & Send gallery, click Change File Type, click Template in the right pane, click the Save As button, enter the template name (Save As dialog box), if necessary select the Templates folder, and then click the Save button in the dialog box. To use the template, click File on the Ribbon to open the Backstage view, click the New tab to display the New gallery, click My templates, and then double-click the template icon or name.
BTW
1439078459_CH03.indd 1641439078459_CH03.indd 164 7/8/10 8:00:16 PM7/8/10 8:00:16 PM
Copyright 2010 Cengage Learning, Inc. All Rights Reserved. May not be copied, scanned, or duplicated, in whole or in part.

Creating a Business Letter with a Letterhead and Table Word Chapter 3 WD 165
Wo
rd C
hap
ter
3
Click the ‘New from • existing’ button in the New gallery to display the New from Existing Document dialog box.
If necessary, navigate • to the location of the saved Heartland Letterhead fi le (in this case, the Word folder in the CIS 101 folder on the USB fl ash drive).
Click Heartland • Letterhead to select the fi le (Figure 3–40).
2
To Create a New File from an Existing File
The top of the business letter in this chapter contains the letterhead, which you saved in a separate fi le. You could open the letterhead fi le and then save it with a new name, so that the letterhead fi le remains intact for future use. A more effi cient technique is to create a new fi le from the letterhead fi le. Doing this enables you to save the document the fi rst time using the Save button on the Quick Access Toolbar instead of requiring you to use the Save As command in the Backstage view. The following steps create a new fi le from an existing fi le.
Click File on the • Ribbon to open the Backstage view.
Click the New tab in • the Backstage view to display the New gallery (Figure 3–39).
What are the templates in the New gallery?
A template is a document that includes prewritten text and/or formatting common to documents of the specifi ed type. Word provides many templates to simplify the task of creating documents.
1
Figure 3–39
File tab
New from existing button
New tab
New gallery presents options for creating documents
opens a new blank document window when you click Create button
Figure 3–40
New from Existing Document dialog box
folder on USB fl ash drive opened
fi le selected
USB fl ash drive
Create New button
Q&
A
1439078459_CH03.indd 1651439078459_CH03.indd 165 7/8/10 8:00:16 PM7/8/10 8:00:16 PM
Copyright 2010 Cengage Learning, Inc. All Rights Reserved. May not be copied, scanned, or duplicated, in whole or in part.

WD 166 Word Chapter 3 Creating a Business Letter with a Letterhead and Table
To Save a Document
Because you do not want to lose the letterhead at the top of this document, you should save the letter before continuing. The following steps assume you already have created folders for storing your fi les, for example, a CIS 101 folder (for your class) that contains a Word folder (for your assignments). Thus, these steps save the document in the Word folder in the CIS 101 folder on a USB fl ash drive using the fi le name, Heartland Advertisement Letter.
Click the Create New • button (New from Existing Document dialog box) to open a new document window that contains the contents of the selected fi le.
If necessary, click • the paragraph mark below the letterhead to position the insertion point at that location (Figure 3–41).
3
Figure 3–41
new document window opened that contains contents of Heartland Letterhead fi le
insertion point
With a USB fl ash drive connected to one of the computer’s USB ports, click the Save button on the Quick Access Toolbar to display the Save As dialog box.
Type Heartland Advertisement Letter in the File name text box to change the fi le name. Do not press the ENTER key after typing the fi le name because you do not want to close the dialog box at this time.
If necessary, navigate to the desired save location (in this case, the Word folder in the CIS 101 folder [or your class folder] on the USB fl ash drive).
Click the Save button (Save As dialog box) to save the document in the selected folder on the selected drive with the entered fi le name.
1
2
3
4
To Apply a Quick Style
Recall that the Normal style in Word places 10 points of blank space after each paragraph and inserts a vertical space equal to 1.15 lines between each line of text. The business letter should use single spacing for paragraphs and double spacing between paragraphs. Thus, you will modify the spacing for the paragraphs.
Word has many built-in, or predefi ned, styles called Quick Styles that you can use to format text. The No Spacing style, for example, defi nes line spacing to single and does not insert any additional blank space between lines when you press the enter key. To apply a quick style to a paragraph, you fi rst position the insertion point in the paragraph and then apply the style. The next step applies the No Spacing quick style to a paragraph.
New Document WindowIf you wanted to open a new blank document window, you could press CTRL+N or click File on the Ribbon to open the Backstage view, click the New tab to display the New gallery, click the Blank document button, and then click the Create button.
BTW
1439078459_CH03.indd 1661439078459_CH03.indd 166 7/8/10 8:00:18 PM7/8/10 8:00:18 PM
Copyright 2010 Cengage Learning, Inc. All Rights Reserved. May not be copied, scanned, or duplicated, in whole or in part.

Creating a Business Letter with a Letterhead and Table Word Chapter 3 WD 167
Wo
rd C
hap
ter
3
With the insertion • point positioned in the paragraph to be formatted, click No Spacing in the Quick Style gallery (Home tab | Styles group) to apply the selected style to the current paragraph (Figure 3 – 42).
Will this style be used in the rest of the document?
Yes. The paragraph formatting, which includes the style, will carry forward to subsequent paragraphs each time you press the ENTER key.
1 Home tab
1. Click Styles Dialog Box Launcher (Home tab | Styles group), click desired style in Styles task pane
2. Press CTRL+SHIFT+S, click Style Name box arrow in Apply Styles task pane, click desired style in list
Other Ways
Include all essential letter elements. Be sure to include all essential business letter elements, properly spaced, in your letter.
The • date line, which consists of the month, day, and year, is positioned two to six lines below the letterhead.
The • inside address, placed three to eight lines below the date line, usually contains the addressee’s courtesy title plus full name, job title, business affi liation, and full geographical address.
The • salutation, if present, begins two lines below the last line of the inside address. If you do not know the recipient’s name, avoid using the salutation “To whom it may concern” — it is impersonal. Instead, use the recipient’s title in the salutation, e.g., Dear Personnel Director. In a business letter, use a colon (:) at the end of the salutation; in a personal letter, use a comma.
The body of the letter, the • message, begins two lines below the salutation. Within the message, paragraphs are single-spaced with one blank line between paragraphs.
Two lines below the last line of the message, the • complimentary close is displayed. Capitalize only the fi rst word in a complimentary close.
Type the • signature block at least four blank lines below the complimentary close, allowing room for the author to sign his or her name.
Plan Ahead
Q&
A
document saved with name, Heartland Advertisement Letter
Figure 3–42
Styles groupNo Spacing style
Quick Style gallery
default style is Normal
insertion point
1439078459_CH03.indd 1671439078459_CH03.indd 167 7/8/10 8:00:19 PM7/8/10 8:00:19 PM
Copyright 2010 Cengage Learning, Inc. All Rights Reserved. May not be copied, scanned, or duplicated, in whole or in part.

WD 168 Word Chapter 3 Creating a Business Letter with a Letterhead and Table
Using Tab Stops to Align TextA tab stop is a location on the horizontal ruler that tells Word where to position
the insertion point when you press the tab key on the keyboard. Word, by default, places a tab stop at every one-half inch mark on the ruler. These default tab stops are indicated at the bottom of the horizontal ruler by small vertical tick marks (shown in Figure 3–43). You also can set your own custom tab stops. Tab settings are a paragraph format. Thus, each time you press the enter key, any custom tab stops are carried forward to the next paragraph.
To move the insertion point from one tab stop to another, press the tab key on the keyboard. When you press the tab key, a tab character formatting mark appears in the empty space between the tab stops.
When you set a custom tab stop, you specify how the text will align at a tab stop. The tab marker on the ruler refl ects the alignment of the characters at the location of the tab stop. Table 3–3 shows types of tab stop alignments in Word and their corresponding tab markers.
Table 3–3 Types of Tab Stop Alignments
Tab StopAlignment Tab Marker Result of Pressing TAB Key Example
Left Tab Left-aligns text at the locationof the tab stop
toolbarruler
Center Tab Centers text at the locationof the tab stop
toolbar ruler
Right Tab Right-aligns text at the locationof the tab stop
toolbar ruler
Decimal Tab Aligns text on decimal pointat the location of the tab stop
45.72 223.75
Bar Tab Aligns text at a bar characterat the location of the tab stop
toolbarruler
Determine which letter style to use.Three common business letter styles are the block, the modifi ed block, and the modifi ed semi-block. Each style specifi es different alignments and indentations.
In the block letter style, all components of the letter begin fl ush with the left margin.•
In the modifi ed block letter style, the date, complimentary close, and signature block are • positioned approximately one-half inch to the right of center or at the right margin. All other components of the letter begin fl ush with the left margin.
In the modifi ed semi-block letter style, the date, complimentary close, and signature • block are centered, positioned approximately one-half inch to the right of center or at the right margin. The fi rst line of each paragraph in the body of the letter is indented one-half to one inch from the left margin. All other components of the letter begin fl ush with the left margin.
The business letter in this project follows the modifi ed block style.
Plan Ahead
Tabs Dialog BoxYou can use the Tabs dialog box to set, change the alignment of, and remove custom tab stops. To display the Tabs dialog box, click the Paragraph Dialog Box Launcher (Home tab or Page Layout tab | Paragraph group) and then click the Tabs button (Paragraph dialog box), or double-click a tab marker on the ruler. To set a custom tab stop, enter the desired position (Tabs dialog box) and then click the Set button. To change the alignment of a custom tab stop, click the tab stop position to be changed, click the new alignment, and then click the Set button. To remove an existing tab stop, click the tab stop position to be removed and then click the Clear button. To remove all tab stops, click the Clear All button in the Tabs dialog box.
BTW
1439078459_CH03.indd 1681439078459_CH03.indd 168 7/8/10 8:00:21 PM7/8/10 8:00:21 PM
Copyright 2010 Cengage Learning, Inc. All Rights Reserved. May not be copied, scanned, or duplicated, in whole or in part.

Creating a Business Letter with a Letterhead and Table Word Chapter 3 WD 169
Wo
rd C
hap
ter
3
To Display the Ruler
One way to set custom tab stops is by using the horizontal ruler. Thus, the following step displays the ruler in the document window.
If the rulers are not displayed already, click the View Ruler button on the vertical scroll bar (shown in Figure 3–43).
What if the View Ruler button is not visible on the vertical scroll bar?
Display the View tab and then place a check mark in the Ruler check box.
1
To Set Custom Tab Stops
The fi rst required element of the business letter is the date line, which in this letter is positioned two lines below the letterhead. The date line contains the month, day, and year, and begins four inches from the left margin, which is approximately one-half inch to the right of center. Thus, you should set a custom tab stop at the 4" mark on the ruler. The following steps set a left-aligned tab stop.
With the insertion • point on the paragraph mark below the border (shown in Figure 3 – 42 on page WD 167), press the ENTER key so that a blank line appears above the insertion point.
If necessary, click the • tab selector at the left edge of the horizontal ruler until it displays the type of tab you wish to use, which is the Left Tab icon in this case.
Position the mouse • pointer on the 4" mark on the ruler, which is the location of the desired custom tab stop (Figure 3–43).
What is the purpose of the tab selector?
Before using the ruler to set a tab stop, ensure the correct tab stop icon appears in the tab selector. Each time you click the tab selector, its icon changes. The Left Tab icon is the default. For a list of the types of tab stops, see Table 3–3.
1
Figure 3–43
left margin
rulers
Left Tab icon appears in tab selector
right margin
one blank line
default tab stops
default tab stops
View Ruler button
tip of mouse pointer at 4" mark on ruler
insertion point
Q&
AQ
&A
1439078459_CH03.indd 1691439078459_CH03.indd 169 7/8/10 8:00:22 PM7/8/10 8:00:22 PM
Copyright 2010 Cengage Learning, Inc. All Rights Reserved. May not be copied, scanned, or duplicated, in whole or in part.

WD 170 Word Chapter 3 Creating a Business Letter with a Letterhead and Table
To Insert the Current Date in a Document
The next step is to enter the current date at the 4" tab stop in the document, as specifi ed in the guidelines for a modifi ed block style letter. In Word, you can insert a computer’s system date in a document. The following steps insert the current date in the letter.
Click the 4" mark on the ruler to • place a tab marker at that location (Figure 3–44).
What if I click the wrong location on the ruler?
You can move a custom tab stop by dragging the tab marker to the desired location on the ruler. Or, you can remove an existing custom tab stop by pointing to the tab marker on the ruler and then dragging the tab marker down and out of the ruler.
What happened to all the default tab stops on the ruler?
When you set a custom tab stop, Word clears all default tab stops to the left of the newly set custom tab stop on the ruler.
2
Figure 3–44
left tab marker indicates text you type will be left-aligned at this tab stop
clicking mouse on ruler causes Word to place tab marker identifi ed intab selector at location clicked on ruler
default tab stops to left of custom tab stop removed
1. Click Paragraph Dialog Box Launcher (Home tab or Page Layout tab |Paragraph group), click Tabs button (Paragraph
dialog box), type tab stop position (Tabs dialog box), click Set button, click OK button
Other Ways
Press the • TAB key to position the insertion point at the location of the tab stop in the current paragraph.
Display the Insert tab.•
Click the Insert Date and • Time button (Insert tab | Text group) to display the Date and Time dialog box.
Select the desired format (Date • and Time dialog box), in this case April 27, 2012.
If the Update automatically • check box is selected, click the check box to remove the check mark (Figure 3–45).
Why should the Update automatically check box not be selected?
In this project, the date at the top of the letter always should show today’s date (for example, April 27, 2012). If, however, you wanted the date always to change to refl ect the current computer date (for example, showing the date you open or print the letter), then you would place a check mark in this check box.
1
Figure 3–45
Q&
AQ
&A
Q&
A
Date and Time dialog box
list of date and time formats — your list will show current system date and time stored on your computer
formatting mark indicates TAB key pressed
check box not selected
Text group
Insert tab
selected date format
OK button
insertion point
Insert Date and Time button
1439078459_CH03.indd 1701439078459_CH03.indd 170 7/8/10 8:00:23 PM7/8/10 8:00:23 PM
Copyright 2010 Cengage Learning, Inc. All Rights Reserved. May not be copied, scanned, or duplicated, in whole or in part.

Creating a Business Letter with a Letterhead and Table Word Chapter 3 WD 171
Wo
rd C
hap
ter
3
To Enter the Inside Address and Salutation
The next step in composing the business letter is to type the inside address and salutation. The following steps enter this text.
Click the OK button • to insert the current date at the location of the insertion point (Figure 3–46).
2
Figure 3–46
date left-aligned at 4" mark on ruler because you pressed TAB key
current date inserted — your date will differ
insertion point
With the insertion point at the end of the date (shown in Figure 3–46), press the ENTER key three times.
Type Mr. Harvey Wilcox and then press the ENTER key.
Type Wilcox Tractor Restorations and then press the ENTER key.
Type 3009 North 2850 East Road and then press the ENTER key.
Type Roundwood, OK 74519 and then press theENTER key twice.
Type Dear Mr. Wilcox: to complete the inside address and salutation entries (Figure 3–47).
1
2
3
4
5
6
Figure 3–47
inside address entered
salutation entered
To Create a Building Block
If you use the same text or graphic frequently, you can store the text or graphic as a building block and then insert the stored building block entry in the open document, as well as in future documents. That is, you can create the entry once as a building block and then insert the building block when you need it. In this way, you avoid entering the text or graphics inconsistently or incorrectly in different locations throughout the same or multiple documents.
The steps on the next page create a building block for the prospective advertiser’s name, Wilcox Tractor Restorations. Later, you will insert the building block in the document instead of typing the advertiser’s name.
1439078459_CH03.indd 1711439078459_CH03.indd 171 7/8/10 8:00:25 PM7/8/10 8:00:25 PM
Copyright 2010 Cengage Learning, Inc. All Rights Reserved. May not be copied, scanned, or duplicated, in whole or in part.

WD 172 Word Chapter 3 Creating a Business Letter with a Letterhead and Table
Click Save Selection to Quick Part • Gallery in the Quick Parts gallery to display the Create New Building Block dialog box.
Type• wtr in the Name text box (Create New Building Block dialog box) to replace the proposed building block name (Wilcox Tractor, in this case) with a shorter building block name (Figure 3–49).
Click the OK button to store the • building block entry and close the dialog box.
If Word displays another dialog box, • click the Yes button, to save changes to the building blocks.
Will this building block be available in future documents?
When you quit Word, a dialog box may appear asking if you want to save changes to the “Building Blocks”. Click the Save button if you want to use the new building block in future documents.
2
3
Select the text to be a • building block, in this case Wilcox Tractor Restorations. Do not select the paragraph mark at the end of the text because you do not want the paragraph to be part of the building block.
Why is the paragraph mark not part of the building block?
Select the paragraph mark only if you want to store paragraph formatting, such as indentation and line spacing, as part of the building block.
Click the Quick Parts button (Insert tab | Text group) • to display the Quick Parts gallery (Figure 3–48).
1
Figure 3–48Fi 3 48
Insert tab Quick Parts galleryQuick Parts button
clicking AutoText displays any defi ned AutoText entries in a gallery
Save Selection to Quick Part Gallery command
paragraph mark not selected
advertiser name selected
Figure 3–49
1. Select text, press ALT+F3
Other Ways
Q&
AQ
&A
Create New Building Block dialog box
building block to be saved in Quick Parts gallery
name of building block entered in text box
OK button
1439078459_CH03.indd 1721439078459_CH03.indd 172 7/8/10 8:00:26 PM7/8/10 8:00:26 PM
Copyright 2010 Cengage Learning, Inc. All Rights Reserved. May not be copied, scanned, or duplicated, in whole or in part.

Creating a Business Letter with a Letterhead and Table Word Chapter 3 WD 173
Wo
rd C
hap
ter
3
To Modify a Building Block
When you save a building block in the Quick Parts gallery, it is displayed at the top of the Quick Parts gallery. If the building block is a text entry, you can place it in the AutoText gallery instead, which also is accessible through the Quick Parts gallery.
When you point to the building block in the Quick Parts gallery, a ScreenTip displays the building block name. If you want to display more information when the user points to the building block, you can include a description as an Enhanced ScreenTip. The following steps modify a building block to include a description and change its category to AutoText.
Click the Quick Parts • button (Insert tab | Text group) to display the Quick Parts gallery.
Right-click the Wilcox • Tractor Restorations building block to display a shortcut menu (Figure 3–50).
1 Insert tab
shortcut menu
Quick Parts gallery
clicking any of these commands positions the selected building block in the document
Edit Properties command
Quick Parts button
Wilcox Tractor Restorations building block entry appears at top of gallery
Figure 3–50
Click Edit Properties on the shortcut • menu to display the Modify Building Block dialog box, fi lled in with information related to the selected building block.
Click the Gallery box arrow (Modify • Building Block dialog box) and then click AutoText to change the gallery in which the building block will be displayed.
Type• Potential Advertiser in the Description text box (Figure 3–51).
Click the OK button to store the • building block entry and close the dialog box.
Click the Yes button when asked if you want to redefi ne the building block entry.•
2
3Figure 3–51
entered description will show as enhanced ScreenTip
Gallery box arrow
Modify Building Block dialog box
OK button
1439078459_CH03.indd 1731439078459_CH03.indd 173 7/8/10 8:00:29 PM7/8/10 8:00:29 PM
Copyright 2010 Cengage Learning, Inc. All Rights Reserved. May not be copied, scanned, or duplicated, in whole or in part.

WD 174 Word Chapter 3 Creating a Business Letter with a Letterhead and Table
Click to the right of the colon in the • salutation and then press the ENTER key twice to position the insertion point one blank line below the salutation.
Type the beginning of the fi rst • sentence as follows, entering the building block name as shown: We are delighted you are considering advertising your business, wtr (Figure 3–52).
1
Building Blocks versus AutoCorrectIn Project 2, you learned how to use the AutoCorrect feature, which enables you
to insert and create AutoCorrect entries, similarly to how you created and inserted building blocks in this chapter. The difference between an AutoCorrect entry and a building block entry is that the AutoCorrect feature makes corrections for you automatically as soon as you press the spacebar or type a punctuation mark, whereas you must instruct Word to insert a building block. That is, you enter the building block name and then press the f3 key, or click the Quick Parts button and select the building block from one of the galleries.
To Insert a Building Block
In the fi rst sentence in the body of the letter, you want the prospective advertiser name, Wilcox Tractor Restorations, to be displayed. Recall that you stored a building block name of wtr for Wilcox Tractor Restorations. Thus, you will type the building block name and then instruct Word to replace a building block name with the stored building block entry. The following steps insert a building block.
Figure 3–52
Figure 3–53
Press the • F3 key to instruct Word to replace the building block name (wtr) with the stored building block entry (Wilcox Tractor Restorations) (Figure 3–53).
2
1. Click Quick Parts button (Insert tab | Text group), if necessary point to AutoText, click desired building block
Other Ways
building block name for Wilcox Tractor Restorations
blank line
beginning of fi rst sentence entered
insertion point
stored building block entry inserted in document
1439078459_CH03.indd 1741439078459_CH03.indd 174 7/8/10 8:00:31 PM7/8/10 8:00:31 PM
Copyright 2010 Cengage Learning, Inc. All Rights Reserved. May not be copied, scanned, or duplicated, in whole or in part.

Creating a Business Letter with a Letterhead and Table Word Chapter 3 WD 175
Wo
rd C
hap
ter
3
With the insertion point at the end of the building block entry in the document (as shown in • Figure 3–53), press the COMMA key and then press the SPACEBAR.
Type• in and then press the SPACEBAR. Press CTRL+I to turn on italics because magazine names should be italicized.
Type• Heartland as the fi rst word in the magazine name and then press CTRL+SHIFT+SPACEBAR to insert a nonbreaking space after the entered word (Figure 3–54).
1
Figure 3–54
To Insert a Nonbreaking Space
Some compound words, such as proper nouns, dates, units of time and measure, abbreviations, and geographic destinations, should not be divided at the end of a line. These words either should fi t as a unit at the end of a line or be wrapped together to the next line.
Word provides two special characters to assist with this task: the nonbreaking space and the nonbreaking hyphen. A nonbreaking space is a special space character that prevents two words from splitting if the fi rst word falls at the end of a line. Similarly, a nonbreaking hyphen is a special type of hyphen that prevents two words separated by a hyphen from splitting at the end of a line.
The following steps insert a nonbreaking space between the words in the magazine name.
nonbreaking space character inserted
text entered
To Enter Text
The next step in creating the letter is to enter the rest of the text in the fi rst paragraph. The following steps enter this text.
Type• Tractor and then press CTRL+SHIFT+SPACEBAR to insert another nonbreaking space after the entered word.
Type• Magazine and then press CTRL+I to turn off italics (Figure 3–55).
2
Figure 3–55all entered words in magazine name wrapped to next line
1. Click Symbol button (Insert tab | Symbols group), click More Symbols, click Special Characters tab
(Symbol dialog box), click Nonbreaking Space in Character list, click Insert button, click Close button
Other Ways
Press the COMMA key and then press the SPACEBAR.
Type this text: our monthly publication for tractor enthusiasts. The table below outlines advertisement rates per monthly issue:
Press the ENTER key twice to place a blank line between paragraphs (shown in Figure 3–56 on the next page).
Why does my document wrap on different words?
Differences in wordwrap may relate to the printer connected to your computer. Thus, it is possible that the same document could wordwrap differently if associated with a different printer.
1
2
3
Q&
A
nonbreaking space character inserted
Nonbreaking HyphenIf you wanted to insert a nonbreaking hyphen, you would press CTRL+SHIFT+HYPHEN.
BTW
1439078459_CH03.indd 1751439078459_CH03.indd 175 7/8/10 8:00:33 PM7/8/10 8:00:33 PM
Copyright 2010 Cengage Learning, Inc. All Rights Reserved. May not be copied, scanned, or duplicated, in whole or in part.
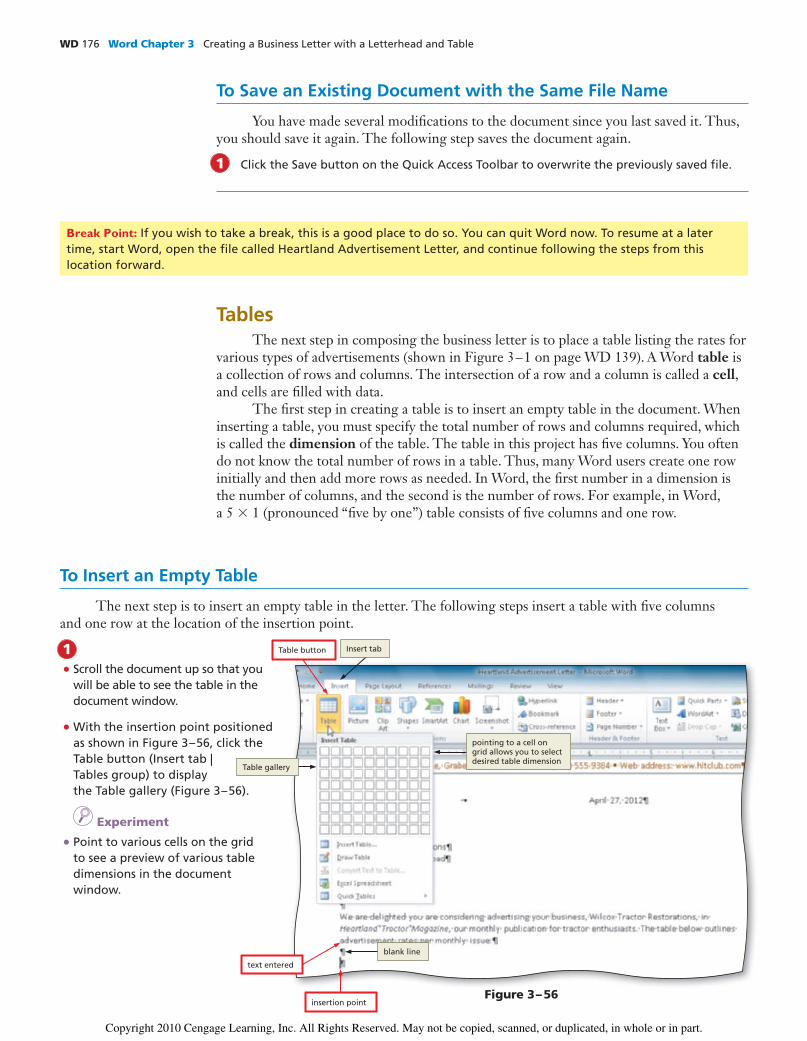
WD 176 Word Chapter 3 Creating a Business Letter with a Letterhead and Table
Click the Save button on the Quick Access Toolbar to overwrite the previously saved fi le.1
To Save an Existing Document with the Same File Name
You have made several modifi cations to the document since you last saved it. Thus, you should save it again. The following step saves the document again.
Break Point: If you wish to take a break, this is a good place to do so. You can quit Word now. To resume at a later time, start Word, open the fi le called Heartland Advertisement Letter, and continue following the steps from this location forward.
TablesThe next step in composing the business letter is to place a table listing the rates for
various types of advertisements (shown in Figure 3–1 on page WD 139). A Word table is a collection of rows and columns. The intersection of a row and a column is called a cell, and cells are fi lled with data.
The fi rst step in creating a table is to insert an empty table in the document. When inserting a table, you must specify the total number of rows and columns required, which is called the dimension of the table. The table in this project has fi ve columns. You often do not know the total number of rows in a table. Thus, many Word users create one row initially and then add more rows as needed. In Word, the fi rst number in a dimension is the number of columns, and the second is the number of rows. For example, in Word,a 5 × 1 (pronounced “fi ve by one”) table consists of fi ve columns and one row.
To Insert an Empty Table
The next step is to insert an empty table in the letter. The following steps insert a table with fi ve columns and one row at the location of the insertion point.
Scroll the document up so that you • will be able to see the table in the document window.
With the insertion point positioned • as shown in Figure 3–56, click the Table button (Insert tab | Tables group) to display the Table gallery (Figure 3–56).
I Experiment
Point to various cells on the grid • to see a preview of various table dimensions in the document window.
1 Insert tab
Table gallery
pointing to a cell on grid allows you to select desired table dimension
blank line
text entered
insertion point
Table button
Figure 3–56
1439078459_CH03.indd 1761439078459_CH03.indd 176 7/8/10 8:00:33 PM7/8/10 8:00:33 PM
Copyright 2010 Cengage Learning, Inc. All Rights Reserved. May not be copied, scanned, or duplicated, in whole or in part.

Creating a Business Letter with a Letterhead and Table Word Chapter 3 WD 177
Wo
rd C
hap
ter
3
Figure 3–57
Position the mouse pointer on the • cell in the fi rst row and fi fth column of the grid to preview the desired table dimension (Figure 3–57).
2dimension of selected cells in grid
live preview of5 x 1 table appears at location of insertion point
mouse pointer
Click the cell in the fi rst row and • fi fth column of the grid to insert an empty table with one row and fi ve columns in the document.
If necessary, scroll the table up in the • document window (Figure 3–58).
What are the small circles in the table cells?
Each table cell has an end-of-cell mark, which is a formatting mark that assists you with selecting and formatting cells. Similarly, each row has an end-of-row mark, which you can use to add columns to the right of a table. Recall that formatting marks do not print on a hard copy. The end-of-cell marks currently are left-aligned, that is, positioned at the left edge of each cell.
3
Figure 3–58
empty table inserted
cells
end-of-row mark
end-of-cell marks
Table Tools tab, which has two subordinate tabs, automatically appears because a table is selected in document window
insertion point in fi rst cell (row 1 and column 1)
when insertion point is in table, the ruler shows boundaries and width of each column in table
Q&
A
To Enter Data in a Table
The next step is to enter data in the cells of the empty table. The data you enter in a cell wordwraps just as text wordwraps between the margins of a document. To place data in a cell, you click the cell and then type.
To advance rightward from one cell to the next, press the tab key. When you are at the rightmost cell in a row, press the tab key to move to the fi rst cell in the next row; do not press the enter key. The enter key is used to begin a new paragraph within a cell. One way to add new rows to a table is to press the tab key when the insertion point is positioned in the bottom-right corner cell of the table. The step on the next page enters data in the fi rst row of the table and then inserts a blank second row.
1. Click Table (Insert tab | Tables group), click Insert Table in Table gallery, enter
number of columns and rows (Insert Table dialog box), click OK button
Other Ways
1439078459_CH03.indd 1771439078459_CH03.indd 177 7/8/10 8:00:34 PM7/8/10 8:00:34 PM
Copyright 2010 Cengage Learning, Inc. All Rights Reserved. May not be copied, scanned, or duplicated, in whole or in part.

WD 178 Word Chapter 3 Creating a Business Letter with a Letterhead and Table
With the insertion • point in the left cell of the table, type Type and then press the TAB key to advance the insertion point to the next cell.
Type• Dimensions and then press the TAB key to advance the insertion point to the next cell.
Type• Word Count and then press the TAB key to advance the insertion point to the next cell.
Type• Photo Count and then press the TAB key to advance the insertion point to the next cell.
Type• Cost and then press the TAB key to insert a second row at the end of the table and position the insertion point in the fi rst column of the new row (Figure 3–59).
How do I edit cell contents if I make a mistake?
Click in the cell and then correct the entry.
1
Q&
A
Type Full Page and then press the TAB key to advance the insertion point to the next cell. Type 9" x 7" and then press the TAB key to advance the insertion point to the next cell. Type 800 and then press the TAB key to advance the insertion point to the next cell. Type 4 and then press the TAB key to advance the insertion point to the next cell. Type $650 and then press the TAB key to insert a row at the end of the table and position the insertion point in the fi rst column of the new row.
In the third row, type Half Page in the fi rst column, 4.5" x 7" as the dimensions, 400 as the word count, 2 as the photo count, and $350 as the cost. Press the TAB key to position the insertion point in the fi rst column of a new row.
In the fourth row, type Quarter Page in the fi rst column, 4.5" x 3.5" as the dimensions, 200 as the word count, 1 as the photo count, and $225 as the cost. Press the TAB key.
In the fi fth row, type Business Card in the fi rst column, 2.25" x 3.5" as the dimensions, 100 as the word count, 0 as the photo count, and $125 as the cost (Figure 3–60).
1
2
3
4
Figure 3–59
blank row inserted in table
insertion point
row 1 data entered
TablesFor simple tables, such as the one just created, Word users often select the table dimension in the Table gallery to create the table. For a more complex table, such as one with a varying number of columns per row, Word has a Draw Table feature that allows users to draw a table in the document using a pencil pointer. To use this feature, click the Table button (Insert tab | Tables group) and then click Draw Table.
BTW
To Enter Data in a Table
The following steps enter the remaining data in the table.
1439078459_CH03.indd 1781439078459_CH03.indd 178 7/8/10 8:00:36 PM7/8/10 8:00:36 PM
Copyright 2010 Cengage Learning, Inc. All Rights Reserved. May not be copied, scanned, or duplicated, in whole or in part.

Creating a Business Letter with a Letterhead and Table Word Chapter 3 WD 179
Wo
rd C
hap
ter
3
To Apply a Table Style
The next step is to apply a table style to the table. Word provides a Table Styles gallery, allowing you to change the basic table format to a more visually appealing style. Word provides a gallery of more than 90 table styles, which include a variety of colors and shading. The following steps apply a table style to the table in the letter.
Figure 3–60
Table Styles galleryTable Style Options group
Table Tools Design tab
table data entered
More button
insertion point
With the insertion point in the table, be sure the check marks match those in • the Table Style Options group (Table Tools Design tab) as shown in Figure 3–60.
What if the Table Tools Design tab no longer is the active tab?
Click in the table and then display the Table Tools Design tab.
What do the options in the Table Style Options group mean?
When you apply table styles, if you want the top row of the table (header row), a row containing totals (total row), fi rst column, or last column to be formatted differently, select those check boxes. If you want the rows or columns to alternate with colors, select Banded Rows or Banded Columns, respectively.
1
Q&
AQ
&A
Click the More button in the Table • Styles gallery (shown in Figure 3–60) (Table Tools Design tab | Table Styles group) to expand the gallery.
Scroll and then point to Medium • Grid 3 - Accent 4 in the Table Styles gallery to display a live preview of that style applied to the table in the document (Figure 3–61).
I Experiment
Point to various table styles in the • Table Styles gallery and watch the format of the table change in the document window.
2
Figure 3–61
expanded gallery
table format changes to show live preview of style to which you are pointing in gallery
mouse pointer on Medium Grid 3 - Accent 4 table style
1439078459_CH03.indd 1791439078459_CH03.indd 179 7/8/10 8:00:38 PM7/8/10 8:00:38 PM
Copyright 2010 Cengage Learning, Inc. All Rights Reserved. May not be copied, scanned, or duplicated, in whole or in part.
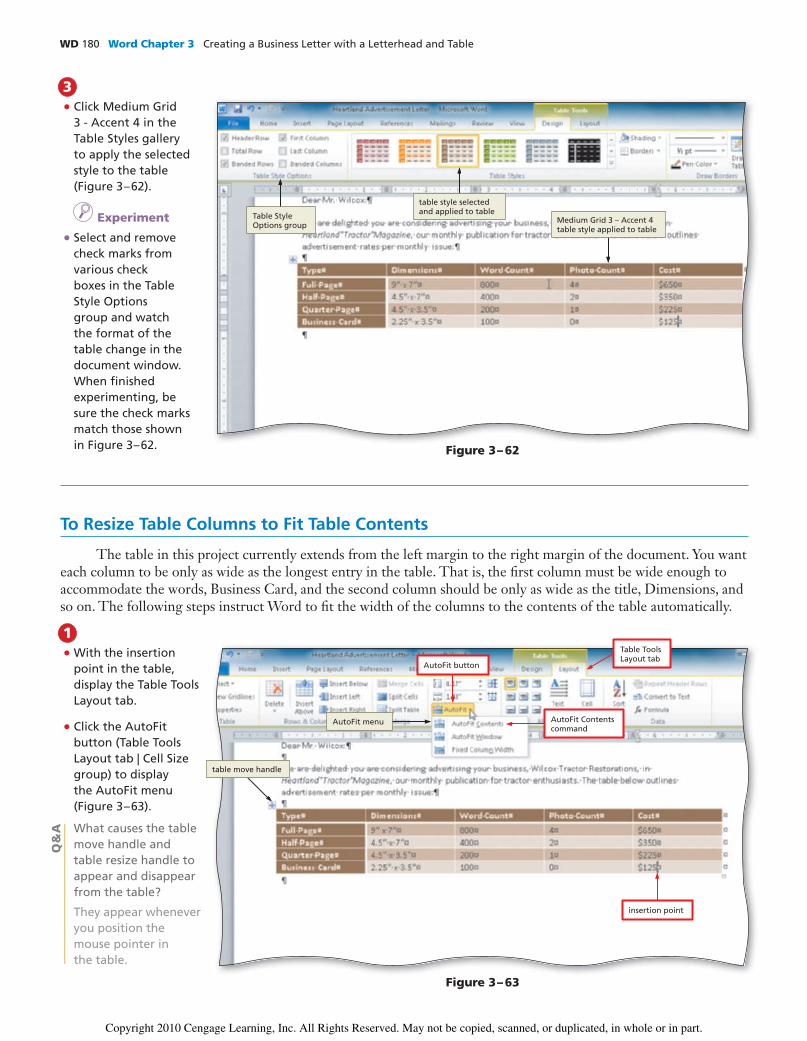
WD 180 Word Chapter 3 Creating a Business Letter with a Letterhead and Table
With the insertion • point in the table, display the Table Tools Layout tab.
Click the AutoFit • button (Table Tools Layout tab | Cell Size group) to display the AutoFit menu (Figure 3–63).
What causes the table move handle and table resize handle to appear and disappear from the table?
They appear whenever you position the mouse pointer in the table.
1
To Resize Table Columns to Fit Table Contents
The table in this project currently extends from the left margin to the right margin of the document. You want each column to be only as wide as the longest entry in the table. That is, the fi rst column must be wide enough to accommodate the words, Business Card, and the second column should be only as wide as the title, Dimensions, and so on. The following steps instruct Word to fi t the width of the columns to the contents of the table automatically.
Click Medium Grid • 3 - Accent 4 in the Table Styles gallery to apply the selected style to the table (Figure 3–62).
I Experiment
Select and remove • check marks from various check boxes in the Table Style Options group and watch the format of the table change in the document window. When fi nished experimenting, be sure the check marks match those shown in Figure 3–62.
3
Figure 3–63
AutoFit menu
AutoFit button
Table Tools Layout tab
AutoFit Contents command
insertion point
Table Style Options group
table move handle
table style selected and applied to table
Medium Grid 3 – Accent 4 table style applied to table
Figure 3–62
Q&
A
1439078459_CH03.indd 1801439078459_CH03.indd 180 7/8/10 8:00:39 PM7/8/10 8:00:39 PM
Copyright 2010 Cengage Learning, Inc. All Rights Reserved. May not be copied, scanned, or duplicated, in whole or in part.

Creating a Business Letter with a Letterhead and Table Word Chapter 3 WD 181
Wo
rd C
hap
ter
3
Click AutoFit Contents • on the AutoFit menu, so that Word automatically adjusts the widths of the columns based on the text in the table (Figure 3–64).
2
Can I resize columns manually?
Yes, you can drag a column boundary, the border to the right of a column, until the column is the desired width. Similarly, you can resize a row by dragging the row boundary, the border at the bottom of a row, until the row is the desired height. You also can resize the entire table by dragging the table resize handle, which is a small square that appears when you point to a corner of the table (shown in Figure 3–63).
column boundary
row boundary
table resize handle
columns resized to table contents
Figure 3–64
1. Right-click table, point to AutoFit on shortcut menu, click AutoFit to Contents
2. Double-click column boundary
Other Ways
Selecting Table ContentsWhen working with tables, you may need to select the contents of cells, rows,
columns, or the entire table. Table 3–4 identifi es ways to select various items in a table.
Table 3–4 Selecting Items in a Table
Item to Select Action
Cell Point to left edge of cell and click when the mouse pointer changes to a small solid upward angled pointing arrow.
Or, position insertion point in cell, click Select button (Table Tools Layout tab | Table group), and then click Select Cell on the Select menu.
Column Point to border at top of column and click when the mouse pointer changes to a small solid downward-pointing arrow.
Or, position insertion point in column, click Select button (Table Tools Layout tab | Table group), and then click Select Column on the Select menu.
Row Point to the left of the row and click when mouse pointer changes to a right-pointing block arrow.
Or, position insertion point in row, click Select button (Table Tools Layout tab | Table group), and then click Select Row on the Select menu.
Multiple cells, rows, or columns adjacent to one another
Drag through cells, rows, or columns.
Multiple cells, rows, or columns not adjacent to one another
Select fi rst cell, row, or column (as described above) and then hold down CTRL key while selecting next cell, row, or column.
Next cell Press TAB key.
Previous cell Press SHIFT+TAB.
Table Point somewhere in table and then click table move handle that appears in upper-left corner of table.
Or, position insertion point in table, click Select button (Table Tools Layout tab | Table group), and then click Select Table on the Select menu.
Q&
A
Resizing Table Columns and RowsTo change the width of a column or height of a row to an exact measurement, hold down the ALT key while dragging markers on the ruler. Or, enter values in the Table Column Width or Table Row Height text boxes (Table Tools Layout tab | Cell Size group).
BTW
Tab Character in TablesIn a table, the TAB key advances the insertion point from one cell to the next. To insert a tab character in a cell, you must press CTRL+TAB.
BTW
1439078459_CH03.indd 1811439078459_CH03.indd 181 7/8/10 8:00:41 PM7/8/10 8:00:41 PM
Copyright 2010 Cengage Learning, Inc. All Rights Reserved. May not be copied, scanned, or duplicated, in whole or in part.

WD 182 Word Chapter 3 Creating a Business Letter with a Letterhead and Table
To Align Data in Cells
The next step is to change the alignment of the data in cells in the second, third, fourth, and fi fth columns of the table. In addition to aligning text horizontally in a cell (left, center, or right), you can align it vertically within a cell (top, center, bottom). When the height of the cell is close to the same height as the text, however, differences in vertical alignment are not readily apparent, which is the case for this table. The following steps center data in cells.
Select the cells in the • second, third, fourth, and fi fth columns using one of the techniques described in Table 3–4 on the previous page (Figure 3–65).
1
Click the Align Top • Center button (Table Tools Layout tab | Alignment group) to center the contents of the selected cells.
Click in the table to • remove the selection (Figure 3–66).
2
Figure 3–65
cells selected
cell contents centered
Table Tools Layout tab
Alignment group
table move handle
Figure 3–66
Align Top Center button
insertion point
1439078459_CH03.indd 1821439078459_CH03.indd 182 7/8/10 8:00:43 PM7/8/10 8:00:43 PM
Copyright 2010 Cengage Learning, Inc. All Rights Reserved. May not be copied, scanned, or duplicated, in whole or in part.
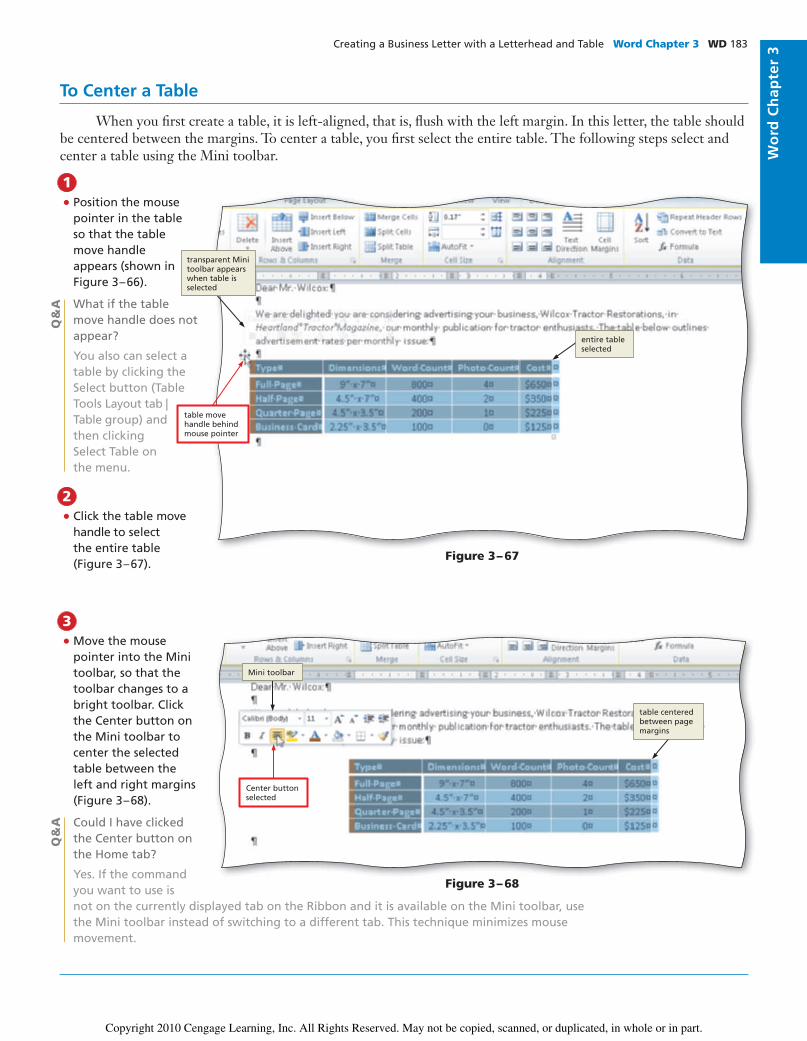
Creating a Business Letter with a Letterhead and Table Word Chapter 3 WD 183
Wo
rd C
hap
ter
3
Position the mouse • pointer in the table so that the table move handle appears (shown in Figure 3–66).
What if the table move handle does not appear?
You also can select a table by clicking the Select button (Table Tools Layout tab |Table group) and then clicking Select Table on the menu.
Click the table move • handle to select the entire table (Figure 3–67).
1
2
Move the mouse • pointer into the Mini toolbar, so that the toolbar changes to a bright toolbar. Click the Center button on the Mini toolbar to center the selected table between the left and right margins (Figure 3–68).
Could I have clicked the Center button on the Home tab?
Yes. If the command you want to use is not on the currently displayed tab on the Ribbon and it is available on the Mini toolbar, use the Mini toolbar instead of switching to a different tab. This technique minimizes mouse movement.
3
To Center a Table
When you fi rst create a table, it is left-aligned, that is, fl ush with the left margin. In this letter, the table should be centered between the margins. To center a table, you fi rst select the entire table. The following steps select and center a table using the Mini toolbar.
Q&
A
entire table selected
table move handle behind mouse pointer
Figure 3–68
Figure 3–67
transparent Mini toolbar appears when table is selected
Mini toolbar
Center button selected
table centered between page margins
Q&
A
1439078459_CH03.indd 1831439078459_CH03.indd 183 7/8/10 8:00:45 PM7/8/10 8:00:45 PM
Copyright 2010 Cengage Learning, Inc. All Rights Reserved. May not be copied, scanned, or duplicated, in whole or in part.

WD 184 Word Chapter 3 Creating a Business Letter with a Letterhead and Table
To Insert a Row in a Table
The next step is to insert a row at the top of the table because you want to place a title on the table. As discussed earlier, you can insert a row at the end of a table by positioning the insertion point in the bottom-right corner cell and then pressing the tab key. You cannot use the tab key to insert a row at the beginning or middle of a table. Instead, you use the Insert Rows Above or Insert Rows Below command. The following steps insert a row in a table.
Position the mouse • pointer somewhere in the fi rst row of the table because you want to insert a row above this row (Figure 3–69).
1
Click the Insert Rows • Above button (Table Tools Layout tab | Rows & Columns group) to insert a row above the row containing the insertion point and then select the newly inserted row (Figure 3–70).
Do I have to insert rows above the row containing the insertion point?
No. You can insert below the row containing the insertion point by clicking the Insert Rows Below button (Table Tools Layout tab | Rows & Columns group).
Why did the colors in the second row change?
The table style specifi es to format the Header row differently, which is the fi rst row.
2
Figure 3–69
Insert Columns to the Right button
Rows & Columns group
Insert Columns tothe Left button
Table Tools Layout tab
Delete button
Insert Rows Below button
Figure 3–70
Insert RowsAbove button
Q&
AQ
&A
1. Right-click row, point to Insert on shortcut menu, click desired command on Insert submenu
Other Ways
row with fi ve columns inserted and selected
insertion point in fi rst row
table move handle
1439078459_CH03.indd 1841439078459_CH03.indd 184 7/8/10 8:00:48 PM7/8/10 8:00:48 PM
Copyright 2010 Cengage Learning, Inc. All Rights Reserved. May not be copied, scanned, or duplicated, in whole or in part.

Creating a Business Letter with a Letterhead and Table Word Chapter 3 WD 185
Wo
rd C
hap
ter
3
TO INSERT A COLUMN IN A TABLE
If, instead of inserting rows, you wanted to insert a column in a table, you would perform the following steps.
1. Position the insertion point in the column to the left or right of where you want to insert the column.
2. Click the Insert Columns to the Left button (Table Tools Layout tab | Rows & Columns group) to insert a column to the left of the current column, or click the Insert Columns to the Right button (Table Tools Layout tab | Rows & Columns group) to insert a column to the right of the current column. Or you could right-click the table, point to Insert on the shortcut menu, and click Insert Columns to the Left or Insert Columns to the Right on the Insert submenu.
Deleting Table DataIf you want to delete row(s) or delete column(s) from a table, position the insertion
point in the row(s) or column(s) to delete, click the Delete button (Table Tools Layout tab |Rows & Columns group), and then click Delete Rows or Delete Columns on the Delete menu. Or, select the row or column to delete, right-click the selection, and then click Delete Rows or Delete Columns on the shortcut menu.
To delete the contents of a cell, select the cell contents and then press the delete or backspace key. You also can drag and drop or cut and paste the contents of cells. To delete an entire table, select the table, click the Delete button (Table Tools Layout tab | Rows & Columns group), and then click Delete Table on the Delete menu. To delete the contents of a table and leave an empty table, you would select the table and then press the delete key.
To Merge Cells
The top row of the table is to contain the table title, which should be centered above the columns of the table. The row just inserted has one cell for each column, in this case, fi ve cells (shown in Figure 3–70). The title of the table, however, should be in a single cell that spans all rows. Thus, the following steps merge the fi ve cells into a single cell.
With the cells to merge selected • (as shown in Figure 3–70), click the Merge Cells button (Table Tools Layout tab | Merge group) to merge the fi ve cells into one cell (Figure 3–71).
1
Split Cells button
Merge group
Table Tools Layout tab
cell has only one end-of-cell mark (instead of fi ve)
fi ve cells merged into one cell
Figure 3–71
Merge Cells button
Moving TablesIf you wanted to move a table to a new location, you would point to the upper-left corner of the table until the table move handle appears (shown in Figure 3 – 69), point to the table move handle, and the drag it to move the entire table to a new location.
BTW
1439078459_CH03.indd 1851439078459_CH03.indd 185 7/8/10 8:00:50 PM7/8/10 8:00:50 PM
Copyright 2010 Cengage Learning, Inc. All Rights Reserved. May not be copied, scanned, or duplicated, in whole or in part.

WD 186 Word Chapter 3 Creating a Business Letter with a Letterhead and Table
Position the insertion • point in the fi rst row and then type Monthly Issue Advertisement Rates as the table title (Figure 3–72).
2
Figure 3–72
table title entered
TO SPLIT TABLE CELLS
Instead of merging multiple cells into a single cell, sometimes you want to split a single cell into multiple cells. If you wanted to split cells, you would perform the following steps.
1. Position the insertion point in the cell to split.2. Click the Split Cells button (Table Tools Layout tab | Merge group), or right-click the
cell and then click Split Cells on the shortcut menu, to display the Split Cells dialog box.3. Enter the number of columns and rows into which you want the cell split (Split Cells
dialog box).4. Click the OK button.
To Add More Text
The table now is complete. The next step is to enter text below the table. The following steps enter text.
1. Right-click selected cells to merge, click Merge Cells on shortcut menu
Other Ways
Position the insertion point on the paragraph mark below the table and then press the ENTER key.
Type Please note that additional fees will be assessed if the word or photo counts exceed the limits listed above. We offer the following discounts: and then press the ENTER key (shown in Figure 3 – 73).
1
2
To Bullet a List as You Type
In Chapter 1, you learned how to apply bullets to existing paragraphs. If you know before you type that a list should be bulleted, you can use Word’s AutoFormat As You Type feature to bullet the paragraphs as you type them (see Table 3–2 on page WD 162). The following steps add bullets to a list as you type.
Press the • ASTERISK key (*) as the fi rst character on the line (Figure 3–73).
1
Figure 3–73
text entered
asterisk entered at beginning of line
blank line
1439078459_CH03.indd 1861439078459_CH03.indd 186 7/8/10 8:00:52 PM7/8/10 8:00:52 PM
Copyright 2010 Cengage Learning, Inc. All Rights Reserved. May not be copied, scanned, or duplicated, in whole or in part.

Creating a Business Letter with a Letterhead and Table Word Chapter 3 WD 187
Wo
rd C
hap
ter
3
Type • 5 percent discount for a camera-ready advertisement (prepared using Microsoft Word at the proper size and with all words and photos in final layout form) and then press the ENTER key.
Type • 3 percent discount if payment in full is submitted with order and then press the ENTER key.
Press the • ENTER key to turn off automatic bullets as you type (Figure 3–75).
Why did automatic bullets stop?
When you press the ENTER key without entering any text after the automatic bullet character, Word turns off the automatic bullets feature.
3
Press the • SPACEBAR to convert the asterisk to a bullet character.
What if I did not want the asterisk converted to a bullet character?
You could undo the AutoFormat by clicking the Undo button, pressing CTRL+Z, clicking the AutoCorrect Options button that appears to the left of the bullet character as soon as you press the SPACEBAR, and then clicking Undo Automatic Bullets on the AutoCorrect Options menu, or by clicking the Bullets button (Home tab | Paragraph group).
Type • 10 percent discount for any advertisement that runs in three consecutive issues as the fi rst bulleted item.
Press the • ENTER key to place another bullet character at the beginning of the next line (Figure 3 –74).
2
Figure 3–74
Bullets button selected
text entered
asterisk converted to bullet automatically
bullet automatically inserted when you pressed ENTER key
Figure 3–75
Bullets button no longer selected
bulleted list
text entered
automatic bullets turned off
Q&
AQ
&A
1. Click Bullets button(Home tab | Paragraph group)
2. Right-click paragraph to be bulleted, point to Bullets on shortcut menu, click desired bullet style
Other Ways
1439078459_CH03.indd 1871439078459_CH03.indd 187 7/8/10 8:00:54 PM7/8/10 8:00:54 PM
Copyright 2010 Cengage Learning, Inc. All Rights Reserved. May not be copied, scanned, or duplicated, in whole or in part.

WD 188 Word Chapter 3 Creating a Business Letter with a Letterhead and Table
To Enter More Text
The following steps enter the remainder of text in the letter.
Press the ENTER key and then type the paragraph shown in Figure 3–76, making certain you use the building block name, wtr, to insert the advertiser name.
If necessary, remove the hyperlink from the e-mail address by right-clicking the e-mail address and then clicking Remove Hyperlink on the shortcut menu. Press the END key to position the insertion point at the end of the line.
Press the ENTER key twice. Press the TAB key to position the insertion point at the 4" mark on the ruler. Type Sincerely, and then press the ENTER key four times.
Press the TAB key to position the insertion point at the 4" mark on the ruler. Type Frank Urbanczyk and then press the ENTER key.
Press the TAB key to position the insertion point at the 4" mark on the ruler. Type President as the fi nal text in the business letter (Figure 3–76).
1
2
3
4
5
Figure 3–76
paragraph entered
remainder of cover letter entered
To Change Document Properties, Save the Document Again, and Print It
Before saving the letter again, you want to add your name and course and section as document properties. The following steps change document properties, save the document again, and then print the document.
Display the Document Information Panel in the Word document window. If necessary, enter your name in the Author property, and enter your course and section in the Subject property. Close the Document Information Panel.
Click the Save button on the Quick Access Toolbar to overwrite the previously saved fi le.
Open the Backstage view and then click the Print tab in the Backstage view to display the Print gallery.
Verify the printer name that appears on the Printer Status button will print a hard copy of the document. If necessary, click the Printer Status button to display a list of available printer options and then click the desired printer to change the currently selected printer.
Click the Print button in the Print gallery to print the letter on the currently selected printer (shown in Figure 3–1 on page WD 139).
1
2
3
4
5
Certifi cationThe Microsoft Offi ce Specialist (MOS) program provides an opportunity for you to obtain a valuable industry credential — proof that you have the Word 2010 skills required by employers. For more information, visit the Word 2010 Certifi cation Web page (scsite.com/wd2010/cert).
BTW
Conserving Ink and TonerIf you want to conserve ink or toner, you can instruct Word to print draft quality documents by clicking File on the Ribbon to open the Backstage view, clicking Options in the Backstage view to display the Word Options dialog box, clicking Advanced in the left pane (Word Options dialog box), scrolling to the Print area in the right pane, placing a check mark in the ‘Use draft quality’ check box, and then clicking the OK button. Then, use the Backstage view to print the document as usual.
BTW
1439078459_CH03.indd 1881439078459_CH03.indd 188 7/8/10 8:00:57 PM7/8/10 8:00:57 PM
Copyright 2010 Cengage Learning, Inc. All Rights Reserved. May not be copied, scanned, or duplicated, in whole or in part.

Creating a Business Letter with a Letterhead and Table Word Chapter 3 WD 189
Wo
rd C
hap
ter
3
To Address and Print an Envelope
The following steps address and print an envelope. If you are in a lab environment, check with your instructor before performing these steps.
Addressing and Printing Envelopes and Mailing LabelsWith Word, you can print address information on an envelope or on a mailing label. Computer-printed addresses look more professional than handwritten ones.
Scroll through the • letter to display the inside address in the document window.
Drag through the • inside address to select it (Figure 3–77).
1
Figure 3–77
Display the Mailings • tab.
Click the Create • Envelopes button (Mailings tab | Create group) to display the Envelopes and Labels dialog box.
If necessary, click • the Envelopes tab (Envelopes and Labels dialog box) (Figure 3–78).
Insert an envelope in • your printer, as shown in the Feed area of the dialog box (your Feed area may be different depending on your printer).
Click the Print button (Envelopes and Labels dialog box) to print the envelope. •
2
3
Figure 3–78
Mailings tabCreate Envelopes button
inside address selected
Print button
Envelopes and Labels dialog box
Envelopes tab
Create Labels button
Create group
Return address area
Add to Document button
Options button
Feed area
delivery address copied from selected text
Labels tab
Envelopes and LabelsInstead of printing the envelope immediately, you can add it to the document by
clicking the Add to Document button (Envelopes and Labels dialog box). To specify a different envelope or label type (identifi ed by a number on the box of envelopes or labels), click the Options button (Envelopes and Labels dialog box).
BTWsFor a complete list of the BTWs found in the margins of this book, visit the Word 2010 BTW Web page (scsite.com/wd2010/btw).
BTW
1439078459_CH03.indd 1891439078459_CH03.indd 189 7/8/10 8:00:58 PM7/8/10 8:00:58 PM
Copyright 2010 Cengage Learning, Inc. All Rights Reserved. May not be copied, scanned, or duplicated, in whole or in part.

WD 190 Word Chapter 3 Creating a Business Letter with a Letterhead and Table
Instead of printing an envelope, you can print a mailing label. To do this, click the Create Labels button (Mailings tab | Create group) (shown in Figure 3–78 on the previous page). Type the delivery address in the Delivery address box. To print the same address on all labels on the page, click ‘Full page of the same label’ in the Print area. Click the Print button (Envelopes and Labels dialog box) to print the label(s).
To Quit Word
This project now is complete. The following steps quit Word.
If you have one Word document open, click the Close button on the right side of the title bar to close the document and quit Word; or if you have multiple Word documents open, click File on the Ribbon to open the Backstage view and then click Exit in the Backstage view to close all open documents and quit Word.
If a Microsoft Word dialog box appears, click the Save button to save any changes made to the document since the last save.
If Word displays a dialog box asking if you want to save modifi ed “Building Blocks”, click the Save button.
1
2
3
Chapter SummaryIn this chapter, you have learned how to use Word to change margins, insert and format a shape, change text wrapping, insert and format clip art, move and copy graphics, insert symbols, add a border, clear formatting, convert a hyperlink to regular text, create a fi le from an existing fi le, set and use tab stops, insert the current date, create and insert building blocks, insert and format tables, and address and print envelopes and mailing labels. The items listed below include all the new Word skills you have learned in this chapter.
1. Change Margin Settings (WD 141) 2. Insert a Shape (WD 142) 3. Apply a Shape Style (WD 144) 4. Add Text to a Shape (WD 145) 5. Use the Grow Font Button to Increase Font Size
(WD 146) 6. Change an Object’s Text Wrapping (WD 148) 7. Insert Clip Art (WD 148) 8. Resize a Graphic to a Percent of the Original (WD 150) 9. Change the Color of a Graphic (WD 151) 10. Set a Transparent Color in a Graphic (WD 152) 11. Adjust the Brightness and Contrast of a Graphic
(WD 153) 12. Change the Border Color on a Graphic (WD 154) 13. Move a Graphic (WD 155) 14. Use Paste Options (WD 156) 15. Flip a Graphic (WD 157) 16. Insert a Symbol from the Symbol Dialog Box (WD 158) 17. Insert a Symbol from the Symbol Gallery (WD 159) 18. Bottom Border a Paragraph (WD 160) 19. Clear Formatting (WD 161)
20. Convert a Hyperlink to Regular Text (WD 163) 21. Create a New File from an Existing File (WD 165) 22. Apply a Quick Style (WD 166)23. Set Custom Tab Stops (WD 169) 24. Insert the Current Date in a Document (WD 170) 25. Create a Building Block (WD 171) 26. Modify a Building Block (WD 173) 27. Insert a Building Block (WD 174)28. Insert a Nonbreaking Space (WD 175) 29. Insert an Empty Table (WD 176) 30. Enter Data in a Table (WD 177) 31. Apply a Table Style (WD 179) 32. Resize Table Columns to Fit Table Contents (WD 180) 33. Align Data in Cells (WD 182) 34. Center a Table (WD 183) 35. Insert a Row in a Table (WD 184) 36. Insert a Column in a Table (WD 185)37. Merge Cells (WD 185)38. Split Table Cells (WD 186)39. Bullet a List as You Type (WD 186) 40. Address and Print an Envelope (WD 189)
If you have a SAM 2010 user profi le, your instructor may have assigned an autogradable version of this assignment. If so, log into the SAM 2010 Web site at www.cengage.com/sam2010to download the instruction and start fi les.
Quick ReferenceFor a table that lists how to complete the tasks covered in this book using the mouse, Ribbon, shortcut menu, and keyboard, see the Quick Reference Summary at the back of this book, or visit the Word 2010 Quick Reference Web page (scsite.com/wd2010/qr).
BTW
1439078459_CH03.indd 1901439078459_CH03.indd 190 7/8/10 8:01:00 PM7/8/10 8:01:00 PM
Copyright 2010 Cengage Learning, Inc. All Rights Reserved. May not be copied, scanned, or duplicated, in whole or in part.

Creating a Business Letter with a Letterhead and Table Word Chapter 3 WD 191
Wo
rd C
hap
ter
3S
TU
DE
NT
AS
SIG
NM
EN
TS
Learn It Online
Test your knowledge of chapter content and key terms.
Instructions: To complete the Learn It Online exercises, start your browser, click the Address bar, and then enter the Web address scsite.com/wd2010/learn. When the Word 2010 Learn It Online page is displayed, click the link for the exercise you want to complete and then read the instructions.
Chapter Reinforcement TF, MC, and SAA series of true/false, multiple choice, and short answer questions that test your knowledge of the chapter content.
Flash CardsAn interactive learning environment where you identify chapter key terms associated with displayed defi nitions.
Practice TestA series of multiple choice questions that test your knowledge of chapter content and key terms.
Who Wants To Be a Computer Genius?An interactive game that challenges your knowledge of chapter content in the style of a televisionquiz show.
Wheel of TermsAn interactive game that challenges your knowledge of chapter key terms in the style of the television show Wheel of Fortune.
Crossword Puzzle ChallengeA crossword puzzle that challenges your knowledge of key terms presented in the chapter.
Apply Your Knowledge
Reinforce the skills and apply the concepts you learned in this chapter.
Working with Tabs and a TableNote: To complete this assignment, you will be required to use the Data Files for Students. See the inside back cover of this book for instructions on downloading the Data Files for Students, or contact your instructor for information about accessing the required fi les.
Instructions: Start Word. Create a new document from the fi le called Apply 3-1 Projected College Expenses Draft, located on the Data Files for Students. The document is a Word table that you are to edit and format. The revised table is shown in Figure 3–79.
Continued >Figure 3–79
1439078459_CH03.indd 1911439078459_CH03.indd 191 7/8/10 8:01:00 PM7/8/10 8:01:00 PM
Copyright 2010 Cengage Learning, Inc. All Rights Reserved. May not be copied, scanned, or duplicated, in whole or in part.

WD 192 Word Chapter 3 Creating a Business Letter with a Letterhead and TableS
TU
DE
NT
AS
SIG
NM
EN
TS
Perform the following tasks:
1. In the line containing the table title, Projected College Expenses, remove the tab stop at the 1" mark on the ruler.
2. Set a centered tab at the 3" mark on the ruler.
3. Bold the characters in the title. Use the Grow Font button to increase their font size to 14. Change their color to Dark Blue, Text 2, Darker 25%.
4. In the table, delete the row containing the Food expenses.
5. Insert a new row at the bottom of the table. In the fi rst cell of the new row, enter Total in the cell. Enter these values in the next three cells: Freshman – $10,100.63; Sophomore – $10,787.58; Senior – $12,317.87.
6. Insert a column between the Sophomore and Senior columns. Fill in the column as follows: Column Title – Junior; Room & Board – 3881.21; Tuition & Books – 5552.72; Entertainment – 727.01; Cell Phone – 372.81; Miscellaneous – 372.09; Clothing – 618.29; Total – $11,524.13.
7. In the Table Style Options group (Table Tools Design tab), these check boxes should have check marks: Header Row, Total Row, Banded Rows, and First Column. The Last Column and Banded Columns check boxes should not be selected.
8. Apply the Medium Grid 3 - Accent 2 style to the table.
9. Make all columns as wide as their contents (AutoFit Contents).
10. Center the cells containing the column headings.
11. Right-align all cells containing numbers in the table.
12. Center the table between the left and right margins of the page.
13. Change the document properties, as specifi ed by your instructor.
14. Save the document using the fi le name, Apply 3-1 Projected College Expenses Modifi ed and submit it in the format specifi ed by your instructor.
Extend Your Knowledge
Extend the skills you learned in this chapter and experiment with new skills. You may need to use Help to complete the assignment.
Working with Formulas, Clip Art, Sorting, Picture Bullets, Tabs, and Mailing LabelsNote: To complete this assignment, you will be required to use the Data Files for Students. See the inside back cover of this book for instructions on downloading the Data Files for Students, or contact your instructor for information about accessing the required fi les.
Instructions: Start Word. Create a new document from the fi le called Extend 3-1 Herbals Letter Draft, located on the Data Files for Students. You will enter formulas in the table, change the clip art to Web clip art, change the table style, sort paragraphs, use picture bullets, move tabs, print mailing labels, and work with the Clip Organizer.
Perform the following tasks:
1. Use Help to learn about entering formulas, clip art from the Web, sorting, picture bullets, and printing mailing labels.
2. Use the Formula dialog box (Figure 3–80) to add formulas to the last column in the table so that the total due displays for each item; be sure to enter a number format so that the products are
Apply Your Knowledge continued
1439078459_CH03.indd 1921439078459_CH03.indd 192 7/8/10 8:01:02 PM7/8/10 8:01:02 PM
Copyright 2010 Cengage Learning, Inc. All Rights Reserved. May not be copied, scanned, or duplicated, in whole or in part.

Creating a Business Letter with a Letterhead and Table Word Chapter 3 WD 193
Wo
rd C
hap
ter
3S
TU
DE
NT
AS
SIG
NM
EN
TS
displayed with dollar signs. Then, add formulas to the last row in the table so that the total quantity and total due are displayed, also with dollar signs. Write down the formulas that Word uses to fi nd the product of values in the rows and to sum the values in a column.
3. Delete the current clip art images in the letterhead. Use the Clip Art pane to locate appropriate clip art from the Web, make the clip available offl ine, and insert an image on each side of the business name in the letterhead.
4. Change the table style. One at a time, select and deselect each check box in the Table Style Options group. Write down the function of each check box: Header Row, Total Row, Banded Rows, First Column, Last Column, and Banded Columns. Select the check boxes you prefer for the table.
5. Sort the paragraphs in the bulleted list. 6. Change the bullets in the bulleted list to picture bullets. 7. Move the tab stops in the date line, complimentary close, and signature block from the 3.5" mark
to the 4" mark on the ruler. 8. Change the document properties, as specifi ed by your instructor. Save the revised document and
then submit it in the format specifi ed by your instructor. 9. Print a single mailing label for the letter. 10. Print a full page of mailing labels, each containing the address shown in Figure 3–80. 11. If your instructor approves, start the Clip Organizer. How many collections appear? Expand the
Offi ce Collections. Copy one of the Academic clips to the Favorites folder in the My Collections folder. Locate the clip you made available offl ine in Step 3 and then preview it. What are fi ve of its properties? Add a keyword to the clip. Delete the clip you made available offl ine.
Figure 3–80
change to clip art from the Web
enter formula for table cells
select format for formula results
insert formula that will compute product of cells to the left
insert formula that will sum the numbers above
bullets to be replaced with picture bullets and list to be sorted
table to be modifi ed
address
1439078459_CH03.indd 1931439078459_CH03.indd 193 7/8/10 8:01:02 PM7/8/10 8:01:02 PM
Copyright 2010 Cengage Learning, Inc. All Rights Reserved. May not be copied, scanned, or duplicated, in whole or in part.

WD 194 Word Chapter 3 Creating a Business Letter with a Letterhead and TableS
TU
DE
NT
AS
SIG
NM
EN
TS
Perform the following tasks:
1. Increase the font size of the text in the letterhead. Change the color of the text in the letterhead.
2. Locate and insert at least one appropriate clip art image in the letterhead. If necessary, resize the graphic(s). Move the graphic(s) into the shape.
3. Change the color of the graphic to match the color of the text or shape. Adjust the brightness and contrast of the graphic. Format one color in the graphic as transparent. Change the picture border color.
4. Change the asterisks in the contact information to the dot symbol. Convert the Web address hyperlink to regular text.
5. The letter currently is the block letter style. It should be the modifi ed block letter style. Format the appropriate paragraphs by setting custom tab stops and then positioning those paragraphs at the tab stops. Be sure to position the insertion point in the paragraph before setting the tab stop.
6. Merge the two cells in the fi rst row of the table to one cell and then center the title in the cell. Center the entire table between the page margins. Apply a table style of your choice.
7. Change the document properties, as specifi ed by your instructor. Save the revised document using the fi le name, Make It Right 3-1 Scholarship Letter Modifi ed, and then submit it in the format specifi ed by your instructor.
Figure 3–81
format text in letterhead
insert and format clip art image(s) in shape convert to
regular text
change asterisks to bullet symbol
change style of letter from block to modifi ed block
merge cells
format the table
Make It Right
Analyze a document and correct all errors and/or improve the design.
Formatting a Business LetterNote: To complete this assignment, you will be required to use the Data Files for Students. See the inside back cover of this book for instructions on downloading the Data Files for Students, or contact your instructor for information about accessing the required fi les.
Instructions: Start Word. Create a new document from the fi le called Make It Right 3-1 Scholarship Letter Draft, located on the Data Files for Students. The document is a business letter that is missing elements and is formatted poorly or incorrectly (Figure 3–81). You are to insert and format clip art in the letterhead, change the color of the text and graphic(s), insert symbols, remove a hyperlink, change the letter style from block to modifi ed block, and format the table.
1439078459_CH03.indd 1941439078459_CH03.indd 194 7/8/10 8:01:05 PM7/8/10 8:01:05 PM
Copyright 2010 Cengage Learning, Inc. All Rights Reserved. May not be copied, scanned, or duplicated, in whole or in part.
Creating a Business Letter with a Letterhead and Table Word Chapter 3 WD 195
Wo
rd C
hap
ter
3S
TU
DE
NT
AS
SIG
NM
EN
TS
In the Lab
Design and/or create a document using the guidelines, concepts, and skills presented in this chapter. Labs are listed in order of increasing diffi culty.
Lab 1: Creating a Letter with a LetterheadProblem: As a consultant for DataLock Storage, you respond to queries from potential customers. One letter you prepare is shown in Figure 3–82.
Figure 3–82
Continued >
Shape style: Light 1 Outline, Colored Fill - Aqua, Accent 1; Shape outline: Aqua, Accent 1, Lighter 60%
28-point bold Rockwell font; right-aligned; color: White, Background 1
Aqua, Accent 1, Darker 50%
1439078459_CH03.indd 1951439078459_CH03.indd 195 7/8/10 8:01:06 PM7/8/10 8:01:06 PM
Copyright 2010 Cengage Learning, Inc. All Rights Reserved. May not be copied, scanned, or duplicated, in whole or in part.

WD 196 Word Chapter 3 Creating a Business Letter with a Letterhead and TableS
TU
DE
NT
AS
SIG
NM
EN
TS
Perform the following tasks:
1. Change the theme colors to Technic. 2. Create the letterhead shown at the top of Figure 3–82 on the previous page, following these guidelines: a. Insert the cloud shape at an approximate height of 0.95" and width of 5.85". Change text
wrapping for the shape to Top and Bottom. Add the company name, DataLock Storage, to the shape. Format the shape and its text as indicated in the fi gure.
b. Insert the bullet symbols as shown in the contact information. Remove the hyperlink format from the Web address. If necessary, clear formatting after entering the bottom border.
c. Save the letterhead with the fi le name, Lab 3-1 Cloud Storage Letterhead. 3. Create the letter shown in Figure 3–82 using the modifi ed block letter style, following these guidelines: a. Apply the No Spacing Quick Style to the document text (below the letterhead). b. Set a left-aligned tab stop at the 3.5" mark on the ruler for the date line, complimentary close,
and signature block. Insert the current date. c. Bullet the list as you type it. d. Convert the e-mail address to regular text. e. Check the spelling of the letter. Change the document properties, as specifi ed by your
instructor. Save the letter with Lab 3-1 Cloud Storage Letter as the fi le name. 4. If your instructor permits, address and print an envelope or a mailing label for the letter.
In the Lab
Lab 2: Creating a Letter with a Letterhead and TableProblem: As head librarian at Jonner Public Library, you are responsible for sending confi rmation letters for class registrations. You prepare the letter shown in Figure 3–83.
Perform the following tasks:
1. Change the theme colors to Trek. Change the margins to 1" top and bottom and .75" left and right. 2. Create the letterhead shown at the top of Figure 3–83, following these guidelines: a. Insert the down ribbon shape at an approximate height of 1" and width of 7". Change text
wrapping for the shape to Top and Bottom. Add the library name to the shape. Format the shape and its text as indicated in the fi gure.
b. Insert the clip art image, resize it, change text wrapping to Top and Bottom, move it to the left of the shape, and format it as indicated in the fi gure. Copy the clip art image and move the copy of the image to the right of the shape, as shown in the fi gure. Flip the copied image horizontally.
c. Insert the black small square symbols as shown in the contact information. Remove the hyperlink format from the Web address. If necessary, clear formatting after entering the bottom border.
d. Save the letterhead with the fi le name, Lab 3-2 Library Letterhead. 3. Create the letter shown in Figure 3–83, following these guidelines: a. Apply the No Spacing Quick Style to the document text (below the letterhead). b. Set a left-aligned tab stop at the 4" mark on the ruler for the date line, complimentary close,
and signature block. Insert the current date. c. Insert and center the table. Format the table as specifi ed in the fi gure. d. Bullet the list as you type it. Convert the e-mail address to regular text. e. Check the spelling of the letter. Change the document properties, as specifi ed by your
instructor. Save the letter with Lab 3-2 Library Letter as the fi le name. 4. If your instructor permits, address and print an envelope or a mailing label for the letter.
In the Lab continued
1439078459_CH03.indd 1961439078459_CH03.indd 196 7/8/10 8:01:10 PM7/8/10 8:01:10 PM
Copyright 2010 Cengage Learning, Inc. All Rights Reserved. May not be copied, scanned, or duplicated, in whole or in part.

Creating a Business Letter with a Letterhead and Table Word Chapter 3 WD 197
Wo
rd C
hap
ter
3S
TU
DE
NT
AS
SIG
NM
EN
TS
Figure 3–83
Shape style: Colored Fill - Orange, Accent 1 24-point bold
Harrington font, centered
Orange, Accent 1, Darker 50%
Table style: Medium Grid 3 - Accent 1; Table style options: Header Row and Banded Columns
Clip art search text: information; Clip art color: Orange, Accent color 6 Light
1439078459_CH03.indd 1971439078459_CH03.indd 197 7/8/10 8:01:10 PM7/8/10 8:01:10 PM
Copyright 2010 Cengage Learning, Inc. All Rights Reserved. May not be copied, scanned, or duplicated, in whole or in part.

WD 198 Word Chapter 3 Creating a Business Letter with a Letterhead and TableS
TU
DE
NT
AS
SIG
NM
EN
TS
In the Lab
Lab 3: Creating a Letter with a Letterhead and TableProblem: As president of the County Education Board, you communicate with schools in your district. One of the schools has just been awarded a four-star rating.
Instructions: Prepare the letter shown in Figure 3–84. Change the theme colors to Pushpin. Change the margins to 1" top and bottom and .75" left and right. Follow the guidelines in the modifi ed semi-block letter style. Use proper spacing between elements of the letter. After entering the inside address,
Figure 3–84
Bevel shape: Intense Effect - Brown, Accent 3
Color: Red, Accent color 2 Light; Brightness: +20% Contrast: +20%
Table style: Medium Grid 3 - Accent 3; Table style options: Header Row and First Column
28-point bold Comic Sans MS font, centered
Brown, Accent 3, Darker 50%
1439078459_CH03.indd 1981439078459_CH03.indd 198 7/8/10 8:01:14 PM7/8/10 8:01:14 PM
Copyright 2010 Cengage Learning, Inc. All Rights Reserved. May not be copied, scanned, or duplicated, in whole or in part.

Creating a Business Letter with a Letterhead and Table Word Chapter 3 WD 199
Wo
rd C
hap
ter
3S
TU
DE
NT
AS
SIG
NM
EN
TS
create a building block for Fair Grove Elementary School and insert the building block whenever you have to enter the school name. Resize table columns to fi t contents. Check the spelling of the letter. Change the document properties, as specifi ed by your instructor. Save the letter with Lab 3-3 Education Board Letter as the fi le name.
Cases and Places
Apply your creative thinking and problem solving skills to design and implement a solution.
Note: To complete these assignments, you may be required to use the Data Files for Students. See the inside back cover of this book for instructions on downloading the Data Files for Students, or contact your instructor for information about accessing the required fi les.
1: Create a Letter to a Potential Employer
AcademicAs a student about to graduate, you are actively seeking employment in your fi eld and have located an advertisement for a job in which you are interested. You decide to write a letter to the potential employer: Ms. Janice Tremont at Home Health Associates, 554 Mountain View Lane, Blue Dust, MO 64319.
The draft wording for the letter is as follows: I am responding to your advertisement for the nursing position in the Blue Dust Press. I have tailored my activities and education for a career in geriatric medicine. This month, I will graduate with concentrations in Geriatric Medicine (24 hours), Osteopathic Medicine (12 hours), and Holistic Nursing (9 hours). In addition to receiving my bachelor degree in nursing, I have enhanced my education by participating in the following activities: volunteered at Blue Dust’s free health care clinic; attended several continuing education and career-specifi c seminars, including An Aging Populace, Care of the Homebound, and Special Needs of the Elderly; completed one-semester internship at Blue Dust Community Hospital in spring semester of 2012; completed Certifi ed Nursing Assistant (CNA) program at Blue Dust Community College; and worked as nurse’s aide for two years during college. I look forward to an interview so that we can discuss the position you offer and my qualifi cations. With my background and education, I am confi dent that I will make a positive contribution to Home Health Associates.
The letter should contain a letterhead that uses a shape and clip art, a table (use a table to present the areas of concentration), and a bulleted list (use a bulleted list to present the activities). Insert nonbreaking spaces in the newspaper name. Use the concepts and techniques presented in this chapter to create and format a letter according to the modifi ed block style, creating appropriate paragraph breaks and rewording the draft as necessary. Use your personal information for contact information in the letter. Be sure to check the spelling and grammar of the fi nished letter. Submit your assignment in the format specifi ed by your instructor.
2: Create a Letter Requesting Donations
PersonalAs an alumnus of your historic high school, you are concerned that the building is being considered for demolition. You decide to write a letter to another graduate: Mr. Jim Lemon, 87 Travis Parkway, Vigil, CT 06802.
The draft wording for the letter is as follows: As a member of the class of 1988, you, like many others, probably have many fond memories of our alma mater, Vigil East High School. I recently learned that the building is being considered for demolition because of its age and structural integrity.
Continued >
1439078459_CH03.indd 1991439078459_CH03.indd 199 7/8/10 8:01:17 PM7/8/10 8:01:17 PM
Copyright 2010 Cengage Learning, Inc. All Rights Reserved. May not be copied, scanned, or duplicated, in whole or in part.

WD 200 Word Chapter 3 Creating a Business Letter with a Letterhead and TableS
TU
DE
NT
AS
SIG
NM
EN
TS
As a result, I have decided to call upon the many graduating classes of the school to band together and save the historic building from demolition. According to the documents I have reviewed and information from meetings I have attended, a minimum of $214,000 is necessary to save the school and bring it up to code. Once the repairs are made, I plan to start the process of having it declared an historic landmark. You can help by donating your time, skills, or money. We need skilled tradesmen, including carpenters, roofers, plumbers, and electricians, as well as laborers. In addition, we are asking for monetary donations, as follows, although donations in any amount will be accepted gladly: a donation of $100 categorizes you as a Save Our School Friend, $250 a Patron, and $500 a Benefactor. Once our monetary goal has been reached, the necessary repairs and replacements will be made as follows: Phase I: roof and exterior, Phase II: electrical and plumbing, and Phase III: interior walls, trim, fl ooring, and fi xtures. I hope you will join our conservation efforts so that Vigil East High School will continue to stand proudly for many more years. If you have questions, please contact me at the phone number or e-mail address above. I hope to hear from you soon.
The letter should contain a letterhead that uses a shape and clip art, a table (use a table to present the Save Our School donor categories), and a bulleted list (use a bulleted list to present the phases). Use the concepts and techniques presented in this chapter to create and format a letter according to the modifi ed block style, creating appropriate paragraph breaks and rewording the draft as necessary. Use your personal information for contact information in the letter and Save Our School as the text in the letterhead. Be sure to check spelling and grammar of the fi nished letter. Submit your assignment in the format specifi ed by your instructor.
3: Create a Confi rmation Letter
ProfessionalAs coordinator for Condor Parks and Recreation, you send letters to confi rm registration for activities. You write a confi rmation letter to this registrant: Ms. Tracey Li, 52 West 15th Street, Harpville, KY 42194. Condor Parks and Recreation is located at 2245 Community Place, Harpville, KY 42194; phone number is (842) 555-0444; and Web address is www.condorparks.com.
The draft wording for the letter is as follows: Thank you for your interest in our new spring activities recently listed in the Condor Daily Press. The courses for which you have enrolled, along with their dates and times are Introductory Golf Clinic on May 5 – 6 from 4:00 – 6:00 p.m. at a cost of $25, Recreational League Volleyball on April 30 – May 28 from 7:30 – 9:00 p.m. at a cost of $130, Pilates on May 30 – June 27 from 8:00 – 9:00 p.m. at a cost of $75, and Intermediate Golf Clinic on June 9 – 10 from 12:00 – 2:00 p.m. at a cost of $30. By paying your annual $25 parks and recreation fee, you also are entitled to the following benefi ts: free access to racquetball and tennis courts, on a fi rst-come-fi rst-served basis; attendance at any park-sponsored events, including plays, musical performances, and festivals; and free parking at any parks and recreation facility. Please confi rm your registration by calling me at [enter your phone number here] or via e-mail at [enter your e-mail address here]. Thank you for your interest in Condor Parks and Recreation offerings. We look forward to seeing you at upcoming events.
The letter should contain a letterhead that uses a shape and clip art, a table (use a table to present the courses enrolled), and a bulleted list (use a bulleted list to present the benefi ts). Insert nonbreaking spaces in the newspaper name. Use the concepts and techniques presented in this chapter to create and format a letter according to the modifi ed block style, creating appropriate paragraph breaks and rewording the draft as necessary. Be sure to check spelling and grammar of the fi nished letter. Submit your assignment in the format specifi ed by your instructor.
Cases and Places continued
1439078459_CH03.indd 2001439078459_CH03.indd 200 7/8/10 8:01:18 PM7/8/10 8:01:18 PM
Copyright 2010 Cengage Learning, Inc. All Rights Reserved. May not be copied, scanned, or duplicated, in whole or in part.

![SAMPLE RFP COVER LETTER - Welcome to NYC.gov … · Web viewSAMPLE REQUEST FOR PROPOSAL (RFP) COVER LETTER Last Updated: 7/23/2008 PRINT LETTER ON ORGANIZATION LETTERHEAD [Date] [Consultant](https://img.pdfslide.net/doc/110x75/5ad4d3227f8b9a48398cd5a9/sample-rfp-cover-letter-welcome-to-nycgov-viewsample-request-for-proposal.jpg)


![[INSERT COMPANY LETTERHEAD] LETTER OF T · 2019-11-20 · [INSERT COMPANY LETTERHEAD] LETTER OF TRANSMITTAL [INSERT DATE OF TRANSMITTAL] Nancy P. Collins Senior Assistant Director-Real](https://img.pdfslide.net/doc/110x75/5f549d49491641273d5e32bc/insert-company-letterhead-letter-of-t-2019-11-20-insert-company-letterhead.jpg)

![Henri Temianka Correspondence; (marnold) · 2020. 4. 19. · Malcolm Arnold Letter #1]] [[Page 1- Letter]] [[Letterhead: PRIMROSE COTTAGE, ST. MERRYN, PADSTOW, CORNWALL]] September](https://img.pdfslide.net/doc/110x75/60cb0b2b2a05a7435d7d3d75/henri-temianka-correspondence-marnold-2020-4-19-malcolm-arnold-letter-1.jpg)