Embed Size (px)
Citation preview
RW635TRL635TRBG635T
Microwave OvenUse and CareManual
Attention: Keep these instructions for future reference.If the oven changes ownership, be sure this manualaccompanies oven.
2
Model Identification .......................................... 3Important Safety Instructions............................ 4Precautions to Avoid Possible Exposureto Excessive Microwave Energy ....................... 5Electrical Requirements ................................... 6
Grounding Instructions ............................. 6Microwave Power ..................................... 7Radio Interference ................................... 7
Installation ........................................................ 7Unpacking OvenOven PlacementBuilt-In Capability
Usage ............................................................ 8Oven SignalOven Operation
Oven LightRotawave®
TurntableSetting the ClockInterlock Systems
Control Panel ................................................... 9Preprogrammed Food Pads ............................. 10Preprogrammed Food Pad Operation .............. 11Full power Cooking........................................... 11Cookmatic® Power Level Cooking .................... 11Independent Timer ........................................... 11Accu-Thaw™ Defrosting by Time ...................... 11Accu-Thaw Defrosting Guide ........................... 12Cooking Program ............................................. 15Instant Replay .................................................. 15
Changing Preprogrammed Food Pads............. 16Lockout and Custom Lock ....................... 16
Microwave Cooking .......................................... 17Microwave UtensilsMicrowave Cooking Principles
Heating and Reheating Chart ........................... 18Microwave Cooking Guide................................ 19
Appetizers/Snacks ................................... 19Beverages ................................................ 21Soups/Stews ............................................ 22Sandwiches .............................................. 23Meats ....................................................... 25Poultry ...................................................... 30Fish/Seafood ............................................ 33Eggs ......................................................... 36Pasta/Rice ................................................ 37Cereals ..................................................... 40Vegetables ............................................... 41Sauces/Jams/Relishes ............................. 44Breads...................................................... 46Baked Goods/Deserts .............................. 49Candies .................................................... 54
Care and Cleaning ........................................... 56Interior, Exterior and DoorsDischarge Air VentsTurntableSplatter ShieldOven Light
Before Calling for Service ................................ 57
Contents
3
Model IdentificationPlease read this Use and Care Manual thoroughly. This manual provides proper maintenanceinformation. Any questions, call the Consumer Affairs Department at 1-800-843-0304 inside U.S.A.and 1-319-622-5511 if outside U.S.A.
Complete enclosed registration card and promptly return. If registration card is missing, call theConsumer Affairs Department.
When contacting Amana, provide product information. Locate product information on the nameplate.Record the following information:
Model Number:Manufacturing Number:Serial or S/N Number:Date of purchase:Dealer’s name and address:
Keep a copy of sales receipt for future reference.
Locate an authorized servicer by calling 1-800-NATLSVC (628-5782) inside U.S.A. and 319-622-5511outside U.S.A. Warranty service must be performed by an authorized servicer. Amana alsorecommends contacting an authorized servicer if service is required after warranty expires.
Amana offers a complete line of appliances...refrigerators, freezers, ranges, cooktops, wall ovens,dishwashers, washers and dryers. Amana also manufactures a complete selection of high efficiencygas furnaces plus both central and room air conditioners. When buying one of these products,choose Amana quality appliances.
Special Features of Your New Amana Microwave Oven
• Removable Turntable
• 1000 Watts of Cooking Power
• 1.2 cu.ft. Capacity
• Built-In Capability

4
IMPORTANT SAFETY INSTRUCTIONRecognize this symbol as a SAFETY messageWARNING
WHEN USING ELECTRICAL APPLIANCES, BASIC SAFETY PRECAUTIONS SHOULD BEFOLLOWED TO REDUCE THE RISK OF BURNS, ELECTRICAL SHOCK, FIRE, INJURYTO PERSONS, OR EXPOSURE TO EXCESSIVE MICROWAVE ENERGY:
1. READ all instructions before using theappliance.
2. READ AND FOLLOW the specific“PRECAUTIONS TO AVOID POSSIBLEEXPOSURE TO EXCESSIVE MICROWAVEENERGY” found on page 5.
3. This appliance MUST BE GROUNDED.Connect only to properly grounded outlet. See“GROUNDING INSTRUCTIONS” on page 6.
4. Install or locate this appliance ONLY inaccordance with the provided installationinstructions.
5. Some products such as whole eggs and sealedcontainers -- for example, closed glass jars --may explode and SHOULD NOT be HEATEDin this oven.
6. Use this appliance ONLY for its intended useas described in this manual. Do not usecorrosive chemicals or vapors in this appliance.This type of oven is specifically designed toheat or cook. It is not designed for industrial orlaboratory use.
7. As with any appliance, CLOSE SUPERVISIONis necessary when used by CHILDREN.
8. DO NOT operate this appliance if it has adamaged cord or plug, if it is not workingproperly, or if it has been damaged or dropped.
9. This appliance should be serviced ONLY byqualified service personnel. Contact nearestauthorized service facility for examination,repair or adjustment.
10. DO NOT cover or block any openings on theappliance.
11. DO NOT store this appliance outdoors. DONOT use this product near water -- forexample, near a kitchen sink, in a wetbasement, or near a swimming pool, and thelike.
12. DO NOT immerse cord or plug in water.
13. Keep cord AWAY from HEATED surfaces.
14. DO NOT let cord hang over edge of table orcounter.
15. See door cleaning instructions on page 56.
TO REDUCE THE RISK OF FIRE IN THE OVEN CAVITY:a. DO NOT overcook food. Carefully attend appliance if paper, plastic, or other combustible materials are
placed inside the oven to facilitate cooking.b. Remove wire twist-ties from paper or plastic bags before placing bag in oven.c. If materials inside the oven should ignite, keep oven door closed, turn oven off, and disconnect the power
cord, or shut off power at the fuse or circuit breaker panel.IF THE DOOR IS OPENED THE FIRE MAY SPREAD!
d. DO NOT use the cavity for storage purposes. DO NOT leave paper products, cooking utensils, or food inthe cavity when not in use.
THIS APPLIANCE MUST BE SERVICED ONLY BY QUALIFIED SERVICE PERSONNEL. CONTACT YOURNEAREST AUTHORIZED SERVICE FACILITY FOR EXAMINATION, REPAIR OR ADJUSTMENT.
SAVE THESE INSTRUCTIONS
5
PRECAUTIONS TO AVOIDPOSSIBLE EXPOSURE TO EXCESSIVE
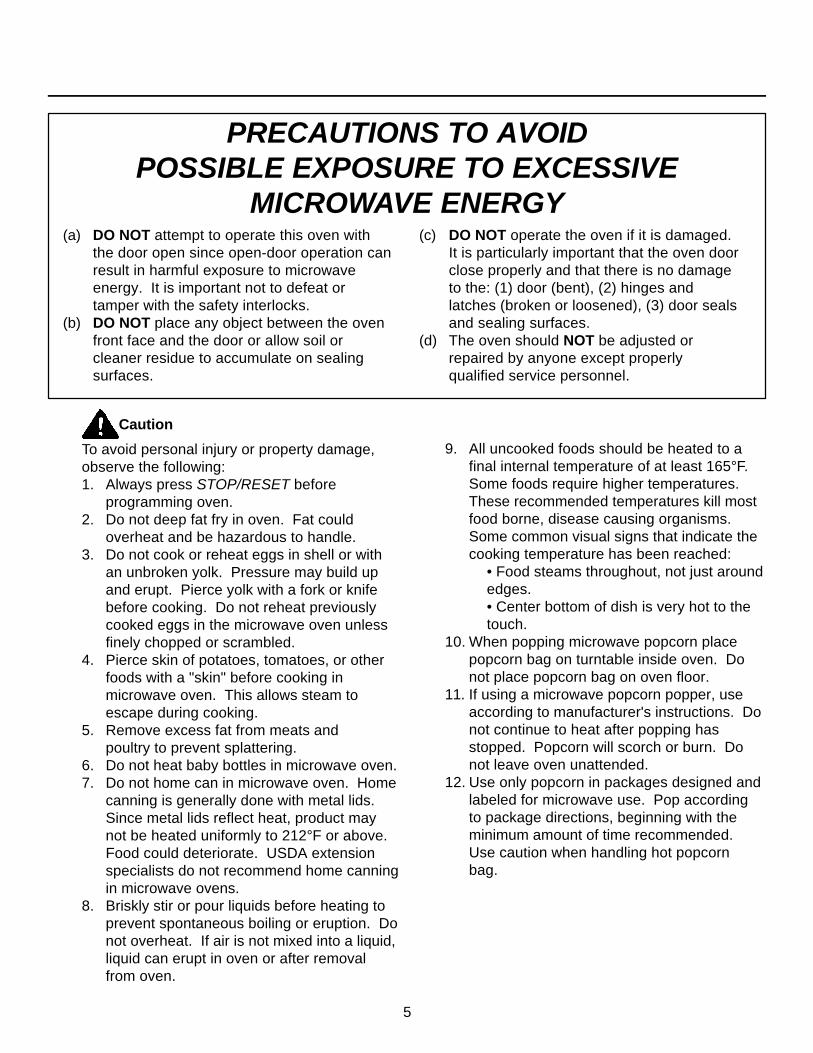
MICROWAVE ENERGY(a) DO NOT attempt to operate this oven with
the door open since open-door operation canresult in harmful exposure to microwaveenergy. It is important not to defeat ortamper with the safety interlocks.
(b) DO NOT place any object between the ovenfront face and the door or allow soil orcleaner residue to accumulate on sealingsurfaces.
(c) DO NOT operate the oven if it is damaged.It is particularly important that the oven doorclose properly and that there is no damageto the: (1) door (bent), (2) hinges andlatches (broken or loosened), (3) door sealsand sealing surfaces.
(d) The oven should NOT be adjusted orrepaired by anyone except properlyqualified service personnel.
Caution
To avoid personal injury or property damage,observe the following:1. Always press STOP/RESET before
programming oven.2. Do not deep fat fry in oven. Fat could
overheat and be hazardous to handle.3. Do not cook or reheat eggs in shell or with
an unbroken yolk. Pressure may build upand erupt. Pierce yolk with a fork or knifebefore cooking. Do not reheat previouslycooked eggs in the microwave oven unlessfinely chopped or scrambled.
4. Pierce skin of potatoes, tomatoes, or otherfoods with a "skin" before cooking inmicrowave oven. This allows steam toescape during cooking.
5. Remove excess fat from meats andpoultry to prevent splattering.
6. Do not heat baby bottles in microwave oven.7. Do not home can in microwave oven. Home
canning is generally done with metal lids.Since metal lids reflect heat, product maynot be heated uniformly to 212°F or above.Food could deteriorate. USDA extensionspecialists do not recommend home canningin microwave ovens.
8. Briskly stir or pour liquids before heating toprevent spontaneous boiling or eruption. Donot overheat. If air is not mixed into a liquid,liquid can erupt in oven or after removalfrom oven.
9. All uncooked foods should be heated to afinal internal temperature of at least 165°F.Some foods require higher temperatures.These recommended temperatures kill mostfood borne, disease causing organisms.Some common visual signs that indicate thecooking temperature has been reached:
• Food steams throughout, not just aroundedges.• Center bottom of dish is very hot to thetouch.
10. When popping microwave popcorn placepopcorn bag on turntable inside oven. Donot place popcorn bag on oven floor.
11. If using a microwave popcorn popper, useaccording to manufacturer's instructions. Donot continue to heat after popping hasstopped. Popcorn will scorch or burn. Donot leave oven unattended.
12. Use only popcorn in packages designed andlabeled for microwave use. Pop accordingto package directions, beginning with theminimum amount of time recommended.Use caution when handling hot popcornbag.
6
16. Do not use regular cooking thermometers inoven. Most cooking thermometers containmercury and may cause “arcing”,malfunction, and/or damage to oven.
17. Metal or ceramic accessories which aredesigned to absorb microwave energy toprovide heat may be used with caution. Testdevice before use (See "Utensil Check Test"on page 17). Read and followmanufacturer's instructions provided with theaccessory. Contact accessory manufacturerwith questions concerning theseaccessories. Amana Refrigeration, Inc.,does not endorse any brand of accessory.
18. Never use newspapers in oven since papermay ignite.
19. Pierce or open plastic bags (and otherairtight containers) before heating inmicrowave oven. This allows steam toescape during cooking.
20. Containers may become hot and potholders may be needed.
21. Closely supervise any use by children.Make sure they can read instructions andreach controls. Never allow them to lean orswing on oven door.
13. Microwave convenience foods are oftenpackaged in specially designed packaging.Special plates, lids, containers, or otherunique packaging materials may be used.Susceptor packing material (a thin,metalized plastic film) is frequently used tohelp brown and crispen foods such asmicrowave pizzas, french fries, or fishsticks. Be sure to follow food packageinstructions carefully. Contact conveniencefood manufacturer with questionsconcerning these products. AmanaRefrigeration, Inc., does not endorseany brand of microwave convenience foods,or any type of microwave food packaging.
14. To place large casserole dish in microwave,remove turntable and turntable support.Place plug, located in turntable support, intohole in oven floor (see diagram on page 56).After removing casserole from oven, placeplug back into turntable support and insertturntable support back into hole in ovenfloor. Place turntable on turntable support.
15. Do not operate microwave oven empty.This could damage the oven.
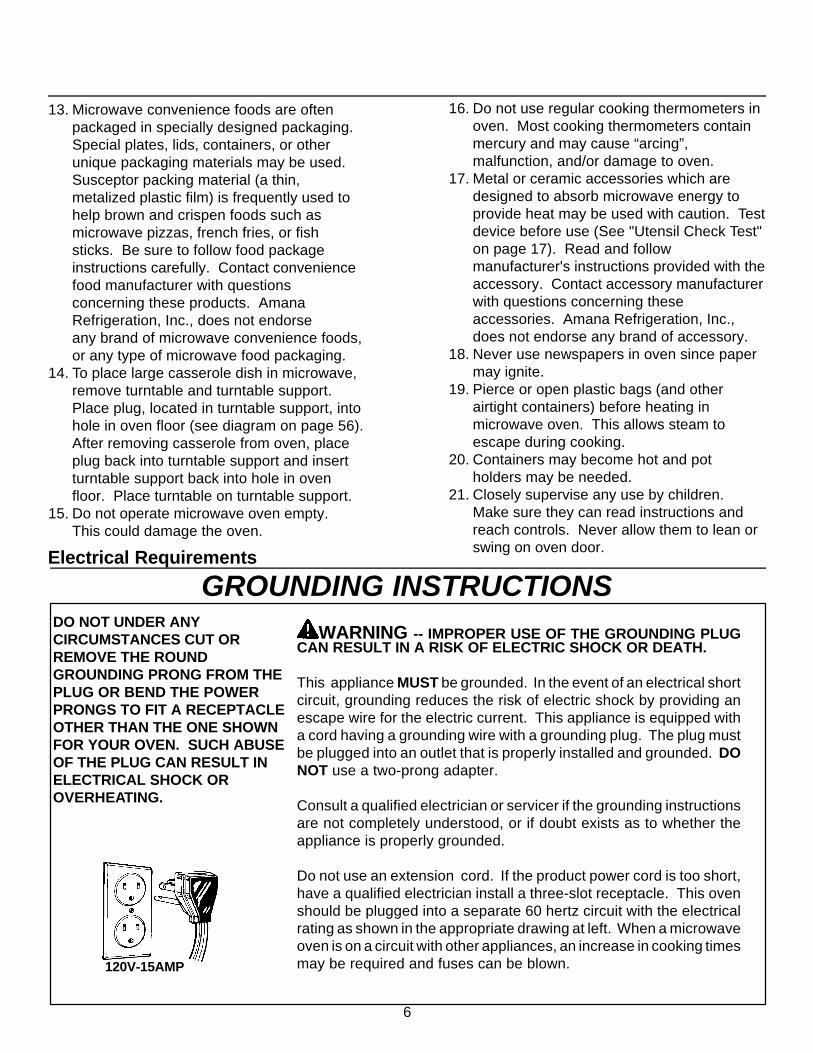
GROUNDING INSTRUCTIONS
120V-15AMP
WARNING -- IMPROPER USE OF THE GROUNDING PLUGCAN RESULT IN A RISK OF ELECTRIC SHOCK OR DEATH.
This appliance MUST be grounded. In the event of an electrical shortcircuit, grounding reduces the risk of electric shock by providing anescape wire for the electric current. This appliance is equipped witha cord having a grounding wire with a grounding plug. The plug mustbe plugged into an outlet that is properly installed and grounded. DONOT use a two-prong adapter.
Consult a qualified electrician or servicer if the grounding instructionsare not completely understood, or if doubt exists as to whether theappliance is properly grounded.
Do not use an extension cord. If the product power cord is too short,have a qualified electrician install a three-slot receptacle. This ovenshould be plugged into a separate 60 hertz circuit with the electricalrating as shown in the appropriate drawing at left. When a microwaveoven is on a circuit with other appliances, an increase in cooking timesmay be required and fuses can be blown.
DO NOT UNDER ANYCIRCUMSTANCES CUT ORREMOVE THE ROUNDGROUNDING PRONG FROM THEPLUG OR BEND THE POWERPRONGS TO FIT A RECEPTACLEOTHER THAN THE ONE SHOWNFOR YOUR OVEN. SUCH ABUSEOF THE PLUG CAN RESULT INELECTRICAL SHOCK OROVERHEATING.
Electrical Requirements
7
Installation
Radio InterferenceMicrowave oven operation may cause interference to radio, TV, or similar equipment. To reduce or eliminateinterference:• Clean door and sealing surfaces of oven. See "Care and Cleaning" instructions on page 56.• Place the radio, TV, etc. away from oven.• Use properly installed antenna on radio, TV, etc. to obtain stronger signal reception.
Unpacking Oven• Inspect microwave oven for damage such as dents
in door or dents inside oven cavity.• Report any dents or breakage to source of purchase
immediately. Do not attempt to use damaged oven.• Remove all packing and printed materials from oven
interior.• Remove turntable from foam pad, located at bottom
of carton.• If oven has been stored in extremely cold area, wait
a few hours before plugging in.
Power Supply CordA short power supply cord is provided to reduce risks of becoming entangled in or tripping over a longercord.• Longer cord sets or extension cords are available and may be used if care is exercised in their use.• If a long cord or extension cord is used, (1) the marked electrical rating of the cord set or extension cord should be at least as great as the electrical rating of the appliance, (2) the extension cord must be a grounding type 3 wire cord, and (3) the longer cord should be arranged so that it will not drape over the countertop or tabletop where it can be pulled on by children or tripped over accidentally.
Microwave PowerModels RW635T, RL635T and RBG635T deliver 1000 watts, based on IEC 705 test method, of microwavepower to the oven cavity.
Built-In Capability
Oven PlacementDo not build oven in with sides, top or bottom airflowrestricted. Oven must have sufficient airflow aroundit. Air flows around electric components. At leastone inch of clearance is required at top and sides ofoven to provide proper ventilation. With restrictedair flow oven will not operate properly and life ofelectrical parts shortens.
To build-in, use only Amana "RS" trim kit. Trim kitwill have a label identifying which oven models maybe used.
8
UsageOven Signal
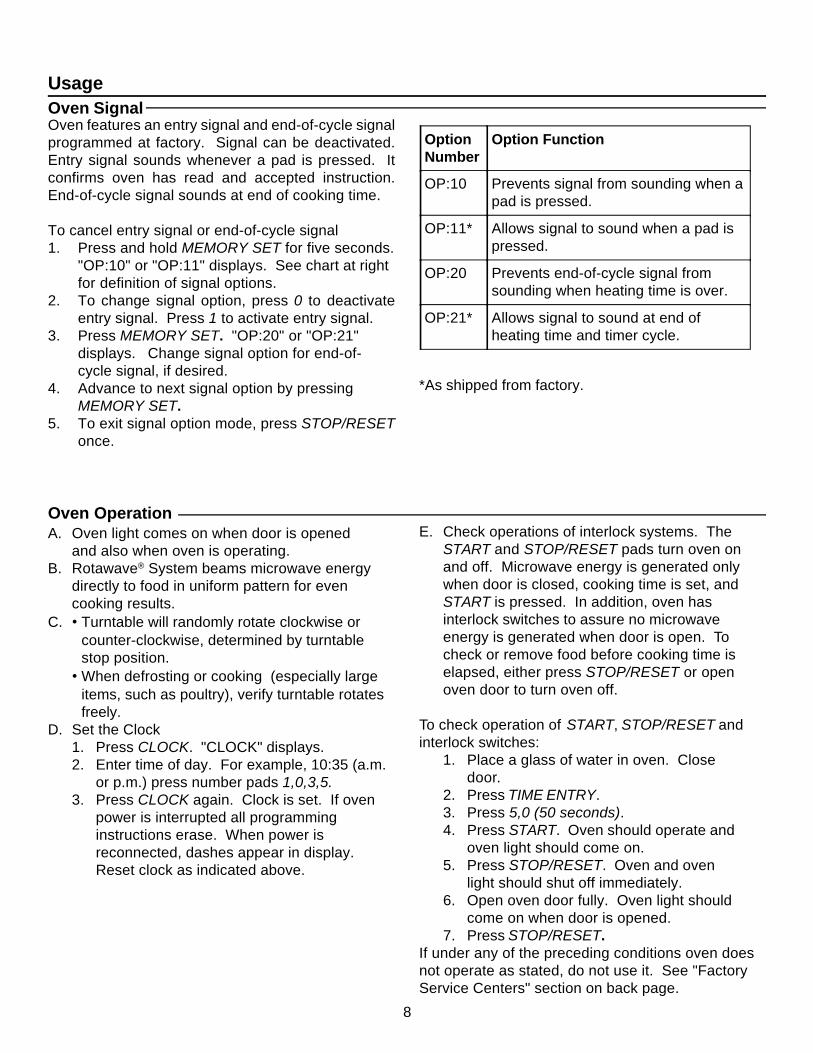
OptionNumber
Option Function
OP:10 Prevents signal from sounding when apad is pressed.
OP:11* Allows signal to sound when a pad ispressed.
OP:20 Prevents end-of-cycle signal fromsounding when heating time is over.
OP:21* Allows signal to sound at end ofheating time and timer cycle.
*As shipped from factory.
Oven Operation
Oven features an entry signal and end-of-cycle signalprogrammed at factory. Signal can be deactivated.Entry signal sounds whenever a pad is pressed. Itconfirms oven has read and accepted instruction.End-of-cycle signal sounds at end of cooking time.
To cancel entry signal or end-of-cycle signal1. Press and hold MEMORY SET for five seconds.
"OP:10" or "OP:11" displays. See chart at rightfor definition of signal options.
2. To change signal option, press 0 to deactivateentry signal. Press 1 to activate entry signal.
3. Press MEMORY SET. "OP:20" or "OP:21"displays. Change signal option for end-of-cycle signal, if desired.
4. Advance to next signal option by pressingMEMORY SET.
5. To exit signal option mode, press STOP/RESETonce.
A. Oven light comes on when door is openedand also when oven is operating.
B. Rotawave® System beams microwave energydirectly to food in uniform pattern for evencooking results.
C. • Turntable will randomly rotate clockwise orcounter-clockwise, determined by turntablestop position.
• When defrosting or cooking (especially largeitems, such as poultry), verify turntable rotatesfreely.
D. Set the Clock1. Press CLOCK. "CLOCK" displays.2. Enter time of day. For example, 10:35 (a.m.
or p.m.) press number pads 1,0,3,5.3. Press CLOCK again. Clock is set. If oven
power is interrupted all programminginstructions erase. When power isreconnected, dashes appear in display.Reset clock as indicated above.
E. Check operations of interlock systems. TheSTART and STOP/RESET pads turn oven onand off. Microwave energy is generated onlywhen door is closed, cooking time is set, andSTART is pressed. In addition, oven hasinterlock switches to assure no microwaveenergy is generated when door is open. Tocheck or remove food before cooking time iselapsed, either press STOP/RESET or openoven door to turn oven off.
To check operation of START, STOP/RESET andinterlock switches:
1. Place a glass of water in oven. Closedoor.
2. Press TIME ENTRY.3. Press 5,0 (50 seconds).4. Press START. Oven should operate and
oven light should come on.5. Press STOP/RESET. Oven and oven
light should shut off immediately.6. Open oven door fully. Oven light should
come on when door is opened.7. Press STOP/RESET.
If under any of the preceding conditions oven doesnot operate as stated, do not use it. See "FactoryService Centers" section on back page.
9
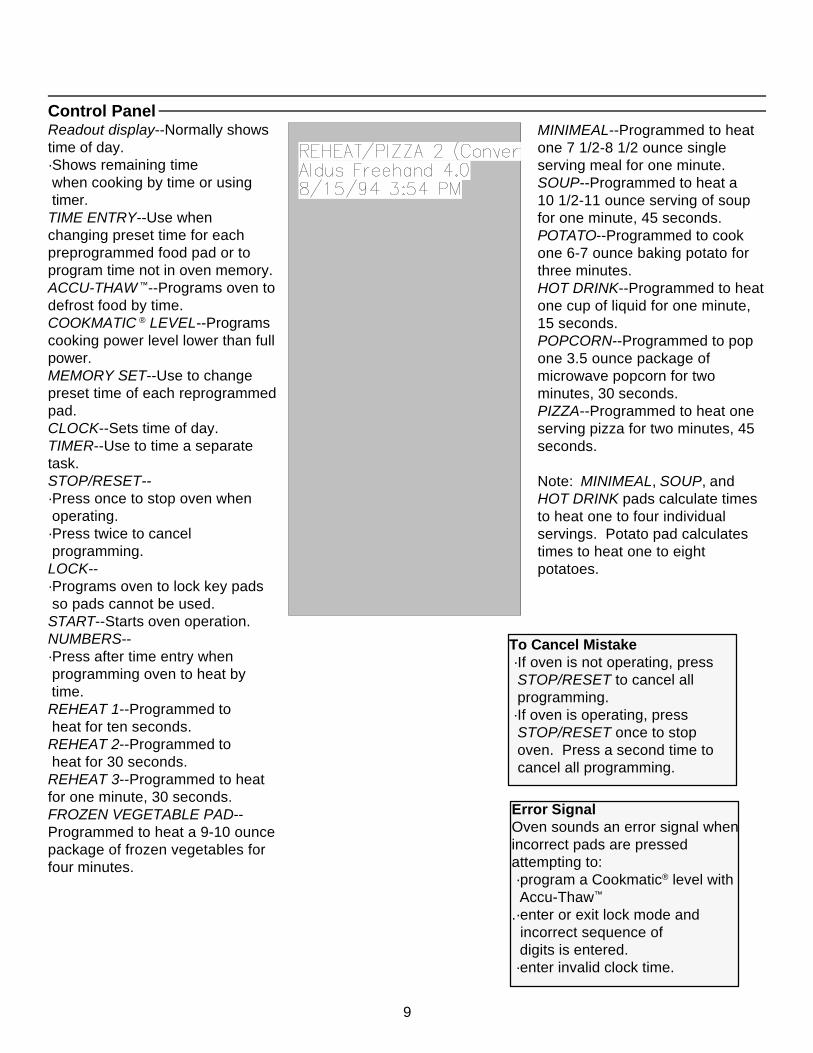
Control PanelReadout display--Normally showstime of day.·Shows remaining time when cooking by time or using timer.TIME ENTRY--Use whenchanging preset time for eachpreprogrammed food pad or toprogram time not in oven memory.ACCU-THAW ™--Programs oven todefrost food by time.COOKMATIC ® LEVEL--Programscooking power level lower than fullpower.MEMORY SET--Use to changepreset time of each reprogrammedpad.CLOCK--Sets time of day.TIMER--Use to time a separatetask.STOP/RESET--·Press once to stop oven when operating.·Press twice to cancel programming.LOCK--·Programs oven to lock key pads so pads cannot be used.START--Starts oven operation.NUMBERS--·Press after time entry when programming oven to heat by time.REHEAT 1--Programmed to heat for ten seconds.REHEAT 2--Programmed to heat for 30 seconds.REHEAT 3--Programmed to heatfor one minute, 30 seconds.FROZEN VEGETABLE PAD--Programmed to heat a 9-10 ouncepackage of frozen vegetables forfour minutes.
Error SignalOven sounds an error signal whenincorrect pads are pressedattempting to: ·program a Cookmatic® level with Accu-Thaw™
.·enter or exit lock mode and incorrect sequence of digits is entered. ·enter invalid clock time.
To Cancel Mistake ·If oven is not operating, press STOP/RESET to cancel all programming. ·If oven is operating, press STOP/RESET once to stop oven. Press a second time to cancel all programming.
MINIMEAL--Programmed to heatone 7 1/2-8 1/2 ounce singleserving meal for one minute.SOUP--Programmed to heat a10 1/2-11 ounce serving of soupfor one minute, 45 seconds.POTATO--Programmed to cookone 6-7 ounce baking potato forthree minutes.HOT DRINK--Programmed to heatone cup of liquid for one minute,15 seconds.POPCORN--Programmed to popone 3.5 ounce package ofmicrowave popcorn for twominutes, 30 seconds.PIZZA--Programmed to heat oneserving pizza for two minutes, 45seconds.
Note: MINIMEAL, SOUP, andHOT DRINK pads calculate timesto heat one to four individualservings. Potato pad calculatestimes to heat one to eightpotatoes.
1 0
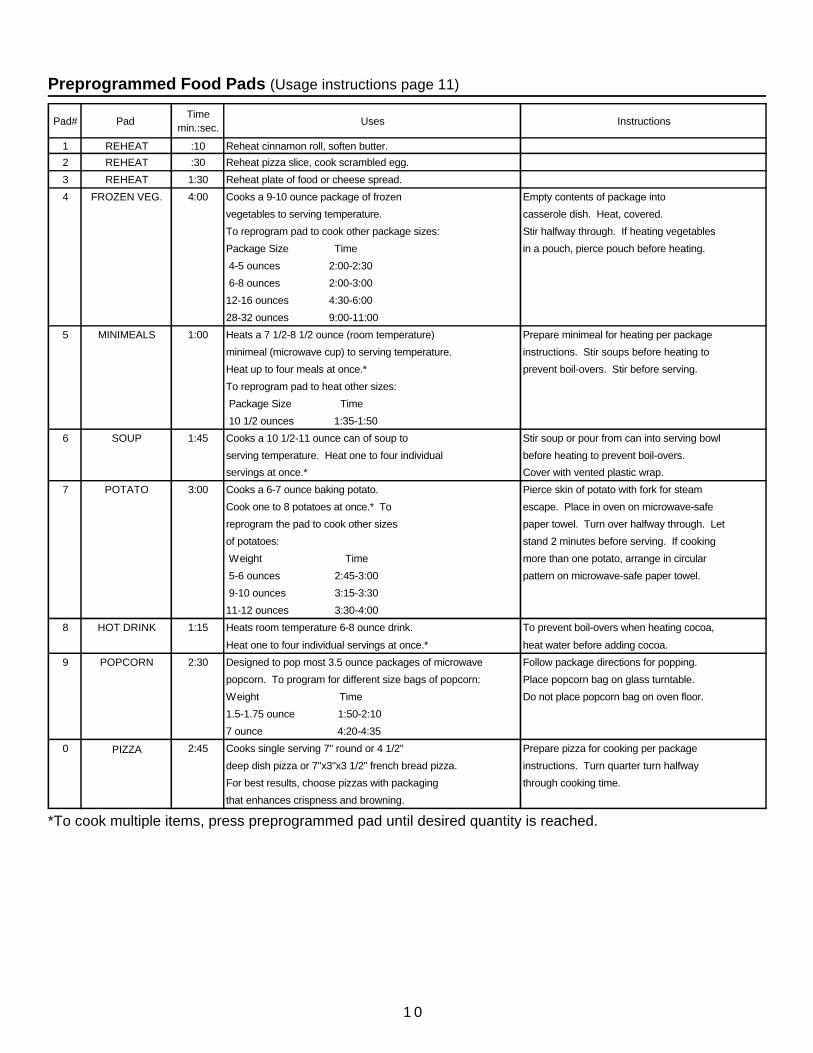
Preprogrammed Food Pads (Usage instructions page 11)
*To cook multiple items, press preprogrammed pad until desired quantity is reached.
Pad# Pad Time
min.:sec.Uses Instructions
1 REHEAT :10 Reheat cinnamon roll, soften butter.2 REHEAT :30 Reheat pizza slice, cook scrambled egg.
3 REHEAT 1:30 Reheat plate of food or cheese spread.
4 FROZEN VEG. 4:00 Cooks a 9-10 ounce package of frozen Empty contents of package into
vegetables to serving temperature. casserole dish. Heat, covered.
To reprogram pad to cook other package sizes: Stir halfway through. If heating vegetables
Package Size Time in a pouch, pierce pouch before heating.
4-5 ounces 2:00-2:30
6-8 ounces 2:00-3:00
12-16 ounces 4:30-6:00
28-32 ounces 9:00-11:00
5 MINIMEALS 1:00 Heats a 7 1/2-8 1/2 ounce (room temperature) Prepare minimeal for heating per package
minimeal (microwave cup) to serving temperature. instructions. Stir soups before heating to
Heat up to four meals at once.* prevent boil-overs. Stir before serving.
To reprogram pad to heat other sizes:
Package Size Time
10 1/2 ounces 1:35-1:50
6 SOUP 1:45 Cooks a 10 1/2-11 ounce can of soup to Stir soup or pour from can into serving bowl
serving temperature. Heat one to four individual before heating to prevent boil-overs.
servings at once.* Cover with vented plastic wrap.
7 POTATO 3:00 Cooks a 6-7 ounce baking potato. Pierce skin of potato with fork for steam
Cook one to 8 potatoes at once.* To escape. Place in oven on microwave-safe
reprogram the pad to cook other sizes paper towel. Turn over halfway through. Let
of potatoes: stand 2 minutes before serving. If cooking
Weight Time more than one potato, arrange in circular
5-6 ounces 2:45-3:00 pattern on microwave-safe paper towel.
9-10 ounces 3:15-3:30
11-12 ounces 3:30-4:00
8 HOT DRINK 1:15 Heats room temperature 6-8 ounce drink. To prevent boil-overs when heating cocoa,
Heat one to four individual servings at once.* heat water before adding cocoa.
9 POPCORN 2:30 Designed to pop most 3.5 ounce packages of microwave Follow package directions for popping.
popcorn. To program for different size bags of popcorn: Place popcorn bag on glass turntable.
Weight Time Do not place popcorn bag on oven floor.
1.5-1.75 ounce 1:50-2:10
7 ounce 4:20-4:35
0 PIZZA 2:45 Cooks single serving 7" round or 4 1/2" Prepare pizza for cooking per package
deep dish pizza or 7"x3"x3 1/2" french bread pizza. instructions. Turn quarter turn halfway
For best results, choose pizzas with packaging through cooking time.
that enhances crispness and browning.
1 1
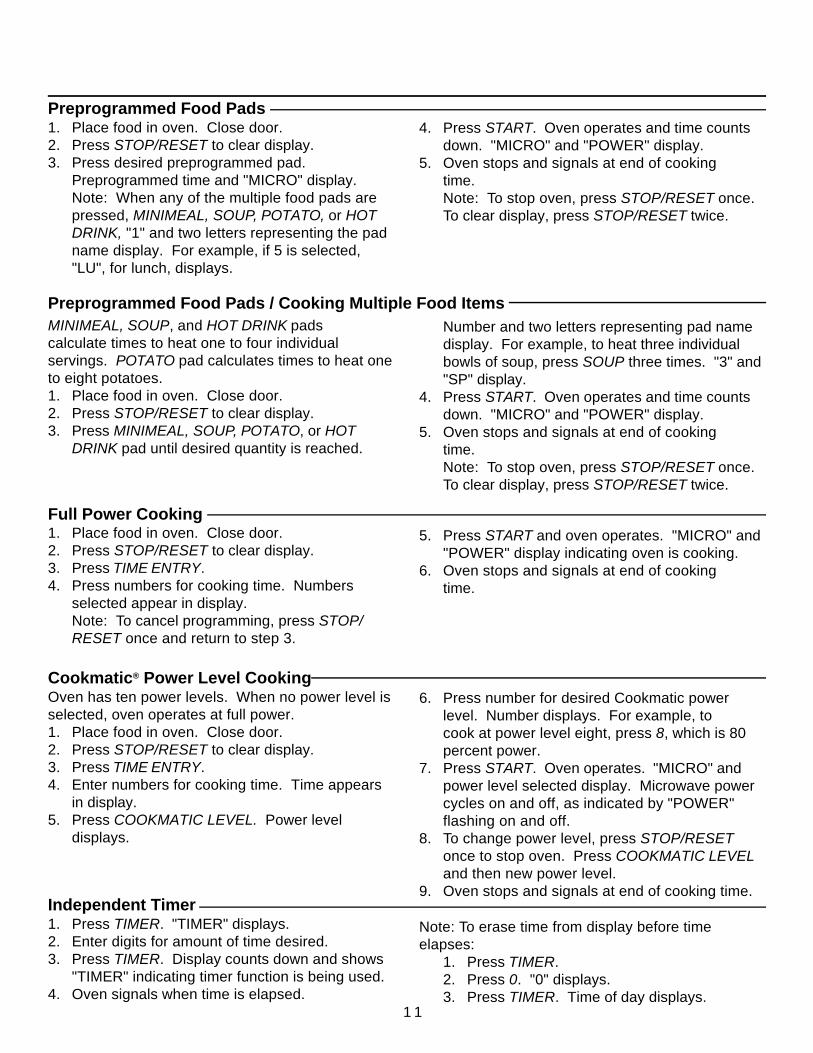
Preprogrammed Food Pads1. Place food in oven. Close door.2. Press STOP/RESET to clear display.3. Press desired preprogrammed pad.
Preprogrammed time and "MICRO" display.Note: When any of the multiple food pads arepressed, MINIMEAL, SOUP, POTATO, or HOTDRINK, "1" and two letters representing the padname display. For example, if 5 is selected,"LU", for lunch, displays.
4. Press START. Oven operates and time countsdown. "MICRO" and "POWER" display.
5. Oven stops and signals at end of cookingtime.Note: To stop oven, press STOP/RESET once.To clear display, press STOP/RESET twice.
Note: To erase time from display before timeelapses:
1. Press TIMER.2. Press 0. "0" displays.3. Press TIMER. Time of day displays.
Cookmatic® Power Level CookingOven has ten power levels. When no power level isselected, oven operates at full power.1. Place food in oven. Close door.2. Press STOP/RESET to clear display.3. Press TIME ENTRY.4. Enter numbers for cooking time. Time appears
in display.5. Press COOKMATIC LEVEL. Power level
displays.
6. Press number for desired Cookmatic powerlevel. Number displays. For example, tocook at power level eight, press 8, which is 80percent power.
7. Press START. Oven operates. "MICRO" andpower level selected display. Microwave powercycles on and off, as indicated by "POWER"flashing on and off.
8. To change power level, press STOP/RESETonce to stop oven. Press COOKMATIC LEVELand then new power level.
9. Oven stops and signals at end of cooking time.
Full Power Cooking1. Place food in oven. Close door.2. Press STOP/RESET to clear display.3. Press TIME ENTRY.4. Press numbers for cooking time. Numbers
selected appear in display.Note: To cancel programming, press STOP/RESET once and return to step 3.
5. Press START and oven operates. "MICRO" and"POWER" display indicating oven is cooking.
6. Oven stops and signals at end of cookingtime.
Preprogrammed Food Pads / Cooking Multiple Food ItemsMINIMEAL, SOUP, and HOT DRINK padscalculate times to heat one to four individualservings. POTATO pad calculates times to heat oneto eight potatoes.1. Place food in oven. Close door.2. Press STOP/RESET to clear display.3. Press MINIMEAL, SOUP, POTATO, or HOT
DRINK pad until desired quantity is reached.
Number and two letters representing pad namedisplay. For example, to heat three individualbowls of soup, press SOUP three times. "3" and"SP" display.
4. Press START. Oven operates and time countsdown. "MICRO" and "POWER" display.
5. Oven stops and signals at end of cookingtime.Note: To stop oven, press STOP/RESET once.To clear display, press STOP/RESET twice.
Independent Timer1. Press TIMER. "TIMER" displays.2. Enter digits for amount of time desired.3. Press TIMER. Display counts down and shows
"TIMER" indicating timer function is being used.4. Oven signals when time is elapsed.
1 2
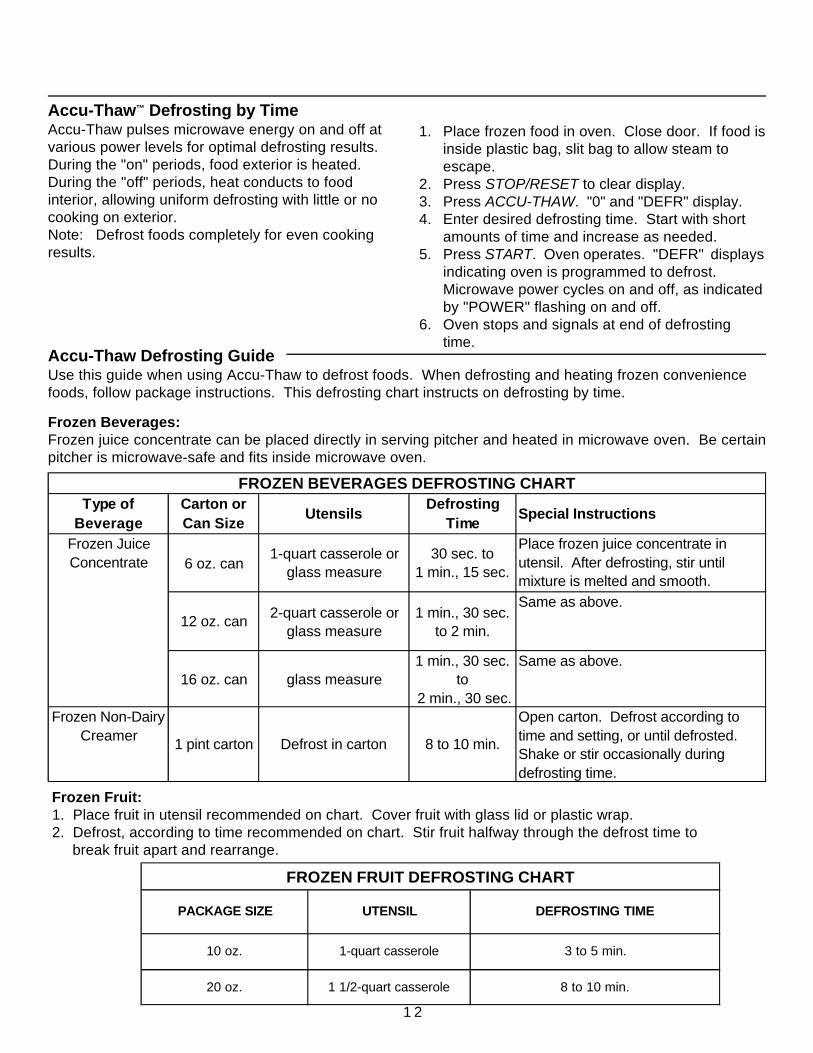
Accu-Thaw™ Defrosting by TimeAccu-Thaw pulses microwave energy on and off atvarious power levels for optimal defrosting results.During the "on" periods, food exterior is heated.During the "off" periods, heat conducts to foodinterior, allowing uniform defrosting with little or nocooking on exterior.Note: Defrost foods completely for even cookingresults.
1. Place frozen food in oven. Close door. If food isinside plastic bag, slit bag to allow steam toescape.
2. Press STOP/RESET to clear display.3. Press ACCU-THAW. "0" and "DEFR" display.4. Enter desired defrosting time. Start with short
amounts of time and increase as needed.5. Press START. Oven operates. "DEFR" displays
indicating oven is programmed to defrost.Microwave power cycles on and off, as indicatedby "POWER" flashing on and off.
6. Oven stops and signals at end of defrostingtime.
Accu-Thaw Defrosting GuideUse this guide when using Accu-Thaw to defrost foods. When defrosting and heating frozen conveniencefoods, follow package instructions. This defrosting chart instructs on defrosting by time.
FROZEN FRUIT DEFROSTING CHART
PACKAGE SIZE UTENSIL DEFROSTING TIME
10 oz. 1-quart casserole 3 to 5 min.
20 oz. 1 1/2-quart casserole 8 to 10 min.
Frozen Fruit: 1. Place fruit in utensil recommended on chart. Cover fruit with glass lid or plastic wrap. 2. Defrost, according to time recommended on chart. Stir fruit halfway through the defrost time to break fruit apart and rearrange.
Frozen Beverages:Frozen juice concentrate can be placed directly in serving pitcher and heated in microwave oven. Be certainpitcher is microwave-safe and fits inside microwave oven.
FROZEN BEVERAGES DEFROSTING CHARTType of
BeverageCarton orCan Size
UtensilsDefrosting
TimeSpecial Instructions
Frozen Juice Concentrate 6 oz. can
1-quart casserole or glass measure
30 sec. to1 min., 15 sec.
Place frozen juice concentrate in utensil. After defrosting, stir until mixture is melted and smooth.
12 oz. can 2-quart casserole or glass measure
1 min., 30 sec. to 2 min.
Same as above.
16 oz. can glass measure1 min., 30 sec.
to 2 min., 30 sec.
Same as above.
Frozen Non-Dairy Creamer 1 pint carton Defrost in carton 8 to 10 min.
Open carton. Defrost according to time and setting, or until defrosted. Shake or stir occasionally during defrosting time.
1 3
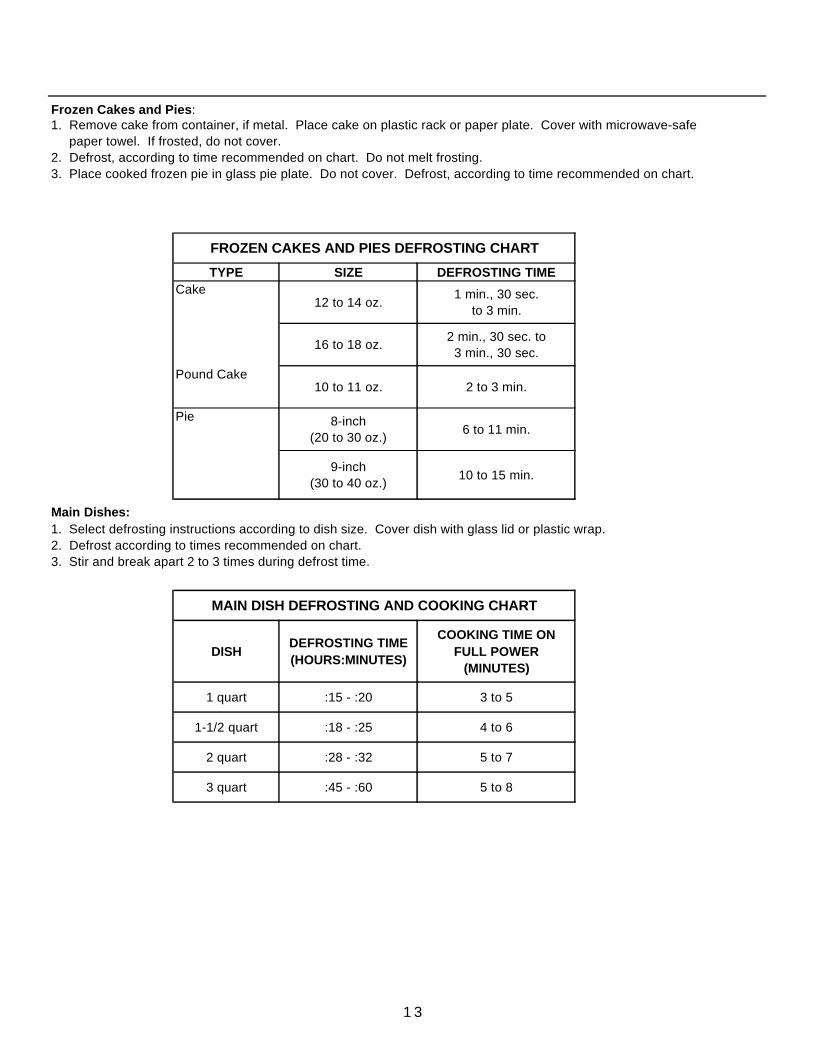
Frozen Cakes and Pies:
FROZEN CAKES AND PIES DEFROSTING CHART
TYPE SIZE DEFROSTING TIMECake
12 to 14 oz.1 min., 30 sec.
to 3 min.
16 to 18 oz. 2 min., 30 sec. to 3 min., 30 sec.
Pound Cake10 to 11 oz. 2 to 3 min.
Pie 8-inch (20 to 30 oz.) 6 to 11 min.
9-inch (30 to 40 oz.) 10 to 15 min.
Main Dishes:
MAIN DISH DEFROSTING AND COOKING CHART
DISHDEFROSTING TIME(HOURS:MINUTES)
COOKING TIME ON FULL POWER
(MINUTES)
1 quart :15 - :20 3 to 5
1-1/2 quart :18 - :25 4 to 6
2 quart :28 - :32 5 to 7
3 quart :45 - :60 5 to 8
1. Remove cake from container, if metal. Place cake on plastic rack or paper plate. Cover with microwave-safe paper towel. If frosted, do not cover. 2. Defrost, according to time recommended on chart. Do not melt frosting.3. Place cooked frozen pie in glass pie plate. Do not cover. Defrost, according to time recommended on chart.
1. Select defrosting instructions according to dish size. Cover dish with glass lid or plastic wrap.2. Defrost according to times recommended on chart.3. Stir and break apart 2 to 3 times during defrost time.
1 4
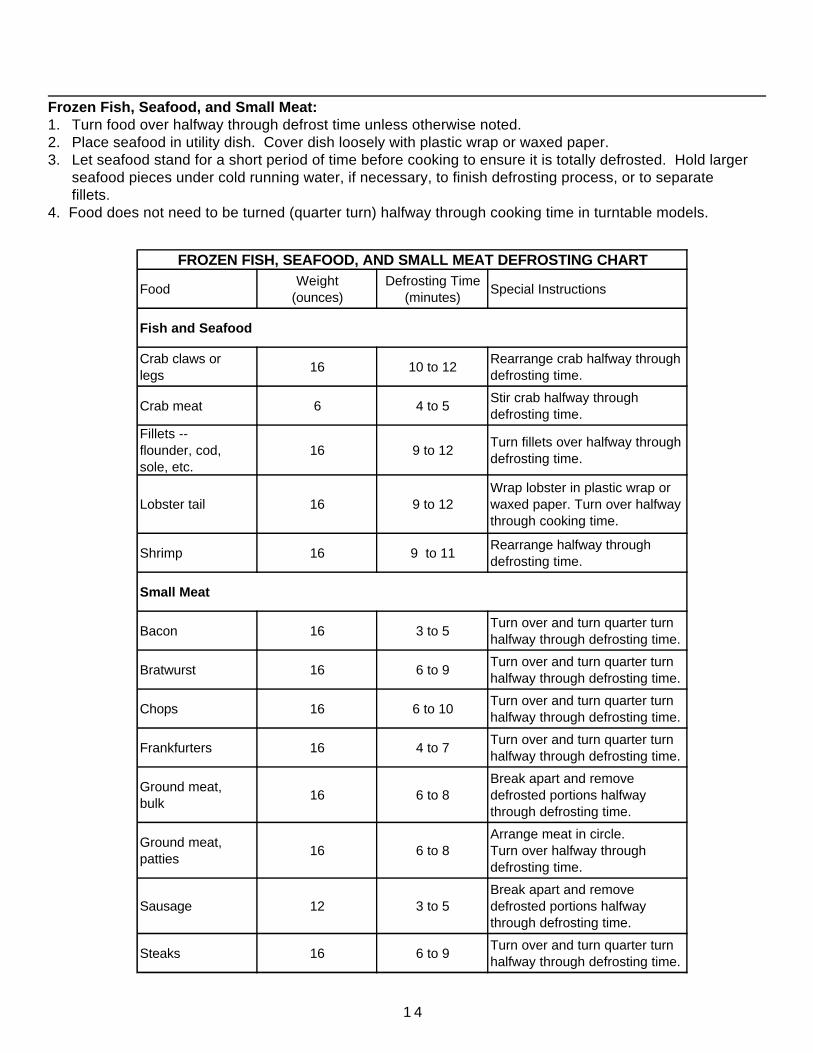
Frozen Fish, Seafood, and Small Meat:1. Turn food over halfway through defrost time unless otherwise noted.2. Place seafood in utility dish. Cover dish loosely with plastic wrap or waxed paper.3. Let seafood stand for a short period of time before cooking to ensure it is totally defrosted. Hold larger
seafood pieces under cold running water, if necessary, to finish defrosting process, or to separatefillets.
4. Food does not need to be turned (quarter turn) halfway through cooking time in turntable models.
FROZEN FISH, SEAFOOD, AND SMALL MEAT DEFROSTING CHART
Food Weight (ounces)
Defrosting Time (minutes) Special Instructions
Fish and Seafood
Crab claws or legs 16 10 to 12 Rearrange crab halfway through
defrosting time.
Crab meat 6 4 to 5 Stir crab halfway through defrosting time.
Fillets -- flounder, cod, sole, etc.
16 9 to 12 Turn fillets over halfway through defrosting time.
Lobster tail 16 9 to 12 Wrap lobster in plastic wrap or waxed paper. Turn over halfway through cooking time.
Shrimp 16 9 to 11 Rearrange halfway through defrosting time.
Small Meat
Bacon 16 3 to 5 Turn over and turn quarter turn halfway through defrosting time.
Bratwurst 16 6 to 9 Turn over and turn quarter turn halfway through defrosting time.
Chops 16 6 to 10 Turn over and turn quarter turn halfway through defrosting time.
Frankfurters 16 4 to 7 Turn over and turn quarter turn halfway through defrosting time.
Ground meat, bulk 16 6 to 8
Break apart and remove defrosted portions halfway through defrosting time.
Ground meat, patties 16 6 to 8
Arrange meat in circle. Turn over halfway through defrosting time.
Sausage 12 3 to 5Break apart and remove defrosted portions halfway through defrosting time.
Steaks 16 6 to 9 Turn over and turn quarter turn halfway through defrosting time.
1 5
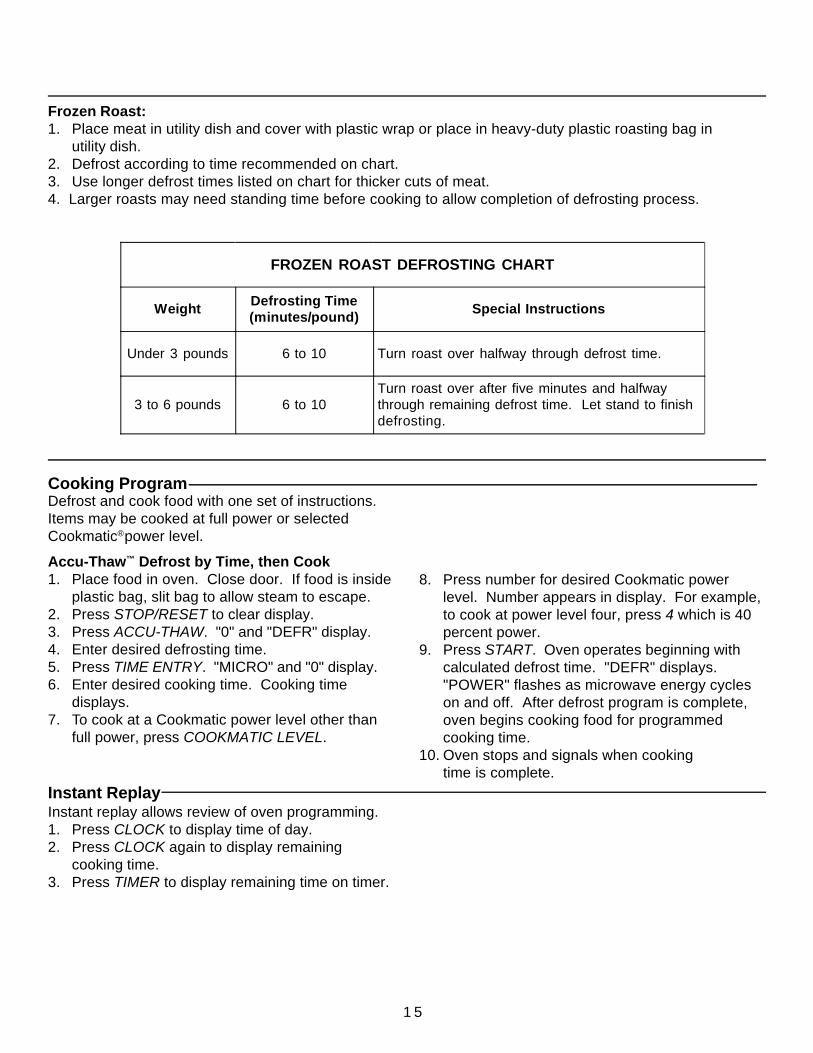
FROZEN ROAST DEFROSTING CHART
Weight Defrosting Time(minutes/pound) Special Instructions
Under 3 pounds 6 to 10 Turn roast over halfway through defrost time.
3 to 6 pounds 6 to 10Turn roast over after five minutes and halfwaythrough remaining defrost time. Let stand to finishdefrosting.
Frozen Roast:1. Place meat in utility dish and cover with plastic wrap or place in heavy-duty plastic roasting bag in
utility dish.2. Defrost according to time recommended on chart.3. Use longer defrost times listed on chart for thicker cuts of meat.4. Larger roasts may need standing time before cooking to allow completion of defrosting process.
Cooking ProgramDefrost and cook food with one set of instructions.Items may be cooked at full power or selectedCookmatic®power level.
Instant ReplayInstant replay allows review of oven programming.1. Press CLOCK to display time of day.2. Press CLOCK again to display remaining
cooking time.3. Press TIMER to display remaining time on timer.
Accu-Thaw™ Defrost by Time, then Cook1. Place food in oven. Close door. If food is inside
plastic bag, slit bag to allow steam to escape.2. Press STOP/RESET to clear display.3. Press ACCU-THAW. "0" and "DEFR" display.4. Enter desired defrosting time.5. Press TIME ENTRY. "MICRO" and "0" display.6. Enter desired cooking time. Cooking time
displays.7. To cook at a Cookmatic power level other than
full power, press COOKMATIC LEVEL.
8. Press number for desired Cookmatic powerlevel. Number appears in display. For example,to cook at power level four, press 4 which is 40percent power.
9. Press START. Oven operates beginning withcalculated defrost time. "DEFR" displays."POWER" flashes as microwave energy cycleson and off. After defrost program is complete,oven begins cooking food for programmedcooking time.
10. Oven stops and signals when cookingtime is complete.
1 6
Changing Preprogrammed Food PadsPreprogrammed food pads cook specified amountsof food to serving temperature (see page 10). Toreprogram pads:1. Press STOP/RESET to clear display.2. Press MEMORY SET. "P" displays.3. Press pad number 0-9 to change. Current
heating time, Cookmatic® level, and "MICRO"display.
4. Press TIME ENTRY. "0" displays.5. Enter new heating time. New time appears in
display.Note: When reprogramming one of themultiple program pads (MINIMEAL, SOUP,POTATO, or HOT DRINK) enter cooking time forone serving. Oven calculates time for cookingmultiple servings.
6. To cook on a power level other than full power,press COOKMATIC LEVEL. "COOK LEVEL"displays.
7. Enter desired Cookmatic power level.
Lockout and Custom LockUse to prevent accidental programming or starting ofoven. Lockout disables all key pads. Custom lockdisables all key pads except one preprogrammedpad. For example, to access only the popcorn pad,the custom lock feature would disable the otherpads from operating, allowing only the popcorn padto operate.
Programming Lockout:1. Press LOCK. "0" displays.2. Press 1,3,5,7.3. Press LOCK. "LOC" displays, then time of day
and "L" (indicating lockout is on) display. If apad is pressed while in lockout mode "LOC"displays for a second.
Removing Lockout Programming:1. Press LOCK. "0" displays.2. Enter 1,3,5,7.3. Press LOCK. Time of day displays.
8. Press MEMORY SET to lock new instructionsinto preprogrammed pad. "P" displays. Note: Ifcooking time and/or Cookmatic power level ischanged on multiple program pad, the change isfor one serving. Oven calculates change formultiple servings. For example, if time ischanged to cook one potato from 3:30 to 3:00,oven calculates time to cook eight potatoes.
9. To change other preprogrammed pads, return tostep 3.
10. To exit this mode, press STOP/RESET. Time ofday displays.
Programming Custom Lock:1. Press LOCK. "0" displays.2. Press 2,4,6,8.3. Press preprogrammed pad to be left on (not
locked off). For example, to access the popcornpad or pad 9 only, press 9. "9" displays.
4. Press LOCK. "LOC" displays, then time of day,pad number programmed in step 3 ("9" fromexample), and "READY" display indicating pad 9is ready for use. If pad other than accessiblepad is pressed, "LOC" displays for a second.
Removing Custom Lock Programming:1. Press LOCK. "0" displays.2. Press 2,4,6,8. "READY" displays.3. Press LOCK. Time of day displays.
1 7
Food PlacementAllow space between foods for proper cooking results.For best results, arrange thickest, or hardest to cookportion of foods toward outside of dish. Place smaller,easier to cook portion toward center.
ReheatingWhen reheating food, cover dish loosely with plasticwrap. Heat at full power. Reheat porous items such asbreads and cakes for a minimum amount of time. Stirsoups, sauces and beverages vigorously beforereheating.
DefrostingIt is important that most foods, especially meats, betotally defrosted before cooking. To determine foodsare totally defrosted, insert sharp knife in center offood, check for remaining ice crystals. Turn large fooditems over during defrosting, for best results.
To prevent excess moisture
1. Cover foods before cooking in microwave.2. Cover potatoes and fresh vegetables with a
microwave-safe paper towel before cooking tohelp absorb excess moisture. Remove papertowel immediately after cooking to preventvegetables from reabsorbing moisture.
3. Open microwave door immediately after cooking to reduce moisture inside oven.
Microwave UtensilsMicrowave Usable utensils include glass, glass-ceramic, natural fiber cloth, non-recycled paper,plastic and wood.
Unusable utensils include aluminum foil, grocerybags, lead crystal, metal, metallic trimmed china,newspapers, and recycled paper.
Utensil Check TestUse the following test to check utensils for microwavesafeness:1. Place glass measuring cup of water next to
empty dish to be tested in unit.2. Heat on full power for one minute.3. Check temperature of dish and water.
If dish remains cool and water is hot, dish ismicrowave safe. If dish is slightly warm, use forshort term cooking only. If dish is hot and water iscool, do not use. Dish remains cool if notabsorbing microwaves and microwaves are beingabsorbed by water. Dish becomes hot if absorbingmicrowaves.
Microwave Cooking PrinciplesDecrease cooking times when:
Foods are high in fat and sugar.Foods are porous.Foods are flat, thin or prepared in shallow pan.
Increase cooking times when:Foods are thick and dense.Foods are frozen or refrigerator temperature.Food volume increases.
When cooking foods in a microwave oven, a considerable amount of steam/water vapor can be generated andaccumulate on foods and inside of oven. This is caused by hot moist air from food coming in contact with coolsurfaces inside oven. Use the following procedures to help reduce moisture buildup.
Microwave Cooking
ShieldingPorous, thin and protruding portions of large fooditems, such as poultry drumsticks, can be covered withthin strips of foil to prevent overcooking.
PiercingMembranes or tight skins on foods, such as egg yolks,potatoes, tomatoes, and acorn squash, must bepierced. Piercing allows steam to escape duringcooking.
BrowningSome foods prepared in microwave will not brown thesame as if done in conventional oven. This is particularlytrue for baked goods, such as breads and cakes.
18
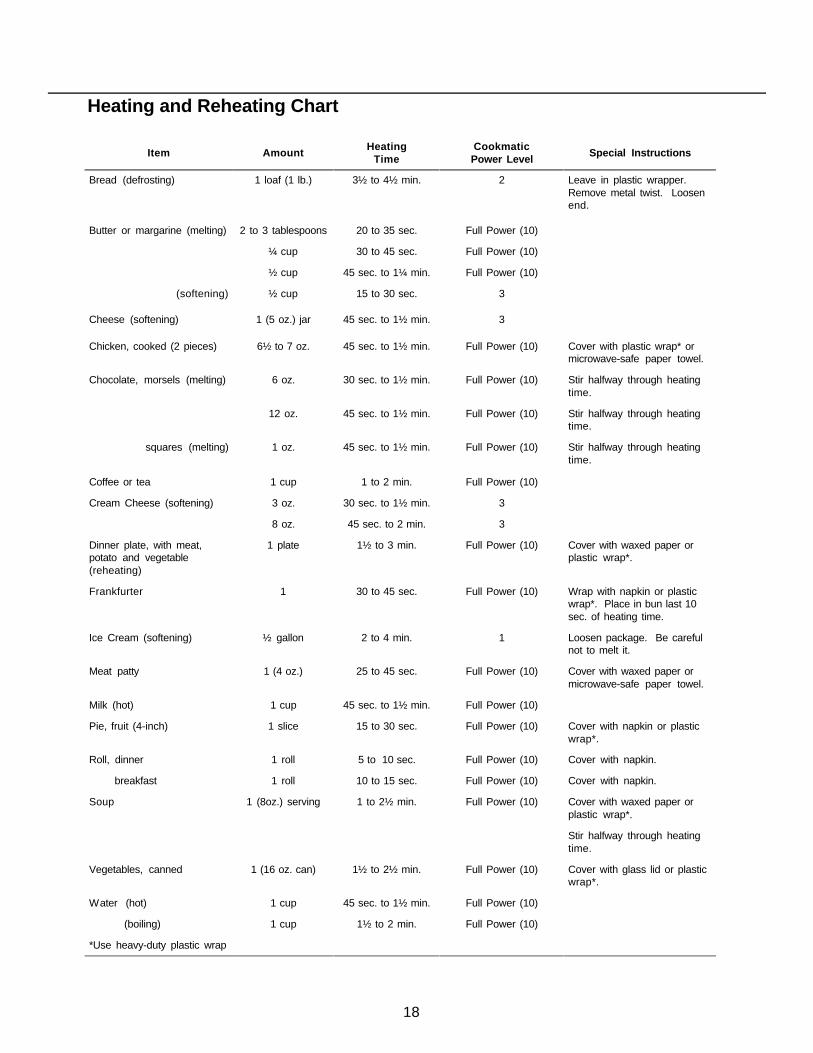
Item Amount HeatingTime
CookmaticPower Level Special Instructions
Bread (defrosting) 1 loaf (1 lb.) 3½ to 4½ min. 2 Leave in plastic wrapper.Remove metal twist. Loosenend.
Butter or margarine (melting) 2 to 3 tablespoons 20 to 35 sec. Full Power (10)
¼ cup 30 to 45 sec. Full Power (10)
½ cup 45 sec. to 1¼ min. Full Power (10)
(softening) ½ cup 15 to 30 sec. 3
Cheese (softening) 1 (5 oz.) jar 45 sec. to 1½ min. 3
Chicken, cooked (2 pieces) 6½ to 7 oz. 45 sec. to 1½ min. Full Power (10) Cover with plastic wrap* ormicrowave-safe paper towel.
Chocolate, morsels (melting) 6 oz. 30 sec. to 1½ min. Full Power (10) Stir halfway through heatingtime.
12 oz. 45 sec. to 1½ min. Full Power (10) Stir halfway through heatingtime.
squares (melting) 1 oz. 45 sec. to 1½ min. Full Power (10) Stir halfway through heatingtime.
Coffee or tea 1 cup 1 to 2 min. Full Power (10)
Cream Cheese (softening) 3 oz. 30 sec. to 1½ min. 3
8 oz. 45 sec. to 2 min. 3
Dinner plate, with meat,potato and vegetable(reheating)
1 plate 1½ to 3 min. Full Power (10) Cover with waxed paper orplastic wrap*.
Frankfurter 1 30 to 45 sec. Full Power (10) Wrap with napkin or plasticwrap*. Place in bun last 10sec. of heating time.
Ice Cream (softening) ½ gallon 2 to 4 min. 1 Loosen package. Be carefulnot to melt it.
Meat patty 1 (4 oz.) 25 to 45 sec. Full Power (10) Cover with waxed paper ormicrowave-safe paper towel.
Milk (hot) 1 cup 45 sec. to 1½ min. Full Power (10)
Pie, fruit (4-inch) 1 slice 15 to 30 sec. Full Power (10) Cover with napkin or plasticwrap*.
Roll, dinner 1 roll 5 to 10 sec. Full Power (10) Cover with napkin.
breakfast 1 roll 10 to 15 sec. Full Power (10) Cover with napkin.
Soup 1 (8oz.) serving 1 to 2½ min. Full Power (10) Cover with waxed paper orplastic wrap*.
Stir halfway through heatingtime.
Vegetables, canned 1 (16 oz. can) 1½ to 2½ min. Full Power (10) Cover with glass lid or plasticwrap*.
Water (hot) 1 cup 45 sec. to 1½ min. Full Power (10)
(boiling) 1 cup 1½ to 2 min. Full Power (10)
*Use heavy-duty plastic wrap
Heating and Reheating Chart
19
Appetizers and Snacks Cooking Guidelines1. Save time by using only one dish for both
heating and serving. Be certain dishes aremicrowave safe.
2. Arrange appetizers in a single layer whenheating, for best results. In most cases, coverwith waxed paper or microwave safe papertowel to prevent splattering. Stir dips beforeserving.
3. Whenever possible, prepare appetizersahead and quickly heat when ready to serve.Freeze meatballs ahead, if desired. Quicklydefrost and heat when needed.
4. Do not place spreads on crackers until readyto heat to prevent sogginess.
5. Use only popcorn in packages designed andlabeled for microwave use. Pop according tomanufacturer's instructions. (See"Precautions" page 4)
6. Shellfish may be heated directly in the shell,since shells allow microwaves to transmitthrough them. Shells make attractive servingdishes.
7. Freshen stale or soggy potato chips, crackers,or other snacks in microwave oven. Heat on fullpower for 15 to 45 seconds, or until heatedthrough. They become more crisp as they cool.
8. Blocks of cheese can be heated for serving.Heat for 10 to 20 seconds on power level 4.
9. Most appetizers, such as canapes or dips, canbe heated on full power.
10. For best results, reheat baked pizza on a paperplate, napkin, or microwave-safe paper towel,on a plastic or ceramic rack, or in a preheatedbrowning skillet or pizza crisping utensil.
1. Place butter in 2-cup glass measure. Heat onfull power for 30 seconds to 1 minute, or untilmelted. Add Worcestershire sauce, salts, andgarlic powder. Mix well. Set aside.
2. Combine popcorn, cereal, pretzels, and nuts in4-quart casserole. Pour butter mixture over all.Toss until well-coated.
3. Heat on full power for 3 to 5 minutes, or untilheated through. Mix thoroughly 2 to 3 timesduring heating. Cool. Store in airtight container.
Microwave Cooking Guide
1. For meatballs: Combine all meatballingredients in a large bowl. Mix well. Form into1-inch diameter balls. Divide evenly between 2,9 x 2-inch round dishes. Cover with waxedpaper.
2. For each dish: Cook, covered, on full power for3 to 5 minutes, or until beef is no longer pink.Drain.
3. For sauce: Combine catsup, barbecue sauceand currant jelly in medium bowl. Divide sauceand pour over meatballs, stirring until wellcoated. Heat on full power for 2 to 4 minutes,or until heated through.
Spicy Meatball AppetizersYield: 50 meatballsMeatballs:2 lbs. ground beef1 cup herb seasoned croutons1 (10 3/4 oz.) can French onion soup1 egg, slightly beaten2 teaspoons monosodium glutamateSauce:1 cup hot catsup1 cup barbecue sauce1 (10 oz.) jar currant jelly (about 1 cup)
Crunchy Nibble MixYield: 10 to 12 servings1/2 cup butter or margarine2 teaspoons Worcestershire sauce1 teaspoon onion salt1/2 teaspoon celery salt1/4 teaspoon garlic powder6 cups popped popcorn2 cups toasted wheat cereal squares2 cups pretzel sticks1 cup mixed nuts1 cup salted cocktail peanuts
20
Hot Pecan DipYield: About 2 cups1 cup water4 to 5 ozs. dried beef, chopped1 (8 oz.) pkg. cream cheese, cubed1/2 cup dairy sour cream1/3 cup chopped pecans1/4 cup grated Parmesan cheese1/4 cup mayonnaise2 tablespoons chopped green pepper1 tablespoon chopped pimento1/2 teaspoon garlic powder1/2 teaspoon dill weed1/4 teaspoon hot pepper sauce
1. Combine water and dried beef in 1-quartcasserole. Cook, covered, on full power for 2 1/2 to 4 minutes or until boiling. Drain.
2. Add remaining ingredients. Blend well. Heat,covered, on full power for 2 1/2 to 4 minutes, oruntil heated through. Stir halfway throughheating time.
Marinated VegetablesYield: 4 servings1 cup julienne strip carrots1 tablespoon water1 1/2 cups broccoli flowerets1 cup cauliflower flowerets1 cup sliced zucchini1 small Bermuda onion, sliced and separated into
rings3/4 cup Italian salad dressing
1. Place carrots and water in 1 1/2 quartcasserole. Cook, covered, on full power for 45seconds to 1 1/2 minutes, or until warmed.
2. Add broccoli and cauliflower. Cook, covered,on full power for 45 seconds to 1 1/2 minutes,or until vegetables are barely tender. Drain.
3. Add zucchini and onion. Pour dressing overvegetables. Stir to coat. Cover and refrigeratefor at least 8 hours before serving.
Pizza FondueYield: 1 quart1 lb. ground beef2/3 cup chopped onion2 (8 oz. each) cans pizza sauce with cheese3/4 teaspoon leaf oregano1/4 teaspoon garlic powder1 cup shredded Mozzarella cheese2 (5 oz.) jars sharp pasteurized process cheese
spreadFrench bread cubes or chips
1. Combine ground beef and onion in casserole.Cook, covered, on full power for 3 to 5 minutes,or until meat is no longer pink. Stir halfwaythrough cooking time.
2. Blend together pizza sauce, oregano, and garlicpowder. Add to meat mixture. Cook on fullpower for 2 to 4 minutes, or until bubbling.
3. Stir in Mozzarella cheese and cheese spread.Heat on full power for 3 to 4 minutes or untilcheese melts and is no longer stringy. Stiroccasionally during heating time. Serve hotwith French bread cubes or chips.
21
Instant Hot chocolate MixYield: 1 gallon mix10 2/3 cups nonfat dry milk (enough to make 8
quarts of milk)1/2 cup (or 6 oz. jar) powdered nondairy coffee
creamer1/2 cup confectioners' sugar1 lb. quick chocolate flavored mixWater
1. Combine all ingredients, except water, in largemixing bowl. (Mix may be stored in airtight 1-gallon container.)
2. Place 1/4 cup mixture in serving mug. Fill withwater. Stir to blend. Heat on full power for 1 to1 1/2 minutes, or until heated through.
Beverages Heating Guidelines1. Hot tap water boils faster than cold.
Refrigerator-temperature beverages require alonger heating or reheating time than room-temperature beverages. Adjust timesaccordingly.
2. If heating several individual servings, considerheating in a pitcher, rather than in individualcups. Try defrosting juice in a serving dish.
3. To avoid boil-overs, only fill a cup 2/3 to 3/4 full.Most coffee cups are 6-ounce cups.
4. Always stir a beverage vigorously beforereheating.
5. Milk should not be allowed to boil. Heat milkuntil it is just warmed. If desired, addmarshmallows to a cup of hot chocolate halfwaythrough heating time. Marshmallows will meltjust the right amount.
6 When reheating coffee and tea, for best taste,do not allow to boil. Most reheated beveragestaste better when reheated to almost boiling.
7. Always add instant coffee or tea to hot water toavoid bitter flavor and boil-overs. Water will notboil over as easily as premixed coffee and tea.
Fiesta Nacho DipYield: About 4 cups1 lb. ground beef2 tablespoons instant minced onion1 (8 oz.) bottle hot taco sauce (about 3/4 cup)1 (4 oz.) can chopped green chilies1 (16 oz.) can refried beans1(8 oz.) carton guacamole dip or dairy sour cream2 cups shredded Cheddar cheese
1. Combine ground beef and onion in 1 1/2-quartcasserole. Cook, covered, on full power for 3 to5 minutes, or until beef is no longer pink. Stirhalfway through cooking time. Drain. Stir intaco sauce and chilies. Set aside.
2. Spread beans on 12-inch round glass platter.Spread meat mixture over beans. Heat on fullpower for 4 to 6 minutes, or until heatedthrough.
3. Spread guacamole dip over meat. Sprinkle withcheese evenly over top. Heat on full power for30 seconds to 1 minute, or until cheese beginsto melt. Serve warm.Micro-tip: Garnish with shredded lettuce,chopped tomatoes, tortilla chips, guacamolesauce, sour cream, and snipped green oniontops, if desired. Serve as dip with tortilla chips.
22
Cafe Bavarian MintYield: 14 (6 oz.) servings1/4 cup powdered nondairy coffee creamer1/4 cup sugar1/4 cup instant coffee2 tablespoons cocoa5 hard candy peppermints, crushedWater
1. Combine all ingredients, except water, in smallmixing bowl. (Mix may be stored in airtightcontainer.)
2. Place 1 tablespoon mixture in serving mug. Fillwith water. Stir to blend. Heat on full power for1 to 1 1/2 minutes, or until heated through.
Hot Egg NogYield: 4 servings1 quart milk4 egg yolks1/2 cup sugar1/4 teaspoon cinnamon1/4 teaspoon nutmeg1/4 teaspoon vanilla
1. Place milk in casserole. Heat on full power for6 to 8 minutes, or until heated through. Stirhalfway through heating time.
2. Beat egg yolks with sugar and spices in smallbowl. Stir one cup hot milk into egg mixtureand then gradually blend all of egg mixture intomilk.
3. Heat on full power for 2 to 3 1/2 minutes, oruntil warmed. Stir halfway through cookingtime. Stir in vanilla.
Orange WassailYield: 10 (6 oz.) servings1 1/2 quarts orange juice2 cups cranberry juice2 tablespoons honey6 whole cloves1 (2-inch) cinnamon stick
1. Combine all ingredients in 3-quart casserole.Cook, covered, on full power for 14 to 19minutes, or until boiling. Stir halfway throughcooking time. Continue cooking, covered, onCook Level 3 for 10 minutes, or until mixturehas simmered and flavors are blended.
2. Remove spices and serve hot.
Soups and Stews Cooking Guidelines1. Soups and stews are quickly heated in the
microwave oven. Soups can be heated directlyin serving bowls or mugs, so there are fewerdishes to wash.
2. Many soups are prepared on full power withgood results. The fast cooking speed allowssoups and stews to maintain a "fresh" flavor.Soups can be simmered on Cook Level 3 toblend flavors.
3. Vegetables and meat can be precooked beforeadding to soups and stews to shorten theheating time.
4. Use a container which is considerably largerthan the amount of soup or stew being heatedto avoid boil-overs.
5. Cook soups and stews, covered, asrecommended in recipes for faster, more evencooking. Cover with a glass lid or heavy-dutyplastic wrap, since these types of coverings arethe most water-vapor-proof. Pierce plastic wrapslightly before heating. Carefully removecoverings from soups and stews to avoid steamburns.
6. When reheating soups or stews, stir the liquidvigorously or pour from a container into servingbowls or casserole before reheating.
23
Corn and Potato ChowderYield: 8 to 10 servings1/2 lb. bacon1 cup chopped onion5 cups peeled and cubed potatoes1/3 cup water1 (16 oz.) can cream-style corn2 1/2 cups milk1/2 teaspoon salt1/4 teaspoon pepper
1. Cut bacon into small pieces. Combine baconand onion in 3-quart casserole. Cook, covered,on full power for 6 to 9 minutes, or until baconis thoroughly cooked and onion is tender. Stirhalfway through cooking time. Drain.
2. Add potatoes and water. Cook, covered, on fullpower for 11 to 13 minutes, or until potatoesare tender. Stir twice during cooking time.
3. Add remaining ingredients. Heat, covered, onfull power for 3 to 6 minutes, or until heatedthrough. Do not boil. Stir halfway throughheating time.
Chili Con CarneYield: 4 to 6 servings1 lb. ground beef1 cup chopped onion1/2 cup chopped green pepper1 (16 oz.) can tomatoes, with liquid1 (8 oz.) can tomato sauce1/3 cup catsup1 (16 oz.) can chili beans1 tablespoon Worcestershire sauce2 to 3 teaspoons chili powder1 bay leaf1/2 teaspoon salt1/4 teaspoon oregano1/8 teaspoon pepper
1. Combine ground beef, onion, and green pepperin casserole. Cook, covered, on full power for 3to 5 minutes, or until vegetables are tender andbeef is no longer pink. Stir halfway throughcooking time. Drain.
2. Blend in remaining ingredients. Cook on fullpower for 7 to 10 minutes, or until heatedthrough. Stir halfway through cooking time.Remove bay leaf.Micro-tip: Amount of chili powder can beincreased or decreased, as desired.
4. Whenever possible, heat the sandwich fillingbefore spreading it inside the bun or on otherbread. Then heat the entire sandwich, until thebun is just warmed.
5. Sandwiches having a "thin" layer of filling willheat faster than sandwiches with thicker fillings.When heating meat sandwiches, use thin,rather than thick, slices of meat.
Sandwiches Cooking Guidelines1. Sandwiches are generally heated on full power.2. Sandwiches should be placed on a microwave-
safe paper towel, or on a plastic or ceramic rackduring heating to prevent the bottoms frombecoming soggy.
3. To heat sandwiches in buns, bagels, orcroissants, heat the bottom half of the breadand filling. Add the top of the bread during thelast 10 to 30 seconds of heating time.
24
Barbecued Beef SandwichesYield: 6 to 8 servings1 cup catsup1/4 cup brown sugar, firmly packed1 tablespoon Worcestershire sauce1/2 teaspoon chili powder1/2 teaspoon liquid smoke1/4 teaspoon onion powder1/8 teaspoon instant minced garlic2 to 3 drops hot pepper sauce3 cups thinly sliced or shredded cooked beef
(about 1 lb.)
Hot BrownsYield: 4 servings1/3 cup butter or margarine1/4 cup finely chopped onion1/3 cup all-purpose flour1 teaspoon finely chopped parsley1/2 teaspoon saltDash cayenne pepperDash nutmeg3 cups milk2 egg yolks1/2 cup grated Parmesan cheese1 cup whipping cream8 slices toasted bread, cut diagonally8 slices turkey4 slices bacon, cooked and crumbled
1. Place butter and onion in casserole. Cook,covered, on full power for 1 to 3 minutes, oruntil onion is tender.
2. Stir in flour and seasonings. Blend to smoothpaste. Blend in milk gradually, stirringconstantly. Cook on full power for 5 to 8minutes or until thickened and bubbling. Stir 2to 3 times during cooking time.
3. Stir about 3/4 cup of hot mixture into egg yolks,stirring constantly. Return egg mixture tocasserole.
4. Stir in cheese and whipping cream. Cook onfull power for 1 to 2 minutes, or until thickened.Stir with the wire whisk often during cookingtime.
5. Arrange four diagonal pieces toasted bread onserving platter. Place two slices turkey onbread. Pour 1 cup sauce over top. Sprinklewith crumbled bacon. Heat on full power for 30seconds to 1 minute, or until heated through.Repeat with remaining ingredients.
Hot Chicken Salad SandwichesYield: 8 sandwiches1 cup diced, cooked chicken2/3 cup diced celery1/2 cup cubed Cheddar cheese1/4 cup mayonnaise1/2 teaspoon lemon juice1/8 teaspoon salt8 hamburger buns
1. Combine all ingredients, except buns, inmedium bowl.
2. Spoon one-eighth of chicken salad onto bottomhalf of each bun. Arrange four open-facedsandwiches on plastic rack.
3. Heat on full power for 1 to 2 1/2 minutes, oruntil heated through and cheese is melted.Place tops of buns on sandwiches after 45seconds of heating time. Repeat withremaining sandwiches.
1. Combine all ingredients, except beef, in 1 1/2-quart casserole. Blend well.
2. Add beef. Stir until well-coated. Heat, covered,on full power for 3 to 6 minutes, or until boiling.Continue heating, covered, on Cook Level 3 for8 minutes, or until flavors are blended.Micro-tip: Serve in whole wheat pita bread orbun, if desired.
25
Item Total Cooking Time Cookmatic Power Level Method
LESS TENDERBeef Roasts (Rump, Pot, Chuck or Sirloin Tip Roasts)
13 to 18 min./lb. 2 Place meat in heavy-duty plastic roasting bag. Placein a dish. Add 1/2 cup of water or favorite meatsauce. Close the bag loosely. Secure with a string.Turn the roast over 2 to 3 times during the cookingtime. Let stand in the bag for 10 to 15 minutes beforeserving.
TENDERBeef Roasts (Standing and Rolled Rib Roasts)
(Rare 140°F)1st - 3 min./lb
2nd - 6 to 9 min./lb.
(Medium 160°)1st - 3 min./lb.
2nd - 9 to 10 min./lb.
(Well 170°F)1st - 3 min./lb.
2nd - 11 to 13 min./lb.
53
53
53
Place meat on plastic rack in a dish. Cover withwaxed paper. Turn large cuts of meat over halfwaythrough the cooking time.
Ground Beef (Bulk) 3 to 4 min./lb. Full Power (10) Place in a dish, cover. Stir halfway through cookingtime. Drain.
Ground Beef Patties 2 patties (4 oz. each) 4 patties (4 oz. each)
1 to 3½ min.2 to 5 min.
55
Place on a plastic rack or preheat in a browning dishaccording to manufacturer’s instructions. Cookcovered. Turn meat over halfway through cookingtime.
Meat Cooking Guidelines1. Meats weighing 3 pounds or more will brown by
themselves "naturally" in the microwave oven.Large cuts of meat become very hot duringcooking and require a longer cooking time thando smaller cuts of meat. A long cooking timeand heat are required for browning.
2. For more browning on small cuts of meat, suchas steaks, chops and meat patties, use abrowning dish or bottled browning sauce.
3. Because salt can cause the surface of meat tobecome dehydrated and tough, it is best to saltmeats only after cooking, or just before serving.If, however, the meat is just one ingredient in amain dish, or the meat is covered by a sauce,you may add salt to the sauce or main dish.
4. Excess fat may be trimmed from meat beforecooking to decrease the amount ofaccumulated meat juices and to reducesplattering during cooking.
5. For the best cooking results, turn most largemeats over halfway through the cooking time.
6. Remember that meats continue to cook duringstanding time. Remove meats from microwaveoven when they reach 5°F to 10°F lower thanthe desired end doneness.
26
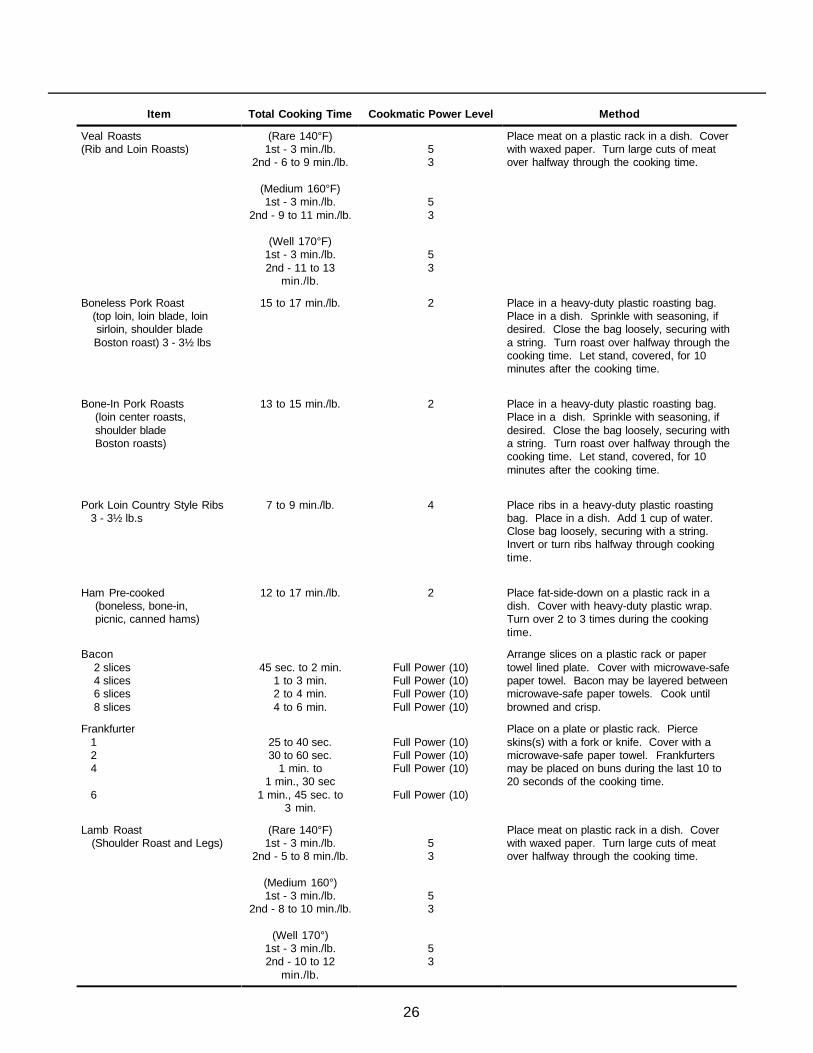
Item Total Cooking Time Cookmatic Power Level Method
Veal Roasts(Rib and Loin Roasts)
(Rare 140°F)1st - 3 min./lb.
2nd - 6 to 9 min./lb.
(Medium 160°F)1st - 3 min./lb.
2nd - 9 to 11 min./lb.
(Well 170°F)1st - 3 min./lb.2nd - 11 to 13
min./lb.
53
53
53
Place meat on a plastic rack in a dish. Coverwith waxed paper. Turn large cuts of meatover halfway through the cooking time.
Boneless Pork Roast (top loin, loin blade, loin sirloin, shoulder blade Boston roast) 3 - 3½ lbs
15 to 17 min./lb. 2 Place in a heavy-duty plastic roasting bag.Place in a dish. Sprinkle with seasoning, ifdesired. Close the bag loosely, securing witha string. Turn roast over halfway through thecooking time. Let stand, covered, for 10minutes after the cooking time.
Bone-In Pork Roasts (loin center roasts, shoulder blade Boston roasts)
13 to 15 min./lb. 2 Place in a heavy-duty plastic roasting bag.Place in a dish. Sprinkle with seasoning, ifdesired. Close the bag loosely, securing witha string. Turn roast over halfway through thecooking time. Let stand, covered, for 10minutes after the cooking time.
Pork Loin Country Style Ribs 3 - 3½ lb.s
7 to 9 min./lb. 4 Place ribs in a heavy-duty plastic roastingbag. Place in a dish. Add 1 cup of water.Close bag loosely, securing with a string.Invert or turn ribs halfway through cookingtime.
Ham Pre-cooked (boneless, bone-in, picnic, canned hams)
12 to 17 min./lb. 2 Place fat-side-down on a plastic rack in adish. Cover with heavy-duty plastic wrap.Turn over 2 to 3 times during the cookingtime.
Bacon 2 slices 4 slices 6 slices 8 slices
45 sec. to 2 min.1 to 3 min.2 to 4 min.4 to 6 min.
Full Power (10)Full Power (10)Full Power (10)Full Power (10)
Arrange slices on a plastic rack or papertowel lined plate. Cover with microwave-safepaper towel. Bacon may be layered betweenmicrowave-safe paper towels. Cook untilbrowned and crisp.
Frankfurter 1 2 4
6
25 to 40 sec.30 to 60 sec.
1 min. to1 min., 30 sec
1 min., 45 sec. to3 min.
Full Power (10)Full Power (10)Full Power (10)
Full Power (10)
Place on a plate or plastic rack. Pierceskins(s) with a fork or knife. Cover with amicrowave-safe paper towel. Frankfurtersmay be placed on buns during the last 10 to20 seconds of the cooking time.
Lamb Roast (Shoulder Roast and Legs)
(Rare 140°F)1st - 3 min./lb.
2nd - 5 to 8 min./lb.
(Medium 160°)1st - 3 min./lb.
2nd - 8 to 10 min./lb.
(Well 170°)1st - 3 min./lb.2nd - 10 to 12
min./lb.
53
53
53
Place meat on plastic rack in a dish. Coverwith waxed paper. Turn large cuts of meatover halfway through the cooking time.
27
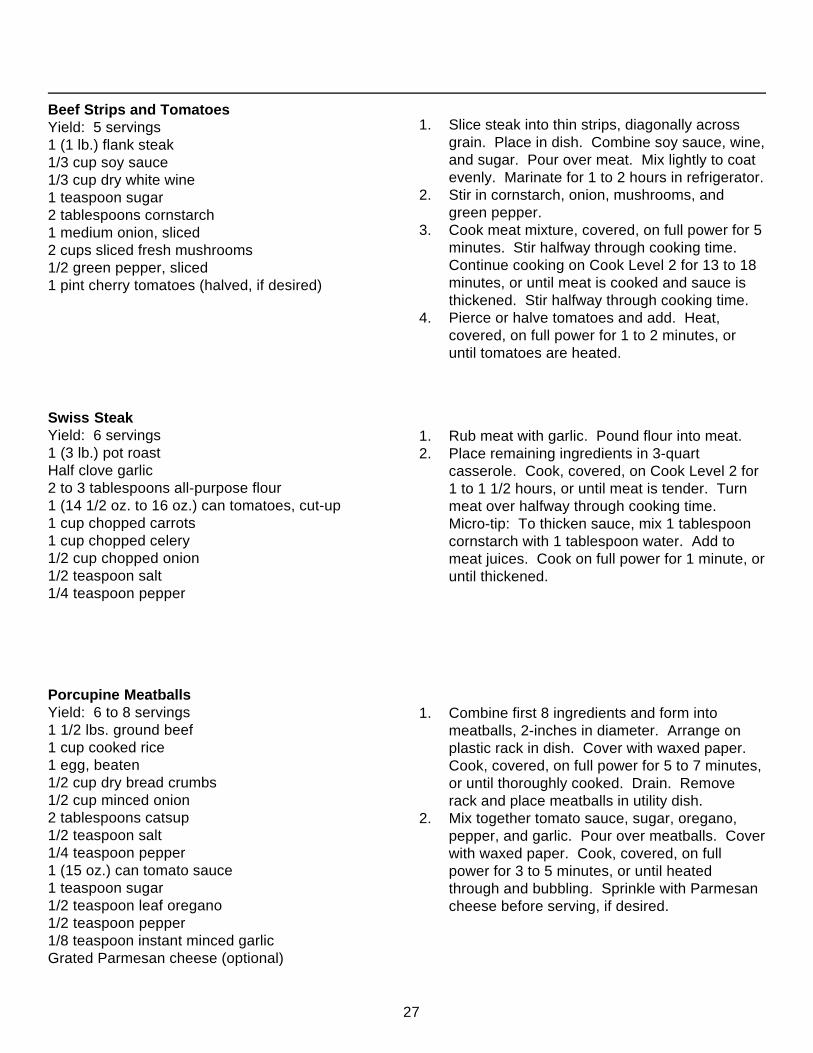
Porcupine MeatballsYield: 6 to 8 servings1 1/2 lbs. ground beef1 cup cooked rice1 egg, beaten1/2 cup dry bread crumbs1/2 cup minced onion2 tablespoons catsup1/2 teaspoon salt1/4 teaspoon pepper1 (15 oz.) can tomato sauce1 teaspoon sugar1/2 teaspoon leaf oregano1/2 teaspoon pepper1/8 teaspoon instant minced garlicGrated Parmesan cheese (optional)
Beef Strips and TomatoesYield: 5 servings1 (1 lb.) flank steak1/3 cup soy sauce1/3 cup dry white wine1 teaspoon sugar2 tablespoons cornstarch1 medium onion, sliced2 cups sliced fresh mushrooms1/2 green pepper, sliced1 pint cherry tomatoes (halved, if desired)
1. Slice steak into thin strips, diagonally acrossgrain. Place in dish. Combine soy sauce, wine,and sugar. Pour over meat. Mix lightly to coatevenly. Marinate for 1 to 2 hours in refrigerator.
2. Stir in cornstarch, onion, mushrooms, andgreen pepper.
3. Cook meat mixture, covered, on full power for 5minutes. Stir halfway through cooking time.Continue cooking on Cook Level 2 for 13 to 18minutes, or until meat is cooked and sauce isthickened. Stir halfway through cooking time.
4. Pierce or halve tomatoes and add. Heat,covered, on full power for 1 to 2 minutes, oruntil tomatoes are heated.
Swiss SteakYield: 6 servings1 (3 lb.) pot roastHalf clove garlic2 to 3 tablespoons all-purpose flour1 (14 1/2 oz. to 16 oz.) can tomatoes, cut-up1 cup chopped carrots1 cup chopped celery1/2 cup chopped onion1/2 teaspoon salt1/4 teaspoon pepper
1. Rub meat with garlic. Pound flour into meat.2. Place remaining ingredients in 3-quart
casserole. Cook, covered, on Cook Level 2 for1 to 1 1/2 hours, or until meat is tender. Turnmeat over halfway through cooking time.Micro-tip: To thicken sauce, mix 1 tablespooncornstarch with 1 tablespoon water. Add tomeat juices. Cook on full power for 1 minute, oruntil thickened.
1. Combine first 8 ingredients and form intomeatballs, 2-inches in diameter. Arrange onplastic rack in dish. Cover with waxed paper.Cook, covered, on full power for 5 to 7 minutes,or until thoroughly cooked. Drain. Removerack and place meatballs in utility dish.
2. Mix together tomato sauce, sugar, oregano,pepper, and garlic. Pour over meatballs. Coverwith waxed paper. Cook, covered, on fullpower for 3 to 5 minutes, or until heatedthrough and bubbling. Sprinkle with Parmesancheese before serving, if desired.
28
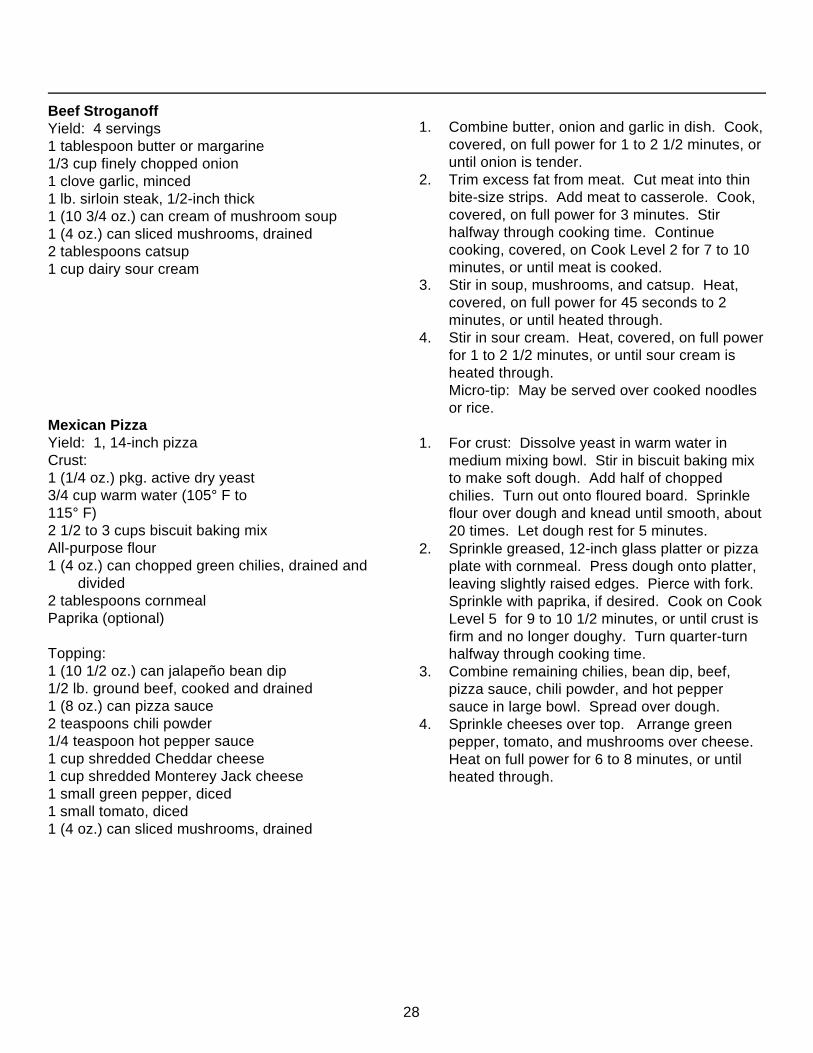
Beef StroganoffYield: 4 servings1 tablespoon butter or margarine1/3 cup finely chopped onion1 clove garlic, minced1 lb. sirloin steak, 1/2-inch thick1 (10 3/4 oz.) can cream of mushroom soup1 (4 oz.) can sliced mushrooms, drained2 tablespoons catsup1 cup dairy sour cream
Mexican PizzaYield: 1, 14-inch pizzaCrust:1 (1/4 oz.) pkg. active dry yeast3/4 cup warm water (105° F to115° F)2 1/2 to 3 cups biscuit baking mixAll-purpose flour1 (4 oz.) can chopped green chilies, drained and
divided2 tablespoons cornmealPaprika (optional)
Topping:1 (10 1/2 oz.) can jalapeño bean dip1/2 lb. ground beef, cooked and drained1 (8 oz.) can pizza sauce2 teaspoons chili powder1/4 teaspoon hot pepper sauce1 cup shredded Cheddar cheese1 cup shredded Monterey Jack cheese1 small green pepper, diced1 small tomato, diced1 (4 oz.) can sliced mushrooms, drained
1. Combine butter, onion and garlic in dish. Cook,covered, on full power for 1 to 2 1/2 minutes, oruntil onion is tender.
2. Trim excess fat from meat. Cut meat into thinbite-size strips. Add meat to casserole. Cook,covered, on full power for 3 minutes. Stirhalfway through cooking time. Continuecooking, covered, on Cook Level 2 for 7 to 10minutes, or until meat is cooked.
3. Stir in soup, mushrooms, and catsup. Heat,covered, on full power for 45 seconds to 2minutes, or until heated through.
4. Stir in sour cream. Heat, covered, on full powerfor 1 to 2 1/2 minutes, or until sour cream isheated through.Micro-tip: May be served over cooked noodlesor rice.
1. For crust: Dissolve yeast in warm water inmedium mixing bowl. Stir in biscuit baking mixto make soft dough. Add half of choppedchilies. Turn out onto floured board. Sprinkleflour over dough and knead until smooth, about20 times. Let dough rest for 5 minutes.
2. Sprinkle greased, 12-inch glass platter or pizzaplate with cornmeal. Press dough onto platter,leaving slightly raised edges. Pierce with fork.Sprinkle with paprika, if desired. Cook on CookLevel 5 for 9 to 10 1/2 minutes, or until crust isfirm and no longer doughy. Turn quarter-turnhalfway through cooking time.
3. Combine remaining chilies, bean dip, beef,pizza sauce, chili powder, and hot peppersauce in large bowl. Spread over dough.
4. Sprinkle cheeses over top. Arrange greenpepper, tomato, and mushrooms over cheese.Heat on full power for 6 to 8 minutes, or untilheated through.
29
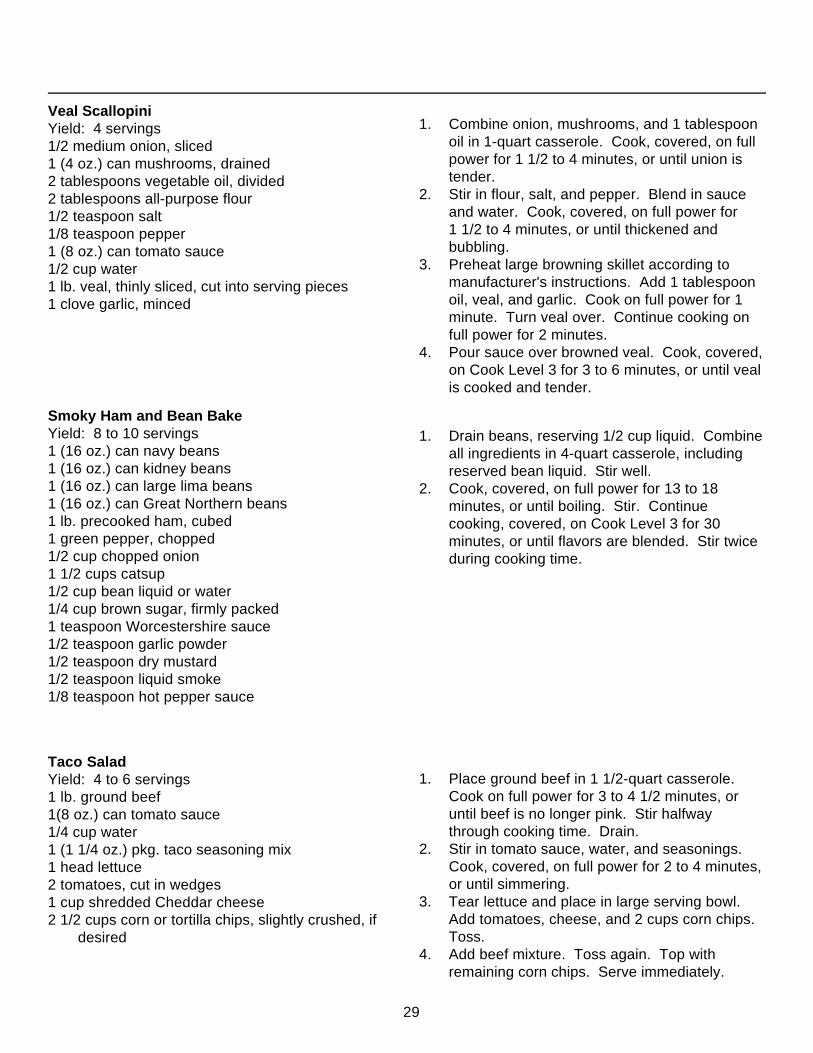
1. Drain beans, reserving 1/2 cup liquid. Combineall ingredients in 4-quart casserole, includingreserved bean liquid. Stir well.
2. Cook, covered, on full power for 13 to 18minutes, or until boiling. Stir. Continuecooking, covered, on Cook Level 3 for 30minutes, or until flavors are blended. Stir twiceduring cooking time.
Taco SaladYield: 4 to 6 servings1 lb. ground beef1(8 oz.) can tomato sauce1/4 cup water1 (1 1/4 oz.) pkg. taco seasoning mix1 head lettuce2 tomatoes, cut in wedges1 cup shredded Cheddar cheese2 1/2 cups corn or tortilla chips, slightly crushed, if
desired
Veal ScallopiniYield: 4 servings1/2 medium onion, sliced1 (4 oz.) can mushrooms, drained2 tablespoons vegetable oil, divided2 tablespoons all-purpose flour1/2 teaspoon salt1/8 teaspoon pepper1 (8 oz.) can tomato sauce1/2 cup water1 lb. veal, thinly sliced, cut into serving pieces1 clove garlic, minced
1. Combine onion, mushrooms, and 1 tablespoonoil in 1-quart casserole. Cook, covered, on fullpower for 1 1/2 to 4 minutes, or until union istender.
2. Stir in flour, salt, and pepper. Blend in sauceand water. Cook, covered, on full power for1 1/2 to 4 minutes, or until thickened andbubbling.
3. Preheat large browning skillet according tomanufacturer's instructions. Add 1 tablespoonoil, veal, and garlic. Cook on full power for 1minute. Turn veal over. Continue cooking onfull power for 2 minutes.
4. Pour sauce over browned veal. Cook, covered,on Cook Level 3 for 3 to 6 minutes, or until vealis cooked and tender.
Smoky Ham and Bean BakeYield: 8 to 10 servings1 (16 oz.) can navy beans1 (16 oz.) can kidney beans1 (16 oz.) can large lima beans1 (16 oz.) can Great Northern beans1 lb. precooked ham, cubed1 green pepper, chopped1/2 cup chopped onion1 1/2 cups catsup1/2 cup bean liquid or water1/4 cup brown sugar, firmly packed1 teaspoon Worcestershire sauce1/2 teaspoon garlic powder1/2 teaspoon dry mustard1/2 teaspoon liquid smoke1/8 teaspoon hot pepper sauce
1. Place ground beef in 1 1/2-quart casserole.Cook on full power for 3 to 4 1/2 minutes, oruntil beef is no longer pink. Stir halfwaythrough cooking time. Drain.
2. Stir in tomato sauce, water, and seasonings.Cook, covered, on full power for 2 to 4 minutes,or until simmering.
3. Tear lettuce and place in large serving bowl.Add tomatoes, cheese, and 2 cups corn chips.Toss.
4. Add beef mixture. Toss again. Top withremaining corn chips. Serve immediately.
30
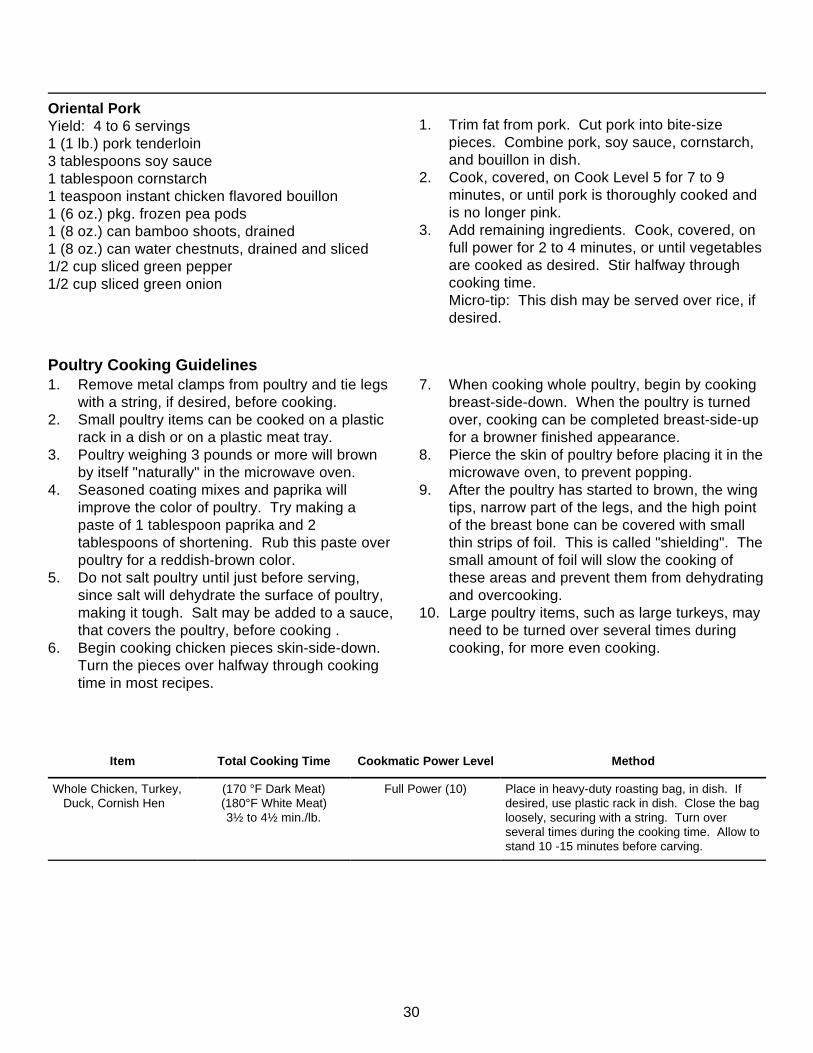
Oriental PorkYield: 4 to 6 servings1 (1 lb.) pork tenderloin3 tablespoons soy sauce1 tablespoon cornstarch1 teaspoon instant chicken flavored bouillon1 (6 oz.) pkg. frozen pea pods1 (8 oz.) can bamboo shoots, drained1 (8 oz.) can water chestnuts, drained and sliced1/2 cup sliced green pepper1/2 cup sliced green onion
1. Trim fat from pork. Cut pork into bite-sizepieces. Combine pork, soy sauce, cornstarch,and bouillon in dish.
2. Cook, covered, on Cook Level 5 for 7 to 9minutes, or until pork is thoroughly cooked andis no longer pink.
3. Add remaining ingredients. Cook, covered, onfull power for 2 to 4 minutes, or until vegetablesare cooked as desired. Stir halfway throughcooking time.Micro-tip: This dish may be served over rice, ifdesired.
Item Total Cooking Time Cookmatic Power Level Method
Whole Chicken, Turkey, Duck, Cornish Hen
(170 °F Dark Meat)(180°F White Meat)3½ to 4½ min./lb.
Full Power (10) Place in heavy-duty roasting bag, in dish. Ifdesired, use plastic rack in dish. Close the bagloosely, securing with a string. Turn overseveral times during the cooking time. Allow tostand 10 -15 minutes before carving.
7. When cooking whole poultry, begin by cookingbreast-side-down. When the poultry is turnedover, cooking can be completed breast-side-upfor a browner finished appearance.
8. Pierce the skin of poultry before placing it in themicrowave oven, to prevent popping.
9. After the poultry has started to brown, the wingtips, narrow part of the legs, and the high pointof the breast bone can be covered with smallthin strips of foil. This is called "shielding". Thesmall amount of foil will slow the cooking ofthese areas and prevent them from dehydratingand overcooking.
10. Large poultry items, such as large turkeys, mayneed to be turned over several times duringcooking, for more even cooking.
Poultry Cooking Guidelines1. Remove metal clamps from poultry and tie legs
with a string, if desired, before cooking.2. Small poultry items can be cooked on a plastic
rack in a dish or on a plastic meat tray.3. Poultry weighing 3 pounds or more will brown
by itself "naturally" in the microwave oven.4. Seasoned coating mixes and paprika will
improve the color of poultry. Try making apaste of 1 tablespoon paprika and 2tablespoons of shortening. Rub this paste overpoultry for a reddish-brown color.
5. Do not salt poultry until just before serving,since salt will dehydrate the surface of poultry,making it tough. Salt may be added to a sauce,that covers the poultry, before cooking .
6. Begin cooking chicken pieces skin-side-down.Turn the pieces over halfway through cookingtime in most recipes.

31
1. Crumble sausage in 4-quart casserole. Stir inonion and celery. Cook, covered, on full powerfor 3 to 6 minutes, or until sausage is thoroughlycooked and no longer pink. Stir halfway throughcooking time. Drain.
2. Stir in apple, melted margarine, and seasonings.When slightly cooled, stir in egg.
3. Gradually stir in bread cubes. Pour chicken brothover all and toss to moisten. Stuff bird.Micro-tip:-Variations: Add 1 to 2 cups chopped, cookedneck and giblets or 2(6 oz. each) cans slicedmushrooms, drained. -To dry the bread in the microwave oven, spreadhalf of the slices, one or two deep, on plastic rack.Heat on full power for 30 seconds to 2 minutes, oruntil hot. Spread out on paper towels to cool.Repeat with remaining bread. Allow to stand 30to 60 minutes.- To cook dressing separately, add 1/4 to 1/2 cupmore broth. Cook, covered, on full power for 5 to7 minutes, or until heated through. Let stand,covered, for 5 to 10 minutes.
Chicken Enchilada BakeYield: 4 to 6 servings1 tablespoon butter or margarine, melted1/2 cup chopped onion1 (10 3/4 oz.) can cream of chicken soup1 cup dairy sour cream1/4 teaspoon coriander1/4 teaspoon cumin12 tortillas, each cut into bite-size pieces2 to 3 cups cooked, cubed, chicken2 (4 oz. each) cans green chilies, chopped,
drained8 oz. shredded Cheddar cheese (about 2 cups)8 oz. shredded Monterey Jack cheese (about 2
cups)
1. Place butter and onion in 1-quart casserole.Cook, covered, on full power for 1 to 3 minutes, oruntil tender. Stir in soup, sour cream, coriander,and cumin. Mix well. Set aside.
2. Layer one third of tortillas, chicken, chilies, soupmixture, Cheddar cheese, and Monterey jackcheese in 3-quart casserole. Repeat layers twicewith remaining ingredients, reserving cheese forlast layer.
3. Cover loosely with heavy-duty plastic wrap. Heat,covered, on full power for 9 to 12 minutes, or untilheated through. Sprinkle remaining cheese overtop. Cover, and let stand for 5 minutes beforeserving.
Sausage- Apple StuffingYield: Stuffing for a 12 to 16 lb. turkey1 lb. pork sausage1 cup chopped onion1 cup chopped celery1 medium apple, chopped1/2 cup butter or margarine, melted1 tablespoon parsley flakes1 teaspoon poultry seasoning1 teaspoon ground sage1/2 teaspoon salt1/2 teaspoon pepper1 egg, slightly-beaten10 cups dry whole wheat or white bread cubes
(about 1, 1 lb. loaf)3/4 cup chicken broth or chicken flavored bouillon
32
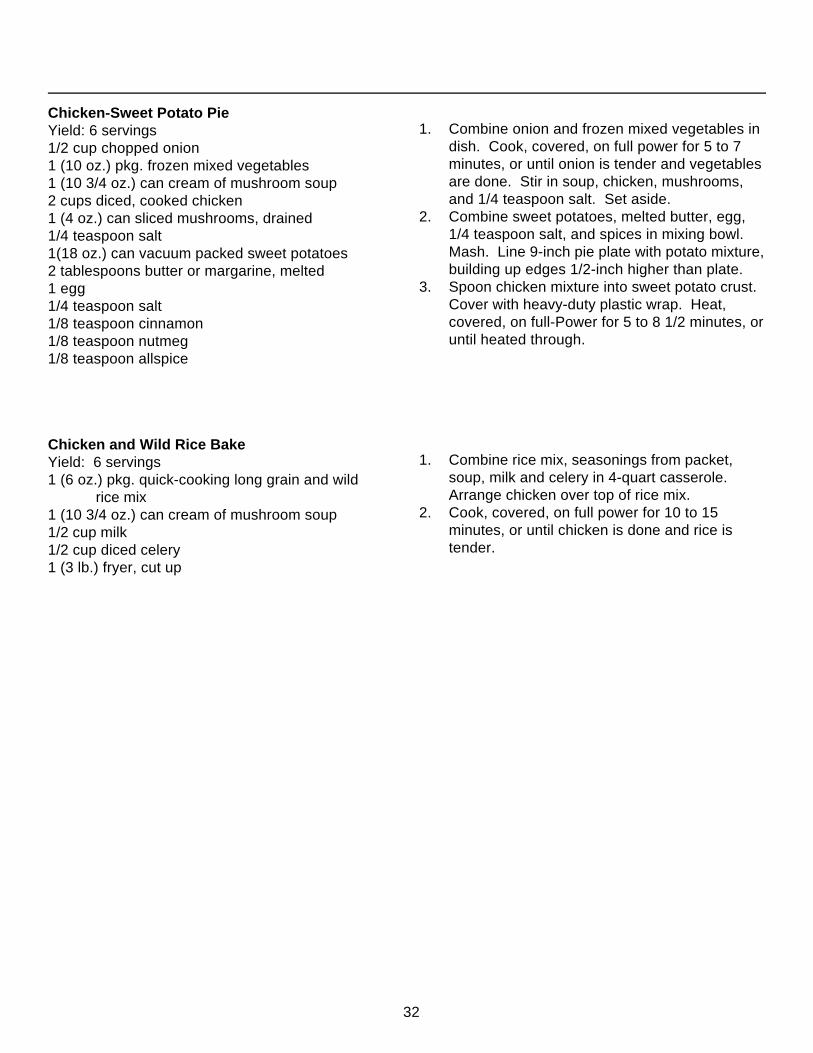
Chicken-Sweet Potato PieYield: 6 servings1/2 cup chopped onion1 (10 oz.) pkg. frozen mixed vegetables1 (10 3/4 oz.) can cream of mushroom soup2 cups diced, cooked chicken1 (4 oz.) can sliced mushrooms, drained1/4 teaspoon salt1(18 oz.) can vacuum packed sweet potatoes2 tablespoons butter or margarine, melted1 egg1/4 teaspoon salt1/8 teaspoon cinnamon1/8 teaspoon nutmeg1/8 teaspoon allspice
1. Combine onion and frozen mixed vegetables indish. Cook, covered, on full power for 5 to 7minutes, or until onion is tender and vegetablesare done. Stir in soup, chicken, mushrooms,and 1/4 teaspoon salt. Set aside.
2. Combine sweet potatoes, melted butter, egg,1/4 teaspoon salt, and spices in mixing bowl.Mash. Line 9-inch pie plate with potato mixture,building up edges 1/2-inch higher than plate.
3. Spoon chicken mixture into sweet potato crust.Cover with heavy-duty plastic wrap. Heat,covered, on full-Power for 5 to 8 1/2 minutes, oruntil heated through.
1. Combine rice mix, seasonings from packet,soup, milk and celery in 4-quart casserole.Arrange chicken over top of rice mix.
2. Cook, covered, on full power for 10 to 15minutes, or until chicken is done and rice istender.
Chicken and Wild Rice BakeYield: 6 servings1 (6 oz.) pkg. quick-cooking long grain and wild
rice mix1 (10 3/4 oz.) can cream of mushroom soup1/2 cup milk1/2 cup diced celery1 (3 lb.) fryer, cut up
33
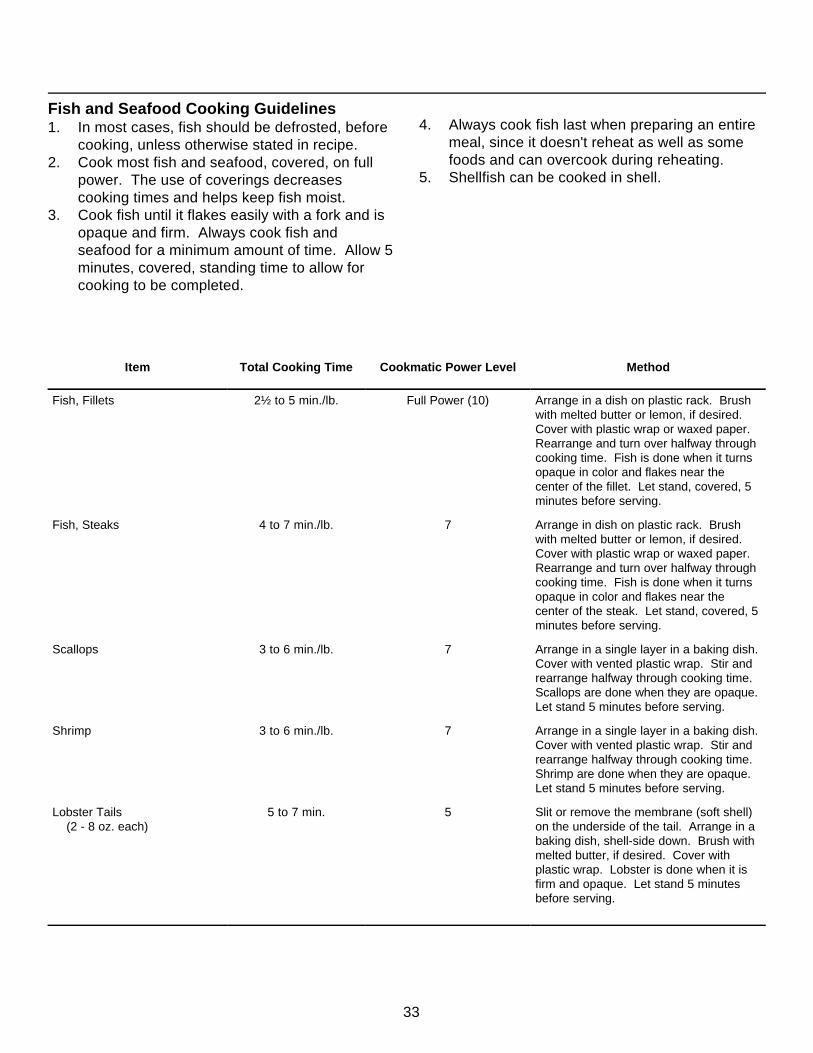
Fish and Seafood Cooking Guidelines1. In most cases, fish should be defrosted, before
cooking, unless otherwise stated in recipe.2. Cook most fish and seafood, covered, on full
power. The use of coverings decreasescooking times and helps keep fish moist.
3. Cook fish until it flakes easily with a fork and isopaque and firm. Always cook fish andseafood for a minimum amount of time. Allow 5minutes, covered, standing time to allow forcooking to be completed.
4. Always cook fish last when preparing an entiremeal, since it doesn't reheat as well as somefoods and can overcook during reheating.
5. Shellfish can be cooked in shell.
Item Total Cooking Time Cookmatic Power Level Method
Fish, Fillets 2½ to 5 min./lb. Full Power (10) Arrange in a dish on plastic rack. Brushwith melted butter or lemon, if desired.Cover with plastic wrap or waxed paper.Rearrange and turn over halfway throughcooking time. Fish is done when it turnsopaque in color and flakes near thecenter of the fillet. Let stand, covered, 5minutes before serving.
Fish, Steaks 4 to 7 min./lb. 7 Arrange in dish on plastic rack. Brushwith melted butter or lemon, if desired.Cover with plastic wrap or waxed paper.Rearrange and turn over halfway throughcooking time. Fish is done when it turnsopaque in color and flakes near thecenter of the steak. Let stand, covered, 5minutes before serving.
Scallops 3 to 6 min./lb. 7 Arrange in a single layer in a baking dish.Cover with vented plastic wrap. Stir andrearrange halfway through cooking time.Scallops are done when they are opaque.Let stand 5 minutes before serving.
Shrimp 3 to 6 min./lb. 7 Arrange in a single layer in a baking dish.Cover with vented plastic wrap. Stir andrearrange halfway through cooking time.Shrimp are done when they are opaque.Let stand 5 minutes before serving.
Lobster Tails (2 - 8 oz. each)
5 to 7 min. 5 Slit or remove the membrane (soft shell)on the underside of the tail. Arrange in abaking dish, shell-side down. Brush withmelted butter, if desired. Cover withplastic wrap. Lobster is done when it isfirm and opaque. Let stand 5 minutesbefore serving.
34
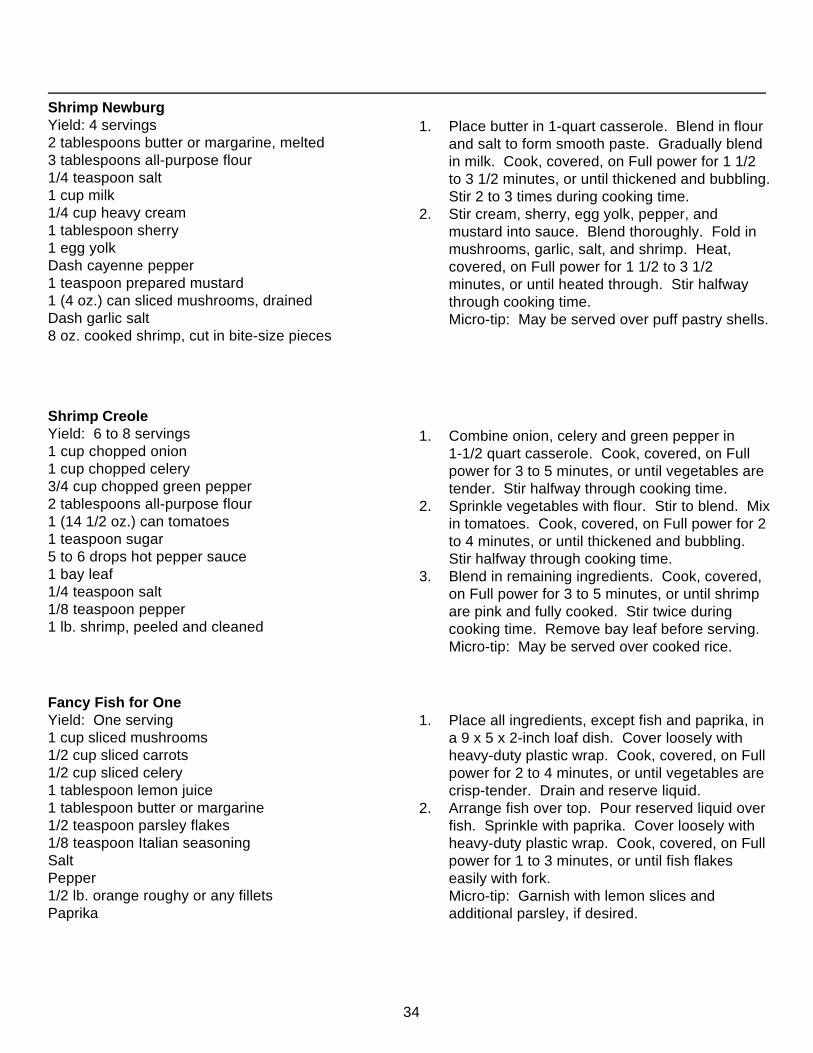
1. Place all ingredients, except fish and paprika, ina 9 x 5 x 2-inch loaf dish. Cover loosely withheavy-duty plastic wrap. Cook, covered, on Fullpower for 2 to 4 minutes, or until vegetables arecrisp-tender. Drain and reserve liquid.
2. Arrange fish over top. Pour reserved liquid overfish. Sprinkle with paprika. Cover loosely withheavy-duty plastic wrap. Cook, covered, on Fullpower for 1 to 3 minutes, or until fish flakeseasily with fork.Micro-tip: Garnish with lemon slices andadditional parsley, if desired.
1. Combine onion, celery and green pepper in1-1/2 quart casserole. Cook, covered, on Fullpower for 3 to 5 minutes, or until vegetables aretender. Stir halfway through cooking time.
2. Sprinkle vegetables with flour. Stir to blend. Mixin tomatoes. Cook, covered, on Full power for 2to 4 minutes, or until thickened and bubbling.Stir halfway through cooking time.
3. Blend in remaining ingredients. Cook, covered,on Full power for 3 to 5 minutes, or until shrimpare pink and fully cooked. Stir twice duringcooking time. Remove bay leaf before serving.Micro-tip: May be served over cooked rice.
Shrimp NewburgYield: 4 servings2 tablespoons butter or margarine, melted3 tablespoons all-purpose flour1/4 teaspoon salt1 cup milk1/4 cup heavy cream1 tablespoon sherry1 egg yolkDash cayenne pepper1 teaspoon prepared mustard1 (4 oz.) can sliced mushrooms, drainedDash garlic salt8 oz. cooked shrimp, cut in bite-size pieces
1. Place butter in 1-quart casserole. Blend in flourand salt to form smooth paste. Gradually blendin milk. Cook, covered, on Full power for 1 1/2to 3 1/2 minutes, or until thickened and bubbling.Stir 2 to 3 times during cooking time.
2. Stir cream, sherry, egg yolk, pepper, andmustard into sauce. Blend thoroughly. Fold inmushrooms, garlic, salt, and shrimp. Heat,covered, on Full power for 1 1/2 to 3 1/2minutes, or until heated through. Stir halfwaythrough cooking time.Micro-tip: May be served over puff pastry shells.
Shrimp CreoleYield: 6 to 8 servings1 cup chopped onion1 cup chopped celery3/4 cup chopped green pepper2 tablespoons all-purpose flour1 (14 1/2 oz.) can tomatoes1 teaspoon sugar5 to 6 drops hot pepper sauce1 bay leaf1/4 teaspoon salt1/8 teaspoon pepper1 lb. shrimp, peeled and cleaned
Fancy Fish for OneYield: One serving1 cup sliced mushrooms1/2 cup sliced carrots1/2 cup sliced celery1 tablespoon lemon juice1 tablespoon butter or margarine1/2 teaspoon parsley flakes1/8 teaspoon Italian seasoningSaltPepper1/2 lb. orange roughy or any filletsPaprika
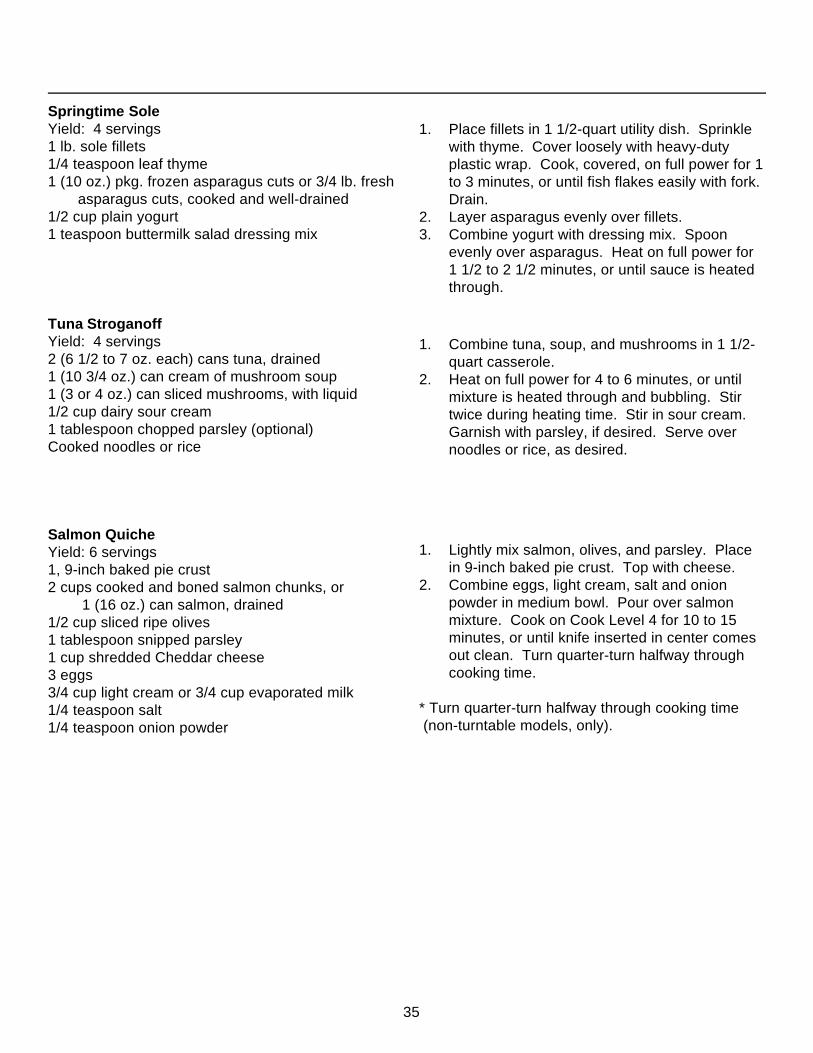
35
Springtime SoleYield: 4 servings1 lb. sole fillets1/4 teaspoon leaf thyme1 (10 oz.) pkg. frozen asparagus cuts or 3/4 lb. fresh
asparagus cuts, cooked and well-drained1/2 cup plain yogurt1 teaspoon buttermilk salad dressing mix
1. Place fillets in 1 1/2-quart utility dish. Sprinklewith thyme. Cover loosely with heavy-dutyplastic wrap. Cook, covered, on full power for 1to 3 minutes, or until fish flakes easily with fork.Drain.
2. Layer asparagus evenly over fillets.3. Combine yogurt with dressing mix. Spoon
evenly over asparagus. Heat on full power for1 1/2 to 2 1/2 minutes, or until sauce is heatedthrough.
Tuna StroganoffYield: 4 servings2 (6 1/2 to 7 oz. each) cans tuna, drained1 (10 3/4 oz.) can cream of mushroom soup1 (3 or 4 oz.) can sliced mushrooms, with liquid1/2 cup dairy sour cream1 tablespoon chopped parsley (optional)Cooked noodles or rice
1. Combine tuna, soup, and mushrooms in 1 1/2-quart casserole.
2. Heat on full power for 4 to 6 minutes, or untilmixture is heated through and bubbling. Stirtwice during heating time. Stir in sour cream.Garnish with parsley, if desired. Serve overnoodles or rice, as desired.
Salmon QuicheYield: 6 servings1, 9-inch baked pie crust2 cups cooked and boned salmon chunks, or
1 (16 oz.) can salmon, drained1/2 cup sliced ripe olives1 tablespoon snipped parsley1 cup shredded Cheddar cheese3 eggs3/4 cup light cream or 3/4 cup evaporated milk1/4 teaspoon salt1/4 teaspoon onion powder
1. Lightly mix salmon, olives, and parsley. Placein 9-inch baked pie crust. Top with cheese.
2. Combine eggs, light cream, salt and onionpowder in medium bowl. Pour over salmonmixture. Cook on Cook Level 4 for 10 to 15minutes, or until knife inserted in center comesout clean. Turn quarter-turn halfway throughcooking time.
* Turn quarter-turn halfway through cooking time (non-turntable models, only).
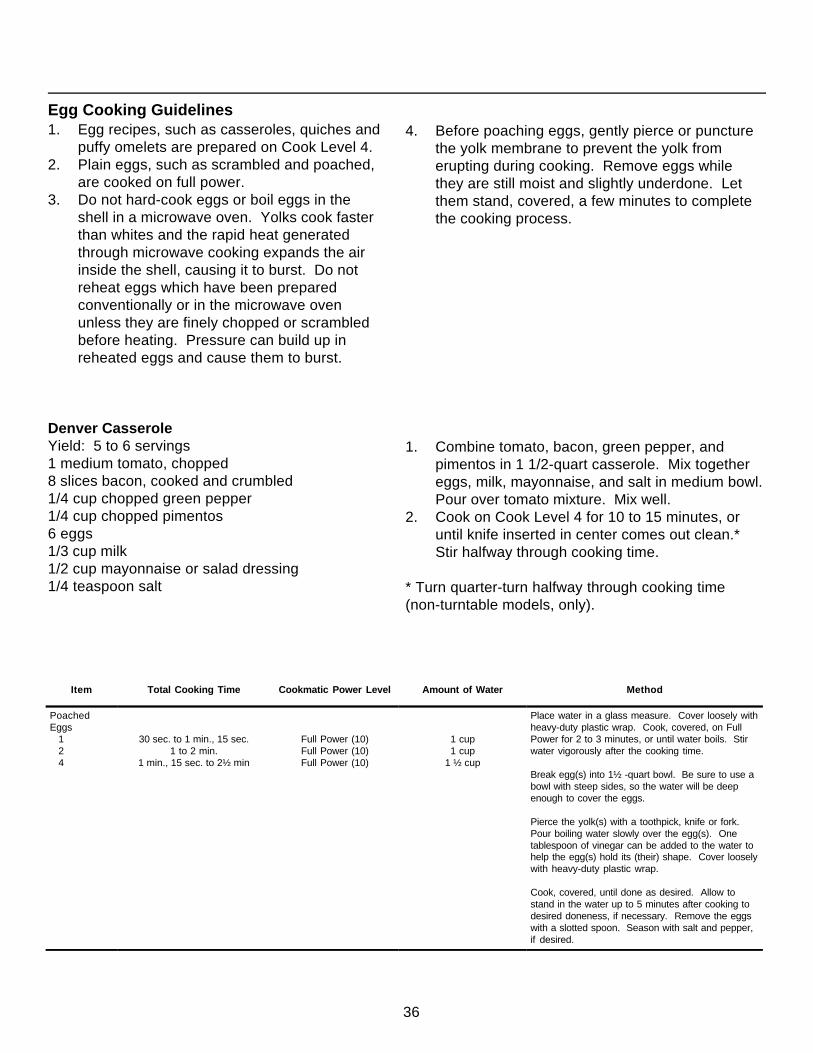
36
Denver CasseroleYield: 5 to 6 servings1 medium tomato, chopped8 slices bacon, cooked and crumbled1/4 cup chopped green pepper1/4 cup chopped pimentos6 eggs1/3 cup milk1/2 cup mayonnaise or salad dressing1/4 teaspoon salt
Item Total Cooking Time Cookmatic Power Level Amount of Water Method
PoachedEggs 1 2 4
30 sec. to 1 min., 15 sec.1 to 2 min.
1 min., 15 sec. to 2½ min
Full Power (10)Full Power (10)Full Power (10)
1 cup1 cup
1 ½ cup
Place water in a glass measure. Cover loosely withheavy-duty plastic wrap. Cook, covered, on FullPower for 2 to 3 minutes, or until water boils. Stirwater vigorously after the cooking time.
Break egg(s) into 1½ -quart bowl. Be sure to use abowl with steep sides, so the water will be deepenough to cover the eggs.
Pierce the yolk(s) with a toothpick, knife or fork.Pour boiling water slowly over the egg(s). Onetablespoon of vinegar can be added to the water tohelp the egg(s) hold its (their) shape. Cover looselywith heavy-duty plastic wrap.
Cook, covered, until done as desired. Allow tostand in the water up to 5 minutes after cooking todesired doneness, if necessary. Remove the eggswith a slotted spoon. Season with salt and pepper,if desired.
4. Before poaching eggs, gently pierce or puncturethe yolk membrane to prevent the yolk fromerupting during cooking. Remove eggs whilethey are still moist and slightly underdone. Letthem stand, covered, a few minutes to completethe cooking process.
Egg Cooking Guidelines1. Egg recipes, such as casseroles, quiches and
puffy omelets are prepared on Cook Level 4.2. Plain eggs, such as scrambled and poached,
are cooked on full power.3. Do not hard-cook eggs or boil eggs in the
shell in a microwave oven. Yolks cook fasterthan whites and the rapid heat generatedthrough microwave cooking expands the airinside the shell, causing it to burst. Do notreheat eggs which have been preparedconventionally or in the microwave ovenunless they are finely chopped or scrambledbefore heating. Pressure can build up inreheated eggs and cause them to burst.
1. Combine tomato, bacon, green pepper, andpimentos in 1 1/2-quart casserole. Mix togethereggs, milk, mayonnaise, and salt in medium bowl.Pour over tomato mixture. Mix well.
2. Cook on Cook Level 4 for 10 to 15 minutes, oruntil knife inserted in center comes out clean.*Stir halfway through cooking time.
* Turn quarter-turn halfway through cooking time(non-turntable models, only).
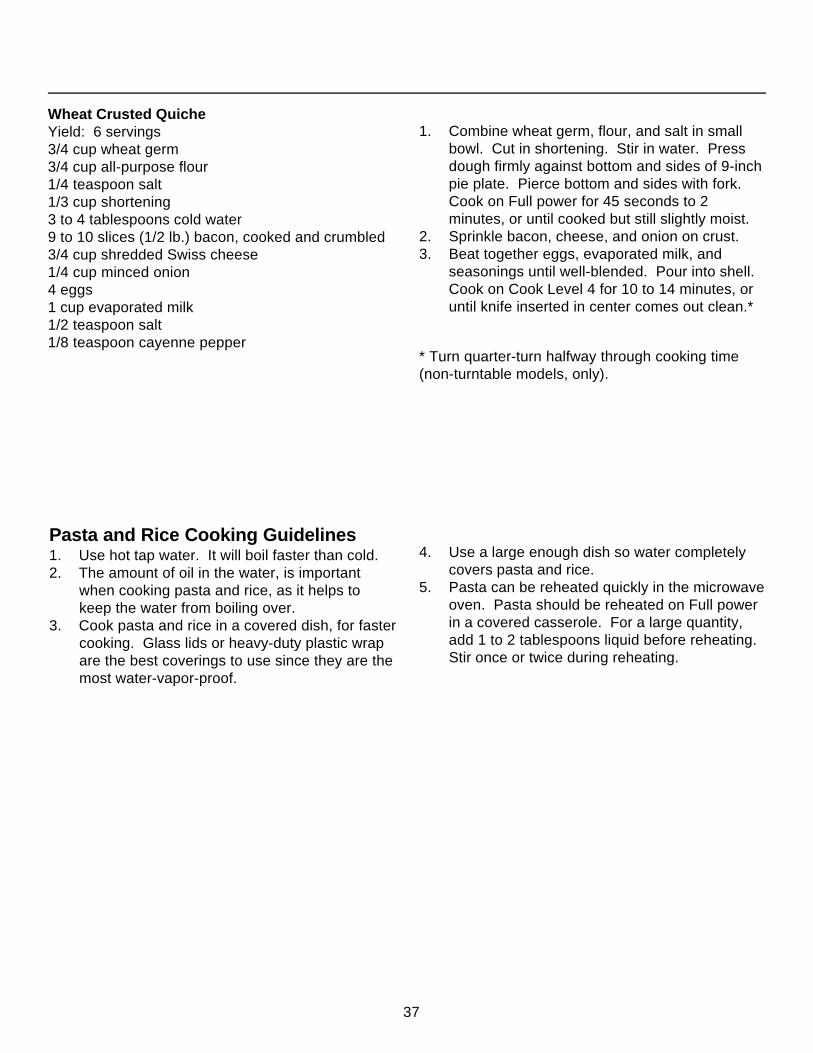
37
1. Combine wheat germ, flour, and salt in smallbowl. Cut in shortening. Stir in water. Pressdough firmly against bottom and sides of 9-inchpie plate. Pierce bottom and sides with fork.Cook on Full power for 45 seconds to 2minutes, or until cooked but still slightly moist.
2. Sprinkle bacon, cheese, and onion on crust.3. Beat together eggs, evaporated milk, and
seasonings until well-blended. Pour into shell.Cook on Cook Level 4 for 10 to 14 minutes, oruntil knife inserted in center comes out clean.*
Pasta and Rice Cooking Guidelines1. Use hot tap water. It will boil faster than cold.2. The amount of oil in the water, is important
when cooking pasta and rice, as it helps tokeep the water from boiling over.
3. Cook pasta and rice in a covered dish, for fastercooking. Glass lids or heavy-duty plastic wrapare the best coverings to use since they are themost water-vapor-proof.
Wheat Crusted QuicheYield: 6 servings3/4 cup wheat germ3/4 cup all-purpose flour1/4 teaspoon salt1/3 cup shortening3 to 4 tablespoons cold water9 to 10 slices (1/2 lb.) bacon, cooked and crumbled3/4 cup shredded Swiss cheese1/4 cup minced onion4 eggs1 cup evaporated milk1/2 teaspoon salt1/8 teaspoon cayenne pepper
4. Use a large enough dish so water completelycovers pasta and rice.
5. Pasta can be reheated quickly in the microwaveoven. Pasta should be reheated on Full powerin a covered casserole. For a large quantity,add 1 to 2 tablespoons liquid before reheating.Stir once or twice during reheating.
* Turn quarter-turn halfway through cooking time(non-turntable models, only).
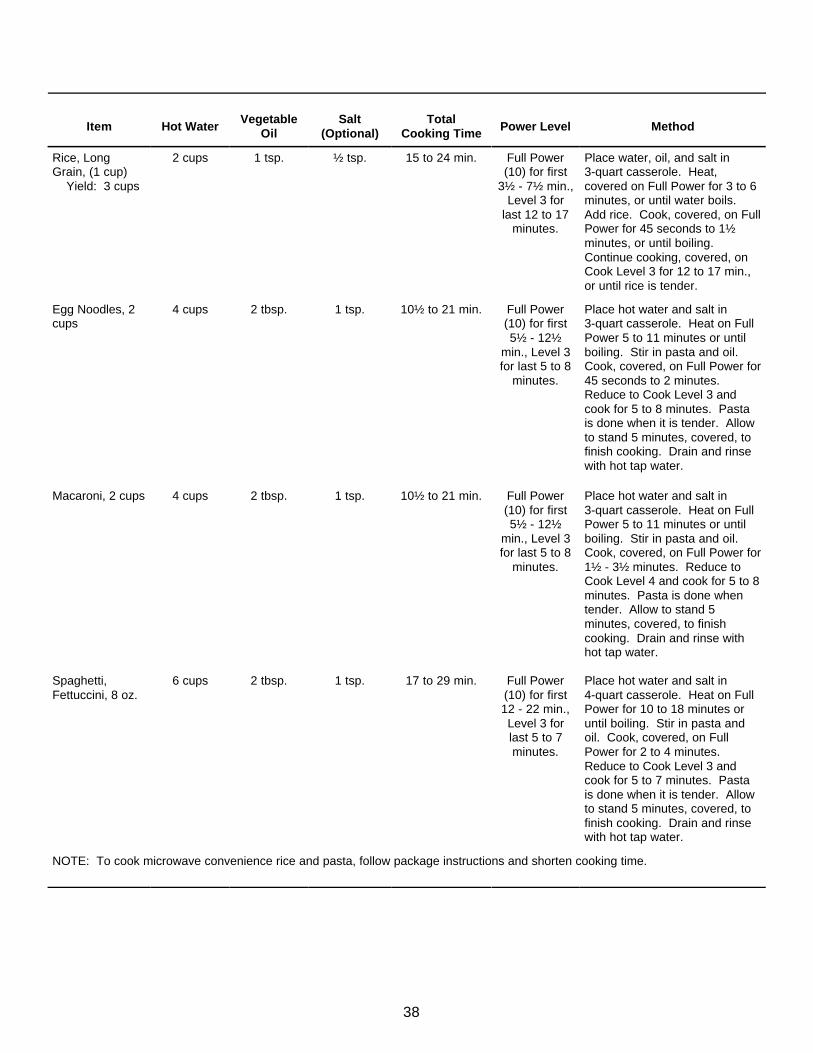
38
Item Hot Water VegetableOil
Salt(Optional)
TotalCooking Time Power Level Method
Rice, LongGrain, (1 cup) Yield: 3 cups
2 cups 1 tsp. ½ tsp. 15 to 24 min. Full Power(10) for first
3½ - 7½ min.,Level 3 for
last 12 to 17minutes.
Place water, oil, and salt in3-quart casserole. Heat,covered on Full Power for 3 to 6minutes, or until water boils.Add rice. Cook, covered, on FullPower for 45 seconds to 1½minutes, or until boiling.Continue cooking, covered, onCook Level 3 for 12 to 17 min.,or until rice is tender.
Egg Noodles, 2cups
4 cups 2 tbsp. 1 tsp. 10½ to 21 min. Full Power(10) for first5½ - 12½
min., Level 3for last 5 to 8
minutes.
Place hot water and salt in3-quart casserole. Heat on FullPower 5 to 11 minutes or untilboiling. Stir in pasta and oil.Cook, covered, on Full Power for45 seconds to 2 minutes.Reduce to Cook Level 3 andcook for 5 to 8 minutes. Pastais done when it is tender. Allowto stand 5 minutes, covered, tofinish cooking. Drain and rinsewith hot tap water.
Macaroni, 2 cups 4 cups 2 tbsp. 1 tsp. 10½ to 21 min. Full Power(10) for first5½ - 12½
min., Level 3for last 5 to 8
minutes.
Place hot water and salt in3-quart casserole. Heat on FullPower 5 to 11 minutes or untilboiling. Stir in pasta and oil.Cook, covered, on Full Power for1½ - 3½ minutes. Reduce toCook Level 4 and cook for 5 to 8minutes. Pasta is done whentender. Allow to stand 5minutes, covered, to finishcooking. Drain and rinse withhot tap water.
Spaghetti,Fettuccini, 8 oz.
6 cups 2 tbsp. 1 tsp. 17 to 29 min. Full Power(10) for first12 - 22 min.,Level 3 forlast 5 to 7minutes.
Place hot water and salt in4-quart casserole. Heat on FullPower for 10 to 18 minutes oruntil boiling. Stir in pasta andoil. Cook, covered, on FullPower for 2 to 4 minutes.Reduce to Cook Level 3 andcook for 5 to 7 minutes. Pastais done when it is tender. Allowto stand 5 minutes, covered, tofinish cooking. Drain and rinsewith hot tap water.
NOTE: To cook microwave convenience rice and pasta, follow package instructions and shorten cooking time.

39
Macaroni and CheeseYield: 4 to 6 servings2 tablespoons all-purpose flour2 cups milk1 1/4 cups uncooked macaroni2 tablespoons butter or margarine1/4 teaspoon pepper1 1/2 cups shredded American process cheese1/4 cup milk
1. Place flour in 1 1/2-quart casserole. Graduallyblend in 2 cups milk, mixing well. Stir inmacaroni, butter and pepper. Cook, covered,on full power for 3 to 5 minutes, or until boiling.Continue cooking, covered, on Cook Level 3 for7 to 9 minutes, or until macaroni is tender. Stir2 to 3 times during cooking time.
2. Stir in cheese and 1/4 cup milk. Cook on fullpower for 30 seconds to 1 minute, or untilcheese is melted. Stir halfway through cookingtime.Micro-tip: For creamier macaroni, blendadditional 1/4 to 1/2 cup milk into macaroni atend of cooking time.
All-At-Once-SpaghettiYield: 6 servings1 lb. ground beef1 cup chopped onion1/2 teaspoon salt1/4 teaspoon pepper2 (8 oz. each) cans tomato sauce1 1/2 cups water1/2 teaspoon ground oregano1/2 teaspoon basil1/4 lb. uncooked spaghetti, broken in halfGrated Parmesan cheese
1. Place ground beef and onion in dish. Cook,covered, on full power for 3 to 5 minutes, oruntil beef is no longer pink and onion is tender.Stir halfway through cooking time. Drain.
2. Add salt, pepper, tomato sauce, water,oregano, basil and spaghetti. Cook, covered,on full power for 4 to 6 minutes, or until boiling.Continue cooking, covered, on Cook Level 3 for14 to 16 minutes, or until spaghetti is tender.Stir twice during cooking time. Sprinkle withParmesan cheese, as desired.
1. Place hot, cooked fettuccini in dish2. Stir in light cream, sour cream, butter, green
onion, and garlic powder. Heat on Full powerfor 3 to 5 minutes, or until heated through.
3. Stir in Parmesan cheese. Serve immediately.
Fettuccini AlfredoYield: 4 (1 cup) servings1/2 lb. fettuccini cooked and drained1 cup light cream (half and half)1/2 cup dairy sour cream1/4 cup butter or margarine1/4 cup chopped green onions1/8 teaspoon garlic powder1/2 cup grated Parmesan cheese
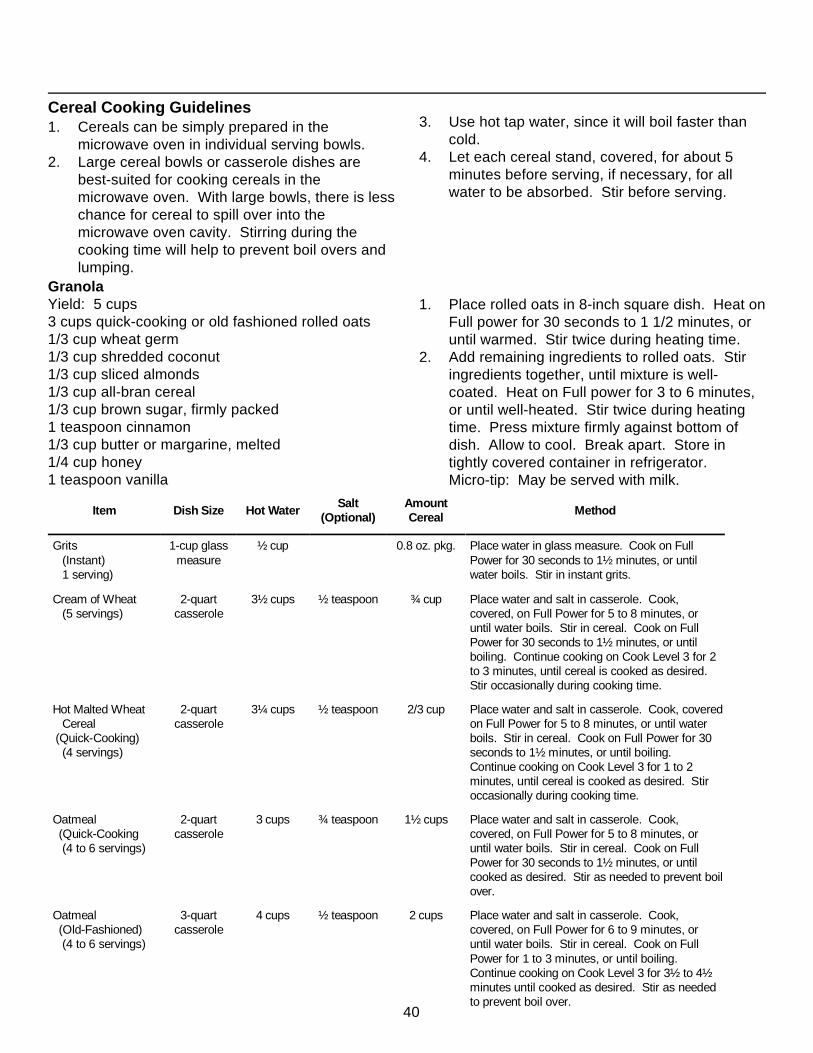
40
1. Place rolled oats in 8-inch square dish. Heat onFull power for 30 seconds to 1 1/2 minutes, oruntil warmed. Stir twice during heating time.
2. Add remaining ingredients to rolled oats. Stiringredients together, until mixture is well-coated. Heat on Full power for 3 to 6 minutes,or until well-heated. Stir twice during heatingtime. Press mixture firmly against bottom ofdish. Allow to cool. Break apart. Store intightly covered container in refrigerator.Micro-tip: May be served with milk.
Cereal Cooking Guidelines1. Cereals can be simply prepared in the
microwave oven in individual serving bowls.2. Large cereal bowls or casserole dishes are
best-suited for cooking cereals in themicrowave oven. With large bowls, there is lesschance for cereal to spill over into themicrowave oven cavity. Stirring during thecooking time will help to prevent boil overs andlumping.
3. Use hot tap water, since it will boil faster thancold.
4. Let each cereal stand, covered, for about 5minutes before serving, if necessary, for allwater to be absorbed. Stir before serving.
GranolaYield: 5 cups3 cups quick-cooking or old fashioned rolled oats1/3 cup wheat germ1/3 cup shredded coconut1/3 cup sliced almonds1/3 cup all-bran cereal1/3 cup brown sugar, firmly packed1 teaspoon cinnamon1/3 cup butter or margarine, melted1/4 cup honey1 teaspoon vanilla
Item Dish Size Hot Water Salt(Optional)
AmountCereal Method
Grits (Instant) 1 serving)
1-cup glassmeasure
½ cup 0.8 oz. pkg. Place water in glass measure. Cook on FullPower for 30 seconds to 1½ minutes, or untilwater boils. Stir in instant grits.
Cream of Wheat (5 servings)
2-quartcasserole
3½ cups ½ teaspoon ¾ cup Place water and salt in casserole. Cook,covered, on Full Power for 5 to 8 minutes, oruntil water boils. Stir in cereal. Cook on FullPower for 30 seconds to 1½ minutes, or untilboiling. Continue cooking on Cook Level 3 for 2to 3 minutes, until cereal is cooked as desired.Stir occasionally during cooking time.
Hot Malted Wheat Cereal (Quick-Cooking) (4 servings)
2-quartcasserole
3¼ cups ½ teaspoon 2/3 cup Place water and salt in casserole. Cook, coveredon Full Power for 5 to 8 minutes, or until waterboils. Stir in cereal. Cook on Full Power for 30seconds to 1½ minutes, or until boiling.Continue cooking on Cook Level 3 for 1 to 2minutes, until cereal is cooked as desired. Stiroccasionally during cooking time.
Oatmeal (Quick-Cooking (4 to 6 servings)
2-quartcasserole
3 cups ¾ teaspoon 1½ cups Place water and salt in casserole. Cook,covered, on Full Power for 5 to 8 minutes, oruntil water boils. Stir in cereal. Cook on FullPower for 30 seconds to 1½ minutes, or untilcooked as desired. Stir as needed to prevent boilover.
Oatmeal (Old-Fashioned) (4 to 6 servings)
3-quartcasserole
4 cups ½ teaspoon 2 cups Place water and salt in casserole. Cook,covered, on Full Power for 6 to 9 minutes, oruntil water boils. Stir in cereal. Cook on FullPower for 1 to 3 minutes, or until boiling.Continue cooking on Cook Level 3 for 3½ to 4½minutes until cooked as desired. Stir as neededto prevent boil over.
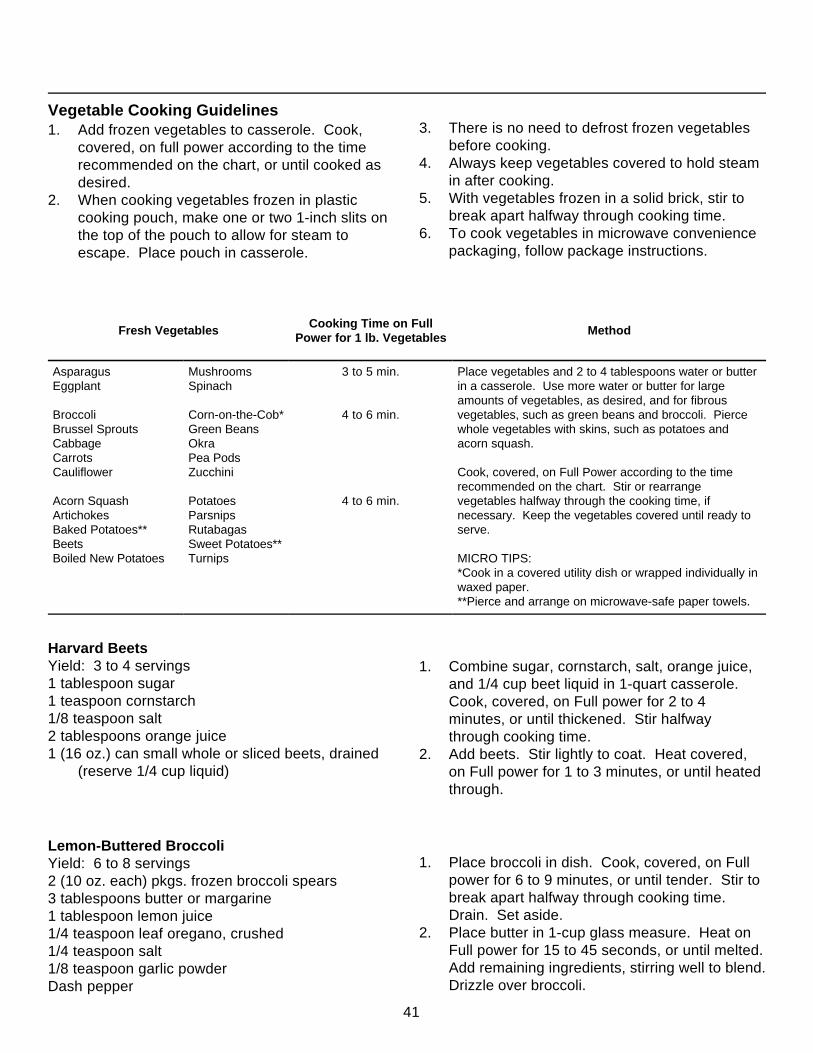
41
Fresh Vegetables Cooking Time on FullPower for 1 lb. Vegetables Method
AsparagusEggplant
BroccoliBrussel SproutsCabbageCarrotsCauliflower
Acorn SquashArtichokesBaked Potatoes**BeetsBoiled New Potatoes
MushroomsSpinach
Corn-on-the-Cob*Green BeansOkraPea PodsZucchini
PotatoesParsnipsRutabagasSweet Potatoes**Turnips
3 to 5 min.
4 to 6 min.
4 to 6 min.
Place vegetables and 2 to 4 tablespoons water or butterin a casserole. Use more water or butter for largeamounts of vegetables, as desired, and for fibrousvegetables, such as green beans and broccoli. Piercewhole vegetables with skins, such as potatoes andacorn squash.
Cook, covered, on Full Power according to the timerecommended on the chart. Stir or rearrangevegetables halfway through the cooking time, ifnecessary. Keep the vegetables covered until ready toserve.
MICRO TIPS:*Cook in a covered utility dish or wrapped individually inwaxed paper.**Pierce and arrange on microwave-safe paper towels.
3. There is no need to defrost frozen vegetablesbefore cooking.
4. Always keep vegetables covered to hold steamin after cooking.
5. With vegetables frozen in a solid brick, stir tobreak apart halfway through cooking time.
6. To cook vegetables in microwave conveniencepackaging, follow package instructions.
Vegetable Cooking Guidelines1. Add frozen vegetables to casserole. Cook,
covered, on full power according to the timerecommended on the chart, or until cooked asdesired.
2. When cooking vegetables frozen in plasticcooking pouch, make one or two 1-inch slits onthe top of the pouch to allow for steam toescape. Place pouch in casserole.
1. Combine sugar, cornstarch, salt, orange juice,and 1/4 cup beet liquid in 1-quart casserole.Cook, covered, on Full power for 2 to 4minutes, or until thickened. Stir halfwaythrough cooking time.
2. Add beets. Stir lightly to coat. Heat covered,on Full power for 1 to 3 minutes, or until heatedthrough.
Harvard BeetsYield: 3 to 4 servings1 tablespoon sugar1 teaspoon cornstarch1/8 teaspoon salt2 tablespoons orange juice1 (16 oz.) can small whole or sliced beets, drained
(reserve 1/4 cup liquid)
1. Place broccoli in dish. Cook, covered, on Fullpower for 6 to 9 minutes, or until tender. Stir tobreak apart halfway through cooking time.Drain. Set aside.
2. Place butter in 1-cup glass measure. Heat onFull power for 15 to 45 seconds, or until melted.Add remaining ingredients, stirring well to blend.Drizzle over broccoli.
Lemon-Buttered BroccoliYield: 6 to 8 servings2 (10 oz. each) pkgs. frozen broccoli spears3 tablespoons butter or margarine1 tablespoon lemon juice1/4 teaspoon leaf oregano, crushed1/4 teaspoon salt1/8 teaspoon garlic powderDash pepper
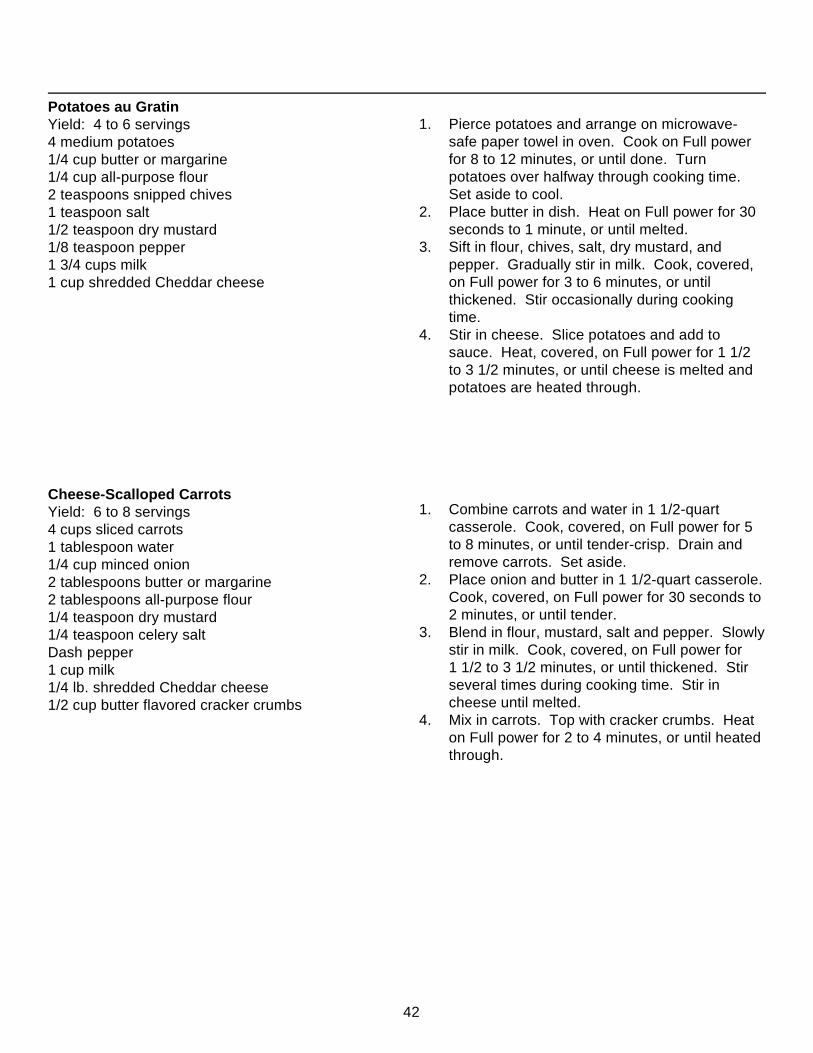
42
Potatoes au GratinYield: 4 to 6 servings4 medium potatoes1/4 cup butter or margarine1/4 cup all-purpose flour2 teaspoons snipped chives1 teaspoon salt1/2 teaspoon dry mustard1/8 teaspoon pepper1 3/4 cups milk1 cup shredded Cheddar cheese
1. Pierce potatoes and arrange on microwave-safe paper towel in oven. Cook on Full powerfor 8 to 12 minutes, or until done. Turnpotatoes over halfway through cooking time.Set aside to cool.
2. Place butter in dish. Heat on Full power for 30seconds to 1 minute, or until melted.
3. Sift in flour, chives, salt, dry mustard, andpepper. Gradually stir in milk. Cook, covered,on Full power for 3 to 6 minutes, or untilthickened. Stir occasionally during cookingtime.
4. Stir in cheese. Slice potatoes and add tosauce. Heat, covered, on Full power for 1 1/2to 3 1/2 minutes, or until cheese is melted andpotatoes are heated through.
Cheese-Scalloped CarrotsYield: 6 to 8 servings4 cups sliced carrots1 tablespoon water1/4 cup minced onion2 tablespoons butter or margarine2 tablespoons all-purpose flour1/4 teaspoon dry mustard1/4 teaspoon celery saltDash pepper1 cup milk1/4 lb. shredded Cheddar cheese1/2 cup butter flavored cracker crumbs
1. Combine carrots and water in 1 1/2-quartcasserole. Cook, covered, on Full power for 5to 8 minutes, or until tender-crisp. Drain andremove carrots. Set aside.
2. Place onion and butter in 1 1/2-quart casserole.Cook, covered, on Full power for 30 seconds to2 minutes, or until tender.
3. Blend in flour, mustard, salt and pepper. Slowlystir in milk. Cook, covered, on Full power for1 1/2 to 3 1/2 minutes, or until thickened. Stirseveral times during cooking time. Stir incheese until melted.
4. Mix in carrots. Top with cracker crumbs. Heaton Full power for 2 to 4 minutes, or until heatedthrough.
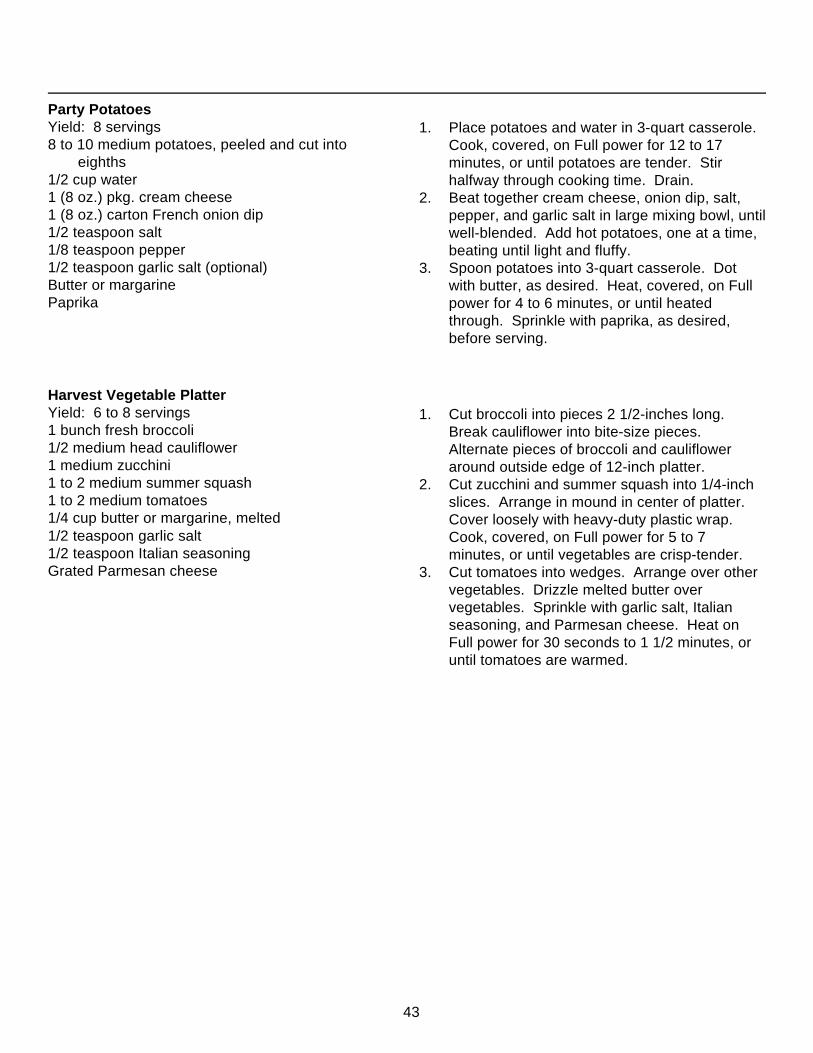
43
Party PotatoesYield: 8 servings8 to 10 medium potatoes, peeled and cut into
eighths1/2 cup water1 (8 oz.) pkg. cream cheese1 (8 oz.) carton French onion dip1/2 teaspoon salt1/8 teaspoon pepper1/2 teaspoon garlic salt (optional)Butter or margarinePaprika
1. Place potatoes and water in 3-quart casserole.Cook, covered, on Full power for 12 to 17minutes, or until potatoes are tender. Stirhalfway through cooking time. Drain.
2. Beat together cream cheese, onion dip, salt,pepper, and garlic salt in large mixing bowl, untilwell-blended. Add hot potatoes, one at a time,beating until light and fluffy.
3. Spoon potatoes into 3-quart casserole. Dotwith butter, as desired. Heat, covered, on Fullpower for 4 to 6 minutes, or until heatedthrough. Sprinkle with paprika, as desired,before serving.
Harvest Vegetable PlatterYield: 6 to 8 servings1 bunch fresh broccoli1/2 medium head cauliflower1 medium zucchini1 to 2 medium summer squash1 to 2 medium tomatoes1/4 cup butter or margarine, melted1/2 teaspoon garlic salt1/2 teaspoon Italian seasoningGrated Parmesan cheese
1. Cut broccoli into pieces 2 1/2-inches long.Break cauliflower into bite-size pieces.Alternate pieces of broccoli and caulifloweraround outside edge of 12-inch platter.
2. Cut zucchini and summer squash into 1/4-inchslices. Arrange in mound in center of platter.Cover loosely with heavy-duty plastic wrap.Cook, covered, on Full power for 5 to 7minutes, or until vegetables are crisp-tender.
3. Cut tomatoes into wedges. Arrange over othervegetables. Drizzle melted butter overvegetables. Sprinkle with garlic salt, Italianseasoning, and Parmesan cheese. Heat onFull power for 30 seconds to 1 1/2 minutes, oruntil tomatoes are warmed.
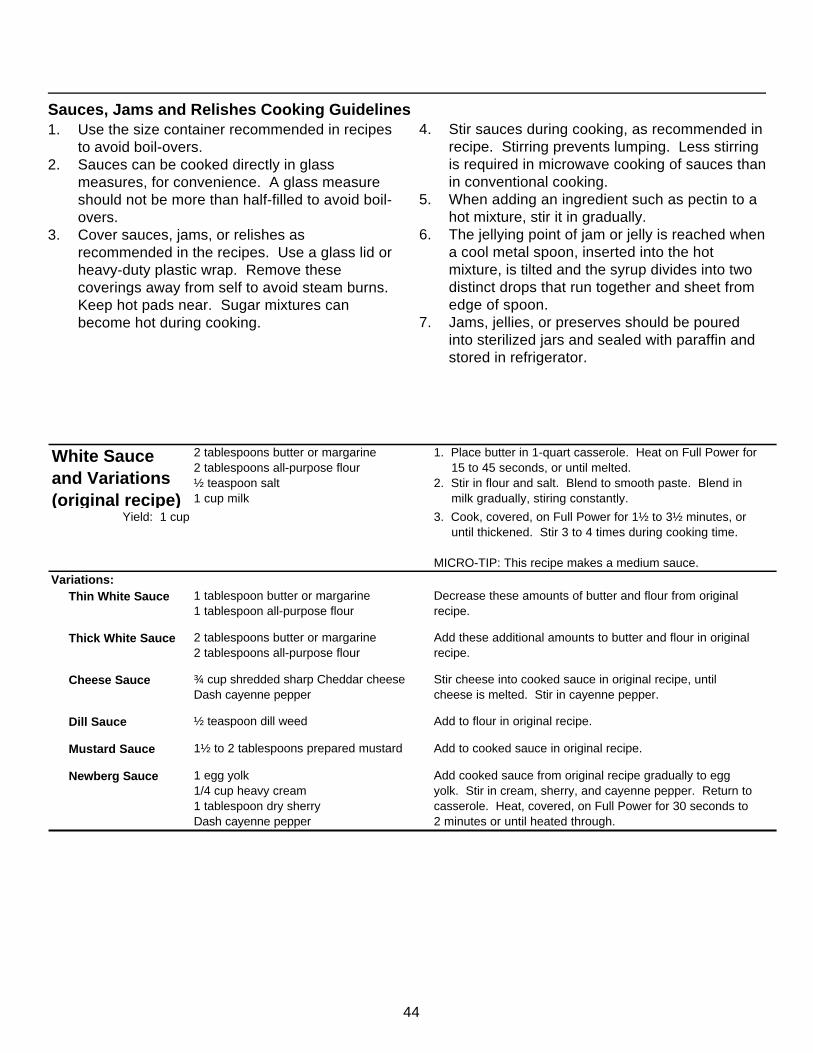
44
Sauces, Jams and Relishes Cooking Guidelines1. Use the size container recommended in recipes
to avoid boil-overs.2. Sauces can be cooked directly in glass
measures, for convenience. A glass measureshould not be more than half-filled to avoid boil-overs.
3. Cover sauces, jams, or relishes asrecommended in the recipes. Use a glass lid orheavy-duty plastic wrap. Remove thesecoverings away from self to avoid steam burns.Keep hot pads near. Sugar mixtures canbecome hot during cooking.
4. Stir sauces during cooking, as recommended inrecipe. Stirring prevents lumping. Less stirringis required in microwave cooking of sauces thanin conventional cooking.
5. When adding an ingredient such as pectin to ahot mixture, stir it in gradually.
6. The jellying point of jam or jelly is reached whena cool metal spoon, inserted into the hotmixture, is tilted and the syrup divides into twodistinct drops that run together and sheet fromedge of spoon.
7. Jams, jellies, or preserves should be pouredinto sterilized jars and sealed with paraffin andstored in refrigerator.
White Sauce and Variations (original recipe)
2 tablespoons butter or margarine 2 tablespoons all-purpose flour ½ teaspoon salt 1 cup milk
1. Place butter in 1-quart casserole. Heat on Full Power for 15 to 45 seconds, or until melted. 2. Stir in flour and salt. Blend to smooth paste. Blend in milk gradually, stiring constantly.
Yield: 1 cup 3. Cook, covered, on Full Power for 1½ to 3½ minutes, or until thickened. Stir 3 to 4 times during cooking time.
MICRO-TIP: This recipe makes a medium sauce.Variations: Thin White Sauce 1 tablespoon butter or margarine
1 tablespoon all-purpose flourDecrease these amounts of butter and flour from original recipe.
Thick White Sauce 2 tablespoons butter or margarine 2 tablespoons all-purpose flour
Add these additional amounts to butter and flour in original recipe.
Cheese Sauce ¾ cup shredded sharp Cheddar cheese Dash cayenne pepper
Stir cheese into cooked sauce in original recipe, until cheese is melted. Stir in cayenne pepper.
Dill Sauce ½ teaspoon dill weed Add to flour in original recipe.
Mustard Sauce 1½ to 2 tablespoons prepared mustard Add to cooked sauce in original recipe.
Newberg Sauce 1 egg yolk 1/4 cup heavy cream 1 tablespoon dry sherry Dash cayenne pepper
Add cooked sauce from original recipe gradually to egg yolk. Stir in cream, sherry, and cayenne pepper. Return to casserole. Heat, covered, on Full Power for 30 seconds to 2 minutes or until heated through.
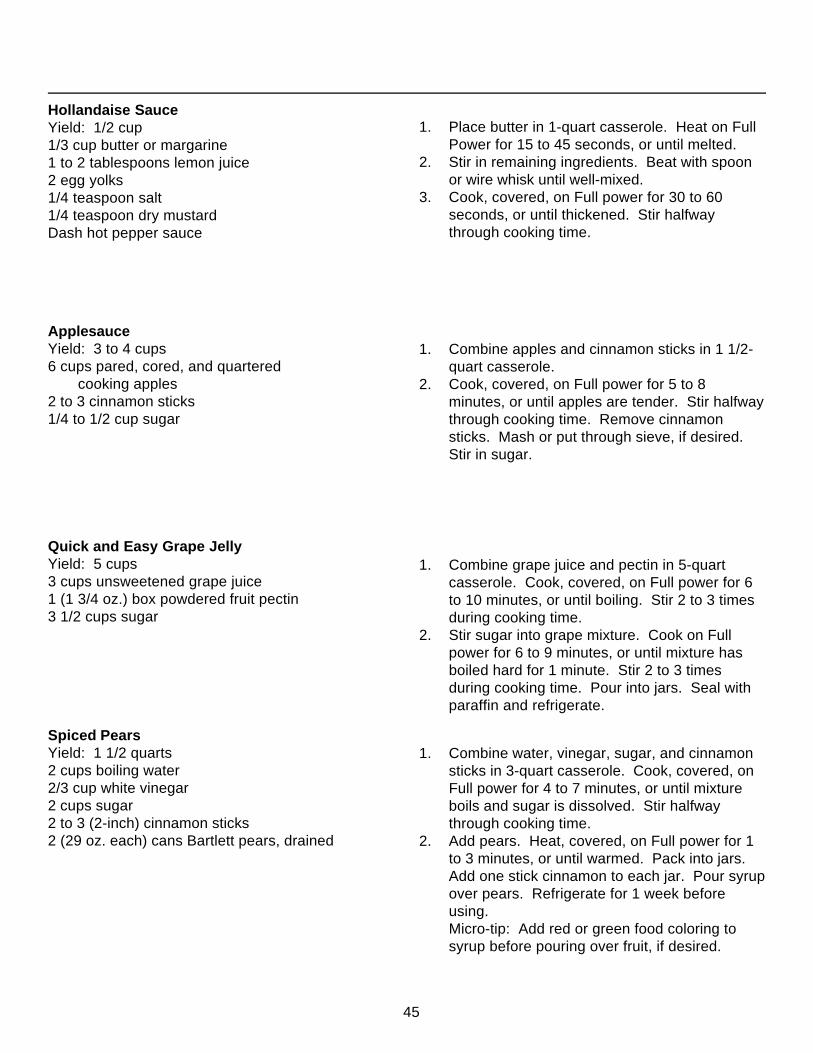
45
Quick and Easy Grape JellyYield: 5 cups3 cups unsweetened grape juice1 (1 3/4 oz.) box powdered fruit pectin3 1/2 cups sugar
1. Combine grape juice and pectin in 5-quartcasserole. Cook, covered, on Full power for 6to 10 minutes, or until boiling. Stir 2 to 3 timesduring cooking time.
2. Stir sugar into grape mixture. Cook on Fullpower for 6 to 9 minutes, or until mixture hasboiled hard for 1 minute. Stir 2 to 3 timesduring cooking time. Pour into jars. Seal withparaffin and refrigerate.
1. Place butter in 1-quart casserole. Heat on FullPower for 15 to 45 seconds, or until melted.
2. Stir in remaining ingredients. Beat with spoonor wire whisk until well-mixed.
3. Cook, covered, on Full power for 30 to 60seconds, or until thickened. Stir halfwaythrough cooking time.
ApplesauceYield: 3 to 4 cups6 cups pared, cored, and quartered
cooking apples2 to 3 cinnamon sticks1/4 to 1/2 cup sugar
1. Combine apples and cinnamon sticks in 1 1/2-quart casserole.
2. Cook, covered, on Full power for 5 to 8minutes, or until apples are tender. Stir halfwaythrough cooking time. Remove cinnamonsticks. Mash or put through sieve, if desired.Stir in sugar.
Hollandaise SauceYield: 1/2 cup1/3 cup butter or margarine1 to 2 tablespoons lemon juice2 egg yolks1/4 teaspoon salt1/4 teaspoon dry mustardDash hot pepper sauce
Spiced PearsYield: 1 1/2 quarts2 cups boiling water2/3 cup white vinegar2 cups sugar2 to 3 (2-inch) cinnamon sticks2 (29 oz. each) cans Bartlett pears, drained
1. Combine water, vinegar, sugar, and cinnamonsticks in 3-quart casserole. Cook, covered, onFull power for 4 to 7 minutes, or until mixtureboils and sugar is dissolved. Stir halfwaythrough cooking time.
2. Add pears. Heat, covered, on Full power for 1to 3 minutes, or until warmed. Pack into jars.Add one stick cinnamon to each jar. Pour syrupover pears. Refrigerate for 1 week beforeusing.Micro-tip: Add red or green food coloring tosyrup before pouring over fruit, if desired.
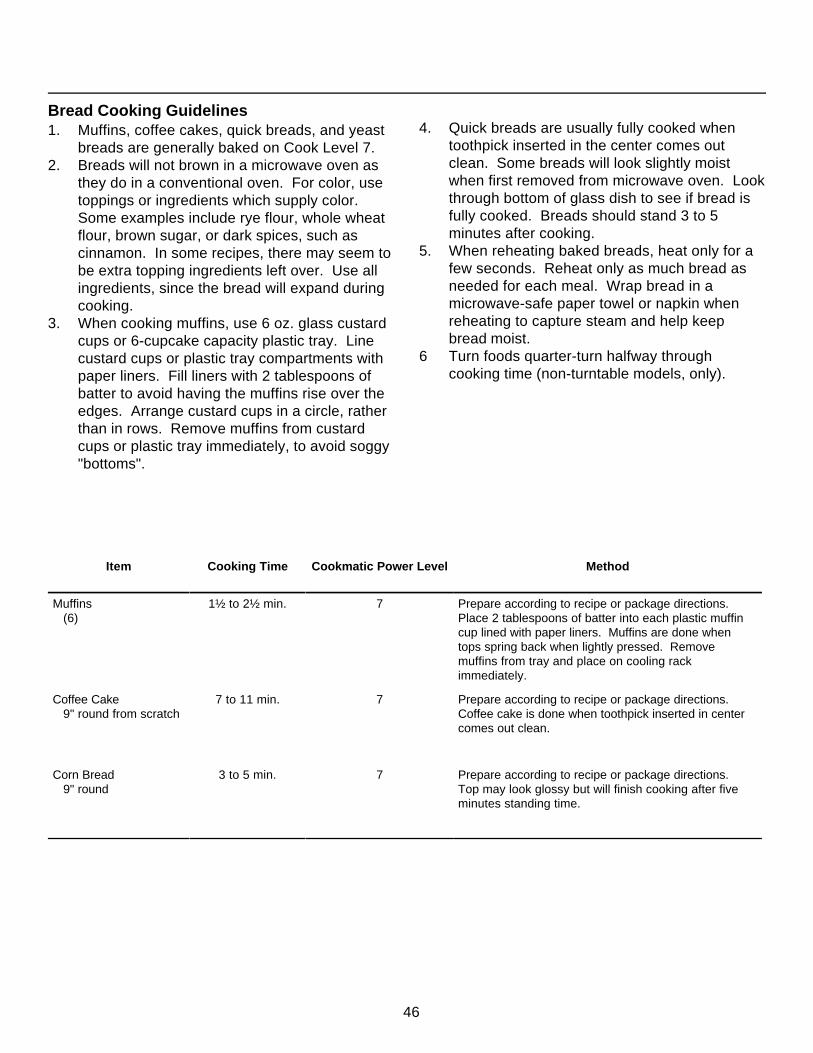
46
Bread Cooking Guidelines1. Muffins, coffee cakes, quick breads, and yeast
breads are generally baked on Cook Level 7.2. Breads will not brown in a microwave oven as
they do in a conventional oven. For color, usetoppings or ingredients which supply color.Some examples include rye flour, whole wheatflour, brown sugar, or dark spices, such ascinnamon. In some recipes, there may seem tobe extra topping ingredients left over. Use allingredients, since the bread will expand duringcooking.
3. When cooking muffins, use 6 oz. glass custardcups or 6-cupcake capacity plastic tray. Linecustard cups or plastic tray compartments withpaper liners. Fill liners with 2 tablespoons ofbatter to avoid having the muffins rise over theedges. Arrange custard cups in a circle, ratherthan in rows. Remove muffins from custardcups or plastic tray immediately, to avoid soggy"bottoms".
Item Cooking Time Cookmatic Power Level Method
Muffins (6)
1½ to 2½ min. 7 Prepare according to recipe or package directions.Place 2 tablespoons of batter into each plastic muffincup lined with paper liners. Muffins are done whentops spring back when lightly pressed. Removemuffins from tray and place on cooling rackimmediately.
Coffee Cake 9" round from scratch
7 to 11 min. 7 Prepare according to recipe or package directions.Coffee cake is done when toothpick inserted in centercomes out clean.
Corn Bread 9" round
3 to 5 min. 7 Prepare according to recipe or package directions.Top may look glossy but will finish cooking after fiveminutes standing time.
4. Quick breads are usually fully cooked whentoothpick inserted in the center comes outclean. Some breads will look slightly moistwhen first removed from microwave oven. Lookthrough bottom of glass dish to see if bread isfully cooked. Breads should stand 3 to 5minutes after cooking.
5. When reheating baked breads, heat only for afew seconds. Reheat only as much bread asneeded for each meal. Wrap bread in amicrowave-safe paper towel or napkin whenreheating to capture steam and help keepbread moist.
6 Turn foods quarter-turn halfway throughcooking time (non-turntable models, only).
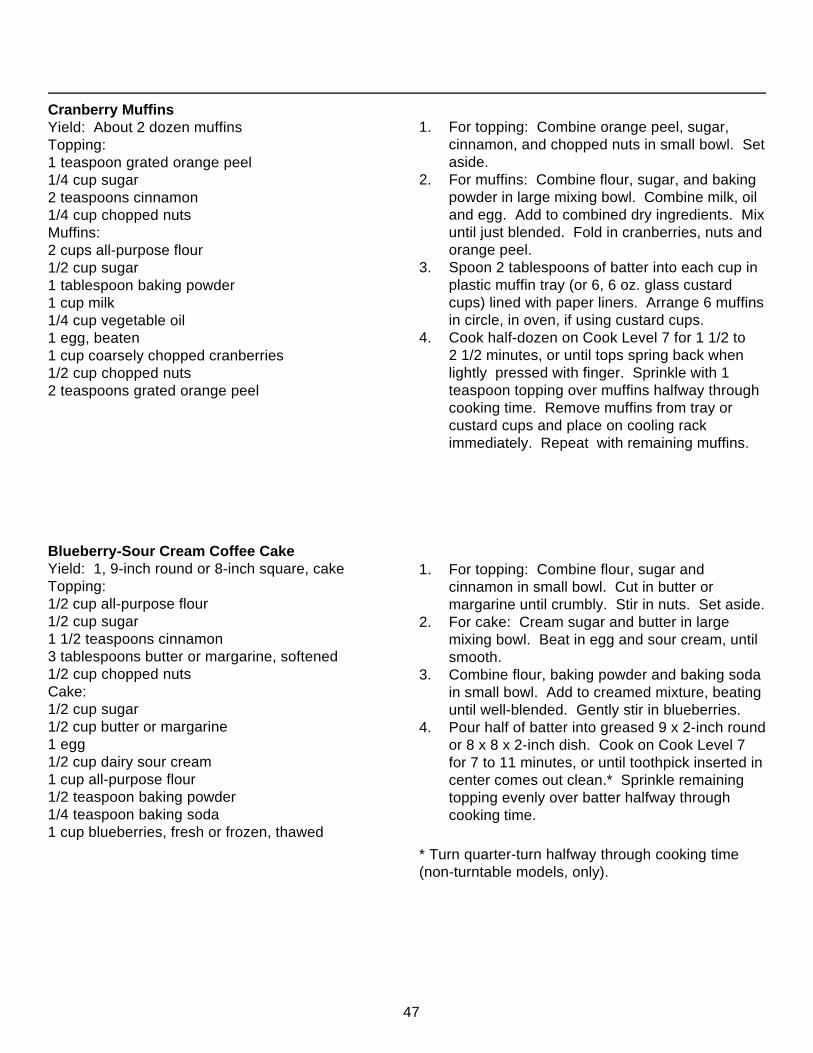
47
Blueberry-Sour Cream Coffee CakeYield: 1, 9-inch round or 8-inch square, cakeTopping:1/2 cup all-purpose flour1/2 cup sugar1 1/2 teaspoons cinnamon3 tablespoons butter or margarine, softened1/2 cup chopped nutsCake:1/2 cup sugar1/2 cup butter or margarine1 egg1/2 cup dairy sour cream1 cup all-purpose flour1/2 teaspoon baking powder1/4 teaspoon baking soda1 cup blueberries, fresh or frozen, thawed
1. For topping: Combine flour, sugar andcinnamon in small bowl. Cut in butter ormargarine until crumbly. Stir in nuts. Set aside.
2. For cake: Cream sugar and butter in largemixing bowl. Beat in egg and sour cream, untilsmooth.
3. Combine flour, baking powder and baking sodain small bowl. Add to creamed mixture, beatinguntil well-blended. Gently stir in blueberries.
4. Pour half of batter into greased 9 x 2-inch roundor 8 x 8 x 2-inch dish. Cook on Cook Level 7for 7 to 11 minutes, or until toothpick inserted incenter comes out clean.* Sprinkle remainingtopping evenly over batter halfway throughcooking time.
Cranberry MuffinsYield: About 2 dozen muffinsTopping:1 teaspoon grated orange peel1/4 cup sugar2 teaspoons cinnamon1/4 cup chopped nutsMuffins:2 cups all-purpose flour1/2 cup sugar1 tablespoon baking powder1 cup milk1/4 cup vegetable oil1 egg, beaten1 cup coarsely chopped cranberries1/2 cup chopped nuts2 teaspoons grated orange peel
1. For topping: Combine orange peel, sugar,cinnamon, and chopped nuts in small bowl. Setaside.
2. For muffins: Combine flour, sugar, and bakingpowder in large mixing bowl. Combine milk, oiland egg. Add to combined dry ingredients. Mixuntil just blended. Fold in cranberries, nuts andorange peel.
3. Spoon 2 tablespoons of batter into each cup inplastic muffin tray (or 6, 6 oz. glass custardcups) lined with paper liners. Arrange 6 muffinsin circle, in oven, if using custard cups.
4. Cook half-dozen on Cook Level 7 for 1 1/2 to2 1/2 minutes, or until tops spring back whenlightly pressed with finger. Sprinkle with 1teaspoon topping over muffins halfway throughcooking time. Remove muffins from tray orcustard cups and place on cooling rackimmediately. Repeat with remaining muffins.
* Turn quarter-turn halfway through cooking time(non-turntable models, only).
48
1. Place water in 1-quart mixing bowl. Heat onFull power for 30 seconds to 1 minute, or untiltemperature of 105° F to 115° F is reached.Dissolve yeast in water. Stir in sugar and salt.
2. Blend in oil and eggs. Mix in flour, 2 cups at atime. Scrape dough from sides of bowl tocenter. Cover. Let stand for 20 minutes.Knead dough until smooth and elastic, or about5 minutes.
3. Turn dough out onto lightly floured board.Divide dough into thirds. Roll each third into 5 x12-inch rectangle,1/4-inch thick. Spread eachwith butter, as desired. Sprinkle each withmixture of sugar and cinnamon. Sprinkleraisins on each, if desired. Roll each startingwith narrow sides. Cut each roll into dozen 3/4-inch slices.
4. Place 1/4 cup butter in 9 x 2-inch round dish.Heat on Full power for 15 to 30 seconds, oruntil melted. Stir in 1/4 cup brown sugar and1/4 cup pecans. Place dozen rolls in dish.Repeat with remaining two dozen rolls.
5. Let each dish of rolls rise and cook separately.Place 2 cups of water in 2-cup glass measure inrear corner of oven cavity. Let rise on CookLevel 1 for 5 to 7 minutes. Let stand for 10minutes, or until doubled.
6. Cook, on Cook Level 5 for 4 1/2 to 6 minutes, oruntil top springs back when lightly pressed withfinger. Invert on serving platter. Repeat withremaining rolls.
Caramel Pecan Sweet RollsYield: 3 batches of about 1 dozen rolls each2 cups warm water2 (1/4 oz. each) pkgs. active dry yeast1/3 cup sugar1 tablespoon salt1/3 cup vegetable oil2 eggs, beaten6 to 6 1/2 cups all-purpose flourButter or margarine, softened1/2 cup sugar1 tablespoon cinnamon1/3 cup raisins (optional)3/4 cup butter or margarine, divided3/4 cup brown sugar, firmly packed, divided3/4 cup pecan pieces, divided
49
1. Circular and tube dishes provide best cookingresults. Arrange cupcakes in a circle, if bakingthem in custard cups or use circular-shapedcupcake trays.
2. A tube dish can be created by placing a 2 to 3-inch diameter drinking glass in a 3 to 4-quartcasserole. Pour the cake batter around theglass.
3. If desired, to turn layer cake out of dish andonto a serving platter, grease the dish and linethe bottom with waxed paper before baking.This will allow easy removal of the cake. Do notuse flour when greasing a dish since it will tendto lump in bottom of dish. Avoid using spray-onvegetable coating, as it makes cakes sticky.
4. When cooking microwave oven cakes,decrease the amount of batter slightly. Dishesshould be about half-filled with batter. Excessbatter can be used for baking cupcakes.
5. Cook cake layers separately, one at a time.The same dish may be used, if desired. Use afresh piece of waxed paper when cooking thesecond layer.
Baked Goods and Desserts Cooking Guidelines6. Cakes and bars are baked on Cook Level 5 or
Cook Level 7.7. Cakes and bars are done when tops spring
back when lightly pressed with a finger. Cakesmay appear slightly moist after cooking."Moisture" is not "raw" batter. This moisture willdisappear when cake stands for 3 to 5 minutesafter cooking. Remember this "carry-overcooking" time.
8. Due to the short amount of cooking time,microwave oven cooked cakes and bars will notbrown. When using frosting or toppings, thelack of browning is not noticed. Confectioners'sugar, a mixture of cinnamon and sugar, nuts orcoconut may be sprinkled over top of cake.Sauces, fruit toppings, and fresh or frozen fruitmay be served over cake. Even pudding canbe used as a topping for cake.
Item Cooking Time Cookmatic Power Level Method
Cake Layer 8" round
7 to 9 min. 5 Microwave one layer at a time.* Cake is done when top springsback when touched lightly. Top may still appear moist but notraw. Let stand for 5 minutes. Invert on a cooling rack. Coolcompletely.
Cupcakes 2 to 3 min. 5 Prepare according to recipe or package directions. Place 2tablespoons of batter into each cup of plastic cupcake tray linedwith paper liners.* Cupcakes are done when top springs backwhen lightly pressed. Remove from tray and place on coolingrack immediately.
Bundt Cake 12 to 15 min. 5 Prepare according to recipe or package directions. Place ingreased bundt pan.* Cake is done when top springs back whentouched lightly. Top may still appear moist, but not raw. Letstand 5 minutes. Invert on cooling rack. Cool completely.
Brownies 8" square
4½ - 6 min. 5 Prepare according to recipe or package directions.* Brownies aredone when top springs back when touched lightly. Top may stillappear moist but not raw. Let stand until cool.
Single Pie Crust 9" round
1 to 3 min. Full Power (10) Prepare according to recipe or use thawed ready-made pie crust.Cover with microwave-safe paper towel.* Pie crust is done whendough is no longer moist. Cool. Fill with desired filling.
NOTE: To bake microwave convenience cakes, bars, desserts, etc., follow package instructions and decrease cooking time.
* Turn quarter-turn halfway through cooking time (non-turntable models, only).
50
Chocolate Malt CakeYield: 1, 9-inch 2-layer cakeCake:1 cup sugar1/2 cup butter or margarine1 cup vegetable oil3 eggs1 teaspoon vanilla2 cups all-purpose flour1 1/2 cup chocolate flavored malted milk powder1 tablespoon baking powder1 1/4 cups milkFrosting:1 (12 oz.) carton frozen non-dairy whipped topping,
thawed1/2 cup chocolate flavored malted milk powder1/4 cup cocoa
Cherry CheesecakeYield: 12 to 15 servings1/2 cup butter or margarine2 cups graham cracker crumbs1/2 cup sugar1/2 teaspoon cinnamon3 (8 oz. each) pkgs. cream cheese, softened5 eggs1 cup sugar1/2 teaspoon vanilla2 1/2 cups dairy sour cream1/3 cup sugar1 1/2 teaspoons vanilla1 (21 oz.) can cherry pie filling*
1. Place butter in 3-quart utility dish. Heat on Fullpower for 30 seconds to 1 1/2 minutes, or untilmelted.
2. Blend in crumbs, sugar, and cinnamon. Pressmixture firmly against bottom and sides of dish.Cook on Full power for 30 seconds to 1 1/2minutes, or until firm. Turn half-turn halfwaythrough cooking time.*
3. Beat cream cheese until smooth. Beat in eggs,one at a time. Mix in sugar and vanilla, untilsmooth and creamy. Pour over crust. Cook onCook Level 4 for 20 to 30 minutes, or until knifeinserted in center comes out clean.*
4. Combine sour cream, sugar, and vanilla. Blendwell. Pour mixture over cheesecake. Chill.Top with cherry pie filling.Micro-tip: cherry pie filling may be substitutedwith glazed fresh fruit or other fruit pie fillings,such as strawberry or blueberry.
1. For cake: Line bottoms of 2, 9 x 2-inch rounddishes with waxed paper.
2. Cream together sugar and butter in large mixingbowl, until fluffy. Gradually blend in oil.
3. Add eggs, one at a time. Beat well after eachaddition. Blend in vanilla.
4. Mix together flour, malted milk powder, andbaking powder in medium mixing bowl. Add dryingredients alternately with milk. Beat well aftereach addition.
5. Pour one-half of batter into dish. Cook on CookLevel 5 for 6 1/2 to 8 1/2 minutes, or until topsprings back when lightly pressed with finger.*Let stand 5 minutes. Invert on cooling rack.Cool completely. Repeat with remaining layer.
6. For frosting: Combine all frosting ingredients inlarge mixing bowl. Mix until well-blended. Filland frost cooled cake.
* Turn quarter-turn halfway through cooking time(non-turntable models, only).
51
Rhubarb Custard PieYield: 1, 9-inch pieFilling:4 egg yolks3/4 cup milk1 teaspoon vanilla1 1/2 cups sugar3 tablespoons all-purpose flourDash saltDash nutmeg3 cups diced rhubarb1, 9-inch baked pie crustMeringue:4 egg whites1/4 teaspoon cream of tartar1/2 cup sugar
Lemon BarsYield: 1 dozen bars1/2 cup butter or margarine1 1/2 cups all-purpose flour1/4 cup confectioners' sugar1 cup sugar2 eggs3 tablespoons lemon juice2 tablespoons all-purpose flour1 teaspoon grated lemon peel3 to 4 tablespoons confectioners' sugar
Dutch Apple Cream PieYield: 1, 9-inch pie1 cup all-purpose flour1/2 cup brown sugar, firmly-packed1 teaspoon cinnamon1/3 cup butter or margarine, softened1/3 cup chopped nuts1 cup dairy sour cream3/4 cup sugar1 egg, slightly-beaten2 tablespoons all-purpose flour1/2 teaspoon cinnamon4 cups cored, peeled, and sliced apples1, 9-inch baked pie crust
1. For topping: Combine 1 cup flour, brown sugarand 1 teaspoon cinnamon. Cut in butter, untilmixture is crumbly. Stir in nuts. Set aside.
2. For filling: Combine sour cream, sugar, egg,flour, and cinnamon. Stir in apples.
3. Add filling to baked pie crust. Cook on fullpower for 7 to 9 minutes, or until apples aretender. Sprinkle topping over pie, halfwaythrough cooking time.*
* Turn quarter-turn halfway through cooking time(non-turntable models, only).
1. Place butter in 8 x 8 x 2-inch baking dish. Heaton full power for 30 seconds to 1 1/2 minutes,or until melted. Blend together melted butter,1 1/2 cups flour and 1/4 cup confectioners'sugar.
2. Cook on full power for 45 seconds to 1 1/2minutes, or until crumbly. Stir 2 to 3 timesduring cooking time. Press mixture firmlyagainst bottom of dish. Cook on full power for 1to 2 minutes, or until slightly firm.
3. Beat together sugar, eggs, lemon juice, 2tablespoons flour, and grated lemon peel. Pourover hot crust. Cook on Cook Level 4 for 8 to11 minutes, or until center is firm.* Sprinklewith 3 to 4 tablespoons confectioners' sugar.Cool completely. Cut into squares.
1. For filling: Combine egg yolks, milk, and vanillain large bowl.
2. Mix together sugar, flour, salt, and nutmeg insmall bowl. Add to egg mixture.
3. Spread rhubarb evenly in 9-inch baked piecrust. Pour filling over rhubarb. Cook on CookLevel 4 for 22 to 27 minutes, or until filling isalmost set.*
4. For meringue: Beat egg whites with cream oftartar, until foamy. Add sugar, 1 tablespoon ata time, beating until egg whites are stiff.Spread meringue over filling. Seal edges. Heaton full power for 1 to 2 1/2 minutes, or untilmeringue is set.
52
Triple TreatsYield: 1 1/2 dozen bars1/2 cup butter or margarine, softened1/2 cup brown sugar, firmly packed1 egg1/2 teaspoon vanilla1 cup all-purpose flour1 1/2 cups confectioners' sugar2 tablespoons milk1 tablespoon butter or margarine, softened1/2 teaspoon vanilla1/4 teaspoon almond extract1/2 cup semi-sweet chocolate morsels2/3 cup confectioners' sugar1/2 cup butter or margarine, softened1/4 cup slivered almonds or 1/4 cup chopped
walnuts
1. Cream 1/2 cup butter and brown sugar in largemixing bowl. Add egg, 1/2 teaspoon vanilla,and flour. Beat until fluffy. Spread evenly inungreased, 8 x 8 x 2-inch dish. Cook on CookLevel 7 for 4 to 5 1/2 minutes, or until firm.*Allow to cool.
2. Beat together 1 1/2 cups confectioners' sugar,milk, 1 tablespoon butter, vanilla, and almondextract, until creamy. Spread on cooled bottomlayer. Chill.
3. Place chocolate morsels in 1-cup glassmeasure. Heat on full power for 20 to 45seconds, or until melted. Stir well.
4. Cream confectioners' sugar and butter in smallbowl. Add chocolate to creamed mixture. Beatuntil fluffy. Spread on white layer. Sprinklewith nuts. Refrigerate. Cut into bars beforeserving.
Rocky Road CakeYield: 1 cake1 (13 1/2 oz.) pkg. chocolate fudge chip snack cake mix1 cup water1 1/2 cups miniature marshmallows1/2 cup semi-sweet chocolate morsels1/4 cup crunchy-style peanut butter
1. Prepare cake according to package instructionsusing 1/2 cup water and 1 egg white. Pourbatter into 9 x 2-inch round dish. Cook on CookLevel 5 for 4 1/2 to 6 minutes, or until topsprings back when lightly pressed with finger.*
2. Place water in 2-cup glass measure. Heat onfull power for 1 1/2 to 2 1/2 minutes, or untilboiling. Stir in gelatin to dissolve.
3. Poke holes in cake with toothpick. Pour gelatinover cake. Refrigerate for 1 hour.
4. For topping: Combine instant pudding mix andmilk in small bowl. Beat for 1 minute withelectric mixer. Fold in whipped topping.Spread over cake. Chill.Micro-tip: This is a good dessert for St.Patrick's Day, or for other holidays. Use otherflavors of gelatin, if desired.
Lime Gelatin Delight CakeYield: 1, 9-inch round cake1 (9 oz.) pkg. white cake mix1/2 cup water1 egg white1 cup hot tap water1 (3 oz.) pkg. lime flavored gelatin1 (3 oz.) pkg. instant lemon flavored pudding mix1 cup milk1 cup nondairy whipped topping
1. Combine cake mix and water in 9 x 2-inchround dish. Mix according to packageinstructions. Cook on Cook Level 5 for 5 to 7minutes.*
2. Immediately after removing from oven, sprinklemarshmallows evenly over top.
3. Combine chocolate morsels and peanut butterin 2-cup glass measure. Heat on full power for45 seconds to 1 minute 15 seconds, or untilmelted. Stir halfway through cooking time.
4. Drizzle well-blended chocolate mixture overmarshmallows. Cool.
* Turn quarter-turn halfway through cooking time(non-turntable models, only).
53
Apple CrispYield: 6 to 8 servings6 cups cored, peeled, and sliced cooking apples1 tablespoon lemon juice (optional)1/4 cup sugar1/2 teaspoon cinnamon1 tablespoon all-purpose flour1 cup all-purpose flour1 cup quick-cooking, rolled oats1/2 cup brown sugar, firmly packed1 teaspoon cinnamon1/2 cup butter or margarine, softened
Thumbprint CookiesYield: 3 dozen2/3 cup butter or margarine1/3 cup sugar2 eggs, separated1 teaspoon vanilla1/4 teaspoon salt1 3/4 cups sifted all-purpose flour3/4 cup finely chopped pecans1/2 cup preserves
1. Place butter in 9 x 2-inch round dish. Heat onFull power for 15 to 30 seconds, or until melted.Sprinkle brown sugar over butter.
2. Reserve 1/4 cup pineapple juice in 2-cupmeasure. Arrange pineapple slices over butter-brown sugar mixture. Invert maraschino cherryhalf in center of each pineapple ring, if desired.
3. Add oil and eggs to reserved juice. Stir untilblended. Add liquid ingredients to cake mix inlarge mixing bowl. Stir until well-blended.Batter will be lumpy. Spread batter evenly overpineapple rings. Cook on Cook Level 5 for 7 to10 minutes, or until top springs back whenlightly pressed with finger.* Let stand for 10minutes. Invert on serving platter.Micro tip: Crushed pineapple may besubstituted for sliced.
Pineapple Upside-Down CakeYield: 1, 9 x 2-inch cake2 tablespoons butter or margarine1/2 cup dark brown sugar, firmly packed1 (8 oz.) can sliced pineapple, with liquid2 maraschino cherries, halved (optional)1/2 cup vegetable oil2 eggs1 (9 oz.) pkg. one layer yellow cake mix
1. Cream butter and sugar until fluffy in largemixing bowl.
2. Stir in egg yolks, vanilla, and salt, beating well.Gradually stir in flour. Mix well.
3. Shape dough into 3/4-inch diameter balls. Dipin slightly-beaten egg whites. Roll in pecans.
4. Line 12-inch glass platter or pizza plate withwaxed paper. Place 9 balls in circle aroundedge and 3 balls in center of platter. Makethumbprint in each.
5. Cook dozen on Cook Level 7 for 1 minute, 15seconds to 2 minutes, or until firm but slightlymoist.* Allow cookies to cool slightly beforeremoving from waxed paper. Fill "thumbprints"with preserves just before serving. Repeat withremaining cookies.Micro-tip: Cookies may be filled with pie fillingrather than preserves.
* Turn quarter-turn halfway through cooking time(non-turntable models, only).
1. Place apples in 8 x 8 x 2-inch dish. Sprinklewith lemon juice, if desired.
2. Combine 1/4 cup sugar, 1/2 teaspooncinnamon, and 1 tablespoon flour in small bowl.Toss with apples to coat.
3. Combine flour, oats, brown sugar, andcinnamon in mixing bowl. Cut in butter, untilmixture is crumbly. Sprinkle over apples. Cookon Full power for 5 to 7 minutes, or until applesare tender.Micro-tip: For less sweet Apple Crisp, omitsugar in Step 2.
54
Candy Cooking Guidelines1. Candy becomes very hot during cooking.
Select a cooking utensil which will withstand hottemperatures. Select a utensil which is largeenough to hold the candy during cooking toavoid boil-overs. Use the recommended utensilin the recipe. Generally, candy is cookeduncovered for easy stirring.
2. If a candy thermometer is used when preparingcandies, do not leave thermometer in candywhile the microwave oven is operating, unlessthe thermometer is especially designed formicrowave oven use.
3. In this cooking guide, candies are described asbeing completely done when the followingstages are reached:
Coconut 'N' Cherry FudgeYield: 25 pieces1 2/3 cups sugar2/3 cup evaporated milk1/2 cup butter2 cups miniature marshmallows1 1/2 cups semi-sweet chocolate morsels1 teaspoon vanilla1/2 cup flake coconut1/2 cup chopped nuts1/3 cup chopped maraschino cherries
1. Combine sugar, evaporated milk, and butter in3-quart casserole. Cook on full power for 6 to 9minutes, or until soft ball stage is reached.* Stirmixture 3 times during cooking time.
2. Beat in marshmallows, chocolate morsels, andvanilla with wire whisk, until mixture is smoothand creamy. Stir in coconut, nuts, and cherries.Pour into greased, 8 x 8 x 2-inch dish.Micro-tip: *The soft ball stage is described in"Candy Cooking Guidelines."
Soft Ball: Candy syrup, when dropped intovery cold water, forms a soft ball which flattenson removal from water.Firm Ball: Candy syrup, when dropped intovery cold water, forms a firm ball which doesnot flatten on removal from water.Hard Ball: Candy syrup, when dropped intovery cold water, forms a hard ball which is hardenough to hold its shape, yet elastic.Soft Crack: Candy syrup when dropped intovery cold water, separates into threads whichare hard but not brittle.Hard crack: Candy syrup when dropped intovery cold water, separates into threads whichare hard and brittle.
4. Since candies do become quite hot duringcooking, be careful when removing them fromthe microwave oven. Keep pot holders handy.
Peanut BrittleYield: About 2 lbs.2 cups sugar1 cup light corn syrup1/3 cup water1 (16 oz.) pkg. salted peanuts4 tablespoons butter or margarine2 teaspoons baking soda
1. Grease 2, 15 1/2 x 12-inch baking sheets.2. Place sugar, corn syrup, and water in 3-quart
casserole. Cook on full power for 6 to 9minutes, or until soft ball stage is reached.* Stiroccasionally during cooking time.
3. Stir in peanuts. Cook on full power for 7 to 11minutes, or until hard crack stage is reached.*
4. Stir in butter and baking soda. Pour half ofcandy onto each sheet, spreading to 1/4-inchthickness. Cool. Break into pieces.Micro-tip:*The soft ball and hard crack stages aredescribed in "Candy Cooking Guidelines."

55
Chocolate-Maple BonbonsYield: 2 1/2 to 3 dozen1/4 cup butter or margarine, softened3 cups sifted confectioners' sugar1 tablespoon maple flavoring3 to 4 teaspoons milk1/4 cup chopped peanuts (optional)1 cup semi-sweet chocolate morsels1 cup butterscotch morsels1/2 cup creamy-style peanut butter1(2 1/2 x 3 x 1/2-inch) bar paraffin, grated
Almond BarkYield: 1 lb.3/4 lb. white or dark chocolate*2/3 cup toasted almonds**
1. Beat butter in large mixing bowl until fluffy.Blend in confectioners' sugar and mapleflavoring. Add enough milk to make mixturehold together. If necessary, knead mixture untilall combined. (Mixture should be very stiff.)Mix in peanuts, if desired. Roll into 1/2 to 1-inch balls. Place on waxed paper and chill for1 hour, or until firm.
2. Combine morsels, peanut butter, and paraffin in1-quart casserole. Heat on full power for 1minute, 45 seconds to 2 1/2 minutes, or untilmelted. Stir several times during cooking time.Stir until smooth. Dip maple balls in chocolate.Let cool on waxed paper. Store in refrigerator.Micro-tip: Use remaining chocolate as dip forpound cake or fruit, or add peanuts to makepeanut clusters.
1. Place chocolate in 1-quart casserole. Heat onfull power for 1 to 2 minutes, or until melted.Stir occasionally during heating time.
2. Stir in almonds. Pour immediately onto waxedpaper or aluminum foil. Spread thinly. Cool forapproximately 1 hour. Break into pieces forserving.Micro-tips:*1 (12 oz.) pkg. semi-sweet chocolate morselsmay be substituted for 3/4 lb. chocolate, ifdesired.**Pecans or crushed peppermint candies maybe substituted for almonds.
* Turn quarter-turn halfway through cookingtime (non-turntable models, only).
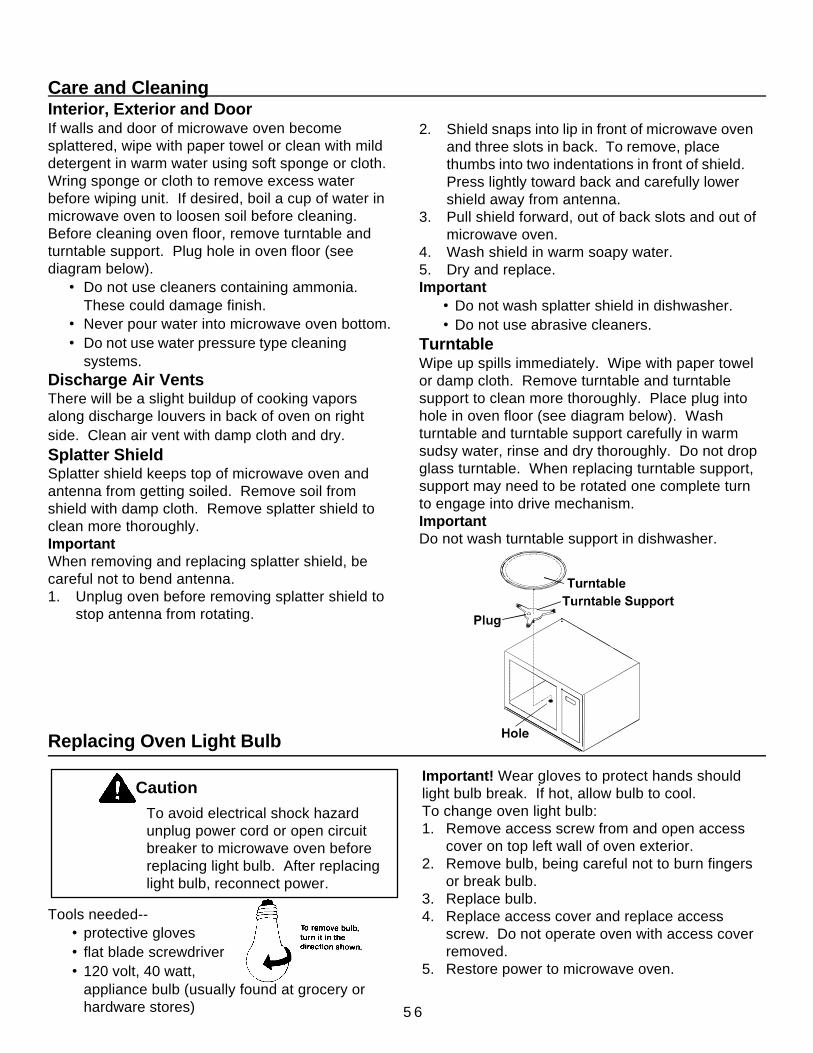
5 6
Care and CleaningInterior, Exterior and DoorIf walls and door of microwave oven becomesplattered, wipe with paper towel or clean with milddetergent in warm water using soft sponge or cloth.Wring sponge or cloth to remove excess waterbefore wiping unit. If desired, boil a cup of water inmicrowave oven to loosen soil before cleaning.Before cleaning oven floor, remove turntable andturntable support. Plug hole in oven floor (seediagram below).
• Do not use cleaners containing ammonia.These could damage finish.
• Never pour water into microwave oven bottom.• Do not use water pressure type cleaning
systems.Discharge Air VentsThere will be a slight buildup of cooking vaporsalong discharge louvers in back of oven on rightside. Clean air vent with damp cloth and dry.Splatter ShieldSplatter shield keeps top of microwave oven andantenna from getting soiled. Remove soil fromshield with damp cloth. Remove splatter shield toclean more thoroughly.ImportantWhen removing and replacing splatter shield, becareful not to bend antenna.1. Unplug oven before removing splatter shield to
stop antenna from rotating.
2. Shield snaps into lip in front of microwave ovenand three slots in back. To remove, placethumbs into two indentations in front of shield.Press lightly toward back and carefully lowershield away from antenna.
3. Pull shield forward, out of back slots and out ofmicrowave oven.
4. Wash shield in warm soapy water.5. Dry and replace.Important
• Do not wash splatter shield in dishwasher.• Do not use abrasive cleaners.
TurntableWipe up spills immediately. Wipe with paper towelor damp cloth. Remove turntable and turntablesupport to clean more thoroughly. Place plug intohole in oven floor (see diagram below). Washturntable and turntable support carefully in warmsudsy water, rinse and dry thoroughly. Do not dropglass turntable. When replacing turntable support,support may need to be rotated one complete turnto engage into drive mechanism.ImportantDo not wash turntable support in dishwasher.
Tools needed--• protective gloves• flat blade screwdriver• 120 volt, 40 watt,
appliance bulb (usually found at grocery orhardware stores)
Replacing Oven Light Bulb
CautionTo avoid electrical shock hazardunplug power cord or open circuitbreaker to microwave oven beforereplacing light bulb. After replacinglight bulb, reconnect power.
Important! Wear gloves to protect hands shouldlight bulb break. If hot, allow bulb to cool.To change oven light bulb:1. Remove access screw from and open access
cover on top left wall of oven exterior.2. Remove bulb, being careful not to burn fingers
or break bulb.3. Replace bulb.4. Replace access cover and replace access
screw. Do not operate oven with access coverremoved.
5. Restore power to microwave oven.
5 7
Before Calling for ServiceIf oven light does not work:
• Confirm light bulb is screwed in tightly.• Confirm light bulb is not defective.
If room lights dim or pulse when oven is in use:• Confirm microwave is on proper circuit. See
grounding instructions on page 6.
If unit operates, but will not heat food:• Place one cup cool water in unit. Heat for one
minute. If water temperature does not rise,unit is operating incorrectly.
If dash lines appear in display:• This is a power interruption signal and will
appear whenever oven is initially plugged in orwhen power is interrupted. Set the clock toclear.
If microwave oven does not operate:• Confirm unit is plugged into dedicated circuit.• Confirm unit is on grounded and polarized
circuit.• Check fuse or circuit breaker. Determine if
circuit is operable by plugging another item inoutlet.
• Confirm microwave oven door is securelyclosed.
• If condition remains unchanged, see"Unchanged Condition" instructions below.
If control will not accept instructions:• For cooking by time, see "Unchanged
Condition" instructions below.
If readout appears wrong:• Press STOP/RESET.• See "Unchanged Condition" instructions
below.
WARNINGTo avoid electrical shock which cancause severe personal injury or death, donot remove outer case at any time. Onlyauthorized servicer should remove outercase.
Unchanged ConditionIf condition remains unchanged, perform thefollowing steps:1. Check to see if fuse or circuit breaker is
open.2. Unplug oven.3. Reconnect oven to wall outlet. Dash lines
appear in display.4. Press STOP/RESET or set clock.

5 8

5 9

6 0
1994 Amana Refrigeration, Inc.Amana, Iowa 52204
Part No. B8383296Printed in U.S.A.
• Amana Factory Service Center ArizonaAlso dispatches service in areas of Nevada
• Amana Factory Service Center Northern California• Amana Factory Service Center Southern California• Amana Factory Service Center Colorado
Also dispatches service in areas of Utah• Amana Factory Service Center Florida• Amana Factory Service Center Georgia
Also dispatches service in areas of Alabama, North Carolina,South Carolina and Tennessee
• Amana Factory Service Center IowaAlso dispatches service in areas of Kansas, Minnesota,Missouri and Wisconsin
• Amana Factory Service Center IllinoisAlso dispatches service in areas of Indiana and Kentucky
• Amana Factory Service Center MassachusettsAlso dispatches service in areas of New Hampshire and Rhode Island
• Amana Factory Service Center MarylandAlso dispatches service in areas of Pennsylvania, Virginia andWashington D.C.
• Amana Factory Service Center New YorkAlso dispatches service in areas of Conneticut and New Jersey
• Amana Factory Service Center OhioAlso dispatches service in areas of Michigan and Pennsylvania
• Amana Factory Service Center Texas• Amana Factory Service Center Washington
Also dispatches service in areas of OregonAsure Extended Service PlanAmana is pleased to offer long-term service protection on this new microwave oven. Asure ExtendedService Plan is specially designed to supplement Amana's strong warranty. Asure provides budget-protecting coverage on microwave for up to five full years and includes parts, labor and travelcharges. A participating Amana dealer has details.
Factory Service CentersListed below are Factory Service Centers which service most metropolitan and surrounding areas.Amana also has a network of independent authorized servicers. Locate a Factory Service Center orindependent servicer by calling 1-800-NATLSVC (628-5782) inside U.S.A. and 319-622-5511 ifoutside U.S.A. When contacting Amana, provide model, manufacturing, and serial numbers anddate of purchase. Locate model, manufacturing, and serial numbers on the nameplate. Warrantyservice must be performed by an authorized servicer. Amana also recommends contacting anauthorized servicer if service is required after warranty expires.