Embed Size (px)
Citation preview
• An easy-to-follow guide to achieving a perfect result. • Outlines all the tools you will need for the job.• Includes a materials checklist.
PLEASE NOTE: Before starting this project or buying any materials, it is worth your time to read all steps thoroughly first to be sure you understand what is required.
mitre10.com.auMitre 10 is proudly Australian owned.
MItrePlAn PrOJeCt PlAnner
Your local MITRE 10 Store is:
IMPORTANT: This project planner has been produced to provide basic information and our experienced staff are available to answer any questions you may have. However, this information is provided for use on the understanding that Mitre 10 is not liable for any loss or damage which is suffered or incurred (including but not limited to indirect or consequential loss), for any personal injury or damage to property suffered or sustained as a result of using the information contained in this MitrePlan Project Planner. Mitre 10 advises you to call in a qualified tradesperson, such as an electrician or plumber, where expert services are required, and to independently assess any safety precautions that will need to be followed prior to using the information in this MitrePlan Project Planner.
WARNING: There may be by laws or regulations of councils or other statutory bodies that you must comply with when following this MitrePlan Project Planner.
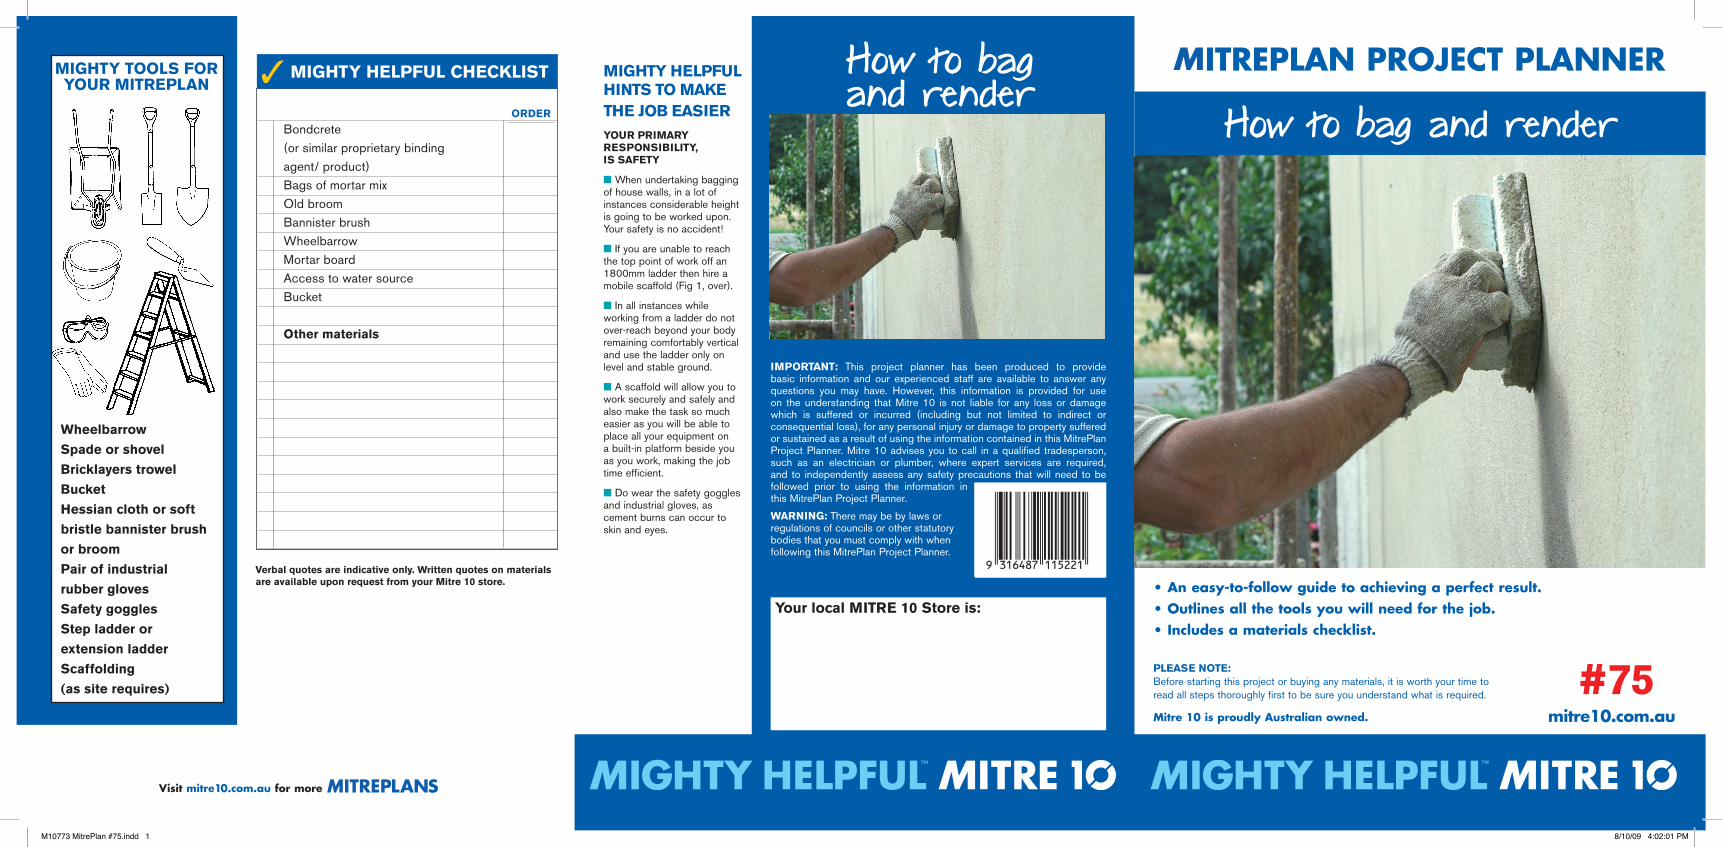
How to bag and render
How to bag and render
Bondcrete (or similar proprietary binding agent/ product)
Bags of mortar mix Old broom Bannister brush Wheelbarrow Mortar board Access to water source Bucket
Other materials
MIGhTY TOOLS fOR YOuR MITREPLAN
Verbal quotes are indicative only. Written quotes on materials are available upon request from your Mitre 10 store.
ORDER
#75
MIGhTY hELPfuL chEckLIST✓ MIGhTY hELPfuL hINTS TO MAkE ThE jOb EASIERYOuR PRIMARY RESPONSIbILITY, IS SAfETY
■ When undertaking bagging of house walls, in a lot of instances considerable height is going to be worked upon. Your safety is no accident!
■ If you are unable to reach the top point of work off an 1800mm ladder then hire a mobile scaffold (Fig 1, over).
■ In all instances while working from a ladder do not over-reach beyond your body remaining comfortably vertical and use the ladder only on level and stable ground.
■ A scaffold will allow you to work securely and safely and also make the task so much easier as you will be able to place all your equipment on a built-in platform beside you as you work, making the job time efficient.
■ Do wear the safety goggles and industrial gloves, as cement burns can occur to skin and eyes.
Wheelbarrow
Spade or shovel
bricklayers trowel
bucket
hessian cloth or soft
bristle bannister brush
or broom
Pair of industrial
rubber gloves
Safety goggles
Step ladder or
extension ladder
Scaffolding
(as site requires)
Visit mitre10.com.au for more S
M10773 MitrePlan #75.indd 1 8/10/09 4:02:01 PM
The quantity of materials required to do the chosen job will depend on many factors. The type and size of brick or block to be covered, if the surface is smooth concrete or cement sheet, the type of joint between the bricks or blocks, the fullness of cover you want to achieve.
Step 1: Surface preparation for the jobThe surface needs to be cleaned of all foreign matter such as dust and dirt, mould and any unsightly protuberances such as loose bits of mortar. Fill any holes or imperfections prior to the actual bagging with an exterior grade filler or damp mix of mortar mix. Be sure to allow all patching to dry fully before you begin bagging.
Porous surfaces such as cement sheet, concrete, sandstone, masonry brick or blockwork will need a preparation over it to provide a good base for the bagging mix to adhere to. This is completed by applying the purchased binding agent to the surface in accordance with the manufacturer’s instructions. Where the product instructions say to mix with water this is exactly what you must do, as applying it in the concentrated state does not make for a more secure job but places a sealed skin on the surface which will in time peel and the bagging effect will deteriorate prematurely. Application can be carried out with a paint roller, brush or, to speed things up, use a soft bristle broom.
Step 2: bagging mixDue to the wet nature of the bagging mix it is best to use a wheelbarrow to mix the ingredients in (Fig. 2). First wet the wheelbarrow tray with several litres of water (this makes cleaning the barrow later easier), swirl the water around then discard. Next empty a bag of dry mortar mix into the wheel barrow – use one bag of mix at the start until you can accurately gauge the speed of application against the drying time of the mix. Fill a bucket with water, gradually adding it to the mortar mix while mixing with a spade. While doing this pour a quarter cup – or manufacturer’s recommended quantity – of the binding agent into the mortar mix.
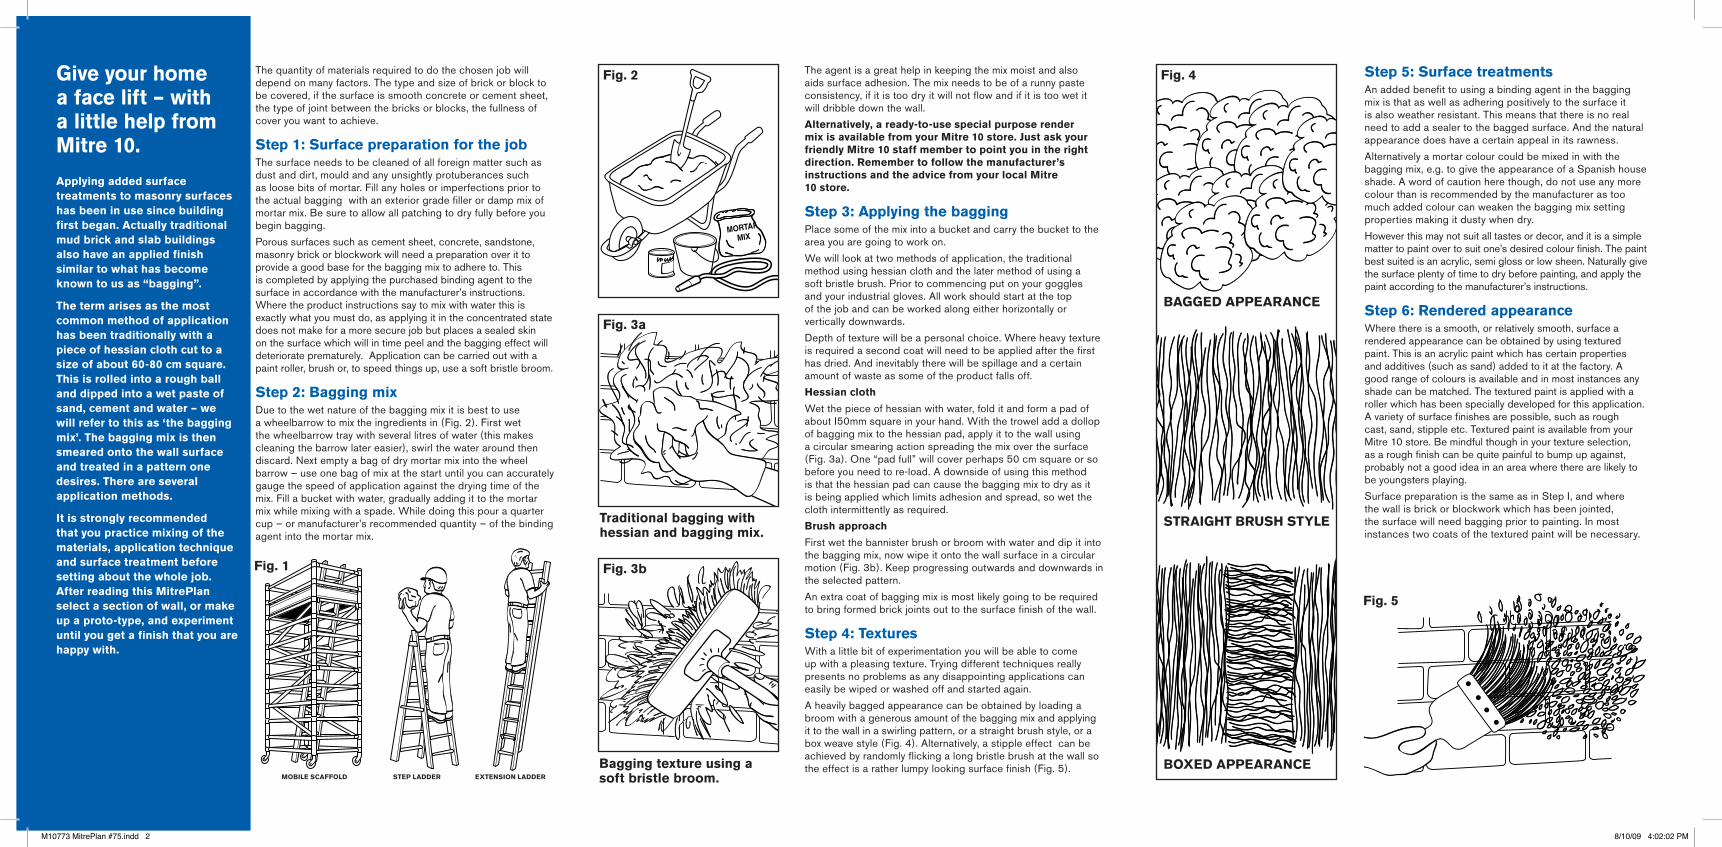
Step 5: Surface treatmentsAn added benefit to using a binding agent in the bagging mix is that as well as adhering positively to the surface it is also weather resistant. This means that there is no real need to add a sealer to the bagged surface. And the natural appearance does have a certain appeal in its rawness.
Alternatively a mortar colour could be mixed in with the bagging mix, e.g. to give the appearance of a Spanish house shade. A word of caution here though, do not use any more colour than is recommended by the manufacturer as too much added colour can weaken the bagging mix setting properties making it dusty when dry.
However this may not suit all tastes or decor, and it is a simple matter to paint over to suit one’s desired colour finish. The paint best suited is an acrylic, semi gloss or low sheen. Naturally give the surface plenty of time to dry before painting, and apply the paint according to the manufacturer’s instructions.
Step 6: Rendered appearanceWhere there is a smooth, or relatively smooth, surface a rendered appearance can be obtained by using textured paint. This is an acrylic paint which has certain properties and additives (such as sand) added to it at the factory. A good range of colours is available and in most instances any shade can be matched. The textured paint is applied with a roller which has been specially developed for this application. A variety of surface finishes are possible, such as rough cast, sand, stipple etc. Textured paint is available from your Mitre 10 store. Be mindful though in your texture selection, as a rough finish can be quite painful to bump up against, probably not a good idea in an area where there are likely to be youngsters playing.
Surface preparation is the same as in Step I, and where the wall is brick or blockwork which has been jointed, the surface will need bagging prior to painting. In most instances two coats of the textured paint will be necessary.
fig. 5
fig. 4The agent is a great help in keeping the mix moist and also aids surface adhesion. The mix needs to be of a runny paste consistency, if it is too dry it will not flow and if it is too wet it will dribble down the wall.
Alternatively, a ready-to-use special purpose render mix is available from your Mitre 10 store. just ask your friendly Mitre 10 staff member to point you in the right direction. Remember to follow the manufacturer’s instructions and the advice from your local Mitre 10 store.
Step 3: Applying the baggingPlace some of the mix into a bucket and carry the bucket to the area you are going to work on.
We will look at two methods of application, the traditional method using hessian cloth and the later method of using a soft bristle brush. Prior to commencing put on your goggles and your industrial gloves. All work should start at the top of the job and can be worked along either horizontally or vertically downwards.
Depth of texture will be a personal choice. Where heavy texture is required a second coat will need to be applied after the first has dried. And inevitably there will be spillage and a certain amount of waste as some of the product falls off.
hessian cloth
Wet the piece of hessian with water, fold it and form a pad of about I50mm square in your hand. With the trowel add a dollop of bagging mix to the hessian pad, apply it to the wall using a circular smearing action spreading the mix over the surface (Fig. 3a). One “pad full” will cover perhaps 50 cm square or so before you need to re-load. A downside of using this method is that the hessian pad can cause the bagging mix to dry as it is being applied which limits adhesion and spread, so wet the cloth intermittently as required.
brush approach
First wet the bannister brush or broom with water and dip it into the bagging mix, now wipe it onto the wall surface in a circular motion (Fig. 3b). Keep progressing outwards and downwards in the selected pattern.
An extra coat of bagging mix is most likely going to be required to bring formed brick joints out to the surface finish of the wall.
Step 4: TexturesWith a little bit of experimentation you will be able to come up with a pleasing texture. Trying different techniques really presents no problems as any disappointing applications can easily be wiped or washed off and started again.
A heavily bagged appearance can be obtained by loading a broom with a generous amount of the bagging mix and applying it to the wall in a swirling pattern, or a straight brush style, or a box weave style (Fig. 4). Alternatively, a stipple effect can be achieved by randomly flicking a long bristle brush at the wall so the effect is a rather lumpy looking surface finish (Fig. 5).
fig. 2
fig. 1
Applying added surface treatments to masonry surfaces has been in use since building first began. Actually traditional mud brick and slab buildings also have an applied finish similar to what has become known to us as “bagging”.
The term arises as the most common method of application has been traditionally with a piece of hessian cloth cut to a size of about 60-80 cm square. This is rolled into a rough ball and dipped into a wet paste of sand, cement and water – we will refer to this as ‘the bagging mix’. The bagging mix is then smeared onto the wall surface and treated in a pattern one desires. There are several application methods.
It is strongly recommended that you practice mixing of the materials, application technique and surface treatment before setting about the whole job. After reading this MitrePlan select a section of wall, or make up a proto-type, and experiment until you get a finish that you are happy with.
fig. 3a
fig. 3b
Give your home a face lift – with a little help from Mitre 10.
Traditional bagging with hessian and bagging mix.
bAGGED APPEARANcE
STRAIGhT bRuSh STYLE
bOXED APPEARANcE MObILE ScAffOLD STEP LADDER EXTENSION LADDER
bagging texture using a soft bristle broom.
M10773 MitrePlan #75.indd 2 8/10/09 4:02:02 PM