Embed Size (px)
Citation preview

Aastra X Series Migrating from R4.2 to R5.1
Migration Guide AMT/PTD/PBX/0089/1/6/EN 10/2009

AASTRA 1 rue Arnold Schoenberg 78280 Guyancourt - France Tel.: +33 1 30 96 42 00 Fax.: +33 1 30 96 43 00 www.aastra.com Copyright © AASTRA Telecom
Page 2 10/2009 AMT/PTD/PBX/0089/1/6/EN

AMT/PTD/PBX/0089/1/6/EN 10/2009 Page 3
C O N T E N T S
1. ABOUT THIS DOCUMENT.................................................................................6
1.1 PURPOSE OF THIS DOCUMENT..................................................................................6 1.2 TARGET AUDIENCE OF THIS DOCUMENT.................................................................6 1.3 SCOPE OF THIS DOCUMENT.......................................................................................6 1.4 CONTENTS OF THIS DOCUMENT ...............................................................................6 1.5 TERMINOLOGY .............................................................................................................6
1.5.1 TERMS AND EXPRESSIONS.............................................................................................. 6 1.5.2 ABBREVIATIONS AND TERMINOLOGY ........................................................................... 7
1.6 REFERENCE DOCUMENTS..........................................................................................7 1.7 REMINDER CONCERNING THE LAW ON INFORMATION TECHNOLOGY ...............7
2. MIGRATION........................................................................................................8
2.1 PRINCIPLES...................................................................................................................8 2.2 PREREQUISITES.........................................................................................................10
2.2.1 SYSTEM PREREQUISITES ............................................................................................... 10 2.2.2 IPBX PREREQUISITES ..................................................................................................... 10
2.3 INSTALLING THE MIGRATION TOOL........................................................................12 2.3.1 AASTRA SOFTWARE PACKAGE “F6.PCK”................................................................... 13 2.3.2 THE MICROSOFT ".NET FRAMEWORK 2.0" COMPONENT.......................................... 14 2.3.3 MIGRATION TOOL ............................................................................................................ 14
2.4 RETRIEVING R4.2 DATA.............................................................................................15 2.5 MIGRATION..................................................................................................................20
2.5.1 PHYSICAL MIGRATION .................................................................................................... 20 2.5.2 CONFIGURING THE PBX R5.1 ......................................................................................... 21 2.5.3 PARTIAL RESTORE FROM THE R4.2 BACKUP ON R5.1.............................................. 22 2.5.4 RESTORING LISTED DATA.............................................................................................. 25
2.6 VERIFICATION: VIEWING THE DETAILED REPORT................................................27 2.6.1 DISPLAYING TRACES ...................................................................................................... 27 2.6.2 DISPLAYING R4.2 DATA .................................................................................................. 28 2.6.3 DISPLAYING EXPORTED R5.1 DATA ............................................................................. 28 2.6.4 DISPLAYING IMPORTED R5.1 DATA AND REPORTS................................................... 28
2.7 R4.2 MULTI-SITE MIGRATION: CASE OF A SHARED DIRECTORY........................30 2.7.1 MIGRATING FROM THE MASTER DIRECTORY SITE.................................................... 30 2.7.2 MIGRATING FROM SITES WITHOUT ANY DIRECTORY ............................................... 30
2.8 MIGRATING FROM R4.2 TO R5.1 WITH OR WITHOUT AM7450 ..............................31 2.9 RECONFIGURATION...................................................................................................32
2.10 RESTORING THE INITIAL CONFIGURATION.........................................................32 2.11 IP DECT REGISTRATION .........................................................................................32 2.12 RESUMING THE MIGRATION PROCESS................................................................33 2.13 OTHER OPERATIONS ..............................................................................................35
3. LIMITATIONS ...................................................................................................38
Page 4 10/2009 AMT/PTD/PBX/0089/1/6/EN

AMT/PTD/PBX/0089/1/6/EN 10/2009 Page 5
F I G U R E S
Figure 1: Migrating from R4.2 to R5.1 ..................................................................................................... 9 Figure 2: Configuring the HTTP access ................................................................................................ 11 Figure 3: Configuring telephony parameters......................................................................................... 12 Figure 4: Configuring multi-company management .............................................................................. 12 Figure 5: Selecting the language of the migration tool.......................................................................... 15 Figure 6: Configuring the migration parameters.................................................................................... 15 Figure 7: Configuring the PBX access .................................................................................................. 16 Figure 8: Additional parameters ............................................................................................................ 17 Figure 9: Using a day/night calendar .................................................................................................... 18 Figure 10: Speed dial number length: ................................................................................................... 18 Figure 11: Retrieving R4.2 data ............................................................................................................ 19 Figure 12: Migration steps..................................................................................................................... 20 Figure 13: Parameters for R5.1 initialisation ......................................................................................... 22 Figure 14: Selecting the backup file address ........................................................................................ 23 Figure 15: Selecting the file to restore (1) ............................................................................................. 23 Figure 16: Selecting the file to restore (2) ............................................................................................. 24 Figure 17: Downloading the file to restore ............................................................................................ 24 Figure 18: Launching the restoration process....................................................................................... 24 Figure 19: Restoring listed data ............................................................................................................ 25 Figure 20: End of migration ................................................................................................................... 26 Figure 21: Detailed report: "Traces" tab................................................................................................ 27 Figure 22: Detailed report: "R4.2 data" tab ........................................................................................... 28 Figure 23: Detailed report: "Exported R5.1 data" tab............................................................................ 28 Figure 24: Detailed report: "R5.1 imported data and reports" tab......................................................... 29 Figure 25: Selecting the operation to perform when resuming ............................................................. 33 Figure 26: Selecting an existing archive ............................................................................................... 34 Figure 27: Existing R4.2 archive management ..................................................................................... 35
1. ABOUT THIS DOCUMENT
1.1 PURPOSE OF THIS DOCUMENT
This document describes how to migrate from a NeXspan PBX (XS, XL or XD) release R4.2 to a similar Aastra X series PBX release R5.1.
1.2 TARGET AUDIENCE OF THIS DOCUMENT
This document is intended for users in charge of installing and updating PBX hardware and software.
1.3 SCOPE OF THIS DOCUMENT
This document applies to the NeXspan range of Aastra F6 PBXs: XS, XL, XD PBX release R4.2 should be upgraded to Aastra X series release R5.1.
Migration allows XS, XL and XD PBX release R4.2 to be upgraded to R5000.1 R5.1B phase 2 (H1H6) and upper.
Note : It is not possible to upgrade NeXspan C (XC) to release R5.1.
1.4 CONTENTS OF THIS DOCUMENT
This document describes how to migrate from R4.2 to R5.1 using the migration tool which can retrieve data from a PBX R4.2 and restore it on the same PBX after its hardware and software are upgraded to R5.1.
1.5 TERMINOLOGY
1.5.1 TERMS AND EXPRESSIONS
Aastra X series This term refers to all AXS, AXL and AXD systems
AXS, AXL, AXD A5000 series physical gateways
AXS This term refers to the AXS, AXS12 and AXS6 systems
XS, XL, XD NeXspan series physical gateways
XS This term includes the XS and XS-12 systems
Page 6 10/2009 AMT/PTD/PBX/0089/1/6/EN

AMT/PTD/PBX/0089/1/6/EN 10/2009 Page 7
1.5.2 ABBREVIATIONS AND TERMINOLOGY
AMP Aastra Management Portal: PBX R5.1 operation interface.
IP Internet Protocol. This is a protocol used to route packets on networks. IP is an OSI-model level 3 protocol which offers a single addressing service for all connected terminals.
OMM Open Mobility Manager.
MMC Man Machine Interface, in this document: Aastra Management Portal (AMP).
1.6 REFERENCE DOCUMENTS
The information in this manual refers to the following documents:
AASTRA MANAGEMENT PORTAL: AXD – AXL – AXS – AASTRA 5000 SERVER. [1] OPERATING MANUAL AMT/PTD/PBX/0080
AXD – AXL – AXS – AASTRA 5000 SERVER [2] INSTALLATION AND MAINTENANCE MANUAL AMT/PTD/PBX/0058
A5000 – MULTI-SITE MANAGEMENT [3] OPERATING MANUAL AMT/PTD/PBX/0081
IP DECT SERVICE [4] INSTALLATION AND IMPLEMENTATION MANUAL AMT/PTD/PBX/0062
1.7 REMINDER CONCERNING THE LAW ON INFORMATION TECHNOLOGY
The user is reminded that the use of PBXs in the workplace must comply with the recommendations of the IT law in force.
The user's attention is also drawn to any clauses applicable in laws relating to the confidentiality of calls transmitted by means of telecommunication.
2. MIGRATION
2.1 PRINCIPLES
Release R5.1 contains major configuration improvements compared with previous releases, particularly the new LDAP format for subscriber data storage and independence of subscription/equipment. The backup/restore procedure is not enough to upgrade data to the new formats, and a special tool is required to migrate from R4.2 to R5.1.
Note : The migration applies only to an F6 PBX R4.2 upgraded to a similar X series Aastra system R5.1 (XS AXS, XL AXL, XD AXD) without any other configuration-related changes. If the PBX release is lower than R4.2, an upgrade to R4.2 is needed before migrating to R5.1.
The main steps in the migration procedure are:
Retrieving R4.2 data using the migration tool: generating listing files and a backup file
Physical migration of the PBX (changing cards)
Resetting the PBX R5.1 (TOTAL)
Restoring data from the backup through AMP (applies to data which has not changed significantly between releases R4.2 and R5.1)
Restoring data from dumps using the migration tool (applies to data affected by major changes between releases R4.2 and R5.1)
Checking the operations performed during the migration process
Reconfiguring the data lost during restoration (using the Import/Export function of AMP) if needed.
All these steps are described in detail in the paragraphs below.
The following figure outlines the main steps for upgrading a PBX R4.2 to release R5.1:
Page 8 10/2009 AMT/PTD/PBX/0089/1/6/EN

AMT/PTD/PBX/0089/1/6/EN 10/2009 Page 9
Figure 1: Migrating from R4.2 to R5.1
Backup Dumps
Physical migration
R4.2
R5.1
Restoration
Restoration
Verification
Reconfiguration
TOTAL reset
Migration tool
Manual operation
Hyper terminal
AMP
Migration tool
AMP
ATTENTION : For certain data and configuration parameters lost while migrating from R4.2 to R5.1, it is advisable to consult the list given in Chapter 3 before starting the migration process, and to remember the data values not migrated so as to restore the initial configuration at the end of the process. The length of the numbering plan used before the migration should also be remembered.
2.2 PREREQUISITES
2.2.1 SYSTEM PREREQUISITES
The migration tool is installed and used on a PC running with Windows 2000, Windows XP or Windows Vista having TCP/IP access to the PBX.
The ".NET Framework 2.0" component is needed to execute the migration tool. This component is already installed in Windows Vista. It must be installed for Windows 2000 and Windows XP. The English version is available on the Aastra Extranet. It can also be downloaded for other languages (see Section 2.3.2).
2.2.2 IPBX PREREQUISITES
2.2.2.1 TECHNICAL STATUSES OF CARDS
Refer to the Generation summary of the PBX in question (H1H or higher).
For PBX XL, the reference for the back plane must be at least HJ4630AC.
2.2.2.2 SOFTWARE RELEASES
Software releases < R4.2 must first be upgraded to R4.2.
2.2.2.3 CONFIGURATION
2.2.2.3.1 PBX ACCESS
The PBX R4.2 must have a physical IP access and an active http access.
A browser can be used to connect to the PBX in order to check the http access: http://@IP_PBX/.
Page 10 10/2009 AMT/PTD/PBX/0089/1/6/EN

AMT/PTD/PBX/0089/1/6/EN 10/2009 Page 11
If this fails, connect to the PBX in VT100 emulation mode and activate the WEB MMC from the SYSTEM/TERMINAL MANAGEMENT screen:
TERMINAL MANAGEMENT
CONSOLE: - SPEED V24.9600 - DONGLE ON SERIAL PORT NO - REMOTE OPER. ACCESS, VIRTUAL PAD YES - COMPACT FORMAT HANDLING ACCESS YES - ACCESS MODE VT100 or PC - ACTIVE SERVICE AT INIT. VT100 MMC MODEM - REMOTE OPER. ACCESS, VIRTUAL PAD NO - ACCESS MODE VT100 - DO ACTIVATE CALLING FILTERING NO - DO ACTIVATE CALLS MONIT. (LgB) NO SERVER: - ACCESS WEB MMI YES
Figure 2: Configuring the HTTP access
2.2.2.3.2 CONFIGURING THE PBX PARAMETERS
For the migration tool to work correctly, PBX R4.2 must be configured as follows:
♦ Feature class management = YES
♦ TL class management = YES
♦ Intercom groups manual management = YES
♦ Multi-company management = YES
Case of a multi-site network
On a multi-site network, perform the following additional configurations:
♦ Check the configuration of the TCP ports (80, 3203 and 3215) corresponding to the R4.2 data recovery link.
♦ On the iPBX R4.2, activate link 0-04 number 030 of the CPU card because in release R5.1 AMP is only accessible through the CPU card. Upon immediate switchover after data restoration, if link 0-04 is not in service, it will be impossible to access AMP through the browser.
To locate the values of these parameters, from the integrated portal of PBX R4.2, open the following screens:
♦ TELEPHONY MANAGEMENT / Parameter Management / Miscellaneous Parameters

Figure 3: Configuring telephony parameters
Note : The parameter Intercom Group Manual Management is forced to YES for multi-site configuration and does not show on the miscellaneous parameters screen.
♦ SYSTEM MANAGEMENT / Parameter management
Figure 4: Configuring multi-company management
Note : If these parameters had to be modified, their initial values must be restored after the migration procedure in order to obtain the same configuration on the R5.1 system.
2.3 INSTALLING THE MIGRATION TOOL
The following software components must be installed in order to use the migration tool:
♦ The software package Aastra f6.pck
♦ The software component Microsoft .NET Framework 2.0.
The software package Aastra f6.pck is available on the R4.2 CD (see Section 0).
Page 12 10/2009 AMT/PTD/PBX/0089/1/6/EN
AMT/PTD/PBX/0089/1/6/EN 10/2009 Page 13
The migration tool and Microsoft component .NET Framework 2.0 are available on the Aastra Extranet as a compressed file Migration_tools.zip in the folder:
Services Aastra5000 Software Applications Migration tool
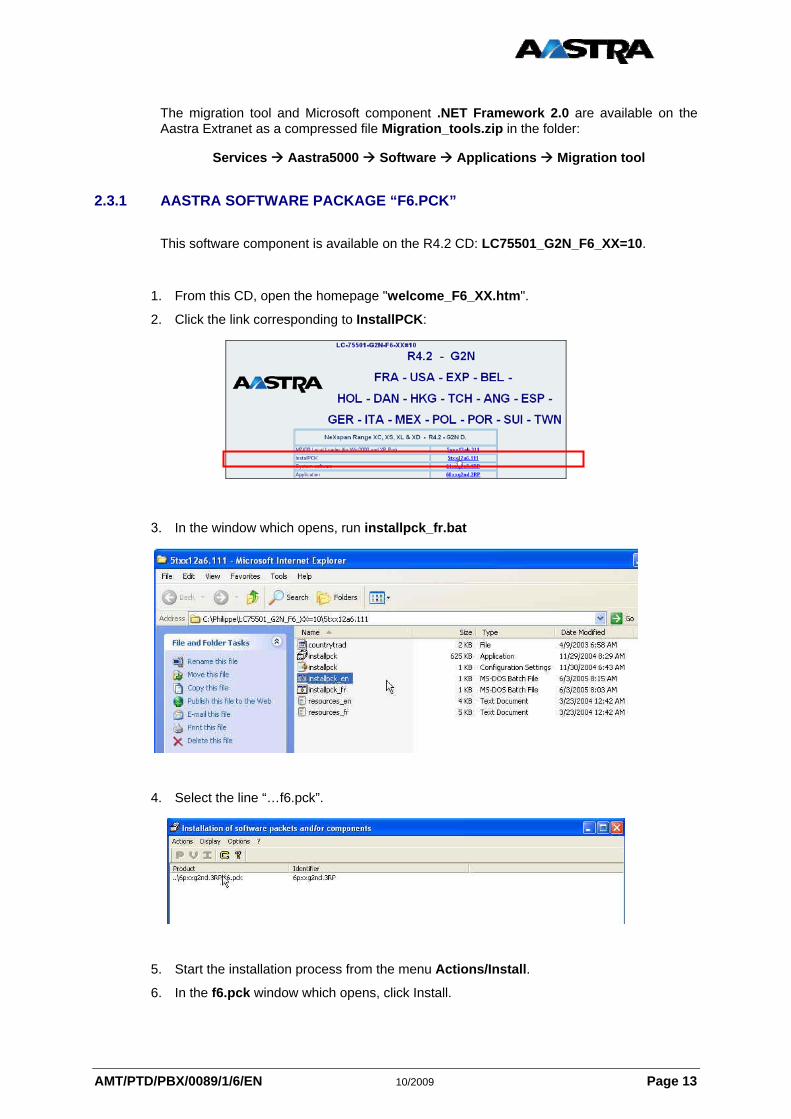
2.3.1 AASTRA SOFTWARE PACKAGE “F6.PCK”
This software component is available on the R4.2 CD: LC75501_G2N_F6_XX=10.
1. From this CD, open the homepage "welcome_F6_XX.htm".
2. Click the link corresponding to InstallPCK:
3. In the window which opens, run installpck_fr.bat
4. Select the line “…f6.pck”.
5. Start the installation process from the menu Actions/Install.
6. In the f6.pck window which opens, click Install.

At the end of the installation, the registry is updated, and the following folders created:
To display this screen, use the menu Settings/Configuration.
2.3.2 THE MICROSOFT ".NET FRAMEWORK 2.0" COMPONENT
This component is already installed in Windows Vista.
It must be installed for Windows 2000 or Windows XP.
The language of this component affects the language of certain messages issued by the system during the use of the migration tool.
The English version is available in the file Migration_tools.zip:
Versions for other languages are available at the following address:
http://www.microsoft.com/downloads/details.aspx?FamilyId=0856EACB-4362-4B0D-8EDD-AAB15C5E04F5&displaylang=fr
To install the software component, run the file dotnet.exe.
2.3.3 MIGRATION TOOL
Extract the folder migrationtool from Migration_tools.zip on the PC, (into any location). The application is ready for use.
Page 14 10/2009 AMT/PTD/PBX/0089/1/6/EN
AMT/PTD/PBX/0089/1/6/EN 10/2009 Page 15
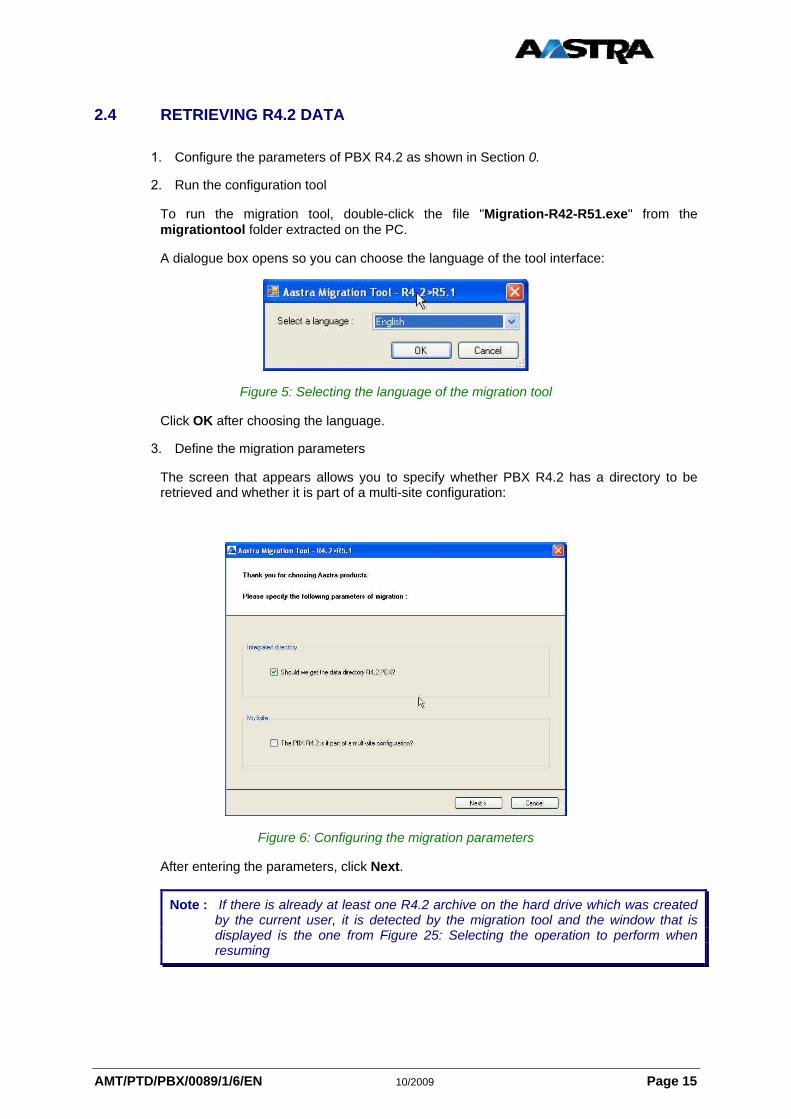
2.4 RETRIEVING R4.2 DATA
1. Configure the parameters of PBX R4.2 as shown in Section 0.
2. Run the configuration tool
To run the migration tool, double-click the file "Migration-R42-R51.exe" from the migrationtool folder extracted on the PC.
A dialogue box opens so you can choose the language of the tool interface:
Figure 5: Selecting the language of the migration tool
Click OK after choosing the language.
3. Define the migration parameters
The screen that appears allows you to specify whether PBX R4.2 has a directory to be retrieved and whether it is part of a multi-site configuration:
Figure 6: Configuring the migration parameters
After entering the parameters, click Next.
Note : If there is already at least one R4.2 archive on the hard drive which was created by the current user, it is detected by the migration tool and the window that is displayed is the one from Figure 25: Selecting the operation to perform when resuming
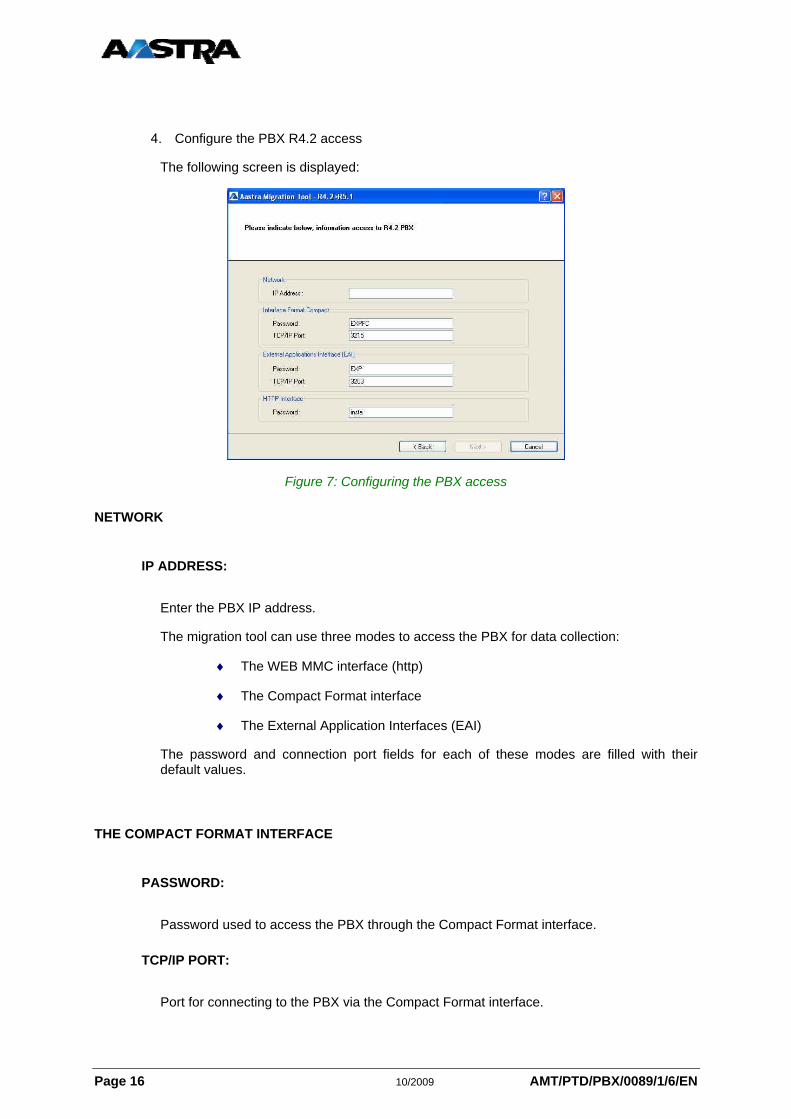
4. Configure the PBX R4.2 access
The following screen is displayed:
Figure 7: Configuring the PBX access
NETWORK
IP ADDRESS:
Enter the PBX IP address.
The migration tool can use three modes to access the PBX for data collection:
♦ The WEB MMC interface (http)
♦ The Compact Format interface
♦ The External Application Interfaces (EAI)
The password and connection port fields for each of these modes are filled with their default values.
THE COMPACT FORMAT INTERFACE
PASSWORD:
Password used to access the PBX through the Compact Format interface.
TCP/IP PORT:
Port for connecting to the PBX via the Compact Format interface.
Page 16 10/2009 AMT/PTD/PBX/0089/1/6/EN
AMT/PTD/PBX/0089/1/6/EN 10/2009 Page 17
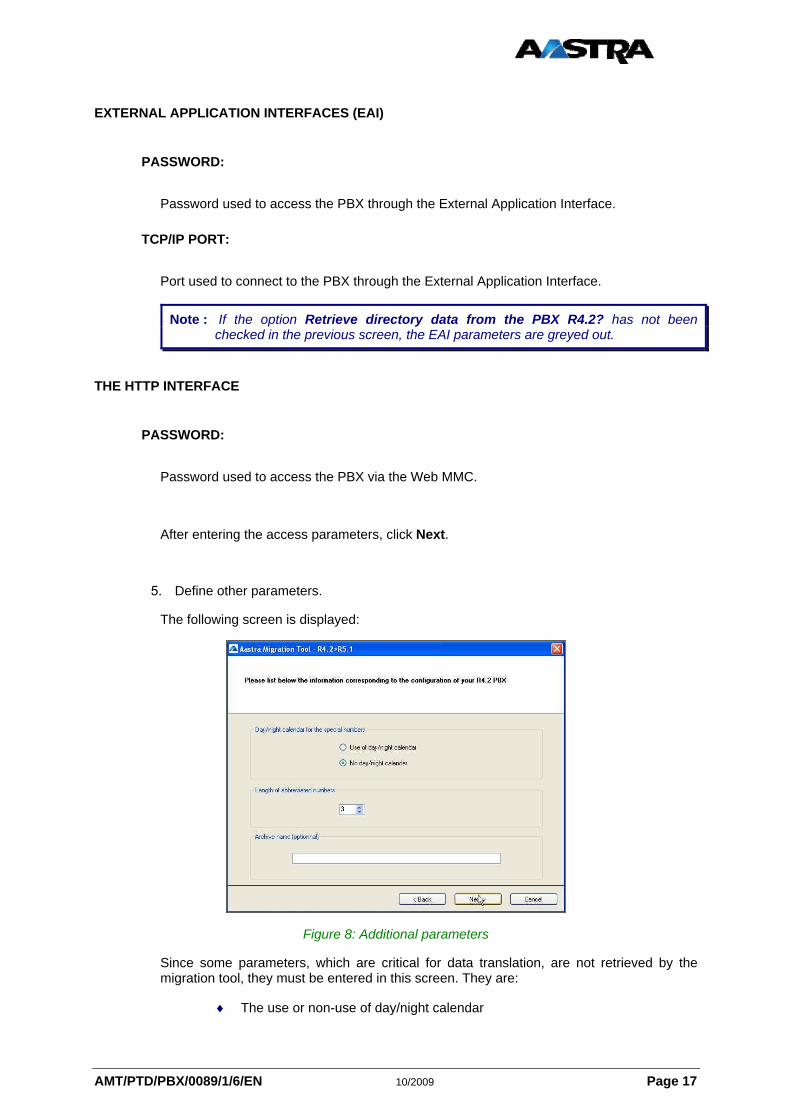
EXTERNAL APPLICATION INTERFACES (EAI)
PASSWORD:
Password used to access the PBX through the External Application Interface.
TCP/IP PORT:
Port used to connect to the PBX through the External Application Interface.
Note : If the option Retrieve directory data from the PBX R4.2? has not been checked in the previous screen, the EAI parameters are greyed out.
THE HTTP INTERFACE
PASSWORD:
Password used to access the PBX via the Web MMC.
After entering the access parameters, click Next.
5. Define other parameters.
The following screen is displayed:
Figure 8: Additional parameters
Since some parameters, which are critical for data translation, are not retrieved by the migration tool, they must be entered in this screen. They are:
♦ The use or non-use of day/night calendar

♦ The speed-dial number length.
To check the use of a day/night calendar, use the PBX Web MMC and access the screen of the special speed dial numbers screen from list 0 for instance, using the command "NUMBERING PLAN / SPECIAL ABBREVIATED NUMBERS":
Figure 9: Using a day/night calendar
If the input field extended night no appears on this screen, this means that the special numbers are using a day/night calendar.
To check the speed dial number length, open the miscellaneous parameters screen using the command: "TELEPHONY MANAGEMENT / Parameter Management / Miscellaneous Parameters":
Figure 10: Speed dial number length:
♦ If the value of the parameter Extension to 100 special numbers is NO, the speed dial number length is 2.
♦ If the value of the parameter Extension to 100 special numbers is YES, the speed dial number length is 3.
The parameter Archive name is optional. However, it makes it easier to locate an archive while searching for files to restore. In fact, all created archives are preserved by the tool.
Note : An archive is uniquely identified by its creation date.
After entering the parameters, click Next in Migration tool.
The following dialogue box is displayed:
Page 18 10/2009 AMT/PTD/PBX/0089/1/6/EN

AMT/PTD/PBX/0089/1/6/EN 10/2009 Page 19
Before starting the data retrieval procedure, please close all current connections to the PBX interfaces.
Once the interfaces have no other connections, click OK to begin the data retrieval process.
The progress of this process is shown by a progress bar with the current operation label.
Note : It is possible to interrupt the data retrieval process at any time by clicking the Cancel button.
Figure 11: Retrieving R4.2 data
At the end of this step, the migration tool has created:
♦ An R4.2 data backup file
♦ Dump files for the data which can be retrieved by restoring the backup.
These are stored in a folder created under:
C:\Documents and Settings\User\Local Settings\Application Data\Aastra\Migration-R42-R51 \Archive-R42.
The folder name is created according to the retrieval date and identifies the data in a unique manner.
If the user has given a name to the archive (optional), the folder will contain a file "label.txt" containing the chosen name.

2.5 MIGRATION
At the end of the data retrieval process, the following screen is displayed:
Figure 12: Migration steps
This screen displays the operations to be carried out on the PBX before going to the next step within the migration tool.
IMPORTANT : The length of the internal numbering plan of PBX R4.2 must be known so the PBX can be correctly upgraded to R5.1. To check it before physically upgrading the PBX, go to the screen "TELEPHONY MANAGEMENT / Numbering plan / User numbering plan / Access to internal numbers" for the "INTERNAL" direction. This is the Number of digits parameter.
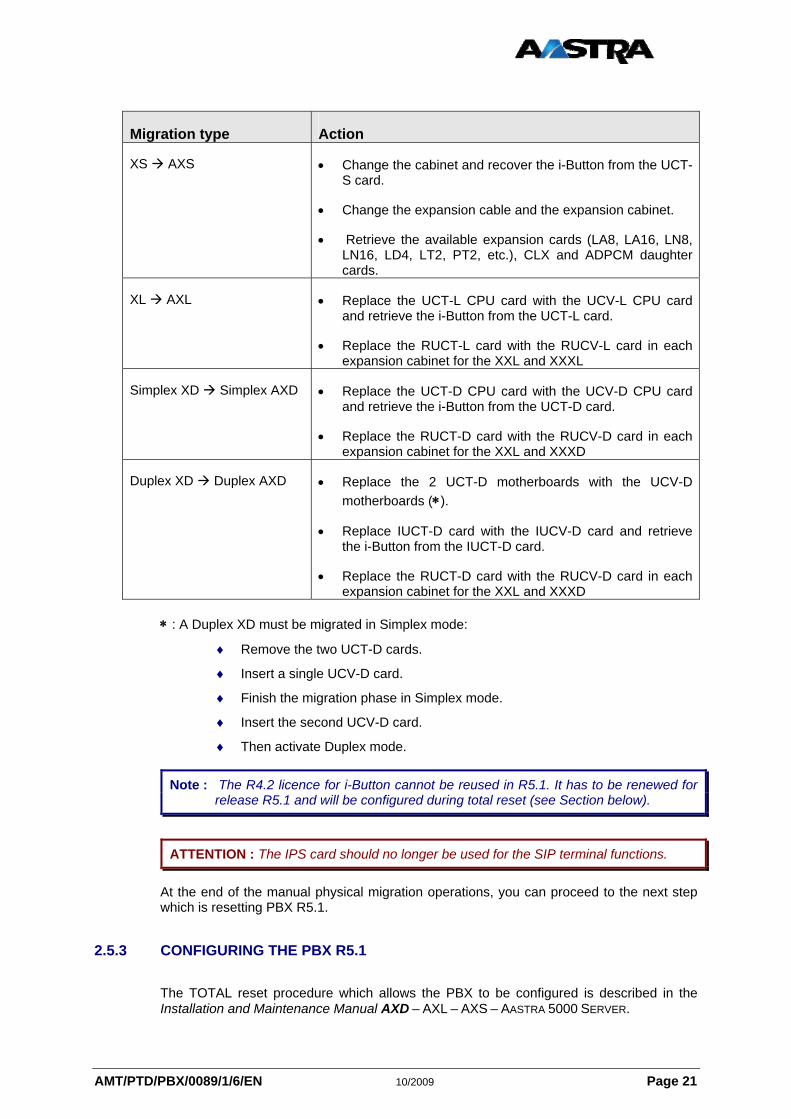
2.5.1 PHYSICAL MIGRATION
The operations to be carried out for the physical migration of the PBX differ according to PBX type. In all cases, the cards included in the migration kit are delivered without an “i-Button” dongle. It is advisable to retrieve this module from the R4.2 cards and reinstall it on the corresponding R5.1 cards. For more information on this module, see the Installation and Maintenance manual AXD – AXL – AXS – AASTRA 5000 SERVER.
2.5.2 BESIDES THE CARD-RELATED OPERATIONS DESCRIBED ON THE TABLE IN STEP 2 OF THE FOLLOWING PROCEDURE, THE LOCATION OF CARDS IN PBX R5.1 MUST BE IDENTICAL TO THAT OF PBX R4.2 (CARDS, VOIP ETC.). THE TECHNICAL STATUS OF THE CARDS MUST BE IN LINE WITH THE SPECIFICATIONS OF SECTION 2.2.2 IPBX PREREQUISITES
1. Power off the PBX.
2. Change the card(s):
Page 20 10/2009 AMT/PTD/PBX/0089/1/6/EN
AMT/PTD/PBX/0089/1/6/EN 10/2009 Page 21
Migration type Action
XS AXS • Change the cabinet and recover the i-Button from the UCT-S card.
• Change the expansion cable and the expansion cabinet.
• Retrieve the available expansion cards (LA8, LA16, LN8, LN16, LD4, LT2, PT2, etc.), CLX and ADPCM daughter cards.
XL AXL • Replace the UCT-L CPU card with the UCV-L CPU card and retrieve the i-Button from the UCT-L card.
• Replace the RUCT-L card with the RUCV-L card in each expansion cabinet for the XXL and XXXL
Simplex XD Simplex AXD • Replace the UCT-D CPU card with the UCV-D CPU card and retrieve the i-Button from the UCT-D card.
• Replace the RUCT-D card with the RUCV-D card in each expansion cabinet for the XXL and XXXD
Duplex XD Duplex AXD
• Replace the 2 UCT-D motherboards with the UCV-D motherboards (∗).
• Replace IUCT-D card with the IUCV-D card and retrieve the i-Button from the IUCT-D card.
• Replace the RUCT-D card with the RUCV-D card in each expansion cabinet for the XXL and XXXD
∗ : A Duplex XD must be migrated in Simplex mode:
♦ Remove the two UCT-D cards.
♦ Insert a single UCV-D card.
♦ Finish the migration phase in Simplex mode.
♦ Insert the second UCV-D card.
♦ Then activate Duplex mode.
Note : The R4.2 licence for i-Button cannot be reused in R5.1. It has to be renewed for release R5.1 and will be configured during total reset (see Section below).
ATTENTION : The IPS card should no longer be used for the SIP terminal functions.
At the end of the manual physical migration operations, you can proceed to the next step which is resetting PBX R5.1.
2.5.3 CONFIGURING THE PBX R5.1
The TOTAL reset procedure which allows the PBX to be configured is described in the Installation and Maintenance Manual AXD – AXL – AXS – AASTRA 5000 SERVER.
The configuration to apply during this procedure is the following:
♦ Numbering plan length = value previously defined on PBX R4.2
♦ Licence number = licence is regenerated for the R5.1 configuration (it is possible to configure the licence number afterwards
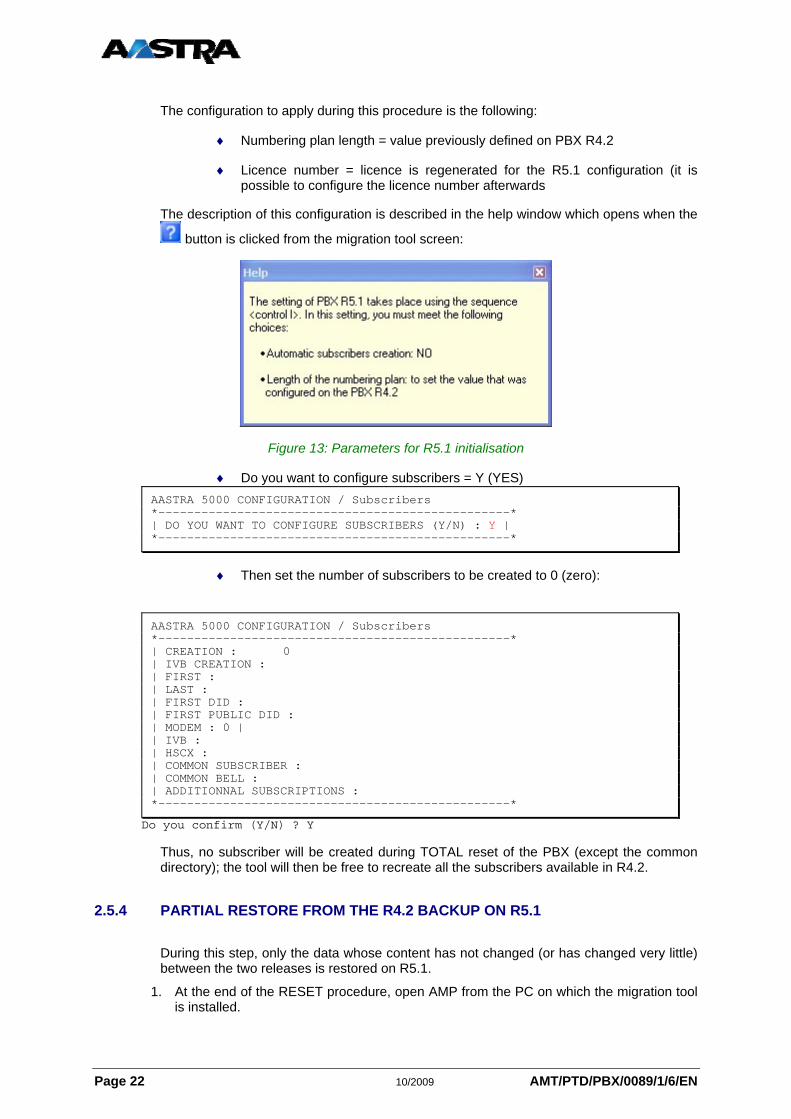
The description of this configuration is described in the help window which opens when the
button is clicked from the migration tool screen:
Figure 13: Parameters for R5.1 initialisation
♦ Do you want to configure subscribers = Y (YES) AASTRA 5000 CONFIGURATION / Subscribers *-------------------------------------------------* | DO YOU WANT TO CONFIGURE SUBSCRIBERS (Y/N) : Y | *-------------------------------------------------*
♦ Then set the number of subscribers to be created to 0 (zero):
AASTRA 5000 CONFIGURATION / Subscribers *-------------------------------------------------* | CREATION : 0 | IVB CREATION : | FIRST : | LAST : | FIRST DID : | FIRST PUBLIC DID : | MODEM : 0 | | IVB : | HSCX : | COMMON SUBSCRIBER : | COMMON BELL : | ADDITIONNAL SUBSCRIPTIONS : *-------------------------------------------------*
Do you confirm (Y/N) ? Y
Thus, no subscriber will be created during TOTAL reset of the PBX (except the common directory); the tool will then be free to recreate all the subscribers available in R4.2.
2.5.4 PARTIAL RESTORE FROM THE R4.2 BACKUP ON R5.1
During this step, only the data whose content has not changed (or has changed very little) between the two releases is restored on R5.1.
1. At the end of the RESET procedure, open AMP from the PC on which the migration tool is installed.
Page 22 10/2009 AMT/PTD/PBX/0089/1/6/EN

AMT/PTD/PBX/0089/1/6/EN 10/2009 Page 23
2. From AMP R5.1, click the button corresponding to TELEPHONY SERVICE and then on "SYSTEM / Software Maintenance / Restore".
3. Select PC IMPORT then click Confirm.
4. In the migration tool, click the link file://backup.tar.gz.
5. In the "Backup-R42" window, select and copy the full address of the backup folder.
Figure 14: Selecting the backup file address
6. On the AMP screen "LOAD FILE TO RESTORE", click Browse:
Figure 15: Selecting the file to restore (1)
7. In the "Choose file" window, paste the previously copied address in the File name field then click Open.

Figure 16: Selecting the file to restore (2)
8. Select the file backup.tar.gz then click Open. The name of the file to restore is displayed in the File to download field from the screen "LOAD FILE TO RESTORE" in AMP.
9. Click Download:
Figure 17: Downloading the file to restore
10. Once the file is downloaded, (the File to download field is empty), click Confirm. The screen "CONSTITUTION OF THE RESTORE" opens:
Figure 18: Launching the restoration process
11. Select the value IMMEDIATE for the switching type, then click Confirm.
Page 24 10/2009 AMT/PTD/PBX/0089/1/6/EN

AMT/PTD/PBX/0089/1/6/EN 10/2009 Page 25
The restoration process of the R4.2 backup on the PBX R5.1 will start and a message will show that the process is running. When the message window disappears, the restoration process is finished.
Case of S2 subscribers: After this restoration phase, the following operation needs to be performed on S2-type LT2 cards: change the card's status to NOT EQUIPPED and then change it back to IN SERVICE.
At the end of this operation, click Next in the migration tool to go to the restoration phase of the data listed by the migration tool during data retrieval.
A window opens so you can fill in the authentication fields required to access the iPBX.
2.5.5 RESTORING LISTED DATA
This data represents the data which was not processed during restoration.
Figure 19: Restoring listed data
The progress of this process is shown by a progress bar with the current operation label.
Note : It is possible to interrupt the data retrieval process at any time by clicking the Cancel button.
During this phase, the migration tool performs the following operations:

♦ Exporting data to R5.1: this operation retrieves .csv format files which are then used to import R4.2 data.
♦ Importing the data listed during the previous R4.2 data retrieval process, and changing it to R5.1 format.
At the end of this phase, the following screen is displayed:
Figure 20: End of migration
The success rate on this screen is not shown unless there is at least a piece of R4.2 data which the tool was not able to retrieve into R5.1. It represents the ratio between the number of restored records compared to the total number of records.
This screen shows:
♦ A hyperlink to a folder containing the CSV files used for importing data; these files can be used after modification, to modify and/or complete the data configuration on PBX R5.1.
♦ A hyperlink to the folder containing the CSV file for importing internal directory files for the other sites
Note : This link is not shown except when the two options: Retrieve directory data from the PBX R4.2? Is the PBX R4.2 part of a multi-site configuration? have been ticked on the configuration screen for the migration parameters (voir Figure 6: Configuring the migration parameters
Note : ).
Other information
The migration tool gives the address for locating the directory file on the link directory-import-CSV-files.
Back up the file “SITE SUBSCRIPTION RECORD SELECTION TABLE.CSV” in a folder, or back up its address. This file will be used to update other sites that do not have any directory.
This address will no longer be proposed while updating the sites without any directory.
Page 26 10/2009 AMT/PTD/PBX/0089/1/6/EN

AMT/PTD/PBX/0089/1/6/EN 10/2009 Page 27
♦ Access to the detailed report on the migration operations performed; checking this report allows you to retrieve some data possibly rejected by PBX R5.1 during the restoration phase. The necessary corrections can then be made via data import from the modified CSV files.
ATTENTION : If the success ratio is not 100%, it is advisable to check the detailed report. Once the migration tool is closed, the detailed report is no longer available.
2.6 VERIFICATION: VIEWING THE DETAILED REPORT
To check the detailed report, click the Detailed report button.
The window that opens contains the following four tabs:
♦ R4.2 data
♦ R5.1 data
♦ R5.1 imported data and reports
♦ Trace
Note : Once the migration tool is closed, the detailed report is no longer available.
2.6.1 DISPLAYING TRACES
The Traces" tab from the detailed report represents the operations log created by the migration tool as well as potential error messages.
Figure 21: Detailed report: "Traces" tab
Note : A more detailed trace level is available in the "View / Detailed traces display" menu.
2.6.2 DISPLAYING R4.2 DATA
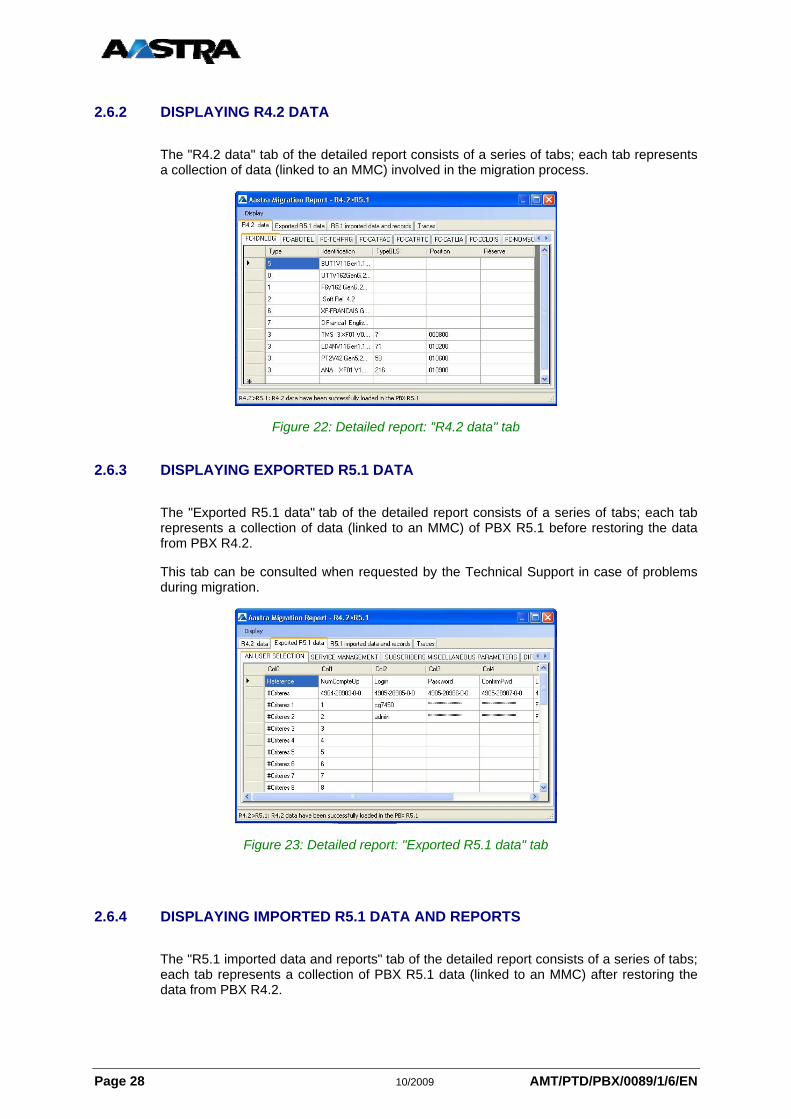
The "R4.2 data" tab of the detailed report consists of a series of tabs; each tab represents a collection of data (linked to an MMC) involved in the migration process.
Figure 22: Detailed report: "R4.2 data" tab
2.6.3 DISPLAYING EXPORTED R5.1 DATA
The "Exported R5.1 data" tab of the detailed report consists of a series of tabs; each tab represents a collection of data (linked to an MMC) of PBX R5.1 before restoring the data from PBX R4.2.
This tab can be consulted when requested by the Technical Support in case of problems during migration.
Figure 23: Detailed report: "Exported R5.1 data" tab
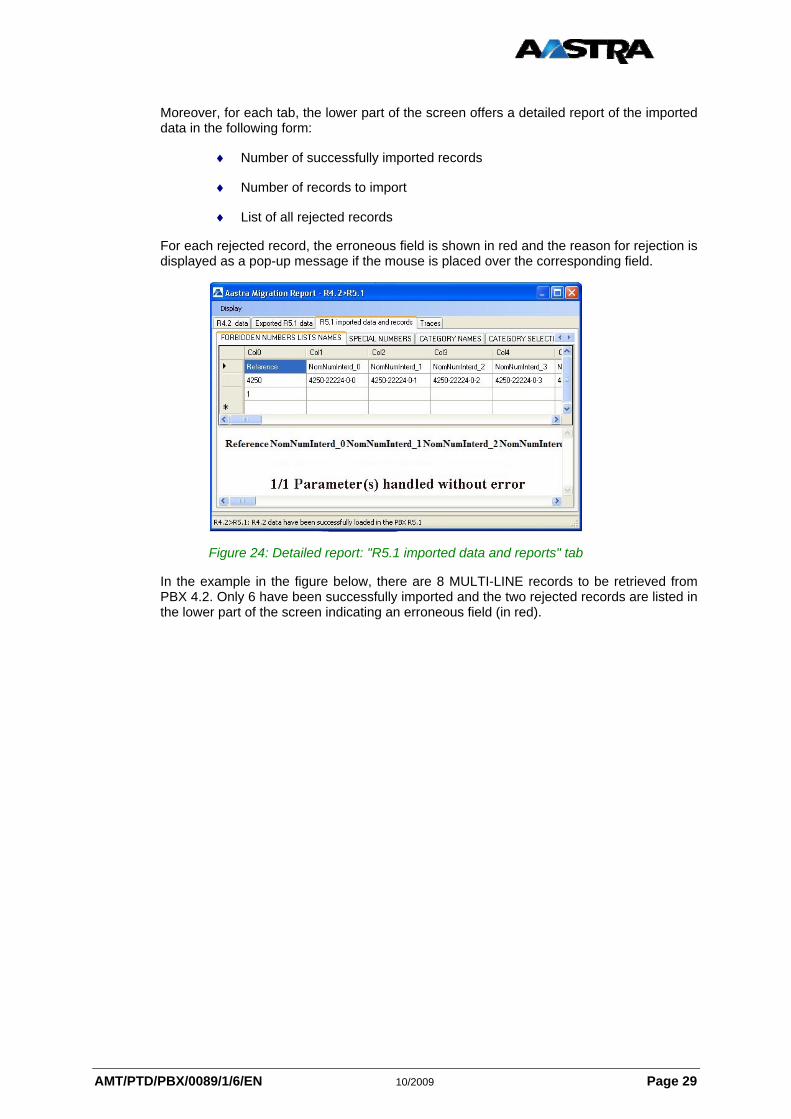
2.6.4 DISPLAYING IMPORTED R5.1 DATA AND REPORTS
The "R5.1 imported data and reports" tab of the detailed report consists of a series of tabs; each tab represents a collection of PBX R5.1 data (linked to an MMC) after restoring the data from PBX R4.2.
Page 28 10/2009 AMT/PTD/PBX/0089/1/6/EN
AMT/PTD/PBX/0089/1/6/EN 10/2009 Page 29
Moreover, for each tab, the lower part of the screen offers a detailed report of the imported data in the following form:
♦ Number of successfully imported records
♦ Number of records to import
♦ List of all rejected records
For each rejected record, the erroneous field is shown in red and the reason for rejection is displayed as a pop-up message if the mouse is placed over the corresponding field.
Figure 24: Detailed report: "R5.1 imported data and reports" tab
In the example in the figure below, there are 8 MULTI-LINE records to be retrieved from PBX 4.2. Only 6 have been successfully imported and the two rejected records are listed in the lower part of the screen indicating an erroneous field (in red).
2.7 R4.2 MULTI-SITE MIGRATION: CASE OF A SHARED DIRECTORY
For a directory shared by several sites, the directory must be restored in R5.1 on a site by site basis.
2.7.1 MIGRATING FROM THE MASTER DIRECTORY SITE
First migrate the site that supports the common directory in order to obtain the file containing all the multi-site directory records.
Tick the following two options while the tool is backing up the data:
Retrieve directory data from the PBX R4.2? YES Is the PBX R4.2 part of a multi-site configuration? YES
After migration, the site that supports the directory will only contain the records of its subscribers.
2.7.2 MIGRATING FROM SITES WITHOUT ANY DIRECTORY
Tick only one option while the tool is backing up the data:
Retrieve directory data from the PBX R4.2? NO Is the PBX R4.2 part of a multi-site configuration? YES
At the end of the migration process, transfer more subscriber records from this site.
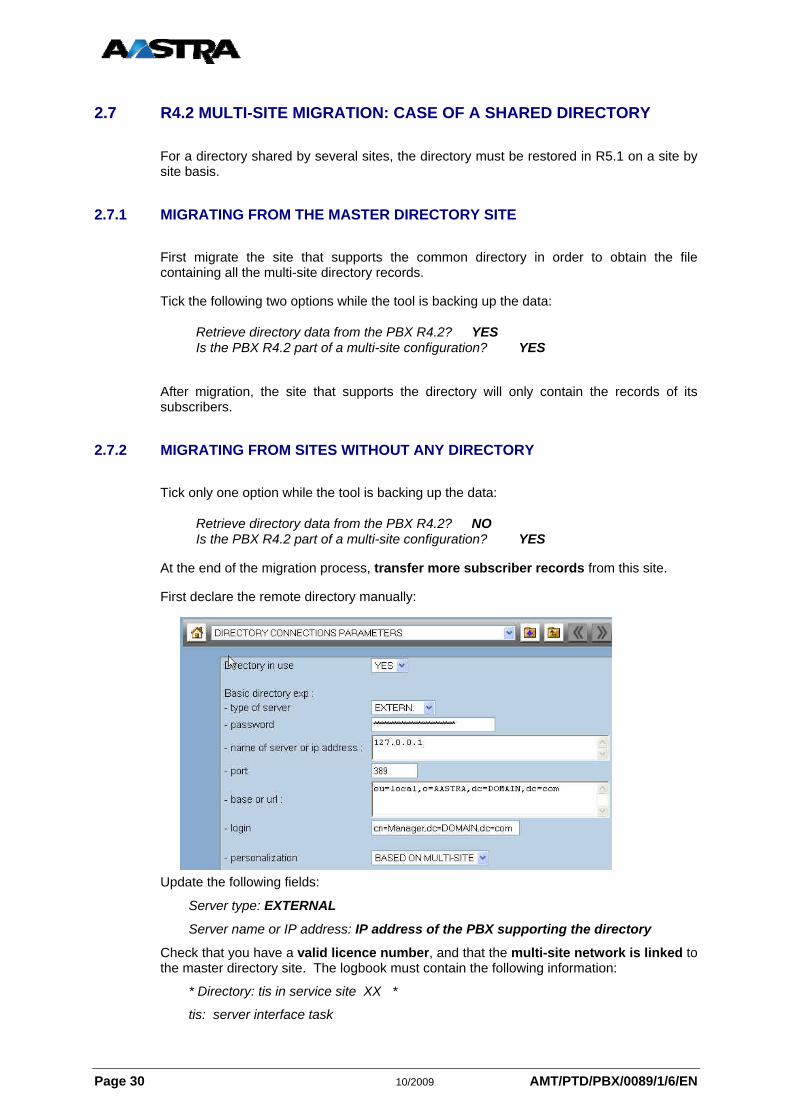
First declare the remote directory manually:
Update the following fields:
Server type: EXTERNAL
Server name or IP address: IP address of the PBX supporting the directory
Check that you have a valid licence number, and that the multi-site network is linked to the master directory site. The logbook must contain the following information:
* Directory: tis in service site XX *
tis: server interface task
Page 30 10/2009 AMT/PTD/PBX/0089/1/6/EN

AMT/PTD/PBX/0089/1/6/EN 10/2009 Page 31
Import the subscriber records from the site through a massive import operation:
Select the file "SITE SUBSCRIPTION RECORD SELECTION TABLE.CSV" you backed up while migrating from the master directory site.
Then start via "Take data into account":
At the end of the operation, the tool opens a result window if some errors have been detected.
Only the internal records on the site were taken into account during the operation; the others are erroneous, but the errors are not serious:
The erroneous parameter is indicated in red; placing the mouse over the item displays the description of the error. This description may be “incorrect directory”; this latter belongs to another site and should not be taken into account.
Repeat this operation on each of the sites.
You can notice the appearance of new records as the sites are migrated, by consulting the master directory.
2.8 MIGRATING FROM R4.2 TO R5.1 WITH OR WITHOUT AM7450
The integrated directory is systematically either on the R5.1 site or on AM7450.
In this case, do not retrieve the directory data from the R4.2 sites (refer to the procedure described in Section 0).
2.9 RECONFIGURATION
If there were error messages during migration, it is advisable to make appropriate corrections. For this purpose, one of the following can be used:
♦ The AMP TELEPHONY SERVICE, and the corrections can be made directly from the corresponding MMCs.
♦ The mass import function, after modifying the corresponding .csv files.
The .csv files used for restoring the data are available at the link provided in the last screen of the migration tool: file:///Migration-CSV-files.
For a detailed description of the massive import function, please refer to AMP Operating Manual Aastra MANAGEMENT PORTAL: AXD – AXL – AXS – AASTRA 5000 SERVER..
2.10 RESTORING THE INITIAL CONFIGURATION
In order to have the same configuration in R5.1 as it was in R4.2, the values for the parameters which were potentially modified must be restored to ensure the migration tool functions correctly:
♦ Feature class management (SUBSCRIBERS / Access rights / General parameters)
♦ TL class management (SUBSCRIBERS / Access rights / General parameters)
♦ Intercom groups manual management (SUBSCRIBERS / Access rights / General parameters)
♦ Multi-company management (SYSTEM / Configuration / Services)
♦ Activate the duplex mode if necessary (SYSTEM / Configuration / Cards / Power supply / Duplex).
♦ For a multi-site network, check the configuration of the TCP ports (80, 3203 and 3215) corresponding to the R4.2 data recovery link.
♦ On the iPBX R4.2, activate link 0-04 number 030 of the CPU card because in release R5.1 AMP is only accessible through the CPU card. Upon immediate switchover after data restoration, if link 0-04 is not in service, it will be impossible to access AMP through the browser.
2.11 IP DECT REGISTRATION
At the end of the migration process, the IP DECT units are no longer registered. Restarting the OMM will trigger a request to register all IP DECT units of the system.
Page 32 10/2009 AMT/PTD/PBX/0089/1/6/EN

AMT/PTD/PBX/0089/1/6/EN 10/2009 Page 33
2.12 RESUMING THE MIGRATION PROCESS
If the migration tool is restarted (on the same PC and using the same user account), after a complete migration operation or if migration is interrupted at the R4.2 data retrieval phase, the tool will detect at least one archive. After choosing the language and configuring the migration parameters, the following screen is displayed:
Figure 25: Selecting the operation to perform when resuming
Two choices are then available to the user:
♦ Creating a new archive
♦ Resuming the migration process from an existing archive.
In both cases, none of the old archives will be deleted by the tool unless explicitly requested by the user in the screen shown in Figure 26: Selecting an existing archive
If creating a new archive is selected, the process continues from step 4 of Section 0.
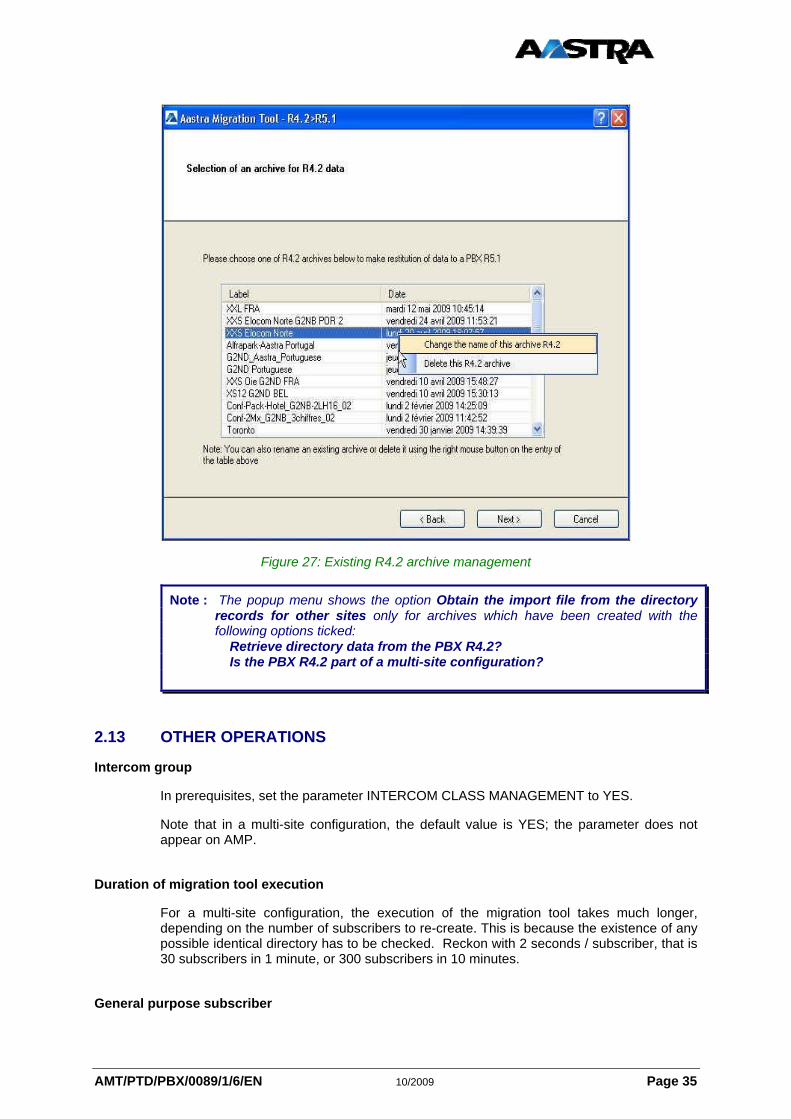
If the user selects to restore data to a PBX R5.1 from an existing R4.2, the following screen shows the list of existing R4.2 archives:

Figure 26: Selecting an existing archive
When selecting an archive, a pop-up window opens, showing the configuration that was applied when the archive was created as well as the directory records contained in the archive in case the archive contains any.
Select an archive from the list, then click Next >. The process starts from the step described in Section 2.5.
This screen is also used to rename or delete an existing R4.2 archive using the popup menu available by right-clicking with the mouse:
Page 34 10/2009 AMT/PTD/PBX/0089/1/6/EN
AMT/PTD/PBX/0089/1/6/EN 10/2009 Page 35
Figure 27: Existing R4.2 archive management
Note : The popup menu shows the option Obtain the import file from the directory records for other sites only for archives which have been created with the following options ticked: Retrieve directory data from the PBX R4.2? Is the PBX R4.2 part of a multi-site configuration?
2.13 OTHER OPERATIONS
Intercom group
In prerequisites, set the parameter INTERCOM CLASS MANAGEMENT to YES.
Note that in a multi-site configuration, the default value is YES; the parameter does not appear on AMP.
Duration of migration tool execution
For a multi-site configuration, the execution of the migration tool takes much longer, depending on the number of subscribers to re-create. This is because the existence of any possible identical directory has to be checked. Reckon with 2 seconds / subscriber, that is 30 subscribers in 1 minute, or 300 subscribers in 10 minutes.
General purpose subscriber

During Total reset, with zero subscriber request, a general purpose subscriber is created all the same. The migration tool tries to delete it; this action is rejected.
This error does not have any impact on the operation and appears in form of a warning.
Interoperation
If there is any remaining PBX R4.2 or earlier on the multi-site network, do not forget to modify DCF 176 to indicate an interoperation.
Distribution of internal calls
8 broadcast types were possible in release R4.2. In release R5.1, only the first broadcast type is available, if there were several of them in release R4.2.
Speed dialling
In release R4.2, it was possible to insert some pauses in form of letters: A for a short pause, B for a long pause.
These pauses are not supported in release R5.1; they are deleted by the migration tool.
DECT handsets
Information about the reference cell is lost during the migration process.
This information is not necessarily required; it is only used for a multi-site configuration during first access by the handset.
The subscriber handsets are no longer registered after migration. This operation must be performed manually on each handset, with a base station in registration mode.
Page 36 10/2009 AMT/PTD/PBX/0089/1/6/EN

AMT/PTD/PBX/0089/1/6/EN 10/2009 Page 37
Hunt group
The hunt group name is lost. A directory record is automatically created in R5.1 with a SUBSC xxx (xxx = hunt group directory).
You can then manually re-edit the hunt group name in the corresponding directory record.
Export the hunt groups’ directory records and copy/paste the data based on the file generated by the tool (the parameters are characterised by different identifiers) to import these files.
Integrated voicemail box
If during the migration process you are limited to 300 subscribers with voicemail box (the other erroneous ones on IVB declaration), your 1 GB flash card will not be sufficient, you need a 2 GB card to change to 1000 voicemail boxes.
Voicemail
If an external Q23 type voicemail system is used, access is via a hunt group.
A new type of hunt group now exists in R5.1: a VOICEMAIL HUNT GROUP which did not exist in R4.2.
The migration tool does not have the information to create the right hunt group type, and the action fails.
The solution is simple and requires some actions:
♦ Using the web portal, create a VOICEMAIL HUNT GROUP subscription.
♦ Create the hunt group by carrying out a massive import of the file HUNT GROUP TABLE.CSV (or manually).
Operation done. SIP and GSI terminals
GSI release R4.2 is not compatible with R5.1. Therefore, you have to change to the integrated GSI in R5.1.
Stop GSI release R4.2 to avoid clashes with the new GSI, and modify the DHCP server so the terminals will take account of the new Registrar and Proxy address (IP address of the PBX).

3. LIMITATIONS
At the end of the migration from R4.2 to R5.1, certain data may be lost or missing because they did not exist in R4.2 but are needed for correct operation in R5.1. In this case, the operator should perform a manual configuration (reconfiguration) using AMP, either directly via the preferred MMCs or through the import/export functions. In both cases, for a detailed description, refer to AMP Operating Manual AASTRA MANAGEMENT PORTAL: AXD – AXL – AXS – AASTRA 5000 SERVER.
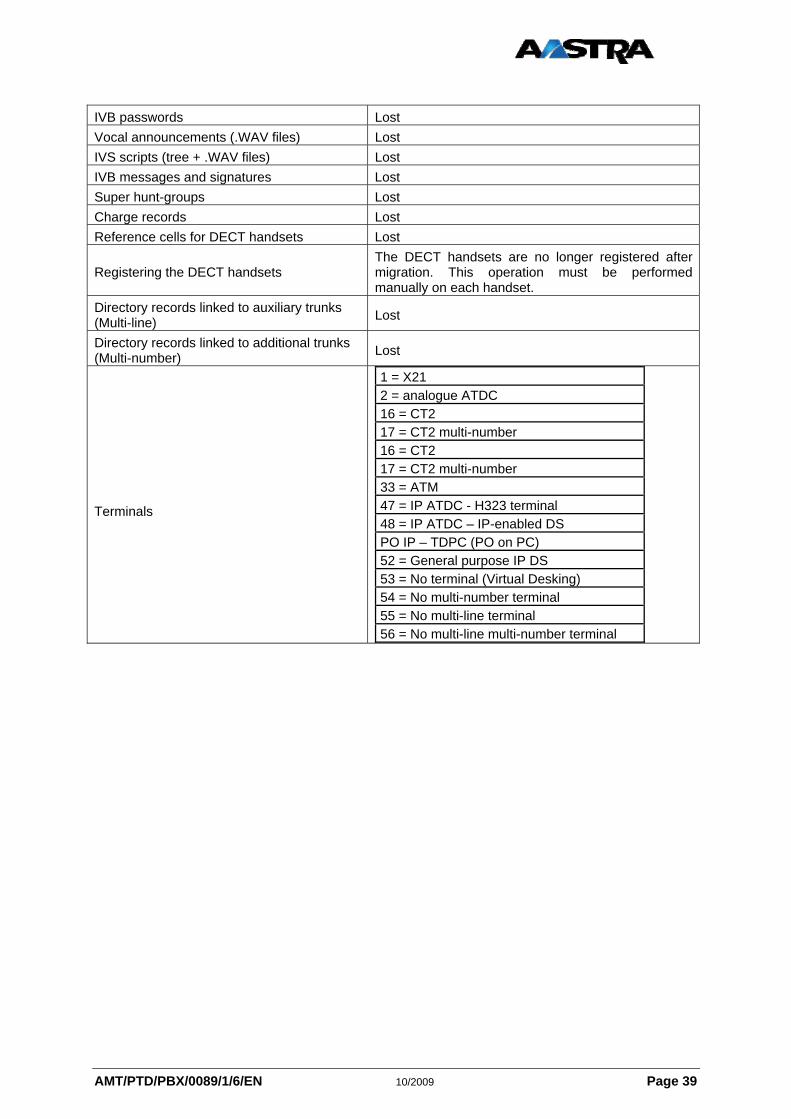
The following table outlines the data that was not retrieved or which needs reconfiguring.
Data Status / Action Wake-up programs Lost Dumps of conference calls (linked to a subscription of the type CONF SYSTEM) Lost
Messages on terminals (UUS) Lost Subscriber charging counters (prepayment) Lost Private lines definitions Lost Emergency numbers for 911 (US configuration only) Lost
Forwarding groups for paging services Lost
Subscriber names (micro-directory) Lost. If directory records are used, the name is retrieved in the internal record.
Voicemail hunt-groups Migrated into subscriptions of the type HUNT-GROUP. The VOICEMAIL HUNT-GROUP type must be reconfigured.
Uniform hunt-groups Migrated with losses of the order defined in R4.2. Must be reconfigured.
Associated (Partner) sets Not configured.
ATDC classes The ATDCs are systematically configured to class B. In case changing to class A is desired, this configuration parameter must be changed.
Forbidden numbers list
Barred numbers from R4.2 are changed into forbidden numbers in a single list. In case it is desired to have configuration features for allocating forbidden numbers to different lists, this allocation must be made by the operator (the usage of the import/export functions is recommended)
Speed dial numbers
Speed dial numbers are retrieved and listed in the appropriate external records but they are accessible to all administrative hierarchies. If it is desired to restrict the usage of certain speed dial numbers, the assignment of an administrative hierarchy must be made by the operator either by using the AMP, by directly modifying the corresponding external records or by using the import/export functions.
User passwords Lost
Page 38 10/2009 AMT/PTD/PBX/0089/1/6/EN
AMT/PTD/PBX/0089/1/6/EN 10/2009 Page 39
IVB passwords Lost Vocal announcements (.WAV files) Lost IVS scripts (tree + .WAV files) Lost IVB messages and signatures Lost Super hunt-groups Lost Charge records Lost Reference cells for DECT handsets Lost
Registering the DECT handsets The DECT handsets are no longer registered after migration. This operation must be performed manually on each handset.
Directory records linked to auxiliary trunks (Multi-line) Lost
Directory records linked to additional trunks (Multi-number) Lost
Terminals
1 = X21 2 = analogue ATDC 16 = CT2 17 = CT2 multi-number 16 = CT2 17 = CT2 multi-number 33 = ATM 47 = IP ATDC - H323 terminal 48 = IP ATDC – IP-enabled DS PO IP – TDPC (PO on PC) 52 = General purpose IP DS 53 = No terminal (Virtual Desking) 54 = No multi-number terminal 55 = No multi-line terminal 56 = No multi-line multi-number terminal