Embed Size (px)
Citation preview
- 0 -
Mobile Devices Email Setup
- 1 -
Managing Mailboxes on Your Domain
*** Contents Page ***
Blackberry Curve…………………………………………………..………………….………… 2
Galaxy S3 Series....……………………………………………………………………….……… 8
iPad / iPhone……………………………………………………………………….……………. 16
N7000 Galaxy Note.…………………………………………………………..……………….. 21
Appendix A…………………..……………………………………………………….…………. 32
- 2 -
BLACKBERRY CURVE
Blackberry phones differ in the way that email is setup on it. This article will cover the basics of email setup on Blackberry phones using the Blackberry Curve as an example. Even though your phone might be slightly different, the same basic principles should apply.
To set up email on your BlackBerry Curve you will need:
An email account at an internet or email provider.
Login details of the incoming and outgoing mail servers.
An active internet connection.
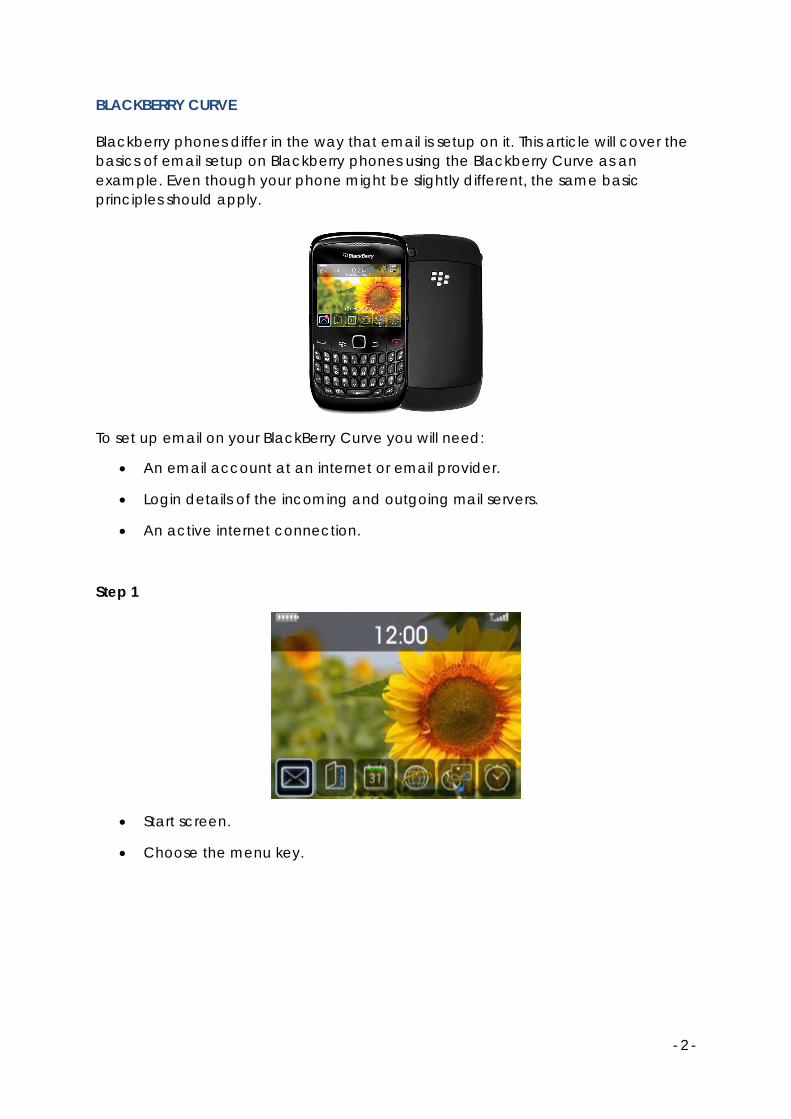
Step 1
Start screen.
Choose the menu key.
- 3 -
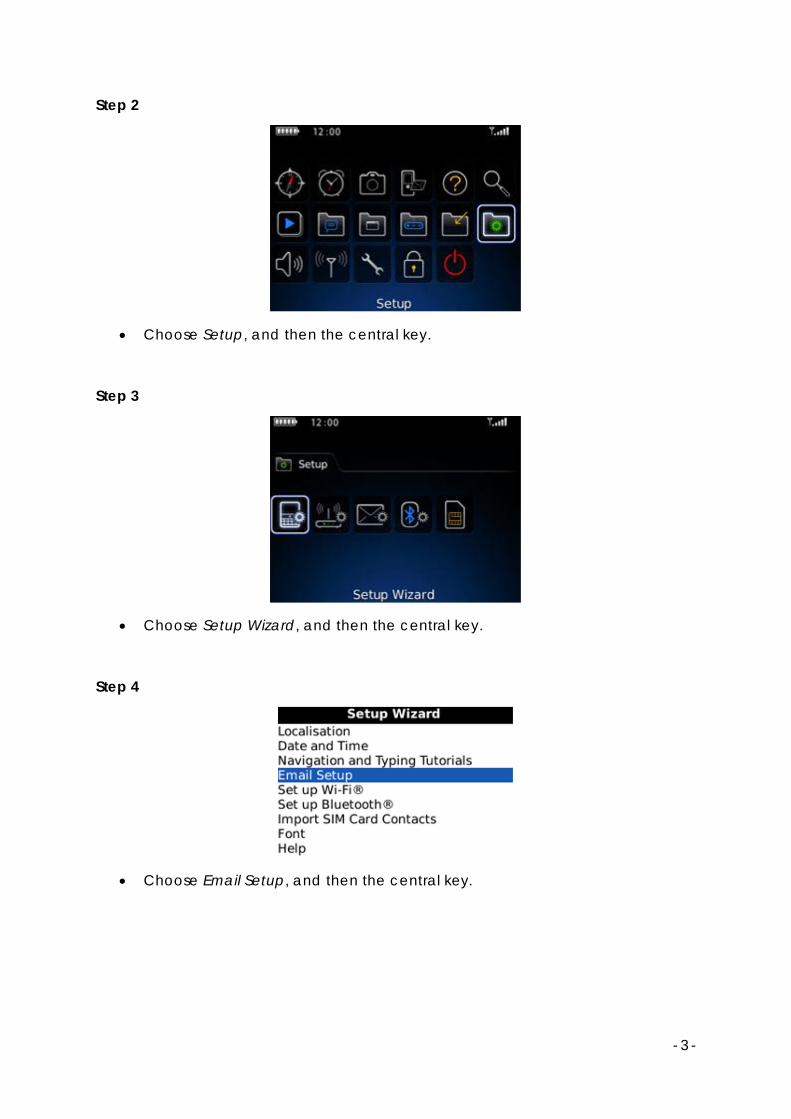
Step 2
Choose Setup, and then the central key.
Step 3
Choose Setup Wizard, and then the central key.
Step 4
Choose Email Setup, and then the central key.
- 4 -
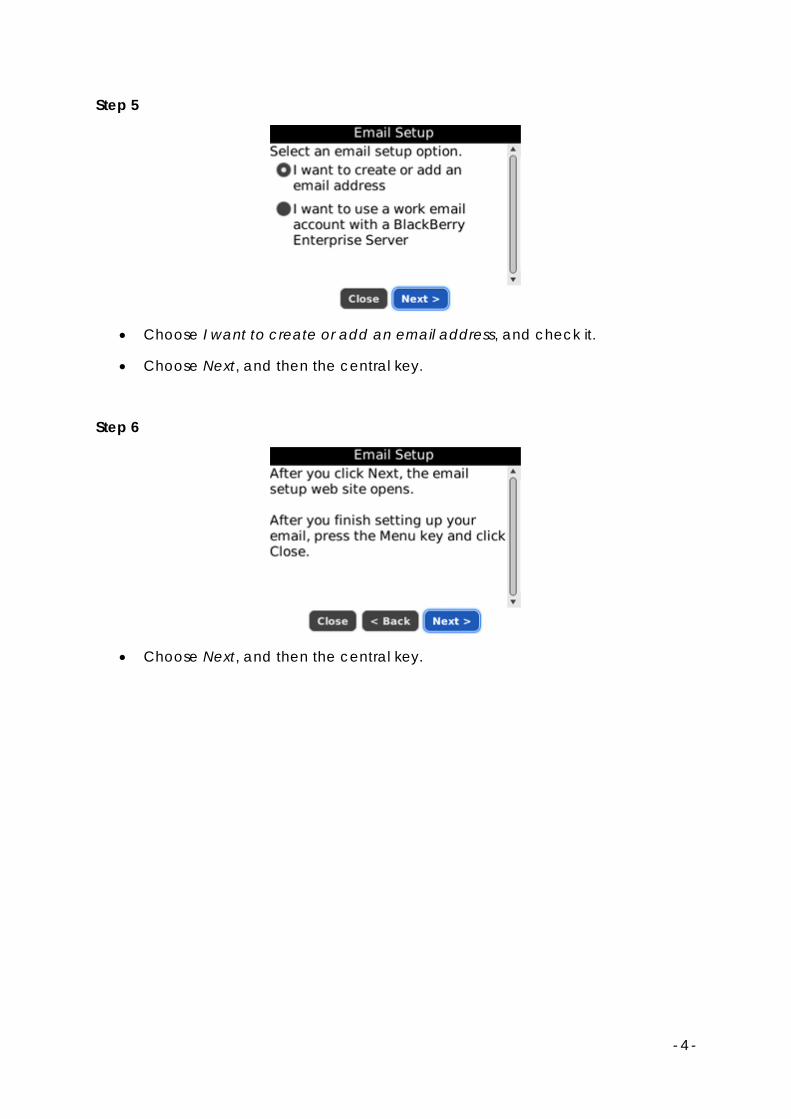
Step 5
Choose I want to create or add an email address, and check it.
Choose Next, and then the central key.
Step 6
Choose Next, and then the central key.
- 5 -
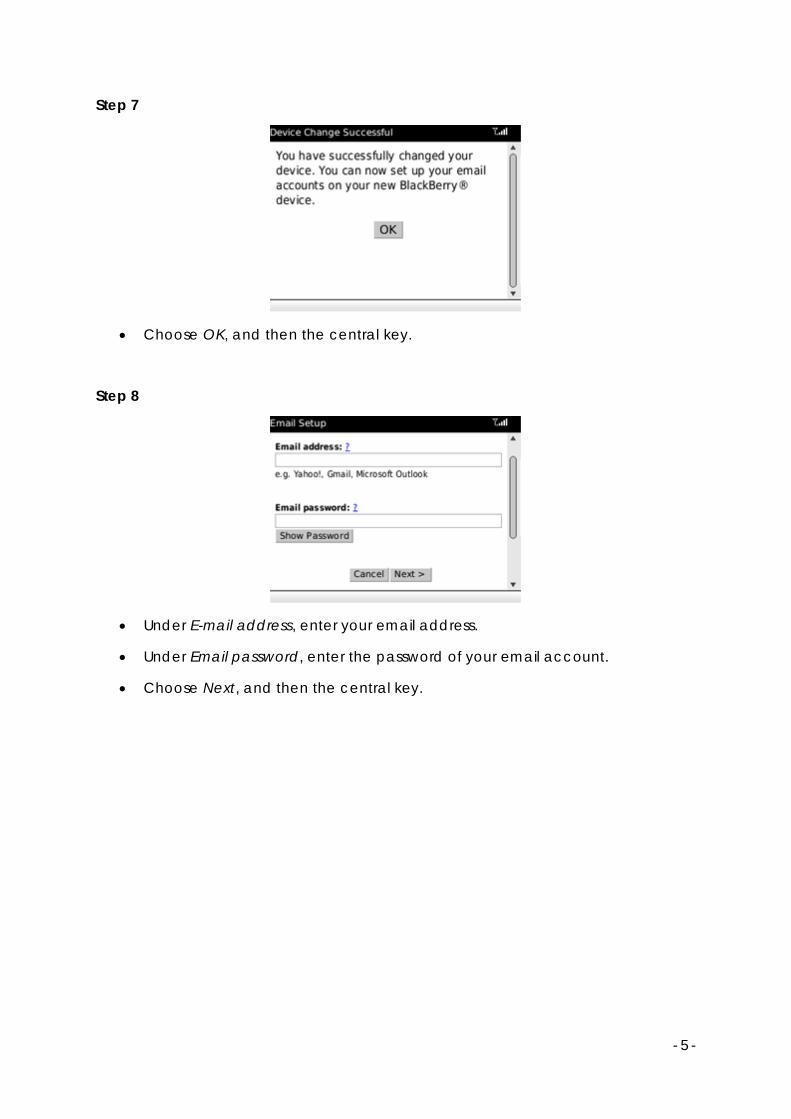
Step 7
Choose OK, and then the central key.
Step 8
Under E-mail address, enter your email address.
Under Email password, enter the password of your email account.
Choose Next, and then the central key.
- 6 -
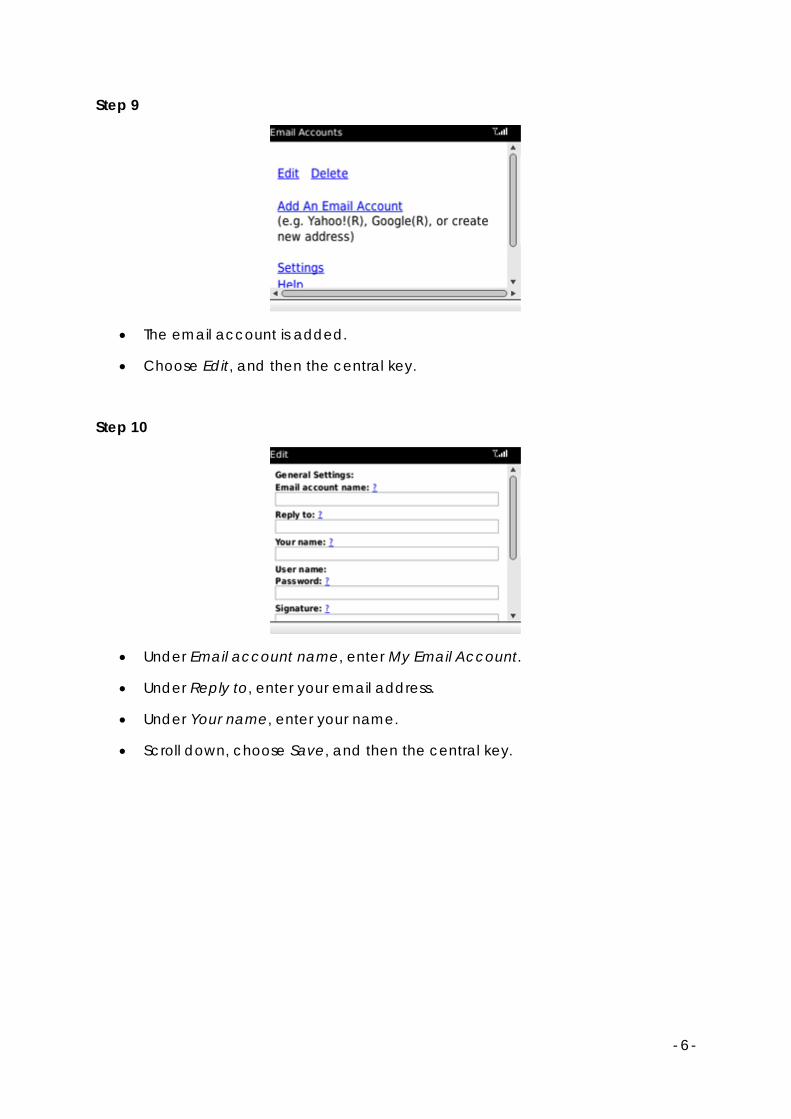
Step 9
The email account is added.
Choose Edit, and then the central key.
Step 10
Under Email account name, enter My Email Account.
Under Reply to, enter your email address.
Under Your name, enter your name.
Scroll down, choose Save, and then the central key.
- 7 -
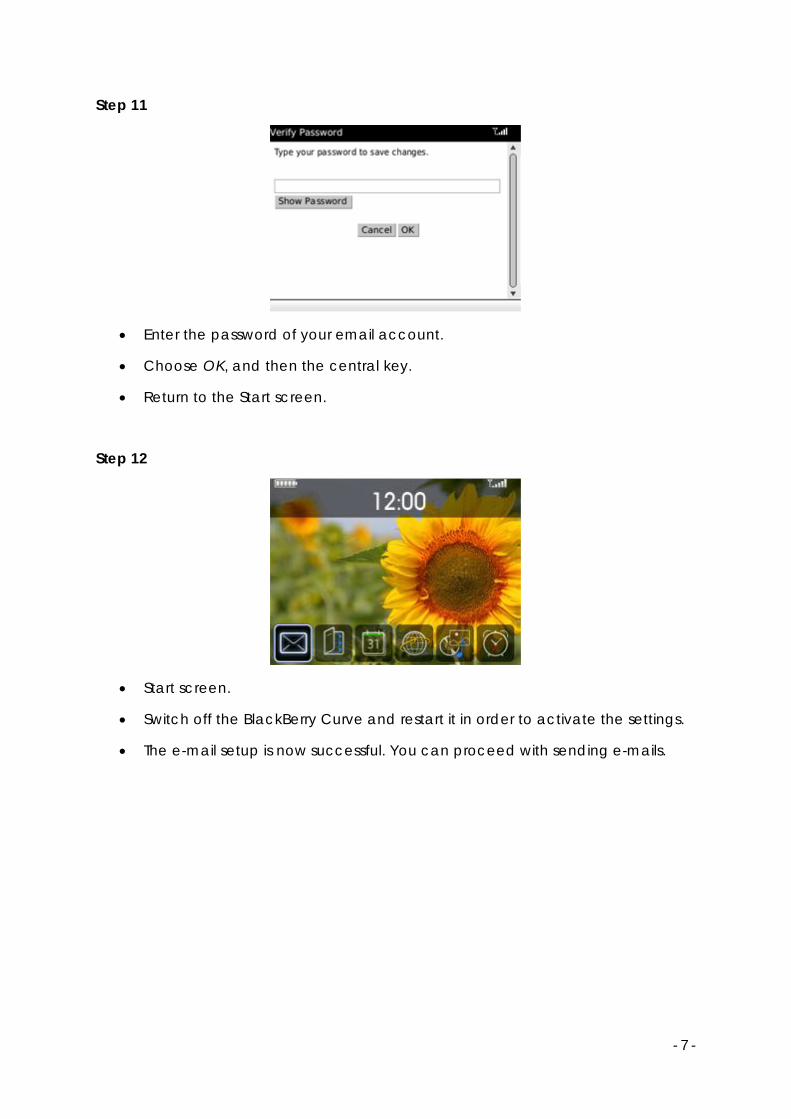
Step 11
Enter the password of your email account.
Choose OK, and then the central key.
Return to the Start screen.
Step 12
Start screen.
Switch off the BlackBerry Curve and restart it in order to activate the settings.
The e-mail setup is now successful. You can proceed with sending e-mails.
- 8 -
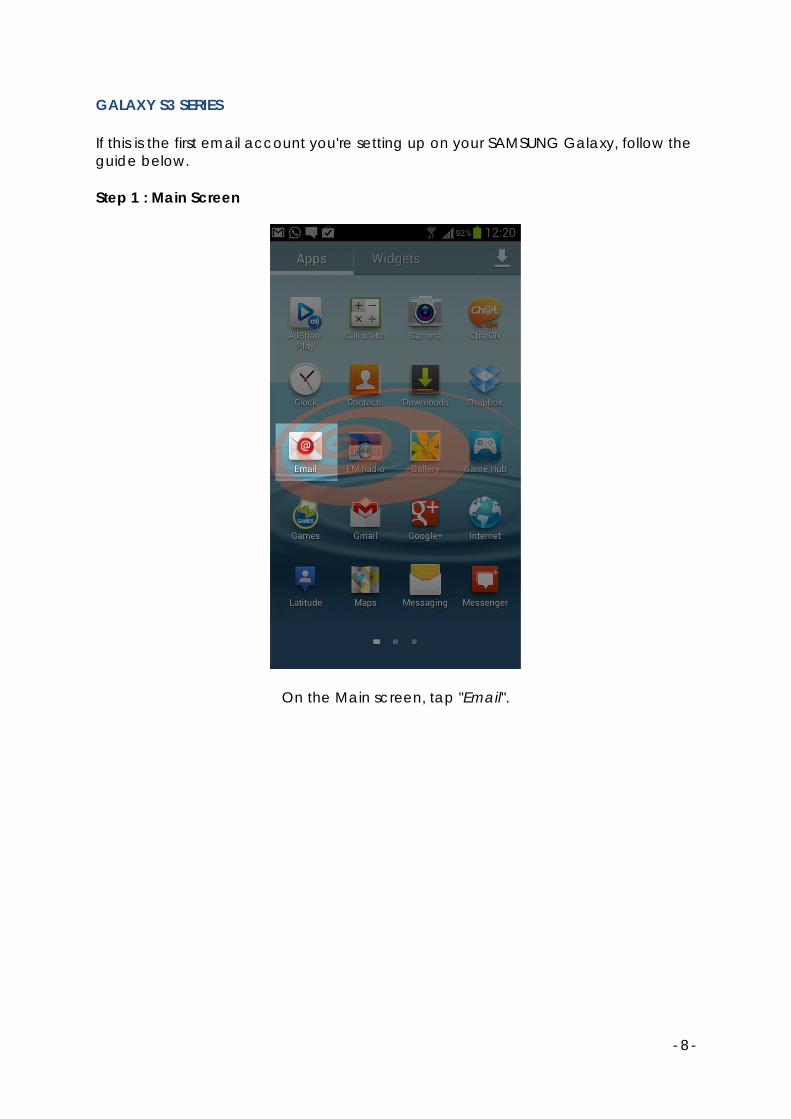
GALAXY S3 SERIES
If this is the first email account you're setting up on your SAMSUNG Galaxy, follow the guide below.
Step 1 : Main Screen
On the Main screen, tap "Email".
- 9 -
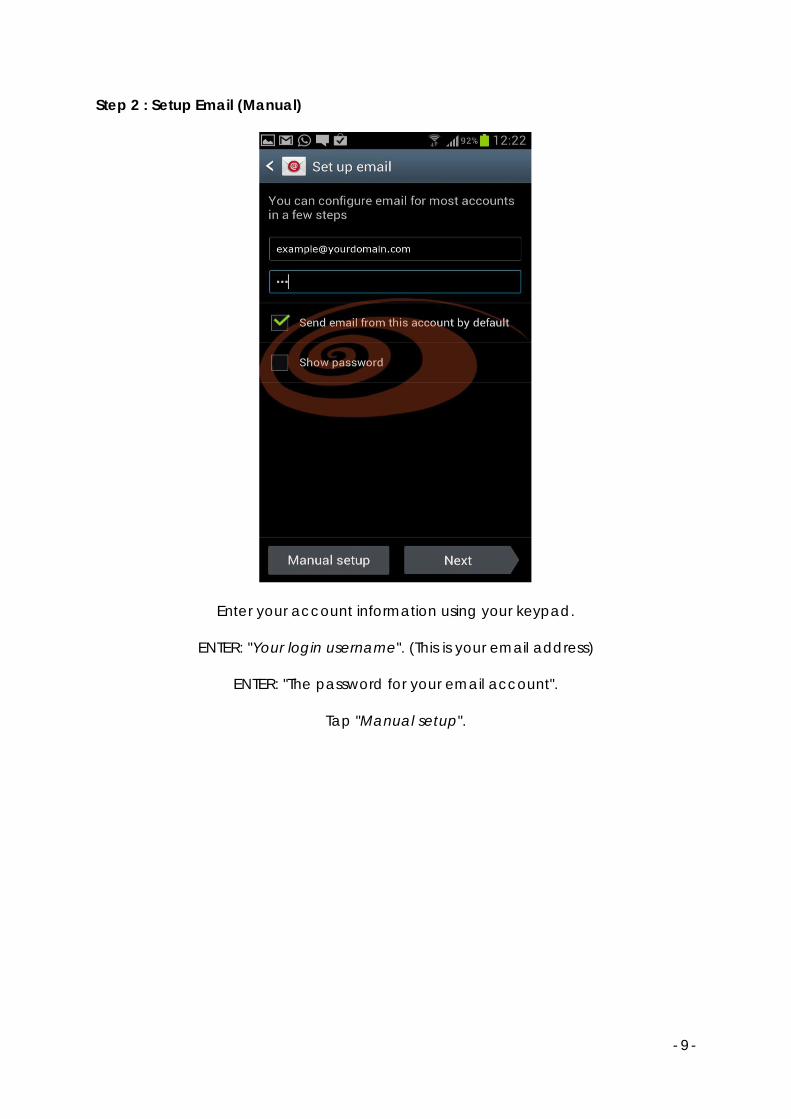
Step 2 : Setup Email (Manual)
Enter your account information using your keypad.
ENTER: "Your login username". (This is your email address)
ENTER: "The password for your email account".
Tap "Manual setup".
- 10 -
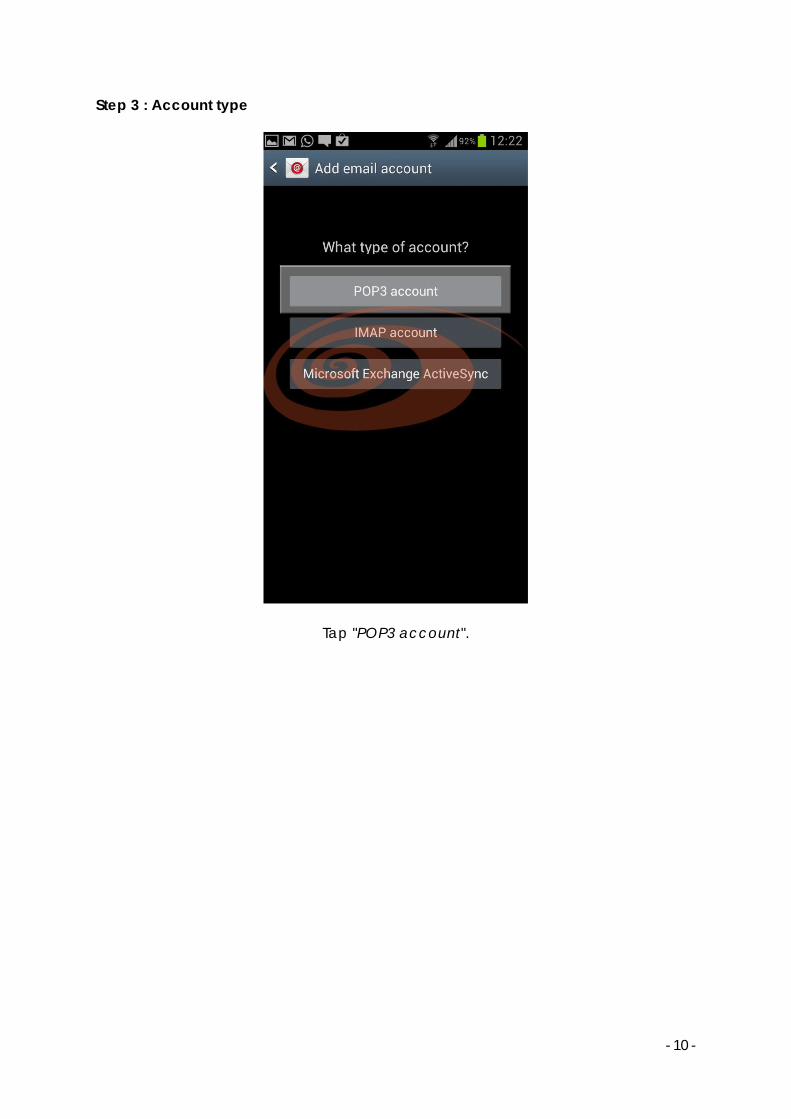
Step 3 : Account type
Tap "POP3 account".
- 11 -
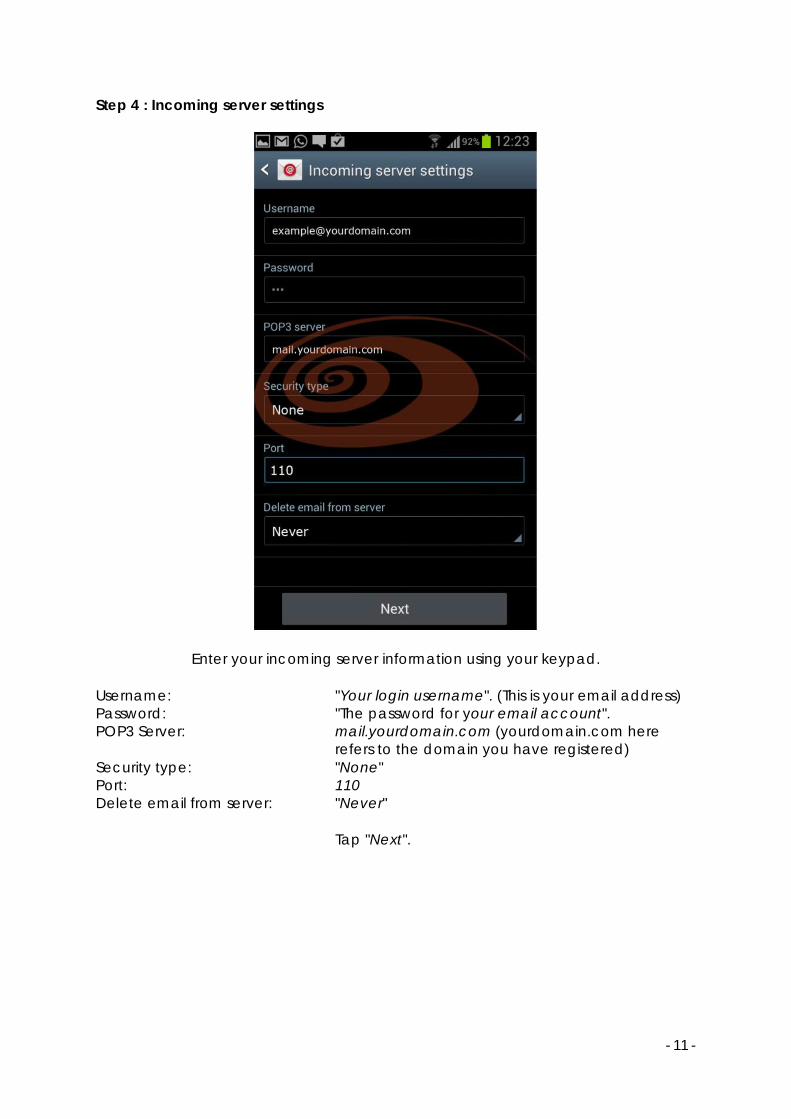
Step 4 : Incoming server settings
Enter your incoming server information using your keypad.
Username: "Your login username". (This is your email address) Password: "The password for your email account". POP3 Server: mail.yourdomain.com (yourdomain.com here
refers to the domain you have registered) Security type: "None" Port: 110 Delete email from server: "Never"
Tap "Next".

- 12 -
Step 5 : Outgoing server settings
Enter your outgoing server information using your keypad.
SMTP server: See Appendix A below Security type: "None" Port: "25" Require sign-in: DISABLE
Tap "Next".
- 13 -
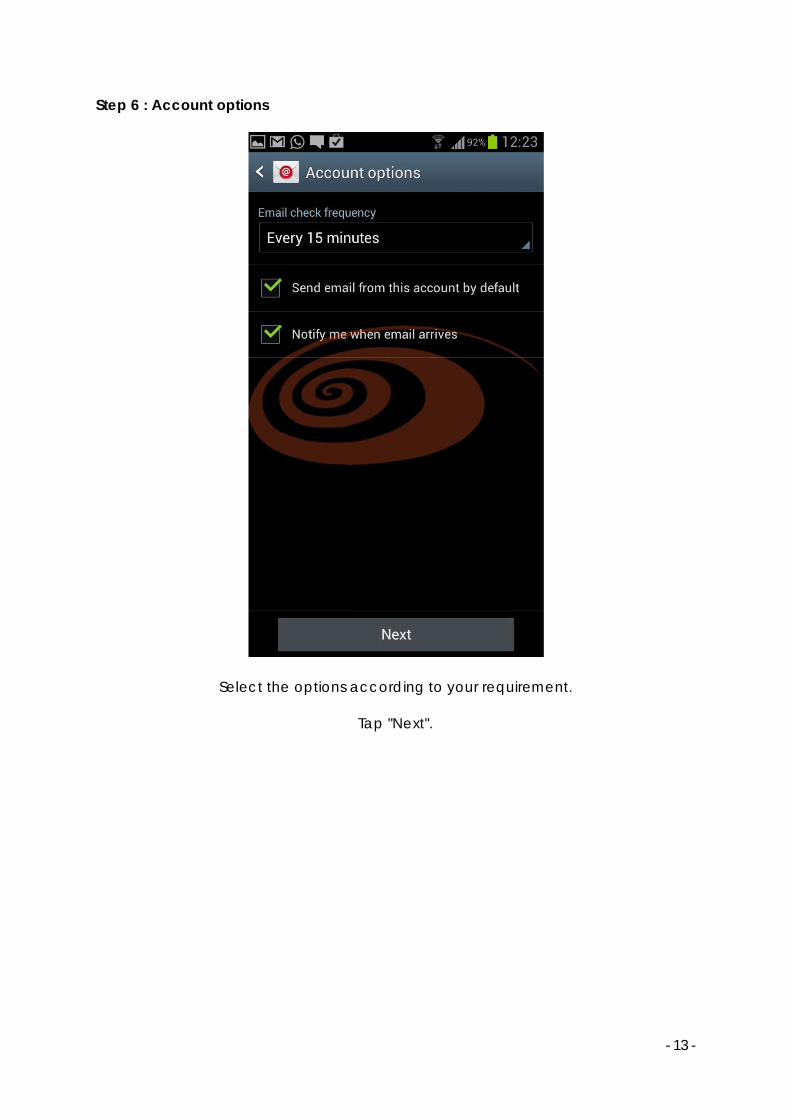
Step 6 : Account options
Select the options according to your requirement.
Tap "Next".
- 14 -
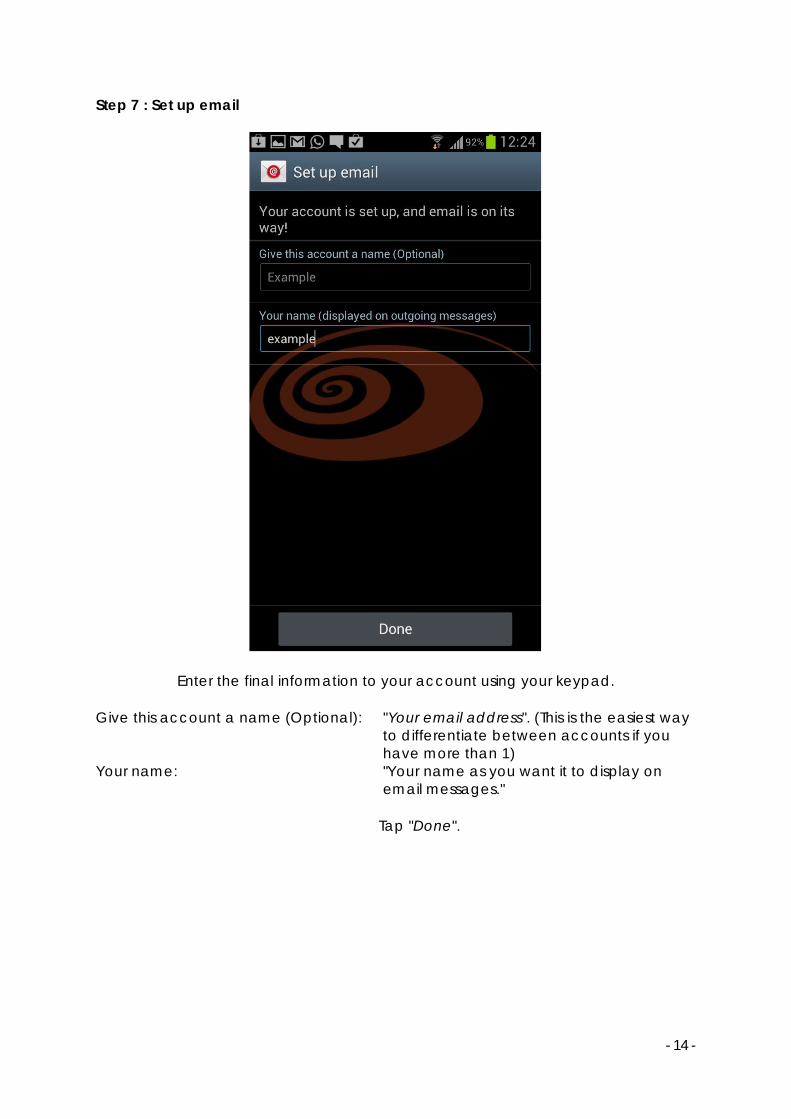
Step 7 : Set up email
Enter the final information to your account using your keypad.
Give this account a name (Optional): "Your email address". (This is the easiest way to differentiate between accounts if you have more than 1)
Your name: "Your name as you want it to display on email messages."
Tap "Done".
- 15 -
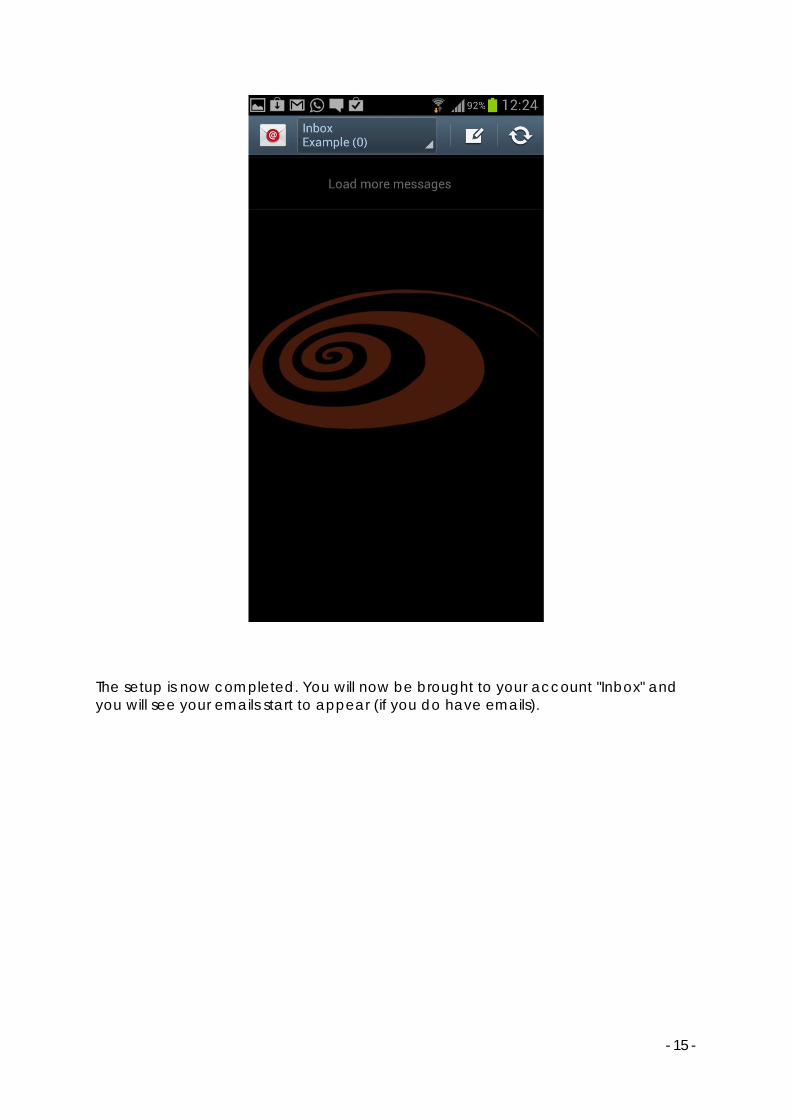
The setup is now completed. You will now be brought to your account "Inbox" and you will see your emails start to appear (if you do have emails).
- 16 -
IPAD
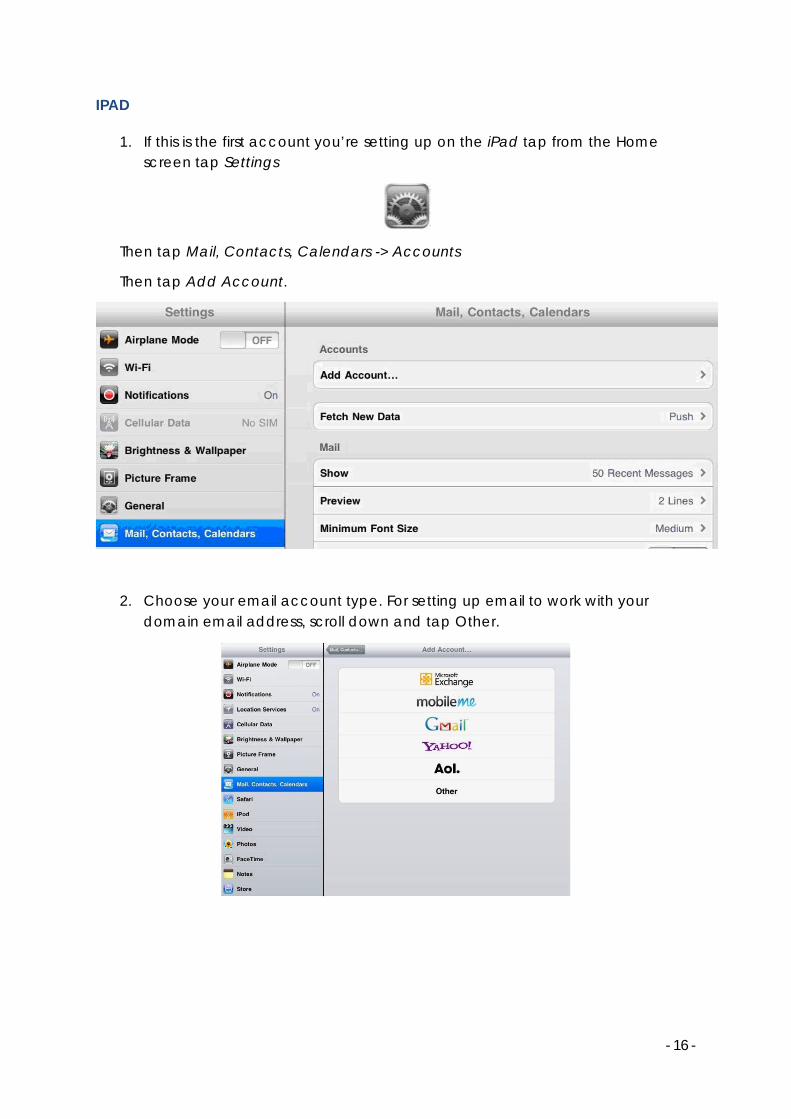
1. If this is the first account you’re setting up on the iPad tap from the Home screen tap Settings
Then tap Mail, Contacts, Calendars -> Accounts
Then tap Add Account.
2. Choose your email account type. For setting up email to work with your domain email address, scroll down and tap Other.
- 17 -
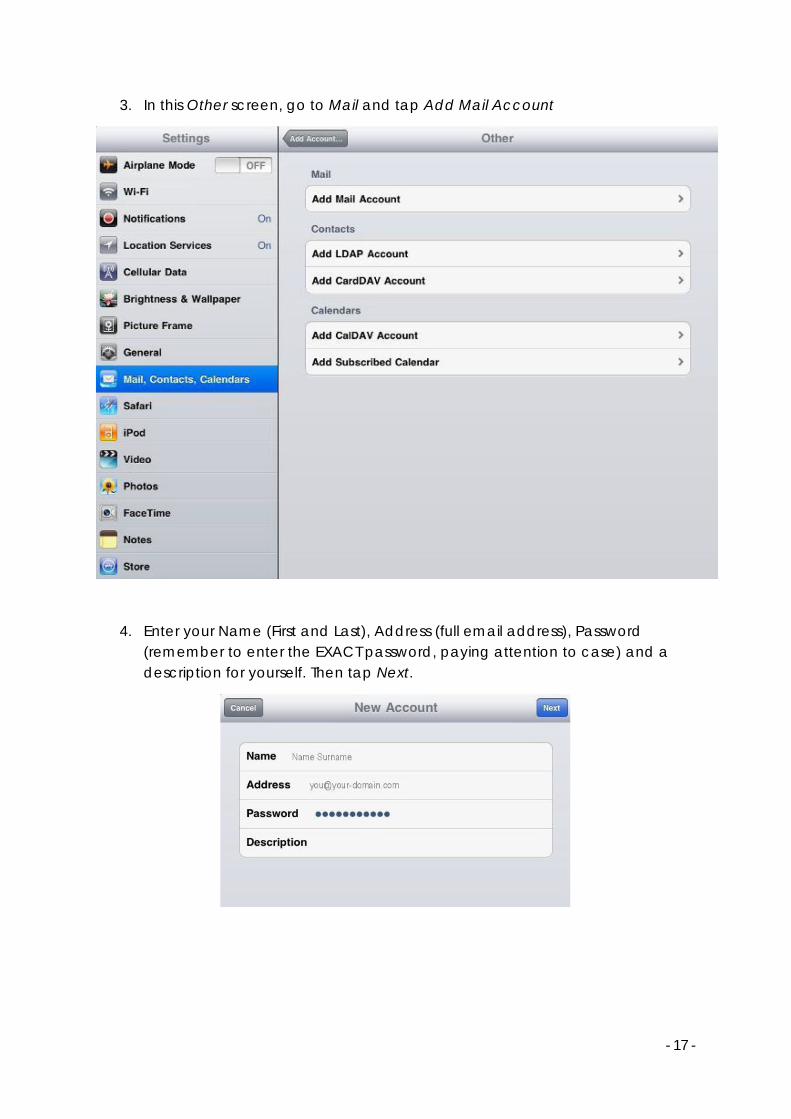
3. In this Other screen, go to Mail and tap Add Mail Account
4. Enter your Name (First and Last), Address (full email address), Password (remember to enter the EXACT password, paying attention to case) and a description for yourself. Then tap Next.
- 18 -
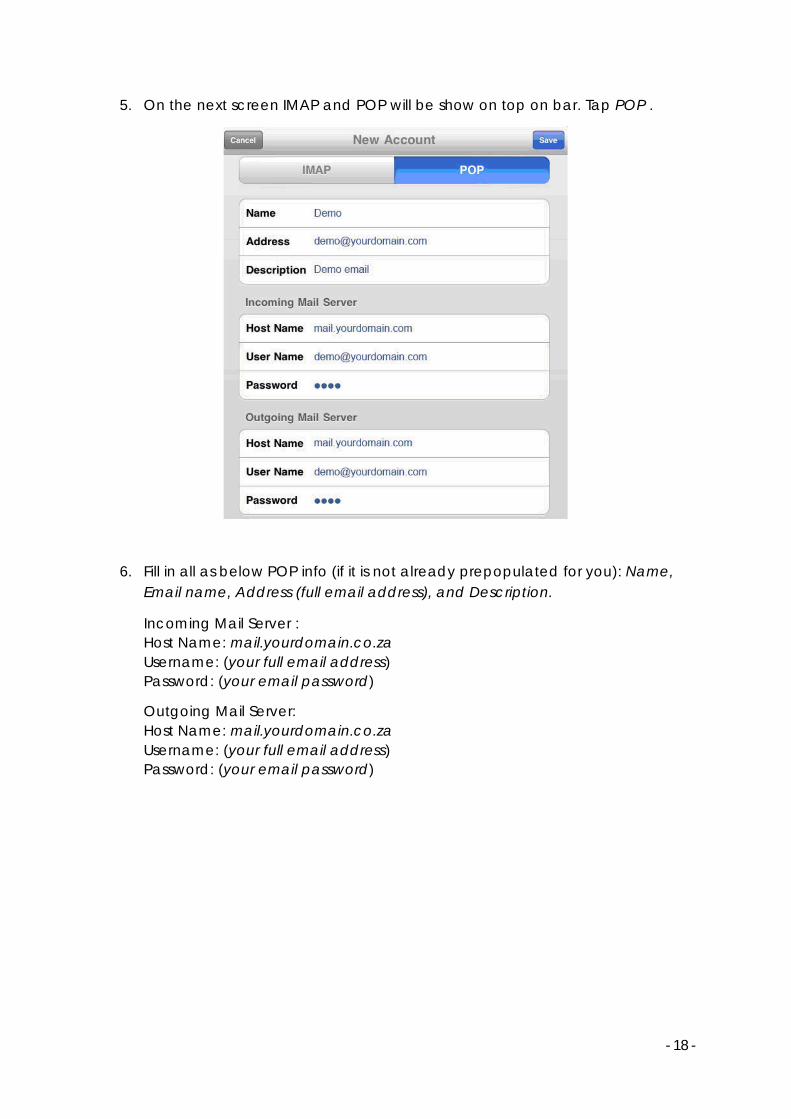
5. On the next screen IMAP and POP will be show on top on bar. Tap POP .
6. Fill in all as below POP info (if it is not already prepopulated for you): Name, Email name, Address (full email address), and Description.
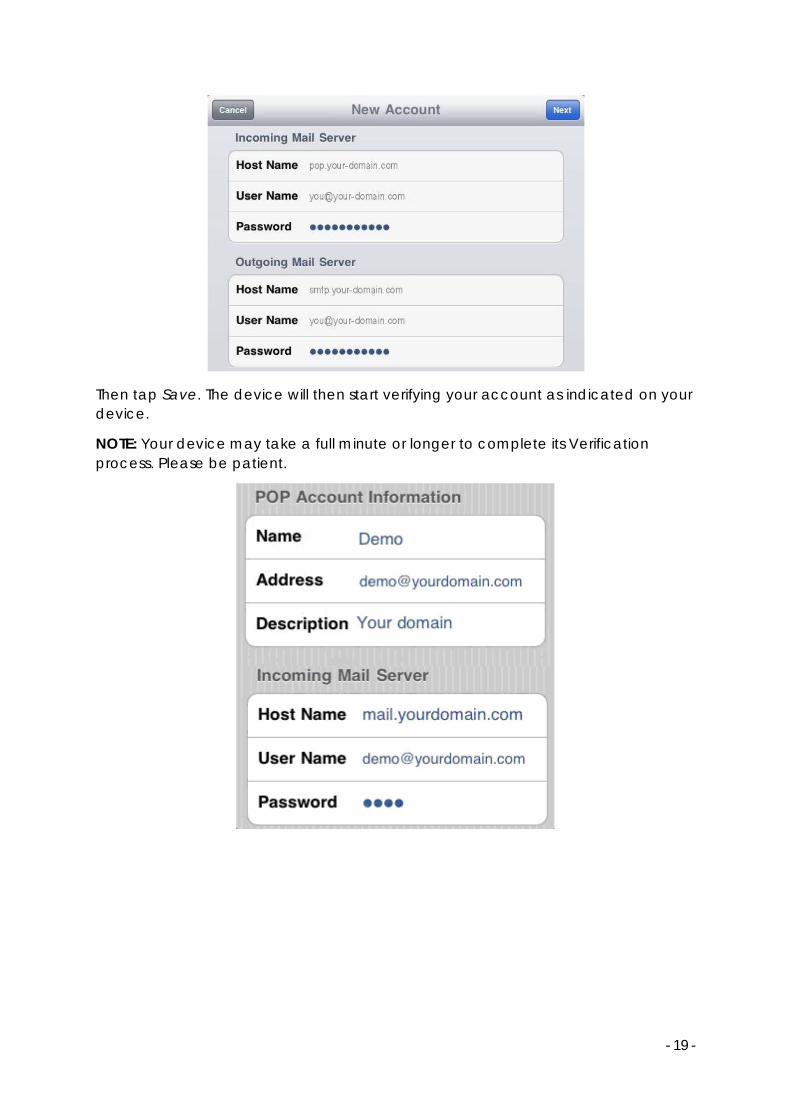
Incoming Mail Server : Host Name: mail.yourdomain.co.za Username: (your full email address) Password: (your email password)
Outgoing Mail Server: Host Name: mail.yourdomain.co.za Username: (your full email address) Password: (your email password)
- 19 -
Then tap Save. The device will then start verifying your account as indicated on your device.
NOTE: Your device may take a full minute or longer to complete its Verification process. Please be patient.
- 20 -
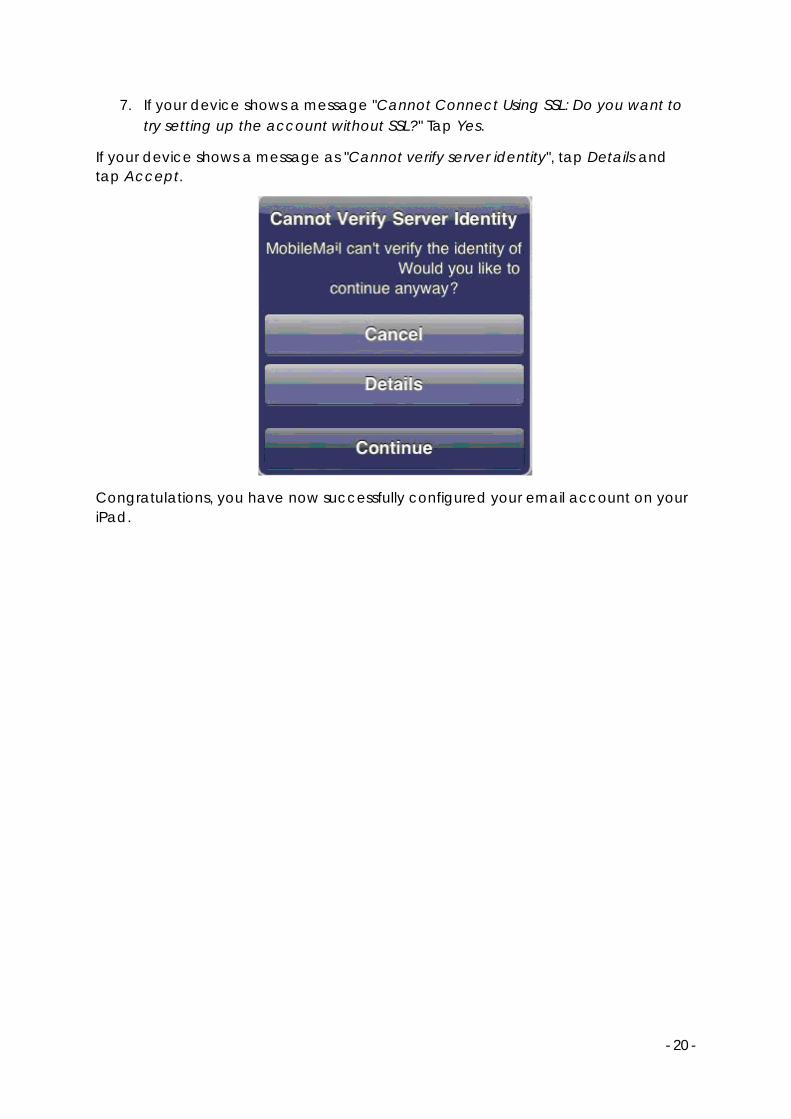
7. If your device shows a message "Cannot Connect Using SSL: Do you want to try setting up the account without SSL?" Tap Yes.
If your device shows a message as "Cannot verify server identity", tap Details and tap Accept.
Congratulations, you have now successfully configured your email account on your iPad.

- 21 -
N7000 GALAXY NOTE
To set up email on your Samsung Galaxy Note you will need:
An email account at an internet or email provider. Login details of the incoming and outgoing mail servers. An active internet connection.
- 22 -
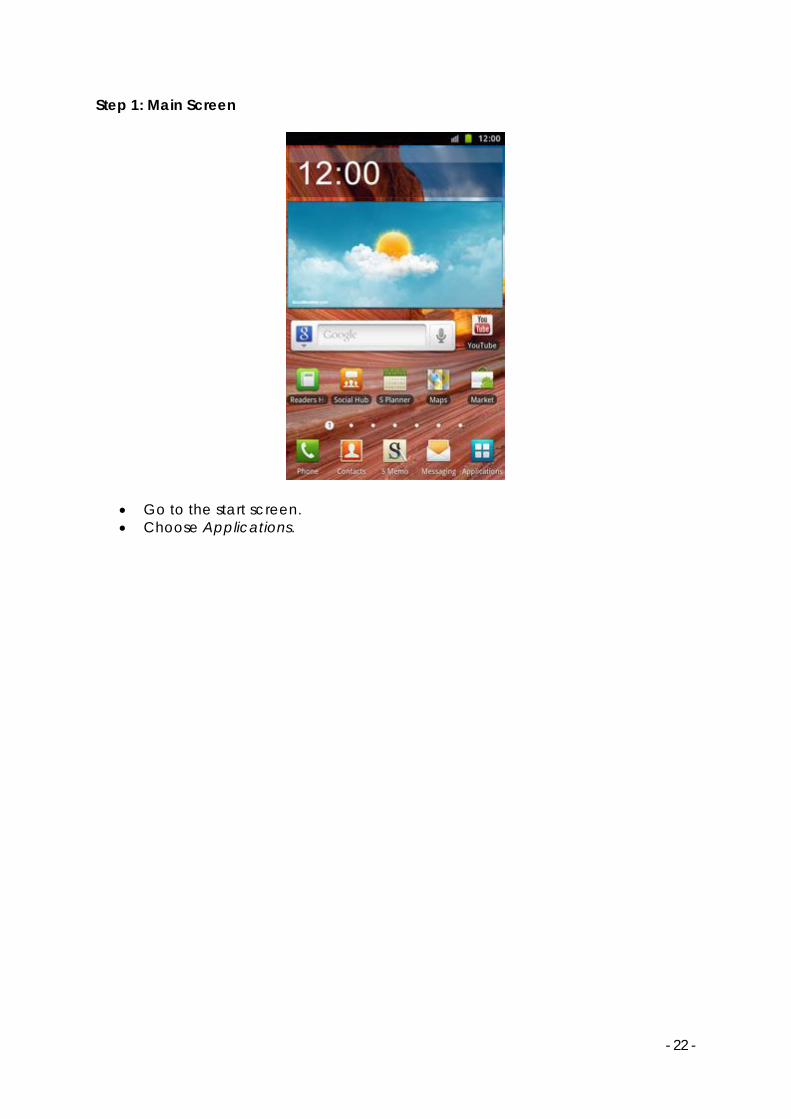
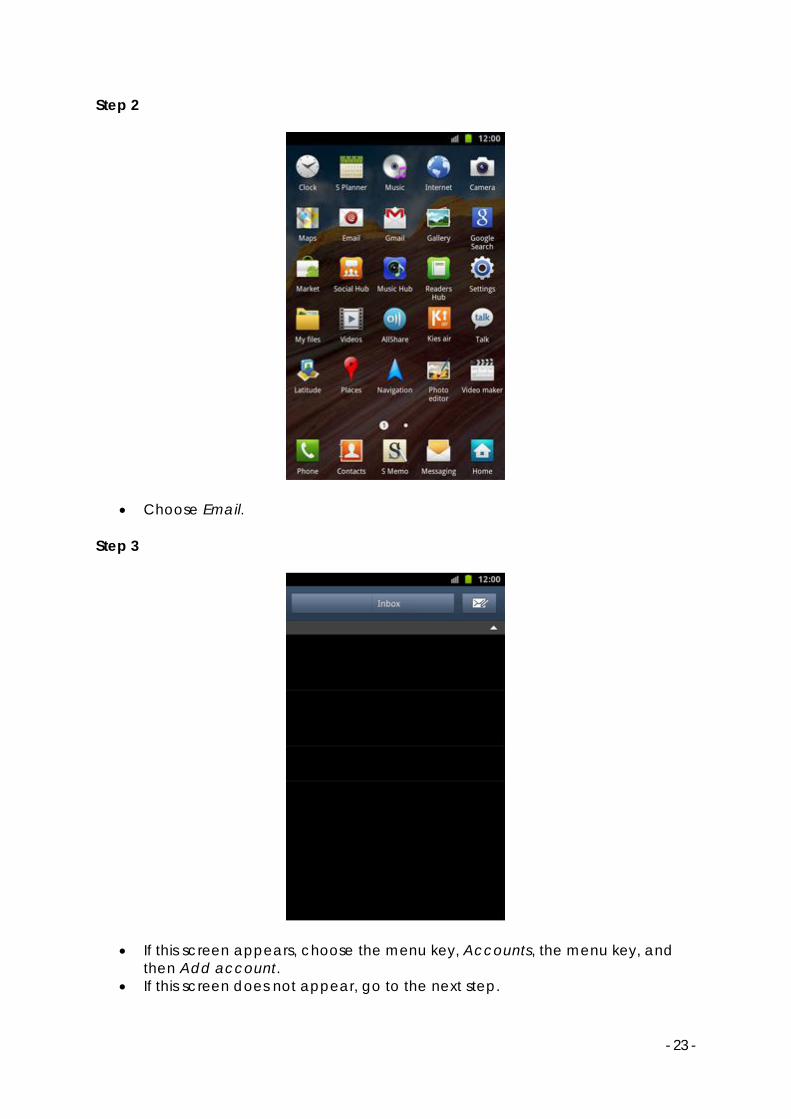
Step 1: Main Screen
Go to the start screen. Choose Applications.
- 23 -
Step 2
Choose Email.
Step 3
If this screen appears, choose the menu key, Accounts, the menu key, and then Add account.
If this screen does not appear, go to the next step.
- 24 -
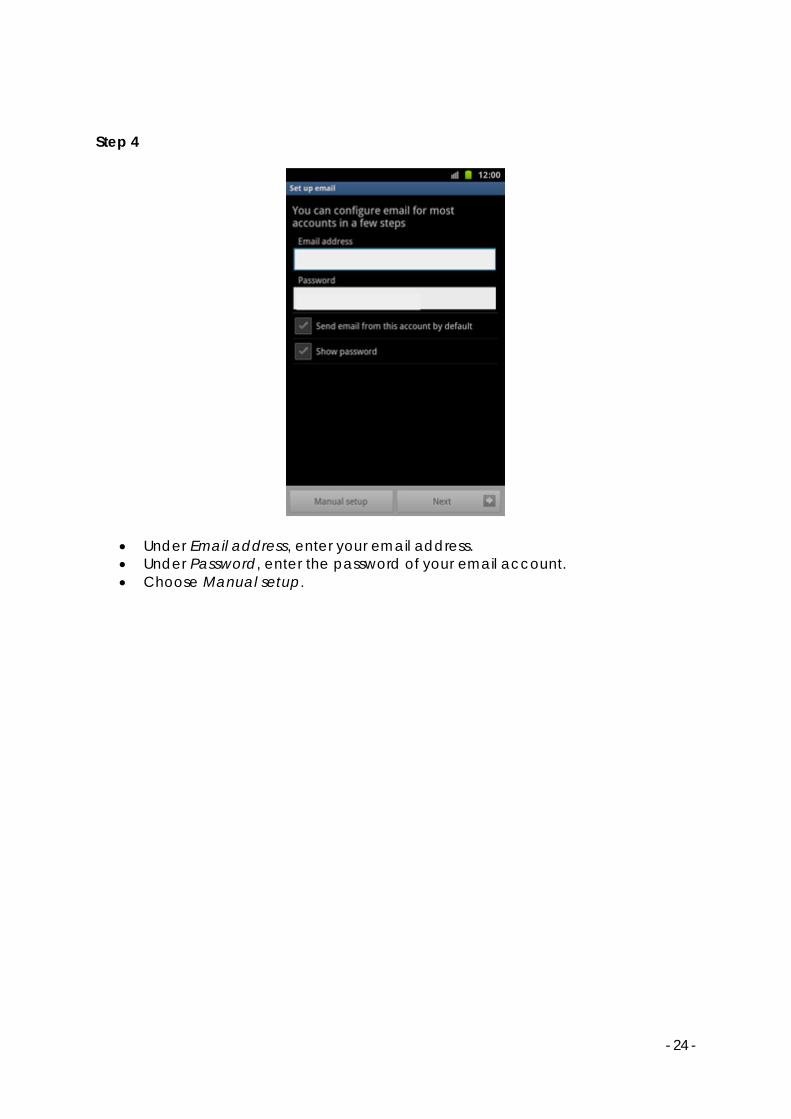
Step 4
Under Email address, enter your email address. Under Password, enter the password of your email account. Choose Manual setup.
- 25 -
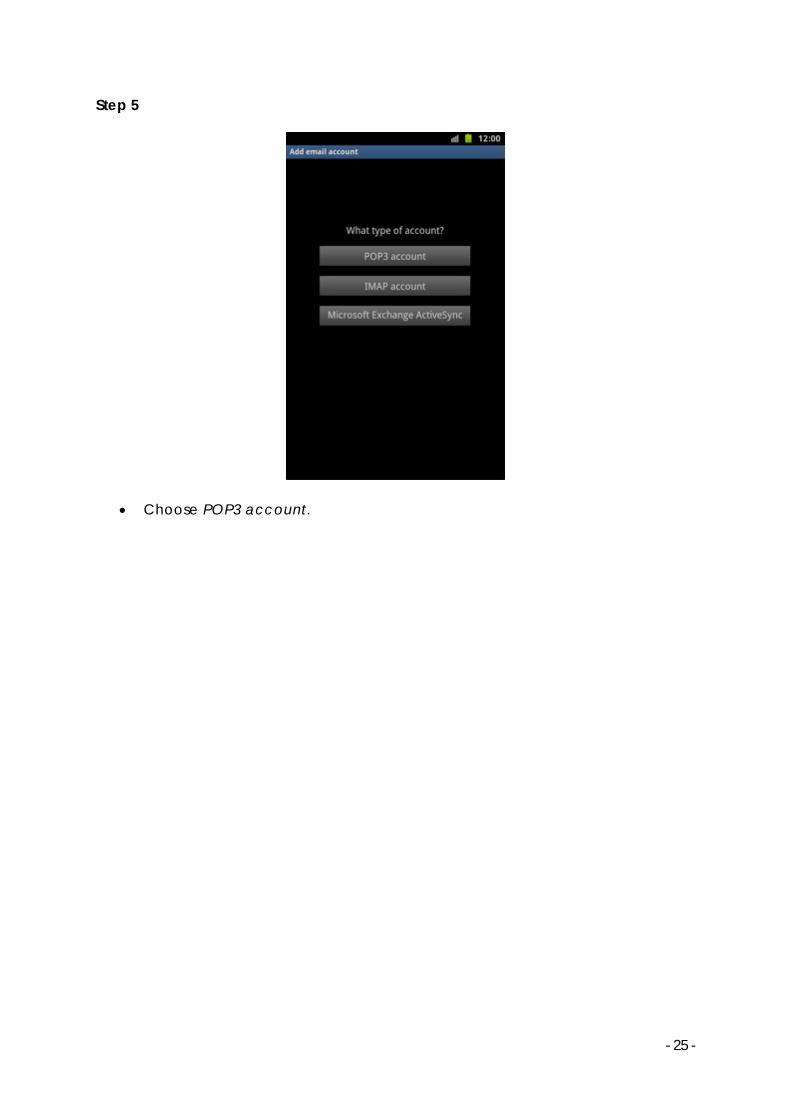
Step 5
Choose POP3 account.
- 26 -
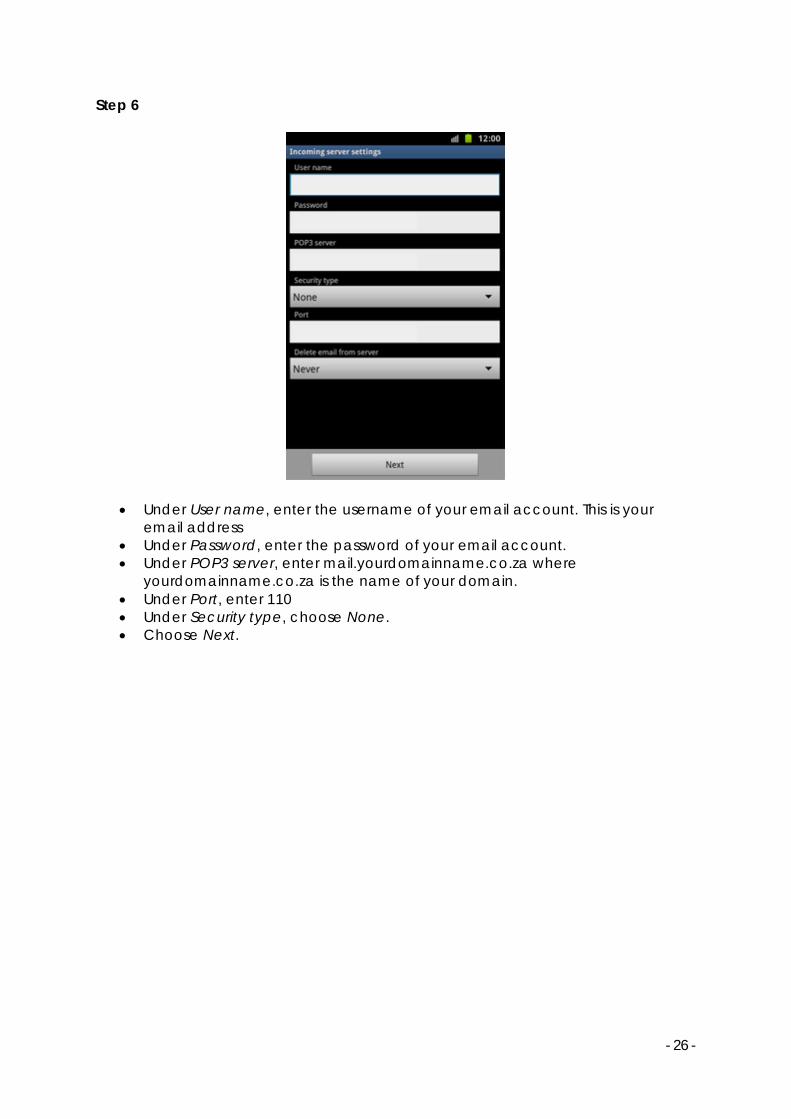
Step 6
Under User name, enter the username of your email account. This is your email address
Under Password, enter the password of your email account. Under POP3 server, enter mail.yourdomainname.co.za where
yourdomainname.co.za is the name of your domain. Under Port, enter 110 Under Security type, choose None. Choose Next.
- 27 -
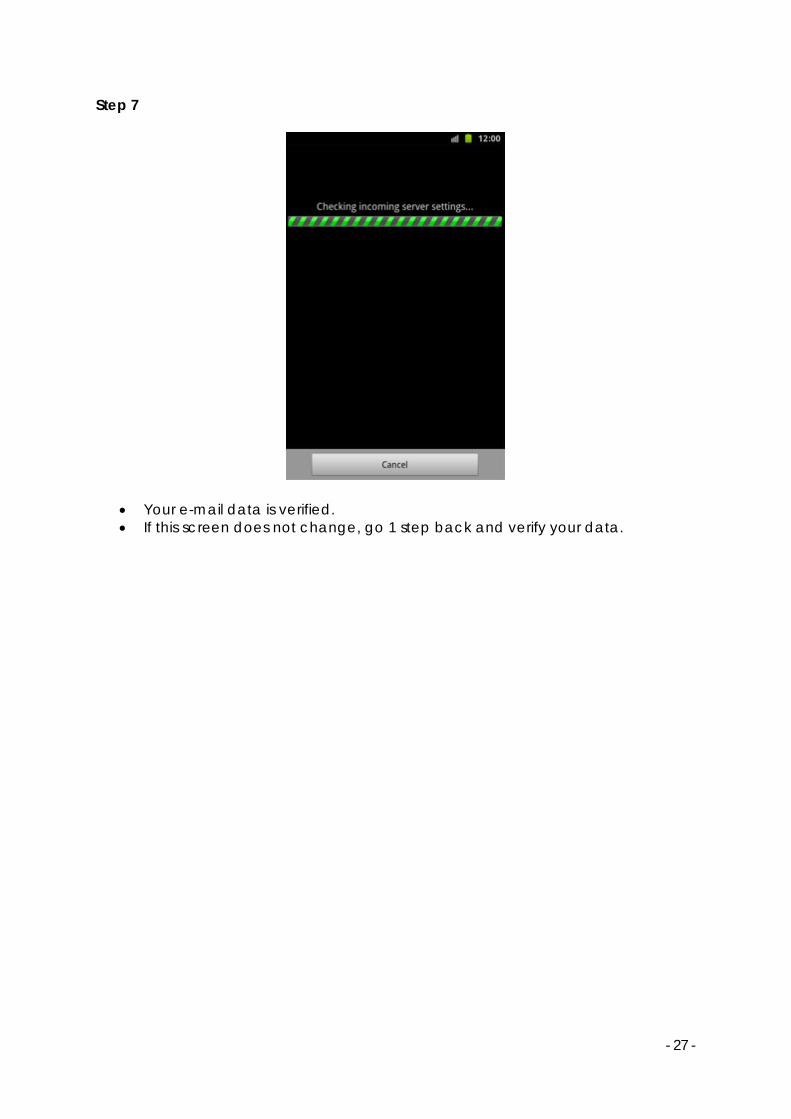
Step 7
Your e-mail data is verified. If this screen does not change, go 1 step back and verify your data.
- 28 -
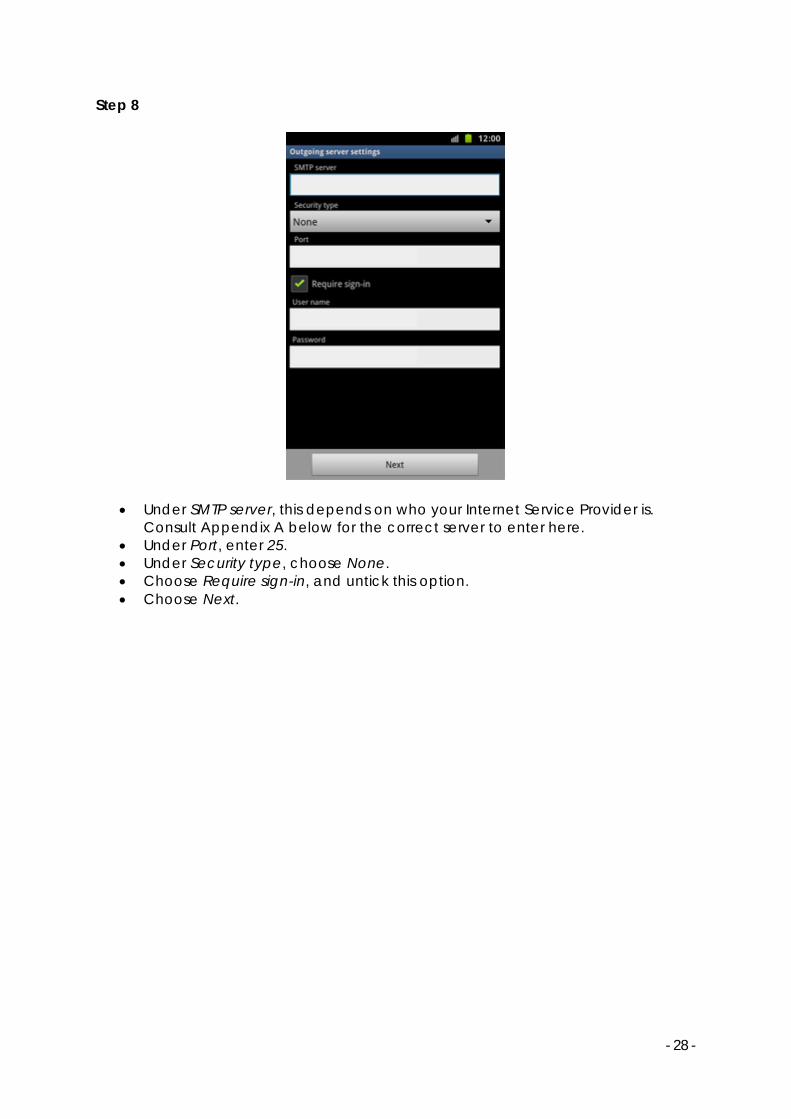
Step 8
Under SMTP server, this depends on who your Internet Service Provider is. Consult Appendix A below for the correct server to enter here.
Under Port, enter 25. Under Security type, choose None. Choose Require sign-in, and untick this option. Choose Next.
- 29 -
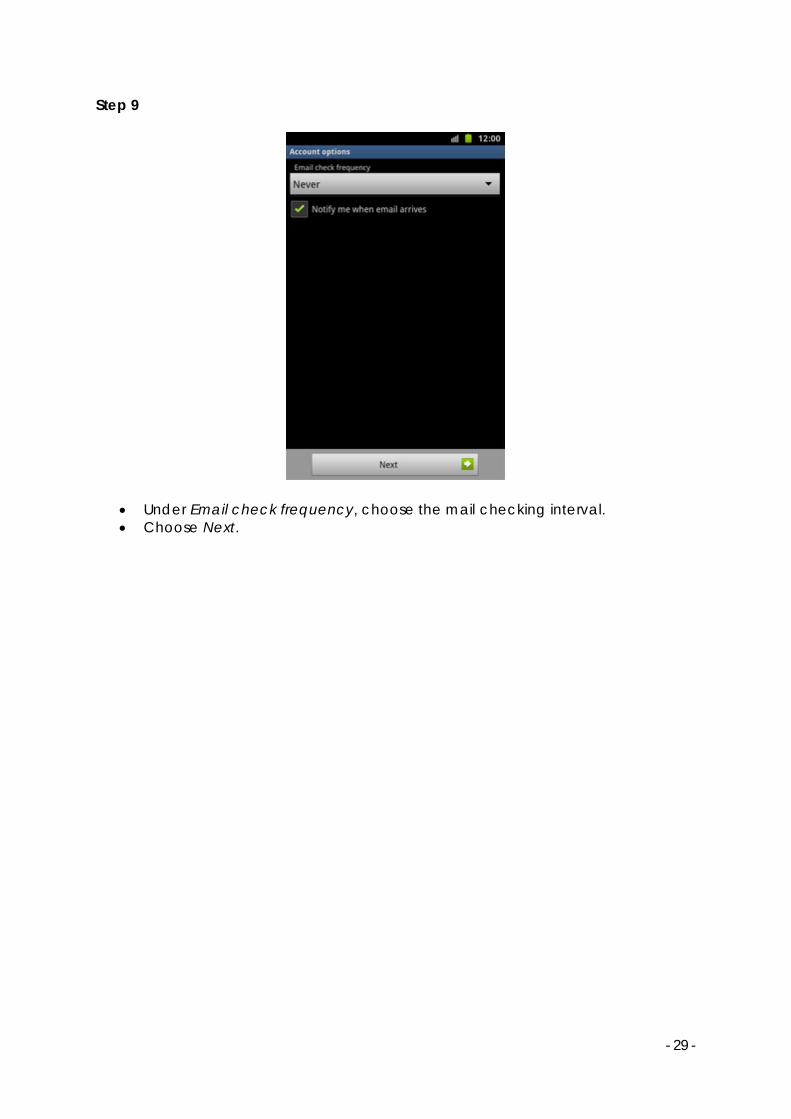
Step 9
Under Email check frequency, choose the mail checking interval. Choose Next.
- 30 -
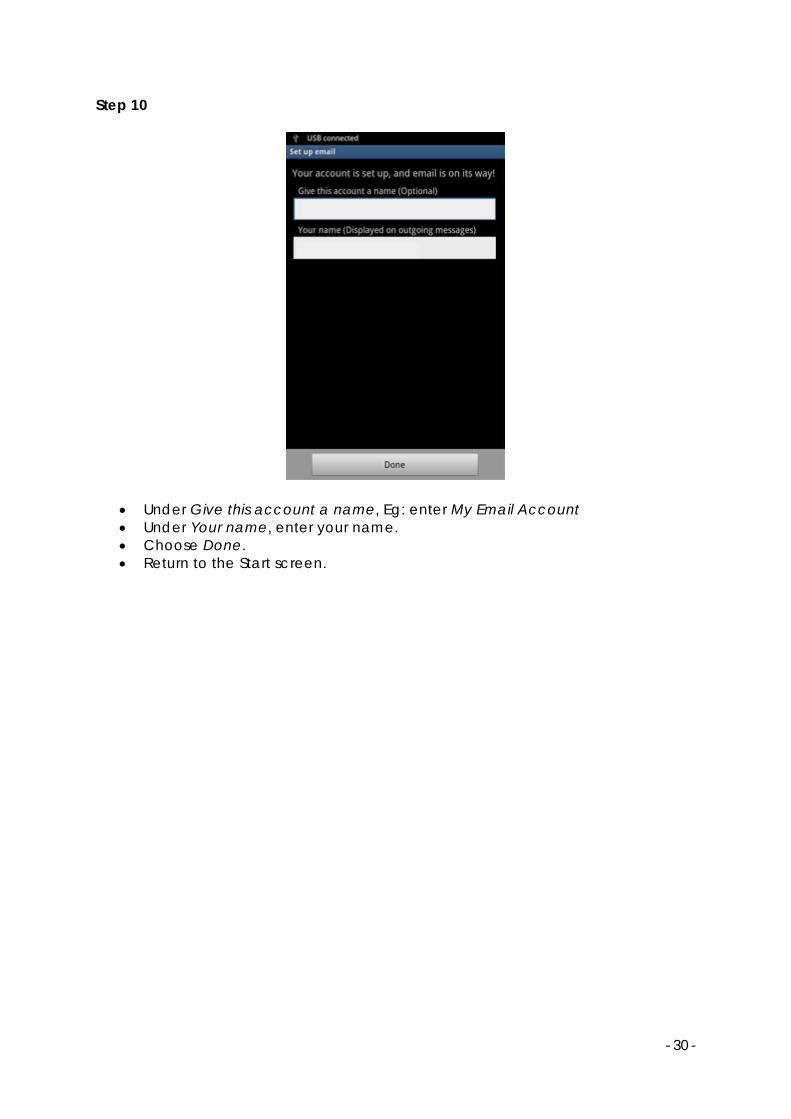
Step 10
Under Give this account a name, Eg: enter My Email Account Under Your name, enter your name. Choose Done. Return to the Start screen.
- 31 -
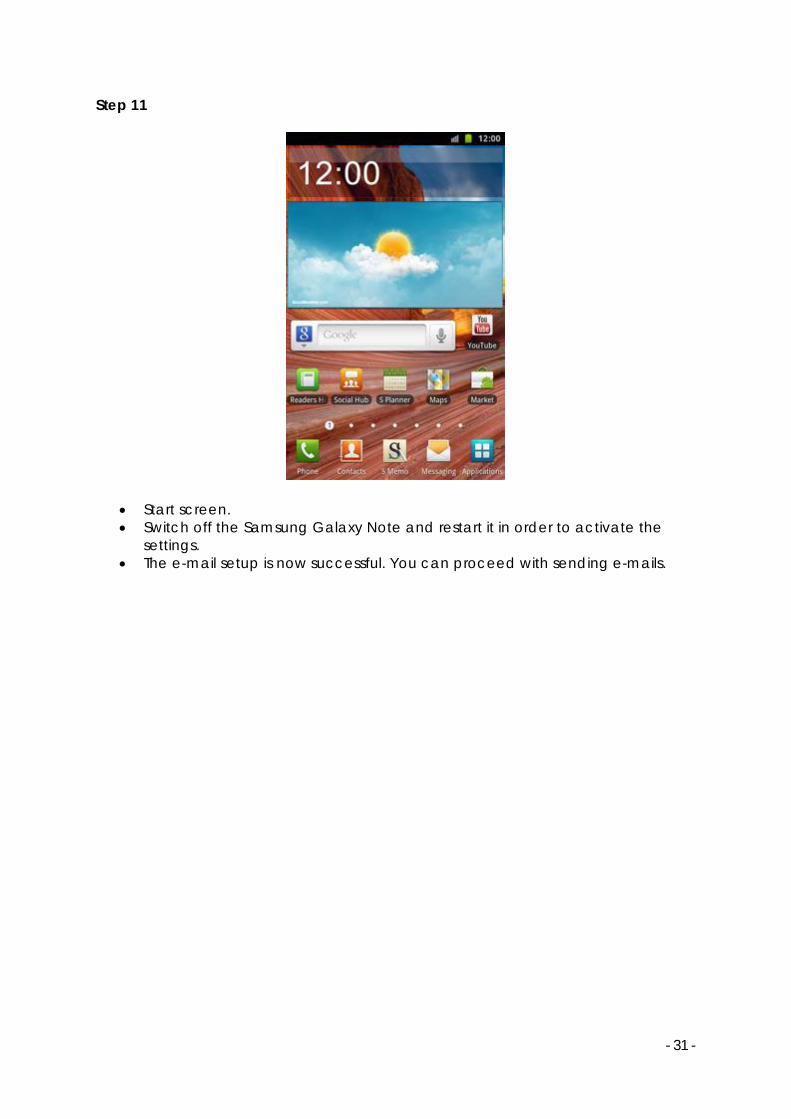
Step 11
Start screen. Switch off the Samsung Galaxy Note and restart it in order to activate the
settings. The e-mail setup is now successful. You can proceed with sending e-mails.

- 32 -
APPENDIX A
Your Outgoing (SMTP) Server is used for sending emails. Your internet service provider (ISP) will supply you with the server name.
Here is a list of the most common Outgoing servers:
For Telkom ADSL, outgoing server is smtp.dsl.telkomsa.net or smtp.saix.net
For Telkom Analogue Dial Up, use smtp.saix.net or smtp.dsl.telkomsa.net
For 8TA (Eita), the outgoing server is smtp.saix.net
For MWEB ADSL, outgoing server is smtp.mweb.co.za or smtp.mweb.net
For Vodacom 3G, outgoing server is smtp.vodacom.co.za
For MTN 3G, the outgoing server is mail.mtn.co.za
For Cell C the outgoing server is mail.cmobile.co.za
For Iburst, outgoing server is smtp.iburst.co.za
For I.S. ADSL the outgoing server is smtp.isdsl.net
For I.S. 3G the outgoing server is smtp.isgsm.netor smtp.dial-up.net
For goggaconnect outgoing server is smtp.vodacom.co.za
For Neotel, outgoing server is smtp.neomail.co.za
For ABSA, outgoing server is smtp.absamail.co.za or mail.absa.co.za
For @lantic (ADSL,Dialup, ISDN) : smtp.lantic.net
For NetActive (ADSL,Dialup, ISDN) : smtp.netactive.co.za
For Polka (ADSL,Dialup, ISDN) : smtp.polka.co.za
For Web Africa (ADSL,Dialup, ISDN) : smtp.wa.co.za