Embed Size (px)
Citation preview

Modular Tanks: Tau Devilfish/Hammerhead
- 1 -
Introduction & Overview
This guide deals with the construction of modular
Tau tanks that are easily convertible between the
Devilfish and Hammerhead configurations. At the
time of this articles writing, these are the only
two official tanks available to the Tau and are
both based around the same chassis. There are
of course various other models and conversion
kits from Forge World, also based around the
same chassis.
This guide will cover the construction of the
Hammerhead, and how to make it convertible to
and from a Devilfish, with the use of magnets to
hold parts together instead of plastic glue. Also
provided are alternatives for materials, methods,
and ways to convert already built models.
Origins
This guide was originally written for Tau Online
by mace, heavily inspired by a thread on 40k
Online forums by She-and-Ski. This guide itself
is written by mace, as an update of the Tau
Online thread. Many thanks to all the members
who have contributed to the threads on both
forums and to Joeboy V. for providing the
magnets that have made this conversion guide
possible.
The original 40k Online thread can be found here:
http://40konline.com/community/index.php?topic=55642.0
and the Tau Online thread here:
http://forums.tauonline.org/index.php?topic=4750.0
Materials
For a complete conversion, you will need the
following:
- 1x Tau Hammerhead Kit
- Plastic Glue - Super Glue - A set of small files – similar to the Citadel
ones
- 5x Small Rare Earth magnets (per
Hammerhead) – 3mm x 1.5mm should be
sufficient
- Drill bits – the same diameter as the
magnets – 3mm or 1/8”
- Spare bits of sprue – there should be plenty left over from the Hammerhead kit
- A ruler with millimeter divisions
- Optional Pin vice, with drill bits and wire of the same diameter, for pinning the hatches
If you can’t get hold of some magnets, some
blu-tac will do the job temporarily.

Modular Tanks: Tau Devilfish/Hammerhead
- 2 -
Construction – The Complete Guide This guide focuses on two main sections: the top
weapons turret on the hammerhead, and the
front weapons/sensor turret in the devilfish and
hammerhead respectively.
General Construction --------------------------------
This part may be pretty obvious, but before you
begin, file any mould lines etc off the pieces, this
will help later when gluing together the model.
There are four hatches on the model – one at the
back, the top crew hatch and one on each side.
The rear hatch is designed to be able to open and
close, and would obviously not require any glue.
The side and top hatches however, are designed
to be glued in place. If you want to allow them to
open and close, now would be a good time to pin
them. I’m not exactly an expert in this, but its
basically drilling a hole through the pivot point on
the hatch, and some holes in the hull, and
inserting a piece of wire through the holes so that
it creates a hinge. For more details and proper
instructions, contact your local hobby shop or
search online on various forums/hobby websites.
The engines are designed to be able to pivot
whilst attached to the model, and so won’t need
gluing. This can be assembled separately, as per
the instructions included with the kit.
Assemble the main hull of the tank, without any
of the top turret parts or any of the front turret
parts. You should now have something that looks
like this:
Note: If you want to paint the interior of the
tank, don’t glue on the sides of the tank, you can
do this later. The pieces can be primed
separately, then after priming, you can then file
off any basecoat spray paint on the areas where
gluing is needed, and apply plastic glue.
The hammerhead weapon drones (without
weapons attached) and the burst cannons and
smart missile system can be constructed
normally – do not glue the weapons to the
drones.
Up to now, you should have assembled:
- 1x hull/chassis (or at least partially
constructed)
- 2x engines
- 2x weapons drone without weapons
- 2x burst cannons and smart missile
system assembled
- 1x top crew hatch
The parts so far…
Front Turret -------------------------------------------
I’ve seen and read of various methods to make
the targeting array and burst cannon
interchangeable in the front turret – this method
seems to be the most efficient and requiring the
least effort. The most important part – is to not
glue in anything to do with the front turret, that
is; the two pieces that hold the burst cannon in
place (the ‘C’ ring and the hemisphere like piece),
the ‘t’ shaped piece and the burst cannon and
targeting array itself. Basically only two
modifications are required – adding a magnet in
both the hull and the ‘t’ shaped piece, and adding
some sprue onto the targeting array.
Modular Tanks: Tau Devilfish/Hammerhead
- 3 -
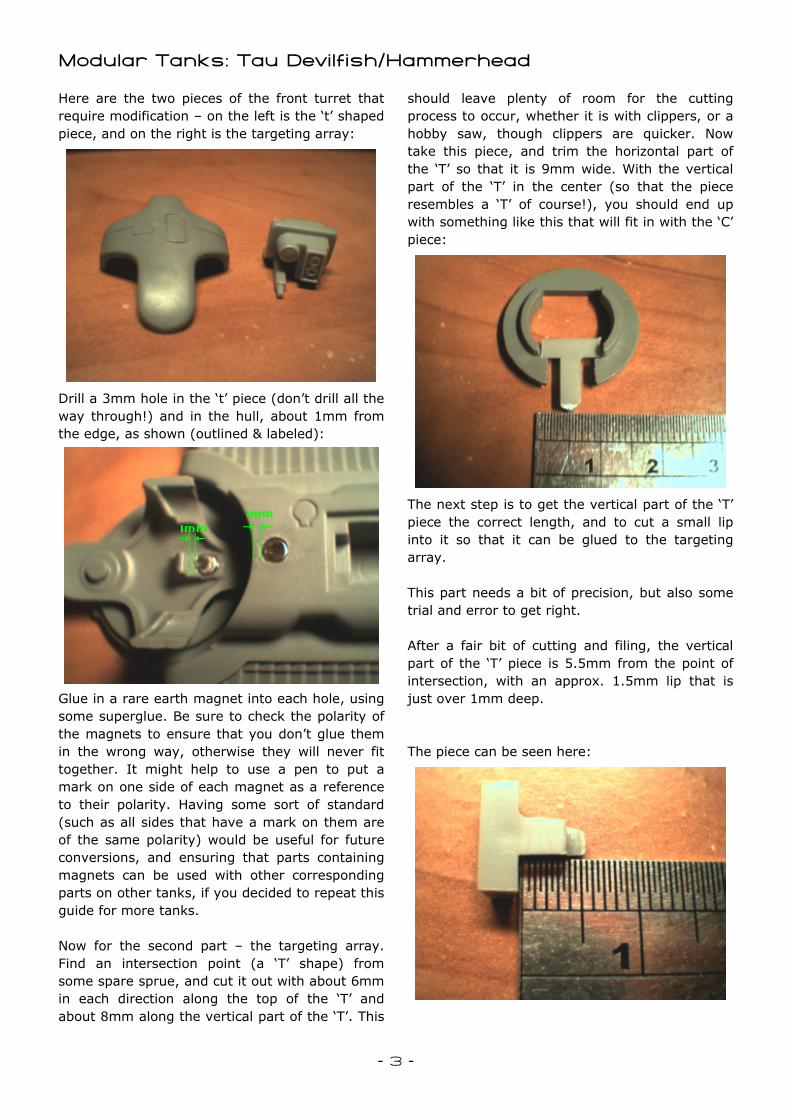
Here are the two pieces of the front turret that
require modification – on the left is the ‘t’ shaped
piece, and on the right is the targeting array:
Drill a 3mm hole in the ‘t’ piece (don’t drill all the
way through!) and in the hull, about 1mm from
the edge, as shown (outlined & labeled):
Glue in a rare earth magnet into each hole, using
some superglue. Be sure to check the polarity of
the magnets to ensure that you don’t glue them
in the wrong way, otherwise they will never fit
together. It might help to use a pen to put a
mark on one side of each magnet as a reference
to their polarity. Having some sort of standard
(such as all sides that have a mark on them are
of the same polarity) would be useful for future
conversions, and ensuring that parts containing
magnets can be used with other corresponding
parts on other tanks, if you decided to repeat this
guide for more tanks.
Now for the second part – the targeting array.
Find an intersection point (a ‘T’ shape) from
some spare sprue, and cut it out with about 6mm
in each direction along the top of the ‘T’ and
about 8mm along the vertical part of the ‘T’. This
should leave plenty of room for the cutting
process to occur, whether it is with clippers, or a
hobby saw, though clippers are quicker. Now
take this piece, and trim the horizontal part of
the ‘T’ so that it is 9mm wide. With the vertical
part of the ‘T’ in the center (so that the piece
resembles a ‘T’ of course!), you should end up
with something like this that will fit in with the ‘C’
piece:
The next step is to get the vertical part of the ‘T’
piece the correct length, and to cut a small lip
into it so that it can be glued to the targeting
array.
This part needs a bit of precision, but also some
trial and error to get right.
After a fair bit of cutting and filing, the vertical
part of the ‘T’ piece is 5.5mm from the point of
intersection, with an approx. 1.5mm lip that is
just over 1mm deep.
The piece can be seen here:

Modular Tanks: Tau Devilfish/Hammerhead
- 4 -
Once glued to the targeting array, the piece
should look like this (one I prepared earlier):
Don’t glue it in just yet though, as this is just for
reference.
This piece fits in to the front turret like so (also
prepared earlier):
Using the pictures as a reference, try out a ‘dry-
fit’ with the parts, checking that they fit together
and line up.
Once you’re happy with the sprue bit, glue it to
the back of the targeting array. Try to keep it as
centered as possible. Once it has dried, check to
make sure it fits together nicely, assembling the
front turret in the same way as with the burst
cannon (i.e. placing the ‘C’ ring on last).
That is basically the front turret covered so
you’re done (for now anyway).
Other methods involve cutting slots into the front
turret, and mounting magnets at the back of the
turret, with more magnets in the back of one
burst cannon and another behind the targeting
array. This method can be seen in the two forum
threads mentioned at the end of the first page of
this guide. It does require some butchering of
parts though, and doesn’t allow normal
movement of the burst cannon, and also uses up
more parts and more magnets.
Main Turret --------------------------------------------
The main turret presents many choices as to how
to mount it and attach the gun to the mount.
Unfortunately, the kit only comes with one of the
small mounting pieces that connect the gun to
the mount, and all it to track up or down.
Various methods that could be used (detailed in
the 40k Online forum thread – link on the first
page) include casting another of the mounting
pieces from modeling putty/green stuff, using
small model train screws to hold the gun in place,
or just using blu-tac.
The option I have chosen is the embedding of a
rare earth magnet in the mounting piece, and
another in some filler material within each
weapon.
To do this, get a 3mm drill bit, and just twist it
into the middle of the mounting piece – this can
be done by hand without the need for an actual
drill. You do not have to drill very far, just a few
millimeters into the plastic – enough to mount
the magnet so that it’s flush (or fairly close to it).
Ensure that you have checked the polarity of the
magnet in the mounting piece, as it will become
important later on so that it’s compatible with the
weapons. At this point, the mounting piece can
be glued into the main turret itself.
In order to mount magnets inside the Railgun
and Ion Cannon, some form of filler material can
be used to hold the magnet. This can be in the
form of modeling putty or green stuff, with just a
blob inside the gun with the magnet pressed into
it, so that when the mounting piece is inserted,
the two magnets will come in contact, or close to
it (pretty self explanatory), or for example,
placing the magnet on some plasticard within the
gun. The latter method can be found in the Tau
Online Forum thread (see link on first page).
Both methods are viable, though I’ve gone for
another method that is slightly more economical.
For one thing, it’s free! I’ve cut up and glued

Modular Tanks: Tau Devilfish/Hammerhead
- 5 -
together various bits of sprue to form sprue
bricks:
The one on the left will be placed inside the
railgun, whilst the one on the right will go in the
ion cannon.
How were they made? I used 6 15mm lengths of
sprue that are of equal thickness, and glued
them in pairs of two, one over the other. The
three pairs were then glued sideways to each
other like so (end view):
It is then filed so that one end is flat and smooth,
and the other end is relatively flat, with a 3mm
diameter/2mm deep hole in it to fit the magnet.
The piece measures 12mm in length. Filing of the
sides may be necessary to ensure the Ion
Cannon can be glued together properly whilst this
piece is inside.
This will glue to the inner top flat section of the
ion cannon, as can be seen here:
Note: Don’t drill the piece until the glue has
definitely set, otherwise the piece will split.
The railgun piece is similar, but is just
constructed in layers to match the recess within
the railgun:
The railgun piece may need some filing on the
top side (in picture) so that a better surface for
gluing is obtained.
Once both pieces are in place and they appear to
fit properly and position the magnet close enough
to the mounting piece (when attached), glue the
pieces to their respective weapons, and then glue
the halves of the weapons together.
You should then have two guns with magnets
held securely within them.
Railgun with embedded magnet.

Modular Tanks: Tau Devilfish/Hammerhead
- 6 -
Ion Cannon with embedded magnet.
This should adequately hold the magnets in place,
and bring them close enough to be held securely.
If assembled correctly, the Ion cannon should
have minimal ‘drooping’ of the gun (due to the
front heaviness). However the same cannot be
said for the Railgun in many cases. To fix this,
the magnets just have to come into direct
contact. To achieve this, you will have to file
down the insides of the railgun mount, where the
plastic would usually sit on the mounting piece
and allow it to track up or down. All you have to
do is to get a file and smooth down the slots, so
that its completely flat, allowing the railgun to sit
lower on the mounting piece.
The slots cut into the railgun.
Misc. Parts --------------------------------------------
You may notice that there are various parts of
the kit have not mentioned yet in this guide –
such as the landing gear, seeker missile, various
sensors/spines and the crew member. These can
be filed and added on however you please, and
glued if needed, though mine are still attached
using some blu-tac or just press-fitted into place
(in the case of the landing gear and seeker
missiles). If you need a place to attach the
seeker missiles, they can be pushed into the slots
at the back of the front fins, just behind where
the drones sit. As for the landing gear, if you
wish to use the clear stand and to have the
landing gear retracted, you will need to cut off
the top part of the landing gear so that it can fit
into the recesses. If you have hinged the crew
hatch, you can just place the crew member inside
with the hatch open or remove him and close the
hatch as you please.
Assembling/Swapping between the DF & HH -----
Putting together the final tank is as simple as
clicking the parts into place, as they should hold
by themselves thanks to the rare earth magnets.
All the parts.
For the weapon drones on the Hammerhead, the
burst cannons/smart missile systems can be held
in place without any glue, so they can track up
and down etc. They can also be removed by
gently prising apart the drone mount, so that the
burst cannon can be used on the front turret for
the Devilfish.
For the Devilfish, you just insert the crew hatch
into the top of the tank, and place the burst
cannon into the front turret and attach it to the
hull.
When you want a Hammerhead, simply replace
the burst cannon with a targeting array, and
move the crew hatch to the main weapons turret,
add in whichever weapon you choose, and place

Modular Tanks: Tau Devilfish/Hammerhead
- 7 -
it on top – and you’re done! It’s as simple as that.
You now have a complete modular Tau tank that
is interchangeable between the Devilfish and
Hammerhead configurations, and as a free bonus,
compatible with the Forge World Hammerhead
conversion kits that attach to the top of the
Hammerhead.
Completed Devilfish.
Completed Hammerhead (RG + BC).
Competed Hammerhead (Ion + SMS).
Other tips If you don’t have the necessary parts listed on
the first page, you can always use alternatives,
just be creative. Blu-tac can be used in the place
of magnets, for holding the front turret together
and the gun to the main turret. If you don’t have
any spare sprue lying around to glue onto the
targeting array, again, blu-tac can be used to
secure it in place. In fact, blu-tac is pretty much
a complete temporary solution if your missing
things like magnets, as you can always just
remove it and apply the necessary modifications
afterwards.
If you have a devilfish kit instead, or an already
assembled hammerhead, you can still follow this
guide where applicable, depending on whether or
not parts are glued together (see next section).
I’ve actually had this guide in mind when I
constructed my first hammerhead, and haven’t
had access to rare earth magnets until recently,
and so I’ve been using blu-tac instead.
Converting an existing model -----------------------
Assuming that the weapon options and front
turret haven’t been glued in place, the steps are
the same for modifying the front turret and the
mounting piece of the main turret. Using green
stuff/modeling putty would be the easiest method
for mounting magnets within the weapons
themselves, as the gun would presumably
already by constructed.
Conclusion To finish up, the tank and its components can be
painted separately, and the magnets can be
painted over, as the paint won’t affect them.
Hopefully this guide has been helpful to you in
building a modular Tau tank. You should keep in
mind, that although this guide is based around
Tau tanks, the same principles can be applied to
other models in the Games Workshop
Warhammer 40k model range, such as
Dreadnoughts, Crisis Suits, Carnifexes and other
tanks – basically anything large enough to fit
magnets that have different options for weapons
etc.
Feedback would be greatly appreciated via the
Tau Online forum thread, linked to on the first
page.

Modular Tanks: Tau Devilfish/Hammerhead
- 8 -
References:
Original Guide/Tips on 40k Online, written by She-and-Ski
with a helpful contribution by Zustiur:
http://www.40konline.com/community/index.php/topic,55642.0.html
Tau Online thread with a contribution from Catsy:
http://forums.tauonline.org/index.php?topic=4750.15#msg123635
Magnets provided by: http://www.hobbytoolz.com
Other Guides you might be interested in:
“Maki My Fish” by ShasEl_Tael – A series of tutorials
on Devilfish construction, with guides on pinning,
magnetic doors, interior detailing, and many other
modelling and painting tips. Look to this for more
detailed information on pinning etc, which I haven’t
covered here. The tutorials can be found at:
http://forums.tauonline.org/index.php?topic=12487.0
ShasEl_Tael - http://www.eastern-empire.com/
Modular Tanks: Tau Devilfish/Hammerhead
Version 1.0
13/10/2005
Legal & Disclaimer This guide is completely unofficial and in no way endorsed by
Games Workshop Limited.
Citadel, Citadel Device, Codex, Fire Warrior, Forge World,
Games Workshop, Games Workshop logo, Kroot, Tau, the Tau
caste designations, Warhammer, Warhammer 40k Device,
White Dwarf, the White Dwarf logo, and all associated marks,
names, races, race insignia, characters, vehicles, locations,
units, illustrations and images from the Warhammer 40,000
universe are either ®, TM and/or © Games Workshop Ltd
2000-2005, variably registered in the UK and other countries
around the world. Used without permission. No challenge to
their status intended. All Rights Reserved to their respective
owners.
This guide and all included media (unless otherwise stated) is
the property of mace, and no part of this article may be
reproduced or distributed without express permission.
© mace*net 2005
mace
Global Moderator – Tau Online – http://www.tauonline.org/
Webmaster – mace*net – http://mace.darktide.net/