Embed Size (px)
Citation preview

Technical Service
800 USG.4YOUWeb Site
usg.comSamples/Literature
888 874.2450Samples/Literature E-mail
[email protected]/Literature/Fax
888 874.2348Customer Service
800 950.3839
Manufactured by United States Gypsum Company550 West Adams StreetChicago, IL 60661
SA934/rev. 4-08© 2008, United States Gypsum CompanyPrinted in U.S.A.
NoticeWe shall not be liable for incidental and consequential damages, directly or indirectly sustained, nor for any loss caused by application of these goods not in accordance with current printed instruc-tions or for other than the intended use. Our liability is expressly limited to replace-ment of defective goods. Any claim shall be deemed waived unless made in writing to us within thirty (30) days from date it was or reasonably should have been discovered.Note All products described here may not be available in all geographic mar kets. Consult your local sales office or representative for information.Safety First!Follow good safety/indus-trial hygiene practices during installation. Wear appropriate personal protective equipment. Read MSDS and literature before specification and installation.
Product InformationSee usg.com for the most up-to-date product information. Metric SpecificationsUSG Corporation, through its operating subsidiaries, will provide metric conversions on its products and systems to help specifiers match metric design sizes. In addition, some products are available in metric dimensions from selected manufacturing plants. Refer to SA100, Fire-Resistant Assemblies, for additional information and a Table of Metric Equivalents.TrademarksThe following trademarks used herein are owned by United States Gypsum or a related company: A/P Lite, AquA-tough, Astro, Brio, CeLeBrAtion, ClimaPlus, DiAmonD, DuroCk, DurABonD, eAsy sAnD, eCLipse, FiBeroCk, FireCoDe, FresCo, Frost, imperiAL, miDweight, moLD tough, orion, pLus 3, rADAr. sAnDriFt, sheetroCk, summit, usg. thermAFiBer is a trademark of Thermafiber LLC. LEED is a registered trademark of the U.S. Green Building Council.

Protection from moisture
damage through each phase
of a building’s lifecycle
Moisture-Resistant Assemblies

When it comes to moisture and mold, the ultimate goal is managing risk. It is crucial to manage moisture during a building’s design, construction and maintenance lifecycle, because without moisture, mold cannot grow.
Moisture is the easiest and most cost-effective component to control. Although mold spores and nutrients must also be available for mold to develop, they are found everywhere and cannot be eliminated from most spaces without expensive clean room equipment.
Avoiding Moisture Problems

3 USG Moisture-Resistant Assemblies
User’s Guide
This brochure provides: — Information about how to avoid damage from moisture and mold — Resources to learn more about moisture and mold resistance — A performance selector and design details that help you select the
appropriate products and systems for wet and intermittently wet locations
Pages
Understand Your System 4 Overview
Applications
Components
Performance Testing
Select Your System 14 Performance Selector
Design Your System 15 Design Details
Good Design Practices
Specify Your System 25 Application Guide Specifications
For More Information Technical Service 800 USG.4YOU
Web Sites usg.com getmoldfacts.com

4 USG Moisture-Resistant Assemblies
Overview
Moisture exposure can occur during all phases of the construction process and throughout the building lifecycle because of condensation, roof and pipe leaks, gross water penetration of the facade, and natural disasters. USG provides the industry’s most comprehensive information regarding best practices to reduce the risk of moisture damage.
Products alone cannot control moisture or prevent mold. All products become susceptible to mold growth under unfavorable conditions. The EPA has found that mold will grow on stainless steel and glass—in fact, mold can grow on virtually all surfaces, given the right conditions.
The Tile Council of North America has defined two types of areas that are exposed to potential moisture damage:
Limited Water Tile surfaces that are subjected to moisture or liquids but do not become soaked or saturated due to the system design Exposure or the time exposure. Examples include: residential bathroom floors and foyers, residential bathroom vertical surfaces
including tub and shower surrounds, and residential kitchens and bathroom countertops.
Wet Areas Surfaces that are either soaked, saturated, or regularly and frequently subjected to moisture or liquids (usually water),
such as gang showers, tub enclosures, showers, laundries, saunas, steam rooms, swimming pools, hot tubs, and
exterior areas.
5 USG Moisture-Resistant Assemblies
Applications
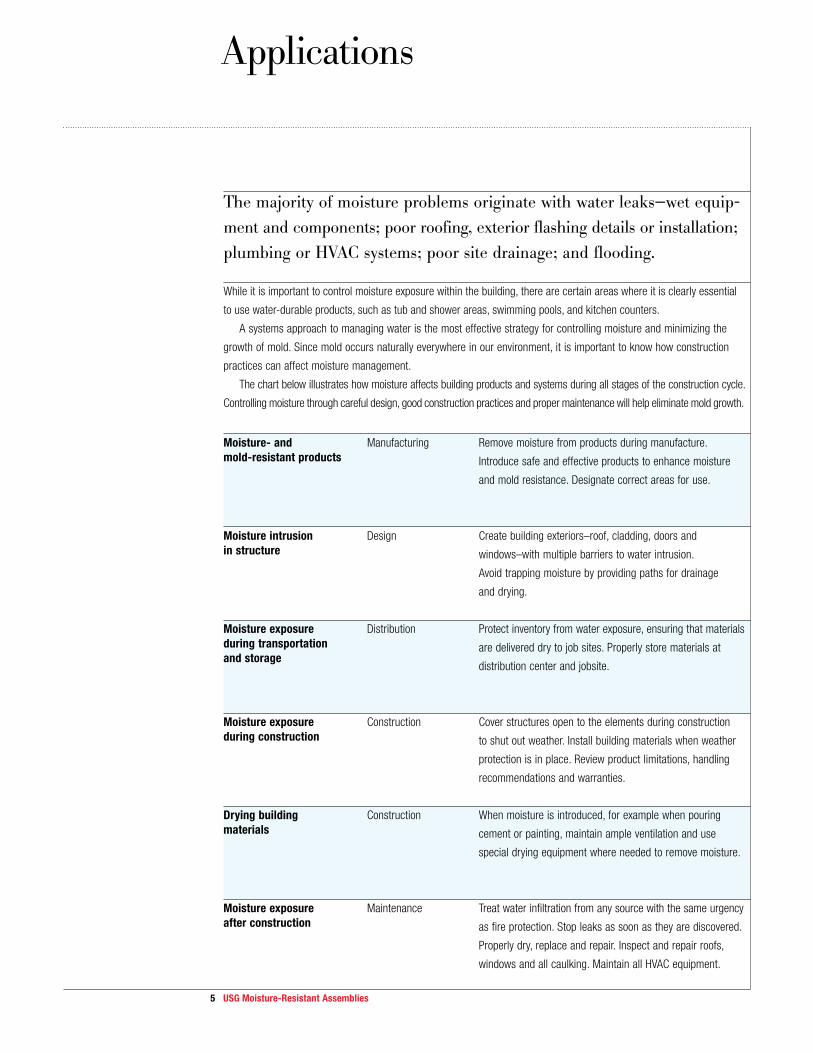
The majority of moisture problems originate with water leaks—wet equip-ment and components; poor roofing, exterior flashing details or installation; plumbing or HVAC systems; poor site drainage; and flooding.
While it is important to control moisture exposure within the building, there are certain areas where it is clearly essential
to use water-durable products, such as tub and shower areas, swimming pools, and kitchen counters.
A systems approach to managing water is the most effective strategy for controlling moisture and minimizing the
growth of mold. Since mold occurs naturally everywhere in our environment, it is important to know how construction
practices can affect moisture management.
The chart below illustrates how moisture affects building products and systems during all stages of the construction cycle.
Controlling moisture through careful design, good construction practices and proper maintenance will help eliminate mold growth.
Moisture- and Manufacturing Remove moisture from products during manufacture. mold-resistant products Introduce safe and effective products to enhance moisture
and mold resistance. Designate correct areas for use.
Moisture intrusion Design Create building exteriors–roof, cladding, doors and in structure windows–with multiple barriers to water intrusion.
Avoid trapping moisture by providing paths for drainage
and drying.
Moisture exposure Distribution Protect inventory from water exposure, ensuring that materialsduring transportation are delivered dry to job sites. Properly store materials at and storage
distribution center and jobsite.
Moisture exposure Construction Cover structures open to the elements during construction during construction to shut out weather. Install building materials when weather
protection is in place. Review product limitations, handling
recommendations and warranties.
Drying building Construction When moisture is introduced, for example when pouring materials cement or painting, maintain ample ventilation and use
special drying equipment where needed to remove moisture.
Moisture exposure Maintenance Treat water infiltration from any source with the same urgency after construction as fire protection. Stop leaks as soon as they are discovered.
Properly dry, replace and repair. Inspect and repair roofs,
windows and all caulking. Maintain all HVAC equipment.

Moisture-resistant systems have been comprehensively tested for fire resistance and moisture intrusion. Substitutions of any of the components are not recommended or supported by USG. Refer to the appropriate product material safety data sheet for complete health and safety information.
Tile Backerboard Durock® Brand Cement Board
–Strong, water-durable tile base for wet areas, exterior tile and thin brick
– Ideal underlayment for tile on floors and countertops in new construction and remodeling
– Low thermal and hygrometric expansion helps prevent cracking; high flexural strength resists bending to prevent
finish cracking
– Will not swell, soften, decay, delaminate, or disintegrate in water
– 1/2 board is one-fourth the weight (3 psf) of a conventional 1 thick metal lath and portland cement plaster system
– Refer to product submittal sheet CB399 for more information
Fiberock® Brand AquA-Tough™ Tile Backerboard
– Water-resistant through the core for use in intermittently wet areas, including tub surrounds
– Designed for wall assemblies in high-traffic areas where moisture, mold and fire resistance are especially important
– Suitable for use as a painted surface adjacent to tile areas and exterior ceiling board
– Made from 95% recycled materials
– Refer to product submittal sheet F134 for more information
Underlayment Durock® Underlayment
– Use for floors and countertops (applies directly over old substrate on countertops to save time)
– Nominal 5/16 thickness helps eliminate transition trim when abutting carpet or wood flooring, and helps minimize level
variations with other finish materials
– 4 x 4 size is easy to handle and helps cut down on waste
– Refer to product submittal sheet CB399 for more information
Fiberock® AquA-Tough™ Underlayment
– Water and indentation resistance for all residential underlayment needs, including intermittently wet areas
– Use under resilient flooring, ceramic and vinyl tile, carpeting, hardwood flooring and laminate flooring
– Uniform water-resistant composition helps prevent problems associated with plywood, OSB and lauan underlayments
– Made from 95% recycled materials
– Refer to product submittal sheet F103 for more information
6 USG Moisture-Resistant Assemblies
Components

7 USG Moisture-Resistant Assemblies
Sheathing Fiberock® AquA-Tough™ Sheathing
– Outperforms paper- or glass-mat-faced gypsum sheathing
– Strong and water durable, with a 12-month exposure warranty
– Refer to product submittal sheet F135 for more information
SheeTrock® Brand Gypsum Sheathing
– Water-resistant gypsum core encased in specially formulated black water-repellent paper on both sides and long edges
– Weather resistant, water repellent, fire resistant and low applied cost
– Exposure to the elements is limited to 30 days
– Economical choice for brick veneer exterior curtain wall construction and conventional stucco systems
– Refer to SA927, Gypsum Panels and Accessories
Exterior Soffit SheeTrock® Exterior Ceiling Board
– Ideal weather-resistant and sag-resistant surface material for sheltered exterior ceiling areas
– Specially treated gypsum core encased in treated water-repellent paper
– Residential uses include open porches, breezeways, carports, and exterior soffits
– Refer to product submittal sheet WB1152 for more information
Fiberock® AquA-Tough™ Interior Panels
– Water resistant through the core
– Mold resistant
– Superior fire resistance and exceptional surface burning characteristics
– Outperforms paper-faced or glass mat faced panels in abuse resistance
– Refer to product submittal sheet F135 for more information
Interior Panels SheeTrock® MolD Tough™ Gypsum Panels
– Designed specifically for use in interior areas such as bathrooms, basements, and in areas with high humidity
and incidental moisture
– Uses proprietary technology for enhanced mold resistance
– Refer to product submittal sheet WB2390 for more information
Fiberock AquA-Tough Interior Panels
– Smooth, paintable surface that can also be finished with ceramic tile
– Water, mold and fire resistant
– Made from 95% recycled materials
– Refer to product submittal sheet F135 for more information
Shaft Wall SheeTrock® MolD Tough™ Gypsum Liner Panels
– Water resistance and enhanced mold resistance
– For use in shaft wall and area separation wall systems
– Refer to product submittal sheet WB2389 for more information

8 USG Moisture-Resistant Assemblies
Components
Related Products Durock™ Interior Tape
– Akali-resistant glass-fiber construction
– For use with FiBeroCk and DuroCk underlayment and tile backerboard products
– Reinforces joints and corners in interior tile or thin-brick applications
– Refer to product submittal sheet ES338 for more information
Durock™ Wood and Steel Screws
– Corrosion-resistant coating
– Available for wood and steel framing
– Refer to product submittal sheet CB400 for more information
Durock™ High-Performance Tile Mastic
– High-performance, multi-purpose adhesive for all types of ceramic and stone (except moisture-sensitive marble)
– Superior water resistance and tile bond strength
– Excellent sag resistance
– Refer to product submittal sheet CB472 for more information
Durock™ Multi-Purpose Tile Mastic
– High-performance, multi-purpose adhesive for large-body ceramic, porcelain and stone tile
– Excellent sag resistance, water resistance and tile bond strength
– Refer to product submittal sheet CB474 for more information
Durock™ Commercial Grade Tile Mastic
– High-performance commercial adhesive for all types of ceramic and stone (except moisture-sensitive marble)
– Excellent vertical grab for wall and ceiling tiles
– Refer to product submittal sheet CB471 for more information
Durock™ Latex-Modified Flexible Thin-Set High-Performance Mortar
– High-performance mortar for interior or exterior installations to set ceramic, porcelain, granite, slate, marble and limestone
– Good freeze/thaw stability
– Refer to product submittal sheet CB475 for more information
Durock™ Latex-Modified Flexible Medium-Set High-Performance Mortar
– Premium mortar to set large body tile and stone for interior and exterior applications
– Good freeze/thaw stability
– Superior durability
– Refer to product submittal sheet CB476 for more information

9 USG Moisture-Resistant Assemblies
Durock™ Latex-Modified Multi-Purpose Mortar
– Multi-purpose mortar to set tile and stone for interior and exterior applications
– Superior durability
– Suitable for vertical and horizontal installations
– Refer to product submittal sheet CB477 for more information
Durock™ Latex-Modified Sanded Tile Grout
– High early strength and fast setting time
– Superior strength and durability for a variety of tiles
– Freeze/thaw resistant
– Refer to product submittal sheet CB478 for more information
Durock™ Latex-Modified Unsanded Tile Grout
– High early strength and fast setting time
– Superior strength and durability for a variety of tiles
– Freeze/thaw resistant
– Refer to product submittal sheet CB479 for more information

Testing provides a basis of comparative performance results under controlled lab conditions. This does not mean that the test will accurately represent the mold performance of building materials in actual end use. Unsuitable project conditions during storage, installation and after completion can introduce moisture to building materials and cause mold.
Testing Methods All USG products and systems undergo exhaustive testing to ensure that they meet exacting standards. USG’s products
are Classified as to fire resistance and fire-hazard properties. As part of this protocol, Underwriters Laboratories (UL)
periodically audits production of these materials to ensure compliance with necessary properties. UL is an independent,
not-for-profit product safety testing and certification organization that has tested products for public safety for over
a century.
Products are manufactured and tested in accordance with ASTM standards. ASTM International is one of the largest
voluntary standards development organizations in the world, and is a trusted source for technical standards for materials,
products, systems, and services.
Measuring the performance of building systems exposed to moisture is difficult. Existing tests examine products
under artificially created, static conditions. Building systems experience dynamic conditions where steady-state
conditions are rarely achieved.
Currently, there are no standardized tests for reliably determining how various building materials may resist moisture
damage or mold growth over time.
In the absence of specific tests for the broad category of construction products, the industry uses ASTM C473 and
D3273. ASTM C473 measures water absorption of panels as a percentage of weight. ASTM D3273 measures resistance
to mold growth. These test results do not represent definitive installed performance in specific project conditions.
USG is actively working with academic and industry testing leaders to develop a new test method that more closely
approximates real-life conditions.
Moisture/Mold The best way to minimize damage from moisture and mold is to minimize or eliminate exposure to water before, during
and after construction. In all cases where moisture intrusion occurs, eliminate all sources of moisture immediately.
The use of products that are specially engineered to resist water and moisture can also help reduce moisture
intrusion. DuroCk cement board and DuroCk underlayment both provide a strong, water-durable base that will not swell,
soften, decay, delaminate or disintegrate in water. FiBeroCk interior panels, tile backerboard and underlayment are water-
resistant through the core for use in intermittently wet areas. SheetroCk gypsum sheathing is water-resistant, with a
water-repellent paper on both sides and long edges. SheetroCk exterior ceiling board is weather- and sag-resistant, with
a treated water-repellent paper. SheetroCk moLD tough gypsum panels have a moisture- and mold-resistant gypsum core
encased in moisture- and mold-resistant, 100% recycled face and back papers. SheetroCk moLD tough gypsum liner
panels have water-resistant facings, moisture- and mold-resistant paper and a water-resistant core.
10 USG Moisture-Resistant Assemblies
Performance Testing

11 USG Moisture-Resistant Assemblies
When used in conjunction with good construction practices, these products will minimize, but not eliminate, the risk of
moisture damage.
For more information on moisture control and mold, see the following:
New York City Department of Health United States Environmental Protection Agency www.ci.nyc.ny.us/html/doh www.epa.gov
Moisture, Mold, and Construction Practices WB2317 Moisture Control: System Solution to Prevent Mold WB2325
Sustainability
The LEED® (Leadership in Energy and Environmental Design) program is a guideline for building solutions established by the
U.S. Green Building Council (USGBC). LEED’s mission is to transform the building industry by establishing a common standard
of measurement to define what constitutes a “green building.” To this end, LEED provides a framework for assessing
building performance and meeting sustainability goals. This framework assigns points for certain sustainability criteria,
such as sustainable site development, water savings, energy efficiency, materials selection and indoor environmental quality.
Specific products cannot be LEED-certified, because there are many contingent factors on each project that must be
considered. However, certain products may assist you in obtaining LEED points for your design solution. For example:
USGBC LEED Credits Construction Waste MR 2 Management 2.1 Divert 50% of project waste (by weight) from landfill (1 point)
2.2 Divert another 25% of project waste (by weight) from landfill (1 point)
Recycled Content MR 4 4.1 If 25% of project materials by weight have 20% post-consumer or 40% post-industrial (1 point)
4.2 Another 25% of project materials (1 point)
Local/Regional Materials MR 5 5.1 If 20% of project materials are manufactured within 500 miles (1 point)
5.2 If raw materials for above products are obtained within 500 miles of manufacturing (1 point)
Low-Emitting Materials EQ 4 4.2 Drywall installation less than 200g/L per Green Seal, Table 5 (1 point)

12 USG Moisture-Resistant Assemblies
The following chart lists the products in USG moisture-resistant systems that may be eligible for LEED points. But using
products with a high recycled content is only one part of the equation. Another key measure of sustainability is
embodied energy, or the total energy required to produce a particular material or building component and get it to a
building site. For example, if you use wallboard with a high recycled content but need to ship it across the country,
the embodied energy costs of transportation may outweigh the environmental advantage of using a recycled product.
It may be more environmentally sound to ship natural gypsum wallboard products from a plant close to a job site.
USGBC LEED Credits MR 4.1 and 4.2 EQ 4 MR 5.2 Product Family Post- Post- Embodied Density VOCc Mfg. Raw Materials Consumer Industrial Energya,b lbs./cu. ft. Efficiency (% by weight)
sheetroCk Panels - percent ~5% 0%-95% 3.6 MJ/kg 43-50 none 95+% 95% gypsum, 5% paper, varies across 23 plants 36.5% 1% starch; special panel with nationwided ave wax and glass fiber
DuroCk Cement Board 0 20% 10 MJ/kg 72 portland cement and fly ash
FiBeroCk Panelsd 10% 85% 5 MJ/kg 55 none 95% 85% FGD gypsum (barged 250 miles), 10% cellulose (local), and 1% starch (local)
Paper Tape 0 0 .6 MJ/kg none 95+% paper
Glass Fiber Tape 0 0 fibrous glass (continuous filament)
Paper Faced Bead 0 25% 40.8 MJ/kg none steel, paper, and non-solvent organic adhesive
Metal Bead 0 25% 34.8 MJ/kg none steel
Joint Compound— 0 0 3 MJ/kg 100 none 98% plaster of paris, limestone and mica Setting Type
For more information on USGBC and LEED, visit the following web sites:
U.S. Green Building Council Leadership in Energy & Environmental Design usgbc.org usgbc.org/leed/leed_main.asp
Notes(a) Megajoules per kilogram. (b) Transportation of gypsum board accounts for over 10% of the board’s embodied energy, while mining accounts for less than 1%. (c) Section 01350 of the Material Specifications adopted by the Collaborative for High Performance Schools (CHPS) for VOC emissions. (d) USG uses more recaptured (FGD or flue gas desulfurization) gypsum than any other wallboard supplier—over 3 million tons in 2003. Based on current operations, all FiBeroCk Brand panels use FGD gypsum, but the FGD gypsum content of SheetroCk Brand panels changes from plant to plant and even day to day at any one plant, due to availability. The recycled contents above are approximate, based on plant averages for 2002. Most of the power plants that produce recaptured gypsum are east of the Mississippi River. While FGD gypsum is not available everywhere in North America, USG does have plants strategically located to meet your needs. Evaluation should be made for each job on the benefits of using FGD instead of natural gypsum.
Performance Testing

13 USG Moisture-Resistant Assemblies
Testing Results ASTM D3273a
A “0” rating on D3273 means excessive mold growth on gypsum wall or ceiling panel surfaces, while a “10” rating
indicates that no mold grew on the panel. This grade is determined by inspecting the panel with a microscope and
comparing the findings with standardized photographs of allowable growth for each score level. With this stringent
method, a panel may not receive the top “10” rating even if mold growth is invisible to the naked eye.
This ASTM lab test may not accurately represent the mold performance of building materials in actual use. Given
unsuitable project conditions during storage, installation or after completion, any building material can be overwhelmed by
mold. To manage the growth of mold, the best and most cost-effective strategy is to protect building products from water
exposure during storage and installation and after completion of the building. This can be accomplished by using good
design and construction practices.
Panels RatingDrywall 1/2 sheetroCk® moLD tough™ (FireCoDe® C Core gypsum panels only) 10
5/8 sheetroCk® moLD tough™ gypsum panels, including FireCoDe® Core 10 FireCoDe® C core and AR
3/4 sheetroCk® moLD tough™ uLtrACoDe® Core 10
sheetroCk® moLD tough™ gypsum liner panels 10
FiBeroCk® AquA-tough™ interior panels 10
Backerboard DuroCk® cement board 10
FiBeroCk® AquA-tough™ underlayment 10
FiBeroCk® AquA-tough™ underlayment 10
Sheathing FiBeroCk® AquA-tough™ sheathing 10
Ceilings Astro™, Brio™, FresCo™, Frost™, sAnDriFt™ and summit™ ClimaPlus™ panels, 10 and select eCLipse™ ClimaPlus™ panels
Typical Physical Properties Property ASTM Durock Durock SheeTrock Fiberock Fiberock Test Cement Board Underlayment MolD Tough AquA-Tough Tile AquA-Tough
Gypsum Panels Backerboard Interior Panels
1/2 5/16 1/2 5/8 1/2 1/2 5/8
Weight—psf C473-00 3 2 1.6 2.2 2.6 2.6 2.9
Surface burning E84 0/0 5/0 20/0 20/0 5/0 5/0 5/0characteristics—flame/smoke
Thermal “R”/k value C177 0.26/1.92 0.16/1.92 0.45 0.56 0.41/1.214 0.41/ 0.51/
1.214 1.214
Min. bending radius b—ft. C473-00 8 — 12 18 25 25 30
Edge square square tapered tapered square tapered tapered
Notes (a) Where K = Btu – in./hr. – °F – sq. ft. and R = hr. – °F – sq. ft./Btu. (b) Requires special framing. Details available on request. For AquA-tough, bending two 1/4 pieces successively permits radii shown for 1/4 gypsum board.

14 USG Moisture-Resistant Assemblies
Performance Selector
Exterior
Application Function Finish Water Product ARL Reference Barrier Required Exterior soffita Commercial/residential Direct-apply finish DuroCk Cement Board SA934
exterior soffits Lay-in tile Gypsum Lay-In Panel SC2000
Paint FiBeroCk AquA-tough Interior Panel sA934
Paint sheetroCk Exterior Gypsum Ceiling Board SA934
Metal lay-in panel CeLeBrAtion™ Metal Ceiling Panels SC2000
Exterior wall sheathinga Residential/commercial Brick • FiBeroCk AquA-tough Sheathing/ SA700 exterior walls sheetroCk Gypsum Sheathing
Conventionalstucco • FiBeroCk AquA-tough Sheathing/ SA700 sheetroCk Gypsum Sheathing
Woodsiding • FiBeroCk AquA-tough Sheathing/ SA700 sheetroCk Gypsum Sheathing
Metalpanel • FiBeroCk AquA-tough Sheathing/ SA700 sheetroCk Gypsum Sheathing
EIFS DuroCk Cement Board/ SA700 FiBeroCk AquA-tough Sheathing
Interior
Application Function Finish Water Product ARL Reference Barrier Required Interior floor Limited water exposure Ceramic tile FiBeroCk AquA-tough Underlayment/ SA934 underlayment DuroCk Underlayment
Wet Ceramictile • DuroCk Underlayment/DuroCk Cement Board SA934
Interior wall Dry Paint sheetroCk Gypsum Panel sheetroCk moLD tough Gypsum Panel/ SA934 FiBeroCk AquA-tough Interior Panel
Limited water exposure Ceramic tile FiBeroCk AquA-tough Tile Backerboard SA934
cavity Paint FiBeroCk AquA-tough Interior Panel/moLD tough
Wet Ceramictile •b DuroCk Cement Board SA934
Interior of exterior wall Above grade Paint sheetroCk moLD tough Gypsum Panel SA934
Below grade furreda Paint FiBeroCk AquA-tough Interior Panel SA934 sheetroCk moLD tough Gypsum Panel
Kitchens Countertops Ceramictile • DuroCk Cement Board/ SA934 FiBeroCk AquA-tough Tile Backerboard
Bathrooms Walls Paint FiBeroCk AquA-tough Interior Panel/moLD tough SA934
Steam rooms or saunasa Walls Ceramictile • DuroCk Cement Board SA934
Ceilings Acousticaltile • rADAr™ Ceramic ClimaPlus™ SC2000
Swimming pool roomsa Walls Ceramictile/ext.finish • DuroCk Cement Board SA934
Ceilings Ceramictile/ext.finish • DuroCk Cement Board SA934
Acoustical tile rADAr Ceramic ClimaPlus, orion™ 210 ClimaPlus SC2000
Notes (a) Dew Point Analysis and Vapor Retarder Analysis required. (b) See Good Design Practices, No. 3
All details, specifications, and data contained in this literature are intended as a general guide. These products must not be used in a design or construction of any given structure without complete and detailed evaluation by a qualified structural engineer or architect to verify suitability of a particular product for use in the structure.

15 USG Moisture-Resistant Assemblies
Design Details
Counter Tops Floors, Interior—Wood or Steel Joists
Suspended Ceiling Detail Wood Soffit Framing
Large Shower Area Residential Tub Residential Shower Residential Shower Wall
Note For bonding cement backerboard to plywood subfloor, use Type 1 organic adhesive or latex-fortified mortar that is suitable for this kind of application. For application of various types of tiles to cement backerboard on floors or countertops, contact the tile manufacturer for the appropriate type of tile-setting mortar.
tile
3⁄4" min. plywood DUROCK cement boardor underlayment, or FIBEROCK
AQUA-TOUGH underlayment
DUROCK interior tape
membrane
Type I organic adhesive or latex-fortified mortar
Note: For bonding cement backer board to plywood subfloor, use Type 1 organic adhesive or latex-fortified mortar that is suitable for this kind of application. For application of various types of tiles to cement backer board on floors or countertops, contact the tile manufacturer for the appropriate type of tile-setting mortar.
padding
wood or steel joists
carpet
3⁄4" min. plywood subfloor
tile
Type I organic adhesive or latex-fortified mortar
DUROCK cement board orunderlayment, or FIBEROCK underlayment
USG 093 control joint
USG drywall suspension system
main tee
DUROCK cement board orFIBEROCK tile backerboard
back block for fire-rated system
hanger wire
13/4"
wood blocking 16" o.c.
DUROCK interior tape
DUROCK cement board or FIBEROCK tile backerboard
2"x4" wood stud 16" o.c.
SHEETROCK joint compound
corner reinforcement
ceramic tile
painted SHEETROCK MOLD TOUGH gypsumpanel
DUROCK wood screws 6" o.c.
Type I organic adhesive or latex-fortified mortar
tile
wood or metal studs
flexible sealant
1' to 13⁄4" reinforced mortar bed
shower pan or membrane
sloped fill weep holes
crushed tile or stone
Type I organic adhesive or latex-fortified mortar
DUROCK cement board or FIBEROCK AQUA-TOUGH tile backerboard
caulk
tub rim
leveling guide
Type I organic adhesive or latex-fortified mortar
DUROCK cement board or FIBEROCK AQUA-TOUGH tile backerboard Type I organic adhesive
or latex-fortified mortar
tile
caulk
horizontal support at panel edge
preformed shower base
DUROCK cement board or FIBEROCK tile backerboard DUROCK steel or
wood screw 8" o.c.
tile
Type I organic adhesive or latex- fortified mortar
DUROCK interior tape
setting material
wood or steel studs 16" o.c. max.
vapor permeable water membrane (if required)
DUROCK cement board or FIBEROCK tile backerboard
Interior Installation

16 USG Moisture-Resistant Assemblies
Interior Installation
Design Details
Typical Bathtub Installation Fixture Attachment—Steel Framing
Typical Swimming Pool—Tile or Exterior Finish
DUROCK tape
DUROCK tape embedded in basecoat
water barrier
DUROCK screws at 8" o.c.
exterior finish
in cement board tile areas treatjoints by embedding DUROCK tape in tile setting material
wood or metal studs at 16" o.c.
DUROCK cement board
DUROCK tape
Type I organic adhesive or latex-fortified mortar
basecoat
DUROCK cement board
tile setting mortar tile base
pool
2 x 4 wood studs 16" o.c.
wood plate
paint
or tile
tile
tub
ceramic tile
ceramic tile
1/4" space
joint finishing system
fasteners 8" o.c.
support framing for attachment of fixtures
in tiled areas treat DUROCK or FIBEROCK
tile backerboard joints by embedding DUROCK tape in tile setting material
Type I organic adhesive or latex- fortified mortar
DUROCK cement board or FIBEROCK tile backerboard
DUROCK cement board or FIBEROCK tile backerboard
DUROCK Underlayment or FIBEROCK AQUA-TOUGH Underlayment
FIBEROCK tilebackerboardor SHEETROCKMOLD TOUGHgypsum panel
3/8" TYPE S-12pan head screw
steel runner
steel framingmember–gauge and size as required
3/8" TYPE S-12pan head screw
steel framingmembers–misc.gauge and depth

17 USG Moisture-Resistant Assemblies
Scale: 3 = 1-0 Conventional Stucco
insulated concrete roof deck
girder
top set base
concrete or steel deck
bar joist
SHEETROCK gypsum sheathing or FIBEROCK sheathing
Intermediate Floor
3/8" type S-12 pan head screw
11/4" type S-12 pancake head screw
sealant
sealant
sealant
continuous flashing
1"
zinc control joint no. 100
steel stud
continuous flashing
continuous sealant backer
sealant
metal casing bead
continuous metal angle–20 ga. min.
insulation
steel runner
portland cement– lime stucco
3.4-lb. galvanized self- furring diamond mesh metal lath
No. 15 asphalt felt or grade D, 60 - min. building paper
SHEETROCK MOLD TOUGH gypsum panel
Curtain Walls

18 USG Moisture-Resistant Assemblies
Curtain Walls
Design Details
Masonry Veneer Horizontal Flashing
Foundation
SHEETROCK gypsum ceiling panel suspended from metalfurring channel
SHEETROCK MOLD TOUGH gypsum panel
SHEETROCK gypsum sheathing or FIBEROCK sheathing
Intermediate Floor
Roof
3 co
urse
s m
ax. t
o fir
st b
rick
tie
3 co
urse
s or
8"
max
. 6
cour
ses
or 1
6" m
ax. b
etw
een
ties
3 co
urse
s or
8"
max
.
continuous flashing
continuous flashing weep
sealant
sealant
sealant
sealant
adjustable brick tie
steel runner
steel stud
fastener
concrete
concrete
weep holes as required
compression pad
compression pad
concrete
2" lap in felt
sealant backer
masonry veneer
fastener
adjustable brick tie
gravel stop
insulation
No. 15 asphalt felt or grade D, 60 - min. building paper
No. 15 asphalt felt or grade D, 60 - min. building paper
3 co
urse
s or
8"
max
.
steel stud
masonry veneer unit
flashing embedded in mastic continuous
ledge
concrete
4" min.
SHEETROCK MOLD TOUGH gypsum panelSHEETROCK gypsum
sheathing or FIBEROCK sheathing
3 co
urse
s m
ax.
to fi
rst b
rick
tie
continuous flashing
concreteweep holesas required
No. 15 asphalt felt or grade D, 60 - min. building paper
NoteConsult BIA technical note 28B, revised November 1999, for framing recom mendations for brick veneer buildings.
The architect and/or structural engineer shall determine appropriate selection and placement of brick ties, flashing, weep holes, wall cavity width, masonry building requirements, mortar selection, and workmanship requirements.Scale: 3 = 1-0

metal trim
wall furring bracket
1/4" min. 21/4" max.
3/4" cold-rolled channel
SHEETROCK regular or MOLD TOUGH gypsum panel
19 USG Moisture-Resistant Assemblies
Scale: 3 = 1-0 Wall—Control Joint Freestanding Furring
Furred Wall (for reduced shadowing and spotting) Exterior Curtain Wall
Ceiling Attachment Attachment—Suspended Ceiling
Note For furred exterior walls below grade, use FiBeroCk AquA-tough interior panel or DuroCk cement board.
zinc control joint no. 093
metal furring channel
SHEETROCK joint compound
SHEETROCK regular orMOLD TOUGH gypsum panel
SHEETROCK foil-back or MOLD TOUGHgypsum panel
steel stud
3/8" pan head framing screw
steel runner
wall furring bracket as required
steel stud
1" TYPE S bugle head screw
4" max. (floor and
ceiling)
metal furring channel 24" o.c. max.
concrete
SHEETROCK regular, foil-back, or MOLD TOUGHgypsum panel
1" SHEETROCK liner panel or MOLD TOUGHliner panel
curtain wall panel
curtain wallclosure plate
sealant
double-layerSHEETROCK MOLD TOUGH gypsum panels
8d duplex nail
flashing
1/4" weep holes12" o.c. in steel J-runner
No. 15 asphalt felt or grade D, 60 - min. building paper
continuous girt
dustproof membrane
metal furring channel
SHEETROCK regular or MOLD TOUGH gypsum panel
Furring Systems

20 USG Moisture-Resistant Assemblies
Design Details
Scale: 3 = 1-0 Attachment—Furring at Floor Attachment—Direct Furring
Jamb
Steel Door Frame Window—Metal
wire tie
metal furring channel
SHEETROCK regular or foil-back gypsum panel Note: For furred exterior walls below grade use DUROCK cement board, FIBEROCK tile backerboard or SHEETROCK MOLD TOUGH gypsum panel
asphalt strip
SHEETROCK regular or foil-back gypsum panel Note: For furred exterior walls below grade use DUROCK cement board, FIBEROCK tile backerboard or SHEETROCK MOLD TOUGH gypsum panel
metal furring channel
metal furring channel
sealant
metal trim (shim to plumb)
steel door frame
masonry
SHEETROCK regular or MOLD TOUGH gypsum panel
masonry
3" max.
metal furring channel
joint compound
corner reinforcement 1" TYPE S screw
7/8"
SHEETROCK regular or MOLD TOUGH gypsum panel
Furring Systems

21 USG Moisture-Resistant Assemblies
Scale: 3 = 1-0 Closet Carrier Lavatory Carrier
Heavy Plumber’s Bracket Medium
Medium Grab Bar Attachment Exterior Wall and Soffit
steel stud
closet weight supported by carrier
DUROCK cement board, FIBEROCK tile backerboard or SHEETROCK MOLD TOUGH gypsum panel
lavatory weight supported by carrier
DUROCK cement board, FIBEROCK tile backerboard or SHEETROCK MOLD TOUGH gypsum panel
steel stud
heavybolt weldedto 11/2" channel
vertical cross section
8" max.
11/2" channel innotched stud flange hanger plate
hollow wallanchor
Medium
soffit ventilator
asphalt felt
interior finished wall
SHEETROCK gypsum sheathing or FIBEROCK sheathing
SHEETROCK gypsum sheathing or FIBEROCK sheathing
Mediumgrab bar attachment
2 bolts weldedto 21/2" x 20 ga.metal plate
Fixture Attachment

22 USG Moisture-Resistant Assemblies
Design Details
Scale: 3 = 1- 0 Double-Layer Panel Shower Receptor
tile
continuous caulk with weeps
tub rim
leveling guide
Double-layer panels
DUROCK cement board or FIBEROCK tile backerboard
tile
continuous caulk with weeps
wood furring
shower base
1/4" space
DUROCK cement board or FIBEROCK tile backerboard

23 USG Moisture-Resistant Assemblies
Good Design Practices
Use this section as a reference if questions arise during the design or application of USG moisture-resistant assemblies.
This section is an overview of good design, application, installation and safety concerns that should be addressed when USG’s products and systems are used. This section outlines some major issues, but is not intended to be comprehensive.
These products must not be used in a design or construction without a complete evaluation by a qualified engineer or architect to verify suitability of a particular product for use in the structure. For safety considerations and material handling, please refer to Chapter 13 in The Gypsum Construction Handbook, Centennial Edition.
1 System Performance United States Gypsum Company conducts tests on products and systems to meet performance requirements of
established test procedures specified by various agencies. Upon written request we will provide test certification for
published fire, sound, structural and other pertinent data covering systems designed and constructed according to
our published specifications.
Important: Substitutions of any of the components are not recommended or supported by the United States
Gypsum Company.
Systems covered herein have been tested and evaluated for use as described. For other system applications,
consult your local representative. Information in this publication should be used only for products of United
States Gypsum Company, as physical properties of competitive products may vary. United States Gypsum
Company assumes no liability for failure resulting from the use of alternative materials or improper application
or installation as specified herein.
2 Expansion and Wall surfaces should be isolated with surface control joints (sometimes referred to by the industry as expansion joints)
Contraction or other means where: (a) a wall abuts a structural element or dissimilar wall or ceiling; (b) construction changes within
the plane of the wall; (c) tile and thin brick surfaces exceed 16'. Surface control joint width should comply with
architectural practices.
Location of building control joints is the responsibility of the design professional/architect. Steel framing at building
control joints that extend through the wall (with top and bottom runner tracks broken) should have 1-1/2 cold-rolled
channel alignment stabilizers spaced a maximum of 50 o.c. vertically. Channels should be placed through holes in the
stud web of the first two adjacent studs on both sides of the joint and securely attached to the first adjacent stud on
either side of the joint.
Cement board and gypsum panels should be separated at all surface and building control joints. Where vertical and
horizontal joints intersect, the vertical joint should be continuous and the horizontal joint should abut it. Splices, terminals,
and intersections should be caulked with a sealant complying with architectural practices and sealant manufacturer
recommendations. Do not apply tile or finishes over caulked sealed expansion joints. See SA700, Exterior System
Substrates, for additional information.

24 USG Moisture-Resistant Assemblies
Good Design Practices
3 Water Barrier DuroCk cement board is vapor permeable and does not deteriorate in the presence of water. For interior applications,
if a vapor retarder or waterproof construction is specified, a separate barrier must be applied over or behind the DuroCk
cement board. For exterior applications, see SA700, Exterior System Substrates.
4 Swimming Pool DuroCk cement board may be used for the walls and ceilings around indoor swimming pools. Consideration shall be
Enclosures given to adequate ventilation in plenums and corrosion protection of metal hangers and framing members.
5 Soffits and DuroCk cement board and FiBeroCk interior panels finished with paint or textured finish may be used on properly vented
Exterior Ceilings soffits and ceilings with DuroCk screws spaced 6 o.c. max. A qualified structural engineer should evaluate design,
including uplift bracing. Ceramic tile or thin brick may be applied to DuroCk panels.
6 Steam Rooms and For steam rooms and saunas where temperatures exceed 120 °F for extended periods, use DuroCk cement board
Saunas and dryset or latex-fortified portland cement mortar; do not use organic adhesive.
7 Air and Water Select flashing and sealants to provide resistance to air and water infiltration. Install flashing and sealants in a workman-
Infiltration like manner and in appropriate locations to maintain continuity of air/water barriers, particularly at windows, doors and
other penetrations in the exterior wall. Cover all gypsum sheathing with No. 15 asphalt felt or Grade D 60 min. Building
Paper to ensure water-tight construction. Apply asphalt horizontally in a shingle-like manner starting from the bottom of
the wall, with 2 overlap and attached to sheathing.
8 Smooth Side/ DuroCk cement board has a smooth side and a rough side. Use the smooth side for mastic applications and the rough
Rough Side side for mortar applications.
9 Shadowing and When the outside temperature differs considerably from the building’s interior temperature, airborne dirt can accumulate
Spotting on the colder regions of walls, causing “shadowing” or “spotting,” particularly over fasteners and framing. This natural
phenomenon occurs through no fault in the products. Where temperature, humidity, and soiling conditions are expected
to cause objectionable blemishes, provide a thermal separation between the interior and exterior faces.
10 Leaching and Latex leaching and efflorescence are natural phenomena which occur with the use of latex modified mortars and grouts
Efflorescence through no fault in the products. To help protect against their occurrence, follow current industry guidelines and recommendations.
11 Vapor Retarders Water vapor control must always be considered in the design of exterior wall systems. Humidity and temperature
conditions may require the installation of a vapor retarder to prevent moisture condensation within the wall and the
resulting damage. To determine the necessity and location of vapor retarders, a water vapor transmission and dew
point analysis of the layered wall assembly should be conducted by a qualified engineer.
12 Corrosion Protection All architectural components, such as anodized-aluminum window frames, trims, flashings and casings, shall be
protected from alkaline building materials such as cement board, portland cement basecoats, mortars and grouts.
Isolate steel from aluminum in moist environments to protect against electro-galvanic corrosion.
13 SheeTrock Exterior Exposed surfaces should receive two coats of good quality exterior paint. First coat: oil-based primer; second coat: Gypsum Ceiling either alkyd or latex exterior paint. Board

25 USG Moisture-Resistant Assemblies
Application Guide Specifications
This guide is provided to assist you in specification of USG moisture-resistant systems and assemblies. If you have additional questions or would like more information regarding this or other USG products and systems, please contact USG at 800 USG.4YOU.
Part 1: General
1.1 Specify to meet project requirements. Scope
1.2 All materials, unless otherwise indicated, shall be manufactured by United States Gypsum Company and shall be Qualifications installed in accordance with its current printed directions.
1.3 All materials shall be delivered in their original unopened packages and stored in an enclosed shelter providing Delivery and protection from damage and exposure to the elements. Damaged or deteriorated materials shall be removed from Storage of Materials
the premises.
Warning: Store all panel products flat. Panels are heavy and can fall over, causing serious injury or death. Do not move
unless authorized.
1.4 In cold weather and during interior finishing and tile installation, temperatures within the building shall be maintained Environmental within the range of 40 to 100 °F. Adequate ventilation shall be provided to carry off excess moisture. Conditions A. Interior Applications
Wood framing shall approximate the moisture content it will reach in service by allowing the enclosed building to stand
as long as possible prior to the application of the panel. Do not install panel when wet.
B. Exterior Applications
Finishes, leveling/skim coats and basecoats shall not be applied to panels that are wet or frozen or that contain frost.
After application, and for at least 24 hours, finishes, leveling/skim coats and basecoats shall be effectively protected
from rain and excessive moisture.
In cold weather and during finish applications, panel, skim or basecoat, mortar, finish material and air temperature
must be at least 40 °F, and must remain at this temperature or higher for at least 24 hours after application. Hot and
dry weather may affect working time of leveling/skim or basecoat and finish materials. Under rapid drying conditions,
dampening or light fogging of board, leveling/skim or basecoat surface may be required to improve workability.
1.5 Steel or wood wall framing to receive panel shall be structurally sound, free from bow, and in general compliance with Framing local building code requirements. Damaged and excessively bowed studs shall be replaced before installation of panel.
Framing shall be designed (based on stud properties alone) not to exceed L/360 deflection for tile, thin brick veneer and
conventional stucco, L/240 for Direct-Applied Exterior Finish Systems. Steel framing must be 20 gauge or heavier with
corrosion-resistant metal coating equivalent to G60 hot-dipped galvanized. Exterior steel framing should be laterally braced.
1.6 DuroCk cement board should be cut to size with carbide-tipped knife and straight edge. Power saw should be used Installation Practices only if equipped with a dust-collection device and a NIOSH/MSHA-approved respirator is worn.
sheetroCk gypsum panels can be cut to size with a standard utility knife in a score-and-snap manner.
FiBeroCk panels should be cut to size using a knife and a straight edge. Power saw should only be used if it is
equipped with a dust-collection device.
Contractors installing tile and tile-setting materials should always follow current ANSI specifications and TCNA guidelines.
Application Guide Specifications
26 USG Moisture-Resistant Assemblies
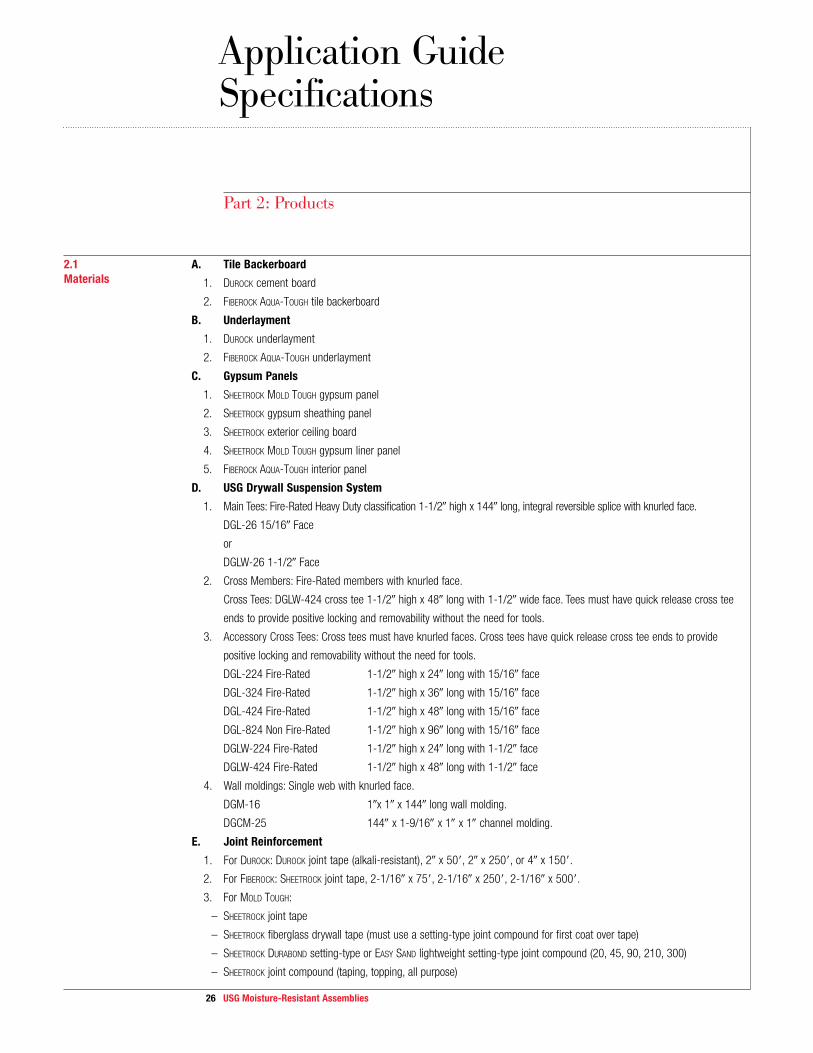
Part 2: Products
2.1 A. Tile BackerboardMaterials 1. DuroCk cement board
2. FiBeroCk AquA-tough tile backerboard
B. Underlayment
1. DuroCk underlayment
2. FiBeroCk AquA-tough underlayment
C. Gypsum Panels
1. SheetroCk moLD tough gypsum panel
2. SheetroCk gypsum sheathing panel
3. SheetroCk exterior ceiling board
4. SheetroCk moLD tough gypsum liner panel
5. FiBeroCk AquA-tough interior panel
D. USG Drywall Suspension System
1. Main Tees: Fire-Rated Heavy Duty classification 1-1/2 high x 144 long, integral reversible splice with knurled face.
DGL-26 15/16 Face
or
DGLW-26 1-1/2 Face
2. Cross Members: Fire-Rated members with knurled face.
Cross Tees: DGLW-424 cross tee 1-1/2 high x 48 long with 1-1/2 wide face. Tees must have quick release cross tee
ends to provide positive locking and removability without the need for tools.
3. Accessory Cross Tees: Cross tees must have knurled faces. Cross tees have quick release cross tee ends to provide
positive locking and removability without the need for tools.
DGL-224 Fire-Rated 1-1/2 high x 24 long with 15/16 face
DGL-324 Fire-Rated 1-1/2 high x 36 long with 15/16 face
DGL-424 Fire-Rated 1-1/2 high x 48 long with 15/16 face
DGL-824 Non Fire-Rated 1-1/2 high x 96 long with 15/16 face
DGLW-224 Fire-Rated 1-1/2 high x 24 long with 1-1/2 face
DGLW-424 Fire-Rated 1-1/2 high x 48 long with 1-1/2 face
4. Wall moldings: Single web with knurled face.
DGM-16 1x 1 x 144 long wall molding.
DGCM-25 144 x 1-9/16 x 1 x 1 channel molding.
E. Joint Reinforcement
1. For DuroCk: DuroCk joint tape (alkali-resistant), 2 x 50, 2 x 250, or 4 x 150.
2. For FiBeroCk: sheetroCk joint tape, 2-1/16 x 75, 2-1/16 x 250, 2-1/16 x 500.
3. For moLD tough:
– sheetroCk joint tape
– sheetroCk fiberglass drywall tape (must use a setting-type joint compound for first coat over tape)
– sheetroCk DurABonD setting-type or eAsy sAnD lightweight setting-type joint compound (20, 45, 90, 210, 300)
– sheetroCk joint compound (taping, topping, all purpose)

27 USG Moisture-Resistant Assemblies
– sheetroCk lightweight all purpose joint compound (A/P Lite)
– sheetroCk ready-mixed joint compound (taping, topping, all purpose, multi-purpose)
– sheetroCk pLus 3 lightweight all purpose joint compound ready-mixed
– sheetroCk miDweight all purpose joint compound, ready-mixed
F. Fasteners
For DuroCk:
– DuroCk steel screws, 1-1/4 for 14 to 20 gauge steel framing; DuroCk wood screws 1-1/4 or 1-5/8
for wood framing.
– Nails (1-1/2 hot-dipped galvanized roofing nails).
For FiBeroCk:
– Corrosion-resistant screws.
– 1/4 crown staples.
G. Subfloor
(5/8) (3/4) plywood or oriented strand board (OSB), 4 x 8 sheets, exterior grade or better, exterior glue conforming
with PS-1-66, T&G or back block long edges.
H. Adhesives/Mortars
Products compatible with alkaline or portland cement-based DuroCk cement board and FiBeroCk AquA-tough
tile backerboard:
1. Meeting ASTM C557-73: multipurpose adhesive (for subfloor to framing attachment).
2. Meeting ANSI A136.1 Type I.
3. Meeting ANSI A118.1: dry-set mortar mixed with acrylic latex additive.
4. Meeting ANSI A118.4: latex portland cement mortar.
I. Grout
Meeting ANSI A118.6: specify type.
J. Tile
Tile shall meet ANSI A137.1.
K. Membrane
DuroCk only: #15-lb. felt or 4-mil polyethylene water barrier, if required, in accordance with local building codes.
Part 3: Execution
3.1 A. SubfloorFloors Apply 3/8 bead of multipurpose adhesive to center of top flange of joists. Place 5/8 min. exterior grade plywood or OSB
sheets with long dimension across or parallel to wood or steel joists spaced max. 16 o.c. (For 3/4 plywood or OSB,
wood or steel joists should be spaced 24 o.c.) Fasten plywood to steel joists with 1-15/16 pilot point self-drilling
screws spaced as required. Fasten plywood to wood joists with adhesive and suitable nails or screws spaced
as required.
B. Panel Application
Laminate 5/16 DuroCk or FiBeroCk AquA-tough underlayment to subfloor using Type 1 organic adhesive, latex- fortified
mortar or dry-set mortar mixed with acrylic latex additive that is suitable for bonding cement backer board to plywood
Application Guide Specifications
28 USG Moisture-Resistant Assemblies
subfloor, with 1/4 square-notched trowel for mortar, 5/32 V-notched trowel for adhesive. Place underlayment with
joints staggered from subfloor joints. Fit ends and edges closely but not forced together, leaving a 1/8 gap. Fasten
to subfloor with 1-1/4 DuroCk wood screws or 1-1/2 hot-dipped galvanized roofing nails or corrosion-resistant screws
(for FiBeroCk) spaced 8 o.c. in both directions with perimeter fasteners at least 3/8 and less than 5/8 from
ends and edges. 1/2 and 5/8 DuroCk cement board or FiBeroCk AquA-tough tile backerboard—same procedure.
3.2 A. Framing Walls Space wood and steel framing a maximum of 16 o.c. (24 o.c. for UL Design U459 or U415). The studs of freestanding
furred walls must be secured to the exterior wall with wall furring brackets or laterally braced with horizontal studs or
runners spaced 4 o.c. max. Laterally brace all steel-framed walls prior to the application of joint treatment.
B. Gypsum Panel Application—Basic Single-Layer System, Treated Joints
1. Position all ends and edges of all gypsum panels over framing members, except when joints are at right angles to framing
members as in perpendicular application or when end joints are backblocked.
2. Apply gypsum panels first to the ceiling and then to the walls. Extend ceiling board into corners and make firm contact
with top plate. To minimize end joints, use panels of maximum practical lengths. Fit ends and edges closely, but not forced
together. Stagger end joints in successive courses with joints on opposite sides of a partition placed on different studs.
3. Attach panels to framing supports by: (Standard Single Nailing Method) (Adhesive Application) (Double Nailing Method)
(Power-driven Screws). Space fasteners not less than 3/8 from edges and ends of panels and drive as recommended
for specified fastening method. Drive fasteners in field of panels first, working toward ends and edges. Hold panel in firm
contact with framing while driving fasteners. Drive fastener heads slightly below surface of gypsum panels in a uniform
dimple without breaking face paper.
4. Cut ends, edges, scribe or make cutouts within field of panels in a workmanlike manner. Gypsum board should be cut to
size using a knife and a straight edge. A power saw should be used only if it is equipped with a dust collection device.
5. Install trim at all internal and external angles formed by the intersection of either panel surfaces or other surfaces. Apply
corner bead to all vertical or horizontal external corners in accordance with manufacturer's directions. (Multilayer systems:
see pertinent United States Gypsum Company reference.)
C. Durock or Fiberock Panel Application
After tub, shower pan or receptor is installed, place temporary 1/4 spacer strips around lip of fixture. Pre-cut board
to required sizes and make necessary cut-outs. Fit ends and edges closely but not forced together, leaving a 1/8 gap.
Install board abutting top of spacer strip. Stagger end joints in successive courses. Fasten boards to wood studs spaced
max. 16 o.c. and bottom plates with 1-1/4 DuroCk wood screws or 1-1/2 hot-dipped galvanized roofing nails or
corrosion resistant screws (for FiBeroCk) spaced 8 o.c. Fasten DuroCk cement board or FiBeroCk AquA-tough tile back-
erboard to steel studs spaced max. 16 o.c. and bottom runners with 1-1/4 DuroCk steel screws or corrosion-resistant
screws (for FiBeroCk) spaced 8 o.c. with perimeter fasteners at least 3/8 and less than 5/8 from ends and edges.
In double-layer walls where cement boards are installed over base-layer gypsum boards, apply a vapor-permeable water
barrier over gypsum boards.
D. Shaft Wall System with Ceramic Tile Finish
Attach DuroCk cement board over base layer of gypsum panels with 1-5/8 DuroCk steel screws at 8 o.c. to studs.
Since studs are at 24 o.c., laminate cement board to base layer of gypsum panels with a 4 wide strip of construction
adhesive between studs. Apply adhesive with a 1/4 square-notched trowel.

29 USG Moisture-Resistant Assemblies
E. Exterior Walls
Attach DuroCk cement board with corrosion-resistant screws spaced a maximum of 8 o.c. over framing spaced a
maximum of 16 o.c. Apply a weather-resistive barrier and flashing behind the panels as required. Follow the exterior
finish manufacturer’s recommendations for application over DuroCk cement board.
3.3 A. Base Countertops Install minimum 3/4 exterior-grade plywood base across wood cabinet supports spaced maximum 16 o.c. Position
ends and edges over supports.
B. Membrane
Staple-attach 15-lb. felt or 4-mil polyethylene film using 1/4 galvanized stapes over plywood base.
C. Panel Application
Secure 5/16 DuroCk or FiBeroCk AquA-tough underlayment to plywood. Fasten to plywood with 1-1/4 DuroCk wood
screws or 1-1/2 hot-dipped galvanized roofing nails spaced 8 in both directions and around edges; fit ends and edges
closely but not forced together, leaving a 1/8 gap.
Application of 1/2 or 5/8 DuroCk cement board or FiBeroCk AquA-tough tile backerboard—Use same procedure.
D. Joint Finishing
1. For DuroCk: Prefill joints with latex-fortified mortar or Type 1 organic adhesive; completely embed DuroCk interior tape;
and level all joints and outside corners.
2. For FiBeroCk: Prefill joints with latex-fortified mortar or Type 1 organic adhesive; completely embed sheetroCk fiberglass
tape; and level all joints and outside corners.
3.4 A. FramingCeilings Ceiling joists, furring channels or strips must be spaced max. 16 o.c. Framing must be capable of supporting the total
ceiling system dead load, including insulation, ceramic tile, bonding materials and cement board, with deflection not
exceeding L/360 of the span. When steel framing is used, min. 20 ga. is required.
B. Panel Application
Apply 1/2 DuroCk cement board or FiBeroCk AquA-tough tile backerboard to framing with long dimension across
framing. Center end or edge joints on framing and stagger joints in adjacent rows. Fit ends and edges closely, but
not forced together, leaving a 1/8 gap. Fasten boards to steel framing with 1-1/4 DuroCk steel screws or corrosion-
resistant screws (for FiBeroCk) spaced 6 o.c. and to wood framing with 1-5/8 DuroCk wood screws spaced 6 o.c.
with perimeter fasteners at least 3/8 and less than 5/8 from ends and edges. If necessary, provide additional
blocking to permit proper attachment. Edges or ends parallel to framing shall be continuously supported.
3.5 A. For Tile and Thin BrickJoint Treatment Prefill all DuroCk cement board joints, and joints where DuroCk cement boards abut other panels or surfaces such as Application
gypsum board, with tile-setting mortar or adhesive, and then immediately embed tape and level the joints.
B. For Dry Untiled Areas
For small areas where the DuroCk cement board will not be tiled, such as a board extending beyond the tiled area and
abutting another surface, treat joints as follows. Seal DuroCk cement board with DuroCk high-performance tile mastic or
Type I Ceramic Tile Adhesive. (Mix four parts adhesive with one part water.) Embed sheetroCk joint tape over joints and
treat fasteners with sheetroCk setting-type joint compound (DurABonD 45 or 90) applied in conventional manner.

30 USG Moisture-Resistant Assemblies
Application Guide Specifications
Flat trowel sheetroCk setting-type joint compound over board to cover fasteners and fill voids to a smooth surface.
Finish joints with at least two coats sheetroCk ready-mixed joint compound. Do not apply ready-mixed or setting-type
joint compound over unsealed board.
3.6 A. Tile ApplicationInterior Plan tile layout, then spread DuroCk high-performance tile mastic with trowel recommended by tile manufacturer heldCeramic Tile
at 45° angle. Apply no more adhesive than can be covered in 20-30 mins. Open time will vary according to temperature Application and humidity.
When applying over old ceramic tile, allow adhesive to set 10-15 mins. before applying new tile. Wall tiles may be set
top down or bottom up. Press, do not slide, tiles and sheets of tile into adhesive. Maintain accurate joint alignment
and spacing as tiles are positioned. Use wooden or rubber-faced beating block, tapped lightly with a mallet to level and
ensure solid tile positioning. Check occasionally to ensure at least 95% adhesive transfer to back of tile. Avoid adhesive
squeeze-up between tiles. It may be necessary to butter adhesive on backs of large pavers and quarry tile.
Note: Contractors installing ceramic tile should always follow ANSI Specifications and TCNA Guidelines. Do not use Type I
Ceramic Tile Adhesive for the installation of button back tile, slate, marble and floor tiles over 6 x 6; instead, use DuroCk
latex-modified high performance mortar or a latex- fortified mortar.
B. Recommended Adhesive and Mortar Coverage
Recommended adhesive and mortar coverage will vary based on the substrates and notched trowel sizes commonly
recommended by the tile or adhesive manufacturer.
C. Drying Time
Do not walk on floors for at least 48 hrs. unless walking boards or plywood sheets are used. To finish job, wait 24 hrs.
after tile has been installed for walls and countertops, 48 to 72 hrs. for floors, before grouting.
D. Grouting
Select, prepare and install grout in accordance with recommendations provided by grout manufacturers.

About the cover:
Project
The Maritime Hotel
New York, NY
Architects
BD Stanhope LLC
Chicago, IL
Photographer
©Gregory Goode