Embed Size (px)
Citation preview

Morphology and Sedimentology
of Panther Creek, Montgomery County Preserve
Erik D. Scott, Ph.D. Houston, Texas
April, 2016
This guide is for educational use.
The author gives permission to reproduce this guide for non-profit use only.

Panther Creek Field Guide
Location Sites along Panther Creek where it merges with Spring Creek in the Montgomery County Preserve, south of The Woodlands, Texas provide an excellent location to view numerous features of a meandering stream system.
Directions – Off of Interstate 45 take the Rayford/Sawdust exit. Turn West onto Sawdust. Turn South onto Budde Road. Go straight on Budde Road which will turn into Pruitt Road. Keep on Pruitt Road and turn left at the Montgomery County Preserve and Nature Trail entrance sign located at 1118 Pruitt Road and park in the parking area on the right.
.
Parking
Parking
Field Trip Area
2 Erik D. Scott

Panther Creek Field Guide
Safety
The distance walked that this field guide covers is a total of ~1.75 kms along a gravel access road and generally well-groomed trails. There are small portions of the trail that can be uneven next to the creeks. Depending upon the time from the last maintenance on the trail and if there have been previous high winds in the area, there may be some vegetation across portions of the trail.
You will be walking through the water in Panther Creek so footwear and clothing that you do not mind getting wet should be worn. Hiking boots are not needed. Tennis shoes, rubber boots, hiking sandals or any other sports shoes will be adequate. If sandals are worn, there is a possibility that sticks or other material could injure feet.
Participants will be walking in Panther Creek itself to see the ongoing sedimentological processes and the resultant deposits. The typical water depth in Panther Creek is just over the ankle, but there may be small areas up to 50cm deep. Currents in Panther Creek are not strong and will not affect the average person’s walking stability. Spring Creek on average is slightly deeper (30cm to 1m with slower currents than Panther Creek. The trip will not be walking in Spring Creek. Wet, loosely packed sediments next to and in the creek can quickly liquefy if stepped on resulting in sinking into the sediments potentially up to and beyond knees. If there has been significant rainfall in the area during the previous week(s), water levels and currents can be increased to the point where it may be unsafe to walk in the creek.
As with all outings involving water, caution should be taken to avoid any circumstance that increases the risk of drowning. Drowning can occur in water as shallow as 30mm. Appropriate behavior respecting the environment where we will be is the best way to reduce this risk.
Most of the year, especially during the summer months, it can be hot and sunny in the area. It is highly recommended to bring adequate water, use sunscreen and wear a hat. Insect repellant is also advised.
Poison ivy, poison oak and sumac are in the area. Long pants and long sleeves can be worn if desired to prevent contact with these plants and the urushiol oil that causes a skin rash.
Dangerous spiders and snakes may also be encountered. Staying on the trail and/or in the creek will greatly reduce the risk of encountering any dangerous animal. If one is come upon, stay calm and back away pointing it out to the other field trip participants.
More information on identification of and dealing with potential dangerous animals and plants in the Panther Creek area can be found in the back of the field guide.
3 Erik D. Scott

Panther Creek Field Guide
Emergency Contacts
There is mobile phone coverage across the field trip area.
In case of an emergency dial 911. Be prepared to give the following information: 1. Your name and phone number 2. Your location : Montgomery County Preserve at 1118 Pruitt Rd., The Woodlands, TX 77380 o If you are on the trails or by the creek you will need to give additional location information
3. The nature of your emergency Closest St Michael’s Emergency Rooms Hospital 26226 Interstate 45N, Spring TX 77386
(281) 419-2911 24hrer.com
4 Erik D. Scott

Panther Creek Field Guide
Setting
Panther Creek comes out of Lake Woodlands five miles to the north. The water that flows into the stream is the less muddy, cleaner upper part of the water column in the lake that comes over the dam spillway. This leads to the water flowing through Panther Creek to be clearer enabling us to see through the water and investigate features on the bed of the stream.
From Lake Woodlands, the stream runs through golf courses and by subdivisions where its course has been modified. However in the Montgomery County Preserve the stream has undergone very little alteration allowing natural processes to modify the landscape into what can be seen today.
Plan on getting wet if you would like to investigate all the features of Panther Creek, as the best way to see everything that is happening is to go into the stream itself and observe the active processes that are at work and the resultant deposits that are left behind.
There are three stops that will allow for investigatation of different features of Panther Creek.
Location of stops along Panther Creek covered in this guide and the paths to access them. Recommended path walking up Panther Creek between Stop 1, 2 and 3 is shown in yellow.
Stop 1
Stop 2
Stop 3
PANTHER CREEK SPRING CREEK
5 Erik D. Scott

Panther Creek Field Guide
Stream Morphology
Most of us speak of rivers, but geoscientists tend to call everything a stream. A stream is any body of running water that occupies a channel: it can even be underground in a cave or underneath a glacier. A river is a large surface stream, but other than that there isn't a clear boundary between a stream and a river. Streams smaller than rivers, roughly in order of size, may be called branches or forks, bayous, creeks, brooks, coulées, runnels and rivulets. The very smallest kind of stream, just a trickle, is a rill.
Features Associated with Meandering Streams
A meandering stream migrates laterally by sediment erosion on the outside of the meander and deposition on the inside. Adjacent to the channel, levee deposits build up, and gradually raise up the river over the floodplain (mainly fine sediments). If the climate is humid the floodplain area beyond the levees may be covered with water most of the time, and may form a swamp. Meanders may cut into each other as they grow (neck cutoffs), and then the river shortcuts (growing meanders reduce the slope, cutoffs are a means to increase the slope again) and the old meander is abandoned and slowly fills with fine sediment during floods (oxbow lakes). As a river builds up its levees and raises itself over the floodplain, the slope and the transport power of the stream decrease, the channel fills gradually with sediment, and finally (often during a flood) the river will breach its levee (this process is called avulsion) and follow a steeper path down the valley.
6 Erik D. Scott

Panther Creek Field Guide
The morphology of a stream (its shape, dimensions and other characteristics) are influenced by the slope it is going over, the speed (velocity) of the current, the volume of water (discharge), and the size of the sediment it is moving. Streams may be permanent or intermittent—occurring only part of the time. The most important part of a stream is its channel or streambed, the natural passage or depression in the ground that holds the water. The channel is always there even if no water is running in it. The deepest part of the channel, the route taken by the last (or first) bit of water, is called the thalweg (TALL-vegg, from the German for "valley way"). The sides of the channel, along the edges of the stream, are its banks. A stream channel has a right bank and a left bank: you tell which is which by looking downstream.
Riffles are areas where the water is flowing faster over shallow parts of the stream. Pools are areas of slower water where the stream is deeper. Runs are the sections of the stream between the pools and riffles where the current is smooth.
Run:
Run: Riffle: fast, shallow flow over boulders and cobbles which break the water
R Direction of Flow
Run:
R
Run: smooth unbroken flow connecting riffle and pool areas
Run: Pool: areas of slow flowing deep water, often on the outside of bends
LLeefftt BBaannkk
RRiigghhtt BBaannkk
7 Erik D. Scott

Panther Creek Field Guide
Under normal conditions, usually the water in a stream does not completely fill the channel up to the top of the banks on the side of the stream. After a heavy rain and there is extra water runoff the stream can fill up the whole channel to what is called the bankfull stage. If the water rises higher and overflows it banks it goes into flood stage and spills over onto the flood plain.
Stream channels have different channel patterns, the shapes they show when viewed from above or on a map. The curviness of a channel is measured by its sinuosity, which is the ratio between the length of the thalweg and the distance downstream along the stream valley between two points along the stream. Straight channels are linear or nearly so, with a sinuosity of nearly 1. Sinuous channels curve back and forth. Meandering channels curve very strongly, with a sinuosity of 1.5 or more. Braided channels split and rejoin, like the braids in hair or a rope.
Run:
Run: Flood-Prone Width Run:
FFlloooodd PPllaaiinn FFlloooodd PPllaaiinn
Meandering Pattern
Braided Pattern
8 Erik D. Scott

Panther Creek Field Guide
The loops and curves of a slow-moving stream are called meanders. Meanders are formed by erosion and occur where a stream has worn away its banks. Most erosion normally occurs on the
outside bend of a meander called a cutbank. This is because the velocity (speed) of the stream is faster. As well as the water hitting the banks, pieces of sediment may also be thrown against the stream banks wearing them away. Meandering stream channels are asymmetrical. The deepest part of the channel is on the outside of each bend. The water flows faster in these deeper sections and erodes material from the stream bank. The water flows more slowly in the shallow areas near the inside of
each bend. The slower water can't carry as much sediment and deposits its load on a series of point bars. Meandering streams erode sediment from the outer curve of each meander bend and deposit it on an inner curve further downstream. This causes individual meanders to grow larger over time.
Streams need energy to transport material. Normally, a stream has the energy to carry some sediment. When energy levels are very high due to a fast current and a lot of water (velocity and discharge), large rocks and boulders can be transported. When energy levels are low when the stream is slow with little water, only small particles can be transported. The velocity (speed) of a stream is not the same along its length or across is width. The thalweg of the channel contains the fastest current with the highest velocities. Lower velocities occur toward the banks of the stream. This allows the stream to erode sediment in one part of the stream and deposit it in another.
Spring
1
2
3 4
1. Stream erodes the outer bank of a meander 2. Stream deposits sediment on the inner bank of a meander 3. Erosion 4. Deposition
9 Erik D. Scott

Panther Creek Field Guide
Deposition is where a river lays down or drops the sediment or material that it is carrying. Streams carry lots of different sediment or grains, including rocks, pebbles, sand, silt, and mud. These grains move along the stream in different ways depending on their size and the velocity of the current.
The smallest sized grains (clays and silts) will be suspended in the water and not touch the stream bed. Bigger grains (sands and gravels,) are too heavy and they bounce, slide and roll along the stream bed.
Movement of sediment in a stream – 1. Fine-grained particles in suspension (suspended load) 2. Coarse-grained particles by traction (rolling, sliding, saltation or bouncing) along the streambed (bed load)
Rolling Suspension Saltation (bouncing)
10 Erik D. Scott

Panther Creek Field Guide
Point bars are the most common deposit formed in meandering streams, but other types of bars can also be deposited. Side bars, mid-channel bars, and delta bars (seen at Stop 1) can be found.
Sedimentary Structures In the deposits of a stream, smaller scale features can be seen. As the stream erodes sediment in one area (like the cutbank) it will deposit that sediment in layers in other areas building up point bars and other features. These layers can be seen due to the different grain sizes and material found in each layer.
Sediment layers of varying thickness seen in a point bar deposit at Stop 2.
LLLaaayyyeeerrr BBBooouuunnndddaaarrryyy
Point Bars
Numerous Mid-channel Bars
Point Bars with few Mid-channel Bars
Side Bars
Diagonal Bars
Main Channel Branching with Numerous Mid-Channel Bars and Islands
Side Bars and Mid-channel Bars with Length Exceeding 2-3 Channel Widths
Delta Bars
11 Erik D. Scott

Panther Creek Field Guide
When a current flows over the bottom of the creek and moves grains along it, the larger size grains move along the stream bed in different ways (rolling, bouncing, sliding) and at different speeds and can form ripples.
A ripple generated from a uni-directional current (a current always going in one direction) has pointed crests and rounded troughs, and are inclined more strongly in the direction of the current with a gentle up-current slope (stoss surface) and a steeper down-current slope or slip face (lee surface). When the deposits from ripples stack on top of each other in layers composed of different angles of the lee surface of the ripples, this is called crossbedding.
In most present-day streams, ripples will not form in sediment larger than coarse sand. Therefore, the stream beds of sand-bed streams are dominated by current ripples, while gravel-bed streams do not contain bedforms. The internal structure of ripples is a base of fine sand with coarse grains deposited on top since the size distribution of sand grains correlates to the size of the ripples. This
Delta i
Ripple
12 Erik D. Scott

Panther Creek Field Guide
occurs because the fine grains continue to move while the coarse grains accumulate and provide a protective barrier.
In the layers of a bar deposit you will mostly find only the lee side of the ripple. This is because the current of the stream will erode the stoss side of the ripple and deposit on the lee side as the ripple migrates downstream, only leaving part of the lee side behind.
Layers of the lee side of ripples of different sizes seen in the point bars at Stop 2 resulting in crossbedding.
RRRiiippppppllleeesss
CCCrrrooossssssbbbeeeddddddiiinnnggg
LLLaaayyyeeerrr BBBooouuunnndddaaarrryyy
LLLaaayyyeeerrr BBBooouuunnndddaaarrryyy
RRRiiippppppllleeesss
CCCrrrooossssss BBBeeeddddddiiinnnggg
13 Erik D. Scott
Panther Creek Field Guide
Stop 1 – Confluence of Panther Creek and Spring Creek
Directions – From the parking area walk down the road toward the creek and go past the metal gate and along the gravel road. Where the gravel road makes a bend to the right there is a marker on the left of the road for the Spring Creek Overlook path. Walk along the path until you get to Spring Creek. At the creek continue along the path upstream to where Panther Creek enters Spring Creek.
Stop 1 is where Panther Creek merges with Spring Creek. Here the clearer water coming from Panther Creek mixes with the muddier water of Spring Creek. The difference in the amount of sediment in the water coming down the two creeks causes the water in these creeks to have different densities. Where these different density waters meet, there are small swirling patterns (eddies) on the surface of the water along a line where the clearer, less sediment laden, lower density water from Panther Creek mixes with the muddier, more sediment laden, higher density water of Spring Creek. A similar occurrence is happening in Costa Rica along the Rio Sucio where a sediment laden creek (as a result of mining runoff upstream) merges with the main flow.
Image of the confluence of the clearer waters of Panther Creek and the muddier waters of Spring Creek from Google Earth. Notice that the creeks are at bankful stage in this image.
PANTHER CREEK
SPRING CREEK
Mixing waters
50 ft
Current Direction
Mixing waters
EEddddiieess
Mixing waters
14 Erik D. Scott

Panther Creek Field Guide
Rio Sucio in Costa Rica showing the confluence of a muddy creek mixing with the clear water of the river.
Where the smaller Panther Creek flows in the larger Spring Creek, a delta bar can typically be found as sediment in the faster flowing Panther Creek falls out of the water column when it encounters the slower moving waters of Spring Creek. Different lobes of the delta bar can be seen on the below satellite image. Notice how the delta bar is elongated in the downstream direction. Because of subsequent flooding events and the variable flow of the creeks, these delta bars are deposited, eroded and modified on a frequent basis.
Mixing waters
DDeellttaa BBaarr DDeeppoossiittss
SPRING CREEK
Mixing waters
50 ft
Current Direction
PANTHER CREEK
15 Erik D. Scott

Panther Creek Field Guide
Pictures taken twelve days apart show the advance (progradation) of a delta bar out of Panther Creek and into Spring Creek.
Notice how the prograding delta bar is elongated in a down current direction as the sediments coming out of Panther Creek is pushed downstream by the current of Spring Creek before they are deposited in the delta bar. Look at the delta deposits in the satellite images and the pictures above and compare them to the deposits you are seeing during your visit.
DDeellttaa BBaarr DDeeppoossiittss
Mixing waters
PANTHER CREEK
SPRING CREEK
NNoovv 99,, 22001133
SPRING CREEK
NNoovv 2211,, 22001133
PANTHER CREEK DDeellttaa BBaarr DDeeppoossiittss
16 Erik D. Scott

Panther Creek Field Guide
In the shallow portions of Panther Creek ripples are forming and migrating along the bottom of the creek. If you get in the creek and watch a single ripple for a minute or two, you can see sand grains bouncing along moving up the stoss (upcurrent) side of the ripple and then deposit on the lee (down current) side of the ripple. The whole ripple will move down the stream in this fashion. As you observe this process think about how a ripple feature can form a layer and why typically only the lee side of a ripple is preserved.
As you observe the ripples, look at the size of the grains that are being transported by the current. Compare that to the full range of grain sizes that can be observed in the creek. Under normal current conditions, the velocity of the water is capable of moving grain sizes from mud and silt to medium grained sand. The grains coarser than medium grained sand in the stream were moved under current conditions with higher velocities when the discharge of the creek was greater due to increased rainfall.
Scraping at a bank can reveal the range of grain size that the creek can transport as well as various sedimentary structures including layering, ripples and crossbedding in the creek deposits.
Stoss Side
Lee Side
Crest
Trough
Trough
LLLaaayyyeeerrr BBBooouuunnndddaaarrryyy
RRRiiippppppllleeesss
CCCrrrooossssssbbbeeeddddddiiinnnggg GGGrrraaavvveeelll
SSSaaannnddd
17 Erik D. Scott
Panther Creek Field Guide
Stop 2 – Meander Bends along Panther Creek
Directions – Walk in Panther Creek upstream from Stop 1 to the first meander (curve) in the creek. As you walk up the creek observe the depositional patterns (bar forms) and sedimentary structures. Alternatively, return to the road along the same path that you took to get there. At the road turn left and continue ~20 yards and enter the Circle path on the left. Go down the Circle path until the path splits. At the split go down the left hand path and follow it to Panther Creek.
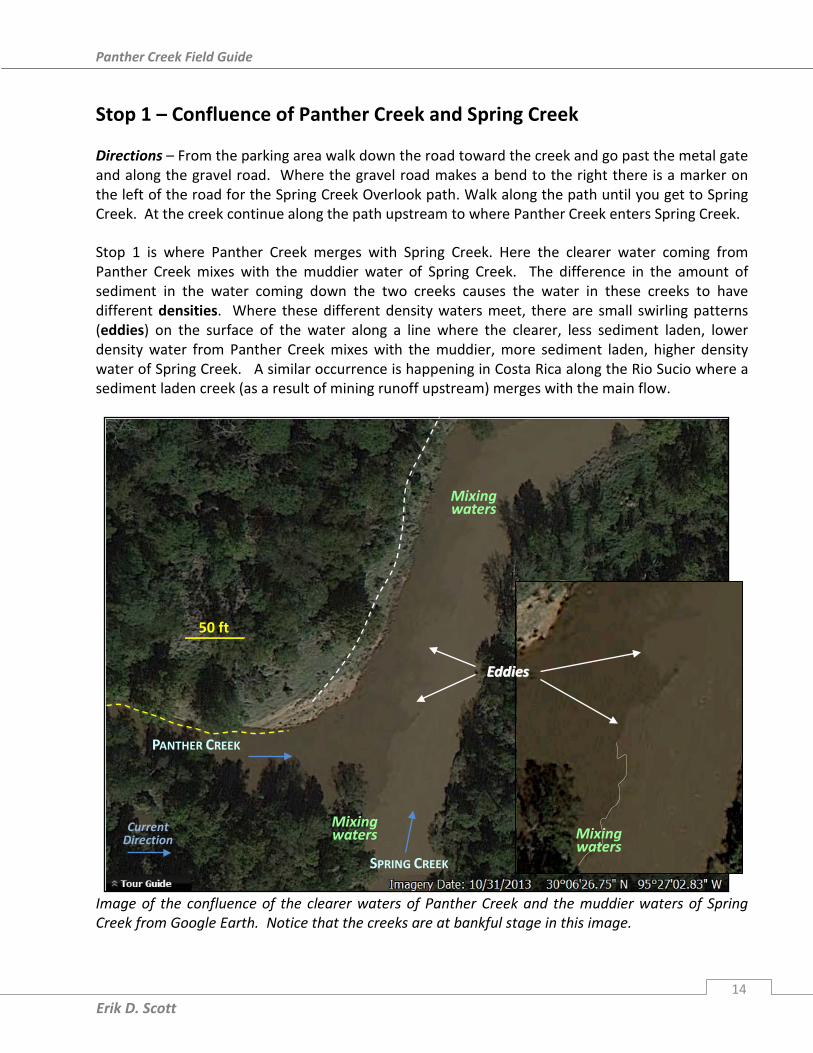
Panther Creek has a number of meanders (curves) along its length. At this stop, observations can be made of the many morphological features of a meandering stream including cutbanks, point bars, pools, runs and riffles. The sharp bend in the creek at Meander 3 typically has a log jam.
Cutbank 50 ft
Right Bank
Left Bank
Pool
Riffle
Cutbank
Cutbank
PPooiinntt BBaarr
PPooiinntt BBaarr
Pool
Riffle
PPooiinntt BBaarr Cutbank
PPooiinntt BBaarr
Log Jam
MMeeaannddeerr 22
MMeeaannddeerr 33
MMeeaannddeerr 44
MMeeaannddeerr 44 MMeeaannddeerr 11
PPooiinntt BBaarr
Cutbank
Run
Run
Run
Thalweg
18 Erik D. Scott

Panther Creek Field Guide
Scraping at a bank can reveal the range of grain size that the creek can move as well as various sedimentary structures including layering, ripples and crossbedding.
Recent erosion of a cutbank on the outer bend of a meander has caused the trees at the top of the cutbank to fall over into the creek.
LLLaaayyyeeerrr BBBooouuunnndddaaarrriiieeesss
RRRiiippppppllleeesss
Cutbank
PPooiinntt BBaarr
CCCrrrooossssssbbbeeeddddddiiinnnggg
LLLaaayyyeeerrrsss
MMeeaannddeerr 22
19 Erik D. Scott

Panther Creek Field Guide
From satellite images taken at different dates over these meander bends, changes through time can be observed. What differences in bar forms, cut banks and channel paths can you observe? The creek will also be different from the satellite images and pictures during your visit.
50 ft
20 Erik D. Scott

Panther Creek Field Guide
This satellite image shows the creek at bankful stage. Notice on the cutbank of the top meander the trees that have fallen over across the creek caused by erosion from this flooding event (the same trees and cutbank can be see in a previous image).
50 ft
21 Erik D. Scott
Panther Creek Field Guide
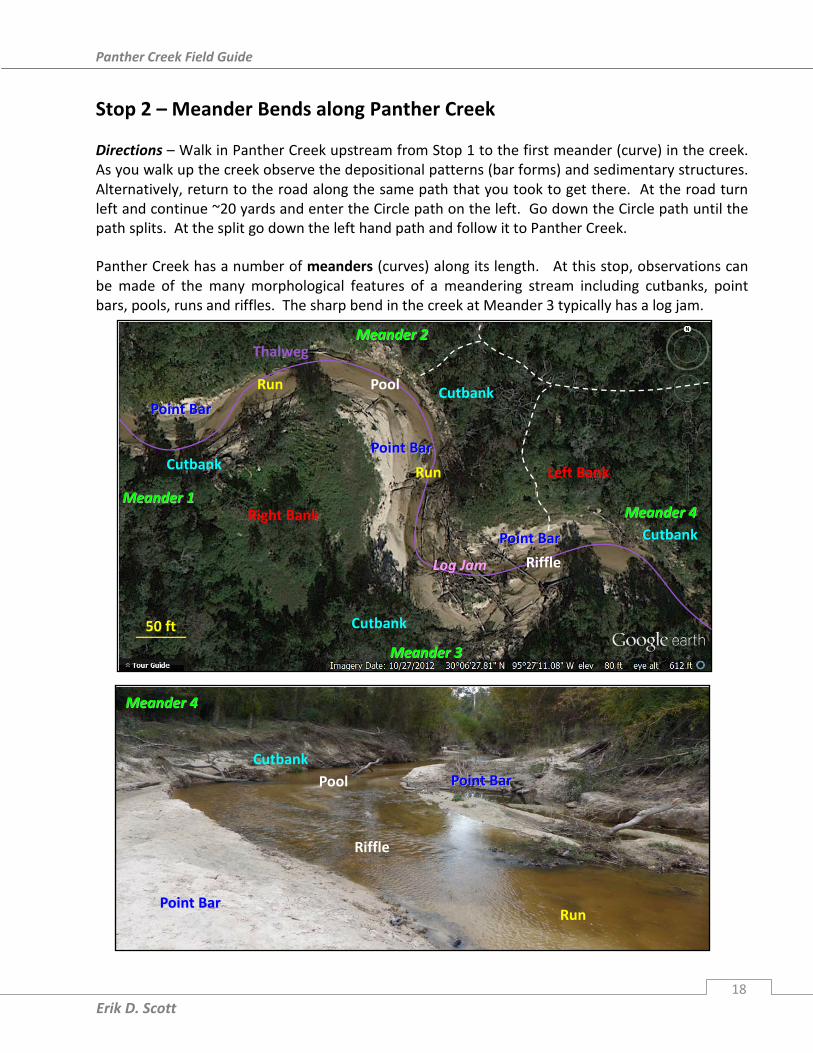
Stop 3 – Bridge over Panther Creek
Directions – From Stop 2 continue walking upstream in Panther Creek through some more meanders. Continue to observe the depositional patterns (bar forms) and sedimentary structures until you get to the bridge. Alternatively return to the Circle path along the same path that you took to get there. At the Circle path go the left and continue on the Circle path until in comes back to the gravel road. At the road, turn left and continue along until you reach the bridge crossing over Panther Creek.
The previous stops have looked at the morphology of a stream under natural conditions. At Stop 3 a bridge has been built across the creek and has modified the natural process. Take a look around and see how the stream has changed because of the bridge from what we have observed at the previous two stops.
1. How has the stream interacted with the man-made structure of the bridge? 2. What parts of stream morphology can you identify here? 3. The bridge was completely rebuilt in the fall of 2014. Below is a photo of the bridge that was
replaced. From your observations and understanding of the natural processes occurring, why was it necessary for a new bridge to be built?
4. The new bridge is built differently than the old bridge. What are the differences? Why did they build it this way?
5. What will happen to the new bridge in the future?
50 ft
22 Erik D. Scott

Panther Creek Field Guide
Bridge (Fall 2014)
Erosion at base of
concrete
Bridge (Fall 2013)
Erosion around pipes
23 Erik D. Scott

Panther Creek Field Guide
Notes
24 Erik D. Scott

Panther Creek Field Guide
References for Material Used
http://gomyclass.com/files/lecture16/html/index.htm http://science.kennesaw.edu/~jdirnber/limno/LecStream/LecStreamEcologyPhysChem.html http://hunterkunkeljohnson7.blogspot.com/2011/11/water-cycle-exam.html http://www.sd13.org/teachers/dirving/ http://www.geographypods.com/terminal-exam-12th-june-2013.html https://www.bae.ncsu.edu/programs/extension/wqg/srp/rc101.html http://ocw.mit.edu/courses/earth-atmospheric-and-planetary-sciences/12-090-special-topics-an-
introduction-to-fluid-motions-sediment-transport-and-current-generated-sedimentary-structures-fall-2006/lecture-notes/ch12.pdf
http://www.onegeology.org/extra/kids/earthprocesses/meanderingRivers.html http://static.panoramio.com/photos/large/44039115.jpg http://bc.outcrop.org/GEOL_B10/lecture11.html http://www.geol.umd.edu/~piccoli/100/CH12.htm http://www.glc.org/tributary/documents/sedimentcourse/roscommon/MIStreamTeamSurveyingPr
otocol.pdf http://www.niwa.co.nz/our-science/freshwater/tools/shmak/manual/9catchment http://w3.salemstate.edu/~lhanson/gls210/gls210_streams2.htm http://www.geologycafe.com/class/chapter9.html
Web Resources for Teachers
http://glaquarium.org/wp-content/uploads/2012/11/A-Meandering-Story.pdf http://imssearth.org/Resources/Rivers_2%20Lesson.pdf http://geology.com/teacher/erosion.shtml http://education.usgs.gov/lessons/bedding.pdf http://www.lhsgems.org/GEMSrivercutters.html http://www.mysciencebox.org/files/7erosion_patterns.doc http://www.msnucleus.org/membership/html/jh/earth/sedimentary/jhsedmentary.pdf http://learningtogive.org/lessons/unit5/lesson2.html#lesson
25 Erik D. Scott

Label the features of a meandering stream that can be seen on a section of Spring Creek. 1) Cut bank 2) Point bar 3) Thalweg 4) Right bank 5) Left Bank 6) Riffle 7) Pool
Exercise 1
50ft
Field Trip Area
Exercise Area
Spring Creek

Sketch and label the sedimentary structures found when a section of a bar is scraped clean. Include a scale bar. 1) Layering 2) Ripple features
Exercise 2

At Stop 2, locate these points on one of the cross sections from one side of the stream to the other to use for your sediment sample descriptions. The creek will be different from the
satellite image so just do you best to find locations that cover different features of the stream.
Exercise 3 – Stop 2
Cross section A
Cross section B Stop 2

Describe the location of the sample point (bar, thalweg, right bank, left bank, pool, riffle) Describe the sediment at the sample point (grain size, roundness, sorting, color, composition)
Exercise 3 – Stop 2
Sample Location Sediment description
1 2 3 4
In a cross-section across the stream where do you think will be the coarsest grains?
In a cross-section across the stream where do you think will be the finest grains?

HS04-064C(11-15)
Poison Ivy, Oak, and Sumac
Employers and employees should take precautions when working in and around wooded areas and in heavy foliage because they may come in contact with poison ivy, oak, or sumac. According to the American Skin Association, approximately 85 percent of the population is allergic to these plants that cause a bothersome rash and intense itching.
The sap of poison ivy, oak, and sumac Poison Ivy
plants contains urushiol (pronounced oo-roo-shee-ohl) oil and it only takes small amounts of this chemical to cause an allergic reaction. Urushiol is inside the plant, so brushing against an intact plant will not usually cause a reaction. However, undamaged plants are rare, and touching the stems, roots, or leaves of damaged plants can result in direct contact between urushiol and the skin. If urushiol penetrates the skin, it can cause a reaction. Urushiol can stick to anything, including tools, shoes, clothes, or pets.
Avoiding Exposure1. Employees should wear long pants, long sleeves,
boots, and gloves for protection when working in wooded areas and in heavy foliage.
2. After consulting with their doctor, an employee may use barrier skin creams, such as lotion containing bentoquatum. These should be washed off and reapplied twice a day.
3. Control poison ivy, oak, and sumac at a worksite by spraying them with the herbicide glyphosate according to label directions. These plants should not be burned because urushiol could then be inhaled and cause lung irritation. The best time to apply the herbicide is from May through July, while poison ivy, oak, and sumac are flowering. For plants that climb high into trees, cut the vine off six inches above ground level. Treat the stump with glyphosate immediately after cutting to kill the roots and prevent sprouting. If resprouting does occur, treat the leaves with glyphosate.
Table 1 – Myth and Fact Explained
Myth Fact
Poison ivy rash is contagious.Rubbing the rash will not spread poison ivy to other parts of your body (or to another person). You spread the rash only if urushiol oil, the sticky, resin like substance that causes the rash, has been left on your hands.
You can catch poison ivy simply by being near the plants.
Direct contact with the plants is needed to release urushiol oil. Stay away from forest fires, direct burning, and lawnmowers and trimmers when they are being used because they can cause the urushiol oil to become airborne.
Leaves of three, let them be. While poison ivy and oak have three leaves per cluster, poison sumac has seven to 13 leaves on a branch.
Do not worry about dead plants. Urushiol oil stays active on any surface, including dead plants, for up to five years.
Breaking the blisters releases urushiol oil that can spread.
Not true. However, wounds can become infected and make the scarring worse. In very extreme cases, excessive fluid may need to be withdrawn by a doctor.
I’ve been in poison ivy many times and never broken out. I’m immune.
Not necessarily true. The more times a person is exposed to urushiol, the more likely they will break out with an allergic reaction. For the first time sufferer, it generally takes longer for the rash to show up, generally in seven to ten days.

What to do if ExposedBecause urushiol can penetrate the skin within
minutes, do not waste time if exposed. The faster the victim’s skin is cleansed, the greater the chance of removing the urushiol before it penetrates the skin. Cleansing may not stop the initial outbreak of the rash if more than ten minutes has passed, but it can help prevent the rash from spreading.
If exposed to poison ivy, oak or sumac, stay indoors (if possible) until the following steps are completed. Wear gloves or cover hands while completing the steps and then discard the hand covering.
1. Cleanse exposed skin with generous amounts of isopropyl (rubbing) alcohol immediately. Do not return to the woods or yard the same day. Alcohol removes your skin’s protection along with the urushiol, and any new contact will cause the urushiol to penetrate twice as fast.
2. Wash exposed skin with water. 3. Take a shower with soap and warm water. Do not
use soap before this point because soap could pick up some of the urushiol from the surface of the skin and move it around.
4. Wipe off shoes, tools, and anything else that may have been in contact with the urushiol with alcohol and water.
5. Wash clothing separately in hot water and detergent.
Dealing with the RashIf the exposed area is not
cleansed quickly or thoroughly enough, or if the skin is so sensitive that cleansing does not help, redness and swelling may appear within 12 to 48 hours. Blisters and itching will follow. For those rare people who react after their very first exposure, the rash appears after seven to ten days. The oozing blisters are not contagious nor can the fluid cause further spread on the affected person’s body because they do not contain urushiol. Nevertheless, scratching the blisters with fingernails that may carry germs could cause an infection.
The rash will only occur where urushiol has touched the skin; it does not spread throughout the body. However, the rash may seem to spread if it appears over time instead of all at once. This is either because the urushiol is absorbed at different rates in different parts of the body or because of repeated exposure to contaminated objects or urushiol trapped under the fingernails.
Consult a physician before using any of the following remedies.
Itch ReliefThe rash, blisters, and itch normally disappear in 14 to
20 days without any treatment. Temporary itch relief may be found by using:
• Wet compresses or soaking in cool water;
• Oral or topical antihistamines;
• Over-the-counter topical corticosteroids (commonly called hydrocortisones); or
• Topical anesthetics to numb the itchy rash, such as menthol, benzocaine, and pramoxine
Treating the BlistersThere are a number of over the counter products to
help dry up oozing blisters including:
• aluminum acetate;
• baking soda;
• oatmeal bath;
• aluminum hydroxide gel;
• calamine;
• kaolin;
• zinc acetate;
• zinc carbonate; and
• zinc oxide.
Poison Sumac

Signs of an EmergencyFor severe cases, prescription topical corticosteroid
drugs can halt the reaction, but only if treatment begins within a few hours of exposure. The American Academy of Dermatology recommends that people who have had severe reactions in the past should contact a dermatologist as soon as possible after a new exposure.
In rare cases, persons who are highly allergic to poison ivy, oak, and sumac may break out in a rash and begin to swell in four to 12 hours. Their eyes may swell shut and blisters may erupt on their skin. This is an emergency. Call 911 and get the victim to a hospital as soon as possible.
This fact sheet was published with information from the U.S. Food and Drug Administration, the Poison Ivy Information Center, the Missouri Department of Conservation and the Texas Department of Insurance, Division of Workers’ Compensation.
Remember to practice safety, don’t learn it by accident.
For other free Division of Workers’ Compensation (DWC) safety publications on this and other safety topics, visit the TDI website at http://www.tdi.texas.gov/wc/safety/videoresources/index.html.
DWC features a free occupational safety and health audiovisual loan library. Call (800) 252-7031, option 2 for more information or visit the TDI website at http://www.tdi.texas.gov/wc/safety/videoresources/avcatalog.html.
DWC Workplace Safety (800) 252-7031, option 2, or [email protected].

Venomous Animals of Texas By Carolyn Insall, M.S.
Central Texas Poison Center
The Poison Center is available at all times to advise you on bites and stings.
A venomous animal is one that produces a poison (venom) to attack its prey or defend itself. Some animal’s venom is more toxic than others. People, who have an encounter with these animals, have varied reactions to their venom. This article is an overview of the more commonly reported animals in Texas that produce venomous bites and stings. Hopefully, this will help you identify critters you encounter including flying insects, crawling critters, spiders, snakes and marine life. Some of the information used is provided by Dr. John Jackman, and is used with his permission. To read or print more in depth information, click on this link or copy and paste in your browser: http://tcebookstore.org/publications_details.cfm?whichpublication=1585. If you are bitten or stung or have a question, call the poison center. If you are having life threatening symptoms, such as difficulty breathing, call 911.
Mistaken as Venomous Texas has many insects, arachnids and arthropods that are mistakenly thought to be venomous. The list includes windspiders and windscorpions, “daddy long-legs”, crane flies that look like giant mosquitoes, scorpionflies, dragonflies, and many more.
Nuisance Biters and Sprayers Various insects, spiders and arthropods can produce painful bites or stings that vary in intensity depending on the victim’s sensitivity. The effects are felt, but are not long lasting or life threatening. These bites or stings, however, can be quite painful or irritating for a short while. These include giant water bugs, wolf spiders, tarantulas, and jumping spiders. Ground beetles and bombardier beetles spray caustic substances that can burn or irritate the skin. Whip scorpions can spray a vinegar-like substance from the tail. Millipedes produce chemicals that can irritate the skin if they are handled.
Flying Insects Bees Bees typically establish new hives in the spring and fall. This is when they are most active. Honey bees are the only bees with a barbed stinger that can sting only once. Bee stings are intense and immediate. If possible, remove the stinger and the attached poison sac by scraping it from the skin with a dull edge or fingernail. Do not pinch the stinger to remove it. Honey Bees are about ½ inch long. Their color varies from light brown to black mixed with yellow. Africanized honey bees are a strain of this species and difficult to distinguish from managed honey bees.

Bumble Bees are large, husky bees and about ¾ inch long. Their bodies are fuzzy with black and yellow or black and orange hairs. They usually nest in the ground or abandoned areas.
Other Bees you might encounter are Carpenter bees, leaf-cutting bees, and sweat bees.
Wasps Wasps stingers are not barbed which allows for multiple stings. The pain is sharp and intense and may cause local swelling. Treat local reactions the same as other stings. Reactions should subside in a few hours.
Yellow Jackets, sometimes called “hornets” are about ½ inch long. They are typically black with yellow markings on the head, thorax and abdomen. The body is smooth and wings are clear. They may be aggressive when looking for food, especially in the fall.
Paper Wasps include the common “red” wasp, with a reddish-brown body color that may have yellow markings. They are ¾ to one inch long. They usually nest under eaves or other sheltered areas, with less than 200 cells dangling on a single filament.
Mud Daubers come in several species that are ¾ to one inch long. Their body may be dull black, iridescent blue-black or black and yellow. They build mud tubes on the sides of buildings or other objects in sheltered areas. They can sting, but most attacks are bluffs.
Cicada Killers are large wasps measuring 1.5 inches long. The head and thorax are dark red, and the abdomen is black with yellow spots or bands. The wings are honey or rust-colored. They build nests in sandy soil or embankments that are about 6 inches deep. Females sting cicadas to paralyze them and carry them to their nests. Even though the female can sting, they are rarely aggressive. Males are aggressive, but cannot sting.
Velvet Ants are approximately ¾ inch long. The wingless female wasps look like “fuzzy ants”, but they are not ants. The black and orange-red markings make them strikingly colorful. The males have wings and can actually “squeak” when cornered. Stings are extremely painful. This species is commonly called the cow killer because of the pain it causes.
Reference for more information on insects: http://insects.tamu.edu

Crawling Critters
Ants Fire Ants consist of four species in Texas. The most aggressive is the Red Imported Fire Ants which are found mainly in the eastern two-thirds of Texas. They are less than ¼ inch long. The females are reddish-brown and the males are darker. They respond rapidly and aggressively to any disturbance of the colony or to a food source. Ants both bite and sting. A single fire ant can and will sting repeatedly, even after the venom sac is empty. Initially the stings result in a localized intense burning sensation followed within 24-48 hours by the formation of a white pustule at the sting site. A minority of those stung who are hypersensitive to the venom require more intense treatment.
Velvet Ants : See wasps
Blister Beetles Blister beetles have a long, cylindrical body with a narrow neck. They are 3/8 to one inch long. There are more than 50 species in Texas. The color is variable, commonly black, gray metallic blue and yellow. They may have lines or spots on their back. Blister beetles are not venomous, in that they do not inject venom through a bite or sting. They do, however, produce a fluid which blisters the skin. They feed on alfalfa, soybeans and other legumes. They are poisonous if eaten and have been known to cause death when ingested by horses. Puss Caterpillars Puss caterpillars are sometimes called asp caterpillars. They are approximately 2 inches long and are covered with a thick mat of hair. They are usually tan or gray, but can vary from white to black. Adults are called flannel moths. They feed on oaks, elm and other woody plants. The hair conceals spines on the back that inject toxic chemicals. These are extremely painful and can cause fever, inflammation and nausea. Scorpions There are about 18 species of scorpions in Texas with most of them found in the Big Bend area. They have an average size of 2 inches. The color may vary from dark to light. Although Texas scorpions are not considered deadly, they can inflict a sharp, painful, sting which may produce a local reaction. Individual reactions may vary. The venom is a neurotoxin and anyone stung should be watched closely for adverse or allergic reactions.

Centipedes Texas has several species of centipedes that are small and of little medical importance. The species of concern are the large ones that average about 6-8 inches, but can be larger. They have one pair of legs per body segment. The body is brown to deep blue with yellowish to orange head and legs. Centipedes have a pair of pincers that produce an intense, scorpion-like pain. Most victims complain of a burning sensation. Each leg has a needle like structure on the tip that can also inflict pain.
Spiders
Spiders serve a very beneficial purpose in nature, often feeding on nuisance critters such as mosquitoes, gnats, flies, crickets. etc. All spiders have venom; that is how they kill their prey. However, most bites are usually not medically significant, with the exception of bites from widow spiders and recluse spiders. If you are bitten by a spider, you may experience a red, swollen, itchy area on your skin. In most cases, these go away without much care or attention. If you feel or see the spider biting you, wash the area with soap and water. Call the Poison Center for further instructions 1-800-222-1222. Tarantulas Tarantulas in Texas are large hairy spiders, brown to black in color, and adults are about 3 inches long. They may be seen in the evenings when they are looking for food. Males can sometimes be seen in numbers during warmer months. If you find one crawling, get your camera and take a picture or just leave it alone. Tarantulas are not aggressive spiders and only bite when cornered or feel threatened. They do possess venom. There is no scientific evidence that any of their venoms are lethal, but bites from some species can be painful and cause unpleasant symptoms. Tarantulas can also brush hairs off their abdomen which can be irritating to the skin or eyes. Wolf Spider Wolf Spiders hunt at night. They are often large, generally brown and black, and may have stripes on both their abdomen and head. They are very common, especially in new housing developments where the soil has been disturbed. They frequently enter homes. They are relatively harmless but their bite can produce local pain and swelling. Orbweaver Spiders Orb-weaving spiders make the beautiful webs with concentric circles that are often very ornate. They come in many shapes, sizes, and colors. Orbweavers are generally harmless, but can be a nuisance if they build large webs in places you like to walk. If you've been bitten by a spider of any kind and feel concerned, collect the spider, if possible, and see your doctor or contact your local Poison Center.

Yellow Garden Spiders are the largest and best-known, of the orbweavers. They are marked with yellow, black, orange or silver. The female body can be more than 1 inch long, with much longer legs. The males are about half the size of females, and dark colored. This garden spider is also known for the zigzag design in their web and some folks call them the “writing spiders.” They are very beneficial and eat harmful insects, such as grasshoppers. It is possible for them to bite you if you get into their web or try to handle them. They will often spin a web across a walkway or trail, spanning several feet. If you notice these spiders building webs close to your home and would like them to move, you don't need to harm the spiders. Simply tear down the webs. The spiders will relocate further away where they can continue to do their part in keeping down the insect population.
Spinybacked Orbweavers are sometimes called hardbacked orbweavers, just in case you want to learn more about this unique little spider. They are common in wooded areas and their abdomen colors may be white, yellow, orange or red. The unusual flattened, spiny body shape makes it look like a crab...but it is not a crab spider...they are different.
Golden Silk Spiders weave very strong webs which look like gold thread in the sunshine. The female (3”) is much bigger than the male (1/2”). They rarely ever bite people. Although many people call them Banana Spiders because of their yellow bodies, they are not banana spiders. In fact they are very different from the spiders found in banana bunches.
Jumping Spiders Jumping spiders are among the most interesting spider groups to watch. Jumping spiders come in many sizes and color patterns. Active hunters during the day, they have good eyesight, relying primarily on movement to locate prey. They stalk their prey before attacking in a fast leap. Jumping spiders put out a line of webbing when they jump and can sometimes be seen dangling from this silken dragline after a leap that fails. Many jumping spiders are bold, stocky and often brightly colored. They often have conspicuous bands of black and white on their bodies or legs. Others have velvety red abdomens. Like most spiders, jumping spiders are not considered hazardous to humans and are unlikely to bite unless cornered or handled. One of the most common and conspicuous of the jumping spiders is black with a distinct irregular orange to white spot on the top of the abdomen. It can be found in gardens and around homes.

Recluse Spiders There are several different species of recluse spiders. The brown recluse spider is commonly known as a "fiddle-back" because of the violin-shaped marking on the top of the head portion. The shape and intensity of the fiddle design may vary. The body size is 1/4 to 3/4 inch with the leg span about the size of a quarter or half dollar. It lives in dark secluded places where there is little activity. Effects from a bite vary. It may be immediate or delayed; vary from no pain, to a stinging sensation, to intense pain. Within 24-36 hours fever, chills, weakness and pain may or may not occur. Within 2-3 days, the bite site may or may not erupt into an ulcerating lesion. Widow Spiders There are several species of widow spiders in Texas, but the most notorious is the southern black widow. It is the most recognized of the venomous spiders. They are shy and prefer to live in protected areas outdoors. The female is about 1.5 inches long with a red marking on the underside of her spherical abdomen. The marking typically is a red hourglass shaped, but not always. The color may vary from white, red, orange, pink, or other colors. The male is about half her size and along with juveniles tend to have more markings. Females bite when threatened or protecting an egg sac. The neurotoxin causes intense pain in 1 - 3 hours and may cause medical difficulties. Bites may be problematic, especially for infants and elderly. Call the Poison Center for instructions if bitten. Reference for more information on spiders, click on this link or copy and paste in your browser: http://tcebookstore.org/tmppdfs/viewpdf_252.pdf?CFID=21193191&CFTOKEN=56342965&jsessionid=8e3083f86cc328225a70
Snakes
In Texas, there are four types of venomous snakes, rattlesnakes, copperheads, water moccasins (cottonmouths), and coral snakes. The first three are in a group we call vipers. Vipers have a characteristic large head described as arrowhead or triangle shaped. They have heat sensing pits on their head, and elliptical eyes. They have retractable fangs in the upper part of their mouth that can pierce the skin and deliver venom when used for prey or defense. Anti-venom treatment is available when necessary for the majority of Texas vipers. The fourth snake is a coral snake which is not a viper. Its head is basically the same size as the rest of the body, it has round eyes, and 1/8 inch long fixed rear fangs. The venom is different from the others and therefore the anti-venom is different. If bitten by any of these snakes. Call the Poison Center 1-800-222-1222. Although non-venomous snakes may bite to protect themselves, they have no venom. Wash the bite to avoid a bacterial infection.

Rattlesnakes There are about ten different types of rattlesnakes in Texas. They range from the small pigmy rattler to the large timber rattler and include the massasauga, mojave, black tail, western diamond back, mottled rock, banded rock, and prairie. Rattlesnakes are pit vipers that have a triangular-shaped head which is broader than their neck. Their trademark is a rattle on the end of their tail, which usually serves as a warning signal when they feel threatened, however they may strike without warning. They have a wide range of color variation. They use heat sensitive areas in the pits on their heads. Venom is injected through fangs which puncture the victim's skin. Copperheads There are three different types of Copperheads found in Texas. The broadband copperhead and the southern copperhead cover a large area of the state. The trans-Pecos copperhead is only found around the Big Bend area. Copperheads are also pit vipers, and are recognized by their copper-colored head and body. The body is marked with bands of darker brown in somewhat of an hourglass pattern. Like all vipers, copperheads can pose a danger to humans. It is the most common viper bite in many parts of Texas. Cottonmouth Water Moccasin The cottonmouth is the only North American venomous water snake. This dangerous semi-aquatic snake is aggressive and will stand its ground or even approach an intruder. It is characterized by a brown, olive or blackish dark body with a lighter belly. The underbelly is frequently mottled with dark areas. The mouth is frequently in an ominous open position exposing the white inner surface from which it derives its name. It is a dangerous predator and can inflict a damaging bite. It is a very close relative of the copperhead and the young look the same. Coral Snakes This typically very small snake averages only 26 inches. The beauty of this snake represents a true danger since small children may want to pick it up. The coral snake found in Texas is the only black, red, and yellow cross-banded snake with the red and yellow bands touching. "Red against yellow kills a fellow, red against black, poison lack." It can be confused with the king, milk, or scarlet snakes, which have bands of similar color. The snake’s small fangs do not penetrate well so many bites do not inject venom.

Prevention and Treatment for Bites and Stings
For insect or spider bites: • Remove webs and nests• Remove stinger if applicable• Wash with soap and water• If victim develops itching, or irritation, call The Poison Center for instructions• If patient develops breathing problems, wheezing or swelling around the lips or tongue,
call 911.
For snake bites: • Avoid habitat areas• If bitten, note the time of the bite, remove jewelry or other items that might constrict
swelling, remain calm.• Do not try to capture the snake.• Do not cut the wound and try to extract the venom by mouth.• Do not use ice or a tourniquet.• If possible, wash the bitten area with soap and water and cover with a cloth. Keep the
bitten area level with the heart.• Do not take pain relievers or other medications without medical advice. Do not drink
alcohol.• Call the Poison Center for instructions on all snake bites. 1-800-222-1222
If you have questions about any bite, wound, or sting from an animal, consult the free services of the
Texas Poison Center Network, 1-800-222-1222.