Embed Size (px)
Citation preview

Compum
otor
Compumotor DivisionParker Hannifin Corporationp/n 88-013056-01
Motion ArchitectUser Guide
®

Motion Architect ®
The information in this document is subject to change without notice and does not represent a commitment onthe part of Parker Hannifin Corporation. Motion Architect is furnished under a license agreement ornondisclosure agreement, and may be in installed and used only in accordance with the terms of theagreement.
No part of this document may be reproduced or transmitted in any form or by any means, electronic ormechanical, including photocopying, recording, or information storage and retrieval systems, for any purposeother than the purchaser's personal use, without permission of Parker Hannifin Corporation.
Motion Architect is a registered trademark and Servo Tuner and CompuCAM are trademarks of ParkerHannifin Corporation.
AT and IBM are registered trademarks of International Business Machines Corporation.
Microsoft and MS-DOS are registered trademarks and Windows is a trademark of Microsoft Corporation.
© Copyright 1992-4 by Parker Hannifin Corporation.All rights reserved.Printed in the United States of America.
WARNING Motion Architect is used to control your system's electrical and mechanical components.Therefore, you should test your system for safety under all potential conditions. Failure todo so can result in damage to equipment and/or serious injury to personnel.
Technical Assistance Contact your local automation technology center, or ...
North America Compumotor Division of Parker Hannifin& Asia 5500 Business Park Drive
Rohnert Park, CA 94928Telephone: (800) 358-9070Fax: (707) 584-3793BBS: (707) 584-4059
Europe Parker Digiplan Germany, Austria HAUSER Elektronik GmbH(non-German speaking) 21 Balena Close & Switzerland Postfach: 77607-1720
Poole, Dorset Robert-Bosch-Str. 22 • D-77656 OffenburgEngland BH17 7DX Telephone: (0781) 509-0Telephone: 0202-690911 Fax: (0781) 509-176Fax: 0202-600820
Compumotor User Guide Part Number: 88-013056-01CReleased: August 1994


Change SummaryMotion Architect User Guide
Revision C
The following is a summary of the primary technical changes to this user guide since the last version was released. Thisuser guide, p/n 88-013056-01C (released in August 1994), supersedes 88-013056-01B.
Topic Description
Add-on Utilities Servo Tuner™: References to the Servo Tuner option for Motion Architect have removed to the new Servo Tuner UserGuide (p/n 88-014249-01).
CompuCAM is a new add-on module to Motion Architect (it can also be launched separately from Motion Architect).CompuCAM allows you to translate DXF, HP-GL, and G-Code files into 6000 Series Language motion programs.
After add-on utilities are installed, they can be launched from the Utilities menu.To order CompuCAM or Servo Tuner, contact your local Automation Technology Center.
Installation The procedure (setup utility) for installing Motion Architect has been changed.
DLL(dynamic linklibrary)
Refer to the 6000 Series Programmer's Guide for instructions on using Compumotor's DLLs.
• WIN6400.DLL provides communication and fast status services for all 6000 Series bus-based products (not just theAT6400). Function prototypes, type definitions, and error conditions can be found in WIN6400.H.
• Functions added: Is controller ready; Timeout; Delay; Get extend fast status; and Send file.
New ProductsSupported
Motion Architect now supports these 6000 Series products, as shown in the product selection dialog box:AT6400-AUX1 AT6250 6270AT6400-AUX2 AT6450 APEX615n Series6200 6250 ZETA6104
Panel ModuleEnhancements
• Following motion (master cycle number, master cycle position, master velocity, and net position shift) and Followingstatus (TFS status report) may be displayed.
• Status of the ANI inputs (servos with ANI option) may be displayed—see “Hi-Res Analog Inputs”.
• When you launch the Panel module, the controller is automatically “connected” (communication is established). Whenyou close the Panel module, the controller is automatically disconnected. The changes you make under the Settingsmenu are automatically saved for subsequent Panel sessions.
• NOTE: The Panel module is considered a “test panel”, not an “opera�tor panel”.
On-Line ReferenceGuides
• The on-line 6000 Series Software Reference Guide (see 6000 Software Reference) has been updated. Refer to theHelp menu.
• The on-line 6000 Following User Guide (see 6000 Following Reference) has been added. Following instructions andFollowing-specific command descriptions are found in this utility. Refer to the Help menu.
Editor ModuleEnhancements
• A toolbar has been added to provide easy access to common functions:
New
Ope
n
Sav
e
Cut
Cop
y
Pas
te
Prin
t
Com
man
ds
Hel
p
• The View menu allows you to display or hide the toolbox and the status bar. You can also customize the fonts and colorsin the editor window.
• “Navigate” and “Search” have been removed from the menu header. Refer to the list of keystroke shortcuts on page 12.
• Editor now supports 255 levels of “Undo”. “Redo” reverses the previous “Undo”.
• Print Preview is now supported (see File menu).
Terminal ModuleEnhancements
• Same toolbar and View enhancements as noted above for the Editor.
• Now you can paste code from the clipboard into the active Terminal window, where the code is immediately executed bythe controller.
• When you launch the Terminal module, the controller is automatically “connected” (communication is established).When you close the Terminal module, the controller is automatically disconnected. The changes you make under theSettings menu are automatically saved for subsequent Terminal sessions.
• Print Preview is now supported (see File menu).


T A B L E O F C O N T E N T S
WelcomeIntroducing Motion Architect............................................................................................................. 1Before You Begin ........................................................................................................................... 2
User Guide Contents........................................................................................................... 2Who Should Use Motion Architect? ........................................................................................ 2Windows™ Operating System Experience............................................................................... 2Hardware and Software Requirements .................................................................................... 2Make a Backup Copy .......................................................................................................... 2Install Motion Architect on Your Hard Disk............................................................................... 2Launching Motion Architect ................................................................................................. 3Selecting a 6000 Series Product ........................................................................................... 3
Chapter 1: Motion Architect BasicsShell Window................................................................................................................................. 5On-line Help (Help).......................................................................................................................... 5
Help Window Buttons .......................................................................................................... 6Command Dialog Box (6000 Commands) ................................................................................. 6
Standard File Operations (File) .......................................................................................................... 7Arranging Multiple Windows in the Same Module (Window) ...................................................................... 7Productivity Tips............................................................................................................................ 8
Chapter 2: System Configuration (Setup)What is the Setup Module................................................................................................................. 9
Establishing System Set-up Parameters (Configure) ................................................................. 9Generating Controller Code For System Set-up Parameters (Generate) ......................................... 10
Chapter 3: Program Editor (Editor)What is the Editor Module................................................................................................................. 11Using the Editor Module................................................................................................................... 11
Editing Your Controller Code (Edit) ......................................................................................... 11Customizing the Display Window (View) .................................................................................. 12Hot Keys .......................................................................................................................... 12
What to do after Editing ................................................................................................................... 13
Chapter 4: Terminal Emulator (Terminal)What is the Terminal Module ............................................................................................................. 15Using the Terminal Module................................................................................................................ 15
Editing Your Controller Code (Edit) ......................................................................................... 15Setting Up Communications with the 6000 Series Controller (Settings) .......................................... 16Communicating with the 6000 Series Controller (Transfers)......................................................... 16Customizing the Display Window (View) .................................................................................. 17
Chapter 5: Test Panel (Panel)What is the Panel Module................................................................................................................. 19Creating Your Own Custom Test Panel................................................................................................ 20
Setting Up Displays ............................................................................................................ 20Setting Up User-Defined Buttons........................................................................................... 21
Communicating with the 6000 Series Controller..................................................................................... 22Setting Up Communications with the 6000 Series Controller (Settings) .......................................... 22Communicating with the 6000 Series Controller (Transfers)......................................................... 22
Appendix A–Creating Your Own Windows ApplicationDevice Driver—Dynamic Link Library (WIN6400.DLL) ............................................................................ 23Visual Basic™ Support Files............................................................................................................. 23Software Development Kit™ (SDK) Support Files .................................................................................. 25
Index ..................................................................................................................................................... 29

Welcome 1
W E L C O M E
Introducing Motion Architect®
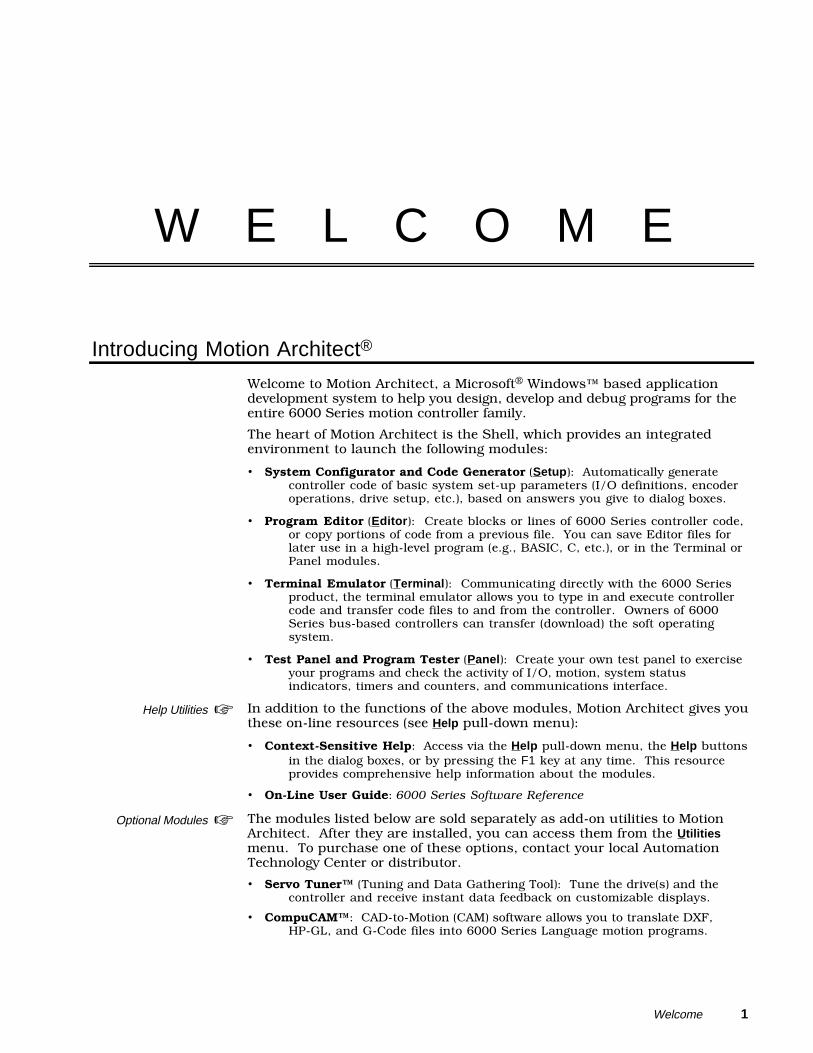
Welcome to Motion Architect, a Microsoft® Windows™ based applicationdevelopment system to help you design, develop and debug programs for theentire 6000 Series motion controller family.
The heart of Motion Architect is the Shell, which provides an integratedenvironment to launch the following modules:
• System Configurator and Code Generator (Setup): Automatically generatecontroller code of basic system set-up parameters (I/O definitions, encoderoperations, drive setup, etc.), based on answers you give to dialog boxes.
• Program Editor (Editor): Create blocks or lines of 6000 Series controller code,or copy portions of code from a previous file. You can save Editor files forlater use in a high-level program (e.g., BASIC, C, etc.), or in the Terminal orPanel modules.
• Terminal Emulator (Terminal): Communicating directly with the 6000 Seriesproduct, the terminal emulator allows you to type in and execute controllercode and transfer code files to and from the controller. Owners of 6000Series bus-based controllers can transfer (download) the soft operatingsystem.
• Test Panel and Program Tester (Panel): Create your own test panel to exerciseyour programs and check the activity of I/O, motion, system statusindicators, timers and counters, and communications interface.
Help Utilities ☞ In addition to the functions of the above modules, Motion Architect gives youthese on-line resources (see Help pull-down menu):
• Context-Sensitive Help: Access via the Help pull-down menu, the Help buttonsin the dialog boxes, or by pressing the F1 key at any time. This resourceprovides comprehensive help information about the modules.
• On-Line User Guide: 6000 Series Software Reference
Optional Modules ☞ The modules listed below are sold separately as add-on utilities to MotionArchitect. After they are installed, you can access them from the Utilitiesmenu. To purchase one of these options, contact your local AutomationTechnology Center or distributor.
• Servo Tuner™ (Tuning and Data Gathering Tool): Tune the drive(s) and thecontroller and receive instant data feedback on customizable displays.
• CompuCAM™: CAD-to-Motion (CAM) software allows you to translate DXF,HP-GL, and G-Code files into 6000 Series Language motion programs.

2 Motion Architect User Guide
Before You Begin
User Guide Contents• Chapter ➀—Motion Architect Basics:
- Motion Architect's on-line help and on-line reference guide utilities- Standard file operations (New, Open, Save, Save As, and Exit)- Managing multiple windows within one module- Productivity tips
• Chapters ➁-➄: These chapters describe how to use each of Motion Architect'sfour main modules (Setup, Editor, Terminal, and Panel). Information about theoptional add-on modules, such as Servo Tuner and CompuCAM, (see Utilitiesmenu) are provided in their respective user guides.
Who Should Use Motion Architect?This software is intended to be used by software engineers or othersresponsible for programming 6000 Series products for motion controlapplications.
Windows™ Operating System ExperienceTo use Motion Architect most effectively, you should be familiar with theWindows operating environment. If you are new to the Microsoft Windowsoperating system, refer to your Microsoft Windows User's Guide to learnabout the basic skills you need to work with Windows-based applications—such skills include:• Mouse and keyboard techniques• Standard file operations (opening, closing, saving, printing, etc.)• Managing windows• Using menus and dialog boxes
Hardware and Software RequirementsMotion Architect requires the resources listed below (this does not includememory requirements for optional add-on modules).• Microsoft® Windows™ release 3.1 or later• At least 2 MB of RAM• At least 3 MB of hard disk space
Make a Backup Copy
5-1/4" diskettesmay be requested
from your localdistributor.
Motion Architect is shipped on two 3-1/2" high-density diskettes. Before youinstall Motion Architect on your hard disk, make backup copies of eachdiskette in your Motion Architect package (refer to your operating systemmanual for instructions). Label the diskettes identical to the originals. Afteryou have made copies, store the originals in a safe place and use the copiesas working copies.
Install Motion Architect on Your Hard Disk
Step 1 Insert the Motion Architect diskette labeled Disk 1 with Setup into floppy diskdrive A.
Step 2 From the Program Manager, click File and choose Run. You can also do thisfrom the File Manager. When the dialog box appears, type a:setup. When theWelcome screen appears, click Continue. After a short period, the registrationscreen will appear.

Welcome 3
Step 3 In the Custom Installation dialog box, you can specify the location where youwant to install Motion Architect, and you can select only those parts ofMotion Architect you wish to install.
Unless otherwise specified with the Set Location option, Motion Architect will beinstalled in the MA6000 sub-directory.
In the Installation Options area, select the parts of Motion Architect you wishto install:
• Motion Architect Program installs the files necessary to run Motion Architect.• Motion Architect Help installs the on-line help system for Motion Architect.• SDK/VB Samples installs sample Microsoft C and Visual Basic source code that
you can use to create your own Windows motion application.
Also, in the Installation Options area, select one or more 6000 Seriesproducts that you will be working with.
After you have made the appropriate selections, click Install. If you selectedMotion Architect Help, you will be prompted to insert “Disk 2” of the two MotionArchitect diskettes. If you selected a 6000 Series bus-based product to workwith, you will be prompted to insert the “DOS Support Disk” (the support diskthat ships with the product and contains the soft operating system).
Step 4 After the installation is complete, the Installation Complete dialog boxappears. At this point, you have the options of reading the README file,running Motion Architect, or returning to Windows.
Launching Motion ArchitectAfter the setup utility has finished installing Motion Architect, the followingprogram group (Motion Architect) will appear.
To launch Motion Architect, double-click on the Motion Architect icon. TheMotion Architect welcome screen will appear. Click the Okay button toremove the screen. After a few moments, the Shell window will be displayed.
Selecting a 6000 Series ProductClick Product on the Motion Architect shell menu bar and choose Selection.When the dialog box appears, select the 6000 Series product you are usingand click Okay. As an example, the dialog box below shows that the 6270 isselected. The product you select here will be automatically selected the nexttime you launch Motion Architect.
OEM Products:Type in the name of yourproduct in the “Other” field.


➀ Motion Architect Basics 5
C H A P T E R ➀
Motion Architect Basics
Shell Window
When you launch Motion Architect, the first window you see (after the start-up screen) is the Shell. Consider this window home base, if you will, for usingMotion Architect. From the Shell window, you can do the following:
• Click the Product menu to select, or change, the 6000 Series product for whichyou are using Motion Architect (see Step ➈ in the installation procedure).
• Launch the four main modules of Motion Architect (Setup, Editor, Terminal, andPanel).
• Launch optional add-on modules, such as Drive Tuner, Servo Tuner, orCompuCAM (Utilities).
• Access the on-line help utilities (Help).
On-line Help (Help)
Menu varies by module
From the menu bar in the Shell or any module, you can access the on-linehelp system by clicking on Help, or by pressing the F1 key when a menu itemis selected. The Help pull-down menu items are briefly described below.
Tip ☞ Click on the underlined green words, known as jump words, to get information on aspecific topic.
• Help for help. The same help resource for all modules, describes how to usethe on-line help system's features.
• Keys help. Defines the short-cut (hot) keys you can use within a particularmodule to help you select certain commands or menu items faster.
• Help index. Provides information on how to use the particular module fromwhich you accessed the on-line help system. The information is categorized bythe items that appear in the module's menu bar.

6 Motion Architect User Guide
• 6000 Commands. Displays the Command Dialog Box, from which you can lookup commands, edit them, and insert them into an active program editor sessionor terminal emulator session. For more information, refer to Command DialogBox below.
• 6000 Software Reference. Brings you directly to the Contents menu of the on-line version of the 6000 Series Software Reference Guide. This is a valuableresource for detailed command descriptions and programming guidelines.
• 6000 Following Reference. Brings you directly to the Contents menu of the on-line version of the 6000 Series Following User Guide.
• About. Displays revision and copyright information.
Help Window ButtonsThe buttons under the menu bar allow you to navigate through the on-linehelp system:
• Contents will display the table of contents for the help system. Clicking on anunderlined green item will take you to a particular topic.
• Search will allow you to jump to topics based on a keyword search.
• Back will take you back to the previously selected topic.
• History shows a complete record of your movements through the on-line helpsession.
• Glossary, not shown on some menu bars, provides definitions of commonlyused terms in the help system.
• << or >>, not shown on some menu bars, allows you to browse backward orforward through a sequence of topics.
Command Dialog Box (6000 Commands)Clicking on the 6000 Commands menu item launches a dialog box similar tothe one shown below (this dialog box can also be accessed in the Terminaland Editor modules by selecting the button on the toolbar).
Selecting a command category will fill the adjacent list box with commandsfrom that category. Selecting a command from the command list box will fillthe edit box at the bottom of the dialog where further editing can be done.Clicking on Paste will paste the command from the edit box to the Editor orTerminal session you have open at the time (command is pasted at thelocation of the cursor).

➀ Motion Architect Basics 7
Clicking on the Help button displays a detailed description of the command,as provided in the 6000 Series Software Reference Guide (examplebelow).
Standard File Operations (File)
Menu varies by module
These five standard file operations are found under the File pull-down menuin all four modules:
• New creates a new file.• Open opens an existing file.• Save updates the file currently open with the latest edits.• Save As saves the file currently open as a separate file under a new name.• Exit exits (closes) the module and any open files within that module.
The New and Save As file operations give you the flexibility of creatingmultiple controller code files and test panel files to solve complex orfluctuating applications. For instance, if you want to test several differentsystem I/O configurations, you could create several system set-up controllercode files with the Setup module. These files could later be edited in theEditor module and tested with several versions of test panels created with thePanel module.
Printing ☞ In the Editor and Terminal modules, printing operations (Print, Print Preview,and Print Setup) are included so you can print your controller code files. Inthe Terminal module, you can print only the contents (up to 1500 lines) ofthe terminal emulator window.
Arranging Multiple Windows in the Same Module (Window)
In the Editor and Panel modules, you can work with multiple files or windowsopen at one time (e.g., viewing multiple controller programs in the Editormodule, or viewing several status displays in the Panel module). To help youarrange these windows for easy viewing, use one of the window viewingoptions under the Window menu bar item.
Tile Horizontally: Tile Vertically:

8 Motion Architect User Guide
Cascade:
Arrange (Arranging Icons of Minimized Windows):
If you minimized (reduced to the icon level—see below) some of thewindows/files within a module, you can arrange their icons neatly along thebottom of the window by clicking on Arrange. To view the minimizedwindow/file, simply double-click the icon.
Close All (Closing All Windows):
Chose Close All if you want to close all the windows/files within the module.If you made changes to the open files, you will be prompted with the option tosave before closing.
Productivity Tips• To help with the iterative process of creating and revising programs, open the
Editor and Terminal modules and resize the two windows so that they are side byside on your screen. This allows you to easily switch between creating andediting programs in the Editor, and downloading programs and checkingresponses and error messages in the Terminal.
• Using the keystroke shortcuts (hot keys) to select menu commands is faster thanif you use the mouse. To learn these hot keys, read the Keys Help descriptionsunder the Help menu in each module, or simply look through the pull-downmenus for the keystroke listed next to the menu item.
• Use the on-line help, as well as the on-line 600 Software Reference (see 6000Software Reference under the Help menu):
• If you need to test several different system configurations, controller programs, ortest panels, you may want to save several versions of the files created in eachmodule. For instance, if you want to test several different system I/Oconfigurations, you could create several system set-up controller code files withthe Setup module. These files could later be edited in the Editor module andtested with several versions of operator panels created with the Panel module.
• Avoid confusion when several windows are open at one time:- Avoid having more windows open than you really need.- Use the Tiling feature in the Editor module to arrange the windows for easy
access to other files you are using.- Try resizing windows, especially on-line help and command reference
windows, to be less than full screen.- If you are working in a module and you lose track of a file's window (e.g., lost
behind several others) or if you do not have a mouse, you can access thedesired window by selecting its name from the list at the bottom of theWindow pull-down menu.

➁ Setup 9
C H A P T E R ➁
System Configuration (Setup)
What is the Setup Module?
The Setup module takes much of the drudgery out of motion controlprogramming. This module automatically generates configuration code inresponse to your answers to a series of dialogs concerning I/O definitions,encoder operations, homing operations, end-of-travel limits, drive setup,joystick setup, execution modes, etc.
Establishing System Set-up Parameters (Configure)Under the Configure pull-down menu are the configuration parameters toconsider for your application. When you select one of these parameters, adialog box appears. Below is an example of the encoder configuration dialogbox. Note that as you complete the configuration of the parameters, a checkmark (✓) appears next to the menu item. If you are not going to generate codenow, you can save these configuration parameters as a separate configuration(.cfg) file; otherwise, it will automatically be saved along with the program (.prg)file for the resultant code when you click the Generate menu (see below).

1 0 Motion Architect User Guide
Generating Controller Code For System Set-up Parameters (Generate)After you finish answering the dialog boxes under the Configure menu, clickthe Generate menu to view the resultant controller code. A message box willappear to let you know that code generation is complete—click OK. After youclick OK, if you have not saved the configuration parameters establishedunder the Configure menu, a SAVE AS dialog box appears and prompts youto save these parameters as a separate configuration (.cfg) file. As the .cfg fileis saved, a program (.prg) file is automatically saved to store the newlygenerated code. You can later use this .prg file as a building block for a set-upprogram.
You will find the code to be neatly formatted and fully documented (seeexample below).
Controller set-upcode is automaticallygenerated, based onyour answers to theconfiguration dialog
boxes.

➂ Editor 1 1
C H A P T E R ➂
Program Editor (Editor)
What is the Editor Module?
The Editor module is a tool you can use to create and edit controllerprograms using the 6000 Series Programming Language. You can then savethese programs as separate files for later use in high-level programs (e.g.,BASIC, C, etc.), or in the Terminal and Panel modules.
Using the Editor Module
This section describes the functions of the Edit and View menu bar items.The functions of File, Window, and Help are discussed in Chapter ➀, MotionArchitect Basics.
Printing Controller Code Program FilesThe Editor allows you to print your controller code program files. Refer to the printingoperation commands under the File pull-down menu.
Editing Your Controller Code (Edit)Under the Edit pull-down menu are commands that help you edit thecontents of your motion programs:
• Undo: Undo the last edit operation, including deleting text (up to 255consecutive undo operations are possible).
• Redo: Undo the last Undo operation (up to 255 operations).
• Cut: Cut (remove) highlighted text and send to the clipboard to later pastesomewhere else in the same file or in another program file. This function isduplicated by the button on the toolbar.
• Copy: Copy highlighted text to the clipboard to later paste somewhere else inthe same file or in another program file, or in an active Terminal session. Thisfunction is duplicated by the button on the toolbar.
1 2 Motion Architect User Guide
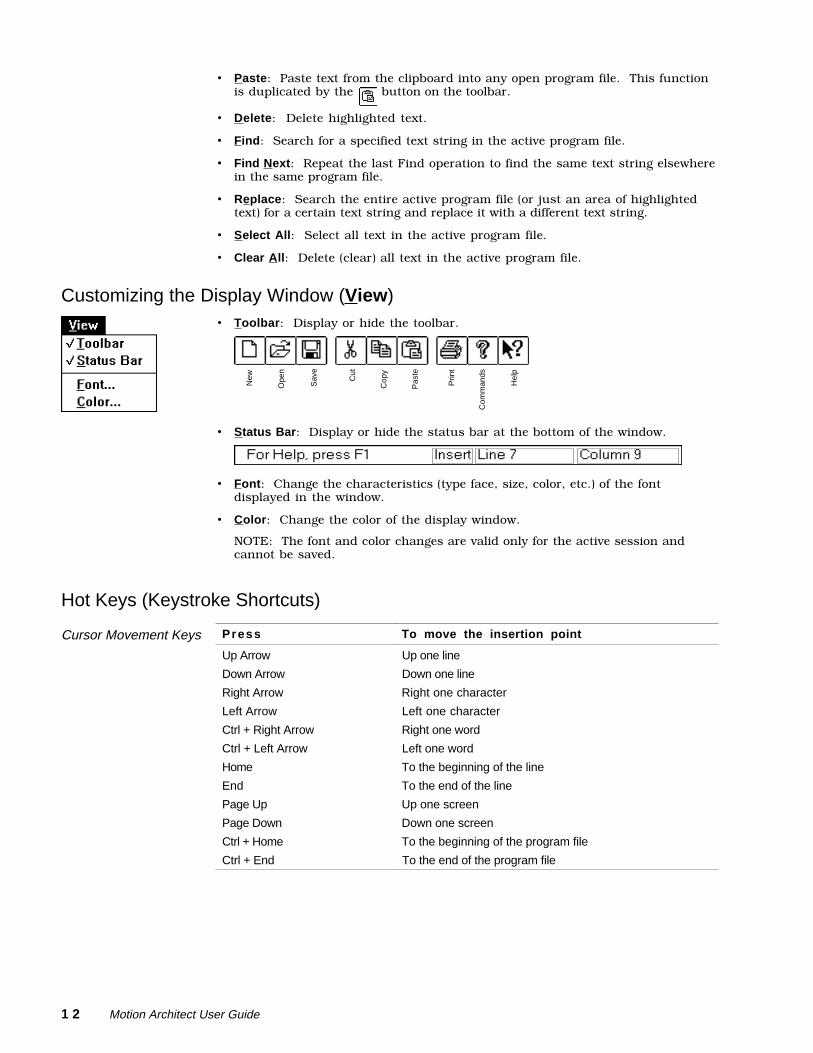
• Paste: Paste text from the clipboard into any open program file. This functionis duplicated by the button on the toolbar.
• Delete: Delete highlighted text.
• Find: Search for a specified text string in the active program file.
• Find Next: Repeat the last Find operation to find the same text string elsewherein the same program file.
• Replace: Search the entire active program file (or just an area of highlightedtext) for a certain text string and replace it with a different text string.
• Select All: Select all text in the active program file.
• Clear All: Delete (clear) all text in the active program file.
Customizing the Display Window (View)• Toolbar: Display or hide the toolbar.
New
Ope
n
Sav
e
Cut
Cop
y
Pas
te
Prin
t
Com
man
ds
Hel
p
• Status Bar: Display or hide the status bar at the bottom of the window.
• Font: Change the characteristics (type face, size, color, etc.) of the fontdisplayed in the window.
• Color: Change the color of the display window.
NOTE: The font and color changes are valid only for the active session andcannot be saved.
Hot Keys (Keystroke Shortcuts)
Cursor Movement Keys Press To move the insertion point
Up Arrow Up one line
Down Arrow Down one line
Right Arrow Right one character
Left Arrow Left one character
Ctrl + Right Arrow Right one word
Ctrl + Left Arrow Left one word
Home To the beginning of the line
End To the end of the line
Page Up Up one screen
Page Down Down one screen
Ctrl + Home To the beginning of the program file
Ctrl + End To the end of the program file

➂ Editor 1 3
Editing Keys Press To
Backspace Delete one character to the left of the insertion point
Delete Delete one character to the right of the insertion point, ordelete the highlighted text
Ctrl + C, or Ctrl + Insert Copy the select text and place it onto the Clipboard
Ctrl + X, or Ctrl + Delete Delete the select text and place it onto the Clipboard
Ctrl + V, or SHIFT + Insert Paste from the Clipboard into the active window
Ctrl + Z, or Alt + Backspace Undo the last editing action (up to 255 levels of undo)
SHIFT + Ctrl + Z Undo the last Undo action (up to 255 levels)
Text Selection Keys Press To select or cancel selection of
SHIFT + Left or Right Arrow One character at a time to the left or right
SHIFT + Up or Down Arrow One line of text up or down
SHIFT + Page Up All text, one screen up
SHIFT + Page Down All text, one screen down
SHIFT + Home Text to the beginning of the line
SHIFT + End Text to the end of the line
Ctrl + SHIFT + Left Arrow The previous word
Ctrl + SHIFT + Right Arrow The next word
Ctrl + SHIFT + Home Text to the beginning of the program file
Ctrl + SHIFT + End Text to the end of the program file
What to do after Editing
After you have created or edited an controller code file in the Editor, you cansave it as a separate file. This file can then be used in the following ways:
• Before running the program in an application, you can test-run the file from thePanel module.
• From within the Editor module, you can open any program file and print itscontents.
• From within the Editor module, you can copy the contents (part or all) of the fileand then paste it into the Terminal module for immediate execution.
• Within the Terminal module, download the file that was created in the Editormodule to the 6000 Series product for immediate execution (see Chapter ➃).
• Use the file's controller code in a high-level program (e.g., BASIC, C, etc.).
Note to bus-based controller users: Refer to the DOS Support Disk for sampleprograms in C, QuickBasic, Pascal, and Assembly.


➃ Terminal 1 5
C H A P T E R ➃Terminal Emulator (Terminal)
What is the Terminal Module?
Communicating directly with the 6000 Series product, the Terminal moduleallows you to type in and execute controller code and transfer code files toand from the controller. The code is based on the 6000 Series ProgrammingLanguage. From the Terminal module, bus-based product owners cantransfer (download) the soft operating system.
Using the Terminal ModuleThis section describes the functions of the following Terminal module menubar items: Edit, Settings, Transfers, and View. The functions of File andHelp are discussed in Chapter ➀, Motion Architect Basics.
Printing Controller CodeThe Editor allows you to print the contents (up to 1500 lines) of the terminal emulator window.Refer to the printing operation commands under the File pull-down menu.
Editing Your Controller Code (Edit)Under the Edit pull-down menu are commands that help you edit (on a line-by-line basis) the contents of your motion programs:
• Copy: Copy highlighted text to the clipboard to later paste it in the activeterminal emulator session or paste it in a program editor file. This function isduplicated by the button on the toolbar.
• Paste: Paste text from the clipboard into the active terminal emulator session.When the text is pasted, it is immediately executed. This function isduplicated by the button on the toolbar.
• Find: Search for a specified text string in the active session.
• Find Next: Repeat the last Find operation to find the text string elsewhere.
• Select All: Select all text in the current terminal emulator session.
• Clear All: Delete (clear) all text in the current terminal emulator session.
Tip ☞ You can save the contents of the active terminal emulator session to a “_____.ter” fileand then edit that file in the Editor module.

1 6 Motion Architect User Guide
Setting Up Communications with the 6000 Series Controller (Settings)The changes you make to the communication settings will be used for allsubsequent Terminal sessions, until you change them again.
NOTEYou can change these settings only if the controller is disconnected. This is evident if thereis no check mark (✓) next to Connect under the Transfers pull-down menu.Bus Based Controllers: The address and interrupt settings are essentially a verificationof the DIP switch settings on the controller card mounted in your PC-AT; they do not overridethe DIP switches. Refer to the controller's user guide for procedures to set the DIP switches.
• Board Address: Use the dialog box to set the bus-based controller's boardaddress. The default is 768 Decimal (300 Hexadecimal).
• PC-AT Interrupt: Use the dialog box to set the PC-AT interrupt. The default isno interrupt.
• Serial Port: If you are using a stand-alone 6000 Series controller, use thedialog box to select a communications port. The default is COM1.
Communicating with the 6000 Series Controller (Transfers)Use the commands under the Transfers pull-down menu to communicatewith the 6000 Series controller (referred to as controller).• Connect: Click this menu item to connect (enable communication with) or
disconnect the controller. A check mark (✓) appears to indicate successfulconnection to the controller. Once the controller is connected, the New andOpen file operations under the File pull-down menu are not allowed until thecontroller is disconnected. To disconnect, select this menu item again(disconnection is verified when the check mark disappears). Launching theTerminal module automatically connects the controller, and exiting the Terminalmodule automatically disconnects the controller.
• Send Operating System (bus-based controllers): Click this menu item to sendthe soft operating system (6000 Series Command Language) to the bus-basedcontroller. (This is a prerequisite to connecting, programming, orsending/receiving a motion program.) A message box appears to indicate if thisoperation was successful. If you have problems downloading the operating system,refer to the troubleshooting procedures in the bus-based controller's user guide.
• Send Motion Program: Click this menu item to send a controller code program(file from your hard drive) to the controller, where it is immediately executed. Amessage box appears to indicate if this operation was successful.
WARNINGDownloading a motion-based program file to the controller can cause motion. Beforedownloading the program file, make the necessary precautions to ensure the safeoperation of the equipment. Failure to do so can result in damage to equipment and/orserious injury to personnel.
• Receive Motion Program: Click this menu item to receive (upload) a controllercode program residing in the controller's memory. From the dialog box, click onthe program(s) you wish to upload and click Okay. When the Save As dialogbox appears, you can save the contents of the uploaded file under a new filename or overwrite the contents of an existing file on your hard drive.

➃ Terminal 1 7
Customizing the Display Window (View)• Toolbar: Display or hide the toolbar.
New
Ope
n
Sav
e
Cut
Cop
y
Pas
te
Prin
t
Com
man
ds
Hel
p
• Status Bar: Display or hide the status bar at the bottom of the window.
• Font: Change the characteristics (size, type face, color, etc.) of the fontdisplayed in the window.
• Color: Change the color of the display window.
NOTE: The font and color changes are valid only for the active session andcannot be saved.


➄ Panel 1 9
C H A P T E R ➄
Test Panel (Panel)
What is the Panel Module?
The Panel module allows you to test your controller programs with your owntest panel. You can customize the panel with multiple windows (monitoringcontroller output) and programmable buttons (for user input).
One or more windows can be opened to view the following controllerinformation:• I/O (programmable I/O, analog I/O, limits)• Motion (motor and encoder position, velocity)• Status (axis, system, interrupt, user status, and Following)• Misc. (timer and counter values)• Communications interface
Four tiers of eight user-definable buttons are available that allow you to sendcontroller code fragments (up to 256 characters each) to a 6000 Seriesproduct.
You can download controller programs to the 6000 Series product via the file-transfer (Transfer) menu, and execute them using programmable buttons orexternal I/O.
Additionally, you can create as many test panel configurations as you wish,and save them as separate files.
The remainder of this chapter is divided into Creating Your Own Custom TestPanel and Communicating with the 6000 Series Controller. The functions ofmenu bar items File, Window, and Help are discussed in Chapter ➀, MotionArchitect Basics.

2 0 Motion Architect User Guide
Creating Your Own Custom Test Panel
This section describes how to create a custom test panel of display windowsand user-defined buttons.
Setting Up DisplaysThe following is a typical procedure to create new display windows:
➀ Select the subject of the new display from the Display pull-down menu. Anempty window appears, displaying a message like Display not defined. Select(I/O, Motion, Status, etc.) menu to define. Notice that the menu bar changes toinclude a pull-down menu item for the display subject (e.g., I/O, Motion, etc.)and View. Below is an example of the menu bar change after selecting New I/ODisplay.
➀ From the Displays menu, select New I/O Display.
➁ New menu bar items appear.
➁ From the I/O, Motion, etc. pull-down menu, select what you want to display.
➂ Complete the dialog box. Hint: Using the tab and arrow keys may be the mostefficient means of navigating through the dialog boxes. (If you need help, clickthe Help button.)
➃ When you have completed the dialog box, click Okay. The new window isdisplayed with the parameters specified.
➄ From the View pull-down menu (Font..., Color..., and Grid...), tailor thedisplay's font, color, and grid as desired.
➅ Repeat steps ➀ through ➃ for the rest of the display windows you want in yourcustom operator panel.
➆ From the Window pull-down menu, select the desired window tiling method.Tiling is described in Chapter ➀, Motion Architect Basics.
The following is an example of a panel of display windows created to showprogrammable inputs, programmable outputs, motor position, and axisstatus. Tile Horizontally is selected.
➄ Panel 2 1
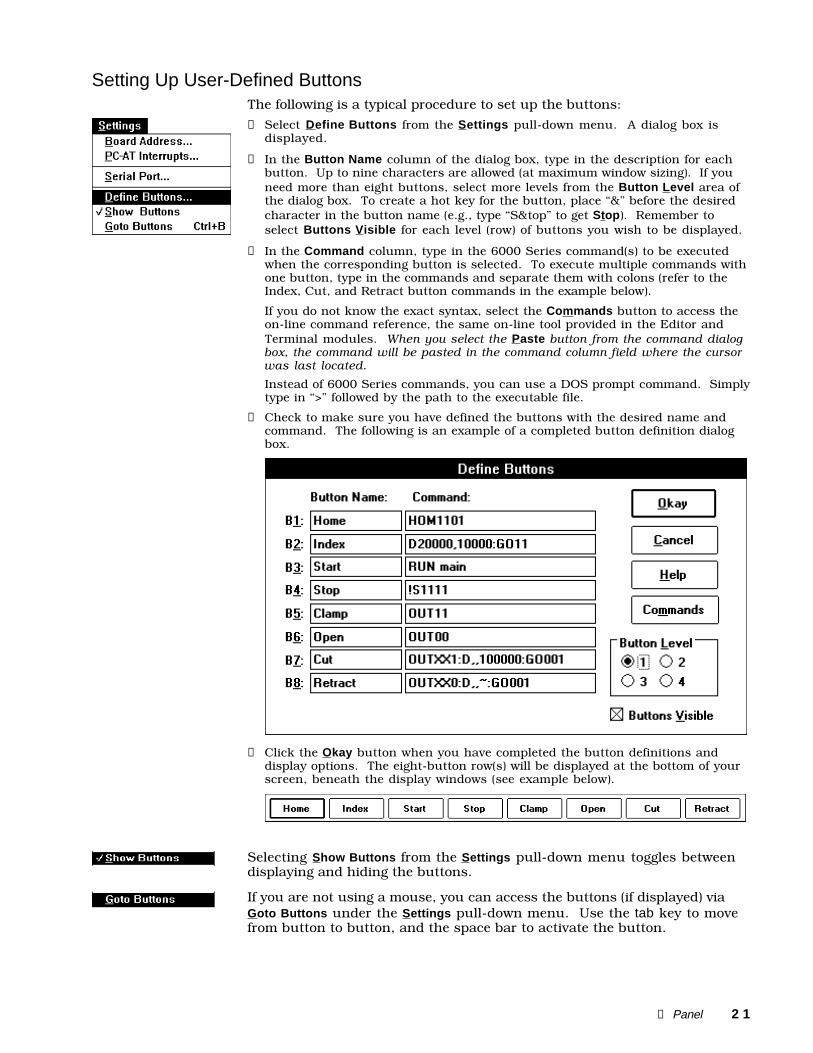
Setting Up User-Defined ButtonsThe following is a typical procedure to set up the buttons:
➀ Select Define Buttons from the Settings pull-down menu. A dialog box isdisplayed.
➁ In the Button Name column of the dialog box, type in the description for eachbutton. Up to nine characters are allowed (at maximum window sizing). If youneed more than eight buttons, select more levels from the Button Level area ofthe dialog box. To create a hot key for the button, place “&” before the desiredcharacter in the button name (e.g., type “S&top” to get Stop). Remember toselect Buttons Visible for each level (row) of buttons you wish to be displayed.
➂ In the Command column, type in the 6000 Series command(s) to be executedwhen the corresponding button is selected. To execute multiple commands withone button, type in the commands and separate them with colons (refer to theIndex, Cut, and Retract button commands in the example below).
If you do not know the exact syntax, select the Commands button to access theon-line command reference, the same on-line tool provided in the Editor andTerminal modules. When you select the Paste button from the command dialogbox, the command will be pasted in the command column field where the cursorwas last located.
Instead of 6000 Series commands, you can use a DOS prompt command. Simplytype in “>” followed by the path to the executable file.
➃ Check to make sure you have defined the buttons with the desired name andcommand. The following is an example of a completed button definition dialogbox.
➄ Click the Okay button when you have completed the button definitions anddisplay options. The eight-button row(s) will be displayed at the bottom of yourscreen, beneath the display windows (see example below).
Selecting Show Buttons from the Settings pull-down menu toggles betweendisplaying and hiding the buttons.
If you are not using a mouse, you can access the buttons (if displayed) viaGoto Buttons under the Settings pull-down menu. Use the tab key to movefrom button to button, and the space bar to activate the button.

2 2 Motion Architect User Guide
Communicating with the 6000 Series Controller
This section describes how to set up communications (Settings) and performtransfer operations (Transfers) between your custom test panel and the 6000Series Controller (referred to as controller).
Setting Up Communications with the 6000 Series Controller (Settings)The changes you make to the communication settings will be used for allsubsequent Panel sessions, until you change them again.
NOTEYou can change these settings only if the controller is disconnected. This is evident if thereis no check mark (✓) next to Connect under the Transfers pull-down menu.Bus Based Controllers: The address and interrupt settings are essentially a verificationof the DIP switch settings on the controller card mounted in your PC-AT; they do not overridethe DIP switches. Refer to the controller's user guide for procedures to set the DIP switches.
• Board Address: Use the dialog box to set the bus-based controller's boardaddress. The default is 768 Decimal (300 Hexadecimal).
• PC-AT Interrupt: Use the dialog box to set the PC-AT interrupt. The default isno interrupt.
• Serial Port: If you are using a stand-alone 6000 Series controller, use thedialog box to select a communications port. The default is COM1.
Communicating with the 6000 Series Controller (Transfers)Use the commands under the Transfers pull-down menu to communicatewith the controller.
• Connect: Click this menu item to connect (enable communication with) ordisconnect the controller. A check mark (✓) appears to indicate successfulconnection to the controller. Once the controller is connected, the New andOpen file operations under the File pull-down menu are not allowed until thecontroller is disconnected. To disconnect, simply select this menu item again(disconnection is verified when the check mark disappears). Launching thePanel module automatically connects the controller, and exiting the Panel moduleautomatically disconnects the controller.
• Send Operating System (bus-based controllers): Click this menu item to sendthe soft operating system (6000 Series Command Language) to the bus-basedcontroller. (This is a prerequisite to connecting, programming, orsending/receiving a motion program.) A message box appears to indicate if thisoperation was successful. If you have problems downloading the operatingsystem, refer to the troubleshooting procedures in bus-based controller's userguide.
• Send Motion Program: Click this menu item to send a controller code program(file from your hard drive) to the controller, where it is immediately executed. Amessage box appears to indicate if this operation was successful.
WARNINGDownloading a motion-based program file to the controller can cause motion. Beforedownloading the program file, make the necessary precautions to ensure the safeoperation of the equipment. Failure to do so can result in damage to equipment and/orserious injury to personnel.
Index 2 3
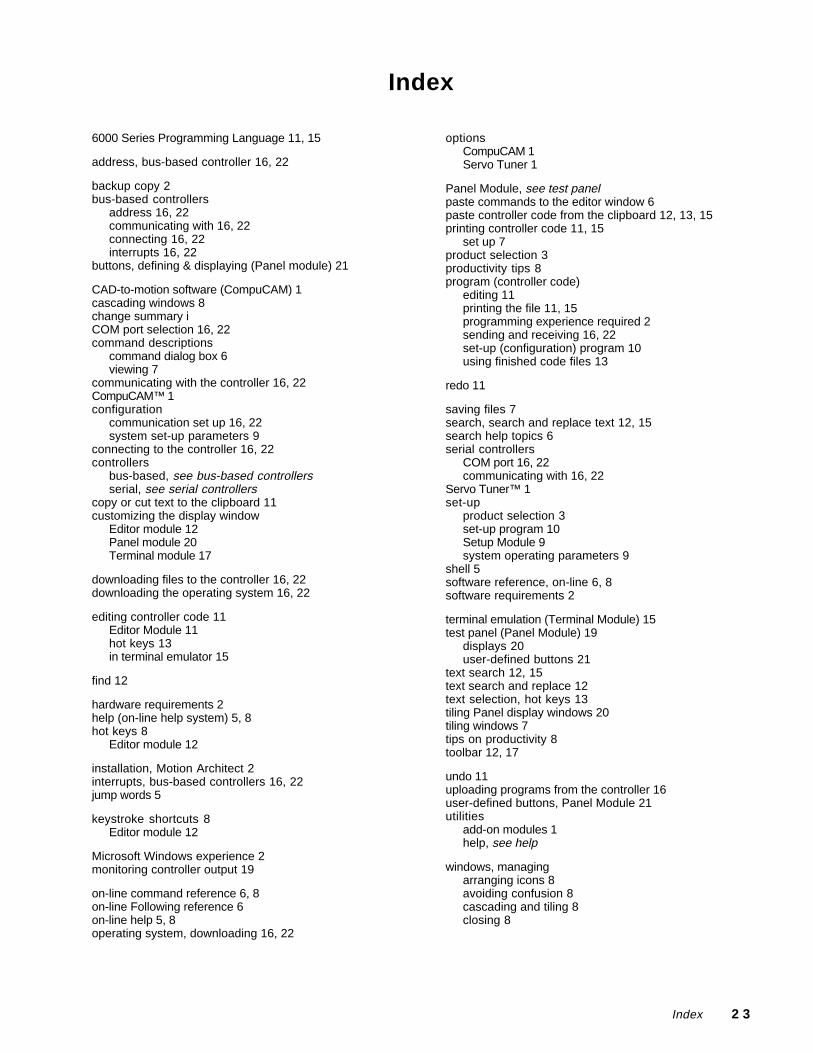
Index
6000 Series Programming Language 11, 15
address, bus-based controller 16, 22
backup copy 2bus-based controllers
address 16, 22communicating with 16, 22connecting 16, 22interrupts 16, 22
buttons, defining & displaying (Panel module) 21
CAD-to-motion software (CompuCAM) 1cascading windows 8change summary iCOM port selection 16, 22command descriptions
command dialog box 6viewing 7
communicating with the controller 16, 22CompuCAM™ 1configuration
communication set up 16, 22system set-up parameters 9
connecting to the controller 16, 22controllers
bus-based, see bus-based controllersserial, see serial controllers
copy or cut text to the clipboard 11customizing the display window
Editor module 12Panel module 20Terminal module 17
downloading files to the controller 16, 22downloading the operating system 16, 22
editing controller code 11Editor Module 11hot keys 13in terminal emulator 15
find 12
hardware requirements 2help (on-line help system) 5, 8hot keys 8
Editor module 12
installation, Motion Architect 2interrupts, bus-based controllers 16, 22jump words 5
keystroke shortcuts 8Editor module 12
Microsoft Windows experience 2monitoring controller output 19
on-line command reference 6, 8on-line Following reference 6on-line help 5, 8operating system, downloading 16, 22
optionsCompuCAM 1Servo Tuner 1
Panel Module, see test panelpaste commands to the editor window 6paste controller code from the clipboard 12, 13, 15printing controller code 11, 15
set up 7product selection 3productivity tips 8program (controller code)
editing 11printing the file 11, 15programming experience required 2sending and receiving 16, 22set-up (configuration) program 10using finished code files 13
redo 11
saving files 7search, search and replace text 12, 15search help topics 6serial controllers
COM port 16, 22communicating with 16, 22
Servo Tuner™ 1set-up
product selection 3set-up program 10Setup Module 9system operating parameters 9
shell 5software reference, on-line 6, 8software requirements 2
terminal emulation (Terminal Module) 15test panel (Panel Module) 19
displays 20user-defined buttons 21
text search 12, 15text search and replace 12text selection, hot keys 13tiling Panel display windows 20tiling windows 7tips on productivity 8toolbar 12, 17
undo 11uploading programs from the controller 16user-defined buttons, Panel Module 21utilities
add-on modules 1help, see help
windows, managingarranging icons 8avoiding confusion 8cascading and tiling 8closing 8