Embed Size (px)
Citation preview

EMERGENCY FLAT TIRE REPAIRMOTO SPAIR
PENCIL TIRE GAUGE• Stores on keychain• 10-50 psi
POWER ADAPTERS:
AIR HOSE • 18" air hose
ON/OFF SWITCH
POWER CONNECTION• 8' main power harness• Connect with power
adapter (A, B or C)
TIRE SEALANT• 8 oz (237 mL)• Non-toxic and
non-corrosive• Cleans up with water
Attach rings to battery(motorcycle)
A
Clip to battery(motorcycle, ATV, mower)
B
Plug into DC accessory outlet(auto)
C
PART# 50001 | 04.22.15
ATTENTION!READALLINSTRUCTIONSCAREFULLYFAILURE TO FOLLOW WARNING INSTRUCTIONS CAN RESULT IN FIRE,
PERSONAL INJURY OR PROPERTY DAMAGE.
!
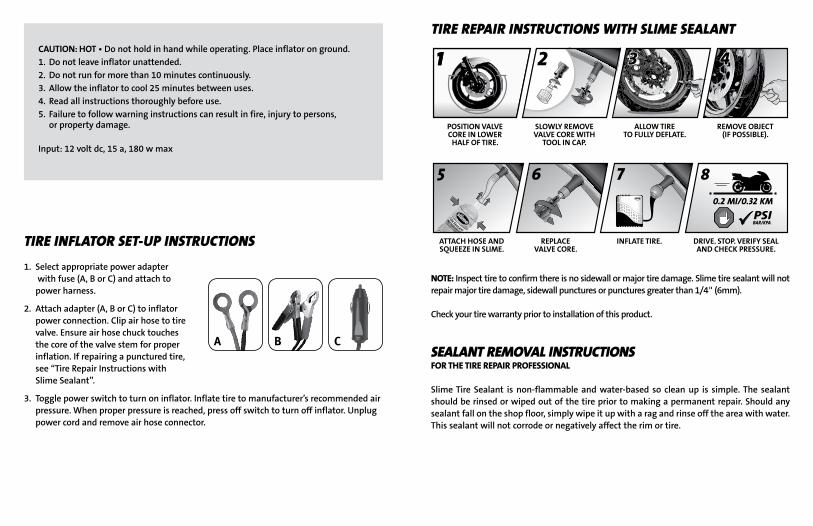
TIRE REPAIR INSTRUCTIONS WITH SLIME SEALANT
0.2 MI/0.32 KM PSIBAR/KPA
0.2 MI/0.32 KM PSIBAR/KPA
POSITION VALVE CORE IN LOWER
HALF OF TIRE.
ATTACH HOSE AND SQUEEZE IN SLIME.
SLOWLY REMOVE VALVE CORE WITH
TOOL IN CAP.
REPLACE VALVE CORE.
REMOVE OBJECT (IF POSSIBLE).
DRIVE. STOP. VERIFY SEAL AND CHECK PRESSURE.
ALLOW TIRE TO FULLY DEFLATE.
INFLATE TIRE.
SEALANT REMOVAL INSTRUCTIONSFOR THE TIRE REPAIR PROFESSIONAL
Slime Tire Sealant is non-flammable and water-based so clean up is simple. The sealant should be rinsed or wiped out of the tire prior to making a permanent repair. Should any sealant fall on the shop floor, simply wipe it up with a rag and rinse off the area with water. This sealant will not corrode or negatively affect the rim or tire.
NOTE: Inspect tire to confirm there is no sidewall or major tire damage. Slime tire sealant will not repair major tire damage, sidewall punctures or punctures greater than 1/4" (6mm).
Check your tire warranty prior to installation of this product.
TIRE INFLATOR SET-UP INSTRUCTIONS1. Select appropriate power adapter
with fuse (A, B or C) and attach to power harness.
2. Attach adapter (A, B or C) to inflator power connection. Clip air hose to tire valve. Ensure air hose chuck touches the core of the valve stem for proper inflation. If repairing a punctured tire, see “Tire Repair Instructions with Slime Sealant”.
3. Toggle power switch to turn on inflator. Inflate tire to manufacturer’s recommended air pressure. When proper pressure is reached, press off switch to turn off inflator. Unplug power cord and remove air hose connector.
A B C
CAUTION: HOT • Do not hold in hand while operating. Place inflator on ground.1. Do not leave inflator unattended. 2. Do not run for more than 10 minutes continuously. 3. Allow the inflator to cool 25 minutes between uses. 4. Read all instructions thoroughly before use. 5. Failure to follow warning instructions can result in fire, injury to persons, or property damage.
Input: 12 volt dc, 15 a, 180 w max
TROUBLESHOOTINGInflator does not turn on:1. The fuse, located in the plug adaptor (C), may
have blown. Unscrew the tip of the plug adaptor, remove fuse, and inspect. (If necessary, replace fuse with one of the same amperage.)
2. The fuse, located in the power connection adaptors (A, B), may have blown. Unclasp the power connection adaptor, remove fuse, and inspect. (If necessary, replace fuse with one of the same amperage.)
3. Check vehicle power outlet fuse; it should be a minimum of 15 amps.
4. Check receptacle and plug terminals for dirt (particularly tobacco). Use a nonconductive probe (not fingers or metal) to dislodge and remove debris.
5. Push the power plug firmly into the receptacle and twist it back and forth.
Inflator runs but does not inflate:1. Be sure the air hose connector is on the valve stem as far as possible before closing locking lever.2. Check tire for leaks and check hose for breaks and leaks at fittings.
Inflator runs slowly:1. Unit may have overheated from excessive use. Shut it off and allow unit to cool for 25 minutes. 2. Voltage may be too low. Check condition of battery.
NOTE: If tire is totally deflated, it is possible that the tire could separate from the rim allowing air to leak out when trying to inflate. In the event this occurs, it may be necessary to jack up the tire prior to inflation. Inflator and hose included for tire inflation only.
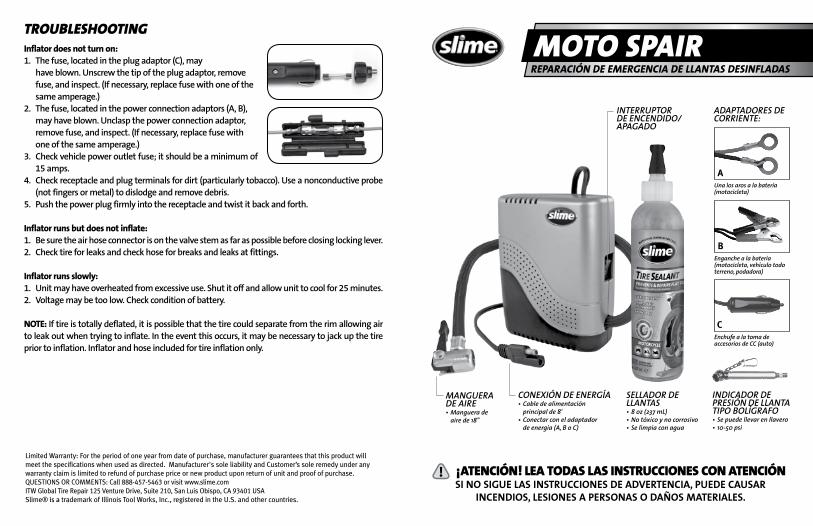
REPARACIÓN DE EMERGENCIA DE LLANTAS DESINFLADASMOTO SPAIR
INDICADOR DE PRESIÓN DE LLANTA TIPO BOLÍGRAFO• Se puede llevar en llavero• 10-50 psi
ADAPTADORES DE CORRIENTE:
MANGUERA DE AIRE • Manguera de
aire de 18"
CONEXIÓN DE ENERGÍA• Cable de alimentación
principal de 8'• Conectar con el adaptador
de energía (A, B o C)
SELLADOR DE LLANTAS• 8 oz (237 mL)• No tóxico y no corrosivo• Se limpia con agua
Una los aros a la batería (motocicleta)
A
Enganche a la batería (motocicleta, vehículo todo terreno, podadora)
B
Enchufe a la toma de accesorios de CC (auto)
C
¡ATENCIÓN!LEATODASLASINSTRUCCIONESCONATENCIÓNSI NO SIGUE LAS INSTRUCCIONES DE ADVERTENCIA, PUEDE CAUSAR
INCENDIOS, LESIONES A PERSONAS O DAÑOS MATERIALES.
!
INTERRUPTOR DE ENCENDIDO/APAGADO
Limited Warranty: For the period of one year from date of purchase, manufacturer guarantees that this product will meet the specifications when used as directed. Manufacturer's sole liability and Customer’s sole remedy under any warranty claim is limited to refund of purchase price or new product upon return of unit and proof of purchase.QUESTIONS OR COMMENTS: Call 888-457-5463 or visit www.slime.comITW Global Tire Repair 125 Venture Drive, Suite 210, San Luis Obispo, CA 93401 USASlime® is a trademark of Illinois Tool Works, Inc., registered in the U.S. and other countries.
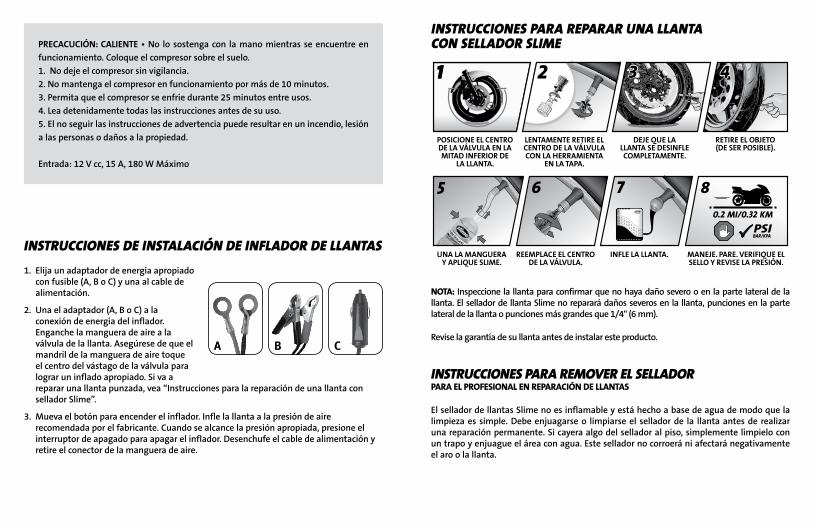
INSTRUCCIONES PARA REPARAR UNA LLANTA CON SELLADOR SLIME
0.2 MI/0.32 KM PSIBAR/KPA
0.2 MI/0.32 KM PSIBAR/KPA
POSICIONE EL CENTRO DE LA VÁLVULA EN LA MITAD INFERIOR DE
LA LLANTA.
UNA LA MANGUERA Y APLIQUE SLIME.
LENTAMENTE RETIRE EL CENTRO DE LA VÁLVULA CON LA HERRAMIENTA
EN LA TAPA.
REEMPLACE EL CENTRO DE LA VÁLVULA.
RETIRE EL OBJETO (DE SER POSIBLE).
MANEJE. PARE. VERIFIQUE EL SELLO Y REVISE LA PRESIÓN.
DEJE QUE LA LLANTA SE DESINFLE COMPLETAMENTE.
INFLE LA LLANTA.
INSTRUCCIONES PARA REMOVER EL SELLADORPARA EL PROFESIONAL EN REPARACIÓN DE LLANTAS
El sellador de llantas Slime no es inflamable y está hecho a base de agua de modo que la limpieza es simple. Debe enjuagarse o limpiarse el sellador de la llanta antes de realizar una reparación permanente. Si cayera algo del sellador al piso, simplemente límpielo con un trapo y enjuague el área con agua. Este sellador no corroerá ni afectará negativamente el aro o la llanta.
NOTA: Inspeccione la llanta para confirmar que no haya daño severo o en la parte lateral de la llanta. El sellador de llanta Slime no reparará daños severos en la llanta, punciones en la parte lateral de la llanta o punciones más grandes que 1/4" (6 mm).
Revise la garantía de su llanta antes de instalar este producto.
INSTRUCCIONES DE INSTALACIÓN DE INFLADOR DE LLANTAS1. Elija un adaptador de energía apropiado
con fusible (A, B o C) y una al cable de alimentación.
2. Una el adaptador (A, B o C) a la conexión de energía del inflador. Enganche la manguera de aire a la válvula de la llanta. Asegúrese de que el mandril de la manguera de aire toque el centro del vástago de la válvula para lograr un inflado apropiado. Si va a reparar una llanta punzada, vea “Instrucciones para la reparación de una llanta con sellador Slime”.
3. Mueva el botón para encender el inflador. Infle la llanta a la presión de aire recomendada por el fabricante. Cuando se alcance la presión apropiada, presione el interruptor de apagado para apagar el inflador. Desenchufe el cable de alimentación y retire el conector de la manguera de aire.
A B C
PRECACUCIÓN: CALIENTE • No lo sostenga con la mano mientras se encuentre en funcionamiento. Coloque el compresor sobre el suelo.1. No deje el compresor sin vigilancia.2. No mantenga el compresor en funcionamiento por más de 10 minutos.3. Permita que el compresor se enfríe durante 25 minutos entre usos.4. Lea detenidamente todas las instrucciones antes de su uso.5. El no seguir las instrucciones de advertencia puede resultar en un incendio, lesión a las personas o daños a la propiedad.
Entrada: 12 V cc, 15 A, 180 W Máximo
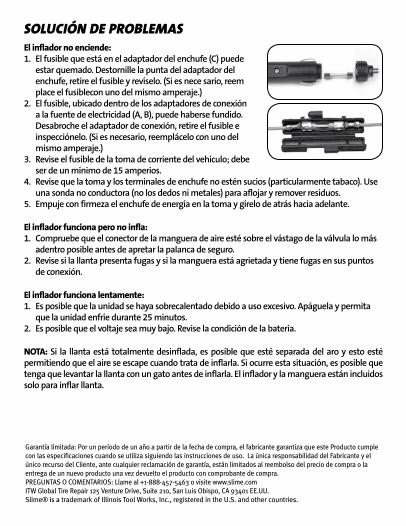
SOLUCIÓN DE PROBLEMASEl inflador no enciende:1. El fusible que está en el adaptador del enchufe (C) puede
estar quemado. Destornille la punta del adaptador del enchufe, retire el fusible y revíselo. (Si es nece sario, reem place el fusiblecon uno del mismo amperaje.)
2. El fusible, ubicado dentro de los adaptadores de conexión a la fuente de electricidad (A, B), puede haberse fundido. Desabroche el adaptador de conexión, retire el fusible e inspecciónelo. (Si es necesario, reemplácelo con uno del mismo amperaje.)
3. Revise el fusible de la toma de corriente del vehículo; debe ser de un mínimo de 15 amperios.
4. Revise que la toma y los terminales de enchufe no estén sucios (particularmente tabaco). Use una sonda no conductora (no los dedos ni metales) para aflojar y remover residuos.
5. Empuje con firmeza el enchufe de energía en la toma y gírelo de atrás hacia adelante.
El inflador funciona pero no infla:1. Compruebe que el conector de la manguera de aire esté sobre el vástago de la válvula lo más
adentro posible antes de apretar la palanca de seguro.2. Revise si la llanta presenta fugas y si la manguera está agrietada y tiene fugas en sus puntos
de conexión.
El inflador funciona lentamente:1. Es posible que la unidad se haya sobrecalentado debido a uso excesivo. Apáguela y permita
que la unidad enfríe durante 25 minutos. 2. Es posible que el voltaje sea muy bajo. Revise la condición de la batería.
NOTA: Si la llanta está totalmente desinflada, es posible que esté separada del aro y esto esté permitiendo que el aire se escape cuando trata de inflarla. Si ocurre esta situación, es posible que tenga que levantar la llanta con un gato antes de inflarla. El inflador y la manguera están incluidos solo para inflar llanta.
Garantía limitada: Por un período de un año a partir de la fecha de compra, el fabricante garantiza que este Producto cumple con las especificaciones cuando se utiliza siguiendo las instrucciones de uso. La única responsabilidad del Fabricante y el único recurso del Cliente, ante cualquier reclamación de garantía, están limitados al reembolso del precio de compra o la entrega de un nuevo producto una vez devuelto el producto con comprobante de compra. PREGUNTAS O COMENTARIOS: Llame al +1-888-457-5463 o visite www.slime.comITW Global Tire Repair 125 Venture Drive, Suite 210, San Luis Obispo, CA 93401 EE.UU.Slime® is a trademark of Illinois Tool Works, Inc., registered in the U.S. and other countries.