Embed Size (px)
Citation preview
MRI for Nucleus® implant recipientsRadiographer’s instructions
Nucleus® implants offer patients a high level of MRI safety. Some staightforward precautions must be followed by the radiographer. Please read this leafl et carefully. For more information, contact Cochlear™ Ltd at the addresses below. If required, the patient’s CI surgeon or audiologist can also provide information.
General considerationsMRI for a Nucleus recipient is straightforward. It is not necessary to:
Contact Cochlear Ltd or the implanting surgeonWait for months after implant surgeryPosition the patient in a certain wayPerform a CT scan to check bone thickness under the magnet
How soon after implantation surgery?Before performing an MRI, it is prudent to wait until the swelling from implantation surgery has reduced. For most patients, this is two to four weeks.
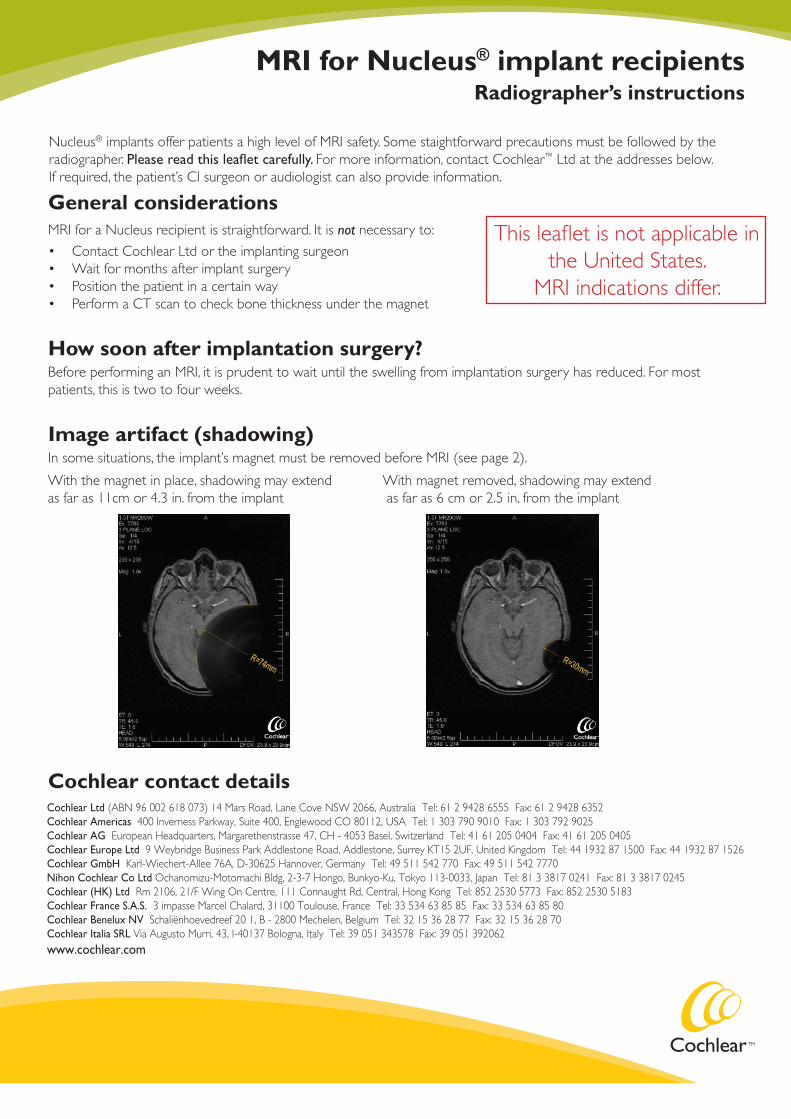
Image artifact (shadowing)In some situations, the implant’s magnet must be removed before MRI (see page 2).
••••
Cochlear Ltd (ABN 96 002 618 073) 14 Mars Road, Lane Cove NSW 2066, Australia Tel: 61 2 9428 6555 Fax: 61 2 9428 6352Cochlear Americas 400 Inverness Parkway, Suite 400, Englewood CO 80112, USA Tel: 1 303 790 9010 Fax: 1 303 792 9025Cochlear AG European Headquarters, Margarethenstrasse 47, CH - 4053 Basel, Switzerland Tel: 41 61 205 0404 Fax: 41 61 205 0405Cochlear Europe Ltd 9 Weybridge Business Park Addlestone Road, Addlestone, Surrey KT15 2UF, United Kingdom Tel: 44 1932 87 1500 Fax: 44 1932 87 1526Cochlear GmbH Karl-Wiechert-Allee 76A, D-30625 Hannover, Germany Tel: 49 511 542 770 Fax: 49 511 542 7770Nihon Cochlear Co Ltd Ochanomizu-Motomachi Bldg, 2-3-7 Hongo, Bunkyo-Ku, Tokyo 113-0033, Japan Tel: 81 3 3817 0241 Fax: 81 3 3817 0245Cochlear (HK) Ltd Rm 2106, 21/F Wing On Centre, 111 Connaught Rd, Central, Hong Kong Tel: 852 2530 5773 Fax: 852 2530 5183Cochlear France S.A.S. 3 impasse Marcel Chalard, 31100 Toulouse, France Tel: 33 534 63 85 85 Fax: 33 534 63 85 80Cochlear Benelux NV Schaliënhoevedreef 20 1, B - 2800 Mechelen, Belgium Tel: 32 15 36 28 77 Fax: 32 15 36 28 70Cochlear Italia SRL Via Augusto Murri, 43, I-40137 Bologna, Italy Tel: 39 051 343578 Fax: 39 051 392062www.cochlear.com
With the magnet in place, shadowing may extendas far as 11cm or 4.3 in. from the implant
With magnet removed, shadowing may extend as far as 6 cm or 2.5 in. from the implant
Cochlear contact details
This leafl et is not applicable in the United States.
MRI indications differ.
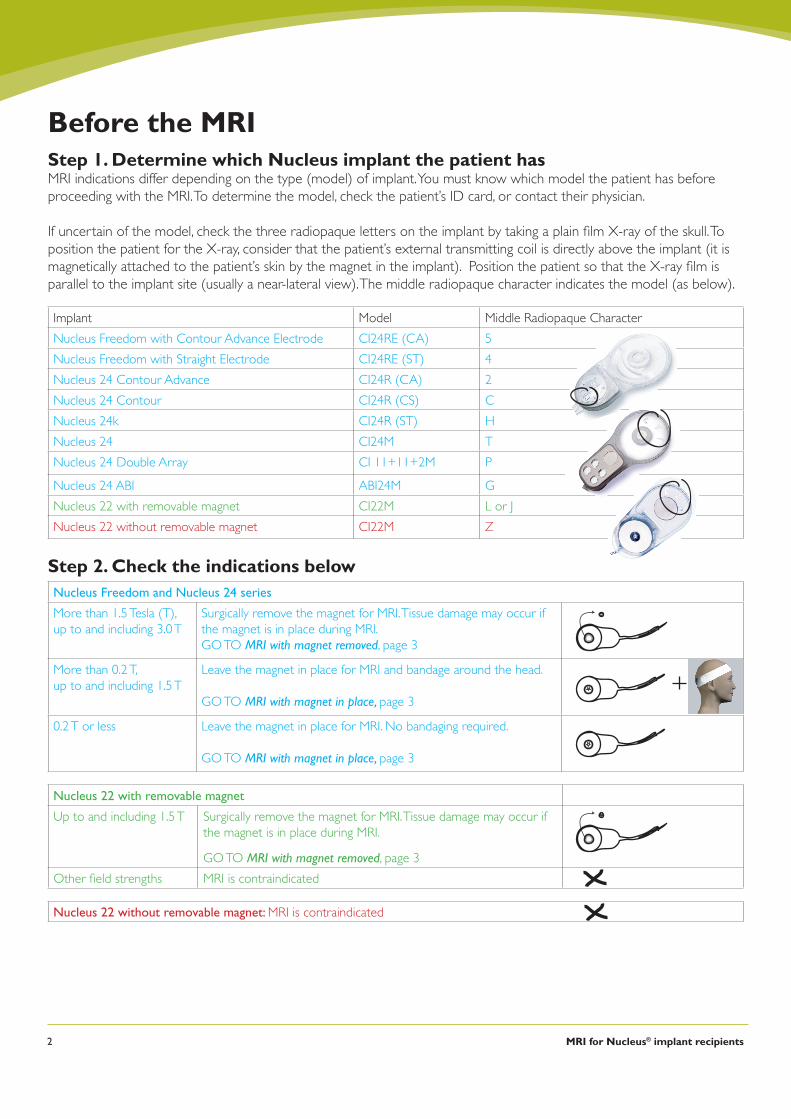
Before the MRI Step 1. Determine which Nucleus implant the patient hasMRI indications differ depending on the type (model) of implant. You must know which model the patient has before proceeding with the MRI. To determine the model, check the patient’s ID card, or contact their physician.
If uncertain of the model, check the three radiopaque letters on the implant by taking a plain fi lm X-ray of the skull. To position the patient for the X-ray, consider that the patient’s external transmitting coil is directly above the implant (it is magnetically attached to the patient’s skin by the magnet in the implant). Position the patient so that the X-ray fi lm is parallel to the implant site (usually a near-lateral view). The middle radiopaque character indicates the model (as below).
Implant Model Middle Radiopaque Character
Nucleus Freedom with Contour Advance Electrode CI24RE (CA) 5
Nucleus Freedom with Straight Electrode CI24RE (ST) 4
Nucleus 24 Contour Advance CI24R (CA) 2
Nucleus 24 Contour CI24R (CS) C
Nucleus 24k CI24R (ST) H
Nucleus 24 CI24M T
Nucleus 24 Double Array CI 11+11+2M P
Nucleus 24 ABI ABI24M G
Nucleus 22 with removable magnet CI22M L or J
Nucleus 22 without removable magnet CI22M Z
Step 2. Check the indications belowNucleus Freedom and Nucleus 24 series
More than 1.5 Tesla (T), up to and including 3.0 T
Surgically remove the magnet for MRI. Tissue damage may occur if the magnet is in place during MRI. GO TO MRI with magnet removed, page 3
More than 0.2 T, up to and including 1.5 T
Leave the magnet in place for MRI and bandage around the head. GO TO MRI with magnet in place, page 3
0.2 T or less Leave the magnet in place for MRI. No bandaging required.
GO TO MRI with magnet in place, page 3
Nucleus 22 with removable magnet
Up to and including 1.5 T Surgically remove the magnet for MRI. Tissue damage may occur if the magnet is in place during MRI.
GO TO MRI with magnet removed, page 3
Other fi eld strengths MRI is contraindicated
Nucleus 22 without removable magnet: MRI is contraindicated
MRI for Nucleus® implant recipients2
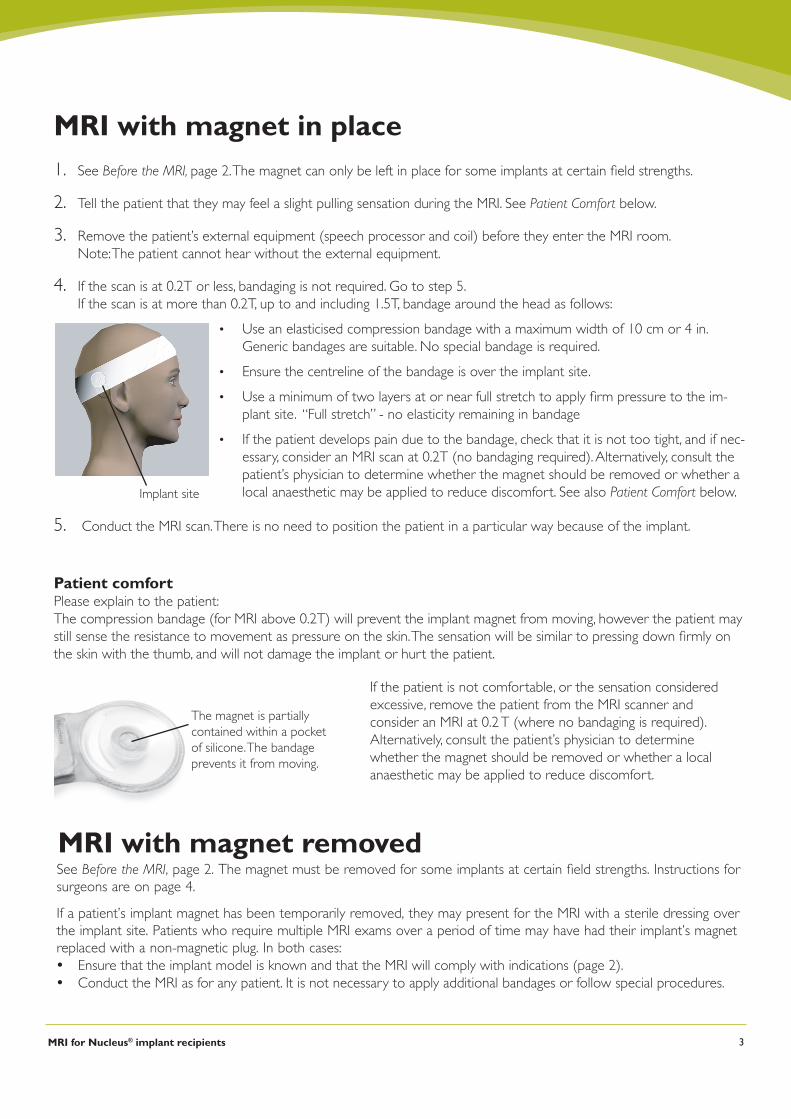
MRI with magnet in place See Before the MRI, page 2. The magnet can only be left in place for some implants at certain fi eld strengths.
Tell the patient that they may feel a slight pulling sensation during the MRI. See Patient Comfort below.
Remove the patient’s external equipment (speech processor and coil) before they enter the MRI room. Note: The patient cannot hear without the external equipment.
If the scan is at 0.2T or less, bandaging is not required. Go to step 5.If the scan is at more than 0.2T, up to and including 1.5T, bandage around the head as follows:
Use an elasticised compression bandage with a maximum width of 10 cm or 4 in. Generic bandages are suitable. No special bandage is required.
Ensure the centreline of the bandage is over the implant site.
Use a minimum of two layers at or near full stretch to apply fi rm pressure to the im-plant site. “Full stretch” - no elasticity remaining in bandage
If the patient develops pain due to the bandage, check that it is not too tight, and if nec-essary, consider an MRI scan at 0.2T (no bandaging required). Alternatively, consult the patient’s physician to determine whether the magnet should be removed or whether a local anaesthetic may be applied to reduce discomfort. See also Patient Comfort below.
Conduct the MRI scan. There is no need to position the patient in a particular way because of the implant.
Patient comfortPlease explain to the patient:The compression bandage (for MRI above 0.2T) will prevent the implant magnet from moving, however the patient may still sense the resistance to movement as pressure on the skin. The sensation will be similar to pressing down fi rmly on the skin with the thumb, and will not damage the implant or hurt the patient.
MRI with magnet removed
1.
2.
3.
4.
•
•
•
•
5.
See Before the MRI, page 2. The magnet must be removed for some implants at certain fi eld strengths. Instructions for surgeons are on page 4.
If a patient’s implant magnet has been temporarily removed, they may present for the MRI with a sterile dressing over the implant site. Patients who require multiple MRI exams over a period of time may have had their implant’s magnet replaced with a non-magnetic plug. In both cases: Ensure that the implant model is known and that the MRI will comply with indications (page 2). Conduct the MRI as for any patient. It is not necessary to apply additional bandages or follow special procedures.
MRI for Nucleus® implant recipients
The magnet is partially contained within a pocket of silicone. The bandage prevents it from moving.
Implant site
If the patient is not comfortable, or the sensation considered excessive, remove the patient from the MRI scanner and consider an MRI at 0.2 T (where no bandaging is required). Alternatively, consult the patient’s physician to determine whether the magnet should be removed or whether a local anaesthetic may be applied to reduce discomfort.
3
Printed in AustraliaN31559F ISS2
Nucleus is a registered trademark of Cochlear Limited. Cochlear, Contour, Contour Advance, Freedom and the elliptical logo are trademarks of Cochlear Limited. © Cochlear Limited 2006.
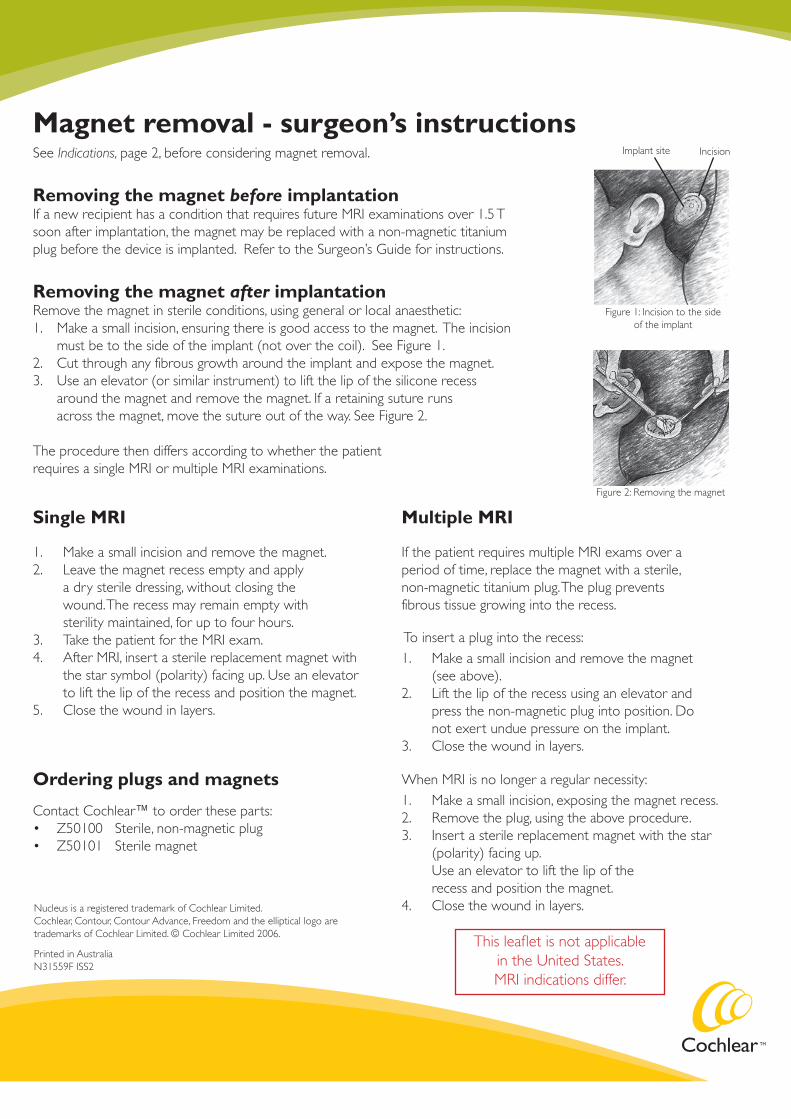
Figure 2: Removing the magnet
IncisionImplant site
Figure 1: Incision to the side of the implant
Single MRI
1. Make a small incision and remove the magnet.2. Leave the magnet recess empty and apply
a dry sterile dressing, without closing the wound. The recess may remain empty with sterility maintained, for up to four hours.
3. Take the patient for the MRI exam.4. After MRI, insert a sterile replacement magnet with
the star symbol (polarity) facing up. Use an elevator to lift the lip of the recess and position the magnet.
5. Close the wound in layers.
Multiple MRI
If the patient requires multiple MRI exams over a period of time, replace the magnet with a sterile, non-magnetic titanium plug. The plug prevents fibrous tissue growing into the recess.
To insert a plug into the recess:1. Make a small incision and remove the magnet
(see above).2. Lift the lip of the recess using an elevator and
press the non-magnetic plug into position. Do not exert undue pressure on the implant.
3. Close the wound in layers.
When MRI is no longer a regular necessity:1. Make a small incision, exposing the magnet recess.2. Remove the plug, using the above procedure.3. Insert a sterile replacement magnet with the star
(polarity) facing up. Use an elevator to lift the lip of the recess and position the magnet.
4. Close the wound in layers.
Ordering plugs and magnets
Contact Cochlear™ to order these parts:Z50100 Sterile, non-magnetic plugZ50101 Sterile magnet
••
Magnet removal - surgeon’s instructionsSee Indications, page 2, before considering magnet removal.
Removing the magnet before implantationIf a new recipient has a condition that requires future MRI examinations over 1.5 T soon after implantation, the magnet may be replaced with a non-magnetic titanium plug before the device is implanted. Refer to the Surgeon’s Guide for instructions.
Removing the magnet after implantationRemove the magnet in sterile conditions, using general or local anaesthetic:
Make a small incision, ensuring there is good access to the magnet. The incision must be to the side of the implant (not over the coil). See Figure 1.Cut through any fibrous growth around the implant and expose the magnet.Use an elevator (or similar instrument) to lift the lip of the silicone recess around the magnet and remove the magnet. If a retaining suture runs across the magnet, move the suture out of the way. See Figure 2.
The procedure then differs according to whether the patient requires a single MRI or multiple MRI examinations.
1.
2.3.
This leafl et is not applicable in the United States. MRI indications differ.