Embed Size (px)
Citation preview

BedienungsanleitungUser ManualMode d'emploiIstruzioni d'usoManual de instruccionesGebruiksaanwijzingBetjeningsvejledningBruksanvisningKäyttöopasInstrukcja obsługiNávod k obsluze

- 3 -

- 22 -
English
Dear customer,
we congratulate you on the purchase of this electronic magnifying glass for hand-held or contact use - a quality product made by Eschenbach - and we hope you enjoy using the device on a daily basis.
As the market leader for magnifying glasses and reading glasses, we at Eschenbach are able to look back on many years of experience which are mirrored in the quality, handling and design of our products.
Before initial useBefore using the device for the first time, please read the entire manual carefully so that you can get to know all the functions of the device.

- 23 -
Safety instructions XRisk of glare and injury! Never look directly at the light source on the underside of the housing! Risk group 1 according to EN 62471:2008. Danger value in case of exposure (EHV): 2200 seconds in 800 mm. The free group limit values are complied with at a distance of 1.8 m. Retinal danger due to actinic light 400 nm to 780 nm. XDo not allow children to handle electronic devices without supervision. XCharge the reader only with the supplied mains adapter or a USB connection! XCheck your mobilux DIGITAL Touch HD and the mains adapter and its power cable for visible damage. If the mobilux DIGITAL Touch HD, the mains adapter or its cable are damaged, disconnect the mains adapter from the mains power immediately. Ask a qualified specialist to check the product before you use it again. XNever open the housing of the mobilux DIGITAL Touch HD. There are no serviceable parts whatsoever inside. The guarantee will be void if the device is opened. XNever expose the mobilux DIGITAL Touch HD to moisture. XProtect the mobilux DIGITAL Touch HD from knocks or blows and excessive heat! Never place the mobilux DIGITAL Touch HD on heating devices or in direct sunlight! XEnsure that other people, particularly children, are aware of these risks!

- 24 -
Package contents XElectronic reader mobilux DIGITAL Touch HD (in the remaining text also referred to simply as "reader") XCharger (with plugs for EU, GB, US, AUS) XUSB cable XSD card (supplied preinstalled) XCase XCleaning cloth XLanyard XOperating instructions
Operating elements 1. Touch-sensitive screen 2. On/Off button 3. USB/charging socket 4. Eyelet for lanyard 5. LED charging indicator
6. Cover for SD card slot 7. SD card slot 8. Reset opening 9. LED lights10. Camera11. Contact surface

- 25 -
OperationCharging the internal battery: before you use the mobilux DIGITAL Touch HD for the first time, you must fully charge the internal battery.
To charge, connect the USB plug of the charger with the USB/charger socket (e) of the reader. Then connect the charger with the plug appropriate for the operating location and plug the charger into a power outlet. Charging takes about 2 hours. The charging indicator LED (t) will light up red during the charging process. Once the charging process is complete, the LED charging control lamp goes out. Disconnect the charger from the electrical outlet and the reader once charging is completed.
You can use the reader during the charging process. Using the reader while charging will, how-ever, prolong the charging time.
Switching on/offPress and hold the On/Off button (w) for a second to turn on mobilux DIGITAL Touch HD and to switch to live image mode. The enlarged image of the reading material will appear on the screen (q).

- 26 -
On the upper edge of the screen, icons appear for 5 seconds to display the battery charge level, the last set zoom level and the screen brightness.
Battery fully charged 75% charge 50% charge 25% remaining charge, the icon lights up red for 5 seconds on the upper edge of the screen Remaining run time approx. 3 minutes, the icon lights up red permanently on the upper
edge of the screen
To switch off the device, press and hold the On/Off button for one second. The current zoom, screen mode and brightness settings will be saved.
To prolong the battery charge of the internal battery, the reader switches off automatically if it is not moved for more than 3 minutes. If you want to use the reader again after this time, switch it on again.
Reading with the deviceSwitch on the device and place its contact surface (s) on the reading material and move it in the direction of reading while reading.

- 27 -
Writing with the deviceOnce in place, the reader can be tilted forward so that it also rests on the front edge of the display and thus – to a limited extent – you can write under the reader. In addition, due to its high depth-of-field the reader can also be held in the hand at a very short distance to the reading material.
Save display image as fileBy briefly tapping on the screen, three icons will appear on the right-hand edge of the screen:
icon for the "Save display image as file" (screenshot)
icon for "Set zoom"
icon for "Display mode"

- 28 -
Tap briefly on the icon to save the current live image as a file in the reader. The image is then shown on the display. The screenshots are numbered sequentially in the memory. Tap again on the icon to return to live image mode.
Touch the icon for 2 seconds to display to change to the "Display image files" mode.
If you tap on the icon, you will move back one menu level. If you tap on the icon, the menu will close and the reader returns to live image mode.
Adjusting the MagnificationTap repeatedly on the icon to scroll through the the six available zoom levels 4×, 5×, 6×, 8×, 10× and 12×. These factors apply to contact use. In hand-held use, the zoom levels are lower than stated. The currently set zoom level is shown on the upper edge of the screen for approx. 2 seconds.
Setting the screen modeThe mobilux DIGITAL Touch HD is equipped with a range of display modes so that you can achieve the best possible image. Tap repeatedly on the icon to scroll through the various display modes from true-colour mode via high-contrast black/white and white/black displays to false-colour black/yellow and yellow/black displays.
- 29 -
Touch the icon for 2 seconds to switch on/off the LEDs (o) that illuminate the reading material on the underside of the device.
Tap again briefly on the screen to hide the three icons.
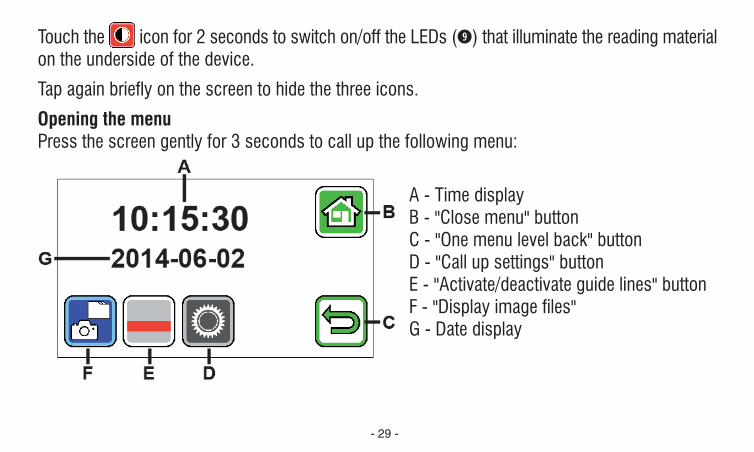
Opening the menuPress the screen gently for 3 seconds to call up the following menu:
A - Time displayB - "Close menu" buttonC - "One menu level back" buttonD - "Call up settings" buttonE - "Activate/deactivate guide lines" buttonF - "Display image files"G - Date display

- 30 -
Display image filesIf you tap this button briefly, the two most recently recorded image files are displayed as thumb-nails. Tap a thumbnail to view it full screen. Tap on the screen to hide the icons. Tap again on the screen to restore the icons.The following icons will appear in addition to the B and C icons:
Delete fileTo delete a file, tap on this icon and answer the subsequent security prompt by tapping on the icon. The file will then be permanently deleted from the memory of the reader or from the SD card. If you do not want to delete the file, tap on the icon to cancel the operation.
Tap repeatedly on the icon to scroll through the six available zoom levels 4×, 5×, 6×, 8×, 10× and 12×.
Tap repeatedly on the icon to scroll through the already described display modes.
Tap on the icon to move back one menu level. You will then see the thumbnails as well as the icons described below.

- 31 -
Tap on the icon to go back 10 files in the preview.
Tap on the icon to display the thumbnails of the previous two files.
Tap on the icon to display the thumbnails of the following two files.
Tap on the icon to move forward 10 files in the preview.
Tap on the icon to close the menu and return to the live image mode.
Show guidelinesIf you tap this button briefly, you can then switch the line guide function on or off. Tap on the icon to activate the function. Tap on the icon to deactivate the function. The menu is automati-cally closed in both cases.

- 32 -
Call up device settingsIf you tap this button briefly, you can then adjust the device settings described below. Here, too, you can use the icon to return to the previous menu level. Use the to close the menu and return to the live image display.
Setting the signal toneDepending on the desired tone, tap the or icon.
Tap on if you prefer to have no acoustic confirmation of your input.
Setting display brightnessSet the desired screen brightness here: 50%, 75% or 100%.
Setting continuous zoomAfter activating this function, when you tap on the icon you are not limited to the fixed zoom levels but rather can use the / icons to change the zoom factor in a continuous transition.

- 33 -
Activate/deactivate save confirmationHere you can set whether a display image is saved as a file immediately or whether the reader will only save the file after a confirmation. For immediate saving, tap here on the icon; for saving only after a confirmation, tap on the icon. To finalise this setting, tap on the icon.
Transferring image files from the internal memory to an inserted SD cardAs long as the SD card that is already in the card slot (u) when the device is supplied is currently in the slot, images will be saved automatically onto the SD card. Otherwise, they will be saved onto the internal memory of the reader. To transfer these images from the internal memory to an SD card, flip open the cover (y) of the card slot and insert an SD card into the card slot. Insert the card as shown on the diagram next to the card slot (to the left). If there are already images on the SD card, these will not be overwritten if you have duplicate file names as the files to be trans-ferred will, in this case, be renamed.

- 34 -
Setting the date and timeAfter calling up this function, you can tap on the parameters for the date and time to increase or decrease the parameters (now displayed white) using the / buttons. Tap on "24H" to switch between 24-hour and 12-hour mode.
Setting the line guide functionAfter calling up this function, you can set the the reading line or reading bar (shadow bars that darken the upper and lower part of the display black). Tap on the icon to switch between read-ing line and reading bar. If a red reading line is displayed in front of the current live image, you can move this as required using the / buttons. If shadow bars are displayed at the top and the bottom of the screen instead of the reading line, you can adjust their size as required using the / buttons.
Update softwareIf you call up this function, the current software version is displayed and you can either tap on the icon to update the the reader’s software or tap on the icon to cancel the function.

- 35 -
To update the software, the reader must be connected to the computer via a USB cable or the software version to be installed must have been previously copied onto the SD card.
Using the mobilux DIGITAL Touch HD on the computerYou can transfer the live image from the reader onto your computer screen. To do this, you must first install the “mobilux Digital” software supplied onto the computer. The installation guide can be found on the preinstalled SD card. The following operating systems are required for running mobilux Digital: Windows Vista, Windows 7 or Windows 8. mobilux Digital may also run on other Windows platforms, but this cannot be guaranteed. We can accept no liability for the data integrity of computers running operating systems other than those mentioned here.3 USB functionsIf you connect the reading device to a computer USB connection and switch it on, you will see the following 3 symbols on the reading device screen:
Tap the icon to set up the contents of the SD card in the reader as a new removable drive.

- 36 -
Then proceed with the required file operation. You will find a PDF installation guide called “Software installation manual” in the “manuals” folder. Double-click the file name to open the manual using the default program for viewing PDF files. Follow the installation instructions corresponding to the operating system installed on your computer.
Tap the symbol to enable communication between the reading device and the mobilux Digital software previously installed.
Tap the symbol in order to work with the reading device while the internal battery is being charged using the USB cable..
To change the USB mode, tap the screen briefly to display the symbols if necessary. Then tap bottom left on the symbol for the current USB mode in order to re-display the selection of 3 symbols as described above. Then tap the symbol for the required USB mode.
ResetIf the reader stops working as described in this manual, it may be due a fault that you can rectify yourself by resetting the reader. Insert a small, pointed object carefully into the opening labelled RESET (i) and press the switch contained within.

- 37 -
Technical dataDisplay size: 11.0 cm (4.3")Zoom range: Contact operation: 4×, 5×, 6×, 8×, 10×, 12×
Hand-held at approx. 4 cm: 1.6×, 1.9×, 2.2×, 3.0×, 3.7×, 4.5×
Operating time: Approx. 3 hoursCharging time: Approx. 2 hoursSystem voltage of the charger: 100 V–240 V~, 50–60 HzTemperature range: 10°C–40°CWeight: 230 g
Care Instructions XWhen cleaning the mobilux DIGITAL Touch HD do not use any soap solutions that contain softening agents, alcoholic or organic solvents, and do not use abrasive detergents! XDo not clean the mobilux DIGITAL Touch HD in an ultrasonic bath or under flowing water! XOnly clean the mobilux DIGITAL Touch HD with a soft, dry cloth. For heavier soiling (e.g. finger-prints), moisten the cloth slightly. X If you are not using the mobilux DIGITAL Touch HD, always keep it in the hard foam case sup-plied.

- 38 -
WarrantyWithin the parameters of the applicable statutory provisions, we provide a warranty for the func-tioning of the product described in this manual with regard to faults arising in connection with manufacturing defects or material defects. In event of damage due to improper handling, including damage from a fall or impact, no warranty claims can be made. Warranty claims are only accept-ed upon presentation of the sales receipt!
Disposal XWhen the reading device reaches the end of its useful life, do not dispose of it with the normal household waste. This product is subject to the European directive 2002/96/EC. XDispose of the product or parts of the product through a certified disposal facility or your mu-nicipal disposal facility. Observe the currently applicable regulations. In case of doubt, contact your disposal facility. Dispose of all packaging materials in an environmentally friendly manner.