Embed Size (px)
Citation preview

Music Tech Sibelius 7 Notation guide for
Mac For HSC Stage 6 and Tertiary students
Tutorial 5 Transcribe Lead Sheet from audio
Objective - to explain how to transcribe a piece of recorded music Outcomes - by following this tutorial, students will gain an understanding of how to;
• Critically assess the recorded audio • Determine the predominant components • Interpret vocal and instrumental phrasing • Input triplets, text, articulations
Index
1. Open and set up session 2. Input melodies 3. Input triplets 4. Input text 5. Add Guitar string bend articulations 6. Input vocal melody and lyrics, interpreting phrasing, slurs 7. Input chords, Rehearsal Marks, repeats. 8. Completed transcription.

1
1a. Download audio clip “Give You What I Got” from the tutorial webpage 1b. Launch Sibelius 1c. From the Quick Start menu, select Lead Sheet 1d. Select; • 6/8 time signature • In Pickup Bar box, tick ‘Start with bar of length’, then from
drop down menu select a crotchet followed by a dot. This will insert a pickup bar of 3 quavers at the start.
• In the Tempo box tick ‘Metronome mark’, select a quaver
from the drop down menu and type in 160
• Select G Major key signature
1e. In ‘Score Information Setup’ enter; • Title; Give you what I got • Composer; Wendy Rene • Copyright date; 1965 • Click ‘Create’
1. Opening and setting up a session
Tick here Select crotchet Select dot
Tick here Select quaver Type tempo here

2
2a. Your main page will look like this.
2b. Listen carefully to the audio clip. First you will hear the pickup line from the horns, followed by piano vamping and a lead guitar line, and finally the vocal commences at bar 4, emulating the horn pickup line. 2c. Play the horn line, piano chords and guitar line in to Sibelius, using either your MIDI keyboard (see Tutorial 1 for MIDI setup) or a Step Time option (see Tutorial 2 for Step Time input).
2. Input melodies
Horn line Piano vamp Lead guitar line

3
3a. To create semiquaver triplets in bar 3, first select the quaver rest 3b. Select the semiquaver symbol from the keypad, and the quaver rest will become two semiquaver rests
3c. Click on the ‘Note Input’ tab, and click on the ‘Triplets’ icon, or keyboard Command + 3. The semiquaver rests now become semiquaver triplet rests. 3d. Select the rests one by one and play in the notes A, G and E. Semiquaver triplets are complete! This method of triplet input is often more reliable than playing the triplets in real time from a MIDI keyboard.
3. Input triplets

4
4a. Select the tempo mark, move it up, right click the where tempo mark was, mouseover Text, select Technique or ‘Command T’
4b. After you select ‘Technique’ the mouse arrow cursor will turn blue. Place the blue arrow where you wish to input the text. The text cursor will flash, and you can type in the instrument name.
4c. Repeat these steps for the other instruments in the intro.
Move tempo mark to here, to make room for text Right click here Mouse over ‘Text’ Select ‘Technique’
4. Input text

5
5a. You will hear that in bar 3 the lead guitar bends up to the notes B. Sibelius reproduces this with the ‘Scoop’ mark. Click ‘Notations’ tab, ‘Symbols’, scroll down to ‘Techniques’ and select ‘Scoop’.
5b. Select the note B in the guitar part, and an up bend mark is added. Like most Sibelius articulations, this one works in playback mode as well as notation. If the bend mark appears above the staff you can simply select it and drag it down closer to the note.
5. Input guitar string bend articulation

6
6a. Input lyrics as per Tutorial 3. 6b. When notating this bluesy vocal style it is important to capture the feel of the artist’s performance rather than every nuance. This is accomplished by concentrating on phrasing, e.g. • syncopation in bars 8 and 9, ‘spend all my time’ • “swing” feel in bars 10 and 11, the phrase ‘I’m gonna give
you what I got’; even though Sibelius reproduces this phrase more strictly than the singer, the meaning in the notation is clear.
• slur over a syllable held over more than one note, e.g. in bar 28 the lyric ‘mine’ runs over 6 semiquavers.
6c. To input slurs, first select the notes you wish to slur, then…
6d. Alternatively, select the notes you wish to slur, then hit s.
6. Input vocal melody and lyrics
Click Notations tab Click Lines Select the slur symbol, top left, and the slur will appear above or below the selected notes
7
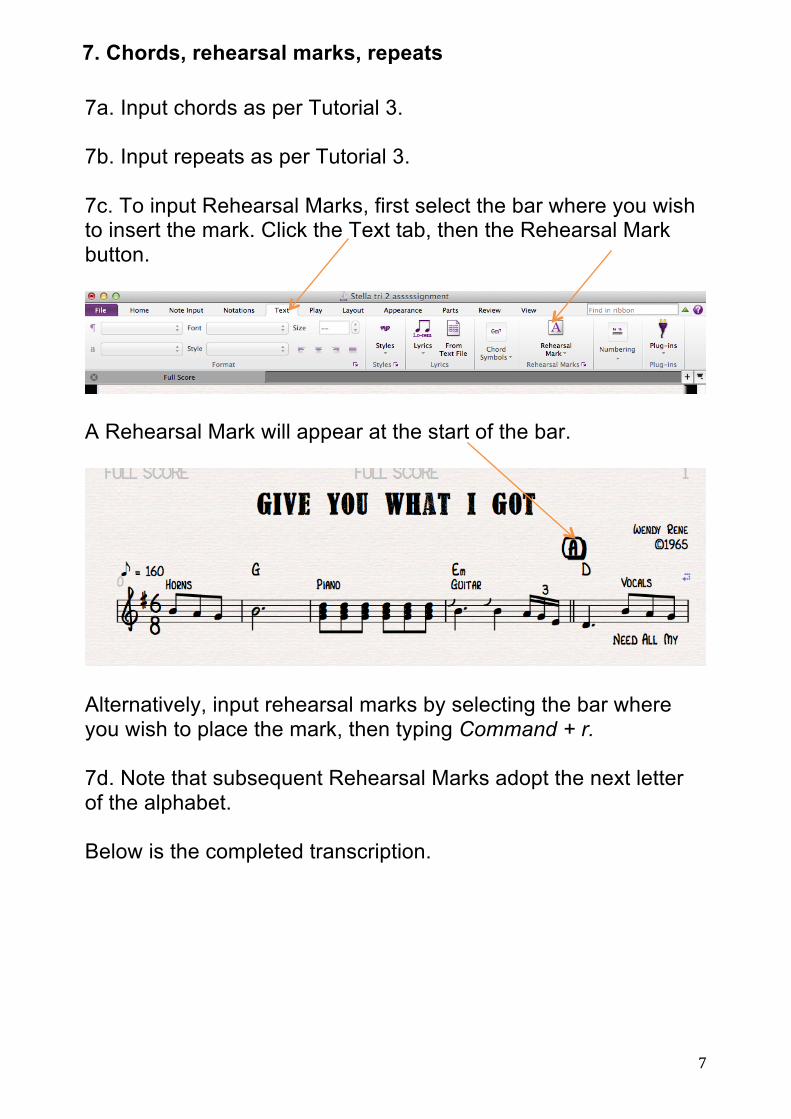
7a. Input chords as per Tutorial 3. 7b. Input repeats as per Tutorial 3. 7c. To input Rehearsal Marks, first select the bar where you wish to insert the mark. Click the Text tab, then the Rehearsal Mark button.
A Rehearsal Mark will appear at the start of the bar.
Alternatively, input rehearsal marks by selecting the bar where you wish to place the mark, then typing Command + r. 7d. Note that subsequent Rehearsal Marks adopt the next letter of the alphabet. Below is the completed transcription.
7. Chords, rehearsal marks, repeats

8
8. Complete transcription.