Embed Size (px)
Citation preview

N 300 Mbps

Package Contents
Product Overview
Thank you for purchasing DG-WA3002NP wireless LAN Access Point with PoE! With this high cost-efficiency wireless Access Point, computers and wireless devices which are compatible with IEEE 802.11n can connect to existing wired Ethernet network, at the speed of up to 300Mbps. DG-WA3002NP also supports power over ethernet which helps in easy installation, by eliminating the need of a dedicated power source for the access point. With Quick Setup installation procedure, any computer user can setup a wireless network environment in very short time - within minutes, even inexperienced users. Just follow the instructions given in this user manual, you can complete the setup procedure.
The following items should be present in your package · DG-WA3002NP Wireless Access Point with PoE · Switching Power Adapter (5V DC, 2A) · Quick Installation Guide · Installation Guide CD (includes User Manual, QIG & Utility) · Patch cord (1 No.)
Make sure that the package contains above items. If any of the listed items is damaged or missing, please contact your retailer immediately.

Product Features
System Requirements
· Complies with IEEE 802.11b/g/n wireless network standards - works with other 802.11b/g/n wireless devices.
· Complies with 802.3af PoE standard. · High speed wireless network, six times faster than conventional
802.11g wireless network (up to 300Mbps). · Allows wireless devices to connect to existing wired network and
share network resources. · Supports 64/128-bit WEP, WPA, and WPA2 wireless data encryption. · Supports 802.1x Authentication. · Supports MAC address filtering (Only allows specific wireless device of
your choice to connect to this Access Point). · Supports DHCP server function. · Supports point-to-point and point-to-multi point bridge function. · Supports WDS (Wireless Distributed System) repeater mode. · Supports Universal Repeater mode. · Supports AP Client mode. · Supports hidden SSID function. · Supports WPS (Wi-Fi Protected Setup), simplifies wireless client setup
procedures. Even inexperienced users can setup a wireless network without network technician’s help.
· Easy to use web-based GUI (Graphical User Interface) for network configuration and management purposes.
The following system requirements are recommended · Computer or network devices with wired or wireless network interface
card. · Web browser (Microsoft Internet Explorer 4.0 or above, Netscape
Navigator 4.7 or above, Opera web browser, or Safari web browser). · An available AC power socket (100 – 240 V, 50/60Hz)
LED
Name Light
Status Description
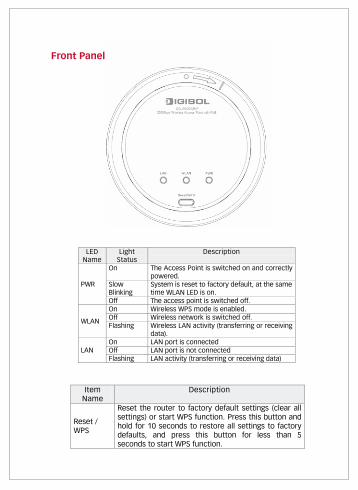
On The Access Point is switched on and correctly powered.
Slow Blinking
System is reset to factory default, at the same time WLAN LED is on.
PWR
Off The access point is switched off. On Wireless WPS mode is enabled. Off Wireless network is switched off. WLAN Flashing Wireless LAN activity (transferring or receiving
data). On LAN port is connected Off LAN port is not connected LAN Flashing LAN activity (transferring or receiving data)
Item Name
Description
Reset / WPS
Reset the router to factory default settings (clear all settings) or start WPS function. Press this button and hold for 10 seconds to restore all settings to factory defaults, and press this button for less than 5 seconds to start WPS function.

Hardware Installation
Place the unit in an appropriate place after conducting a site survey.
Connect the Access Point to ADSL modem, router, or switch/hub in your network through the LAN port of the Access Point by using Ethernet cable.
Connect the A/C power adapter to the wall socket, and then connect it to the ‘Power’ socket of the Access Point.
Please check all the LEDs on the front panel. ‘PWR’ LED should be steadily ON, ‘LAN’ LED should be ON if the Access Point is correctly connected to the ADSL modem, router or switch/hub.
1
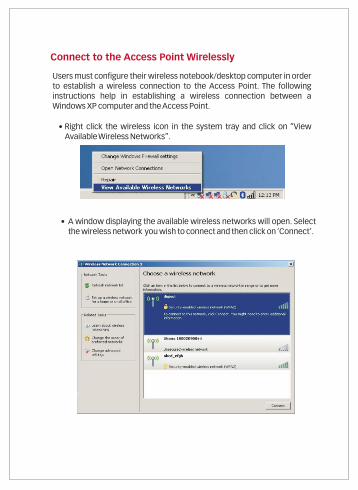
Please follow the below mentioned instructions to build the network connection between your new wireless Access Point and your computers, network devices:
2
3
4
Interfaces Description Power Power connector, connects to A/C power adapter. Ethernet Local Area Network (LAN) port.

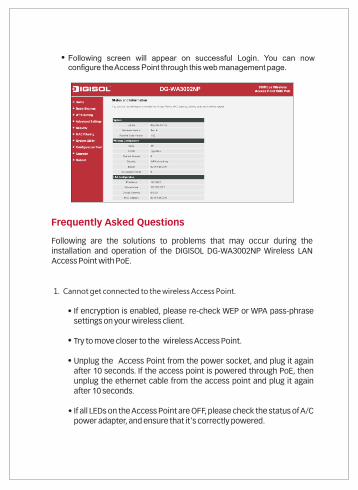
4 Enter the AP’s password to log in to the AP. The default password is “1234”. It is recommended to change the AP’s password to protect it from being accessed by other users. If you do not wish to change the current password, you can leave “New Password” and “Confirm New Password” fields blank. Click ‘Log in’ to continue.
3 Connect one end of the network cable to the LAN port on the Router and the other end to the PoE switch. From the PoE switch connect a cable to the AP. Power ON the router, the AP and the PoE switch. Ensure that all the LED’s on the Access Point are ON. If not, try the above steps again else click ‘Next’ to continue.