Embed Size (px)
Citation preview
NETWRIX USER ACTIVITY VIDEO
REPORTER
ADMINISTRATOR’S GUIDE
Copyright © 2013 NetWrix Corporation. All Rights Reserved.
January 2013
Product Version: 1.0
NetWrix User Activity Video Reporter Administrator’s Guide
Page 2 of 65
Copyright © 2013 NetWrix Corporation. All Rights Reserved
Suggestions or comments about this document? www.netwrix.com/feedback
Legal Notice
The information in this publication is furnished for information use only, and does not constitute a
commitment from NetWrix Corporation of any features or functions discussed. NetWrix Corporation
assumes no responsibility or liability for the accuracy of the information presented, which is subject
to change without notice.
NetWrix is a registered trademark of NetWrix Corporation. The NetWrix logo and all other NetWrix
product or service names and slogans are registered trademarks or trademarks of NetWrix
Corporation. Active Directory is a trademark of Microsoft Corporation. All other trademarks and
registered trademarks are property of their respective owners.
Disclaimers
This document may contain information regarding the use and installation of non-NetWrix products.
Please note that this information is provided as a courtesy to assist you. While NetWrix tries to
ensure that this information accurately reflects the information provided by the supplier, please refer
to the materials provided with any non-NetWrix product and contact the supplier for confirmation.
NetWrix Corporation assumes no responsibility or liability for incorrect or incomplete information
provided about non-NetWrix products.
© 2013 NetWrix Corporation.
All rights reserved.

NetWrix User Activity Video Reporter Administrator’s Guide
Page 3 of 65
Copyright © 2013 NetWrix Corporation. All Rights Reserved
Suggestions or comments about this document? www.netwrix.com/feedback
Table of Contents
1. INTRODUCTION ................................................................................ 5
1.1. Overview .............................................................................. 5
1.2. How This Guide is Organized ....................................................... 5
2. PRODUCT OVERVIEW .......................................................................... 6
2.1. Key Features .......................................................................... 6
2.2. Product Workflow .................................................................... 6
2.3. Product Editions ...................................................................... 7
3. NETWRIX MANAGEMENT CONSOLE OVERVIEW ................................................. 8
4. MANAGED OBJECT ............................................................................. 9
4.1. Creating Managed Object ........................................................... 9
4.2. Modifying Managed Object ........................................................ 20
5. CONFIGURING USER ACTIVITY VIDEO REPORTER SETTINGS ................................... 23
5.1. Users .................................................................................. 24
5.2. Applications .......................................................................... 25
5.3. Video Recording Settings........................................................... 26
5.3.1. . Granting Access to Video Files ............................................ 27
5.4. Activity Summary Delivery ......................................................... 27
6. MONITORED COMPUTERS .................................................................... 29
7. DATA COLLECTION ........................................................................... 32
7.1. Data Collection Workflow .......................................................... 32
7.2. Activity Summary ................................................................... 32
8. ACTIVITY RECORDS .......................................................................... 34
9. REPORTS .................................................................................... 37
9.1. Reports Overview ................................................................... 37
9.2. Configuring Reports ................................................................. 37
9.2.1. Specifying SQL Server Settings ............................................ 38
9.2.2. Uploading Report Templates to the Report Server ..................... 39
9.2.3. Importing Audit Data to SQL Database ................................... 40
9.2.4. Assigning Permissions to View Reports ................................... 40
9.3. Viewing Reports ..................................................................... 42
9.3.1. Viewing Reports in NetWrix Enterprise Management Console ........ 42
9.3.2. Viewing Reports in Web Browser ......................................... 45
NetWrix User Activity Video Reporter Administrator’s Guide
Page 4 of 65
Copyright © 2013 NetWrix Corporation. All Rights Reserved
Suggestions or comments about this document? www.netwrix.com/feedback
9.4. Configuring Report Subscriptions ................................................. 47
9.4.1. Creating Subscription ...................................................... 47
9.4.2. Modifying Subscription ..................................................... 51
9.4.3. Forcing On-Demand Report Delivery ..................................... 52
10. CONFIGURING GLOBAL SETTINGS ........................................................... 53
10.1. Configuring Reports Settings ..................................................... 53
10.2. Configuring Email Notifications Settings ....................................... 55
10.3. Configuring Audit Archive Settings .............................................. 56
10.4. Configuring Data Collection Settings ............................................ 57
10.5. Configuring Licenses Settings .................................................... 58
10.6. Configuring NetWrix Console Audit .............................................. 58
11. CONFIGURING INTEGRATION WITH OTHER MODULES ......................................... 61
A APPENDIX: RELATED DOCUMENTATION ....................................................... 65
NetWrix User Activity Video Reporter Administrator’s Guide
Page 5 of 65
Copyright © 2013 NetWrix Corporation. All Rights Reserved
Suggestions or comments about this document? www.netwrix.com/feedback
1. INTRODUCTION
1.1. Overview
This guide contains an overview of the NetWrix User Activity Video Reporter functionality,
and step-by-step instructions on how to configure and use the product. For details on how to
install the product, refer to NetWrix User Activity Video Reporter Installation and
Configuration Guide.
1.2. How This Guide is Organized
This section explains how this guide is organized and provides a brief overview of each
chapter.
Chapter 1 Introduction is the current chapter. It explains the purpose of this
document and its structure.
Chapter 2 Product Overview provides an overview of the NetWrix User Activity
Video Reporter functionality, lists its main features and benefits, and explains the
product workflow. It also contains the information on the product editions and a
side-by-side comparison of their features.
Chapter 3 NetWrix Management Console Overview provides a description of
NetWrix Management Console, which is an integrated interface for most NetWrix
products.
Chapter 4 Managed Object explains how to configure a Managed Object, which in
NetWrix User Activity Video Reporter is a computer collection that you monitor for
users’ activity. It also explains how to modify Managed Object settings.
Chapter 5 Configuring User Activity Video Reporter Settings provides instructions
on how to configure the product settings, such as video recording quality, filters,
and so on.
Chapter 6 Monitored Computers explains how to check and manage the status of
the NetWrix User Activity Video Reporter agents installed on the monitored
computers.
Chapter 7 Data Collection explains the NetWrix User Activity Video Reporter data
collection workflow and contains a detailed Activity Summary description.
Chapter 8 Activity Records explains how to generate a summary of activity records
in NetWrix Management Console.
Chapter 9 Reports contains an overview of the Reports functionality, explains how
to configure and view reports, and provides report examples. It also contains step-
by-step instructions on how to configure subscriptions to Reports.
Chapter 10 Configuring Global Settings explains how to configure or modify the
settings that are applied to all Managed Objects and all NetWrix modules enabled
for these Managed Objects. It also provides instructions on how to configure
NetWrix Console Audit that allows tracking of changes to Managed Objects and
NetWrix modules configuration.
Chapter 11 Configuring Integration with other Modules provides instructions on
how to integrate videos captured by NetWrix User Activity Video Reporter into
change reports of other NetWrix modules.
Appendix: Related Documentation contains a list of all documents published to
support NetWrix User Activity Video Reporter.
NetWrix User Activity Video Reporter Administrator’s Guide
Page 6 of 65
Copyright © 2013 NetWrix Corporation. All Rights Reserved
Suggestions or comments about this document? www.netwrix.com/feedback
2. PRODUCT OVERVIEW Complete visibility over critical IT systems can be difficult to implement, inefficient and
expensive. Moreover, many change auditing tools require the administrators who use them to
be given extensive permissions that would easily allow them to circumvent any change or
configuration logging. In addition, many critical applications do not create logs, or, if they
do, these logs are not easily accessible by an auditing solution.
Often, native and 3rd-party tools lack key audit detail, do not translate complex data into a
human-readable format, or are too dangerous and costly to implement. Without the
comprehensive information on who changes what, where and when, efficiency is reduced and
issues go unresolved risking security, compliance, audit requirements and troubleshooting.
NetWrix User Activity Video Reporter, like a surveillance camera for your servers, records all
user activity for later review. NetWrix VideoScape™ playback lets you jump to a specific
timestamp and watch how specific actions were performed in various applications or
management tools. Like scenes in a movie, NetWrix VideoScape™ embeds key metadata into
video files, allowing the viewer to fast-forward to a specific activity (such as a window
opened or a process started) instead of filtering through thousands of hours of activity.
NetWrix User Activity Video Reporter is an excellent complement to traditional configuration
and change auditing solutions, as it provides control over applications that do not produce
logs or do not provide enough insight into users’ activity.
2.1. Key Features
NetWrix User Activity Video Reporter is a tool for video capture and reporting on users’
activity. Its main features are:
Video recording of users’ activity for both interactive and remote sessions.
The NetWrix VideoScape™ technology allows collecting session embedded
metadata (application names, windows titles, and so on.) that can be used for
filtering and data search inside video recordings.
Possibility to optimize video file size by limiting video recording for specific users
and applications only and by adjusting video quality (grayscale, frames per
second, and so on).
Reports on users’ activity with sorting and filtering capabilities.
Reports Subscriptions allow scheduling any available reports for automatic email
delivery.
Integration with other NetWrix Change Reporter products allows seeing HOW
particular changes reported by these products were made.
The NetWrix Console Audit feature allows to keep record of any actions performed
using NetWrix Management Console and track changes to NetWrix modules
configuration, Managed Objects and global settings.
2.2. Product Workflow
A typical NetWrix User Activity Video Reporter data collection and reporting workflow is as
follows:
1. An administrator configures Managed Objects and sets the parameters for automated
screen video capture and reporting.
2. The NetWrix User Activity Video Reporter agents are installed automatically on the
target computers.
NetWrix User Activity Video Reporter Administrator’s Guide
Page 7 of 65
Copyright © 2013 NetWrix Corporation. All Rights Reserved
Suggestions or comments about this document? www.netwrix.com/feedback
3. The NetWrix User Activity Video Reporter agents monitor the target computers and
trigger a video recording session when specified users log in or specified applications
are activated.
4. On video session completion, NetWrix User Activity Video Reporter agents connect to
the NetWrix server (the computer where NetWrix User Activity Video Reporter is
installed) and transfer video files and metadata. Audit data is written to the Audit
Archive.
5. The product emails Activity Summaries with a list of video recordings and links to
video files at set intervals to the specified recipients.
6. If the Reports functionality is enabled and configured, audit data is imported from the
Audit Archive to a dedicated SQL database. Reports can be viewed through NetWrix
Management Console, or in a web browser.
2.3. Product Editions
NetWrix User Activity Video Reporter is available in two editions: Freeware and Enterprise.
The Freeware Edition can be used by companies or individuals for an unlimited period of
time. The Enterprise Edition can be evaluated free of charge for 20 days.
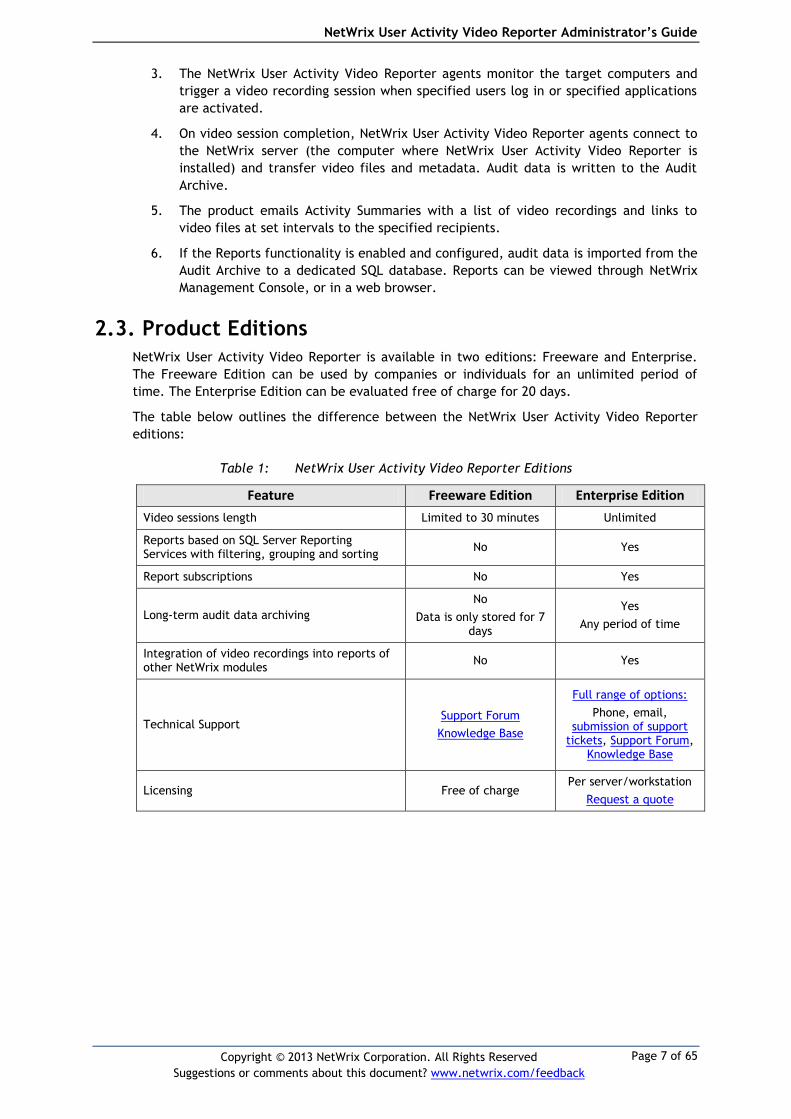
The table below outlines the difference between the NetWrix User Activity Video Reporter
editions:
Table 1: NetWrix User Activity Video Reporter Editions
Feature Freeware Edition Enterprise Edition
Video sessions length Limited to 30 minutes Unlimited
Reports based on SQL Server Reporting Services with filtering, grouping and sorting
No Yes
Report subscriptions No Yes
Long-term audit data archiving
No
Data is only stored for 7 days
Yes
Any period of time
Integration of video recordings into reports of other NetWrix modules
No Yes
Technical Support Support Forum
Knowledge Base
Full range of options:
Phone, email, submission of support
tickets, Support Forum, Knowledge Base
Licensing Free of charge Per server/workstation
Request a quote
NetWrix User Activity Video Reporter Administrator’s Guide
Page 8 of 65
Copyright © 2013 NetWrix Corporation. All Rights Reserved
Suggestions or comments about this document? www.netwrix.com/feedback
3. NETWRIX MANAGEMENT CONSOLE OVERVIEW NetWrix User Activity Video Reporter is integrated into NetWrix Management Console: an MMC
snap-in that allows configuring Managed Objects, the Reports options and global settings.
NetWrix Management Console allows you to do the following:
Manage the settings for different NetWrix products via an integrated interface
Create and configure Managed Objects
Enable and configure SSRS-based Reports
View Reports
Configure long-term archiving
Configure Reports subscriptions
Handle numerous Managed Objects with a single installation
Configure your Managed Objects settings in a batch
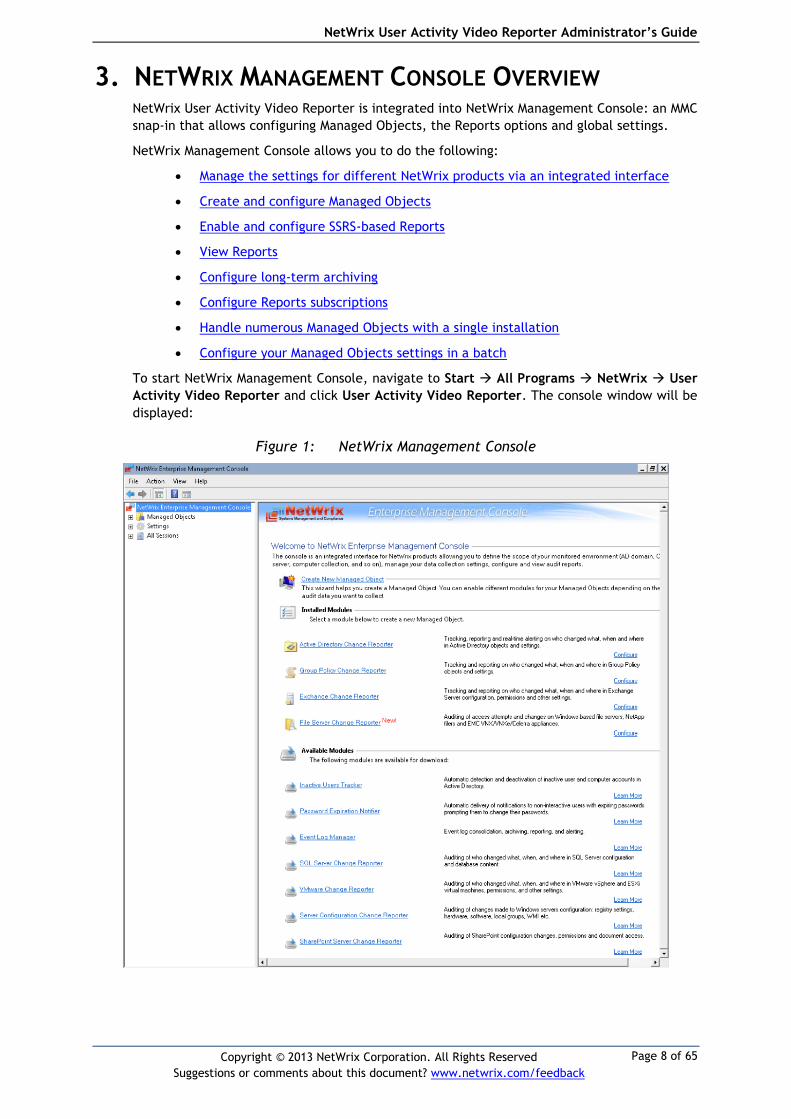
To start NetWrix Management Console, navigate to Start All Programs NetWrix User
Activity Video Reporter and click User Activity Video Reporter. The console window will be
displayed:
Figure 1: NetWrix Management Console
NetWrix User Activity Video Reporter Administrator’s Guide
Page 9 of 65
Copyright © 2013 NetWrix Corporation. All Rights Reserved
Suggestions or comments about this document? www.netwrix.com/feedback
4. MANAGED OBJECT In NetWrix User Activity Video Reporter, a Managed Object is a collection of computers
monitored for users’ activity.
This chapter provides detailed step-by-step instructions on how to:
Create and configure a Managed Object
Modify Managed Object settings
4.1. Creating Managed Object
Procedure 1. To create and configure a Managed Object
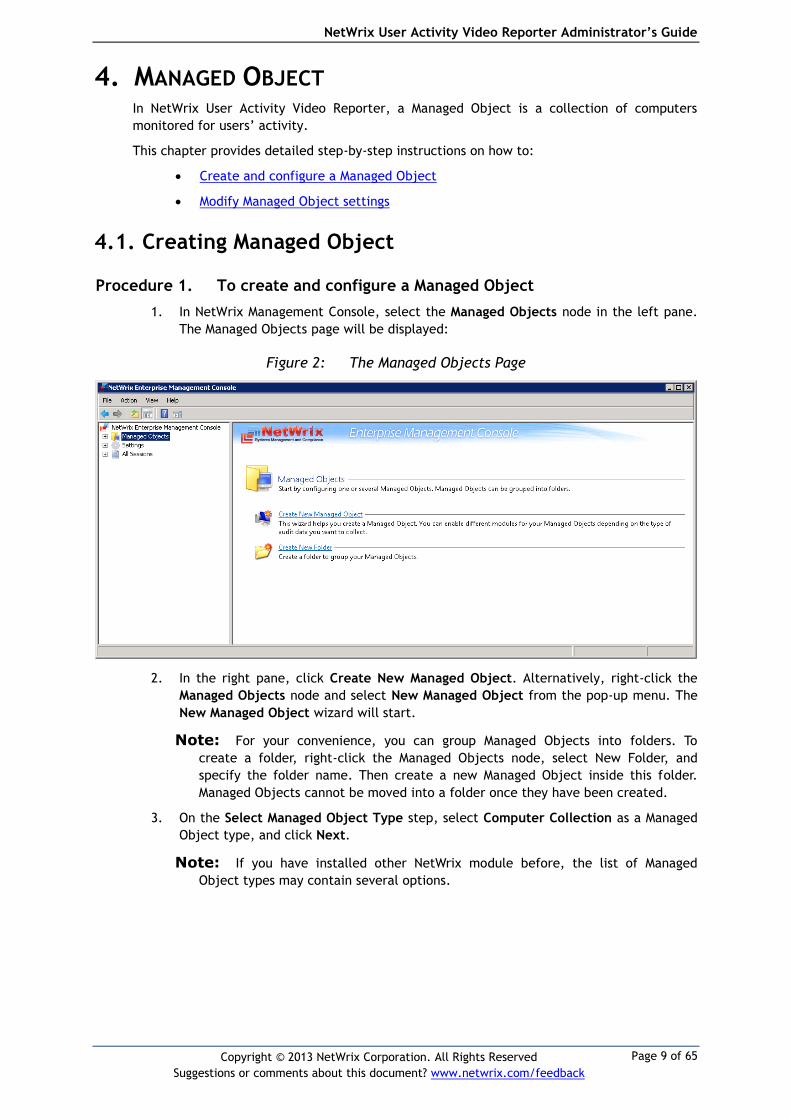
1. In NetWrix Management Console, select the Managed Objects node in the left pane.
The Managed Objects page will be displayed:
Figure 2: The Managed Objects Page
2. In the right pane, click Create New Managed Object. Alternatively, right-click the
Managed Objects node and select New Managed Object from the pop-up menu. The
New Managed Object wizard will start.
Note: For your convenience, you can group Managed Objects into folders. To
create a folder, right-click the Managed Objects node, select New Folder, and
specify the folder name. Then create a new Managed Object inside this folder.
Managed Objects cannot be moved into a folder once they have been created.
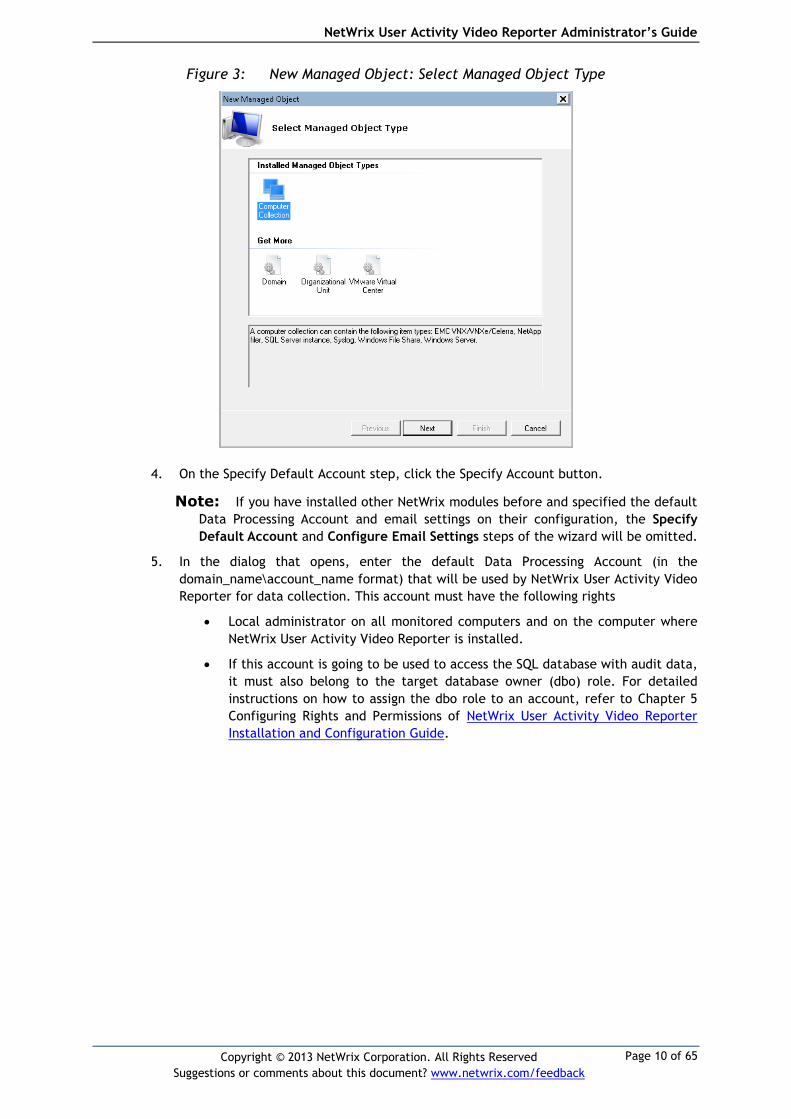
3. On the Select Managed Object Type step, select Computer Collection as a Managed
Object type, and click Next.
Note: If you have installed other NetWrix module before, the list of Managed
Object types may contain several options.
NetWrix User Activity Video Reporter Administrator’s Guide
Page 10 of 65
Copyright © 2013 NetWrix Corporation. All Rights Reserved
Suggestions or comments about this document? www.netwrix.com/feedback
Figure 3: New Managed Object: Select Managed Object Type
4. On the Specify Default Account step, click the Specify Account button.
Note: If you have installed other NetWrix modules before and specified the default
Data Processing Account and email settings on their configuration, the Specify
Default Account and Configure Email Settings steps of the wizard will be omitted.
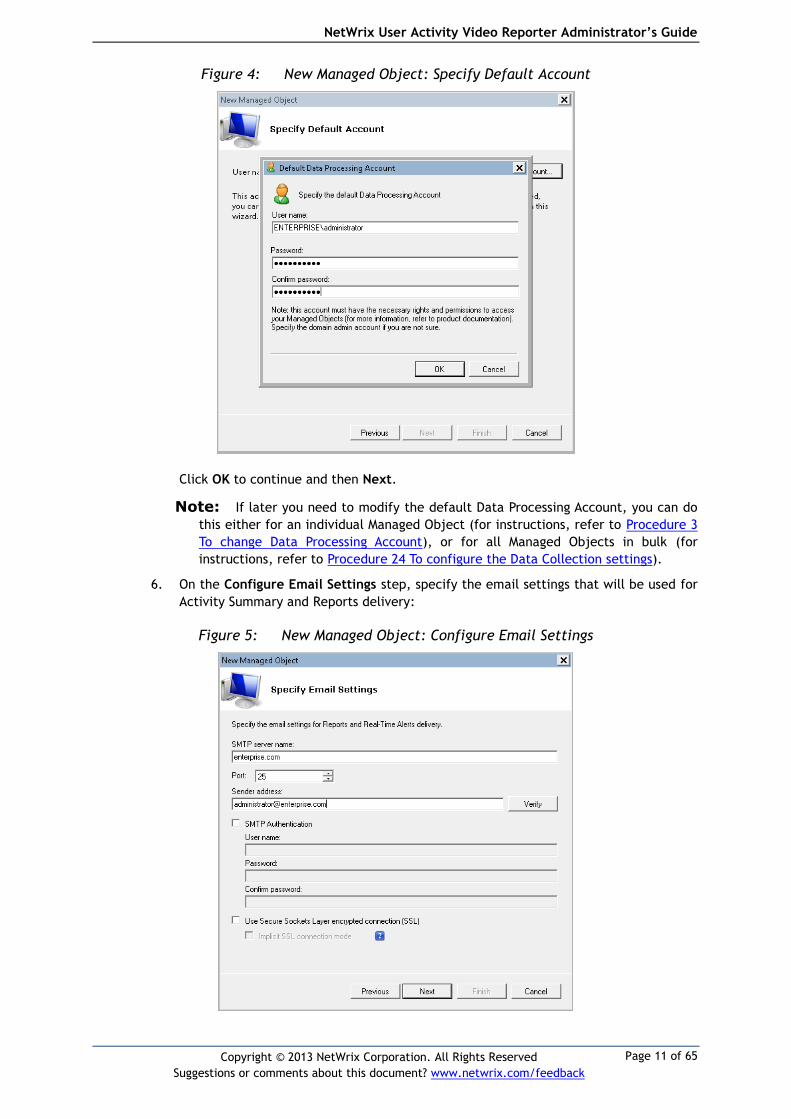
5. In the dialog that opens, enter the default Data Processing Account (in the
domain_name\account_name format) that will be used by NetWrix User Activity Video
Reporter for data collection. This account must have the following rights
Local administrator on all monitored computers and on the computer where
NetWrix User Activity Video Reporter is installed.
If this account is going to be used to access the SQL database with audit data,
it must also belong to the target database owner (dbo) role. For detailed
instructions on how to assign the dbo role to an account, refer to Chapter 5
Configuring Rights and Permissions of NetWrix User Activity Video Reporter
Installation and Configuration Guide.
NetWrix User Activity Video Reporter Administrator’s Guide
Page 11 of 65
Copyright © 2013 NetWrix Corporation. All Rights Reserved
Suggestions or comments about this document? www.netwrix.com/feedback
Figure 4: New Managed Object: Specify Default Account
Click OK to continue and then Next.
Note: If later you need to modify the default Data Processing Account, you can do
this either for an individual Managed Object (for instructions, refer to Procedure 3
To change Data Processing Account), or for all Managed Objects in bulk (for
instructions, refer to Procedure 24 To configure the Data Collection settings).
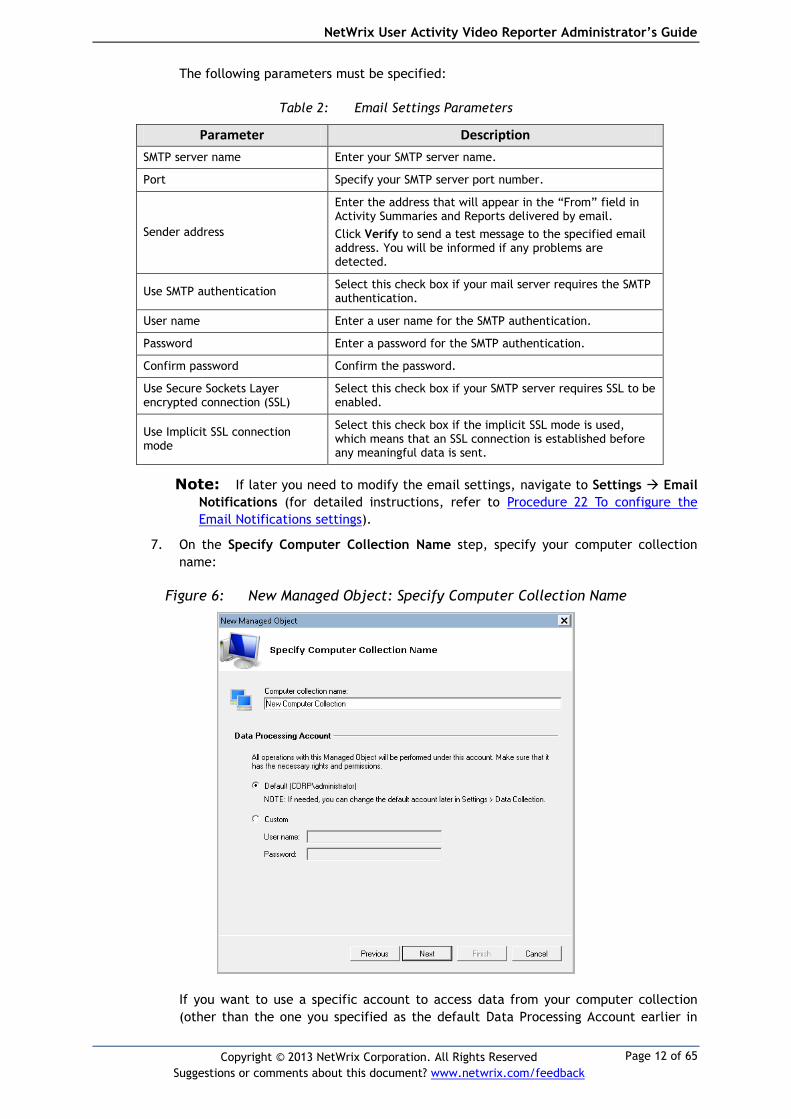
6. On the Configure Email Settings step, specify the email settings that will be used for
Activity Summary and Reports delivery:
Figure 5: New Managed Object: Configure Email Settings
NetWrix User Activity Video Reporter Administrator’s Guide
Page 12 of 65
Copyright © 2013 NetWrix Corporation. All Rights Reserved
Suggestions or comments about this document? www.netwrix.com/feedback
The following parameters must be specified:
Table 2: Email Settings Parameters
Parameter Description
SMTP server name Enter your SMTP server name.
Port Specify your SMTP server port number.
Sender address
Enter the address that will appear in the “From” field in Activity Summaries and Reports delivered by email.
Click Verify to send a test message to the specified email address. You will be informed if any problems are detected.
Use SMTP authentication Select this check box if your mail server requires the SMTP authentication.
User name Enter a user name for the SMTP authentication.
Password Enter a password for the SMTP authentication.
Confirm password Confirm the password.
Use Secure Sockets Layer encrypted connection (SSL)
Select this check box if your SMTP server requires SSL to be enabled.
Use Implicit SSL connection mode
Select this check box if the implicit SSL mode is used, which means that an SSL connection is established before any meaningful data is sent.
Note: If later you need to modify the email settings, navigate to Settings Email
Notifications (for detailed instructions, refer to Procedure 22 To configure the
Email Notifications settings).
7. On the Specify Computer Collection Name step, specify your computer collection
name:
Figure 6: New Managed Object: Specify Computer Collection Name
If you want to use a specific account to access data from your computer collection
(other than the one you specified as the default Data Processing Account earlier in
NetWrix User Activity Video Reporter Administrator’s Guide
Page 13 of 65
Copyright © 2013 NetWrix Corporation. All Rights Reserved
Suggestions or comments about this document? www.netwrix.com/feedback
this procedure), select the Custom option and enter the credentials. This account
must be granted the same permissions and access rights as the default Data
Processing Account. Click Next to continue.
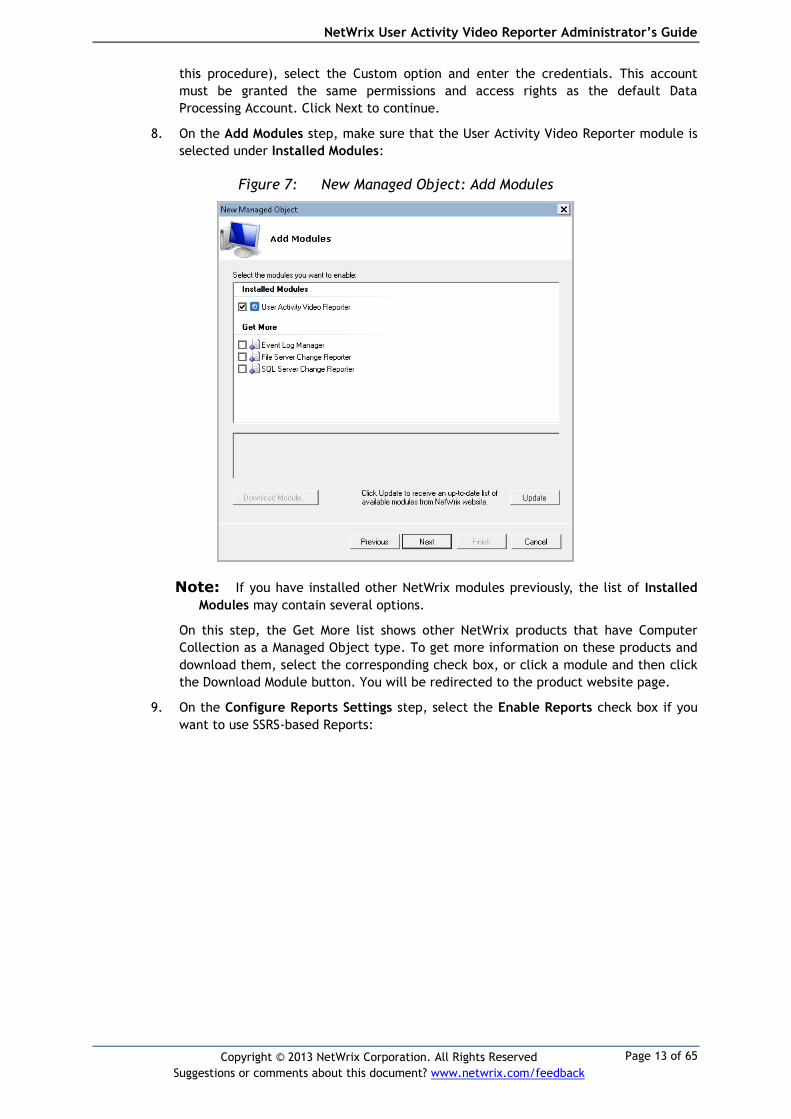
8. On the Add Modules step, make sure that the User Activity Video Reporter module is
selected under Installed Modules:
Figure 7: New Managed Object: Add Modules
Note: If you have installed other NetWrix modules previously, the list of Installed
Modules may contain several options.
On this step, the Get More list shows other NetWrix products that have Computer
Collection as a Managed Object type. To get more information on these products and
download them, select the corresponding check box, or click a module and then click
the Download Module button. You will be redirected to the product website page.
9. On the Configure Reports Settings step, select the Enable Reports check box if you
want to use SSRS-based Reports:

NetWrix User Activity Video Reporter Administrator’s Guide
Page 14 of 65
Copyright © 2013 NetWrix Corporation. All Rights Reserved
Suggestions or comments about this document? www.netwrix.com/feedback
Figure 8: New Managed Object: Reports Settings
Note: If you do not enable Reports, audit data will only be saved locally and will
not be written to a SQL database. You can enable and configure Reports later (for
details refer to Section 9.2 Configuring Reports).
If you have enabled the Reports functionality, select one of the following options:
Automatically install and configure a new instance of SQL Server Express
Edition. Once you have selected this option and clicked Next, the Reports
Configuration wizard will start. Follow the instructions of the wizard to
automatically install and configure SQL Server Express with Advanced Services.
SQL server version depends on the operating system your computer is running (for
details, refer to the following NetWrix Knowledge Base article: Which SQL Server
versions can be installed automatically via NetWrix Management Console).
Use an existing SQL Server with SQL Server Reporting Services to use an already
installed SQL Server instance, or to install and configure it manually before
proceeding with NetWrix User Activity Video Reporter configuration. For detailed
instructions on how to install Microsoft SQL Server 2005/2008 R2/2012 Express
with Advanced Services and configure the Reporting Services, refer to the
following NetWrix Technical Article: Installing Microsoft SQL Server and
Configuring the Reporting Services.
Note: It is recommended to consider the maximum database size in different SQL
Server versions, and make your choice based on the size of the environment you
are going to monitor, the number of users and other factors. Note that the
maximum database size in SQL Server Express editions may be insufficient.
If you have selected the second option, specify the following parameters:
NetWrix User Activity Video Reporter Administrator’s Guide
Page 15 of 65
Copyright © 2013 NetWrix Corporation. All Rights Reserved
Suggestions or comments about this document? www.netwrix.com/feedback
Table 3: Reports Parameters
Parameter Instruction
SQL Server Specify the name of the SQL Server instance where a database of collected audit data will be created.
User name
Specify a user name for the SQL Server authentication.
NOTE: This user must belong to the target database owners (dbo) role. For instructions on how to assign this role to a user, refer to Chapter 5 Configuring Rights and Permissions of NetWrix User Activity Video Reporter Installation and Configuration Guide.
Password Enter a password for the SQL Server authentication.
Windows Authentication Select this option if you want to use the Data Processing Account specified earlier in this procedure to be used to access the SQL database.
Report Server URL Specify the Report Server URL. Click Verify to ensure that the resource is reachable.
Report Manager URL Specify the Report Manager URL. Click Verify to ensure that the resource is reachable.
Note: If you have already created other Managed Objects, and configured the
Reports settings for them, on this step you will only be prompted to enable or
disable the Reports feature. If you want to use custom Reports settings for this
Managed Object (for example, write data to a different SQL database), you can
change the Reports settings later (for instructions, refer to Section 9.2.1
Specifying SQL Server Settings of this guide).
Click Next to continue and wait until NetWrix Management Console has established a
connection with the Report Server.
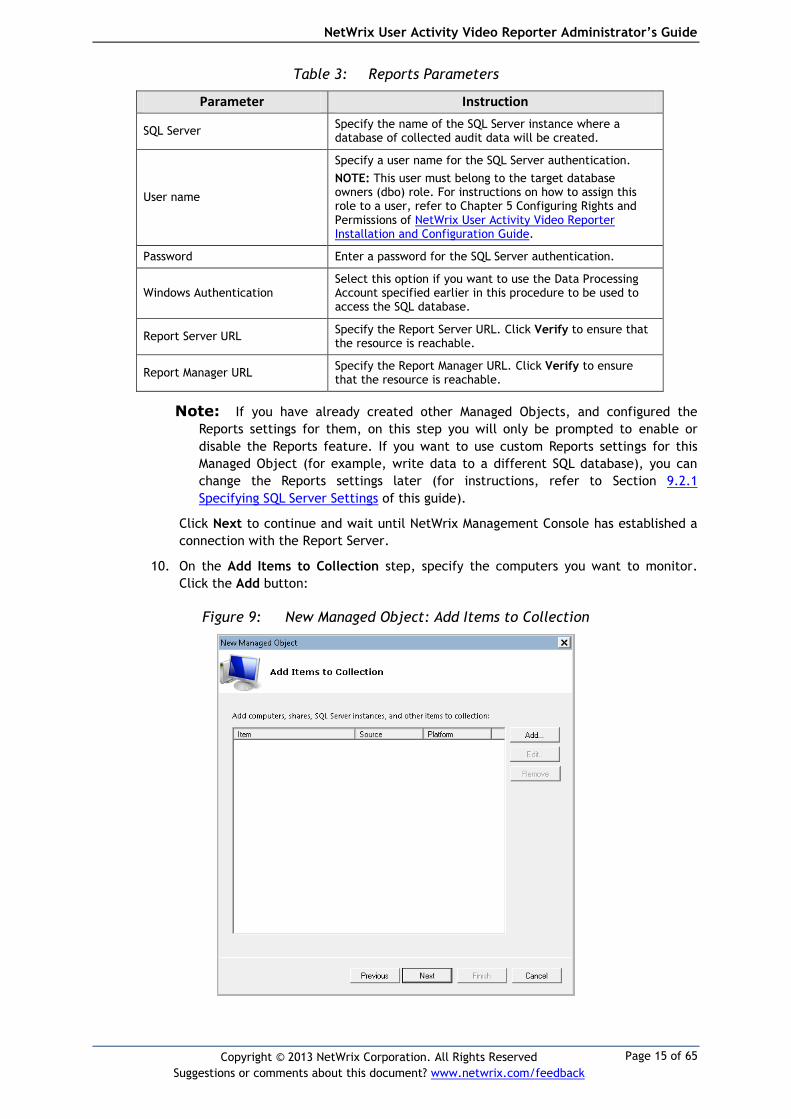
10. On the Add Items to Collection step, specify the computers you want to monitor.
Click the Add button:
Figure 9: New Managed Object: Add Items to Collection
NetWrix User Activity Video Reporter Administrator’s Guide
Page 16 of 65
Copyright © 2013 NetWrix Corporation. All Rights Reserved
Suggestions or comments about this document? www.netwrix.com/feedback
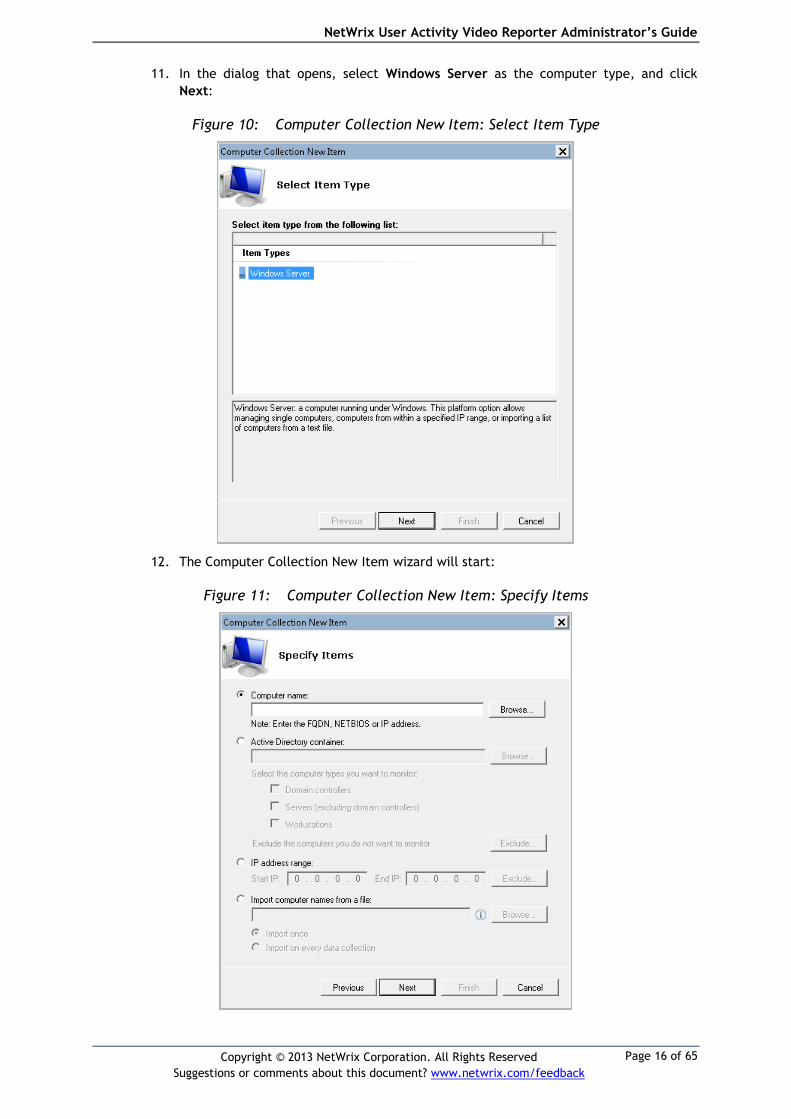
11. In the dialog that opens, select Windows Server as the computer type, and click
Next:
Figure 10: Computer Collection New Item: Select Item Type
12. The Computer Collection New Item wizard will start:
Figure 11: Computer Collection New Item: Specify Items
NetWrix User Activity Video Reporter Administrator’s Guide
Page 17 of 65
Copyright © 2013 NetWrix Corporation. All Rights Reserved
Suggestions or comments about this document? www.netwrix.com/feedback
13. Select one of the following options:
Computer name: allows specifying a single computer by entering its FQDN,
NETBIOS or IP address. You can click Browse to select from the list of
computers in your network.
Active Directory container: allows specifying a whole AD container. Click
Browse to select from the list of containers in your network. Under this
option you also can:
o Select a particular computer type to be monitored within the chosen AD
container: domain controllers, servers (excluding the domain
controllers), or workstations.
o Exclude the computers you do not want to monitor: click Exclude to
specify a container with the computers you do not want to monitor.
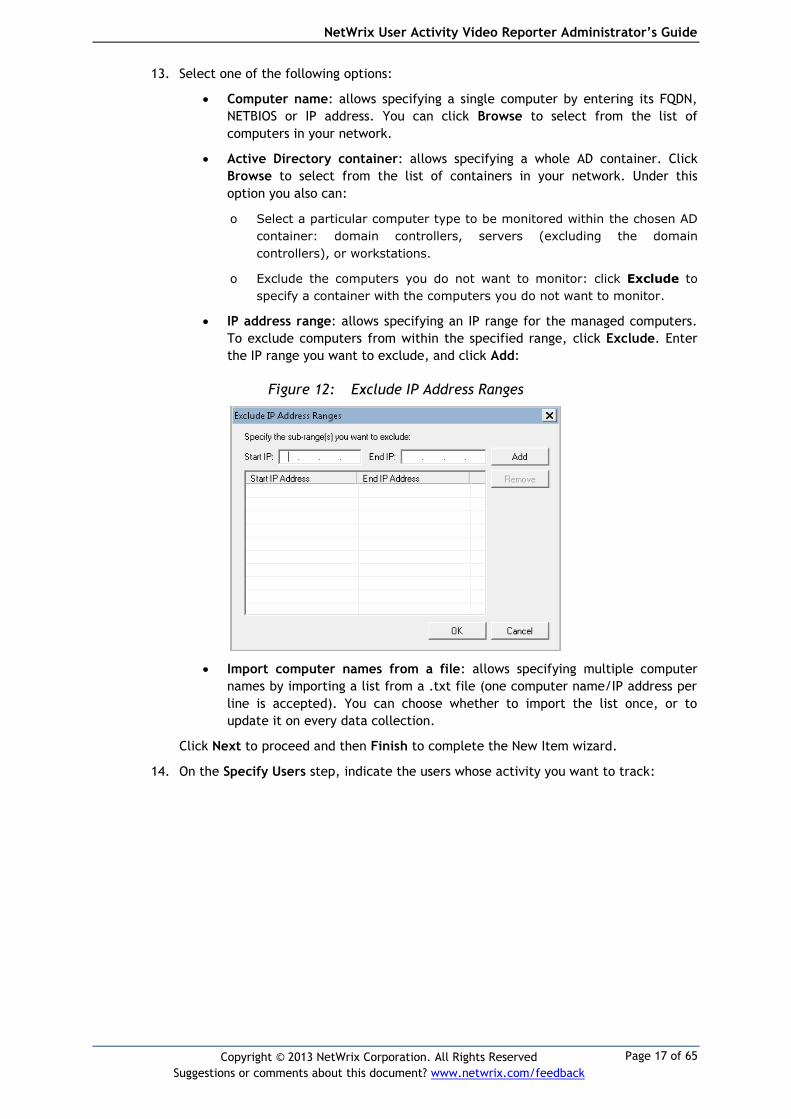
IP address range: allows specifying an IP range for the managed computers.
To exclude computers from within the specified range, click Exclude. Enter
the IP range you want to exclude, and click Add:
Figure 12: Exclude IP Address Ranges
Import computer names from a file: allows specifying multiple computer
names by importing a list from a .txt file (one computer name/IP address per
line is accepted). You can choose whether to import the list once, or to
update it on every data collection.
Click Next to proceed and then Finish to complete the New Item wizard.
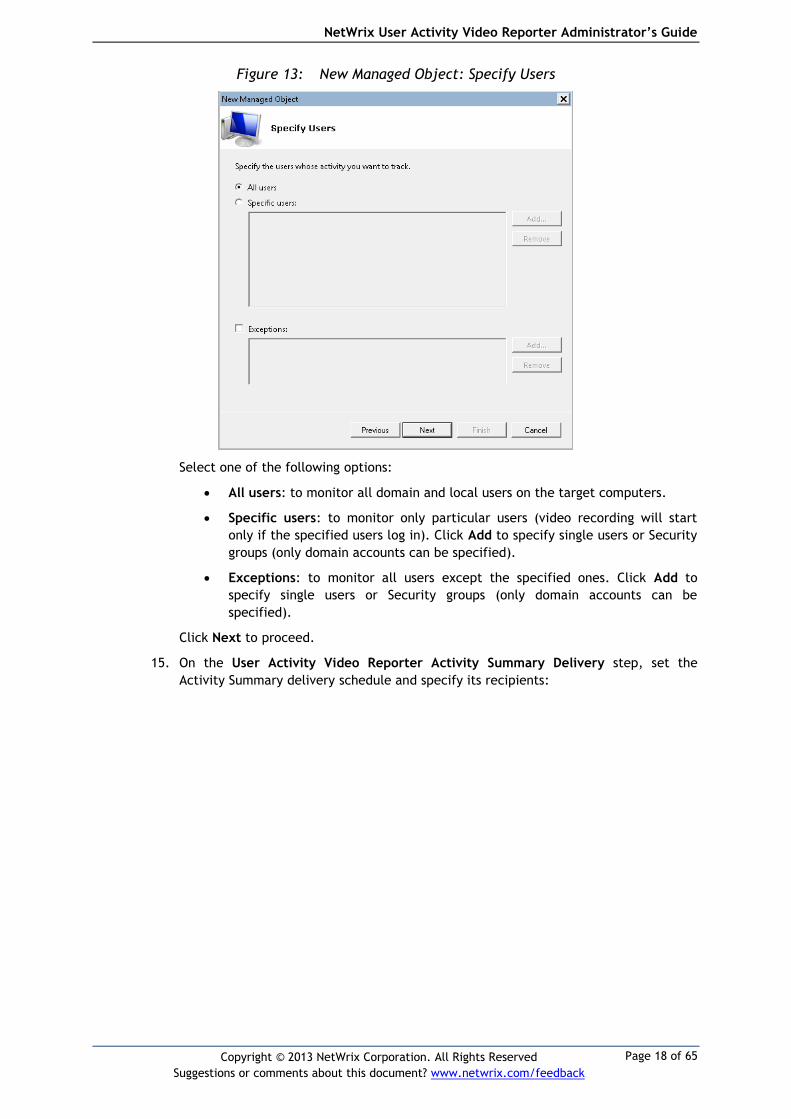
14. On the Specify Users step, indicate the users whose activity you want to track:
NetWrix User Activity Video Reporter Administrator’s Guide
Page 18 of 65
Copyright © 2013 NetWrix Corporation. All Rights Reserved
Suggestions or comments about this document? www.netwrix.com/feedback
Figure 13: New Managed Object: Specify Users
Select one of the following options:
All users: to monitor all domain and local users on the target computers.
Specific users: to monitor only particular users (video recording will start
only if the specified users log in). Click Add to specify single users or Security
groups (only domain accounts can be specified).
Exceptions: to monitor all users except the specified ones. Click Add to
specify single users or Security groups (only domain accounts can be
specified).
Click Next to proceed.
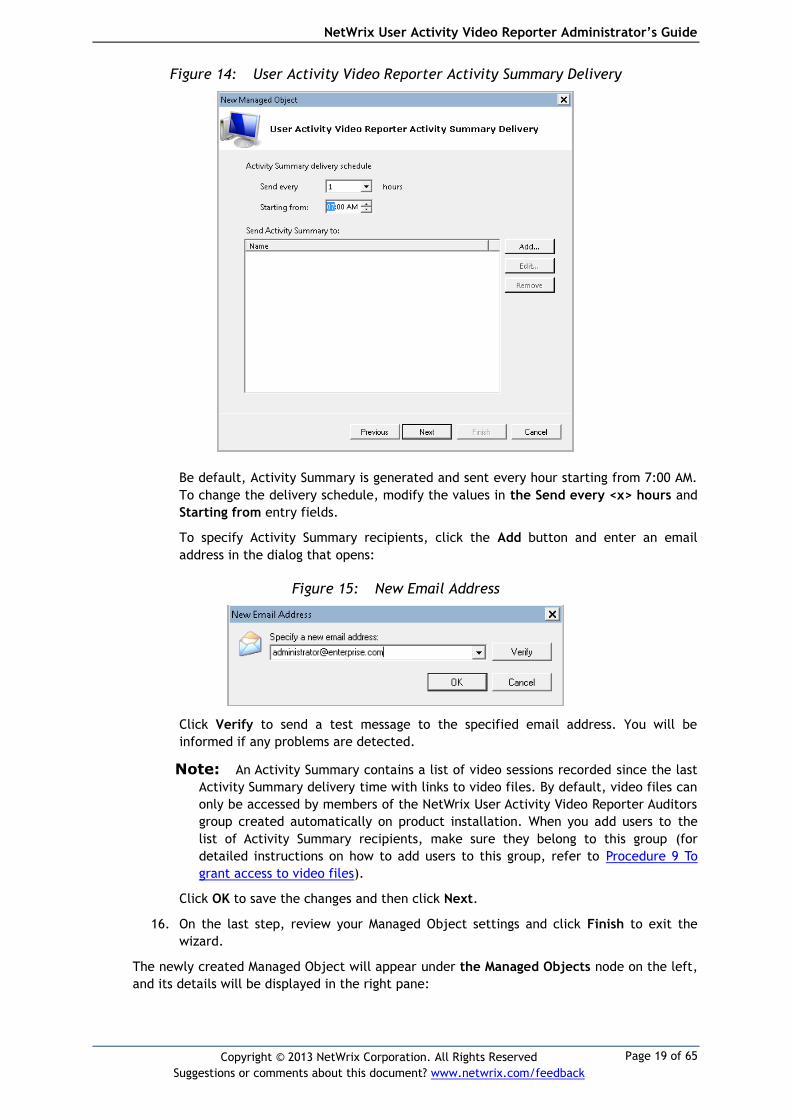
15. On the User Activity Video Reporter Activity Summary Delivery step, set the
Activity Summary delivery schedule and specify its recipients:
NetWrix User Activity Video Reporter Administrator’s Guide
Page 19 of 65
Copyright © 2013 NetWrix Corporation. All Rights Reserved
Suggestions or comments about this document? www.netwrix.com/feedback
Figure 14: User Activity Video Reporter Activity Summary Delivery
Be default, Activity Summary is generated and sent every hour starting from 7:00 AM.
To change the delivery schedule, modify the values in the Send every <x> hours and
Starting from entry fields.
To specify Activity Summary recipients, click the Add button and enter an email
address in the dialog that opens:
Figure 15: New Email Address
Click Verify to send a test message to the specified email address. You will be
informed if any problems are detected.
Note: An Activity Summary contains a list of video sessions recorded since the last
Activity Summary delivery time with links to video files. By default, video files can
only be accessed by members of the NetWrix User Activity Video Reporter Auditors
group created automatically on product installation. When you add users to the
list of Activity Summary recipients, make sure they belong to this group (for
detailed instructions on how to add users to this group, refer to Procedure 9 To
grant access to video files).
Click OK to save the changes and then click Next.
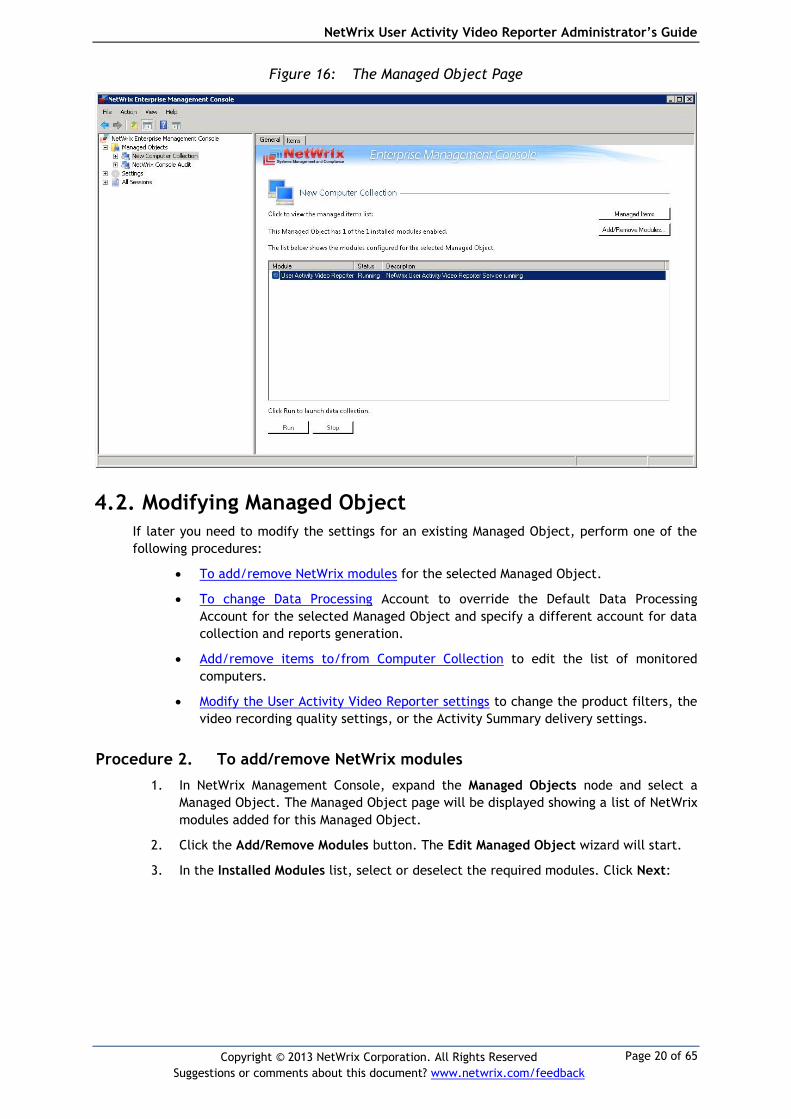
16. On the last step, review your Managed Object settings and click Finish to exit the
wizard.
The newly created Managed Object will appear under the Managed Objects node on the left,
and its details will be displayed in the right pane:
NetWrix User Activity Video Reporter Administrator’s Guide
Page 20 of 65
Copyright © 2013 NetWrix Corporation. All Rights Reserved
Suggestions or comments about this document? www.netwrix.com/feedback
Figure 16: The Managed Object Page
4.2. Modifying Managed Object
If later you need to modify the settings for an existing Managed Object, perform one of the
following procedures:
To add/remove NetWrix modules for the selected Managed Object.
To change Data Processing Account to override the Default Data Processing
Account for the selected Managed Object and specify a different account for data
collection and reports generation.
Add/remove items to/from Computer Collection to edit the list of monitored
computers.
Modify the User Activity Video Reporter settings to change the product filters, the
video recording quality settings, or the Activity Summary delivery settings.
Procedure 2. To add/remove NetWrix modules
1. In NetWrix Management Console, expand the Managed Objects node and select a
Managed Object. The Managed Object page will be displayed showing a list of NetWrix
modules added for this Managed Object.
2. Click the Add/Remove Modules button. The Edit Managed Object wizard will start.
3. In the Installed Modules list, select or deselect the required modules. Click Next:
NetWrix User Activity Video Reporter Administrator’s Guide
Page 21 of 65
Copyright © 2013 NetWrix Corporation. All Rights Reserved
Suggestions or comments about this document? www.netwrix.com/feedback
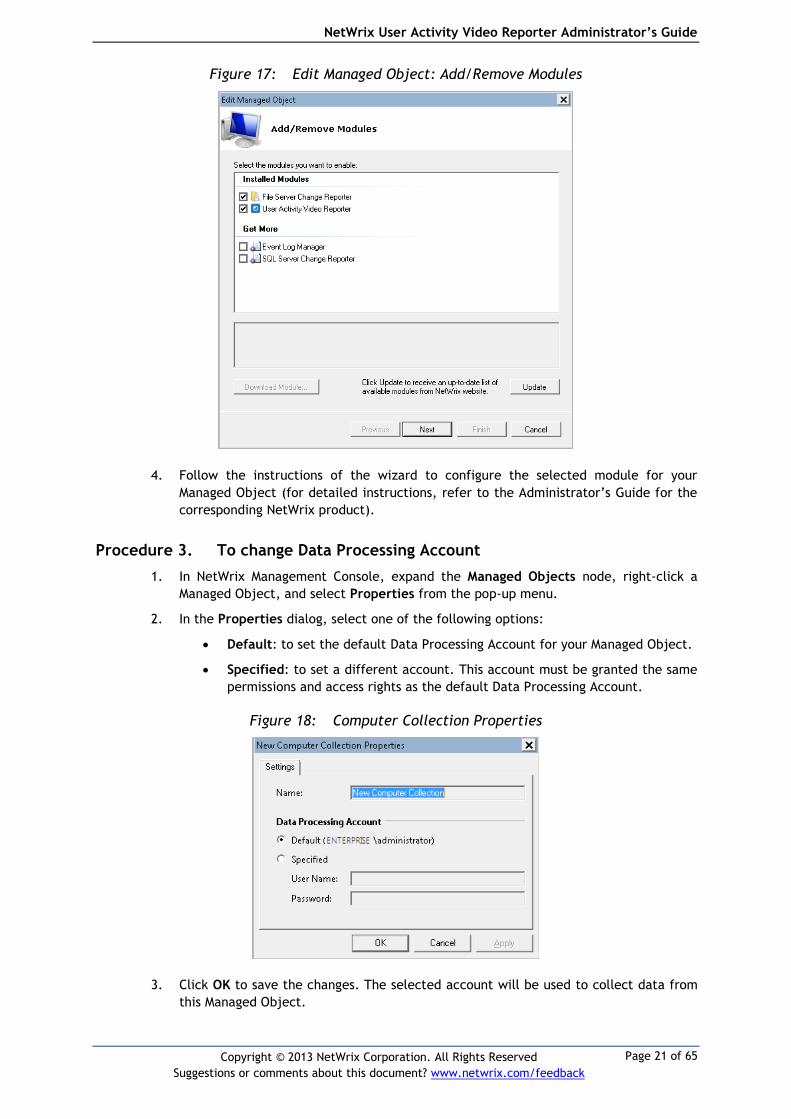
Figure 17: Edit Managed Object: Add/Remove Modules
4. Follow the instructions of the wizard to configure the selected module for your
Managed Object (for detailed instructions, refer to the Administrator’s Guide for the
corresponding NetWrix product).
Procedure 3. To change Data Processing Account
1. In NetWrix Management Console, expand the Managed Objects node, right-click a
Managed Object, and select Properties from the pop-up menu.
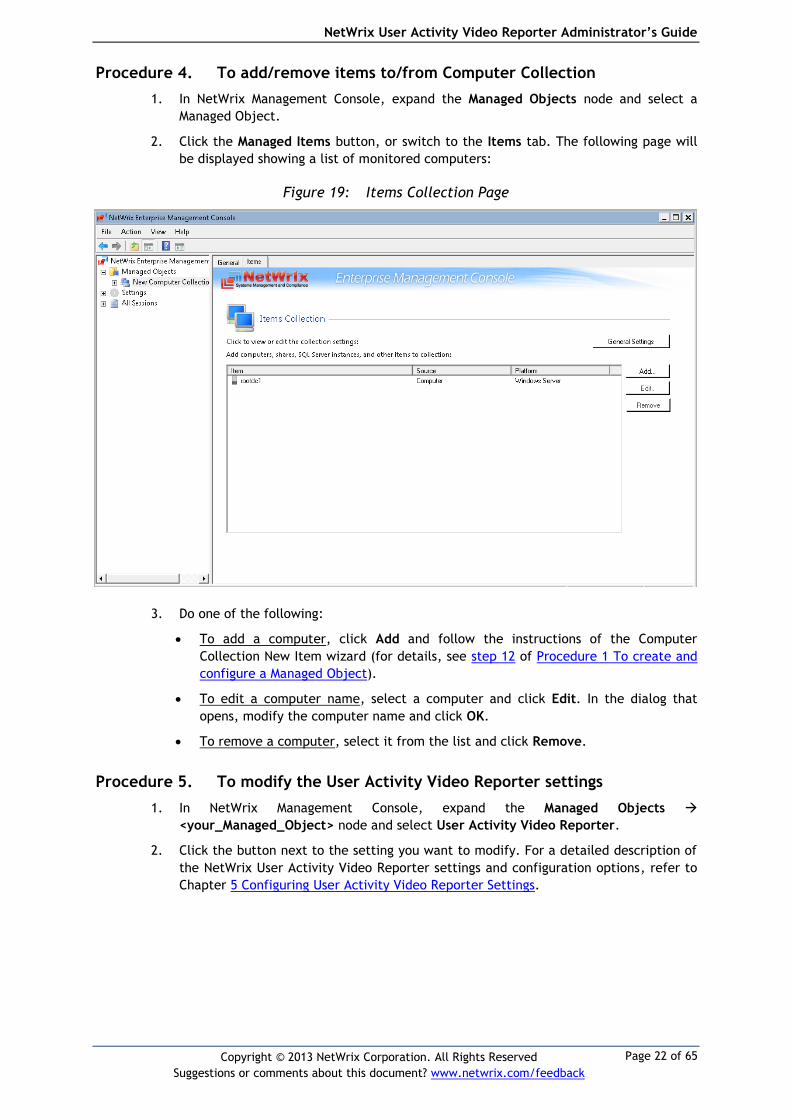
2. In the Properties dialog, select one of the following options:
Default: to set the default Data Processing Account for your Managed Object.
Specified: to set a different account. This account must be granted the same
permissions and access rights as the default Data Processing Account.
Figure 18: Computer Collection Properties
3. Click OK to save the changes. The selected account will be used to collect data from
this Managed Object.
NetWrix User Activity Video Reporter Administrator’s Guide
Page 22 of 65
Copyright © 2013 NetWrix Corporation. All Rights Reserved
Suggestions or comments about this document? www.netwrix.com/feedback
Procedure 4. To add/remove items to/from Computer Collection
1. In NetWrix Management Console, expand the Managed Objects node and select a
Managed Object.
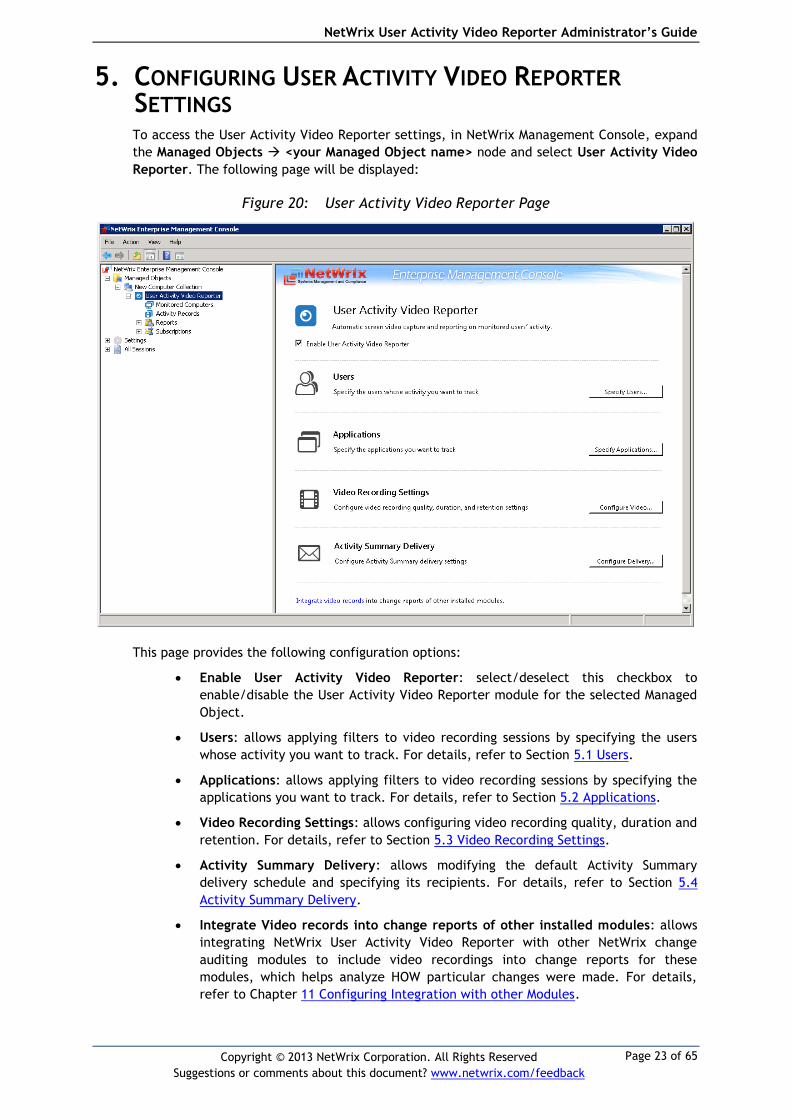
2. Click the Managed Items button, or switch to the Items tab. The following page will
be displayed showing a list of monitored computers:
Figure 19: Items Collection Page
3. Do one of the following:
To add a computer, click Add and follow the instructions of the Computer
Collection New Item wizard (for details, see step 12 of Procedure 1 To create and
configure a Managed Object).
To edit a computer name, select a computer and click Edit. In the dialog that
opens, modify the computer name and click OK.
To remove a computer, select it from the list and click Remove.
Procedure 5. To modify the User Activity Video Reporter settings
1. In NetWrix Management Console, expand the Managed Objects
<your_Managed_Object> node and select User Activity Video Reporter.
2. Click the button next to the setting you want to modify. For a detailed description of
the NetWrix User Activity Video Reporter settings and configuration options, refer to
Chapter 5 Configuring User Activity Video Reporter Settings.
NetWrix User Activity Video Reporter Administrator’s Guide
Page 23 of 65
Copyright © 2013 NetWrix Corporation. All Rights Reserved
Suggestions or comments about this document? www.netwrix.com/feedback
5. CONFIGURING USER ACTIVITY VIDEO REPORTER
SETTINGS To access the User Activity Video Reporter settings, in NetWrix Management Console, expand
the Managed Objects <your Managed Object name> node and select User Activity Video
Reporter. The following page will be displayed:
Figure 20: User Activity Video Reporter Page
This page provides the following configuration options:
Enable User Activity Video Reporter: select/deselect this checkbox to
enable/disable the User Activity Video Reporter module for the selected Managed
Object.
Users: allows applying filters to video recording sessions by specifying the users
whose activity you want to track. For details, refer to Section 5.1 Users.
Applications: allows applying filters to video recording sessions by specifying the
applications you want to track. For details, refer to Section 5.2 Applications.
Video Recording Settings: allows configuring video recording quality, duration and
retention. For details, refer to Section 5.3 Video Recording Settings.
Activity Summary Delivery: allows modifying the default Activity Summary
delivery schedule and specifying its recipients. For details, refer to Section 5.4
Activity Summary Delivery.
Integrate Video records into change reports of other installed modules: allows
integrating NetWrix User Activity Video Reporter with other NetWrix change
auditing modules to include video recordings into change reports for these
modules, which helps analyze HOW particular changes were made. For details,
refer to Chapter 11 Configuring Integration with other Modules.
NetWrix User Activity Video Reporter Administrator’s Guide
Page 24 of 65
Copyright © 2013 NetWrix Corporation. All Rights Reserved
Suggestions or comments about this document? www.netwrix.com/feedback
5.1. Users
You can apply filters to video recording sessions by specifying the users whose activity you
want to track. To do this, perform the following procedure:
Procedure 6. To specify the users you want to track
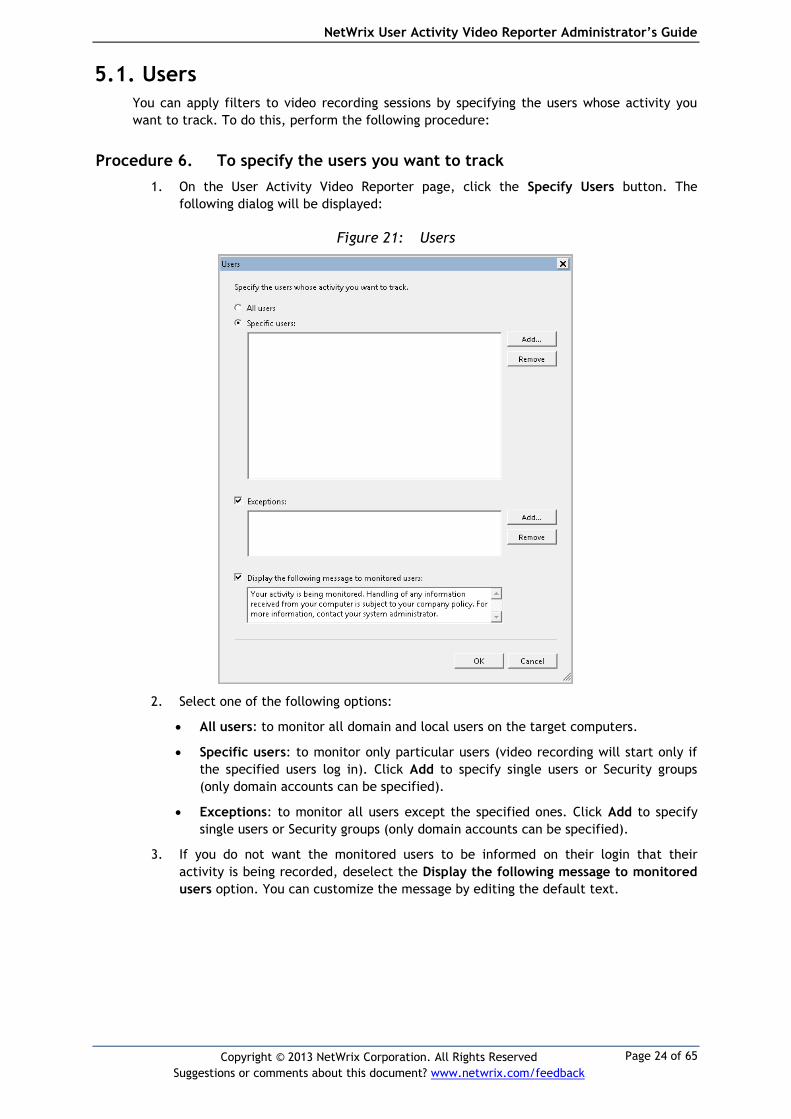
1. On the User Activity Video Reporter page, click the Specify Users button. The
following dialog will be displayed:
Figure 21: Users
2. Select one of the following options:
All users: to monitor all domain and local users on the target computers.
Specific users: to monitor only particular users (video recording will start only if
the specified users log in). Click Add to specify single users or Security groups
(only domain accounts can be specified).
Exceptions: to monitor all users except the specified ones. Click Add to specify
single users or Security groups (only domain accounts can be specified).
3. If you do not want the monitored users to be informed on their login that their
activity is being recorded, deselect the Display the following message to monitored
users option. You can customize the message by editing the default text.
NetWrix User Activity Video Reporter Administrator’s Guide
Page 25 of 65
Copyright © 2013 NetWrix Corporation. All Rights Reserved
Suggestions or comments about this document? www.netwrix.com/feedback
5.2. Applications
You can apply filters to video recording sessions by specifying the applications whose launch
will trigger a video recording. To do this, perform the following procedure:
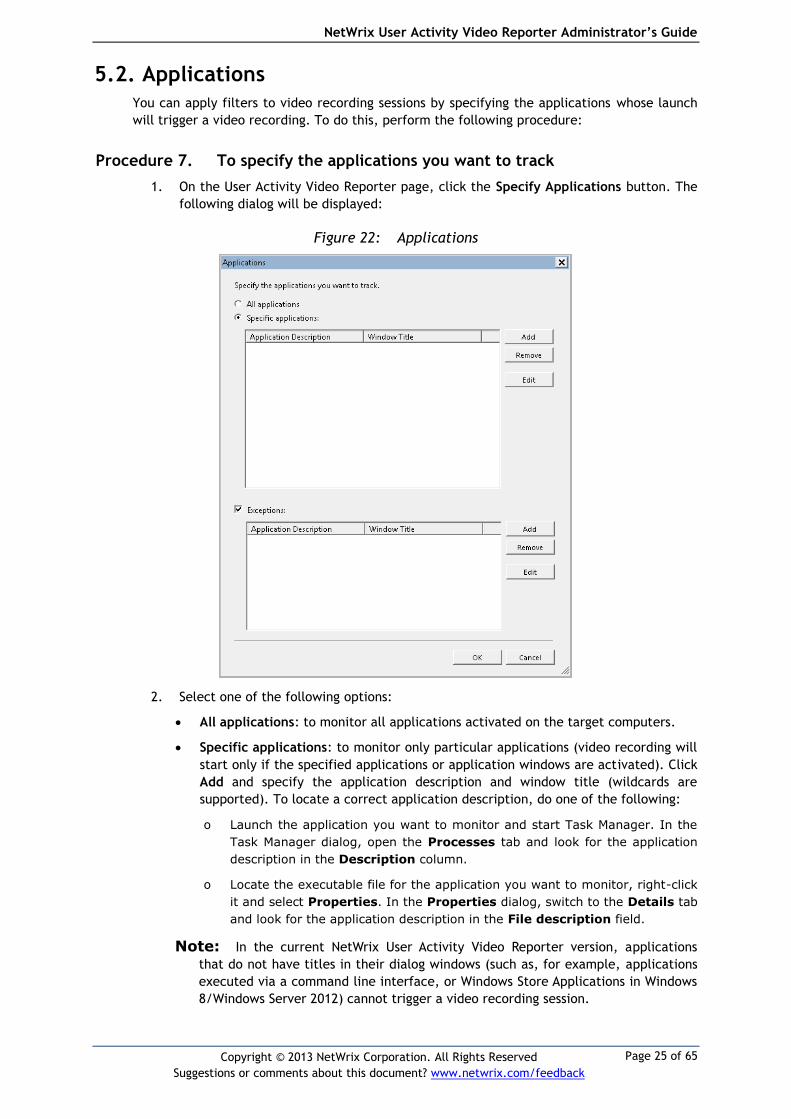
Procedure 7. To specify the applications you want to track
1. On the User Activity Video Reporter page, click the Specify Applications button. The
following dialog will be displayed:
Figure 22: Applications
2. Select one of the following options:
All applications: to monitor all applications activated on the target computers.
Specific applications: to monitor only particular applications (video recording will
start only if the specified applications or application windows are activated). Click
Add and specify the application description and window title (wildcards are
supported). To locate a correct application description, do one of the following:
o Launch the application you want to monitor and start Task Manager. In the
Task Manager dialog, open the Processes tab and look for the application
description in the Description column.
o Locate the executable file for the application you want to monitor, right-click
it and select Properties. In the Properties dialog, switch to the Details tab
and look for the application description in the File description field.
Note: In the current NetWrix User Activity Video Reporter version, applications
that do not have titles in their dialog windows (such as, for example, applications
executed via a command line interface, or Windows Store Applications in Windows
8/Windows Server 2012) cannot trigger a video recording session.
NetWrix User Activity Video Reporter Administrator’s Guide
Page 26 of 65
Copyright © 2013 NetWrix Corporation. All Rights Reserved
Suggestions or comments about this document? www.netwrix.com/feedback
Exceptions: to monitor all applications except the specified ones. Click Add to
specify the applications you do not want to monitor.
Note: NetWrix User Activity Video Reporter captures the whole desktop
irrespective of the application filters. These filters determine which applications
or application windows trigger a video recording session.
5.3. Video Recording Settings
To configure video recording quality, duration and Audit Archive settings do the following:
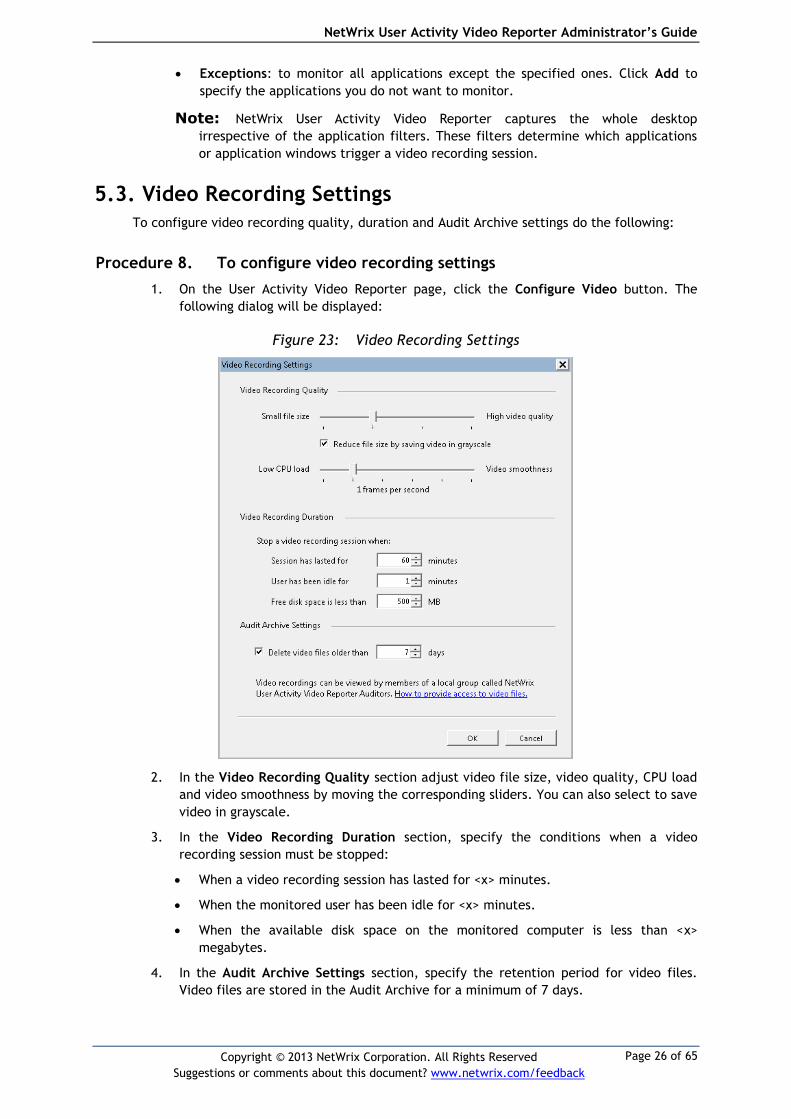
Procedure 8. To configure video recording settings
1. On the User Activity Video Reporter page, click the Configure Video button. The
following dialog will be displayed:
Figure 23: Video Recording Settings
2. In the Video Recording Quality section adjust video file size, video quality, CPU load
and video smoothness by moving the corresponding sliders. You can also select to save
video in grayscale.
3. In the Video Recording Duration section, specify the conditions when a video
recording session must be stopped:
When a video recording session has lasted for <x> minutes.
When the monitored user has been idle for <x> minutes.
When the available disk space on the monitored computer is less than <x>
megabytes.
4. In the Audit Archive Settings section, specify the retention period for video files.
Video files are stored in the Audit Archive for a minimum of 7 days.
NetWrix User Activity Video Reporter Administrator’s Guide
Page 27 of 65
Copyright © 2013 NetWrix Corporation. All Rights Reserved
Suggestions or comments about this document? www.netwrix.com/feedback
Note: The Delete video files older than <x> days option defines the retention
period for video files only, while the Write data to the Audit Archive setting on
the Audit Archive page defines the storage term of both video files and video
recording sessions data (for details, refer to Section 10.3 Configuring Audit Archive
Settings). For example, if the retention period for audit data is set to 24 months
and the period after which old video files are removed is set to 10 days, reports on
users’ activity will return data for the last 2 years, but videos will be available for
the last 10 days only. Mind that the longer the retention period for video files, the
more disk space is required for audit data.
5.3.1. Granting Access to Video Files
When the User Activity Video Reporter module is added to a Managed Object, it automatically
creates a shared folder called NetWrix_UAVR$ where video recording files will be stored. At
the same time, the product setup creates a local group called NetWrix User Activity Video
Reporter Auditors (the current user is automatically added to this group). This group has read
access to the shared folder with video files.
To grant other users access to this folder, so that they can view videos by following the links
from email Activity Summaries or web-based reports, add these users to the NetWrix User
Activity Video Reporter Auditors Group by performing the following procedure:
Procedure 9. To grant access to video files
1. On the computer where NetWrix User Activity Video Reporter is installed, navigate to Start Control Panel Administrative Tools Computer Management (if it is installed on a domain controller, navigate to Start Administrative Tools Active Directory Users and Computers).
2. In the Computer Management dialog, in the left pane, navigate to System Tools Local Users and Groups Groups (on a domain controller, navigate to <your_domain_name> Users).
3. In the right pane, right-click NetWrix User Activity Video Reporter Auditors, and select Add to Group from the pop-up menu.
4. In the dialog that opens, click the Add button, select the user(s) you want to add and click OK.
5.4. Activity Summary Delivery
To configure/modify the Activity Summary delivery settings, do the following:
Procedure 10. To configure the Activity Summary Delivery settings
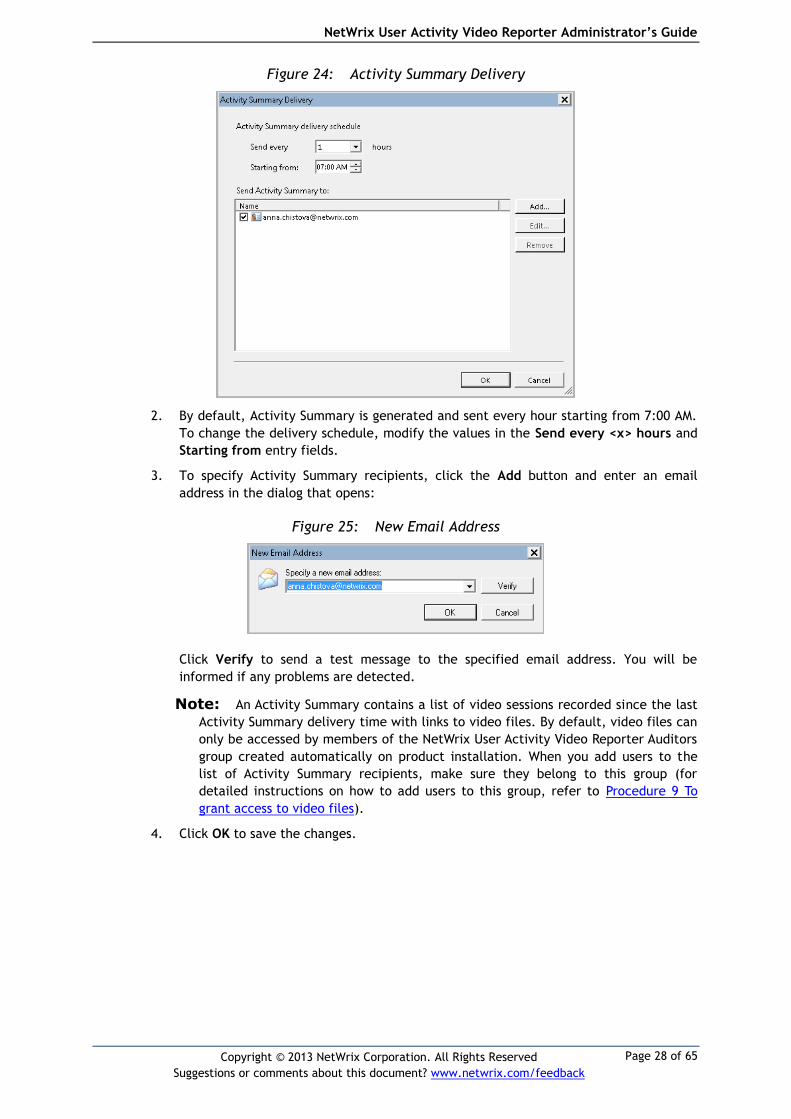
1. On the User Activity Video Reporter page, click the Configure Delivery button. The
following dialog will be displayed:
NetWrix User Activity Video Reporter Administrator’s Guide
Page 28 of 65
Copyright © 2013 NetWrix Corporation. All Rights Reserved
Suggestions or comments about this document? www.netwrix.com/feedback
Figure 24: Activity Summary Delivery
2. By default, Activity Summary is generated and sent every hour starting from 7:00 AM.
To change the delivery schedule, modify the values in the Send every <x> hours and
Starting from entry fields.
3. To specify Activity Summary recipients, click the Add button and enter an email
address in the dialog that opens:
Figure 25: New Email Address
Click Verify to send a test message to the specified email address. You will be
informed if any problems are detected.
Note: An Activity Summary contains a list of video sessions recorded since the last
Activity Summary delivery time with links to video files. By default, video files can
only be accessed by members of the NetWrix User Activity Video Reporter Auditors
group created automatically on product installation. When you add users to the
list of Activity Summary recipients, make sure they belong to this group (for
detailed instructions on how to add users to this group, refer to Procedure 9 To
grant access to video files).
4. Click OK to save the changes.
NetWrix User Activity Video Reporter Administrator’s Guide
Page 29 of 65
Copyright © 2013 NetWrix Corporation. All Rights Reserved
Suggestions or comments about this document? www.netwrix.com/feedback
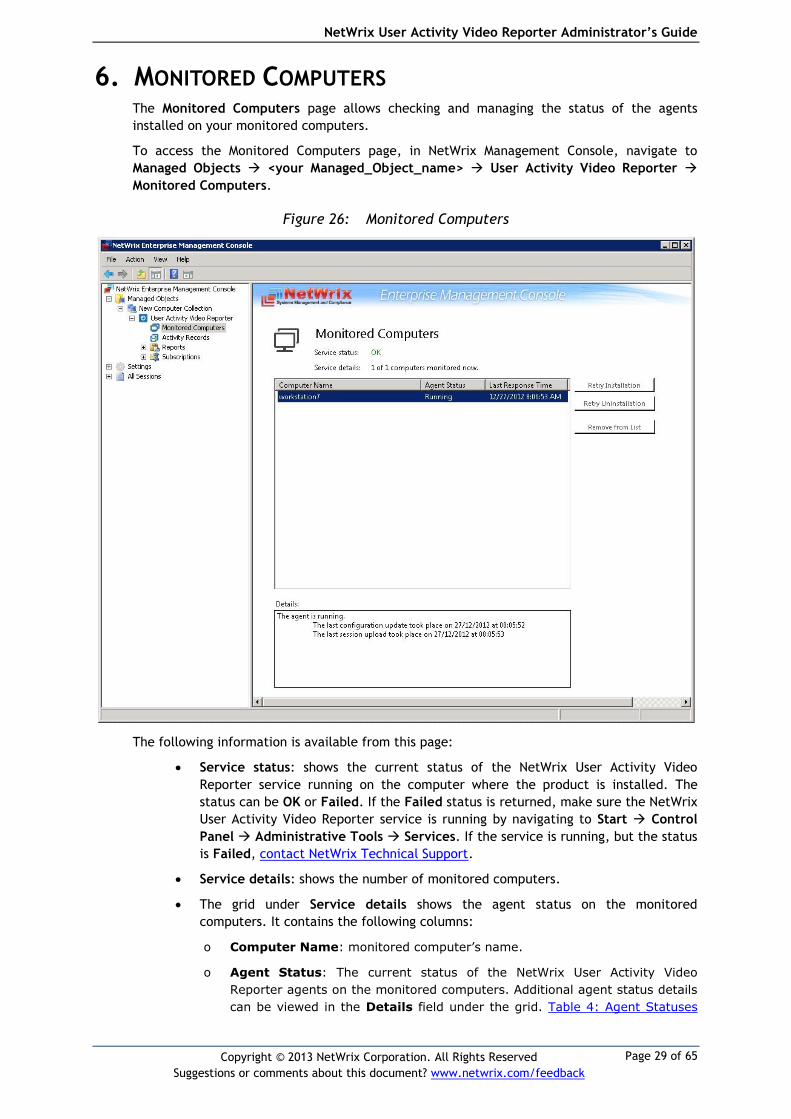
6. MONITORED COMPUTERS The Monitored Computers page allows checking and managing the status of the agents
installed on your monitored computers.
To access the Monitored Computers page, in NetWrix Management Console, navigate to
Managed Objects <your Managed_Object_name> User Activity Video Reporter
Monitored Computers.
Figure 26: Monitored Computers
The following information is available from this page:
Service status: shows the current status of the NetWrix User Activity Video
Reporter service running on the computer where the product is installed. The
status can be OK or Failed. If the Failed status is returned, make sure the NetWrix
User Activity Video Reporter service is running by navigating to Start Control
Panel Administrative Tools Services. If the service is running, but the status
is Failed, contact NetWrix Technical Support.
Service details: shows the number of monitored computers.
The grid under Service details shows the agent status on the monitored
computers. It contains the following columns:
o Computer Name: monitored computer’s name.
o Agent Status: The current status of the NetWrix User Activity Video
Reporter agents on the monitored computers. Additional agent status details
can be viewed in the Details field under the grid. Table 4: Agent Statuses
NetWrix User Activity Video Reporter Administrator’s Guide
Page 30 of 65
Copyright © 2013 NetWrix Corporation. All Rights Reserved
Suggestions or comments about this document? www.netwrix.com/feedback
below provides a list of all possible agent statuses, their descriptions and
workarounds for statuses that reflect agent issues.
o Last Response Time: The time when the agent on the monitored computer
last responded to the NetWrix User Activity Video Reporter service running
on the computer where the product is installed. This information is useful
when the agent status is other than “Running” to define when the agent was
last active.
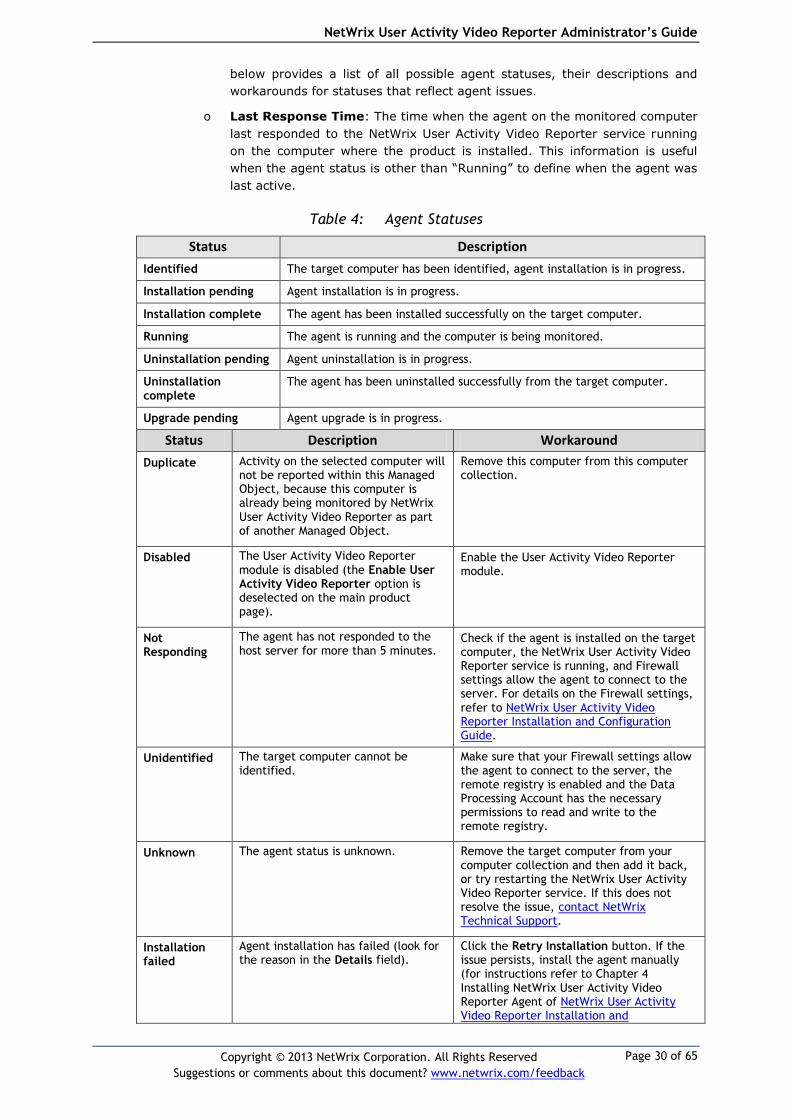
Table 4: Agent Statuses
Status Description
Identified The target computer has been identified, agent installation is in progress.
Installation pending Agent installation is in progress.
Installation complete The agent has been installed successfully on the target computer.
Running The agent is running and the computer is being monitored.
Uninstallation pending Agent uninstallation is in progress.
Uninstallation complete
The agent has been uninstalled successfully from the target computer.
Upgrade pending Agent upgrade is in progress.
Status Description Workaround
Duplicate Activity on the selected computer will not be reported within this Managed Object, because this computer is already being monitored by NetWrix User Activity Video Reporter as part of another Managed Object.
Remove this computer from this computer collection.
Disabled The User Activity Video Reporter module is disabled (the Enable User Activity Video Reporter option is deselected on the main product page).
Enable the User Activity Video Reporter module.
Not Responding
The agent has not responded to the host server for more than 5 minutes.
Check if the agent is installed on the target computer, the NetWrix User Activity Video Reporter service is running, and Firewall settings allow the agent to connect to the server. For details on the Firewall settings, refer to NetWrix User Activity Video Reporter Installation and Configuration Guide.
Unidentified The target computer cannot be identified.
Make sure that your Firewall settings allow the agent to connect to the server, the remote registry is enabled and the Data Processing Account has the necessary permissions to read and write to the remote registry.
Unknown The agent status is unknown. Remove the target computer from your computer collection and then add it back, or try restarting the NetWrix User Activity Video Reporter service. If this does not resolve the issue, contact NetWrix Technical Support.
Installation failed
Agent installation has failed (look for the reason in the Details field).
Click the Retry Installation button. If the issue persists, install the agent manually (for instructions refer to Chapter 4 Installing NetWrix User Activity Video Reporter Agent of NetWrix User Activity Video Reporter Installation and
NetWrix User Activity Video Reporter Administrator’s Guide
Page 31 of 65
Copyright © 2013 NetWrix Corporation. All Rights Reserved
Suggestions or comments about this document? www.netwrix.com/feedback
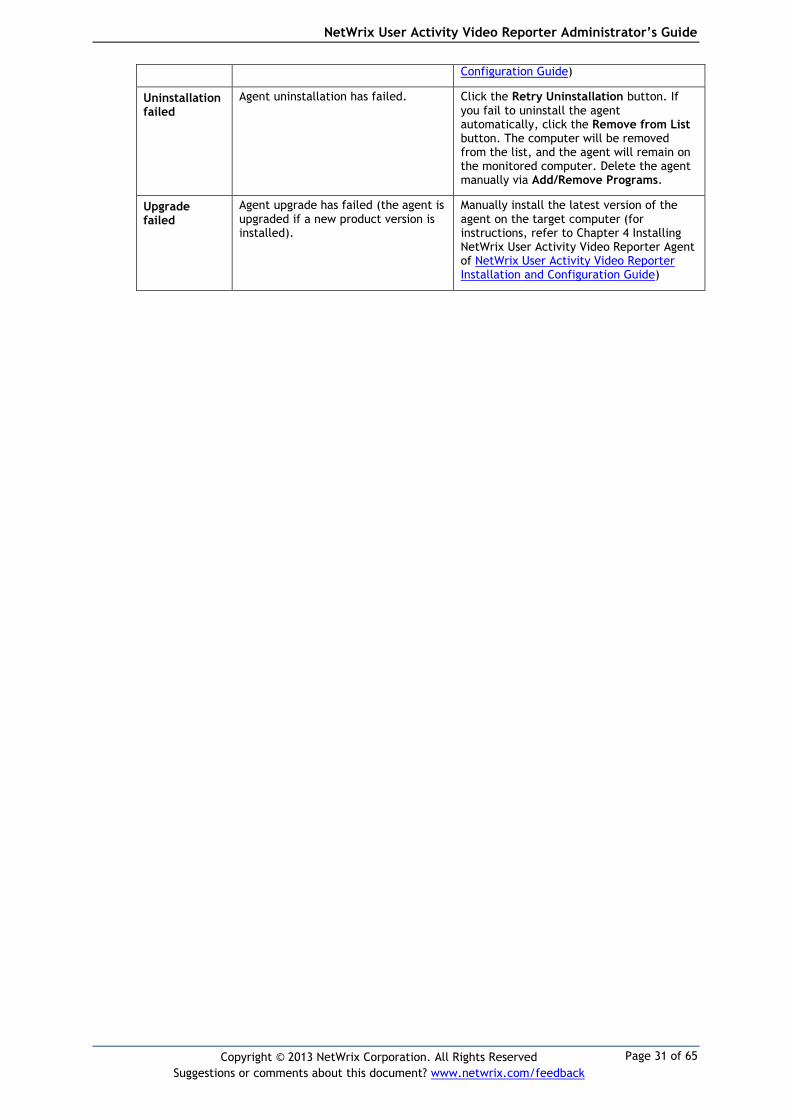
Configuration Guide)
Uninstallation failed
Agent uninstallation has failed.
Click the Retry Uninstallation button. If you fail to uninstall the agent automatically, click the Remove from List button. The computer will be removed from the list, and the agent will remain on the monitored computer. Delete the agent manually via Add/Remove Programs.
Upgrade failed
Agent upgrade has failed (the agent is upgraded if a new product version is installed).
Manually install the latest version of the agent on the target computer (for instructions, refer to Chapter 4 Installing NetWrix User Activity Video Reporter Agent of NetWrix User Activity Video Reporter Installation and Configuration Guide)
NetWrix User Activity Video Reporter Administrator’s Guide
Page 32 of 65
Copyright © 2013 NetWrix Corporation. All Rights Reserved
Suggestions or comments about this document? www.netwrix.com/feedback
7. DATA COLLECTION
7.1. Data Collection Workflow
NetWrix User Activity Video Reporter data collection workflow is as follows:
1. After a new Managed Object is created, the NetWrix User Activity Video Reporter
agents are installed on the monitored computer(s).
2. The agent monitors users’ activity and triggers a video recording session if a condition
matching the product filters is met. Video files are written to the following directory
on the monitored computers:
Windows 2000/Windows XP: %systemdrive%\Documents and Settings\All
Users\Application Data\NetWrix\User Activity Video Reporter\Agent.
Windows Vista or later: %systemdrive%\ProgramData\NetWrix\User Activity Video
Reporter\Agent.
3. Once a minute, the agent connects to the server and transfers video files and session
data to Audit Archive (it is then removed from the monitored computer).
4. If the Reports feature is enabled and configured, audit data is imported from the
Audit Archive to a SQL database.
5. An Activity Summary containing a list of recorded video sessions with links to video
files is sent to the specified recipients in accordance with your Activity Summary
delivery settings.
6. Audit data can be viewed by generating a summary of Activity Records or detailed
SSRS-based Reports.
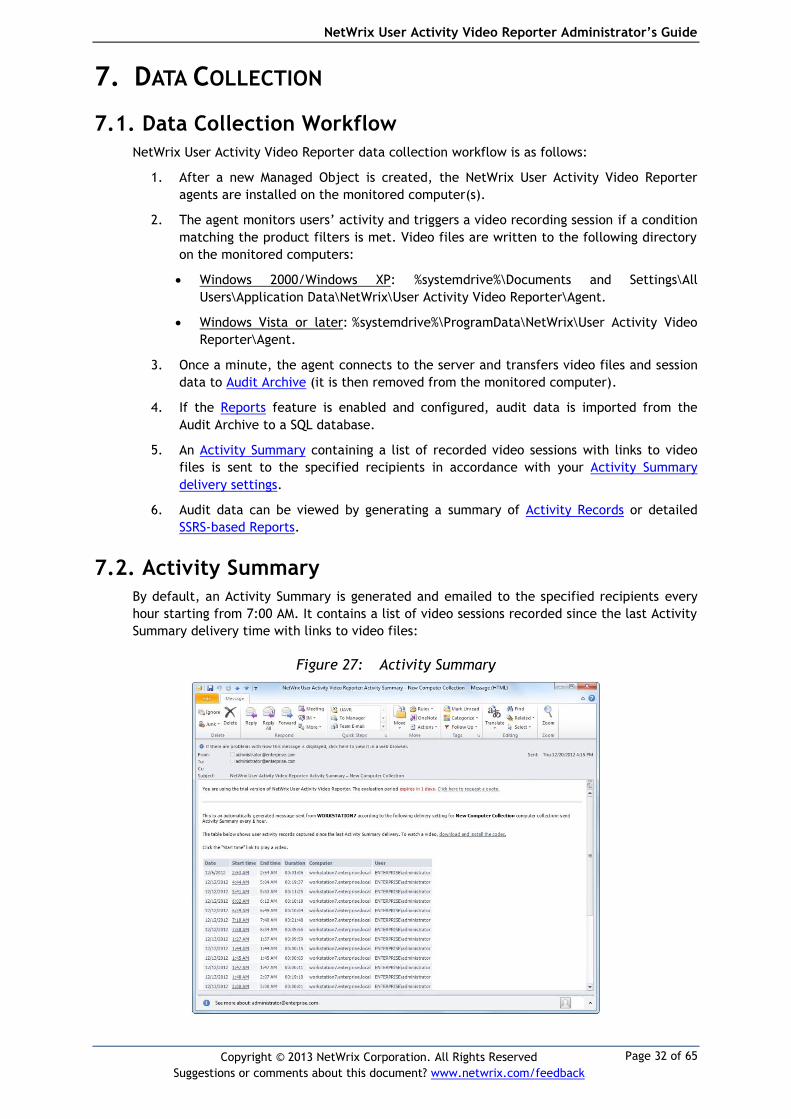
7.2. Activity Summary
By default, an Activity Summary is generated and emailed to the specified recipients every
hour starting from 7:00 AM. It contains a list of video sessions recorded since the last Activity
Summary delivery time with links to video files:
Figure 27: Activity Summary
NetWrix User Activity Video Reporter Administrator’s Guide
Page 33 of 65
Copyright © 2013 NetWrix Corporation. All Rights Reserved
Suggestions or comments about this document? www.netwrix.com/feedback
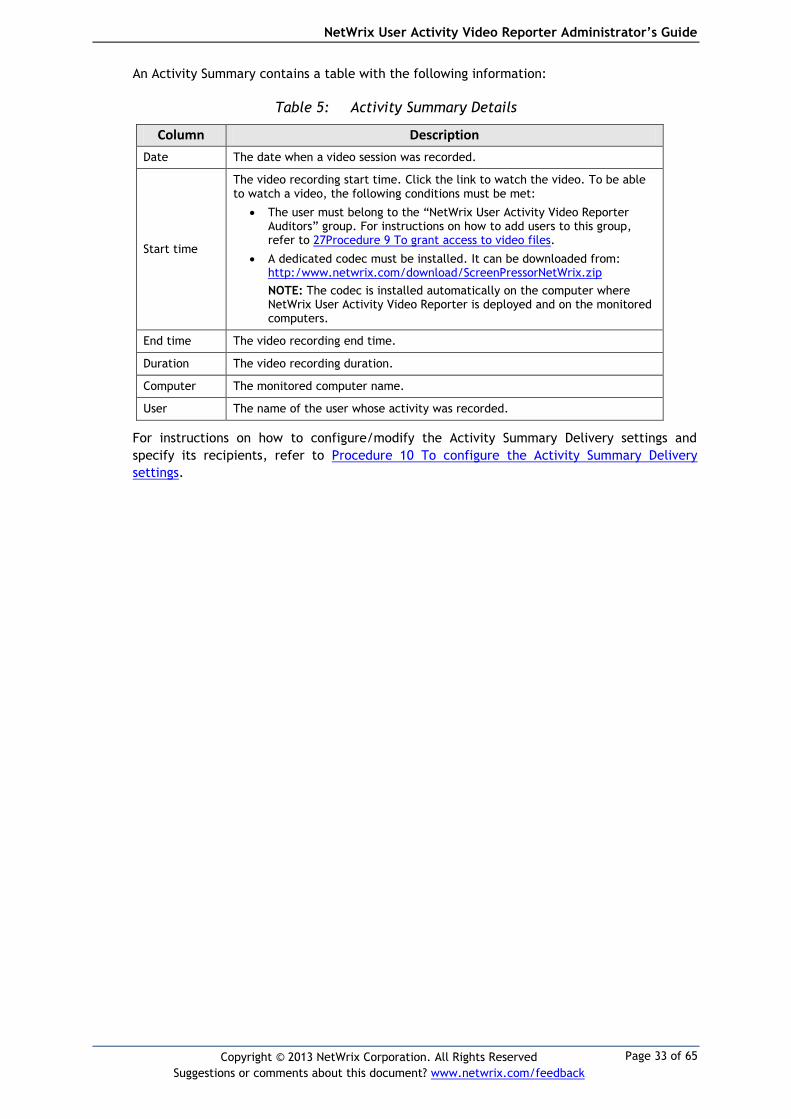
An Activity Summary contains a table with the following information:
Table 5: Activity Summary Details
Column Description
Date The date when a video session was recorded.
Start time
The video recording start time. Click the link to watch the video. To be able to watch a video, the following conditions must be met:
The user must belong to the “NetWrix User Activity Video Reporter Auditors” group. For instructions on how to add users to this group, refer to 27Procedure 9 To grant access to video files.
A dedicated codec must be installed. It can be downloaded from: http:/www.netwrix.com/download/ScreenPressorNetWrix.zip
NOTE: The codec is installed automatically on the computer where NetWrix User Activity Video Reporter is deployed and on the monitored computers.
End time The video recording end time.
Duration The video recording duration.
Computer The monitored computer name.
User The name of the user whose activity was recorded.
For instructions on how to configure/modify the Activity Summary Delivery settings and
specify its recipients, refer to Procedure 10 To configure the Activity Summary Delivery
settings.

NetWrix User Activity Video Reporter Administrator’s Guide
Page 34 of 65
Copyright © 2013 NetWrix Corporation. All Rights Reserved
Suggestions or comments about this document? www.netwrix.com/feedback
8. ACTIVITY RECORDS The Activity Records page allows generating a summary of activity records for a selected
period and by applying a variety of filters. To generate a summary of activity records, do the
following:
Procedure 11. To generate a summary of activity records
1. In NetWrix Management Console, navigate to Managed Objects <your
Managed_Object_name> User Activity Video Reporter Activity Records. The
following page will be displayed:
Figure 28: Activity Records Page
2. Select the time range in the From and To fields.
3. Select how you want to group the information in the activity records summary: by
date, computer or user.
4. To filter out unnecessary information, you can specify only the computers and/or
users you want to include into your summary. To do this, click the Specify button
next to the Computers or Users section respectively. In the dialog that opens, select
the computers/users from the list of monitored computers/users.
5. Do one of the following:
To generate a brief summary, click the Generate Summary button. A summary
will be generated and opened in the right pane containing the computer name,
user name, video session start time and end time. You can watch a video session
in the console by clicking the link in the Computer column:
NetWrix User Activity Video Reporter Administrator’s Guide
Page 35 of 65
Copyright © 2013 NetWrix Corporation. All Rights Reserved
Suggestions or comments about this document? www.netwrix.com/feedback
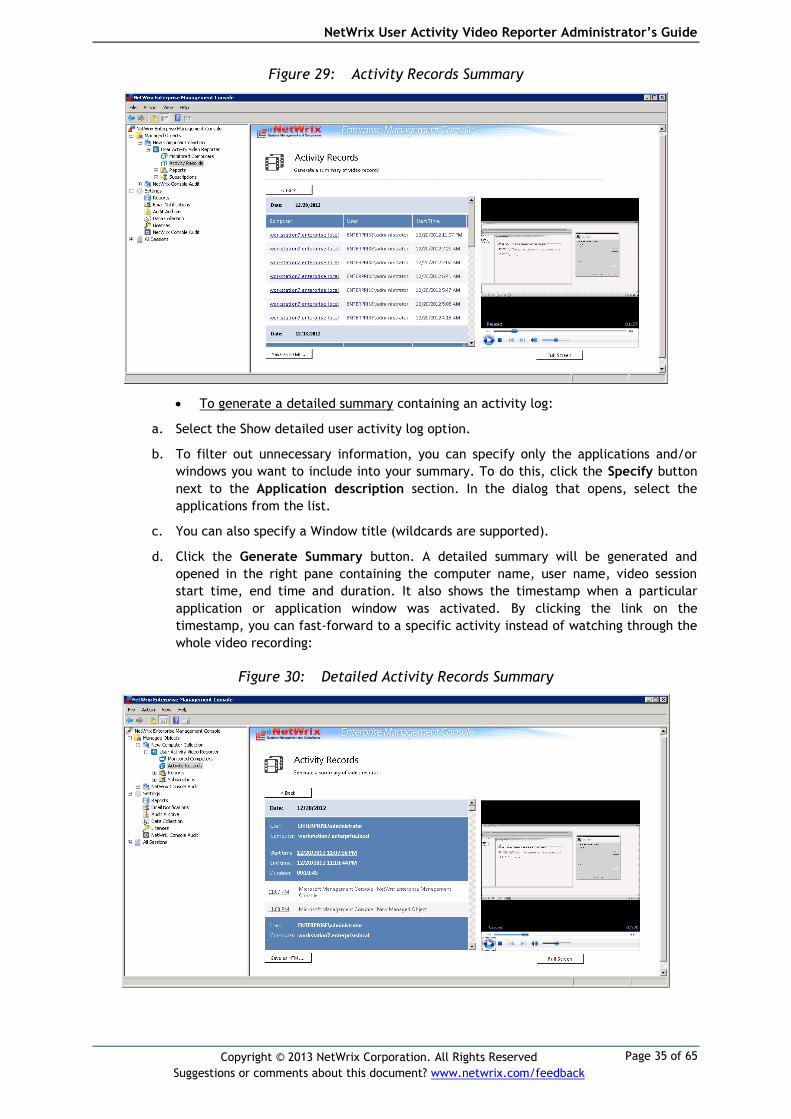
Figure 29: Activity Records Summary
To generate a detailed summary containing an activity log:
a. Select the Show detailed user activity log option.
b. To filter out unnecessary information, you can specify only the applications and/or
windows you want to include into your summary. To do this, click the Specify button
next to the Application description section. In the dialog that opens, select the
applications from the list.
c. You can also specify a Window title (wildcards are supported).
d. Click the Generate Summary button. A detailed summary will be generated and
opened in the right pane containing the computer name, user name, video session
start time, end time and duration. It also shows the timestamp when a particular
application or application window was activated. By clicking the link on the
timestamp, you can fast-forward to a specific activity instead of watching through the
whole video recording:
Figure 30: Detailed Activity Records Summary
NetWrix User Activity Video Reporter Administrator’s Guide
Page 36 of 65
Copyright © 2013 NetWrix Corporation. All Rights Reserved
Suggestions or comments about this document? www.netwrix.com/feedback
Note: If you are unable to watch a video and the following message is displayed:
“JavaScript is not enabled. Unable to play video. Enable JavaScript in the Internet
Explorer settings”, adjust your Internet Explorer settings: in Internet Explorer,
open the Tools menu option, click Custom level on the Security tab and select
“Enable” for Scripting Active scripting.
This issue also occurs in Windows Server operating systems with IE Enhanced
Security Configuration (for example, in Windows server 2003/2008). If this is the
case, add NetWrix Management Console to the Trusted Sites zone (for instructions,
refer to section Add sites to the Trusted Sites zone of the following Microsoft
Knowledge Base article: Internet Explorer Enhanced Security Configuration
changes the browsing experience), or disable IE Enhanced Security Configuration
(open Server Manager, in the right pane click the Configure IE ESC link in the
Security Information section and turn it off).
NetWrix User Activity Video Reporter Administrator’s Guide
Page 37 of 65
Copyright © 2013 NetWrix Corporation. All Rights Reserved
Suggestions or comments about this document? www.netwrix.com/feedback
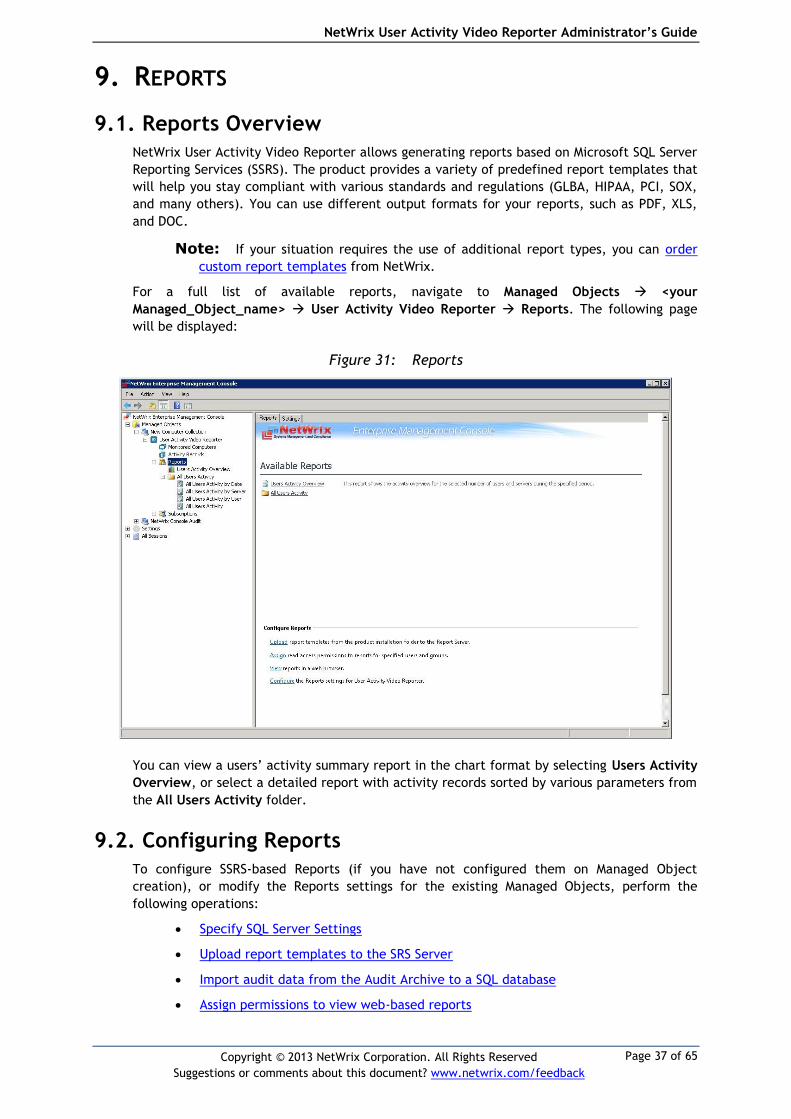
9. REPORTS
9.1. Reports Overview
NetWrix User Activity Video Reporter allows generating reports based on Microsoft SQL Server
Reporting Services (SSRS). The product provides a variety of predefined report templates that
will help you stay compliant with various standards and regulations (GLBA, HIPAA, PCI, SOX,
and many others). You can use different output formats for your reports, such as PDF, XLS,
and DOC.
Note: If your situation requires the use of additional report types, you can order
custom report templates from NetWrix.
For a full list of available reports, navigate to Managed Objects <your
Managed_Object_name> User Activity Video Reporter Reports. The following page
will be displayed:
Figure 31: Reports
You can view a users’ activity summary report in the chart format by selecting Users Activity
Overview, or select a detailed report with activity records sorted by various parameters from
the All Users Activity folder.
9.2. Configuring Reports
To configure SSRS-based Reports (if you have not configured them on Managed Object
creation), or modify the Reports settings for the existing Managed Objects, perform the
following operations:
Specify SQL Server Settings
Upload report templates to the SRS Server
Import audit data from the Audit Archive to a SQL database
Assign permissions to view web-based reports
NetWrix User Activity Video Reporter Administrator’s Guide
Page 38 of 65
Copyright © 2013 NetWrix Corporation. All Rights Reserved
Suggestions or comments about this document? www.netwrix.com/feedback
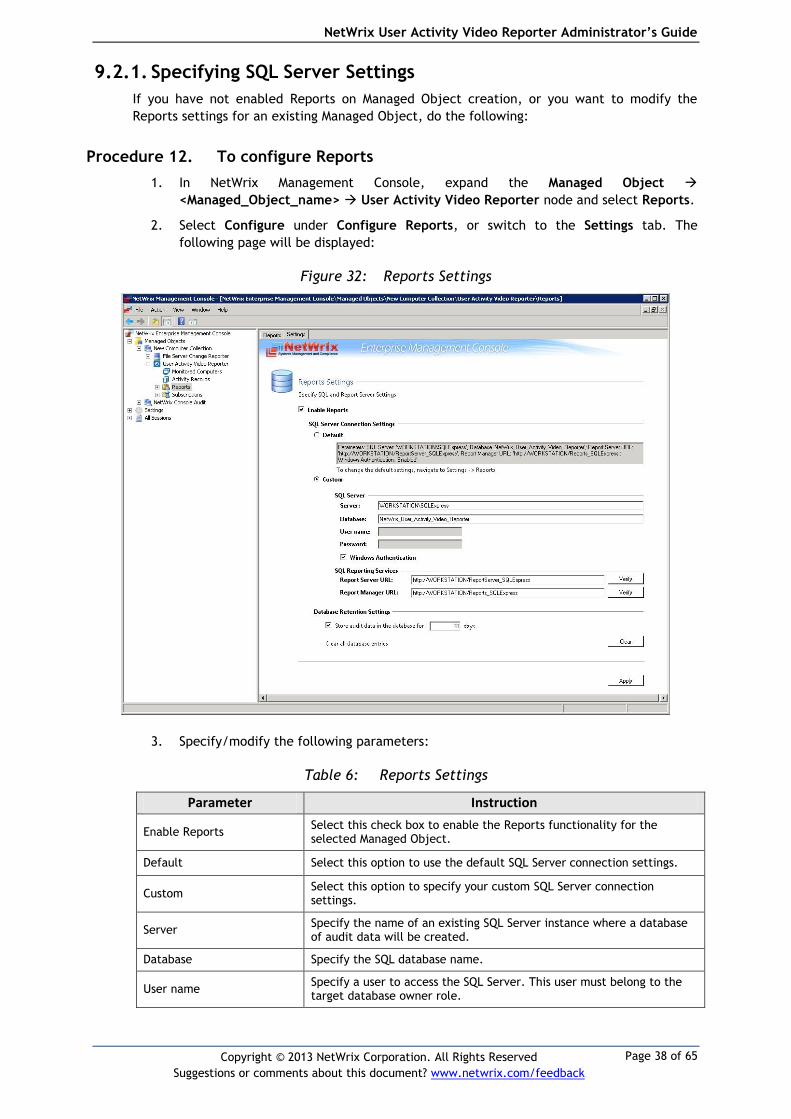
9.2.1. Specifying SQL Server Settings
If you have not enabled Reports on Managed Object creation, or you want to modify the
Reports settings for an existing Managed Object, do the following:
Procedure 12. To configure Reports
1. In NetWrix Management Console, expand the Managed Object
<Managed_Object_name> User Activity Video Reporter node and select Reports.
2. Select Configure under Configure Reports, or switch to the Settings tab. The
following page will be displayed:
Figure 32: Reports Settings
3. Specify/modify the following parameters:
Table 6: Reports Settings
Parameter Instruction
Enable Reports Select this check box to enable the Reports functionality for the selected Managed Object.
Default Select this option to use the default SQL Server connection settings.
Custom Select this option to specify your custom SQL Server connection settings.
Server Specify the name of an existing SQL Server instance where a database of audit data will be created.
Database Specify the SQL database name.
User name Specify a user to access the SQL Server. This user must belong to the target database owner role.

NetWrix User Activity Video Reporter Administrator’s Guide
Page 39 of 65
Copyright © 2013 NetWrix Corporation. All Rights Reserved
Suggestions or comments about this document? www.netwrix.com/feedback
Password Specify a password to access the SQL Server.
Windows Authentication
Select this option if you want to use the default Data Processing Account (specified on Managed Object creation) to access the SQL database. Clear the check box if you want to use the SQL Server authentication.
Report Server URL Specify the Report Server URL. Click Verify to ensure that the resource is reachable.
Report Manager URL Specify the Report Manager URL. Click Verify to ensure that the resource is reachable.
Store audit data in the database for x days
Specify the retention period for audit data. Only the data for the specified period will be available in reports.
Clear all database entries Click Clear to delete all data from the SQL database.
4. Click Apply to save the changes.
Note: If you skip Reports configuration on Managed Object creation and enable
them later, you also need to do the following:
Upload the report templates to the Report Server (if Reports are enabled on
Managed Object creation, this operation is performed automatically). For
instructions on how to upload report templates manually, refer to Section
9.2.2 Uploading Report Templates to the Report Server.
Import audit data to the SQL database. When you configure the Reports
settings, A SQL database for audit data is created. If you skip Reports
configuration on Managed Object creation, the database will not be created
and audit data will only be written to the local repository, the Audit Archive.
If later you enable the Reports feature for a selected Managed Object and
want historical audit data to be available for reporting, you will have to
import data from the Audit Archive to the SQL database. For detailed
instructions on how to do this, refer to Section 9.2.3 Importing Audit Data to
SQL Database.
9.2.2. Uploading Report Templates to the Report Server
If you did not enable the Reports feature when creating a Managed Object and do it later,
you need to upload the report templates to the Report Server.
Procedure 13. To upload report templates
In NetWrix Management Console, on the Reports page, click Upload under
Configure Reports. The system will upload the report templates to the Report
Server and will display the following confirmation message when the operation is
completed:
Figure 33: Report Templates Imported Successfully

NetWrix User Activity Video Reporter Administrator’s Guide
Page 40 of 65
Copyright © 2013 NetWrix Corporation. All Rights Reserved
Suggestions or comments about this document? www.netwrix.com/feedback
9.2.3. Importing Audit Data to SQL Database
If you did not enable the Reports feature when creating a Managed Object, and do it later,
you may want to make audit data stored in the Audit Archive available for Reports. This can
be achieved by importing data from the Audit Archive to your SQL database with the DB
Importer tool. This tool can also be used for data recovery in case the database is corrupted.
Procedure 14. To import audit data
1. Navigate to Start All Programs NetWrix User Activity Video Reporter
Advanced Tools and select DB Importer. The following dialog will open:
Figure 34: NetWrix User Activity Video Reporter DB Importer
2. Select a Managed Object that you want to import audit data for from the Managed
Object drop-down list.
3. Under Computer, select “All Computers” or a particular computer if you do not want
to import audit data for the whole computer collection.
4. Set the time range to import data for in the From session and To session fields.
5. Leave the default target database, or specify a different one by clicking the
button.
6. Click the Import button. A confirmation message will be displayed on successful
operation completion.
9.2.4. Assigning Permissions to View Reports
By default, only domain administrators can view reports in NetWrix Management Console or a
web browser. To grant other users access to your reports, do the following:
Procedure 15. To assign permissions to view reports
1. In NetWrix Management Console, on the Reports page, click Assign under Configure
Reports. The SQL Database Access dialog will be displayed:
NetWrix User Activity Video Reporter Administrator’s Guide
Page 41 of 65
Copyright © 2013 NetWrix Corporation. All Rights Reserved
Suggestions or comments about this document? www.netwrix.com/feedback
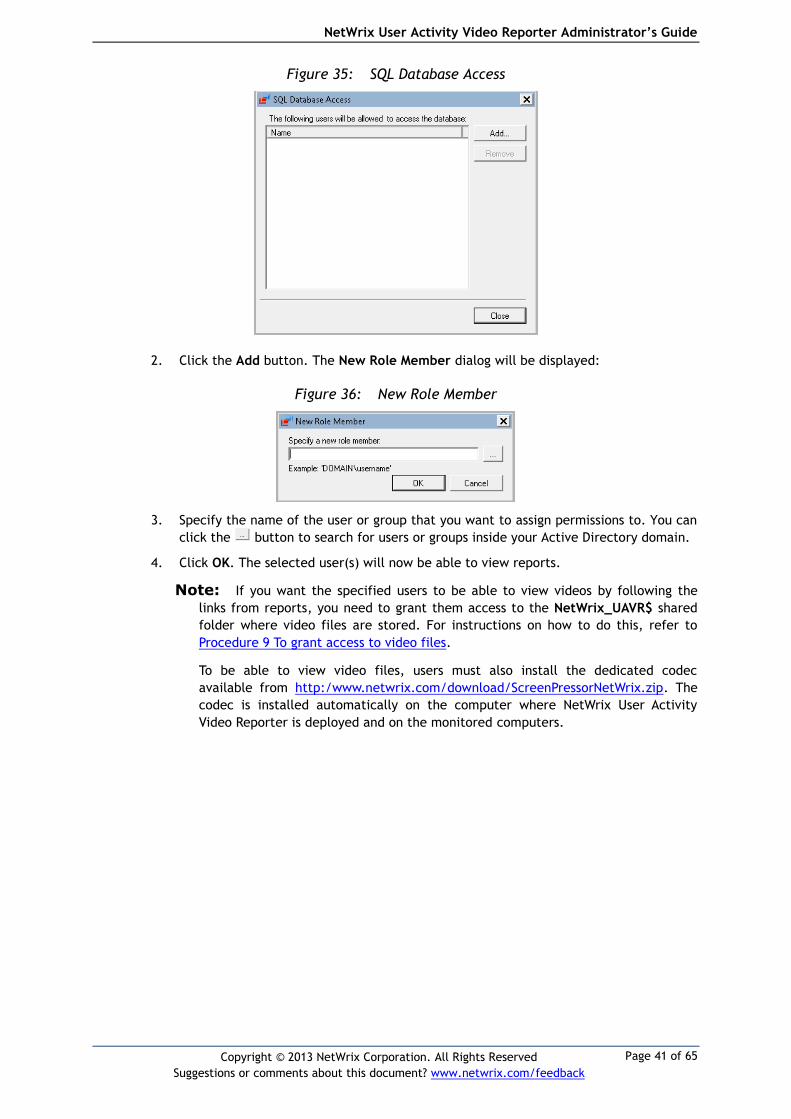
Figure 35: SQL Database Access
2. Click the Add button. The New Role Member dialog will be displayed:
Figure 36: New Role Member
3. Specify the name of the user or group that you want to assign permissions to. You can
click the button to search for users or groups inside your Active Directory domain.
4. Click OK. The selected user(s) will now be able to view reports.
Note: If you want the specified users to be able to view videos by following the
links from reports, you need to grant them access to the NetWrix_UAVR$ shared
folder where video files are stored. For instructions on how to do this, refer to
Procedure 9 To grant access to video files.
To be able to view video files, users must also install the dedicated codec
available from http:/www.netwrix.com/download/ScreenPressorNetWrix.zip. The
codec is installed automatically on the computer where NetWrix User Activity
Video Reporter is deployed and on the monitored computers.
NetWrix User Activity Video Reporter Administrator’s Guide
Page 42 of 65
Copyright © 2013 NetWrix Corporation. All Rights Reserved
Suggestions or comments about this document? www.netwrix.com/feedback
9.3. Viewing Reports
NetWrix User Activity Video Reporter provides two options for viewing reports:
In NetWrix Management Console
In a web browser
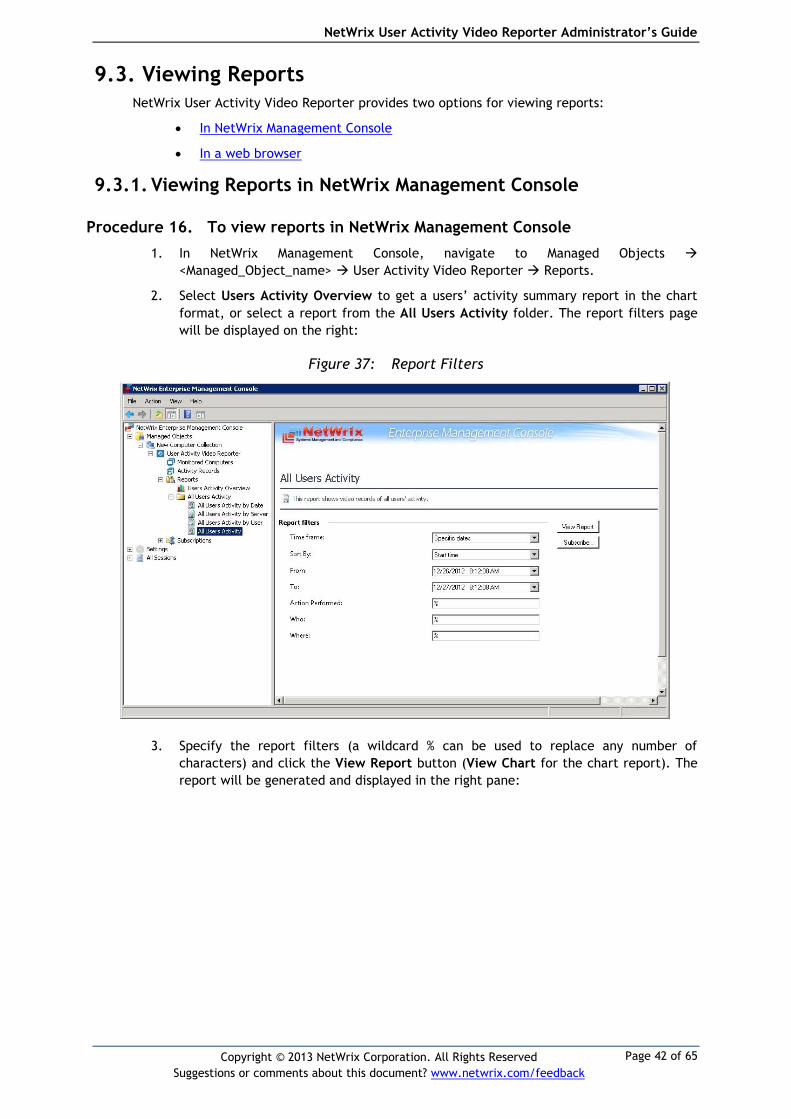
9.3.1. Viewing Reports in NetWrix Management Console
Procedure 16. To view reports in NetWrix Management Console
1. In NetWrix Management Console, navigate to Managed Objects
<Managed_Object_name> User Activity Video Reporter Reports.
2. Select Users Activity Overview to get a users’ activity summary report in the chart
format, or select a report from the All Users Activity folder. The report filters page
will be displayed on the right:
Figure 37: Report Filters
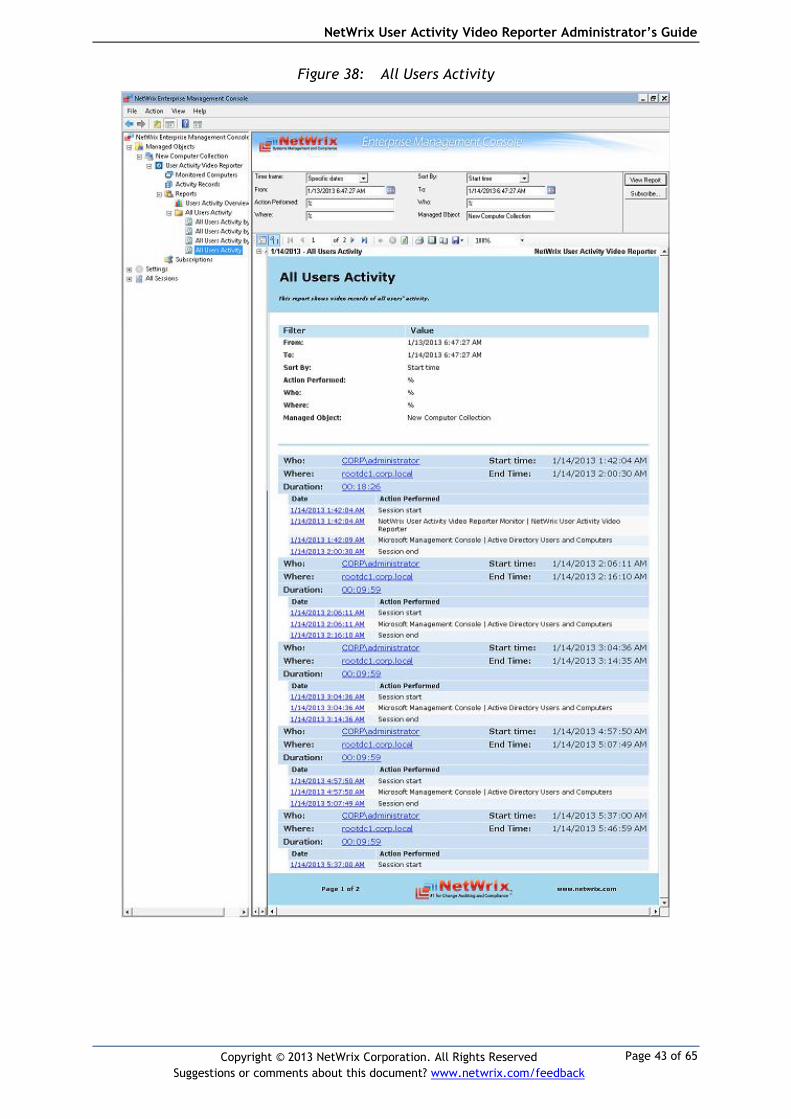
3. Specify the report filters (a wildcard % can be used to replace any number of
characters) and click the View Report button (View Chart for the chart report). The
report will be generated and displayed in the right pane:
NetWrix User Activity Video Reporter Administrator’s Guide
Page 43 of 65
Copyright © 2013 NetWrix Corporation. All Rights Reserved
Suggestions or comments about this document? www.netwrix.com/feedback
Figure 38: All Users Activity
NetWrix User Activity Video Reporter Administrator’s Guide
Page 44 of 65
Copyright © 2013 NetWrix Corporation. All Rights Reserved
Suggestions or comments about this document? www.netwrix.com/feedback
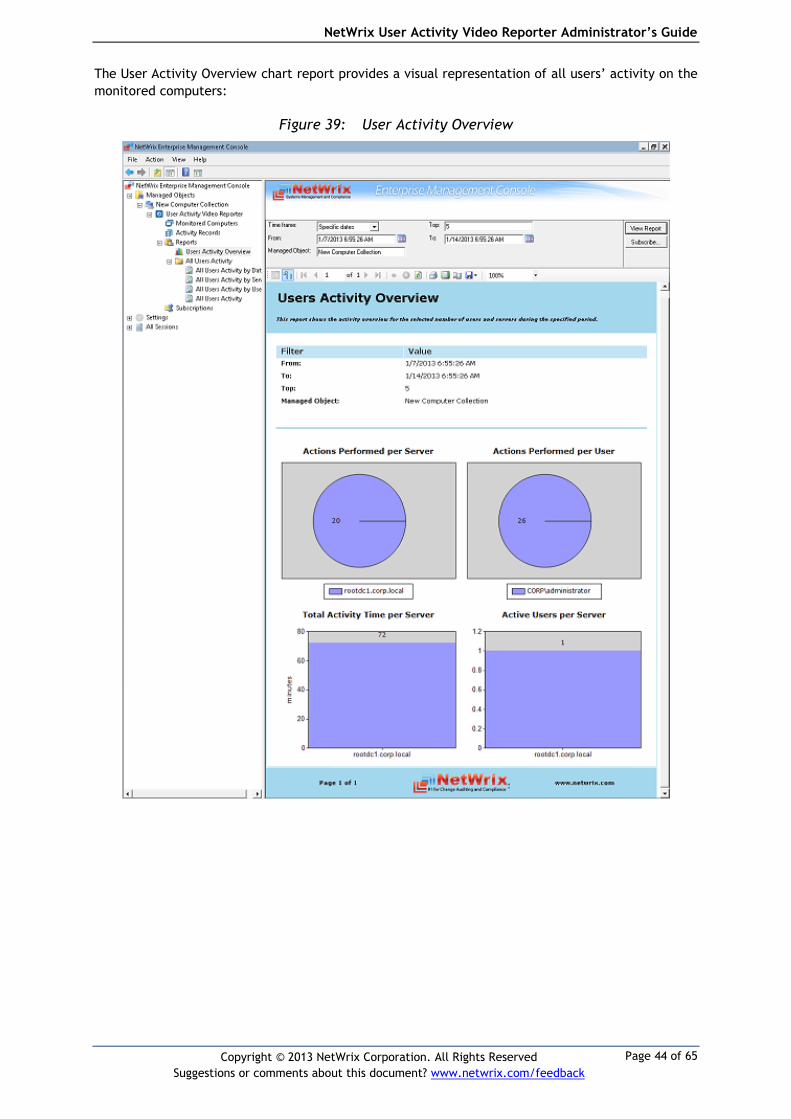
The User Activity Overview chart report provides a visual representation of all users’ activity on the
monitored computers:
Figure 39: User Activity Overview
NetWrix User Activity Video Reporter Administrator’s Guide
Page 45 of 65
Copyright © 2013 NetWrix Corporation. All Rights Reserved
Suggestions or comments about this document? www.netwrix.com/feedback
9.3.2. Viewing Reports in Web Browser
Procedure 17. To view reports in a web browser
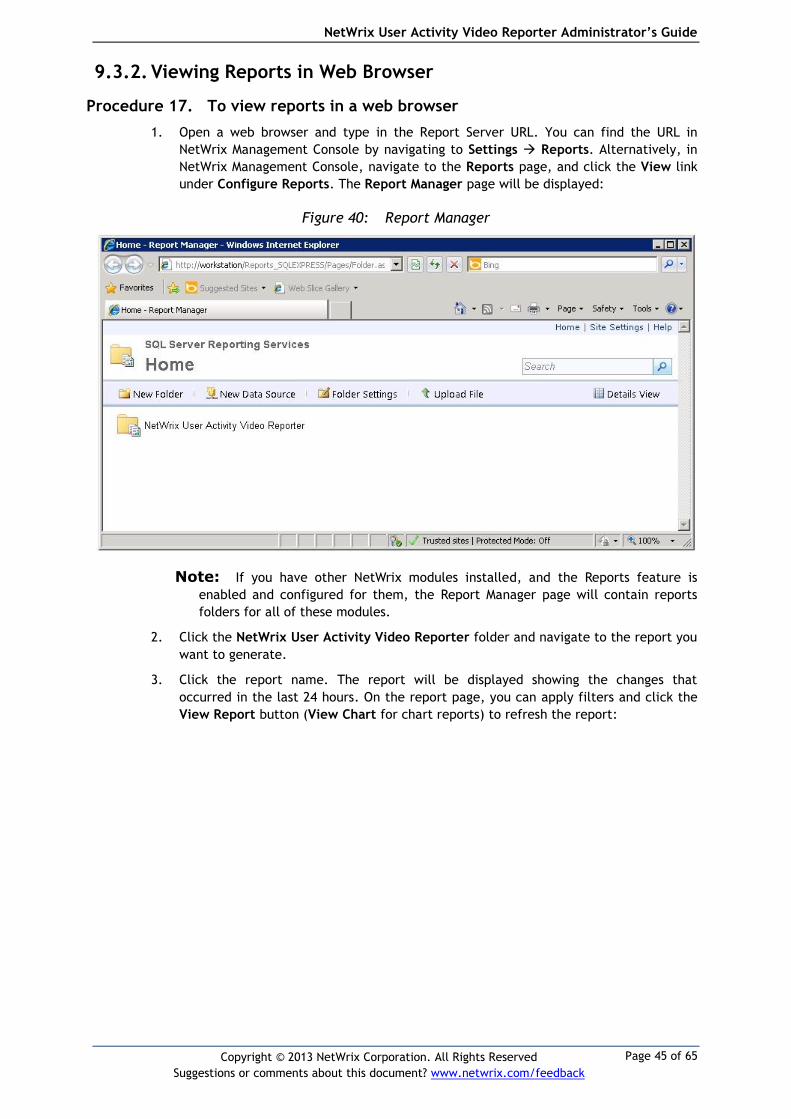
1. Open a web browser and type in the Report Server URL. You can find the URL in
NetWrix Management Console by navigating to Settings Reports. Alternatively, in
NetWrix Management Console, navigate to the Reports page, and click the View link
under Configure Reports. The Report Manager page will be displayed:
Figure 40: Report Manager
Note: If you have other NetWrix modules installed, and the Reports feature is
enabled and configured for them, the Report Manager page will contain reports
folders for all of these modules.
2. Click the NetWrix User Activity Video Reporter folder and navigate to the report you
want to generate.
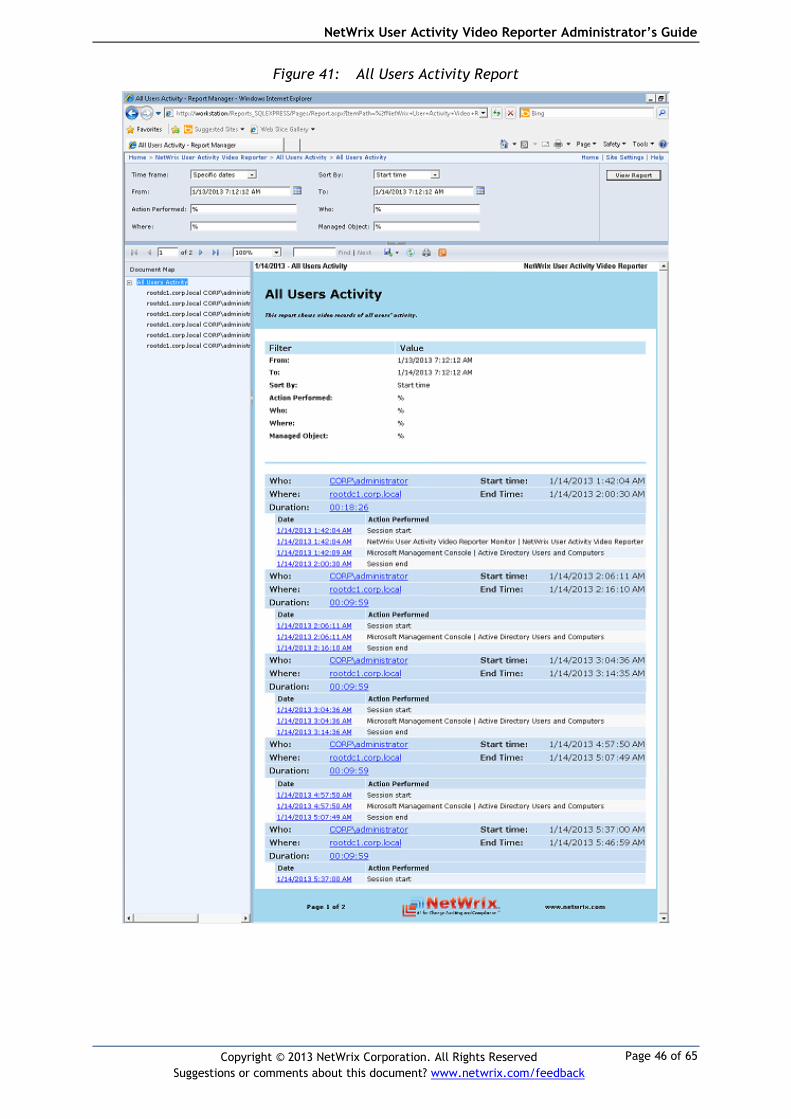
3. Click the report name. The report will be displayed showing the changes that
occurred in the last 24 hours. On the report page, you can apply filters and click the
View Report button (View Chart for chart reports) to refresh the report:
NetWrix User Activity Video Reporter Administrator’s Guide
Page 46 of 65
Copyright © 2013 NetWrix Corporation. All Rights Reserved
Suggestions or comments about this document? www.netwrix.com/feedback
Figure 41: All Users Activity Report
NetWrix User Activity Video Reporter Administrator’s Guide
Page 47 of 65
Copyright © 2013 NetWrix Corporation. All Rights Reserved
Suggestions or comments about this document? www.netwrix.com/feedback
9.4. Configuring Report Subscriptions
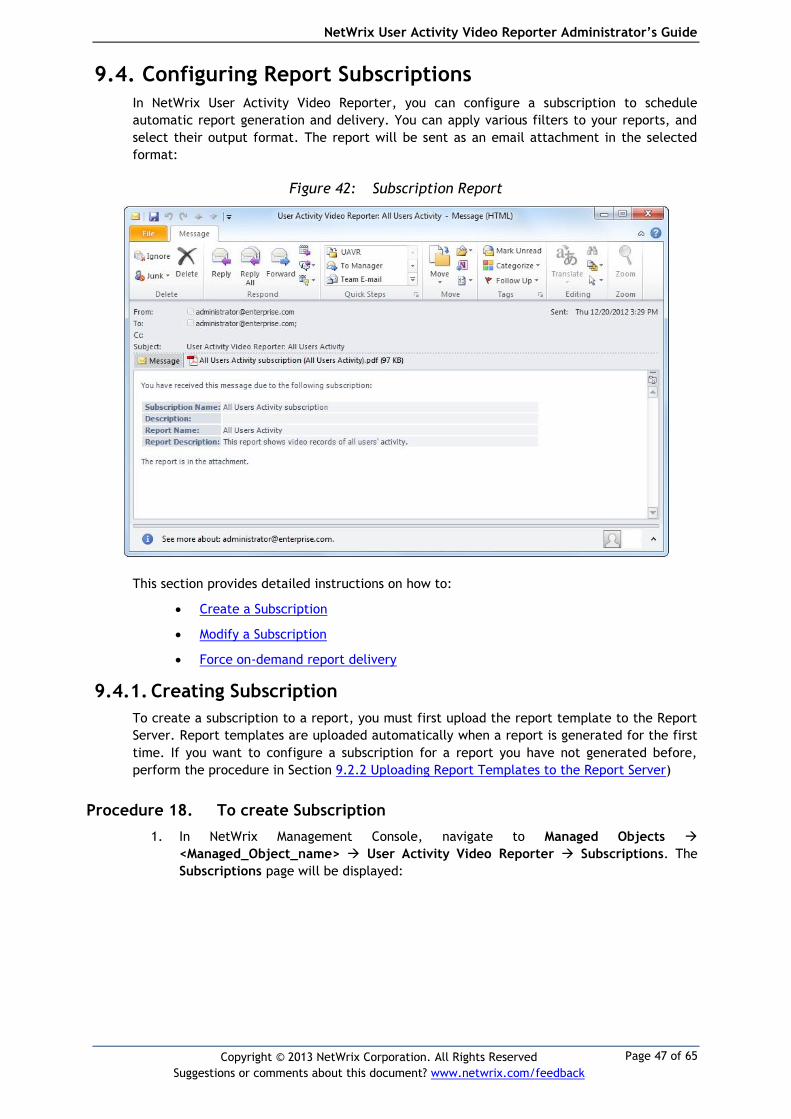
In NetWrix User Activity Video Reporter, you can configure a subscription to schedule
automatic report generation and delivery. You can apply various filters to your reports, and
select their output format. The report will be sent as an email attachment in the selected
format:
Figure 42: Subscription Report
This section provides detailed instructions on how to:
Create a Subscription
Modify a Subscription
Force on-demand report delivery
9.4.1. Creating Subscription
To create a subscription to a report, you must first upload the report template to the Report
Server. Report templates are uploaded automatically when a report is generated for the first
time. If you want to configure a subscription for a report you have not generated before,
perform the procedure in Section 9.2.2 Uploading Report Templates to the Report Server)
Procedure 18. To create Subscription
1. In NetWrix Management Console, navigate to Managed Objects
<Managed_Object_name> User Activity Video Reporter Subscriptions. The
Subscriptions page will be displayed:
NetWrix User Activity Video Reporter Administrator’s Guide
Page 48 of 65
Copyright © 2013 NetWrix Corporation. All Rights Reserved
Suggestions or comments about this document? www.netwrix.com/feedback
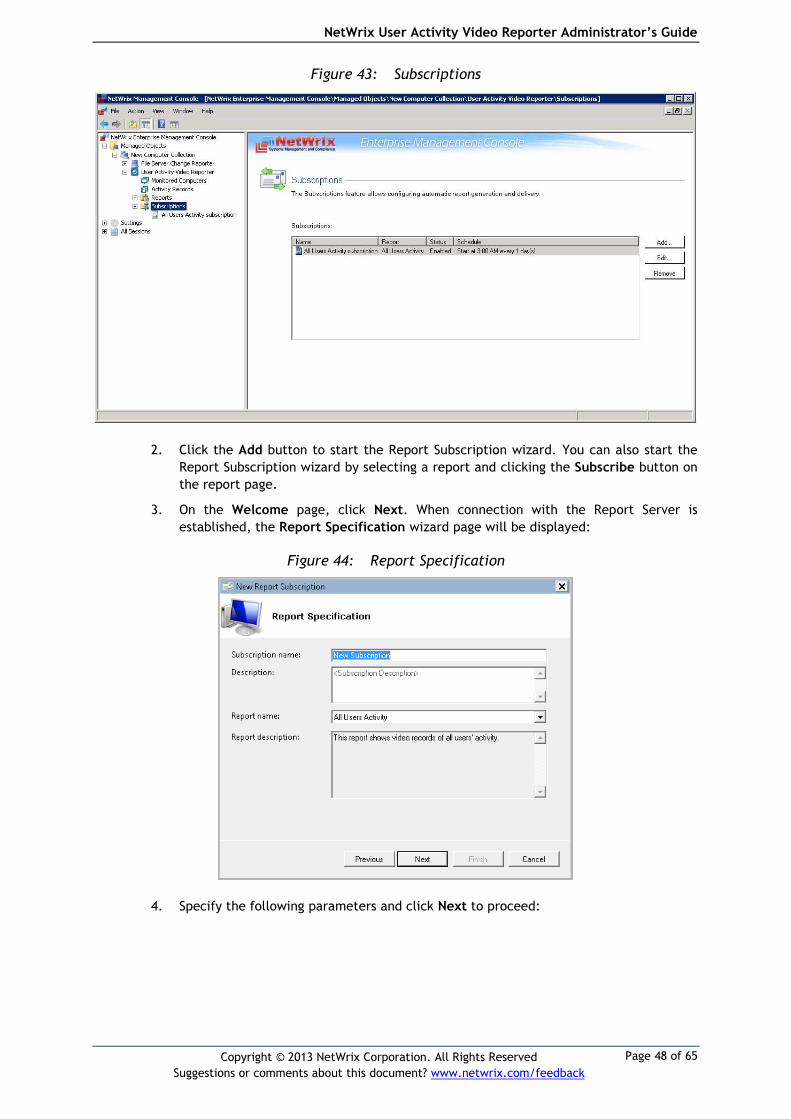
Figure 43: Subscriptions
2. Click the Add button to start the Report Subscription wizard. You can also start the
Report Subscription wizard by selecting a report and clicking the Subscribe button on
the report page.
3. On the Welcome page, click Next. When connection with the Report Server is
established, the Report Specification wizard page will be displayed:
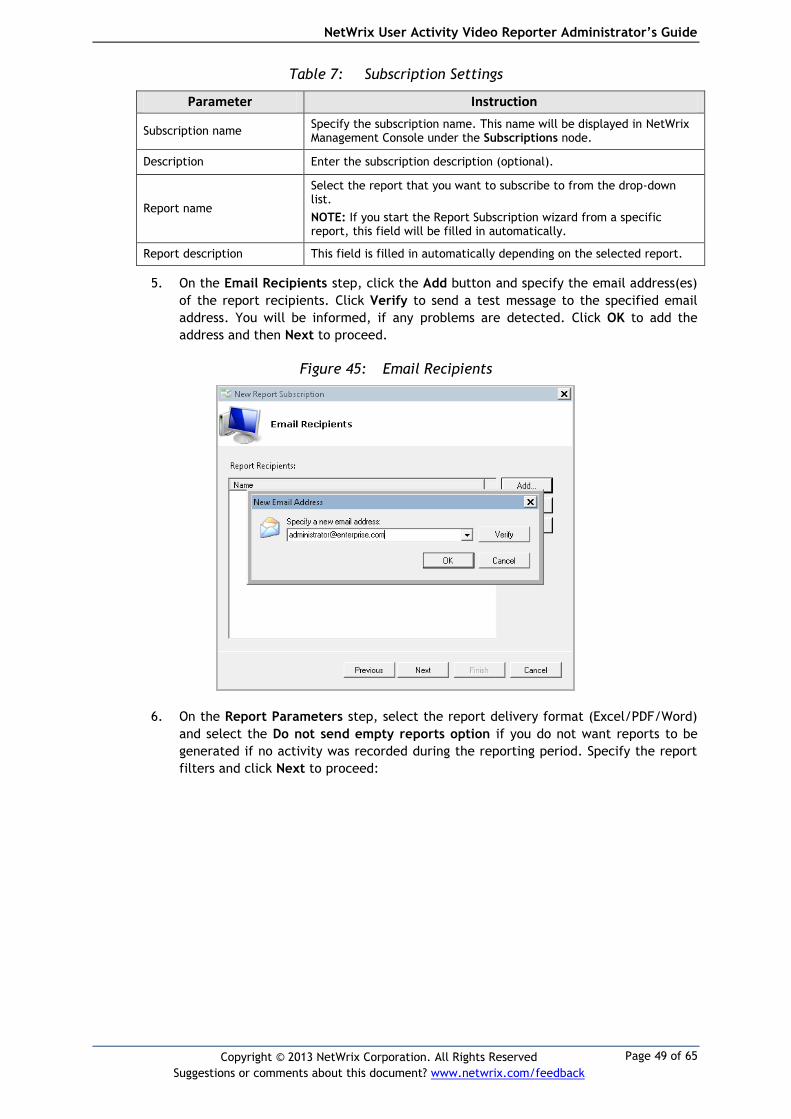
Figure 44: Report Specification
4. Specify the following parameters and click Next to proceed:
NetWrix User Activity Video Reporter Administrator’s Guide
Page 49 of 65
Copyright © 2013 NetWrix Corporation. All Rights Reserved
Suggestions or comments about this document? www.netwrix.com/feedback
Table 7: Subscription Settings
Parameter Instruction
Subscription name Specify the subscription name. This name will be displayed in NetWrix Management Console under the Subscriptions node.
Description Enter the subscription description (optional).
Report name
Select the report that you want to subscribe to from the drop-down list.
NOTE: If you start the Report Subscription wizard from a specific report, this field will be filled in automatically.
Report description This field is filled in automatically depending on the selected report.
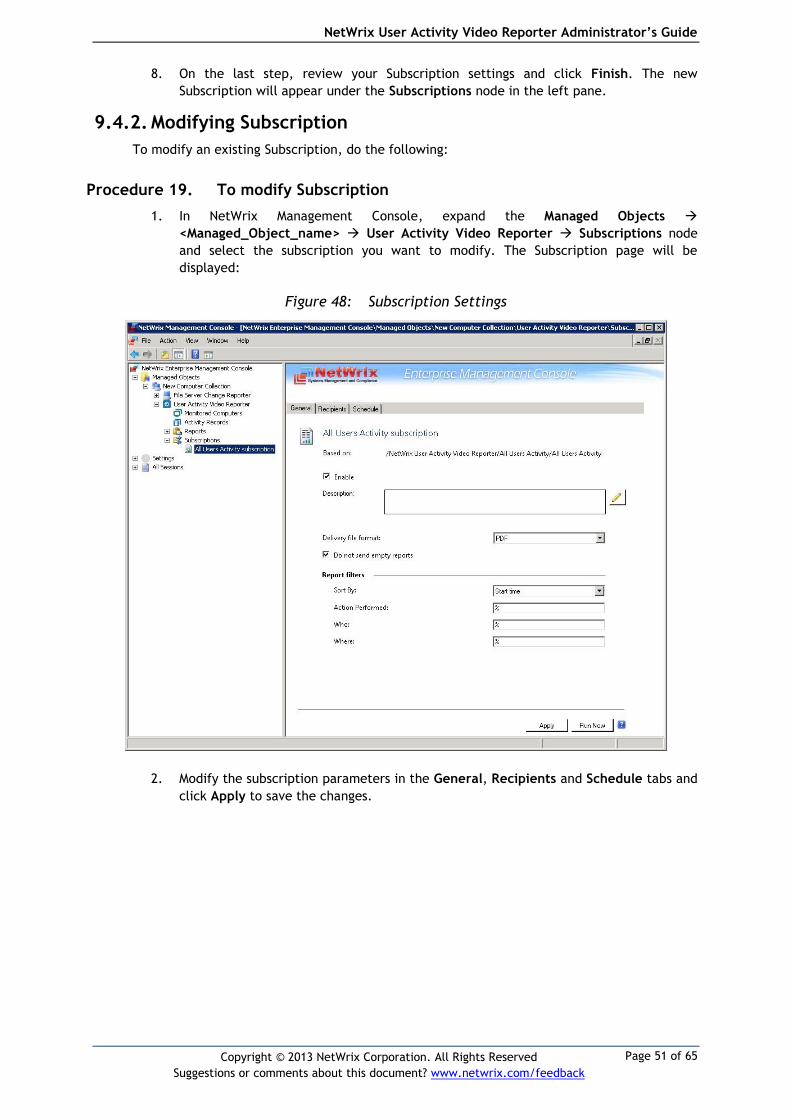
5. On the Email Recipients step, click the Add button and specify the email address(es)
of the report recipients. Click Verify to send a test message to the specified email
address. You will be informed, if any problems are detected. Click OK to add the
address and then Next to proceed.
Figure 45: Email Recipients
6. On the Report Parameters step, select the report delivery format (Excel/PDF/Word)
and select the Do not send empty reports option if you do not want reports to be
generated if no activity was recorded during the reporting period. Specify the report
filters and click Next to proceed:

NetWrix User Activity Video Reporter Administrator’s Guide
Page 50 of 65
Copyright © 2013 NetWrix Corporation. All Rights Reserved
Suggestions or comments about this document? www.netwrix.com/feedback
Figure 46: Report Parameters
Note: Due to limitations of Microsoft Word and Excel, links to video files from
reports saved in these formats are broken. If you want to be able to play video
files by following links from reports, it is recommended to export them to the PDF
format.
7. On the Subscription Schedule step, specify the report delivery schedule. The
following options are supported:
Daily: reports will be delivered at a specified interval (in days) at 3:00 AM.
Weekly: reports will be delivered on the specified day(s) of the week at 3:00 AM.
Monthly: reports will be delivered in the specified months on the selected date at
3:00 AM.
Note: The time specified is the local time on the computer where NetWrix User
Activity Video Reporter is installed.
Figure 47: Subscription Schedule
NetWrix User Activity Video Reporter Administrator’s Guide
Page 51 of 65
Copyright © 2013 NetWrix Corporation. All Rights Reserved
Suggestions or comments about this document? www.netwrix.com/feedback
8. On the last step, review your Subscription settings and click Finish. The new
Subscription will appear under the Subscriptions node in the left pane.
9.4.2. Modifying Subscription
To modify an existing Subscription, do the following:
Procedure 19. To modify Subscription
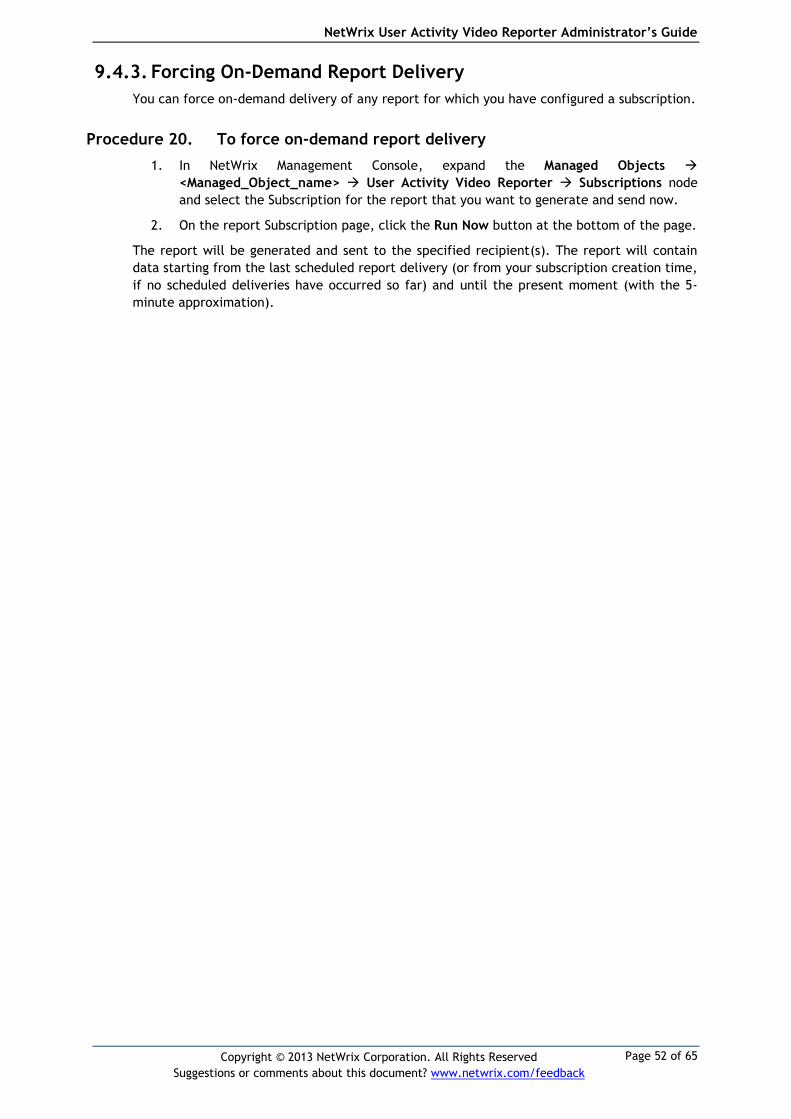
1. In NetWrix Management Console, expand the Managed Objects
<Managed_Object_name> User Activity Video Reporter Subscriptions node
and select the subscription you want to modify. The Subscription page will be
displayed:
Figure 48: Subscription Settings
2. Modify the subscription parameters in the General, Recipients and Schedule tabs and
click Apply to save the changes.
NetWrix User Activity Video Reporter Administrator’s Guide
Page 52 of 65
Copyright © 2013 NetWrix Corporation. All Rights Reserved
Suggestions or comments about this document? www.netwrix.com/feedback
9.4.3. Forcing On-Demand Report Delivery
You can force on-demand delivery of any report for which you have configured a subscription.
Procedure 20. To force on-demand report delivery
1. In NetWrix Management Console, expand the Managed Objects
<Managed_Object_name> User Activity Video Reporter Subscriptions node
and select the Subscription for the report that you want to generate and send now.
2. On the report Subscription page, click the Run Now button at the bottom of the page.
The report will be generated and sent to the specified recipient(s). The report will contain
data starting from the last scheduled report delivery (or from your subscription creation time,
if no scheduled deliveries have occurred so far) and until the present moment (with the 5-
minute approximation).
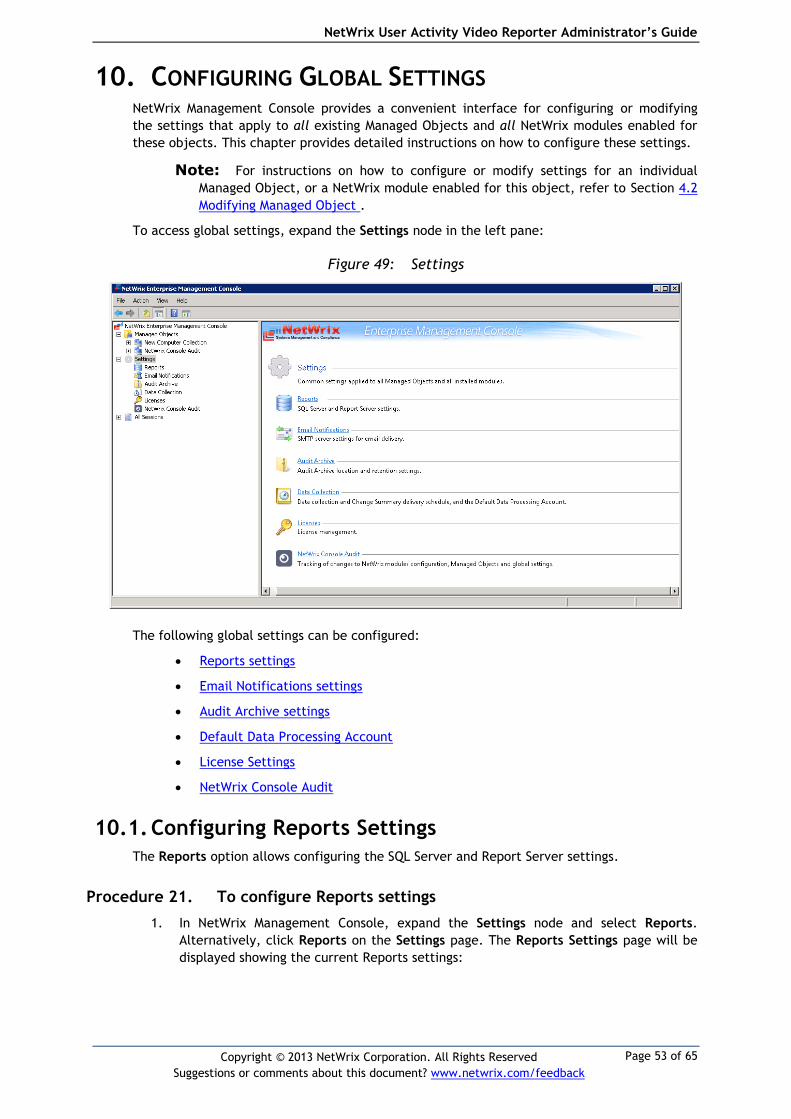
NetWrix User Activity Video Reporter Administrator’s Guide
Page 53 of 65
Copyright © 2013 NetWrix Corporation. All Rights Reserved
Suggestions or comments about this document? www.netwrix.com/feedback
10. CONFIGURING GLOBAL SETTINGS NetWrix Management Console provides a convenient interface for configuring or modifying
the settings that apply to all existing Managed Objects and all NetWrix modules enabled for
these objects. This chapter provides detailed instructions on how to configure these settings.
Note: For instructions on how to configure or modify settings for an individual
Managed Object, or a NetWrix module enabled for this object, refer to Section 4.2
Modifying Managed Object .
To access global settings, expand the Settings node in the left pane:
Figure 49: Settings
The following global settings can be configured:
Reports settings
Email Notifications settings
Audit Archive settings
Default Data Processing Account
License Settings
NetWrix Console Audit
10.1. Configuring Reports Settings
The Reports option allows configuring the SQL Server and Report Server settings.
Procedure 21. To configure Reports settings
1. In NetWrix Management Console, expand the Settings node and select Reports.
Alternatively, click Reports on the Settings page. The Reports Settings page will be
displayed showing the current Reports settings:
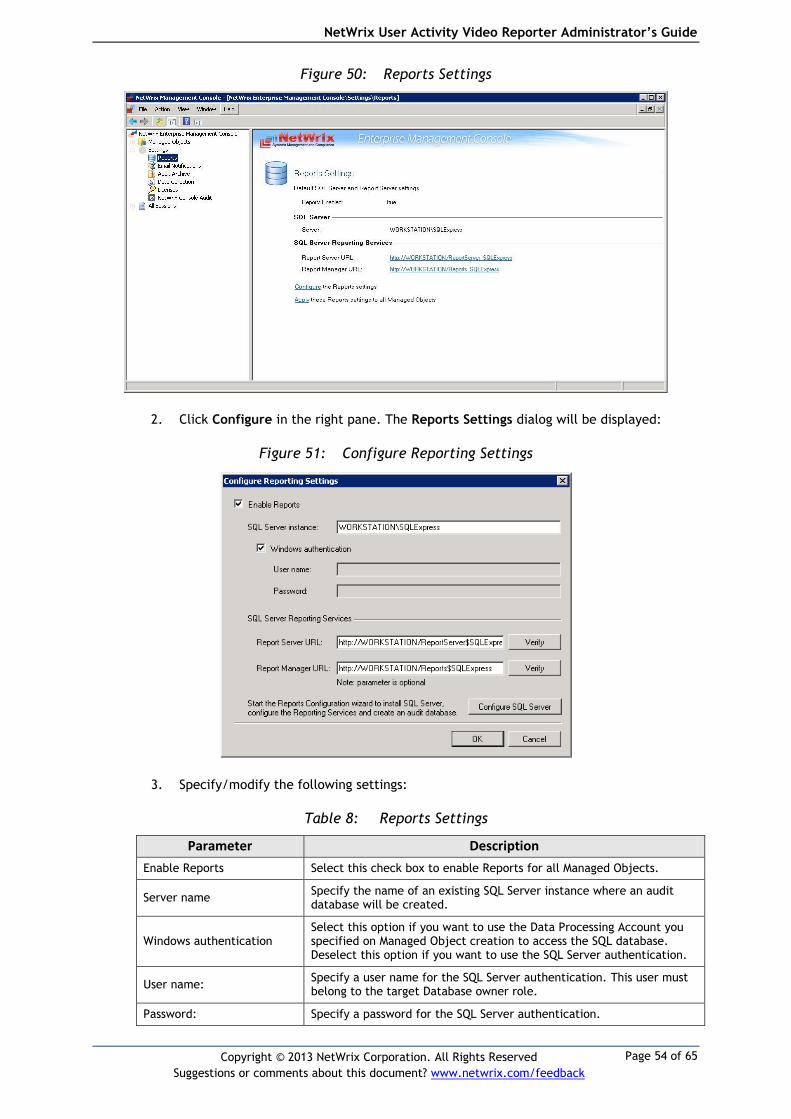
NetWrix User Activity Video Reporter Administrator’s Guide
Page 54 of 65
Copyright © 2013 NetWrix Corporation. All Rights Reserved
Suggestions or comments about this document? www.netwrix.com/feedback
Figure 50: Reports Settings
2. Click Configure in the right pane. The Reports Settings dialog will be displayed:
Figure 51: Configure Reporting Settings
3. Specify/modify the following settings:
Table 8: Reports Settings
Parameter Description
Enable Reports Select this check box to enable Reports for all Managed Objects.
Server name Specify the name of an existing SQL Server instance where an audit database will be created.
Windows authentication Select this option if you want to use the Data Processing Account you specified on Managed Object creation to access the SQL database. Deselect this option if you want to use the SQL Server authentication.
User name: Specify a user name for the SQL Server authentication. This user must belong to the target Database owner role.
Password: Specify a password for the SQL Server authentication.
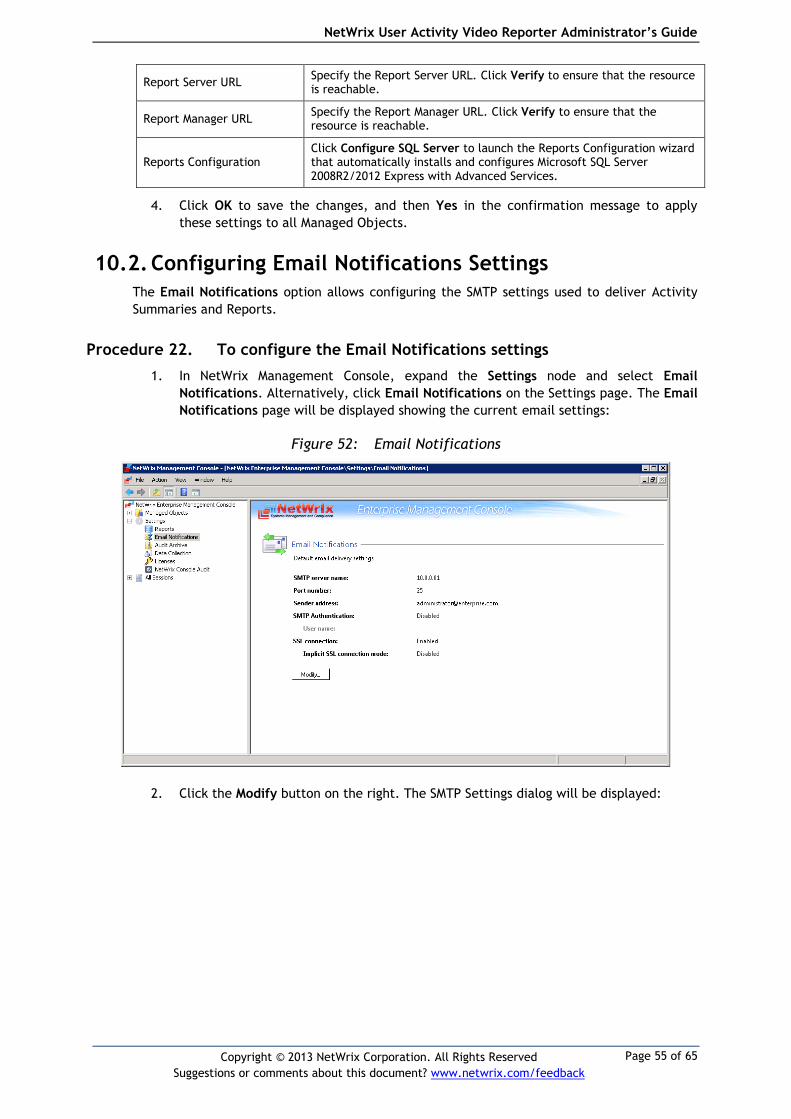
NetWrix User Activity Video Reporter Administrator’s Guide
Page 55 of 65
Copyright © 2013 NetWrix Corporation. All Rights Reserved
Suggestions or comments about this document? www.netwrix.com/feedback
Report Server URL Specify the Report Server URL. Click Verify to ensure that the resource is reachable.
Report Manager URL Specify the Report Manager URL. Click Verify to ensure that the resource is reachable.
Reports Configuration Click Configure SQL Server to launch the Reports Configuration wizard that automatically installs and configures Microsoft SQL Server 2008R2/2012 Express with Advanced Services.
4. Click OK to save the changes, and then Yes in the confirmation message to apply
these settings to all Managed Objects.
10.2. Configuring Email Notifications Settings
The Email Notifications option allows configuring the SMTP settings used to deliver Activity
Summaries and Reports.
Procedure 22. To configure the Email Notifications settings
1. In NetWrix Management Console, expand the Settings node and select Email
Notifications. Alternatively, click Email Notifications on the Settings page. The Email
Notifications page will be displayed showing the current email settings:
Figure 52: Email Notifications
2. Click the Modify button on the right. The SMTP Settings dialog will be displayed:
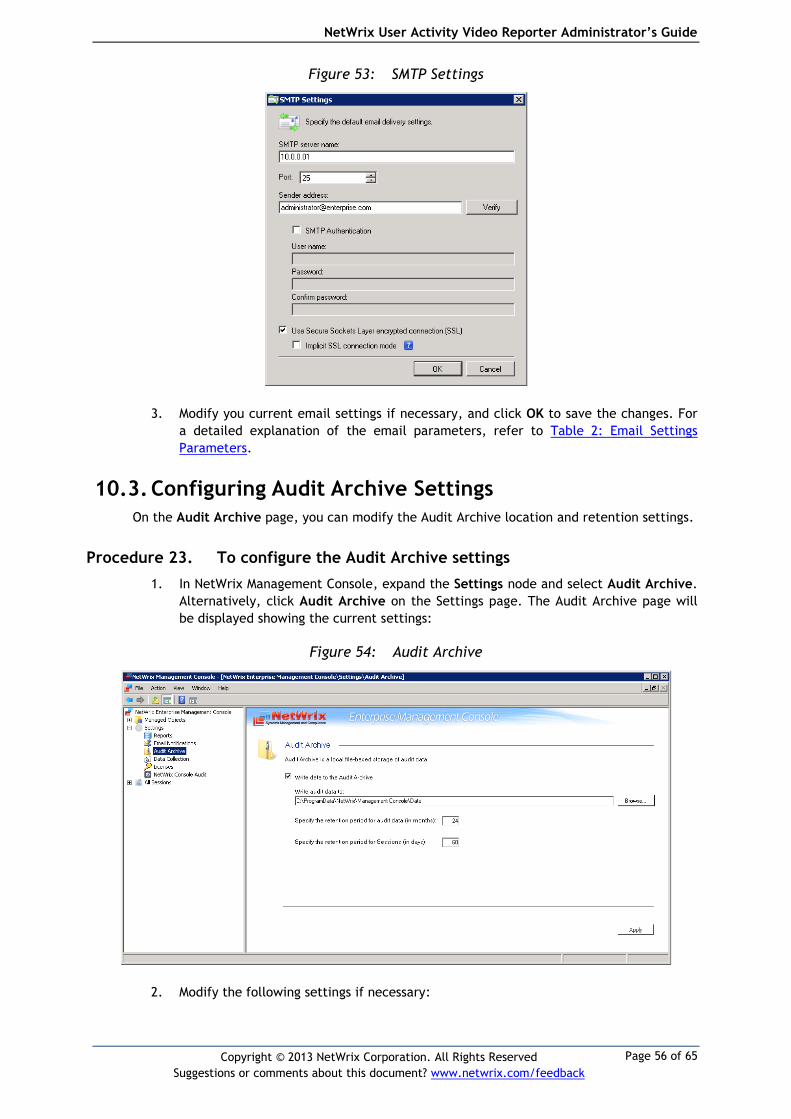
NetWrix User Activity Video Reporter Administrator’s Guide
Page 56 of 65
Copyright © 2013 NetWrix Corporation. All Rights Reserved
Suggestions or comments about this document? www.netwrix.com/feedback
Figure 53: SMTP Settings
3. Modify you current email settings if necessary, and click OK to save the changes. For
a detailed explanation of the email parameters, refer to Table 2: Email Settings
Parameters.
10.3. Configuring Audit Archive Settings
On the Audit Archive page, you can modify the Audit Archive location and retention settings.
Procedure 23. To configure the Audit Archive settings
1. In NetWrix Management Console, expand the Settings node and select Audit Archive.
Alternatively, click Audit Archive on the Settings page. The Audit Archive page will
be displayed showing the current settings:
Figure 54: Audit Archive
2. Modify the following settings if necessary:
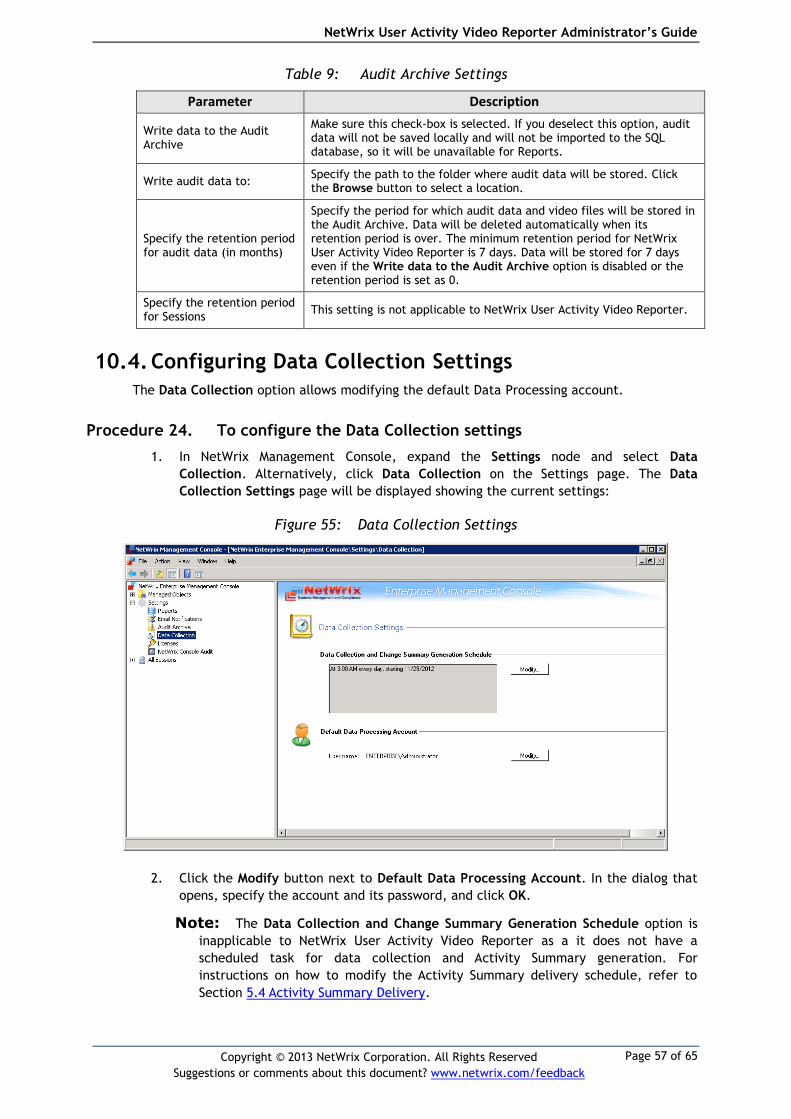
NetWrix User Activity Video Reporter Administrator’s Guide
Page 57 of 65
Copyright © 2013 NetWrix Corporation. All Rights Reserved
Suggestions or comments about this document? www.netwrix.com/feedback
Table 9: Audit Archive Settings
Parameter Description
Write data to the Audit Archive
Make sure this check-box is selected. If you deselect this option, audit data will not be saved locally and will not be imported to the SQL database, so it will be unavailable for Reports.
Write audit data to: Specify the path to the folder where audit data will be stored. Click the Browse button to select a location.
Specify the retention period for audit data (in months)
Specify the period for which audit data and video files will be stored in the Audit Archive. Data will be deleted automatically when its retention period is over. The minimum retention period for NetWrix User Activity Video Reporter is 7 days. Data will be stored for 7 days even if the Write data to the Audit Archive option is disabled or the retention period is set as 0.
Specify the retention period for Sessions
This setting is not applicable to NetWrix User Activity Video Reporter.
10.4. Configuring Data Collection Settings
The Data Collection option allows modifying the default Data Processing account.
Procedure 24. To configure the Data Collection settings
1. In NetWrix Management Console, expand the Settings node and select Data
Collection. Alternatively, click Data Collection on the Settings page. The Data
Collection Settings page will be displayed showing the current settings:
Figure 55: Data Collection Settings
2. Click the Modify button next to Default Data Processing Account. In the dialog that
opens, specify the account and its password, and click OK.
Note: The Data Collection and Change Summary Generation Schedule option is
inapplicable to NetWrix User Activity Video Reporter as a it does not have a
scheduled task for data collection and Activity Summary generation. For
instructions on how to modify the Activity Summary delivery schedule, refer to
Section 5.4 Activity Summary Delivery.
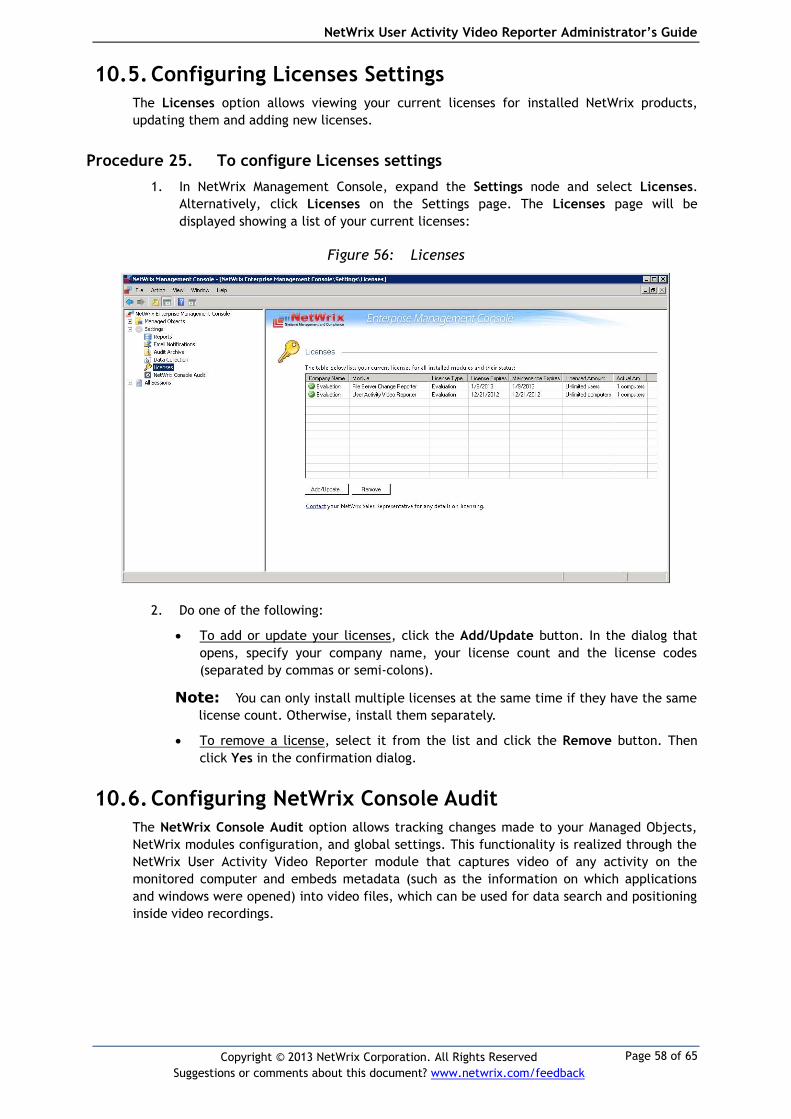
NetWrix User Activity Video Reporter Administrator’s Guide
Page 58 of 65
Copyright © 2013 NetWrix Corporation. All Rights Reserved
Suggestions or comments about this document? www.netwrix.com/feedback
10.5. Configuring Licenses Settings
The Licenses option allows viewing your current licenses for installed NetWrix products,
updating them and adding new licenses.
Procedure 25. To configure Licenses settings
1. In NetWrix Management Console, expand the Settings node and select Licenses.
Alternatively, click Licenses on the Settings page. The Licenses page will be
displayed showing a list of your current licenses:
Figure 56: Licenses
2. Do one of the following:
To add or update your licenses, click the Add/Update button. In the dialog that
opens, specify your company name, your license count and the license codes
(separated by commas or semi-colons).
Note: You can only install multiple licenses at the same time if they have the same
license count. Otherwise, install them separately.
To remove a license, select it from the list and click the Remove button. Then
click Yes in the confirmation dialog.
10.6. Configuring NetWrix Console Audit
The NetWrix Console Audit option allows tracking changes made to your Managed Objects,
NetWrix modules configuration, and global settings. This functionality is realized through the
NetWrix User Activity Video Reporter module that captures video of any activity on the
monitored computer and embeds metadata (such as the information on which applications
and windows were opened) into video files, which can be used for data search and positioning
inside video recordings.
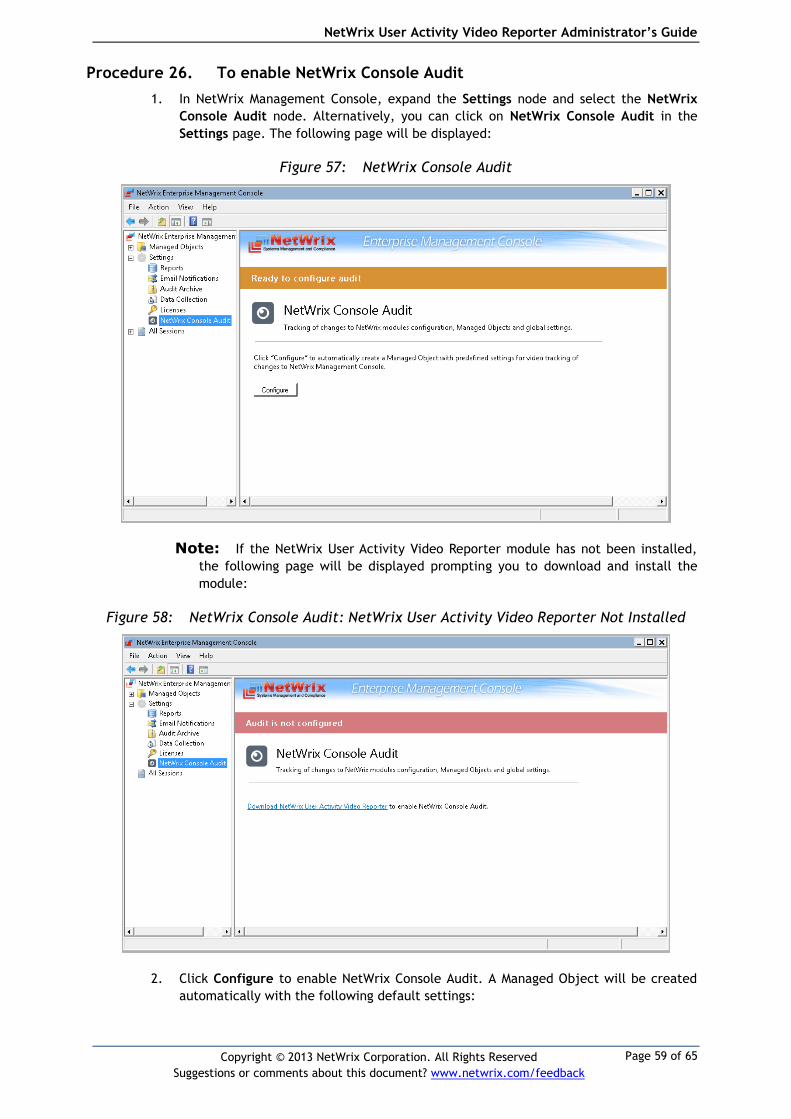
NetWrix User Activity Video Reporter Administrator’s Guide
Page 59 of 65
Copyright © 2013 NetWrix Corporation. All Rights Reserved
Suggestions or comments about this document? www.netwrix.com/feedback
Procedure 26. To enable NetWrix Console Audit
1. In NetWrix Management Console, expand the Settings node and select the NetWrix
Console Audit node. Alternatively, you can click on NetWrix Console Audit in the
Settings page. The following page will be displayed:
Figure 57: NetWrix Console Audit
Note: If the NetWrix User Activity Video Reporter module has not been installed,
the following page will be displayed prompting you to download and install the
module:
Figure 58: NetWrix Console Audit: NetWrix User Activity Video Reporter Not Installed
2. Click Configure to enable NetWrix Console Audit. A Managed Object will be created
automatically with the following default settings:
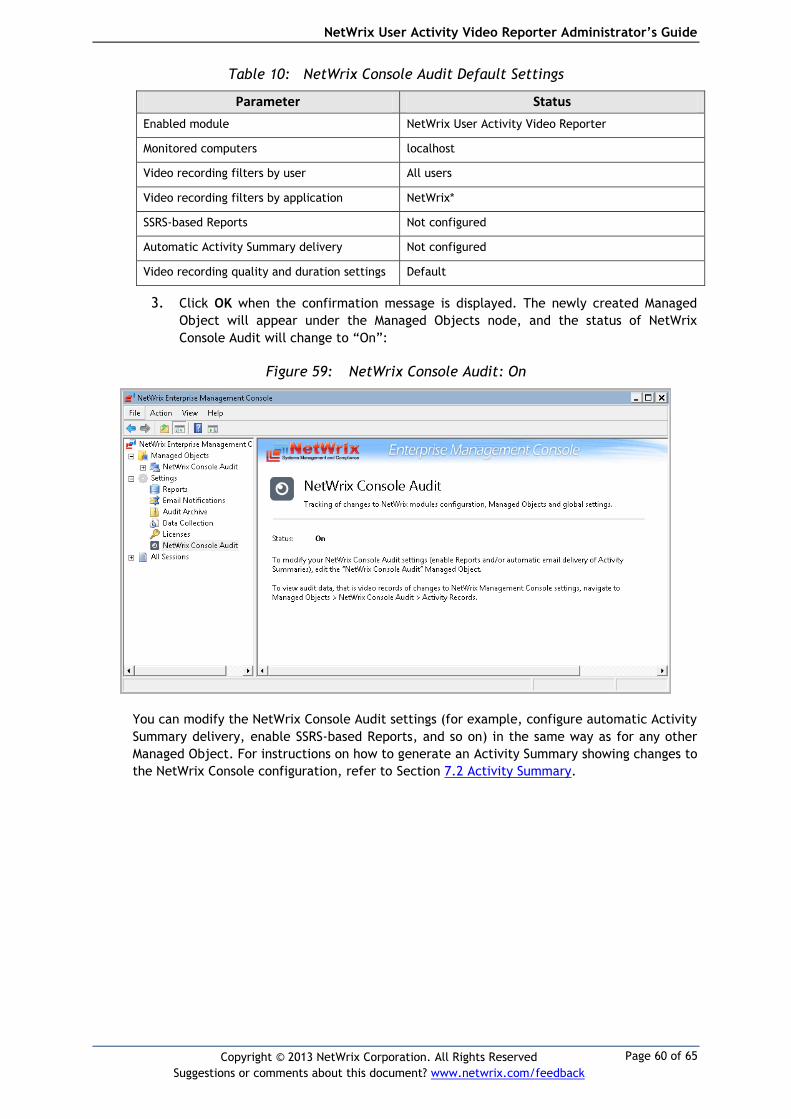
NetWrix User Activity Video Reporter Administrator’s Guide
Page 60 of 65
Copyright © 2013 NetWrix Corporation. All Rights Reserved
Suggestions or comments about this document? www.netwrix.com/feedback
Table 10: NetWrix Console Audit Default Settings
Parameter Status
Enabled module NetWrix User Activity Video Reporter
Monitored computers localhost
Video recording filters by user All users
Video recording filters by application NetWrix*
SSRS-based Reports Not configured
Automatic Activity Summary delivery Not configured
Video recording quality and duration settings Default
3. Click OK when the confirmation message is displayed. The newly created Managed
Object will appear under the Managed Objects node, and the status of NetWrix
Console Audit will change to “On”:
Figure 59: NetWrix Console Audit: On
You can modify the NetWrix Console Audit settings (for example, configure automatic Activity
Summary delivery, enable SSRS-based Reports, and so on) in the same way as for any other
Managed Object. For instructions on how to generate an Activity Summary showing changes to
the NetWrix Console configuration, refer to Section 7.2 Activity Summary.

NetWrix User Activity Video Reporter Administrator’s Guide
Page 61 of 65
Copyright © 2013 NetWrix Corporation. All Rights Reserved
Suggestions or comments about this document? www.netwrix.com/feedback
11. CONFIGURING INTEGRATION WITH OTHER MODULES If you have Managed Objects monitored by other NetWrix modules, you can integrate video
recordings captured by NetWrix User Activity Video Reporter into change reports of these
modules. If integration is enabled, change reports will contain an additional column for each
change with a link to the corresponding video file. This can help analyze how a particular
change was made.
Integration can be enabled if the following conditions are met:
SSRS-based Reports are enabled and configured for the Managed Objects monitored by
NetWrix User Activity Video Reporter and the module you want to integrate video
records with.
The modules are configured to use the same SQL Server instance. You can check SQL
Server instance settings for each Managed Object in the <Managed_Object_name>
Reports Settings page.
At least one data collection must run on the Managed Object monitored by the
module you want to integrate with.
Integration will be enabled for all Managed Objects monitored by the selected
modules if these Managed Objects are configured to store data in the same SQL
database.
Video records integration is supported by the following modules:
NetWrix Server Configuration Change Reporter
NetWrix File Server Change Reporter
NetWrix Active Directory Change Reporter
NetWrix Group Policy Change Reporter
NetWrix Exchange Change Reporter
NetWrix SQL Server Change Reporter.
Procedure 27. To enable integration of video records
1. Click the Integrate video records link at the bottom of the User Activity Video
Reporter main page:
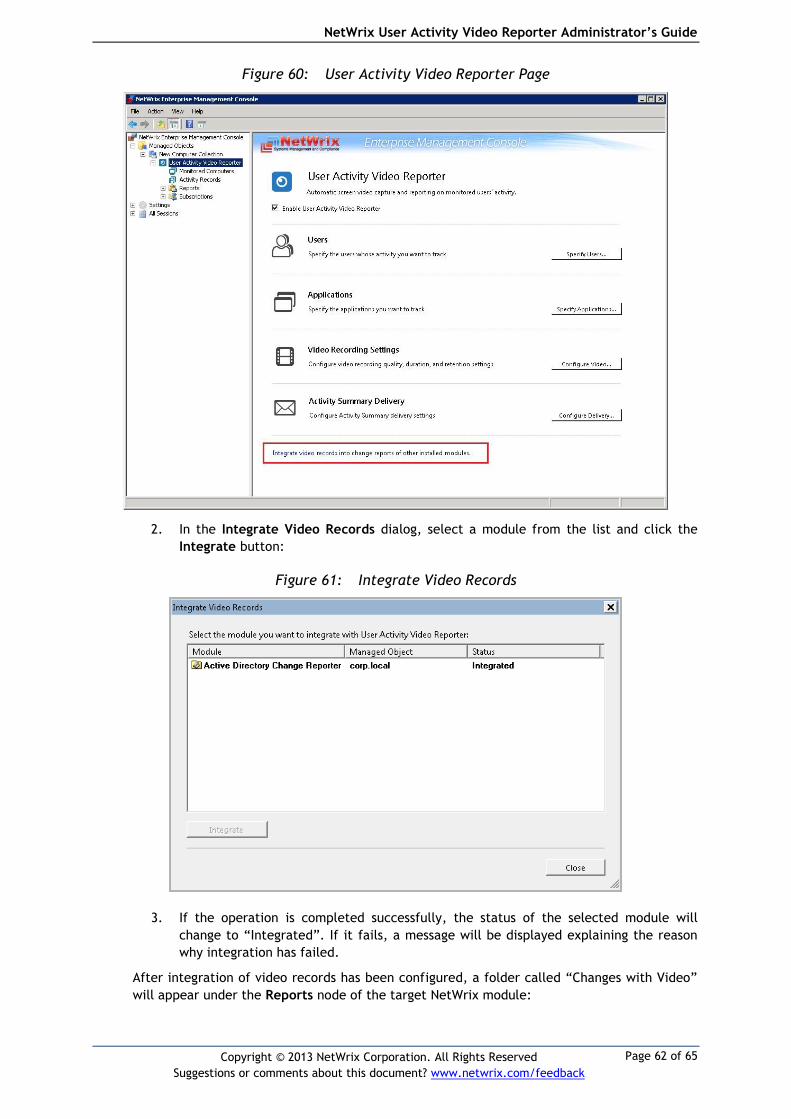
NetWrix User Activity Video Reporter Administrator’s Guide
Page 62 of 65
Copyright © 2013 NetWrix Corporation. All Rights Reserved
Suggestions or comments about this document? www.netwrix.com/feedback
Figure 60: User Activity Video Reporter Page
2. In the Integrate Video Records dialog, select a module from the list and click the
Integrate button:
Figure 61: Integrate Video Records
3. If the operation is completed successfully, the status of the selected module will
change to “Integrated”. If it fails, a message will be displayed explaining the reason
why integration has failed.
After integration of video records has been configured, a folder called “Changes with Video”
will appear under the Reports node of the target NetWrix module:
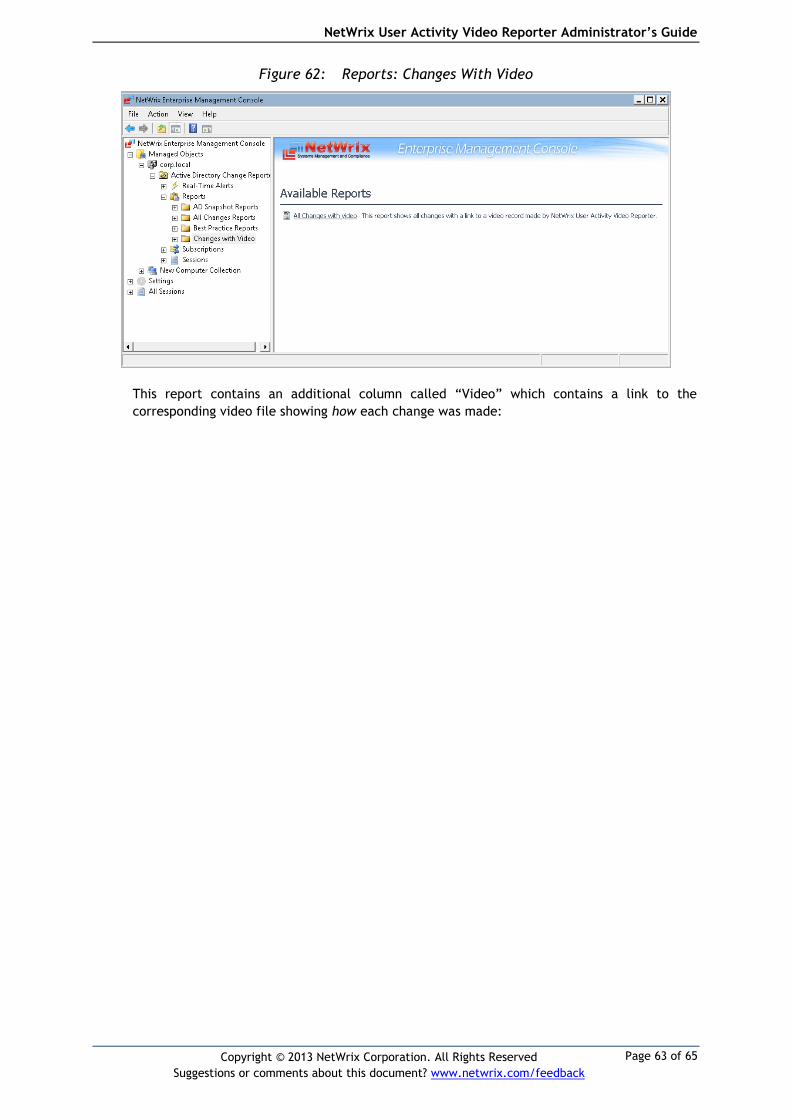
NetWrix User Activity Video Reporter Administrator’s Guide
Page 63 of 65
Copyright © 2013 NetWrix Corporation. All Rights Reserved
Suggestions or comments about this document? www.netwrix.com/feedback
Figure 62: Reports: Changes With Video
This report contains an additional column called “Video” which contains a link to the
corresponding video file showing how each change was made:
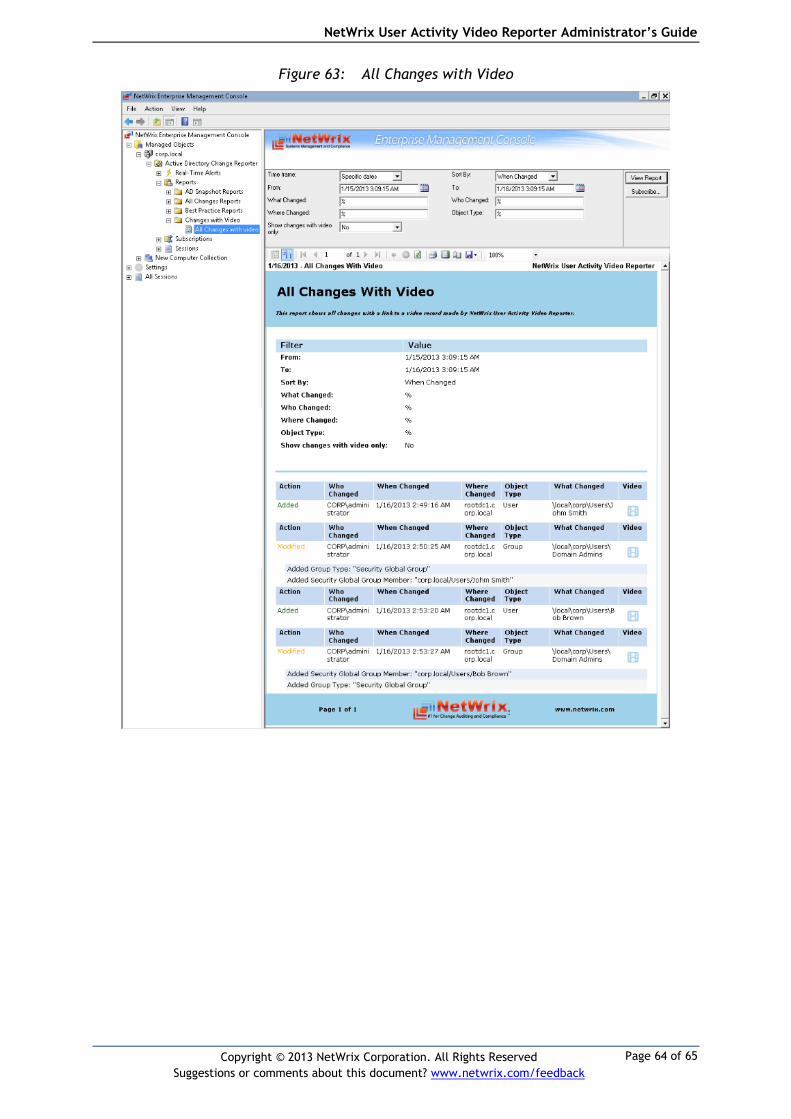
NetWrix User Activity Video Reporter Administrator’s Guide
Page 64 of 65
Copyright © 2013 NetWrix Corporation. All Rights Reserved
Suggestions or comments about this document? www.netwrix.com/feedback
Figure 63: All Changes with Video
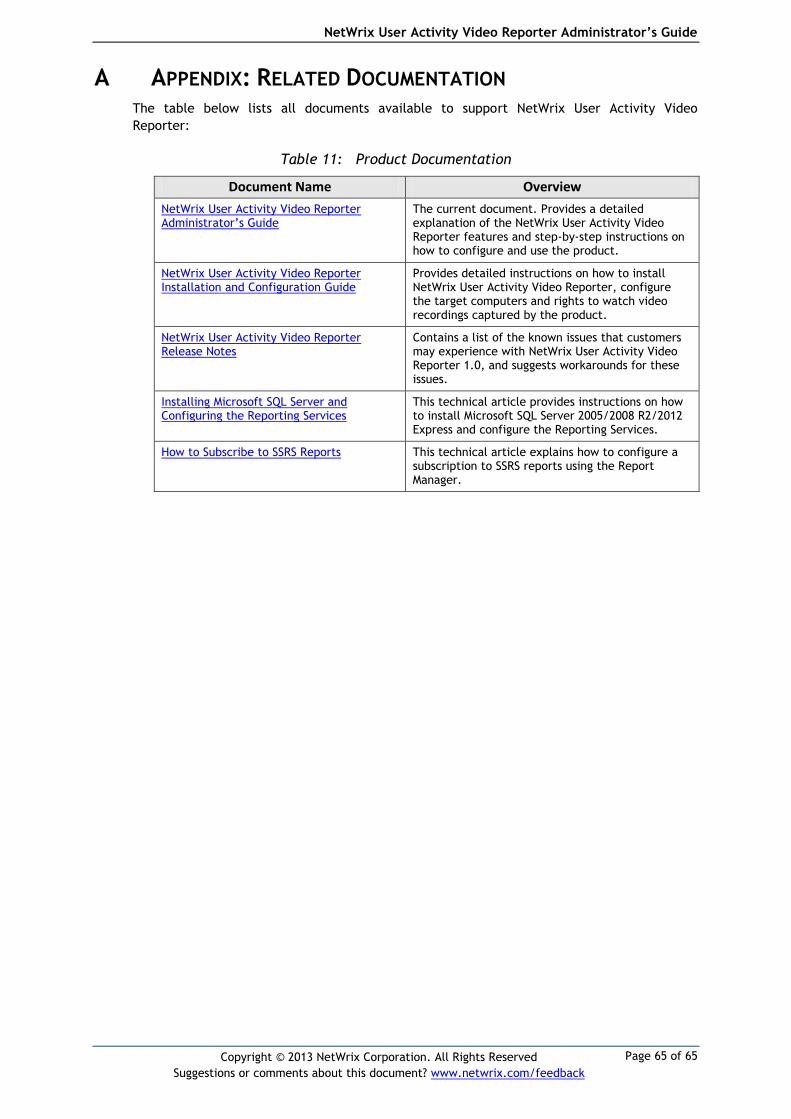
NetWrix User Activity Video Reporter Administrator’s Guide
Page 65 of 65
Copyright © 2013 NetWrix Corporation. All Rights Reserved
Suggestions or comments about this document? www.netwrix.com/feedback
A APPENDIX: RELATED DOCUMENTATION The table below lists all documents available to support NetWrix User Activity Video
Reporter:
Table 11: Product Documentation
Document Name Overview
NetWrix User Activity Video Reporter Administrator’s Guide
The current document. Provides a detailed explanation of the NetWrix User Activity Video Reporter features and step-by-step instructions on how to configure and use the product.
NetWrix User Activity Video Reporter Installation and Configuration Guide
Provides detailed instructions on how to install NetWrix User Activity Video Reporter, configure the target computers and rights to watch video recordings captured by the product.
NetWrix User Activity Video Reporter Release Notes
Contains a list of the known issues that customers may experience with NetWrix User Activity Video Reporter 1.0, and suggests workarounds for these issues.
Installing Microsoft SQL Server and Configuring the Reporting Services
This technical article provides instructions on how to install Microsoft SQL Server 2005/2008 R2/2012 Express and configure the Reporting Services.
How to Subscribe to SSRS Reports This technical article explains how to configure a subscription to SSRS reports using the Report Manager.