Embed Size (px)
Citation preview
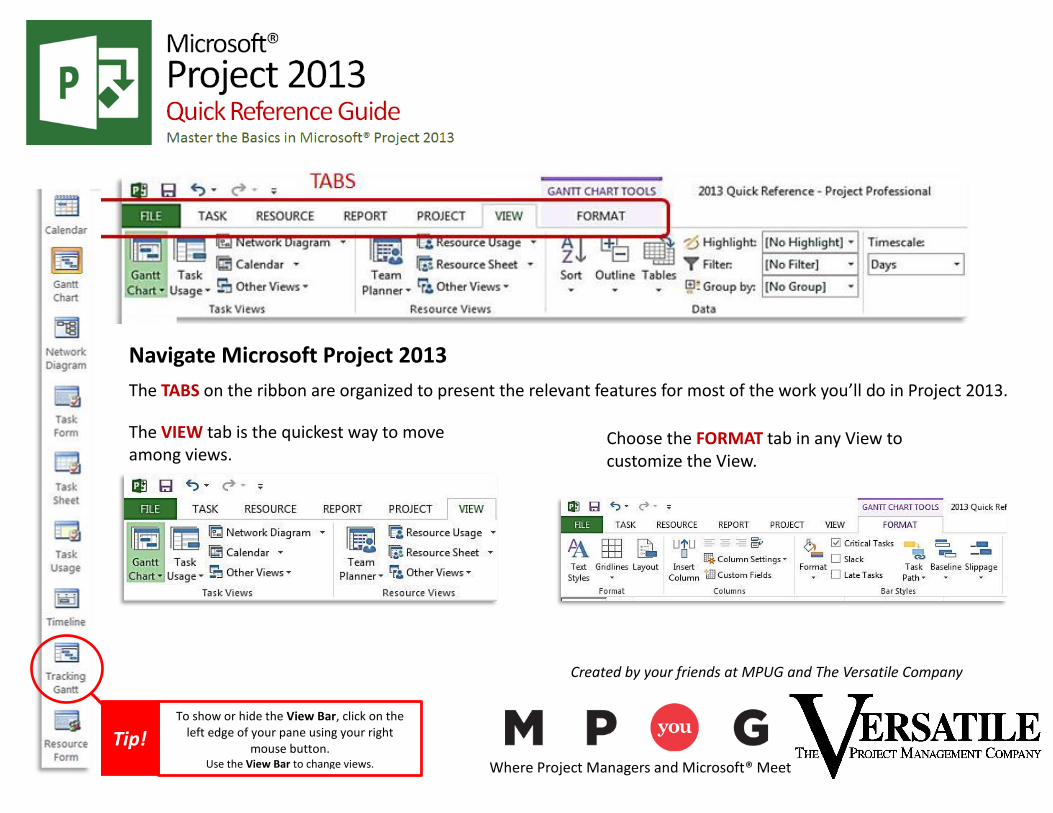
Tip! To show or hide the View Bar, click on the
left edge of your pane using your right mouse button.
Use the View Bar to change views.
Created by your friends at MPUG and The Versatile Company
Where Project Managers and Microsoft® Meet
The VIEW tab is the quickest way to move among views.
Choose the FORMAT tab in any View to customize the View.
Navigate Microsoft Project 2013
The TABS on the ribbon are organized to present the relevant features for most of the work you’ll do in Project 2013.
© The Versatile Company 2014. www.VersatileCompany.com
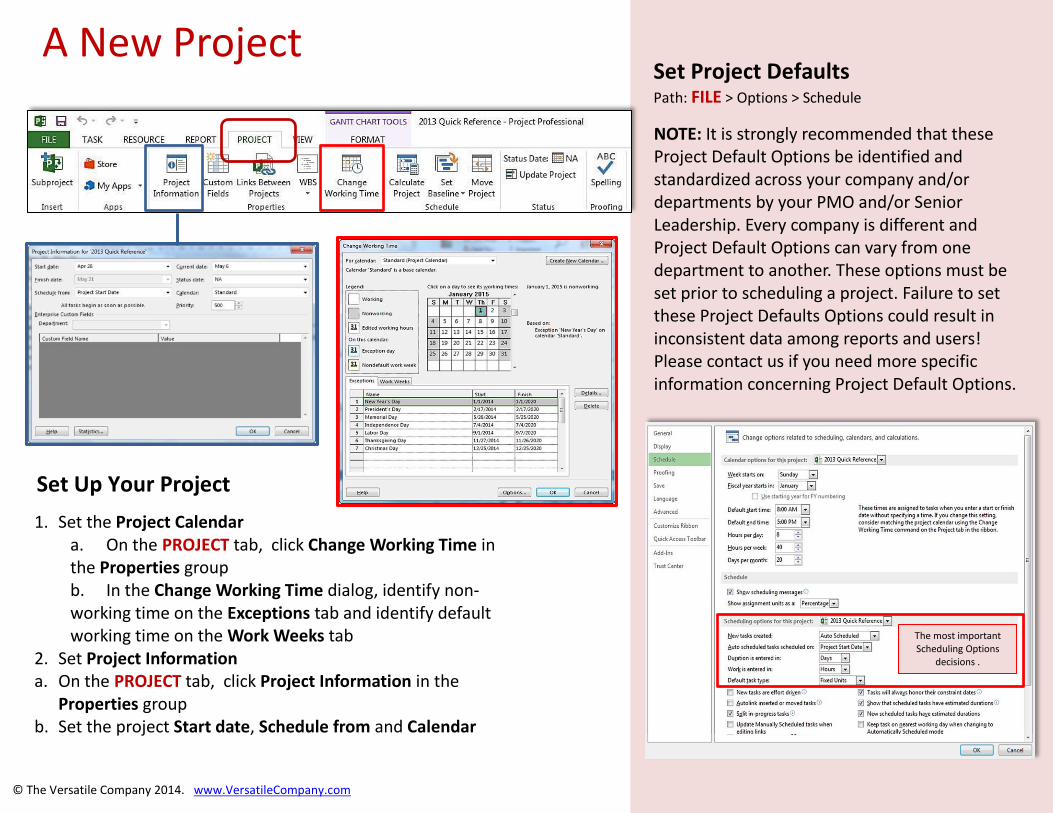
A New Project
1. Set the Project Calendar a. On the PROJECT tab, click Change Working Time in the Properties group b. In the Change Working Time dialog, identify non-working time on the Exceptions tab and identify default working time on the Work Weeks tab
2. Set Project Information a. On the PROJECT tab, click Project Information in the
Properties group b. Set the project Start date, Schedule from and Calendar
Set Up Your Project
Set Project Defaults Path: FILE > Options > Schedule
NOTE: It is strongly recommended that these Project Default Options be identified and standardized across your company and/or departments by your PMO and/or Senior Leadership. Every company is different and Project Default Options can vary from one department to another. These options must be set prior to scheduling a project. Failure to set these Project Defaults Options could result in inconsistent data among reports and users! Please contact us if you need more specific information concerning Project Default Options.
The most important Scheduling Options
decisions .
© The Versatile Company 2014. www.VersatileCompany.com
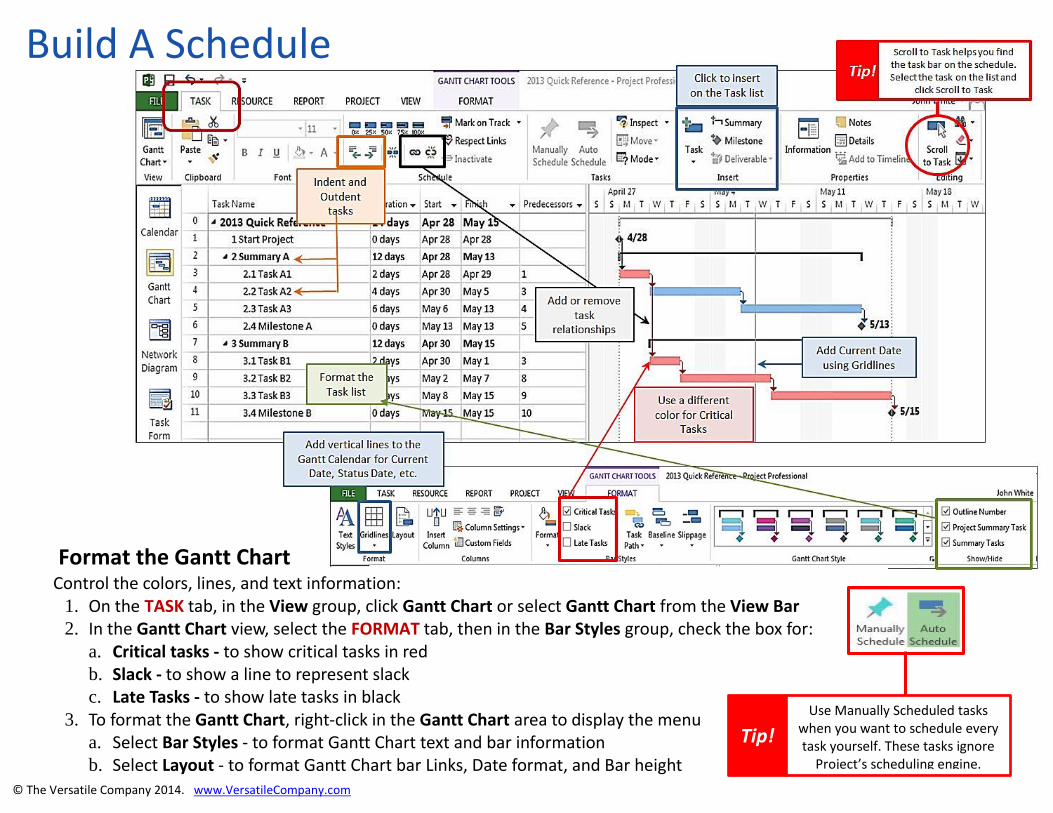
Build A Schedule
Control the colors, lines, and text information: 1. On the TASK tab, in the View group, click Gantt Chart or select Gantt Chart from the View Bar 2. In the Gantt Chart view, select the FORMAT tab, then in the Bar Styles group, check the box for:
a. Critical tasks - to show critical tasks in red
b. Slack - to show a line to represent slack
c. Late Tasks - to show late tasks in black
3. To format the Gantt Chart, right-click in the Gantt Chart area to display the menu
a. Select Bar Styles - to format Gantt Chart text and bar information
b. Select Layout - to format Gantt Chart bar Links, Date format, and Bar height
Format the Gantt Chart
Tip!
Use Manually Scheduled tasks when you want to schedule every task yourself. These tasks ignore
Project’s scheduling engine.
© The Versatile Company 2014. www.VersatileCompany.com
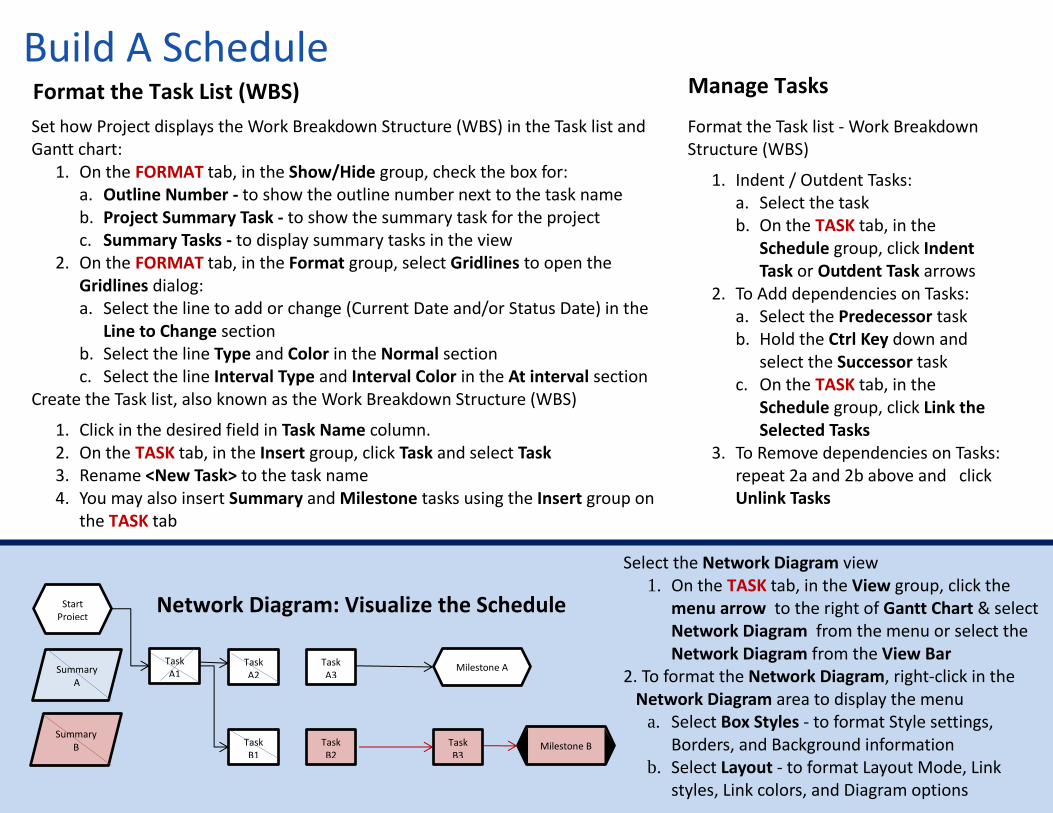
Build A Schedule
Set how Project displays the Work Breakdown Structure (WBS) in the Task list and Gantt chart:
1. On the FORMAT tab, in the Show/Hide group, check the box for: a. Outline Number - to show the outline number next to the task name b. Project Summary Task - to show the summary task for the project c. Summary Tasks - to display summary tasks in the view
2. On the FORMAT tab, in the Format group, select Gridlines to open the Gridlines dialog: a. Select the line to add or change (Current Date and/or Status Date) in the
Line to Change section b. Select the line Type and Color in the Normal section c. Select the line Interval Type and Interval Color in the At interval section
Create the Task list, also known as the Work Breakdown Structure (WBS) 1. Click in the desired field in Task Name column. 2. On the TASK tab, in the Insert group, click Task and select Task 3. Rename <New Task> to the task name 4. You may also insert Summary and Milestone tasks using the Insert group on
the TASK tab
Format the Task List (WBS)
Format the Task list - Work Breakdown Structure (WBS)
1. Indent / Outdent Tasks: a. Select the task b. On the TASK tab, in the
Schedule group, click Indent Task or Outdent Task arrows
2. To Add dependencies on Tasks: a. Select the Predecessor task b. Hold the Ctrl Key down and
select the Successor task c. On the TASK tab, in the
Schedule group, click Link the Selected Tasks
3. To Remove dependencies on Tasks: repeat 2a and 2b above and click Unlink Tasks
Manage Tasks
Start Project
Milestone A Summary A
Summary B
Task A1
Task A2
Task A3
Task B1 Milestone B Task
B2 Task B3
Select the Network Diagram view 1. On the TASK tab, in the View group, click the
menu arrow to the right of Gantt Chart & select Network Diagram from the menu or select the Network Diagram from the View Bar
2. To format the Network Diagram, right-click in the Network Diagram area to display the menu
a. Select Box Styles - to format Style settings, Borders, and Background information
b. Select Layout - to format Layout Mode, Link styles, Link colors, and Diagram options
Network Diagram: Visualize the Schedule
© The Versatile Company 2014. www.VersatileCompany.com
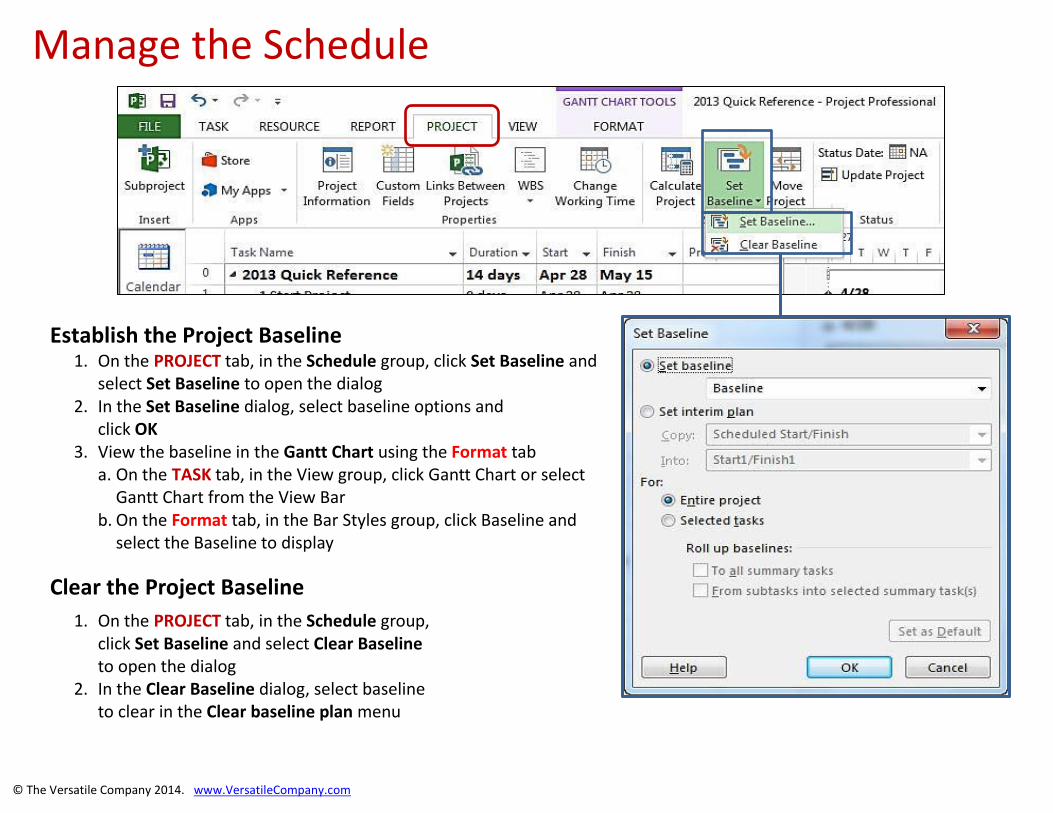
Manage the Schedule
Establish the Project Baseline 1. On the PROJECT tab, in the Schedule group, click Set Baseline and
select Set Baseline to open the dialog 2. In the Set Baseline dialog, select baseline options and
click OK 3. View the baseline in the Gantt Chart using the Format tab
a. On the TASK tab, in the View group, click Gantt Chart or select Gantt Chart from the View Bar
b. On the Format tab, in the Bar Styles group, click Baseline and select the Baseline to display
Clear the Project Baseline
1. On the PROJECT tab, in the Schedule group, click Set Baseline and select Clear Baseline to open the dialog
2. In the Clear Baseline dialog, select baseline to clear in the Clear baseline plan menu
© The Versatile Company 2014. www.VersatileCompany.com
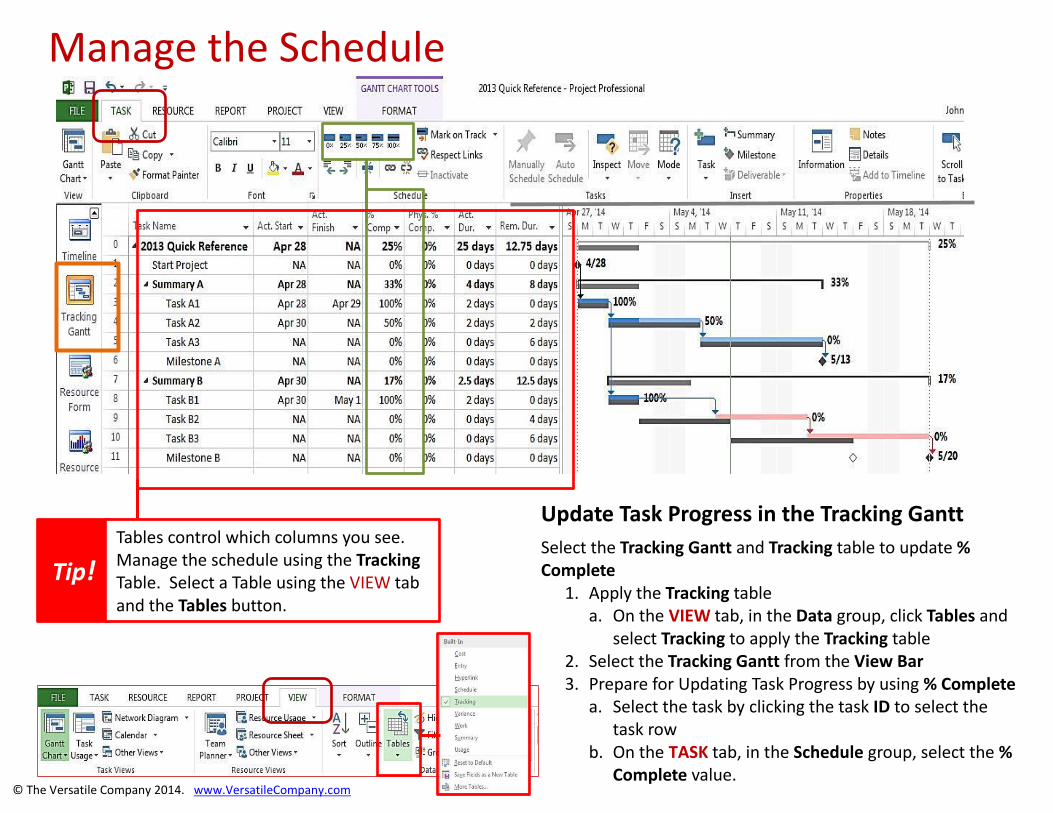
Manage the Schedule
Tip!
Tables control which columns you see. Manage the schedule using the Tracking Table. Select a Table using the VIEW tab and the Tables button.
Update Task Progress in the Tracking Gantt
Select the Tracking Gantt and Tracking table to update % Complete
1. Apply the Tracking table a. On the VIEW tab, in the Data group, click Tables and
select Tracking to apply the Tracking table 2. Select the Tracking Gantt from the View Bar 3. Prepare for Updating Task Progress by using % Complete
a. Select the task by clicking the task ID to select the task row
b. On the TASK tab, in the Schedule group, select the % Complete value.
© The Versatile Company 2014. www.VersatileCompany.com
Manage Resources
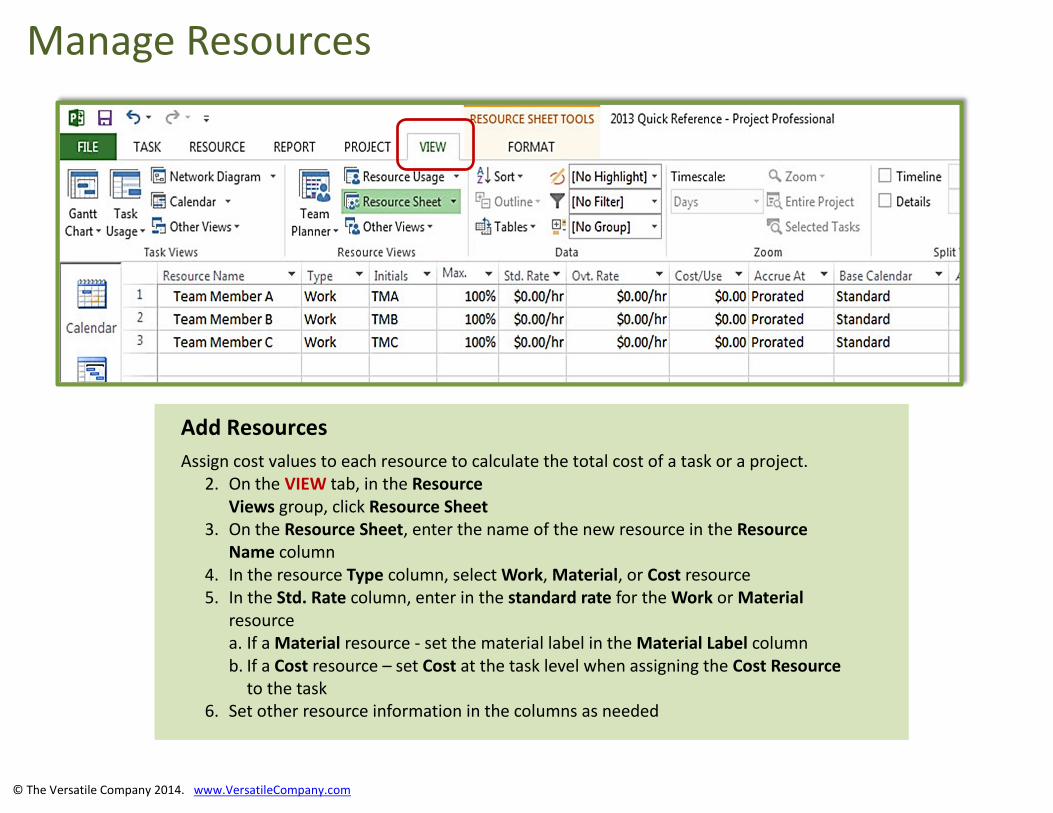
Add Resources
Assign cost values to each resource to calculate the total cost of a task or a project. 2. On the VIEW tab, in the Resource
Views group, click Resource Sheet 3. On the Resource Sheet, enter the name of the new resource in the Resource
Name column 4. In the resource Type column, select Work, Material, or Cost resource 5. In the Std. Rate column, enter in the standard rate for the Work or Material
resource a. If a Material resource - set the material label in the Material Label column b. If a Cost resource – set Cost at the task level when assigning the Cost Resource
to the task 6. Set other resource information in the columns as needed
© The Versatile Company 2014. www.VersatileCompany.com
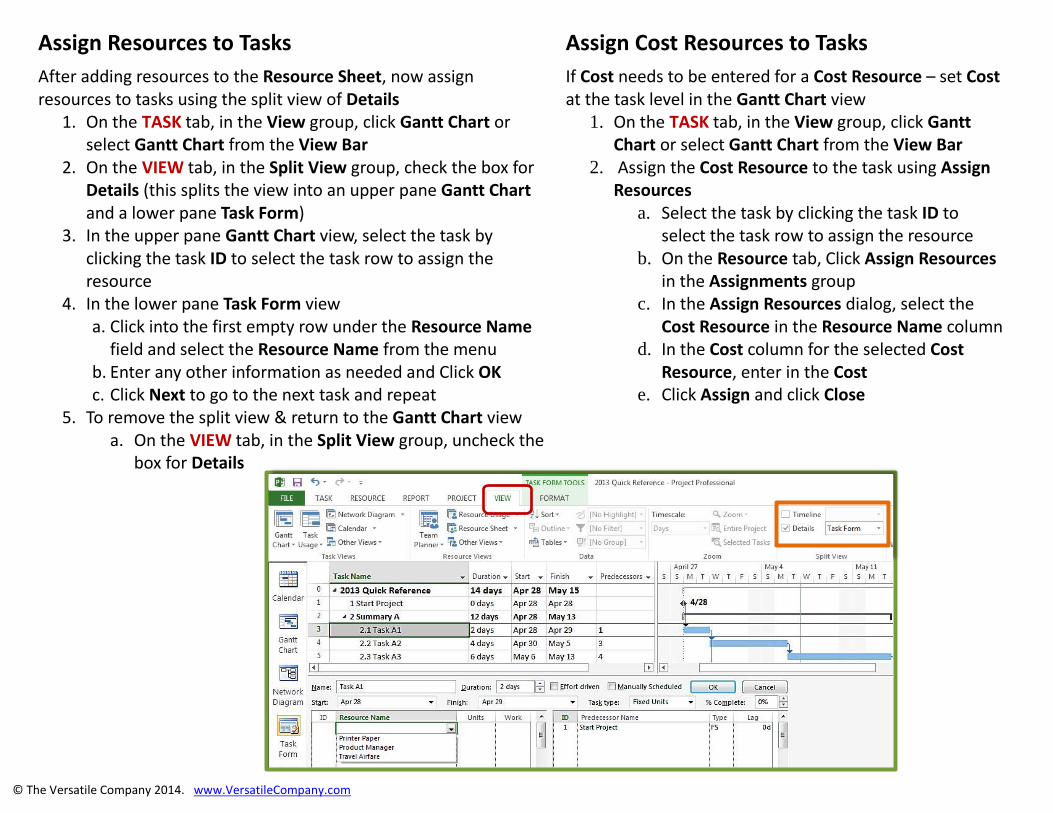
Assign Resources to Tasks
After adding resources to the Resource Sheet, now assign resources to tasks using the split view of Details
1. On the TASK tab, in the View group, click Gantt Chart or select Gantt Chart from the View Bar
2. On the VIEW tab, in the Split View group, check the box for Details (this splits the view into an upper pane Gantt Chart and a lower pane Task Form)
3. In the upper pane Gantt Chart view, select the task by clicking the task ID to select the task row to assign the resource
4. In the lower pane Task Form view a. Click into the first empty row under the Resource Name
field and select the Resource Name from the menu b. Enter any other information as needed and Click OK c. Click Next to go to the next task and repeat
5. To remove the split view & return to the Gantt Chart view a. On the VIEW tab, in the Split View group, uncheck the
box for Details
Assign Cost Resources to Tasks
If Cost needs to be entered for a Cost Resource – set Cost at the task level in the Gantt Chart view
1. On the TASK tab, in the View group, click Gantt Chart or select Gantt Chart from the View Bar
2. Assign the Cost Resource to the task using Assign Resources
a. Select the task by clicking the task ID to select the task row to assign the resource
b. On the Resource tab, Click Assign Resources in the Assignments group
c. In the Assign Resources dialog, select the Cost Resource in the Resource Name column
d. In the Cost column for the selected Cost Resource, enter in the Cost
e. Click Assign and click Close
© The Versatile Company 2014. www.VersatileCompany.com
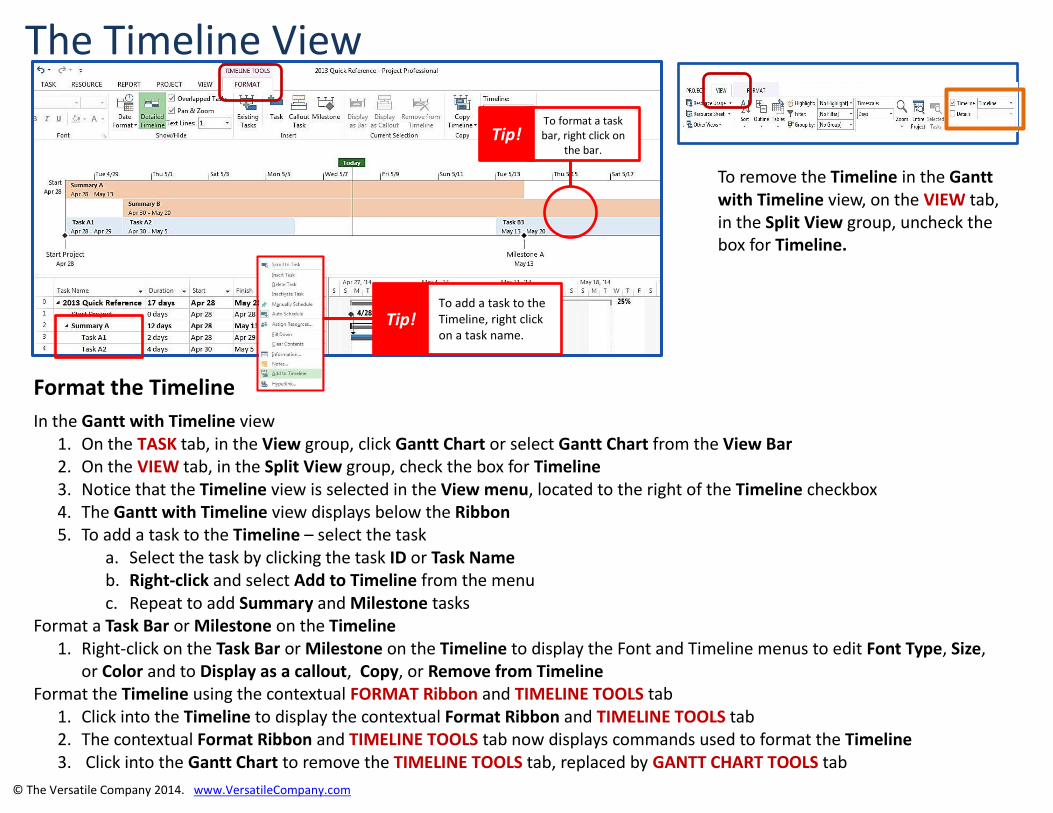
To format a task bar, right click on
the bar.
Tip! To add a task to the Timeline, right click on a task name.
Tip!
Format the Timeline
In the Gantt with Timeline view 1. On the TASK tab, in the View group, click Gantt Chart or select Gantt Chart from the View Bar 2. On the VIEW tab, in the Split View group, check the box for Timeline 3. Notice that the Timeline view is selected in the View menu, located to the right of the Timeline checkbox 4. The Gantt with Timeline view displays below the Ribbon 5. To add a task to the Timeline – select the task
a. Select the task by clicking the task ID or Task Name b. Right-click and select Add to Timeline from the menu c. Repeat to add Summary and Milestone tasks
Format a Task Bar or Milestone on the Timeline 1. Right-click on the Task Bar or Milestone on the Timeline to display the Font and Timeline menus to edit Font Type, Size,
or Color and to Display as a callout, Copy, or Remove from Timeline Format the Timeline using the contextual FORMAT Ribbon and TIMELINE TOOLS tab
1. Click into the Timeline to display the contextual Format Ribbon and TIMELINE TOOLS tab 2. The contextual Format Ribbon and TIMELINE TOOLS tab now displays commands used to format the Timeline 3. Click into the Gantt Chart to remove the TIMELINE TOOLS tab, replaced by GANTT CHART TOOLS tab
The Timeline View
To remove the Timeline in the Gantt with Timeline view, on the VIEW tab, in the Split View group, uncheck the box for Timeline.