Embed Size (px)
Citation preview

HRSA Electronic Handbooks
NCC FY 2013 Progress Report User Guide for BPHCUser Guide for ApplicantsLast updated on: October 1, 2012

NCC FY 2013 Progress Report User Guide for BPHC
2 of 94 User Guide For Applicants
Table of Contents3.1.1. Add an Authorizing Official ........................................................................................................................ 15 3.1.2. Change the Selected Authorizing Official ................................................................................................... 18 3.1.3. To Update the AO information ................................................................................................................... 21 3.1.4. Delete an Authorizing Official .................................................................................................................... 22 3.2.1. To Modify the Department Name or Division Name .................................................................................. 25 3.2.2. To Change the Point Of Contact................................................................................................................. 25 3.2.3. To Add a Point Of Contact ......................................................................................................................... 27 3.2.4. To Update the POC information................................................................................................................. 28 3.2.5. To Delete the Point of Contact.................................................................................................................... 29 3.3.1. To complete the Budget Details Form, ....................................................................................................... 31 3.3.2. Update Sub Programs................................................................................................................................. 32 3.3.3. Section A - Update Budget Summary.......................................................................................................... 33 3.3.4. Section B - Update the Budget Categories.................................................................................................. 34 3.3.5. Section C - Update Non-Federal Resources ............................................................................................... 35 4.7.1. View Service Sites ....................................................................................................................................... 51 4.12.1. Update a Performance Measure................................................................................................................. 61

User Guide For Applicants 3 of 94 NCC FY 2013 Progress Report User Guide for BPHC
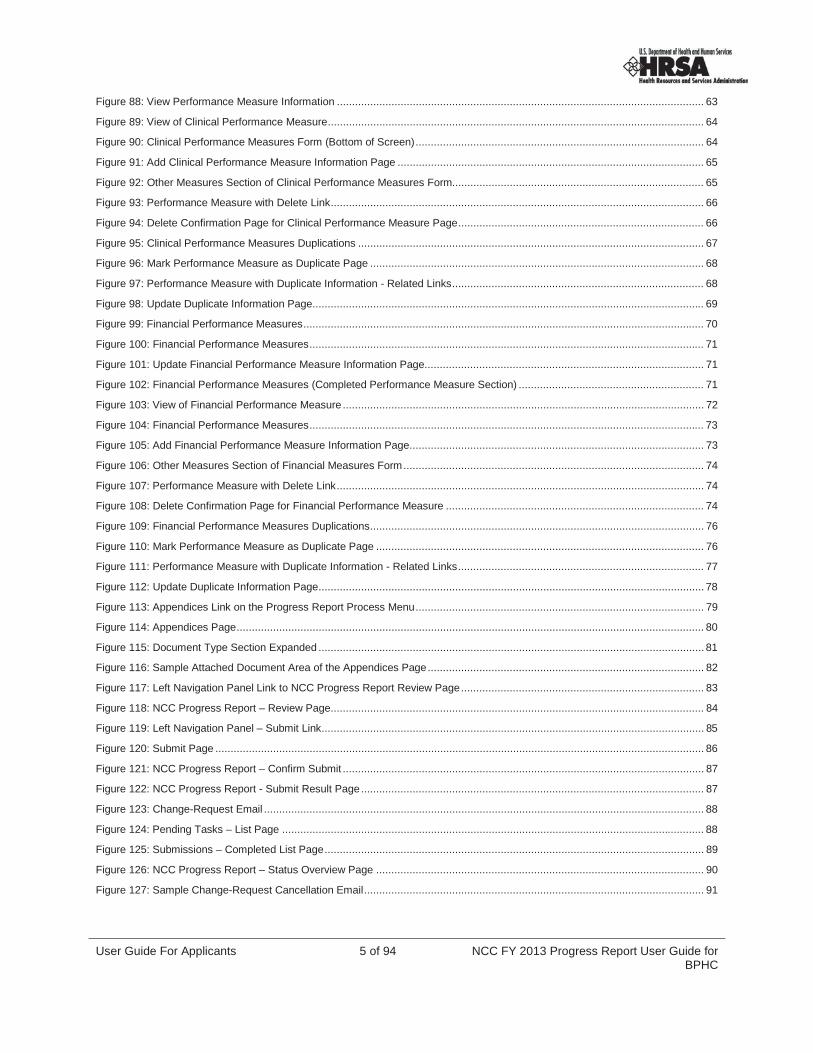
Table of FiguresFigure 1: Login Fields ........................................................................................................................................................................ 9 Figure 2: HRSA EHBs Welcome Page............................................................................................................................................. 10 Figure 3: Pending Tasks – List Page ............................................................................................................................................... 10 Figure 4: Submissions – Incomplete List Page................................................................................................................................. 11 Figure 10: Left Navigation Panel...................................................................................................................................................... 12 Figure 11: NCC Progress Report Process Status ............................................................................................................................ 13 Figure 12: SF-PPR Form ................................................................................................................................................................. 14 Figure 13: Authorizing Official – Change Page (Add New AO)......................................................................................................... 15 Figure 14: Authorizing Official – Request New Page................................................................................................................... 16 Figure 15: Notify AO Page............................................................................................................................................................. 17 Figure 16: Authorizing Official – Change Page (Select Existing AO) ................................................................................................ 18 Figure 17: Authorizing Official – Change Page (2) ........................................................................................................................... 19 Figure 18: Authorizing Official – Confirm Change Page ................................................................................................................... 20 Figure 19: Authorizing Official Update Page................................................................................................................................ 21 Figure 20: Authorizing Official Information – Confirm Update Page .......................................................................................... 22 Figure 21: Authorizing Official – Confirm Delete Page ..................................................................................................................... 23 Figure 22: Status Overview – Left Navigation Panel (SF PPR 2) ................................................................................................ 24 Figure 23: SF-PPR-2 (Cover Page Continuation) ......................................................................................................................... 24 Figure 24: Point of Contact – Change Page ................................................................................................................................. 25 Figure 25: Point of Contact – Change Page (2)............................................................................................................................ 26 Figure 26: Point of Contact – Confirm Change Page................................................................................................................... 27 Figure 27: Point of Contact – Change Page (Blank) .................................................................................................................... 28 Figure 28: Point of Contact – Confirm Update Page.................................................................................................................... 29 Figure 29: Point of Contact – Confirm Delete Page..................................................................................................................... 29 Figure 30: Business Rules for the Budget Details Form ................................................................................................................... 30 Figure 31: Budget Details Page ....................................................................................................................................................... 31 Figure 32: Sub Programs - Update .................................................................................................................................................. 32 Figure 33: Budget Information (Support Year XX) - Update for Section A – Budget Summary Page ................................................ 33 Figure 34: Budget Information (Support Year XX) - Update for Section B – Budget Categories Page .............................................. 34 Figure 35: Budget Information (Support Year XX) - Update for Section C – Non-Federal Resources ............................................... 35 Figure 36: Budget Narrative Page.................................................................................................................................................... 36 Figure 37: Program Specific Information Link on the Left navigation panel ...................................................................................... 37 Figure 38: Program Specific Information Status Overview Page ...................................................................................................... 37 Figure 39: Form 1A: General Information Worksheet ....................................................................................................................... 38 Figure 40: Form 1A, Applicant Information Section .......................................................................................................................... 38 Figure 41: Form 1A, Proposed Service Area.................................................................................................................................... 39 Figure 42: Form 1A, Target Population and Provider Information..................................................................................................... 39 Figure 43: Patients and Visits By Service Type................................................................................................................................ 40 Figure 44: Patients and Visits By Population Type........................................................................................................................... 40 Figure 45: Form 1C, Documents on File .......................................................................................................................................... 41

NCC FY 2013 Progress Report User Guide for BPHC
4 of 94 User Guide For Applicants
Figure 46: Form 2, Staffing Profile ................................................................................................................................................... 42 Figure 47: Form 2, Administration Section ....................................................................................................................................... 42 Figure 48: Form 2, Medical Staff Section ......................................................................................................................................... 43 Figure 49: Form 2, Dental, Behavioral Health, and Enabling Staff Section ....................................................................................... 43 Figure 50: Form 2, Other Staff Section ............................................................................................................................................ 44 Figure 51: Form 3, Income Analysis................................................................................................................................................. 44 Figure 52: Form 3, Document Download and Upload Sections ........................................................................................................ 45 Figure 53: Instructions for Downloading the Income Analysis........................................................................................................... 45 Figure 54: File Download Dialog Box ............................................................................................................................................... 45 Figure 55: Save As Dialog Box ........................................................................................................................................................ 46 Figure 56: Save As Type Example................................................................................................................................................... 46 Figure 57: Income Analysis.............................................................................................................................................................. 47 Figure 58: Form 3, Document Upload Area...................................................................................................................................... 47 Figure 59: Attach Document Screen ................................................................................................................................................ 48 Figure 60: Attached Documents Area of the Attach Document Page ............................................................................................... 48 Figure 61: Attached Documents Area Showing Finished Attaching Button....................................................................................... 49 Figure 62: Form 5A, Services Provided – Required Services........................................................................................................... 49 Figure 63: Refresh Scope for Required Services ............................................................................................................................. 50 Figure 64: Form 5A, Services Provided – Additional Services.......................................................................................................... 50 Figure 65: Refresh Scope for Additional Services ............................................................................................................................ 50 Figure 66: Form 5B, Service Sites ................................................................................................................................................... 51 Figure 67: View Link for a Site on Form 5B...................................................................................................................................... 51 Figure 68: Read-Only Version of Service Site Information for Form 5B Page................................................................................... 52 Figure 69: Form 5C: Other Activities/Locations ................................................................................................................................ 53 Figure 70: Read-Only View of the Activity/Location.......................................................................................................................... 54 Figure 71: Form 6A: Current Board Member Characteristics............................................................................................................ 55 Figure 72: Board Members Area of Form 6A ................................................................................................................................... 56 Figure 73: Important Note Regarding Board Members..................................................................................................................... 56 Figure 74: Add Board Member Information Page ............................................................................................................................. 56 Figure 75: Board Member Counts on Form 6A................................................................................................................................. 57 Figure 76: Form 10: Annual Emergency Preparedness Report ........................................................................................................ 57 Figure 77: Form 10, Emergency Preparedness and Management Plan ........................................................................................... 58 Figure 78: Form 10, Readiness........................................................................................................................................................ 58 Figure 79: Form 12: Organization Contacts ..................................................................................................................................... 59 Figure 80: Click Add… Button to Add a Contact............................................................................................................................... 59 Figure 81: Contact Information Page for Form 12 ............................................................................................................................ 60 Figure 82: Clinical Performance Measures Form ............................................................................................................................. 60 Figure 83: Project Period Fields....................................................................................................................................................... 61 Figure 84: Update a Performance Measure ..................................................................................................................................... 61 Figure 85: Update Clinical Performance Measure Information ......................................................................................................... 62 Figure 86: Performance Measure Category for the Oral Health Focus Area..................................................................................... 63 Figure 87: Clinical Performance Measures (Completed Performance Measure Section).................................................................. 63
User Guide For Applicants 5 of 94 NCC FY 2013 Progress Report User Guide for BPHC
Figure 88: View Performance Measure Information ......................................................................................................................... 63 Figure 89: View of Clinical Performance Measure............................................................................................................................ 64 Figure 90: Clinical Performance Measures Form (Bottom of Screen)............................................................................................... 64 Figure 91: Add Clinical Performance Measure Information Page ..................................................................................................... 65 Figure 92: Other Measures Section of Clinical Performance Measures Form................................................................................... 65 Figure 93: Performance Measure with Delete Link........................................................................................................................... 66 Figure 94: Delete Confirmation Page for Clinical Performance Measure Page................................................................................. 66 Figure 95: Clinical Performance Measures Duplications .................................................................................................................. 67 Figure 96: Mark Performance Measure as Duplicate Page .............................................................................................................. 68 Figure 97: Performance Measure with Duplicate Information - Related Links................................................................................... 68 Figure 98: Update Duplicate Information Page................................................................................................................................. 69 Figure 99: Financial Performance Measures.................................................................................................................................... 70 Figure 100: Financial Performance Measures.................................................................................................................................. 71 Figure 101: Update Financial Performance Measure Information Page............................................................................................ 71 Figure 102: Financial Performance Measures (Completed Performance Measure Section) ............................................................. 71 Figure 103: View of Financial Performance Measure ....................................................................................................................... 72 Figure 104: Financial Performance Measures.................................................................................................................................. 73 Figure 105: Add Financial Performance Measure Information Page................................................................................................. 73 Figure 106: Other Measures Section of Financial Measures Form................................................................................................... 74 Figure 107: Performance Measure with Delete Link......................................................................................................................... 74 Figure 108: Delete Confirmation Page for Financial Performance Measure ..................................................................................... 74 Figure 109: Financial Performance Measures Duplications.............................................................................................................. 76 Figure 110: Mark Performance Measure as Duplicate Page ............................................................................................................ 76 Figure 111: Performance Measure with Duplicate Information - Related Links................................................................................. 77 Figure 112: Update Duplicate Information Page............................................................................................................................... 78 Figure 113: Appendices Link on the Progress Report Process Menu............................................................................................... 79 Figure 114: Appendices Page.......................................................................................................................................................... 80 Figure 115: Document Type Section Expanded ............................................................................................................................... 81 Figure 116: Sample Attached Document Area of the Appendices Page........................................................................................... 82 Figure 117: Left Navigation Panel Link to NCC Progress Report Review Page................................................................................ 83 Figure 118: NCC Progress Report – Review Page........................................................................................................................... 84 Figure 119: Left Navigation Panel – Submit Link.............................................................................................................................. 85 Figure 120: Submit Page ................................................................................................................................................................. 86 Figure 121: NCC Progress Report – Confirm Submit ....................................................................................................................... 87 Figure 122: NCC Progress Report - Submit Result Page................................................................................................................. 87 Figure 123: Change-Request Email ................................................................................................................................................. 88 Figure 124: Pending Tasks – List Page ........................................................................................................................................... 88 Figure 125: Submissions – Completed List Page............................................................................................................................. 89 Figure 126: NCC Progress Report – Status Overview Page ............................................................................................................ 90 Figure 127: Sample Change-Request Cancellation Email................................................................................................................ 91

NCC FY 2013 Progress Report User Guide for BPHC
6 of 94 User Guide For Applicants
Revision HistoryDate Reason for changes Authors
05/27/2010 Original document REI - Ed Molin
06/10/2010 Removed generic material (i.e., SF-PPR and Budget Forms), and re-structured it to change scope of manual to only discuss BPHC Program Specific Information.
REI - Ed Molin
07/15/2010 Combined this document with generic NCC Progress Report User Guide (for H80 Grants). Included Log in, Standard Forms, and other sections of the NCC Progress Report User Guide (for H80 Grants) that were previously not contained in this document.
03/29/2011 Updated document to reflect new Budget Details forms; eliminated Budget Summary and Budget Categories.
REI - Ed Molin
5/9/2011 Revised document to reflect new functions and fields. Organized document into more sections.
REI – Demetrio Ford
4/24/2012 FY2013 User Guide with new text and screenshots. REI – Peter Keefe
9/26/2012 Revised document to reflect new screens and screen functions and fields.
REI – Barbara Gould
User Guide For Applicants 7 of 94 NCC FY 2013 Progress Report User Guide for BPHC
11.. IInnttrroodduuccttiioonn
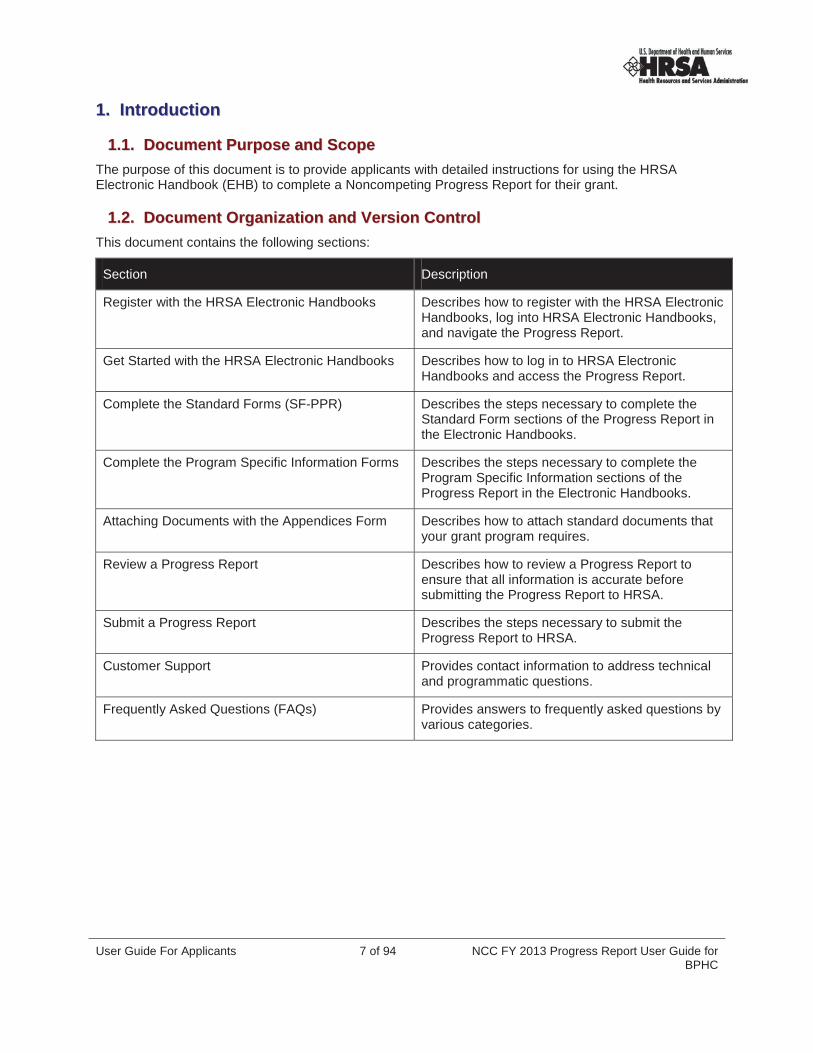
11..11.. DDooccuummeenntt PPuurrppoossee aanndd SSccooppeeThe purpose of this document is to provide applicants with detailed instructions for using the HRSA Electronic Handbook (EHB) to complete a Noncompeting Progress Report for their grant.
11..22.. DDooccuummeenntt OOrrggaanniizzaattiioonn aanndd VVeerrssiioonn CCoonnttrroollThis document contains the following sections:
Section Description
Register with the HRSA Electronic Handbooks Describes how to register with the HRSA Electronic Handbooks, log into HRSA Electronic Handbooks, and navigate the Progress Report.
Get Started with the HRSA Electronic Handbooks Describes how to log in to HRSA Electronic Handbooks and access the Progress Report.
Complete the Standard Forms (SF-PPR) Describes the steps necessary to complete the Standard Form sections of the Progress Report in the Electronic Handbooks.
Complete the Program Specific Information Forms Describes the steps necessary to complete the Program Specific Information sections of the Progress Report in the Electronic Handbooks.
Attaching Documents with the Appendices Form Describes how to attach standard documents that your grant program requires.
Review a Progress Report Describes how to review a Progress Report to ensure that all information is accurate before submitting the Progress Report to HRSA.
Submit a Progress Report Describes the steps necessary to submit the Progress Report to HRSA.
Customer Support Provides contact information to address technical and programmatic questions.
Frequently Asked Questions (FAQs) Provides answers to frequently asked questions by various categories.

NCC FY 2013 Progress Report User Guide for BPHC
8 of 94 User Guide For Applicants
11..33.. RReeggiisstteerr wwiitthh tthhee HHRRSSAA EElleeccttrroonniicc HHaannddbbooookkssBefore you begin your Progress Report, you need to register with the HRSA Electronic Handbooks (EHBs) to complete the Noncompeting Progress Report. Registration allows HRSA to collect consistent information from all users, avoid collection of redundant information, and identify each system useruniquely.
NNoottee:: YYoouu aarree rreeqquuiirreedd ttoo rreeggiisstteerr wwiitthh HHRRSSAA EEHHBBss oonnccee ffoorr eeaacchh oorrggaanniizzaattiioonn yyoouu rreepprreesseenntt..
For detailed registration information, see HRSA’s Electronic Submission User Guide(http://www.hrsa.gov/grants/userguide.htm).
For assistance in registering with HRSA EHBs, call 877-GO4-HRSA (877-464-4772) between 9:00 am and 5:30 pm ET or email [email protected].
If you are a new user in a grantee organization, you need to:
1. Create an individual account in the system to get appropriate access.
Go to https://grants.hrsa.gov/webexternal/home.asp and click Registration in the left navigation panel for registration guidance.
2. Associate your account with your grantee organization.
Use your 10-digit grant number from Box 4b of the Notice of Award to search for your organization.
To work on and submit the Progress Report within the EHBs, request that your Project Director assignthe following access rights as permitted by your role:
Edit Noncompeting Continuation
Submit Noncompeting Continuation

User Guide For Applicants 9 of 94 NCC FY 2013 Progress Report User Guide for BPHC
22.. GGeett SSttaarrtteedd wwiitthh tthhee HHRRSSAA EElleeccttrroonniicc HHaannddbbooookkss
22..11.. SSeessssiioonn TTiimmee LLiimmiittYour session will remain active for 30 minutes after your last activity. Save your work every five minutes to avoid losing information.
22..22.. LLoogg IInn ttoo tthhee HHRRSSAA EElleeccttrroonniicc HHaannddbbooookkss3. Point your browser to https://grants.hrsa.gov/webexternal/login.asp.
4. Enter your username and password.
Figure 1: Login Fields
1. Click the Login button.2. The HRSA Electronic Handbooks Welcome page opens (Figure 2).

NCC FY 2013 Progress Report User Guide for BPHC
10 of 94 User Guide For Applicants
Figure 2: HRSA EHBs Welcome Page
22..33.. HHooww ttoo AAcccceessss tthhee PPrrooggrreessss RReeppoorrttTo access the Progress Report:
1. On the HRSA EHBs Welcome page, click the Tasks tab (Figure 2). The Pending Tasks – Listpage opens.
Figure 3: Pending Tasks – List Page

User Guide For Applicants 11 of 94 NCC FY 2013 Progress Report User Guide for BPHC
2. Click the Submissions link in the left navigation panel. The Submissions – Incomplete List page opens (Figure 4).
Figure 4: Submissions – Incomplete List Page
3. Use the filters just beneath the column headers to help you find your Submission. The Submissions – Incomplete List page refreshes showing only the Submissions that match your filters.
4. Click the Start or Edit drop-down for your Submission.
5. Click the Edit link. The NCC Progress Report – Status Overview page opens.
NCC FY 2013 Progress Report User Guide for BPHC
12 of 94 User Guide For Applicants
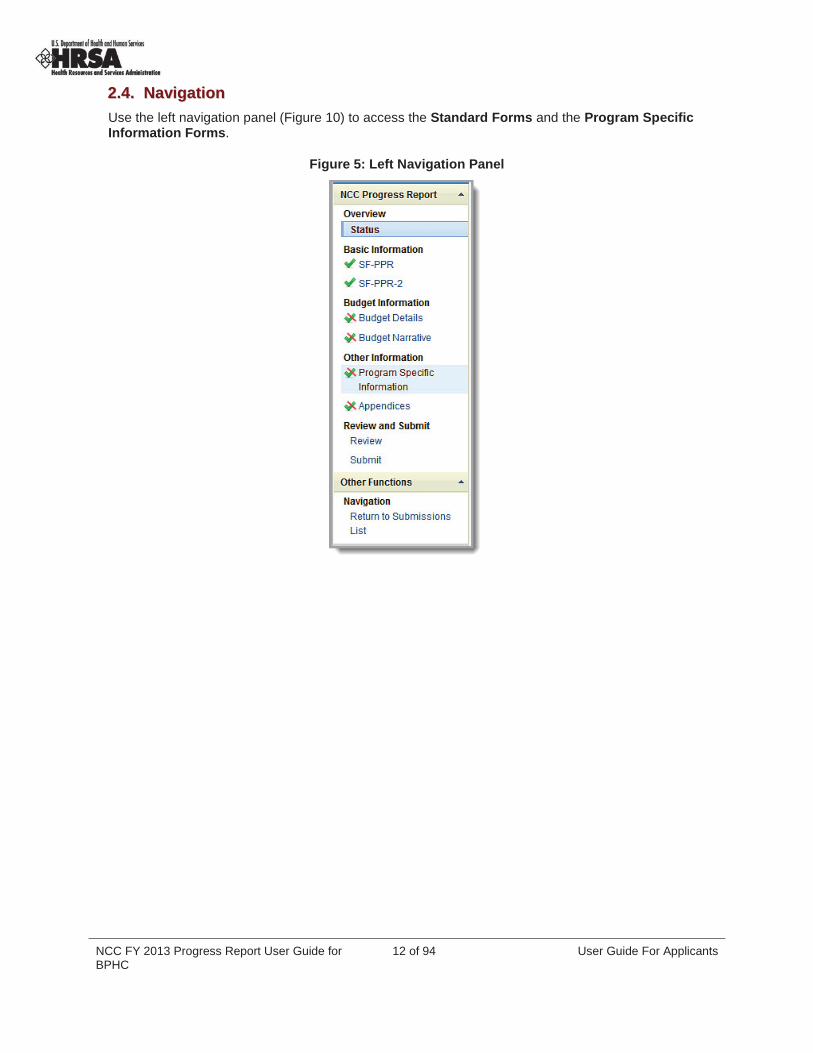
22..44.. NNaavviiggaattiioonnUse the left navigation panel (Figure 10) to access the Standard Forms and the Program Specific Information Forms.
Figure 5: Left Navigation Panel

User Guide For Applicants 13 of 94 NCC FY 2013 Progress Report User Guide for BPHC
33.. CCoommpplleettee tthhee SSttaannddaarrdd FFoorrmmss ((SSFF--PPPPRR))
When you open your Progress Report, the first screen that appears is the NCC Progress Report Process Status Page, which shows the sections of the SF-PPR (Figure 11).
Figure 6: NCC Progress Report Process Status
The NCC Progress Report Process Status Page shows the status of:
Each SF-PPR form
The Budget forms
The Program Specific Information forms
Appendices
NCC FY 2013 Progress Report User Guide for BPHC
14 of 94 User Guide For Applicants
Notes:
YYoouu ccaannnnoott ssuubbmmiitt yyoouurr PPrrooggrreessss RReeppoorrtt uunnttiill yyoouu ccoommpplleettee aallll ffoorrmmss iinn aallll sseeccttiioonnss..FFoorr tthhee ppuurrppoossee ooff tthhiiss ddooccuummeenntt,, tthhee lleefftt nnaavviiggaattiioonn ppaanneell wwiillll bbee uusseedd ttoo aacccceessss eeaacchh ffoorrmm..HHoowweevveerr,, aass nnootteedd aabboovvee,, yyoouu ccaann aacccceessss aannyy SSFF--PPPPRR oorr bbuuddggeett ffoorrmm bbyy rreettuurrnniinngg ttoo tthhee SSttaattuussPPaaggee ((ffoorr PPrrooggrreessss RReeppoorrtt)),, aanndd cclliicckkiinngg iittss UUppddaattee lliinnkk..
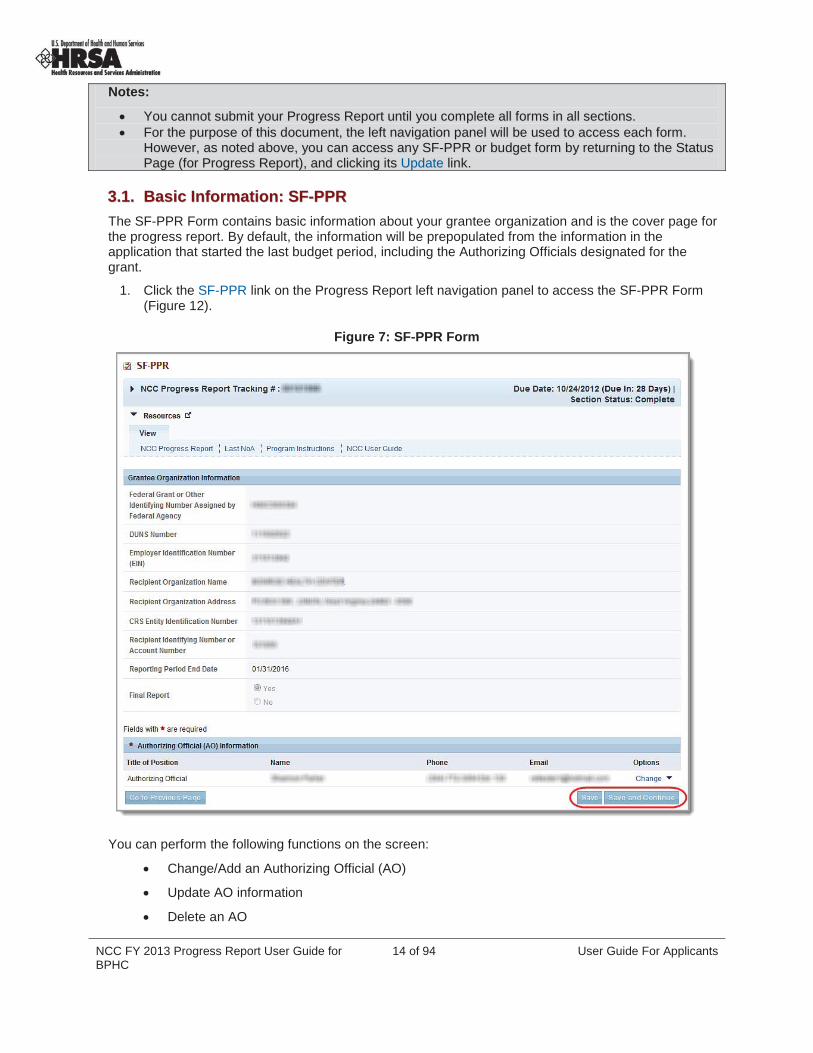
33..11.. BBaassiicc IInnffoorrmmaattiioonn:: SSFF--PPPPRRThe SF-PPR Form contains basic information about your grantee organization and is the cover page for the progress report. By default, the information will be prepopulated from the information in the application that started the last budget period, including the Authorizing Officials designated for the grant.
1. Click the SF-PPR link on the Progress Report left navigation panel to access the SF-PPR Form(Figure 12).
Figure 7: SF-PPR Form
You can perform the following functions on the screen:
Change/Add an Authorizing Official (AO)
Update AO information
Delete an AO

User Guide For Applicants 15 of 94 NCC FY 2013 Progress Report User Guide for BPHC
33..11..11.. AAdddd aann AAuutthhoorriizziinngg OOffffiicciiaallTo add a new person to the list of available AOs:
1. On the NCC Progress Report – Status Overview page, click the SF-PPR link on the left navigation panel or the Update drop-down on the SF-PPR row. The SF-PPR page opens.
2. On the SF-PPR page, in the Authorizing Official (AO) Information section, click the Changedrop-down for an AO and then select the Change link from the drop-down. The Authorizing Official – Change page opens (Figure 13), and is populated with all the AOs registered for the grant.
Figure 8: Authorizing Official – Change Page (Add New AO)
3. Click the Request New AO button. The Authorizing Official – Request New page opens (Figure 14).
NCC FY 2013 Progress Report User Guide for BPHC
16 of 94 User Guide For Applicants
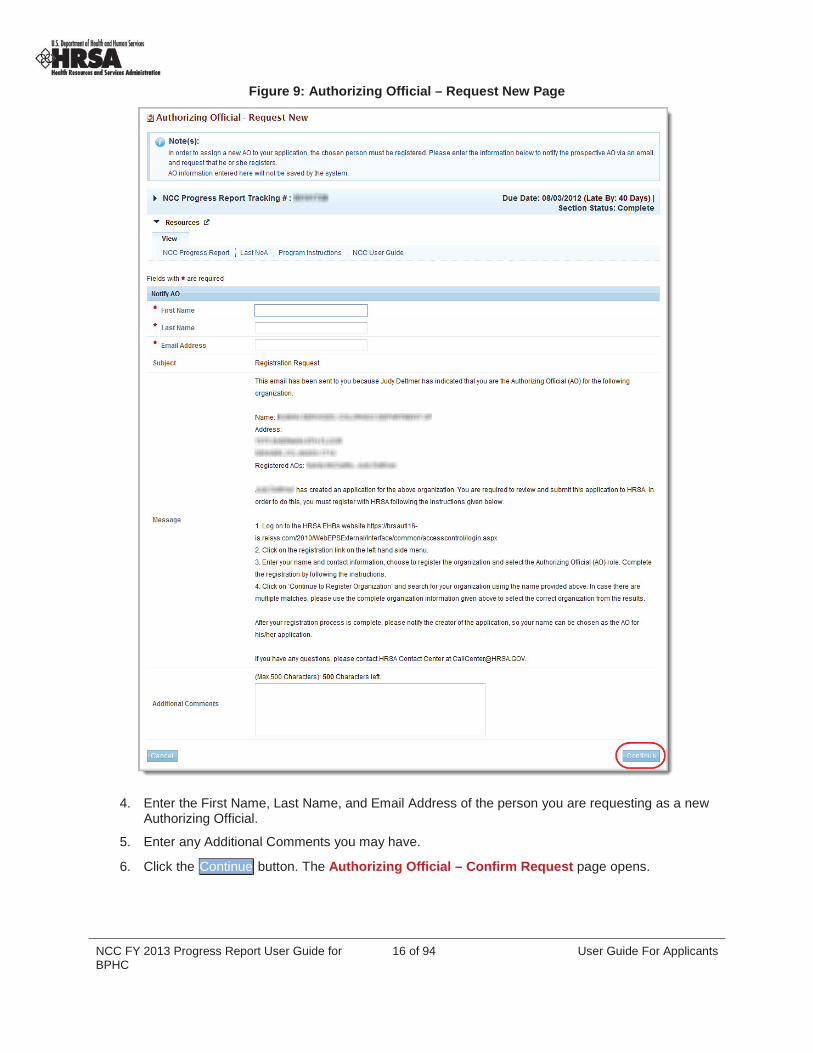
Figure 9: Authorizing Official – Request New Page
4. Enter the First Name, Last Name, and Email Address of the person you are requesting as a new Authorizing Official.
5. Enter any Additional Comments you may have.
6. Click the Continue button. The Authorizing Official – Confirm Request page opens.
User Guide For Applicants 17 of 94 NCC FY 2013 Progress Report User Guide for BPHC
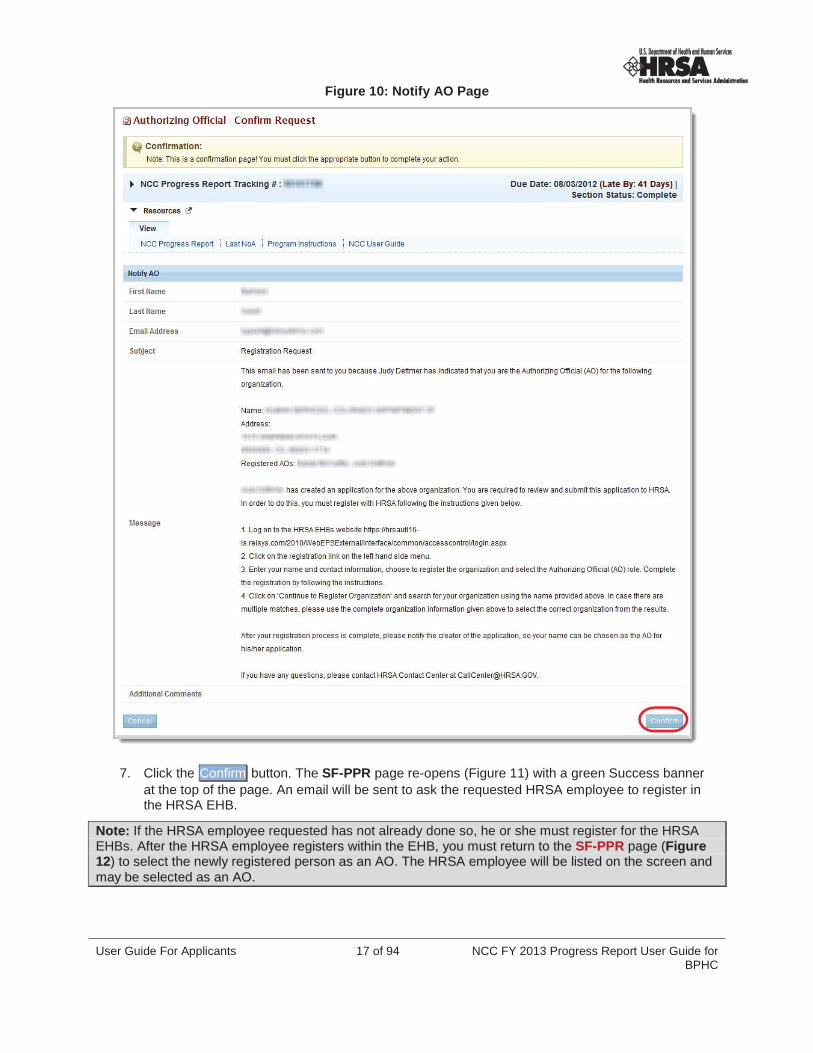
Figure 10: Notify AO Page
7. Click the Confirm button. The SF-PPR page re-opens (Figure 11) with a green Success banner at the top of the page. An email will be sent to ask the requested HRSA employee to register in the HRSA EHB.
NNoottee:: If the HHRRSSAA eemmppllooyyeeee requested has not already done so, he or she must register for the HRSA EHBs. AAfftteerr tthhee HHRRSSAA eemmppllooyyeeee rreeggiisstteerrss wwiitthhiinn tthhee EEHHBB,, yyoouu mmuusstt rreettuurrnn ttoo tthhee SSFF--PPPPRR ppaaggee ((FFiigguurree1122)) ttoo sseelleecctt tthhee nneewwllyy rreeggiisstteerreedd ppeerrssoonn aass aann AAOO.. TThhee HHRRSSAA eemmppllooyyeeee wwiillll bbee lliisstteedd oonn tthhee ssccrreeeenn aannddmmaayy bbee sseelleecctteedd aass aann AAOO..

NCC FY 2013 Progress Report User Guide for BPHC
18 of 94 User Guide For Applicants
33..11..22.. CChhaannggee tthhee SSeelleecctteedd AAuutthhoorriizziinngg OOffffiicciiaallTo change the selected Authorizing Official,
1. On the NCC Progress Report – Status Overview page, click the SF-PPR link on the left navigation panel or the Update drop-down on the SF-PPR row. The SF-PPR page opens.
2. On the SF-PPR page, in the Authorizing Official (AO) Information section, click the Changedrop-down for the AO and then select the Change link from the drop-down. The Authorizing Official – Change page opens (Figure 16), and is populated with all the AOs registered for the grant.
Figure 11: Authorizing Official – Change Page (Select Existing AO)
3. Click the radio button for the user to be designated as the AO.
4. Click the Add Selected Person as AO button. The second Authorizing Official – Change page(containing personal information about the requested AO) opens (Figure 17).

User Guide For Applicants 19 of 94 NCC FY 2013 Progress Report User Guide for BPHC
Figure 12: Authorizing Official – Change Page (2)
5. Revise the contact information, if necessary. Fields marked with an asterisk (*) are required.
6. Click the Save and Continue button to save your information and open the Authorizing Official – Confirm Change page (Figure 18.

NCC FY 2013 Progress Report User Guide for BPHC
20 of 94 User Guide For Applicants
Figure 13: Authorizing Official – Confirm Change Page
7. Click the Confirm button. The SF-PPR page re-opens. The user that you added will be listed as the Authorizing Official.

User Guide For Applicants 21 of 94 NCC FY 2013 Progress Report User Guide for BPHC
33..11..33.. TToo UUppddaattee tthhee AAOO iinnffoorrmmaattiioonn1. On the SF-PPR page (Figure 12), click the Change link for an AO and then select Update from
the drop-down. The Authorizing Official Information – Update page opens (Figure 19), and is populated with the information for the selected AO.
Figure 14: Authorizing Official Update Page

NCC FY 2013 Progress Report User Guide for BPHC
22 of 94 User Guide For Applicants
2. Verify and revise the contact information, as necessary.
3. Click the Save and Continue button to save your information and open the Authorizing Official Information – Confirm Update page.
Figure 15: Authorizing Official Information – Confirm Update Page
4. Click the Confirm button. The SF-PPR page re-opens (Figure 12) with a green Success banner at the top of the page.
33..11..44.. DDeelleettee aann AAuutthhoorriizziinngg OOffffiicciiaallTo Delete an AO:

User Guide For Applicants 23 of 94 NCC FY 2013 Progress Report User Guide for BPHC
1. On the SF-PPR page (Figure 12), click the Change link for an AO and then select Delete from the drop-down. The Authorizing Official – Confirm Delete page opens.
Figure 16: Authorizing Official – Confirm Delete Page
2. Click the Confirm button. The SF-PPR page (Figure 12) re-opens and the AO that you deleted is not listed under the Name column in the Authorizing Official (AO) Information section. (However it will still be listed in the SF-PPR Add Authorizing Official Form (On the NCC Progress Report – Status Overview page, click the SF-PPR link on the left navigation panel or the Update drop-down on the SF-PPR row. The SF-PPR page opens.
3. On the SF-PPR page, in the Authorizing Official (AO) Information section, click the Changedrop-down for the AO and then select the Change link from the drop-down. The Authorizing Official – Change page opens (Figure 16), and is populated with all the AOs registered for thegrant.
4. ).
If you are satisfied with the information on the SF-PPR page (Figure 11), click the Save and Continuebutton to save your work and proceed to the next form.
33..22.. BBaassiicc IInnffoorrmmaattiioonn:: SSFF--PPPPRR--22The SF-PPR-2 Form is a continuation of the SF-PPR Form. It contains information about the grant for which you are creating or updating the progress report. By default, the information will be prepopulatedfrom the information in the application that started the last budget period. This includes the Department Name, Division Name, and the Point of Contact (POC) registered for the grant.
If a Point of Contact (POC) was not added in the application that initiated the last budget period, the system will list the Project Director (PD), Business Official (BO), and Authorizing Official (AO) from the application, so that one of them can be selected as a POC (see Add/Change POC below).
In addition, the system will pre-populate the list of areas affected from all the awarded applications in the last budget period.
1. Click the SF-PPR-2 link on the NCC Progress Report – Status Overview page left navigation panel to access the SF-PPR-2 (Cover Page Continuation) page (Figure 23), if it is not already displayed.

NCC FY 2013 Progress Report User Guide for BPHC
24 of 94 User Guide For Applicants
Figure 17: Status Overview – Left Navigation Panel (SF PPR 2)
Figure 18: SF-PPR-2 (Cover Page Continuation)
By default, the information will be pre-populated from the information in the application which started the last budget period. This includes the Department Name, Division Name, and the Point of Contact (POC) registered for the grant.
If a POC was not added in the application that initiated the last budget period, the system will list the Project Director (PD) , Business Official (BO), and Authorizing Official (AO) from the application, so that one of them can be selected as a POC (see section 3.2.3, To Add a Point Of Contact).

User Guide For Applicants 25 of 94 NCC FY 2013 Progress Report User Guide for BPHC
In addition, the system will pre-populate the list of areas affected from all the awarded applications in the last budget period.
You can perform the following functions on the screen:
Options:MODIFY Department Name and/or Division NameCHANGE Point of ContactADD Point of ContactUPDATE POC informationDELETE Point of Contact
33..22..11.. TToo MMooddiiffyy tthhee DDeeppaarrttmmeenntt NNaammee oorr DDiivviissiioonn NNaammee1. On the SF-PPR-2 (Cover Page Continuation) page (Figure 23), replace the text in the
appropriate text boxes.
2. Click the Save and Continue button.
33..22..22.. TToo CChhaannggee tthhee PPooiinntt OOff CCoonnttaacctt1. On the SF-PPR-2 (Cover Page Continuation) page click the Change link for a POC and then select
Change from the drop-down. The Point of Contact – Change page (Figure 24) will be displayed, and will be populated from the list of contacts proposed in the awarded application which started the last budget period.
Figure 19: Point of Contact – Change Page
1. Select the person to be designated as the POC, if more than one user is listed.
2. Click the Add Selected Person as POC button. The second Point of Contact – Change page opens (Figure 25) opens, listing the current contact information for the newly selected contact.
NCC FY 2013 Progress Report User Guide for BPHC
26 of 94 User Guide For Applicants
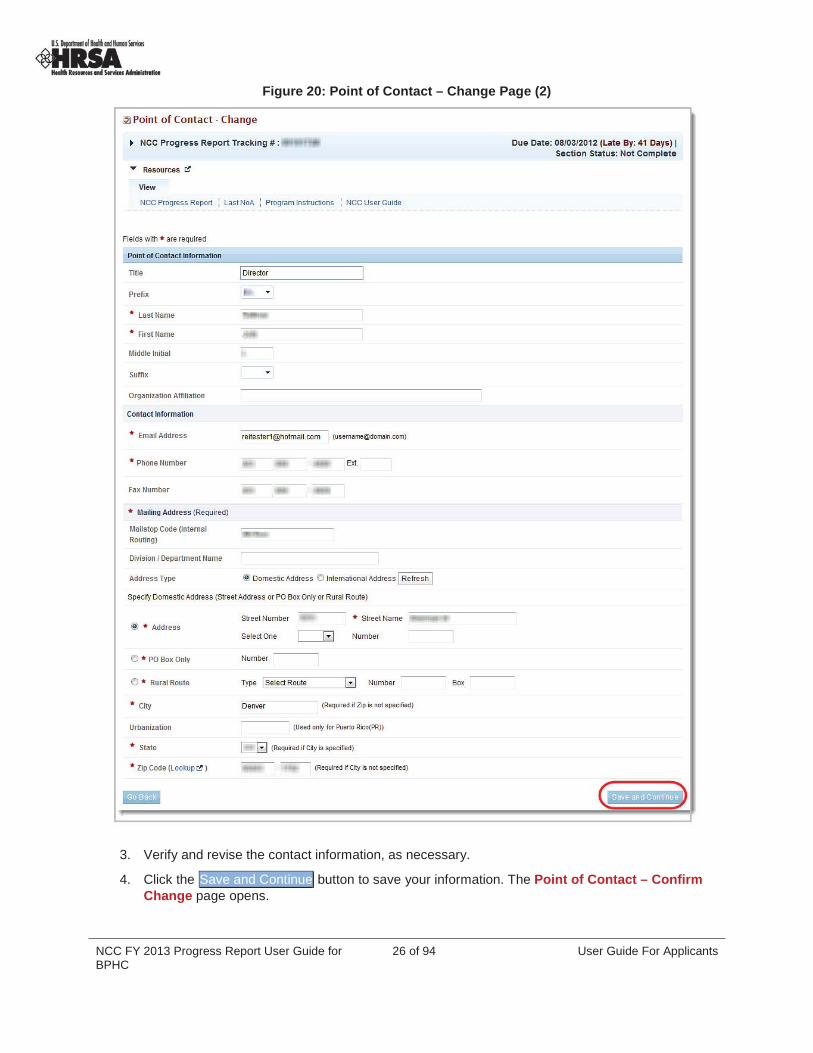
Figure 20: Point of Contact – Change Page (2)
3. Verify and revise the contact information, as necessary.
4. Click the Save and Continue button to save your information. The Point of Contact – Confirm Change page opens.

User Guide For Applicants 27 of 94 NCC FY 2013 Progress Report User Guide for BPHC
Figure 21: Point of Contact – Confirm Change Page
5. Click the Confirm button. The SF-PPR-2 page opens with a Success banner at the top of the page.
33..22..33.. TToo AAdddd aa PPooiinntt OOff CCoonnttaacctt1. On the SF-PPR-2 (Cover Page Continuation) page click the Change link for a POC and then
select Change from the drop-down. The first Point of Contact – Change page (Figure 24) will open.
2. Click the Add New POC button. The second Point of Contact – Change page opens opens, with all contact information fields blank (Figure 27).

NCC FY 2013 Progress Report User Guide for BPHC
28 of 94 User Guide For Applicants
Figure 22: Point of Contact – Change Page (Blank)
3. Enter all required information and the optional information of your choosing.
4. Click the Save and Continue button.
5. The Point of Contact – Confirm Change page opens (Figure 26).
6. Click the Confirm button. The SF-PPR-2 (Cover Page Continuation) page opens with a green Success banner at the top of the page.
33..22..44.. TToo UUppddaattee tthhee PPOOCC iinnffoorrmmaattiioonn1. On the SF-PPR-2 (Cover Page Continuation) page click the Change link for a POC and then
select Update from the drop-down. The first Point of Contact – Change page (Figure 24) will open.
2. Verify or revise the contact information, as necessary.
3. Click the Save and Continue button to save your information. The Point of Contact Information – Confirm Update page opens.
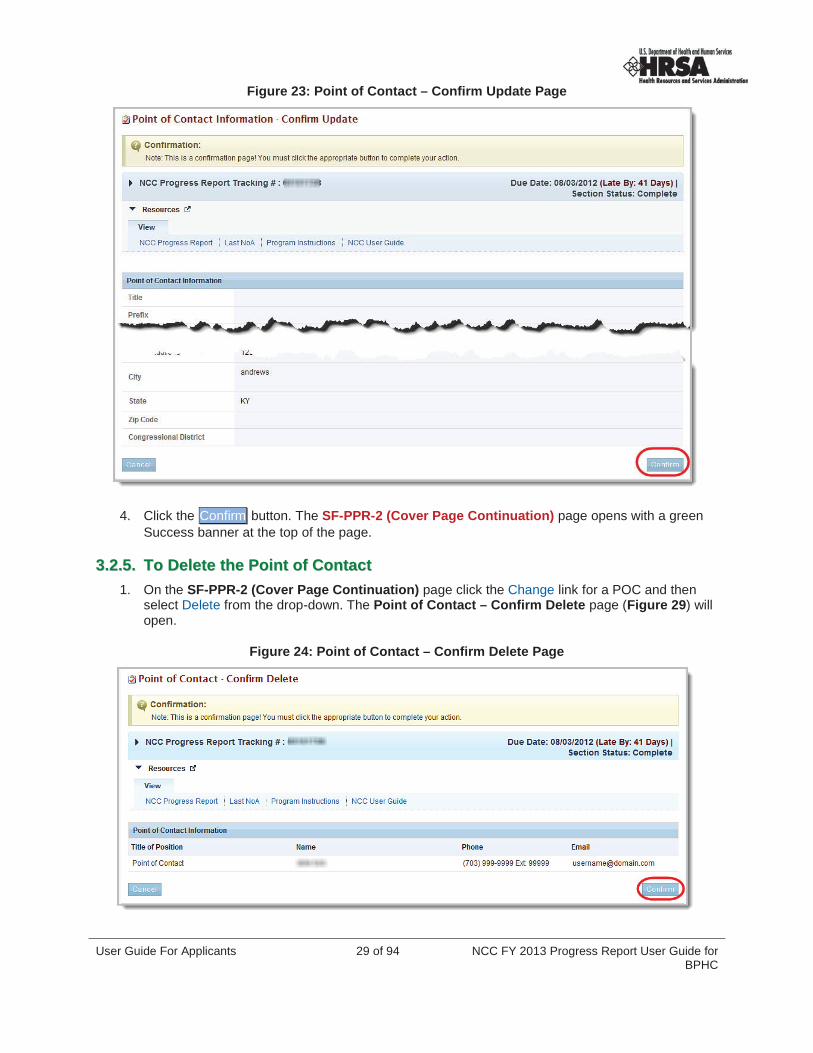
User Guide For Applicants 29 of 94 NCC FY 2013 Progress Report User Guide for BPHC
Figure 23: Point of Contact – Confirm Update Page
4. Click the Confirm button. The SF-PPR-2 (Cover Page Continuation) page opens with a green Success banner at the top of the page.
33..22..55.. TToo DDeelleettee tthhee PPooiinntt ooff CCoonnttaacctt1. On the SF-PPR-2 (Cover Page Continuation) page click the Change link for a POC and then
select Delete from the drop-down. The Point of Contact – Confirm Delete page (Figure 29) will open.
Figure 24: Point of Contact – Confirm Delete Page

NCC FY 2013 Progress Report User Guide for BPHC
30 of 94 User Guide For Applicants
2. Click the Confirm button
3. The SF-PPR-2 (Cover Page Continuation) page opens with a green Success banner at the top of the page.
NNoottee:: TThhee PPOOCC tthhaatt yyoouu ddeelleetteedd wwiillll nnoott bbee lliisstteedd uunnddeerr tthhee NNaammee ccoolluummnn4. If you are satisfied with the information on the SF-PPR-2 (Cover Page Continuation) Form
(Figure 23), click the Save and Continue button to save your work and proceed to the next form.
33..33.. BBuuddggeett IInnffoorrmmaattiioonn:: BBuuddggeett DDeettaaiillssThe Budget Details Form allows you to specify the budget information for the upcoming budget period (future Support Year) of the grant. The Budget Details Form consists of the following sections:
Section A – Budget Summary
Section B – Budget Categories
Section C – Non-Federal Resources
TThhee RReeccoommmmeennddeedd FFeeddeerraall BBuuddggeett ppoorrttiioonn ooff tthhee ttoottaall bbuuddggeett ffoorr tthhee ffuuttuurree SSuuppppoorrtt YYeeaarr ooff tthhee ggrraanntt iisspprreeppooppuullaatteedd ffrroomm SSeeccttiioonn 1133 ooff tthhee llaasstt NNoottiiccee ooff AAwwaarrdd,, wwhhiicchh lliissttss tthhee rreeccoommmmeennddeedd ffuuttuurree FFeeddeerraallffuunnddiinngg ssuuppppoorrtt aammoouunnttss.. TThhee FFeeddeerraall ppoorrttiioonn ooff tthhee bbuuddggeett ffoorr tthhee ffuuttuurree SSuuppppoorrtt YYeeaarr ccaannnnoott bbeeuuppddaatteedd ttoo aann aammoouunntt tthhaatt iiss ddiiffffeerreenntt ffrroomm tthhee rreeccoommmmeennddeedd aammoouunntt iinn tthhee llaasstt NNoottiiccee ooff AAwwaarrdd..
Observe the following business rules (Figure 30) to complete the Budget Details Form for the future Support Year:
Figure 25: Business Rules for the Budget Details Form
1 The total of the individual Budget Object Class Categories in Section B (Budget Categories) must match the Total Budget specified in Section A (Budget Summary).
2 Non-Federal Budget must match Total of the Non-Federal Resources Fields.
CCoommpplleettee SSeeccttiioonn AA ffiirrsstt iinn ccaassee yyoouu nneeeedd ttoo mmaakkee aannyy cchhaannggeess ttoo tthhee ttyyppeess ooff ffuunnddiinngg ((CCHHCC,, MMHHCC,,HHCCHH,, oorr PPHHPPCC))..
User Guide For Applicants 31 of 94 NCC FY 2013 Progress Report User Guide for BPHC
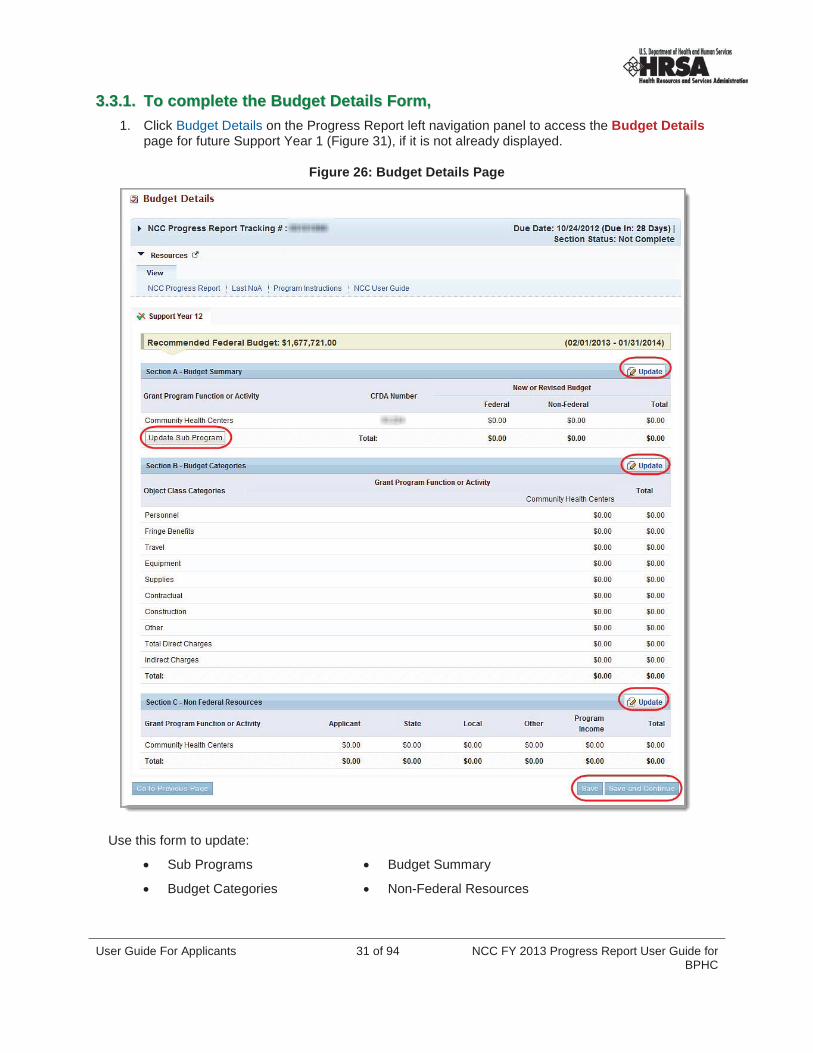
33..33..11.. TToo ccoommpplleettee tthhee BBuuddggeett DDeettaaiillss FFoorrmm,,1. Click Budget Details on the Progress Report left navigation panel to access the Budget Details
page for future Support Year 1 (Figure 31), if it is not already displayed.
Figure 26: Budget Details Page
Use this form to update:
Sub Programs Budget Summary
Budget Categories Non-Federal Resources

NCC FY 2013 Progress Report User Guide for BPHC
32 of 94 User Guide For Applicants
33..33..22.. UUppddaattee SSuubb PPrrooggrraammssTo update Sub Programs,
1. Click the Update Sub Program button in the Budget Summary (Section A) area of the Budget Details page (Figure 31). The Sub Programs - Update page (Figure 32) will be displayed.
Figure 27: Sub Programs - Update
2. Select or deselect the checkboxes for the sub programs, as necessary.
In the progress report, grantees should not seek funding for any sub program for which they are not receiving federal funds.
3. Click the Save and Continue button. You will be returned to the Budget Details page (Figure 31)for the selected Support Year. The sub programs listed in Section A, Section B, and Section C will reflect your changes.
User Guide For Applicants 33 of 94 NCC FY 2013 Progress Report User Guide for BPHC
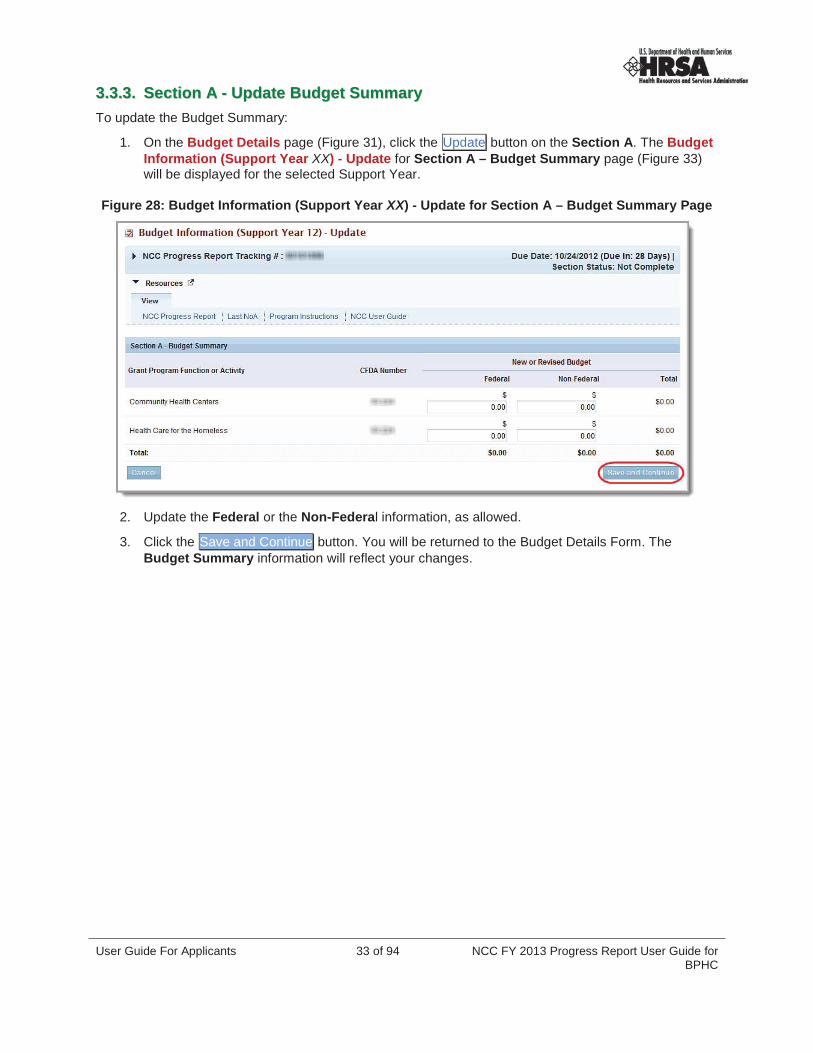
33..33..33.. SSeeccttiioonn AA -- UUppddaattee BBuuddggeett SSuummmmaarryyTo update the Budget Summary:
1. On the Budget Details page (Figure 31), click the Update button on the Section A. The Budget Information (Support Year XX) - Update for Section A – Budget Summary page (Figure 33)will be displayed for the selected Support Year.
Figure 28: Budget Information (Support Year XX) - Update for Section A – Budget Summary Page
2. Update the Federal or the Non-Federal information, as allowed.
3. Click the Save and Continue button. You will be returned to the Budget Details Form. The Budget Summary information will reflect your changes.

NCC FY 2013 Progress Report User Guide for BPHC
34 of 94 User Guide For Applicants
33..33..44.. SSeeccttiioonn BB -- UUppddaattee tthhee BBuuddggeett CCaatteeggoorriieessTo update the budget categories,
1. On the Budget Details page (Figure 31), click the Update button on the Section B – Budget Categories header. The Budget Information (Support Year XX) - Update for Section B –Budget Categories page (Figure 34) opens.
Figure 29: Budget Information (Support Year XX) - Update for Section B – Budget Categories Page
YYoouu mmuusstt eenntteerr iinnffoorrmmaattiioonn ffoorr tthhee OObbjjeecctt CCllaassss CCaatteeggoorriieess,, ssoo tthhaatt tthhee ttoottaall ooff aallll tthhee ccaatteeggoorriieess eeqquuaallsstthhee aammoouunntt iinn tthhee TToottaall BBuuddggeett ssppeecciiffiieedd iinn tthhee BBuuddggeett SSuummmmaarryy..
2. Click the Save and Continue button. You will be returned to the Budget Details page (Figure 31). The Budget Categories information will reflect your changes.

User Guide For Applicants 35 of 94 NCC FY 2013 Progress Report User Guide for BPHC
33..33..55.. SSeeccttiioonn CC -- UUppddaattee NNoonn--FFeeddeerraall RReessoouurrcceessTo update Non-Federal Resources,
1. On the Budget Details page (Figure 31), click the Update button on the Section C – Non-Federal Resources header. The Budget Information (Support Year XX) - Update for Section C – Non-Federal Resources page (Figure 35) opens.
Figure 30: Budget Information (Support Year XX) - Update for Section C – Non-Federal Resources
2. Update the Non-Federal funding resource fields, as appropriate.
3. Click the Save and Continue button. You will be returned to the Budget Details page (Figure 31). The Non-Federal Resources information will reflect your changes.
4. When you are finished updating the Budget Details page (Figure 31) for the selected Support Year, click the Save and Continue button to save your work and proceed to the next form.
YYoouu aarree rreeqquuiirreedd ttoo pprroovviiddee bbuuddggeett ddeettaaiillss ffoorr aallll rreemmaaiinniinngg SSuuppppoorrtt yyeeaarrss iinn yyoouurr pprroojjeecctt ppeerriioodd..

NCC FY 2013 Progress Report User Guide for BPHC
36 of 94 User Guide For Applicants
33..44.. BBuuddggeett IInnffoorrmmaattiioonn:: BBuuddggeett NNaarrrraattiivveeThe Budget Narrative Form allows you to upload attachments (maximum of two) that provide a justification for your budget. (For more information regarding the budget narrative description, refer to the Instructions for Preparing and Submitting the FY 2013 Health Center Program Budget Period Progress Report.)
1. Click the Budget Narrative link on the Progress Report Process left navigation panel (Figure 10)to access the Budget Narrative page (Figure 36), if it is not already displayed.
Figure 31: Budget Narrative Page
2. To attach a budget narrative document, click the Attach File button. The Budget Narrativesection expands to show the entry fields for the document file name and a description.
3. Enter or select a file name and path. You may also enter a description if, appropriate.
4. Click the Attach button. The Budget Narrative page refreshes listing the file you just attached.
5. When you are finished attaching the documents, click the Save and Continue button to save your work and proceed to the next form.
NNoottee:: YYoouu mmuusstt aattttaacchh aatt lleeaasstt oonnee,, bbuutt nnoo mmoorree tthhaann ttwwoo BBuuddggeett NNaarrrraattiivvee ddooccuummeennttss..

User Guide For Applicants 37 of 94 NCC FY 2013 Progress Report User Guide for BPHC
44.. CCoommpplleettee tthhee PPrrooggrraamm SSppeecciiffiicc IInnffoorrmmaattiioonn FFoorrmmss
To enter or revise Program Specific Information,
1. Click the Program Specific Information link on the left navigation panel (Figure 37) or click the Program Specific Information Update link, under Other Information, on the NCC Progress Report Process Status page (Figure 38). The Program Specific Information Status Overview page opens (Figure 38).
Figure 32: Program Specific Information Link on the Left navigation panel
Figure 33: Program Specific Information Status Overview Page

NCC FY 2013 Progress Report User Guide for BPHC
38 of 94 User Guide For Applicants
The Program Specific Information Status Overview page shows the status of each program-specific form.
To submit your Progress Report, you must complete all the Program Specific Information forms listed on this screen (in addition to all the forms listed on the Status Page for Progress Report screen).
FFoorr tthhee bbaallaannccee ooff tthhiiss ddooccuummeenntt,, wwhheenn yyoouu aarree iinnssttrruucctteedd ttoo ““OOppeenn FFoorrmm......,,”” uussee tthhee lleefftt nnaavviiggaattiioonn ppaanneelloorr cclliicckk UUppddaattee oonn tthhee PPrrooggrraamm SSppeecciiffiicc IInnffoorrmmaattiioonn FFoorrmm..
44..11.. FFoorrmm 11AA:: GGeenneerraall IInnffoorrmmaattiioonn WWoorrkksshheeeettForm 1A: General Information Worksheet provides a summary of information related to the applicant, proposed service area, population, patient, and visit projections presented in the project description and other forms. The following instructions are intended to clarify the information to be reported in each section of the form.
1. Open Form 1A (Figure 39). Fields marked with an asterisk (*) are required.
Figure 34: Form 1A: General Information Worksheet
2. Under Applicant Information (Figure 40), select your business entity and the organization typethat best describe your organization. (Multiple selections are allowed for the organization type but not for the business entity.)
Figure 35: Form 1A, Applicant Information Section

User Guide For Applicants 39 of 94 NCC FY 2013 Progress Report User Guide for BPHC
3. Under Proposed Service Area (Figure 41), select the options which best describe the designated service area you propose to serve. (Multiple selections are allowed.)
Figure 36: Form 1A, Proposed Service Area
You must provide Service Area IDs for the selected options if you are applying for Community Health Centers funding. Also select whether the target population type is urban, rural, or sparsely populated. If your proposed service area is sparsely populated, specify the population density by providing the number of people per square mile.
TThhee PPooppuullaattiioonn ttyyppeess ffiieelldd--rreellaatteedd iinnffoorrmmaattiioonn iinn tthhee PPrrooppoosseedd SSeerrvviiccee AArreeaa sseeccttiioonn ooff FFoorrmm 11AA ((FFiigguurree3399)) iiss nnoott eeddiittaabbllee.. IIff yyoouu mmuusstt uuppddaattee tthhee PPooppuullaattiioonn ttyyppeess iinnffoorrmmaattiioonn sshhoowwnn hheerree,, yyoouu wwiillll ffiirrsstt hhaavvee ttoosseelleecctt tthhee rreelleevvaanntt ssuubbpprrooggrraammss iinn SSeeccttiioonn AA -- BBuuddggeett SSuummmmaarryy ((FFiigguurree 2244)),, ooff tthhee BBuuddggeett DDeettaaiillss FFoorrmm,,ooff tthhee NNCCCC FFYY 22001133 PPrrooggrreessss RReeppoorrtt ((FFiigguurree 2233)).. RReeffeerr ttoo SSeeccttiioonn 44..33..11 ffoorr iinnssttrruuccttiioonnss ttoo ddoo tthhiiss..
AA SSppaarrsseellyy PPooppuullaatteedd AArreeaa iiss ddeeffiinneedd aass aa ggeeooggrraapphhiiccaall aarreeaa wwiitthh sseevveenn ppeeooppllee oorr lleessss ppeerr ssqquuaarree mmiilleeffoorr tthhee eennttiirree sseerrvviiccee aarreeaa..
4. Under Target Population and Provider Information (Figure 42), report the aggregate data for all of the sites included in the proposed project. Report the number of provider FTEs by staff type.
Figure 37: Form 1A, Target Population and Provider Information
5. Under Patients and Visits By Service Type (Figure 43), report the current number of patients and visits. Please note that these numbers may be different than what was reported in the most recent submission to the Uniform Data System due to additional funding and/or change in scope.Similarly, provide the corresponding number expected at the end of the project period.

NCC FY 2013 Progress Report User Guide for BPHC
40 of 94 User Guide For Applicants
SSeevveerraall ttaabblleess rreeqquueesstt bbootthh ccuurrrreenntt aanndd pprroojjeecctteedd iinnffoorrmmaattiioonn.. ““CCuurrrreenntt”” rreeffeerrss ttoo tthhee nnuummbbeerr ooff ppaattiieennttssoorr vviissiittss aatt tthhee ttiimmee ooff PPrrooggrreessss RReeppoorrtt.. ““NNuummbbeerr aatt EEnndd ooff YYeeaarr 11”” rreeffeerrss ttoo tthhee nnuummbbeerr ooff ppaattiieennttss oorrvviissiittss aannttiicciippaatteedd bbyy tthhee eenndd ooff tthhee uuppccoommiinngg bbuuddggeett ppeerriioodd.. ““PPrroojjeecctteedd aatt EEnndd ooff PPrroojjeecctt PPeerriioodd”” rreeffeerrss ttootthhee nnuummbbeerr ooff ppaattiieennttss oorr vviissiittss aannttiicciippaatteedd bbyy tthhee eenndd ooff tthhee pprroojjeecctt ppeerriioodd aatt tthhee ccuurrrreenntt lleevveell ooff ffuunnddiinngg..
VViissiittss aarree ddeeffiinneedd ttoo iinncclluuddee aa ddooccuummeenntteedd,, ffaaccee--ttoo--ffaaccee ccoonnttaacctt bbeettwweeeenn aa ppaattiieenntt aanndd aa pprroovviiddeerr wwhhooeexxeerrcciisseess iinnddeeppeennddeenntt jjuuddggmmeenntt iinn tthhee pprroovviissiioonn ooff sseerrvviicceess ttoo tthhee iinnddiivviidduuaall.. TToo bbee iinncclluuddeedd aass aanneennccoouunntteerr,, sseerrvviicceess rreennddeerreedd mmuusstt bbee ddooccuummeenntteedd..
SSiinnccee ppaattiieennttss mmuusstt hhaavvee aatt lleeaasstt oonnee ddooccuummeenntteedd vviissiitt,, iitt iiss nnoott ppoossssiibbllee ffoorr tthhee nnuummbbeerr ooff ppaattiieennttss ttooeexxcceeeedd tthhee nnuummbbeerr ooff vviissiittss..
Figure 38: Patients and Visits By Service Type
TThhiiss ffoorrmm ddooeess nnoott aallllooww yyoouu ttoo lleeaavvee aannyy ffiieelldd bbllaannkk.. ZZeerroo iiss aacccceeppttaabbllee iiff tthheerree iiss nnoo iinnffoorrmmaattiioonn..
6. Under Patients and Visits By Population Type (Figure 44), report the current number of patients and visits. Please note that these numbers may be different than what was reported in the most recent submission to the Uniform Data System due to additional funding and/or change in scope.Similarly, provide the corresponding number expected at the end of Year 1 and the end of the Project Period.
Figure 39: Patients and Visits By Population Type
7. Click Save and Continue at the bottom of Form 1A: General Information Worksheet when you have finished your entries to save your work and proceed to the next form.
User Guide For Applicants 41 of 94 NCC FY 2013 Progress Report User Guide for BPHC
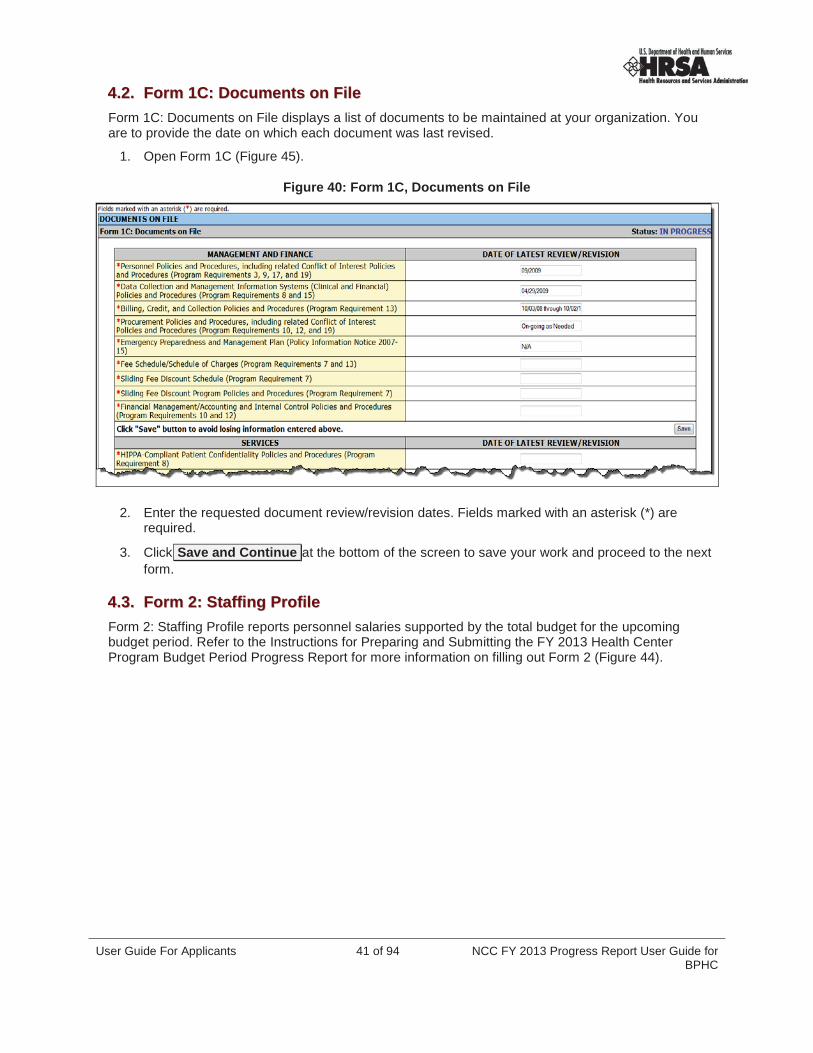
44..22.. FFoorrmm 11CC:: DDooccuummeennttss oonn FFiilleeForm 1C: Documents on File displays a list of documents to be maintained at your organization. Youare to provide the date on which each document was last revised.
1. Open Form 1C (Figure 45).
Figure 40: Form 1C, Documents on File
2. Enter the requested document review/revision dates. Fields marked with an asterisk (*) are required.
3. Click Save and Continue at the bottom of the screen to save your work and proceed to the next form.
44..33.. FFoorrmm 22:: SSttaaffffiinngg PPrrooffiilleeForm 2: Staffing Profile reports personnel salaries supported by the total budget for the upcoming budget period. Refer to the Instructions for Preparing and Submitting the FY 2013 Health Center Program Budget Period Progress Report for more information on filling out Form 2 (Figure 44).

NCC FY 2013 Progress Report User Guide for BPHC
42 of 94 User Guide For Applicants
Figure 41: Form 2, Staffing Profile
TThhiiss ffoorrmm ddooeess nnoott aallllooww yyoouu ttoo lleeaavvee aannyy ffiieelldd bbllaannkk.. ZZeerroo iiss aacccceeppttaabbllee iiff tthheerree iiss nnoo iinnffoorrmmaattiioonn..
4. Enter the information into the form. Fields marked with an asterisk (*) are required.
5. Under Administration (Figure 47), enter the number of employees for each job title and the corresponding salary. The Total Salary column will auto-calculate when you press the tab key or click the Save button.
Figure 42: Form 2, Administration Section
6. Under Medical Staff (Figure 48), enter the number of employees for each job title and the corresponding salary. The Total Salary column will auto-calculate when you press the Tab key or click the Save button.
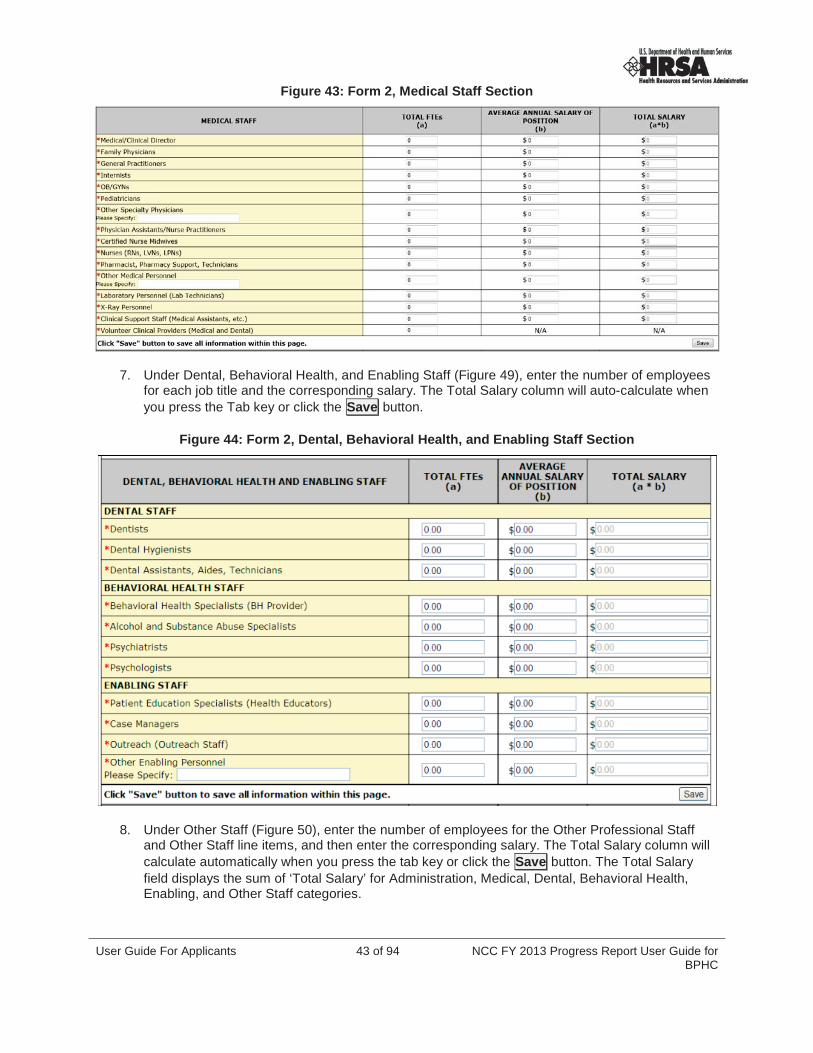
User Guide For Applicants 43 of 94 NCC FY 2013 Progress Report User Guide for BPHC
Figure 43: Form 2, Medical Staff Section
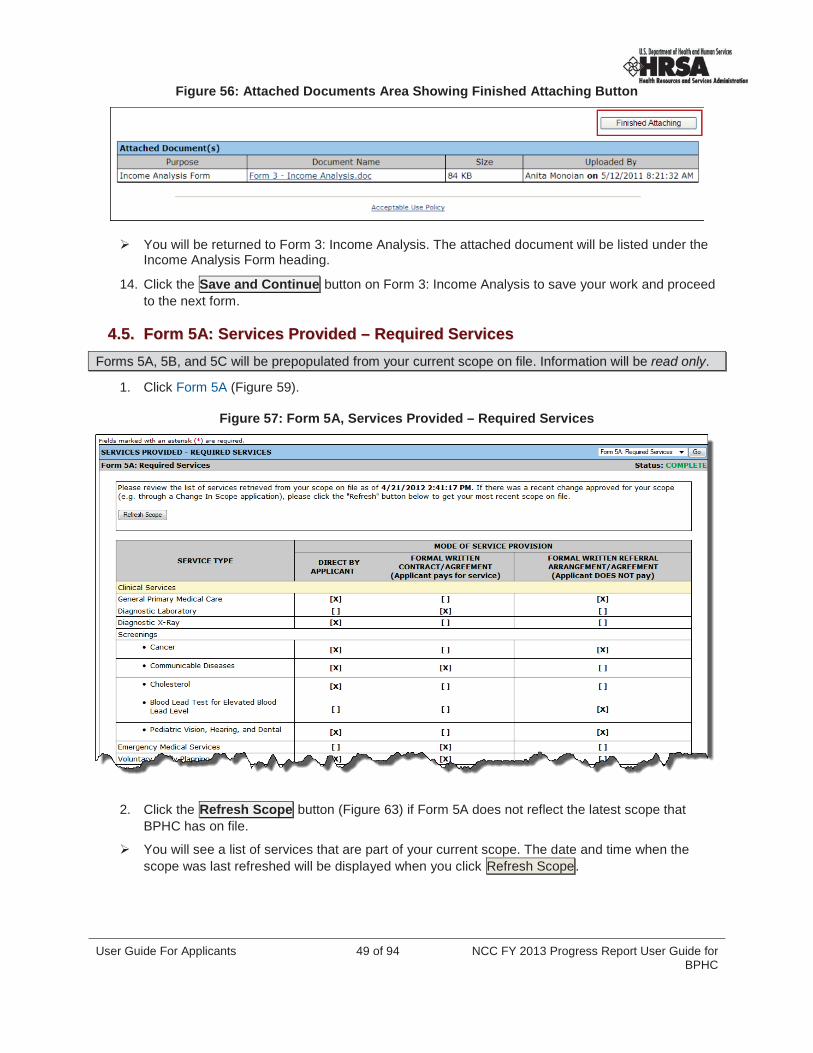
7. Under Dental, Behavioral Health, and Enabling Staff (Figure 49), enter the number of employees for each job title and the corresponding salary. The Total Salary column will auto-calculate when you press the Tab key or click the Save button.
Figure 44: Form 2, Dental, Behavioral Health, and Enabling Staff Section
8. Under Other Staff (Figure 50), enter the number of employees for the Other Professional Staff and Other Staff line items, and then enter the corresponding salary. The Total Salary column will calculate automatically when you press the tab key or click the Save button. The Total Salary field displays the sum of ‘Total Salary’ for Administration, Medical, Dental, Behavioral Health, Enabling, and Other Staff categories.

NCC FY 2013 Progress Report User Guide for BPHC
44 of 94 User Guide For Applicants
Figure 45: Form 2, Other Staff Section
9. Click Save and Continue at the bottom of the screen to save your work and proceed to the next form.
44..44.. FFoorrmm 33:: IInnccoommee AAnnaallyyssiissForm 3: Income Analysis projects program income, by source, for the proposed project period.
1. Click Form 3 (Figure 50).
Figure 46: Form 3, Income Analysis
2. Click the Download link in the Download Template section (Figure 52) to download the Income Analysis.

User Guide For Applicants 45 of 94 NCC FY 2013 Progress Report User Guide for BPHC
Figure 47: Form 3, Document Download and Upload Sections
The next page provides guidance for downloading the Income Analysis (Figure 53).
Figure 48: Instructions for Downloading the Income Analysis
3. Click Continue at the bottom of this page.
4. Click Save on the File Download Dialog Box (Figure 54) to save the document to a folder on your computer.
Figure 49: File Download Dialog Box

NCC FY 2013 Progress Report User Guide for BPHC
46 of 94 User Guide For Applicants
The Save As dialog box will be displayed (Figure 55).
Figure 50: Save As Dialog Box
5. Save the document in Microsoft Word 97-2003 (.doc) format.
Figure 51: Save As Type Example
6. Click Close on the Download Warning Screen.
7. Complete the Income Analysis document (Figure 57).
IInnsstteeaadd ooff uussiinngg tthhee MMiiccrroossoofftt WWoorrdd tteemmppllaattee,, yyoouu ccaann eexxppoorrtt tthhee IInnccoommee AAnnaallyyssiiss ttoo MMiiccrroossoofftt EExxcceell,, aasslloonngg aass yyoouu pprroovviiddee aallll tthhee iinnffoorrmmaattiioonn tthhaatt tthhee tteemmppllaattee aasskkss ffoorr..

User Guide For Applicants 47 of 94 NCC FY 2013 Progress Report User Guide for BPHC
Figure 52: Income Analysis
AAfftteerr yyoouu ccoommpplleettee tthhee ddooccuummeenntt,, bbee ssuurree ttoo ssaavvee iitt iinn MMiiccrroossoofftt WWoorrdd 9977 –– 22000033 ffoorrmmaatt..
8. Click Attach in the Income Analysis section of Form 3 (Figure 58) to upload the Income Analysis Form as an attachment.
Figure 53: Form 3, Document Upload Area
The Attach Document Screen will be displayed.

NCC FY 2013 Progress Report User Guide for BPHC
48 of 94 User Guide For Applicants
Figure 54: Attach Document Screen
9. Click the Browse button.
The Choose File to Upload dialog box will be displayed.
10. Browse to the file and select it.
11. Click Open .
The file name will now appear in the Document field of the Attach Document Screen.
12. On the Attach Document Screen, click Attach Document .
The attached document will appear in the Attached Documents list (Figure 60).
Figure 55: Attached Documents Area of the Attach Document Page
13. Click Finished Attaching (Figure 61).
User Guide For Applicants 49 of 94 NCC FY 2013 Progress Report User Guide for BPHC
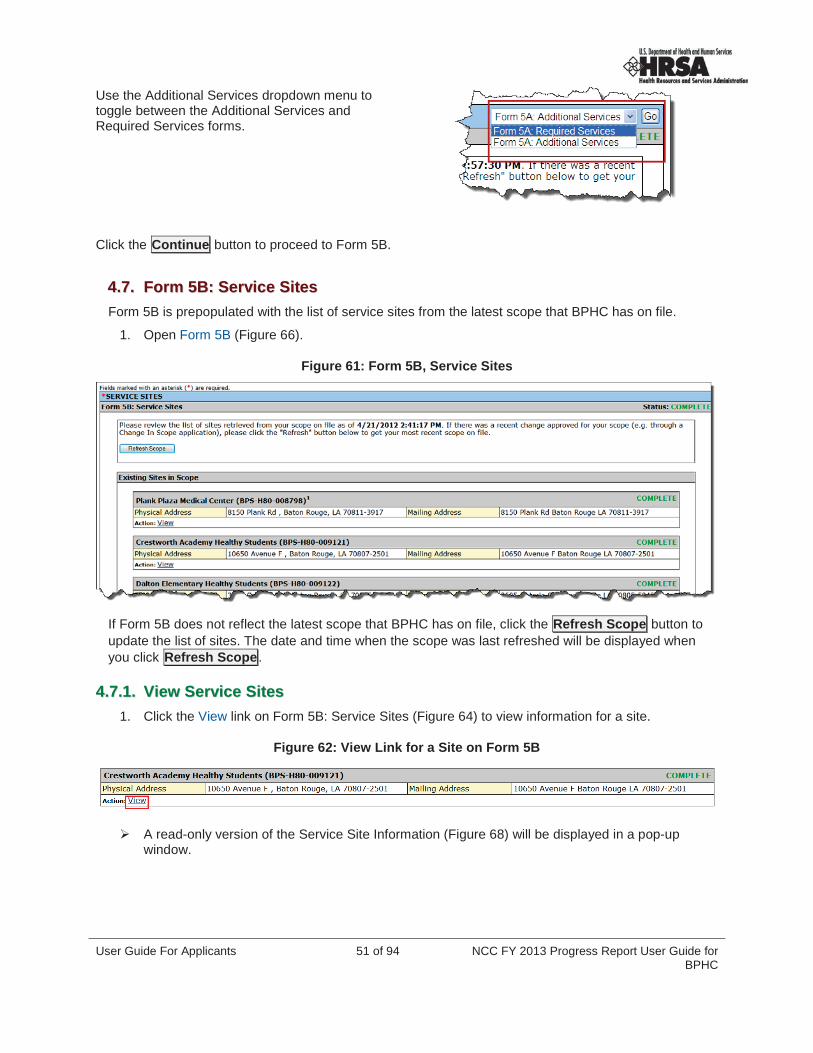
Figure 56: Attached Documents Area Showing Finished Attaching Button
You will be returned to Form 3: Income Analysis. The attached document will be listed under the Income Analysis Form heading.
14. Click the Save and Continue button on Form 3: Income Analysis to save your work and proceed to the next form.
44..55.. FFoorrmm 55AA:: SSeerrvviicceess PPrroovviiddeedd –– RReeqquuiirreedd SSeerrvviicceessFFoorrmmss 55AA,, 55BB,, aanndd 55CC wwiillll bbee pprreeppooppuullaatteedd ffrroomm yyoouurr ccuurrrreenntt ssccooppee oonn ffiillee.. IInnffoorrmmaattiioonn wwiillll bbee rreeaadd oonnllyy..
1. Click Form 5A (Figure 59).
Figure 57: Form 5A, Services Provided – Required Services
2. Click the Refresh Scope button (Figure 63) if Form 5A does not reflect the latest scope that BPHC has on file.
You will see a list of services that are part of your current scope. The date and time when the scope was last refreshed will be displayed when you click Refresh Scope.

NCC FY 2013 Progress Report User Guide for BPHC
50 of 94 User Guide For Applicants
Figure 58: Refresh Scope for Required Services
3. Click the Continue button to proceed to the Additional Services page.
44..66.. FFoorrmm 55AA:: SSeerrvviicceess PPrroovviiddeedd –– AAddddiittiioonnaall SSeerrvviicceessThe Additional Services page (Figure 60) is prepopulated with the additional services and their existing delivery mechanisms from the latest scope that BPHC has on file.
Figure 59: Form 5A, Services Provided – Additional Services
If Form 5A does not reflect the latest scope that BPHC has on file, click the Refresh Scope button to update the list of services. The date and time when the scope was last refreshed will be displayed when you click Refresh Scope.
Figure 60: Refresh Scope for Additional Services
User Guide For Applicants 51 of 94 NCC FY 2013 Progress Report User Guide for BPHC
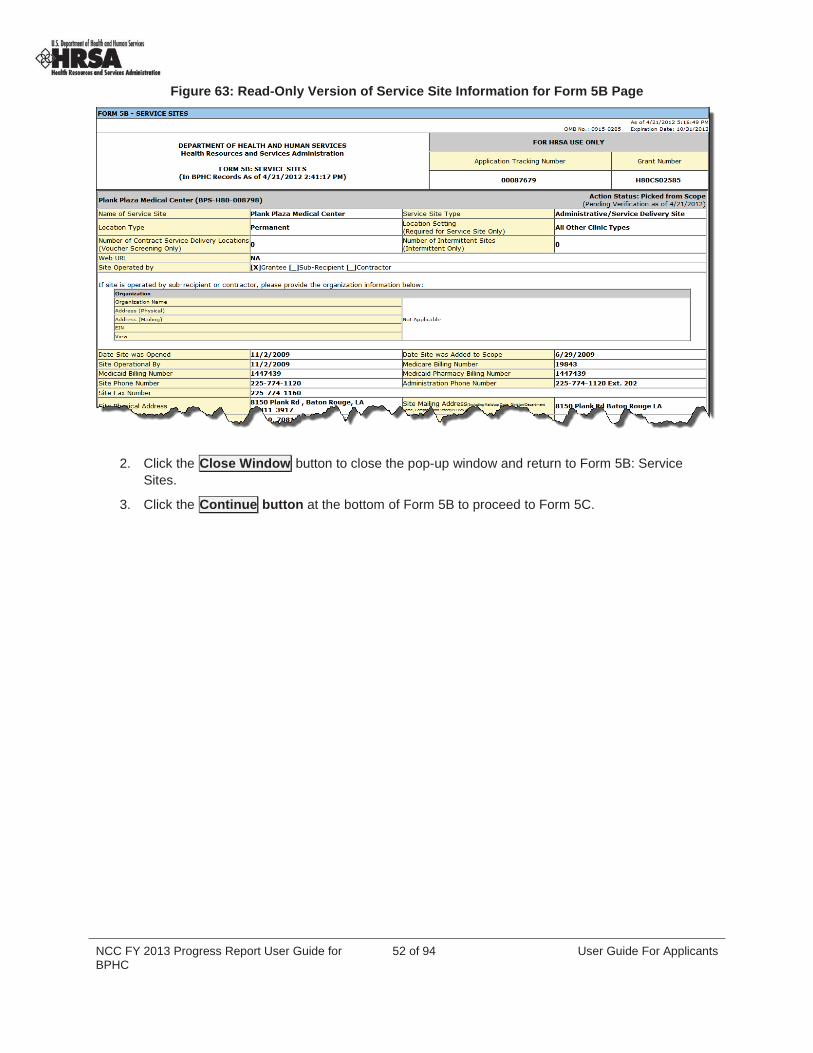
Use the Additional Services dropdown menu to toggle between the Additional Services and Required Services forms.
Click the Continue button to proceed to Form 5B.
44..77.. FFoorrmm 55BB:: SSeerrvviiccee SSiitteessForm 5B is prepopulated with the list of service sites from the latest scope that BPHC has on file.
1. Open Form 5B (Figure 66).
Figure 61: Form 5B, Service Sites
If Form 5B does not reflect the latest scope that BPHC has on file, click the Refresh Scope button to update the list of sites. The date and time when the scope was last refreshed will be displayed when you click Refresh Scope .
44..77..11.. VViieeww SSeerrvviiccee SSiitteess1. Click the View link on Form 5B: Service Sites (Figure 64) to view information for a site.
Figure 62: View Link for a Site on Form 5B
A read-only version of the Service Site Information (Figure 68) will be displayed in a pop-up window.
NCC FY 2013 Progress Report User Guide for BPHC
52 of 94 User Guide For Applicants
Figure 63: Read-Only Version of Service Site Information for Form 5B Page
2. Click the Close Window button to close the pop-up window and return to Form 5B: Service Sites.
3. Click the Continue button at the bottom of Form 5B to proceed to Form 5C.

User Guide For Applicants 53 of 94 NCC FY 2013 Progress Report User Guide for BPHC
44..88.. FFoorrmm 55CC:: OOtthheerr AAccttiivviittiieess//LLooccaattiioonnssForm 5C is prepopulated with the list of other activities and locations from the latest scope that BPHC has on file.
1. Open Form 5C (Figure 69).
Figure 64: Form 5C: Other Activities/Locations
If Form 5C does not reflect the latest scope that BPHC has on file, click Refresh Scope to update the list of activities and locations. The date and time when the scope was last refreshed will be displayed when you click Refresh Scope .
2. Click the View link on Form 5C: Other Activities/Locations to view information about an activity or location.
A read-only view of the Activity/Location (Figure 70) will be displayed.

NCC FY 2013 Progress Report User Guide for BPHC
54 of 94 User Guide For Applicants
Figure 65: Read-Only View of the Activity/Location
3. Click the Close Window button to close the pop-up window and return to Form 5C: Other Activities/Locations.
4. Click the Continue button at the bottom of Form 5C to proceed to the next form.
User Guide For Applicants 55 of 94 NCC FY 2013 Progress Report User Guide for BPHC
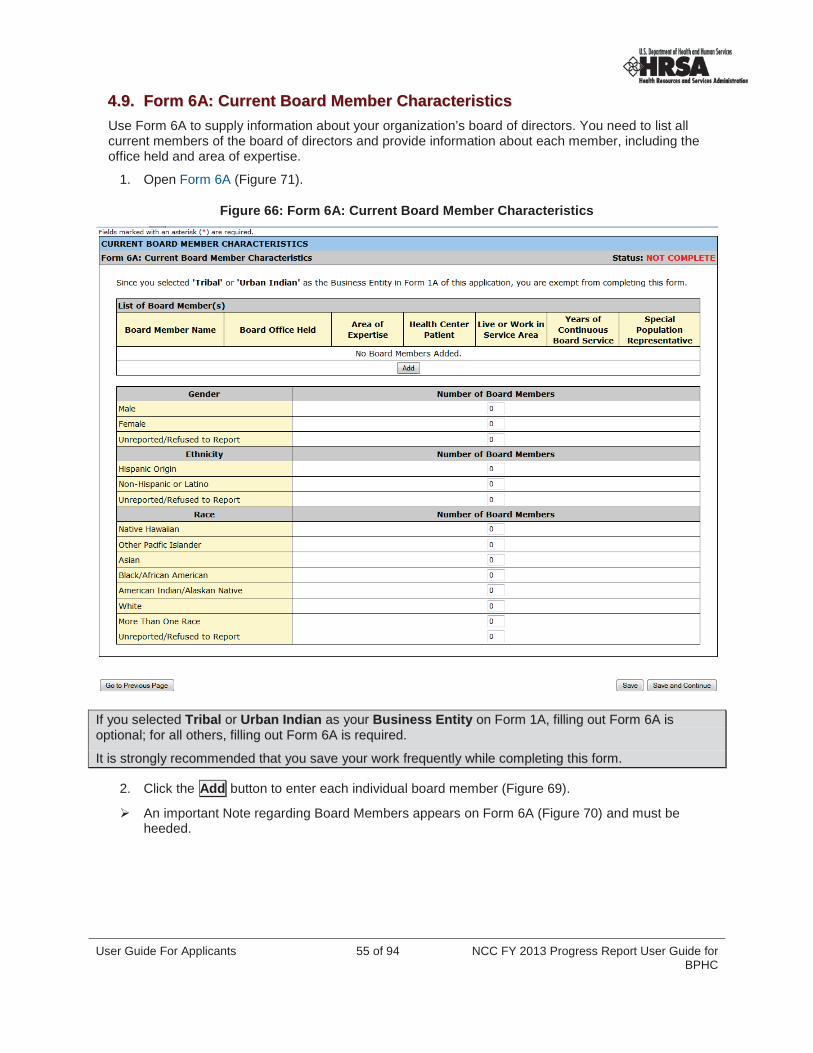
44..99.. FFoorrmm 66AA:: CCuurrrreenntt BBooaarrdd MMeemmbbeerr CChhaarraacctteerriissttiiccssUse Form 6A to supply information about your organization’s board of directors. You need to list all current members of the board of directors and provide information about each member, including the office held and area of expertise.
1. Open Form 6A (Figure 71).
Figure 66: Form 6A: Current Board Member Characteristics
IIff yyoouu sseelleecctteedd TTrriibbaall oorr UUrrbbaann IInnddiiaann aass yyoouurr BBuussiinneessss EEnnttiittyy oonn FFoorrmm 11AA,, ffiilllliinngg oouutt FFoorrmm 66AA iissooppttiioonnaall;; ffoorr aallll ootthheerrss,, ffiilllliinngg oouutt FFoorrmm 66AA iiss rreeqquuiirreedd..
IItt iiss ssttrroonnggllyy rreeccoommmmeennddeedd tthhaatt yyoouu ssaavvee yyoouurr wwoorrkk ffrreeqquueennttllyy wwhhiillee ccoommpplleettiinngg tthhiiss ffoorrmm..
2. Click the Add button to enter each individual board member (Figure 69).
An important Note regarding Board Members appears on Form 6A (Figure 70) and must be heeded.

NCC FY 2013 Progress Report User Guide for BPHC
56 of 94 User Guide For Applicants
Figure 67: Board Members Area of Form 6A
Figure 68: Important Note Regarding Board Members
The Add Board Member Information Page (Figure 74) will be displayed.
Figure 69: Add Board Member Information Page
3. Enter the required information and click the Save and Continue button. Fields marked with an asterisk (*) are required.
You will be returned to Current Board Member Characteristics of Form 6A. The board member you added will be listed under the List of Board Members.
4. Repeat the ‘Add Board Member’ process to add additional board members.
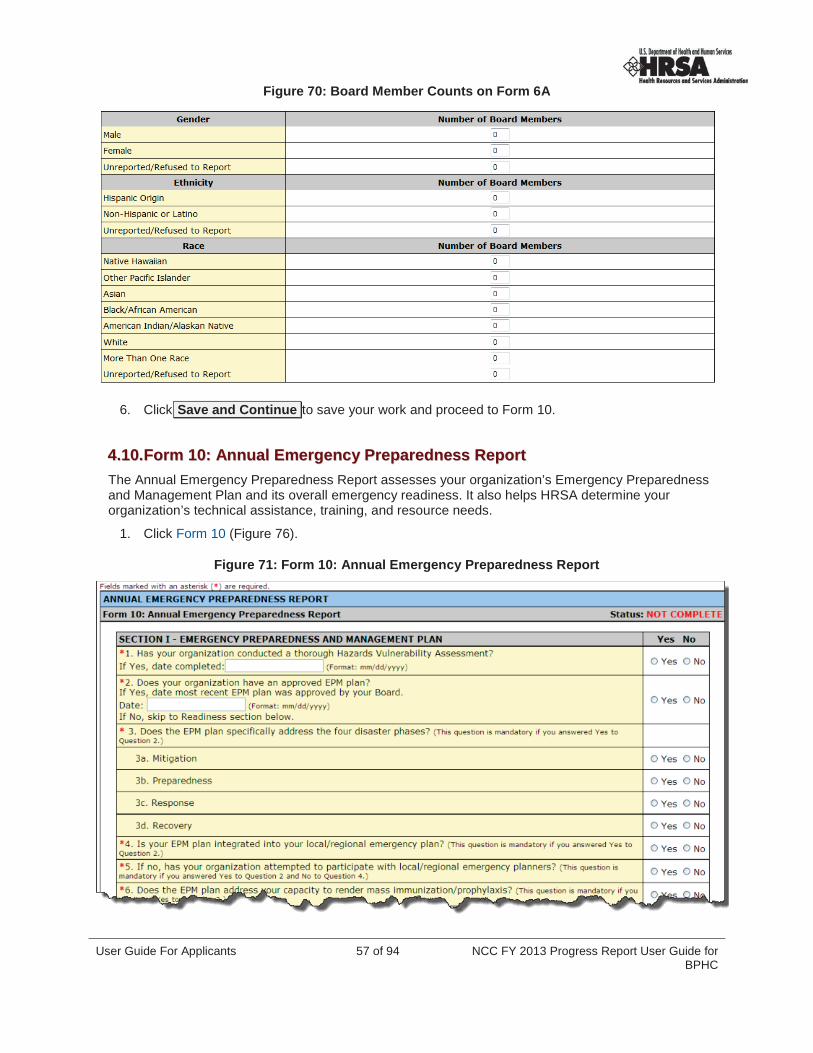
5. After you finish adding the board members, enter the Board Member counts found on the bottom half of the form.
TThhee ttoottaall nnuummbbeerr ooff bbooaarrdd mmeemmbbeerrss ffoorr eeaacchh ccaatteeggoorryy ((GGeennddeerr,, EEtthhnniicciittyy,, aanndd RRaaccee)) mmuusstt bbee eeqquuaall ttoo tthheennuummbbeerr ooff bbooaarrdd mmeemmbbeerrss tthhaatt wweerree pprreevviioouussllyy aaddddeedd..
User Guide For Applicants 57 of 94 NCC FY 2013 Progress Report User Guide for BPHC
Figure 70: Board Member Counts on Form 6A
6. Click Save and Continue to save your work and proceed to Form 10.
44..1100..FFoorrmm 1100:: AAnnnnuuaall EEmmeerrggeennccyy PPrreeppaarreeddnneessss RReeppoorrttThe Annual Emergency Preparedness Report assesses your organization’s Emergency Preparedness and Management Plan and its overall emergency readiness. It also helps HRSA determine your organization’s technical assistance, training, and resource needs.
1. Click Form 10 (Figure 76).
Figure 71: Form 10: Annual Emergency Preparedness Report

NCC FY 2013 Progress Report User Guide for BPHC
58 of 94 User Guide For Applicants
2. Select Yes or No for each question in each section of the form (Figure 77 and Figure 78). Fields marked with an asterisk (*) are required.
3. Click Save and Continue to proceed to Form 12.
Figure 72: Form 10, Emergency Preparedness and Management Plan
Figure 73: Form 10, Readiness
User Guide For Applicants 59 of 94 NCC FY 2013 Progress Report User Guide for BPHC
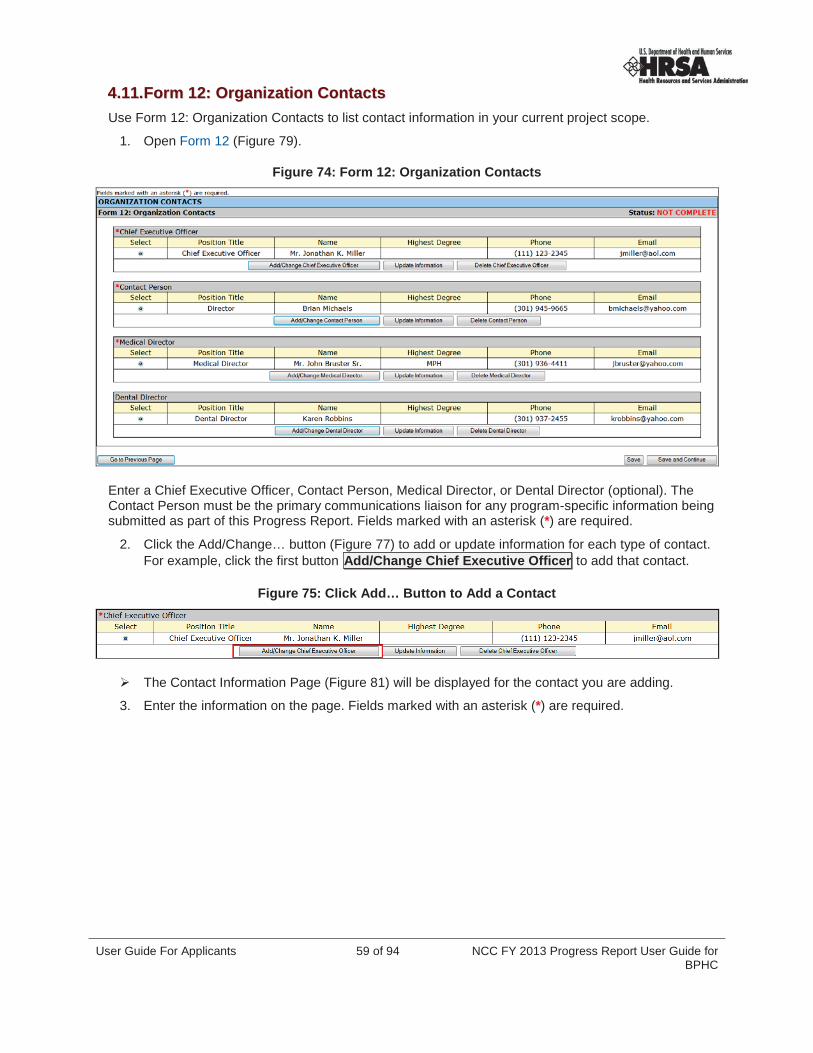
44..1111..FFoorrmm 1122:: OOrrggaanniizzaattiioonn CCoonnttaaccttssUse Form 12: Organization Contacts to list contact information in your current project scope.
1. Open Form 12 (Figure 79).
Figure 74: Form 12: Organization Contacts
Enter a Chief Executive Officer, Contact Person, Medical Director, or Dental Director (optional). The Contact Person must be the primary communications liaison for any program-specific information being submitted as part of this Progress Report. Fields marked with an asterisk (*) are required.
2. Click the Add/Change… button (Figure 77) to add or update information for each type of contact.For example, click the first button Add/Change Chief Executive Officer to add that contact.
Figure 75: Click Add… Button to Add a Contact
The Contact Information Page (Figure 81) will be displayed for the contact you are adding.
3. Enter the information on the page. Fields marked with an asterisk (*) are required.

NCC FY 2013 Progress Report User Guide for BPHC
60 of 94 User Guide For Applicants
Figure 76: Contact Information Page for Form 12
4. Click Save and Continue to save your work for each type of contact and return to Form 12: Organization Contacts.
5. Click Save and Continue for Form 12 to save your work and go to the Clinical Performance Measures form.
44..1122..CClliinniiccaall PPeerrffoorrmmaannccee MMeeaassuurreessUse this form to provide information about your Clinical Performance Measures. Refer to the Instructions for Preparing and Submitting the FY 2013 Health Center Program Budget Period Progress Report for more information on filling out Clinical Performance Measures.
1. Open the Clinical Performance Measures (Figure 82)
Figure 77: Clinical Performance Measures Form
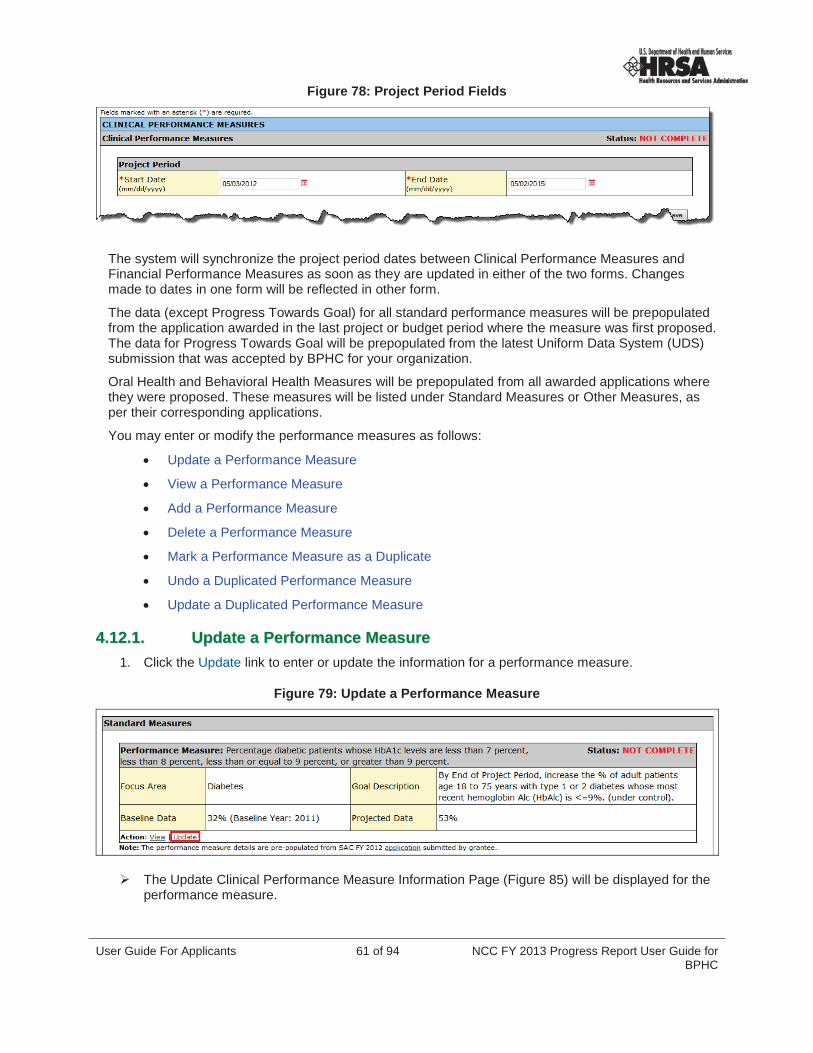
2. Enter the Project Period (Figure 83). Please refer to your latest Notice of Award to determine your project period.
User Guide For Applicants 61 of 94 NCC FY 2013 Progress Report User Guide for BPHC
Figure 78: Project Period Fields
The system will synchronize the project period dates between Clinical Performance Measures and Financial Performance Measures as soon as they are updated in either of the two forms. Changes made to dates in one form will be reflected in other form.
The data (except Progress Towards Goal) for all standard performance measures will be prepopulated from the application awarded in the last project or budget period where the measure was first proposed.The data for Progress Towards Goal will be prepopulated from the latest Uniform Data System (UDS)submission that was accepted by BPHC for your organization.
Oral Health and Behavioral Health Measures will be prepopulated from all awarded applications where they were proposed. These measures will be listed under Standard Measures or Other Measures, as per their corresponding applications.
You may enter or modify the performance measures as follows:
Update a Performance Measure
View a Performance Measure
Add a Performance Measure
Delete a Performance Measure
Mark a Performance Measure as a Duplicate
Undo a Duplicated Performance Measure
Update a Duplicated Performance Measure
44..1122..11.. UUppddaattee aa PPeerrffoorrmmaannccee MMeeaassuurree1. Click the Update link to enter or update the information for a performance measure.
Figure 79: Update a Performance Measure
The Update Clinical Performance Measure Information Page (Figure 85) will be displayed for the performance measure.
NCC FY 2013 Progress Report User Guide for BPHC
62 of 94 User Guide For Applicants
Figure 80: Update Clinical Performance Measure Information
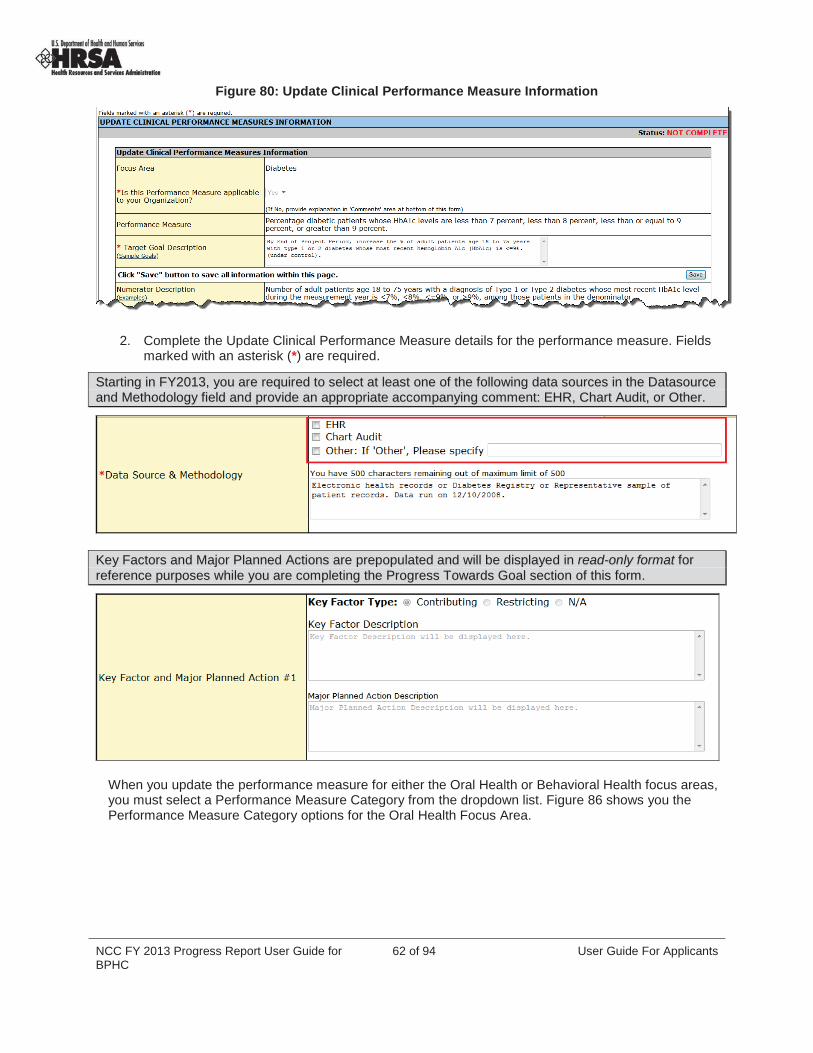
2. Complete the Update Clinical Performance Measure details for the performance measure. Fields marked with an asterisk (*) are required.
SSttaarrttiinngg iinn FFYY22001133,, yyoouu aarree rreeqquuiirreedd ttoo sseelleecctt aatt lleeaasstt oonnee ooff tthhee ffoolllloowwiinngg ddaattaa ssoouurrcceess iinn tthhee DDaattaassoouurrcceeaanndd MMeetthhooddoollooggyy ffiieelldd aanndd pprroovviiddee aann aapppprroopprriiaattee aaccccoommppaannyyiinngg ccoommmmeenntt:: EEHHRR,, CChhaarrtt AAuuddiitt,, oorr OOtthheerr..
KKeeyy FFaaccttoorrss aanndd MMaajjoorr PPllaannnneedd AAccttiioonnss aarree pprreeppooppuullaatteedd aanndd wwiillll bbee ddiissppllaayyeedd iinn rreeaadd--oonnllyy ffoorrmmaatt ffoorrrreeffeerreennccee ppuurrppoosseess wwhhiillee yyoouu aarree ccoommpplleettiinngg tthhee PPrrooggrreessss TToowwaarrddss GGooaall sseeccttiioonn ooff tthhiiss ffoorrmm..
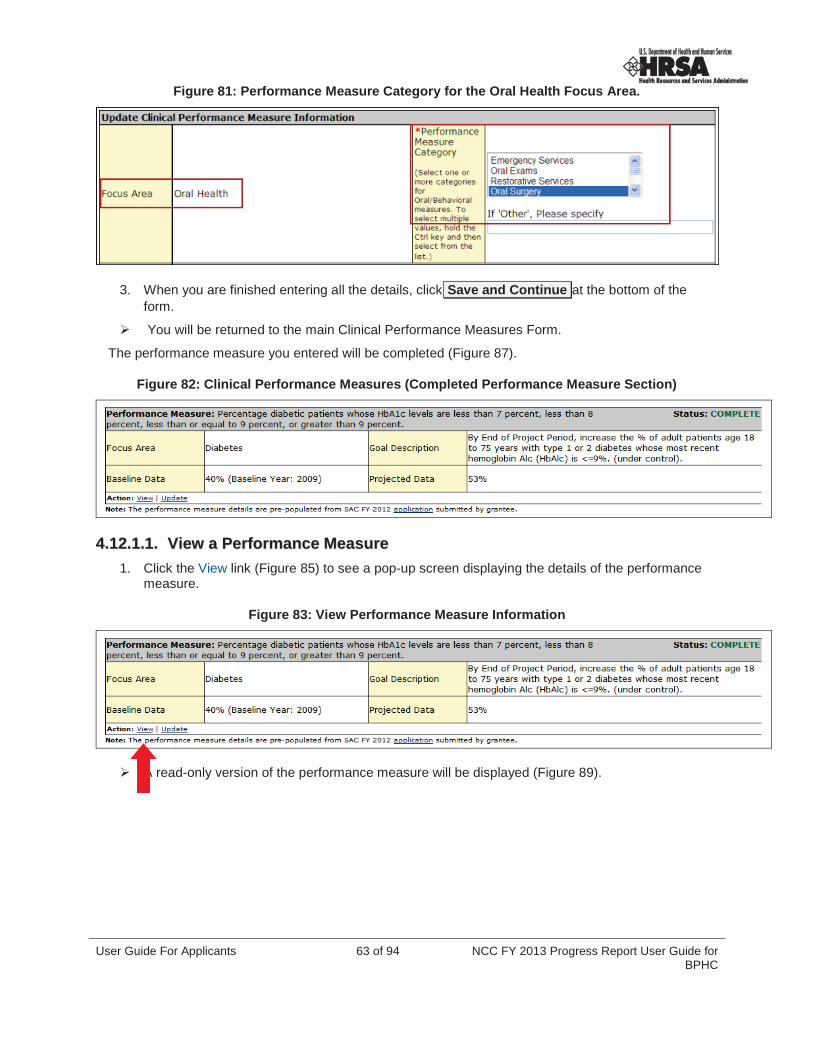
When you update the performance measure for either the Oral Health or Behavioral Health focus areas, you must select a Performance Measure Category from the dropdown list. Figure 86 shows you the Performance Measure Category options for the Oral Health Focus Area.
User Guide For Applicants 63 of 94 NCC FY 2013 Progress Report User Guide for BPHC
Figure 81: Performance Measure Category for the Oral Health Focus Area.
3. When you are finished entering all the details, click Save and Continue at the bottom of the form.
You will be returned to the main Clinical Performance Measures Form.
The performance measure you entered will be completed (Figure 87).
Figure 82: Clinical Performance Measures (Completed Performance Measure Section)
44..1122..11..11.. VViieeww aa PPeerrffoorrmmaannccee MMeeaassuurree1. Click the View link (Figure 85) to see a pop-up screen displaying the details of the performance
measure.
Figure 83: View Performance Measure Information
A read-only version of the performance measure will be displayed (Figure 89).
NCC FY 2013 Progress Report User Guide for BPHC
64 of 94 User Guide For Applicants
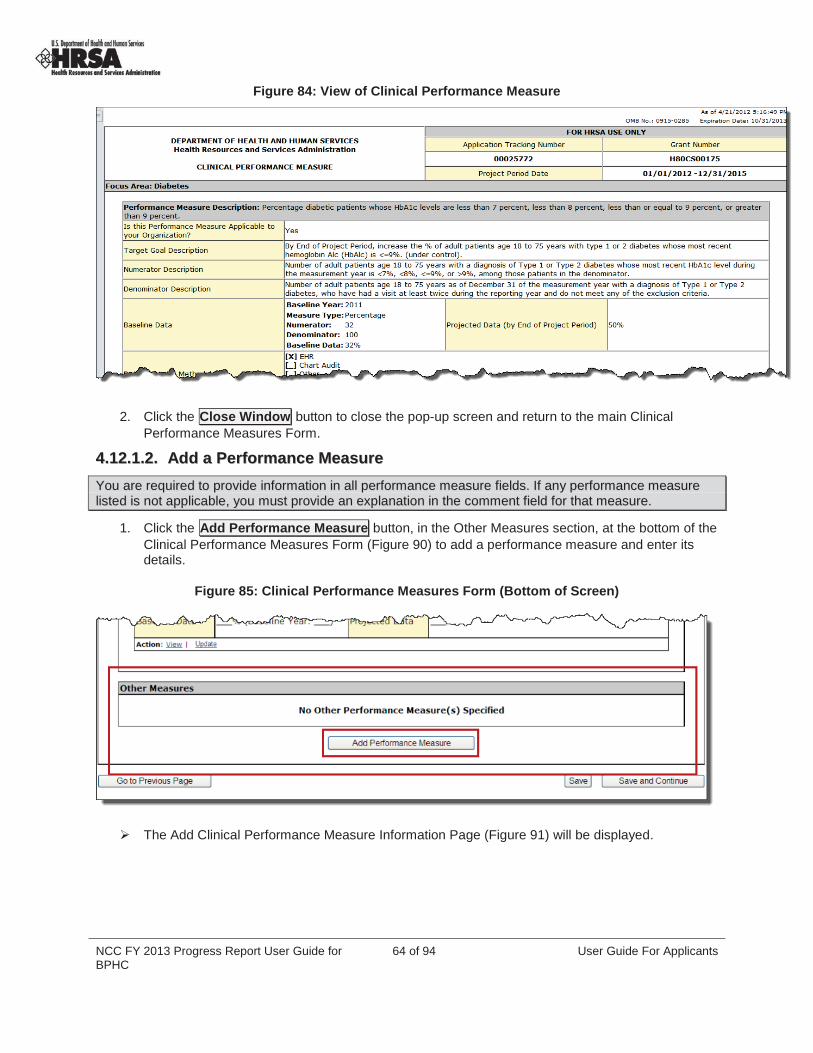
Figure 84: View of Clinical Performance Measure
2. Click the Close Window button to close the pop-up screen and return to the main Clinical Performance Measures Form.
44..1122..11..22.. AAdddd aa PPeerrffoorrmmaannccee MMeeaassuurreeYYoouu aarree rreeqquuiirreedd ttoo pprroovviiddee iinnffoorrmmaattiioonn iinn aallll ppeerrffoorrmmaannccee mmeeaassuurree ffiieellddss.. IIff aannyy ppeerrffoorrmmaannccee mmeeaassuurreelliisstteedd iiss nnoott aapppplliiccaabbllee,, yyoouu mmuusstt pprroovviiddee aann eexxppllaannaattiioonn iinn tthhee ccoommmmeenntt ffiieelldd ffoorr tthhaatt mmeeaassuurree..
1. Click the Add Performance Measure button, in the Other Measures section, at the bottom of the Clinical Performance Measures Form (Figure 90) to add a performance measure and enter its details.
Figure 85: Clinical Performance Measures Form (Bottom of Screen)
The Add Clinical Performance Measure Information Page (Figure 91) will be displayed.

User Guide For Applicants 65 of 94 NCC FY 2013 Progress Report User Guide for BPHC
Figure 86: Add Clinical Performance Measure Information Page
2. Enter the requested information on the Add Clinical Performance Measure Information Page.Fields marked with an asterisk (*) are required.
TThhee AAdddd CClliinniiccaall PPeerrffoorrmmaannccee MMeeaassuurree IInnffoorrmmaattiioonn PPaaggee aallwwaayyss ccoonnttaaiinnss aa ddrrooppddoowwnn ffoorr ppeerrffoorrmmaanncceemmeeaassuurree ccaatteeggoorriieess.. HHoowweevveerr,, yyoouu mmuusstt oonnllyy sseelleecctt ccaatteeggoorriieess iiff yyoouurr FFooccuuss AArreeaa iiss OOrraall HHeeaalltthh oorrBBeehhaavviioorr HHeeaalltthh..
3. Click Save and Continue at the bottom of the screen after you have completed all fields.
You will be returned to the Clinical Performance Measures Form.
A summary of the Clinical Performance Measure information you entered will be listed as a new performance measure, in the Other Measures section (Figure 92), at the bottom of the form.
Figure 87: Other Measures Section of Clinical Performance Measures Form
44..1122..11..33.. DDeelleettee aa PPeerrffoorrmmaannccee MMeeaassuurree1. Click the Delete link if it appears under a performance measure that you added (Figure 93) to
delete the performance measure.

NCC FY 2013 Progress Report User Guide for BPHC
66 of 94 User Guide For Applicants
Figure 88: Performance Measure with Delete Link
A Delete Confirmation Page will be displayed (Figure 94) to enable you to confirm deletion of the performance measure.
Figure 89: Delete Confirmation Page for Clinical Performance Measure Page
2. Click the Confirm Delete button to confirm the deletion.
You will be returned to the Clinical Performance Measures Form.
The performance measure you deleted will no longer be listed.
44..1122..11..44.. MMaarrkk aa PPeerrffoorrmmaannccee MMeeaassuurree aass aa DDuupplliiccaattee1. Click the Mark as Duplicate link (Figure 95) if it appears under a performance measure to resolve
any Clinical Performance Measure duplications.

User Guide For Applicants 67 of 94 NCC FY 2013 Progress Report User Guide for BPHC
Figure 90: Clinical Performance Measures Duplications
The Mark Performance Measure as Duplicate Page (Figure 96) will be displayed.
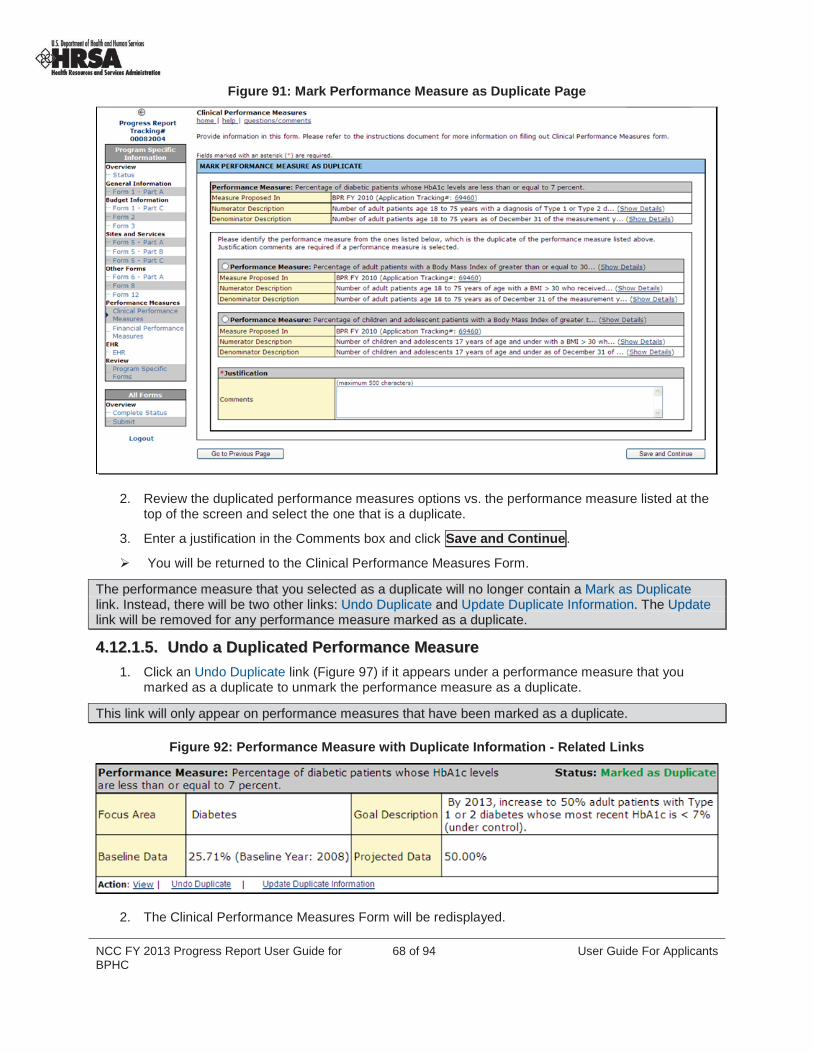
NCC FY 2013 Progress Report User Guide for BPHC
68 of 94 User Guide For Applicants
Figure 91: Mark Performance Measure as Duplicate Page
2. Review the duplicated performance measures options vs. the performance measure listed at the top of the screen and select the one that is a duplicate.
3. Enter a justification in the Comments box and click Save and Continue .
You will be returned to the Clinical Performance Measures Form.
TThhee ppeerrffoorrmmaannccee mmeeaassuurree tthhaatt yyoouu sseelleecctteedd aass aa dduupplliiccaattee wwiillll nnoo lloonnggeerr ccoonnttaaiinn aa MMaarrkk aass DDuupplliiccaatteelliinnkk.. IInnsstteeaadd,, tthheerree wwiillll bbee ttwwoo ootthheerr lliinnkkss:: UUnnddoo DDuupplliiccaattee aanndd UUppddaattee DDuupplliiccaattee IInnffoorrmmaattiioonn.. TThhee UUppddaatteelliinnkk wwiillll bbee rreemmoovveedd ffoorr aannyy ppeerrffoorrmmaannccee mmeeaassuurree mmaarrkkeedd aass aa dduupplliiccaattee..
44..1122..11..55.. UUnnddoo aa DDuupplliiccaatteedd PPeerrffoorrmmaannccee MMeeaassuurree1. Click an Undo Duplicate link (Figure 97) if it appears under a performance measure that you
marked as a duplicate to unmark the performance measure as a duplicate.
TThhiiss lliinnkk wwiillll oonnllyy aappppeeaarr oonn ppeerrffoorrmmaannccee mmeeaassuurreess tthhaatt hhaavvee bbeeeenn mmaarrkkeedd aass aa dduupplliiccaattee..
Figure 92: Performance Measure with Duplicate Information - Related Links
2. The Clinical Performance Measures Form will be redisplayed.
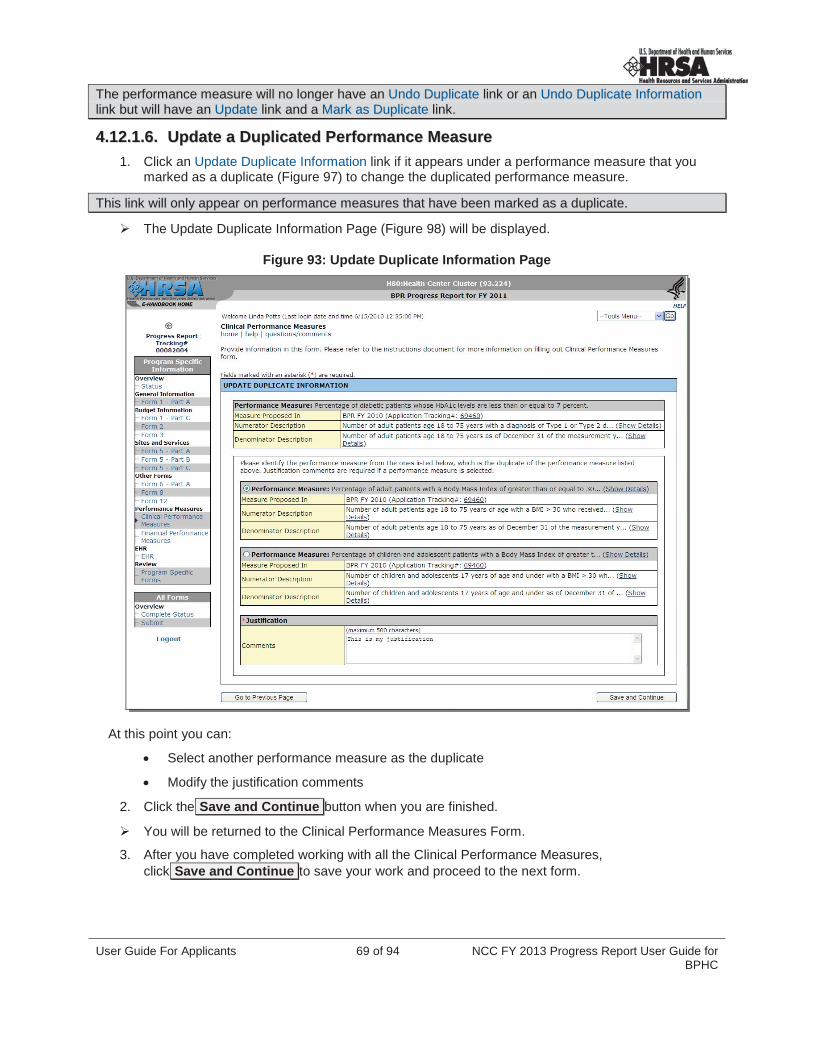
User Guide For Applicants 69 of 94 NCC FY 2013 Progress Report User Guide for BPHC
TThhee ppeerrffoorrmmaannccee mmeeaassuurree wwiillll nnoo lloonnggeerr hhaavvee aann UUnnddoo DDuupplliiccaattee lliinnkk oorr aann UUnnddoo DDuupplliiccaattee IInnffoorrmmaattiioonnlliinnkk bbuutt wwiillll hhaavvee aann UUppddaattee lliinnkk aanndd aa MMaarrkk aass DDuupplliiccaattee lliinnkk..
44..1122..11..66.. UUppddaattee aa DDuupplliiccaatteedd PPeerrffoorrmmaannccee MMeeaassuurree1. Click an Update Duplicate Information link if it appears under a performance measure that you
marked as a duplicate (Figure 97) to change the duplicated performance measure.
TThhiiss lliinnkk wwiillll oonnllyy aappppeeaarr oonn ppeerrffoorrmmaannccee mmeeaassuurreess tthhaatt hhaavvee bbeeeenn mmaarrkkeedd aass aa dduupplliiccaattee..
The Update Duplicate Information Page (Figure 98) will be displayed.
Figure 93: Update Duplicate Information Page
At this point you can:
Select another performance measure as the duplicate
Modify the justification comments
2. Click the Save and Continue button when you are finished.
You will be returned to the Clinical Performance Measures Form.
3. After you have completed working with all the Clinical Performance Measures, click Save and Continue to save your work and proceed to the next form.

NCC FY 2013 Progress Report User Guide for BPHC
70 of 94 User Guide For Applicants
44..1133..FFiinnaanncciiaall PPeerrffoorrmmaannccee MMeeaassuurreessUse this form to provide information about your Financial Performance Measures. Refer to the Instructions for Preparing and Submitting the FY 2013 Health Center Program Budget Period Progress Report for more information on filling out Financial Performance Measures.
1. Click the Financial Performance Measures link on the Program Specific Information side menu to access this form (Figure 99), if it is not already displayed.
2. The data for all standard performance measures will be populated from the application awarded in the last project or budget period where the measure was first proposed.
3. Enter the Project Period.
Figure 94: Financial Performance Measures
TThhee ssyysstteemm wwiillll ssyynncchhrroonniizzee tthhee pprroojjeecctt ppeerriioodd ddaatteess bbeettwweeeenn CClliinniiccaall PPeerrffoorrmmaannccee MMeeaassuurreess aannddFFiinnaanncciiaall PPeerrffoorrmmaannccee MMeeaassuurreess aass ssoooonn aass tthheeyy aarree uuppddaatteedd iinn eeiitthheerr ooff tthhee ttwwoo ffoorrmmss.. CChhaannggeess mmaaddeettoo ddaatteess iinn oonnee ffoorrmm wwiillll bbee rreefflleecctteedd iinn ootthheerr ffoorrmm..
You may enter or modify the performance measure information as follows:
Update a Performance Measure
View a Performance Measure
Add a Performance Measure
Delete a Performance Measure
Mark a Performance Measure as a Duplicate
Undo a Duplicated Performance Measure
Update a Duplicated Performance Measure
44..1133..11..11.. UUppddaattee aa PPeerrffoorrmmaannccee MMeeaassuurree1. Click an Update (Figure 97) link to enter or update the information for each performance
measure.
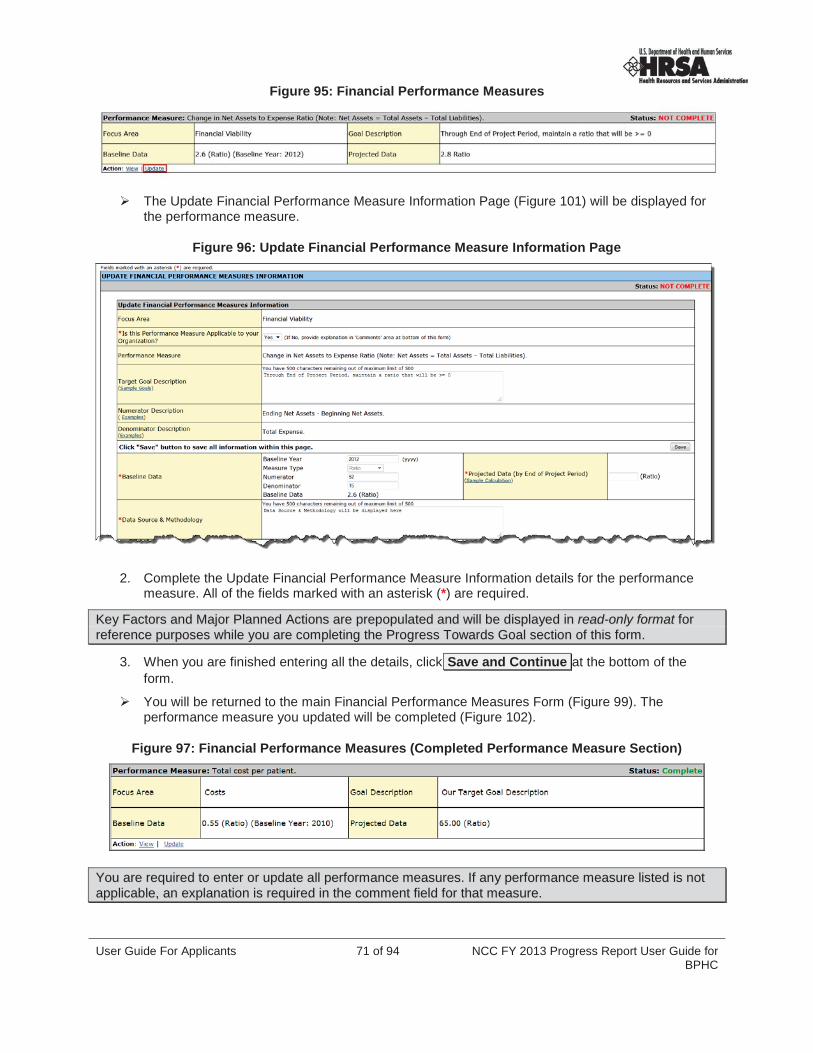
User Guide For Applicants 71 of 94 NCC FY 2013 Progress Report User Guide for BPHC
Figure 95: Financial Performance Measures
The Update Financial Performance Measure Information Page (Figure 101) will be displayed for the performance measure.
Figure 96: Update Financial Performance Measure Information Page
2. Complete the Update Financial Performance Measure Information details for the performance measure. All of the fields marked with an asterisk (*) are required.
KKeeyy FFaaccttoorrss aanndd MMaajjoorr PPllaannnneedd AAccttiioonnss aarree pprreeppooppuullaatteedd aanndd wwiillll bbee ddiissppllaayyeedd iinn rreeaadd--oonnllyy ffoorrmmaatt ffoorrrreeffeerreennccee ppuurrppoosseess wwhhiillee yyoouu aarree ccoommpplleettiinngg tthhee PPrrooggrreessss TToowwaarrddss GGooaall sseeccttiioonn ooff tthhiiss ffoorrmm..
3. When you are finished entering all the details, click Save and Continue at the bottom of the form.
You will be returned to the main Financial Performance Measures Form (Figure 99). The performance measure you updated will be completed (Figure 102).
Figure 97: Financial Performance Measures (Completed Performance Measure Section)
YYoouu aarree rreeqquuiirreedd ttoo eenntteerr oorr uuppddaattee aallll ppeerrffoorrmmaannccee mmeeaassuurreess.. IIff aannyy ppeerrffoorrmmaannccee mmeeaassuurree lliisstteedd iiss nnoottaapppplliiccaabbllee,, aann eexxppllaannaattiioonn iiss rreeqquuiirreedd iinn tthhee ccoommmmeenntt ffiieelldd ffoorr tthhaatt mmeeaassuurree..
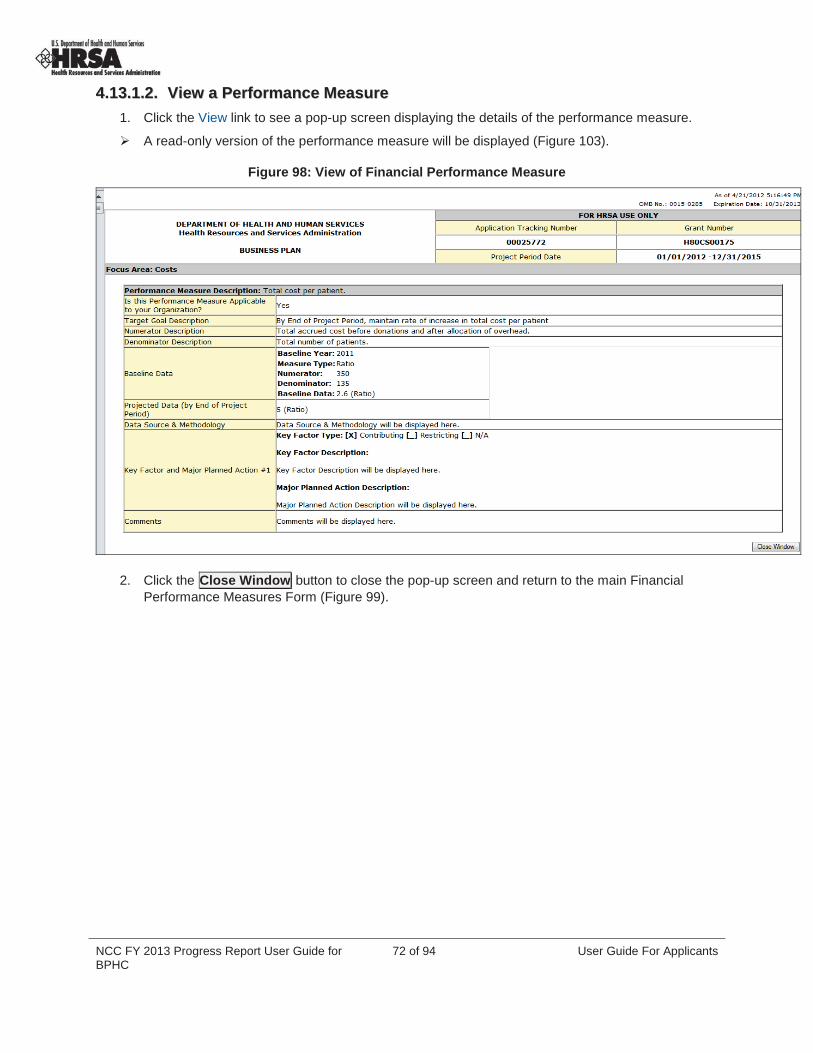
NCC FY 2013 Progress Report User Guide for BPHC
72 of 94 User Guide For Applicants
44..1133..11..22.. VViieeww aa PPeerrffoorrmmaannccee MMeeaassuurree1. Click the View link to see a pop-up screen displaying the details of the performance measure.
A read-only version of the performance measure will be displayed (Figure 103).
Figure 98: View of Financial Performance Measure
2. Click the Close Window button to close the pop-up screen and return to the main Financial Performance Measures Form (Figure 99).
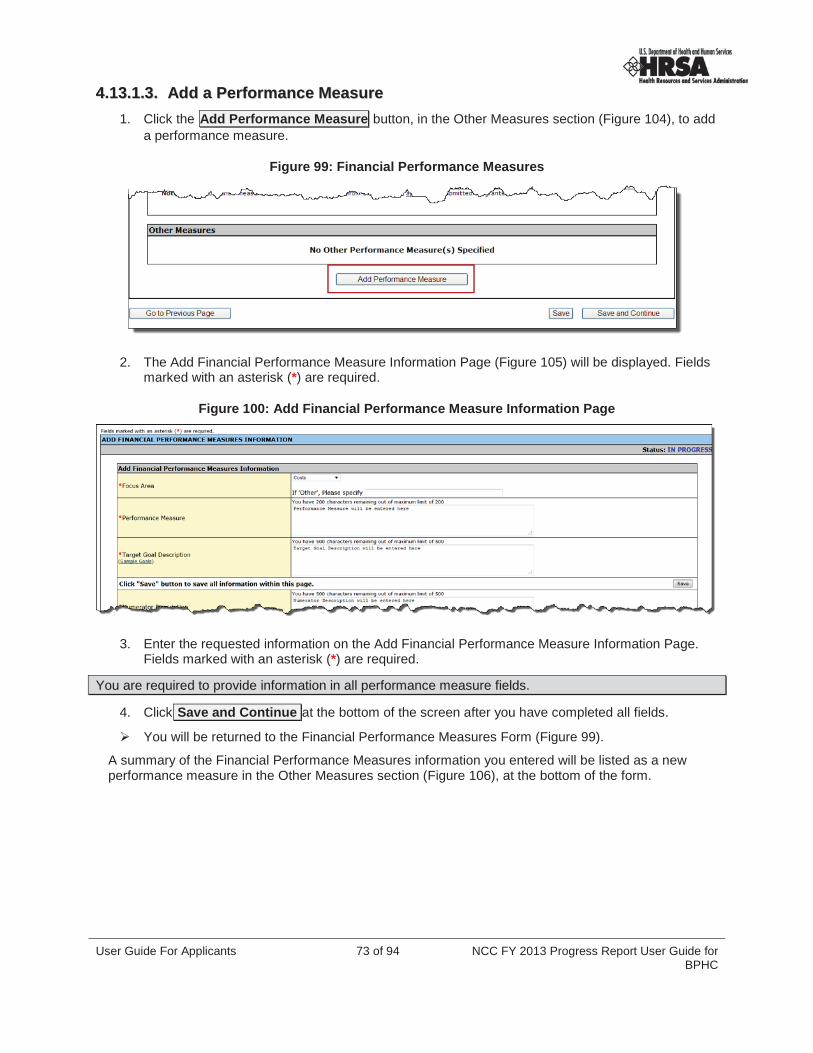
User Guide For Applicants 73 of 94 NCC FY 2013 Progress Report User Guide for BPHC
44..1133..11..33.. AAdddd aa PPeerrffoorrmmaannccee MMeeaassuurree1. Click the Add Performance Measure button, in the Other Measures section (Figure 104), to add
a performance measure.
Figure 99: Financial Performance Measures
2. The Add Financial Performance Measure Information Page (Figure 105) will be displayed. Fields marked with an asterisk (*) are required.
Figure 100: Add Financial Performance Measure Information Page
3. Enter the requested information on the Add Financial Performance Measure Information Page.Fields marked with an asterisk (*) are required.
YYoouu aarree rreeqquuiirreedd ttoo pprroovviiddee iinnffoorrmmaattiioonn iinn aallll ppeerrffoorrmmaannccee mmeeaassuurree ffiieellddss..
4. Click Save and Continue at the bottom of the screen after you have completed all fields.
You will be returned to the Financial Performance Measures Form (Figure 99).
A summary of the Financial Performance Measures information you entered will be listed as a new performance measure in the Other Measures section (Figure 106), at the bottom of the form.

NCC FY 2013 Progress Report User Guide for BPHC
74 of 94 User Guide For Applicants
Figure 101: Other Measures Section of Financial Measures Form
44..1133..11..44.. DDeelleettee aa PPeerrffoorrmmaannccee MMeeaassuurree1. Click the Delete link if it appears under a performance measure that you added (Figure 107) to
delete the performance measure.
Figure 102: Performance Measure with Delete Link
A Delete Confirmation Page will be displayed (Figure 108) to enable you to confirm deletion of the performance measure.
Figure 103: Delete Confirmation Page for Financial Performance Measure

User Guide For Applicants 75 of 94 NCC FY 2013 Progress Report User Guide for BPHC
2. Click the Confirm Delete button to confirm the deletion.
You will be returned to the Financial Performance Measures Form (Figure 99).
The performance measure you deleted will no longer be listed.

NCC FY 2013 Progress Report User Guide for BPHC
76 of 94 User Guide For Applicants
44..1133..11..55.. MMaarrkk aa PPeerrffoorrmmaannccee MMeeaassuurree aass aa DDuupplliiccaattee1. Click the Mark as Duplicate link if it appears under a performance measure to resolve any
Financial Performance Measure duplications (Figure 109).
Figure 104: Financial Performance Measures Duplications
2. The Mark Performance Measure as Duplicate Page (Figure 110) will be displayed.
Figure 105: Mark Performance Measure as Duplicate Page
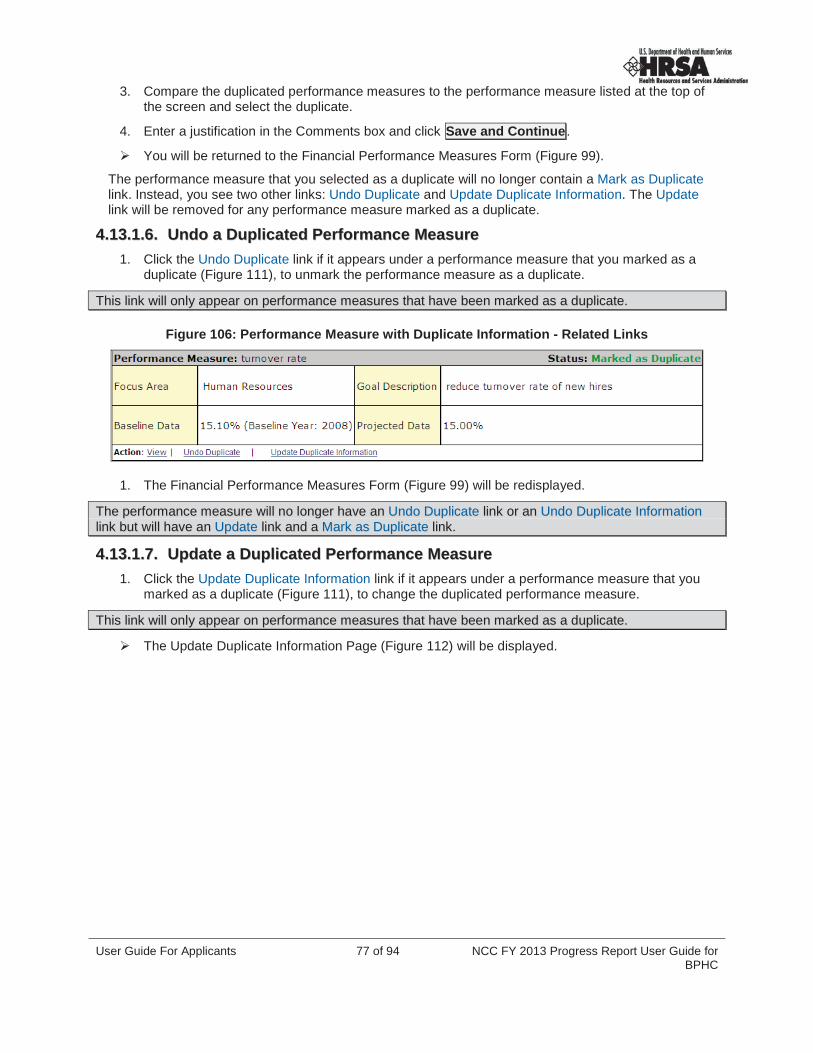
User Guide For Applicants 77 of 94 NCC FY 2013 Progress Report User Guide for BPHC
3. Compare the duplicated performance measures to the performance measure listed at the top of the screen and select the duplicate.
4. Enter a justification in the Comments box and click Save and Continue .
You will be returned to the Financial Performance Measures Form (Figure 99).
The performance measure that you selected as a duplicate will no longer contain a Mark as Duplicatelink. Instead, you see two other links: Undo Duplicate and Update Duplicate Information. The Updatelink will be removed for any performance measure marked as a duplicate.
44..1133..11..66.. UUnnddoo aa DDuupplliiccaatteedd PPeerrffoorrmmaannccee MMeeaassuurree1. Click the Undo Duplicate link if it appears under a performance measure that you marked as a
duplicate (Figure 111), to unmark the performance measure as a duplicate.
TThhiiss lliinnkk wwiillll oonnllyy aappppeeaarr oonn ppeerrffoorrmmaannccee mmeeaassuurreess tthhaatt hhaavvee bbeeeenn mmaarrkkeedd aass aa dduupplliiccaattee..
Figure 106: Performance Measure with Duplicate Information - Related Links
1. The Financial Performance Measures Form (Figure 99) will be redisplayed.
TThhee ppeerrffoorrmmaannccee mmeeaassuurree wwiillll nnoo lloonnggeerr hhaavvee aann UUnnddoo DDuupplliiccaattee lliinnkk oorr aann UUnnddoo DDuupplliiccaattee IInnffoorrmmaattiioonnlliinnkk bbuutt wwiillll hhaavvee aann UUppddaattee lliinnkk aanndd aa MMaarrkk aass DDuupplliiccaattee lliinnkk..
44..1133..11..77.. UUppddaattee aa DDuupplliiccaatteedd PPeerrffoorrmmaannccee MMeeaassuurree1. Click the Update Duplicate Information link if it appears under a performance measure that you
marked as a duplicate (Figure 111), to change the duplicated performance measure.
TThhiiss lliinnkk wwiillll oonnllyy aappppeeaarr oonn ppeerrffoorrmmaannccee mmeeaassuurreess tthhaatt hhaavvee bbeeeenn mmaarrkkeedd aass aa dduupplliiccaattee..
The Update Duplicate Information Page (Figure 112) will be displayed.
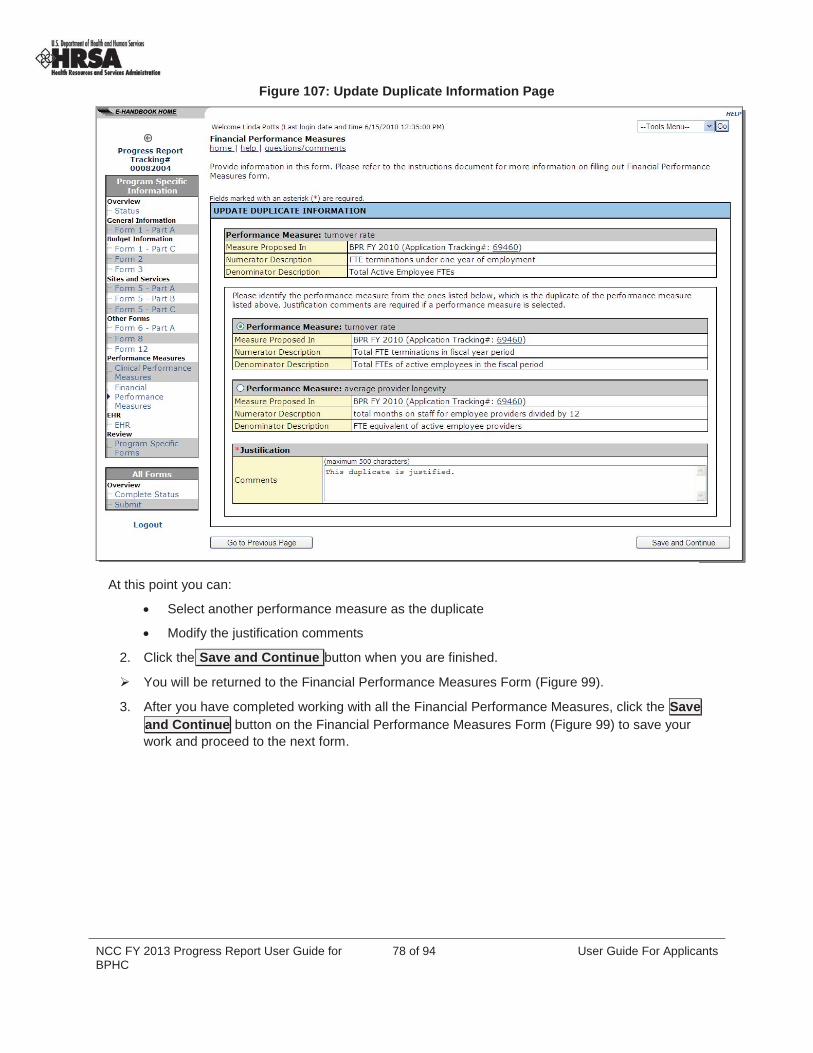
NCC FY 2013 Progress Report User Guide for BPHC
78 of 94 User Guide For Applicants
Figure 107: Update Duplicate Information Page
At this point you can:
Select another performance measure as the duplicate
Modify the justification comments
2. Click the Save and Continue button when you are finished.
You will be returned to the Financial Performance Measures Form (Figure 99).
3. After you have completed working with all the Financial Performance Measures, click the Saveand Continue button on the Financial Performance Measures Form (Figure 99) to save your work and proceed to the next form.
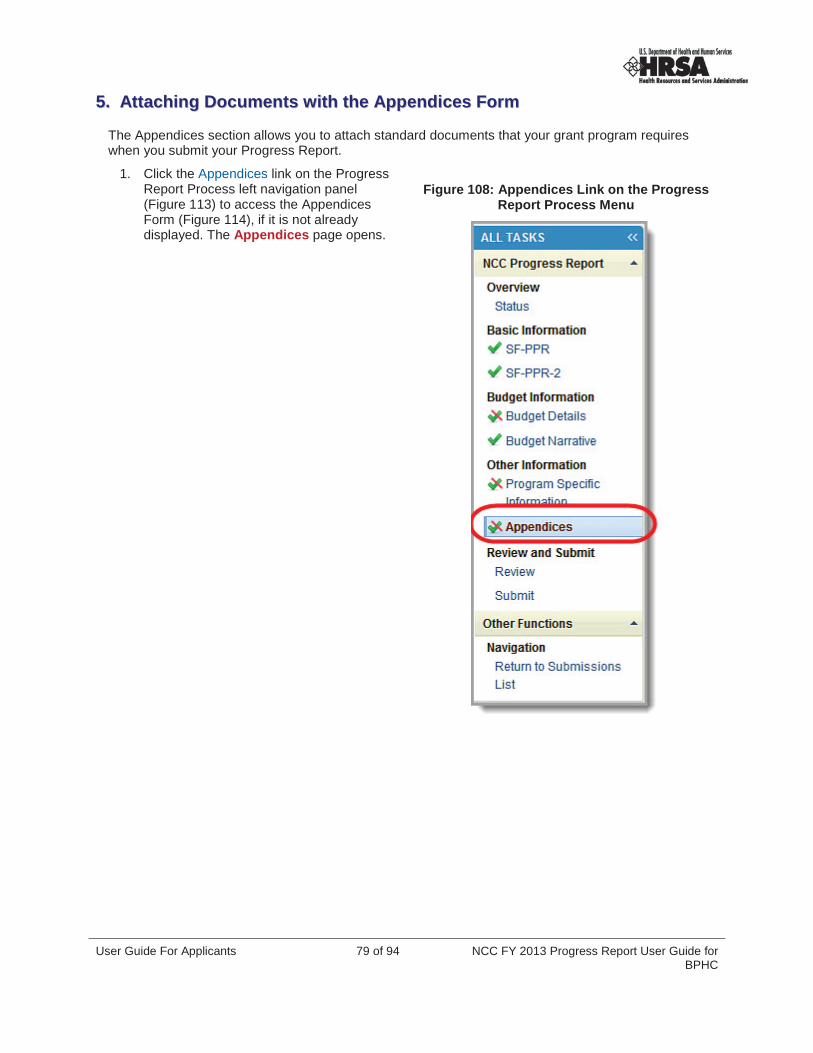
User Guide For Applicants 79 of 94 NCC FY 2013 Progress Report User Guide for BPHC
55.. AAttttaacchhiinngg DDooccuummeennttss wwiitthh tthhee AAppppeennddiicceess FFoorrmm
The Appendices section allows you to attach standard documents that your grant program requires when you submit your Progress Report.
1. Click the Appendices link on the Progress Report Process left navigation panel(Figure 113) to access the Appendices Form (Figure 114), if it is not already displayed. The Appendices page opens.
Figure 108: Appendices Link on the Progress Report Process Menu

NCC FY 2013 Progress Report User Guide for BPHC
80 of 94 User Guide For Applicants
Figure 109: Appendices Page
2. On the Appendices page, for each type of document you wish to attach as an appendix, click the Attach File button. The section for that document type expands (Figure 115).

User Guide For Applicants 81 of 94 NCC FY 2013 Progress Report User Guide for BPHC
Figure 110: Document Type Section Expanded
3. Select or enter a file name and path.
4. Enter a description of the file, if appropriate.
5. Click the Attach button. The Appendices pages refreshes, listing the file you just attached in the document type section you attached it to. That section now has an Update Description drop-down from which you can update or delete the document description.
NNoottee:: YYoouu aarree rreeqquuiirreedd ttoo pprroovviiddee aattttaacchhmmeennttss rreellaatteedd ttoo PPrrooggrraamm NNaarrrraattiivvee UUppddaattee aannddSSlliiddiinngg FFeeee DDiissccoouunntt SScchheedduulleess..
YYoouu ccaann aattttaacchh oonnllyy oonnee ddooccuummeenntt ffoorr tthhee ffoolllloowwiinngg::
11.. PPrrooggrraamm NNaarrrraattiivvee UUppddaattee
22.. SSlliiddiinngg FFeeee DDiissccoouunntt SScchheedduulleess
33.. SSeerrvviiccee AArreeaa MMaapp
44.. OOrrggaanniizzaattiioonnaall CChhaarrtt
55.. PPoossiittiioonn DDeessccrriippttiioonnss ffoorr KKeeyy MMaannaaggeemmeenntt SSttaaffff
66.. BBiiooggrraapphhiiccaall SSkkeettcchheess ffoorr KKeeyy MMaannaaggeemmeenntt SSttaaffff
YYoouu ccaann aattttaacchh aa mmaaxxiimmuumm ooff ttwwoo ddooccuummeennttss ffoorr tthhee ffoolllloowwiinngg::
11.. SSuummmmaarryy ooff CCoonnttrraaccttss aanndd AAggrreeeemmeennttss
22.. OOtthheerr RReelleevvaanntt DDooccuummeennttss
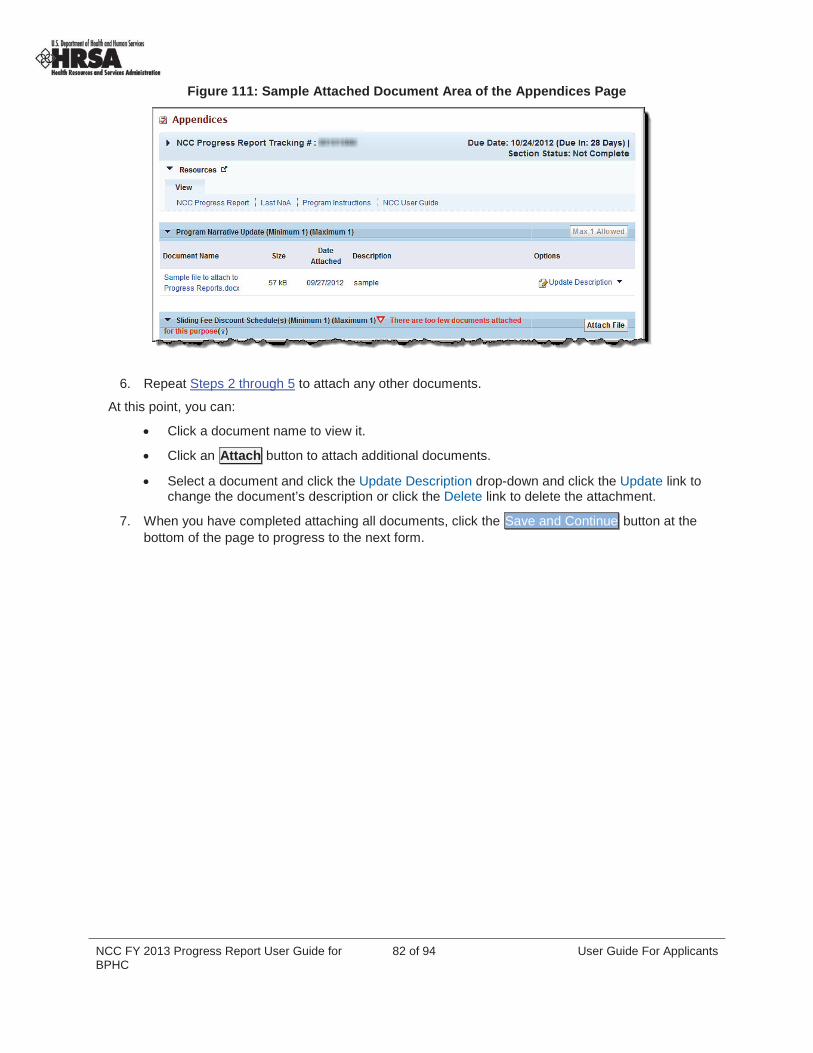
NCC FY 2013 Progress Report User Guide for BPHC
82 of 94 User Guide For Applicants
Figure 111: Sample Attached Document Area of the Appendices Page
6. Repeat Steps 2 through 5 to attach any other documents.
At this point, you can:
Click a document name to view it.
Click an Attach button to attach additional documents.
Select a document and click the Update Description drop-down and click the Update link to change the document’s description or click the Delete link to delete the attachment.
7. When you have completed attaching all documents, click the Save and Continue button at the bottom of the page to progress to the next form.

User Guide For Applicants 83 of 94 NCC FY 2013 Progress Report User Guide for BPHC
66.. RReevviieeww aa PPrrooggrreessss RReeppoorrtt
66..11.. RReevviieeww SSttaannddaarrdd FFoorrmmss ((SSFF--PPPPRR))The NCC Progress Report - Review page shows the completion status for the Standard Forms (SF-PPR and SF-PPR-2), Program Specific Information forms, Attachments, and Budget Information.
Figure 112: Left Navigation Panel Link to NCC Progress Report Review Page
1. Click Review in the Review and Submit section of the left navigation panel to open the NCCProgress Report – Review page. The NCC Progress Report – Review page will open.

NCC FY 2013 Progress Report User Guide for BPHC
84 of 94 User Guide For Applicants
Figure 113: NCC Progress Report – Review Page
This page lists all sections in the Progress Report. Use the links and buttons on this page to perform the following actions:
Click a View link in the Options column to open a view-only version of the form.
Click Print NCC Progress Report to print the complete report.
Click Proceed to Submit to go to the Submit Page.

User Guide For Applicants 85 of 94 NCC FY 2013 Progress Report User Guide for BPHC
77.. SSuubbmmiitt aa PPrrooggrreessss RReeppoorrtt
When the status of all Standard Forms and Program Specific Forms is complete, you are ready to submit your Progress Report to HRSA.
TToo ssuubbmmiitt tthhee PPrrooggrreessss RReeppoorrtt,, yyoouu mmuusstt hhaavvee tthhee SSuubbmmiitt NNoonnccoommppeettiinngg CCoonnttiinnuuaattiioonn aacccceessss rriigghhttss..
To submit your Progress Report:
1. Click Submit under Review and Submit on the left navigation panel to start the Submit Progress Report process. The Submit page (Figure 120) will be displayed.
Figure 114: Left Navigation Panel – Submit Link

NCC FY 2013 Progress Report User Guide for BPHC
86 of 94 User Guide For Applicants
Figure 115: Submit Page
2. Click the Submit to HRSA button. The Progress Report – Confirm Submit page (Figure 121)will be displayed.
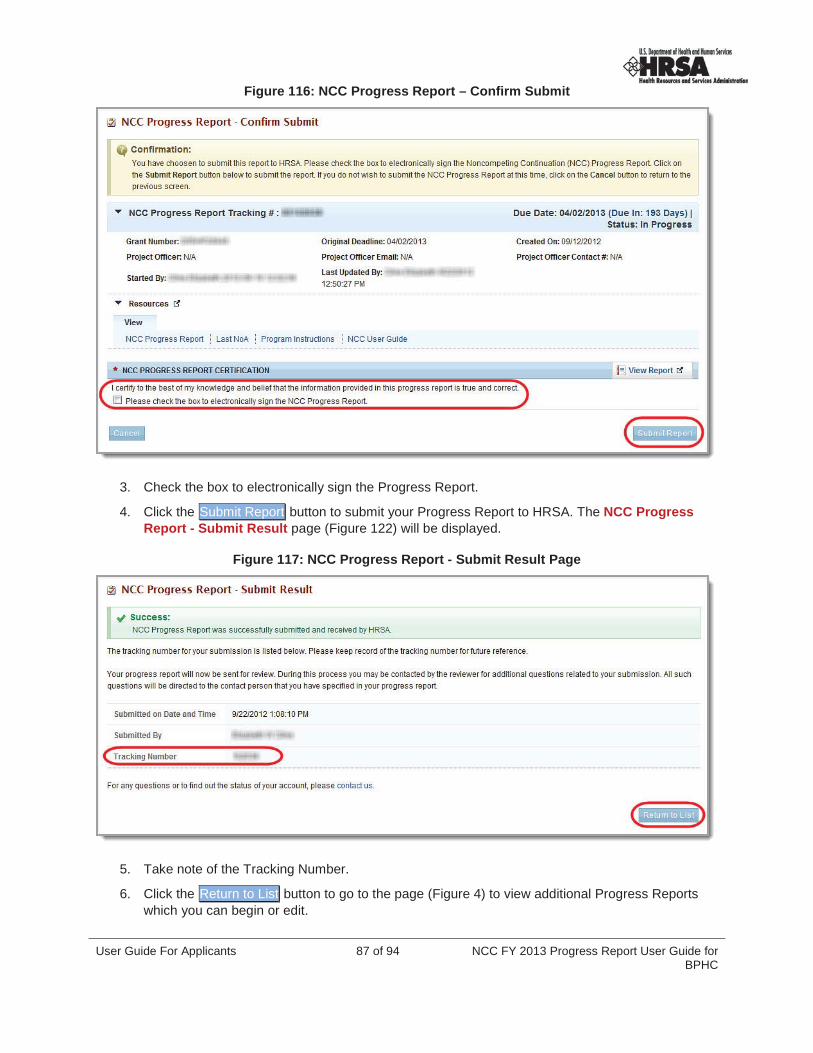
User Guide For Applicants 87 of 94 NCC FY 2013 Progress Report User Guide for BPHC
Figure 116: NCC Progress Report – Confirm Submit
3. Check the box to electronically sign the Progress Report.
4. Click the Submit Report button to submit your Progress Report to HRSA. The NCC Progress Report - Submit Result page (Figure 122) will be displayed.
Figure 117: NCC Progress Report - Submit Result Page
5. Take note of the Tracking Number.
6. Click the Return to List button to go to the page (Figure 4) to view additional Progress Reports which you can begin or edit.

NCC FY 2013 Progress Report User Guide for BPHC
88 of 94 User Guide For Applicants
77..11.. SSuubbmmiitt aa CChhaannggee--RReeqquueesstteedd PPrrooggrreessss RReeppoorrttHRSA sends you a Change Request Email (Figure 123) if your Progress Report needs to be revised.
Figure 118: Change-Request Email
To revise your Progress Report:
1. Go to the Pending Tasks – List page (Figure 124).
Figure 119: Pending Tasks – List Page
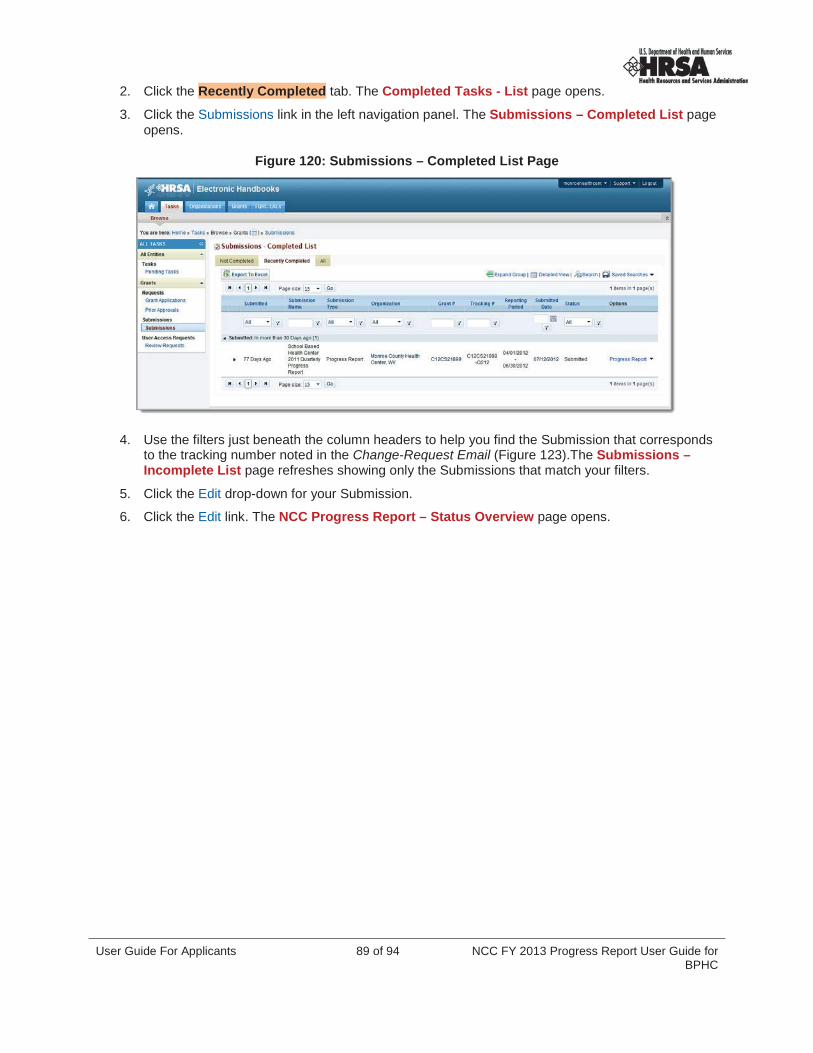
User Guide For Applicants 89 of 94 NCC FY 2013 Progress Report User Guide for BPHC
2. Click the Recently Completed tab. The Completed Tasks - List page opens.
3. Click the Submissions link in the left navigation panel. The Submissions – Completed List page opens.
Figure 120: Submissions – Completed List Page
4. Use the filters just beneath the column headers to help you find the Submission that correspondsto the tracking number noted in the Change-Request Email (Figure 123).The Submissions –Incomplete List page refreshes showing only the Submissions that match your filters.
5. Click the Edit drop-down for your Submission.
6. Click the Edit link. The NCC Progress Report – Status Overview page opens.
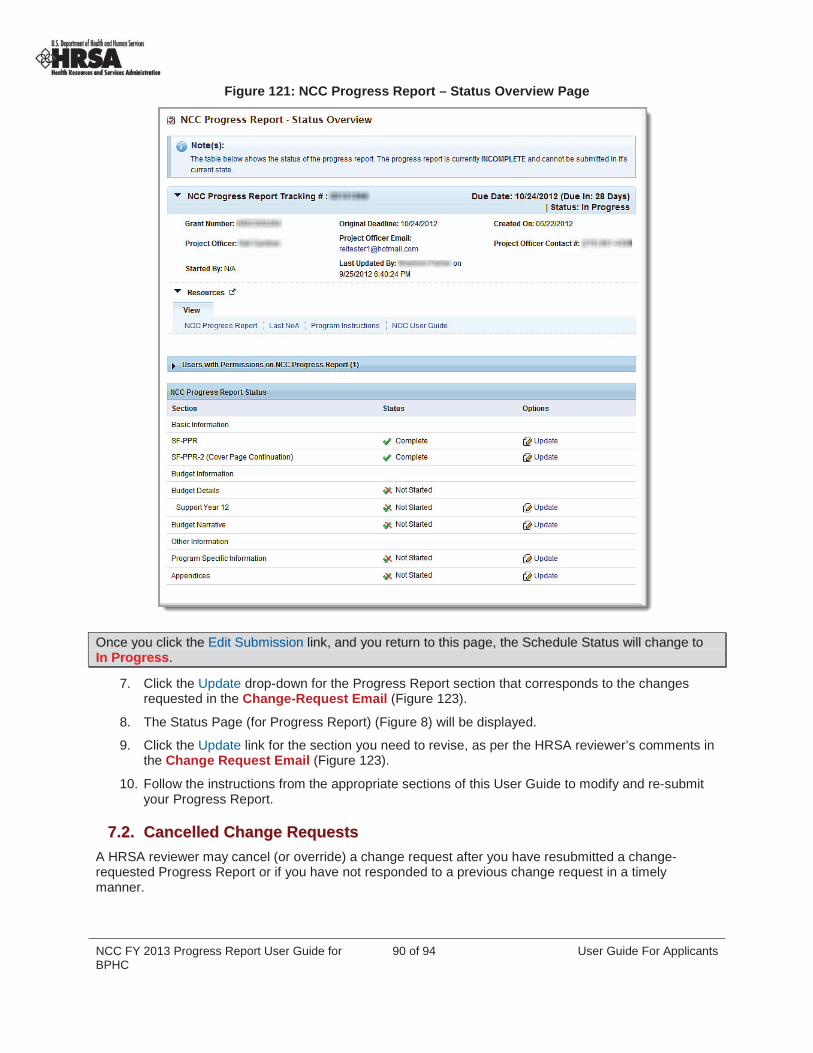
NCC FY 2013 Progress Report User Guide for BPHC
90 of 94 User Guide For Applicants
Figure 121: NCC Progress Report – Status Overview Page
OOnnccee yyoouu cclliicckk tthhee EEddiitt SSuubbmmiissssiioonn lliinnkk,, aanndd yyoouu rreettuurrnn ttoo tthhiiss ppaaggee,, tthhee SScchheedduullee SSttaattuuss wwiillll cchhaannggee ttooIInn PPrrooggrreessss..
7. Click the Update drop-down for the Progress Report section that corresponds to the changes requested in the Change-Request Email (Figure 123).
8. The Status Page (for Progress Report) (Figure 8) will be displayed.
9. Click the Update link for the section you need to revise, as per the HRSA reviewer’s comments in the Change Request Email (Figure 123).
10. Follow the instructions from the appropriate sections of this User Guide to modify and re-submit your Progress Report.
77..22.. CCaanncceelllleedd CChhaannggee RReeqquueessttssA HRSA reviewer may cancel (or override) a change request after you have resubmitted a change-requested Progress Report or if you have not responded to a previous change request in a timely manner.
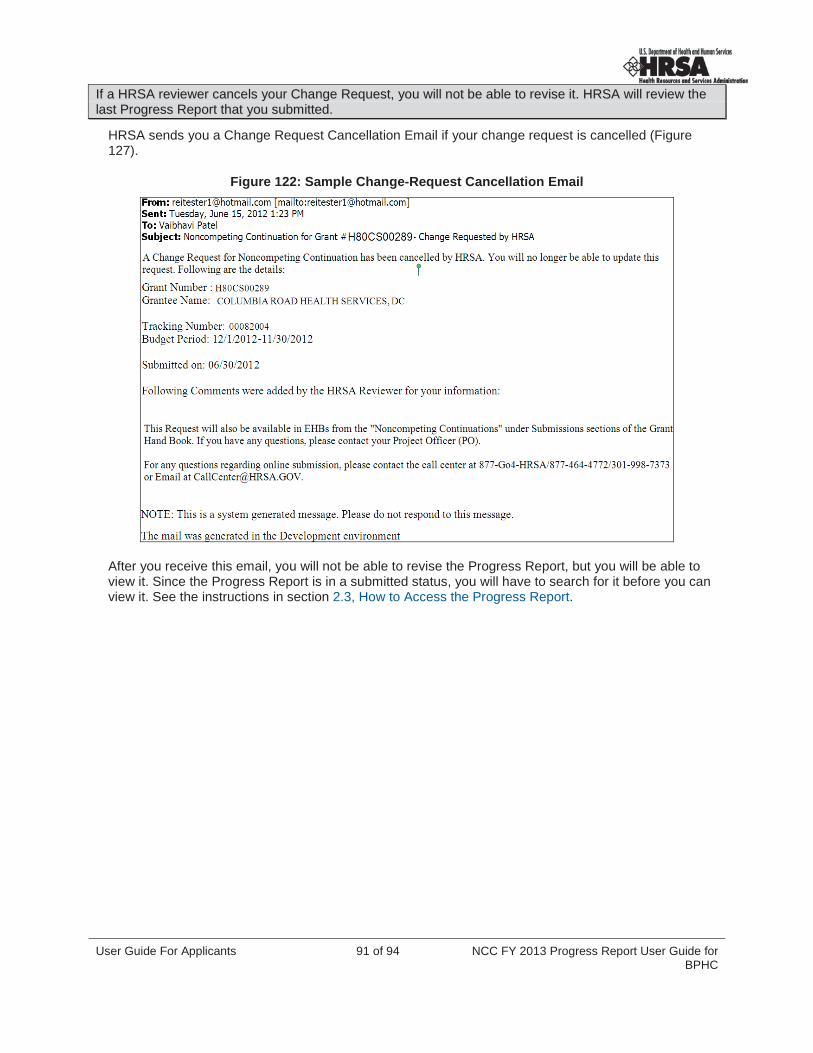
User Guide For Applicants 91 of 94 NCC FY 2013 Progress Report User Guide for BPHC
IIff aa HHRRSSAA rreevviieewweerr ccaanncceellss yyoouurr CChhaannggee RReeqquueesstt,, yyoouu wwiillll nnoott bbee aabbllee ttoo rreevviissee iitt.. HHRRSSAA wwiillll rreevviieeww tthheellaasstt PPrrooggrreessss RReeppoorrtt tthhaatt yyoouu ssuubbmmiitttteedd..
HRSA sends you a Change Request Cancellation Email if your change request is cancelled (Figure 127).
Figure 122: Sample Change-Request Cancellation Email
After you receive this email, you will not be able to revise the Progress Report, but you will be able to view it. Since the Progress Report is in a submitted status, you will have to search for it before you can view it. See the instructions in section 2.3, How to Access the Progress Report.

NCC FY 2013 Progress Report User Guide for BPHC
92 of 94 User Guide For Applicants
88.. CCuussttoommeerr SSuuppppoorrtt
UUssee yyoouurr PPrrooggrreessss RReeppoorrtt TTrraacckkiinngg NNuummbbeerr ffoorr aallll ccoorrrreessppoonnddeennccee..
88..11.. BBPPHHCC HHeellpp DDeesskkFor assistance with completing Standard and Program Specific forms within the application, contactBPHC Help Desk:
By Email: [email protected]
OR
By Phone: 1-877-974-BPHC (2742) (8:30 am to 5:30 pm ET)
DDOO NNOOTT ccaallll tthhee BBPPHHCC HHeellpp DDeesskk ffoorr aannyy qquueessttiioonnss oonn tthhee IInnssttrruuccttiioonnss ffoorr PPrreeppaarriinngg aanndd SSuubbmmiittttiinngg tthheeFFYY 22001133 HHeeaalltthh CCeenntteerr PPrrooggrraamm BBuuddggeett PPeerriioodd PPrrooggrreessss RReeppoorrtt oorr pprrooggrraammmmaattiicc qquueessttiioonnss tthhaatt yyoouummiigghhtt hhaavvee wwhheenn ccoommpplleettiinngg yyoouurr aapppplliiccaattiioonn..
88..22.. HHRRSSAA CCaallll CCeenntteerrFor assistance with registering in HRSA EHBs, or access/password related issues, call the HRSA Call Center:
By Phone: 877-GO4-HRSA (877-464-4772) (between 9:00 am to 5:30 pm ET)
OR
By Email: [email protected]
Visit HRSA EHBs for additional online help.
Go to: https://grants.hrsa.gov/webexternal/home.asp
Click on ‘Help’
DDOO NNOOTT ccaallll tthhee CCaallll CCeenntteerr ffoorr aannyy qquueessttiioonnss oonn tthhee IInnssttrruuccttiioonnss ffoorr PPrreeppaarriinngg aanndd SSuubbmmiittttiinngg tthhee FFYY22001133 HHeeaalltthh CCeenntteerr PPrrooggrraamm BBuuddggeett PPeerriioodd PPrrooggrreessss RReeppoorrtt oorr pprrooggrraammmmaattiicc qquueessttiioonnss tthhaatt yyoouu mmiigghhtthhaavvee wwhheenn ccoommpplleettiinngg yyoouurr aapppplliiccaattiioonn..
88..33.. HHRRSSAA PPrrooggrraamm SSuuppppoorrttFor any questions on the Instructions for Preparing and Submitting the FY 2013 Health Center Program Budget Period Progress Report or programmatic questions that you might have when completing your application, contact the Program Point of Contact within Bureau of Primary Health Care (BPHC) Officeof Policy and Program Development (OPPD) as noted within the Instructions for Preparing and Submitting the FY 2013 Health Center Program Budget Period Progress Report.
By Phone: 301-594-4300
OR
By Email: [email protected]

User Guide For Applicants 93 of 94 NCC FY 2013 Progress Report User Guide for BPHC
99.. FFrreeqquueennttllyy AAsskkeedd QQuueessttiioonnss
99..11.. WWhhaatt aarree tthhee ssooffttwwaarree rreeqquuiirreemmeennttss ffoorr HHRRSSAA EEHHBBss??System Requirements
Internet Explorer 6 and later or Netscape 4.72 and later
Internet browser settings that permit pop-ups
Viewers for Microsoft Word and Adobe PDF
99..22.. AArree HHRRSSAA EEHHBBss ccoommpplliiaanntt wwiitthh SSeeccttiioonn 550088??HRSA EHBs are compliant with Section 508 requirements for the visually impaired.
99..33.. WWhhaatt aarree tthhee ssyysstteemm rreeqquuiirreemmeennttss ffoorr uussiinngg HHRRSSAA EEHHBBss oonn aa MMaacciinnttoosshhccoommppuutteerr??
Mac users are requested to download the latest version of Netscape for their operating system version. It is recommended that Safari 1.2.4 and later or Netscape v7.2 and above be used.
NNoottee:: IInntteerrnneett EExxpplloorreerr ((IIEE)) ffoorr MMaacc hhaass kknnoowwnn iissssuueess wwiitthh SSSSLL aanndd MMiiccrroossoofftt iiss nnoo lloonnggeerr ssuuppppoorrttiinngg IIEEffoorr MMaacc.. HHRRSSAA EEHHBBss ddoo nnoott wwoorrkk oonn IIEE ffoorr MMaacc..
In addition, to view attachments such as Word and PDF, you will need appropriate viewers.
99..44.. WWhhaatt aarree tthhee ssooffttwwaarree rreeqquuiirreemmeennttss ffoorr GGAAAAMM??Refer to the software requirements for HRSA EHBs. In addition, you will need Microsoft Word to complete GAAM unstructured forms.
99..55.. WWhhaatt ddooccuummeenntt ttyyppeess ccaann II uuppllooaadd??The following document types are supported in HRSA EHBs:
.DOC - Microsoft Word
.DOCX - Microsoft Word
.JPEG – Graphics Format
.JPG - Graphics Format
.MSG – Microsoft Mail Document
.PDF - Adobe Portable Document Format
.PPT – Power Point
.RTF - Rich Text Format
.TIF - Graphics Format
.TXT - Text
.WPD - Word Perfect Document
.XFD - Extensible Forms Description Language files
.XLS - Microsoft Excel
.XLSX - Microsoft Excel

NCC FY 2013 Progress Report User Guide for BPHC
94 of 94 User Guide For Applicants