Embed Size (px)
Citation preview

Insight ProMobile App and Cloud PortalUser Manual
July 2018202-11916-01
350 E. Plumeria DriveSan Jose, CA 95134USA
SupportThank you for purchasing this NETGEAR product.You can visit www.netgear.com/support to register yourproduct, get help, access the latest downloads and user manuals, and join our community. We recommend thatyou use only official NETGEAR support resources.
Trademarks© NETGEAR, Inc., NETGEAR, and the NETGEAR Logo are trademarks of NETGEAR, Inc. Any non-NETGEARtrademarks are used for reference purposes only.
Revision History
CommentsPublish DatePublication Part Number
First publication.July 2018202-11916-01
2
Insight Pro, Mobile App and Cloud Portal User Manual
Contents
Chapter 1 Introduction to Insight Pro
Overview of Insight Pro..........................................................................................7Insight Pro System Architecture.............................................................................7
Organization Concepts......................................................................................8Network Location Concepts..............................................................................8Provisioning Concepts.......................................................................................9
Insight Pro Roles and Role-Based Access, Rights, and Responsibilities..............9Insight Pro Subscriptions.....................................................................................10Insight Pro Deployment Examples.......................................................................12
MSP is the Device Owner, Admin, and Manager............................................12Business or VAR Is the Device Owner but VAR Is the Admin and Manager....13Business is the Device Owner, Admin, and Manager.....................................14
Insight Cloud Portal and Insight Mobile App........................................................15Insight Cloud Portal Dashboard...........................................................................15Insight Pro and the Local Browser–Based Management Interface......................16Supported Devices...............................................................................................17Lexicon of Insight Pro Terms................................................................................18
Chapter 2 Get Started With Insight Pro
Insight Pro Accounts............................................................................................22Purchase an Insight Pro Subscription.............................................................22Migrate From Insight Basic or Premium to Insight Pro....................................22Create an Insight Pro Account........................................................................22
Access the Insight Cloud Portal...........................................................................24Install the NETGEAR Insight Mobile App.............................................................24Manage Organizations and Roles in Insight Pro..................................................24
Create an Organization and Assign a Business Owner..................................25Confirm That You Are the Business Owner for an Organization......................26Add a Manager for an Organization................................................................27Confirm That You Are a Manager for an Organization.....................................28View Owners or Managers Using the Insight App...........................................29Change the Policy or Device Ownership for an Organization Using the CloudPortal...............................................................................................................29Change the Organization Information.............................................................30
Create an Insight Network Location for an Organization.....................................30Create an Insight Network Location for an Organization Using the InsightApp..................................................................................................................31Create an Insight Network Location for an Organization Using the CloudPortal...............................................................................................................31
Discover and Add Devices to a Network Location of an Organization.................32Add a Device by Scanning Your Network With the Insight App.......................33Add a Device by Scanning Its QR Code With the Insight App........................34
3
Add a Device by Scanning Its Barcode With the Insight App..........................34Add a Device by Entering Its Serial Number in the Insight App......................35Add a Device by Entering Its Serial Number Using the Cloud Portal..............35
Access a Network Location and Its Devices Remotely........................................36Access a Network Location and Its Devices Remotely Using the Insight App.36Access a Network Location and Its Devices Remotely Using the Cloud Portal.37
Interpret the Green, Red, Orange, and Gray Circles Next to a Device................38View and Manage Insight Notifications................................................................38
View, Share, or Delete Notifications Using the Insight App.............................39View, Share, or Delete Notifications in the Cloud Portal.................................40Manage the Insight Notifications That You Receive Using the Insight App.....41Manage the Insight Notifications That You Receive Using the Cloud Portal....42
Add a Purchase Confirmation Key to Your Insight Pro Subscription....................43Set Up Two-Step Verification for Logging In to Insight.........................................44
Set Up Two-Step Verification for Logging In Using the Insight App.................45Set Up Two-Step Verification for Logging In Using the Cloud Portal...............46
Manage Network Locations, Networks, and Devices...........................................47
Chapter 3 Monitor Insight Organizations, Network Locations, and Devices Usingthe Cloud Portal
Overview of the Monitoring Options for a Network Location in the Cloud Portal..49Customize Widgets..............................................................................................51Monitor All Organizations.....................................................................................51Display All Devices at All Organizations..............................................................52Monitor All Devices at a Single Network Location................................................52Monitor a Single Network Location......................................................................53Monitor the Wired Network at a Location.............................................................54Monitor the WiFi Network and SSIDs at a Location.............................................55Monitor the Storage Network at a Location..........................................................56Monitor an Individual Switch and Individual Ports................................................56Monitor an Individual Access Point and Its Client................................................57Monitor an Individual ReadyNAS Storage System..............................................58Monitor the WiFi Clients at a Network Location...................................................59Generate a Report Manually and Download a Previously Automatically GeneratedReport..................................................................................................................59
Chapter 4 Perform Diagnostics and Troubleshooting
Use the Device Diagnostic Options in Insight......................................................62Configure Port Mirroring on a Switch..............................................................62
Configure Port Mirroring on a Switch Using the Insight App......................62Configure Port Mirroring on a Switch Using the Cloud Portal.....................63
Perform a Cable Test on a Switch...................................................................63Perform a Cable Test on a Switch Using the Insight App...........................63Perform a Cable Test on a Switch Using the Cloud Portal..........................64
Share Diagnostic Information From a Device..................................................65Share Diagnostic Information From a Device Using the Insight App..........65Share Diagnostic Information From a Device Using the Cloud Portal........65
Reload the Last Saved Cloud Configuration on a Device...............................66
4
Insight Pro, Mobile App and Cloud Portal User Manual
Reload the Last Saved Cloud Configuration on a Device Using the InsightApp.............................................................................................................66Reload the Last Saved Cloud Configuration on a Switch Using the CloudPortal..........................................................................................................67
Register New Products That Are Not Manageable in Insight...............................67Register a Product Using the Insight App.......................................................67Register a Product Using the Cloud Portal......................................................68
Troubleshoot Connectivity Problems Between Your Device and Insight...............68Check to See If the Insight App Can Recognize Your Device..............................69Reboot Your Device Using the Insight App...........................................................69Remove Your Device From the Network and Re-add It Using the Insight App.....70Reset a Device to Factory Default Settings Using the Insight App......................71Send Diagnostic Files From the Insight App to a NETGEAR CommunityModerator.............................................................................................................72View Your Product Support Information Using the Insight App............................72Open a Technical Support Case For a Product Using the Insight App................73
5
Insight Pro, Mobile App and Cloud Portal User Manual
1Introduction to Insight Pro
NETGEAR Insight Pro is a cloud-based, multi-tenant management platform for VARs, MSPs, and other typesof businesses. Insight Pro lets you set up multiple organizations, add multiple locations to each organization,and add NETGEAR Insight Managed access points, switches, and ReadyNAS storage systems to each location.
With the advantage of unified setup and configuration of devices through the cloud, Insight Pro provides simplifiedongoing maintenance, continuous visibility and control, remote access, and scalability.
This chapter includes the following sections:
• Overview of Insight Pro• Insight Pro System Architecture• Insight Pro Roles and Role-Based Access, Rights, and Responsibilities• Insight Pro Subscriptions• Insight Pro Deployment Examples• Insight Cloud Portal and Insight Mobile App• Insight Cloud Portal Dashboard• Insight Pro and the Local Browser–Based Management Interface• Supported Devices• Lexicon of Insight Pro Terms
6
Overview of Insight Pro
NETGEAR Insight Pro is a multi-tenant application that enables unified multidevice configuration of NETGEARInsight managed devices such as WiFi access points, switches, and ReadyNAS storage systems. InsightPro provides network management, monitoring, and service deployment across multiple remote organizations,each with multiple network locations.
Insight Pro provides the following features:
• Management of multiple organizations, each with multiple network locations
• Management of roles and access policies within an organization
• Unified visibility and management of the entire network location for an organization with a single password
• Management and monitoring of an entire organization and all network locations for the organizationfrom a single Insight account
• Simplified device setup at a network location
• Email and push notifications for all Insight managed devices for network problems at an organization
• Remote firmware updates for devices that are assigned to network location of an organization
• No need for a cloud controller, appliance, server, or additional software applications
Insight Pro System Architecture
The Insight Pro architecture includes a multilevel hierarchy that supports four distinct layers:
1. Insight Pro account level. A managed service provider (MSP), value-added reseller (VAR), or othertype of business can establish an Insight Pro account and is the subscriber and administrator (admin)of that account and the admin for all organizations created under that account. An Insight Pro accountrequires a paid subscription, which you can purchase from a NETGEAR distributor.
2. Organization (subaccount) level. A single Insight Pro account can support the creation of multipleorganizations (subaccounts) to reflect different customers of the MSP or VAR. For example, an MSPcould create a single Insight Pro account under their business name to use it for all of their 22 customers,which would be configured as 22 organizations under the single Insight Pro account. Insight Pro partitionsthe organizations so that no data is shared between organizations, with the exception of the overallcross-organizational dashboard, which is accessible only to the admin and to managers with rights tomultiple organizations.
3. Network location level. Each organization can support multiple locations where the actual networksreside. A single network location can consist of multiple devices that can support a wired network, WiFinetwork with multiple SSIDs, and storage system.These devices are not shared among multiple locationsof the organization but are provisioned at that single location only.
4. Device level. At each network location for an organization, you can configure each device separatelyor similar types of Insight managed devices at one network location (for example, all Insight Managedswitches at one network location) can share the same configuration, with the exception of their IPaddresses and device names. The purchase confirmation keys for an Insight Pro account determinethe total number of Insight managed devices that are supported under the Insight Pro account.
The following figure illustrates the Insight Pro multilevel hierarchy. For information about the Insight Proroles (admin, owner, and manager, see Insight Pro Roles and Role-Based Access, Rights, and Responsibilitieson page 9.
Introduction to Insight Pro
7
Insight Pro, Mobile App and Cloud Portal User Manual

Figure 1. Insight Pro multilevel hierarchy
Organization ConceptsAn organization is a subaccount of a single Insight Pro account.
An organization is characterized by the following:
• Includes a business owner who owns the physical NETGEAR devices and holds the NETGEAR supportand warranty entitlements for those devices. (The admin can be the business owner.)
• Includes a business owner who, by accepting business ownership of the organization, grants the adminpermission to manage the organization.
• Can support multiple network locations, each of which can be considered a subacount of the organization.
• Supports a single business owner role, a single admin role, and multiple manager roles.
Network Location ConceptsA location, which is generally referred to as a network location, can be considered a subaccount of a singleorganization.
A network location is characterized by the following:
• Is the location where the physical NETGEAR devices reside.
• Is the location where a wired network, WiFi network with SSIDs, and storage system can reside.
• Belongs to an organization, that is, can be considered a subaccount of an organization.
• Supports multiple manager roles.
Introduction to Insight Pro
8
Insight Pro, Mobile App and Cloud Portal User Manual
Provisioning ConceptsWith Insight Pro, the provisioning process is network location based. Although you can set up multiplenetwork locations for each organization, you provision devices and the associated wired network, WiFinetwork, and storage system for one particular network location at a time. Each network location mightrequire a different configuration so you must provision each network location separately from others.
Similar types of Insight managed devices at one network location (for example, all Insight Managed switchesat one network location) can either share the same configuration (with the exception of their IP addressesand device names) or be configured differently.
You can simultaneously configure features such as VLANs, spanning tree, and PoE schedules for multipleswitches at a network location and you can simultaneously configure features such an SSID, URL filtering,automatic Radio Resource Management (auto RRM), and fast roaming for multiple access points at anetwork location.
If you create a VLAN for a network location, you can assign that VLAN to both Insight Managed switchesand Insight Managed access points.
An SSID that you configure for one access point at a network location is not limited to that single accesspoint but is automatically provisioned on all access points at that location and broadcast by all access pointsat that location.
Insight Pro Roles and Role-Based Access, Rights, andResponsibilities
Typically, a VAR, MSP, or other type of business establishes an Insight Pro account and is the subscriberand administrator (admin) of the Insight Pro account. An individual Insight Pro account is a multi-tenantapplication. That is, it can support multiple organizations. The admin of the Insight Pro account createsorganizations in Insight Pro and performs the role of admin for each organization.
For each organization that is set up under the Insight Pro account, Insight Pro supports the following roles:
• Admin. The admin is the Insight Pro account holder and can perform all Insight Pro functions on behalfof a business owner, including setting up locations for the organization, adding devices to a locationand managing those devices at the location, and inviting managers and users for the location.The VAR,MSP, or business that establishes the Insight Pro account always performs the role of admin for anorganization. By default, an admin can perform all functions in Insight Pro.
• Business owner. The business owner is the business or person who owns the physical NETGEARdevices and is entitled to NETGEAR support and warranty. Ownership does not imply administrativecontrol of the devices through Insight Pro. That is, ownership is a passive role.After the Insight Pro admin sets up an organization, the admin invites the business owner to acceptownership of the organization. By doing so, the business owner grants the admin permission to activelymanage the devices through Insight Pro. The business owner can purchase Insight Pro subscriptionsfor the organization or can request the admin to purchase subscriptions on behalf of the organization.In either case, the admin applies the purchase confirmation keys to the Insight Pro account.The businessowner can also request the admin to manage support and warranty of the devices. (You can assigndevice ownership to either the business owner or the admin.) The business owner is assigned read-onlycredentials in Insight Pro.The admin can also be the business owner. For example, if an MSP owns the NETGEAR devices,leases the devices to a customer, and provides Software-as-a-Service (SaaS, including Insight Promanagement) to the customer, the business owner and admin are identical.
Introduction to Insight Pro
9
Insight Pro, Mobile App and Cloud Portal User Manual
Ownership of an organization is not to be confused with ownership of the Insight Proaccount.
Note
• Manager. The manager of devices for one or more organizations. Generally, a manager receives readand write credentials in Insight Pro from the admin and can add, configure, monitor, and maintainlocations and devices for these locations. The most likely scenario is that a manager, not the admin,performs the day-to-day management of the networks and storage systems for locations at anorganization. However, a manager can also receive read-only credentials and monitor, not manage, anorganization and its network locations.
For more information about roles, see Manage Organizations and Roles in Insight Pro on page 24.
The following table shows the Insight Pro roles and role-based access and rights
Table 1. Insight Pro roles and role-based access, rights, and responsibilities
Managerwithread-onlyaccess
Managerwithread/writeaccess
AdminBusinessOwner
Rights and Responsibilities
XCreate a device owner account in mynetgear.com
XConfirm device ownership in mynetgear.com
XAccept ownership of an organization, thereby grantingpermission to the admin to manage the organization
XAllow the admin to purchase Insight Pro subscriptions
XPurchase the Insight Pro application
XCreate an organization, add the owner of the organization,and define the organizational policy
XAssign access rights, including notification policies
XManage Insight Pro subscriptions for an organization
XXCreate network locations for an organization
XAdd managers for an organization
XXAdd devices to network locations
XXConfigure and manage devices at a network location
XXUpdate firmware for devices at a network location
XXXXMonitor devices at a network location
Insight Pro Subscriptions
NETGEAR Insight Pro requires a subscription. When you purchase a subscription, you receive an emailwith a registration link and a purchase confirmation key.The purchase confirmation key specifies the numberof device credits that are available for your subscription and the expiration date of those device credits.Device credits that are supported under a subscription apply to Insight managed devices only (one devicecredit per Insight managed device). NETGEAR does not require you to spend device credits for non-Insightmanaged devices, even though Insight can discover, register, and, in some cases, even perform basicmonitoring of such devices.
Introduction to Insight Pro
10
Insight Pro, Mobile App and Cloud Portal User Manual
Insight Pro includes the following features:
• Access to both the Insight mobile app and the Insight Cloud Portal, which allows you to access andmanage your Insight devices from a web browser and lets you perform additional tasks
• Support for multi-tenancy with management of multiple organizations, each with multiple network locationsand multiple user roles
• Guided installation and configuration
• Secure remote access
• Instant alerts for critical events
• Access to logs and traffic history
• Self-help and click-to-connect support portal
You can purchase a subscription from a NETGEAR distributor.
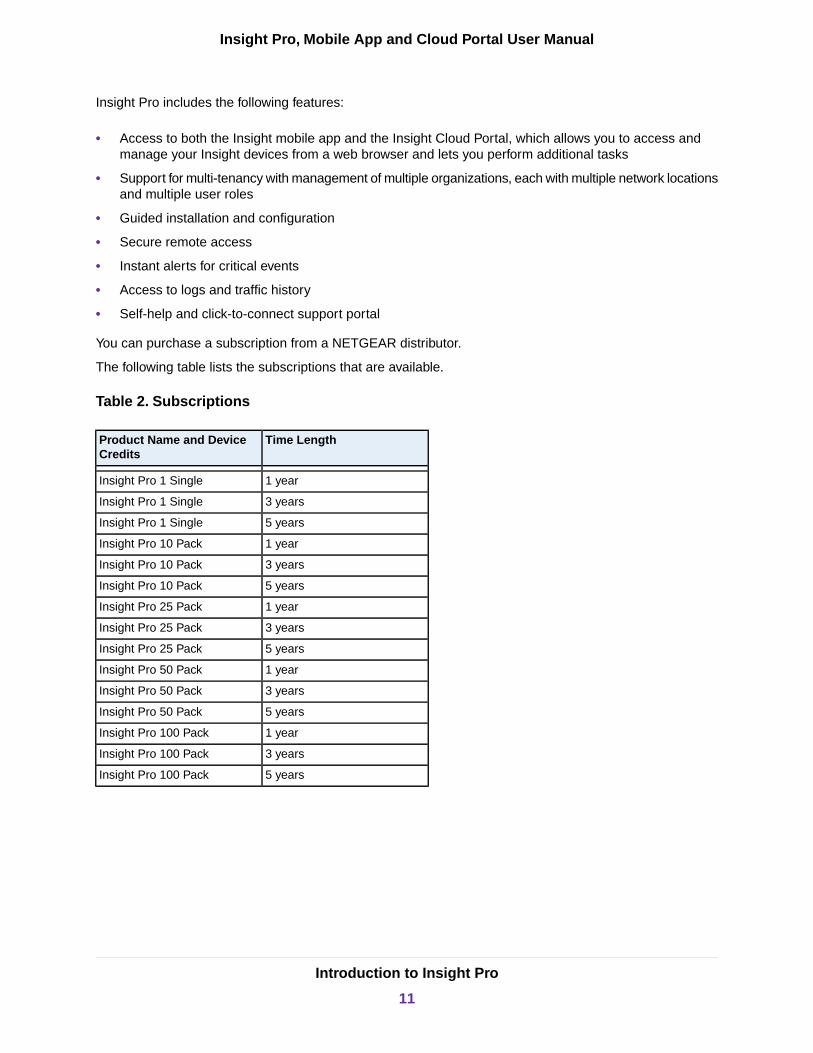
The following table lists the subscriptions that are available.
Table 2. Subscriptions
Time LengthProduct Name and DeviceCredits
1 yearInsight Pro 1 Single
3 yearsInsight Pro 1 Single
5 yearsInsight Pro 1 Single
1 yearInsight Pro 10 Pack
3 yearsInsight Pro 10 Pack
5 yearsInsight Pro 10 Pack
1 yearInsight Pro 25 Pack
3 yearsInsight Pro 25 Pack
5 yearsInsight Pro 25 Pack
1 yearInsight Pro 50 Pack
3 yearsInsight Pro 50 Pack
5 yearsInsight Pro 50 Pack
1 yearInsight Pro 100 Pack
3 yearsInsight Pro 100 Pack
5 yearsInsight Pro 100 Pack
Introduction to Insight Pro
11
Insight Pro, Mobile App and Cloud Portal User Manual
Insight Pro Deployment Examples
The following sections provide Insight Pro deployment examples.
MSP is the Device Owner, Admin, and ManagerIn this example, the MSP is the Insight Pro account holder, owns the NETGEAR devices, and is the adminand manager of the organizations and network locations where the devices are located.
Figure 2. MSP is the device owner and admin and assigns the managers
In this example, the MSP does the following:
• Initiates the Insight Pro account and is the account holder.
• Owns the physical NETGEAR devices.
• Holds the NETGEAR support and warranty entitlements for those devices.
• Purchases the Insight Pro subscription and receives the purchase confirmation keys.
• Leases the devices to different customers (organizations) as part of a service such as Network as aService (NaaS).
• Is the business owner for the customers (organizations) and could, for example, provide IT support andfacilities management for one or more customers.
• Is the admin for the customers (organizations).
• Manages the devices on behalf of the customers (organizations) at the network locations of the customers.
Introduction to Insight Pro
12
Insight Pro, Mobile App and Cloud Portal User Manual
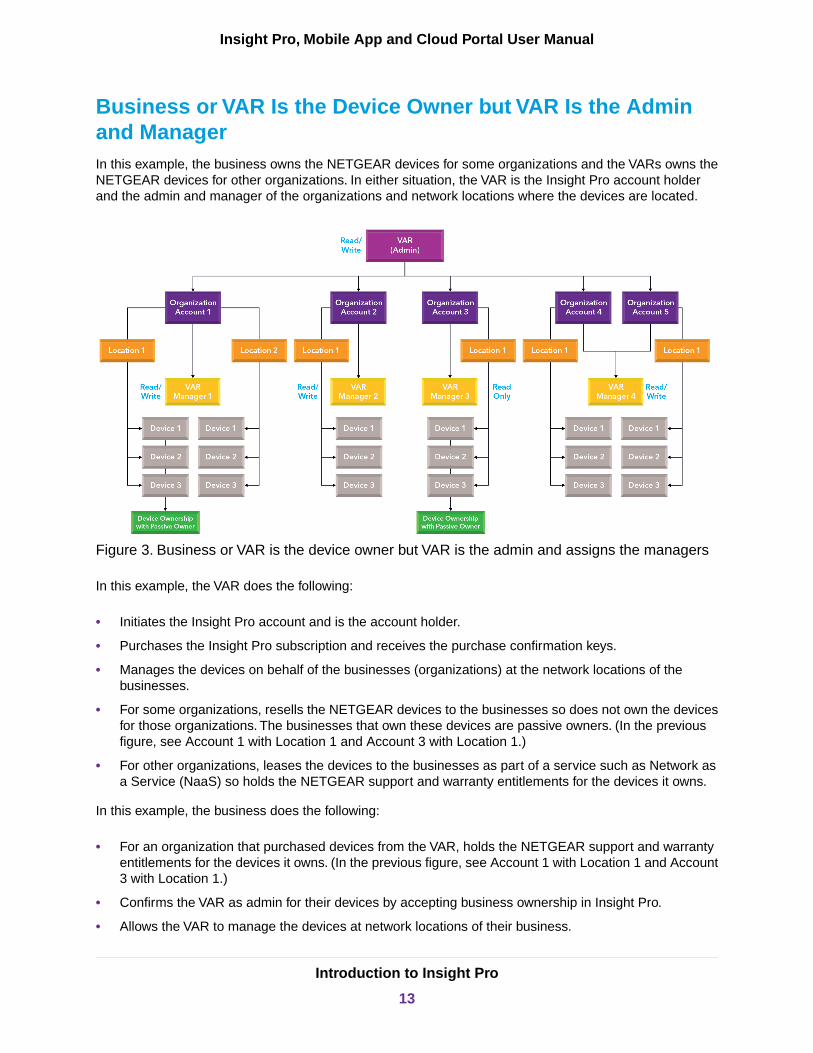
Business or VAR Is the Device Owner but VAR Is the Adminand ManagerIn this example, the business owns the NETGEAR devices for some organizations and the VARs owns theNETGEAR devices for other organizations. In either situation, the VAR is the Insight Pro account holderand the admin and manager of the organizations and network locations where the devices are located.
Figure 3. Business or VAR is the device owner but VAR is the admin and assigns the managers
In this example, the VAR does the following:
• Initiates the Insight Pro account and is the account holder.
• Purchases the Insight Pro subscription and receives the purchase confirmation keys.
• Manages the devices on behalf of the businesses (organizations) at the network locations of thebusinesses.
• For some organizations, resells the NETGEAR devices to the businesses so does not own the devicesfor those organizations. The businesses that own these devices are passive owners. (In the previousfigure, see Account 1 with Location 1 and Account 3 with Location 1.)
• For other organizations, leases the devices to the businesses as part of a service such as Network asa Service (NaaS) so holds the NETGEAR support and warranty entitlements for the devices it owns.
In this example, the business does the following:
• For an organization that purchased devices from the VAR, holds the NETGEAR support and warrantyentitlements for the devices it owns. (In the previous figure, see Account 1 with Location 1 and Account3 with Location 1.)
• Confirms the VAR as admin for their devices by accepting business ownership in Insight Pro.
• Allows the VAR to manage the devices at network locations of their business.
Introduction to Insight Pro
13
Insight Pro, Mobile App and Cloud Portal User Manual
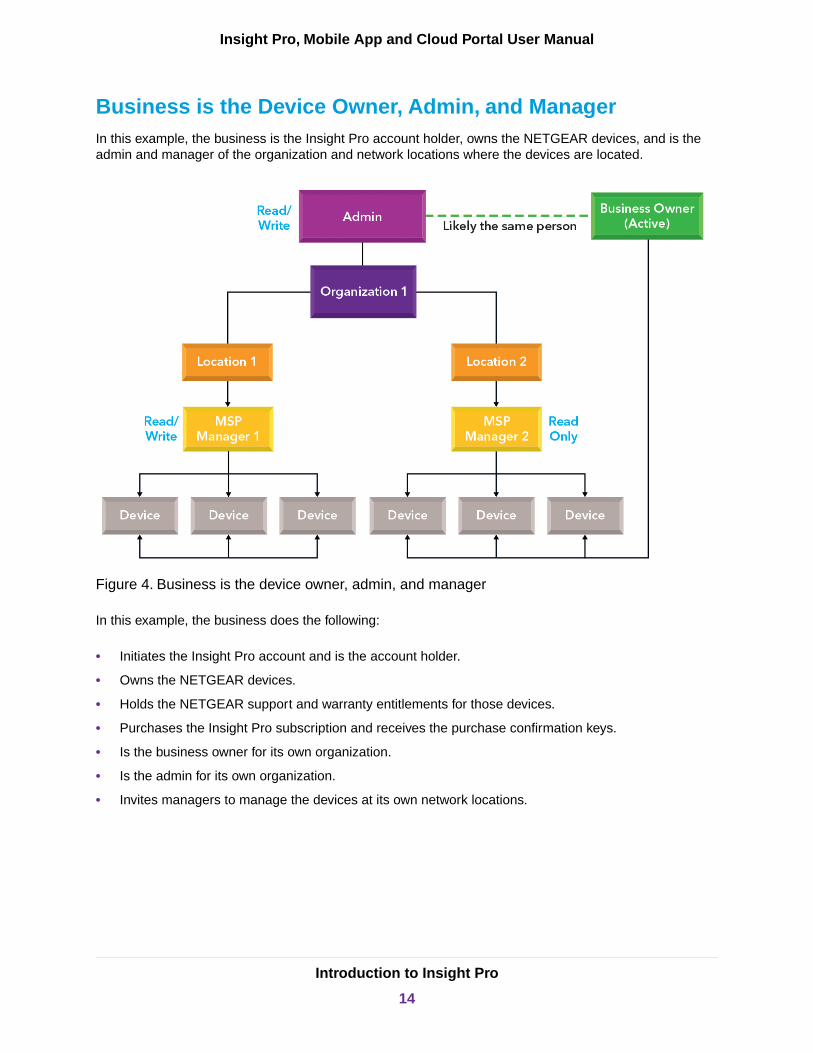
Business is the Device Owner, Admin, and ManagerIn this example, the business is the Insight Pro account holder, owns the NETGEAR devices, and is theadmin and manager of the organization and network locations where the devices are located.
Figure 4. Business is the device owner, admin, and manager
In this example, the business does the following:
• Initiates the Insight Pro account and is the account holder.
• Owns the NETGEAR devices.
• Holds the NETGEAR support and warranty entitlements for those devices.
• Purchases the Insight Pro subscription and receives the purchase confirmation keys.
• Is the business owner for its own organization.
• Is the admin for its own organization.
• Invites managers to manage the devices at its own network locations.
Introduction to Insight Pro
14
Insight Pro, Mobile App and Cloud Portal User Manual
Insight Cloud Portal and Insight Mobile App
You can access the Insight Pro cloud-based management platform in two ways.You can use the InsightCloud Portal and you can use the Insight mobile app installed on a smartphone or tablet.
• Insight Cloud Portal.The Insight Cloud Portal lets you access and manage your Insight devices onlinefrom a web browser. The Cloud Portal supports the following features for Insight managed devices:
- Capability to create organizations and invite associated business owners and managers. (Thesecapabilities are not available in the Insight app.)
- Feature parity with the Insight app for device management.
- A granular dashboard on which you can customize how your monitoring and diagnostics pagesdisplay.
- A layout that takes advantage of your computer’s screen size to display more information at onetime.
• Insight mobile app. The Insight mobile app is an application that is available for iOS and Androiddevices and supports the following features for Insight managed devices:
- Secure remote access.
- Four different ways to add a device to a network location, including scanning your network, scanningthe device QR code, scanning the device barcode, and entering the device serial number.
- Instant alerts for critical events.
- Access to logs and traffic history.
- Self-help and click-to-connect support portal.
The Insight Cloud Portal and Insight mobile app are different interfaces into the same cloud-basedmanagement platform. The cloud-based management platform applies the configuration changes in theorder that it receives them. However, we do not recommend that different users configure the same Insightnetwork simultaneously, one using the Insight mobile app and the other using the Insight Cloud Portal oranother instance of the Insight mobile app.
Insight Cloud Portal Dashboard
The Insight Cloud Portal provides a dashboard that lets you view the system and client health for allorganizations, for each organization, and for each network location of an organization. The dashboard alsoprovides access to detailed information about each device at a network location.
You can customize the dashboard by adding or removing predefined widgets. In a widget, you can customizethe information that displays in the widget.
For more information about the monitoring options that are available through the dashboard, see MonitorInsight Organizations, Network Locations, and Devices Using the Cloud Portal on page 48.
Introduction to Insight Pro
15
Insight Pro, Mobile App and Cloud Portal User Manual

Insight Pro and the Local Browser–Based ManagementInterface
As an Insight Pro subscriber, you can create and manage organizations, network locations, and Insightmanaged devices from the Insight Cloud Portal, which is accessible from a web browser on yourWindows-based computer, Mac, or tablet.You can also add and configure Insight managed devices throughthe Insight mobile app on a smartphone or tablet.
Each Insight managed device also provides a traditional, local browser–based management interface thatfunctions independently of the Insight cloud-based management platform.This hybrid model lets you manageyour device either with the local browser interface or with Insight. However, if you intend to use Insight Pro,we do not recommend that you set up a device in “offline” mode because any configuration changes arenot pushed to the Insight cloud-based management platform and are therefore not reflected in the Insightmobile app and Insight Cloud Portal.
Note the following about changing the management mode:
• Access points. If you configure an access point through the local browser interface and then enablethe Insight management mode, or the other way around, the settings are reset to their factory defaultsettings with some exceptions:
- Change to local browser interface mode. The Insight management mode becomes disabled andall settings except for the access point IP address and access point name are reset to their factorydefault settings.
- Change to Insight management mode. The local browser interface does not become disabledbut all settings except for the access point IP address and access point name are reset to theirfactory default settings. Access point settings that are Insight-manageable are masked out in thelocal browser interface. However, you can use the local browser interface to change access pointsettings that are not Insight-manageable.
• Switches. If you configure a switch through the local browser interface and then enable the Insightmanagement mode, or the other way around, the settings are not reset to their factory default settings:
- Change to local browser interface mode. The Insight management mode becomes disabled andthe current Insight-manageable switch settings are saved to the cloud server. Any changes that youmake using the local browser interface (including changing the switch password) are not saved tothe cloud server.
- Change to Insight management mode. If you added the switch to an Insight network locationbefore, all Insight-manageable switch settings are returned to the last configuration saved on thecloud server, including the switch password (that is, the password is reset to the Insight networklocation password). However, switch settings that are not Insight-manageable and that you changedusing the local browser interface are not reset.
Changes to Insight-manageable settings from the local browser interface might alsocreate conflicts with the rest of the Insight-managed network to which the device isconnected. While you manage a device with the local browser interface, you cannotuse the Insight mobile app or Insight Cloud Portal.
Note
Introduction to Insight Pro
16
Insight Pro, Mobile App and Cloud Portal User Manual
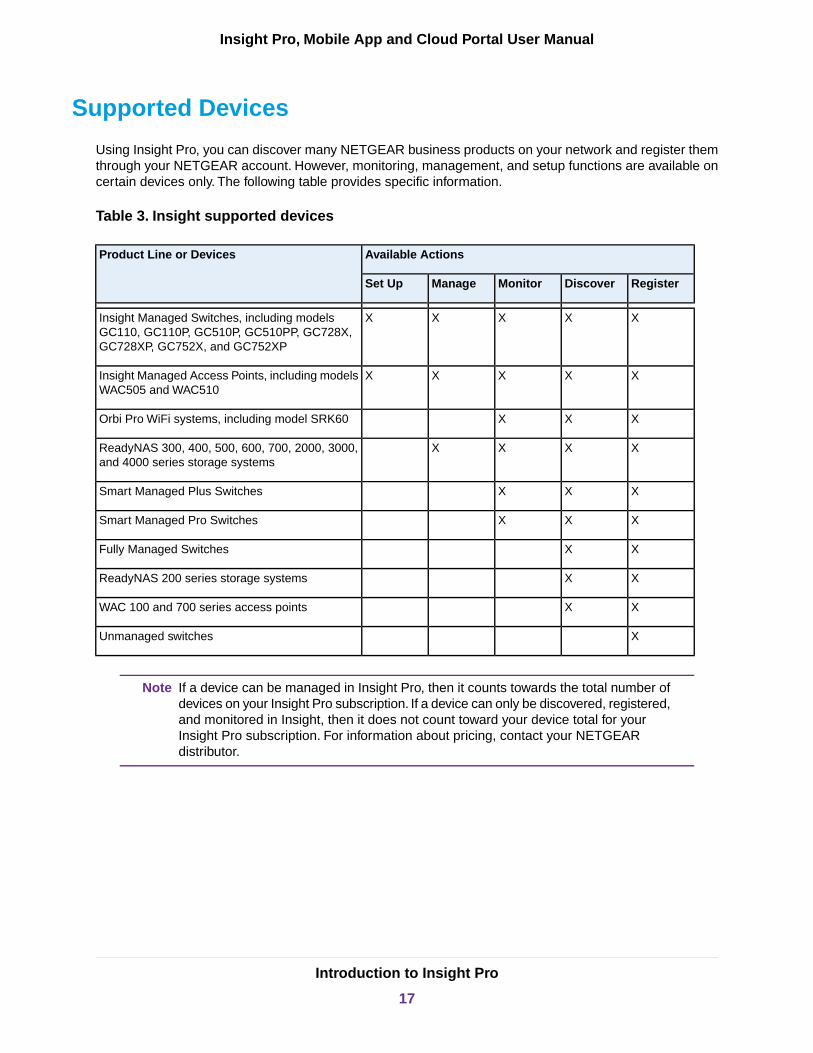
Supported Devices
Using Insight Pro, you can discover many NETGEAR business products on your network and register themthrough your NETGEAR account. However, monitoring, management, and setup functions are available oncertain devices only. The following table provides specific information.
Table 3. Insight supported devices
Available ActionsProduct Line or Devices
RegisterDiscoverMonitorManageSet Up
XXXXXInsight Managed Switches, including modelsGC110, GC110P, GC510P, GC510PP, GC728X,GC728XP, GC752X, and GC752XP
XXXXXInsight Managed Access Points, including modelsWAC505 and WAC510
XXXOrbi Pro WiFi systems, including model SRK60
XXXXReadyNAS 300, 400, 500, 600, 700, 2000, 3000,and 4000 series storage systems
XXXSmart Managed Plus Switches
XXXSmart Managed Pro Switches
XXFully Managed Switches
XXReadyNAS 200 series storage systems
XXWAC 100 and 700 series access points
XUnmanaged switches
If a device can be managed in Insight Pro, then it counts towards the total number ofdevices on your Insight Pro subscription. If a device can only be discovered, registered,and monitored in Insight, then it does not count toward your device total for yourInsight Pro subscription. For information about pricing, contact your NETGEARdistributor.
Note
Introduction to Insight Pro
17
Insight Pro, Mobile App and Cloud Portal User Manual
Lexicon of Insight Pro Terms
The following is an explanation of Insight Pro terms and abbreviations that we use in this manual:
• Account holder. The managed service provider (MSP), value-added reseller (VAR), small businessowner (SBO), or individual that initiates and owns the Insight Pro account and that can own the NETGEARdevices that are used in an Insight Pro network.
• Access rights. The read and write or read-only access rights for an Insight Pro role, which determinethe tasks that are associated with the role. Administrators receive read and write access; Owners receiveread-only access; Managers receive either read and write or read-only access.
• Admin or administrator. The MSP, VAR, SBO, or individual that owns the Insight Pro account, setsup organizations, and invites owners and managers for those organizations.
• Business owner. The entity or individual that owns the Insight Pro organization and can own theNETGEAR devices that are used in an Insight Pro network.
• Channel. The sales and distribution method that is used for the purchase of Insight Pro. The channelconsists of a distributor and a VAR or MSP.
• Client. An Ethernet (wired) or WiFi client of a network at a location of an organization.
• Device. See Managed device.
• Device credit. The unit that lets you add a single Insight managed device to a network location. Asubscription key includes a set number of device credits. NETGEAR does not require you to spenddevice credits for non-Insight managed devices, even though Insight can discover, register, and, insome cases, even perform basic monitoring of such devices.
• Device entitlement.The NETGEAR support and warranty entitlements for a device.These entitlementscan be hold by the business owner or by the administrator.
• Distributor. The wholesaler that sells Insight Pro to a VAR or MSP.
• Insight. NETGEAR Insight is the cloud-based network and device management platform.
• Insight Basic. A free Insight account that lets you manage and monitor a maximum of two Insightdevices using the NETGEAR Insight mobile app only. Insight Basic excludes premium features suchas Smart WiFi roaming and PoE scheduling. This version of Insight is not a multi-tenant managementplatform.
• Insight Cloud Portal. The Insight Cloud Portal (or abbreviated as the Cloud Portal), is the website thatprovides access to the Insight cloud-based management platform. The Cloud Portal is available toInsight Premium subscribers and Insight Pro subscribers.
• Insight mobile app.The NETGEAR Insight mobile app (or abbreviated as the Insight app or the mobileapp) is the application for Android and iOS smartphones.The Insight app provides access to the Insightcloud-based management platform. The Insight app is available to all subscribers, including InsightBasic subscribers.
• Insight Premium. An Insight account that requires a subscription fee for each managed Insight deviceand that grants access to both the NETGEAR Insight mobile app and the Insight Cloud Portal. InsightPremium includes premium features such as Smart WiFi roaming and PoE scheduling. This version ofInsight is not a multi-tenant management platform.
• Insight Pro. Insight Pro is the cloud-based management, multi-tenant management platform for VARs,MSPs, and other types of businesses.
Introduction to Insight Pro
18
Insight Pro, Mobile App and Cloud Portal User Manual
• LAG. Link aggregation group, which is two or more Ethernet links grouped into a single logical linkbetween two network devices, allowing for an increase in throughput, fault tolerance, or both. The mostcommon combinations involve connecting a switch to another switch, a server, a network attachedstorage (NAS) device, or a multiport WiFi access point.
• Managed device. A device such as a switch, access point, or ReadyNAS storage system that is managedby Insight and that requires one device credit.
• Manager.The individual who is assigned one or more organizations for configuration and management(both of which require read and write access), monitoring (which requires either read and write accessor read-only access), or a combination of these tasks.
• MSP. A managed service provider (MSP). In relation to Insight Pro, an MSP can create an Insight Proaccount on behalf of its clients, own the NETGEAR devices, lease them to its clients, and manage theInsight network locations on behalf of its clients.
• Network location. Also referred to as a network or a location. A network location is a subaccount ofan organization and is the physical site where the NETGEAR devices reside. Therefore, a networklocation includes a wired network, WiFi network with SSIDs, storage network, or a combination of thesethree components.
• Organization. An organization is a subaccount of a single Insight Pro account. Each organization canreflect a customer of an MSP or VAR. An organization can support multiple network locations, each ofwhich, in turn, can be considered a subaccount of the organization.
• Organization policy. The policy that determines the notifications, reports, and device ownership for anorganization in Insight Pro.
• Owner. See Business owner.
• PoE. Power over Ethernet, which allows a device that is PoE-capable to receive power over the Ethernetcable from a switch that is also PoE-capable.
• Policy. See Organization policy.
• Provisioning.The process of installing and configuring devices and the associated wired network, WiFinetwork, and storage system for one particular network location.
• Purchase confirmation key. (Used to be referred to as license key.) A string of numerical andalphanumerical characters that lets you initiate an Insight Pro account. After you set up an Insight Proaccount, you can obtain additional purchase confirmation keys to increase the number of device credits,extend the expiration date of device credits, or do both.
• PVID. A port VLAN ID, which is the VLAN ID that is assigned to the port. By default, all switch ports aremembers of VLAN 1 and are assigned a port VLAN ID (PVID) of 1. If you set up other VLANs, you canassign a different PVID to a port.
• RADIUS. Remote Authentication Dial-In User Service, which is a protocol that allows authenticationand accounting for WPA2 Enterprise WiFi security and MAC access control lists (ACLs), both of whichare supported on Insight Managed access points.
• Reseller. See VAR.
• Rights. See Access rights.
• Roles. The roles that an Insight Pro organization requires: a single administrator, a single (business)owner, and one ore more managers.
• SBO. A small business owner (SBO). In relation to Insight Pro, an SBO creates its own Insight Proaccount, owns the NETGEAR devices, and managed its own Insight network locations.
• SSID. Service set identifier, which is the WiFi network name. When you add a new SSID to a networklocation, you are not only creating a WiFi network name but are actually defining the settings for a new
Introduction to Insight Pro
19
Insight Pro, Mobile App and Cloud Portal User Manual
virtual access point (VAP). An SSID that you create on one access point at a location is deployed onall access points at that location.
• Storage network. A storage network that consist of at least one ReadyNAS storage device at onenetwork location.
• Subscription. An Insight Pro account requires a subscription with one or more purchase confirmationkeys, which define the number of available device credits and the expiration date of those device credits.
• Uplink. For a switch, the Ethernet connection to the router or modem that provides the Internetconnection. For an access point or ReadyNAS storage system, to the Ethernet connection to the wirednetwork.
• VAR. A value-added reseller (VAR). In relation to Insight Pro, a VAR can create an Insight Pro accounton behalf of its clients, sell the NETGEAR devices with added services to its clients, and manage theInsight network locations for its clients.
• VLAN. A virtual LAN (VLAN), which is a local area network (LAN) that maps devices on a basis otherthan geographic location, for example, by department, type of user, or primary application. Traffic thatflows between different VLANs must go through a router, just as if the VLANs are on two separate LANs.
• Wired network. An Ethernet network that consists of at least one switch at one network location withdistinct features such as VLANs, spanning tree, and PoE schedules that apply to the entire wired network.(Other switch features apply to individual switches only or to individual switch ports only.)
• Wireless network. A collection of SSIDs at one network location with distinct features such as URLfiltering, Auto RRM, Fast Roaming, and Facebook Wi-Fi that apply to the entire WiFi network. (OtherWiFi features apply to individual SSIDs only or to individual access points only.) An SSID that you createon one access point at a location is deployed on all access points at that location.
Introduction to Insight Pro
20
Insight Pro, Mobile App and Cloud Portal User Manual
2Get Started With Insight Pro
This chapter describes how to install the Insight mobile app and access the Insight Cloud Portal, create anaccount, create an Insight network organization, create a location under that organization, and discover, add,and register devices. The chapter also describes how to manage your organizational policies and notificationsand how to add a purchase confirmation key to your Insight Pro subscription.
This chapter includes the following sections:
• Insight Pro Accounts• Access the Insight Cloud Portal• Install the NETGEAR Insight Mobile App• Manage Organizations and Roles in Insight Pro• Create an Insight Network Location for an Organization• Discover and Add Devices to a Network Location of an Organization• Access a Network Location and Its Devices Remotely• Interpret the Green, Red, Orange, and Gray Circles Next to a Device• View and Manage Insight Notifications• Add a Purchase Confirmation Key to Your Insight Pro Subscription• Set Up Two-Step Verification for Logging In to Insight• Manage Network Locations, Networks, and Devices
21
Insight Pro Accounts
To create an Insight Pro account, you need a purchase confirmation key and you must use the Cloud Portalto set up your Insight Pro account (see Create an Insight Pro Account on page 22). That is, you cannot usethe Insight app to create an Insight Pro account. However, after you created an Insight Pro account in theCloud Portal, you can use both the Cloud Portal and the Insight app to manage your organizations, networks,and devices.
If you already own an Insight Basic or Premium account, you can migrate to an Insight Pro account withoutlosing your network and device configurations (see Migrate From Insight Basic or Premium to Insight Proon page 22).
Purchase an Insight Pro SubscriptionYou can purchase an Insight Pro subscription from a NETGEAR distributor.
After purchase of your Insight Pro subscription, you receive a confirmation email from NETGEAR.This emailincludes a registration link and a purchase confirmation key.You must open the registration link and enteryour purchase confirmation key so that you can set up an Insight Pro account.
For more information about setting up an Insight Pro account, see Create an Insight Pro Account on page22.
Migrate From Insight Basic or Premium to Insight ProIf you are already an Insight Basic or Insight Premium account holder and are trying to use the email addressthat is associated with your existing Insight account to set up a new Insight Pro account as an administrator,you can migrate to Insight Pro using the same email address. (You cannot do so as a business owner ormanager.) As an administrator, after you set up an organization in Insight Pro, you can migrate existingnetwork locations and device settings to that organization as well.
If you use your existing Insight Basic or Insight Premium email address to set up an Insight Pro account(see Create an Insight Pro Account on page 22), you are presented with the Upgrade Account pop-upwindow that lets you upgrade your existing account to Insight Pro.
Create an Insight Pro AccountYou can create an Insight Pro account using the Cloud Portal. Before you can do so, you must purchasean Insight Pro subscription from your NETGEAR distributor. After purchase of your Insight Pro subscription,you receive a purchase confirmation email from NETGEAR.
If you perform this task, you become an Insight Pro administrator.
You can set up the following types of accounts:
• Managed Service Provider.You are signing up on behalf of your customers. Enter the informationabout your own business as a managed service provider, not the information about your customers.
• Small Business Owner.You are signing up for your own business. Enter the information about yourown business.
Get Started With Insight Pro
22
Insight Pro, Mobile App and Cloud Portal User Manual
To create an Insight Pro account and sign in to your new account:
1. In your email program, open the purchase confirmation email from NETGEAR.
The email includes a registration link and a purchase confirmation key.
2. Copy the purchase confirmation key and click the registration link.
A NETGEAR verification page opens.
3. Paste the purchase confirmation key into the field on the page and click the Next button.
The NETGEAR Account Sign-Up page displays.
4. Specify an email address and password, complete the required fields about your contact information,and select your country.
The password that you specify must be at least six characters in length and must contain one uppercase,one lowercase, and one numerical character. The following special characters are allowed: ! @ # $ %^ & * ( )
5. Click the Next button.
6. Select your account type.
Select Managed Service Provider or Small Business Owner.
7. Complete the required fields about your business information and select the country in which you dobusiness.
8. Read the terms and conditions and, if you agree, select the By Signing up, I agree to the Terms andConditions check box.
9. Click the NETGEAR Sign-Up button.
A confirmation page displays. A verification email is sent to the email address that you used to set upyour Insight account.You must confirm your email address.
10. In your email program, open the email from NETGEAR Support and click the Verify your email addresslink.
A web page opens with the message Your email address has been verified.
11. If the Account Sign-In web page of the Insight Cloud Portal does not open automatically, visithttps://insight.netgear.com/#/login.
The Account Sign-In web page displays.
12. Enter the email address and password that you used to set up your new Insight Pro account.
13. Click the NETGEAR Log In button.
You are now ready to set up an Insight organization and assign a business owner and managers to theorganization, add network locations to the organization, and add devices to the network locations.
For more information, see the following sections:
• Manage Organizations and Roles in Insight Pro on page 24
• Create an Insight Network Location for an Organization on page 30
• Discover and Add Devices to a Network Location of an Organization on page 32
Get Started With Insight Pro
23
Insight Pro, Mobile App and Cloud Portal User Manual
Access the Insight Cloud Portal
The Insight Cloud Portal is available for Insight Pro subscribers (administrators) and for business ownersand managers of organizations that are set up under an Insight Pro account athttps://insight.netgear.com/#/login.
To access the Insight Cloud Portal:
1. Visit https://insight.netgear.com/#/login.
The Insight Cloud Portal web page displays.
2. Select Login.
The NETGEAR Account Sign-In page displays.
3. Enter your Insight Pro email address and password.
If you do not own an Insight Pro account, see Insight Pro Accounts on page 22.
4. Click the NETGEAR Sign In button.
Depending on your credentials, you can now manage organizations, network locations, and devices,and do more.
Install the NETGEAR Insight Mobile App
You can install the NETGEAR Insight mobile app on an iOS or Android mobile device.
To install the Insight mobile app:
On your mobile device, go to the Apple App Store or the Google Play Store, search for NETGEARInsight, and download the app.
Manage Organizations and Roles in Insight Pro
As an Insight Pro account holder with administrator credentials, you can create and manage organizationsand roles in the Cloud Portal.
You cannot manage organizations and roles using the Insight app, you must use theCloud Portal. However, you can use the Insight app for the management of locationsand devices that are set up for an organization.
Note
Get Started With Insight Pro
24
Insight Pro, Mobile App and Cloud Portal User Manual
When you set up a new organization, you must assign an owner to the organization. After you specify theowner and send an invitation email to the owner, the owner must acknowledge the invitation and set up anInsight account. Once the owner account is established, you can assign the owner to multiple locations, oryou can assign different owners to different locations.
After you set up an organization, you must assign at least one manager to the organization. After you specifya manager and send an invitation email to the manager, the manager must acknowledge the invitation andset up an Insight account. Once the manager account is established, you can assign the manager to multiplelocations, including future organizations that you did not yet set up, or you can assign different managersto different locations.
After you set up an organization, you can set up one or more locations under the organization.You can adddevices to a location only and manage devices for a location only. However, as an administrator, you cansearch and view all devices that are assigned to all locations at all organizations.
You can manage organizations and roles in Insight Pro as described in the following sections:
• Create an Organization and Assign a Business Owner on page 25
• Confirm That You Are the Business Owner for an Organization on page 26
• Add a Manager for an Organization on page 27
• Confirm That You Are a Manager for an Organization on page 28
Create an Organization and Assign a Business OwnerTo perform this task, you must be an administrator.
An Insight organization is a subaccount of a single Insight Pro account.You can set up multiple locationsunder one single organization. In Insight Pro, an organization consists of a name, a business owner, anorganizational policy, and, as an option, a logo.
To create an organization and assign a business owner:
1. Access the Insight Cloud Portal.
All organizations display.
2. If the network menu at the top of the page does not show All Organizations, click the network menu andselect See All Organizations.
3. At the top right of the page, click the + button.
The Add New Organization page displays.
4. If this is the first organization that you are setting up, or you do not want to use an existing owner, invitea new business owner by specifying the name, email address, phone number, and business phonenumber for the new owner.
The email address is used to send the owner an invitation email so that the owner can set up an InsightPro account with that email address.
If this is not the first organization that you are setting up, you can select an existing owner from the PickExisting Owner menu.
5. To upload an image for the new organization, click the Choose a file button, locate the image, andupload it.
6. Specify the policy for the new organization by specifying the following information:
Get Started With Insight Pro
25
Insight Pro, Mobile App and Cloud Portal User Manual
• Email Notifications. By default, the admin and manager receive email notifications but the businessowner does not.You can specify different setting by selecting and clearing check boxes.
• Email Reports. By default, the admin and manager receive email reports but the business ownerdoes not.You can specify different setting by selecting and clearing check boxes.
• Scheduled Reports. By default, reports are emailed weekly.You can change the frequency tomonthly, or you can disable the mailing of reports entirely by clicking the button so that it displaysgray.
• Push Notifications. By default, the admin and manager receive push notifications on theirsmartphones but the business owner does not.You can specify different setting by selecting andclearing check boxes.
• Device Ownership. By default, device ownership is assigned to the admin but, you can assign itto the business owner. The organization supports a single device owner. Device ownershipdetermines who owns the physical NETGEAR devices and holds the NETGEAR support and warrantyentitlements for those devices.
7. Click the Save button.
Your settings are saved and the new organization is set up.
For information about adding location to the organization, see Create an Insight Network Location for anOrganization on page 30.
Confirm That You Are the Business Owner for an OrganizationWhen an Insight Pro account holder with administrator credentials sets up an organization and assigns youas the business owner, you must confirm your role and use an Insight Pro account with the same emailaddress at which you received the invitation to become an owner.You cannot use an existing Insight account.You must use an Insight Pro account. If you already set up an Insight Pro account with the email addressat which you received the invitation, you can log in using that account.
To confirm that you are the business owner for an organization and log in to or create yourInsight Pro account.
1. In your email program, open the email from NETGEAR and click the click here to confirm link.
The NETGEAR Account Login web page at https://insight.netgear.com/#/register opens.
2. If you already set up an Insight Pro account with the email address at which you received the invitation,scroll to the bottom of the page and click the LOG IN button and follow the prompts.
Otherwise, continue creating a new Insight Pro account.
3. Complete the required fields and select your country.
The password that you specify must be at least six characters in length and must contain one uppercase,one lowercase, and one numerical character. The following special characters are allowed: ! @ # $ %^ & * ( )
4. Read the terms and conditions and, if you agree, select the By Signing up I agree to the Terms andConditions check box.
5. Click the NETGEAR Sign Up button.
Get Started With Insight Pro
26
Insight Pro, Mobile App and Cloud Portal User Manual
A confirmation page displays. A verification email is sent to the email address that you used to set upyour Insight Pro account.You must confirm your email address.
6. In your email program, open the email from NETGEAR and click the Verify your email address link.
A web page opens with the message Your Email verification has been completed or a similar message.
7. If the Account Sign-In web page of the Insight Cloud Portal does not open automatically, visithttps://insight.netgear.com/#/login.
The Account Sign-In web page displays.
8. Enter the email address and password that you used to set up your new Insight Pro account.
9. Click the NETGEAR Log In button.
You are now ready to view your organization. As an owner, your access is read-only. Only theadministrator and manager of the organization can make changes to the organization and add locationsand devices.
Add a Manager for an OrganizationTo perform this task, you must be an administrator.
You can add a manager with either read and write credentials or read-only credentials for an organization.If you want to assign the day-to-day management of an organization to a manager, provide read and writeaccess to the manager. Doing so allows the manager to add and manage locations and devices, andconsequently, networks, storage systems, and clients.
To add a manager for an organization:
1. Access the Insight Cloud Portal.
All organizations display.
2. In the menu at the top of the page, select Managers.
The Managers page displays. If you did not yet add any managers, none are displayed.
3. At the top right of the page, click the + (Add Manager) button.
The Invite New Manager page displays.
4. Specify the name and email address.
The email address is used to send the manager an invitation email so that the manager can set up anInsight Pro account with that email address.
5. From the Access Policy menu, select one of the following policies:
• Read/Write.The manager can actively manage locations and devices, and consequently, networks,storage systems, and clients.
• Read. The manager can monitor locations and devices but cannot actively manage them.
6. Specify individual organizations to which the access policy applies or, to allow management of allorganizations, select the Select All check box.
Get Started With Insight Pro
27
Insight Pro, Mobile App and Cloud Portal User Manual
7. To allow management of future organizations, select the Grant access to all future organizationscheck box.
8. Click the Invite button.
Your settings are saved and an invitation is sent to the manager.
Confirm That You Are a Manager for an OrganizationWhen an Insight Pro account holder with administrator credentials sets up an organization and assigns youas the manager, you must confirm your role and use an Insight Pro account with the same email addressat which you received the invitation to become a manager.You cannot use an existing Insight account.Youmust use an Insight Pro account. If you already set up an Insight Pro account with the email address atwhich you received the invitation, you can log in using that account.
To confirm that you are a manager for an organization and log in to or create your InsightPro account.
1. In your email program, open the email from NETGEAR and click the click here to confirm link.
The NETGEAR Account Login web page at https://insight.netgear.com/#/register opens.
2. If you already set up an Insight Pro account with the email address at which you received the invitation,scroll to the bottom of the page and click the LOG IN button and follow the prompts.
Otherwise, continue creating a new Insight Pro account.
3. Complete the required fields and select your country.
The password that you specify must be at least six characters in length and must contain one uppercase,one lowercase, and one numerical character. The following special characters are allowed: ! @ # $ %^ & * ( )
4. Read the terms and conditions and, if you agree, select the By Signing up I agree to the Terms andConditions check box.
5. Click the NETGEAR Sign Up button.
A confirmation page displays. A verification email is sent to the email address that you used to set upyour Insight Pro account.You must confirm your email address.
6. In your email program, open the email from NETGEAR and click the Verify your email address link.
A web page opens with the message Your Email verification has been completed or a similar message.
7. If the Account Sign-In web page of the Insight Cloud Portal does not open automatically, visithttps://insight.netgear.com/#/login.
The Account Sign-In web page displays.
8. Enter the email address and password that you used to set up your new Insight Pro account.
9. Click the NETGEAR Log In button.
You are now ready to view or manage the organizations to which you are assigned.
Get Started With Insight Pro
28
Insight Pro, Mobile App and Cloud Portal User Manual
View Owners or Managers Using the Insight AppYour Insight Pro role determines your access rights in the Insight app. As an administrator, you can viewboth the managers and business owners. As a business owner, you can view the managers only. As amanager you can view the business owners only.
To manage business owners and managers, you must be the administrator and you must use the CloudPortal (see Create an Organization and Assign a Business Owner on page 25 and Add a Manager for anOrganization on page 27). That is, you cannot manage owners and managers through the Insight app.
To views owners and managers using the Insight app:
1. Launch the Insight app.
All organizations display.
2. Tap the menu button in the upper left corner of the screen.
3. Tap Account Management.
4. Do one of the following:
• To view managers, tap View Managers.The managers display, including their email addresses and the number of organizations eachmanager is assigned to.
• To view business owners, tap View Owners.The owners display, including their email addresses and the number of organizations each owneris assigned to.
Change the Policy or Device Ownership for an OrganizationUsing the Cloud PortalTo perform this task, you must be an administrator.
When you set up a new organization, you specify the policy for the organization. That is, you specify thedevice ownership (admin or business owner), email and push notifications, email reports, and scheduledreports.You can change any of these policy components.
To change the policy for an organization using the Cloud Portal:
1. Access the Insight Cloud Portal.
All organizations display.
2. If the network menu at the top of the page does not show All Organizations, click the network menu andselect See All Organizations.
3. Select your organization.
The business owner, locations, and managers for the organization display.
4. Select Settings.
The Locations page displays.
5. Select Policy.
The Policy page displays.
Get Started With Insight Pro
29
Insight Pro, Mobile App and Cloud Portal User Manual
6. Change the policy for the organization by specifying the following information:
• Email Notifications. Specify who receives email notifications by selecting and clearing check boxes.
• Email Reports. Specify who receives email reports by selecting and clearing check boxes.
• Scheduled Reports. Change the frequency of reporting by selecting a radio button, or disable themailing of reports entirely by clicking the button so that it displays gray. If reporting is disabled,reenable the mailing of reports by clicking the button so that it displays green.
• Push Notifications. Specify who receives push notifications by selecting and clearing check boxes.
• Device Ownership. Specify device ownership by selecting a radio button.The organization supportsa single device owner. Device ownerships determines who owns the physical NETGEAR devicesand holds the NETGEAR support and warranty entitlements for those devices.
7. To upload another image for the organization, click the Choose a file button, locate the image, andupload it.
8. Click the Submit button.
Your settings are saved.
Change the Organization InformationTo perform this task, you must be an administrator.
You can change the information for an existing organization. For information about changing the policy, seeChange the Policy or Device Ownership for an Organization Using the Cloud Portal on page 29.
To change the information for an organization:
1. Access the Insight Cloud Portal.
All organizations display.
2. If the network menu at the top of the page does not show All Organizations, click the network menu andselect See All Organizations.
3. For the organization that you want to change, click the … button and select Edit Organization.
The Edit Organization page displays.
4. Change the name of the organization, the owner or owner information, the logo, or a combination ofthese.
You can also change the policy on the Edit Organization page (for more information, see Change thePolicy or Device Ownership for an Organization Using the Cloud Portal on page 29).
5. Click the Save button.
Your settings are saved.
Create an Insight Network Location for an Organization
For an organization, you can create multiple network locations. A network location is a collection of devicesin the same physical location that use the same administrator password and can be monitored simultaneously
Get Started With Insight Pro
30
Insight Pro, Mobile App and Cloud Portal User Manual
in Insight. If you want to monitor and manage Insight devices in different physical locations belonging to thesame organization, you must create a new Insight network location for each physical location.
Create an Insight Network Location for an Organization Usingthe Insight AppYou can create an Insight network location for an organization using the Insight app.
To create an Insight network location for an organization using the Insight app:
1. Launch the Insight app.
All organizations display.
2. If the organizations do not display, tap the menu in the upper middle of the screen and then tap Back.
3. In the upper middle of the screen, tap the organization for which you want to create a network locationand then tap Create New Network Location.
4. In the Network Location Name field, enter a name for your new network location.
The name must be 3 to 24 characters long, letters and numbers only. If you plan to set up more thanone Insight network location, be sure that you create descriptive names that can help you rememberwhich network location is which, such as 2nd Floor Marketing, Mowry Avenue, or Richmond Office.
5. In the Device Admin Password field, enter the password that you want to use for your Insight networklocation.
This device admin password replaces the administrative password on all devices added to this networklocation. The password must be 6 to 20 characters long.
6. Select the country and time zone for your new Insight network location and tap Next.
7. Read the pop-up notification about password changes to devices on the network and tap OK.
Your Insight network location is now set up.You can view your network location at any time on theNetworks page. Tap the menu in the upper middle of the screen, tap the network location that you wantto view, and in the menu at the bottom, tap Networks.
For information about adding devices to your network location, see Discover and Add Devices to a NetworkLocation of an Organization on page 32.
Create an Insight Network Location for an Organization Usingthe Cloud PortalYou can create an Insight network location for an organization using the Cloud Portal.
To create an Insight network location for an organization using the Cloud Portal:
1. Access the Insight Cloud Portal.
All organizations display.
2. If the network menu at the top of the page does not show All Organizations, click the network menu andselect See All Organizations.
3. Select the organization for which you want to create a network location.
Get Started With Insight Pro
31
Insight Pro, Mobile App and Cloud Portal User Manual
All network locations for the organization display. If you did not yet add any locations, none are displayed.
4. At the top right of the page, click the + (Add Location) button.
The Setup a New Network Location pop-up window opens.
5. In the Location Name field, enter a name for your new network location.
The name must be 3 to 24 characters long, letters and numbers only. If you plan to set up more thanone Insight network location, be sure that you create descriptive names that can help you rememberwhich network location is which, such as 2nd Floor Marketing, Mowry Avenue, or Richmond Office.
6. In the Device Admin Password field, enter the password that you want to use for your Insight networklocation.
This device admin password replaces the administrative password on all devices added to this networklocation. The password must be 6 to 20 characters long.
7. As an option, add the street, city, and state for your new network location.
8. Enter the zip code for your location.
9. Select the country and time zone for your new network location.
10. To upload an image for your new network location, click the Choose a file button, locate the image,and upload it.
11. Click the Save button.
Your settings are saved and your new Insight network location is set up.
For information about adding devices to your network location, see Discover and Add Devices to a NetworkLocation of an Organization on page 32.
Discover and Add Devices to a Network Location of anOrganization
You can add a device to a network location of an organization in Insight Pro using the Insight app in fourdifferent ways.You can add a device using the Cloud Portal only by entering the serial number of the device.
When you add an unregistered device to a network location of an organization, the device is automaticallyregistered to the business owner that you specified for the organization.
IMPORTANT:For you to be able to add a device to Insight, the device must be connectedto the Internet, the default gateway and DNS servers that are being used forthe Internet connection must be defined correctly, and a firewall must not beblocking the traffic between the device and the Insight cloud-basedmanagement platform.
When you add a device for the first time, Insight pushes firmware updates to thedevice, which causes the device to be reconfigured and might cause it to rebootmultiple times. The entire process of adding a device for the first time might take upto 20 minutes.
Note
Get Started With Insight Pro
32
Insight Pro, Mobile App and Cloud Portal User Manual
Before you can add a device in the Insight app or through the Insight Cloud Portal, you must complete thefollowing steps:
1. Create an Insight Pro account.For more information, see Create an Insight Pro Account on page 22.
2. Create an organization and assign a business owner to the organization.For more information, see Create an Organization and Assign a Business Owner on page 25.
3. Create a network location for the organization.For more information, see Create an Insight Network Location for an Organization on page 30.
The following sections describe the ways in which you can add devices in the Insight app or through theCloud Portal:
• Add a Device by Scanning Your Network With the Insight App• Add a Device by Scanning Its QR Code With the Insight App• Add a Device by Scanning Its Barcode With the Insight App• Add a Device by Entering Its Serial Number in the Insight App• Add a Device by Entering Its Serial Number Using the Cloud Portal
Add a Device by Scanning Your Network With the Insight AppIf you connect your mobile device to the same WiFi network that your new device is connected to, the Insightapp can reach the device and you can scan your network for the new device.
To add a device by scanning your network with the Insight app:
1. Launch the Insight app.
All organizations display.
2. If the organizations do not display, tap the menu in the upper middle of the screen and then tap Back.
3. In the upper middle of the screen, tap the organization for which you want to add a device to a networklocation.
4. Tap + in the upper right corner of the screen.
5. Tap Scan Network.
Insight scans for devices on the network that your mobile device is connected to.
6. Select the check box next to the device that you want to add and tap Next.
7. Select a network location.
8. Name your device and tap Next.
9. Tap Continue.
10. If you are adding an Insight Managed switch or access point, follow the onscreen instructions to set upyour device.
It might take up to 20 minutes for the status of your device to turn green in the Insight app and in theCloud Portal.
Get Started With Insight Pro
33
Insight Pro, Mobile App and Cloud Portal User Manual
Add a Device by Scanning Its QR Code With the Insight AppTo add a device by scanning its QR code with the Insight app:
1. Locate the product label on the rear or bottom of your device.
2. Launch the Insight app.
All organizations display.
3. If the organizations do not display, tap the menu in the upper middle of the screen and then tap Back.
4. In the upper middle of the screen, tap the organization for which you want to add a device to a networklocation.
5. Tap + in the upper right corner of the screen.
6. Tap Scan QR Code.
7. Point the camera of your mobile device at the QR code on the product label.
The Insight app automatically recognizes a valid QR code.
8. Select a network location.
9. Name your device and tap Next.
10. Tap Continue.
11. If you are adding an Insight Managed switch or access point, follow the onscreen instructions to set upyour device.
It might take up to 20 minutes for the status of your device to turn green in the Insight app and in theCloud Portal.
Add a Device by Scanning Its Barcode With the Insight AppTo add a device by scanning its barcode with the Insight app:
1. Locate the product label on the rear or bottom of your device.
2. Launch the Insight app.
All organizations display.
3. If the organizations do not display, tap the menu in the upper middle of the screen and then tap Back.
4. In the upper middle of the screen, tap the organization for which you want to add a device to a networklocation.
5. Tap + in the upper right corner of the screen.
6. Tap SCAN BARCODE.
7. Point the camera of your mobile device at the barcode on the product label.
The Insight app automatically recognizes a valid barcode and places the associated serial number inthe Enter Serial Number field.
8. To the right of the Enter Serial Number field, tap GO.
9. Select a network location.
Get Started With Insight Pro
34
Insight Pro, Mobile App and Cloud Portal User Manual
10. Name your device and tap Next.
11. Tap Continue.
12. If you are adding an Insight Managed switch or access point, follow the onscreen instructions to set upyour device.
It might take up to 20 minutes for the status of your device to turn green in the Insight app and in theCloud Portal.
Add a Device by Entering Its Serial Number in the Insight AppTo add a device by entering its serial number in the Insight app:
1. Locate the product label on the rear or bottom of your device.
2. Launch the Insight app.
All organizations display.
3. If the organizations do not display, tap the menu in the upper middle of the screen and then tap Back.
4. In the upper middle of the screen, tap the organization for which you want to add a device to a networklocation.
5. Tap + in the upper right corner of the screen.
6. Enter the serial number of your device in the Enter Serial Number field and, to the right of the field, tapGO.
7. Select a network location.
8. Name your device and tap Next.
9. Tap Continue.
10. If you are adding an Insight Managed switch or access point, follow the onscreen instructions to set upyour device.
It might take up to 20 minutes for the status of your device to turn green in the Insight app and in theCloud Portal.
Add a Device by Entering Its Serial Number Using the CloudPortalTo add a device by entering its serial number using the Cloud Portal:
1. Locate the product label on the rear or bottom of your device.
2. Access the Insight Cloud Portal.
All organizations display.
3. If the network menu at the top of the page does not show All Organizations, click the network menu andselect See All Organizations.
4. Select the organization for which you want to add a device to a network location.
All network locations for the organization display.
Get Started With Insight Pro
35
Insight Pro, Mobile App and Cloud Portal User Manual
5. Select a network location.
6. At the top right of the page, click the + (Add Device) button.
The Add a New Device pop-up window opens.
7. Enter the serial number of your device in the Serial Number field and click the Go button.
If the serial number is validated, the Device Name field displays.
8. In the Device Name field, name your device.
9. Click the Save button.
Your settings are saved and your device is added to the network.
10. If you are adding an Insight Managed switch or access point, follow the instructions on the page to setup your device.
It might take up to 20 minutes for the status of your device to turn green in the Insight app and in theCloud Portal.
Access a Network Location and Its Devices Remotely
Insight is a cloud-based management platform, so you can monitor and manage your devices (see SupportedDevices on page 17) from anywhere using the Insight app or the Cloud Portal.
However, to add a device to an Insight network location of an organization, you must either be able tophysically access the device, your smartphone or tablet must be on the same network as the device, or youmust add the serial number of the device through the Cloud Portal (see Discover and Add Devices to aNetwork Location of an Organization on page 32).
Access a Network Location and Its Devices Remotely Usingthe Insight AppYou can access a network location of an organization and the devices that are set up at the network locationremotely using the Insight app.
The following remote access instructions apply only after you create an Insight Proaccount, create an organization, create a network location, and set up a device.
Note
To access a network location of an organization and the devices that are set up at thenetwork location remotely using the Insight app:
1. Launch the Insight app.
All organizations display.
2. If the organizations do not display, tap the menu in the upper middle of the screen and then tap Back.
3. In the upper middle of the screen, tap the organization for which you want to access a network locationand its devices.
4. Tap Devices.
Get Started With Insight Pro
36
Insight Pro, Mobile App and Cloud Portal User Manual
5. Tap the device that you want to monitor or manage.
6. To monitor or manage a network location for the organization, do the following:
a. Tap Networks.
b. If you set up more than one Insight network location for the organization, at the top of the page,select the network that you want to monitor or manage.
Access a Network Location and Its Devices Remotely Usingthe Cloud PortalYou can access a network location of an organization and the devices that are set up at the network locationremotely using the Cloud Portal.
The following remote access instructions apply only after you create an Insight Proaccount, create an organization, create a network location, and set up a device.
Note
To access a network location of an organization and the devices that are set up at thenetwork location remotely using the Cloud Portal:
1. Access the Insight Cloud Portal.
All organizations display.
2. If the network menu at the top of the page does not show All Organizations, click the network menu andselect See All Organizations.
3. Select the organization for which you want to access a network location.
All network locations for the organization display.
4. Select the network location.
The Summary page for the network location displays.
5. To monitor or manage a device, do the following:
a. In the menu for the network location (that is, not in the main menu for the organization at the top ofthe page), select Devices.The page displays all devices at the network location.
b. Point to the device and click the pencil icon at the right of the page.The page that displays shows details about the device and provides access to other pages withmore details.
6. To monitor or manage a network location for the organization, click the network location, or if the networklocations no longer display, select the organization and then the network from the menu at the top ofthe page.
Get Started With Insight Pro
37
Insight Pro, Mobile App and Cloud Portal User Manual
Interpret the Green, Red, Orange, and Gray Circles Nextto a Device
On the Devices page in the Insight app and for a selected network on the Devices page in the Cloud Portal,the colored circle to the left of each device indicates the current status of the device as follows:
• Green. The device is connected to the Insight cloud-based management platform.
• Red. The device is disconnected from the Insight cloud-based management platform.
• Orange. The device is connected to the Insight cloud-based management platform but with limitedsupport only.
• Gray. The status of the device is unknown.
View and Manage Insight Notifications
Insight sends you three categories of notifications:
• Critical. Insight sends a critical notification whenever an Insight Managed device loses connection withthe Insight cloud.
• Warning. Insight sends a warning notification when it detects an error or a problem in your Insightnetwork.
• Notifications. Insight sends regular notifications when new firmware is available, when a devicereconnects to the Insight cloud, when you edit administrator settings, when a device is rebooted, andfor other regular system events.
You can view and manage your notifications in the Insight app and Cloud Portal, including turning eachcategory of notifications on or off for each network location.
You can view, share, or delete notifications using the following methods:
• View, Share, or Delete Notifications Using the Insight App on page 39
• View, Share, or Delete Notifications in the Cloud Portal on page 40
You can manage the Insight notifications that you receive using the following methods:
• Manage the Insight Notifications That You Receive Using the Insight App on page 41
• Manage the Insight Notifications That You Receive Using the Cloud Portal on page 42
Get Started With Insight Pro
38
Insight Pro, Mobile App and Cloud Portal User Manual
View, Share, or Delete Notifications Using the Insight AppTo view, share, or delete notifications for a network location of an organization using theInsight app:
1. Launch the Insight app.
All organizations display.
2. If the organizations do not display, tap the menu in the upper middle of the screen and then tap Back.
3. Tap the organization.
4. Tap the network location.
5. Tap Notifications in the lower right corner of the page.
6. To filter notifications by device, severity, or time received, do the following:
a. Tap ... in the upper right corner of the page and tap Filter.
b. Tap each category of notifications (Device, Severity, and Time) to view or hide notifications in thatcategory.
c. In each category, clear the check box for the type of notifications that you do not want to view.
d. Tap Apply.
7. To share all notifications by email, do the following:
a. Tap ... in the upper right corner of the page and tap Share.
b. Enter an email address.
c. To enter more email addresses, tap +.
d. Tap Send.
8. To delete notifications, do the following:
• To delete a single notification, do the following:
a. Tap and hold the notification and move it to the left.
b. Tap the red trash can icon.
• To delete all notifications, do the following:
a. Tap ... in the upper right corner of the page and tap Delete All.
b. Confirm your decision by tapping Delete All again.
Get Started With Insight Pro
39
Insight Pro, Mobile App and Cloud Portal User Manual
View, Share, or Delete Notifications in the Cloud PortalTo view, share, or delete your notifications in the Cloud Portal:
1. Access the Insight Cloud Portal.
All organizations display.
2. Click the bell (Notification) icon in the upper right corner of the page.
The notifications pop-up window opens.
3. Scroll down and click the See All button.
The Notifications page displays.
4. To filter notifications by time received, device, severity, location, or a combination of these, do thefollowing:
a. Click the Filter icon.A pop-up window opens.
b. Click the button for each type of notification that you do want to view.By default, all notifications display. If you select a button, the button displays green and only theassociated notifications display.You can select multiple buttons.
c. Click the Apply button.The notifications are filtered.
5. To share notifications by email, do the following:
• To share a single notification, do the following:
a. Point to the notification.
b. Click the mail tray icon that displays on the right.The Share Notifications pop-up window opens.
c. Enter an email address.
d. To enter more email addresses, click the + button.
e. Click the Send button.The notification is sent.
• To share several notifications, do the following:
a. Click the check box and pencil icon.
b. Select the check boxes for the notifications that you want to share.
c. Click the Share button.The Share Notifications pop-up window opens.
d. Enter an email address.
e. To enter more email addresses, click the + button.
f. Click the Send button.
Get Started With Insight Pro
40
Insight Pro, Mobile App and Cloud Portal User Manual
The selected notifications are sent.
• To share all notifications, do the following:
a. Click the check box and pencil icon.
b. Select the check box in the table heading.
c. Click the Share button.The Share Notifications pop-up window opens.
d. Enter an email address.
e. To enter more email addresses, click the + button.
f. Click the Send button.All notifications are sent.
6. To delete notifications, do the following:
• To delete a single notification, do the following:
a. Point to the notification.
b. Click the red x that displays on the right.The notification is deleted.
• To delete several notifications, do the following:
a. Click the check box and pencil icon.
b. Select the check boxes for the notifications that you want to delete.
c. Click the Delete button.The selected notifications are deleted.
• To delete all notifications, do the following:
a. Click the check box and pencil icon.
b. Select the check box in the table heading.
c. Click the Delete button.All notifications are deleted.
Manage the Insight Notifications That You Receive Using theInsight AppThe policy for an organization determines the push and email notifications that are sent to an admin, businessowner, and manager. As a manager or business owner of an organization, if the organizational policy allowsyou to receive notifications, you can manage the push and email notifications that you receive for the networklocations of an organization.
Get Started With Insight Pro
41
Insight Pro, Mobile App and Cloud Portal User Manual
To manage your Insight notifications using the Insight app:
1. Launch the Insight app.
All organizations display.
2. Tap the menu button in the upper left corner of the screen.
3. Tap Account Management > Manage Notifications.
4. To edit smartphone or tablet push notification settings, do the following:
a. Tap Push Notifications.
b. Tap the button to turn all push notifications on or off.
c. If you want to receive some push notifications and not others, tap each network location and thentap the buttons for Critical, Warning, and Notifications to turn them on or off.
d. Tap the arrow at the top of the page to return to the previous page.
5. To edit email notification settings, do the following:
a. Tap Email Notifications.
b. Tap the button to turn all push notifications on or off.
To change the email address that receives email notifications, you must changethe email address that is associated with your Insight account, which, in turn,changes your login credentials.
Note
c. If you want to receive some email notifications and not others, tap each network location and thentap the buttons for Critical, Warning, and Notifications to turn them on or off.
d. Tap the arrow at the top of the page to return to the previous page, and tap the arrow again to returnto the page that lets you manage your account settings.
Manage the Insight Notifications That You Receive Using theCloud PortalThe policy for an organization determines the push and email notifications that are sent to an admin, businessowner, and manager. As a manager or business owner of an organization, if the organizational policy allowsyou to receive notifications, you can manage the push and email notifications that you receive for the networklocations of an organization.
To manage your Insight notifications using the Cloud Portal:
1. Access the Insight Cloud Portal.
All organizations display.
2. Click the account icon in the upper right corner of the page.
A pop-up menu opens.
3. Select Account Management.
Get Started With Insight Pro
42
Insight Pro, Mobile App and Cloud Portal User Manual
The Manage Notifications page displays.
By default, the push notification settings display and the push notifications are enabled (the PushNotifications button displays green).
4. To edit smartphone or tablet push notification settings, do the following:
a. To turn off all push notifications, click the Push Notifications button so that it displays gray.
b. If you want to receive some push notifications and not others, click each network location and thenclick the buttons for Critical, Warning, and Notifications to turn them on or off.
c. Click the Save button at the bottom of the page.
Your settings are saved.
5. To edit email notification settings, do the following:
a. To the right of the Email Notifications heading, click +.
The email notification settings display. By default, the email notifications are enabled (the EmailNotifications button displays green).
To change the email address that receives email notifications, you must changethe email address that is associated with your Insight account, which, in turn,changes your login credentials.
Note
b. To turn off all email notifications, click the Email Notifications button so that it displays gray.
c. If you want to receive some email notifications and not others, click each network location and thenclick the buttons for Critical, Warning, and Notifications to turn them on or off.
d. Click the Save button at the bottom of the page.
Your settings are saved.
Add a Purchase Confirmation Key to Your Insight ProSubscription
To perform this task, you must be an administrator.
As an Insight Pro account holder with administrator credentials, you can add a purchase confirmation keyto your Insight Pro subscription. For information about subscriptions, see Insight Pro Subscriptions on page10.
For Insight Pro, you cannot add a purchase confirmation key using the Insight app. To add a purchaseconfirmation key, you must use the Cloud Portal.
To add a purchase confirmation key to your Insight Pro subscription:
1. Access the Insight Cloud Portal.
All organizations display.
2. Click the account icon in the upper right corner of the page.
Get Started With Insight Pro
43
Insight Pro, Mobile App and Cloud Portal User Manual
A pop-up menu opens.
3. Select Account Management.
The Manage Notifications page displays.
4. Select Subscriptions.
The Subscription page displays. The page shows the Active License Key table with active purchaseconfirmation keys.
5. To view expired purchase confirmation keys, if any, click + to the right of the Expired License Keyheading.
6. Click the Add License Key button.
The Add License Key pop-up window opens.
7. Copy or enter your new purchase confirmation key in the Key field.
8. Click the Add button.
The pop-up window closes and the purchase confirmation key is added to the Active License Key table.The table shows the number of devices credits that are activated by the purchase confirmation key andthe expiration date of the purchase confirmation key.
Set Up Two-Step Verification for Logging In to Insight
With two-step verification, you log in to the Insight app or Cloud Portal with an extra verification step. Thatis, you not only must enter your password, you must also enter a login verification code that you receive asan SMS message on the phone number that you must specify as the primary number, or as an email messageat your account email address. For easier verification without the requirement to enter a login verificationcode after initial verification, you can set up push notifications to a trusted device.
Note the following security measures:
• Primary number. If you set up a primary phone number, you receive an SMS text message with a loginverification code when you or someone else tries to log in to your account from another phone number.A one-time password (OTP) is sent to the primary phone number so that you can approve the loginattempt, for example, by forwarding the OTP to the other phone number.
• Trusted device. A trusted device is a device that is already verified by Insight. If you set up a trusteddevice, you receive a push notification if you or someone else tries to log in to your account from anontrusted device so that you can approve the login attempt.
You can set up two-step verification for logging in to Insight using the following methods:
• Set Up Two-Step Verification for Logging In Using the Insight App on page 45
• Set Up Two-Step Verification for Logging In Using the Cloud Portal on page 46
Get Started With Insight Pro
44
Insight Pro, Mobile App and Cloud Portal User Manual
Set Up Two-Step Verification for Logging In Using the InsightApp
As another secure method of logging in, on devices that support touch ID, you canlog in using the touch ID option of the Insight app so that you do not need to enter auser name and password.This option is displayed only on devices that support touchID. To use touch ID login, you must first configure the fingerprint settings on yourdevice.
Note
When you set up two-step verification for logging in using the Insight app, the verification process appliesto both the Insight app and the Cloud Portal.
To set up two-step verification for logging in using the Insight app:
1. Launch the Insight app.
2. Tap the menu button in the upper left corner of the screen.
3. Tap Account Management > Manage Profile > Login Settings > Two-Step Verification.
4. Tap the Enable button so that the button displays purple.
The Select verification method page displays.You can use both push notifications and SMS textmessages, but you need to set up one method at a time.
By default, the Push Notifications check box is selected.
5. To use push notifications, do the following
a. Tap CONTINUE.
b. To approve the device that you are using as a trusted device for push notifications, tap APPROVE.
c. Name your device and tap GOT IT.Your device is added as a trusted device for push notifications. When you log into the Insight appor the Cloud Portal from the trusted device, you do not need to enter a security code because theverification process for the trusted device occurs in the background.
d. To also add SMS text message verification, tap ADD SMS VERIFICATION, and follow the Step 6.cand Step 6.d.
6. To use SMS text message verification, do the following:
a. Select the SMS Text Message check box.
b. Tap CONTINUE.
c. Select a country, enter a phone number, and tap ADD PHONE NUMBER.Insight sends an SMS text message with a one-time security pair code to the phone number. TheAdd SMS Verification page displays.
d. Enter the security pair code that you received and tap NEXT.The phone number is verified and added to the page as the primary number for login verification.Now, each time that you log into the Insight app or the Cloud Portal, an SMS text message with alogin verification code is sent to the phone number and you must enter the code during the loginprocess.
Get Started With Insight Pro
45
Insight Pro, Mobile App and Cloud Portal User Manual
If the device that you use to log into the Insight app is the same device on which you received thecode, the first time that you log in after you entered the code, you can add your device as a trusteddevice so that Insight automatically verifies your identity when you log in.
During the Insight app login process, you either can let Insight send a loginverification code to the primary phone number or you can tap TRY ANOTHERVERIFICATION METHOD and let Insight send a login verification code to youraccount email address.
Note
7. To add another phone number, click the ADD SMS VERIFCATION button and repeat Step 6.c and Step6.d.
8. To return to the Account Management page, click the left arrow button at the upper left of the page threetimes.
Set Up Two-Step Verification for Logging In Using the CloudPortalWhen you set up two-step verification for logging in using the Cloud Portal, the verification process appliesto both the Cloud Portal and the Insight app.
To set up two-step verification for logging in using the Cloud Portal:
1. Access the Insight Cloud Portal.
All network locations display.
2. Click the account icon in the upper right corner of the page.
A pop-up menu opens.
3. Select Update Profile.
Your profile page displays.
4. Select Login Settings > Two-Step Verification.
The Two-Step Verification page displays.
5. Click the Enable button.
The Add SMS Verification page displays.
6. Select a country, enter a phone number (which must be capable of receiving SMS messages), and clickthe ADD PHONE NUMBER button.
Insight sends a one-time security pair code to the phone number. The Add SMS Verification pagedisplays.
7. Enter the security pair code that you received and click the NEXT button.
The phone number is verified and added to the page as the primary number for login verification. Now,each time that you log into the Cloud Portal, a login verification code is sent to the phone number andyou must enter the code during the login process.
Get Started With Insight Pro
46
Insight Pro, Mobile App and Cloud Portal User Manual
During the Cloud Portal login process, you either can let Insight send a login verificationcode to the phone number or you can click the Try Another Verification Methodlink and let Insight send a login verification code to your account email address.
Note
8. To add another phone number, click the ADD SMS VERIFCATION button and repeat Step 6 and Step7.
9. To return to the dashboard, click the left arrow button at the upper left of the page three times.
Manage Network Locations, Networks, and Devices
For information about managing network locations, networks, and devices using Insight Pro, see the InsightBasic and Premium Mobile App and Cloud Portal User Manual, which you can download by visitingnetgear.com/support/download.
The following table lists the chapters in that user manual that describe how to manage network locations,networks, and devices.
Table 4. Chapters in the Insight Basic and Premium Mobile App and Cloud Portal UserManual
TitleChapter
Maintain Your Insight Managed Devices and Network LocationsChapter 3
Manage VLANs and VLAN-Based Features for a LocationChapter 4
Manage the Wired Network for a LocationChapter 5
Manage the WiFi Network and SSIDs for a LocationChapter 6
Manage Individual SwitchesChapter 7
Manage Individual Access PointsChapter 8
Manage Individual ReadyNAS Storage SystemsChapter 9
Get Started With Insight Pro
47
Insight Pro, Mobile App and Cloud Portal User Manual
3Monitor Insight Organizations, NetworkLocations, and Devices Using the CloudPortal
This chapter describes the options to monitor an Insight organization, network locations, and individual devicesusing the Cloud Portal.
The chapter includes the following sections:
• Overview of the Monitoring Options for a Network Location in the Cloud Portal• Customize Widgets• Monitor All Organizations• Display All Devices at All Organizations• Monitor All Devices at a Single Network Location• Monitor a Single Network Location• Monitor the Wired Network at a Location• Monitor the WiFi Network and SSIDs at a Location• Monitor the Storage Network at a Location• Monitor an Individual Switch and Individual Ports• Monitor an Individual Access Point and Its Client• Monitor an Individual ReadyNAS Storage System• Monitor the WiFi Clients at a Network Location• Generate a Report Manually and Download a Previously Automatically Generated Report
If you are an Insight Pro user, depending on your role, you might need to select yourorganization before you can select a network location. If applicable, the procedures inthis chapter start with all network locations for an organization. If your Insight Pro rolelets you select an organization, these procedures assume that you do so.
Note
48
Overview of the Monitoring Options for a Network Locationin the Cloud Portal
The Cloud Portal provides extensive options for monitoring your Insight networks and devices.
For each network location, the main menu at the top of the page provides the following options:
• Summary. The Summary tab provides access to the following monitoring widgets:
- Properties.The widget displays the types and numbers of active devices, clients, storage volumes,and so on.
- System Health. The widget displays the number of online and offline devices and the situationsthat require your attention.
- Wireless Clients. The widget displays the number of WiFi clients for each access point, viewableper radio band and per predefined period.
- Port Utilization. The widget displays the status and utilization of the ports for each switch.
- Notifications. The widget displays the notifications for the network location.
- Optional widgets.You can add the Storage Utilization, Wireless Data Consumption, Switch TrafficUtilization, and PoE Power Utilization widgets.
• Wireless. The Wireless tab provides access to the following monitoring widgets (in addition to accessto the settings for the access points):
- Usage : Clients. For each access point, the widget displays the number of WiFi clients, viewableper radio band and per predefined period.
- Usage :Traffic. For each access point, the widget displays the volume of WiFi traffic, viewable perradio band and per predefined period.
- Devices. For each access point, the widget displays the status, serial number, number of clients,model, MAC address, firmware version, IP address, and the up time (the period since the devicewas last restarted).
To display more details about an individual access point, point to it and click thepencil icon at the right of the page.
Note
- Client List. For each WiFi client, the widget displays the type of device, the access point it isconnected to, the SSID it is connected to, and the operating system, MAC address, IP address,number of transmitted bytes, number of received bytes, RSSI strength (indicated by an icon), andradio band that the device uses.
• Wired. The Wired tab provides access to the following monitoring widgets (in addition to access to thesettings for the switches):
- Usage. For each switch, the widget displays the ports that are connected and using power, connectedand not using power, disabled, in an error state, and available (free).
- PoE Power Usage. For each switch, the widget displays the PoE power usage.
Monitor Insight Organizations, Network Locations, and Devices Using the Cloud Portal
49
Insight Pro, Mobile App and Cloud Portal User Manual
To display more details, click the Detailed View button.Note
- Wired - Traffic. For each switch, the widget displays the volume of wired traffic, viewable perpredefined period.
- Devices. For each switch, the widget displays the status, the serial number, the model, the MACaddress, the firmware version, the IP address, and the uptime.
To display more details about an individual switch, point to it and click the pencilicon at the right of the page.
Note
• Storage. The Storage tab provides access to the following monitoring widgets:
- Usage. For each ReadyNAS storage system, the widget displays the size of the data, snapshots,and free storage space.
- Devices. For each ReadyNAS storage system, the widget displays the status, serial number, model,MAC address, firmware version, IP address, and up time.
To display more details about an an individual ReadyNAS storage system, pointto it and click the pencil icon at the right of the page.
Note
• Firmware. The Firmware tab provides access to the following monitoring widgets:
- Updates Available. The widget displays the devices for which firmware updates are available, thecurrent firmware versions on the devices, and the latest firmware versions that are available for thedevices.
- Up-To-Date. The widget displays the devices for which the firmware is up to date, the currentfirmware version, and the date on which the firmware was updated.
- Offline. The widget displays devices that are offline, if any are offline.
• Devices. The Devices tab displays a single widget with the devices at the network location. For eachdevice, the widget displays the status, serial number, number of clients, type of device, MAC address,firmware version, IP address, and up time.
To display more details about an individual device, point to it and click the pencil iconat the right of the page.
Note
• Clients. The Clients tab displays a single widget with the WiFi clients at the network location. For eachWiFi client, the widget displays the type of device, the device name, the access point the device isconnected to, the SSID the device is connected to, and the operating system, MAC address, IP address,radio band that the device uses, number of transmitted bytes, number of received bytes, channel,associated time stamp, BSSID, and RSSI strength (indicated by an icon).
Monitor Insight Organizations, Network Locations, and Devices Using the Cloud Portal
50
Insight Pro, Mobile App and Cloud Portal User Manual
Customize Widgets
You can customize the Cloud Portal dashboard and pages. Depending on the Cloud Portal page, you cancustomize the following options:
• Summary page for a network location. To customize the widgets that display on the Summary pagefor a network location, click the + Add a Widget button at the bottom of the page, select the widgets,and click the Add button.You can restore the default layout by clicking the Restore Layout button atthe bottom of the page.
• Wireless page and Wired page for a network location. To customize the widgets that display on theWireless page or Wired page for a network location, click the … (Options) button.
• Tables in a widget. To customize the columns that display in a table in a widget, click the … (Options)button in the widget.
Monitor All Organizations
As an administrator, you can display all organizations that you set up for your Insight Pro account.
As a manager you can display all organizations that you manage.
To display all organizations (or all organizations that you manage):
1. Access the Insight Cloud Portal.
All organizations display.
2. If the network menu at the top of the page does not show All Organizations, click the network menu andselect See All Organizations.
3. To search for an organization, click the Search icon, enter the term that you want to search for, andclick the Search button.
If a match or matches are found, the page displays them.
4. To change the information that displays for each organization on the page, click the Options icon, selectthe information that you want to display, and click the Apply button.
The selected information displays for each organization.
5. To switch between icon view (the default view) and list view, do one of the following:
• List view. To show the organizations in list view (that is, in a table), click the Options icon, clickthe list view icon, and click the Apply button.The organizations display in a table.
• Icon view.To show the organizations as icons (the default view) with the logo and information listedin the icon, click the Options icon, click the dotted square icon, and click the Apply button.The organizations display as icons.
Monitor Insight Organizations, Network Locations, and Devices Using the Cloud Portal
51
Insight Pro, Mobile App and Cloud Portal User Manual
Display All Devices at All Organizations
As an administrator, you can display all devices for all organizations that you set up for your Insight Proaccount.
As a manager you can display all devices for all organizations that you manage.
To display all devices at all organizations (or all organizations that you manage):
1. Access the Insight Cloud Portal.
All organizations display.
2. If the network menu at the top of the page does not show All Organizations, click the network menu andselect See All Organizations.
3. From the main menu at the top of the page, select Devices.
The devices at all organizations and all associated network locations display.
4. To sort the table in a different order, click a table heading.
5. To filter devices, click the Filter icon, select the type or types of devices, and click the Apply button.
Only the selected type or types of devices display on the page.
6. To search for a device, click the Search icon, enter the term that you want to search for, and click theSearch button.
If a match or matches are found, the page displays them.
7. To change the columns that display on the page, click the Options icon, select the columns that youwant to display, and click the Apply button.
The page display the selected columns.
Monitor All Devices at a Single Network Location
To monitor all devices at a single network location:
1. Access the Insight Cloud Portal.
All organizations display.
2. If the network menu at the top of the page does not show All Organizations, click the network menu andselect See All Organizations.
3. Select the organization for which you want to monitor a network location.
All network locations for the organization display.
4. Select the network location.
The Summary page for the network location displays.
5. From the network location menu (that is, the menu below the main menu at the top of the page), selectDevices.
The devices at the network location display.
Monitor Insight Organizations, Network Locations, and Devices Using the Cloud Portal
52
Insight Pro, Mobile App and Cloud Portal User Manual
6. To sort the table in a different order, click a table heading.
7. To filter devices, click the Filter icon, select the type or types of devices, and click the Apply button.
Only the selected type or types of devices display on the page.
8. To search for a device, click the Search icon, enter the term that you want to search for, and click theSearch button.
If a match or matches are found, the page displays them.
9. To change the columns that display on the page, click the Options icon, select the columns that youwant to display, and click the Apply button.
The page display the selected columns.
10. To view details about a device, point to the device and click the pencil icon at the right of the page.
The Summary page for the device displays.
Monitor a Single Network Location
To monitor a single network location:
1. Access the Insight Cloud Portal.
All network locations display.
2. Select your network.
The Summary page displays.
By default, the Properties, System Health, Wireless Clients, Port Utilization, and Notifications widgetsdisplay.
Optional widgets include Storage Utilization, Wireless Data Consumption, Switch Traffic Utilization (thatis, the Wired Data Consumption widget), and PoE Power Utilization (that is, the PoE Power Usagewidget).
3. To customize the data that displays in a widget or perform a task in a widget, do the following:
• Wireless Clients widget. Select the radio band and the period over which data is displayed.
• Port Utilization widget. Scroll horizontally through the port utilization for the switches at the networklocation.
• Notifications widget. Share notifications by clicking the mail tray icon in the widget, entering oneor more email addresses, and sending an email with notifications to the email addresses.
4. To customize the widgets and the page layout, do the following:
• Add optional widgets. To add one or more optional widgets, click the + Add a widget button atthe bottom of the page, selects one or more widgets in the Widget pop-up window, and click theAdd button.
• Rearrange widgets.To rearrange a widget on the page, click the dotted square icon in the widget,and move the widget to another location on the page.
Monitor Insight Organizations, Network Locations, and Devices Using the Cloud Portal
53
Insight Pro, Mobile App and Cloud Portal User Manual

• Refresh data. To refresh the data in a widget, click the … button in the widget, and from the pop-upmenu, select Refresh.
• Remove a widget. To remove a widget from the page, click the … button in the widget, and fromthe pop-up menu, select Remove Widget.
• Restore the default widgets and layout.To restore the default widgets and locations of the widgetson the page, click the Restore Layout button at the bottom of the page.
Monitor the Wired Network at a Location
To monitor the wired network at a location:
1. Access the Insight Cloud Portal.
All network locations display.
2. Select your network.
The Summary page displays.
3. Select Wired.
The Wired page displays.
The page shows the Usage, PoE Power Usage, and Wired - Traffic, and Devices widgets.
4. To hide or show widgets on the page, click the … (Options) button, select or clear one or more widgetsat the top of the page, and click the Apply button.
By default, all available widgets display on the page.
5. To customize the data that displays in a widget or perform a task in a widget, do the following:
• PoE Power Usage. Click the Detailed View button.
• Wired - Traffic. Select the period over which data is displayed.
• Devices. Click the … (Options) button, select or clear the buttons for columns that display in thetable, and click the Apply button.You can also sort the table in a different order by clicking a table heading.
Using the Devices widget, you can also add, change, reboot, or delete a device.These tasks are described in detail in other sections in this manual.
Note
Monitor Insight Organizations, Network Locations, and Devices Using the Cloud Portal
54
Insight Pro, Mobile App and Cloud Portal User Manual
Monitor the WiFi Network and SSIDs at a Location
To monitor the WiFi (wireless) network and SSIDs at a location:
1. Access the Insight Cloud Portal.
All network locations display.
2. Select your network.
The Summary page displays.
3. Select Wireless.
The Wireless page displays.
The page shows the Usage : Clients, Usage : Traffic, Devices, and Client List widgets.
4. To hide or show widgets on the page, click the … (Options) button at the top of the page, select or clearone or more widgets, and click the Apply button.
By default, all available widgets display on the page.
5. To customize the data that displays in a widget or perform a task in a widget, do the following:
• Usage : Clients. Select the period over which data is displayed.
• Usage :Traffic. Select the period over which data is displayed.
• Devices. Click the … (Options) button, select or clear the buttons for columns that display in thetable, and click the Save button.You can also sort the table in a different order by clicking a table heading.
Using the Devices widget, you can also add, change, reboot, or delete a device.These tasks are described in detail in other sections in this manual.
Note
• Client List. Click the … (Options) button, select or clear the buttons for columns that display in thetable, and click the Save button.You can also sort the table in a different order by clicking a table heading.
6. To display information about the SSIDs at the WiFi network and about an individual SSID, do thefollowing:
a. At the top of the page, click the Settings button.The WiFi page display, showing the SSIDs that are set up in the WiFi network.Although you can change the configuration of the WiFi network from this page, this section of themanual describes the monitoring options for the WiFi network.
b. To search for an SSID, click the Search icon and enter the term that you want to search for.If a match or matches are found, the page displays them.
c. Click the … (Options) button, select or clear the buttons for columns that display in the table withSSIDs, and click the Save button.
d. To view details about an SSID, point to the SSID and click the pencil icon at the right of the page.The Settings page for the SSID displays.
Monitor Insight Organizations, Network Locations, and Devices Using the Cloud Portal
55
Insight Pro, Mobile App and Cloud Portal User Manual
Although you can change the configuration of the SSID from this page, this section of the manualdescribes the monitoring options for the SSID.
Monitor the Storage Network at a Location
To monitor the storage network at a location:
1. Access the Insight Cloud Portal.
All network locations display.
2. Select your network.
The Summary page displays.
3. Select Storage.
The Storage page displays.
The page shows the Usage and Devices widgets.
4. If your network location includes more than one ReadyNAS storage device, select the device from themenu in the upper right of the Usage widget.
5. To change the information that is shown in the table, click the … (Options) button at the top right of thepage, select or clear the buttons for columns that display in the table, and click the Save button.
6. To sort the table in a different order, click a table heading.
Monitor an Individual Switch and Individual Ports
To monitor an individual switch and individual ports:
1. Access the Insight Cloud Portal.
All network locations display.
2. Select your network.
The Summary page displays.
3. Select Wired.
The Wired page displays.
4. Scroll down to the Devices widget (also referred to as pane), point to the switch that you want to monitor,and click the pencil icon at the right of the page.
The Summary page for the switch displays, showing port and device details.
Although you can change the configuration of the switch from this page, this section of the manualdescribes the monitoring options for the switch.
5. To display details about a switch feature, select an item from the menu on the left.
The following menu items are specific to monitoring a switch:
Monitor Insight Organizations, Network Locations, and Devices Using the Cloud Portal
56
Insight Pro, Mobile App and Cloud Portal User Manual
• Connected Neighbors. For each connected port, the page displays the neighbor name, neighborIP address, neighbor MAC address, and VLAN ID for the port connection. To display details abouta neighbor, see Step 7.
• Traffic. Display the traffic usage over a period that you can select.
• Statistics. Displays information about the temperature, CPU usage, transmitted (Tx) data, received(Rx) data, and fan status.To clear the counters, click the Clear Counters button.
• Notifications. Displays the type of notification, details about the notification, and timestamp of thenotification.
6. To share diagnostic information about the switch, click the mail tray (Share) icon at the top of the page,enter an email address, and send an email with the diagnostic information.
You can share diagnostic information by using the mail tray (Share) icon on the Summary, ConnectedNeighbors, Traffic, Statistics, or Notifications page for the switch.
7. To display details about an individual port and a connected neighbor, do the following:
a. Click Summary.
b. Click a port.The Overview and Neighbor Info panes display, showing details about the port and the connectedneighbor.
c. To share diagnostic information about the switch from the Summary page for the port, click the mailtray (Share) icon at the top of the page, enter an email address, and send an email with theinformation.
Monitor an Individual Access Point and Its Client
To monitor an individual access point and its clients:
1. Access the Insight Cloud Portal.
All network locations display.
2. Select your network.
The Summary page displays.
3. Select Wireless.
The Wireless page displays.
4. Scroll down to the Devices widget (also referred to as pane), point to the WiFi device that you want tomonitor, and click the pencil icon at the right of the page.
The Summary page for the WiFi device displays, showing the Channel Utilization and Client OS widgetsand the Device Details pane.
Although you can change the configuration of the WiFi device from this page, this section of the manualdescribes the monitoring options for the WiFi device.
5. To customize the data that displays in a widget, do the following:
Monitor Insight Organizations, Network Locations, and Devices Using the Cloud Portal
57
Insight Pro, Mobile App and Cloud Portal User Manual
• Channel Utilization. Select the radio band and the period over which data is displayed.
• Client OS. Select the radio band.
6. To hide or show widgets on the page, click the … (Options) button, select or clear one or more widgetsat the top of the page, and click the Save button.
By default, both widgets display on the page.
7. To display details about a WiFi device feature, select an item from the menu on the left.
The following menu items are specific to monitoring a WiFi device:
• Clients. For each client, displays information about the type of device, access point name, SSID,operating system, MAC address, IP address, the number of transmitted (Tx) bytes, and the numberof received (Rx) bytes, and RSSI.To sort the table in a different order, click a table heading.
• Statistics. Displays information about the transmitted (Tx) data and received (Rx) data.
• Notifications. Displays the type of notification, details about the notification, and timestamp of thenotification.
8. To share diagnostic information about the access point, click the mail tray (Share) icon at the top ofthe page, enter an email address, and send an email with the diagnostic information.
You can share diagnostic information by using the mail tray (Share) icon on the Summary, Statistics,or Notifications page for the access point.
Monitor an Individual ReadyNAS Storage System
To monitor an individual ReadyNAS storage system:
1. Access the Insight Cloud Portal.
All network locations display.
2. Select your network.
The Summary page displays.
3. Select Storage.
The Storage page displays.
4. Scroll down to the Devices widget (also referred to as pane), point to the ReadyNAS storage systemthat you want to monitor, and click the pencil icon at the right of the page.
The Summary page for the ReadyNAS storage system displays, showing the Disk Overview and DeviceDetails widgets.
Although you can change the configuration of the ReadyNAS storage system from this page, this sectionof the manual describes the monitoring options for the ReadyNAS storage system.
5. To see more information about the disk, click the More link in the Disk Overview widget.
6. To display details about a ReadyNAS storage system feature, select an item from the menu on the left.
The following menu items are specific to monitoring a ReadyNAS storage system:
Monitor Insight Organizations, Network Locations, and Devices Using the Cloud Portal
58
Insight Pro, Mobile App and Cloud Portal User Manual
• Statistics. Displays information about the disk temperature, CPU temperature, and fan speed.
• Notifications. Displays the type of notification, details about the notification, and timestamp of thenotification.
7. To share diagnostic information about the ReadyNAS storage system, click the mail tray (Share) iconat the top of the page, enter an email address, and send an email with the diagnostic information.
You can share diagnostic information by using the mail tray (Share) icon on the Summary, Statistics,or Notifications page for the ReadyNAS storage system.
Monitor the WiFi Clients at a Network Location
To monitor the WiFi clients at a network location:
1. Access the Insight Cloud Portal.
All network locations display.
2. Select your network.
The Summary page displays.
3. Select Clients.
The Clients page displays, showing for each client the type of device, access point name, SSID, operatingsystem, MAC address, IP address, the number of transmitted (Tx) bytes, and the number of received(Rx) bytes, and RSSI.
4. To search for a client, click the Search icon, amd enter the term that you want to search for.
If a match or matches are found, the page displays them.
5. To change the information that is shown in the table, click the … (Options) button at the top right of thepage, select or clear the buttons for columns that display in the table, and click the Save button.
6. To sort the table in a different order, click a table heading.
Generate a Report Manually and Download a PreviouslyAutomatically Generated Report
In addition to weekly or monthly automatically generated reports that are specified by the policy for anorganization (see Change the Policy or Device Ownership for an Organization Using the Cloud Portal onpage 29), you can manually generate reports.
You can also download a report that Insight previously automatically generated based on the policy for anorganization. (This is not the same report as a report that you manually generate.)
Monitor Insight Organizations, Network Locations, and Devices Using the Cloud Portal
59
Insight Pro, Mobile App and Cloud Portal User Manual
A report can include the following information:
• A summary for the organization, including information such as the number of devices and clients, totaldata consumption, and total bandwidth usage
• A summary for all locations of the organization together, including information such as data consumption,PoE power usage, the number of devices that are online and offline, the bandwidth consumed, thenumber of unique clients, and the system health
• For each individual location of the organization, details about data consumption, PoE power usage, top5 devices, storage utilization, and client information
To let Insight generate and email a report for an organization and to download a previouslyautomatically generated report:
1. Access the Insight Cloud Portal.
All organizations display.
2. If the network menu at the top of the page does not show All Organizations, click the network menu andselect See All Organizations.
3. Select your organization.
The business owner, locations, and managers for the organization display.
4. Click the … button and from the pop-up menu, select Generate Current Report.
A notification pop-up window opens and informs you that Insight is generating a report and will email itto you.
5. Click the OK button.
The pop-up window closes.
6. To download a report that Insight previously automatically generated report based on the policy for theorganization, do the following:
a. Click the … button again and from the pop-up menu, select the report that you just generated.
b. Download and save the report to your device.
The report that you downloaded is not the same report that you generated in Step 4,but a report that Insight previously automatically generated report based on the policyfor the organization.
Note
Monitor Insight Organizations, Network Locations, and Devices Using the Cloud Portal
60
Insight Pro, Mobile App and Cloud Portal User Manual
4Perform Diagnostics andTroubleshooting
This chapter describes how to use the diagnostics options in the Insight app, how to troubleshoot connectionsbetween the Insight app and devices, and how to troubleshoot managed devices.
The chapter includes the following sections:
• Use the Device Diagnostic Options in Insight• Register New Products That Are Not Manageable in Insight• Troubleshoot Connectivity Problems Between Your Device and Insight• Check to See If the Insight App Can Recognize Your Device• Reboot Your Device Using the Insight App• Remove Your Device From the Network and Re-add It Using the Insight App• Reset a Device to Factory Default Settings Using the Insight App• Send Diagnostic Files From the Insight App to a NETGEAR Community Moderator• View Your Product Support Information Using the Insight App• Open a Technical Support Case For a Product Using the Insight App
If you are an Insight Pro user, depending on your role, you might need to select yourorganization before you can select a network location. If applicable, the procedures inthis chapter start with all network locations for an organization. If your Insight Pro rolelets you select an organization, these procedures assume that you do so.
Note
61
Use the Device Diagnostic Options in Insight
The diagnostics options that are available for an Insight managed device depend on the type of device:
• Insight Managed switches.You can reload the last saved cloud configuration, share diagnosticsinformation, configure port mirroring, and perform a cable test.
• Insight Managed access points.You can reload the last saved cloud configuration and share diagnosticsinformation.
• Insight Managed ReadyNAS storage systems.You can share diagnostics information.
The following subsections describe the device diagnostics options:
• Configure Port Mirroring on a Switch• Perform a Cable Test on a Switch• Share Diagnostic Information From a Device• Reload the Last Saved Cloud Configuration on a Device
Configure Port Mirroring on a SwitchPort mirroring lets you mirror the incoming (ingress) and outgoing (egress) traffic of one or more ports (thesource ports) to a single predefined destination port. Port mirroring is useful if you want to analyze networktraffic. Typically, you would send the traffic that is mirrored on the destination port to a network analyzerdevice.
Configure Port Mirroring on a Switch Using the Insight App
To configure port mirroring on a switch using the Insight app:
1. Launch the Insight app.
2. If the managed devices do not display, in the menu at the bottom, tap Devices.
3. Select the switch for which you want to configure port mirroring.
4. Scroll down and tap Diagnostics.
The diagnostics options that are supported for the selected device display.
5. Tap Port Mirroring.
The Port Mirroring page displays.
6. Tap the Port Mirroring button so that the button displays green and port mirroring is enabled.
By default, port mirroring is disabled.
7. Select one or more source ports by tapping the ports.
8. Select the single destination port by tapping the port.
9. Tap Apply.
Your settings are saved.
10. Tap OK.
Perform Diagnostics and Troubleshooting
62
Insight Pro, Mobile App and Cloud Portal User Manual
The diagnostics options display again.
Configure Port Mirroring on a Switch Using the Cloud Portal
To configure port mirroring on a switch using the Cloud Portal:
1. Access the Insight Cloud Portal.
All network locations display.
2. Select your network.
The Summary page displays.
3. Select Wired.
The Wired page displays.
4. Scroll down to the Devices pane, point to the switch that you want to configure, and click the pencilicon at the right of the page.
The Summary page for the switch displays.
5. Select Port Mirroring.
The Port Mirroring page displays.
6. Click the Port Mirroring button so that the button displays green and port mirroring is enabled.
By default, port mirroring is disabled.
7. Select one or more source ports by clicking the ports.
8. Select the single destination port by clicking the port.
9. Click the Apply button.
Your settings are saved.
Perform a Cable Test on a SwitchYou can perform a cable test to easily find out the health status of network cables. If any problems exist,this feature helps to quickly locate the point where the cabling fails, allowing connectivity issues to be fixedmuch faster, potentially saving technicians hours of troubleshooting.
If an error is detected, the distance at which the fault is detected is stated in meters. (This is the distancefrom the port.)
Perform a Cable Test on a Switch Using the Insight App
To perform a cable test on a switch using the Insight app:
1. Launch the Insight app.
2. If the managed devices do not display, in the menu at the bottom, tap Devices.
3. Select the switch for which you want to perform a cable test.
4. Scroll down and tap Diagnostics.
Perform Diagnostics and Troubleshooting
63
Insight Pro, Mobile App and Cloud Portal User Manual
The diagnostics options display.
5. Tap Cable Test.
The Cable Test page displays.
6. Select one or more ports by tapping the ports.
7. Tap Test Selected Ports.
A warning displays: The cable test will disrupt connectivity to all devices on the selected port or portsfor a few seconds. If you are performing a cable test on the port that connects the switch to the Internet,the switch will lose Internet connectivity and Insight will show the switch and devices that are connectedto the switch as offline while the test is being performed.
8. Tap OK.
The cable test starts. After a short period, the test results display.
9. Tap the arrow at the top of the page twice to return to the page that displays the diagnostics options.
Perform a Cable Test on a Switch Using the Cloud Portal
To perform a cable test on a switch using the Cloud Portal:
1. Access the Insight Cloud Portal.
All network locations display.
2. Select your network.
The Summary page displays.
3. Select Wired.
The Wired page displays.
4. Scroll down to the Devices pane, point to the switch that you want to configure, and click the pencilicon at the right of the page.
The Summary page for the switch displays.
5. Select Cable Test.
The Cable Test page displays.
6. Select one or more ports by clicking the ports.
7. Click the Test Selected Ports button.
A warning displays: The cable test will disrupt connectivity to all devices on the selected port or portsfor a few seconds. If you are performing a cable test on the port that connects the switch to the Internet,the switch will lose Internet connectivity and Insight will show the switch and devices that are connectedto the switch as offline while the test is being performed.
8. Click the Yes,Test the cable button.
The cable test starts. After a short period, the test results display.
Perform Diagnostics and Troubleshooting
64
Insight Pro, Mobile App and Cloud Portal User Manual

Share Diagnostic Information From a DeviceYou can let the Insight collect diagnostic information from a device and send the information in a .zip fileto one or more email addresses. If you encounter difficulties with your device, Technical Support mightrequest the .zip file.
The .zip file includes the Tech Support file and the Insight Log file. Both of these files are .txt files.
Share Diagnostic Information From a Device Using the Insight App
To share diagnostic information from a device using the Insight app:
1. Launch the Insight app.
2. If the managed devices do not display, in the menu at the bottom, tap Devices.
3. Select the device for which you want to share diagnostic information.
4. Scroll down and tap Diagnostics.
The diagnostics options that are supported for the selected device display.
5. Tap Share Diagnostics.
The Share Diagnostics page displays.
6. Enter an email address.
7. To enter another email address, tap + and enter the address.
8. Tap Send.
The diagnostic information is sent to the email addresses.
9. Tap the arrow at the top of the page to return to the page that displays the diagnostics options.
Share Diagnostic Information From a Device Using the Cloud Portal
To share diagnostic information from a device using the Cloud Portal:
1. Access the Insight Cloud Portal.
All network locations display.
2. Select your network.
The Summary page displays.
3. In the menu for the network location (that is, not in the main menu for the organization at the top of thepage), select Devices.
The page displays all devices at the network location.
4. Point to the device and click the pencil icon at the right of the page.
The Summary page for the device displays.
5. Click the mail tray (Share) icon at the top of the page.
The Share Diagnostics pop-up window opens
Perform Diagnostics and Troubleshooting
65
Insight Pro, Mobile App and Cloud Portal User Manual
6. Enter an email address.
7. Click the Send button.
Insight sends the email with diagnostics information and the pop-up window closes.
Reload the Last Saved Cloud Configuration on a DeviceIf communication problems occur between Insight and a device, reloading the last saved cloud configurationcould resolve those problems.
You can reload the last saved cloud configuration for a device from your cloud account. During this process,the device goes offline for several minutes while the configuration is erased, the last saved cloud configurationis reloaded, and the device is rebooted for the changes to take effect.
For Insight Managed switches and Insight Managed access points, you can use the Insight app to reloadthe configuration to restore the last saved configuration for the device. This is the configuration that waslast saved on the Insight cloud-based management platform. If you use the Cloud Portal, you can restorethe last saved configuration on Insight Managed switches but not on Insight Managed access points. However,for Insight Managed access points, you can reset the configuration to default settings.
For devices that are capable of being managed by Insight but that are no longermanaged by Insight, any configuration changes that you saved through the localbrowser interface that occurred after the last saved configuration in the cloud are lost.Use the local browser interface to reapply these settings.
Note
Reload the Last Saved Cloud Configuration on a Device Using the InsightApp
To reload the last saved cloud configuration on a device using the Insight app:
1. Launch the Insight app.
2. If the managed devices do not display, in the menu at the bottom, tap Devices.
3. Select the device for which you want reload the last saved cloud configuration.
4. Scroll down and tap Diagnostics.
By default, Ports is selected.The diagnostics options that are supported for the selected device display.
5. Tap Reload Configuration.
The Reload Configuration page displays.
6. Tap Reload.
A notification displays. The configuration is reloaded and the device is offline for a few minutes.
7. Tap OK.
The diagnostic options display again.
Perform Diagnostics and Troubleshooting
66
Insight Pro, Mobile App and Cloud Portal User Manual
Reload the Last Saved Cloud Configuration on a Switch Using the CloudPortal
To reload the last saved cloud configuration on a switch using the Cloud Portal:
1. Access the Insight Cloud Portal.
All network locations display.
2. Select your network.
The Summary page displays.
3. In the menu for the network location (that is, not in the main menu for the organization at the top of thepage), select Devices.
The page displays all devices at the network location.
4. Point to the device and click the pencil icon at the right of the page.
The Summary page for the device displays.
5. Click the Reload icon at the top of the page.
The Reload Configuration pop-up window opens.
6. Click the Yes, reload button.
A notification displays. The configuration is reloaded and the device is offline for a few minutes.
Register New Products That Are Not Manageable in Insight
Insight Managed Switches, Insight Managed Wireless Access Points, ReadyNAS OS 6 storage systems,and Orbi Pro WiFi Systems are automatically registered when you add them to a network location in Insight.For more information, see Discover and Add Devices to a Network Location of an Organization on page 32.
You can register any product that is not manageable in Insight using the following methods:
• Register a Product Using the Insight App on page 67
• Register a Product Using the Cloud Portal on page 68
Register a Product Using the Insight AppUse this procedure only for a product that is not manageable in Insight.
To register a product using the Insight app:
1. Launch the Insight app.
2. Tap the menu button in the upper left corner of the screen.
3. Tap Register Any NETGEAR Device.
4. Do one of the following:
Perform Diagnostics and Troubleshooting
67
Insight Pro, Mobile App and Cloud Portal User Manual
• Enter the serial number. Enter the serial number of your device in the Enter Serial Number fieldand, to the right of the field, tap GO.
• Scan the barcode. Do the following:
a. Tap Scan Barcode.
b. Point the camera of your mobile device at the barcode on the product label.The Insight app automatically recognizes a valid barcode and places the associated serialnumber in the Enter Serial Number field.
c. To the right of the Enter Serial Number field, tap GO.
After the information is validated by the NETGEAR registration server, a confirmation displays.
Register a Product Using the Cloud PortalUse this procedure only for a product that is not manageable in Insight.
To register a product using the Cloud Portal:
1. Access the Insight Cloud Portal.
All network locations display.
2. Click the account icon in the upper right corner of the page.
A pop-up menu opens.
3. Select Register Any Network Device.
The Register any NETGEAR Product pop-up window opens.
4. Enter the serial number of your device in the Enter Serial Number, and click the Go button.
After the information is validated by the NETGEAR registration server, a confirmation displays.
Troubleshoot Connectivity Problems Between Your Deviceand Insight
If connectivity problems occur and you cannot get a connection between your device and the Insight app,start with the following general troubleshooting steps:
1. Make sure that the device is powered on.
This is relevant because, for example, a ReadyNAS storage system can be powered off through aschedule.
2. Make sure that the cable connections between your device and your network are good.
3. Make sure that your device is connected to the Internet and that the Internet connection is good.
4. Make sure that the LEDs on your device do not indicate a problem.
5. For devices that support a Cloud LED, make sure that the Cloud LED indicates that the device isconnected to the cloud.
Perform Diagnostics and Troubleshooting
68
Insight Pro, Mobile App and Cloud Portal User Manual
6. Make sure that the device is functioning in the Insight management mode (which it is by default) andnot in the local browser interface mode.
7. Make sure that the device is running the latest device firmware.
If the previous steps do not resolve the problem, see the following sections in the order suggested:
1. Check to See If the Insight App Can Recognize Your Device on page 69
2. Reboot Your Device Using the Insight App on page 69
3. Remove Your Device From the Network and Re-add It Using the Insight App on page 70
4. Reload the Last Saved Cloud Configuration on a Device Using the Insight App on page 66
5. Reset a Device to Factory Default Settings Using the Insight App on page 71
For more troubleshooting help, see the hardware installation guide (HIG) for your switch, access point, orReadyNAS storage system.You can download your product’s HIG from your product’s support pageunder Documentation.
Check to See If the Insight App Can Recognize Your Device
If the Insight app cannot communicate with your device, the Insight app might still recognize your device.
To check if the Insight app can recognize your device:
1. Launch the Insight app.
2. If the managed devices do not display, in the menu at the bottom, tap Devices.
3. Find your device.
4. Determine the device status:
• If your device does not display, the Insight app does not recognize your device.
• If your device displays with a red icon, the Insight app recognizes your device but cannot communicatewith it.
• If your device displays with a green icon, the Insight app recognizes your device and can communicatewith it.
Reboot Your Device Using the Insight App
You can resolve some communication problems between the Insight app and your device by rebooting yourdevice.
To reboot your device using the Insight app:
1. Launch the Insight app.
2. If the managed devices do not display, in the menu at the bottom, tap Devices.
3. Select the device that you want to reboot.
4. Scroll down to the bottom and tap Reboot.
Perform Diagnostics and Troubleshooting
69
Insight Pro, Mobile App and Cloud Portal User Manual
A warning displays.
5. Read the warning and tap Continue.
A notification displays. The device reboots and is offline for a few minutes.
6. Tap OK.
The device page displays again.
Remove Your Device From the Network and Re-add ItUsing the Insight App
You can resolve some communication problems between the Insight app and your device by removing yourdevice from the network and re-adding it using the Insight app. (You do not physically remove the deviceform the network and re-add it.)
To remove your device from the network and re-add it using the Insight app:
1. Launch the Insight app.
2. If the managed devices do not display, in the menu at the bottom, tap Devices.
3. Select the device that you want to remove.
4. Scroll down to the bottom and tap Remove.
A warning displays.
5. Read the warning and tap Remove.
The device is removed and the list of devices displays again. The device that you just removed is nowlisted as an unclaimed device.
6. Select the same device.
7. Tap ADD DEVICE.
8. Select the network location to which you want to add the device.
9. If you want to rename your device, in the Device Name field, enter a new name.
10. Tap Next.
A warning displays.
11. Tap Continue.
The device is added to the network.
12. Tap Devices.
When the process of adding the device to the network is complete, the status of your device turns greenin the Insight app and in the Cloud Portal. This process might take up to 20 minutes.
Perform Diagnostics and Troubleshooting
70
Insight Pro, Mobile App and Cloud Portal User Manual
Reset a Device to Factory Default Settings Using theInsight App
If you cannot resolve communication problems between a device and Insight, reset the device to factorydefault settings to see if that resolves the problem.
To reset a device to factory default settings using the Insight app:
1. Launch the Insight app.
2. If the managed devices do not display, in the menu at the bottom, tap Devices.
3. Select the device that you want to reset.
To reset the device, you must first remove it from the network.
4. Scroll down to the bottom and tap Remove.
A warning displays.
5. Read the warning and tap Remove.
The device is removed and the list of devices displays again. The device that you just removed is nowlisted as an unclaimed device.
6. Locate the recessed reset or factory defaults button on device.
7. Insert a device such as a straightened paper clip into the opening.
8. Press the button for up to 30 seconds or until Power LED lights amber.
The device resets to factory defaults settings and reboots.
9. After the reboot process is complete, select the same device in the Insight app.
10. Tap ADD DEVICE.
11. Select the network location to which you want to add the device.
12. If you want to rename your device, in the Device Name field, enter a new name.
13. Tap Next.
A warning displays.
14. Tap Continue.
The device is added to the network.
15. Tap Devices.
When the process of adding the device to the network is complete, the status of your device turns greenin the Insight app and in the Cloud Portal. This process might take up to 20 minutes.
Perform Diagnostics and Troubleshooting
71
Insight Pro, Mobile App and Cloud Portal User Manual
Send Diagnostic Files From the Insight App to a NETGEARCommunity Moderator
To help troubleshoot a problem, community moderators or NETGEAR employees might request diagnosticfiles from your Insight managed device.You can let the Insight app collect diagnostic information from anInsight managed device and send the information in a .zip file.
The .zip file includes the Tech Support file and the Insight Log file. Both of these files are .txt files.
Before you send the file, first create a thread on the NETGEAR Community or contribute to an existingthread that is relevant to your issue. Do not send files unless instructed to do so by a community moderatoror a NETGEAR employee.
To send diagnostic files from the Insight app to a NETGEAR community moderator:
1. Launch the Insight app.
2. If the managed devices do not display, in the menu at the bottom, tap Devices.
3. Select the device for which you want to send diagnostic files.
4. Scroll down and tap Diagnostics.
The diagnostics options that are supported for the selected device display.
5. Tap Share Diagnostics.
The Share Diagnostics page displays.
6. Enter [email protected].
If the community moderator or NETGEAR employee gave you another email address, enter that emailaddress instead.
7. Tap Send.
The diagnostic information is sent to the email address.
8. Tap the arrow at the top of the page to return to the page that displays the diagnostics options.
View Your Product Support Information Using the InsightApp
Your can view product support information for your registered products, including entitlements, contracts,(support) cases, and return merchandise authorizations (RMAs).
To view your product support information using the Insight app:
1. Launch the Insight app.
All organizations display.
2. Tap the menu button in the upper left corner of the screen.
3. Tap Technical Support.
4. Tap Registered Products.
The registered products display.
Perform Diagnostics and Troubleshooting
72
Insight Pro, Mobile App and Cloud Portal User Manual
5. Tap a product.
Product information displays.
In addition to tabs that let you select and view videos, articles, and community questions and responses,the following tabs provide specific support information:
• Entitlement. Lists your hardware warranty information, chat support expiration date, phone supportexpiration date, and online support expiration date.For information about opening a chat, phone, or online support case, see Open a Technical SupportCase For a Product Using the Insight App on page 73.
• Contracts. List your support contracts, if any.
• Cases. List the support cases that you opened, if any.
• RMA. Lists the RMAs that you initiated and that were approved, if any.
6. To view all support cases that you opened, tap the support case icon in the upper right corner of thescreen.
The subject and status of each case displays.
Open a Technical Support Case For a Product Using theInsight App
You can open a support case for a registered product for which you are entitled support.You can use chat,online, or phone technical support.
To open a technical support case for a product using the Insight app:
1. Launch the Insight app.
All organizations display.
2. Tap the menu button in the upper left corner of the screen.
3. Tap Technical Support.
4. Tap Registered Products.
The registered products display.
5. Tap a product.
Product information displays.
6. Open a support case using one of the following methods:
• Online. To open an online case, do the following:
a. Tap Cases.
b. Tap Create a Case.A pop-up window opens.
c. Enter the subject and the message, and tap Send.
Perform Diagnostics and Troubleshooting
73
Insight Pro, Mobile App and Cloud Portal User Manual
A confirmation displays and an email message is sent to the email address that is associatedwith your Insight account.
d. Tap Done.The product information displays again.
• Chat. To open a chat case, do the following:
a. Tap Entitlements.
b. Tap Chat Support.A chat window opens, providing you access to online support.
• Phone. To open a case over the phone, do the following:
a. Tap Entitlements.
b. Tap Phone Support.Phone numbers and support information display.
c. Call a phone number to open a case.
7. To view all support cases that you opened, including the one you just opened, tap the support caseicon in the upper right corner of the screen.
The subject and status of each case displays.
Perform Diagnostics and Troubleshooting
74
Insight Pro, Mobile App and Cloud Portal User Manual

![What is GEFIRAgefira.com/public/presentation/specialpresentation.pdf · Project EIGER [Web App, Web Portal, Apps]Event Picture & Sharing Project RENO[Web App, Web Portal, Apps] STAFF](https://img.pdfslide.net/doc/110x75/5fe68a61b34c2033304a326e/what-is-project-eiger-web-app-web-portal-appsevent-picture-sharing-project.jpg)