Embed Size (px)
Citation preview

North Dakota University System
PeopleSoft Finance 9.0
How to Add New Vendors
Version 1.0
September 2012
Table of Contents Step 1: Verify the W-9, Substitute W-9, or W-8BEN Form ............................................................................... 2
Step 2: Search ......................................................................................................................................................... 4
Duplicate Vendor Records ................................................................................................................................. 5
Step 3: Adding the Vendor ..................................................................................................................................... 5
Step 4: Identifying Information Tab ...................................................................................................................... 7
*Status ..................................................................................................................................................... 10
*Classification ......................................................................................................................................... 10
*Persistence ........................................................................................................................................... 10
*HCM Class ............................................................................................................................................ 10
VAT Registration.................................................................................................................................... 10
Withholding ............................................................................................................................................. 11
Open for Ordering.................................................................................................................................. 11
Step 5: Address Tab ............................................................................................................................................ 19
Vendor Address Section ........................................................................................................................... 19
Address ID .............................................................................................................................................. 19
Description .............................................................................................................................................. 19
Details Section ........................................................................................................................................... 20
Effective Date ......................................................................................................................................... 20
Status ...................................................................................................................................................... 20
Address Lines: (Address 1, Address 2, Address 3) ........................................................................ 20
Address Validation ................................................................................................................................ 20
Multiple Addresses ................................................................................................................................ 22
Payment/Withholding Alt Names Section .............................................................................................. 23
Payment Alternate Name ..................................................................................................................... 23
Withholding Alternate Name ................................................................................................................ 23

Phone Information ................................................................................................................................. 24
Step 6: Contacts Tab (optional) ......................................................................................................................... 24
Step 7: Location Tab ............................................................................................................................................ 25
Location Section ............................................................................................................................................ 25
Details Section ............................................................................................................................................... 26
Options ........................................................................................................................................................ 27
Payables ................................................................................................................................................. 27
Procurement ........................................................................................................................................... 32
1099 ......................................................................................................................................................... 33
Page 1
OVERVIEW
This document provides instructions to add PeopleSoft vendor records to the shared vendor database. Before adding a new vendor to the database, it is important to verify that the vendor does not already exist. IRS Reference: For guidelines to ensure all 1099 reportable vendors are set up correctly, refer to http://www.irs.gov. Specific 1099 instructions are located at http://www.irs.gov/pub/irs-pdf/i1099msc.pdf. Note: Navigate to http://www.irs.gov/pub/irs-pdf/i1099gi.pdf or search www.irs.gov for “General Instructions for Certain Information Returns” to access important IRS instructions. System Information Technology Services performs the year end filing with the IRS. However, these instructions are helpful for Vendor Maintenance Representatives. Please refer to the “General Instructions for Certain Information Returns”. IMPORTANT: The PeopleSoft vendor database is shared across the North Dakota University System including all 11 public campuses and the board office. All changes to a vendor record will impact the other campuses. The vendor classification is also important to ensure that the appropriate information displays correctly in the public reporting database.
Page 2
HOW TO ADD A NEW VENDOR
Step 1: Verify the W-9, Substitute W-9, or W-8BEN Form The first step in adding a vendor is to determine that the information provided on the W-9, Substitute W-9, or W-8BEN form is accurate.
If the vendor has not provided a W-9, Substitute W-9, or W-8BEN, contact the vendor to request the appropriate documentation.
Note: It is important to follow the campus business process. Even if a W-9, Substitute W-9, or W-8BEN form is received, the vendor record may not be created until a purchase order is required or the vendor has provided an invoice.
IMPORTANT: If a W-9, substitute W-9, or W-8BEN has not been received, refer to the IRS.gov at http://www.irs.gov/govt/fslg/article/0,,id=110339,00.html for information regarding backup withholding.
• If the form lists the tax classification as something other than Non-Profit or Exempt: • System Information Technology Services will research programming alternatives to help prevent
duplicate vendor records. • Short term, the IRS e-services On-Line Taxpayer Identification Number (TIN) Matching Program
may be helpful to verify the TIN and vendor name information. • “…TIN Matching is one of the e-services products that is offered and is accessible through
the IRS website. For program guidelines, see Pub. 2108A, On-Line Taxpayer Identification Number (TIN) Matching Program, or go to IRS.gov and enter keyword “TIN MATCHING” in the upper right corner. It is anticipated that payers who validate the TIN and name combinations before filing information returns will receive fewer backup withholding (CP2100) notices and penalty notices. E-services technical support is available by calling 1-866-255-0654.”
• If the form lists the tax classification as Non-Profit or Exempt:
• If the vendor provides an original determination letter or affirmation letter with a W-9, substitute W-9, or W-8BEN, skip the following steps and continue with Step 2.
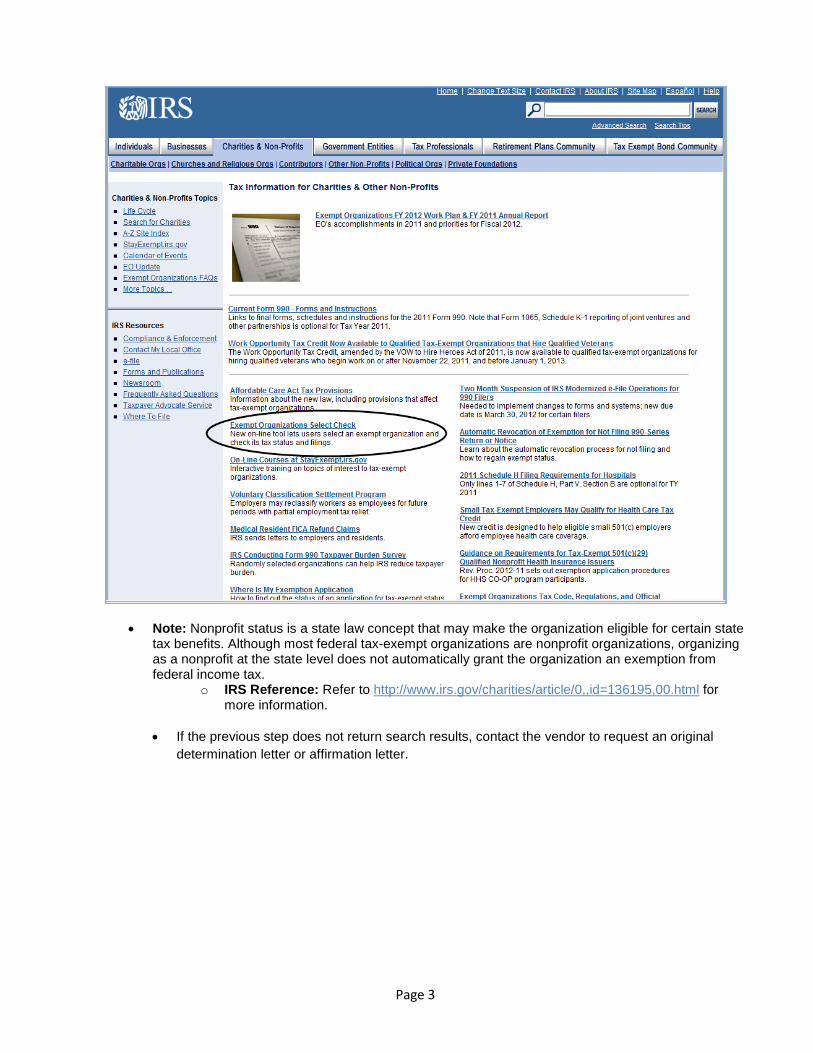
• If an original determination letter or affirmation letter is not provided by the vendor: • Contact the vendor and request an original determination letter or affirmation letter; or • Continue with the following steps to verify the federal exempt status. • For vendors claiming the federal exempt status, navigate to http://www.irs.gov/charities/ and click
the “Exempt Organizations Select Check” link to determine if the vendor is federally exempt. o Click the Exempt Organizations Select Check again on the following page and follow
the instructions.
Page 3
• Note: Nonprofit status is a state law concept that may make the organization eligible for certain state tax benefits. Although most federal tax-exempt organizations are nonprofit organizations, organizing as a nonprofit at the state level does not automatically grant the organization an exemption from federal income tax.
o IRS Reference: Refer to http://www.irs.gov/charities/article/0,,id=136195,00.html for more information.
• If the previous step does not return search results, contact the vendor to request an original
determination letter or affirmation letter.
Page 4
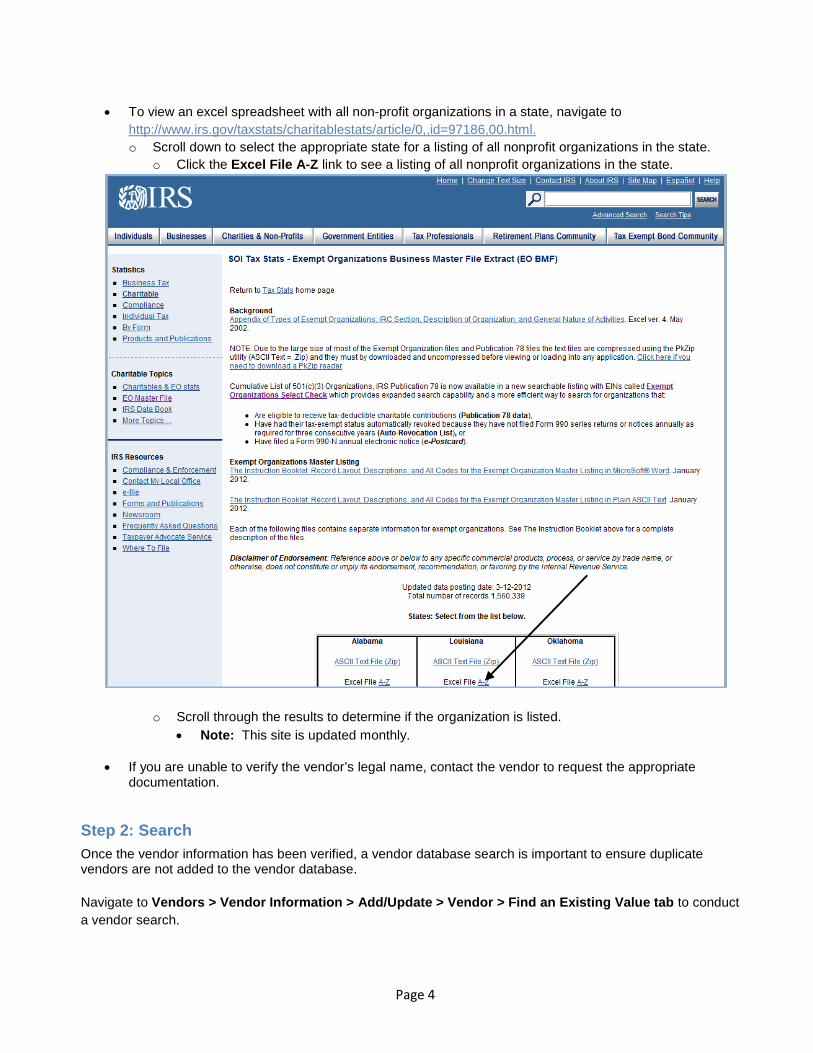
• To view an excel spreadsheet with all non-profit organizations in a state, navigate to
http://www.irs.gov/taxstats/charitablestats/article/0,,id=97186,00.html. o Scroll down to select the appropriate state for a listing of all nonprofit organizations in the state.
o Click the Excel File A-Z link to see a listing of all nonprofit organizations in the state.
o Scroll through the results to determine if the organization is listed. • Note: This site is updated monthly.
• If you are unable to verify the vendor’s legal name, contact the vendor to request the appropriate documentation.
Step 2: Search Once the vendor information has been verified, a vendor database search is important to ensure duplicate vendors are not added to the vendor database. Navigate to Vendors > Vendor Information > Add/Update > Vendor > Find an Existing Value tab to conduct a vendor search.
Page 5
Search each field separately to verify the vendor does not exist.
Note: Employee’s EMPL IDs are app messaged from HRMS to the Financial System and as a result, searching for a supplier record is different than searching for an employee record.
Refer to Step 4 to understand how suppliers and students are added to the vendor database for help conducting appropriate vendor database searches. IMPORTANT: Employees are maintained in HRMS and are not manually added to the Financial System.
• Short Vendor Name (*Vendor Short Name) • Taxpayer Identification Number • Name 1 (*Vendor Name 1) • Vendor ID
o Utilize this field to search for Empl ID #’s to verify the record does not already exist.
o Note: Employees have a 7 digit Vendor ID, not a 10 digit Vendor ID.
o IMPORTANT: A duplicate vendor record using the system generated 10 digit Vendor ID is added if an employee also provides services to Higher Ed that are 1099 Reportable.
Duplicate vendor records are required in the following instances: • HCM vendors with unique HR classifications require unique vendor records.
o Note: HCM vendors are required for HRMS/Payroll vouchers for garnishments, benefit payments, etc.
• Employees providing services to Higher Ed require a duplicate vendor record with a “Supplier” classification.
o Note: This will create a duplicate vendor record. One classification will be a “Supplier” and one will be an “Employee” classification. As long as the classifications are different, the duplicate vendor record is allowed.
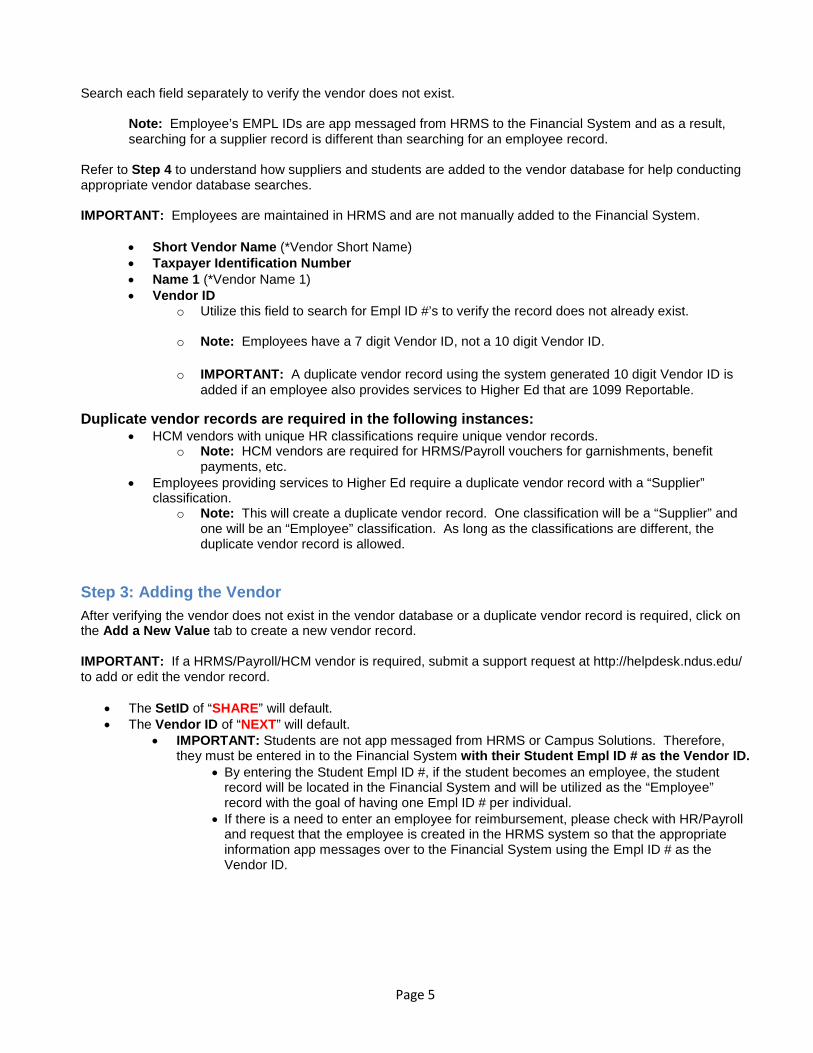
Step 3: Adding the Vendor After verifying the vendor does not exist in the vendor database or a duplicate vendor record is required, click on the Add a New Value tab to create a new vendor record. IMPORTANT: If a HRMS/Payroll/HCM vendor is required, submit a support request at http://helpdesk.ndus.edu/ to add or edit the vendor record.
• The SetID of “SHARE” will default. • The Vendor ID of “NEXT” will default.
• IMPORTANT: Students are not app messaged from HRMS or Campus Solutions. Therefore, they must be entered in to the Financial System with their Student Empl ID # as the Vendor ID.
• By entering the Student Empl ID #, if the student becomes an employee, the student record will be located in the Financial System and will be utilized as the “Employee” record with the goal of having one Empl ID # per individual.
• If there is a need to enter an employee for reimbursement, please check with HR/Payroll and request that the employee is created in the HRMS system so that the appropriate information app messages over to the Financial System using the Empl ID # as the Vendor ID.
Page 6
• Persistence • One Time – Do not utilize the One Time option for vendors that are 1099 reportable. Once the
voucher is processed and paid, the vendor record will automatically be set to inactive. • Permanent – System Information Technology Services utilizes for HCM/HRMS vendors only.
This status prevents the inactivation of the vendors during the 36 month inactivation process. • Regular – Most often utilized. • Single Payment Vendor – Not utilized by Higher Ed.
• Click Add.
Page 7
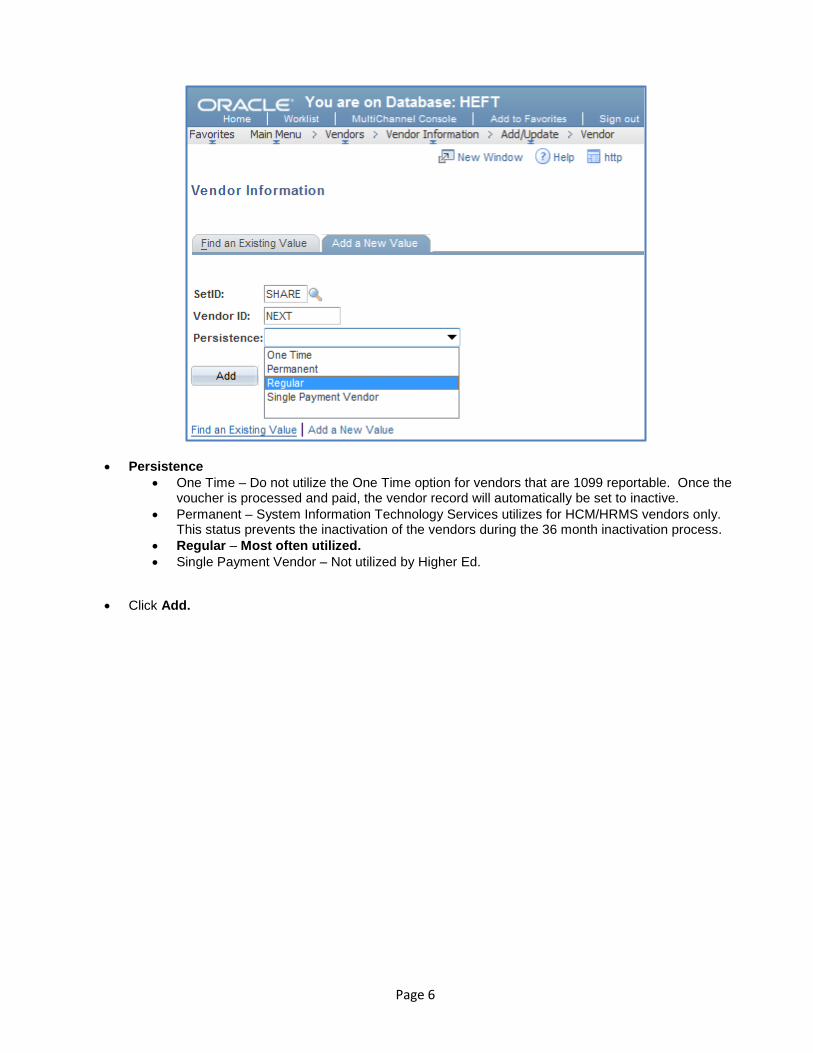
Step 4: Identifying Information Tab The Identifying Information tab will appear.
• The SetID field will default to SHARE. • The Vendor ID field will populate with “NEXT” for suppliers and employees providing a 1099 Reportable
service.
• Note: The “NEXT” Vendor ID number will be assigned when the page is saved.
• In the *Vendor Short Name field, o For Sole-Proprietors and students, enter the business name, if applicable, or the last name of the
individual if no business name is provided. Note: PeopleSoft assigns a unique number beginning “-001” for each value when the
record is saved. When the “-999” limit has been reached such as for Johnson, the following will appear:
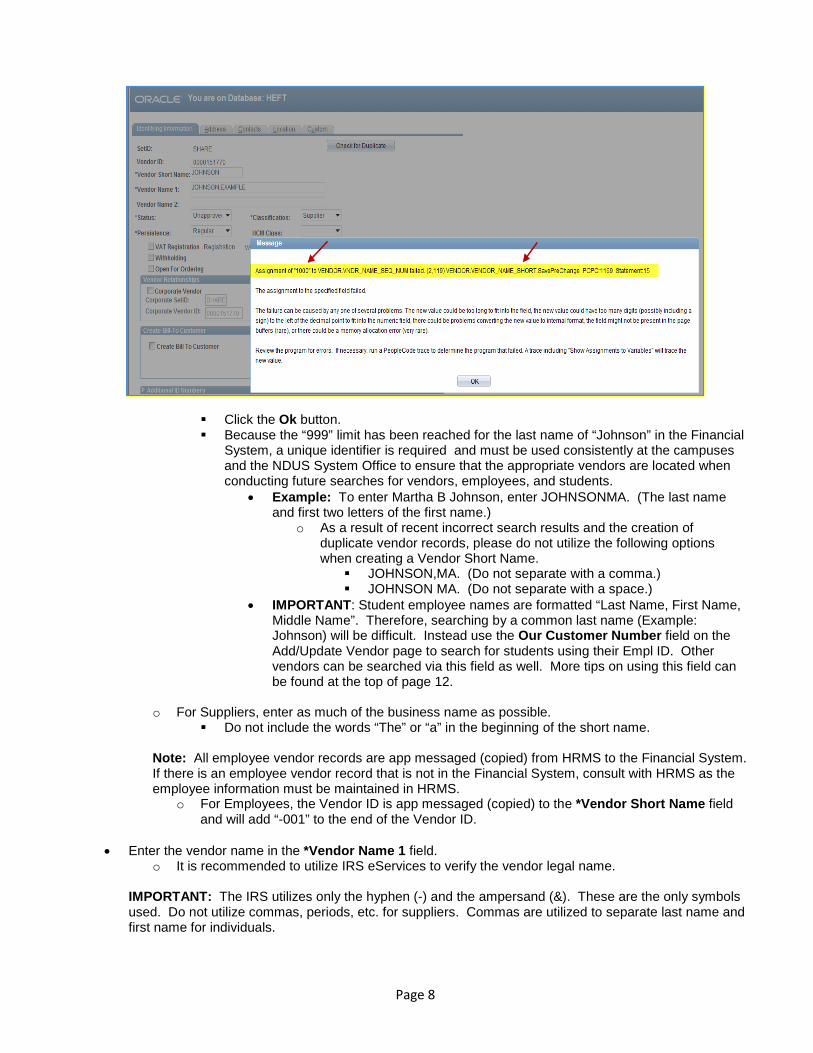
Page 8
Click the Ok button. Because the “999” limit has been reached for the last name of “Johnson” in the Financial
System, a unique identifier is required and must be used consistently at the campuses and the NDUS System Office to ensure that the appropriate vendors are located when conducting future searches for vendors, employees, and students.
• Example: To enter Martha B Johnson, enter JOHNSONMA. (The last name and first two letters of the first name.)
o As a result of recent incorrect search results and the creation of duplicate vendor records, please do not utilize the following options when creating a Vendor Short Name.
JOHNSON,MA. (Do not separate with a comma.) JOHNSON MA. (Do not separate with a space.)
• IMPORTANT: Student employee names are formatted “Last Name, First Name, Middle Name”. Therefore, searching by a common last name (Example: Johnson) will be difficult. Instead use the Our Customer Number field on the Add/Update Vendor page to search for students using their Empl ID. Other vendors can be searched via this field as well. More tips on using this field can be found at the top of page 12.
o For Suppliers, enter as much of the business name as possible.
Do not include the words “The” or “a” in the beginning of the short name.
Note: All employee vendor records are app messaged (copied) from HRMS to the Financial System. If there is an employee vendor record that is not in the Financial System, consult with HRMS as the employee information must be maintained in HRMS.
o For Employees, the Vendor ID is app messaged (copied) to the *Vendor Short Name field and will add “-001” to the end of the Vendor ID.
• Enter the vendor name in the *Vendor Name 1 field.
o It is recommended to utilize IRS eServices to verify the vendor legal name.
IMPORTANT: The IRS utilizes only the hyphen (-) and the ampersand (&). These are the only symbols used. Do not utilize commas, periods, etc. for suppliers. Commas are utilized to separate last name and first name for individuals.
Page 9
• For a Sole proprietor enter the “Doing Business As (DBA)” name in the *Vendor Name 1 line. In the Vendor Name 2 line, enter the individual’s name.
Vendor Name 1: DAKOTA MOTORCYCLES Vendor Name 2: SMITH,DAVE
• For a Limited Liability Company (LLC) enter the company name in the *Vendor Name 1 line and the individual name in the Vendor Name 2 line.
• For an individual Vendor Name 1: LAST,FIRST MIDDLE Note: There is not a space after the comma between the Last and First names, but
there is a space between the First and Middle names. • Note: The order in which these fields are entered correspond to how they will print on a check or
1099 form, unless Alternate Names are utilized (explained later).
• In the Vendor Name 2 section, enter the individual’s name if a DBA name is provided.
o The business process has been to precede the information with “LN:” for Legal Name. However, the values in this field will print on the 1099 if the fields within the Payment/Withholding Alt Names section within the Address tab are blank. (Includes addresses linked to locations that are set up for 1099 Reporting.)
The business process to add “LN:” is not required, however, there will still be vendor records that have the “LN:” as the data has not been cleaned up.
o IMPORTANT: The Vendor Name 2 field has also been utilized to add inactivated vendor notes
as this field helps to quickly identify that a vendor has been inactivated. Utilizing this field to add inactivated vendor notes will require careful consideration when verifying 1099 information to ensure that the fields within the Payment/Withholding Alt Names section on the Address tab has the appropriate values or the Vendor Name 2 field will print on the 1099. THE VENDOR NAME 2 FIELD WILL PRINT ON A 1099 UNLESS AN ALTERNATE NAME HAS BEEN SET UP.
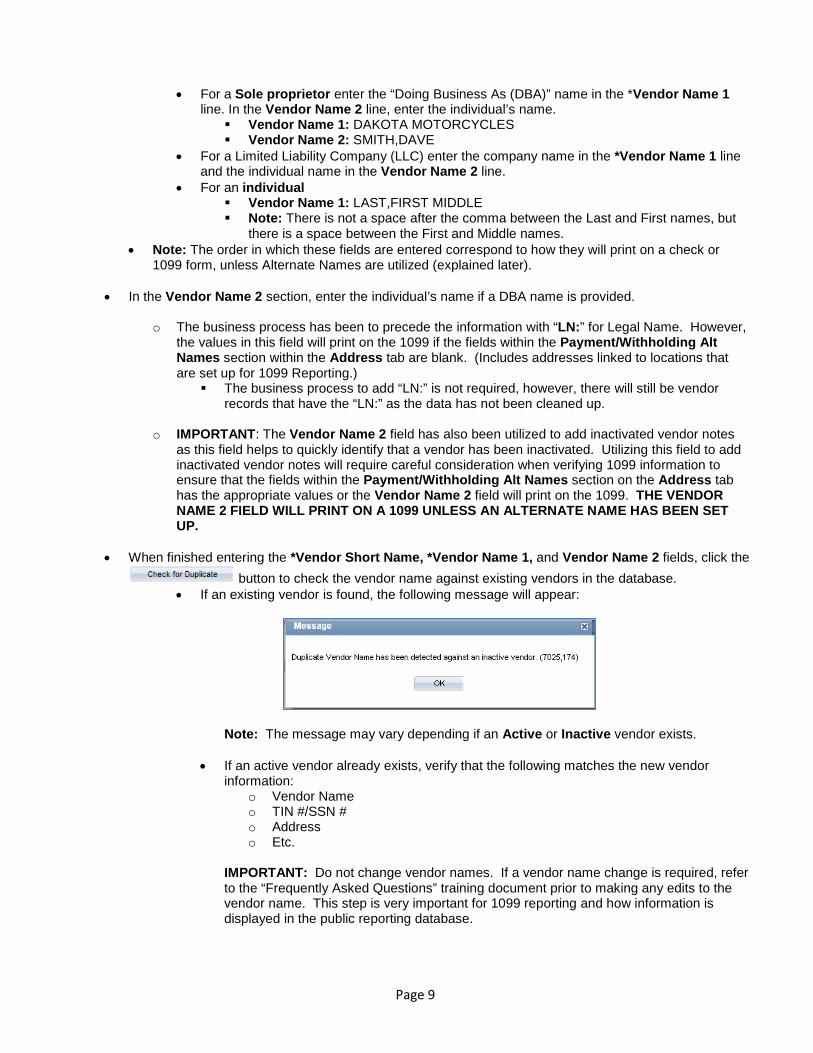
• When finished entering the *Vendor Short Name, *Vendor Name 1, and Vendor Name 2 fields, click the
button to check the vendor name against existing vendors in the database. • If an existing vendor is found, the following message will appear:
Note: The message may vary depending if an Active or Inactive vendor exists.
• If an active vendor already exists, verify that the following matches the new vendor information:
o Vendor Name o TIN #/SSN # o Address o Etc.
IMPORTANT: Do not change vendor names. If a vendor name change is required, refer to the “Frequently Asked Questions” training document prior to making any edits to the vendor name. This step is very important for 1099 reporting and how information is displayed in the public reporting database.
Page 10
• If an inactive vendor exists, refer to the “Frequently Asked Vendor Questions” document for information on reactivating a vendor.
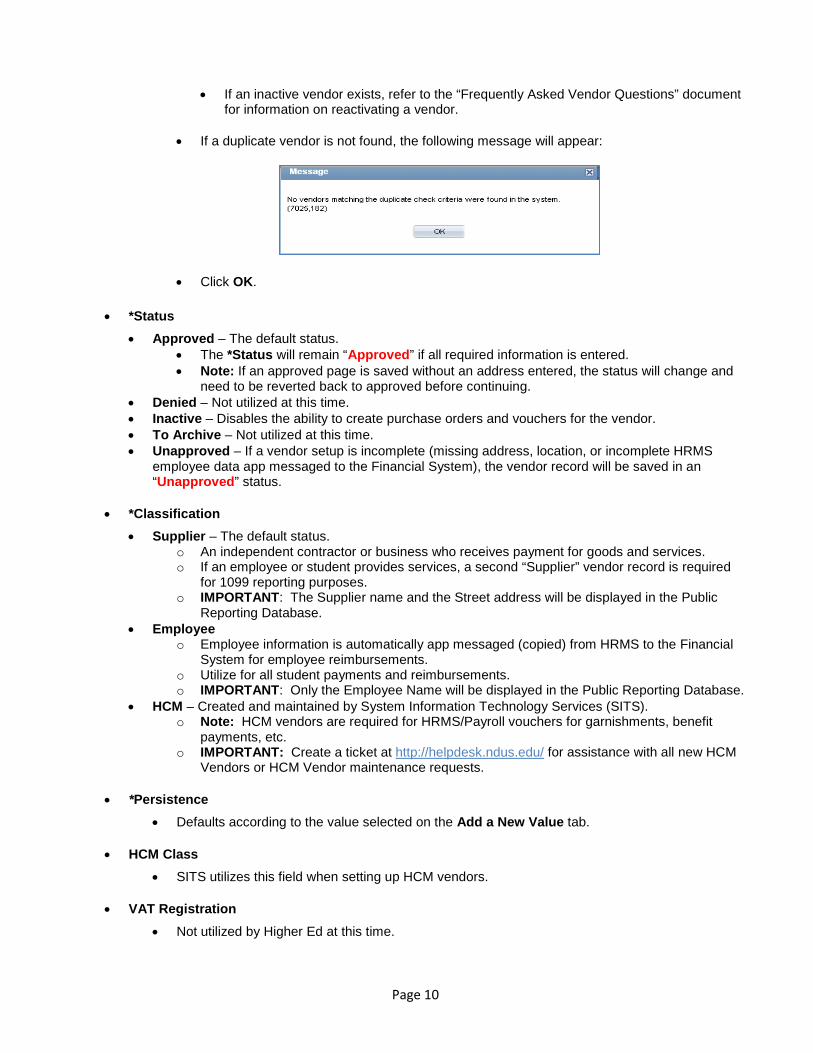
• If a duplicate vendor is not found, the following message will appear:
• Click OK.
• *Status • Approved – The default status.
• The *Status will remain “Approved” if all required information is entered. • Note: If an approved page is saved without an address entered, the status will change and
need to be reverted back to approved before continuing. • Denied – Not utilized at this time. • Inactive – Disables the ability to create purchase orders and vouchers for the vendor. • To Archive – Not utilized at this time. • Unapproved – If a vendor setup is incomplete (missing address, location, or incomplete HRMS
employee data app messaged to the Financial System), the vendor record will be saved in an “Unapproved” status.
• *Classification • Supplier – The default status.
o An independent contractor or business who receives payment for goods and services. o If an employee or student provides services, a second “Supplier” vendor record is required
for 1099 reporting purposes. o IMPORTANT: The Supplier name and the Street address will be displayed in the Public
Reporting Database. • Employee
o Employee information is automatically app messaged (copied) from HRMS to the Financial System for employee reimbursements.
o Utilize for all student payments and reimbursements. o IMPORTANT: Only the Employee Name will be displayed in the Public Reporting Database.
• HCM – Created and maintained by System Information Technology Services (SITS). o Note: HCM vendors are required for HRMS/Payroll vouchers for garnishments, benefit
payments, etc. o IMPORTANT: Create a ticket at http://helpdesk.ndus.edu/ for assistance with all new HCM
Vendors or HCM Vendor maintenance requests.
• *Persistence • Defaults according to the value selected on the Add a New Value tab.
• HCM Class • SITS utilizes this field when setting up HCM vendors.
• VAT Registration • Not utilized by Higher Ed at this time.

Page 11
• Withholding • Check the withholding box if the vendor is 1099 reportable.
IRS Reference: Refer to the “Instructions for Form 1099-MISC” at http://www.irs.gov/pub/irs-pdf/i1099msc.pdf for more information.
Note: PeopleSoft utilizes the word “Withholding” to indicate that the vendor will have 1099 reporting.
• If the organization is exempt, do not check the Withholding checkbox. Note: The exemption for reporting payments made to corporations does not apply to
payments for legal services. Therefore, for legal services, select the Withholding checkbox.
• Open for Ordering • Checking the box allows purchase order functionality. • Note: A purchase order cannot be entered if the box is left unchecked.
Note: The buttons expand and collapse the regions within the current tab.
If the Expand All button is not selected, the region may be expanded by clicking the arrow on the blue bar.
Page 12
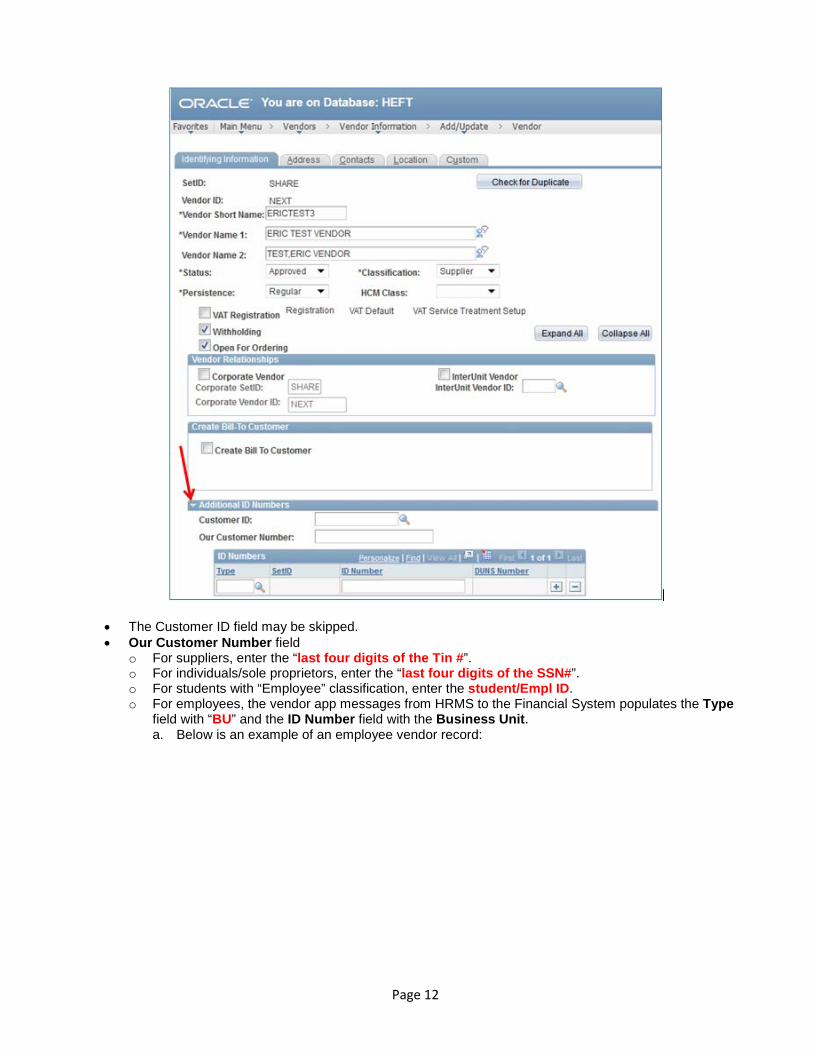
• The Customer ID field may be skipped. • Our Customer Number field
o For suppliers, enter the “last four digits of the Tin #”. o For individuals/sole proprietors, enter the “last four digits of the SSN#”. o For students with “Employee” classification, enter the student/Empl ID. o For employees, the vendor app messages from HRMS to the Financial System populates the Type
field with “BU” and the ID Number field with the Business Unit. a. Below is an example of an employee vendor record:

Page 13
• For Grants and Contracts suppliers, certain U.S. government agencies require that a vendor have a DUNS number. As a result, Grants and Contracts purchase requisitions may contain a Data Universal Numbering System number abbreviated as DUNS®. The DUNS® is a system developed and regulated by Dun & Bradstreet (D&B).
• To add a DUNS Number, click on the Type magnifying glass.
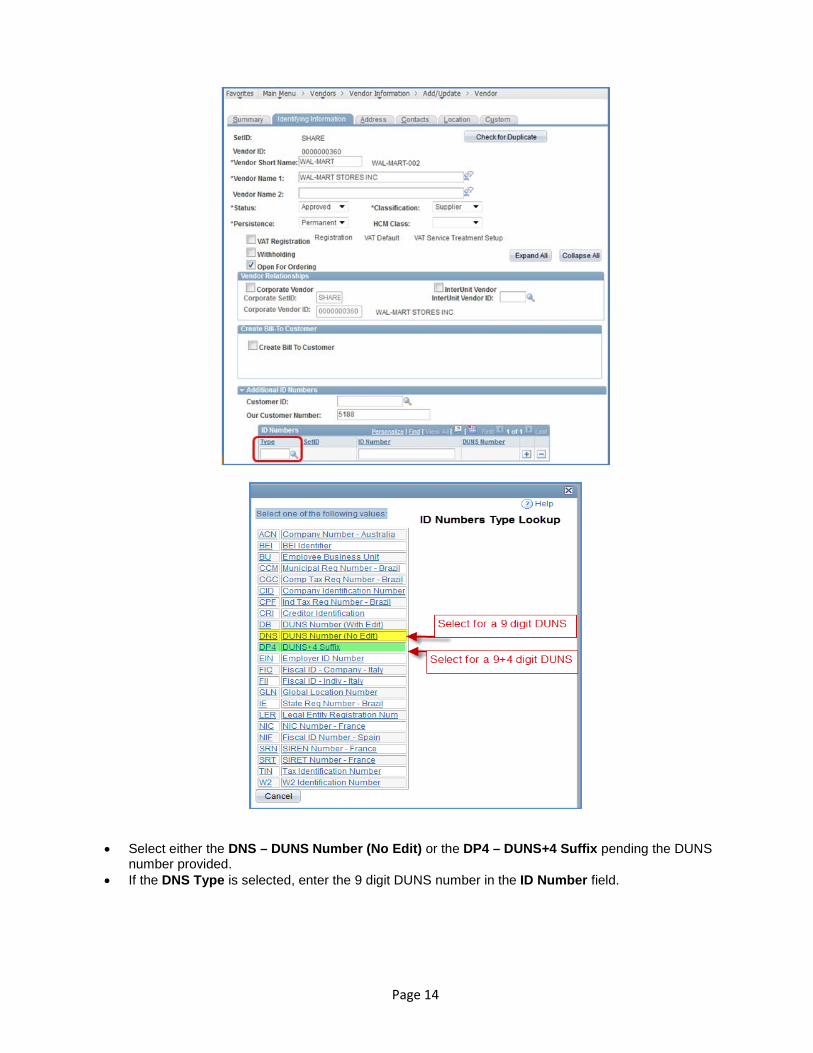
Page 14
• Select either the DNS – DUNS Number (No Edit) or the DP4 – DUNS+4 Suffix pending the DUNS number provided.
• If the DNS Type is selected, enter the 9 digit DUNS number in the ID Number field.
Page 15
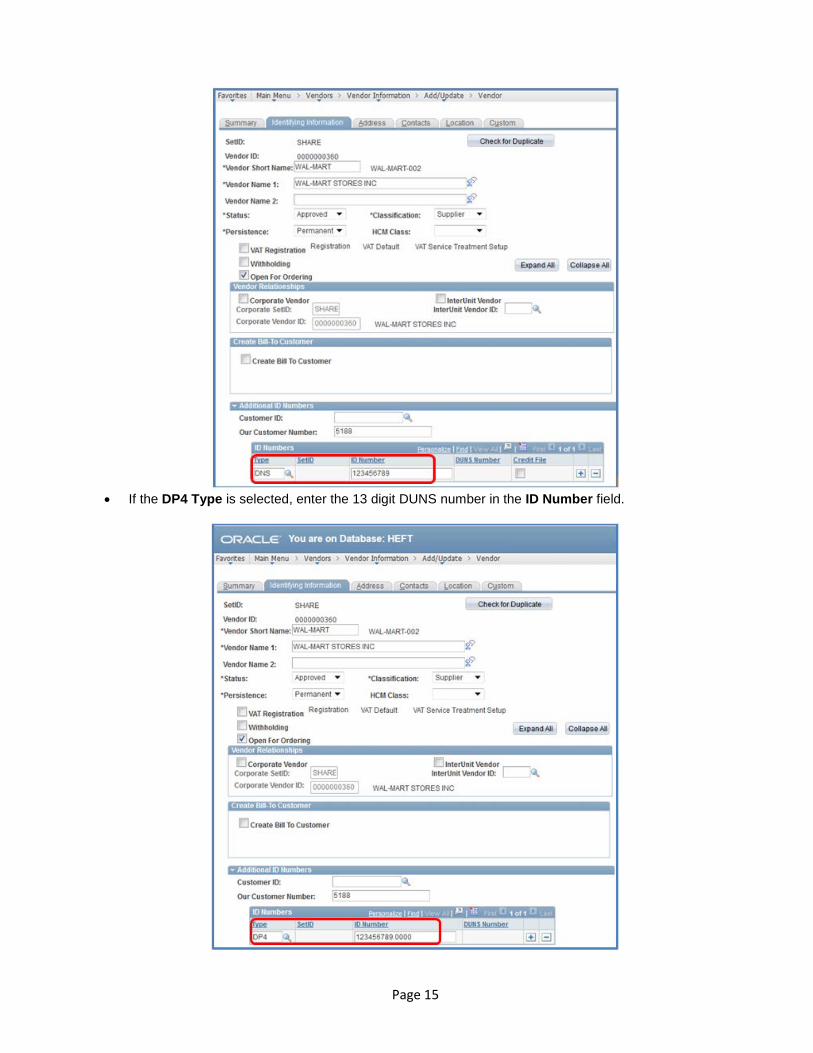
• If the DP4 Type is selected, enter the 13 digit DUNS number in the ID Number field.

Page 16
The region is not utilized by Higher Ed.
The region is utilized to classify the organization type. The W-9, substitute W-9, W-8BEN, determination letter, or affirmation letter must be received and verified prior to adding or editing an existing vendor record. Refer to Step 1 above if the above documents have not already been verified.
• If the federally exempt status provided on the document cannot be verified, contact the vendor and request their determination or affirmation letter provided by the IRS.
• Note: If a vendor does not have a determination or affirmation letter, refer them to http://www.irs.gov/charities/article/0,,id=212056,00.html. Alternatively, search “tax exempt letter of determination” on www.irs.gov.
• While waiting for the letter of determination, the vendor record may be set up as long as an explanation is entered in the Cert Nbr field stating the non-profit/exempt status could not be verified and the IRS letter of determination has been requested.
If the Expand All button was not clicked, click on the arrow to expand the region.

Page 17
Note: The right hand side of the “Government Sources” section states 1 of 1. Multiple sources may be added.
o EEO Certification Date- Not utilized by Higher Ed. • *Source field:
If the organization is not EXEMPT, utilize the lookup to select “ORG TYPE”. If the organization is EXEMPT, utilize the lookup to select “EXEMPT”. The state has added additional options in this field. Higher Ed is not utilizing at this time.
o Cert Nbr: enter information about the required documents that were received:
Business Unit (where documents are on file)
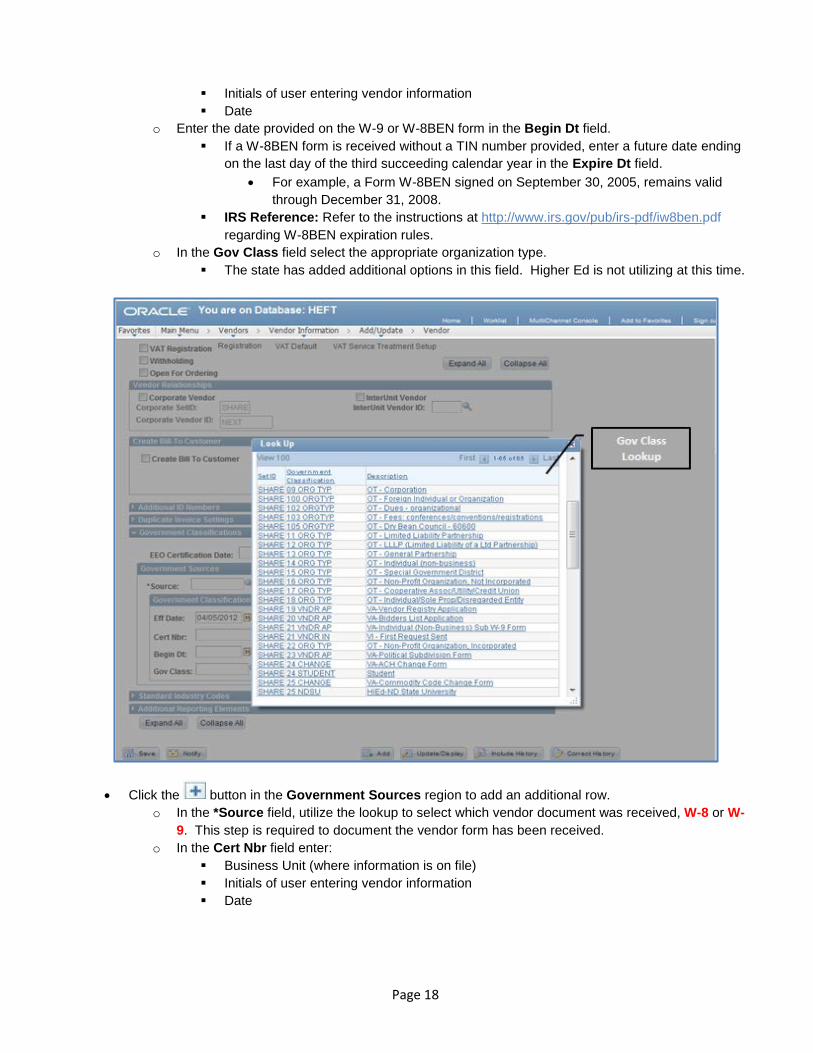
Page 18
Initials of user entering vendor information Date
o Enter the date provided on the W-9 or W-8BEN form in the Begin Dt field. If a W-8BEN form is received without a TIN number provided, enter a future date ending
on the last day of the third succeeding calendar year in the Expire Dt field. • For example, a Form W-8BEN signed on September 30, 2005, remains valid
through December 31, 2008. IRS Reference: Refer to the instructions at http://www.irs.gov/pub/irs-pdf/iw8ben.pdf
regarding W-8BEN expiration rules. o In the Gov Class field select the appropriate organization type.
The state has added additional options in this field. Higher Ed is not utilizing at this time.
• Click the button in the Government Sources region to add an additional row. o In the *Source field, utilize the lookup to select which vendor document was received, W-8 or W-
9. This step is required to document the vendor form has been received. o In the Cert Nbr field enter:
Business Unit (where information is on file) Initials of user entering vendor information Date
Page 19
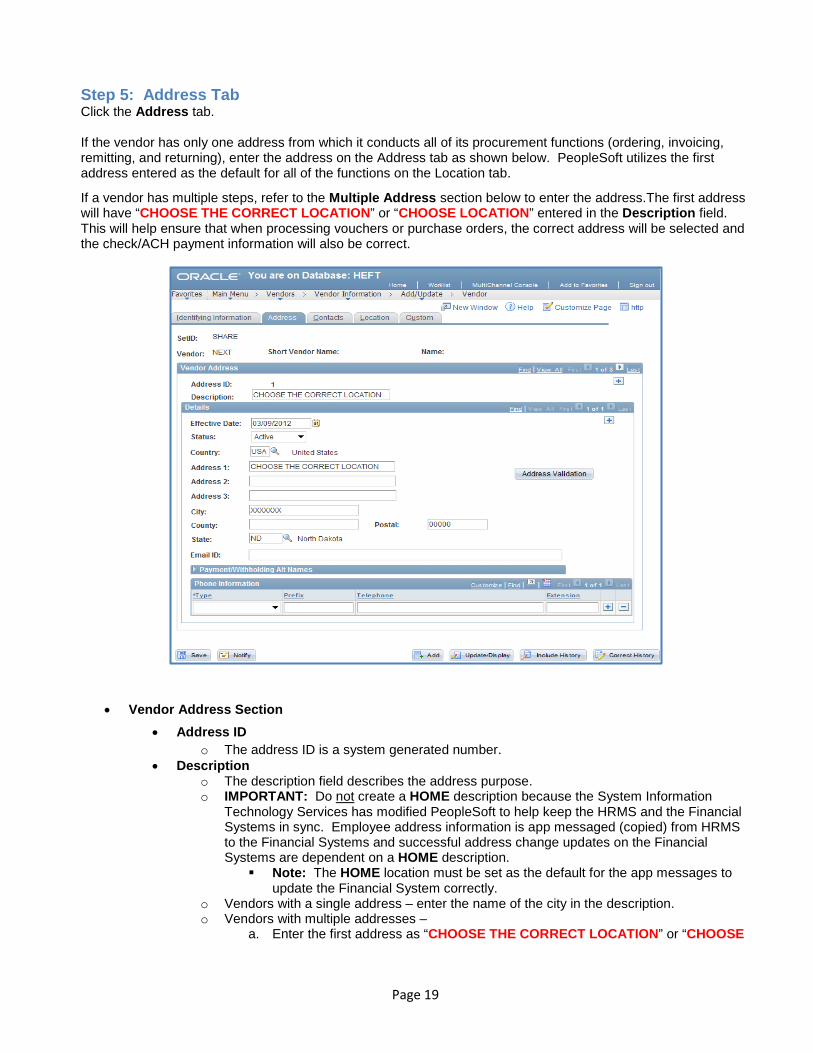
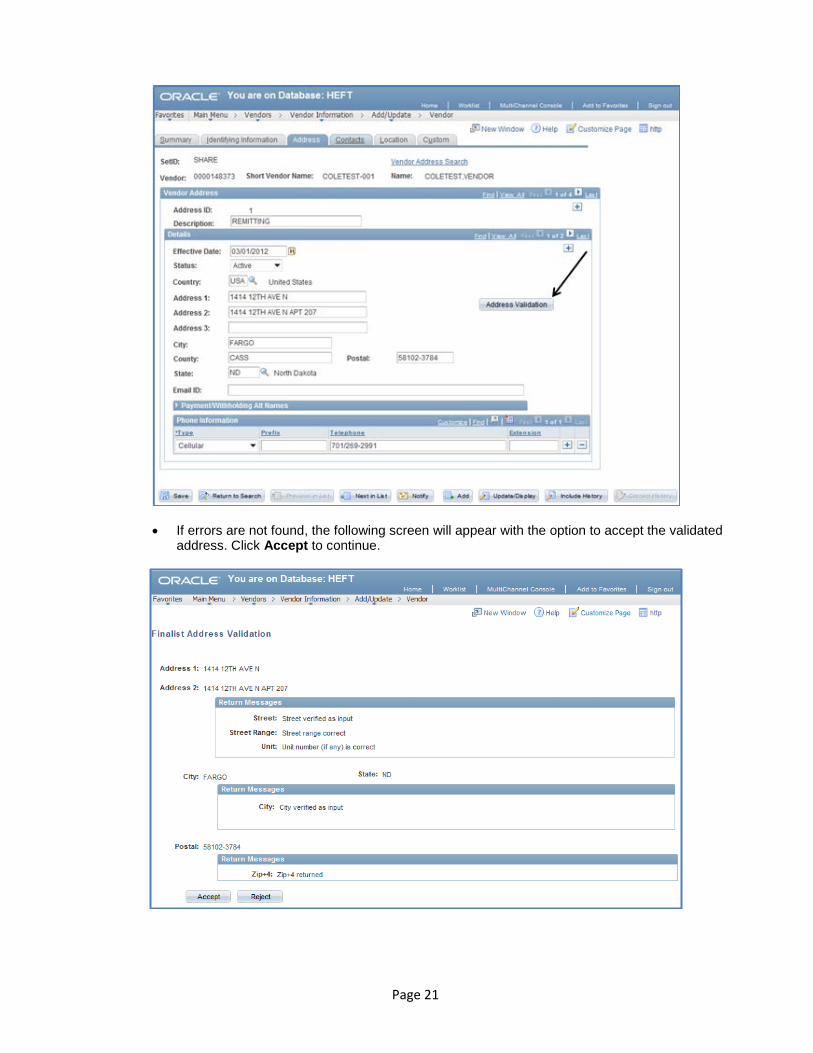
Step 5: Address Tab Click the Address tab.
If the vendor has only one address from which it conducts all of its procurement functions (ordering, invoicing, remitting, and returning), enter the address on the Address tab as shown below. PeopleSoft utilizes the first address entered as the default for all of the functions on the Location tab.
If a vendor has multiple steps, refer to the Multiple Address section below to enter the address.The first address will have “CHOOSE THE CORRECT LOCATION” or “CHOOSE LOCATION” entered in the Description field. This will help ensure that when processing vouchers or purchase orders, the correct address will be selected and the check/ACH payment information will also be correct.
• Vendor Address Section • Address ID
o The address ID is a system generated number. • Description
o The description field describes the address purpose. o IMPORTANT: Do not create a HOME description because the System Information
Technology Services has modified PeopleSoft to help keep the HRMS and the Financial Systems in sync. Employee address information is app messaged (copied) from HRMS to the Financial Systems and successful address change updates on the Financial Systems are dependent on a HOME description.
Note: The HOME location must be set as the default for the app messages to update the Financial System correctly.
o Vendors with a single address – enter the name of the city in the description. o Vendors with multiple addresses –
a. Enter the first address as “CHOOSE THE CORRECT LOCATION” or “CHOOSE

Page 20
LOCATION”. b. Click on the sign to enter additional addresses as required.
Note: If a specific remit to address is required for a specific campus, the “Campus Name Remit To Only” may be utilized if this is helpful when selecting the correct location when processing vouchers.
• Details Section • Effective Date
The effective date defaults to the current date. In addition, if address changes are made, a new effective date should be added using the button to record changes.
If a vendor has provided a new address that is effective on a future date, enter the future date that the address will take effect.
• Status The status will default to Active.
Country Click on the magnifying glass to select the appropriate country. If selecting a country other than USA, additional address lines may automatically be
added. • Address Lines: (Address 1, Address 2, Address 3)
Enter the address information according to the US Postal Standards handbook located at http://pe.usps.gov, and selecting Postal Addressing Standards.
• Example: Address 1: 6960 N 101ST ST Address 2: PO BOX 55555 SAN DIEGO CA 92120-5555
Note: Address lines will print on the 1099 if the fields are populated with characters. For instance, if address information was put in Address lines 1 and 2, only those two Address lines will appear.
Note: Avoid adding an individual’s name in the address line, e.g. ATTN: CAROL in the Address 1 field. If necessary, enter department names or position titles to help minimize the need to update vendor information for employee/position changes. A more appropriate title would be “ATTN: AR Clerk”.
• City
Enter the City. • County
Enter the County, if known (optional) • Postal
Enter the Postal code, if known. The address validation button can add this if it has enough information from the previous fields.
• State Enter the State, if known. The address validation button can add this if it has enough
information from the previous fields. • Email ID
Enter the email address of the business for future correspondence such as requesting updated documents.
• Address Validation Button
• Click the button to check the address for errors, retrieve any zip code extensions, and format a telephone number, if provided.
Note: If a name was entered into the Address 1 field, the validation button will not work. This step will help ensure that the address corresponds to a valid postal code.
Page 21
• If errors are not found, the following screen will appear with the option to accept the validated address. Click Accept to continue.
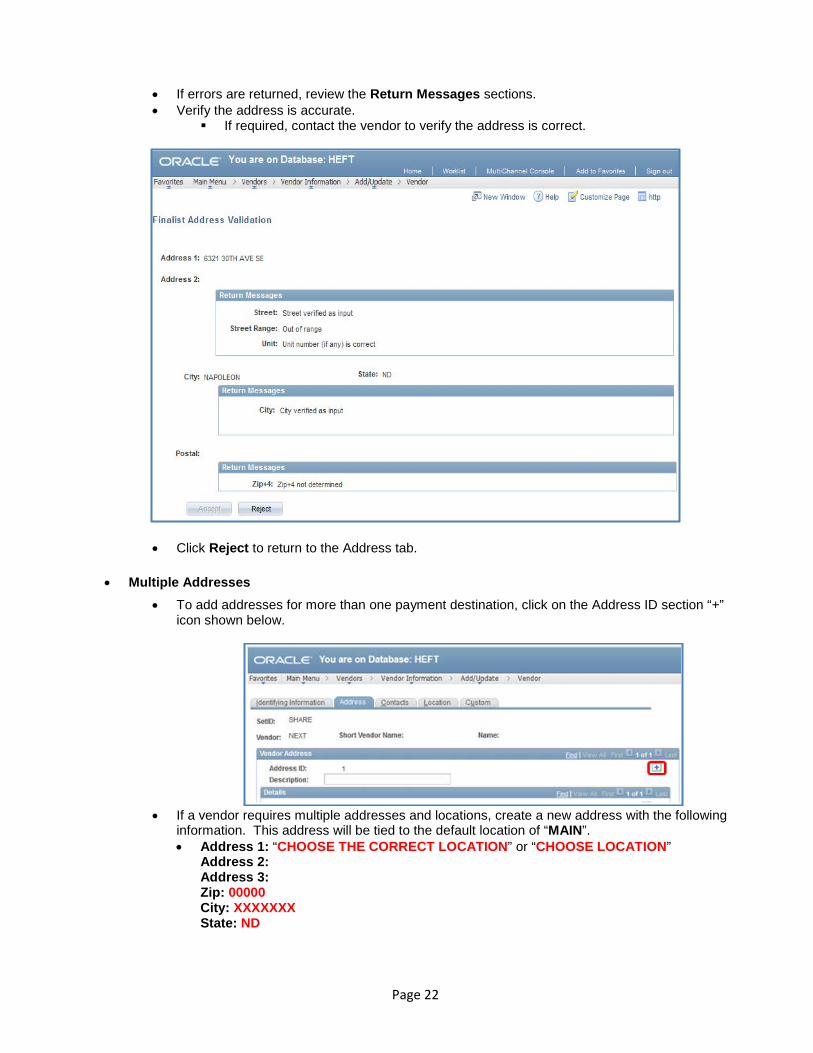
Page 22
• If errors are returned, review the Return Messages sections. • Verify the address is accurate.
If required, contact the vendor to verify the address is correct.
• Click Reject to return to the Address tab.
• Multiple Addresses • To add addresses for more than one payment destination, click on the Address ID section “+”
icon shown below.
• If a vendor requires multiple addresses and locations, create a new address with the following
information. This address will be tied to the default location of “MAIN”. • Address 1: “CHOOSE THE CORRECT LOCATION” or “CHOOSE LOCATION”
Address 2: Address 3: Zip: 00000 City: XXXXXXX State: ND
Page 23
• After adding the above address, continue adding desired address using the button.
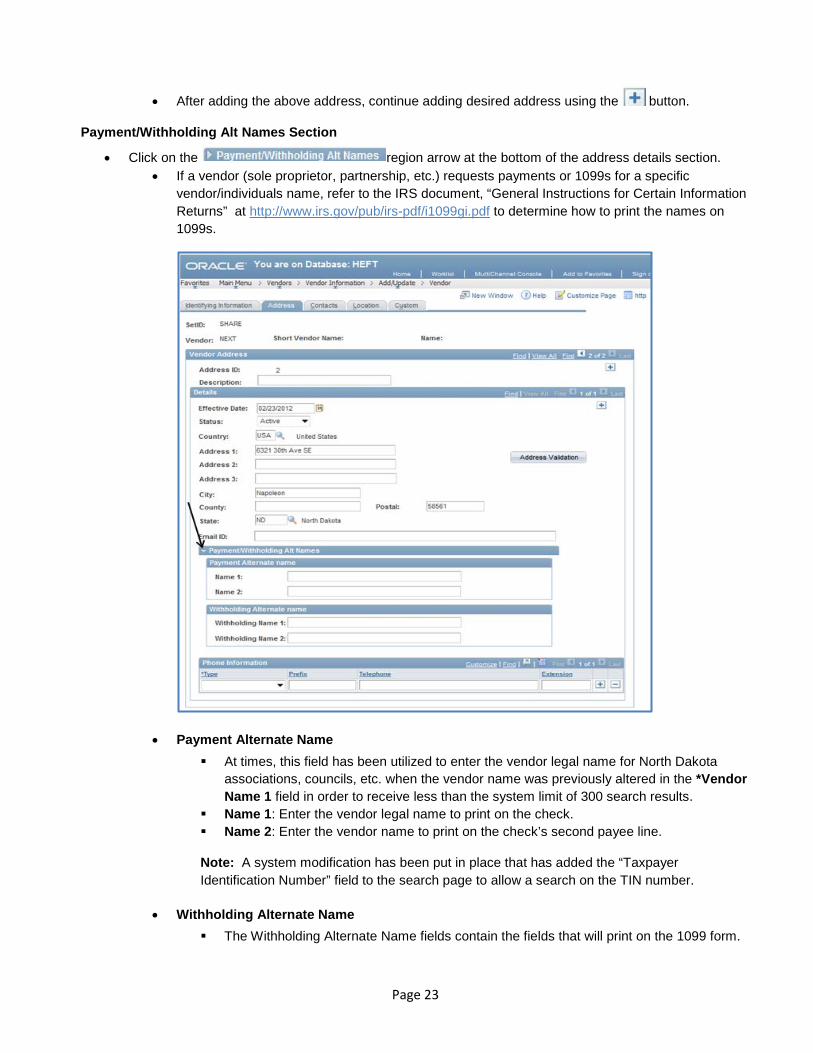
Payment/Withholding Alt Names Section
• Click on the region arrow at the bottom of the address details section. • If a vendor (sole proprietor, partnership, etc.) requests payments or 1099s for a specific
vendor/individuals name, refer to the IRS document, “General Instructions for Certain Information Returns” at http://www.irs.gov/pub/irs-pdf/i1099gi.pdf to determine how to print the names on 1099s.
• Payment Alternate Name At times, this field has been utilized to enter the vendor legal name for North Dakota
associations, councils, etc. when the vendor name was previously altered in the *Vendor Name 1 field in order to receive less than the system limit of 300 search results.
Name 1: Enter the vendor legal name to print on the check. Name 2: Enter the vendor name to print on the check’s second payee line.
Note: A system modification has been put in place that has added the “Taxpayer Identification Number” field to the search page to allow a search on the TIN number.
• Withholding Alternate Name The Withholding Alternate Name fields contain the fields that will print on the 1099 form.
Page 24
• Withholding Name 1: Enter the vendor legal name to print on the 1099. • Withholding Name 2: Enter the vendor name to print on the 1099, if applicable.
Note: Small business owners may want their checks made payable to the business name. However, 1099 reporting must match the IRS’s records.
IMPORTANT: Some Vendor Name 2 fields have directions or instructions instead of name information. This information will print on 1099 forms. Therefore, it is important that Withholding Name 2 be entered. Otherwise the 1099 form may read “Use Vendor #XXX instead” in the Name 2 field.
Vendor names are not effective dated in PeopleSoft. As a result, all vendor name changes will affect the 1099 reporting.
IMPORTANT: Refer to the “Frequently Asked Questions” documentation to inactivate a vendor record and add a new vendor record for vendor name changes.
• Phone Information When a separate Contact page is not required, telephone number(s) may be entered here.
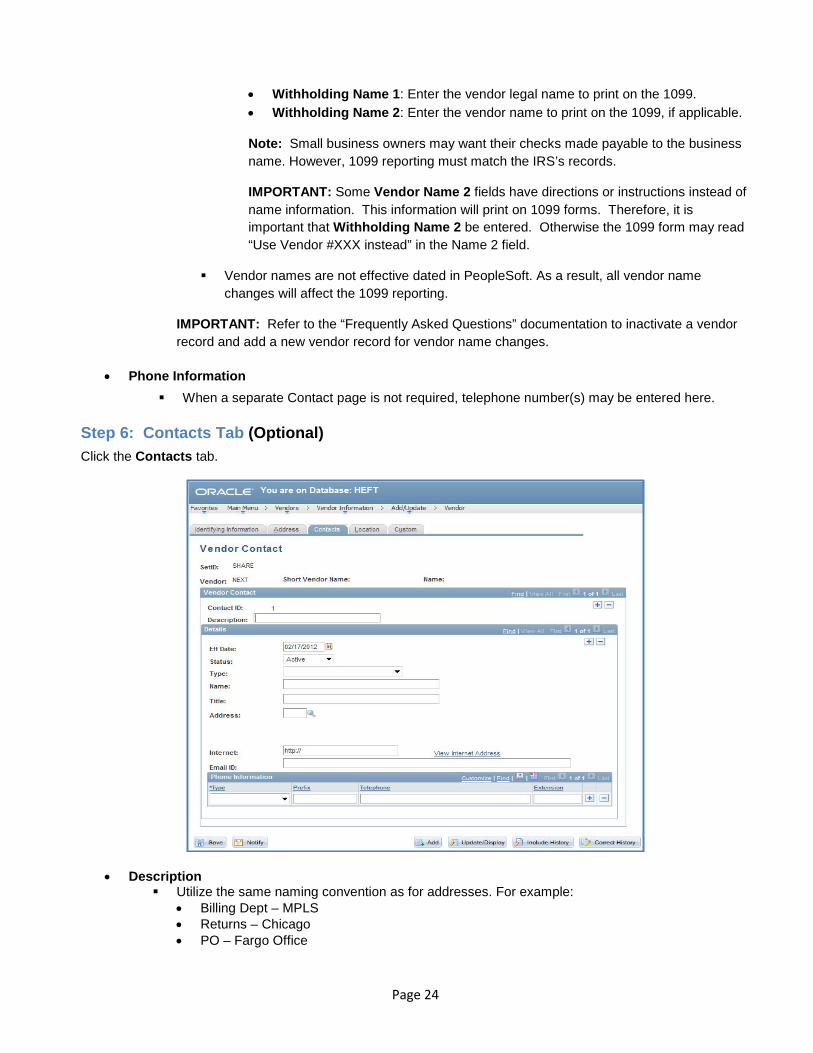
Step 6: Contacts Tab (Optional) Click the Contacts tab.
• Description Utilize the same naming convention as for addresses. For example:
• Billing Dept – MPLS • Returns – Chicago • PO – Fargo Office
Page 25
• Sales – Bismarck • Bids – Minot • Account Administration – Grand Forks
• Eff Date
Leave as defaulted • Status
Active • Type
Utilize the dropdown arrow to select the contact type • Name
Enter the name of the department/office to contact. • Title
Add if desired • Address
Add if desired
Note: This address is the contact’s mailing address and is not utilized for procurement functions (ordering, invoicing, remitting, and returning).
• Internet This field is utilized to attach a website to the contact or business.
• Email ID Enter an email address if desired.
• Phone Information Enter the contact’s phone information.
If multiple contacts exist, an additional contact may be added by clicking the button in the Vendor Contact section.
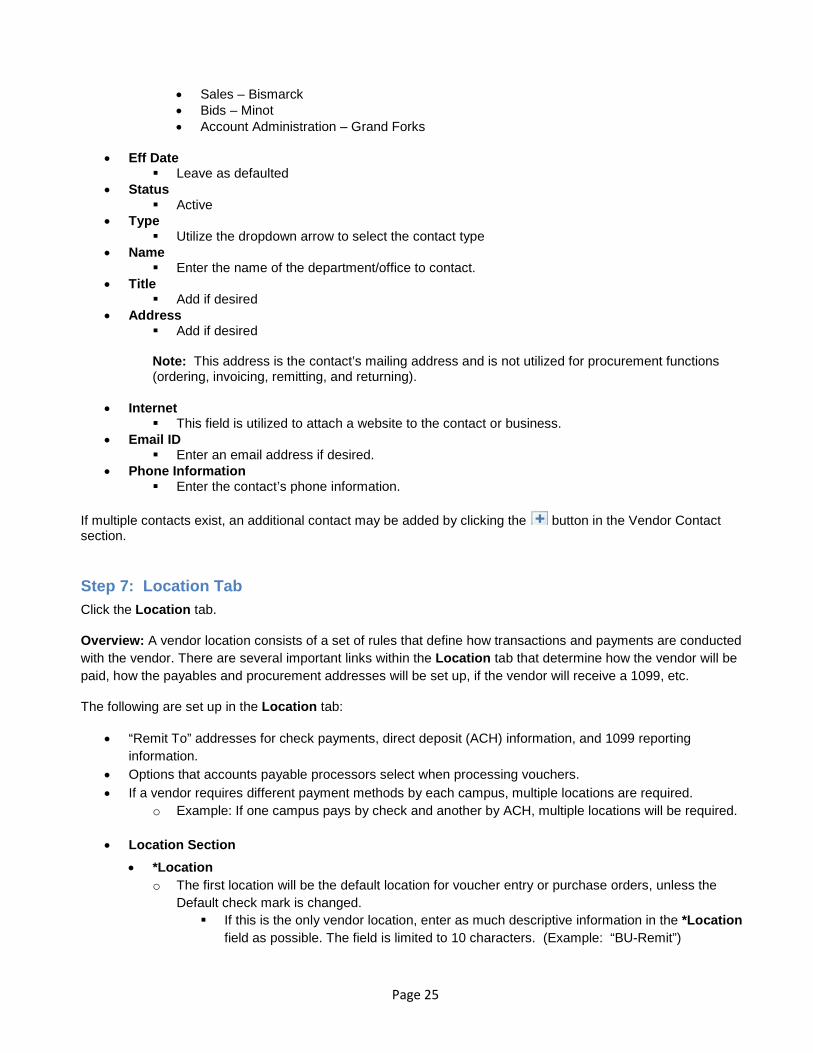
Step 7: Location Tab Click the Location tab.
Overview: A vendor location consists of a set of rules that define how transactions and payments are conducted with the vendor. There are several important links within the Location tab that determine how the vendor will be paid, how the payables and procurement addresses will be set up, if the vendor will receive a 1099, etc.
The following are set up in the Location tab:
• “Remit To” addresses for check payments, direct deposit (ACH) information, and 1099 reporting information.
• Options that accounts payable processors select when processing vouchers. • If a vendor requires different payment methods by each campus, multiple locations are required.
o Example: If one campus pays by check and another by ACH, multiple locations will be required.
• Location Section • *Location
o The first location will be the default location for voucher entry or purchase orders, unless the Default check mark is changed.
If this is the only vendor location, enter as much descriptive information in the *Location field as possible. The field is limited to 10 characters. (Example: “BU-Remit”)
Page 26
If multiple locations are required, enter “MAIN” in the *Location field.
• Click on the button in the Location section to add additional locations. • Check the “MAIN” location’s Default checkbox to make it the default location for
purchase orders and vouchers. • The “MAIN” location will be tied to the “CHOOSE THE CORRECT LOCATION”
address.
• For Students, click on the button in the Location section to add a “STUDENT” location.
o IMPORTANT: When processing vouchers, the STUDENT location must be selected in order to aggregate the payment information to protect student data according to FERPA requirements.
Note: It is permissible for more than one location to link to the same remittance address. However, utilizing one address per location is the recommended method.
• Description o The Description field is utilized to help identify the location when entering purchase orders
and vouchers. Examples include: An expansion of the *Location field. Identification of certain bank accounts. Example: “CAMPUS BU DIRECT DEPOSIT USE ONLY”.
• RTV Fees o The RTV Fees link is not utilized by Higher Ed at this time.
• Details Section
• *Effective Date: The effective date will default to the current date. • If the vendor location is to take effect on a future date, enter the future date in this field.
• Status: The status will default to “Active”.
Page 27
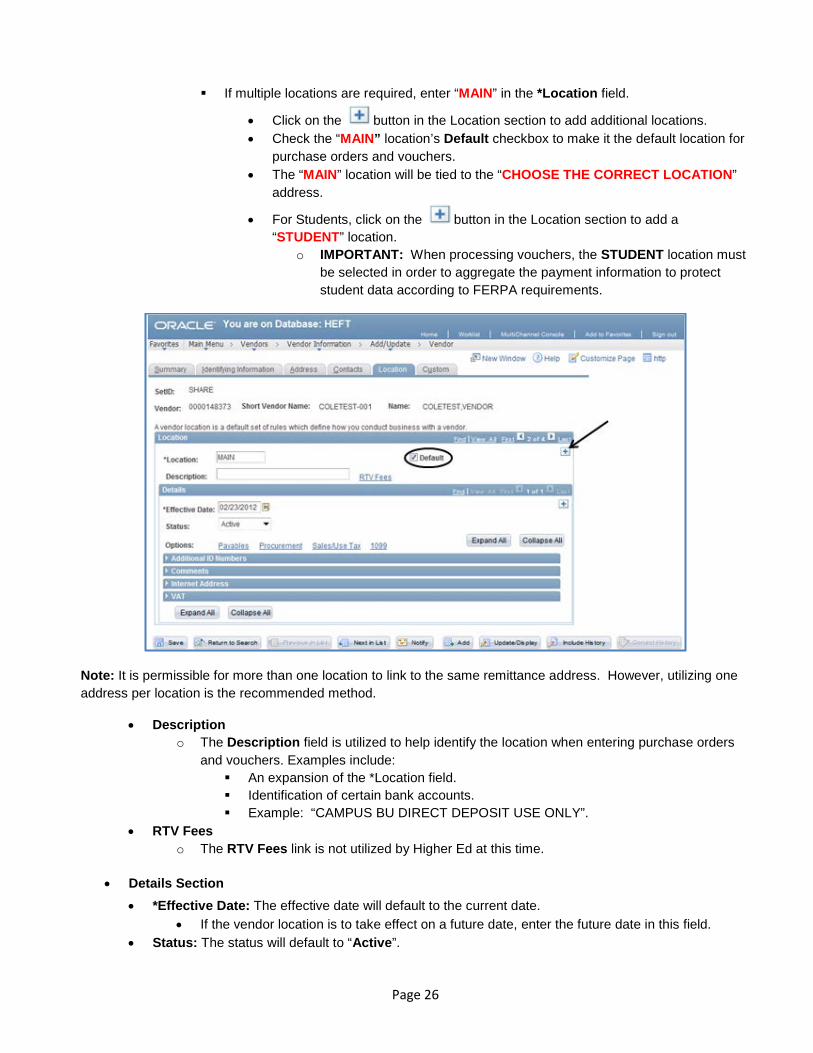
• Options • The options row, located in the location Details section, includes the following links: Payables,
Procurement, Sales/Use Tax and 1099. o Note: Sales/Use Tax is not utilized by Higher Ed.
• If only one address is set up, the address fields in the Payables and Procurement will automatically populate with the correct information.
• Payables • Click the Payables link.
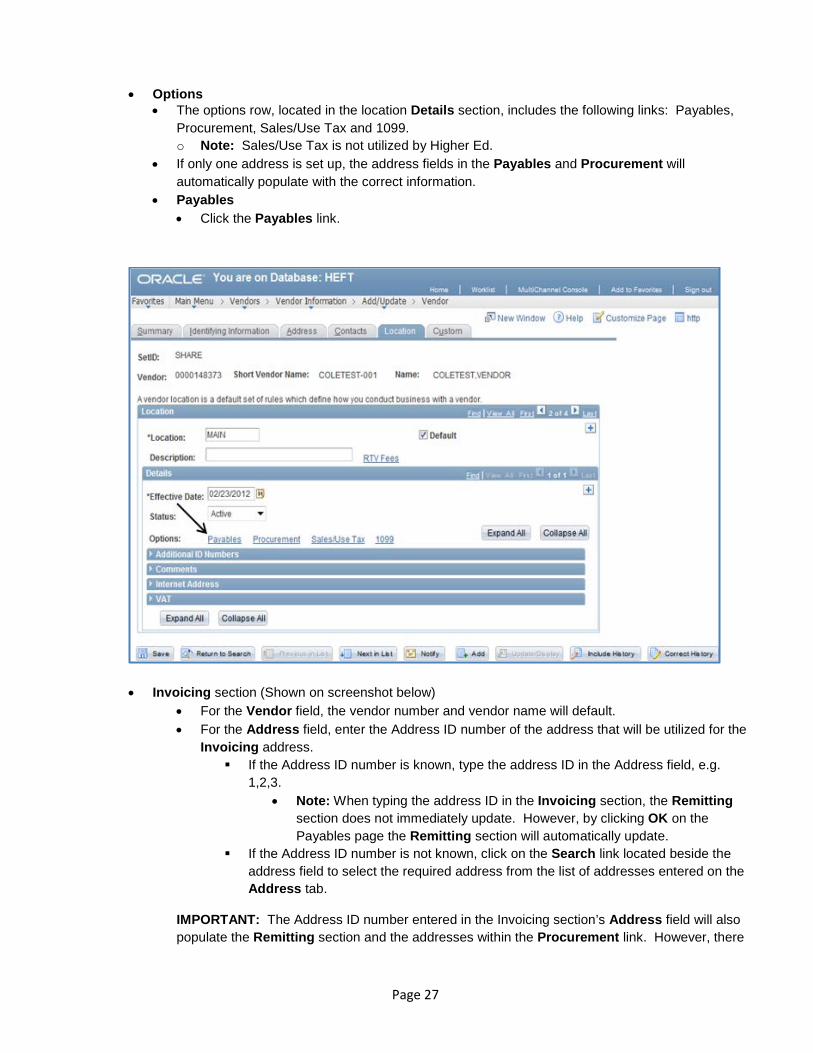
• Invoicing section (Shown on screenshot below)
• For the Vendor field, the vendor number and vendor name will default. • For the Address field, enter the Address ID number of the address that will be utilized for the
Invoicing address. If the Address ID number is known, type the address ID in the Address field, e.g.
1,2,3. • Note: When typing the address ID in the Invoicing section, the Remitting
section does not immediately update. However, by clicking OK on the Payables page the Remitting section will automatically update.
If the Address ID number is not known, click on the Search link located beside the address field to select the required address from the list of addresses entered on the Address tab.
IMPORTANT: The Address ID number entered in the Invoicing section’s Address field will also populate the Remitting section and the addresses within the Procurement link. However, there
Page 28
are a few key steps that must be taken for this to occur. It is recommended that the following steps are actually attempted to understand how PeopleSoft attempts to keep the address information in sync.
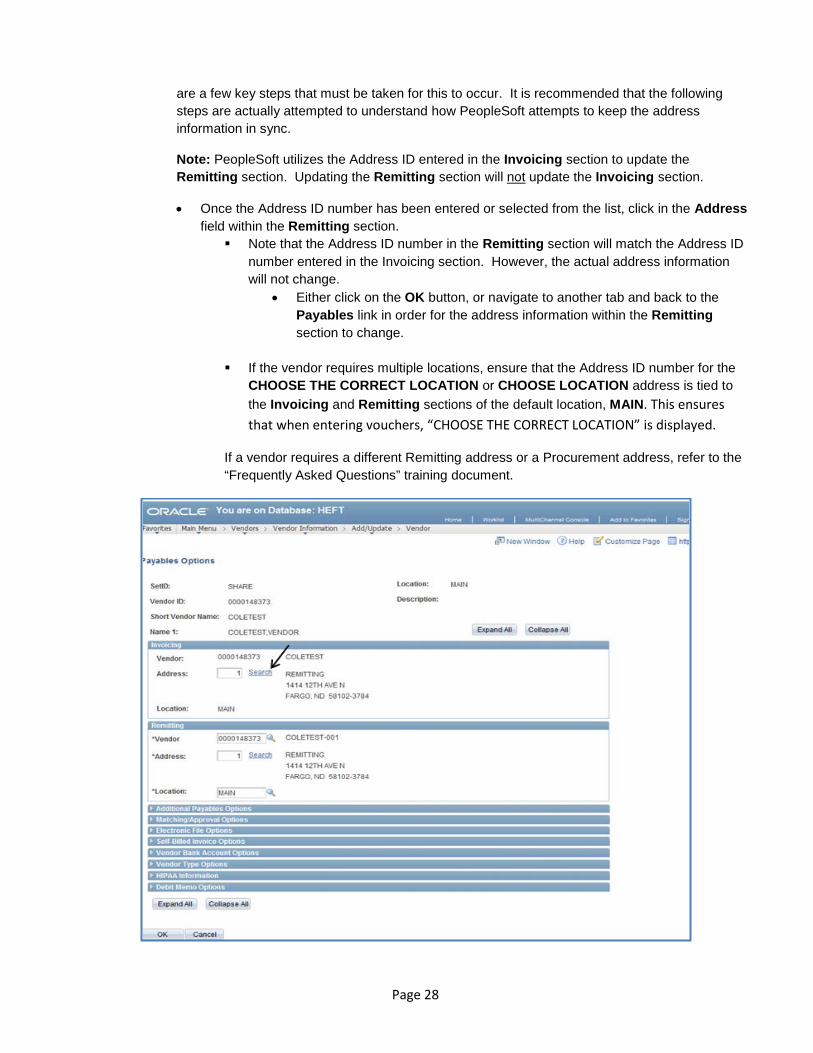
Note: PeopleSoft utilizes the Address ID entered in the Invoicing section to update the Remitting section. Updating the Remitting section will not update the Invoicing section.
• Once the Address ID number has been entered or selected from the list, click in the Address field within the Remitting section.
Note that the Address ID number in the Remitting section will match the Address ID number entered in the Invoicing section. However, the actual address information will not change.
• Either click on the OK button, or navigate to another tab and back to the Payables link in order for the address information within the Remitting section to change.
If the vendor requires multiple locations, ensure that the Address ID number for the CHOOSE THE CORRECT LOCATION or CHOOSE LOCATION address is tied to the Invoicing and Remitting sections of the default location, MAIN. This ensures that when entering vouchers, “CHOOSE THE CORRECT LOCATION” is displayed.
If a vendor requires a different Remitting address or a Procurement address, refer to the “Frequently Asked Questions” training document.
Page 29
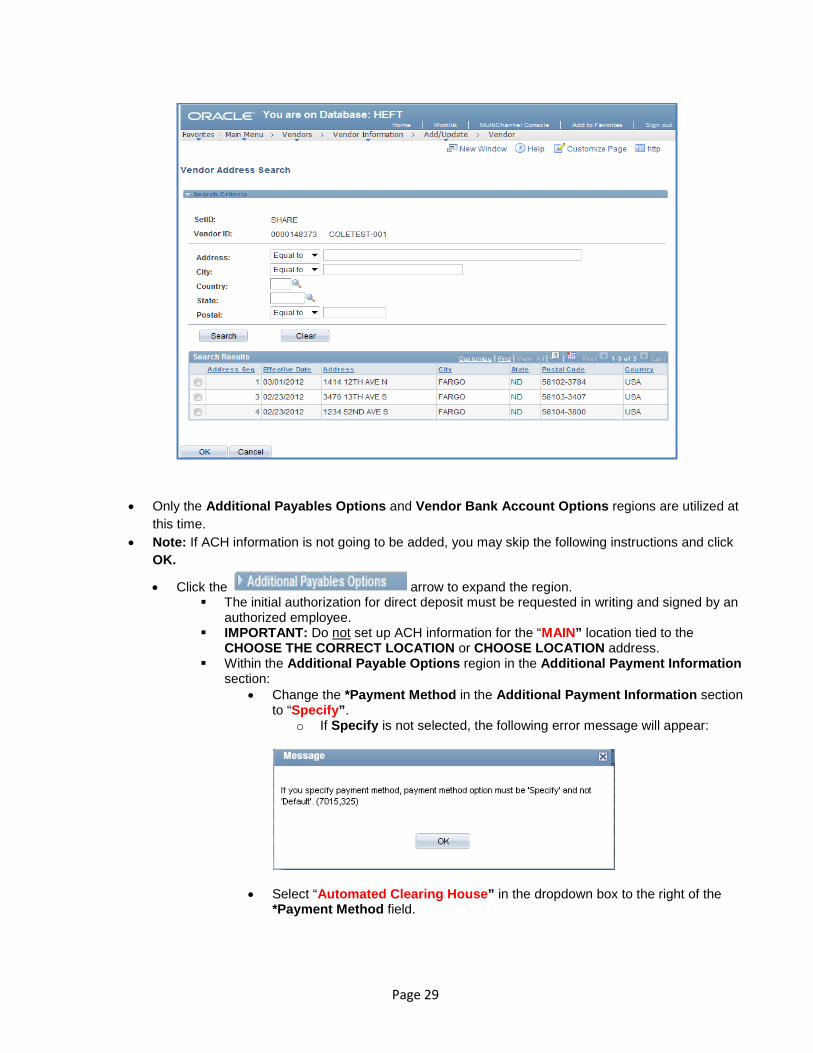
• Only the Additional Payables Options and Vendor Bank Account Options regions are utilized at this time.
• Note: If ACH information is not going to be added, you may skip the following instructions and click OK.
• Click the arrow to expand the region. The initial authorization for direct deposit must be requested in writing and signed by an
authorized employee. IMPORTANT: Do not set up ACH information for the “MAIN” location tied to the
CHOOSE THE CORRECT LOCATION or CHOOSE LOCATION address. Within the Additional Payable Options region in the Additional Payment Information
section: • Change the *Payment Method in the Additional Payment Information section
to “Specify”. o If Specify is not selected, the following error message will appear:
• Select “Automated Clearing House” in the dropdown box to the right of the *Payment Method field.
Page 30
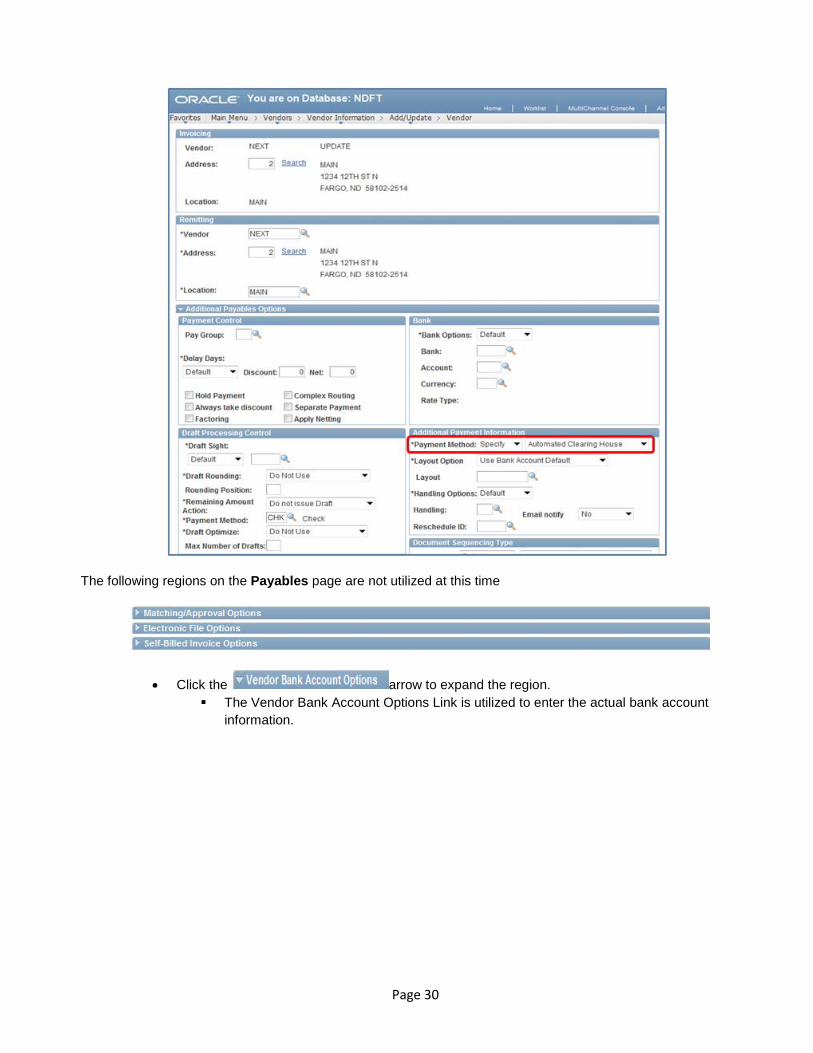
The following regions on the Payables page are not utilized at this time
• Click the arrow to expand the region. The Vendor Bank Account Options Link is utilized to enter the actual bank account
information.

Page 31
• Only four of the available options are needed to set up an account, although entering more information is preferred. Required fields are starred (*) below.
Descr - Enter an appropriate description for the account. Bank Name - Enter the bank name. *Bank Account Number – Enter the banking account number as provided. *DFI Qualifier – Always enter “01”. *Account Type – Select the account type from the dropdown field.
o Check Acct – Checking Account o Savings – Savings Account
• Personal Acct box – Check this box if this account is a personal account. • *DFI ID – This field corresponds to the 9 digit bank routing number.
Page 32
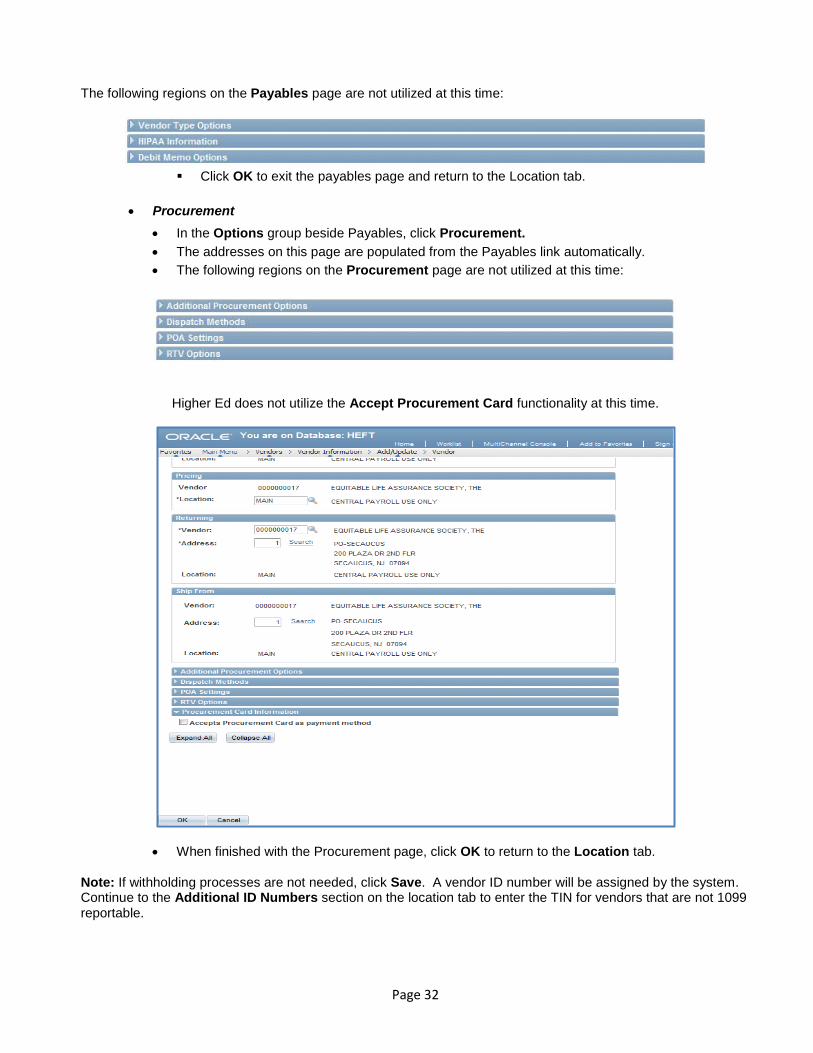
The following regions on the Payables page are not utilized at this time:
Click OK to exit the payables page and return to the Location tab.
• Procurement • In the Options group beside Payables, click Procurement. • The addresses on this page are populated from the Payables link automatically. • The following regions on the Procurement page are not utilized at this time:
Higher Ed does not utilize the Accept Procurement Card functionality at this time.
• When finished with the Procurement page, click OK to return to the Location tab.
Note: If withholding processes are not needed, click Save. A vendor ID number will be assigned by the system. Continue to the Additional ID Numbers section on the location tab to enter the TIN for vendors that are not 1099 reportable.
Page 33
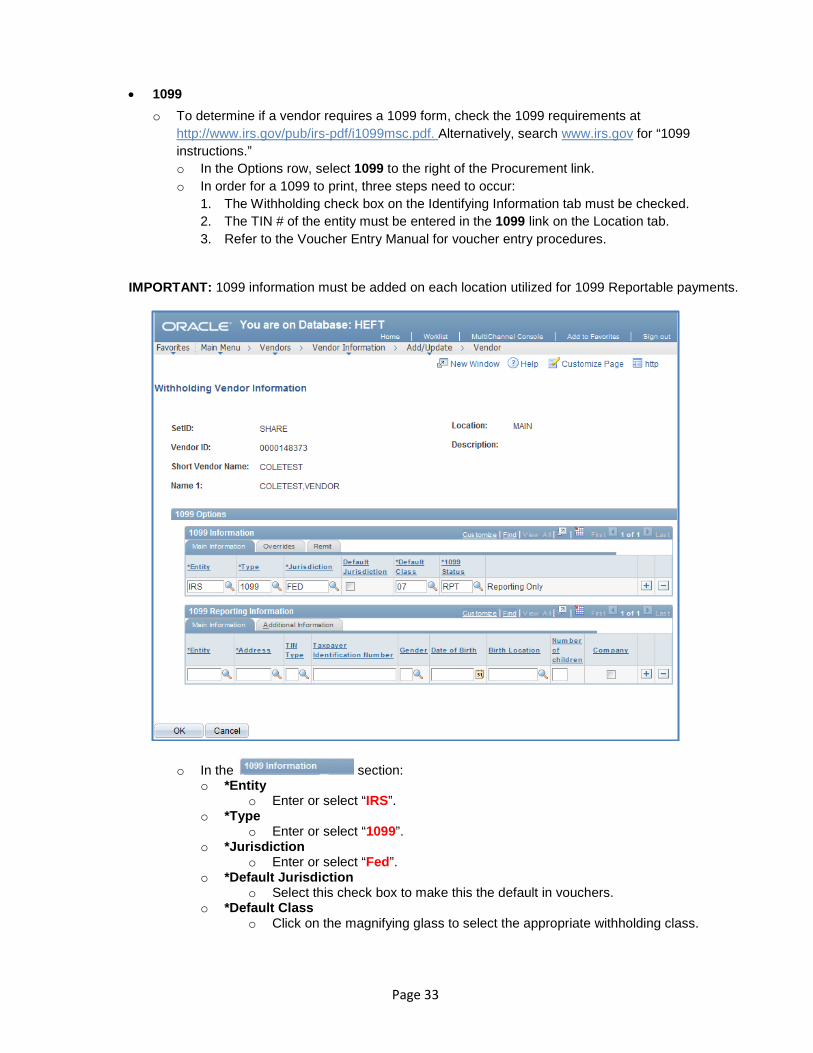
• 1099 o To determine if a vendor requires a 1099 form, check the 1099 requirements at
http://www.irs.gov/pub/irs-pdf/i1099msc.pdf. Alternatively, search www.irs.gov for “1099 instructions.” o In the Options row, select 1099 to the right of the Procurement link. o In order for a 1099 to print, three steps need to occur:
1. The Withholding check box on the Identifying Information tab must be checked. 2. The TIN # of the entity must be entered in the 1099 link on the Location tab. 3. Refer to the Voucher Entry Manual for voucher entry procedures.
IMPORTANT: 1099 information must be added on each location utilized for 1099 Reportable payments.
o In the section: o *Entity
o Enter or select “IRS”. o *Type
o Enter or select “1099”. o *Jurisdiction
o Enter or select “Fed”. o *Default Jurisdiction
o Select this check box to make this the default in vouchers. o *Default Class
o Click on the magnifying glass to select the appropriate withholding class.
Page 34
IMPORTANT: The classes set up here will be the only available options that will display when entering vouchers.
o *1099 Status o Enter or select “RPT”.
o In the section:
o *Entity Enter “IRS”. When this field is populated, some data fields will disappear.
o *Address Enter or select the address number to utilize for mailing the 1099. IMPORTANT: Ensure this field does not point to the address that says
CHOOSE THE CORRECT LOCATION or CHOOSE LOCATION. o Tin Type
Enter or select “S” for social security number or “F” for federal employer ID.
o Taxpayer Identification Number Enter the TIN without any hyphens or spaces
o To add multiple withholding classes, click the button in the 1099 Information section.
o Note: If multiple withholding classes are defined, the Default Jurisdiction check box must be checked on one withholding class only.
o Click OK, then click Save. Return to the Identifying Information tab
o Check the withholding check box which enables the 1099 reporting processing. o If the vendor is used for ordering, verify Open For Ordering is checked. o Click Save.
Page 35
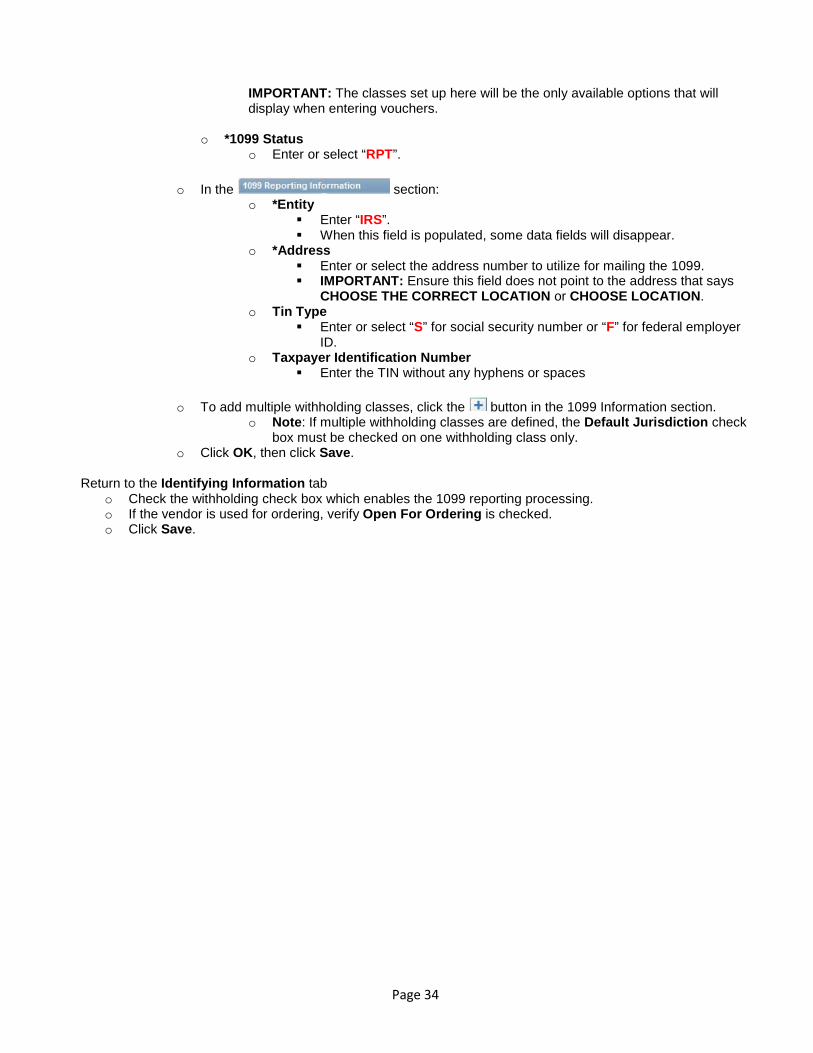
Click the Location tab. In the Details section note the bottom of the section has 4 blue bar regions. Only the Additional ID Numbers and the Comments are utilized at this time. To select these links, click the arrow on the left side of the link to expand the region. Click the arrow to expand the region.
• Utilize this region to record the TIN number of those vendors who are not 1099 reportable, e.g. corporation EINs.
• Type o Click on the magnifying glass to select the appropriate option.
• ID Number o Enter the TIN number without hyphens.
Page 36
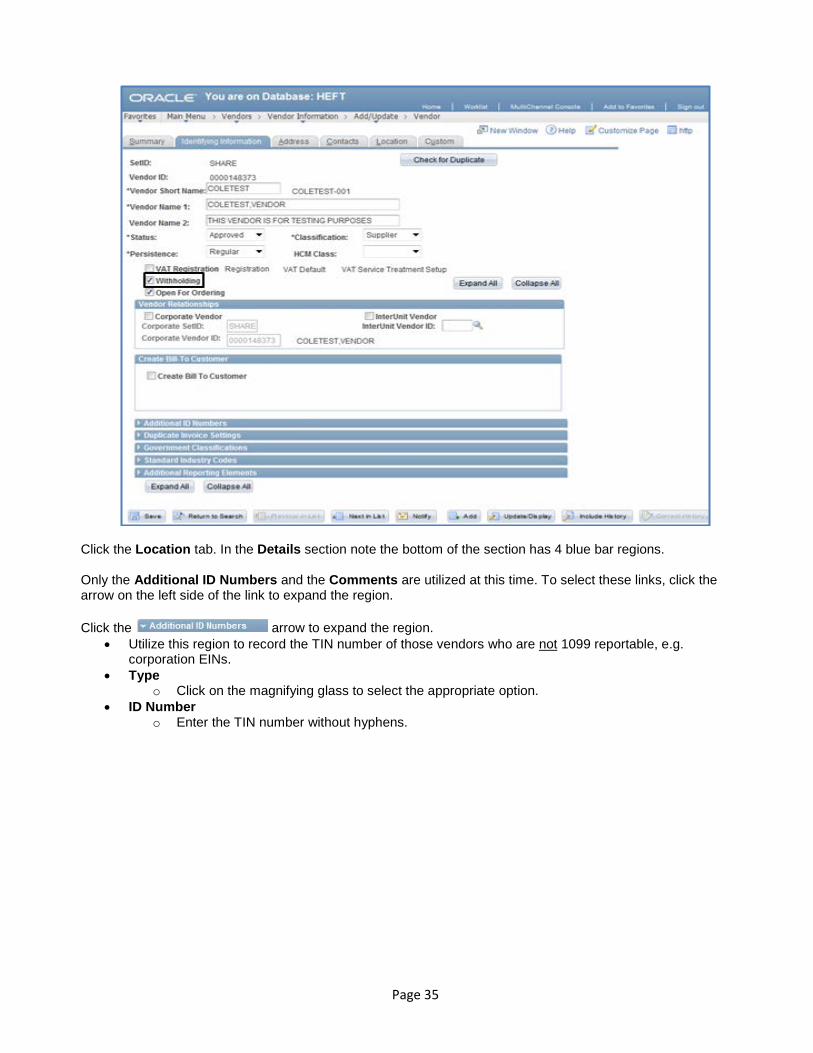
Click the arrow to expand the region. • Utilize this region to document bank account changes, vendor inactivations, location changes, etc. • Document what was changed, the campus Business Unit, who made the change, and the date.
Page 37
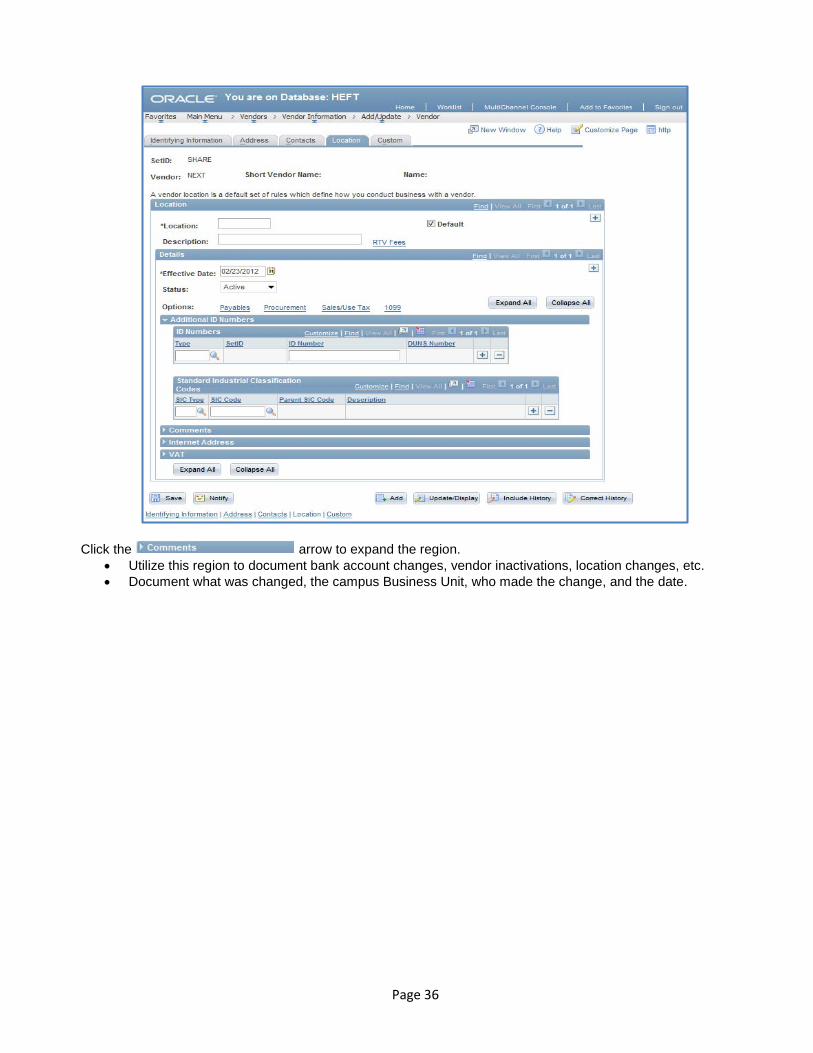
The region is not utilized by Higher Ed at this time.
Page 38
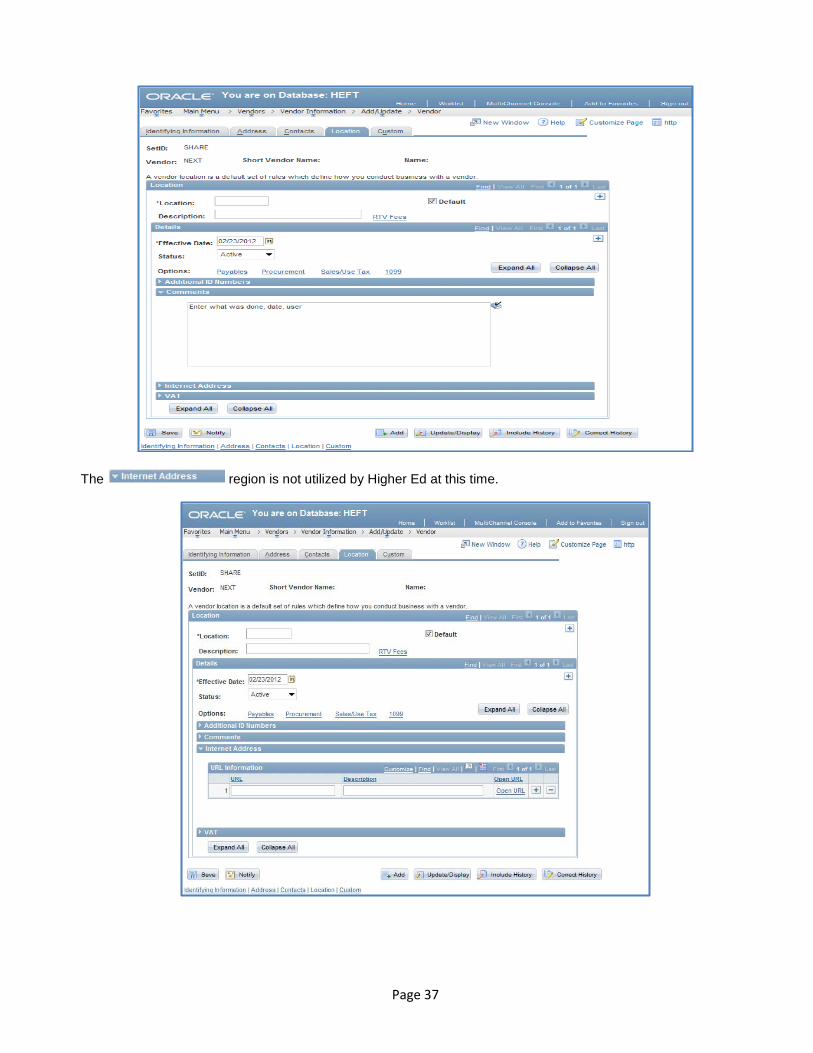
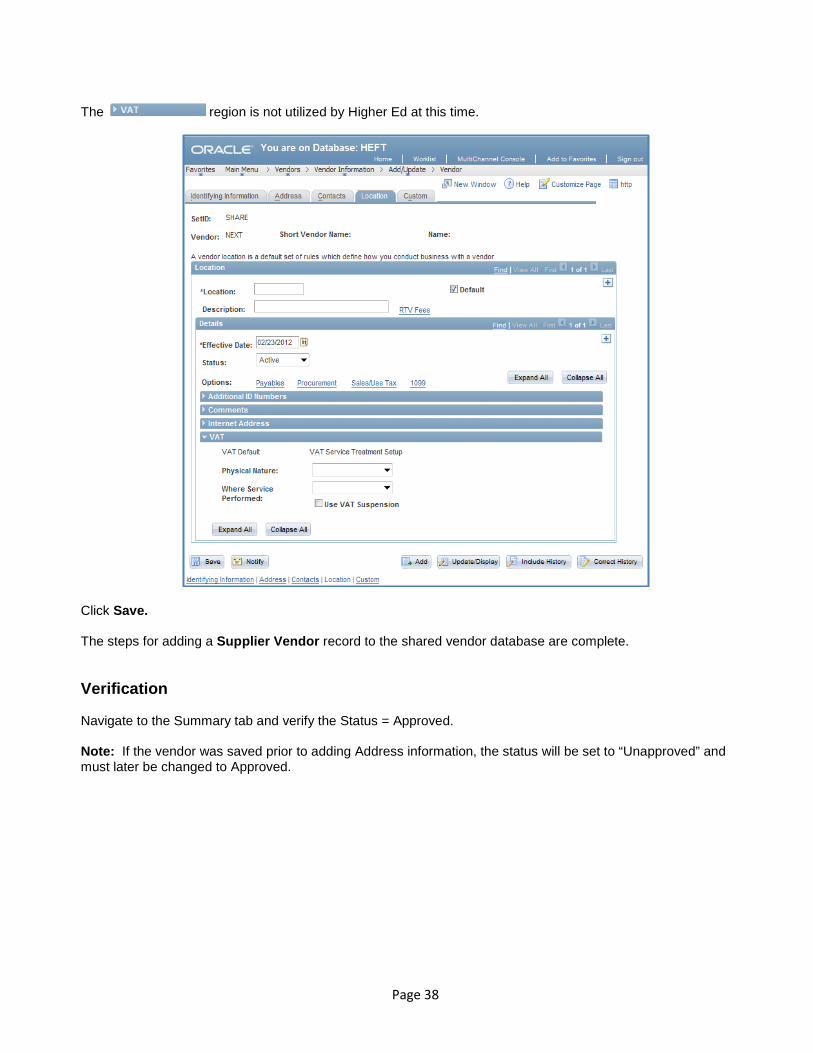
The region is not utilized by Higher Ed at this time.
Click Save. The steps for adding a Supplier Vendor record to the shared vendor database are complete. Verification Navigate to the Summary tab and verify the Status = Approved. Note: If the vendor was saved prior to adding Address information, the status will be set to “Unapproved” and must later be changed to Approved.