Embed Size (px)
Citation preview
ntouch PC
Copyright © 2018 Sorenson Communications. All Rights Reserved. ntouch PC is subject to patents and patents pending.
Any trademarks mentioned herein are the property of their respective owners. All names and phone numbers used herein are fictitious and are not intended to refer to actual persons, businesses, or numbers.
User GuideApp Version 8.6
Version 8.6November 19, 2018
Table of Contents • New 8.6 Features ....................................................... 2
• System Requirements .............................................. 3
• Quick App Overview ................................................. 4
• Make and Receive Calls ........................................... 13
• Share Text and Contacts ......................................... 29
• Use Voice Feature ..................................................... 39
• Use Personal SignMail Greeting ............................ 43
• Send SignMails .......................................................... 46
• View SignMails............................................................ 53
• See Call History........................................................... 57
• Add a Profile Photo .................................................. 62
• Use the Phonebook ................................................... 67
• Use the Video Center ................................................ 85
• Change Settings ......................................................... 88
• Get Help ....................................................................... 105
New 8.6 Features
2User Guide
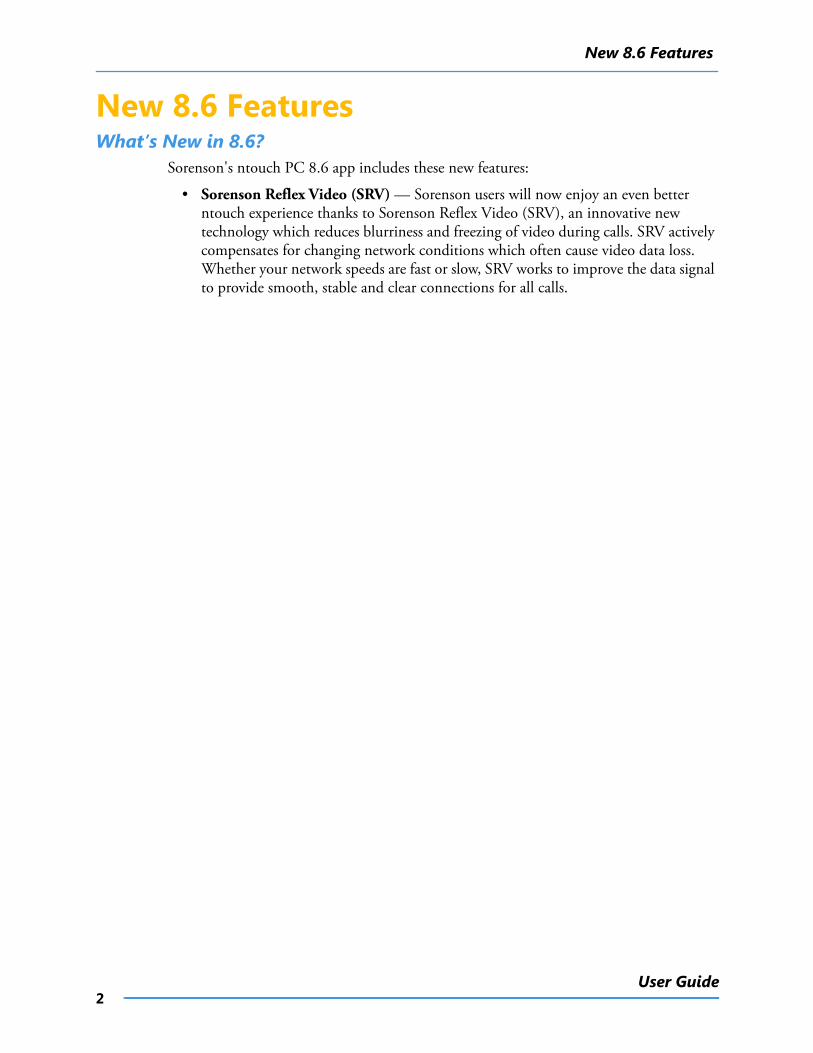
New 8.6 FeaturesWhat’s New in 8.6?
Sorenson's ntouch PC 8.6 app includes these new features:
• Sorenson Reflex Video (SRV) — Sorenson users will now enjoy an even better ntouch experience thanks to Sorenson Reflex Video (SRV), an innovative new technology which reduces blurriness and freezing of video during calls. SRV actively compensates for changing network conditions which often cause video data loss. Whether your network speeds are fast or slow, SRV works to improve the data signal to provide smooth, stable and clear connections for all calls.
System Requirements
3ntouch PC 8.6
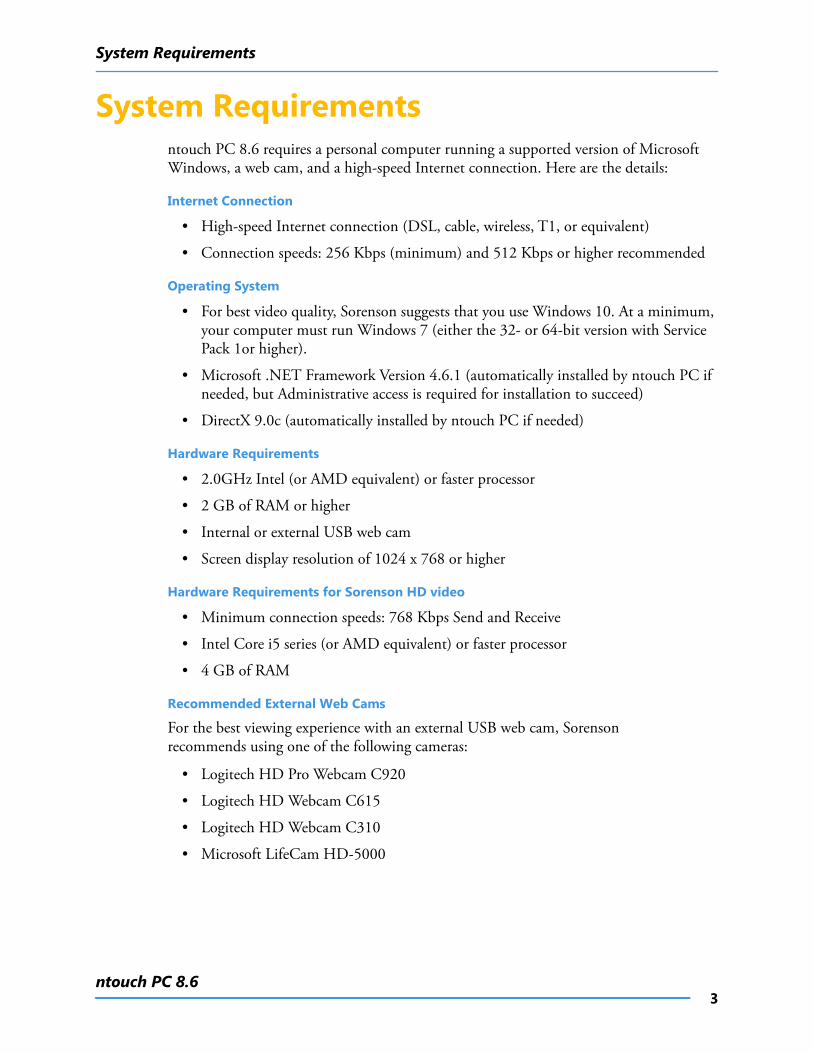
System Requirementsntouch PC 8.6 requires a personal computer running a supported version of Microsoft Windows, a web cam, and a high-speed Internet connection. Here are the details:
Internet Connection
• High-speed Internet connection (DSL, cable, wireless, T1, or equivalent)
• Connection speeds: 256 Kbps (minimum) and 512 Kbps or higher recommended
Operating System
• For best video quality, Sorenson suggests that you use Windows 10. At a minimum, your computer must run Windows 7 (either the 32- or 64-bit version with Service Pack 1or higher).
• Microsoft .NET Framework Version 4.6.1 (automatically installed by ntouch PC if needed, but Administrative access is required for installation to succeed)
• DirectX 9.0c (automatically installed by ntouch PC if needed)
Hardware Requirements
• 2.0GHz Intel (or AMD equivalent) or faster processor
• 2 GB of RAM or higher
• Internal or external USB web cam
• Screen display resolution of 1024 x 768 or higher
Hardware Requirements for Sorenson HD video
• Minimum connection speeds: 768 Kbps Send and Receive
• Intel Core i5 series (or AMD equivalent) or faster processor
• 4 GB of RAM
Recommended External Web Cams
For the best viewing experience with an external USB web cam, Sorenson recommends using one of the following cameras:
• Logitech HD Pro Webcam C920
• Logitech HD Webcam C615
• Logitech HD Webcam C310
• Microsoft LifeCam HD-5000
Quick App Overview
4User Guide
Quick App OverviewAfter you have installed ntouch PC on your personal computer and requested your ntouch PC account, you can start using ntouch PC to make videophone calls. You will need to spend a few minutes learning about ntouch PC’s user interface (UI). The steps in this section show you how to move around ntouch PC’s UI.
To Launch ntouch PCStep 1. Launch ntouch PC either by selecting its icon in the Windows Start menu or by
double-clicking the ntouch PC icon on your computer’s desktop.
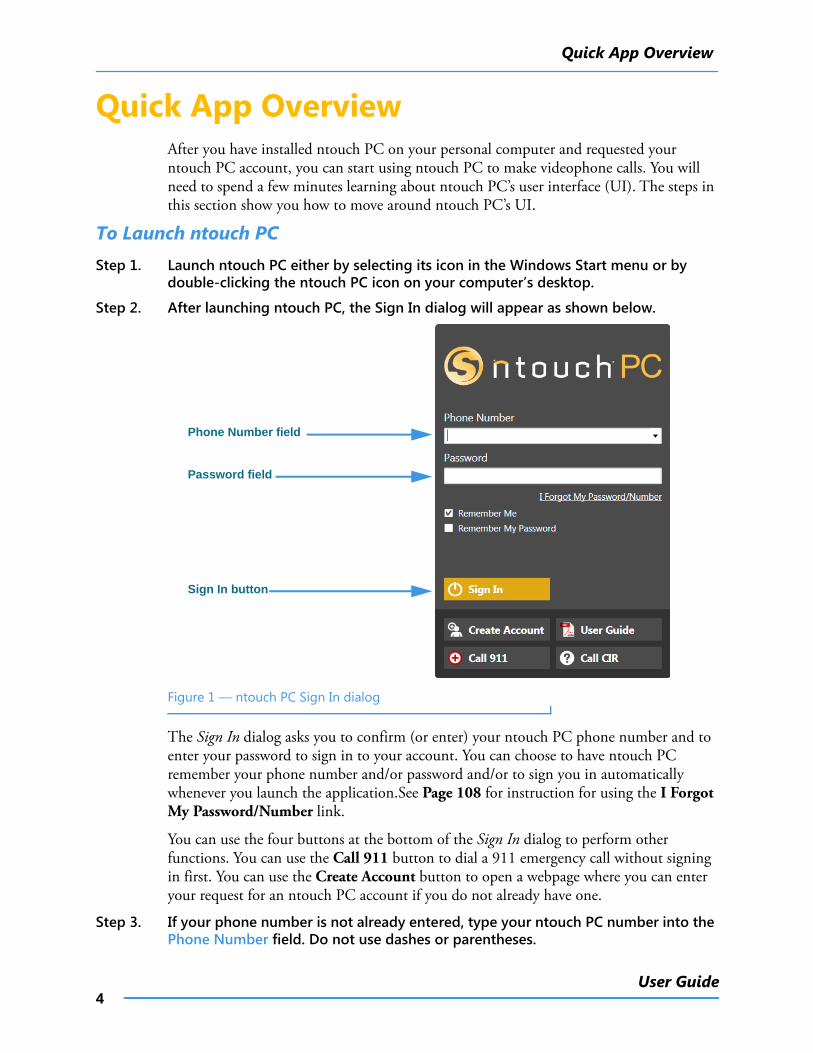
Step 2. After launching ntouch PC, the Sign In dialog will appear as shown below.
Figure 1 — ntouch PC Sign In dialog
The Sign In dialog asks you to confirm (or enter) your ntouch PC phone number and to enter your password to sign in to your account. You can choose to have ntouch PC remember your phone number and/or password and/or to sign you in automatically whenever you launch the application.See Page 108 for instruction for using the I Forgot My Password/Number link.
You can use the four buttons at the bottom of the Sign In dialog to perform other functions. You can use the Call 911 button to dial a 911 emergency call without signing in first. You can use the Create Account button to open a webpage where you can enter your request for an ntouch PC account if you do not already have one.
Step 3. If your phone number is not already entered, type your ntouch PC number into the Phone Number field. Do not use dashes or parentheses.
Phone Number field
Password field
Sign In button

Quick App Overview
5ntouch PC 8.6
Step 4. Type your password into the Password field.
Step 5. Select the Sign In button.
Step 6. ntouch PC’s Home screen will then appear as shown below.
Figure 2 — Home screen
Whenever you see the Home screen, ntouch PC is ready to make videophone calls.
Quick App Overview
6User Guide
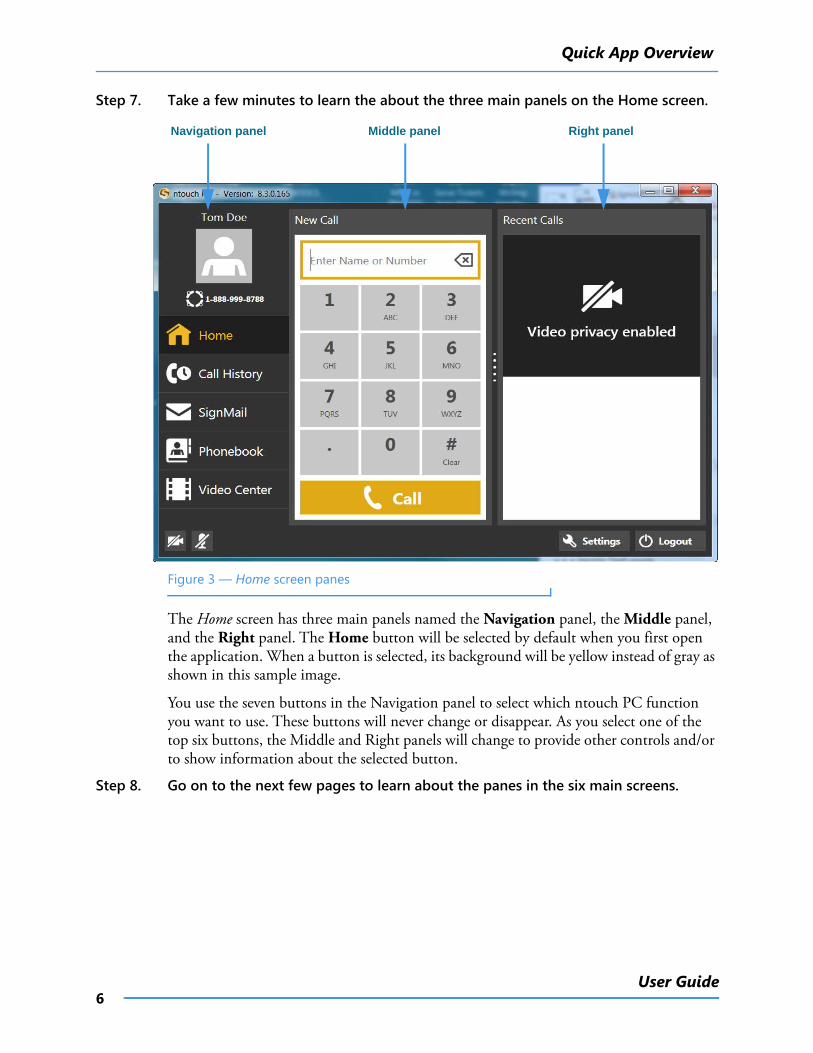
Step 7. Take a few minutes to learn the about the three main panels on the Home screen.
Figure 3 — Home screen panes
The Home screen has three main panels named the Navigation panel, the Middle panel, and the Right panel. The Home button will be selected by default when you first open the application. When a button is selected, its background will be yellow instead of gray as shown in this sample image.
You use the seven buttons in the Navigation panel to select which ntouch PC function you want to use. These buttons will never change or disappear. As you select one of the top six buttons, the Middle and Right panels will change to provide other controls and/or to show information about the selected button.
Step 8. Go on to the next few pages to learn about the panes in the six main screens.
Middle panel Right panelNavigation panel
Quick App Overview
7ntouch PC 8.6
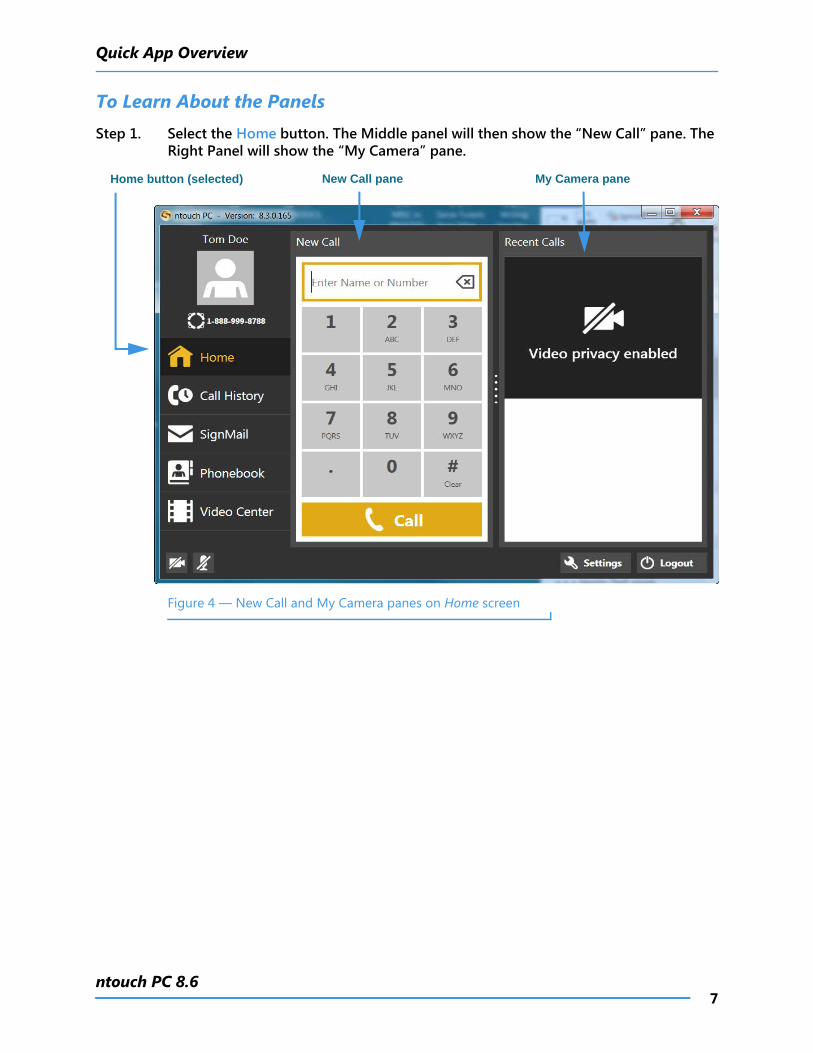
To Learn About the PanelsStep 1. Select the Home button. The Middle panel will then show the “New Call” pane. The
Right Panel will show the “My Camera” pane.
Figure 4 — New Call and My Camera panes on Home screen
Home button (selected) New Call pane My Camera pane
Quick App Overview
8User Guide
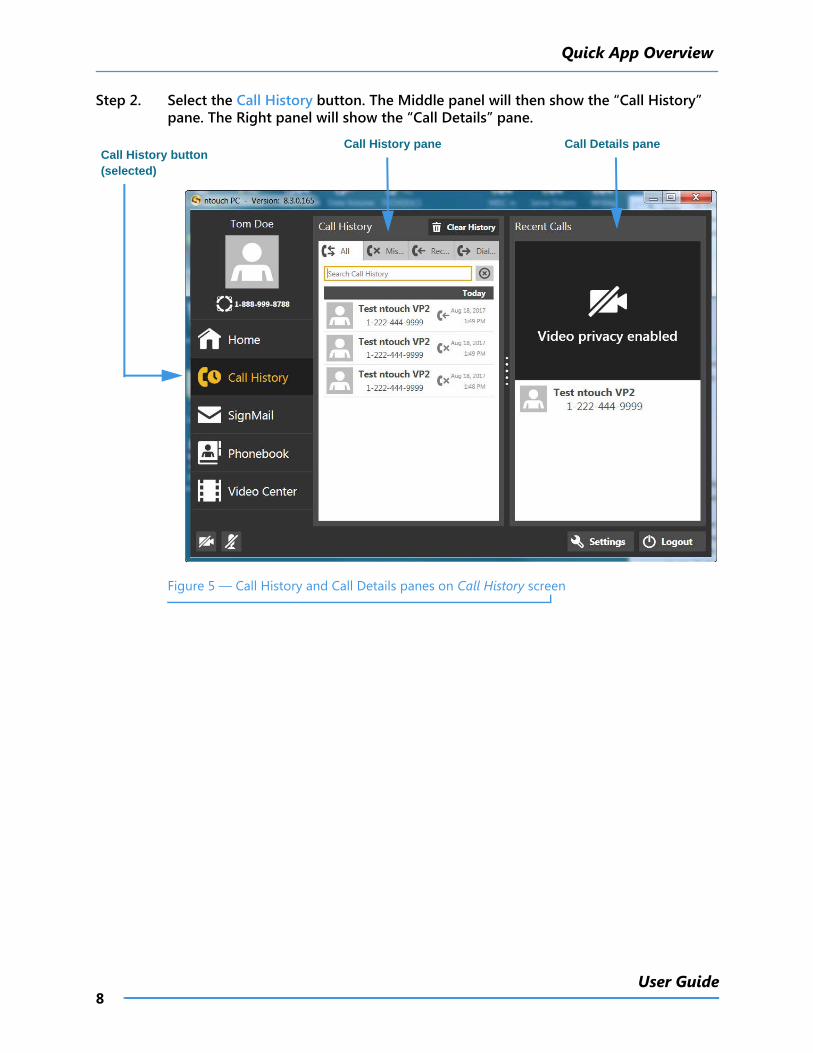
Step 2. Select the Call History button. The Middle panel will then show the “Call History” pane. The Right panel will show the “Call Details” pane.
Figure 5 — Call History and Call Details panes on Call History screen
Call History button (selected)
Call History pane Call Details pane
Quick App Overview
9ntouch PC 8.6
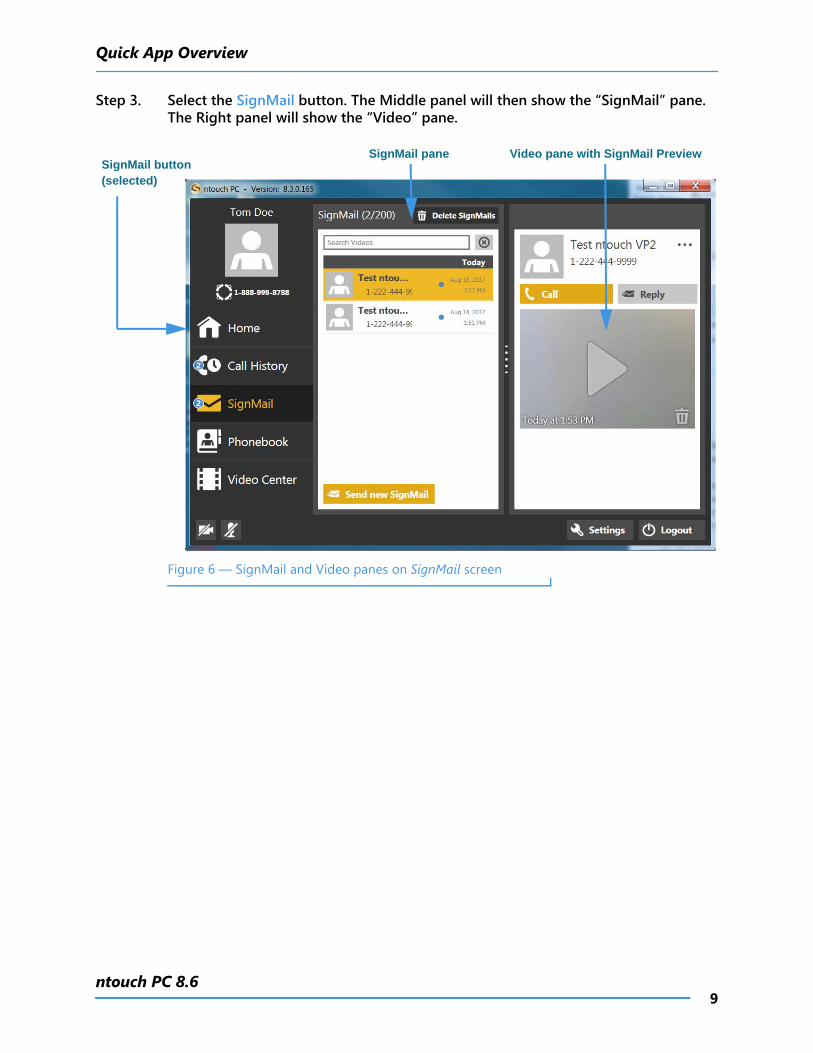
Step 3. Select the SignMail button. The Middle panel will then show the “SignMail” pane. The Right panel will show the “Video” pane.
Figure 6 — SignMail and Video panes on SignMail screen
SignMail button (selected)
SignMail pane Video pane with SignMail Preview
Quick App Overview
10User Guide
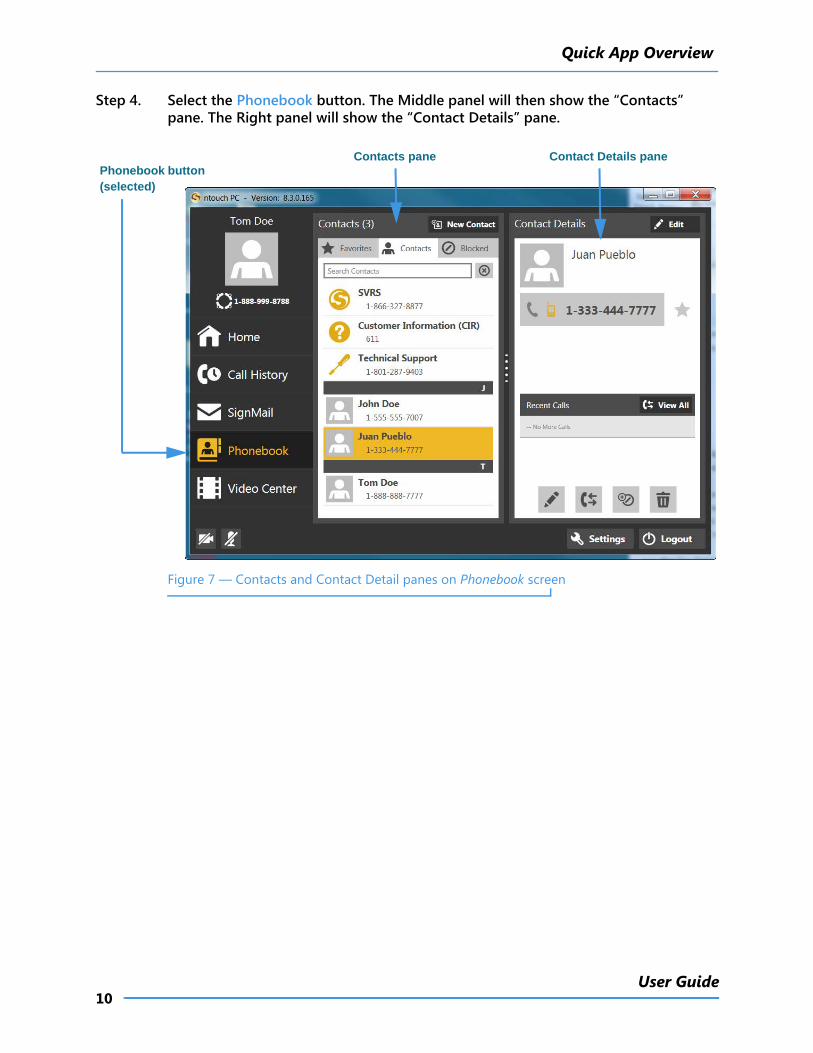
Step 4. Select the Phonebook button. The Middle panel will then show the “Contacts” pane. The Right panel will show the “Contact Details” pane.
Figure 7 — Contacts and Contact Detail panes on Phonebook screen
Phonebook button (selected)
Contacts pane Contact Details pane
Quick App Overview
11ntouch PC 8.6
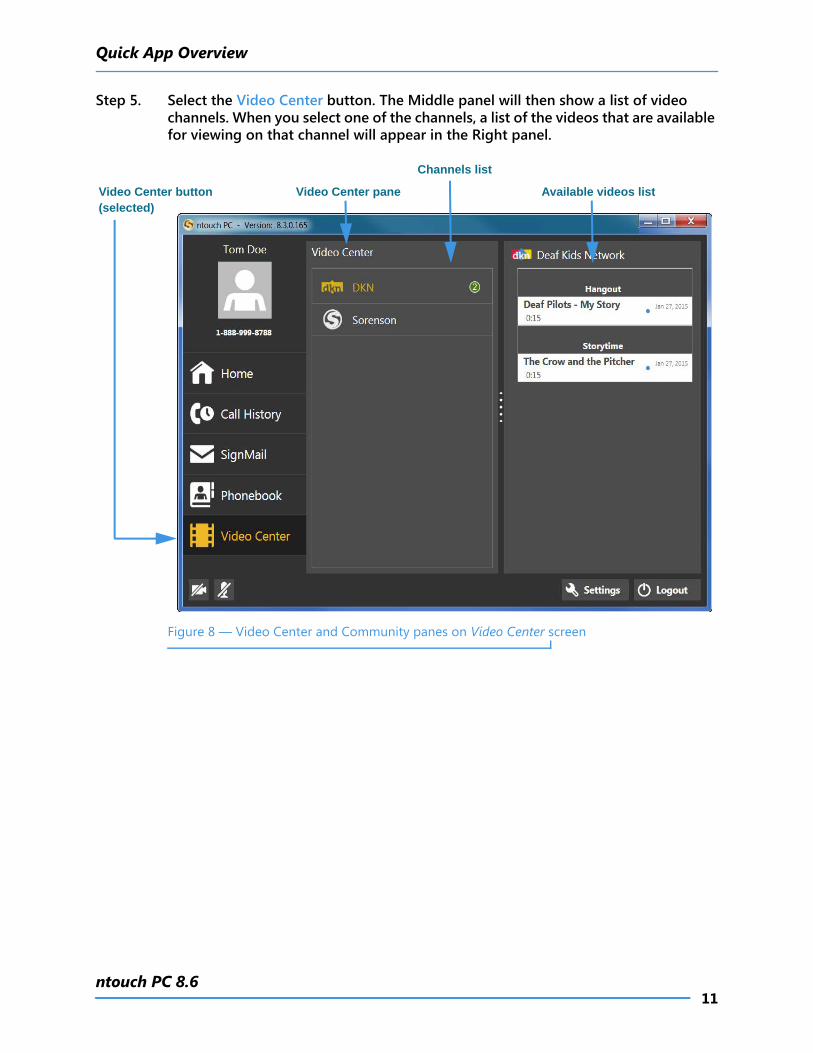
Step 5. Select the Video Center button. The Middle panel will then show a list of video channels. When you select one of the channels, a list of the videos that are available for viewing on that channel will appear in the Right panel.
Figure 8 — Video Center and Community panes on Video Center screen
Video Center button (selected)
Video Center pane Available videos list
Channels list
Quick App Overview
12User Guide
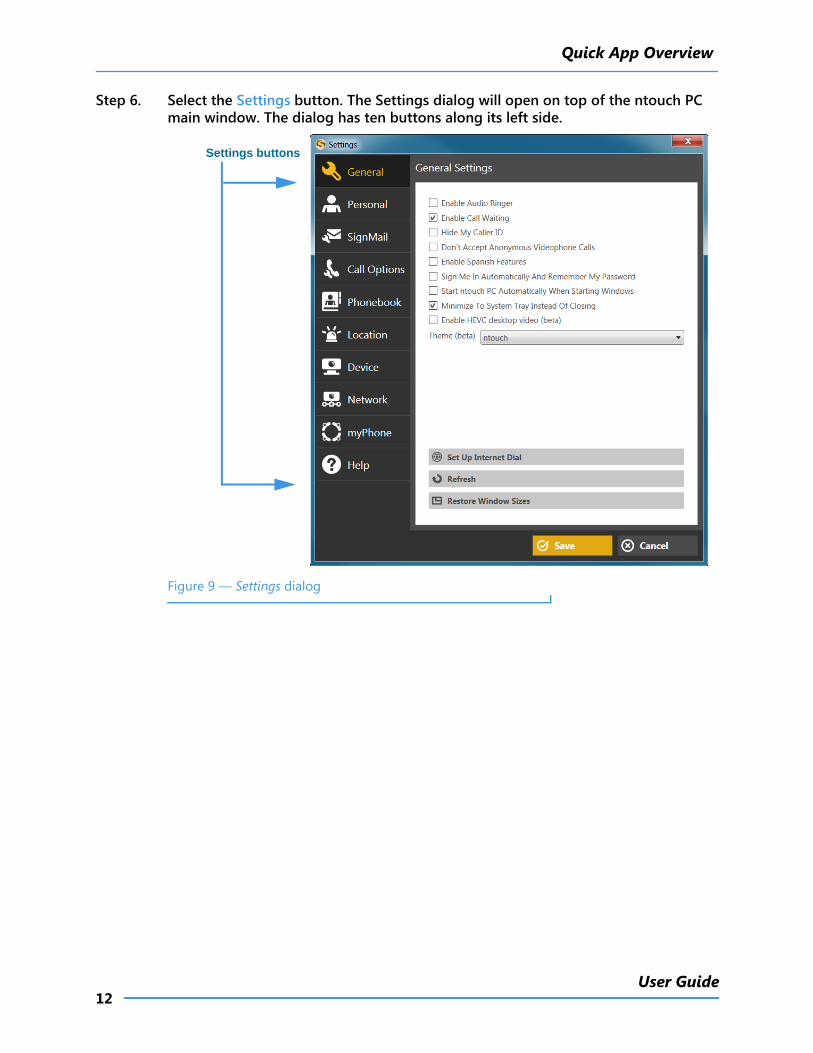
Step 6. Select the Settings button. The Settings dialog will open on top of the ntouch PC main window. The dialog has ten buttons along its left side.
Figure 9 — Settings dialog
Settings buttons
Make and Receive Calls
13ntouch PC 8.6
Make and Receive CallsYou can make outgoing calls to and receive incoming calls from both hearing and deaf callers using ntouch PC. You can call any hearing person through Sorenson VRS (SVRS). You can also call other deaf videophone users directly (point-to-point).
To be able to call someone using ntouch PC, you just need to know that person’s telephone number or the IP address of the videophone or other device that they use. To receive incoming calls, you must have your computer turned on and the ntouch PC application must be running. When you dial a hearing person’s telephone number, your call automatically goes through Sorenson VRS.
To Make an Outgoing Call
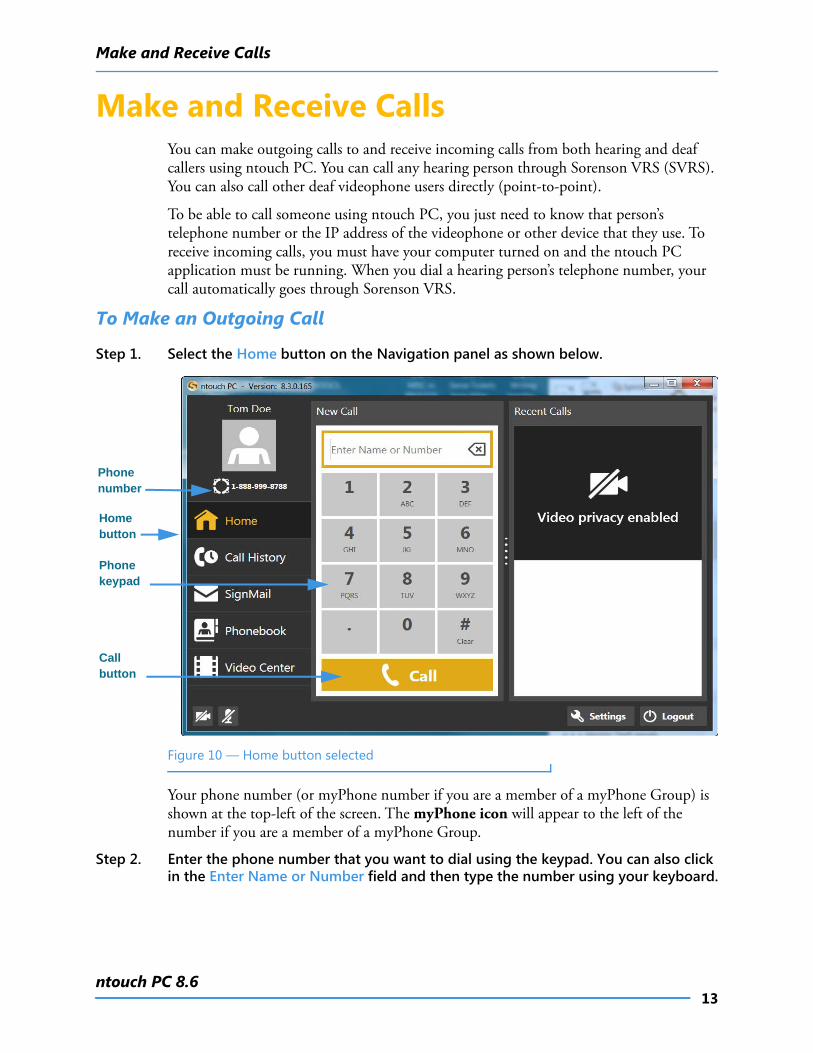
Step 1. Select the Home button on the Navigation panel as shown below.
Figure 10 — Home button selected
Your phone number (or myPhone number if you are a member of a myPhone Group) is shown at the top-left of the screen. The myPhone icon will appear to the left of the number if you are a member of a myPhone Group.
Step 2. Enter the phone number that you want to dial using the keypad. You can also click in the Enter Name or Number field and then type the number using your keyboard.
Phone keypad
Call button
Home button
Phone number
Make and Receive Calls
14User Guide
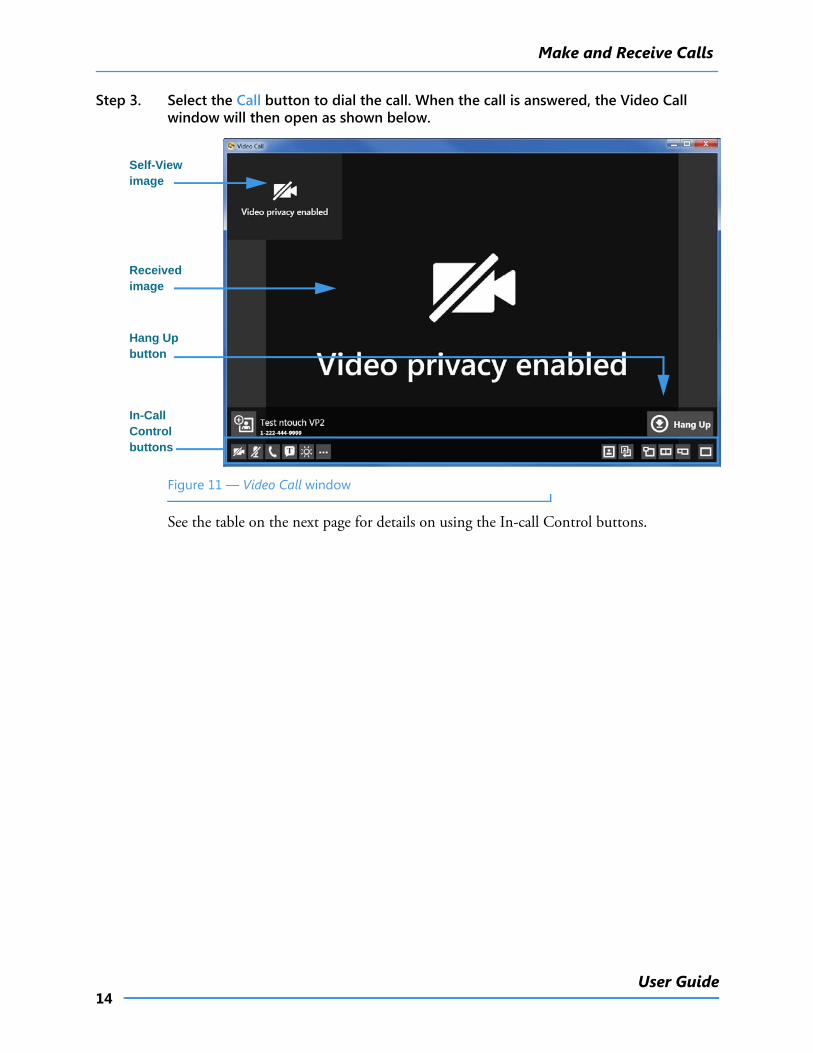
Step 3. Select the Call button to dial the call. When the call is answered, the Video Call window will then open as shown below.
Figure 11 — Video Call window
See the table on the next page for details on using the In-call Control buttons.
Self-View image
Received image
Hang Up button
In-Call Control buttons
Make and Receive Calls
15ntouch PC 8.6
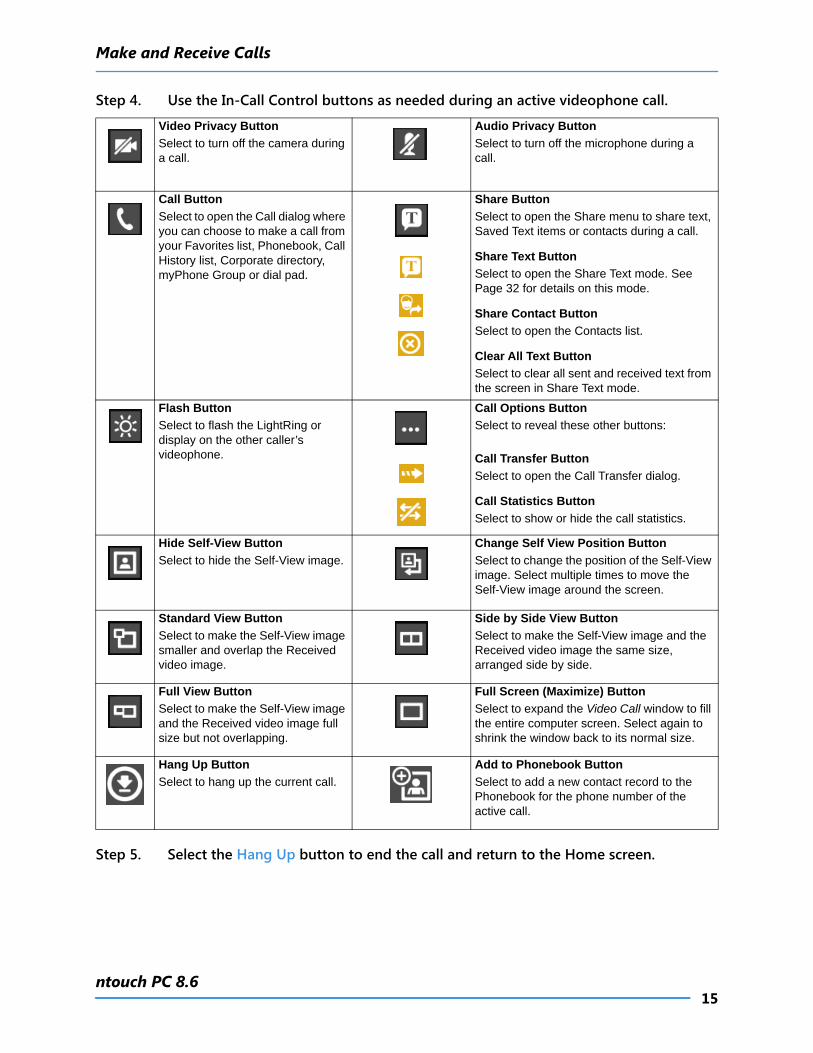
Step 4. Use the In-Call Control buttons as needed during an active videophone call.
Step 5. Select the Hang Up button to end the call and return to the Home screen.
Video Privacy Button
Select to turn off the camera during a call.
Audio Privacy Button
Select to turn off the microphone during a call.
Call Button
Select to open the Call dialog where you can choose to make a call from your Favorites list, Phonebook, Call History list, Corporate directory, myPhone Group or dial pad.
Share Button
Select to open the Share menu to share text, Saved Text items or contacts during a call.
Share Text Button
Select to open the Share Text mode. See Page 32 for details on this mode.
Share Contact Button
Select to open the Contacts list.
Clear All Text Button
Select to clear all sent and received text from the screen in Share Text mode.
Flash Button
Select to flash the LightRing or display on the other caller’s videophone.
Call Options Button
Select to reveal these other buttons:
Call Transfer Button
Select to open the Call Transfer dialog.
Call Statistics Button
Select to show or hide the call statistics.
Hide Self-View Button
Select to hide the Self-View image.
Change Self View Position Button
Select to change the position of the Self-View image. Select multiple times to move the Self-View image around the screen.
Standard View Button
Select to make the Self-View image smaller and overlap the Received video image.
Side by Side View Button
Select to make the Self-View image and the Received video image the same size, arranged side by side.
Full View Button
Select to make the Self-View image and the Received video image full size but not overlapping.
Full Screen (Maximize) Button
Select to expand the Video Call window to fill the entire computer screen. Select again to shrink the window back to its normal size.
Hang Up Button
Select to hang up the current call.
Add to Phonebook Button
Select to add a new contact record to the Phonebook for the phone number of the active call.
Make and Receive Calls
16User Guide
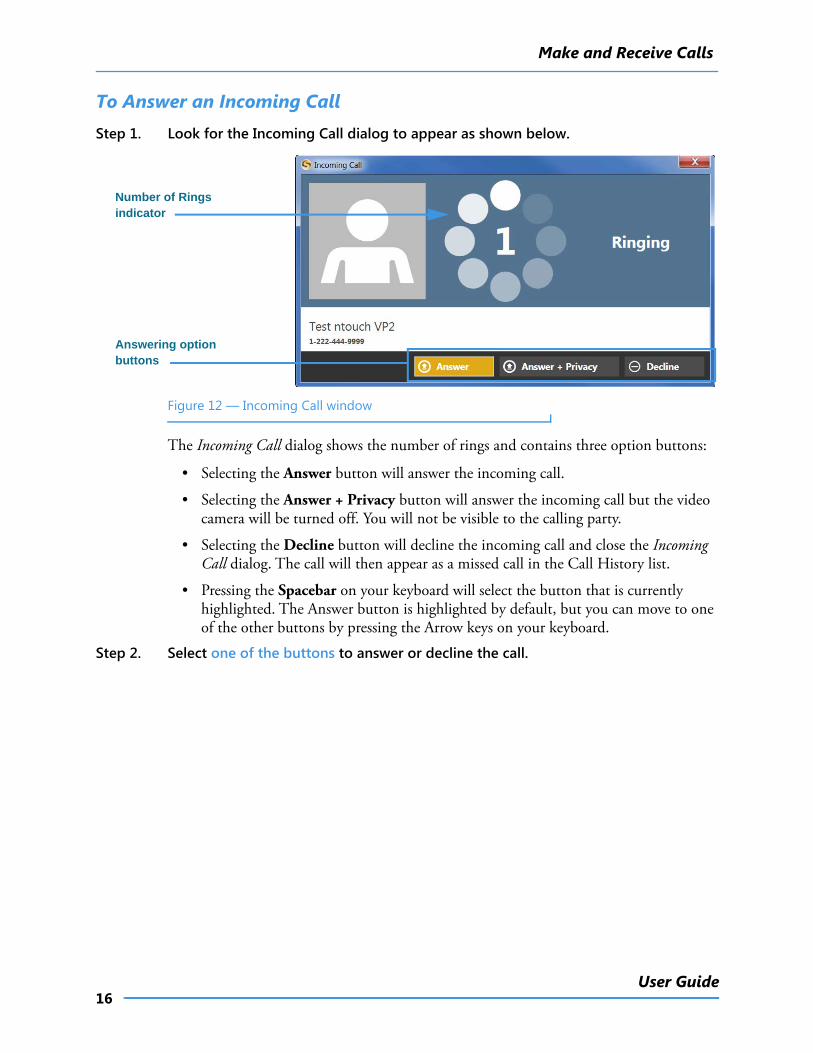
To Answer an Incoming CallStep 1. Look for the Incoming Call dialog to appear as shown below.
Figure 12 — Incoming Call window
The Incoming Call dialog shows the number of rings and contains three option buttons:
• Selecting the Answer button will answer the incoming call.
• Selecting the Answer + Privacy button will answer the incoming call but the video camera will be turned off. You will not be visible to the calling party.
• Selecting the Decline button will decline the incoming call and close the Incoming Call dialog. The call will then appear as a missed call in the Call History list.
• Pressing the Spacebar on your keyboard will select the button that is currently highlighted. The Answer button is highlighted by default, but you can move to one of the other buttons by pressing the Arrow keys on your keyboard.
Step 2. Select one of the buttons to answer or decline the call.
Number of Rings indicator
Answering option buttons
Make and Receive Calls
17ntouch PC 8.6
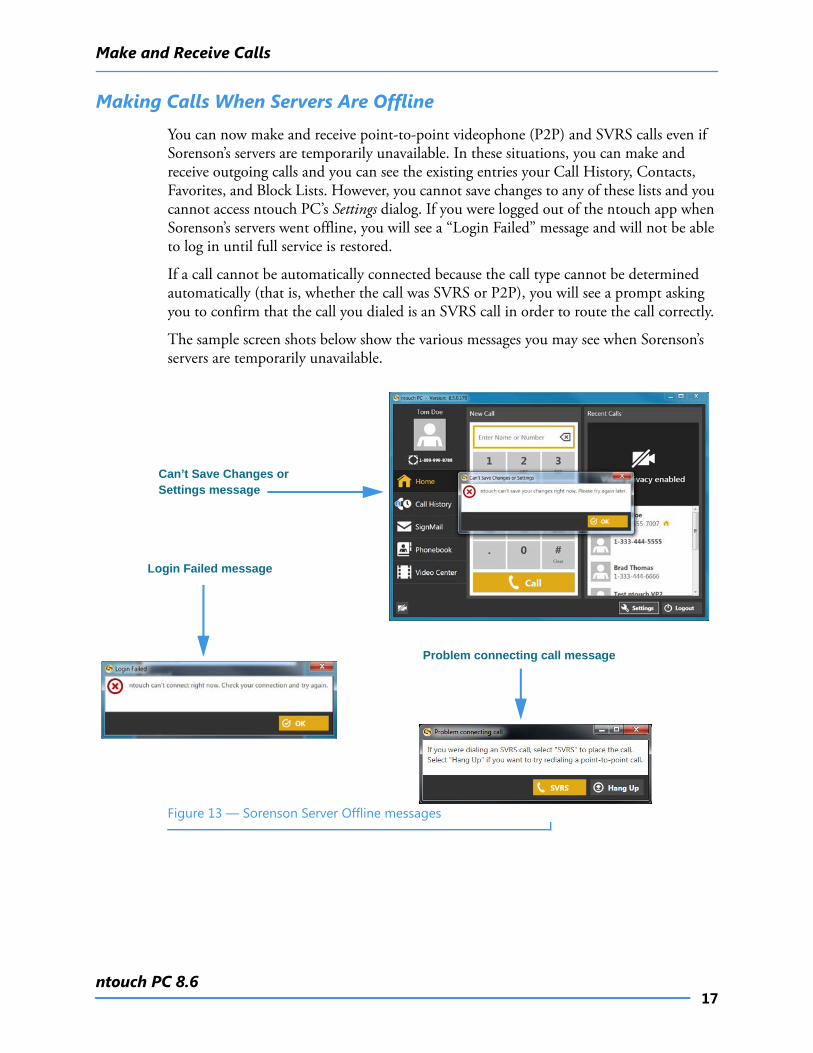
Making Calls When Servers Are Offline
You can now make and receive point-to-point videophone (P2P) and SVRS calls even if Sorenson’s servers are temporarily unavailable. In these situations, you can make and receive outgoing calls and you can see the existing entries your Call History, Contacts, Favorites, and Block Lists. However, you cannot save changes to any of these lists and you cannot access ntouch PC’s Settings dialog. If you were logged out of the ntouch app when Sorenson’s servers went offline, you will see a “Login Failed” message and will not be able to log in until full service is restored.
If a call cannot be automatically connected because the call type cannot be determined automatically (that is, whether the call was SVRS or P2P), you will see a prompt asking you to confirm that the call you dialed is an SVRS call in order to route the call correctly.
The sample screen shots below show the various messages you may see when Sorenson’s servers are temporarily unavailable.
Figure 13 — Sorenson Server Offline messages
Can’t Save Changes or Settings message
Login Failed message
Problem connecting call message
Make and Receive Calls
18User Guide
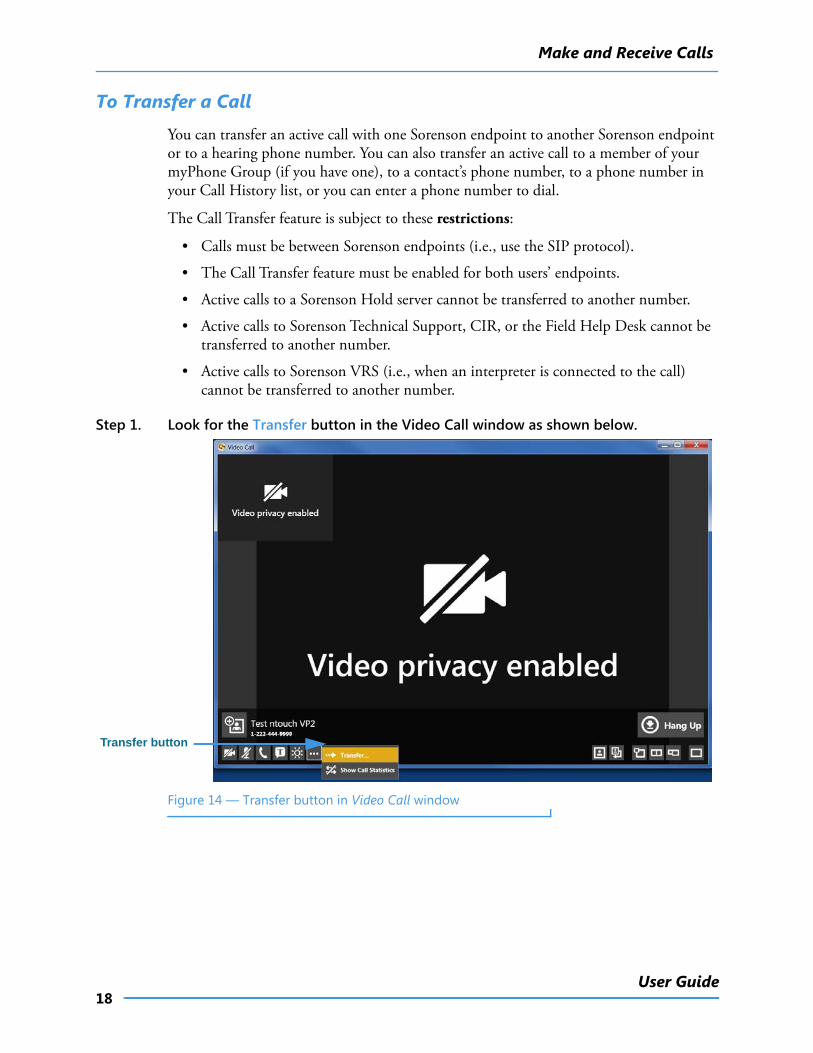
To Transfer a Call
You can transfer an active call with one Sorenson endpoint to another Sorenson endpoint or to a hearing phone number. You can also transfer an active call to a member of your myPhone Group (if you have one), to a contact’s phone number, to a phone number in your Call History list, or you can enter a phone number to dial.
The Call Transfer feature is subject to these restrictions:
• Calls must be between Sorenson endpoints (i.e., use the SIP protocol).
• The Call Transfer feature must be enabled for both users’ endpoints.
• Active calls to a Sorenson Hold server cannot be transferred to another number.
• Active calls to Sorenson Technical Support, CIR, or the Field Help Desk cannot be transferred to another number.
• Active calls to Sorenson VRS (i.e., when an interpreter is connected to the call) cannot be transferred to another number.
Step 1. Look for the Transfer button in the Video Call window as shown below.
Figure 14 — Transfer button in Video Call window
Transfer button
Make and Receive Calls
19ntouch PC 8.6
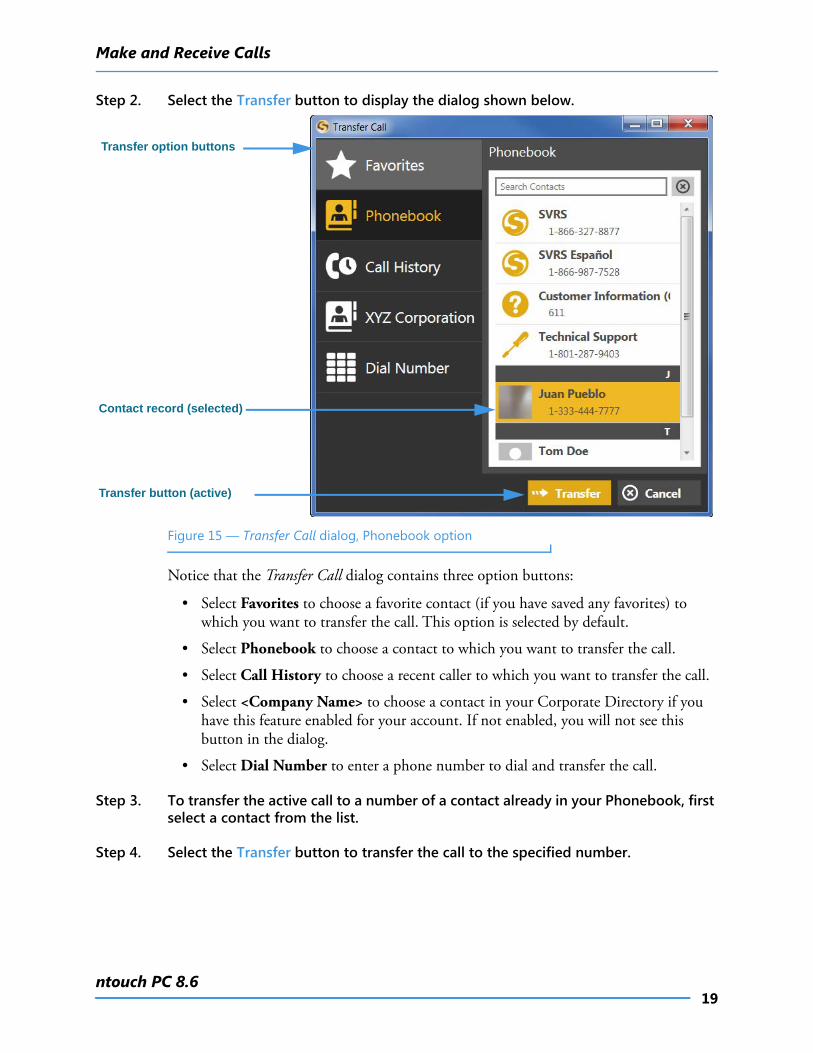
Step 2. Select the Transfer button to display the dialog shown below.
Figure 15 — Transfer Call dialog, Phonebook option
Notice that the Transfer Call dialog contains three option buttons:
• Select Favorites to choose a favorite contact (if you have saved any favorites) to which you want to transfer the call. This option is selected by default.
• Select Phonebook to choose a contact to which you want to transfer the call.
• Select Call History to choose a recent caller to which you want to transfer the call.
• Select <Company Name> to choose a contact in your Corporate Directory if you have this feature enabled for your account. If not enabled, you will not see this button in the dialog.
• Select Dial Number to enter a phone number to dial and transfer the call.
Step 3. To transfer the active call to a number of a contact already in your Phonebook, first select a contact from the list.
Step 4. Select the Transfer button to transfer the call to the specified number.
Transfer option buttons
Transfer button (active)
Contact record (selected)
Make and Receive Calls
20User Guide
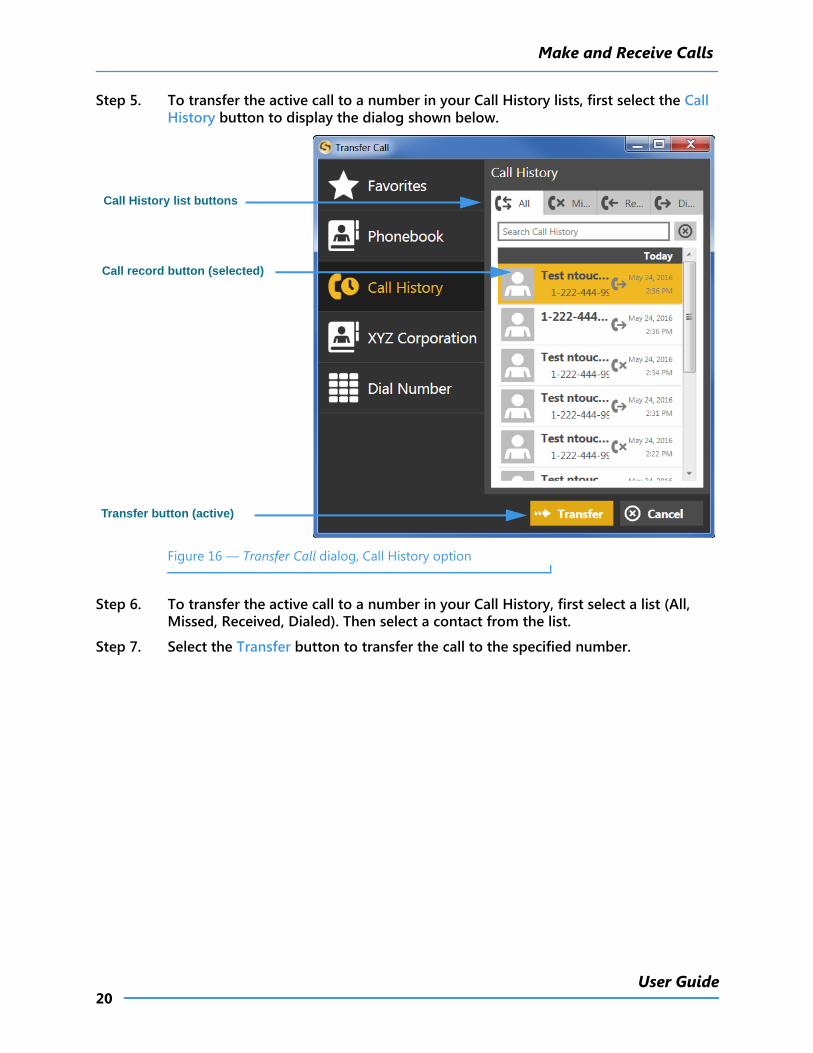
Step 5. To transfer the active call to a number in your Call History lists, first select the Call History button to display the dialog shown below.
Figure 16 — Transfer Call dialog, Call History option
Step 6. To transfer the active call to a number in your Call History, first select a list (All, Missed, Received, Dialed). Then select a contact from the list.
Step 7. Select the Transfer button to transfer the call to the specified number.
Call History list buttons
Transfer button (active)
Call record button (selected)
Make and Receive Calls
21ntouch PC 8.6
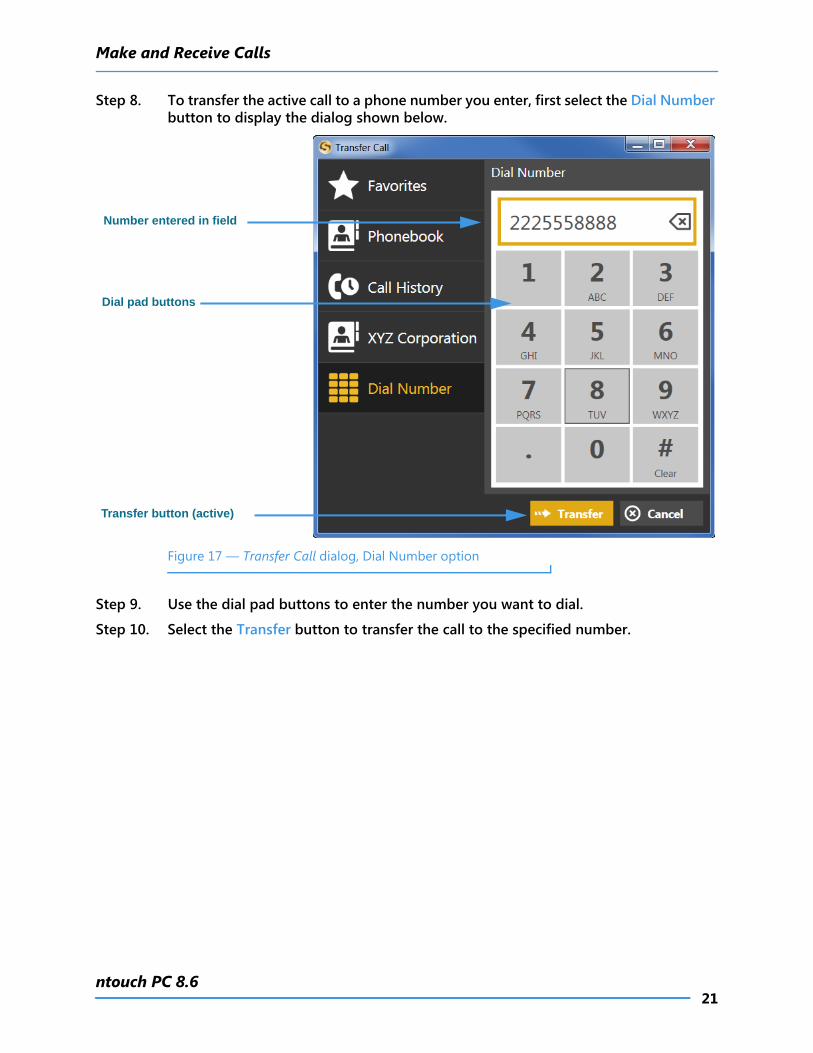
Step 8. To transfer the active call to a phone number you enter, first select the Dial Number button to display the dialog shown below.
Figure 17 — Transfer Call dialog, Dial Number option
Step 9. Use the dial pad buttons to enter the number you want to dial.
Step 10. Select the Transfer button to transfer the call to the specified number.
Number entered in field
Transfer button (active)
Dial pad buttons
Make and Receive Calls
22User Guide
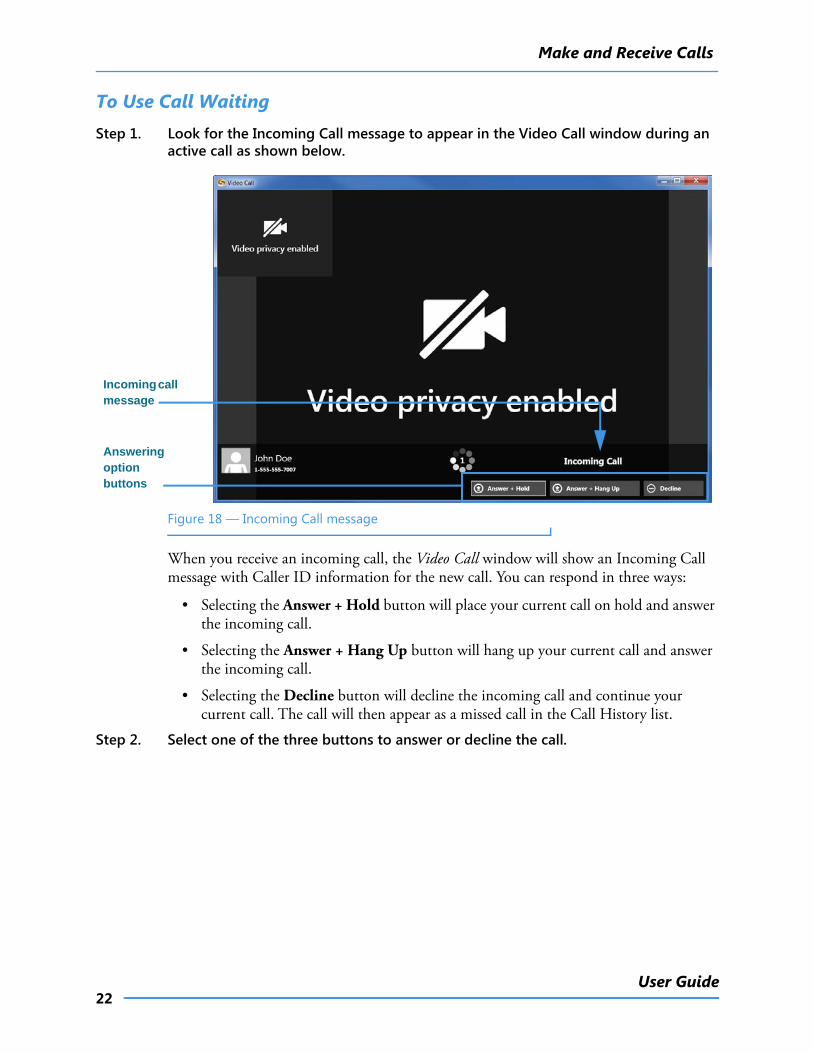
To Use Call WaitingStep 1. Look for the Incoming Call message to appear in the Video Call window during an
active call as shown below.
Figure 18 — Incoming Call message
When you receive an incoming call, the Video Call window will show an Incoming Call message with Caller ID information for the new call. You can respond in three ways:
• Selecting the Answer + Hold button will place your current call on hold and answer the incoming call.
• Selecting the Answer + Hang Up button will hang up your current call and answer the incoming call.
• Selecting the Decline button will decline the incoming call and continue your current call. The call will then appear as a missed call in the Call History list.
Step 2. Select one of the three buttons to answer or decline the call.
Incoming call message
Answering option buttons
Make and Receive Calls
23ntouch PC 8.6
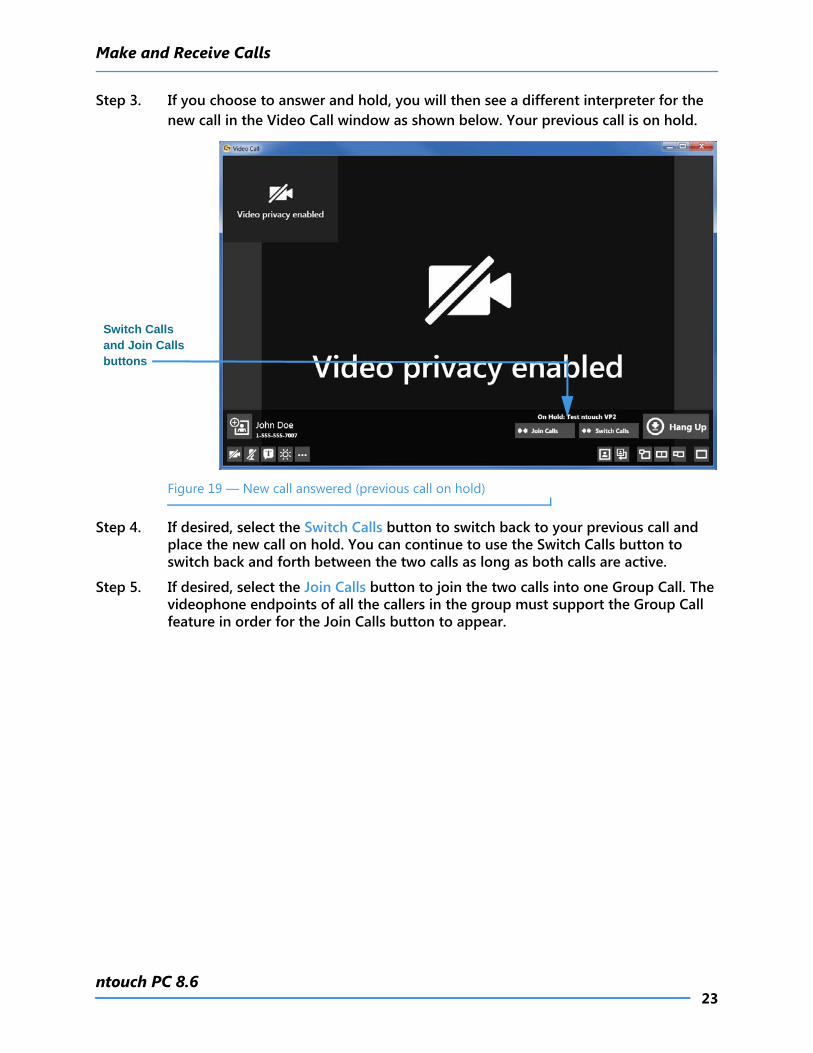
Step 3. If you choose to answer and hold, you will then see a different interpreter for the new call in the Video Call window as shown below. Your previous call is on hold.
Figure 19 — New call answered (previous call on hold)
Step 4. If desired, select the Switch Calls button to switch back to your previous call and place the new call on hold. You can continue to use the Switch Calls button to switch back and forth between the two calls as long as both calls are active.
Step 5. If desired, select the Join Calls button to join the two calls into one Group Call. The videophone endpoints of all the callers in the group must support the Group Call feature in order for the Join Calls button to appear.
Switch Calls and Join Calls buttons
Make and Receive Calls
24User Guide
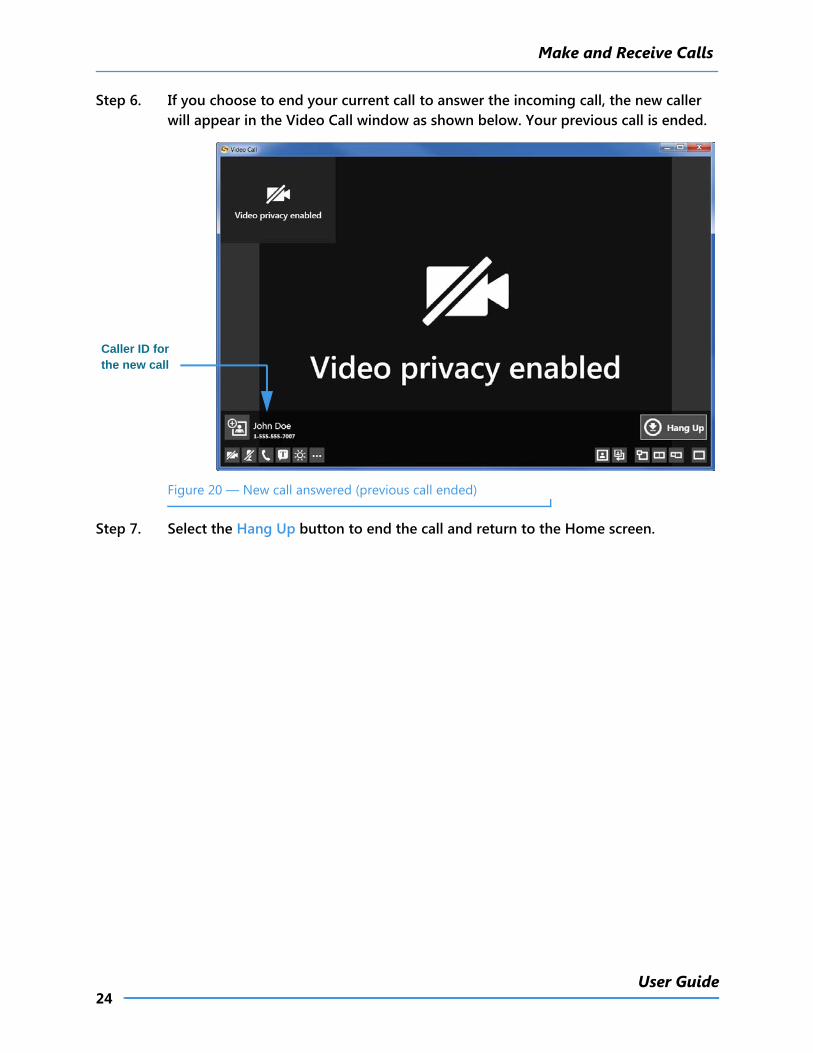
Step 6. If you choose to end your current call to answer the incoming call, the new caller will appear in the Video Call window as shown below. Your previous call is ended.
Figure 20 — New call answered (previous call ended)
Step 7. Select the Hang Up button to end the call and return to the Home screen.
Caller ID for the new call
Make and Receive Calls
25ntouch PC 8.6
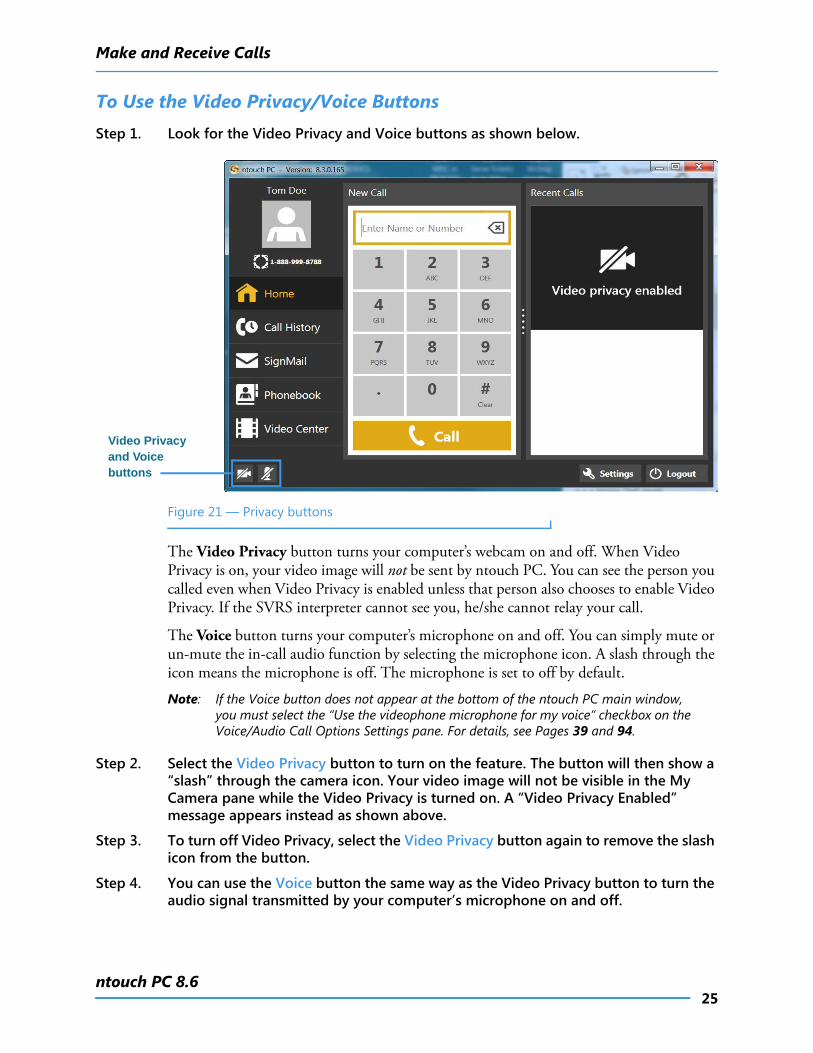
To Use the Video Privacy/Voice ButtonsStep 1. Look for the Video Privacy and Voice buttons as shown below.
Figure 21 — Privacy buttons
The Video Privacy button turns your computer’s webcam on and off. When Video Privacy is on, your video image will not be sent by ntouch PC. You can see the person you called even when Video Privacy is enabled unless that person also chooses to enable Video Privacy. If the SVRS interpreter cannot see you, he/she cannot relay your call.
The Voice button turns your computer’s microphone on and off. You can simply mute or un-mute the in-call audio function by selecting the microphone icon. A slash through the icon means the microphone is off. The microphone is set to off by default.
Note: If the Voice button does not appear at the bottom of the ntouch PC main window, you must select the “Use the videophone microphone for my voice” checkbox on the Voice/Audio Call Options Settings pane. For details, see Pages 39 and 94.
Step 2. Select the Video Privacy button to turn on the feature. The button will then show a “slash” through the camera icon. Your video image will not be visible in the My Camera pane while the Video Privacy is turned on. A “Video Privacy Enabled” message appears instead as shown above.
Step 3. To turn off Video Privacy, select the Video Privacy button again to remove the slash icon from the button.
Step 4. You can use the Voice button the same way as the Video Privacy button to turn the audio signal transmitted by your computer’s microphone on and off.
Video Privacy and Voice buttons
Make and Receive Calls
26User Guide
To Use the Yelp Search Feature
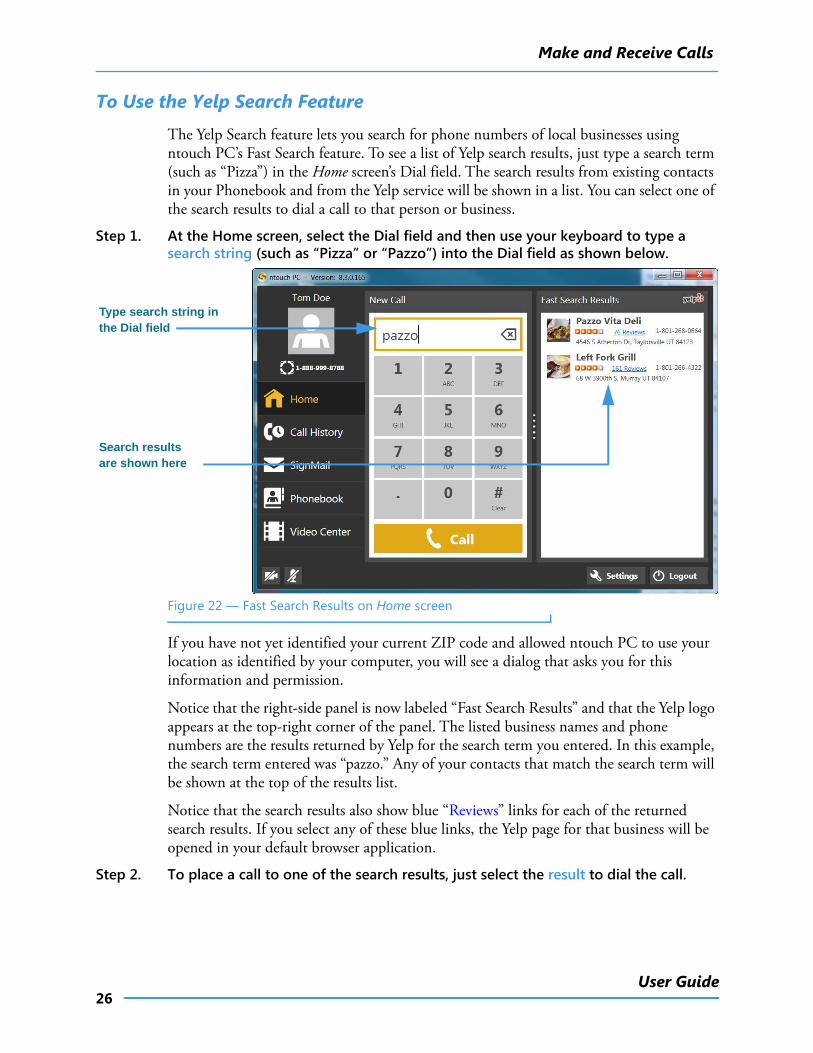
The Yelp Search feature lets you search for phone numbers of local businesses using ntouch PC’s Fast Search feature. To see a list of Yelp search results, just type a search term (such as “Pizza”) in the Home screen’s Dial field. The search results from existing contacts in your Phonebook and from the Yelp service will be shown in a list. You can select one of the search results to dial a call to that person or business.
Step 1. At the Home screen, select the Dial field and then use your keyboard to type a search string (such as “Pizza” or “Pazzo”) into the Dial field as shown below.
Figure 22 — Fast Search Results on Home screen
If you have not yet identified your current ZIP code and allowed ntouch PC to use your location as identified by your computer, you will see a dialog that asks you for this information and permission.
Notice that the right-side panel is now labeled “Fast Search Results” and that the Yelp logo appears at the top-right corner of the panel. The listed business names and phone numbers are the results returned by Yelp for the search term you entered. In this example, the search term entered was “pazzo.” Any of your contacts that match the search term will be shown at the top of the results list.
Notice that the search results also show blue “Reviews” links for each of the returned search results. If you select any of these blue links, the Yelp page for that business will be opened in your default browser application.
Step 2. To place a call to one of the search results, just select the result to dial the call.
Type search string in the Dial field
Search results are shown here
Make and Receive Calls
27ntouch PC 8.6
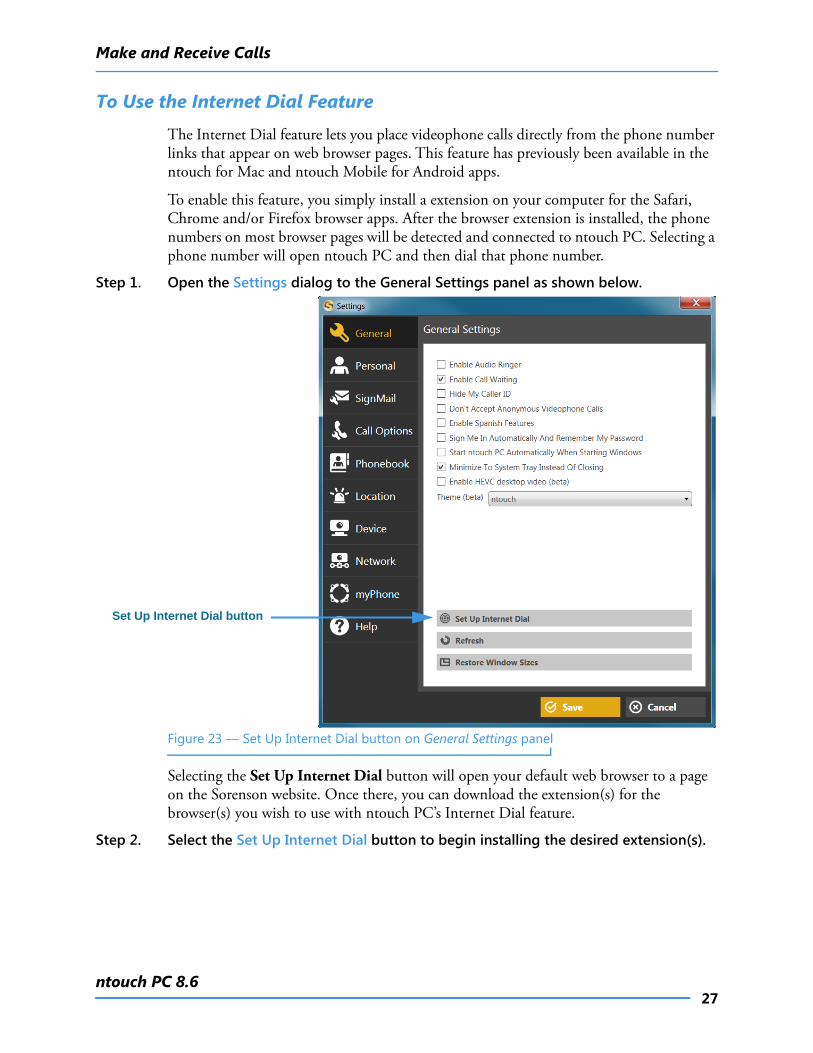
To Use the Internet Dial Feature
The Internet Dial feature lets you place videophone calls directly from the phone number links that appear on web browser pages. This feature has previously been available in the ntouch for Mac and ntouch Mobile for Android apps.
To enable this feature, you simply install a extension on your computer for the Safari, Chrome and/or Firefox browser apps. After the browser extension is installed, the phone numbers on most browser pages will be detected and connected to ntouch PC. Selecting a phone number will open ntouch PC and then dial that phone number.
Step 1. Open the Settings dialog to the General Settings panel as shown below.
Figure 23 — Set Up Internet Dial button on General Settings panel
Selecting the Set Up Internet Dial button will open your default web browser to a page on the Sorenson website. Once there, you can download the extension(s) for the browser(s) you wish to use with ntouch PC’s Internet Dial feature.
Step 2. Select the Set Up Internet Dial button to begin installing the desired extension(s).
Set Up Internet Dial button
Make and Receive Calls
28User Guide
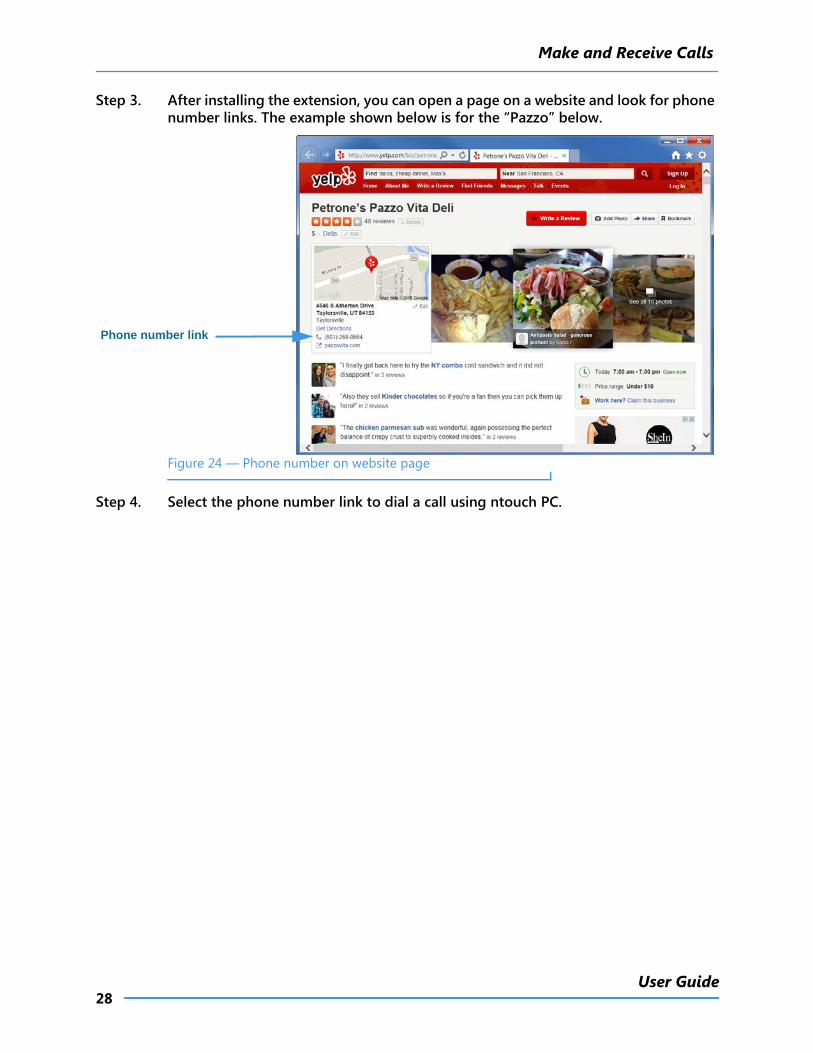
Step 3. After installing the extension, you can open a page on a website and look for phone number links. The example shown below is for the “Pazzo” below.
Figure 24 — Phone number on website page
Step 4. Select the phone number link to dial a call using ntouch PC.
Phone number link
Share Text and Contacts
29ntouch PC 8.6
Share Text and Contactsntouch PC’s Share feature lets you share the phone numbers of your contacts and any text with another Sorenson videophone user. You can use the Share options during a call, when recording a Deaf SignMail video, or when calling hearing numbers because the Sorenson interpreter can see the text or contacts that you share.
You can also share text messages during a call which you have saved before the call begins. The Saved Text function lets you save up to 10 short text messages to use during calls.
Note: The ntouch PC app does not include the Share Location feature supported by the ntouch Mobile for iOS and ntouch Tablet apps.
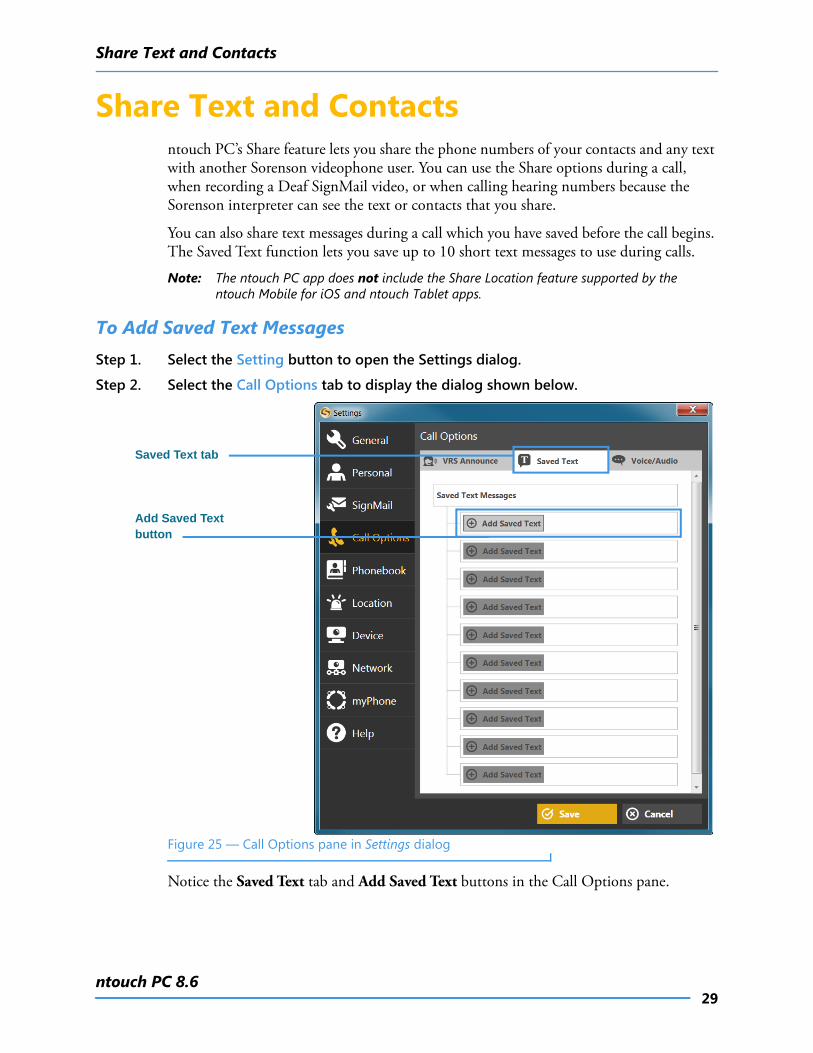
To Add Saved Text MessagesStep 1. Select the Setting button to open the Settings dialog.
Step 2. Select the Call Options tab to display the dialog shown below.
Figure 25 — Call Options pane in Settings dialog
Notice the Saved Text tab and Add Saved Text buttons in the Call Options pane.
Saved Text tab
Add Saved Text button
Share Text and Contacts
30User Guide
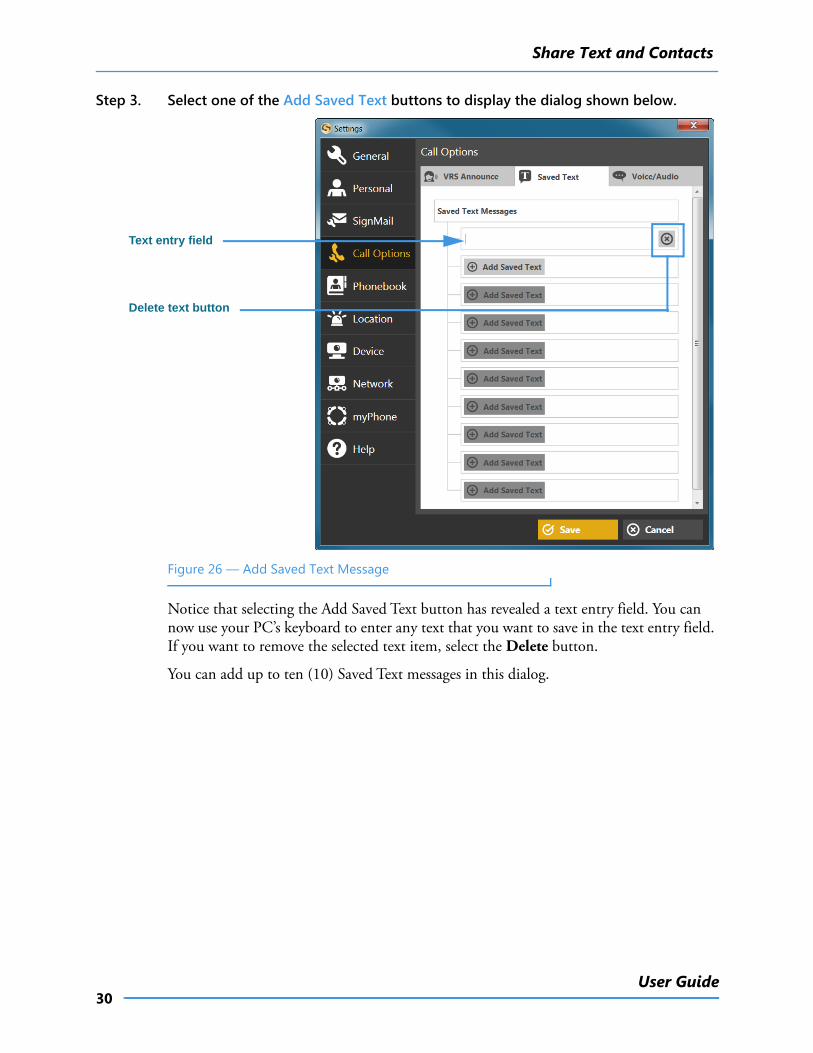
Step 3. Select one of the Add Saved Text buttons to display the dialog shown below.
Figure 26 — Add Saved Text Message
Notice that selecting the Add Saved Text button has revealed a text entry field. You can now use your PC’s keyboard to enter any text that you want to save in the text entry field. If you want to remove the selected text item, select the Delete button.
You can add up to ten (10) Saved Text messages in this dialog.
Delete text button
Text entry field
Share Text and Contacts
31ntouch PC 8.6
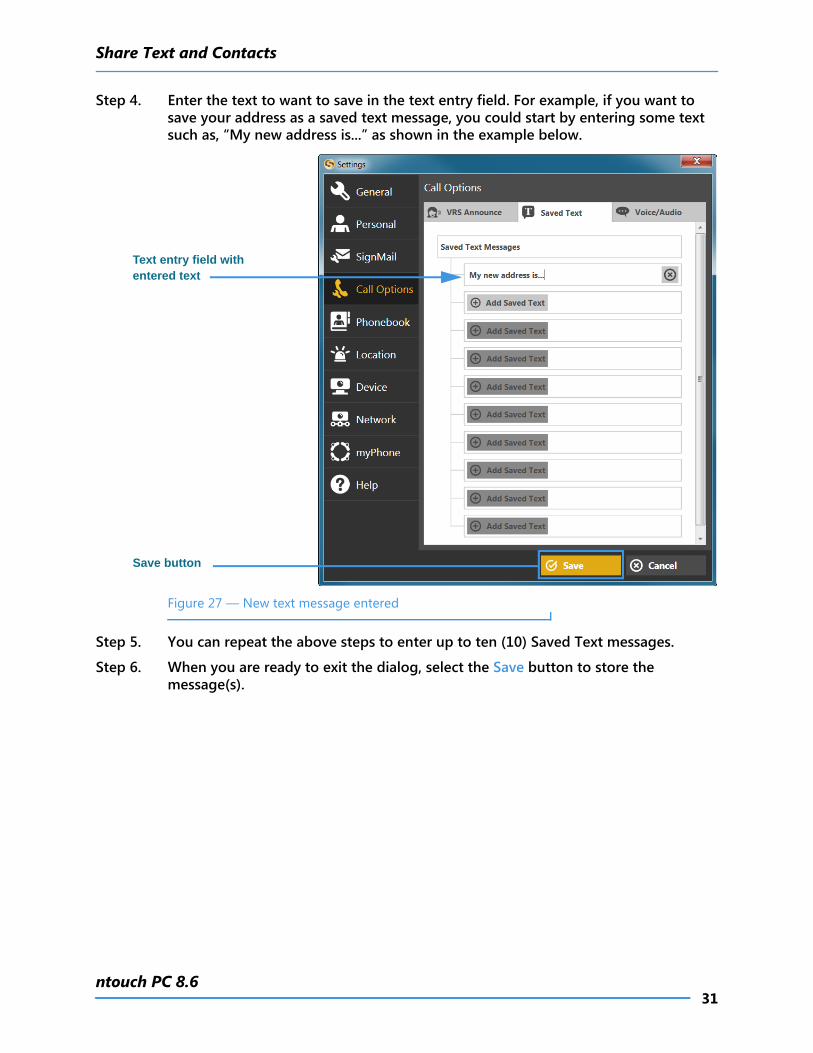
Step 4. Enter the text to want to save in the text entry field. For example, if you want to save your address as a saved text message, you could start by entering some text such as, “My new address is...” as shown in the example below.
Figure 27 — New text message entered
Step 5. You can repeat the above steps to enter up to ten (10) Saved Text messages.
Step 6. When you are ready to exit the dialog, select the Save button to store the message(s).
Save button
Text entry field with entered text
Share Text and Contacts
32User Guide
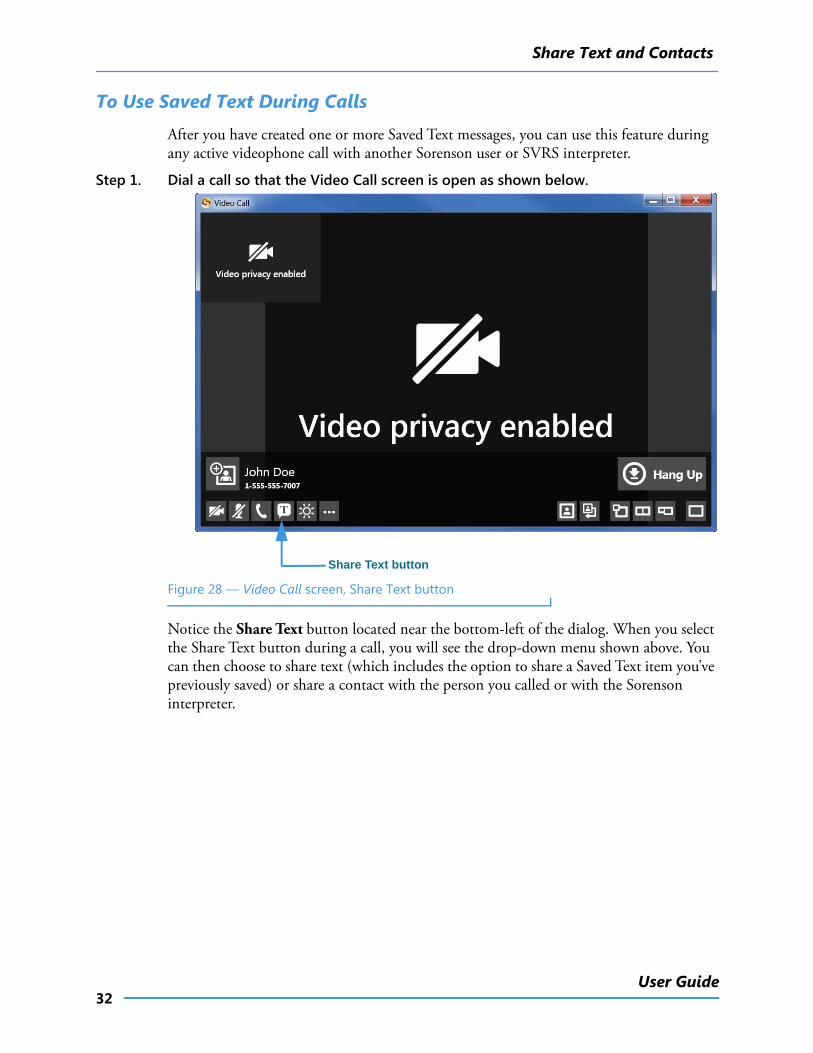
To Use Saved Text During Calls
After you have created one or more Saved Text messages, you can use this feature during any active videophone call with another Sorenson user or SVRS interpreter.
Step 1. Dial a call so that the Video Call screen is open as shown below.
Figure 28 — Video Call screen, Share Text button
Notice the Share Text button located near the bottom-left of the dialog. When you select the Share Text button during a call, you will see the drop-down menu shown above. You can then choose to share text (which includes the option to share a Saved Text item you’ve previously saved) or share a contact with the person you called or with the Sorenson interpreter.
Share Text button

Share Text and Contacts
33ntouch PC 8.6
Step 2. Select the Share Text button to open the menu shown below.
Figure 29 — Video Call screen, Share menu opened
Notice that selecting the Share button has revealed the Share menu. There are three options in the Share menu:
• Select the Share Text button to enter text to share with the caller or to select one of your Saved Text messages, if you have entered any, with the caller.
• Select the Share Contact button to select to share information about one of your contacts with the caller.
• Select the Clear All Text button to clear (erase) the text that you have already shared with a caller.
Share menu opened
Share Text and Contacts
34User Guide
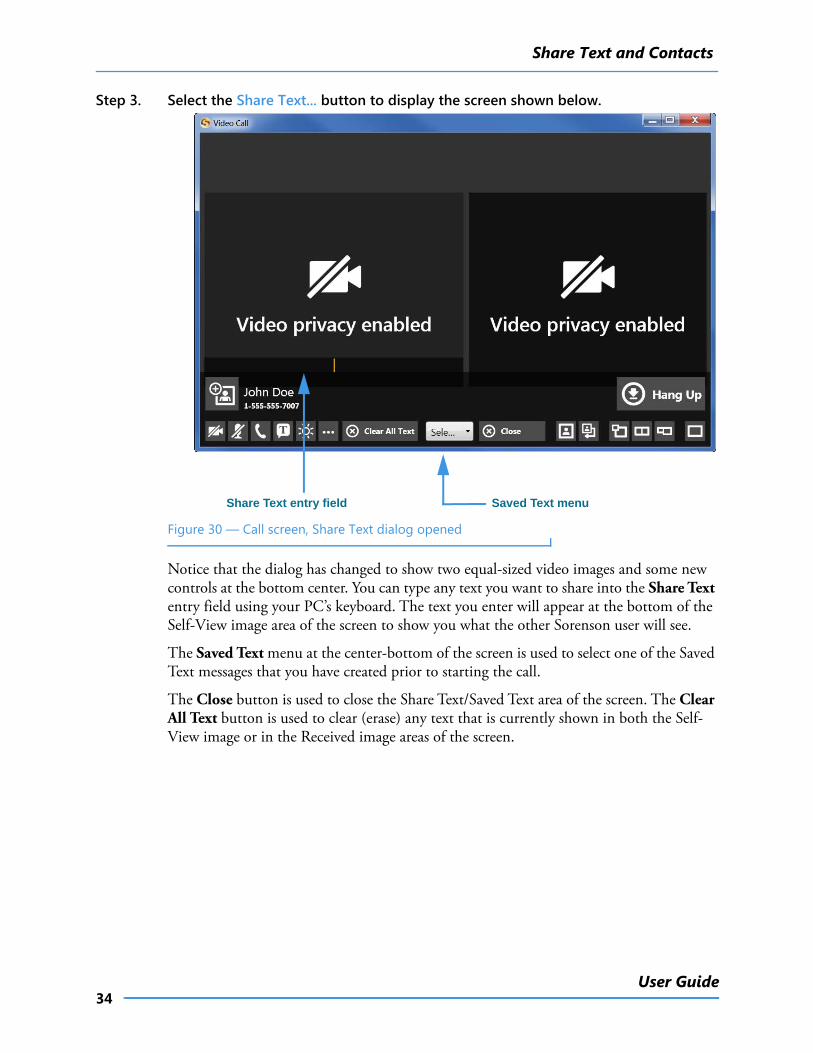
Step 3. Select the Share Text... button to display the screen shown below.
Figure 30 — Call screen, Share Text dialog opened
Notice that the dialog has changed to show two equal-sized video images and some new controls at the bottom center. You can type any text you want to share into the Share Text entry field using your PC’s keyboard. The text you enter will appear at the bottom of the Self-View image area of the screen to show you what the other Sorenson user will see.
The Saved Text menu at the center-bottom of the screen is used to select one of the Saved Text messages that you have created prior to starting the call.
The Close button is used to close the Share Text/Saved Text area of the screen. The Clear All Text button is used to clear (erase) any text that is currently shown in both the Self-View image or in the Received image areas of the screen.
Saved Text menuShare Text entry field

Share Text and Contacts
35ntouch PC 8.6
Step 4. Select the Select from this list to enter... button to open the Saved Text drop-down menu as shown below.
Figure 31 — Video Call screen, Saved Text dialog opened
Notice that the drop-down menu in this example includes one Saved Text message. Up to ten (10) messages can appear in the menu. There is also an Edit Saved Text... button which you can select to open the Saved Text dialog so that you can enter, delete, or change any of your Saved Text messages during an active call.
Saved Text menu opened Saved Text messagesEdit Saved Text... button
Share Text and Contacts
36User Guide
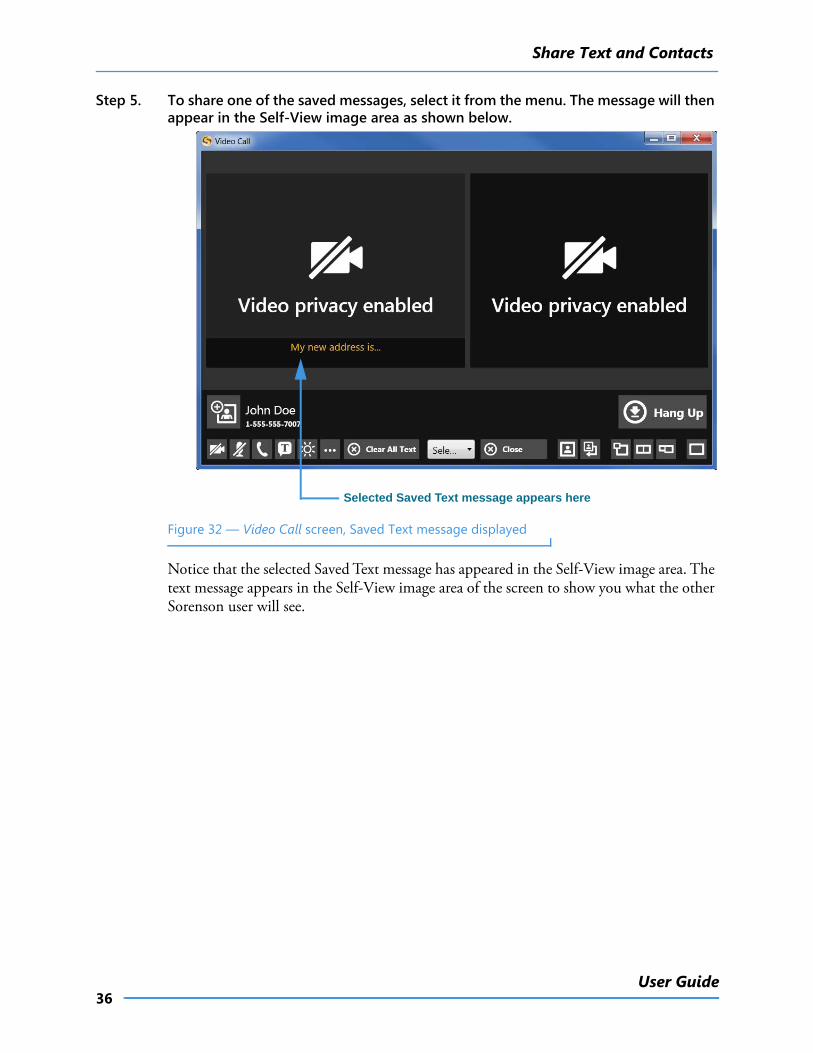
Step 5. To share one of the saved messages, select it from the menu. The message will then appear in the Self-View image area as shown below.
Figure 32 — Video Call screen, Saved Text message displayed
Notice that the selected Saved Text message has appeared in the Self-View image area. The text message appears in the Self-View image area of the screen to show you what the other Sorenson user will see.
Selected Saved Text message appears here
Share Text and Contacts
37ntouch PC 8.6
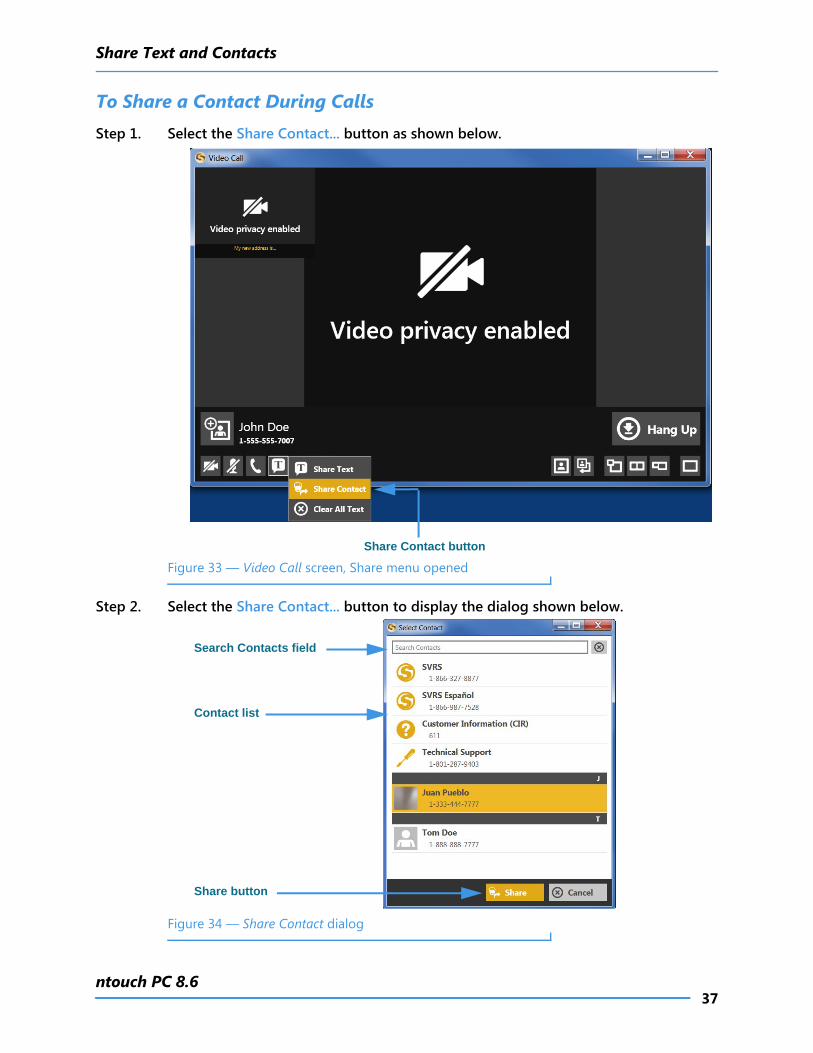
To Share a Contact During CallsStep 1. Select the Share Contact... button as shown below.
Figure 33 — Video Call screen, Share menu opened
Step 2. Select the Share Contact... button to display the dialog shown below.
Figure 34 — Share Contact dialog
Share Contact button
Search Contacts field
Share button
Contact list
Share Text and Contacts
38User Guide
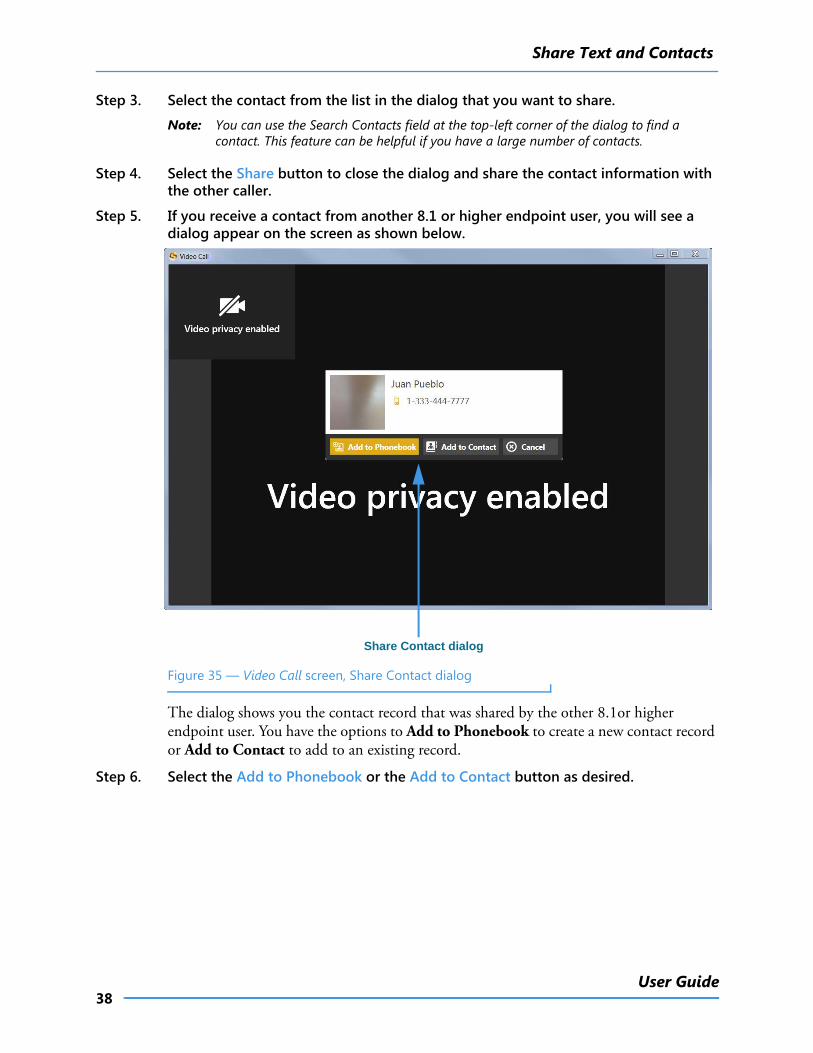
Step 3. Select the contact from the list in the dialog that you want to share.
Note: You can use the Search Contacts field at the top-left corner of the dialog to find a contact. This feature can be helpful if you have a large number of contacts.
Step 4. Select the Share button to close the dialog and share the contact information with the other caller.
Step 5. If you receive a contact from another 8.1 or higher endpoint user, you will see a dialog appear on the screen as shown below.
Figure 35 — Video Call screen, Share Contact dialog
The dialog shows you the contact record that was shared by the other 8.1or higher endpoint user. You have the options to Add to Phonebook to create a new contact record or Add to Contact to add to an existing record.
Step 6. Select the Add to Phonebook or the Add to Contact button as desired.
Share Contact dialog
Use Voice Feature
39ntouch PC 8.6
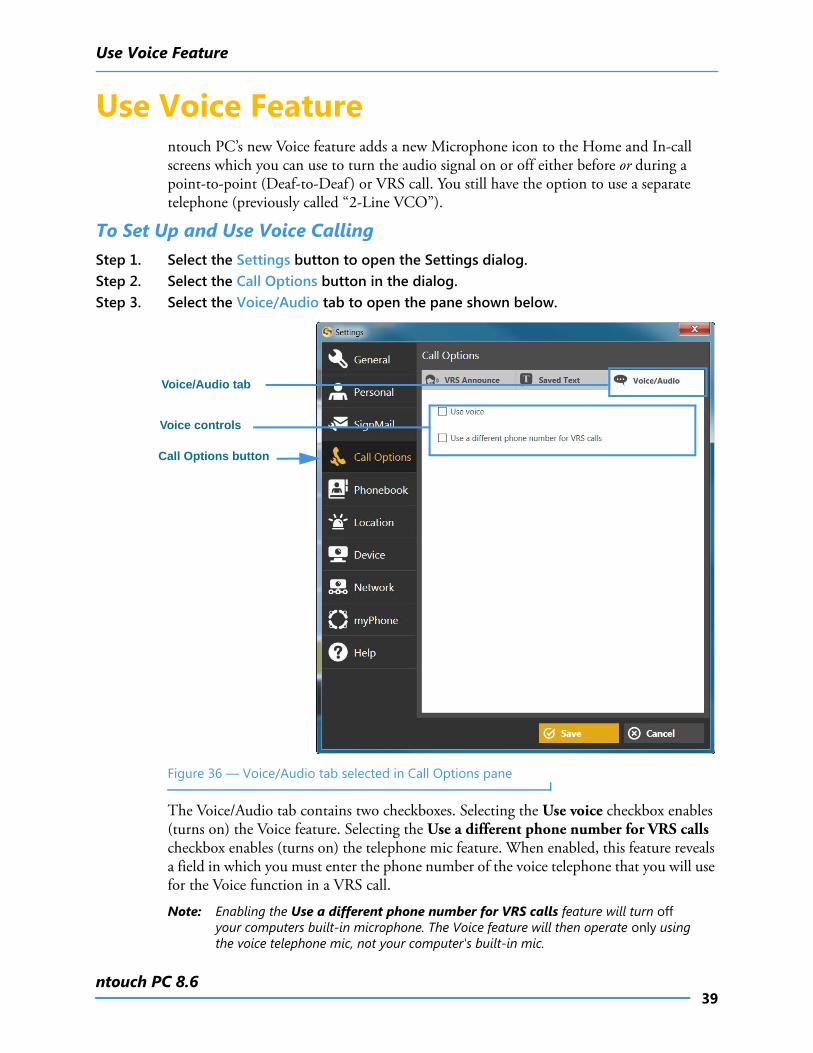
Use Voice Featurentouch PC’s new Voice feature adds a new Microphone icon to the Home and In-call screens which you can use to turn the audio signal on or off either before or during a point-to-point (Deaf-to-Deaf ) or VRS call. You still have the option to use a separate telephone (previously called “2-Line VCO”).
To Set Up and Use Voice CallingStep 1. Select the Settings button to open the Settings dialog. Step 2. Select the Call Options button in the dialog. Step 3. Select the Voice/Audio tab to open the pane shown below.
Figure 36 — Voice/Audio tab selected in Call Options pane
The Voice/Audio tab contains two checkboxes. Selecting the Use voice checkbox enables (turns on) the Voice feature. Selecting the Use a different phone number for VRS calls checkbox enables (turns on) the telephone mic feature. When enabled, this feature reveals a field in which you must enter the phone number of the voice telephone that you will use for the Voice function in a VRS call.
Note: Enabling the Use a different phone number for VRS calls feature will turn off your computers built-in microphone. The Voice feature will then operate only using the voice telephone mic, not your computer's built-in mic.
Call Options button
Voice controls
Voice/Audio tab
Use Voice Feature
40User Guide
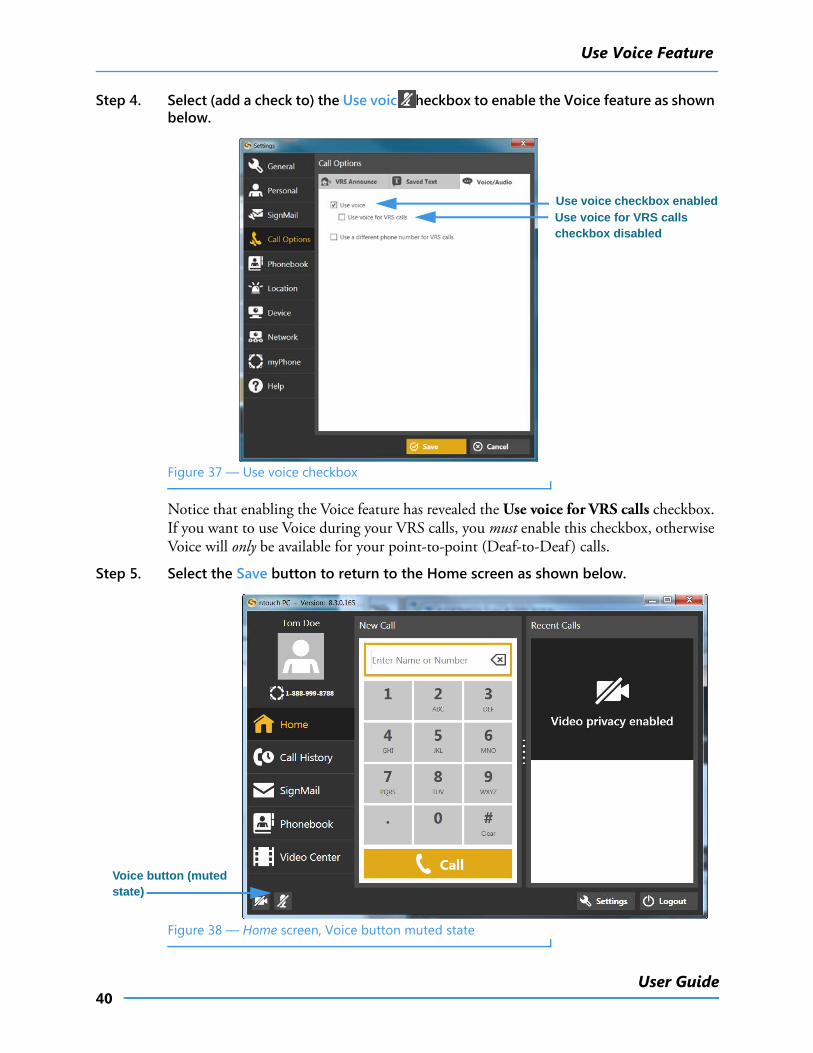
Step 4. Select (add a check to) the Use voice checkbox to enable the Voice feature as shown below.
Figure 37 — Use voice checkbox
Notice that enabling the Voice feature has revealed the Use voice for VRS calls checkbox. If you want to use Voice during your VRS calls, you must enable this checkbox, otherwise Voice will only be available for your point-to-point (Deaf-to-Deaf ) calls.
Step 5. Select the Save button to return to the Home screen as shown below.
Figure 38 — Home screen, Voice button muted state
Use voice checkbox enabledUse voice for VRS calls checkbox disabled
Voice/Audio tab
Voice button (muted state)
Use Voice Feature
41ntouch PC 8.6
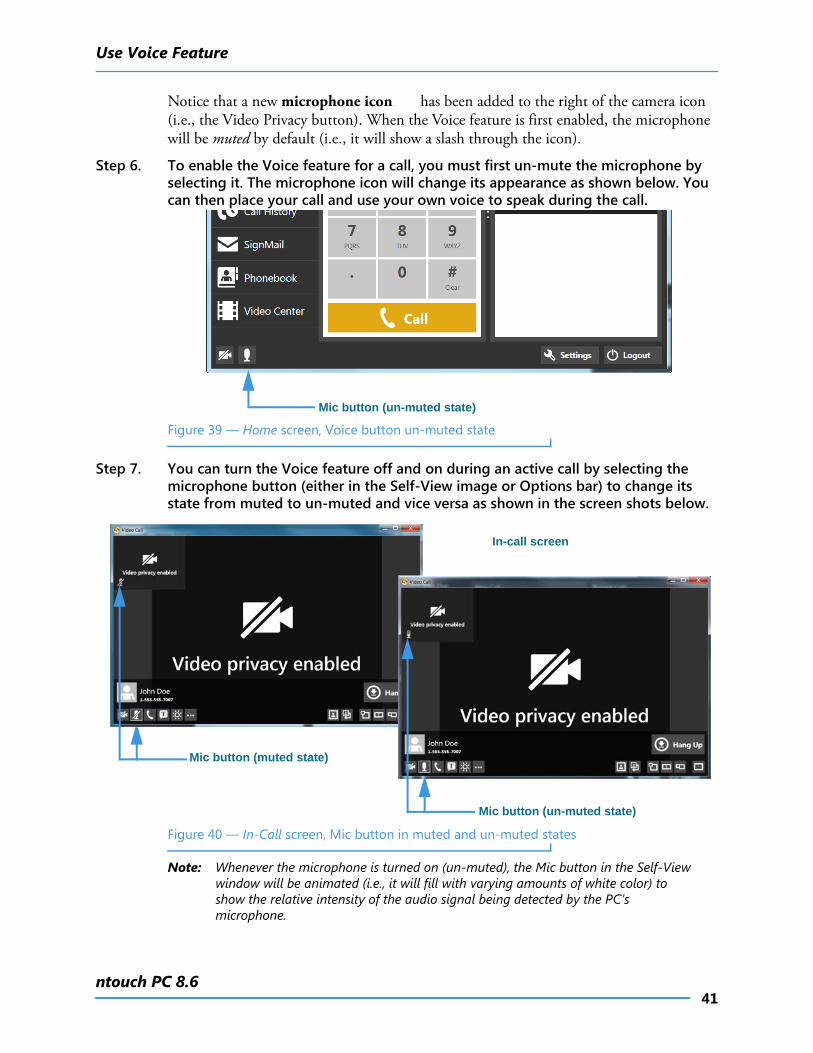
Notice that a new microphone icon has been added to the right of the camera icon (i.e., the Video Privacy button). When the Voice feature is first enabled, the microphone will be muted by default (i.e., it will show a slash through the icon).
Step 6. To enable the Voice feature for a call, you must first un-mute the microphone by selecting it. The microphone icon will change its appearance as shown below. You can then place your call and use your own voice to speak during the call.
Figure 39 — Home screen, Voice button un-muted state
Step 7. You can turn the Voice feature off and on during an active call by selecting the microphone button (either in the Self-View image or Options bar) to change its state from muted to un-muted and vice versa as shown in the screen shots below.
Figure 40 — In-Call screen, Mic button in muted and un-muted states
Note: Whenever the microphone is turned on (un-muted), the Mic button in the Self-View window will be animated (i.e., it will fill with varying amounts of white color) to show the relative intensity of the audio signal being detected by the PC’s microphone.
Mic button (un-muted state)
Mic button (muted state)
Mic button (un-muted state)
In-call screen
Use Voice Feature
42User Guide
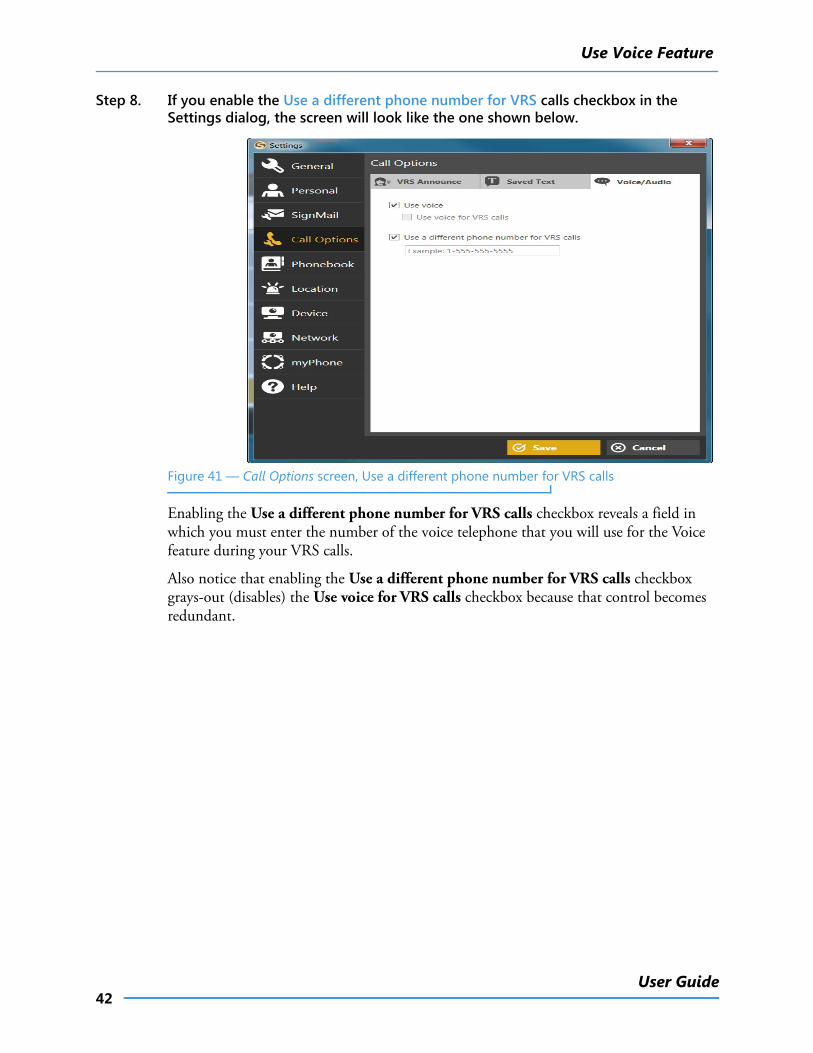
Step 8. If you enable the Use a different phone number for VRS calls checkbox in the Settings dialog, the screen will look like the one shown below.
Figure 41 — Call Options screen, Use a different phone number for VRS calls
Enabling the Use a different phone number for VRS calls checkbox reveals a field in which you must enter the number of the voice telephone that you will use for the Voice feature during your VRS calls.
Also notice that enabling the Use a different phone number for VRS calls checkbox grays-out (disables) the Use voice for VRS calls checkbox because that control becomes redundant.
Use Personal SignMail Greeting
43ntouch PC 8.6
Use Personal SignMail Greetingntouch PC includes a Personal SignMail Greeting feature that lets you record your own SignMail greeting video. You can customize your greeting with text messages, or create a text-only greeting (i.e., no video image). You can change your personal greeting as often as you like, switch back to use the default Sorenson greeting, or use no greeting.
To Record a Personal GreetingStep 1. From the Home screen, select the Settings button to open the Settings dialog.
Step 2. Select the SignMail button to display the SignMail Settings pane.
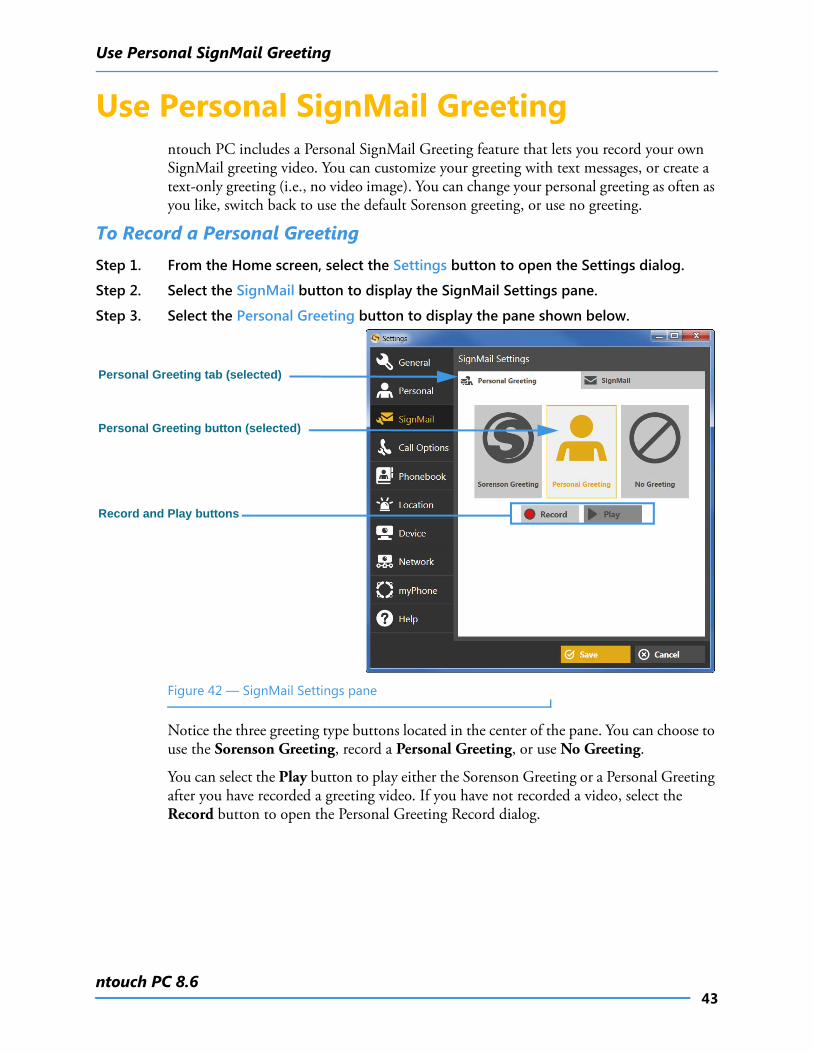
Step 3. Select the Personal Greeting button to display the pane shown below.
Figure 42 — SignMail Settings pane
Notice the three greeting type buttons located in the center of the pane. You can choose to use the Sorenson Greeting, record a Personal Greeting, or use No Greeting.
You can select the Play button to play either the Sorenson Greeting or a Personal Greeting after you have recorded a greeting video. If you have not recorded a video, select the Record button to open the Personal Greeting Record dialog.
Personal Greeting button (selected)
Personal Greeting tab (selected)
Record and Play buttons
Use Personal SignMail Greeting
44User Guide
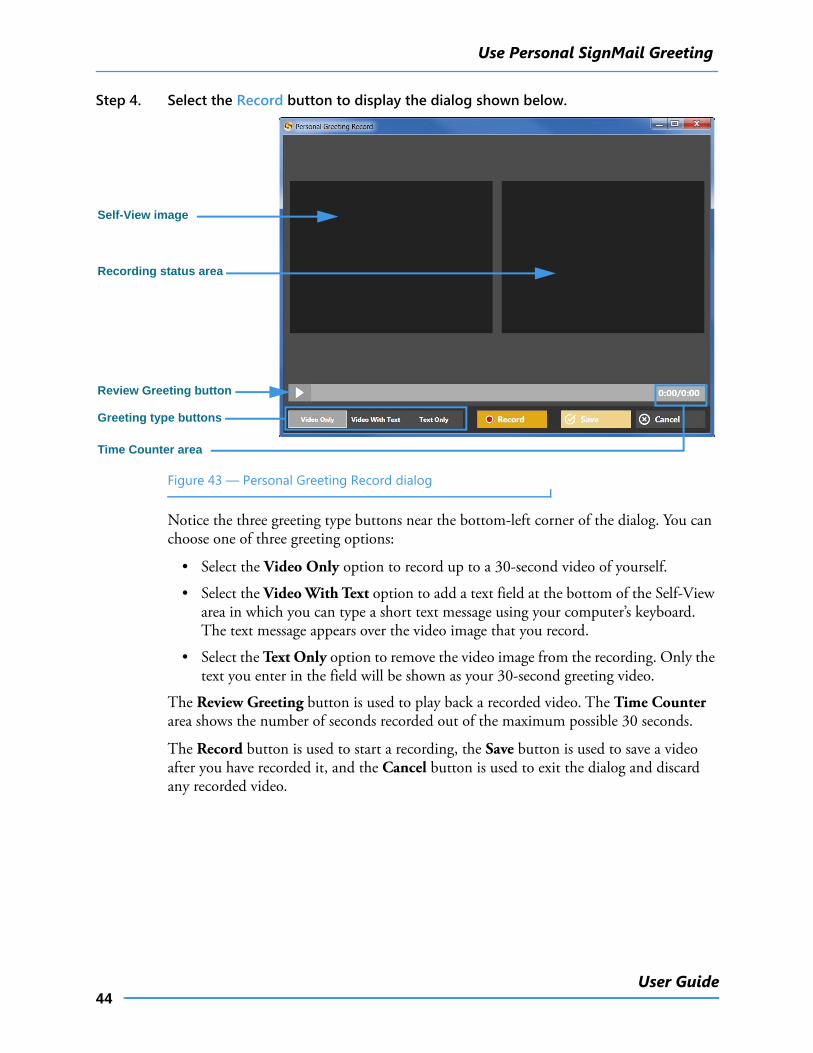
Step 4. Select the Record button to display the dialog shown below.
Figure 43 — Personal Greeting Record dialog
Notice the three greeting type buttons near the bottom-left corner of the dialog. You can choose one of three greeting options:
• Select the Video Only option to record up to a 30-second video of yourself.
• Select the Video With Text option to add a text field at the bottom of the Self-View area in which you can type a short text message using your computer’s keyboard. The text message appears over the video image that you record.
• Select the Text Only option to remove the video image from the recording. Only the text you enter in the field will be shown as your 30-second greeting video.
The Review Greeting button is used to play back a recorded video. The Time Counter area shows the number of seconds recorded out of the maximum possible 30 seconds.
The Record button is used to start a recording, the Save button is used to save a video after you have recorded it, and the Cancel button is used to exit the dialog and discard any recorded video.
Self-View image
Greeting type buttons
Recording status area
Review Greeting button
Time Counter area
Use Personal SignMail Greeting
45ntouch PC 8.6
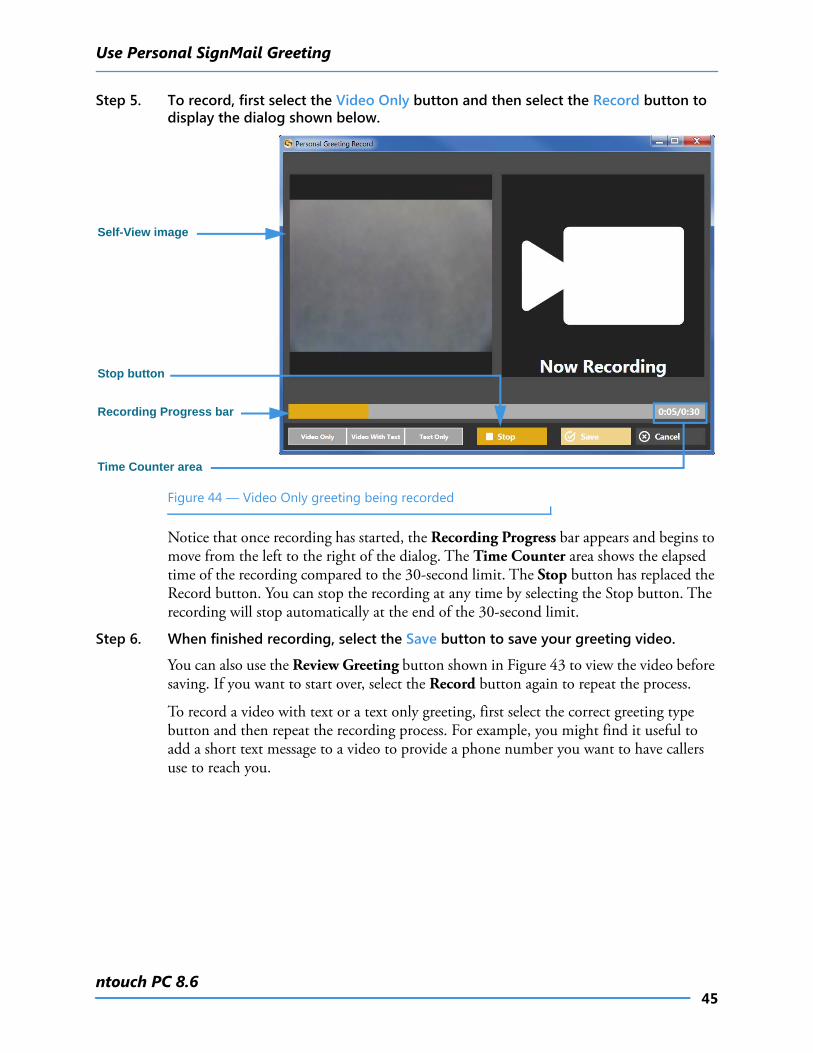
Step 5. To record, first select the Video Only button and then select the Record button to display the dialog shown below.
Figure 44 — Video Only greeting being recorded
Notice that once recording has started, the Recording Progress bar appears and begins to move from the left to the right of the dialog. The Time Counter area shows the elapsed time of the recording compared to the 30-second limit. The Stop button has replaced the Record button. You can stop the recording at any time by selecting the Stop button. The recording will stop automatically at the end of the 30-second limit.
Step 6. When finished recording, select the Save button to save your greeting video.
You can also use the Review Greeting button shown in Figure 43 to view the video before saving. If you want to start over, select the Record button again to repeat the process.
To record a video with text or a text only greeting, first select the correct greeting type button and then repeat the recording process. For example, you might find it useful to add a short text message to a video to provide a phone number you want to have callers use to reach you.
Self-View image
Stop button
Recording Progress bar
Time Counter area
Send SignMails
46User Guide
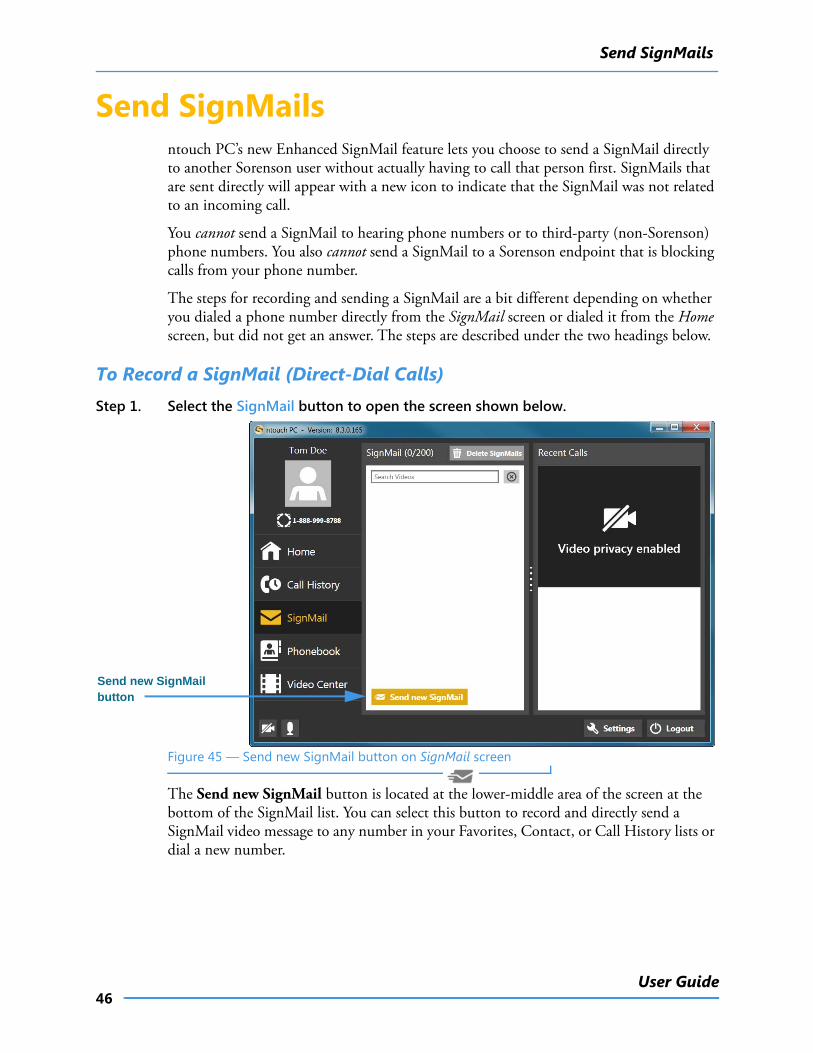
Send SignMailsntouch PC’s new Enhanced SignMail feature lets you choose to send a SignMail directly to another Sorenson user without actually having to call that person first. SignMails that are sent directly will appear with a new icon to indicate that the SignMail was not related to an incoming call.
You cannot send a SignMail to hearing phone numbers or to third-party (non-Sorenson) phone numbers. You also cannot send a SignMail to a Sorenson endpoint that is blocking calls from your phone number.
The steps for recording and sending a SignMail are a bit different depending on whether you dialed a phone number directly from the SignMail screen or dialed it from the Home screen, but did not get an answer. The steps are described under the two headings below.
To Record a SignMail (Direct-Dial Calls)Step 1. Select the SignMail button to open the screen shown below.
Figure 45 — Send new SignMail button on SignMail screen
The Send new SignMail button is located at the lower-middle area of the screen at the bottom of the SignMail list. You can select this button to record and directly send a SignMail video message to any number in your Favorites, Contact, or Call History lists or dial a new number.
Send new SignMail button
Send SignMails
47ntouch PC 8.6
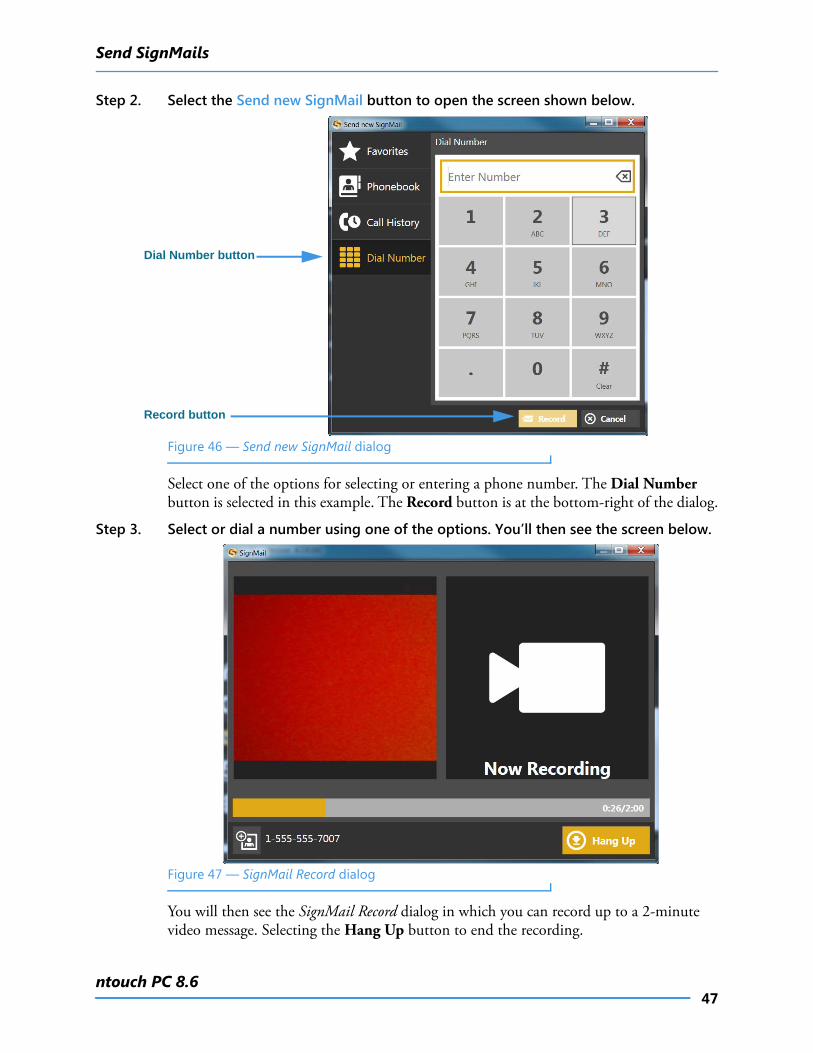
Step 2. Select the Send new SignMail button to open the screen shown below.
Figure 46 — Send new SignMail dialog
Select one of the options for selecting or entering a phone number. The Dial Number button is selected in this example. The Record button is at the bottom-right of the dialog.
Step 3. Select or dial a number using one of the options. You’ll then see the screen below.
Figure 47 — SignMail Record dialog
You will then see the SignMail Record dialog in which you can record up to a 2-minute video message. Selecting the Hang Up button to end the recording.
Dial Number button
Record button
Send SignMails
48User Guide
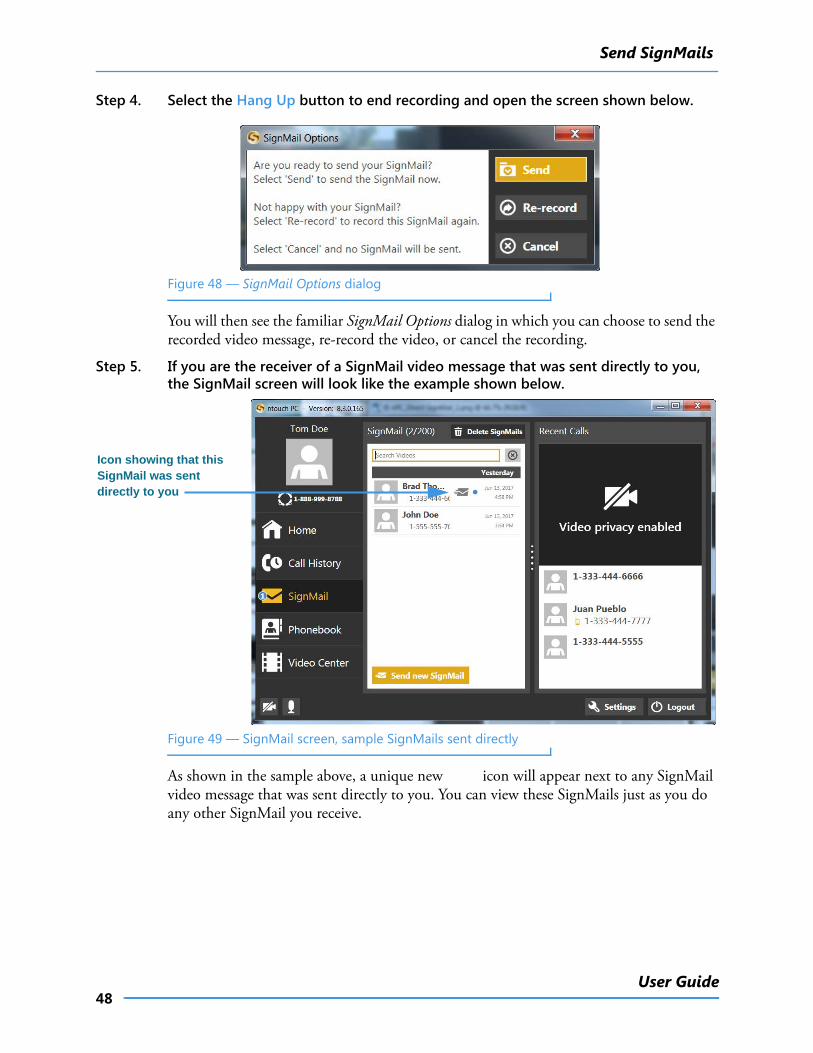
Step 4. Select the Hang Up button to end recording and open the screen shown below.
Figure 48 — SignMail Options dialog
You will then see the familiar SignMail Options dialog in which you can choose to send the recorded video message, re-record the video, or cancel the recording.
Step 5. If you are the receiver of a SignMail video message that was sent directly to you, the SignMail screen will look like the example shown below.
Figure 49 — SignMail screen, sample SignMails sent directly
As shown in the sample above, a unique new icon will appear next to any SignMail video message that was sent directly to you. You can view these SignMails just as you do any other SignMail you receive.
Icon showing that this SignMail was sent directly to you
Send SignMails
49ntouch PC 8.6
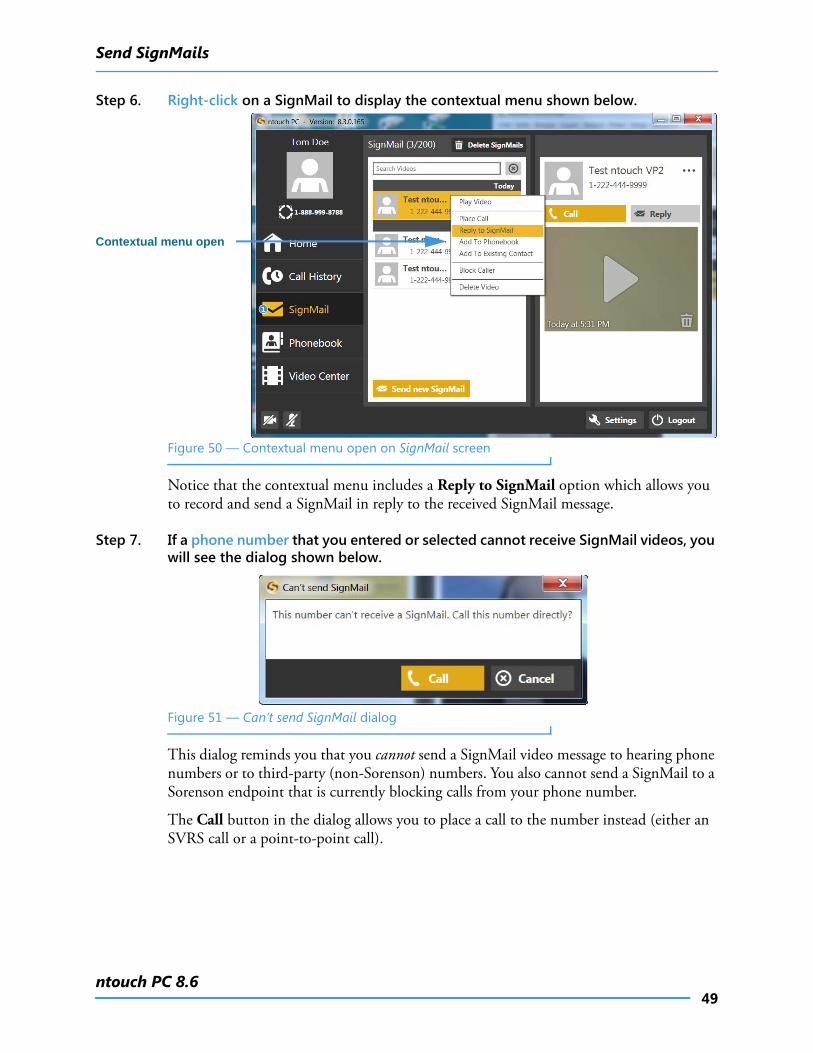
Step 6. Right-click on a SignMail to display the contextual menu shown below.
Figure 50 — Contextual menu open on SignMail screen
Notice that the contextual menu includes a Reply to SignMail option which allows you to record and send a SignMail in reply to the received SignMail message.
Step 7. If a phone number that you entered or selected cannot receive SignMail videos, you will see the dialog shown below.
Figure 51 — Can’t send SignMail dialog
This dialog reminds you that you cannot send a SignMail video message to hearing phone numbers or to third-party (non-Sorenson) numbers. You also cannot send a SignMail to a Sorenson endpoint that is currently blocking calls from your phone number.
The Call button in the dialog allows you to place a call to the number instead (either an SVRS call or a point-to-point call).
Contextual menu open
Send SignMails
50User Guide
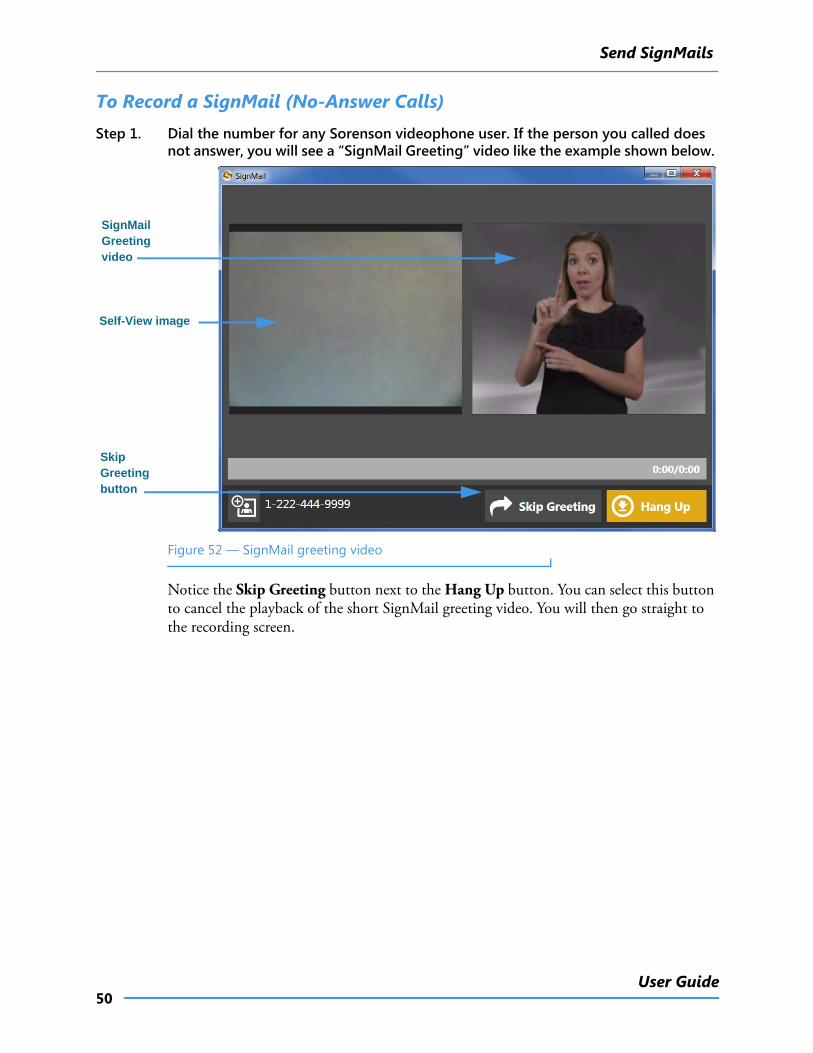
To Record a SignMail (No-Answer Calls)Step 1. Dial the number for any Sorenson videophone user. If the person you called does
not answer, you will see a “SignMail Greeting” video like the example shown below.
Figure 52 — SignMail greeting video
Notice the Skip Greeting button next to the Hang Up button. You can select this button to cancel the playback of the short SignMail greeting video. You will then go straight to the recording screen.
SignMail Greeting video
Skip Greeting button
Self-View image
Send SignMails
51ntouch PC 8.6
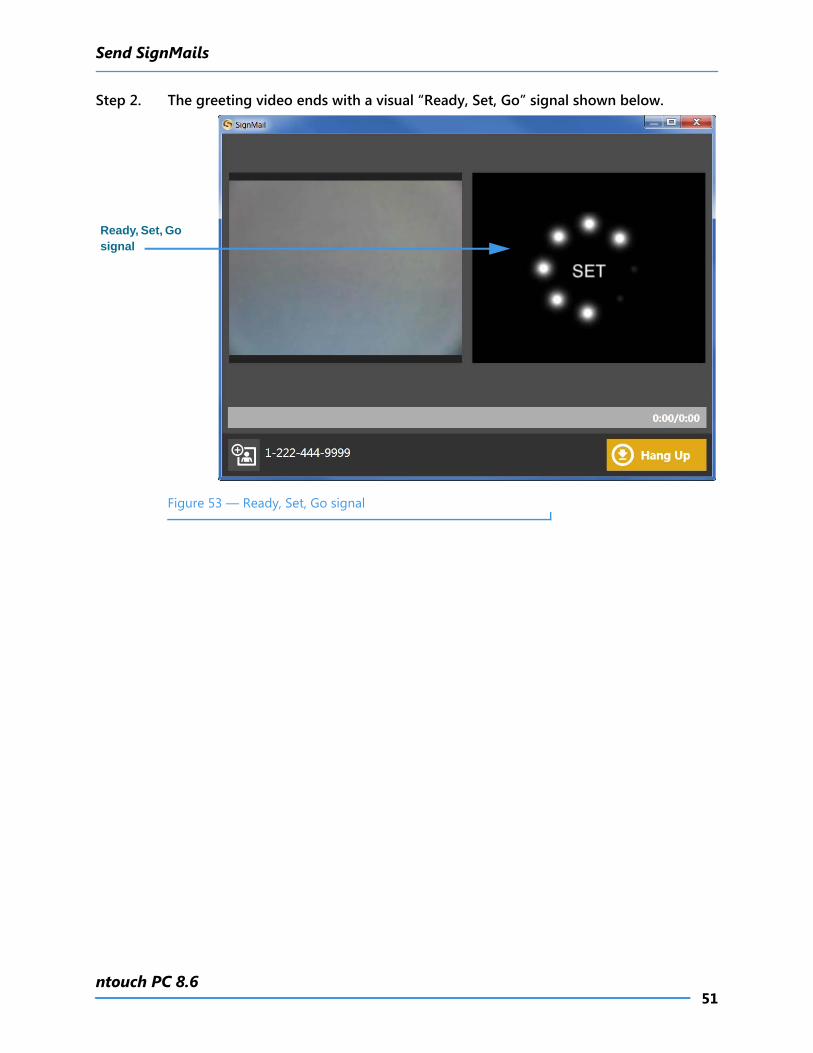
Step 2. The greeting video ends with a visual “Ready, Set, Go” signal shown below.
Figure 53 — Ready, Set, Go signal
Ready, Set, Go signal
Send SignMails
52User Guide
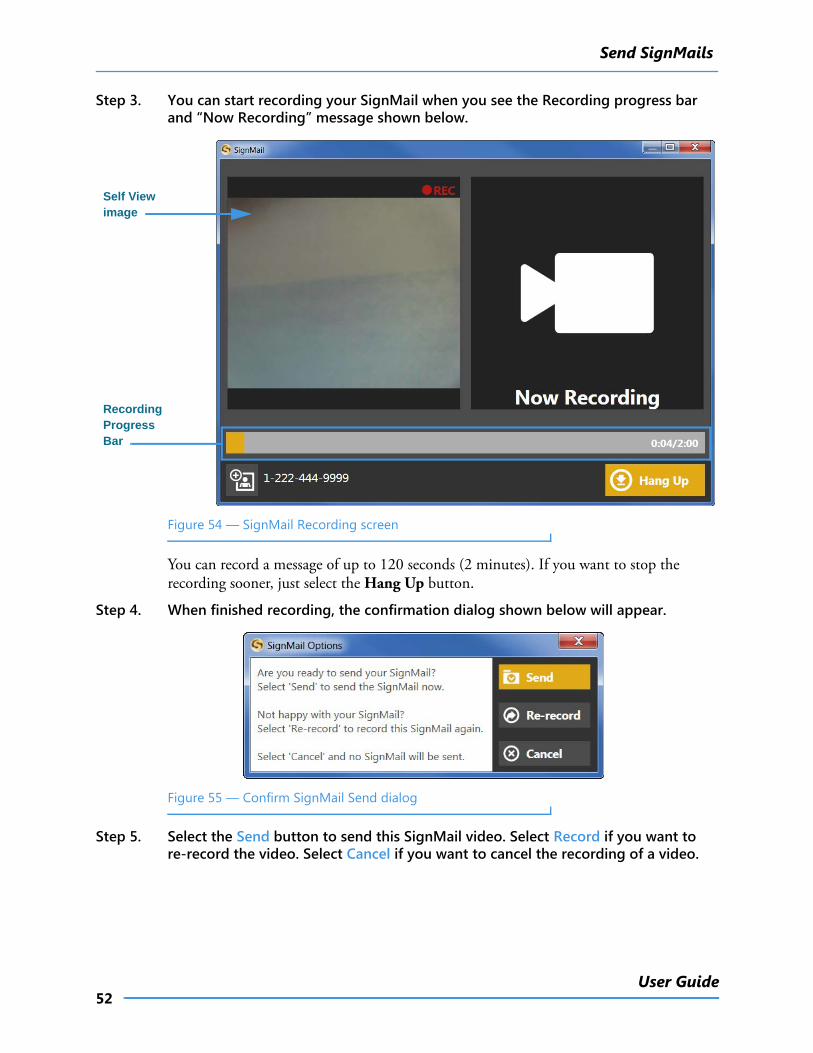
Step 3. You can start recording your SignMail when you see the Recording progress bar and “Now Recording” message shown below.
Figure 54 — SignMail Recording screen
You can record a message of up to 120 seconds (2 minutes). If you want to stop the recording sooner, just select the Hang Up button.
Step 4. When finished recording, the confirmation dialog shown below will appear.
Figure 55 — Confirm SignMail Send dialog
Step 5. Select the Send button to send this SignMail video. Select Record if you want to re-record the video. Select Cancel if you want to cancel the recording of a video.
Recording Progress Bar
Self View image
View SignMails
53ntouch PC 8.6
View SignMailsntouch PC’s SignMail feature lets you see all of your SignMails in a single list. When playing back your SignMail videos, you can use the playback controls on the screen to start, stop, or rewind the video so that it plays from the beginning again. You can also see detailed information about the video, such as its length in minutes and seconds. You can also call the sender of the SignMail, add a new contact for the sender, delete a selected SignMail video, or block any new calls and videos from the sender.
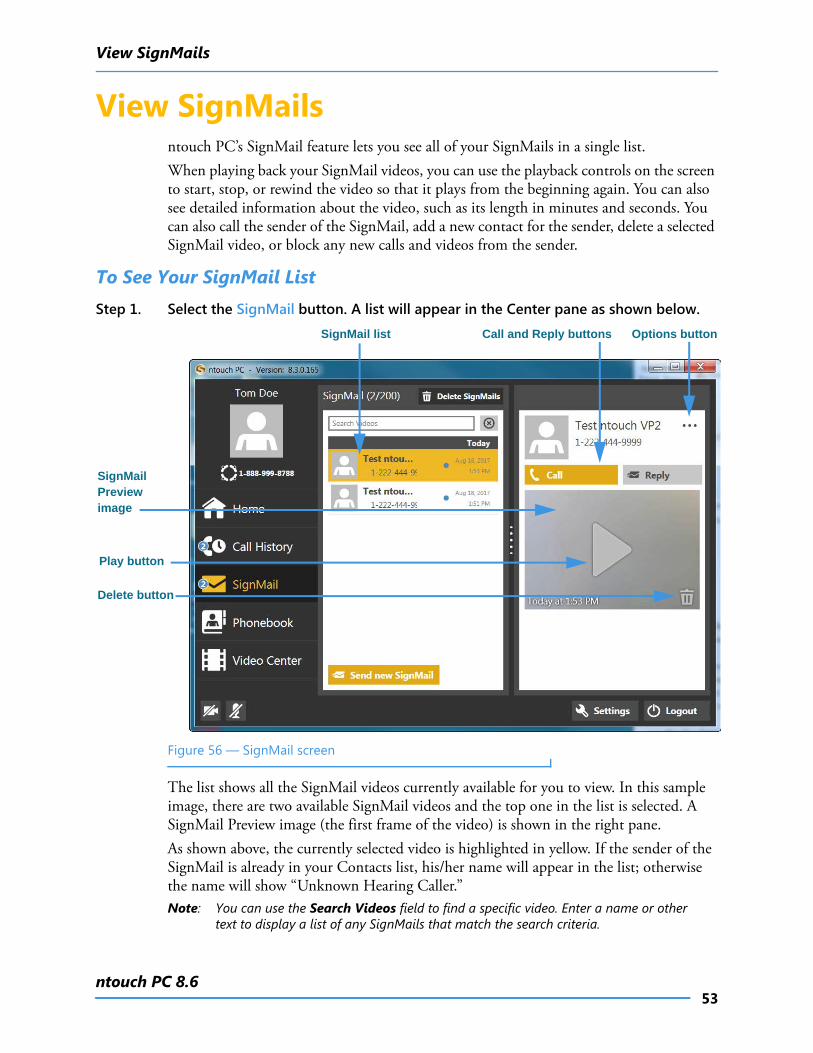
To See Your SignMail ListStep 1. Select the SignMail button. A list will appear in the Center pane as shown below.
Figure 56 — SignMail screen
The list shows all the SignMail videos currently available for you to view. In this sample image, there are two available SignMail videos and the top one in the list is selected. A SignMail Preview image (the first frame of the video) is shown in the right pane.As shown above, the currently selected video is highlighted in yellow. If the sender of the SignMail is already in your Contacts list, his/her name will appear in the list; otherwise the name will show “Unknown Hearing Caller.”Note: You can use the Search Videos field to find a specific video. Enter a name or other
text to display a list of any SignMails that match the search criteria.
SignMail list
SignMail Preview image
Options button
Play button
Delete button
Call and Reply buttons
View SignMails
54User Guide
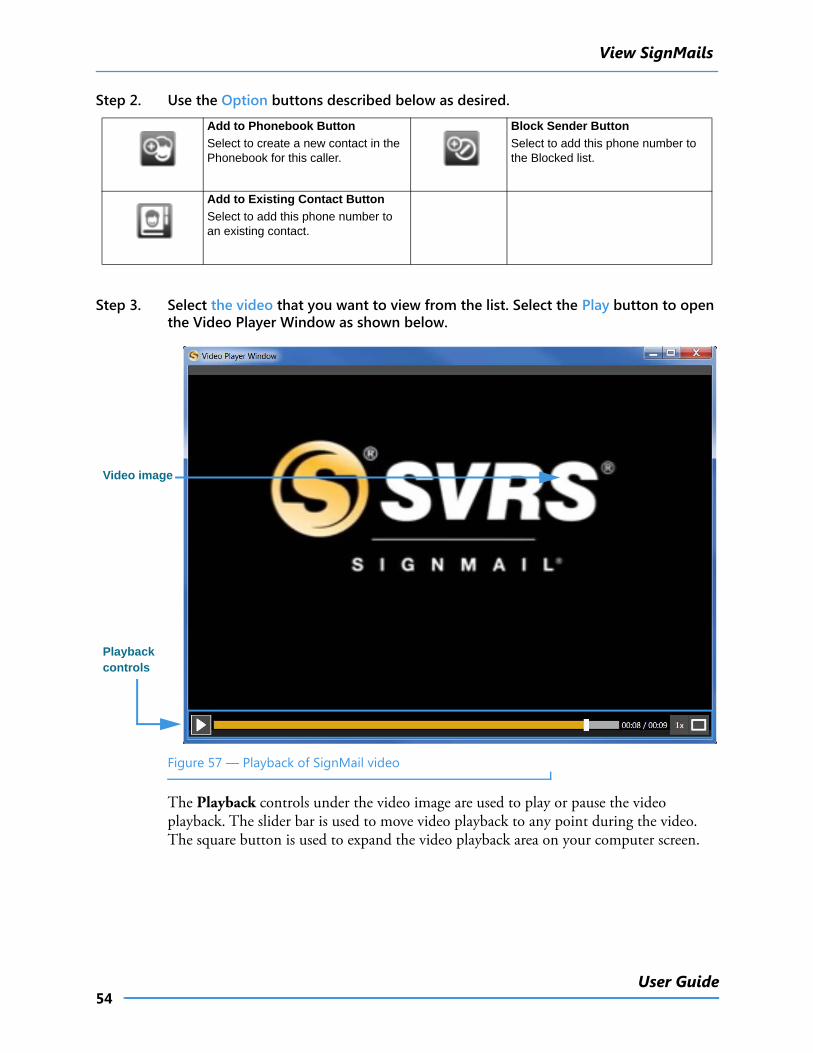
Step 2. Use the Option buttons described below as desired.
Step 3. Select the video that you want to view from the list. Select the Play button to open the Video Player Window as shown below.
Figure 57 — Playback of SignMail video
The Playback controls under the video image are used to play or pause the video playback. The slider bar is used to move video playback to any point during the video. The square button is used to expand the video playback area on your computer screen.
Add to Phonebook Button
Select to create a new contact in the Phonebook for this caller.
Block Sender Button
Select to add this phone number to the Blocked list.
Add to Existing Contact Button
Select to add this phone number to an existing contact.
Video image
Playback controls
View SignMails
55ntouch PC 8.6
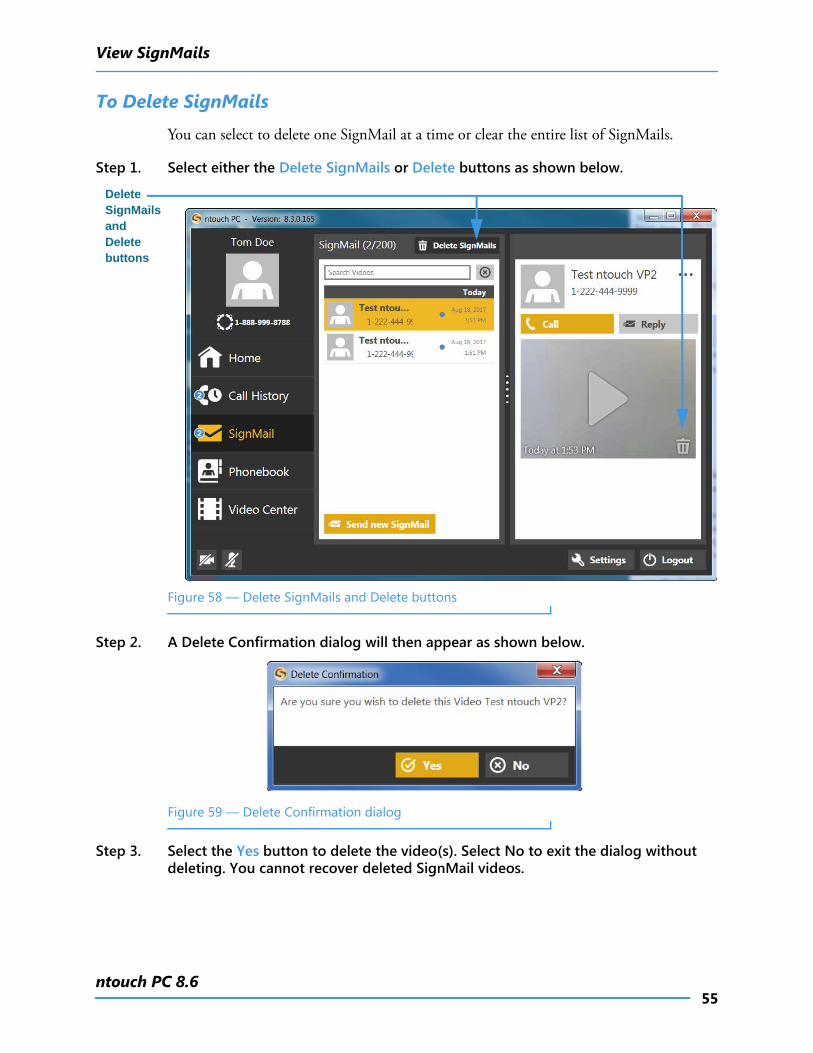
To Delete SignMails
You can select to delete one SignMail at a time or clear the entire list of SignMails.
Step 1. Select either the Delete SignMails or Delete buttons as shown below.
Figure 58 — Delete SignMails and Delete buttons
Step 2. A Delete Confirmation dialog will then appear as shown below.
Figure 59 — Delete Confirmation dialog
Step 3. Select the Yes button to delete the video(s). Select No to exit the dialog without deleting. You cannot recover deleted SignMail videos.
Delete SignMails andDelete buttons
View SignMails
56User Guide
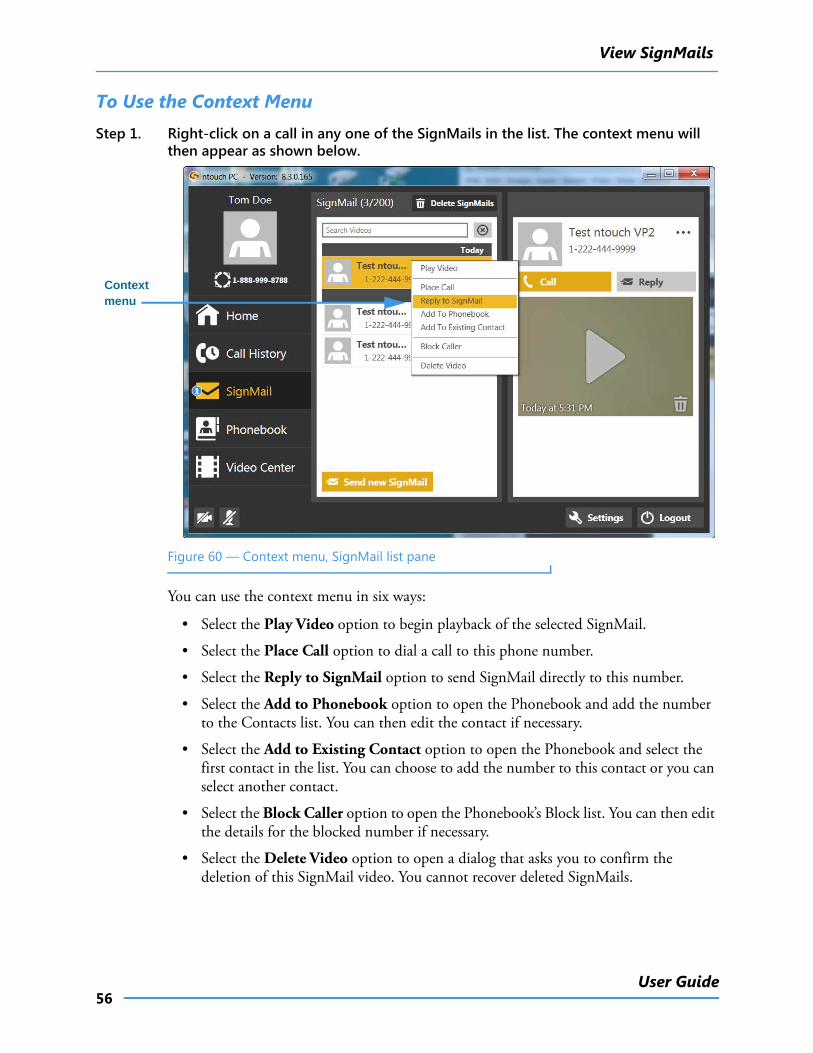
To Use the Context MenuStep 1. Right-click on a call in any one of the SignMails in the list. The context menu will
then appear as shown below.
Figure 60 — Context menu, SignMail list pane
You can use the context menu in six ways:
• Select the Play Video option to begin playback of the selected SignMail.
• Select the Place Call option to dial a call to this phone number.
• Select the Reply to SignMail option to send SignMail directly to this number.
• Select the Add to Phonebook option to open the Phonebook and add the number to the Contacts list. You can then edit the contact if necessary.
• Select the Add to Existing Contact option to open the Phonebook and select the first contact in the list. You can choose to add the number to this contact or you can select another contact.
• Select the Block Caller option to open the Phonebook’s Block list. You can then edit the details for the blocked number if necessary.
• Select the Delete Video option to open a dialog that asks you to confirm the deletion of this SignMail video. You cannot recover deleted SignMails.
Context menu
See Call History
57ntouch PC 8.6
See Call Historyntouch PC keeps a record of all outgoing calls you make and all incoming calls you receive from hearing or deaf people. You can use the Call History feature to look at a list of all your calls or you can choose to look at just the missed, received, or dialed calls.
The Call History feature lets you easily redial any caller in the Call History list. You can add new contact records to ntouch PC’s Phonebook directly from the Call History list.
You also have the option to block incoming calls from specified phone numbers. When you block a phone number, ntouch PC will automatically reject all incoming calls and SignMails from that number. You cannot block certain Sorenson numbers (such as from Sorenson Technical Support) using this feature.
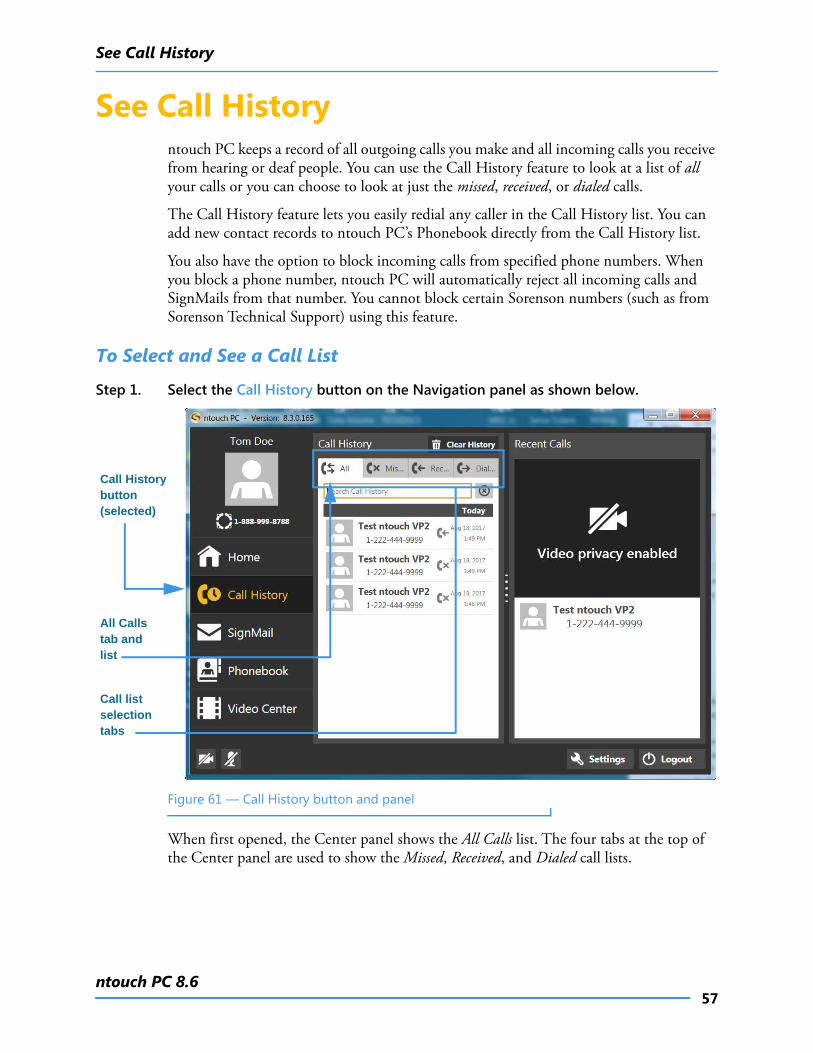
To Select and See a Call List
Step 1. Select the Call History button on the Navigation panel as shown below.
Figure 61 — Call History button and panel
When first opened, the Center panel shows the All Calls list. The four tabs at the top of the Center panel are used to show the Missed, Received, and Dialed call lists.
All Calls tab and list
Call Historybutton (selected)
Call list selection tabs
See Call History
58User Guide
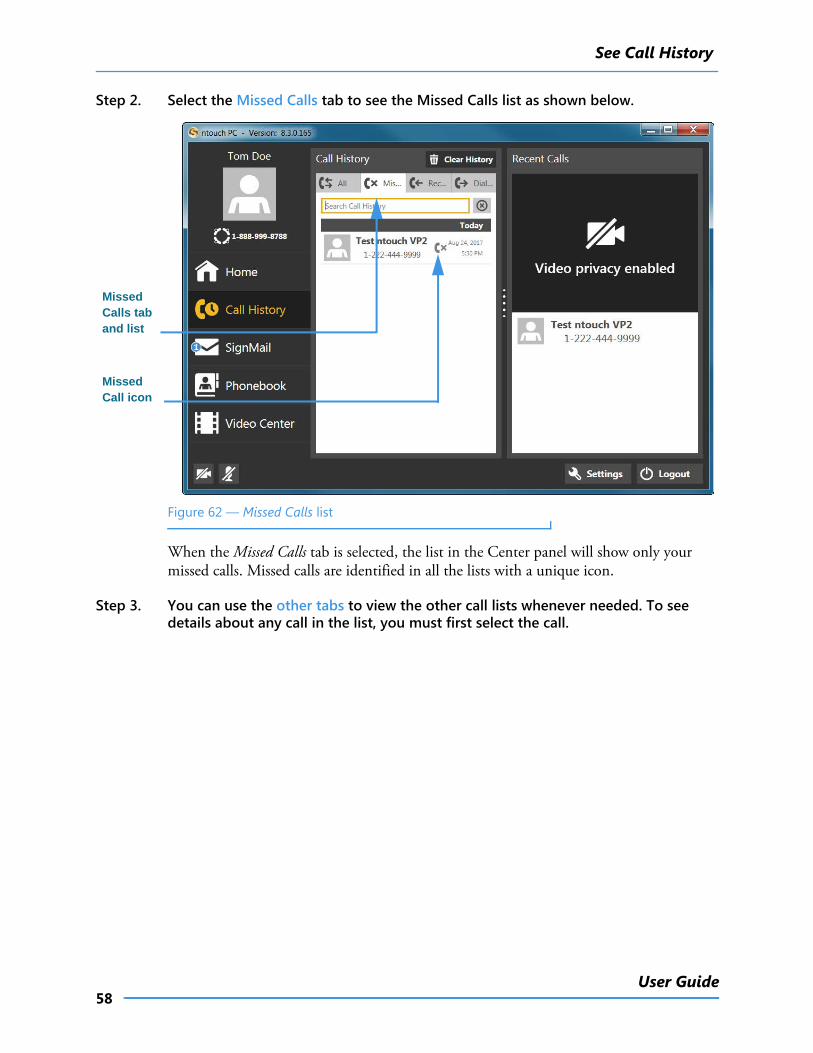
Step 2. Select the Missed Calls tab to see the Missed Calls list as shown below.
Figure 62 — Missed Calls list
When the Missed Calls tab is selected, the list in the Center panel will show only your missed calls. Missed calls are identified in all the lists with a unique icon.
Step 3. You can use the other tabs to view the other call lists whenever needed. To see details about any call in the list, you must first select the call.
Missed Calls tab and list
Missed Call icon
See Call History
59ntouch PC 8.6
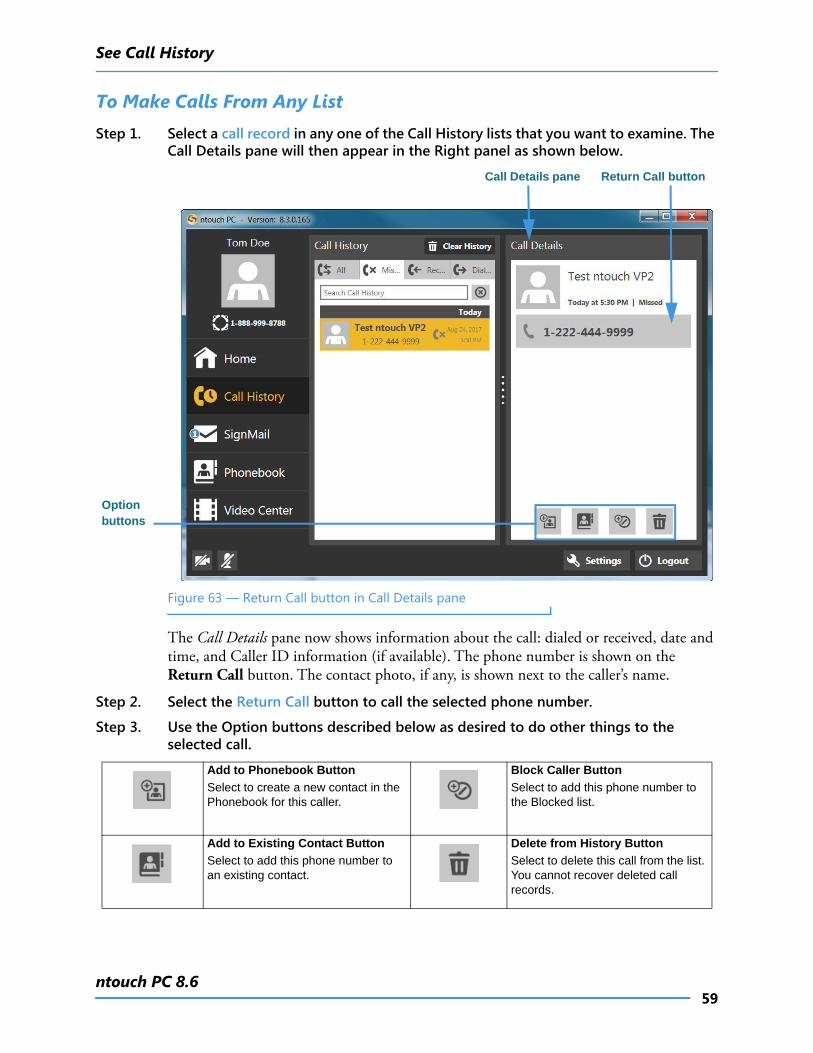
To Make Calls From Any ListStep 1. Select a call record in any one of the Call History lists that you want to examine. The
Call Details pane will then appear in the Right panel as shown below.
Figure 63 — Return Call button in Call Details pane
The Call Details pane now shows information about the call: dialed or received, date and time, and Caller ID information (if available). The phone number is shown on the Return Call button. The contact photo, if any, is shown next to the caller’s name.
Step 2. Select the Return Call button to call the selected phone number.
Step 3. Use the Option buttons described below as desired to do other things to the selected call.
Call Details pane Return Call button
Option buttons
Add to Phonebook Button
Select to create a new contact in the Phonebook for this caller.
Block Caller Button
Select to add this phone number to the Blocked list.
Add to Existing Contact Button
Select to add this phone number to an existing contact.
Delete from History Button
Select to delete this call from the list. You cannot recover deleted call records.
See Call History
60User Guide
To Delete All Call History
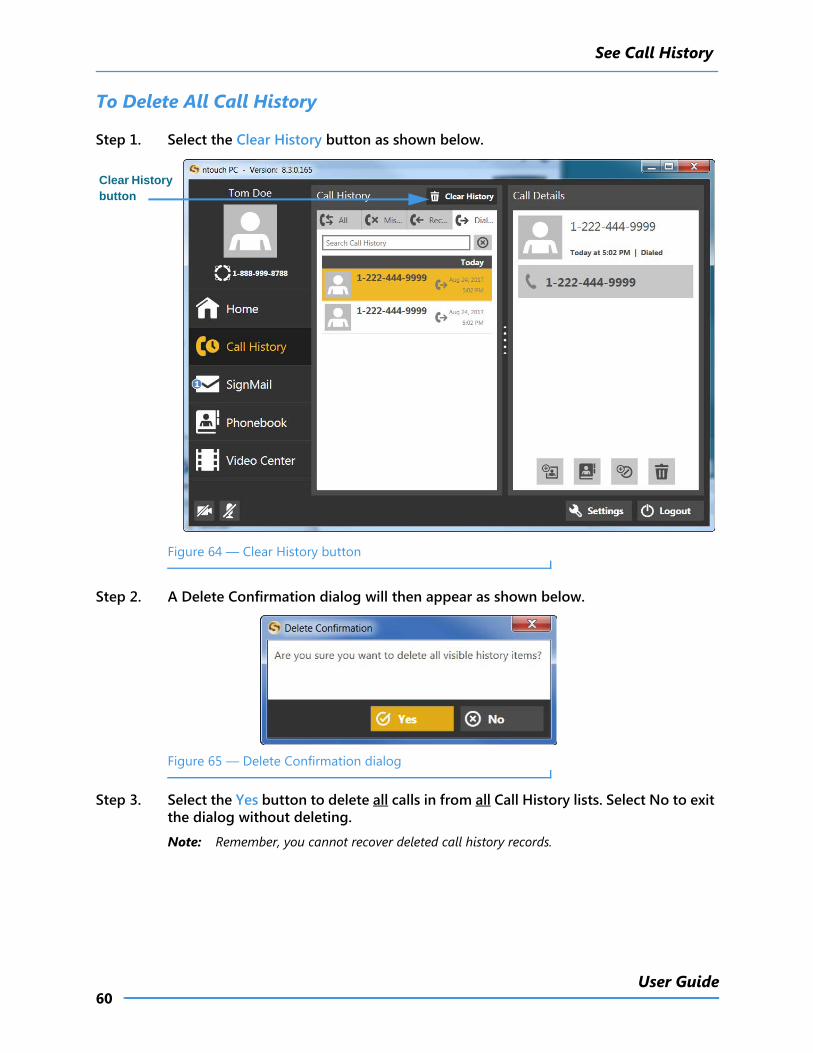
Step 1. Select the Clear History button as shown below.
Figure 64 — Clear History button
Step 2. A Delete Confirmation dialog will then appear as shown below.
Figure 65 — Delete Confirmation dialog
Step 3. Select the Yes button to delete all calls in from all Call History lists. Select No to exit the dialog without deleting.
Note: Remember, you cannot recover deleted call history records.
Clear History button
See Call History
61ntouch PC 8.6
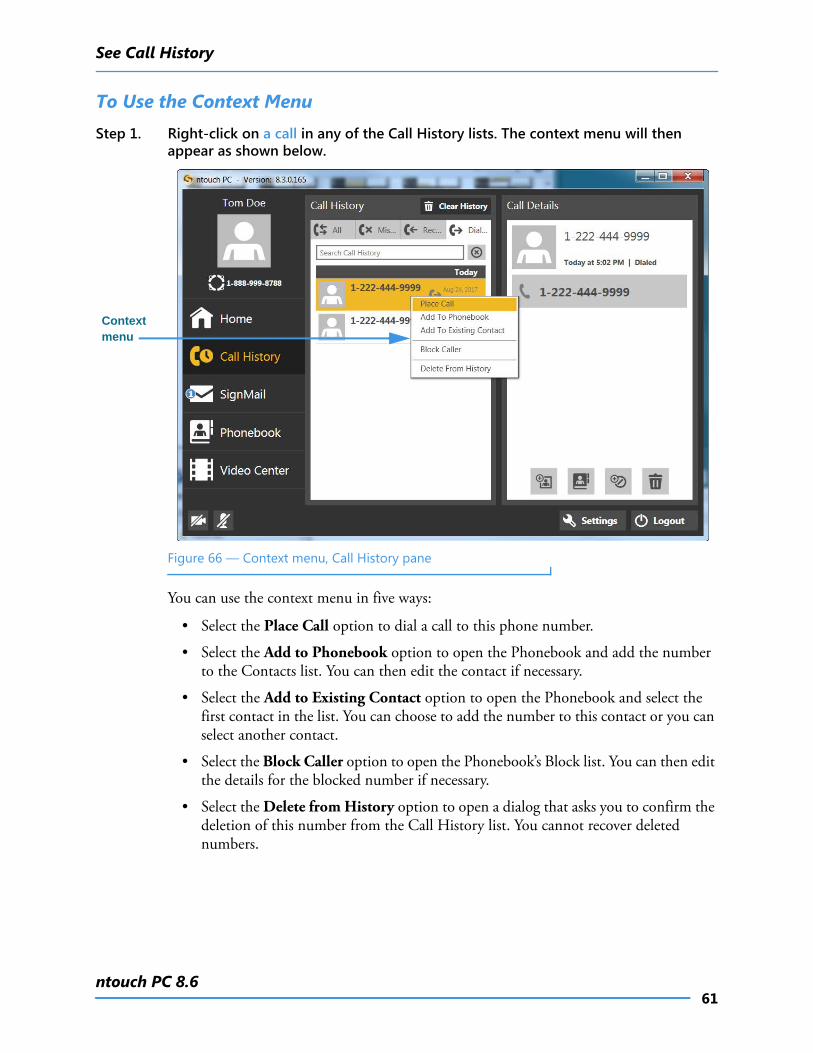
To Use the Context MenuStep 1. Right-click on a call in any of the Call History lists. The context menu will then
appear as shown below.
Figure 66 — Context menu, Call History pane
You can use the context menu in five ways:
• Select the Place Call option to dial a call to this phone number.
• Select the Add to Phonebook option to open the Phonebook and add the number to the Contacts list. You can then edit the contact if necessary.
• Select the Add to Existing Contact option to open the Phonebook and select the first contact in the list. You can choose to add the number to this contact or you can select another contact.
• Select the Block Caller option to open the Phonebook’s Block list. You can then edit the details for the blocked number if necessary.
• Select the Delete from History option to open a dialog that asks you to confirm the deletion of this number from the Call History list. You cannot recover deleted numbers.
Context menu
Add a Profile Photo
62User Guide
Add a Profile Photontouch PC’s Profile Photo feature lets you take a snapshot photo of yourself using your PC’s camera. Profile photos are stored with your Sorenson profile record.
When you make outgoing calls to other Sorenson endpoint users, your profile photo will be displayed in the incoming call dialog and will also appear in the Call History, SignMail and Phonebook lists if a contact record for your phone number is saved on the endpoint.
You have the option to choose how widely you share your profile photo. You can choose to share your profile photo with everyone or limit the sharing to only those contacts stored in your Phonebook. If you don’t want anyone to see a profile photo of you, do not add one.
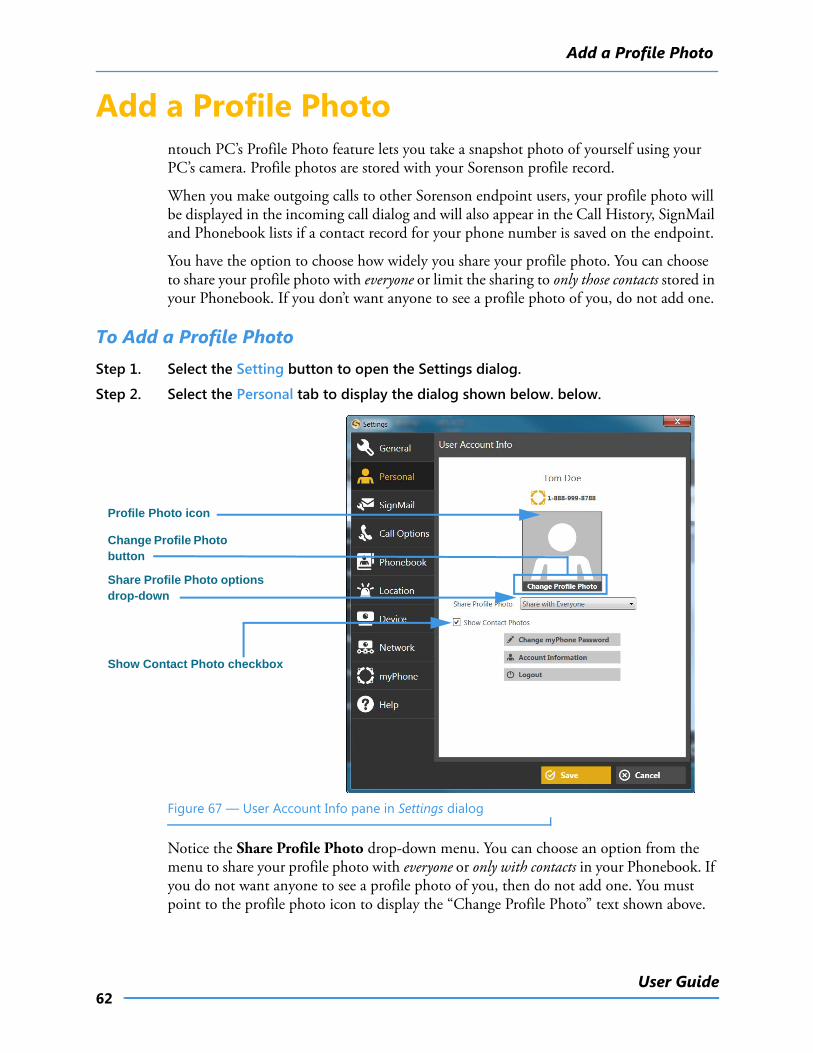
To Add a Profile PhotoStep 1. Select the Setting button to open the Settings dialog.
Step 2. Select the Personal tab to display the dialog shown below. below.
Figure 67 — User Account Info pane in Settings dialog
Notice the Share Profile Photo drop-down menu. You can choose an option from the menu to share your profile photo with everyone or only with contacts in your Phonebook. If you do not want anyone to see a profile photo of you, then do not add one. You must point to the profile photo icon to display the “Change Profile Photo” text shown above.
Change Profile Photo button
Share Profile Photo options drop-down
Profile Photo icon
Show Contact Photo checkbox
Add a Profile Photo
63ntouch PC 8.6
The Show Contact Photos checkbox is used to enable (box checked) or disable (box unchecked) the Contact Photos feature. Disabling Contact Photos does not hide your profile photo, if you have added one.
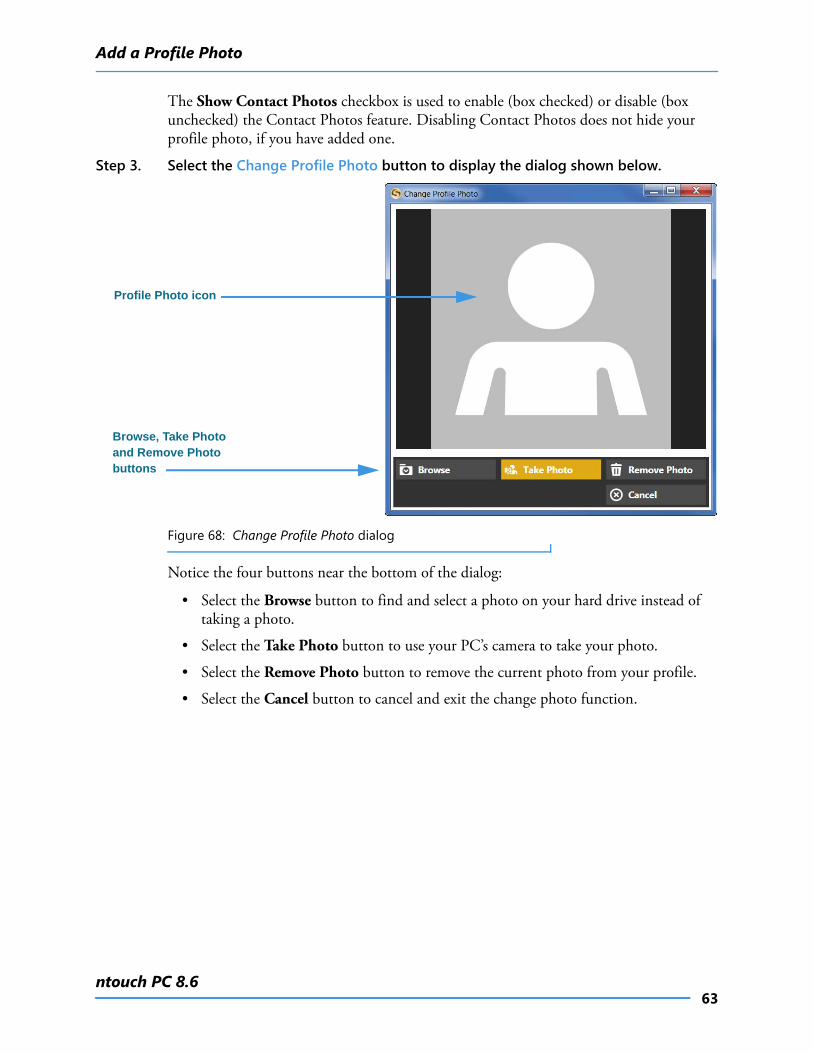
Step 3. Select the Change Profile Photo button to display the dialog shown below.
Figure 68: Change Profile Photo dialog
Notice the four buttons near the bottom of the dialog:
• Select the Browse button to find and select a photo on your hard drive instead of taking a photo.
• Select the Take Photo button to use your PC’s camera to take your photo.
• Select the Remove Photo button to remove the current photo from your profile.
• Select the Cancel button to cancel and exit the change photo function.
Profile Photo icon
Browse, Take Photo and Remove Photo buttons
Add a Profile Photo
64User Guide
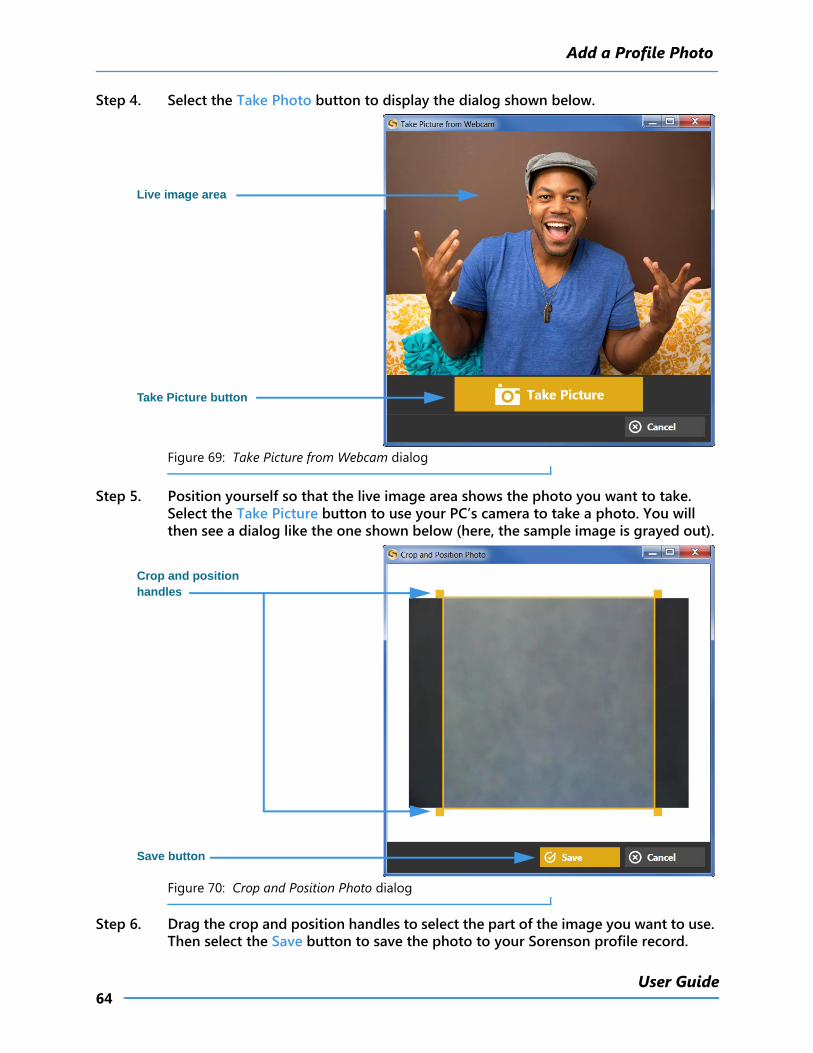
Step 4. Select the Take Photo button to display the dialog shown below.
Figure 69: Take Picture from Webcam dialog
Step 5. Position yourself so that the live image area shows the photo you want to take. Select the Take Picture button to use your PC’s camera to take a photo. You will then see a dialog like the one shown below (here, the sample image is grayed out).
Figure 70: Crop and Position Photo dialog
Step 6. Drag the crop and position handles to select the part of the image you want to use. Then select the Save button to save the photo to your Sorenson profile record.
Take Picture button
Live image area
Save button
Crop and position handles
Add a Profile Photo
65ntouch PC 8.6
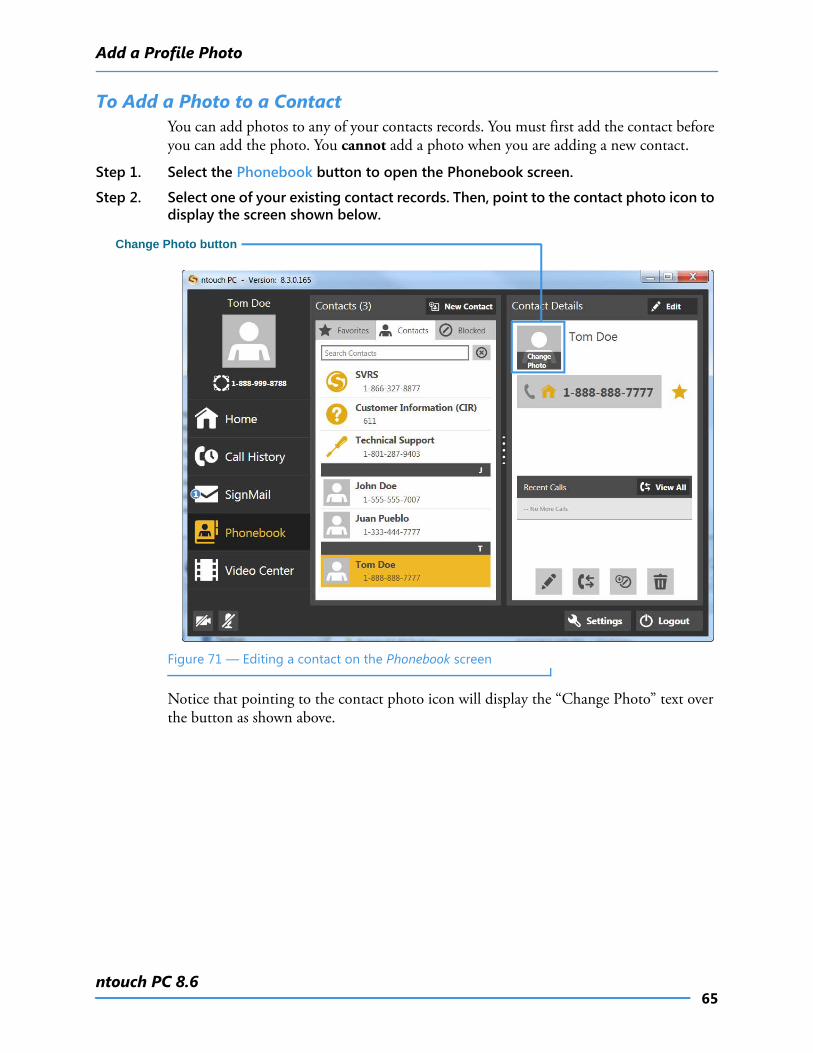
To Add a Photo to a ContactYou can add photos to any of your contacts records. You must first add the contact before you can add the photo. You cannot add a photo when you are adding a new contact.
Step 1. Select the Phonebook button to open the Phonebook screen.
Step 2. Select one of your existing contact records. Then, point to the contact photo icon to display the screen shown below.
Figure 71 — Editing a contact on the Phonebook screen
Notice that pointing to the contact photo icon will display the “Change Photo” text over the button as shown above.
Change Photo button
Add a Profile Photo
66User Guide
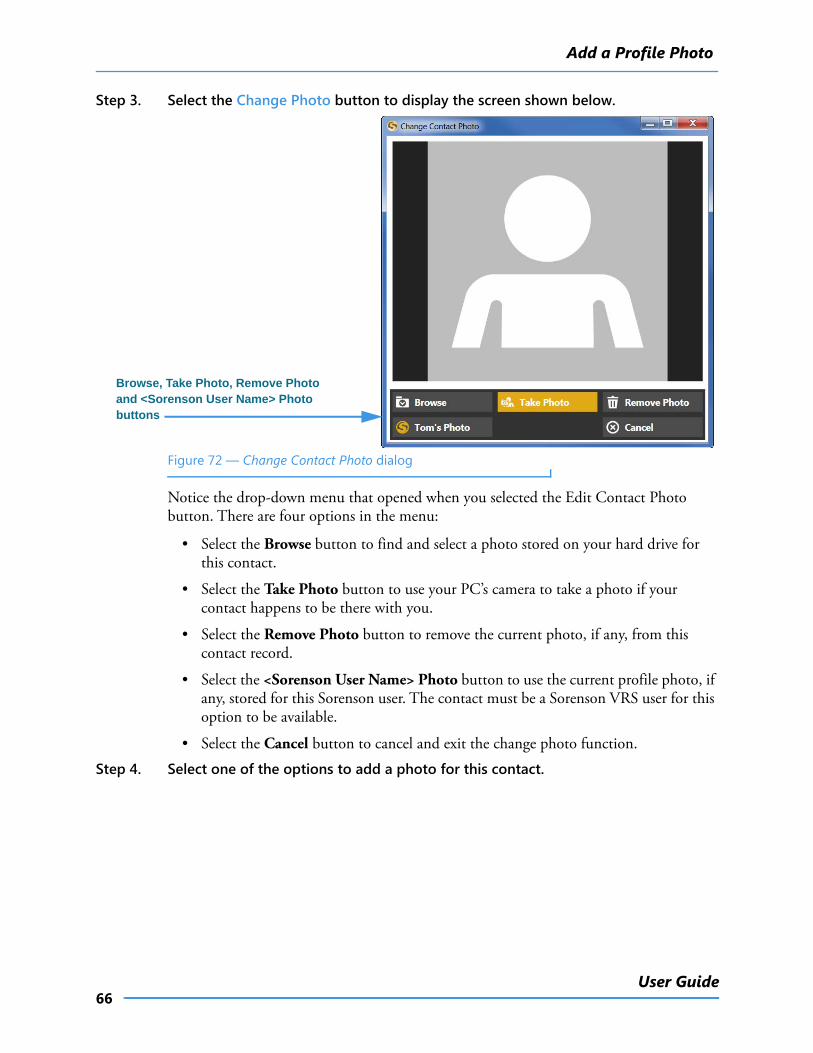
Step 3. Select the Change Photo button to display the screen shown below.
Figure 72 — Change Contact Photo dialog
Notice the drop-down menu that opened when you selected the Edit Contact Photo button. There are four options in the menu:
• Select the Browse button to find and select a photo stored on your hard drive for this contact.
• Select the Take Photo button to use your PC’s camera to take a photo if your contact happens to be there with you.
• Select the Remove Photo button to remove the current photo, if any, from this contact record.
• Select the <Sorenson User Name> Photo button to use the current profile photo, if any, stored for this Sorenson user. The contact must be a Sorenson VRS user for this option to be available.
• Select the Cancel button to cancel and exit the change photo function.
Step 4. Select one of the options to add a photo for this contact.
Browse, Take Photo, Remove Photo and <Sorenson User Name> Photo buttons
Use the Phonebook
67ntouch PC 8.6
Use the Phonebookntouch PC’s Phonebook can store up to 500 contact records. ntouch PC’s Call History feature is linked to the Phonebook to let you quickly add new contact records to the Phonebook. You can also add new contact records directly to the Phonebook.
After you add a new contact to the Phonebook, you can call that person by opening the Phonebook and looking up the contact. The Phonebook is organized alphabetically to make it easy for you to find the contacts you want to call.
The Phonebook’s Favorites feature lets you create a list of favorite contacts. You can store your most important contacts in the Favorites list to make them easy to find quickly. Using the Favorites list is helpful if you have a large number of contacts. You can add a phone number to your Favorites list at the time you create the contact or afterwards.
The Phonebook also lets you see and manage your Blocked numbers list. When you block a phone number, ntouch PC will automatically reject all incoming calls and SignMails from that number. You cannot block certain Sorenson numbers (such as Sorenson Technical Support) using this feature.
You can “clean up” the Phonebook by deleting individual contact records. Any records that you delete are gone forever. You cannot restore a contact after it has been deleted.
Use the Phonebook
68User Guide
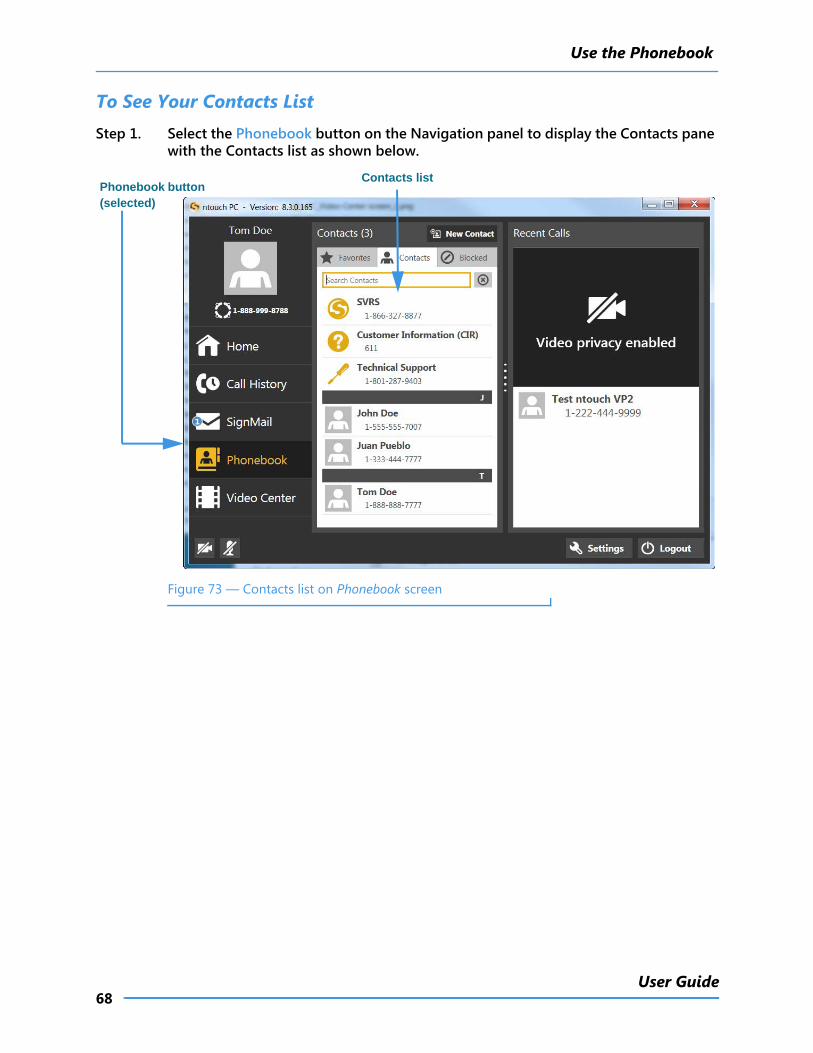
To See Your Contacts ListStep 1. Select the Phonebook button on the Navigation panel to display the Contacts pane
with the Contacts list as shown below.
Figure 73 — Contacts list on Phonebook screen
Phonebook button (selected)
Contacts list
Use the Phonebook
69ntouch PC 8.6
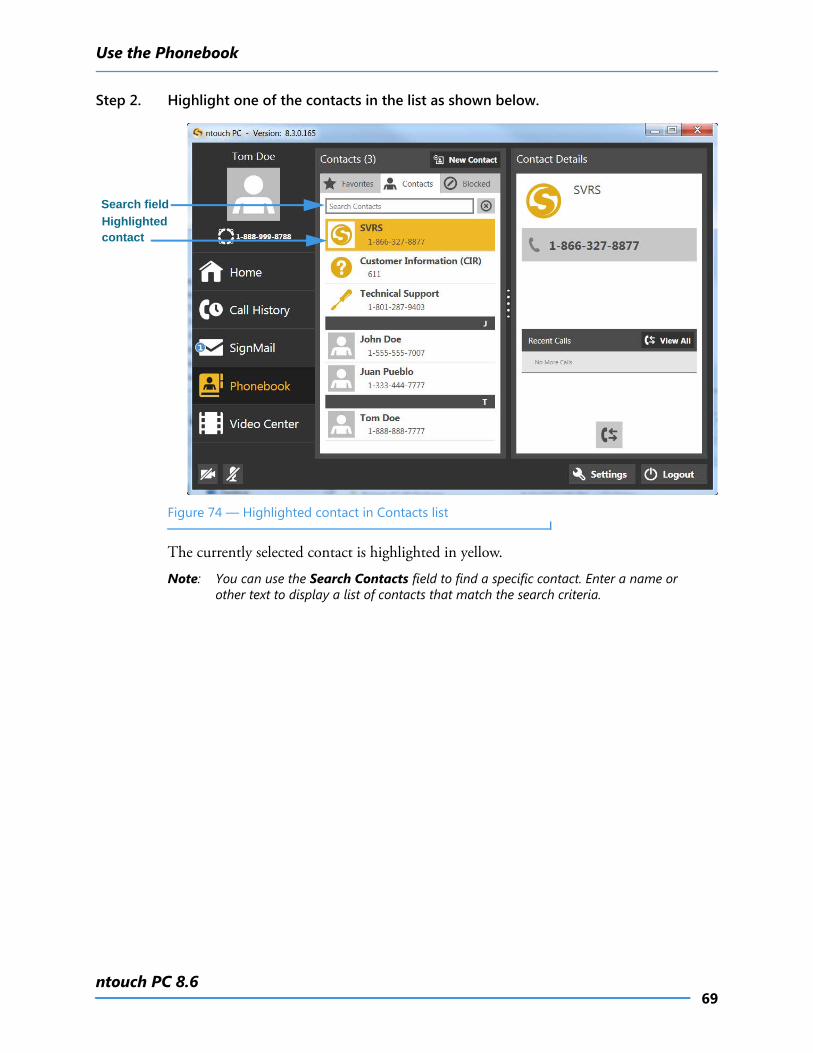
Step 2. Highlight one of the contacts in the list as shown below.
Figure 74 — Highlighted contact in Contacts list
The currently selected contact is highlighted in yellow.
Note: You can use the Search Contacts field to find a specific contact. Enter a name or other text to display a list of contacts that match the search criteria.
Highlighted contact
Search field
Use the Phonebook
70User Guide
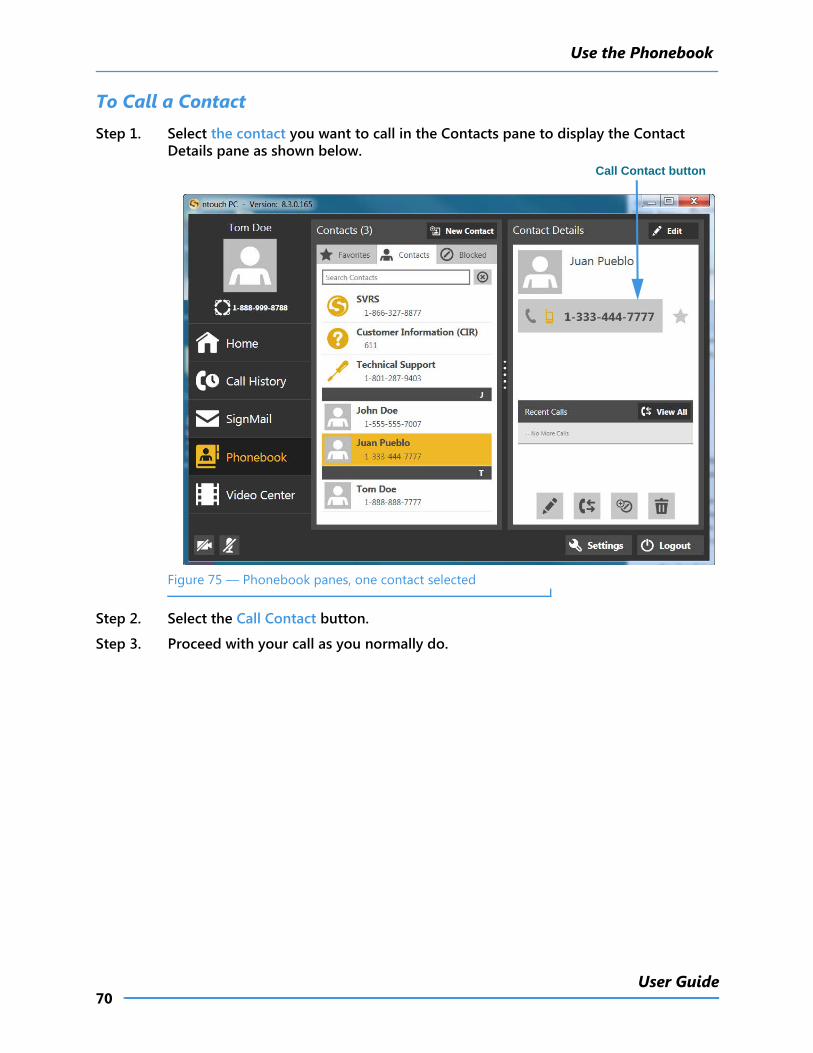
To Call a ContactStep 1. Select the contact you want to call in the Contacts pane to display the Contact
Details pane as shown below.
Figure 75 — Phonebook panes, one contact selected
Step 2. Select the Call Contact button.
Step 3. Proceed with your call as you normally do.
Call Contact button
Use the Phonebook
71ntouch PC 8.6
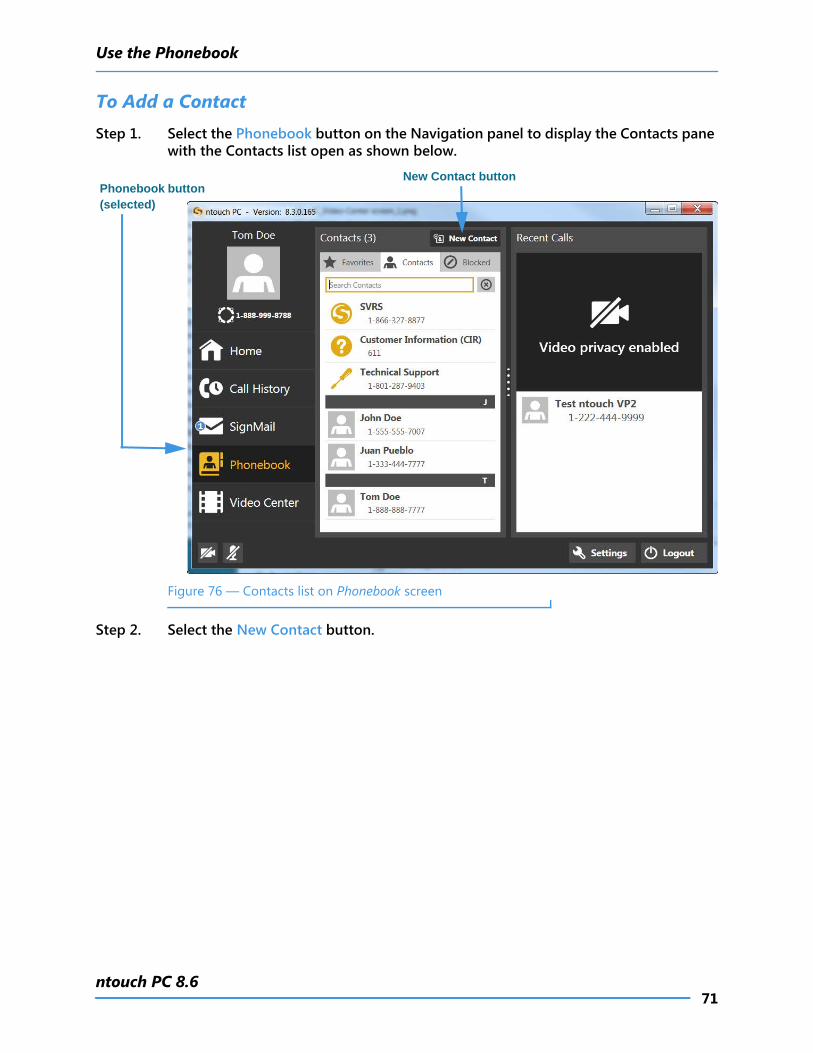
To Add a ContactStep 1. Select the Phonebook button on the Navigation panel to display the Contacts pane
with the Contacts list open as shown below.
Figure 76 — Contacts list on Phonebook screen
Step 2. Select the New Contact button.
Phonebook button (selected)
New Contact button
Use the Phonebook
72User Guide
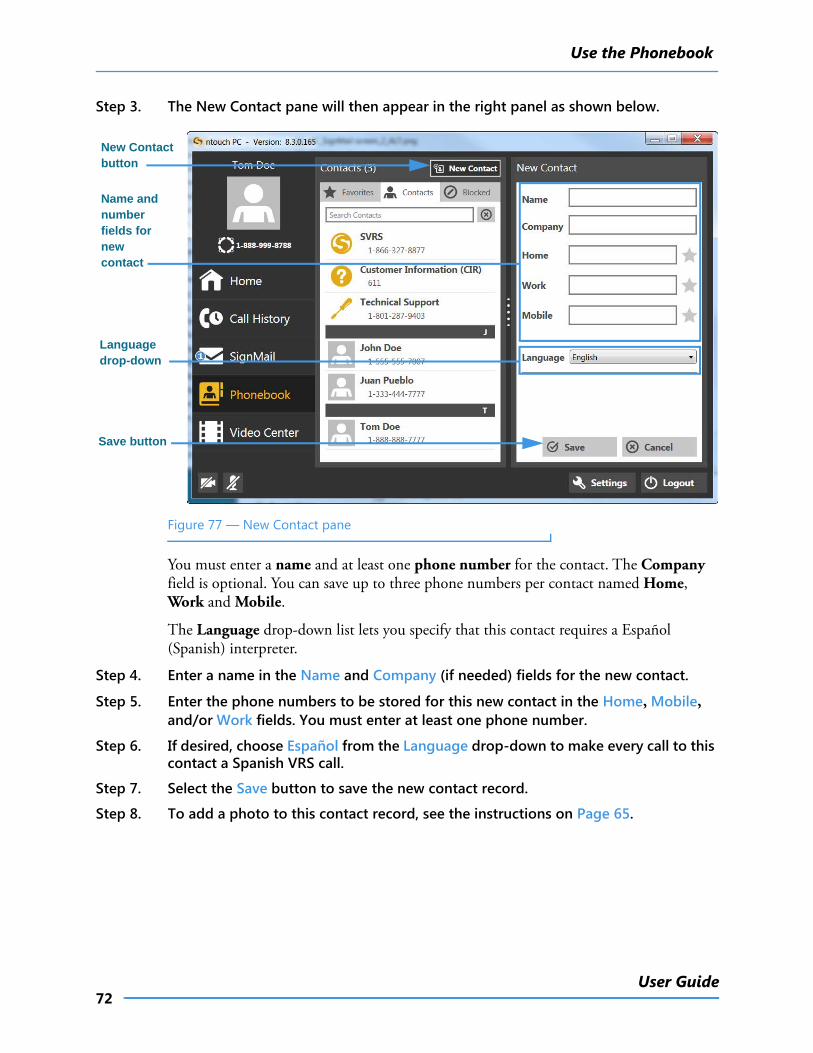
Step 3. The New Contact pane will then appear in the right panel as shown below.
Figure 77 — New Contact pane
You must enter a name and at least one phone number for the contact. The Company field is optional. You can save up to three phone numbers per contact named Home, Work and Mobile.
The Language drop-down list lets you specify that this contact requires a Español (Spanish) interpreter.
Step 4. Enter a name in the Name and Company (if needed) fields for the new contact.
Step 5. Enter the phone numbers to be stored for this new contact in the Home, Mobile, and/or Work fields. You must enter at least one phone number.
Step 6. If desired, choose Español from the Language drop-down to make every call to this contact a Spanish VRS call.
Step 7. Select the Save button to save the new contact record.
Step 8. To add a photo to this contact record, see the instructions on Page 65.
New Contact button
Name and number fields for new contact
Language drop-down
Save button
Use the Phonebook
73ntouch PC 8.6
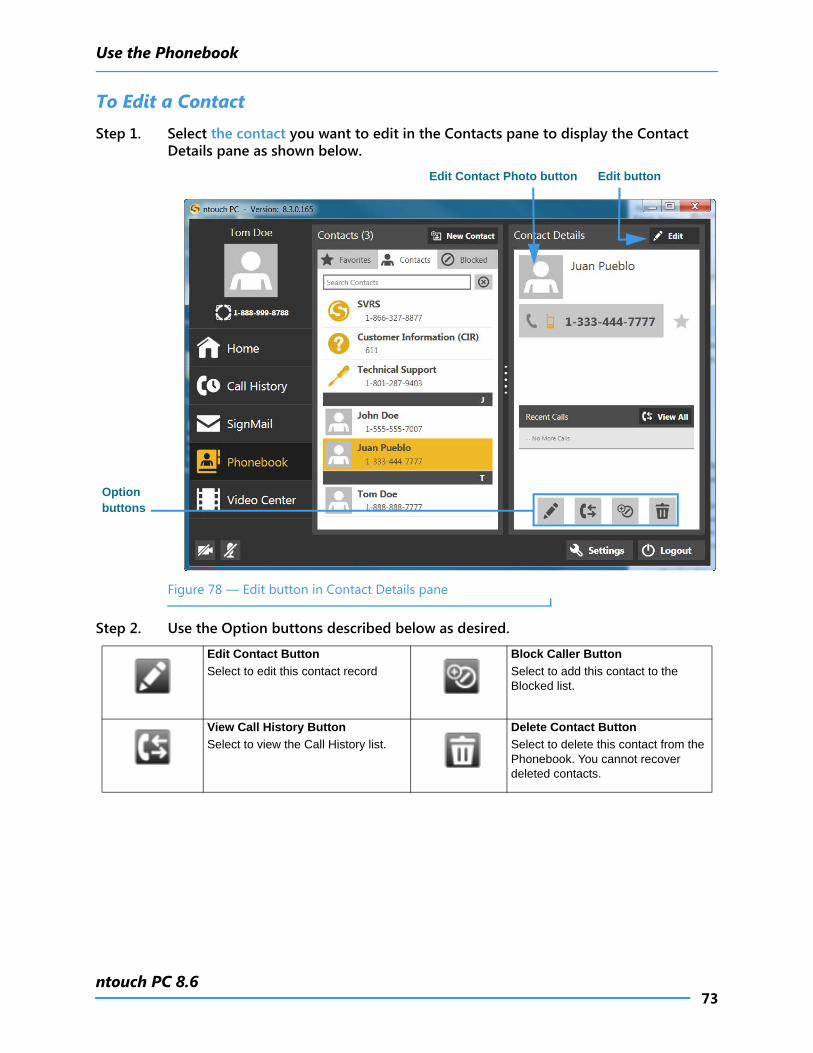
To Edit a ContactStep 1. Select the contact you want to edit in the Contacts pane to display the Contact
Details pane as shown below.
Figure 78 — Edit button in Contact Details pane
Step 2. Use the Option buttons described below as desired.
Edit Contact Button
Select to edit this contact record
Block Caller Button
Select to add this contact to the Blocked list.
View Call History Button
Select to view the Call History list.
Delete Contact Button
Select to delete this contact from the Phonebook. You cannot recover deleted contacts.
Edit Contact Photo button Edit button
Option buttons
Use the Phonebook
74User Guide
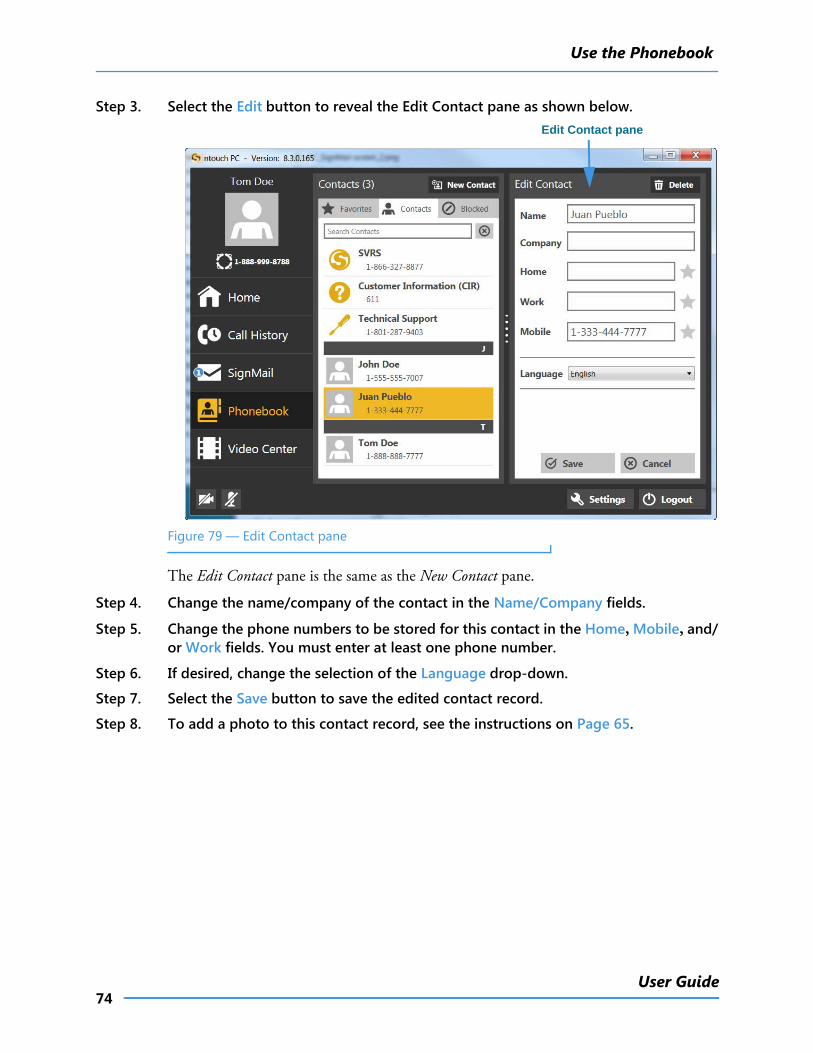
Step 3. Select the Edit button to reveal the Edit Contact pane as shown below.
Figure 79 — Edit Contact pane
The Edit Contact pane is the same as the New Contact pane.
Step 4. Change the name/company of the contact in the Name/Company fields.
Step 5. Change the phone numbers to be stored for this contact in the Home, Mobile, and/or Work fields. You must enter at least one phone number.
Step 6. If desired, change the selection of the Language drop-down.
Step 7. Select the Save button to save the edited contact record.
Step 8. To add a photo to this contact record, see the instructions on Page 65.
Edit Contact pane
Use the Phonebook
75ntouch PC 8.6
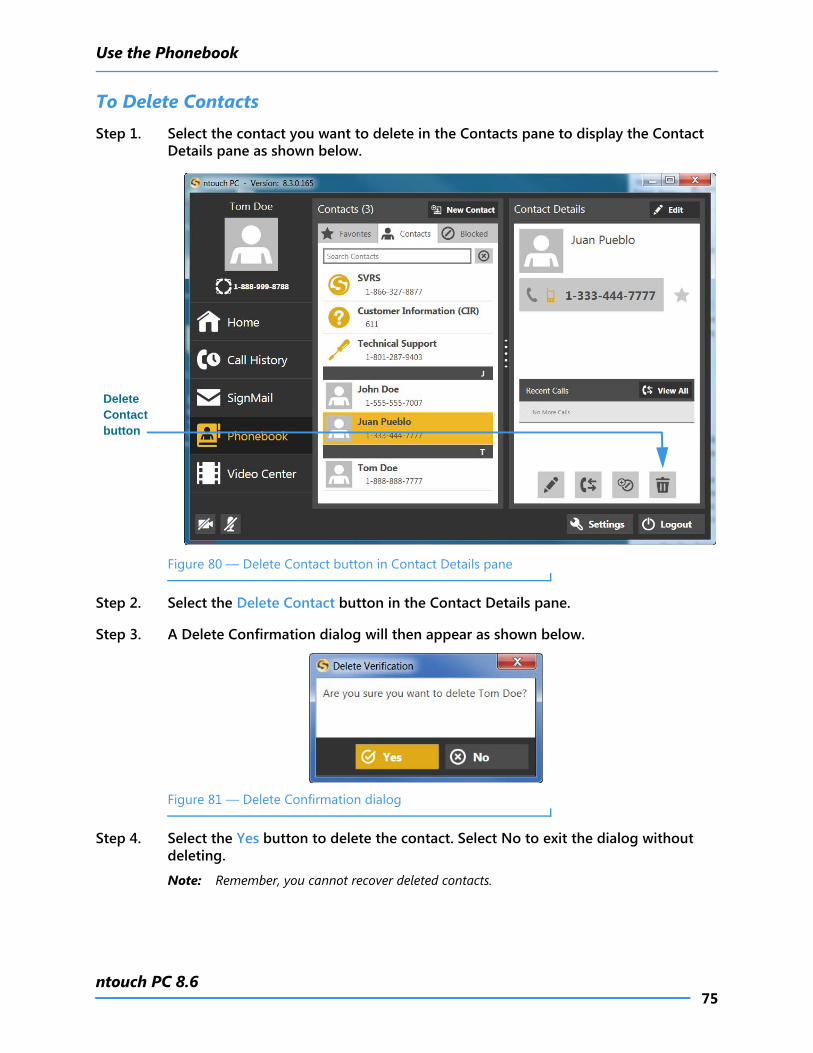
To Delete ContactsStep 1. Select the contact you want to delete in the Contacts pane to display the Contact
Details pane as shown below.
Figure 80 — Delete Contact button in Contact Details pane
Step 2. Select the Delete Contact button in the Contact Details pane.
Step 3. A Delete Confirmation dialog will then appear as shown below.
Figure 81 — Delete Confirmation dialog
Step 4. Select the Yes button to delete the contact. Select No to exit the dialog without deleting.
Note: Remember, you cannot recover deleted contacts.
Delete Contact button
Use the Phonebook
76User Guide
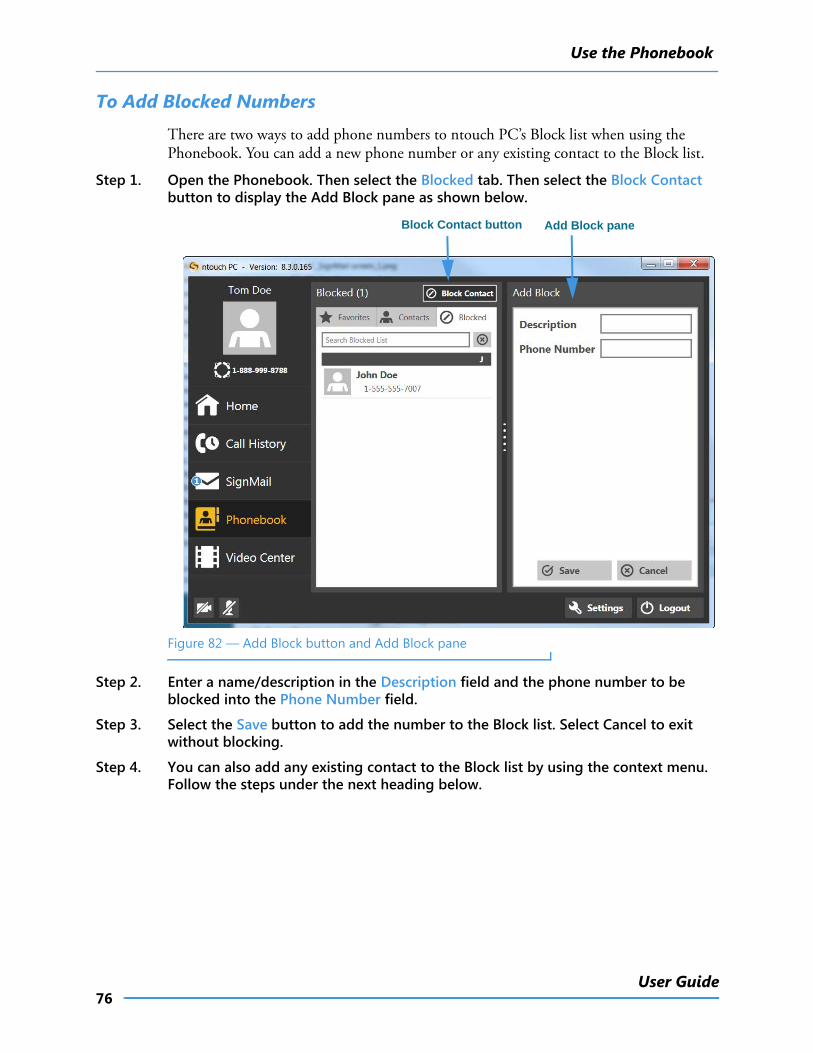
To Add Blocked Numbers
There are two ways to add phone numbers to ntouch PC’s Block list when using the Phonebook. You can add a new phone number or any existing contact to the Block list.
Step 1. Open the Phonebook. Then select the Blocked tab. Then select the Block Contact button to display the Add Block pane as shown below.
Figure 82 — Add Block button and Add Block pane
Step 2. Enter a name/description in the Description field and the phone number to be blocked into the Phone Number field.
Step 3. Select the Save button to add the number to the Block list. Select Cancel to exit without blocking.
Step 4. You can also add any existing contact to the Block list by using the context menu. Follow the steps under the next heading below.
Add Block paneBlock Contact button
Use the Phonebook
77ntouch PC 8.6
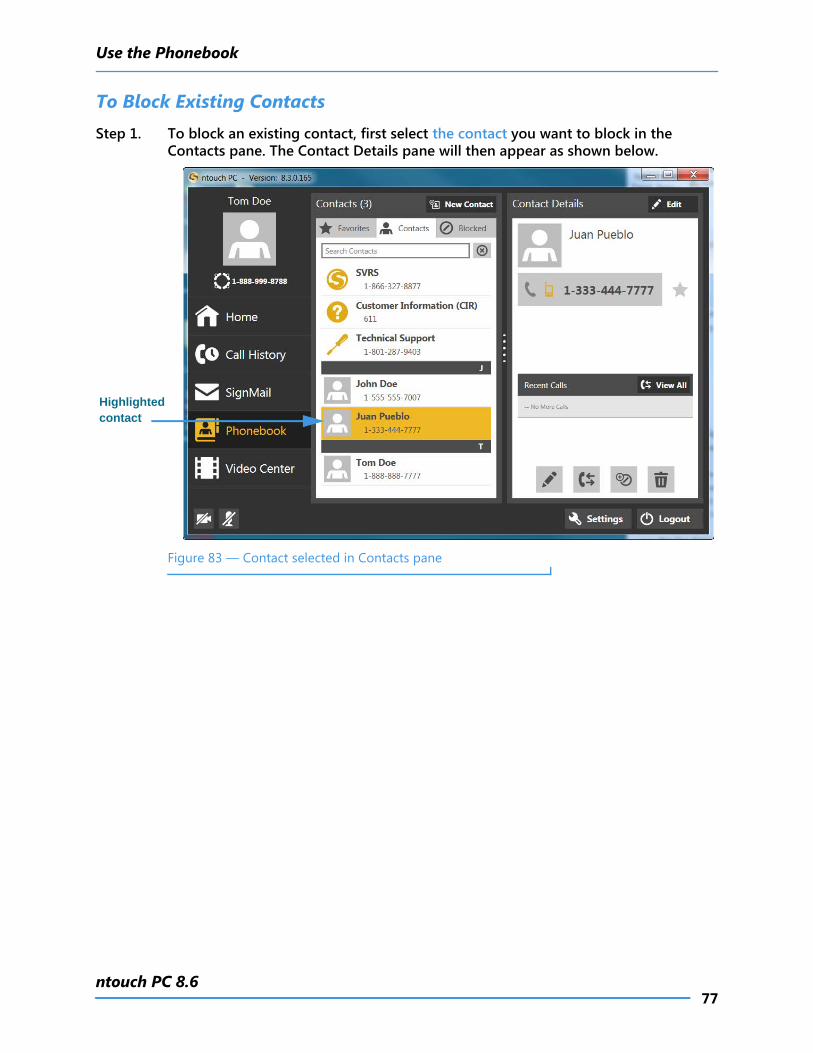
To Block Existing ContactsStep 1. To block an existing contact, first select the contact you want to block in the
Contacts pane. The Contact Details pane will then appear as shown below.
Figure 83 — Contact selected in Contacts pane
Highlighted contact
Use the Phonebook
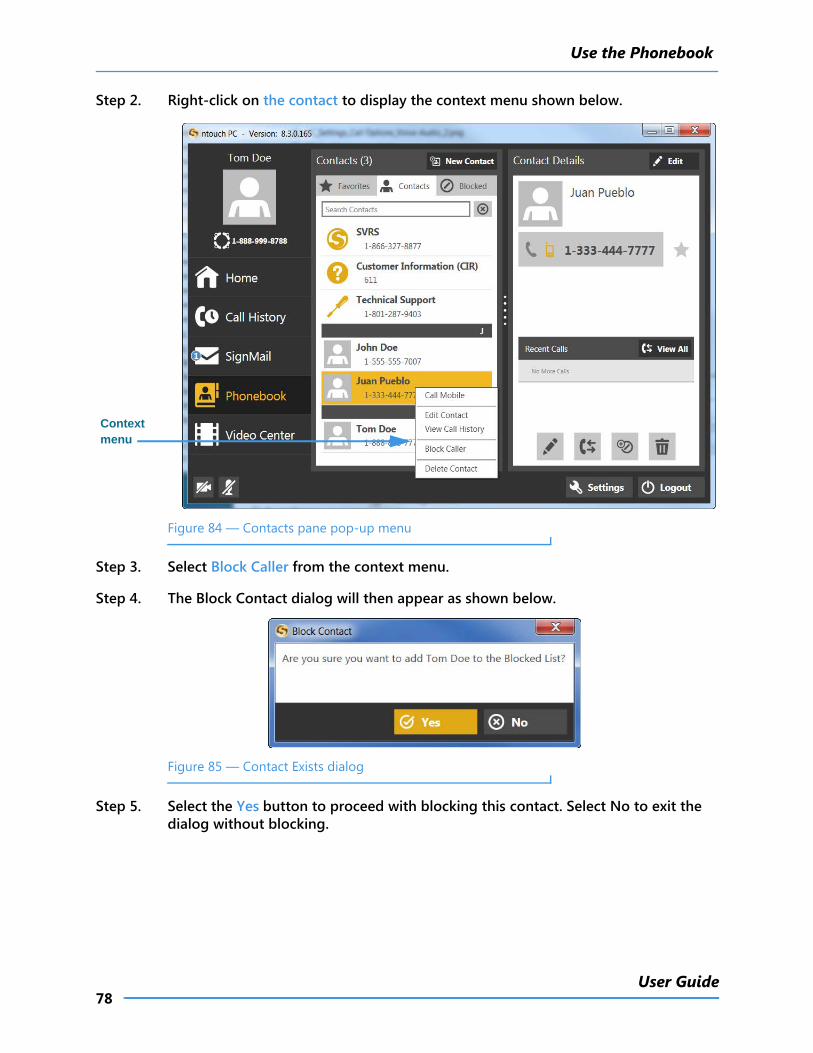
78User Guide
Step 2. Right-click on the contact to display the context menu shown below.
Figure 84 — Contacts pane pop-up menu
Step 3. Select Block Caller from the context menu.
Step 4. The Block Contact dialog will then appear as shown below.
Figure 85 — Contact Exists dialog
Step 5. Select the Yes button to proceed with blocking this contact. Select No to exit the dialog without blocking.
Context menu
Use the Phonebook
79ntouch PC 8.6
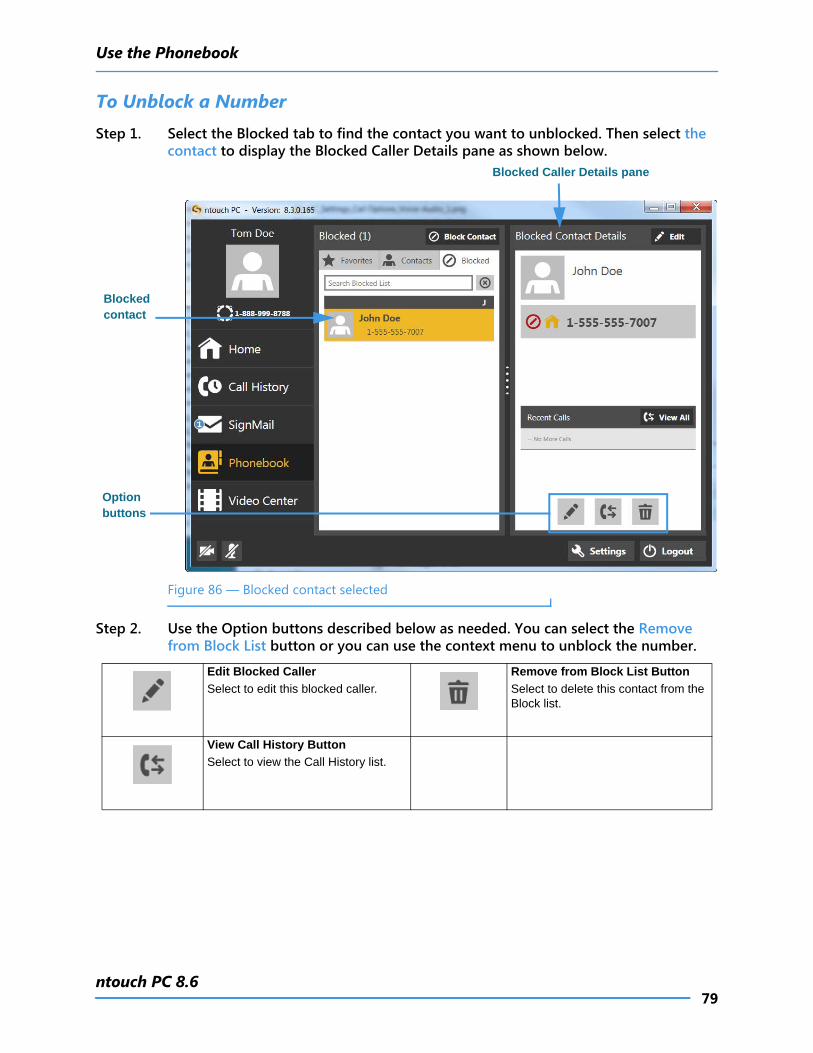
To Unblock a NumberStep 1. Select the Blocked tab to find the contact you want to unblocked. Then select the
contact to display the Blocked Caller Details pane as shown below.
Figure 86 — Blocked contact selected
Step 2. Use the Option buttons described below as needed. You can select the Remove from Block List button or you can use the context menu to unblock the number.
Edit Blocked Caller
Select to edit this blocked caller.
Remove from Block List Button
Select to delete this contact from the Block list.
View Call History Button
Select to view the Call History list.
Blocked contact
Blocked Caller Details pane
Option buttons
Use the Phonebook
80User Guide
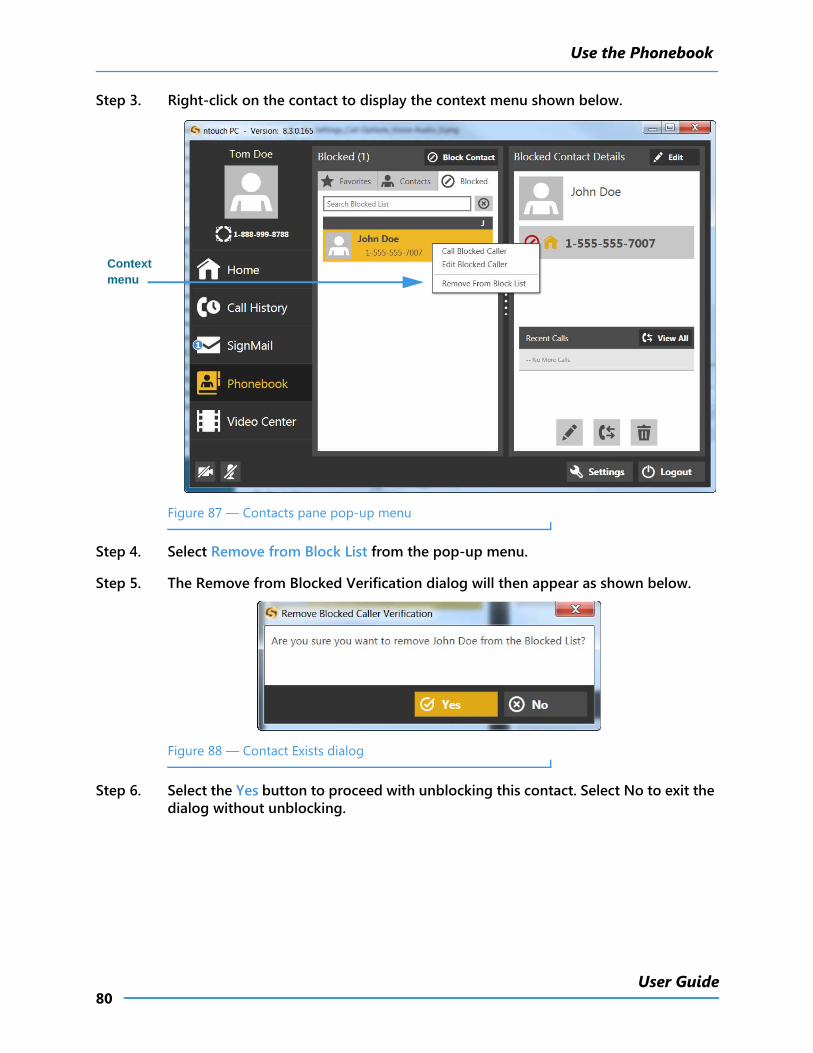
Step 3. Right-click on the contact to display the context menu shown below.
Figure 87 — Contacts pane pop-up menu
Step 4. Select Remove from Block List from the pop-up menu.
Step 5. The Remove from Blocked Verification dialog will then appear as shown below.
Figure 88 — Contact Exists dialog
Step 6. Select the Yes button to proceed with unblocking this contact. Select No to exit the dialog without unblocking.
Context menu
Use the Phonebook
81ntouch PC 8.6
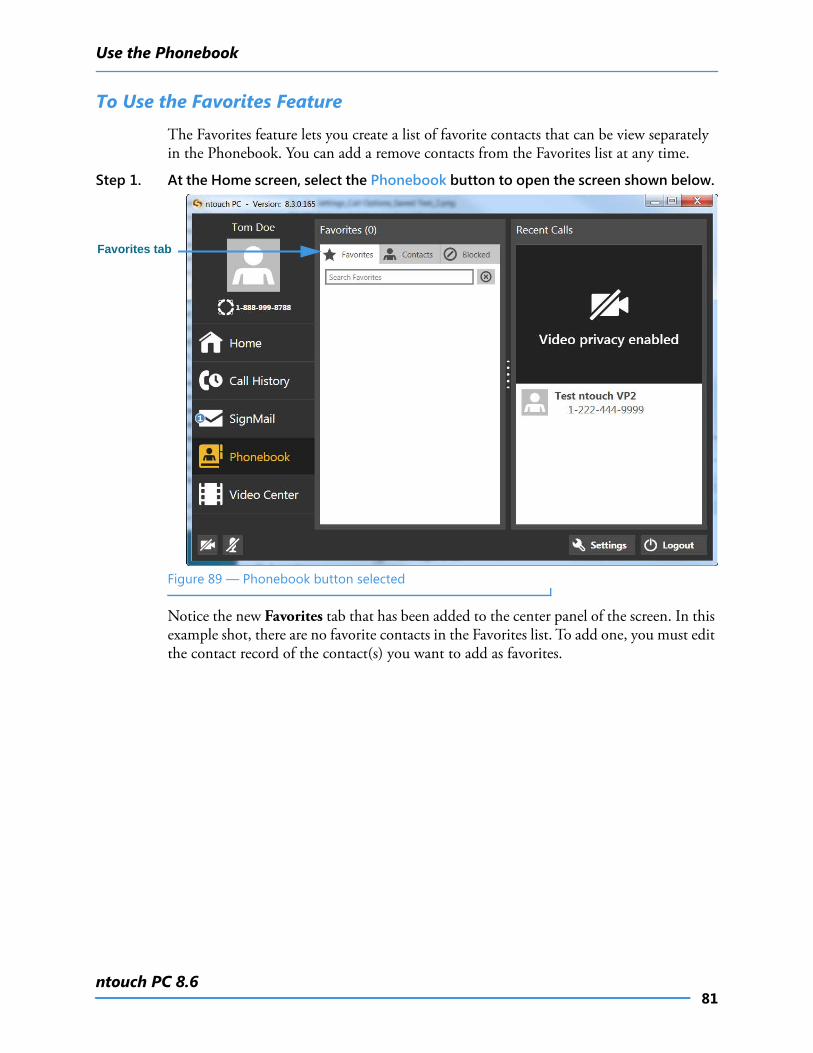
To Use the Favorites Feature
The Favorites feature lets you create a list of favorite contacts that can be view separately in the Phonebook. You can add a remove contacts from the Favorites list at any time.
Step 1. At the Home screen, select the Phonebook button to open the screen shown below.
Figure 89 — Phonebook button selected
Notice the new Favorites tab that has been added to the center panel of the screen. In this example shot, there are no favorite contacts in the Favorites list. To add one, you must edit the contact record of the contact(s) you want to add as favorites.
Favorites tab

Use the Phonebook
82User Guide
Step 2. Select the Contacts tab to open the screen shown below.
Figure 90 — Contacts tab selected, Contacts list open
Step 3. Select the contact you want to add as a Favorite to open the screen shown below.
Figure 91 — Selected contact opened
Contacts tab
Star icon to set number as a Favorite
Use the Phonebook
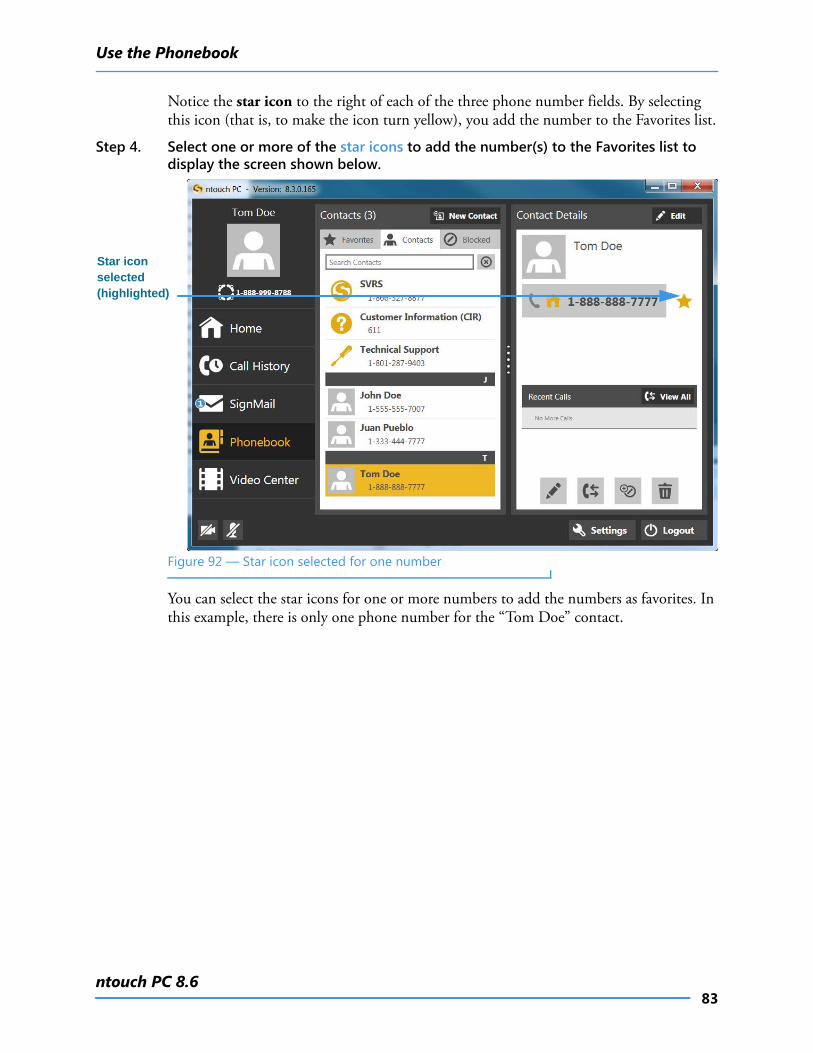
83ntouch PC 8.6
Notice the star icon to the right of each of the three phone number fields. By selecting this icon (that is, to make the icon turn yellow), you add the number to the Favorites list.
Step 4. Select one or more of the star icons to add the number(s) to the Favorites list to display the screen shown below.
Figure 92 — Star icon selected for one number
You can select the star icons for one or more numbers to add the numbers as favorites. In this example, there is only one phone number for the “Tom Doe” contact.
Star icon selected (highlighted)
Use the Phonebook
84User Guide
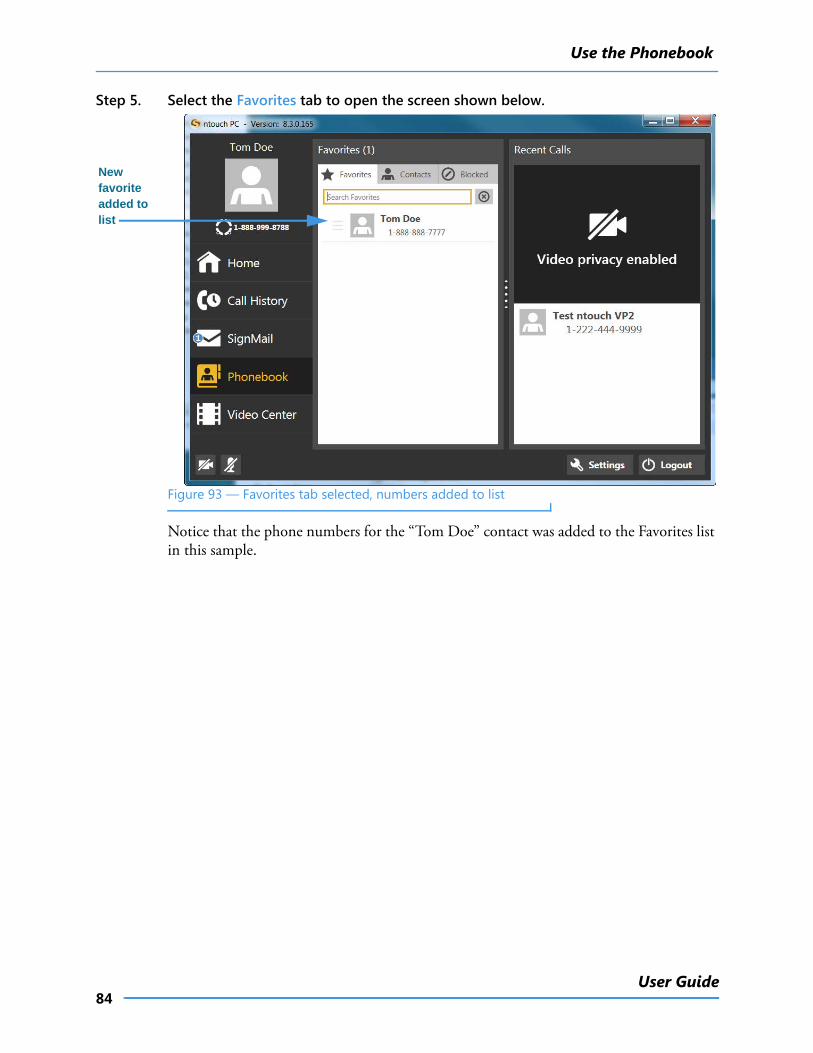
Step 5. Select the Favorites tab to open the screen shown below.
Figure 93 — Favorites tab selected, numbers added to list
Notice that the phone numbers for the “Tom Doe” contact was added to the Favorites list in this sample.
New favorite added to list
Use the Video Center
85ntouch PC 8.6
Use the Video Centerntouch PC’s Video Center includes entertainment and informational videos organized under multiple channels, programs, and episodes.
When playing back any type of video, you can use the playback controls on the screen to start, stop, or rewind the video so that it plays from the beginning again. You can also see detailed information about the video, such as its length in minutes and seconds.
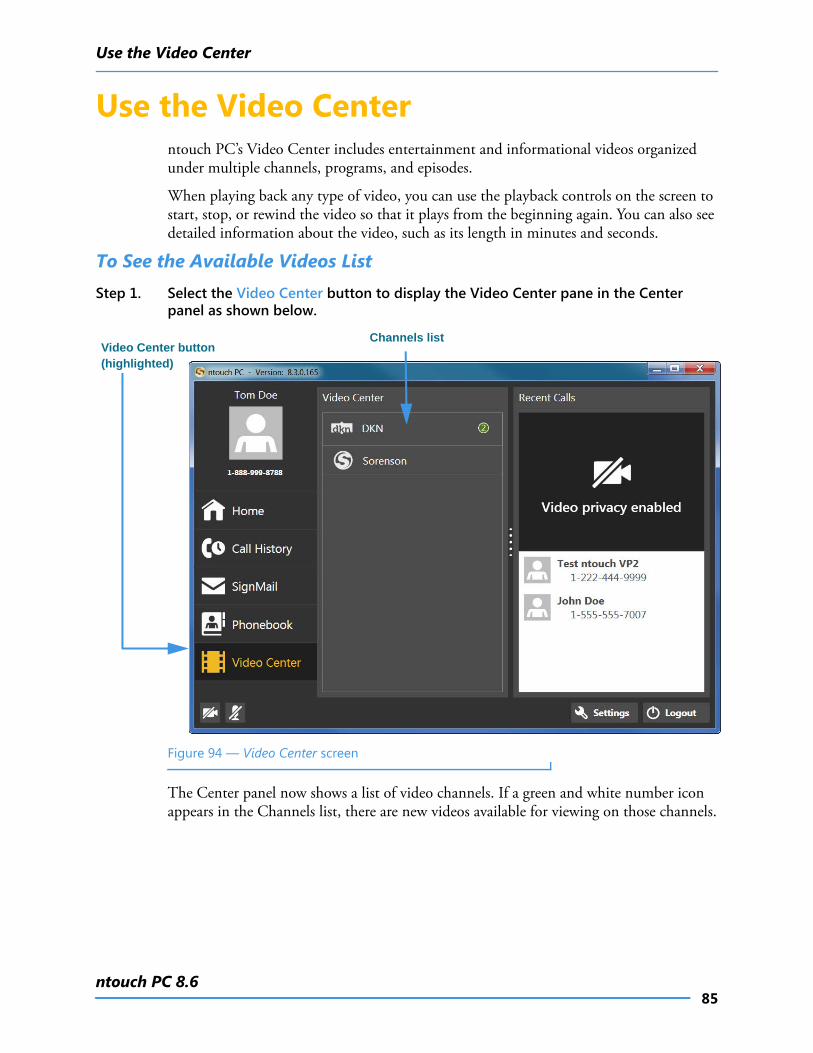
To See the Available Videos ListStep 1. Select the Video Center button to display the Video Center pane in the Center
panel as shown below.
Figure 94 — Video Center screen
The Center panel now shows a list of video channels. If a green and white number icon appears in the Channels list, there are new videos available for viewing on those channels.
Channels list Video Center button (highlighted)
Use the Video Center
86User Guide
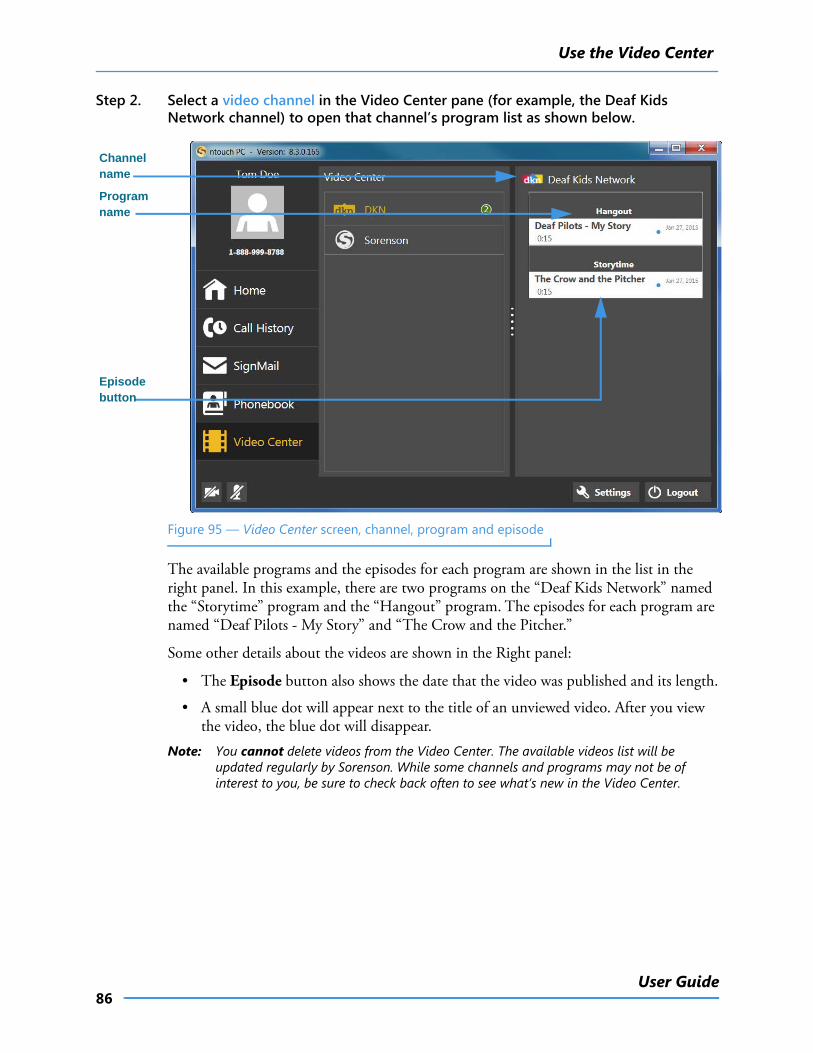
Step 2. Select a video channel in the Video Center pane (for example, the Deaf Kids Network channel) to open that channel’s program list as shown below.
Figure 95 — Video Center screen, channel, program and episode
The available programs and the episodes for each program are shown in the list in the right panel. In this example, there are two programs on the “Deaf Kids Network” named the “Storytime” program and the “Hangout” program. The episodes for each program are named “Deaf Pilots - My Story” and “The Crow and the Pitcher.”
Some other details about the videos are shown in the Right panel:
• The Episode button also shows the date that the video was published and its length.
• A small blue dot will appear next to the title of an unviewed video. After you view the video, the blue dot will disappear.
Note: You cannot delete videos from the Video Center. The available videos list will be updated regularly by Sorenson. While some channels and programs may not be of interest to you, be sure to check back often to see what’s new in the Video Center.
Channel name
Program name
Episode button
Use the Video Center
87ntouch PC 8.6
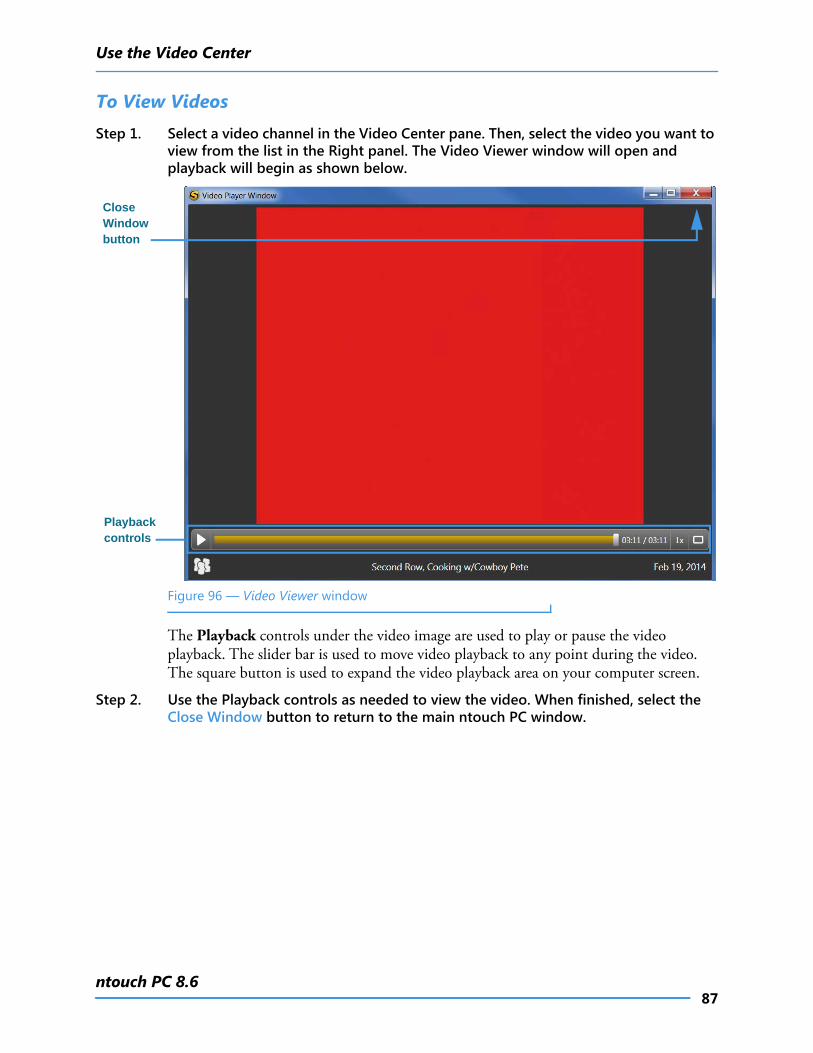
To View Videos Step 1. Select a video channel in the Video Center pane. Then, select the video you want to
view from the list in the Right panel. The Video Viewer window will open and playback will begin as shown below.
Figure 96 — Video Viewer window
The Playback controls under the video image are used to play or pause the video playback. The slider bar is used to move video playback to any point during the video. The square button is used to expand the video playback area on your computer screen.
Step 2. Use the Playback controls as needed to view the video. When finished, select the Close Window button to return to the main ntouch PC window.
Playback controls
Close Window button
Change Settings
88User Guide
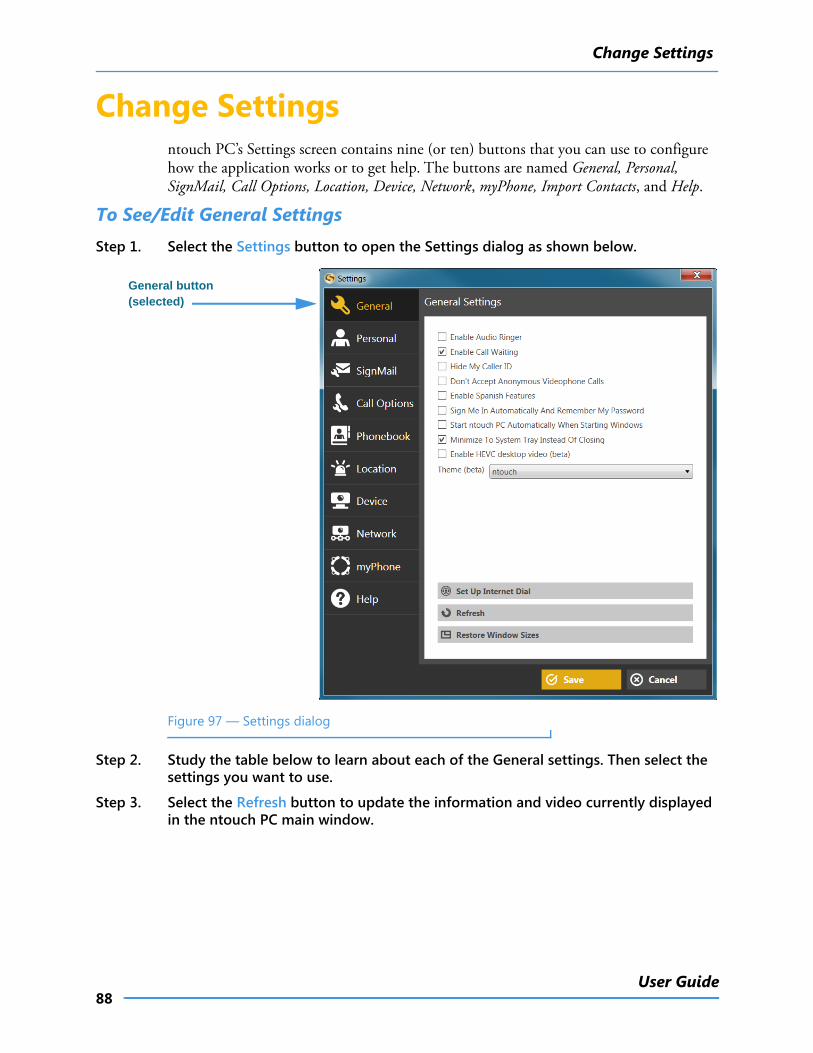
Change Settingsntouch PC’s Settings screen contains nine (or ten) buttons that you can use to configure how the application works or to get help. The buttons are named General, Personal, SignMail, Call Options, Location, Device, Network, myPhone, Import Contacts, and Help.
To See/Edit General SettingsStep 1. Select the Settings button to open the Settings dialog as shown below.
Figure 97 — Settings dialog
Step 2. Study the table below to learn about each of the General settings. Then select the settings you want to use.
Step 3. Select the Refresh button to update the information and video currently displayed in the ntouch PC main window.
General button (selected)
Change Settings
89ntouch PC 8.6
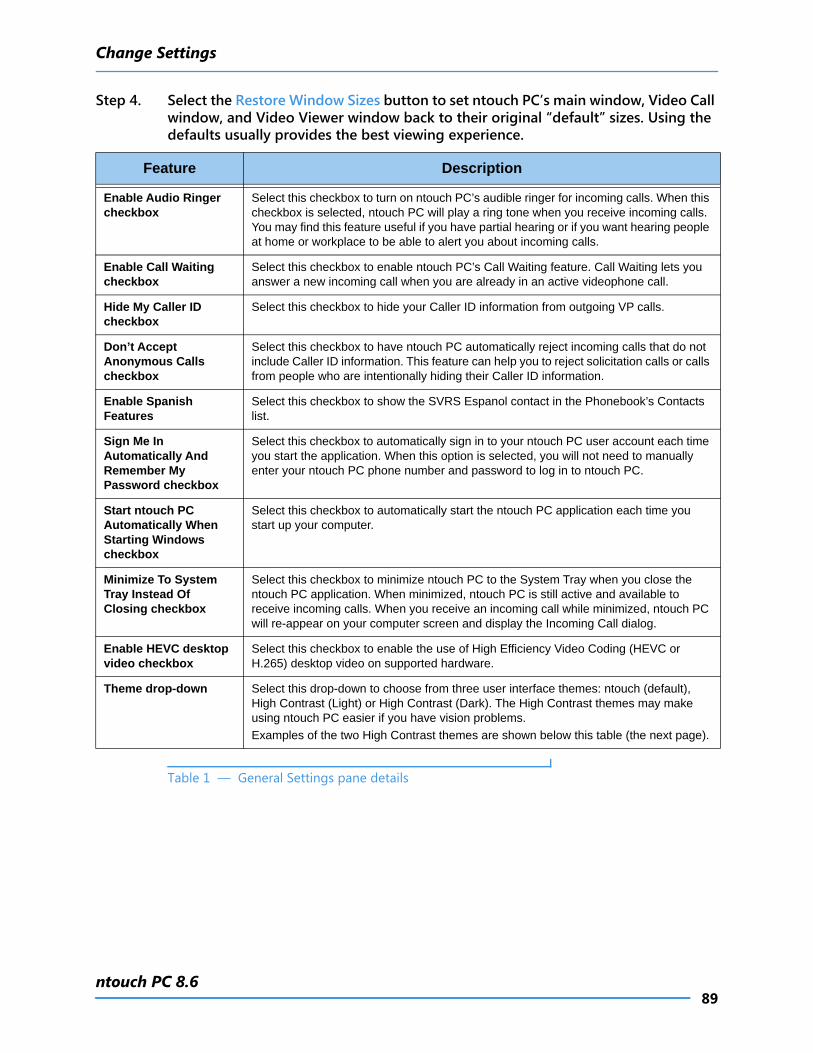
Step 4. Select the Restore Window Sizes button to set ntouch PC’s main window, Video Call window, and Video Viewer window back to their original “default” sizes. Using the defaults usually provides the best viewing experience.
Table 1 — General Settings pane details
Feature Description
Enable Audio Ringer checkbox
Select this checkbox to turn on ntouch PC’s audible ringer for incoming calls. When this checkbox is selected, ntouch PC will play a ring tone when you receive incoming calls. You may find this feature useful if you have partial hearing or if you want hearing people at home or workplace to be able to alert you about incoming calls.
Enable Call Waiting checkbox
Select this checkbox to enable ntouch PC’s Call Waiting feature. Call Waiting lets you answer a new incoming call when you are already in an active videophone call.
Hide My Caller ID checkbox
Select this checkbox to hide your Caller ID information from outgoing VP calls.
Don’t Accept Anonymous Calls checkbox
Select this checkbox to have ntouch PC automatically reject incoming calls that do not include Caller ID information. This feature can help you to reject solicitation calls or calls from people who are intentionally hiding their Caller ID information.
Enable Spanish Features
Select this checkbox to show the SVRS Espanol contact in the Phonebook’s Contacts list.
Sign Me In Automatically And Remember My Password checkbox
Select this checkbox to automatically sign in to your ntouch PC user account each time you start the application. When this option is selected, you will not need to manually enter your ntouch PC phone number and password to log in to ntouch PC.
Start ntouch PC Automatically When Starting Windows checkbox
Select this checkbox to automatically start the ntouch PC application each time you start up your computer.
Minimize To System Tray Instead Of Closing checkbox
Select this checkbox to minimize ntouch PC to the System Tray when you close the ntouch PC application. When minimized, ntouch PC is still active and available to receive incoming calls. When you receive an incoming call while minimized, ntouch PC will re-appear on your computer screen and display the Incoming Call dialog.
Enable HEVC desktop video checkbox
Select this checkbox to enable the use of High Efficiency Video Coding (HEVC or H.265) desktop video on supported hardware.
Theme drop-down Select this drop-down to choose from three user interface themes: ntouch (default), High Contrast (Light) or High Contrast (Dark). The High Contrast themes may make using ntouch PC easier if you have vision problems.
Examples of the two High Contrast themes are shown below this table (the next page).
Change Settings
90User Guide
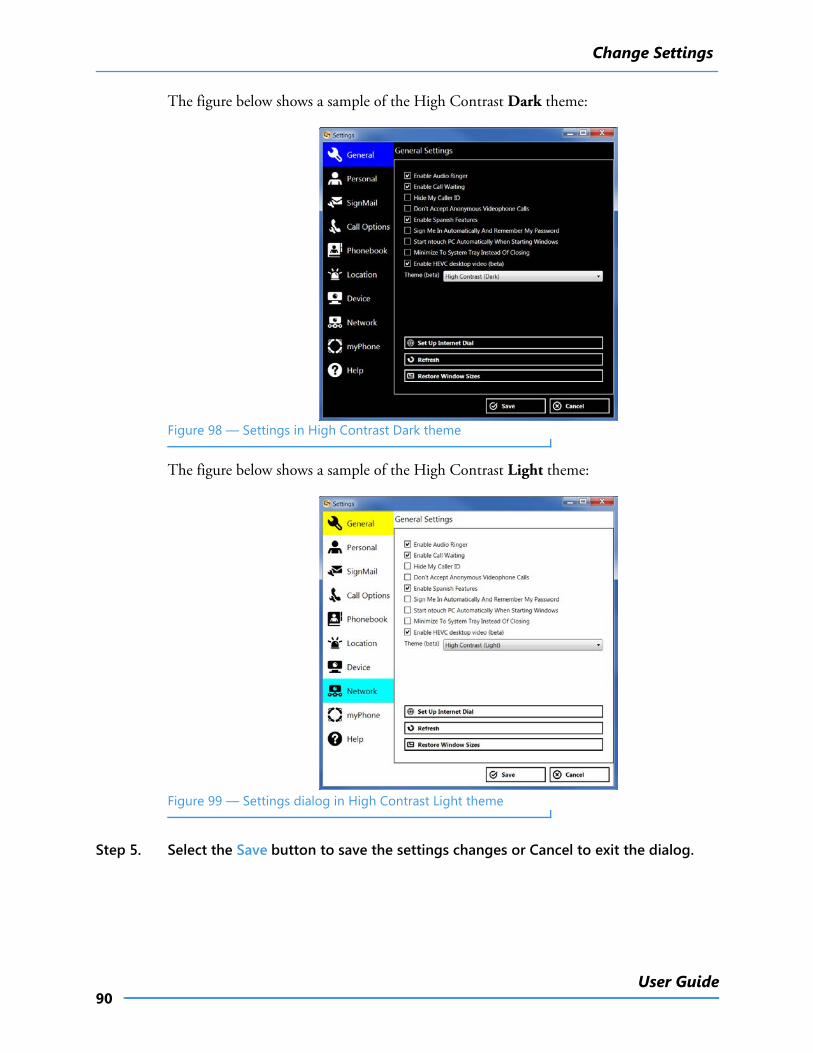
The figure below shows a sample of the High Contrast Dark theme:
Figure 98 — Settings in High Contrast Dark theme
The figure below shows a sample of the High Contrast Light theme:
Figure 99 — Settings dialog in High Contrast Light theme
Step 5. Select the Save button to save the settings changes or Cancel to exit the dialog.
Change Settings
91ntouch PC 8.6
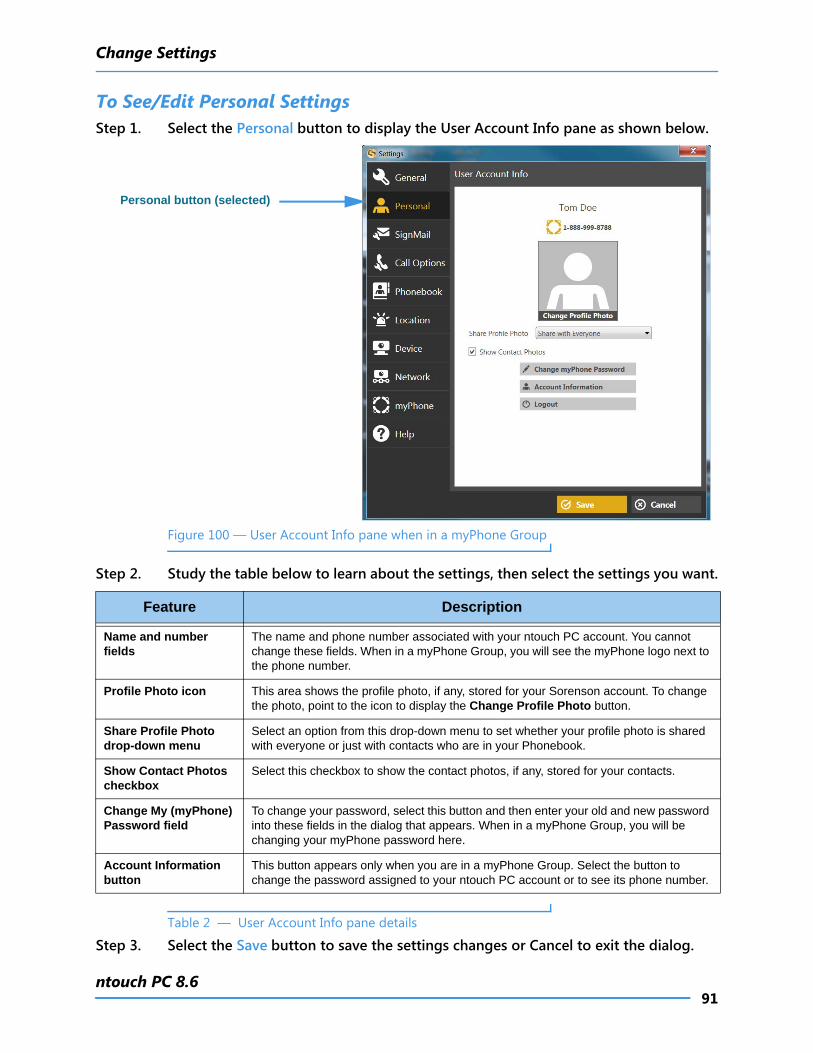
To See/Edit Personal SettingsStep 1. Select the Personal button to display the User Account Info pane as shown below.
Figure 100 — User Account Info pane when in a myPhone Group
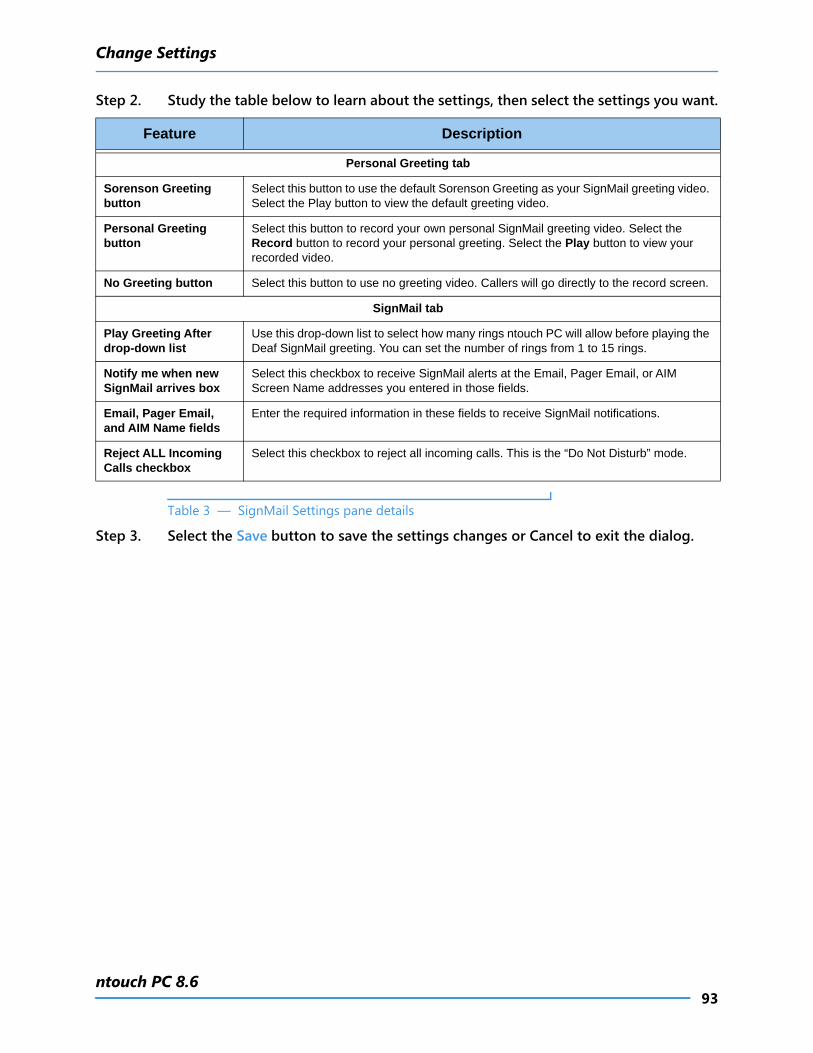
Step 2. Study the table below to learn about the settings, then select the settings you want.
Table 2 — User Account Info pane details
Step 3. Select the Save button to save the settings changes or Cancel to exit the dialog.
Feature Description
Name and number fields
The name and phone number associated with your ntouch PC account. You cannot change these fields. When in a myPhone Group, you will see the myPhone logo next to the phone number.
Profile Photo icon This area shows the profile photo, if any, stored for your Sorenson account. To change the photo, point to the icon to display the Change Profile Photo button.
Share Profile Photo drop-down menu
Select an option from this drop-down menu to set whether your profile photo is shared with everyone or just with contacts who are in your Phonebook.
Show Contact Photos checkbox
Select this checkbox to show the contact photos, if any, stored for your contacts.
Change My (myPhone) Password field
To change your password, select this button and then enter your old and new password into these fields in the dialog that appears. When in a myPhone Group, you will be changing your myPhone password here.
Account Information button
This button appears only when you are in a myPhone Group. Select the button to change the password assigned to your ntouch PC account or to see its phone number.
Personal button (selected)
Change Settings
92User Guide
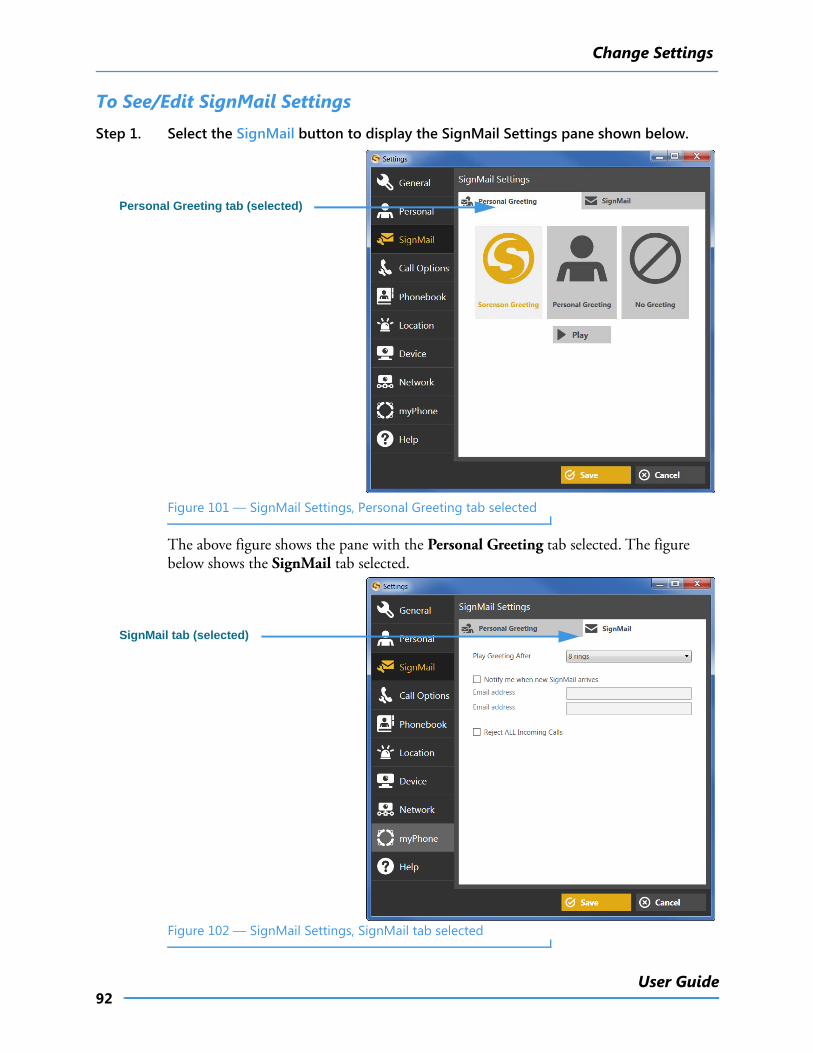
To See/Edit SignMail SettingsStep 1. Select the SignMail button to display the SignMail Settings pane shown below.
Figure 101 — SignMail Settings, Personal Greeting tab selected
The above figure shows the pane with the Personal Greeting tab selected. The figure below shows the SignMail tab selected.
Figure 102 — SignMail Settings, SignMail tab selected
Personal Greeting tab (selected)
SignMail tab (selected)
Change Settings
93ntouch PC 8.6
Step 2. Study the table below to learn about the settings, then select the settings you want.
Table 3 — SignMail Settings pane details
Step 3. Select the Save button to save the settings changes or Cancel to exit the dialog.
Feature Description
Personal Greeting tab
Sorenson Greeting button
Select this button to use the default Sorenson Greeting as your SignMail greeting video. Select the Play button to view the default greeting video.
Personal Greeting button
Select this button to record your own personal SignMail greeting video. Select the Record button to record your personal greeting. Select the Play button to view your recorded video.
No Greeting button Select this button to use no greeting video. Callers will go directly to the record screen.
SignMail tab
Play Greeting After drop-down list
Use this drop-down list to select how many rings ntouch PC will allow before playing the Deaf SignMail greeting. You can set the number of rings from 1 to 15 rings.
Notify me when new SignMail arrives box
Select this checkbox to receive SignMail alerts at the Email, Pager Email, or AIM Screen Name addresses you entered in those fields.
Email, Pager Email, and AIM Name fields
Enter the required information in these fields to receive SignMail notifications.
Reject ALL Incoming Calls checkbox
Select this checkbox to reject all incoming calls. This is the “Do Not Disturb” mode.
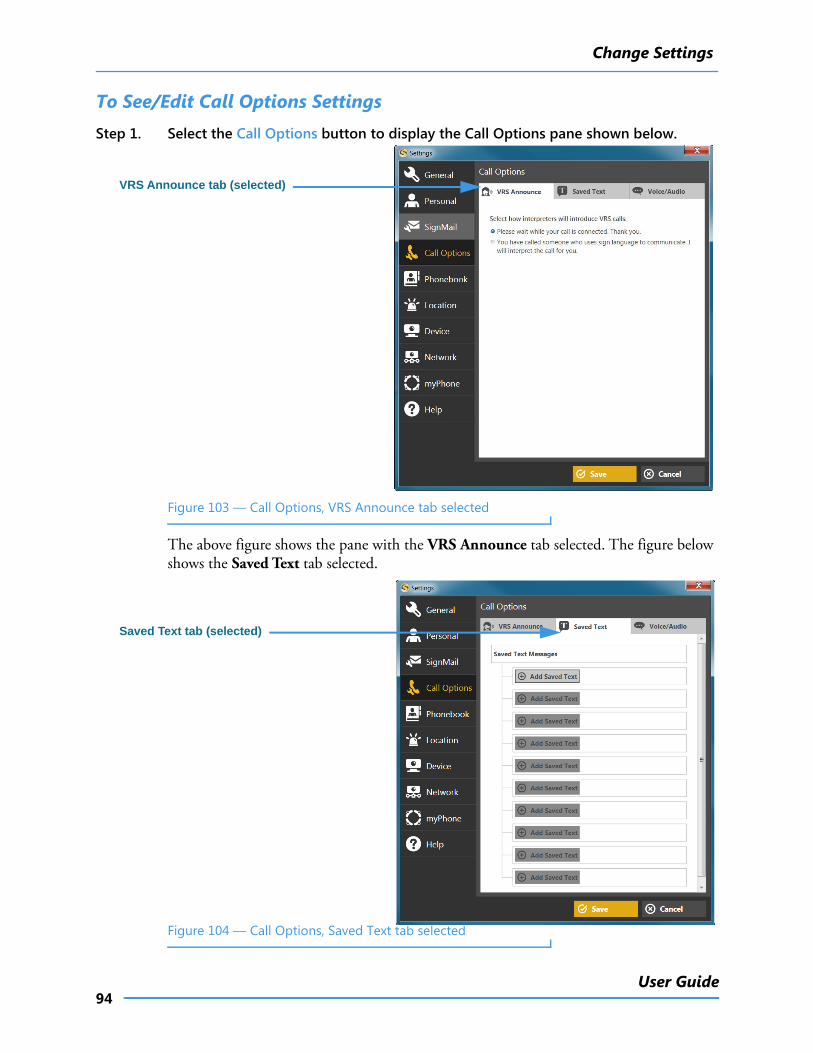
Change Settings
94User Guide
To See/Edit Call Options SettingsStep 1. Select the Call Options button to display the Call Options pane shown below.
Figure 103 — Call Options, VRS Announce tab selected
The above figure shows the pane with the VRS Announce tab selected. The figure below shows the Saved Text tab selected.
Figure 104 — Call Options, Saved Text tab selected
VRS Announce tab (selected)
Saved Text tab (selected)
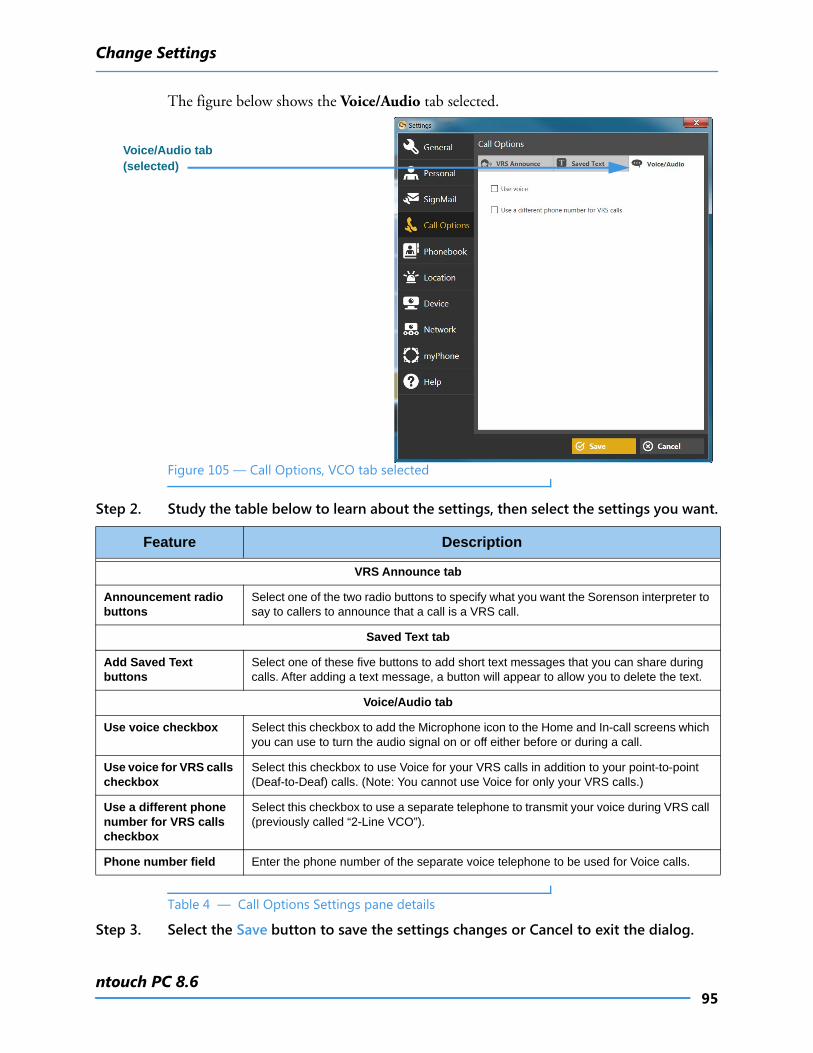
Change Settings
95ntouch PC 8.6
The figure below shows the Voice/Audio tab selected.
Figure 105 — Call Options, VCO tab selected
Step 2. Study the table below to learn about the settings, then select the settings you want.
Table 4 — Call Options Settings pane details
Step 3. Select the Save button to save the settings changes or Cancel to exit the dialog.
Feature Description
VRS Announce tab
Announcement radio buttons
Select one of the two radio buttons to specify what you want the Sorenson interpreter to say to callers to announce that a call is a VRS call.
Saved Text tab
Add Saved Text buttons
Select one of these five buttons to add short text messages that you can share during calls. After adding a text message, a button will appear to allow you to delete the text.
Voice/Audio tab
Use voice checkbox Select this checkbox to add the Microphone icon to the Home and In-call screens which you can use to turn the audio signal on or off either before or during a call.
Use voice for VRS calls checkbox
Select this checkbox to use Voice for your VRS calls in addition to your point-to-point (Deaf-to-Deaf) calls. (Note: You cannot use Voice for only your VRS calls.)
Use a different phone number for VRS calls checkbox
Select this checkbox to use a separate telephone to transmit your voice during VRS call (previously called “2-Line VCO”).
Phone number field Enter the phone number of the separate voice telephone to be used for Voice calls.
Voice/Audio tab (selected)
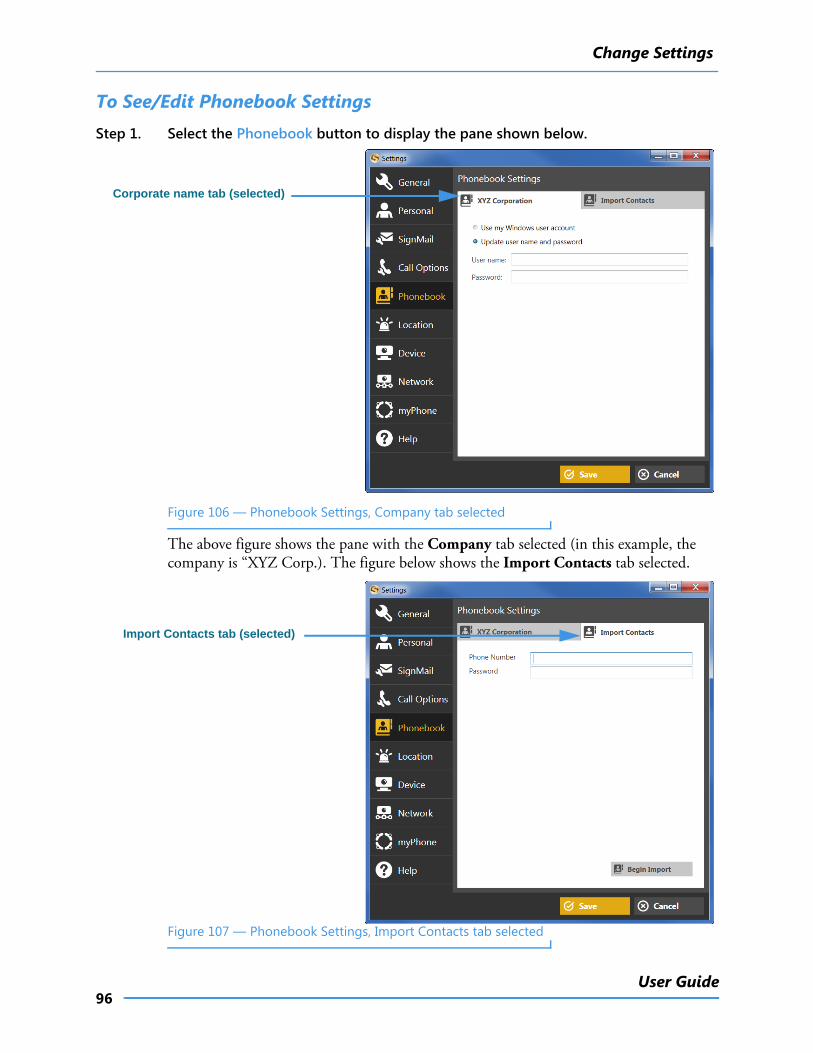
Change Settings
96User Guide
To See/Edit Phonebook SettingsStep 1. Select the Phonebook button to display the pane shown below.
Figure 106 — Phonebook Settings, Company tab selected
The above figure shows the pane with the Company tab selected (in this example, the company is “XYZ Corp.). The figure below shows the Import Contacts tab selected.
Figure 107 — Phonebook Settings, Import Contacts tab selected
Corporate name tab (selected)
Import Contacts tab (selected)
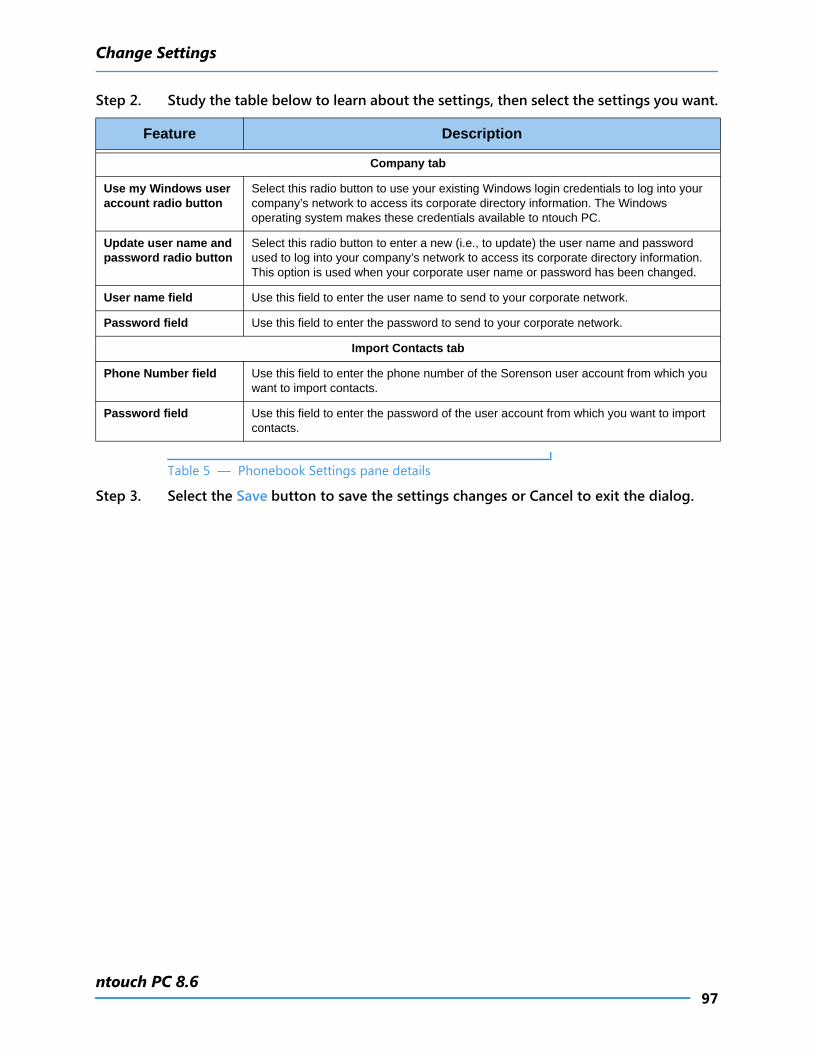
Change Settings
97ntouch PC 8.6
Step 2. Study the table below to learn about the settings, then select the settings you want.
Table 5 — Phonebook Settings pane details
Step 3. Select the Save button to save the settings changes or Cancel to exit the dialog.
Feature Description
Company tab
Use my Windows user account radio button
Select this radio button to use your existing Windows login credentials to log into your company’s network to access its corporate directory information. The Windows operating system makes these credentials available to ntouch PC.
Update user name and password radio button
Select this radio button to enter a new (i.e., to update) the user name and password used to log into your company’s network to access its corporate directory information. This option is used when your corporate user name or password has been changed.
User name field Use this field to enter the user name to send to your corporate network.
Password field Use this field to enter the password to send to your corporate network.
Import Contacts tab
Phone Number field Use this field to enter the phone number of the Sorenson user account from which you want to import contacts.
Password field Use this field to enter the password of the user account from which you want to import contacts.
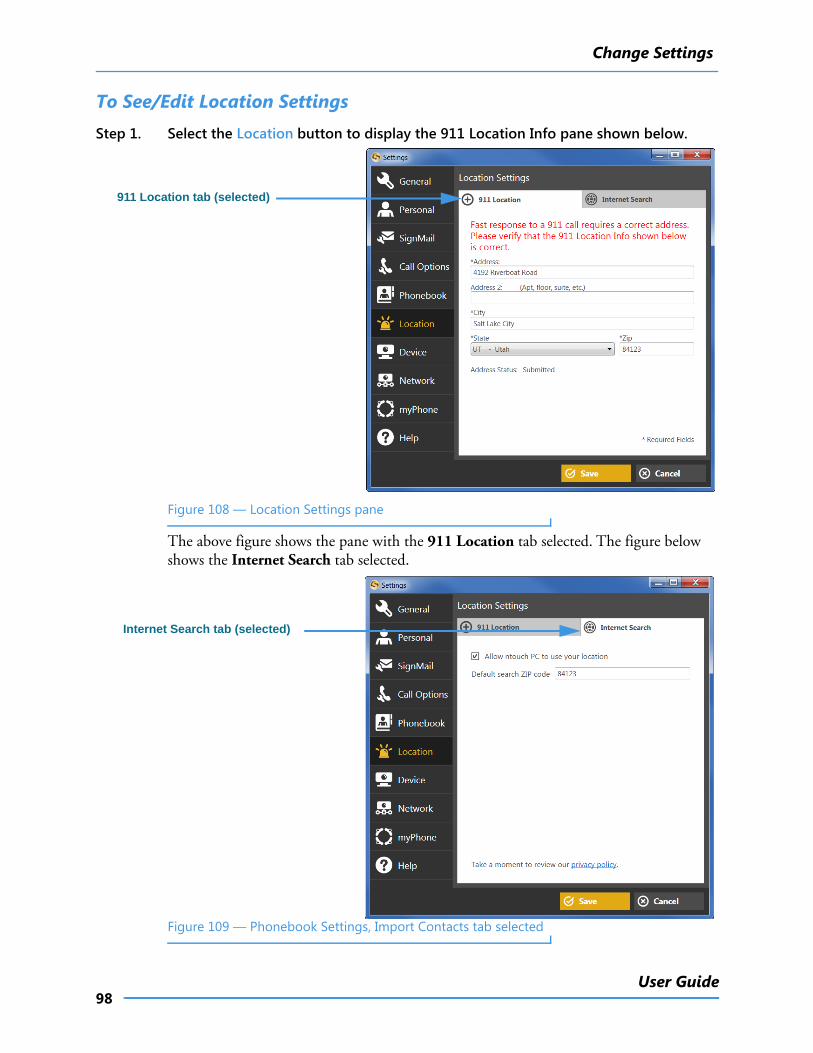
Change Settings
98User Guide
To See/Edit Location SettingsStep 1. Select the Location button to display the 911 Location Info pane shown below.
Figure 108 — Location Settings pane
The above figure shows the pane with the 911 Location tab selected. The figure below shows the Internet Search tab selected.
Figure 109 — Phonebook Settings, Import Contacts tab selected
911 Location tab (selected)
Internet Search tab (selected)
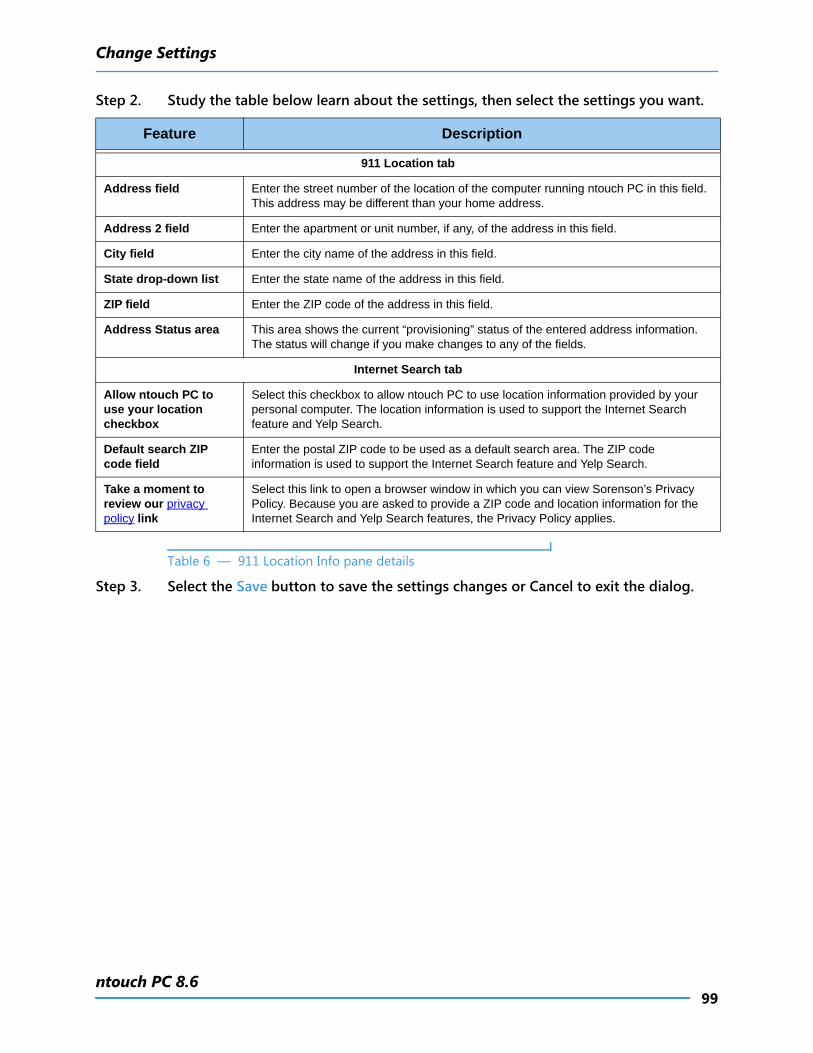
Change Settings
99ntouch PC 8.6
Step 2. Study the table below learn about the settings, then select the settings you want.
Table 6 — 911 Location Info pane details
Step 3. Select the Save button to save the settings changes or Cancel to exit the dialog.
Feature Description
911 Location tab
Address field Enter the street number of the location of the computer running ntouch PC in this field. This address may be different than your home address.
Address 2 field Enter the apartment or unit number, if any, of the address in this field.
City field Enter the city name of the address in this field.
State drop-down list Enter the state name of the address in this field.
ZIP field Enter the ZIP code of the address in this field.
Address Status area This area shows the current “provisioning” status of the entered address information. The status will change if you make changes to any of the fields.
Internet Search tab
Allow ntouch PC to use your location checkbox
Select this checkbox to allow ntouch PC to use location information provided by your personal computer. The location information is used to support the Internet Search feature and Yelp Search.
Default search ZIP code field
Enter the postal ZIP code to be used as a default search area. The ZIP code information is used to support the Internet Search feature and Yelp Search.
Take a moment to review our privacy policy link
Select this link to open a browser window in which you can view Sorenson’s Privacy Policy. Because you are asked to provide a ZIP code and location information for the Internet Search and Yelp Search features, the Privacy Policy applies.

Change Settings
100User Guide
To See/Edit Device SettingsStep 1. Select the Device button to display the Audio/Video Device Settings pane shown
below.
Figure 110 — Device Settings pane
Step 2. Study the table below to learn about the settings, then select the settings you want.
Table 7 — Device Settings pane details
Step 3. Select the Save button to save the settings changes or Cancel to exit the dialog.
Feature Description
Camera drop-down list Select this drop-down list to view the camera(s) connected to your computer. Select the camera to use with ntouch PC from the list. The list will typically show only one camera.
Camera Properties button
Select this button to view details about the third-party camera software that controls the operation of the selected camera. Refer to your PC or camera manufacturer’s documentation for information on how to use and/or update the camera’s software.
Microphone drop-down list
Select this drop-down list to view the microphone(s) connected to your computer. Select the microphone to use with ntouch PC from the list. The list will typically show only one microphone (i.e., the built-in microphone or in an attached camera).
Speakers drop-down list
Select this drop-down list to view the speakers available for use with ntouch PC. Select the speakers to use with ntouch PC from the list.
Device button (selected)
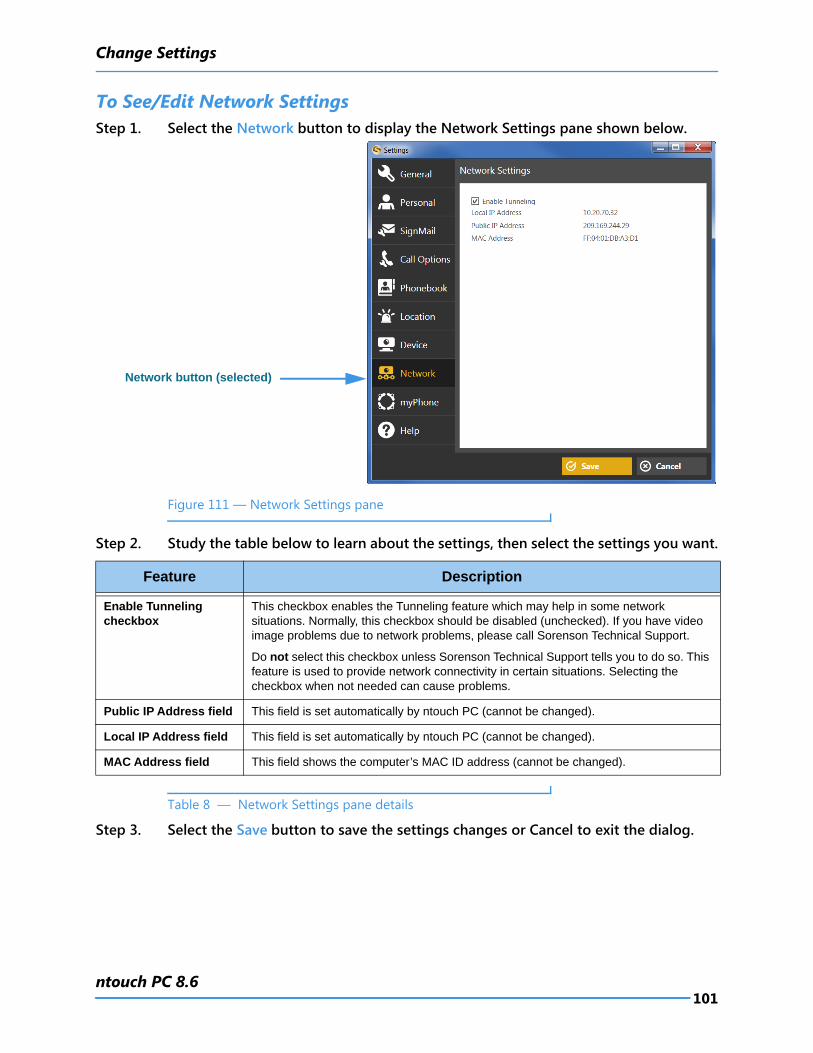
Change Settings
101ntouch PC 8.6
To See/Edit Network SettingsStep 1. Select the Network button to display the Network Settings pane shown below.
Figure 111 — Network Settings pane
Step 2. Study the table below to learn about the settings, then select the settings you want.
Table 8 — Network Settings pane details
Step 3. Select the Save button to save the settings changes or Cancel to exit the dialog.
Feature Description
Enable Tunneling checkbox
This checkbox enables the Tunneling feature which may help in some network situations. Normally, this checkbox should be disabled (unchecked). If you have video image problems due to network problems, please call Sorenson Technical Support.
Do not select this checkbox unless Sorenson Technical Support tells you to do so. This feature is used to provide network connectivity in certain situations. Selecting the checkbox when not needed can cause problems.
Public IP Address field This field is set automatically by ntouch PC (cannot be changed).
Local IP Address field This field is set automatically by ntouch PC (cannot be changed).
MAC Address field This field shows the computer’s MAC ID address (cannot be changed).
Network button (selected)
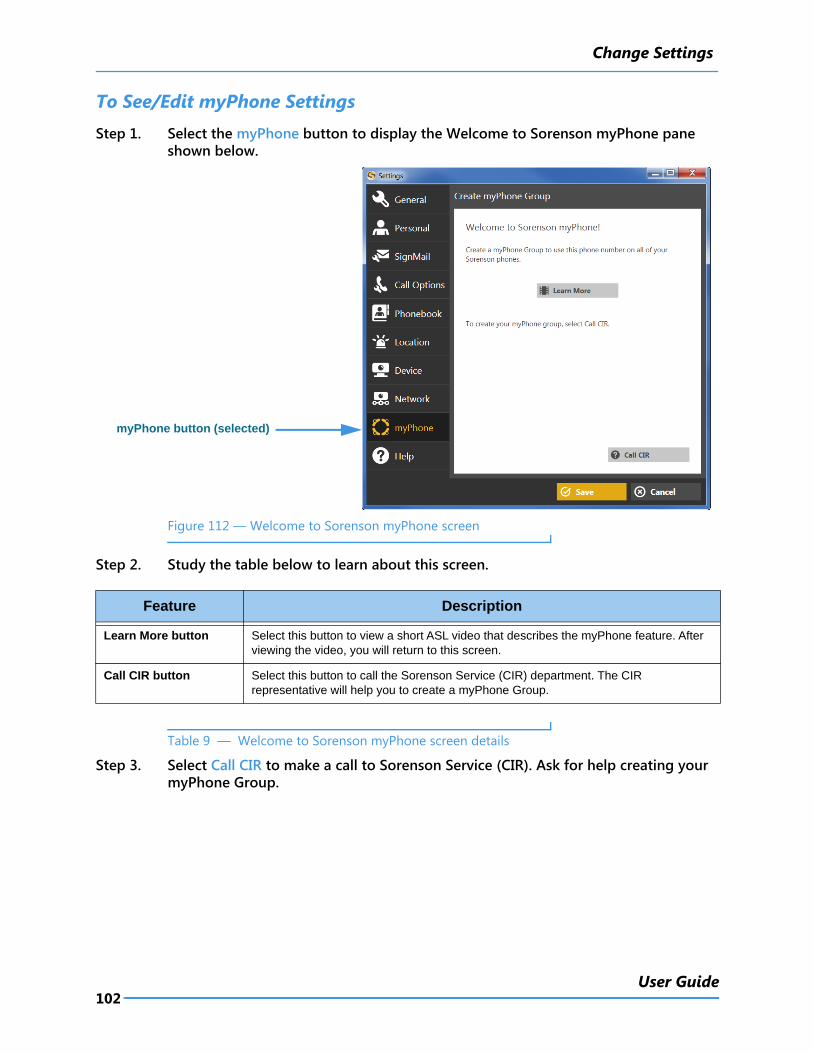
Change Settings
102User Guide
To See/Edit myPhone SettingsStep 1. Select the myPhone button to display the Welcome to Sorenson myPhone pane
shown below.
Figure 112 — Welcome to Sorenson myPhone screen
Step 2. Study the table below to learn about this screen.
Table 9 — Welcome to Sorenson myPhone screen details
Step 3. Select Call CIR to make a call to Sorenson Service (CIR). Ask for help creating your myPhone Group.
Feature Description
Learn More button Select this button to view a short ASL video that describes the myPhone feature. After viewing the video, you will return to this screen.
Call CIR button Select this button to call the Sorenson Service (CIR) department. The CIR representative will help you to create a myPhone Group.
myPhone button (selected)
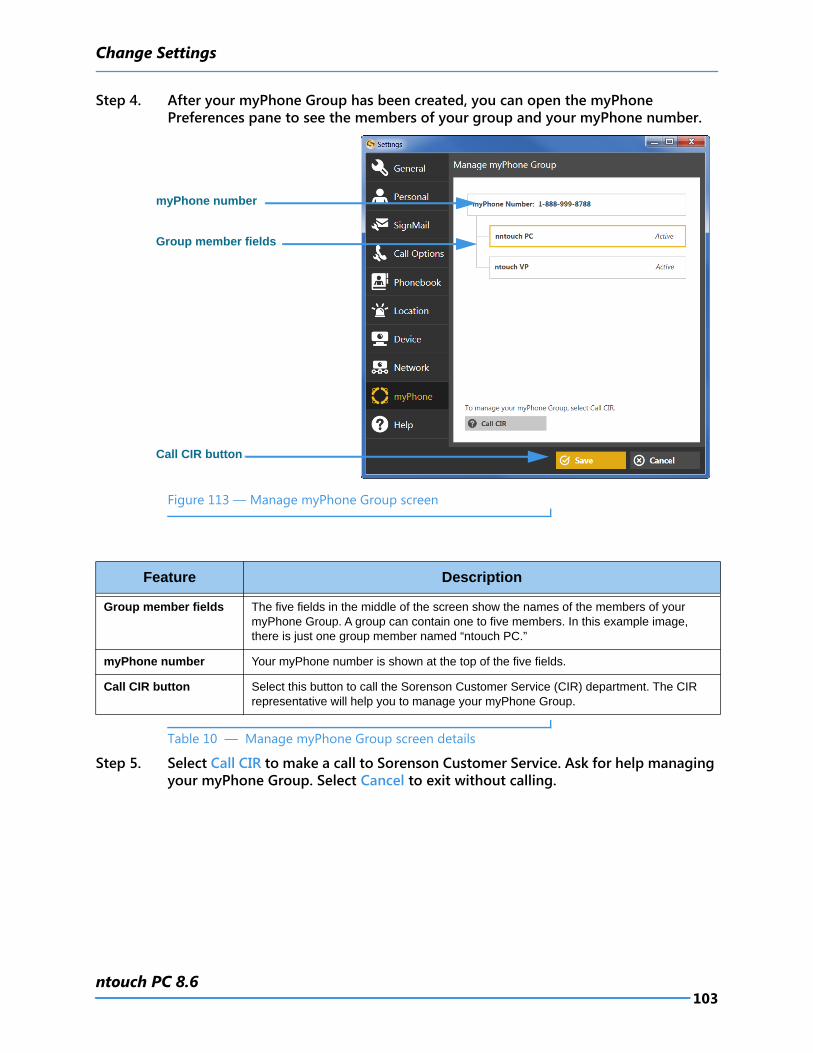
Change Settings
103ntouch PC 8.6
Step 4. After your myPhone Group has been created, you can open the myPhone Preferences pane to see the members of your group and your myPhone number.
Figure 113 — Manage myPhone Group screen
Table 10 — Manage myPhone Group screen details
Step 5. Select Call CIR to make a call to Sorenson Customer Service. Ask for help managing your myPhone Group. Select Cancel to exit without calling.
Group member fields
myPhone number
Call CIR button
Feature Description
Group member fields The five fields in the middle of the screen show the names of the members of your myPhone Group. A group can contain one to five members. In this example image, there is just one group member named “ntouch PC.”
myPhone number Your myPhone number is shown at the top of the five fields.
Call CIR button Select this button to call the Sorenson Customer Service (CIR) department. The CIR representative will help you to manage your myPhone Group.
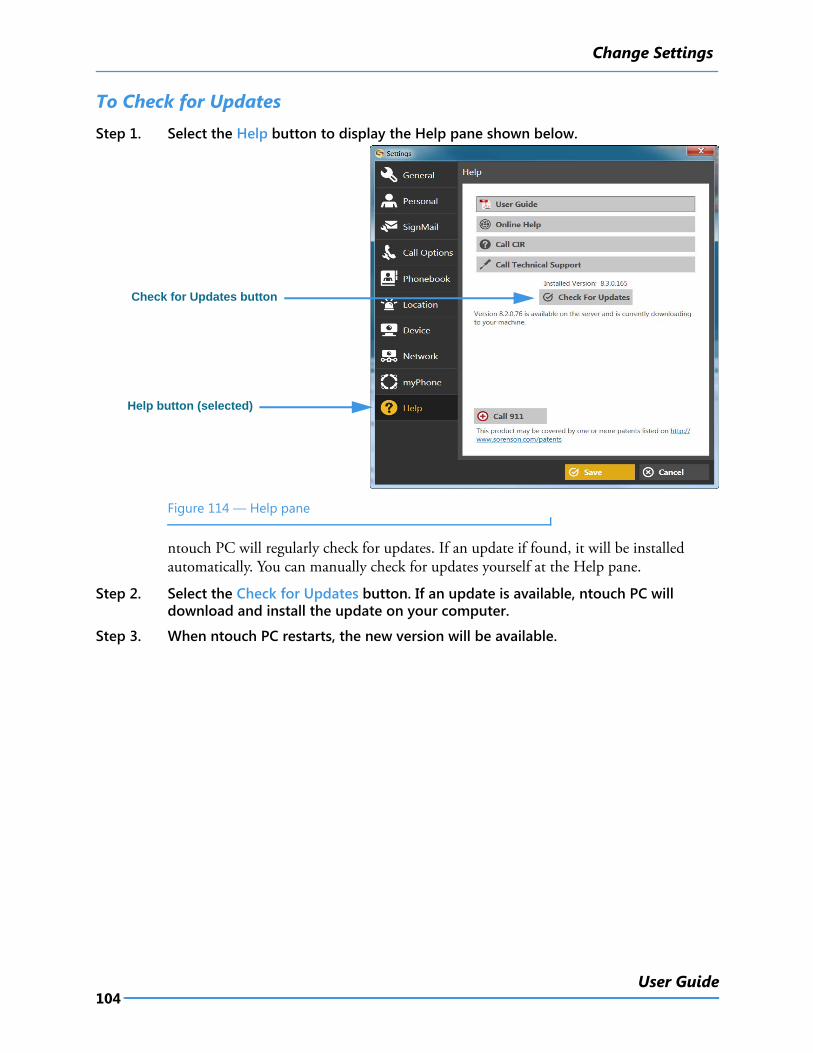
Change Settings
104User Guide
To Check for UpdatesStep 1. Select the Help button to display the Help pane shown below.
Figure 114 — Help pane
ntouch PC will regularly check for updates. If an update if found, it will be installed automatically. You can manually check for updates yourself at the Help pane.
Step 2. Select the Check for Updates button. If an update is available, ntouch PC will download and install the update on your computer.
Step 3. When ntouch PC restarts, the new version will be available.
Check for Updates button
Help button (selected)
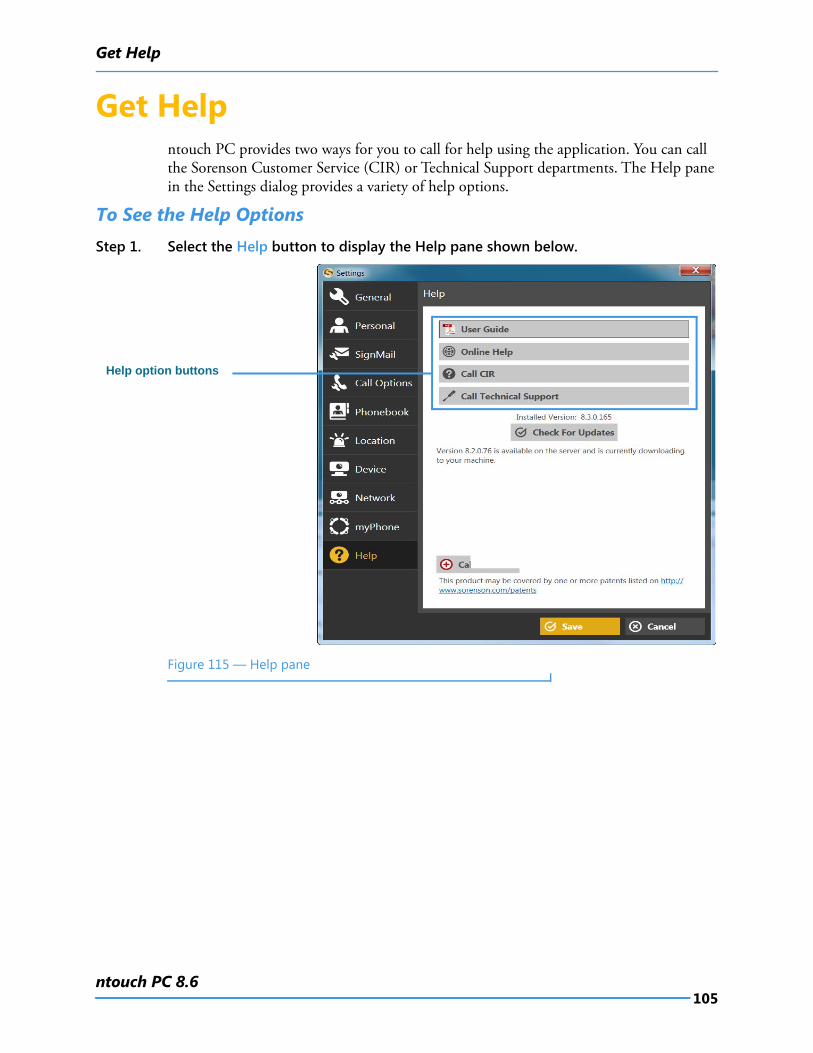
Get Help
105ntouch PC 8.6
Get Helpntouch PC provides two ways for you to call for help using the application. You can call the Sorenson Customer Service (CIR) or Technical Support departments. The Help pane in the Settings dialog provides a variety of help options.
To See the Help OptionsStep 1. Select the Help button to display the Help pane shown below.
Figure 115 — Help pane
Help option buttons
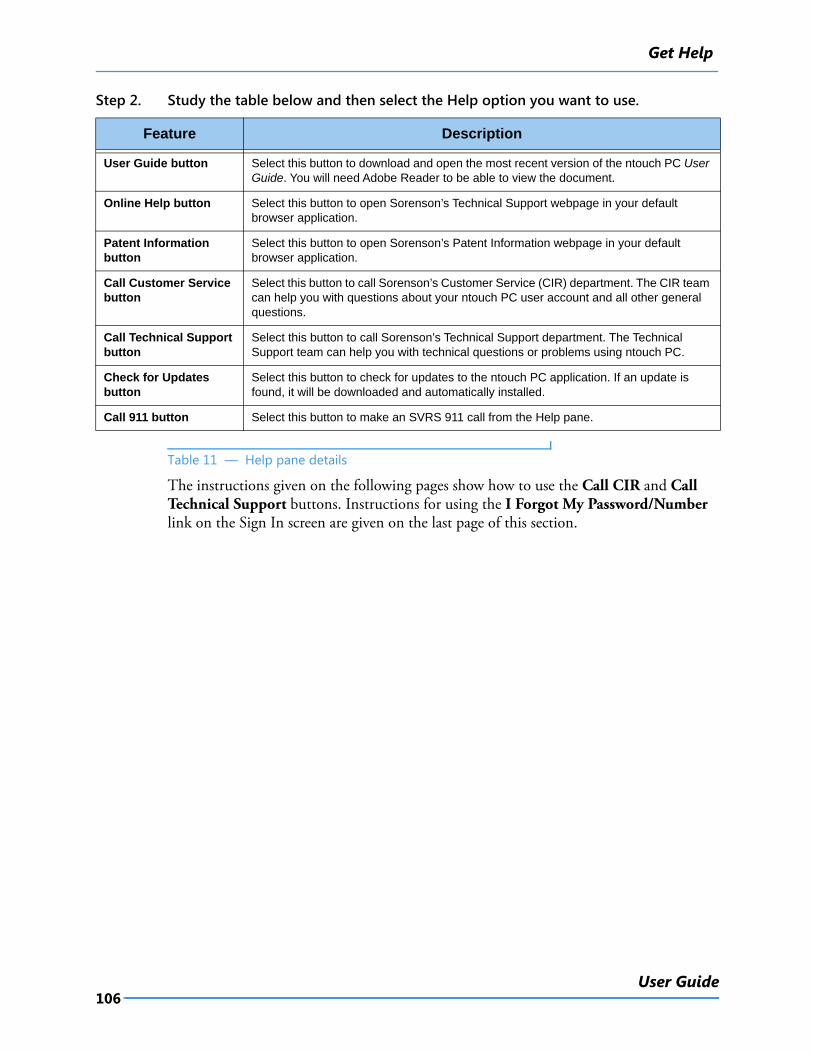
Get Help
106User Guide
Step 2. Study the table below and then select the Help option you want to use.
Table 11 — Help pane details
The instructions given on the following pages show how to use the Call CIR and Call Technical Support buttons. Instructions for using the I Forgot My Password/Number link on the Sign In screen are given on the last page of this section.
Feature Description
User Guide button Select this button to download and open the most recent version of the ntouch PC User Guide. You will need Adobe Reader to be able to view the document.
Online Help button Select this button to open Sorenson’s Technical Support webpage in your default browser application.
Patent Information button
Select this button to open Sorenson’s Patent Information webpage in your default browser application.
Call Customer Service button
Select this button to call Sorenson’s Customer Service (CIR) department. The CIR team can help you with questions about your ntouch PC user account and all other general questions.
Call Technical Support button
Select this button to call Sorenson’s Technical Support department. The Technical Support team can help you with technical questions or problems using ntouch PC.
Check for Updates button
Select this button to check for updates to the ntouch PC application. If an update is found, it will be downloaded and automatically installed.
Call 911 button Select this button to make an SVRS 911 call from the Help pane.
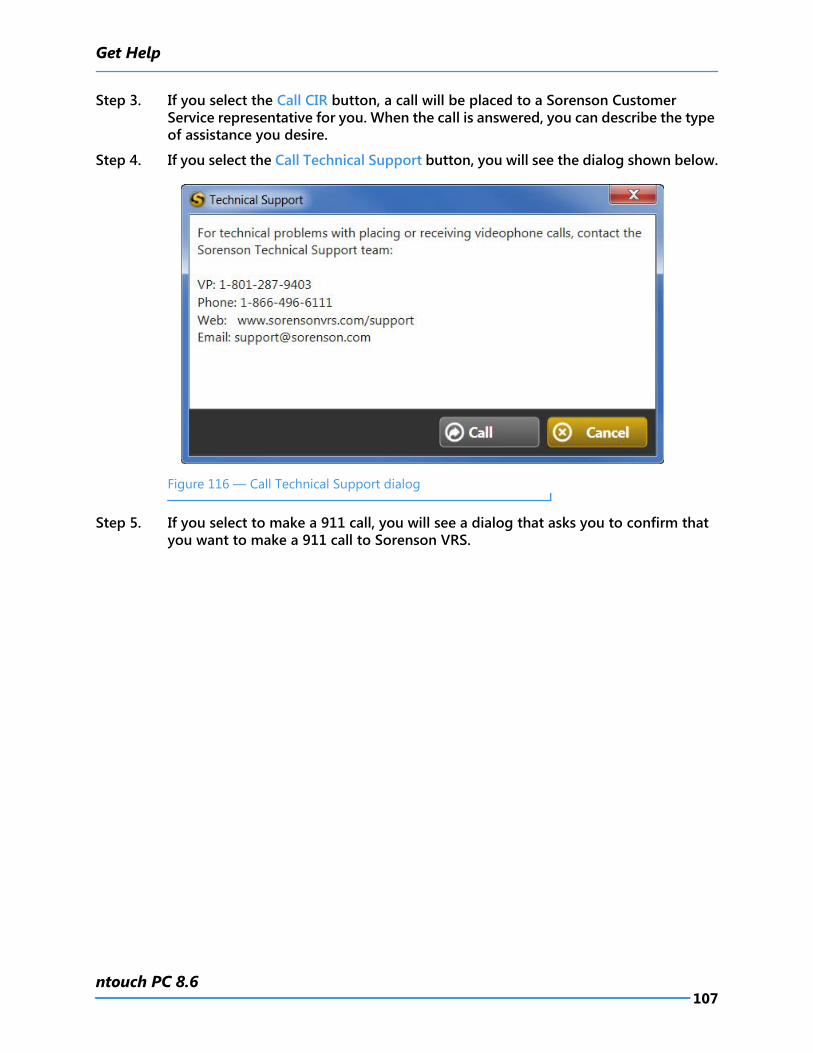
Get Help
107ntouch PC 8.6
Step 3. If you select the Call CIR button, a call will be placed to a Sorenson Customer Service representative for you. When the call is answered, you can describe the type of assistance you desire.
Step 4. If you select the Call Technical Support button, you will see the dialog shown below.
Figure 116 — Call Technical Support dialog
Step 5. If you select to make a 911 call, you will see a dialog that asks you to confirm that you want to make a 911 call to Sorenson VRS.
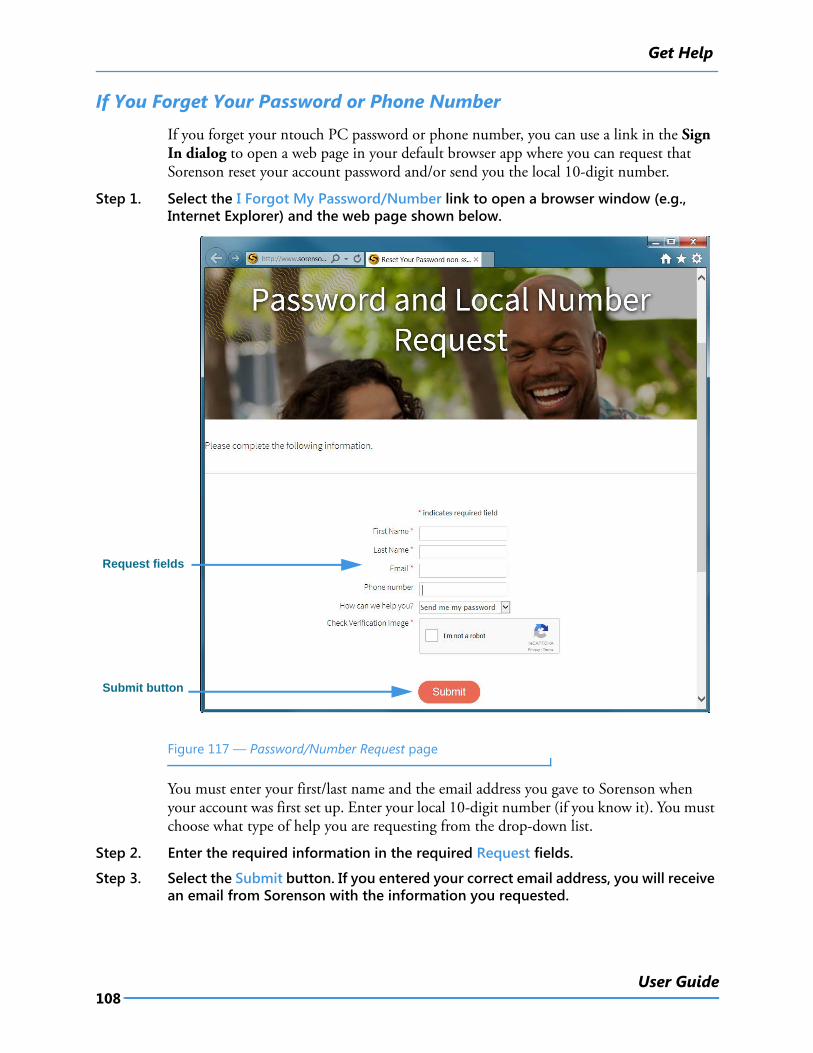
Get Help
108User Guide
If You Forget Your Password or Phone Number
If you forget your ntouch PC password or phone number, you can use a link in the Sign In dialog to open a web page in your default browser app where you can request that Sorenson reset your account password and/or send you the local 10-digit number.
Step 1. Select the I Forgot My Password/Number link to open a browser window (e.g., Internet Explorer) and the web page shown below.
Figure 117 — Password/Number Request page
You must enter your first/last name and the email address you gave to Sorenson when your account was first set up. Enter your local 10-digit number (if you know it). You must choose what type of help you are requesting from the drop-down list.
Step 2. Enter the required information in the required Request fields.
Step 3. Select the Submit button. If you entered your correct email address, you will receive an email from Sorenson with the information you requested.
Request fields
Submit button


![UTM · UTM UNIVERSITI TEKNOLOGI MALAYSIA ... Data Communication Lab ... You will enter to PC Start menu. 2) [ITS1to ITS6] Select icon Desktop](https://img.pdfslide.net/doc/110x75/5b87a0387f8b9a435b8bd68d/utm-utm-universiti-teknologi-malaysia-data-communication-lab-you-will.jpg)