Embed Size (px)
Citation preview

Océ Colour Copy 7.0
User Manual

Copyright
© 2003 Océ-Technologies B.V. Venlo, The Netherlands All rights reserved. No part of this work may be reproduced, copied, adapted, or transmitted in any form or by any means without written permission from Océ.
Océ-Technologies B.V. makes no representation or warranties with respect to the contents hereof and specifically disclaims any implied warranties of merchantability or fitness for any particular purpose. Further, Océ-Technologies B.V. reserves the right to revise this publication and to make changes from time to time in the content hereof without obligation to notify any person of such revision or changes.
Edition 10-2003
Océ-Technologies B.V.
US
Trademarks
Products in this manual are referred to by their trade names. In most, if not all cases, these designations are claimed as trademarks or registered trademarks of their respective companies.
Safety information
Warning: This is a Class A product. In a domestic environment this product may cause radio interference in which case the user may be required to take adequate measures.
This manual contains the following safety information:Where applicable, cautions and warnings are used throughout this manual to draw your attention to safety precautions to take.

Table of Contents 3
Table of Contents
Chapter 1Getting StartedAbout Océ Colour Copy 10
Checking installation 10Starting Océ Colour Copy 11
Main window 12Status light 12
Registering the software 13Configuring the scanner and the printer 14
Defining the Océ Scanner 15Defining a TWAIN Scanner 16Defining a printer 17
Calibrating the copying system 23Selecting user options 26
Choosing a scanning mode 26Setting preferences 26
Making a simple copy 33Selecting the paper size and copy count 34Selecting the medium 34Setting contrast and brightness 35Making copies 36Reprinting copies 36
Chapter 2Using copy functionsSelecting output options 38
Setting margins 39Setting trim lines 39Labeling a copy 39Optimizing printing space 39Aligning a copy 40Mirroring a print 40
Using the tiling function 41Selecting the tile size 42Setting overlap and glueing marks 42
The output preview 43Working with tiles 44Working with an area of interest 45

4 Océ Colour Copy 7.0 User Manual
Zoom into the preview 46Working with the Automatic Deskew 46The roll preview 47Saving copy presets 47
Chapter 3Adjusting imagesAdjusting image brightness and contrast 50
Creating filters in Color Mode 50Making image adjustments 50Working in the overview and zoom windows 52Reading the Histogram 54Setting the black and white points 54Adjusting the gamma 56Creating Filters in Black and White Mode 56Making image adjustments 58Creating Filters in Grayscale Mode 59Working in the filter archive 62
Chapter 4Using archiving functionsArchiving copies 66
Opening the archive window 66The archive buttons 67Scanning files into the archive 68Printing from the archive 69Moving or copying files between archives 69
Making copies in batches 70Editing archive images 73
Import and export functions 74Viewing functions 75Edit functions 75Starting the ‘Editor’ 78Viewing the image 78Cancelling an editing change 79Rotating and mirroring the image 79Despeckling the image 79Editing an image selection 79Deskewing the image 80Printing the image 82

Table of Contents 5
Chapter 5Scan into file & Scan into emailMaking a scan into a file 84
Selecting the scanner 85Selecting the filename and file format 85Available options 85Selecting the sizes and resolution 86Setting contrast and brightness 86
Making a scan into email 87Making scans 88
Appendix AGlossary
Adaptive thresholding 90Additive colours 90Bitmap image 90Black point 90Blueprint 90Blur 90Brightness 91Calibration 91CALS 91CCD 91CCITT Group 3 91CCITT Group 4 92CIE 92CIE LAB 92CMY(K) 92Colour 92Colour bit depth 93Colour cast 93Colour correction 93Colour management system (CMS) 93Colour separation 94Colour space 94Compression 94Contrast 94Density 94Density units 94Device dependent colour space 95Device independent colour space 95Device profile 95Display 95

6 Océ Colour Copy 7.0 User Manual
Dpi 95Dsp 95Dynamic range 96Equalizing 96Foreground 96Gamma 96Gamut 96Gamut transformation (or gamut mapping) 96GCR 96Gray balance adjustment 97Halftoning 97Histogram 97HLS 97HSV 97Hue 98ICC 98Indexed colour 98Ink jet colour printer/plotter 98Interpolation 98JPEG compression 99Lossless compression 99Lossy compression 99LZW 99Monochrome 99Neutral 99Noise 99Palette 100Pixel (picture element) 100Printable colour 100Resolution 100RGB 100RIP 100Runlength encoding 101Saturation 101Scanning 101SCSI 101Shadow detail 101Stitching 102Subtractive colours 102TIFF file format 102Tonal distribution 102Tone 102Tone compression 103Tone curves 103True colour 103TWAIN 103

Table of Contents 7
UCR 103Vector file 104Vectorization 104Video card 104Viewing conditions 104White point 104Zoom 105
Appendix BPrinter Configuration under TCP/IPPrinter Configuration under TCP/IP 108
Appendix CThe spooling subsystemWorking with the spooling subsystem 112
Installing the Spooling Subsystem 112Job Processing 113
Appendix DMiscellaneousHow to Read this Manual 116User Survey 117Addresses of Local Océ Organizations 119
Appendix EOcé Colour Copy LiteFeatures in the Lite version 122Index 123

8 Océ Colour Copy 7.0 User Manual

9
Océ Colour Copy 7.0
User Manual
Chapter 1Getting Started
■ Starting Océ Colour Copy (page 11)■ Registrating the software (page 13)■ Configuring the scanner and printer (page 14)■ Calibrating the copying system (page 23)■ Selecting the user options (page 26)■ Making a Simple Copy (page 33)

10 Océ Colour Copy 7.0 User Manual
About Océ Colour Copy
Océ Colour Copy integrates high quality colour scanning technology with large format digital reproduction. Its outstanding features are:
■ Direct copy size up to the maximum width of the scanner and printer■ Fine detail reproduction using modern scanning technology■ Automatic filter function for high colour fidelity■ Tiling functions■ Multiple copies from one input scan■ State of the art scan-to-file functionality■ Client-server printing architecture■ User-friendly graphic interface
Checking installation
Before starting Océ Colour Copy, check the following items:
■ Packing list■ Hardware requirements■ Printer setup■ SCSI driver controller■ Dongle (hardlock) installation and keycode target■ Océ Colour Copy installation software

Getting Started 11
Starting Océ Colour Copy
Turn on your peripheral equipment such as scanner or printer, before you start the computer. If you forget to do this, you will have to restart the computer after you switch on the peripherals.
▼ To start Océ Colour Copy
1 From the Windows ‘Start’ menu, select ‘Programs’.2 Choose Océ Colour Copy. The main window appears.
[1] Océ Colour Copy main window
A
B
C
D

12 Océ Colour Copy 7.0 User Manual
Main window
■ Scanner and printer connection, status light (A)■ General copy settings (B)■ Image brightness and contrast settings (C)■ Command buttons: ‘Archive’, ‘Scan into File’, ‘Scan into EMail’, ‘Reprint’
and ‘Copy’ (D).
Status light
The status light and Copy button display different colours depending on the scanner’s state of operation. Following the installation of Océ Colour Copy, the ‘LED’ shows black because there is no scanner or printer selected yet.
You can only make copies when the copy button is green.
Note: If you use a TWAIN scanner, the status light will always show green once the drivers are installed, even if the scanner itself is switched off or not connected at all.
Light colour Scanner statusGreen operationalBlack does not respondYellow warming upRed detects an error

Getting Started 13
Registering the software
Prior to using Océ Colour Copy, you register the software by either scanning or by entering manually a 24-character key code.
▼ To scan the keycode
1 Start Océ Colour Copy.2 From the ‘Configuration’ menu, choose ‘Hardware’.3 Insert the registration printout (provided with the software) into the scanner in
the direction of the arrow.4 Click ‘Scan’.5 Once the scanning completes successfully, click ‘OK’ to restart the computer.
▼ To enter the key code manually
1 Start Océ Colour Copy.2 From the ‘Configuration’ menu, choose ‘Hardware’.3 In the key code box, enter the key code provided with the software.
Note: You must respect the upper and lower case letters.4 When you have entered the keycode, please restart your computer.

14 Océ Colour Copy 7.0 User Manual
Configuring the scanner and the printer
Before making copies, you must indicate a scanner and a printer to use in your copying system. If there are several connected scanners and printers, you must identify the devices to use with the correct configurations.
▼ To access the configuration window
1 Start Océ Colour Copy. The main window appears.2 From the ‘Configuration’ menu, select ‘Hardware’. This dialog box appears:
[2] Hardware configuration

Getting Started 15
Defining the Océ Scanner
You must have a connected and powered on scanner to use with Océ Colour Copy.
▼ To select and configure the scanner
1 In the ‘Scanner’ box of the ‘Setup’ window, click the arrow to select a connected scanner from the list.
[3] Scanner configuration
This dialog is device-dependent. The options you may be able to choose range from resolution to paper adjustment, via ICC profile.

16 Océ Colour Copy 7.0 User Manual
Defining a TWAIN Scanner
The manufacturers TWAIN drivers must be installed on the system. Make sure the scanner is connected and powered on.
▼ To select and configure the scanner
1 In the ‘Scanner’ box of the ‘Setup’ window, click the arrow to select a connected scanner from the list.
2 No additional options are necessary.
Attention: If you are using a TWAIN scanner, Océ Colour Copy will launch the driver software provided by the TWAIN manufacturer. There is no standard for the functionality of a TWAIN driver. The interface and functionality of TWAIN drivers vary from company to company. What is possible with one driver, might not be possible with another.
Certain features within Océ Colour Copy are not possible with TWAIN scanners:
■ Scan to file■ Preview (TWAIN driver usually has its own preview)■ Setting of paper sizes (handled by the TWAIN driver)■ Use of automatic modes■ Use of the manual mode (can usually be done within the TWAIN driver)

Getting Started 17
Defining a printer
Once you have selected a scanner, you choose and configure a printer to use with Océ Colour Copy.
▼ To select a printer
1 In the ‘Available printers’ box of the ‘Setup’ window, select a printer from the list.
2 Click the arrow to move it to the list of ‘Installed printers’.
▼ To configure a printer with the calibration wizard
1 Below the list of installed printers, click ‘Options’.The ‘Connection’ dialog box appears to choose one of the following:■ For a network printer, select TCP/IP and enter the IP address and socket
number. Click ‘OK’.Note: The typical socket number for TCP/IP connected printers is 9100.■ For a windows printer, click the magnifying glass to search the network for
a remote printer. (Depending on the size of your network, this may take several minutes.)
■ For a dedicated printer, select ‘LPT’.■ For the spooling system, select ‘Output System’.

18 Océ Colour Copy 7.0 User Manual
Note: The available connection types are sorted in order of preference, the most recommended way of connecting the printer being the first option.
2 Click ‘Next’ to go to the Medium dialog box and select the type of medium.

Getting Started 19
3 Click ‘Next’ to go to the Loaded Consumables dialog box and select the type.

20 Océ Colour Copy 7.0 User Manual
■ ‘Size of roll’ to select the applicable options■ ‘Medium’ - if applicable■ ‘Ink type’ - if applicable
4 Click ‘Next’ to go to the Default print job settings dialog box.

Getting Started 21
■ ‘Quality‘ (quality settings are device-specific and not available on every printer)
■ ‘Dither pattern‘ to change the Dither method■ ‘Monochrome’ for black and white■ ‘Ink type’ - if applicable■ ‘Cut paper’ to enable or disable the cutter

22 Océ Colour Copy 7.0 User Manual
▼ To change the options of installed printers
1 From the list of installed printers, select the printer for which you want to change settings.
2 Click ‘Options’.3 Make applicable changes to connection, paper roll size, print quality, or
medium.4 Click ‘OK’ to confirm.
▼ To delete an installed printer
1 From the list of installed printers, click to highlight the printer that you want to delete.
2 Click ‘Delete’ to remove the printer from the list.

Getting Started 23
Calibrating the copying system
With Océ Colour Copy, the calibration of the copying system depends on three components: the scanner type, the printer type (with corresponding resolution and - to certain extents - the different printmodes), and the medium. If one of these components changes or if you are using several printers, you must perform a calibration for each configuration in order to obtain optimal output results.
Note: It is essential for the system to be properly calibrated. Please take your time to do the calibration. Only a well-performed calibration results in good copies!
When you add a device to the list of installed printers, the symbols ?! appear next to the name of the printer. This indicates that you must perform a calibration of the system before you can use the configuration.
To carry out the calibration process, you must print a computer-generated raster file, the target, on the selected printer using the selected medium. You then scan the resulting printout to produce a profile for the selected scanner-printer combination. This is called a closed-loop calibration.
To select the output settings, select the scanner and the installed printer in the hardware window (‘Configuration’ / ‘Hardware’)
▼ To select the output settings
1 From the ‘Setup’ window, select the scanner and the installed printer (See procedures above).
2 Select the medium you want to use with the installed printer from the drop-down list.Note: For a complete list of specific media types supported by your printer, please consult your printer user documentation.
3 Click the ‘Options’ button to go to the printer dialog (See procedures above).Select the resolution and the quality level in the ‘Print job’ menu.

24 Océ Colour Copy 7.0 User Manual
▼ To print target
1 Click ‘Next‘ in Default print job setting box to go to the Calibration dialog box.2 Place the media you have selected in the printer.3 Click ‘Print target’. The printer prints an approximate ISO-DIN A4 size target,
which is mosaic of colours with an arrow in the center and surrounded by a white margin and black cutting lines.Note: Please check the label at the bottom of the target to see whether you have selected the right resolution and quality settings.
▼ To scan target
1 Remove the target printout from the printer. 2 Cut along the black lines. Do not cut off the white margins around the mosaic.3 Insert the target in the scanner in the direction of the arrow. Insert the target
without skewing, otherwise an error message appears and you will have to repeat the process. Note: Make sure that the ink has dried before you do this step to prevent smears on the scanner glass plate.
4 Click the ‘Scan target’ button. 5 Once the scan completes successfully, the status ‘OK’ appears next to the
printer in the installed printer list. This indicates that your copying system has correctly calibrated for the scanner, printer, and medium.Note: The positioning of the target inside the scanner depends on whether you have selected centered in the scanner setup.
6 Clicking right on the quality settings opens a menu to change media parameters and size correction.

Getting Started 25
Note: Under certain circumstances, it may be necessary to change the default media parameters INKLIMIT or GAMMA. This is usually not necessary and can lead to a color mismatch of original and copy if a wrong value is input. During the color calibration, correction factors for width and length are calculated. These factors can be changed manually. This is usually not necessary and can lead to a size mismatch of original and copy if a wrong value is input.
7 Click ‘Finish‘to complete the Calibration and the Option wizard.

26 Océ Colour Copy 7.0 User Manual
Selecting user options
Once you have calibrated your copying system, you can select certain user options when working with Océ Colour Copy.
Choosing a scanning mode
In Océ Colour Copy main window, you can activate the check box ‘Auto Start’. This convenient option is intended to help you save time: just insert your document into the scanner and it will automatically start reading.
Setting preferencesWhen working with Océ Colour Copy, you can select the type of paper format, units, or Warning messages to display. Also you can adjust the options for Label, Accounting, EMail and User administration.
▼ To set preferences
1 From the ‘Configuration’ menu, choose ‘Preferences’. A dialog box appears.

Getting Started 27
2 From the ‘General’ tab, select the following applicable preferences:■ In the ‘Unit’ box, select millimeter or inch.■ In the ‘Paper format box, select ISO or US.Note: If a touchscreen if available to you, activate the corresponding check box.■ Select the ‘maximum length of prescan’ value, if you don’t want to prescan
an entire image (for example, an oversize drawing.) However, this may affect the ‘Automatic’ brightness and contrast setting and the preview mode.
■ By changing the ‘Media filter’, you select the locally available Océ paper brands.
■ Choose ‘Use screen ICC profile’ if available. ■ Scanner status changes can be displayed or hidden. Accordingly, activate or
not the corresponding box.■ Check for news, if you want to be reminded of update possibilities.
3 From the ‘Warning options’ tab, select the cases in which you want to have warnings show before copying, for outputs that involve: ■ the scanned file already exists (overwrite warning)■ the disc space is not sufficient (free capacity of your hard disk in Mb) ■ you print from the archive using a scaling factor ■ the copy count exceeds a certain number of copies■ paneling is active■ margins exceed a certain size■ the gamma has been changed■ the image has been mirrored■ the scan resolution is a fixed dpi value■ calibration too old (indicates a possible need to make a new calibration)

28 Océ Colour Copy 7.0 User Manual
4 From the ‘Label tab’, select the type of information you want to have printed on the copy label, and click ‘OK’. The label can contain the following standard pieces of information:■ Date and time■ Program name■ Version■ Scanner■ Scan resolution■ Mode■ Printer■ Printing resolution■ Scaling factor

Getting Started 29
5 From the ‘Accounting tab’, you can select how you want the accounting done. You can either export the accounting information to an ASCII textfile or to an Excel file.■ Textfiles are continuously written. After each action in the program, one line
is added to the file.■ Alternatively, Excel files can be written at the program shutdown. Since the
Excel-export takes some time, this is the preferable solution.■ A customer name can either be given as a default or on a copy-by-copy basis.
This gives you four choices:
‘Always ask’ checkbox
‘Customer info’ editline
Result
On Blank Software asks for customer info before each copy
On Filled out Software asks before each copy, using the given default.
Off Blank No customer info is written to the accounting logfile
Off Filled out Always the same customer info is written to the logfile

30 Océ Colour Copy 7.0 User Manual
6 From the ‘User Administration’ tab, select the type of user rights each user must have. Note: The default user "_" has all administrator´s rights.

Getting Started 31
7 A dialog appears and you are prompted to enter a personal user name and a password.
8 To rename the predefined administrator account, click on the button ‘Edit User’:
You will then be prompted to rename the user and to enter a password:
9 As an administrator you can create user accounts with different rights with the button ‘New User’:
Select a name and a password, the rights for this user and click ‘OK’.

32 Océ Colour Copy 7.0 User Manual
To delete users, click the bin button:
Determine if a password is required at program start and which default user is to logged in. You can set that the program log in the last user, and select which user should be logged in after the current user has logged out.
From the main interface, a drop down list will allow to switch between the various users. And, from the Configuration menu, the item ‘Save Current Settings on Log off’ will allow the user to save their last settings.
10 From the ‘EMail tab’, select the type you prefer for Scan to EMail. Enter your email account and your mail server. If you do not know the server adress, please call your network administrator.
Using the WizKey
To use the WizKey you must have administrator´s rights. If the User administration has been opened, and if you plug a WizKey to the USB port, it will be identified and its number will be shown under ‘Userkey’. You can edit the WizKey as any user and define its user rights. Each time the WizKey is plugged in a login occurs; if it is plugged out, you will be logged out.

Getting Started 33
Making a simple copy
Once you have configured and calibrated your copying system, you can start making copies. You begin by selecting basic copy settings such as paper size, copy count, medium, Color Mode or Black and White Mode and contrast and brightness from the ‘General’ tab of the main window.
[4] Océ Colour Copy main window

34 Océ Colour Copy 7.0 User Manual
Selecting the paper size and copy count
▼ To enter original paper size and copy count
1 In the ‘Copies’ box, select the number of output copies. The button to the right of the copy count enables the collating function. This function allows you to select pictures to print them as a set.
2 In order to work with the collating function, click the button ‘Start Collated Print Set’.
3 Scan your first picture, enter the necessary settings and press the Copy button. The print job is not sent to the printer but put back for the batch mode instead.
4 Load the next picture, adjust parameters and click the Copy button. When you have handled all the pictures you want to print together, click the active button ‘Finish Collated Print Set’. You will be asked if you want to open the Print Set window. By confirming you enable the batch mode.
5 Under ‘Original Size’ and ‘Copy Size’, enter the format manually or click the drop down arrow to obtain a list of standard sizes. Note: When selecting a size, you can use either ISO or US standard formats. This depends on the standard setting you set as "Paper Format" in the Preferences dialog (see ‘Setting preferences’ on page 26).
6 Alternatively, you can select:■ ‘Retrieve width’ to have the software determine the width of the original.
You must then enter the height manually.■ ‘Auto width detection’. You enter the height manually.■ ‘Auto height detection’. You enter the width manually.■ ‘Auto size detection’
7 If you are making a 1:1 copy, the input paper size transfers automatically to the ‘Copy size’ box. Alternatively, you can select a ‘Zoom’ factor to enlarge or reduce your output size with respect to your original image.
Selecting the medium
The ‘Medium’ box shows the medium that you have calibrated for the selected scanner and printer. If you wish to use another medium, check that you have properly calibrated it with the scanner and printer in use.
▼ To select medium and roll size
1 In the ‘Medium’ box, click ‘Change’ to display the list of available media.2 Select the medium.3 Select the roll size.

Getting Started 35
Setting contrast and brightness
For simple copies, Océ Colour Copy can automatically correct for contrast and brightness.
▼ To set automatic contrast and brightness
1 From the contrast and brightness options at the bottom of the ‘General’ tab, choose color mode or black and white mode, than select ‘Automatic’.
2 In the box next to the ‘Automatic’ option, click the arrow to select the type of original:Color Mode:■ Unchanged (for fast copies without any particular quality■ Maps (maps without images, with colour preserving ‘black point’
correction)■ Photos (photographs and printed raster images without text)■ Lineart (technical drawings with sharp edges)■ CAD plots (original inkjet prints)■ Mixed originalsBlack and White Mode:■ Photos (photographs and printed raster images without text)■ Unchanged (for fast copies without any particular quality
3 Choose the brightness slider to make the copy darker (left) or brighter (right) than the scanned original.
4 Click Fast Draft Mode to use a lower scan resolution.Note: This can change the quality of the print.
▼ To apply a filter for brightness and contrast
1 From the contrast and brightness options at the bottom of the ‘General’ tab, select ‘Filter’.
2 In the box next to the ‘Filter’ option, click the arrow to select the filter to apply. If you are creating a new filter, see ‘Creating filters in Color Mode’ on page 48.

36 Océ Colour Copy 7.0 User Manual
Making copies
You can start making copies when the Copy button is green.
▼ To make copies
1 Insert your original into the scanner.2 Enter the copy settings.3 Click ‘Copy’ at the bottom of the ‘General’ tab. If you have connected the
printer directly to the computer running Océ Colour Copy, the output copy prints out simultaneously on the printer.
Reprinting copiesOnce you have checked a test copy for correct brightness and contrast, you can reprint it using different output options, or print the copy in several tiles.
▼ To reprint a copy
1 Click the ‘General’ tab of the main window to adjust the basic parameters.2 You can also adjust other parameters such as output options and tiling by
clicking on their respective tabs. (See chapter 2, ‘Using copy functions’ on page 37).
3 Click ‘Reprint’.

37
Océ Colour Copy 7.0
User Manual
Chapter 2Using copy functions
■ Selecting output options (page 38)■ Using the tiling function (page 41)■ The output preview (page 43)■ Saving copy presets (page 47)

38 Océ Colour Copy 7.0 User Manual
Selecting output options
Output options allow you to customize your copy by setting margins, nesting, and labeling. These options can apply for a single copy, additional copies, or copy to an archive (file).
Note: The same output options remain effective until you reset them.
To access the output options window, click the ‘Output Options’ tab.
[5] Output options window

Using copy functions 39
Setting margins
You can set individual margin sizes for the left, right, top, and bottom edges.
Note: You reduce the maximum print width when you add margins.
▼ To set margin size (in mm)
1 From the ‘Output options’ tab, select the ‘Margins’ check box. 2 In the margin size box, set the size for the top, left, right, and bottom margins. 3 Alternatively, you can set the size for the left margin and click ‘borders equal’
to have equally sized margins.
Setting trim lines
The trim lines option prints black borders as a cutting frame.
▼ To set trim lines
■ From the ‘Output options’ tab, select the ‘Trim lines’ check box.
Labeling a copy
The ‘Print label’ option gives you the date, time, output device, resolution value, and scaling information on the margin of the copy.
▼ To label a copy
1 From the ‘Output options’ tab, select the ‘Print label’ check box.2 Below this check box, enter any other useful information (optional).
Optimizing printing space
When you are making several copies, and at least two copies will fit on the available paper width, you can select the nesting function to print the copies side by side to optimize the paper use.
▼ To optimize printing space
1 From the ‘Output options’ tab, select the ‘Use full paper width’ check box.2 In the ‘distance’ box, set the space required between two prints.

40 Océ Colour Copy 7.0 User Manual
3 Depending on the output size, select ‘Autorotate’ to rotate the print automatically to save media.
Aligning a copy
You have the option of aligning your output copy to the left, right, or center on the paper.
▼ To align a copy
1 From the ‘Output options’ tab, select the ‘Alignment’ check box.2 Choose ‘left offset’, ‘right offset’, or ‘centered’.3 In the alignment box, set the distance for the offset.
Mirroring a print
The mirroring option gives you a mirror copy of the original image.
▼ To mirror a print
■ From the ‘Output options’ tab, select the ‘Mirroring’ check box.

Using copy functions 41
Using the tiling function
For large output format copies such as posters that exceed the maximum print width or the print length of a printer, you can print the copy in several different tiles and re-assemble them to produce a single large copy.
▼ To access the tiling window
■ Click the ‘Tiling’ tab. The following window appears:
[6] Tiling parameters window
42 Océ Colour Copy 7.0 User Manual
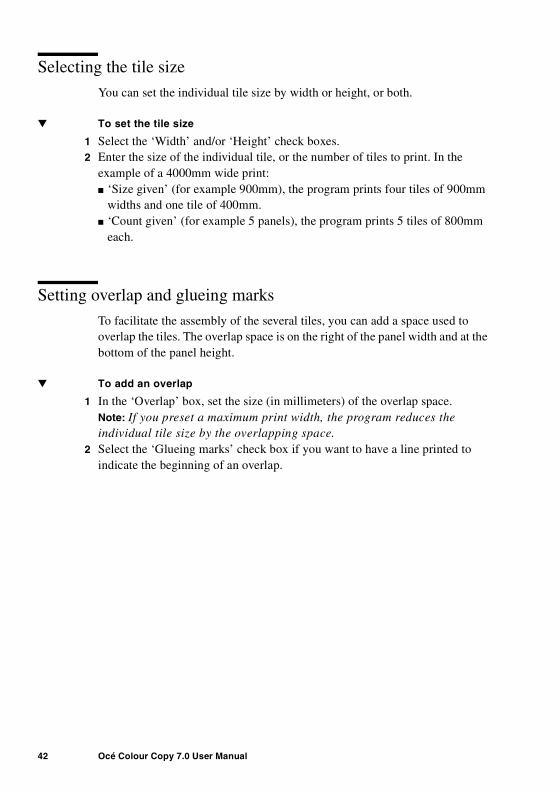
Selecting the tile size
You can set the individual tile size by width or height, or both.
▼ To set the tile size
1 Select the ‘Width’ and/or ‘Height’ check boxes.2 Enter the size of the individual tile, or the number of tiles to print. In the
example of a 4000mm wide print:■ ‘Size given’ (for example 900mm), the program prints four tiles of 900mm
widths and one tile of 400mm.■ ‘Count given’ (for example 5 panels), the program prints 5 tiles of 800mm
each.
Setting overlap and glueing marks
To facilitate the assembly of the several tiles, you can add a space used to overlap the tiles. The overlap space is on the right of the panel width and at the bottom of the panel height.
▼ To add an overlap
1 In the ‘Overlap’ box, set the size (in millimeters) of the overlap space. Note: If you preset a maximum print width, the program reduces the individual tile size by the overlapping space.
2 Select the ‘Glueing marks’ check box if you want to have a line printed to indicate the beginning of an overlap.

Using copy functions 43
The output preview
A preview of the output copy shows on screen the partitioning of tiles, which allows you to select individual tiles for printing. In this screen you can also select a particular area of interest in the image to print.
▼ To activate the preview screen
1 Click the speed button ‘Scan Pre-View’ (depicted below) or select this command in the View menu.

44 Océ Colour Copy 7.0 User Manual
Working with tiles
▼ To select individual tiles (panels) for printing
1 At the top of the preview screen, choose the ‘Select panels’ button (’C’).2 Click on the tiles you don’t want to print by clicking on them. The remaining
tiles selected for printing have a red border around them.
▼ To change the number of tiles
1 From the ‘Tiling’ tab, make the necessary modifications. The changes are shown immediately on the preview.

Using copy functions 45
Working with an area of interest
The AOI, or area of interest, is a zone selected on the image for an enlargement or the printout.
▼ To select an area of interest
1 If the preview window is empty, click ‘Rescan’ to display the image.2 Select ‘Set area of interest/Cropping’. A cross-hair appears on the preview
image.3 Click and pull on the rectangle to cover the area you want to select, and release.
The area of interest that you have selected has a dotted rectangle.
▼ To move the area of interest
1 Click on the rectangle you have selected.2 Drag the rectangle to the new location and release.
To zoom into the area of interest, click ‘Zoom to AOI/Cropping’. To zoom out, click the button again:
To delete the area of interest, click ‘Reset AOI Setting’:
All functions invoked through the speed buttons are available in the menu ‘Pre-View’.

46 Océ Colour Copy 7.0 User Manual
Zoom into the preview
The preview allows for a one-level zoom.
▼ To zoom into the preview
1 Click on the ‘Zoom In’ button.
An enlarged picture will be displayed at low resolution.2 To get a finer image, click on ‘Scan Pre-View’.
3 To get back to the original image, click on the button ‘Zoom Out’:
Note: The zooming functions can be combined with the ‘Zoom to AOI’ function.
Working with the Automatic Deskew
Will be used if the pattern is in a distored position.
▼ To activate Automatic Deskew
1 Click on the ‘Automatic Deskew’ button. An enlarged picture will be displayed at low resolution.
2 To get back to the original position, click on ‘Automatic Deskew’ again:
Note: These functions can not be combined with the ‘Zoom to AOI’ function.

Using copy functions 47
The roll preview
The lower part of the preview window shows a preview of how the image will appear on the roll. As soon as one of the output options is changed, the preview adjusts accordingly. You can see:
■ Number of copies■ Additional paper-save copies■ Margins and distances■ Alignment■ Tiling frames
Note: If you do not wish to see the roll preview, deactivate it in the Pre-View menu.
Saving copy presets
You can save the frequently used copy settings in presets. You store these presets in directory, and load them as necessary.
▼ To save a copy preset
1 Make the necessary copy settings and output selections.2 From the ‘File’ menu, select ‘Preset’.3 Choose ‘Save’. A dialog box appears. 4 Give the preset a name. The file extension for copy presets is *.PRE.
▼ To load a copy preset
1 From the ‘File’ menu, select ‘Preset’.2 Choose ‘Load’. A browser appears.3 Select the copy preset to use, and click ‘OK’.

48 Océ Colour Copy 7.0 User Manual

49
Océ Colour Copy 7.0
User Manual
Chapter 3Adjusting images
■ Creating filters to adjust image brightness and contrast (page 50)■ Reading the histogram (page 54)■ Using the filter archive (page 62)

50 Océ Colour Copy 7.0 User Manual
Adjusting image brightness and contrast
Océ Colour Copy has a filter mode that allows you to make basic image adjustments to a scanned original prior to copying. You can create filters in the Color Mode and the Black and White Mode.
Creating filters in Color Mode
▼ To create a new filter
1 Activate the radio button ‘Manual’.2 Click ‘New’. The filter editor appears. An histogram shows the distribution of
pixels. It will help you set, if necessary, the black and white points. In the editor you will also be able to modify the background and the gamma value, choose a filter and a scan resolution.
3 Click ‘Save’.4 Enter a name for the new filter.5 Click ‘OK’.
▼ To adapt an existing filter
1 Highlight the filter you want to change in the drop down list under ‘Manual’.2 Click ‘Change’. The filter editor appears.3 Make the necessary image adjustments.4 Save them as a filter.
Making image adjustments
You can do the following image adjustments prior to copying, in the preview window (see ‘Working in the filter archive’ on page 62):
■ Black and white points (see ‘Setting the black and white points’ on page 54)■ Gamma (see ‘Adjusting the gamma’ on page 56)
▼ To make image adjustments
1 In the ‘mode’ box, click the arrow to select the type of original you are copying. With difficult originals we recommend working with special filter in order to achieve an optimal print quality.

Adjusting images 51
■ Descreening combines the advantages of the two filters Soften and Sharpen. Therefore, these filters are best suited for rastered originals. Depending on the raster of the original either the special filter Descreen1 or Descreen2 can be more effective.
■ With the help of the soften filter the image sharpness of the whole image is reduced by smoothing the color transitions of clearly defined image lines and shaded areas. The functions Soften and Soften More are excellent for photos and only differ in the intensity of their effect.
■ If your image is blurry, you may use the sharpen filter to additionally enhance the image sharpness. This filter increases the contrast between bright and dark pixels and significantly enhances the edge sharpness for text and lines. With the filters Sharpen more and Sharpen most the intensity of the edge sharpness can be increased even more.
■ None (for fast copies without any particular quality)■ Maps (maps without images, with colour preserving ‘black point’
correction) and Mixed originals (printed originals with text and areas of colour)
■ Photos (photographs and printed raster images without text)■ Lineart (technical drawings with sharp edges)■ Monochrome (for black + white)
2 In the ‘background correction’ box, select either:■ ‘Contrast enhancement’ for printed originals, photos, and imported graphic
files with low black and white point correction.■ ‘Colour preservation’ for technical drawings, maps/mixed originals with
strong black and white point correction.
3 From the combo box Scan resolution select the dpi value that you would like to scan with. The selection of the dpi values offered depends on the de-vice used and is different for each scanner type. We recommend accepting the standard value Automatic. Colorado uses the optimal dpi value for scan-ning, depending on the device and the scaling factor used. The setting Warp can be compared to the ’Draft mode’ in printing and is intended for drafts

52 Océ Colour Copy 7.0 User Manual
[7] Color ModeFilter window
4 Click ‘Preview’. The image scans, and displays in an ‘overview’ and ‘zoom’ window. The lightness range in the histogram displays.
Working in the overview and zoom windows
■ The overview window shows the original in its entirety. ■ The zoom window focuses on a scan area delineated by a small square in the
overview window.
When you modify a colour parameter such as gamma or black and white point, the zoomed area within the dotted outline rescans automatically using the updated values.

Adjusting images 53
[8] Overview and Zoom windows
▼ To change the position of the zoom area
■ Click on the dotted outline in the overview window and drag to a new position.
▼ To resize the overview window
1 Click on the window border and drag to resize.2 Click ‘Rescan’ in the overview window to get an adjusted image size.
▼ To resize the zoom window
■ Click on the window border and drag to resize. An updated zoom area automatically displays in the newly sized window.
▼ To rescan the entire image using updated values
■ Click ‘Rescan’ at the bottom of the overview window.

54 Océ Colour Copy 7.0 User Manual
Reading the Histogram
■ The x-axis shows the brightness values, with the left extremity representing low intensity values (black) and the right extremity high intensity values (white).
■ The y-axis shows the frequency of occurrence for each red, green, and blue (RGB) value.
[9] Histogram
▼ To magnify the histogram
■ Click on the up or down arrow at the top right corner of the histogram.
Setting the black and white points
You can set the black and white points for an optimal contrast adjustment. This function determines two points for each colour channel (red, green, blue.) Thereafter, all colour values below the first point are interpreted as black. Similarly, all colour values above the second point are then seen as white. This ensures that the scanned original contains a pure white without any gray haze, as well as a pure black with full saturation.
The range of values located between the two points are transformed over the full contrast range from 0 to 100% to obtain an optimal colour reproduction.
Below the histogram, the three colour bars represent the RGB values. The length of the bars represents the active range of the contrast filter. The empty area to the left of each colour bar shows the range that is full black, while the empty area to the right of each colour bar represents the range that is pure white.

Adjusting images 55
▼ To set the points automatically
■ Click the ‘Suggest’ button below the Gamma bars. For most uses, it is sufficient to let the program make the contrast adjustment.
▼ To set the points manually (for all colours)
Note: The black point (left extremity) moves using the left mouse button (normal click), and the white point (right extremity) moves with the right mouse button (right click).
1 Select the ‘Red, Green, Blue’ check boxes to move the three colour bars simultaneously.
2 Click and drag the bars to set the black point.3 Right-click and drag the bars to set the white point. The effect shows
immediately in the zoom window.
▼ To set the points manually (for each individual colour)
1 Select the check box to the left of the colour for which you want to set the white point. Work on one primary colour (red, green, blue) at a time.
2 Right click to drag the white point to each respective colour’s peak value on the histogram (where it is most pronounced). The activated colour appears in the square box above the colour check boxes.
3 Repeat the step above to set the black point (using the normal click). We recommend setting the black point to the same value for each primary colour.
▼ To use the eyedropper to set the points
Note: Below the colour bars, you find an eyedropper icon on the left for the black point, and another eyedropper on the right for the white point.
1 Click the black eyedropper icon. 2 Choose a dark area in the image to use as reference for the black point by
clicking and drawing an outline around the sample area. 3 The program calculates an average colour value for the sample area, and
assigns that value to the black point. The image automatically updates using the corrected value.
4 Click the white eyedropper button. 5 Repeat step 2 and 3 for the white point.

56 Océ Colour Copy 7.0 User Manual
Adjusting the gamma
A gamma correction increases or decreases the brightness, or colour intensity, of the values between the black and white points, which remain constant. When you set the gamma values, you can choose to work with RGB (red, green, blue) or CMY (cyan, magenta, yellow). Activate a radio button correspondingly
[10] Preview window: gamma settings
The gamma value is set to a standard of 1.000 for all colours.To change gamma values simultaneously, activate the check box to the right of the gamma values and proceed with the correction.
To change gamma values separately, clear the check box to the right of the gamma values, then click on the slider to set the colour value for each colour.
If necessary, click "Reset" to return to the initial gamma values.
Creating Filters in Black and White Mode
▼ To create a new filter
1 Activate the radio button ‘Manual’.2 Click ‘New’. The filter editor appears. An histogram shows the distribution of
pixels. It will help you set, if necessary, the black and white points. In the editor you will also be able to modify the background and the gamma value, choose a filter and a scan resolution.
3 Click ‘Save’.4 Enter a name for the new filter.5 Click ‘OK’.

Adjusting images 57
▼ To adapt an existing filter
1 Highlight the filter you want to change in the drop down list under ‘Manual’.2 Click ‘Change’. The filter editor appears.3 Make the necessary image adjustments.4 Save them as a filter.
[11] Black and White Mode filter window

58 Océ Colour Copy 7.0 User Manual
Making image adjustments
▼ Threshold Manual
When using the threshold manual control, a brightness value is determined. Below this "threshold" a pixel is considered as not present (white).
▼ Threshold Adaptive
The setting is best suited for originals with a varying background, i.e. containing bright map parts only hard to read, as well as very dark and dirty parts. Using the adaptive threshold, the scanner reads several lines and defines different thresholds for bright and dark areas. With the variability slider you can determine the number of thresholds.
▼ Dithered
Dithering is the process of turning a monochrome picture into a fake grayscale one.
▼ Edge Enhancement
Edge enhancement is especially recommended for copies of technical drawings, maps etc... Here you can choose between the options none, slight, medium and strong. Drawings and maps with fine lines will obtain excellent edge sharpness with this setting.
▼ Inverted
When using this setting, all white pixels are displayed black and all black pixels are displayed white.
▼ Scan Resolution
In the drop down list "Scan resolution" select the dpi value you want to scan with. The list of the dpi values is device-dependent. We recommend accepting the standard value "Automatic". Océ Colour Copy uses the optimal dpi value for scanning, according to the device and the scaling factor selected.

Adjusting images 59
Creating Filters in Grayscale Mode
▼ To create a new filter
1 Activate the radio button ‘Manual’.2 Click ‘New’. The filter editor appears. 3 Click on the Grayscale button. An histogram shows the distribution of pixels.
It will help you set, if necessary, the black and white points. In the editor you will also be able to modify the background and the gamma value, choose a filter and a scan resolution.
4 Click ‘Save’.5 Enter a name for the new filter.6 Click ‘OK’.
▼ To adapt an existing filter
1 Highlight the filter you want to change in the drop down list under ‘Manual’.2 Click ‘Change’. The filter editor appears.3 Make the necessary image adjustments.4 Save them as a filter.
[12] Black and White Mode filter window

60 Océ Colour Copy 7.0 User Manual
▼ The Histogram Window
The x-axis of the histogram shows the brightness values, the y-axis the frequency of occurrence of each grayscale value. On the x-axis, the left side represents values of low intensity (black) while the right side indicates values of high intensity (white). So the black point can be set with the left mouse button and the white point with the right one.
▼ How to Set the Black and White Points
For most applications it will suffice to let the program determine the black and white point automatically with the Suggest button. The program searches for the darkest pixel to set the black point and set the white point at the highest intensity.
▼ Background Correction
There are two methods for correcting the background. In the drop down list you can choose between "Color Preservation" and "Contrast Enhancement". The background correction is strongly dependent on the black and white points and the sort of the original that has been scanned.
Contrast enhancement works well with printed originals, photos and imported graphic files (RIP) with low black and white point corrections.
Color preservation is best suited to technical drawings, maps and mixed originals with strong black and white point corrections.
▼ Gamma Value
When performing a gamma correction, both the white and black points remain constant. Only the intensity of the grayscale values between these points will be enhanced or lowered. The gamma value is set to a standard of 1.000.
▼ Special Filters
While working with difficult originals you should use special filters in order to achieve optimal print quality. There are three filter sorts: "Descreen", "Soften", "Sharpen", "Photo", "Lineart" and "Maps/mixed originals" . If you do not want to use any filter, choose "None" in the drop down list.
■ Descreening combines the advantages of the two filters Soften and Sharpen. This filter type is best suited for rastered originals. Depending on the raster of the original either the special filter Descreen 1 or 2 will prove more effective.

Adjusting images 61
■ With the help of a softening filter the image sharpness is reduced: color transitions of clearly defined image lines and shaded areas are smoothed. The functions Soften and Soften More are excellent for photos and only differ in the intensity of their effect.
■ If your image is blurry, you may use a sharpening filter to enhance its sharpness. This filter increases the contrast between bright and dark pixels and significantly enhances the edge sharpness for text and lines. The filters Sharpen more and Sharpen most give extra intensity to the edge sharpness.
■ Photos (photographs and printed raster images without text)
■ Lineart (technical drawings with sharp edges)
■ Maps (without images, with colour preserving black point correction) and mixed originals (with text and areas of colour)
▼ Scan Resolution
Under "Scan Resolution" select the dpi value you would like to scan with. The list of dpi values is device-dependent. We recommend accepting the standard value "Automatic". Océ Colour Copy uses the optimal dpi value for scanning, depending on the device and the scaling factor used

62 Océ Colour Copy 7.0 User Manual
Working in the filter archive
Once you have made detailed colour corrections, you can save your settings and reuse them with a similar type of original. This saves you from restarting a entire process of colour correction for each original.
▼ To save the filter
1 Make the necessary adjustments to gamma and black and white points (see ‘Making image adjustments’ on page 50).
2 Once the filter is satisfactory, click ‘Save’. A dialog box appears.
[13] Filter dialog box
3 Give the filter a new name, and click "OK".

Adjusting images 63
▼ To delete a filter
1 From the ‘Filter’ menu, select ‘Filter archive’. A dialog box appears:
2 Select the filter you want to delete. 3 Right-click and select "Delete".
▼ To retrieve a filter
1 From the ‘Filter’ menu, select ‘Filter archive’. A dialog box appears.2 Select the filter to use.3 Right-click and select ‘Get filter’.4 Click ‘OK’ to copy using the filter settings.

64 Océ Colour Copy 7.0 User Manual

65
Océ Colour Copy 7.0
User Manual
Chapter 4Using archiving functions
■ Archiving copies (page 66)■ Copying in batches (page 70)■ Saving copy presets (page 73)

66 Océ Colour Copy 7.0 User Manual
Archiving copies
The archiving function lets you save the current scan in a special directory for printing individually or in batches at a later time. You can also scan image files directly into the archive for post-printing. You can create as many archives as your disk space allows.
Note: Before saving a scanned image to the archive, check that you have the correct brightness and contrast settings. Once the image is in the archive, you cannot readjust these settings unless you make another scan.
Opening the archive window
▼ To open the archive window
■ From the ‘General’ tab of the main window, click ‘Archive’.
[14] Archive window
▼ To display a short-cut menu
1 Select a file and right-click. A short-cut menu appears.2 From this menu, you have the same options like the MS-Explorer.

Using archiving functions 67
The archive buttons
[15] The buttons in the upper bar
[16] The buttons in the lower bar
▼ View
Under View, you can select whether the symbols are to be displayed large, small, as a list or with details. You can change the different views by using the combo box or by clicking on the menu field View. Under Details you will get important information on the file e.g. date of creation or date of last change, file and output size, and the output device.
▼ Insert Current
To archive the last/current copy, click on the menu field Insert current. The file is placed in the archive.
▼ Import File
With ‘RIP to File’ you can import vector files and various graphic formats (bmp, pcx, gif, png, tif, tga, jpg, hpg and ps).
After clicking on ‘RIP to File’, you will get to the window ‘RIP File and Archive’. If your operating system allows, you can determine under ‘ICC Options...’ whether a special profile is to be used. Depending on the color space you can use different ICC profiles or determine a path to a profile.With postscript files you will have to choose the most suitable color space.
The check box ‘Use Color Correction’ gives you the option to deactivate the color calibration (3-D filter) during file import. Under normal circumstances, you always should use the color correction filter.
Besides, you can change the copy size or the scaling factor, the printer and the medium. You can choose the automatic mode or select a filter you created. If you finally confirm the dialog with ‘OK’, the file will be transferred to a pgf file. This file gets a symbol and the initial filename and can be printed or edited at any time. The RIP to File button has an equivalent in the Actions menu.

68 Océ Colour Copy 7.0 User Manual
▼ Editor
Archived files can be edited with the internal editor. Mark the file that is supposed to be edited and click on the menu field Editor.
▼ Rotate Image
Using the menu field ‘Rotate Picture’, the archived files can be rotated by 90°, 180° or 270°. You can select the rotation degree by clicking the drop down arrow of the button. You can select the degree of rotation in the combo box to the right of the menu field. After the rotation process, a new file is created with the same filename and the addition ‘rotated’. This rotation degree effected last is applied to the speed button as well as the sub-item under ‘Actions’.
▼ Batch
The batch window will open, containing your marked files. The batch window can also be opened from the Actions menu.
Scanning files into the archive
▼ To scan directly into the archive in different modes
1 Insert a document into the scanner.2 In the archive window, click on the arrow at the ‘Scan and RIP’ button. You
can choose the mode you want.
▼ Scan and RIP:
the scanned data are stored in the archive
▼ Scan into File:
the scanned data are stored in a file; different file formats are available.
▼ Scan into EMail:
the scanned data will be sent via E-mail; different file formats are available.

Using archiving functions 69
▼ Copy:
the scanned data will be printed.
▼ Copy and RIP:
the scanned data will be printed and stored in the archive.
3 Set your copy settings in the corresponding window.4 Click ‘OK’ to scan the document into the archive.5 In the archive window, right-click the file to rename it.
▼ To scan documents continuously into the archive
1 From the ‘Configuration’ menu, select ‘Scan mode’.2 Choose ‘Continuous scan’.3 Click ‘Archive’ to open the archive dialog box.4 Insert the document into the scanner.5 Click ‘Scan’ (’D’). The general copy settings window appears.6 Select the input size of the original.7 By default, Océ Colour Copy names each scanned image successively as
’current 1’, ’current 2’, ’current 3’, etc. Right-click to rename the file.8 As each scan completes, a prompt appears to ‘insert next...’9 To stop scanning, click ‘Cancel’ at the end of the scan.
Printing from the archive
▼ To print a file from the archive
1 From the archive window, select the file you want to print.2 Click on the menu field ‘print‘ or Right-click and select ‘print’. The Output
options window opens to let you choose copy settings.3 Click ‘OK’.
Note: You cannot modify brightness and contrast settings when printing from the archive. You must rescan an image to modify these settings.
Moving or copying files between archives
▼ To move or copy files between archives
1 In the ‘General’ tab, click ‘Archive’ to open the first archive window.2 Use Windows-Explorer like functionality to move or copy files among
different folders.

70 Océ Colour Copy 7.0 User Manual
Making copies in batches
The batch mode allows you to print multiple scans from the archive, using copy settings and filters that you have selected for each document.
▼ To copy in batches
1 To work on files in the Print Set mode, click the button ‘Start Collated Print Set’.
2 Scan your first picture in, enter the necessary settings and press the Copy button. The print job will not be sent to the printer but put back for the batch mode instead.
3 Load the next picture, adjust parameters and click the Copy button. 4 When you have handled all the pictures you want to print together, click the
activated button ‘Finish Collated Print Set’. You will be asked if you want to open the Print Set window.
5 From the archive window, select one or more files to print.6 Click the ‘Print Set’ button or select ‘Print Set’ in the menu ‘Actions’.
The following window appears:
[17] Batch mode dialog box

Using archiving functions 71
7 Select an pgf-file and choose the copy settings for each file, such as the number of copies, output options, or tiling.
8 To add the current or last scanned file to the batch, click ‘Insert current’ (optional).
9 Set the batch count (number of batches to print.)10 Set the distance between copies.11 Click ‘Print’ to begin copying.
▼ To change the print order of files in a batch
1 Select the file.2 Click ‘Batch job up’ or ‘Batch job down’.
▼ Load Batch Jobs
With this menu item you can load saved batch jobs
▼ Add batch job
With this menu field you can add existing batch - jobs to the selected jobs.
▼ Save batch job
With this menu item you can save and name your batch job.
▼ Insert current
With this menu field the last copy or the last scan is added to the batch job.
▼ Import PGF-Files
With the menu field Import PGF-files pgf files can be imported into the batch.
▼ Scan Picture
You can also scan directly into the batch. To do this, click on Scan image in the batch window. A dialog (tab General) appears where you can enter the familiar output options such as original size, scaling, output device, medium, quality settings etc.. After entering the scan settings click on OK again. The original is read and you are asked for a name of the pgf file and to save it..
▼ Delete
With the menu field Delete or using the context menu you can remove the selected file from the batch window.
▼ Additional
Using the menu field Additional the picture preview window of the marked file can be closed.

72 Océ Colour Copy 7.0 User Manual
▼ Management of Compose Function
Left of the file name a little rectangle appears. The prime mark stands for composing, i.e. the outputs are automatically placed next to each other to optimally use the paper width. Composing works only for groups of jobs.
1 Use the up and down arrows or drag and drop to arrange the jobs in the desired way.
2 With the buttons:
all highlighted jobs can be marked for composing, marked for no composing or you can switch composing. If no jobs are highlighted, these buttons effect all jobs.These functions are also available using the right mouse button or using the "Edit" menu.
▼ Roll Preview of Compose Result
The roll preview is displayed below the list of batch entries. The preview shows the placement of the composed copies and the number of copies.
▼ Batch job up / down
The jobs in the batch window are processed and printed in the order of their entry. If you would like to change the order or the priority of the print jobs, proceed as follows: Select the desired job and then click on the menu field Batch job up or Batch job down until the job is at the desired position. You can also drag and drop the jobs up or down.
▼ Comment Field
Into the comment field you can enter a text for every batch job. This text will be saved with the batch job.
▼ Copy Count Control
At the right side of the file name you find two numbers. The first number indicates how often this job has already been printed, the second number indicates how often this job should be printed. This number is determined in the "Batch Count" field at the bottom of the window.
The job settings are made in the window at the right, where you can determine the output size, number of copies etc.

Using archiving functions 73
Editing archive images
With the image ‘Editor’, you can make edit images in the archive, such as:
■ Deskew ■ Despeckle■ Insert text■ Rotate, mirror, crop

74 Océ Colour Copy 7.0 User Manual
You will get to the editor selecting ‘Viewer/Editor’ in the File menu of the main interface. When you are in the editor, open the file you want to edit by clicking the speed button ‘Load File’:
In the RGB editor you will have the folllowing toolbar to work with:
Import and export functionsLoad
If you click on the icon ‘Load File’, a dialog appears. Its icons and the drop down lists at the top of the window facilitate the search for the desired file in the directory. If you search a particular type of file, select the corresponding file extension under ‘Filetype’. Only the corresponding files will be displayed. At the bottom of the window, under the entry field ‘Filename’, you get information on the highlighted file.
Save
When you click the save button, a dialog opens in which you have to determine a folder, a filename and a file format. Under ‘Options’ you will be able to enter quality settings such as color resolution and palette.
Scan
When you click on this button, the window ‘Scan to file’ appears. Make settings as usual.

Using archiving functions 75
Viewing functionsZoom in/out
The editor is in zoom mode as soon as an image has been scanned or loaded. Then the mouse pointer turns to a magnifying glass when on the copy. There are several ways of activating the zoom function:
■ Click the drop down arrow of the Zoom button and choose which function should be carried out (zoom in, zoom out or 1:1).
■ Left-click to magnify the image and right-click to scale it down. This action can be performed several times. When you left-click on a given area several times, it becomes the focus of the enlargement.
■ If you want only a detail to be zoomed in on, draw a frame around the desired area. Your selection is then magnified and centered in the active preview window.
Scroll bars will appear when the image does no longer fit on the actual window surface.
Zoom to Window Size
This function is active when at least on action was carried out. Click this icon to reset the image to its best resolution.
Edit functionsUndo
Undo will reverse only the last action.
Horizontal/Vertical Mirroring
Images can be mirrored on the horizontal or vertical axis.

76 Océ Colour Copy 7.0 User Manual
Rotate
You have the possibility to rotate images by 90° and 180° to the left, 90° to the right. By default, images will be rotated to the left by 90°. Click on the drop down arrow to open the menu and select a rotation degree. When the software has effected a rotation, say by 180°, the Rotate icon features this rotation degree.
If you simply click on the icon, this last action will be performed anew.
Invert Picture
If you click on this icon, you will obtain a colour negative of your image. That is to say that the original colours are replaced by their complementary colours.
Despeckling
The Despeckling button is only active when you work with black and white files. The despeckling function allows you to remove unwanted spots from a background. You can select an either fine or coarse despeckling.
To despeckle the image, click on the Despeckle button in the toolbar or select "Despeckling" under "Edit". Choose then a grade (fine or coarse) and click the Despeckle button again.
Nota bene: A coarse despeckling may entail information losses.
Manual Deskew
If your image is askew, you can adjust it with the deskew function. Firstly press the icon in heh toolbar to activate the function. The pointer shows two deskew points when you move it over the picture preview.
To define a line, position point A by pressing the left mouse button and point B by releasing it. Alternatively, you can click once for each point. The points you set are represented as crosses. If you decide to change the position of the tags after setting two deskew points and click once, the first point you set disappears, the former point B turns to point A and the new point is point B.
When two points are set, the deskew button displays an active feature. You cn now click on the button to invoke the deskew process.

Using archiving functions 77
The maximum shearing angle is 30°. You can read the angle degree at the bottom of the window. When you exceed this threshold, the red arrow will not be displayed in the deskew icon.
Crop
To remove image parts with the crop function, press the corresponding button first. The pointer, when on the image, shows a drag rectangle. You can define an area by pressing the left mouse button on a corner point, holding it while you drag the rectangle or click twice for two corner points.
When you have selected an area, the Crop button displays an active feature. Click on the button to start cropping.
You can move the area to a new position or resize it by dragging an edge towards the inside or the outside.
To define a new area, click outside the frame. This click sets the first corner point of the rectangle.
While selecting an area, the position of the pointer on the abscissa and the ordinate is displayed at the bottom of the window. There you can read:
■ the pointer position■ the position of the top left corner point■ the position of the right bottom corner point ■ the size of the selected area
Insert text
To insert a text, first click the button "Insert Text" in the toolbar. The pointer shows the three first letters of the alphabet.
Type in your text. You will see that the button "Insert Text" displays a red arrow. If you want to edit the font type and color, double-click. The window "Font options" opens. Confirm with "OK".
Click then the button "Insert Text" to exit the text mode.
Note: To delete a text, select "Undo the action". Bear in mind that only the last action can be undone in the editor.[18] Image ‘Editor’ window

78 Océ Colour Copy 7.0 User Manual
Starting the ‘Editor’
▼ To start the Editor from the image archive
1 In the ‘General’ tab, click ‘Archive’.2 In the image archive window, select the file to open in the Editor.3 Right-click the file, and select ‘PGF Editor’. You can click the speed button or
select the menu item under ‘Actions’.
▼ To start the Editor from the main window
■ From the ‘File’ menu, select ‘PGF Editor’.
▼ To scan an image into the ‘Editor’
1 Insert the document into the scanner.2 With the ‘Editor’ window open, click the ‘Scan Picture’ button on the toolbar.
The image scans and displays in the window.
Viewing the image
For performance reasons, the scanned image displays in black and white by default. You can change this display option to suit your image:■ Scale dark■ Scale middle■ Scale median
▼ To select the display option
1 From the ‘Options’ menu, select ‘Scale to gray’.2 Choose the display option.
▼ To zoom in the image
■ Click the zoom buttons on the toolbar.

Using archiving functions 79
Cancelling an editing change
You can undo only one level of image modification.
▼ To cancel an editing change
■ Click the ‘Undo the action’ button on the toolbar.
Rotating and mirroring the image
▼ To rotate the image
1 From the ‘Options’ menu, select ‘Rotate Picture’ or the command ‘Rotate’ in the Edit menu.
2 Choose the rotation angle. This value becomes the default value assigned to the ‘Rotate’ button on the toolbar.
3 Click ‘Rotate’.
▼ To mirror the image
■ Click the ‘Mirror’ button on the toolbar.
Despeckling the image
Despeckling allows you to remove unwanted spots from a background. You can select either fine or coarse despeckling.
▼ To despeckle the image
1 From the ‘Options’ menu, select ‘Despeckle’.2 Choose ‘Fine’ or ‘Coarse’.3 Click the ‘Despeckle’ button on the toolbar.
Editing an image selection
▼ To mark a selection area
1 Click the ‘Mark area’ button on the toolbar. A cross-hair appears.2 Click and drag to draw an outline around the selection area. 3 With a marked selection area, you can make the following manipulations, by
clicking on the corresponding button on the toolbar:

80 Océ Colour Copy 7.0 User Manual
▼ To crop the selection
1 Select the area to crop in the image.2 Click the ‘Crop’ button on the toolbar.
▼ To delete the selection
1 Select the area to crop in the image.2 Click the ‘Delete’ button on the toolbar.
▼ To insert text in a selection
1 Select the area in which you want to insert text.2 Click the ‘Text mode’ button. 3 Click the ‘Insert text’ button. A cursor appears inside the selection area.4 Type in your text. The font size of your text depends on the size of the selection
area.5 Click the ‘Mark area’ button, to exit the text mode.
Note: To delete the text you have just inserted, click the ‘Undo’ button. Keep in mind that only one level of ‘Undo’ is possible in the ‘Editor’.
Deskewing the image
If an image was skewed during scanning you can straighten it with the ‘deskew’ function.
Deskew 2 points (A) straightens the image along two vertical points or two horizontal points.
Deskew 3 points / crop (B) straightens the image along three vertical and horizontal points

Using archiving functions 81
▼ To deskew the image along 2 points
1 Click the ‘Set 2 Skewpoints’ button on the toolbar. The cursor becomes a cross-hair on the image.
2 Position the first point on the image, and click.3 Position the second point on the image, and click.4 Click the ‘Skew’ button on the toolbar. The image realigns along the selected
points (C).
▼ To deskew the image along 3 points
1 Click the ‘Set 3 Skewpoints’ button on the toolbar. The cursor becomes a cross-hair on the image.
2 Position the first point on the image, and click.3 Position the second point on the image, and click.4 Position the third point on the image, and click.5 Click the ‘Skew’ button on the toolbar. The image realigns along the selected
points (C).
▼ To deskew and crop the image
1 Deskew the image along 3 points.2 Click the ‘Skew and crop’ button on the toolbar. The image realigns along the
selected points, and discards any extra borders (C).
+ ++
+
A C
+ +
+B C

82 Océ Colour Copy 7.0 User Manual
Printing the image
▼ To print the image from the Editor
1 Click the ‘Print Picture’ button on the toolbar. The Océ Colour Copy main window appears.
2 Make your copy settings (see ‘Making a simple copy’ on page 32).3 Click ‘Copy’ at the bottom of the ‘General’ tab.

83
Océ Colour Copy 7.0
User Manual
Chapter 5Scan into file & Scan into email
■ Filename and file format (page 85)■ Scan into email (page 85)■ Making scans (page 88)

84 Océ Colour Copy 7.0 User Manual
Making a scan into a file
Once you have configured and calibrated your copying system, you can also start to scan into different file formats. You begin by selecting ‘Scan into file’ from the main menu. The user interface of the program is then replaced by a specialized one for scan into file.
[19] Scan into file main window

Scan into file & Scan into email 85
Selecting the scanner
In the field Scanner, the installed type of scanner is displayed. The current state of operation the scanner is in is given by the color of the LED (green = operational, yellow = warm-up phase, red = Scanner reports a fatal error, black = a connection to the scanner could not be established).
Selecting the filename and file format
Under Fileformat you find the current file format and the extension. Under Filename it shows the path of the standard file name Default . If you do not enter a filename, by default the scan is saved under Default. If a file with this name and the same fileformat (extension) already exists in this directory, it gives a warning.
1 Click the arrow in the file format field to choose another fileformat. In the Fileformat-Options field, you can change the fileformat options that should be used.
2 With the menu field Change you will get to the window Save as. Under Save as, select a directory where the file is supposed to be saved. Now you only have to enter the desired filename. The type of the file (e.g. pcx, tif) is automatically added as an extension to the filename. If you then confirm with OK, the directory with the filename is transferred to the scan window
Available options
Four check boxes respectively offer the options to:
■ number the files you save■ to mirror pictures■ to rotate files by 90°■ to load the current file to the editor

86 Océ Colour Copy 7.0 User Manual
Selecting the sizes and resolution
When selecting sizes, you can use either ISO or US standard formats (See ‘Setting preferences’ on page 26).
▼ To enter sizes and resolution
3 In the ‘Original size’ box, click the arrow to enter a standard size for your original.
4 Alternatively, you can select:■ ‘Retrieve width’ to have the software determine the width of the original.
You must then enter the height manually.■ ‘Auto width detection’. You enter the height manually.■ ‘Auto height detection’. You enter the width manually.■ ‘Auto size detection’
5 If you are making a 1:1 copy, the input paper size transfers automatically to the ‘copy size’ box. Alternatively, you can select a ‘Zoom’ factor to enlarge or reduce your output size with respect to your original image.
6 Select the resolution in which you want the file scanned. This can be any resolution, you want the final file to have.
Setting contrast and brightnessOcé Colour Copy can automatically correct for brightness and contrast.
▼ To change the color mode
1 In the Contrast and Brightness field select the mode you need (Color Mode, Grayscale Mode or Black and White Mode).Note: Not all fileformats could be used in any mode. They turn into red.
▼ To set automatic brightness and contrast
1 From the Contrast and Brightness options at the bottom, select ‘Automatic’.2 In the box next to the ‘Automatic’ option, click the arrow to select the filter in
order to the original.
▼ To apply a filter for brightness and contrast
1 From the brightness and contrast options at the bottom, select ‘Filter’.Note: If you prefer a filter of your own creation, activate the radio button ‘Manual’.
2 In the box next to the ‘Filter’ option, click the arrow to select the filter to apply. If you are creating a new filter, see ‘Creating filters in Color Mode’ on page 48.

Scan into file & Scan into email 87
Making a scan into email
With this menu item you can directly scan into an email. Settings are made under Configuration > Preferences > EMail. You haver to enter the recipient such as ‘[email protected]‘ and the subject.

88 Océ Colour Copy 7.0 User Manual
Making scans
You can start making scans when the scanner is operational and you have properly entered the settings (indicated by a green status light and OK button).
▼ To make scans
1 Insert your original into the scanner.2 Enter the settings.3 Click ‘OK’ at the bottom of the ‘Scan into file’ window.
89
Océ Colour Copy 7.0
User Manual
Appendix AGlossary

90 Océ Colour Copy 7.0 User Manual
Adaptive thresholding
Advanced 2-dimensional adaptive thresholding estimates the background gray level in a window area around each pixel. The difference between the actual pixel value and the background is then compared to the adaptive settings to determine if a pixel is thresholded as a black pixel or a white pixel.
Additive colours
The primary additive colours are red, green, and blue, which represent the three main components of white light. When mixed in equal portions, they produce white. When used individually or together, these primary colours can mix to create nearly all colours. Additive colours are used in scanners and graphic displays.
Bitmap image
A computer file of a lineart image that had been scanned with a scanner. Bitmap refers to the pattern (or map) of bits that represent either black or white.
Black point The black point adjustment determines the amount of shadow detail in an image. Ideally, it is best to set the black point at a value where the darkest part of the image will have zero detail.
Blueprint
A process of photographic printing used mainly for copying architectural and mechanical drawings. It produces blue lines on a white/bluish background.
Blur
The averaging of pixel elements.

91
Brightness
An adjustment on the scanner that allows the user to compensate for a light or dark original.
Calibration
The adjustment of equipment so that it performs according to established standards. The calibration of a scanner aims to minimize the colour deviation between the scanned IT8 reference colour chart and the known colour reference values.
CALS
Computer-aided Acquisition and Logistics Support. This is a U.S. Defense Department and industry initiative that addresses the design, manufacture, and support issues in the generation, access, management, and use of technical data in digital form.
CCD
Charged coupled device, which acts as the image sensor in the scanner that converts light to voltages. The scanner then converts these voltages into a digital file representing the image.
CCITT Group 3
Standard run-length compression format used with FAX transmissions. It uses modified Huffman encoding to compress even further the run-length numbers. Most scanner file formats are variations of this format.

92 Océ Colour Copy 7.0 User Manual
CCITT Group 4
Two-dimensional compression format, which gives very compact image files. Standardized by CALS (MIL 28002) and ISO-ODA for Drawing Archival and interchange.
CIE
Centre Internationale d’Eclairage. An international organization that establishes methods for measuring colour. These colour standards for colourimetric measurements are internationally accepted specifications that define colour values mathematically. The first colour space model, CIE XYZ (developed in 1931), defines colour as a combination of three values on the X, Y, Z axes. Two other colour spaces were defined in 1978: CIE LAB and CIE LUV. The aim was to provide an accurate and uniform reference of visual perception.
CIE LAB
A device independent colour space specified by CIE, used in modern colour management software to facilitate conversion of data from a scanner to a graphic display, or from a display to an output device.
CMY(K)The three subtractive printing colours: cyan, magenta, yellow (and black). Theoretically, only three components (CMY) are necessary for subtractive synthesis. Black was added for practical reasons.
Colour
The electromagnetic energy existing in the form of wavelengths creates the perception of colour. There is a huge difference between the visible spectrum and the colours that can be reproduced on a screen and then printed from a colour printer. The total number of colours that a device can produce is called its colour gamut. The visible spectrum is larger than the colour gamut of a

93
colour monitor, which in turn is larger than the gamut of a printer. No system can reproduce all the colours visible to the human eye.
Colour bit depth
The simplest pixel has two possibilities: black or white. A pixel with two possibilities is called a 1-bit image, or two raised to the power of one. Adding more bit information increases the number of colour options. The number of potential colour options for a pixel is called colour bit depth. For example, a 4-bit pixel would have 16 colour options, and an 8-bit pixel would have 256 colour options, while and 24-bit pixel would have 16.7 million options.
Colour cast
A colour cast is typically due to non-uniform dot gain between the printing inks. Non-uniform dot gains can be due to different factors, such as the order in which the inks print or the specific properties of the inks. For example, cyan ink, which often prints first, tends to have higher dot gain values than other process inks.
Colour correction
Correcting for, and eliminating an unwanted colour cast.
Colour management system (CMS)The software that increases the accuracy of colour interchange between scanners, displays, and printers, based on profiles for each device. It performs the colour transformations necessary to exchange accurate colour information between the different devices. These device-specific profiles are standardized by the International Colour Consortium (ICC).

94 Océ Colour Copy 7.0 User Manual
Colour separation
The conversion of an RGB colour image into a CMYK colour image. Colour separation is a technical function during which critical settings such as GCR, black ink limit and total ink limit are applied to the image.
Colour space
A particular method used to describe colour. Examples of colour spaces are: RGB, CMYK, HSV, CIE LAB.
Compression
Reduction of image file sizes by encoding the data (see also runlength, CCIT)
Contrast
The range between the light and dark in an image. Good contrast is important in order for an image to appear realistic.
Density
The light stopping ability of a film. Density is inversely proportional to the amount of light reflected or transmitted by an image.
Density units
Photographers and printers measure transmission in base-10 logarithmic density units, where transmission of unity corresponds to a density of 0, transmission of 0.1 corresponds to a density of 1, transmission of 0.01 corresponds to a density of 2 and so on.

95
Device dependent colour space
In a device dependent colour space, such as RGB, the same scanned image will appear differently when viewed on different graphic displays.
Device independent colour space
A device independent colour space, such as CIE LAB, uses absolute colour values as defined by CIE standards. CIE LAB is widely used in colour management systems to translate between different device dependent colour spaces such as an RGB scanner and an RGB graphic display.
Device profile
Used in colour management systems, a device profile contains information about the characteristics of a scanner, computer graphic display, or printer. The format for device profiles are standardized by the International Colour Consortium.
Display
The monitor or graphic display attached to the computer.
Dpi
An expression of resolution of a scanned image, in dots per inch, equivalent to pixels per inch.
Dsp
Digital Signal Processor, which performs image enhancement in real-time while scanning.

96 Océ Colour Copy 7.0 User Manual
Dynamic range
A measurement of scanner quality as the density difference between highlights and shadows.
Equalizing
Distributing all colours or tones equally along a density range.
Foreground
When scanning raster data (black and white, or monochrome), foreground refers to the pixels that represent data of interest. Typically, lines and shapes are represented by black pixels (foreground), and empty space is represented by white pixels (background).
Gamma
An adjustment that makes the tone distribution lighter or darker in an image.
Gamut
The colour range that can be scanned, printed, or displayed by a device.
Gamut transformation (or gamut mapping)
A colour management system function, where out-or-gamut colours are converted to colours within the gamut of the targeted device.
GCR
Gray component replacement. A colour separation process used for colour photographs where cyan, magenta, and yellow inks are replaced by black ink,

97
in a proportion that yields a gray value. The advantages are a reduction in overall ink usage and some increase in image detail.
Gray balance adjustment
A colour correction to ensure that gray elements within a scanned image appear as a neutral grey. When properly achieved, it is possible that other elements within the image will have a true colour reproduction.
Halftoning
The processes of offset printing and laser printing are intrisically bilevel. However, these devices can reproduce a range of tone levels by halftoning. This means that an array of widely spaced dots produces the perception of light gray, and an array of tightly spaced dots produces dark gray. Halftone dots are usually placed in a regular grid. In colour printing, it is conventional to use cyan, magenta, yellow, and black grids that have exactly the same dot pitch but different carefully-chosen screen angles.
Histogram
A bar graph representing the statistical distribution of graytones or colours in an image. Each column represents the number of pixels at that gray level or colour.
HLS
A colour space with three components of hue, lightness, and saturation. See also HSV.
HSV
A colour space with three components of hue, saturation, and value. Hue means colour (as in the colour wheel). Saturation is an indication relating to the richness or vibracy of the colour. Value is a term best related to the intensity of light illuminating an object.

98 Océ Colour Copy 7.0 User Manual
Hue
A measurement of colour by pointing towards a certain colour on the colour wheel. Hue indicates the relative redness, blueness, greenness, etc. of a colour.
ICC
International Colour Consortium, formed to address the need for a common colour framework. The ICC has developed a standard device profile that contains information about how various devices render colour.
Indexed colour
Indexed colour is the provision of a relatively small number of discrete colours (for example 256) in a colour map or palette. For each pixel in the image, the index number of a colour is recorded. When retrieving the image, a lookup table uses the index to retrieve red, green, and blue components that are then sent to the display. In graphic file formats such as PCX or TIFF, an indexed colour image is accompanied by its colour map.
Ink jet colour printer/plotterInkjet devices transfer colour to paper by squirting cyan, magenta, yellow, and black ink onto the paper. The ink dries on the paper through evaporation.
Interpolation
A method of re-sampling to generate values for points between the actual pixels by looking at the surrounding colours or intensities. In a scanner, resolution is increased beyond the actual number of CCD cells. As each line of data arrives from the cameras, newly interpolated pixels are added between the original pixels to enhance line edge definition.

99
JPEG compression
Joint Photographic Experts Group compression. A method to save storage space by compressing files. JPEG achieves a high degree of compression by discarding unimportant picture details (lossy compression).
Lossless compression
File compression and subsequent de-compression without any loss of data.
Lossy compression
High-degree file compression and subsequent de-compression with some loss of data
LZW
Method of lossless compression used with many file formats, developed by Lempel, Zev, and Welch.
Monochrome
Files composed of a single colour.
Neutral
An area of no colour, such as white, gray, or black.
Noise
A term used to describe the occurrence of pixels within an image that contain random colours.

100 Océ Colour Copy 7.0 User Manual
Palette
The set of colours available for an image.
Pixel (picture element)
The word pixel is a combination of two words, picture and element, which is the smallest building block within a scanned line-art or photographic image. A pixel is the small square picture element that is filled with a colour, black or white.
Printable colour
A colour that falls within the gamut of a particular device. The output of a printable colour will be similar to the input, whereas a colour that falls outside of the gamut will print as a different shade. See also Gamut.
Resolution
Defines the level of detail that can be captured or viewed by a scanner, display, or other output device. For scanners, the resolution is defined by the number of dots (pixels) per inch (dpi) that can be captured horizontally and vertically. For example, 300 dpi resolution equals 90000 pixels per square inch.
RGBRed, green, blue. These additive primary colours are the basic elements of white light. By mixing them on a computer monitor or in a scanned image file, other colours can be created.
RIP
Raster image processor. A RIP is a special software that converts image files into a colour dithered (halftone) image that can be output directly. An image

101
must be ‘ripped’ before it can be reproduced on a CMYK device such as an inkjet plotter.
Runlength encoding
A method of compressing raster or bitmap data by representing runs of white or black dots along a scanned line as the number of dots in each run. Many variations exist of this scheme, with varying compression efficiency. Typically runlength compression formats yield a file that is about 20% to 25% of the size of an uncompressed file.
Saturation
One of the attributes of colour in the HSV colour space (hue, saturation, and value). Saturation is a characteristic indicating the vibrancy or purity of a hue. A colour with high saturation will appear more intense than the same colour with less saturation.
Scanning
The process of running a hard copy original through an optical scanner. The scanner produces a digital image (raster image) of the hard copy drawing, which is then stored on a disk.
SCSISmall Computer System Interface specification of interface with computer equipment equipment like disks, printers, scanners, etc.
Shadow detail
The amount of detail contained in the dark parts of an image. Although it is good to maintain shadow detail, there is a risk of decreasing overall contrast if the shadow is lightened too much in an attempt to expose additional detail. If an image is scanned without shadow detail, it is not possible to regain detail afterwards by using an image editing program.
102 Océ Colour Copy 7.0 User Manual
Stitching
In large format multiple CCD camera scanners, electronic stitching adjusts for the overlap in the field of view of adjacent cameras. Automatic stitching at the start of the scan ensures that each camera captures the correct number of pixels independently of mechanical and thermal changes.
Subtractive colours
Cyan, magenta, and yellow. As ink is applied to a piece of paper by a printer, these colours absorb light and alter the colours visible by looking at the paper. Cyan absorbs the red third of the spectrum, magenta absorbs the green third, and yellow absorbs the blue third. Theoretically, what is visible should be black, but due to unavoidable impurities in the inks, light is still reflected and a muddy brown is visible. The absence of CMY pigments results in white.
TIFF file format
Tagged Image File Format. One of the most common graphic file formats for line-art and photographich images.
Tonal distribution
The distribution of various bright or dark tones within an image. During the scanning or editing process, tones can be redistributed to lighten a dark image or darken a light image.
ToneAny colour or neutral that is denser than white.

103
Tone compression
A term used in scanning and image editing that refers to the compression of a broad range of tones and colours in an image down to a narrower range available on a printer.
Tone curves
The shape of the tone transfer curves can be adjusted by the user to alter colour or tone correction. The lower left end of the curve typically represents the dark portions of a picture and an upward bend will typically lighten the shadows. Similar functions exist when working with the middle or highlight parts of the curve. In this way you can alter only certain tonal ranges of an image without making unwanted changes to other parts of the image.
True colour
True colour systems provide eight bits for each of the red, green, and blue components. Therefore, true colour is often referred to as 24-bit colour.
TWAINStandard for interfacing (typically) small format colour scanners.
UCRUnder Colour Removal. A colour separation process used on colour photographs where cyan, magenta, and yellow inks are removed from dark, neutral areas and substituted with black ink. The advantages are a reduction in overall ink usage.

104 Océ Colour Copy 7.0 User Manual
Vector file
Also called a vector drawing. A method that consists of mathematically defined elements that is widely used in computer aided design for its accuracy, relatively low memory requirements and file sizes compared to raster images.
Vectorization
Also called raster to vector conversion (RTV). This process automatically converts a raster (bitmap) image into a vector (CAD) drawing.
Video card
Expansion card installed inside the computer. Different types of video cards support varying monitor sizes and the number of displayable colours.
Viewing conditions
Different light sources affect the colours that you see. For instance, a colour viewed under fluorescent light will look radically different when viewed under incandescent light. Fluorescent light adds green to colours while incandescent light adds red. For this reason, the printing industry developed a standard viewing condition known as the D50 (5000 Kelvin) light source in addition to a neutral gray background. This light source duplicates daylight with equal parts of red, green, and blue.
White point
An adjustment to determine the amount of highlight detail in an image. The white point should be set so that the lightest part of an image will have just zero detail.

105
Zoom
Changing the size of the viewing area, to see a larger or smaller area in greater detail.

106 Océ Colour Copy 7.0 User Manual

107
Océ Colour Copy 7.0
User Manual
Appendix BPrinter Configuration under TCP/IP

108 Océ Colour Copy 7.0 User Manual
Printer Configuration under TCP/IP
To increase your printing performance, you should use a print server instead of a parallel port connection. To do this, configure your printer devices under TCP/IP using the Xconnect 100 server.
You will need the following equipment:
■ a network adapter, with a 100 mbps UTP connection (such as 3COM 3c905)■ a twisted pair cable (cross over patch cable)■ XCD Xconnect 100 server (XCD Pony 100 is an alternative)
Note: The following procedures apply to a stand-alone solution, without a network connection. In a network environment, consult your system administrator for the configuration and IP address.
▼ To install the print server
1 Install the network adapter and the network driver software.2 Enter the TCP/IP address (e. g. 192.168.1.1) in Windows NT.3 Attach the Xconnect 100 server to the parallel port of the printer.4 Using the twisted pair cable, connect the Xconnect 100 server to the network
adapter.
▼ To enter the print server address
1 Link the set IP address (e. g. 192.168.1.1) to the Ethernet address noted on the print server, using the ‘ARP’ command in DOS.Note: You can only set the IP address using the ARP command once for new devices. Therefore, remember to note the IP address when entering it.
2 Open a DOS window.3 Enter the following command: ARP-s<IP address><Ethernet address> (Example: ARP-s192.168.1.200-40-17-00-c3-e4
4 To test the IP address set for the print server, use the ping command:ping <IP address> (Example: 192.168.1.2)
▼ To configure the print server using Telnet
1 In the DOS window, enter the following command:TELNET<IP address> (Example: TELNET192.168.1.2)
2 Enter the standard password “ACCESS” and an arbitrary user name to connect to the print server. Then the configuration for the IP connection follows.

109
3 Enter the following command:SET IP Address<IP address>Example: SET IP Address 192.168.1.2 SET IP Subnet 255.255.255.0
4 Use the Show IP command to check the IP settings. Note the number shown under TCP port (e. g. 9100).
▼ To configure the parallel port
1 In the DOS window, enter the following commands:SET Port P1 ECP ENableSET Port P1 ACKH ENableSET Port P1 FSTB ENableSET Port P1 BIDir ENableSET Port P1 NBUF ENable
2 Check the parallel port settings with the Show Port command.3 When all settings are correct, the following line appears:BID FSTB ECP NBUF
4 Deactivate the two protocols “Appletalk” and “Netware”:SET NETWare DISableSET Appletalk DISable
5 Check the settings:Show NETWareAppletalk
6 Check that the queue for “Service 1” is activated:SET SERVIce 1 queue ENabled
7 Check the setting:Show SERVIceIf the settings are correct, a “Q” for “Service 1” displays in the column “OPT”.
8 End the configuration:InitializeEXIT
▼ To configure the printer device
■ Refer to ‘Configuring the scanner and the printer’ on page 14.

110 Océ Colour Copy 7.0 User Manual

111
Océ Colour Copy 7.0
User Manual
Appendix CThe spooling subsystem

112 Océ Colour Copy 7.0 User Manual
Working with the spooling subsystem
The spooling subsystem serves as an output system only, and offers the option to work even faster and more effectively with Océ Colour Copy. The scanned data is placed in a common poll directory. The subsystem will poll the scan data from the poll directory and process the print jobs in sequence.
Installing the Spooling Subsystem
1 Installation of the HardlockAttach the hardlock to the parallel port (LPT1) of your computer. Make sure that the arrow on the hardlock is pointing towards the PC port. If a printer is already attached to the parallel port, you can place the hardlock between the PC port and the printer cable.
2 Installation of the SoftwareIf you are working with Windows NT operating system, you have to log in as an administrator before installing the subsystem. Exit all other applications and insert the Océ Colour Copy CD into the CD-ROM drive. If "Autostart" is activated in your operating system, the installation program is started automatically. If the Autostart function is deactivated, click on “Start” / “Settings” / “Control Panel” and then on “Software”, menu button “Install”. When using the standard installation of Océ Colour Copy, the subsystem is automatically installed as well.When the installation is finished you will find an icon to start the subsystem on your desktop.
3 Configuration of the SubsystemStart the subsystem using the program icon on the desktop and click on “Configuration” / “Configuration”. In the Setup window enter the path for the common poll directory under “Poll directory” or accept the one suggested. Both systems must have user rights for the poll directory! Then, as usual, install the printer type that is connected to your subsystem. Under “Connection” activate the corresponding port (e.g. SCSI, TCP/IP or LPT1).

113
4 Configuration of the Océ Colour Copy SystemVia “Configuration” / “Hardware” install the printer that is connected to the subsystem. Under “Connection” activate the radio button “Output system” and enter the path for the poll directory in the adjacent empty field. If you choose the installed printer for the subsystem in Océ Colour Copy main window, all copies will be automatically placed as print jobs in the common poll directory. If the poll directory does not exist yet, it will automatically be opened by the program with the first copy you save.
Job Processing
Start the subsystem and switch on the printer. Once print jobs are placed in the poll directory by your Océ Colour Copy system, they will successively be processed and printed by the subsystem. All settings such as Count, Scaling, Output options etc. are set by the Océ Colour Copy system when creating the jobs. Using the menu bar or the menu fields processing the jobs can be interrupted or restarted. You can change the output priority of individual jobs with the arrow keys. Job processing can be stopped with the Esc key.
Interrupted or failed copy jobs are displayed in the lower part of the window. These failed copy jobs can be sent to the printer once again using the menu field “Restart job”.

114 Océ Colour Copy 7.0 User Manual

115
Océ Colour Copy 7.0
User Manual
Appendix DMiscellaneous

116 Océ Colour Copy 7.0 User Manual
How to Read this Manual
The consistent style that is used in this manual enables you to quickly become familiar with the use of this manual and ultimately the software.
Description
Each section or subsection contains a description of the feature or operation identified in the title. It might also include possible applications, as well as any guidelines that you should bear in mind. A description is followed by a procedure that takes you, step by step, through all phases of the operation.
Figures and tables
Figures and tables are titled and numbered sequentially throughout this manual. Figures include pictures of product components, screen dumps, examples, and diagrams of concepts discussed in the description.
Attention getters
There are several types of information to which we draw your attention. This information is classified as follows:
Note: In a "Note" information is given about matters which ensure the proper functioning of the machine or application, but useful advice concerning its operation may also be given.
Attention: The information that follows "Attention" is given to prevent your copy, data or device or original from being damaged.
Caution: The information that follows "Caution" is given to avoid any personal injury.

117
User Survey
Did you find this manual to be accurate?❏ Yes❏ No
Were you able to operate the product after reading this manual?❏ Yes❏ No
Does this manual provide adequate background information?❏ Yes❏ No
Is the format of this manual convenient in size, easy to read and layed out well?❏ Yes❏ No
Did you find the information you were looking for?❏ Always❏ Most of the times❏ Sometimes❏ Not at all
How did you find the information you were looking for?❏ Table of contents❏ Index❏ Neither
Are you satisfied with this manual?❏ Yes❏ No
Thank you for evaluating this manual. If you have any other comments or concerns, please explain them on the following page.

118 Océ Colour Copy 7.0 User Manual
Comments:
--------------------------------------------------------------------------------------------
--------------------------------------------------------------------------------------------
--------------------------------------------------------------------------------------------
--------------------------------------------------------------------------------------------
--------------------------------------------------------------------------------------------
---------------------------------------------------------------------------------------------Date:
This reader’s comment sheet is completed by:
Name (optional):
Occupation:
Company:
Phone:
Address:
City:
Country:
Please return this sheet to:
Océ-Technologies B.V.Attn: ITC-User DocumentationP.O. Box 1015900 MA VenloThe Netherlands
Send you comments by E-mail to : [email protected]
For the addresses of local Océ organizations see : www.oce.com

Miscellaneous 119
Addresses of Local Océ Organizations
Océ-Australia Ltd.P.O.Box 363Ferntree Gully MDC VIC 3165Australia
Océ-Österreich GmbHPostfach 951233 ViennaAustria
Océ-Belgium N.V./S.A.Avenue J.Bordetlaan 321140 Brussels Belgium
Océ-Brasil Comércio e Industria Ltda.Caixa Postal 318701060-970 Sao Paulo, SPBrazil
Océ-Canada Inc.525, Logan Avenue,Toronto, Ontario M4K 3B3Canada
Océ Office Equipment (Beijing) Co Ltd.Xu Mu ChengChaoyang DistrictBeijing 100028China
Océ-Èeská republika s.r.o.Hanusova 1814021 Praha 4Pankrác,Czech Republic
Océ-Danmark A.S.Kornmarksvej 6DK 2605 BrøndbyDenmark
Océ-France S.A.32, Avenue du Pavé Neuf,93161 Noisy-le-grand, CedexFrance
Océ-Deutschland GmbHPostfach 1014544330 Mülheim an der Ruhr (13)Deutschland
Océ (Hong Kong China) Ltd.12/F 1202 The Lee Gardens33 Hysan Avenue, Causeway BayHong Kong
Océ-Hungária Kft.P.O.B. 2371241 BudapestHungary
Océ-Italia S.p.A.Strada Padana Superiore 2/B20063 Cernusco sul Naviglio (MI)Italia
Océ Systems (Malaysia Sdn. Bhd.)#3.01, Level 3, Wisma AcademyLot 4A, Jalan 19/146300 Petalig JayaMalaysia

120 Océ Colour Copy 7.0 User Manual
Océ-Nederland B.V.P.O.Box 8005201 AV ‘s-HertogenboschThe Netherlands
Océ Norge A/SPostboks 53, Grefsen0409 Oslo 4Norway
Océ-Poland Ltd.ul. £opuszañska 5302-232 WarszawaPoland
Océ-Lima Mayer S.A.Av. José Gomes Ferreira, 11Ed. Atlas II Miraflores1495 AlgésPortugal
Océ (Far East) Pte. Ltd./Océ (Singapore) Pte. Ltd.,#03-00 Wisma Gulab190 MacPherson RoadSingapore 348548
Océ España SABusiness Park MAS BLAUC/Osona 2, 2-3a Planta08820 El Prat del Llobregat (Barcelona)Spain
Océ-Svenska ABP.O.box 1231S-164 28 KistaSweden
Océ-Schweiz AGSägereistrasse 29CH8152 GlattbruggSwitzerland
Océ (Taiwan) Ltd.No. 99-24 Nan Kang Road Sec.2Taipeh, TaiwanTaiwan, RO
Océ (Thailand) Ltd.16th Floor, B.B. Building54 Asoke Road, Sukhumvit 21Bangkok 10110Thailand
Océ-U.K.Ltd.Langston RoadLoughton, Essex IG10 3SLUnited Kingdom
Océ-USA Inc.5450 North Cumberland Av.Chicago, Ill. 60656U.S.A.

121
Océ Colour Copy 7.0
User Manual
Appendix EOcé Colour Copy Lite

122 Océ Colour Copy 7.0 User Manual
Features in the Lite version
Some of the features described in this manual ore not available in the Lite version. Those features are:
■ Archive■ ICC-profile support■ Save filter presets■ Automatic size detection■ Continuous mode■ Accounting■ Raster Editor■ Multiple CPU support■ Save workspace settings■ Batch printing■ Output options (Second tab of the main window)■ Tiling (Third tab of the main window)
Moreover, the Lite version only comes with one printer driver with no option for additional drivers.
In this User manual, the following icon indicates that the described function only applies to Océ Color Copy Full.

Index 123
Index
AAdaptive thresholding 90Additive colours 90Archive 47
printing from 69scanning files into 68window 66
BBitmap image 90Black and White 86Black and White Mode 33, 35, 56, 86Black and white mode 35black and white mode 33Black and white points 54Black point, definition 90Blur, definition 90brightness slider 35
CCalibration 91
for scanner, printer, and medium 23print target 24scan target 24, 25
calibration wizard 17CALS 91CCD 91CCITT Group 4 92CIE 92closed-loop calibration 23CMS 93CMY 92Color 86Color Mode 33, 35, 50, 86color mode 33, 35Colour
additive 90
bit depth 93cast 93definition 92indexed mode 98management system 93printable 100separation 94space 94subtractive 102true 103
Colour spaceCIE LAB 92device dependent 95device independent 95HLS 97HSV 97
Compressiondefinition 94JPEG 99lossless 99lossy 99LZW 99
Contrastdefinition 94
Copybatches 70button 12output options 38, 66simple 33
Copy presets 47
DDensity
definition 94units 94
Deskewing 80Deskewing and cropping 81Despeckling 77, 79Device profile 95Display 95Dither method 21DPI 95DSP 95Dynamic range 96

124 Océ Colour Copy 7.0 User Manual
EEditor
deskewing image 80despeckling 77, 79for image adjustments 73image selection 79insert text 77, 80printing image 82rotating, mirroring image 74, 79starting 78viewing the image 78
Encoding, runlength 101Equalizing 96
FFast Draft Mode 35Foreground 96
GGamma
adjustment 56definition 96
Gamut 96Gamut mapping 96GCR 96Gluing marks 42Gray balance 97Grayscale 86Grayscale Mode 59, 86
HHalftoning 97Histogram 54Histogram, definition 97HLS 97HSV 97Hue 98
IICC 98Image
bitmap 90Indexed colour mode 98Ink jet printer 98Interpolation 98
JJPEG compression 99
KKeycode
entering 13
LLabeling a copy 41LZW 99
MMargins 39media parameters 24Mirroring 39Monochrome 99
NNesting 39Noise 99
OOcé Colour Copy
about 10registration 13

Index 125
starting 11Output options 38, 66
copy alignment 41label 39margins 39mirroring 39optimizing printing space 39trim lines 39
Overlap 42
PPalette 100Pixel 100Preview
area of interest 45histogram 54
Printable colour 100Printer
configuration 17definition 16, 17TCP/IP configuration 107, 108
Printing in batches 70
RRegistration
keycode 13Resolution 100RGB 100RIP 100Runlength encoding 101
SSaturation 101Scan to EMail 32, 87Scan to email 87Scanner
definition 15, 16status light 12
Scanning 101into archive 68modes 26
Shadow detail 101size correction 24Stitching 102Subtractive colours 102
TTarget 24target 23Threshold, adaptive 90TIFF 102Tiling 41
gluing marks 42output preview 43overlap 42tile size 42
Tonal distribution 102Tone
compression 102curves 103
Trim lines 39True colour 103TWAIN 16
UUser options 26
VVector file 104Vectorization 104Video card 104View conditions 104
WWhite point 104WizKey 32

126 Océ Colour Copy 7.0 User Manual
ZZoom 52
definition 105