Embed Size (px)
Citation preview
Océ VarioPrint®
6160/6200/6250
Océ User manual
Operating information

Edition 2007-09 US
Océ-Technologies B.V.Copyright
© 2007, OcéAll rights reserved. No part of this work may be reproduced, copied, adapted, or transmitted in any form or by any means without written permission from Océ.
Océ makes no representation or warranties with respect to the contents hereof and specifically disclaims any implied warranties of merchantability or fitness for any particular purpose.Further, Océ reserves the right to revise this publication and to make changes from time to time in the content hereof without obligation to notify any person of such revision or changes.

3
Trademarks
Trademarks
List of trademarks
Océ, VarioPrint, PRISMAaccess, PRISMAprepare, PRISMAproduction and DPlink are registered trademarks of Océ-Technologies B.V.Xerox, DocuTech, DigiPath and FreeFlow are registered trademarks of Xerox Corporation.Adobe and PostScript are registered trademarks of Adobe Systems Incorporated.
Products in this publication are referred to by their general trade names. In most, if not all cases, these designations are claimed as trademarks or registered trademarks of their respective companies.

4
Trademarks
5
Table of Contents
Table of Contents
Chapter 1 Introduction . . . . . . . . . . . . . . . . . . . . . . . . . . . . . . . . . . . . . . . . . . . . . . . . . . . . . . . 9
Notes for the reader . . . . . . . . . . . . . . . . . . . . . . . . . . . . . . . . . . . . . . . . . 10Introduction to the Océ VarioPrint® 6160/6200/6250. . . . . . . . . . . . . . . . 11Available documentation . . . . . . . . . . . . . . . . . . . . . . . . . . . . . . . . . . . . . 12
Chapter 2 Power information . . . . . . . . . . . . . . . . . . . . . . . . . . . . . . . . . . . . . . . . . . . . . . . . . 13
The power modes . . . . . . . . . . . . . . . . . . . . . . . . . . . . . . . . . . . . . . . . . . 14Turn on the printer . . . . . . . . . . . . . . . . . . . . . . . . . . . . . . . . . . . . . . . . . . 17Shut down the printer. . . . . . . . . . . . . . . . . . . . . . . . . . . . . . . . . . . . . . . . 18
Chapter 3 Overview of the system components . . . . . . . . . . . . . . . . . . . . . . . . . . . . . . . . . 21
Introduction to the main system components . . . . . . . . . . . . . . . . . . . . . 22The operator panel. . . . . . . . . . . . . . . . . . . . . . . . . . . . . . . . . . . . . . . . . . 24The operator attention light . . . . . . . . . . . . . . . . . . . . . . . . . . . . . . . . . . . 27The output locations. . . . . . . . . . . . . . . . . . . . . . . . . . . . . . . . . . . . . . . . . 29The paper modules . . . . . . . . . . . . . . . . . . . . . . . . . . . . . . . . . . . . . . . . . 32
Chapter 4 Working with the operator panel . . . . . . . . . . . . . . . . . . . . . . . . . . . . . . . . . . . . . 35
Introduction . . . . . . . . . . . . . . . . . . . . . . . . . . . . . . . . . . . . . . . . . . . . . . . 36The dashboard . . . . . . . . . . . . . . . . . . . . . . . . . . . . . . . . . . . . . . . . . . 36
The Schedule view. . . . . . . . . . . . . . . . . . . . . . . . . . . . . . . . . . . . . . . . . . 39Introduction to the 'Schedule' view . . . . . . . . . . . . . . . . . . . . . . . . . . . 39Load the media . . . . . . . . . . . . . . . . . . . . . . . . . . . . . . . . . . . . . . . . . . 44Example of a workflow . . . . . . . . . . . . . . . . . . . . . . . . . . . . . . . . . . . . 46Stop a job . . . . . . . . . . . . . . . . . . . . . . . . . . . . . . . . . . . . . . . . . . . . . . 62
The Jobs view . . . . . . . . . . . . . . . . . . . . . . . . . . . . . . . . . . . . . . . . . . . . . 65Introduction to the 'Jobs' view . . . . . . . . . . . . . . . . . . . . . . . . . . . . . . . 65Schedule a waiting job for printing . . . . . . . . . . . . . . . . . . . . . . . . . . . 68Reprint a job . . . . . . . . . . . . . . . . . . . . . . . . . . . . . . . . . . . . . . . . . . . . 70Give priority to a scheduled job. . . . . . . . . . . . . . . . . . . . . . . . . . . . . . 72Delete a job . . . . . . . . . . . . . . . . . . . . . . . . . . . . . . . . . . . . . . . . . . . . . 73Print a scheduled job later. . . . . . . . . . . . . . . . . . . . . . . . . . . . . . . . . . 75Make a proof . . . . . . . . . . . . . . . . . . . . . . . . . . . . . . . . . . . . . . . . . . . . 77Print the job parameters . . . . . . . . . . . . . . . . . . . . . . . . . . . . . . . . . . . 79Bundle and split jobs . . . . . . . . . . . . . . . . . . . . . . . . . . . . . . . . . . . . . . 80Print all the jobs for which the media are available . . . . . . . . . . . . . . . 84
6
Table of Contents
Print the jobs that have a label . . . . . . . . . . . . . . . . . . . . . . . . . . . . . . 85Checking and changing the job properties . . . . . . . . . . . . . . . . . . . . . 87
Change the media . . . . . . . . . . . . . . . . . . . . . . . . . . . . . . . . . . . . . 87Change the number of sets . . . . . . . . . . . . . . . . . . . . . . . . . . . . . . 90Change the output location. . . . . . . . . . . . . . . . . . . . . . . . . . . . . . . 92Change the number of staples . . . . . . . . . . . . . . . . . . . . . . . . . . . . 94Change the sorting method . . . . . . . . . . . . . . . . . . . . . . . . . . . . . . 96Change the type of offset stacking . . . . . . . . . . . . . . . . . . . . . . . . . 98Check the first set. . . . . . . . . . . . . . . . . . . . . . . . . . . . . . . . . . . . . 101Shift the image . . . . . . . . . . . . . . . . . . . . . . . . . . . . . . . . . . . . . . . 103
The Trays view. . . . . . . . . . . . . . . . . . . . . . . . . . . . . . . . . . . . . . . . . . . . 105Introduction to the 'Trays' view . . . . . . . . . . . . . . . . . . . . . . . . . . . . . 105Assign the media to a paper tray. . . . . . . . . . . . . . . . . . . . . . . . . . . . 108
The System view . . . . . . . . . . . . . . . . . . . . . . . . . . . . . . . . . . . . . . . . . . 110The Printer section . . . . . . . . . . . . . . . . . . . . . . . . . . . . . . . . . . . . . . 110
Introduction to the 'Printer' section . . . . . . . . . . . . . . . . . . . . . . . . 110Check the status of the toner reservoirs. . . . . . . . . . . . . . . . . . . . 112Check the status of the stapler cartridges . . . . . . . . . . . . . . . . . . 114Reset the day counters. . . . . . . . . . . . . . . . . . . . . . . . . . . . . . . . . 115Find the meter readings . . . . . . . . . . . . . . . . . . . . . . . . . . . . . . . . 117
The Setup section . . . . . . . . . . . . . . . . . . . . . . . . . . . . . . . . . . . . . . . 119Introduction to the 'Setup' section. . . . . . . . . . . . . . . . . . . . . . . . . 119Work with the workflow profiles . . . . . . . . . . . . . . . . . . . . . . . . . . 121Change the language . . . . . . . . . . . . . . . . . . . . . . . . . . . . . . . . . . 126Change the warning time . . . . . . . . . . . . . . . . . . . . . . . . . . . . . . . 128Change the advanced media settings . . . . . . . . . . . . . . . . . . . . . 131Make an intermediate check print. . . . . . . . . . . . . . . . . . . . . . . . . 135
The Media section . . . . . . . . . . . . . . . . . . . . . . . . . . . . . . . . . . . . . . . 137Introduction to the 'Media' section . . . . . . . . . . . . . . . . . . . . . . . . 137Introduction to the media handling . . . . . . . . . . . . . . . . . . . . . . . . 139Add temporary media to the 'Media catalog' . . . . . . . . . . . . . . . . 141Perform a media registration for standard-size media . . . . . . . . . 143Perform a media registration for large media . . . . . . . . . . . . . . . . 148
Chapter 5 Keeping the printer running . . . . . . . . . . . . . . . . . . . . . . . . . . . . . . . . . . . . . . . . 155
Add toner . . . . . . . . . . . . . . . . . . . . . . . . . . . . . . . . . . . . . . . . . . . . . . . . 156Finisher: Add staples . . . . . . . . . . . . . . . . . . . . . . . . . . . . . . . . . . . . . . . 158Stacker/stapler: Replace the stapler cartridge . . . . . . . . . . . . . . . . . . . . 163Troubleshooting . . . . . . . . . . . . . . . . . . . . . . . . . . . . . . . . . . . . . . . . . . . 164
Appendix A Miscellaneous . . . . . . . . . . . . . . . . . . . . . . . . . . . . . . . . . . . . . . . . . . . . . . . . . . . 169
Product specifications . . . . . . . . . . . . . . . . . . . . . . . . . . . . . . . . . . . . . . 170Reader's comment sheet . . . . . . . . . . . . . . . . . . . . . . . . . . . . . . . . . . . . 173

7
Table of Contents
Addresses of local Océ organisations . . . . . . . . . . . . . . . . . . . . . . . . . . 175

8
Table of Contents

9
Chapter 1 Introduction
10 Chapter 1 Introduction
Notes for the reader
Notes for the reader
Introduction
This manual helps you use the Océ VarioPrint® 6160/6200/6250. The manual contains a description of the Océ VarioPrint® 6160/6200/6250 and guidelines for its use and operation. There are also tips given to help you increase your knowledge of the Océ VarioPrint® 6160/6200/6250 and to help you better manage the workflow.
Definition
Attention Getters
Parts of this manual require your special attention. These parts provide important, additional information or are about the prevention of damage to your properties.
Note, Attention and Caution
Caution: A part marked with Caution contains information to prevent personal injury.
Attention: A part marked with Attention contains information to prevent damage to items, for example the Océ VarioPrint® 6160/6200/6250 or a file.
Note: A part marked with Note contains additional information about the correct operation of the Océ VarioPrint® 6160/6200/6250.
Safety information
The safety information for this product is included in a separate user manual with the title Safety information. This manual is part of the documentation set that you received with your product.
11
Introduction to the Océ VarioPrint® 6160/6200/6250
Introduction to the Océ VarioPrint® 6160/6200/6250
Introduction
The Océ VarioPrint® 6160/6200/6250 series is a series of high-volume, cut-sheet printers. The printers are intended both for document printing and stream printing.The key feature of the printer is the Océ Gemini Instant Duplex Technology. This technology enables the printer to print the front side and back side of a sheet at the same time. Depending on the version, the sustained print speed, including reconditioning, ranges from 80 - 125 sheets per minute (A4 / Letter). Therefore, the printer can print 160 - 250 images per minute (A4 / Letter) when you print a 2-sided document.This section gives a short description of the main features of the printer.
Overview of the main features
■ Océ Gemini Instant Duplex Technology that enables the printing of both sides of a sheet at the same time.
■ Advanced scheduling concept on the operator panel to keep the printer running.■ Load and assign the media while the Océ VarioPrint® 6160/6200/6250 prints.■ Support of up to 12 paper trays (total input capacity up to 13,800 sheets) and a
roll feeder.■ Support of up to 3 stackers, a finisher, a stacker/stapler and other external
finishers.■ Support of a large range of media, media sizes and media weights.■ Support of PS/PCL/PDF and streaming PS.■ Support of a large range of software products, for example the Océ PRISMA
series, Xerox FreeFlow™ and Xerox DigiPath®.■ Support of RDO files via Océ DPlink.■ Support of a direct copy path from the optional Océ DS60 scanner to the Océ
VarioPrint® 6160/6200/6250.
12 Chapter 1 Introduction
Available documentation
Available documentation
Introduction
Océ delivers the Océ VarioPrint® 6160/6200/6250 with a documentation set. The documentation set contains the following:■ A CD-ROM with all the manuals mentioned below■ A hardcopy of the Safety manual■ Integrated Online Help in the Océ VarioPrint® 6160/6200/6250 printer driver, the
Océ VarioPrint® 6160/6200/6250 Settings Editor and other Océ applications.
Main Content of the User Manuals
The following table provides an overview of the main content of the user manuals.
[1]
[1] Main Content of the User Manuals
User Manual Main content
Operating information
■ Overview of the main system components■ Working with the operator panel■ Handling and managing jobs on the operator panel■ Adding media, toner and staples.
Workflow Use the Océ VarioPrint® 6160/6200/6250 in combination with■ Océ PRISMAproduction®
■ Océ PRISMAprepare®
■ Océ Doc Works®
■ Océ DPconvert™
■ Océ DocSetter®
■ Xerox® DigiPath®
■ Xerox® FreeFlow™.
Maintenance tasks ■ Replacing parts■ Cleaning parts■ Clearing a paper jam in the engine module.
Safety information ■ Instructions for safe use■ Safety data sheets.

13
Chapter 2 Power information
14 Chapter 2 Power information
The power modes
The power modes
Introduction
This section describes the main power modes of the printer. Refer to the Product safety data sheet in the Océ VarioPrint® 6160/6200/6250 Safety manual for information on power consumption.
Note: The table in this section describes, among other things, the low-power mode and the sleep mode. These modes are energy-saving modes. You can set the timers for these modes in the Océ VarioPrint® 6160/6200/6250 Settings Editor on the controller. Furthermore, you can set a calendar timer in the Océ VarioPrint® 6160/6200/6250 Settings Editor. The printer will then will wake up from the sleep mode at the indicated time. You can use the calendar timer to make sure that the printer is ready for use at the beginning of your working day. The printer can warm up before you start your working day. Refer to the online help on the Océ VarioPrint® 6160/6200/6250 Settings Editor for more information about these timers.
Description of the power switch and the On/Off button
The printer has the following switch and button to control the power supply.■ Power switch
The power switch is located at the rear of the printer. The power switch connects and disconnects the printer to the power outlet.
■ On/Off button with amber and green LEDs .The On/Off button is located on the engine module (see ‘Introduction to the main system components’ on page 22). The On/Off button allows you to toggle between various system statuses. This is only possible if the power switch is in the '1' position and the start-up phase has been completed.
15
The power modes
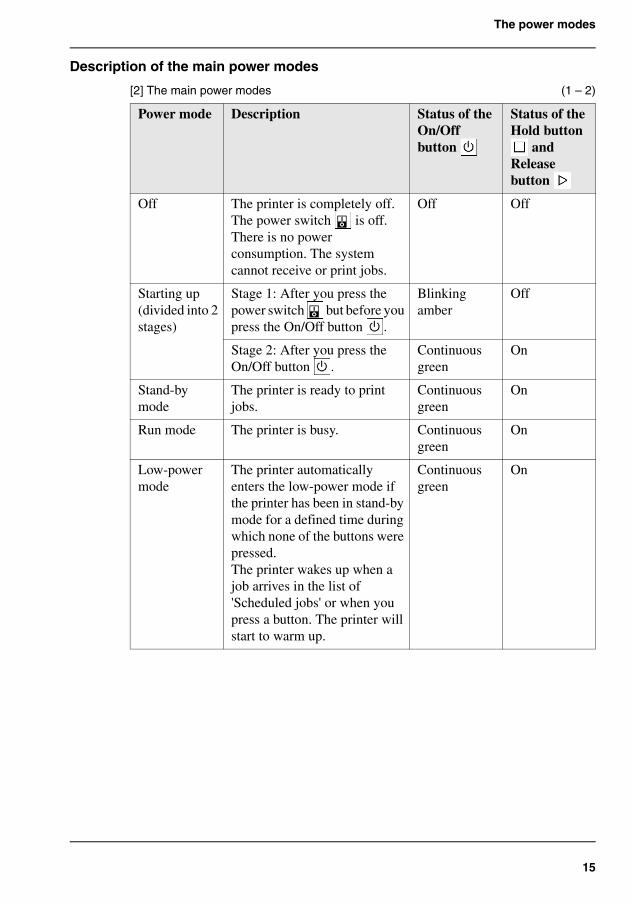
Description of the main power modes[2]
[2] The main power modes (1 – 2)
Power mode Description Status of the On/Off button
Status of the Hold button
and Release button
Off The printer is completely off. The power switch is off. There is no power consumption. The system cannot receive or print jobs.
Off Off
Starting up (divided into 2 stages)
Stage 1: After you press the power switch but before you press the On/Off button .
Blinking amber
Off
Stage 2: After you press the On/Off button .
Continuous green
On
Stand-by mode
The printer is ready to print jobs.
Continuous green
On
Run mode The printer is busy. Continuous green
On
Low-power mode
The printer automatically enters the low-power mode if the printer has been in stand-by mode for a defined time during which none of the buttons were pressed. The printer wakes up when a job arrives in the list of 'Scheduled jobs' or when you press a button. The printer will start to warm up.
Continuous green
On
16 Chapter 2 Power information
The power modes
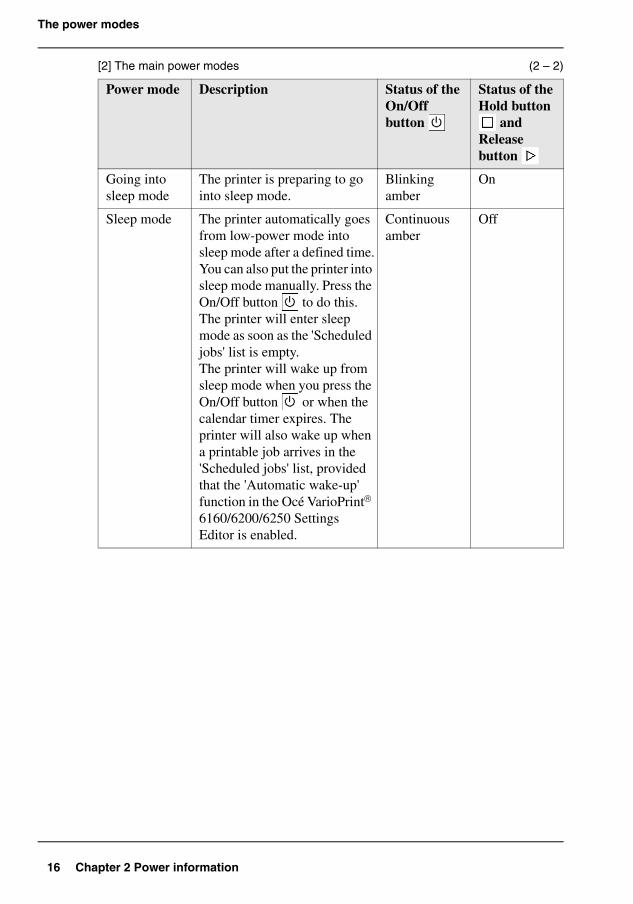
Going into sleep mode
The printer is preparing to go into sleep mode.
Blinking amber
On
Sleep mode The printer automatically goes from low-power mode into sleep mode after a defined time.You can also put the printer into sleep mode manually. Press the On/Off button to do this. The printer will enter sleep mode as soon as the 'Scheduled jobs' list is empty.The printer will wake up from sleep mode when you press the On/Off button or when the calendar timer expires. The printer will also wake up when a printable job arrives in the 'Scheduled jobs' list, provided that the 'Automatic wake-up' function in the Océ VarioPrint® 6160/6200/6250 Settings Editor is enabled.
Continuous amber
Off
[2] The main power modes (2 – 2)
Power mode Description Status of the On/Off button
Status of the Hold button
and Release button
17
Turn on the printer
Turn on the printer
Introduction
This section describes how to turn on the printer when the printer is completely off.
Note: When the printer is in sleep mode (see ‘The power modes’ on page 14), you must press the On/Off button to wake up the printer.
Turn on the printer
1. Press the power switch on the back of the printer.The On/Off button blinks amber while the system starts up.Wait until the operator panel asks you to press the On/Off button .
2. Press the On/Off button .The On/Off button is continuously green. The system warms up.
18 Chapter 2 Power information
Shut down the printer
Shut down the printer
Introduction
This section describes how to shut down the printer completely, for such occasions as the holidays, for example.
Note: If you want to put the printer into sleep mode manually (see ‘The power modes’ on page 14), for example at the end of a working day, you must press the On/Off button . The printer will then go into sleep mode as soon as the list of 'Scheduled jobs' is empty. When the printer is in sleep mode, the On/Off button is continuously amber.
Illustration[1]
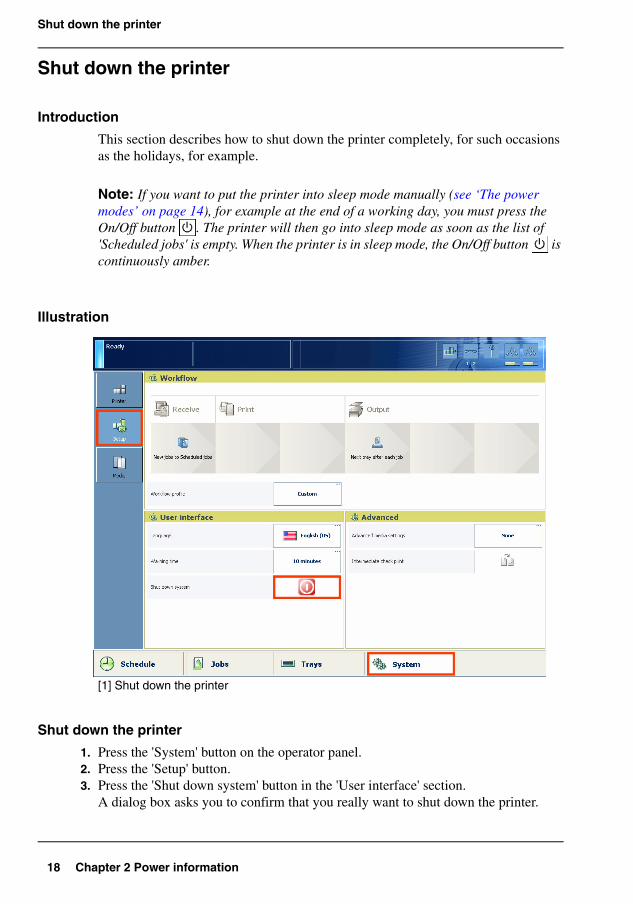
[1] Shut down the printer
Shut down the printer
1. Press the 'System' button on the operator panel.2. Press the 'Setup' button.3. Press the 'Shut down system' button in the 'User interface' section.
A dialog box asks you to confirm that you really want to shut down the printer.
19
Shut down the printer
4. Press 'Yes'.A message indicates when the shutdown will begin. Wait until the following has happened.■ The Hold button and the Release button are off■ The On/Off button blinks amber■ The operator panel screen is off.
5. Press the power switch on the back of the printer.

20 Chapter 2 Power information
Shut down the printer

21
Chapter 3 Overview of the system components
22 Chapter 3 Overview of the system components
Introduction to the main system components
Introduction to the main system components
Introduction
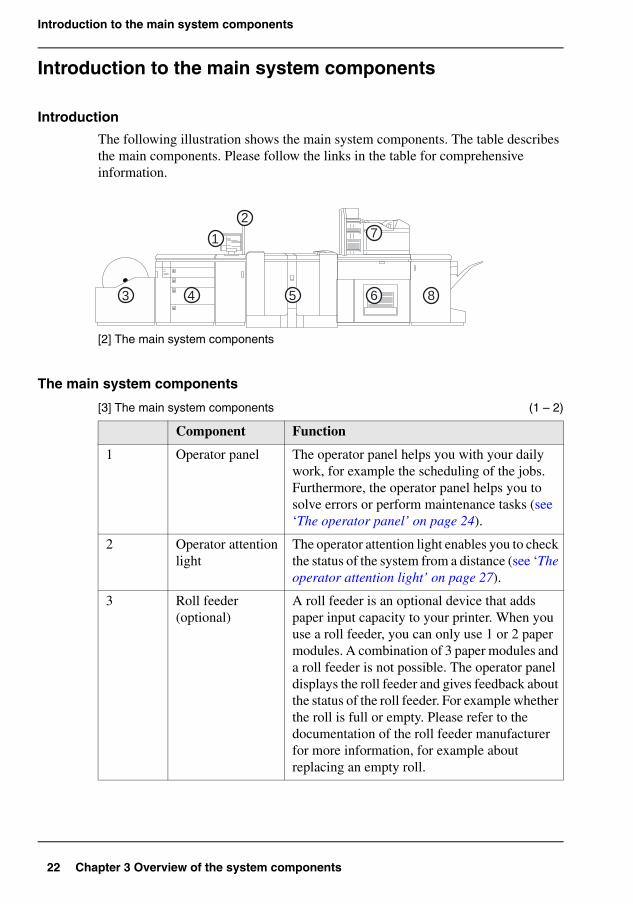
The following illustration shows the main system components. The table describes the main components. Please follow the links in the table for comprehensive information.
[2]
[2] The main system components
The main system components[3]
1
2
3
4
3
12
5 64 8
7
[3] The main system components (1 – 2)
Component Function
1 Operator panel The operator panel helps you with your daily work, for example the scheduling of the jobs. Furthermore, the operator panel helps you to solve errors or perform maintenance tasks (see ‘The operator panel’ on page 24).
2 Operator attention light
The operator attention light enables you to check the status of the system from a distance (see ‘The operator attention light’ on page 27).
3 Roll feeder (optional)
A roll feeder is an optional device that adds paper input capacity to your printer. When you use a roll feeder, you can only use 1 or 2 paper modules. A combination of 3 paper modules and a roll feeder is not possible. The operator panel displays the roll feeder and gives feedback about the status of the roll feeder. For example whether the roll is full or empty. Please refer to the documentation of the roll feeder manufacturer for more information, for example about replacing an empty roll.
23
Introduction to the main system components
4 Paper module The paper module contains 4 paper trays. The paper trays contain the media that will be printed. The default configuration of the system contains 1 paper module. You can add 1 or 2 more paper modules to the default configuration to increase the media input capacity (see ‘The paper modules’ on page 32).
5 Engine module The engine module contains the components that print the media. Access to the engine module is only required when a paper jam occurs or when maintenance is required. The doors at the left-hand side and right-hand side of the engine module give access to the toner units (see ‘Add toner’ on page 156).
6 Stacker The stacker is the output location of a default configuration. The system supports up to 3 stackers The output locations on page 29.
7 Finisher (optional) The finisher on top of the stacker is an optional output location for the print jobs. The finisher can staple the jobs The output locations on page 29.
8 Stacker/stapler (optional)
The stacker/stapler is an optional output location for the print jobs The output locations on page 29. The stacker/stapler supports a large number of media sizes Product specifications on page 170.
[3] The main system components (2 – 2)
Component Function
24 Chapter 3 Overview of the system components
The operator panel
The operator panel
Introduction
The operator panel is a touch screen panel. You must touch the buttons on the operator panel to access the various functions. The operator panel is divided into 4 main views. The taskbar at the bottom of the screen contains the buttons that give access to the 4 main views. Furthermore, the operator panel has 2 hardkeys ( and
) at the bottom of the panel.This section gives an overview of the main keys and buttons of the operator panel.
Note: You can clean the screen of the operator panel with a 50% mix of water and isopropyl alcohol (K2). Use a lint-free cloth. Always put the cleaner onto the cloth and not directly on the screen.
25
The operator panel
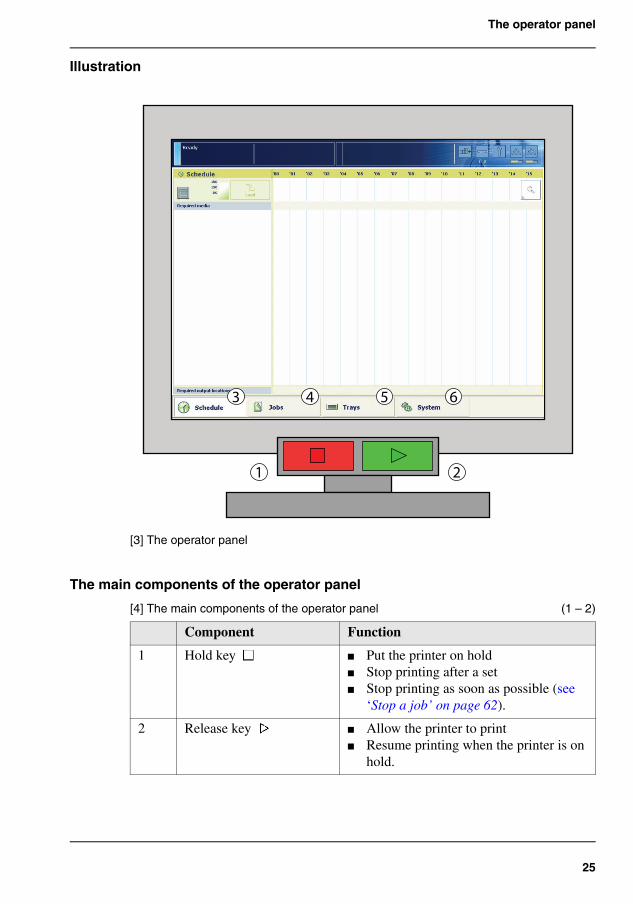
Illustration[3]
[3] The operator panel
The main components of the operator panel[4]
1 2
3 4 5 6
[4] The main components of the operator panel (1 – 2)
Component Function
1 Hold key ■ Put the printer on hold■ Stop printing after a set■ Stop printing as soon as possible (see
‘Stop a job’ on page 62).
2 Release key ■ Allow the printer to print■ Resume printing when the printer is on
hold.
26 Chapter 3 Overview of the system components
The operator panel
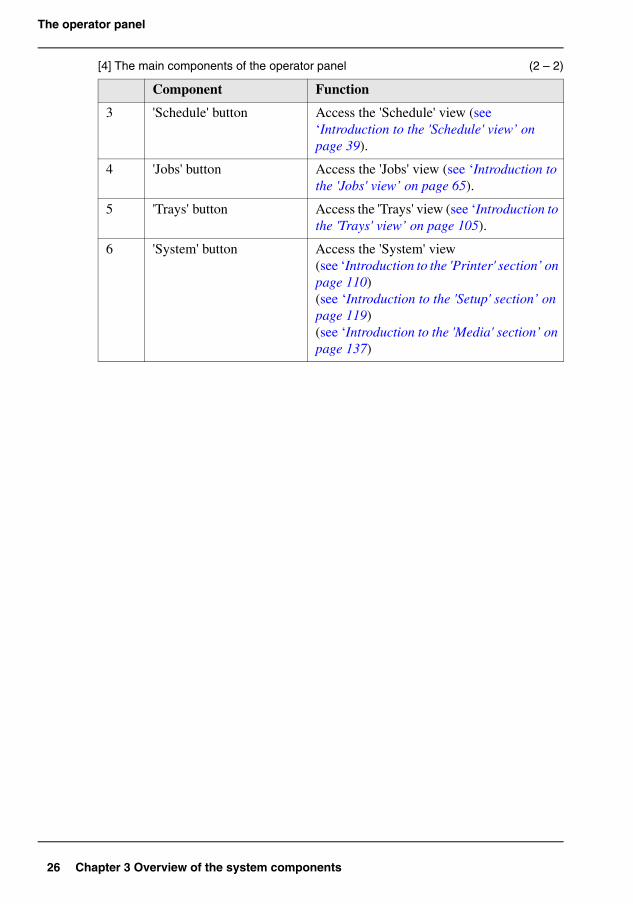
3 'Schedule' button Access the 'Schedule' view (see ‘Introduction to the 'Schedule' view’ on page 39).
4 'Jobs' button Access the 'Jobs' view (see ‘Introduction to the 'Jobs' view’ on page 65).
5 'Trays' button Access the 'Trays' view (see ‘Introduction to the 'Trays' view’ on page 105).
6 'System' button Access the 'System' view(see ‘Introduction to the 'Printer' section’ on page 110)(see ‘Introduction to the 'Setup' section’ on page 119)(see ‘Introduction to the 'Media' section’ on page 137)
[4] The main components of the operator panel (2 – 2)
Component Function
27
The operator attention light
The operator attention light
Introduction
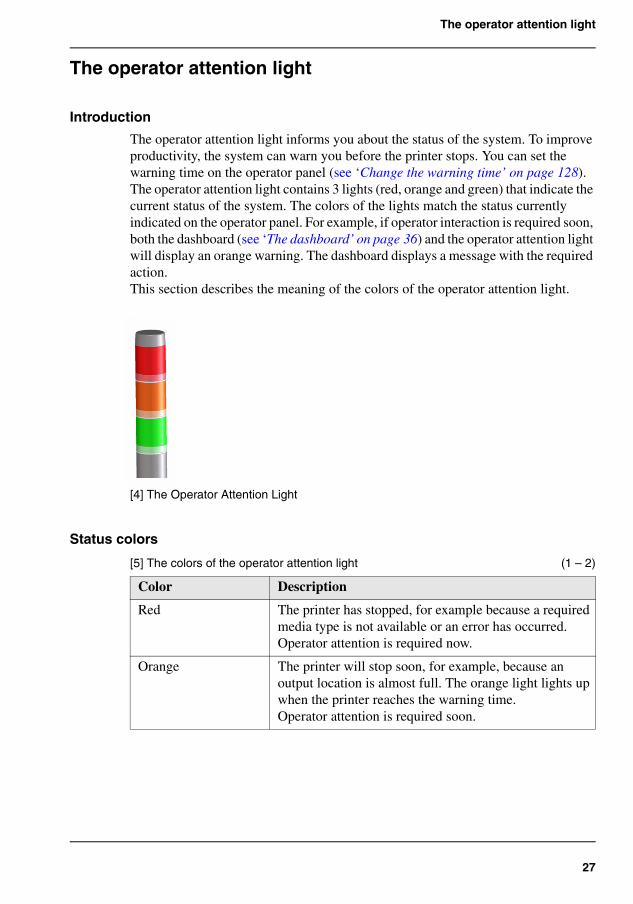
The operator attention light informs you about the status of the system. To improve productivity, the system can warn you before the printer stops. You can set the warning time on the operator panel (see ‘Change the warning time’ on page 128).The operator attention light contains 3 lights (red, orange and green) that indicate the current status of the system. The colors of the lights match the status currently indicated on the operator panel. For example, if operator interaction is required soon, both the dashboard (see ‘The dashboard’ on page 36) and the operator attention light will display an orange warning. The dashboard displays a message with the required action.This section describes the meaning of the colors of the operator attention light.
[4]
[4] The Operator Attention Light
Status colors[5]
[5] The colors of the operator attention light (1 – 2)
Color Description
Red The printer has stopped, for example because a required media type is not available or an error has occurred.Operator attention is required now.
Orange The printer will stop soon, for example, because an output location is almost full. The orange light lights up when the printer reaches the warning time.Operator attention is required soon.
28 Chapter 3 Overview of the system components
The operator attention light
Green The printer is busy printing. The printer can print longer than the defined warning time.Operator attention is not required.
All lights off The printer is idle. There are no jobs scheduled for printing.
[5] The colors of the operator attention light (2 – 2)
Color Description
29
The output locations
The output locations
Introduction
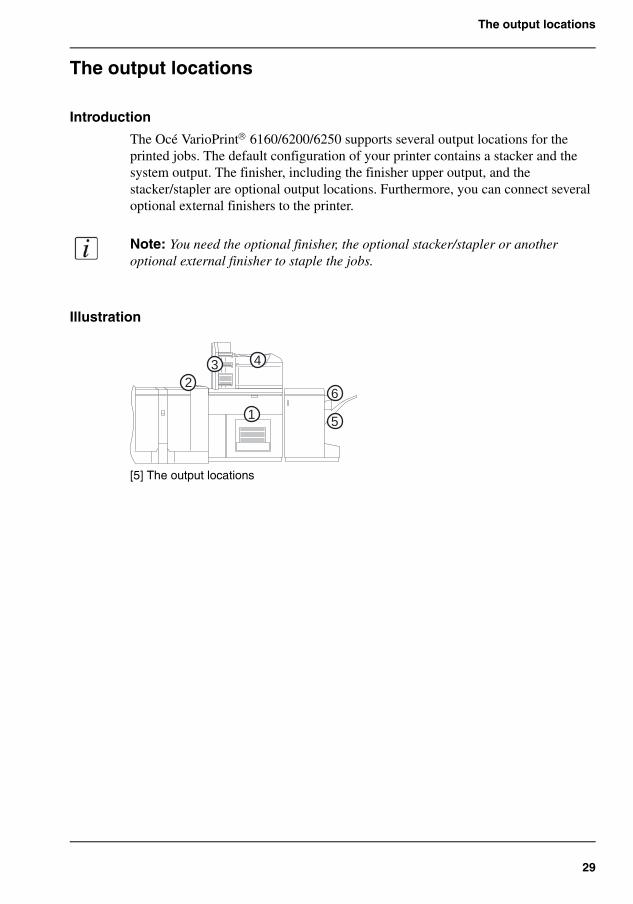
The Océ VarioPrint® 6160/6200/6250 supports several output locations for the printed jobs. The default configuration of your printer contains a stacker and the system output. The finisher, including the finisher upper output, and the stacker/stapler are optional output locations. Furthermore, you can connect several optional external finishers to the printer.
Note: You need the optional finisher, the optional stacker/stapler or another optional external finisher to staple the jobs.
Illustration[5]
[5] The output locations
3
1
2
4
6
5
30 Chapter 3 Overview of the system components
The output locations
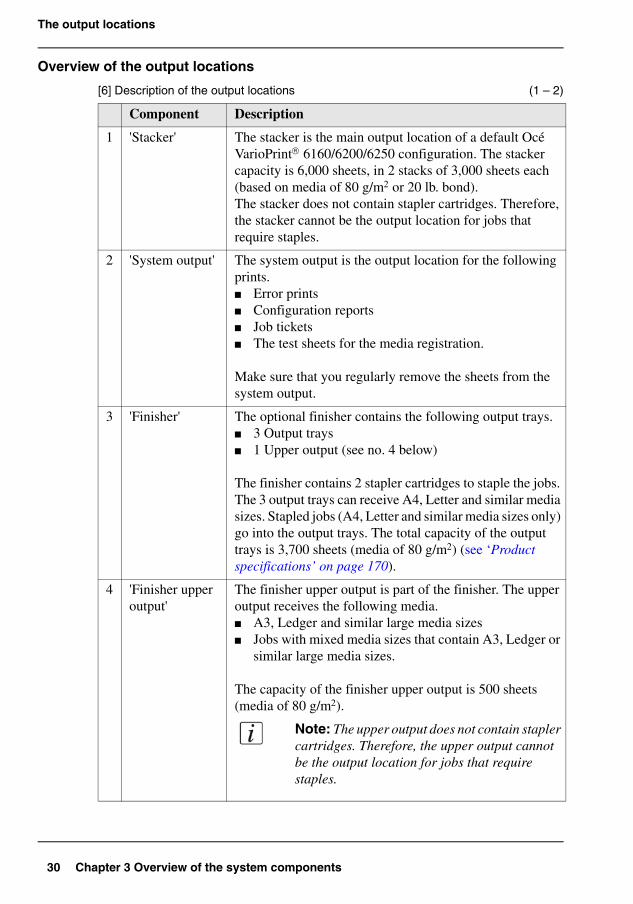
Overview of the output locations[6]
[6] Description of the output locations (1 – 2)
Component Description
1 'Stacker' The stacker is the main output location of a default Océ VarioPrint® 6160/6200/6250 configuration. The stacker capacity is 6,000 sheets, in 2 stacks of 3,000 sheets each (based on media of 80 g/m2 or 20 lb. bond).The stacker does not contain stapler cartridges. Therefore, the stacker cannot be the output location for jobs that require staples.
2 'System output' The system output is the output location for the following prints.■ Error prints■ Configuration reports■ Job tickets■ The test sheets for the media registration.
Make sure that you regularly remove the sheets from the system output.
3 'Finisher' The optional finisher contains the following output trays.■ 3 Output trays■ 1 Upper output (see no. 4 below)
The finisher contains 2 stapler cartridges to staple the jobs. The 3 output trays can receive A4, Letter and similar media sizes. Stapled jobs (A4, Letter and similar media sizes only) go into the output trays. The total capacity of the output trays is 3,700 sheets (media of 80 g/m2) (see ‘Product specifications’ on page 170).
4 'Finisher upper output'
The finisher upper output is part of the finisher. The upper output receives the following media.■ A3, Ledger and similar large media sizes■ Jobs with mixed media sizes that contain A3, Ledger or
similar large media sizes.
The capacity of the finisher upper output is 500 sheets (media of 80 g/m2).
Note: The upper output does not contain stapler cartridges. Therefore, the upper output cannot be the output location for jobs that require staples.
31
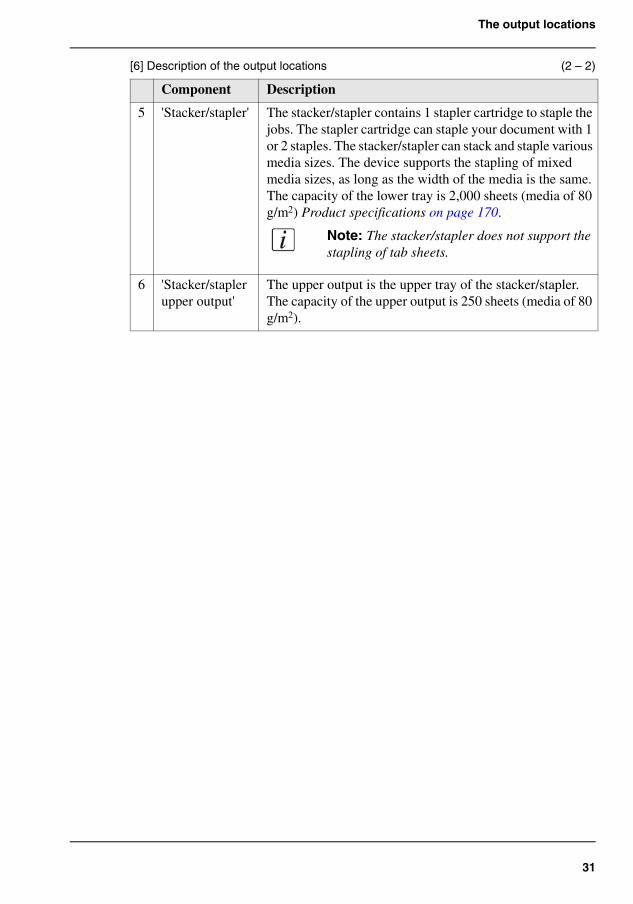
The output locations
5 'Stacker/stapler' The stacker/stapler contains 1 stapler cartridge to staple the jobs. The stapler cartridge can staple your document with 1 or 2 staples. The stacker/stapler can stack and staple various media sizes. The device supports the stapling of mixed media sizes, as long as the width of the media is the same. The capacity of the lower tray is 2,000 sheets (media of 80 g/m2) Product specifications on page 170.
Note: The stacker/stapler does not support the stapling of tab sheets.
6 'Stacker/stapler upper output'
The upper output is the upper tray of the stacker/stapler. The capacity of the upper output is 250 sheets (media of 80 g/m2).
[6] Description of the output locations (2 – 2)
Component Description
32 Chapter 3 Overview of the system components
The paper modules
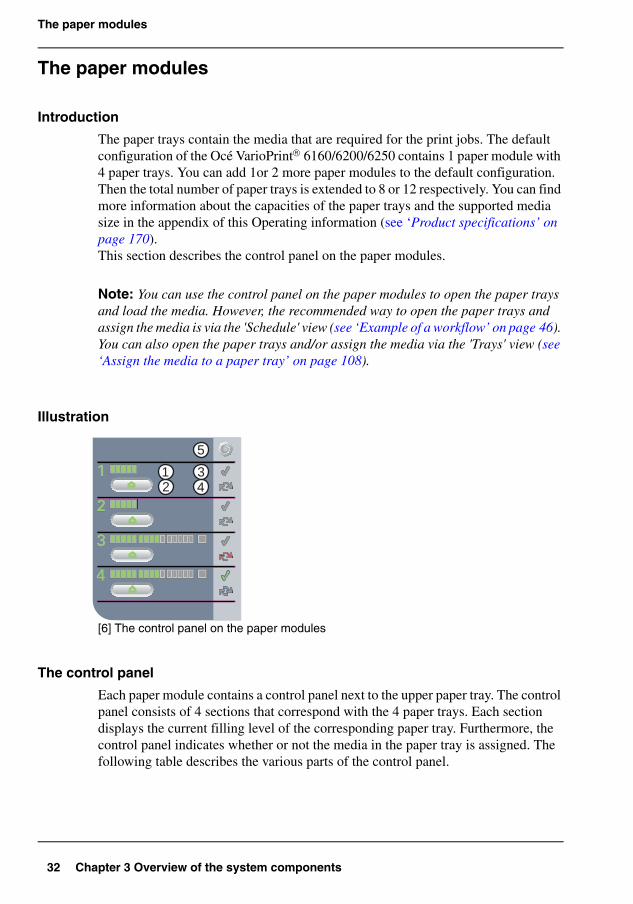
The paper modules
Introduction
The paper trays contain the media that are required for the print jobs. The default configuration of the Océ VarioPrint® 6160/6200/6250 contains 1 paper module with 4 paper trays. You can add 1or 2 more paper modules to the default configuration. Then the total number of paper trays is extended to 8 or 12 respectively. You can find more information about the capacities of the paper trays and the supported media size in the appendix of this Operating information (see ‘Product specifications’ on page 170).This section describes the control panel on the paper modules.
Note: You can use the control panel on the paper modules to open the paper trays and load the media. However, the recommended way to open the paper trays and assign the media is via the 'Schedule' view (see ‘Example of a workflow’ on page 46). You can also open the paper trays and/or assign the media via the 'Trays' view (see ‘Assign the media to a paper tray’ on page 108).
Illustration[6]
[6] The control panel on the paper modules
The control panel
Each paper module contains a control panel next to the upper paper tray. The control panel consists of 4 sections that correspond with the 4 paper trays. Each section displays the current filling level of the corresponding paper tray. Furthermore, the control panel indicates whether or not the media in the paper tray is assigned. The following table describes the various parts of the control panel.
1
2
3
4
1
2
3
4
1 32
5
4
33
The paper modules
[7]
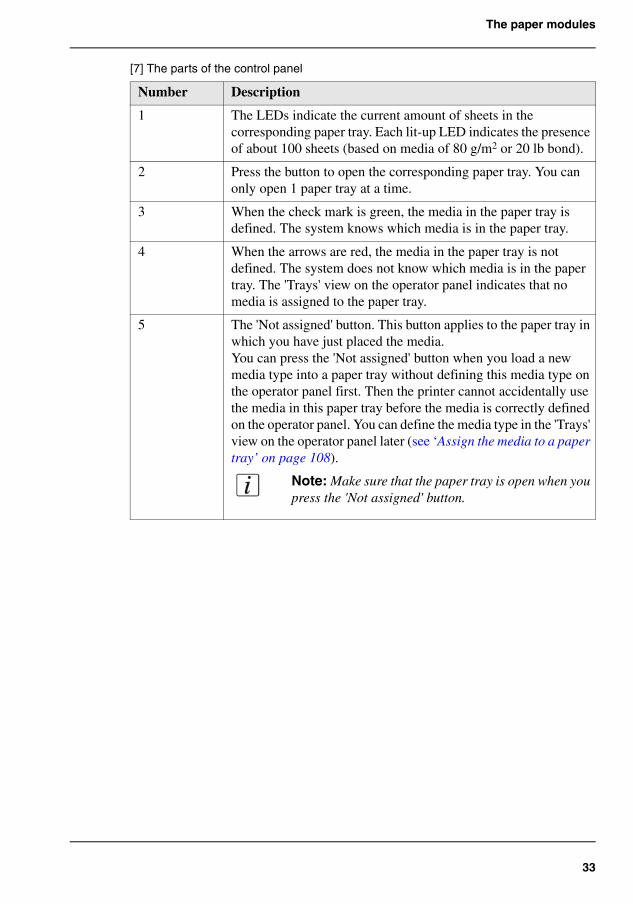
[7] The parts of the control panel
Number Description
1 The LEDs indicate the current amount of sheets in the corresponding paper tray. Each lit-up LED indicates the presence of about 100 sheets (based on media of 80 g/m2 or 20 lb bond).
2 Press the button to open the corresponding paper tray. You can only open 1 paper tray at a time.
3 When the check mark is green, the media in the paper tray is defined. The system knows which media is in the paper tray.
4 When the arrows are red, the media in the paper tray is not defined. The system does not know which media is in the paper tray. The 'Trays' view on the operator panel indicates that no media is assigned to the paper tray.
5 The 'Not assigned' button. This button applies to the paper tray in which you have just placed the media.You can press the 'Not assigned' button when you load a new media type into a paper tray without defining this media type on the operator panel first. Then the printer cannot accidentally use the media in this paper tray before the media is correctly defined on the operator panel. You can define the media type in the 'Trays' view on the operator panel later (see ‘Assign the media to a paper tray’ on page 108).
Note: Make sure that the paper tray is open when you press the 'Not assigned' button.
34 Chapter 3 Overview of the system components
The paper modules

35
Chapter 4 Working with the operator panel
36 Chapter 4 Working with the operator panel
The dashboard
Introduction
The dashboard
Introduction
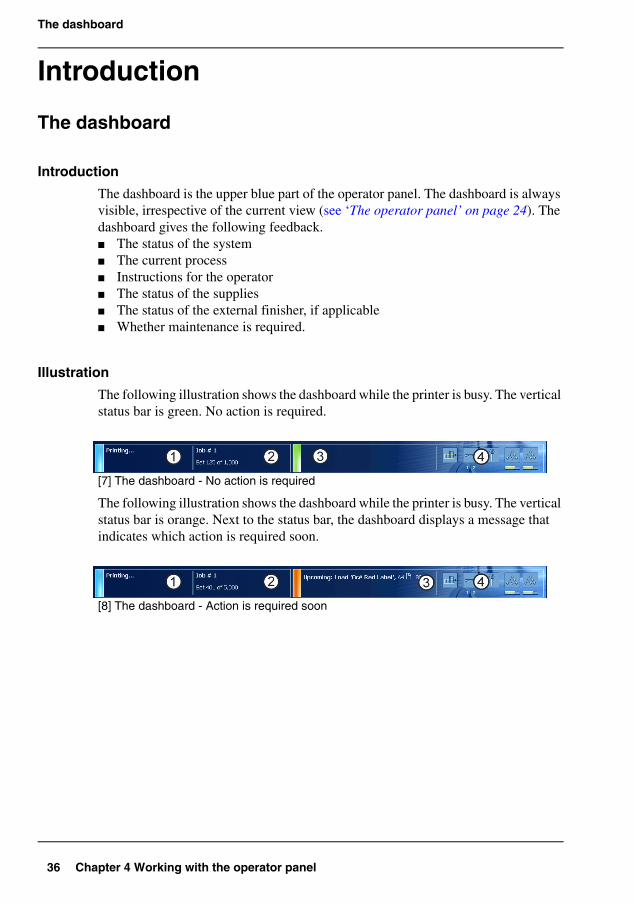
The dashboard is the upper blue part of the operator panel. The dashboard is always visible, irrespective of the current view (see ‘The operator panel’ on page 24). The dashboard gives the following feedback.■ The status of the system■ The current process■ Instructions for the operator■ The status of the supplies■ The status of the external finisher, if applicable■ Whether maintenance is required.
Illustration
The following illustration shows the dashboard while the printer is busy. The vertical status bar is green. No action is required.
[7]
[7] The dashboard - No action is required
The following illustration shows the dashboard while the printer is busy. The vertical status bar is orange. Next to the status bar, the dashboard displays a message that indicates which action is required soon.
[8]
[8] The dashboard - Action is required soon
37
The dashboard
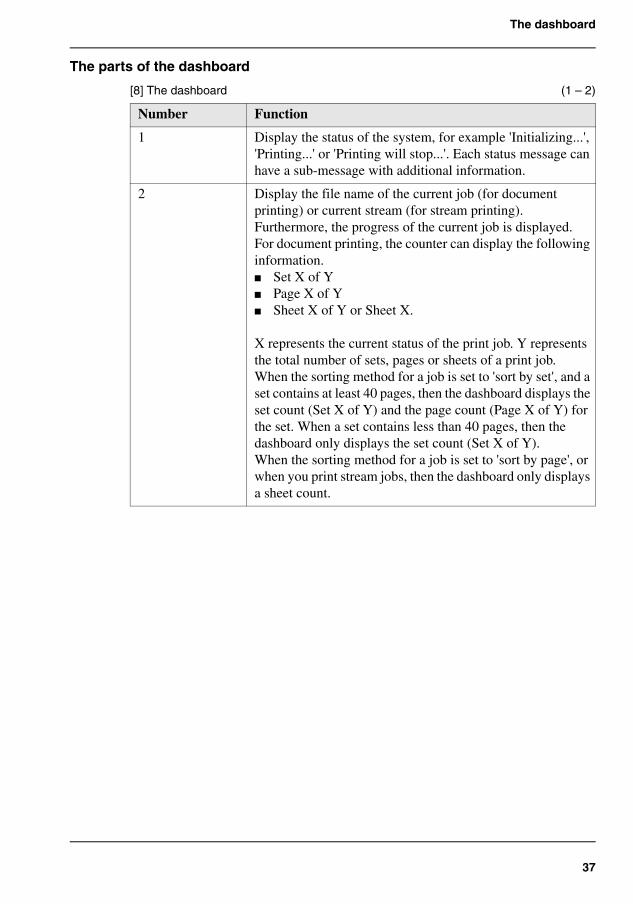
The parts of the dashboard[8]
[8] The dashboard (1 – 2)
Number Function
1 Display the status of the system, for example 'Initializing...', 'Printing...' or 'Printing will stop...'. Each status message can have a sub-message with additional information.
2 Display the file name of the current job (for document printing) or current stream (for stream printing). Furthermore, the progress of the current job is displayed.For document printing, the counter can display the following information.■ Set X of Y■ Page X of Y■ Sheet X of Y or Sheet X.
X represents the current status of the print job. Y represents the total number of sets, pages or sheets of a print job.When the sorting method for a job is set to 'sort by set', and a set contains at least 40 pages, then the dashboard displays the set count (Set X of Y) and the page count (Page X of Y) for the set. When a set contains less than 40 pages, then the dashboard only displays the set count (Set X of Y).When the sorting method for a job is set to 'sort by page', or when you print stream jobs, then the dashboard only displays a sheet count.
38 Chapter 4 Working with the operator panel
The dashboard
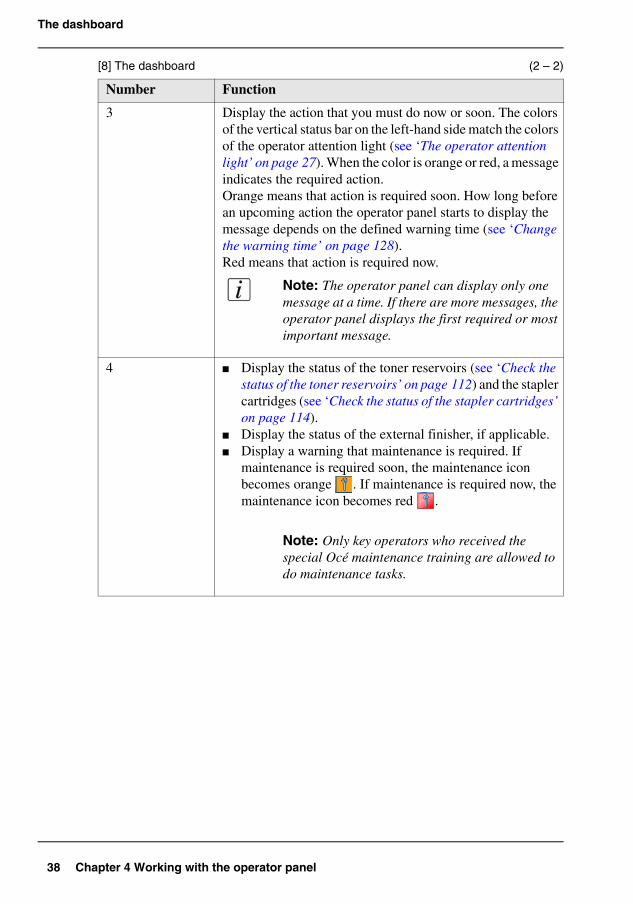
3 Display the action that you must do now or soon. The colors of the vertical status bar on the left-hand side match the colors of the operator attention light (see ‘The operator attention light’ on page 27). When the color is orange or red, a message indicates the required action.Orange means that action is required soon. How long before an upcoming action the operator panel starts to display the message depends on the defined warning time (see ‘Change the warning time’ on page 128).Red means that action is required now.
Note: The operator panel can display only one message at a time. If there are more messages, the operator panel displays the first required or most important message.
4 ■ Display the status of the toner reservoirs (see ‘Check the status of the toner reservoirs’ on page 112) and the stapler cartridges (see ‘Check the status of the stapler cartridges’ on page 114).
■ Display the status of the external finisher, if applicable.■ Display a warning that maintenance is required. If
maintenance is required soon, the maintenance icon becomes orange . If maintenance is required now, the maintenance icon becomes red .
Note: Only key operators who received the special Océ maintenance training are allowed to do maintenance tasks.
[8] The dashboard (2 – 2)
Number Function

39
Introduction to the 'Schedule' view
The Schedule view
Introduction to the 'Schedule' view
Introduction
The 'Schedule' is your daily planning board for print jobs. The 'Schedule' helps you to keep the Océ VarioPrint® 6160/6200/6250 running.
This section shows and describes the main parts of the 'Schedule'. You can find more information about the practical use of the 'Schedule' in the next section (see ‘Example of a workflow’ on page 46).
Note: The descriptions of the colors of the bars and the indication of the required amount of sheets are only valid for document printing. For streaming jobs , all the bars remain grey until the paper trays are empty or the output locations are full. Then the printer stops and the bars become red. Furthermore, the media toolbar does not indicate the required amount of sheets.
The 'Schedule' view[9]
[9] The 'Schedule' view
40 Chapter 4 Working with the operator panel
Introduction to the 'Schedule' view
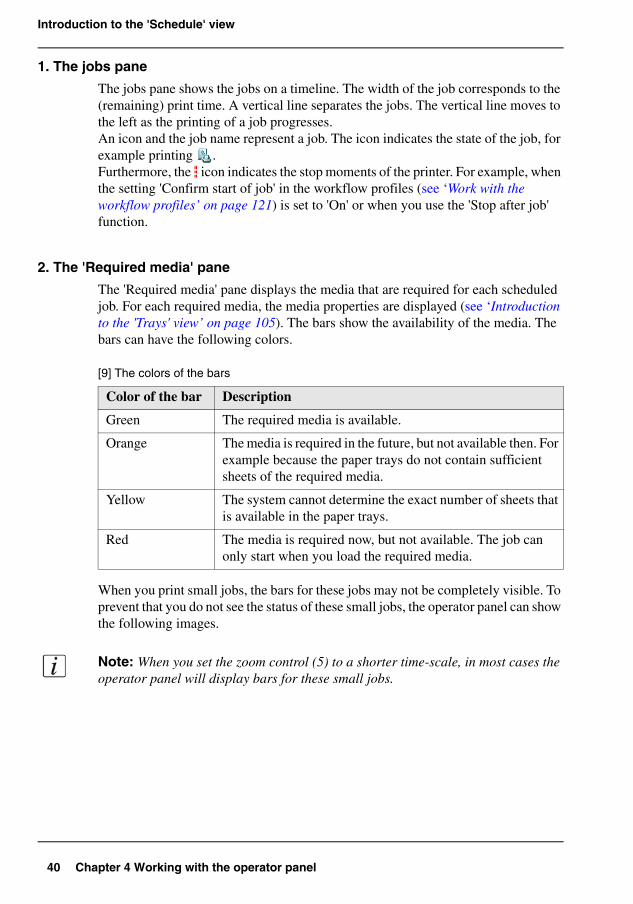
1. The jobs pane
The jobs pane shows the jobs on a timeline. The width of the job corresponds to the (remaining) print time. A vertical line separates the jobs. The vertical line moves to the left as the printing of a job progresses.An icon and the job name represent a job. The icon indicates the state of the job, for example printing .Furthermore, the icon indicates the stop moments of the printer. For example, when the setting 'Confirm start of job' in the workflow profiles (see ‘Work with the workflow profiles’ on page 121) is set to 'On' or when you use the 'Stop after job' function.
2. The 'Required media' pane
The 'Required media' pane displays the media that are required for each scheduled job. For each required media, the media properties are displayed (see ‘Introduction to the 'Trays' view’ on page 105). The bars show the availability of the media. The bars can have the following colors.
[9]
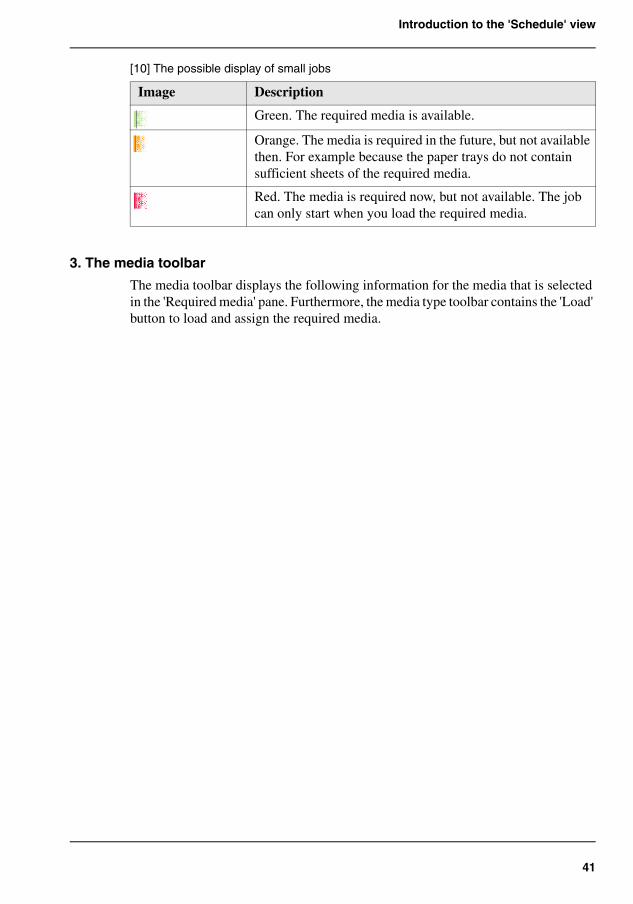
When you print small jobs, the bars for these jobs may not be completely visible. To prevent that you do not see the status of these small jobs, the operator panel can show the following images.
Note: When you set the zoom control (5) to a shorter time-scale, in most cases the operator panel will display bars for these small jobs.
[9] The colors of the bars
Color of the bar Description
Green The required media is available.
Orange The media is required in the future, but not available then. For example because the paper trays do not contain sufficient sheets of the required media.
Yellow The system cannot determine the exact number of sheets that is available in the paper trays.
Red The media is required now, but not available. The job can only start when you load the required media.
41
Introduction to the 'Schedule' view
[10]
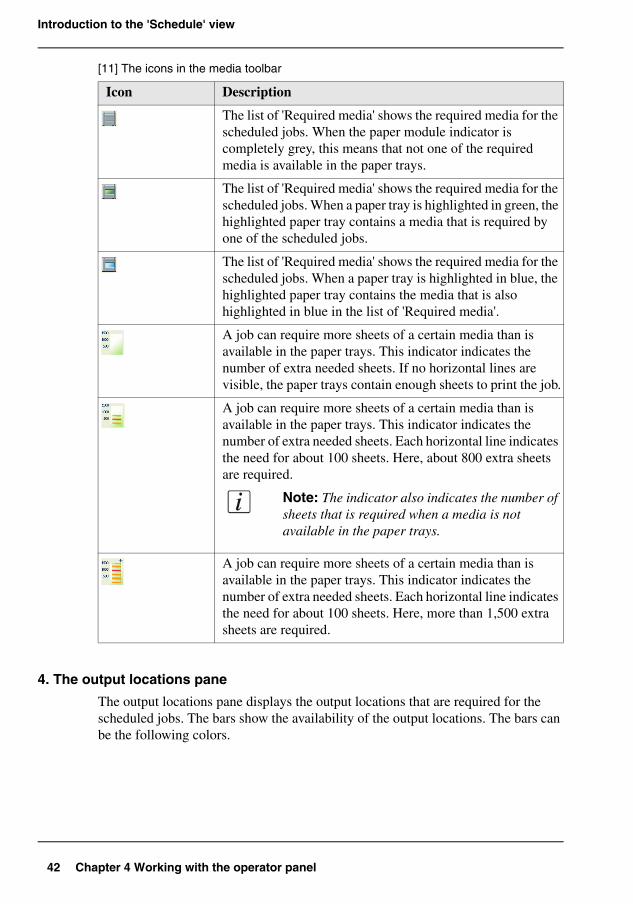
3. The media toolbar
The media toolbar displays the following information for the media that is selected in the 'Required media' pane. Furthermore, the media type toolbar contains the 'Load' button to load and assign the required media.
[10] The possible display of small jobs
Image Description[10]
Green. The required media is available.[11]
Orange. The media is required in the future, but not available then. For example because the paper trays do not contain sufficient sheets of the required media.
[12]
Red. The media is required now, but not available. The job can only start when you load the required media.
42 Chapter 4 Working with the operator panel
Introduction to the 'Schedule' view
[11]
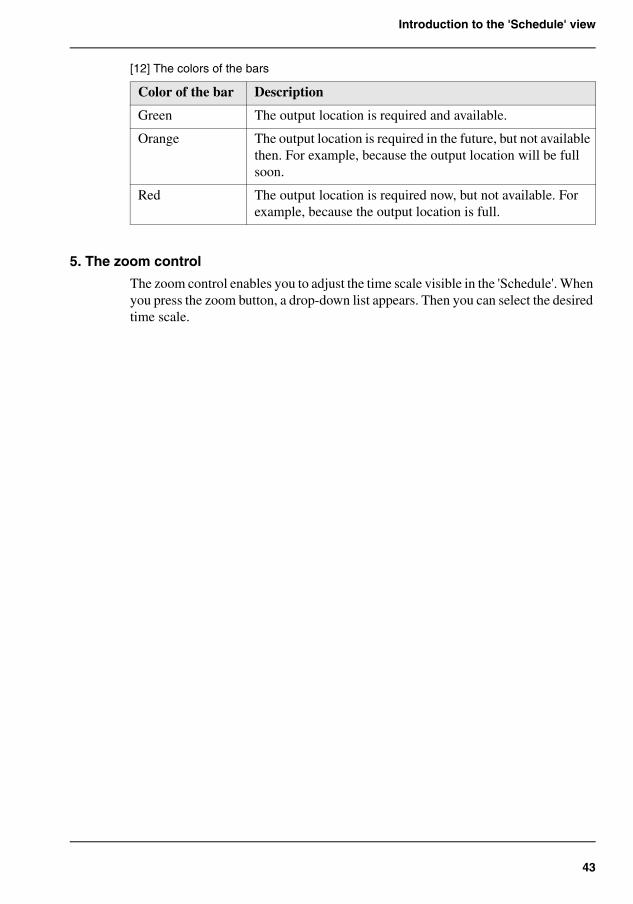
4. The output locations pane
The output locations pane displays the output locations that are required for the scheduled jobs. The bars show the availability of the output locations. The bars can be the following colors.
[11] The icons in the media toolbar
Icon Description[13]
The list of 'Required media' shows the required media for the scheduled jobs. When the paper module indicator is completely grey, this means that not one of the required media is available in the paper trays.
[14]
The list of 'Required media' shows the required media for the scheduled jobs. When a paper tray is highlighted in green, the highlighted paper tray contains a media that is required by one of the scheduled jobs.
[15]
The list of 'Required media' shows the required media for the scheduled jobs. When a paper tray is highlighted in blue, the highlighted paper tray contains the media that is also highlighted in blue in the list of 'Required media'.
[16]
A job can require more sheets of a certain media than is available in the paper trays. This indicator indicates the number of extra needed sheets. If no horizontal lines are visible, the paper trays contain enough sheets to print the job.
[17]
A job can require more sheets of a certain media than is available in the paper trays. This indicator indicates the number of extra needed sheets. Each horizontal line indicates the need for about 100 sheets. Here, about 800 extra sheets are required.
Note: The indicator also indicates the number of sheets that is required when a media is not available in the paper trays.
[18]
A job can require more sheets of a certain media than is available in the paper trays. This indicator indicates the number of extra needed sheets. Each horizontal line indicates the need for about 100 sheets. Here, more than 1,500 extra sheets are required.
43
Introduction to the 'Schedule' view
[12]
5. The zoom control
The zoom control enables you to adjust the time scale visible in the 'Schedule'. When you press the zoom button, a drop-down list appears. Then you can select the desired time scale.
[12] The colors of the bars
Color of the bar Description
Green The output location is required and available.
Orange The output location is required in the future, but not available then. For example, because the output location will be full soon.
Red The output location is required now, but not available. For example, because the output location is full.
44 Chapter 4 Working with the operator panel
Load the media
Load the media
Introduction
This section describes how to load the media into a paper tray.When you load the media via the 'Load' button in the 'Schedule', the paper tray is automatically assigned to the correct media.When you load and assign the media via the 'Assign' button in the 'Trays' view, you must assign the paper tray to the loaded media manually.
Note: When no external finisher is connected to the printer, you must put all the media types face up and header up into the paper trays. The tabs of tab sheets must be aligned with the right-hand side. If an external finisher is connected to the printer, you may have to put the media into the paper trays in a different way. Refer to the documentation of the external finisher for more information about how to place the media.
When to do
■ The 'Schedule' displays a red bar next to a required media. The red bar indicates that a scheduled job now requires a media that is not available in the paper trays.
■ The 'Schedule' displays an orange bar next to a required media. The orange bar indicates that a scheduled job requires media which is either not available in the paper trays or which is available, but not in sufficient quantity to finish the job.
■ The current job requires more of the same media than is currently loaded in the paper trays. You can add more of the required media into another paper tray.
■ You already want to load and assign media that are required for the next job (work ahead).
Attention: Always put the stack of media aligned with the left-hand side of the paper guides inside the paper trays, as indicated on the sticker inside the paper trays.
45
Load the media
Illustration[19]
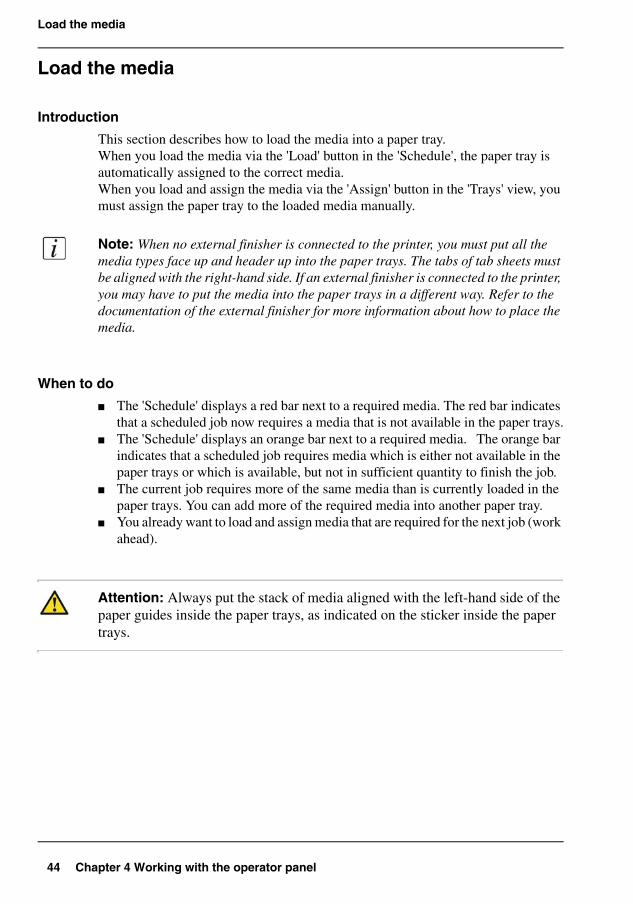
[19] The sticker inside the paper trays indicates how to load the media
Load the media
1. Put a small stack of media into the paper tray.2. Press the green handle on the right-hand guide and push the guide against the edge
of the media.3. Turn the green knob to adjust the front guide and the rear guide.4. Put the rest of the media on top of the small stack.
Note: If you want to assign the media later you must press the 'Not assigned' button (see ‘The paper modules’ on page 32), as indicated on the right-hand side of the sticker.
SR
SR
46 Chapter 4 Working with the operator panel
Example of a workflow
Example of a workflow
Introduction
This section gives an example of a workflow for 3 jobs that were sent to the list of 'Waiting jobs' and must be printed. The procedure is divided into the following sub-procedures.■ Move the waiting jobs to the 'Scheduled jobs' and print the first job.■ Prepare the second job for printing (work ahead)■ Prepare the third job for printing (work ahead).
Job requirements
The example in this section is based on the following jobs and job properties.
[13]
Note: Only Océ Red Label is available in one of the paper trays. The other media are not yet available.
[13] Overview of the job properties
Job number Job name Required media
1 Job # 1 ■ Océ Tab Cards, A4, 80 g/m2 ■ Océ Red Label, A4, 80 g/m2
2 Job # 2 Océ Black Label, A3, 80 g/m2
3 Job # 3 Océ Green Label, A4, 120 g/m2
47
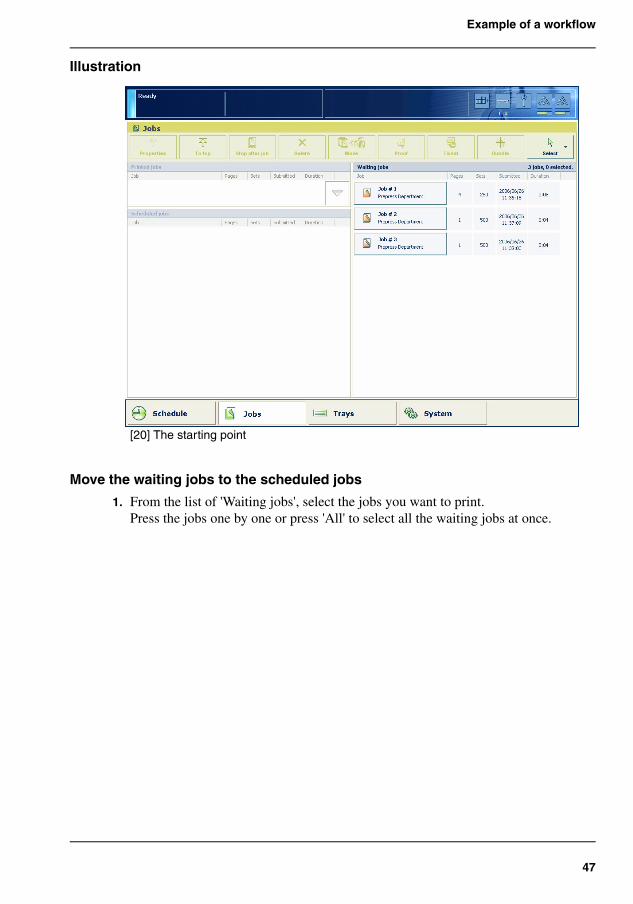
Example of a workflow
Illustration[20]
[20] The starting point
Move the waiting jobs to the scheduled jobs
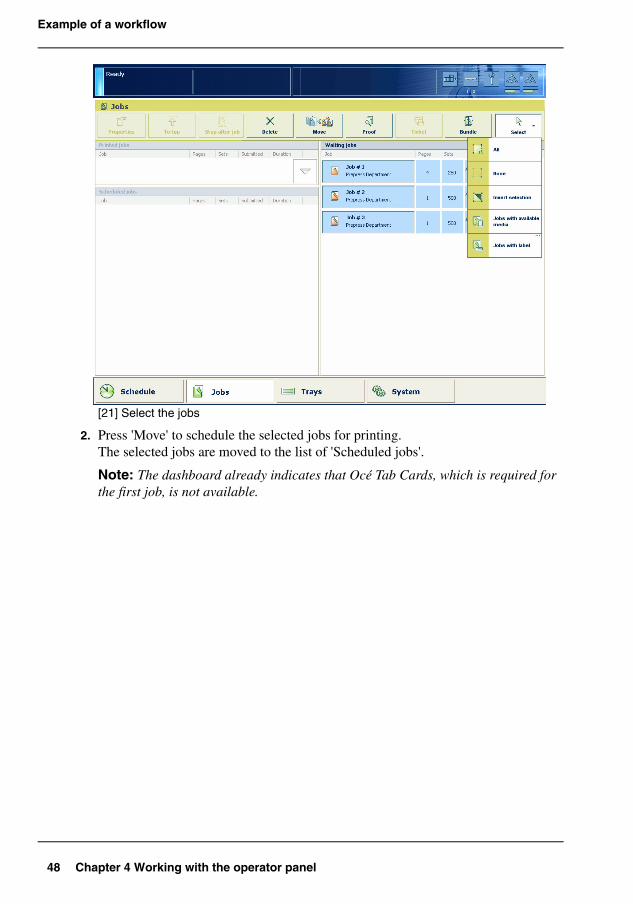
1. From the list of 'Waiting jobs', select the jobs you want to print.Press the jobs one by one or press 'All' to select all the waiting jobs at once.
48 Chapter 4 Working with the operator panel
Example of a workflow
[21]
[21] Select the jobs
2. Press 'Move' to schedule the selected jobs for printing.The selected jobs are moved to the list of 'Scheduled jobs'.
Note: The dashboard already indicates that Océ Tab Cards, which is required for the first job, is not available.
49
Example of a workflow
[22]
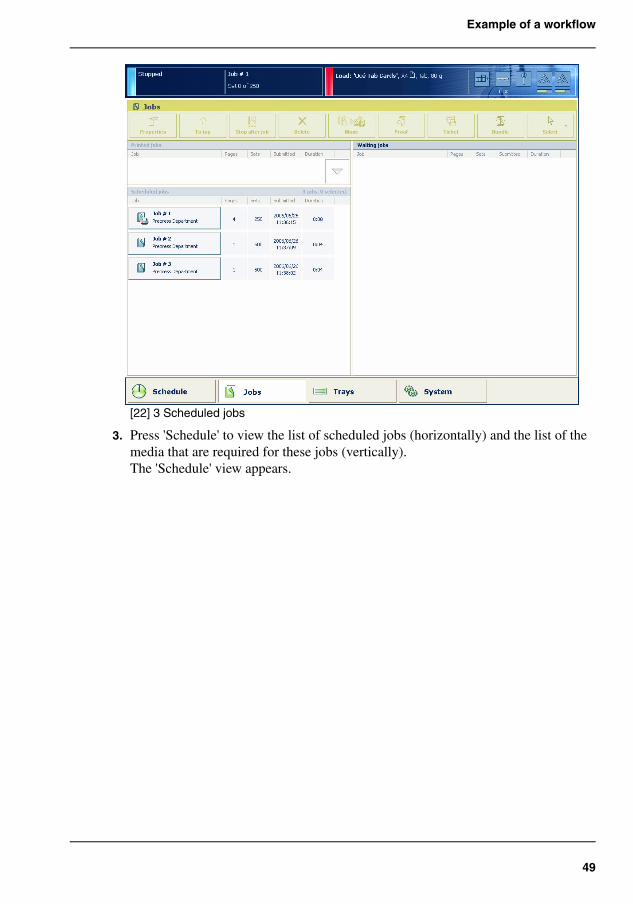
[22] 3 Scheduled jobs
3. Press 'Schedule' to view the list of scheduled jobs (horizontally) and the list of the media that are required for these jobs (vertically).The 'Schedule' view appears.
50 Chapter 4 Working with the operator panel
Example of a workflow
[23]
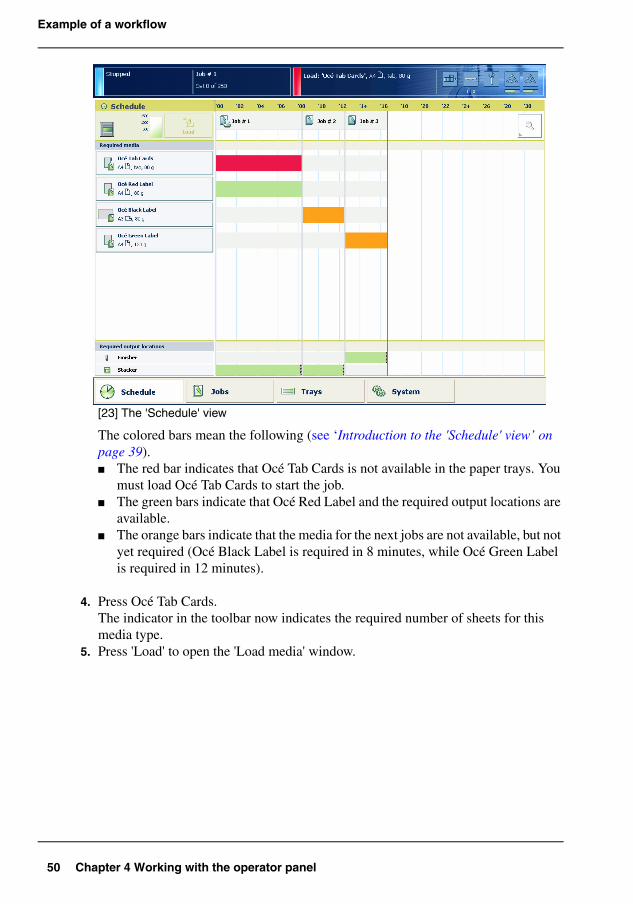
[23] The 'Schedule' view
The colored bars mean the following (see ‘Introduction to the 'Schedule' view’ on page 39).■ The red bar indicates that Océ Tab Cards is not available in the paper trays. You
must load Océ Tab Cards to start the job.■ The green bars indicate that Océ Red Label and the required output locations are
available.■ The orange bars indicate that the media for the next jobs are not available, but not
yet required (Océ Black Label is required in 8 minutes, while Océ Green Label is required in 12 minutes).
4. Press Océ Tab Cards.The indicator in the toolbar now indicates the required number of sheets for this media type.
5. Press 'Load' to open the 'Load media' window.
51
Example of a workflow
[24]
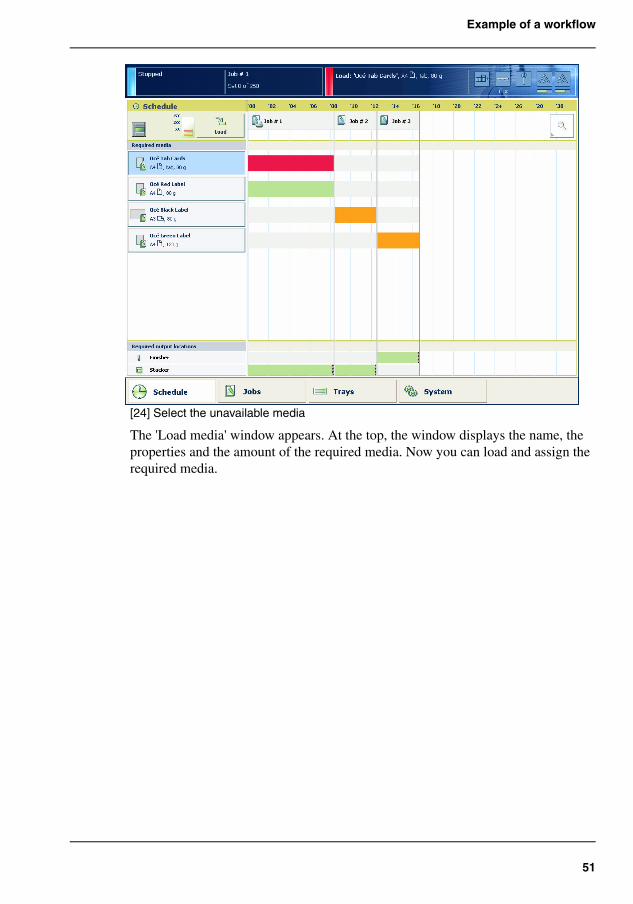
[24] Select the unavailable media
The 'Load media' window appears. At the top, the window displays the name, the properties and the amount of the required media. Now you can load and assign the required media.
52 Chapter 4 Working with the operator panel
Example of a workflow
[25]
[25] Load the media
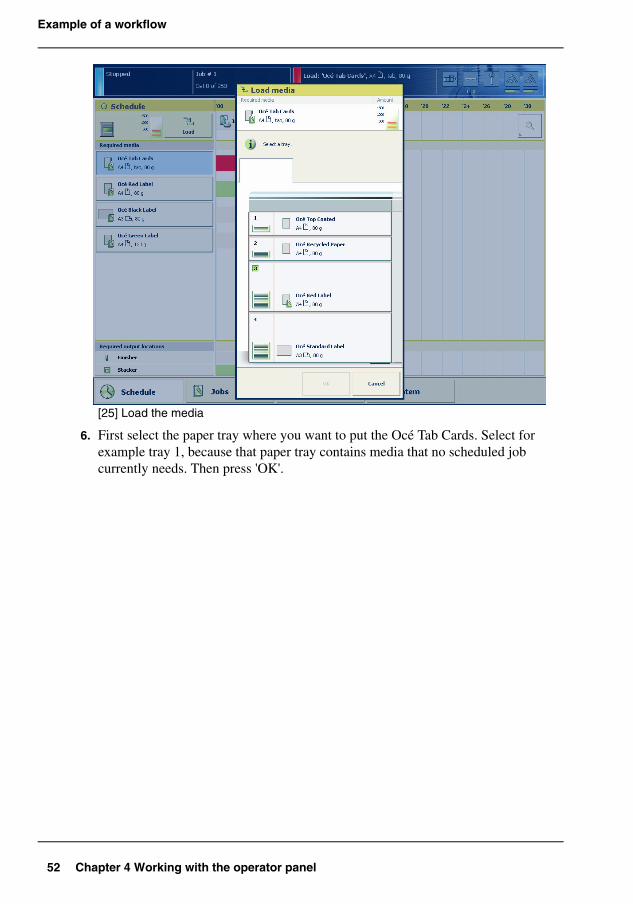
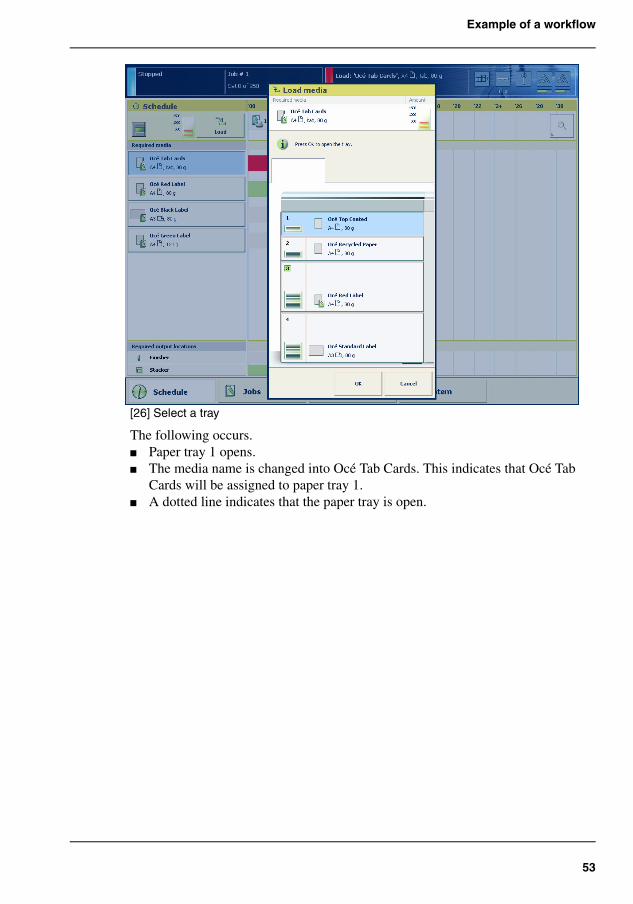
6. First select the paper tray where you want to put the Océ Tab Cards. Select for example tray 1, because that paper tray contains media that no scheduled job currently needs. Then press 'OK'.
53
Example of a workflow
[26]
[26] Select a tray
The following occurs.■ Paper tray 1 opens.■ The media name is changed into Océ Tab Cards. This indicates that Océ Tab
Cards will be assigned to paper tray 1.■ A dotted line indicates that the paper tray is open.
54 Chapter 4 Working with the operator panel
Example of a workflow
[27]
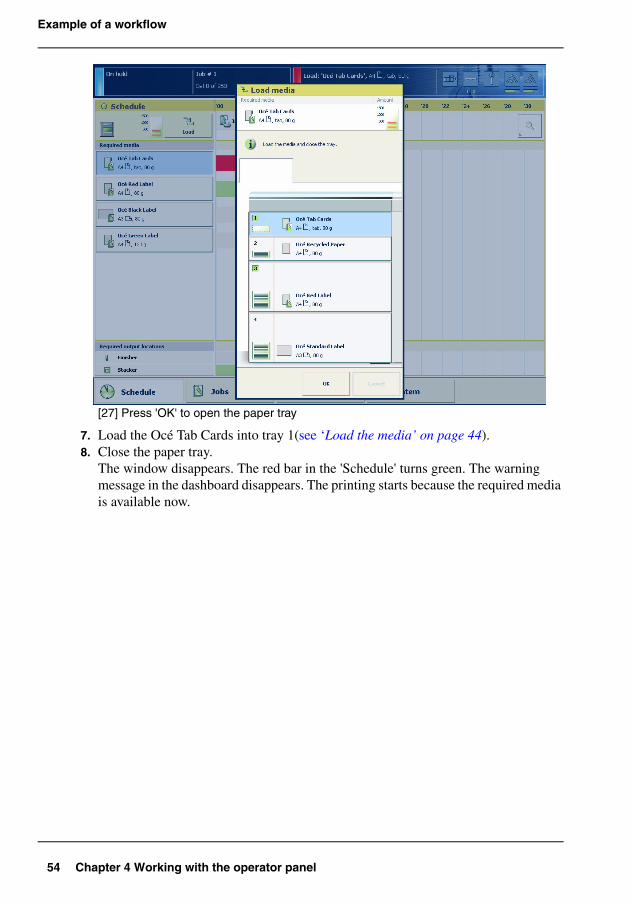
[27] Press 'OK' to open the paper tray
7. Load the Océ Tab Cards into tray 1(see ‘Load the media’ on page 44).8. Close the paper tray.
The window disappears. The red bar in the 'Schedule' turns green. The warning message in the dashboard disappears. The printing starts because the required media is available now.
55
Example of a workflow
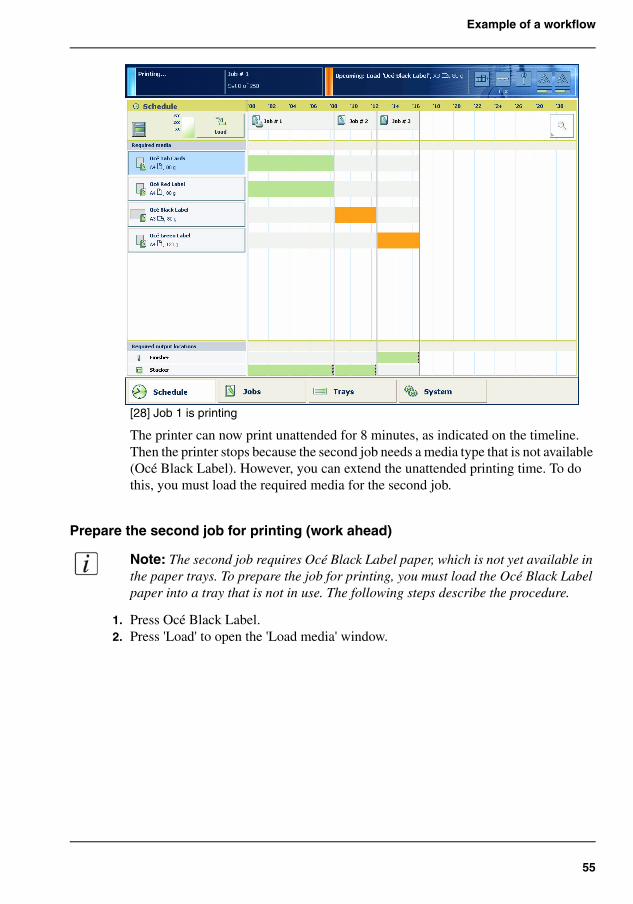
[28]
[28] Job 1 is printing
The printer can now print unattended for 8 minutes, as indicated on the timeline. Then the printer stops because the second job needs a media type that is not available (Océ Black Label). However, you can extend the unattended printing time. To do this, you must load the required media for the second job.
Prepare the second job for printing (work ahead)
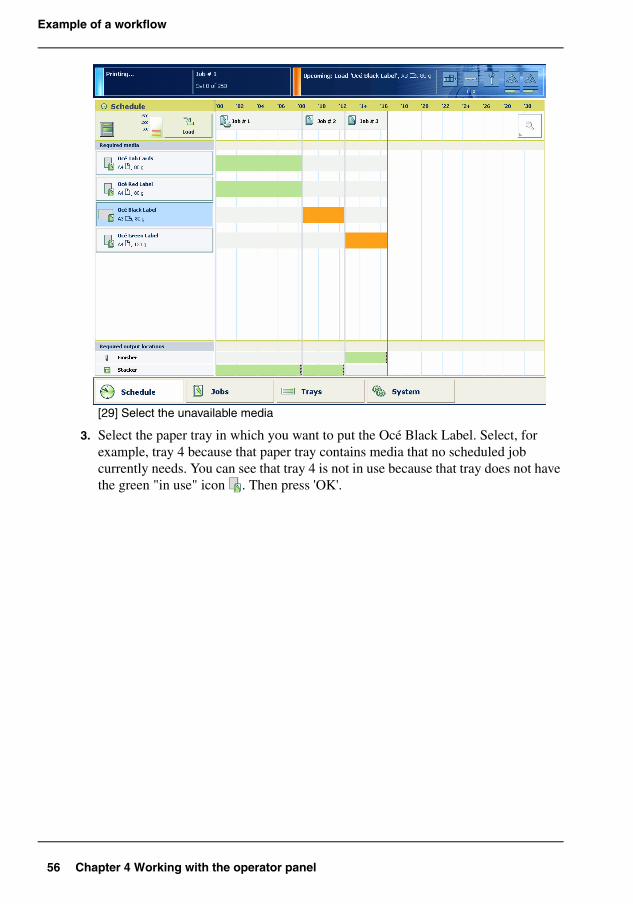
Note: The second job requires Océ Black Label paper, which is not yet available in the paper trays. To prepare the job for printing, you must load the Océ Black Label paper into a tray that is not in use. The following steps describe the procedure.
1. Press Océ Black Label.2. Press 'Load' to open the 'Load media' window.
56 Chapter 4 Working with the operator panel
Example of a workflow
[29]
[29] Select the unavailable media
3. Select the paper tray in which you want to put the Océ Black Label. Select, for example, tray 4 because that paper tray contains media that no scheduled job currently needs. You can see that tray 4 is not in use because that tray does not have the green "in use" icon . Then press 'OK'.
57
Example of a workflow
[30]
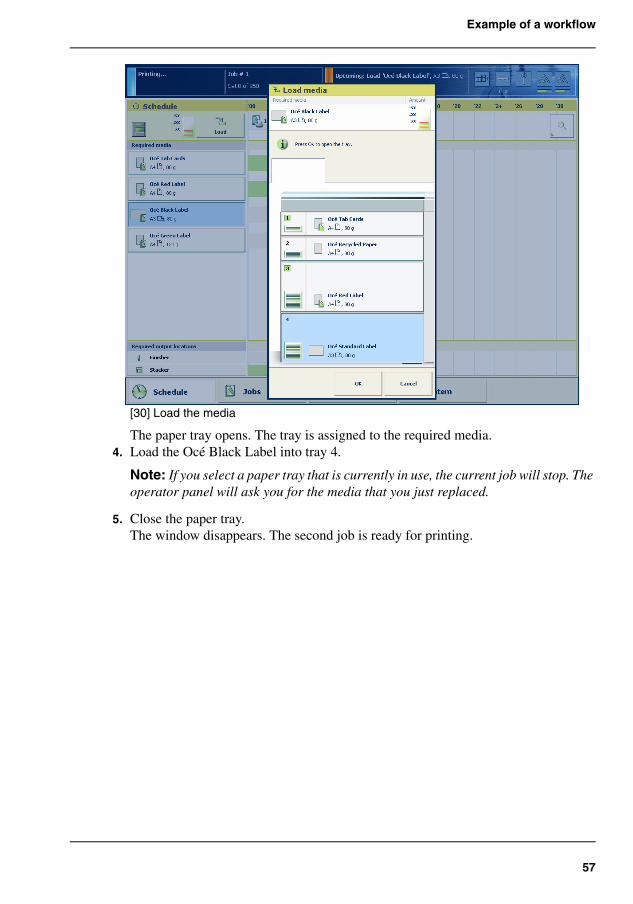
[30] Load the media
The paper tray opens. The tray is assigned to the required media.4. Load the Océ Black Label into tray 4.
Note: If you select a paper tray that is currently in use, the current job will stop. The operator panel will ask you for the media that you just replaced.
5. Close the paper tray.The window disappears. The second job is ready for printing.
58 Chapter 4 Working with the operator panel
Example of a workflow
[31]
[31] The second job is ready for printing
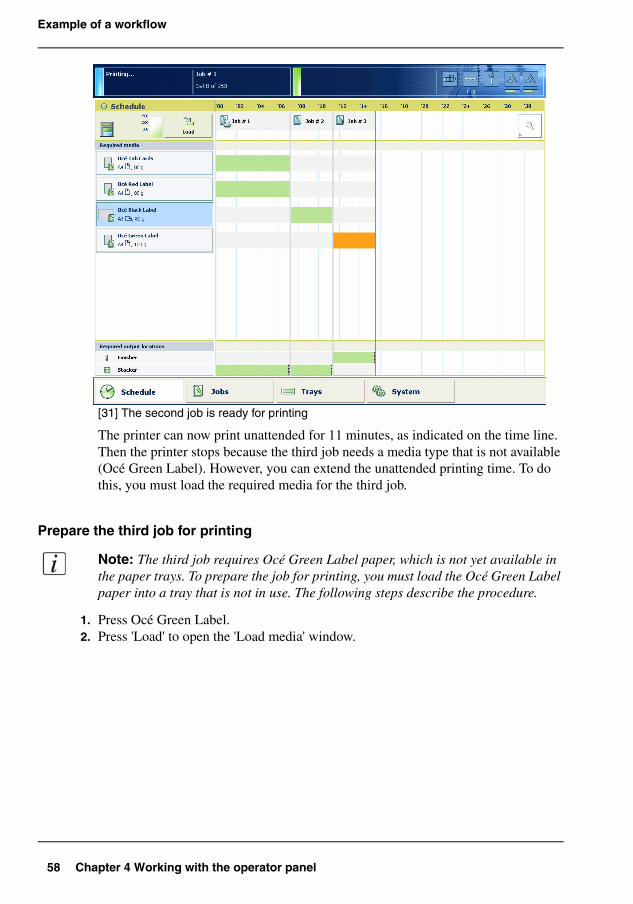
The printer can now print unattended for 11 minutes, as indicated on the time line. Then the printer stops because the third job needs a media type that is not available (Océ Green Label). However, you can extend the unattended printing time. To do this, you must load the required media for the third job.
Prepare the third job for printing
Note: The third job requires Océ Green Label paper, which is not yet available in the paper trays. To prepare the job for printing, you must load the Océ Green Label paper into a tray that is not in use. The following steps describe the procedure.
1. Press Océ Green Label.2. Press 'Load' to open the 'Load media' window.
59
Example of a workflow
[32]
[32] Select the unavailable media
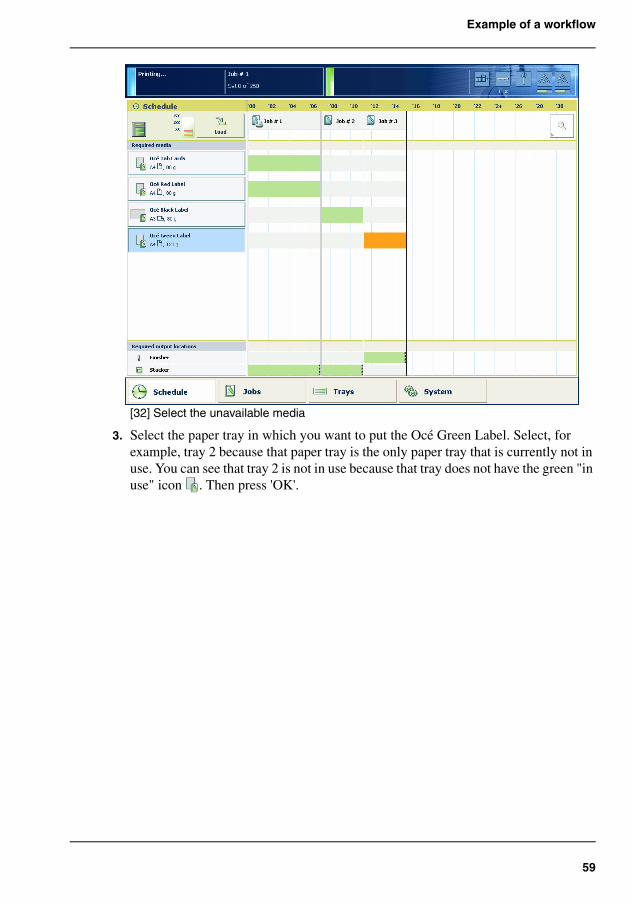
3. Select the paper tray in which you want to put the Océ Green Label. Select, for example, tray 2 because that paper tray is the only paper tray that is currently not in use. You can see that tray 2 is not in use because that tray does not have the green "in use" icon . Then press 'OK'.
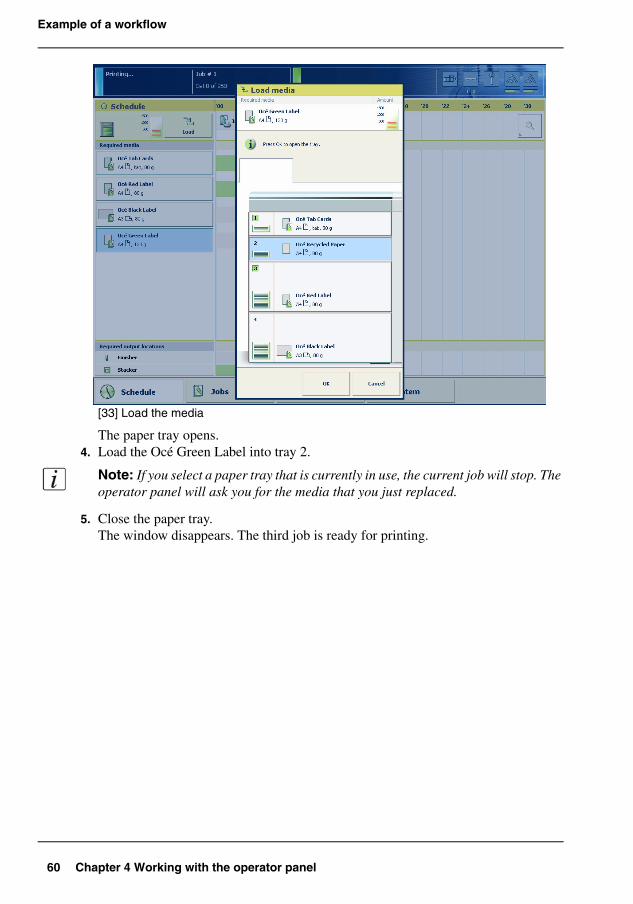
60 Chapter 4 Working with the operator panel
Example of a workflow
[33]
[33] Load the media
The paper tray opens.4. Load the Océ Green Label into tray 2.
Note: If you select a paper tray that is currently in use, the current job will stop. The operator panel will ask you for the media that you just replaced.
5. Close the paper tray.The window disappears. The third job is ready for printing.
61
Example of a workflow
[34]
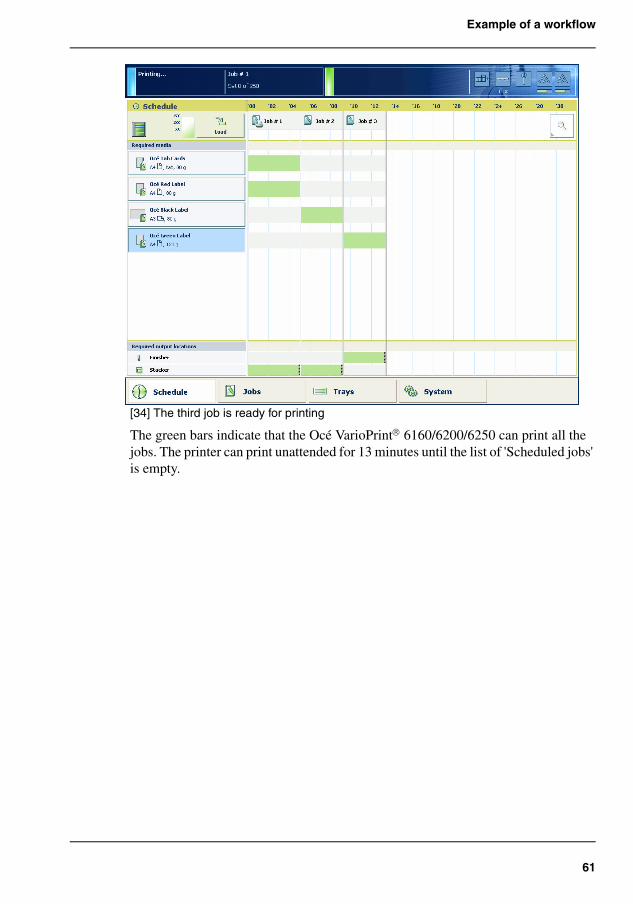
[34] The third job is ready for printing
The green bars indicate that the Océ VarioPrint® 6160/6200/6250 can print all the jobs. The printer can print unattended for 13 minutes until the list of 'Scheduled jobs' is empty.
62 Chapter 4 Working with the operator panel
Stop a job
Stop a job
Introduction
When the printer is printing a job, you can stop the printer at the following moments.■ Stop after a set■ Stop after a page■ Stop after a job.
The following table gives an overview of the stop behavior of the printer. The procedures in this section describe how to stop the printer via the operator panel.
Note: You can also stop a job by ejecting a stack of sheets from the stacker. When you press the eject button next to the stacker door 1 time, the stacker ejects the stack when a set is ready. When you press the eject button 2 times, the stacker ejects the stack as soon as possible.
63
Stop a job
The stop behavior of the printer[14]
Note: When you print streaming jobs or jobs that consist of 1 large set, you must always press the Hold key 2 times to stop the printer.
Stop after a set
Press the Hold key 1 time.The red LED of the Hold key starts to blink.The printer stops when a set of the active print job is ready.
Note: The memory of the printer can contain up to 50 pages. Therefore, it is possible that the printer prints more than a set before the printer stops.
Stop after a page
Press the Hold key 2 times.The red LED of the Hold key starts to blink.The printer stops as soon as possible.
[14] When does the printer stop
When Then
You press the Hold key 1 time The printer stops when a set of the active print job is ready (in most cases within 30 seconds).
You press the Hold key 2 times The printer stops as soon as possible (after a page).
You press the 'Stop after job' button in the toolbar of the 'Jobs' view
The printer stops when the selected job is ready.The 'Jobs' view displays a horizontal red and white stop bar below the selected job.The 'Schedule' view displays a vertical stop bar behind the selected job.
The 'Check first set' setting in a 'Workflow profile' is 'On'(see ‘Work with the workflow profiles’ on page 121)
The printer stops each time the first set of a print job is ready. You can check the first set before you continue the print job.
The 'Confirm start of job' setting in a 'Workflow profile' is 'On'
The printer stops each time a print job is ready. You must start each job manually.
64 Chapter 4 Working with the operator panel
Stop a job
Stop after a job
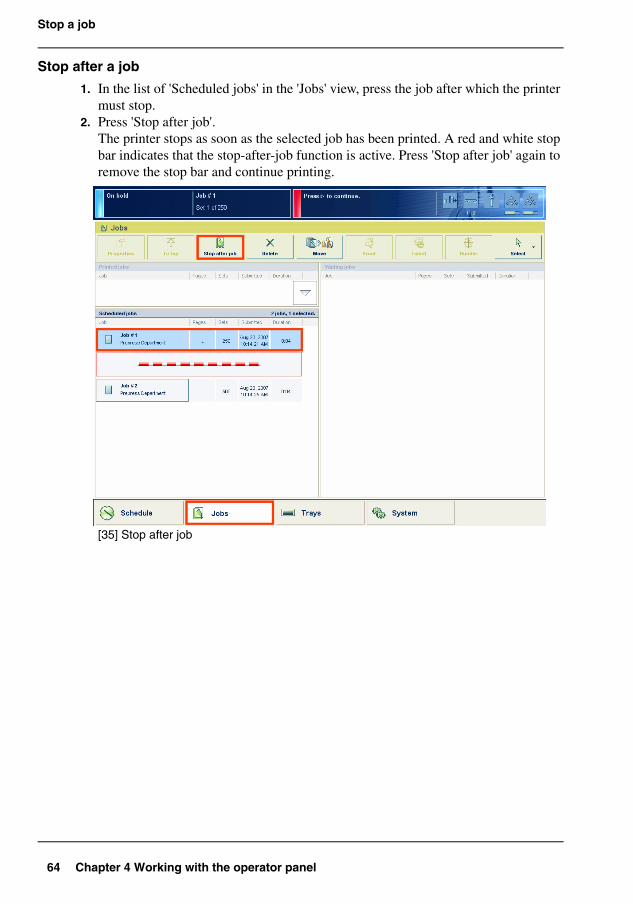
1. In the list of 'Scheduled jobs' in the 'Jobs' view, press the job after which the printer must stop.
2. Press 'Stop after job'.The printer stops as soon as the selected job has been printed. A red and white stop bar indicates that the stop-after-job function is active. Press 'Stop after job' again to remove the stop bar and continue printing.
[35]
[35] Stop after job
65
Introduction to the 'Jobs' view
The Jobs view
Introduction to the 'Jobs' view
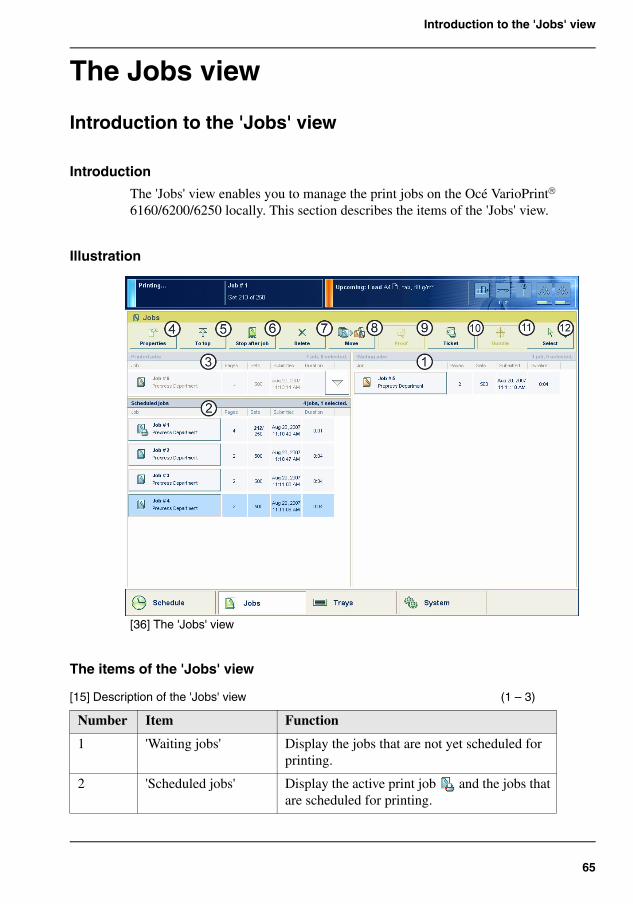
Introduction
The 'Jobs' view enables you to manage the print jobs on the Océ VarioPrint® 6160/6200/6250 locally. This section describes the items of the 'Jobs' view.
Illustration[36]
[36] The 'Jobs' view
The items of the 'Jobs' view[15]
[15] Description of the 'Jobs' view (1 – 3)
Number Item Function
1 'Waiting jobs' Display the jobs that are not yet scheduled for printing.
2 'Scheduled jobs' Display the active print job and the jobs that are scheduled for printing.
66 Chapter 4 Working with the operator panel
Introduction to the 'Jobs' view
3 'Printed jobs' Display the jobs that were printed successfully. The system only moves the printed jobs to the list of 'Printed jobs' when the setting 'Job history' in the Océ VarioPrint® 6160/6200/6250 Settings Editor is enabled.
4 'Properties' button Check or change the properties of a job. The button is only enabled when you select 1 job.
5 'To top' button Give priority to a scheduled job. The job is printed when the active print job is ready (see ‘Give priority to a scheduled job’ on page 72). The button is only enabled when you select 1 job.
6 'Stop after job' button Stop the printer after a selected job (see ‘Stop a job’ on page 62). The button is only enabled when you select 1 job.
7 'Delete' button Delete the selected job(s) (see ‘Delete a job’ on page 73). The button is enabled when you select 1 or more jobs.
8 'Move' or 'Copy' button ■ 'Move'Move a job from the list of 'Waiting jobs' to the list of 'Scheduled jobs'(see ‘Schedule a waiting job for printing’ on page 68), or the other way round (see ‘Print a scheduled job later’ on page 75).The 'Move' button is only active when you work with jobs in the list of 'Scheduled jobs' or 'Waiting jobs'.
■ 'Copy'Send a copy of a job that has been printed before to the list of 'Waiting jobs' to reprint the job (see ‘Reprint a job’ on page 70). The 'Copy' button is only active when you work with jobs in the list of 'Printed jobs'. The button is enabled when you select 1 or more jobs.
[15] Description of the 'Jobs' view (2 – 3)
Number Item Function
67
Introduction to the 'Jobs' view
Note: Whether a button is enabled depends on the number of selected jobs, the state of the jobs and the list that is active. Not all of the above settings are available for streaming jobs .
9 'Proof' button Print 1 copy of a job to check whether the result of the print job meets your expectation (see ‘Make a proof’ on page 77). The button is only enabled when you select 1 job.
Note: The proof print is not subtracted from the number of sets you defined for this job.
10 'Ticket' button Print an overview of the main job settings and job parameters (see ‘Print the job parameters’ on page 79). The button is only enabled when you select 1 job.
11 'Bundle' or 'Split' button
Combine a number of jobs into 1 job, for example to create a set of documents that are required for a meeting Bundle and split jobs on page 80.
12 'Select' button Select a number of jobs at the same time. You can use one of the following:■ Use 'All' to select all the jobs in the list.■ Use 'None' to deselect all the jobs in the list.■ Use 'Invert selection' to turn the selected jobs
into deselected jobs, and the other way round.
■ Use 'Jobs with available media' to select all the jobs for which the media are currently available in the paper trays Print all the jobs for which the media are available on page 84.
■ Use 'Jobs with label' to select all the jobs with a certain label Print the jobs that have a label on page 85
Note: The active print job is only selected when the printer is on hold.
[15] Description of the 'Jobs' view (3 – 3)
Number Item Function
68 Chapter 4 Working with the operator panel
Schedule a waiting job for printing
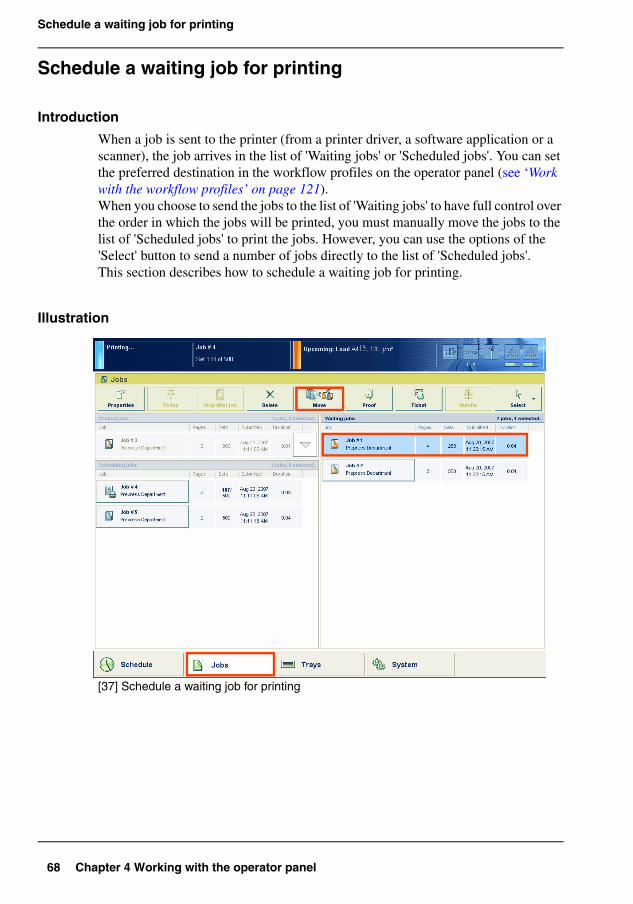
Schedule a waiting job for printing
Introduction
When a job is sent to the printer (from a printer driver, a software application or a scanner), the job arrives in the list of 'Waiting jobs' or 'Scheduled jobs'. You can set the preferred destination in the workflow profiles on the operator panel (see ‘Work with the workflow profiles’ on page 121).When you choose to send the jobs to the list of 'Waiting jobs' to have full control over the order in which the jobs will be printed, you must manually move the jobs to the list of 'Scheduled jobs' to print the jobs. However, you can use the options of the 'Select' button to send a number of jobs directly to the list of 'Scheduled jobs'.This section describes how to schedule a waiting job for printing.
Illustration[37]
[37] Schedule a waiting job for printing
69
Schedule a waiting job for printing
Schedule a waiting job for printing
1. On the operator panel, press the 'Jobs' button.2. In the list of 'Waiting jobs', press the job you want to print.
Note: You can use the options of the 'Select' button to select a number of waiting jobs at once. You can also press a number of jobs one by one. To undo the multiple selection and only select 1 job, you must press the desired job for 2 seconds. Then only the desired job is selected.
3. Press 'Move'.The selected job is moved to the bottom of the list of 'Scheduled jobs'.
70 Chapter 4 Working with the operator panel
Reprint a job
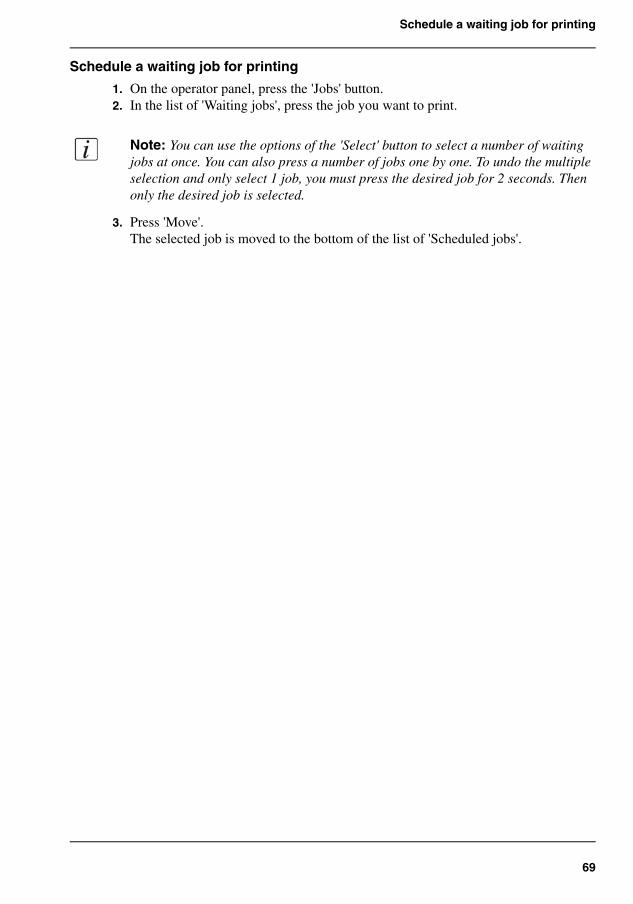
Reprint a job
Introduction
When the Océ VarioPrint® 6160/6200/6250 has successfully printed a job, the system can move the job to the list of 'Printed jobs'. This list can temporarily store the printed jobs. The list of 'Printed jobs' is not an archive. It is intended to enable you to reprint a job quicker and easier. Each printed jobs remains in the list of 'Printed jobs' for 24 hours. Then the job is automatically removed from the system.
When you reprint a job from the list of 'Printed jobs', the job is not moved. The original job remains in the list of 'Printed jobs'. The system only sends a copy of the job to the list of 'Waiting jobs'. You cannot send a job directly to the list of 'Scheduled jobs'. If you no longer need a job, you can delete the job from the list of 'Printed jobs'.This section describes how to reprint a job.
Note: The system only moves the printed jobs to the list of 'Printed jobs' when the setting 'Job history' in the Océ VarioPrint® 6160/6200/6250 Settings Editor is enabled.
Illustration[38]
[38] Reprint a job

71
Reprint a job
Reprint a job
1. Press the 'Jobs' button on the operator panel.2. In the list of 'Printed jobs', press the job you want to reprint.3. Press 'Copy'.
The system sends a copy of the job to the list of 'Waiting jobs'.4. Press the job in the list of 'Waiting jobs'.5. Press 'Properties' to change the settings, for example the number of prints.6. Press 'Move'.
The job is moved to the bottom of the list of 'Scheduled jobs'.
72 Chapter 4 Working with the operator panel
Give priority to a scheduled job
Give priority to a scheduled job
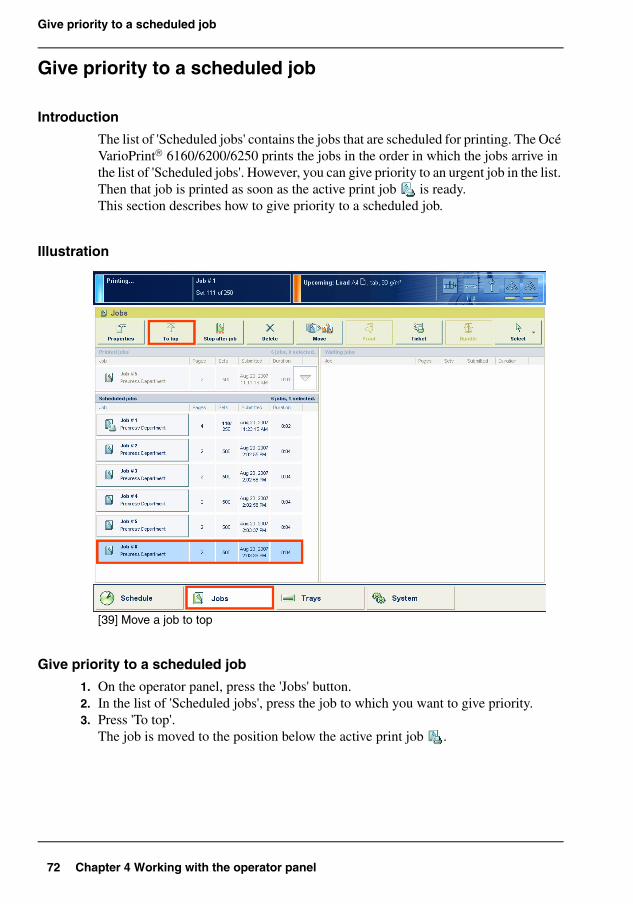
Introduction
The list of 'Scheduled jobs' contains the jobs that are scheduled for printing. The Océ VarioPrint® 6160/6200/6250 prints the jobs in the order in which the jobs arrive in the list of 'Scheduled jobs'. However, you can give priority to an urgent job in the list. Then that job is printed as soon as the active print job is ready.This section describes how to give priority to a scheduled job.
Illustration[39]
[39] Move a job to top
Give priority to a scheduled job
1. On the operator panel, press the 'Jobs' button.2. In the list of 'Scheduled jobs', press the job to which you want to give priority.3. Press 'To top'.
The job is moved to the position below the active print job .
73
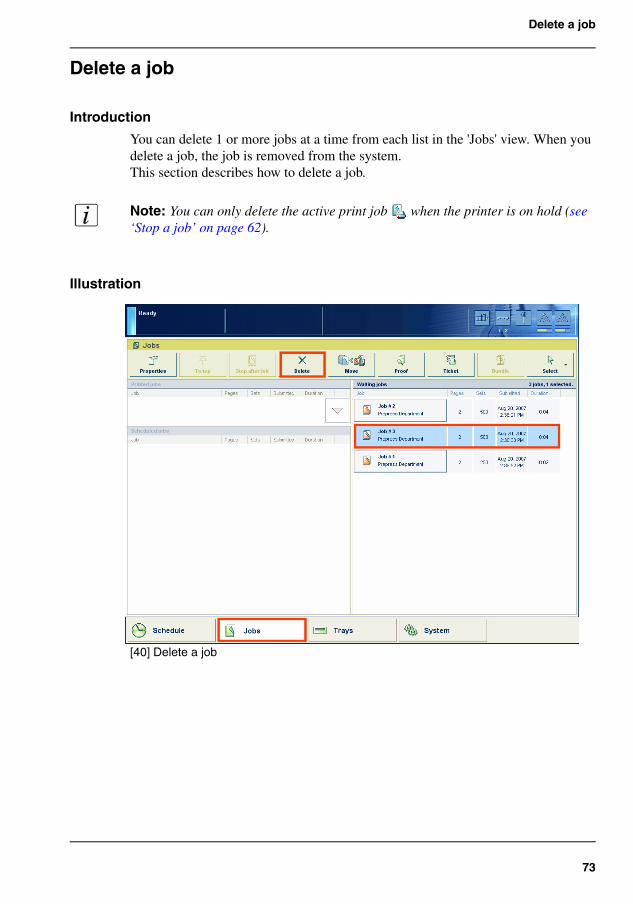
Delete a job
Delete a job
Introduction
You can delete 1 or more jobs at a time from each list in the 'Jobs' view. When you delete a job, the job is removed from the system.This section describes how to delete a job.
Note: You can only delete the active print job when the printer is on hold (see ‘Stop a job’ on page 62).
Illustration[40]
[40] Delete a job
74 Chapter 4 Working with the operator panel
Delete a job
Delete a job
1. On the operator panel, press the 'Jobs' button.2. In one of the lists in the 'Jobs' view, press the job you want to delete.
Note: You can use the options of the 'Select' button to select a number of jobs at once. You can also press a number of jobs one by one. To undo the multiple selection and only select 1 job, you must press the desired job for 2 seconds. Then only the desired job is selected.
3. Press 'Delete'.A dialog box will ask you to confirm that you really want to delete the selected job.
4. Press 'Yes' to remove the selected job from the list and from the system.
75
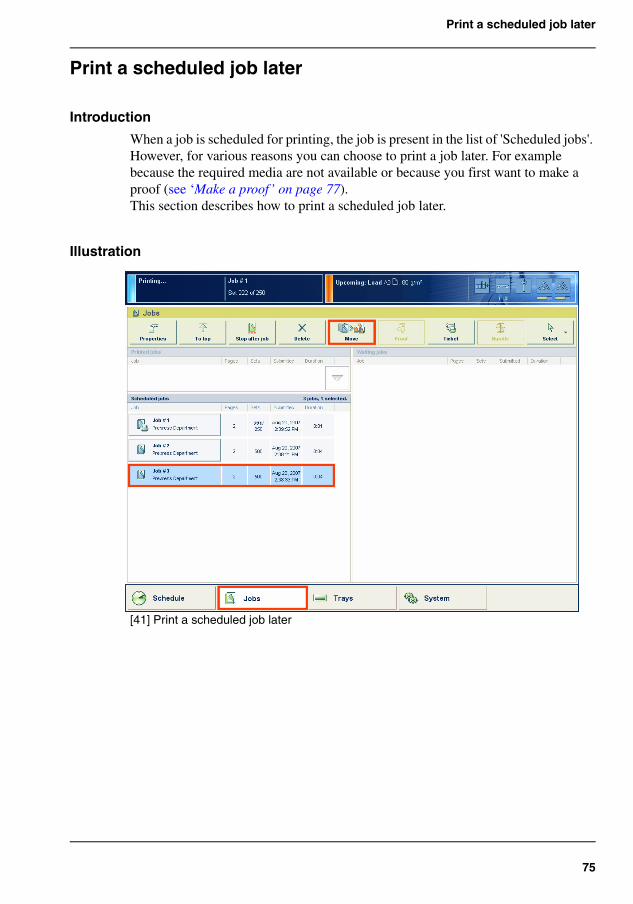
Print a scheduled job later
Print a scheduled job later
Introduction
When a job is scheduled for printing, the job is present in the list of 'Scheduled jobs'. However, for various reasons you can choose to print a job later. For example because the required media are not available or because you first want to make a proof (see ‘Make a proof’ on page 77).This section describes how to print a scheduled job later.
Illustration[41]
[41] Print a scheduled job later
76 Chapter 4 Working with the operator panel
Print a scheduled job later
Print a scheduled job later
1. On the operator panel, press the 'Jobs' button.2. In the list of 'Scheduled jobs', press the job you want to print later.
Note: From the drop-down list of the 'Select' button, you can also select 'All', 'Jobs with available media' or 'Jobs with label' to select more jobs at once, except the active print job . To move the active print job , you must first press the Hold key
. You can also press a number of jobs one by one. To undo the multiple selection and only select 1 job, you must press the desired job for 2 seconds. Then only the desired job is selected.
3. Press 'Move'.The job is moved to the bottom of the list of 'Waiting jobs'.
77
Make a proof
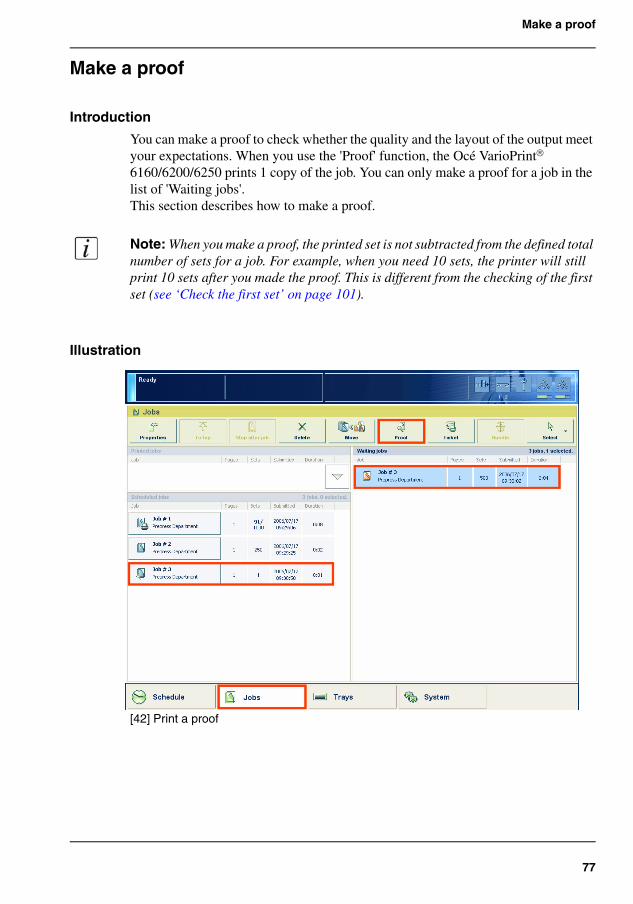
Make a proof
Introduction
You can make a proof to check whether the quality and the layout of the output meet your expectations. When you use the 'Proof' function, the Océ VarioPrint® 6160/6200/6250 prints 1 copy of the job. You can only make a proof for a job in the list of 'Waiting jobs'.This section describes how to make a proof.
Note: When you make a proof, the printed set is not subtracted from the defined total number of sets for a job. For example, when you need 10 sets, the printer will still print 10 sets after you made the proof. This is different from the checking of the first set (see ‘Check the first set’ on page 101).
Illustration[42]
[42] Print a proof
78 Chapter 4 Working with the operator panel
Make a proof
Make a proof
1. Press the 'Jobs' button on the operator panel.2. In the list of 'Waiting jobs', press the job of which you want to make a proof.
Note: You can select more than 1 job at a time.
3. Press 'Proof'.A copy of the job goes to the bottom of the list of 'Scheduled jobs'.The original job remains in the list of 'Waiting jobs'.You can recognize a proof by the magnifying glass on the job icon .
79
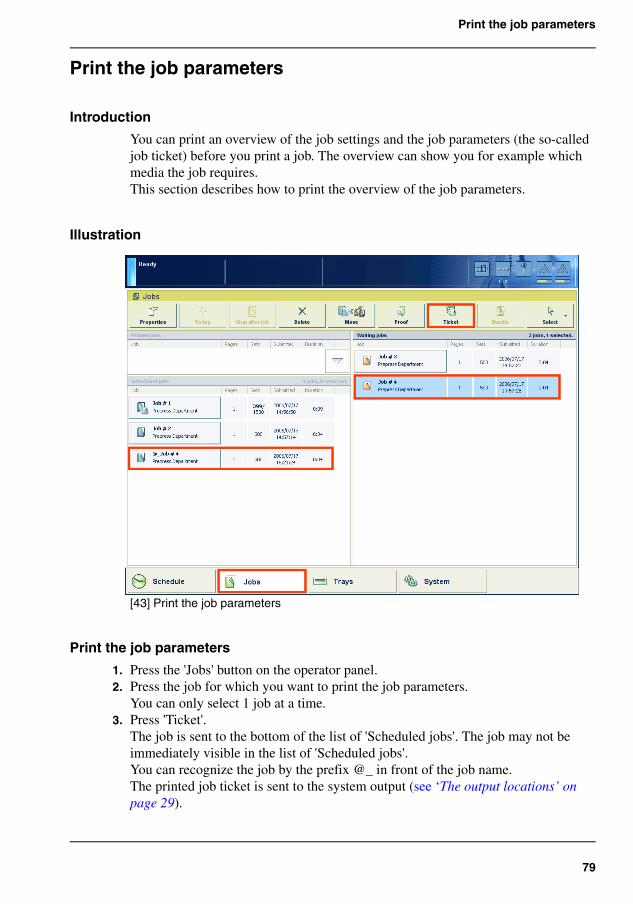
Print the job parameters
Print the job parameters
Introduction
You can print an overview of the job settings and the job parameters (the so-called job ticket) before you print a job. The overview can show you for example which media the job requires.This section describes how to print the overview of the job parameters.
Illustration[43]
[43] Print the job parameters
Print the job parameters
1. Press the 'Jobs' button on the operator panel.2. Press the job for which you want to print the job parameters.
You can only select 1 job at a time.3. Press 'Ticket'.
The job is sent to the bottom of the list of 'Scheduled jobs'. The job may not be immediately visible in the list of 'Scheduled jobs'.You can recognize the job by the prefix @_ in front of the job name.The printed job ticket is sent to the system output (see ‘The output locations’ on page 29).
80 Chapter 4 Working with the operator panel
Bundle and split jobs
Bundle and split jobs
Introduction
Create a bundled jobIf you want to combine 2 or more documents into 1 set, for example to prepare a meeting, you can bundle jobs that are present in the list of 'Waiting jobs'. The original jobs are removed from the list. The bundled job appears at the bottom of the list of 'Waiting jobs'. The system automatically creates a name for the bundled job that is based on the name of the first job in the bundle.The number of copies for the bundled job is initially set to 1. You can handle the bundled job like any other job. For example, you can move the job to the list of 'Scheduled jobs', edit the job, delete the job or make a proof.
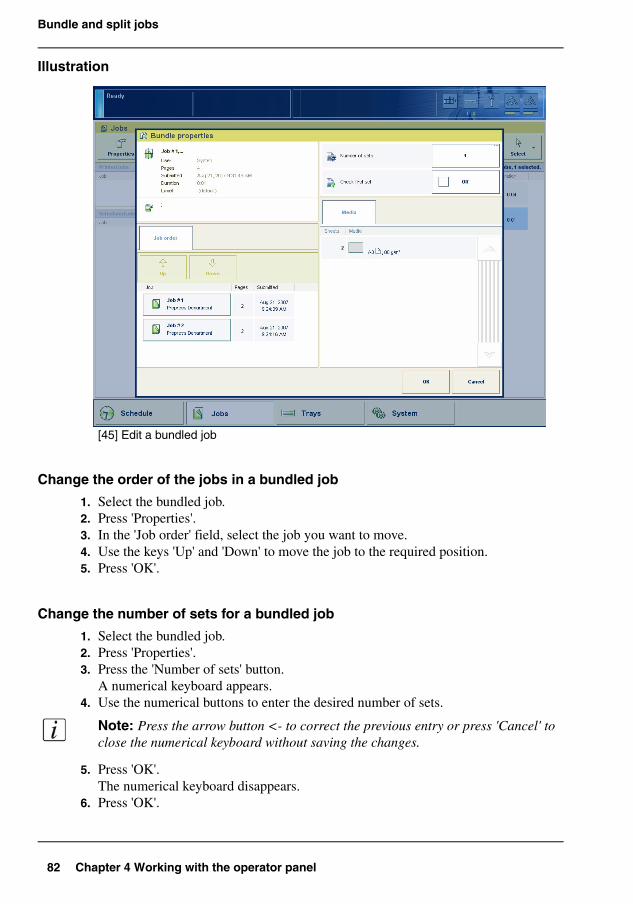
Edit a bundled job
You can define the following properties for a bundled job.■ The order of the jobs in the bundle■ The number of sets■ Whether you want to check the first set of the bundled job.
Note: This section describes the above in separate procedures. However, you can always access the 'Properties' window and change 1 or more properties at the same time. You cannot change the properties of the individual jobs in the bundle. To do this, you must first split the bundled job. Then you can change the properties of each job.
Split a bundled jobIn the list of 'Waiting jobs', you can split a bundled job into the original jobs. The system removes the bundled job. The individual jobs are added at the end of the list of 'Waiting jobs'.
This section describes how to create, edit and split a bundled job.
General information
■ When you print a bundled job, the system prints the number of copies that you indicated for the bundled job. The number of copies of the original jobs is ignored.
■ When you stop a job after a set Stop a job on page 62, the printing stops after 1 copy of the complete bundle.
■ The jobs in a bundle are accounted separately under the account ID of the original jobs.
■ You cannot combine a bundled job with another bundled job.
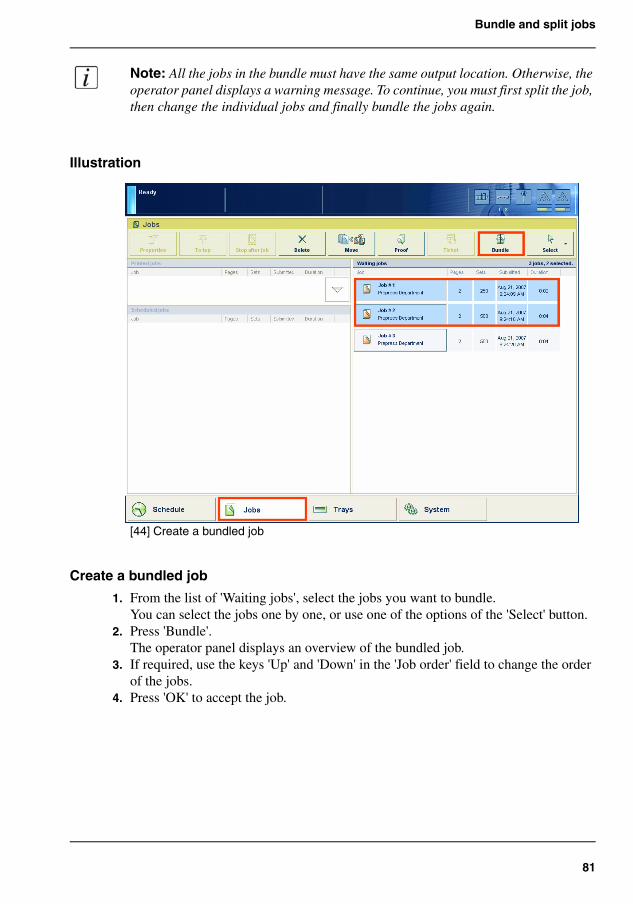
81
Bundle and split jobs
Note: All the jobs in the bundle must have the same output location. Otherwise, the operator panel displays a warning message. To continue, you must first split the job, then change the individual jobs and finally bundle the jobs again.
Illustration[44]
[44] Create a bundled job
Create a bundled job
1. From the list of 'Waiting jobs', select the jobs you want to bundle.You can select the jobs one by one, or use one of the options of the 'Select' button.
2. Press 'Bundle'.The operator panel displays an overview of the bundled job.
3. If required, use the keys 'Up' and 'Down' in the 'Job order' field to change the order of the jobs.
4. Press 'OK' to accept the job.
82 Chapter 4 Working with the operator panel
Bundle and split jobs
Illustration[45]
[45] Edit a bundled job
Change the order of the jobs in a bundled job
1. Select the bundled job.2. Press 'Properties'.3. In the 'Job order' field, select the job you want to move.4. Use the keys 'Up' and 'Down' to move the job to the required position.5. Press 'OK'.
Change the number of sets for a bundled job
1. Select the bundled job.2. Press 'Properties'.3. Press the 'Number of sets' button.
A numerical keyboard appears.4. Use the numerical buttons to enter the desired number of sets.
Note: Press the arrow button <- to correct the previous entry or press 'Cancel' to close the numerical keyboard without saving the changes.
5. Press 'OK'.The numerical keyboard disappears.
6. Press 'OK'.
83
Bundle and split jobs
Check the first set of a bundled job
1. Select the bundled job.2. Press 'Properties'.3. Press 'Check first set' when the button states 'Off'.
The text changes from 'Off' to 'On'. A check mark indicates that the checking of the first set is enabled. The printer will automatically go on hold after the first set was printed.
4. Press 'OK'.
Split a bundled job
1. Select a bundled job in the list of 'Waiting jobs'.2. Press 'Split'.
The system adds the original jobs to the end of the list of 'Waiting jobs'.
84 Chapter 4 Working with the operator panel
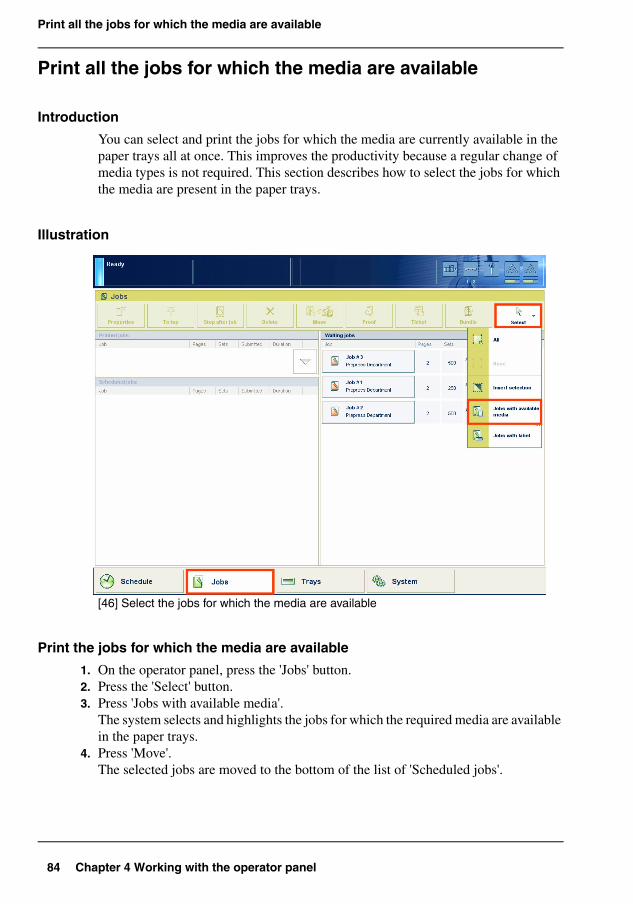
Print all the jobs for which the media are available
Print all the jobs for which the media are available
Introduction
You can select and print the jobs for which the media are currently available in the paper trays all at once. This improves the productivity because a regular change of media types is not required. This section describes how to select the jobs for which the media are present in the paper trays.
Illustration[46]
[46] Select the jobs for which the media are available
Print the jobs for which the media are available
1. On the operator panel, press the 'Jobs' button.2. Press the 'Select' button.3. Press 'Jobs with available media'.
The system selects and highlights the jobs for which the required media are available in the paper trays.
4. Press 'Move'.The selected jobs are moved to the bottom of the list of 'Scheduled jobs'.
85
Print the jobs that have a label
Print the jobs that have a label
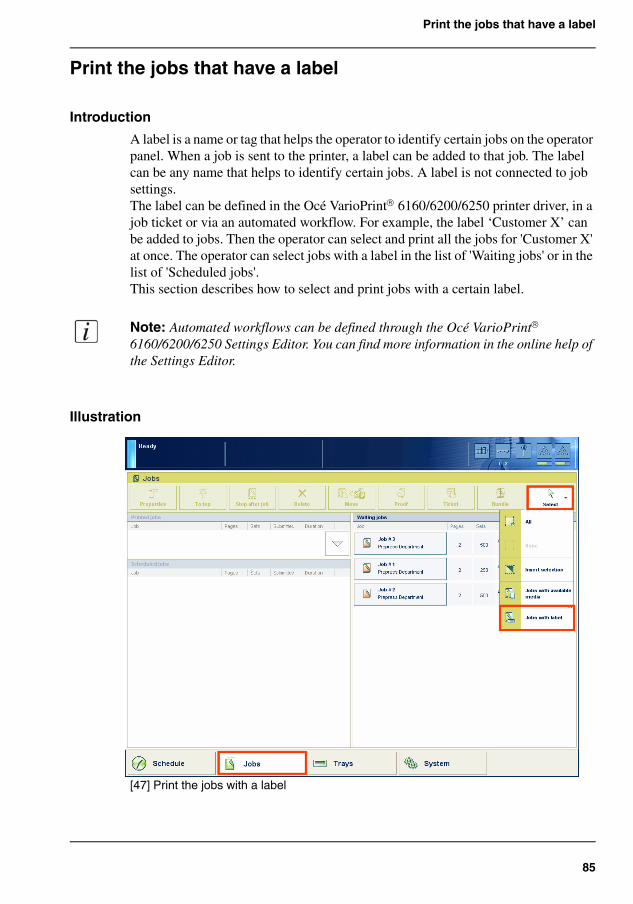
Introduction
A label is a name or tag that helps the operator to identify certain jobs on the operator panel. When a job is sent to the printer, a label can be added to that job. The label can be any name that helps to identify certain jobs. A label is not connected to job settings.The label can be defined in the Océ VarioPrint® 6160/6200/6250 printer driver, in a job ticket or via an automated workflow. For example, the label ‘Customer X’ can be added to jobs. Then the operator can select and print all the jobs for 'Customer X' at once. The operator can select jobs with a label in the list of 'Waiting jobs' or in the list of 'Scheduled jobs'.This section describes how to select and print jobs with a certain label.
Note: Automated workflows can be defined through the Océ VarioPrint® 6160/6200/6250 Settings Editor. You can find more information in the online help of the Settings Editor.
Illustration[47]
[47] Print the jobs with a label
86 Chapter 4 Working with the operator panel
Print the jobs that have a label
Print the jobs with a label
1. On the operator panel, press the 'Jobs' button.2. Press 'Select'.
A drop-down list appears.3. Press 'Jobs with label'.
A pop-up window with an overview of the available labels appears.4. Press the desired label.
Note: You can select more than 1 label.
5. Press 'OK'.The pop-up window disappears.
6. Press 'Move'.The selected jobs are moved to the bottom of the list of 'Scheduled jobs'.
87
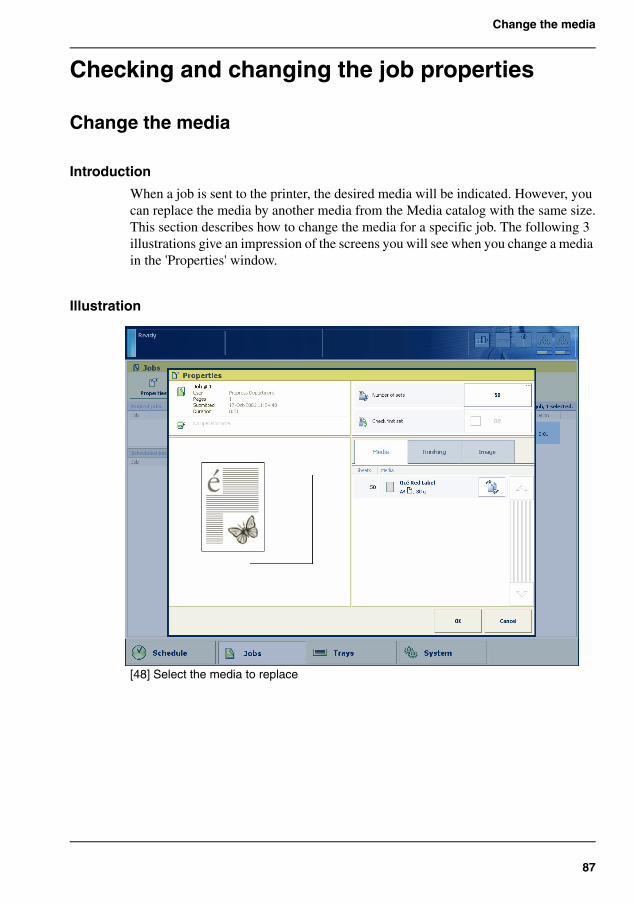
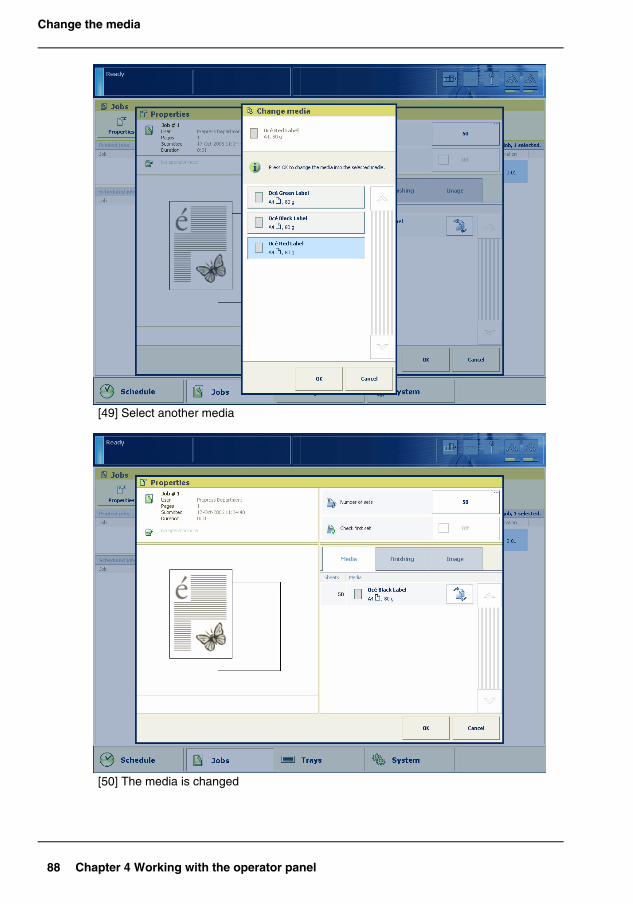
Change the media
Checking and changing the job properties
Change the media
Introduction
When a job is sent to the printer, the desired media will be indicated. However, you can replace the media by another media from the Media catalog with the same size.This section describes how to change the media for a specific job. The following 3 illustrations give an impression of the screens you will see when you change a media in the 'Properties' window.
Illustration[48]
[48] Select the media to replace
88 Chapter 4 Working with the operator panel
Change the media
[49]
[49] Select another media[50]
[50] The media is changed
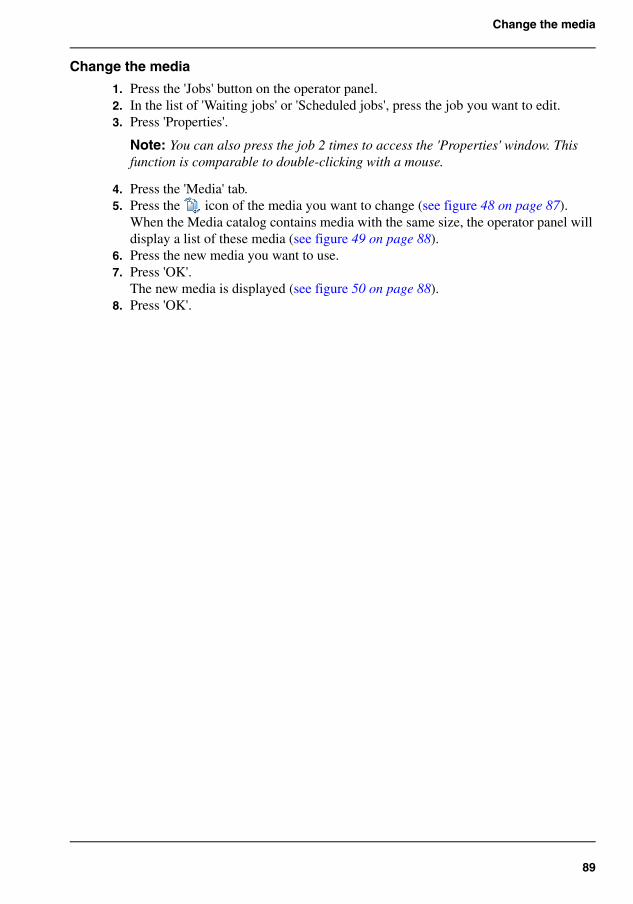
89
Change the media
Change the media
1. Press the 'Jobs' button on the operator panel.2. In the list of 'Waiting jobs' or 'Scheduled jobs', press the job you want to edit.3. Press 'Properties'.
Note: You can also press the job 2 times to access the 'Properties' window. This function is comparable to double-clicking with a mouse.
4. Press the 'Media' tab.5. Press the icon of the media you want to change (see figure 48 on page 87).
When the Media catalog contains media with the same size, the operator panel will display a list of these media (see figure 49 on page 88).
6. Press the new media you want to use.7. Press 'OK'.
The new media is displayed (see figure 50 on page 88).8. Press 'OK'.
90 Chapter 4 Working with the operator panel
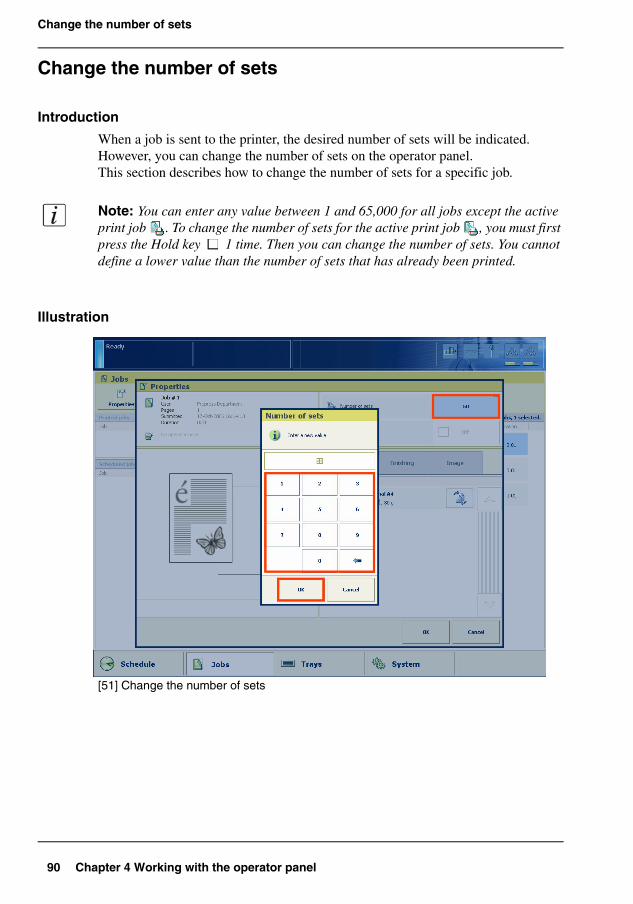
Change the number of sets
Change the number of sets
Introduction
When a job is sent to the printer, the desired number of sets will be indicated. However, you can change the number of sets on the operator panel.This section describes how to change the number of sets for a specific job.
Note: You can enter any value between 1 and 65,000 for all jobs except the active print job . To change the number of sets for the active print job , you must first press the Hold key 1 time. Then you can change the number of sets. You cannot define a lower value than the number of sets that has already been printed.
Illustration[51]
[51] Change the number of sets
91
Change the number of sets
Change the number of sets
1. Press the 'Jobs' button on the operator panel.2. In the list of 'Waiting jobs' or 'Scheduled jobs', press the job you want to edit.3. Press 'Properties'.
Note: You can also press the job 2 times to access the 'Properties' window. This function is comparable to double-clicking with a mouse.
4. Press the 'Number of sets' button.A numerical keyboard appears.
5. Use the numerical buttons to enter the desired number of sets.
Note: Press the arrow button <- to correct the previous entry or press 'Cancel' to close the numerical keyboard without saving the changes.
6. Press 'OK'.The numerical keyboard disappears.
7. Press 'OK'.

92 Chapter 4 Working with the operator panel
Change the output location
Change the output location
Introduction
In the Océ VarioPrint® 6160/6200/6250 Settings Editor, you can set the default output location for print jobs. However, you can change the output location on the operator panel for each job individually. Depending on the configuration of your system, you can select one of the following output locations.■ 'Finisher upper output'■ 'Finisher'■ 'Stacker' or, if you have more than 1 stacker, 'Left-hand stacker', 'Middle stacker'
or 'Right-hand stacker'.■ 'Stacker/stapler'■ 'Stacker/stapler upper output'■ 'External finisher'.
This section describes how to select another output location for a specific job.
Note: There must be a match between the selected output location and the job requirements. For example, when a job does not require staples, you can select any output location. If a job requires 1 or 2 staples, you can only select the output locations that can staple the jobs, for example 'Finisher' or 'External finisher' because the 'Stacker' cannot staple the jobs. When you make a combination that is not possible, the operator panel displays an error message.
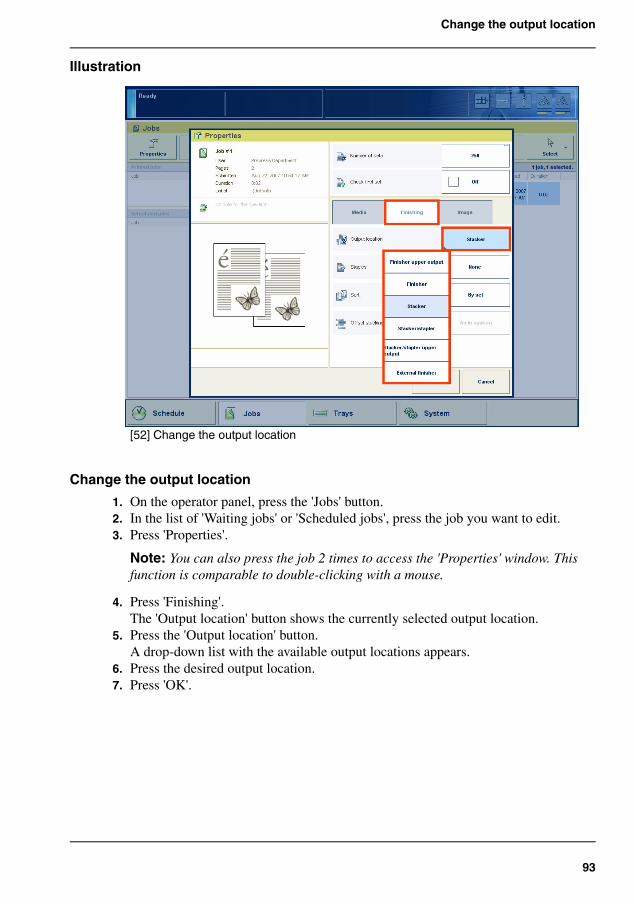
93
Change the output location
Illustration[52]
[52] Change the output location
Change the output location
1. On the operator panel, press the 'Jobs' button.2. In the list of 'Waiting jobs' or 'Scheduled jobs', press the job you want to edit.3. Press 'Properties'.
Note: You can also press the job 2 times to access the 'Properties' window. This function is comparable to double-clicking with a mouse.
4. Press 'Finishing'.The 'Output location' button shows the currently selected output location.
5. Press the 'Output location' button.A drop-down list with the available output locations appears.
6. Press the desired output location.7. Press 'OK'.
94 Chapter 4 Working with the operator panel
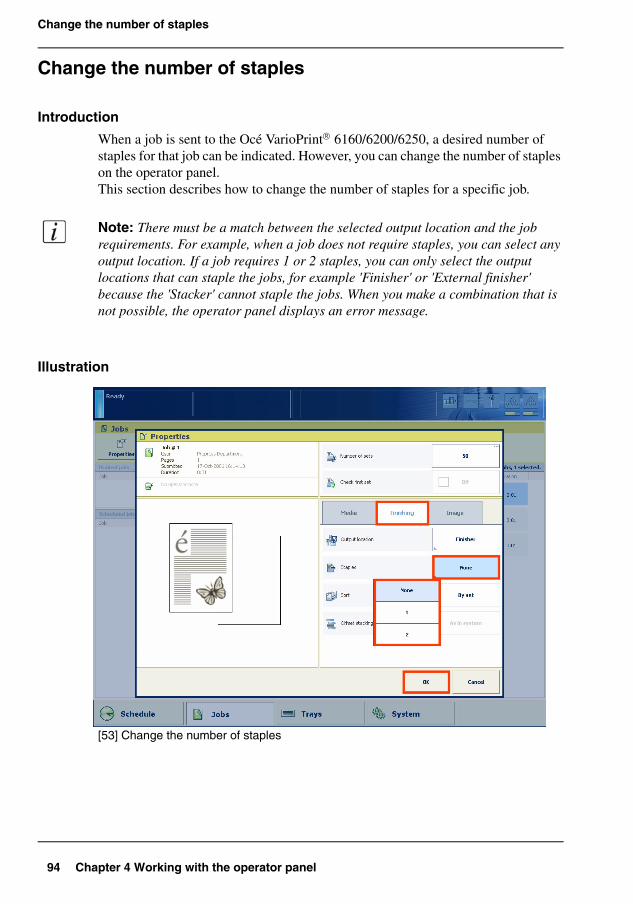
Change the number of staples
Change the number of staples
Introduction
When a job is sent to the Océ VarioPrint® 6160/6200/6250, a desired number of staples for that job can be indicated. However, you can change the number of staples on the operator panel.This section describes how to change the number of staples for a specific job.
Note: There must be a match between the selected output location and the job requirements. For example, when a job does not require staples, you can select any output location. If a job requires 1 or 2 staples, you can only select the output locations that can staple the jobs, for example 'Finisher' or 'External finisher' because the 'Stacker' cannot staple the jobs. When you make a combination that is not possible, the operator panel displays an error message.
Illustration[53]
[53] Change the number of staples
95
Change the number of staples
Change the number of staples
1. Press the 'Jobs' button on the operator panel.2. In the list of 'Waiting jobs' or 'Scheduled jobs', press the job you want to edit.3. Press 'Properties'.
Note: You can also press the job 2 times to access the 'Properties' window. This function is comparable to double-clicking with a mouse.
4. Press 'Finishing'.The 'Staples' button shows the currently selected number of staples.
5. Press the 'Staples' button.A drop-down list appears.
6. Press the desired number of staples.7. Press 'OK'.
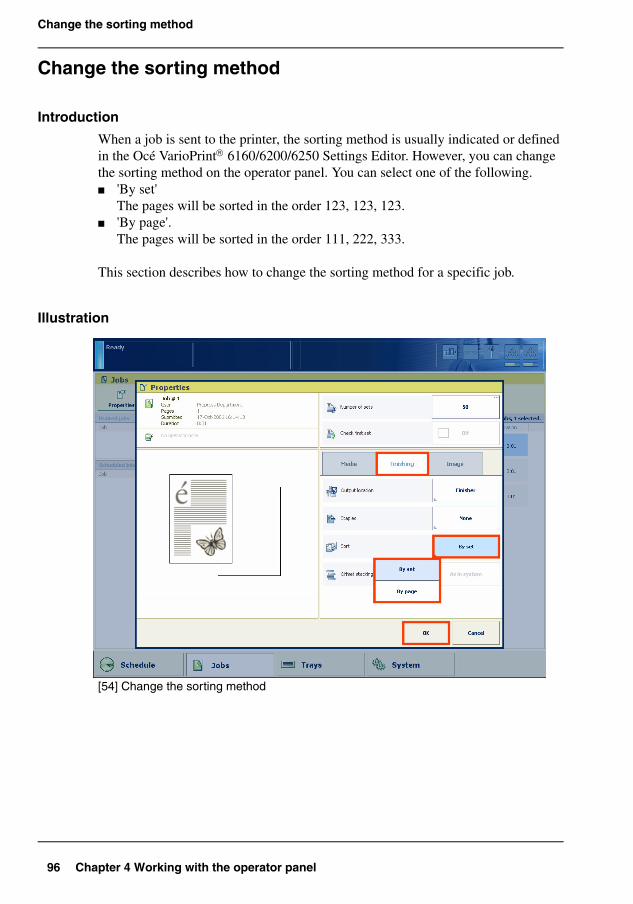
96 Chapter 4 Working with the operator panel
Change the sorting method
Change the sorting method
Introduction
When a job is sent to the printer, the sorting method is usually indicated or defined in the Océ VarioPrint® 6160/6200/6250 Settings Editor. However, you can change the sorting method on the operator panel. You can select one of the following.■ 'By set'
The pages will be sorted in the order 123, 123, 123.■ 'By page'.
The pages will be sorted in the order 111, 222, 333.
This section describes how to change the sorting method for a specific job.
Illustration[54]
[54] Change the sorting method
97
Change the sorting method
Change the sorting method
1. Press the 'Jobs' button on the operator panel.2. In the list of 'Waiting jobs' or 'Scheduled jobs', press the job you want to edit.3. Press 'Properties'.
Note: You can also press the job 2 times to access the 'Properties' window. This function is comparable to double-clicking with a mouse.
4. Press 'Finishing'.The 'Sort' button shows the currently selected sorting method.
5. Press the 'Sort' button.A drop-down list appears.
6. Press the desired sorting method.7. Press 'OK'.
98 Chapter 4 Working with the operator panel
Change the type of offset stacking
Change the type of offset stacking
Introduction
You can use the function 'Offset stacking' to create a visible distinction between sets or jobs in an output location. When 'Offset stacking' is enabled, each set or job will be stacked with an offset compared to the previous set or job. You can set the default type of offset stacking in the workflow profile on the operator panel (see ‘Work with the workflow profiles’ on page 121). The following table describes when you can change the type of offset stacking for specific jobs.
[16]
This section describes the following:■ The values you can select in the 'Properties' window when 'Sets (as in job)' is set
in the workflow profile■ How to change the type of offset stacking per job via the 'Properties' window.
Types of offset stacking in the 'Properties' window
When 'Sets (as in job)' is set in the workflow profile, then you can select one of the following types of offset stacking.
[16] Possibility to change the type of offset stacking per job
When Then
The type of offset stacking is set to 'Sets (as in job)'
You can change the type of offset stacking per job via the 'Properties' window in the 'Jobs' view.
The type of offset stacking is set to 'Jobs', 'Sets (always)', 'Banners' or 'Off'
You cannot change the type of offset stacking per job. The 'Properties' window displays 'As in system'.

99
Change the type of offset stacking
[17]
Illustration[55]
[55] Change the type of offset stacking
[17] Available types of offset stacking in the 'Properties' window
When Then
You select 'Off' All the printed sets are sent to the output location in one straight stack.
You select 'Each set' All the printed sets are sent to the output location with an offset between the sets.
You select 'As in document' All the printed sets are sent to the output location as defined in the job ticket.
100 Chapter 4 Working with the operator panel
Change the type of offset stacking
Change the type of offset stacking
1. On the operator panel, press the 'Jobs' button.2. In the list of 'Waiting jobs' or 'Scheduled jobs', press the job you want to edit.3. Press 'Properties'.
Note: You can also press the job 2 times to access the 'Properties' window. This function is comparable to double-clicking with a mouse.
4. Press 'Finishing'.The 'Offset stacking' button shows the currently selected type of offset stacking.
5. Press the 'Offset stacking' button.A drop-down list appears.
6. Press the desired type of offset stacking.7. Press 'OK'.
101
Check the first set
Check the first set
Introduction
You can indicate that you want to print 1 set of a job first to check the print quality. When the print quality meets your expectations, you can continue the job.
You can use 1 of the following methods to indicate that you want to check the first set.■ Use a workflow profile where 'Check first set' is enabled (see ‘Work with the
workflow profiles’ on page 121). Then the printer always prints 1 set before the entire job is printed. The printer goes on hold after 1 set is printed.
■ Enable the 'Check first set' function in the 'Properties' option of the 'Jobs' view for a specific job only.
This section describes how to indicate that you want to check the first set for a specific job only.
Note: When you use the 'Check first set' function, the printed set is subtracted from the indicated total number of sets for a job. For example, when you need 10 sets, the printer will print only 9 more sets. This is different from the making of a proof (see ‘Make a proof’ on page 77).
102 Chapter 4 Working with the operator panel
Check the first set
Illustration[56]
[56] Check the first set
Enable the checking of the first set
Note: You cannot enable the checking of the first set for the active print job or a job in the list of 'Printed jobs'.
1. On the operator panel, press the 'Jobs' button.2. In the list of 'Waiting jobs' or 'Scheduled jobs', press the job you want to edit.3. Press 'Properties'.
Note: You can also press the job 2 times to access the 'Properties' window. This function is comparable to double-clicking with a mouse.
4. Press 'Check first set' when the button states 'Off'.The text changes from 'Off' to 'On'. A check mark indicates that the checking of the first set is enabled. The printer will automatically go on hold after the first set is printed.
5. Press 'OK'.
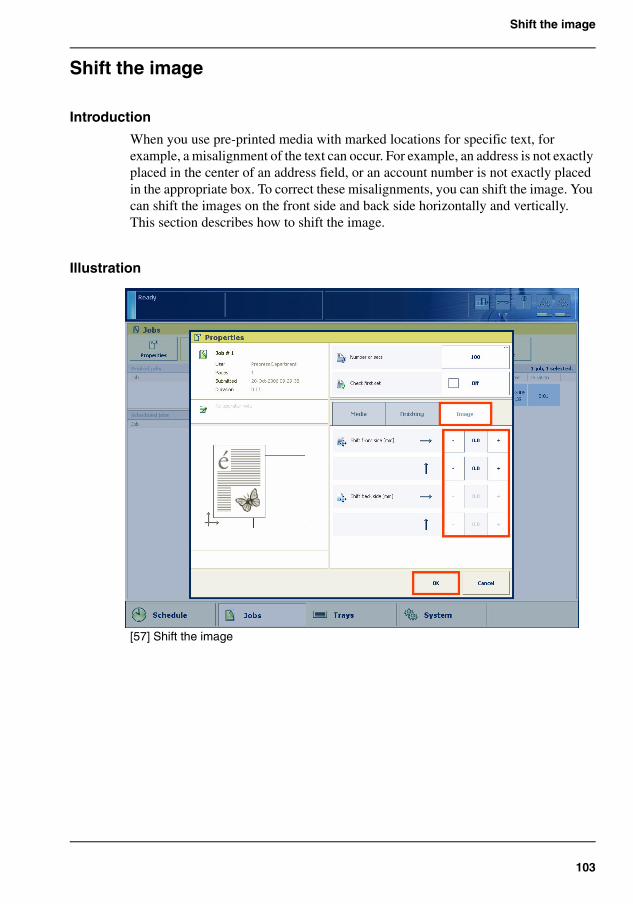
103
Shift the image
Shift the image
Introduction
When you use pre-printed media with marked locations for specific text, for example, a misalignment of the text can occur. For example, an address is not exactly placed in the center of an address field, or an account number is not exactly placed in the appropriate box. To correct these misalignments, you can shift the image. You can shift the images on the front side and back side horizontally and vertically.This section describes how to shift the image.
Illustration[57]
[57] Shift the image

104 Chapter 4 Working with the operator panel
Shift the image
Shift the image
1. Press the 'Jobs' button on the operator panel.2. In the list of 'Waiting jobs' or 'Scheduled jobs', press the job you want to edit.3. Press 'Properties'.
Note: You can also press the job 2 times to access the 'Properties' window. This function is comparable to double-clicking with a mouse.
4. Press 'Image'.5. Press the - or + buttons to shift the image on the front side or back side of the sheet.6. Press 'OK'.
105
Introduction to the 'Trays' view
The Trays view
Introduction to the 'Trays' view
Introduction
The 'Trays' view has the following functions.■ Display the current content and filling level of the paper trays■ Open the paper trays and assign the required media for the print jobs (see ‘Assign
the media to a paper tray’ on page 108)■ Change the media that is currently assigned to a paper tray■ Assign media to a paper tray when you already loaded the media and pressed the
button for 'Not assigned' on the control panel of the paper module (see ‘The paper modules’ on page 32).
This section describes the items of the 'Trays' view.
Note: The Océ VarioPrint® 6160/6200/6250 can have 1, 2 or 3 paper modules. When the Océ VarioPrint® 6160/6200/6250 has 2 or 3 paper modules, the 'Trays' view displays all the available paper modules.
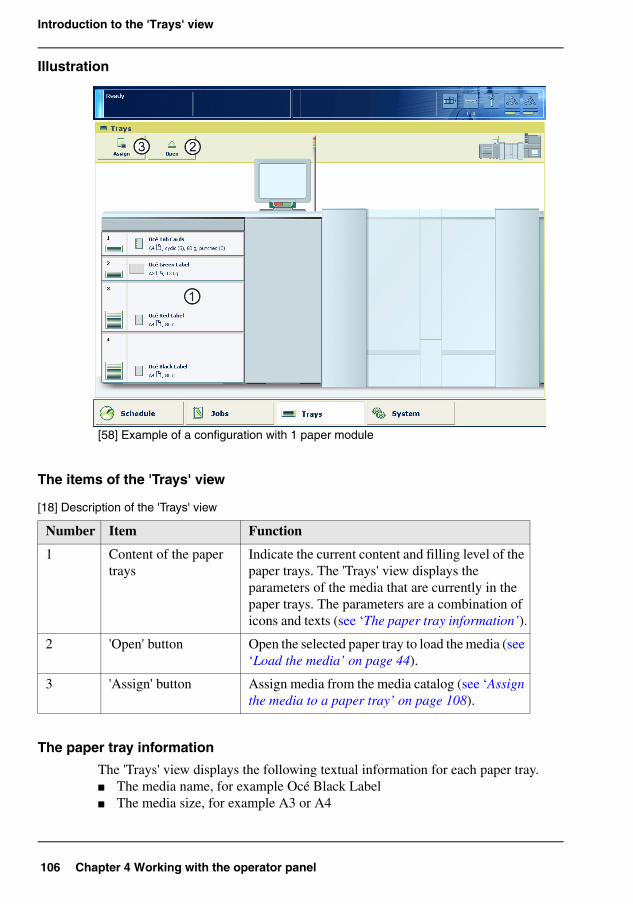
106 Chapter 4 Working with the operator panel
Introduction to the 'Trays' view
Illustration[58]
[58] Example of a configuration with 1 paper module
The items of the 'Trays' view[18]
The paper tray information
The 'Trays' view displays the following textual information for each paper tray.■ The media name, for example Océ Black Label■ The media size, for example A3 or A4
[18] Description of the 'Trays' view
Number Item Function
1 Content of the paper trays
Indicate the current content and filling level of the paper trays. The 'Trays' view displays the parameters of the media that are currently in the paper trays. The parameters are a combination of icons and texts (see ‘The paper tray information’).
2 'Open' button Open the selected paper tray to load the media (see ‘Load the media’ on page 44).
3 'Assign' button Assign media from the media catalog (see ‘Assign the media to a paper tray’ on page 108).
107
Introduction to the 'Trays' view
■ The media weight, for example 80 g■ The media color■ The special characteristics of the media, for example 'cyclic' or 'punched'. In
brackets, additional information is given about these media, for example the cycle count or the number of holes for punched media.
The 'Trays' view displays the following icons for each paper tray.
[19]
[19] The meaning of the icons
Icon Description[59]
The paper tray is empty[60]
The paper tray is full
Note: Each line indicates the presence of about 100 sheets
[61]
The paper tray is too full. Please remove sheets from the stack[62]
The plate inside the paper tray is down[63]
The paper tray is open[64]
The paper guides inside the paper tray do not match the selected media size. You must correct the paper guides or the selected media
or The paper tray contains media that are fed over the long edge (LEF) or short edge (SEF) . The small icons indicate A4 or A4-like media. The large icons indicate A3 or A3-like media. When you defined a color for a media, the icon can have that color
The paper tray is in use for one or more scheduled jobs
The paper tray contains tab sheets
The paper tray contains tab sheets that must be processed as inserts
The paper tray contains inserts
The paper tray contains media that are fed over the long edge (LEF)
The paper tray contains media that are fed over the short edge (SEF)
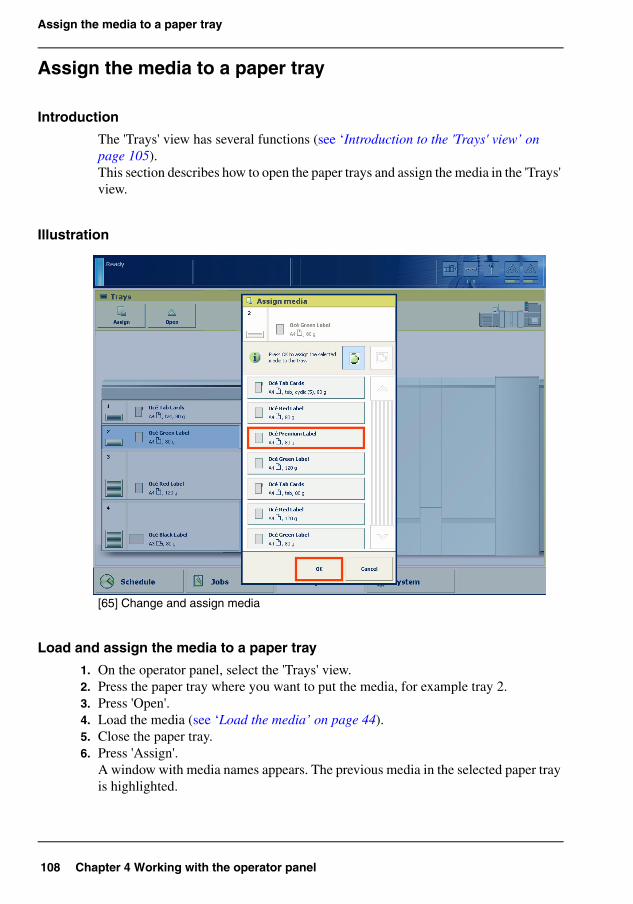
108 Chapter 4 Working with the operator panel
Assign the media to a paper tray
Assign the media to a paper tray
Introduction
The 'Trays' view has several functions (see ‘Introduction to the 'Trays' view’ on page 105).This section describes how to open the paper trays and assign the media in the 'Trays' view.
Illustration[65]
[65] Change and assign media
Load and assign the media to a paper tray
1. On the operator panel, select the 'Trays' view.2. Press the paper tray where you want to put the media, for example tray 2.3. Press 'Open'.4. Load the media (see ‘Load the media’ on page 44).5. Close the paper tray.6. Press 'Assign'.
A window with media names appears. The previous media in the selected paper tray is highlighted.
109
Assign the media to a paper tray
Note: The list displays all the media in the media catalog that match the position of the paper guides inside the closed paper tray. When the list is empty, the media catalog does not contain media that match the position of the paper guides.
7. Press the name of the loaded media, for example Océ Premium Label.8. Press 'OK'.
Change the media type currently assigned
1. On the operator panel, select the 'Trays' view.2. Select the paper tray for which you want to change the assigned media type.3. Press 'Assign'.
A window with media names appears.
Note: The list displays all the media in the media catalog that match the current position of the paper guides inside the paper tray. When the list is empty, the media catalog does not contain media that match the position of the paper guides.
4. Press the name of the new media type.5. Press 'OK'.
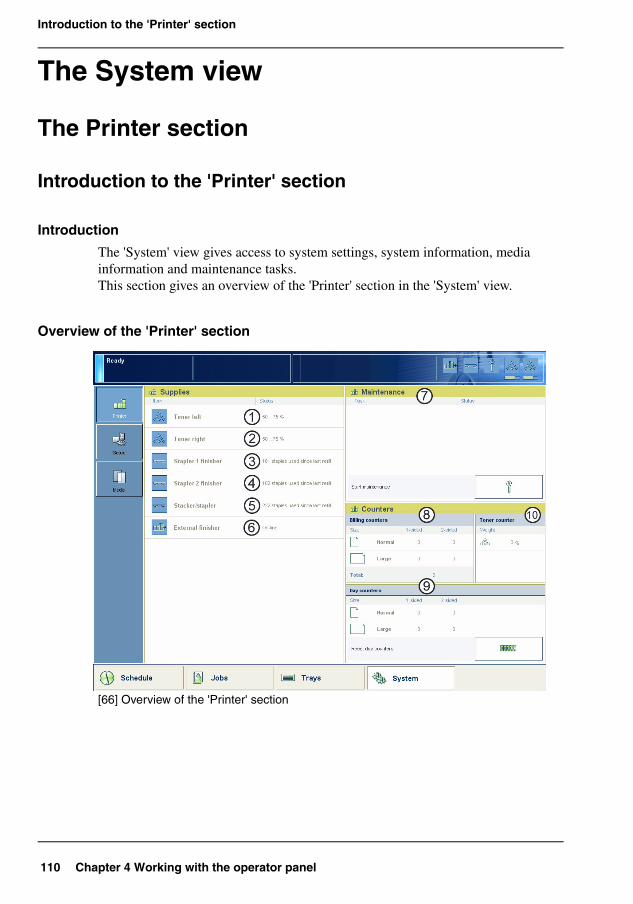
110 Chapter 4 Working with the operator panel
Introduction to the 'Printer' section
The System view
The Printer section
Introduction to the 'Printer' section
Introduction
The 'System' view gives access to system settings, system information, media information and maintenance tasks.This section gives an overview of the 'Printer' section in the 'System' view.
Overview of the 'Printer' section[66]
[66] Overview of the 'Printer' section

111
Introduction to the 'Printer' section
The items of the 'Printer' section[20]
[20] Description of the 'Printer' section
Number
Item Function
1 Toner level Indicates the filling level of the left-hand toner unit (see ‘Check the status of the toner reservoirs’ on page 112).
2 Toner level Indicates the filling level of the left-hand toner unit (see ‘Check the status of the toner reservoirs’ on page 112).
3 Stapler level Indicates the number of staples that stapler 1 of the finisher has used since the last refill (see ‘Check the status of the stapler cartridges’ on page 114).
4 Stapler level Indicates the number of staples that stapler 2 of the finisher has used since the last refill (see ‘Check the status of the stapler cartridges’ on page 114).
5 Stapler level Indicates the number of staples that the stapler of the stacker/stapler has used since the last replacement.
6 Status of the external finisher
Indicate whether the optional external finisher is on-line or off-line.
7 Maintenance tasks Indicate the suggested or required maintenance tasks.
Note: Only a trained and certified operator is allowed to perform the maintenance tasks.
8 'Billing counters' Indicates the total number of prints that have been made since the printer was installed (see ‘General counter information’ on page 115). You cannot reset the billing counters.
9 'Day counters' Indicates the number of prints that have been made since the latest reset. You can always reset the day counters (see ‘Reset the day counters’ on page 115).
10 'Toner counter' Indicates the amount of toner that has been used since the printer was installed. You cannot reset the toner counter.
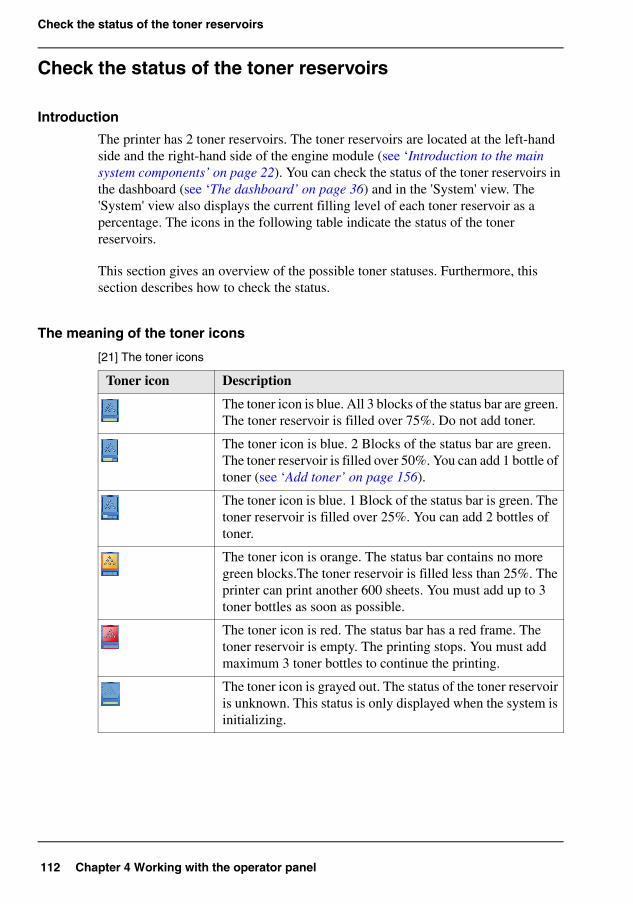
112 Chapter 4 Working with the operator panel
Check the status of the toner reservoirs
Check the status of the toner reservoirs
Introduction
The printer has 2 toner reservoirs. The toner reservoirs are located at the left-hand side and the right-hand side of the engine module (see ‘Introduction to the main system components’ on page 22). You can check the status of the toner reservoirs in the dashboard (see ‘The dashboard’ on page 36) and in the 'System' view. The 'System' view also displays the current filling level of each toner reservoir as a percentage. The icons in the following table indicate the status of the toner reservoirs.
This section gives an overview of the possible toner statuses. Furthermore, this section describes how to check the status.
The meaning of the toner icons[21]
[21] The toner icons
Toner icon Description[67]
The toner icon is blue. All 3 blocks of the status bar are green. The toner reservoir is filled over 75%. Do not add toner.
[68]
The toner icon is blue. 2 Blocks of the status bar are green. The toner reservoir is filled over 50%. You can add 1 bottle of toner (see ‘Add toner’ on page 156).
[69]
The toner icon is blue. 1 Block of the status bar is green. The toner reservoir is filled over 25%. You can add 2 bottles of toner.
[70]
The toner icon is orange. The status bar contains no more green blocks.The toner reservoir is filled less than 25%. The printer can print another 600 sheets. You must add up to 3 toner bottles as soon as possible.
[71]
The toner icon is red. The status bar has a red frame. The toner reservoir is empty. The printing stops. You must add maximum 3 toner bottles to continue the printing.
[72]
The toner icon is grayed out. The status of the toner reservoir is unknown. This status is only displayed when the system is initializing.
113
Check the status of the toner reservoirs
Check the status of the toner reservoirs
1. Check the toner icons in the dashboard.
Note: Follow the steps 2 and 3 to view the status of the toner reservoirs as a percentage.
2. Press the 'System' button.3. Press 'Printer'.
The 'System' view displays the current filling level of the toner reservoirs as a percentage. The percentage matches the blocks that are indicated in the dashboard.
114 Chapter 4 Working with the operator panel
Check the status of the stapler cartridges
Check the status of the stapler cartridges
Introduction
The optional finisher (see ‘The output locations’ on page 29) contains 2 staplers to staple your jobs. You can check the status of the stapler cartridges in the dashboard (see ‘The dashboard’ on page 36) and in the 'System' view. The 'System' view also displays the number of staples that have been used since the last refill. The icons in the following table indicate the status of the stapler cartridges.
This section gives an overview of the possible stapler statuses. Furthermore, this section describes how to check the status.
The meaning of the stapler icons[22]
Check the status of the stapler cartridges
1. Check the stapler icon in the dashboard.
Note: Follow the steps 2 and 3 to view the number of staples that have been used since the last refill.
2. Press the 'System' button.3. Press 'Printer'.
The 'System' view displays the status of the stapler cartridges. The 'System' view also displays the number of staples that have been used since the last refill.
[22] The stapler icons
Stapler icon Description[73]
The stapler icon is blue. The stapler cartridges are filled.
[74]
The stapler icon is orange. The stapler level in one of the stapler cartridges is low. The highlighted number indicates which of the stapler cartridges is almost empty (see ‘Finisher: Add staples’ on page 158).
[75]
The stapler icon is red. One of the stapler cartridges is empty. The highlighted number indicates which of the stapler cartridges is empty. The printer stops.
115
Reset the day counters
Reset the day counters
Introduction
The 'Printer' section of the 'System' view displays 3 types of counters. 2 of these counters provide information about the number of sheets that have been printed. The other counter provides information about the amount of toner that has been used.This section first describes the 3 counters in the 'Printer' section. Then it is described how to reset the day counters.
General counter information
The following table describes the counters in the 'Printer' section of the 'System' view.
[23]
The 'Billing counters' and the 'Day counters' provide information about the number of 1-sided and 2-sided prints that have been made on standard-size and large media. The length of the media determines whether a media is standard size or large. Media with a length of less than 390 mm (15.35") are referred to and counted as standard-size media. Media with a length of 390 mm (15.35") or more are referred to and counted as large media.The operator panel displays the media icon ( or ) as a small icon for standard-size media. For large media, the media icon is big. The media icon is used in various places on the operator panel, for example in the 'Counters' section, in the 'Trays' view and in the job information.
Type of counter Description
'Billing counters' The 'Billing counters' section displays the total number of prints that have been made since the printer was installed. You cannot reset the billing counters.
'Day counters' The 'Day counters' section displays the number of prints that have been made since the counter was last reset to 0. You can, for example, reset the day counters at the beginning of a working day or before you start a new job for a particular customer.
'Toner counter' The 'Toner counter' section displays the amount of toner that has been used since the printer was installed. You cannot reset the toner counter.
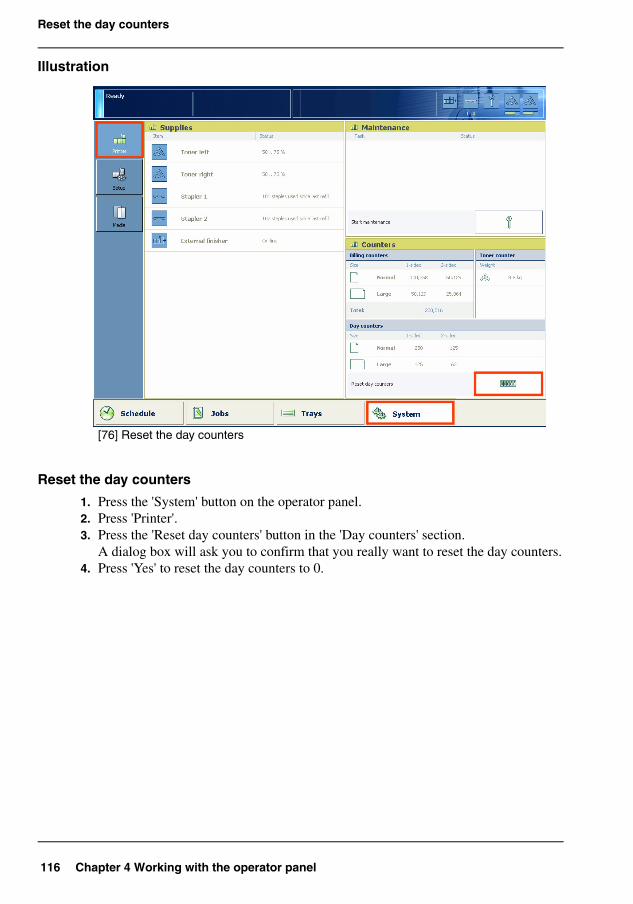
116 Chapter 4 Working with the operator panel
Reset the day counters
Illustration[76]
[76] Reset the day counters
Reset the day counters
1. Press the 'System' button on the operator panel.2. Press 'Printer'.3. Press the 'Reset day counters' button in the 'Day counters' section.
A dialog box will ask you to confirm that you really want to reset the day counters.4. Press 'Yes' to reset the day counters to 0.
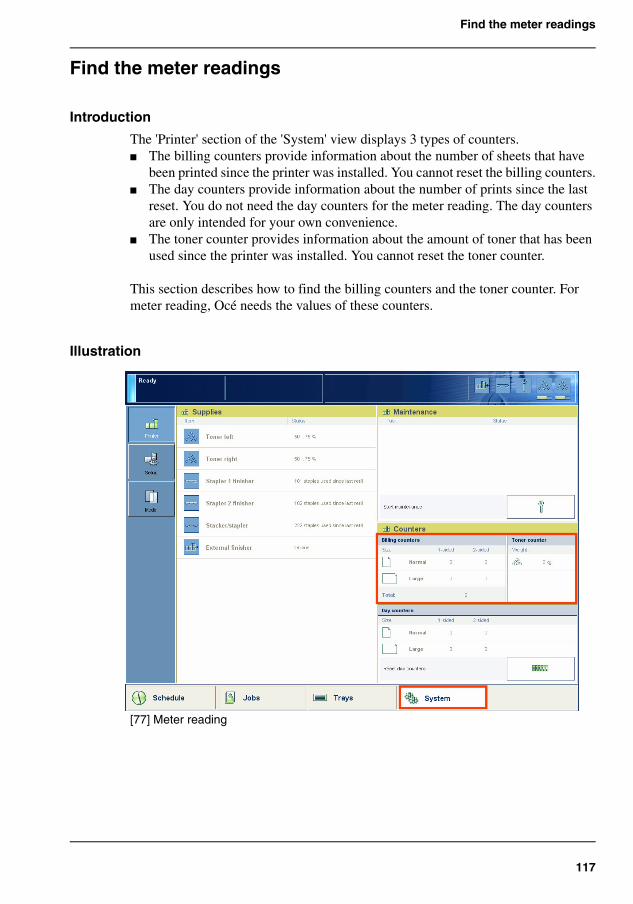
117
Find the meter readings
Find the meter readings
Introduction
The 'Printer' section of the 'System' view displays 3 types of counters.■ The billing counters provide information about the number of sheets that have
been printed since the printer was installed. You cannot reset the billing counters.■ The day counters provide information about the number of prints since the last
reset. You do not need the day counters for the meter reading. The day counters are only intended for your own convenience.
■ The toner counter provides information about the amount of toner that has been used since the printer was installed. You cannot reset the toner counter.
This section describes how to find the billing counters and the toner counter. For meter reading, Océ needs the values of these counters.
Illustration[77]
[77] Meter reading
118 Chapter 4 Working with the operator panel
Find the meter readings
Find the meter readings
1. On the operator panel, press the 'System' button.2. Press 'Printer'.
You can find the required meter readings on the right-hand side of the screen.
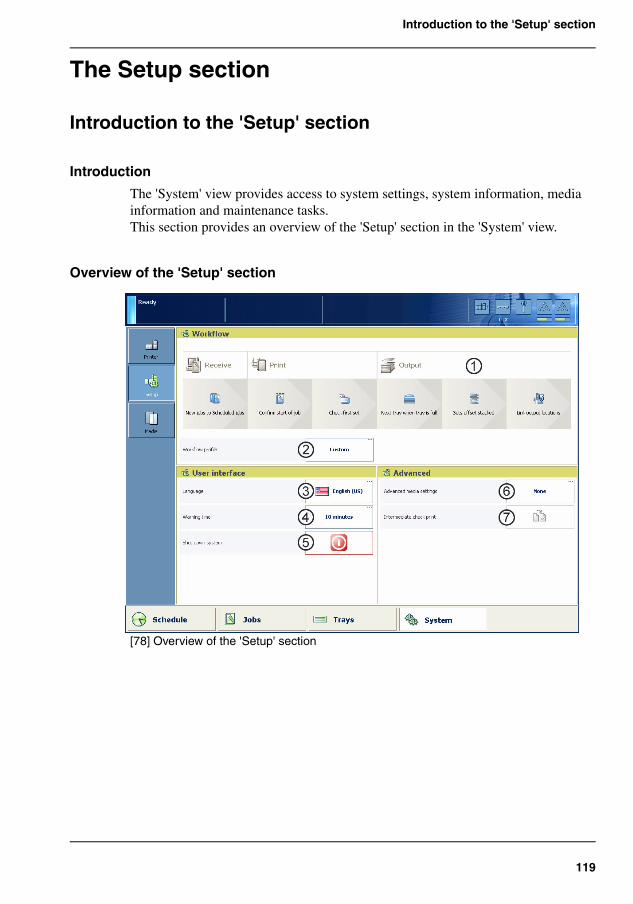
119
Introduction to the 'Setup' section
The Setup section
Introduction to the 'Setup' section
Introduction
The 'System' view provides access to system settings, system information, media information and maintenance tasks.This section provides an overview of the 'Setup' section in the 'System' view.
Overview of the 'Setup' section[78]
[78] Overview of the 'Setup' section

120 Chapter 4 Working with the operator panel
Introduction to the 'Setup' section
The items of the 'Setup' section[24]
[24] Description of the 'Setup' section
Number
Item Function
1 Summary of the defined workflow settings
Display the main settings of the current workflow profile. These settings are read-only.
2 'Workflow profile' button
Define a workflow profile that matches your needs (see ‘Work with the workflow profiles’ on page 121).
3 'Language' button Change the language of the operator panel (see ‘Change the language’ on page 126).
4 'Warning time' button Define at which point you want the system to warn you about an action that is required soon, for example 10 minutes in advance (see ‘Change the warning time’ on page 128).
5 'Shut down system' button
Shut down the system in a controlled way (see ‘Shut down the printer’ on page 18).
6 'Advanced media settings' button
Define a number of special media-related settings (see ‘Change the advanced media settings’ on page 131).
7 'Intermediate check print' button
Print a test sheet of a running job to check the quality (see ‘Make an intermediate check print’ on page 135).
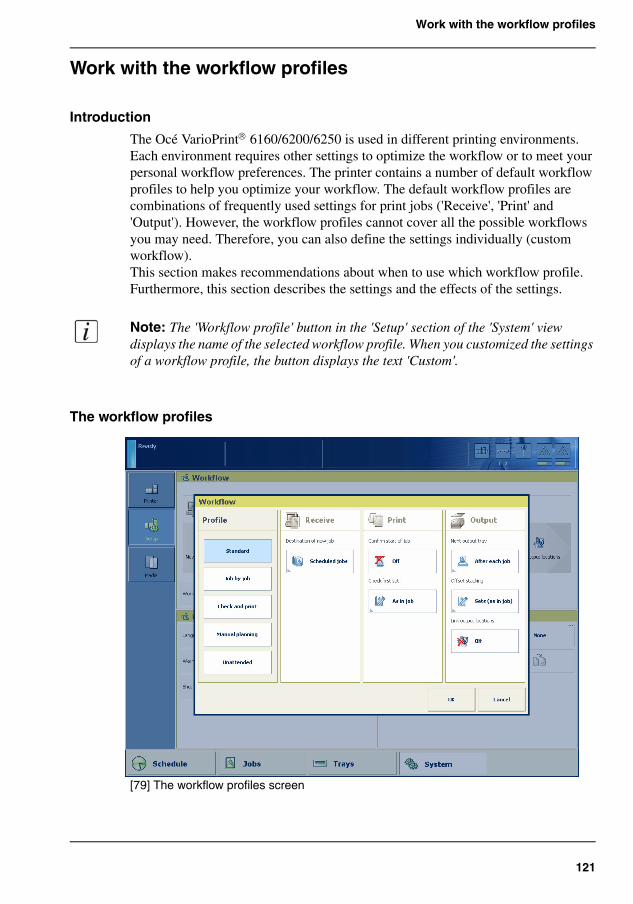
121
Work with the workflow profiles
Work with the workflow profiles
Introduction
The Océ VarioPrint® 6160/6200/6250 is used in different printing environments. Each environment requires other settings to optimize the workflow or to meet your personal workflow preferences. The printer contains a number of default workflow profiles to help you optimize your workflow. The default workflow profiles are combinations of frequently used settings for print jobs ('Receive', 'Print' and 'Output'). However, the workflow profiles cannot cover all the possible workflows you may need. Therefore, you can also define the settings individually (custom workflow).This section makes recommendations about when to use which workflow profile. Furthermore, this section describes the settings and the effects of the settings.
Note: The 'Workflow profile' button in the 'Setup' section of the 'System' view displays the name of the selected workflow profile. When you customized the settings of a workflow profile, the button displays the text 'Custom'.
The workflow profiles[79]
[79] The workflow profiles screen
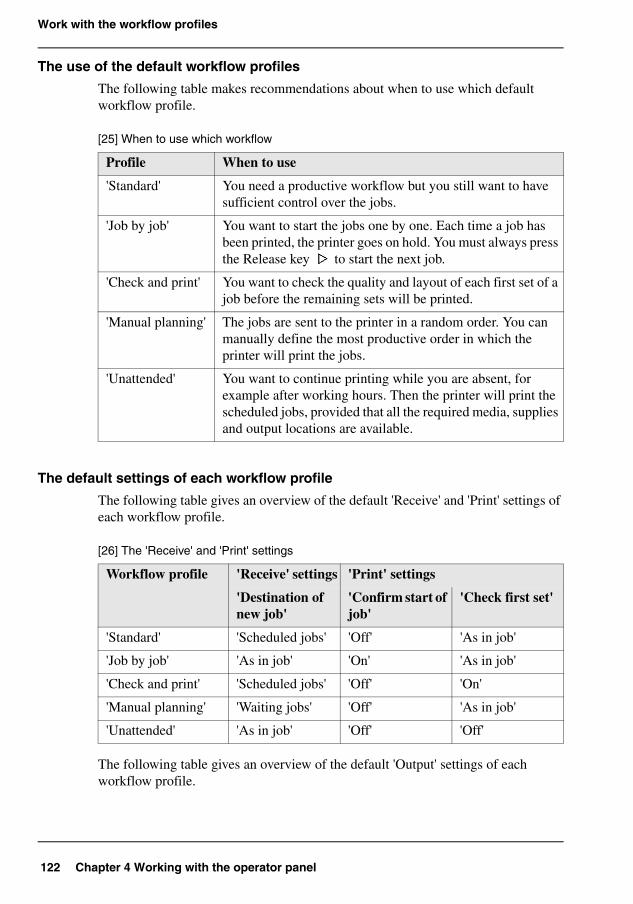
122 Chapter 4 Working with the operator panel
Work with the workflow profiles
The use of the default workflow profiles
The following table makes recommendations about when to use which default workflow profile.
[25]
The default settings of each workflow profile
The following table gives an overview of the default 'Receive' and 'Print' settings of each workflow profile.
[26]
The following table gives an overview of the default 'Output' settings of each workflow profile.
[25] When to use which workflow
Profile When to use
'Standard' You need a productive workflow but you still want to have sufficient control over the jobs.
'Job by job' You want to start the jobs one by one. Each time a job has been printed, the printer goes on hold. You must always press the Release key to start the next job.
'Check and print' You want to check the quality and layout of each first set of a job before the remaining sets will be printed.
'Manual planning' The jobs are sent to the printer in a random order. You can manually define the most productive order in which the printer will print the jobs.
'Unattended' You want to continue printing while you are absent, for example after working hours. Then the printer will print the scheduled jobs, provided that all the required media, supplies and output locations are available.
[26] The 'Receive' and 'Print' settings
Workflow profile 'Receive' settings 'Print' settings
'Destination of new job'
'Confirm start of job'
'Check first set'
'Standard' 'Scheduled jobs' 'Off' 'As in job'
'Job by job' 'As in job' 'On' 'As in job'
'Check and print' 'Scheduled jobs' 'Off' 'On'
'Manual planning' 'Waiting jobs' 'Off' 'As in job'
'Unattended' 'As in job' 'Off' 'Off'
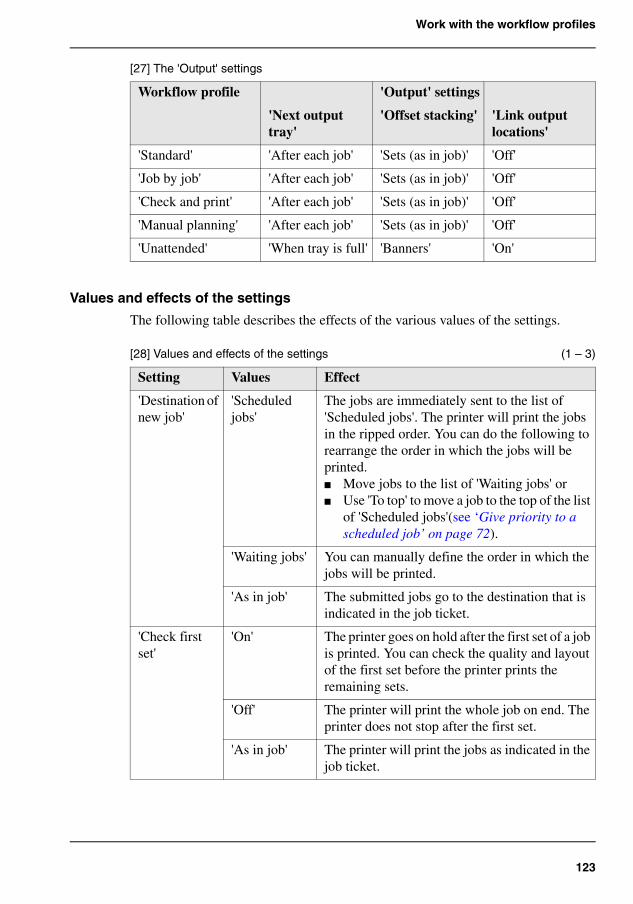
123
Work with the workflow profiles
[27]
Values and effects of the settings
The following table describes the effects of the various values of the settings.
[28]
[27] The 'Output' settings
Workflow profile 'Output' settings
'Next output tray'
'Offset stacking' 'Link output locations'
'Standard' 'After each job' 'Sets (as in job)' 'Off'
'Job by job' 'After each job' 'Sets (as in job)' 'Off'
'Check and print' 'After each job' 'Sets (as in job)' 'Off'
'Manual planning' 'After each job' 'Sets (as in job)' 'Off'
'Unattended' 'When tray is full' 'Banners' 'On'
[28] Values and effects of the settings (1 – 3)
Setting Values Effect
'Destination of new job'
'Scheduled jobs'
The jobs are immediately sent to the list of 'Scheduled jobs'. The printer will print the jobs in the ripped order. You can do the following to rearrange the order in which the jobs will be printed.■ Move jobs to the list of 'Waiting jobs' or■ Use 'To top' to move a job to the top of the list
of 'Scheduled jobs'(see ‘Give priority to a scheduled job’ on page 72).
'Waiting jobs' You can manually define the order in which the jobs will be printed.
'As in job' The submitted jobs go to the destination that is indicated in the job ticket.
'Check first set'
'On' The printer goes on hold after the first set of a job is printed. You can check the quality and layout of the first set before the printer prints the remaining sets.
'Off' The printer will print the whole job on end. The printer does not stop after the first set.
'As in job' The printer will print the jobs as indicated in the job ticket.

124 Chapter 4 Working with the operator panel
Work with the workflow profiles
'Confirm start of job'
'On' The printer always stops before the next scheduled job. You must press the Release key
to start each job.
'Off' The printer prints the scheduled jobs one after the other. The printer does not stop before the next scheduled job, unless there is a reason to stop. For example when a media is not available.
'Next output tray'
'After each job'
Each job is sent to the next available output tray. In this context, the second stack of the stacker is also defined as an output tray.
'When tray is full'
All the jobs are stacked until an output tray is full. When an output tray is full, the next jobs are sent to the next output tray.
'Offset stacking'
'Jobs' Each printed job that is delivered to an output location is stacked on top of the previous printed job with an offset. This helps you to identify the various jobs.
'Sets (always)' Each printed set that is delivered to an output location is stacked on top of the previous set with an offset. This helps you to identify the various sets.
'Sets (as in job)'
Each printed set is delivered to the output location as indicated in the job ticket. Therefore, the sets can be stacked in one straight line or with an offset.
'Banners' Each banner page of a job is delivered to the output location with an offset. This helps you to identify the separate jobs. The jobs themselves are stacked in one straight line.
'Off' All the printed jobs or sets are stacked in one straight line. There is no offset between the jobs or sets.
[28] Values and effects of the settings (2 – 3)
Setting Values Effect
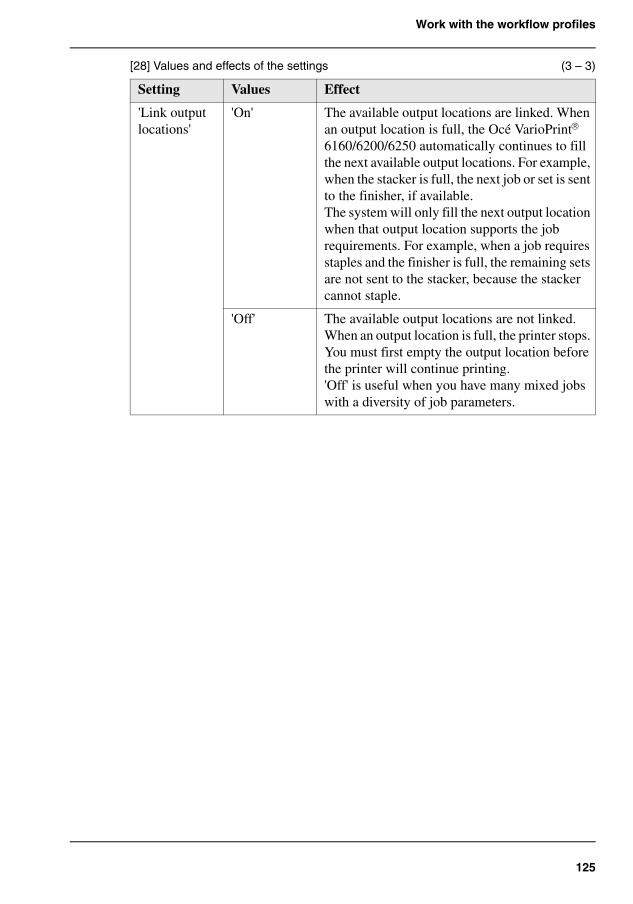
125
Work with the workflow profiles
'Link output locations'
'On' The available output locations are linked. When an output location is full, the Océ VarioPrint® 6160/6200/6250 automatically continues to fill the next available output locations. For example, when the stacker is full, the next job or set is sent to the finisher, if available.The system will only fill the next output location when that output location supports the job requirements. For example, when a job requires staples and the finisher is full, the remaining sets are not sent to the stacker, because the stacker cannot staple.
'Off' The available output locations are not linked. When an output location is full, the printer stops. You must first empty the output location before the printer will continue printing.'Off' is useful when you have many mixed jobs with a diversity of job parameters.
[28] Values and effects of the settings (3 – 3)
Setting Values Effect

126 Chapter 4 Working with the operator panel
Change the language
Change the language
Introduction
This section describes how to change the language of the operator panel.
Change the language
1. On the operator panel, press the 'System' button.2. Press the 'Setup' button.
[80]
[80] Change the language
3. Press the 'Language' button in the 'User interface' section.An overview of the available languages appears.
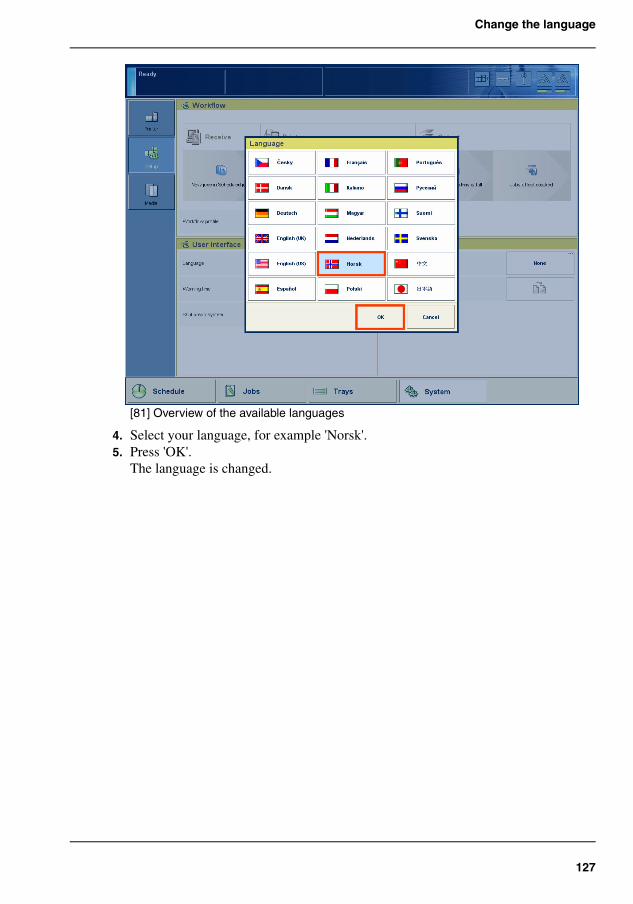
127
Change the language
[81]
[81] Overview of the available languages
4. Select your language, for example 'Norsk'.5. Press 'OK'.
The language is changed.
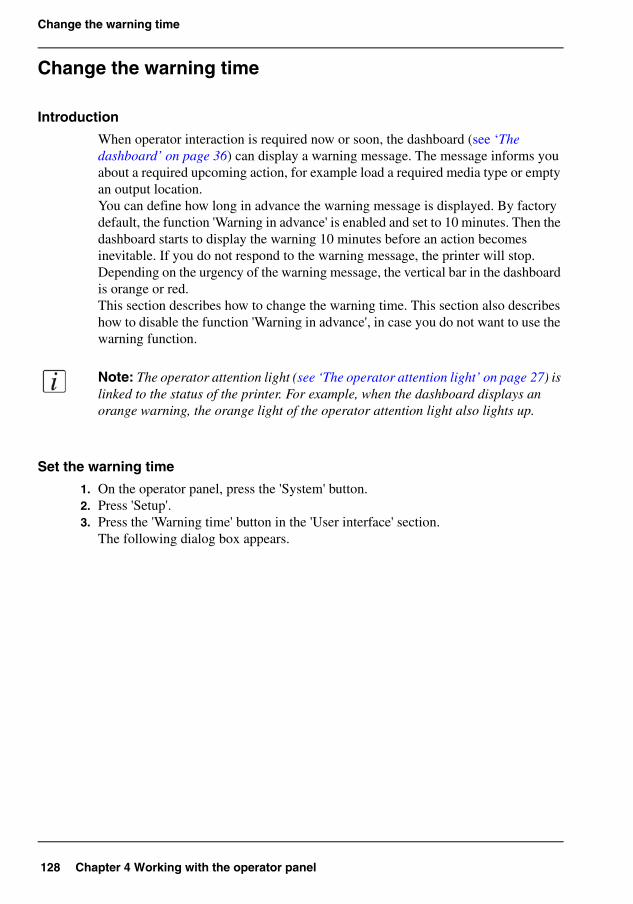
128 Chapter 4 Working with the operator panel
Change the warning time
Change the warning time
Introduction
When operator interaction is required now or soon, the dashboard (see ‘The dashboard’ on page 36) can display a warning message. The message informs you about a required upcoming action, for example load a required media type or empty an output location.You can define how long in advance the warning message is displayed. By factory default, the function 'Warning in advance' is enabled and set to 10 minutes. Then the dashboard starts to display the warning 10 minutes before an action becomes inevitable. If you do not respond to the warning message, the printer will stop. Depending on the urgency of the warning message, the vertical bar in the dashboard is orange or red.This section describes how to change the warning time. This section also describes how to disable the function 'Warning in advance', in case you do not want to use the warning function.
Note: The operator attention light (see ‘The operator attention light’ on page 27) is linked to the status of the printer. For example, when the dashboard displays an orange warning, the orange light of the operator attention light also lights up.
Set the warning time
1. On the operator panel, press the 'System' button.2. Press 'Setup'.3. Press the 'Warning time' button in the 'User interface' section.
The following dialog box appears.
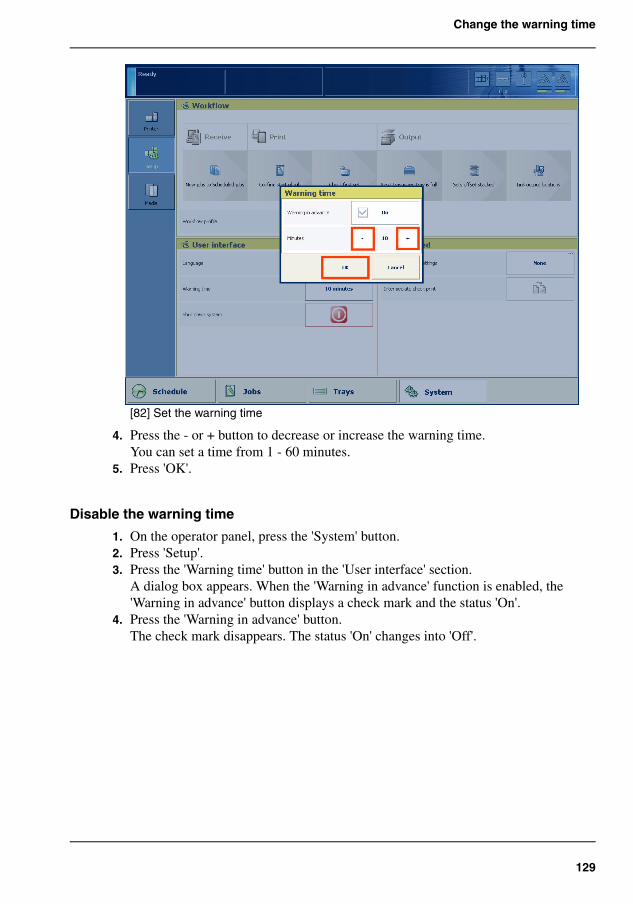
129
Change the warning time
[82]
[82] Set the warning time
4. Press the - or + button to decrease or increase the warning time.You can set a time from 1 - 60 minutes.
5. Press 'OK'.
Disable the warning time
1. On the operator panel, press the 'System' button.2. Press 'Setup'.3. Press the 'Warning time' button in the 'User interface' section.
A dialog box appears. When the 'Warning in advance' function is enabled, the 'Warning in advance' button displays a check mark and the status 'On'.
4. Press the 'Warning in advance' button.The check mark disappears. The status 'On' changes into 'Off'.
130 Chapter 4 Working with the operator panel
Change the warning time
[83]
[83] Disable the warning time
5. Press 'OK'.
131
Change the advanced media settings
Change the advanced media settings
Introduction
The Océ VarioPrint® 6160/6200/6250 has various advanced media settings that can help you solve possible problems when you print on certain special media.When all the advanced media settings have their default value, the button for 'Advanced media settings' displays the word 'None'. After you changed one or more settings, this button shows one or more of the following icons: .This means that 'Double-sheet detection' is 'Off', the 'Enhanced media mode' is 'On' and the 'Media quality factor' is set to the indicated value respectively.
This section describes when it is recommended to change the advanced media settings. Furthermore, this section describes how to change the settings.
When to do
■ 'Double-sheet detection'Double-sheet detection warns you that 2 or more sheets have been separated from the media stack in a paper tray at the same time. However, it is not always convenient when the double-sheet detection is enabled, for example when you use transparent media with a cover sheet. Then you can set the 'Double-sheet detection' to 'Off'. By factory default, 'Double-sheet detection' is 'On'.
■ 'Enhanced media mode'Glossy media can cause a collating or stapling error in the finisher. You can set the 'Enhanced media mode' to 'On' to prevent the error. This will influence the speed of the printer. By factory default, the 'Enhanced media mode' is 'Off'. When you set the 'Enhanced media mode' to 'On' and the printer status is 'Printing...', the dashboard displays a message that the enhanced media mode is enabled.The 'Enhanced media mode' is only available on printers that are equipped with the optional finisher (see ‘The output locations’ on page 29).
■ 'Media quality factor'When you use fiber-rich media, for example recycled media, the printer can become polluted quicker than with other media. When you discover that the print quality becomes less good, you can set a lower value for the 'Media quality factor'. You can select '600 (default)', '400' or '200'. When you select '400' or '200', the printer is automatically cleaned more often. The number indicates the number of prints after which the printer is cleaned. The cleaning takes only a couple of seconds. Please refer to the chapter Troubleshooting for more information Overview of the possible toner problems when using fiber-rich media on page 166.
■ 'Enhanced cleaning mode'When you set the 'Media quality factor' to '200' and the print quality of the fiber-rich media is still not optimal, then you can enable the 'Enhanced cleaning mode'. Please refer to the chapter Troubleshooting for more information
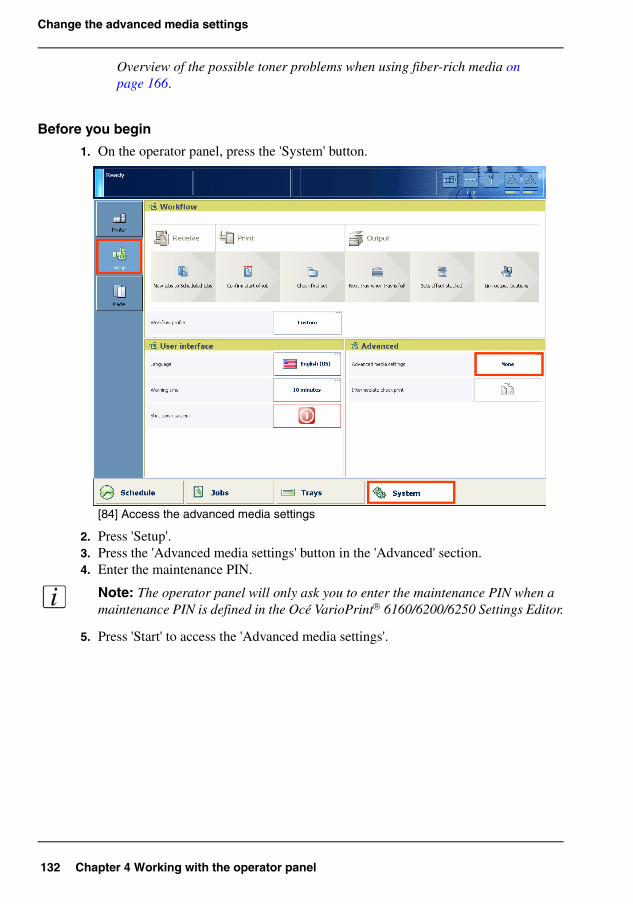
132 Chapter 4 Working with the operator panel
Change the advanced media settings
Overview of the possible toner problems when using fiber-rich media on page 166.
Before you begin
1. On the operator panel, press the 'System' button.[84]
[84] Access the advanced media settings
2. Press 'Setup'.3. Press the 'Advanced media settings' button in the 'Advanced' section.4. Enter the maintenance PIN.
Note: The operator panel will only ask you to enter the maintenance PIN when a maintenance PIN is defined in the Océ VarioPrint® 6160/6200/6250 Settings Editor.
5. Press 'Start' to access the 'Advanced media settings'.
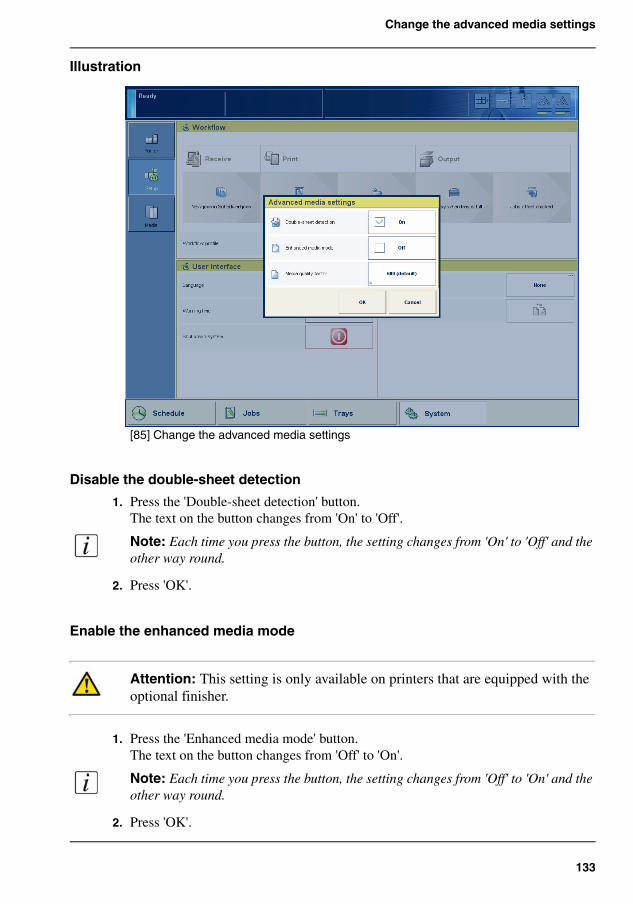
133
Change the advanced media settings
Illustration[85]
[85] Change the advanced media settings
Disable the double-sheet detection
1. Press the 'Double-sheet detection' button.The text on the button changes from 'On' to 'Off'.
Note: Each time you press the button, the setting changes from 'On' to 'Off' and the other way round.
2. Press 'OK'.
Enable the enhanced media mode
Attention: This setting is only available on printers that are equipped with the optional finisher.
1. Press the 'Enhanced media mode' button.The text on the button changes from 'Off' to 'On'.
Note: Each time you press the button, the setting changes from 'Off' to 'On' and the other way round.
2. Press 'OK'.
134 Chapter 4 Working with the operator panel
Change the advanced media settings
Change the media quality factor
1. Press the 'Media quality factor' button.A drop-down list appears.
2. Press the desired value.3. Press 'OK'.
Enable the enhanced cleaning mode
1. Press the 'Enhanced cleaning mode' button.The text on the button changes from 'Off' to 'On'.
Note: Each time you press the button, the setting changes from 'Off' to 'On' and the other way round.
2. Press 'OK'.
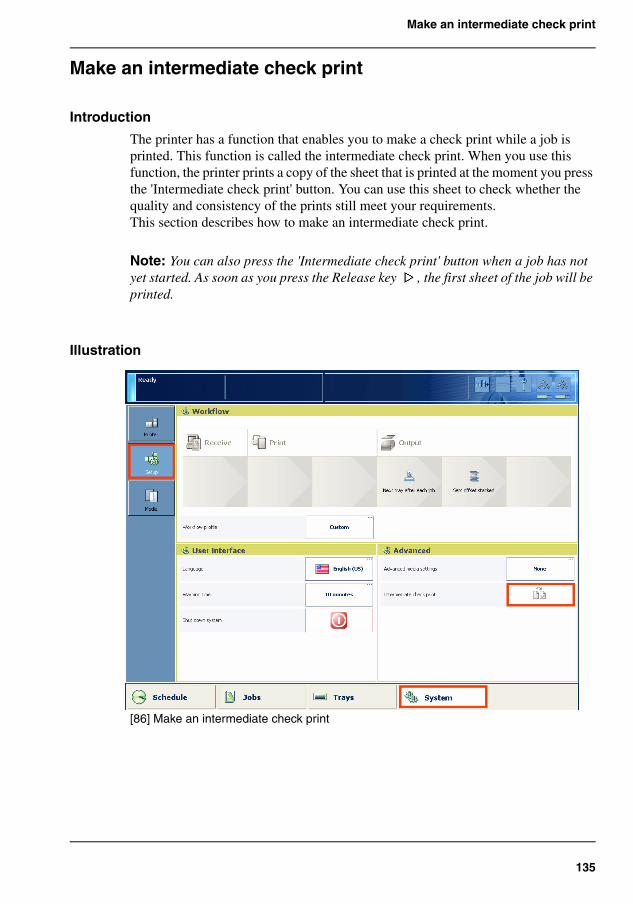
135
Make an intermediate check print
Make an intermediate check print
Introduction
The printer has a function that enables you to make a check print while a job is printed. This function is called the intermediate check print. When you use this function, the printer prints a copy of the sheet that is printed at the moment you press the 'Intermediate check print' button. You can use this sheet to check whether the quality and consistency of the prints still meet your requirements.This section describes how to make an intermediate check print.
Note: You can also press the 'Intermediate check print' button when a job has not yet started. As soon as you press the Release key , the first sheet of the job will be printed.
Illustration[86]
[86] Make an intermediate check print
136 Chapter 4 Working with the operator panel
Make an intermediate check print
Make an intermediate check print
1. On the operator panel, press the 'System' button.2. Press 'Setup'.3. Press the 'Intermediate check print' button in the 'Advanced' section.
The intermediate check print is sent to the system output (see ‘The output locations’ on page 29).
137
Introduction to the 'Media' section
The Media section
Introduction to the 'Media' section
Introduction
The 'System' view gives access to system settings, system information, media information and maintenance tasks.This section gives an overview of the 'Media' section in the 'System' view.
Overview of the 'Media' section[87]
[87] Overview of the 'Media' section
138 Chapter 4 Working with the operator panel
Introduction to the 'Media' section
The items of the 'Media' section[29]
[29] Description of the 'Media' section
Number
Item Function
1 List of all the media that are available in the 'Media catalog'.
Display the current content of the 'Media catalog'(see ‘Introduction to the 'Trays' view’ on page 105).
2 List of temporary media
Display the temporary media that are currently available on the system (see ‘What are temporary media’ on page 140).
3 'To catalog' button Add temporary media to the media catalog (see ‘Add temporary media to the 'Media catalog'’ on page 141).
4 'Registration' button Print test sheets and perform the registration for individual media. You can do a media registration for standard-size media (see ‘Perform a media registration for standard-size media’ on page 143) and large media (see ‘Perform a media registration for large media’ on page 148).
139
Introduction to the media handling
Introduction to the media handling
Introduction
The Océ VarioPrint® 6160/6200/6250 supports a wide range of media, including tabs and inserts. The supported media sizes range from 203 mm x 203 mm (minimum) to 320 mm x 488 mm (maximum). The supported media weights range from 50 - 300 g/m2 for Océ recommended media (60 - 200 g/m2 for other media).
This section describes the following.■ Media handling in general■ The 'Media catalog'■ Temporary media.
Note: You can place all the supported media in any paper tray.
General introduction to the media handling
All the print jobs require media that you can assign to the paper trays via the operator panel (see ‘Example of a workflow’ on page 46). The print jobs can require media that are included in the 'Media catalog'. However, the print jobs can also require media that are not included in the 'Media catalog'. These media become temporary media on the system.
What is the 'Media catalog'
The 'Media catalog' is a list of predefined media and media attributes which you can define in the Océ VarioPrint® 6160/6200/6250 Settings Editor application on the controller. The use of the 'Media catalog' is only recommended, not compulsory.
When you use the 'Media catalog', the operator panel, the printer drivers and other applications all display the same list of predefined media. The operator panel and the printer driver automatically retrieve and show the latest version of the 'Media catalog'.
Note: Refer to the Online Help of the Océ VarioPrint® 6160/6200/6250 Settings Editor for information about the media attributes that you can define. The Online Help also describes how to change the 'Media catalog' (add, edit or delete media).
140 Chapter 4 Working with the operator panel
Introduction to the media handling
What are temporary media
You can also use many other media that are not included in the 'Media catalog'. These media become temporary media. You can look up the currently used temporary media in the 'Media' section of the 'System' view. Furthermore, you can assign the temporary media to a paper tray.
The temporary media remain available on the system until:■ No more waiting jobs need this media type■ No more scheduled jobs need this media type■ No more printed jobs need this media type■ This media type is no longer available in the paper trays.
When you plan to use these media more often, you can add these temporary media to the 'Media catalog'(see ‘Add temporary media to the 'Media catalog'’ on page 141).
141
Add temporary media to the 'Media catalog'
Add temporary media to the 'Media catalog'
Introduction
When a job is submitted that requires media that are not included in the 'Media catalog', these media become temporary media. The operator panel displays the temporary media in the following places.■ In the list of 'Required media' in the 'Schedule' view, when the job is scheduled
for printing.■ In the list of 'Temporary media' in the 'Media' tab of the 'System' view.
When you plan to use a temporary media more often, you can add the media to the 'Media catalog'.This section describes how to add temporary media to the 'Media catalog'.
Illustration[88]
[88] Temporary media
142 Chapter 4 Working with the operator panel
Add temporary media to the 'Media catalog'
Add temporary media to the 'Media catalog'
1. Press the 'System' button on the operator panel.2. Press 'Media'.
The names of the temporary media are displayed in the 'Temporary media' section.3. Select the media you want to add to the 'Media catalog'.4. Press 'To catalog'.
The media is added to the 'Media catalog'.
Note: If required, you can edit the attributes of the media in the 'Media catalog' on the Océ VarioPrint® 6160/6200/6250 Settings Editor.

143
Perform a media registration for standard-size media
Perform a media registration for standard-size media
Introduction
The different properties of media can influence the alignment of images when the media are printed. To ensure a correct alignment, you can perform a media registration for each individual media in the 'Media catalog'. The following values will be measured.■ The Z-position of side 1■ The X-length of side 1■ The Z-position of side 2■ The X-position of side 1■ The X-position of side 2.
For each media registration, a paper ruler and 3 test sheets will be printed. Depending on the regional setting in the Océ VarioPrint® 6160/6200/6250 Settings Editor, the paper ruler is printed on A4 or Letter. You can use the first printed sheet to create the paper ruler. However, you can also use a universal ruler of your own. The ruler must be long enough to carry out the measurements. You must carry out each measurement on all 3 test sheets. The system calculates the average value of the measurements.This section describes how to perform a media registration for standard-size media (media with a length of less than 390 mm / 15.35").
Note: It is recommended to perform the media registration when the list of 'Scheduled jobs' is empty.
Before you begin
1. Press the 'System' button on the operator panel.2. Press 'Media'.3. Select a media from the 'Media catalog' for which you want to perform a media
registration.4. Press 'Registration'.
When a maintenance PIN is defined in the Océ VarioPrint® 6160/6200/6250 Settings Editor, a numerical keyboard appears.
5. Enter the maintenance PIN to start the wizard.
Note: The following procedures often refer to the start of the ruler. The start of the ruler is the line where the shaft of the arrow starts.

144 Chapter 4 Working with the operator panel
Perform a media registration for standard-size media
Print the test sheets and create the ruler
1. Read the introduction on the screen. Then press 'Next'.The printed test sheets go to the system output.
2. Take the first printed sheet.3. Fold the sheet along the line 'B-H' on side 1.
[89]
[89] Fold the sheet to create a ruler
This is your ruler.[90]
[90] The ruler
Adjust the Z-position of side 1
1. Take the first test sheet.2. Align the start of the ruler with point 'B' of the test sheet.
Tes
t bitm
ap: R
EG
IST
RA
TIO
N
Size
: 210
x 2
97 m
m
2006
-10-
09 /
14:
08:3
6
Page
1 1Prim
ary
imag
e
A G
05-
0
05+
3weksteehS-
B H
D
C
I
F
Tes
t bitm
ap: R
EG
IST
RA
TIO
N
Size
: 210
x 2
97 m
m
2006
-10-
09 /
14:
08:3
6
Page
1 1Prim
ary
imag
e
A G
05-
0
05+
3weksteehS-
B H
D
Tes
t bitm
ap: R
EG
IST
RA
TIO
N
Size
: 210
x 2
97 m
m
2006
-10-
09 /
14:
08:3
6
Page
1 1Prim
ary
imag
e
A G
05-
0
05+
3weksteehS-
B H
D
1000 1050 1100 1150 1200 1250 1300 1350 1400 1450 1500 1550 1600 1650 1700 1750 1800 1850 1900 1950 2000 2050 2100 2150 2200 2250 2300 2350 2400 2450 2500 2550 2600 2650 2700 2750 2800
-50
0
+50
Primary X image position
Primary Z image position
Primary diamond shape
X length
L
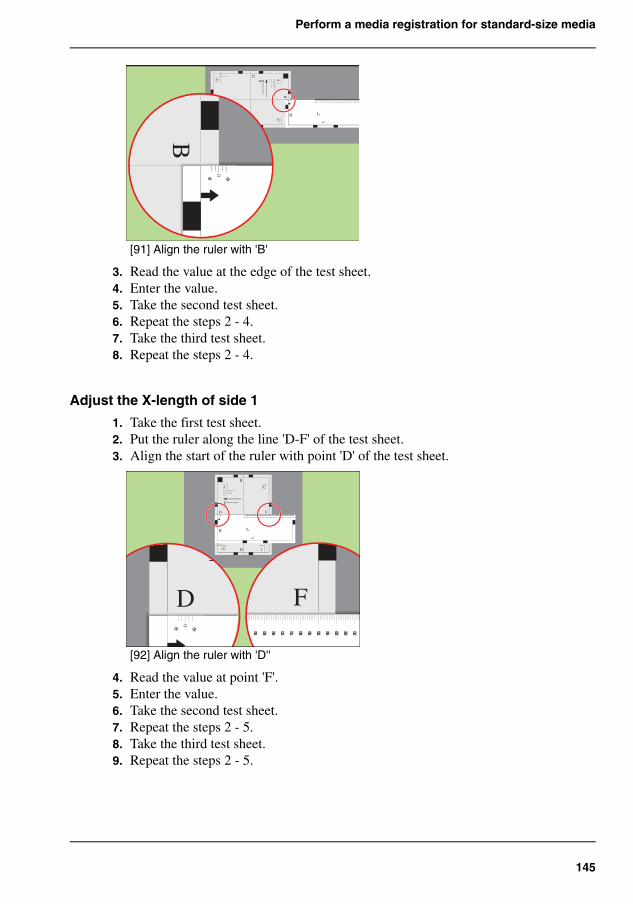
145
Perform a media registration for standard-size media
[91]
[91] Align the ruler with 'B'
3. Read the value at the edge of the test sheet.4. Enter the value.5. Take the second test sheet.6. Repeat the steps 2 - 4.7. Take the third test sheet.8. Repeat the steps 2 - 4.
Adjust the X-length of side 1
1. Take the first test sheet.2. Put the ruler along the line 'D-F' of the test sheet.3. Align the start of the ruler with point 'D' of the test sheet.
[92]
[92] Align the ruler with 'D''
4. Read the value at point 'F'.5. Enter the value.6. Take the second test sheet.7. Repeat the steps 2 - 5.8. Take the third test sheet.9. Repeat the steps 2 - 5.
Test bitm
ap: RE
GIST
RA
TIO
N
Size: 210 x 297 mm
2006-10-09 / 14:08:36
Page 1
1Prim
ary image
AC
GI
05-
0
05+
3 weksteehS-
BH
DF
1000 1050 1100 1150 1200 1250 1300 1350 1400 1450 1500 1550 1600 1650 1700 1750 1800 1850 1900 1950 2000 2050 2100 2150 2200 2250 2300 2350 2400 2450 2500 2550 2600 2650
-50
0
+50
Primary X image position
Primary Z image position
Primary diamond shape
X length
L
B
-50
0
+50
Test bitmap: REGISTRATION
Size: 210 x 297 mm
2006-10-09 / 14:08:36
Page 1
1Primary image
A C
G I
05-
0 05+ 3
weksteeh
S-
B
H
D F
1000 1050 1100 1150 1200 1250 1300 1350 1400 1450 1500 1550 1600 1650 1700 1750 1800 1850 1900 1950 2000 2050 2100 2150 2200 2250 2300 2350 2400 2450 2500 2550 2600 2650 2700 2750 2800
-50
0
+50
Primary X image position
Primary Z image position
Primary diamond shape
X length
L
F
1500 1550 1600 1650 1700 1750 1800 1850 1900 1950 2000 2050 2100
1D
-50
0
+50
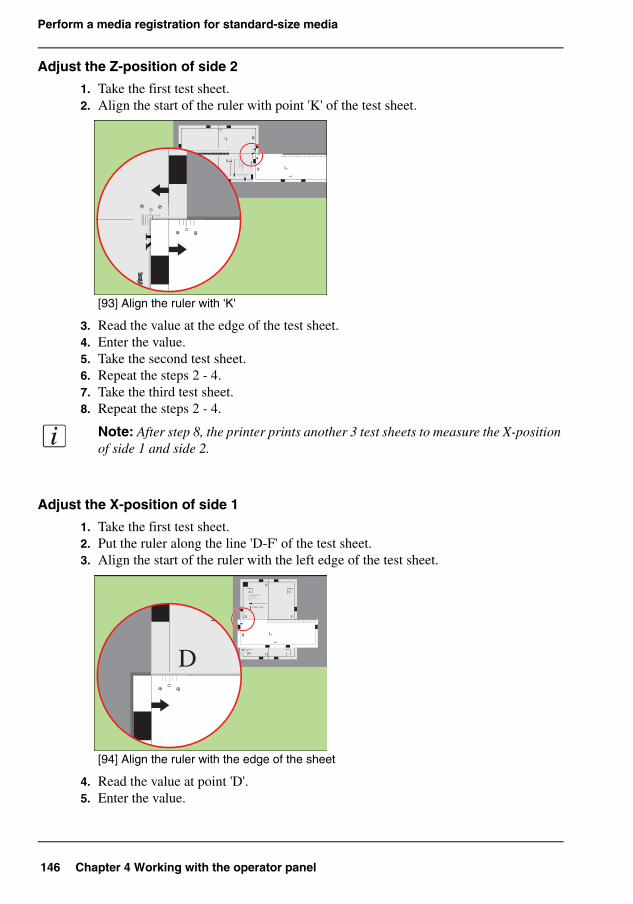
146 Chapter 4 Working with the operator panel
Perform a media registration for standard-size media
Adjust the Z-position of side 2
1. Take the first test sheet.2. Align the start of the ruler with point 'K' of the test sheet.
[93]
[93] Align the ruler with 'K'
3. Read the value at the edge of the test sheet.4. Enter the value.5. Take the second test sheet.6. Repeat the steps 2 - 4.7. Take the third test sheet.8. Repeat the steps 2 - 4.
Note: After step 8, the printer prints another 3 test sheets to measure the X-position of side 1 and side 2.
Adjust the X-position of side 1
1. Take the first test sheet.2. Put the ruler along the line 'D-F' of the test sheet.3. Align the start of the ruler with the left edge of the test sheet.
[94]
[94] Align the ruler with the edge of the sheet
4. Read the value at point 'D'.5. Enter the value.
Test bitm
ap: RE
GIST
RA
TIO
N
Size: 210 x 297 mm
2006-10-09 / 14:08:36
Page 2
2Secondary im
age
05-
0
05+
2 epahS dno mai D yradnoceS
2
05-
0
05+
1 epahS dno mai D yradnoceS
105-
0
05+
noiti sop ega mi X yradnoceS
5
-50
0
+50
Secondary Z image position
4-50
0
+50
Primary X image position
Primary Z image position
1000105011001150120012501300135014001450150015501600165017001750180018501900195020002050210021502200225023002350240024502500255026002650270027502800
Primary diamond shape
X length
K
NL
P
1000 1050 1100 1150 1200 1250 1300 1350 1400 1450 1500 1550 1600 1650 1700 1750 1800 1850 1900 1950 2000 2050 2100 2150 2200 2250 2300 2350 2400 2450 2500 2550 2600 2650
-50
0
+50
Primary X image position
Primary Z image position
Primary diamond shape
X length
L
Secondary Z image pos
-50
0
+50K
-50
0
+50
Test bitmap: REGISTRATION
Size: 210 x 297 mm
2006-10-09 / 14:08:36
Page 1
1Primary image
A C
G I
05-
0 0 5+ 3
weksteehS
-
B
H
D F
1000 1050 1100 1150 1200 1250 1300 1350 1400 1450 1500 1550 1600 1650 1700 1750 1800 1850 1900 1950 2000 2050 2100 2150 2200 2250 2300 2350 2400 2450 2500 2550 2600 2650 2700 2750 2800
-50
0
+50
Primary X image position
Primary Z image position
Primary diamond shape
X length
L
1D
-50
0
+50
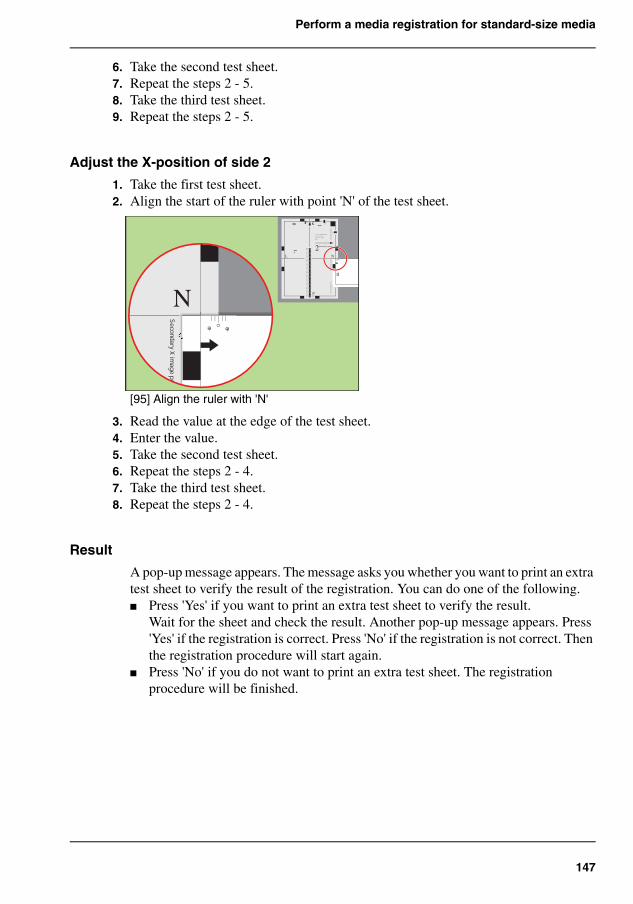
147
Perform a media registration for standard-size media
6. Take the second test sheet.7. Repeat the steps 2 - 5.8. Take the third test sheet.9. Repeat the steps 2 - 5.
Adjust the X-position of side 2
1. Take the first test sheet.2. Align the start of the ruler with point 'N' of the test sheet.
[95]
[95] Align the ruler with 'N'
3. Read the value at the edge of the test sheet.4. Enter the value.5. Take the second test sheet.6. Repeat the steps 2 - 4.7. Take the third test sheet.8. Repeat the steps 2 - 4.
Result
A pop-up message appears. The message asks you whether you want to print an extra test sheet to verify the result of the registration. You can do one of the following.■ Press 'Yes' if you want to print an extra test sheet to verify the result.
Wait for the sheet and check the result. Another pop-up message appears. Press 'Yes' if the registration is correct. Press 'No' if the registration is not correct. Then the registration procedure will start again.
■ Press 'No' if you do not want to print an extra test sheet. The registration procedure will be finished.
Test bitmap: REGISTRATION
Size: 210 x 297 mm
2006-10-09 / 14:08:36
Page 2
2Secondary image
05- 0 05
+
2 e p
ahS
dno
mai
D yr
a dn o
ceS
2
0 5-
005
+
1 e p
ahS
dno
mai
D yr
adno
ceS
105
-
0 0 5+
n oit i
s op
ega
mi X
y ra d
noc e
S
5
-50
0
+50
Secondary Z image position
4-50
0
+50
Primary X image position
Primary Z image position
1000
1050
1100
1150
1200
1250
1300
1350
1400
1450
1500
1550
1600
1650
1700
1750
1800
1850
1900
1950
2000
2050
2100
2150
2200
2250
2300
2350
2400
2450
2500
2550
2600
2650
2700
2750
2800
Primary diamond shape
X length
K
NL
P
-50
0
+50
Primary X image position
Primary Z image position
0 5-
0 0 5+
isop
eg a
mi X
y rad
noc e
S
5
N
-50
0
+50
148 Chapter 4 Working with the operator panel
Perform a media registration for large media
Perform a media registration for large media
Introduction
The different properties of media can influence the alignment of images when the media are printed. To ensure a correct alignment, you can perform a media registration for each individual media in the 'Media catalog'. The following values will be measured.■ The Z-position of side 1■ The X-length of side 1■ The Z-position of side 2■ The X-position of side 1■ The X-position of side 2.
For each media registration, a paper ruler and 3 test sheets will be printed. Depending on the regional setting in the Océ VarioPrint® 6160/6200/6250 Settings Editor, the paper ruler is printed on A4 or Letter. You can use the first printed sheet to create the paper ruler. However, you can also use a universal ruler of your own. The ruler must be long enough to carry out the measurements. You must carry out each measurement on all 3 test sheets. The system calculates the average value of the measurements.This section describes how to perform a media registration for large media (media with a length of 390 mm / 15.35" or more).
Note: It is recommended to perform the media registration when the list of 'Scheduled jobs' is empty.
Before you begin
1. Press the 'System' button on the operator panel.2. Press 'Media'.3. Select a media from the 'Media catalog' for which you want to perform a media
registration.4. Press 'Registration'.
When a maintenance PIN is defined in the Océ VarioPrint® 6160/6200/6250 Settings Editor, a numerical keyboard appears.
5. Enter the maintenance PIN to start the wizard.
Note: The following procedures often refer to the start of the ruler. The start of the ruler is the line where the shaft of the arrow starts.
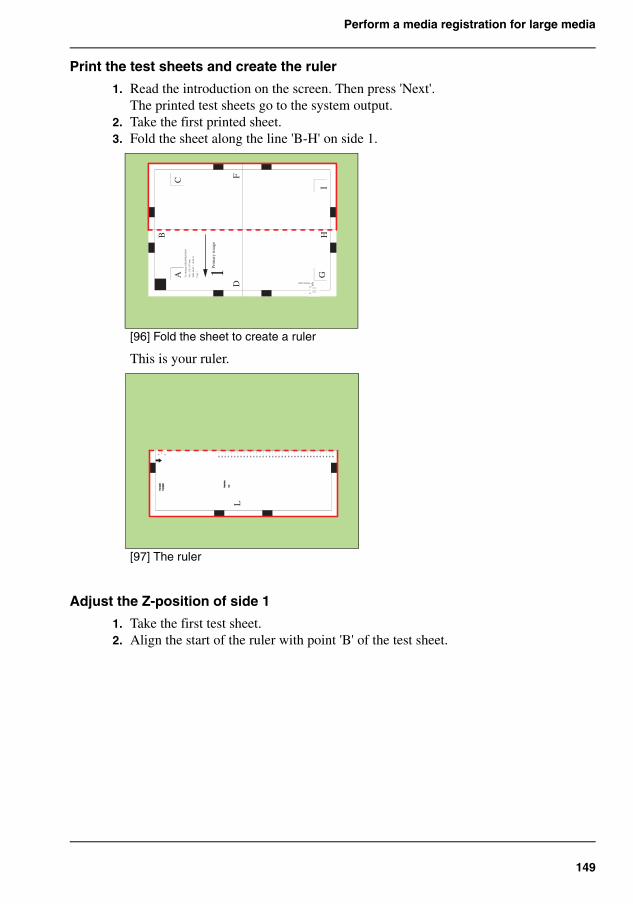
149
Perform a media registration for large media
Print the test sheets and create the ruler
1. Read the introduction on the screen. Then press 'Next'.The printed test sheets go to the system output.
2. Take the first printed sheet.3. Fold the sheet along the line 'B-H' on side 1.
[96]
[96] Fold the sheet to create a ruler
This is your ruler.[97]
[97] The ruler
Adjust the Z-position of side 1
1. Take the first test sheet.2. Align the start of the ruler with point 'B' of the test sheet.
Tes
t bitm
ap: R
EG
IST
RA
TIO
N
Size
: 210
x 2
97 m
m
2006
-10-
09 /
14:
08:3
6
Page
1 1Prim
ary
imag
e
A G
05-
0
05+
3weksteehS-
B H
D
C
I
F
Tes
t bitm
ap: R
EG
IST
RA
TIO
N
Size
: 210
x 2
97 m
m
2006
-10-
09 /
14:
08:3
6
Page
1 1Prim
ary
imag
e
A G
05-
0
05+
3weksteehS-
B H
D
Tes
t bitm
ap: R
EG
IST
RA
TIO
N
Size
: 210
x 2
97 m
m
2006
-10-
09 /
14:
08:3
6
Page
1 1Prim
ary
imag
e
A G
05-
0
05+
3weksteehS-
B H
D
1000 1050 1100 1150 1200 1250 1300 1350 1400 1450 1500 1550 1600 1650 1700 1750 1800 1850 1900 1950 2000 2050 2100 2150 2200 2250 2300 2350 2400 2450 2500 2550 2600 2650 2700 2750 2800
-50
0
+50
Primary X image position
Primary Z image position
Primary diamond shape
X length
L
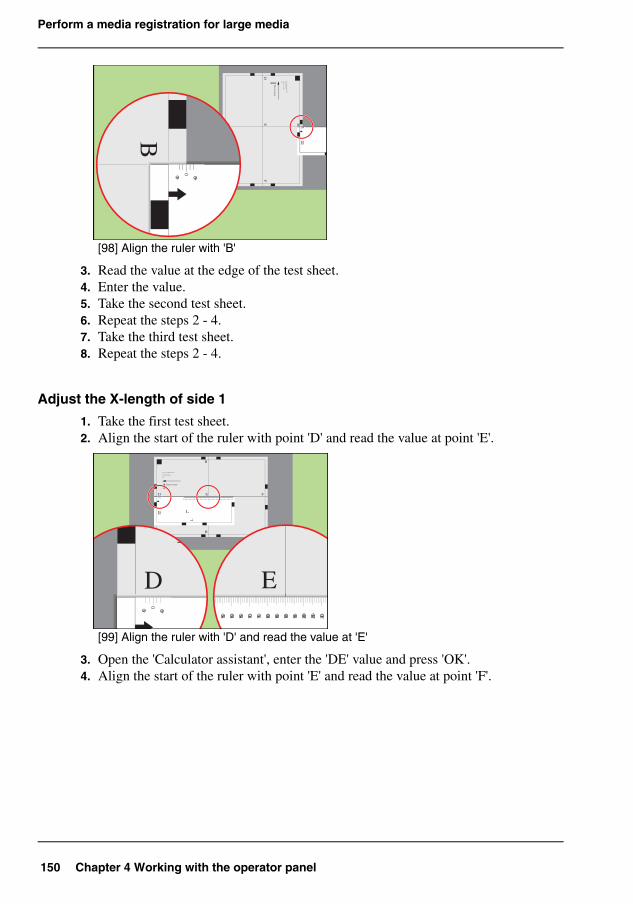
150 Chapter 4 Working with the operator panel
Perform a media registration for large media
[98]
[98] Align the ruler with 'B'
3. Read the value at the edge of the test sheet.4. Enter the value.5. Take the second test sheet.6. Repeat the steps 2 - 4.7. Take the third test sheet.8. Repeat the steps 2 - 4.
Adjust the X-length of side 1
1. Take the first test sheet.2. Align the start of the ruler with point 'D' and read the value at point 'E'.
[99]
[99] Align the ruler with 'D' and read the value at 'E'
3. Open the 'Calculator assistant', enter the 'DE' value and press 'OK'.4. Align the start of the ruler with point 'E' and read the value at point 'F'.
Test bitm
ap: RE
GIST
RA
TIO
N
Size: 420 x 297 mm
2006-10-09 / 14:08:22
Page 1
1Prim
ary image
-50 0
+50 3
- Sheet skew
BH ED
F
1000
-50
0
+50
Primary X image position
Primary Z image positionB
-50
0
+50
Test bitmap: REGISTRATION
Size: 420 x 297 mm
2006-10-09 / 14:08:22
Page 1
1Primary image
-50
0
+50
3 - Sheet skew
B
H
ED F
1000 1050 1100 1150 1200 1250 1300 1350 1400 1450 1500 1550 1600 1650 1700 1750 1800 1850 1900 1950 2000 2050 2100 2150 2200 2250 2300 2350 2400 2450 2500 2550 2600 2650 2700 2750 2800
-50
0
+50
Primary X image position
Primary Z image position
Primary diamond shape
X length
L1D
-50
0
+50
E
1500 1550 1600 1650 1700 1750 1800 1850 1900 1950 2000 2050 2100
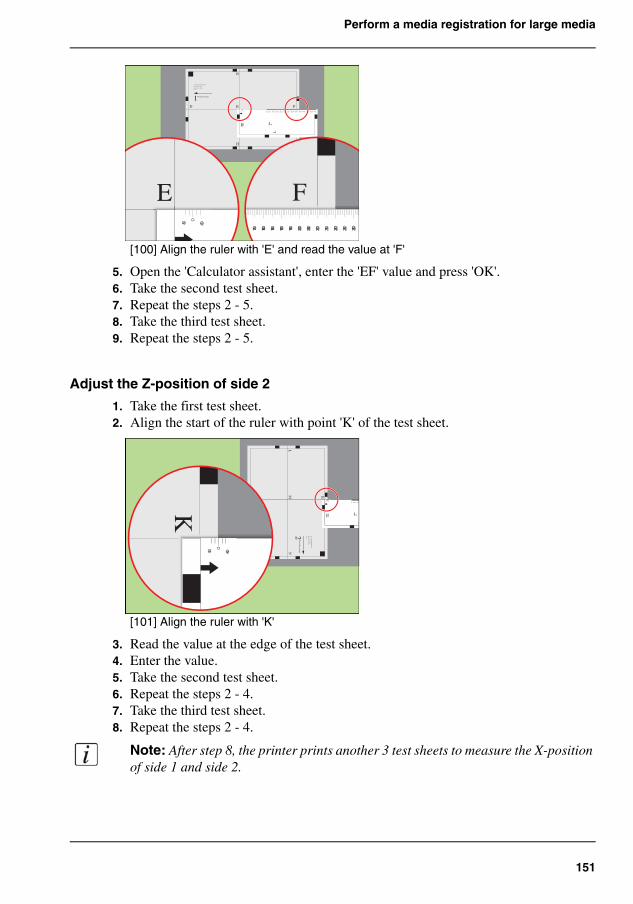
151
Perform a media registration for large media
[100]
[100] Align the ruler with 'E' and read the value at 'F'
5. Open the 'Calculator assistant', enter the 'EF' value and press 'OK'.6. Take the second test sheet.7. Repeat the steps 2 - 5.8. Take the third test sheet.9. Repeat the steps 2 - 5.
Adjust the Z-position of side 2
1. Take the first test sheet.2. Align the start of the ruler with point 'K' of the test sheet.
[101]
[101] Align the ruler with 'K'
3. Read the value at the edge of the test sheet.4. Enter the value.5. Take the second test sheet.6. Repeat the steps 2 - 4.7. Take the third test sheet.8. Repeat the steps 2 - 4.
Note: After step 8, the printer prints another 3 test sheets to measure the X-position of side 1 and side 2.
Test bitmap: REGISTRATION
Size: 420 x 297 mm
2006-10-09 / 14:08:22
Page 1
1Primary image
-50
0
+50
3 - Sheet skew
B
H
ED F
1000 1050 1100 1150 1200 1250 1300 1350 1400 1450 1500 1550 1600 1650 1700 1750 1800 1850 1900 1950 2000 2050 2100 2150 2200 2250 2300 2350 2400 2450 2500 2550 2600 2650 2700 2750 2800
-50
0
+50
Primary X image position
Primary Z image position
Primary diamond shape
X length
L
E-50
0
+50F
1700 1750 1800 1850 1900 1950 2000 2050 2100 2150 2200 2250 2300
Test bitm
ap: RE
GIST
RA
TIO
N
Size: 420 x 297 mm
2006-10-09 / 14:08:22
Page 2
2Secondary im
age
KP ML
N
1000 1050 1100 1150 1200 1250
-50
0
+50
Primary X image position
Primary Z image position
Primary diamond shape
X length
L
K
-50
0
+50
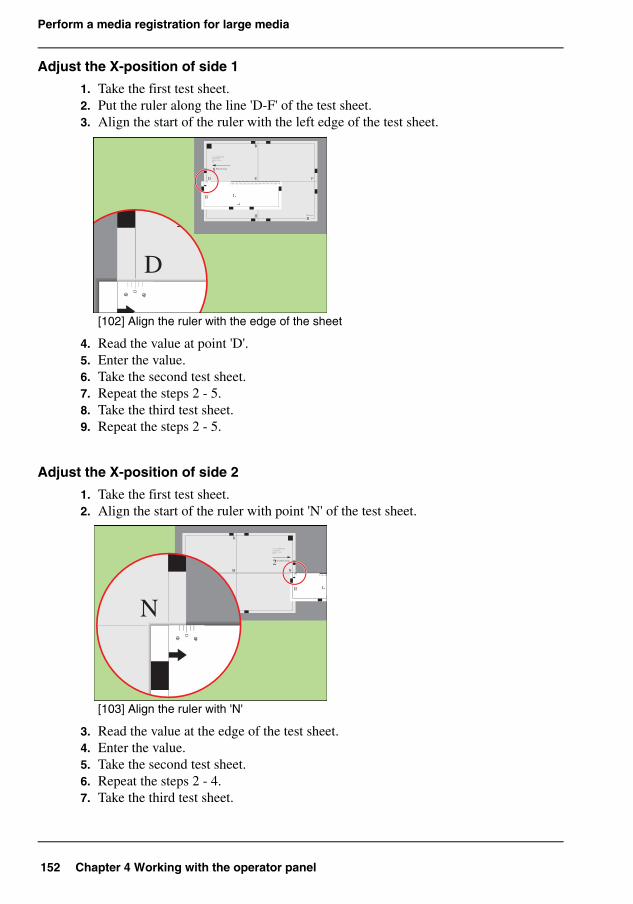
152 Chapter 4 Working with the operator panel
Perform a media registration for large media
Adjust the X-position of side 1
1. Take the first test sheet.2. Put the ruler along the line 'D-F' of the test sheet.3. Align the start of the ruler with the left edge of the test sheet.
[102]
[102] Align the ruler with the edge of the sheet
4. Read the value at point 'D'.5. Enter the value.6. Take the second test sheet.7. Repeat the steps 2 - 5.8. Take the third test sheet.9. Repeat the steps 2 - 5.
Adjust the X-position of side 2
1. Take the first test sheet.2. Align the start of the ruler with point 'N' of the test sheet.
[103]
[103] Align the ruler with 'N'
3. Read the value at the edge of the test sheet.4. Enter the value.5. Take the second test sheet.6. Repeat the steps 2 - 4.7. Take the third test sheet.
Test bitmap: REGISTRATION
Size: 420 x 297 mm
2006-10-09 / 14:08:22
Page 1
1Primary image
-50
0
+50
3 - Sheet skew
B
H
ED F
1000 1050 1100 1150 1200 1250 1300 1350 1400 1450 1500 1550 1600 1650 1700 1750 1800 1850 1900 1950 2000 2050 2100 2150 2200 2250 2300 2350 2400 2450 2500 2550 2600 2650 2700 2750 2800
-50
0
+50
Primary X image position
Primary Z image position
Primary diamond shape
X length
L1D
-50
0
+50
Test bitmap: REGISTRATION
Size: 420 x 297 mm
2006-10-09 / 14:08:22
Page 2
2Secondary image
K
P
ML N
1000 1050 1100 1150 1200 1250
-50
0
+50
Primary X image position
Primary Z image position
Primary diamond shape
X length
L
N
-50
0
+50

153
Perform a media registration for large media
8. Repeat the steps 2 - 4.
Result
A pop-up message appears. The message asks you whether you want to print an extra test sheet to verify the result of the registration. You can do one of the following.■ Press 'Yes' if you want to print an extra test sheet to verify the result.
Wait for the sheet and check the result. Another pop-up message appears. Press 'Yes' if the registration is correct. Press 'No' if the registration is not correct. Then the registration procedure will start again.
■ Press 'No' if you do not want to print an extra test sheet. The registration procedure will be finished.
154 Chapter 4 Working with the operator panel
Perform a media registration for large media

155
Chapter 5 Keeping the printer running
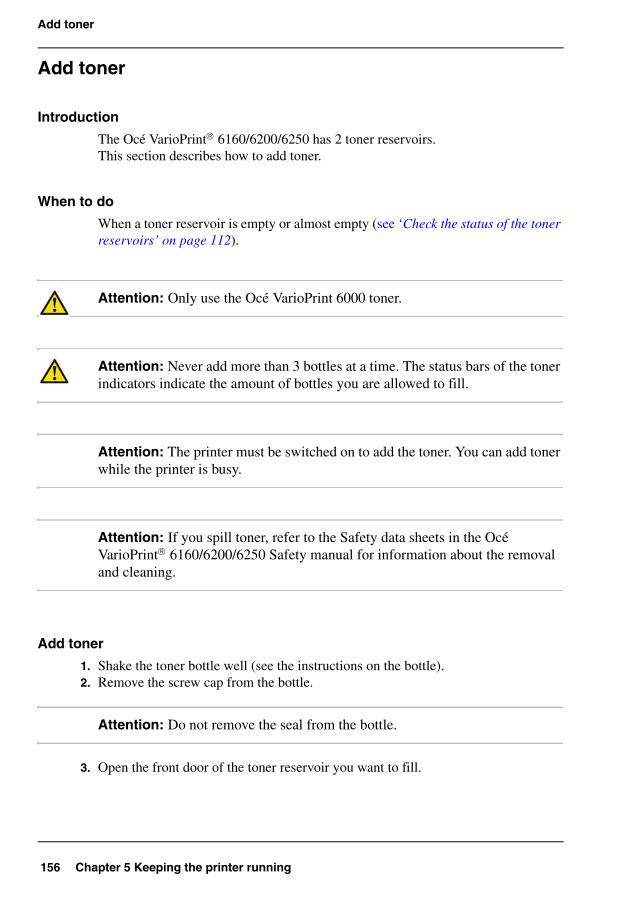
156 Chapter 5 Keeping the printer running
Add toner
Add toner
Introduction
The Océ VarioPrint® 6160/6200/6250 has 2 toner reservoirs.This section describes how to add toner.
When to do
When a toner reservoir is empty or almost empty (see ‘Check the status of the toner reservoirs’ on page 112).
Attention: Only use the Océ VarioPrint 6000 toner.
Attention: Never add more than 3 bottles at a time. The status bars of the toner indicators indicate the amount of bottles you are allowed to fill.
Attention: The printer must be switched on to add the toner. You can add toner while the printer is busy.
Attention: If you spill toner, refer to the Safety data sheets in the Océ VarioPrint® 6160/6200/6250 Safety manual for information about the removal and cleaning.
Add toner
1. Shake the toner bottle well (see the instructions on the bottle).2. Remove the screw cap from the bottle.
Attention: Do not remove the seal from the bottle.
3. Open the front door of the toner reservoir you want to fill.
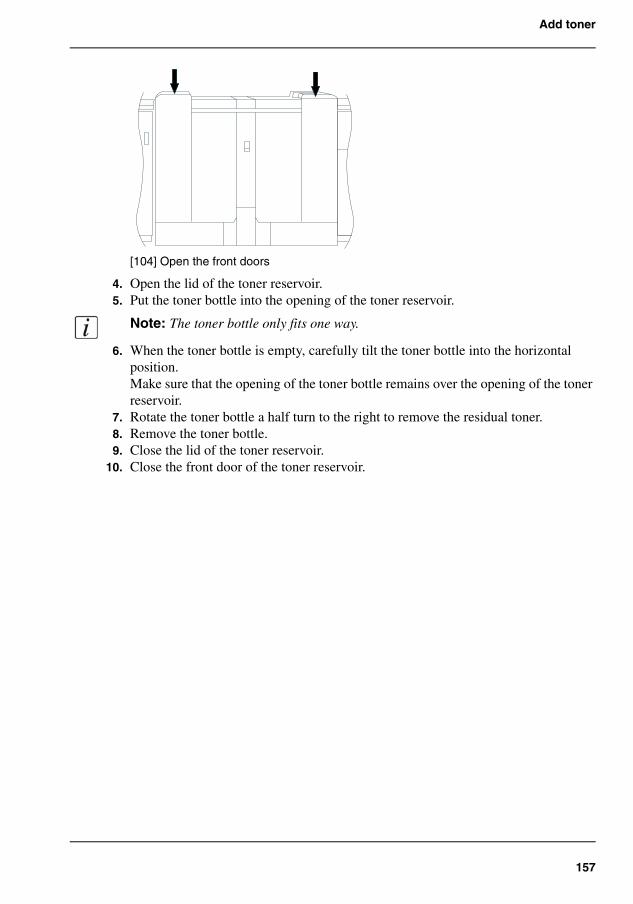
157
Add toner
[104]
[104] Open the front doors
4. Open the lid of the toner reservoir.5. Put the toner bottle into the opening of the toner reservoir.
Note: The toner bottle only fits one way.
6. When the toner bottle is empty, carefully tilt the toner bottle into the horizontal position.Make sure that the opening of the toner bottle remains over the opening of the toner reservoir.
7. Rotate the toner bottle a half turn to the right to remove the residual toner.8. Remove the toner bottle.9. Close the lid of the toner reservoir.
10. Close the front door of the toner reservoir.
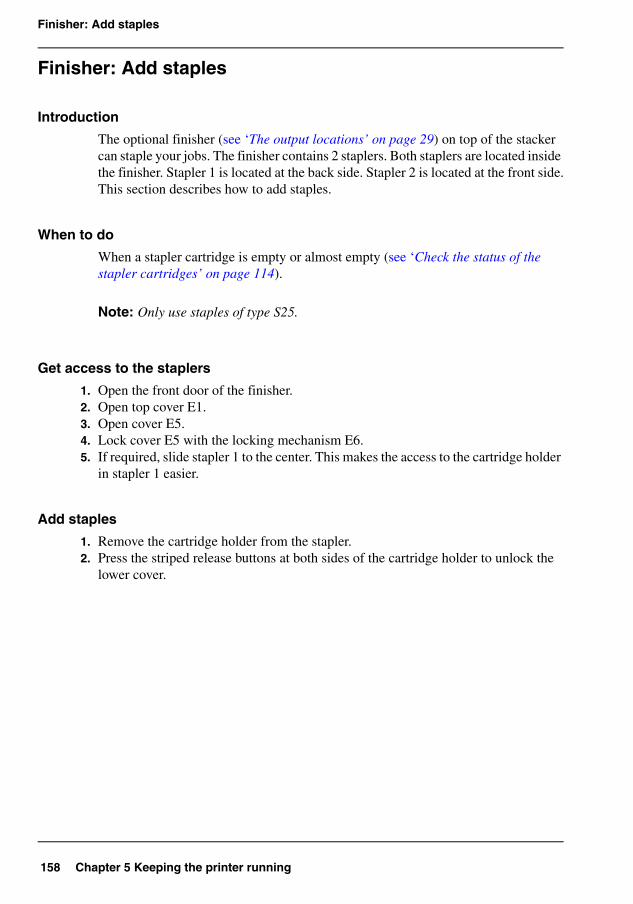
158 Chapter 5 Keeping the printer running
Finisher: Add staples
Finisher: Add staples
Introduction
The optional finisher (see ‘The output locations’ on page 29) on top of the stacker can staple your jobs. The finisher contains 2 staplers. Both staplers are located inside the finisher. Stapler 1 is located at the back side. Stapler 2 is located at the front side.This section describes how to add staples.
When to do
When a stapler cartridge is empty or almost empty (see ‘Check the status of the stapler cartridges’ on page 114).
Note: Only use staples of type S25.
Get access to the staplers
1. Open the front door of the finisher.2. Open top cover E1.3. Open cover E5.4. Lock cover E5 with the locking mechanism E6.5. If required, slide stapler 1 to the center. This makes the access to the cartridge holder
in stapler 1 easier.
Add staples
1. Remove the cartridge holder from the stapler.2. Press the striped release buttons at both sides of the cartridge holder to unlock the
lower cover.
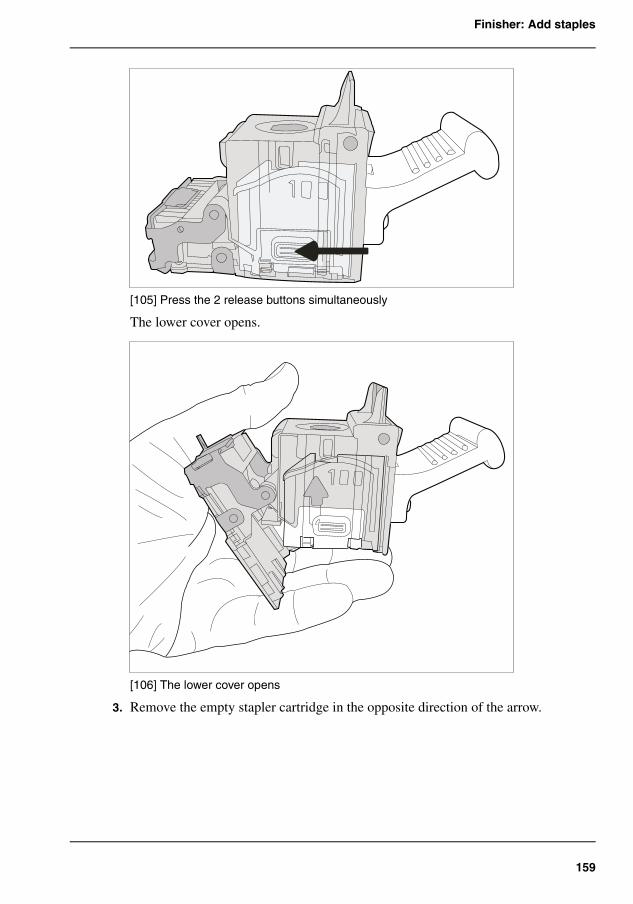
159
Finisher: Add staples
[105]
[105] Press the 2 release buttons simultaneously
The lower cover opens.[106]
[106] The lower cover opens
3. Remove the empty stapler cartridge in the opposite direction of the arrow.
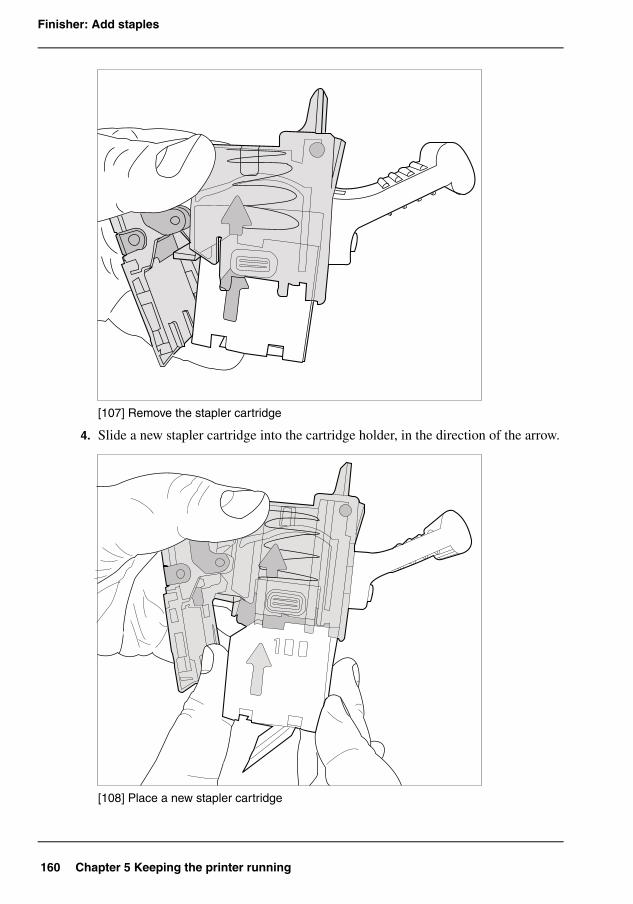
160 Chapter 5 Keeping the printer running
Finisher: Add staples
[107]
[107] Remove the stapler cartridge
4. Slide a new stapler cartridge into the cartridge holder, in the direction of the arrow.[108]
[108] Place a new stapler cartridge

161
Finisher: Add staples
5. Push the stapler cartridge into the cartridge holder until the cartridge clicks into place.
[109]
[109] Firmly push the stapler cartridge into the holder
6. Remove the paper ribbon that secures the staples in the stapler cartridge.
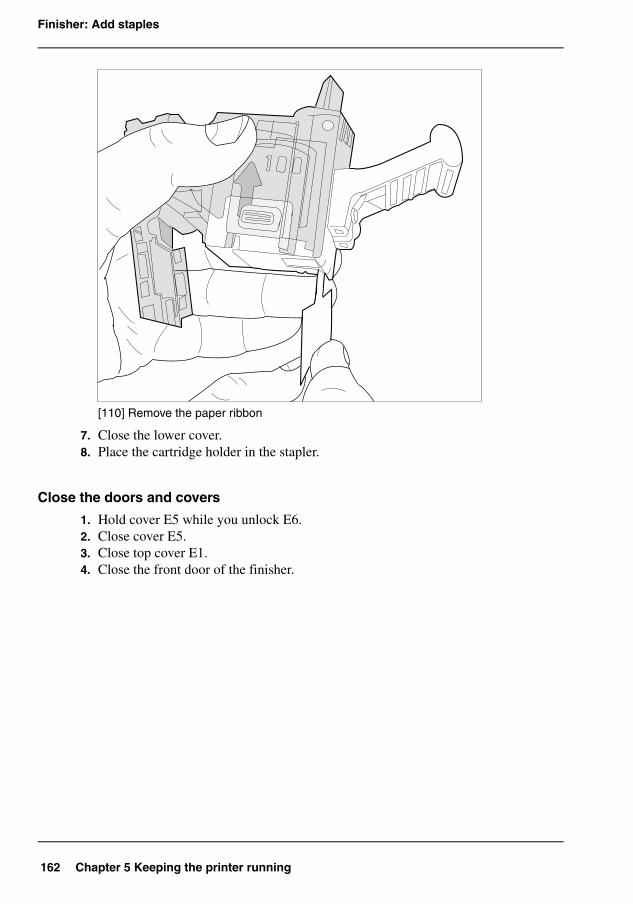
162 Chapter 5 Keeping the printer running
Finisher: Add staples
[110]
[110] Remove the paper ribbon
7. Close the lower cover.8. Place the cartridge holder in the stapler.
Close the doors and covers
1. Hold cover E5 while you unlock E6.2. Close cover E5.3. Close top cover E1.4. Close the front door of the finisher.

163
Stacker/stapler: Replace the stapler cartridge
Stacker/stapler: Replace the stapler cartridge
Introduction
The optional stacker/stapler The output locations on page 29 can staple your jobs. This section describes how to replace the stapler cartridge.
Replace the stapler cartridge
1. Open the front side of the stacker/stapler.2. Pull the metal staple unit that contains the stapler cartridge towards you.3. Push and hold the little amber lever to the left to unlock the staple unit.4. Pull the white, right-hand side of the staple unit towards you, at an angle of 90
degrees.5. Hold the little metal ridge at the top of the staple unit to prevent that the staple unit
slides to the front.6. Take the stapler cartridge from the holder and insert a new stapler cartridge.7. Push the little amber lever to the left to move the staple unit up again.8. Close the front side of the stacker/stapler.
164 Chapter 5 Keeping the printer running
Troubleshooting
Troubleshooting
Introduction
The main types of possible errors are the following.■ Errors that relate to the printer■ Errors that relate to the jobs■ Toner problems that relate to the use of fiber-rich media.
This section gives an overview of the possible errors and the solutions to these errors.
Note: Only operators who received the Océ VarioPrint® 6160/6200/6250 maintenance training are allowed to replace or clean parts and solve paper jams in the process units.
Overview of the possible printer errors[30]
[30] Handle the printer errors (1 – 2)
Error Solution Additional information
Paper jam Follow the instructions on the operator panel.
After you solved the error, the printer starts from the point where the printing stopped due to the error. Please check for double prints.
Software error Follow the instructions on the operator panel.
A message on the operator panel will indicate that you must restart the printer.
Service required
Follow the instructions on the operator panel.
A message on the operator panel will indicate that you must call an Océ service technician.
Maintenance required
Follow the instructions on the operator panel.
The maintenance wizard appears. You need the maintenance PIN to access the maintenance mode. The machine is automatically switched off.
Note: Only trained operators are allowed to perform maintenance tasks.
165
Troubleshooting
Unit reconditioning
Follow the instructions on the operator panel.
After an error was solved, the printer checks if the print job can continue from the point where the printing stopped. When you use cyclic media, you must probably remove a couple of sheets.
The system cannot determine if the output is complete
Follow the instructions on the operator panel and check the output.
The system can sometimes not determine if the output is complete. Then you must check the output. Press the 'OK' button when the output is complete.
[30] Handle the printer errors (2 – 2)
Error Solution Additional information
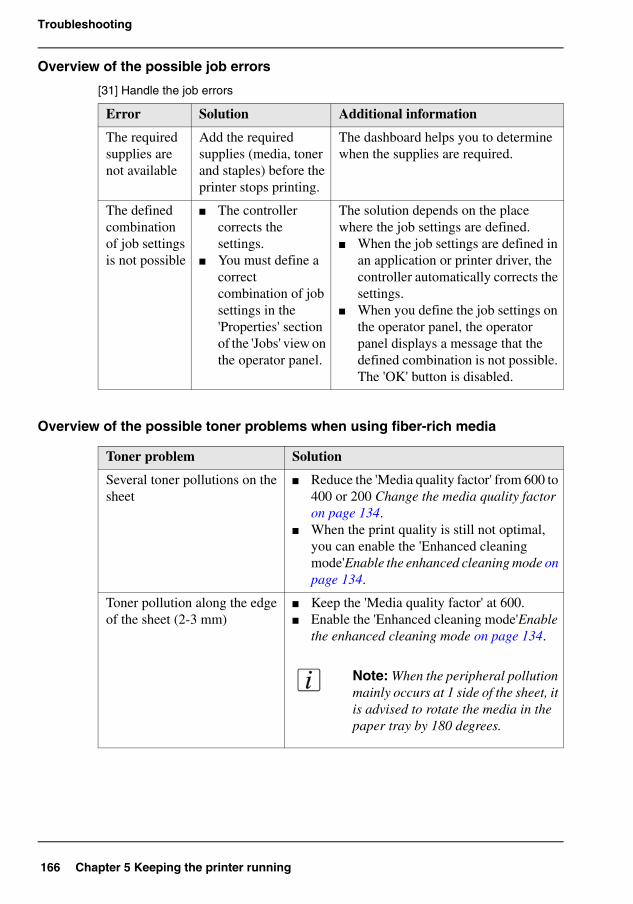
166 Chapter 5 Keeping the printer running
Troubleshooting
Overview of the possible job errors[31]
Overview of the possible toner problems when using fiber-rich media[32]
[31] Handle the job errors
Error Solution Additional information
The required supplies are not available
Add the required supplies (media, toner and staples) before the printer stops printing.
The dashboard helps you to determine when the supplies are required.
The defined combination of job settings is not possible
■ The controller corrects the settings.
■ You must define a correct combination of job settings in the 'Properties' section of the 'Jobs' view on the operator panel.
The solution depends on the place where the job settings are defined.■ When the job settings are defined in
an application or printer driver, the controller automatically corrects the settings.
■ When you define the job settings on the operator panel, the operator panel displays a message that the defined combination is not possible. The 'OK' button is disabled.
Toner problem Solution
Several toner pollutions on the sheet
■ Reduce the 'Media quality factor' from 600 to 400 or 200 Change the media quality factor on page 134.
■ When the print quality is still not optimal, you can enable the 'Enhanced cleaning mode'Enable the enhanced cleaning mode on page 134.
Toner pollution along the edge of the sheet (2-3 mm)
■ Keep the 'Media quality factor' at 600.■ Enable the 'Enhanced cleaning mode'Enable
the enhanced cleaning mode on page 134.
Note: When the peripheral pollution mainly occurs at 1 side of the sheet, it is advised to rotate the media in the paper tray by 180 degrees.
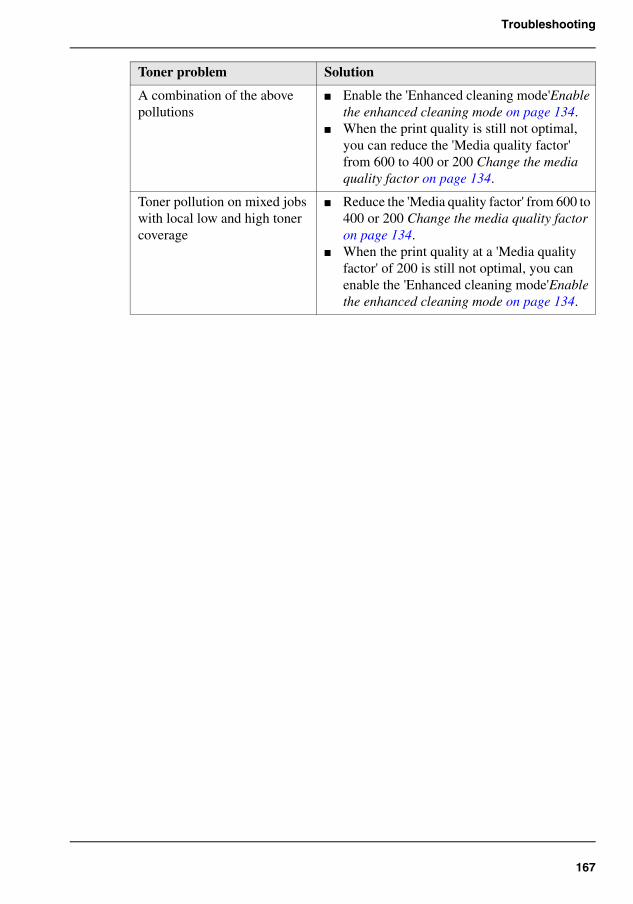
167
Troubleshooting
A combination of the above pollutions
■ Enable the 'Enhanced cleaning mode'Enable the enhanced cleaning mode on page 134.
■ When the print quality is still not optimal, you can reduce the 'Media quality factor' from 600 to 400 or 200 Change the media quality factor on page 134.
Toner pollution on mixed jobs with local low and high toner coverage
■ Reduce the 'Media quality factor' from 600 to 400 or 200 Change the media quality factor on page 134.
■ When the print quality at a 'Media quality factor' of 200 is still not optimal, you can enable the 'Enhanced cleaning mode'Enable the enhanced cleaning mode on page 134.
Toner problem Solution

168 Chapter 5 Keeping the printer running
Troubleshooting

169
Appendix A Miscellaneous
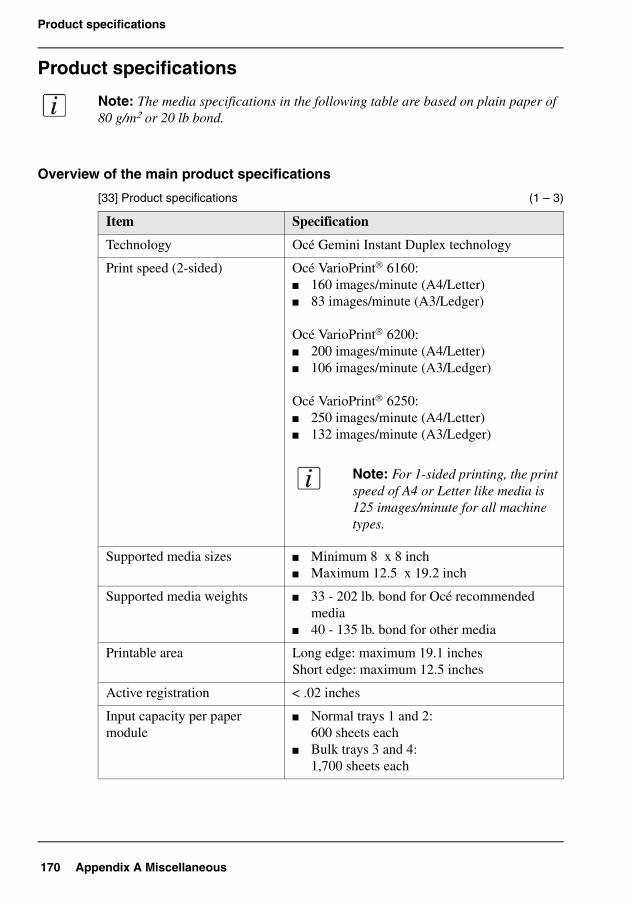
170 Appendix A Miscellaneous
Product specifications
Product specifications
Note: The media specifications in the following table are based on plain paper of 80 g/m2 or 20 lb bond.
Overview of the main product specifications[33]
[33] Product specifications (1 – 3)
Item Specification
Technology Océ Gemini Instant Duplex technology
Print speed (2-sided) Océ VarioPrint® 6160:■ 160 images/minute (A4/Letter)■ 83 images/minute (A3/Ledger)
Océ VarioPrint® 6200:■ 200 images/minute (A4/Letter)■ 106 images/minute (A3/Ledger)
Océ VarioPrint® 6250:■ 250 images/minute (A4/Letter)■ 132 images/minute (A3/Ledger)
Note: For 1-sided printing, the print speed of A4 or Letter like media is 125 images/minute for all machine types.
Supported media sizes ■ Minimum 8 x 8 inch■ Maximum 12.5 x 19.2 inch
Supported media weights ■ 33 - 202 lb. bond for Océ recommended media
■ 40 - 135 lb. bond for other media
Printable area Long edge: maximum 19.1 inchesShort edge: maximum 12.5 inches
Active registration < .02 inches
Input capacity per paper module
■ Normal trays 1 and 2:600 sheets each
■ Bulk trays 3 and 4:1,700 sheets each
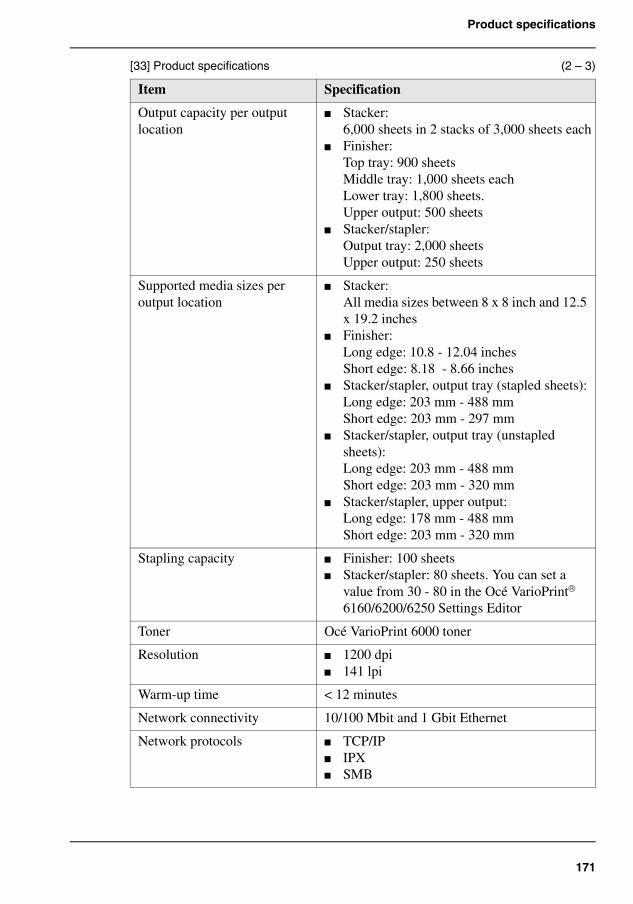
171
Product specifications
Output capacity per output location
■ Stacker:6,000 sheets in 2 stacks of 3,000 sheets each
■ Finisher:Top tray: 900 sheetsMiddle tray: 1,000 sheets eachLower tray: 1,800 sheets.Upper output: 500 sheets
■ Stacker/stapler:Output tray: 2,000 sheetsUpper output: 250 sheets
Supported media sizes per output location
■ Stacker:All media sizes between 8 x 8 inch and 12.5 x 19.2 inches
■ Finisher:Long edge: 10.8 - 12.04 inchesShort edge: 8.18 - 8.66 inches
■ Stacker/stapler, output tray (stapled sheets):Long edge: 203 mm - 488 mmShort edge: 203 mm - 297 mm
■ Stacker/stapler, output tray (unstapled sheets):Long edge: 203 mm - 488 mmShort edge: 203 mm - 320 mm
■ Stacker/stapler, upper output:Long edge: 178 mm - 488 mmShort edge: 203 mm - 320 mm
Stapling capacity ■ Finisher: 100 sheets■ Stacker/stapler: 80 sheets. You can set a
value from 30 - 80 in the Océ VarioPrint® 6160/6200/6250 Settings Editor
Toner Océ VarioPrint 6000 toner
Resolution ■ 1200 dpi■ 141 lpi
Warm-up time < 12 minutes
Network connectivity 10/100 Mbit and 1 Gbit Ethernet
Network protocols ■ TCP/IP■ IPX■ SMB
[33] Product specifications (2 – 3)
Item Specification
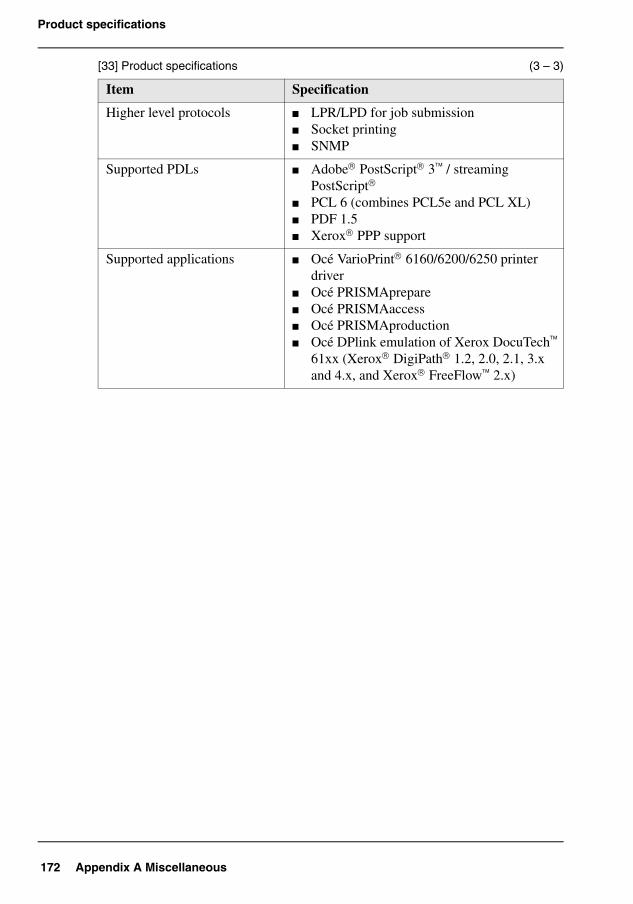
172 Appendix A Miscellaneous
Product specifications
Higher level protocols ■ LPR/LPD for job submission■ Socket printing■ SNMP
Supported PDLs ■ Adobe® PostScript® 3™ / streaming PostScript®
■ PCL 6 (combines PCL5e and PCL XL)■ PDF 1.5■ Xerox® PPP support
Supported applications ■ Océ VarioPrint® 6160/6200/6250 printer driver
■ Océ PRISMAprepare■ Océ PRISMAaccess■ Océ PRISMAproduction■ Océ DPlink emulation of Xerox DocuTech™
61xx (Xerox® DigiPath® 1.2, 2.0, 2.1, 3.x and 4.x, and Xerox® FreeFlow™ 2.x)
[33] Product specifications (3 – 3)
Item Specification
173
Reader's comment sheet
Reader's comment sheet
Questions
Have you found this manual to be accurate? O YesO No
Were you able to operate the product, after reading this manual? O YesO No
Does this manual provide sufficient background information? O YesO No
Is the format of this manual convenient in size, readability and arrangement (page layout, chapter order, etc.)?O YesO No
Could you find the information you were looking for? O AlwaysO Most of the timesO SometimesO Not at all
What did you use to find the required information? O Table of contentsO Index
Are you satisfied with this manual?O YesO No
Thank you for evaluating this manual.If you have other comments or concerns, please explain or suggest improvements overleaf or on a separate sheet.
Comments:------------------------------------------------------------------------------------------------------------------------------------------------------------------------------------------------------------------------------------------------------------------------------------------------------------------------------------------------------------------------------------------------------------------------------------------------------------------------------------------------------------------------------------------------------------------------
174 Appendix A Miscellaneous
Reader's comment sheet
Date:
This reader's comment sheet is completed by: (If you prefer to remain unknown, please do fill in your occupation)
Name:
Occupation:
Company:
Phone:
Address:
City:
Country:
Please return this sheet to:
Océ-Technologies B.V.For the attention of ITC User Documentation. P.O. Box 101,5900 MA VenloThe Netherlands
Send your comments by E-mail to: [email protected]
For the addresses of local Océ organisations see: http://www.oce.com
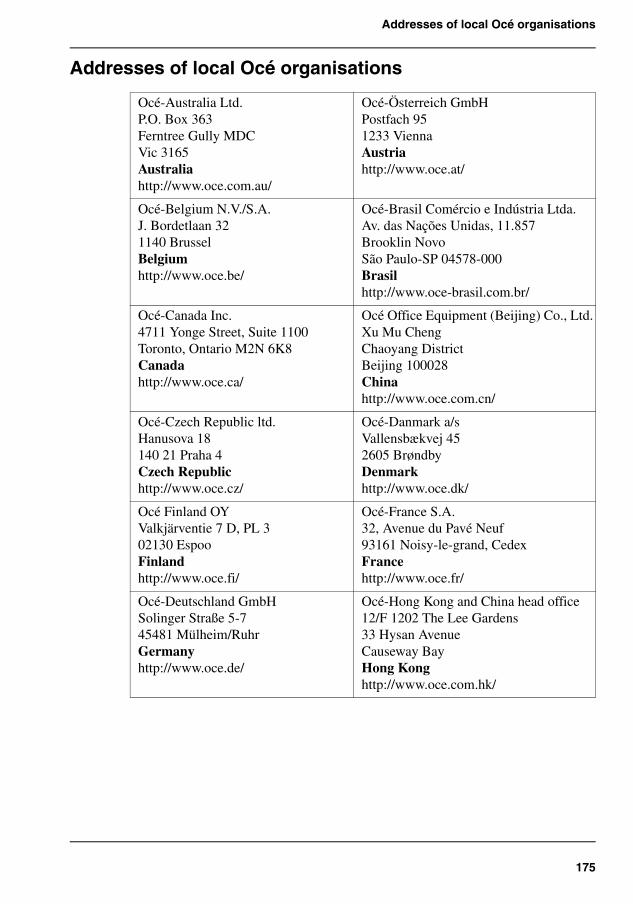
175
Addresses of local Océ organisations
Addresses of local Océ organisations [34]
Océ-Australia Ltd.P.O. Box 363Ferntree Gully MDCVic 3165Australiahttp://www.oce.com.au/
Océ-Österreich GmbHPostfach 951233 ViennaAustriahttp://www.oce.at/
Océ-Belgium N.V./S.A.J. Bordetlaan 321140 BrusselBelgiumhttp://www.oce.be/
Océ-Brasil Comércio e Indústria Ltda.Av. das Nações Unidas, 11.857Brooklin NovoSão Paulo-SP 04578-000Brasilhttp://www.oce-brasil.com.br/
Océ-Canada Inc.4711 Yonge Street, Suite 1100Toronto, Ontario M2N 6K8Canadahttp://www.oce.ca/
Océ Office Equipment (Beijing) Co., Ltd.Xu Mu ChengChaoyang DistrictBeijing 100028Chinahttp://www.oce.com.cn/
Océ-Czech Republic ltd.Hanusova 18140 21 Praha 4Czech Republichttp://www.oce.cz/
Océ-Danmark a/sVallensbækvej 452605 BrøndbyDenmarkhttp://www.oce.dk/
Océ Finland OYValkjärventie 7 D, PL 302130 EspooFinlandhttp://www.oce.fi/
Océ-France S.A.32, Avenue du Pavé Neuf93161 Noisy-le-grand, CedexFrancehttp://www.oce.fr/
Océ-Deutschland GmbHSolinger Straße 5-745481 Mülheim/RuhrGermanyhttp://www.oce.de/
Océ-Hong Kong and China head office12/F 1202 The Lee Gardens33 Hysan AvenueCauseway BayHong Konghttp://www.oce.com.hk/
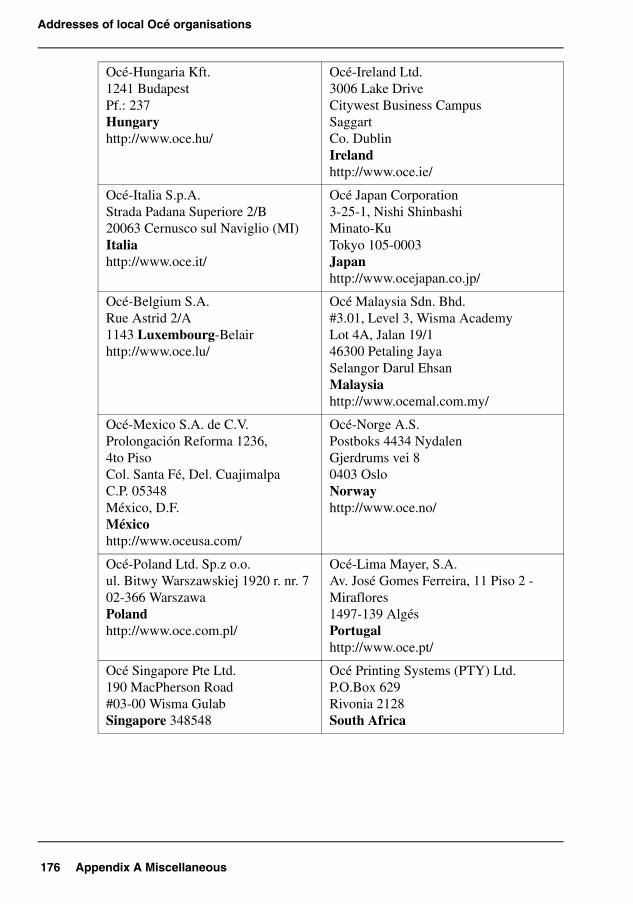
176 Appendix A Miscellaneous
Addresses of local Océ organisations
Océ-Hungaria Kft.1241 BudapestPf.: 237Hungaryhttp://www.oce.hu/
Océ-Ireland Ltd.3006 Lake DriveCitywest Business CampusSaggartCo. DublinIrelandhttp://www.oce.ie/
Océ-Italia S.p.A.Strada Padana Superiore 2/B20063 Cernusco sul Naviglio (MI)Italiahttp://www.oce.it/
Océ Japan Corporation3-25-1, Nishi ShinbashiMinato-KuTokyo 105-0003Japanhttp://www.ocejapan.co.jp/
Océ-Belgium S.A.Rue Astrid 2/A1143 Luxembourg-Belairhttp://www.oce.lu/
Océ Malaysia Sdn. Bhd.#3.01, Level 3, Wisma AcademyLot 4A, Jalan 19/146300 Petaling JayaSelangor Darul EhsanMalaysiahttp://www.ocemal.com.my/
Océ-Mexico S.A. de C.V.Prolongación Reforma 1236,4to PisoCol. Santa Fé, Del. CuajimalpaC.P. 05348México, D.F.Méxicohttp://www.oceusa.com/
Océ-Norge A.S.Postboks 4434 NydalenGjerdrums vei 80403 OsloNorwayhttp://www.oce.no/
Océ-Poland Ltd. Sp.z o.o.ul. Bitwy Warszawskiej 1920 r. nr. 702-366 WarszawaPolandhttp://www.oce.com.pl/
Océ-Lima Mayer, S.A.Av. José Gomes Ferreira, 11 Piso 2 - Miraflores1497-139 AlgésPortugalhttp://www.oce.pt/
Océ Singapore Pte Ltd.190 MacPherson Road#03-00 Wisma GulabSingapore 348548
Océ Printing Systems (PTY) Ltd.P.O.Box 629Rivonia 2128South Africa
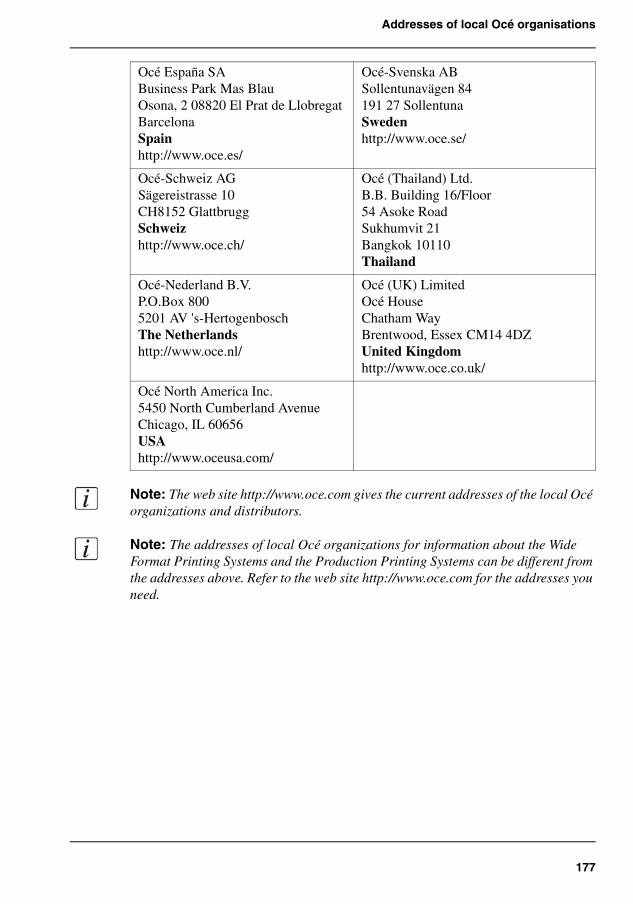
177
Addresses of local Océ organisations
Note: The web site http://www.oce.com gives the current addresses of the local Océ organizations and distributors.
Note: The addresses of local Océ organizations for information about the Wide Format Printing Systems and the Production Printing Systems can be different from the addresses above. Refer to the web site http://www.oce.com for the addresses you need.
Océ España SABusiness Park Mas BlauOsona, 2 08820 El Prat de LlobregatBarcelonaSpainhttp://www.oce.es/
Océ-Svenska ABSollentunavägen 84191 27 SollentunaSwedenhttp://www.oce.se/
Océ-Schweiz AGSägereistrasse 10CH8152 GlattbruggSchweizhttp://www.oce.ch/
Océ (Thailand) Ltd.B.B. Building 16/Floor54 Asoke RoadSukhumvit 21Bangkok 10110Thailand
Océ-Nederland B.V.P.O.Box 8005201 AV 's-HertogenboschThe Netherlandshttp://www.oce.nl/
Océ (UK) LimitedOcé HouseChatham WayBrentwood, Essex CM14 4DZUnited Kingdomhttp://www.oce.co.uk/
Océ North America Inc.5450 North Cumberland AvenueChicago, IL 60656USAhttp://www.oceusa.com/

178 Appendix A Miscellaneous
Addresses of local Océ organisations
179
Index
Index
AAdd
Toner . . . . . . . . . . . . . . . . . . . . . . . . . . . . . 156Add staples
Finisher . . . . . . . . . . . . . . . . . . . . . . . . . . . 158Stacker/stapler . . . . . . . . . . . . . . . . . . . . . . 163
Add temporary media to the Media catalog . . . 141Add toner . . . . . . . . . . . . . . . . . . . . . . . . . . . . . 156Assign media to paper tray . . . . . . . . . . . . . . . . 108Available documentation . . . . . . . . . . . . . . . . . . 12
BBilling counters . . . . . . . . . . . . . . . . . . . . 115, 117Bundle your jobs . . . . . . . . . . . . . . . . . . . . . . . . 81Bundled job
Change the job order . . . . . . . . . . . . . . . . . . 82Change the number of sets . . . . . . . . . . . . . . 82Check the first set . . . . . . . . . . . . . . . . . . . . . 83Split . . . . . . . . . . . . . . . . . . . . . . . . . . . . . . . 83
CChange
Check first set . . . . . . . . . . . . . . . . . . . . . . . 101Image shift . . . . . . . . . . . . . . . . . . . . . . . . . 103Language . . . . . . . . . . . . . . . . . . . . . . . . . . 126Media . . . . . . . . . . . . . . . . . . . . . . . . . . . . . . 87Number of sets . . . . . . . . . . . . . . . . . . . . . . . 90Number of staples . . . . . . . . . . . . . . . . . . . . 94Output location . . . . . . . . . . . . . . . . . . . . . . . 92Sorting method . . . . . . . . . . . . . . . . . . . . . . . 96Type of offset stacking . . . . . . . . . . . . . . . . . 98Warning time . . . . . . . . . . . . . . . . . . . . . . . 128
CheckStapler cartridges . . . . . . . . . . . . . . . . . . . . 114Toner level . . . . . . . . . . . . . . . . . . . . . . . . . 112
Check first set . . . . . . . . . . . . . . . . . . . . . . . . . . 101Clean the operator panel . . . . . . . . . . . . . . . . . . . 24Content of the manuals . . . . . . . . . . . . . . . . . . . . 12Counters . . . . . . . . . . . . . . . . . . . . . . . . . . 115, 117Create a bundled job . . . . . . . . . . . . . . . . . . . . . . 81
DDashboard . . . . . . . . . . . . . . . . . . . . . . . . . . . . . . 36Day counters . . . . . . . . . . . . . . . . . . . . . . . . . . . 115Delete a job . . . . . . . . . . . . . . . . . . . . . . . . . . . . . 73Double-sheet detection . . . . . . . . . . . . . . . . . . . 131
Disable . . . . . . . . . . . . . . . . . . . . . . . . . . . . 133Enable . . . . . . . . . . . . . . . . . . . . . . . . . . . . . 133
EEdit a bundled job
Change the job order . . . . . . . . . . . . . . . . . . 82Change the number of sets . . . . . . . . . . . . . . 82Check the first set . . . . . . . . . . . . . . . . . . . . . 83
Eject a stackAfter a set . . . . . . . . . . . . . . . . . . . . . . . . . . . 62As soon as possible . . . . . . . . . . . . . . . . . . . 62
Enhanced cleaning mode . . . . . . . . . . . . . 131, 134Enhanced media mode . . . . . . . . . . . . . . . . . . . 131
Disable . . . . . . . . . . . . . . . . . . . . . . . . . . . . 133Enable . . . . . . . . . . . . . . . . . . . . . . . . . . . . . 133
ErrorsJob errors . . . . . . . . . . . . . . . . . . . . . . . . . . 164Printer errors . . . . . . . . . . . . . . . . . . . . . . . . 164
FFeatures . . . . . . . . . . . . . . . . . . . . . . . . . . . . . . . . 11
IImage shift . . . . . . . . . . . . . . . . . . . . . . . . . . . . 103Intermediate check print . . . . . . . . . . . . . . . . . . 135
JJob
Change number of sets . . . . . . . . . . . . . . . . . 90Change the media . . . . . . . . . . . . . . . . . . . . . 87Change the number of staples . . . . . . . . . . . 94Change the output location . . . . . . . . . . . . . . 92Change the sorting method . . . . . . . . . . . . . . 96Change the type of offset stacking . . . . . . . . 98Check the first set . . . . . . . . . . . . . . . . . . . . 101
180
Index
Delete . . . . . . . . . . . . . . . . . . . . . . . . . . . . . . 73Give priority . . . . . . . . . . . . . . . . . . . . . . . . . 72Make a proof . . . . . . . . . . . . . . . . . . . . . . . . . 77Print later . . . . . . . . . . . . . . . . . . . . . . . . . . . 75Print the job parameters . . . . . . . . . . . . . . . . 79Reprint . . . . . . . . . . . . . . . . . . . . . . . . . . . . . 70Schedule . . . . . . . . . . . . . . . . . . . . . . . . . . . . 68Shift the image . . . . . . . . . . . . . . . . . . . . . . 103To top . . . . . . . . . . . . . . . . . . . . . . . . . . . . . . 72
Job ticket . . . . . . . . . . . . . . . . . . . . . . . . . . . . . . . 79Jobs view
Overview . . . . . . . . . . . . . . . . . . . . . . . . . . . . 65
LLarge media . . . . . . . . . . . . . . . . . . . . . . . . . . . . 115Load the media . . . . . . . . . . . . . . . . . . . . . . . . . . 44
MMake a proof . . . . . . . . . . . . . . . . . . . . . . . . . . . . 77Media
Icons . . . . . . . . . . . . . . . . . . . . . . . . . . . . . . 106Information . . . . . . . . . . . . . . . . . . . . . . . . . 106Large . . . . . . . . . . . . . . . . . . . . . . . . . . . . . . 115Standard . . . . . . . . . . . . . . . . . . . . . . . . . . . 115
Media catalog . . . . . . . . . . . . . . . . . . . . . . . . . . 139Media handling
Description . . . . . . . . . . . . . . . . . . . . . . . . . 139Media quality factor . . . . . . . . . . . . . . . . .131, 134Media registration
Large media . . . . . . . . . . . . . . . . . . . . . . . . 148Standard-size media . . . . . . . . . . . . . . . . . . 143
Meter readings . . . . . . . . . . . . . . . . . . . . . . . . . 118
NNumber of sets . . . . . . . . . . . . . . . . . . . . . . . . . . 90
OOffset stacking . . . . . . . . . . . . . . . . . . . . . . . . . . 98On/Off button . . . . . . . . . . . . . . . . . . . . . . . . . . . 14Operator attention light
Status colors . . . . . . . . . . . . . . . . . . . . . . . . . 27Operator panel
Clean . . . . . . . . . . . . . . . . . . . . . . . . . . . . . . . 24Main components . . . . . . . . . . . . . . . . . . . . . 24
Output locationsExternal finisher . . . . . . . . . . . . . . . . . . . . . . 30Finisher . . . . . . . . . . . . . . . . . . . . . . . . . . . . . 30
Finisher upper output . . . . . . . . . . . . . . . . . . 30Stacker . . . . . . . . . . . . . . . . . . . . . . . . . . . . . . 30Stacker/stapler . . . . . . . . . . . . . . . . . . . . . . . . 30Stacker/stapler upper output . . . . . . . . . . . . . 30System output . . . . . . . . . . . . . . . . . . . . . . . . 30
PPaper module
Control panel . . . . . . . . . . . . . . . . . . . . . . . . . 32Green check mark . . . . . . . . . . . . . . . . . . . . . 32LEDs . . . . . . . . . . . . . . . . . . . . . . . . . . . . . . . 32Not assigned button . . . . . . . . . . . . . . . . . . . . 32Red arrows . . . . . . . . . . . . . . . . . . . . . . . . . . 32
Paper tray icons . . . . . . . . . . . . . . . . . . . . . . . . . 106Power modes . . . . . . . . . . . . . . . . . . . . . . . . . . . . 14Power switch . . . . . . . . . . . . . . . . . . . . . . . . . . . . 14Print
Job parameters . . . . . . . . . . . . . . . . . . . . . . . 79Job settings . . . . . . . . . . . . . . . . . . . . . . . . . . 79
Print a scheduled job later . . . . . . . . . . . . . . . . . . 75Print all jobs with available media . . . . . . . . . . . 84Print the jobs with a label . . . . . . . . . . . . . . . . . . 85Printer
Shut down . . . . . . . . . . . . . . . . . . . . . . . . . . . 18Sleep mode . . . . . . . . . . . . . . . . . . . . . . . . . . 18Turn on . . . . . . . . . . . . . . . . . . . . . . . . . . . . . 17Wake up . . . . . . . . . . . . . . . . . . . . . . . . . . . . . 17
Priority for a job . . . . . . . . . . . . . . . . . . . . . . . . . 72Product specifications . . . . . . . . . . . . . . . . . . . . 170
RReplace stapler cartridge of stacker/stapler . . . . 163Reprint a job . . . . . . . . . . . . . . . . . . . . . . . . . . . . 70Reset day counters . . . . . . . . . . . . . . . . . . . . . . . 116
SSchedule a job . . . . . . . . . . . . . . . . . . . . . . . . . . . 68Schedule view
Introduction . . . . . . . . . . . . . . . . . . . . . . . . . . 39Jobs pane . . . . . . . . . . . . . . . . . . . . . . . . . . . . 40Media toolbar . . . . . . . . . . . . . . . . . . . . . . . . 41Output locations pane . . . . . . . . . . . . . . . . . . 42Required media pane . . . . . . . . . . . . . . . . . . 40Streaming jobs . . . . . . . . . . . . . . . . . . . . . . . 39Zoom control . . . . . . . . . . . . . . . . . . . . . . . . . 43
Shut-down procedure . . . . . . . . . . . . . . . . . . . . . 18Sorting method . . . . . . . . . . . . . . . . . . . . . . . . . . 96Split a bundled job . . . . . . . . . . . . . . . . . . . . . . . . 83
181
Index
StackerEject a stack . . . . . . . . . . . . . . . . . . . . . . . . . 62Eject button . . . . . . . . . . . . . . . . . . . . . . . . . 62
Standard media . . . . . . . . . . . . . . . . . . . . . . . . . 115Stapler icons . . . . . . . . . . . . . . . . . . . . . . . . . . . 114Staples
Finisher . . . . . . . . . . . . . . . . . . . . . . . . . . . 158Stacker/stapler . . . . . . . . . . . . . . . . . . . . . . 163
Stop a jobAfter a job . . . . . . . . . . . . . . . . . . . . . . . . . . 64
Stop behaviorStop after a job . . . . . . . . . . . . . . . . . . . . . . . 62Stop after a set . . . . . . . . . . . . . . . . . . . . . . . 62Stop as soon as possible . . . . . . . . . . . . . . . . 62
Stopping a JobAfter a page . . . . . . . . . . . . . . . . . . . . . . . . . 63After a set . . . . . . . . . . . . . . . . . . . . . . . . . . . 63As soon as possible . . . . . . . . . . . . . . . . . . . 63
System componentsEngine module . . . . . . . . . . . . . . . . . . . . . . . 22Finisher . . . . . . . . . . . . . . . . . . . . . . . . . . . . 22Operator attention light . . . . . . . . . . . . . . . . 22Operator panel . . . . . . . . . . . . . . . . . . . . . . . 22Paper module . . . . . . . . . . . . . . . . . . . . . . . . 22Roll feeder . . . . . . . . . . . . . . . . . . . . . . . . . . 22Stacker . . . . . . . . . . . . . . . . . . . . . . . . . . . . . 22Stacker/stapler . . . . . . . . . . . . . . . . . . . . . . . 22
System viewMedia section . . . . . . . . . . . . . . . . . . . . . . . 137Printer section . . . . . . . . . . . . . . . . . . . . . . 110Setup section . . . . . . . . . . . . . . . . . . . . . . . 119
TTemporary media . . . . . . . . . . . . . . . . . . . 140, 141Ticket . . . . . . . . . . . . . . . . . . . . . . . . . . . . . . . . . 79Toner . . . . . . . . . . . . . . . . . . . . . . . . . . . . . . . . . 156Toner counter . . . . . . . . . . . . . . . . . . . . . . 115, 117Toner icons . . . . . . . . . . . . . . . . . . . . . . . . . . . . 112Toner indicator
Status bar . . . . . . . . . . . . . . . . . . . . . . . . . . 156Toner icon . . . . . . . . . . . . . . . . . . . . . . . . . 156
Toner problems on fiber-rich media . . . . . . . . . 164Trademarks . . . . . . . . . . . . . . . . . . . . . . . . . . . . . . 3Trays view
Overview . . . . . . . . . . . . . . . . . . . . . . . . . . 105Troubleshooting . . . . . . . . . . . . . . . . . . . . . . . . 164
WWarning time
Disable . . . . . . . . . . . . . . . . . . . . . . . . . . . . 129Set . . . . . . . . . . . . . . . . . . . . . . . . . . . . . . . . 128
WorkflowExample . . . . . . . . . . . . . . . . . . . . . . . . . . . . 46Print a job . . . . . . . . . . . . . . . . . . . . . . . . . . . 46
Workflow profilesCheck and print . . . . . . . . . . . . . . . . . . . . . 122Function . . . . . . . . . . . . . . . . . . . . . . . . . . . 121Job by job . . . . . . . . . . . . . . . . . . . . . . . . . . 122Manual planning . . . . . . . . . . . . . . . . . . . . . 122Standard . . . . . . . . . . . . . . . . . . . . . . . . . . . 122Unattended . . . . . . . . . . . . . . . . . . . . . . . . . 122

182
Index