Embed Size (px)
DESCRIPTION
EMS 100 Modem user manual
Citation preview

Manual
External RS232 v.92 ModemOD-EMS-100
October 2004
Version 1.1

2
Contents
Package Contents ................................................................................3
Introduction............................................................................................4
Features ...............................................................................................5
Hardware Installation .............................................................................6
Software Installation: Windows 98SE/Me...............................................7
Software Installation: Windows 2000 .....................................................9
Software Installation: Windows XP ...................................................... 11
Configuring Your Location in Windows XP/2000 ..................................12
Configuring Your Location in Windows Me ...........................................14
Configuring Your Location in Windows 98SE .......................................16
Diagnostics in Windows XP/2000 .......................................................18
Diagnostics in Windows Me/98SE ......................................................20
Uninstalling the Modem Drivers in Windows XP/2000 .........................22
Uninstalling the Modem Drivers in Windows Me/98SE.........................23
Installing Classic Phone Tools..............................................................24
Using Classic Phone Tools ..................................................................28
Troubleshooting...................................................................................43
Technical Specifications ......................................................................44
Contacting Technical Support ..............................................................46
Warranty..............................................................................................47

3
Contents of Package:OD-EMS-100 External RS232 v.921 Modem
Manual, Quick Installation Guide, Warranty, Drivers andApplication software on CD
RJ-11 cable
Quick Installation Guide
RS-232 cable
Power Adapter2
If any of the above items are missing, please contact your reseller.
�
�
�
�
�
�
Package Contents
Minimum System Requirements:
2Use of a different power adapter may damage the modem and will void the warranty for this product.
At least 32 MB of memory and a 300 MHz processor�
Windows XP/2000/Me/98SE�
40 MB of free hard disk space and 64 MB of RAM�
A desktop computer with an available COM port�
Full duplex sound card�
Microphone and loudspeakers�
Modem Fax Class 1.2 or 2.0�
CD-ROM drive�
1Due to line conditions and FCC regulations, your rate may be different. Current FCC regulations limitdownload speed to 53Kbps maximum.

4
Introduction
Use the OD-EMS-100 to fax documents, transfer and upload files or use it as aspeakerphone/answering machine with multiple voice mailboxes. With the External RS232v.92 Modem, many features are at your fingertips.
Using the speakerphone mode, you can experience the convenience of dialing andreceiving calls directly from your computer’s desktop without using a phone handset.Included is a Phonebook option that allows you to record important phone numbers andstore them on your computer. You can speed dial up to 24 different numbers from yourcomputer desktop.
You can fax documents from any Windows application, or you can fax documents usingthe Classic Phonetools interface. Classic Phonetools, a user-friendly managementsystem, makes it easy to use all the features of the OD-EMS-100.
Using Classic Phonetools, you can personalize your fax coverpage, making your choicefrom the selection of free templates offered, or create your own. Add a logo to your coverpage and manage your sent and received faxes. You can print, view, delete, save orchange faxed documents that are automatically stored.
With its Terminal Emulation mode, the External RS232 v.92 Modem allows you to connectto various computers and online services to retrieve information, receive and sendelectronic mail, and upload and download data files. The Data File Transfer mode allowsyou to automatically send and receive data files.
With its many features, the OD-EMS-100 can manage your faxing, phone, answeringmachine and data transfer needs in one convenient device!

5
Fax modemSend faxes from any Windows application or use the Classic Phone Tools interface.Manage your faxes; customize your cover page with graphics or logos.
Phone/SpeakerphoneMake calls from the convenience of your computer. No need to use the handset.Keep the phonebook handy on your hard drive.
Advanced Answering machineEnjoy the luxury of multiple mail-boxes.
Features
�
�
�
Windows XP/2000/Me/98SE compatible
Software upgradeable
�
�
Data File TransferAutomatically send and receive data files.
�
Terminal EmulationConnect to other computers and online services to retrieve information, receiveand send electronic mail, download or upload data files.
�

6
Hardware Installation
2
1
2
3
4
Attach the supplied RS-232C cable’s 9-pinmale connector to the connector labeled RS-232 on the modem’s rear panel.
Plug other end of the RS-232C cable into aCOM port on your computer.
Plug the phone cord supplied with yourmodem into the socket labeled LINE on therear panel of the modem.
Plug the other end of the phone cord into anavailable telephone wall jack.
Plug the supplied power adapter into thesocket marked PWR on the rear panel ofthe modem.
5
Shut down the computer and unplug the computer’s power cord fromthe electrical outlet before you begin the hardware installation.

7
Windows 98SE and Windows Me
1
2
Software Installation
Click Install Software
Click Windows 98 Drivers orWindows Me Drivers dependingupon your operating system.
Windows 98SE and Me users be sure to INSTALL THE SOFTWAREBEFORE CONNECTING THE HARDWARE to your system.
Insert the OD-EMS-100 CD-ROM.
The Software Install menu appears.
3 The InstallShield Wizard appears.
Click Next

8
6
Click Finish
4
Click Next
When prompted to restart, click no and then shut down your system. Follow theHardware Installation steps on page 2 to complete the installation. After completingthe hardware installation, restart and Windows will automatically install the hardware.
The InstallShield Wizard continues.
The InstallShield Wizard is finished.
Windows 98SE and Windows MeSoftware Installation (continued)
5 The InstallShield Wizard continues.
Click Install

9
Windows 2000
1
2
3
Click Cancel
Click Install Software
Click Windows 2000 Drivers
To install the OD-EMS-100 in WIndows 2000, be sure to connect thehardware to your system (see page 2) BEFORE installing the software.
Upon startup, the Found NewHardware Wizard will appear.
Insert the OD-EMS-100 CD-ROM.
The Software Install menu appears.
Software Installation (continued)

10
5
4
Click OK
6
The Device Driver InstallationWizard appears.
Digital Signature Not Foundmessage appears.
Device Driver Installation isComplete appears.
Installation is complete!
Software Installation (continued)Windows 2000
Click Yes
Click Yes
Click OK

11
Windows XPConnect the hardware (as shown on page 2) and follow the steps below to allow WindowsXP to automatically detect and install the software from the CD-ROM.
Click Next
Click Finish
1
2
3
Insert the OD-EMS-100 CD-ROM. Ifthe autorun menu appears, click exitto close the window.
The Found New Hardware Wizardappears.
Select Install the softwareautomatically (Recommended)
Click Finish to complete the driverinstallation.
Installation is complete!
Software Installation (continued)

12
Configuring Your Locationin Windows XP/2000
Click Edit.
Select the Dialing Rules tab.
Double-click Phoneand Modem Options.
Go toStart>Settings>ControlPanel.

13
Configuring Your Locationin Windows XP/2000 (continued)
Select your Country fromthe pulldown menu.
You have completed the location configuration in Windows XP/2000!
Click OK.
Click OK.

14
OD-EMS-100 External RS-232 V.92 Modem
Configuring Your Locationin Windows Me
Double-click Modems.
Go toStart>Settings>ControlPanel.
Click DialingProperties.
have

15
OD-EMS-100 External RS-232 V.92 Modem
Configuring Your Location in Windows Me(continued)
Select your Country fromthe pulldown menu.
Click OK.
Click OK.
You have completed the location configuration in Windows Me!

16
Configuring Your Locationin Windows 98SE
Go toStart>Settings>ControlPanel.
Double-click System.
Select the Device Manager tab.
Click OK.
Select OD-EMS-100 External RS-232 V.92 Modem tab.
OD-EMS-100 External RS-232 V.92 Modem

17
Configuring Your Location in Windows 98SE(continued)
Select the Country.
Click Apply.
Click OK.
Click OK.
OD-EMS-100 External RS-232 V.92 Modem
You have completed the location configuration in Windows 98SE!

18
Diagnostics in Windows XP/2000
Go toStart>Settings>ControlPanel.
Select Modem.
Select OD-EMS-100 ExternalRS232 V.92 Modem.
Click OK.
Double-click Phone andModem options.

19
Diagnostics in Windows XP/2000 (continued)
Select Diagnostics.
To test the modem,select Query Modem.
If your modem is responding to AT commandsand functioning correctly, activity will bedisplayed in this window.
Click OK.
Click OK.
You have completed the diagnostics in Windows XP/2000!

20
Diagnostics in Windows Me/98SE
Go toStart>Settings>ControlPanel.
Click Modems.
Select Diagnostics.
Select the COM Port that corre-sponds to the modem.
Click More Info...

21
Diagnostics in Windows Me/98SE (continued)
You have completed the diagnostics in Windows Me/98SE!
Your modem is functioningproperly when there isactivity in this window.
Click OK.
Click OK.

22
Uninstalling the Modem Driversin Windows XP/2000
Go toStart>Settings>ControlPanel.
Click Add/RemovePrograms.
You have completed uninstalling the modem driver in Windows XP/2000!
Click Change/Remove.
Click Close.
Select OD-EMS-100 External RS232V.92 Modem.

23
Uninstalling the Modem Driversin Windows Me/98SE
You have completed uninstalling the modem driver in Windows Me/98SE!
Go toStart>Settings>ControlPanel.
Click Add/RemovePrograms.
Select OD-EMS-100 External RS-232V.92 Modem.
Click Add/Remove.
After the OD-EMS-100 ExternalRS-232 V.92 Modem has beenremoved from the list, click OK.

24
Installing Classic Phone ToolsThe Classic Phone Tools installation wizard will automatically open when the installa-tion CD is inserted in the CD-ROM drive.
Click Yes.
Click Next.
Select Install theapplication.
Select the Language.
If you have anyquestionsabout ClassicPhone Tools
please consult themanufacturer’s website athttp://www.bvrp.com, or callBVRP’s technical support at1-303-450-1139.
25
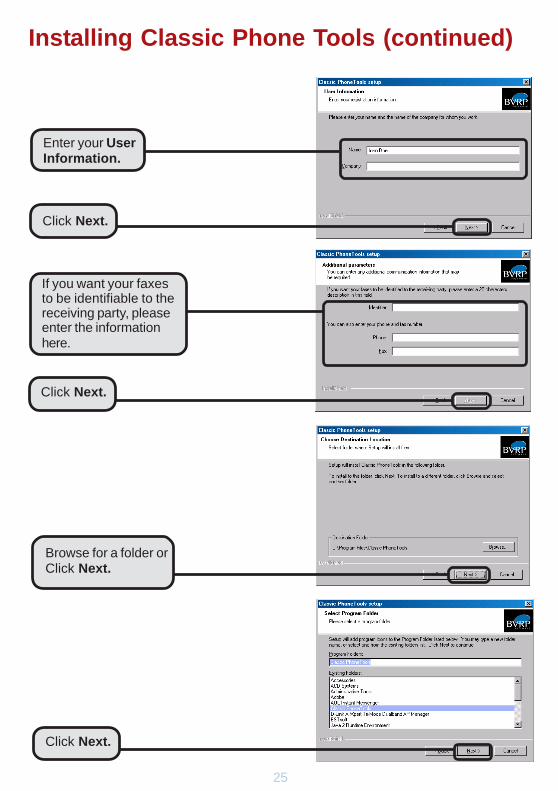
Installing Classic Phone Tools (continued)
Click Next.
Click Next.
Browse for a folder orClick Next.
Click Next.
Enter your UserInformation.
If you want your faxesto be identifiable to thereceiving party, pleaseenter the informationhere.

26
Installing Classic Phone Tools (continued)
Click Next.
Select a phonebook.Click Next.
Standard Interface
Select an Interface. Click Next.
Select an Interface. Click Next.
-or-
Kid Interface

27
Installing Classic Phone Tools (continued)
Touch Interface
Select an Interface. Click Next.
-or-
Wood Interface
Select an Interface. Click Next.
-or-
Click Finish.
You have completed the installation of Classic Phone Tools!

28
Using Classic Phone ToolsBefore you begin...
At the main user interface, clickConfigure or press F6.
Select General Setup.
Select Location.
Ensure that UseWindows dialingproperties is selected.
If you wish to modify asetting, choose thelocation and click Modify.
Make sure that all yoursettings are accurate for properoperation.
Click OK.
If you have anyquestionsabout ClassicPhone Tools
that are not answered,either here, or in the onlinehelp , please consultthe manufacturer’s websiteat http://www.bvrp.com, orcall BVRP’s technicalsupport at 1-303-450-1139.
Click to access theonline Help menu.

29
Using Classic Phone Tools (continued)
Phone
Classic Phone Tools Menu BarDisplays all Classic PhoneTools’ menus.
Displays a list of receiveddocuments.
Click to connect to the BVRPwebsite for firmware upgradesand technical support.
This LEDflashes toindicate newdocuments inthe Inbox.
This LEDdisplays RDYto indicate thatthe modem isready.
Click to activate theSpeakerphone. (TheSpeakerphone moderequires external speakersand an externalmicrophone.)
Click to access thePhonebook for directdialing.
Click to access the Dialbox.
Click to access the QuickDial keys. (See thefollowing page forinformation on programmingthe keys.)
Click to hang-up and endthe call.
Mute- mute yourmicrophone to listenwithout being heard.
Hold- silences yourmicrophone and yourspeaker.
Fax Reception Mode-Allows you to startreceiving faxes.
Click the LED below the icon toactivate the following features:Control the
volume forthe speakerand themicrophone.
Questions about ClassicPhone Tools? Please consultthe online Help menu byclicking in the upper righthand corner of the interface, orcall tech support at1-303-450-1139.

30
Using Classic Phone Tools (continued)
Phonebook
Phonebook Management
Click Menus and selectPhonebook > Phonebookmanagement from thepulldown menu.
Smith Joe Home 5555505000
Click a button and thescreen below will appearallowing you to add aQuick Dial number.
Add Quick Dial
Extract a number from thephone book.
Assign a name to the QuickDial key.
Enter the complete nameand the phone number asyou would dial it.
Click OK.
Create new records here.
Click here to import existingrecords into thePhonebook. A wizard willpop-up leading you throughthe process of importing adatabase into yourphonebook.

31
Using Classic Phone Tools (continued)
Fax
Click Send Fax and theSend Fax Wizard appearsto assist in setting up yourfax transmission.
Click Hang Up to interruptthe current fax transmission.
Click Fax Inbox or FaxOutbox to view their contents.
Receive FaxesAutomatically
Click Configure in the lowerleft corner of the screen thatis displayed above. SelectGeneral Setup in thepulldown menu.
Auto voice / fax / data
Select the Communicationtab.
Select the Auto voice / fax/data in Reception mode.
You must have thesesettings in order toreceive faxes.
Click OK.
Questions about ClassicPhone Tools? Please consultthe online Help menu byclicking in the upper righthand corner of the interface, orcall tech support at1-303-450-1139.

32
Using Classic Phone Tools (continued)
Send Fax Wizard
Select this box to bypassthe wizard and go directly tothe send fax window.
Do not bypass thewizard if you are
faxing a Word document,unless the Word documentis open on your desktop!
Click Next.
Select the coverpage from theTemplate pulldown menu.
Enter the message you wishto include in the coverpage.
Click Logo Management tochange or create a new logofor the cover page.
Click Next.
Click Send Fax in the Fax menu window. The Send Fax Wizard will appear, asshown below.
Click the Phonebook iconto copy the recipient’sName, Company and Fax# or you can type theinformation.

33
Using Classic Phone Tools (continued)
Click the Attach file icon.The Browse for files window,shown below, appears.
Browse the files on yourhard drive and select thedocument you wish to fax.
After selecting the file, clickOpen.
The previous screen willappear. Click Next.
Send Fax Wizard (continued)
Click Finish.

34
Using Classic Phone Tools (continued)
Sending a Fax from any openWindows Application
The Windowsdocument must beopen on the desktop in
order to fax it with the SendFax button.
Click Send Fax.
If the Send Fax Wizardappears, select this box tobypass it.
Click Next.
Click Send. The faxtransmission begins.
Enter the recipient’sinformation (Name,Company, Fax #) or usethe phonebook feature to dothis for you.

35
Using Classic Phone Tools (continued)
Voice Mail
To play a received voicemessage, right-click on thedesired message andchoose Play.
Click Setup and select theVoice tab to access thesemenus:� Modify/Create Greetings� Advanced Setup� Remote Msg. Retrieval
Setup>Voice>Modify/Create Greetings
To create a new voicemailgreeting, without using theWizard, click New.
The Greeting Message Recording Wizard will appear, as shown on the next page.
Activate the answering machine byclicking Greeting Only or Greeting& Record. Click AnsweringMachine Off to turn it off.
Click Setup in the screenshown above. Select theVoice tab. Click Modify/Create Greetings.
Questions about Classic Phone Tools? Pleaseconsult the online Help menu by clicking inthe upper right hand corner of the interface, orcall tech support at1-303-450-1139.
To create a new voicemailgreeting, using theRecording Wizard, clickRecording Wizard.

36
Using Classic Phone Tools (continued)
Greeting MessageRecording Wizard
To begin creating a newgreeting, click Next.
Click Next.
Enter a name for yourgreeting.
Click Start to start recording themessage. Click Stop when youhave finished recording.
Click Next.
Voicemail

37
Using Classic Phone Tools (continued)
Greeting MessageRecording Wizard (continued)
Voicemail
Click Next.
Click Start to beginlistening to themessage you justrecorded.
Assign a mode toyour greetingmessage.
Click Finish.
You have completed the creation of a greetingusing the Recording Wizard!

38
Using Classic Phone Tools (continued)Voicemail>Setup>Voice>Advanced Setup
In the Voicemailinterface, click Setup.
Click Advanced Setup.
Click OK.
Input your advancedsettings here.

39
Using Classic Phone Tools (continued)Voicemail
Setup>Voice>Remote Message Retrieval
To setup the answering machine,so that you can retrievemessages remotely, make surethat the answering machinefunction is enabled in the mainVoicemail window. Click Setupin the main Voicemail screen.Select the Voice tab. ClickRemote Message Retrieval.
Enter the Access Code thatyou will punch in, with yourTouch-Tone phone, to retrieveremote messages. It must bea four digit number. To accessyour messages, you willpunch in the access code,after dialing up, and during therecorded greeting.
To retrieve your messages after you have completed setting up the Access Code:
1 Dial-up Classic PhoneTools.
Retrieving your messages
While the mailbox greeting message is played, dial your Access Code to accessthe received messages.
You will need a touch-tone phone to access all the features of message retrieval.
Once you've accessed your messages, you can use the Touch-Tones you have as-signed to the Replay, Next, Delete, and Play All Messages actions.
2
3
Enter a phone key value for each of these actions.Assign a different phone key to each item:
Message replay: specify the touch-tone key to dial to replay the msge.
Next message: specify the touch-tone key to dial to get the next msge.
Deleting a message: specify the touch-tone key to dial to delete a msge.
Listening to all messages: specify the touch-tone key to dial to listen to allmessages. If you do not dial this key, you will only hear new messages
Click OK

40
Using Classic Phone Tools (continued)
Inbox
Click Inbox.
There are two ways to access theInbox:
When the red LED, labeledNew, blinks to indicate thatyou have received newdocuments, double-clickit.The light stops blinkingwhen the documents areviewed or printed.
-or-
Viewing a document
Tom 03/22/
After highlighting thedocument you wishto view, click theView icon in themenu bar.
Use the View icon to viewdocuments in the Outbox,Finished Transmissionsand FailedTransmissions, as shownin this panel.
Questions about Classic Phone Tools?Please consult the online Help menu by clicking in the upper right hand corner ofthe interface, or call tech support at 1-303-450-1139.

41
Using Classic Phone Tools (continued)
Inbox>Create a New Mailbox
Click Inbox, in the mainmenu window, as shownon the previous page.
Double-click this icon inthe Inbox window.
When this windowappears, enter a namefor the new mailbox.
Click OK.

42
Using Classic Phone Tools (continued)
Starting a Connection by Modem
Click this icon in the main Terminal window, shown above.
Enter the phonenumber of the serverto which you wish toconnect, or extract itfrom the phonebook.
Select theEmulation mode.
Select theConnection settings.
Click OK.
TerminalTerminal emulation allowsyou to connect to computersand online services to receiveinformation, send and receiveelectronic mail, and upload anddownload data files.
Starts a direct connection,permitting AT commands tobe sent directly to themodem.
Starts a connection bymodem, permitting you toupload files to remotesystems, and to save themin a text file.
Opens the Send Filewindow, allowing forautomatic data file transfer.
View theInbox.
Click toaccessonline Help.
Questions about Classic Phone Tools? Please consult the online Help menu byclicking in the upper right hand corner of the interface, or call BVRP tech support at1-303-450-1139.

43
Modem will not dial-out
� Ensure that your phone cable is inserted properly into the LINE jack.
� Ensure that you have selected the proper dialing method (Touch-tone or Pulse) onyour telephone.
Modem will not answer an incoming call
� Ensure that your phone cable is inserted properly into the LINE jack.
� Make sure the Fax interface in Classic Phone Tools has been configured to receivefaxes automatically. In Classic Phone Tools, go to Fax>Configure>GeneralSetup>Communication>Reception>Mode>Auto voice/fax/data.
No connection after modem dial out
� If you don’t hear a high-pitched tone when connecting to the remote modem, theremote (destination) modem may not be set to answer mode.
� Send the fax again. You may be experiencing problems with the remote phoneconnection.
Problems sending data over the modem connection
� Make sure your software data format matches the remote site (for example: 8,N,1).
� Make sure the modem flow control method matches the communication software.
� Try another call; there may be a problem with the telephone connection.
Fax and voice problems
� Ensure that you have installed the modem and drivers according to the steps in theQuick Installation Guide and this manual.
� Uninstall the drivers according to the procedure in this manual, and reinstall themodem and the drivers.
Troubleshooting
44
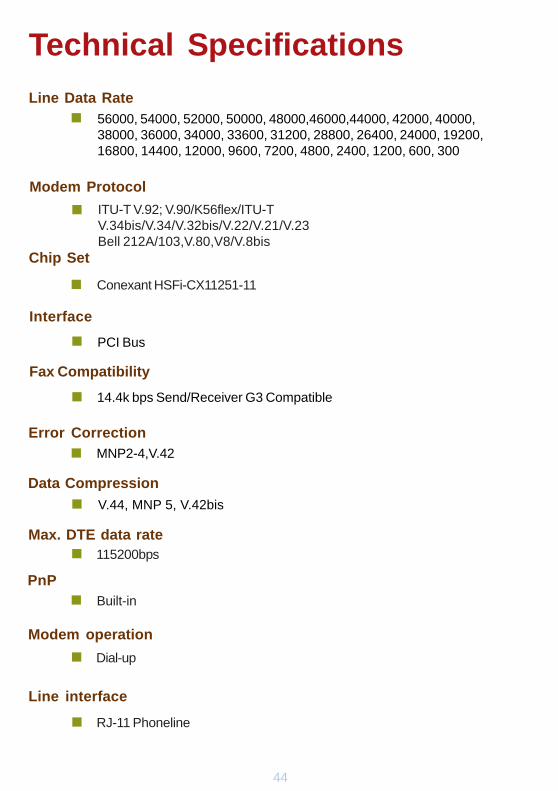
Technical Specifications
Line interface
RJ-11 Phoneline�
PnPBuilt-in�
Max. DTE data rate115200bps�
Data CompressionV.44, MNP 5, V.42bis�
Error CorrectionMNP2-4,V.42�
Fax Compatibility
14.4k bps Send/Receiver G3 Compatible�
Interface
PCI Bus�
Chip Set
Conexant HSFi-CX11251-11�
Modem Protocol
ITU-T V.92; V.90/K56flex/ITU-TV.34bis/V.34/V.32bis/V.22/V.21/V.23Bell 212A/103,V.80,V8/V.8bis
�
Line Data Rate56000, 54000, 52000, 50000, 48000,46000,44000, 42000, 40000,38000, 36000, 34000, 33600, 31200, 28800, 26400, 24000, 19200,16800, 14400, 12000, 9600, 7200, 4800, 2400, 1200, 600, 300
�
Modem operation
Dial-up�

45
Technical Specifications (continued)
Software Compatibility
AT command set compatible�
System Requirements
Pentium CPU 233+, 64M RAM+, 1.2 cache 256k�
System Compatibility
OS Windows XP/2000/Me/98SE�

46
Hardware and Driver Installation:Telephone:(877) 453-54656am-6pm PST, Mon-FriWorld Wide Web:http://support.dlink.comemail:[email protected]
Installation and Use of Classic PhoneTools®:Telephone:(303) 450-1139World Wide Web:http://www.bvrp.com
If you require Technical Support for your product, please contact the appropriate companybelow, depending upon the type of issue you need assistance with.
Made in China. Office Depot, Inc. 2200 Old Germantown Road, Delray Beach, FL 33445 © 2004, Office Depot, Inc.All logos and trademarks are used with permission and are the property of their respective owners.

47
What Is Not Covered: This limited warranty does not cover: Products, if in Accent Communication’sjudgment, have been subjected to abuse, accident, alteration, modification, tampering, negligence, misuse,faulty installation, lack of reasonable care, repair or service in any way that is not contemplated in thedocumentation for the product, or if the model or serial number has been altered, tampered with, defacedor removed; Initial installation, installation and removal of the product for repair; Operational adjustmentscovered in the operating manual for the product, and normal maintenance; Damage that occurs inshipment, due to act of God, failures due to power surge, and cosmetic damage; Any hardware,software, firmware or other products or services provided by anyone other than Accent Communications;Products that have been purchased from inventory clearance or liquidation sales or other sales in whichAccent Communication, the sellers, or the liquidators expressly disclaim their warranty obligation pertainingto the product.
Disclaimer of Other Warranties: EXCEPT FOR THE LIMITED WARRANTY SPECIFIED HEREIN, THEPRODUCT IS PROVIDED “AS-IS” WITHOUT ANY WARRANTY OF ANY KIND WHATSOEVER INCLUDING,WITHOUT LIMITATION, ANY WARRANTY OF MERCHANTABILITY, FITNESS FOR A PARTICULAR PURPOSEAND NON-INFRINGEMENT. IF ANY IMPLIED WARRANTY CANNOT BE DISCLAIMED IN ANY TERRITORYWHERE A PRODUCT IS SOLD, THE DURATION OF SUCH IMPLIED WARRANTY SHALL BE LIMITED TONINETY (90) DAYS. EXCEPT AS EXPRESSLY COVERED UNDER THE LIMITED WARRANTY PROVIDEDHEREIN, THE ENTIRE RISK AS TO THE QUALITY, SELECTION AND PERFORMANCE OF THE PRODUCT ISWITH THE PURCHASER OF THE PRODUCT.
Subject to the terms and conditions set forth herein, Accent Communications provides this Limitedwarranty for its product only to the person or entity that originally purchased the product from:
• Accent Communications or its authorized reseller or distributor and• Products purchased and delivered within the fifty states of the United States, the District of
Columbia, U.S. Possessions or Protectorates, U.S. Military Installations, addresses with anAPO or FPO.
Limited Warranty: Accent Communications warrants that the hardware portion of the AccentCommunications products described below will be free from material defects in workmanship andmaterials from the date of original retail purchase of the product, for the period set forth below applicableto the product type (“Warranty Period”), except as otherwise stated herein.
1-Year Limited Warranty for the Product(s) is defined as follows:
• Hardware (excluding power supplies and fans) One (1) Year• Power Supplies and Fans One (1) Year• Spare parts and spare kits Ninety (90) days
Accent Communication’s sole obligation shall be to repair or replace the defective Hardware during theWarranty Period at no charge to the original owner. A refund is available only during the first 30 daysafter the purchase of the product.
Submitting A Claim: Within the first 30 days of the warranty, the customer shall return the product tothe point of purchase, with the original sales receipt, for a full refund or an exchange. After 30 days fromthe date of purchase, and while the 1-year warranty is still in effect, the customer shall first call D-LinkTechnical Support at 877-453-5465 to obtain an “RMA” (Returned Merchandise Authorization) number.The customer shall take this RMA number, while the 1-year warranty is in effect, along with the originalsales receipt, to the point of purchase, to obtain an exchange of merchandise.
Limited Warranty(USA only)
Classic Phone Tools: For any issues or difficulties relating to Classic Phone Tools, please callBVRP at 303-450-1139.
Limitation of Liability: TO THE MAXIMUM EXTENT PERMITTED BY LAW, ACCENT COMMUNICATIONSIS NOT LIABLE UNDER ANY CONTRACT, NEGLIGENCE, STRICT LIABILITY OR OTHER LEGAL OREQUITABLE THEORY FOR ANY LOSS OF USE OF THE PRODUCT, INCONVENIENCE OR DAMAGES OFANY CHARACTER, WHETHER DIRECT, SPECIAL, INCIDENTAL OR CONSEQUENTIAL (INCLUDING, BUTNOT LIMITED TO, DAMAGES FOR LOSS OF GOODWILL, LOSS OF REVENUE OR PROFIT, WORK STOPPAGE,COMPUTER FAILURE OR MALFUNCTION, FAILURE OF OTHER EQUIPMENT OR COMPUTER PROGRAMSTO WHICH ACCENT COMMUNICATION’S PRODUCT IS CONNECTED WITH, LOSS OF INFORMATION ORDATA CONTAINED IN, STORED ON, OR INTEGRATED WITH ANY PRODUCT RETURNED TO ACCENTCOMMUNICATIONS FOR WARRANTY SERVICE) RESULTING FROM THE USE OF THE PRODUCT, RELATING

48
Governing Law: This Limited Warranty shall be governed by the laws of the State of California. Somestates do not allow exclusion or limitation of incidental or consequential damages, or limitations on howlong an implied warranty lasts, so the foregoing limitations and exclusions may not apply. This limitedwarranty provides specific legal rights and the product owner may also have other rights which varyfrom state to state.
Trademarks: Accent Communications is a registered trademark of Accent Communications. Othertrademarks or registered trademarks are the property of their respective manufacturers or owners.
Copyright Statement: No part of this publication or documentation accompanying this Product maybe reproduced in any form or by any means or used to make any derivative such as translation,transformation, or adaptation without permission from Accent Communications, as stipulated by theUnited States Copyright Act of 1976. Contents are subject to change without prior notice.
CE Mark Warning: This is a Class B product. In a domestic environment, this product may cause radiointerference, in which case the user may be required to take adequate measures.
FCC Statement: This equipment has been tested and found to comply with the limits for a Class Bdigital device, pursuant to part 15 of the FCC Rules. These limits are designed to provide reasonableprotection against harmful interference in a residential installation. This equipment generates, uses, andcan radiate radio frequency energy and, if not installed and used in accordance with the instructions,may cause harmful interference to radio communication. However, there is no guarantee that interferencewill not occur in a particular installation. If this equipment does cause harmful interference to radio ortelevision reception, which can be determined by turning the equipment off and on, the user is encouragedto try to correct the interference by one or more of the following measures:
• Reorient or relocate the receiving antenna.• Increase the separation between the equipment and receiver.• Connect the equipment into an outlet on a circuit different from that to which the receiver is
connected.• Consult the dealer or an experienced radio/TV technician for help.
FROM THE USE OF THE PRODUCT, RELATING TO WARRANTY SERVICE, OR ARISING OUT OF ANYBREACH OF THIS LIMITED WARRANTY, EVEN IF ACCENT COMMUNICATIONS HAS BEEN ADVISED OFTHE POSSIBILITY OF SUCH DAMAGES. THE SOLE REMEDY FOR A BREACH OF THE FOREGOING LIMITEDWARRANTY IS REPAIR, REPLACEMENT OR REFUND OF THE DEFECTIVE OR NON-CONFORMING PRODUCT.THE MAXIMUM LIABILITY OF ACCENT COMMUNICATIONS UNDER THIS WARRANTY IS LIMITED TO THEPURCHASE PRICE OF THE PRODUCT COVERED BY THE WARRANTY. THE FOREGOING EXPRESS WRITTENWARRANTIES AND REMEDIES ARE EXCLUSIVE AND ARE IN LIEU OF ANY OTHER WARRANTIES ORREMEDIES, EXPRESS, IMPLIED OR STATUTORY.
October 5, 2004