Embed Size (px)
Citation preview
Addovation AS © 2019
Office Automation Suite 5.0
Setup Guide
4.12.2019
Addovation R&D © 2019
Page 1/ 31
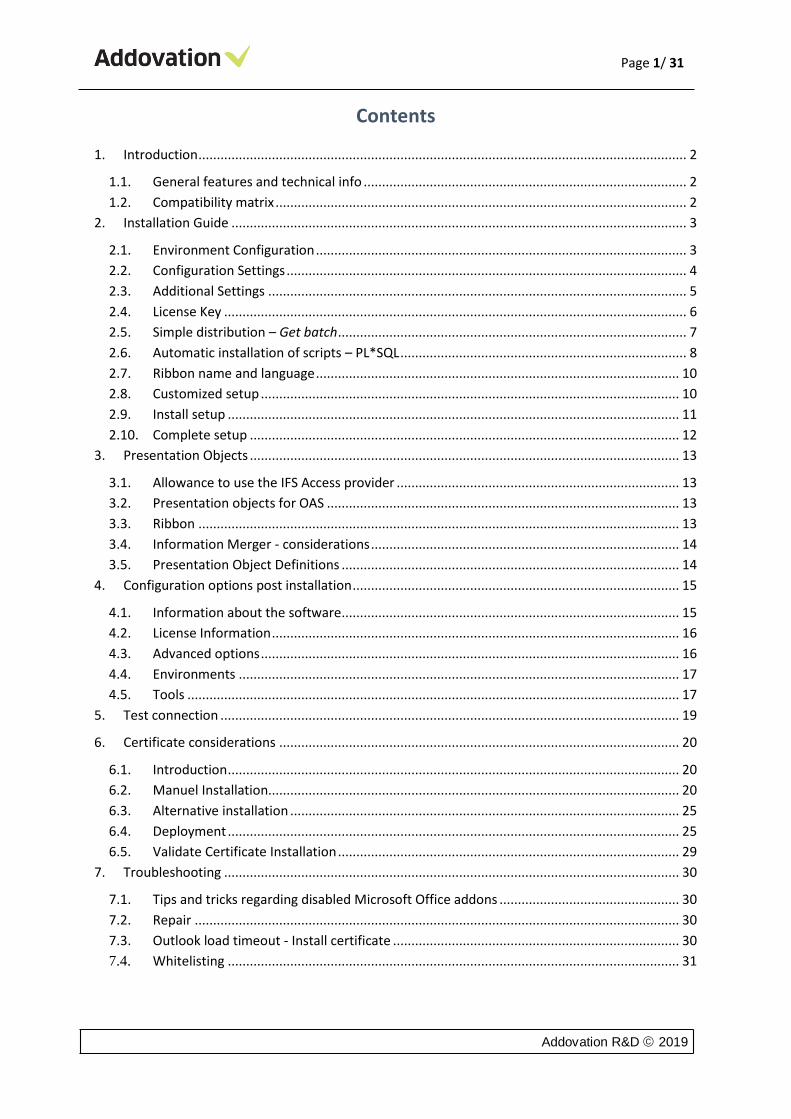
Contents
1. Introduction ..................................................................................................................................... 2
1.1. General features and technical info ........................................................................................ 2
1.2. Compatibility matrix ................................................................................................................ 2
2. Installation Guide ............................................................................................................................ 3
2.1. Environment Configuration ..................................................................................................... 3
2.2. Configuration Settings ............................................................................................................. 4
2.3. Additional Settings .................................................................................................................. 5
2.4. License Key .............................................................................................................................. 6
2.5. Simple distribution – Get batch ............................................................................................... 7
2.6. Automatic installation of scripts – PL*SQL .............................................................................. 8
2.7. Ribbon name and language ................................................................................................... 10
2.8. Customized setup .................................................................................................................. 10
2.9. Install setup ........................................................................................................................... 11
2.10. Complete setup ..................................................................................................................... 12
3. Presentation Objects ..................................................................................................................... 13
3.1. Allowance to use the IFS Access provider ............................................................................. 13
3.2. Presentation objects for OAS ................................................................................................ 13
3.3. Ribbon ................................................................................................................................... 13
3.4. Information Merger - considerations .................................................................................... 14
3.5. Presentation Object Definitions ............................................................................................ 14
4. Configuration options post installation ......................................................................................... 15
4.1. Information about the software ............................................................................................ 15
4.2. License Information ............................................................................................................... 16
4.3. Advanced options .................................................................................................................. 16
4.4. Environments ........................................................................................................................ 17
4.5. Tools ...................................................................................................................................... 17
5. Test connection ............................................................................................................................. 19
6. Certificate considerations ............................................................................................................. 20
6.1. Introduction ........................................................................................................................... 20
6.2. Manuel Installation................................................................................................................ 20
6.3. Alternative installation .......................................................................................................... 25
6.4. Deployment ........................................................................................................................... 25
6.5. Validate Certificate Installation ............................................................................................. 29
7. Troubleshooting ............................................................................................................................ 30
7.1. Tips and tricks regarding disabled Microsoft Office addons ................................................. 30
7.2. Repair .................................................................................................................................... 30
7.3. Outlook load timeout - Install certificate .............................................................................. 30
7.4. Whitelisting ........................................................................................................................... 31
Addovation R&D © 2019
Page 2/ 31
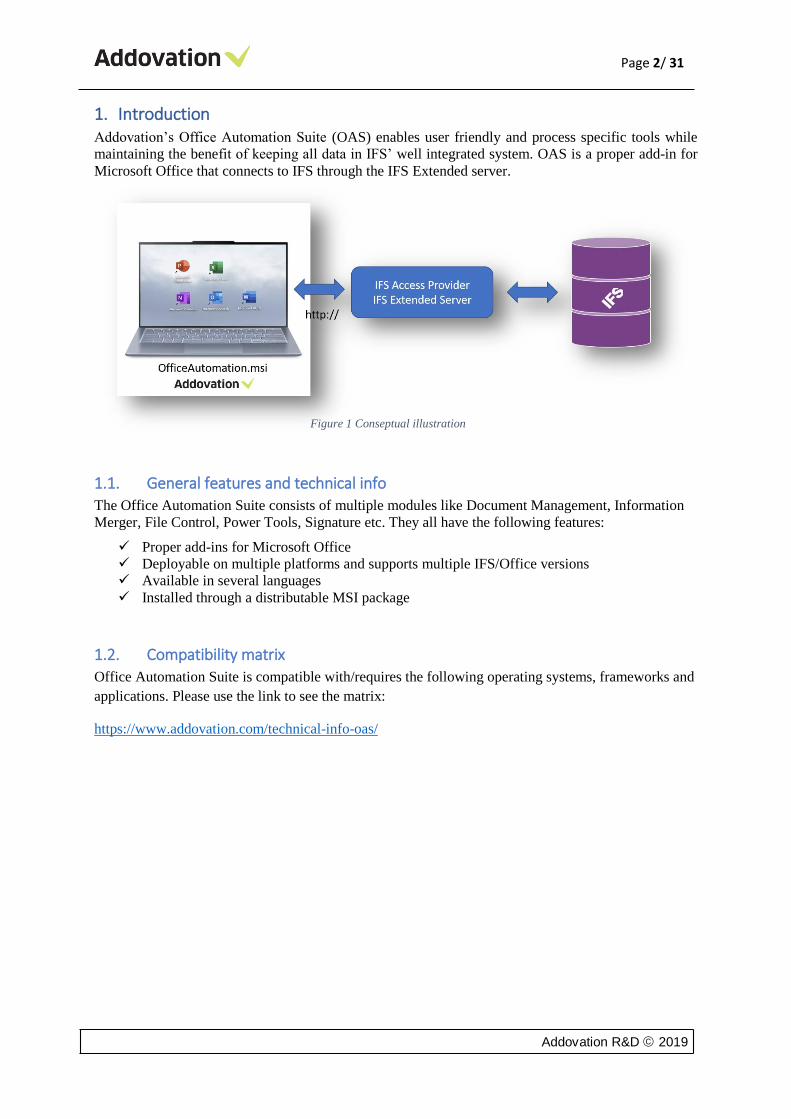
1. Introduction Addovation’s Office Automation Suite (OAS) enables user friendly and process specific tools while
maintaining the benefit of keeping all data in IFS’ well integrated system. OAS is a proper add-in for
Microsoft Office that connects to IFS through the IFS Extended server.
1.1. General features and technical info
The Office Automation Suite consists of multiple modules like Document Management, Information
Merger, File Control, Power Tools, Signature etc. They all have the following features:
✓ Proper add-ins for Microsoft Office
✓ Deployable on multiple platforms and supports multiple IFS/Office versions
✓ Available in several languages
✓ Installed through a distributable MSI package
1.2. Compatibility matrix
Office Automation Suite is compatible with/requires the following operating systems, frameworks and
applications. Please use the link to see the matrix:
https://www.addovation.com/technical-info-oas/
Figure 1 Conseptual illustration
Addovation R&D © 2019
Page 3/ 31
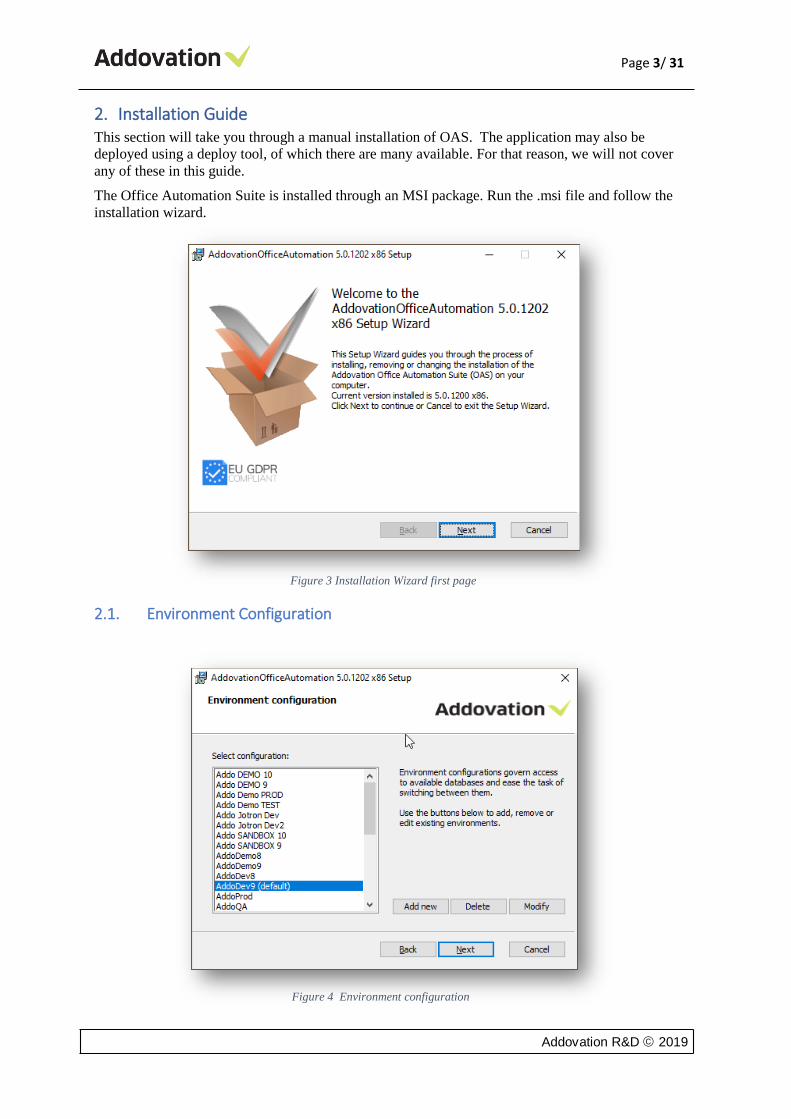
2. Installation Guide This section will take you through a manual installation of OAS. The application may also be
deployed using a deploy tool, of which there are many available. For that reason, we will not cover
any of these in this guide.
The Office Automation Suite is installed through an MSI package. Run the .msi file and follow the
installation wizard.
2.1. Environment Configuration
Figure 3 Installation Wizard first page
Figure 4 Environment configuration
Addovation R&D © 2019
Page 4/ 31
When installing the software for the first time, you will need to specify which environment(s) you wish
to be able to connect to (see screenshot below, and chapter 2.2). You do this by clicking the Add new
button. When upgrading to a new version, or modifying an existing installation, you may choose to
retain the current settings and simply click Next or make changes to the environment configuration by
clicking Modify.
You will be able to choose between the environments in the OAS login dialog, from any of the supported
MS Office applications.
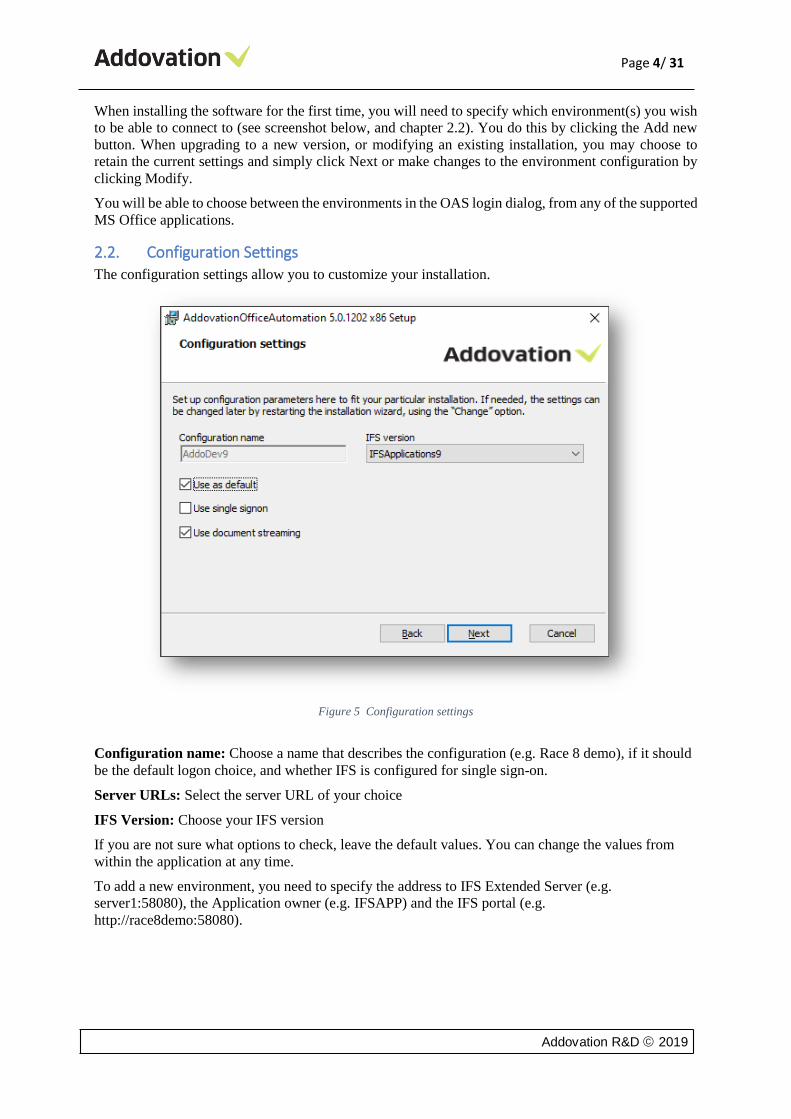
2.2. Configuration Settings
The configuration settings allow you to customize your installation.
Configuration name: Choose a name that describes the configuration (e.g. Race 8 demo), if it should
be the default logon choice, and whether IFS is configured for single sign-on.
Server URLs: Select the server URL of your choice
IFS Version: Choose your IFS version
If you are not sure what options to check, leave the default values. You can change the values from
within the application at any time.
To add a new environment, you need to specify the address to IFS Extended Server (e.g.
server1:58080), the Application owner (e.g. IFSAPP) and the IFS portal (e.g.
http://race8demo:58080).
Figure 5 Configuration settings
Addovation R&D © 2019
Page 5/ 31
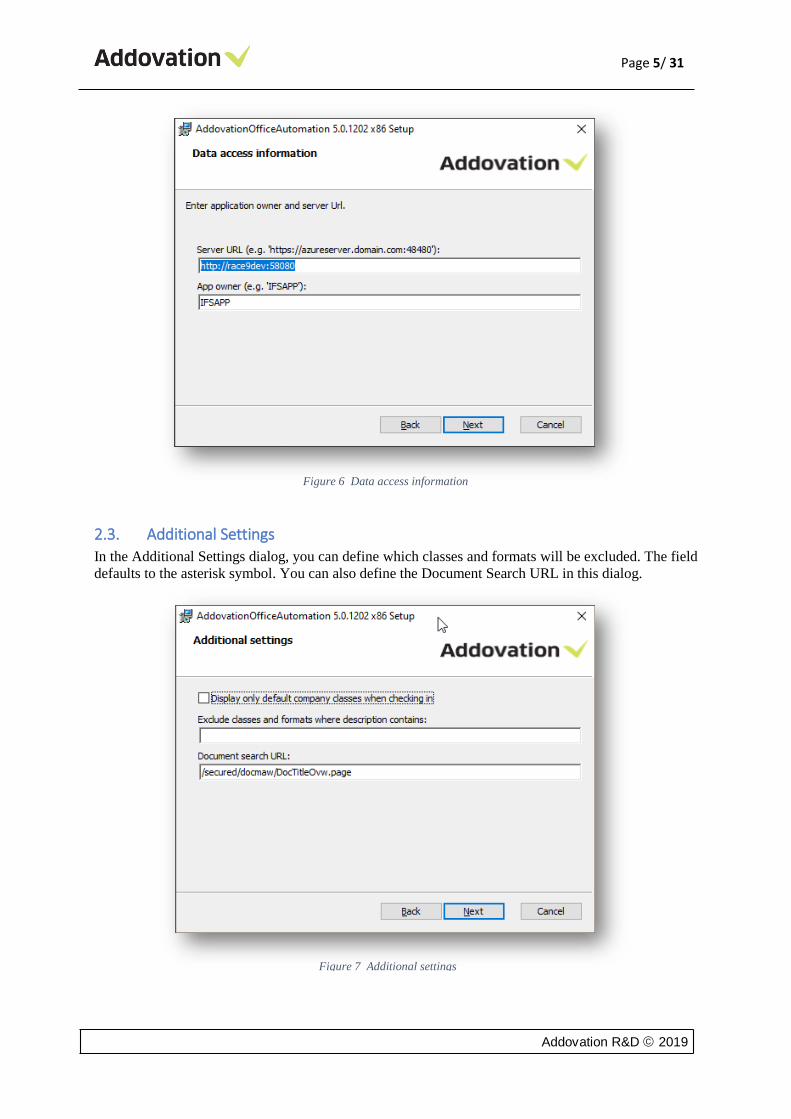
2.3. Additional Settings
In the Additional Settings dialog, you can define which classes and formats will be excluded. The field
defaults to the asterisk symbol. You can also define the Document Search URL in this dialog.
Figure 6 Data access information
Figure 7 Additional settings
Addovation R&D © 2019
Page 6/ 31
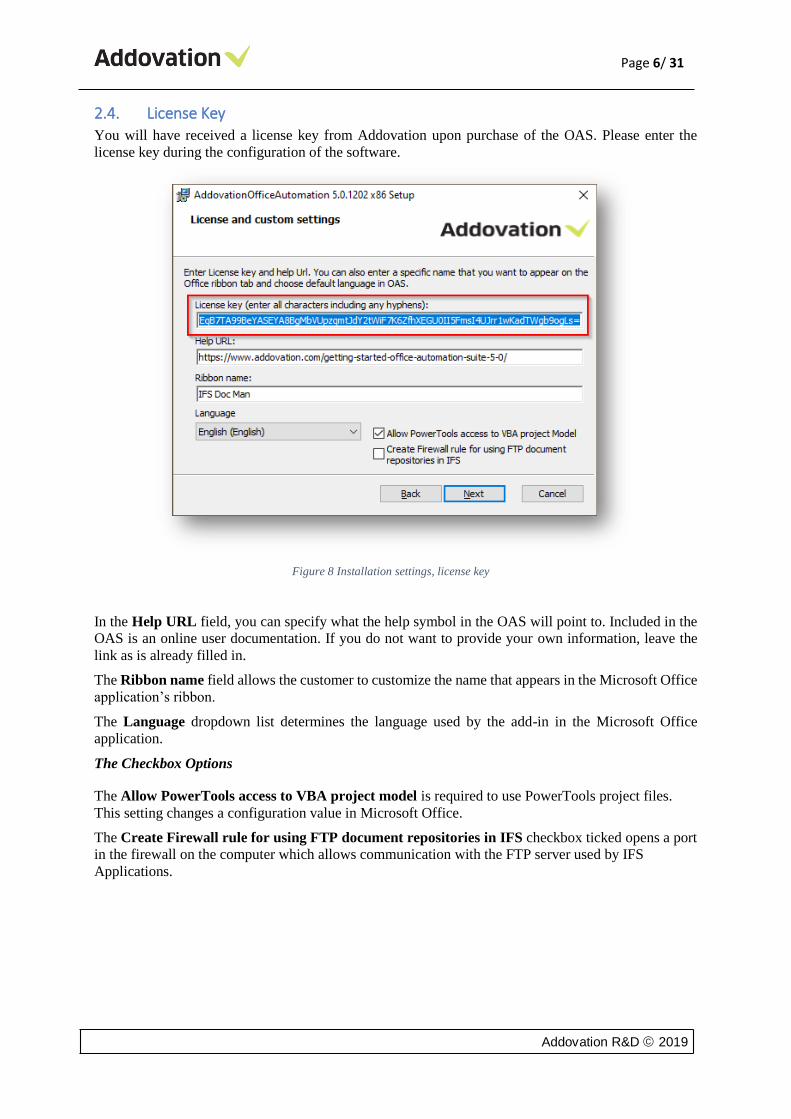
2.4. License Key You will have received a license key from Addovation upon purchase of the OAS. Please enter the
license key during the configuration of the software.
In the Help URL field, you can specify what the help symbol in the OAS will point to. Included in the
OAS is an online user documentation. If you do not want to provide your own information, leave the
link as is already filled in.
The Ribbon name field allows the customer to customize the name that appears in the Microsoft Office
application’s ribbon.
The Language dropdown list determines the language used by the add-in in the Microsoft Office
application.
The Checkbox Options
The Allow PowerTools access to VBA project model is required to use PowerTools project files.
This setting changes a configuration value in Microsoft Office.
The Create Firewall rule for using FTP document repositories in IFS checkbox ticked opens a port
in the firewall on the computer which allows communication with the FTP server used by IFS
Applications.
Figure 8 Installation settings, license key
Addovation R&D © 2019
Page 7/ 31
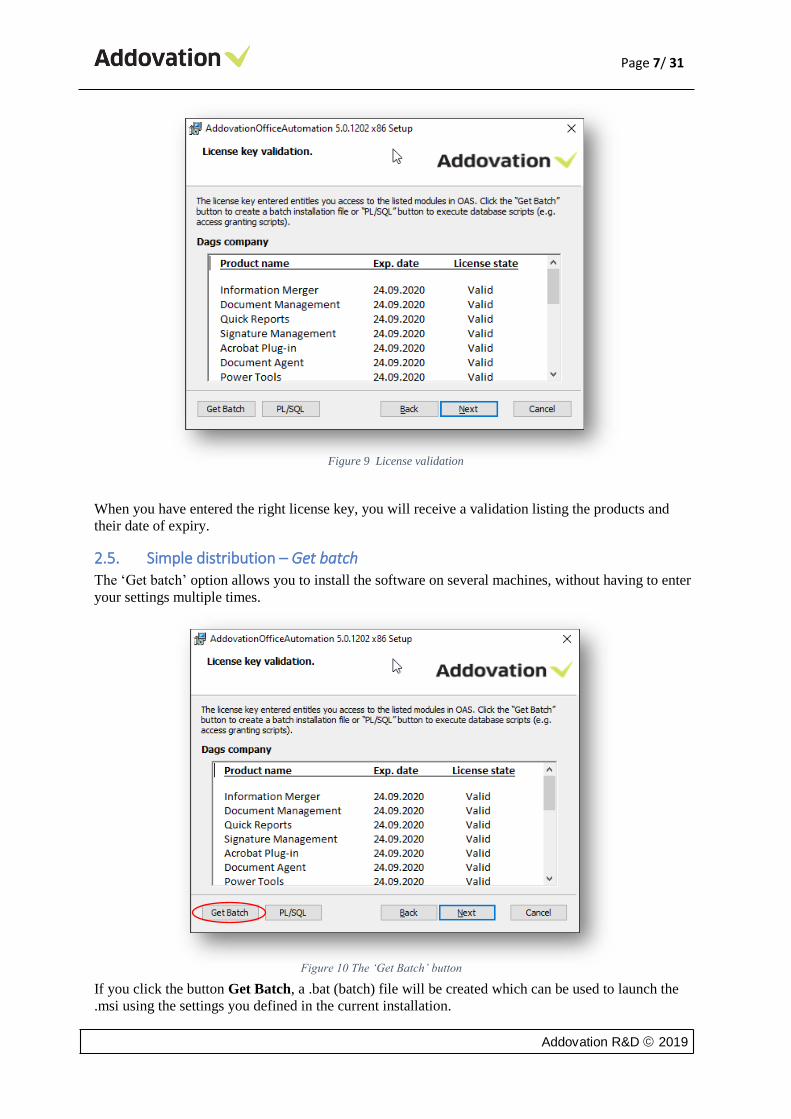
When you have entered the right license key, you will receive a validation listing the products and
their date of expiry.
2.5. Simple distribution – Get batch The ‘Get batch’ option allows you to install the software on several machines, without having to enter
your settings multiple times.
If you click the button Get Batch, a .bat (batch) file will be created which can be used to launch the
.msi using the settings you defined in the current installation.
Figure 9 License validation
Figure 10 The ‘Get Batch’ button
Addovation R&D © 2019
Page 8/ 31
Observe the following with generating the batch file:
• The batch file must be executed by a user having administrator rights
• If you experience problems running from a network drive, try to copy the installation file to a
local drive
• The batch file created can only be used to install 32-bit or 64-bit version, depending on the
bitness of the installation file used to create it.
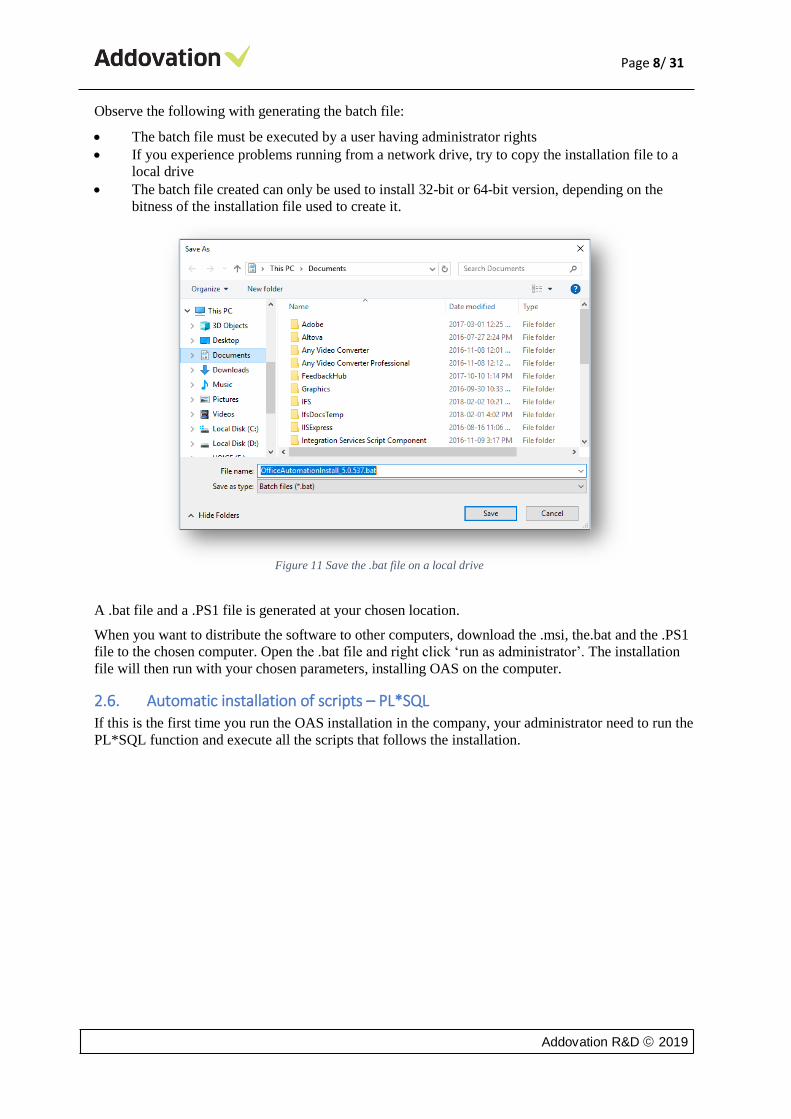
A .bat file and a .PS1 file is generated at your chosen location.
When you want to distribute the software to other computers, download the .msi, the.bat and the .PS1
file to the chosen computer. Open the .bat file and right click ‘run as administrator’. The installation
file will then run with your chosen parameters, installing OAS on the computer.
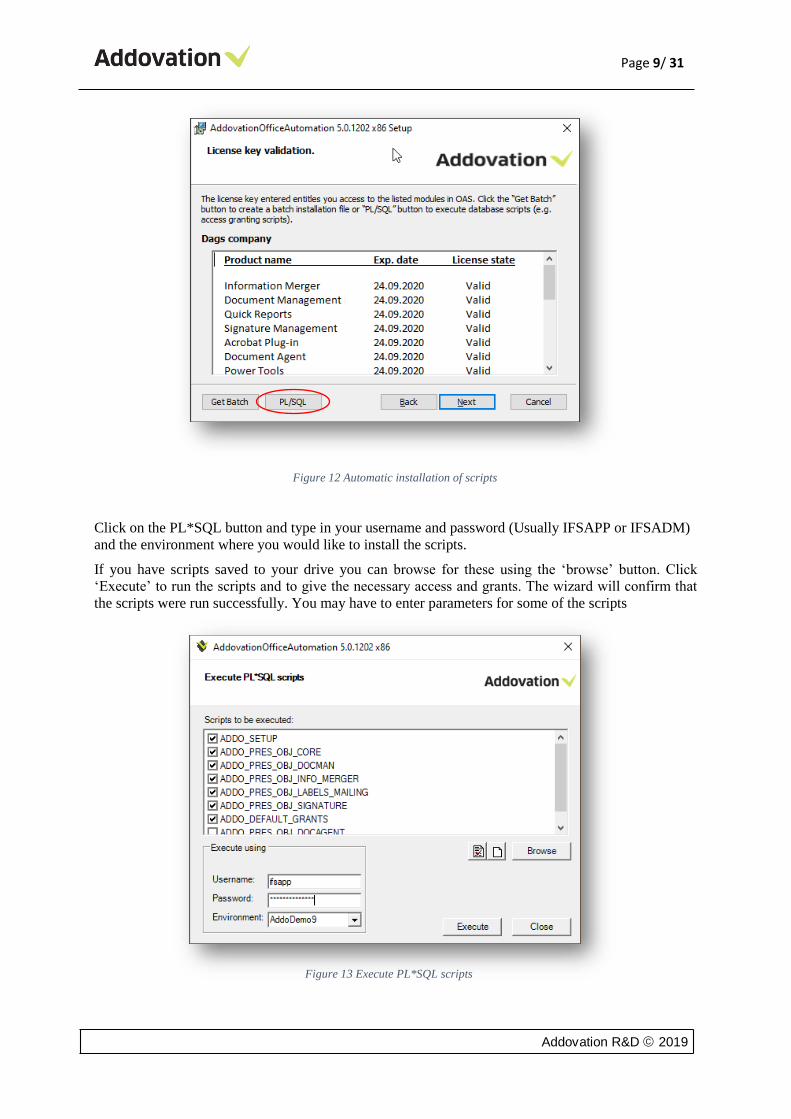
2.6. Automatic installation of scripts – PL*SQL If this is the first time you run the OAS installation in the company, your administrator need to run the
PL*SQL function and execute all the scripts that follows the installation.
Figure 11 Save the .bat file on a local drive
Addovation R&D © 2019
Page 9/ 31
Click on the PL*SQL button and type in your username and password (Usually IFSAPP or IFSADM)
and the environment where you would like to install the scripts.
If you have scripts saved to your drive you can browse for these using the ‘browse’ button. Click
‘Execute’ to run the scripts and to give the necessary access and grants. The wizard will confirm that
the scripts were run successfully. You may have to enter parameters for some of the scripts
Figure 12 Automatic installation of scripts
Figure 13 Execute PL*SQL scripts
Addovation R&D © 2019
Page 10/ 31
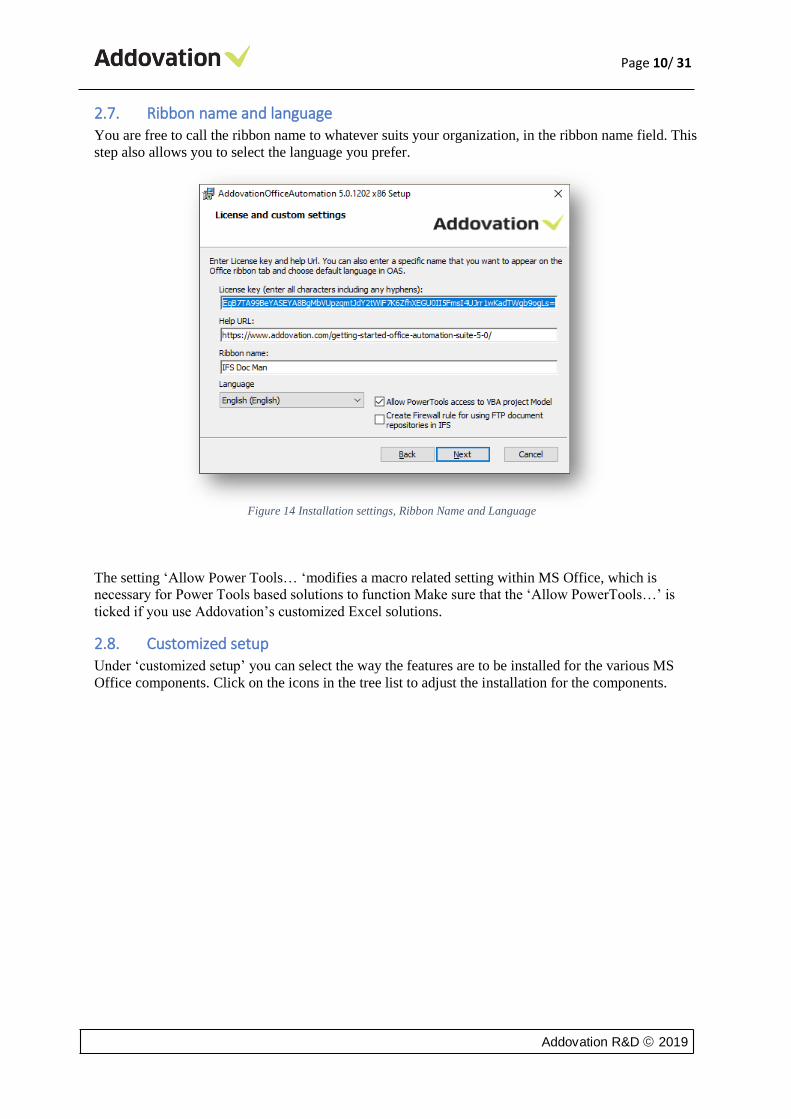
2.7. Ribbon name and language You are free to call the ribbon name to whatever suits your organization, in the ribbon name field. This
step also allows you to select the language you prefer.
The setting ‘Allow Power Tools… ‘modifies a macro related setting within MS Office, which is
necessary for Power Tools based solutions to function Make sure that the ‘Allow PowerTools…’ is
ticked if you use Addovation’s customized Excel solutions.
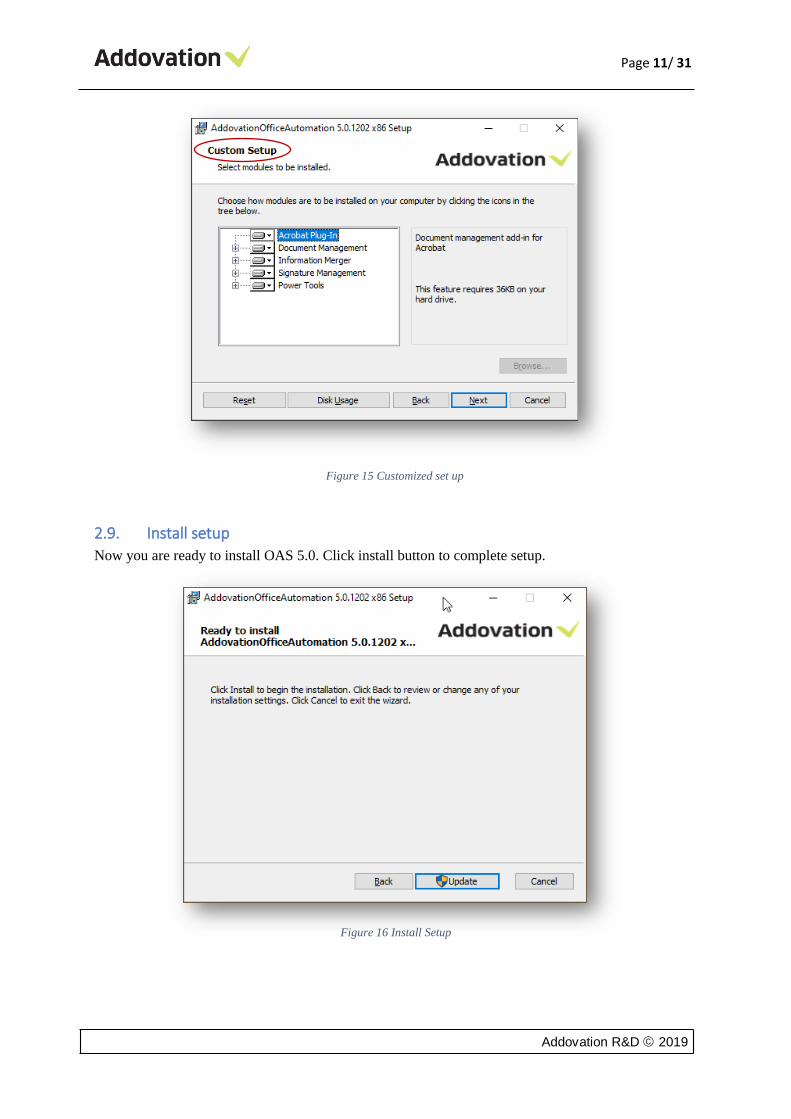
2.8. Customized setup Under ‘customized setup’ you can select the way the features are to be installed for the various MS
Office components. Click on the icons in the tree list to adjust the installation for the components.
Figure 14 Installation settings, Ribbon Name and Language
Addovation R&D © 2019
Page 11/ 31
2.9. Install setup
Now you are ready to install OAS 5.0. Click install button to complete setup.
Figure 15 Customized set up
Figure 16 Install Setup

Addovation R&D © 2019
Page 12/ 31
2.10. Complete setup
Figure 17 Complete Setup
Addovation R&D © 2019
Page 13/ 31
3. Presentation Objects OAS is a client-side application that communicates with IFS through the IFS Extended Server. When
using OAS, a user must log on using their own user credentials. All business logic and access control
mechanisms that exists in IFS is fully obeyed by OAS.
To make it easy to grant access, OAS comes with predefined presentation objects.
3.1. Allowance to use the IFS Access provider
The easiest way to do this is to use the standard permission set FND_PLSQLAP. Users must have this
(or equivalent) to run anything through IFS Access Provider.
3.2. Presentation objects for OAS To make it easy to set up OAS, we have defined a set of presentation objects that are required to run
the various modules within OAS.
For each of the modules there are Database Objects and for some modules there are also presentation
objects that correspond to a particular button in the ribbon.
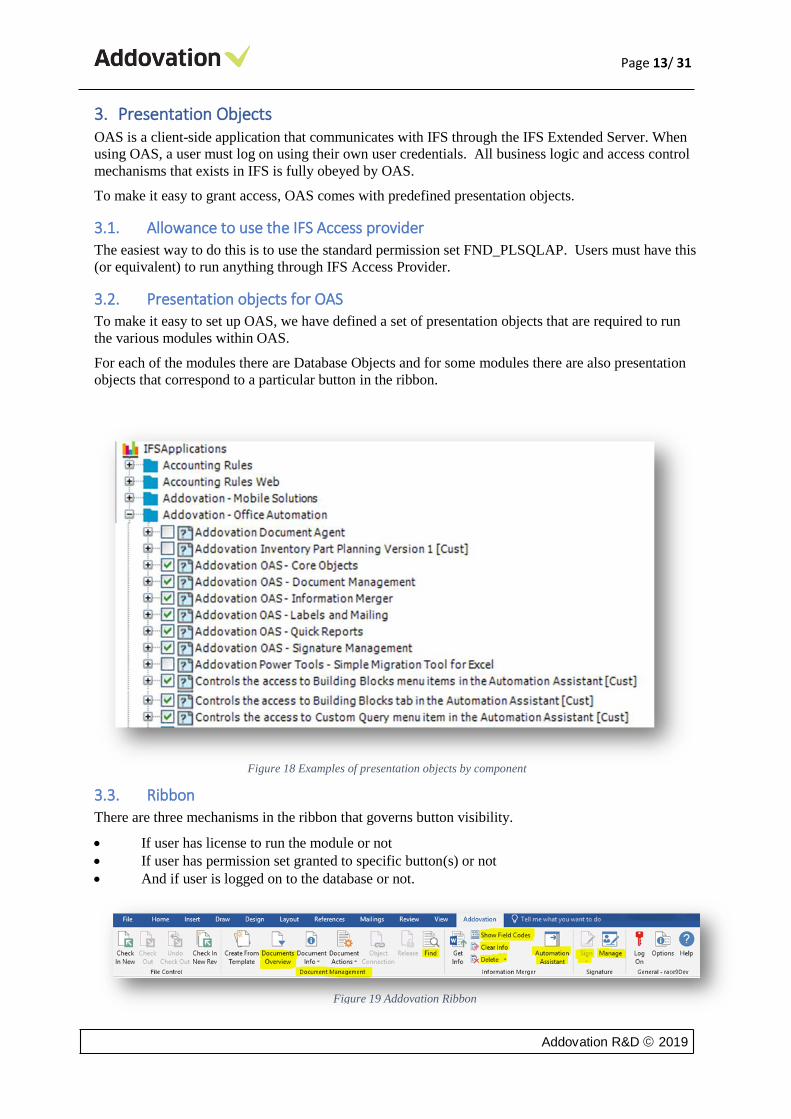
3.3. Ribbon
There are three mechanisms in the ribbon that governs button visibility.
• If user has license to run the module or not
• If user has permission set granted to specific button(s) or not
• And if user is logged on to the database or not.
Figure 18 Examples of presentation objects by component
Figure 19 Addovation Ribbon

Addovation R&D © 2019
Page 14/ 31
The highlighted buttons are governed by the presentation objects that are listed below. E.g.
Automation Assistant button is governed by presentation object displayed below.
Note that until the user has logged on, it is not possible to know if the user has grants or not. That
means some buttons will be invisible until the user is logged on.
3.4. Information Merger - considerations
Note that for Information Merger we have created presentation objects for the “core operations”.
However, there are no presentation objects for objects like Project and WorkOrder that may be
connected to an object.
3.5. Presentation Object Definitions
The presentation object definition files are located under the Program Files folder e.g.
C:\Program Files (x86)\Addovation\Office Automation\SQL_SCRIPTS
Note that every new version of OAS may come with new or modified functionality that may require
access to new database objects, which means that the presentation objects scripted in these script files
may have been modified or new added. So, whenever a new version of OAS is installed, the scripts
should always be re-executed. Go to the OAS Options | Tools | PL*SQL dialog to do this. You need
the application owner password to perform this operation.
Figure 20 Examples of presentation objects by component
Addovation R&D © 2019
Page 15/ 31
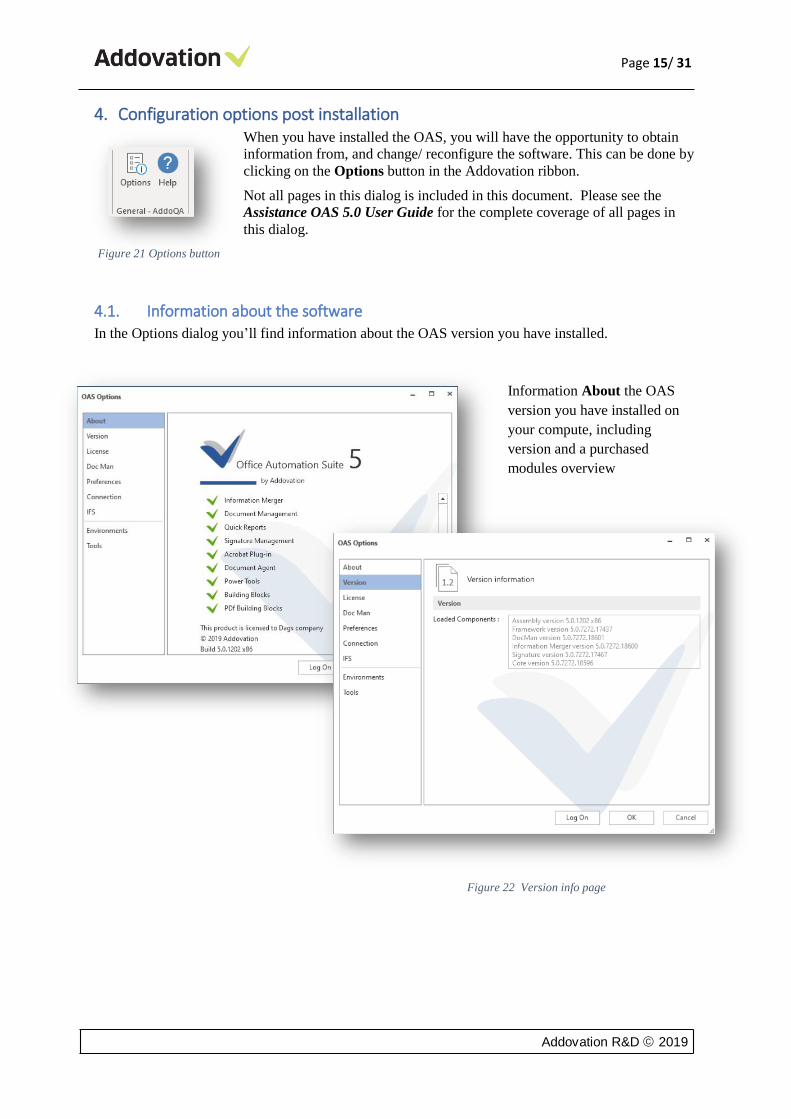
4. Configuration options post installation When you have installed the OAS, you will have the opportunity to obtain
information from, and change/ reconfigure the software. This can be done by
clicking on the Options button in the Addovation ribbon.
Not all pages in this dialog is included in this document. Please see the
Assistance OAS 5.0 User Guide for the complete coverage of all pages in
this dialog.
4.1. Information about the software
In the Options dialog you’ll find information about the OAS version you have installed.
Information About the OAS
version you have installed on
your compute, including
version and a purchased
modules overview
Figure 21 Options button
Figure 22 Version info page
Addovation R&D © 2019
Page 16/ 31
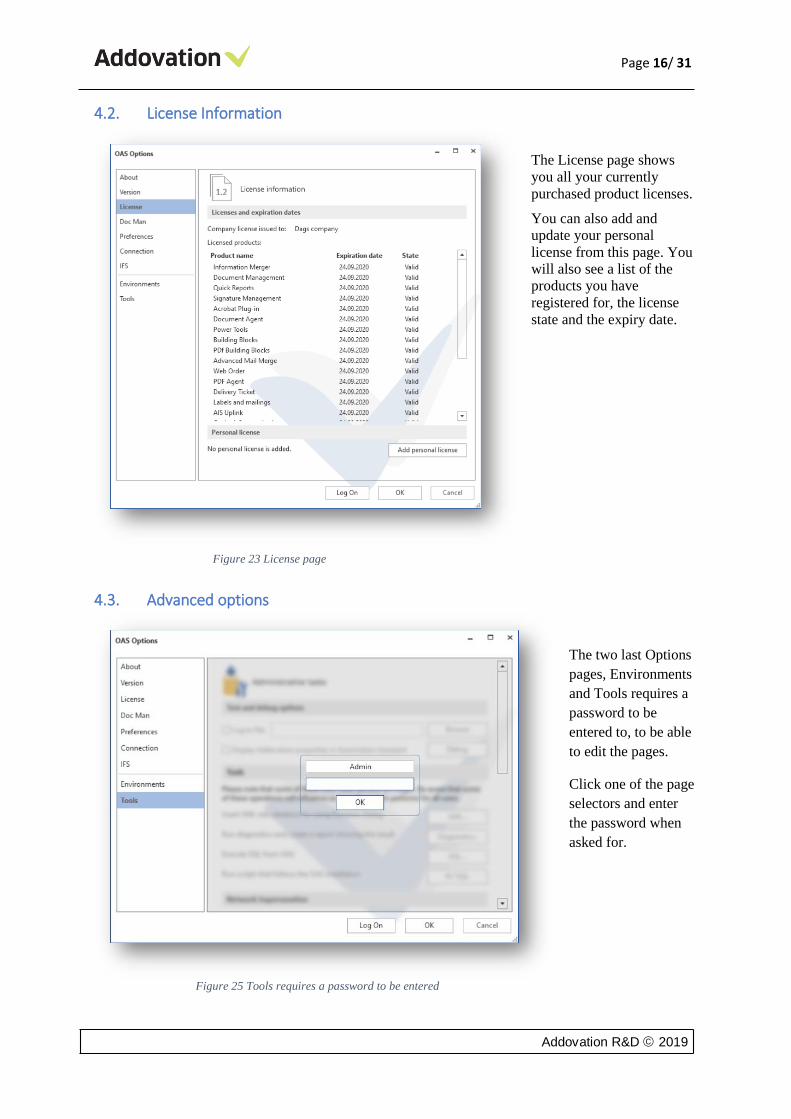
4.2. License Information
The License page shows
you all your currently
purchased product licenses.
You can also add and
update your personal
license from this page. You
will also see a list of the
products you have
registered for, the license
state and the expiry date.
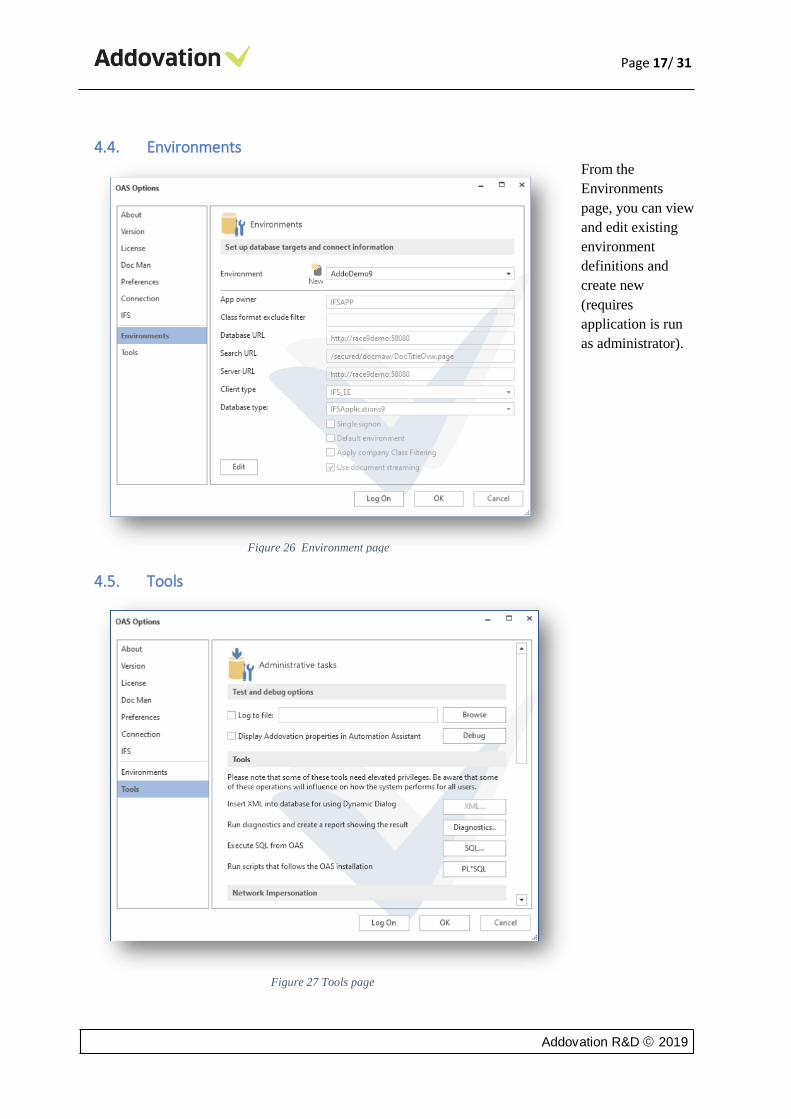
4.3. Advanced options
The two last Options
pages, Environments
and Tools requires a
password to be
entered to, to be able
to edit the pages.
Click one of the page
selectors and enter
the password when
asked for.
Figure 23 License page
Figure 25 Tools requires a password to be entered
Addovation R&D © 2019
Page 17/ 31
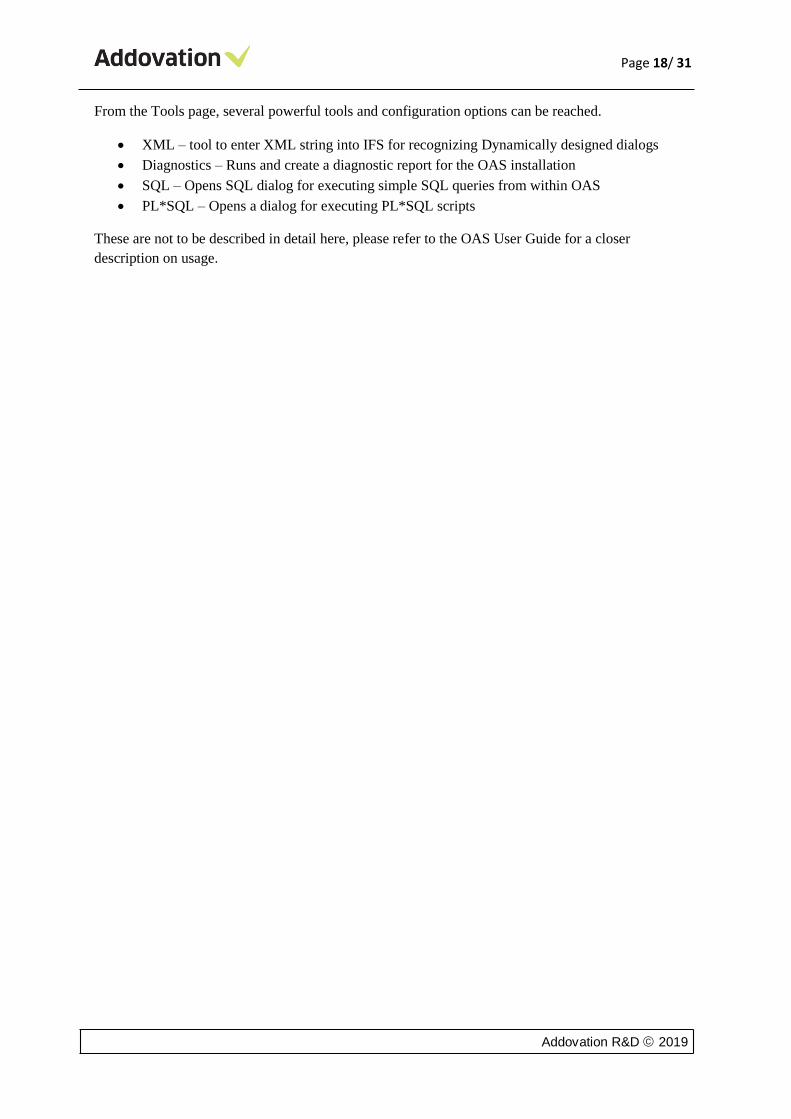
4.4. Environments From the
Environments
page, you can view
and edit existing
environment
definitions and
create new
(requires
application is run
as administrator).
4.5. Tools
Figure 26 Environment page
Figure 27 Tools page
Addovation R&D © 2019
Page 18/ 31
From the Tools page, several powerful tools and configuration options can be reached.
• XML – tool to enter XML string into IFS for recognizing Dynamically designed dialogs
• Diagnostics – Runs and create a diagnostic report for the OAS installation
• SQL – Opens SQL dialog for executing simple SQL queries from within OAS
• PL*SQL – Opens a dialog for executing PL*SQL scripts
These are not to be described in detail here, please refer to the OAS User Guide for a closer
description on usage.
Addovation R&D © 2019
Page 19/ 31
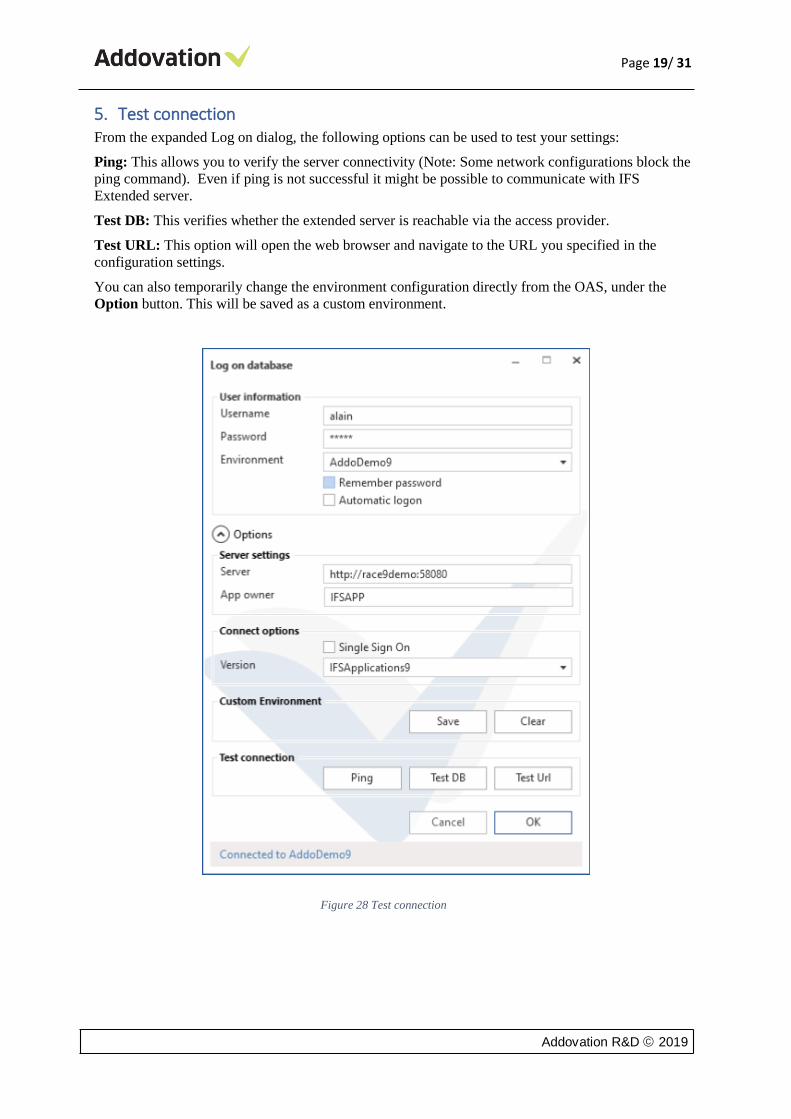
5. Test connection From the expanded Log on dialog, the following options can be used to test your settings:
Ping: This allows you to verify the server connectivity (Note: Some network configurations block the
ping command). Even if ping is not successful it might be possible to communicate with IFS
Extended server.
Test DB: This verifies whether the extended server is reachable via the access provider.
Test URL: This option will open the web browser and navigate to the URL you specified in the
configuration settings.
You can also temporarily change the environment configuration directly from the OAS, under the
Option button. This will be saved as a custom environment.
Figure 28 Test connection
Addovation R&D © 2019
Page 20/ 31
6. Certificate considerations
6.1. Introduction
Office Automation Suite (OAS) is a digitally signed application, which means that you know that the
software you are running is the original software and that no-one has tampered it.
The Trusted Publishers certificate store contains information about the Authenticode (signing)
certificates of trusted publishers that are installed on a computer. A publisher is any developer or
software company that has created and distributed a digitally signed add-in. The certificate associated
with the digital signature must be issued by a reputable certificate authority (CA).
If the verifier is offline or blocked (disconnected from the Internet) it is impossible to check
certificate-revocation data, or to verify time stamps if they are present (expiry). The root certificate
authority who issued the certificate must be trusted by the user. If any of these scenarios occur, the
verification of the add-in may be delayed or impossible, in which case the add-in may be deactivated
by the Office Application.
For OAS to work optimally, it is strongly recommended to install the Addovation Certificate on your
computer(s).
There are several ways to this, in this guide we provide you with
• Manual installation with a step by step instructions to how this can be done in an easy way.
• Tips on how one can deploy the certificate from the IT department
6.2. Manuel Installation
There are two starting points for installing the certificate manually:
• If you are provided with the certificate file itself, you can skip part 1 of the installation steps
and go directly to part 2.
• If you have access to the msi file (Addovation installation package), you can install the
certificate using this file, as described in part 1 and complete the installation by doing steps 3
through 5 in part 2.
In the following section, all step to install the Certificate and place it in the Trusted Publishers location
is provided
First, to install a certificate into the Trusted Publishers store, you must have administrator rights on
your computer.
Addovation R&D © 2019
Page 21/ 31
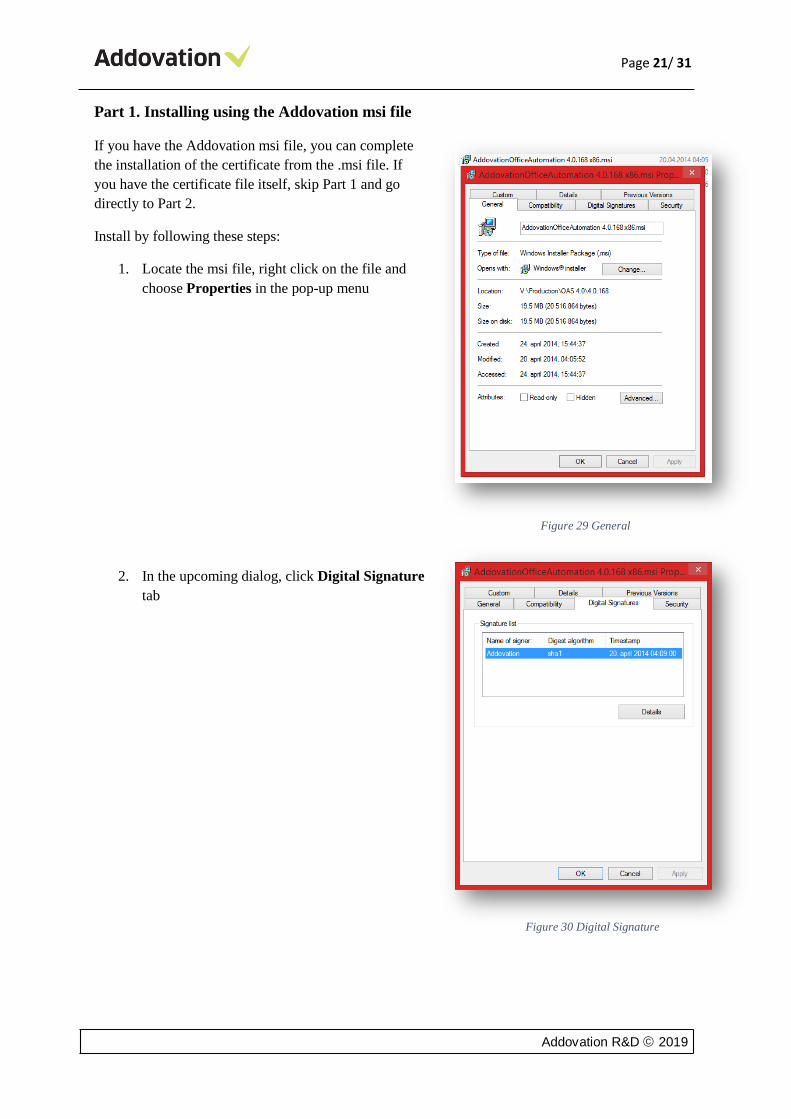
Part 1. Installing using the Addovation msi file
If you have the Addovation msi file, you can complete
the installation of the certificate from the .msi file. If
you have the certificate file itself, skip Part 1 and go
directly to Part 2.
Install by following these steps:
1. Locate the msi file, right click on the file and
choose Properties in the pop-up menu
2. In the upcoming dialog, click Digital Signature
tab
Figure 29 General
Figure 30 Digital Signature

Addovation R&D © 2019
Page 22/ 31
3. Now, click on the Addovation signature
in the list and click Details
4. Click the View Certificate button, the
dialog below appears:
5. Click the Install Certificate… button
6. Go to Part 2 of the installation guide
and proceed from step 3 to the end.
Figure 31 General
Figure 33 Install Certificate

Addovation R&D © 2019
Page 23/ 31
Part 2. Installing using the Addovation Certificate file
Provided you have a certificate file, you can install the certificate by following the steps below.
If you do not have a certificate file, install from the installation file (.msi file) as described in Part 1.
1. Locate the certificate file, right click and choose Install Certificate
2. The Certificate installation wizard will appear
3. Click Next button. Choose the Place all certificates in the following store and then click the
Browse… button. The Select Certificate Store dialog appears:
Figure 34 Locate Certificate file
Figure 35 import wizard
Addovation R&D © 2019
Page 24/ 31
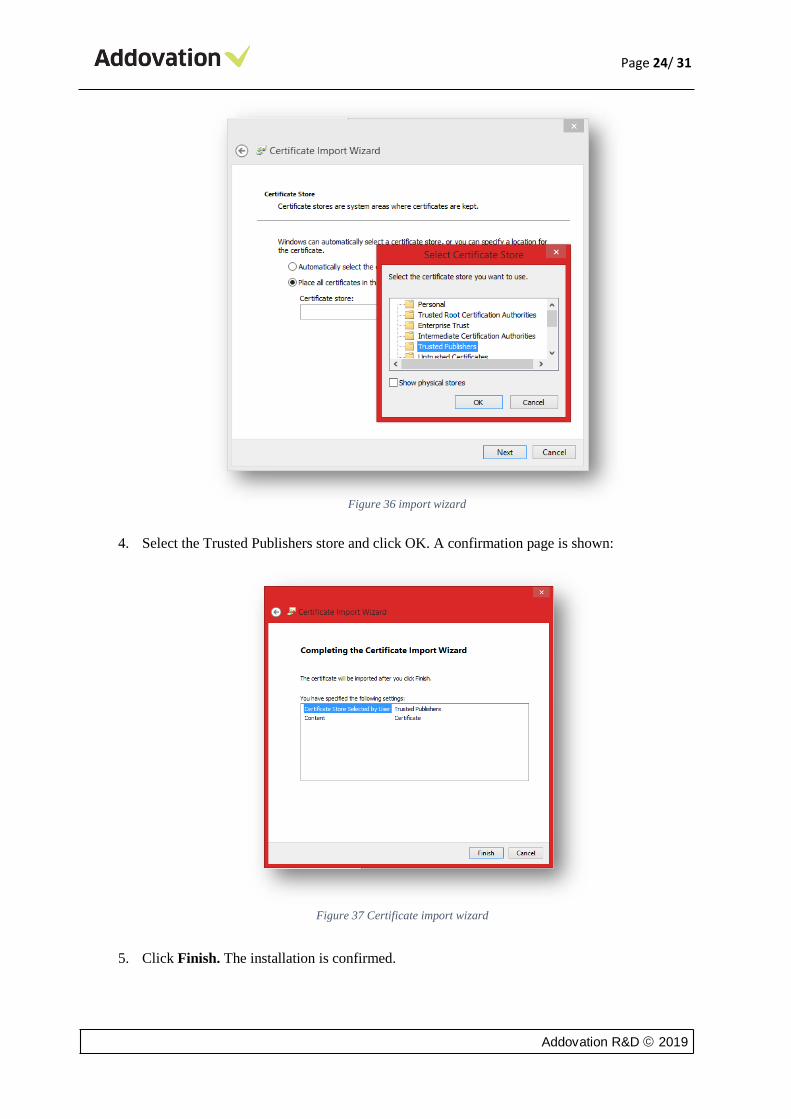
4. Select the Trusted Publishers store and click OK. A confirmation page is shown:
5. Click Finish. The installation is confirmed.
Figure 36 import wizard
Figure 37 Certificate import wizard
Addovation R&D © 2019
Page 25/ 31
6.3. Alternative installation
As mentioned, there are several other ways to obtain and install a Publishers Certificate, a couple of
them described below. If the above description does not fit your needs, please contact Addovation or
learn more using the links below.
http://office.microsoft.com/en-us/word-help/add-remove-or-view-a-trusted-publisher-HA010034138.aspx
http://technet.microsoft.com/en-us/library/ff428091.aspx
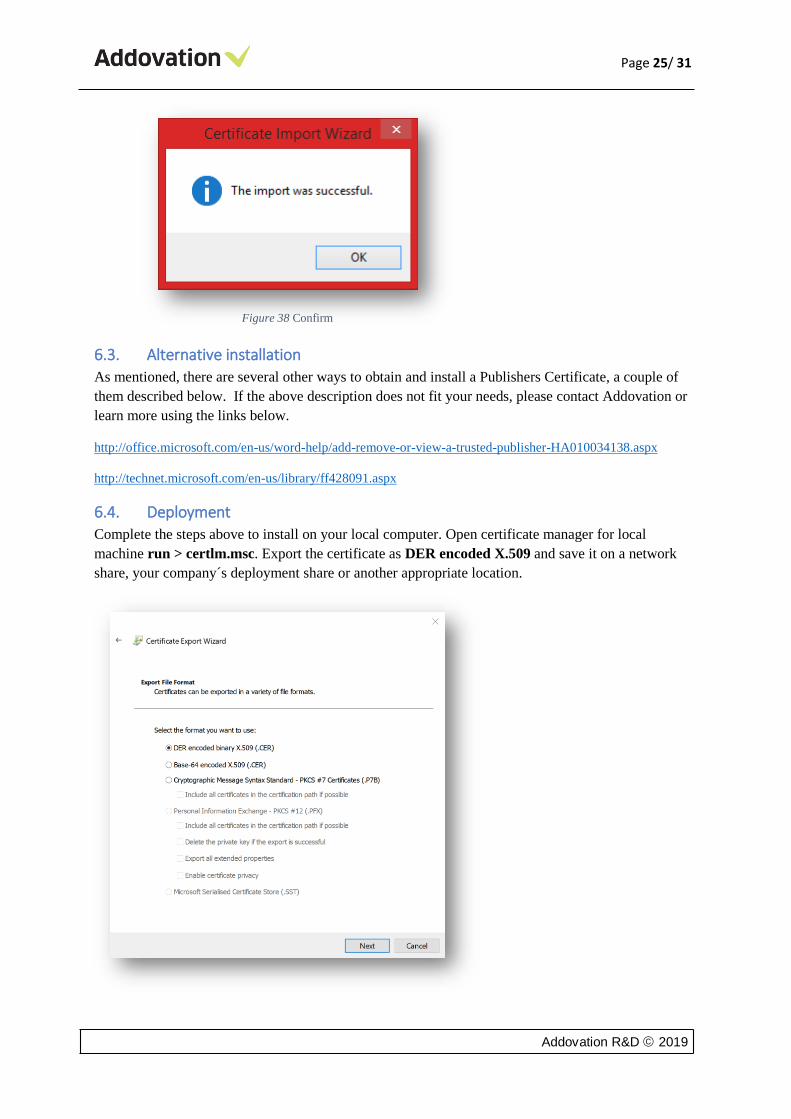
6.4. Deployment
Complete the steps above to install on your local computer. Open certificate manager for local
machine run > certlm.msc. Export the certificate as DER encoded X.509 and save it on a network
share, your company´s deployment share or another appropriate location.
Figure 38 Confirm
Addovation R&D © 2019
Page 26/ 31
GPO
Use this procedure to deploy a certificate to multiple computers by using the Active Directory Domain
Services and Group Policy Object (GPO):
1. Open the Group Policy Management Console.
2. Find an existing or create a new GPO that contain the certificate settings. Ensure that the GPO
is associated with the domain, site, or organizational unit whose users you want affected by
the policy.
3. Right click the GPO, and then select Edit.
4. The Group Policy Management Editor opens and displays the current contents of the policy
object.
5. In the navigation pane, open Computer Configuration\Windows Settings\Security
Settings\Public Key Policies\Trusted Publishers.
6. Click the Action menu, and then click Import.
7. Follow the instructions in the Certificate Import Wizard to find and import the certificate.
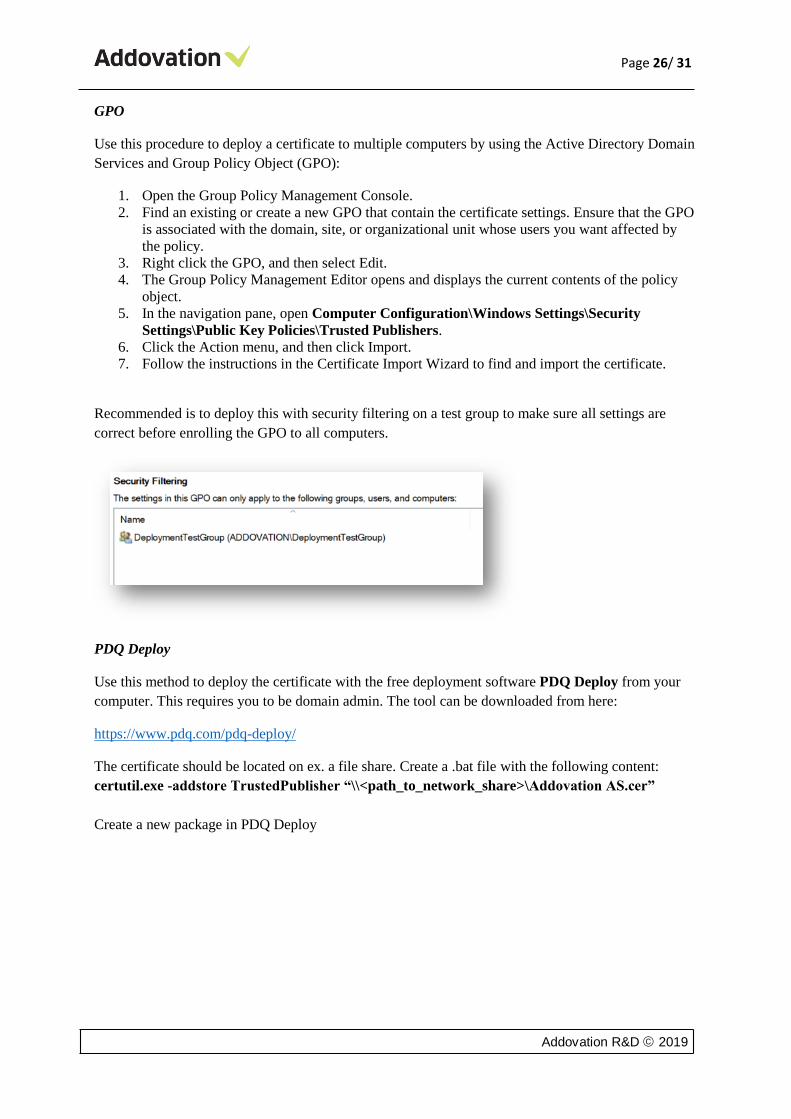
Recommended is to deploy this with security filtering on a test group to make sure all settings are
correct before enrolling the GPO to all computers.
PDQ Deploy
Use this method to deploy the certificate with the free deployment software PDQ Deploy from your
computer. This requires you to be domain admin. The tool can be downloaded from here:
https://www.pdq.com/pdq-deploy/
The certificate should be located on ex. a file share. Create a .bat file with the following content:
certutil.exe -addstore TrustedPublisher “\\<path_to_network_share>\Addovation AS.cer”
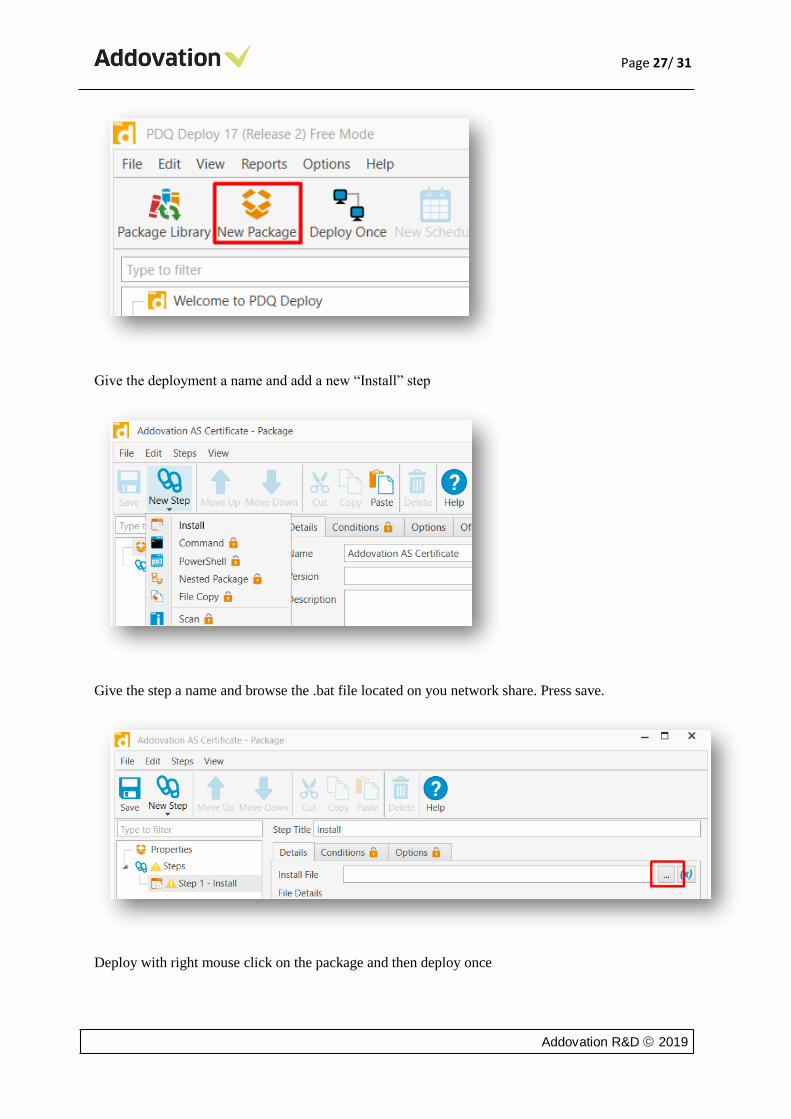
Create a new package in PDQ Deploy
Addovation R&D © 2019
Page 27/ 31
Give the deployment a name and add a new “Install” step
Give the step a name and browse the .bat file located on you network share. Press save.
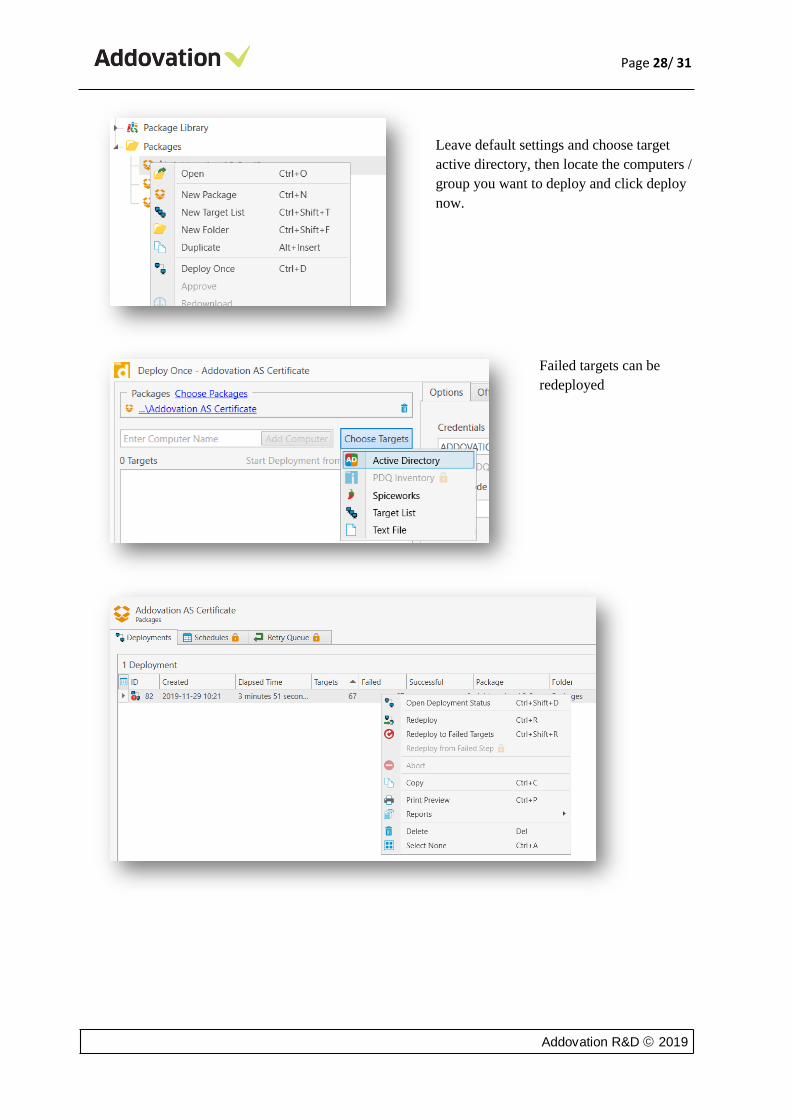
Deploy with right mouse click on the package and then deploy once
Addovation R&D © 2019
Page 28/ 31
Leave default settings and choose target
active directory, then locate the computers /
group you want to deploy and click deploy
now.
Failed targets can be
redeployed

Addovation R&D © 2019
Page 29/ 31
6.5. Validate Certificate Installation If the certificate were correctly installed it should be visible from Outlook.
File > Options > Trust Center > Trust Center Settings > Trusted Publishers
Addovation AS should be listed as a trusted publisher.
If the certificate is missing, an indication button will also appear in the OAS ribbon:
Addovation R&D © 2019
Page 30/ 31
7. Troubleshooting
7.1. Tips and tricks regarding disabled Microsoft Office addons
This section contains tips and tricks on how to prevent Microsoft Office and, in particular Microsoft
Outlook, from disabling Addovation add-ins. Consider this section as a recommendation to read
through if you experience such problems.
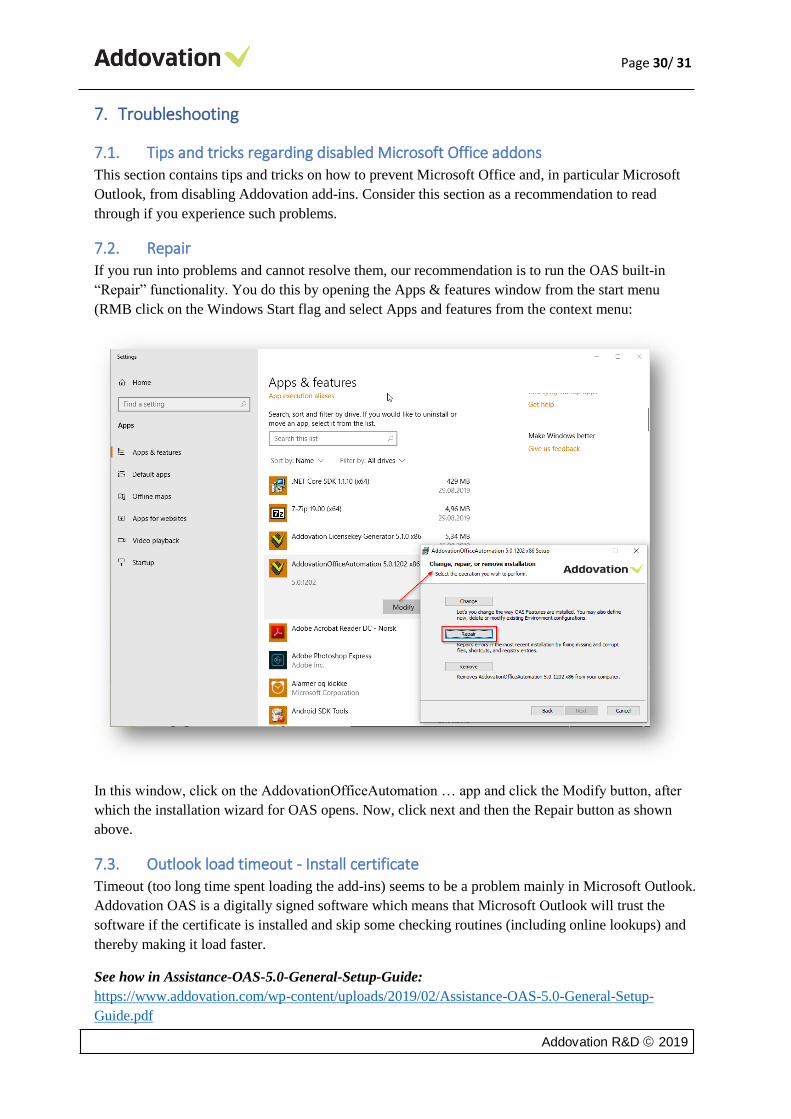
7.2. Repair
If you run into problems and cannot resolve them, our recommendation is to run the OAS built-in
“Repair” functionality. You do this by opening the Apps & features window from the start menu
(RMB click on the Windows Start flag and select Apps and features from the context menu:
In this window, click on the AddovationOfficeAutomation … app and click the Modify button, after
which the installation wizard for OAS opens. Now, click next and then the Repair button as shown
above.
7.3. Outlook load timeout - Install certificate
Timeout (too long time spent loading the add-ins) seems to be a problem mainly in Microsoft Outlook.
Addovation OAS is a digitally signed software which means that Microsoft Outlook will trust the
software if the certificate is installed and skip some checking routines (including online lookups) and
thereby making it load faster.
See how in Assistance-OAS-5.0-General-Setup-Guide:
https://www.addovation.com/wp-content/uploads/2019/02/Assistance-OAS-5.0-General-Setup-
Guide.pdf
Addovation R&D © 2019
Page 31/ 31
Tip on how to centralize roll out:
https://www.manageengine.com/sccm-third-party-patch-management/kb/deploy-signing-certificates-
using-gpo-how-to.html
The important part here is that the software is signed within the time period defined valid in the
certificate currently rolled out. If the problem persists, it can also be related to network issues causing
the load procedure to time out.
7.4. Whitelisting
If certificate is installed and the add-ins are still disabled, a final remedy could be to “whitelist” the
add-ins. This is basically a way to tell the Microsoft Office application that the add-in is safe and
should never be disabled.
Tip on how to prevent managed add-ons to be disabled:
https://docs.microsoft.com/en-us/office/vba/outlook/concepts/getting-started/support-for-keeping-add-
ins-enabled
In this post, it's an answer describing the registry entry options:
https://communities.bentley.com/products/projectwise/content_management/f/content-management-
forum/96492/projectwise-v8i-selectseries-4-integration-module-for-microsoft-office-2013
Script for doing this:
https://rakhesh.com/windows/enabling-disabled-office-add-ins-automatically/ Example:
REG ADD "HKCU\Software\Microsoft\Office\15.0\Outlook\Resiliency\DoNotDisableAddInList" /v
PWOfficeAddin.ConnectProxy_15 /t REG_DWORD /d 1 /f
REG ADD "HKCU\Software\Microsoft\Office\15.0\Word\Resiliency\DoNotDisableAddInList" /v
PWOfficeAddin.ConnectProxy_15 /t REG_DWORD /d 1 /f
REG ADD "HKCU\Software\Microsoft\Office\15.0\Excel\Resiliency\DoNotDisableAddInList" /v
PWOfficeAddin.ConnectProxy_15 /t REG_DWORD /d 1 /f
REG ADD "HKCU\Software\Microsoft\Office\15.0\PowerPoint\Resiliency\DoNotDisableAddInList" /v
PWOfficeAddin.ConnectProxy_15 /t REG_DWORD /d 1 /f
REG ADD "HKLM\Software\Microsoft\Office\15.0\Outlook\Resiliency\DoNotDisableAddInList"
/vPWOfficeAddin.ConnectProxy_15 /t REG_DWORD /d 1 /f
REG ADD "HKLM\Software\Microsoft\Office\15.0\Word\Resiliency\DoNotDisableAddInList" /v
PWOfficeAddin.ConnectProxy_15 /t REG_DWORD /d 1 /f
REG ADD "HKLM\Software\Microsoft\Office\15.0\Excel\Resiliency\DoNotDisableAddInList" /v
PWOfficeAddin.ConnectProxy_15 /t REG_DWORD /d 1 /f
REG ADD "HKLM\Software\Microsoft\Office\15.0\PowerPoint\Resiliency\DoNotDisableAddInList" /v
PWOfficeAddin.ConnectProxy_15 /t REG_DWORD /d 1 /f
If the end-user is still experiencing problems, then please try to log on to the same machine with
another Microsoft Windows user. If this user is not experiencing the same problems, the former user
profile may be corrupted and probably has to be rebuilt.