Embed Size (px)
Citation preview
VOLUME
INPUT SELECTOR MUSIC
PHONESDOWN UP
AV/MOVE TUNE TUNE
^ SFC
VIDEO IN L AUDIO IN R VCR 2
8POWER
MULTI CONTROL
ENTER
TOP MENU
PREV / NEXT /
RETURN
SC-HT07
P PC PP RQT7380-3P
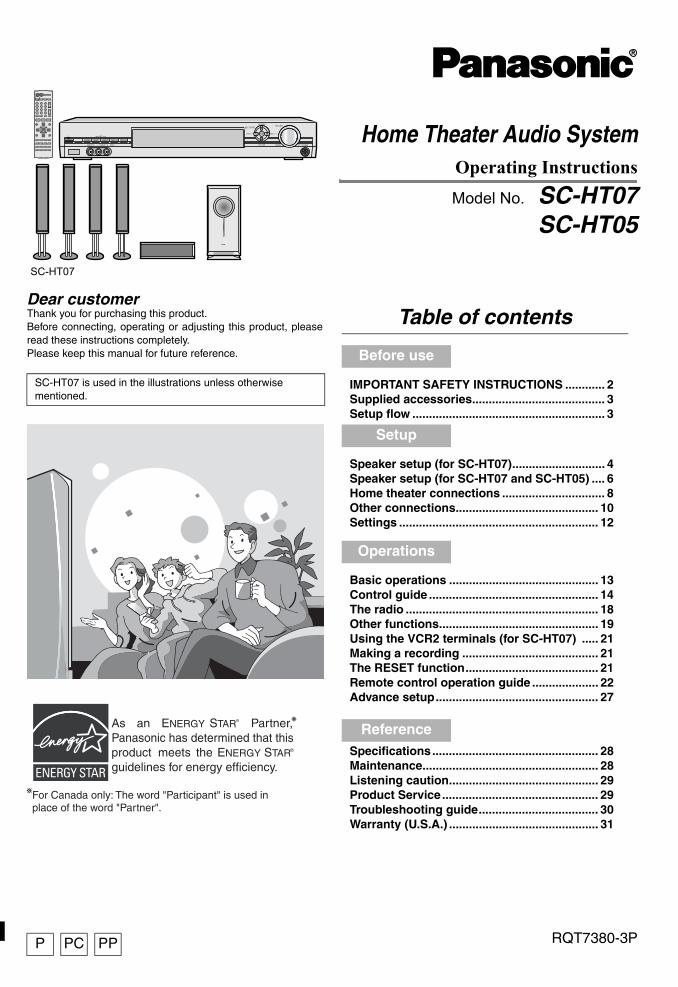
Dear customerThank you for purchasing this product.Before connecting, operating or adjusting this product, pleaseread these instructions completely.Please keep this manual for future reference.
SC-HT07 is used in the illustrations unless otherwise mentioned.
Table of contents
Before use
IMPORTANT SAFETY INSTRUCTIONS ............ 2Supplied accessories........................................ 3Setup flow .......................................................... 3
Setup
Speaker setup (for SC-HT07)............................ 4Speaker setup (for SC-HT07 and SC-HT05) .... 6Home theater connections ............................... 8Other connections........................................... 10Settings ............................................................ 12
Operations
Basic operations ............................................. 13Control guide ................................................... 14The radio .......................................................... 18Other functions................................................ 19Using the VCR2 terminals (for SC-HT07) ..... 21Making a recording ......................................... 21The RESET function........................................ 21Remote control operation guide .................... 22Advance setup................................................. 27
ReferenceSpecifications.................................................. 28Maintenance..................................................... 28Listening caution............................................. 29Product Service............................................... 29Troubleshooting guide.................................... 30Warranty (U.S.A.) ............................................. 31
Home Theater Audio SystemOperating InstructionsModel No. SC-HT07
SC-HT05
For Canada only: The word "Participant" is used in place of the word "Partner".
SC-HT07PP-EN.fm Page 1 Friday, May 7, 2004 3:41 PM

2
RQ
T73
80B
efo
re u
se
IMPORTANT SAFETY INSTRUCTIONSRead these operating instructions carefully before using the unit. Follow the safety instructions on the unit and the applicable safetyinstructions listed below. Keep these operating instructions handy for future reference.
1) Read these instructions.
2) Keep these instructions.
3) Heed all warnings.
4) Follow all instructions.
5) Do not use this apparatus near water.
6) Clean only with dry cloth.
7) Do not block any ventilation openings. Install in accordancewith the manufacturer’s instructions.
8) Do not install near any heat sources such as radiators, heatregisters, stoves, or other apparatus (including amplifiers)that produce heat.
9) Do not defeat the safety purpose of the polarized orgrounding-type plug. A polarized plug has two blades withone wider than the other. A grounding-type plug has twoblades and a third grounding prong. The wide blade or thethird prong are provided for your safety. If the provided plugdoes not fit into your outlet, consult an electrician forreplacement of the obsolete outlet.
10) Protect the power cord from being walked on or pinchedparticularly at plugs, convenience receptacles, and thepoint where they exit from the apparatus.
11) Only use attachments/accessories specified by themanufacturer.
12) Use only with the cart, stand, tripod,bracket, or table specified by themanufacturer, or sold with the apparatus.When a cart is used, use caution whenmoving the cart/apparatus combination toavoid injury from tip-over.
13) Unplug this apparatus during lightning storms or whenunused for long periods of time.
14) Refer all servicing to qualified service personnel. Servicingis required when the apparatus has been damaged in anyway, such as power-supply cord or plug is damaged, liquidhas been spilled or objects have fallen into the apparatus,the apparatus has been exposed to rain or moisture, doesnot operate normally, or has been dropped.
CAUTIONRISK OF ELECTRIC SHOCK
DO NOT OPEN
CAUTION: TO REDUCE THE RISK OF ELECTRIC SHOCK, DO NOT REMOVE SCREWS.NO USER-SERVICEABLE PARTS INSIDE.REFER SERVICING TO QUALIFIED SERVICE PERSONNEL.
The lightning flash with arrowhead symbol,within an equilateral triangle, is intended toalert the user to the presence of uninsulated“dangerous voltage” within the product’senclosure that may be of sufficient magnitudeto constitute a risk of electric shock topersons.
The exclamation point within an equilateraltriangle is intended to alert the user to thepresence of important operating andmaintenance (servicing) instructions in theliterature accompanying the appliance.
CAUTION:This equipment has been tested and found to comply with thelimits for a Class B digital device, pursuant to Part 15 of theFCC Rules.These limits are designed to provide reasonable protectionagainst harmful interference in a residential installation. Thisequipment generates, uses and can radiate radio frequencyenergy and, if not installed and used in accordance with theinstructions, may cause harmful interference to radiocommunications. However, there is no guarantee thatinterference will not occur in a particular installation. If thisequipment does cause harmful interference to radio ortelevision reception, which can be determined by turning theequipment off and on, the user is encouraged to try to correctthe interference by one or more of the following measures:• Reorient or relocate the receiving antenna.• Increase the separation between the equipment and
receiver.• Connect the equipment into an outlet on a circuit different
from that to which the receiver is connected.• Consult the dealer or an experienced radio/TV technician
for help.
Any unauthorized changes or modifications to this equipmentwould void the user’s authority to operate this device.
This device complies with Part 15 of the FCC Rules.Operation is subject to the following two conditions: (1) Thisdevice may not cause harmful interference, and (2) thisdevice must accept any interference received, includinginterference that may cause undesired operation.
WARNING: TO REDUCE THE RISK OF FIRE, ELECTRIC SHOCK OR PRODUCT DAMAGE, DO NOT EXPOSE THIS APPARATUS TO RAIN, MOISTURE, DRIPPING OR SPLASHING AND THAT NO OBJECTS FILLED WITH LIQUIDS, SUCH AS VASES, SHALL BE PLACED ON THE APPARATUS.
THE FOLLOWING APPLIES ONLY IN THE U.S.A.
SC-HT07PP-EN.fm Page 2 Friday, May 7, 2004 3:41 PM
3
RQ
T73
80B
efo
re u
se
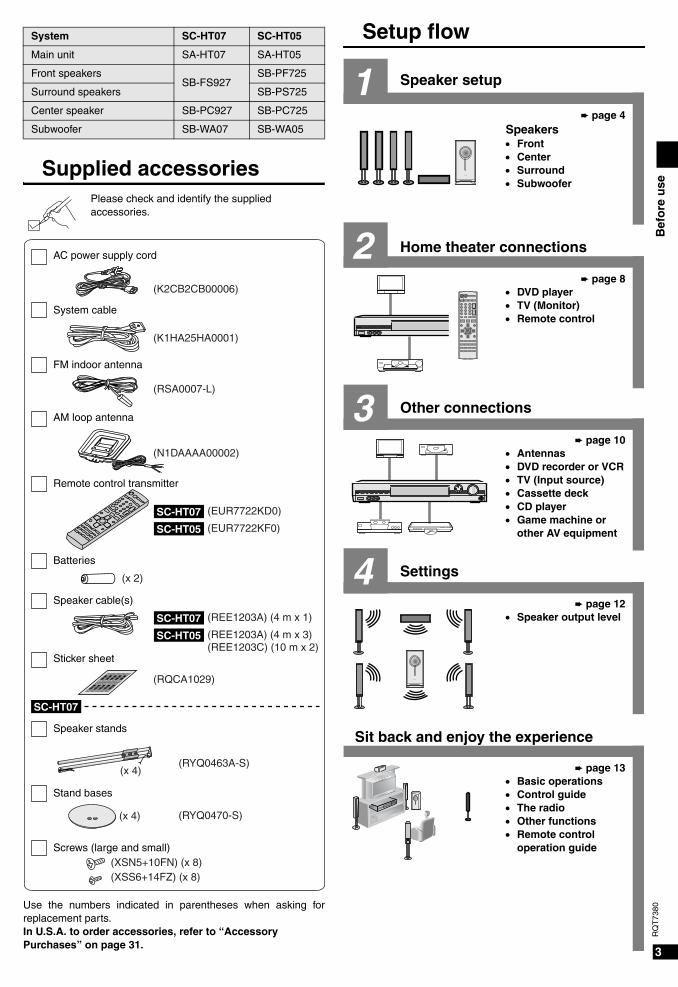
Setup flow
(K2CB2CB00006)
(EUR7722KD0)SC-HT07
(EUR7722KF0)SC-HT05
(RSA0007-L)
(N1DAAAA00002)
(K1HA25HA0001)
(RQCA1029)
(RYQ0463A-S)
(RYQ0470-S)
(REE1203A) (4 m x 1)SC-HT07
(REE1203A) (4 m x 3) (REE1203C) (10 m x 2)
SC-HT05
SC-HT07
(XSN5+10FN) (x 8)(XSS6+14FZ) (x 8)
5
xxxxxxxxx
5
xxxxxxxxx
4
xxxxxxxxx
4
xxxxxxxxx
3
xxxxxxxxx
3
xxxxxxxxx
2
xxxxxxxxx
2
xxxxxxxxx
1
xxxxxxxxx
1
xxxxxxxxx
5
xxxxxxxxx
5
xxxxxxxxx
4
xxxxxxxxx
4
xxxxxxxxx
3
xxxxxxxxx
3
xxxxxxxxx
2
xxxxxxxxx
2
xxxxxxxxx
1
xxxxxxxxx
1
xxxxxxxxx
(x 4)
(x 4)
(x 2)
Please check and identify the supplied accessories.
AC power supply cord
System cable
FM indoor antenna
Remote control transmitter
AM loop antenna
Batteries
Speaker cable(s)
Sticker sheet
Speaker stands
Stand bases
Screws (large and small)
Use the numbers indicated in parentheses when asking forreplacement parts.In U.S.A. to order accessories, refer to “Accessory Purchases” on page 31.
1
2
3
4
VOLUME
PHONES
DOWN UP
MULTI CONTROL
ENTER
TOP MENU
PREV / NEXT /
RETURN
è page 4Speakers• Front• Center• Surround• Subwoofer
è page 8• DVD player• TV (Monitor)• Remote control
è page 10• Antennas• DVD recorder or VCR• TV (Input source)• Cassette deck• CD player• Game machine or
other AV equipment
è page 12• Speaker output level
è page 13• Basic operations• Control guide• The radio• Other functions• Remote control
operation guide
Speaker setup
Home theater connections
Other connections
Settings
Sit back and enjoy the experience
Supplied accessories
System SC-HT07 SC-HT05
Main unit SA-HT07 SA-HT05
Front speakersSB-FS927
SB-PF725
Surround speakers SB-PS725
Center speaker SB-PC927 SB-PC725
Subwoofer SB-WA07 SB-WA05
SC-HT07PP-EN.fm Page 3 Friday, May 7, 2004 3:41 PM
4
RQ
T73
80S
pea
ker
setu
p (
for
SC
-HT
07)
Set
up
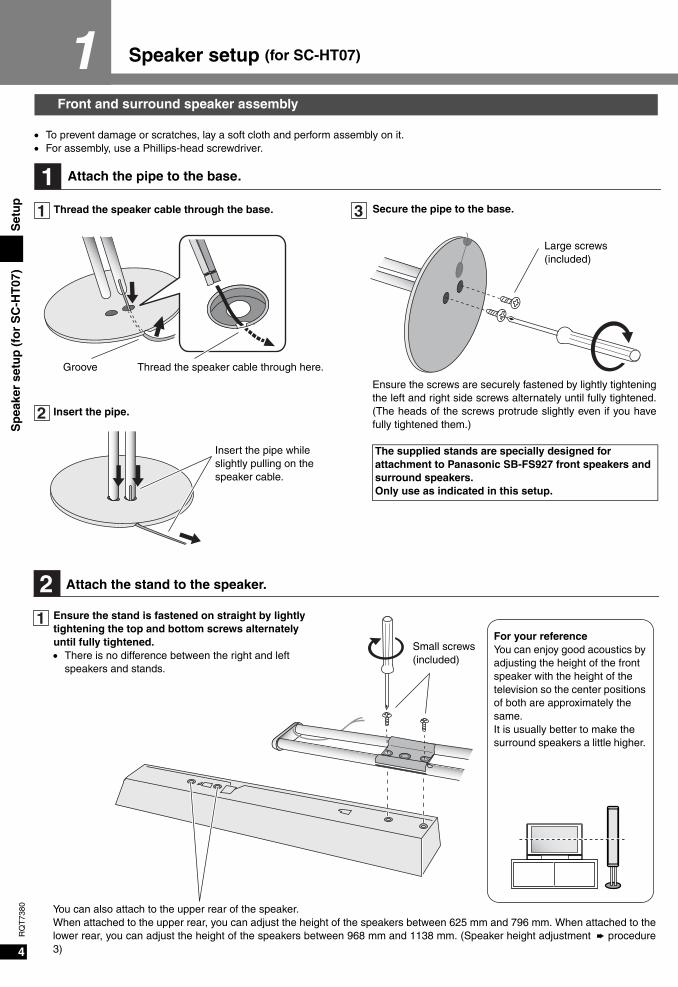
1 Speaker setup (for SC-HT07)
• To prevent damage or scratches, lay a soft cloth and perform assembly on it.• For assembly, use a Phillips-head screwdriver.
Front and surround speaker assembly
11
2
3
Attach the pipe to the base.
Thread the speaker cable through the base.
Thread the speaker cable through here.Groove
Insert the pipe.
Insert the pipe while slightly pulling on the speaker cable.
Secure the pipe to the base.
Ensure the screws are securely fastened by lightly tighteningthe left and right side screws alternately until fully tightened.(The heads of the screws protrude slightly even if you havefully tightened them.)
The supplied stands are specially designed for attachment to Panasonic SB-FS927 front speakers and surround speakers.Only use as indicated in this setup.
Large screws(included)
21
Attach the stand to the speaker.
Ensure the stand is fastened on straight by lightly tightening the top and bottom screws alternately until fully tightened.• There is no difference between the right and left
speakers and stands.
You can also attach to the upper rear of the speaker.When attached to the upper rear, you can adjust the height of the speakers between 625 mm and 796 mm. When attached to thelower rear, you can adjust the height of the speakers between 968 mm and 1138 mm. (Speaker height adjustment è procedure3)
For your referenceYou can enjoy good acoustics by adjusting the height of the front speaker with the height of the television so the center positions of both are approximately the same.It is usually better to make the surround speakers a little higher.
Small screws(included)
SC-HT07PP-EN.fm Page 4 Friday, May 7, 2004 3:41 PM
5
RQ
T73
80S
pea
ker
setu
p (
for
SC
-HT
07)
Set
up
3
1
2
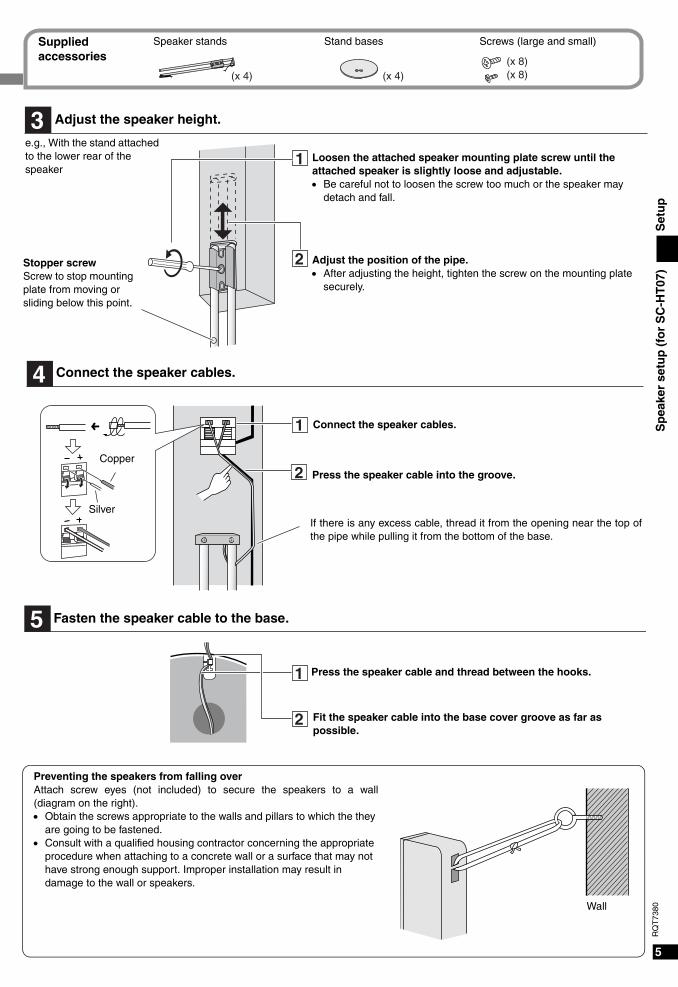
Adjust the speaker height.
e.g., With the stand attached to the lower rear of the speaker
Loosen the attached speaker mounting plate screw until the attached speaker is slightly loose and adjustable.• Be careful not to loosen the screw too much or the speaker may
detach and fall.
Adjust the position of the pipe. • After adjusting the height, tighten the screw on the mounting plate
securely.
Stopper screwScrew to stop mounting plate from moving or sliding below this point.
4
1
2
Connect the speaker cables.
Connect the speaker cables.
Press the speaker cable into the groove.
If there is any excess cable, thread it from the opening near the top ofthe pipe while pulling it from the bottom of the base.
Copper
Silver
5
1
2
Fasten the speaker cable to the base.
Press the speaker cable and thread between the hooks.
Fit the speaker cable into the base cover groove as far as possible.
Wall
Preventing the speakers from falling overAttach screw eyes (not included) to secure the speakers to a wall(diagram on the right).• Obtain the screws appropriate to the walls and pillars to which the they
are going to be fastened.• Consult with a qualified housing contractor concerning the appropriate
procedure when attaching to a concrete wall or a surface that may not have strong enough support. Improper installation may result in damage to the wall or speakers.
(x 8)(x 8)(x 4)(x 4)
Supplied accessories
Speaker stands Stand bases Screws (large and small)
SC-HT07PP-EN.fm Page 5 Friday, May 7, 2004 3:41 PM
6
RQ
T73
80S
pea
ker
setu
p (
for
SC
-HT
07 a
nd
SC
-HT
05)
Set
up
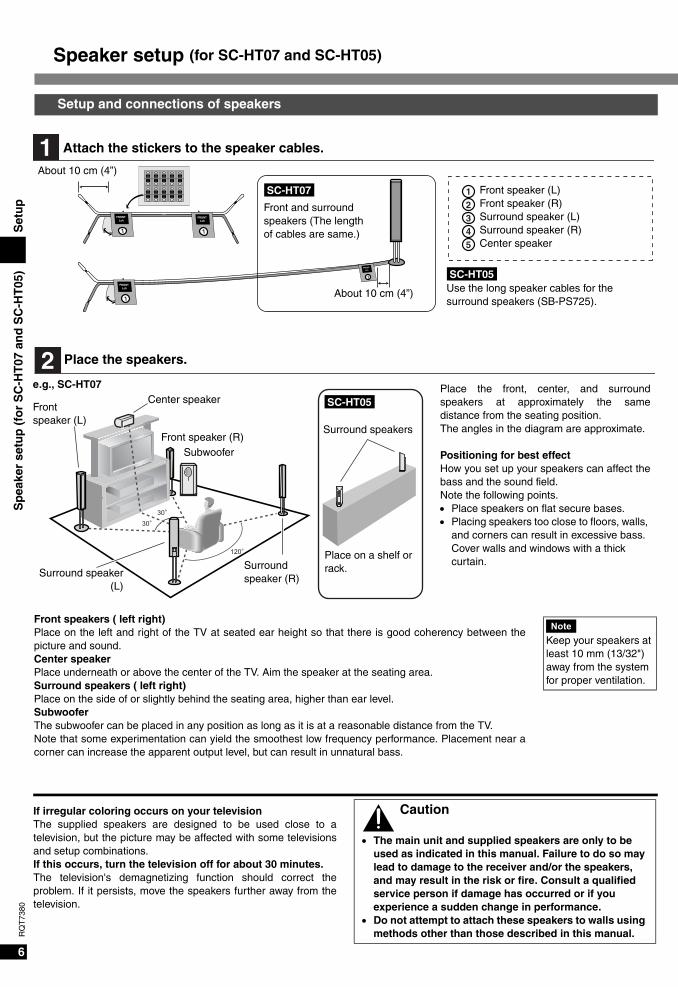
Speaker setup (for SC-HT07 and SC-HT05)
Setup and connections of speakers
1
SC-HT07
5
xxxxxx
xxx
5
xxxxxx
xxx
4
xxxxxx
xxx
4
xxxxxx
xxx
3
xxxxxx
xxx
3
xxxxxx
xxx
2
xxxxxx
xxx
2
xxxxxx
xxx
1
xxxxxx
xxx
1
xxxxxx
xxx
5
xxxxxx
xxx
5
xxxxxx
xxx
4
xxxxxx
xxx
4
xxxxxx
xxx
3
xxxxxx
xxx
3
xxxxxx
xxx
2
xxxxxx
xxx
2
xxxxxx
xxx
1
xxxxxx
xxx
1
xxxxxx
xxx
1
FRONTLch
1
FRONTLch
1
FRONTLch
1
FRONT
Lch
12345
SC-HT05
Attach the stickers to the speaker cables.
Front and surround speakers (The length of cables are same.)
About 10 cm (4”)
Front speaker (L)Front speaker (R)Surround speaker (L)Surround speaker (R)Center speaker
Use the long speaker cables for the surround speakers (SB-PS725).
About 10 cm (4”)
2
SC-HT05
Place the speakers.
Center speaker
Front speaker (R)Subwoofer
Front speaker (L)
Surround speaker (R)Surround speaker
(L)
Place the front, center, and surroundspeakers at approximately the samedistance from the seating position.The angles in the diagram are approximate.
Positioning for best effectHow you set up your speakers can affect thebass and the sound field.Note the following points.• Place speakers on flat secure bases.• Placing speakers too close to floors, walls,
and corners can result in excessive bass. Cover walls and windows with a thick curtain.
e.g., SC-HT07
Surround speakers
Place on a shelf or rack.
Front speakers ( left right)Place on the left and right of the TV at seated ear height so that there is good coherency between thepicture and sound.Center speakerPlace underneath or above the center of the TV. Aim the speaker at the seating area.Surround speakers ( left right)Place on the side of or slightly behind the seating area, higher than ear level. SubwooferThe subwoofer can be placed in any position as long as it is at a reasonable distance from the TV.Note that some experimentation can yield the smoothest low frequency performance. Placement near acorner can increase the apparent output level, but can result in unnatural bass.
If irregular coloring occurs on your televisionThe supplied speakers are designed to be used close to atelevision, but the picture may be affected with some televisionsand setup combinations.If this occurs, turn the television off for about 30 minutes.The television's demagnetizing function should correct theproblem. If it persists, move the speakers further away from thetelevision.
Caution
• The main unit and supplied speakers are only to be used as indicated in this manual. Failure to do so may lead to damage to the receiver and/or the speakers, and may result in the risk or fire. Consult a qualified service person if damage has occurred or if you experience a sudden change in performance.
• Do not attempt to attach these speakers to walls using methods other than those described in this manual.
NoteKeep your speakers at least 10 mm (13/32") away from the system for proper ventilation.
SC-HT07PP-EN.fm Page 6 Friday, May 7, 2004 3:41 PM
7
RQ
T73
80S
pea
ker
setu
p (
for
SC
-HT
07 a
nd
SC
-HT
05)
Set
up
7.5 -9.5 mm
SC-HT07SC-HT05
150 mm(5-29/32”) 230 mm
(9-1/16”)
Screw (not included)
Attaching to a wall
Wall or pillar
30 - 35 mm(1-3/16” - 1-3/8”)
8 - 11 mm(3/8” - 7/16”)
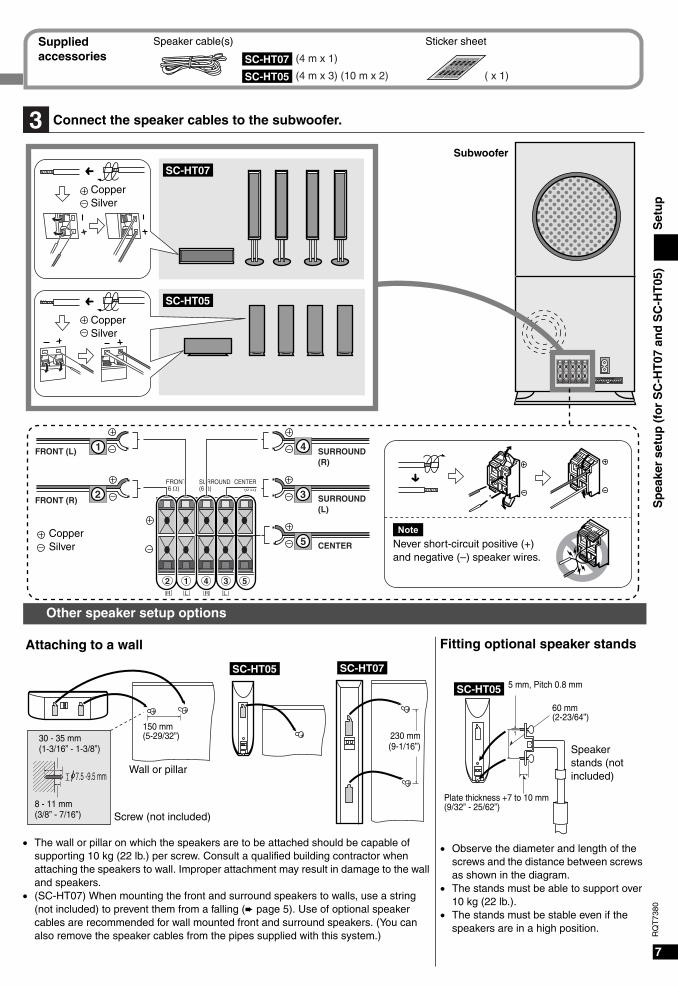
3
SC-HT07
SC-HT05
CENTER
FRONT (R)
FRONT (L)
SURROUND(L)
2 1 4 3 5
SURROUND(R)
4
3
1
5
2FRONT(6 Ω)
CENTER(6 Ω)
SURROUND(6 Ω)
R L R L
Connect the speaker cables to the subwoofer.
Subwoofer
CopperSilver
NoteNever short-circuit positive (+) and negative (–) speaker wires.
CopperSilver
CopperSilver
Other speaker setup options
• The wall or pillar on which the speakers are to be attached should be capable of supporting 10 kg (22 lb.) per screw. Consult a qualified building contractor when attaching the speakers to wall. Improper attachment may result in damage to the wall and speakers.
• (SC-HT07) When mounting the front and surround speakers to walls, use a string (not included) to prevent them from a falling (è page 5). Use of optional speaker cables are recommended for wall mounted front and surround speakers. (You can also remove the speaker cables from the pipes supplied with this system.)
Fitting optional speaker stands
SC-HT05
60 mm(2-23/64”)
Plate thickness +7 to 10 mm(9/32” - 25/62”)
Speaker stands (not included)
• Observe the diameter and length of the screws and the distance between screws as shown in the diagram.
• The stands must be able to support over 10 kg (22 lb.).
• The stands must be stable even if the speakers are in a high position.
5 mm, Pitch 0.8 mm
(4 m x 1)SC-HT07
(4 m x 3) (10 m x 2)SC-HT05
5
xxxxxxxxx
5
xxxxxxxxx
4
xxxxxxxxx
4
xxxxxxxxx
3
xxxxxxxxx
3
xxxxxxxxx
2
xxxxxxxxx
2
xxxxxxxxx
1
xxxxxxxxx
1
xxxxxxxxx
5
xxxxxxxxx
5
xxxxxxxxx
4
xxxxxxxxx
4
xxxxxxxxx
3
xxxxxxxxx
3
xxxxxxxxx
2
xxxxxxxxx
2
xxxxxxxxx
1
xxxxxxxxx
1
xxxxxxxxx ( x 1)
Supplied accessories
Speaker cable(s) Sticker sheet
SC-HT07PP-EN.fm Page 7 Friday, May 7, 2004 3:41 PM

8
RQ
T73
80H
om
e th
eate
r co
nn
ecti
on
sS
etu
p
LOOP ANTGND
CD TAPE DVR / VCR1 TV DVD / DVD 6CH TV
IN REC(OUT) PLAY(IN) OUT IN IN FRONT SURROUND SUBWOOFER DVR / VCR1 DVD OUT IN IN
CENTERL
R
L
R
L
R
L
R
L
R
L
R
AUDIO VIDEO
TO SB-WA07
A
FM ANT AM ANT
75 Ω LOOP EXT
MONITOR OUT IN
FRONT(L, R)
SURROUND(L, R)
SUBWOOFER CENTER
AUDIO OUT
VIDEOOUT
VIDEOIN
AC IN ~
Subwoofer
TV (Monitor)
DVD player
To disconnectPress the catch and pull out.
Catch
AC power supply cord (included)Connect this cord after all other cables are connected.
Household AC outlet(AC 120 V/60 Hz)
System cable (included)
Stereo connection cable(not included)
Video connection cable(not included)
LeftRight
Other accessories
Turn off all components before making any connections.To connect equipment, refer to the appropriate operating instructions.
NoteThe included AC power supply cord is for use with this unit only.Do not use it with other equipment.
Changing the digital input settingsYou can change the input settings for the digital terminals ifnecessary. Note the equipment you have connected to theterminals, then change the settings (è page 21).
2 Home theater connections
SC-HT07PP-EN.fm Page 8 Friday, May 7, 2004 3:41 PM
9
RQ
T73
80H
om
e th
eate
r co
nn
ecti
on
sS
etu
p
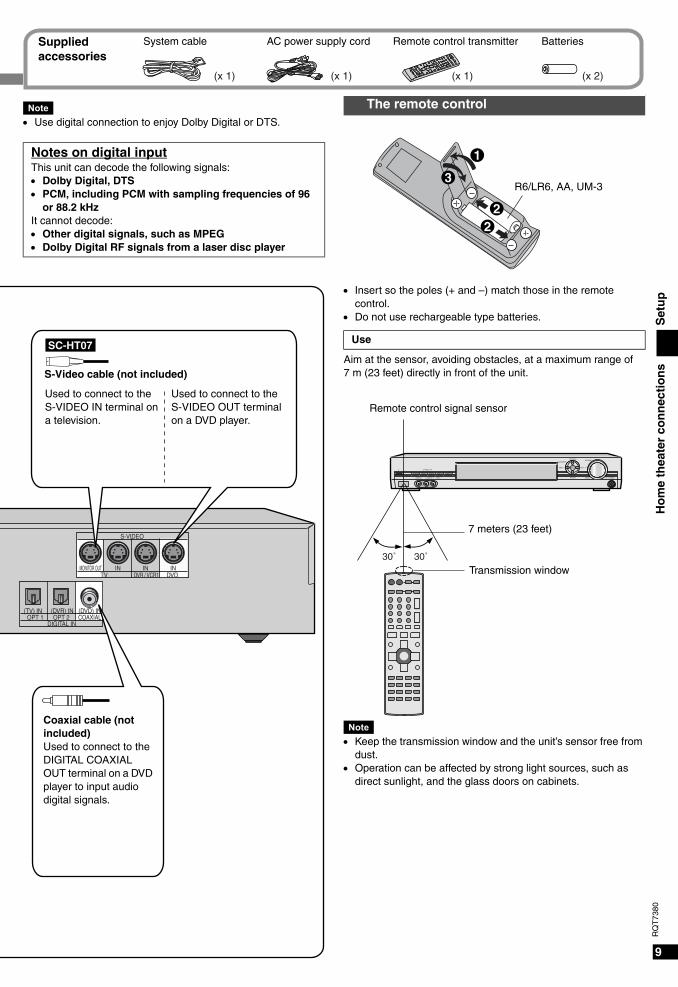
OPT 1 OPT 2 COAXIAL (TV) IN (DVR) IN (DVD) IN
DIGITAL IN
S-VIDEO
MONITOR OUT IN IN INTV DVR / VCR1 DVD
SC-HT07
Used to connect to the S-VIDEO IN terminal on a television.
Coaxial cable (not included)Used to connect to the DIGITAL COAXIAL OUT terminal on a DVD player to input audio digital signals.
Used to connect to the S-VIDEO OUT terminal on a DVD player.
S-Video cable (not included)
3
22
1
R6/LR6, AA, UM-3
VOLUME
INPUT SELECTOR MUSIC
PHONESDOWN UP
AV/MOVE TUNE TUNE
^ SFC
VIDEO IN L AUDIO IN R VCR 2
8POWER
MULTI CONTROL
ENTER
TOP MENU
PREV / NEXT /
RETURN
Remote control signal sensor
Transmission window
7 meters (23 feet)
The remote control
• Insert so the poles (+ and –) match those in the remote control.
• Do not use rechargeable type batteries.
Aim at the sensor, avoiding obstacles, at a maximum range of 7 m (23 feet) directly in front of the unit.
Use
Note• Keep the transmission window and the unit’s sensor free from
dust.• Operation can be affected by strong light sources, such as
direct sunlight, and the glass doors on cabinets.
Note• Use digital connection to enjoy Dolby Digital or DTS.
Notes on digital inputThis unit can decode the following signals:• Dolby Digital, DTS• PCM, including PCM with sampling frequencies of 96
or 88.2 kHzIt cannot decode:• Other digital signals, such as MPEG• Dolby Digital RF signals from a laser disc player
(x 1) (x 1)(x 1) (x 2)
Supplied accessories
System cable AC power supply cord Remote control transmitter Batteries
SC-HT07PP-EN.fm Page 9 Friday, May 7, 2004 3:41 PM
10
RQ
T73
80O
ther
co
nn
ecti
on
sS
etu
p
CD TAPE DVR / VCR1 TV DVD / DVD 6CH TV
IN REC(OUT) PLAY(IN) OUT IN IN FRONT SURROUND SUBWOOFER DVR / VCR1 DVD OUT IN IN
CENTERL
R
L
R
L
R
L
R
L
R
L
R
AUDIO VIDEO
TO SB-WA07
A
FM ANT AM ANT
75 Ω LOOP EXT
MONITOR OUT IN
LOOP ANTGND
FM ANT AM ANT
75 Ω LOOP EXT
LOOP ANTGND
2
3
1
2
1
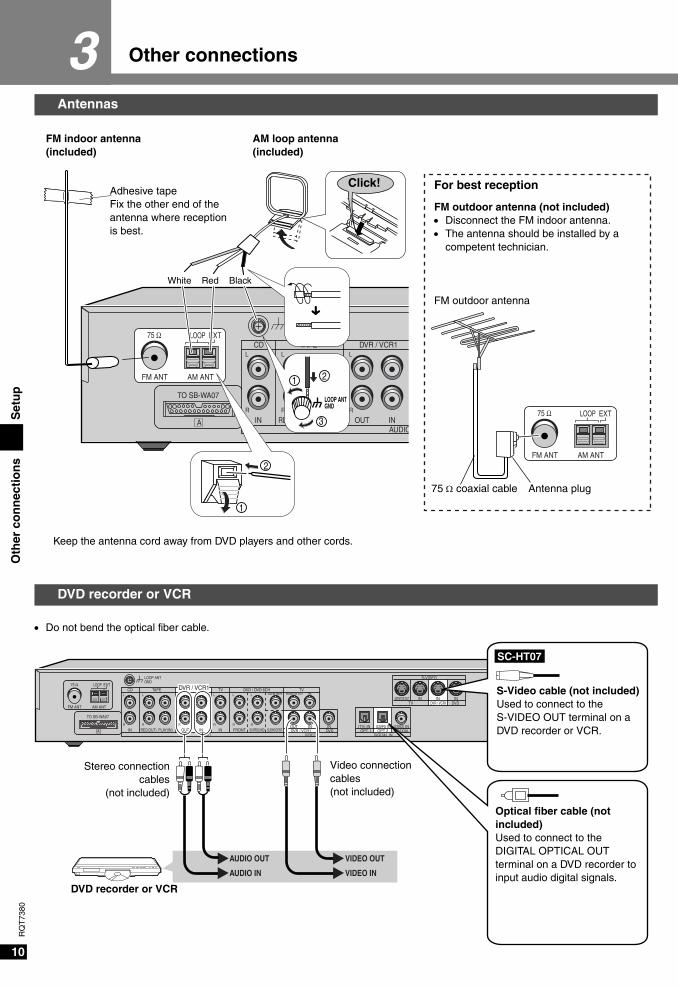
FM indoor antenna (included)
AM loop antenna (included)
Adhesive tapeFix the other end of the antenna where reception is best.
For best reception
FM outdoor antenna (not included)• Disconnect the FM indoor antenna.• The antenna should be installed by a
competent technician.
75 Ω coaxial cable
Keep the antenna cord away from DVD players and other cords.
FM outdoor antenna
White Red Black
Antenna plug
Click!
3 Other connections
CD TAPE TV DVD / DVD 6CH TV
IN REC(OUT) PLAY(IN) OUT IN IN FRONT SURROUND SUBWOOFER DVR / VCR1 DVD OPT 1 OPT 2 COAXIAL OUT IN IN (TV) IN (DVR) IN (DVD) IN
CENTERL
R
L
R
L
R
L
R
L
R
L
R
AUDIO VIDEO DIGITAL IN
S-VIDEO
MONITOR OUT IN IN INTV DVR / VCR1 DVD
TO SB-WA07
A
FM ANT AM ANT
75 Ω LOOP EXT
MONITOR OUT IN
LOOP ANTGND
DVR / VCR1
VIDEO OUT
VIDEO IN
AUDIO OUT
AUDIO IN
SC-HT07
DVD recorder or VCR
Stereo connectioncables
(not included)
Video connection cables(not included)
S-Video cable (not included)Used to connect to the S-VIDEO OUT terminal on a DVD recorder or VCR.
Optical fiber cable (not included)Used to connect to the DIGITAL OPTICAL OUT terminal on a DVD recorder to input audio digital signals.
Antennas
DVD recorder or VCR
• Do not bend the optical fiber cable.
SC-HT07PP-EN.fm Page 10 Friday, May 7, 2004 3:41 PM
11
RQ
T73
80O
ther
co
nn
ecti
on
sS
etu
p
CD TAPE DVR / VCR1 DVD / DVD 6CH
IN REC(OUT) PLAY(IN) OUT IN IN FRONT SURROUND SUBWOOFER DVR / VCR1 DVD OPT 1 OPT 2 COAXIAL OUT IN IN (TV) IN (DVR) IN (DVD) IN
CENTERL
R
L
R
L
R
L
R
L
R
L
R
AUDIO VIDEO DIGITAL IN
S-VIDEO
MONITOR OUT IN IN INTV DVR / VCR1 DVD
TO SB-WA07
A
FM ANT AM ANT
75 Ω LOOP EXT
MONITOR OUT IN
LOOP ANTGND
TV TV
VIDEO OUT
VIDEO IN
AUDIOOUT
SC-HT07
TV
Video connection cables(not included)
Stereo connection cable (not included)
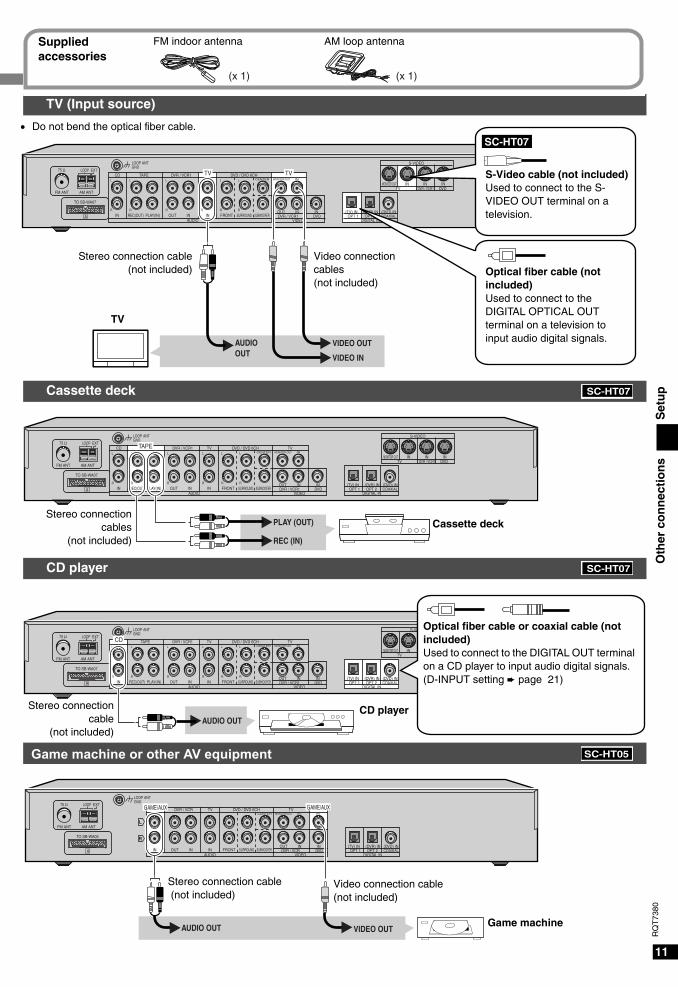
S-Video cable (not included)Used to connect to the S-VIDEO OUT terminal on a television.
Optical fiber cable (not included)Used to connect to the DIGITAL OPTICAL OUT terminal on a television to input audio digital signals.
• Do not bend the optical fiber cable.
CD DVR / VCR1 TV DVD / DVD 6CH TV
IN REC(OUT) PLAY(IN) OUT IN IN FRONT SURROUND SUBWOOFER DVR / VCR1 DVD OPT 1 OPT 2 COAXIAL OUT IN IN (TV) IN (DVR) IN (DVD) IN
CENTERL
R
L
R
L
R
L
R
L
R
L
R
AUDIO VIDEO DIGITAL IN
S-VIDEO
MONITOR OUT IN IN INTV DVR / VCR1 DVD
TO SB-WA07
A
FM ANT AM ANT
75 Ω LOOP EXT
MONITOR OUT IN
LOOP ANTGND
TAPE
PLAY (OUT)
REC (IN)
Cassette deck
TAPE DVR / VCR1 TV DVD / DVD 6CH TV
IN REC(OUT) PLAY(IN) OUT IN IN FRONT SURROUND SUBWOOFER DVR / VCR1 DVD OPT 1 OPT 2 COAXIAL OUT IN IN (TV) IN (DVR) IN (DVD) IN
CENTERL
R
L
R
L
R
L
R
L
R
L
R
AUDIO VIDEO DIGITAL IN
S-VIDEO
MONITOR OUT IN IN INTV DVR / VCR1 DVD
TO SB-WA07
A
FM ANT AM ANT
75 Ω LOOP EXT
MONITOR OUT IN
LOOP ANTGND
CD
AUDIO OUTCD playerStereo connection
cable (not included)
Optical fiber cable or coaxial cable (not included)Used to connect to the DIGITAL OUT terminal on a CD player to input audio digital signals. (D-INPUT setting è page 21)
DVR / VCR TV DVD / DVD 6CH TV
OUT IN IN IN FRONT SURROUND SUBWOOFER DVR / VCR DVD OPT 1 OPT 2 COAXIAL OUT IN IN (TV) IN (DVR) IN (DVD) IN
CENTER MONITOR OUT IN IN
AUDIO VIDEO DIGITAL IN
TO SB-WA05
A
FM ANT AM ANT
75 Ω LOOP EXT
L
R
LOOP ANTGND
GAME/AUX GAME/AUX
VIDEO OUTAUDIO OUT Game machine
Stereo connection cable (not included)
Video connection cable(not included)
TV (Input source)
CD player
Game machine or other AV equipment
Stereo connectioncables
(not included)
Cassette deck
SC-HT07SC-HT07
SC-HT07SC-HT07
SC-HT07SC-HT05
(x 1)(x 1)
Supplied accessories
FM indoor antenna AM loop antenna
SC-HT07PP-EN.fm Page 11 Friday, May 7, 2004 3:41 PM
12
RQ
T73
80S
etti
ng
sS
etu
p
4 Settings
Adjusting speaker output level
INPUTMODE
STEREO/2CH MIX MUSIC AV/MOVIE
SFC
SLEEP TONE/BALANCE LEVEL EFFECT
ENTER
DISC
TUNER/BAND
CH
VOLUME
TOP MENU MENU
DIRECT NAVIGATOR
DISPLAY
DIMMER SUBWOOFERCENTERFOCUSTV/VIDEO
RETURN
PLAY LIST
DIRECT TUNING
1 2 3
7
0
8 9
10
4 5 6
>=
TEST
u/t y/i MUTING
qg h
%PL
TV VOL TV VOL
/L /R
ENTER
^ ^
AV SYSTEMRECEIVER
VCR CDDVD
DVD TV
DVD/HDDDVD RECORDER
RECORDER
ANALOG 6CH
OFF
1 2 3 4 5 6
^
RECEIVERTEST TESTLEVEL
VOLUME
/L /R
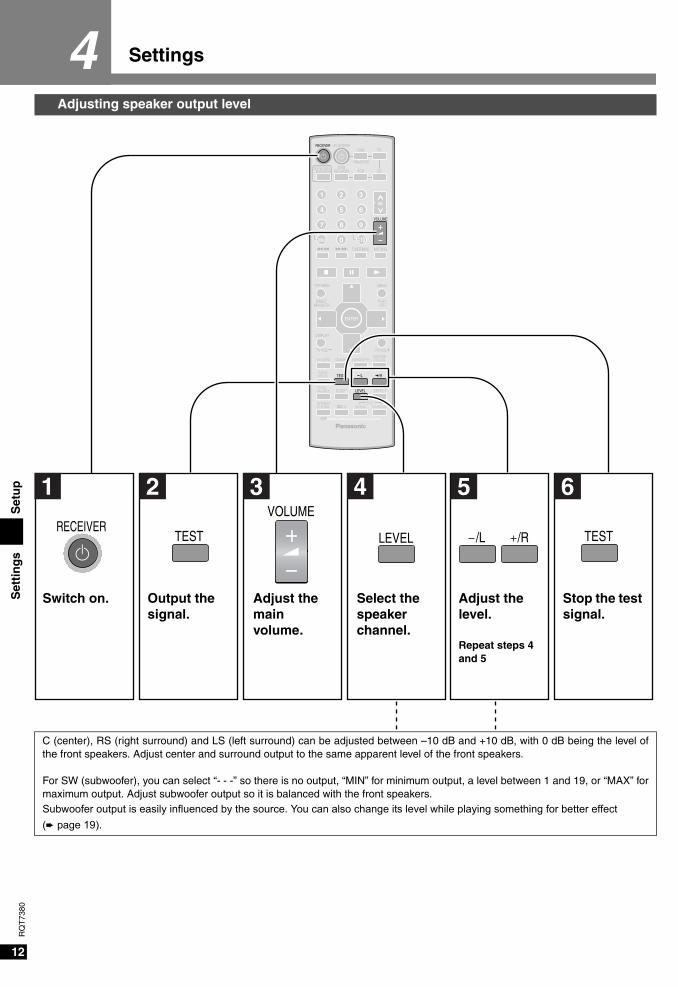
Switch on. Output the signal.
Adjust the main volume.
Select the speaker channel.
Adjust the level.
Repeat steps 4 and 5
Stop the test signal.
C (center), RS (right surround) and LS (left surround) can be adjusted between –10 dB and +10 dB, with 0 dB being the level ofthe front speakers. Adjust center and surround output to the same apparent level of the front speakers.
For SW (subwoofer), you can select “- - -” so there is no output, “MIN” for minimum output, a level between 1 and 19, or “MAX” formaximum output. Adjust subwoofer output so it is balanced with the front speakers.Subwoofer output is easily influenced by the source. You can also change its level while playing something for better effect (è page 19).
SC-HT07PP-EN.fm Page 12 Friday, May 7, 2004 3:41 PM
Op
erat
ion
s
13
RQ
T73
80
Basic operations
Sound modes
VOLUME
INPUT SELECTOR MUSIC
PHONESDOWN UP
AV/MOVE TUNE TUNE
^ SFC
VIDEO IN L AUDIO IN R VCR 2
8POWER
MULTI CONTROL
ENTER
TOP MENU
PREV / NEXT /
RETURNINPUTMODE
STEREO/2CH MIX MUSIC AV/MOVIE
SFC
SLEEP TONE/BALANCE LEVEL EFFECT
ENTER
DISPLAY
DIMMER SUBWOOFERCENTERFOCUSTV/VIDEO
RETURN
TEST
%PL
TV VOL TV VOL
/L /R
OFF
STEREO/2CH MIX
%PL
MUSIC AV/MOVIESFC
1 2 3 4INPUT SELECTOR VOLUME
DOWN UP
^
TUNER CD TVDVD
DVR/VCR1VCR2TAPE
TUNER TVDVD
DVR/VCRGAME/AUX
SC-HT07
SC-HT05
8POWER
OFF
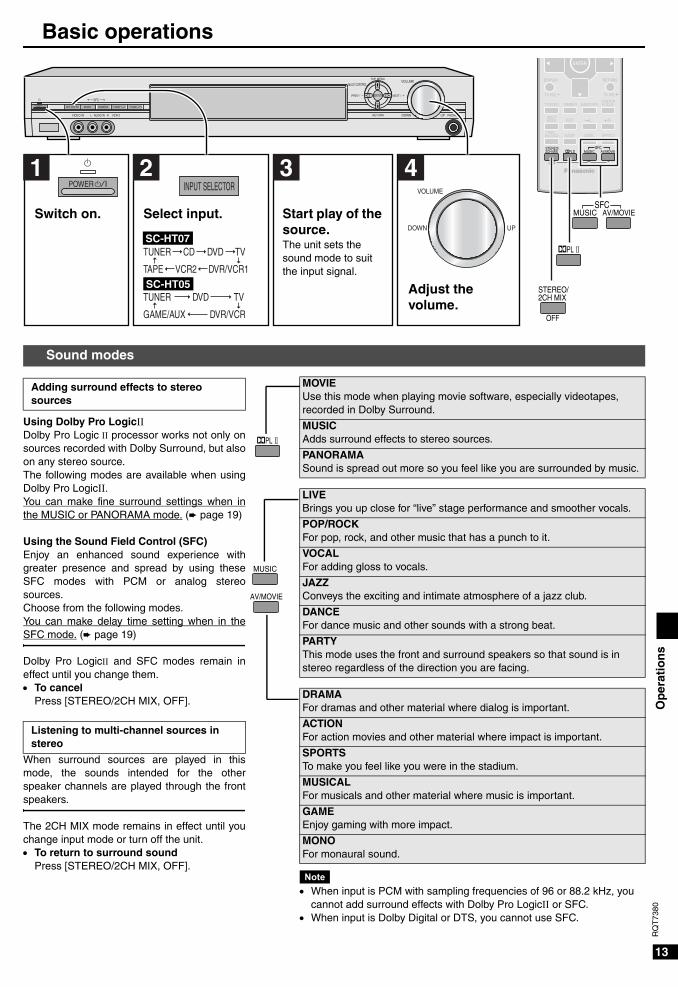
Switch on. Select input. Start play of the source.The unit sets the sound mode to suit the input signal.
Adjust the volume.
Using Dolby Pro LogicIIDolby Pro Logic II processor works not only onsources recorded with Dolby Surround, but alsoon any stereo source.The following modes are available when usingDolby Pro LogicII.You can make fine surround settings when inthe MUSIC or PANORAMA mode. (è page 19)
Using the Sound Field Control (SFC)Enjoy an enhanced sound experience withgreater presence and spread by using theseSFC modes with PCM or analog stereosources.Choose from the following modes.You can make delay time setting when in theSFC mode. (è page 19)
Dolby Pro LogicII and SFC modes remain ineffect until you change them.• To cancel
Press [STEREO/2CH MIX, OFF].
When surround sources are played in thismode, the sounds intended for the otherspeaker channels are played through the frontspeakers.
The 2CH MIX mode remains in effect until youchange input mode or turn off the unit.• To return to surround sound
Press [STEREO/2CH MIX, OFF].
Adding surround effects to stereo sources
Listening to multi-channel sources in stereo
%PL
MUSIC
AV/MOVIE
Note• When input is PCM with sampling frequencies of 96 or 88.2 kHz, you
cannot add surround effects with Dolby Pro LogicII or SFC.• When input is Dolby Digital or DTS, you cannot use SFC.
MOVIEUse this mode when playing movie software, especially videotapes, recorded in Dolby Surround.
MUSICAdds surround effects to stereo sources.
PANORAMASound is spread out more so you feel like you are surrounded by music.
LIVEBrings you up close for “live” stage performance and smoother vocals.
POP/ROCKFor pop, rock, and other music that has a punch to it.
VOCALFor adding gloss to vocals.
JAZZConveys the exciting and intimate atmosphere of a jazz club.
DANCEFor dance music and other sounds with a strong beat.
PARTYThis mode uses the front and surround speakers so that sound is in stereo regardless of the direction you are facing.
DRAMAFor dramas and other material where dialog is important.
ACTIONFor action movies and other material where impact is important.
SPORTSTo make you feel like you were in the stadium.
MUSICALFor musicals and other material where music is important.
GAMEEnjoy gaming with more impact.
MONOFor monaural sound.
SC-HT07PP-EN.fm Page 13 Friday, May 7, 2004 3:41 PM
Op
erat
ion
s
14
RQ
T73
80
Control guide
TUNEDMONO SLEEPST
kHzMHz
DIGITAL INPUTSURROUND
SFC
M 2CH MIXC.FOCUSL C R
LS RSS LFE%%
DIGITALPRO LOGIC
100Hz 1kHz 10kHz
Main unit
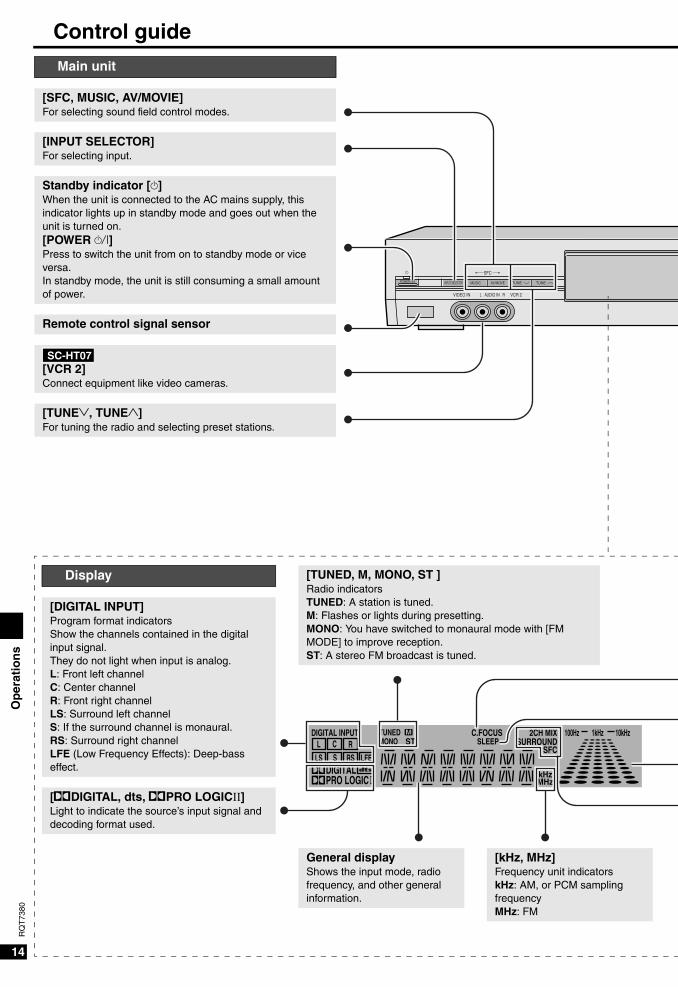
[SFC, MUSIC, AV/MOVIE]For selecting sound field control modes.
[INPUT SELECTOR]For selecting input.
Standby indicator [^]When the unit is connected to the AC mains supply, this indicator lights up in standby mode and goes out when the unit is turned on.[POWER 8]Press to switch the unit from on to standby mode or vice versa.In standby mode, the unit is still consuming a small amount of power.
Remote control signal sensor
[VCR 2]Connect equipment like video cameras.
[TUNE2, TUNE1]For tuning the radio and selecting preset stations.
Display
[DIGITAL INPUT]Program format indicatorsShow the channels contained in the digital input signal.They do not light when input is analog.L: Front left channelC: Center channelR: Front right channelLS: Surround left channelS: If the surround channel is monaural.RS: Surround right channelLFE (Low Frequency Effects): Deep-bass effect.
[%DIGITAL, dts, %PRO LOGICII]Light to indicate the source’s input signal and decoding format used.
[TUNED, M, MONO, ST ]Radio indicatorsTUNED: A station is tuned.M: Flashes or lights during presetting.MONO: You have switched to monaural mode with [FM MODE] to improve reception.ST: A stereo FM broadcast is tuned.
General displayShows the input mode, radio frequency, and other general information.
[kHz, MHz]Frequency unit indicatorskHz: AM, or PCM sampling frequencyMHz: FM
INPUT SELECTOR MUSIC AV/MOVE TUNE TUNE
^ SFC
VIDEO IN L AUDIO IN R VCR 2
8POWER
SC-HT07
SC-HT07PP-EN.fm Page 14 Friday, May 7, 2004 3:41 PM
Op
erat
ion
s
15
RQ
T73
80
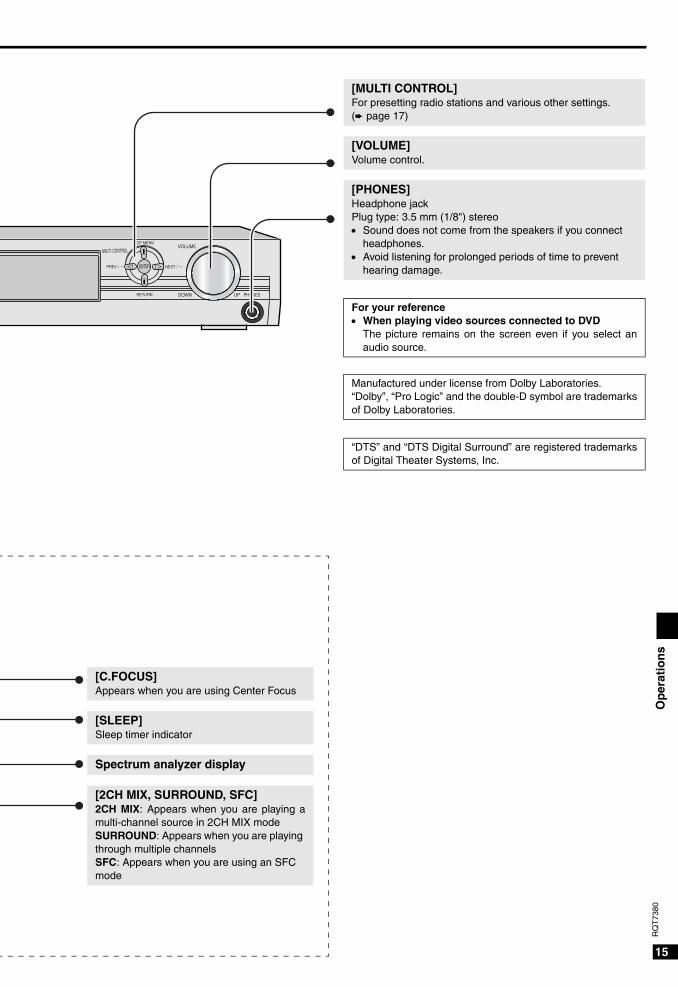
[MULTI CONTROL]For presetting radio stations and various other settings. (è page 17)
[VOLUME]Volume control.
[PHONES]Headphone jackPlug type: 3.5 mm (1/8") stereo• Sound does not come from the speakers if you connect
headphones.• Avoid listening for prolonged periods of time to prevent
hearing damage.
For your reference• When playing video sources connected to DVD
The picture remains on the screen even if you select anaudio source.
Manufactured under license from Dolby Laboratories.“Dolby”, “Pro Logic” and the double-D symbol are trademarksof Dolby Laboratories.
“DTS” and “DTS Digital Surround” are registered trademarksof Digital Theater Systems, Inc.
[C.FOCUS]Appears when you are using Center Focus
[SLEEP]Sleep timer indicator
Spectrum analyzer display
[2CH MIX, SURROUND, SFC]2CH MIX: Appears when you are playing amulti-channel source in 2CH MIX modeSURROUND: Appears when you are playing through multiple channelsSFC: Appears when you are using an SFC mode
VOLUME
PHONESDOWN UP
MULTI CONTROL
ENTER
TOP MENU
PREV / NEXT /
RETURN
SC-HT07PP-EN.fm Page 15 Friday, May 7, 2004 3:41 PM
Op
erat
ion
s
16
RQ
T73
80
Control guide
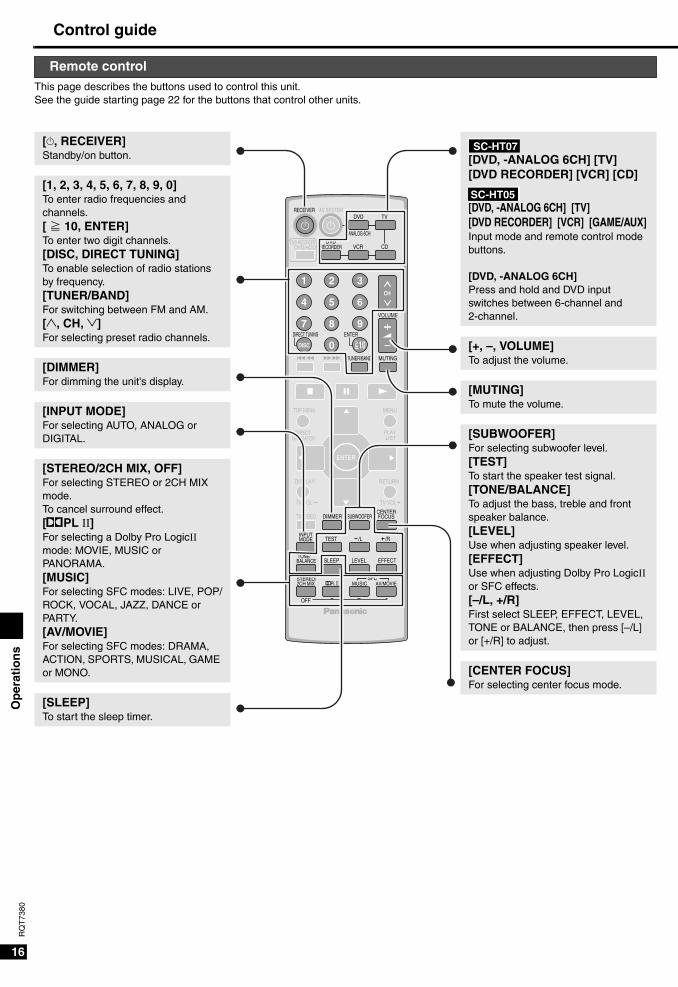
[^, RECEIVER]Standby/on button.
[1, 2, 3, 4, 5, 6, 7, 8, 9, 0]To enter radio frequencies and channels.[ ≧ 10, ENTER]To enter two digit channels.[DISC, DIRECT TUNING]To enable selection of radio stations by frequency.[TUNER/BAND]For switching between FM and AM.[1, CH, 2]For selecting preset radio channels.
[DIMMER]For dimming the unit's display.
[INPUT MODE]For selecting AUTO, ANALOG or DIGITAL.
[STEREO/2CH MIX, OFF]For selecting STEREO or 2CH MIX mode.To cancel surround effect.[%PL II]For selecting a Dolby Pro LogicII mode: MOVIE, MUSIC or PANORAMA.[MUSIC]For selecting SFC modes: LIVE, POP/ROCK, VOCAL, JAZZ, DANCE or PARTY.[AV/MOVIE]For selecting SFC modes: DRAMA, ACTION, SPORTS, MUSICAL, GAME or MONO.
[SLEEP]To start the sleep timer.
Remote controlThis page describes the buttons used to control this unit. See the guide starting page 22 for the buttons that control other units.
[DVD, -ANALOG 6CH] [TV] [DVD RECORDER] [VCR] [CD]
[DVD, -ANALOG 6CH] [TV] [DVD RECORDER] [VCR] [GAME/AUX]Input mode and remote control modebuttons.
[DVD, -ANALOG 6CH]Press and hold and DVD input switches between 6-channel and 2-channel.
[+, –, VOLUME]To adjust the volume.
[MUTING]To mute the volume.
[SUBWOOFER]For selecting subwoofer level.[TEST]To start the speaker test signal.[TONE/BALANCE]To adjust the bass, treble and front speaker balance.[LEVEL]Use when adjusting speaker level.[EFFECT]Use when adjusting Dolby Pro LogicII or SFC effects.[–/L, +/R]First select SLEEP, EFFECT, LEVEL, TONE or BALANCE, then press [–/L] or [+/R] to adjust.
[CENTER FOCUS]For selecting center focus mode.
INPUTMODE
STEREO/2CH MIX MUSIC AV/MOVIE
SFC
SLEEP TONE/BALANCE LEVEL EFFECT
ENTER
DISC
TUNER/BAND
CH
VOLUME
TOP MENU MENU
DIRECT NAVIGATOR
DISPLAY
DIMMER SUBWOOFERCENTERFOCUSTV/VIDEO
RETURN
PLAY LIST
DIRECT TUNING
1 2 3
7
0
8 9
10
4 5 6
>=
TEST
u/t y/i MUTING
qg h
%PL
TV VOL TV VOL
/L /R
ENTER
^ ^
AV SYSTEMRECEIVER
VCR CDDVD
DVD TV
DVD/HDDDVD RECORDER
RECORDER
ANALOG 6CH
OFF
SC-HT07
SC-HT05
SC-HT07PP-EN.fm Page 16 Friday, May 7, 2004 3:41 PM
Op
erat
ion
s
17
RQ
T73
80
MULTI CONTROL operations
TONE
TUNER
BALANCE
DIMMER OFF
ON
2
1
3
FM MODE
TUNING
MEMORY
AUTO MEM
MANUAL PRESET
AUTO MONO
OFF ON
OFF ON
ON OFF
NO YES
CD TV
DVR DVD
CH1
START
CH30
BASS TREBLE
OFF 30 60 90 120
10dB 0dB 10dB
LEVEL1 LEVEL2 LEVEL3
OFF STANDARD MAX
SLEEP
D-INPUTSETUP
EXIT
A/D ATT
RESET
SPECTRUM
DTS-PCM
OPTION
(SC-HT07)NONE OPT1
OPT2 COAX
(SC-HT07)
DR COMP
ENTER
L R L R L R
MULTI CONTROL
ENTER
TOP MENU
PREV / NEXT /
RETURN
TOP MENU
ENTER ENTER ENTER ENTER
Auto memory
Tuning mode
FM mode
Tone
(Only when input is TUNER)
Memory
Balance
Dimmer
Option
Setup
Sleep timer
Dynamic range compression
A/D attenuator
Spectrum display
Digital input
Reset
Tuner
To exit
Top menu Sub menu (Level 1)
or
(Level 2) (Level 3)
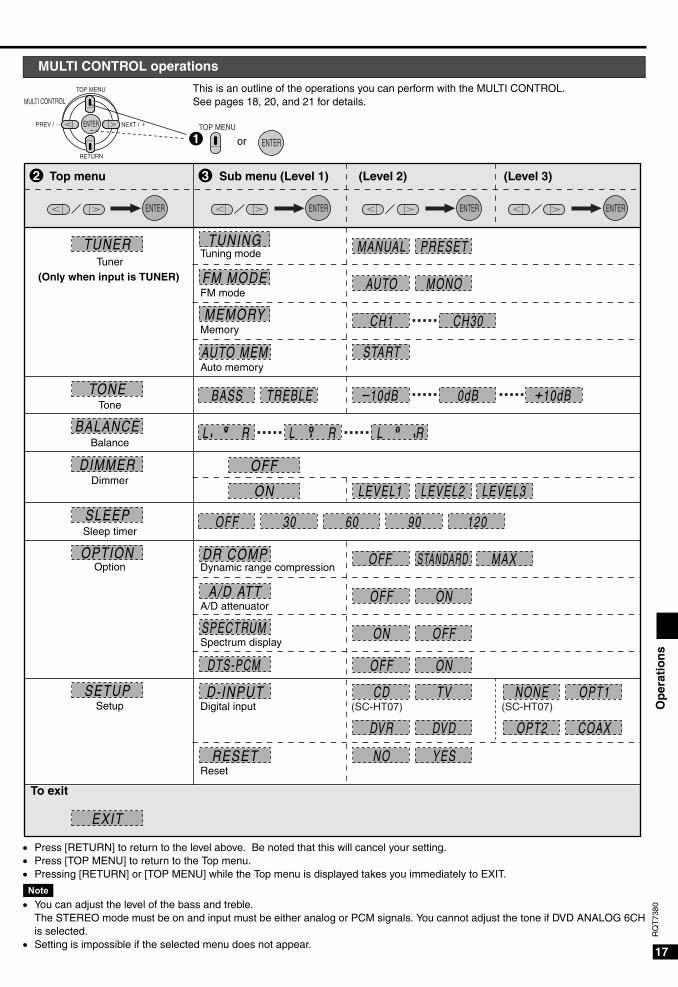
This is an outline of the operations you can perform with the MULTI CONTROL. See pages 18, 20, and 21 for details.
• Press [RETURN] to return to the level above. Be noted that this will cancel your setting.• Press [TOP MENU] to return to the Top menu. • Pressing [RETURN] or [TOP MENU] while the Top menu is displayed takes you immediately to EXIT.
Note• You can adjust the level of the bass and treble.
The STEREO mode must be on and input must be either analog or PCM signals. You cannot adjust the tone if DVD ANALOG 6CHis selected.
• Setting is impossible if the selected menu does not appear.
SC-HT07PP-EN.fm Page 17 Friday, May 7, 2004 3:41 PM
Op
erat
ion
s
18
RQ
T73
80
The radio
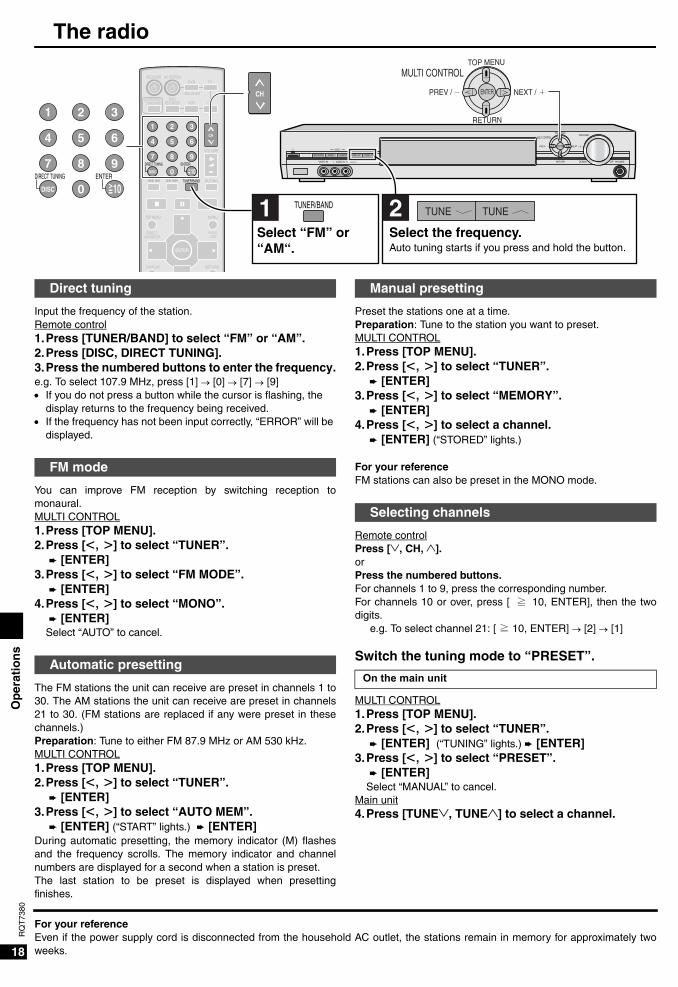
Input the frequency of the station.Remote control1.Press [TUNER/BAND] to select “FM” or “AM”.2.Press [DISC, DIRECT TUNING].3.Press the numbered buttons to enter the frequency.e.g. To select 107.9 MHz, press [1] → [0] → [7] → [9]• If you do not press a button while the cursor is flashing, the
display returns to the frequency being received.• If the frequency has not been input correctly, “ERROR” will be
displayed.
You can improve FM reception by switching reception tomonaural.MULTI CONTROL1.Press [TOP MENU].2.Press [<, >] to select “TUNER”.
è [ENTER] 3.Press [<, >] to select “FM MODE”.
è [ENTER] 4.Press [<, >] to select “MONO”.
è [ENTER] Select “AUTO” to cancel.
The FM stations the unit can receive are preset in channels 1 to30. The AM stations the unit can receive are preset in channels21 to 30. (FM stations are replaced if any were preset in thesechannels.)Preparation: Tune to either FM 87.9 MHz or AM 530 kHz.MULTI CONTROL1.Press [TOP MENU].2.Press [<, >] to select “TUNER”.
è [ENTER] 3.Press [<, >] to select “AUTO MEM”.
è [ENTER] (“START” lights.) è [ENTER] During automatic presetting, the memory indicator (M) flashesand the frequency scrolls. The memory indicator and channelnumbers are displayed for a second when a station is preset.The last station to be preset is displayed when presettingfinishes.
Direct tuning
FM mode
Automatic presetting
Preset the stations one at a time.Preparation: Tune to the station you want to preset. MULTI CONTROL1.Press [TOP MENU].2.Press [<, >] to select “TUNER”.
è [ENTER]3.Press [<, >] to select “MEMORY”.
è [ENTER]4.Press [<, >] to select a channel.
è [ENTER] (“STORED” lights.)
For your referenceFM stations can also be preset in the MONO mode.
Remote controlPress [2, CH, 1].orPress the numbered buttons.For channels 1 to 9, press the corresponding number.For channels 10 or over, press [ ≧ 10, ENTER], then the twodigits.
e.g. To select channel 21: [ ≧ 10, ENTER] → [2] → [1]
Switch the tuning mode to “PRESET”.
MULTI CONTROL1.Press [TOP MENU].2.Press [<, >] to select “TUNER”.
è [ENTER] (“TUNING” lights.) è [ENTER]3.Press [<, >] to select “PRESET”.
è [ENTER]Select “MANUAL” to cancel.
Main unit4.Press [TUNE2, TUNE1] to select a channel.
Manual presetting
Selecting channels
On the main unit
For your referenceEven if the power supply cord is disconnected from the household AC outlet, the stations remain in memory for approximately twoweeks.
ENTER
DISC
TUNER/BAND
CH
VOLUME
TOP MENU MENU
DIRECT NAVIGATOR
DISPLAY RETURN
PLAY LIST
DIRECT TUNING
1 2 3
7
0
8 9
10
4 5 6
>=u/t y/i MUTING
qg h
ENTER
MULTI CONTROLTOP MENU
ENTERPREV / NEXT /
RETURN
^ ^
AV SYSTEMRECEIVER
VCR CDDVD
DVD TV
DVD/HDDDVD RECORDER
RECORDER
ANALOG 6CH CH
DISC
DIRECT TUNING
1 2 3
7
0
8 9
10
4 5 6
>=ENTER
1 2TUNER/BANDTUNE TUNE
VOLUME
INPUT SELECTOR MUSIC
PHONESDOWN UP
AV/MOVE TUNE TUNE
^ SFC
VIDEO IN L AUDIO IN R VCR 2
8POWER
MULTI CONTROL
ENTER
TOP MENU
PREV / NEXT /
RETURN
Select “FM” or “AM“.
Select the frequency.Auto tuning starts if you press and hold the button.
SC-HT07PP-EN.fm Page 18 Friday, May 7, 2004 3:41 PM
Op
erat
ion
s
19
RQ
T73
80
Other functions
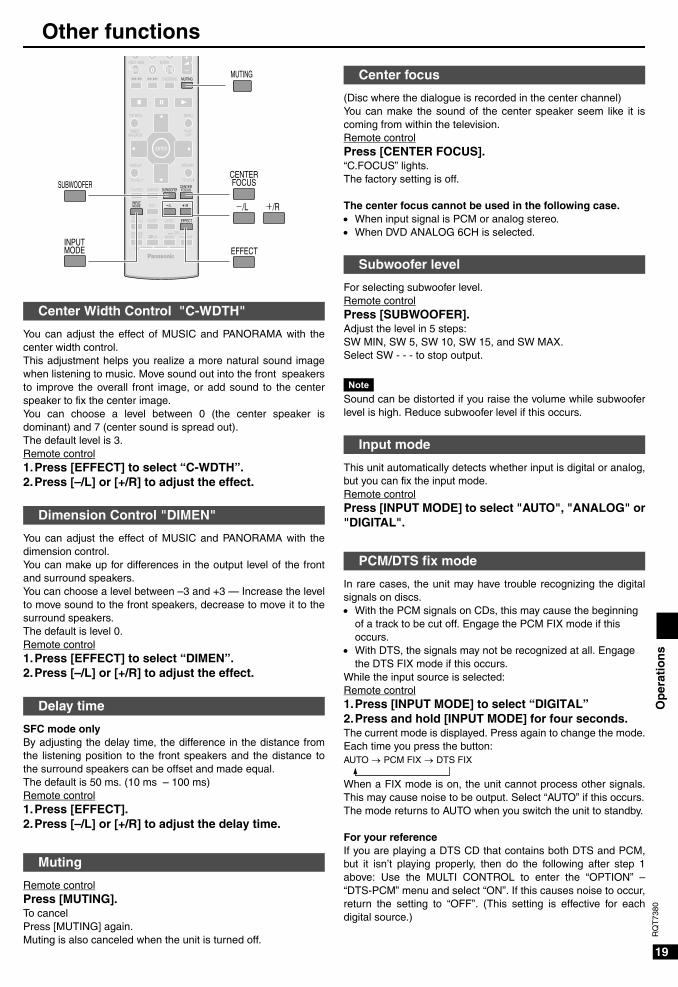
You can adjust the effect of MUSIC and PANORAMA with thecenter width control.This adjustment helps you realize a more natural sound imagewhen listening to music. Move sound out into the front speakersto improve the overall front image, or add sound to the centerspeaker to fix the center image.You can choose a level between 0 (the center speaker isdominant) and 7 (center sound is spread out).The default level is 3.Remote control1.Press [EFFECT] to select “C-WDTH”.2.Press [–/L] or [+/R] to adjust the effect.
You can adjust the effect of MUSIC and PANORAMA with thedimension control.You can make up for differences in the output level of the frontand surround speakers.You can choose a level between –3 and +3 — Increase the levelto move sound to the front speakers, decrease to move it to thesurround speakers.The default is level 0.Remote control1.Press [EFFECT] to select “DIMEN”.2.Press [–/L] or [+/R] to adjust the effect.
SFC mode onlyBy adjusting the delay time, the difference in the distance fromthe listening position to the front speakers and the distance tothe surround speakers can be offset and made equal. The default is 50 ms. (10 ms – 100 ms)Remote control1.Press [EFFECT].2.Press [–/L] or [+/R] to adjust the delay time.
Remote controlPress [MUTING]. To cancelPress [MUTING] again.Muting is also canceled when the unit is turned off.
Center Width Control "C-WDTH"
Dimension Control "DIMEN"
Delay time
Muting
(Disc where the dialogue is recorded in the center channel)You can make the sound of the center speaker seem like it iscoming from within the television.Remote controlPress [CENTER FOCUS].“C.FOCUS” lights.The factory setting is off.
The center focus cannot be used in the following case.• When input signal is PCM or analog stereo.• When DVD ANALOG 6CH is selected.
For selecting subwoofer level.Remote controlPress [SUBWOOFER]. Adjust the level in 5 steps:SW MIN, SW 5, SW 10, SW 15, and SW MAX.Select SW - - - to stop output.
NoteSound can be distorted if you raise the volume while subwooferlevel is high. Reduce subwoofer level if this occurs.
This unit automatically detects whether input is digital or analog,but you can fix the input mode.Remote controlPress [INPUT MODE] to select "AUTO", "ANALOG" or"DIGITAL".
In rare cases, the unit may have trouble recognizing the digitalsignals on discs. • With the PCM signals on CDs, this may cause the beginning
of a track to be cut off. Engage the PCM FIX mode if this occurs.
• With DTS, the signals may not be recognized at all. Engage the DTS FIX mode if this occurs.
While the input source is selected:Remote control1.Press [INPUT MODE] to select “DIGITAL”2.Press and hold [INPUT MODE] for four seconds.The current mode is displayed. Press again to change the mode.Each time you press the button:AUTO → PCM FIX → DTS FIX
When a FIX mode is on, the unit cannot process other signals.This may cause noise to be output. Select “AUTO” if this occurs.The mode returns to AUTO when you switch the unit to standby.
For your referenceIf you are playing a DTS CD that contains both DTS and PCM,but it isn’t playing properly, then do the following after step 1above: Use the MULTI CONTROL to enter the “OPTION” –“DTS-PCM” menu and select “ON”. If this causes noise to occur,return the setting to “OFF”. (This setting is effective for eachdigital source.)
Center focus
Subwoofer level
Input mode
PCM/DTS fix mode
INPUTMODE
STEREO/2CH MIX MUSIC AV/MOVIE
SFC
SLEEP TONE/BALANCE LEVEL EFFECT
ENTER
DISC
TUNER/BAND
TOP MENU MENU
DIRECT NAVIGATOR
DISPLAY
DIMMER SUBWOOFERCENTERFOCUSTV/VIDEO
RETURN
PLAY LIST
DIRECT TUNING
7
0
8 9
10>=
TEST
u/t y/i MUTING
qg h
%PL
TV VOL TV VOL
/L /R
ENTER
MUTING
OFF
SUBWOOFERCENTERFOCUS
INPUTMODE
/L /R
EFFECT
SC-HT07PP-EN.fm Page 19 Friday, May 7, 2004 3:41 PM
Op
erat
ion
s
20
RQ
T73
80
Other functions
INPUTMODE
STEREO/2CH MIX MUSIC AV/MOVIE
SFC
SLEEP TONE/BALANCE LEVEL EFFECT
ENTER
TOP MENU MENU
DIRECT NAVIGATOR
DISPLAY
DIMMER SUBWOOFERCENTERFOCUSTV/VIDEO
RETURN
PLAY LIST
TEST
qg h
%PL
TV VOL TV VOL
/L /R
MULTI CONTROLTOP MENU
PREV / NEXT /
RETURN
OFF
DIMMER
TONE/BALANCE
SLEEP
/L /R
ENTER
VOLUME
INPUT SELECTOR MUSIC
PHONESDOWN UP
AV/MOVE TUNE TUNE
^ SFC
VIDEO IN L AUDIO IN R VCR 2
8POWER
MULTI CONTROL
ENTER
TOP MENU
PREV / NEXT /
RETURN
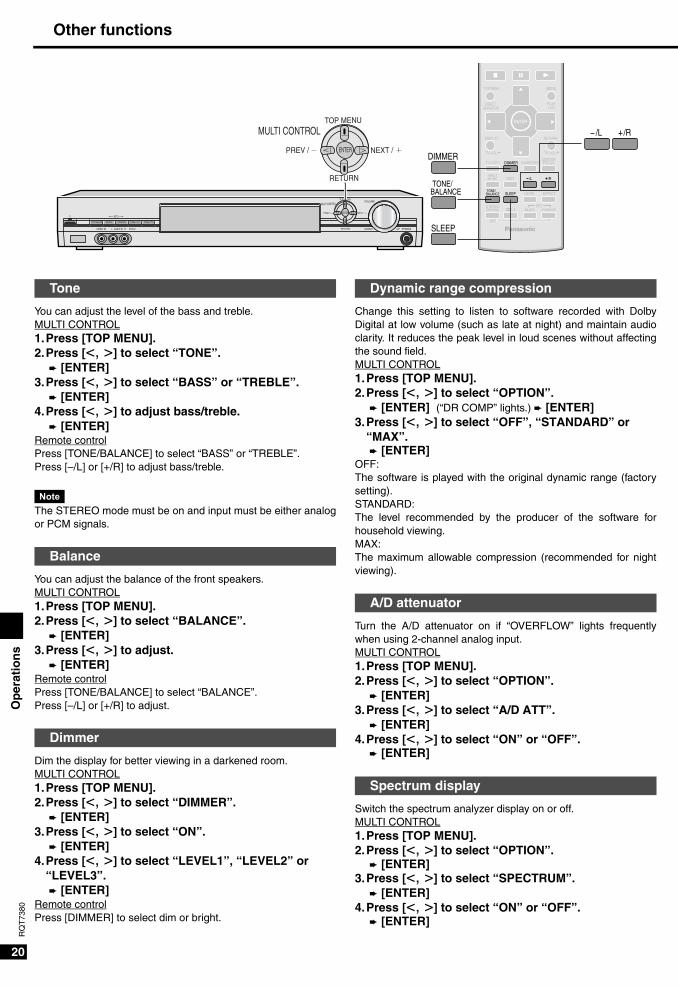
You can adjust the level of the bass and treble.MULTI CONTROL1.Press [TOP MENU].2.Press [<, >] to select “TONE”.
è [ENTER]3.Press [<, >] to select “BASS” or “TREBLE”.
è [ENTER]4.Press [<, >] to adjust bass/treble.
è [ENTER]Remote controlPress [TONE/BALANCE] to select “BASS” or “TREBLE”.Press [–/L] or [+/R] to adjust bass/treble.
NoteThe STEREO mode must be on and input must be either analogor PCM signals.
You can adjust the balance of the front speakers.MULTI CONTROL1.Press [TOP MENU].2.Press [<, >] to select “BALANCE”.
è [ENTER]3.Press [<, >] to adjust.
è [ENTER]Remote controlPress [TONE/BALANCE] to select “BALANCE”.Press [–/L] or [+/R] to adjust.
Dim the display for better viewing in a darkened room. MULTI CONTROL1.Press [TOP MENU].2.Press [<, >] to select “DIMMER”.
è [ENTER]3.Press [<, >] to select “ON”.
è [ENTER]4.Press [<, >] to select “LEVEL1”, “LEVEL2” or
“LEVEL3”. è [ENTER]
Remote controlPress [DIMMER] to select dim or bright.
Tone
Balance
Dimmer
Change this setting to listen to software recorded with DolbyDigital at low volume (such as late at night) and maintain audioclarity. It reduces the peak level in loud scenes without affectingthe sound field.MULTI CONTROL1.Press [TOP MENU].2.Press [<, >] to select “OPTION”.
è [ENTER] (“DR COMP” lights.) è [ENTER]3.Press [<, >] to select “OFF”, “STANDARD” or
“MAX”. è [ENTER]
OFF:The software is played with the original dynamic range (factorysetting).STANDARD:The level recommended by the producer of the software forhousehold viewing.MAX:The maximum allowable compression (recommended for nightviewing).
Turn the A/D attenuator on if “OVERFLOW” lights frequentlywhen using 2-channel analog input.MULTI CONTROL1.Press [TOP MENU].2.Press [<, >] to select “OPTION”.
è [ENTER]3.Press [<, >] to select “A/D ATT”.
è [ENTER]4.Press [<, >] to select “ON” or “OFF”.
è [ENTER]
Switch the spectrum analyzer display on or off. MULTI CONTROL1.Press [TOP MENU].2.Press [<, >] to select “OPTION”.
è [ENTER]3.Press [<, >] to select “SPECTRUM”.
è [ENTER]4.Press [<, >] to select “ON” or “OFF”.
è [ENTER]
Dynamic range compression
A/D attenuator
Spectrum display
SC-HT07PP-EN.fm Page 20 Friday, May 7, 2004 3:41 PM
Op
erat
ion
s
21
RQ
T73
80
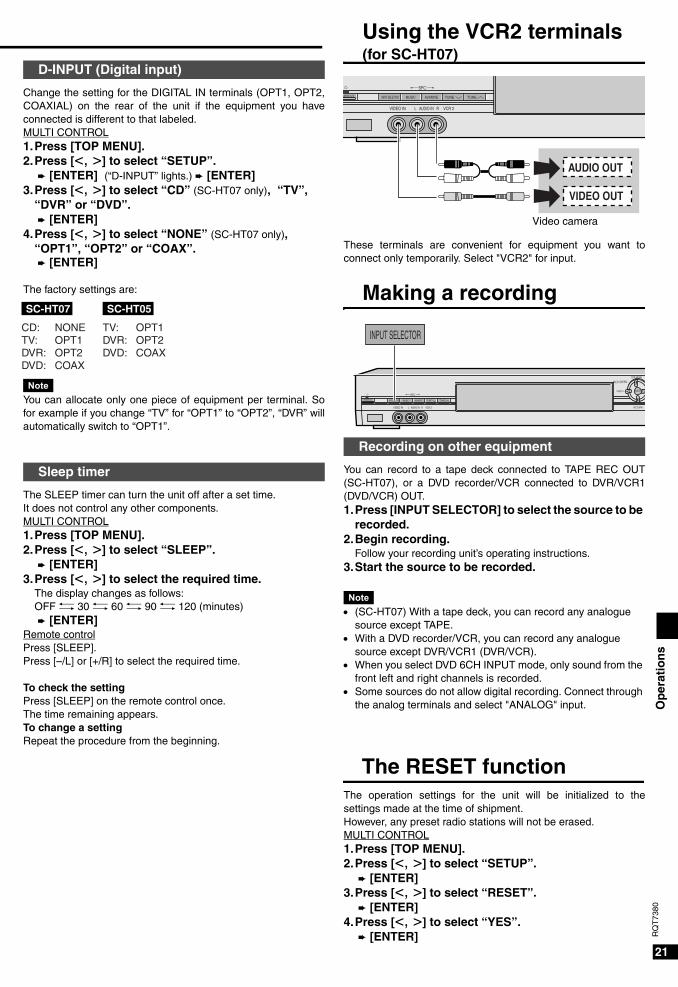
Making a recording
INPUT SELECTOR MUSIC AV/MOVE TUNE TUNE
^ SFC
VIDEO IN L AUDIO IN R VCR 2
8WER
AUDIO OUT
VIDEO OUT
Video camera
You can record to a tape deck connected to TAPE REC OUT(SC-HT07), or a DVD recorder/VCR connected to DVR/VCR1(DVD/VCR) OUT.1.Press [INPUT SELECTOR] to select the source to be
recorded.2.Begin recording.
Follow your recording unit’s operating instructions.3.Start the source to be recorded.
Note• (SC-HT07) With a tape deck, you can record any analogue
source except TAPE. • With a DVD recorder/VCR, you can record any analogue
source except DVR/VCR1 (DVR/VCR).• When you select DVD 6CH INPUT mode, only sound from the
front left and right channels is recorded.• Some sources do not allow digital recording. Connect through
the analog terminals and select "ANALOG" input.
Recording on other equipment
Using the VCR2 terminals (for SC-HT07)
These terminals are convenient for equipment you want toconnect only temporarily. Select "VCR2" for input.
INPUT SELECTOR
INPUT SELECTOR MUSIC AV/MOVE TUNE TUNE
^ SFC
VIDEO IN L AUDIO IN R VCR 2
8POWER
MULTI CONTROL
ENTER
TOP MENU
PREV /
RETURN
Change the setting for the DIGITAL IN terminals (OPT1, OPT2,COAXIAL) on the rear of the unit if the equipment you haveconnected is different to that labeled. MULTI CONTROL1.Press [TOP MENU].2.Press [<, >] to select “SETUP”.
è [ENTER] (“D-INPUT” lights.) è [ENTER]3.Press [<, >] to select “CD” (SC-HT07 only), “TV”,
“DVR” or “DVD”. è [ENTER]
4.Press [<, >] to select “NONE” (SC-HT07 only), “OPT1”, “OPT2” or “COAX”. è [ENTER]
The factory settings are:
NoteYou can allocate only one piece of equipment per terminal. Sofor example if you change “TV” for “OPT1” to “OPT2”, “DVR” willautomatically switch to “OPT1”.
The SLEEP timer can turn the unit off after a set time.It does not control any other components.MULTI CONTROL1.Press [TOP MENU].2.Press [<, >] to select “SLEEP”.
è [ENTER]3.Press [<, >] to select the required time.
The display changes as follows:OFF v 30 v 60 v 90 v 120 (minutes) è [ENTER]
Remote controlPress [SLEEP].Press [–/L] or [+/R] to select the required time.
To check the settingPress [SLEEP] on the remote control once.The time remaining appears.To change a settingRepeat the procedure from the beginning.
D-INPUT (Digital input)
Sleep timer
The RESET functionThe operation settings for the unit will be initialized to thesettings made at the time of shipment.However, any preset radio stations will not be erased.MULTI CONTROL1.Press [TOP MENU].2.Press [<, >] to select “SETUP”.
è [ENTER]3.Press [<, >] to select “RESET”.
è [ENTER]4.Press [<, >] to select “YES”.
è [ENTER]
SC-HT07
CD:TV:DVR:DVD:
NONEOPT1OPT2COAX
SC-HT05
TV:DVR:DVD:
OPT1OPT2COAX
SC-HT07PP-EN.fm Page 21 Friday, May 7, 2004 3:41 PM

Op
erat
ion
s
22
RQ
T73
80
Remote control operation guide
INPUTMODE
STEREO/2CH MIX MUSIC AV/MOVIE
SFC
SLEEP TONE/BALANCE LEVEL EFFECT
ENTER
DISC
TUNER/BAND
CH
VOLUME
TOP MENU MENU
DIRECT NAVIGATOR
DISPLAY
DIMMER SUBWOOFERCENTERFOCUSTV/VIDEO
RETURN
PLAY LIST
DIRECT TUNING
1 2 3
7
0
8 9
10
4 5 6
>=
TEST
u/t y/i MUTING
qg h
%PL
TV VOL TV VOL
/L /R
MENU
MENU
MENU
^
AV SYSTEM
TOP MENU
DIRECT NAVIGATOR
MENU
PLAY LIST
TV TV/VIDEO
q
g h
u/t y/i
ENTER
DISPLAY
TV VOL
RETURN
TV VOL
1 2 3
7
0
8 9
10
4 5 6
>=ENTER
DIRECT TUNINGDISC
^
AV SYSTEM TV
h
h
u/t y/i
1 2 3
4 5
u/t y/i
^
AV SYSTEM
^
AV SYSTEM
ENTER
^ ^
AV SYSTEMRECEIVER
VCR CDDVD
TV
DVD/HDDDVD RECORDER
RECORDER
DVD
ANALOG 6CH
OFF
DVD/HDDDVD RECORDER
DVD
ANALOG 6CH
DVDRECORDERDVD
ANALOG 6CH
DVDRECORDER
Watching DVDs
Switch on
Switch off
Switch on the television and select input
Switch on the player and start play
or
or
Operating the DVD player/DVD recorder
Show disc menus
Show player menus
Show disc menus
Select and enter menu items
Clear menus or return to previous menus
Specify a disc [5-disc changer]
Pause playStop play
Start play from a selected item
Skip items during play
Search through the disc (Press and hold)
Start slow-motion play
To view frame-by-frame
Switch between DVD and HDD[DVD recorder with HDD]
DVD
This remote control can operate Panasonic and Technics audiovisual equipment that have remote control sensors. Note that this remote control cannot operate some equipment and that it may not be able to perform some operations.Set your DVD player speaker output to "small" when playing in DVD-6CH mode, provided it has speaker output setting function.
When using both a DVD player and a DVD recorderTo prevent accidental operation• When operating a DVD recorder, use the remote control that comes with the DVD recorder.• When using a Panasonic DVD recorder, change its remote control code to a different number such as "2" or "3". (Refer to its
Operating Instructions for details.)
SC-HT07PP-EN.fm Page 22 Friday, May 7, 2004 3:41 PM

Op
erat
ion
s
23
RQ
T73
80
TV / CABLE TV / VCR
INPUTMODE
STEREO/2CH MIX MUSIC AV/MOVIE
SFC
SLEEP TONE/BALANCE LEVEL EFFECT
ENTER
DISC
TUNER/BAND
CH
VOLUME
TOP MENU MENU
DIRECT NAVIGATOR
DISPLAY
DIMMER SUBWOOFERCENTERFOCUSTV/VIDEO
RETURN
PLAY LIST
DIRECT TUNING
1 2 3
7
0
8 9
10
4 5 6
>=
TEST
u/t y/i MUTING
qg h
%PL
TV VOL TV VOL
/L /R
TV TV/VIDEO
TV
43
21
VCR
CH
DISPLAY
TV VOL
RETURN
TV VOL
1 2 3
7
0
8 9
10
4 5 6
>=ENTER
TV TV/VIDEO
q
TVVCR
43
21
CH
1 2 3
7
0
8 9
10
4 5 6
>=ENTER
gh
u/t y/i
^
TV^
AV SYSTEM
^
AV SYSTEM
^
AV SYSTEM
^
AV SYSTEM
^
AV SYSTEM
^
AV SYSTEM
ENTER
^ ^
AV SYSTEMRECEIVER
VCR CDDVD
DVD TV
DVD/HDDDVD RECORDER
RECORDER
ANALOG 6CH
OFF
AV SYSTEM
Watching TV / cable TV
Switch on
Switch off
Switch on the television and select input
Operating the TV / cable box
Watching videotapes
Operating the video deck
Change channels sequentially
Select channels directly
Adjust the volume
Switch on
Switch off
Switch on the television and select input
Switch on the player and start play
Change channels sequentially
Select channels directly
Rewind or fast-forward
Stop play
Pause play
When the TV code is set
When the cable TV code is set
Only when the TV code is set
SC-HT07PP-EN.fm Page 23 Friday, May 7, 2004 3:41 PM
Op
erat
ion
s
24
RQ
T73
80
Remote control operation guide
CD
INPUTMODE
STEREO/2CH MIX MUSIC AV/MOVIE
SFC
SLEEP TONE/BALANCE LEVEL EFFECT
ENTER
DISC
TUNER/BAND
CH
VOLUME
TOP MENU MENU
DIRECT NAVIGATOR
DISPLAY
DIMMER SUBWOOFERCENTERFOCUSTV/VIDEO
RETURN
PLAY LIST
DIRECT TUNING
1 2 3
7
0
8 9
10
4 5 6
>=
TEST
u/t y/i MUTING
qg h
%PL
TV VOL TV VOL
/L /R
5
10
4
9
3
8
2
7
1
6
DISC
DIRECT TUNING
CDq
u/t y/i
1 2 3
7
0
8 9
10
4 5 6
>=ENTER
1 2 3
4 5
DIRECT TUNINGDISC
CD
g
h 1 2 3
7
0
8 9
4 5 6q
^
AV SYSTEM
^
AV SYSTEM
ENTER
^ ^
AV SYSTEMRECEIVER
VCR CDDVD
DVD TV
DVD/HDDDVD RECORDER
RECORDER
ANALOG 6CH
OFF
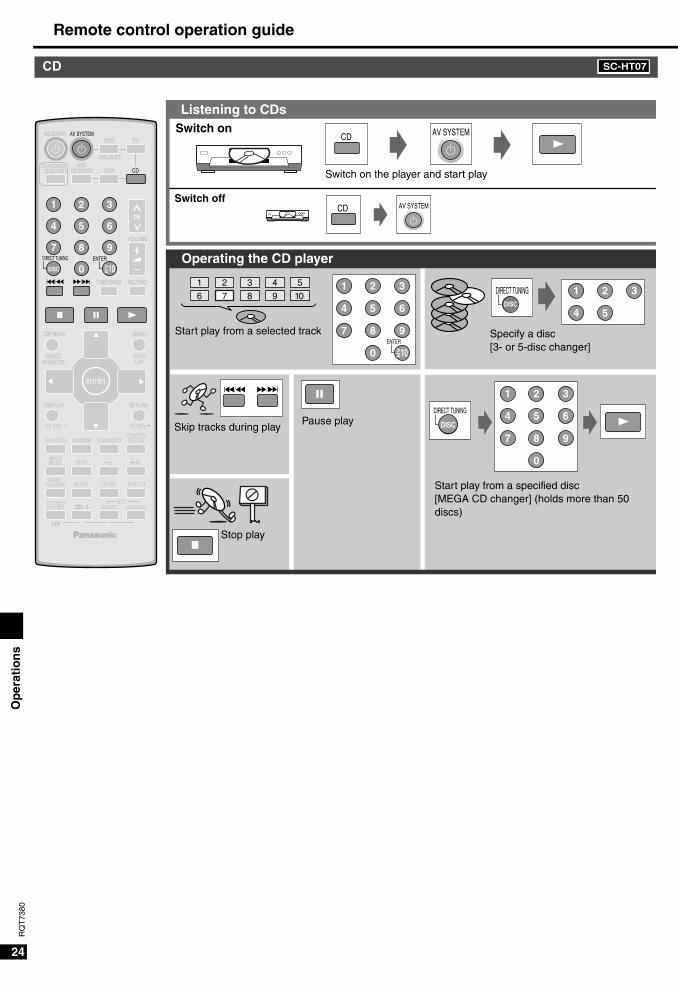
Listening to CDsSwitch on
Switch off
Switch on the player and start play
Operating the CD player
Start play from a selected track Specify a disc[3- or 5-disc changer]
Skip tracks during play
Stop play
Pause play
Start play from a specified disc [MEGA CD changer] (holds more than 50 discs)
SC-HT07SC-HT07
SC-HT07PP-EN.fm Page 24 Friday, May 7, 2004 3:41 PM
Op
erat
ion
s
25
RQ
T73
80
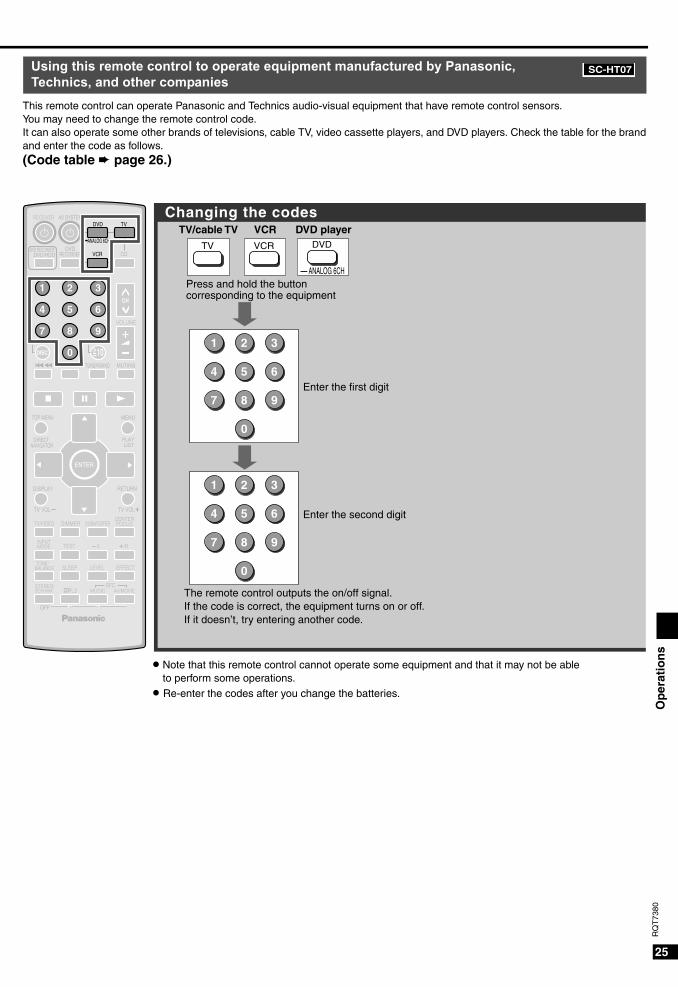
Press and hold the button corresponding to the equipment
Enter the first digit
Changing the codes
Enter the second digit
TV/cable TV VCR DVD player
1 2 3
4 5 6
7 8 9
0
DVDTV VCR
-ANALOG 6CH
1 2 3
4 5 6
7 8 9
0
Note that this remote control cannot operate some equipment and that it may not be able to perform some operations.Re-enter the codes after you change the batteries.
INPUTMODE
STEREO/2CH MIX MUSIC AV/MOVIE
SFC
SLEEP TONE/BALANCE LEVEL EFFECT
ENTER
DISC
TUNER/BAND
CH
VOLUME
TOP MENU MENU
DIRECT NAVIGATOR
DISPLAY
DIMMER SUBWOOFERCENTERFOCUSTV/VIDEO
RETURN
PLAY LIST
DIRECT TUNING
10>=
TEST
u/t y/i MUTING
qg h
%PL
TV VOL TV VOL
/L /R
ENTER
^
AV SYSTEMRECEIVER
VCR CDDVD
DVD TV
DVD/HDDDVD RECORDER
RECORDER
ANALOG 6CH
OFF
1 2 3
7
0
8 9
4 5 6
^
Using this remote control to operate equipment manufactured by Panasonic, Technics, and other companies
SC-HT07SC-HT07
This remote control can operate Panasonic and Technics audio-visual equipment that have remote control sensors. You may need to change the remote control code.It can also operate some other brands of televisions, cable TV, video cassette players, and DVD players. Check the table for the brandand enter the code as follows.(Code table è page 26.)
The remote control outputs the on/off signal. If the code is correct, the equipment turns on or off. If it doesn’t, try entering another code.
SC-HT07PP-EN.fm Page 25 Friday, May 7, 2004 3:41 PM
Op
erat
ion
s
26
RQ
T73
80
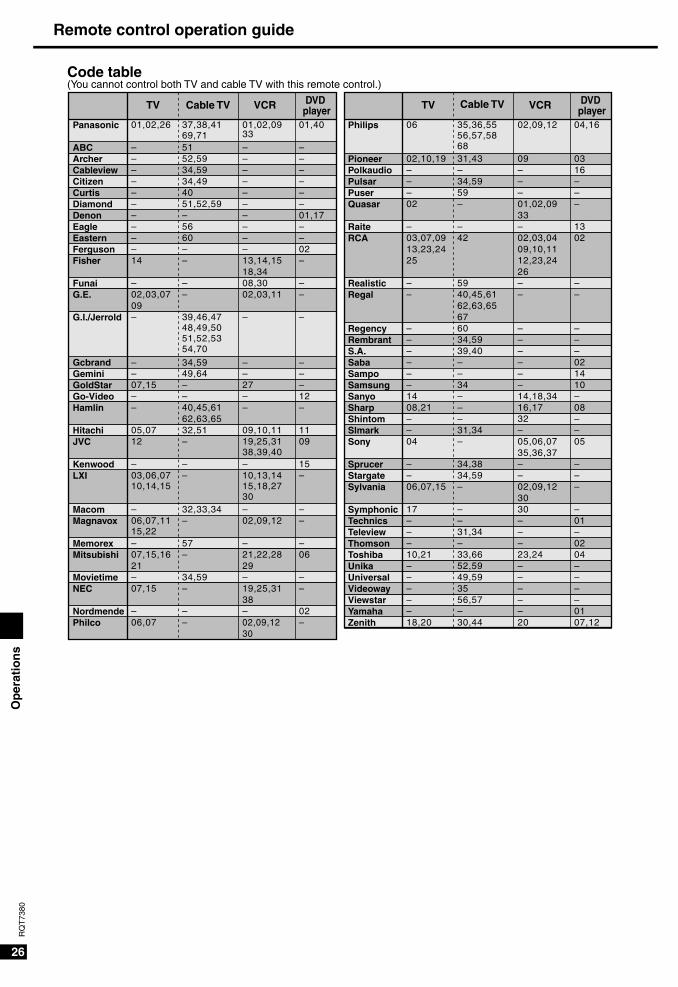
Code table(You cannot control both TV and cable TV with this remote control.)
Remote control operation guide
SC-HT07PP-EN.fm Page 26 Friday, May 7, 2004 3:41 PM
Op
erat
ion
s
27
RQ
T73
80
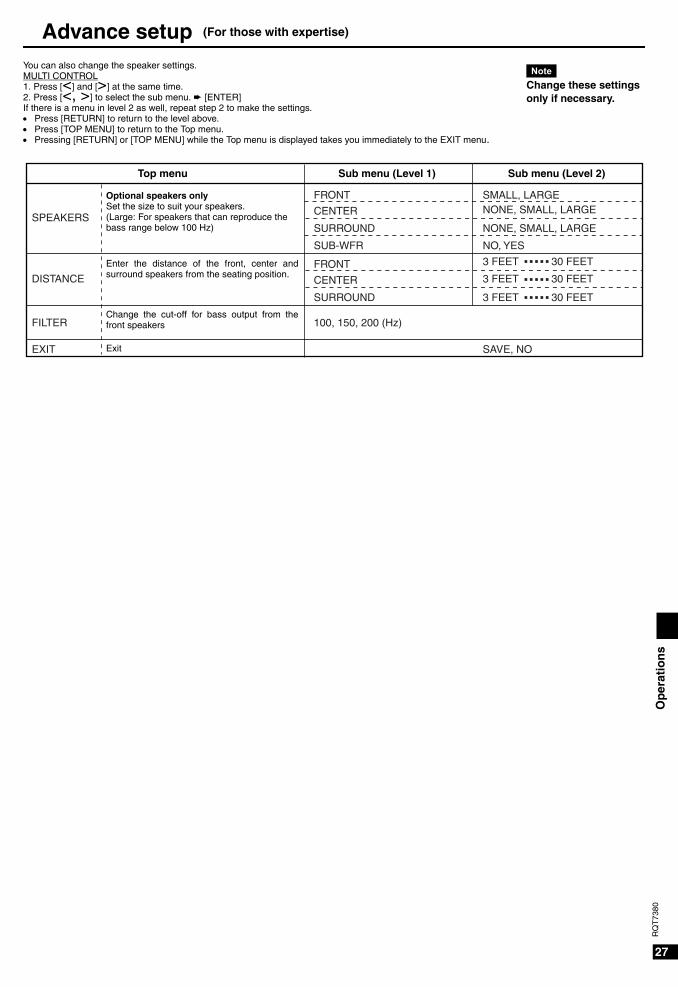
Advance setupYou can also change the speaker settings.MULTI CONTROL1. Press [<] and [>] at the same time. 2. Press [<, >] to select the sub menu. è [ENTER]If there is a menu in level 2 as well, repeat step 2 to make the settings. • Press [RETURN] to return to the level above.• Press [TOP MENU] to return to the Top menu.• Pressing [RETURN] or [TOP MENU] while the Top menu is displayed takes you immediately to the EXIT menu.
NoteChange these settings only if necessary.
(For those with expertise)
SPEAKERS
DISTANCE
FILTER 100, 150, 200 (Hz)
EXIT
FRONT SMALL, LARGENONE, SMALL, LARGE
NONE, SMALL, LARGE
NO, YES
SAVE, NO
CENTER
3 FEET 30 FEET
3 FEET 30 FEET
3 FEET 30 FEET
SURROUND
FRONT
CENTER
SURROUND
SUB-WFR
Optional speakers onlySet the size to suit your speakers.(Large: For speakers that can reproduce the bass range below 100 Hz)
Enter the distance of the front, center andsurround speakers from the seating position.
Change the cut-off for bass output from thefront speakers
Exit
Top menu Sub menu (Level 1) Sub menu (Level 2)
SC-HT07PP-EN.fm Page 27 Friday, May 7, 2004 3:41 PM
28
RQ
T73
80R
efer
ence
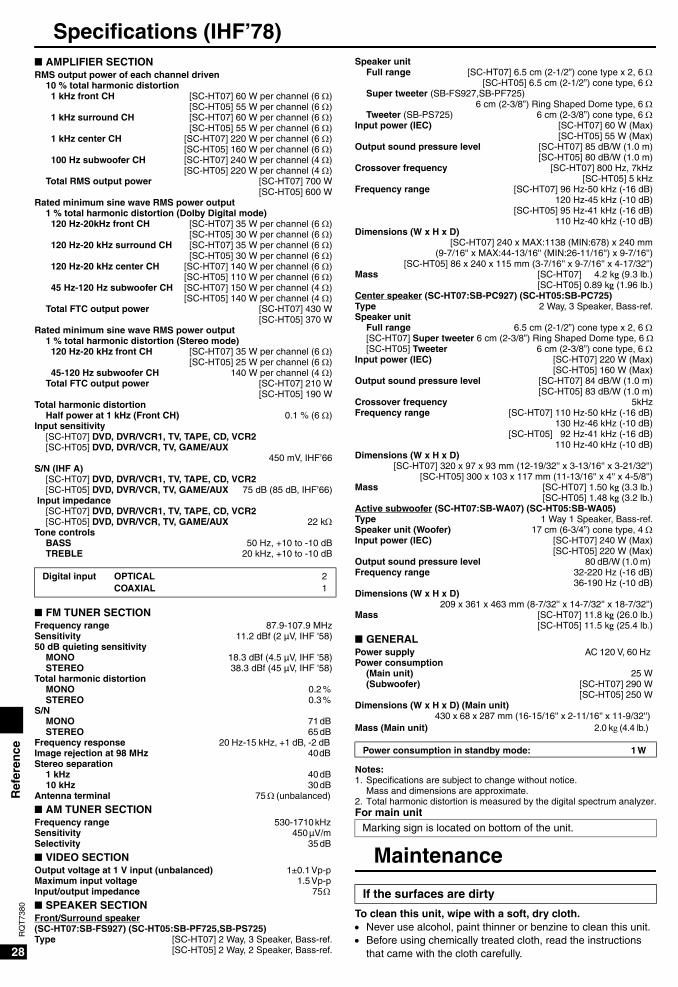
Specifications (IHF’78)n AMPLIFIER SECTION RMS output power of each channel driven
10 % total harmonic distortion 1 kHz front CH [SC-HT07] 60 W per channel (6 Ω)
[SC-HT05] 55 W per channel (6 Ω) 1 kHz surround CH [SC-HT07] 60 W per channel (6 Ω)
[SC-HT05] 55 W per channel (6 Ω) 1 kHz center CH [SC-HT07] 220 W per channel (6 Ω)
[SC-HT05] 160 W per channel (6 Ω) 100 Hz subwoofer CH [SC-HT07] 240 W per channel (4 Ω)
[SC-HT05] 220 W per channel (4 Ω)Total RMS output power [SC-HT07] 700 W
[SC-HT05] 600 WRated minimum sine wave RMS power output
1 % total harmonic distortion (Dolby Digital mode) 120 Hz-20kHz front CH [SC-HT07] 35 W per channel (6 Ω)
[SC-HT05] 30 W per channel (6 Ω) 120 Hz-20 kHz surround CH [SC-HT07] 35 W per channel (6 Ω)
[SC-HT05] 30 W per channel (6 Ω) 120 Hz-20 kHz center CH [SC-HT07] 140 W per channel (6 Ω)
[SC-HT05] 110 W per channel (6 Ω) 45 Hz-120 Hz subwoofer CH [SC-HT07] 150 W per channel (4 Ω)
[SC-HT05] 140 W per channel (4 Ω)Total FTC output power [SC-HT07] 430 W
[SC-HT05] 370 WRated minimum sine wave RMS power output
1 % total harmonic distortion (Stereo mode) 120 Hz-20 kHz front CH [SC-HT07] 35 W per channel (6 Ω)
[SC-HT05] 25 W per channel (6 Ω) 45-120 Hz subwoofer CH 140 W per channel (4 Ω)Total FTC output power [SC-HT07] 210 W
[SC-HT05] 190 WTotal harmonic distortion
Half power at 1 kHz (Front CH) 0.1 % (6 Ω)Input sensitivity
[SC-HT07] DVD, DVR/VCR1, TV, TAPE, CD, VCR2[SC-HT05] DVD, DVR/VCR, TV, GAME/AUX
450 mV, IHF’66S/N (IHF A)
[SC-HT07] DVD, DVR/VCR1, TV, TAPE, CD, VCR2[SC-HT05] DVD, DVR/VCR, TV, GAME/AUX 75 dB (85 dB, IHF’66)
Input impedance [SC-HT07] DVD, DVR/VCR1, TV, TAPE, CD, VCR2[SC-HT05] DVD, DVR/VCR, TV, GAME/AUX 22 kΩ
Tone controls BASS 50 Hz, +10 to -10 dBTREBLE 20 kHz, +10 to -10 dB
n FM TUNER SECTION Frequency range 87.9-107.9 MHzSensitivity 11.2 dBf (2 µV, IHF '58)50 dB quieting sensitivity
MONO 18.3 dBf (4.5 µV, IHF '58)STEREO 38.3 dBf (45 µV, IHF '58)
Total harmonic distortion MONO 0.2 % STEREO 0.3 %
S/N MONO 71 dB STEREO 65 dB
Frequency response 20 Hz-15 kHz, +1 dB, -2 dB Image rejection at 98 MHz 40 dB Stereo separation
1 kHz 40 dB 10 kHz 30 dB
Antenna terminal 75 Ω (unbalanced)
n AM TUNER SECTION Frequency range 530-1710 kHz Sensitivity 450 µV/m Selectivity 35 dB
n VIDEO SECTION Output voltage at 1 V input (unbalanced) 1±0.1 Vp-p Maximum input voltage 1.5 Vp-p Input/output impedance 75 Ω
n SPEAKER SECTIONFront/Surround speaker(SC-HT07:SB-FS927) (SC-HT05:SB-PF725,SB-PS725)Type [SC-HT07] 2 Way, 3 Speaker, Bass-ref. [SC-HT05] 2 Way, 2 Speaker, Bass-ref.
Digital input OPTICAL 2 COAXIAL 1
Speaker unitFull range [SC-HT07] 6.5 cm (2-1/2”) cone type x 2, 6 Ω
[SC-HT05] 6.5 cm (2-1/2”) cone type, 6 ΩSuper tweeter (SB-FS927,SB-PF725)
6 cm (2-3/8”) Ring Shaped Dome type, 6 ΩTweeter (SB-PS725) 6 cm (2-3/8”) cone type, 6 Ω
Input power (IEC) [SC-HT07] 60 W (Max)[SC-HT05] 55 W (Max)
Output sound pressure level [SC-HT07] 85 dB/W (1.0 m)[SC-HT05] 80 dB/W (1.0 m)
Crossover frequency [SC-HT07] 800 Hz, 7kHz[SC-HT05] 5 kHz
Frequency range [SC-HT07] 96 Hz-50 kHz (-16 dB)120 Hz-45 kHz (-10 dB)
[SC-HT05] 95 Hz-41 kHz (-16 dB)110 Hz-40 kHz (-10 dB)
Dimensions (W x H x D)[SC-HT07] 240 x MAX:1138 (MIN:678) x 240 mm
(9-7/16'' x MAX:44-13/16'' (MIN:26-11/16'') x 9-7/16'')[SC-HT05] 86 x 240 x 115 mm (3-7/16'' x 9-7/16'' x 4-17/32'')
Mass [SC-HT07] 4.2 kg (9.3 lb.)[SC-HT05] 0.89 kg (1.96 lb.)
Center speaker (SC-HT07:SB-PC927) (SC-HT05:SB-PC725)Type 2 Way, 3 Speaker, Bass-ref.Speaker unit
Full range 6.5 cm (2-1/2”) cone type x 2, 6 Ω[SC-HT07] Super tweeter 6 cm (2-3/8”) Ring Shaped Dome type, 6 Ω[SC-HT05] Tweeter 6 cm (2-3/8”) cone type, 6 Ω
Input power (IEC) [SC-HT07] 220 W (Max)[SC-HT05] 160 W (Max)
Output sound pressure level [SC-HT07] 84 dB/W (1.0 m)[SC-HT05] 83 dB/W (1.0 m)
Crossover frequency 5kHzFrequency range [SC-HT07] 110 Hz-50 kHz (-16 dB)
130 Hz-46 kHz (-10 dB)[SC-HT05] 92 Hz-41 kHz (-16 dB)
110 Hz-40 kHz (-10 dB)Dimensions (W x H x D)
[SC-HT07] 320 x 97 x 93 mm (12-19/32'' x 3-13/16'' x 3-21/32'')[SC-HT05] 300 x 103 x 117 mm (11-13/16'' x 4'' x 4-5/8'')
Mass [SC-HT07] 1.50 kg (3.3 lb.)[SC-HT05] 1.48 kg (3.2 lb.)
Active subwoofer (SC-HT07:SB-WA07) (SC-HT05:SB-WA05)Type 1 Way 1 Speaker, Bass-ref.Speaker unit (Woofer) 17 cm (6-3/4”) cone type, 4 ΩInput power (IEC) [SC-HT07] 240 W (Max)
[SC-HT05] 220 W (Max)Output sound pressure level 80 dB/W (1.0 m) Frequency range 32-220 Hz (-16 dB)
36-190 Hz (-10 dB)Dimensions (W x H x D)
209 x 361 x 463 mm (8-7/32'' x 14-7/32'' x 18-7/32'')Mass [SC-HT07] 11.8 kg (26.0 lb.)
[SC-HT05] 11.5 kg (25.4 lb.)
n GENERALPower supply AC 120 V, 60 Hz Power consumption
(Main unit) 25 W(Subwoofer) [SC-HT07] 290 W
[SC-HT05] 250 WDimensions (W x H x D) (Main unit)
430 x 68 x 287 mm (16-15/16'' x 2-11/16'' x 11-9/32'') Mass (Main unit) 2.0 kg (4.4 lb.)
Notes:1. Specifications are subject to change without notice.
Mass and dimensions are approximate.2. Total harmonic distortion is measured by the digital spectrum analyzer.For main unit
Power consumption in standby mode: 1 W
Marking sign is located on bottom of the unit.
Maintenance
To clean this unit, wipe with a soft, dry cloth. • Never use alcohol, paint thinner or benzine to clean this unit. • Before using chemically treated cloth, read the instructions
that came with the cloth carefully.
If the surfaces are dirty
SC-HT07PP-EN.fm Page 28 Friday, May 7, 2004 3:41 PM
Ref
eren
ce
29
RQ
T73
80
Listening caution
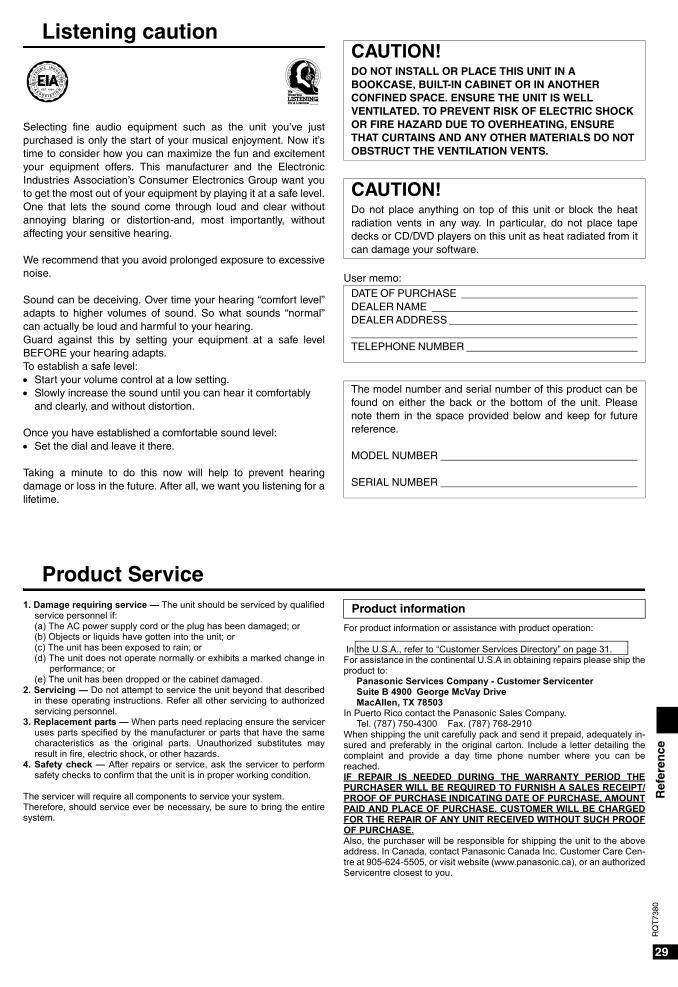
Selecting fine audio equipment such as the unit you’ve justpurchased is only the start of your musical enjoyment. Now it’stime to consider how you can maximize the fun and excitementyour equipment offers. This manufacturer and the ElectronicIndustries Association’s Consumer Electronics Group want youto get the most out of your equipment by playing it at a safe level.One that lets the sound come through loud and clear withoutannoying blaring or distortion-and, most importantly, withoutaffecting your sensitive hearing.
We recommend that you avoid prolonged exposure to excessivenoise.
Sound can be deceiving. Over time your hearing “comfort level”adapts to higher volumes of sound. So what sounds “normal”can actually be loud and harmful to your hearing. Guard against this by setting your equipment at a safe levelBEFORE your hearing adapts. To establish a safe level: • Start your volume control at a low setting. • Slowly increase the sound until you can hear it comfortably
and clearly, and without distortion.
Once you have established a comfortable sound level: • Set the dial and leave it there.
Taking a minute to do this now will help to prevent hearingdamage or loss in the future. After all, we want you listening for alifetime.
User memo:
EST. 1924
CAUTION!DO NOT INSTALL OR PLACE THIS UNIT IN A BOOKCASE, BUILT-IN CABINET OR IN ANOTHER CONFINED SPACE. ENSURE THE UNIT IS WELL VENTILATED. TO PREVENT RISK OF ELECTRIC SHOCK OR FIRE HAZARD DUE TO OVERHEATING, ENSURE THAT CURTAINS AND ANY OTHER MATERIALS DO NOT OBSTRUCT THE VENTILATION VENTS.
CAUTION!Do not place anything on top of this unit or block the heatradiation vents in any way. In particular, do not place tapedecks or CD/DVD players on this unit as heat radiated from itcan damage your software.
DATE OF PURCHASE DEALER NAME DEALER ADDRESS TELEPHONE NUMBER
The model number and serial number of this product can befound on either the back or the bottom of the unit. Pleasenote them in the space provided below and keep for futurereference.
MODEL NUMBER
SERIAL NUMBER
Product Service1. Damage requiring service — The unit should be serviced by qualified
service personnel if: (a) The AC power supply cord or the plug has been damaged; or (b) Objects or liquids have gotten into the unit; or (c) The unit has been exposed to rain; or (d) The unit does not operate normally or exhibits a marked change in
performance; or (e) The unit has been dropped or the cabinet damaged.
2. Servicing — Do not attempt to service the unit beyond that describedin these operating instructions. Refer all other servicing to authorizedservicing personnel.
3. Replacement parts — When parts need replacing ensure the serviceruses parts specified by the manufacturer or parts that have the samecharacteristics as the original parts. Unauthorized substitutes mayresult in fire, electric shock, or other hazards.
4. Safety check — After repairs or service, ask the servicer to performsafety checks to confirm that the unit is in proper working condition.
The servicer will require all components to service your system.Therefore, should service ever be necessary, be sure to bring the entiresystem.
For product information or assistance with product operation:
In the U.S.A., refer to “Customer Services Directory” on page 31.For assistance in the continental U.S.A in obtaining repairs please ship theproduct to: Panasonic Services Company - Customer Servicenter Suite B 4900 George McVay Drive MacAllen, TX 78503In Puerto Rico contact the Panasonic Sales Company. Tel. (787) 750-4300 Fax. (787) 768-2910When shipping the unit carefully pack and send it prepaid, adequately in-sured and preferably in the original carton. Include a letter detailing thecomplaint and provide a day time phone number where you can bereached.IF REPAIR IS NEEDED DURING THE WARRANTY PERIOD THEPURCHASER WILL BE REQUIRED TO FURNISH A SALES RECEIPT/PROOF OF PURCHASE INDICATING DATE OF PURCHASE, AMOUNTPAID AND PLACE OF PURCHASE. CUSTOMER WILL BE CHARGEDFOR THE REPAIR OF ANY UNIT RECEIVED WITHOUT SUCH PROOFOF PURCHASE.Also, the purchaser will be responsible for shipping the unit to the aboveaddress. In Canada, contact Panasonic Canada Inc. Customer Care Cen-tre at 905-624-5505, or visit website (www.panasonic.ca), or an authorizedServicentre closest to you.
Product information
SC-HT07PP-EN.fm Page 29 Friday, May 7, 2004 3:41 PM
30
RQ
T73
80R
efer
ence
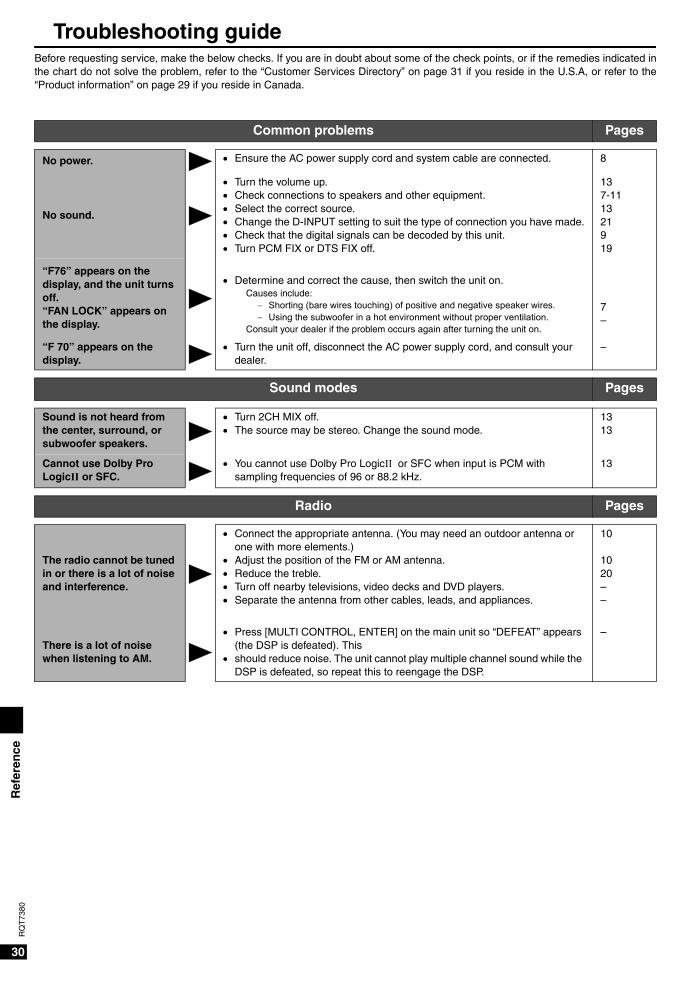
Troubleshooting guideBefore requesting service, make the below checks. If you are in doubt about some of the check points, or if the remedies indicated inthe chart do not solve the problem, refer to the “Customer Services Directory” on page 31 if you reside in the U.S.A, or refer to the“Product information” on page 29 if you reside in Canada.
Common problems Pages
No power. • Ensure the AC power supply cord and system cable are connected. 8
No sound.
• Turn the volume up.• Check connections to speakers and other equipment.• Select the correct source.• Change the D-INPUT setting to suit the type of connection you have made.• Check that the digital signals can be decoded by this unit.• Turn PCM FIX or DTS FIX off.
137-111321919
“F76” appears on the display, and the unit turns off.“FAN LOCK” appears on the display.
• Determine and correct the cause, then switch the unit on. Causes include:
− Shorting (bare wires touching) of positive and negative speaker wires. − Using the subwoofer in a hot environment without proper ventilation.
Consult your dealer if the problem occurs again after turning the unit on.
7–
“F 70” appears on the display.
• Turn the unit off, disconnect the AC power supply cord, and consult your dealer.
–
Sound modes Pages
Sound is not heard from the center, surround, or subwoofer speakers.
• Turn 2CH MIX off. • The source may be stereo. Change the sound mode.
1313
Cannot use Dolby Pro LogicII or SFC.
• You cannot use Dolby Pro LogicII or SFC when input is PCM with sampling frequencies of 96 or 88.2 kHz.
13
Radio Pages
The radio cannot be tuned in or there is a lot of noise and interference.
• Connect the appropriate antenna. (You may need an outdoor antenna or one with more elements.)
• Adjust the position of the FM or AM antenna.• Reduce the treble.• Turn off nearby televisions, video decks and DVD players.• Separate the antenna from other cables, leads, and appliances.
10
1020––
There is a lot of noise when listening to AM.
• Press [MULTI CONTROL, ENTER] on the main unit so “DEFEAT” appears (the DSP is defeated). This
• should reduce noise. The unit cannot play multiple channel sound while the DSP is defeated, so repeat this to reengage the DSP.
–
SC-HT07PP-EN.fm Page 30 Friday, May 7, 2004 3:41 PM
Ref
eren
ce
31
RQ
T73
80
Warranty (U.S.A.)
SC-HT07PP-EN.fm Page 31 Friday, May 7, 2004 3:41 PM

RQT7380-3PH1203SG3024
Panasonic Consumer Electronics Company, Division of Matsushita Electric Corporation of America One Panasonic Way Secaucus,New Jersey 07094 http://www.panasonic.com
Panasonic Sales Company, Division of Matsushita Electric of Puerto Rico, Inc. (“PSC”)Ave. 65 de InfanterÍa, Km. 9.5San Gabriel Industrial Park, Carolina,Puerto Rico 00985
Panasonic Canada Inc.5770 Ambler Drive Mississauga, Ontario L4W 2T3 www.panasonic.ca
En
2004 Matsushita Electric Industrial Co., LtdPrinted in MalaysiaC
SC-HT07PP-EN.fm Page 32 Friday, May 7, 2004 3:41 PM