Embed Size (px)
Citation preview

User Guide
OnBase 13
Unity Client Retrieval, Upload and Batch Processing
IT Training
(818) 677-1700
www.csun.edu/it/training
*The information in this guide was provided by Hyland Software, Inc. This document has been adapted for accessibility.

OnBase 13, Hyland Software, Inc. – 01/14/14
Table of Contents
Log In ..................................................................................................................................... 1
Unity Homepage .................................................................................................................... 2
Document Retrieval By Custom Query ................................................................................... 3
Performing a Custom Query ............................................................................................... 3
Document Retrieval By Keyword ............................................................................................ 8
Keyword Operators and Wildcards ......................................................................................... 9
Keyword Operators ...........................................................................................................10
Document Retrieval By Date Range ......................................................................................11
Document Retrieval By Cross-Reference ..............................................................................12
Opening a Document by Cross-Reference ........................................................................12
Document Retrievl Using Note Search ..................................................................................13
Retrieving a Document Using Note Search .......................................................................13
Document Retrieval Using External Text Search ...................................................................15
Using External Text Search ...............................................................................................15
Working with Documents .......................................................................................................17
Document Tab ...................................................................................................................18
Image Tab .........................................................................................................................19
Text Tab ............................................................................................................................21
Internal Text Search ..........................................................................................................21
Notes .................................................................................................................................21
Annotations ...........................................................................................................................23
Highlights ..........................................................................................................................23
Arrows ...............................................................................................................................24
Ellipses ..............................................................................................................................26
Deleting Annotations .........................................................................................................26
Upload ..................................................................................................................................27
Import an Electronic Document .........................................................................................27
Scan a Document ..............................................................................................................29
Batch Scanning .....................................................................................................................31
Batch Indexing ......................................................................................................................33

OnBase 13, Hyland Software, Inc. – 01/14/14
Indexing ............................................................................................................................33
Split Documents ................................................................................................................34
Configure Keyword Panel ..................................................................................................35
Need Help? ...........................................................................................................................36

OnBase 13, Hyland Software, Inc. – 01/14/14
LOG IN
To log in to OnBase:
1. Select the Unity Client shortcut.
2. Depending on your configuration, you may need to enter a username and password and then select the Login button.
Page 1

OnBase 13, Hyland Software, Inc. – 01/14/14
UNITY HOMEPAGE
Once you have successfully logged into the system, you are presented with a Home Page, which may include your organization’s webpage, as well as an RSS Feed related to your organization or industry. This Home Page layout is user-configurable, and can be easily changed to other screens in OnBase, such as Custom Queries, Document Retrieval, and Workflow, among others.
To access the Home page from anywhere within OnBase, select the Home button at the top, left of the screen.
To select a new home page layout, select the Down arrow beneath the Home button, and select Make this layout my home page. You can always reset the Home page by selecting Reset home page.
Page 2

OnBase 13, Hyland Software, Inc. – 01/14/14
DOCUMENT RETRIEVAL BY CUSTOM QUERY
A Custom Query can be developed to allow users to more easily retrieve documents that exist within OnBase. This allows the user to find the specified documents using a pre-defined form and limits the criteria needed to perform the search.
Performing a Custom Query
1. Select Custom Queries in the ribbon.
2. Select a custom query from the pane on the left. Once selected, the query will open to the right.
3. Enter the appropriate search criteria, and then press the Enter key, or select the Search button configured on the custom query. Your search results will be displayed on a tab.
4. Double-click on a document to view it.
Page 3

OnBase 13, Hyland Software, Inc. – 01/14/14
When you conduct multiple custom queries, results are retained on their respective tabs for future use.
Note: results are retained for the duration of your OnBase session.
A tab contains the following buttons:
Buttom Image Description
Select to open the Custom Query results in a new window.
Select to close the Custom Query results. These results will no longer be available.
To access Document Retrieval, select the Retrieval icon:
1. Select the Retrieval icon. The Document Retrieval pane will open to the left.
Page 4

OnBase 13, Hyland Software, Inc. – 01/14/14 Page 5
Document Types and Groups
1. Select a Document Type Group and/or Document Type(s). 2. (Optional) Provide other search parameters (such as a date range and/or Keyword Values). See the following sections for further information:
• Retrieval by Keyword Value • Retrieval by Document Date • Retrieval Using Note Search • Retrieval Using External Text Search
3. Select Find. NOTE: You need user rights to access the Document Retrieval layout and to view documents. If you have any problems, see your system administrator.
NOTE: Depending on your configuration, you may not be able to perform searches without providing some search parameters.
Date Range – Define specific date or range of dates based on the document date of the document. A specific date can be selected from the drop-down arrow.
Keywords – Enter specific Keywords to narrow document searches. The Keyword edit fields will change depending on the Document Type selected.
Note Search – Search documents for notes. You can limit your search by Document Type, Keyword Value, Note Type, note text, note creation date, and the note creator. Text Search – Find specific text in a text-based document assigned to a Document Type or Document Type Group.
OnBase 13, Hyland Software, Inc. – 01/14/14
To retrieve all documents in the system under a particular Document Type:
NOTE: This type of blind search is only possible under certain configurations, as it may inhibit system performance for other users by putting a strain on the database.
4. Select a Document Type Group. You will now see a list of Document Types for the selected Document Type Group.
5. Select the Document Type(s) to retrieve.
6. Select Find to execute the search. The Document Search Results will display to the right.
Page 6
OnBase 13, Hyland Software, Inc. – 01/14/14 Page 7
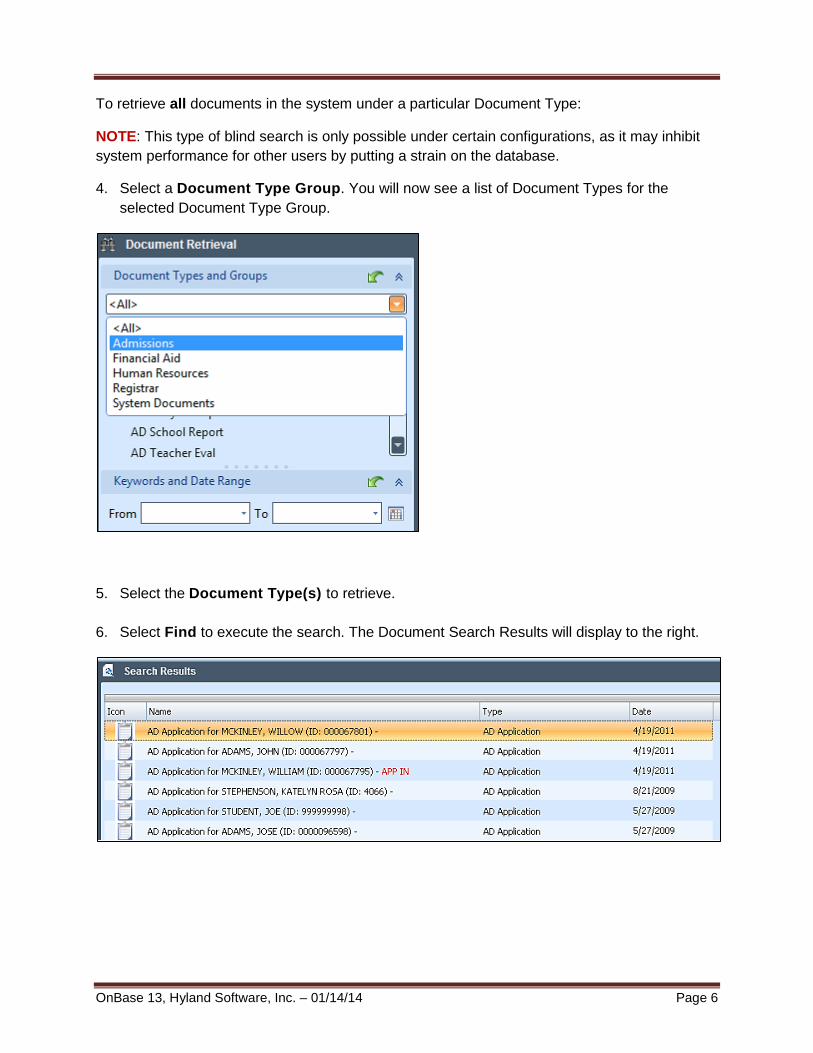
7. Double-click on the document in the results hit list. The document will open in a new window.
OnBase 13, Hyland Software, Inc. – 01/14/14
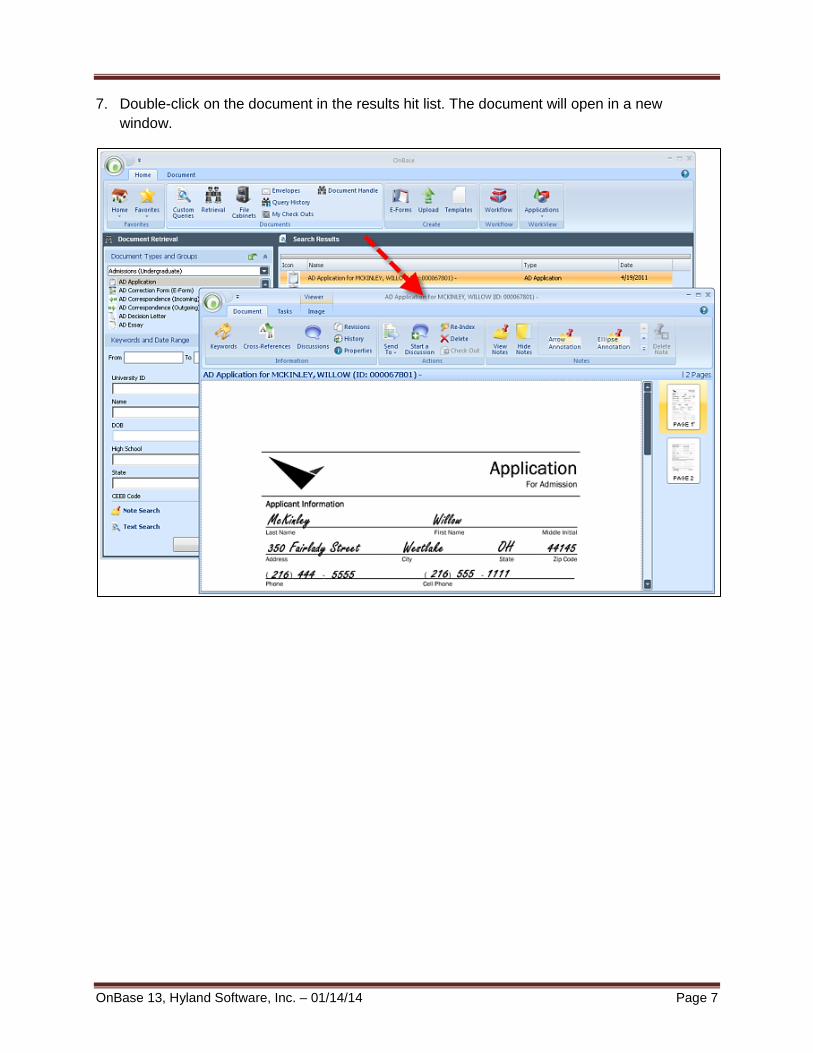
DOCUMENT RETRIEVAL BY KEYWORD
A Keyword is an identifying piece of information used to locate documents stored within the electronic document imaging system.
To retrieve documents by keyword values:
1. Select a Document Type Group. 2. Select the Document Type(s) to retrieve
NOTE: If multiple Document Types are selected, only the common Keyword Types for those Document Types appear.
3. Enter a keyword value into one or more fields. The more information entered the more specific the search will be. 4. Select Find to execute the search. All of the documents in OnBase for the selected Document Type that have the keyword value(s) indicated are displayed in the Document Search Results window. 5. Double-click on a document to view it.
Page 8

OnBase 13, Hyland Software, Inc. – 01/14/14
NOTE: Select the keyword label (or within the keyword box press F6) to add additional search fields of the same keyword type. Example: You would like to search for the essays for students Bryan Chin and Chris Stone. In order to search for both last names, select the last name keyword label and be sure to select the AND operator to change it to OR.
KEYWORD OPERATORS AND WILDCARDS
The Keyword Type Edit Field default property = (equal to) will appear in a box on the right side of each Keyword Type Edit Field, and the default binary operator, AND will appear in a box on the right side of each Keyword Type Edit Field when multiple search fields have been activated
for a Keyword in the Document Retrieval dialog box.
If you left-click the = operator, it will act as a toggle switch and allow you to toggle through the following choices (choices vary depending on the format of the Keyword, i.e. date, alphanumeric, currency, etc. )
Page 9

OnBase 13, Hyland Software, Inc. – 01/14/14 Page 10
Keyword Operators
Button Image Description
Equal To allows you to search for keyword values that are an exact match to what is entered for retrieval.
Not Equal To allows you to search for keyword values that are not equal to the keyword value entered for retrieval.
Double Quotes returns only those documents containing the literal entry.
Greater Than allows for the retrieval of documents with keyword values greater than the numeric or date value entered for retrieval.
Less Than allows for the retrieval of documents with keyword values less than the numeric or date value entered for retrieval.
Greater Than/Equal To allows for the retrieval of documents with keyword values greater than or equal to the numeric or date value entered for retrieval.
Less Than/Equal To allows for the retrieval of documents with keyword values less than or equal to the numeric or date value entered for retrieval.
F6 F6 opens a second entry field for the active keyword. You can also click on the keyword label.
And allows for searching two or more values of the same keyword type that exists on the selected document type.
Or allows you to search either one (or more) documents containing either one or more specific keyword types. Click And to change to Or.
To allows you to search from one keyword to another keyword of the same keyword. Used with Numeric or Date keywords.
Wildcards:
Combined with keyword values, wildcards can be used to retrieve documents.
* Replaces multiple characters. (ADAMS* would retrieve ADAMS, ADAMSON, ADAMSTON, etc.)
? Replaces a single character. (SM?TH would retrieve SMITH, SMYTH, SMOTH, etc.)

OnBase 13, Hyland Software, Inc. – 01/14/14
DOCUMENT RETRIEVAL BY DATE RANGE
1. Select a Document Type Group. You will see a list of Document Types for the selected Document Type Group.
2. Select the Document Type(s) to retrieve.
3. Enter a date range in the From and To fields.
NOTE: Select the calendar to the right of the From and To fields to select a Custom Date Range.
4. Select Find.
All of the documents in OnBase for the selected Document Type that have a Document Date within the date range indicated in the search parameters will be displayed in the Search Results window.
5. Double-click on a document to view it.
Page 11

OnBase 13, Hyland Software, Inc. – 01/14/14
DOCUMENT RETRIEVAL BY CROSS-REFERENCE
A Cross Reference is a relationship between a Document Type and one or more other Document Type(s). This allows you to double-click on a document and retrieve the related document(s).
Opening a Document by Cross-Reference
1. Retrieve a document.
2. Highlight that document, and select the Document tab. Select the Cross-References button. If a cross reference has been configured for the Document Type, this will automatically display a new Cross-References pane with all of the documents related to the original document.
NOTE: This happens without having to enter Keyword information.
3. Double-click a document in the Cross-References pane to open it. You can then position the windows side-by-side, or move the new window to a separate monitor if your workstation is configured with dual monitoring, to view multiple documents at the same time.
Page 12

OnBase 13, Hyland Software, Inc. – 01/14/14
DOCUMENT RETRIEVL USING NOTE SEARCH
Note Search allows you to search documents for notes. You can limit your search by Document Type, Keyword Value, Note Type, note text, note creation date, and the note creator.
Retrieving a Document Using Note Search
1. In the Document Retrieval pane, select the Document Type Group(s) and/or Document Type(s) to search.
2. Select the Note Search hyperlink.
3. Enter the note text to search for in the Find What field, or use the dropdown list to select from previous note searches. You can also expand the Options pane for additional search parameters based on Date Range, Note Owner, or Note Type.
4. Select and click outside the Note Search window.
The Note Search window closes and the Note Search field displays in the Document Retrieval pane:
If you specified note text to search for in the Note Search window’s Find What field, the Note Search field contains this text enclosed by quotation marks; additional search criteria are represented as +Parameters.
Page 13

OnBase 13, Hyland Software, Inc. – 01/14/14
5. You can remove the note search by selecting the Close button:
6. Select the Find button.
When the search is finished, OnBase displays all matching documents in a Document Search Results list.
7. Open a document by double-clicking its listing. The document is displayed in the Document Viewer:
Page 14

OnBase 13, Hyland Software, Inc. – 01/14/14
DOCUMENT RETRIEVAL USING EXTERNAL TEXT SEARCH
If you have sufficient privileges, you can search for specific text in a text-based document assigned to a Document Type or Document Type Group.
Using External Text Search
1. In the Document Retrieval pane, select the Document Type Group(s) and/or Document Type(s) to search.
2. Select the Text Search hyperlink.
The Text Search window is displayed:
3. In the Find What field, enter the text string you want to search for. The string must contain at least two characters, and at least one character in the string must be a letter or a number. Use the dropdown list to select from previous text searches. To add additional search parameters, expand the Options pane:
Page 15

OnBase 13, Hyland Software, Inc. – 01/14/14
4. Select a Type radio button: • Text - Searches for alphanumeric text. • Number - Searches for numeric values and allows the use of the following operators to
limit the search: =, >, <, =>, and <=. You can use and, or, and to as operators to search for a range of values. For example, type 2009 and 2010 to find documents containing both 2009 and 2010.
• If you are searching for an exact number that is part of an alphanumeric text string, then the number will not be found. For example, if you search for 001 and the actual text is ABC001, then the value will not be found.
• Formatted Number - Searches for numeric values that use formatting characters. For example, to search for all Social Security Numbers greater than 800-00-0000, type > 800-00-0000 in the Search String field. You can use this option with following operators to limit your search: =, >, <, =>, and <=. The and, or, and to operators can be used to search for a range of values. For example, type 800-00-000 to 900-00-0000 to find documents containing values within this range.
5. Select one of the following check boxes if necessary: • Select Use Wildcards to include wild card characters in your text string search criteria. • Select Case Sensitive to return only matches that have the same capitalization as the
text string search criteria. • Select Column Search to search for a text string within specified columns. In the From
field, type the character position of the column to start the search in (the left most column to be searched). The column of characters at the far left of the document is 1, the next column to the right is 2, and so on. In the To field, type the character position of the column to end the search in (the right most column to be searched). The number in the To field must be greater than or equal to the number in the From field.
6. Select and click outside the Text Search window. The Text Search window closes and the Text Search field displays in the Document Retrieval pane:
Page 16

OnBase 13, Hyland Software, Inc. – 01/14/14
7. You can clear the text search by clicking the Close button:
8. Select the Find button.
When the search is finished, OnBase displays all matching documents in a Document Search Results list.
9. Open a document by double-clicking its listing. The document is displayed in the Document Viewer.
WORKING WITH DOCUMENTS
This section provides a general overview of working with documents. When working with documents in OnBase, it is important to understand that documents may behave slightly differently depending upon their file format. A file format identifies the type of file. The two most common file formats are image documents and text documents. Other file formats include XML, video formats, or OLE documents, such as those created with Microsoft Office applications. See your system administrator for specific questions regarding your system’s file types and their default behavior.
When you open a document, it is displayed in the Document Viewer. The document’s Auto-Name string and page count are displayed above the document.
Depending on the Document Type and your rights, you might see different ribbon tabs, ribbon groups, icons and other graphics that indicate the presence of notes or annotations.
The Document tab provides a variety of options for viewing or changing the document as well as navigation features.
From an open document, right-click to receive a list of possible options.
Page 17

OnBase 13, Hyland Software, Inc. – 01/14/14
Document Tab
Button Image Description
Keywords displays the Add/Modify Keywords pane in the task pane
Tip: When the Add/Modify Keywords pane is displayed, you can easily view the document’s notes and cross-references by selecting the corresponding tab.
Cross-References displays the Cross-References pane in the task pane.
Tip: When the Cross-References pane is displayed, you can easily view the document’s keywords and notes by selecting the corresponding tab.
Discussions displays the Discussions pane in the task pane.
Note: Collaboration licensing is required to use discussions. For information on using discussions, see the Collaboration documentation.
Revisions displays the Revisions and Renditions dialog box.
Note: EDM Services licensing is required to use revisions. For information on using revisions, see the EDM Services documentation.
History displays the Document History dialog box.
Properties displays the Document Properties dialog box.
Send To displays the following options:
• Briefcase sends the selected document to a Unity Briefcase folio. Unity Briefcase licensing is required to send documents to Unity Briefcase folios. See the Unity Briefcase documentation for more information on folios.
• Mail Recipient sends the document or a link to the document to a user via external mail.
• Envelope displays the Envelope pane in the task pane. • Print displays the Print dialog box. • File displays the File pane in the task pane.
Start a Discussion displays the Discussions pane in the task pane.
Note: Collaboration licensing is required to use discussions. For information on using discussions, see the Collaboration documentation.
Page 18
OnBase 13, Hyland Software, Inc. – 01/14/14 Page 19
Re-Index displays the Re-Index pane in the task pane.
Delete removes the document from OnBase.
Check Out persistently checks out the selected document(s).
Note: EDM Services licensing is required to check out documents. For information on using persistent check out, see the EDM Services documentation.
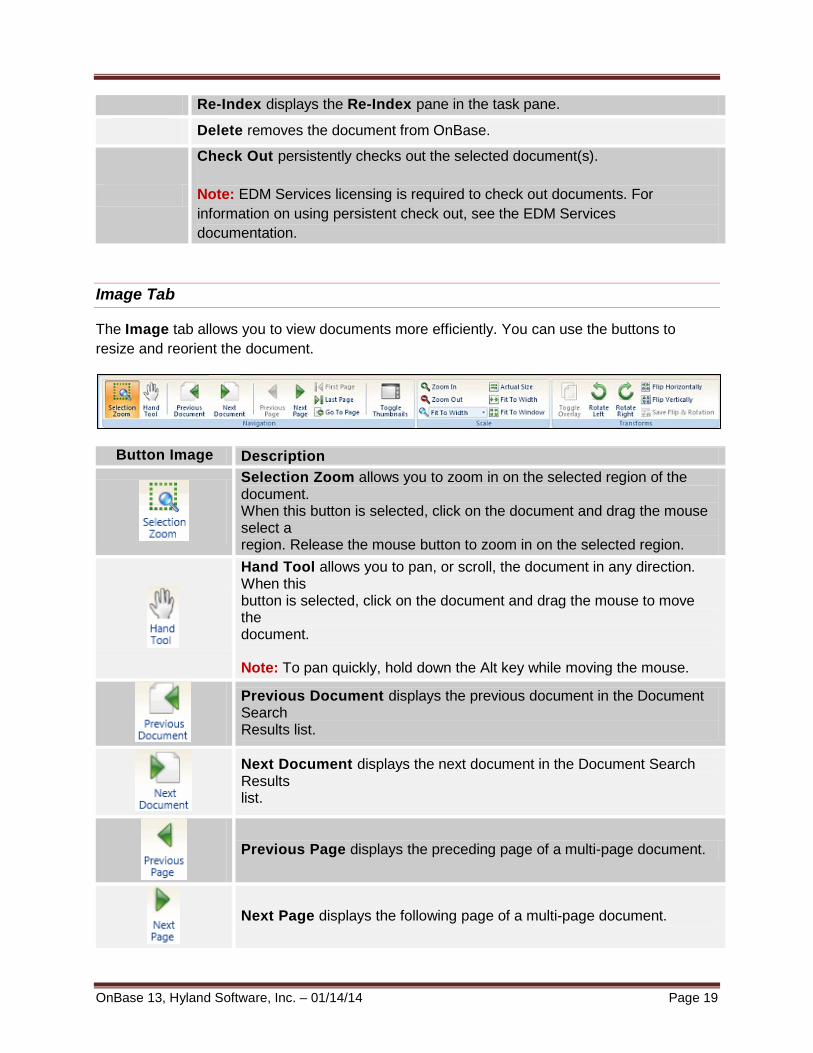
Image Tab
The Image tab allows you to view documents more efficiently. You can use the buttons to resize and reorient the document.
Button Image Description
Selection Zoom allows you to zoom in on the selected region of the document. When this button is selected, click on the document and drag the mouse select a region. Release the mouse button to zoom in on the selected region.
Hand Tool allows you to pan, or scroll, the document in any direction. When this button is selected, click on the document and drag the mouse to move the document. Note: To pan quickly, hold down the Alt key while moving the mouse.
Previous Document displays the previous document in the Document Search Results list.
Next Document displays the next document in the Document Search Results list.
Previous Page displays the preceding page of a multi-page document.
Next Page displays the following page of a multi-page document.

OnBase 13, Hyland Software, Inc. – 01/14/14 Page 20
First Page displays the first page of the document.
Last Page displays the last page of the document.
Go To Page allows you to go to a specific page in the document. After clicking this button, type a page number and click OK.
Toggle Thumbnails displays or hides thumbnails.
Zoom In magnifies the view of a document, reducing the portion that is visible. Every zoom increases magnification by one third.
Zoom Out reduces the magnification of a document, increasing the portion that is visible. Every zoom reduces magnification by one third.
Sizing options allow you to select a standard sizing option. Select a specific percentage of reduction or magnification (25%, 50%, 75%, 100%, or 200%), Fit To Width, or Fit To Window. You can also type a custom scale. Also displays the current magnification percentage whenever the Zoom In or the Zoom Out options are used. Note: Fit To Width is selected by default.
Actual Size displays the document in its actual size (as it is stored in OnBase).
Fit To Width resizes the document page so that its width is the same as the width of the document display area.
Fit To Window resizes the document page so that the entire image is displayed in the window.
Toggle Overlay turns the overlay on and off, if an overlay is present.
Rotate Left rotates the document 90 degrees counterclockwise.
Rotate Right rotates the document 90 degrees clockwise.
Flip Horizontally flips the document along the horizontal axis.
Flip Vertically flips the document along the vertical axis.
Save Flip & Rotation saves any flips or rotations.

OnBase 13, Hyland Software, Inc. – 01/14/14 Page 21
Text Tab
The Text tab allows you to view text documents more efficiently. You can use the buttons to resize and reorient the document. You can also search for text. The Text tab contains similar icons and functionality as the Image tab, save for the Find in Document search box.
Internal Text Search
Use the Find in Document field on the Text tab to search for specific text strings within the document. To perform an internal text search:
1. Click in the Find in Document field and type the characters to search for. Internal text
searches are case-insensitive, so searches for Account will also find account, and searches for account will also find Account.
2. Press the Enter key. 3. The number of occurrences of the specified string of text is displayed below the Find in
Document field as Result 1 of #, where # is the total number of occurrences. 4. The first occurrence of the specified string of text is displayed within a highlight bar. 5. Click Find Next to search for the next following occurrence of the specified string within
the current text document.
6. Click Find Previous to search for the previous occurrence of the specified string within
the current text document.
Notes
If you have sufficient privileges, you can view notes and create notes and annotations on documents using the Notes gallery.
When you select View Notes, the Notes pane displays in the task pane.

OnBase 13, Hyland Software, Inc. – 01/14/14 Page 22
Tip: When the Notes pane is displayed, you can easily view the document’s keywords and cross-references by selecting the corresponding tab.
Scroll through the available notes and annotations using the following buttons:
To display all available notes and annotations, click the following button:
Notes are available from the Notes gallery when a document is opened in the OnBase viewer or selected in the Document Search Results list. Notes are limited to 250 characters.
Adding Notes:
1. On the Document tab, in Notes, select the type of note.
2. If you are adding a note to an open text or image document, select the document to place the note. To enter text for the note, double-click the note. You can also select View Notes, and enter text in the Notes pane.
3. If you are adding a note to a document in the Document Search Results list, or an open OLE document or E-Form, the Notes pane is displayed. If necessary, enter text for the note.
4. Select Close.
Deleting Notes:
1. Select the note and select Delete Note in the Notes gallery.
2. Right-click the note and select Delete.

OnBase 13, Hyland Software, Inc. – 01/14/14 Page 23
ANNOTATIONS
Annotations are available from the Notes gallery when a document is opened in the OnBase Viewer. Annotations are not available from the Notes gallery when a document is selected in the Document Search Results list. This is because annotations have to be drawn on documents.
Highlights
To use a Highlight Annotation:
1. Select a highlight annotation from the Note Selection.

OnBase 13, Hyland Software, Inc. – 01/14/14 Page 24
2. Left-click and drag your mouse over the portion of the document that you would like to highlight.
3. Release your left-click and the highlight will appear on the document.
Arrows
To use the Arrow Annotation:
1. Select Arrow as an Annotation Type.
2. Left-click and drag your mouse where you would like the arrow to display. (Where you release the left-click is where the head of the arrow will be displayed).

OnBase 13, Hyland Software, Inc. – 01/14/14 Page 25
To Use Overlap Text:
1. Select Overlapped Text Annotation Type.
2. Left-click and drag your mouse where you would like the Overlapped Text to be displayed on the document.
3. Enter the text you would like to display on the document.
4. When you click away from the text box, the Overlapped Text will be displayed on the document.
OnBase 13, Hyland Software, Inc. – 01/14/14 Page 26
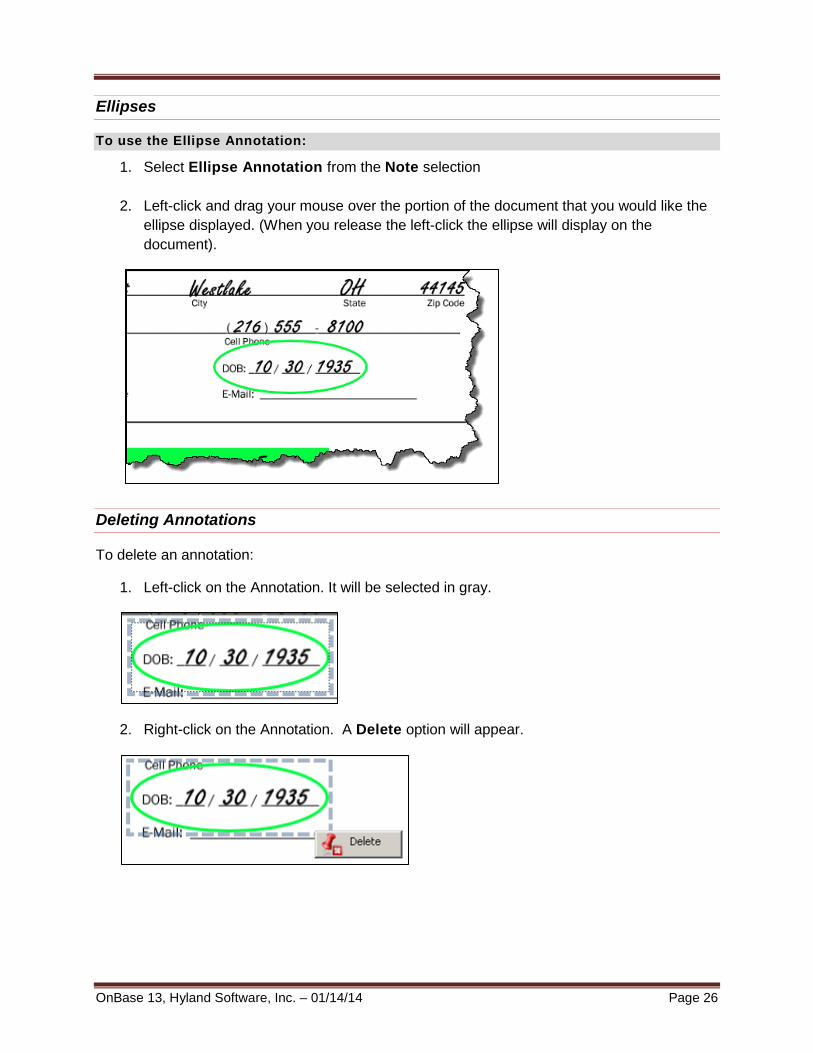
Ellipses
To use the Ellipse Annotation:
1. Select Ellipse Annotation from the Note selection
2. Left-click and drag your mouse over the portion of the document that you would like the ellipse displayed. (When you release the left-click the ellipse will display on the document).
Deleting Annotations
To delete an annotation:
1. Left-click on the Annotation. It will be selected in gray.
2. Right-click on the Annotation. A Delete option will appear.

OnBase 13, Hyland Software, Inc. – 01/14/14 Page 27
3. Select Delete. Select Yes when it asks Are you sure you want to delete this note?
UPLOAD
Import an Electronic Document
1. Select the Upload button or select the Upload tab.
2. Select Browse.
3. Select a document from your workstation or on a network location. A preview of the document will appear in the window.

OnBase 13, Hyland Software, Inc. – 01/14/14 Page 28
4. Index the document with information such as Document Type Group, Document Type, and any necessary Keywords.
5. Select Upload when finished.

OnBase 13, Hyland Software, Inc. – 01/14/14 Page 29
Scan a Document
1. Select the Upload button or select the Upload tab.
2. Select Acquire.
3. Select an Imaging Device and then select OK. (A compatible scanner must be attached and configured to the workstation).
4. The scanner device interface opens. Select appropriate criteria such as Resolution, Simplex or Duplex, Paper Size, and Color or Black and White.
5. Select Scan.

OnBase 13, Hyland Software, Inc. – 01/14/14 Page 30
The image appears in the Preview window.
Pages can be reordered by selecting Move Up or Move Down. Delete pages by selecting Remove. Rotate Image Left or Right as well.
6. Index the document with information such as Document Type Group, Document Type, and any necessary Keywords.
7. Select Upload when finished.
Items to Note:
Ad-hoc Scanning is used to scan ONE document (either a single page or multi-page) at a time. Meaning if you try to scan multiple documents, there is no way to separate/split them (using this feature).
Say you scanned a document and forgot to add a page. As long as you did not select ‘Upload’ after indexing the document, you can press the ‘Acquire’ button again, and the additional page(s) will appear in the ‘Preview’.

OnBase 13, Hyland Software, Inc. – 01/14/14 Page 31
BATCH SCANNING
Batch Scanning is where batches of documents can be Scanned or Swept into OnBase.
1. Select a Scan Queue to scan or sweep documents into. Scan Queues vary by department or Document Type, such as Admissions Documents Scan Queue or Transcripts Scan Queue.
2. Select Scan to bring in paper documents or Sweep to browse to a directory and import electronic documents.
3. Enter a Name for your batch and select a Scan Format.

OnBase 13, Hyland Software, Inc. – 01/14/14 Page 32
4. After documents are finished scanning, a dialog box appears asking if you are complete with scanning, select Done if finished.
The batch will be saved and appear in Awaiting Index or Index in Progress queue for Indexing.

OnBase 13, Hyland Software, Inc. – 01/14/14 Page 33
BATCH INDEXING
Indexing is the process of applying Document Type and Keyword, or index, values to the document.
The Scan Batch Processing button allows a user with appropriate rights to view scanned batches either by Scan Queue processing status or Scan Queue name.
1. Select a batch with a status of Awaiting Index or Index in Progress, right-click and select Index Documents. The number next to each Scan Queue status represents the number of batches in that processing queue.
Indexing
The Indexing pane is displayed when a batch is opened for indexing. It contains all of the options needed to navigate and index the documents in the batch.
1. Select a Document Type and add appropriate keywords (index values) for the document.

OnBase 13, Hyland Software, Inc. – 01/14/14 Page 34
Split Documents
1. With the multi-page document selected, select the thumbnail of the page that is to be the first page of the newly-created document. This page is displayed in detail in the Document Viewer.

OnBase 13, Hyland Software, Inc. – 01/14/14 Page 35
2. Select the Create New Document button in the Indexing pane.
The new document is created. It consists of the currently-displayed page and all subsequent pages of the original document. The newly-created document is now the currently-selected document and it is added to the current batch after the document it was created from.
Configure Keyword Panel
Unity Client allows the user to customize which Keywords are available in Indexing. This feature may be useful for scenarios where not all keyword values need to be populated by the indexer right away, and a more targeted set of keywords is desired instead.
1. On the Scan Batch Processing tab, select Configure Keyword Panel.
2. Select a Scan Queue and Document Type to configure
Configuration Style allows you to select either the Standard keyword panel or a Unity Indexing Form.
Keywords on the left side are included in the Indexing panel for this particular Document Type. Keywords can be re-ordered by selecting and dragging the Keyword.

OnBase 13, Hyland Software, Inc. – 01/14/14 Page 36
NEED HELP?
Contact the IT Help Center by phone (818-677-1400), online at (http://techsupport.csun.edu) or in person in (Oviatt Library, First Floor, Learning Commons).
CONTENT NOTE: The information in this guide was provided by Hyland Software, Inc. This document has been adapted for accessibility.