Embed Size (px)
Citation preview

Online Exam Instructions
Website Link:
Click on the following link to go to the NFHS Exam System and begin the steps below to take an exam.
https://exams.nfhs.org/
New Online Exam Site:
As of June 1, 2017, all users must create a new account the 1st time they login to the site. Please make
note of the user name and password you create for future login.
Creating a User:
If this is your first time using the new NFHS Online Exam System. Click on “Register” or “Create
an Account”. This will take you to the “Account Setup” screen.

The Account Setup is set up in to three sections (Account Information, Personal Information and
Association Information)
Account Setup
Username – Type in the Username you
wish to use for your account.
E-Mail Address – Type in the email
address you wish to use for this account.
(Some states require the same email
address you use for your ArbiterSports
account.)
Confirm E-Mail Address – Retype your
email address
Password – Type in the Password you
wish to use for this account.
Note: Passwords must be at least 6
characters in length.
Confirm Password – Retype your
password

Personal Information
Prefix (Optional) – Choose a Prefix you
would like from the drop-down menu.
First Name – Enter your First Name as
you would like it reported to your State
Association.
Middle Name (Optional) – Enter your
Middle Name or Initial.
Last Name – Enter your Last Name as you
would like it reported to your State
Association.
Suffix (optional) – Choose a Suffix you
would like from the drop-down menu.
Address – Enter your street address or PO
Box.
City – Enter the City you reside.
State – Enter the State you reside.
Zip/Postal Code – Enter your Zip/Postal
Code.
Timezone – Choose the appropriate Time
Zone where you reside.
Once all your information is complete
Click “Next”

Association Information
Primary State Association – Select the
State that you are taking your officials
Exam.
State ID will only show for those States
requiring an ID number be entered.
State ID - Enter your state officials ID for
the state you are taking your exam.
Alternate State Associations – Select any
other state you officiate in. (Ctrl+Click to
select multiple states.)
Local Association – Inter the name of
your Local Chapter(s)/Association(s).
Once all your information is complete
Click “Finish”
You will then see the following message on your screen and you will receive an email regarding your
Account Creation.
Click “here” to go to the User Sign In.
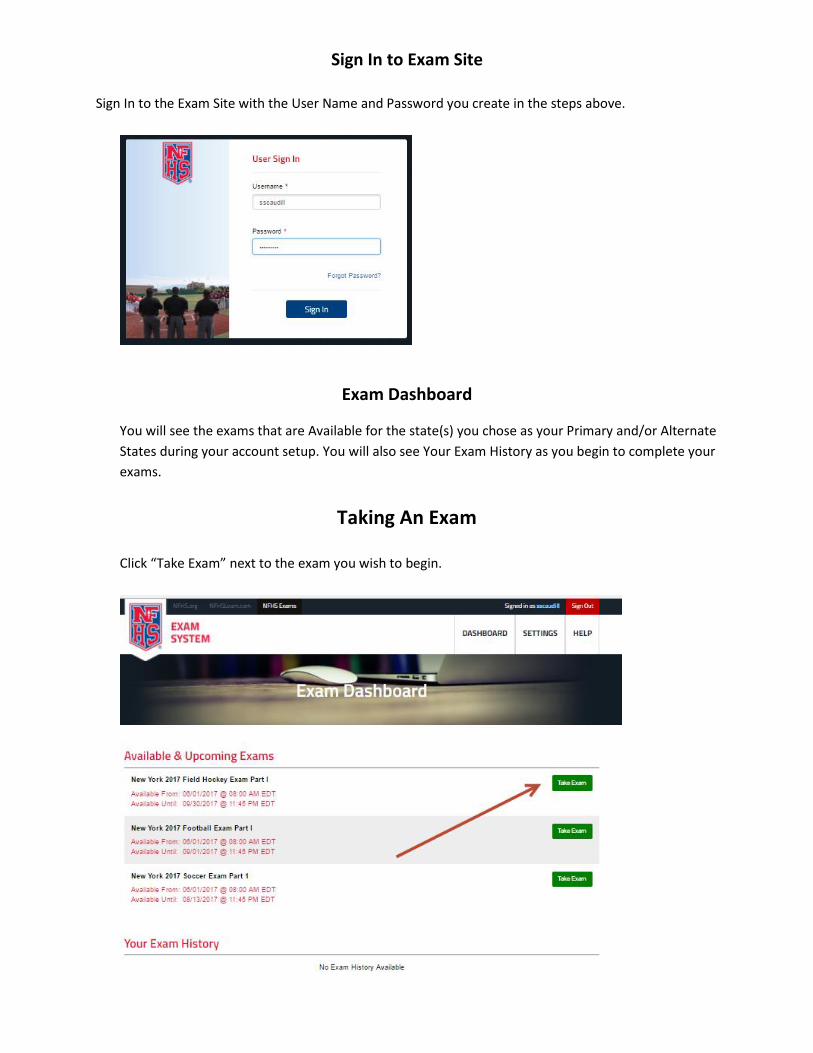
Sign In to Exam Site
Sign In to the Exam Site with the User Name and Password you create in the steps above.
Exam Dashboard
You will see the exams that are Available for the state(s) you chose as your Primary and/or Alternate
States during your account setup. You will also see Your Exam History as you begin to complete your
exams.
Taking An Exam
Click “Take Exam” next to the exam you wish to begin.

You will then be given any special notes for that exam and asked “Are you ready to begin the exam?”,
Click “Yes, I’m Ready”
Once you have click the “Yes, I’m Ready” button your exam will come up in your screen and you can
begin taking your exam.
You can “Save & Exit” your exam at any time to complete it at a later time.
You can also flag a question (either answered or unanswered) to come back and review it at a later time
before you Submit your Exam by Clicking the “Flag Question” icon next to the questions.

As you continue through your exam questions, you will see the “Flagged Questions” and/or
“Unanswered Questions” button appear at the top.
To go to a flagged question at any time during your exam, Click on the “Flagged Questions” button and
then the Question Number.
To go to an unanswered question at any time during your exam, Click on the “Unanswered Questions”
button and then the Question Number.

Once you have answered all the questions on the exam, you will Click on “Score & Submit”
You will see the following “Warning” pop up. Click on the “Score & Submit” button if you are sure you
have answered and reviewed all of your questions.
You will then see your results and the Rule References of any questions you have missed. You can click
on the “To Dashboard” button. You will also receive an email with your Score and Rule Reference listed
for you to review in the Rules Book.

Once back at the Dashboard you will see your Exam listed under “Your Exam History” section. If a
Retake is available you will see a “Retake” button next to the Exam.
You can review the “Details” of your Exam for 30 days after the Close of the Exam Period for your .
Simple log back into the Exam System and Click the “Details” button next to your exam.