Embed Size (px)
Citation preview

MAY 2016
Microsoft Volume Licensing Service Center
Online Service Reservations for
Enterprise Agreements
Microsoft Volume Licensing
2 | Online Service Reservations for Enterprise Agreements
MICROSOFT VOLUME LICENSING SERVICE CENTER TASKS 3
Online Services – Customer Contact Information 3
Tenant Discovery email - Sign In versus Sign Up options 4
Activation – step-by-step process 4 New online services customer 4 Existing Online Services for Enterprise customers 6
Create and manage online service license reservations 7
To change your roles and permissions 7
LICENSE RESERVATIONS AND TRANSITIONS 8
To place a reservation 8 Usage Date Rules 9 View your services 10 Select products to reserve 10 After you complete a reservation 12
PLACING A STEP-UP RESERVATION 13
VIEWING YOUR SERVICE, LICENSE ID, AND RESERVATION DETAILS 15
GETTING HELP 16
Microsoft Volume Licensing
3 | Online Service Reservations for Enterprise Agreements
Microsoft Volume Licensing Service
Center tasks
The Microsoft Volume Licensing Service Center (VLSC) is the primary location for Microsoft
Volume Licensing customers to view and manage their licensing agreements.
NOTE The information and procedures in this guide apply only to Enterprise agreements.
Online Services – Customer Contact Information
Every Online Service for Enterprise scenario begins with Microsoft sending a “tenant
discovery” email describing how to activate your online services.
Important – Next Steps to Activation: After the reservation is complete, the person who
placed the reservation will receive a confirmation email from Microsoft detailing features of
the reservation.
If your agreement does not have any existing Online Services (OLS) prior to this reservation,
e.g. this is your first reservation or order, the person who placed the reservation will receive
an activation email from Microsoft with instructions on how to create an online service
account (tenant). This account is connected to your Volume Licensing subscription.
If your agreement has an existing Tenant you will not receive this email, and your reserved
licenses will be added to the existing Tenant. Once the reserved licenses are ready for
assignment to users, the person who placed the reservation and the online services account
administrator (Tenant Admin) will be notified that the service is ready and that users can be
assigned in order to begin using the services.
The default contact at your organization for the activation email is the Online Services
Manager (OSM).
The OSM is listed on your organization’s Volume Licensing enrollment form. If the OSM
contact information needs to be updated, please provide that information via the Contract
Information Change Request form. Updates to the form will not automatically generate a
new email.
If the enrollment form does not designate an OSM, the activation email will be sent to
either the VLSC Online Administrator or the Notices Contact and Online Administrator
identified on the enrollment.
NOTE All purchase orders for online services must include the correct contact information for
the OSM and/or the VLSC Administrator. Without the correct information, the notification email
could be sent to the wrong individual within your organization.

Microsoft Volume Licensing
4 | Online Service Reservations for Enterprise Agreements
Tenant Discovery email - Sign In versus Sign Up options
When you receive the Tenant Discovery email, you will have the option to either “Sign In” or
“Sign Up,” depending on how the profile is set up.
NOTE It is important to understand the difference between the Sign In and Sign Up options
before taking any action, as the action cannot be changed.
Activation – step-by-step process
New online services customer
As a new online service customer when you purchase online services via the Enterprise
Agreement (EA), and have never participated in an Online Service Trial, follow these steps.
1. Microsoft or Microsoft Partner enters the volume licensing order.
2. You will receive a “Tenant” email from Microsoft. Select Sign up in option #2 to Create
a New Account.
3. You will be taken to the Microsoft Office 365 site to create a new account profile.
4. You will create a new Microsoft Online Services user ID, with a unique user name, for
each user account that you add to your subscription. The domain part of the user ID is
the "onmicrosoft.com" domain that you create. This can be changed later to reflect
your organization's domain.

Microsoft Volume Licensing
5 | Online Service Reservations for Enterprise Agreements
5. The Account Profile acknowledgement screen confirms the information you have
submitted to establish your account. Watch your email for a message confirming this
information.
6. The provisioning confirmation email will include the User ID and domain credentials,
sign-in URL, modification of contact preferences, community links and partner set-up
information for the services that you have purchased. Select the Sign In link to get
started setting up and managing your services.

Microsoft Volume Licensing
6 | Online Service Reservations for Enterprise Agreements
7. The link will take you to the Office 365 admin center where you can view a Get Started
Quick video, Service health dashboard and admin shortcuts.
Existing Online Services for Enterprise customers
If you previously purchased Microsoft Online Services for Enterprises and want to use the
same Tenant for additional Online Services, please choose the Sign In option from the link
in the Tenant Discovery email that you receive.

Microsoft Volume Licensing
7 | Online Service Reservations for Enterprise Agreements
You will be taken to the Online Services sign-in page. Once you sign in, you will receive an
acknowledgement that your existing account information is being associated with your
Volume Licensing information.
NOTE If you do not remember your existing account profile information, contact Microsoft
Support.
In the United States and Canada: online or via telephone 1-866-676-6546 and
select option 2 (6:00 AM Pacific Time to 6:00 PM Pacific Time, Monday through
Friday).
International customers: contact information for your country is available here.
Create and manage online service license reservations
You can use the VLSC to create and OLS license reservations. You may need to change your
roles and permissions.
In order for a VLSC user to see the reservation page, they must have:
The Online Administrator (OLA) role, which is the role automatically assigned to the
End Customer when an order is placed.
The OLS Manager role with the Manage Reservation constraint.
An agreement type of E6, EU, or USG.
To change your roles and permissions
NOTE You must have Administrator permissions to perform these tasks.
1. In the main navigation, select Administration.
2. Select Add New User, and then enter the new user details.
3. Select the agreement that you want to add roles.
4. A new constraint or role is added to the OLS role Manage Reservations, which
allows you to access VLSC pages that are relevant to Online Services reservations.
Microsoft Volume Licensing
8 | Online Service Reservations for Enterprise Agreements
License Reservations and Transitions
A License Reservation Order is a statement of intent that you plan to migrate users to the
use of Online Services, also known as Microsoft Cloud products either by creating new
orders or by transitioning licenses from prior on-premises purchases. A reservation gives
you the ability to use Microsoft Cloud products with the commitment that you will
complete the purchase at the next anniversary.
A commitment to sign the uEA amendment (if Enterprise Agreement was signed
before 2011) and Online Services Terms and Conditions (if Microsoft Business and
Services Agreement was signed before 2010)
A commitment to establish a locked price, as needed
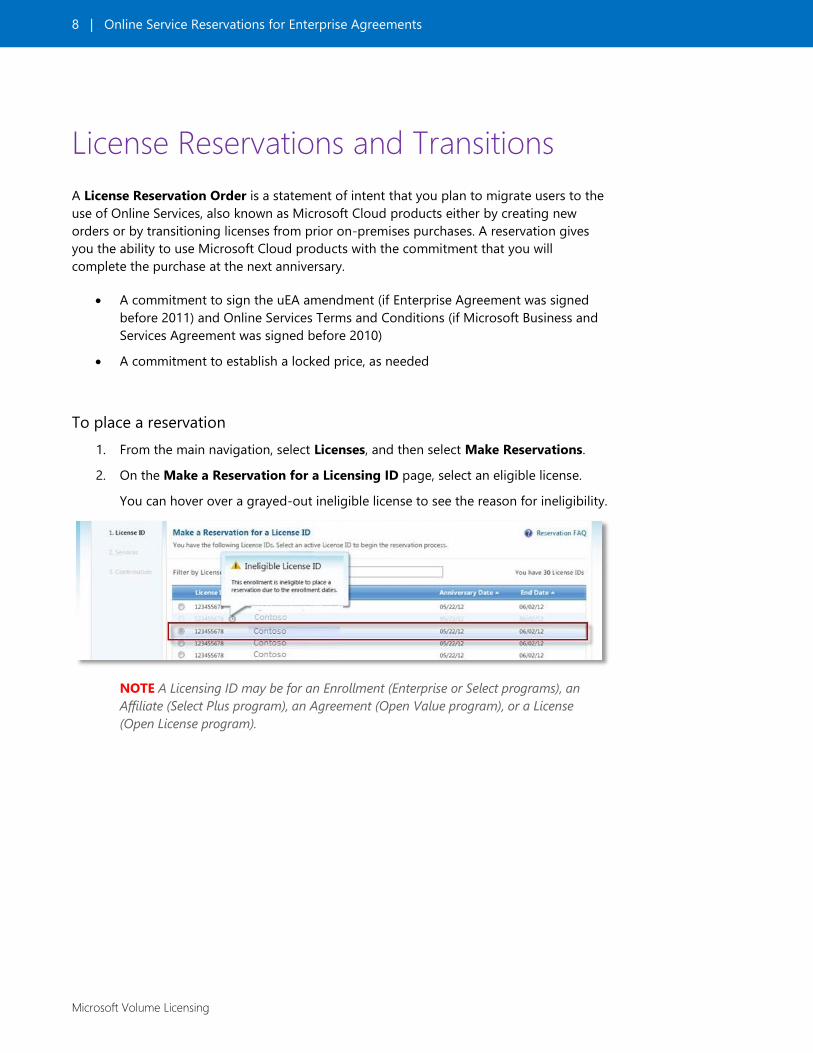
To place a reservation
1. From the main navigation, select Licenses, and then select Make Reservations.
2. On the Make a Reservation for a Licensing ID page, select an eligible license.
You can hover over a grayed-out ineligible license to see the reason for ineligibility.
NOTE A Licensing ID may be for an Enrollment (Enterprise or Select programs), an
Affiliate (Select Plus program), an Agreement (Open Value program), or a License
(Open License program).

Microsoft Volume Licensing
9 | Online Service Reservations for Enterprise Agreements
3. Select an eligible licensing row, and then select Continue.
4. Select the reservation Usage Date from the Calendar icon, and then select
Continue. The Usage Date will apply to all items in this reservation purchase order.
5. Once you select a Usage Date and select Continue, you can view a list of services in
the form of product family names, and then select from a list of products to
reserve.
Usage Date Rules
The Usage Date cannot occur:
In the past
More than six months in the future
Less than 30 days before the end of the agreement

Microsoft Volume Licensing
10 | Online Service Reservations for Enterprise Agreements
Usage Date colors:
Grey indicates an ineligible time period
Green indicates the time frame is within 30–60 days of the Anniversary Date
Red indicates the time frame is within 30 days of the end date
View your services
Your services are determined by your company’s agreement and the amendments already
signed. Not every agreement selected has all services available for use.
Select products to reserve
1. Select the product or service you would like to reserve.
2. If you want to change the usage date for the overall reservation, select the
Calendar icon to open the date selection widget.
3. Once you have selected a service to reserve, from the Action drop-down menu,
select New License or Step-Up. Step-up Licensing enables your organization
to upgrade to a higher-level software edition at a low cost.
4. Type the number of licenses in the Licenses text box, and then select the Usage
Country from the drop-down list.
5. If you want to reserve multiple products, select another online service and
repeat steps 10 and 11.

Microsoft Volume Licensing
11 | Online Service Reservations for Enterprise Agreements
More about usage dates:
o If you change the Usage Date after modifying step-up line items on the
reservation (but before submitting the reservation), the system must
evaluate if the change in the Usage Date also changes step-up
opportunities.
o If the new Usage Date is outside of the original step-up opportunities
usage date ranges, a warning message appears. If you select Continue and
accept the date, the modified step-up items are deleted.
6. On the Online Services page, select Continue.
7. After reviewing and, if necessary, correcting the reservation, select Submit
Reservation.
NOTE Ensure all details are correct. You have 72 hours to cancel the reservation
once it is submitted. Get more information on how to cancel a reservation.
8. Next, to commit to the terms of the reservation, you will see one of three
Reservation Commitment pop-up windows.

Microsoft Volume Licensing
12 | Online Service Reservations for Enterprise Agreements
o If your company has not signed the uEA amendment (if Enterprise
Agreement was signed before 2011) and the Online Services Terms and
Conditions (if Microsoft Business and Services Agreement was signed
before 2010) and/or locked pricing, a pop-up window will appear,
suggesting you work with your Microsoft representative to sign the uEA
amendment and Online Services Terms and Conditions, Once you select
Accept and Submit, the Reservation Complete screen will appear.
9. At the confirmation popup window, read the entire agreement. If you want to
commit financially on behalf of your company, select Accept and Submit or
Submit Reservation depending on the pop-up that appears. You may also
select Cancel to restart the process from the beginning.
10. The Reservation Complete screen will appear, showing details about the
reservation placed. It will indicate if it is complete or if there were any errors in
the submission.
After you complete a reservation
After the reservation is complete, the person who placed the reservation will receive a
confirmation email from Microsoft detailing features of the reservation.
If your agreement does not include any OLS prior to this reservation, the person who
placed the reservation will receive an Activation email from Microsoft with instructions on
how to create an online services account (tenant) to connect to your Volume Licensing
subscription. If your agreement has an existing OLS account (Tenant) you will not receive
this email, and your reserved licenses will be added to the existing account.

Microsoft Volume Licensing
13 | Online Service Reservations for Enterprise Agreements
Once the reserved licenses are ready to be assigned to users, the person who placed the
reservation and the online services account administrator (Tenant Admin) will be notified
that the service is ready and users can be assigned in order to begin using the services.
Until these requirements are satisfied, reminder email messages will be sent to your
company’s OLS Administrator, Customer Notices Contact, and Partner representative every
two weeks.
Placing a Step-up reservation
1. Follow the same reservation process as previously described; however, on the
Online Services page, select the Action drop-down menu.
2. Confirm that the product shown at the top (1) is the one you want to reserve.
3. Make the following selections:
Action (2): Select the Action drop-down list, and then select Step-up
License.
Step-up Source (3): Select the appropriate source for the step-up
reservation.
Selecting a product populates the Available field.
Available (4): Note the number that appears in this field. It is the
maximum number of licenses that you can reserve.
Licenses (5): Type the number of licenses required. Once this field is
populated, the total number of licenses in the Available column decreases
by the number of licenses you reserve.
In this example, 200 licenses were available, and 150 are reserved. There
are 50 licenses remaining for the source product.

Microsoft Volume Licensing
14 | Online Service Reservations for Enterprise Agreements
Usage Country (6): Select the Usage Country where the licenses are
reserved.
After you finish making all these selections, the number of licenses you
selected will appear beneath the product logo.
4. If you want, select Add Entry to add another line item to the same service.
5. Review your line items, and then select Continue. For each product you
selected, the number of licenses you are reserving appears beneath the
product logo. Be sure to view other pages where you may have made
selections.
6. The Reservation Confirmation page displays the multiple online services
chosen for step-up included in this reservation.
7. Select Submit Reservation or Edit Reservation to make changes.

Microsoft Volume Licensing
15 | Online Service Reservations for Enterprise Agreements
Viewing your Service, License ID, and
Reservation details
Use the Service History link to display the details of your previous reservations.
1. From the main page, select Licenses, and then select Manage Reservations.
You can view the Manage Reservations by Service, License ID, and Reservation
pages.
2. Select the Service button to display all of your reservations.
o Select a number in the Reservation column to see reservation details.
o Select Cancel if you want to cancel a reservation within 72 hours of
submitting the reservation.

Microsoft Volume Licensing
16 | Online Service Reservations for Enterprise Agreements
o Select a license ID in the Licensing ID column to display the License Details
page.
NOTE Services will not be active until provisioned in the Microsoft commerce
platform.
o Select Close to close the Service section.
3. Select the License ID to view your reservations by license ID.
o Select a number in the License ID column to view reservation details.
o Select a number in the Reservation column to view reservation
information for the license ID selected.
o If you select a reservation number link, the page will open the Reservation
view and close the License ID view. You can view reservation information
by descending order or by the reservation date.
Getting help
Select the Help link on the main navigation bar to view a drop-down menu with two
options: See FAQ (Frequently Asked Questions) or Training & Resources. You do not have
to be signed in to the VLSC to view and use the VLSC FAQs or Training and Resources.

Microsoft Volume Licensing
17 | Online Service Reservations for Enterprise Agreements
The Help link in the footer at the bottom of every page in the VLSC also points to the FAQs
page. The Contact Us link at the bottom of the FAQs page points to information about
how to contact Microsoft by phone or email if you need support. This Contact Us page has
three items:
Support Center Contact Info: This drop-down menu lets you select your country
from the drop-down list to display the Support Center information.
Interactive map: This lets you select the region to limit the number of entries in
the Support Center Contact Info drop-down list.
Support Center Contact Info: This displays contact information and Support
Center hours of operation.
![[2014] FWCA 3554 - SDA Nationalsda.org.au/download/enterprise-agreements/NONI-B-ENTERPRISE... · Noni B gives the following written undertakings with regards to the Noni B Enterprise](https://img.pdfslide.net/doc/110x75/5bcc31a009d3f2761f8dc1cf/2014-fwca-3554-sda-noni-b-gives-the-following-written-undertakings-with.jpg)
![Human Resources - Uni of Wollongong 2018 [Read-Only]web/@bus/... · • Enterprise Agreements are the most common method of wage determination in Australia. • Enterprise Agreements](https://img.pdfslide.net/doc/110x75/5b5d26317f8b9ac6028daae2/human-resources-uni-of-wollongong-2018-read-only-webbus-enterprise.jpg)
![[2013] FWCA 5001 - SDA Nationalsda.org.au/download/enterprise-agreements/MCDONALDS-AUSTRALIA... · MCDONALD'S AUSTRALIA ENTERPRISE AGREEMENT 2013 1 Title This Agreement shall be known](https://img.pdfslide.net/doc/110x75/5c74b44409d3f22e5a8c0802/2013-fwca-5001-sda-mcdonalds-australia-enterprise-agreement-2013-1-title.jpg)

![DECISION - SDA Nationalsda.org.au/download/enterprise-agreements/KMART-AUSTRALIA-LTD... · 1 [2012] FWAA 7357 DECISION Fair Work Act 2009 s.185—Enterprise agreement Kmart Australia](https://img.pdfslide.net/doc/110x75/5b1455637f8b9a2f7c8c8ef3/decision-sda-1-2012-fwaa-7357-decision-fair-work-act-2009-s185enterprise.jpg)