Embed Size (px)
Citation preview
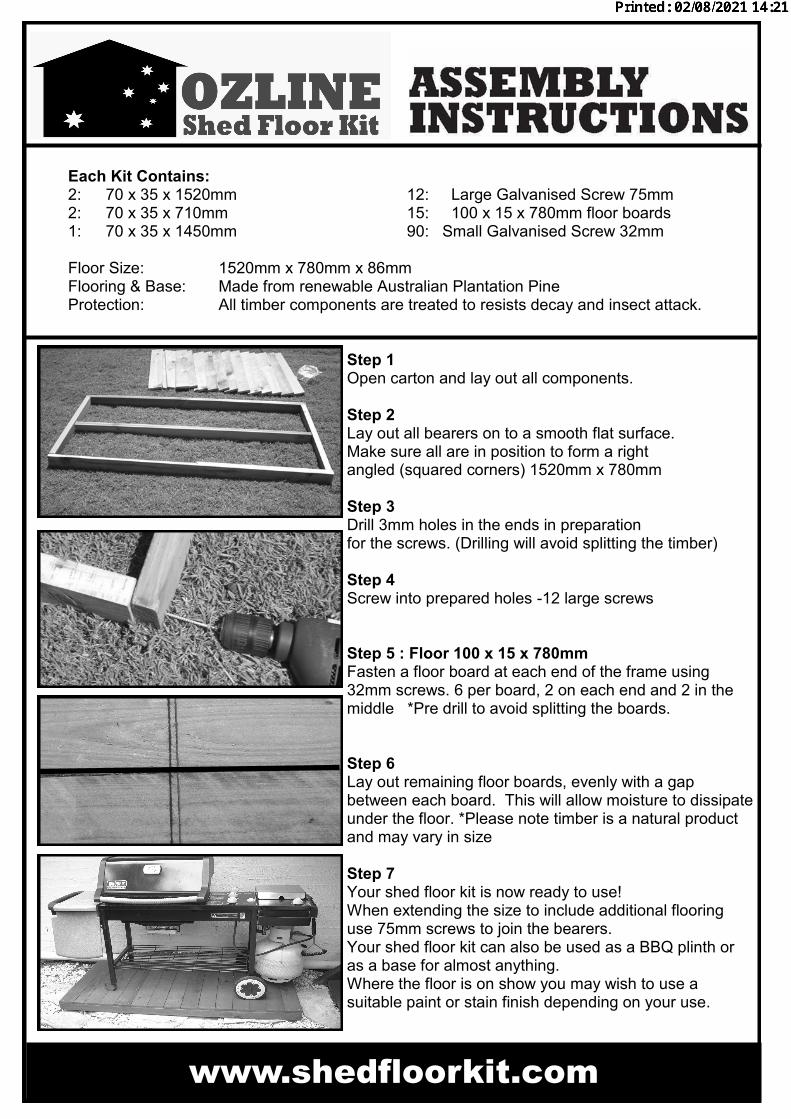
Each Kit Contains: 2: 70 x 35 x 1520mm 12: Large Galvanised Screw 75mm 2: 70 x 35 x 710mm 15: 100 x 15 x 780mm floor boards 1: 70 x 35 x 1450mm 90: Small Galvanised Screw 32mm Floor Size: 1520mm x 780mm x 86mm Flooring & Base: Made from renewable Australian Plantation Pine Protection: All timber components are treated to resists decay and insect attack.
Step 1 Open carton and lay out all components. Step 2 Lay out all bearers on to a smooth flat surface. Make sure all are in position to form a right angled (squared corners) 1520mm x 780mm Step 3 Drill 3mm holes in the ends in preparation for the screws. (Drilling will avoid splitting the timber) Step 4 Screw into prepared holes -12 large screws Step 5 : Floor 100 x 15 x 780mm Fasten a floor board at each end of the frame using 32mm screws. 6 per board, 2 on each end and 2 in the middle *Pre drill to avoid splitting the boards. Step 6 Lay out remaining floor boards, evenly with a gap between each board. This will allow moisture to dissipate under the floor. *Please note timber is a natural product and may vary in size Step 7 Your shed floor kit is now ready to use! When extending the size to include additional flooring use 75mm screws to join the bearers. Your shed floor kit can also be used as a BBQ plinth or as a base for almost anything. Where the floor is on show you may wish to use a suitable paint or stain finish depending on your use.
www.shedfloorkit.com

The Ozline Shed Floor Kit has been created to make it easier for people
to erect their garden shed with out having to worry about laying a concrete slab. The wooden floor is also portable making it ideal for the temporary erection of
your shed. Where wind conditions are such that your shed and floor kit may blow over, we recommend the flooring kit be secured to the ground and then your shed
anchored to the flooring kit. Caution : In severe wind or exposed conditions follow the shed manufacturer’s instructions and use a concrete slab. Your wooden flooring kit can then be used on top of the slab providing the floor and shed are securely anchored together.
Note : When using the floor kit on top of a concrete slab the floor kit needs to be securely anchored to the slab and the shed securely anchored to the floor kit.
Steel corner brackets or straps should be used for this.
Materials and Tools Required
4 x 50mm x 50mm x 500mm hardwood garden stakes available from most Hardware or garden stores (500mm large tent pegs could be substituted). 8 x 75mm baton screws 1 x baton screw bit 1 x 5mm drill bit
Hammer or heavy mallet, electric drill
Step 1 Drill 2 x 5mm holes in the square end of the hardwood garden pegs. Step 2 Position flooring kit and drive pegs into the ground until they are flush with the flooring frame. In uneven ground dig out the corners, place pegs into the ground and fill with soil or concrete. Step 3 Screw 2 baton screws in each of the four corners Please Note : Where more than 1 flooring kit is being used, use 75mm baton screws at 300mm intervals to join the flooring kits together and use 2 anchor points for each new flooring kit.
www.shedfloorkit.com
Warranty : The treatment on this Floor Kit is warranted to provide protection to the floor kit against rotting or insect attack for 10 years. A replacement will be provided free of charge upon presentation of photographic evidence of failure and proof of purchase. The warranty is limited to replacement only. Disclaimer : Due to varying construction materials used and varying conditions owners need to make sure adequate anchoring is used in windy conditions. No claims will be considered for sheds or flooring moving in windy conditions. The warranty applies only to insect or moisture ingress.