Embed Size (px)
Citation preview

web openqcm.com mail [email protected]
Centro Direzionale, Isola G7 80143 Naples (Italy)
phone +39 081 0320584
1
openQCM Q-1 User’s Guide
openQCM Q-1 Quartz Crystal Microbalance
with Dissipation Monitoring based on Scalar Network Analyzer
Authors: openQCM Team
Version: 2.1 rev1
Date: 2018-12-20
web openqcm.com mail [email protected]
Centro Direzionale, Isola G7 80143 Naples (Italy)
phone +39 081 0320584
2
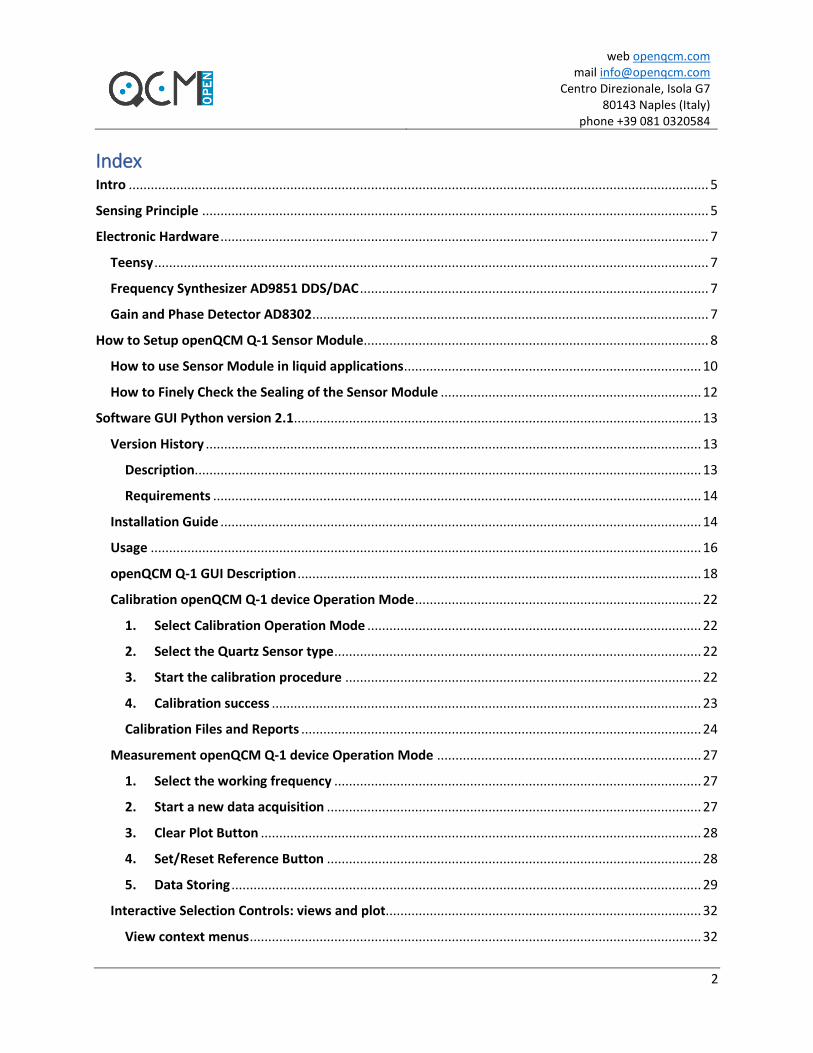
Index Intro .............................................................................................................................................................. 5
Sensing Principle .......................................................................................................................................... 5
Electronic Hardware ..................................................................................................................................... 7
Teensy ....................................................................................................................................................... 7
Frequency Synthesizer AD9851 DDS/DAC ............................................................................................... 7
Gain and Phase Detector AD8302 ............................................................................................................ 7
How to Setup openQCM Q-1 Sensor Module.............................................................................................. 8
How to use Sensor Module in liquid applications ................................................................................. 10
How to Finely Check the Sealing of the Sensor Module ....................................................................... 12
Software GUI Python version 2.1............................................................................................................... 13
Version History ....................................................................................................................................... 13
Description.......................................................................................................................................... 13
Requirements ..................................................................................................................................... 14
Installation Guide ................................................................................................................................... 14
Usage ...................................................................................................................................................... 16
openQCM Q-1 GUI Description .............................................................................................................. 18
Calibration openQCM Q-1 device Operation Mode .............................................................................. 22
1. Select Calibration Operation Mode ........................................................................................... 22
2. Select the Quartz Sensor type .................................................................................................... 22
3. Start the calibration procedure ................................................................................................. 22
4. Calibration success ..................................................................................................................... 23
Calibration Files and Reports ............................................................................................................. 24
Measurement openQCM Q-1 device Operation Mode ........................................................................ 27
1. Select the working frequency .................................................................................................... 27
2. Start a new data acquisition ...................................................................................................... 27
3. Clear Plot Button ........................................................................................................................ 28
4. Set/Reset Reference Button ...................................................................................................... 28
5. Data Storing ................................................................................................................................ 29
Interactive Selection Controls: views and plot...................................................................................... 32
View context menus ........................................................................................................................... 32

web openqcm.com mail [email protected]
Centro Direzionale, Isola G7 80143 Naples (Italy)
phone +39 081 0320584
3
Plot context menus ............................................................................................................................ 36
Exceptions and Warnings during Calibration Operation Mode ............................................................ 37
Exceptions and Warnings during Measurement Operation Mode ...................................................... 40
Further information ............................................................................................................................... 41
Starting the software without connecting device ............................................................................. 41
Closing the software ........................................................................................................................... 42
Disconnecting the USB cable of the device during run ..................................................................... 43
Architecture of the Python Software .................................................................................................... 44
Temperature, Voltage and Material Warning Notice ............................................................................... 45
Temperature ........................................................................................................................................... 45
Voltage .................................................................................................................................................... 45
Material .................................................................................................................................................. 45
openQCM Open Source Device Important Notice .................................................................................... 46
FCC Warning ........................................................................................................................................... 46
Important Notice ........................................................................................................................................ 47
Other References ........................................................................................................................................ 48

web openqcm.com mail [email protected]
Centro Direzionale, Isola G7 80143 Naples (Italy)
phone +39 081 0320584
4
web openqcm.com mail [email protected]
Centro Direzionale, Isola G7 80143 Naples (Italy)
phone +39 081 0320584
5
Intro openQCM device is released as a scientific open source instrument, and it is intended solely for use for
SCIENTIFIC, RESEARCH and DEVELOPMENT APPLICATION, DEMONSTRATION, OR EVALUATION
PURPOSES and is not considered to be a finished end-product fit for general consumer use.
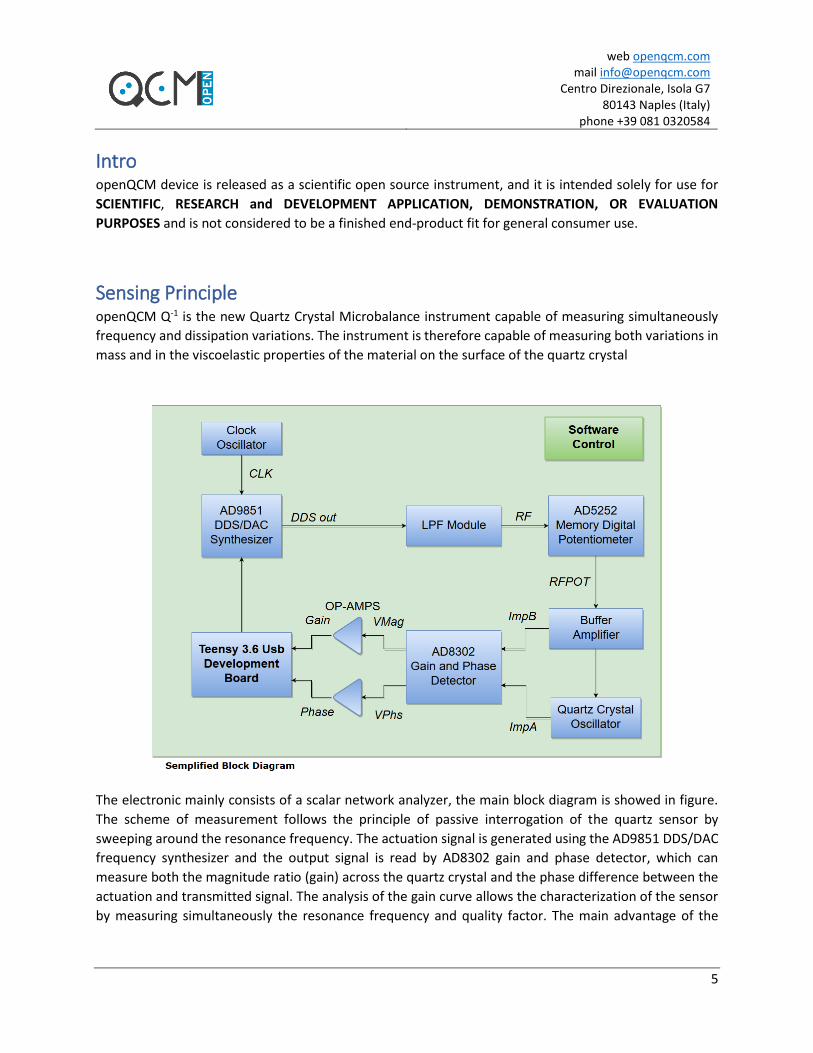
Sensing Principle openQCM Q-1 is the new Quartz Crystal Microbalance instrument capable of measuring simultaneously
frequency and dissipation variations. The instrument is therefore capable of measuring both variations in
mass and in the viscoelastic properties of the material on the surface of the quartz crystal
The electronic mainly consists of a scalar network analyzer, the main block diagram is showed in figure.
The scheme of measurement follows the principle of passive interrogation of the quartz sensor by
sweeping around the resonance frequency. The actuation signal is generated using the AD9851 DDS/DAC
frequency synthesizer and the output signal is read by AD8302 gain and phase detector, which can
measure both the magnitude ratio (gain) across the quartz crystal and the phase difference between the
actuation and transmitted signal. The analysis of the gain curve allows the characterization of the sensor
by measuring simultaneously the resonance frequency and quality factor. The main advantage of the
web openqcm.com mail [email protected]
Centro Direzionale, Isola G7 80143 Naples (Italy)
phone +39 081 0320584
6
scheme of measurement is the possibility to measure quartz sensor parameters in isolation without an
external circuity influence.
openQCM Q-1 electronic consists mainly of two boards: i) the main board features the network analyzer
and Teensy microcontroller, and ii) the secondary board which is inserted in the fluidic cell, which features
the electro-mechanical connections with the quartz crystal sensor using pogo-pin and also a temperature
sensor which is mounted as close as possible to the quartz crystal sensor, in order to measure the
temperature inside the fluidic cell.

web openqcm.com mail [email protected]
Centro Direzionale, Isola G7 80143 Naples (Italy)
phone +39 081 0320584
7
Electronic Hardware
Teensy The openQCM Q-1 PCB is designed to use a Teensy 3.6 development board
https://www.pjrc.com/teensy/index.html
which is a powerful arduino-compatible microcontroller, featuring a 32 bit 180 MHz ARM Cortex-M4
processor developed by Paul Stoffregen. The development board has a lot of functionalities, the most
interesting one is the analog input ADC with an usable resolution of 13 bits
https://www.pjrc.com/teensy/techspecs.html
It means that over the full-scale range of 3.3 volt it is possible to measure input voltage variations with a
resolution 0.4 mV/bits.
Frequency Synthesizer AD9851 DDS/DAC The AD9851 DDS/DAC frequency synthesizers
http://www.analog.com/media/en/technical-documentation/data-sheets/AD9851.pdf
is an integrated device which uses DDS technology for generating an analog output sine wave when it is
referenced to a stable clock source. In this application the AD9851 was connected to a 30MHz standard
clock oscillators. The DDS can generate a sine wave with frequency from DC up to 72 MHz, with an output
tuning resolution of about 0.04 Hz when clocked at 180 MHz. The output frequency is controlled by the
digital pin W_CLK and S_LD using a defined protocol of communication.
The wide – range frequency output capability of AD9851 ( 0 – 72 MHz) enables to interrogate the quartz
sensor not only at the fundamental frequency but also to the higher mode of vibration, which are
supposed to be more suitable for biosensing applications, mainly because they have less drift and less
environmental effects.
Gain and Phase Detector AD8302 The AD8302 Gain and Phase Detector
www.analog.com/media/en/technical-documentation/data-sheets/AD8302.pdf
is capable of measure simultaneously both the magnitude ratio, defined as gain, and phase difference
between two signals, from low frequencies up to 2.7 GHz. The AD8302 measures the gain loss through
the quartz crystal, referenced to the input signal, and simultaneously the phase lag between the response
and actuation signal.
web openqcm.com mail [email protected]
Centro Direzionale, Isola G7 80143 Naples (Italy)
phone +39 081 0320584
8
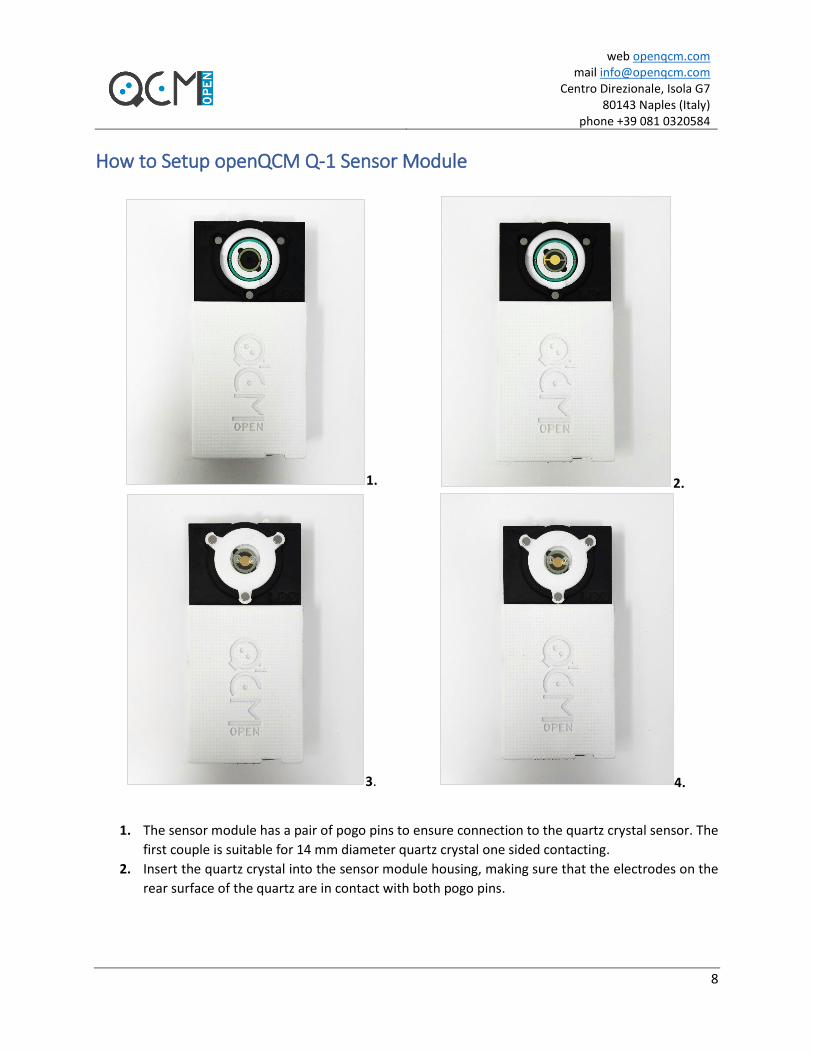
How to Setup openQCM Q-1 Sensor Module
1. 2.
3. 4.
1. The sensor module has a pair of pogo pins to ensure connection to the quartz crystal sensor. The
first couple is suitable for 14 mm diameter quartz crystal one sided contacting.
2. Insert the quartz crystal into the sensor module housing, making sure that the electrodes on the
rear surface of the quartz are in contact with both pogo pins.
web openqcm.com mail [email protected]
Centro Direzionale, Isola G7 80143 Naples (Italy)
phone +39 081 0320584
9
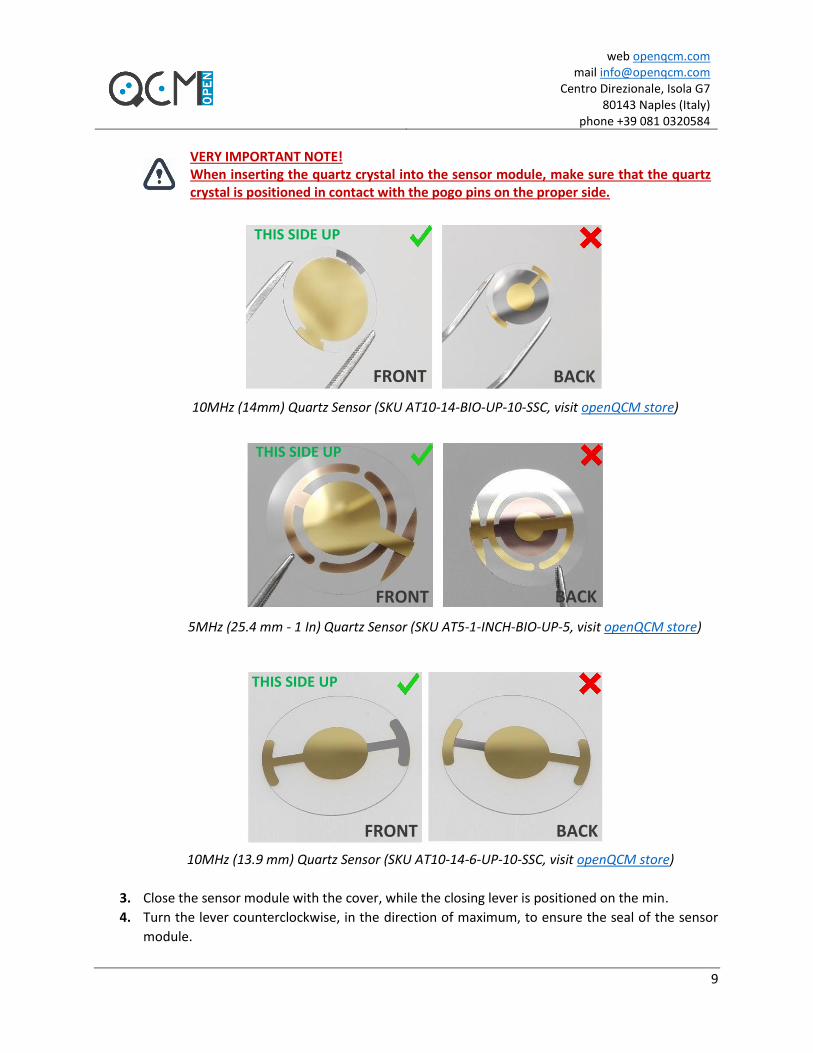
VERY IMPORTANT NOTE! When inserting the quartz crystal into the sensor module, make sure that the quartz crystal is positioned in contact with the pogo pins on the proper side.
10MHz (14mm) Quartz Sensor (SKU AT10-14-BIO-UP-10-SSC, visit openQCM store)
5MHz (25.4 mm - 1 In) Quartz Sensor (SKU AT5-1-INCH-BIO-UP-5, visit openQCM store)
10MHz (13.9 mm) Quartz Sensor (SKU AT10-14-6-UP-10-SSC, visit openQCM store)
3. Close the sensor module with the cover, while the closing lever is positioned on the min.
4. Turn the lever counterclockwise, in the direction of maximum, to ensure the seal of the sensor
module.
FRONT BACK
THIS SIDE UP
FRONT BACK
THIS SIDE UP
FRONT BACK
THIS SIDE UP
web openqcm.com mail [email protected]
Centro Direzionale, Isola G7 80143 Naples (Italy)
phone +39 081 0320584
10
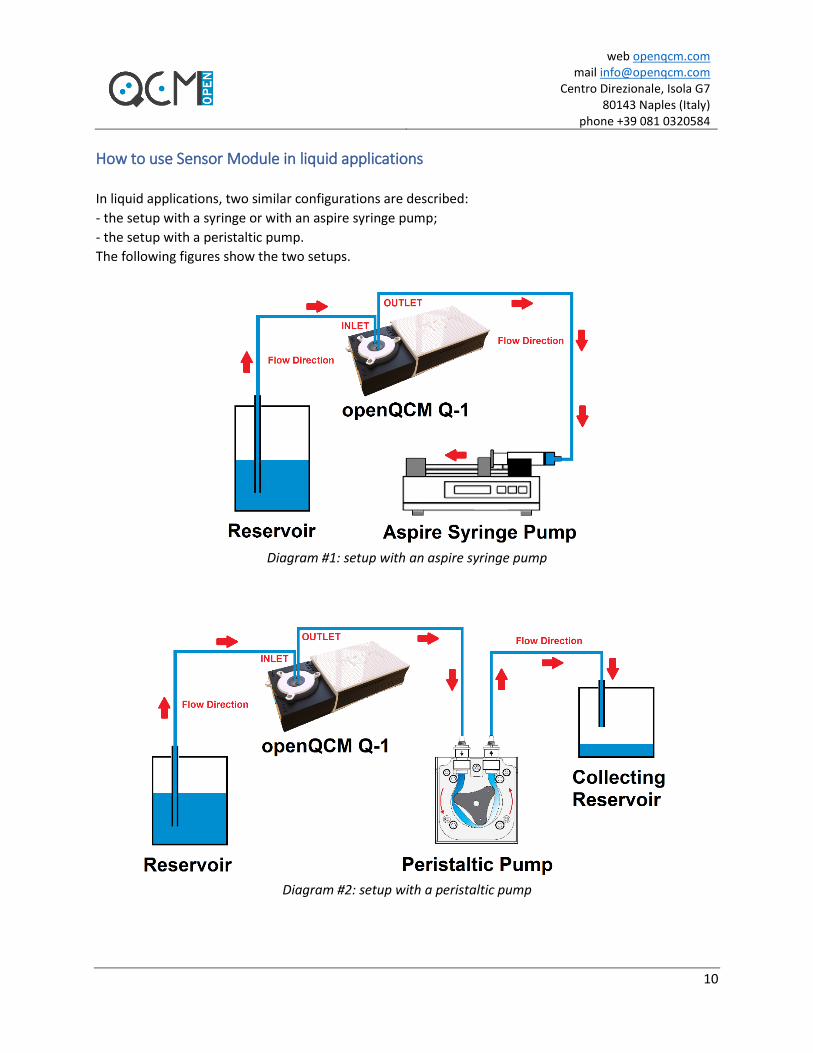
How to use Sensor Module in liquid applications
In liquid applications, two similar configurations are described:
- the setup with a syringe or with an aspire syringe pump;
- the setup with a peristaltic pump.
The following figures show the two setups.
Diagram #1: setup with an aspire syringe pump
Diagram #2: setup with a peristaltic pump
web openqcm.com mail [email protected]
Centro Direzionale, Isola G7 80143 Naples (Italy)
phone +39 081 0320584
11
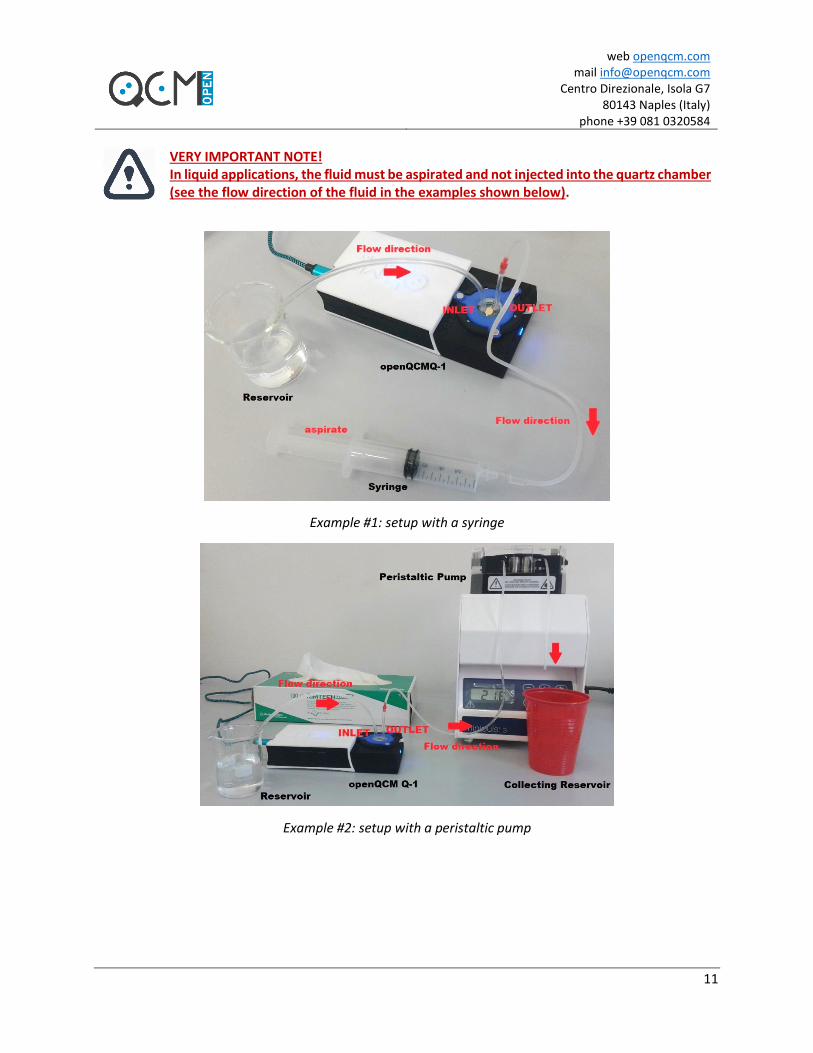
VERY IMPORTANT NOTE! In liquid applications, the fluid must be aspirated and not injected into the quartz chamber (see the flow direction of the fluid in the examples shown below).
Example #1: setup with a syringe
Example #2: setup with a peristaltic pump

web openqcm.com mail [email protected]
Centro Direzionale, Isola G7 80143 Naples (Italy)
phone +39 081 0320584
12
detail of the quartz chamber (inlet and outlet)
How to Finely Check the Sealing of the Sensor Module
• Connect the tubes to the flow cover.
• Connect one tube to the liquid reservoir (inlet) and the other tube to a syringe / pump (outlet)
• Aspirate the liquid with the syringe / pump and stop before the liquid enters the quartz chamber.
o if the liquid remains stationary at the same level, the seal of the chamber is guaranteed.
Otherwise:
o the seal of the chamber is not guaranteed: fine turn the lever counterclockwise, in the
direction of maximum, to ensure the seal of the sensor module.
The machining process of the openQCM sensor module is carried out using 3D printing technology, so
that the fine adjustment of the sensor module measuring cell can depend on the specific device used.
Once the adjustment lever has been positioned in the appropriate working position, it is recommended
to keep its position fixed during the measurement cycle.
It may be possible to observe frequency drifts because the cover presses too much on the quartz surface of the quartz. You can solve this by finely turning the lever clockwise in the direction of minimum. PLEASE BE CAREFUL ! Turning clockwise the lever too far towards the minimum may cause the cell to be flooded because it loses sealing.
It may be possible to observe tilting of the top cover, which can prevent the measurement
cell from being sealed properly. Gently press on the top cover to check that it does not tilt,
otherwise sealing may not be guaranteed. If the top cover tilts, it is suggested that you turn
the adjustment lever anti-clockwise, in the maximum direction, to prevent the top cover
from tilting.
web openqcm.com mail [email protected]
Centro Direzionale, Isola G7 80143 Naples (Italy)
phone +39 081 0320584
13
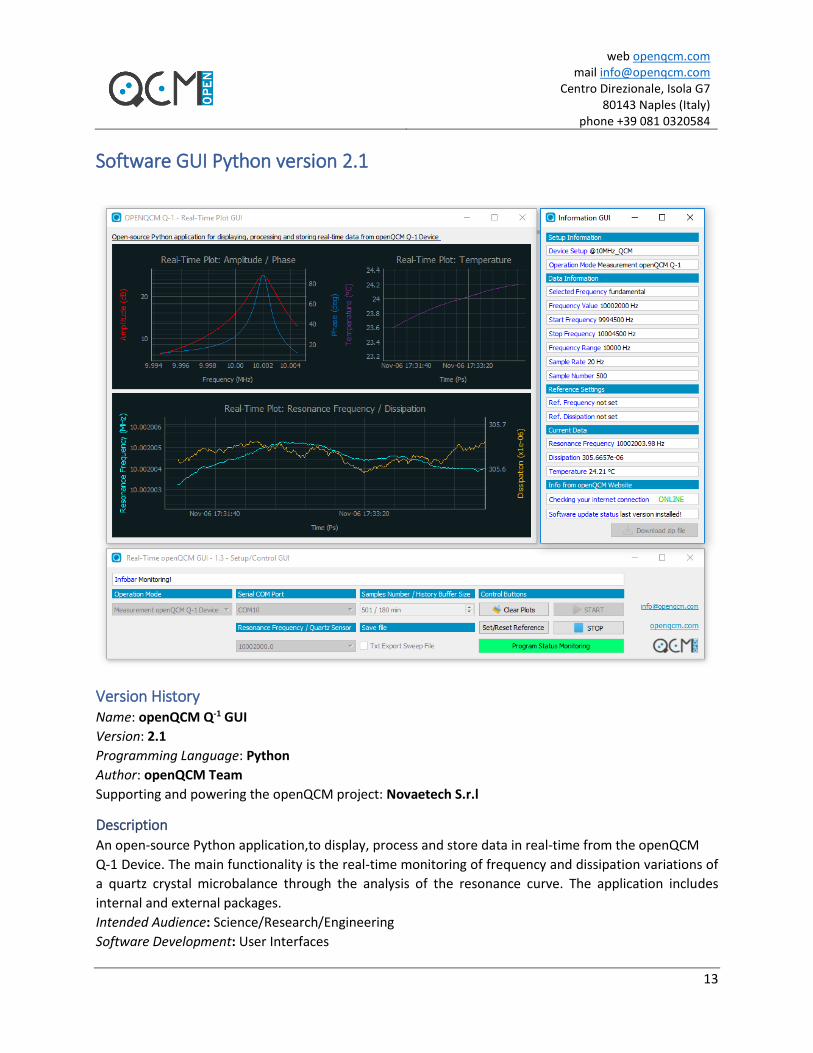
Software GUI Python version 2.1
Version History Name: openQCM Q-1 GUI
Version: 2.1
Programming Language: Python
Author: openQCM Team
Supporting and powering the openQCM project: Novaetech S.r.l
Description
An open-source Python application,to display, process and store data in real-time from the openQCM
Q-1 Device. The main functionality is the real-time monitoring of frequency and dissipation variations of
a quartz crystal microbalance through the analysis of the resonance curve. The application includes
internal and external packages.
Intended Audience: Science/Research/Engineering
Software Development: User Interfaces
web openqcm.com mail [email protected]
Centro Direzionale, Isola G7 80143 Naples (Italy)
phone +39 081 0320584
14
Requirements:
- Python 3.7 (verified compatibility with Python 3.6)
- Anaconda3-5.3.0
External Packages:
- PyQt5
- PySerial 3.4
- PyQtGraph 0.10.0
- progressbar 2.5
Installation Guide Download openQCM QQ-1 Python application version 2.1 here:
https://openqcm.com/shared/q-1/openQCM_Q-1_py_v2.1.zip
Using Anaconda3
Windows, macOS
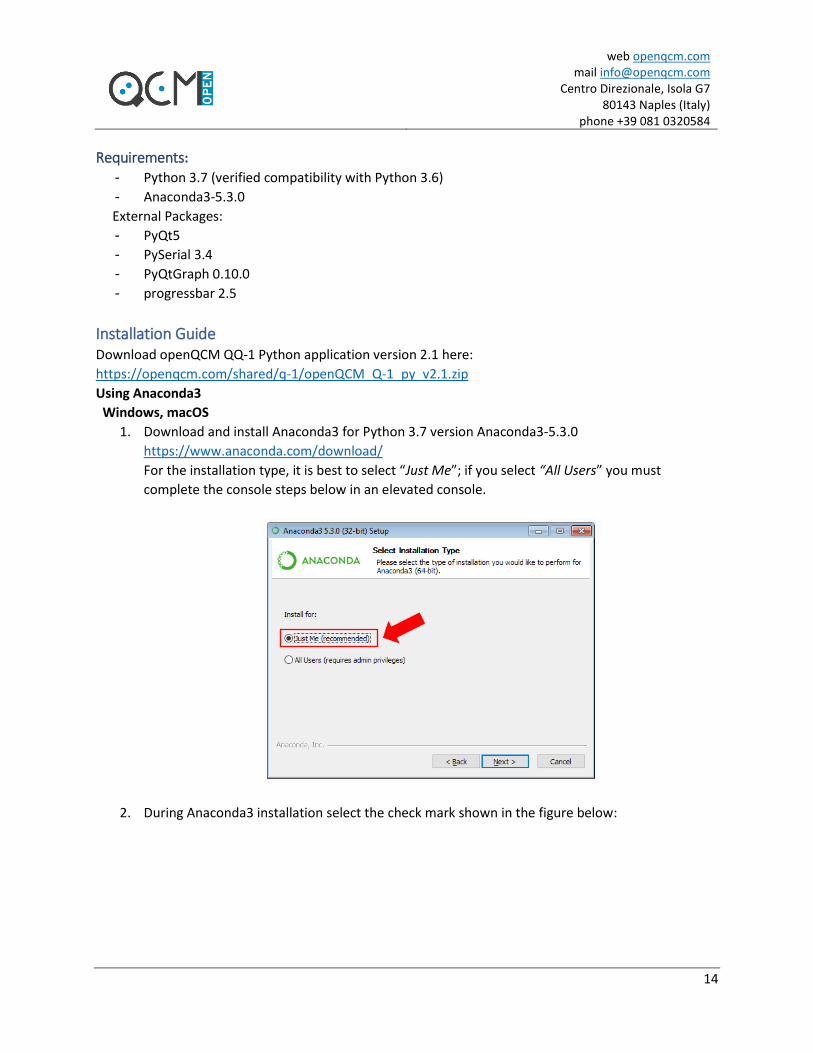
1. Download and install Anaconda3 for Python 3.7 version Anaconda3-5.3.0
https://www.anaconda.com/download/
For the installation type, it is best to select “Just Me”; if you select “All Users” you must
complete the console steps below in an elevated console.
2. During Anaconda3 installation select the check mark shown in the figure below:

web openqcm.com mail [email protected]
Centro Direzionale, Isola G7 80143 Naples (Italy)
phone +39 081 0320584
15
3. Open Anaconda3 prompt (Windows) or terminal (macOS) and type (install/upgrade Python
packages) : conda install pyqtgraph pyserial
python -m pip install --upgrade pip
python -m pip install --upgrade h5py
pip install progressbar
If you choose to install Anaconda for “All Users” you will need to set administrator privileges on
the Command Prompt. Right click “Anaconda Prompt” and choose "Run As Administrator". If you
do not want to do this every time you will need to set the permissions on the entire Anaconda
directory for user to Full Access.
Type here to search Anaconda prompt

web openqcm.com mail [email protected]
Centro Direzionale, Isola G7 80143 Naples (Italy)
phone +39 081 0320584
16
Linux
1. Type the command below by replacing username with that of your pc change permission of
Anaconda3 sudo chown -R username:username /home/username/anaconda3
2. Open Anaconda3 terminal and type (install/upgrade Python packages) : conda install pyqtgraph pyserial
pip install --upgrade pip --user
pip install progressbar --user
3. Set permission on serial port sudo usermod -a -G uucp username
sudo usermod -a -G dialout username
4. Logout and Login
Usage Start the application from Anaconda3 prompt
1. Launch Anaconda3 prompt
2. Browse to the openQCM Q-1 Python software main directory ...\openQCM_Q-1_py_v2.1\OPENQCM\
3. Start the application main GUI by typing the command python – m openQCM
Start the application double-click app.py file
You can make executable and launch app.py Python file
1. Browse to the openQCM Q-1 Python software main directory ...\openQCM_Q-1_py_v2.1\OPENQCM\
2. Right click on app.py file -> open with -> choose another app in this PC 3. Browse to Anaconda3 directory on your PC C:\Users\[your_user_name]\Anaconda3 4. Select python.exe executable file 5. Double-click on app.py file in the OPENQCM Python software main directory (see folders and
program files below)
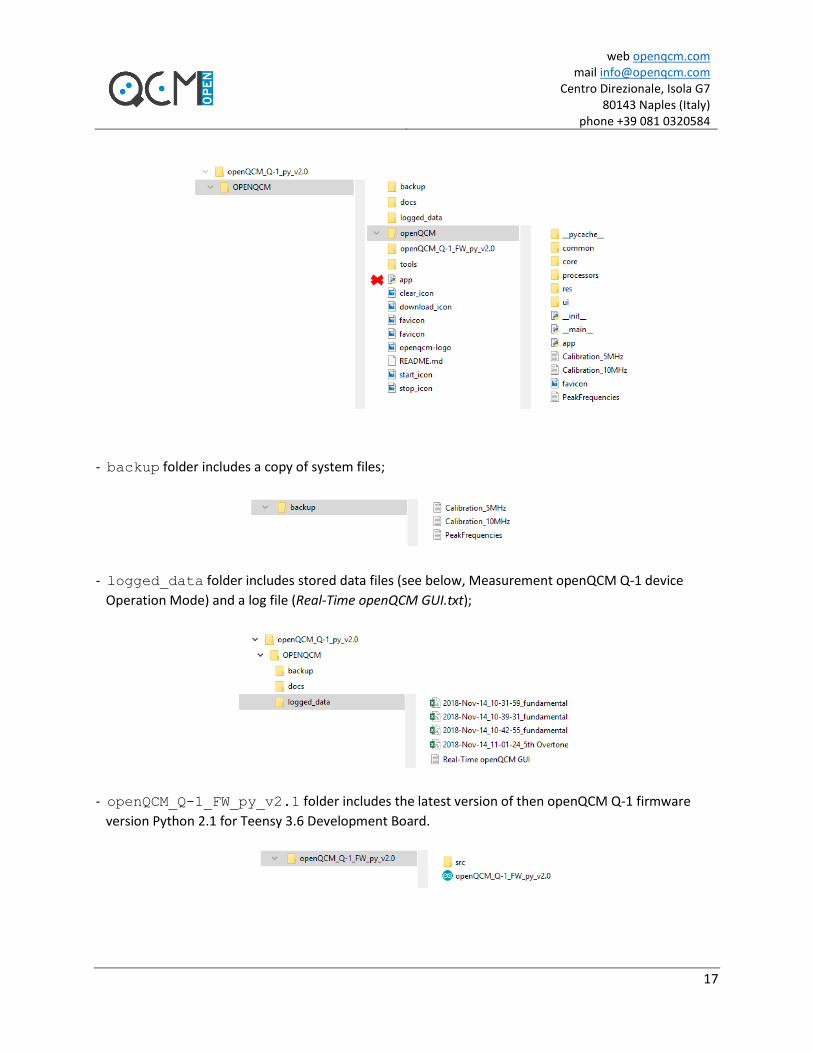
Folders and program files
The figure below shows the main folders and the program files.
web openqcm.com mail [email protected]
Centro Direzionale, Isola G7 80143 Naples (Italy)
phone +39 081 0320584
17
- backup folder includes a copy of system files;
- logged_data folder includes stored data files (see below, Measurement openQCM Q-1 device
Operation Mode) and a log file (Real-Time openQCM GUI.txt);
- openQCM_Q-1_FW_py_v2.1 folder includes the latest version of then openQCM Q-1 firmware
version Python 2.1 for Teensy 3.6 Development Board.
web openqcm.com mail [email protected]
Centro Direzionale, Isola G7 80143 Naples (Italy)
phone +39 081 0320584
18
openQCM Q-1 GUI Description
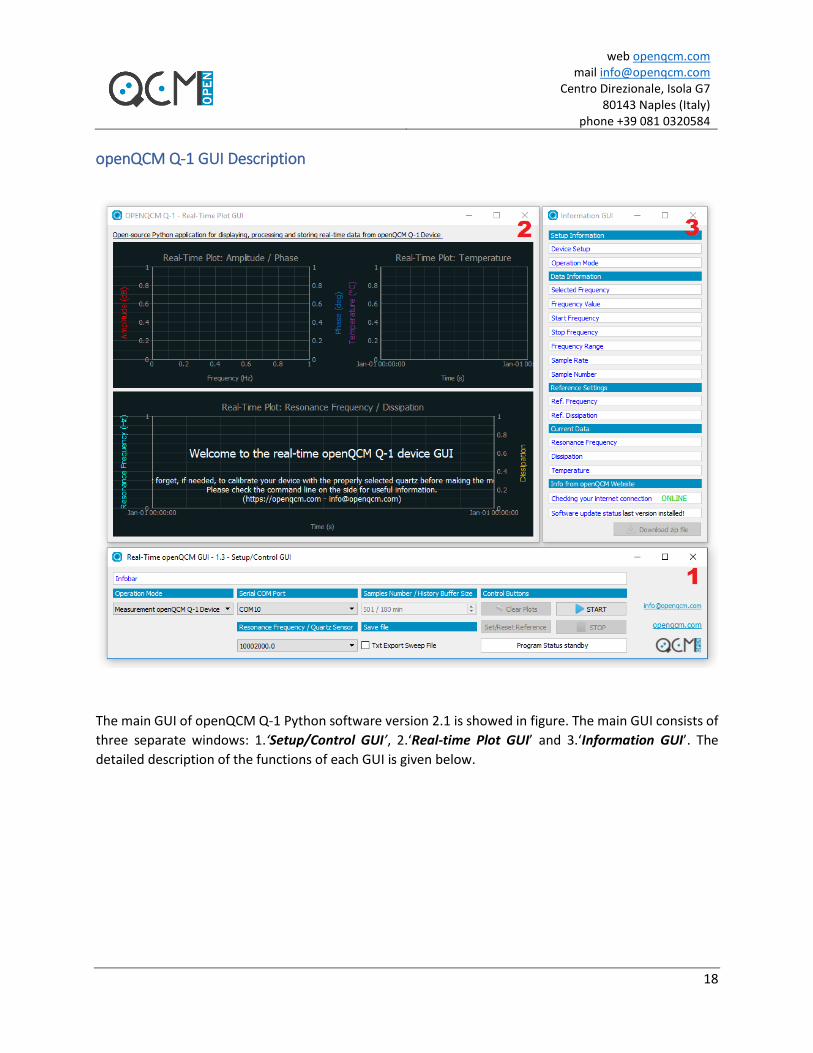
The main GUI of openQCM Q-1 Python software version 2.1 is showed in figure. The main GUI consists of
three separate windows: 1.‘Setup/Control GUI’, 2.‘Real-time Plot GUI’ and 3.‘Information GUI’. The
detailed description of the functions of each GUI is given below.
web openqcm.com mail [email protected]
Centro Direzionale, Isola G7 80143 Naples (Italy)
phone +39 081 0320584
19
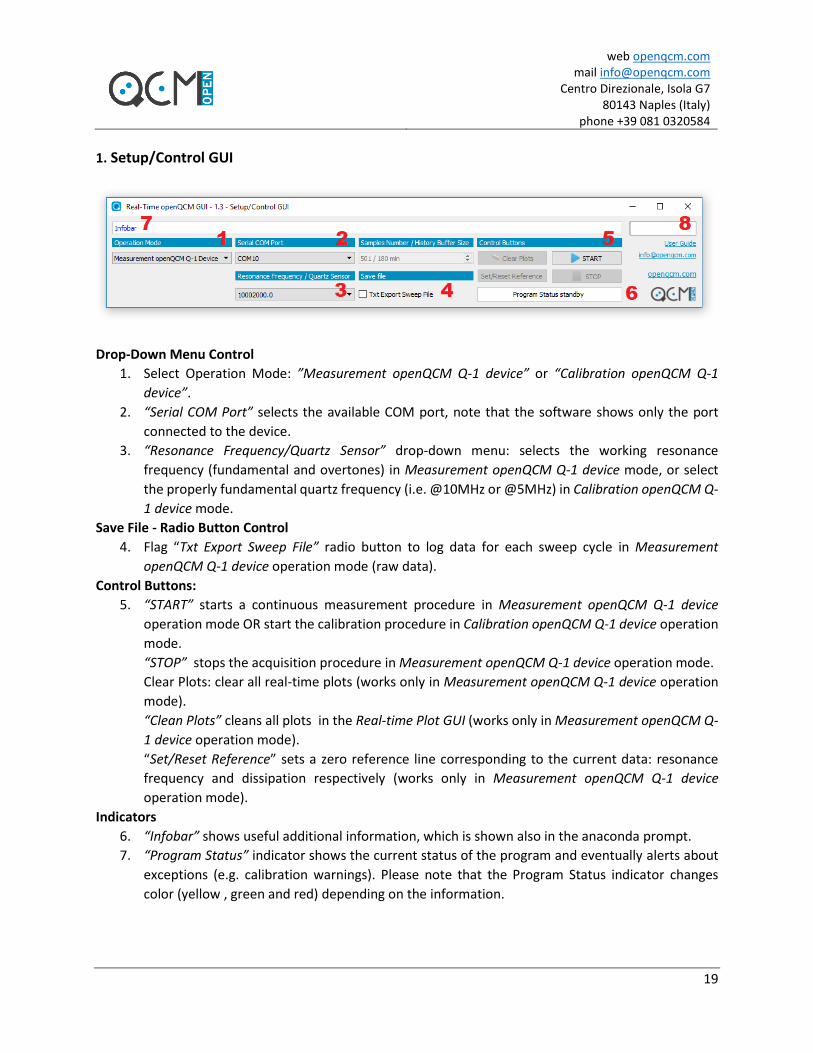
1. Setup/Control GUI
Drop-Down Menu Control
1. Select Operation Mode: ”Measurement openQCM Q-1 device” or “Calibration openQCM Q-1
device”.
2. “Serial COM Port” selects the available COM port, note that the software shows only the port
connected to the device.
3. “Resonance Frequency/Quartz Sensor” drop-down menu: selects the working resonance
frequency (fundamental and overtones) in Measurement openQCM Q-1 device mode, or select
the properly fundamental quartz frequency (i.e. @10MHz or @5MHz) in Calibration openQCM Q-
1 device mode.
Save File - Radio Button Control
4. Flag “Txt Export Sweep File” radio button to log data for each sweep cycle in Measurement
openQCM Q-1 device operation mode (raw data).
Control Buttons:
5. “START” starts a continuous measurement procedure in Measurement openQCM Q-1 device
operation mode OR start the calibration procedure in Calibration openQCM Q-1 device operation
mode.
“STOP” stops the acquisition procedure in Measurement openQCM Q-1 device operation mode.
Clear Plots: clear all real-time plots (works only in Measurement openQCM Q-1 device operation
mode).
“Clean Plots” cleans all plots in the Real-time Plot GUI (works only in Measurement openQCM Q-
1 device operation mode).
“Set/Reset Reference” sets a zero reference line corresponding to the current data: resonance
frequency and dissipation respectively (works only in Measurement openQCM Q-1 device
operation mode).
Indicators
6. “Infobar” shows useful additional information, which is shown also in the anaconda prompt.
7. “Program Status” indicator shows the current status of the program and eventually alerts about
exceptions (e.g. calibration warnings). Please note that the Program Status indicator changes
color (yellow , green and red) depending on the information.

web openqcm.com mail [email protected]
Centro Direzionale, Isola G7 80143 Naples (Italy)
phone +39 081 0320584
20
By clicking on the text “openqcm.com” you can access our website or by clicking
“[email protected]” you can send us an e-mail. In the latest version of the software you are able
to refer to this user’s guide online by clicking on the text “User Guide”.
8. A progress bar is used to show a user how far along is in a process (works in Measurement/
Calibration openQCM Q-1 device operation mode).
2. Real-Time Plot GUI
1. “Amplitude /Phase” displays the amplitude and phase curve during both operation modes.
2. “Temperature”: displays the current value of the temperature, measured by sensor embedded on
the fluidic cell only during Measurement openQCM Q-1 device operation mode.
3. “Resonance Frequency/Dissipation” real-time chart simultaneously displays the current frequency
and dissipation value, calculated at the end of each sweep in Measurement openQCM Q-1 device
operation mode.
web openqcm.com mail [email protected]
Centro Direzionale, Isola G7 80143 Naples (Italy)
phone +39 081 0320584
21
3. Information GUI
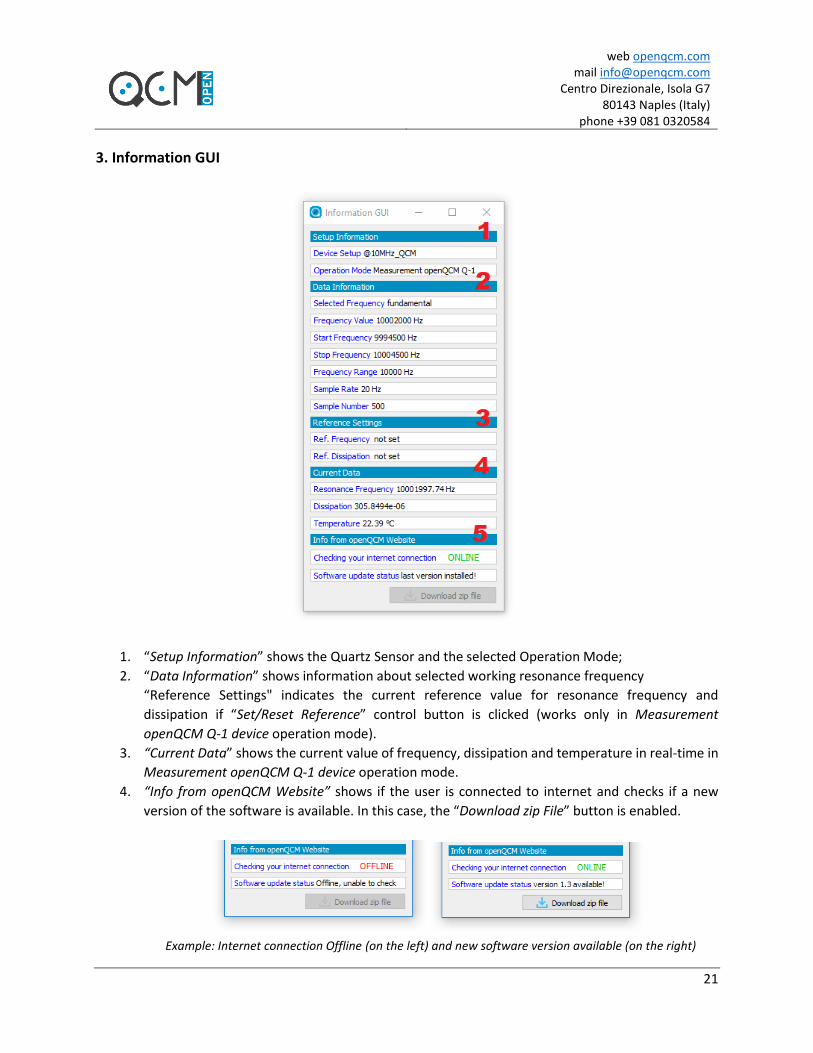
1. “Setup Information” shows the Quartz Sensor and the selected Operation Mode;
2. “Data Information” shows information about selected working resonance frequency
“Reference Settings" indicates the current reference value for resonance frequency and
dissipation if “Set/Reset Reference” control button is clicked (works only in Measurement
openQCM Q-1 device operation mode).
3. “Current Data” shows the current value of frequency, dissipation and temperature in real-time in
Measurement openQCM Q-1 device operation mode.
4. “Info from openQCM Website” shows if the user is connected to internet and checks if a new
version of the software is available. In this case, the “Download zip File” button is enabled.
Example: Internet connection Offline (on the left) and new software version available (on the right)
web openqcm.com mail [email protected]
Centro Direzionale, Isola G7 80143 Naples (Italy)
phone +39 081 0320584
22
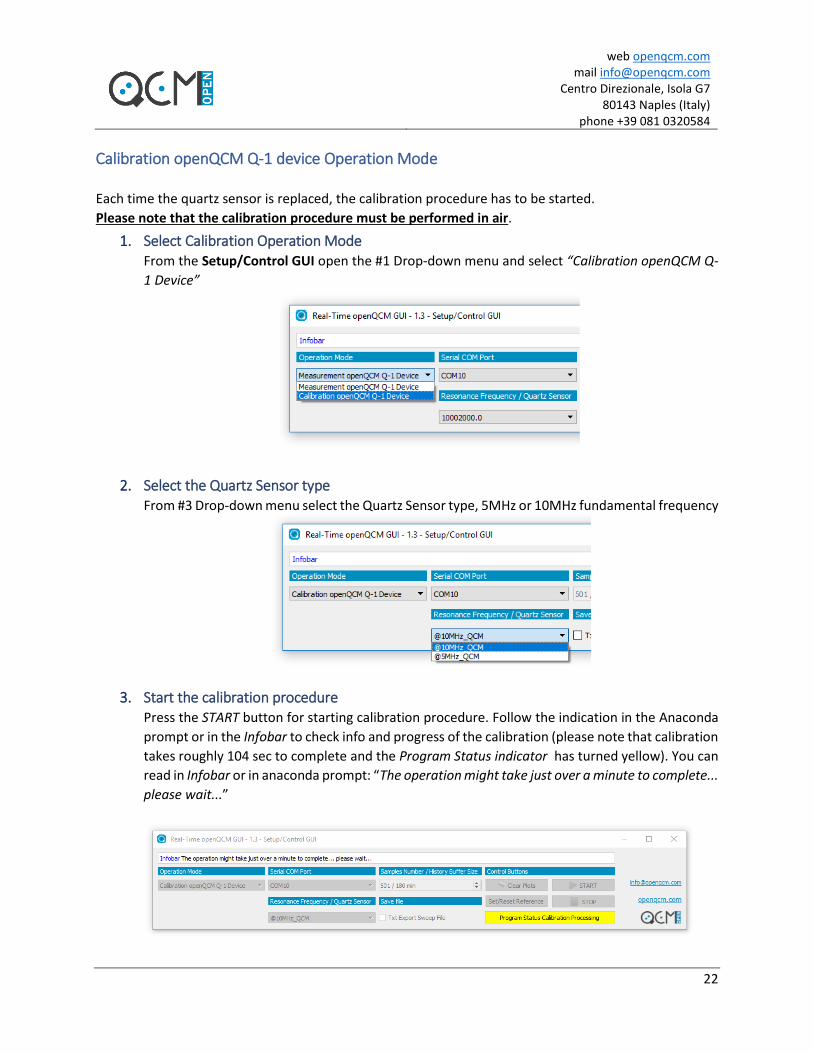
Calibration openQCM Q-1 device Operation Mode
Each time the quartz sensor is replaced, the calibration procedure has to be started.
Please note that the calibration procedure must be performed in air.
1. Select Calibration Operation Mode From the Setup/Control GUI open the #1 Drop-down menu and select “Calibration openQCM Q-
1 Device”
2. Select the Quartz Sensor type From #3 Drop-down menu select the Quartz Sensor type, 5MHz or 10MHz fundamental frequency
3. Start the calibration procedure Press the START button for starting calibration procedure. Follow the indication in the Anaconda
prompt or in the Infobar to check info and progress of the calibration (please note that calibration
takes roughly 104 sec to complete and the Program Status indicator has turned yellow). You can
read in Infobar or in anaconda prompt: “The operation might take just over a minute to complete...
please wait...”
web openqcm.com mail [email protected]
Centro Direzionale, Isola G7 80143 Naples (Italy)
phone +39 081 0320584
23
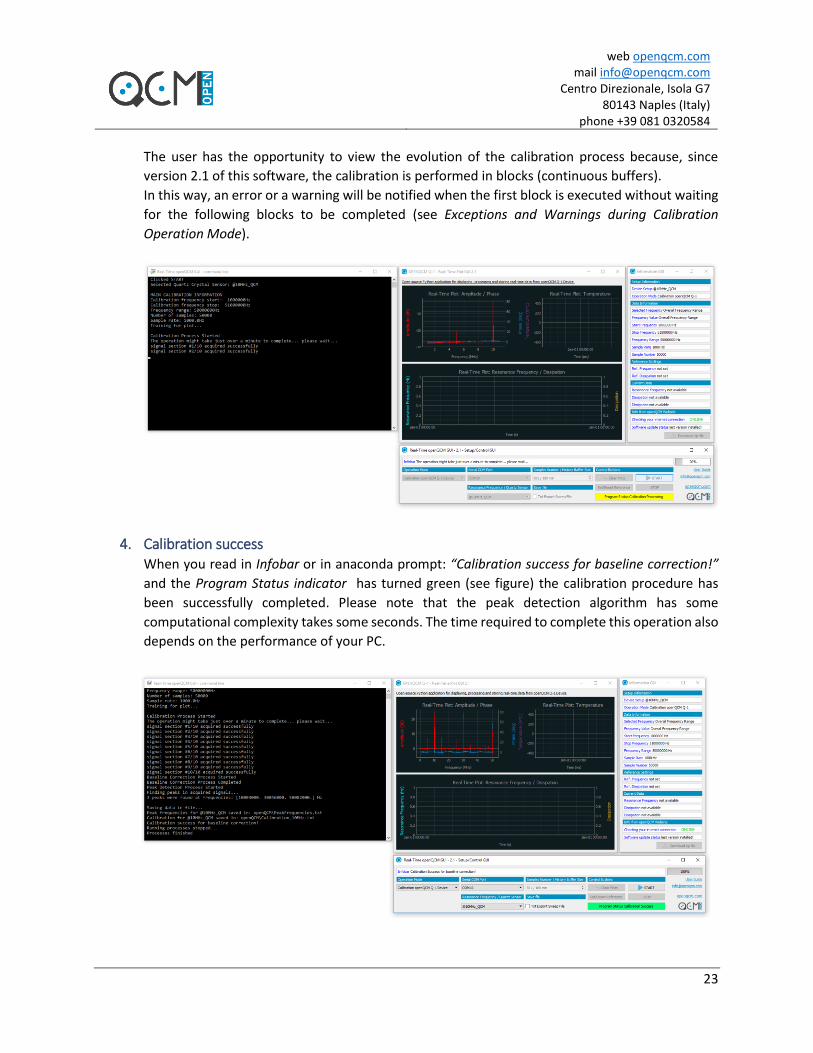
The user has the opportunity to view the evolution of the calibration process because, since
version 2.1 of this software, the calibration is performed in blocks (continuous buffers).
In this way, an error or a warning will be notified when the first block is executed without waiting
for the following blocks to be completed (see Exceptions and Warnings during Calibration
Operation Mode).
4. Calibration success When you read in Infobar or in anaconda prompt: “Calibration success for baseline correction!”
and the Program Status indicator has turned green (see figure) the calibration procedure has
been successfully completed. Please note that the peak detection algorithm has some
computational complexity takes some seconds. The time required to complete this operation also
depends on the performance of your PC.
web openqcm.com mail [email protected]
Centro Direzionale, Isola G7 80143 Naples (Italy)
phone +39 081 0320584
24
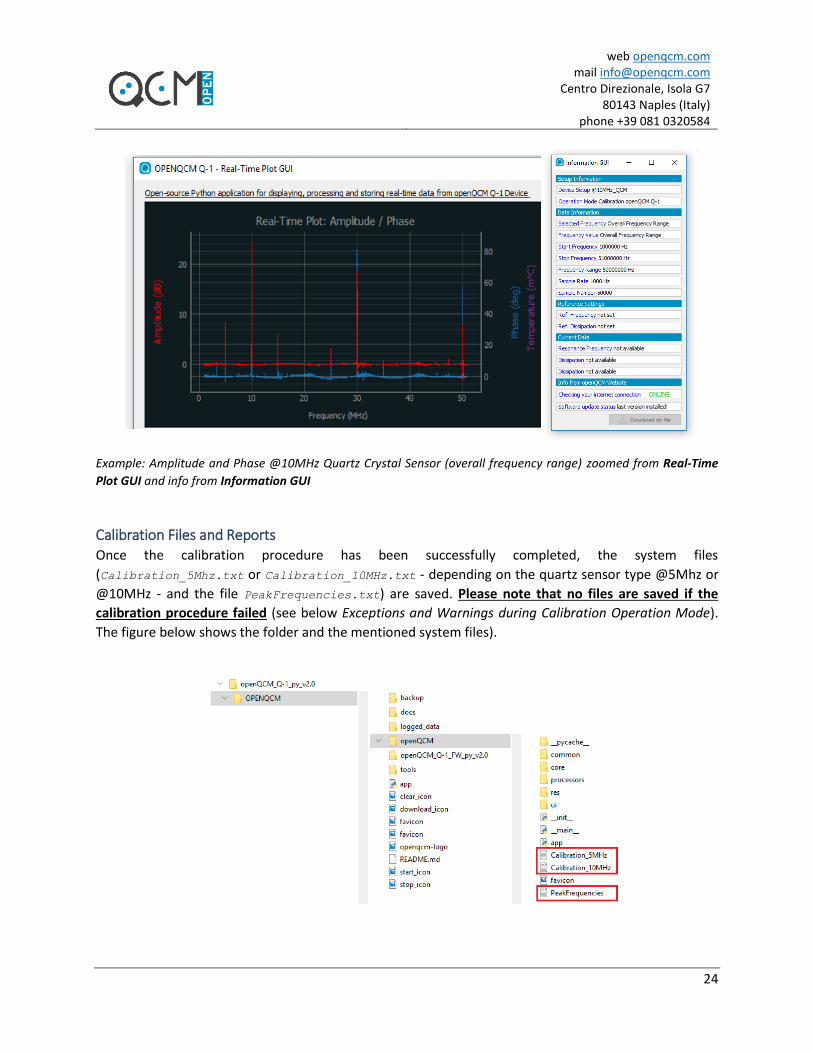
Example: Amplitude and Phase @10MHz Quartz Crystal Sensor (overall frequency range) zoomed from Real-Time
Plot GUI and info from Information GUI
Calibration Files and Reports Once the calibration procedure has been successfully completed, the system files
(Calibration_5Mhz.txt or Calibration_10MHz.txt - depending on the quartz sensor type @5Mhz or
@10MHz - and the file PeakFrequencies.txt) are saved. Please note that no files are saved if the
calibration procedure failed (see below Exceptions and Warnings during Calibration Operation Mode).
The figure below shows the folder and the mentioned system files).

web openqcm.com mail [email protected]
Centro Direzionale, Isola G7 80143 Naples (Italy)
phone +39 081 0320584
25
In the following figures, the files Calibration_5MHz.txt and Calibration_10Mhz.txt are plotted with
baseline corrected. These plots are the same as those you can see in the Real-Time Plot GUI at a successful
calibration end.
Amplitude (red) and Phase (blue) signal (overall fequency range, 50MHz): baseline corrected, standard quartz frequency @5MHz
(5 detected peaks)
Amplitude (red) and Phase (blue) signal (overall fequency range, 50MHz): baseline corrected, standard quartz frequency
@10MHz (3 detected peaks)
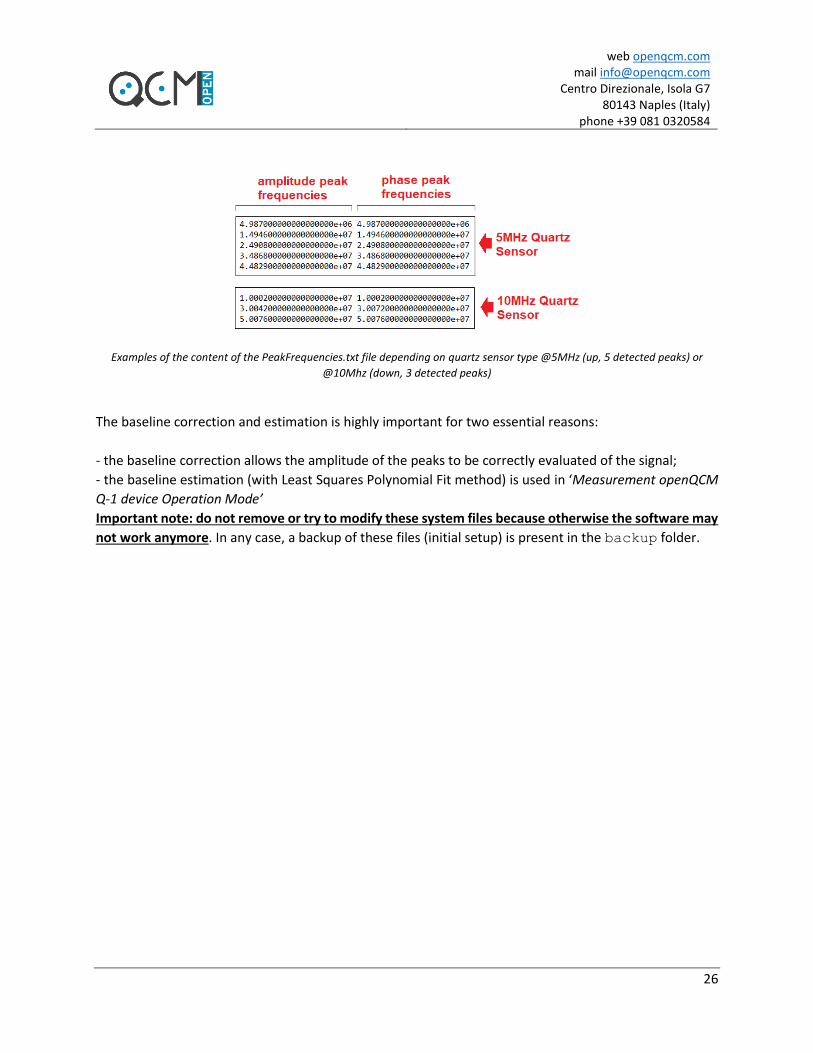
Detected peak frequencies by the peak detection algorithm are stored in the file PeakFrequencies.txt
shown below:
web openqcm.com mail [email protected]
Centro Direzionale, Isola G7 80143 Naples (Italy)
phone +39 081 0320584
26
Examples of the content of the PeakFrequencies.txt file depending on quartz sensor type @5MHz (up, 5 detected peaks) or
@10Mhz (down, 3 detected peaks)
The baseline correction and estimation is highly important for two essential reasons:
- the baseline correction allows the amplitude of the peaks to be correctly evaluated of the signal;
- the baseline estimation (with Least Squares Polynomial Fit method) is used in ‘Measurement openQCM
Q-1 device Operation Mode’
Important note: do not remove or try to modify these system files because otherwise the software may
not work anymore. In any case, a backup of these files (initial setup) is present in the backup folder.
web openqcm.com mail [email protected]
Centro Direzionale, Isola G7 80143 Naples (Italy)
phone +39 081 0320584
27
Measurement openQCM Q-1 device Operation Mode
In order to start a new acquisition and measurement procedure of frequency and dissipation follow the
steps below:
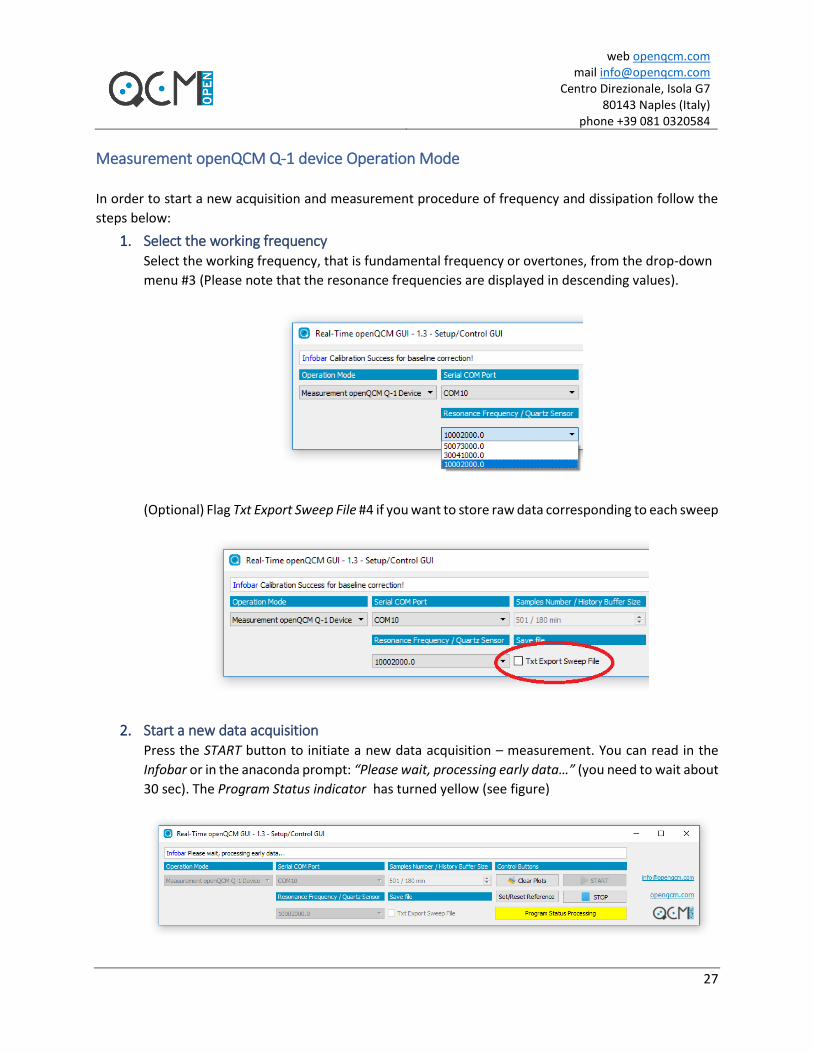
1. Select the working frequency Select the working frequency, that is fundamental frequency or overtones, from the drop-down
menu #3 (Please note that the resonance frequencies are displayed in descending values).
(Optional) Flag Txt Export Sweep File #4 if you want to store raw data corresponding to each sweep
2. Start a new data acquisition Press the START button to initiate a new data acquisition – measurement. You can read in the
Infobar or in the anaconda prompt: “Please wait, processing early data…” (you need to wait about
30 sec). The Program Status indicator has turned yellow (see figure)
web openqcm.com mail [email protected]
Centro Direzionale, Isola G7 80143 Naples (Italy)
phone +39 081 0320584
28
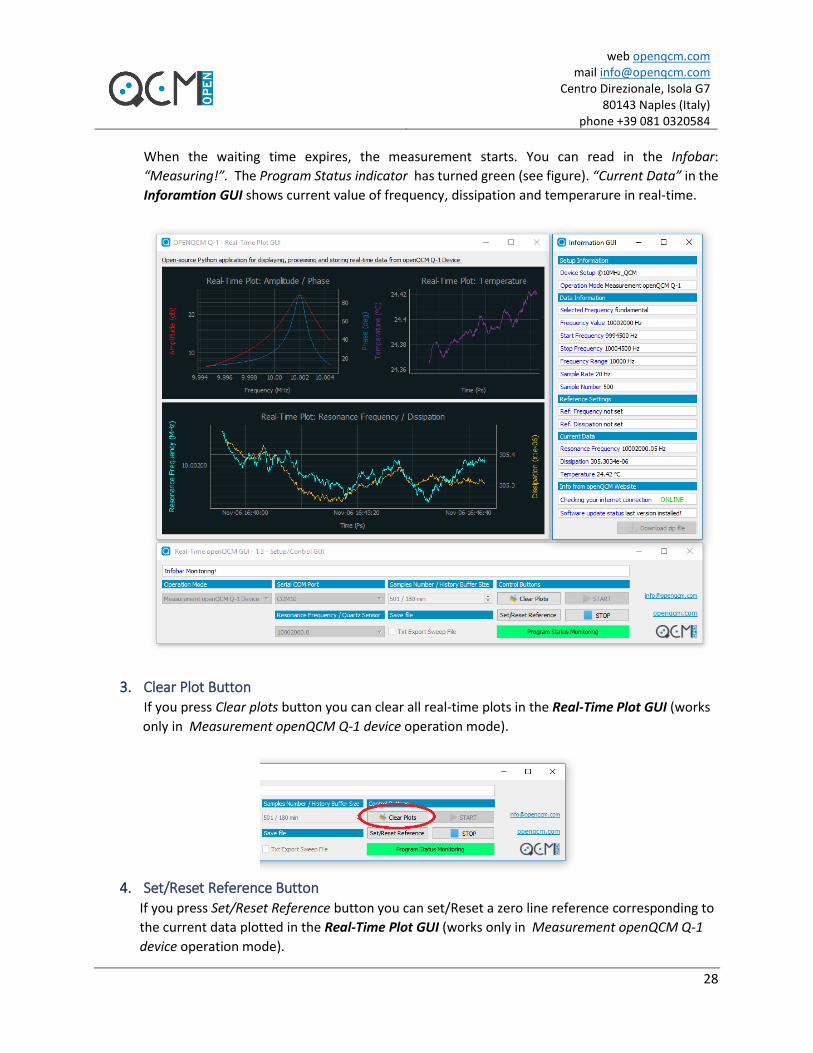
When the waiting time expires, the measurement starts. You can read in the Infobar:
“Measuring!”. The Program Status indicator has turned green (see figure). “Current Data” in the
Inforamtion GUI shows current value of frequency, dissipation and temperarure in real-time.
3. Clear Plot Button If you press Clear plots button you can clear all real-time plots in the Real-Time Plot GUI (works
only in Measurement openQCM Q-1 device operation mode).
4. Set/Reset Reference Button If you press Set/Reset Reference button you can set/Reset a zero line reference corresponding to
the current data plotted in the Real-Time Plot GUI (works only in Measurement openQCM Q-1
device operation mode).
web openqcm.com mail [email protected]
Centro Direzionale, Isola G7 80143 Naples (Italy)
phone +39 081 0320584
29
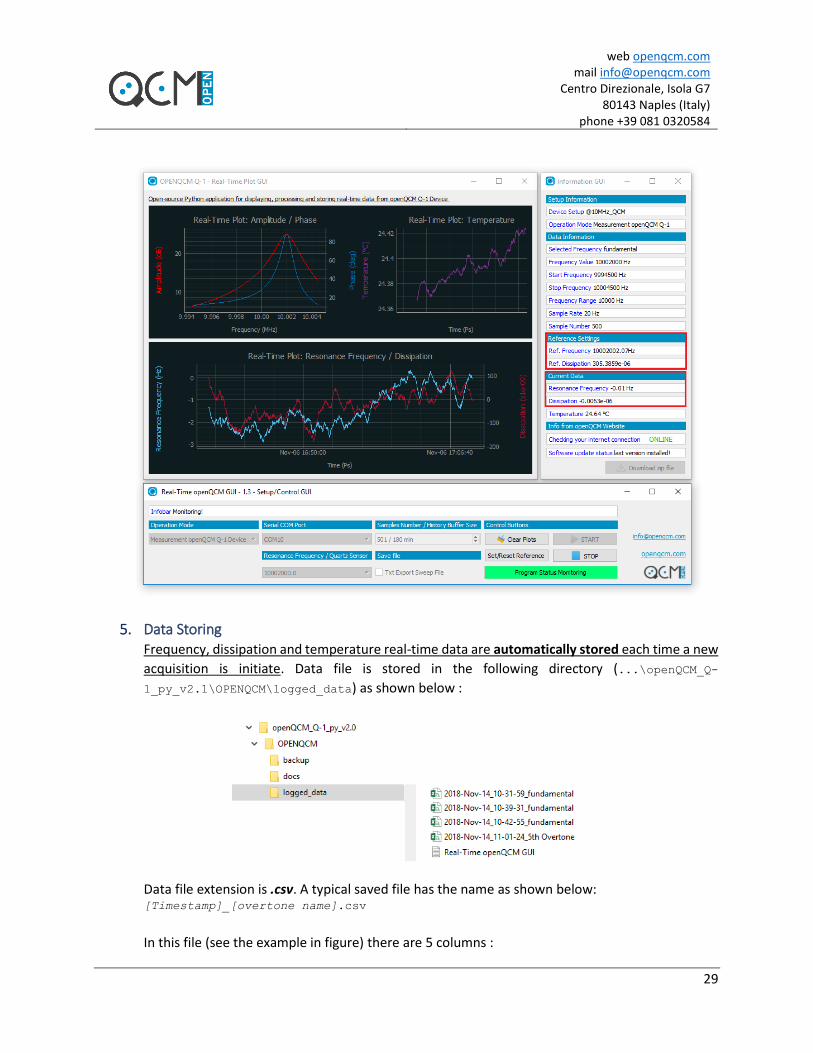
5. Data Storing Frequency, dissipation and temperature real-time data are automatically stored each time a new
acquisition is initiate. Data file is stored in the following directory (...\openQCM_Q-
1_py_v2.1\OPENQCM\logged_data) as shown below :
Data file extension is .csv. A typical saved file has the name as shown below: [Timestamp]_[overtone name].csv
In this file (see the example in figure) there are 5 columns :
web openqcm.com mail [email protected]
Centro Direzionale, Isola G7 80143 Naples (Italy)
phone +39 081 0320584
30
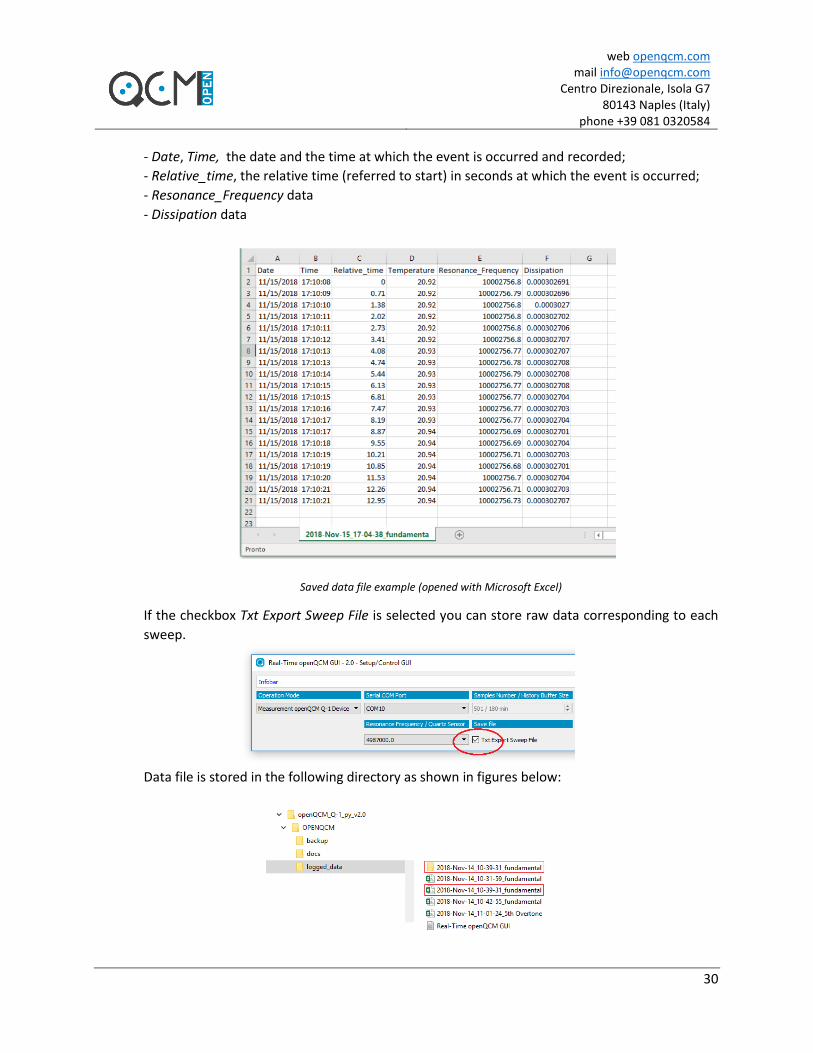
- Date, Time, the date and the time at which the event is occurred and recorded;
- Relative_time, the relative time (referred to start) in seconds at which the event is occurred;
- Resonance_Frequency data
- Dissipation data
Saved data file example (opened with Microsoft Excel)
If the checkbox Txt Export Sweep File is selected you can store raw data corresponding to each
sweep.
Data file is stored in the following directory as shown in figures below:
web openqcm.com mail [email protected]
Centro Direzionale, Isola G7 80143 Naples (Italy)
phone +39 081 0320584
31
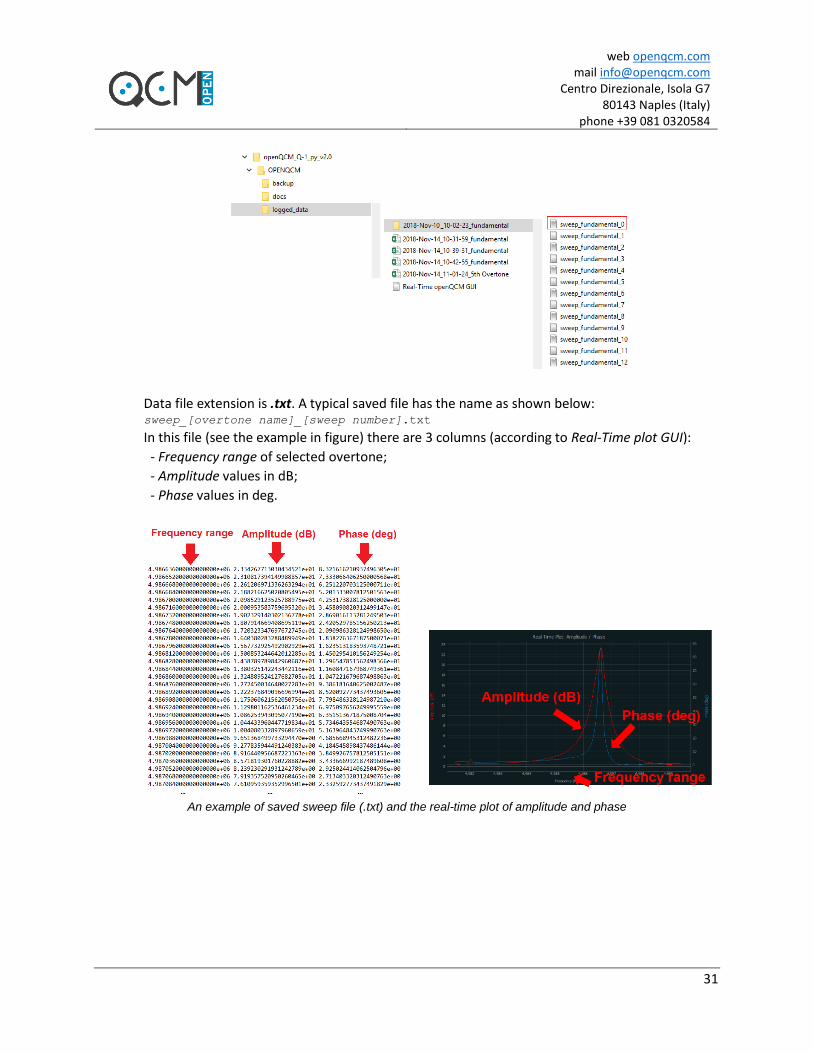
Data file extension is .txt. A typical saved file has the name as shown below: sweep_[overtone name]_[sweep number].txt
In this file (see the example in figure) there are 3 columns (according to Real-Time plot GUI):
- Frequency range of selected overtone;
- Amplitude values in dB;
- Phase values in deg.
An example of saved sweep file (.txt) and the real-time plot of amplitude and phase
web openqcm.com mail [email protected]
Centro Direzionale, Isola G7 80143 Naples (Italy)
phone +39 081 0320584
32
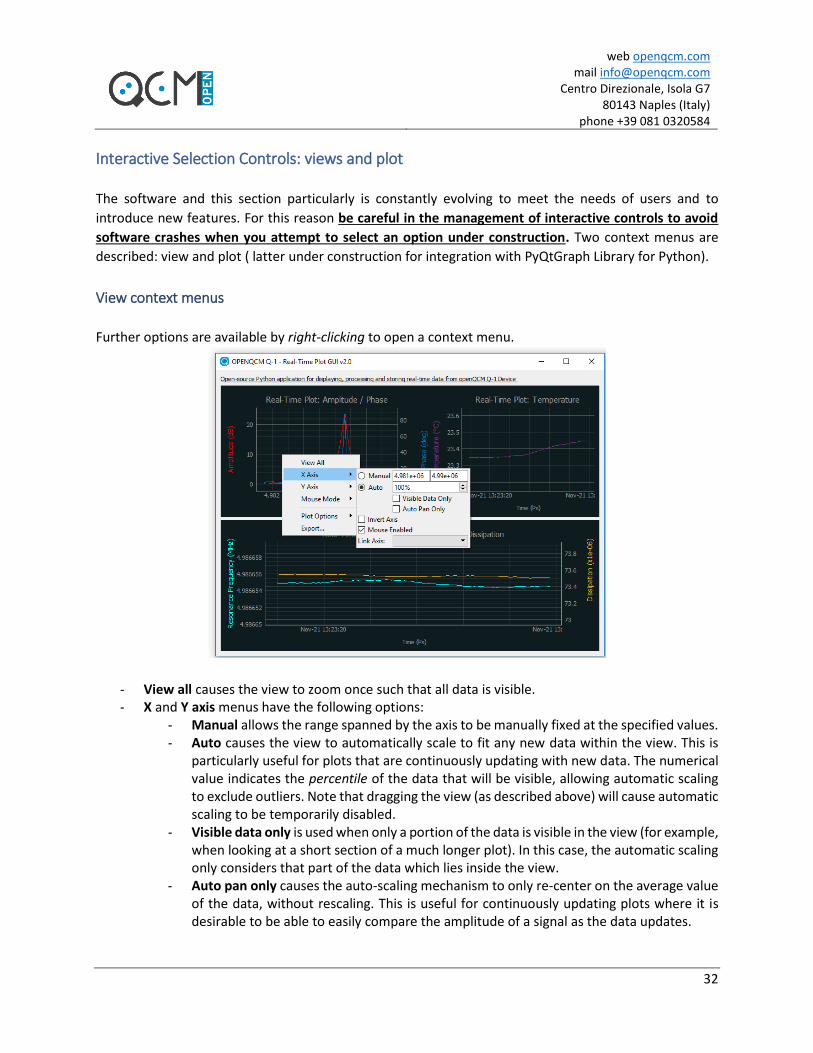
Interactive Selection Controls: views and plot
The software and this section particularly is constantly evolving to meet the needs of users and to
introduce new features. For this reason be careful in the management of interactive controls to avoid
software crashes when you attempt to select an option under construction. Two context menus are
described: view and plot ( latter under construction for integration with PyQtGraph Library for Python).
View context menus
Further options are available by right-clicking to open a context menu.
- View all causes the view to zoom once such that all data is visible. - X and Y axis menus have the following options:
- Manual allows the range spanned by the axis to be manually fixed at the specified values. - Auto causes the view to automatically scale to fit any new data within the view. This is
particularly useful for plots that are continuously updating with new data. The numerical value indicates the percentile of the data that will be visible, allowing automatic scaling to exclude outliers. Note that dragging the view (as described above) will cause automatic scaling to be temporarily disabled.
- Visible data only is used when only a portion of the data is visible in the view (for example, when looking at a short section of a much longer plot). In this case, the automatic scaling only considers that part of the data which lies inside the view.
- Auto pan only causes the auto-scaling mechanism to only re-center on the average value of the data, without rescaling. This is useful for continuously updating plots where it is desirable to be able to easily compare the amplitude of a signal as the data updates.

web openqcm.com mail [email protected]
Centro Direzionale, Isola G7 80143 Naples (Italy)
phone +39 081 0320584
33
- Mouse enabled specifies whether any of the mouse-dragging operations described above will affect the given axis. This is typically used to lock one axis while allowing the other to be manipulated with the mouse.
- Invert axis indicates whether the direction of increasing value should be reversed from the default.
- Link axis allows the ranges of two plots to be linked together such that the data they display may be compared with the same scaling and alignment.
- Mouse mode allows selection between the default 3-button mouse mode (described above) and a simplified interaction mode that is more natural for one-button mice.
web openqcm.com mail [email protected]
Centro Direzionale, Isola G7 80143 Naples (Italy)
phone +39 081 0320584
34
In this mode, a scrolling motion (typically a two-finger swipe) will zoom the plot exactly as the mouse wheel, while dragging the mouse will draw a rectangular area to be zoomed.
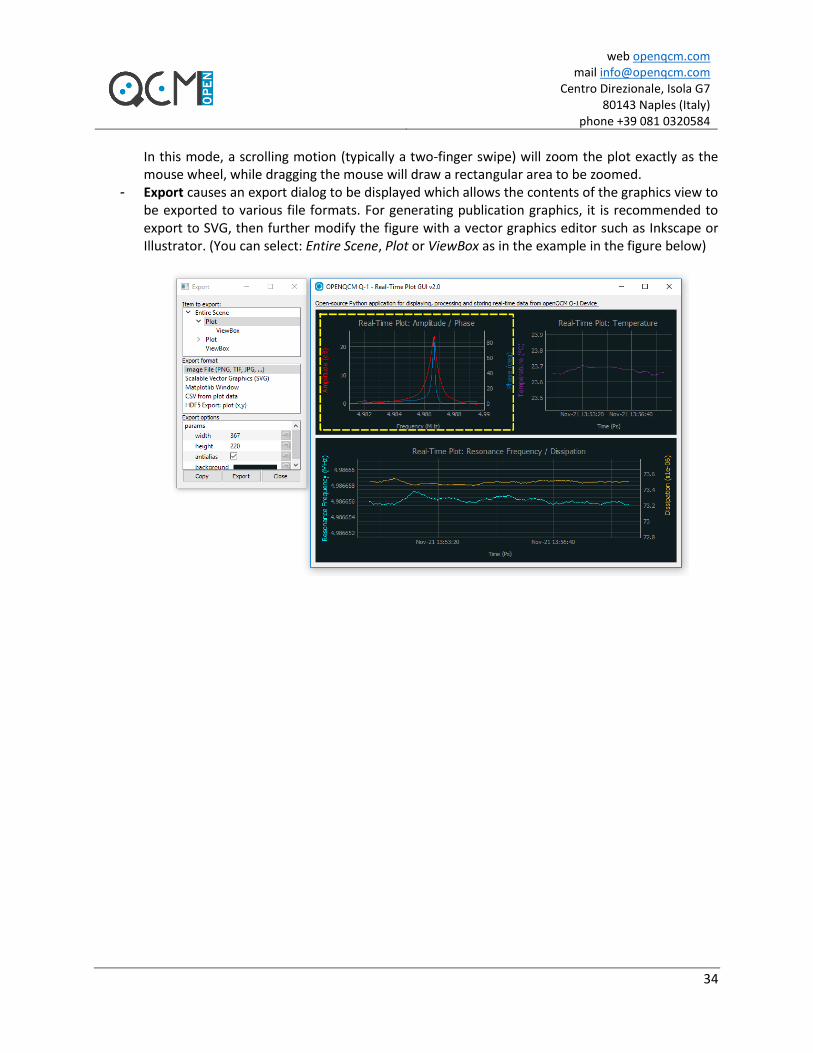
- Export causes an export dialog to be displayed which allows the contents of the graphics view to be exported to various file formats. For generating publication graphics, it is recommended to export to SVG, then further modify the figure with a vector graphics editor such as Inkscape or Illustrator. (You can select: Entire Scene, Plot or ViewBox as in the example in the figure below)
web openqcm.com mail [email protected]
Centro Direzionale, Isola G7 80143 Naples (Italy)
phone +39 081 0320584
35
Export Format The following options currently work: - Scalable Vector Graphics (SVG) - Graphics exported as SVG. - CSV from plot data - Exports plotted data as CSV. - HDF5 export - Image File (PNG, TIF, JPG…)
Pyqtgraph SOLVED ISSUE (for advanced user only) We have identified and SOLVED a problem in a specific internal file of the Pyqtgraph package called: ImageExporter.py.To fix the problem quickly, while waiting to find a solution that is included directly in our software, we recommend you replace the ImageExporter.py file that we have modified and replace it instead of the old one (ImageExporter.py download link). Here is the path to the file to be replaced: 1. If you have installed Anaconda in the default directory: C:\Users\[your_user_name]\Anaconda3\Lib\site-packages\pyqtgraph\exporters otherwise open “Anaconda prompt“ and type: where anaconda this command will show you the directory Anaconda is working from (e.g. C:\Users\Vittorio\Anaconda3\Scripts\anaconda.exe so: C:\Users\Vittorio\Anaconda3\Lib\site-packages\pyqtgraph\exporters) 2. replace the file; 3. restart our software. If you don't make this modification, please don't select this option.
The following other options are being implemented, so please don't select them. - Matplotlib (under construction)
web openqcm.com mail [email protected]
Centro Direzionale, Isola G7 80143 Naples (Italy)
phone +39 081 0320584
36
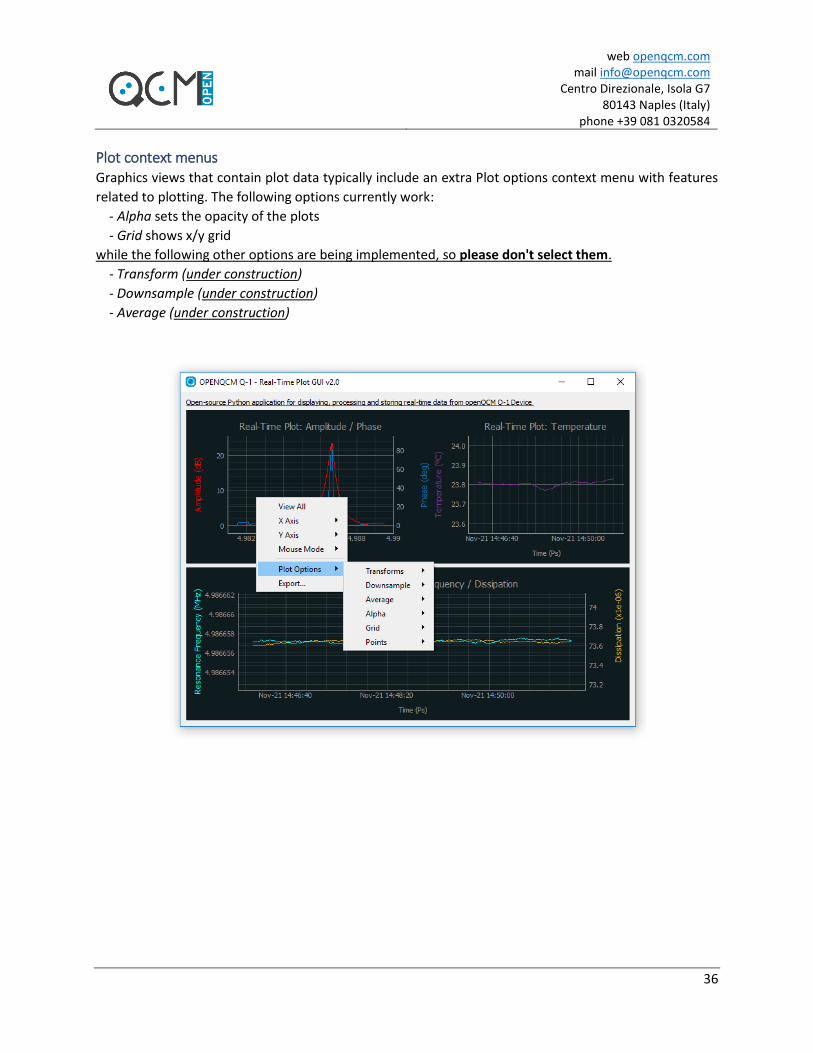
Plot context menus Graphics views that contain plot data typically include an extra Plot options context menu with features
related to plotting. The following options currently work:
- Alpha sets the opacity of the plots
- Grid shows x/y grid
while the following other options are being implemented, so please don't select them.
- Transform (under construction)
- Downsample (under construction)
- Average (under construction)

web openqcm.com mail [email protected]
Centro Direzionale, Isola G7 80143 Naples (Italy)
phone +39 081 0320584
37
Exceptions and Warnings during Calibration Operation Mode
It may happen that you have not properly connected the sensor module, or not properly selected the
quartz crystal in the Resonance Frequency/Quartz Sensor drop-down menu, or even not properly placed
the quartz crystal into the sensor module. In this cases, the calibration procedure may not be successful.
The figure below shows what happens during the calibration procedure if, for example, the openQCM
sensor module is not properly connected.
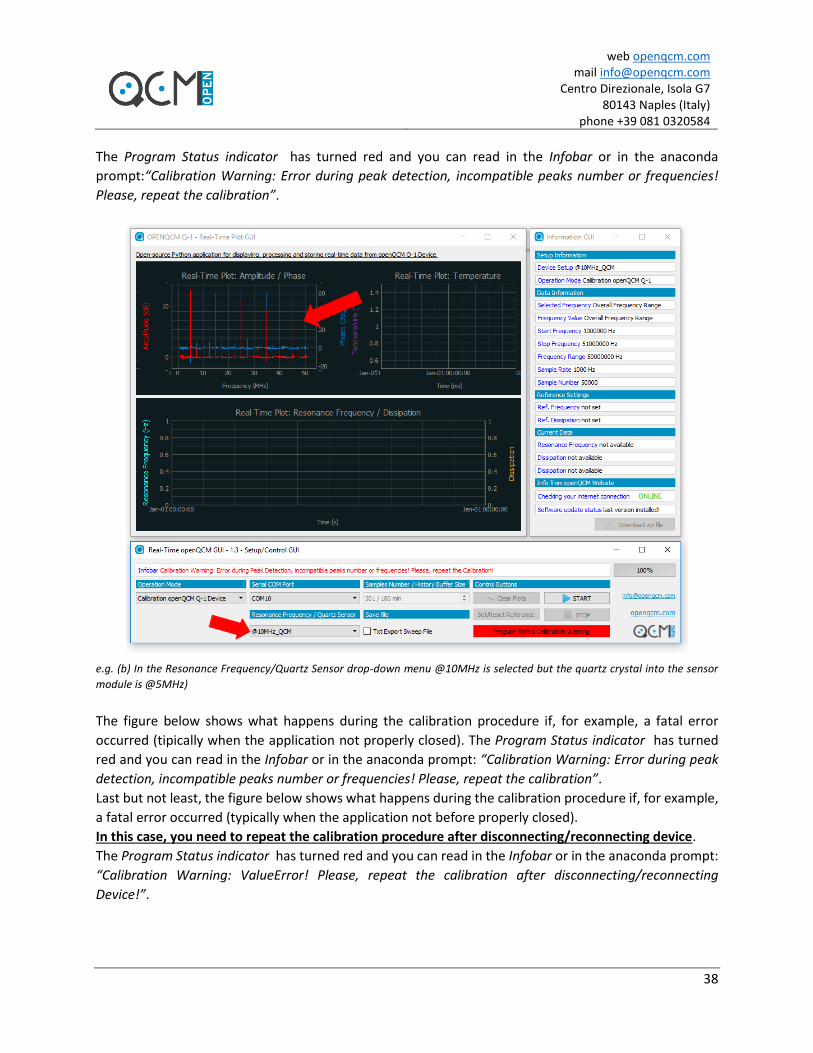
The Program Status indicator has turned red and you can read in the Infobar or in the anaconda prompt:
“Calibration Warning: Error during peak detection, incompatible peaks number or frequencies! Please,
repeat the calibration”.
e.g. (a) the openQCM sensor module is not properly connected.
The figure below shows what happens during the calibration procedure if, for example, not properly
selected the quartz crystal in the Resonance Frequency/Quartz Sensor drop-down menu (e.g. in the
Resonance Frequency/Quartz Sensor drop-down menu @10MHz is selected but the quartz crystal into the
sensor module is @5MHz).
web openqcm.com mail [email protected]
Centro Direzionale, Isola G7 80143 Naples (Italy)
phone +39 081 0320584
38
The Program Status indicator has turned red and you can read in the Infobar or in the anaconda
prompt:“Calibration Warning: Error during peak detection, incompatible peaks number or frequencies!
Please, repeat the calibration”.
e.g. (b) In the Resonance Frequency/Quartz Sensor drop-down menu @10MHz is selected but the quartz crystal into the sensor
module is @5MHz)
The figure below shows what happens during the calibration procedure if, for example, a fatal error
occurred (tipically when the application not properly closed). The Program Status indicator has turned
red and you can read in the Infobar or in the anaconda prompt: “Calibration Warning: Error during peak
detection, incompatible peaks number or frequencies! Please, repeat the calibration”.
Last but not least, the figure below shows what happens during the calibration procedure if, for example,
a fatal error occurred (typically when the application not before properly closed).
In this case, you need to repeat the calibration procedure after disconnecting/reconnecting device.
The Program Status indicator has turned red and you can read in the Infobar or in the anaconda prompt:
“Calibration Warning: ValueError! Please, repeat the calibration after disconnecting/reconnecting
Device!”.

web openqcm.com mail [email protected]
Centro Direzionale, Isola G7 80143 Naples (Italy)
phone +39 081 0320584
39
e.g. (c) a fatal error occurred (tipically when the application not properly closed)

web openqcm.com mail [email protected]
Centro Direzionale, Isola G7 80143 Naples (Italy)
phone +39 081 0320584
40
Exceptions and Warnings during Measurement Operation Mode
It may happen that the Sensor Module or the quartz sensor has not been properly connected or, when
replacing the quartz sensor, the calibration procedure has not been performed. In this cases, when you
start a new acquisition and measurement procedure, you may see e.g. a screenshot like the following.
e.g. warning during Measurement Operation Mode (Sensor Module not properly connected)
The Program Status indicator has turned red and you can read in the Infobar or in the anaconda prompt
something like this: “Warning: unable to apply half-power bandwidth method, … not found”. In this case,
the software is unable to apply the half-power bandwidth method. It's not possible to find either or both
cut-off frequencies f1 lower and f2 upper. In this case, you need to check your device set-up and restart.
You have the possibility to verify that everything is right by checking “Amplitude /Phase” real-time chart
in the Real-Time Plot GUI.
web openqcm.com mail [email protected]
Centro Direzionale, Isola G7 80143 Naples (Italy)
phone +39 081 0320584
41
Further information
Starting the software without connecting device
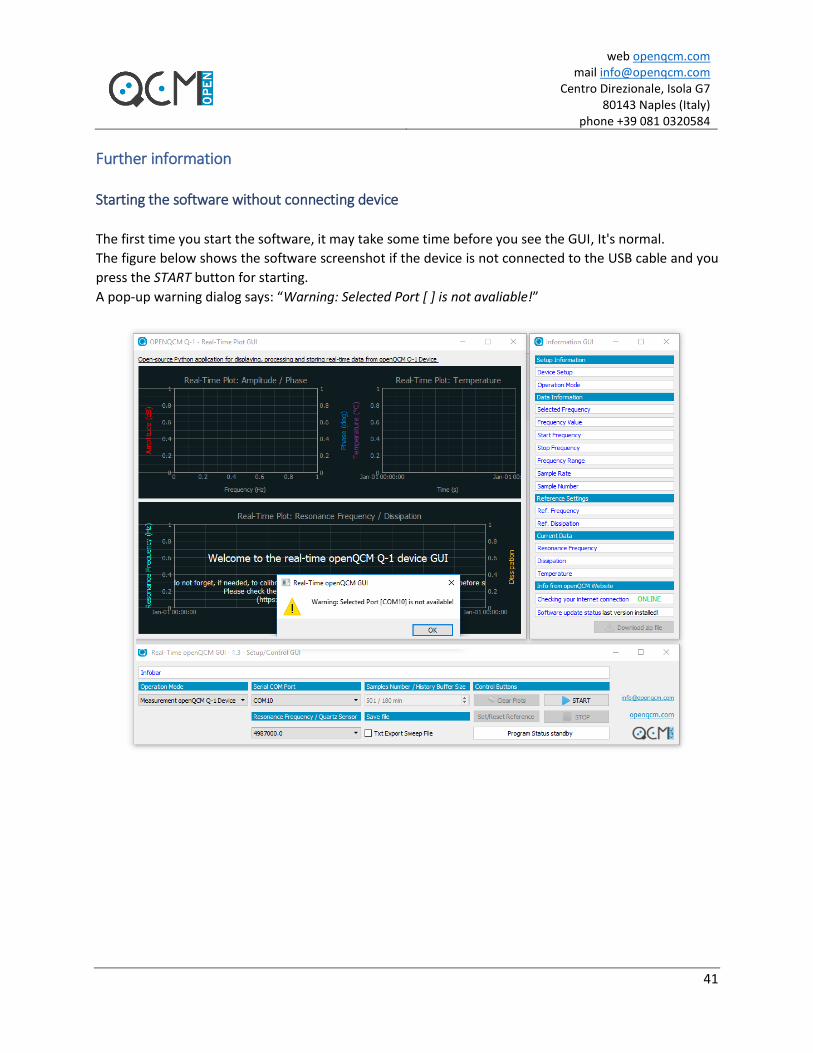
The first time you start the software, it may take some time before you see the GUI, It's normal.
The figure below shows the software screenshot if the device is not connected to the USB cable and you
press the START button for starting.
A pop-up warning dialog says: “Warning: Selected Port [ ] is not avaliable!”
web openqcm.com mail [email protected]
Centro Direzionale, Isola G7 80143 Naples (Italy)
phone +39 081 0320584
42
Closing the software
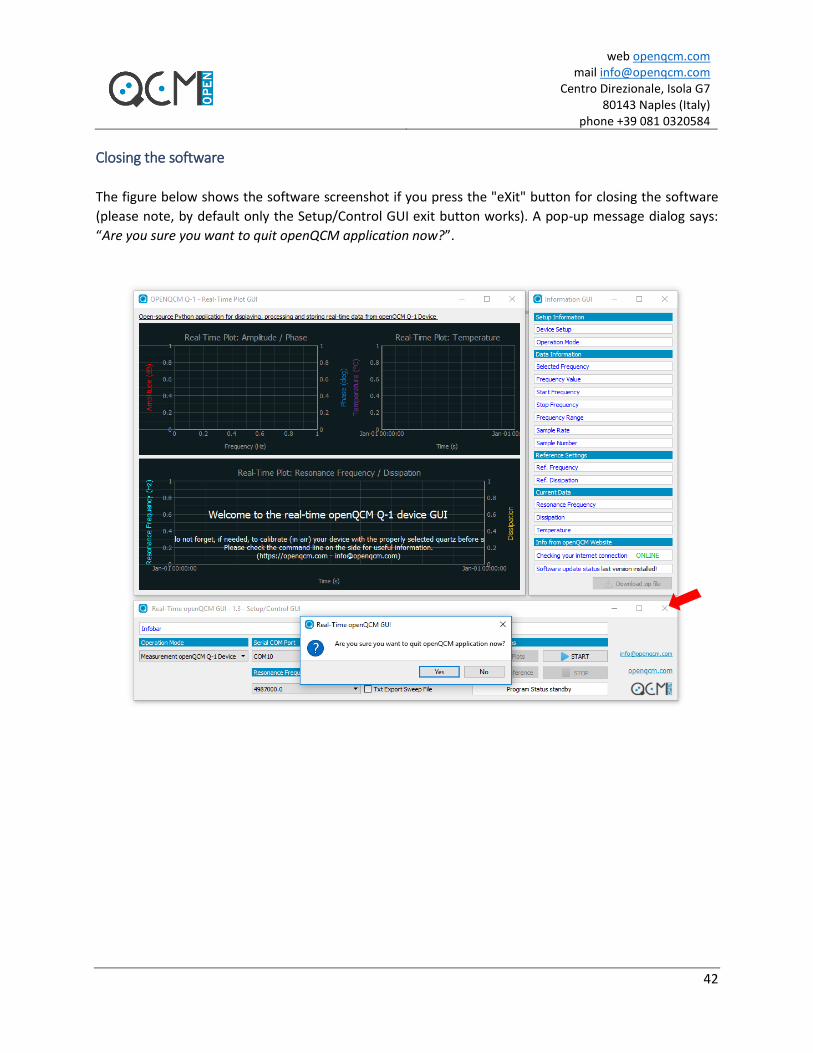
The figure below shows the software screenshot if you press the "eXit" button for closing the software
(please note, by default only the Setup/Control GUI exit button works). A pop-up message dialog says:
“Are you sure you want to quit openQCM application now?”.
web openqcm.com mail [email protected]
Centro Direzionale, Isola G7 80143 Naples (Italy)
phone +39 081 0320584
43
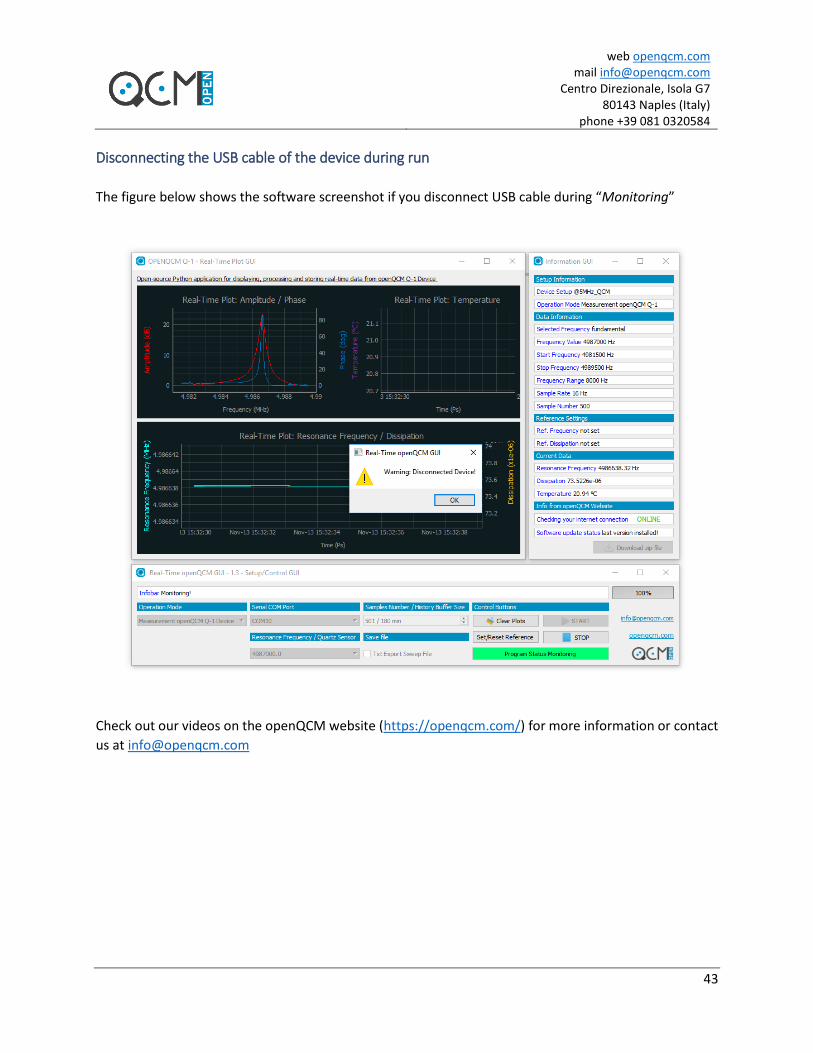
Disconnecting the USB cable of the device during run
The figure below shows the software screenshot if you disconnect USB cable during “Monitoring”
Check out our videos on the openQCM website (https://openqcm.com/) for more information or contact
us at [email protected]
web openqcm.com mail [email protected]
Centro Direzionale, Isola G7 80143 Naples (Italy)
phone +39 081 0320584
44
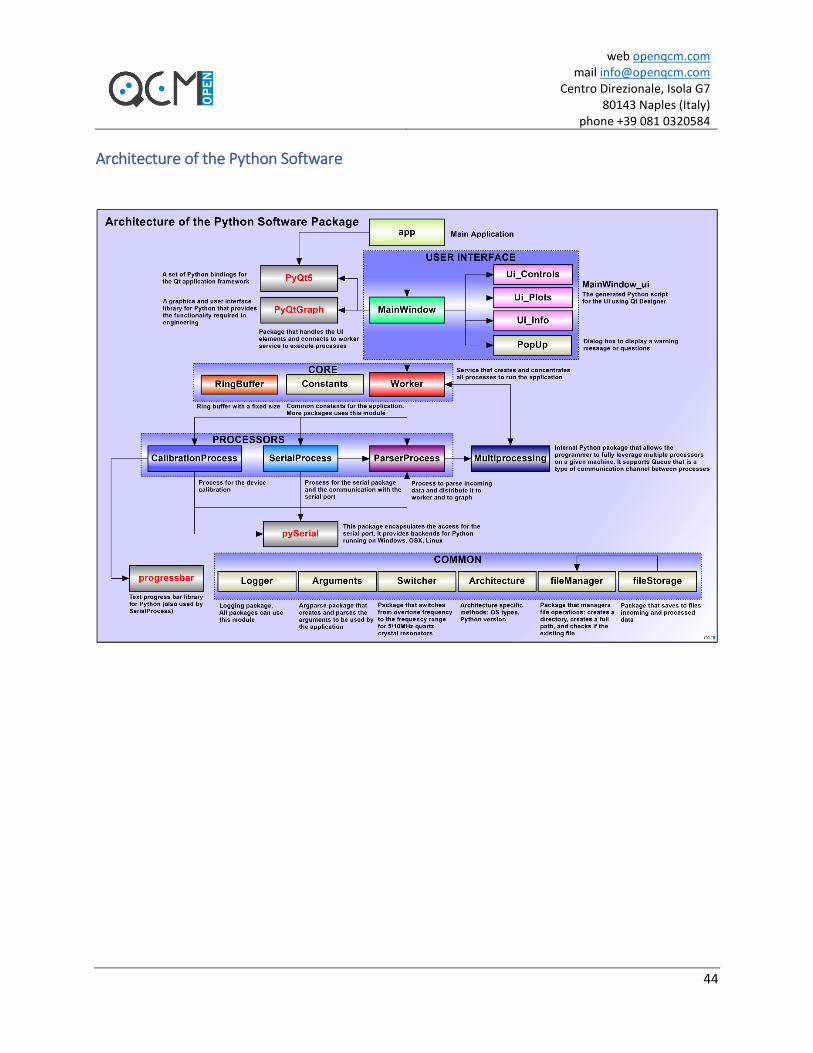
Architecture of the Python Software

web openqcm.com mail [email protected]
Centro Direzionale, Isola G7 80143 Naples (Italy)
phone +39 081 0320584
45
Temperature, Voltage and Material Warning Notice
Temperature The openQCM device hardware case is 3D-printed using Nylon material. It is heatproof to 80°C and higher
temperatures may significantly change material properties.
It is recommended to use openQCM electronics components and device (as a non-restrictive example
Teensy microcontroller, openQCM Q-1 shield) in the working temperature range -40°C to 85°.
Using the device at temperatures other than those indicated may significantly alter the materials and components resulting in a malfunction of the device. openQCM device is intended solely for use for scientific, R&D application, demonstration, or evaluation purposes Users handling the device must observe good engineering practice standards.
Voltage openQCM Q-1 device is designed to be powered at a continuous voltage of 5VDC through connection to
the USB port.
Power supply different from that indicated will damage the device. openQCM device is intended solely for use for scientific, R&D application, demonstration, or evaluation purposes Users handling the device must observe good engineering practice standards.
Material openQCM devices are realized with the 3D printing technique. The 3D printed case is made in Nylon strong
and flexible plastic. This material is very adaptable, it is dishwasher safe and heatproof to 80℃ / 176℉
degrees. The material datasheet is available at this link: https://goo.gl/NzkbSG and the material safety
datasheet is available here https://goo.gl/abrP8y
The only materials of the sensor module that are in contact with the sample are those of the measurement
chamber, consisting of the window cell and the oring. The standard window cell materials are PMMA
acrylic glass (Plexyglass®) or PTFE synthetic fluoropolymer (Teflon®) standard oring is made of FKM
Viton®.
It is strongly suggested not to use the PMMA window cell with organic solvents PMMA acrylic glass (Plexyglass®) material swells and dissolves in many organic solvents (such as ethanol); it also has poor resistance to many other chemicals due to its easily hydrolyzed ester groups.
It is advisable to be very careful with aggressive chemical materials. openQCM device is intended solely for use for scientific, R&D application, demonstration, or evaluation purposes Users handling the device must observe good engineering practice standards.
web openqcm.com mail [email protected]
Centro Direzionale, Isola G7 80143 Naples (Italy)
phone +39 081 0320584
46
openQCM Open Source Device Important Notice
openQCM provides the device described in this document under the following conditions:
openQCM device is released as a scientific open source instrument, and it is intended solely for use for SCIENTIFIC, RESEARCH
and DEVELOPMENT APPLICATION, DEMONSTRATION, OR EVALUATION PURPOSES and is not considered to be a finished end-
product fit for general consumer use.
Users handling the device must have electronics training and observe good engineering practice standards. As such, the goods
being provided are not intended to be complete in terms of required design-, marketing-, and/or manufacturing-related
protective considerations, including product safety and environmental measures typically found in end products for general
consumer use. This open source instrument does not fall within the scope of the European Union directives regarding
electromagnetic compatibility, restricted substances (RoHS), recycling (WEEE), FCC, CE or UL, and therefore may not meet the
technical requirements of these directives or other related directives.
The user assumes all responsibility and liability for proper and safe handling of the goods. Further, the user indemnifies openQCM
from all claims arising from the handling or use of the goods. Due to the open source construction and nature of the device, it is
the user’s responsibility to take any and all appropriate precautions with regard to electrostatic discharge. EXCEPT TO THE
EXTENT OF THE INDEMNITY SET FORTH ABOVE, NEITHER PARTY SHALL BE LIABLE TO THE OTHER FOR ANY INDIRECT, SPECIAL,
INCIDENTAL, OR CONSEQUENTIAL DAMAGES.
openQCM currently deals with a variety of customers for products, and therefore our arrangement with the user is not exclusive.
openQCM assumes no liability for applications assistance, customer product design, software performance, or infringement
of patents or services described herein.
Please read the User’s Guide and, specifically, the Warnings and Restrictions notice in the User’s Guide prior to handling
theproduct. This notice contains important safety information about temperatures, voltages and materials.
FCC Warning openQCM device is released as a scientific open source instrument, and it is intended solely for use for SCIENTIFIC, RESEARCH
and DEVELOPMENT APPLICATION, DEMONSTRATION, OR EVALUATION PURPOSES and is not considered to be a finished end-
product fit for general consumer use. It should generate, use, and radiate radio frequency energy and has not been tested for
compliance with the limits of computing devices pursuant to part 15 of FCC rules, which are designed to provide reasonable
protection against radio frequency interference. Operation of this equipment in other environments may cause interference with
radio communications, in which case the user at his own expense will be required to take whatever measures may be required
to correct this interference.
web openqcm.com mail [email protected]
Centro Direzionale, Isola G7 80143 Naples (Italy)
phone +39 081 0320584
47
Important Notice
openQCM reserves the right to make corrections, modifications, enhancements, improvements, and other changes to its
products and services at any time and to discontinue any product or service without notice. Customers should obtain the latest
relevant information before placing orders and should verify that such information is current and complete. All products are sold
subject to openQCM terms and conditions of sale supplied at the time of order acknowledgment, which is available at this link
https://store.openqcm.com/content/3-terms-and-conditions-of-use
openQCM assumes no liability for applications assistance or customer product design. Customers are responsible for their
products and applications using openQCM devices and components. To minimize the risks associated with customer products
and applications, customers should provide adequate design and operating safeguard.
openQCM does not warrant or represent that any license, either express or implied, is granted under any openQCM patent right,
copyright, mask work right, or other openQCM intellectual property right relating to any combination, machine, or process in
which openQCM componets, devices and services are used.
Information published by openQCM regarding third-party products or services does not constitute a license from openQCM to
use such products or services or a warranty or endorsement thereof. Use of such information may require a license from a third
party under the patents or other intellectual property of the third party, or a license from openQCM under the license or other
intellectual property of openQCM.
Reproduction of openQCM information in openQCM website, data books or data sheets is permissible only if reproduction is is
in agreement with creative common license Attribution-NonCommercial-ShareAlike 4.0 International (CC BY-NC-SA 4.0)
available here https://creativecommons.org/licenses/by-nc-sa/4.0/
and is accompanied by all associated warranties, conditions, limitations, and notices. Reproduction of this information with
alteration is an unfair and deceptive business practice. TI is not responsible or liable for such altered documentation. Information
of third parties may be subject to additionalrestrictions.
Resale of openQCM products or services with statements different from or beyond the parameters stated by openQCM for that
product or service voids all express and any implied warranties for the associated openQCM product or service and is an unfair
and deceptive business practice. openQCM is not responsible or liable for any such statements.
openQCM components, devices and services are not authorized for use in safety-critical applications (such as life support) where
a failure of the openQCM product would reasonably be expected to cause severe personal injury or death. Users represent that
they have all necessary expertise in the safety and regulatory ramifications of their applications, and acknowledge and agree that
they are solely responsible for all legal, regulatory and safety-related requirements concerning their products
and any use of openQCM components, devices and services in such safety-critical applications, notwithstanding any applications-
related information or support that may be provided by TI. Further, Buyers must fully indemnify openQCM and its representatives
against any damages arising out of the use of openQCM products in such safety-critical applications.
openQCM components, devices and services are neither designed nor intended for use in military/aerospace applications or.
Buyers / users acknowledge and agree that any such use of openQCM products which openQCM has not designated as military-
grade is solely at the Buyer's / User’s risk, and that they are solely responsible for compliance with all legal and regulatory
requirements in connection with such use.
openQCM components, devices and services are neither designed nor intended for use in automotive applications or
environments Buyers / Users acknowledge and agree that, if they use any non-designated products in automotive applications,
openQCM will not be responsible for any failure to meet such requirements.

web openqcm.com mail [email protected]
Centro Direzionale, Isola G7 80143 Naples (Italy)
phone +39 081 0320584
48
Other References - Teensy 3.6 USB Development Board, https://www.pjrc.com/teensy/techspecs.html
https://www.pjrc.com/store/teensy36.html
- Python, https://www.python.org
- Anaconda, Python data science platform https://www.anaconda.com/
- L. Campagnola, PyQtGraph, Scientific Graphics and GUI Library for Python, http://www.pyqtgraph.org/
- PyQt5 package, https://pypi.org/project/PyQt5/
- PySerial package, https://pypi.org/project/pyserial/
- progressbar 2.5 https://pypi.org/project/progressbar/