Embed Size (px)
Citation preview

BremenRCM 127
Radio / Cassette
Operating instructions

2
Table of contents
Traffic safety .................................................................. 2Important information ................................................... 3Quick reference ............................................................. 5KeyCard - Anti-theft system ....................................... 10Detailed operating instructions ................................. 14First-time installation ............................................................... 14Operating the radio with RDS.................................................. 17RDS information ...................................................................... 23PTY - Programme Type........................................................... 25
Traffic message reception with RDS-EON ................ 29Traffic Memo (TIM) ...................................................... 32
Warning .............................................................................. 37
Operating the tape player ........................................... 39Operating the CD changer (optional) ........................ 44Operating the AUX mode............................................ 52Audio settings ............................................................. 53DNC ......................................................................................... 54EQ (equalizer) .......................................................................... 56Manual equalizer ..................................................................... 56Hi-fi calibration ......................................................................... 57
Programming with DSC .............................................. 61Muting the audio source while using the car phone................ 66
Specifications .............................................................. 67
Traffic safety
As the driver of a motor vehicle, it is your responsibility to payattention to the traffic situation at all times. Never use your carradio in a way that could distract you.
Please keep in mind that you travel a distance of 14 m per sec-ond at a speed of only 50 km/h.
Should the traffic situation become particularly demanding, weadvise you not to use the car radio equipment.
Always make sure that you are still able to hear any warning sig-nals coming from outside of the vehicle, such as police or fireengine sirens, so that you can react accordingly.
As a result, you should always select a moderate volume for play-ing your car radio equipment while you are driving.

CD - Betrieb (Option)
3
DEUTSCH ENGLISH FRANÇAIS ITALIANO NEDERLANDS SVENSKA ESPAÑOL PORTUGUÊS
Important information
Precautions
Before operating your new car radio for the first time, please readthe following information carefully.
InstallationIf you would like to install your new car radio yourself or add otheraudio components to the existing ones, then please read the en-closed instructions on installation and connection carefully.
Car phone
If there is a mobile telephone installed in your vehicle, the radio,tape player or CD player (optional) can be muted automaticallywhen the phone is being used.
It is possible to program the system so that traffic messages orthe playback of stored traffic messages always have priority overthe use of the telephone. (For more information, please refer tothe section on muting the audio source while using the car phone.)
AccessoriesUse accessories and spare parts approved by Blaupunkt only.
You can use the following Blaupunkt products with this car radio:
Amplifier: All Blaupunkt amplifiers, the pre-amp out cable7 607 893 093 is required.
Sub out: Subwoofer pre-amp out for connecting an amplifier.
Changer: CDC F 07
Remote control:With the infrared remote control RC 07 you cancontrol all of the important functions of your car ra-dio system from the steering wheel.
Navigation: The Blaupunkt RGN 06 navigation component canbe added to allow active route guidance (expectedto be available: mid 1997)Navigation components can only be installedby specialised Blaupunkt navigation dealer-ships.
Other components are currently in the planning.

4
1
2
13
15
Mute
3
14
1
13 12
74 52 6 8 109 11
Remote control RC 07(optional)

CD - Betrieb (Option)
5
DEUTSCH ENGLISH FRANÇAIS ITALIANO NEDERLANDS SVENSKA ESPAÑOL PORTUGUÊS
Quick reference
1 ON / MuteSwitching on/off:
Press ON.
To switch the set on with the ON button, the KeyCard has tobe inserted. The unit will play at the pre-adjusted volumelevel (VOL FIX).To switch the set off, press ON for longer than 0.5 seconds.
Mute:
On/off:Press ON or on the remote control briefly. MUTE will ap-pear in the display when the mute function has been activat-ed.The set will switch off automatically if it is set to mute forlonger than 5 minutes.
Switching the set on for the first time:
If the set is switched on for the first time or after the powersupply has been disconnected, the FIRST INSTALLmenu will appear in the display.If you would like to alter any of the settings, read the in-structions in the section on “First installation”.You can exit the FIRST INSTALL menu by pressing the se-lection button marked EXIT .
Switching on/off with the KeyCard:
Switch the set on by pressing ON.
NoteFirst read the information in the section on the “KeyCardanti-theft system”.
Switching on/off with the ignition:
It is possible to switch the set on and off with the vehicle ig-nition if it has been installed to do so.After the set has been switched off using the ignition, a dou-ble beep will remind you to remove the KeyCard before youleave the vehicle.
Switching the set on when the ignition is off:
The set can be switched on again by pressing ON if theKeyCard is left in the set after the double beep.After playing for one hour, the set will switch off again auto-matically in order to save battery power.If you press ON again, the set will play again for one hour.

6
2 + / -Adjusting the volume:
The volume can be adjusted from VOLUME +0 toVOLUME +80. Press + or - to adjust the volume in eitherdirection in 15 increments per second.Each time the set is switched on, it will play at the pre-adjusted volume level. The pre-adjusted volume level (VOLFIX) can be altered. Read the information in the section on“Programming with DSC – VARIOUS”.
Switching the volume to zero immediately:
Press ON briefly. MUTE will then appear in the display andthe volume will be reduced to zero immediately.Press ON again, and the set will resume playing at the vol-ume level last set.The set will switch off automatically if it is set to mute forlonger than 5 minutes.
3 TIM (traffic memo)Setting the TIM times:
Press TIM for approximately 1 second.
Recalling stored traffic messages:
Press TIM briefly.
Switching TIM off while using a car wash:
Press ON to switch the set off and then press TIM.TIM-FUNCTION DEACTIVATED will appear briefly in thedisplay. The motor antenna will retract.Be sure to read the section on “Traffic Memo (TIM)” formore important information.
4 TU (tuner)Press this key to switch to operating the radio (main menu).If you press TU while the radio is playing, the set will switchbetween the main menu and the menu selected last.
5 CC (compact cassette)Press to switch to operating the tape player.
6 CDC (CD changer)Press to switch to operating the CD changer (optional).If the Blaupunkt CDC F 07 changer has not been connect-ed, NO CHANGER CONNECTED will appear in the display.
7 AUXPress to switch to any additional equipment connected.Refer to “Accessories” to find out which auxiliary equipmentcan be added to this system.

CD - Betrieb (Option)
7
DEUTSCH ENGLISH FRANÇAIS ITALIANO NEDERLANDS SVENSKA ESPAÑOL PORTUGUÊS
8 S (select)Press S briefly:The current time will appear in the display header.The menu for the sound settings will appear in the display.Press / to retrieve the function you would like to alter.
Press / or << / >> to select TREBLE, BASS, FADER orBALANCE.If LOUDNESS is highlighted in the display, this means thatthis function is currently active. Switch it off by pressing thecorresponding softkey again. Refer to the section on “Pro-gramming with DSC – VARIOUS” to set the intensity.The settings for EQ (equalizer) and DNC are described sep-arately.
DSC main menu:
Press S for approximately 1 second.:This activates the DSC MAIN MENU.Here you can adjust the programmable basic settings. Forfurther information, read: “Programming with DSC”.
9 Display/Selection menuThe selected mode of operation and the functions whichcan be selected appear in the display.It is possible to preselect colour, illumination and other set-tings. Refer to the operating instructions in the section on“Display settings”.
: Display headerIndicates the current selections, e.g.when operating the radio, the station;when operating the tape player, the track.
; Cassette ejectOpen/close panel.Eject/insert cassette.
< / SoftkeysUse these keys to select the functions appearing in the dis-play (a new menu will appear).Other functions can be switched on/off (alternates betweennormal and highlighted display).Press EXIT to return to the previous (main) menu.

8
= Multi-functional rocker switch or remote control but-tons (optional)Radio mode
<</>> Switching between reception andmemory table (preference menu)
/ Scrolling in the selected table up / down
Using the remote control, you can select the following orprevious station.
Cassette mode
/ Select the title (S-CPS) forwards / reverse
>> fast forward
<< fast rewind
Stop the function by pressing the opposite key.
CD changer mode (optional)
Select CD>> up<< down
Select trackup: Press briefly.down: Press two or more times in quick succession.
CUE - fast forward (audible):Hold pressed down.
Restart same track:Press briefly.
Review - fast reverse (audible):Hold pressed down.
Additional functions for the rocker switch:Other settings can be selected in combination with theS (select) key.

CD - Betrieb (Option)
9
DEUTSCH ENGLISH FRANÇAIS ITALIANO NEDERLANDS SVENSKA ESPAÑOL PORTUGUÊS
> KeyCard anti-theft systemYou must insert the KeyCard in order to be able to operatethis set.
KeyCard
Inserting the KeyCardWhile the KeyCard tongue is protruding out of its opening,insert the KeyCard into the slot with the contact area fac-ing up .If necessary, press the KeyCard tongue to release it.Be sure to read the information in the section on the“KeyCard anti-theft system”.
Flashing KeyCard tongueIt is possible to program this unit so that the KeyCardtongue will flash when the set is switched off and theKeyCard has been removed. This flashing light indicates tothieves that it is useless to try and steal the set.The flashing light can be switched off if desired.For further information, read the section on “Programmingwith DSC”.
? SRCRemote control (optional)
Press SRC as often as necessary in order to switch be-tween the different operating modes for radio, tape player,CD changer (optional), AUX (if activated).

10
The KeyCard anti-theft system
One KeyCard is included with the set.
You can, however, also use a second KeyCard with your set. You can purchasea second KeyCard at any specialised dealership.
Starting up the unit
• Press ON to switch the set on.With the KeyCard tongue protruding out of its opening, insert the KeyCardinto the slot with the contact area facing up . Make sure that the KeyCardis inserted properly.
The car radio is now ready to operate.
If a KeyCard which does not belong to the set is inserted, KEYCARD ERROR willappear in the display. Do not attempt to use the equipment in this case.
After approximately 10 seconds the unit will switch off automatically.
If you insert any other type of card (e.g. telephone or credit card) into the slot, thedisplay will indicate THIS IS NO KEYCARD for approximately 2 seconds.
Remove the incorrect card and insert the correct KeyCard into the unit.
Following KEYCARD ERROR or THIS IS NO KEYCARD• press ON to switch the unit on.
KeyCard

CD - Betrieb (Option)
11
DEUTSCH ENGLISH FRANÇAIS ITALIANO NEDERLANDS SVENSKA ESPAÑOL PORTUGUÊS
Removing the KeyCard
• Press the KeyCard tongue.The KeyCard can now be removed.• Pull the KeyCard out of the slot.
“Training” the second KeyCard / replacing the KeyCardA KeyCard can be “trained” as an additional KeyCard if the unit is still beingoperated with the original KeyCard.
If you want to “train” a second KeyCard:• insert the original KeyCard and switch the unit on.
• Press S for approximately 1 second. DSC-MAIN MENU will appear in thedisplay header.
• Select the following functions one after the other: KEYCARD (playbackwill be set to mute) and LEARN KC.
PLEASE CHANGE CARD will appear in the display.• Remove the original KeyCard and insert the new KeyCard.LEARNING READY will then appear in the display, the new KeyCard is now“trained”.
The new KeyCard can now be used to operate the set.This car radio will not accept more than two KeyCards.
When trying to “train” a third KeyCard, the KeyCard which was not used in the“training” process will automatically become invalid.
S
DISPLAYVARIOUSKEYCARD
DSC-MAIN MENUTUNER
EXIT
S
LEARN KEYCARDPLEASE
EXIT
CHANGECARD
S
DSC-KEYCARDLEARN KCREAD KC

12
Displaying the radio pass dataAfter inserting the original KeyCard, you can have the radio pass data such asthe model name, the product number (7 6...) and the serial number shown in thedisplay.• Insert the original KeyCard and switch the unit on.
• Press S for approximately 1 second. DSC-MAIN MENU will appear in thedisplay header.
• Select the following functions one after the other: KEYCARD and READ KC.
The radio pass data will appear in the display. If the data does not appear in thedisplay, then a replacement KeyCard or an incorrect (WRONG) KeyCard hasbeen inserted.
• Press EXIT (repeatedly if necessary) to exit the menu.
Short Additional Memory (S.A.M)Using the second KeyCard which can be purchased at any specialised dealer-ship, you can program a short text by selecting the DSC menu item READ KC.This text might be the telephone number of a car repair service or the emergencycall number of your auto club.Any specialised dealer with the proper equipment can program the desired textwith up to a maximum of 54 characters onto the KeyCard.
Turn On Message (T.O.M.)Using the second KeyCard which can be purchased at any specialised dealer-ship, you can program the unit to display a selected “Turn On Message” after theset is switched on.Any specialised dealer with the proper equipment can program the desired textwith up to a maximum of 48 characters onto the KeyCard.Each time you switch on your car radio using the second KeyCard, this text willappear in the display.
S
DISPLAYVARIOUSKEYCARD
DSC-MAIN MENUTUNER
EXIT
S
READ KEYCARD
EXIT
7646860010BP6860T.......
Bremen RCM 127
S
DSC-KEYCARDLEARN KC
EXIT
READ KC

CD - Betrieb (Option)
13
DEUTSCH ENGLISH FRANÇAIS ITALIANO NEDERLANDS SVENSKA ESPAÑOL PORTUGUÊS
Optical indication of anti-theft protectionFlashing KeyCard tongue
When the radio has been switched off and the KeyCard removed, the KeyCardtongue can be programmed to flash as a warning to thieves.
The following requirements must be fulfilled for this to function correctly:The positive power supply line and the permanent +12 V lead must be connectedproperly, as described in the installation instructions.In the DSC mode, the LED setting must be switched to “LED ON”.If necessary, please refer to the section on “Programming with DSC – VARIOUS,KC LED”.
Switching off the flashing light
The flashing light can be switched off by pushing in the KeyCard tongue to lock it.Before inserting the KeyCard, make sure that the KeyCard tongue is in the outposition.If you would like to deactivate the flashing tongue permanently, switch the LEDsetting to “LED OFF” in the DSC menu.For further information, read the section on “Programming with DSC – VARIOUS,KC LED”.
Taking care of your KeyCard
In order to ensure that the KeyCard always functions correctly, it is important forthe contacts to be free from any foreign particles. Avoid direct skin contact.If necessary, clean the KeyCard contacts using a cotton swab dipped in alcohol.

14
Detailed operating instructions
First-time installation
If the set is switched on for the first time or after the power supply has beendisconnected, FIRST INSTALL will appear in the display header.
Using this menu you can adjust the following settings: CLOCK Set the clock
OWNER-ID Enter proof of ownership
AUX-IN Activate AUX / Enter name of auxiliary equipment
NORM SET Reset to original factory settingsPress EXIT to exit the menu.
You can activate this menu if you switch the radio off, then press down S andhold it while you switch the set on again.
Setting the clock
• Press CLOCK. The current time will appear in the display header.
• Press - HOURS / HOURS + to alter the hours and - MIN / MIN + to alter the minutes.
When you have completed the setting,
• press EXIT .
Entering OWNER ID
On four lines (max. 64 characters) you can enter information as proof of owner-ship.• Press OWNER-ID. OWNER-ID will appear in the display header.
• Press / to select the characters.
S
AUX-INNORM SET
FIRST INSTALLCLOCKOWNER-ID
EXIT
S
AUX-INNORM SET
FIRST INSTALLCLOCKOWNER-ID
EXIT
S
HOURS +MIN +
CLOCK- HOURS- MIN
EXIT
12:27

CD - Betrieb (Option)
15
DEUTSCH ENGLISH FRANÇAIS ITALIANO NEDERLANDS SVENSKA ESPAÑOL PORTUGUÊS
• Press << / >> to select the entry position.If you are at one of the end positions (first or last character), you can movedirectly to the opposite end position by pressing << / >>.
Press / in order to select the line.
Press CLEAR to delete the entire entry.
Press EXIT to exit the menu. The last setting will be stored automatically.
Activating AUX / Entering the name of the auxiliary equipment
If you want to operate an additional piece of equipment, you must activate theAUX setting first. You can enter any name (max. 8 characters) for this equip-ment.• Press AUX-IN.
• Press AUX. The function is activated when AUX is highlighted. AUX cannow also be selected with the RC 07 remote control.
• Press AUX-NAME and enter the name of the auxiliary equipment, suchas Walkman.
• Press / to select the characters.
• Press << / >> to select the entry position.Press CLEAR to delete the entire entry.
Press EXIT to exit the menu. The last setting will be stored automatically.
S
OWNER-ID________________________________
EXITCLEAR
________________________________
S
FIRST INSTALLAUXAUX-NAME
EXIT
S
W A L K M A N
EXITCLEAR

16
S
AUX-INNORM SET
FIRST INSTALLCLOCKOWNER-ID
EXIT
S
PLEASE WAIT
ALL ADJUSTMENTSARE SET TO
DEFAULT VALUES
Resetting to original factory settings
Using NORM SET you can return all of the altered settings except for the currenttime to the original factory settings.
Warning!You will delete all of the adjusted settings such as DSC, OWNER-ID, equaliz-er settings, preference tables, etc.
If you want to reset all of the altered settings to the original factory settings,• press NORM␣ SET for approximately 4 seconds. The following message
will appear in the display:PLEASE WAIT.ALL ADJUSTMENTS ARE SET TO DEFAULT VALUES.
As soon as the FIRST INSTALL menu appears in the display, the settings haveall been returned to the original factory settings.
Press EXIT to exit the menu.
CD - Betrieb (Option)
17
DEUTSCH ENGLISH FRANÇAIS ITALIANO NEDERLANDS SVENSKA ESPAÑOL PORTUGUÊS
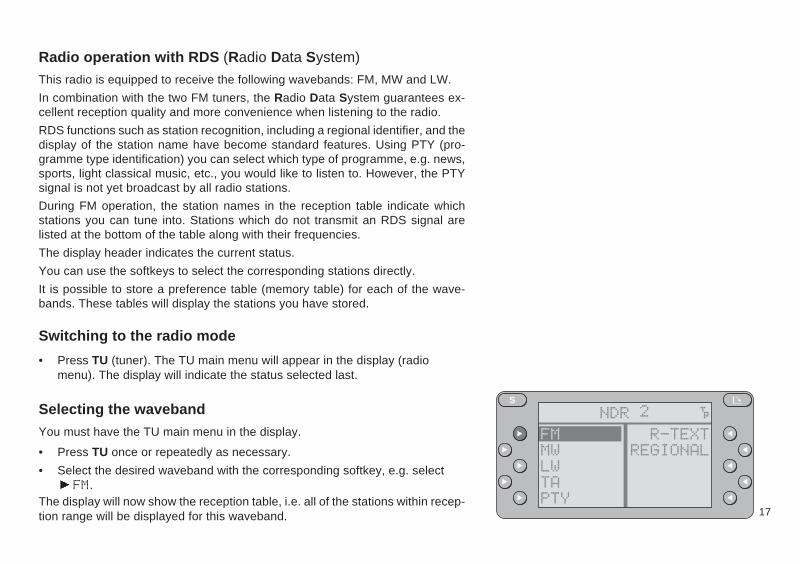
Radio operation with RDS (Radio Data System)
This radio is equipped to receive the following wavebands: FM, MW and LW.
In combination with the two FM tuners, the Radio Data System guarantees ex-cellent reception quality and more convenience when listening to the radio.
RDS functions such as station recognition, including a regional identifier, and thedisplay of the station name have become standard features. Using PTY (pro-gramme type identification) you can select which type of programme, e.g. news,sports, light classical music, etc., you would like to listen to. However, the PTYsignal is not yet broadcast by all radio stations.
During FM operation, the station names in the reception table indicate whichstations you can tune into. Stations which do not transmit an RDS signal arelisted at the bottom of the table along with their frequencies.
The display header indicates the current status.
You can use the softkeys to select the corresponding stations directly.
It is possible to store a preference table (memory table) for each of the wave-bands. These tables will display the stations you have stored.
Switching to the radio mode
• Press TU (tuner). The TU main menu will appear in the display (radiomenu). The display will indicate the status selected last.
Selecting the wavebandYou must have the TU main menu in the display.
• Press TU once or repeatedly as necessary.
• Select the desired waveband with the corresponding softkey, e.g. select FM.
The display will now show the reception table, i.e. all of the stations within recep-tion range will be displayed for this waveband.
S
LWTAPTY
R-TEXTREGIONAL
NDR 2FMMW

18
Switching from the reception table to the preference tableDuring FM reception, you can choose whether you want to display the receptiontable including all of the stations currently within reception range or the prefer-ence menu with all of the stations you have previously stored.The display header will be highlighted in the preference menu.
During MW or LW reception, it is only possible to display the preference menu.
In order for this function to operate properly, it is necessary to store stations first.Otherwise, the search menu will appear for MW and LW reception and the recep-tion table for FM reception.
Switching from one table to the other
• Press << or >>.
Scrolling in the table
The table may consist of several pages.
To scroll through the entries:• press or .
Selecting a station . . .The display header will indicate the station name or, if the set does not receivean RDS signal, the station frequency of the station currently playing.
There are several different ways of selecting a station:
. . . from the reception or preference table
• When listening to an FM station, select the desired table by pressing<< />>.
• Select the station by pressing or .The station name or the frequency will appear in the display header.
S
D-RadioBREMEN 1BREMEN 2
BREMEN 3HR 3
NDR 2SEARCHSCAN
NDR1 NDSNDR 2NDR 3
S
ANTENNEMDR LIFEBROCKEN
HR 1HR 3
NDR1 NDSSEARCHSCAN
NDR 2NDR1 NDS
NDR 3

CD - Betrieb (Option)
19
DEUTSCH ENGLISH FRANÇAIS ITALIANO NEDERLANDS SVENSKA ESPAÑOL PORTUGUÊS
Note:
If a station is displayed but crossed out in the preference menu, this means thateither the reception is very poor or that the station could not be clearly identifiedas the one stored.
Stations on the same frequency which do not transmit an RDS signal cannot beclearly differentiated from one another.
. . . by station search or manually
You must select the station search menu first.
You can switch from the reception or preference table• by pressing SEARCH.The search menu has been selected when SCAN appears in the upper left cor-ner of the display.
Start the station search function by pressing• (up) or (down).The station search will stop at the next station within reception range.
The station search sensitivity selected LOCAL or DX (distant) will be highlightedin the display.
• You can toggle between the two levels of station search sensitivity bypressing the corresponding softkey .
The station search sensitivity can be set separately for LOCAL and DX. For moreinformation refer to the section on “Programming with DSC – TUNER, S-LO orS-DX”.
If you hold down / , the station search will run forwards or backwards quickly.
Start the manual station search by pressing << or >>, the frequency will moveup or down in increments.
If you hold << or >> down, then the frequencies will run through quickly.
S
D-RadioBREMEN 1BREMEN 2
BREMEN 3HR 3
NDR 2SEARCHSCAN
NDR1 NDSNDR 2NDR 3
S
DXSTORE
EXIT
NDR 2 92.10SCANLOCAL

20
. . . with SCAN
The SCAN feature will briefly play all of the stations listed in the table displayed.
FM SCAN
If the reception table is displayed, all of the FM stations within reception rangewill be scanned.
If the preference table is displayed (display header highlighted), all of the storedFM stations will be scanned.
Start SCAN:• Press SCAN.The display will indicate the station name, or if no RDS signal is received, thefrequency of the station being scanned. SCAN will appear in the display header.
End SCAN:• Press EXIT , the last station scanned will begin normal play.
MW/LW SCAN
If the preference table is displayed (display header highlighted), all of the storedstations will be scanned.
In the SEARCH menu it is possible to scan all of the stations currently withinreception range.
Select the corresponding menu.
Select preference table:• Press TU, MW or LW.
S
ANTENNEMDR LIFEBROCKEN
HR 1HR 3
NDR1 NDSSEARCHSCAN
NDR 2NDR1 NDS
NDR 3
S
LW
756FMMW
S
NDR 3
S C A N
EXIT
CD - Betrieb (Option)
21
DEUTSCH ENGLISH FRANÇAIS ITALIANO NEDERLANDS SVENSKA ESPAÑOL PORTUGUÊS
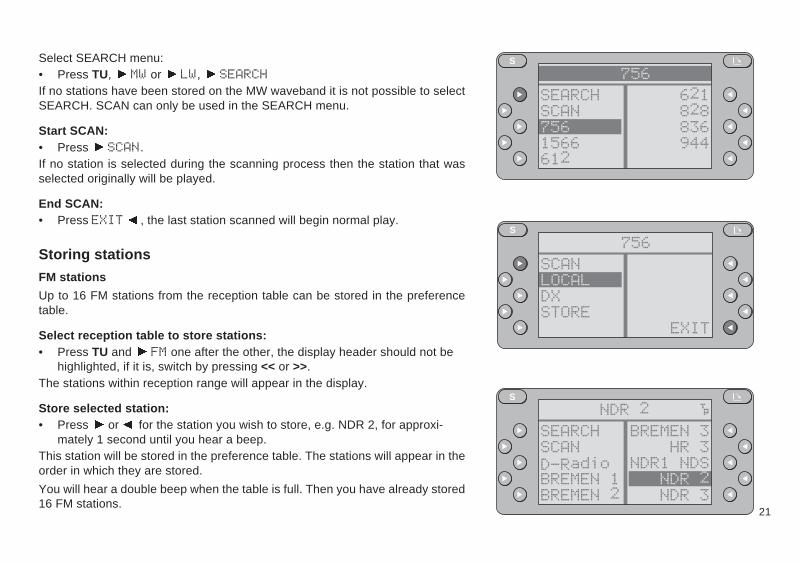
Select SEARCH menu:• Press TU, MW or LW, SEARCHIf no stations have been stored on the MW waveband it is not possible to selectSEARCH. SCAN can only be used in the SEARCH menu.
Start SCAN:• Press SCAN.If no station is selected during the scanning process then the station that wasselected originally will be played.
End SCAN:• Press EXIT , the last station scanned will begin normal play.
Storing stations
FM stations
Up to 16 FM stations from the reception table can be stored in the preferencetable.
Select reception table to store stations:• Press TU and FM one after the other, the display header should not be
highlighted, if it is, switch by pressing << or >>.The stations within reception range will appear in the display.
Store selected station:• Press or for the station you wish to store, e.g. NDR 2, for approxi-
mately 1 second until you hear a beep.This station will be stored in the preference table. The stations will appear in theorder in which they are stored.
You will hear a double beep when the table is full. Then you have already stored16 FM stations.
S
7561566612
621828
756SEARCHSCAN
836944
S
DXSTORE
EXIT
756SCANLOCAL
S
D-RadioBREMEN 1BREMEN 2
BREMEN 3HR 3
NDR 2SEARCHSCAN
NDR1 NDSNDR 2NDR 3

22
Storing MW/LW stations
Up to 8 MW stations from the search menu can be stored in the preference table.8 LW stations have already been stored in the preference table.
Select search menu to store stations:• Press TU, MW or LW, SEARCHIf no stations have been stored on the MW waveband it is not possible to selectSEARCH.
Select station with search or manually:• Station search (up) or (down).
• manually >> (up) or << (down).The station currently received will appear in the display header.
Store selected station:• Press STORE for approximately 1 second until you hear a beep.STORE will disappear from the display when 8 stations have been stored.
Deleting stored station:
• Select preference table.
• Press or for the station you wish to delete for approximately 4 sec-onds, until you hear a beep.
This station will be deleted.
S
7561566612
621828
756SEARCHSCAN
836944
S
DXSTORE
EXIT
756SCANLOCAL

CD - Betrieb (Option)
23
DEUTSCH ENGLISH FRANÇAIS ITALIANO NEDERLANDS SVENSKA ESPAÑOL PORTUGUÊS
RDS information (RDS - Radio Data System)
RDS offers you more convenience when listening to FM radio. Most radio sta-tions now transmit RDS information along with their regular programming.
RDS offers you a number of interesting advantages:
Station name
If it is possible to identify a station, the station name including a regional identifi-er, if applicable, will appear in the display, for example, NDR1 NDS (regionalprogramme in Lower Saxony, Germany).
Alternative frequencyIf a station has been identified as an RDS station, the radio will automaticallyselect the frequency with the best reception for the station selected.
This means that you can drive all through northern Germany, for example, afterselecting the station (e.g. NDR 2) you wish to listen to only once. You will hearthis station in the best possible reception quality the entire time without having toadjust your set.
If you leave the reception area for the station selected - you will notice a consid-erable decrease in reception quality - we recommend that you tune into a differ-ent station.
A station which is not currently within your reception range will appear crossedout in the preference table.
This station will be deleted from the reception table as soon as it is no longerwithin the radio’s reception range.
S
ANTENNEMDR LIFEBROCKEN
HR 1HR 3
NDR1 NDSSEARCHSCAN
NDR 2NDR1 NDS
NDR 3
S
ANTENNEMDR LIFEBROCKEN
HR 1HR 3
89.50SEARCHSCAN
NDR2NDR1 NDS
NDR 3
----------

24
REG – Regional programmesAt certain times of the day or on a permanent basis, certain radio stations dividetheir FM programmes into different regional programmes providing local infor-mation.
You can select these regional programmes directly from the reception or prefer-ence table.
If you are listening to a regional programme and wish to continue doing so thenREGIONAL must be highlighted in the radio’s main menu.
If the regional programme function has been activated, the radio optimises thereception only for the selected regional programme. If the radio cannot find analternative frequency offering better better reception of the regional programme,the selected programme will continue to play even if the reception quality deteri-orates.
Switching the regional programme function on/off
To switch the regional programme function on/off, you must activate the mainradio menu. Depending on the situation
• press TU once or twice until FM is highlighted in the display.If REGIONAL is highlighted as well, the regional programme function has alsobeen activated.
To switch the regional programme function on/off ,• press REGIONAL briefly.
Selecting a regional radio station
If the regional programme function has been activated, a regional radio stationwill be displayed in the display header of the main radio menu as: NDR 1 NDSREG-E, for example.
S
LWTAPTY
R-TEXTREGIONAL
NDR1 NDSFMMW
S
LWTAPTY
R-TEXTREGIONAL
NDR1 NDS REG-EFMMW

CD - Betrieb (Option)
25
DEUTSCH ENGLISH FRANÇAIS ITALIANO NEDERLANDS SVENSKA ESPAÑOL PORTUGUÊS
REG indicates that the regional programme function is switched on. The letterfollowing (A to L is possible) indicates which regional programme has been se-lected.
If you are currently somewhere where several different versions of the regionalstation are within reception range then you can select another alternative.• Briefly press the softkey for the station selected.If there are no alternative stations within reception range there will be no change.
PTY – Programme type
PTY is an RDS service now being offered by an increasing number of radio sta-tions.
This feature allows you to select FM stations according to the type of programmethey broadcast. After you have chosen the type of programme you wish to listento, you can select the corresponding stations directly by pressing the softkeys.
Switching the PTY menu on/off
You can activate the PTY menu in the main radio menu.
Call up the main radio menu by
• pressing TU. FM will be highlighted in the display.
To switch on:• Press PTY.The programme types will appear in the display.
Press EXIT to exit the menu.
S
LWTAPTY
R-TEXTREGIONAL
NDR 2FMMW
S
INFOSPORTEDUCATE
DRAMACULTURE
PTY - MENUNEWSAFFAIRS
SCIENCE
EXIT
----------
------------------------------
------------------------------

26
Programme typeUse the softkeys or to select the programme type, use or to “turn” tothe next page.
You can use DSC to switch the language to German, English or French (refer to“Programming with DSC – TUNER, PTY LANG”).
All of the programme types listed below are available.
The letters printed in bold are identical to the actual PTY display.
NEWSCURRENT AFFAIRSINFORMATIONSPORTEDUCATEDRAMACULTURESCIENCEVARIEDPOP MUSICROCK MUSICM.O.R. M (middle of the road music)LIGHT M (light classical)CLASSICS (serious classical)OTHER M (other music)
PTY 16 to PTY 30 have not yet been assigned.
S
INFOSPORTEDUCATE
DRAMACULTURE
PTY - MENUNEWSAFFAIRS
SCIENCE
EXIT
----------
------------------------------
------------------------------

CD - Betrieb (Option)
27
DEUTSCH ENGLISH FRANÇAIS ITALIANO NEDERLANDS SVENSKA ESPAÑOL PORTUGUÊS
Switching PTY on / Selecting the programme typeYou can activate the PTY menu in the main radio menu. In the PTY menu youcan select the programme type.
• Press TU. FM will be highlighted in the display.
• Press PTY.The programme types will appear in the display.
Any programme types which are crossed out on the list are not currently availa-ble. If any of the 30 different types of programmes are listed, then• press or in order to “turn” to the next page.
• Select the programme type by pressing or .All radio stations which are currently broadcasting the programme type selectedwill appear in the display.
• Select the station by pressing or .You will receive this station in the selected programme type.
A programme type which is not currently available (crossed out in the display)can be selected anyway.
If this type of programme should then become available within the station chain,the radio will switch to it automatically provided that ACTIVATE is highlighted (isswitched on). If necessary,
• press ACTIVATE .As soon as this programme can no longer be received, the radio will switch backto the previous station.
If you would like to switch this function off (deactivate),
• press DEACT in the PTY menu.If there are no stations available in the programme type selected, the stationtable for this programme type will remain blank if selected.
S
INFOSPORTEDUCATE
DRAMACULTURE
PTY - MENUNEWSAFFAIRS
SCIENCE
EXIT
----------
------------------------------
------------------------------
S
EXITACTIVATE
PTY - AFFAIRS
S
INFOSPORTEDUCATE
DRAMACULTURE
PTY - MENUNEWSAFFAIRS
SCIENCE
EXIT
----------
------------------------------
------------------------------
DEACT

28
Giving radio stations a nameIf only the frequency of a radio station is displayed, it is possible to give thisstation a name with up to 8 characters. It is not possible to name RDS stationswhich already have a station name.
Start entry:• Press S for approximately 1 second. DSC-MAIN MENU will appear in the
display header.
• Select TUNER, ST NAME, NAMING one after the other. The sta-tion frequency and the first entry position (highlighted) will appear in thedisplay header.
• Select the desired character by pressing / .
• Select the entry position by pressing << / >>.In this way you can enter up to 8 characters.
Press CLEAR to delete the entire entry.
End entry:• Press EXIT . The entry will be stored automatically.
You can alter the name by entering other characters and storing them (over-write).
S
CLEAR EXIT
90.10ENTER

CD - Betrieb (Option)
29
DEUTSCH ENGLISH FRANÇAIS ITALIANO NEDERLANDS SVENSKA ESPAÑOL PORTUGUÊS
Traffic message reception with RDS-EON
The abbreviation “EON” stands for Enhanced Other Networks, meaning theexchange of information within a radio network.
Many FM radio stations offer traffic messages for their service area at regularintervals.
In addition to their programmes, all traffic programme stations transmit a specialcarrier signal which is decoded by your car radio. If this signal is identified, TP(traffic programme) or TA (traffic announcement priority) will appear in the dis-play.
There are also stations which do not actually transmit traffic programmes them-selves, but by using RDS-EON it is possible for them to receive the traffic mes-sages broadcast by another traffic programme station in the same radio network.
If you want traffic announcements to have priority while you are listening to oneof these stations (e.g. NDR3), TA must appear in the display panel.
If a traffic announcement is broadcast, the radio will automatically switch to thelinked traffic programme station (in this case, NDR2) for the duration of the mes-sage and return to the original programme (NDR3) afterwards.
Switching traffic announcement priority on/off
If you are tuned into a traffic programme station, TA will light up in the upper rightcorner of the display if the traffic priority is activated or TP if it has been switchedoff.
You can switch the priority on or off in the main radio menu.
Depending on the situation, call up the main radio menu
• by pressing MENU , EXIT or TU. FM will be highlighted in the display.If TA is highlighted as well, the priority is switched on.
S
D-RadioBREMEN 1BREMEN 2
BREMEN 3HR 3
NDR 2SEARCHSCAN
NDR1 NDSNDR 2NDR 3
S
LWTAPTY
R-TEXTREGIONAL
NDR 2FMMW

30
Switching the priority on/off:
• Press TA.Interrupting a traffic message when it is being broadcast:
Press EXIT or SRC on the remote control during the message. This inter-rupts the priority for this message only.
The set will then switch back to the previous mode of operation. The recording ofthis message in the TIM memory will only be interrupted if the message wasswitched through by EON.
The priority for other traffic messages will remain active.
If you press TA OFF you will switch off the priority status for traffic messages.
Warning beep
Situation: The priority for traffic messages is activated, TA is lit up in the display.
If you select a radio station which does not broadcast traffic announcements orleave the reception area of the traffic programme station you are currently tunedinto, TA will disappear from the display and you will hear a warning beep approx-imately every 30 seconds.
This beep indicates that not all of the traffic message functions are activated.
Switching the warning beep off
Tune into another station which broadcasts traffic information or switch off thepriority for traffic announcements in the main radio menu by pressing TA.
Automatic start of station search(when operating the tape or optional CD player)
When you leave the reception area of the traffic programme station you are tunedinto while listening to a tape or a CD, the system will automatically start search-ing for a new TA programme.
S
LWTAPTY
R-TEXTREGIONAL
NDR 2FMMW
S
TA OFF EXIT
TRAFFIC MESSAGE
NDR 2

CD - Betrieb (Option)
31
DEUTSCH ENGLISH FRANÇAIS ITALIANO NEDERLANDS SVENSKA ESPAÑOL PORTUGUÊS
If no such station is found within approximately 30 seconds, you will hear a warn-ing beep every 30 seconds. Switch the warning beep off as described above.
Adjusting the volume for traffic announcementsThis volume was preset at the factory, though you can alter the value using theDSC function (see “Programming with DSC – TUNER, TA VOL”).
Adjusting the sound stage for traffic messages and TIM
You can adjust the treble, bass, balance and fader settings separately for bothtraffic announcements and TIM.
It is, for example, possible to have only the front left (or right) speaker transmitthe traffic messages.
This provides the driver with the important traffic information without unneces-sarily bothering the passengers in the vehicle.
To alter the setting:
During an announcement• press S briefly.
• Select the settings you wish to adjust by pressing the corresponding key,e.g. treble.
• Press << / >> or / to adjust the sound as you wish to hear it for futuretraffic messages.
The last setting made will be stored automatically. 8 seconds after the last set-ting is made, the unit will switch back to the previous menu. You can return to theprevious menu immediately by• pressing EXIT .
S
FADERBALANCE
TIMETREBLEBASS
EXIT
12:13

32
Traffic Memo (TIM)
This set is equipped with a digital speech memory which can automatically recordup to four traffic messages lasting a maximum of four minutes.
As soon as TP appears in the display, the system will record all incoming trafficmessages broadcast by the station when the radio is switched on.
If the priority for traffic announcements is activated (TA shown in the displaypanel), the set will also record the messages broadcast by the traffic station ofthe same programme network (see also “Traffic message reception with RDS-EON”).
If “TIM ACTIVE” appears briefly in the display when the radio is switched off,the TIM standby mode is active. In this case the radio will record the traffic infor-mation broadcast for 90 minutes before and after the programmed TIM timeseven if it is switched off.
The radio will also record the traffic messages broadcast by the last station it wastuned into for three hours after the set has been switched off.
Depending on the length of the new message, the oldest messages will be delet-ed automatically.
If a message is longer than four minutes, “OVERFLOW” will appear in the displayheader for 2 seconds after you have activated TIM to indicate that the systemwas unable to record the message in full.
WarningYour motor antenna may be damaged in a car wash
If your vehicle is equipped with a motor antenna, then please be sure to read theimportant warning note at the end of this section.
S
TIM ACTIVE

CD - Betrieb (Option)
33
DEUTSCH ENGLISH FRANÇAIS ITALIANO NEDERLANDS SVENSKA ESPAÑOL PORTUGUÊS
Setting the exact timeTIM needs the exact time in order to operate precisely. Note that the clock alsohas to be reset after any interruption in the power supply. If the time display ishighlighted there has been an interruption in the power supply. When you switchthe radio on, the FIRST INSTALL menu will appear automatically.
Setting the clock following an interruption in the power supply
• Press CLOCK and the time will be appear in the display header.To set the clock• alter the hours by pressing - HOURS / HOURS + and the minutes
by pressing - MIN / MIN + . When you have completed resettingthe clock
• press EXIT . Return to the previous menu by way of the FIRSTINSTALL menu.
Displaying the time
The time will appear in the display header if you• press S briefly.
Correcting the time
The clock can be reset in the FIRST INSTALL menu and in the DSC-MAINMENU.If necessary, call up one of these menus and set the exact time.
Using the FIRST INSTALL menu• Switch the unit off.
• Press S (and hold it down) and switch the unit back on. The FIRSTINSTALL menu will appear in the display.
• Select CLOCK and set the correct time.
S
AUX-INNORM SET
FIRST INSTALLCLOCKOWNER-ID
EXIT
S
HOURS +MIN +
CLOCK- HOURS- MIN
EXIT
12:27
34
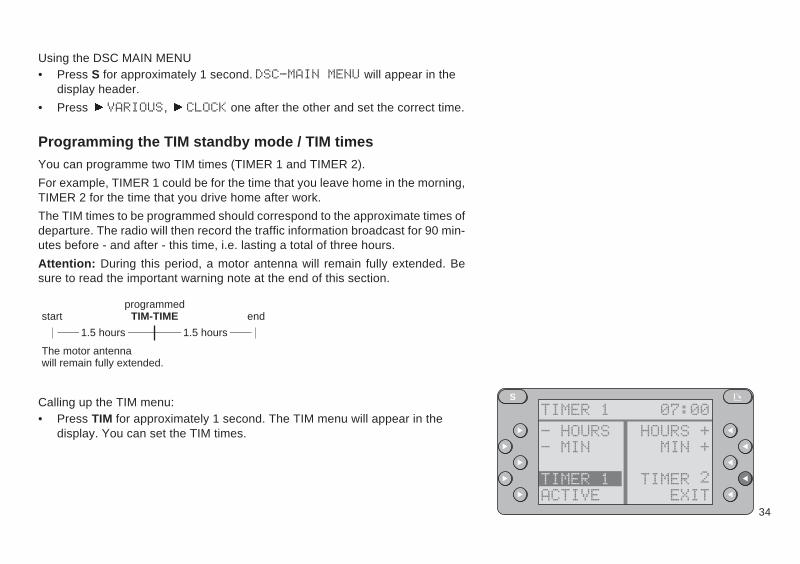
Using the DSC MAIN MENU• Press S for approximately 1 second. DSC-MAIN MENU will appear in the
display header.
• Press VARIOUS, CLOCK one after the other and set the correct time.
Programming the TIM standby mode / TIM timesYou can programme two TIM times (TIMER 1 and TIMER 2).
For example, TIMER 1 could be for the time that you leave home in the morning,TIMER 2 for the time that you drive home after work.
The TIM times to be programmed should correspond to the approximate times ofdeparture. The radio will then record the traffic information broadcast for 90 min-utes before - and after - this time, i.e. lasting a total of three hours.
Attention: During this period, a motor antenna will remain fully extended. Besure to read the important warning note at the end of this section.
1.5 hours
The motor antennawill remain fully extended.
startprogrammed
TIM-TIME end
1.5 hours
Calling up the TIM menu:• Press TIM for approximately 1 second. The TIM menu will appear in the
display. You can set the TIM times.
S
TIMER 1- HOURS- MIN
EXITTIMER 1
HOURS +MIN +
07:00
ACTIVETIMER 2

CD - Betrieb (Option)
35
DEUTSCH ENGLISH FRANÇAIS ITALIANO NEDERLANDS SVENSKA ESPAÑOL PORTUGUÊS
Checking TIM times:
The TIM time of the timer marked by a highlighter bar will appear in the displayheader.
If you want to see the time set for the other timer,• press the corresponding key or .
Setting TIM times:
You can set the TIM times for TIMER 1 and TIMER 2 in the TIM menu. Thetimer which you can programme will be highlighted. TIMER will appear in thedisplay header along with the preset time.• Select TIMER 1 or TIMER 2 .
• Alter the hours by pressing -␣ HOURS / HOURS␣ + and the minutesby pressing - MIN / MIN + .
Alter the other TIM time if necessary. After completing the settings, exit the TIMmenu by• pressing EXIT .
Recalling stored traffic messages
• Press TIM briefly or press SRC on the remote control for approximately1 second.
The display will indicate the recorded traffic messages T1 to T4 with each of thecorresponding recording times.
The messages will be played back automatically, starting with T4, T3, T2 and T1,depending on how many messages have been recorded. If no messages havebeen recorded, NO TIM MESSAGE will appear in the display panel.
Calling up specific messages:
You can call up any of the individual messages by• pressing the corresponding key .
S
TIMER 1- HOURS- MIN
EXITTIMER 1
HOURS +MIN +
07:00
ACTIVETIMER 2
S
TIM NDR 2T4 08:27T3 08:00
EXIT
T2 07:27T1 07:01
CUEREVIEW

36
Fast forward or reverse in a message:
Press and hold down CUE or REVIEW and you will be able to hear themessage as it is fast forwarded or reversed.
End playback:
Playback will stop automatically after T1 has been played.
You can end the playback immediately by• pressing TIM, EXIT or SRC on the remote control.
TIM standby mode while the radio is switched off
The TIM standby mode is active if the display shows TIM ACTIVE after theradio has been switched off.
In this case the radio will record all traffic bulletins broadcast by the tuned instation for three hours after the set has been switched off.
During this period a motor antenna will remain fully extended.
The set will also record the traffic information broadcast for 90 minutes beforeand after the programmed TIM times. During these periods a motor antenna willalso remain out.
Switching the TIM standby mode on/off
Automatically:
The TIM standby mode will switch off automatically if the car radio is not turnedon within 72 hours.
Switching the set back on re-activates the standby function.
S
TIM ACTIVE
S
TIMER 1- HOURS- MIN
EXITTIMER 1
HOURS +MIN +
07:00
ACTIVETIMER 2

CD - Betrieb (Option)
37
DEUTSCH ENGLISH FRANÇAIS ITALIANO NEDERLANDS SVENSKA ESPAÑOL PORTUGUÊS
Manually:
Select the TIM menu by• pressing TIM for approximately 1 second while the radio is switched on.
• Press ACTIVE to switch the TIM standby mode on or off.If ACTIVE is not highlighted, then the TIM standby mode is switched off.
In this case, a motor antenna will retract when the radio is switched off.
Warning noteYour motor antenna may be damaged in a car wash
If your vehicle is equipped with a motor antenna, it will remain fullyextended if the TIM timer is active when the radio is switched off.
The antenna may also come out inside the car wash even if the setis turned off but the TIM timer active. This can cause serious dam-age!
Please read the next section for more information on how to inter-rupt the TIM standby mode temporarily before driving into a carwash.
Temporarily interrupting the TIM standby mode(before driving into a car wash)
• Switch off the radio before driving into the car wash.If the display switches off immediately, the TIM standby mode is inactive and themotor antenna will retract.
You can now drive into the car wash.
However, if TIM ACTIVE lights up briefly in the display panel when the set isturned off, the TIM standby mode is active.• Press TIM.
S
TIM ACTIVE

38
TIM-FUNCTION DEACTIVATED will appear briefly in the display.
The antenna will retract (please check to be sure) and will stay that way until theunit is switched back on.
Now the TIM standby mode is temporarily inactive.
You can drive into the car wash.
The standby function will be automatically re-activated as soon as you switch theradio on again. The motor antenna will then extend.
Warning!
In order to prevent possible damage, do not switch on the radio until after youhave left the car wash!
S
TIM-FUNCTIONDEACTIVATED

CD - Betrieb (Option)
39
DEUTSCH ENGLISH FRANÇAIS ITALIANO NEDERLANDS SVENSKA ESPAÑOL PORTUGUÊS
Cassette operation
The car radio must be switched on.
The unit automatically switches to tape operation when a cassette is inserted. Ifa cassette is already inserted in the tape player you can switch to the tape playermode from any other operating mode by• pressing CC.
Inserting a tape
• Turn on the set.
• Press . The front panel (operating panel) will open downwards.
• Insert a tape with side 1 or A facing up, the open side facing to the right.The tape will be transported to the playback position automatically. The displayheader will indicate which side will start to play.
Removing a tape
• Press . The front panel (operating panel) will open downwards. The cas-sette will eject.
If the cassette is not removed from the tape player within approximately 15 sec-onds, it will be transported back into the unit.
S
DOLBY BDOLBY CR-MON
B-SKIPPLAY SIDE A
REVERSESCAN
40
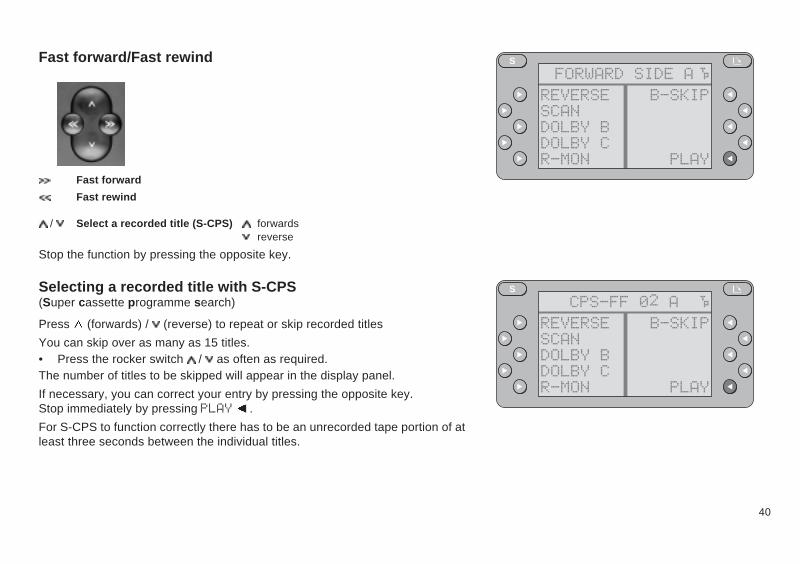
Fast forward/Fast rewind
Fast forward
Fast rewind
/ Select a recorded title (S-CPS) forwardsreverse
Stop the function by pressing the opposite key.
Selecting a recorded title with S-CPS(Super cassette programme search)
Press (forwards) / (reverse) to repeat or skip recorded titles
You can skip over as many as 15 titles.• Press the rocker switch / as often as required.The number of titles to be skipped will appear in the display panel.
If necessary, you can correct your entry by pressing the opposite key.Stop immediately by pressing PLAY .
For S-CPS to function correctly there has to be an unrecorded tape portion of atleast three seconds between the individual titles.
S
DOLBY BDOLBY CR-MON
B-SKIPCPS-FF 02 A
REVERSESCAN
PLAY
S
DOLBY BDOLBY CR-MON
B-SKIPFORWARD SIDE A
REVERSESCAN
PLAY

CD - Betrieb (Option)
41
DEUTSCH ENGLISH FRANÇAIS ITALIANO NEDERLANDS SVENSKA ESPAÑOL PORTUGUÊS
Switching tracks (REVERSE)
To change the tape track during cassette playback:• Press REVERSE.At the end of a track, the tape player will automatically change directions to playthe other side of the tape (autoreverse). The display header will indicate PLAYSIDE A or PLAY SIDE B.
Note:If there is too much tension on the tape during playback, the set may switch overto the opposite track before it has reached the end of the tape side. In this casecheck the condition of the cassette tape. Sometimes it helps to rewind the tapecompletely.
Tape equalisationThe tape mechanism is able to recognise which type of tape is playing (ferrousoxide, CrO2 or metal) and will automatically adjust to the correct setting. This isnot indicated in the display.
Scanning cassette titles (SCAN)
Use the scan function to briefly play the cassette titles. If you like a title, stop thescan to continue listening to that song.
To start/stop the scan function:• Press SCAN.You can adjust the scan time to your individual preference in the DSC menu (see“Programming with DSC – SCANTIME”).
S
DOLBY BDOLBY CR-MON
B-SKIPPLAY SIDE A
REVERSESCAN

42
Dolby B•C NR*Noise reduction for playing cassette tapes in the best possible quality for thesystem.
Dolby C-NR is an improvement on the Dolby B-NR system and reduces undesir-able noise still further.
Depending on how the tape has been recorded, select the corresponding type ofplayback:
Dolby B-NR, Dolby C-NR, no Dolby NR.
Press DOLBY␣ B or DOLBY␣ C to switch from one mode to the other. Ahighlighter bar will mark the function currently activated in the display. If neitherDOLBY B or DOLBY C is highlighted, then the Dolby NR function has been deac-tivated.* Noise Reduction system manufactured under license from Dolby Laboratories Licensing Corpora-
tion. “Dolby” and the double-D symbol are trademarks of Dolby Laboratories Licensing Corporation.
Listening to the radio during fast tape winding(R-MON = Radio Monitor)
While a tape is fast forwarded or rewound (also with S-CPS), the radio will nor-mally be muted. To listen to the radio during fast winding, switch on R-MON.
To switch R-MON on and off:• Press R-MON.When the function is active, a highlighter bar will mark R-MON in the display.
S
DOLBY BDOLBY CR-MON
B-SKIPPLAY SIDE A
REVERSESCAN

CD - Betrieb (Option)
43
DEUTSCH ENGLISH FRANÇAIS ITALIANO NEDERLANDS SVENSKA ESPAÑOL PORTUGUÊS
Skipping unrecorded tape portions(B-SKIP = Blank Skip)
If this function has been activated, it will detect any unrecorded tape portionwhich is longer than 15 seconds. The tape player will automatically fast forwardthe cassette to the beginning of the next title.
To switch the Blank Skip function on and off:• Press B-SKIP.When the function has been activated, B-SKIP will be highlighted in the display.
Care and maintenance tips
We recommend that you use only C-60/C-90 type cassette tapes in your car tapeplayer. Store your tapes in a cool place away from dirt, dust and temperaturesexceeding 50 °C. Allow very cold tapes to warm up before playing them in orderto prevent uneven tape transport. After approximately 100 hours of use, dustparticles collected on the playback head or roller may lead to problems in trans-porting the tape and sound distortions.
Use a head cleaning tape to remove normal dirt build-up. For tougher cases, usea cotton swab (Q-Tip) dipped in rubbing alcohol. Never insert hard objects intothe tape player.
Note that the front panel will automatically close again after approximately 15 sec-onds.
S
DOLBY BDOLBY CR-MON
B-SKIPPLAY SIDE A
REVERSESCAN

44
CD changer operation (optional)
This car radio offers you convenient control of a Blaupunkt CD changerCDC-F 07.
This changer is not included with the car radio equipment and is available forpurchase from any specialised dealer.
Note:
Use only perfectly circular CDs.
CDs manufactured in the shape of a butterfly or a beer mug, for example, are notsuitable for use with this equipment.
Using such CDs can very likely result in the destruction of the CD and the CDdrive.
We assume no responsibility for damages caused by using unsuitable CDs.
Switching to the CD changer mode
A magazine containing at least one CD must be inserted correctly.
• Press CDC. The display header will indicate the CD and the track numberof the song currently playing.
Depending on the situation, the display will indicate
a) the occupied and empty slots in the magazine
b) the changer functions such as MIX, SCAN, REPEAT, TPM, TPM CLR,CDC␣ NAME , TIME.
To switch• press CDC.
S
DISC 03DISC 04DISC 05
DISC 06DISC 05 TR 08DISC 01DISC 02 DISC 07
DISC 08EMPTYEMPTY
S
REPEATTPMTPM CLR
CDC NAMEDISC 05 TR 08MIXSCAN TIME
CD - Betrieb (Option)
45
DEUTSCH ENGLISH FRANÇAIS ITALIANO NEDERLANDS SVENSKA ESPAÑOL PORTUGUÊS
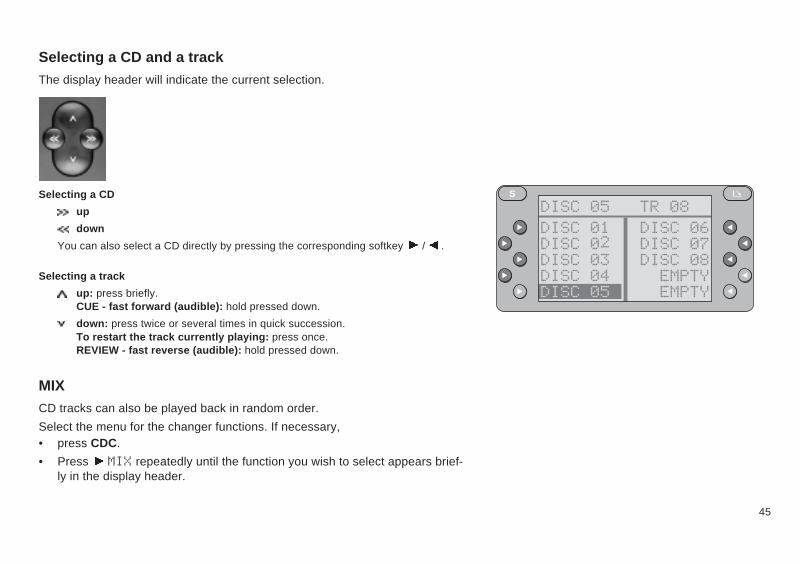
Selecting a CD and a trackThe display header will indicate the current selection.
Selecting a CD
up
down
You can also select a CD directly by pressing the corresponding softkey / .
Selecting a track
up: press briefly.CUE - fast forward (audible): hold pressed down.
down: press twice or several times in quick succession.To restart the track currently playing: press once.REVIEW - fast reverse (audible): hold pressed down.
MIXCD tracks can also be played back in random order.
Select the menu for the changer functions. If necessary,• press CDC.
• Press MIX repeatedly until the function you wish to select appears brief-ly in the display header.
S
DISC 03DISC 04DISC 05
DISC 06DISC 05 TR 08DISC 01DISC 02 DISC 07
DISC 08EMPTYEMPTY

46
MIX DISC – The tracks of the selected CD will be played back in randomorder. The next discs will be selected in numerical order. Thetracks on these CDs will be played in random order.
MIX MAG – All of the tracks on all of the CDs in the magazine will beplayed in random order.
MIX OFF – The mix function has been deactivated. MIX is no longer high-lighted in the display. CDs and their tracks will be played innumerical order.
SCAN
Scan the tracks of all of the CDs.
Select the changer functions menu. If necessary,
• press CDC.
Start SCAN:• Press SCAN. The function has been activated when a highlighter bar
marks SCAN in the display.The tracks on all of the CDs will be played briefly in ascending order. The scantime can be altered (see “Programming with DSC - VARIOUS, SCANTIME”).
End SCAN:• Press SCAN.The track scanned last will now play.
The SCAN function will also end if you press• TU, CC, AUX, S, << / >> or / .
S
REPEATTPMTPM CLR
CDC NAMEMIX DISC
MIXSCAN TIME
S
REPEATTPMTPM CLR
CDC NAMESCAN TR 09
MIXSCAN TIME

CD - Betrieb (Option)
47
DEUTSCH ENGLISH FRANÇAIS ITALIANO NEDERLANDS SVENSKA ESPAÑOL PORTUGUÊS
Repeat a CD or a track (REPEAT)
You can repeat any CD or track (continuously).
Select the changer functions menu. If necessary,• press CDC.
• Press REPEAT until the desired function appears briefly in the displayheader.
REPEAT TRACK – The track selected will repeat (continuously).
REPEAT DISC – The CD selected will repeat (continuously).
REPEAT OFF – REPEAT has been switched off. REPEAT is no longerhighlighted in the display. CDs and tracks will play backin numerical order.
TPMTrack programme memory
To store and play back favourite CD tracks.
It is possible to catalogue up to 99 CDs with a maximum of 20 tracks each.
Select the changer functions menu. If necessary,• press CDC.
Storing a track with TPM
The TPM function must be switched off (TPM is not highlighted in the display).
If necessary,• switch TPM on/off by pressing TPM.
• Select the CD and the track by pressing << / >> and / . The CD and thetrack number will appear in the display header.
S
REPEATTPMTPM CLR
CDC NAMEREPEAT TRACK
MIXSCAN TIME

48
• Press TPM until you hear a beep.The track has been stored. TPM PROGRAMMED will appear in the display head-er.
Select the next track and store it by pressing TPM etc., as described above.
You can store tracks at any time while they are being played. Both TPM andSCAN must be switched off.
CD playback with TPM
The TPM function must be switched on (TPM appears highlighted in the display).
The tracks stored with TPM will be played in ascending order. Any tracks whichhave not been stored will be skipped.
If a CD without TPM is selected while TPM is active, then NO TPM ON DISCwill appear in the display header. This CD will be played back normally. TPM willbe active again for the next CD selected automatically.
Deleting the TPM memory (TPM CLR)
Using TPM CLR (clear) you can delete individual tracks, all of the tracks on oneCD, all of the tracks on the magazine currently inserted or all of the magazines.
If the TPM memory is empty, NOT MEMORIZED will appear in the display head-er.
Select the changer functions menu. If necessary,• press CDC.
a) Deleting the TPM memory for one track:
• Select the track by pressing / .
• Press TPM␣ CLR for approximately 1 second. TPM TRACK CLRDwill appear in the display header. You will hear a beep at the same time.
This track has been deleted in the TPM memory.
S
REPEATTPMTPM CLR
CDC NAMETPM PROGRAMMED
MIXSCAN TIME
S
REPEATTPMTPM CLR
CDC NAMEDISC 01 TR 02MIXSCAN TIME
S
REPEATTPMTPM CLR
CDC NAMETPM TRACK CLRD
MIXSCAN TIME

CD - Betrieb (Option)
49
DEUTSCH ENGLISH FRANÇAIS ITALIANO NEDERLANDS SVENSKA ESPAÑOL PORTUGUÊS
b) Deleting the TPM memory for one CD:
• Press TPM␣ CLR for approximately 4 seconds. TPM DISC␣ CLRDwill appear in the display header. You will hear a beep at the same time.
This CD has been deleted in the TPM memory.
c) Deleting the TPM memory for all of the magazines:
• Press TPM␣ CLR for approximately 8 seconds. TPM MEMO␣ CLRDwill appear in the display header. You will hear a beep at the same time.
All of the CDs have been deleted in the TPM memory.
Giving CDs a name (CDC NAME)
You can allocate names to 99 CDs.
Select the changer functions menu. If necessary,• press CDC.
Start entry:• Press CDC␣ NAME . 8 dashes will appear in the display header.
• Press / to select a character.
• Press << / >> to select the entry position.In this way you can select up to 8 characters.
Press CLEAR to delete the entry.
S
REPEATTPMTPM CLR
CDC NAMETPM DISC CLRD
MIXSCAN TIME
S
EXITCLEAR
PREV CD NEXT CD

50
Selecting the next CD:
• Press NEXT␣ CD .
Selecting the previous CD:
• Press PREV CD.
Complete the entry:• Press EXIT . The entry will be stored automatically.
You can alter the name by entering other characters and storing them (over-write).
Deleting the name of a CD (CDC NAME)
Select the changer functions menu. If necessary,• press CDC.
• Press << / >> to select the CD whose name you wish to delete.
• Press CDC␣ NAME . The name of the CD will appear in the display head-er.
• Press CLEAR. The name will be deleted.Proceed in the same way for all of the CDs whose names you wish to delete.
You can delete the name and the TPM memory of a CD at the same time. Ifnecessary, refer to “Programming with DSC – CD CLEAR”.
Complete the entry:• Press EXIT .
S
V I V A L D I
EXITCLEAR
PREV CD NEXT CD
S
EXITCLEAR
PREV CD NEXT CD V I V A L D I

CD - Betrieb (Option)
51
DEUTSCH ENGLISH FRANÇAIS ITALIANO NEDERLANDS SVENSKA ESPAÑOL PORTUGUÊS
Selecting the display mode (TRACK/TIME)
You can select the display mode of the display header for CD playback:
TRACK – the track number, e.g. “TR 10” will appear in the display.
TIME – the time a track has played, e.g. “3:19” will be displayed inminutes.
Switching between display modes:
Select the changer functions menu. If necessary,• press CDC.
• Press TRACK or TIME .
S
REPEATTPMTPM CLR
CDC NAMEDISC 05 03:19MIXSCAN TRACK

52
AUX mode
External equipment can be connected to this stereo system.a) Any type using AUX-IN, e.g. a Walkman
b) A navigation unit (expected to be available starting mid 1997)
Switching on AUX
AUX must be activated in the FIRST INSTALL menu.
• Press AUX. The AUXILIARY MENU will appear in the display listing all ofthe additional equipment connected. If AUX has not been activated,NO EXTERNAL SOURCE CONNECTED will appear in the display.
• Select the desired piece of equipment by pressing .Refer to the operating instructions for the auxiliary equipment for further informa-tion.

CD - Betrieb (Option)
53
DEUTSCH ENGLISH FRANÇAIS ITALIANO NEDERLANDS SVENSKA ESPAÑOL PORTUGUÊS
S
FADERBALANCELOUDNESS
EQDNC
TREBLE +5TREBLEBASS
EXIT
Audio settings
Bass, treble, balance, fader
You can alter the settings for BASSTREBLEBALANCE left/rightFADER front/rear.
BASS and TREBLE can be set individually for every mode of operation (TU, CC,CDC, AUX). If you wish to make any adjustments, select the mode of operationconcerned and• press S briefly.Press to select the function you wish to alter. The function selected and thecurrently valid setting will appear in the display header, e.g. TREBLE +5.• Press / or << / >> to alter the setting as desired.
• Press EXIT to exit the menu.
Loudness
Adjusts the low bass frequencies for a more natural sound.
Switching Loudness on/off:• Press S briefly.If LOUDNESS is highlighted, this function is active. Switch it off• by pressing LOUDNESS. The currently selected mode will appear in the
display header.You can adjust the intensity with “Programming with DSC – VARIOUS, LOUD-NESS”.
S
FADERBALANCELOUDNESS
EQDNC
LOUDNESS ONTREBLEBASS
EXIT

54
DNC – Dynamic Noise Covering
With the help of DNC it is possible to enjoy the same volume while driving thatyou find pleasant in the stationary vehicle.
The volume is increased at different rates for different frequency bands, depend-ing on the noise in the moving vehicle.
In this way, the volume and the sound balance remain pleasant to the ear, re-gardless of whether the vehicle noise increases or decreases. Noise of veryshort duration, e.g. crossing railway tracks, is ignored.
Adjusting DNC
For DNC to operate correctly, it is necessary to first perform a calibration proce-dure with the help of a microphone. Using the enclosed self-adhesive Velcrotape, install the microphone permanently in the immediate vicinity of the console,but not close to sources of noise such as heating vents and air-conditioning.
The mouth of the microphone must face into the passenger area. Select a quietarea for the calibration and switch the engine off.• Press S briefly.
• Press DNC for approximately 1 second. DNC-ADJUST will appear in thedisplay header.
The DNC calibration procedure has begun and will run through automatically.You can abort the procedure by• pressing STOP .As soon as DNC-ADJUST READY appears in the display, the calibration proce-dure has been completed.
S
DNC-ADJUST 10
STOP

CD - Betrieb (Option)
55
DEUTSCH ENGLISH FRANÇAIS ITALIANO NEDERLANDS SVENSKA ESPAÑOL PORTUGUÊS
Adjusting DNC sensitivityYou can select three different levels for adjusting the volume:DNC-LEVEL LOW, -MID, -HIGH.
Select DNC-LEVEL LOW if the vehicle is loud and the music has a distinct basssound.Select DNC-LEVEL HIGH if the vehicle is quiet and you play a lot of classicalmusic.Try out the different levels to find out which one you find the most pleasant.
• Press S briefly.
• Then press DNC . The level selected will appear in the display header.
• Alter the level by pressing << / >>. When DNC OFF appears in the display,then the DNC function has been switched off.
Approximately 8 seconds after the last adjustment is made, the system will auto-matically switch back to the previous display. You can return to this display im-mediately by pressing EXIT .
S
FADERBALANCELOUDNESS
EQDNC
DNC-LEVEL MIDTREBLEBASS
EXIT

56
EQ (Equalizer)
Equalizer functions
The quality of the stereo playback inside your vehicle is affected by such factorsas the vehicle interior (upholstery, windows), the position of the loudspeakers,etc.
Using the integrated equalizer, it is possible to adjust nine frequency bands perchannel:63 Hz, 125 Hz, 250 Hz, 500 Hz, 1 kHz, 2 kHz, 4 kHz, 8 kHz, 16 kHz.
It is possible to store and recall three automatic and one manual equalizer set-ting on four memories.
Use EQ OFF to switch off the equalizer.
The following functions are available to provide optimum sound quality:
Automatic equalizer (AUTO-EQ 1 - 3)(Hi-fi calibration)
The car radio is equipped with a self-adjusting, adaptive 9-band equalizer forfour channels.
Three different settings can be stored.
Manual equalizer
Separate equalizer settings can be set manually for the front and the rear.
S
AUTO-EQ3MAN-EQEQ OFF
VIEW EQEQUALIZER MENU
AUTO-EQ1AUTO-EQ2
EXIT

CD - Betrieb (Option)
57
DEUTSCH ENGLISH FRANÇAIS ITALIANO NEDERLANDS SVENSKA ESPAÑOL PORTUGUÊS
Hi-fi calibrationYou can set and store automatic calibrations for three different situations.
The calibrations are started and called up using the softkey ( ).
You can select the following settings:AUTO-EQ1 for the driver alone
AUTO-EQ2 for the driver and front-seat passenger
AUTO-EQ3 for passengers in the front and rear.Press EQ OFF to switch off the equalizer (EQ OFF in the display header).
To make the calibration hold the microphone in the corresponding position (donot cover microphone opening).
For setting 1 (driver alone), position the microphone directly at the height of thedriver’s head. For setting 2, place the microphone between the driver and thepassenger on the front seat. For setting 3, place the microphone centrally be-tween the front and rear seats.
Start Hi-fi calibration
During the calibration process it is important that the surroundings are very quiet.Any outside noises will distort the readings.
The loudspeakers should not be blocked by any objects.
The car radio must be switched on.• Place the microphone in the desired position.The readings will be distorted if the microphone is placed in an incorrect position.
Depending on the vehicle and the position of the loudspeakers, the calibrationcan be linear or can boost the bass sounds.
Try the settings to find out which one you prefer.

58
Use DNC for the preliminary check.
DNC-LEVEL OFF means linear frequencyDNC-LEVEL LOW means slight emphasis on bass soundDNC-LEVEL MID means medium emphasis on bass soundDNC-LEVEL HIGH means heavy emphasis on bass sound.• Press S, EQ one after the other.Place the microphone in one of the positions.• Press the corresponding softkey (AUTO-EQ1 ... AUTO-EQ3) for approxi-
mately 1 second.PLEASE PLACE MICROPHONE 10 ... 0, the countdown has begun. Thecalibration procedure will run automatically after the countdown.
Make sure that the surroundings are as quiet as possible during the calibrationprocedure. Press STOP to abort the calibration if necessary.
As soon as the calibration procedure has been completed, AUTO-EQ READY ...will appear in the display. The following question will appear in the display: ALLBASS/TREBLE ADJUSTMENTS ARE SET TO “0”.• Press either YES or NO .The calibration process for this setting has been completed.
Checking/altering Hi-fi calibration
If necessary, you can check or correct the automatic calibration for any of thechannels:• Press S, EQ one after the other.
• Press the corresponding softkey briefly (AUTO-EQ1 ... AUTO-EQ3). Thefunction selected, e.g. AUTO-EQ2 will be highlighted in the display.
• Press VIEW␣ EQ . VIEW AUTO-EQ 2 will appear in the display header,for example. The display will indicate the equalizer settings for the front leftloudspeaker.
S
10
AUTO-EQ ADJUSTPLEASE PLACEMICROPHONE
STOP
S
------------------
NEXT
VIEW AUTO-EQ 2FRONT LEFT
EXIT
S
SET TO "0"
YES
AUTO-EQ READYALL BASS/TREBLEADJUSTMENTS ARE
NO

CD - Betrieb (Option)
59
DEUTSCH ENGLISH FRANÇAIS ITALIANO NEDERLANDS SVENSKA ESPAÑOL PORTUGUÊS
• Press << / >> to select the frequency band you wish to correct, e.g. 1 kHz.The selected frequency band will appear in the bottom line.
• Press / to adjust the frequency range as desired.After completing the adjustments, press NEXT and adjust the loudspeaker onthe front right, rear left and rear right.
If necessary, adjust the other channels as described above.• Press EXIT to exit the menu.Die letzte Einstellung ist automatisch gespeichert.
Note:During the calibration procedure, loudspeakers should be hooked up to all fourconnections.If one of the loudspeakers is not detected during calibration because it is defec-tive, not connected or obstructed, then a linear equalizer control will be done forthis loudspeaker pair.The balance/fader settings can be adjusted in a limited range only.
Calling up the Hi-fi calibration
If you want the playback to function according to the Hi-fi calibration,• press S, EQ and the corresponding softkey (AUTO-EQ1 ... AUTO-EQ3)
one after the other.
S
------------------
NEXT
SET AUTO-EQ 2FRONT LEFT
EXIT 1k HZ

60
Setting the equalizer manuallyIf you would rather set the equalizer manually, you can set nine different frequen-cy bands from 63 Hz to 16 kHz for the front and rear loudspeakers separately.
In this case,• press S, EQ and MAN-EQ if necessary one after the other.
MAN-EQ (manual equalizer) must be highlighted.
• Press VIEW␣ EQ . VIEW MANUAL-EQ will appear in the display header.The display will indicate the equalizer setting for the front loudspeakers.
• Select the frequency band by pressing << / >>. The frequency band select-ed will appear at the bottom of the display.
• Alter the sound level by pressing / .After you have completed the adjustments, press NEXT. REAR will appear inthe display. Adjust the equalizer for the rear loudspeakers.
• Press EXIT to exit the menu.The last setting will be stored.
Calling up the manual equalizer setting
If you want the playback to take place with the manual equalizer setting,• press S, EQ and MAN-EQ if necessary one after the other.
MAN-EQ (manual equalizer) must be highlighted.
S
------------------
NEXT
VIEW MANUAL-EQFRONT
EXIT
S
NEXT
SET MANUAL-EQFRONT
EXIT63 HZ
------------------

CD - Betrieb (Option)
61
DEUTSCH ENGLISH FRANÇAIS ITALIANO NEDERLANDS SVENSKA ESPAÑOL PORTUGUÊS
Programming with DSC
The car radios have been pre-programmed at the factory.
Using the DSC (Direct Software Control) MAIN MENU you can customise certainsettings and functions to suit your own personal needs and preferences.
If you wish to alter any of the programming,• press S for approximately 1 second. DSC-MAIN MENU will appear in the
display header.
• Select a sub-menu, e.g. TUNER. A list of the DSC functions which canbe altered in the TUNER MENU will appear in the display.
• Adjust the settings by pressing << / >> or / . The new settings will ap-pear in the display header.
TUNER TIM TIME Set TIM times.Refer to “Traffic Memo (TIM)”.
TA VOL Set the volume for traffic messages.If “VOL +00” is set, the music or radio will play-back at the last volume setting selected.
PTY-LANG Select PTY language: GERMAN, ENGLISH,FRENCH.
SPEECH Sound adjustment for voice programmesIn future many RDS radio stations will differenti-ate between music and speech programmes.You can alter the tone for speech programmesfrom “M/S-LEVEL 0 ... 4”.LEVEL 0:Music/speech off
S
DISPLAYVARIOUSKEYCARD
DSC-MAIN MENUTUNER
EXIT
S
PTY-LANGSPEECHST NAME
DSC-TUNER MENUTIM TIME
EXIT
TA VOLS-LOS-DXTABLE

62
LEVEL 1:Linear reproduction (bass, treble and Loudnessset to “0”). Equalizer settings remain the same.LEVEL 2-4:Different settings for volume, bass and treble withthe Loudness switched off. Equalizer settings re-main the same. Try out which SPEECH settingyou like most.
ST NAME Appears only during radio operation.Allocate a name to the radio station (not for RDSstations).
S-LO Set the station search sensitivity for local radiostationsLO 1 - high sensitivityLO 3 - normal sensitivity
S-DX Set the station search sensitivity for distant radiostationsDX 1 - high sensitivityDX 3 - normal sensitivity
TABLE Set the size of the station table, depending on thesensitivityTABLE SIZE 1 -longest station table (all stations within receptionrange)TABLE SIZE 3 -shortest station table (stations with strong recep-tion signals only)

CD - Betrieb (Option)
63
DEUTSCH ENGLISH FRANÇAIS ITALIANO NEDERLANDS SVENSKA ESPAÑOL PORTUGUÊS
CD CLEAR Appears only when the DSC MAIN MENU iscalled up while the changer is in operation.It is possible to delete both the name and theTPM title of a CD at the same time.CLEAR - deletePREV CD - select previous CDNEXT CD - select next CD.
DISPLAY COLOUR Adjust the colour of the display.GREEN / ORANGE
ANGLE Set the angle of the display to your individualneeds from -3, 0, +3. Choose the best setting.
BRIGHT You can set the brightness of the display from1 to 15. You can select two different settings forday and night.Selecting the night brightness:Switch on the vehicle lights and programme thebrightness setting.The car radio’s lighting connector must behooked up to the vehicle’s electric system for thisto function properly.
POS/NEG Select whether the characters in the displayshould appear positively or negatively.ALWAYS POSITIVE -The characters will always appear positively.ALWAYS NEGATIVE -The characters will always appear negatively.
S
DISPLAYVARIOUSKEYCARD
DSC-MAIN MENUTUNER
EXIT
CD CLEAR
S
BRIGHTPOS/NEGMENU-OFF
DSC-DISPLAY MENUCOLOUR
EXIT
ANGLE
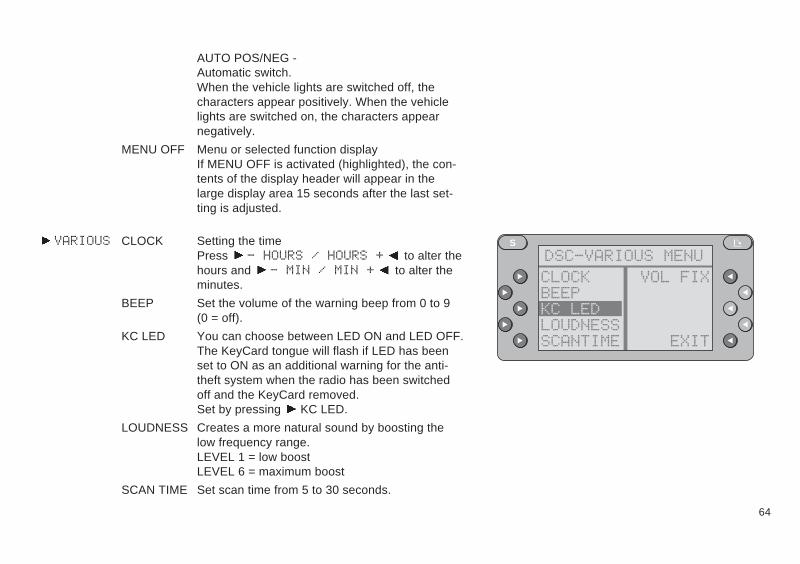
64
AUTO POS/NEG -Automatic switch.When the vehicle lights are switched off, thecharacters appear positively. When the vehiclelights are switched on, the characters appearnegatively.
MENU OFF Menu or selected function displayIf MENU OFF is activated (highlighted), the con-tents of the display header will appear in thelarge display area 15 seconds after the last set-ting is adjusted.
VARIOUS CLOCK Setting the timePress - HOURS / HOURS + to alter thehours and - MIN / MIN + to alter theminutes.
BEEP Set the volume of the warning beep from 0 to 9(0 = off).
KC LED You can choose between LED ON and LED OFF.The KeyCard tongue will flash if LED has beenset to ON as an additional warning for the anti-theft system when the radio has been switchedoff and the KeyCard removed.Set by pressing KC LED.
LOUDNESS Creates a more natural sound by boosting thelow frequency range.LEVEL 1 = low boostLEVEL 6 = maximum boost
SCAN TIME Set scan time from 5 to 30 seconds.
S
KC LEDLOUDNESSSCANTIME
DSC-VARIOUS MENUCLOCK
EXIT
BEEPVOL FIX

CD - Betrieb (Option)
65
DEUTSCH ENGLISH FRANÇAIS ITALIANO NEDERLANDS SVENSKA ESPAÑOL PORTUGUÊS
VOL FIX Set the volume at which the car radio will playwhen first switched on.Press << / >> to set the desired volume. If youselect “VOL +00” the unit will begin playing at thevolume set before it was switched off last.
KEYCARD LEARN KC “Train” a second KeyCard.Refer to the information in the section on“KeyCard anti-theft system -Training second KeyCard”
READ KC Read the data stored on the KeyCard.Using the original KeyCard it is possible to dis-play the model name, product and serial number.
Press EXIT to exit the menu.
S
DSC-KEYCARDLEARN KC
EXIT
READ KC

66
Muting the audio source while using the car phoneIf you operate a car phone in your vehicle, you can have the radio, tape player,CD changer (optional) automatically switch to mute (telephone mute).
PHONE will then appear in the display.
Traffic messages will have priority if TA has been activated (highlighted in thedisplay).Interrupt the traffic message by pressing EXIT .
During a telephone call you can retrieve stored traffic messages with TIM.

CD - Betrieb (Option)
67
DEUTSCH ENGLISH FRANÇAIS ITALIANO NEDERLANDS SVENSKA ESPAÑOL PORTUGUÊS
Specifications
Output power: 4 x 23 W RMS power acc. to DIN 45324 at 14.4 V4 x 35 W max. power
TunerWavebands:FM : 87.5 – 108 MHzMW : 531 – 1602 kHzLW : 153 – 279 kHz
FM sensitivity: 0.9 µV at 26 dBsignal-to-noise ratio
FM frequency response:30 - 16 000 Hz
Tape playerFrequency response:
25 - 20 000 Hz
Subject to modifications!

68
Blaupunkt telephone hotline
Address of the next service centre in your vicinity(only for Germany)If you would like to know the address of the next Blaupunkt service centre ofyour area without having our service list at hand:- Find out your area code.
- Then call the following chargeable phone number: 01 80 / 5 25 56 66.
- Using the area code to be entered you will be automatically given theaddress and phone number of the next Blaupunkt service centre. Youcan also request this information by fax.
Blaupunkt-Werke GmbHBosch Gruppe
8/96 Pf K7/VKD 8 622 400 761


![Roman Keycard Blackwood, Delayed Kickback and Crosswoodweb.mit.edu/mitdlbc/www/articles/Crosswood.pdf · 4NT [RKB Ask in hearts] 5 c [0 or 3 keycard s] 6 c [offer to play ] Pass When](https://img.pdfslide.net/doc/110x75/5e5a43167741456a7b6d4959/roman-keycard-blackwood-delayed-kickback-and-4nt-rkb-ask-in-hearts-5-c-0-or.jpg)