Embed Size (px)
Citation preview

UN Peacekeeping PDT Standards for Formed Police Units 1st edition 2015
POLICE TECHNIQUES & TACTICS
Operational First Aid

Police Tactics & Techniques First Aid
1
UN Peacekeeping PDT Standards for Formed Police Units 1st edition 2015
Background
Peacekeeping may involve an element of risk where officer may be injured in the line
of duty. Whilst it is accepted that every FPU has its own Medical Unit, there may be
occasions where the members of the unit are away from their HQ and do not have
access to immediate medical care. If one of their members is injured in these
circumstances, the knowledge of basic First Aid skills can make the difference
between life and death.
The basic skills of First Aid included as part of this syllabus are aimed at giving the
officer sufficient knowledge to stabilise a casualty until they can be handed over to
health care professionals.
As FPU members are probably most at risk whilst engaged in crowd control
activities, this module includes a section on evacuating a casualty from a crowd
control situation and removal of a helmet.
Aim
It is to provide FPU members with the basic First Aid skills to sustain a casualty until they can be handed to a medical professional.
Learning outcomes
On completion of this module the participants will be able to:
- Carry out an assessment of a casualty
- Recognise levels of consciousness
- Demonstrate placing a casualty in the recovery position
- Demonstrate CPR
- Remove a crash helmet from an injured casualty
- Demonstrate the treatment for bleeding
- Explain the use of a tourniquet
- Explain the treatment for burns
- Demonstrate methods for evacuating a casualty in public order situations
Training sequence
The material in this module is designed to be delivered over three 40 minute periods,

Police Tactics & Techniques First Aid
2
UN Peacekeeping PDT Standards for Formed Police Units 1st edition 2015
with a mixture of PowerPoint presentation and practical application. There is a
further additional 40 minute period for revision and assessment. It is an option to
consider that the FPU staff could all be trained by an external First Aid Provider (Red
Cross, Red Crescent, St John Ambulance or other local provider) and each member
would then receive a recognised First Aid qualification.
Duration
Minimum Session time
Lecture/Presentation Question/Assessment Session Activities
2 Hours 40 mins 2 hours 40 mins
Additional Options
Mission Specific Optional film Optional activity
Methodology This module contains three PowerPoint presentations which cover the main aspects of emergency first aid. The session should be interactive and there is a student involvement throughout, with the use of practical sessions using the EDIP method, (Explanation, Demonstrate, Imitate, Practice). There is a 40 minute period for assessment at the end of the module. First Aid scenarios can always be incorporated in any exercises used to practice the students on the Crowd Control and Firearms aspects of the course.
The instructor should inform participants of the content, format and timing. Knowing what to expect, participants can improve their ability to focus on the subject and benefit better from the session.
Basic Principles of First Aid (40 minute classroom lesson)
Bleeding & Trauma (40 minute classroom lesson)
Emergency Casualty transport (40 minute classroom lesson)
Assessment session (40 minutes)
Instructors are encouraged to add practical examples and mission specific information related to the specific deployment of participants, if known.
Instructor Profile This module is best presented by an instructor who has practical experience in peacekeeping operations and who has a recognised Medical or First Aid qualification. It may be that the FPU Doctor, Nurse or Medical Officer is used to deliver the training, or alternately the whole session could be delivered by a qualified external training organisation (see Training Sequence above).

Police Tactics & Techniques First Aid
3
UN Peacekeeping PDT Standards for Formed Police Units 1st edition 2015
Instructor Preparations Required Readings
· Medical Support Manual for United Nations Peacekeeping Operations
General Preparations
Equipment: 1. Computer, projector and PowerPoint slides 2. Whiteboard or flipcharts with pens 3. Resuscitation Dummies and face masks/face shields (Lesson 1) 4. Bandages, dressings and protective gloves (Lesson 2) 5. Helmets (Lesson 1) Training Area: The lessons should be carried out in the classroom. However, there needs to be sufficient room for the students to practice the Recovery Position in pairs and for them to perform Resuscitation on the Dummies, and to practice the emergency evacuation techniques.
Lesson 1 – Operational First Aid Basics
OPERATIONAL
FIRST AID BASICSPART I
POLICE TACTICS AND TECHNIQUES
UN Peacekeeping PDT Standards for Formed police Units, 1st edition 2015
Slide 1
Session notes

Police Tactics & Techniques First Aid
4
UN Peacekeeping PDT Standards for Formed Police Units 1st edition 2015
Slide 2
Slide 3

Police Tactics & Techniques First Aid
5
UN Peacekeeping PDT Standards for Formed Police Units 1st edition 2015
Slide 4
Slide 5
Basic First Aid skills properly used can mean the difference between life and death
for officers. Whilst the priority will always be to get casualties to a medical Treatment
Facility with qualified personnel, sometimes this can be delayed due to the situation
and the distances involved.

Police Tactics & Techniques First Aid
6
UN Peacekeeping PDT Standards for Formed Police Units 1st edition 2015
Examination of a casualty
• Danger
• Response
• Airway
• Breathing
• Circulation
Slide 6
The initial examination of a casualty is the key to life saving. Information obtained
during this first assessment will not only guide the First Aider but will also provide
valuable information to Medical professionals once the casualty is handed over to
their care.
Of critical importance to the First Aider is to check for any element of danger, either
to themselves or the casualty, or indeed other persons in the area. Before
approaching any casualty, the First Aider needs to ensure the area is safe. In Road
Traffic Collisions, that means ensuring that the vehicles engines have been switched
off and the hand brake applied and that the risk of traffic aggravating the accident
has been dealt with, (rerouting the traffic, warnings…). In the case of a shooting
incident, the First Aider must ensure that they are not about to put themselves in the
line of fire. Where incidents occur on electric railway lines, the power lines must be
shut down, as high voltage electricity can ‘jump’ several metres. Whatever the
danger, it must be neutralised first. Failing to do so, the First Aider may also become
a casualty and prevent First Aid to be timely provided to the initial victim.
Having assessed that the scene is safe and the First Aider can approach the
suspect, he must now check the casualty’s level of response and call for medical
assistance if this has not already been done. He will then need to ensure that the
casualty’s airway is open and he is breathing. Following that, the Fist Aider must
check to see that the casualty’s circulation is not interrupted and there is no major
bleeding.

Police Tactics & Techniques First Aid
7
UN Peacekeeping PDT Standards for Formed Police Units 1st edition 2015
Response – level consciousness
AVPU
A The person is alert, knows who he is, the date, where
he is, and so forth.
V The person responds to verbal commands, but is not
alert.
P The person only responds to pain, not verbal
commands.
U The person is unresponsive (unconscious).
Re-check every 15 minutes
Slide 7
When assessing a casualty’s level of consciousness, the AVPU scale can be used. If
the casualty is alert, then he/she will be able to respond to questions from the first
aider and it will be obvious that their airway is clear, they are breathing and that there
is no major interruption in their circulation.
If the person only responds to verbal commands then their level of consciousness
may be deteriorating. The above will still apply but the first aider must monitor them
carefully.
The casualty may only respond to pain. This is when the first aider touches an area
of his/her body which has incurred injury. He/she may moan or flinch but other than
that they are unable to speak to the first aider and are clearly only semi-conscious.
If the casualty is not responding at all, then they are classed as being unconscious.

Police Tactics & Techniques First Aid
8
UN Peacekeeping PDT Standards for Formed Police Units 1st edition 2015
Slide 8
Try to approach the casualty from the feet if possible as this will be less threatening if
he/she is only semi-conscious. Kneel beside him/her and ask if he/she is OK and if
he/she can hear you. Speak loudly in case the casualty is asleep or only semi-
conscious. Shake him/her by the shoulders or touch his/her hand. You can ask him
to squeeze you hand if he can hear you to see if you get a response. If there is no
response then you must quickly move on to check the airway.
Slide 9
Open the airway by carrying out the chin lift and head tilt.

Police Tactics & Techniques First Aid
9
UN Peacekeeping PDT Standards for Formed Police Units 1st edition 2015
Slide 10
Once the airway is open, the first aider needs to check to see if the casualty is
breathing. This is done by placing the side of the head next to the casualty’s mouth
so that he/she will feel any air being exhaled, whilst looking down the chest to see if
it is rising and falling. At the same time, he/she should listen for the sound of
breathing. If after 10 seconds of checking for breathing the first aider has not been
able to see hear of feel anything he/she must assume that the casualty is not
breathing and commence CPR, (Cardio- (heart) Pulmonary (breathing)
Resuscitation).
Slide 11
The First Aider should kneel next to the casualty and place the heel of one hand on
the centre of the chest, place the heel of the other over the top and link the fingers,
pressing down about 5-6cm and releasing. Each compression should be given at a

Police Tactics & Techniques First Aid
10
UN Peacekeeping PDT Standards for Formed Police Units 1st edition 2015
rate of 100-120 per minute (about half a second each). After 30 compressions, the
First Aider should tilt back the head and place two breaths into the casualty,
watching the chest rise and fall to see that the air has gone into the body. He then
carries on with another 30 compressions followed by another two breaths until the
casualty recovers, Medical assistance arrives and takes over or the First Aider is so
tired that if he continued he would also become a casualty.
The purpose of this activity is to practice CPR
Time Required: 3 minute demonstration followed by 7 minute practice by the students Total time: 10 minutes NB the fewer Dummies available the longer this session will take
Preparations:
1. Resuscitation dummies (where possible sufficient for one for each student) 2. Face masks or shields 3. Cleaning equipment for the dummies
Activity Guidelines:
1. The instructor will demonstrate the Resuscitation technique 2. Students will practice on the dummies 3. The Instructors will circulate and correct any mistakes
Slide 12
Activity – Practical Resuscitation

Police Tactics & Techniques First Aid
11
UN Peacekeeping PDT Standards for Formed Police Units 1st edition 2015
At this point the Instructor should explain that if there is the possibility of a spinal
injury, the airway can be opened without moving the neck by the use of the jaw
thrust which is illustrated in Slide 11. The jaw is moved up and forward to ensure that
the tongue is off the back of the throat.
Slide 13
Where the checks have been done and the casualty is breathing but unconscious,
he/she should be placed in the Recovery Position to maintain their airway.
The First Aider can carry out a more in depth check of the casualty to see if they can
ascertain the cause of their unconsciousness, prior to putting them in the recovery
position, and if they encounter any bleeding deal with it accordingly (This will be
dealt with in more detail in lesson 2).
. Slide 14

Police Tactics & Techniques First Aid
12
UN Peacekeeping PDT Standards for Formed Police Units 1st edition 2015
Slide 15
Slide 16

Police Tactics & Techniques First Aid
13
UN Peacekeeping PDT Standards for Formed Police Units 1st edition 2015
Slide 17
The purpose of this activity is to practice the Recovery Position
Time Required: 3 minute demonstration followed by 7 minute practice by the students Total time: 10 minutes
Preparations:
1. Sufficient space for the students to pair up and practice the recovery position 2. Mats or blankets
Activity Guidelines:
1. The instructor will carry out a full demonstration of the Recovery Position 2. The students will split into pairs and practice the technique on each other 3. The Instructors circulate the class, correct any mistakes and answer questions.
Activity – Practical Recovery Position

Police Tactics & Techniques First Aid
14
UN Peacekeeping PDT Standards for Formed Police Units 1st edition 2015
Slide 18
Slide 19
Officers involved in Crowd Control situations are likely to be wearing helmets, whilst
these may differ in type to the motor cycle crash helmet the principles of removal are
the same. As a general rule, it is normally safer to leave the helmet on the casualty
until Medical help arrives unless there is a problem with the airway or it needs to be
removed in order to control bleeding.
Instructors note: The methods shown in slides 17 – 19 should be used, however
it must be stressed that removal by an lone First Aider is difficult and should only be
carried out is necessary and not as a matter of course.

Police Tactics & Techniques First Aid
15
UN Peacekeeping PDT Standards for Formed Police Units 1st edition 2015
Slide 20
Slide 21
The officers should be given a summary of the key points of the lesson before being
asked if they have any questions.

Police Tactics & Techniques First Aid
16
UN Peacekeeping PDT Standards for Formed Police Units 1st edition 2015
QUESTIONS
POLICE TACTICS AND TECHNIQUES
UN Peacekeeping PDT Standards for Formed police Units, 1st edition 2015
Slide 21
Lesson 2 –Bleeding & Trauma
Slide 1

Police Tactics & Techniques First Aid
17
UN Peacekeeping PDT Standards for Formed Police Units 1st edition 2015
Slide 2
Slide 3
Police Tactics & Techniques First Aid
18
UN Peacekeeping PDT Standards for Formed Police Units 1st edition 2015
Slide 4
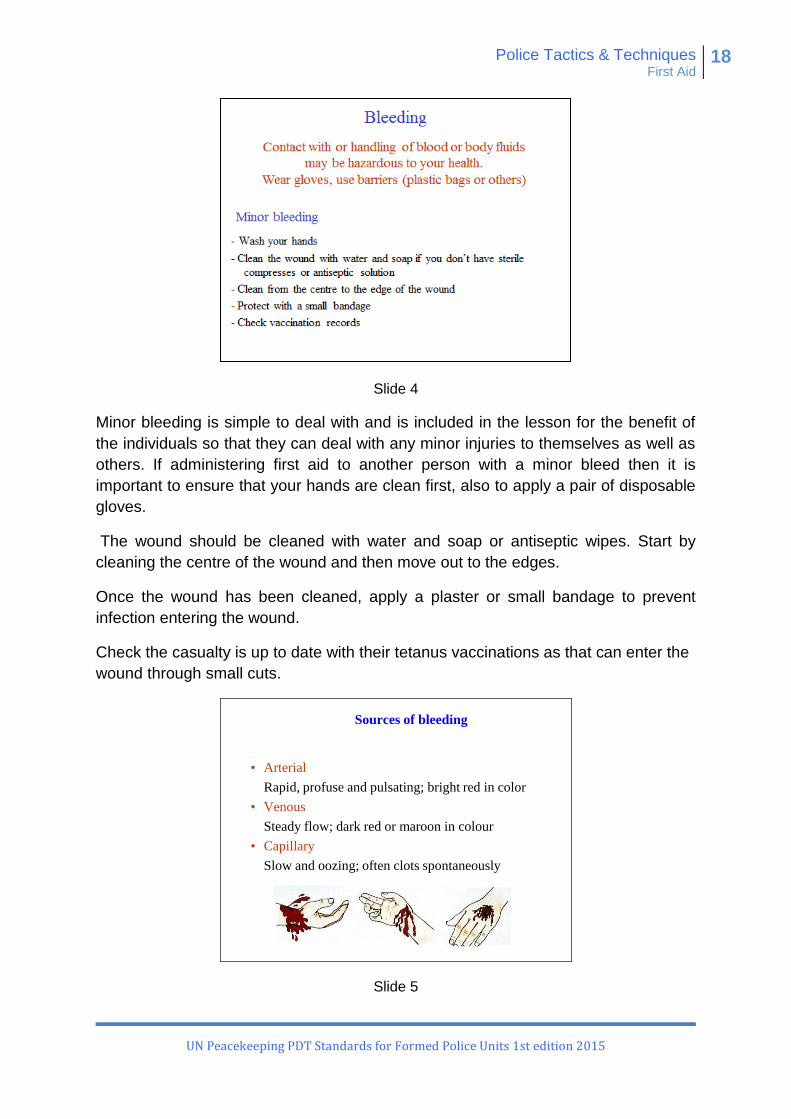
Minor bleeding is simple to deal with and is included in the lesson for the benefit of
the individuals so that they can deal with any minor injuries to themselves as well as
others. If administering first aid to another person with a minor bleed then it is
important to ensure that your hands are clean first, also to apply a pair of disposable
gloves.
The wound should be cleaned with water and soap or antiseptic wipes. Start by
cleaning the centre of the wound and then move out to the edges.
Once the wound has been cleaned, apply a plaster or small bandage to prevent
infection entering the wound.
Check the casualty is up to date with their tetanus vaccinations as that can enter the
wound through small cuts.
Sources of bleeding
• Arterial
Rapid, profuse and pulsating; bright red in color
• Venous
Steady flow; dark red or maroon in colour
• Capillary
Slow and oozing; often clots spontaneously
Slide 5

Police Tactics & Techniques First Aid
19
UN Peacekeeping PDT Standards for Formed Police Units 1st edition 2015
Bleeding is classified by the type of blood vessel that is damaged.
Arteries carry oxygenated blood under pressure from the heart. If an artery is
damaged bleeding will be profuse. Blood will spurt out in time with the heartbeat. If a
main artery is severed, the volume of circulating blood will fall rapidly. Blood from
veins, having given up its oxygen into the body is darker red and under less
pressure, although if a large varicose vein is broken it can gush profusely. Bleeding
from capillaries occurs with any wound. At first bleeding may be rapid but blood loss
is usually slight. A blow may rupture capillaries under the skin causing bleeding into
the tissue which will show in the form of a bruise.
Bleeding - General
- About 15 percent of the casualties that die before reaching a
medical treatment facility can be saved if proper measures are
taken.
- Bleeding from an arm or leg can usually be controlled by
manual pressure and elevation
- Serious Bleeding that cannot be controlled in that way can be
stopped with the use of a tourniquet
- Patients suffering from serious bleeding will almost certainly
start to suffer from shock
- Watch for a pale, cold, & clammy skin
- Rapid pulse
- Rapid, shallow breathing
Slide 6
Casualties with bleeding injuries can be stabilised prior to evacuation, provided the
basic steps are taken with any bleed the casualty’s chance of survival increases.
Bleeding from a limb can easily be controlled by applying direct pressure to the
wound and elevating the limb above the heart. This can then be reinforced by a
bandage to maintain the pressure.
Where the injury is more serious and so large that it is difficult to apply direct
pressure then indirect pressure can be applied to a pressure point. In the case of a
serious, multiple wound or amputation it may be controlled through the use of a
tourniquet.
Any patient that is subject to blood loss will start to exhibit the signs of shock. He will
become pale and the skin will feel cold and clammy. He/she will often be confused,
dizzy and possibly nauseous. His heart rate will be rapid and weak and their
breathing will become rapid and shallow and as the situation becomes worse may

Police Tactics & Techniques First Aid
20
UN Peacekeeping PDT Standards for Formed Police Units 1st edition 2015
become gasping. He may show cyanosis in the lips and skin (grey/blue colouration).
Eventually he/she will fall unconscious and if left untreated will die.
Treatment for shock is simple, treat the cause, which in this case is bleeding, where
possible lie the casualty down (although see treatment positions later) and raise the
legs covering them in a blanket to keep them warm, loosen tight clothing and keep
then calm and still until medical assistance arrives.
Slide 7
Slide 7 illustrates the basic treatment, if left untreated (top right) the blood will flow
out and the heart will have insufficient blood to keep it working therefore the casualty
will become unconscious and die.
Manual pressure
- Push or cut away loose clothing
- Do not remove clothing that is stuck to the wound
- Check for exit wound
- Direct pressure over wound. To protect yourself, use
gloves or barriers (plastic bag for example)
- Lay the patient down
- Apply bandage
- Use the appropriate treatment position
Slide 8
For a serious bleed the clothing around the wound should be removed so that the

Police Tactics & Techniques First Aid
21
UN Peacekeeping PDT Standards for Formed Police Units 1st edition 2015
whole wound is exposed, if there is clothing or a foreign object in the wound do not
attempt to remove it but apply pressure around the object.
In the case of stabbing or gunshot wounds, always check the casualty for any exit
wounds as they may not be obvious.
Provided there is not foreign object in the wound, apply direct pressure over the
wound, with a pad or bandage. Always wear protective gloves or if you do not have
any some form of barrier to reduce the possibility of infection.
Lay the casualty down and keep them still to negate the effects of shock.
Apply a bandage to the wound and raise it above the level of the heart where
possible.
Put the casualty in the appropriate treatment position (see later).
- If blood soaks through, apply another dressing on top and bandage
in place (use an Emergency Trauma Dressing if available)
- If ineffective start again and maintain direct pressure
- The pressure has to cover the entire wound in order to be efficient
and strong enough to stop the bleeding
- The pressure must be permanent
Manual pressure
Slide 9
Once the bandage has been applied, if blood soaks through, then apply another on
top. If the blood soaks through the second bandage then remove both bandages and
apply a fresh one trying to apply sufficient pressure to stop the blood flow.
If direct pressure is not working consider indirect pressure (see later).
If the pressure is not applied over the whole surface of the wound then it will
continue to bleed from the parts where there is no or little pressure, that is why it is
important to see the whole wound so that the bandage can be applied across all of it.
If the pressure is not kept permanently on the wound it will start to bleed again.
Police Tactics & Techniques First Aid
22
UN Peacekeeping PDT Standards for Formed Police Units 1st edition 2015
Slide 10
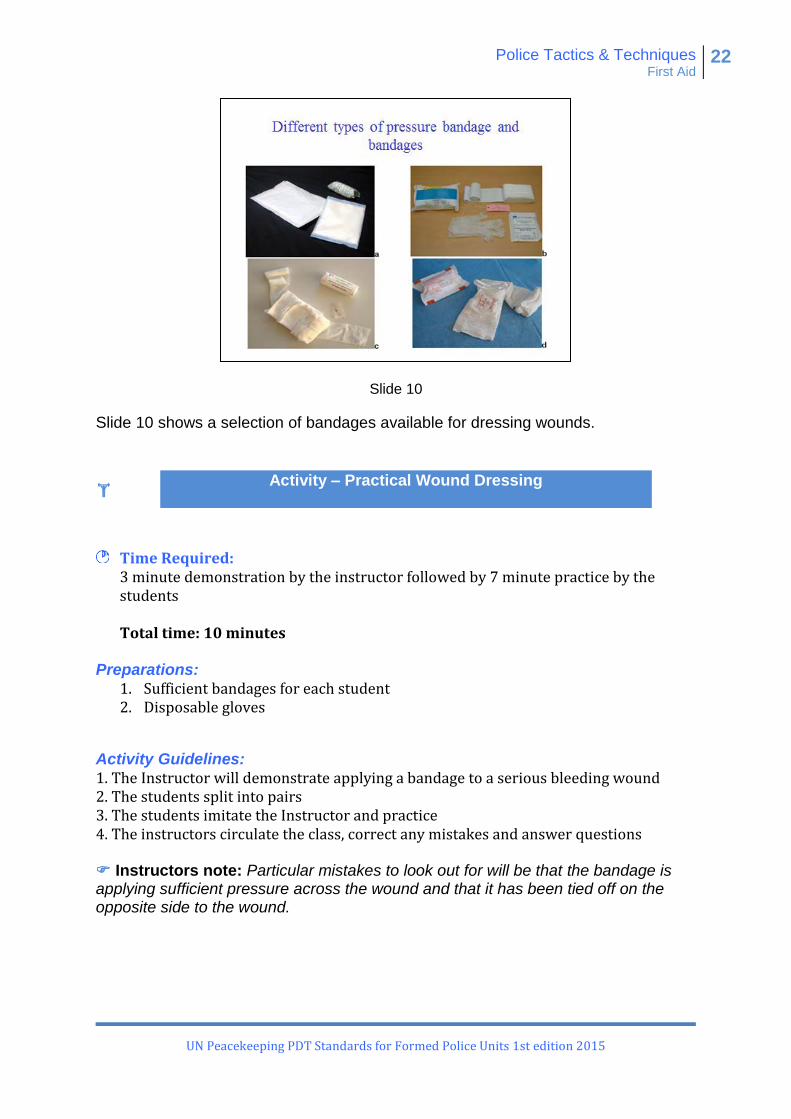
Slide 10 shows a selection of bandages available for dressing wounds.
Time Required: 3 minute demonstration by the instructor followed by 7 minute practice by the students Total time: 10 minutes
Preparations:
1. Sufficient bandages for each student 2. Disposable gloves
Activity Guidelines:
1. The Instructor will demonstrate applying a bandage to a serious bleeding wound 2. The students split into pairs 3. The students imitate the Instructor and practice 4. The instructors circulate the class, correct any mistakes and answer questions Instructors note: Particular mistakes to look out for will be that the bandage is applying sufficient pressure across the wound and that it has been tied off on the opposite side to the wound.
Activity – Practical Wound Dressing

Police Tactics & Techniques First Aid
23
UN Peacekeeping PDT Standards for Formed Police Units 1st edition 2015
Slide 11
There are a number of pressure points around the body, this is where an artery
crosses close to a bone and pressure can be applied with the hand on top of the
artery pressing it against the bone and stopping the blood flow.
Direct pressure must always be tried first and only if that is not working, should
indirect pressure be attempted, once the pressure has been applied the bleeding
should stop, the pressure must then be released after 15 minutes to allow the blood
to circulate to the limb otherwise other damage may be caused to the limb.
Slide 12
Where there is a major multiple bleeding injury and direct and indirect pressure are not sufficient to control the bleeding, a tourniquet may be applied. These can only be applied to a limb and it is imperative that it is made obvious to medical professionals that one has been used as there may be other effects on the body as a result.
Police Tactics & Techniques First Aid
24
UN Peacekeeping PDT Standards for Formed Police Units 1st edition 2015
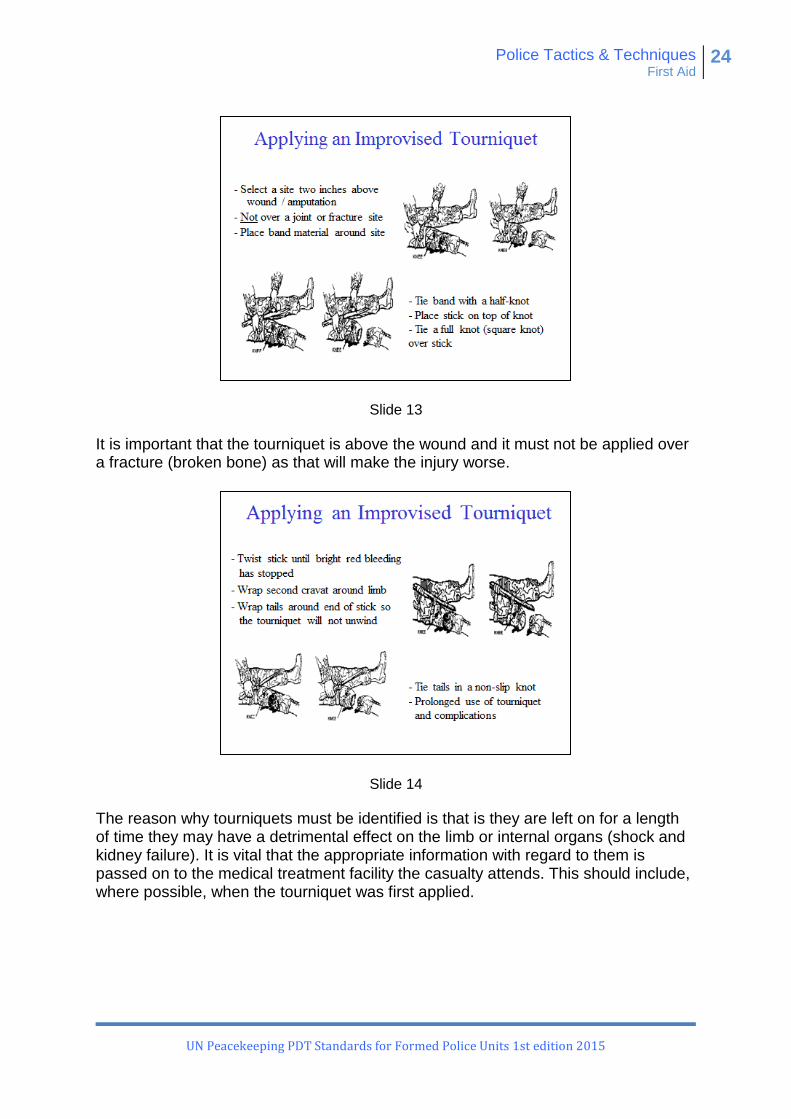
Slide 13
It is important that the tourniquet is above the wound and it must not be applied over a fracture (broken bone) as that will make the injury worse.
Slide 14
The reason why tourniquets must be identified is that is they are left on for a length of time they may have a detrimental effect on the limb or internal organs (shock and kidney failure). It is vital that the appropriate information with regard to them is passed on to the medical treatment facility the casualty attends. This should include, where possible, when the tourniquet was first applied.

Police Tactics & Techniques First Aid
25
UN Peacekeeping PDT Standards for Formed Police Units 1st edition 2015
Slide 15
If there is no tourniquet available they can easily be improvised using ties, belts and straps.
Slide 16
Where there is a foreign object in the wound the first aider should not attempt to try and remove it, in this case they should apply pressure around the object to try and control the bleeding, never apply pressure on or over the object and if applying a dressing padding must be built up around the object to ensure that the bandage does not push the object further into the wound. The basic treatment remains the same in that pressure should be used to control the bleeding and where possible the limb should be raised above the heart.

Police Tactics & Techniques First Aid
26
UN Peacekeeping PDT Standards for Formed Police Units 1st edition 2015
Slide 17
When dealing with casualties suffering from bleeding there are certain positions in which they should be placed to assist recovery. If the casualty has an injury to the chest then he should be placed in the sitting position. If a lung is affected, he should be inclined to the injured side. If there is a wound to the abdomen, then the casualty should be laid on their back with the legs slightly raised. The same position should be adopted for a casualty with bleeding to the limb with the appropriate limb being raised above the level of the heart. Casualties suffering from shock should also be placed in this position. Should the casualty be thought to have suffered spine or neck injury then they should be left in the prone position and the legs should not be raised. If there is blood flowing from any of the body orifices (nose, ears, mouth), then the casualty should be put in a position where it can drain out naturally without affecting the airway. A casualty with a nose bleed should be placed in the sitting position bent forward so that the blood does not fall down the throat and affect the airway. All unconscious casualties should be placed in the recovery position.

Police Tactics & Techniques First Aid
27
UN Peacekeeping PDT Standards for Formed Police Units 1st edition 2015
BURNSSigns & Symptoms:
- Pain
- Color of the skin - red/black dependent on depth
- Shock
- Difficulty breathing
-Action of the first aider
-Immediate application of water, on the area,
until the pain disappears
Slide 18
Burns are classified according to the depth of the skin damage, superficial, partial thickness and full thickness. Superficial burns only affect the outermost layer of the skin and are normally characterised by their redness, swelling and tenderness. Partial thickness burns are red and raw and blisters will form over the skin due to fluid being released from the damaged tissue. Full thickness burns affect all layers of the skin there may be damage to nerves, fat tissue, muscles and blood vessels. Apart from the colour of the injury and pain the casualty may be suffering from shock and if they have inhaled heat or smoke their breathing may be affected. The immediate action should be to cool the burn; normally this is best done with cold running water for at least ten minutes or until the pain is relieved, although it should not delay the evacuation of the casualty to a Medical Treatment Facility.
Slide 19

Police Tactics & Techniques First Aid
28
UN Peacekeeping PDT Standards for Formed Police Units 1st edition 2015
The most serious consequence for a burn victim is infection entering the wound. Once the burn has been cooled, kitchen film can be used to protect it as this can be easily applied and removed and it will not stick to the wound. As with bleeding, any loose clothing around the burn should be removed. However, if clothing has been burnt onto the wound then it should be left in place. Burn medications are only suitable for very minor burns and they should not be used on serious cases. Only cold running water should be applied to cool the burn. Lay the casualty down to assist in the treatment of shock, although it is important that the burn does not come into contact with the ground.
• Minor Bleeding
• Major Bleeding
• Dressings and Bandages
• Pressure points
• Tourniquets
• Burns
SUMMARY
Slide 20
The officers should be given a summary of the key points of the lesson before being
asked if they have any questions

Police Tactics & Techniques First Aid
29
UN Peacekeeping PDT Standards for Formed Police Units 1st edition 2015
QUESTIONS
POLICE TACTICS AND TECHNIQUES
UN Peacekeeping PDT Standards for Formed police Units, 1st edition 2015
Slide 21
Lesson 3 – Emergency Evacuation in Crowd Control situations
Contents:
OPERATIONAL FIRST AID
Emergency Evacuation in
Crowd Control situationsPART III
POLICE TACTICS AND TECHNIQUES
UN Peacekeeping PDT Standards for Formed police Units, 1st edition 2015
Slide 1

Police Tactics & Techniques First Aid
30
UN Peacekeeping PDT Standards for Formed Police Units 1st edition 2015
Slide 2
Slide 3

Police Tactics & Techniques First Aid
31
UN Peacekeeping PDT Standards for Formed Police Units 1st edition 2015
Slide 4
Slide 5
Emergency casualty evacuation is only to be carried out in certain circumstances.
When there is no danger present, a casualty should be dealt with normally following
the procedure outlines in lesson 1 (DR ABC). However police officers are often in
dangerous situations where it may be necessary that the casualty is evacuated to a
safe location, for the benefit of both the casualty and the first aider.
Therefore Emergency casualty evacuation should only be carried out where there is
immediate clear and present danger to both the casualty and first aider and the
evacuation has to be carried out as a priority due to the injury.
It is also a reason why officers deployed on Public Order crowd Control situations
should have medical back up available, at the site of deployment where possible.

Police Tactics & Techniques First Aid
32
UN Peacekeeping PDT Standards for Formed Police Units 1st edition 2015
Slide 6
The first priority in First Aid must still be maintained. The casualty must be able to be
reached without danger to the First Aider. In a crowd control situation, there is the
potential for any member of the FPU being hit by missiles thrown by the crowd,
which should be minimised by the use of shields for protection.
Once the casualty has been reached they must be evacuated via the safest route.
They should be removed to a safe and secure location, which, where possible,
should already have been predetermined as a casualty holding area.
When using any of these techniques it is vitally important to keep a firm grip on the
casualty, as failure to do so, may result in a delay in the process exposing both the
casualty and the rescuer to additional danger.
Different Methods
of E.C.E.
Slide 7
In this lesson we will look at nine different techniques of emergency evacuation:
Arm drag, Leg drag, Belt drag, Piggy back, Fireman’s lift, double under arm drag,

Police Tactics & Techniques First Aid
33
UN Peacekeeping PDT Standards for Formed Police Units 1st edition 2015
Shoulder drag, Single under arm drag, Wrist hold under arm drag.
Some of these can be done on an unconscious casualty, some require the casualty
to assist in some way by holding onto the rescuer, it will be for the rescuer to decide
at the time which is the most appropriate dependant on the circumstances and the
condition of the casualty.
Slide 8
Figure 1 shows the ‘Arm drag’, the rescuer takes a firm grip of the casualty’s wrists
and drags them along the ground to safety. Clearly, this can be carried out on an
unconscious casualty.
Figure 2 shows the ‘Leg drag’, in this case the rescuer takes hold of the casualty’s
legs and drags, and once again this can be carried out on an unconscious casualty.
In both cases care must be taken with regard to the head, however in crowd control
situations the casualty is likely to be wearing a helmet which should aid protection.
Slide 9
Figure 3 shows the ‘Belt drag’ method, this requires the casualty to take hold of the

Police Tactics & Techniques First Aid
34
UN Peacekeeping PDT Standards for Formed Police Units 1st edition 2015
rescuers belt and therefore to be conscious and not have any serious upper limb
injury. It allows the rescuer to use a shied to protect the two of them or to use their
arms for any other purpose.
Figure 4 shows the ‘Piggy back’ method, the casualty is picked up and held on the
rescuers back by placing their arms around the neck and the rescuer holding on to
the casualty’s thighs. This is difficult to perform on an unconscious casualty as it
requires assistance from the casualty to get them onto the rescuer’s back.
Slide 10
Figure 5 shows the ‘Fireman’s lift’. In this technique the rescuer takes hold of the casualty’s arm and lifts them up on to their shoulder holding the arm with one hand whilst the other arm is places between the legs, this can be performed on an unconscious casualty. Figure 6 shows the ‘Double under arm drag’. This is performed by two rescuers placing their arms under the casualty’s armpits and dragging the casualty along. They can raise the casualty so that they are able to move at speed with just the casualty’s feet dragging on the floor. This can be carried out on an unconscious casualty.

Police Tactics & Techniques First Aid
35
UN Peacekeeping PDT Standards for Formed Police Units 1st edition 2015
Slide 11
Figure 7 shows the ‘Shoulder drag’. The rescuer takes a firm grip on the clothing around the shoulders of the casualty and drags them along the ground; once again this can be carried out on the unconscious casualty. Figure 8 shows the ‘Single under arm drag’ the rescuer wraps their arms under the casualty’s armpits and links their figure then dragging the casualty to the rear. This can be carried out on an unconscious casualty and protects the head, unlike many of the other ‘drag’ methods.
Slide 12
This shows the ‘Wrist hold under arm drag’. The rescuer places their arms under the armpits of the casualty and folds up the casualty’s forearms taking hold of them just above the wrist. He then removes the casualty by dragging him along the ground; Again this method give protection to the head and can be used on an unconscious casualty.

Police Tactics & Techniques First Aid
36
UN Peacekeeping PDT Standards for Formed Police Units 1st edition 2015
Time Required: 5 minute demonstration by the instructor followed by 10 minute practice by the students Total time: 15 minutes
Preparations:
1. Area large enough for the students to carry out all the techniques (where possible a location with a soft floor or gym mats)
Activity Guidelines:
1. The Instructor will demonstrate the various techniques 2. The students split into pairs 3. The students imitate the Instructor and practice 4. The instructors circulate the class, correct any mistakes and answer questions
Evacuation of an injured
officer during a
demonstration
Slide 13
Later during the practical element of the crowd control module the students will get the chance to practice the evacuation of a casualty, but to enable them to do so, they need to understand the theory of the subject.
Activity – Practical Evacuation

Police Tactics & Techniques First Aid
37
UN Peacekeeping PDT Standards for Formed Police Units 1st edition 2015
Slide 14
This slide shows the basic deployment of an FPU during a crowd control deployment with a line of officers facing a crowd. There are support vehicles to the rear and the flanks and rear of the FPU are protected by either buildings or reserves. Among the reserves would be the medical element.
Slide 15
An officer in the front line is injured and falls to the ground, the matter is immediately reported into the control so that the Commander is aware and Medical assistance

Police Tactics & Techniques First Aid
38
UN Peacekeeping PDT Standards for Formed Police Units 1st edition 2015
can be alerted.
Slide 16
The officers either side of the casualty immediately move around to cover the casualty with their shields, the rear rank officers evacuate the casualty away from the front line using an appropriate evacuation method.
Slide 17
The casualty is now in a safe position where initial emergency first aid can be given and the casualty stabilised pending the arrival of the medical team; the cordon is

Police Tactics & Techniques First Aid
39
UN Peacekeeping PDT Standards for Formed Police Units 1st edition 2015
reformed by the officers on either side closing in.
Slide 18
The casualty can now be dealt with by the Medical team and following triage, evacuated to the appropriate facility if necessary. The rescuing officers return to take their place on the cordon. The Commander makes any necessary rearrangements to the deployment.
SUMMARY
• Emergency Casualty Evacuation:
– Arm drag
– Leg drag
– Belt drag
– Piggy back
– Fireman’s lift
– Double under arm drag
– Shoulder drag
– Single under arm drag
– Wrist hold under arm drag
• Use in Crowd Control situation
Slide 19
The officers should be given a summary of the key points of the lesson before being
asked if they have any questions

Police Tactics & Techniques First Aid
40
UN Peacekeeping PDT Standards for Formed Police Units 1st edition 2015
QUESTIONS
POLICE TACTICS AND TECHNIQUES
UN Peacekeeping PDT Standards for Formed police Units, 1st edition 2015
Slide 20
Lesson 4 – Further Practice & Assessment
This lesson is at the discretion of the instructor. It can be in the form of further
practice or it could take the format of a series of scenarios or it could be a straight
forward assessment of all the techniques in front of the instructors. It is for the team
of instructors to decide on which is the most appropriate dependant on the standard
of the students.