Embed Size (px)
Citation preview

Orange
County
4-H
Intermediate Archery Project Book
Instructions• Complete sections of your Intermediate Archery Project Book throughout the year.
• It is required to complete either a Junior, Intermediate, or Senior Project Report to
turn in with this Project Book for proper judging.
• Fillable Project Reports can be found at
http://sfyl.ifas.ufl.edu/orange/4-h-youth-development/4-h-youth-membership-and-project-areas/#Proj%20Books
2 | O C 4 - H I n t . A r c h e r y P r o j e c t B o o k
LƴǘŜNJƳŜŘƛŀǘŜ !NJŎƘŜNJȅ tNJƻƧŜŎǘ .ƻƻƪ Table of Contents
Welcome Back 3
Intermediate Pretest 4-5
Sayings from Archery 6-7
Goals of Archery 8-12
The Shot Process 13-29
Equipment Maintenance 30
Archery Tackle 31-38
Archery Accessories 39-40
Reference Articles 41-42
Competition Shooting 43-45
Paper Tuning 46-50
Intermediate Post-test 51-52
4-H Project Report Score Sheets 53-55
Project Story 56
References & Reading List 57
Process Log 58
3 | O C 4 - H I n t . A r c h e r y P r o j e c t B o o k
Welcome Back to Archery
Welcome to a new year and we hope that at the end of this year you will have gained the additional skills laid out in this book. We are excited to get started, we have much to cover.
Now that you have a full year of learning behind you are now an intermediate archer, there is much to learn every day but at least now we expect you can handle yourself on the range or in a tournament. It is a great accomplishment all that you have learned so far, feel proud! You are learning in all kinds of ways.
Some of this knowledge has to be given in stages, this also shows us what your level of commitment is in your archery career.
As with last year you will have a pre and post test to determine what you remember and what you will learn. This year we will dive deeper into each of the same topics we covered in last year’s book.
2017-2018 Archery Instructors are as follow:
• Larry Middour – Level 2 Instructor • Enid Marrero-Hinchey – Level 1 Instructor • Rett Polachek – Level 1 Instructor • Nathan Bailey – Level 1 Instructor • Bart Polachek – Level 1 Instructor • Gail Eckman – Level 1 Instructor
If you should have any questions on concerns please contact any one of the instructors listed above and they will be happy to assist you.
Parents you are welcome to volunteer and assist in any way that you can or would like, we welcome suggestions. Please feel free to contact any of us at any time. We encourage parent and member attendance at our volunteer meetings monthly.
There are many ways that you can continue to get involved in 4-H so please ask if you would like to, we will point you in the right direction.
Needed for this year’s book are:
• Last Year’s book for reference & graded sheets Team Calendars • This year’s book • Log Pages • SOE Pages • Building 4H Portfolio
4 | O C 4 - H I n t . A r c h e r y P r o j e c t B o o k
Intermediate Pre-Test
Experience
1. What is the upshot?
2. What does it mean to Robin Hood your arrows?
a. Shoot at a long distance over a wall
b. Shoot with a longbow and a back quiver
c. When an arrow hits another that’s already in the target and ends up perfectly
inside the shaft.
3. What is a struggle stick?
4. What is happening when you look at your friend and they are shaking while
holding their draw?
a. They are cold
b. They are not able to aim properly
c. They are overbowed
5. What piece of equipment to you use to align yourself to the target in the shot
process?
6. This is a process based goal… I will get my arrows to hit the X’s by May 2018.
Circle your answer: True False
5 | O C 4 - H I n t . A r c h e r y P r o j e c t B o o k
Intermediate Pre-Test Experience
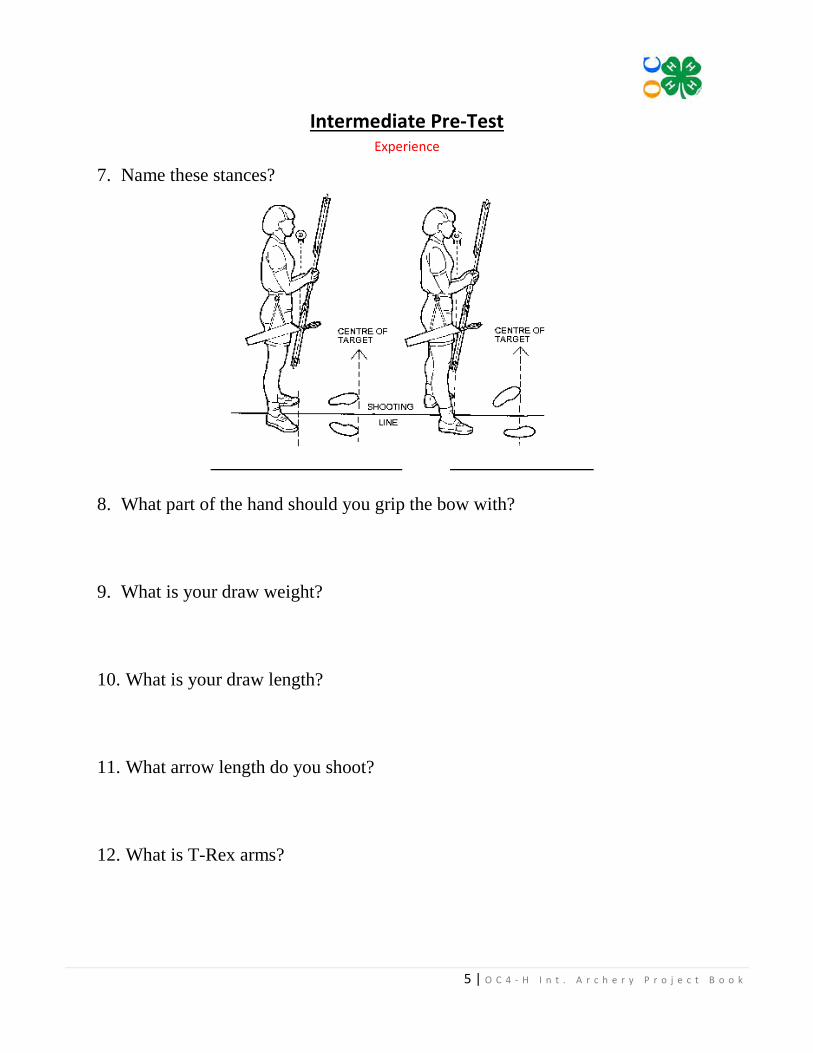
7. Name these stances?
8. What part of the hand should you grip the bow with?
9. What is your draw weight?
10. What is your draw length?
11. What arrow length do you shoot?
12. What is T-Rex arms?
6 | O C 4 - H I n t . A r c h e r y P r o j e c t B o o k
Sayings from Archery
Archery has had an effect on the English language and no doubt on most other languages too we want to ensure that you know your sport slang so here you go.
• "The upshot" is the final shot in an archery competition and often the deciding shot. • Having "a quiver-full" means to have a lot of children. • "Point blank" comes from the French point blanc, a small white target, and meant originally to be
close enough to hit the target with a direct and level flight, and now means to hit more or less without fail.
• "Having two strings to your bow" was once good practice in the days when bowstrings could rot and break easily.
• "A parting shot" seems to have come from the Parthians of north east Persia, known to pretend to flee from the enemy but shooting arrows backwards, Parthian shots.
• Interestingly, "hitting bull's eye" isn't from archery because bull's eye targets weren't used in ancient archery but were introduced later for rifle shooting competitions.
Lancaster Archery Supply surveyed the company and came up with a list of slang terms and phrases they regularly use on the target range and in the woods. Pin wheel – When your arrow hits dead center in a scoring ring.
Spider – When there’s an X in the center of the bull’s-eye, and your arrow hits the center of the X.
Chunk – A bad shot. “Man, I chunked that one.”
T-Rex arms – This is when the archer doesn’t extend his or her arms all the way out while shooting.
Jar-licker – A shot where the arrow just barely touches the line for a higher scoring ring.
Tweener – An arrow that’s between two scoring rings; also, a shot on a 3-D course that’s at a distance
that doesn’t end in “0.”
Grip it and rip it – Just pull back the bowstring and shoot. Don’t think about the shot.
Kiss out – When an arrow is deflected into a lower scoring ring by another arrow already in the target.
English – Pushing or pulling your bow arm at the shot to account for some defect in your form, in an
attempt to “steer” the arrow into the center. “I had to give that arrow a little English to get it in the 10-
ring.”
Tae Kwon Bow; Bow-Jitsu – Exaggerating your body movements at the shot to account for the aiming
device sliding off the center of the target just as the arrow is released.
Lincoln logs; Poles; Line cutters – All of these are terms applied to large diameter arrows used in target
archery to maximize the chances of hitting higher scoring rings.

7 | O C 4 - H I n t . A r c h e r y P r o j e c t B o o k
Sayings from Archery
Kentucky windage – Aiming off the center of the target, or leaning the bow right or left so the bubble in
the level is not in the center, to account for windy conditions.
Too much pinky – When your back tension release goes off faster than normal.
Sandbagger – An archer who intentionally shoots lower scores in order to compete in a division that’s
below their true shooting skills.
Training wheels – The cams/wheels of a compound bow. (This is usually a term of derision aimed at
compound bows by recurve and longbow archers.)
Gunch – When your mind thinks you shot the arrow, but your body didn’t let it go, and you flinch.
Slammer; Hog; Toad – A trophy-sized animal.
Slick head – A doe.
Stewie – A mature doe.
Snot – Arrow lube.
Sticks – Arrows.
Sled; Ax; Rig – An individual archer’s bow setup.
Robin Hood – When an arrow hits another that’s already in the target and ends up perfectly inside the
shaft. Splitting the arrow of a competitor, in reference to the legend archer Robin Hood who won a
competition by splitting his opponent's arrow with his own.
Body stabilizer – The front-weighted midriff of usually older, male compound archers.
Drive-by – Releasing an arrow as the aiming device moves across the center of the target.
Punch – Slapping a trigger or thumb-button release instead of squeezing through the shot.
Bucket hatter – A recurve archer.
Trad – Shortened name for traditional archery.
Inside-out – An arrow that is fully inside the scoring ring. It’s not even touching a line.
Struggle stick – A recurve bow. The term originates from the image of a recurve archer shaking while
trying to pull the arrow through a clicker.
Molly-whopped – A perfect shot on a deer, as in, “I Molly-whopped that buck at 20 yards.”
Burn a hole in the yellow – Keep your aiming device locked on the 10-ring until you release the arrow.
Mash the gas – Pushing with your bow arm and pulling with your release hand with equal pressure
through the shot.
8 | O C 4 - H I n t . A r c h e r y P r o j e c t B o o k
Goals of Archery
This year’s goals for all intermediates are to become accomplished and mentally focused. In order to do so we as instructors will focus on these strategies:
1. Further developing good form 2. Good form leads to precise shot execution 3. Precise shot execution leads to tighter arrow groups 4. Tighter arrow groups leads to higher scores
Process based goals: are best when you are taking on a new goal in an area where you aren’t already skilled or experienced. As an intermediate you have skill and experience but you still have a lot to learn so we will continue to focus on this type of goal setting.
Think of process-based goals as habits or activities. Ultimately, you expect those habits to lead to outcomes but initially your goal should be simply to develop the habit itself! Once you have the habit down, that's when you'll turn your focus to the outcomes those habits are intended to produce.
Let’s say you are trying to learn how play soccer. If you know nothing about how to do it, you can’t possibly set up a realistic outcome goal. Initially, you need to set up some process-based goals. For example, you set out to spending a certain amount of time a week working on examples from a guidebook. You can’t even set up an outcome goal about when to finish the book because you have no idea how long it will take! You’re too new to the subject matter. And as you know, all good goals have a time-based component.
So, if you're really already skilled at soccer, you don't really need to have a process-driven goal if “I'm going to dribble the ball for 30 minutes every day for the next week”. You can jump to outcome based goals like “I will make 5 goals in each game over the next 4 weeks without injury to myself or other players.”
Now eventually, once you're more experienced in something, then you switch to outcome driven goals. Outcome based goals almost disregard the process to get there - all that matters right now is the outcome! You can use outcome based goals for things that make you money.
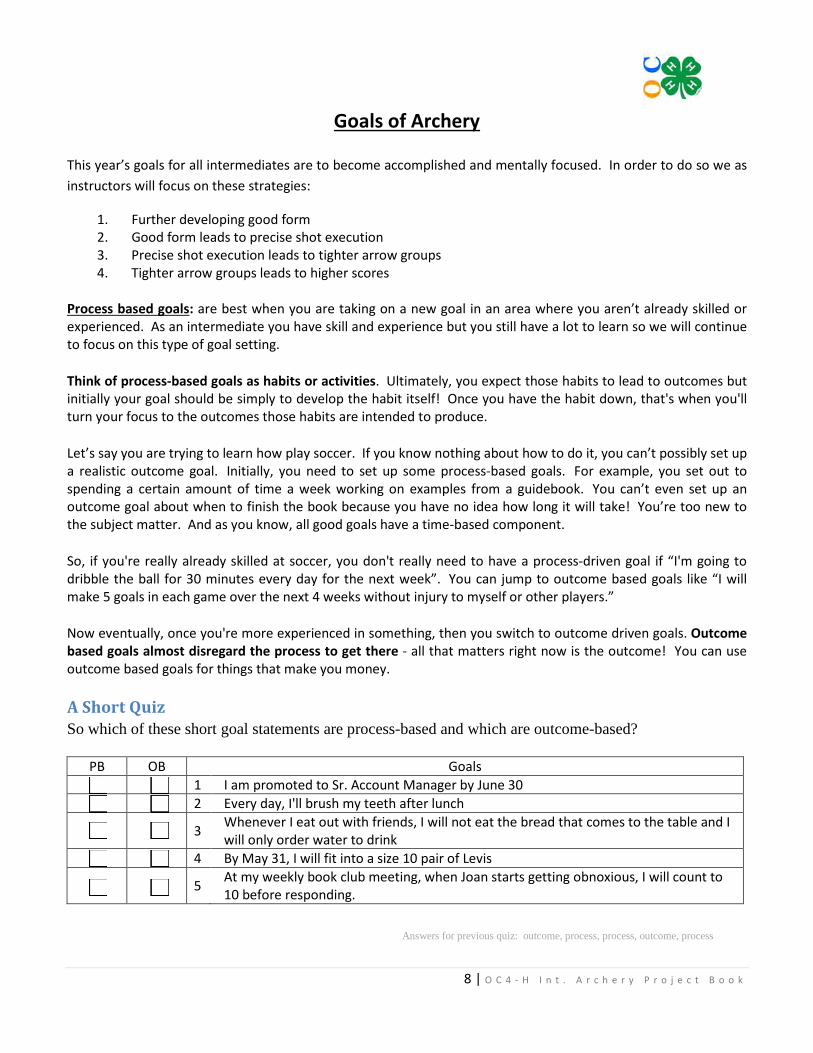
A Short Quiz So which of these short goal statements are process-based and which are outcome-based?
PB OB Goals 1 I am promoted to Sr. Account Manager by June 30 2 Every day, I'll brush my teeth after lunch 3 Whenever I eat out with friends, I will not eat the bread that comes to the table and I
will only order water to drink 4 By May 31, I will fit into a size 10 pair of Levis 5 At my weekly book club meeting, when Joan starts getting obnoxious, I will count to
10 before responding.
Answers for previous quiz: outcome, process, process, outcome, process
9 | O C 4 - H I n t . A r c h e r y P r o j e c t B o o k
Goals of Archery
The following are a list of questions that you ask yourself if you are ready to get serious with this discipline so that you can have a goal in mind. When you are ready for this approach an instructor and indicate what your plans are. This way they can help you achieve the process and point you in the right direction for additional assistance.
Here is an excerpt from a book that is helpful to set up goals for this year.
Mental Management – Goal Setting System
Step Number 1 - “Determine a dream worth trading your life for”
What would you consider would be worthy of telling your kids or grandkids you did? Setting this goal will help you become the person you are going to be and what you have done in your life. It is about living your life and being happy that you took chances. Set yourself up for a tournament winning performance not actually winning the tournament, there is only so much you can control and you can’t control other’s performances if you know what I mean.
Ask yourself, what do you need to become and what should you do to accomplish this goal? In order to achieve that goal there is no need to compromise your integrity so remember how you get there is also important you want to keep your soul pure and intact. Pick something that truly affects your shooting ability. Describe it in detail, and describe how you will achieve it.
Setting your own goals: Focus on process based goals.
Here are two examples on goal setting, short term and attainable:
“I want to keep a calm, focused, confident attitude regardless of my score. Before each shot I will remind myself to give this arrow my best attention. If I get distracted on a past or future arrow, I will clear my mind before starting my shot. I will take a slow, deep breath while thinking, ‘This is the only arrow I can control and I will give it all my attention.’ With my best attitude being 10 and my worst being 1, I will keep my attitude at 7 or better all day. I will do this for today’s practice.”
“I want my posture to be straight and balanced, with a flat back and low shoulders. After I place my feet in the proper stance, I will make sure my hips are directly below my ribcage to flatten my back, and that my shoulders are straight but low and relaxed. I will keep my head held high and straight. I want to focus on having straight posture with a flat back for 80 percent of my shots this week.”
Examples of long term goals:
“I want to train and trying out for the collegiate team at University of Florida in my senior year of high school”
“I want to achieve Olympic style archery skills over the next six years in time for my graduation from college and I will aspire to train 6 days a week for at least 3 hours per day.”
10 | O C 4 - H I n t . A r c h e r y P r o j e c t B o o k
Goals of Archery
What would you like to accomplish in this discipline?
(Short or Long Term Goals) Type of Goal
Short-Term steps will be highlighted in the Improvement of Skills and Project Attachments pages. We
will also discuss short-term goals as they are written in your log books.
Step Number 2 - “Decide when you want it”
Time is relative to the goal, you may need to be flexible, at the beginning of the goal you may have something in mind as to how long it will take you to get there but as you move through your short term goals the time frame to achieve the long term goal may be underestimated so you may have to move the date but you shouldn’t beat yourself up for it. The important thing is to cross the finish line!
When do you want it, and indicate how much time you might think it will take?
Step Number 3 - “List the pay-value”
The goal has to be something that you want not what someone else wants for you.
What motivates you, the promise of gain, fear of loss or recognition? Determine that and you will be able to train yourself into achieving all of your goals. The goal has to be big enough to make you change habits or attitudes. If your goal is too small then you will most likely not appreciate it when you have reached it.
List the pay-value, How are you going to change your habits?
Step Number 4 – “Honestly evaluate the obstacles in your way”
Why don’t you have the goal now?
What do you need to learn? Are new skills needed?
What equipment, coaching opportunities or competitive experience are required?
What habits/attitudes must you master in order to acquire your goal?
11 | O C 4 - H I n t . A r c h e r y P r o j e c t B o o k
Goals of Archery
“You almost always have to give up something good to make room for something great!”
What do you have to give up to make room for archery?
Step Number 5 – “What is your plan to get to your goal?”
The difference between a wish and a goal is that you write out a plan for the goal. Making a plan will help to overcome all of the obstacles to reaching the goal. Planning always saves time and provides direction. You can’t always see the obstacles but that is what we adults call experience. You too with time, will gain experience and will be able to plan for it.
What is your plan to get to your goal?
Step Number 6 – “Evaluate your plan before you proceed.”
How will going for this goal affect other priorities in my life?
How will the people I care about be affected by this plan?
Is the plan consistent with my fundamental values?
Do I believe my plan will work?
Is the prize worth the price?
If any part of this plan makes you uncomfortable you might just need to modify some part of the plan.
Step Number 7 – “Schedule your plan.”
Scheduling adds a commitment to the planning process. If you block out time in the calendar to carry out the process then it has more weight to the commitment. We are going to commit to learning more about The Shot Process this year and being able to execute it, so we are going to log it in.
Doing the work becomes an integrity issue, recording the task is a promise to do it by that date. Being a person that can be relied upon to fulfill their promise is a fundamental value of all winners. Until goals are up on a calendar the commitment to attainment is questionable.
How am I going to keep track and schedule my goals?
12 | O C 4 - H I n t . A r c h e r y P r o j e c t B o o k
Goals of Archery Step Number 8 – “Start Now.”
You are now ready to go. Begin right away. Do not hesitate. Things will not get better if you wait to get started. Put out high-quality effort, consistently over time, and you can do anything you dream of doing.
Clear the deck of time wasters and execute the first step of your plan right now. Step Number 9 – “Before reaching your goal always set a new one to take its place.”
If you wait to complete your goal to set a new one, you’ll lose your direction and motivation. You may also go into a state of depression if you don’t have something else to look forward to. Those feelings may creep up on you without even knowing it, sometimes I believe this is why most people really enjoy multitasking.
Do you have another goal in mind?
Step Number 10 – “Hold on to the end or trade up.”
Do not be surprised that on your way to your goal you discover another. The new one may mean more to you than the one you are working to achieve, this is called trading up.
If you trade up to the new goal you should view the first goal as completed. Finding a new target that means more to you than the first one can be very rewarding, but be cautious not to trade your current goal for one that is easier to reach. If you do, you may regret the choice.
You may be interested in numerous things setting goals in all of them soon exhausts time and resources available. Prioritizing is key, making a list of everything you want to do is a good start, then choose what is most important and schedule it. If time remains then you can add another thing from the wish list.
What did you learn about yourself?
13 | O C 4 - H I n t . A r c h e r y P r o j e c t B o o k
The Shot Process
The next few pages may seem a little redundant but we need to harp on its importance. We would like to help you understand the physics of the steps and the essential nature of the process. In order to grow with your archery career, we suggest you learn and recite this process and make mental checklist each time you shoot. Every time you shoot, you could write in your journal pages to ensure that you recall “What you did well”, what your strengths are in each shot and what you need to work on the next time you practice. It may be grueling to write everything down but it will pay off in the end.
1. Stance and Posture
2. Nock Arrow
3. Set Hook/Release
4. Set Bow hand grip
5. Raise and extend the bow
6. Draw
7. Anchor
8. Aim
9. Release
10. Follow through
11. Relax and Evaluate
I know you have heard this before, the key to archery is repetition doing the same thing time and time again and the only way to do this is to feel good about your shooting. Be comfortable. Be relaxed. Be confident. So practice, practice, practice. When you can’t get a bow and arrow in your hand, shoot in your head. Visualize the shot from inside and out. See the arrows landing squarely in the – ring. Like all sports, you will get from archery what you put into it. Above all, remember: if it doesn’t feel right don’t let go! Throughout these pages we will discuss conscious and subconscious actions. The idea is that until you are able to move some of these steps into the subconscious you need to be conscious (aware!) of your body’s every movement. By being aware you are able to correct yourself any time that you have strayed from the shot process. Process is our focus and it could take years to get this completely right but the fun is in getting there! Something else to consider is your pre-shot routine. When you concentrate on the preparation prior to the shot process it assists with understanding your movements.
14 | O C 4 - H I n t . A r c h e r y P r o j e c t B o o k
The Shot Process
In the official shot process there is no number assigned to warm up but if WARM UP is ignored then there may be some short or long term injuries. Warm ups also help you perform more consistently. Warm up will become part of your pre-shot routine.
We are not here to tell you what the best style is, every archer shoots slightly differently. The following pages are guides to the shot process. What all top archers have in common is that they can repeat the same technique time and time again. With this information develop your own style which feels comfortable then the process is to teach your subconscious through hours of repetition.
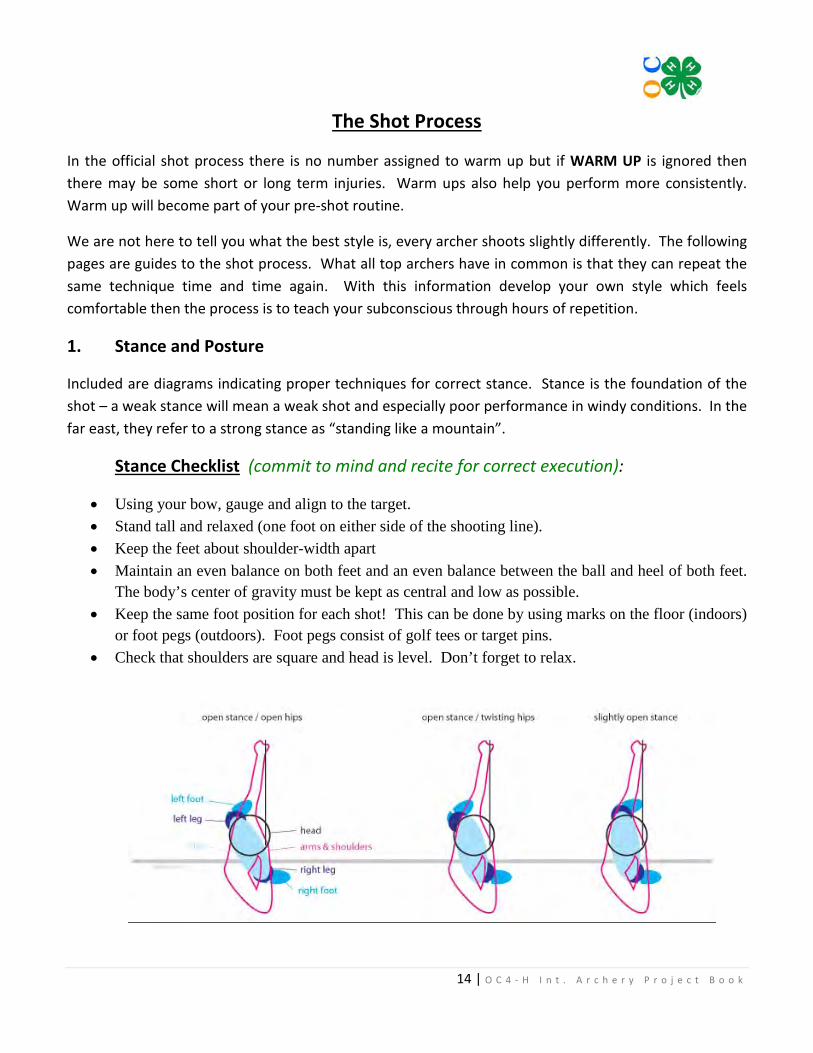
1. Stance and Posture
Included are diagrams indicating proper techniques for correct stance. Stance is the foundation of the shot – a weak stance will mean a weak shot and especially poor performance in windy conditions. In the far east, they refer to a strong stance as “standing like a mountain”.
Stance Checklist (commit to mind and recite for correct execution):
• Using your bow, gauge and align to the target. • Stand tall and relaxed (one foot on either side of the shooting line). • Keep the feet about shoulder-width apart • Maintain an even balance on both feet and an even balance between the ball and heel of both feet.
The body’s center of gravity must be kept as central and low as possible. • Keep the same foot position for each shot! This can be done by using marks on the floor (indoors)
or foot pegs (outdoors). Foot pegs consist of golf tees or target pins. • Check that shoulders are square and head is level. Don’t forget to relax.
15 | O C 4 - H I n t . A r c h e r y P r o j e c t B o o k
The Shot Process
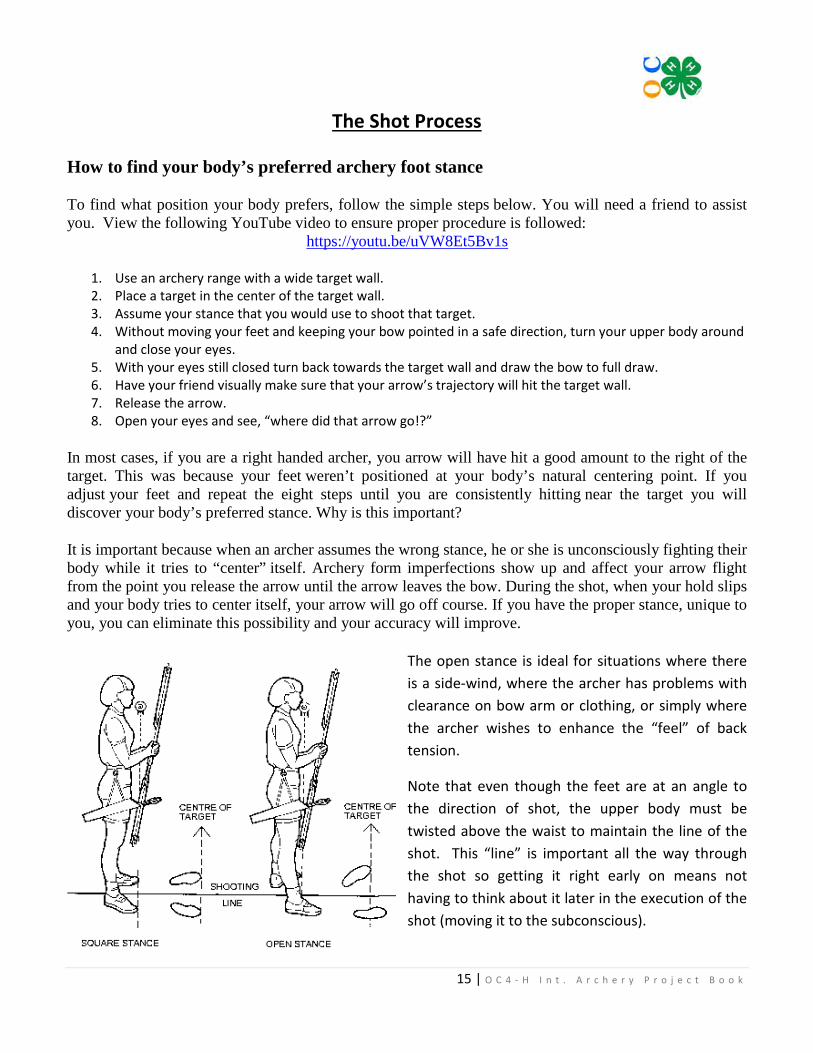
How to find your body’s preferred archery foot stance
To find what position your body prefers, follow the simple steps below. You will need a friend to assist you. View the following YouTube video to ensure proper procedure is followed: https://youtu.be/uVW8Et5Bv1s
1. Use an archery range with a wide target wall. 2. Place a target in the center of the target wall. 3. Assume your stance that you would use to shoot that target. 4. Without moving your feet and keeping your bow pointed in a safe direction, turn your upper body around
and close your eyes. 5. With your eyes still closed turn back towards the target wall and draw the bow to full draw. 6. Have your friend visually make sure that your arrow’s trajectory will hit the target wall. 7. Release the arrow. 8. Open your eyes and see, “where did that arrow go!?”
In most cases, if you are a right handed archer, you arrow will have hit a good amount to the right of the target. This was because your feet weren’t positioned at your body’s natural centering point. If you adjust your feet and repeat the eight steps until you are consistently hitting near the target you will discover your body’s preferred stance. Why is this important?
It is important because when an archer assumes the wrong stance, he or she is unconsciously fighting their body while it tries to “center” itself. Archery form imperfections show up and affect your arrow flight from the point you release the arrow until the arrow leaves the bow. During the shot, when your hold slips and your body tries to center itself, your arrow will go off course. If you have the proper stance, unique to you, you can eliminate this possibility and your accuracy will improve.
The open stance is ideal for situations where there is a side-wind, where the archer has problems with clearance on bow arm or clothing, or simply where the archer wishes to enhance the “feel” of back tension.
Note that even though the feet are at an angle to the direction of shot, the upper body must be twisted above the waist to maintain the line of the shot. This “line” is important all the way through the shot so getting it right early on means not having to think about it later in the execution of the shot (moving it to the subconscious).
16 | O C 4 - H I n t . A r c h e r y P r o j e c t B o o k
The Shot Process
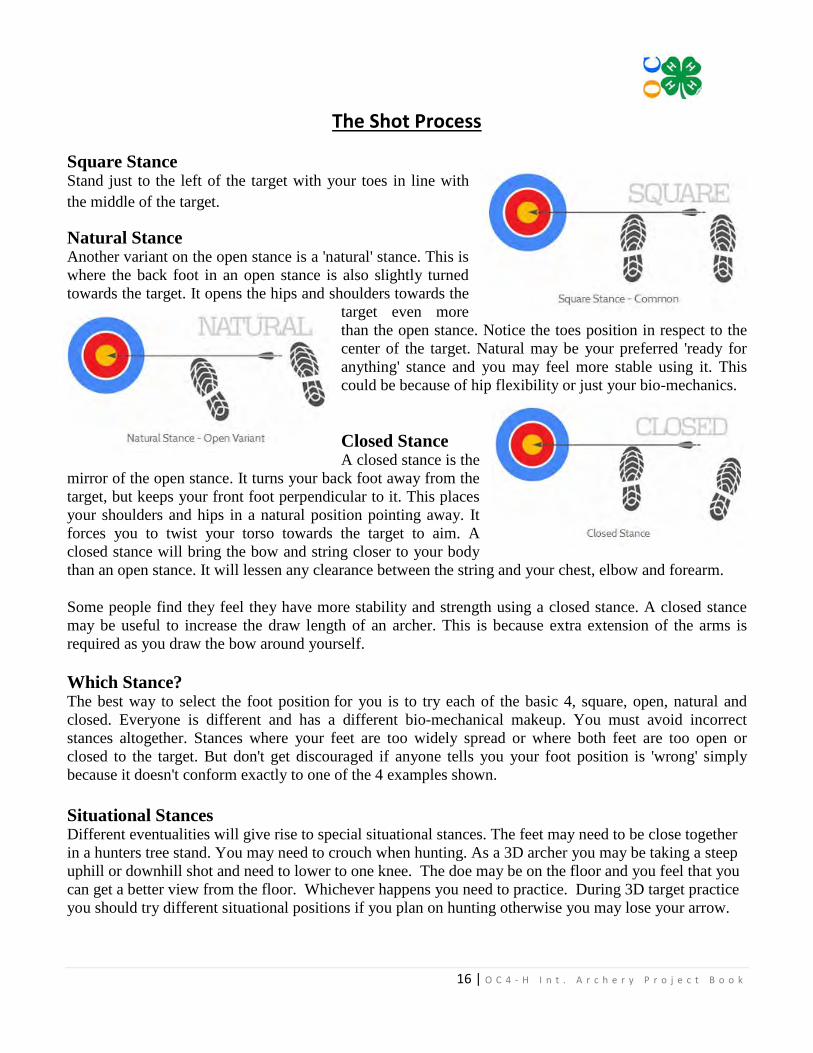
Square Stance Stand just to the left of the target with your toes in line with the middle of the target.
Natural Stance Another variant on the open stance is a 'natural' stance. This is where the back foot in an open stance is also slightly turned towards the target. It opens the hips and shoulders towards the
target even more than the open stance. Notice the toes position in respect to the center of the target. Natural may be your preferred 'ready for anything' stance and you may feel more stable using it. This could be because of hip flexibility or just your bio-mechanics.
Closed Stance A closed stance is the
mirror of the open stance. It turns your back foot away from the target, but keeps your front foot perpendicular to it. This places your shoulders and hips in a natural position pointing away. It forces you to twist your torso towards the target to aim. A closed stance will bring the bow and string closer to your body than an open stance. It will lessen any clearance between the string and your chest, elbow and forearm.
Some people find they feel they have more stability and strength using a closed stance. A closed stance may be useful to increase the draw length of an archer. This is because extra extension of the arms is required as you draw the bow around yourself.
Which Stance? The best way to select the foot position for you is to try each of the basic 4, square, open, natural and closed. Everyone is different and has a different bio-mechanical makeup. You must avoid incorrect stances altogether. Stances where your feet are too widely spread or where both feet are too open or closed to the target. But don't get discouraged if anyone tells you your foot position is 'wrong' simply because it doesn't conform exactly to one of the 4 examples shown. Situational Stances Different eventualities will give rise to special situational stances. The feet may need to be close together in a hunters tree stand. You may need to crouch when hunting. As a 3D archer you may be taking a steep uphill or downhill shot and need to lower to one knee. The doe may be on the floor and you feel that you can get a better view from the floor. Whichever happens you need to practice. During 3D target practice you should try different situational positions if you plan on hunting otherwise you may lose your arrow.
17 | O C 4 - H I n t . A r c h e r y P r o j e c t B o o k
The Shot Process
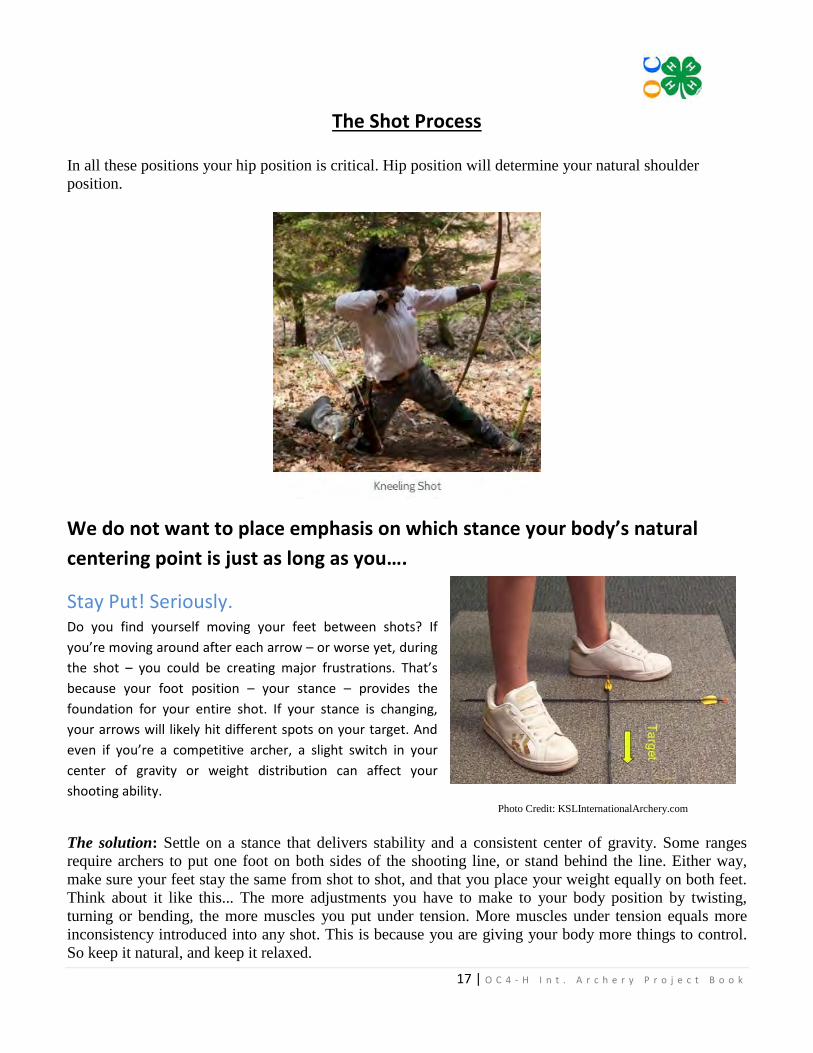
In all these positions your hip position is critical. Hip position will determine your natural shoulder position.
We do not want to place emphasis on which stance your body’s natural centering point is just as long as you….
Stay Put! Seriously. Do you find yourself moving your feet between shots? If you’re moving around after each arrow – or worse yet, during the shot – you could be creating major frustrations. That’s because your foot position – your stance – provides the foundation for your entire shot. If your stance is changing, your arrows will likely hit different spots on your target. And even if you’re a competitive archer, a slight switch in your center of gravity or weight distribution can affect your shooting ability.
Photo Credit: KSLInternationalArchery.com
The solution: Settle on a stance that delivers stability and a consistent center of gravity. Some ranges require archers to put one foot on both sides of the shooting line, or stand behind the line. Either way, make sure your feet stay the same from shot to shot, and that you place your weight equally on both feet. Think about it like this... The more adjustments you have to make to your body position by twisting, turning or bending, the more muscles you put under tension. More muscles under tension equals more inconsistency introduced into any shot. This is because you are giving your body more things to control. So keep it natural, and keep it relaxed.
18 | O C 4 - H I n t . A r c h e r y P r o j e c t B o o k
The Shot Process
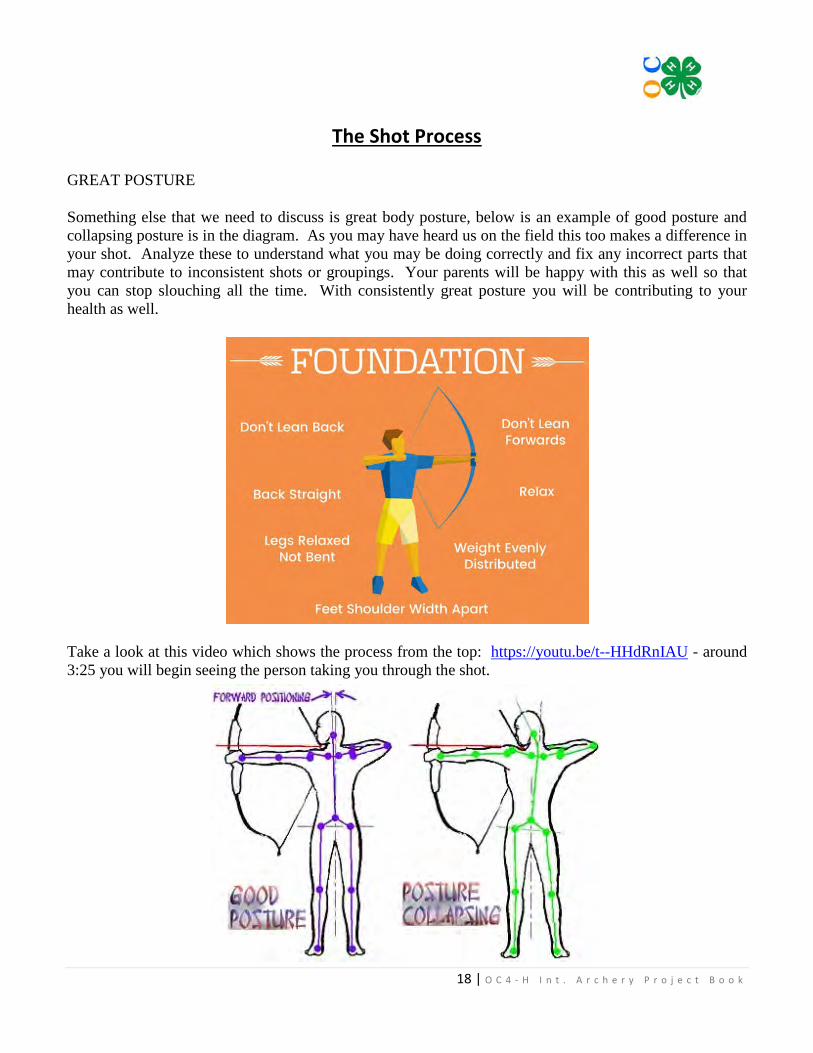
GREAT POSTURE
Something else that we need to discuss is great body posture, below is an example of good posture and collapsing posture is in the diagram. As you may have heard us on the field this too makes a difference in your shot. Analyze these to understand what you may be doing correctly and fix any incorrect parts that may contribute to inconsistent shots or groupings. Your parents will be happy with this as well so that you can stop slouching all the time. With consistently great posture you will be contributing to your health as well.
Take a look at this video which shows the process from the top: https://youtu.be/t--HHdRnIAU - around 3:25 you will begin seeing the person taking you through the shot.
19 | O C 4 - H I n t . A r c h e r y P r o j e c t B o o k
The Shot Process
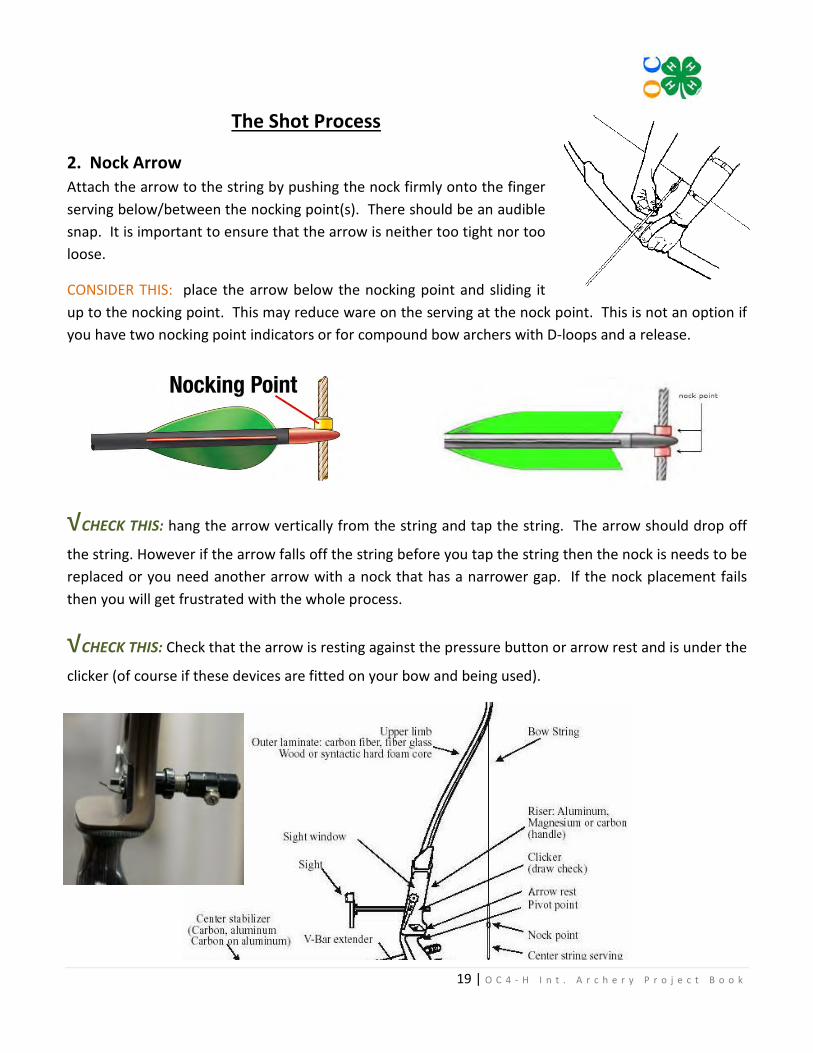
2. Nock Arrow Attach the arrow to the string by pushing the nock firmly onto the finger serving below/between the nocking point(s). There should be an audible snap. It is important to ensure that the arrow is neither too tight nor too loose.
CONSIDER THIS: place the arrow below the nocking point and sliding it up to the nocking point. This may reduce ware on the serving at the nock point. This is not an option if you have two nocking point indicators or for compound bow archers with D-loops and a release.
√CHECK THIS: hang the arrow vertically from the string and tap the string. The arrow should drop off
the string. However if the arrow falls off the string before you tap the string then the nock is needs to be replaced or you need another arrow with a nock that has a narrower gap. If the nock placement fails then you will get frustrated with the whole process.
√CHECK THIS: Check that the arrow is resting against the pressure button or arrow rest and is under the
clicker (of course if these devices are fitted on your bow and being used).
20 | O C 4 - H I n t . A r c h e r y P r o j e c t B o o k
The Shot Process
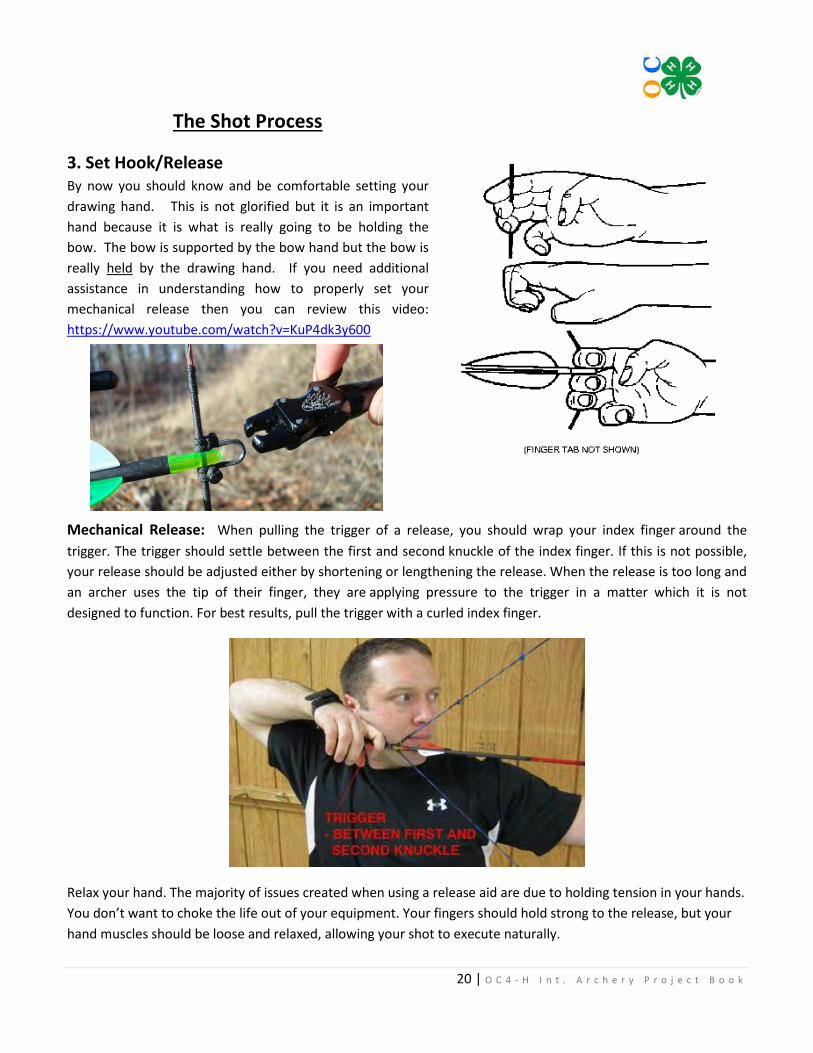
3. Set Hook/Release By now you should know and be comfortable setting your drawing hand. This is not glorified but it is an important hand because it is what is really going to be holding the bow. The bow is supported by the bow hand but the bow is really held by the drawing hand. If you need additional assistance in understanding how to properly set your mechanical release then you can review this video: https://www.youtube.com/watch?v=KuP4dk3y600
Mechanical Release: When pulling the trigger of a release, you should wrap your index finger around the trigger. The trigger should settle between the first and second knuckle of the index finger. If this is not possible, your release should be adjusted either by shortening or lengthening the release. When the release is too long and an archer uses the tip of their finger, they are applying pressure to the trigger in a matter which it is not designed to function. For best results, pull the trigger with a curled index finger.
Relax your hand. The majority of issues created when using a release aid are due to holding tension in your hands. You don’t want to choke the life out of your equipment. Your fingers should hold strong to the release, but your hand muscles should be loose and relaxed, allowing your shot to execute naturally.
21 | O C 4 - H I n t . A r c h e r y P r o j e c t B o o k
The Shot Process
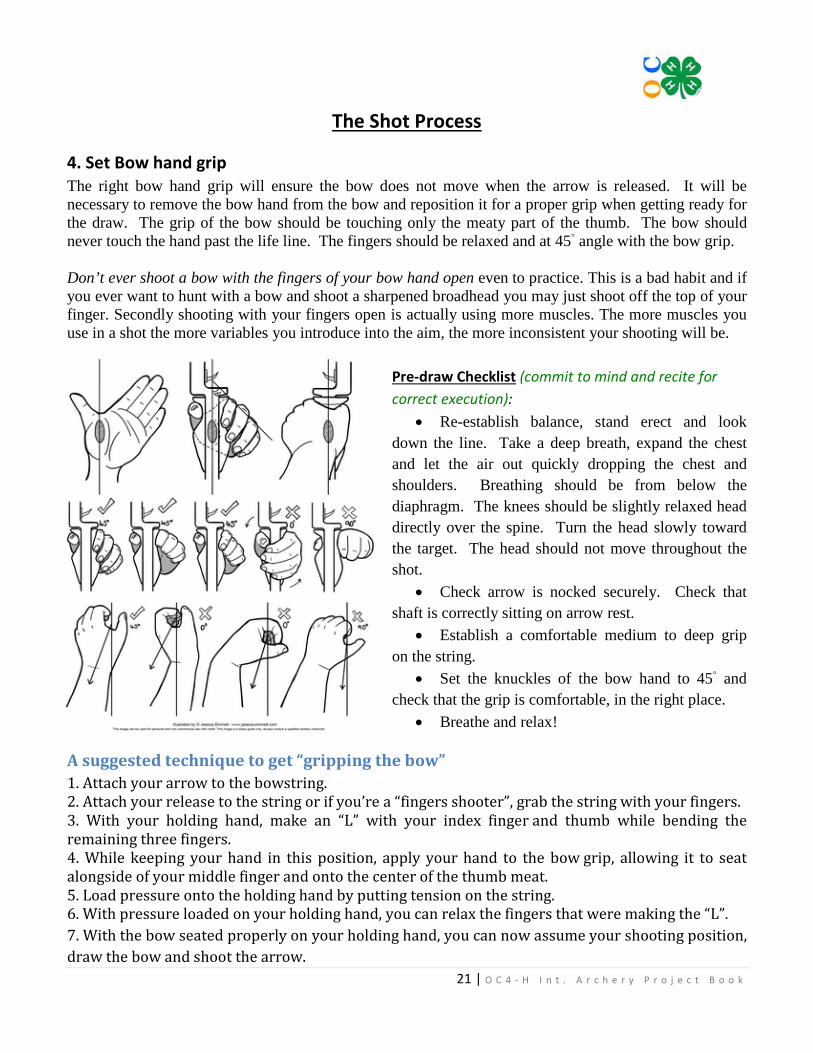
4. Set Bow hand grip The right bow hand grip will ensure the bow does not move when the arrow is released. It will be necessary to remove the bow hand from the bow and reposition it for a proper grip when getting ready for the draw. The grip of the bow should be touching only the meaty part of the thumb. The bow should never touch the hand past the life line. The fingers should be relaxed and at 45◦ angle with the bow grip. Don’t ever shoot a bow with the fingers of your bow hand open even to practice. This is a bad habit and if you ever want to hunt with a bow and shoot a sharpened broadhead you may just shoot off the top of your finger. Secondly shooting with your fingers open is actually using more muscles. The more muscles you use in a shot the more variables you introduce into the aim, the more inconsistent your shooting will be.
Pre-draw Checklist (commit to mind and recite for correct execution):
• Re-establish balance, stand erect and look down the line. Take a deep breath, expand the chest and let the air out quickly dropping the chest and shoulders. Breathing should be from below the diaphragm. The knees should be slightly relaxed head directly over the spine. Turn the head slowly toward the target. The head should not move throughout the shot.
• Check arrow is nocked securely. Check that shaft is correctly sitting on arrow rest.
• Establish a comfortable medium to deep grip on the string.
• Set the knuckles of the bow hand to 45◦ and check that the grip is comfortable, in the right place.
• Breathe and relax!
A suggested technique to get “gripping the bow” 1. Attach your arrow to the bowstring. 2. Attach your release to the string or if you’re a “fingers shooter”, grab the string with your fingers. 3. With your holding hand, make an “L” with your index finger and thumb while bending the remaining three fingers. 4. While keeping your hand in this position, apply your hand to the bow grip, allowing it to seat alongside of your middle finger and onto the center of the thumb meat. 5. Load pressure onto the holding hand by putting tension on the string. 6. With pressure loaded on your holding hand, you can relax the fingers that were making the “L”. 7. With the bow seated properly on your holding hand, you can now assume your shooting position, draw the bow and shoot the arrow.
22 | O C 4 - H I n t . A r c h e r y P r o j e c t B o o k
The Shot Process
5. Raise and extend the bow Raise the bow arm and the string arm together, rotating at the shoulder and check to see that the shoulder stays low. Keep the elbow of the drawing arm high. This will make it easier to correctly use the large back muscles and therefore allow the drawing arm and hand to remain relaxed. The recurve and Genesis bow should be drawn about 1/3d of the way. (Compound bows should be at brace height). Keep the front shoulder in its normal low position. (don’t allow it to rotate up or back). Keep the elbow of the drawing arm high but comfortable.
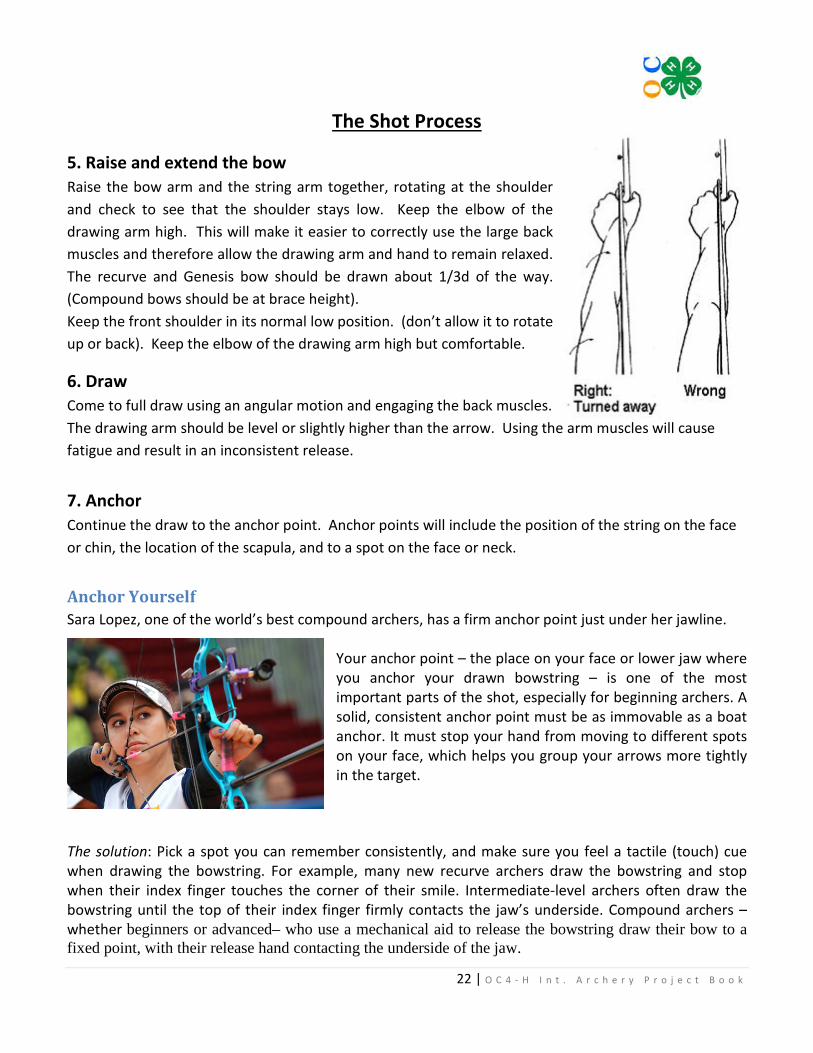
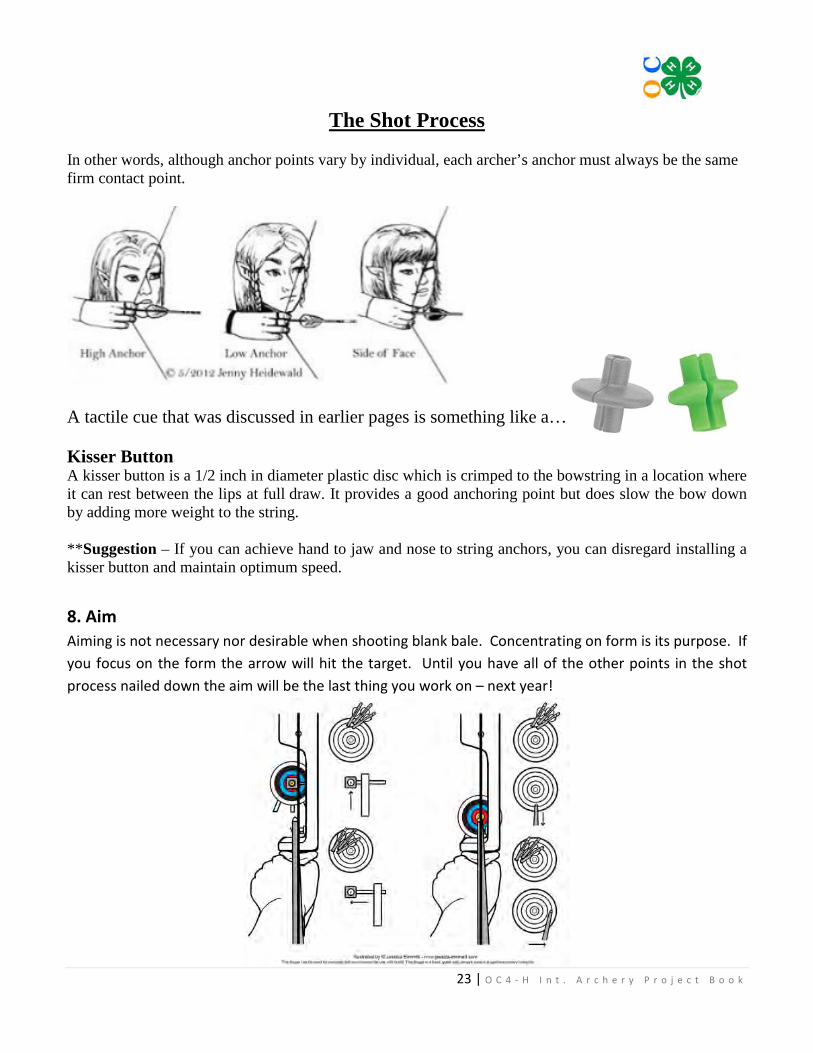
6. Draw Come to full draw using an angular motion and engaging the back muscles. The drawing arm should be level or slightly higher than the arrow. Using the arm muscles will cause fatigue and result in an inconsistent release. 7. Anchor Continue the draw to the anchor point. Anchor points will include the position of the string on the face or chin, the location of the scapula, and to a spot on the face or neck. Anchor Yourself Sara Lopez, one of the world’s best compound archers, has a firm anchor point just under her jawline.
Your anchor point – the place on your face or lower jaw where you anchor your drawn bowstring – is one of the most important parts of the shot, especially for beginning archers. A solid, consistent anchor point must be as immovable as a boat anchor. It must stop your hand from moving to different spots on your face, which helps you group your arrows more tightly in the target.
The solution: Pick a spot you can remember consistently, and make sure you feel a tactile (touch) cue when drawing the bowstring. For example, many new recurve archers draw the bowstring and stop when their index finger touches the corner of their smile. Intermediate-level archers often draw the bowstring until the top of their index finger firmly contacts the jaw’s underside. Compound archers – whether beginners or advanced– who use a mechanical aid to release the bowstring draw their bow to a fixed point, with their release hand contacting the underside of the jaw.
23 | O C 4 - H I n t . A r c h e r y P r o j e c t B o o k
The Shot Process
In other words, although anchor points vary by individual, each archer’s anchor must always be the same firm contact point.
A tactile cue that was discussed in earlier pages is something like a…
Kisser Button A kisser button is a 1/2 inch in diameter plastic disc which is crimped to the bowstring in a location where it can rest between the lips at full draw. It provides a good anchoring point but does slow the bow down by adding more weight to the string. **Suggestion – If you can achieve hand to jaw and nose to string anchors, you can disregard installing a kisser button and maintain optimum speed.
8. Aim Aiming is not necessary nor desirable when shooting blank bale. Concentrating on form is its purpose. If you focus on the form the arrow will hit the target. Until you have all of the other points in the shot process nailed down the aim will be the last thing you work on – next year!
24 | O C 4 - H I n t . A r c h e r y P r o j e c t B o o k
The Shot Process
9. Release Relax the string fingers and let the arrow fly.
For finger release, relax the fingers of the drawing hand while continuing to draw the bow, in an angular
motion, using the back muscles.
For a mechanical release, continue drawing the bow with the back muscles to accomplish the release
using back tension.
Continue holding the bow arm toward the target. The bow may pivot forward.
The head should not move and the eyes continue looking at the point of aim until the arrow strikes the
target.
If four or five seconds have elapsed since the string reached anchor, COME DOWN, Don’t struggle, don’t
fight, because your mind will be full of everything other than releasing. Stresses in the body will induce
shaking and therefore causing shot to fail. A draw of five seconds is too long.
What to do during the Release?
There's a lot about archery that is more complicated than it looks, so when there's a step that is as easy as it seems, that's a wonderful thing. And that describes the first part of the release: when you're ready to shoot, you simply release the tension in your bow string fingers, and let the arrow fly. That's it! Relax all three fingers at once and let the string jump forward by itself. You don't need to do anything but let go---the energy stored in the limbs at full draw will pull the string forward with great force, so there's nothing you need to do.
The second part of the release is a natural continuation of the first: after you relax the tension in your fingers and the string is released, three things should happen:
• Your hand will gracefully fall back a little bit; • Your chest will expand ever-so-slightly, and open up a little bit; and • Your back muscles will contract ever-so-slightly and your shoulders will come together a little bit.
Watch this: https://www.youtube.com/watch?v=lHhYO9KR-9M&t=310s. This process of letting your hand brush past your face is called a "dynamic release." There is a type of release where your hand does NOT fall gracefully backwards---and that's called a "static release"---but it's not a great option for beginners, because it's very difficult to get right. "Best practice" is to start with a follow-through release.
That expansion / contraction is nothing dramatic, but it's an important part of the draw, so have a range staffer or coach or friend give you an eye and make sure you've got it down.
25 | O C 4 - H I n t . A r c h e r y P r o j e c t B o o k
The Shot Process
Some Other Notes About the Release The Release isn't done when you Release the string; It's done after the Follow-Through. After you've let go of the string and your hand flows backwards and your chest expands a little, that's when the step is coming to an end. The follow-through is an important part of the release.
• No Plucking the String. All you have to do is release the string; no theatrics, no forcefully bringing your hand back. You're just letting go---that's it!
• No Pushing the Bow. Both new archers and experienced archers can fall into the tendency of moving the bow ever-so-slightly after the arrow has been released, and that---like absolutely everything else!---can mess up your shot. You want to keep your bow arm as still as possible as the arrow clears the shelf and moves toward your target. The bow will likely dip forward a little, especially if you've got a very relaxed grip, and that's totally OK.
Shooting blank bale helps with practicing this motion. Something else that happens when someone is struggling with their release at some point is “Target Panic”.
Target Panic — The inability to lose the arrow, but more commonly letting the arrow fly before full draw is
reached. Once called “archer’s catalepsy.”
It’s been suggested that most archers will come down with target panic at some point during their shooting careers. The reasons why it happens vary from person to person. Same goes for its severity. The path to beating target panic has been fairly well charted through the years, although there is no quantifiable recovery time and there’s no guarantee it won’t return.
Anticipation and the resulting anxiety are classic calling cards of target panic, one of the best ways to kill both is to be surprised when the string is released at full draw. To do that, you generally need to remove a traditional trigger. One solution does not fit every shooter. Hopefully you will find some ideas below that will help you if target panic ever rears its ugly head in your life. For more discussion of this topic, check out the Campfire Forum at Tradbow.com. There is an active thread called Target Panic that also has some great ideas, and you are welcome to share your opinion there. Here are some example solutions:
Arne M. wrote: I’m not sure there is a simple tip to cure target panic, as it can be caused by so many different stimuli. Here is an approach I use that seems to be effective.
Many place way too much emphasis on aiming–to the extent of setting an “aim” before ever starting to draw. Then they concentrate on holding the aim at the expense of all the rest of the mechanics of the shot. What works for many is to place the aiming step after reaching full draw. If the shooter concentrates only on the step being performed at the moment it is being done, there is no subconscious trigger to release the arrow. Concentration should be on the steps of the shot, placing the aiming step AFTER reaching anchor/holding, THEN mentally moving to shot conclusion. If you concentrate on each step of the shot process, control of the shot will be maintained. By concentrating only on aiming however, the steps will run on autopilot and control is lost.
26 | O C 4 - H I n t . A r c h e r y P r o j e c t B o o k
The Shot Process
Target Panic John P. wrote: While it may ruffle a few feathers, I have found that one of the most effective ways to deal with target panic is to shoot a compound bow for a while. Shooting a compound, with or without sights etc., forces you to come back to full draw and hold just by the nature of the device. Using a compound for a period of time and then going back to the traditional bow, reprograms you to draw, hold and release. I have personally used the compound bow for this problem with great success. Switching my traditional bow to one with a lower draw weight and increased draw length also helped, but it was shooting the compound that really seemed to help the most. Switching to a lower weight traditional bow just made sure I stayed cured. I guess there is a use for bows with training wheels after all. Michael B. wrote: I tried everything, but ended up switching to non-dominant eye/hand shooting. Bob L. wrote: Actually, one of the best cures for target panic is to shoot with your eyes closed. Seriously! Begin by standing about two or three feet from a large bale target, close your eyes and go through the whole shooting cycle. Picture the shot in your mind. Come to full draw and hold, preferably for two to five seconds. After you release the arrow, do it over again. By closing your eyes, your sense of feel is enhanced tremendously. After a while you find that you can concentrate on the subtle aspects of the shot: stance, string feel, hand position and release. After you get that stuff squared away, go back to having your eyes open, but start out at about five yards. Only after you can put three in a tea cup, do you take a step back. It is vitally important that each session begins and ends with your eyes closed; and if you ever start to have a problem while you are shooting, go back to the eyes closed technique. It takes a while, but it works. Kevin F. wrote: The best solution for target panic is NOT to be afraid of losing arrows. I’ve become a much better archer with no target panic after I started making my own arrows. I have an excess amount of junk arrows that I let fly…this improves my distance shooting as well. Gary C. wrote: I’ve had this issue from time to time. It seemed to be more of an issue when I was shooting a compound, but now I have made traditional archery my discipline of choice. Target panic shows its ugly head every now and then. You can almost feel it inching its way into your shooting regimen. For me, that’s the first sign I’m shooting too much or need to slow down. I’ll come to full draw and anchor, then count to three before I shoot. Just slow down. Concentrate on that target. I will also stand close to my target–say 15 feet–come to full draw, then close my eyes and imagine my target. It’s tougher than it seems, but it forces me to slow down. Even just imagining a shot sequence through your mind helps you slow down and create good habits. Remember, it’s called a discipline. What we think about, we bring about.
27 | O C 4 - H I n t . A r c h e r y P r o j e c t B o o k
The Shot Process
10. Follow-Through Most of the follow-through routine is common sense:
• Keep the bow arm up, pointed, and pushed out toward the target until the arrow hits the target. • The drawing hand should continue back to beside the neck with the fingers relaxed and ending
up behind the ear. • If you have the proper bow hand grip the bow will rotate forward. The bow sling prevents the
bow from falling to the ground. One thing that plagues most archers–the best and the worst alike– is the lack of follow through after the shot. It doesn’t matter if you fancy yourself a pure instinctive person who shoots swing arm and is at anchor for a split second, or a barebow robot who shoots set-arm and camps at anchor for a week before the arrow is on its way, we all need some work on our follow through. The string hand often gets neglected. Watch an archer shoot twenty arrows and you might see the string hand in twenty different positions after the shot because the string wasn’t released the same way each time. Improving consistency here is a lot easier than you’d think.
11. Relax and Evaluate • Relax after each shot.
• Evaluate the feeling of each shot to determine if you accomplished the goal you were trying to
achieve.
• If not, you should refocus your efforts on the feeling of the proper shot and try again.
• If so repeat.
• Evaluate but don’t get caught up in over-evaluation. Forget the shot it is over. Concentrate on the
next shot.
• After the last shot of the end return to the waiting line.
After you've shot a full end---an "end" is usually a group of six arrows---see if you've got a grouping, or adjust your scope if you need to.
Then...
Keep practicing! As you develop skill and experience, you'll form a deep understanding of the shot sequence, and how to make it work so that you're accurately hitting your target, again and again.
28 | O C 4 - H I n t . A r c h e r y P r o j e c t B o o k
The Shot Process
What to Evaluate
This step---"Reflect"---is perhaps the most important task in all of the steps we've talked about. You can practice more than anyone in the world, but if you're not paying attention what works and what doesn't, you're not going to improve. So after each end, take a second, and go through each part of your shot. Ask yourself or write it down so you remember:
• How was your stance? Were your feet parallel to the shooting line? Were your knees slightly bent, was your torso facing the same way as your feet, and was your head facing the target? Did your body drift at all during the shot? Were your muscles relaxed? (Step 1)
• Did you nock your arrow correctly? When you were standing on the line, did you have your bow pointing towards the ground before the shot with the limbs vertical, and did you make sure you had the index vane pointing the right way? (Step 2)
• Did you grasp the bow string correctly? If you're using a recurve, did you hold the bow string in the valley of your first knuckle joints? If you're a beginner? (Step 3)
• Was your grip on the bow relaxed? Or did you strain it too much, so that it shook upon your release? (Step 4)
• How was your form when you raised your bow arm? Were your shoulders low, or were they scrunched up? Were you muscles relaxed? Was your elbow at a 9-and-3 position, or was it pointing in all sorts of weird directions? Was your elbow hyper-extended? (If it was, you may be in extreme pain after your shot!) Did you keep your bow below the target when you raised your bow arm? (Step 5)
• How clean was your draw? Was your head held up straight? How was your stance? Was your drawing arm flat, with your wrist flat as well? Did the draw feel too heavy or too light? Was your bow arm shaking, or did you find your bow drifting upward as you drew? (Those might be signs you're using too heavy a bow). Were you able to maintain your grip on the bow string? (Step 6).
• Did you properly connect to your anchor point? Did you bring your string hand to your anchor point, or did you draw and then bring your anchor point to your hand? Did you keep your mouth closed, so as not to alter your anchor point? (Step 7)
• How was your aim? Were you accurate? Did your arrows group well? Do you need to "chase the arrows," and adjust your bow sight? (Step 8).
• How was your release? Did you gracefully allow your string hand to release the bow string? Did you feel your chest expand as you let the arrow loose, and did you feel your back contract a little? Did you move your bow arm during or after the release? (Step 9)
• Did you review your shot? Did you ask yourself all these questions, and did you try and figure out what went right, and what could improve? (Step 10)
Finally--how did it feel?? Did your body feel natural? Odd? How did that feeling translate into your shot?
It's a long checklist, but the longer you're an archer, the more quickly you'll run through it--and the fewer problems you'll have. Remember, this is a sport that rewards repetition, so figure out how to make adjustments until you're highly skilled.

29 | O C 4 - H I n t . A r c h e r y P r o j e c t B o o k
The Shot Process
One Extra Step That's Important
Here's one other bit of advice that might be the most valuable bit of advice: after you shoot and after you review your shot, write down your findings, immediately.
You may not have insights after every end you shoot, and that's totally OK---but when you discover something (like, "The looser I make my bow hand, the better my arrows group" or "I always shoot poorly with a new finger tab" or whatever) write it down immediately. Keep a notepad in your quiver or enter your thoughts into your iPhone. If you wait until later, you'll forget what you've learned. When you write you learn from experiences.
This is, far and away, the step that most archers wish they could skip. It can be a drag to stop and record your thoughts, and it may look a little bit nerdy to take notes all the time, but I promise you: it works. If you want to get better and improve your skills, take notes. (And if you make a great shot, it allows you to re-live what you did, and enjoy it longer).
Another factor that plays into the shot process:
Being overbowed
World renowned traditional Archer G. Fred Asbell recommends a test for determining if an archer is over-bowed. While bending at the waist and aiming at the ground, an archer draws the bow with the back of the bow hand just below the inside of the knee. If an archer cannot do this easily, he or she is likely not strong enough to shoot that draw weight.
30 | O C 4 - H I n t . A r c h e r y P r o j e c t B o o k
Equipment Maintenance
We have discussed maintenance before however we need to remind you that there is a process which we have to follow to ensure all equipment is ready and safe for shooting. Make a habit of checking your bow and arrows before you shoot.
Your Bow Check list:
1. Check limbs for nicks, cracks, and that your bow is strung properly. Lightly run your hands over the surface of your bow limbs and look closely for cracks, bulges in the limb surface, or twisted limbs. While it is rare, cracks may also develop in some risers.
2. Look over the metal parts of your bow to check for rust or corrosion if you shoot in humid or rainy places.
3. For recurves check your bow strings for signs of fraying, loose or broken strands. Does it need wax? If so then wax it.
4. If you shoot a compound bow, routinely check your bowstring and cables. 5. For compounds, make sure that all of your screws are tight and in place. Run through each
screw at least once a month if you are a weekly shooter and tighten up where needed. Make sure not to tighten too much though!
6. Make sure your nock is in the right place and no servings are frayed. 7. If you hear any unusual noise or feel any unusual vibrations STOP shooting your Compound
or Crossbow and check it completely for any damage. If you cannot pinpoint the problems do not shoot the bow, take it to a Pro Shop to have it checked out. The noise may become a problem that could be costly, like a cracked limb.
A bow in need of repair or replacement parts could break if you continue to shoot it. In the case of a damaged riser or limbs, your best bet is to stop shooting, unstring the bow carefully. For recurve or longbow, and contact the local dealer or bow manufacturer to ask their advice.
Your Arrows Check list:
Arrows typically see the most wear and tear of all archery equipment, which is why you should inspect your arrows before practice and each and every time you plan to shoot them.
1. Look at the points to make sure they are not coming unglued or unscrewed. 2. Inspect the fletching to make sure they are fully attached 3. Inspect and replace any nocks that have cracks. 4. If you shoot aluminum or wooden arrow shafts, you can check for straightness by laying them on
a table so the fletching is off the edge. Simply roll them back and forth and bent arrows will be obvious right away.
5. With wooden arrows, keep an eye out for cracks, which can cause the arrow to break dangerously in the middle of the shot.
6. If you are using carbon shafts, flex the arrow and listen for any cracking sounds to be sure the arrow shaft is not splintering in any way. If you do find cracks, be very careful to avoid touching the splinters, which are more dangerous than wooden splinters, and do not shoot the arrow again.
7. Check arrow points to ensure they have not come loose.
31 | O C 4 - H I n t . A r c h e r y P r o j e c t B o o k
Archery Tackle
If you are ready to add accessories to your bow, the next few pages show some accessories and what they are for, they were just touched on a bit in last year’s book.
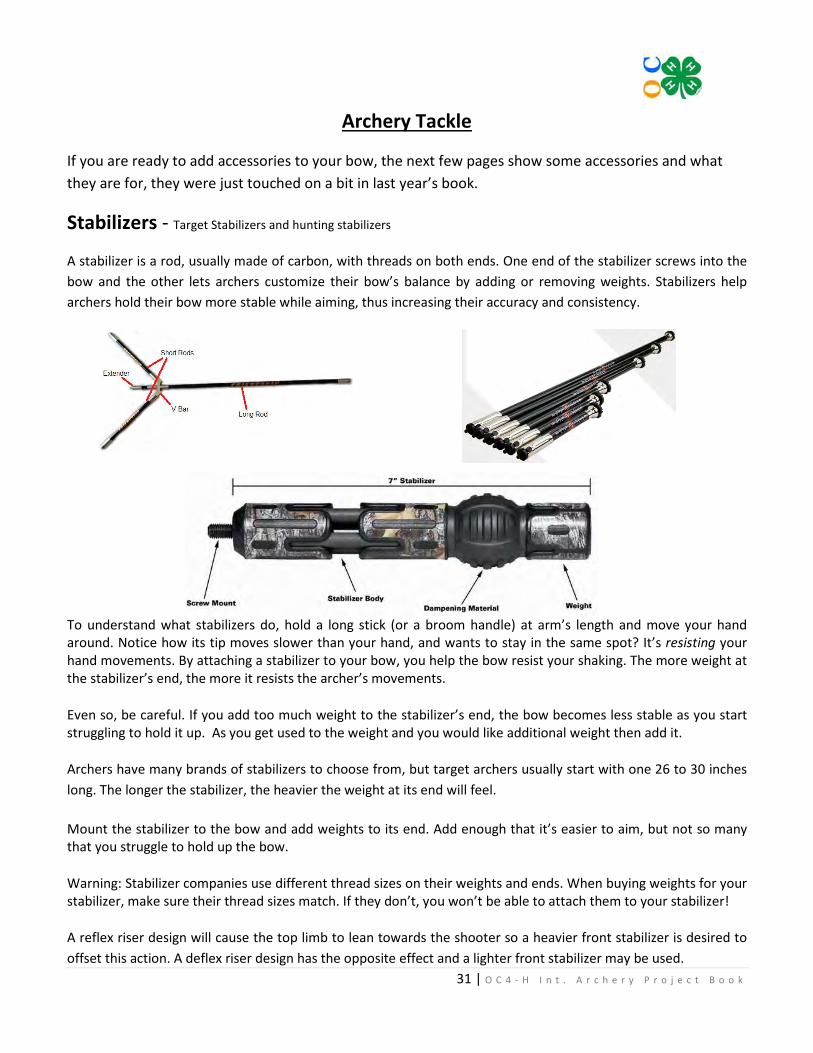
Stabilizers - Target Stabilizers and hunting stabilizers
A stabilizer is a rod, usually made of carbon, with threads on both ends. One end of the stabilizer screws into the bow and the other lets archers customize their bow’s balance by adding or removing weights. Stabilizers help archers hold their bow more stable while aiming, thus increasing their accuracy and consistency.
To understand what stabilizers do, hold a long stick (or a broom handle) at arm’s length and move your hand around. Notice how its tip moves slower than your hand, and wants to stay in the same spot? It’s resisting your hand movements. By attaching a stabilizer to your bow, you help the bow resist your shaking. The more weight at the stabilizer’s end, the more it resists the archer’s movements.
Even so, be careful. If you add too much weight to the stabilizer’s end, the bow becomes less stable as you start struggling to hold it up. As you get used to the weight and you would like additional weight then add it.
Archers have many brands of stabilizers to choose from, but target archers usually start with one 26 to 30 inches long. The longer the stabilizer, the heavier the weight at its end will feel.
Mount the stabilizer to the bow and add weights to its end. Add enough that it’s easier to aim, but not so many that you struggle to hold up the bow.
Warning: Stabilizer companies use different thread sizes on their weights and ends. When buying weights for your stabilizer, make sure their thread sizes match. If they don’t, you won’t be able to attach them to your stabilizer!
A reflex riser design will cause the top limb to lean towards the shooter so a heavier front stabilizer is desired to offset this action. A deflex riser design has the opposite effect and a lighter front stabilizer may be used.
32 | O C 4 - H I n t . A r c h e r y P r o j e c t B o o k
Archery Tackle
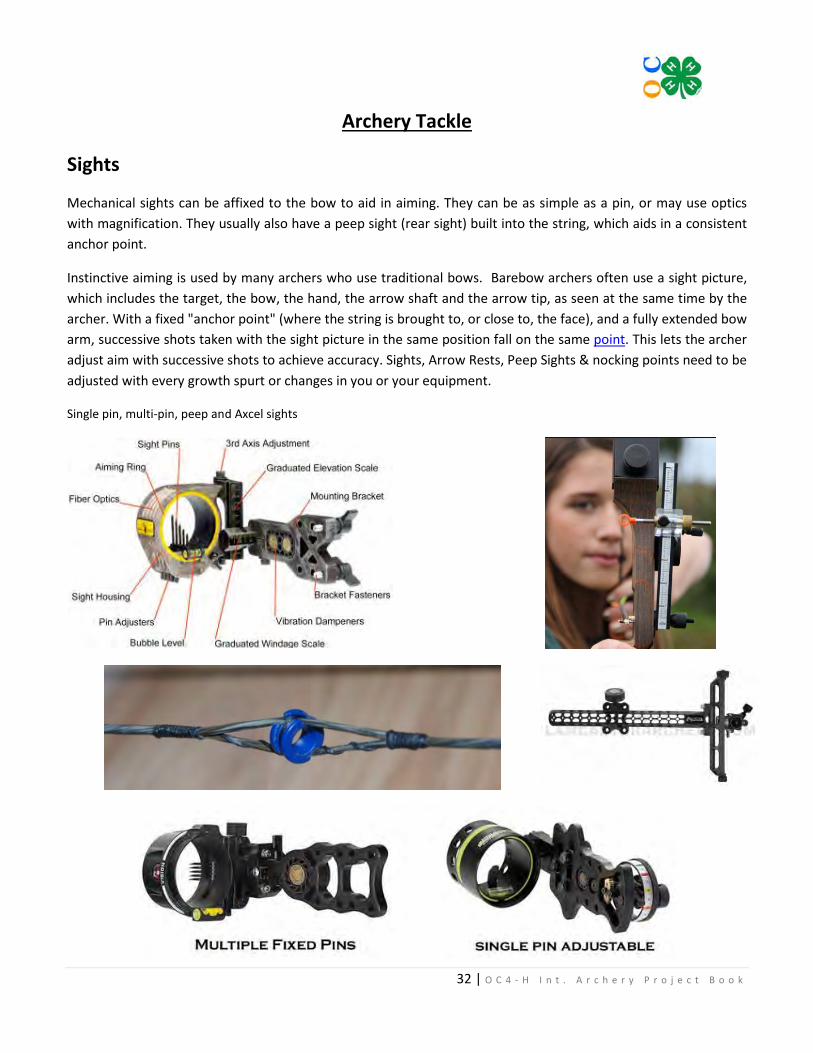
Sights
Mechanical sights can be affixed to the bow to aid in aiming. They can be as simple as a pin, or may use optics with magnification. They usually also have a peep sight (rear sight) built into the string, which aids in a consistent anchor point.
Instinctive aiming is used by many archers who use traditional bows. Barebow archers often use a sight picture, which includes the target, the bow, the hand, the arrow shaft and the arrow tip, as seen at the same time by the archer. With a fixed "anchor point" (where the string is brought to, or close to, the face), and a fully extended bow arm, successive shots taken with the sight picture in the same position fall on the same point. This lets the archer adjust aim with successive shots to achieve accuracy. Sights, Arrow Rests, Peep Sights & nocking points need to be adjusted with every growth spurt or changes in you or your equipment. Single pin, multi-pin, peep and Axcel sights
33 | O C 4 - H I n t . A r c h e r y P r o j e c t B o o k
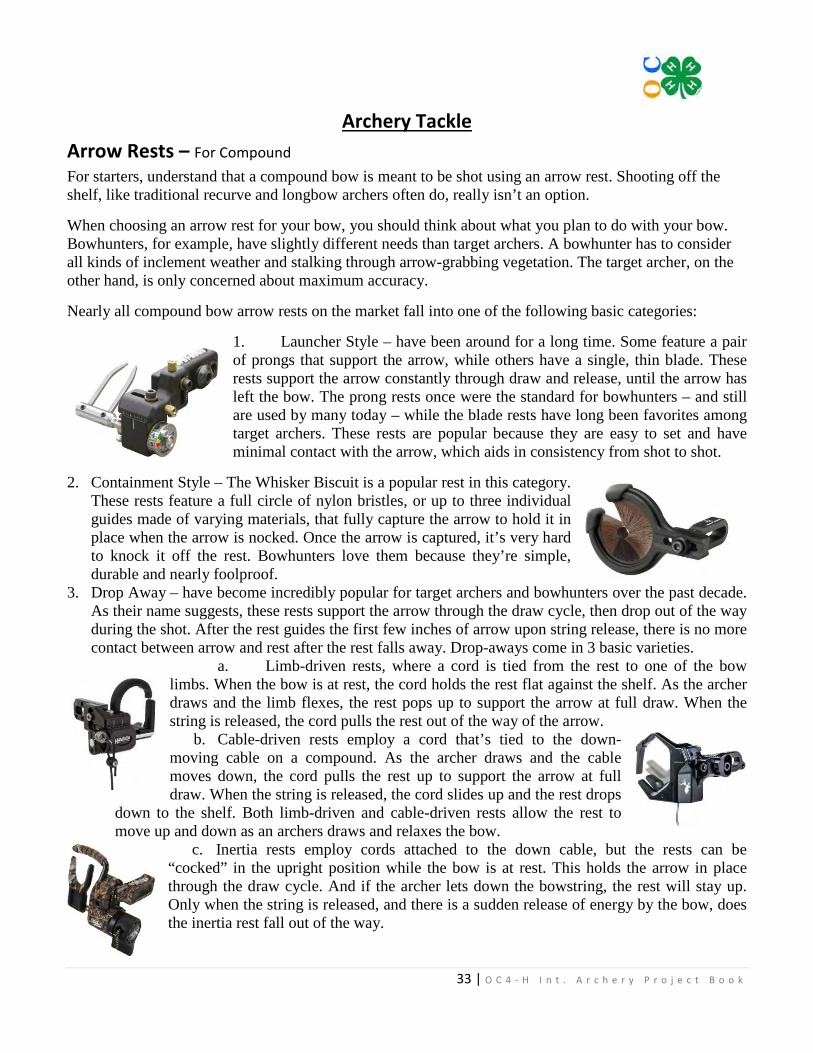
Archery Tackle Arrow Rests – For Compound For starters, understand that a compound bow is meant to be shot using an arrow rest. Shooting off the shelf, like traditional recurve and longbow archers often do, really isn’t an option. When choosing an arrow rest for your bow, you should think about what you plan to do with your bow. Bowhunters, for example, have slightly different needs than target archers. A bowhunter has to consider all kinds of inclement weather and stalking through arrow-grabbing vegetation. The target archer, on the other hand, is only concerned about maximum accuracy. Nearly all compound bow arrow rests on the market fall into one of the following basic categories:
1. Launcher Style – have been around for a long time. Some feature a pair of prongs that support the arrow, while others have a single, thin blade. These rests support the arrow constantly through draw and release, until the arrow has left the bow. The prong rests once were the standard for bowhunters – and still are used by many today – while the blade rests have long been favorites among target archers. These rests are popular because they are easy to set and have minimal contact with the arrow, which aids in consistency from shot to shot.
2. Containment Style – The Whisker Biscuit is a popular rest in this category. These rests feature a full circle of nylon bristles, or up to three individual guides made of varying materials, that fully capture the arrow to hold it in place when the arrow is nocked. Once the arrow is captured, it’s very hard to knock it off the rest. Bowhunters love them because they’re simple, durable and nearly foolproof.
3. Drop Away – have become incredibly popular for target archers and bowhunters over the past decade. As their name suggests, these rests support the arrow through the draw cycle, then drop out of the way during the shot. After the rest guides the first few inches of arrow upon string release, there is no more contact between arrow and rest after the rest falls away. Drop-aways come in 3 basic varieties.
a. Limb-driven rests, where a cord is tied from the rest to one of the bow limbs. When the bow is at rest, the cord holds the rest flat against the shelf. As the archer draws and the limb flexes, the rest pops up to support the arrow at full draw. When the string is released, the cord pulls the rest out of the way of the arrow.
b. Cable-driven rests employ a cord that’s tied to the down-moving cable on a compound. As the archer draws and the cable moves down, the cord pulls the rest up to support the arrow at full draw. When the string is released, the cord slides up and the rest drops
down to the shelf. Both limb-driven and cable-driven rests allow the rest to move up and down as an archers draws and relaxes the bow.
c. Inertia rests employ cords attached to the down cable, but the rests can be “cocked” in the upright position while the bow is at rest. This holds the arrow in place through the draw cycle. And if the archer lets down the bowstring, the rest will stay up. Only when the string is released, and there is a sudden release of energy by the bow, does the inertia rest fall out of the way.
34 | O C 4 - H I n t . A r c h e r y P r o j e c t B o o k
Archery Tackle
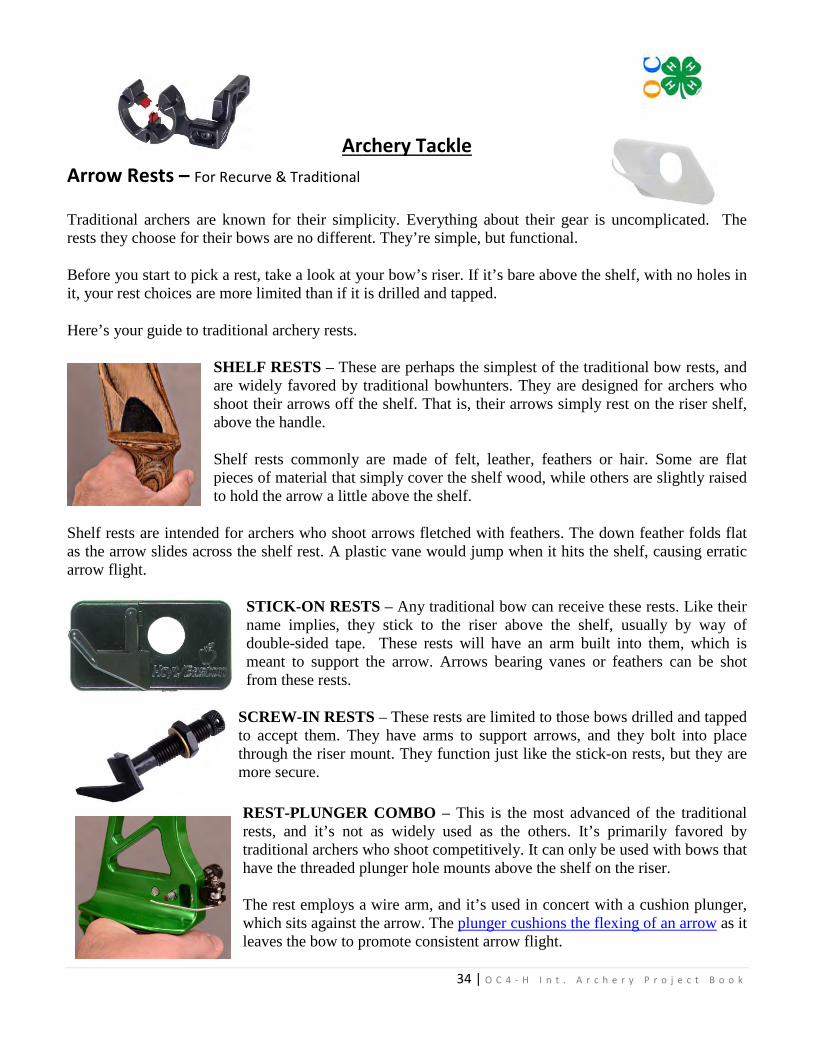
Arrow Rests – For Recurve & Traditional
Traditional archers are known for their simplicity. Everything about their gear is uncomplicated. The rests they choose for their bows are no different. They’re simple, but functional.
Before you start to pick a rest, take a look at your bow’s riser. If it’s bare above the shelf, with no holes in it, your rest choices are more limited than if it is drilled and tapped.
Here’s your guide to traditional archery rests.
SHELF RESTS – These are perhaps the simplest of the traditional bow rests, and are widely favored by traditional bowhunters. They are designed for archers who shoot their arrows off the shelf. That is, their arrows simply rest on the riser shelf, above the handle.
Shelf rests commonly are made of felt, leather, feathers or hair. Some are flat pieces of material that simply cover the shelf wood, while others are slightly raised to hold the arrow a little above the shelf.
Shelf rests are intended for archers who shoot arrows fletched with feathers. The down feather folds flat as the arrow slides across the shelf rest. A plastic vane would jump when it hits the shelf, causing erratic arrow flight.
STICK-ON RESTS – Any traditional bow can receive these rests. Like their name implies, they stick to the riser above the shelf, usually by way of double-sided tape. These rests will have an arm built into them, which is meant to support the arrow. Arrows bearing vanes or feathers can be shot from these rests.
SCREW-IN RESTS – These rests are limited to those bows drilled and tapped to accept them. They have arms to support arrows, and they bolt into place through the riser mount. They function just like the stick-on rests, but they are more secure.
REST-PLUNGER COMBO – This is the most advanced of the traditional rests, and it’s not as widely used as the others. It’s primarily favored by traditional archers who shoot competitively. It can only be used with bows that have the threaded plunger hole mounts above the shelf on the riser. The rest employs a wire arm, and it’s used in concert with a cushion plunger, which sits against the arrow. The plunger cushions the flexing of an arrow as it leaves the bow to promote consistent arrow flight.
35 | O C 4 - H I n t . A r c h e r y P r o j e c t B o o k
Archery Tackle Indoor vs. Outdoor arrows - What’s the difference?
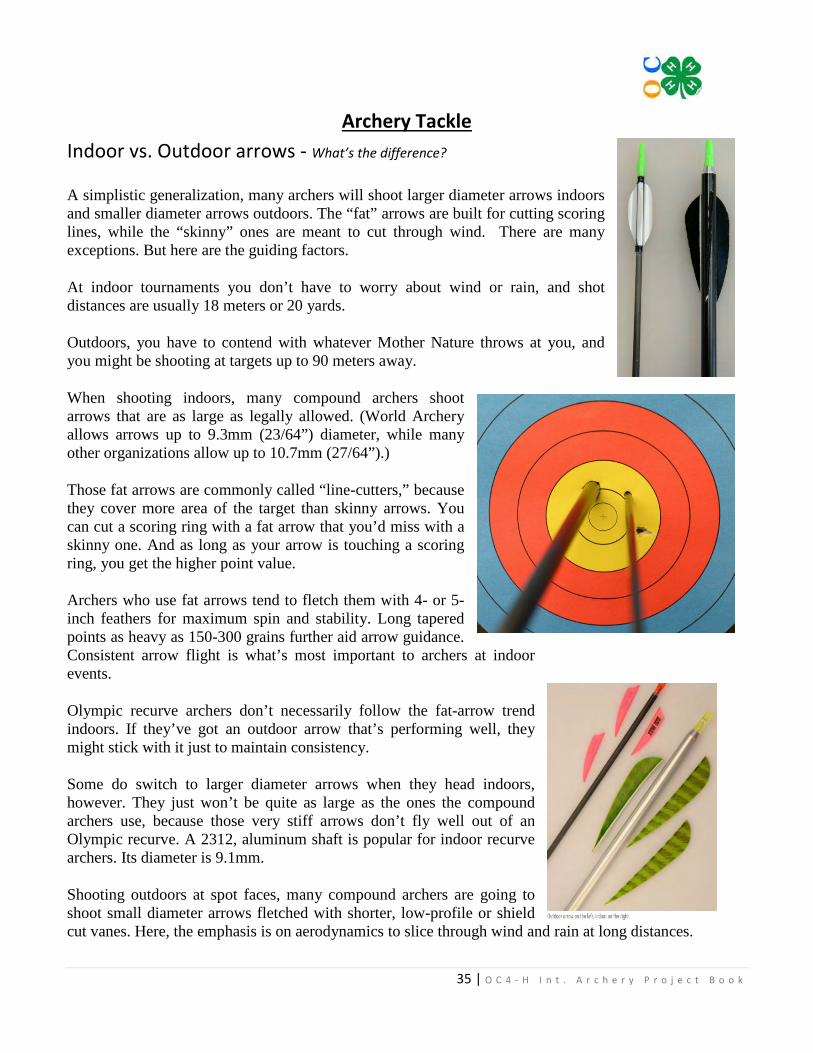
A simplistic generalization, many archers will shoot larger diameter arrows indoors and smaller diameter arrows outdoors. The “fat” arrows are built for cutting scoring lines, while the “skinny” ones are meant to cut through wind. There are many exceptions. But here are the guiding factors.
At indoor tournaments you don’t have to worry about wind or rain, and shot distances are usually 18 meters or 20 yards.
Outdoors, you have to contend with whatever Mother Nature throws at you, and you might be shooting at targets up to 90 meters away.
When shooting indoors, many compound archers shoot arrows that are as large as legally allowed. (World Archery allows arrows up to 9.3mm (23/64”) diameter, while many other organizations allow up to 10.7mm (27/64”).)
Those fat arrows are commonly called “line-cutters,” because they cover more area of the target than skinny arrows. You can cut a scoring ring with a fat arrow that you’d miss with a skinny one. And as long as your arrow is touching a scoring ring, you get the higher point value.
Archers who use fat arrows tend to fletch them with 4- or 5-inch feathers for maximum spin and stability. Long tapered points as heavy as 150-300 grains further aid arrow guidance. Consistent arrow flight is what’s most important to archers at indoor events.
Olympic recurve archers don’t necessarily follow the fat-arrow trend indoors. If they’ve got an outdoor arrow that’s performing well, they might stick with it just to maintain consistency.
Some do switch to larger diameter arrows when they head indoors, however. They just won’t be quite as large as the ones the compound archers use, because those very stiff arrows don’t fly well out of an Olympic recurve. A 2312, aluminum shaft is popular for indoor recurve archers. Its diameter is 9.1mm.
Shooting outdoors at spot faces, many compound archers are going to shoot small diameter arrows fletched with shorter, low-profile or shield cut vanes. Here, the emphasis is on aerodynamics to slice through wind and rain at long distances.
36 | O C 4 - H I n t . A r c h e r y P r o j e c t B o o k
Archery Tackle Indoor vs. Outdoor arrows - What’s the difference?
An exception is 3-D archery. You’ll still find compound archers shooting fat arrows to cut scoring rings on 3-D targets, but they generally will have short, low-profile vanes and lighter points to keep the arrows light and fast. Also, 3-D archers typically don’t shoot over 50 yards.
Olympic recurve archers shoot small diameter arrows outdoors. They’re usually fletched with lightweight, curled-style vanes designed to promote maximum spin, which is key to arrow flight in the wind.
Be sure to check the rules governing the league or tournament you’re shooting in. Some have limits on the size of an arrow’s diameter, and those limits can vary from shoot to shoot.
Indoor target arrows can be either carbon or aluminum, and they’re often tipped with heavy points. Some weigh 300 grains, where the most common point used for hunting and recreational arrows weighs 100 grains.
That heavy weight at the front of the arrow is great for consistent accuracy.
And although these points are pretty hefty and round at the shaft end, the nose is often sharply pointed. That helps guide the arrow into existing holes in the target, which hopefully are in the center of the 10 ring.
At the other end, you’re likely to see 3-, 4-, or 5-inch vanes or feathers attached to the shaft in a twisted fashion. That’s called a helical configuration, where the curved fletchings force the arrow to spin, which stabilizes its flight.
There are nocks made to fit directly into the back of some of the large diameter arrows, but many archers use a bushing that slides into the back and accepts a smaller diameter nock.
The smaller nocks are considered to be better for accuracy, and the bushing helps protect the arrow from being damaged by other arrows.
Choosing the correct arrow spine for your setup depends on your draw length and draw weight. Draw length is important, because that determines how long of an arrow you need to shoot. And the longer a shaft is, the more it’s going to flex. Draw weight is factored in, because that determines the amount of force pushing the arrow.
Every arrow manufacturer has a spine-selection chart, so you know which shaft to choose for your draw weight and arrow length. (Some even factor in the bow’s speed rating, since faster bows exert more force on an arrow.) And every shaft bears its manufacturer’s spine rating.
Unfortunately, the numbering system for spine ratings is not uniform from manufacturer to manufacturer. So don’t assume the numbers you see on shafts across manufacturers are comparable.
37 | O C 4 - H I n t . A r c h e r y P r o j e c t B o o k
Archery Tackle
Indoor vs. Outdoor arrows - What’s the difference?
Beside or below the spine rating, most shafts usually also are stamped with their weight in grains per inch. And this is where archers can get confused.
Let’s take the Easton Bowfire, for example. The 330 shaft weighs 9.6 grains per inch. The 400 shaft weighs 8.5 grains per inch. Logic might tell an archer that, in order to lighten their arrows, they should switch from a 330 to a 400. Bad move. The 400 arrow is lighter, but it’s also weaker, and so tuning could be a real problem.
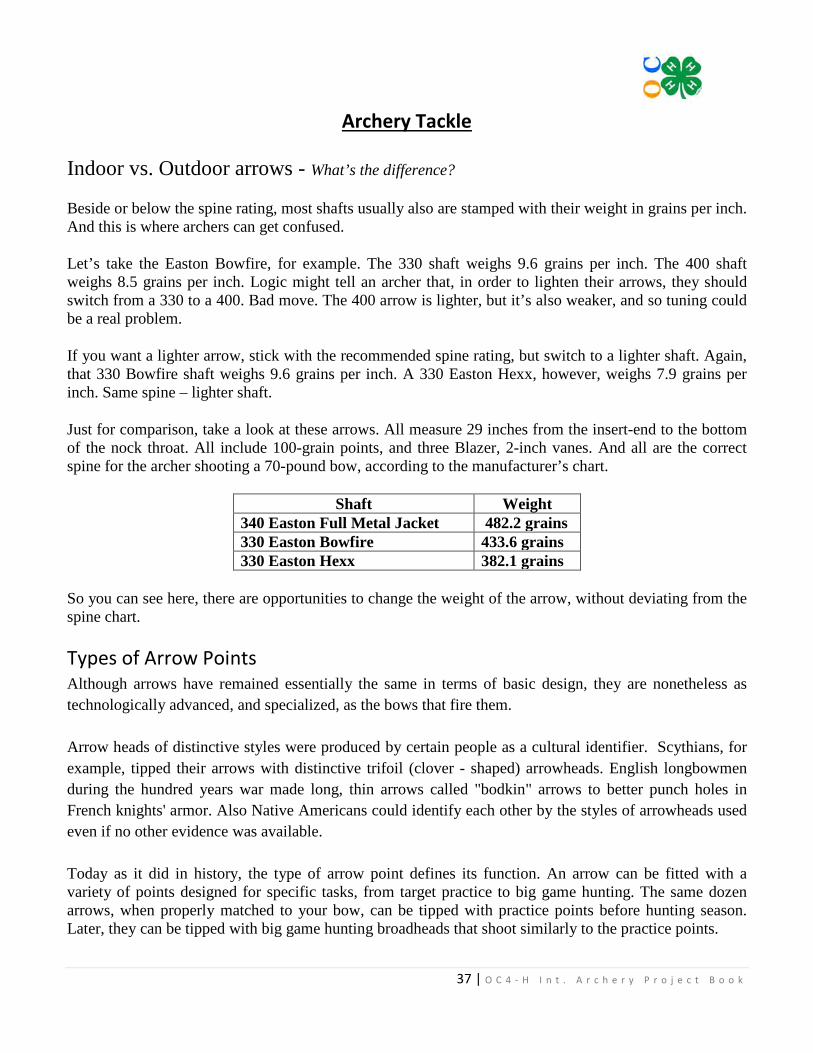
If you want a lighter arrow, stick with the recommended spine rating, but switch to a lighter shaft. Again, that 330 Bowfire shaft weighs 9.6 grains per inch. A 330 Easton Hexx, however, weighs 7.9 grains per inch. Same spine – lighter shaft.
Just for comparison, take a look at these arrows. All measure 29 inches from the insert-end to the bottom of the nock throat. All include 100-grain points, and three Blazer, 2-inch vanes. And all are the correct spine for the archer shooting a 70-pound bow, according to the manufacturer’s chart.
Shaft Weight 340 Easton Full Metal Jacket 482.2 grains 330 Easton Bowfire 433.6 grains 330 Easton Hexx 382.1 grains
So you can see here, there are opportunities to change the weight of the arrow, without deviating from the spine chart.
Types of Arrow Points Although arrows have remained essentially the same in terms of basic design, they are nonetheless as technologically advanced, and specialized, as the bows that fire them. Arrow heads of distinctive styles were produced by certain people as a cultural identifier. Scythians, for example, tipped their arrows with distinctive trifoil (clover - shaped) arrowheads. English longbowmen during the hundred years war made long, thin arrows called "bodkin" arrows to better punch holes in French knights' armor. Also Native Americans could identify each other by the styles of arrowheads used even if no other evidence was available. Today as it did in history, the type of arrow point defines its function. An arrow can be fitted with a variety of points designed for specific tasks, from target practice to big game hunting. The same dozen arrows, when properly matched to your bow, can be tipped with practice points before hunting season. Later, they can be tipped with big game hunting broadheads that shoot similarly to the practice points.
38 | O C 4 - H I n t . A r c h e r y P r o j e c t B o o k
Archery Tackle
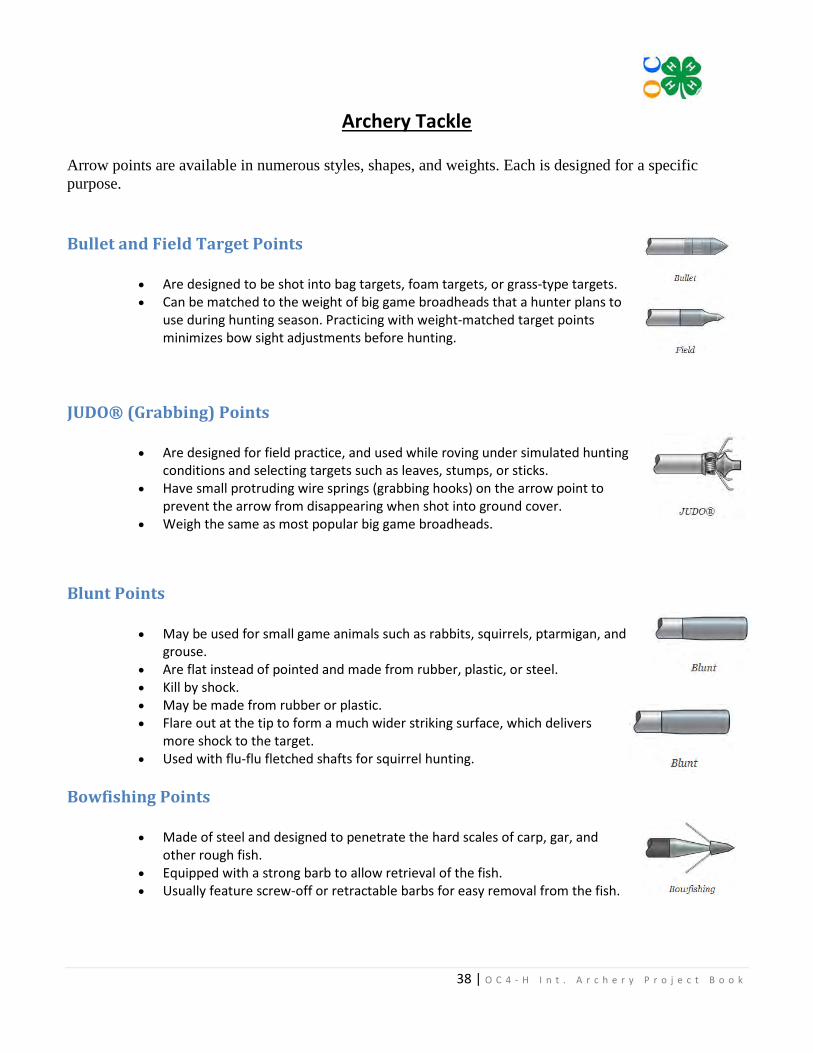
Arrow points are available in numerous styles, shapes, and weights. Each is designed for a specific purpose.
Bullet and Field Target Points
• Are designed to be shot into bag targets, foam targets, or grass-type targets. • Can be matched to the weight of big game broadheads that a hunter plans to
use during hunting season. Practicing with weight-matched target points minimizes bow sight adjustments before hunting.
JUDO® (Grabbing) Points
• Are designed for field practice, and used while roving under simulated hunting conditions and selecting targets such as leaves, stumps, or sticks.
• Have small protruding wire springs (grabbing hooks) on the arrow point to prevent the arrow from disappearing when shot into ground cover.
• Weigh the same as most popular big game broadheads.
Blunt Points
• May be used for small game animals such as rabbits, squirrels, ptarmigan, and grouse.
• Are flat instead of pointed and made from rubber, plastic, or steel. • Kill by shock. • May be made from rubber or plastic. • Flare out at the tip to form a much wider striking surface, which delivers
more shock to the target. • Used with flu-flu fletched shafts for squirrel hunting.
Bowfishing Points
• Made of steel and designed to penetrate the hard scales of carp, gar, and other rough fish.
• Equipped with a strong barb to allow retrieval of the fish. • Usually feature screw-off or retractable barbs for easy removal from the fish.
39 | O C 4 - H I n t . A r c h e r y P r o j e c t B o o k
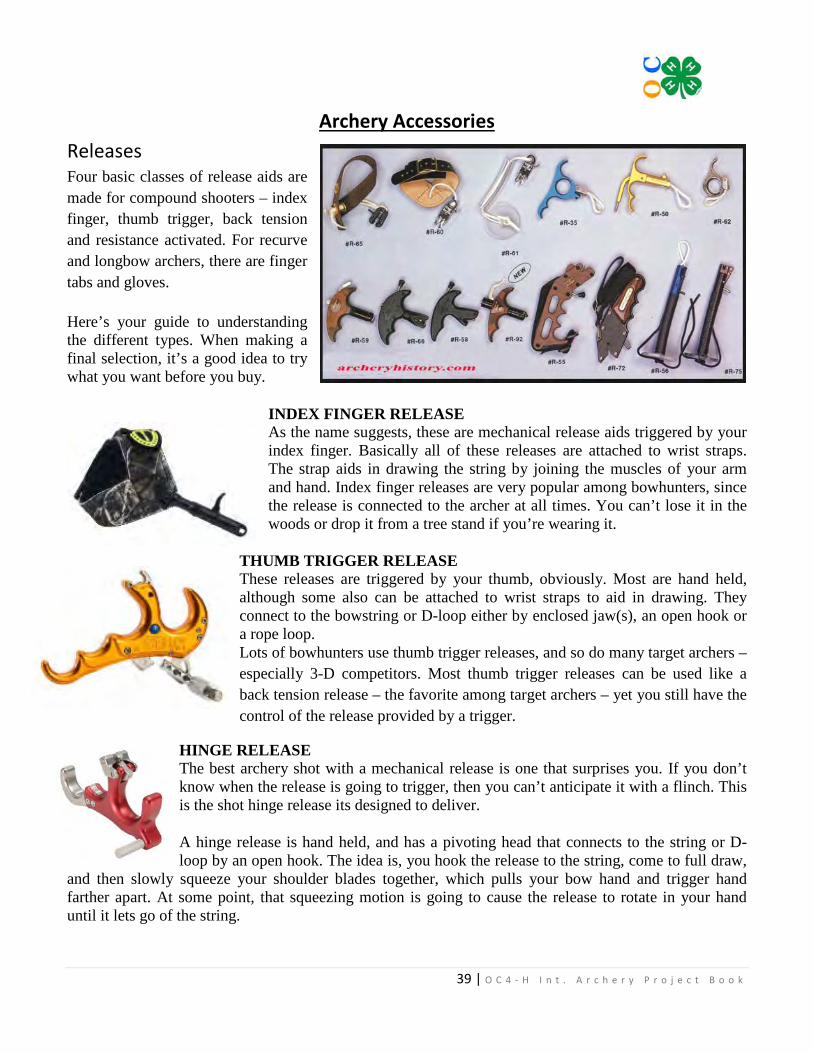
Archery Accessories Releases Four basic classes of release aids are made for compound shooters – index finger, thumb trigger, back tension and resistance activated. For recurve and longbow archers, there are finger tabs and gloves.
Here’s your guide to understanding the different types. When making a final selection, it’s a good idea to try what you want before you buy.
INDEX FINGER RELEASE As the name suggests, these are mechanical release aids triggered by your index finger. Basically all of these releases are attached to wrist straps. The strap aids in drawing the string by joining the muscles of your arm and hand. Index finger releases are very popular among bowhunters, since the release is connected to the archer at all times. You can’t lose it in the woods or drop it from a tree stand if you’re wearing it.
THUMB TRIGGER RELEASE These releases are triggered by your thumb, obviously. Most are hand held, although some also can be attached to wrist straps to aid in drawing. They connect to the bowstring or D-loop either by enclosed jaw(s), an open hook or a rope loop. Lots of bowhunters use thumb trigger releases, and so do many target archers – especially 3-D competitors. Most thumb trigger releases can be used like a back tension release – the favorite among target archers – yet you still have the control of the release provided by a trigger.
HINGE RELEASE The best archery shot with a mechanical release is one that surprises you. If you don’t know when the release is going to trigger, then you can’t anticipate it with a flinch. This is the shot hinge release its designed to deliver.
A hinge release is hand held, and has a pivoting head that connects to the string or D-loop by an open hook. The idea is, you hook the release to the string, come to full draw,
and then slowly squeeze your shoulder blades together, which pulls your bow hand and trigger hand farther apart. At some point, that squeezing motion is going to cause the release to rotate in your hand until it lets go of the string.
40 | O C 4 - H I n t . A r c h e r y P r o j e c t B o o k
Archery Accessories Releases
Another method for activating a hinge is to come to full draw and relax your release hand. That relaxation will cause your hand to stretch, which will rotate the release, and it will fire. A hinge release doesn’t have a trigger. It is a trigger.
You have to keep your sight pin or scope locked on the target the whole time you’re squeezing/relaxing, because you don’t really know when the release will go off. Target archers love the hinges because of the surprise factor, but it might not be the best choice for bowhunters, who need a little more control over when an arrow is released.
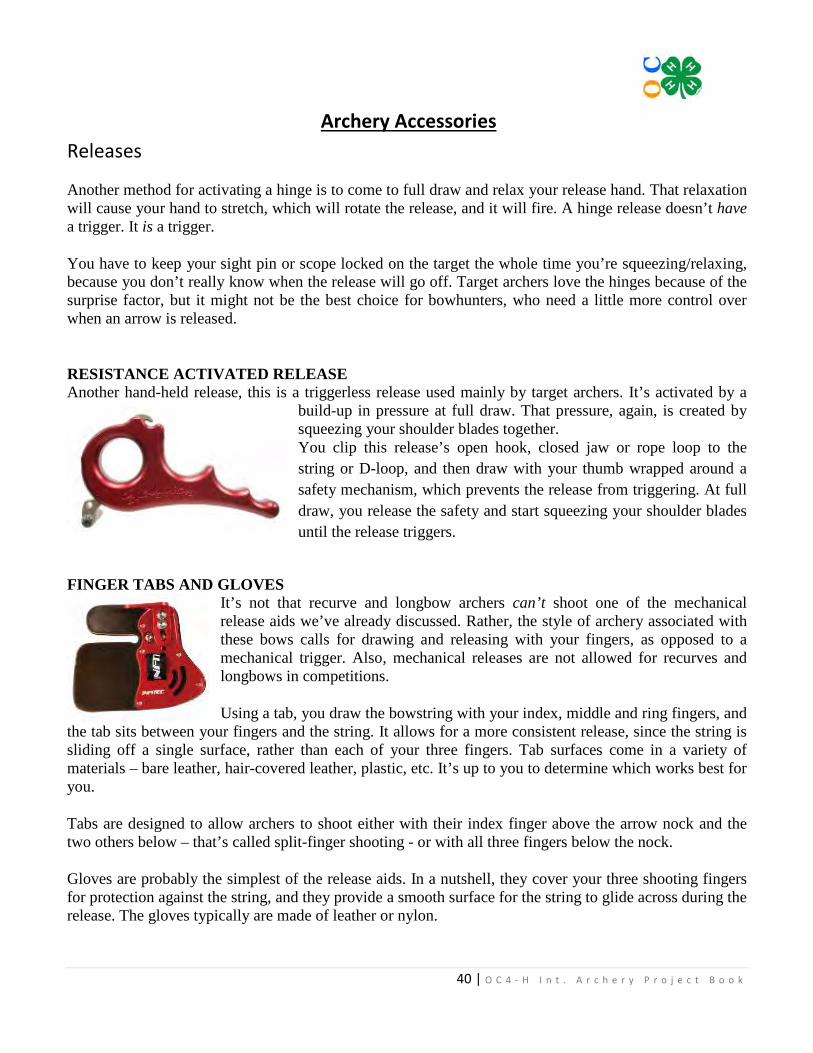
RESISTANCE ACTIVATED RELEASE Another hand-held release, this is a triggerless release used mainly by target archers. It’s activated by a
build-up in pressure at full draw. That pressure, again, is created by squeezing your shoulder blades together. You clip this release’s open hook, closed jaw or rope loop to the string or D-loop, and then draw with your thumb wrapped around a safety mechanism, which prevents the release from triggering. At full draw, you release the safety and start squeezing your shoulder blades until the release triggers.
FINGER TABS AND GLOVES
It’s not that recurve and longbow archers can’t shoot one of the mechanical release aids we’ve already discussed. Rather, the style of archery associated with these bows calls for drawing and releasing with your fingers, as opposed to a mechanical trigger. Also, mechanical releases are not allowed for recurves and longbows in competitions.
Using a tab, you draw the bowstring with your index, middle and ring fingers, and the tab sits between your fingers and the string. It allows for a more consistent release, since the string is sliding off a single surface, rather than each of your three fingers. Tab surfaces come in a variety of materials – bare leather, hair-covered leather, plastic, etc. It’s up to you to determine which works best for you.
Tabs are designed to allow archers to shoot either with their index finger above the arrow nock and the two others below – that’s called split-finger shooting - or with all three fingers below the nock.
Gloves are probably the simplest of the release aids. In a nutshell, they cover your three shooting fingers for protection against the string, and they provide a smooth surface for the string to glide across during the release. The gloves typically are made of leather or nylon.
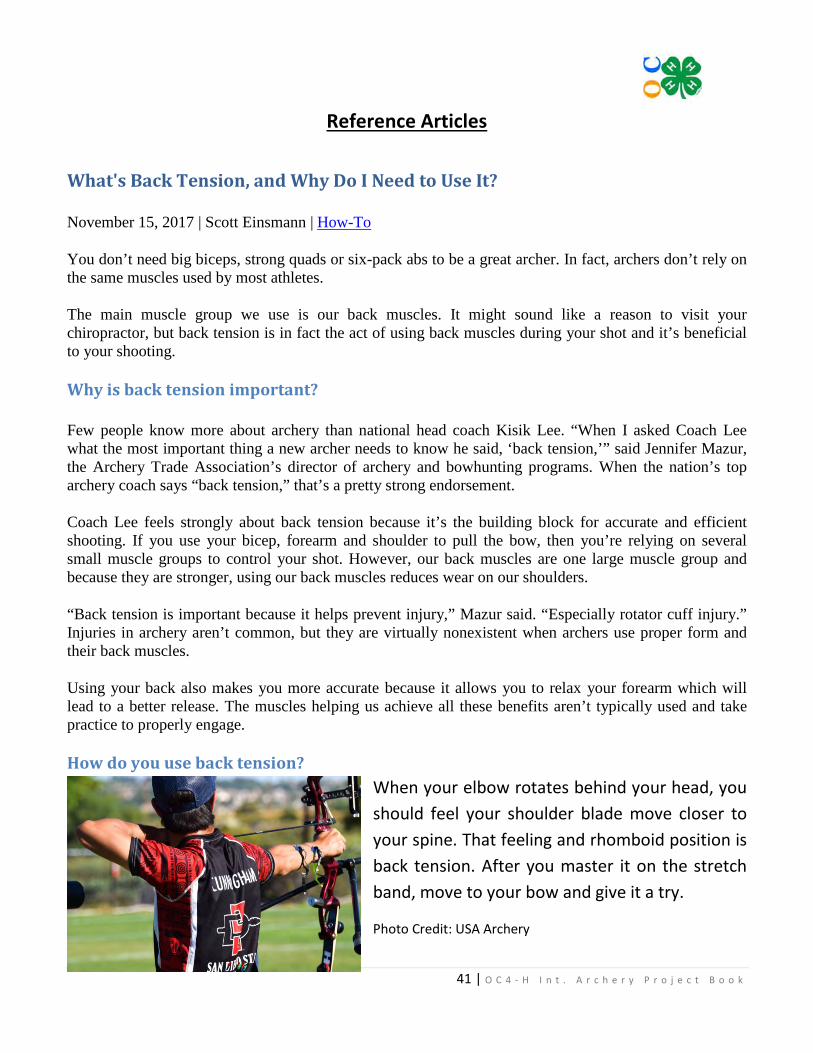
41 | O C 4 - H I n t . A r c h e r y P r o j e c t B o o k
Reference Articles
What's Back Tension, and Why Do I Need to Use It?
November 15, 2017 | Scott Einsmann | How-To
You don’t need big biceps, strong quads or six-pack abs to be a great archer. In fact, archers don’t rely on the same muscles used by most athletes.
The main muscle group we use is our back muscles. It might sound like a reason to visit your chiropractor, but back tension is in fact the act of using back muscles during your shot and it’s beneficial to your shooting.
Why is back tension important?
Few people know more about archery than national head coach Kisik Lee. “When I asked Coach Lee what the most important thing a new archer needs to know he said, ‘back tension,’” said Jennifer Mazur, the Archery Trade Association’s director of archery and bowhunting programs. When the nation’s top archery coach says “back tension,” that’s a pretty strong endorsement.
Coach Lee feels strongly about back tension because it’s the building block for accurate and efficient shooting. If you use your bicep, forearm and shoulder to pull the bow, then you’re relying on several small muscle groups to control your shot. However, our back muscles are one large muscle group and because they are stronger, using our back muscles reduces wear on our shoulders.
“Back tension is important because it helps prevent injury,” Mazur said. “Especially rotator cuff injury.” Injuries in archery aren’t common, but they are virtually nonexistent when archers use proper form and their back muscles.
Using your back also makes you more accurate because it allows you to relax your forearm which will lead to a better release. The muscles helping us achieve all these benefits aren’t typically used and take practice to properly engage.
How do you use back tension? When your elbow rotates behind your head, you should feel your shoulder blade move closer to your spine. That feeling and rhomboid position is back tension. After you master it on the stretch band, move to your bow and give it a try.
Photo Credit: USA Archery
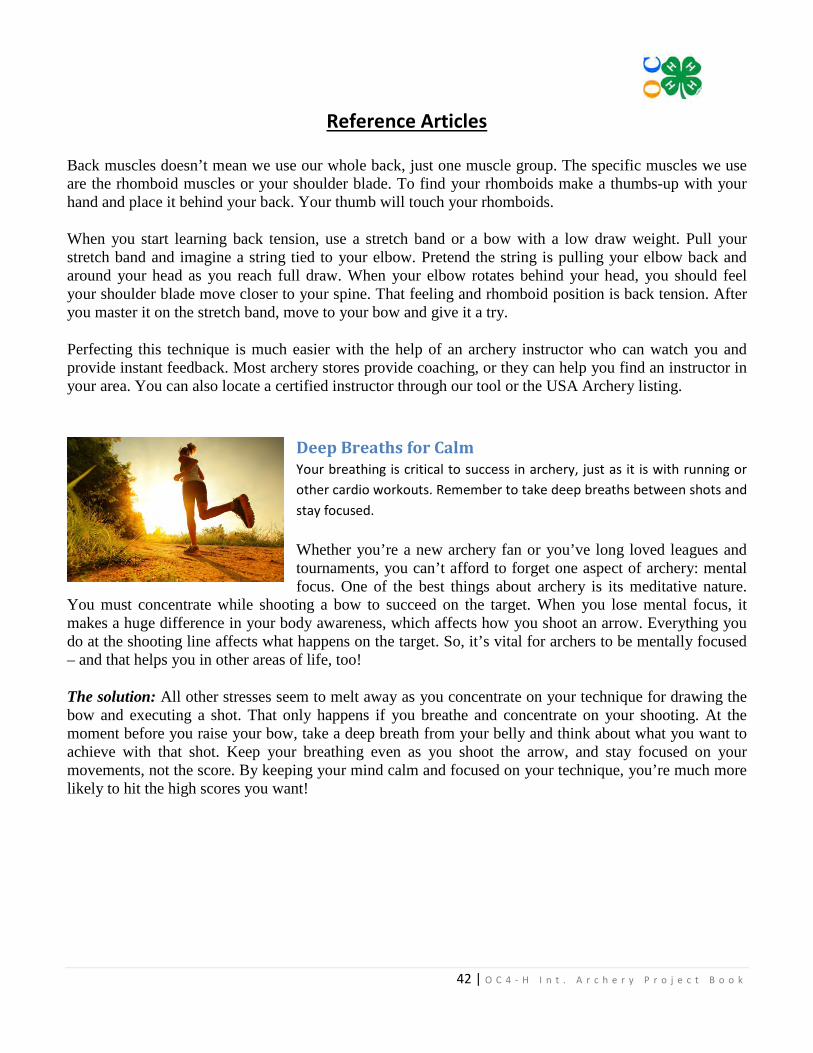
42 | O C 4 - H I n t . A r c h e r y P r o j e c t B o o k
Reference Articles
Back muscles doesn’t mean we use our whole back, just one muscle group. The specific muscles we use are the rhomboid muscles or your shoulder blade. To find your rhomboids make a thumbs-up with your hand and place it behind your back. Your thumb will touch your rhomboids.
When you start learning back tension, use a stretch band or a bow with a low draw weight. Pull your stretch band and imagine a string tied to your elbow. Pretend the string is pulling your elbow back and around your head as you reach full draw. When your elbow rotates behind your head, you should feel your shoulder blade move closer to your spine. That feeling and rhomboid position is back tension. After you master it on the stretch band, move to your bow and give it a try.
Perfecting this technique is much easier with the help of an archery instructor who can watch you and provide instant feedback. Most archery stores provide coaching, or they can help you find an instructor in your area. You can also locate a certified instructor through our tool or the USA Archery listing.
Deep Breaths for Calm Your breathing is critical to success in archery, just as it is with running or other cardio workouts. Remember to take deep breaths between shots and stay focused.
Whether you’re a new archery fan or you’ve long loved leagues and tournaments, you can’t afford to forget one aspect of archery: mental focus. One of the best things about archery is its meditative nature.
You must concentrate while shooting a bow to succeed on the target. When you lose mental focus, it makes a huge difference in your body awareness, which affects how you shoot an arrow. Everything you do at the shooting line affects what happens on the target. So, it’s vital for archers to be mentally focused – and that helps you in other areas of life, too!
The solution: All other stresses seem to melt away as you concentrate on your technique for drawing the bow and executing a shot. That only happens if you breathe and concentrate on your shooting. At the moment before you raise your bow, take a deep breath from your belly and think about what you want to achieve with that shot. Keep your breathing even as you shoot the arrow, and stay focused on your movements, not the score. By keeping your mind calm and focused on your technique, you’re much more likely to hit the high scores you want!
43 | O C 4 - H I n t . A r c h e r y P r o j e c t B o o k
Competition Shooting Even though archery was no longer required in warfare, it continued to be used for hunting and then for recreation. It has now evolved into different types of competition/practice, broadly four: field, flight, clout and target archery, each requiring different skills.
• Field archery involves moving around different environments, such as woodland, hillsides, while shooting at various targets from various distances.
• Flight archery concentrates on the distance an arrow flies rather than the accuracy of the shot. • Clout archery involves shooting a target which is a flag. The arrows land on the ground and the
nearest to the flag wins. • Target archery, the only type that is seen at the Olympic Games, is the most popular. The archer
shoots arrows at a set circular target at a fixed distance.
By the time competition comes around for you it should be for fun. The hard work that needs to happen will be accomplished during the training/practice time. Training process should be where you make all of your adjustments and understand what you need to work on to achieve your process based goals.
For competitions you should prepare by shooting the distances that you are expected to master during the competitions. If you shooting a FITA match that has distances of 70, 60, 50, 40 & 30 then that is what you will need to practice. The same goes for Field or 3D matches. The more you perfect the process the easier it will become during the competition.
Competitive archery is rewarding and lots of fun, but as you gain experience you’ll want to do more than just participate. If you’ve set your sights on winning a tournament, you must master the sport’s physical and mental demands. Then you must gain experience by practicing those elements in competition. After that, you could be on your way to the podium and a gold medal.
In preparation for competitive shooting you need:
1. A Winning Form - Once you have a repeatable form, practice it until it becomes part of your subconscious. After a few thousands repetitions, your shot will feel as natural as walking.
2. A Mental Game Plan - A strong mental game is important because it gives you the ability to execute your good form when it counts. Great form takes you far, but the best archers also excel at archery’s mental game. If you shoot great in practice but not as well on league nights or in other competitions, your form isn’t the culprit. Your mental game needs work. The key is to shoot like you’re not trying to win. Lean on mental strategies to bring home the gold.
A strong mental game helps you execute your good form when it counts. Much like your form, your mental strategy must match your personality. Instructors can help you develop a strategy, as can books like “With Winning in Mind” by Lanny Bassam, and “Archery: Think and Shoot Like a Champion,” by Terry Wunderle.
44 | O C 4 - H I n t . A r c h e r y P r o j e c t B o o k
Competition Shooting
One mental game plan is to repeat a positive phrase while you shoot. This keeps you focused and stifles negative thoughts. Another strategy is a form checklist, which ensures you complete all the necessary steps to make each shot good. Once you find a mental strategy that works well, use it every time you shoot, especially in competitions.
3. Practicing for Competition - If you can’t get to more competitions, you can replicate the experience in practice. Mimic the aspects of competition like scoring, a shot clock and shooting around people.
The best way to practice for competition is to shoot in every tournament possible. The more you shoot in pressure situations, the easier it becomes. Before you know it, competition feels much like practice.
If you can’t compete more often, you can replicate competition in practice. Use a shot clock, shoot with people around you, and score each round before pulling your arrows. You can even add pressure on yourself by placing fun wagers with friends. The more realistic your practice sessions, the better you’ll shoot in competition.
Winning at archery isn’t easy. It takes the right skills and lots of hard work to compete effectively. If you’re ready to get serious about archery, find a coach at the archery shop and clear your schedule for lots of disciplined practice.
Myths about competition shooting To help dispel some of these myths we enlisted the help of professional archer Alex Wifler, one of the lucky few making a living shooting a bow and arrow. Wifler burst onto the pro scene after winning the biggest indoor archery tournament, The Vegas Shoot. It’s safe to say Wifler knows a thing or two about indoor archery, but at one point he was a beginner going to his first tournament. Here are his thoughts on a few indoor myths and his tips for getting started.
Myth: You Need the Best Gear Spend time in a local archery shop or on social media and it’s easy to get caught up in the gear craze, especially if you plan on competing. There’s a lot of great archery products that can help you improve your shooting, but aren’t necessary right away. To get started in indoor archery all you need is a bow and arrows, arm guard, finger tab or release. Wifler said. “Anything else is extra stuff you can upgrade later.”
If you would like to upgrade your equipment, there are some accessories that make indoor easier. “I would say a micro adjust sight is the first thing I would upgrade, then a new release,” Wifler said.
45 | O C 4 - H I n t . A r c h e r y P r o j e c t B o o k
Competition Shooting
Myth: You Have to Be Perfect Indoor archery is typically shot at 20 yards, which is a relatively close distance when compared to outdoor distances. This close range means experienced archers rarely have arrows stray far from the center. “In the professionals, you do need to be perfect, but getting started absolutely not, everyone is going to miss,” Wifler said.
There’s no need to put added pressure on yourself when you are trying out something new. “Go out there, experience it, do the best you can and figure out what you need to work on from there,” Wifler said.
Myth: You Need Fat Arrows It’s common practice for competitive archers to switch to a larger diameter arrow for indoors. Why the bigger arrows? They can give you a few more points because if your arrow touches a higher value scoring ring, you get the higher score.
This advantage isn’t without compromises. “Do you want to shoot something smaller that might be more forgiving or do you want to shoot something fatter that will catch more lines,” Wifler said.
Big arrows can give you an edge, but it’s not for everyone.
“There isn’t a definite recipe that will work for everyone,” Wifler said. “You need to experiment to find what works best for you.”
Just like upgrading your accessories don’t rush into buying new arrows. Practice with the arrows you have and if they leave you wanting a change, talk to your archery shop about your options.
Myth: I’m Not Ready to Compete You don’t need to be a title contender to attend an archery competition. Even if you’re using more of the outer rings than you would like, you should still try competition. “They have classes for everybody, and everyone should experience indoor archery,” Wifler said. “I think that’s what’s great about archery, is that anyone can do it.”
Indoor archery is a great way to get started in archery and competitive shooting. “Indoor is a more forgiving first experience because the distance is close and you don’t have to deal with the wind,” Wifler said.
Plus, here’s an archery secret, competitions aren’t about winning. Archery is a discipline all about self-improvement. Competition is simply a forum for you to test yourself and see what areas you need to work on.
Now that all these myths are put to rest, you’re probably feeling better about indoor archery. You can start by renting a lane at an indoor range. It’ll be good practice before you try competition.
When you’re ready to step onto the tournament line, ask your archery shop for advice, they’ll tell you all about leagues and local tournaments and get you through your first competition.

46 | O C 4 - H I n t . A r c h e r y P r o j e c t B o o k
Paper Tuning
Paper Tuning A Bow – A Step By Step Guide Paper tuning is one of the most common ways compound archers using mechanical releases determine whether their arrows are leaving their bows in a straight line.
Archer shoots an arrow through a piece of paper in order to study the rip it creates. The rip is a “snapshot” of the arrow’s flight at that distance (around 8 feet) and depending on results it lets the archer know what he has to do to perfect his arrow flight. This is a small part of the equipment maintenance but remember good form will get you the best results every time.
When a bow is properly paper tuned, the arrows will be flying true. Paper tuning eliminates porpoising (up and down movement) and fishtailing (left to right movement). When you have perfect flight, you will have improved accuracy and arrow penetration. Several factors can affect paper tuning results.
Paper tuning a bow – The checklist • Are you shooting with a torque free grip? • Are you shooting the right draw length? • Are you shooting an arrow of proper spine? • Are you shooting with good form? • Has your arrow rest been set up properly and is not interfering with the fletchings of your arrows? (if your
fletchings show unusual wear, they may be coming into contact with your rest or cable during flight) • If shooting a solo cam, have you yoke tuned and checked the timing? • If shooting a two cam bow, have you checked the timing? • Is your bow to spec? (set up at the suggested specifications set by the manufacturer; brace height, axle to
axle measurement, etc.)
Through paper tuning you can determine that your arrow rest, bowstring and nocking point are all perfectly aligned, and that you are shooting the proper arrows for your setup. It also lets you know if your hand position on the bow and your shooting form are both correct. If you answered yes to all eight of the above questions, move on, but if not, revisit those questions to correct them. If you want paper tuning to be a rather pain free experience, it is best to make sure your equipment and form is not to blame.
1. Fix a piece of paper so you can shoot through it. The paper should be fixed to a frame or fashioned so that it is not loose. 2. Stand roughly 8 feet from the paper. 3. Draw your bow and level out your arrow. 4. With good overall archery form, shoot through the paper. 5. Study the results. 6. Adjust your bow if necessary and repeat the process until a desirable rip is achieved.

47 | O C 4 - H I n t . A r c h e r y P r o j e c t B o o k
Paper Tuning
Paper tuning results and suggested adjustments
Before you shoot, you must make sure your hand position on the bow grip is correct. If you are torqueing the bow at the shot, due to improper hand position, none of the bow settings will matter. You will have erratic arrow flight.
Also, you must get a smooth, clean release. Don’t slap the trigger or pull your release hand out to the side. Simply pull straight back through the shot with your release.
So you take a good shot through the paper. What you want to see is a round hole with three or four slices extending out from it – depending on the number of fletchings on your arrow.
If you see that, yell, “Bullet-hole!” and don’t change anything. Your setup is perfect.
Short of the bullet hole, what you’ll see is a tear that features a rounded end where the arrow point went through the paper, and a three- or four-slotted hole made by the fletched end of the arrow.
Think about the layout of your tear to figure out how your arrow is flying. If the rounded end is down and the fletched hole is above it, for example, then you know your arrow is flying nose down,
with the point below the nock.
Here’s a list of tears, and the most common remedies for each.
1. NOCK HIGH – Move your nocking point down, or your rest up.
2. NOCK LOW – Move your nocking point up, or your rest down.
3. NOCK RIGHT – Move rest away from the riser on a right-handed bow, toward the riser for a lefty. This tear also can mean your arrow’s spine is too stiff. Switch to an arrow with a weaker spine, or you can increase the point weight on your arrow, which will weaken its spine.
4. NOCK LEFT – Move rest toward riser for right-handed shooter, away
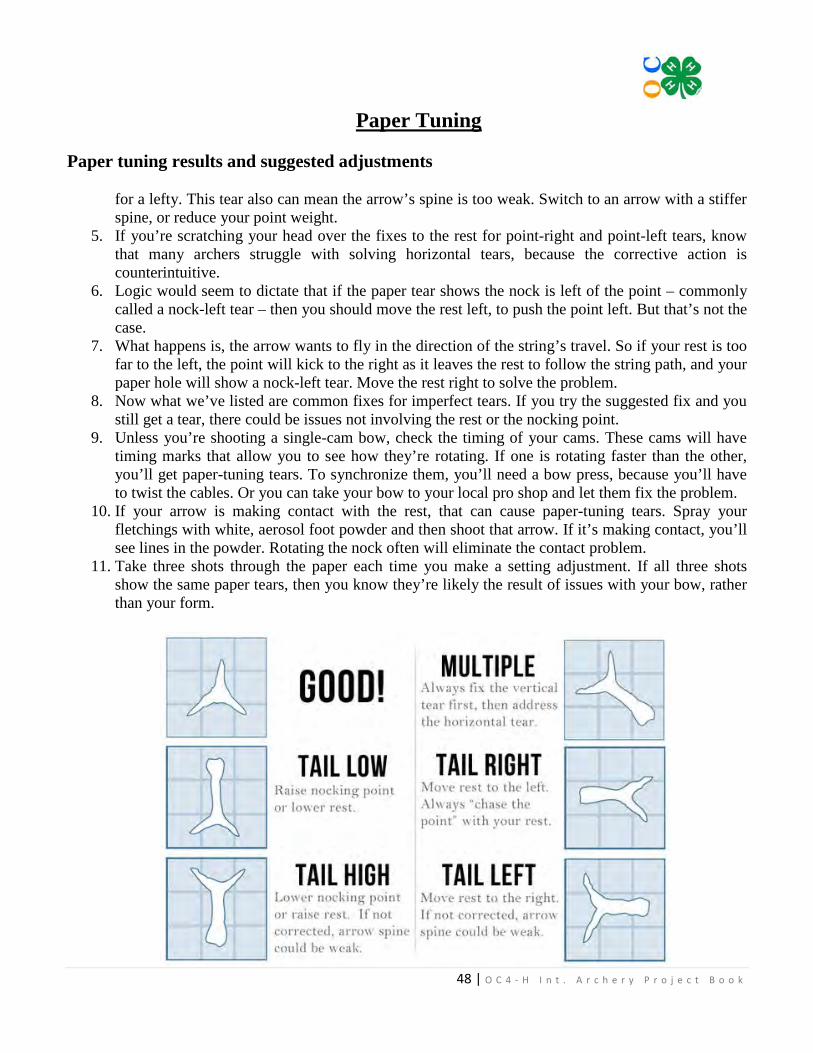
48 | O C 4 - H I n t . A r c h e r y P r o j e c t B o o k
Paper Tuning
Paper tuning results and suggested adjustments
for a lefty. This tear also can mean the arrow’s spine is too weak. Switch to an arrow with a stiffer spine, or reduce your point weight.
5. If you’re scratching your head over the fixes to the rest for point-right and point-left tears, know that many archers struggle with solving horizontal tears, because the corrective action is counterintuitive.
6. Logic would seem to dictate that if the paper tear shows the nock is left of the point – commonly called a nock-left tear – then you should move the rest left, to push the point left. But that’s not the case.
7. What happens is, the arrow wants to fly in the direction of the string’s travel. So if your rest is too far to the left, the point will kick to the right as it leaves the rest to follow the string path, and your paper hole will show a nock-left tear. Move the rest right to solve the problem.
8. Now what we’ve listed are common fixes for imperfect tears. If you try the suggested fix and you still get a tear, there could be issues not involving the rest or the nocking point.
9. Unless you’re shooting a single-cam bow, check the timing of your cams. These cams will have timing marks that allow you to see how they’re rotating. If one is rotating faster than the other, you’ll get paper-tuning tears. To synchronize them, you’ll need a bow press, because you’ll have to twist the cables. Or you can take your bow to your local pro shop and let them fix the problem.
10. If your arrow is making contact with the rest, that can cause paper-tuning tears. Spray your fletchings with white, aerosol foot powder and then shoot that arrow. If it’s making contact, you’ll see lines in the powder. Rotating the nock often will eliminate the contact problem.
11. Take three shots through the paper each time you make a setting adjustment. If all three shots show the same paper tears, then you know they’re likely the result of issues with your bow, rather than your form.
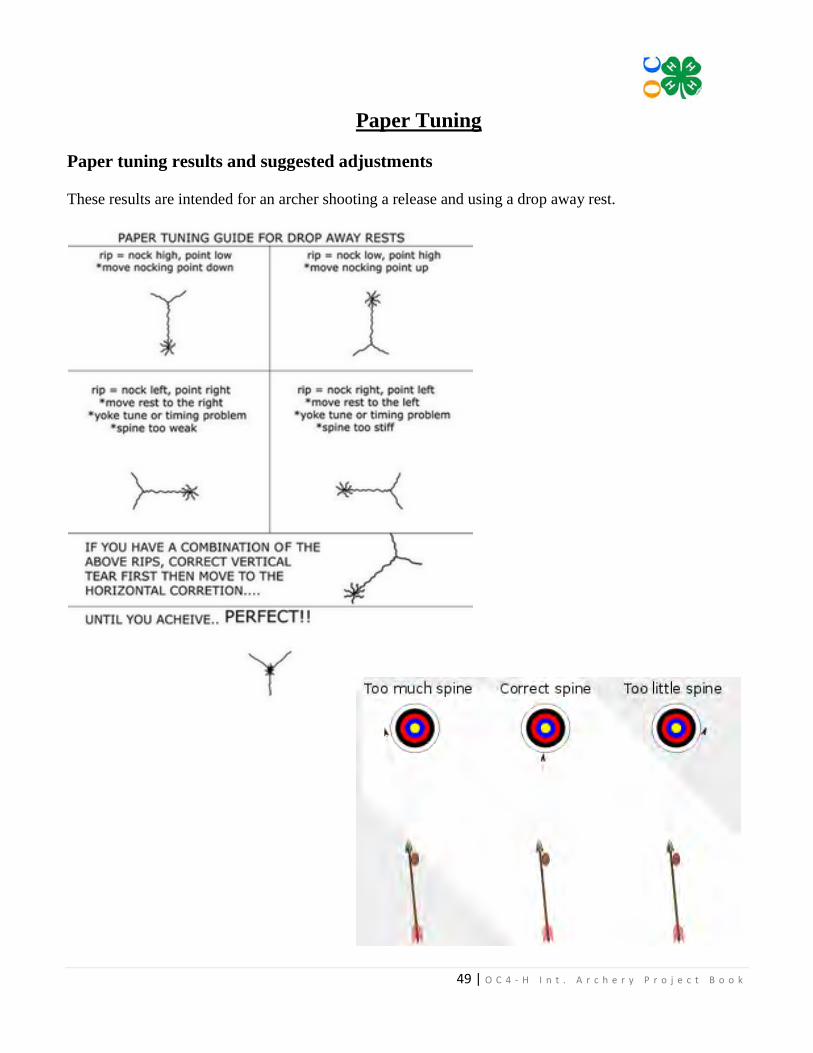
49 | O C 4 - H I n t . A r c h e r y P r o j e c t B o o k
Paper Tuning
Paper tuning results and suggested adjustments
These results are intended for an archer shooting a release and using a drop away rest.
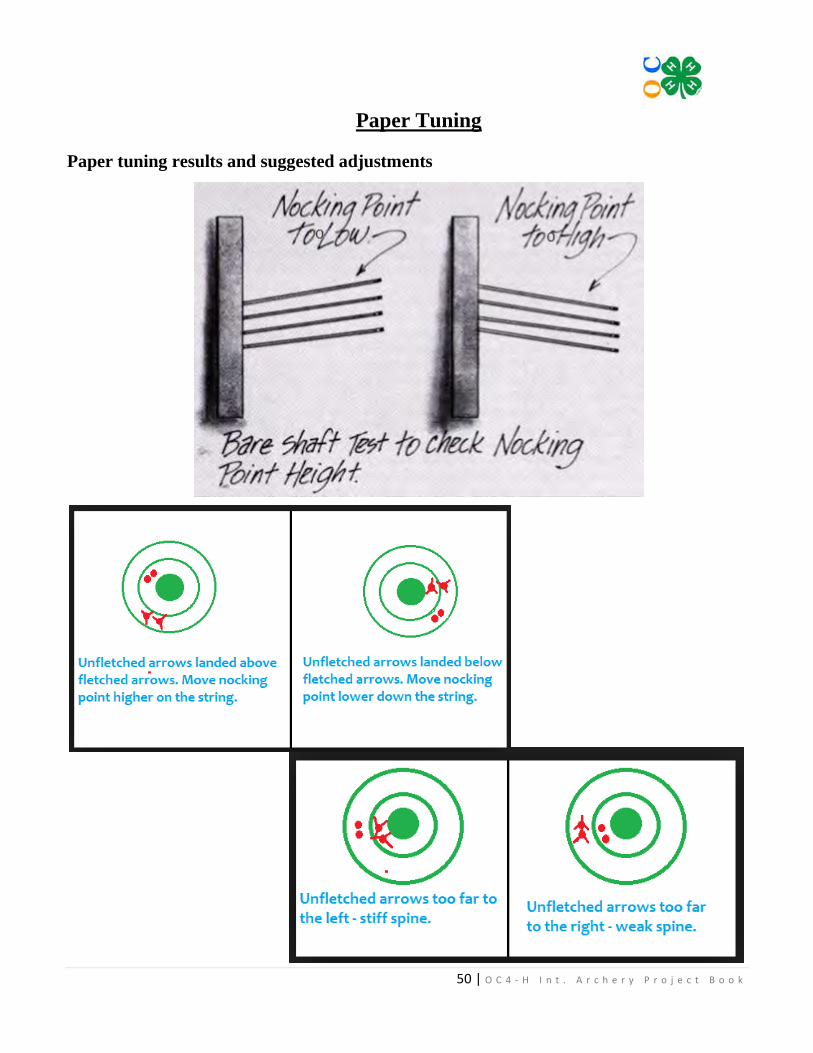
50 | O C 4 - H I n t . A r c h e r y P r o j e c t B o o k
Paper Tuning
Paper tuning results and suggested adjustments
Paper Tuning
Paper Tuning
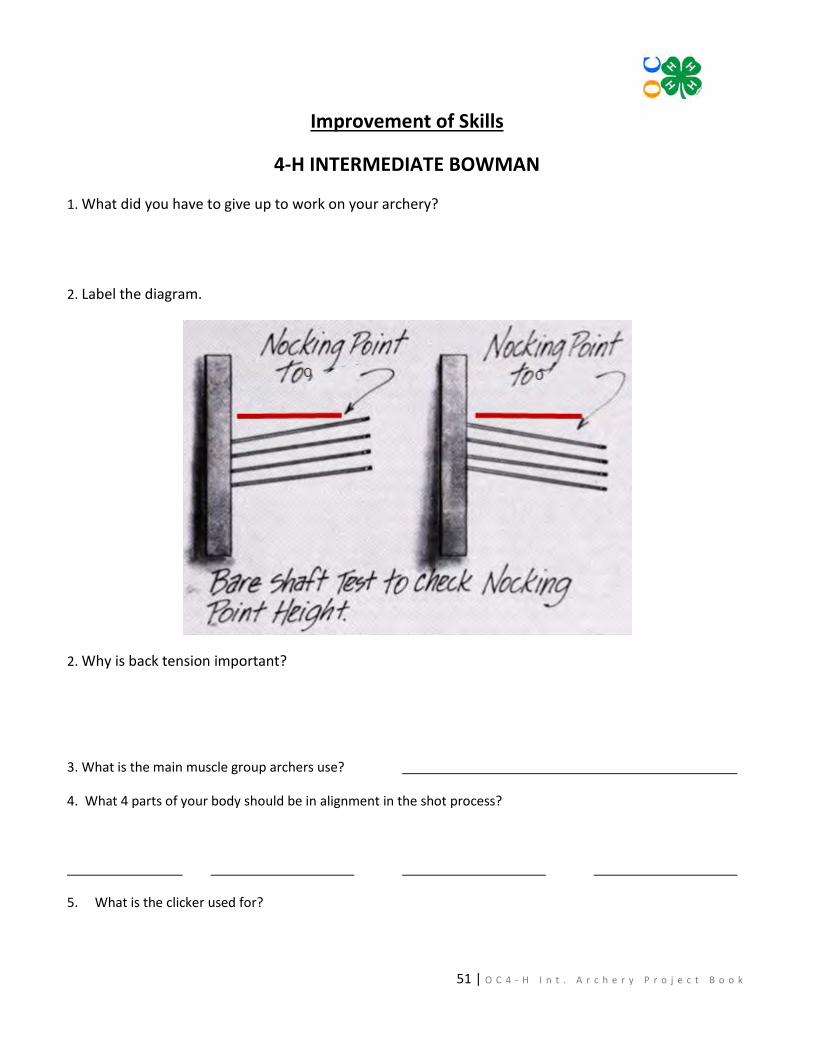
51 | O C 4 - H I n t . A r c h e r y P r o j e c t B o o k
Improvement of Skills
4-H INTERMEDIATE BOWMAN
1. What did you have to give up to work on your archery?
2. Label the diagram.
2. Why is back tension important?
3. What is the main muscle group archers use?
4. What 4 parts of your body should be in alignment in the shot process?
5. What is the clicker used for?
52 | O C 4 - H I n t . A r c h e r y P r o j e c t B o o k
Improvement of Skills
4-H INTERMEDIATE BOWMAN
6. Define these terms:
A. Clout Archery
B. Point Blank
C. Spider
D. Kisser Button
E. Snot
7. Demonstrate setting the bow hand grip.
Date Completed ______________ Approved by 8. Demonstrate your anchor point.
Date Completed ______________ Approved by 9. Shoot 60 arrows at 20, 30, 40 meters and record your score. Use a 60-cm 10 ring target. Date Completed ______________ Approved by 10. Attended 2/3 Club Meetings.
Date Completed ______________ Approved by
__________________________________ has completed all requirements and is approved for
advancement to the rank of 4-H Advanced Bowman.
Date Approved by
57 | O C 4 - H I n t . A r c h e r y P r o j e c t B o o k
References and Reading List
1. https://www.archery360.com/2015/01/18/archery-practice-improve-with-smart-goals/ 2. http://goaltriangle.com/advanced-goal-setting/outcome-base-goals-vs-process-based-goals/ 3. https://skyaboveus.com/hunting-shooting/an-overview-of-archery 4. http://www.lancasterarchery.com/blog/archery-slang-speak-the-language/ 5. http://www.lancasterarchery.com/blog/using-release-aids-to-cure-target-panic/ 6. http://tradbow.com/the-follow-through-anchor/ 7. https://shootingtime.com/archery/paper-tuning-a-bow/ 8. https://shootingtime.com/archery/use-proper-archery-form/ 9. http://www.completeguidetoarchery.com/how-to-release-your-arrow/ 10. http://www.completeguidetoarchery.com/analysis-of-your-shot/ 11. https://www.archery360.com/2016/09/27/bulls-eye-beware-5-tips-releasing-arrow/ 12. https://www.archery360.com/2018/01/04/winning-archery-3-things-can-improve/ 13. https://www.archery360.com/2017/11/29/going-distance-sight-compound-bow/ 14. https://www.archery360.com/2015/11/10/why-a-stabilizer-could-be-your-new-best-friend/ 15. https://www.archery360.com/2017/11/02/4-myths-indoor-archery-tournaments/ 16. https://www.archery360.com/2017/11/15/whats-back-tension-need-use/ 17. https://www.collegexpress.com/lists/list/colleges-with-strength-in-archery/492/ 18. https://www.archery360.com/2016/01/14/are-you-making-these-3-archery-mistakes/ 19. http://ethw.org/w/images/b/b3/The_History_of_the_Bow_and_arrow_by_Michael_Hinckley.pdf 20. https://targetcrazy.com/archery/resources/proper-archery-form/ 21. http://www.lancasterarchery.com/blog/how-to-know-if-your-bows-draw-weight-is-too-heavy/ 22. http://esdf.org/discover-archery/equipment/what-should-i-know-about-tuning-and-
maintenance/ 23. http://www.lancasterarchery.com/blog/indoor-vs-outdoor-arrows/ 24. http://www.lancasterarchery.com/axcel-achieve-rxl-recurve-sight.html 25. http://www.bestrecurvebowguide.com/tuning-your-recurve-bow-part-4/ 26. https://skyaboveus.com/hunting-shooting/13-tips-on-care-for-your-compound-bow 27. http://www.lancasterarchery.com/blog/video/bowhunting-tech-tip-arrow-spine-vs-arrow-
weight/ 28. http://www.lancasterarchery.com/blog/large-diameter-arrows-for-indoor-target-shooting/ 29. http://www.lancasterarchery.com/blog/video/how-to-sight-in-a-bow/ 30. http://www.lancasterarchery.com/blog/arrow-spine-vs-arrow-weight-dont-be-confused/ 31. https://en.wikipedia.org/wiki/Archery 32. http://tradbow.com/glossary-of-archery-terms/ 33. http://www.lancasterarchery.com/blog/guide-to-compound-bow-arrow-rests/ 34. http://www.lancasterarchery.com/blog/guide-to-traditional-archery-arrow-rests/