Embed Size (px)
Citation preview
Original Recipe can be found at www.modabakeshop.com
Original Recipe
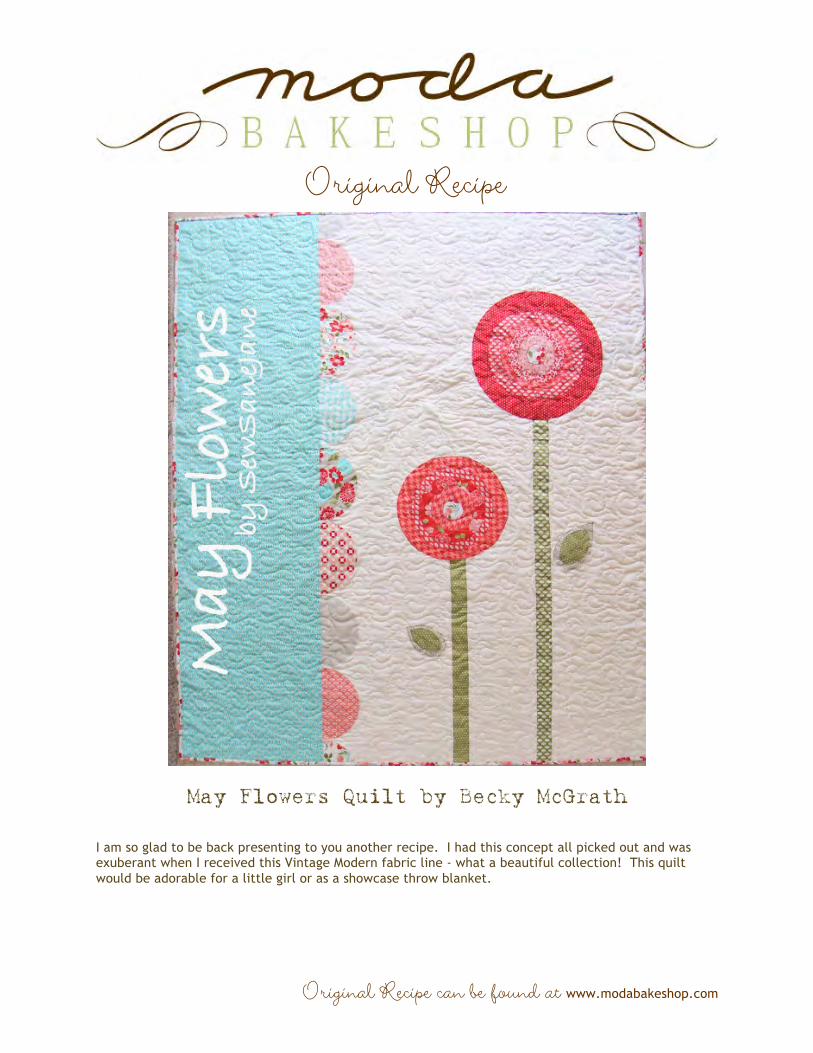
May Flowers Quilt by Becky McGrath
I am so glad to be back presenting to you another recipe. I had this concept all picked out and was exuberant when I received this Vintage Modern fabric line - what a beautiful collection! This quilt would be adorable for a little girl or as a showcase throw blanket.
Original Recipe can be found at www.modabakeshop.com
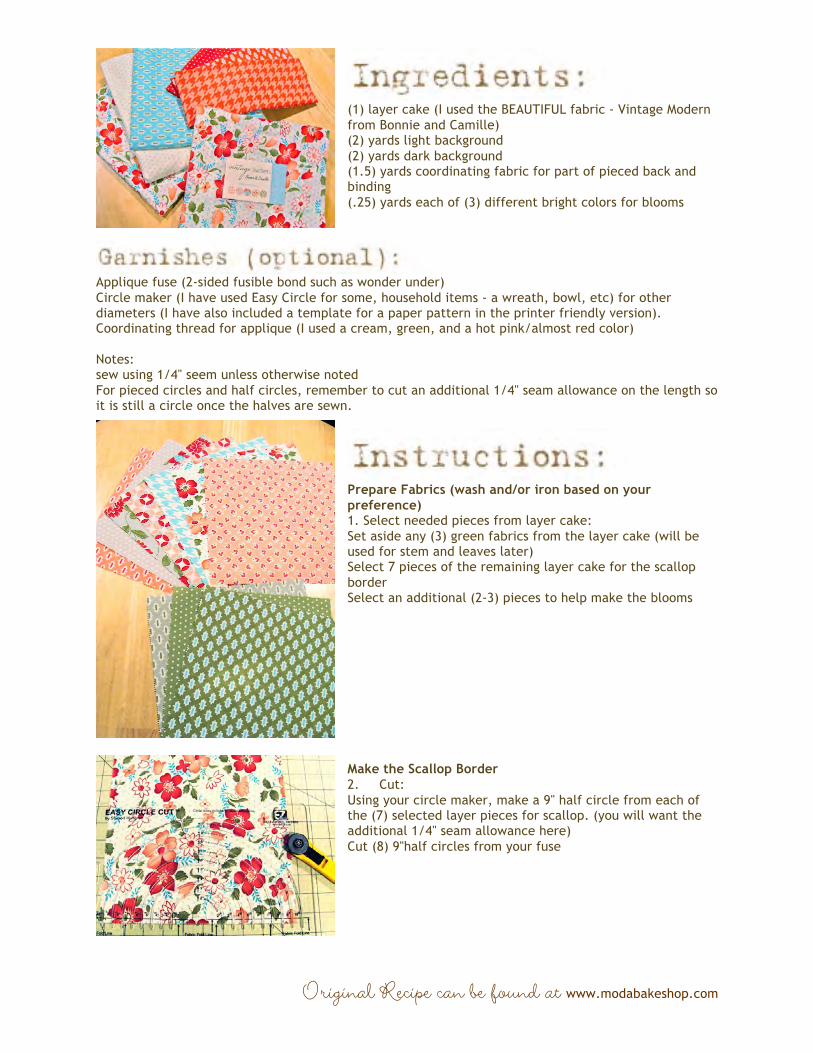
(1) layer cake (I used the BEAUTIFUL fabric - Vintage Modern from Bonnie and Camille) (2) yards light background (2) yards dark background (1.5) yards coordinating fabric for part of pieced back and binding (.25) yards each of (3) different bright colors for blooms
Applique fuse (2-sided fusible bond such as wonder under) Circle maker (I have used Easy Circle for some, household items - a wreath, bowl, etc) for other diameters (I have also included a template for a paper pattern in the printer friendly version). Coordinating thread for applique (I used a cream, green, and a hot pink/almost red color) Notes: sew using 1/4" seem unless otherwise noted For pieced circles and half circles, remember to cut an additional 1/4" seam allowance on the length so it is still a circle once the halves are sewn.
Prepare Fabrics (wash and/or iron based on your preference) 1. Select needed pieces from layer cake: Set aside any (3) green fabrics from the layer cake (will be used for stem and leaves later) Select 7 pieces of the remaining layer cake for the scallop border Select an additional (2-3) pieces to help make the blooms
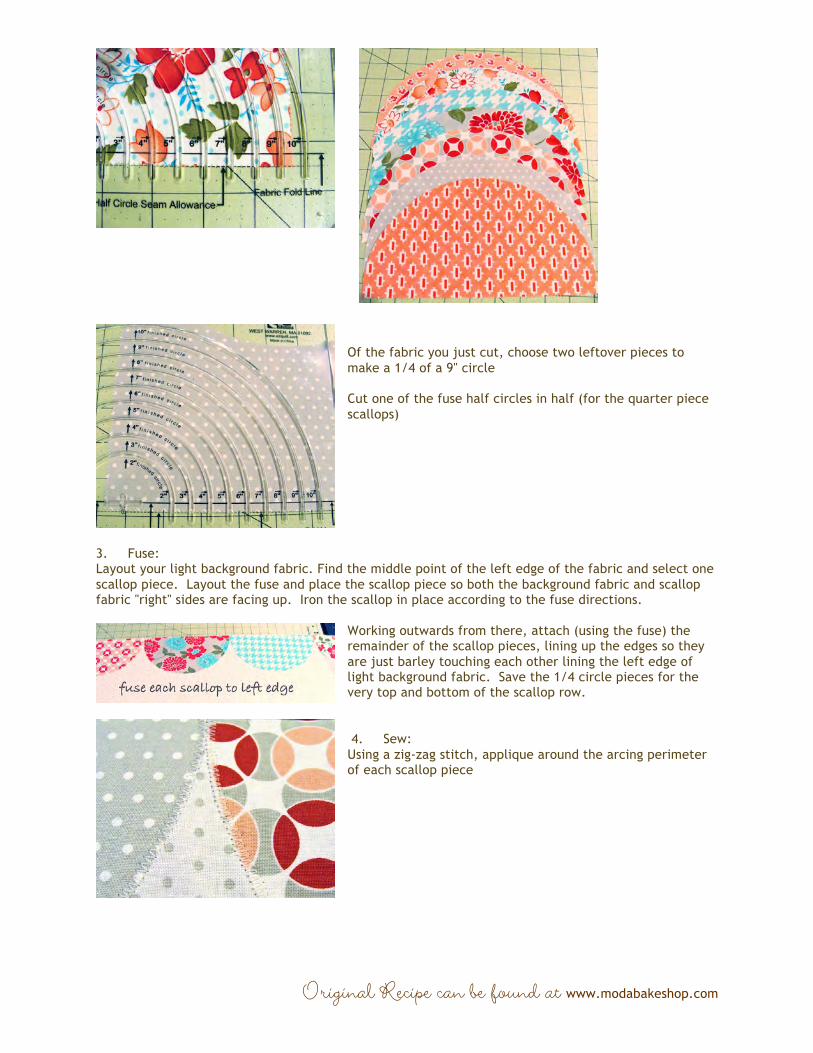
Make the Scallop Border 2. Cut: Using your circle maker, make a 9" half circle from each of the (7) selected layer pieces for scallop. (you will want the additional 1/4" seam allowance here) Cut (8) 9"half circles from your fuse
Original Recipe can be found at www.modabakeshop.com
Of the fabric you just cut, choose two leftover pieces to make a 1/4 of a 9" circle Cut one of the fuse half circles in half (for the quarter piece scallops)
3. Fuse: Layout your light background fabric. Find the middle point of the left edge of the fabric and select one scallop piece. Layout the fuse and place the scallop piece so both the background fabric and scallop fabric "right" sides are facing up. Iron the scallop in place according to the fuse directions.
Working outwards from there, attach (using the fuse) the remainder of the scallop pieces, lining up the edges so they are just barley touching each other lining the left edge of light background fabric. Save the 1/4 circle pieces for the very top and bottom of the scallop row. 4. Sew: Using a zig-zag stitch, applique around the arcing perimeter of each scallop piece
Original Recipe can be found at www.modabakeshop.com
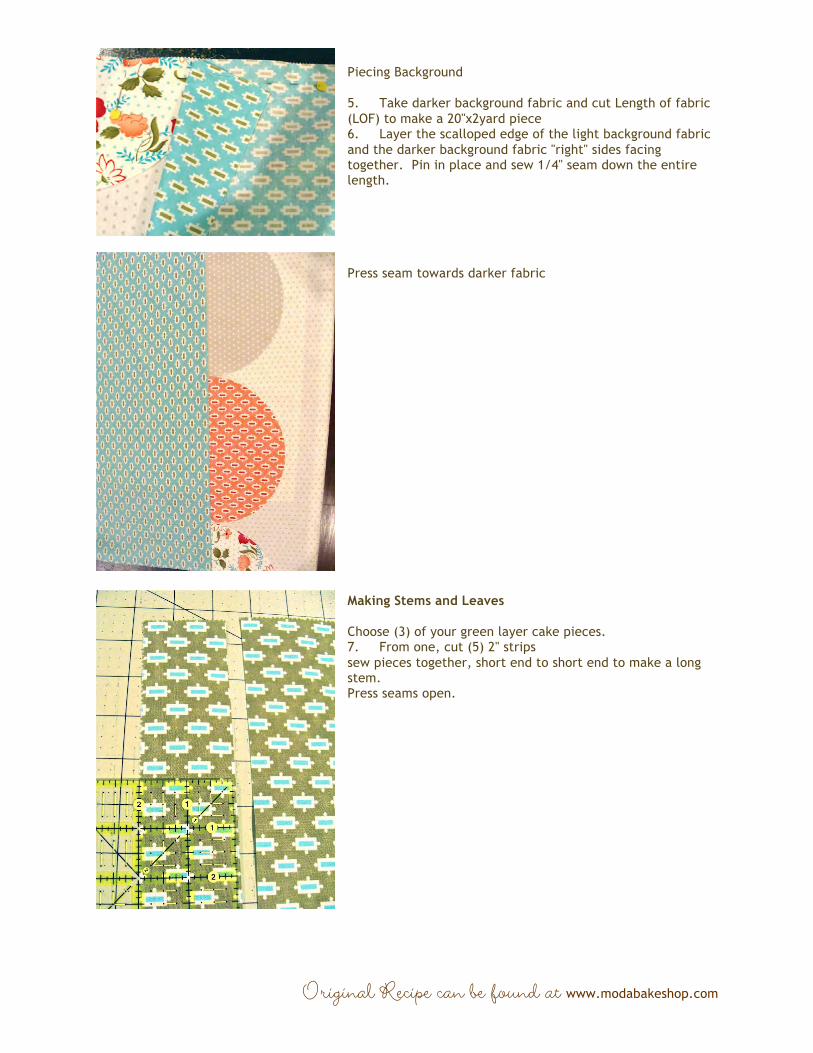
Piecing Background 5. Take darker background fabric and cut Length of fabric (LOF) to make a 20"x2yard piece 6. Layer the scalloped edge of the light background fabric and the darker background fabric "right" sides facing together. Pin in place and sew 1/4" seam down the entire length.
Press seam towards darker fabric
Making Stems and Leaves Choose (3) of your green layer cake pieces. 7. From one, cut (5) 2" strips sew pieces together, short end to short end to make a long stem. Press seams open.
Original Recipe can be found at www.modabakeshop.com
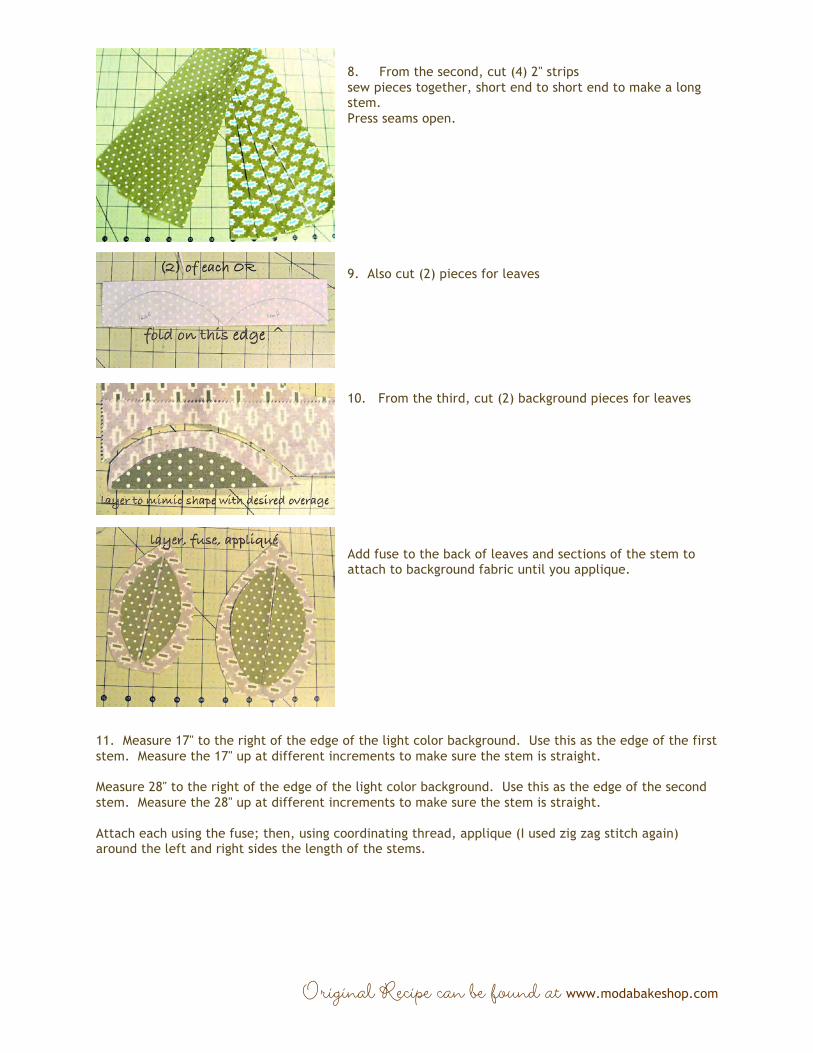
8. From the second, cut (4) 2" strips sew pieces together, short end to short end to make a long stem. Press seams open.
9. Also cut (2) pieces for leaves
10. From the third, cut (2) background pieces for leaves
Add fuse to the back of leaves and sections of the stem to attach to background fabric until you applique.
11. Measure 17" to the right of the edge of the light color background. Use this as the edge of the first stem. Measure the 17" up at different increments to make sure the stem is straight. Measure 28" to the right of the edge of the light color background. Use this as the edge of the second stem. Measure the 28" up at different increments to make sure the stem is straight. Attach each using the fuse; then, using coordinating thread, applique (I used zig zag stitch again) around the left and right sides the length of the stems.
Original Recipe can be found at www.modabakeshop.com
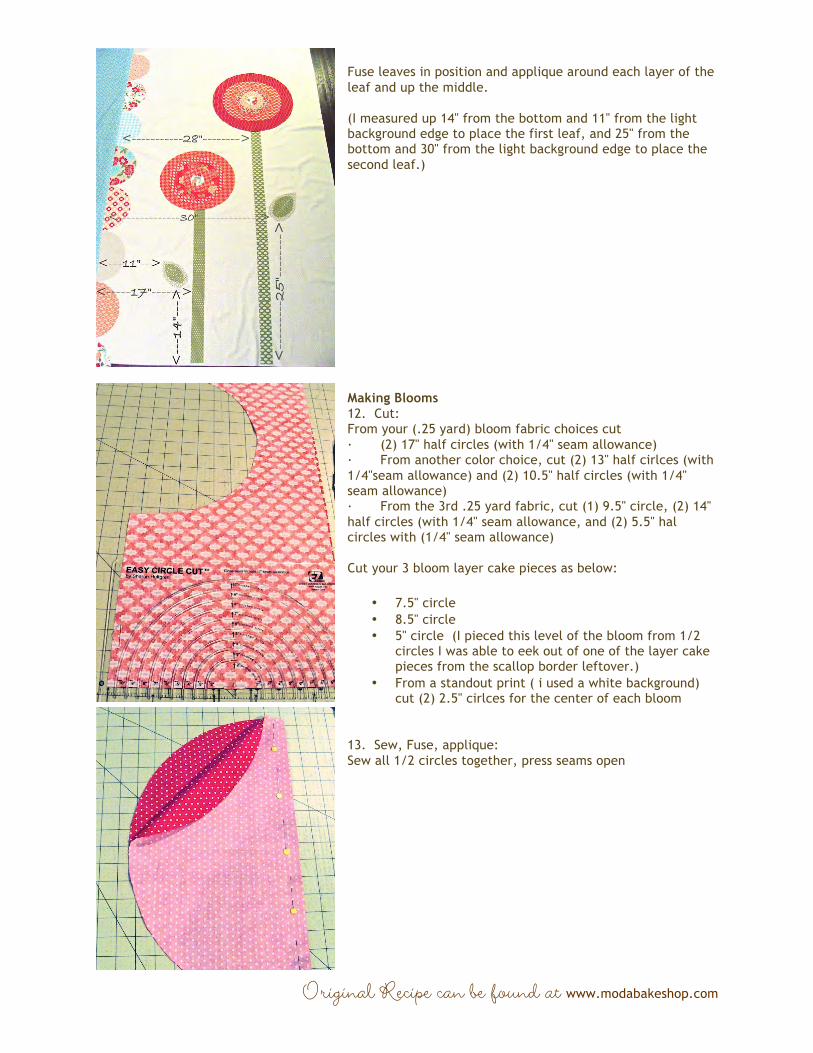
Fuse leaves in position and applique around each layer of the leaf and up the middle. (I measured up 14" from the bottom and 11" from the light background edge to place the first leaf, and 25" from the bottom and 30" from the light background edge to place the second leaf.)
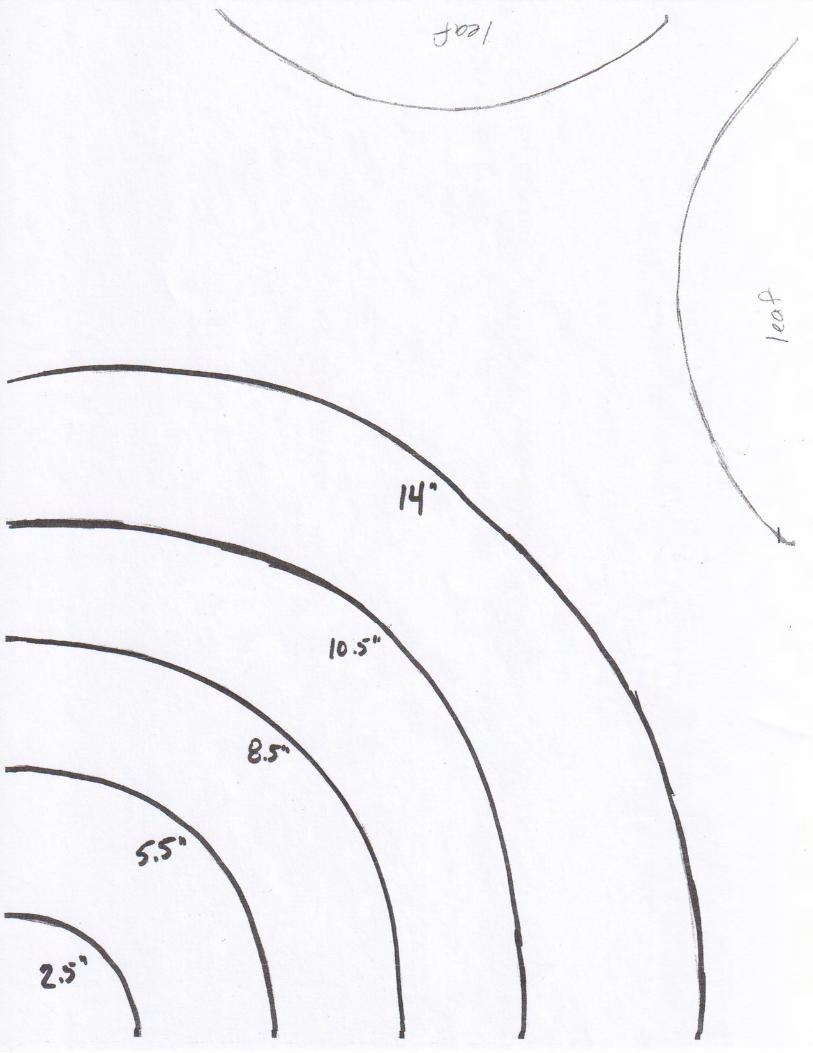
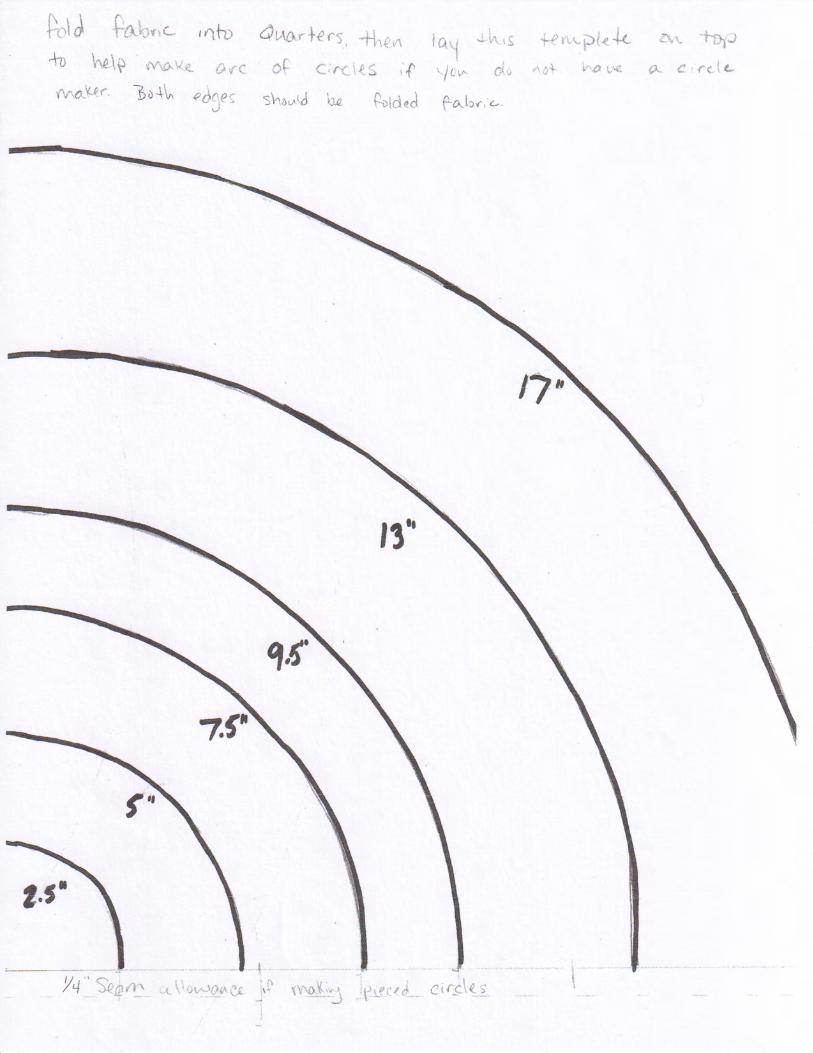
Making Blooms 12. Cut: From your (.25 yard) bloom fabric choices cut · (2) 17" half circles (with 1/4" seam allowance) · From another color choice, cut (2) 13" half cirlces (with 1/4"seam allowance) and (2) 10.5" half circles (with 1/4" seam allowance) · From the 3rd .25 yard fabric, cut (1) 9.5" circle, (2) 14" half circles (with 1/4" seam allowance, and (2) 5.5" hal circles with (1/4" seam allowance) Cut your 3 bloom layer cake pieces as below:
• 7.5" circle • 8.5" circle • 5" circle (I pieced this level of the bloom from 1/2
circles I was able to eek out of one of the layer cake pieces from the scallop border leftover.)
• From a standout print ( i used a white background) cut (2) 2.5" cirlces for the center of each bloom
13. Sew, Fuse, applique: Sew all 1/2 circles together, press seams open
Original Recipe can be found at www.modabakeshop.com
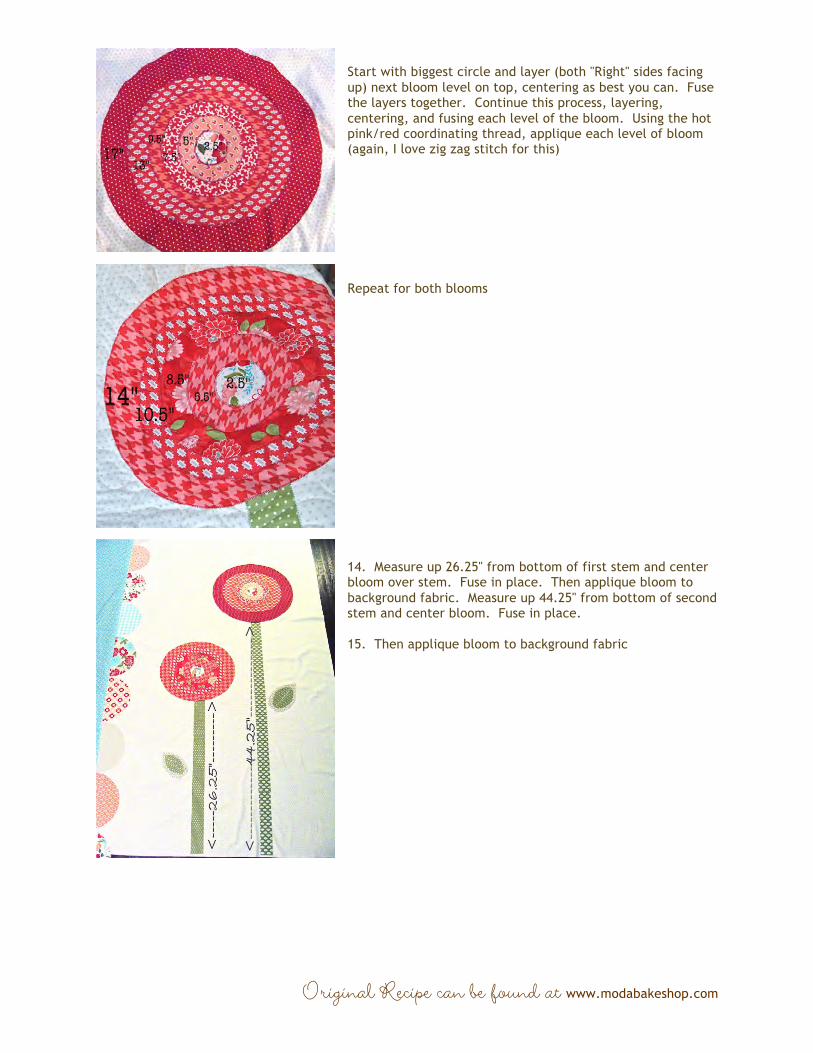
Start with biggest circle and layer (both "Right" sides facing up) next bloom level on top, centering as best you can. Fuse the layers together. Continue this process, layering, centering, and fusing each level of the bloom. Using the hot pink/red coordinating thread, applique each level of bloom (again, I love zig zag stitch for this)
Repeat for both blooms
14. Measure up 26.25" from bottom of first stem and center bloom over stem. Fuse in place. Then applique bloom to background fabric. Measure up 44.25" from bottom of second stem and center bloom. Fuse in place. 15. Then applique bloom to background fabric
Original Recipe can be found at www.modabakeshop.com
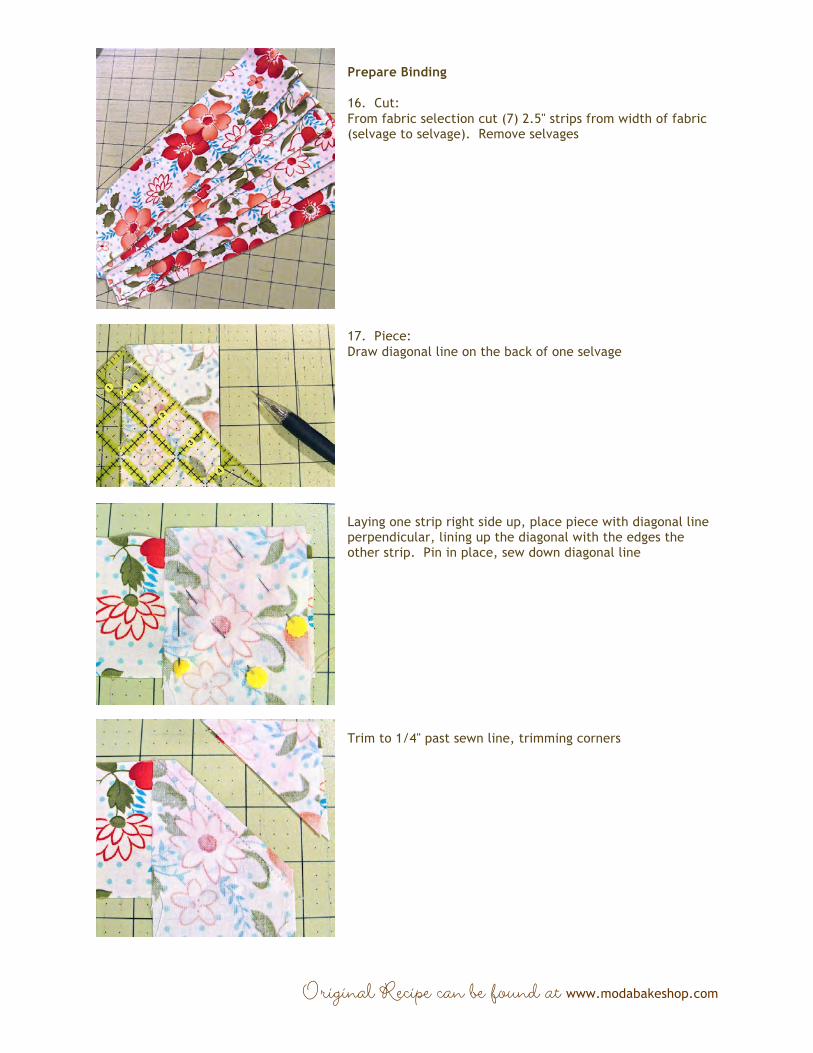
Prepare Binding 16. Cut: From fabric selection cut (7) 2.5" strips from width of fabric (selvage to selvage). Remove selvages
17. Piece: Draw diagonal line on the back of one selvage
Laying one strip right side up, place piece with diagonal line perpendicular, lining up the diagonal with the edges the other strip. Pin in place, sew down diagonal line
Trim to 1/4" past sewn line, trimming corners
Original Recipe can be found at www.modabakeshop.com
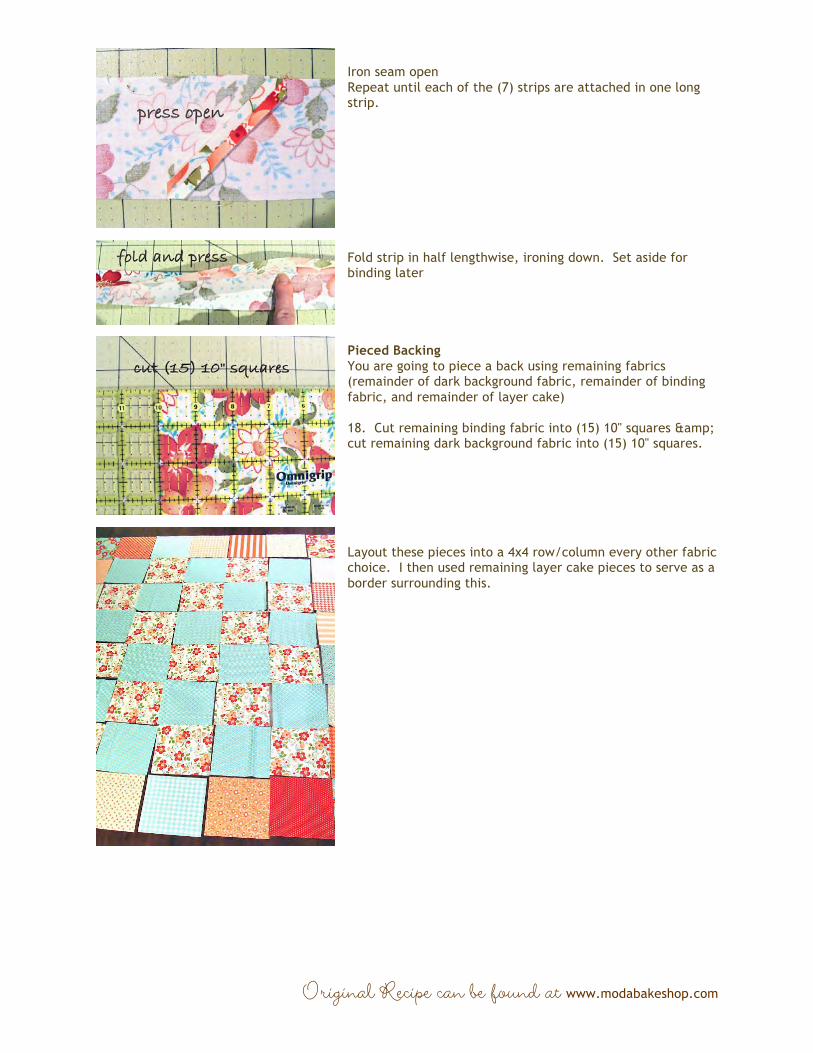
Iron seam open Repeat until each of the (7) strips are attached in one long strip.
Fold strip in half lengthwise, ironing down. Set aside for binding later
Pieced Backing You are going to piece a back using remaining fabrics (remainder of dark background fabric, remainder of binding fabric, and remainder of layer cake) 18. Cut remaining binding fabric into (15) 10" squares & cut remaining dark background fabric into (15) 10" squares.
Layout these pieces into a 4x4 row/column every other fabric choice. I then used remaining layer cake pieces to serve as a border surrounding this.
Original Recipe can be found at www.modabakeshop.com
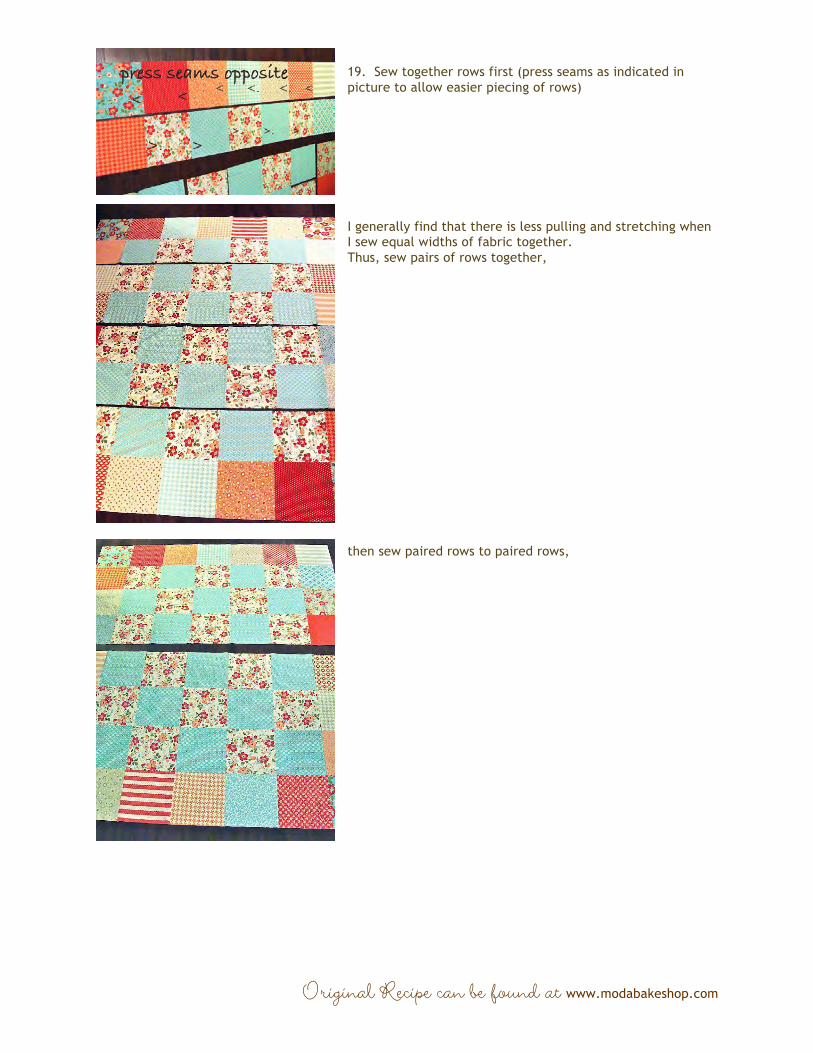
19. Sew together rows first (press seams as indicated in picture to allow easier piecing of rows)
I generally find that there is less pulling and stretching when I sew equal widths of fabric together. Thus, sew pairs of rows together,
then sew paired rows to paired rows,
Original Recipe can be found at www.modabakeshop.com
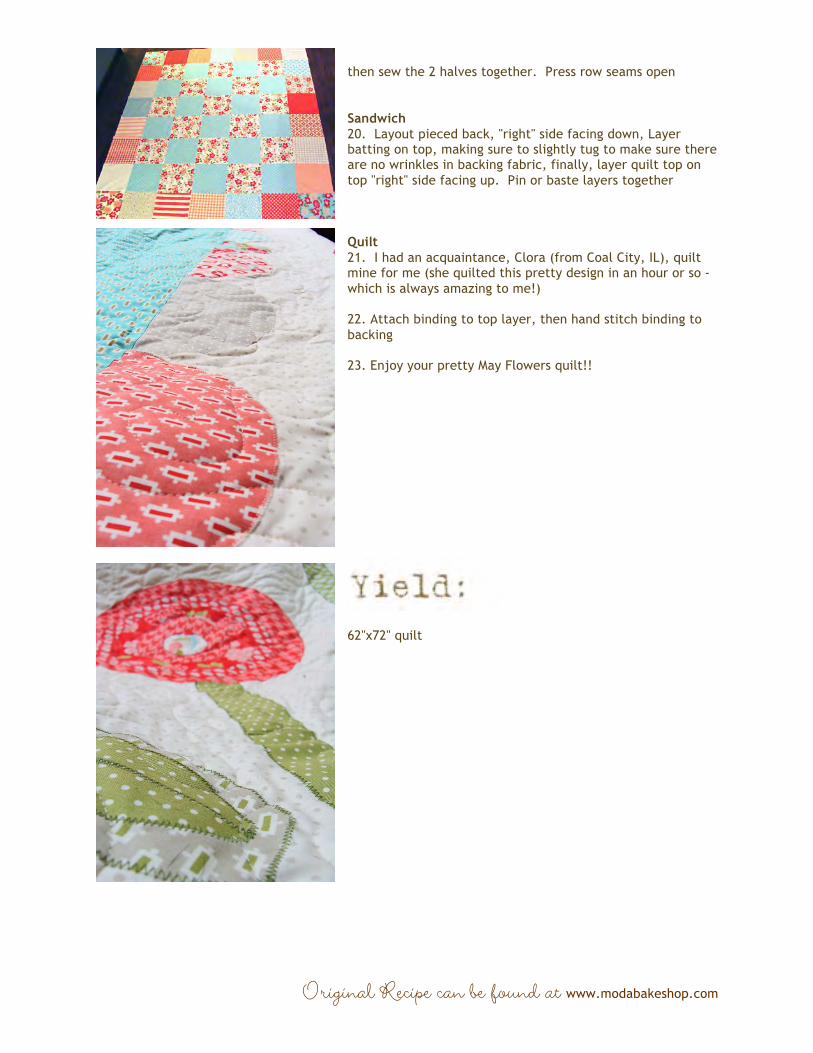
then sew the 2 halves together. Press row seams open Sandwich 20. Layout pieced back, "right" side facing down, Layer batting on top, making sure to slightly tug to make sure there are no wrinkles in backing fabric, finally, layer quilt top on top "right" side facing up. Pin or baste layers together Quilt 21. I had an acquaintance, Clora (from Coal City, IL), quilt mine for me (she quilted this pretty design in an hour or so - which is always amazing to me!) 22. Attach binding to top layer, then hand stitch binding to backing 23. Enjoy your pretty May Flowers quilt!!
62"x72" quilt
Original Recipe can be found at www.modabakeshop.com
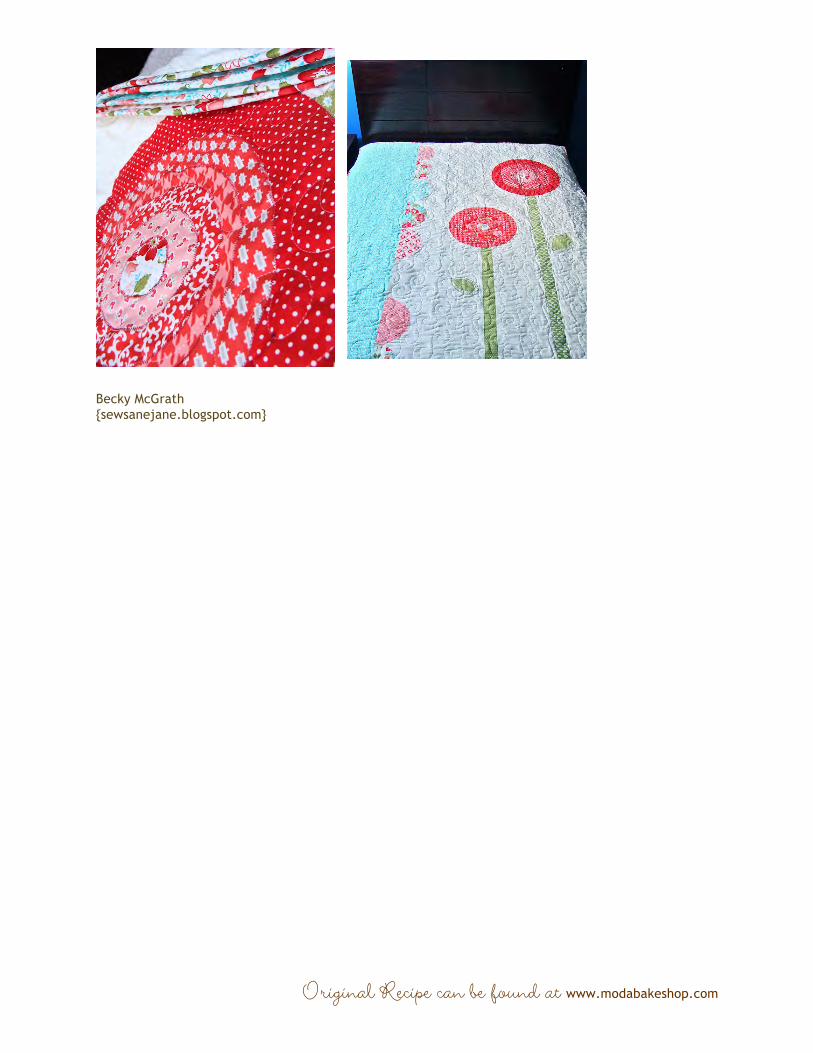
Becky McGrath {sewsanejane.blogspot.com}