Embed Size (px)
Citation preview
PR
OC
ED
UR
E 1
1 Osteochondral Autograft TransplantationAmmar Anbari, Adam B. Yanke, and Brian J. Cole
ch011-X4397.indd 179 4/11/2008 10:47:39 AM

180O
steo
cho
nd
ral
Au
tog
raft
Tra
nsp
lan
tati
on Indications
■ Smaller (1- to 2-cm2) symptomatic localized, full-thickness, unipolar chondral lesions of the femoral condyle, trochlea or patella• Symptoms include swelling, catching, and pain.
■ Patients under 50■ Higher physical demand
Examination/Imaging■ History: should include a thorough review of all
previous injuries, operative reports, and arthroscopic photos and videos.
■ Standard radiographic imaging: weight-bearing anteroposterior, lateral, and Merchant’s view radiographs
■ Supplemental radiographic imaging• 45° flexion posteroanterior view: assesses joint
space narrowing• Long cassette view standing films: assesses
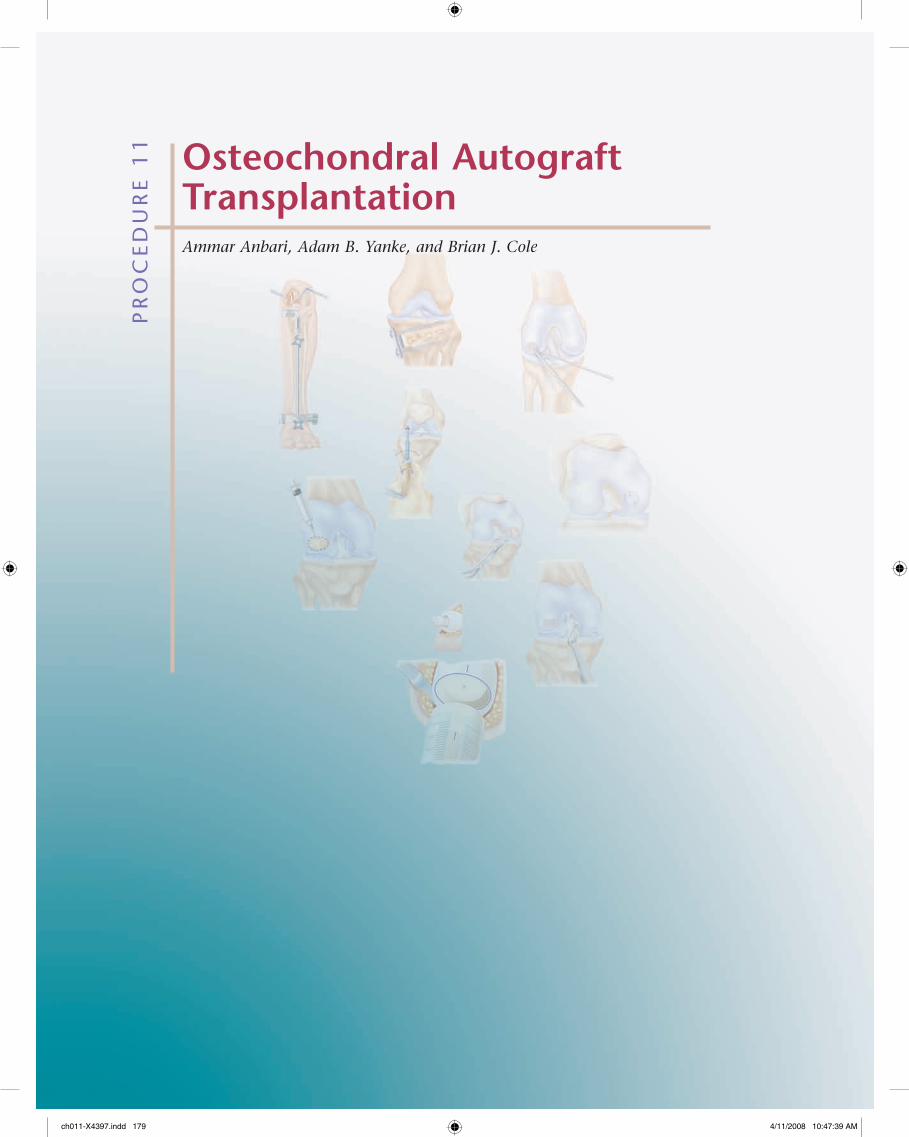
malalignment■ Magnetic resonance imaging (MRI): assesses the size
and extent of the chondral lesion and evaluates for additional abnormalities (i.e., ligament or meniscus deficiency) (Fig. 1A and 1B)
■ Comorbidities must be defined and corrected concomitantly or prior to autograft implantation.
Positioning■ The patient can be positioned in the supine position,
or the limb may be placed in a standard leg holder. Our preference is to drop the foot of the bed, flex the knee, and place the extremity in a leg holder. This allows the surgeon to have more flexibility in accessing lesions on the posterior aspect of the femoral condyle.
■ A tourniquet is applied but is generally not used. If a small incision is made to harvest or implant the autograft plug, the tourniquet is used but deflated prior to closure to achieve hemostasis.
Controversies• Inflammatory arthritis• Morbid obesity• Medical problems that may
interfere with autograft incorporation
Treatment Optionsnonoperative treatment options
• Nonsteroidal anti-inflammatory drugs
• Cortisone injections• Viscosupplementation• Unloader braces• Assistive devices (canes, walkers)
operative treatment options
• Consider osteotomy in all patients with malalignment.
• Lesions less than 2–3 cm2
■ For low-physical-demand patients or low-level symptoms: débridement, microfracture
■ For high-physical-demand patients or high-level symptoms: débridement, microfracture, osteochondral autograft
■ If the above fail: osteochondral allograft, autologous chondrocyte implantation
ch011-X4397.indd 180 4/11/2008 10:47:39 AM
181O
steoch
on
dral A
uto
graft Tran
splan
tation
Portals/Exposure■ The procedure is generally started arthroscopically as
the surgeon may decide to continue arthroscopically or perform the transfer through small incisions. Performing the transfer through a mini-open approach is more accurate and more reliably allows harvesting and implanting perpendicular to the articular surface.
■ Standard arthroscopic anteromedial and anterolateral portals are established first. Using a spinal needle to achieve a perpendicular approach to the lesion, a small accessory portal is created once the lesion is identified. Another portal is created laterally adjacent to the proximal aspect of the patella to harvest the autologous plug.
■ If an open approach is chosen, two 3-cm incisions are made for harvest and implantation. A spinal needle can still be used to create the appropriate trajectory of the instruments and to select the best and smallest incisions possible.
■ Plug harvest is optimally performed open, and implantation can often be performed arthroscopically.
P e a r l s
• The implantation incision may go through the patellar tendon. In that case, care must be taken to split the patellar tendon in line with its fibers and minimize trauma during the implantation.
BA
FIGURE 1
ch011-X4397.indd 181 4/11/2008 10:47:41 AM
182O
steo
cho
nd
ral
Au
tog
raft
Tra
nsp
lan
tati
on
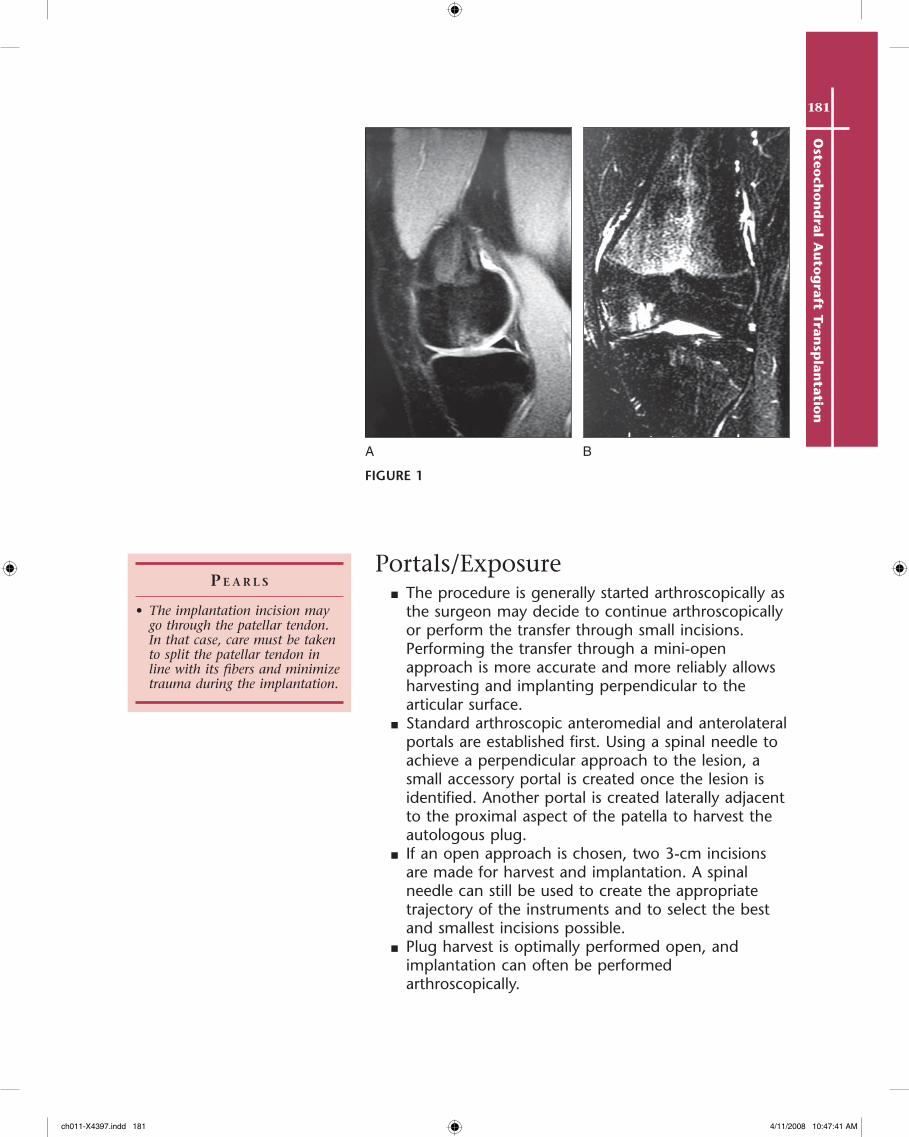
■ The harvest incision is made along the superolateral border of the patella, where a small arthrotomy is created (Fig. 2). Two retractors are placed to expose the superolateral trochlea proximal to the sulcus terminalis.• Advantages of the lateral trochlea as a donor site:
◆ Subjected to relatively low contact forces◆ Convex surface mimicking recipient site◆ Simplified access through a limited incision
• Other sources of donor plugs:◆ Superomedial trochlea and superolateral notch
(cannot obtain plugs larger than 6 mm)◆ Opposite knee
ProceduresteP 1: Diagnostic arthroscoPy
■ After establishing the standard arthroscopic portals, a systematic evaluation of all compartments of the knee is performed. Any loose bodies should be removed.
■ The lesion is exposed, and, if necessary, a small portion of the fat pad may be excised to facilitate visualization.
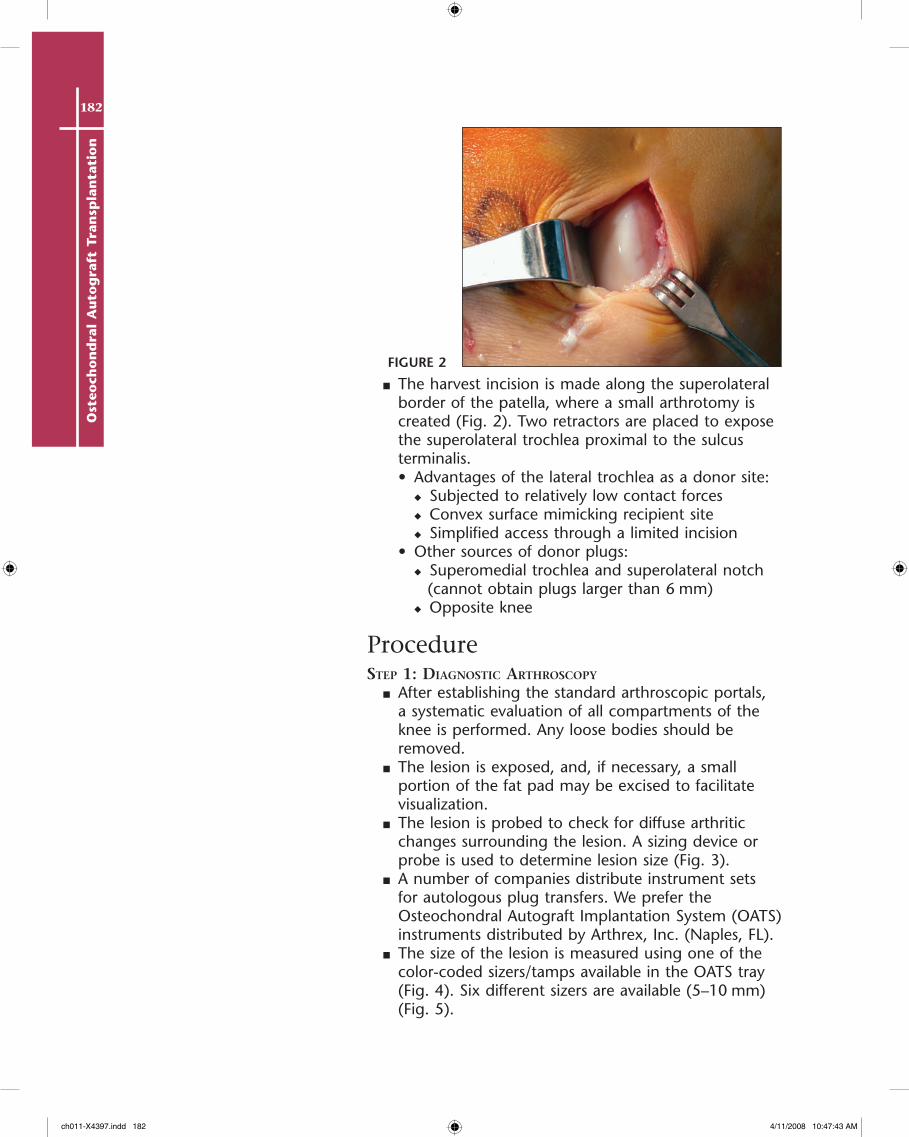
■ The lesion is probed to check for diffuse arthritic changes surrounding the lesion. A sizing device or probe is used to determine lesion size (Fig. 3).
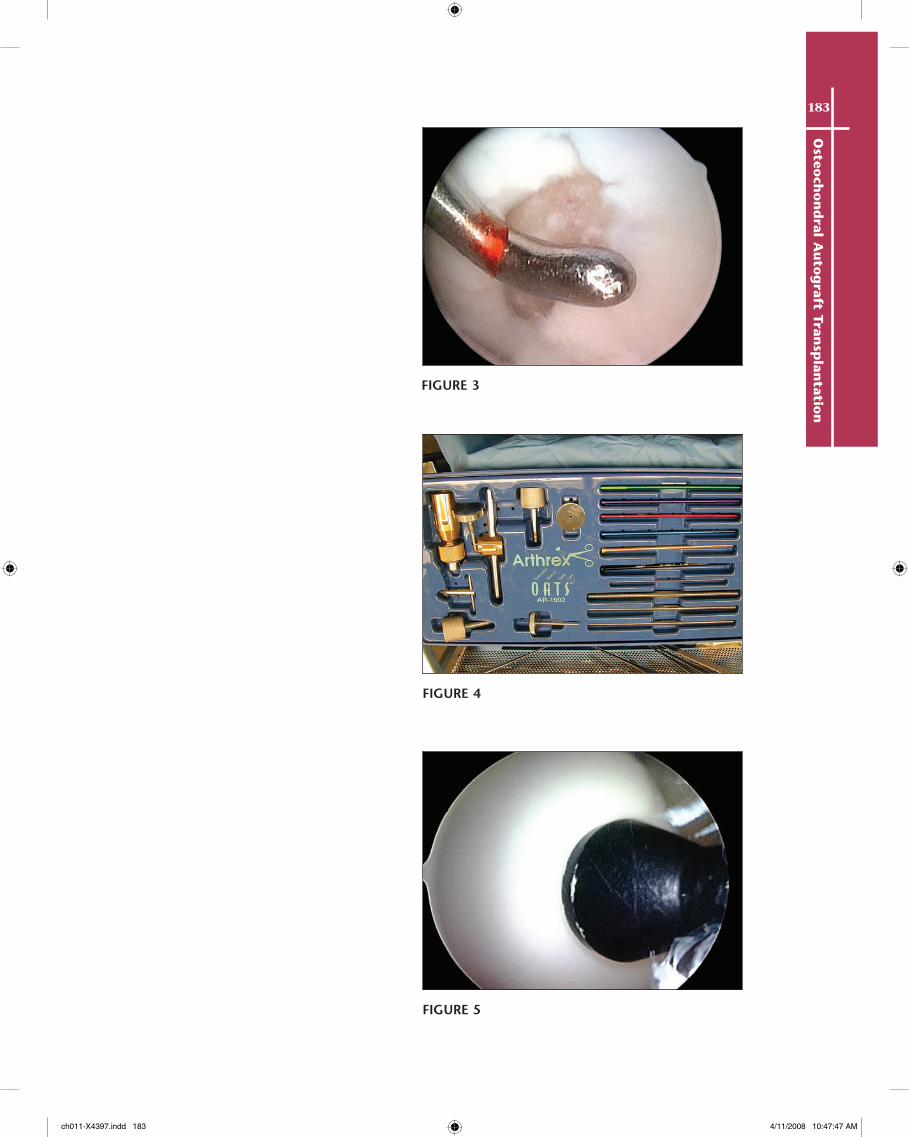
■ A number of companies distribute instrument sets for autologous plug transfers. We prefer the Osteochondral Autograft Implantation System (OATS) instruments distributed by Arthrex, Inc. (Naples, FL).
■ The size of the lesion is measured using one of the color-coded sizers/tamps available in the OATS tray (Fig. 4). Six different sizers are available (5–10 mm) (Fig. 5).
FIGURE 2
ch011-X4397.indd 182 4/11/2008 10:47:43 AM
183O
steoch
on
dral A
uto
graft Tran
splan
tation
FIGURE 3
FIGURE 4
FIGURE 5
ch011-X4397.indd 183 4/11/2008 10:47:47 AM
184O
steo
cho
nd
ral
Au
tog
raft
Tra
nsp
lan
tati
on
P e a r l s
• It is very important to avoid rotation or levering of the harvesting tube during initial impaction.
• Once the desired depth is met, if difficulty is encountered in removing the donor plug, the harvester can be gently levered proximally, distally, and side to side to break the plug from its cancellous bony bed.
• If the plug still is not captured in the harvesting tube, a small thin osteotome can be used along the side of the condyle to transect the junction of the plug and host, freeing the osteochondral plug.
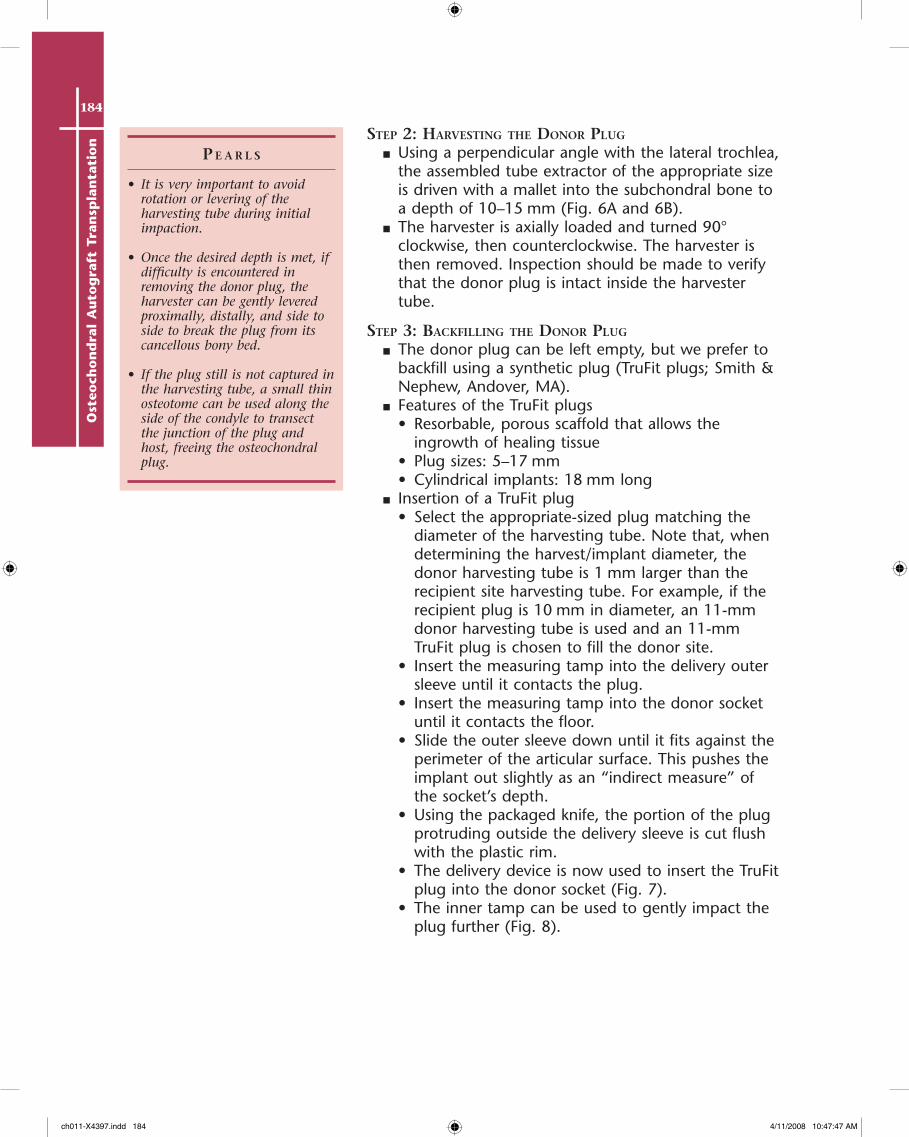
steP 2: harvesting the Donor Plug
■ Using a perpendicular angle with the lateral trochlea, the assembled tube extractor of the appropriate size is driven with a mallet into the subchondral bone to a depth of 10–15 mm (Fig. 6A and 6B).
■ The harvester is axially loaded and turned 90° clockwise, then counterclockwise. The harvester is then removed. Inspection should be made to verify that the donor plug is intact inside the harvester tube.
steP 3: Backfilling the Donor Plug
■ The donor plug can be left empty, but we prefer to backfill using a synthetic plug (TruFit plugs; Smith & Nephew, Andover, MA).
■ Features of the TruFit plugs• Resorbable, porous scaffold that allows the
ingrowth of healing tissue• Plug sizes: 5–17 mm• Cylindrical implants: 18 mm long
■ Insertion of a TruFit plug• Select the appropriate-sized plug matching the
diameter of the harvesting tube. Note that, when determining the harvest/implant diameter, the donor harvesting tube is 1 mm larger than the recipient site harvesting tube. For example, if the recipient plug is 10 mm in diameter, an 11-mm donor harvesting tube is used and an 11-mm TruFit plug is chosen to fill the donor site.
• Insert the measuring tamp into the delivery outer sleeve until it contacts the plug.
• Insert the measuring tamp into the donor socket until it contacts the floor.
• Slide the outer sleeve down until it fits against the perimeter of the articular surface. This pushes the implant out slightly as an “indirect measure” of the socket’s depth.
• Using the packaged knife, the portion of the plug protruding outside the delivery sleeve is cut flush with the plastic rim.
• The delivery device is now used to insert the TruFit plug into the donor socket (Fig. 7).
• The inner tamp can be used to gently impact the plug further (Fig. 8).
ch011-X4397.indd 184 4/11/2008 10:47:47 AM
185O
steoch
on
dral A
uto
graft Tran
splan
tation
A B
FIGURE 6
FIGURE 7FIGURE 8
ch011-X4397.indd 185 4/11/2008 10:47:55 AM
186O
steo
cho
nd
ral
Au
tog
raft
Tra
nsp
lan
tati
on
P e a r l s
• Knee flexion has to be maintained constant during the preparation of the recipient site.
• Watching the laser lines on the recipient harvesting tube as it is impacted assures that the tube remains perpendicular during the impaction process.
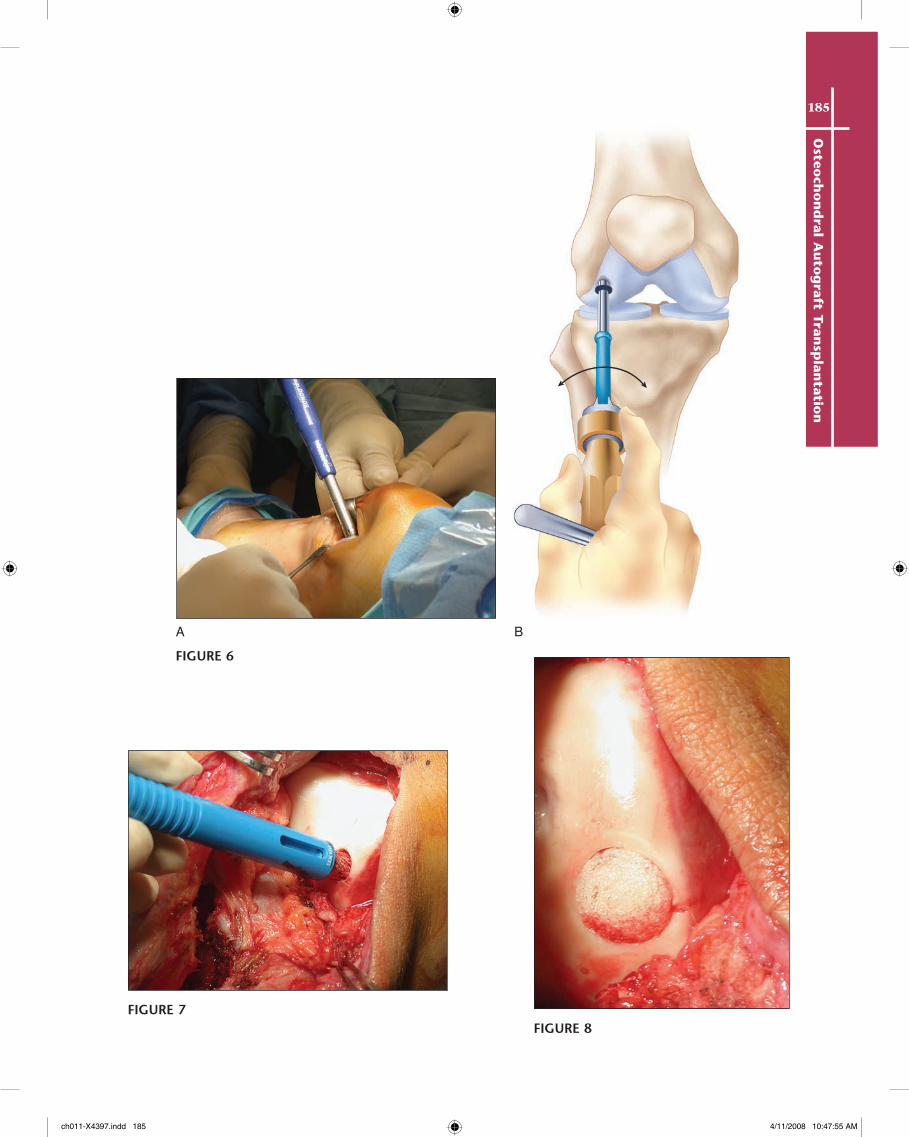
steP 4: PreParing the reciPient site
■ The recipient harvester is placed at 90° to the recipient lesion. The harvester is rotated until the size markings are visible.
■ A mallet is used to drive the harvester into the recipient site up to about 2 mm less than the depth previously achieved by the donor harvester (Fig. 9). Using the same rotational maneuvers, the recipient plug is removed.
■ An alignment stick is used to measure the depth of the recipient socket.
■ The recipient socket is inspected to make sure it is clean of any bony debris (Fig. 10A and 10B).
BA
FIGURE 9
FIGURE 10
ch011-X4397.indd 186 4/11/2008 10:47:59 AM
187O
steoch
on
dral A
uto
graft Tran
splan
tation
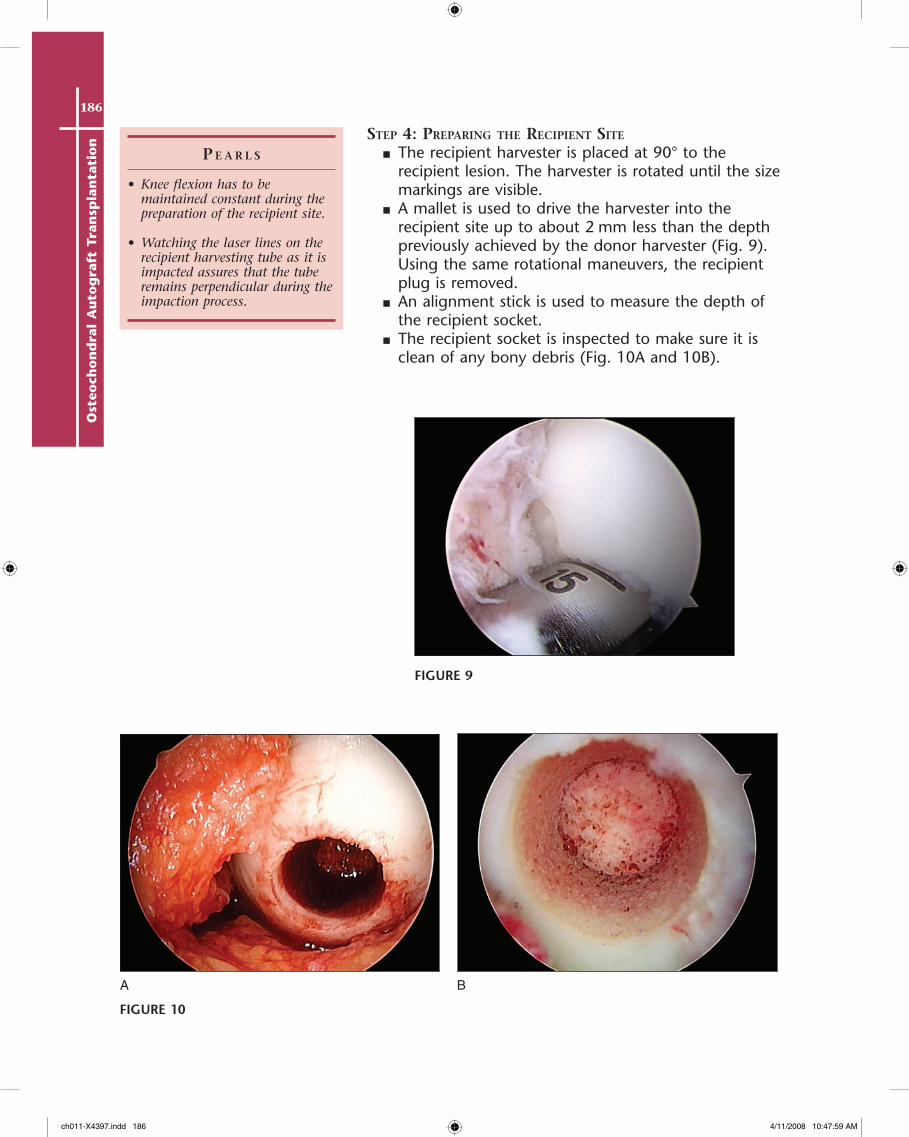
steP 5: Placing the Donor Plug
■ The donor harvester is placed inside the recipient socket and the donor graft is gently extruded. The collard pin of the harvester is advanced until the pin is flush with the pin calibrator. This places the graft 1 mm outside of the socket.
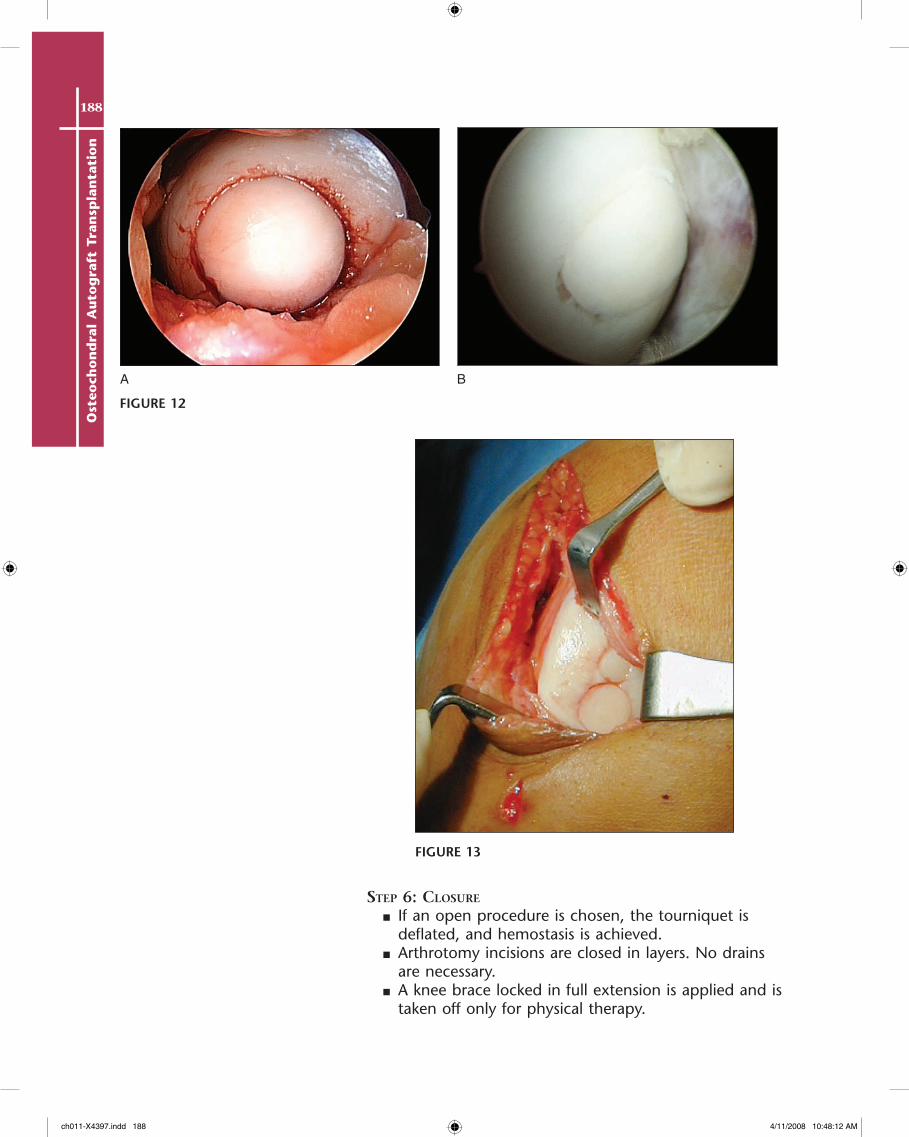
■ A tamp that is 1 mm larger in diameter than the plug is used to gently advance the plug further (Fig. 11A and 11B) until it is fully seated (Fig. 12A and 12B).
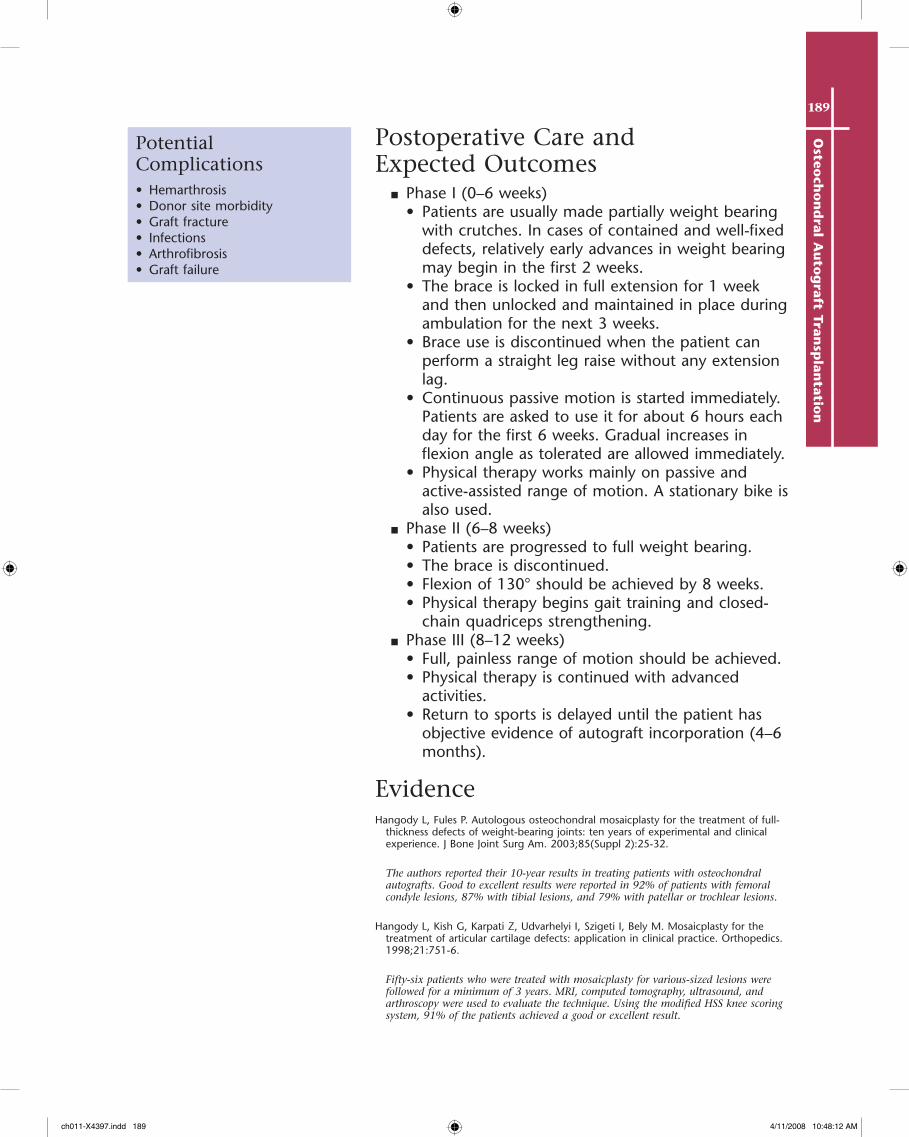
■ If multiple plugs are needed, it is important to complete each transfer before creating a subsequent recipient socket (Fig. 13).
■ The knee is cycled to make sure the graft is stable.
A B
FIGURE 11
ch011-X4397.indd 187 4/11/2008 10:48:07 AM
188O
steo
cho
nd
ral
Au
tog
raft
Tra
nsp
lan
tati
on
BA
FIGURE 12
FIGURE 13
steP 6: closure
■ If an open procedure is chosen, the tourniquet is deflated, and hemostasis is achieved.
■ Arthrotomy incisions are closed in layers. No drains are necessary.
■ A knee brace locked in full extension is applied and is taken off only for physical therapy.
ch011-X4397.indd 188 4/11/2008 10:48:12 AM
189O
steoch
on
dral A
uto
graft Tran
splan
tation
Postoperative Care and Expected Outcomes
■ Phase I (0–6 weeks)• Patients are usually made partially weight bearing
with crutches. In cases of contained and well-fixed defects, relatively early advances in weight bearing may begin in the first 2 weeks.
• The brace is locked in full extension for 1 week and then unlocked and maintained in place during ambulation for the next 3 weeks.
• Brace use is discontinued when the patient can perform a straight leg raise without any extension lag.
• Continuous passive motion is started immediately. Patients are asked to use it for about 6 hours each day for the first 6 weeks. Gradual increases in flexion angle as tolerated are allowed immediately.
• Physical therapy works mainly on passive and active-assisted range of motion. A stationary bike is also used.
■ Phase II (6–8 weeks)• Patients are progressed to full weight bearing.• The brace is discontinued.• Flexion of 130° should be achieved by 8 weeks.• Physical therapy begins gait training and closed-
chain quadriceps strengthening.■ Phase III (8–12 weeks)
• Full, painless range of motion should be achieved.• Physical therapy is continued with advanced
activities.• Return to sports is delayed until the patient has
objective evidence of autograft incorporation (4–6 months).
EvidenceHangody L, Fules P. Autologous osteochondral mosaicplasty for the treatment of full-
thickness defects of weight-bearing joints: ten years of experimental and clinical experience. J Bone Joint Surg Am. 2003;85(Suppl 2):25-32.
The authors reported their 10-year results in treating patients with osteochondral autografts. Good to excellent results were reported in 92% of patients with femoral condyle lesions, 87% with tibial lesions, and 79% with patellar or trochlear lesions.
Hangody L, Kish G, Karpati Z, Udvarhelyi I, Szigeti I, Bely M. Mosaicplasty for the treatment of articular cartilage defects: application in clinical practice. Orthopedics. 1998;21:751-6.
Fifty-six patients who were treated with mosaicplasty for various-sized lesions were followed for a minimum of 3 years. MRI, computed tomography, ultrasound, and arthroscopy were used to evaluate the technique. Using the modified HSS knee scoring system, 91% of the patients achieved a good or excellent result.
Potential Complications• Hemarthrosis• Donor site morbidity• Graft fracture• Infections• Arthrofibrosis• Graft failure
ch011-X4397.indd 189 4/11/2008 10:48:12 AM
190O
steo
cho
nd
ral
Au
tog
raft
Tra
nsp
lan
tati
on
Horas U, Pelinkovic D, Herr G, Aigner T, Schnettler R. Autologous chondrocyte implantation and osteochondral cylinder transplantation in cartilage repair of the knee joint. J Bone Joint Surg Am. 2003;85:185-92.
The authors reported the results of a randomized controlled trial comparing 40 patients treated with autologous chondrocyte implantation (ACI) to 40 patients treated with osteochondral autografts. At a minimum of 2 years’ follow-up, both groups had significant improvements, but the Lysholm scores of the ACI group lagged behind the osteochondral autograft group. The osteochondral autograft group showed consistent hyaline cartilage, whereas the ACI group showed mainly fibrocartilage.
Jakob RP, Franz T, Gautier E, Mainil-Varlet P. Autologous osteochondral grafting in the knee: indications, results, and reflections. Clin Orthop. 2002;401:170-84.
The authors treated 52 patients with osteochondral autografts, with an average follow-up of 37 months. At the latest follow-up, improved knee function was observed in 92% of the patients. The treatment results were limited by the size of the lesion and the number of plugs implanted.
Kish G, Modis L, Hangody L. Osteochondral mosaicplasty for the treatment of focal chondral and osteochondral lesions of the knee and talus in the athlete: rationale, indications, techniques, and results. Clin Sports Med. 1999;18:45-66.
A report of 52 competitive athletes who were treated with osteochondral autografts. The authors reported 100% good to excellent results. Sixty-three percent of the athletes returned to full sports. About 90% of the players under 30 years old returned to full sports compared to 23% of the players over the age of 30.
Koh JL, Wirsing K, Lautenschlager E, Zhang LO. The effect of graft height mismatch on contact pressure following osteochondral grafting. Am J Sports Med. 2004;32:317-20.
A biomechanical study used swine knees to investigate the effect of graft height mismatch on contact pressures following osteochondral grafting. After defect creation, the contact pressures were elevated by 20%. A flush graft plug reduced the pressure to normal. A proud plug (0.5 mm) increased the contact pressures by 40%. A countersunk graft increased the contact pressures by 10%.
ch011-X4397.indd 190 4/11/2008 10:48:12 AM