Embed Size (px)
Citation preview
OWNER’SMANUALCod. 271101
U.S.English
CAUTIONRISK OF ELECTRIC SHOCK
DO NOT OPEN
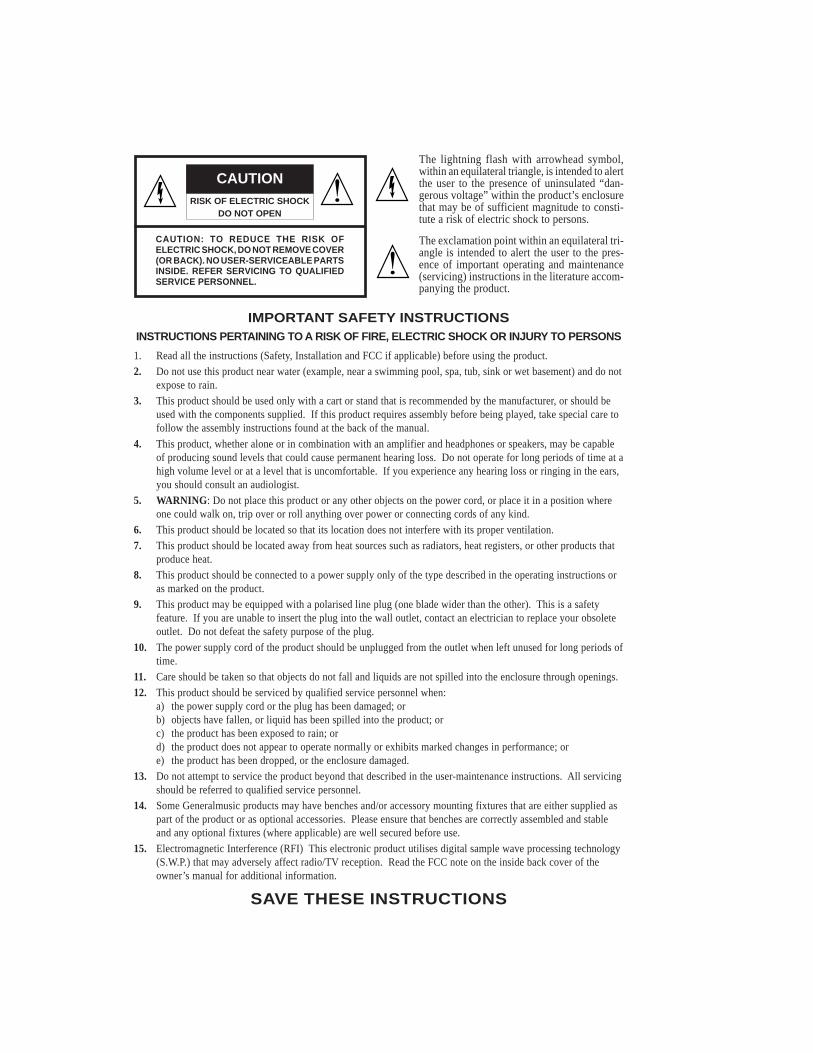
The lightning flash with arrowhead symbol,within an equilateral triangle, is intended to alertthe user to the presence of uninsulated “dan-gerous voltage” within the product’s enclosurethat may be of sufficient magnitude to consti-tute a risk of electric shock to persons.
The exclamation point within an equilateral tri-angle is intended to alert the user to the pres-ence of important operating and maintenance(servicing) instructions in the literature accom-panying the product.
CAUTION: TO REDUCE THE RISK OFELECTRIC SHOCK, DO NOT REMOVE COVER(OR BACK). NO USER-SERVICEABLE PARTSINSIDE. REFER SERVICING TO QUALIFIEDSERVICE PERSONNEL.
IMPORTANT SAFETY INSTRUCTIONSINSTRUCTIONS PERTAINING TO A RISK OF FIRE, ELECTRIC SHOCK OR INJURY TO PERSONS
1. Read all the instructions (Safety, Installation and FCC if applicable) before using the product.
2. Do not use this product near water (example, near a swimming pool, spa, tub, sink or wet basement) and do notexpose to rain.
3. This product should be used only with a cart or stand that is recommended by the manufacturer, or should beused with the components supplied. If this product requires assembly before being played, take special care tofollow the assembly instructions found at the back of the manual.
4. This product, whether alone or in combination with an amplifier and headphones or speakers, may be capableof producing sound levels that could cause permanent hearing loss. Do not operate for long periods of time at ahigh volume level or at a level that is uncomfortable. If you experience any hearing loss or ringing in the ears,you should consult an audiologist.
5. WARNING : Do not place this product or any other objects on the power cord, or place it in a position whereone could walk on, trip over or roll anything over power or connecting cords of any kind.
6. This product should be located so that its location does not interfere with its proper ventilation.
7. This product should be located away from heat sources such as radiators, heat registers, or other products thatproduce heat.
8. This product should be connected to a power supply only of the type described in the operating instructions oras marked on the product.
9. This product may be equipped with a polarised line plug (one blade wider than the other). This is a safetyfeature. If you are unable to insert the plug into the wall outlet, contact an electrician to replace your obsoleteoutlet. Do not defeat the safety purpose of the plug.
10. The power supply cord of the product should be unplugged from the outlet when left unused for long periods oftime.
11. Care should be taken so that objects do not fall and liquids are not spilled into the enclosure through openings.
12. This product should be serviced by qualified service personnel when:a) the power supply cord or the plug has been damaged; orb) objects have fallen, or liquid has been spilled into the product; orc) the product has been exposed to rain; ord) the product does not appear to operate normally or exhibits marked changes in performance; ore) the product has been dropped, or the enclosure damaged.
13. Do not attempt to service the product beyond that described in the user-maintenance instructions. All servicingshould be referred to qualified service personnel.
14. Some Generalmusic products may have benches and/or accessory mounting fixtures that are either supplied aspart of the product or as optional accessories. Please ensure that benches are correctly assembled and stableand any optional fixtures (where applicable) are well secured before use.
15. Electromagnetic Interference (RFI) This electronic product utilises digital sample wave processing technology(S.W.P.) that may adversely affect radio/TV reception. Read the FCC note on the inside back cover of theowner’s manual for additional information.
SAVE THESE INSTRUCTIONS
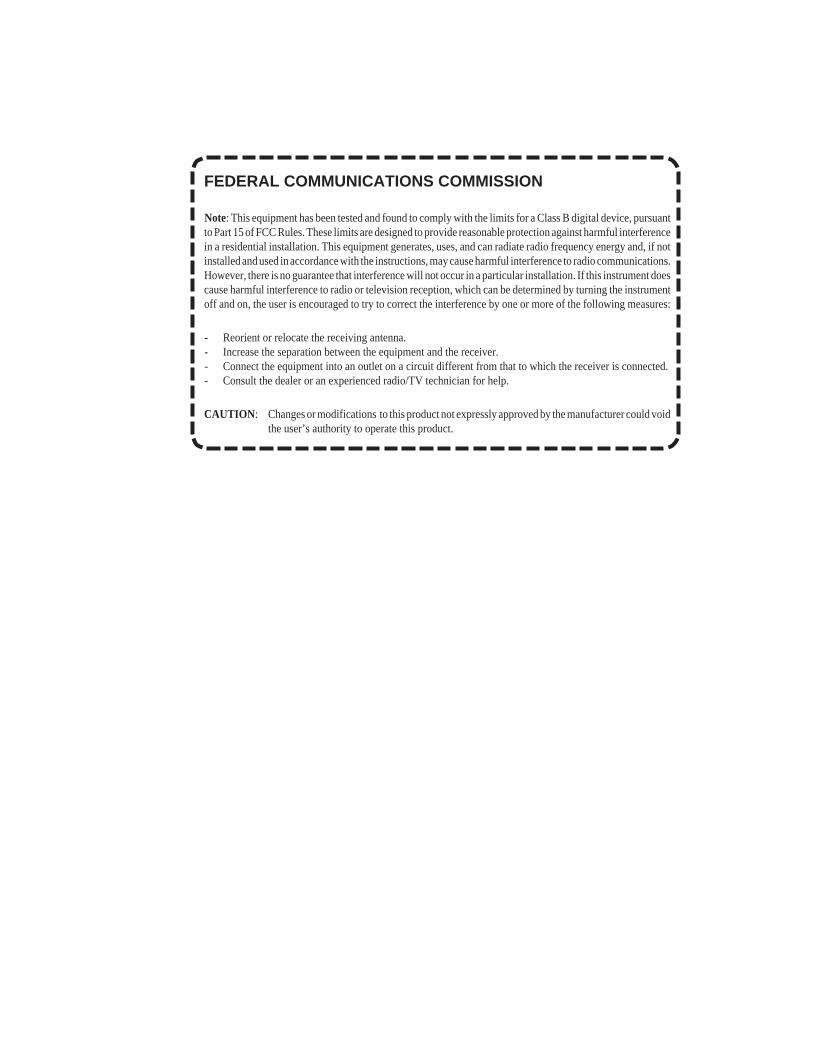
FEDERAL COMMUNICATIONS COMMISSION
Note: This equipment has been tested and found to comply with the limits for a Class B digital device, pursuantto Part 15 of FCC Rules. These limits are designed to provide reasonable protection against harmful interferencein a residential installation. This equipment generates, uses, and can radiate radio frequency energy and, if notinstalled and used in accordance with the instructions, may cause harmful interference to radio communications.However, there is no guarantee that interference will not occur in a particular installation. If this instrument doescause harmful interference to radio or television reception, which can be determined by turning the instrumentoff and on, the user is encouraged to try to correct the interference by one or more of the following measures:
- Reorient or relocate the receiving antenna.- Increase the separation between the equipment and the receiver.- Connect the equipment into an outlet on a circuit different from that to which the receiver is connected.- Consult the dealer or an experienced radio/TV technician for help.
CAUTION : Changes or modifications to this product not expressly approved by the manufacturer could voidthe user’s authority to operate this product.
Stock Code 271101
PRINTED IN ITALY
Specifications are subject to change without prior notice.
Baldwin Piano & Organ Company, 422 Wards Corner Rd., Loveland, Ohio, 45140 - 8390 - USA
○ ○ ○ ○ ○ ○ ○ ○ ○ ○ ○ ○ ○ ○ ○ ○ ○ ○ ○ ○ ○ ○ ○ ○ ○ ○ ○ ○ ○ ○ ○ ○ ○ ○ ○ ○
Contents i
○ ○ ○ ○ ○ ○ ○ ○ ○ ○ ○
ContentsUSER GUIDE
IntroductionHow to use the owner’s manual iSpecifications iiUpdate the Operating System with OS-Disks vSystem Reset v
• 1 Quick Guide 1. 1Power up and get to know the basics. 1. 1The initial status (default) 1. 2Adjusting the General Volume 1. 2Play with Auto Accompaniment Styles 1. 3Listen to the Demo Styles 1. 5Demo Style 1. 5Multimedia 1. 6Selecting instrument Sounds 1. 8Selecting the Programmable Presets 1. 10Change the touch sensitivity 1. 12Play the Programmable Pads 1. 12Play with Effects or bypass them 1. 13Play with headphones 1. 14Play with the pedals 1. 14Regulate the general Effectvolumes and activate loudness 1. 15Transpose the instrument (Semitones) 1. 16Play All Songs 1. 17Song Play - Direct from Disk 1. 18Recording a Song/Style 1. 20
• 2 Front & Rear Panel 2. 1Front Panel (buttons & controls) 2. 6Rear Panel (Connections) 2. 10
• 3 Basic concepts 3. 1Play modes 3. 1Presets 3. 3Tracks 3. 5Sounds 3. 5Edit Modes 3. 6Connections 3. 7The Display 3. 10Data Entry 3. 13
○ ○ ○ ○ ○ ○ ○ ○ ○ ○ ○
ii Contents
○ ○ ○ ○ ○ ○ ○ ○ ○ ○ ○
• 4 Sounds & Presets 4. 1The Sounds and Tracks 4. 1Selecting Single Sounds 4. 3Selecting Presets 4. 6The Grand Piano Preset 4. 8How to Program Presets 4. 10How to Store Presets 4. 19Restore Preset 4. 23
• 5 The Styles 5. 1About PS1500 Styles 5. 1Selecting Styles 5. 2The Accompaniment tracks 5. 5The Style Controls 5. 6Variation, Fill, Style Lock 5. 8The Accompaniment section 5. 9Examples of using Styles 5. 16Tempo 5. 23Restore Sequencer 5. 24
• 6 Disk 6. 1Floppy disk formats 6. 1Files 6. 1Load operations - Play directly from disk 6. 5Load Song, SMF, Style 6. 5Load Styles, Load Presets 6. 9Load Sample 6. 10Load All 6. 11Loading WS and CD compatible files 6. 13Save operations 6. 16Save Song, SMF, Style 6. 18Save Styles, Save Presets 6. 20Save Sample 6. 21Save All 6. 22Utility functions 6. 23General disk handling information 6. 28Precautions to observe when using PS disks with a computer 6. 30
• 7 Songs & MIDI Files 7. 1What is a Song 7. 1What is a MIDI File 7. 1Selecting Songs 7. 3Song Playback 7. 4Displaying lyrics 7. 10Restore Songs memory 7. 13
• 8 Song/Styles 8. 1What is a Song/Style 8. 1Selecting Song/Styles 8. 2
○ ○ ○ ○ ○ ○ ○ ○ ○ ○ ○ ○ ○ ○ ○ ○ ○ ○ ○ ○ ○ ○ ○ ○ ○ ○ ○ ○ ○ ○ ○ ○ ○ ○ ○ ○
Contents iii
○ ○ ○ ○ ○ ○ ○ ○ ○ ○ ○
Song/Style Playback 8. 3Restore Song/Style memory 8. 9
• 9 Digital Effects 9. 1Selecting the effect types 9. 2Bypassing the effects 9. 4Regulating the Send levels 9. 5
• 10 MIDI 10. 1What is MIDI? 10. 1Playing PS1500 with a master keyboard 10. 4PS1500 in Song mode used as a controlling device 10. 7Programming Songs on an external sequencer 10. 8MIDI Panic 10. 10
REFERENCE GUIDE
• 11 Selection/Display Hold/Metronome 11. 1Selection 11. 1Display Hold 11. 6Metronome 11. 6
• 12 Edit Preset section 12. 1Overview 12. 1• Preset 12. 3
The Preset functions 12. 3• MIDI 12. 7
The MIDI functions 12. 8• Mixer 12. 15• Sound 12. 17
The Sound parameters 12. 20Clear Sound and Clear All 12. 24
• Drumkit 12. 27The Drumkit parameters 12. 31Erase “Drumkit” and Clear “Drumkit” 12. 34
• 13 General 13. 1
• 14 Edit effects 14. 1
• 15 User Style recording 15. 1Recording User Styles 15. 3Programming the User Style Preset 15. 7
• 16 Song/Style Recording 16. 1Recording Song/Styles 16. 2Programming the Song/Style Preset 16. 7
• 17 Song Recording 17. 1Recording Songs 17. 2Programming the Song Preset 17. 7
○ ○ ○ ○ ○ ○ ○ ○ ○ ○ ○
iv Contents
○ ○ ○ ○ ○ ○ ○ ○ ○ ○ ○
• 18 Song Edit 18.1Quantize function 18. 2Clear function 18. 4Master Track function 18. 9Copy function 18.1 3
• 19 SAMPLE / RECORD 19.1Regulating the Mic/Line signal 19. 3Preparing to sample - select the Splits 19. 4Programmable Pads Assign 19. 12
• 20 Play All Songs - Restore 20. 1Play all Songs 20. 1Restore 20. 2Software Release Date 20. 3
APPENDIXTables A iMIDI Implementation Chart A. xivGlossary A. xviiIndex A. xxi
○ ○ ○ ○ ○ ○ ○ ○ ○ ○ ○ ○ ○ ○ ○ ○ ○ ○ ○ ○ ○ ○
Introduction i
○ ○ ○ ○ ○ ○ ○ ○ ○ ○ ○ ○ ○ ○ ○ ○ ○ ○ ○ ○ ○ ○ ○ ○ ○
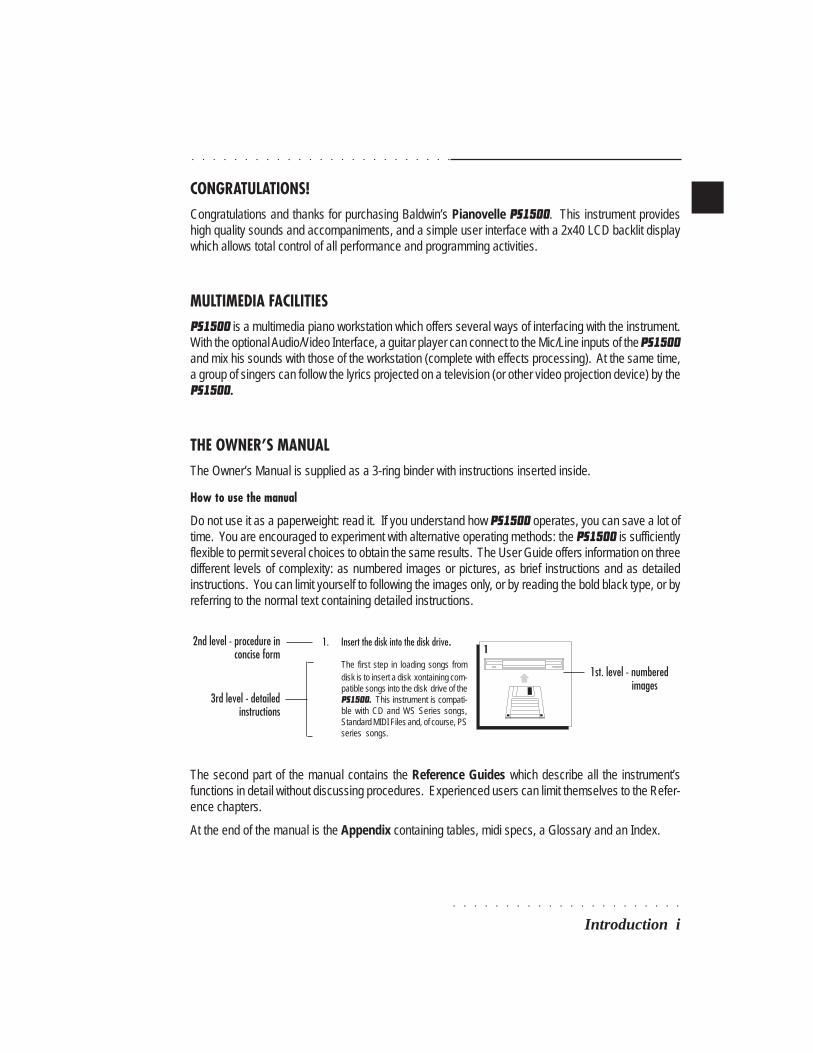
1. Insert the disk into the disk drive.
The first step in loading songs fromdisk is to insert a disk xontaining com-patible songs into the disk drive of thePS1500. This instrument is compati-ble with CD and WS Series songs,Standard MIDI Files and, of course, PSseries songs.
1
CONGRATULATIONS!Congratulations and thanks for purchasing Baldwin’s Pianovelle PS1500. This instrument provideshigh quality sounds and accompaniments, and a simple user interface with a 2x40 LCD backlit displaywhich allows total control of all performance and programming activities.
MULTIMEDIA FACILITIESPS1500 is a multimedia piano workstation which offers several ways of interfacing with the instrument.With the optional Audio/Video Interface, a guitar player can connect to the Mic/Line inputs of the PS1500and mix his sounds with those of the workstation (complete with effects processing). At the same time,a group of singers can follow the lyrics projected on a television (or other video projection device) by thePS1500.
THE OWNER’S MANUALThe Owner’s Manual is supplied as a 3-ring binder with instructions inserted inside.
How to use the manual
Do not use it as a paperweight: read it. If you understand how PS1500 operates, you can save a lot oftime. You are encouraged to experiment with alternative operating methods: the PS1500 is sufficientlyflexible to permit several choices to obtain the same results. The User Guide offers information on threedifferent levels of complexity: as numbered images or pictures, as brief instructions and as detailedinstructions. You can limit yourself to following the images only, or by reading the bold black type, or byreferring to the normal text containing detailed instructions.
The second part of the manual contains the Reference Guides which describe all the instrument’sfunctions in detail without discussing procedures. Experienced users can limit themselves to the Refer-ence chapters.
At the end of the manual is the Appendix containing tables, midi specs, a Glossary and an Index.
1st. level - numberedimages
3rd level - detailedinstructions
2nd level - procedure inconcise form
○ ○ ○ ○ ○ ○ ○ ○ ○ ○ ○ ○ ○ ○ ○ ○ ○ ○ ○ ○ ○ ○
ii Introduction
SPECIFICATIONS• Polyphony & multitimbricity
Maximum polphony: 32 voices. Multitimbric-ity: 8 parts (Style/Preset modes) or 16 parts(Song mode). Each part is assigned to a track.In Style/Preset mode, 3 tracks (maximum) areassigned to the keyboard and the other 5 tothe auto-accompaniments.
• Sound Generation
The Sounds are based on sampled waveforms(PCM, Wavetables and Subtractive Synthe-sis technology) and elaborated by a series ofmacro functions. The instrument’s 32 oscilla-tors generate “single” Sounds (32-note poly-phonic) or “layered” Sounds (16 note poly-phonic), depending on the number of oscilla-tors used to elaborate the Sound (1 or 2).
• ROM Sounds
ROM (permanent memory) contains 4 Mega-bytes of ROM Sounds, totalling almost 400permanent Sounds and Drumkits.
• Sound Edit
PS1500’s macro-edit facilities permit rapid andeasy Sound and Drumkit editing to produceedited Sounds (E-Sounds) which are stored inthe Presets. The modifications are stored inthe Presets to allow Songs, Styles or Presetsto load the correct sounds. You can also opt torecall your modified Presets with originalSounds instead of edited ones.
• Sample-RAM
PS1500 is fitted with a battery-backed Sam-ple-RAM dedicated to the storage of Samples.PCM Sample kits can be loaded into Sample-RAM from disk, or can be recorded with thePS1500 sampler, accessed via the Audio/Vid-eo Interface.
• Digital Effects Processor
Two Digital Effects Processors, controlled inreal time, enrich the sound with effects (re-verbs and modulations). Two different effects(1 Reverb and 1 Modulation) can be assignedto each Preset and an editor is available tocreate user-effects which are stored in thePresets.
• 16 Track Recording Studio
The 16-track Sequencer includes a series offunctions that allow Style, Song/Style andSong recording (real time system), playbackand editing. Also featured is a Text function(to display Song lyrics). Song/Style record-ing allows the rapd recording of an 8-tracksong by using existing Styles. Sequence datais conserved in the battery-backed System-RAM.
• Play All Songs, Chain
The Play All Songs function allows the directplayback of all Songs or MidiFiles present ondisk without loading the data into memory. TheSongs or MidiFiles play as a medley whichyou can stop at any time with the Play AllSongs button. Song/Styles and Songs fea-ture the Chain function which allows you tochain the Song or Song/Styles in memory andplay them one after the other with a singlecommand.
• Automatic Accompaniment
Styles provide autoomatic musical accompa-niment, consisting of 5 tracks. Every Stylehas 4 Variations. Up to 16 disk based Styles(User programmable) can be loaded and au-tomatically stored in the battery-backed Sys-tem-RAM.
• Disk Drive
Data can be stored on 3.5” HD Floppy diskson PS1500 format (1.4 Megabytes - Ms-Dosstandard) or Atari/Falcon format (720 Kbytes
○ ○ ○ ○ ○ ○ ○ ○ ○ ○ ○ ○ ○ ○ ○ ○ ○ ○ ○ ○ ○ ○
Introduction iii
○ ○ ○ ○ ○ ○ ○ ○ ○ ○ ○ ○ ○ ○ ○ ○ ○ ○ ○ ○ ○ ○ ○ ○ ○
- Ms-Dos format). PS1500 is able to initializedisks for both formats. If the Sample-RAM isinstalled, it is also possible to load Sample-kits from disk. Ms-Dos compatibility permitsMIDI File exchange with other instruments andcomputers. The Disk Drive features the ‘Slow’and ‘Fast’ loading options; Slow allows datato be loaded without blocking the instrument(background loading) while ‘Fast’ providesfaster loading times without background load-ing.
• Sampling
The Audio/Video Interface (AVI) renders theMicrophone/Line inputs operational for Sam-pling. The captured sample can be editedwith specific Sample Edit parameters andprocessed by the on-board Digital EffectsProcessor. PCM Samples can also be load-ed directly to the Sample-RAM from disk.
• Updateable Operating System (OS) fromfloppy disk
Since the operating system resides in a flash-ROM, it is possible to load updates from flop-py disk. Operating System updates can addnew functions to the instrument.
• Karaoke
The Karaoke function allows Song and Midi-File lyrics to be displayed on the instrument’s2x40 LCD display. The AVI allows lyrics to beprojected onto a television or other video de-vice during a performance to allow others tosing along with the player. The AVI is config-ured by default for the USA NTSC video stand-ard.
• Audio Inputs
PS1500 is fitted with a set of audio inputssuitable for the connection of musical instru-ments, mixer or homle stereo outputs. Thelevel of the input signal can be regulated byan appropriate volume control situated closeto the inputs. The signal can be directed to
the outputs for further external amplification.The Audio/Video Interface renders the Mic/Line input operational, suitable for samplingpurposes and processing the input signals withthe instrument’s on-board Digital Effects proc-essor.
• MIDI operation
PS1500 is fully implemented for MIDI opera-tion. The instrument can act as a Master con-trolling device, or as a 16 part multi-timbralslave device, regardless of the currently se-lected playing mode. A General MIDI com-patibility switch, MIDI Filters and MIDI Dumpfacilities completes the MIDI features.
• Direct Connection with a computer
The Computer jack permits the connection ofcomputers (MAC/PC/Atari) not fitted with aMIDI interface to PS1500 via a single serialcable. The communication speeds can alsobe configured to suit your specific computersystem.
○ ○ ○ ○ ○ ○ ○ ○ ○ ○ ○ ○ ○ ○ ○ ○ ○ ○ ○ ○ ○ ○
iv Introduction
IMPORTANT INFORMATION1. The PS1500 should contain the following items from the factory.
a) Instrument;b) Bench;c) 3 Floppy disks (2 OS-Disks, 1 Demo);d) Owner’s manual.
2. When contacting your retailer or authorized Baldwin technical assistance center, always provide themodel name and serial number of your instrument (found on the identification plate).
The information in this publication has been carefully prepared and checked. The manufacturers however declineall liability for eventual errors. All rights are reserved. This publication may not be copied, photocopied orreproduced in part or in whole without prior written consent from Baldwin Piano & Organ Company. Baldwinreserves the right to apply any aesthetic, design or function modifications it considers necessary to any of its productswithout prior notice. Baldwin declines all liability for damage to property or persons resulting from improper useof the instrument.
Make sure that all electronic options are installed by an authorised Baldwin Pianovelle service technician. Chackwith the authorised Baldwin Pianovelle dealer for information on the closest service center.
Baldwin Piano & Organ Company © 1996. All rights reserved.
Apple, IBM, Macintosh, Microsoft, MS-DOS, Win-dows, Atari, are regisatered trademarks of the respectivecompanies.
○ ○ ○ ○ ○ ○ ○ ○ ○ ○ ○ ○ ○ ○ ○ ○ ○ ○ ○ ○ ○ ○
Introduction v
○ ○ ○ ○ ○ ○ ○ ○ ○ ○ ○ ○ ○ ○ ○ ○ ○ ○ ○ ○ ○ ○ ○ ○ ○
IMPORTANT PRELIMINARY NOTESObserve these important preliminary notes before using your instrument.
AVOID PLACING DISKS NEAR MAGNETS - Do not place floppy disks on top of speakers, near mag-nets, telephones or other sources of electromagnetic fields. The disk contents could be damaged.
UPDATEABLE OPERATING SYSTEM - two disks containing the operating system are supplied withthe instrument. The disks can contain a more recent version of the operating system than the onecontained in the instrument’s Flash ROM.
To load the operating system contained in the floppy disks:
(1) turn off the instrument, (2) insert OS-disk 1 in the drive, (3) turn on the instrument, (4) When themessage “Loading OS-DISK clears ALL MEMORY !! < Enter to load / Escape to abort >” appears, pressENTER to start the OS update, (5) when the message, “INSERT NEXT OS-DISK please < Enter to load>” appears, extract the first disk, insert OS-Disk 2 and press ENTER to continue (6) when the operationis complete, the instrument sets to the default Style/Preset situation. After completing this process,proceed with the reset that follows below to ensure proper operation. Remember to extract the seconddisk and store both OS-disks in a safe place.
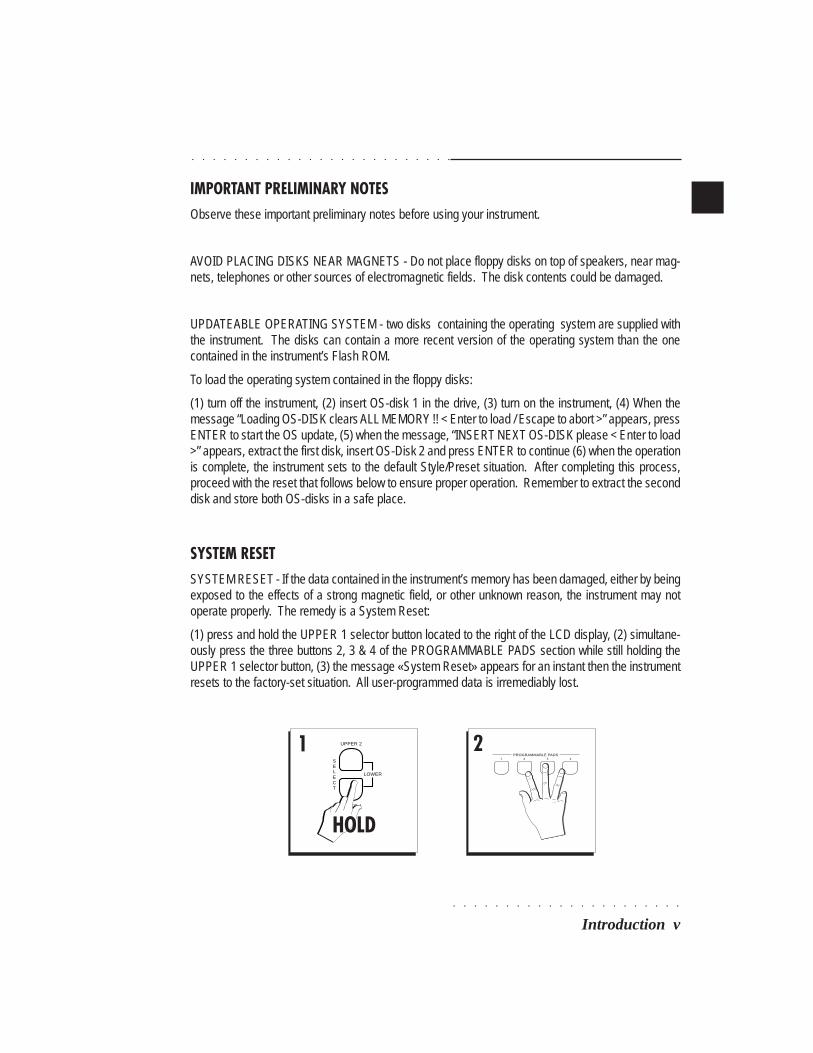
SYSTEM RESETSYSTEM RESET - If the data contained in the instrument’s memory has been damaged, either by beingexposed to the effects of a strong magnetic field, or other unknown reason, the instrument may notoperate properly. The remedy is a System Reset:
(1) press and hold the UPPER 1 selector button located to the right of the LCD display, (2) simultane-ously press the three buttons 2, 3 & 4 of the PROGRAMMABLE PADS section while still holding theUPPER 1 selector button, (3) the message «System Reset» appears for an instant then the instrumentresets to the factory-set situation. All user-programmed data is irremediably lost.
UPPER 2
UPPER 1
LOWER
SELECT
HOLD
PROGRAMMABLE PADS1 2 3 4
1 2

○ ○ ○ ○ ○ ○ ○ ○ ○ ○ ○ ○ ○ ○ ○ ○ ○ ○ ○ ○ ○ ○
vi Introduction
UserGuide• 1 Guick Guide
• 2 Layouts
• 3 Basic concepts
• 4 Sounds & Presets
• 5 Styles
• 6. Disk
• 7. Songs & MIDI Files
• 8 Song/Styles
• 9 Digital Effects
• 10 MIDI
○ ○ ○ ○ ○ ○ ○ ○ ○ ○ ○ ○ ○ ○ ○ ○ ○ ○ ○ ○ ○ ○
User Guide
○ ○ ○ ○ ○ ○ ○ ○ ○ ○ ○ ○ ○ ○ ○ ○ ○ ○ ○ ○ ○ ○ ○ ○ ○
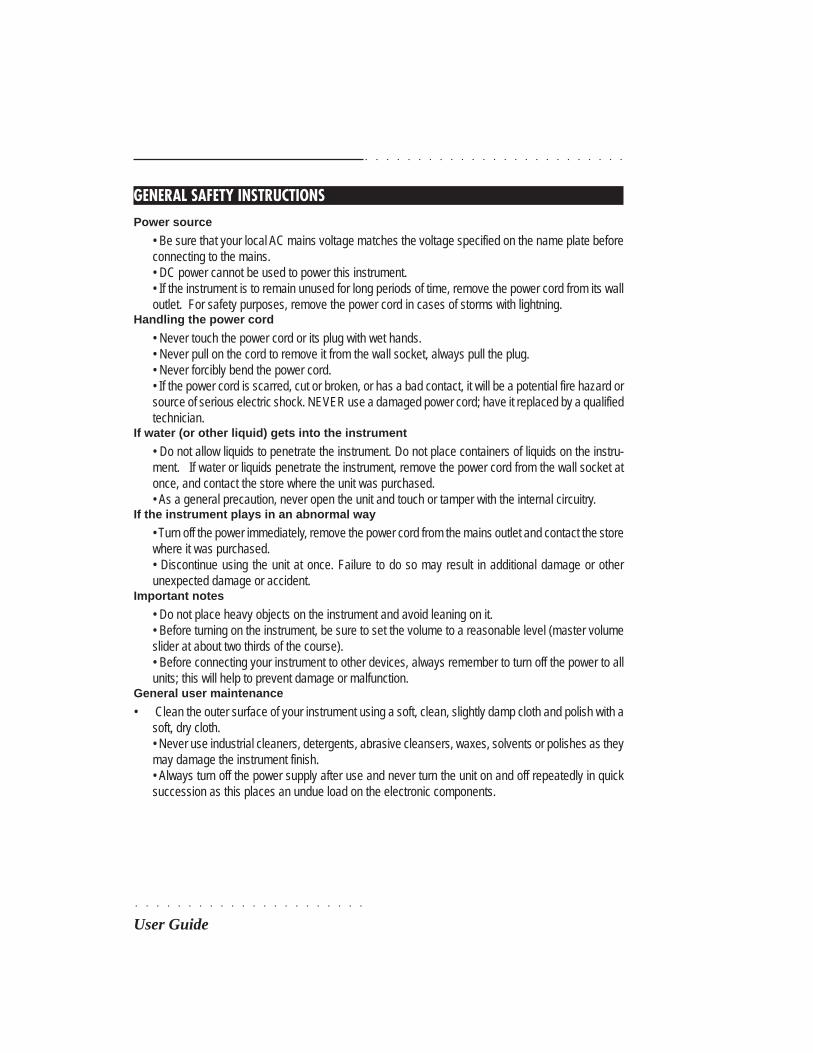
GENERAL SAFETY INSTRUCTIONS
Power source
• Be sure that your local AC mains voltage matches the voltage specified on the name plate beforeconnecting to the mains.• DC power cannot be used to power this instrument.• If the instrument is to remain unused for long periods of time, remove the power cord from its walloutlet. For safety purposes, remove the power cord in cases of storms with lightning.
Handling the power cord
• Never touch the power cord or its plug with wet hands.• Never pull on the cord to remove it from the wall socket, always pull the plug.• Never forcibly bend the power cord.• If the power cord is scarred, cut or broken, or has a bad contact, it will be a potential fire hazard orsource of serious electric shock. NEVER use a damaged power cord; have it replaced by a qualifiedtechnician.
If water (or other liquid) gets into the instrument
• Do not allow liquids to penetrate the instrument. Do not place containers of liquids on the instru-ment. If water or liquids penetrate the instrument, remove the power cord from the wall socket atonce, and contact the store where the unit was purchased.• As a general precaution, never open the unit and touch or tamper with the internal circuitry.
If the instrument plays in an abnormal way
• Turn off the power immediately, remove the power cord from the mains outlet and contact the storewhere it was purchased.• Discontinue using the unit at once. Failure to do so may result in additional damage or otherunexpected damage or accident.
Important notes
• Do not place heavy objects on the instrument and avoid leaning on it.• Before turning on the instrument, be sure to set the volume to a reasonable level (master volumeslider at about two thirds of the course).• Before connecting your instrument to other devices, always remember to turn off the power to allunits; this will help to prevent damage or malfunction.
General user maintenance
• Clean the outer surface of your instrument using a soft, clean, slightly damp cloth and polish with asoft, dry cloth.• Never use industrial cleaners, detergents, abrasive cleansers, waxes, solvents or polishes as theymay damage the instrument finish.• Always turn off the power supply after use and never turn the unit on and off repeatedly in quicksuccession as this places an undue load on the electronic components.
○ ○ ○ ○ ○ ○ ○ ○ ○ ○ ○ ○ ○ ○ ○ ○ ○ ○ ○ ○ ○ ○
○ ○ ○ ○ ○ ○ ○ ○ ○ ○ ○ ○ ○ ○ ○ ○ ○ ○ ○ ○ ○ ○ ○ ○ ○
Quick guide 1•1
• 1 Quick GuidePOWER UP AND GET TO KNOW THEBASICS
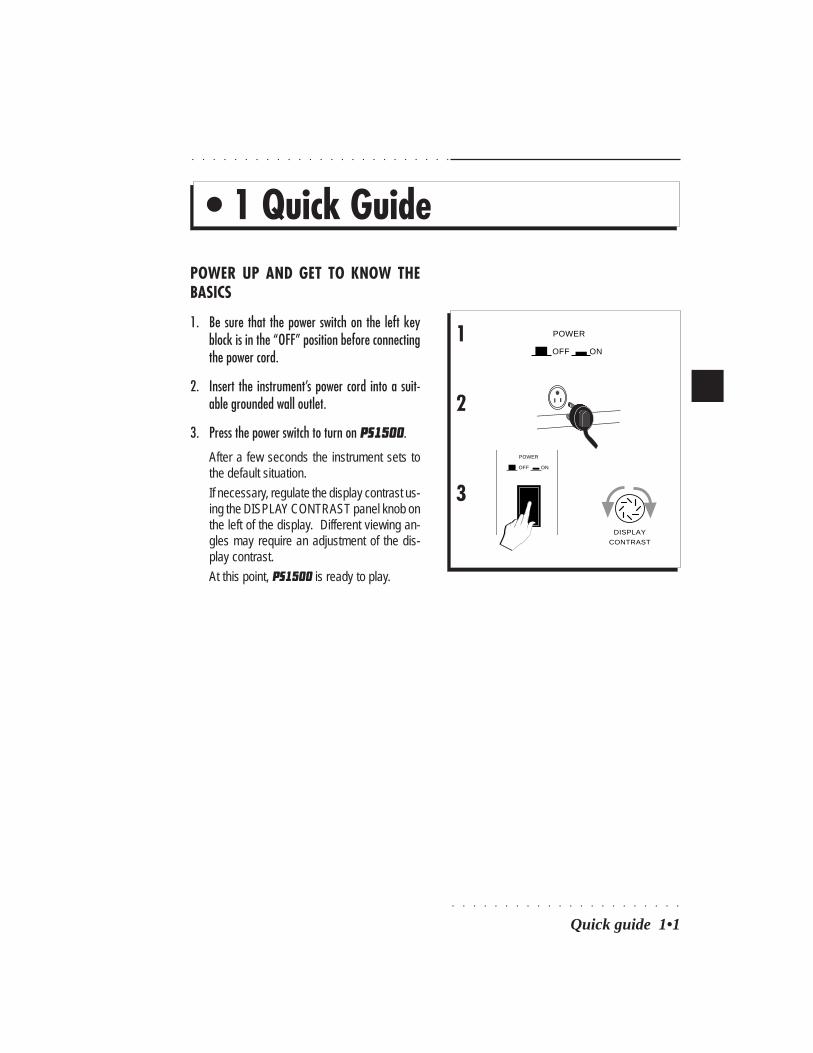
1. Be sure that the power switch on the left keyblock is in the “OFF” position before connectingthe power cord.
2. Insert the instrument’s power cord into a suit-able grounded wall outlet.
3. Press the power switch to turn on PS1500.
After a few seconds the instrument sets tothe default situation.
If necessary, regulate the display contrast us-ing the DISPLAY CONTRAST panel knob onthe left of the display. Different viewing an-gles may require an adjustment of the dis-play contrast.
At this point, PS1500 is ready to play.
1 POWER
OFF ON
DISPLAY
CONTRAST
2
3
POWER
OFF ON
○ ○ ○ ○ ○ ○ ○ ○ ○ ○ ○ ○ ○ ○ ○ ○ ○ ○ ○ ○ ○ ○
1•2 User Guide
○ ○ ○ ○ ○ ○ ○ ○ ○ ○ ○ ○ ○ ○ ○ ○ ○ ○ ○ ○ ○ ○ ○ ○ ○
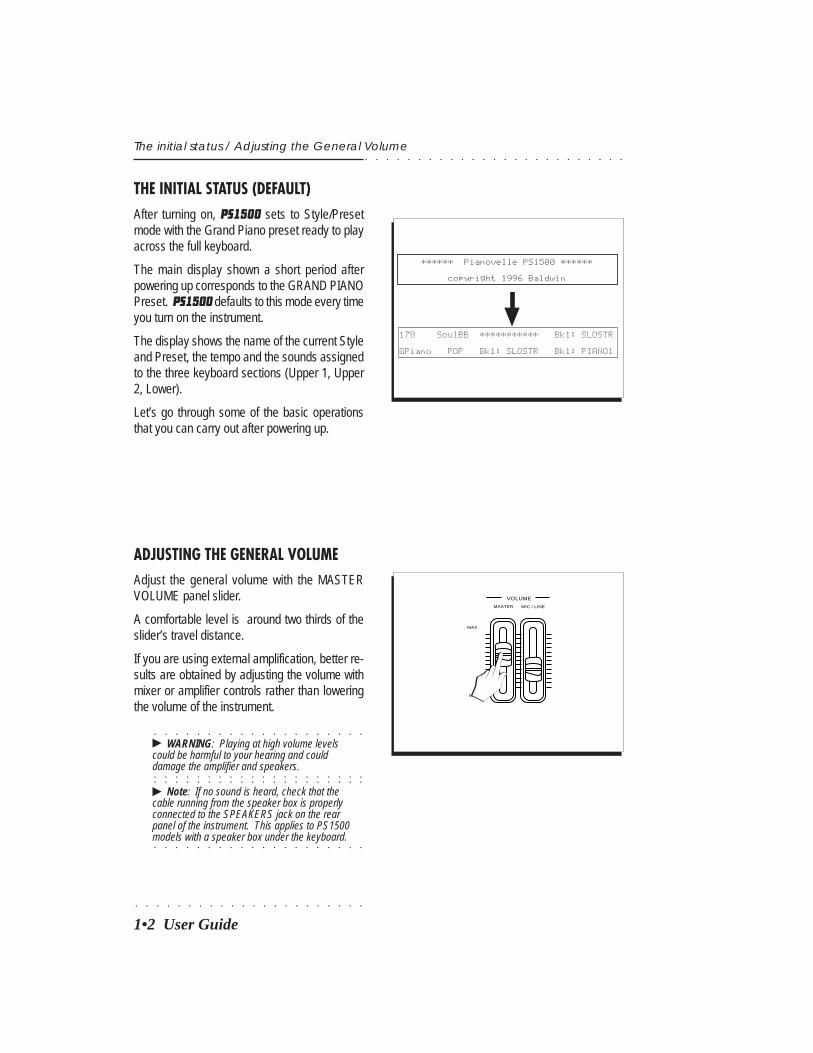
THE INITIAL STATUS (DEFAULT)After turning on, PS1500 sets to Style/Presetmode with the Grand Piano preset ready to playacross the full keyboard.
The main display shown a short period afterpowering up corresponds to the GRAND PIANOPreset. PS1500 defaults to this mode every timeyou turn on the instrument.
The display shows the name of the current Styleand Preset, the tempo and the sounds assignedto the three keyboard sections (Upper 1, Upper2, Lower).
Let’s go through some of the basic operationsthat you can carry out after powering up.
178 SoulBB *********** Bk1: SLOSTR
GPiano POP Bk1: SLOSTR Bk1: PIANO1
The initial status / Adjusting the General Volume
ADJUSTING THE GENERAL VOLUMEAdjust the general volume with the MASTERVOLUME panel slider.
A comfortable level is around two thirds of theslider’s travel distance.
If you are using external amplification, better re-sults are obtained by adjusting the volume withmixer or amplifier controls rather than loweringthe volume of the instrument.
○ ○ ○ ○ ○ ○ ○ ○ ○ ○ ○ ○ ○ ○ ○ ○ ○ ○ ○ ○
© WARNING: Playing at high volume levelscould be harmful to your hearing and could
○ ○ ○ ○ ○ ○ ○ ○ ○ ○ ○ ○ ○ ○ ○ ○ ○ ○ ○ ○
damage the amplifier and speakers.○ ○ ○ ○ ○ ○ ○ ○ ○ ○ ○ ○ ○ ○ ○ ○ ○ ○ ○ ○
© Note: If no sound is heard, check that thecable running from the speaker box is properlyconnected to the SPEAKERS jack on the rearpanel of the instrument. This applies to PS1500
○ ○ ○ ○ ○ ○ ○ ○ ○ ○ ○ ○ ○ ○ ○ ○ ○ ○ ○ ○
models with a speaker box under the keyboard.
MAX
MIN
MASTER MIC / LINE
VOLUME
****** Pianovelle PS1500 ******
copyright 1996 Baldwin

○ ○ ○ ○ ○ ○ ○ ○ ○ ○ ○ ○ ○ ○ ○ ○ ○ ○ ○ ○ ○ ○
○ ○ ○ ○ ○ ○ ○ ○ ○ ○ ○ ○ ○ ○ ○ ○ ○ ○ ○ ○ ○ ○ ○ ○ ○
Quick guide 1•3
PLAY WITH AUTO ACCOMPANIMENTSTYLESPS1500 has 96 auto accompaniment Styles withfour Variations four Intros, a Fill and four End-ings for each Style. You can also load up to 16disk based User Styles of your choice into the 2User Style banks available.
1. Press SINGLE TOUCH PLAY.
Pressing this button activates the KEYSTART function automatically. The EASYPLAY and MEMORY buttons will activate ifnot already on.
When SINGLE TOUCH PLAY is on, thesound memorized in the Style Preset areassigned to all the tracks. Selecting a Stylechanges the sounds of the accompanimentsection as well as those of the keyboard sec-tions.
2. Press a Style Group button in the SONG/STYLEGROUPS (Swing, Country, Rock, etc.).
3. Select a Style.
Use Function buttons F1…F8 under the dis-play to select one of the 8 Style names.
4. Play a single note or a chord (at least three notes)below the Chord Split Point (note F#3) to startStyle play.
A single note or chord triggers a fully orches-trated auto accompaniment pattern. The KEYSTART function allows you to start the Styleby playing a note or chord on the keyboardarea below the Split point.
In default conditions, the keyboard’s chordrecognition mode is set to “One Finger” whichallows you to play Styles using “one finger”chords on a split keyboard.
You can change the chord recognition modefrom “One Finger” to “Fingered1”, “Fingered
Automatic Accompaniment
2
MetalR SlowRk Boogie SlBlue
OpenRk HardRk SoftRk Blues
3
SINGLE TOUCH PLAY1
EASY PLAY
SPLIT
MEMORY
F1 F2 F3 F4 F5 F6 F7 F8
INTRO
KEY START
CONTINUE
ENDING
START / STOP
4
8 BEAT
SWING COUNTRY
16 BEAT
ROCK
LATIN 1
FUNK
LATIN 2
DANCE POP
WORLD ETHNIC
USER 1–8
SONG /STYLE
USER 9–16
SONG
STYLE SONG GROUPS
OR
○ ○ ○ ○ ○ ○ ○ ○ ○ ○ ○ ○ ○ ○ ○ ○ ○ ○ ○ ○ ○ ○
1•4 User Guide
○ ○ ○ ○ ○ ○ ○ ○ ○ ○ ○ ○ ○ ○ ○ ○ ○ ○ ○ ○ ○ ○ ○ ○ ○
2” or “Free”, either by selecting a Preset orby entering the PIANO STYLE options. Seethe PIANO STYLE function in the Styleschapter 5, page 12.
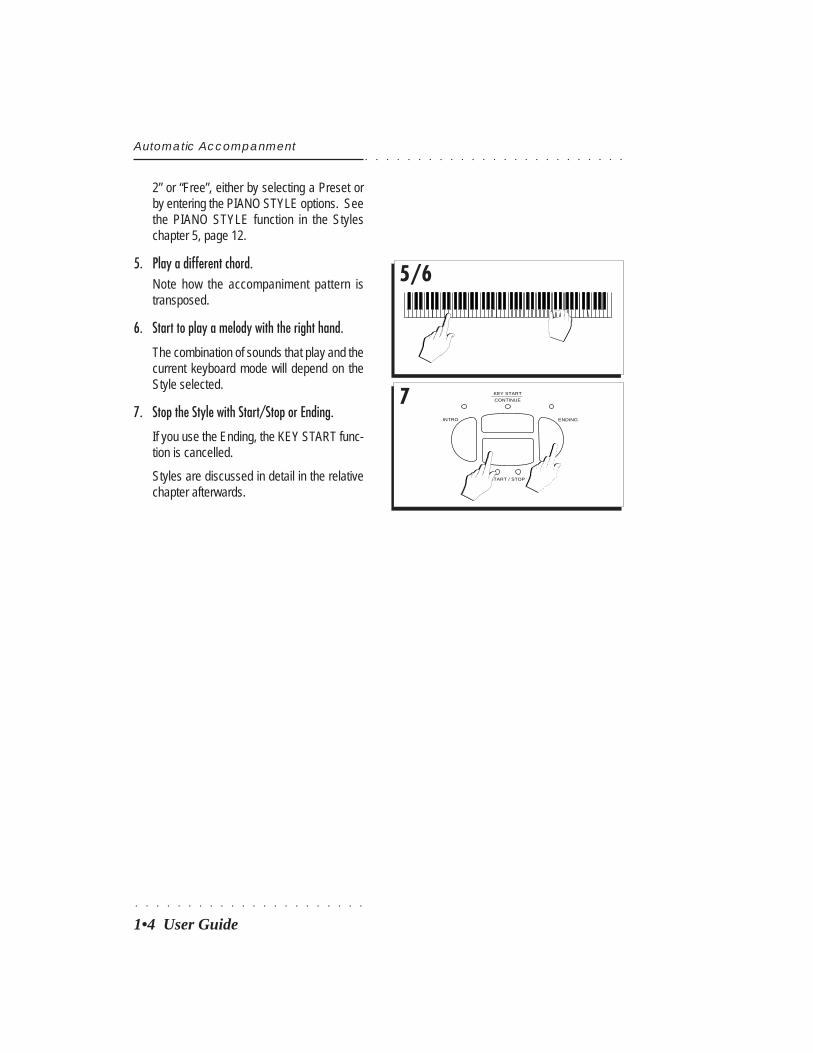
5. Play a different chord.Note how the accompaniment pattern istransposed.
6. Start to play a melody with the right hand.
The combination of sounds that play and thecurrent keyboard mode will depend on theStyle selected.
7. Stop the Style with Start/Stop or Ending.
If you use the Ending, the KEY START func-tion is cancelled.
Styles are discussed in detail in the relativechapter afterwards.
Automatic Accompanment
5/6
7INTRO
KEY START
CONTINUE
ENDING
START / STOP
○ ○ ○ ○ ○ ○ ○ ○ ○ ○ ○ ○ ○ ○ ○ ○ ○ ○ ○ ○ ○ ○
○ ○ ○ ○ ○ ○ ○ ○ ○ ○ ○ ○ ○ ○ ○ ○ ○ ○ ○ ○ ○ ○ ○ ○ ○
Quick guide 1•5
Demo Style
Demo Style
LISTEN TO THE DEMO STYLESYou can listen to the automatic playback of yourPS1500 to get an idea of what the instrument iscapable of doing.
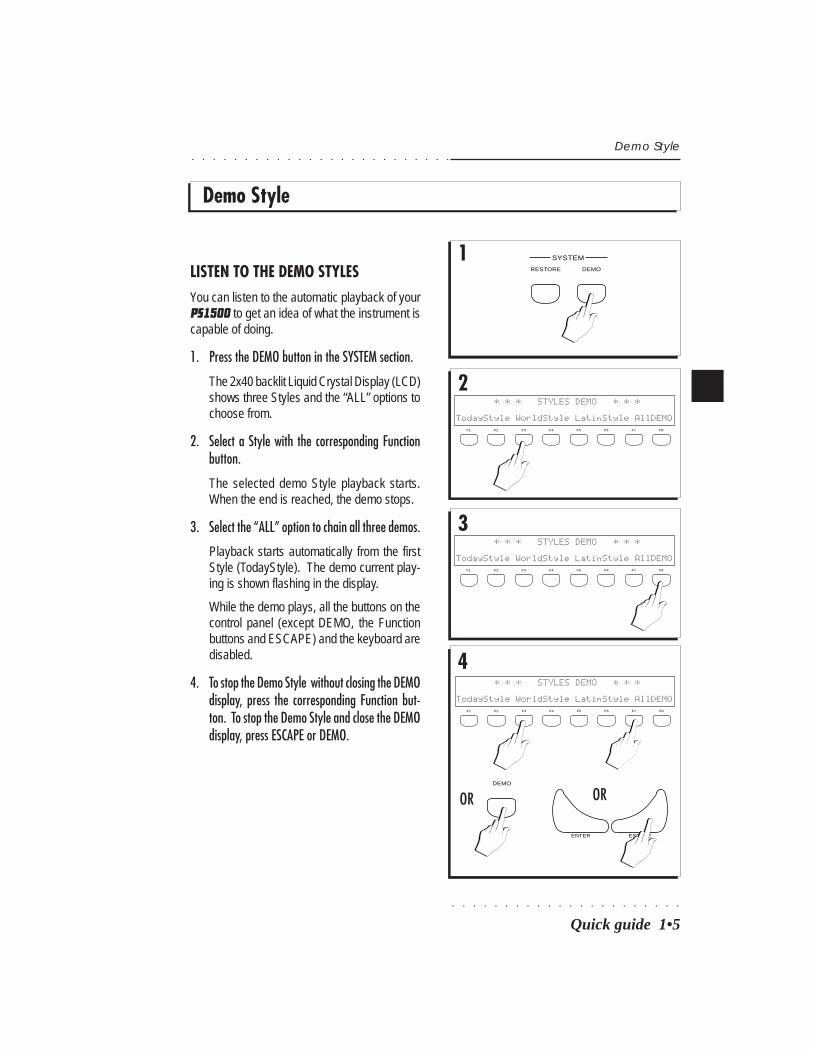
1. Press the DEMO button in the SYSTEM section.
The 2x40 backlit Liquid Crystal Display (LCD)shows three Styles and the “ALL” options tochoose from.
2. Select a Style with the corresponding Functionbutton.
The selected demo Style playback starts.When the end is reached, the demo stops.
3. Select the “ALL” option to chain all three demos.
Playback starts automatically from the firstStyle (TodayStyle). The demo current play-ing is shown flashing in the display.
While the demo plays, all the buttons on thecontrol panel (except DEMO, the Functionbuttons and ESCAPE) and the keyboard aredisabled.
4. To stop the Demo Style without closing the DEMOdisplay, press the corresponding Function but-ton. To stop the Demo Style and close the DEMOdisplay, press ESCAPE or DEMO.
1 SYSTEM
DEMORESTORE
2 * * * STYLES DEMO * * *
TodayStyle WorldStyle LatinStyle AllDEMOF1 F2 F3 F4 F5 F6 F7 F8
3 * * * STYLES DEMO * * *
TodayStyle WorldStyle LatinStyle AllDEMOF1 F2 F3 F4 F5 F6 F7 F8
4 * * * STYLES DEMO * * *
TodayStyle WorldStyle LatinStyle AllDEMOF1 F2 F3 F4 F5 F6 F7 F8
DEMO
ENTER ESCAPE
OROR
○ ○ ○ ○ ○ ○ ○ ○ ○ ○ ○ ○ ○ ○ ○ ○ ○ ○ ○ ○ ○ ○
1•6 User Guide
○ ○ ○ ○ ○ ○ ○ ○ ○ ○ ○ ○ ○ ○ ○ ○ ○ ○ ○ ○ ○ ○ ○ ○ ○
Multimedia
Multimedia
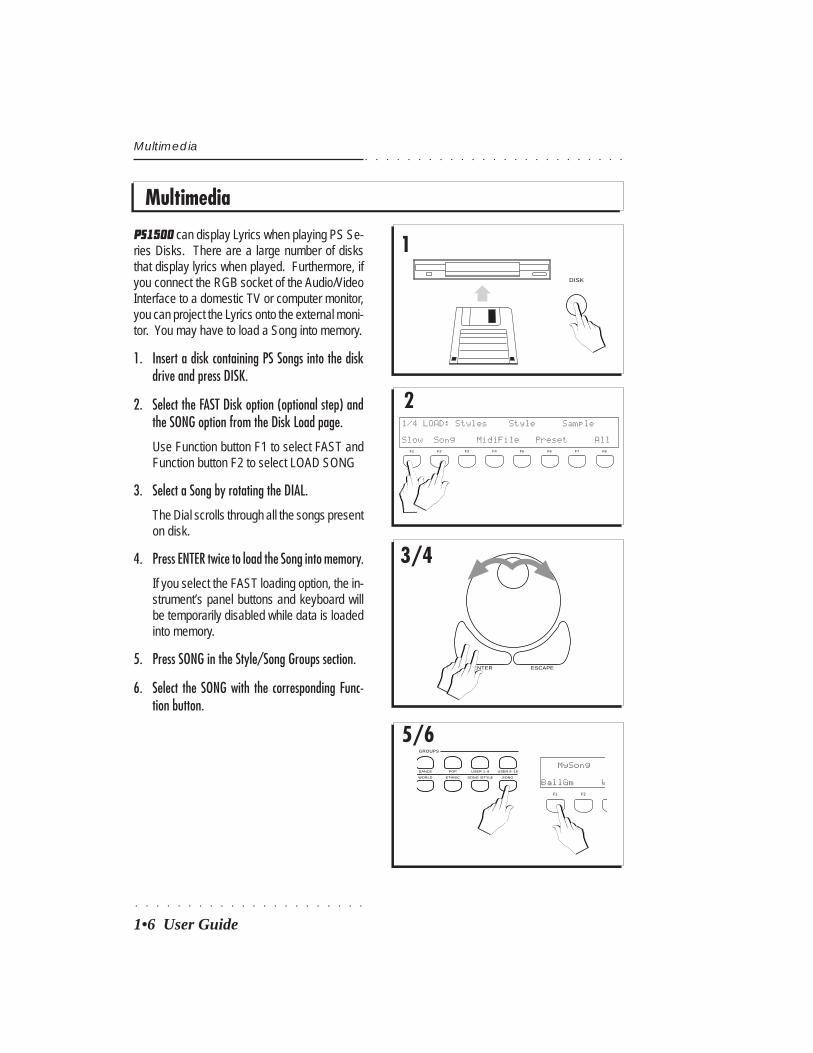
PS1500 can display Lyrics when playing PS Se-ries Disks. There are a large number of disksthat display lyrics when played. Furthermore, ifyou connect the RGB socket of the Audio/VideoInterface to a domestic TV or computer monitor,you can project the Lyrics onto the external moni-tor. You may have to load a Song into memory.
1. Insert a disk containing PS Songs into the diskdrive and press DISK.
2. Select the FAST Disk option (optional step) andthe SONG option from the Disk Load page.
Use Function button F1 to select FAST andFunction button F2 to select LOAD SONG
3. Select a Song by rotating the DIAL.
The Dial scrolls through all the songs presenton disk.
4. Press ENTER twice to load the Song into memory.
If you select the FAST loading option, the in-strument’s panel buttons and keyboard willbe temporarily disabled while data is loadedinto memory.
5. Press SONG in the Style/Song Groups section.
6. Select the SONG with the corresponding Func-tion button.
DISK
1/4 LOAD: Styles Style Sample
Slow Song MidiFile Preset AllF1 F2 F3 F4 F5 F6 F7 F8
1
ENTER ESCAPE
DANCE POP
WORLD ETHNIC
USER 1–8
SONG /STYLE
USER 9–16
SONG
GROUPS
F1 F2
MySong
BallGm W
2
3/4
5/6
○ ○ ○ ○ ○ ○ ○ ○ ○ ○ ○ ○ ○ ○ ○ ○ ○ ○ ○ ○ ○ ○
○ ○ ○ ○ ○ ○ ○ ○ ○ ○ ○ ○ ○ ○ ○ ○ ○ ○ ○ ○ ○ ○ ○ ○ ○
Quick guide 1•7
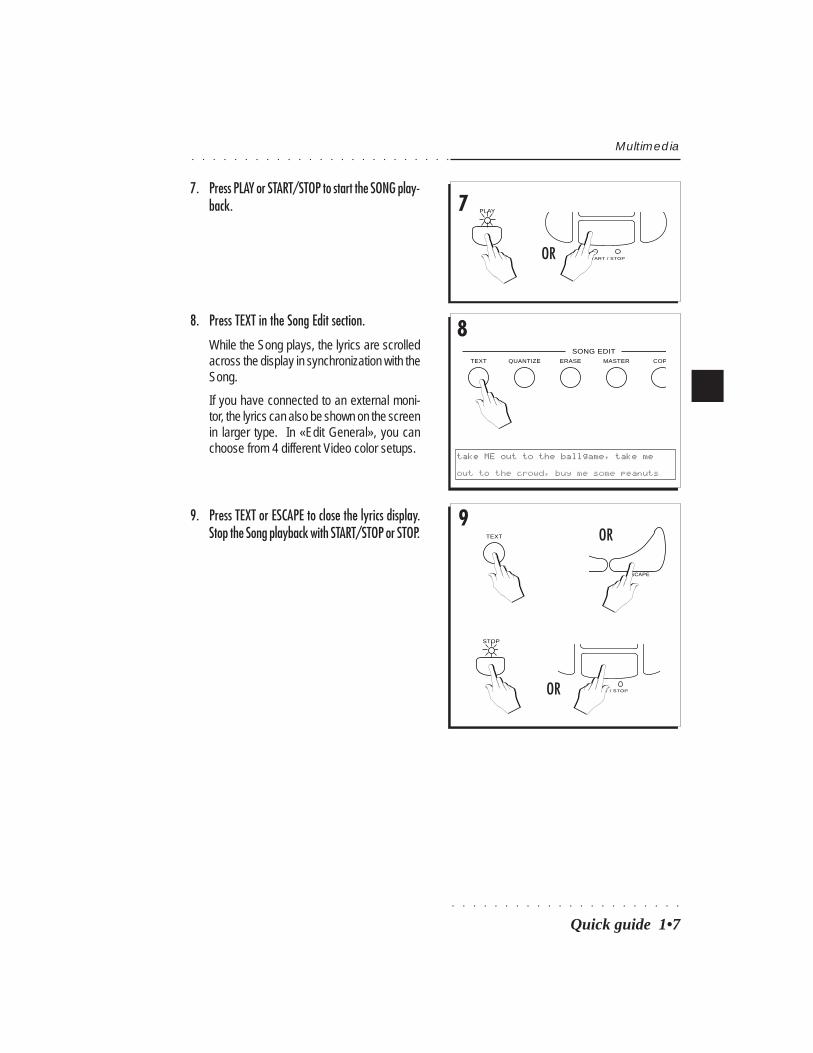
7. Press PLAY or START/STOP to start the SONG play-back.
START / STOP
PLAY
OR
8
take ME out to the ballgame, take me
out to the crowd, buy me some peanuts
ESCAPE
START / STOP
STOP
OR
Multimedia
7
8. Press TEXT in the Song Edit section.
While the Song plays, the lyrics are scrolledacross the display in synchronization with theSong.
If you have connected to an external moni-tor, the lyrics can also be shown on the screenin larger type. In «Edit General», you canchoose from 4 different Video color setups.
SONG EDITTEXT QUANTIZE COPMASTERERASE
9. Press TEXT or ESCAPE to close the lyrics display.Stop the Song playback with START/STOP or STOP. TEXT OR
9
○ ○ ○ ○ ○ ○ ○ ○ ○ ○ ○ ○ ○ ○ ○ ○ ○ ○ ○ ○ ○ ○
1•8 User Guide
○ ○ ○ ○ ○ ○ ○ ○ ○ ○ ○ ○ ○ ○ ○ ○ ○ ○ ○ ○ ○ ○ ○ ○ ○
SELECTING INSTRUMENT SOUNDSPS1500 has almost 400 instrument Sounds, in-cluding orchestral, percussion and contemporarymusical instruments. You can customize anysound to your tastes with the built in sound editcapabilities.
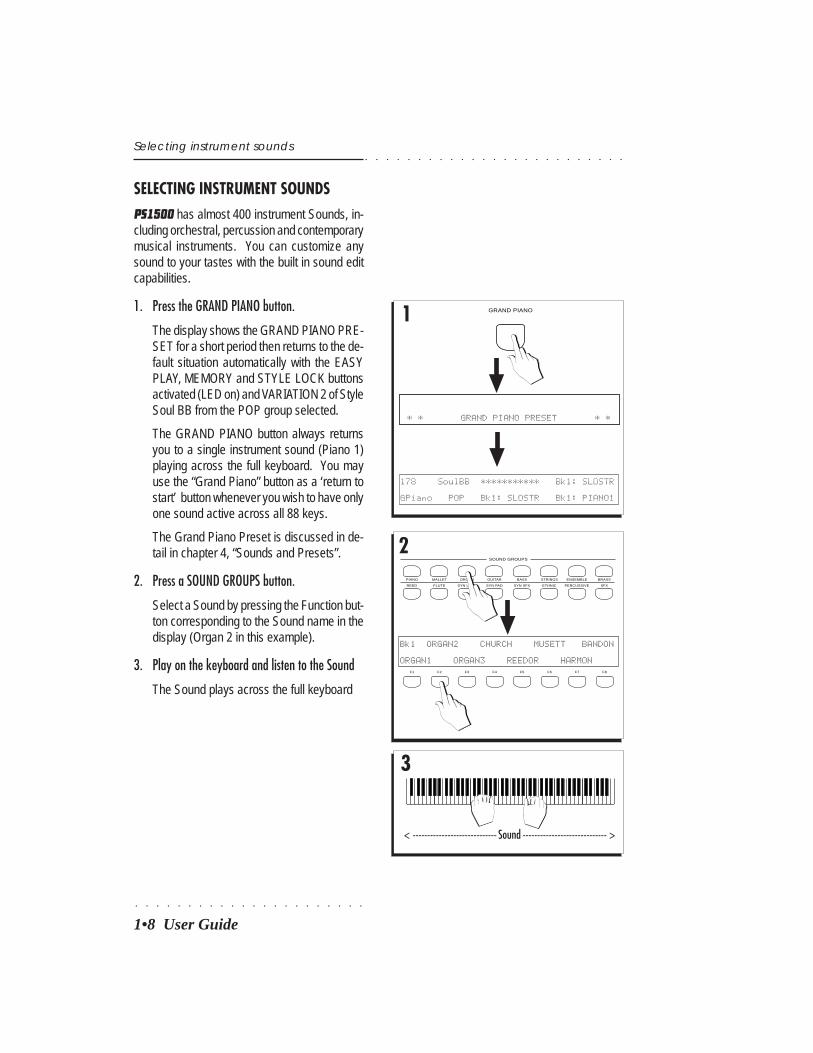
1. Press the GRAND PIANO button.
The display shows the GRAND PIANO PRE-SET for a short period then returns to the de-fault situation automatically with the EASYPLAY, MEMORY and STYLE LOCK buttonsactivated (LED on) and VARIATION 2 of StyleSoul BB from the POP group selected.
The GRAND PIANO button always returnsyou to a single instrument sound (Piano 1)playing across the full keyboard. You mayuse the “Grand Piano” button as a ‘return tostart’ button whenever you wish to have onlyone sound active across all 88 keys.
The Grand Piano Preset is discussed in de-tail in chapter 4, “Sounds and Presets”.
2. Press a SOUND GROUPS button.
Select a Sound by pressing the Function but-ton corresponding to the Sound name in thedisplay (Organ 2 in this example).
3. Play on the keyboard and listen to the Sound
The Sound plays across the full keyboard
Selecting instrument sounds
1
178 SoulBB *********** Bk1: SLOSTR
GPiano POP Bk1: SLOSTR Bk1: PIANO1
GRAND PIANO
* * GRAND PIANO PRESET * *
REED
PIANO MALLET
FLUTE
ORGAN
SYN LEAD
GUITAR
SYN PAD
BASS STRINGS
SYN SFX ETHNIC
ENSEMBLE
PERCUSSIVE
BRASS
SFX
SOUND GROUPS
2
Bk1 ORGAN2 CHURCH MUSETT BANDON
ORGAN1 ORGAN3 REEDOR HARMON
3
F1 F2 F3 F4 F5 F6 F7 F8
< ----------------------------- Sound ----------------------------- >
○ ○ ○ ○ ○ ○ ○ ○ ○ ○ ○ ○ ○ ○ ○ ○ ○ ○ ○ ○ ○ ○
○ ○ ○ ○ ○ ○ ○ ○ ○ ○ ○ ○ ○ ○ ○ ○ ○ ○ ○ ○ ○ ○ ○ ○ ○
Quick guide 1•9
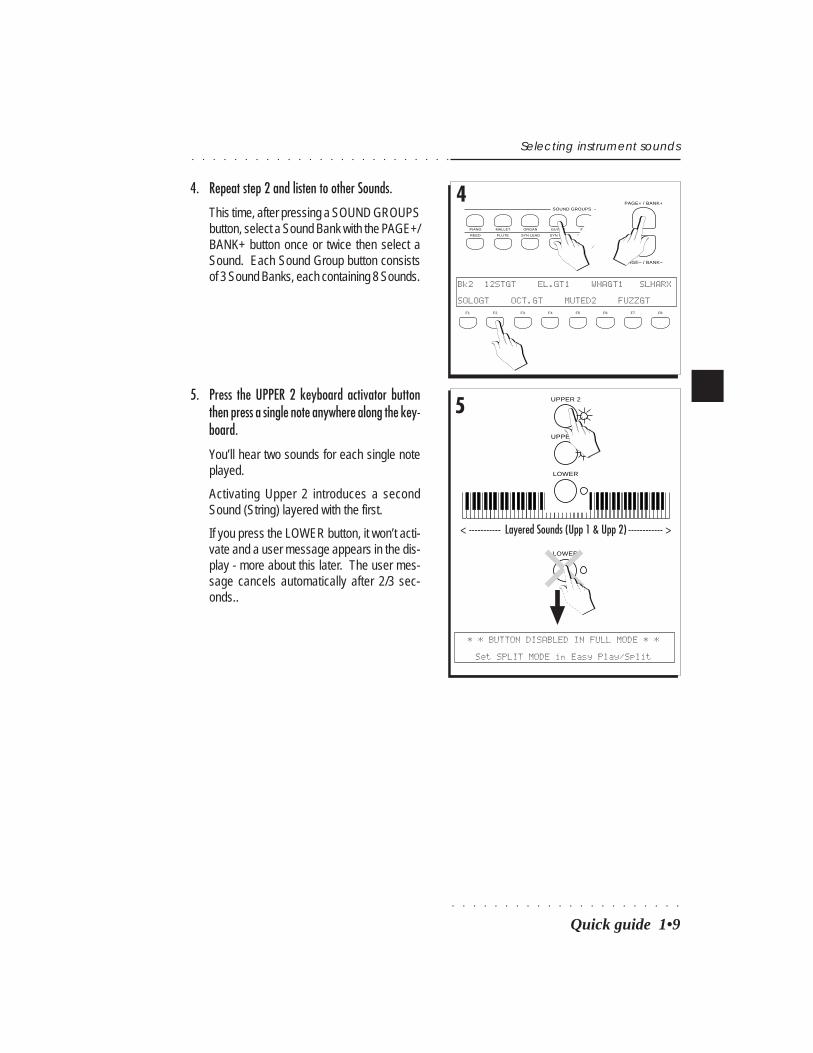
4. Repeat step 2 and listen to other Sounds.
This time, after pressing a SOUND GROUPSbutton, select a Sound Bank with the PAGE+/BANK+ button once or twice then select aSound. Each Sound Group button consistsof 3 Sound Banks, each containing 8 Sounds.
Selecting instrument sounds
Bk2 12STGT EL.GT1 WHAGT1 SLHARX
SOLOGT OCT.GT MUTED2 FUZZGT
4
REED
PIANO MALLET
FLUTE
ORGAN
SYN LEAD
GUITAR
SYN PAD
BASS
SYN SFX
SOUND GROUPSPAGE+ / BANK+
PAGE– / BANK–
F1 F2 F3 F4 F5 F6 F7 F8
5
< ----------- Layered Sounds (Upp 1 & Upp 2) ------------ >
UPPER 2
LOWER
UPPER 1
5. Press the UPPER 2 keyboard activator buttonthen press a single note anywhere along the key-board.
You’ll hear two sounds for each single noteplayed.
Activating Upper 2 introduces a secondSound (String) layered with the first.
If you press the LOWER button, it won’t acti-vate and a user message appears in the dis-play - more about this later. The user mes-sage cancels automatically after 2/3 sec-onds..
LOWER
* * BUTTON DISABLED IN FULL MODE * *
Set SPLIT MODE in Easy Play/Split
○ ○ ○ ○ ○ ○ ○ ○ ○ ○ ○ ○ ○ ○ ○ ○ ○ ○ ○ ○ ○ ○
1•10 User Guide
○ ○ ○ ○ ○ ○ ○ ○ ○ ○ ○ ○ ○ ○ ○ ○ ○ ○ ○ ○ ○ ○ ○ ○ ○
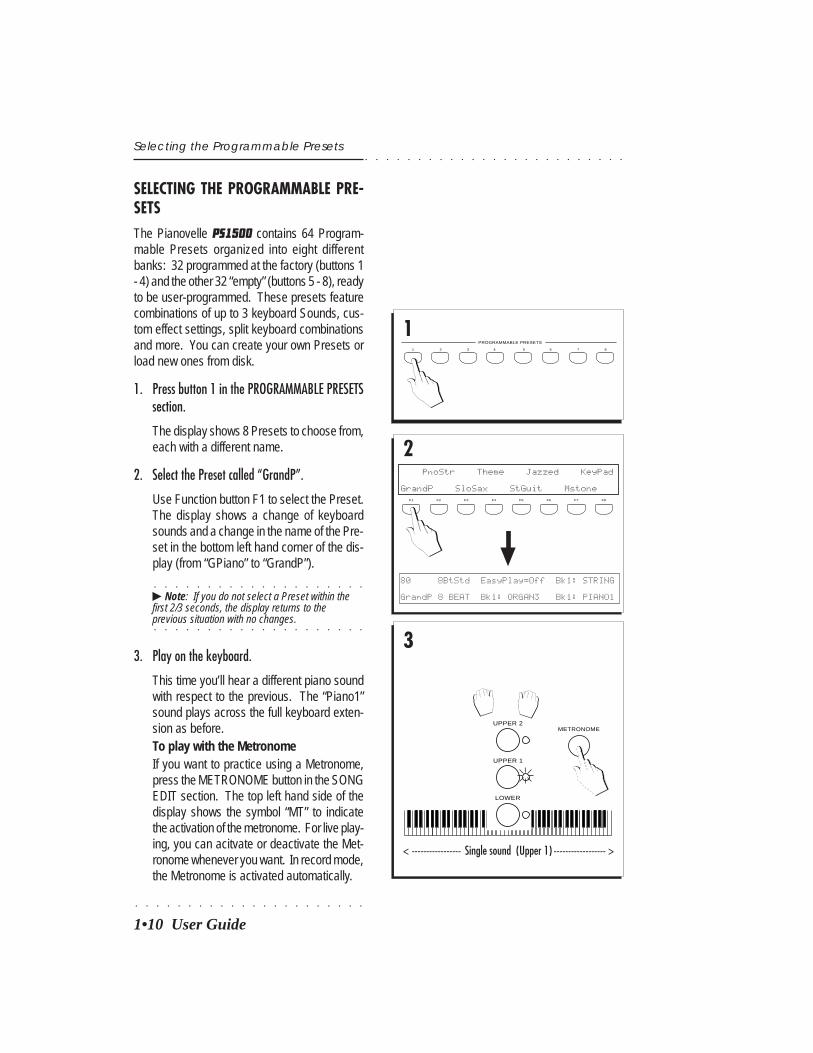
SELECTING THE PROGRAMMABLE PRE-SETSThe Pianovelle PS1500 contains 64 Program-mable Presets organized into eight differentbanks: 32 programmed at the factory (buttons 1- 4) and the other 32 “empty” (buttons 5 - 8), readyto be user-programmed. These presets featurecombinations of up to 3 keyboard Sounds, cus-tom effect settings, split keyboard combinationsand more. You can create your own Presets orload new ones from disk.
1. Press button 1 in the PROGRAMMABLE PRESETSsection.
The display shows 8 Presets to choose from,each with a different name.
2. Select the Preset called “GrandP”.
Use Function button F1 to select the Preset.The display shows a change of keyboardsounds and a change in the name of the Pre-set in the bottom left hand corner of the dis-play (from “GPiano” to “GrandP”).
○ ○ ○ ○ ○ ○ ○ ○ ○ ○ ○ ○ ○ ○ ○ ○ ○ ○ ○ ○
© Note: If you do not select a Preset within thefirst 2/3 seconds, the display returns to the
○ ○ ○ ○ ○ ○ ○ ○ ○ ○ ○ ○ ○ ○ ○ ○ ○ ○ ○ ○
previous situation with no changes.
3. Play on the keyboard.
This time you’ll hear a different piano soundwith respect to the previous. The “Piano1”sound plays across the full keyboard exten-sion as before.To play with the MetronomeIf you want to practice using a Metronome,press the METRONOME button in the SONGEDIT section. The top left hand side of thedisplay shows the symbol “MT” to indicatethe activation of the metronome. For live play-ing, you can acitvate or deactivate the Met-ronome whenever you want. In record mode,the Metronome is activated automatically.
Selecting the Programmable Presets
1
2
80 8BtStd EasyPlay=Off Bk1: STRING
GrandP 8 BEAT Bk1: ORGAN3 Bk1: PIANO1
1 2 3 4 5 6 7 8
PROGRAMMABLE PRESETS
PnoStr Theme Jazzed KeyPad
GrandP SloSax StGuit MstoneF1 F2 F3 F4 F5 F6 F7 F8
3
UPPER 2
LOWER
UPPER 1
< ----------------- Single sound (Upper 1) ------------------ >
METRONOME

○ ○ ○ ○ ○ ○ ○ ○ ○ ○ ○ ○ ○ ○ ○ ○ ○ ○ ○ ○ ○ ○
○ ○ ○ ○ ○ ○ ○ ○ ○ ○ ○ ○ ○ ○ ○ ○ ○ ○ ○ ○ ○ ○ ○ ○ ○
Quick guide 1•11
4. Press the UPPER 2 activator.
A second sound is introduced (String), lay-ered with the first.
4
< ------------ Layered sounds (Upp 1 & Upp 2) ------------ >
UPPER 2
LOWER
UPPER 1
Selecting the Programmable Presets
LOWER
* * BUTTON DISABLED IN FULL MODE * *
Set SPLIT MODE in Easy Play/Split
5A
5B LOWER
< ------- Lower ------- >< ----- Upp 1 &/or Upp 2 ------- >Split keyboard
5. Press the LOWER activator.
A: In the case of the GrandP Preset (F1), theLOWER activator will be disabled becausethis Preset recalls the Full keyboard mode.
B: If, in point 2 overleaf, you selected a dif-ferent Preset, say Preset PnoStr (F2), thekeyboard mode recalled will be Split mode.
In this case, the LOWER activator will intro-duce a third sound and the keyboard will bedivided with a Split Point at note F#3.
The LOWER keyboard plays a Sound overthe range A0 - F#3. The UPPER 1 and UP-PER 2 sections are assigned to the rangeG3 - C8.
Repeat steps 2 and 3 to make additionalchanges.
Observations
Depending on the Preset selected, the keyboardsound combinations will change and the keyboardmode may change from Full to Split and viceversa. The chord recognition mode may alsochange from “Free” to “One finger” or “Fingered1” or “Fingered 2”.
If Full mode is recalled, the Lower keyboard sec-tion is automatically disabled for selection leav-ing Upper 1 and Upper 2 only active for selectionor muting.
If Split mode is recalled, all three keyboard sec-tions will be enabled for selection or muting.
○ ○ ○ ○ ○ ○ ○ ○ ○ ○ ○ ○ ○ ○ ○ ○ ○ ○ ○ ○ ○ ○
1•12 User Guide
○ ○ ○ ○ ○ ○ ○ ○ ○ ○ ○ ○ ○ ○ ○ ○ ○ ○ ○ ○ ○ ○ ○ ○ ○
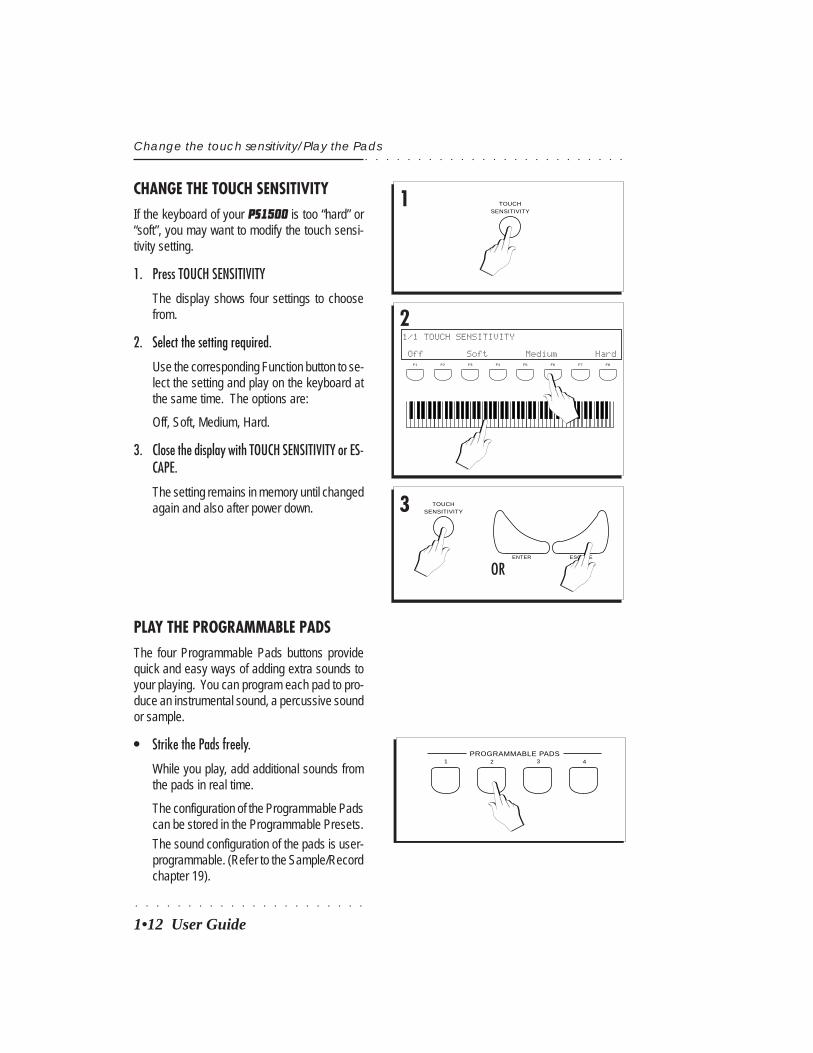
CHANGE THE TOUCH SENSITIVITYIf the keyboard of your PS1500 is too “hard” or“soft”, you may want to modify the touch sensi-tivity setting.
1. Press TOUCH SENSITIVITY
The display shows four settings to choosefrom.
2. Select the setting required.
Use the corresponding Function button to se-lect the setting and play on the keyboard atthe same time. The options are:
Off, Soft, Medium, Hard.
3. Close the display with TOUCH SENSITIVITY or ES-CAPE.
The setting remains in memory until changedagain and also after power down.
Change the touch sensitivity/Play the Pads
1
1/1 TOUCH SENSITIVITY
Off Soft Medium Hard
2
TOUCHSENSITIVITY
3 TOUCHSENSITIVITY
ENTER ESCAPE
F1 F2 F3 F4 F5 F6 F7 F8
PROGRAMMABLE PADS1 2 3 4
OR
PLAY THE PROGRAMMABLE PADSThe four Programmable Pads buttons providequick and easy ways of adding extra sounds toyour playing. You can program each pad to pro-duce an instrumental sound, a percussive soundor sample.
• Strike the Pads freely.
While you play, add additional sounds fromthe pads in real time.
The configuration of the Programmable Padscan be stored in the Programmable Presets.
The sound configuration of the pads is user-programmable. (Refer to the Sample/Recordchapter 19).
○ ○ ○ ○ ○ ○ ○ ○ ○ ○ ○ ○ ○ ○ ○ ○ ○ ○ ○ ○ ○ ○
○ ○ ○ ○ ○ ○ ○ ○ ○ ○ ○ ○ ○ ○ ○ ○ ○ ○ ○ ○ ○ ○ ○ ○ ○
Quick guide 1•13
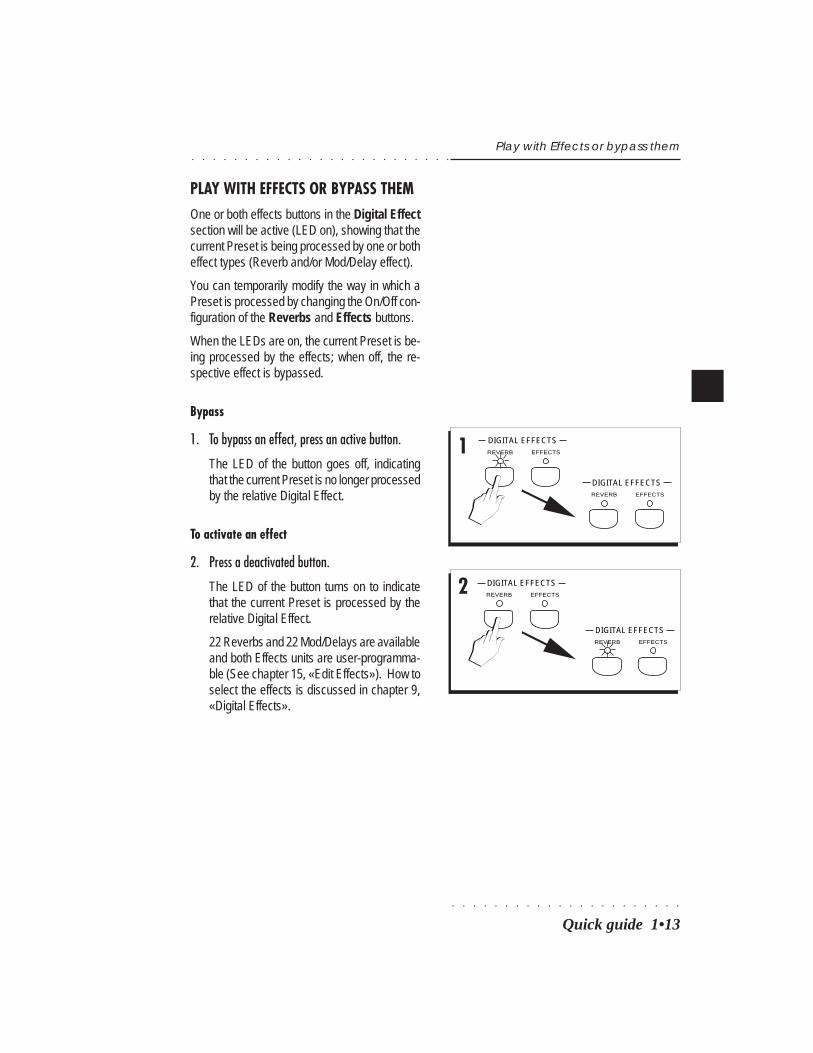
PLAY WITH EFFECTS OR BYPASS THEMOne or both effects buttons in the Digital Effectsection will be active (LED on), showing that thecurrent Preset is being processed by one or botheffect types (Reverb and/or Mod/Delay effect).
You can temporarily modify the way in which aPreset is processed by changing the On/Off con-figuration of the Reverbs and Effects buttons.
When the LEDs are on, the current Preset is be-ing processed by the effects; when off, the re-spective effect is bypassed.
Bypass
1. To bypass an effect, press an active button.
The LED of the button goes off, indicatingthat the current Preset is no longer processedby the relative Digital Effect.
To activate an effect
2. Press a deactivated button.
The LED of the button turns on to indicatethat the current Preset is processed by therelative Digital Effect.
22 Reverbs and 22 Mod/Delays are availableand both Effects units are user-programma-ble (See chapter 15, «Edit Effects»). How toselect the effects is discussed in chapter 9,«Digital Effects».
Play with Effects or bypass them
1DIGITAL EFFECTSREVERB EFFECTS
2
DIGITAL EFFECTSREVERB EFFECTS
DIGITAL EFFECTSREVERB EFFECTS
DIGITAL EFFECTSREVERB EFFECTS
○ ○ ○ ○ ○ ○ ○ ○ ○ ○ ○ ○ ○ ○ ○ ○ ○ ○ ○ ○ ○ ○
1•14 User Guide
○ ○ ○ ○ ○ ○ ○ ○ ○ ○ ○ ○ ○ ○ ○ ○ ○ ○ ○ ○ ○ ○ ○ ○ ○
PLAY WITH HEADPHONES
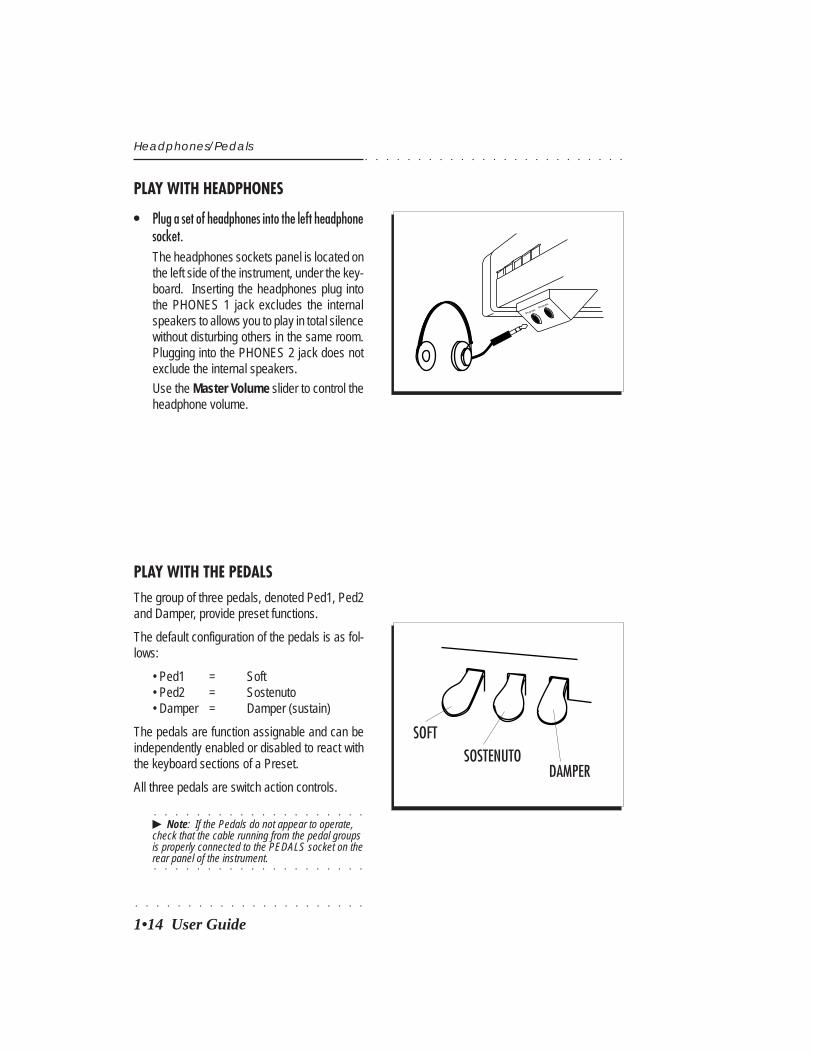
• Plug a set of headphones into the left headphonesocket.The headphones sockets panel is located onthe left side of the instrument, under the key-board. Inserting the headphones plug intothe PHONES 1 jack excludes the internalspeakers to allows you to play in total silencewithout disturbing others in the same room.Plugging into the PHONES 2 jack does notexclude the internal speakers.
Use the Master Volume slider to control theheadphone volume.
Headphones/Pedals
SOSTENUTODAMPER
SOFT
PLAY WITH THE PEDALSThe group of three pedals, denoted Ped1, Ped2and Damper, provide preset functions.
The default configuration of the pedals is as fol-lows:
• Ped1 = Soft• Ped2 = Sostenuto• Damper = Damper (sustain)
The pedals are function assignable and can beindependently enabled or disabled to react withthe keyboard sections of a Preset.
All three pedals are switch action controls.
○ ○ ○ ○ ○ ○ ○ ○ ○ ○ ○ ○ ○ ○ ○ ○ ○ ○ ○ ○
© Note: If the Pedals do not appear to operate,check that the cable running from the pedal groupsis properly connected to the PEDALS socket on the
○ ○ ○ ○ ○ ○ ○ ○ ○ ○ ○ ○ ○ ○ ○ ○ ○ ○ ○ ○
rear panel of the instrument.
○ ○ ○ ○ ○ ○ ○ ○ ○ ○ ○ ○ ○ ○ ○ ○ ○ ○ ○ ○ ○ ○
○ ○ ○ ○ ○ ○ ○ ○ ○ ○ ○ ○ ○ ○ ○ ○ ○ ○ ○ ○ ○ ○ ○ ○ ○
Quick guide 1•15
general Effect volumes and loudness
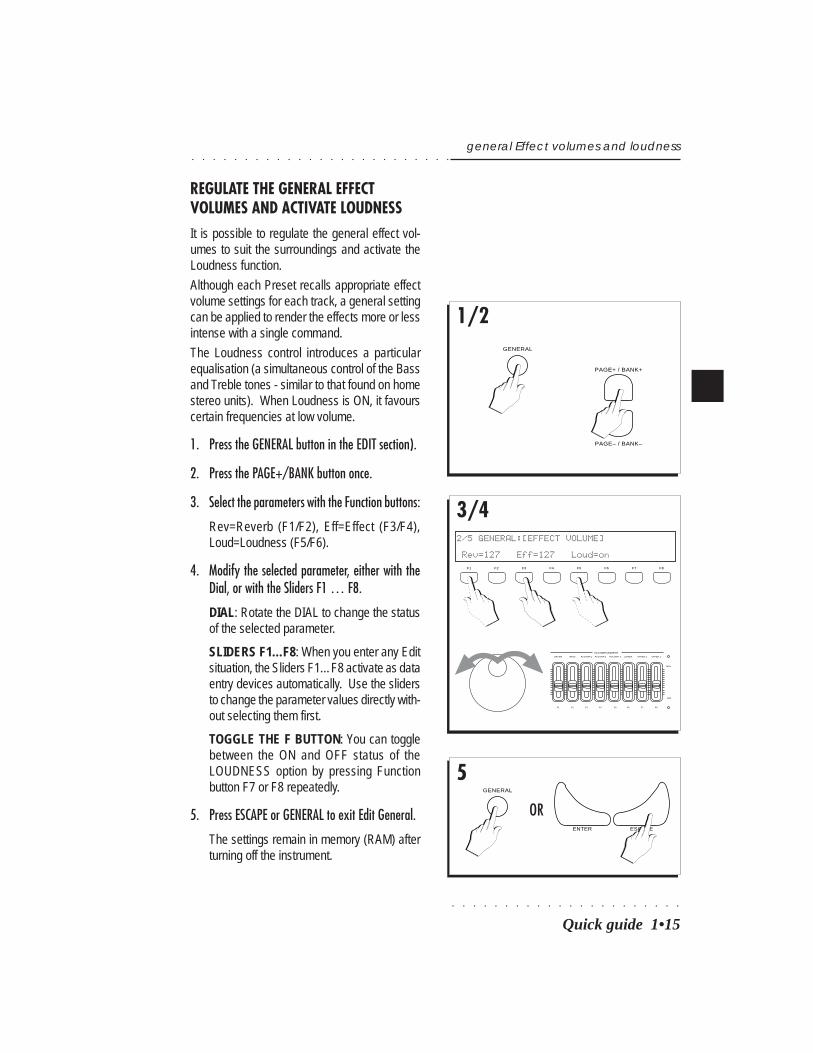
REGULATE THE GENERAL EFFECTVOLUMES AND ACTIVATE LOUDNESSIt is possible to regulate the general effect vol-umes to suit the surroundings and activate theLoudness function.
Although each Preset recalls appropriate effectvolume settings for each track, a general settingcan be applied to render the effects more or lessintense with a single command.
The Loudness control introduces a particularequalisation (a simultaneous control of the Bassand Treble tones - similar to that found on homestereo units). When Loudness is ON, it favourscertain frequencies at low volume.
1. Press the GENERAL button in the EDIT section).
2. Press the PAGE+/BANK button once.
3. Select the parameters with the Function buttons:
Rev=Reverb (F1/F2), Eff=Effect (F3/F4),Loud=Loudness (F5/F6).
4. Modify the selected parameter, either with theDial, or with the Sliders F1 … F8.
DIAL: Rotate the DIAL to change the statusof the selected parameter.
SLIDERS F1…F8: When you enter any Editsituation, the Sliders F1…F8 activate as dataentry devices automatically. Use the slidersto change the parameter values directly with-out selecting them first.
TOGGLE THE F BUTTON: You can togglebetween the ON and OFF status of theLOUDNESS option by pressing Functionbutton F7 or F8 repeatedly.
5. Press ESCAPE or GENERAL to exit Edit General.
The settings remain in memory (RAM) afterturning off the instrument.
1/2
3/42/5 GENERAL:[EFFECT VOLUME]
Rev=127 Eff=127 Loud=on
5
PAGE+ / BANK+
PAGE– / BANK–
MAX
MIN
DRUMS
ACCOMPANIMENT
BASS ACCOMP.1 ACCOMP.2 ACCOMP. 3 LOWER UPPER 2 UPPER 1
F1 F2 F3 F4 F5 F6 F7 F8
ENTER ESCAPE
OR
F1 F2 F3 F4 F5 F6 F7 F8
GENERAL
GENERAL

○ ○ ○ ○ ○ ○ ○ ○ ○ ○ ○ ○ ○ ○ ○ ○ ○ ○ ○ ○ ○ ○
1•16 User Guide
○ ○ ○ ○ ○ ○ ○ ○ ○ ○ ○ ○ ○ ○ ○ ○ ○ ○ ○ ○ ○ ○ ○ ○ ○
Transpose the instrument
TRANSPOSE THE INSTRUMENT (SEMI-TONES)If you would like to play a Song in a different key,or a song is too high or too low for a singer orother instrument, you can transpose PS1500 toplay the song in an easier key.
The TRANSPOSE +/– buttons allow real timesemitone adjustments (transpositions) of theoverall pitch (range ± 12 semitones = 1 octave).
1. Press TRANSPOSE+ to raise the pitch or TRANS-POSE– to lower the pitch.
TRANSPOSE+ pressed once displays an in-crease of +01.
TRANSPOSE– pressed once displays a de-crease of –01:
Holding either button changes the value con-tinually until +12 or –12 is reached.
The LED on one of the buttons will be on toindicate that the instrument is currently in aTransposed status (sharp # or flat b).
120 8btStd *********** Bk1: ORGAN3
GrandP 8BEAT Bk1: STRING TRANSPOSE=+01
120 8btStd *********** Bk1: ORGAN3
GrandP 8BEAT Bk1: STRING TRANSPOSE=-01
1 TRANSPOSE
TRANSPOSE
2
120 8btStd *********** Bk1: ORGAN3
GrandP 8BEAT Bk1: STRING TRANSPOSE= 00
TRANSPOSE
Clear the keyboard transpose setting
2. Press both TRANSPOSE buttons simultaneously.
The LED on the active button goes off andthe instrument’s normal pitch is restored.The display shows the 0 setting for a fewseconds then returns to normal.
○ ○ ○ ○ ○ ○ ○ ○ ○ ○ ○ ○ ○ ○ ○ ○ ○ ○ ○ ○
© Note: Pressing both Transpose buttons at thesame time also provides a PANIC function. See
○ ○ ○ ○ ○ ○ ○ ○ ○ ○ ○ ○ ○ ○ ○ ○ ○ ○ ○ ○
Edit MIDI.
○ ○ ○ ○ ○ ○ ○ ○ ○ ○ ○ ○ ○ ○ ○ ○ ○ ○ ○ ○ ○ ○
○ ○ ○ ○ ○ ○ ○ ○ ○ ○ ○ ○ ○ ○ ○ ○ ○ ○ ○ ○ ○ ○ ○ ○ ○
Quick guide 1•17
Play all Songs
Play All Songs
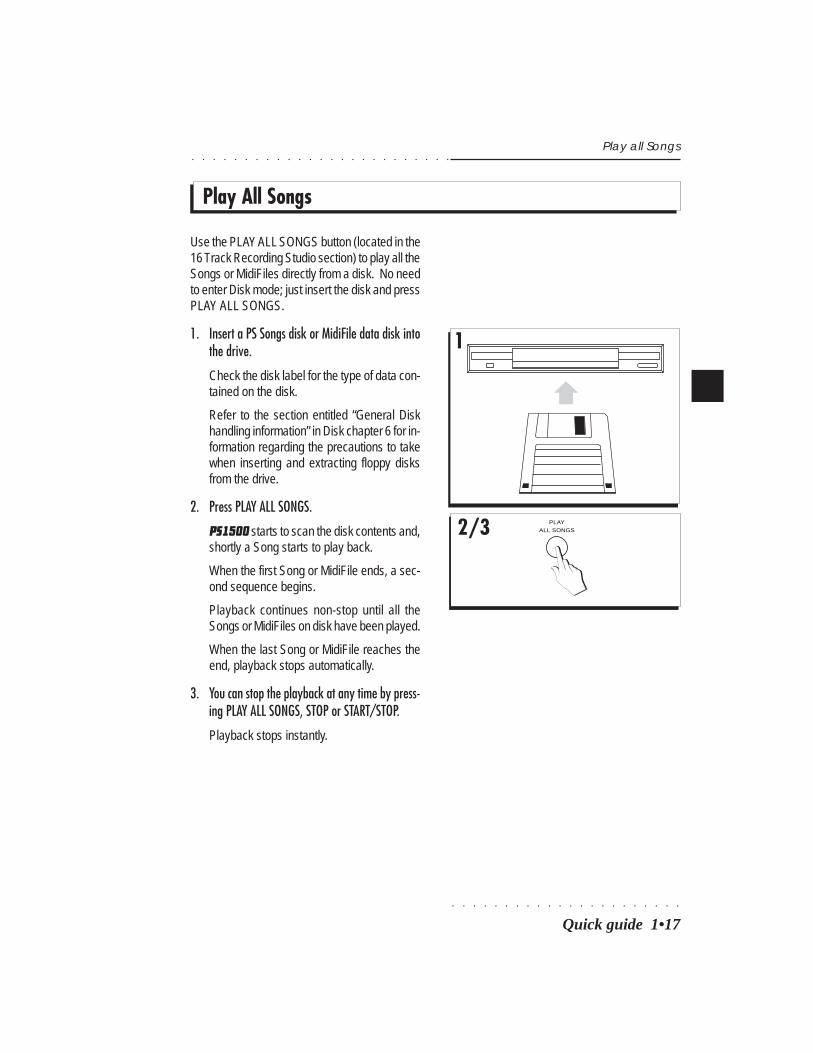
Use the PLAY ALL SONGS button (located in the16 Track Recording Studio section) to play all theSongs or MidiFiles directly from a disk. No needto enter Disk mode; just insert the disk and pressPLAY ALL SONGS.
1. Insert a PS Songs disk or MidiFile data disk intothe drive.
Check the disk label for the type of data con-tained on the disk.
Refer to the section entitled “General Diskhandling information” in Disk chapter 6 for in-formation regarding the precautions to takewhen inserting and extracting floppy disksfrom the drive.
2. Press PLAY ALL SONGS.
PS1500 starts to scan the disk contents and,shortly a Song starts to play back.
When the first Song or MidiFile ends, a sec-ond sequence begins.
Playback continues non-stop until all theSongs or MidiFiles on disk have been played.
When the last Song or MidiFile reaches theend, playback stops automatically.
3. You can stop the playback at any time by press-ing PLAY ALL SONGS, STOP or START/STOP.
Playback stops instantly.
1
2/3 PLAY
ALL SONGS
○ ○ ○ ○ ○ ○ ○ ○ ○ ○ ○ ○ ○ ○ ○ ○ ○ ○ ○ ○ ○ ○
1•18 User Guide
○ ○ ○ ○ ○ ○ ○ ○ ○ ○ ○ ○ ○ ○ ○ ○ ○ ○ ○ ○ ○ ○ ○ ○ ○
Song Play - Direct from Disk
Song Play - Direct from Disk
1
2
1/4 LOAD: Styles Style Sample
Slow Song MidiFile Preset All
3
aLOAD:DemoWK .WK3
[PRESS START TO PLAY OR ENTER TO LOAD]
LOAD:CANTSTOP.MID
[PRESS START TO PLAY OR ENTER TO LOAD]
b
DISK
F1 F2 F3 F4 F5 F6 F7 F8
ba
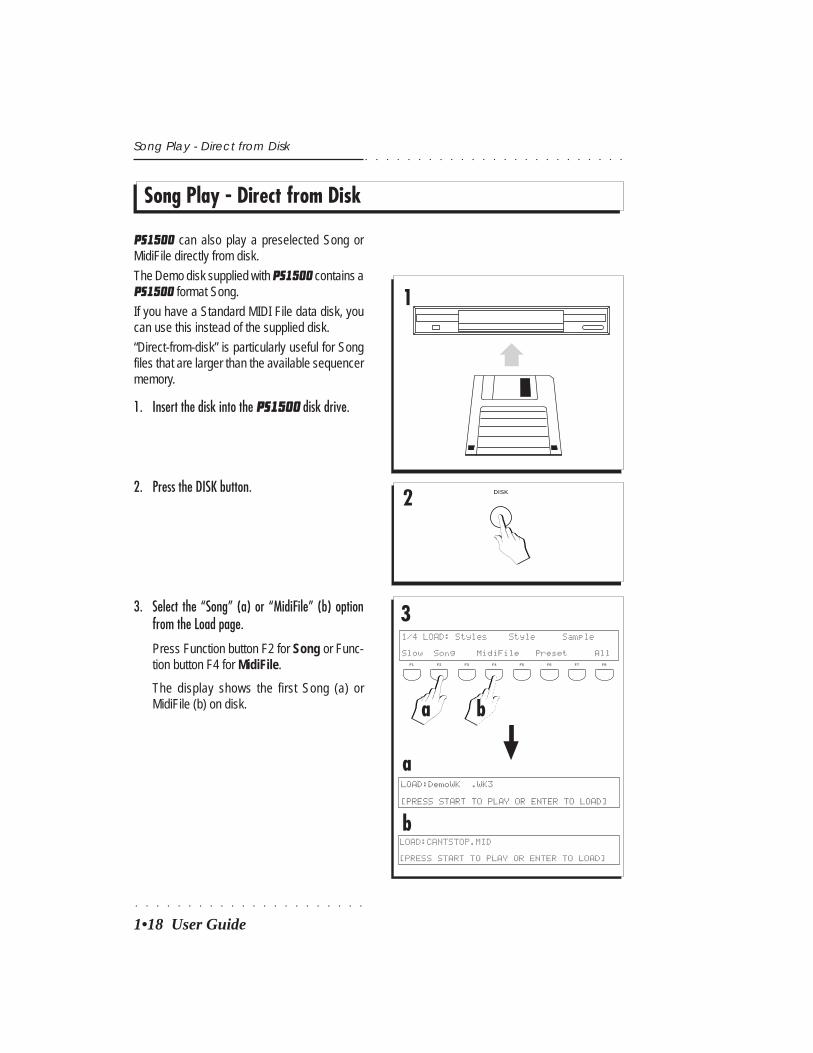
PS1500 can also play a preselected Song orMidiFile directly from disk.
The Demo disk supplied with PS1500 contains aPS1500 format Song.
If you have a Standard MIDI File data disk, youcan use this instead of the supplied disk.
“Direct-from-disk” is particularly useful for Songfiles that are larger than the available sequencermemory.
1. Insert the disk into the PS1500 disk drive.
2. Press the DISK button.
3. Select the “Song” (a) or “MidiFile” (b) optionfrom the Load page.
Press Function button F2 for Song or Func-tion button F4 for MidiFile.
The display shows the first Song (a) orMidiFile (b) on disk.
○ ○ ○ ○ ○ ○ ○ ○ ○ ○ ○ ○ ○ ○ ○ ○ ○ ○ ○ ○ ○ ○
○ ○ ○ ○ ○ ○ ○ ○ ○ ○ ○ ○ ○ ○ ○ ○ ○ ○ ○ ○ ○ ○ ○ ○ ○
Quick guide 1•19
Song Play - Direct from Disk
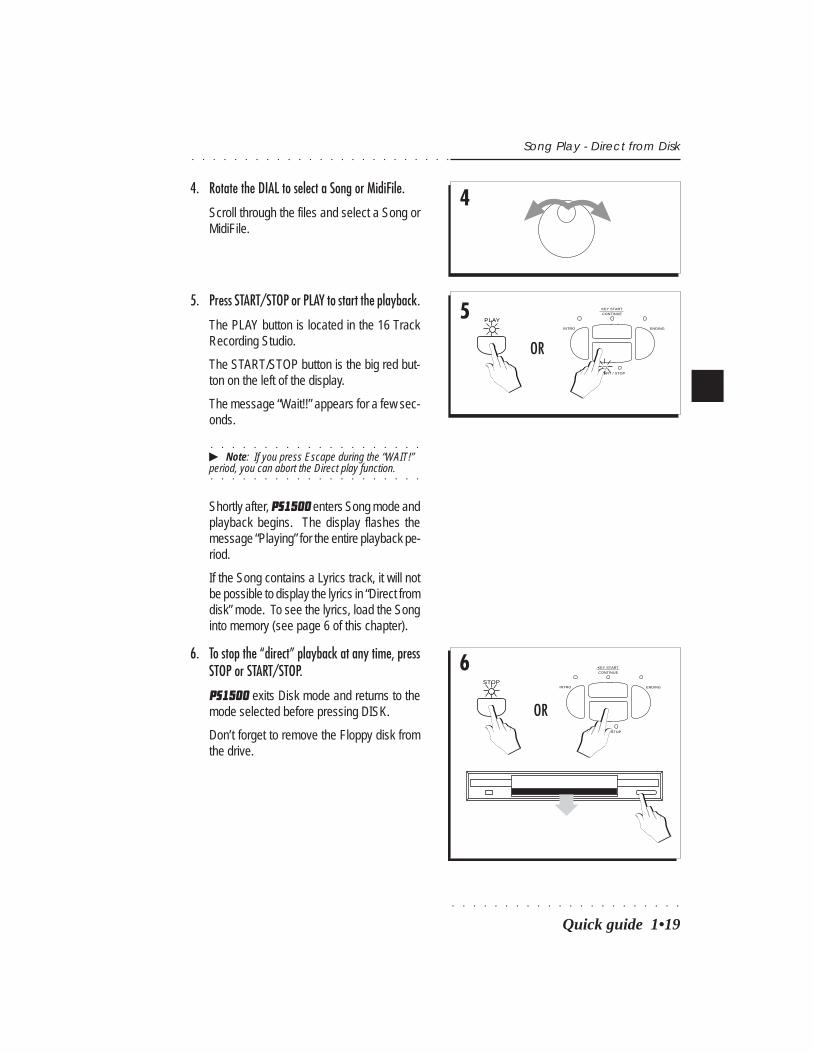
4. Rotate the DIAL to select a Song or MidiFile.
Scroll through the files and select a Song orMidiFile.
4
5PLAY
OR
INTRO
KEY START
CONTINUE
ENDING
START / STOP
5. Press START/STOP or PLAY to start the playback.
The PLAY button is located in the 16 TrackRecording Studio.
The START/STOP button is the big red but-ton on the left of the display.
The message “Wait!!” appears for a few sec-onds.
○ ○ ○ ○ ○ ○ ○ ○ ○ ○ ○ ○ ○ ○ ○ ○ ○ ○ ○ ○
© Note: If you press Escape during the “WAIT!”
○ ○ ○ ○ ○ ○ ○ ○ ○ ○ ○ ○ ○ ○ ○ ○ ○ ○ ○ ○
period, you can abort the Direct play function.
Shortly after, PS1500 enters Song mode andplayback begins. The display flashes themessage “Playing” for the entire playback pe-riod.
If the Song contains a Lyrics track, it will notbe possible to display the lyrics in “Direct fromdisk” mode. To see the lyrics, load the Songinto memory (see page 6 of this chapter).
6. To stop the “direct” playback at any time, pressSTOP or START/STOP.
PS1500 exits Disk mode and returns to themode selected before pressing DISK.
Don’t forget to remove the Floppy disk fromthe drive.
6
OR
INTRO
KEY START
CONTINUE
ENDING
START / STOP
STOP
○ ○ ○ ○ ○ ○ ○ ○ ○ ○ ○ ○ ○ ○ ○ ○ ○ ○ ○ ○ ○ ○
1•20 User Guide
○ ○ ○ ○ ○ ○ ○ ○ ○ ○ ○ ○ ○ ○ ○ ○ ○ ○ ○ ○ ○ ○ ○ ○ ○
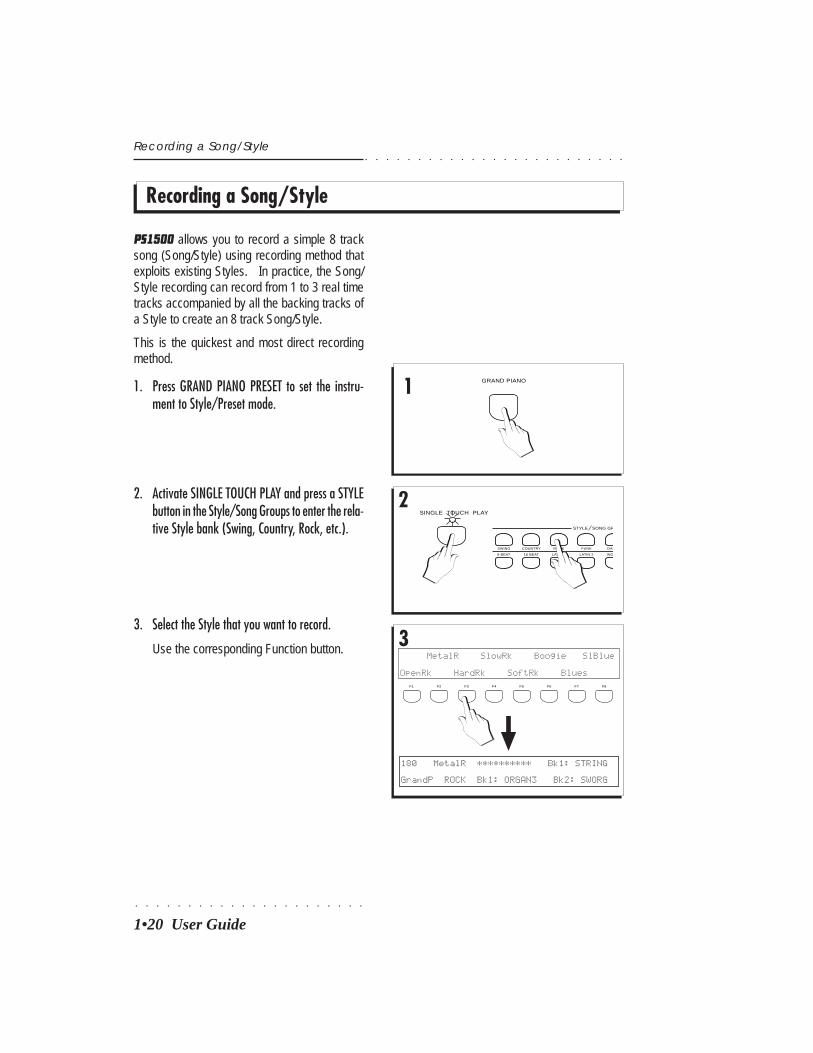
PS1500 allows you to record a simple 8 tracksong (Song/Style) using recording method thatexploits existing Styles. In practice, the Song/Style recording can record from 1 to 3 real timetracks accompanied by all the backing tracks ofa Style to create an 8 track Song/Style.
This is the quickest and most direct recordingmethod.
1. Press GRAND PIANO PRESET to set the instru-ment to Style/Preset mode.
Recording a Song/Style
Recording a Song/Style
2
8 BEAT
SWING COUNTRY
16 BEAT
ROCK
LATIN 1
FUNK
LATIN 2
DAN
WO
STYLE SONG GR
SINGLE TOUCH PLAY
1 GRAND PIANO
3
F1 F2 F3 F4 F5 F6 F7 F8
180 MetalR ********** Bk1: STRING
GrandP ROCK Bk1: ORGAN3 Bk2: SWORG
MetalR SlowRk Boogie SlBlue
OpenRk HardRk SoftRk Blues
2. Activate SINGLE TOUCH PLAY and press a STYLEbutton in the Style/Song Groups to enter the rela-tive Style bank (Swing, Country, Rock, etc.).
3. Select the Style that you want to record.
Use the corresponding Function button.
○ ○ ○ ○ ○ ○ ○ ○ ○ ○ ○ ○ ○ ○ ○ ○ ○ ○ ○ ○ ○ ○
○ ○ ○ ○ ○ ○ ○ ○ ○ ○ ○ ○ ○ ○ ○ ○ ○ ○ ○ ○ ○ ○ ○ ○ ○
Quick guide 1•21
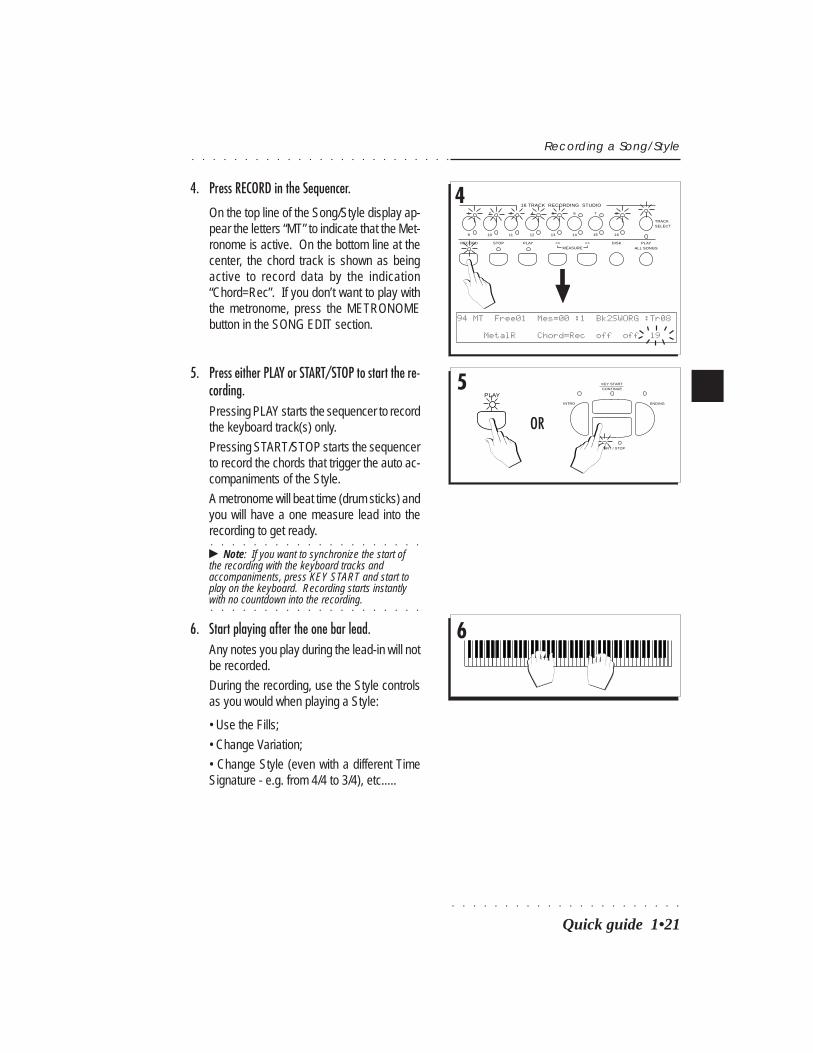
4. Press RECORD in the Sequencer.
On the top line of the Song/Style display ap-pear the letters “MT” to indicate that the Met-ronome is active. On the bottom line at thecenter, the chord track is shown as beingactive to record data by the indication“Chord=Rec”. If you don’t want to play withthe metronome, press the METRONOMEbutton in the SONG EDIT section.
Recording a Song/Style
41 2 3
9 10 11 12
54
13
6
14 15
7 8
16
TRACKSELECT
16 TRACK RECORDING STUDIO
DISK PLAY
ALL SONGSMEASURE<< >>PLAYSTOPRECORD
94 MT Free01 Mes=00 :1 Bk2SWORG :Tr08
MetalR Chord=Rec off off 19
5PLAY
OR
INTRO
KEY START
CONTINUE
ENDING
START / STOP
5. Press either PLAY or START/STOP to start the re-cording.Pressing PLAY starts the sequencer to recordthe keyboard track(s) only.
Pressing START/STOP starts the sequencerto record the chords that trigger the auto ac-companiments of the Style.
A metronome will beat time (drum sticks) andyou will have a one measure lead into therecording to get ready.
○ ○ ○ ○ ○ ○ ○ ○ ○ ○ ○ ○ ○ ○ ○ ○ ○ ○ ○ ○
© Note: If you want to synchronize the start ofthe recording with the keyboard tracks andaccompaniments, press KEY START and start toplay on the keyboard. Recording starts instantly
○ ○ ○ ○ ○ ○ ○ ○ ○ ○ ○ ○ ○ ○ ○ ○ ○ ○ ○ ○
with no countdown into the recording.
6. Start playing after the one bar lead.Any notes you play during the lead-in will notbe recorded.
During the recording, use the Style controlsas you would when playing a Style:
• Use the Fills;
• Change Variation;
• Change Style (even with a different TimeSignature - e.g. from 4/4 to 3/4), etc.....
6
○ ○ ○ ○ ○ ○ ○ ○ ○ ○ ○ ○ ○ ○ ○ ○ ○ ○ ○ ○ ○ ○
1•22 User Guide
○ ○ ○ ○ ○ ○ ○ ○ ○ ○ ○ ○ ○ ○ ○ ○ ○ ○ ○ ○ ○ ○ ○ ○ ○
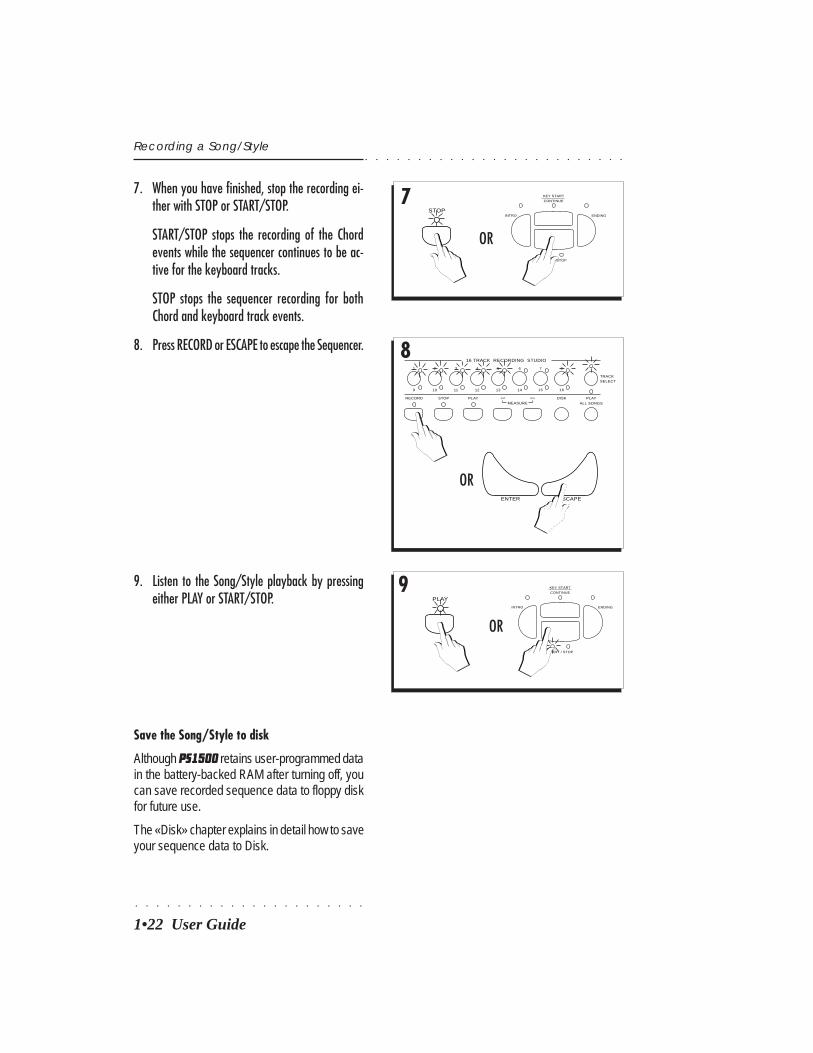
7. When you have finished, stop the recording ei-ther with STOP or START/STOP.
START/STOP stops the recording of the Chordevents while the sequencer continues to be ac-tive for the keyboard tracks.
STOP stops the sequencer recording for bothChord and keyboard track events.
8. Press RECORD or ESCAPE to escape the Sequencer.
7
OR
INTRO
KEY START
CONTINUE
ENDING
START / STOP
STOP
9. Listen to the Song/Style playback by pressingeither PLAY or START/STOP.
8
ENTER ESCAPE
OR
1 2 3
9 10 11 12
54
13
6
14 15
7 8
16
TRACKSELECT
16 TRACK RECORDING STUDIO
DISK PLAY
ALL SONGSMEASURE<< >>PLAYSTOPRECORD
9PLAY
INTRO
KEY START
CONTINUE
ENDING
START / STOP
OR
Save the Song/Style to disk
Although PS1500 retains user-programmed datain the battery-backed RAM after turning off, youcan save recorded sequence data to floppy diskfor future use.
The «Disk» chapter explains in detail how to saveyour sequence data to Disk.
Recording a Song/Style
○ ○ ○ ○ ○ ○ ○ ○ ○ ○ ○ ○ ○ ○ ○ ○ ○ ○ ○ ○ ○ ○
Front & Rear panel 2•1
○ ○ ○ ○ ○ ○ ○ ○ ○ ○ ○ ○ ○ ○ ○ ○ ○ ○ ○ ○ ○ ○ ○ ○ ○
• 2 Front & Rear PanelEach button on the Pianovelle PS1500 controlpanel activates a specific function, selects an itemin the display, or interacts with the currently se-lected operating mode to assist with the opera-tions.
This chapter explains what happens when youpress the buttons.
BUTTONS WITH LEDSFunctions represented by a button with a LED(light emitting diode) indicate the on/off status ofthe respective function. Pressing these type ofbuttons repeatedly toggles between the “On” and“Off” status. When the LED is on, the respectivefunction is active. In some cases, the LED flash-es to indicate a special situation.
BUTTONS WITHOUT LEDSButtons without LEDS normally gain access to aselection environment, or an editor belonging toone of the operating modes. In both cases, anappropriate display is activated showing itemsthat are selected with the underlying Function but-tons (F1…F8).

○ ○ ○ ○ ○ ○ ○ ○ ○ ○ ○ ○ ○ ○ ○ ○ ○ ○ ○ ○ ○ ○
2•2 User Guide
○ ○ ○ ○ ○ ○ ○ ○ ○ ○ ○ ○ ○ ○ ○ ○ ○ ○ ○ ○ ○ ○ ○ ○ ○
Front panel
OFF ON
MAX
MIN
MAX
MIN
MASTER MIC / LINE DRUMS
VOLUME ACCOMPANIMENT
BASS ACCOMP.1 ACCOMP.2 ACCOMP. 3 LOWER UPPER 2 UPPER 1
SINGLE TOUCH PLAY
F1 F2 F3 F4 F5 F6 F7 F8
8 BEAT
SWING COUNTRY
16 BEAT
ROCK
LATIN 1
FUNK
LATIN 2
DANCE POP
WORLD ETHNIC
USER 1–8
SONG /STYLE
USER 9–16
SONG
EASY PLAY PIANO STYLE MEMORY LOWER MEMORY TEMPO LOCK FADE IN /OUT MIXER LOCK BASS FOLLOW
STYLE SONG GROUPS
ACCOMPANIMENT
VARIATION FILL1 2 3 4
STYLE LOCKTAP TEMPO
SPLIT
INTRO
KEY START
CONTINUE
ENDING
START / STOP
TRANSPOSE
DISPLAY
CONTRAST
PAGE+ / BANK+
PAGE– / BANK–
DISPLAY HOLD
TOUCHSENSITIVITY
UPPER 2
UPPER 1
UPPER 2
LOWER
TEMPO
PERFORMANCE
STYLE / SONG CHORDS / MEASURE
LOWER
UPPER 2
UPPER 1
F1 F2 F3 F4 F5 F6 F7 F8
UPPER 1
LOWER
SELECT
ESCAPEENTER
REED
PIANO MALLET
FLUTE
ORGAN
SYN LEAD
GUITAR
SYN PAD
BASS STRINGS
SYN SFX ETHNIC
ENSEMBLE
PERCUSSIVE
BRASS
SFX
1 2 3 4 5 6 7 8
SOUND GROUPS
PROGRAMMABLE PRESETS
PROGRAMMABLE PADSGRAND PIANO
1 2 3 4
STORE
PRESET
1 2 3
9 10 11 12
54
13
6
14 15
7 8
16
TRACKSELECT
SAMPLE
RECORD
SAMPLEMIXERPRESETMIDISOUNDGENERAL
EDIT
16 TRACK RECORDING STUDIO
SONG EDITTEXT QUANTIZE METRONOMECOPYMASTERERASE
SYSTEM HARMONY DIGITAL EFFECTS
REVERB EFFECTSTYPEON OFFDEMORESTORE DISK PLAY
ALL SONGSMEASURE<< >>PLAYSTOPRECORD
120 GENERALMUSICMULTIMEDIA WORKSTATION
keyboardpower
control paneldisplay
disk drive
HEADPHONES 1 HEADPHONES 2
alphanumeric configuration
Stereo Headphones
COMPUTER THRU OUT IN PEDALS VOLUME RIGHT MONO LEFT RIGHT MONO LEFT
MIDI
INPUT OUTPUT
RGB S–VHS MIC LINE IN GAIN
VIDEO
Connections
Rear Panel
○ ○ ○ ○ ○ ○ ○ ○ ○ ○ ○ ○ ○ ○ ○ ○ ○ ○ ○ ○ ○ ○
Front & Rear panel 2•3
○ ○ ○ ○ ○ ○ ○ ○ ○ ○ ○ ○ ○ ○ ○ ○ ○ ○ ○ ○ ○ ○ ○ ○ ○
Control panel (left section)
MA
X
MIN
MA
X
MIN
MA
ST
ER
MIC
/ L
INE
D
RU
MS
VO
LU
ME
AC
CO
MP
AN
IME
NT
BA
SS
AC
CO
MP
.1A
CC
OM
P.2
AC
CO
MP
. 3
LO
WE
RU
PP
ER
2U
PP
ER
1
SIN
GL
E
TO
UC
H
PL
AY
F1
F
2F
3F
4F
5F
6F
7F
8
8 B
EA
T
SW
ING
CO
UN
TR
Y
16
BE
AT
RO
CK
LA
TIN
1
FU
NK
LA
TIN
2
DA
NC
EP
OP
WO
RL
DE
TH
NIC
US
ER
1–
8
SO
NG
/S
TY
LE
US
ER
9–
16
SO
NG
EA
SY
PL
AY
PIA
NO
ST
YL
EM
EM
OR
YL
OW
ER
ME
MO
RY
TE
MP
O L
OC
KF
AD
E I
N /
OU
TM
IXE
R L
OC
KB
AS
S F
OL
LO
W
ST
YL
E
SO
NG
GR
OU
PS
AC
CO
MP
AN
IME
NT
VA
RIA
TIO
NF
ILL
12
34
ST
YL
E L
OC
KT
AP
TE
MP
O
SP
LIT
12
34
5
78
6
○ ○ ○ ○ ○ ○ ○ ○ ○ ○ ○ ○ ○ ○ ○ ○ ○ ○ ○ ○ ○ ○
2•4 User Guide
○ ○ ○ ○ ○ ○ ○ ○ ○ ○ ○ ○ ○ ○ ○ ○ ○ ○ ○ ○ ○ ○ ○ ○ ○
Control panel (central section)
INT
RO
KE
Y S
TA
RT
CO
NT
INU
E
EN
DIN
G
ST
AR
T /
ST
OP
TR
AN
SP
OS
E
DIS
PL
AY
CO
NT
RA
ST
PA
GE
+ /
BA
NK
+
PA
GE
– /
BA
NK
–
DIS
PL
AY
HO
LD
TO
UC
HS
EN
SIT
IVIT
Y
UP
PE
R 2
UP
PE
R 1
UP
PE
R 2
LO
WE
R
TE
MP
O
PE
RF
OR
MA
NC
E
ST
YL
E /
SO
NG
CH
OR
DS
/ M
EA
SU
RE
LO
WE
R
UP
PE
R 2
UP
PE
R 1
F1
F2
F3
F4
F5
F6
F7
F8
UP
PE
R 1
LO
WE
R
S E L E C T
ES
CA
PE
EN
TE
R
SY
ST
EM
HA
RM
ON
YD
IGIT
AL E
FF
EC
TS
RE
VE
RB
EF
FE
CT
ST
YP
EO
N
OF
FD
EM
OR
ES
TO
RE
91
011
12
13
14
15
16
17
18
19
20
21
22
○ ○ ○ ○ ○ ○ ○ ○ ○ ○ ○ ○ ○ ○ ○ ○ ○ ○ ○ ○ ○ ○
Front & Rear panel 2•5
○ ○ ○ ○ ○ ○ ○ ○ ○ ○ ○ ○ ○ ○ ○ ○ ○ ○ ○ ○ ○ ○ ○ ○ ○
Control panel (right section)
RE
ED
PIA
NO
MA
LL
ET
FL
UT
E
OR
GA
N
SY
N L
EA
D
GU
ITA
R
SY
N P
AD
BA
SS
ST
RIN
GS
SY
N S
FX
ET
HN
IC
EN
SE
MB
LE
PE
RC
US
SIV
E
BR
AS
S
SF
X
12
34
56
78
SO
UN
D G
RO
UP
S
PR
OG
RA
MM
AB
LE
PR
ES
ET
S
PR
OG
RA
MM
AB
LE
PA
DS
GR
AN
D P
IAN
O
12
34
ST
OR
E
PR
ES
ET
12
3
91
011
12
54
13
6 14
157
8 16
TR
AC
KS
EL
EC
T
SA
MP
LE
RE
CO
RD
SA
MP
LE
MIX
ER
PR
ES
ET
MID
IS
OU
ND
GE
NE
RA
L
ED
IT
16
TR
AC
K
RE
CO
RD
ING
S
TU
DIO
SO
NG
ED
ITT
EX
TQ
UA
NT
IZE
ME
TR
ON
OM
EC
OP
YM
AS
TE
RE
RA
SE
DIS
KP
LA
Y
AL
L S
ON
GS
ME
AS
UR
E<
<>
>P
LA
YS
TO
PR
EC
OR
D
23
24
25
26
27
28
29
30
31
33
32
○ ○ ○ ○ ○ ○ ○ ○ ○ ○ ○ ○ ○ ○ ○ ○ ○ ○ ○ ○ ○ ○
2•6 User Guide
○ ○ ○ ○ ○ ○ ○ ○ ○ ○ ○ ○ ○ ○ ○ ○ ○ ○ ○ ○ ○ ○ ○ ○ ○
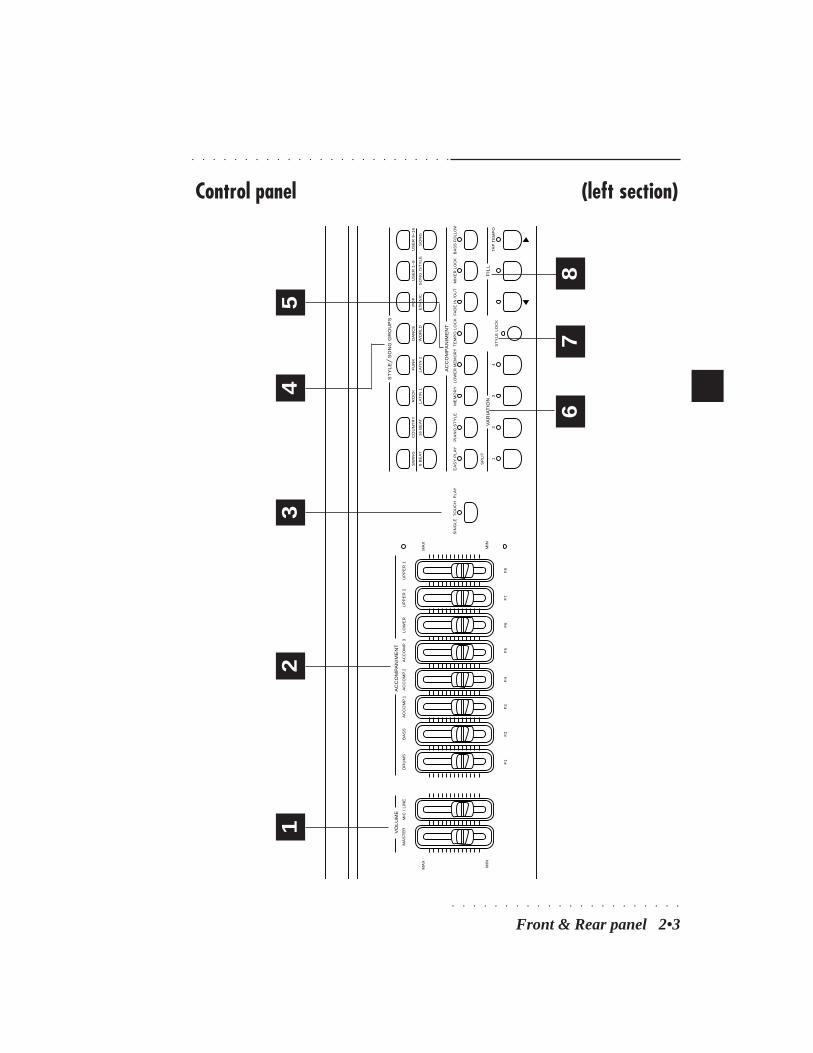
1. VOLUME SLIDERSMASTER VOLUME. Adjusts the general volume (speak-ers, headphones and outputs). Not transmitted or re-ceived via MIDI.MIC/LINE. Controls the volume of the signal fed into theMic/Line Input of the optional Audio/Video Interface.
2. ACCOMPANIMENT SLIDERSDRUM, BASS, ACCOMP1, ACCOMP2, ACCOMP3,LOWER, UPPER2, UPPER1. Independent volume con-trols for the keyboard sections (Upper 1, Upper 2, Lower)and Style Tracks (Drum, Bass, Acc1, Acc2, Acc3). A LEDindicator shows when the sliders are active for Style trackvolume control.F1…F8 SLIDERS: In multi-track mode (Song) or in one ofthe Edit modes, sliders F1…F8 control the volumes oftracks 01-08 or 09-16 and operate as data entry controlsin edit situations. A LED indicator shows when the slid-ers F1…F8 are active as Song volume and Data Entrycontrols.
3. SINGLE TOUCH PLAYWhen ON, Style-Preset sounds are assigned to all thetracks. When OFF, selecting Styles recalls sounds forthe accompaniment sections only while those of the key-board tracks remain unchanged.
4. STYLE/SONG GROUPSEach button corresponds to a bank of 8 Styles (Swing,Country, Rock, etc.), User Styles (User1-8 & User9-16),Song/Styles (Song/Style) or Songs (Song). Press abutton to display the contents of the bank and select anitem with the function button corresponding to the namein the display.
5. ACCOMPANIMENTButtons which control the Styles.• EASY PLAY: Enables (On) or disables (Off) the Style ar-rangements.• PIANO STYLE: Gains access to the Piano Style program-ming page where you can program the chord recognitionmodes for the Style accompaniment.• MEMORY: When ON, releasing the keys from the key-board causes the Style accompaniments to continue play-ing; when OFF, all accompaniments except the Drum trackstop instantly after key release.
• LOWER MEMORY: When ON, the sounds assigned to theLower keyboard track continues playing after releasingthe keys; when OFF, the Lower sound stops instantly af-ter key release.• TEMPO LOCK: When ON, this button locks the currenttempo setting for all Style and Preset selections. WhenOFF, each Style or Preset recalls memorized Tempo data.• FADE IN/OUT: Starts and stops a Style with a gradualincrease or decrease of volume. Starting requires press-ing the Start button.• MIXER LOCK: When ON, this button locks the currentTrack volume settings for all Style and Preset selections.When OFF, each Style or Preset recalls memorized Mix-er settings.• BASS FOLLOW: When ON, the Bass track of the Styleauto accompaniment follows the lowest left note of thechord played, allowing real time changes of the bass ac-companiment according to the lowest note played. WhenOFF, the bass track follows the programmed pattern ofthe Style, regardless of the chord inversion played.
6. VAR 1, VAR 2, VAR 3, VAR 41, 2, 3, 4: These buttons allow you to switch from oneStyle Variation to another.
7. STYLE LOCKWhen ON, selecting Presets recalls keyboard sounds onlywithout changing Style. When OFF, Presets can changeStyle as well as the keyboard sounds.
8. FILL• FILL < (Fill-to-previous-variation): Recalls a Fill patternthen moves to the previous Variation.• FILL (Fill-to-current-variation): Recalls a Fill pattern thencontinues with the same variation.• FILL >/TAP TEMPO (Fill-to-next-variation): FILL > - pressedduring Style play recalls a Fill pattern then moves to thenext variation. TAP TEMPO - sets the Style playing speedby tapping on the button and starts the Style auto accom-paniment automatically.
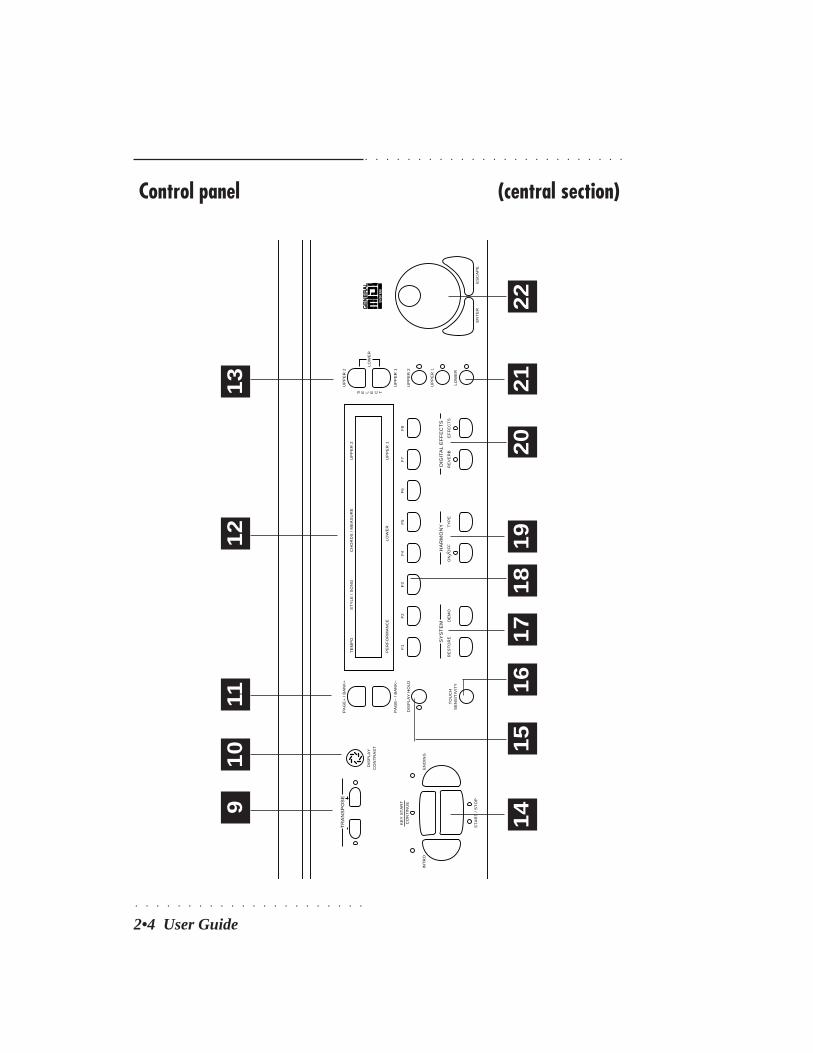
9. TRANSPOSE +, TRANSPOSE –Raises (+) or lowers (–) the pitch of the instrument as awhole in semitone steps, over a range of ±12 semitones.Pressing both buttons at the same time resets to 0.Panic: In MIDI situations, pressing both buttons at thesame time provides a PANIC function.
Front Panel (buttons & controls)

○ ○ ○ ○ ○ ○ ○ ○ ○ ○ ○ ○ ○ ○ ○ ○ ○ ○ ○ ○ ○ ○
Front & Rear panel 2•7
○ ○ ○ ○ ○ ○ ○ ○ ○ ○ ○ ○ ○ ○ ○ ○ ○ ○ ○ ○ ○ ○ ○ ○ ○
Name write: In name writing situations when the key-board activates as a source of alphanumeric data, Trans-pose – moves the cursor backwards while Transpose +moves it forwards.
10. DISPLAY CONTRASTAdjusts the display contrast. Different display viewingangles and lighting conditions may require a slight ad-justment of the contrast.
11. PAGE+/BANK+, PAGE–/BANK–These buttons select Presets in increasing (Page+) ordecreasing (Page–) order when PS1500 is set to Style/Preset mode. In Sound selection situations, they selectthe Sound Banks 1, 2 and 3 in cyclic order (Bank+, Bank–). In the various Edit modes, they pass from one editpage to another.
12. THE DISPLAYA 2x40 LCD (Liquid Crystal Display) display which com-municates the current status of the instrument at all times.In Style/Preset mode, the display’s contents are definedby the silkscreened markings around the perimeter.
13. SELECT - UPPER 1, UPPER 2, LOWERThese buttons allow you to select the respective keyboardsections to enable them for a sound change. The Lowerkeyboard section is selected by pressing both buttons atthe same time. A SELECTED KEYBOARD SECTION ISSHOWN FLASHING IN THE DISPLAY.
14. START/STOP, INTRO, ENDING, KEY START CONTINUE• START/STOP: Starts and stops the playback of a Style,Song/Style or Song. In sequencer recording processes,the Start/Stop button and the Play and Stop buttons ofthe sequencer operate in the same manner.• INTRO: Places the introduction of a Style on “standby”before Style start.• ENDING: Stops a Style with an Ending.• KEY START/CONTINUE: Synchronizes the start of a Stylewith a note (or chord) pressed on the lower keyboard area.Pressing Continue in Song or Song/Style mode restartsthe Song or Song/Style from the current stop point.
15. DISPLAY HOLDON: locks the selection displays (Sound, Preset, Style,Song/Style, Song) for multiple selection possibilities.ESCAPE cancels Display Hold. OFF: the temporary se-lection display closes after a selection, or after a few sec-
onds if no selection has been made.
16. TOUCH SENSITIVITYEnables/disables the keyboard velocity sensitivity accord-ing to the current setting. Holding the button pressed fora few seconds opens a selection display where you canchoose from 3 different sensitivity settings and Off.
17. SYSTEM• RESTORE: Enters a restore display where you can chooseto restore part of the instrument’s RAM to the originalfactory settings (All, Sequencer, Preset). The display alsoshows the release date of the operating system.• DEMO: Gains access to the demonstration Styles whichyou can listen to one at a time or as a medley.
18. FUNCTION BUTTONS F1…F8Buttons which allow you to select the displayed data cor-responding to the relative button.
19. HARMONY• HARMONY ON/OFF: Enables/disables the melody harmo-ny function according to the current Harmony Type set-ting. In Style/Preset modes, the chord notes are coupledto the melody played with the right hand.• HARMONY TYPE: Activates a selection display where youcan select one of the 8 Harmony Types available.
20. DIGITAL EFFECT• REVERB: activates (LED on) or bypasses (LED off) theReverb effect assigned to the current Preset.• EFFECTS: activates (LED on) or bypass (LED off) the Mod-ulation/Delay effect assigned to the current Preset.• EFFECTS EDITOR: Holding down either buttons gains ac-cess to the effects selectors, the effect send controls andthe effects editor.
21. UPPER 1, UPPER 2, LOWER (ACTIVATORS)These buttons activate (LED on) or mute (LED off) therespective keyboard sections and, therefore, determinethe configuration of the keyboard sounds.
22. DIAL, ENTER, ESCAPE• DIAL: active for Tempo changes in Style, Song/Style orSong modes, or operates as a data entry control in Editand Record situations.• ENTER: confirms specified data in edit situations.• ESCAPE: cancels specified data and/or escapes an editsituation.
○ ○ ○ ○ ○ ○ ○ ○ ○ ○ ○ ○ ○ ○ ○ ○ ○ ○ ○ ○ ○ ○
2•8 User Guide
○ ○ ○ ○ ○ ○ ○ ○ ○ ○ ○ ○ ○ ○ ○ ○ ○ ○ ○ ○ ○ ○ ○ ○ ○
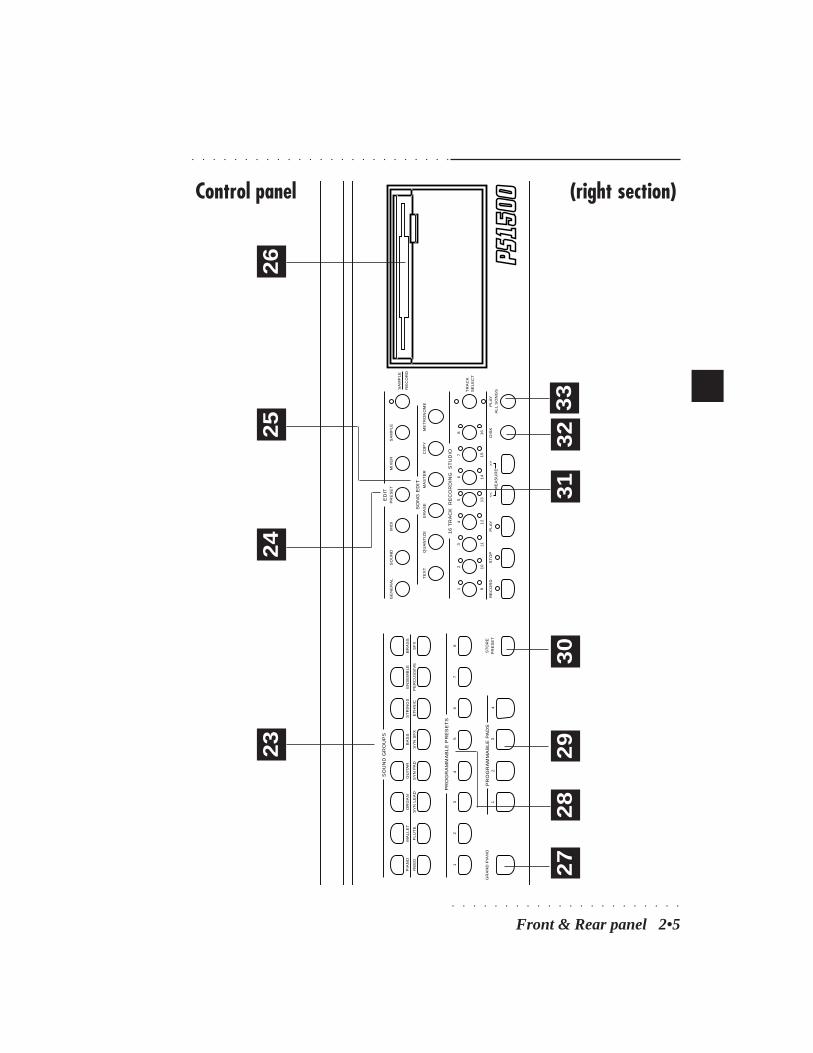
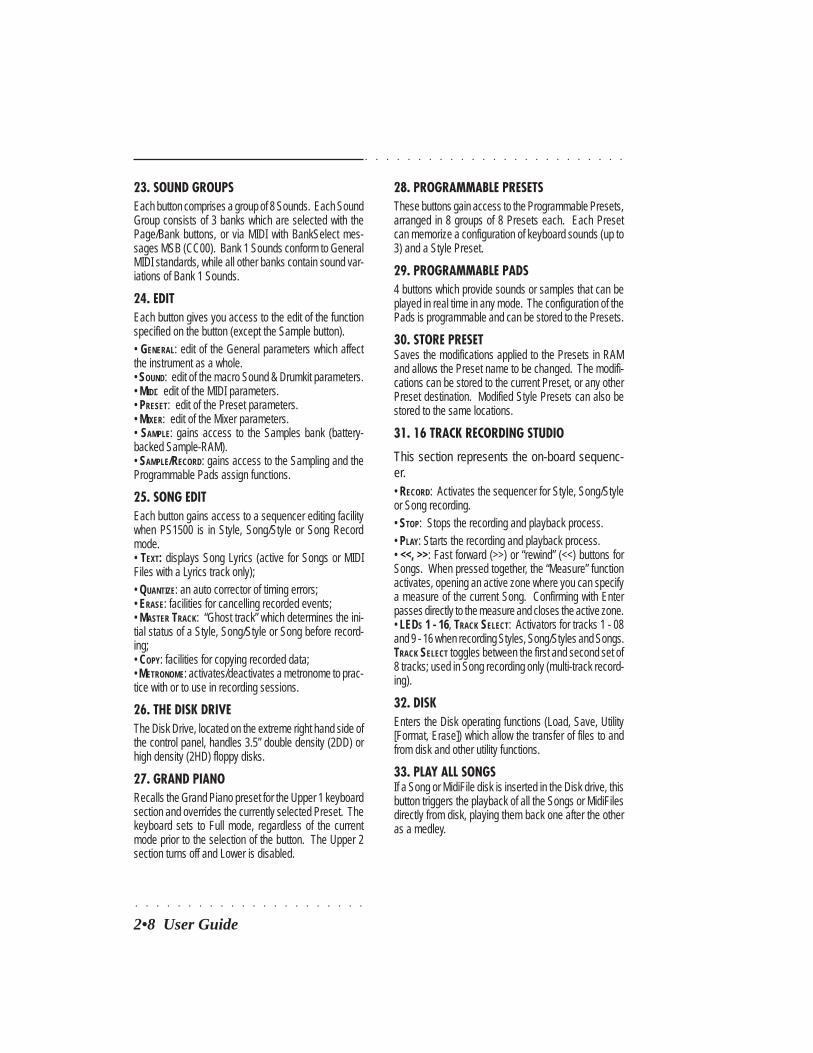
23. SOUND GROUPSEach button comprises a group of 8 Sounds. Each SoundGroup consists of 3 banks which are selected with thePage/Bank buttons, or via MIDI with BankSelect mes-sages MSB (CC00). Bank 1 Sounds conform to GeneralMIDI standards, while all other banks contain sound var-iations of Bank 1 Sounds.
24. EDITEach button gives you access to the edit of the functionspecified on the button (except the Sample button).• GENERAL: edit of the General parameters which affectthe instrument as a whole.• SOUND: edit of the macro Sound & Drumkit parameters.• MIDI: edit of the MIDI parameters.• PRESET: edit of the Preset parameters.• MIXER: edit of the Mixer parameters.• SAMPLE: gains access to the Samples bank (battery-backed Sample-RAM).• SAMPLE/RECORD: gains access to the Sampling and theProgrammable Pads assign functions.
25. SONG EDITEach button gains access to a sequencer editing facilitywhen PS1500 is in Style, Song/Style or Song Recordmode.• TEXT: displays Song Lyrics (active for Songs or MIDIFiles with a Lyrics track only);• QUANTIZE: an auto corrector of timing errors;• ERASE: facilities for cancelling recorded events;• MASTER TRACK: “Ghost track” which determines the ini-tial status of a Style, Song/Style or Song before record-ing;• COPY: facilities for copying recorded data;• METRONOME: activates/deactivates a metronome to prac-tice with or to use in recording sessions.
26. THE DISK DRIVEThe Disk Drive, located on the extreme right hand side ofthe control panel, handles 3.5” double density (2DD) orhigh density (2HD) floppy disks.
27. GRAND PIANORecalls the Grand Piano preset for the Upper 1 keyboardsection and overrides the currently selected Preset. Thekeyboard sets to Full mode, regardless of the currentmode prior to the selection of the button. The Upper 2section turns off and Lower is disabled.
28. PROGRAMMABLE PRESETSThese buttons gain access to the Programmable Presets,arranged in 8 groups of 8 Presets each. Each Presetcan memorize a configuration of keyboard sounds (up to3) and a Style Preset.
29. PROGRAMMABLE PADS4 buttons which provide sounds or samples that can beplayed in real time in any mode. The configuration of thePads is programmable and can be stored to the Presets.
30. STORE PRESETSaves the modifications applied to the Presets in RAMand allows the Preset name to be changed. The modifi-cations can be stored to the current Preset, or any otherPreset destination. Modified Style Presets can also bestored to the same locations.
31. 16 TRACK RECORDING STUDIO
This section represents the on-board sequenc-er.• RECORD: Activates the sequencer for Style, Song/Styleor Song recording.• STOP: Stops the recording and playback process.• PLAY: Starts the recording and playback process.• <<, >>: Fast forward (>>) or “rewind” (<<) buttons forSongs. When pressed together, the “Measure” functionactivates, opening an active zone where you can specifya measure of the current Song. Confirming with Enterpasses directly to the measure and closes the active zone.• LEDS 1 - 16, TRACK SELECT: Activators for tracks 1 - 08and 9 - 16 when recording Styles, Song/Styles and Songs.TRACK SELECT toggles between the first and second set of8 tracks; used in Song recording only (multi-track record-ing).
32. DISKEnters the Disk operating functions (Load, Save, Utility[Format, Erase]) which allow the transfer of files to andfrom disk and other utility functions.
33. PLAY ALL SONGSIf a Song or MidiFile disk is inserted in the Disk drive, thisbutton triggers the playback of all the Songs or MidiFilesdirectly from disk, playing them back one after the otheras a medley.

○ ○ ○ ○ ○ ○ ○ ○ ○ ○ ○ ○ ○ ○ ○ ○ ○ ○ ○ ○ ○ ○
Front & Rear panel 2•9
○ ○ ○ ○ ○ ○ ○ ○ ○ ○ ○ ○ ○ ○ ○ ○ ○ ○ ○ ○ ○ ○ ○ ○ ○
Rear Panel
COMPUTER THRU OUT IN PEDALS VOLUME RIGHT MONO LEFT RIGHT MONO LEFT
MIDI
INPUT OUTPUT
RGB S–VHS MIC LINE IN GAIN
VIDEO
RGB S–VHS MIC LINE IN GAIN COMPUTER THRU OUT IN PEDALS VOLUME RIGHT MONO LEFT RIGHT MONO LEFT
VIDEO MIDI
INPUT OUTPUT
1 3 4 5 62
COMPUTER THRU OUT IN PEDALS VOLUME RIGHT MONO LEFT RIGHT MONO LEFT SPEAKERS
MIDI
INPUT OUTPUT
RGB S–VHS MIC LINE IN GAIN
VIDEO
COMPUTER THRU OUT IN PEDALS VOLUME RIGHT MONO LEFT RIGHT MONO LEFT SPEAKERS
MIDI
INPUT OUTPUT
RGB S–VHS MIC LINE IN GAIN
VIDEO
1 32
Rear Panel (model with Speakers box)
4 5 6 7
○ ○ ○ ○ ○ ○ ○ ○ ○ ○ ○ ○ ○ ○ ○ ○ ○ ○ ○ ○ ○ ○
2•10 User Guide
○ ○ ○ ○ ○ ○ ○ ○ ○ ○ ○ ○ ○ ○ ○ ○ ○ ○ ○ ○ ○ ○ ○ ○ ○
Rear Panel (Connections)
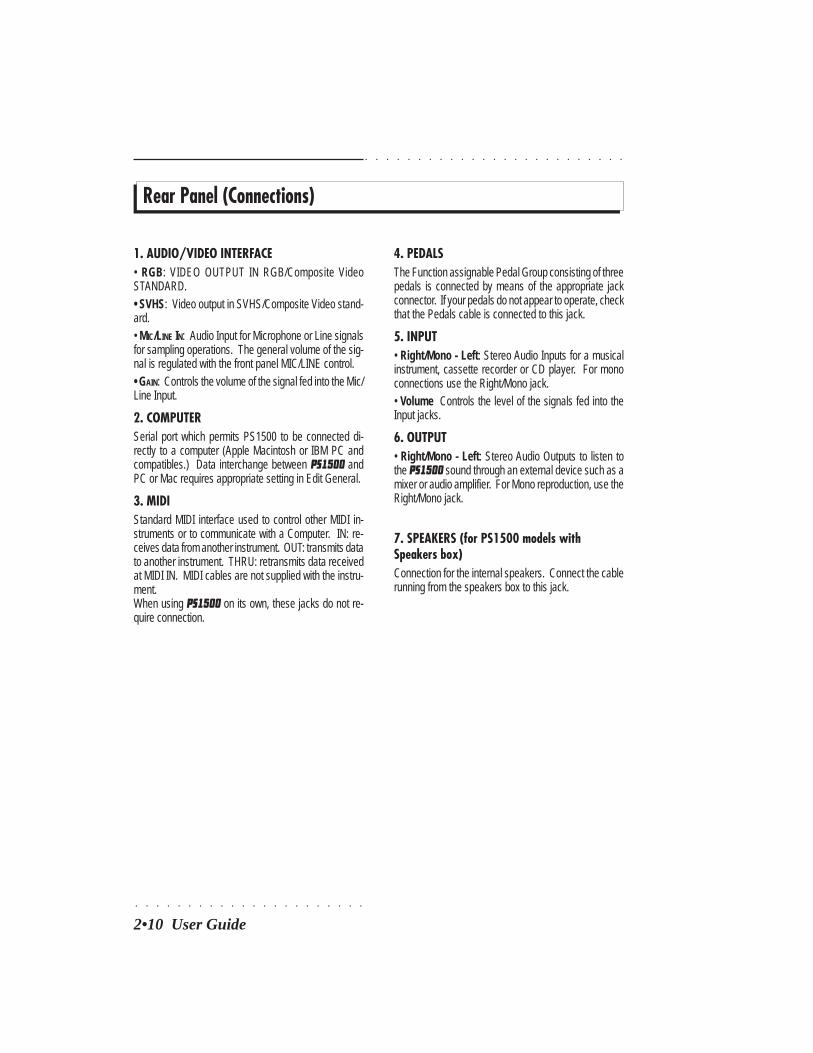
1. AUDIO/VIDEO INTERFACE• RGB: VIDEO OUTPUT IN RGB/Composite VideoSTANDARD.• SVHS: Video output in SVHS/Composite Video stand-ard.• MIC/LINE IN: Audio Input for Microphone or Line signalsfor sampling operations. The general volume of the sig-nal is regulated with the front panel MIC/LINE control.• GAIN: Controls the volume of the signal fed into the Mic/Line Input.
2. COMPUTERSerial port which permits PS1500 to be connected di-rectly to a computer (Apple Macintosh or IBM PC andcompatibles.) Data interchange between PS1500 andPC or Mac requires appropriate setting in Edit General.
3. MIDIStandard MIDI interface used to control other MIDI in-struments or to communicate with a Computer. IN: re-ceives data from another instrument. OUT: transmits datato another instrument. THRU: retransmits data receivedat MIDI IN. MIDI cables are not supplied with the instru-ment.When using PS1500 on its own, these jacks do not re-quire connection.
4. PEDALSThe Function assignable Pedal Group consisting of threepedals is connected by means of the appropriate jackconnector. If your pedals do not appear to operate, checkthat the Pedals cable is connected to this jack.
5. INPUT• Right/Mono - Left: Stereo Audio Inputs for a musicalinstrument, cassette recorder or CD player. For monoconnections use the Right/Mono jack.• Volume Controls the level of the signals fed into theInput jacks.
6. OUTPUT• Right/Mono - Left: Stereo Audio Outputs to listen tothe PS1500 sound through an external device such as amixer or audio amplifier. For Mono reproduction, use theRight/Mono jack.
7. SPEAKERS (for PS1500 models withSpeakers box)Connection for the internal speakers. Connect the cablerunning from the speakers box to this jack.
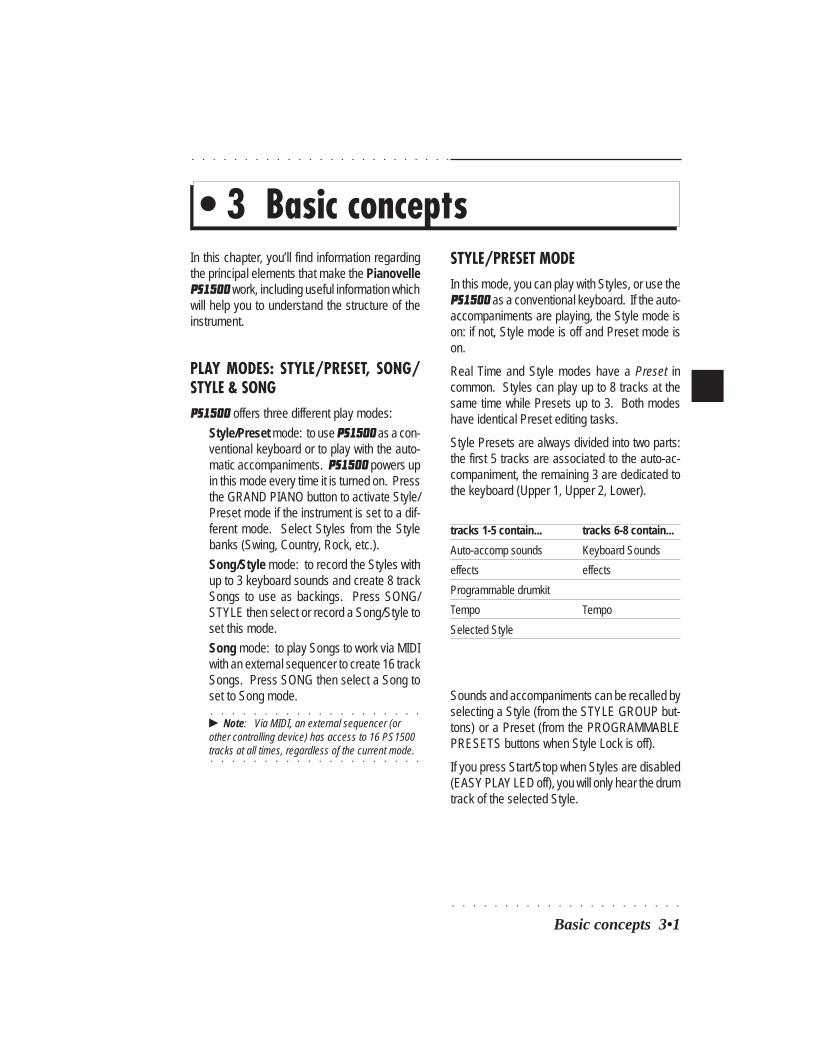
○ ○ ○ ○ ○ ○ ○ ○ ○ ○ ○ ○ ○ ○ ○ ○ ○ ○ ○ ○ ○ ○
Basic concepts 3•1
○ ○ ○ ○ ○ ○ ○ ○ ○ ○ ○ ○ ○ ○ ○ ○ ○ ○ ○ ○ ○ ○ ○ ○ ○
• 3 Basic conceptsIn this chapter, you’ll find information regardingthe principal elements that make the PianovellePS1500 work, including useful information whichwill help you to understand the structure of theinstrument.
PLAY MODES: STYLE/PRESET, SONG/STYLE & SONGPS1500 offers three different play modes:
Style/Preset mode: to use PS1500 as a con-ventional keyboard or to play with the auto-matic accompaniments. PS1500 powers upin this mode every time it is turned on. Pressthe GRAND PIANO button to activate Style/Preset mode if the instrument is set to a dif-ferent mode. Select Styles from the Stylebanks (Swing, Country, Rock, etc.).
Song/Style mode: to record the Styles withup to 3 keyboard sounds and create 8 trackSongs to use as backings. Press SONG/STYLE then select or record a Song/Style toset this mode.
Song mode: to play Songs to work via MIDIwith an external sequencer to create 16 trackSongs. Press SONG then select a Song toset to Song mode.
○ ○ ○ ○ ○ ○ ○ ○ ○ ○ ○ ○ ○ ○ ○ ○ ○ ○ ○ ○
© Note: Via MIDI, an external sequencer (orother controlling device) has access to 16 PS1500
○ ○ ○ ○ ○ ○ ○ ○ ○ ○ ○ ○ ○ ○ ○ ○ ○ ○ ○ ○
tracks at all times, regardless of the current mode.
STYLE/PRESET MODEIn this mode, you can play with Styles, or use thePS1500 as a conventional keyboard. If the auto-accompaniments are playing, the Style mode ison: if not, Style mode is off and Preset mode ison.
Real Time and Style modes have a Preset incommon. Styles can play up to 8 tracks at thesame time while Presets up to 3. Both modeshave identical Preset editing tasks.
Style Presets are always divided into two parts:the first 5 tracks are associated to the auto-ac-companiment, the remaining 3 are dedicated tothe keyboard (Upper 1, Upper 2, Lower).
tracks 1-5 contain... tracks 6-8 contain...
Auto-accomp sounds Keyboard Sounds
effects effects
Programmable drumkit
Tempo Tempo
Selected Style
Sounds and accompaniments can be recalled byselecting a Style (from the STYLE GROUP but-tons) or a Preset (from the PROGRAMMABLEPRESETS buttons when Style Lock is off).
If you press Start/Stop when Styles are disabled(EASY PLAY LED off), you will only hear the drumtrack of the selected Style.
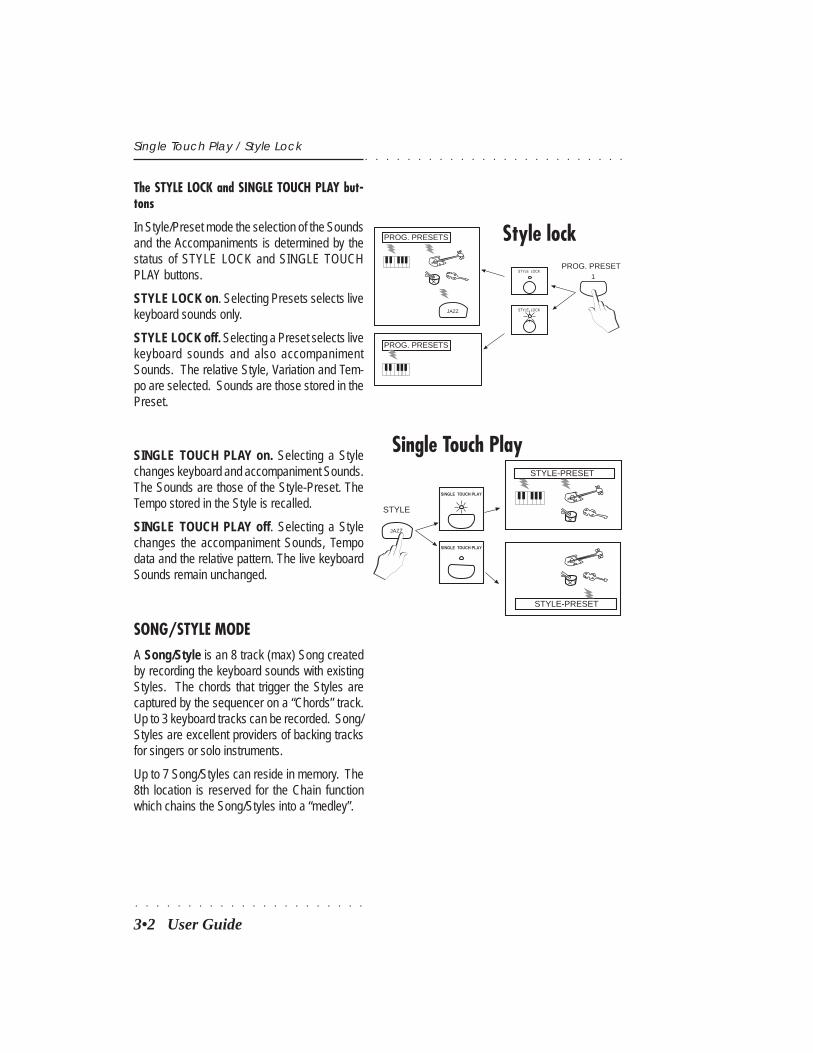
○ ○ ○ ○ ○ ○ ○ ○ ○ ○ ○ ○ ○ ○ ○ ○ ○ ○ ○ ○ ○ ○
3•2 User Guide
○ ○ ○ ○ ○ ○ ○ ○ ○ ○ ○ ○ ○ ○ ○ ○ ○ ○ ○ ○ ○ ○ ○ ○ ○
The STYLE LOCK and SINGLE TOUCH PLAY but-tons
In Style/Preset mode the selection of the Soundsand the Accompaniments is determined by thestatus of STYLE LOCK and SINGLE TOUCHPLAY buttons.
STYLE LOCK on. Selecting Presets selects livekeyboard sounds only.
STYLE LOCK off. Selecting a Preset selects livekeyboard sounds and also accompanimentSounds. The relative Style, Variation and Tem-po are selected. Sounds are those stored in thePreset.
SINGLE TOUCH PLAY on. Selecting a Stylechanges keyboard and accompaniment Sounds.The Sounds are those of the Style-Preset. TheTempo stored in the Style is recalled.
SINGLE TOUCH PLAY off. Selecting a Stylechanges the accompaniment Sounds, Tempodata and the relative pattern. The live keyboardSounds remain unchanged.
SONG/STYLE MODEA Song/Style is an 8 track (max) Song createdby recording the keyboard sounds with existingStyles. The chords that trigger the Styles arecaptured by the sequencer on a “Chords” track.Up to 3 keyboard tracks can be recorded. Song/Styles are excellent providers of backing tracksfor singers or solo instruments.
Up to 7 Song/Styles can reside in memory. The8th location is reserved for the Chain functionwhich chains the Song/Styles into a “medley”.
Single Touch Play / Style Lock
PROG. PRESETS
PROG. PRESET
PROG. PRESETS
1
JAZZ
STYLE LOCK
STYLE LOCK
Style lock
STYLE-PRESET
STYLE-PRESET
STYLE
JAZZ
SINGLE TOUCH PLAY
SINGLE TOUCH PLAY
Single Touch Play
○ ○ ○ ○ ○ ○ ○ ○ ○ ○ ○ ○ ○ ○ ○ ○ ○ ○ ○ ○ ○ ○
Basic concepts 3•3
○ ○ ○ ○ ○ ○ ○ ○ ○ ○ ○ ○ ○ ○ ○ ○ ○ ○ ○ ○ ○ ○ ○ ○ ○
SONG MODEA Song is sequenced data consisting of one ormore tracks (instrumental parts). A Song can beloaded from disk as a PS Song or as a StandardMIDI-file, and it can be recorded one track at atime (multitrack recording).
Up to 16 tracks are available in Song mode. ViaMIDI, PS1500 can be also used as a multitim-bral (16 parts) sound generator for Song record-ing with an external sequencer, regardless of thecurrent play mode.
Up to 7 Songs can be stored in the PS1500 songmemory. The 8th memory location is reservedfor the Chain function which plays back all theSongs in memory as a medley.
PRESETSA Preset is a combination of sounds (for the key-board, for the accompaniments, for a Song/Styleor Song). It also contains the status of the ef-fects, the assignments of the controlling devices(pedals, pads), MIDI channel configuration, trackstatus, Tempo data and the current status of thepanel buttons. Selecting a Preset instantly chang-es all the sounds of the tracks and the relativepreset settings.
Presets are divided into three types: the Grand-Piano preset, a “single” non-programmable ele-ment, those residing in the PROGRAMMABLEPRESETS which govern the keyboard soundsand those associated to the Styles, Song/Stylesand Songs which are recalled by selecting therespective element. With exception of the Grand-Piano Preset, the structure and programmingprocedures of all are practically identical.
Modes/Presets
Grand Piano preset
The Grand Piano preset, recalled every time youturn PS1500 on, sets the instrument to play as aconventional piano, with the Grand Piano soundactive across the full keyboard (assigned to Up-per 1). In addition, the Upper 2 keyboard sectionis turned off and the Lower section is disabled.The Grand Piano Preset recalls factory settingsfor the Reverb effect, Volume and Pan and a pre-set panel situation.
Whatever modifications are applied to the GrandPiano preset (reverb effect change, volumechange, different sound assignment, etc.) can-not be stored to the Grand Piano Preset, but tothe Programmable Presets with the STORE PRE-SET function.
If PS1500 is set to Style/Preset mode, selectingthe Grand Piano Preset cancels the current pre-set and substitutes it with Grand Piano. Upper 2turns off and the Lower section is disabled.
If PS1500 is set to Song or Song/Style mode,recalling the Grand Piano Preset escapes the cur-rent mode and returns the instrument to Style/Preset mode with Grand Piano active to play onthe Upper 1 section in Full mode.
Programmable Presets (Real Time)
64 user-programmable Presets are stored in theeight PROGRAMMABLE PRESETS banks 32 ofwhich are factory-programmed. Presets recallprogrammed combinations of the keyboardsounds (maximum 3), memorized panel settingsand also change the keyboard mode (full or split).
Given that the Presets store the current Style,Variation and Tempo at the moment of activatingthe STORE PRESET command, the Presets canalso be utilized to recall a Style and a Variation.User-programmed Style Presets can be memo-rized to the Presets.
○ ○ ○ ○ ○ ○ ○ ○ ○ ○ ○ ○ ○ ○ ○ ○ ○ ○ ○ ○ ○ ○
3•4 User Guide
○ ○ ○ ○ ○ ○ ○ ○ ○ ○ ○ ○ ○ ○ ○ ○ ○ ○ ○ ○ ○ ○ ○ ○ ○
Style Preset
112 Presets associated to the Styles and UserStyles and stored in the STYLE GROUPS (Style/Song Groups section: Swing, Country, Rock, etc.,User 1-8, User 9-16). Style-Presets assignsounds to the auto-accompaniments and key-board that suit the Style to which they are asso-ciated. If the SINGLE TOUCH PLAY LED is on,the keyboard Sounds can be changed. The UserStyles are progammable.
Song/Style Preset
8 Presets associated to the Song/Styles andstored in the SONG/STYLE GROUP (Style/SongGroups). Song/Style Presets assign sounds tothe auto-accompaniments and keyboard and re-call the chords that trigger the auto-accompani-ments.
For editing purposes, Song/Style Presets can-not be accessed from the PROGRAMMABLEPRESETS; they are accessed by pressing thePRESET button in the EDIT section. A modifiedSong/Style Preset can be saved to any of the 7Song/Style slots available in memory.
Song Preset
Song-Presets can combine up to 16 sounds.They can be applied to two types of operatingmode: the assignment of a sound to each trackof the sequencer, or the reception via MIDI of 16different parts.
For editing purposes, Song Presets cannot beaccessed from the PROGRAMMABLE PRE-SETS; they are accessed by pressing the PRE-SET button in the EDIT section. A modified SongPreset can be saved to any of the 7 Song slotsavailable in memory.
The Presets via MIDI?.........Via MIDI, the Programmable Presets are a sourceof 16 Sounds, regardless of the status of the in-strument. The Grand Piano Preset, however,cannot be selected via MIDI and does not trans-mit MIDI data. You can, however, save the GrandPiano Preset situation to a Programmable Pre-set then select the Preset via MIDI.
Whenever you enter «Edit Preset», you will al-ways have access to 16 tracks. If you are pro-gramming PS1500 for Preset or Style modes, theconfiguration of tracks 9-16 does not influenceeither playing mode, but if you are programmingPS1500 for use as a multitimbral slave device,all 16 tracks are taken into consideration and theprogrammed configurations memorized to thePresets will be recalled as programmed. There-fore, you can program all 16 tracks of your Pre-sets, regardless of how you intend using them
Presets

○ ○ ○ ○ ○ ○ ○ ○ ○ ○ ○ ○ ○ ○ ○ ○ ○ ○ ○ ○ ○ ○
Basic concepts 3•5
○ ○ ○ ○ ○ ○ ○ ○ ○ ○ ○ ○ ○ ○ ○ ○ ○ ○ ○ ○ ○ ○ ○ ○ ○
when you play PS1500 as a stand-alone unit.
Selecting Sounds and Presets via MIDI is dis-cussed in a later chapter.
TRACKSA Track is the smallest part of a Preset. Pro-grammable Presets have up to 3 tracks (for thekeyboard), Style-Presets have a maximum of 8tracks (3 tracks for the keyboard and 5 engagedby the sequencer for the accompaniments). ASong-Preset can contain up to 16 tracks.
A Preset is a configuration of several tracks, sothat different Sounds can be combined to play atthe same time. In Style/Preset and Song/Stylemodes, the Sound names of the keyboard tracksappear in the main display. In Song mode, theSounds of all the tracks appear in the form of aProgramChange number. Sometimes, a track isnot assigned to a PS Sound, but it controls anexpander connected to the MIDI OUT. In thiscase, the relative ProgramChange is shown onthe main display.
In the first page of «Edit Preset», it is possible tosee the sounds assigned to all the tracks of thecurrent Preset in the form of a ProgramChangenumber. For the selected track, the correspond-ing Sound name and Bank number is also shownon the top line of the display. The Tracks areshown from 01-08 and from 09-16. The TrackSelect button in the 16 Track Recording Studiosection allows you to switch from the track set01-08 to 09-16.
Most of the operating modes display the trackswhich can be selected and can be programmedfor Sound assignments, a transposition, an effectselection or a performance control.
The status of the keyboard tracks (active or mute)can be changed by intervening directly on thecorresponding keyboard activators (Upper 1, Up-per 2 and Lower), or Function buttons F8, F7 and
Tracks/Sounds
F4/F5 respectively. The active/mute status of allother tracks (Styles, Song/Style and Songs) ischanged by direct intervention on the correspond-ing track buttons of the sequencer.
SOUNDSPS1500 Sounds are divided in four differenttypes:
• ROM-Sounds• E-Sounds (edited ROM-Sounds)• Drumkits• Samples
Rom-Sound
Sounds contained in ROM. These sounds arepermanent and cannot be cancelled. They arebased on the internal samples archive (ROM-Waves)
E-Sound
E-Sounds are created by modifying ROM-Soundsor by loading the data from disk (loading Presetscontaining E-Sounds). A Preset can store up to8 E-Sounds and it can be programmed to recallE-Sounds or the original sounds.
Drumkit
Drumkits assign a different percussive sound toeach note of the keyboard.
A Preset can store up to 4 modified percussivesounds of a Drumkit. PS1500 contains 16 Drum-kits memorized in Banks 2 and 3 of the Percus-sive Sound Groups.
Samples
The PS1500 on-board sampler can capture aSample which is stored in location 8 of the Sam-ple-RAM.
PS1500 Sample kits are also available to load
○ ○ ○ ○ ○ ○ ○ ○ ○ ○ ○ ○ ○ ○ ○ ○ ○ ○ ○ ○ ○ ○
3•6 User Guide
○ ○ ○ ○ ○ ○ ○ ○ ○ ○ ○ ○ ○ ○ ○ ○ ○ ○ ○ ○ ○ ○ ○ ○ ○
PCM Samples to the first 6 locations of the Sam-ple-Ram (in replacement of an eventual sampleoccupying location 8).
Location 7 can accept PCM Samples originatingfrom CD Series instruments.
EDIT MODESPS1500 offers several Edit modes to modify var-ious aspects of the instrument. Each mode con-sists of a set of parameters spread across sever-al edit pages.
The Edit Modes are:
• Edit Preset (program changes, track trans-pose and tunings and pedal assignments,etc.);
• Edit MIDI (MIDI channel settings, Commonchannel, Local off, General MIDI compatibil-ity, etc.);
• Edit Mixer (track levels, pan settings);
• Edit Sound (macro edit of sound and drumkitparameters);
• Edit General (parameters the affect the in-strument as a whole);
• Edit Effects (parameters that modify the Re-verb and Effects units of the Digital Effectsprocessor);
• Edit Samples/Pads (Sample editing and Padassignment functions);
• Edit Song (editing functions for User Style,Song/Style and Song recordings);
Edit modes
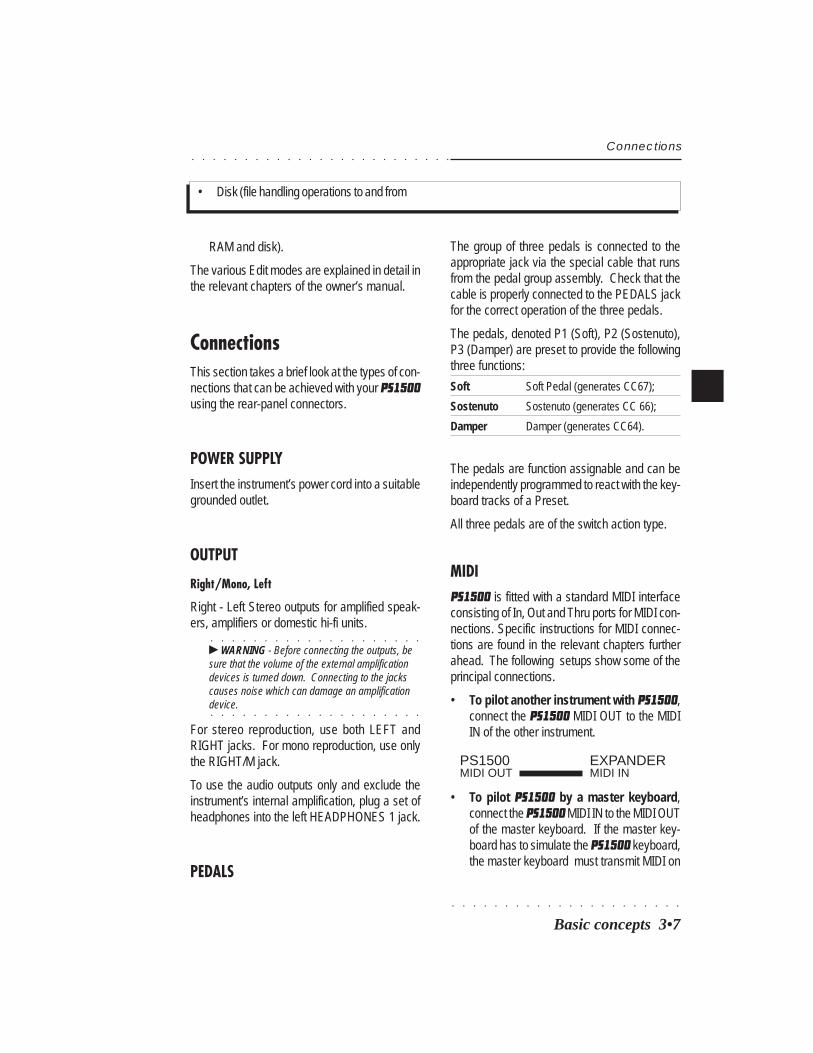
○ ○ ○ ○ ○ ○ ○ ○ ○ ○ ○ ○ ○ ○ ○ ○ ○ ○ ○ ○ ○ ○
Basic concepts 3•7
○ ○ ○ ○ ○ ○ ○ ○ ○ ○ ○ ○ ○ ○ ○ ○ ○ ○ ○ ○ ○ ○ ○ ○ ○
• Disk (file handling operations to and from
Connections
RAM and disk).
The various Edit modes are explained in detail inthe relevant chapters of the owner’s manual.
ConnectionsThis section takes a brief look at the types of con-nections that can be achieved with your PS1500using the rear-panel connectors.
POWER SUPPLYInsert the instrument’s power cord into a suitablegrounded outlet.
OUTPUT
Right/Mono, Left
Right - Left Stereo outputs for amplified speak-ers, amplifiers or domestic hi-fi units.
○ ○ ○ ○ ○ ○ ○ ○ ○ ○ ○ ○ ○ ○ ○ ○ ○ ○ ○ ○
© WARNING - Before connecting the outputs, besure that the volume of the external amplificationdevices is turned down. Connecting to the jackscauses noise which can damage an amplification
○ ○ ○ ○ ○ ○ ○ ○ ○ ○ ○ ○ ○ ○ ○ ○ ○ ○ ○ ○
device.
For stereo reproduction, use both LEFT andRIGHT jacks. For mono reproduction, use onlythe RIGHT/M jack.
To use the audio outputs only and exclude theinstrument’s internal amplification, plug a set ofheadphones into the left HEADPHONES 1 jack.
PEDALS
The group of three pedals is connected to theappropriate jack via the special cable that runsfrom the pedal group assembly. Check that thecable is properly connected to the PEDALS jackfor the correct operation of the three pedals.
The pedals, denoted P1 (Soft), P2 (Sostenuto),P3 (Damper) are preset to provide the followingthree functions:
Soft Soft Pedal (generates CC67);
Sostenuto Sostenuto (generates CC 66);
Damper Damper (generates CC64).
The pedals are function assignable and can beindependently programmed to react with the key-board tracks of a Preset.
All three pedals are of the switch action type.
MIDIPS1500 is fitted with a standard MIDI interfaceconsisting of In, Out and Thru ports for MIDI con-nections. Specific instructions for MIDI connec-tions are found in the relevant chapters furtherahead. The following setups show some of theprincipal connections.
• To pilot another instrument with PS1500,connect the PS1500 MIDI OUT to the MIDIIN of the other instrument.
PS1500MIDI OUT
EXPANDERMIDI IN
• To pilot PS1500 by a master keyboard,connect the PS1500 MIDI IN to the MIDI OUTof the master keyboard. If the master key-board has to simulate the PS1500 keyboard,the master keyboard must transmit MIDI on
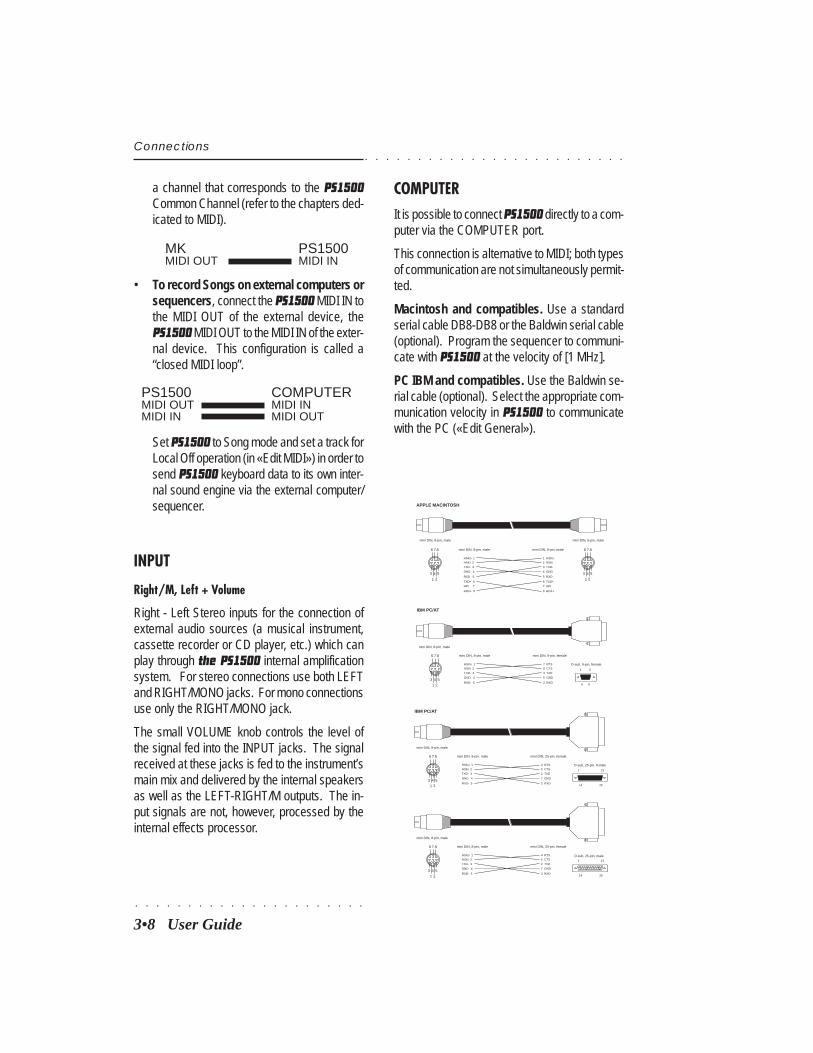
○ ○ ○ ○ ○ ○ ○ ○ ○ ○ ○ ○ ○ ○ ○ ○ ○ ○ ○ ○ ○ ○
3•8 User Guide
○ ○ ○ ○ ○ ○ ○ ○ ○ ○ ○ ○ ○ ○ ○ ○ ○ ○ ○ ○ ○ ○ ○ ○ ○
a channel that corresponds to the PS1500Common Channel (refer to the chapters ded-icated to MIDI).
MKMIDI OUT
PS1500MIDI IN
• To record Songs on external computers orsequencers, connect the PS1500 MIDI IN tothe MIDI OUT of the external device, thePS1500 MIDI OUT to the MIDI IN of the exter-nal device. This configuration is called a“closed MIDI loop”.
PS1500MIDI OUTMIDI IN
COMPUTERMIDI INMIDI OUT
Set PS1500 to Song mode and set a track forLocal Off operation (in «Edit MIDI») in order tosend PS1500 keyboard data to its own inter-nal sound engine via the external computer/sequencer.
INPUT
Right/M, Left + Volume
Right - Left Stereo inputs for the connection ofexternal audio sources (a musical instrument,cassette recorder or CD player, etc.) which canplay through the PS1500 internal amplificationsystem. For stereo connections use both LEFTand RIGHT/MONO jacks. For mono connectionsuse only the RIGHT/MONO jack.
The small VOLUME knob controls the level ofthe signal fed into the INPUT jacks. The signalreceived at these jacks is fed to the instrument’smain mix and delivered by the internal speakersas well as the LEFT-RIGHT/M outputs. The in-put signals are not, however, processed by theinternal effects processor.
COMPUTERIt is possible to connect PS1500 directly to a com-puter via the COMPUTER port.
This connection is alternative to MIDI; both typesof communication are not simultaneously permit-ted.
Macintosh and compatibles. Use a standardserial cable DB8-DB8 or the Baldwin serial cable(optional). Program the sequencer to communi-cate with PS1500 at the velocity of [1 MHz].
PC IBM and compatibles. Use the Baldwin se-rial cable (optional). Select the appropriate com-munication velocity in PS1500 to communicatewith the PC («Edit General»).
mini DIN, 8-pin, male
6 7 8
3 4 5
1 2
6 7 8
3 4 5
1 2
mini DIN, 8-pin, male
mini DIN, 8-pin, male mini DIN, 8-pin, male
HSKo 1HSKi 2
TXD- 3
GND 4
RXD- 5
TXD+ 6
GPi 7
RDX+ 8
1 HSKo2 HSKi
3 TXD-
4 GND
5 RXD-
6 TXD+
7 GPi
8 RDX+
APPLE MACINTOSH
mini DIN, 8-pin, male
6 7 8
3 4 5
1 2
D-sub, 9-pin, female
mini DIN, 8-pin, male mini DIN, 9-pin, female
HSKo 1HSKi 2
TXD- 3
GND 4
RXD- 5
7 RTS8 CTS
3 TXD
5 GND
2 RXD
1 5
6 9
IBM PC/AT
mini DIN, 8-pin, male
6 7 8
3 4 5
1 2
D-sub, 25-pin, female
mini DIN, 8-pin, male mini DIN, 25-pin, female
HSKo 1HSKi 2
TXD- 3
GND 4
RXD- 5
4 RTS5 CTS
2 TXD
7 GND
3 RXD
1 13
14 25
mini DIN, 8-pin, male
6 7 8
3 4 5
1 2
D-sub, 25-pin, male
mini DIN, 8-pin, male mini DIN, 25-pin, female
HSKo 1HSKi 2
TXD- 3
GND 4
RXD- 5
4 RTS5 CTS
2 TXD
7 GND
3 RXD
1 13
14 25
IBM PC/AT
Connections
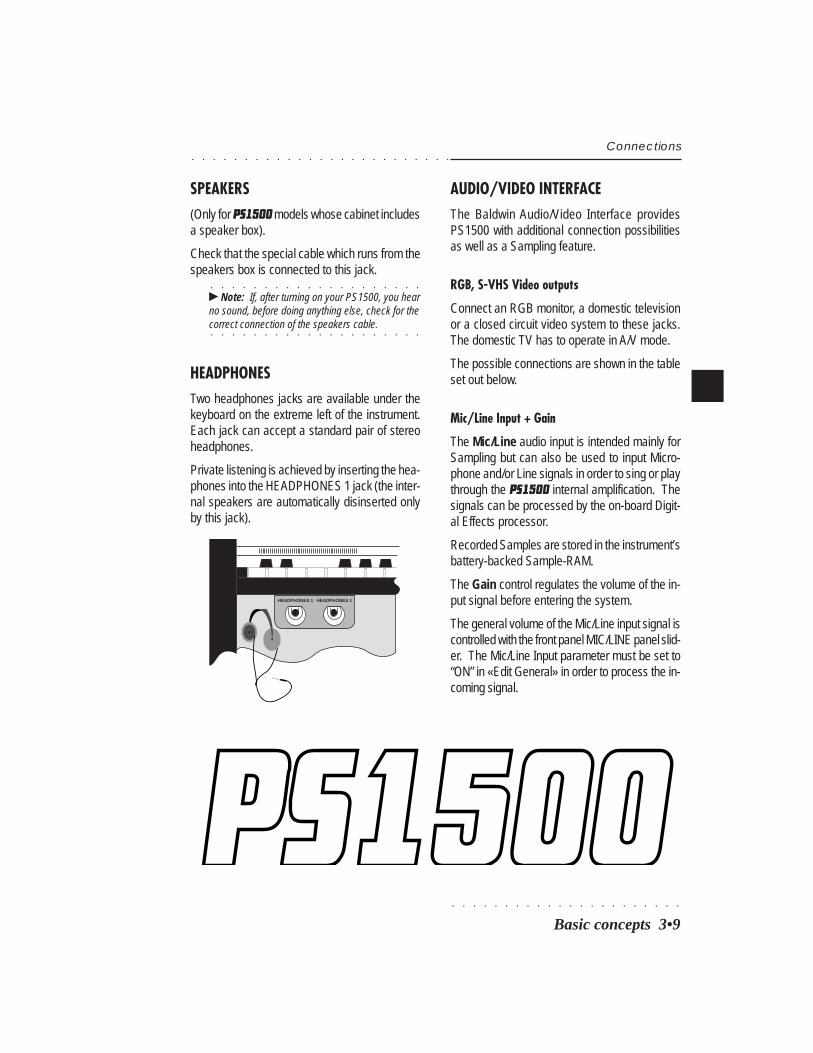
○ ○ ○ ○ ○ ○ ○ ○ ○ ○ ○ ○ ○ ○ ○ ○ ○ ○ ○ ○ ○ ○
Basic concepts 3•9
○ ○ ○ ○ ○ ○ ○ ○ ○ ○ ○ ○ ○ ○ ○ ○ ○ ○ ○ ○ ○ ○ ○ ○ ○
Connections
AUDIO/VIDEO INTERFACEThe Baldwin Audio/Video Interface providesPS1500 with additional connection possibilitiesas well as a Sampling feature.
RGB, S-VHS Video outputs
Connect an RGB monitor, a domestic televisionor a closed circuit video system to these jacks.The domestic TV has to operate in A/V mode.
The possible connections are shown in the tableset out below.
Mic/Line Input + Gain
The Mic/Line audio input is intended mainly forSampling but can also be used to input Micro-phone and/or Line signals in order to sing or playthrough the PS1500 internal amplification. Thesignals can be processed by the on-board Digit-al Effects processor.
Recorded Samples are stored in the instrument’sbattery-backed Sample-RAM.
The Gain control regulates the volume of the in-put signal before entering the system.
The general volume of the Mic/Line input signal iscontrolled with the front panel MIC/LINE panel slid-er. The Mic/Line Input parameter must be set to“ON” in «Edit General» in order to process the in-coming signal.
SPEAKERS(Only for PS1500 models whose cabinet includesa speaker box).
Check that the special cable which runs from thespeakers box is connected to this jack.
○ ○ ○ ○ ○ ○ ○ ○ ○ ○ ○ ○ ○ ○ ○ ○ ○ ○ ○ ○
© Note: If, after turning on your PS1500, you hearno sound, before doing anything else, check for the
○ ○ ○ ○ ○ ○ ○ ○ ○ ○ ○ ○ ○ ○ ○ ○ ○ ○ ○ ○
correct connection of the speakers cable.
HEADPHONESTwo headphones jacks are available under thekeyboard on the extreme left of the instrument.Each jack can accept a standard pair of stereoheadphones.
Private listening is achieved by inserting the hea-phones into the HEADPHONES 1 jack (the inter-nal speakers are automatically disinserted onlyby this jack).
HEADPHONES 1 HEADPHONES 1
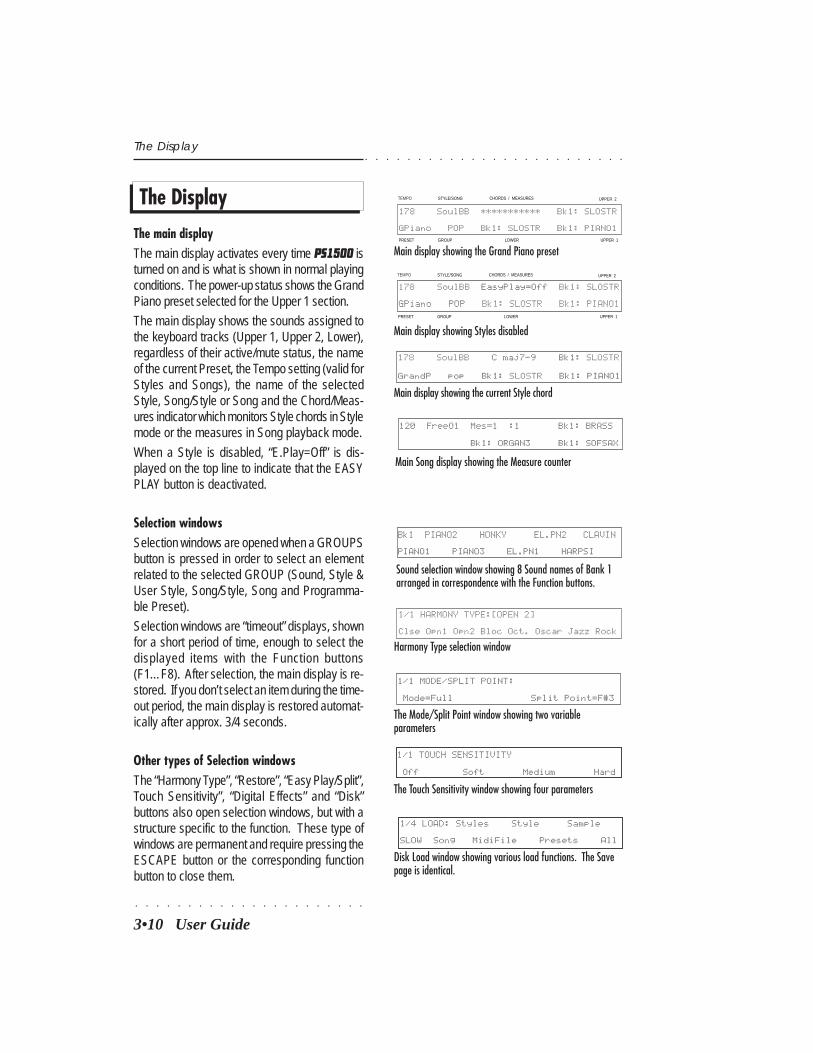
○ ○ ○ ○ ○ ○ ○ ○ ○ ○ ○ ○ ○ ○ ○ ○ ○ ○ ○ ○ ○ ○
3•10 User Guide
○ ○ ○ ○ ○ ○ ○ ○ ○ ○ ○ ○ ○ ○ ○ ○ ○ ○ ○ ○ ○ ○ ○ ○ ○
The Display
The main displayThe main display activates every time PS1500 isturned on and is what is shown in normal playingconditions. The power-up status shows the GrandPiano preset selected for the Upper 1 section.
The main display shows the sounds assigned tothe keyboard tracks (Upper 1, Upper 2, Lower),regardless of their active/mute status, the nameof the current Preset, the Tempo setting (valid forStyles and Songs), the name of the selectedStyle, Song/Style or Song and the Chord/Meas-ures indicator which monitors Style chords in Stylemode or the measures in Song playback mode.
When a Style is disabled, “E.Play=Off” is dis-played on the top line to indicate that the EASYPLAY button is deactivated.
Selection windowsSelection windows are opened when a GROUPSbutton is pressed in order to select an elementrelated to the selected GROUP (Sound, Style &User Style, Song/Style, Song and Programma-ble Preset).
Selection windows are “timeout” displays, shownfor a short period of time, enough to select thedisplayed items with the Function buttons(F1…F8). After selection, the main display is re-stored. If you don’t select an item during the time-out period, the main display is restored automat-ically after approx. 3/4 seconds.
Other types of Selection windowsThe “Harmony Type”, “Restore”, “Easy Play/Split”,Touch Sensitivity”, “Digital Effects” and “Disk”buttons also open selection windows, but with astructure specific to the function. These type ofwindows are permanent and require pressing theESCAPE button or the corresponding functionbutton to close them.
The Display
Disk Load window showing various load functions. The Savepage is identical.
1/4 LOAD: Styles Style Sample
SLOW Song MidiFile Presets All
Sound selection window showing 8 Sound names of Bank 1arranged in correspondence with the Function buttons.
Bk1 PIANO2 HONKY EL.PN2 CLAVIN
PIANO1 PIANO3 EL.PN1 HARPSI
Harmony Type selection window
1/1 HARMONY TYPE:[OPEN 2]
Clse Opn1 Opn2 Bloc Oct. Oscar Jazz Rock
The Mode/Split Point window showing two variableparameters
1/1 MODE/SPLIT POINT:
Mode=Full Split Point=F#3
Main display showing Styles disabled
Main display showing the current Style chord
178 SoulBB C maj7-9 Bk1: SLOSTR
GrandP pop Bk1: SLOSTR Bk1: PIANO1
120 FreeO1 Mes=1 :1 Bk1: BRASS
Bk1: ORGAN3 Bk1: SOFSAX
Main Song display showing the Measure counter
TEMPO
PRESET
CHORDS / MEASURES
LOWER UPPER 1
UPPER 2STYLE/SONG
178 SoulBB EasyPlay=Off Bk1: SLOSTR
GPiano POP Bk1: SLOSTR Bk1: PIANO1GROUP
Main display showing the Grand Piano preset
TEMPO
PRESET
CHORDS / MEASURES
LOWER UPPER 1
UPPER 2STYLE/SONG
GROUP
178 SoulBB *********** Bk1: SLOSTR
GPiano POP Bk1: SLOSTR Bk1: PIANO1
The Touch Sensitivity window showing four parameters
1/1 TOUCH SENSITIVITY
Off Soft Medium Hard
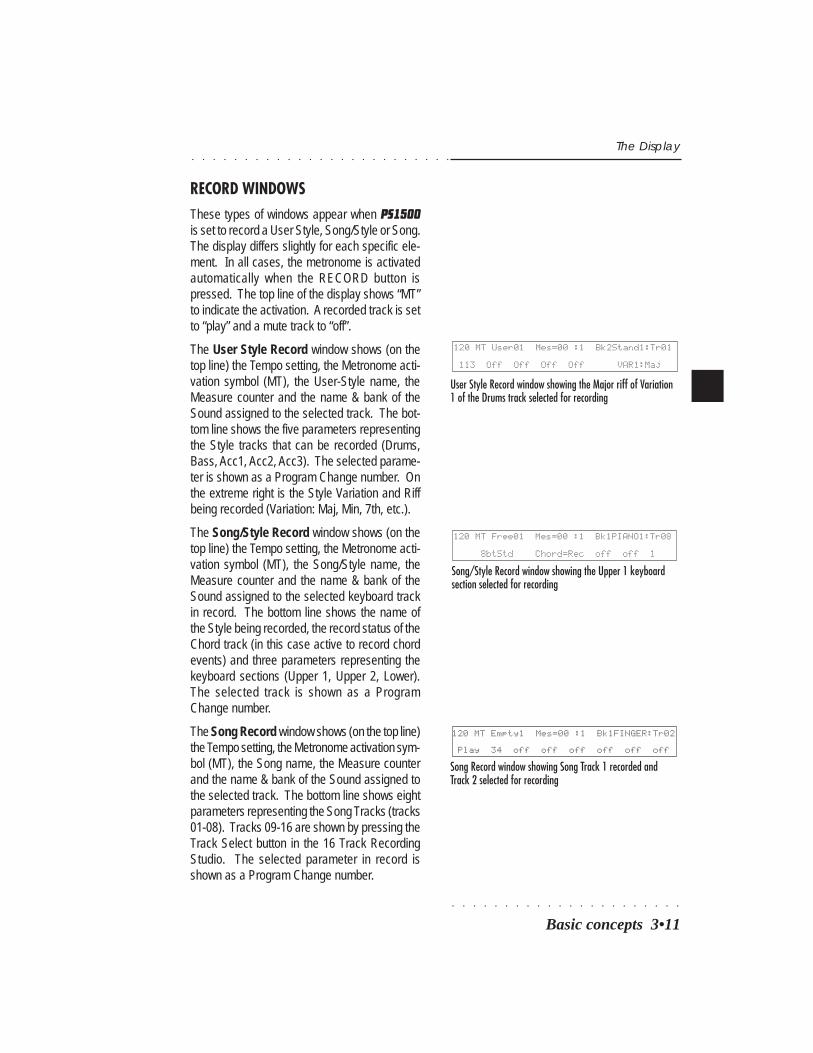
○ ○ ○ ○ ○ ○ ○ ○ ○ ○ ○ ○ ○ ○ ○ ○ ○ ○ ○ ○ ○ ○
Basic concepts 3•11
○ ○ ○ ○ ○ ○ ○ ○ ○ ○ ○ ○ ○ ○ ○ ○ ○ ○ ○ ○ ○ ○ ○ ○ ○
The Display
RECORD WINDOWSThese types of windows appear when PS1500is set to record a User Style, Song/Style or Song.The display differs slightly for each specific ele-ment. In all cases, the metronome is activatedautomatically when the RECORD button ispressed. The top line of the display shows “MT”to indicate the activation. A recorded track is setto “play” and a mute track to “off”.
The User Style Record window shows (on thetop line) the Tempo setting, the Metronome acti-vation symbol (MT), the User-Style name, theMeasure counter and the name & bank of theSound assigned to the selected track. The bot-tom line shows the five parameters representingthe Style tracks that can be recorded (Drums,Bass, Acc1, Acc2, Acc3). The selected parame-ter is shown as a Program Change number. Onthe extreme right is the Style Variation and Riffbeing recorded (Variation: Maj, Min, 7th, etc.).
The Song/Style Record window shows (on thetop line) the Tempo setting, the Metronome acti-vation symbol (MT), the Song/Style name, theMeasure counter and the name & bank of theSound assigned to the selected keyboard trackin record. The bottom line shows the name ofthe Style being recorded, the record status of theChord track (in this case active to record chordevents) and three parameters representing thekeyboard sections (Upper 1, Upper 2, Lower).The selected track is shown as a ProgramChange number.
The Song Record window shows (on the top line)the Tempo setting, the Metronome activation sym-bol (MT), the Song name, the Measure counterand the name & bank of the Sound assigned tothe selected track. The bottom line shows eightparameters representing the Song Tracks (tracks01-08). Tracks 09-16 are shown by pressing theTrack Select button in the 16 Track RecordingStudio. The selected parameter in record isshown as a Program Change number.
User Style Record window showing the Major riff of Variation1 of the Drums track selected for recording
120 MT User01 Mes=00 :1 Bk2Stand1:Tr01
113 Off Off Off Off VAR1:Maj
120 MT Free01 Mes=00 :1 Bk1PIANO1:Tr08
8btStd Chord=Rec off off 1
Song/Style Record window showing the Upper 1 keyboardsection selected for recording
120 MT Empty1 Mes=00 :1 Bk1FINGER:Tr02
Play 34 off off off off off off
Song Record window showing Song Track 1 recorded andTrack 2 selected for recording
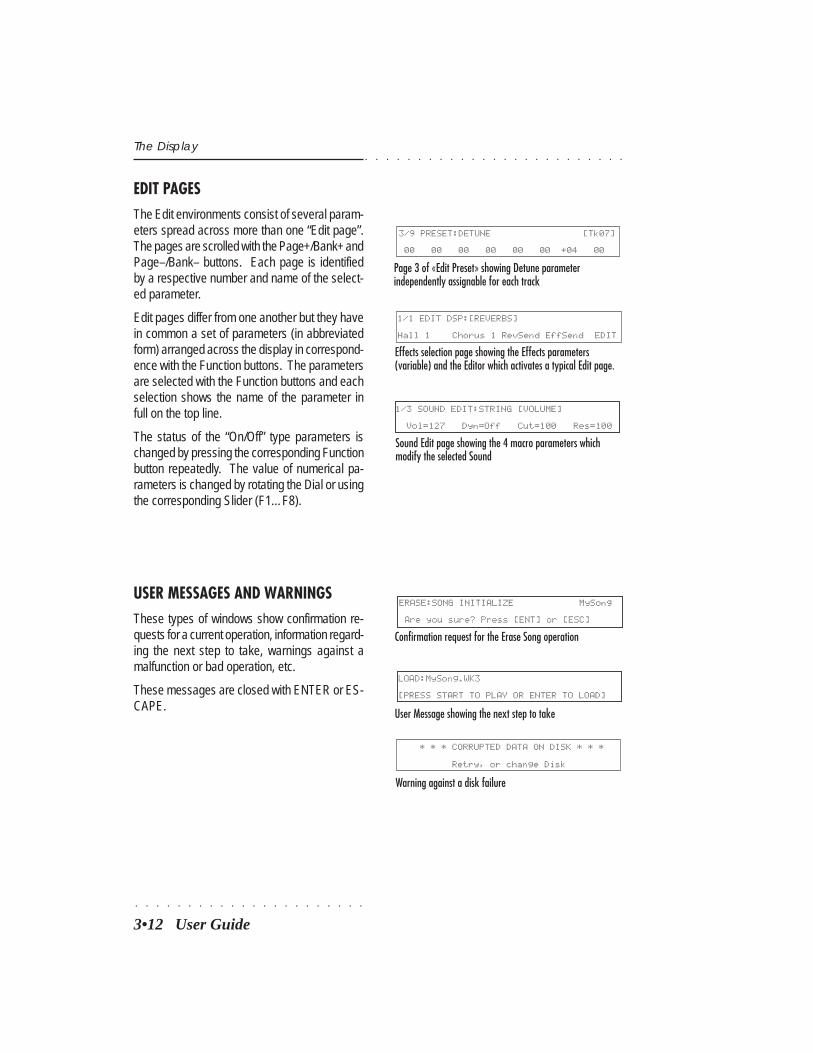
○ ○ ○ ○ ○ ○ ○ ○ ○ ○ ○ ○ ○ ○ ○ ○ ○ ○ ○ ○ ○ ○
3•12 User Guide
○ ○ ○ ○ ○ ○ ○ ○ ○ ○ ○ ○ ○ ○ ○ ○ ○ ○ ○ ○ ○ ○ ○ ○ ○
EDIT PAGESThe Edit environments consist of several param-eters spread across more than one “Edit page”.The pages are scrolled with the Page+/Bank+ andPage–/Bank– buttons. Each page is identifiedby a respective number and name of the select-ed parameter.
Edit pages differ from one another but they havein common a set of parameters (in abbreviatedform) arranged across the display in correspond-ence with the Function buttons. The parametersare selected with the Function buttons and eachselection shows the name of the parameter infull on the top line.
The status of the “On/Off” type parameters ischanged by pressing the corresponding Functionbutton repeatedly. The value of numerical pa-rameters is changed by rotating the Dial or usingthe corresponding Slider (F1…F8).
USER MESSAGES AND WARNINGSThese types of windows show confirmation re-quests for a current operation, information regard-ing the next step to take, warnings against amalfunction or bad operation, etc.
These messages are closed with ENTER or ES-CAPE.
The Display
3/9 PRESET:DETUNE [Tk07]
00 00 00 00 00 00 +04 00
Page 3 of «Edit Preset» showing Detune parameterindependently assignable for each track
1/1 EDIT DSP:[REVERBS]
Hall 1 Chorus 1 RevSend EffSend EDIT
Effects selection page showing the Effects parameters(variable) and the Editor which activates a typical Edit page.
1/3 SOUND EDIT:STRING [VOLUME]
Vol=127 Dyn=Off Cut=100 Res=100
Sound Edit page showing the 4 macro parameters whichmodify the selected Sound
Confirmation request for the Erase Song operation
User Message showing the next step to take
* * * CORRUPTED DATA ON DISK * * *
Retry, or change Disk
Warning against a disk failure
ERASE:SONG INITIALIZE MySong
Are you sure? Press [ENT] or [ESC]
LOAD:MySong.WK3
[PRESS START TO PLAY OR ENTER TO LOAD]
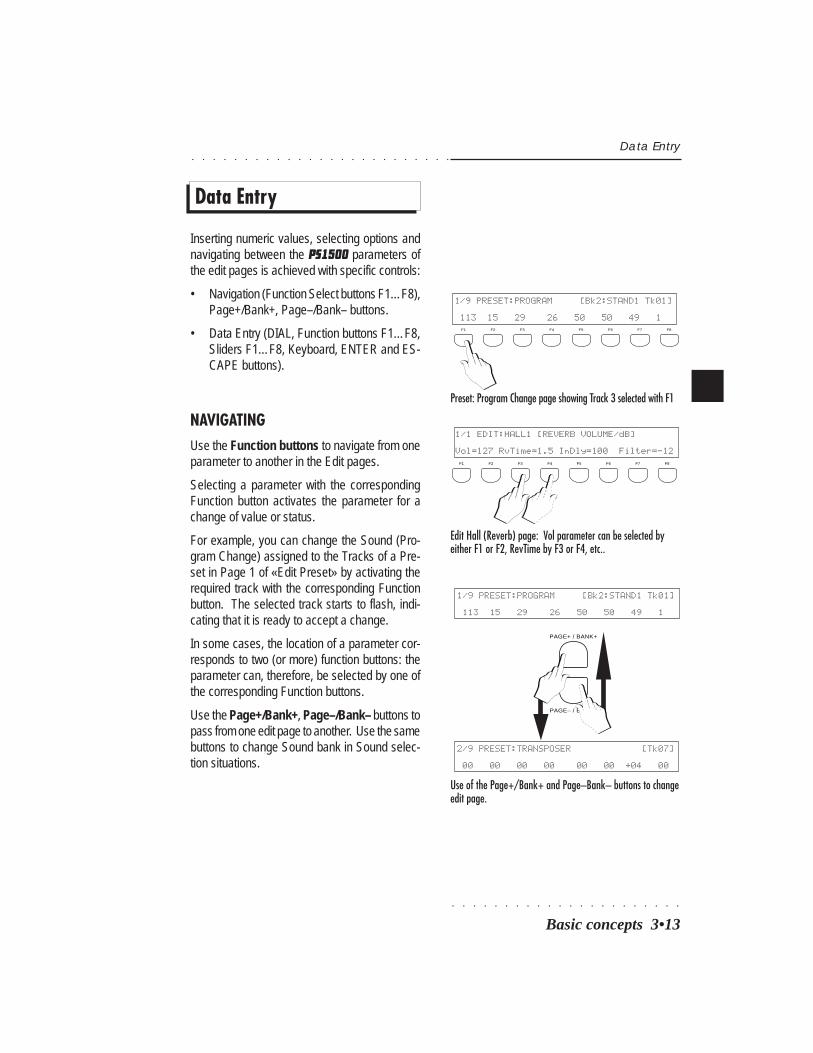
○ ○ ○ ○ ○ ○ ○ ○ ○ ○ ○ ○ ○ ○ ○ ○ ○ ○ ○ ○ ○ ○
Basic concepts 3•13
○ ○ ○ ○ ○ ○ ○ ○ ○ ○ ○ ○ ○ ○ ○ ○ ○ ○ ○ ○ ○ ○ ○ ○ ○
Data Entry
Inserting numeric values, selecting options andnavigating between the PS1500 parameters ofthe edit pages is achieved with specific controls:
• Navigation (Function Select buttons F1…F8),Page+/Bank+, Page–/Bank– buttons.
• Data Entry (DIAL, Function buttons F1…F8,Sliders F1…F8, Keyboard, ENTER and ES-CAPE buttons).
NAVIGATINGUse the Function buttons to navigate from oneparameter to another in the Edit pages.
Selecting a parameter with the correspondingFunction button activates the parameter for achange of value or status.
For example, you can change the Sound (Pro-gram Change) assigned to the Tracks of a Pre-set in Page 1 of «Edit Preset» by activating therequired track with the corresponding Functionbutton. The selected track starts to flash, indi-cating that it is ready to accept a change.
In some cases, the location of a parameter cor-responds to two (or more) function buttons: theparameter can, therefore, be selected by one ofthe corresponding Function buttons.
Use the Page+/Bank+, Page–/Bank– buttons topass from one edit page to another. Use the samebuttons to change Sound bank in Sound selec-tion situations.
Data Entry
F1 F2 F3 F4 F5 F6 F7 F8
1/9 PRESET:PROGRAM [Bk2:STAND1 Tk01]
113 15 29 26 50 50 49 1
Preset: Program Change page showing Track 3 selected with F1
1/1 EDIT:HALL1 [REVERB VOLUME/dB]
Vol=127 RvTime=1.5 InDly=100 Filter=-12F1 F2 F3 F4 F5 F6 F7 F8
Edit Hall (Reverb) page: Vol parameter can be selected byeither F1 or F2, RevTime by F3 or F4, etc..
1/9 PRESET:PROGRAM [Bk2:STAND1 Tk01]
113 15 29 26 50 50 49 1
2/9 PRESET:TRANSPOSER [Tk07]
00 00 00 00 00 00 +04 00
Use of the Page+/Bank+ and Page–Bank– buttons to changeedit page.
PAGE+ / BANK+
PAGE– / BANK–

○ ○ ○ ○ ○ ○ ○ ○ ○ ○ ○ ○ ○ ○ ○ ○ ○ ○ ○ ○ ○ ○
3•14 User Guide
○ ○ ○ ○ ○ ○ ○ ○ ○ ○ ○ ○ ○ ○ ○ ○ ○ ○ ○ ○ ○ ○ ○ ○ ○
MODIFYING THE PARAMETER VALUESThe value or status of a selected parameter canbe changed with the Dial. For On/Off situations,the corresponding Function button toggles be-tween the two states. In many situations, the Slid-ers F1…F8 can be used to change parametervalues without having to select the parameterbeforehand. In Edit situations, the bottom LEDindicator of the Sliders F1…F8 turns on to showsthat the Sliders are enabled as Data Entry devic-es.
Modifying parameters with the DIAL
Change the values of the selected parameter byrotating the DIAL. In normal playing conditions,the DIAL is active for real time Tempo changes,while in Edit situations, it enters data continually:clockwise rotation increases while counter-clock-wise rotation decreases.
Modifying On/Off parameters with the Functionbutton
If the parameter is an On/Off function, togglebetween the two states with the correspondingFunction button after selecting the parameter.
For example, the Local Off parameter setting ofthe tracks in the page shown opposite can betoggled between ON and OFF by pressing thecorresponding Function button repeatedly.
Modifying parameters with the Sliders
In most Edit situations, the Sliders F1…F8 acti-vate as data entry devices for the parameters thatcorrespond to the function buttons F1…F8.
In such cases, the Sliders intervene directly onthe corresponding parameter without having toselect the parameter beforehand.
Data Entry
1/2 MIDI CHANNEL: [CHANNEL] [Tk08]
10 02 03 04 05 06 07 08
MIDI: MIDI Channel page. Assign a different MIDI channel tothe selected track using the DIAL.
Edit General Pedal page: Pedal 1 functions selected with theDial
4/5 GENERAL: [PEDAL 1]
P1=Soft P2=Sosten P3=Damper
MAX
MIN
DRUMS
ACCOMPANIMENT
BASS ACCOMP.1 ACCOMP.2 ACCOMP. 3 LOWER UPPER 2 UPPER 1
F1 F2 F3 F4 F5 F6 F7 F8
2/2 MIXER:PAN [Tk08]
C=00 C=00 C=00 Mute L=24 C=00 R=31 C=00
1/1 MIDI:SECTION LOCAL (On/Off) [Tk08]
On On On On On On On OnF1 F2 F3 F4 F5 F6 F7 F8
MIDI: Section Local Off pageshowing On/Off parameters OffON
MIXER: Pan page. Use the sliders to change the pan settingswithout selecting the corresponding parameter
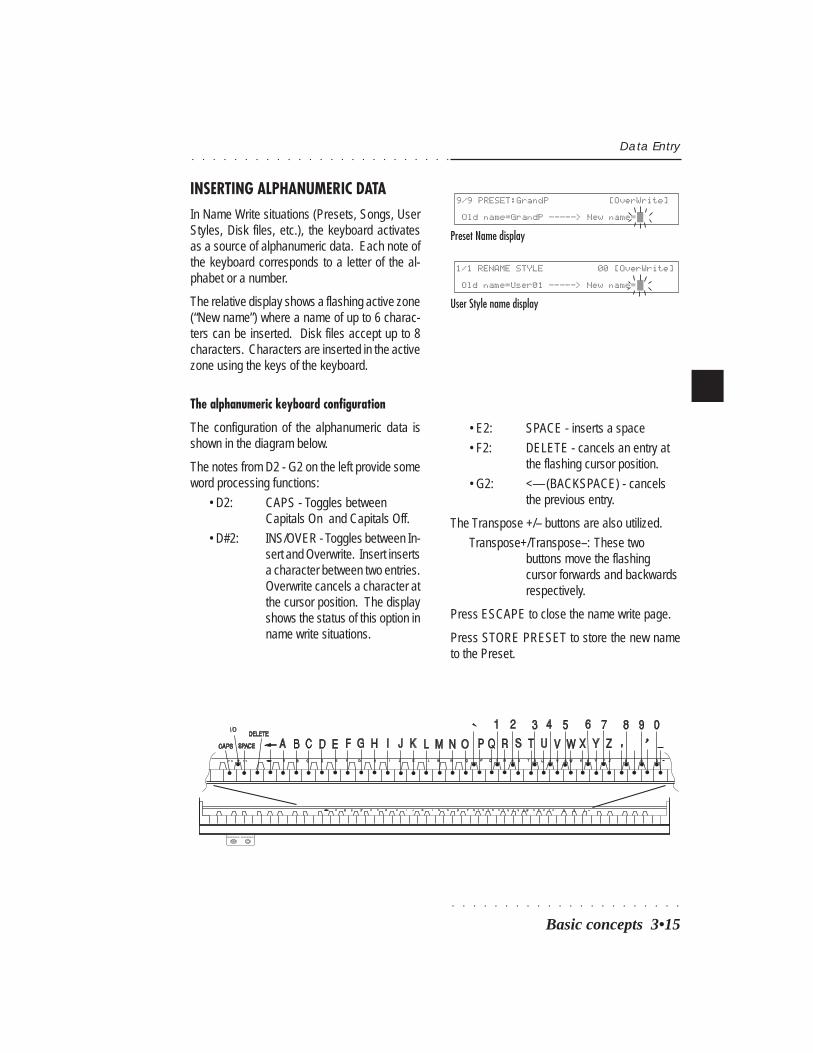
○ ○ ○ ○ ○ ○ ○ ○ ○ ○ ○ ○ ○ ○ ○ ○ ○ ○ ○ ○ ○ ○
Basic concepts 3•15
○ ○ ○ ○ ○ ○ ○ ○ ○ ○ ○ ○ ○ ○ ○ ○ ○ ○ ○ ○ ○ ○ ○ ○ ○
INSERTING ALPHANUMERIC DATAIn Name Write situations (Presets, Songs, UserStyles, Disk files, etc.), the keyboard activatesas a source of alphanumeric data. Each note ofthe keyboard corresponds to a letter of the al-phabet or a number.
The relative display shows a flashing active zone(“New name”) where a name of up to 6 charac-ters can be inserted. Disk files accept up to 8characters. Characters are inserted in the activezone using the keys of the keyboard.
The alphanumeric keyboard configuration
The configuration of the alphanumeric data isshown in the diagram below.
The notes from D2 - G2 on the left provide someword processing functions:
• D2: CAPS - Toggles betweenCapitals On and Capitals Off.
• D#2: INS/OVER - Toggles between In-sert and Overwrite. Insert insertsa character between two entries.Overwrite cancels a character atthe cursor position. The displayshows the status of this option inname write situations.
Data Entry
9/9 PRESET:GrandP [OverWrite]
Old name=GrandP -----> New name=
Preset Name display
1/1 RENAME STYLE 00 [OverWrite]
Old name=User01 -----> New name=
User Style name display
HEADPHONES 1 HEADPHONES 2
• E2: SPACE - inserts a space
• F2: DELETE - cancels an entry atthe flashing cursor position.
• G2: <— (BACKSPACE) - cancelsthe previous entry.
The Transpose +/– buttons are also utilized.
Transpose+/Transpose–: These twobuttons move the flashingcursor forwards and backwardsrespectively.
Press ESCAPE to close the name write page.
Press STORE PRESET to store the new nameto the Preset.
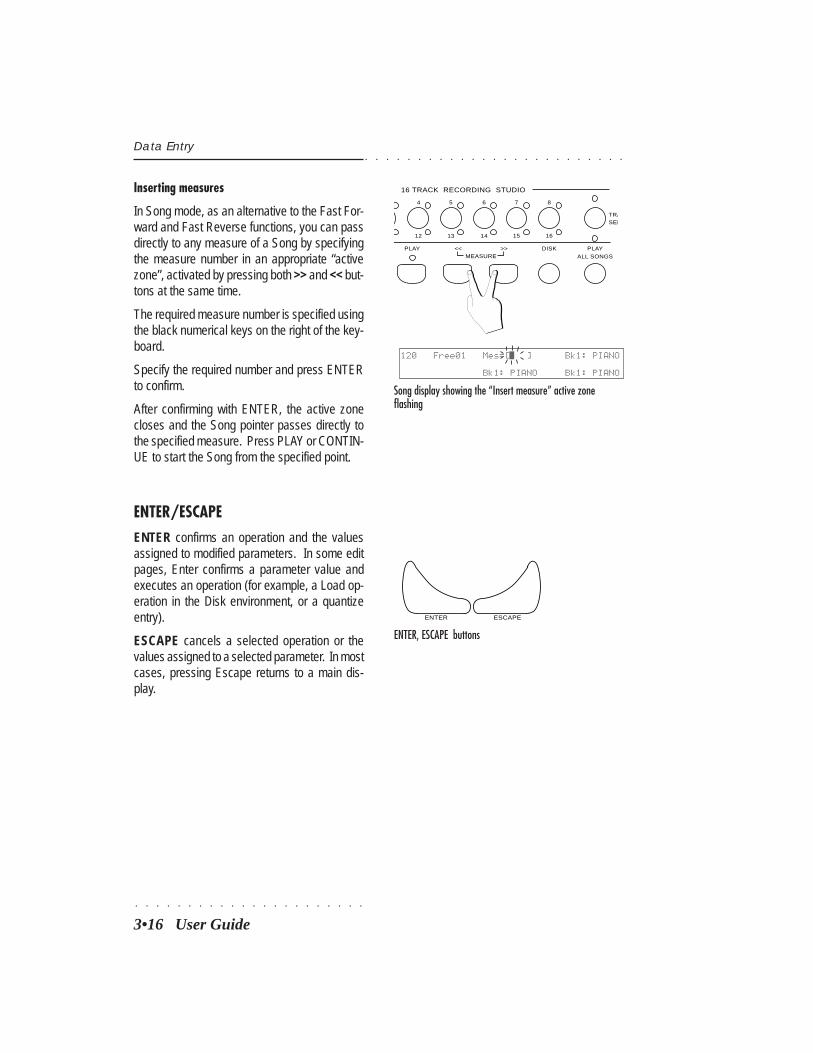
○ ○ ○ ○ ○ ○ ○ ○ ○ ○ ○ ○ ○ ○ ○ ○ ○ ○ ○ ○ ○ ○
3•16 User Guide
○ ○ ○ ○ ○ ○ ○ ○ ○ ○ ○ ○ ○ ○ ○ ○ ○ ○ ○ ○ ○ ○ ○ ○ ○
Data Entry
Inserting measures
In Song mode, as an alternative to the Fast For-ward and Fast Reverse functions, you can passdirectly to any measure of a Song by specifyingthe measure number in an appropriate “activezone”, activated by pressing both >> and << but-tons at the same time.
The required measure number is specified usingthe black numerical keys on the right of the key-board.
Specify the required number and press ENTERto confirm.
After confirming with ENTER, the active zonecloses and the Song pointer passes directly tothe specified measure. Press PLAY or CONTIN-UE to start the Song from the specified point.
ENTER/ESCAPEENTER confirms an operation and the valuesassigned to modified parameters. In some editpages, Enter confirms a parameter value andexecutes an operation (for example, a Load op-eration in the Disk environment, or a quantizeentry).
ESCAPE cancels a selected operation or thevalues assigned to a selected parameter. In mostcases, pressing Escape returns to a main dis-play.
ENTER ESCAPE
ENTER, ESCAPE buttons
12
54
13
6
14 15
7 8
16
TRASEL
16 TRACK RECORDING STUDIO
DISK PLAY
ALL SONGSMEASURE<< >>PLAY
Song display showing the “Insert measure” active zoneflashing
120 Free01 Mes=[ ] Bk1: PIANO
Bk1: PIANO Bk1: PIANO
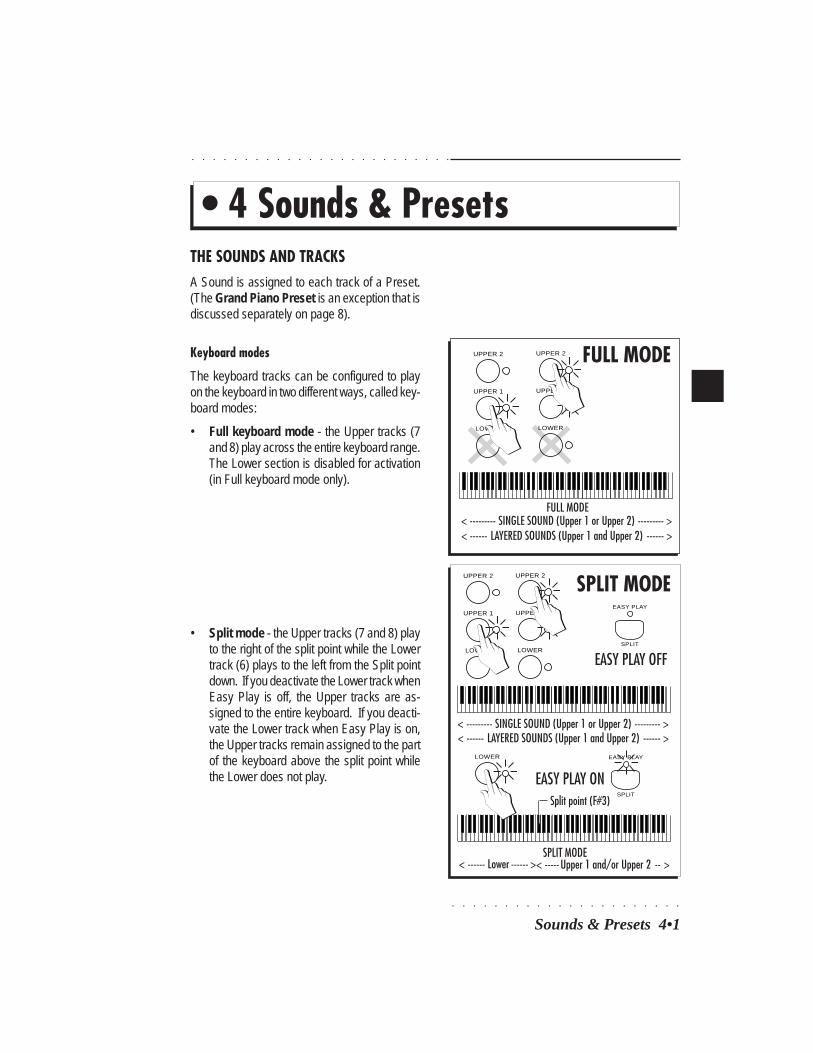
○ ○ ○ ○ ○ ○ ○ ○ ○ ○ ○ ○ ○ ○ ○ ○ ○ ○ ○ ○ ○ ○
Sounds & Presets 4•1
○ ○ ○ ○ ○ ○ ○ ○ ○ ○ ○ ○ ○ ○ ○ ○ ○ ○ ○ ○ ○ ○ ○ ○ ○
• Split mode - the Upper tracks (7 and 8) playto the right of the split point while the Lowertrack (6) plays to the left from the Split pointdown. If you deactivate the Lower track whenEasy Play is off, the Upper tracks are as-signed to the entire keyboard. If you deacti-vate the Lower track when Easy Play is on,the Upper tracks remain assigned to the partof the keyboard above the split point whilethe Lower does not play.
FULL MODE< --------- SINGLE SOUND (Upper 1 or Upper 2) --------- >
FULL MODE
< ------ LAYERED SOUNDS (Upper 1 and Upper 2) ------ >
UPPER 2
LOWER
UPPER 1
UPPER 2
LOWER
UPPER 1
SPLIT MODEUPPER 2
LOWER
UPPER 1
UPPER 2
LOWER
UPPER 1
< --------- SINGLE SOUND (Upper 1 or Upper 2) --------- >< ------ LAYERED SOUNDS (Upper 1 and Upper 2) ------ >
EASY PLAY
SPLIT
EASY PLAY ON
< ----- Upper 1 and/or Upper 2 -- >< ------ Lower ------ >SPLIT MODE
LOWER
EASY PLAY
SPLIT
EASY PLAY OFF
Split point (F#3)
• 4 Sounds & PresetsTHE SOUNDS AND TRACKSA Sound is assigned to each track of a Preset.(The Grand Piano Preset is an exception that isdiscussed separately on page 8).
Keyboard modes
The keyboard tracks can be configured to playon the keyboard in two different ways, called key-board modes:
• Full keyboard mode - the Upper tracks (7and 8) play across the entire keyboard range.The Lower section is disabled for activation(in Full keyboard mode only).
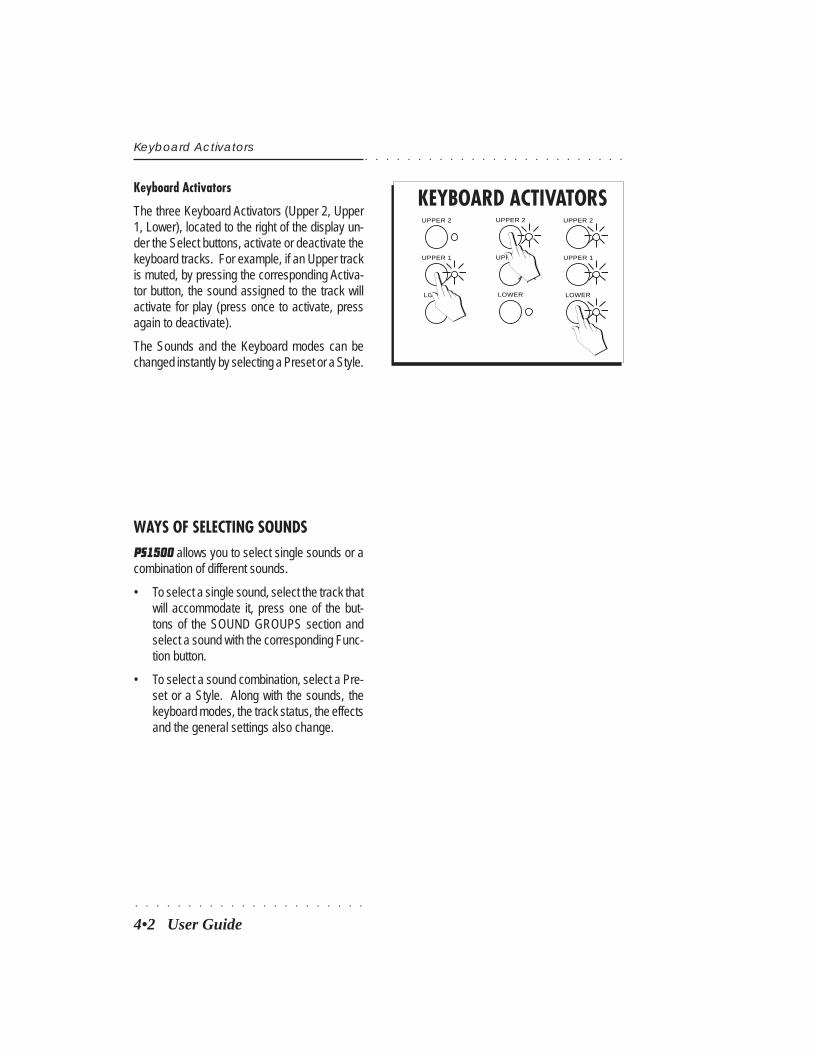
○ ○ ○ ○ ○ ○ ○ ○ ○ ○ ○ ○ ○ ○ ○ ○ ○ ○ ○ ○ ○ ○
4•2 User Guide
○ ○ ○ ○ ○ ○ ○ ○ ○ ○ ○ ○ ○ ○ ○ ○ ○ ○ ○ ○ ○ ○ ○ ○ ○
Keyboard Activators
The three Keyboard Activators (Upper 2, Upper1, Lower), located to the right of the display un-der the Select buttons, activate or deactivate thekeyboard tracks. For example, if an Upper trackis muted, by pressing the corresponding Activa-tor button, the sound assigned to the track willactivate for play (press once to activate, pressagain to deactivate).
The Sounds and the Keyboard modes can bechanged instantly by selecting a Preset or a Style.
Keyboard Activators
UPPER 2
LOWER
UPPER 1
UPPER 2
LOWER
UPPER 1
UPPER 2
LOWER
UPPER 1
KEYBOARD ACTIVATORS
WAYS OF SELECTING SOUNDSPS1500 allows you to select single sounds or acombination of different sounds.
• To select a single sound, select the track thatwill accommodate it, press one of the but-tons of the SOUND GROUPS section andselect a sound with the corresponding Func-tion button.
• To select a sound combination, select a Pre-set or a Style. Along with the sounds, thekeyboard modes, the track status, the effectsand the general settings also change.

○ ○ ○ ○ ○ ○ ○ ○ ○ ○ ○ ○ ○ ○ ○ ○ ○ ○ ○ ○ ○ ○
Sounds & Presets 4•3
○ ○ ○ ○ ○ ○ ○ ○ ○ ○ ○ ○ ○ ○ ○ ○ ○ ○ ○ ○ ○ ○ ○ ○ ○
d *********** Bk1: STRING
T Bk1: SLOSTR Bk1: PIANO1
Selecting Single Sounds
AUPPER 2
UPPER 1
LOWER
SELECT
1
d *********** Bk1: STRING
T Bk1: SLOSTR Bk1: PIANO1
BUPPER 2
UPPER 1
LOWER
SELECT
d *********** Bk1: STRING
T Bk1: SLOSTR Bk1: PIANO1
CUPPER 2
UPPER 1
LOWER
SELECT
2
Bk1 PIANO2 HONKY EL.PN2 CLAVIN
PIANO1 PIANO3 EL.PN1 HARPSI
REED
PIANO MALLET
FLUTE
ORGAN
SYN LEAD
GUITAR
SYN PAD
BASS STRINGS
SYN SFX ETHNIC
ENSEMBLE
PERCUSSIVE
BRASS
SFX
SOUND GROUPS
Selecting Single Sounds
To assign a Sound to a keyboard track (Upper 1,Upper 2 or Lower) in Style/Preset mode, you mustfirst select the track with the SELECT buttons(Upper 2, Upper 1; Lower) located to the right ofthe display. The SELECT buttons enable the dis-played keyboard tracks for a Sound change. Aselected track is shown flashing and only onesection at a time can be in an enabled state. Aselected track (flashing) is not necessarily activefor play.
To assign a Sound to any track, including onenot displayed and regardless of the current mode,you must first enter Edit Preset mode (press thePreset button) to enter the ProgramChange page.The procedure is explained in detail on page 11.
Assign a Sound to a keyboard track
1. Press one of the SELECT buttons.A Press UPPER 2 to select the Upper 2 key-board track;
B Press UPPER 1 to select the Upper 1 key-board track;
C Press UPPER 1 + UPPER 2 together toselect the LOWER keyboard track.
2. Press a SOUND GROUPS button.
The display shows a bank of 8 Sounds be-longing to the selected Group. The currentSound Bank is shown in the top left handcorner of the display.
d *********** Bk1: STRING
T Bk1: SLOSTR Bk1: PIANO1
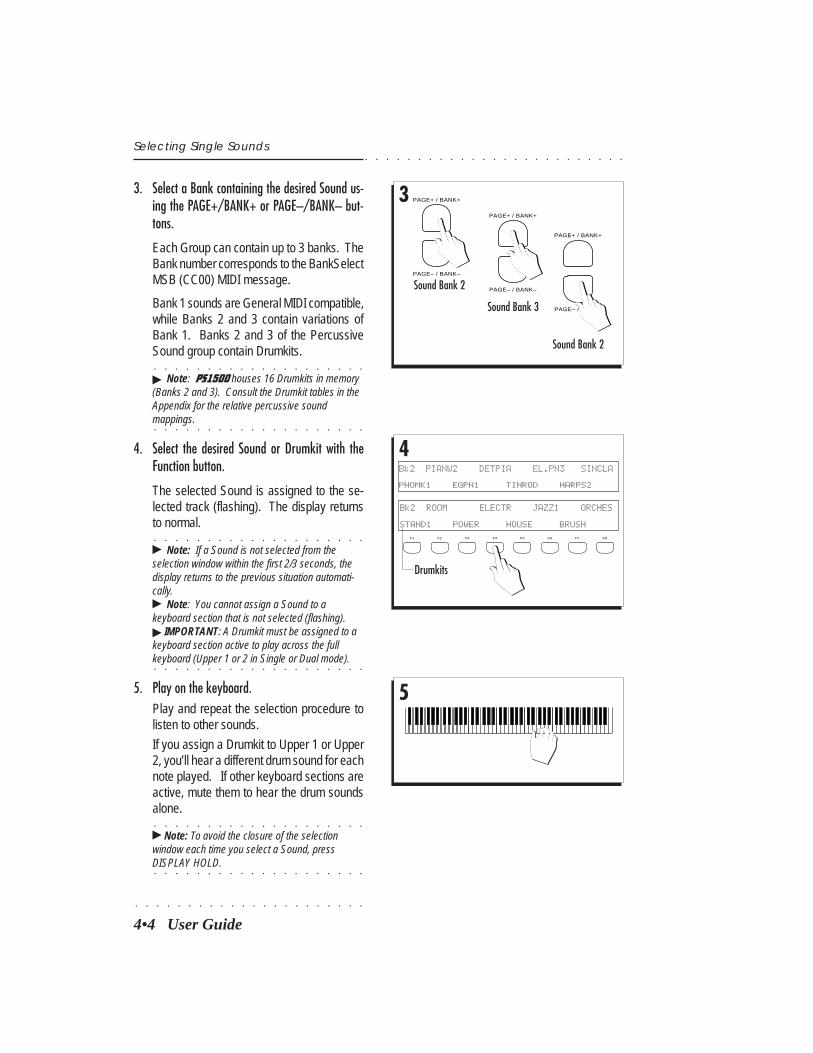
○ ○ ○ ○ ○ ○ ○ ○ ○ ○ ○ ○ ○ ○ ○ ○ ○ ○ ○ ○ ○ ○
4•4 User Guide
○ ○ ○ ○ ○ ○ ○ ○ ○ ○ ○ ○ ○ ○ ○ ○ ○ ○ ○ ○ ○ ○ ○ ○ ○
3. Select a Bank containing the desired Sound us-ing the PAGE+/BANK+ or PAGE–/BANK– but-tons.
Each Group can contain up to 3 banks. TheBank number corresponds to the BankSelectMSB (CC00) MIDI message.
Bank 1 sounds are General MIDI compatible,while Banks 2 and 3 contain variations ofBank 1. Banks 2 and 3 of the PercussiveSound group contain Drumkits.
○ ○ ○ ○ ○ ○ ○ ○ ○ ○ ○ ○ ○ ○ ○ ○ ○ ○ ○ ○
© Note: PS1500 houses 16 Drumkits in memory(Banks 2 and 3). Consult the Drumkit tables in theAppendix for the relative percussive sound
○ ○ ○ ○ ○ ○ ○ ○ ○ ○ ○ ○ ○ ○ ○ ○ ○ ○ ○ ○
mappings.
4. Select the desired Sound or Drumkit with theFunction button.
The selected Sound is assigned to the se-lected track (flashing). The display returnsto normal.
○ ○ ○ ○ ○ ○ ○ ○ ○ ○ ○ ○ ○ ○ ○ ○ ○ ○ ○ ○
© Note: If a Sound is not selected from theselection window within the first 2/3 seconds, thedisplay returns to the previous situation automati-cally.© Note: You cannot assign a Sound to akeyboard section that is not selected (flashing).© IMPORTANT: A Drumkit must be assigned to akeyboard section active to play across the full
○ ○ ○ ○ ○ ○ ○ ○ ○ ○ ○ ○ ○ ○ ○ ○ ○ ○ ○ ○
keyboard (Upper 1 or 2 in Single or Dual mode).
5. Play on the keyboard.Play and repeat the selection procedure tolisten to other sounds.
If you assign a Drumkit to Upper 1 or Upper2, you’ll hear a different drum sound for eachnote played. If other keyboard sections areactive, mute them to hear the drum soundsalone.
○ ○ ○ ○ ○ ○ ○ ○ ○ ○ ○ ○ ○ ○ ○ ○ ○ ○ ○ ○
© Note: To avoid the closure of the selectionwindow each time you select a Sound, press
○ ○ ○ ○ ○ ○ ○ ○ ○ ○ ○ ○ ○ ○ ○ ○ ○ ○ ○ ○
DISPLAY HOLD.
Selecting Single Sounds
3 PAGE+ / BANK+
PAGE– / BANK–
Sound Bank 2
PAGE+ / BANK+
PAGE– / BANK–
Sound Bank 3
PAGE+ / BANK+
PAGE– / BANK–
Sound Bank 2
5
Bk2 ROOM ELECTR JAZZ1 ORCHES
STAND1 POWER HOUSE BRUSHF1 F2 F3 F4 F5 F6 F7 F8
4
Drumkits
Bk2 PIANW2 DETPIA EL.PN3 SINCLA
PNOMK1 EGPN1 TINROD HARPS2
○ ○ ○ ○ ○ ○ ○ ○ ○ ○ ○ ○ ○ ○ ○ ○ ○ ○ ○ ○ ○ ○
Sounds & Presets 4•5
○ ○ ○ ○ ○ ○ ○ ○ ○ ○ ○ ○ ○ ○ ○ ○ ○ ○ ○ ○ ○ ○ ○ ○ ○
Assigning a Sound to the GRAND PIANO preset
The GRAND PIANO Preset accepts a soundchange using the method already described.However, whatever change you make remainstemporary and is instantly cancelled if you eitherselect the GRAND PIANO preset again, select aPreset from the PROGRAMMABLE PRESETS,or enter Song/Style or Song modes.
For example, you can assign a Guitar sound tothe Upper 1 section in order to play Guitar withthe Grand Piano parameters (effect, volume,etc.), BUT, you cannot store the change to theGrand Piano Preset.
To assign Sounds to tracks other than the key-board tracks
To assign sounds to tracks 1-16, use the methoddescribed on page 11.
Selecting Single Sounds

○ ○ ○ ○ ○ ○ ○ ○ ○ ○ ○ ○ ○ ○ ○ ○ ○ ○ ○ ○ ○ ○
4•6 User Guide
○ ○ ○ ○ ○ ○ ○ ○ ○ ○ ○ ○ ○ ○ ○ ○ ○ ○ ○ ○ ○ ○ ○ ○ ○
Selecting Presets
Select a Preset when you want to change thewhole keyboard sound combination, not just asingle sound.
1. Press one of the PROGRAMMABLE PRESETS but-tons.
The timeout display shows 8 Presets tochoose from.
Selecting Presets
11 2 3 4 5 6 7 8
PROGRAMMABLE PRESETS
BigBrs Epad-1 Ronnie Analog
BigSTR BlBand Benson BigOrg
22. Select a Preset using the corresponding Function
button.Once a Preset has been selected, the selec-tion window closes and the display returns toits previous status showing the keyboardsounds of the current Preset.
The setting recalled by the Preset include:the keyboard mode, the track status, theSounds assigned to the tracks and the trackassignments for the action of the pedals.
The name of the selected Preset appears onthe bottom line of the display.
F1 F2 F3 F4 F5 F6 F7 F8
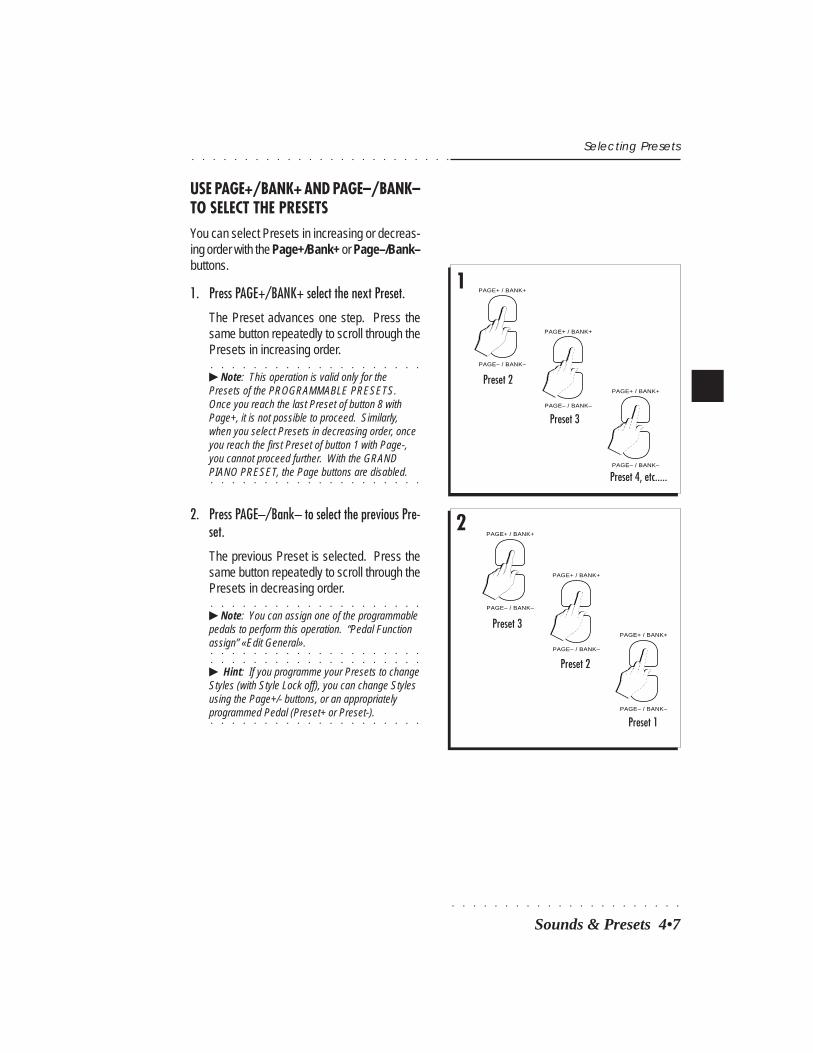
○ ○ ○ ○ ○ ○ ○ ○ ○ ○ ○ ○ ○ ○ ○ ○ ○ ○ ○ ○ ○ ○
Sounds & Presets 4•7
○ ○ ○ ○ ○ ○ ○ ○ ○ ○ ○ ○ ○ ○ ○ ○ ○ ○ ○ ○ ○ ○ ○ ○ ○
USE PAGE+/BANK+ AND PAGE–/BANK–TO SELECT THE PRESETSYou can select Presets in increasing or decreas-ing order with the Page+/Bank+ or Page–/Bank–buttons.
1. Press PAGE+/BANK+ select the next Preset.
The Preset advances one step. Press thesame button repeatedly to scroll through thePresets in increasing order.
○ ○ ○ ○ ○ ○ ○ ○ ○ ○ ○ ○ ○ ○ ○ ○ ○ ○ ○ ○
© Note: This operation is valid only for thePresets of the PROGRAMMABLE PRESETS.Once you reach the last Preset of button 8 withPage+, it is not possible to proceed. Similarly,when you select Presets in decreasing order, onceyou reach the first Preset of button 1 with Page-,you cannot proceed further. With the GRAND
○ ○ ○ ○ ○ ○ ○ ○ ○ ○ ○ ○ ○ ○ ○ ○ ○ ○ ○ ○
PIANO PRESET, the Page buttons are disabled.
Selecting Presets
1
2
PAGE+ / BANK+
PAGE– / BANK–
Preset 2
PAGE+ / BANK+
PAGE– / BANK–
Preset 3
PAGE+ / BANK+
PAGE– / BANK–
Preset 4, etc.....
PAGE+ / BANK+
PAGE– / BANK–
PAGE+ / BANK+
PAGE– / BANK–
PAGE+ / BANK+
PAGE– / BANK–
Preset 3
Preset 2
Preset 1
2. Press PAGE–/Bank– to select the previous Pre-set.
The previous Preset is selected. Press thesame button repeatedly to scroll through thePresets in decreasing order.
○ ○ ○ ○ ○ ○ ○ ○ ○ ○ ○ ○ ○ ○ ○ ○ ○ ○ ○ ○
© Note: You can assign one of the programmablepedals to perform this operation. “Pedal Function
○ ○ ○ ○ ○ ○ ○ ○ ○ ○ ○ ○ ○ ○ ○ ○ ○ ○ ○ ○
assign” «Edit General».○ ○ ○ ○ ○ ○ ○ ○ ○ ○ ○ ○ ○ ○ ○ ○ ○ ○ ○ ○
© Hint: If you programme your Presets to changeStyles (with Style Lock off), you can change Stylesusing the Page+/- buttons, or an appropriately
○ ○ ○ ○ ○ ○ ○ ○ ○ ○ ○ ○ ○ ○ ○ ○ ○ ○ ○ ○
programmed Pedal (Preset+ or Preset-).

○ ○ ○ ○ ○ ○ ○ ○ ○ ○ ○ ○ ○ ○ ○ ○ ○ ○ ○ ○ ○ ○
4•8 User Guide
○ ○ ○ ○ ○ ○ ○ ○ ○ ○ ○ ○ ○ ○ ○ ○ ○ ○ ○ ○ ○ ○ ○ ○ ○
THE GRAND PIANO PRESETThe Grand Piano Preset is an exception to therule because, unlike the Presets of the PRO-GRAMMABLE PRESETS section, this presetrecalls the Grand Piano sound with fixed param-eter values (volume, pan setting, reverb effect,etc.) which, if modified, cannot be memorized tothe Grand Piano Preset. If you attempt to storeany modifications that you apply to the GRANDPIANO Preset, the instrument “invites” you tosave to the Programmable Presets.What happens when you press the GRAND PI-ANO button depends on the current mode se-lected.
Select Grand Piano in Preset mode
If you are currently playing in Preset mode andyou select the GRAND PIANO preset, the cur-rent Preset is cancelled and substituted byGRAND PIANO. The GRAND PIANO PRESETis displayed for a short period then the displayswitches to the standard default situation. Inaddition, the Upper 2 keyboard section is can-celled and the Lower keyboard section is disa-bled. Upper 1 activates across the Full keyboard.
Select Grand Piano in Style mode
If you are currently in Style mode and the Style isnot playing, selecting GRAND PIANO recallsVariation 2 of the Style 8 Beat Standard from the8 BEAT Style Group (unless already selected).The keyboard sounds are substituted by GRANDPIANO, the Upper 2 section is cancelled and theLower section is disabled. Upper 1 activatesacross the Full keyboard.
If the Style is playing, the current Style remainsunchanged while the keyboard sounds are sub-stituted by the GRAND PIANO preset as above.
Select Grand Piano in Song/Style or Song modes
If you are currently playing with Songs or Song/Styles and you select the GRAND PIANO pre-set, the current mode is cancelled and the instru-ment sets to Real Time mode with GRAND PI-ANO selected to play across the full keyboard.
You can, therefore, select GRAND PIANO when-ever you want to escape the current mode to playa single sound.
< --- GRAND PIANO --------------------------- Upper 1 ----- >
UPPER 2
LOWER
UPPER 1
* * BUTTON DISABLED IN FULL MODE * *
Set SPLIT MODE in Easy Play/Split
GRAND PIANO
* * GRAND PIANO PRESET * *
178 SoulBB *********** Bk1: SLOSTR
GPiano POP Bk1: SLOSTR Bk1: PIANO1
The Grand Piano Preset

○ ○ ○ ○ ○ ○ ○ ○ ○ ○ ○ ○ ○ ○ ○ ○ ○ ○ ○ ○ ○ ○
Sounds & Presets 4•9
○ ○ ○ ○ ○ ○ ○ ○ ○ ○ ○ ○ ○ ○ ○ ○ ○ ○ ○ ○ ○ ○ ○ ○ ○
SELECT SOUNDS, PRESETS OR STYLESUSING DISPLAY HOLDNormally, after selecting an item from a selectionwindow, the display returns to the previous situa-tion automatically.
If you activate DISPLAY HOLD (LED on), theselection window remains locked after selectingan item. This allows you to continue selectingitems until you are satisfied with the result.
1. Press DISPLAY HOLD.
The LED of the button turns on.
2. Press a button from the SOUND GROUPS, thePROGRAMMABLE PRESETS or the STYLE GROUPS.
In this case, a Sound.
3. Select an item.
The selection window remains locked.
4. Select other items as required.
5. Press another Group button to open a differentselection window and select another item.
6 Press ESCAPE to close the selection window with-out cancelling Display Hold.
Press DISPLAY HOLD to cancel the function(LED off).
Display Hold
1 DISPLAY HOLD
REED
PIANO MALLET
FLUTE
ORGAN
SYN LEAD
GUITAR
SYN PAD
BASS STRINGS
SYN SFX ETHNIC
ENSEMBLE
PERCUSSIVE
BRASS
SFX
SOUND GROUPS
Bk1 PIANO2 HONKY EL.PN2 CLAVIN
PIANO1 PIANO3 EL.PN1 HARPSIF1 F2 F3 F4 F5 F6 F7 F8
2/3/4
5
REED
PIANO MALLET
FLUTE
ORGAN
SYN LEAD
GUITAR
SYN PAD
BASS STRINGS
SYN SFX ETHNIC
ENSEMBLE
PERCUSSIVE
BRASS
SFX
SOUND GROUPS
DISPLAY HOLD
OR
6
ENTER ESCAPE
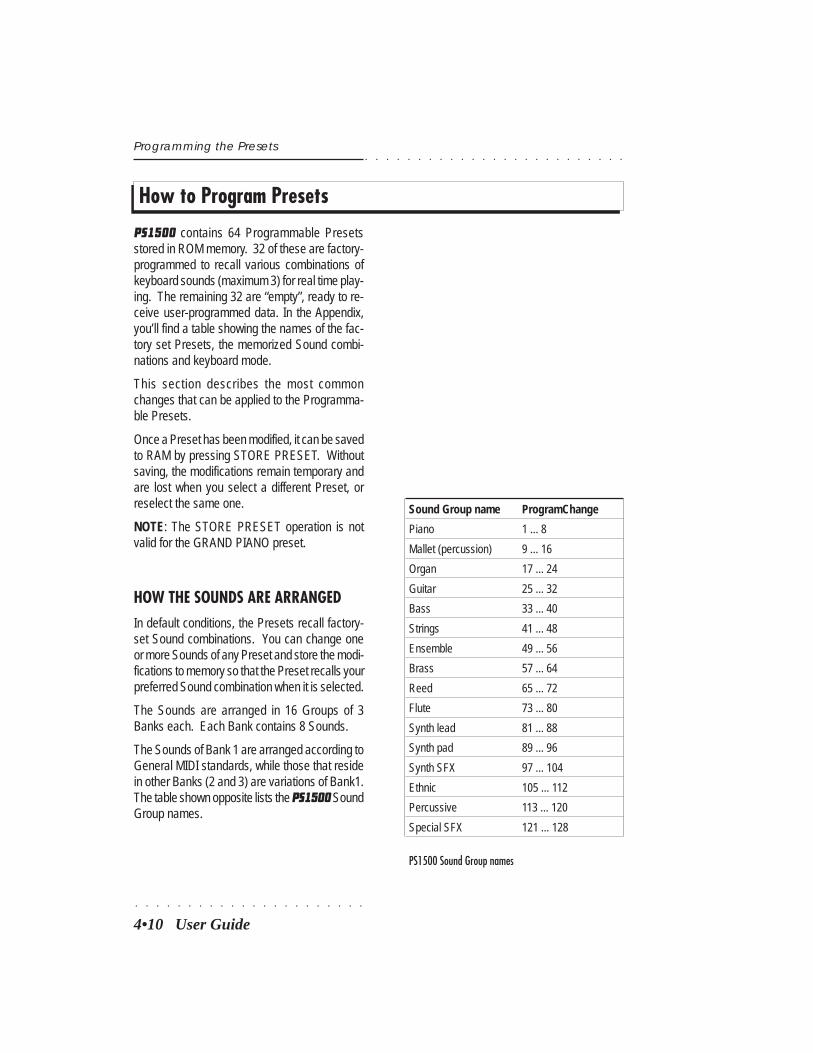
○ ○ ○ ○ ○ ○ ○ ○ ○ ○ ○ ○ ○ ○ ○ ○ ○ ○ ○ ○ ○ ○
4•10 User Guide
○ ○ ○ ○ ○ ○ ○ ○ ○ ○ ○ ○ ○ ○ ○ ○ ○ ○ ○ ○ ○ ○ ○ ○ ○
How to Program Presets
PS1500 contains 64 Programmable Presetsstored in ROM memory. 32 of these are factory-programmed to recall various combinations ofkeyboard sounds (maximum 3) for real time play-ing. The remaining 32 are “empty”, ready to re-ceive user-programmed data. In the Appendix,you’ll find a table showing the names of the fac-tory set Presets, the memorized Sound combi-nations and keyboard mode.
This section describes the most commonchanges that can be applied to the Programma-ble Presets.
Once a Preset has been modified, it can be savedto RAM by pressing STORE PRESET. Withoutsaving, the modifications remain temporary andare lost when you select a different Preset, orreselect the same one.
NOTE: The STORE PRESET operation is notvalid for the GRAND PIANO preset.
HOW THE SOUNDS ARE ARRANGEDIn default conditions, the Presets recall factory-set Sound combinations. You can change oneor more Sounds of any Preset and store the modi-fications to memory so that the Preset recalls yourpreferred Sound combination when it is selected.
The Sounds are arranged in 16 Groups of 3Banks each. Each Bank contains 8 Sounds.
The Sounds of Bank 1 are arranged according toGeneral MIDI standards, while those that residein other Banks (2 and 3) are variations of Bank1.The table shown opposite lists the PS1500 SoundGroup names.
Programming the Presets
Sound Group name ProgramChange
Piano 1 ... 8
Mallet (percussion) 9 ... 16
Organ 17 ... 24
Guitar 25 ... 32
Bass 33 ... 40
Strings 41 ... 48
Ensemble 49 ... 56
Brass 57 ... 64
Reed 65 ... 72
Flute 73 ... 80
Synth lead 81 ... 88
Synth pad 89 ... 96
Synth SFX 97 ... 104
Ethnic 105 ... 112
Percussive 113 ... 120
Special SFX 121 ... 128
PS1500 Sound Group names
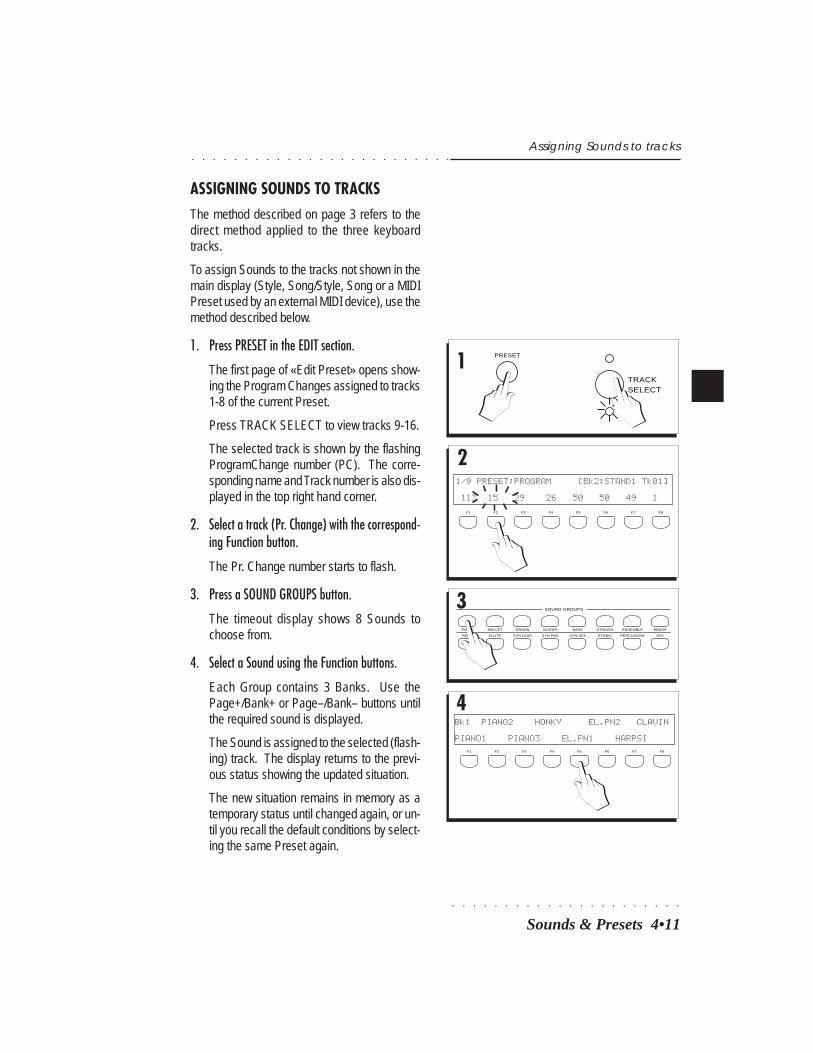
○ ○ ○ ○ ○ ○ ○ ○ ○ ○ ○ ○ ○ ○ ○ ○ ○ ○ ○ ○ ○ ○
Sounds & Presets 4•11
○ ○ ○ ○ ○ ○ ○ ○ ○ ○ ○ ○ ○ ○ ○ ○ ○ ○ ○ ○ ○ ○ ○ ○ ○
ASSIGNING SOUNDS TO TRACKSThe method described on page 3 refers to thedirect method applied to the three keyboardtracks.
To assign Sounds to the tracks not shown in themain display (Style, Song/Style, Song or a MIDIPreset used by an external MIDI device), use themethod described below.
1. Press PRESET in the EDIT section.
The first page of «Edit Preset» opens show-ing the Program Changes assigned to tracks1-8 of the current Preset.
Press TRACK SELECT to view tracks 9-16.
The selected track is shown by the flashingProgramChange number (PC). The corre-sponding name and Track number is also dis-played in the top right hand corner.
2. Select a track (Pr. Change) with the correspond-ing Function button.
The Pr. Change number starts to flash.
3. Press a SOUND GROUPS button.
The timeout display shows 8 Sounds tochoose from.
4. Select a Sound using the Function buttons.
Each Group contains 3 Banks. Use thePage+/Bank+ or Page–/Bank– buttons untilthe required sound is displayed.
The Sound is assigned to the selected (flash-ing) track. The display returns to the previ-ous status showing the updated situation.
The new situation remains in memory as atemporary status until changed again, or un-til you recall the default conditions by select-ing the same Preset again.
Assigning Sounds to tracks
1 PRESET
1/9 PRESET:PROGRAM [Bk2:STAND1 Tk01]
113 15 29 26 50 50 49 1
2
3
Bk1 PIANO2 HONKY EL.PN2 CLAVIN
PIANO1 PIANO3 EL.PN1 HARPSI
4
TRACKSELECT
F1 F2 F3 F4 F5 F6 F7 F8
REED
PIANO MALLET
FLUTE
ORGAN
SYN LEAD
GUITAR
SYN PAD
BASS STRINGS
SYN SFX ETHNIC
ENSEMBLE
PERCUSSIVE
BRASS
SFX
SOUND GROUPS
F1 F2 F3 F4 F5 F6 F7 F8
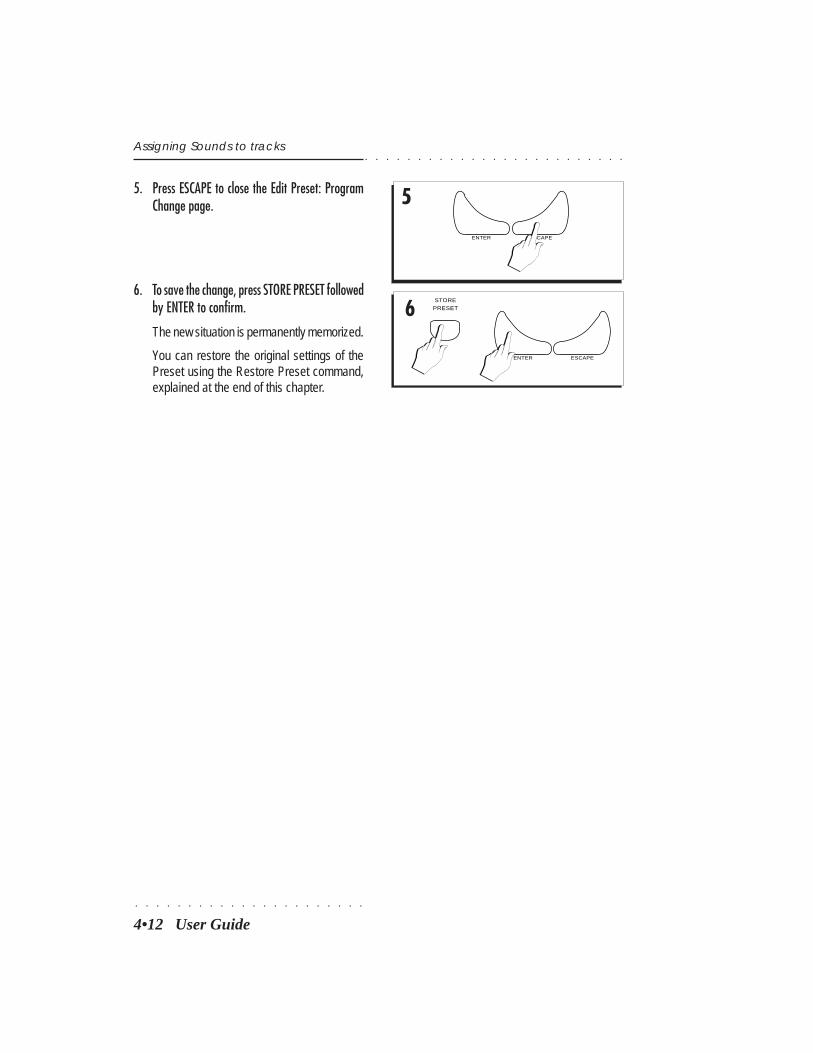
○ ○ ○ ○ ○ ○ ○ ○ ○ ○ ○ ○ ○ ○ ○ ○ ○ ○ ○ ○ ○ ○
4•12 User Guide
○ ○ ○ ○ ○ ○ ○ ○ ○ ○ ○ ○ ○ ○ ○ ○ ○ ○ ○ ○ ○ ○ ○ ○ ○
5. Press ESCAPE to close the Edit Preset: ProgramChange page.
Assigning Sounds to tracks
5
ENTER ESCAPE
6STORE
PRESET
ENTER ESCAPE
6. To save the change, press STORE PRESET followedby ENTER to confirm.
The new situation is permanently memorized.
You can restore the original settings of thePreset using the Restore Preset command,explained at the end of this chapter.
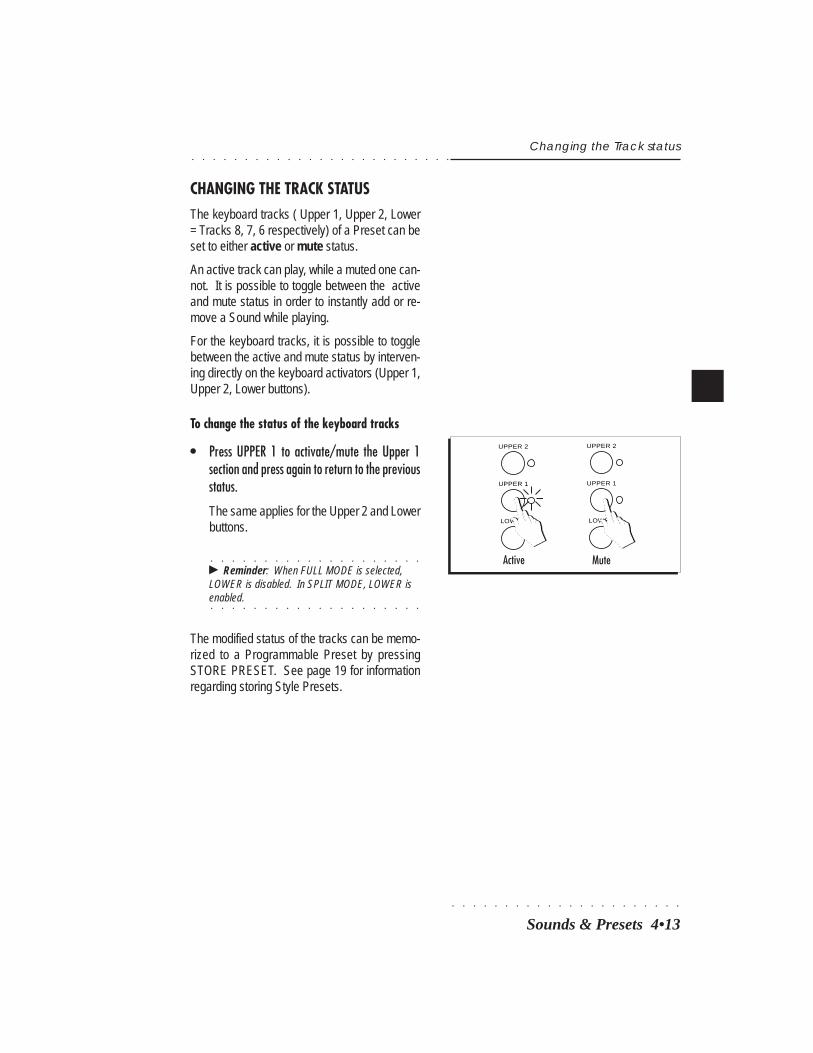
○ ○ ○ ○ ○ ○ ○ ○ ○ ○ ○ ○ ○ ○ ○ ○ ○ ○ ○ ○ ○ ○
Sounds & Presets 4•13
○ ○ ○ ○ ○ ○ ○ ○ ○ ○ ○ ○ ○ ○ ○ ○ ○ ○ ○ ○ ○ ○ ○ ○ ○
CHANGING THE TRACK STATUSThe keyboard tracks ( Upper 1, Upper 2, Lower= Tracks 8, 7, 6 respectively) of a Preset can beset to either active or mute status.
An active track can play, while a muted one can-not. It is possible to toggle between the activeand mute status in order to instantly add or re-move a Sound while playing.
For the keyboard tracks, it is possible to togglebetween the active and mute status by interven-ing directly on the keyboard activators (Upper 1,Upper 2, Lower buttons).
To change the status of the keyboard tracks
• Press UPPER 1 to activate/mute the Upper 1section and press again to return to the previousstatus.
The same applies for the Upper 2 and Lowerbuttons.
○ ○ ○ ○ ○ ○ ○ ○ ○ ○ ○ ○ ○ ○ ○ ○ ○ ○ ○ ○
© Reminder: When FULL MODE is selected,LOWER is disabled. In SPLIT MODE, LOWER is
○ ○ ○ ○ ○ ○ ○ ○ ○ ○ ○ ○ ○ ○ ○ ○ ○ ○ ○ ○
enabled.
The modified status of the tracks can be memo-rized to a Programmable Preset by pressingSTORE PRESET. See page 19 for informationregarding storing Style Presets.
Changing the Track status
Active
UPPER 2
LOWER
UPPER 1
UPPER 2
LOWER
UPPER 1
Mute
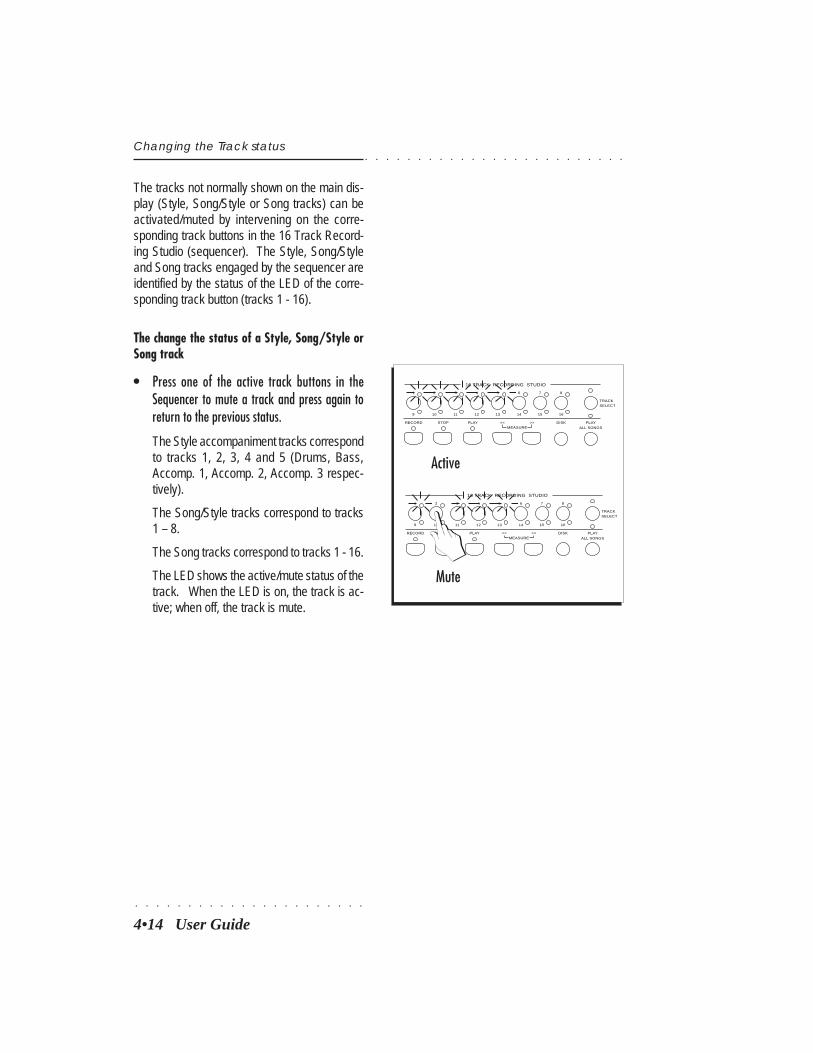
○ ○ ○ ○ ○ ○ ○ ○ ○ ○ ○ ○ ○ ○ ○ ○ ○ ○ ○ ○ ○ ○
4•14 User Guide
○ ○ ○ ○ ○ ○ ○ ○ ○ ○ ○ ○ ○ ○ ○ ○ ○ ○ ○ ○ ○ ○ ○ ○ ○
Changing the Track status
The tracks not normally shown on the main dis-play (Style, Song/Style or Song tracks) can beactivated/muted by intervening on the corre-sponding track buttons in the 16 Track Record-ing Studio (sequencer). The Style, Song/Styleand Song tracks engaged by the sequencer areidentified by the status of the LED of the corre-sponding track button (tracks 1 - 16).
The change the status of a Style, Song/Style orSong track
• Press one of the active track buttons in theSequencer to mute a track and press again toreturn to the previous status.
The Style accompaniment tracks correspondto tracks 1, 2, 3, 4 and 5 (Drums, Bass,Accomp. 1, Accomp. 2, Accomp. 3 respec-tively).
The Song/Style tracks correspond to tracks1 – 8.
The Song tracks correspond to tracks 1 - 16.
The LED shows the active/mute status of thetrack. When the LED is on, the track is ac-tive; when off, the track is mute.
1 2 3
9 10 11 12
54
13
6
14 15
7 8
16
TRACKSELECT
16 TRACK RECORDING STUDIO
DISK PLAY
ALL SONGSMEASURE<< >>PLAYSTOPRECORD
1 2 3
9 10 11 12
54
13
6
14 15
7 8
16
TRACKSELECT
16 TRACK RECORDING STUDIO
DISK PLAY
ALL SONGSMEASURE<< >>PLAYSTOPRECORD
Active
Mute
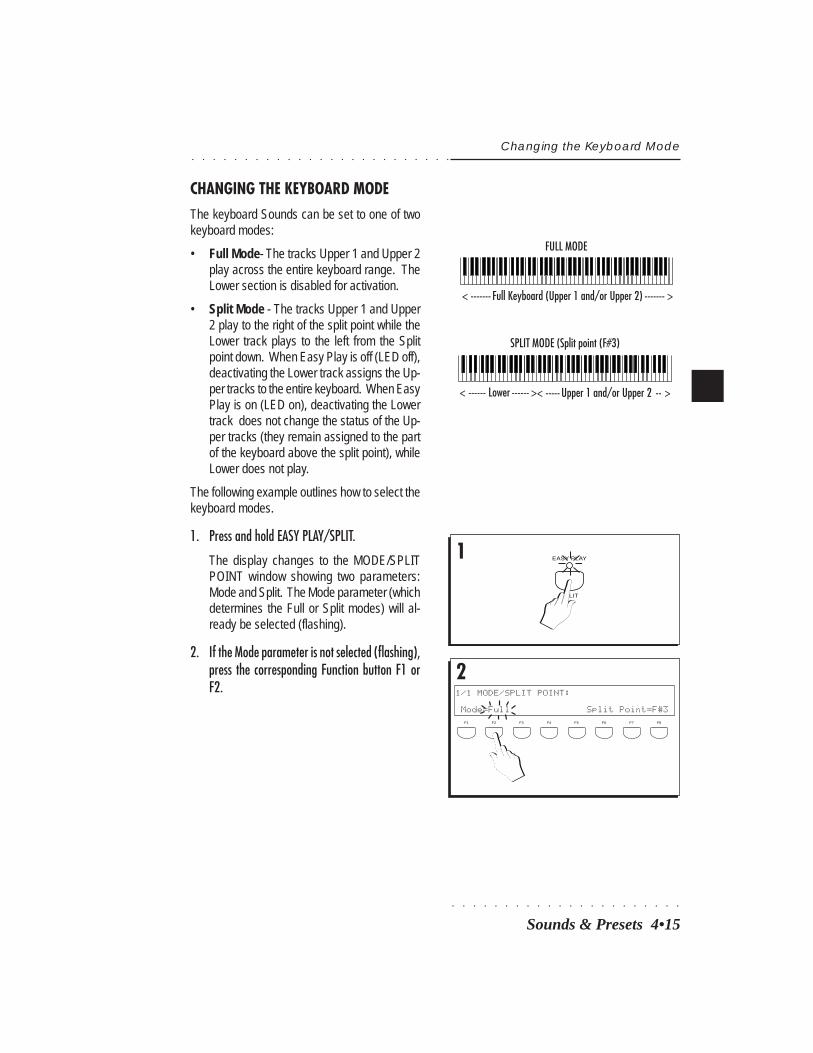
○ ○ ○ ○ ○ ○ ○ ○ ○ ○ ○ ○ ○ ○ ○ ○ ○ ○ ○ ○ ○ ○
Sounds & Presets 4•15
○ ○ ○ ○ ○ ○ ○ ○ ○ ○ ○ ○ ○ ○ ○ ○ ○ ○ ○ ○ ○ ○ ○ ○ ○
CHANGING THE KEYBOARD MODEThe keyboard Sounds can be set to one of twokeyboard modes:
• Full Mode- The tracks Upper 1 and Upper 2play across the entire keyboard range. TheLower section is disabled for activation.
• Split Mode - The tracks Upper 1 and Upper2 play to the right of the split point while theLower track plays to the left from the Splitpoint down. When Easy Play is off (LED off),deactivating the Lower track assigns the Up-per tracks to the entire keyboard. When EasyPlay is on (LED on), deactivating the Lowertrack does not change the status of the Up-per tracks (they remain assigned to the partof the keyboard above the split point), whileLower does not play.
The following example outlines how to select thekeyboard modes.
1. Press and hold EASY PLAY/SPLIT.
The display changes to the MODE/SPLITPOINT window showing two parameters:Mode and Split. The Mode parameter (whichdetermines the Full or Split modes) will al-ready be selected (flashing).
2. If the Mode parameter is not selected (flashing),press the corresponding Function button F1 orF2.
Changing the Keyboard Mode
EASY PLAY
SPLIT
F1 F2 F3 F4 F5 F6 F7 F8
1/1 MODE/SPLIT POINT:
Mode=Full Split Point=F#3
2
1
< ----- Upper 1 and/or Upper 2 -- >< ------ Lower ------ >
SPLIT MODE (Split point (F#3)
< ------- Full Keyboard (Upper 1 and/or Upper 2) ------- >
FULL MODE
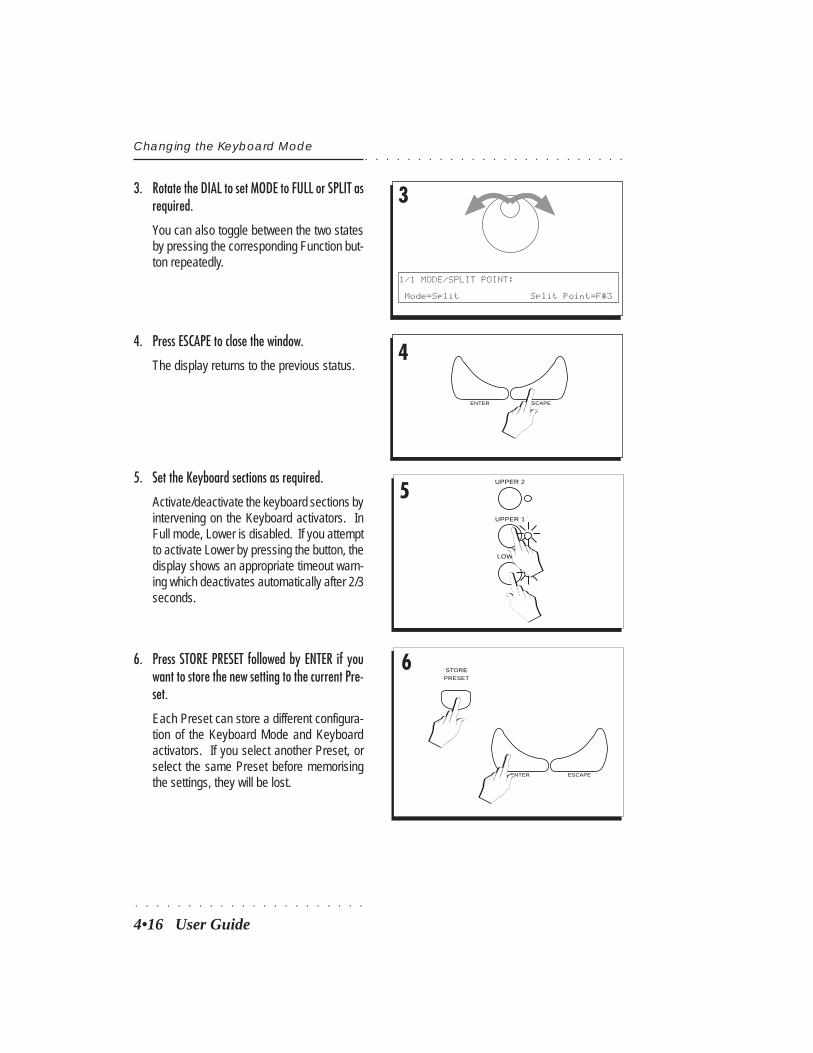
○ ○ ○ ○ ○ ○ ○ ○ ○ ○ ○ ○ ○ ○ ○ ○ ○ ○ ○ ○ ○ ○
4•16 User Guide
○ ○ ○ ○ ○ ○ ○ ○ ○ ○ ○ ○ ○ ○ ○ ○ ○ ○ ○ ○ ○ ○ ○ ○ ○
3. Rotate the DIAL to set MODE to FULL or SPLIT asrequired.
You can also toggle between the two statesby pressing the corresponding Function but-ton repeatedly.
Changing the Keyboard Mode
5UPPER 2
LOWER
UPPER 1
ENTER ESCAPE
6 STORE
PRESET
4
3
1/1 MODE/SPLIT POINT:
Mode=Split Split Point=F#3
ENTER ESCAPE
6. Press STORE PRESET followed by ENTER if youwant to store the new setting to the current Pre-set.
Each Preset can store a different configura-tion of the Keyboard Mode and Keyboardactivators. If you select another Preset, orselect the same Preset before memorisingthe settings, they will be lost.
5. Set the Keyboard sections as required.
Activate/deactivate the keyboard sections byintervening on the Keyboard activators. InFull mode, Lower is disabled. If you attemptto activate Lower by pressing the button, thedisplay shows an appropriate timeout warn-ing which deactivates automatically after 2/3seconds.
4. Press ESCAPE to close the window.
The display returns to the previous status.
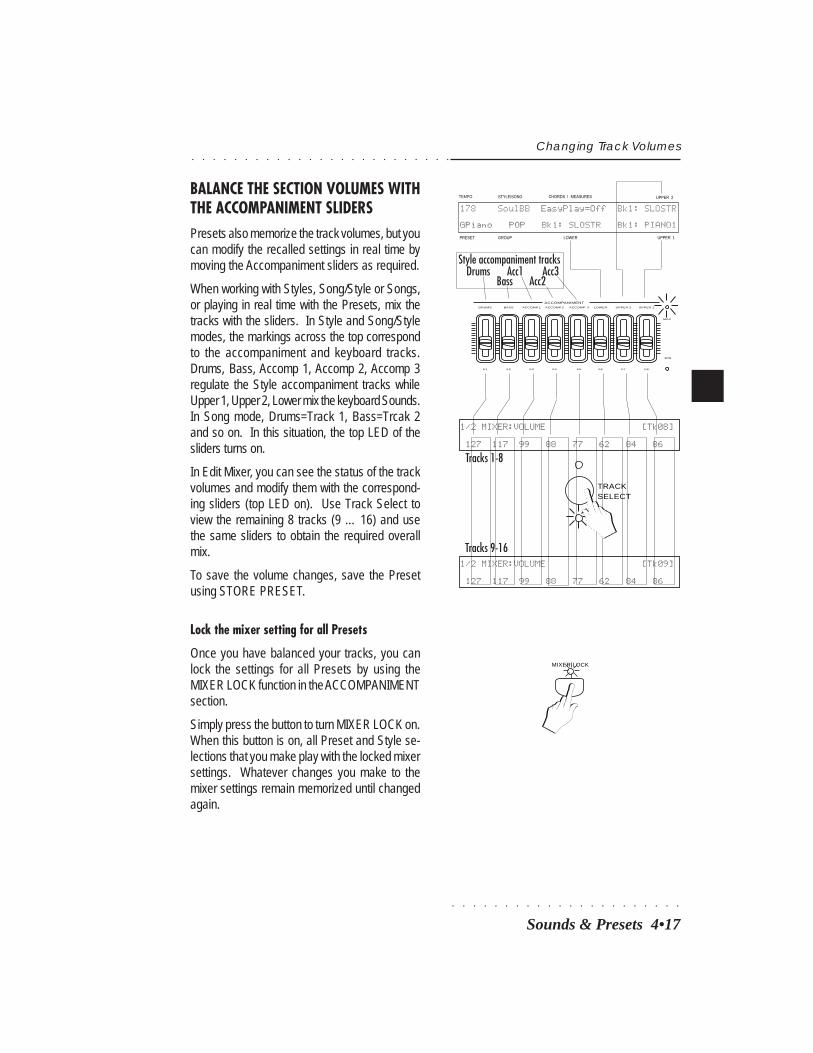
○ ○ ○ ○ ○ ○ ○ ○ ○ ○ ○ ○ ○ ○ ○ ○ ○ ○ ○ ○ ○ ○
Sounds & Presets 4•17
○ ○ ○ ○ ○ ○ ○ ○ ○ ○ ○ ○ ○ ○ ○ ○ ○ ○ ○ ○ ○ ○ ○ ○ ○
Changing Track Volumes
BALANCE THE SECTION VOLUMES WITHTHE ACCOMPANIMENT SLIDERSPresets also memorize the track volumes, but youcan modify the recalled settings in real time bymoving the Accompaniment sliders as required.
When working with Styles, Song/Style or Songs,or playing in real time with the Presets, mix thetracks with the sliders. In Style and Song/Stylemodes, the markings across the top correspondto the accompaniment and keyboard tracks.Drums, Bass, Accomp 1, Accomp 2, Accomp 3regulate the Style accompaniment tracks whileUpper 1, Upper 2, Lower mix the keyboard Sounds.In Song mode, Drums=Track 1, Bass=Trcak 2and so on. In this situation, the top LED of thesliders turns on.
In Edit Mixer, you can see the status of the trackvolumes and modify them with the correspond-ing sliders (top LED on). Use Track Select toview the remaining 8 tracks (9 … 16) and usethe same sliders to obtain the required overallmix.
To save the volume changes, save the Presetusing STORE PRESET.
Lock the mixer setting for all Presets
Once you have balanced your tracks, you canlock the settings for all Presets by using theMIXER LOCK function in the ACCOMPANIMENTsection.
Simply press the button to turn MIXER LOCK on.When this button is on, all Preset and Style se-lections that you make play with the locked mixersettings. Whatever changes you make to themixer settings remain memorized until changedagain.
TEMPO
PRESET
CHORDS / MEASURES
LOWER UPPER 1
UPPER 2STYLE/SONG
178 SoulBB EasyPlay=Off Bk1: SLOSTR
GPiano POP Bk1: SLOSTR Bk1: PIANO1GROUP
Style accompaniment tracksDrums
BassAcc1 Acc3
MAX
MIN
DRUMS
ACCOMPANIMENT
BASS ACCOMP.1 ACCOMP.2 ACCOMP. 3 LOWER UPPER 2 UPPER 1
F1 F2 F3 F4 F5 F6 F7 F8
Acc2
1/2 MIXER:VOLUME [Tk08]
127 117 99 88 77 62 84 86
Tracks 9-16
Tracks 1-8
TRACKSELECT
1/2 MIXER:VOLUME [Tk09]
127 117 99 88 77 62 84 86
MIXER LOCK
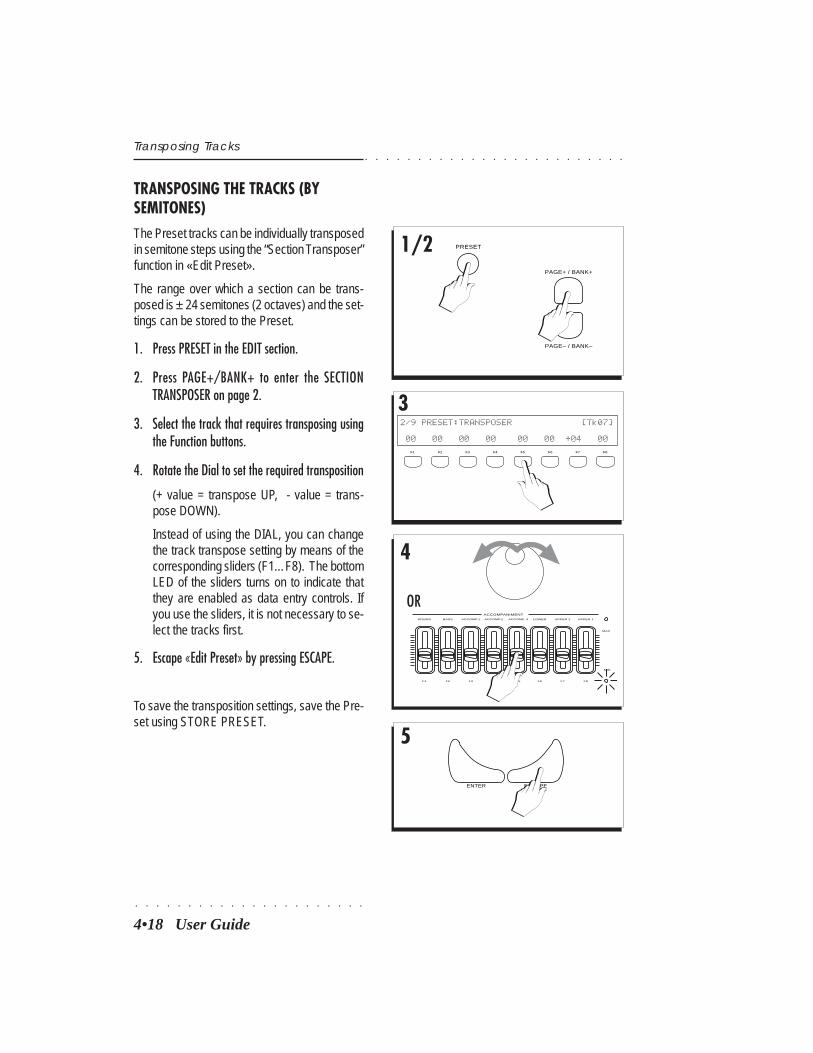
○ ○ ○ ○ ○ ○ ○ ○ ○ ○ ○ ○ ○ ○ ○ ○ ○ ○ ○ ○ ○ ○
4•18 User Guide
○ ○ ○ ○ ○ ○ ○ ○ ○ ○ ○ ○ ○ ○ ○ ○ ○ ○ ○ ○ ○ ○ ○ ○ ○
TRANSPOSING THE TRACKS (BYSEMITONES)The Preset tracks can be individually transposedin semitone steps using the “Section Transposer”function in «Edit Preset».
The range over which a section can be trans-posed is ± 24 semitones (2 octaves) and the set-tings can be stored to the Preset.
1. Press PRESET in the EDIT section.
2. Press PAGE+/BANK+ to enter the SECTIONTRANSPOSER on page 2.
3. Select the track that requires transposing usingthe Function buttons.
4. Rotate the Dial to set the required transposition
(+ value = transpose UP, - value = trans-pose DOWN).
Instead of using the DIAL, you can changethe track transpose setting by means of thecorresponding sliders (F1…F8). The bottomLED of the sliders turns on to indicate thatthey are enabled as data entry controls. Ifyou use the sliders, it is not necessary to se-lect the tracks first.
5. Escape «Edit Preset» by pressing ESCAPE.
To save the transposition settings, save the Pre-set using STORE PRESET.
Transposing Tracks
PRESET1/2PAGE+ / BANK+
PAGE– / BANK–
F1 F2 F3 F4 F5 F6 F7 F8
3
4
5
ENTER ESCAPE
2/9 PRESET:TRANSPOSER [Tk07]
00 00 00 00 00 00 +04 00
MAX
MIN
DRUMS
ACCOMPANIMENT
BASS ACCOMP.1 ACCOMP.2 ACCOMP. 3 LOWER UPPER 2 UPPER 1
F1 F2 F3 F4 F5 F6 F7 F8
OR
○ ○ ○ ○ ○ ○ ○ ○ ○ ○ ○ ○ ○ ○ ○ ○ ○ ○ ○ ○ ○ ○
Sounds & Presets 4•19
○ ○ ○ ○ ○ ○ ○ ○ ○ ○ ○ ○ ○ ○ ○ ○ ○ ○ ○ ○ ○ ○ ○ ○ ○
Store Preset
How to Store Presets
Use the STORE PRESET button to save a Pre-set, to create a new one or to change the name
Save a Preset if you want to conserve thechanges that have been applied. The temporarychanges made to a Preset are lost if you select adifferent one or the same one again or select aStyle.
You can save the changes to the current Preset,or to a different one. The changes can be memo-rized to any of the 64 Programmable Presetsavailable.
○ ○ ○ ○ ○ ○ ○ ○ ○ ○ ○ ○ ○ ○ ○ ○ ○ ○ ○ ○
© Note: The Store Preset operation memorizes allmodifications made to the keyboard tracks as wellthe Style tracks. If you modify the tracks of a Style,you can store the modified Style Preset to the
○ ○ ○ ○ ○ ○ ○ ○ ○ ○ ○ ○ ○ ○ ○ ○ ○ ○ ○ ○
Preset slots.○ ○ ○ ○ ○ ○ ○ ○ ○ ○ ○ ○ ○ ○ ○ ○ ○ ○ ○ ○
© Note: The GRAND PIANO preset cannot
○ ○ ○ ○ ○ ○ ○ ○ ○ ○ ○ ○ ○ ○ ○ ○ ○ ○ ○ ○
memorize modifications.
Presets can memorize the following data:
Data saved to a Preset
The panel status;
EDIT parameters (Preset, MIDI, Mixer, Sound, Effect -some General parameters);
Tempo (for eventual enabled Style);
Style and Variation (for eventual enabled Style);
Presets containing Sounds or a Drumkit modi-fied in «Edit Sound» show the letter “E” as a pre-fix before the corresponding Pr. Change numberin the first page of «Edit Preset».
For example:
○ ○ ○ ○ ○ ○ ○ ○ ○ ○ ○ ○ ○ ○ ○ ○ ○ ○ ○ ○
© Note: The changes made to the factory-setPresets do not damage the original PS1500 data inany way because they are modified RAM copies.The original data can always be restored with the“Restore Original Preset” or “Restore Original
○ ○ ○ ○ ○ ○ ○ ○ ○ ○ ○ ○ ○ ○ ○ ○ ○ ○ ○ ○
Block” commands in «SYSTEM RESTORE».○ ○ ○ ○ ○ ○ ○ ○ ○ ○ ○ ○ ○ ○ ○ ○ ○ ○ ○ ○
© WARNING - STORE PRESET saves the Presetto RAM and not to disk. The memorized data is lostwhen (a) the backing battery runs flat, (b) re-initialisation takes place (the command “Reset All”
○ ○ ○ ○ ○ ○ ○ ○ ○ ○ ○ ○ ○ ○ ○ ○ ○ ○ ○ ○
is given).○ ○ ○ ○ ○ ○ ○ ○ ○ ○ ○ ○ ○ ○ ○ ○ ○ ○ ○ ○
Save the Preset that you intend to keep to disk.
○ ○ ○ ○ ○ ○ ○ ○ ○ ○ ○ ○ ○ ○ ○ ○ ○ ○ ○ ○
Use the “Save Preset” procedure in “Disk” mode.

○ ○ ○ ○ ○ ○ ○ ○ ○ ○ ○ ○ ○ ○ ○ ○ ○ ○ ○ ○ ○ ○
4•20 User Guide
○ ○ ○ ○ ○ ○ ○ ○ ○ ○ ○ ○ ○ ○ ○ ○ ○ ○ ○ ○ ○ ○ ○ ○ ○
SAVING CHANGES TO THE CURRENT PRE-SETSave a Preset to itself if you want to conservethe applied changes (e.g. a section transpositionor a section volume change, etc.).
1. Press STORE PRESET.
The «Preset Store» window opens showingthe same source and destination Preset.
To save changes to the original Preset, thedisplay parameters need not be changed.
Store Preset
1STORE
PRESET
2
ENTER ESCAPE
2. Press ENTER to confirm, or ESCAPE to cancel.
Once ENTER has been pressed, the Presetretains the new settings. When this Preset isrecalled, it will set PS1500 with memorizedsettings.
Presets also memorize the current Tempo andthe selected Style and Variation as well as datafrom the edit pages.
○ ○ ○ ○ ○ ○ ○ ○ ○ ○ ○ ○ ○ ○ ○ ○ ○ ○ ○ ○ ○
© Note: A Style selected from the Style Groups withSingle Touch Play active recalls a default StylePreset. If you modify the accompaniment tracks ofthe Style Preset, you cannot memorize themodifications to the original Style in the ROMlocations. The modified Style Preset is stored to theProgrammable Preset locations. This provides ameans of recalling the same Style arrangementpatterns with different Style Presets. See also the
○ ○ ○ ○ ○ ○ ○ ○ ○ ○ ○ ○ ○ ○ ○ ○ ○ ○ ○ ○ ○
Styles chapter.
Preset Store:01GrandP TO:01GrandP
Are you sure? Press [ENT] or [ESC]
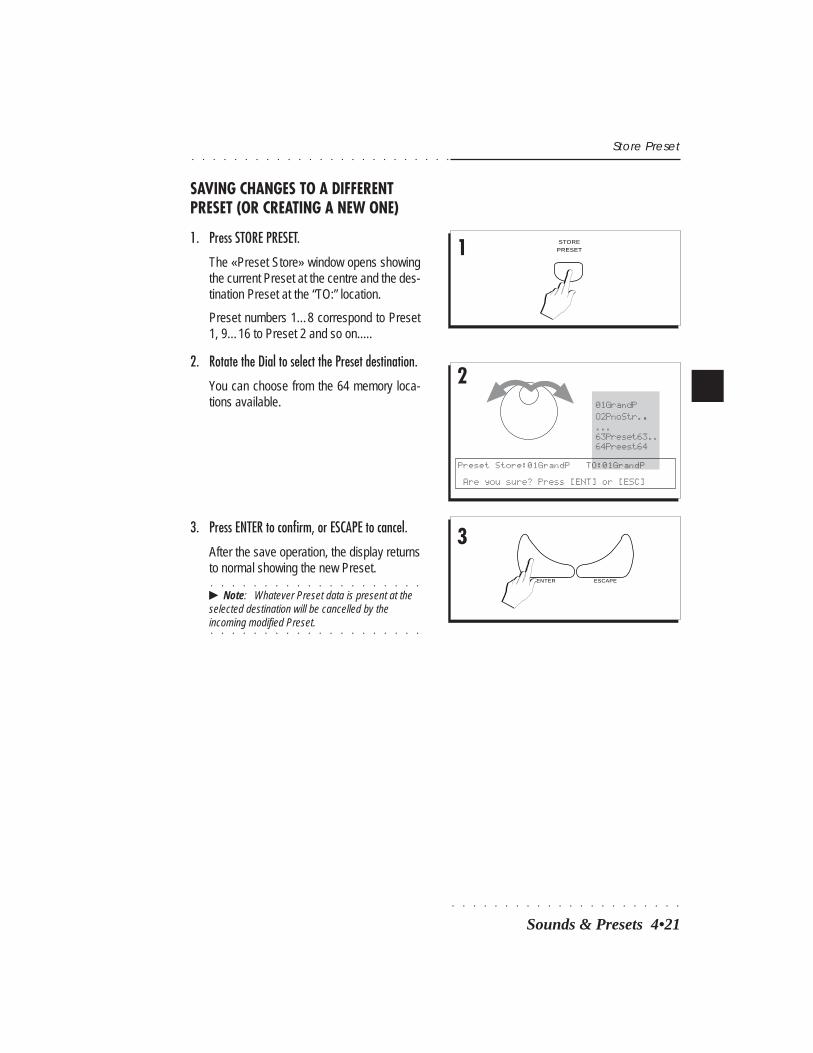
○ ○ ○ ○ ○ ○ ○ ○ ○ ○ ○ ○ ○ ○ ○ ○ ○ ○ ○ ○ ○ ○
Sounds & Presets 4•21
○ ○ ○ ○ ○ ○ ○ ○ ○ ○ ○ ○ ○ ○ ○ ○ ○ ○ ○ ○ ○ ○ ○ ○ ○
SAVING CHANGES TO A DIFFERENTPRESET (OR CREATING A NEW ONE)
1. Press STORE PRESET.
The «Preset Store» window opens showingthe current Preset at the centre and the des-tination Preset at the “TO:” location.
Preset numbers 1…8 correspond to Preset1, 9…16 to Preset 2 and so on.....
2. Rotate the Dial to select the Preset destination.
You can choose from the 64 memory loca-tions available.
Store Preset
1 STORE
PRESET
2
3
ENTER ESCAPE
3. Press ENTER to confirm, or ESCAPE to cancel.
After the save operation, the display returnsto normal showing the new Preset.
○ ○ ○ ○ ○ ○ ○ ○ ○ ○ ○ ○ ○ ○ ○ ○ ○ ○ ○ ○
© Note: Whatever Preset data is present at theselected destination will be cancelled by the
○ ○ ○ ○ ○ ○ ○ ○ ○ ○ ○ ○ ○ ○ ○ ○ ○ ○ ○ ○
incoming modified Preset.
Preset Store:01GrandP TO:01GrandP
Are you sure? Press [ENT] or [ESC]
01GrandPO2PnoStr.....63Preset63..64Preest64
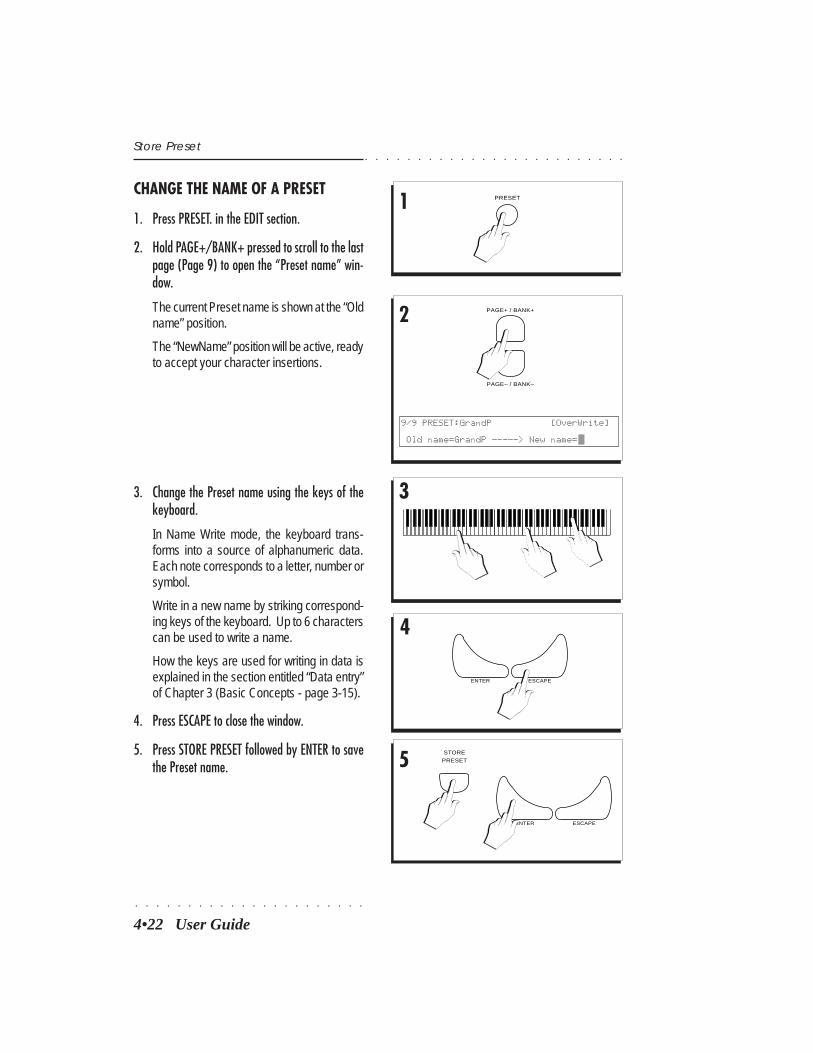
○ ○ ○ ○ ○ ○ ○ ○ ○ ○ ○ ○ ○ ○ ○ ○ ○ ○ ○ ○ ○ ○
4•22 User Guide
○ ○ ○ ○ ○ ○ ○ ○ ○ ○ ○ ○ ○ ○ ○ ○ ○ ○ ○ ○ ○ ○ ○ ○ ○
CHANGE THE NAME OF A PRESET
1. Press PRESET. in the EDIT section.
2. Hold PAGE+/BANK+ pressed to scroll to the lastpage (Page 9) to open the “Preset name” win-dow.
The current Preset name is shown at the “Oldname” position.
The “NewName” position will be active, readyto accept your character insertions.
Store Preset
PRESET1
2
9/9 PRESET:GrandP [OverWrite]
Old name=GrandP -----> New name=
PAGE+ / BANK+
PAGE– / BANK–
3
4
5 STORE
PRESET
ENTER ESCAPE
ENTER ESCAPE
3. Change the Preset name using the keys of thekeyboard.
In Name Write mode, the keyboard trans-forms into a source of alphanumeric data.Each note corresponds to a letter, number orsymbol.
Write in a new name by striking correspond-ing keys of the keyboard. Up to 6 characterscan be used to write a name.
How the keys are used for writing in data isexplained in the section entitled “Data entry”of Chapter 3 (Basic Concepts - page 3-15).
4. Press ESCAPE to close the window.
5. Press STORE PRESET followed by ENTER to savethe Preset name.
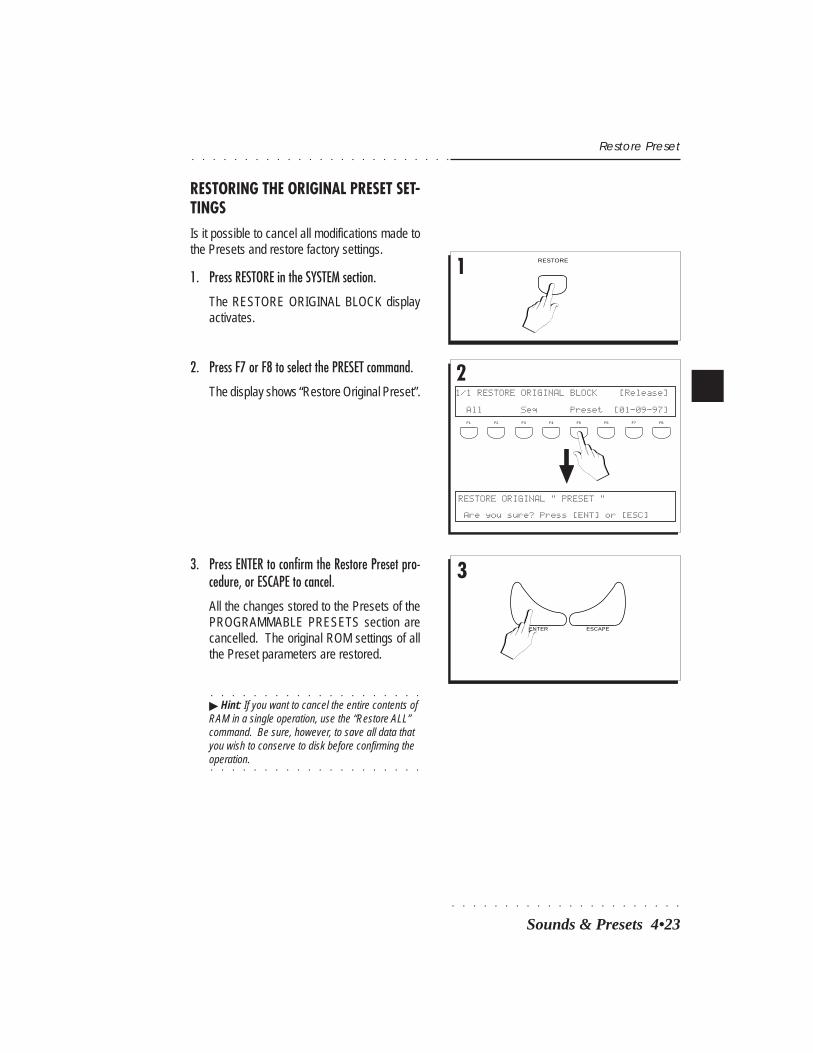
○ ○ ○ ○ ○ ○ ○ ○ ○ ○ ○ ○ ○ ○ ○ ○ ○ ○ ○ ○ ○ ○
Sounds & Presets 4•23
○ ○ ○ ○ ○ ○ ○ ○ ○ ○ ○ ○ ○ ○ ○ ○ ○ ○ ○ ○ ○ ○ ○ ○ ○
Restore Preset
RESTORING THE ORIGINAL PRESET SET-TINGSIs it possible to cancel all modifications made tothe Presets and restore factory settings.
1. Press RESTORE in the SYSTEM section.
The RESTORE ORIGINAL BLOCK displayactivates.
1
2
RESTORE
1/1 RESTORE ORIGINAL BLOCK [Release]
All Seq Preset [01-09-97]F1 F2 F3 F4 F5 F6 F7 F8
RESTORE ORIGINAL " PRESET "
Are you sure? Press [ENT] or [ESC]
3
ENTER ESCAPE
2. Press F7 or F8 to select the PRESET command.
The display shows “Restore Original Preset”.
3. Press ENTER to confirm the Restore Preset pro-cedure, or ESCAPE to cancel.
All the changes stored to the Presets of thePROGRAMMABLE PRESETS section arecancelled. The original ROM settings of allthe Preset parameters are restored.
○ ○ ○ ○ ○ ○ ○ ○ ○ ○ ○ ○ ○ ○ ○ ○ ○ ○ ○ ○
© Hint: If you want to cancel the entire contents ofRAM in a single operation, use the “Restore ALL”command. Be sure, however, to save all data thatyou wish to conserve to disk before confirming the
○ ○ ○ ○ ○ ○ ○ ○ ○ ○ ○ ○ ○ ○ ○ ○ ○ ○ ○ ○
operation.

○ ○ ○ ○ ○ ○ ○ ○ ○ ○ ○ ○ ○ ○ ○ ○ ○ ○ ○ ○ ○ ○
4•24 User Guide
○ ○ ○ ○ ○ ○ ○ ○ ○ ○ ○ ○ ○ ○ ○ ○ ○ ○ ○ ○ ○ ○ ○ ○ ○
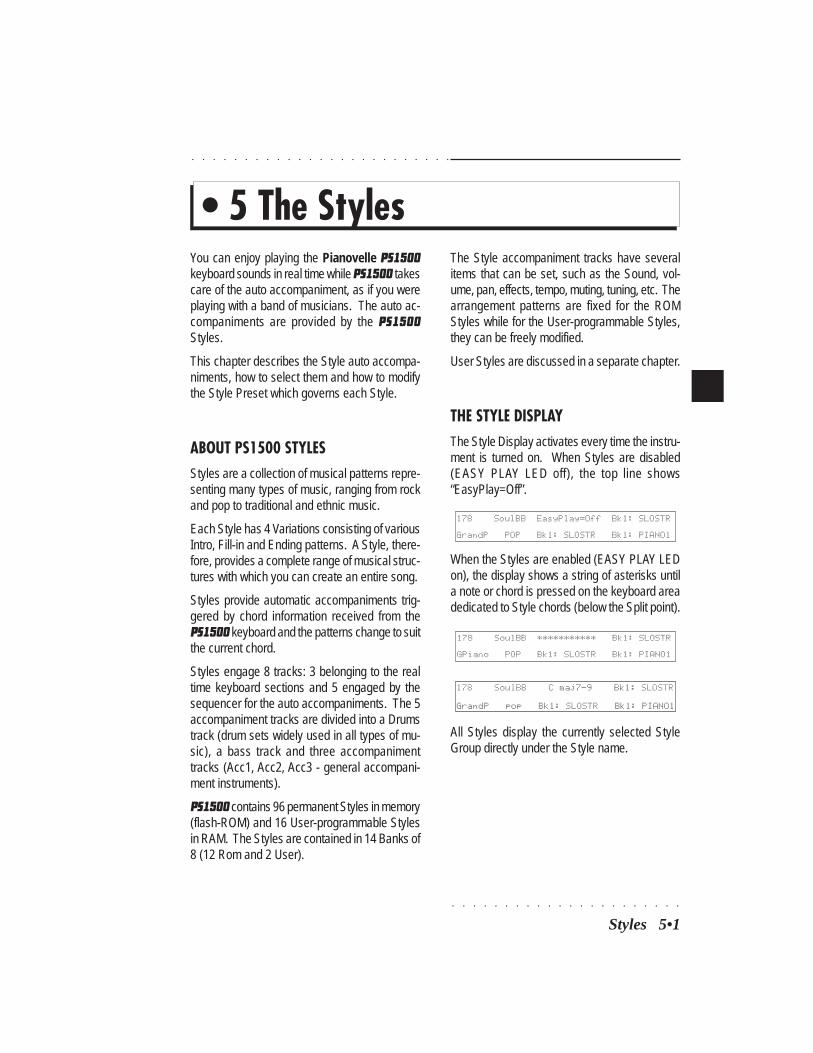
○ ○ ○ ○ ○ ○ ○ ○ ○ ○ ○ ○ ○ ○ ○ ○ ○ ○ ○ ○ ○ ○
○ ○ ○ ○ ○ ○ ○ ○ ○ ○ ○ ○ ○ ○ ○ ○ ○ ○ ○ ○ ○ ○ ○ ○ ○
Styles 5•1
• 5 The StylesYou can enjoy playing the Pianovelle PS1500keyboard sounds in real time while PS1500 takescare of the auto accompaniment, as if you wereplaying with a band of musicians. The auto ac-companiments are provided by the PS1500Styles.
This chapter describes the Style auto accompa-niments, how to select them and how to modifythe Style Preset which governs each Style.
ABOUT PS1500 STYLESStyles are a collection of musical patterns repre-senting many types of music, ranging from rockand pop to traditional and ethnic music.
Each Style has 4 Variations consisting of variousIntro, Fill-in and Ending patterns. A Style, there-fore, provides a complete range of musical struc-tures with which you can create an entire song.
Styles provide automatic accompaniments trig-gered by chord information received from thePS1500 keyboard and the patterns change to suitthe current chord.
Styles engage 8 tracks: 3 belonging to the realtime keyboard sections and 5 engaged by thesequencer for the auto accompaniments. The 5accompaniment tracks are divided into a Drumstrack (drum sets widely used in all types of mu-sic), a bass track and three accompanimenttracks (Acc1, Acc2, Acc3 - general accompani-ment instruments).
PS1500 contains 96 permanent Styles in memory(flash-ROM) and 16 User-programmable Stylesin RAM. The Styles are contained in 14 Banks of8 (12 Rom and 2 User).
The Style accompaniment tracks have severalitems that can be set, such as the Sound, vol-ume, pan, effects, tempo, muting, tuning, etc. Thearrangement patterns are fixed for the ROMStyles while for the User-programmable Styles,they can be freely modified.
User Styles are discussed in a separate chapter.
THE STYLE DISPLAYThe Style Display activates every time the instru-ment is turned on. When Styles are disabled(EASY PLAY LED off), the top line shows“EasyPlay=Off”.
178 SoulBB EasyPlay=Off Bk1: SLOSTR
GrandP POP Bk1: SLOSTR Bk1: PIANO1
When the Styles are enabled (EASY PLAY LEDon), the display shows a string of asterisks untila note or chord is pressed on the keyboard areadedicated to Style chords (below the Split point).
178 SoulBB *********** Bk1: SLOSTR
GPiano POP Bk1: SLOSTR Bk1: PIANO1
178 SoulBB C maj7-9 Bk1: SLOSTR
GrandP pop Bk1: SLOSTR Bk1: PIANO1
All Styles display the currently selected StyleGroup directly under the Style name.
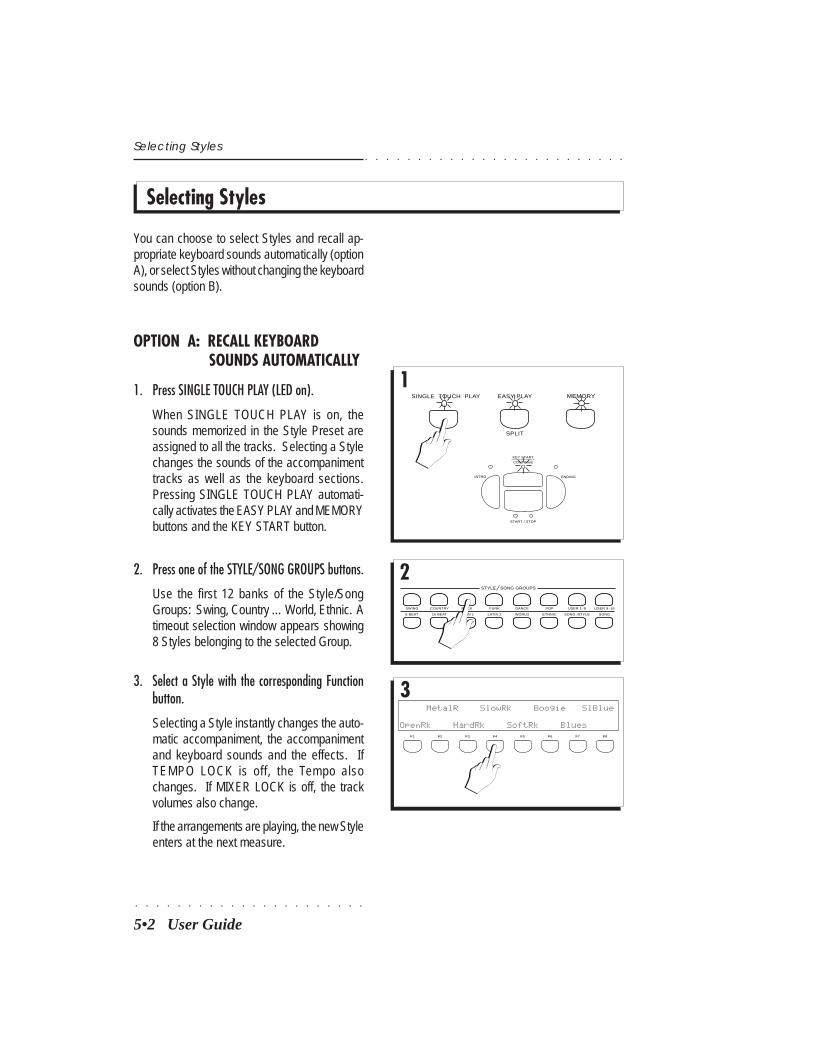
○ ○ ○ ○ ○ ○ ○ ○ ○ ○ ○ ○ ○ ○ ○ ○ ○ ○ ○ ○ ○ ○
5•2 User Guide
○ ○ ○ ○ ○ ○ ○ ○ ○ ○ ○ ○ ○ ○ ○ ○ ○ ○ ○ ○ ○ ○ ○ ○ ○
Selecting Styles
Selecting Styles
You can choose to select Styles and recall ap-propriate keyboard sounds automatically (optionA), or select Styles without changing the keyboardsounds (option B).
OPTION A: RECALL KEYBOARDSOUNDS AUTOMATICALLY
1. Press SINGLE TOUCH PLAY (LED on).
When SINGLE TOUCH PLAY is on, thesounds memorized in the Style Preset areassigned to all the tracks. Selecting a Stylechanges the sounds of the accompanimenttracks as well as the keyboard sections.Pressing SINGLE TOUCH PLAY automati-cally activates the EASY PLAY and MEMORYbuttons and the KEY START button.
SINGLE TOUCH PLAY
1EASY PLAY
SPLIT
MEMORY
2
MetalR SlowRk Boogie SlBlue
OpenRk HardRk SoftRk BluesF1 F2 F3 F4 F5 F6 F7 F8
3
8 BEAT
SWING COUNTRY
16 BEAT
ROCK
LATIN 1
FUNK
LATIN 2
DANCE POP
WORLD ETHNIC
USER 1–8
SONG /STYLE
USER 9–16
SONG
STYLE SONG GROUPS
INTRO
KEY START
CONTINUE
ENDING
START / STOP
3. Select a Style with the corresponding Functionbutton.
Selecting a Style instantly changes the auto-matic accompaniment, the accompanimentand keyboard sounds and the effects. IfTEMPO LOCK is off, the Tempo alsochanges. If MIXER LOCK is off, the trackvolumes also change.
If the arrangements are playing, the new Styleenters at the next measure.
2. Press one of the STYLE/SONG GROUPS buttons.
Use the first 12 banks of the Style/SongGroups: Swing, Country … World, Ethnic. Atimeout selection window appears showing8 Styles belonging to the selected Group.
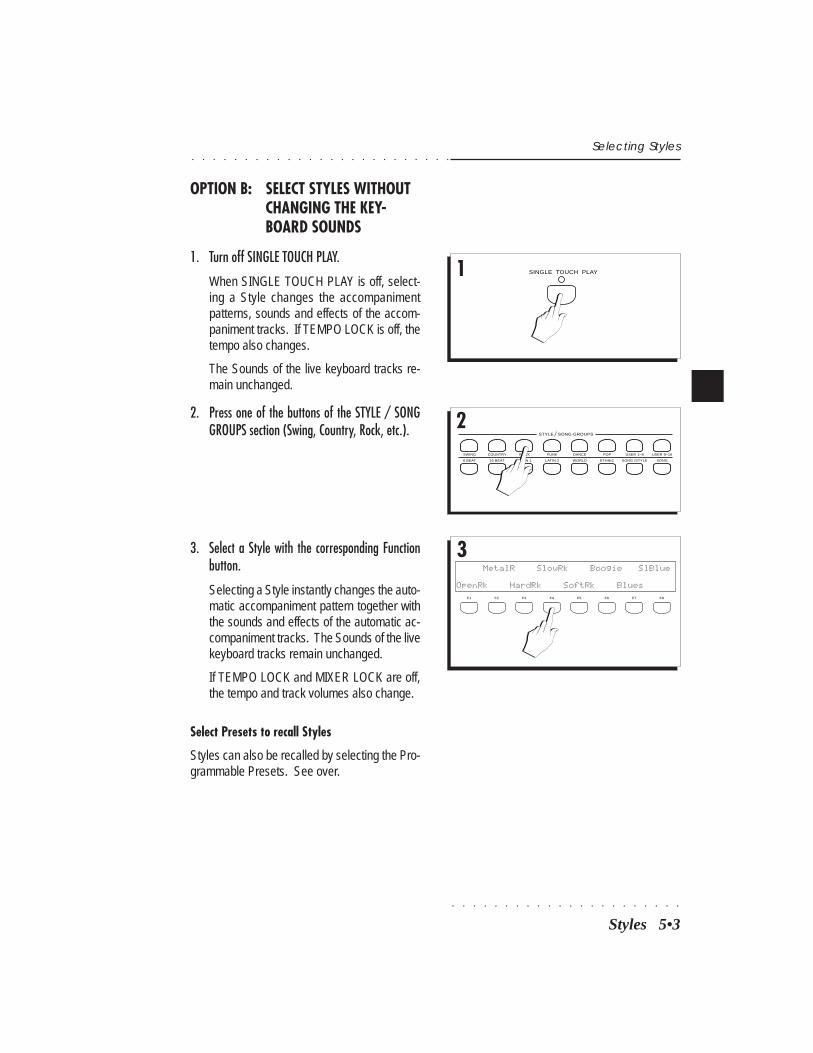
○ ○ ○ ○ ○ ○ ○ ○ ○ ○ ○ ○ ○ ○ ○ ○ ○ ○ ○ ○ ○ ○
○ ○ ○ ○ ○ ○ ○ ○ ○ ○ ○ ○ ○ ○ ○ ○ ○ ○ ○ ○ ○ ○ ○ ○ ○
Styles 5•3
Selecting Styles
OPTION B: SELECT STYLES WITHOUTCHANGING THE KEY-BOARD SOUNDS
1. Turn off SINGLE TOUCH PLAY.
When SINGLE TOUCH PLAY is off, select-ing a Style changes the accompanimentpatterns, sounds and effects of the accom-paniment tracks. If TEMPO LOCK is off, thetempo also changes.
The Sounds of the live keyboard tracks re-main unchanged.
2. Press one of the buttons of the STYLE / SONGGROUPS section (Swing, Country, Rock, etc.).
1 SINGLE TOUCH PLAY
2
8 BEAT
SWING COUNTRY
16 BEAT
ROCK
LATIN 1
FUNK
LATIN 2
DANCE POP
WORLD ETHNIC
USER 1–8
SONG /STYLE
USER 9–16
SONG
STYLE SONG GROUPS
MetalR SlowRk Boogie SlBlue
OpenRk HardRk SoftRk BluesF1 F2 F3 F4 F5 F6 F7 F8
33. Select a Style with the corresponding Functionbutton.
Selecting a Style instantly changes the auto-matic accompaniment pattern together withthe sounds and effects of the automatic ac-companiment tracks. The Sounds of the livekeyboard tracks remain unchanged.
If TEMPO LOCK and MIXER LOCK are off,the tempo and track volumes also change.
Select Presets to recall Styles
Styles can also be recalled by selecting the Pro-grammable Presets. See over.
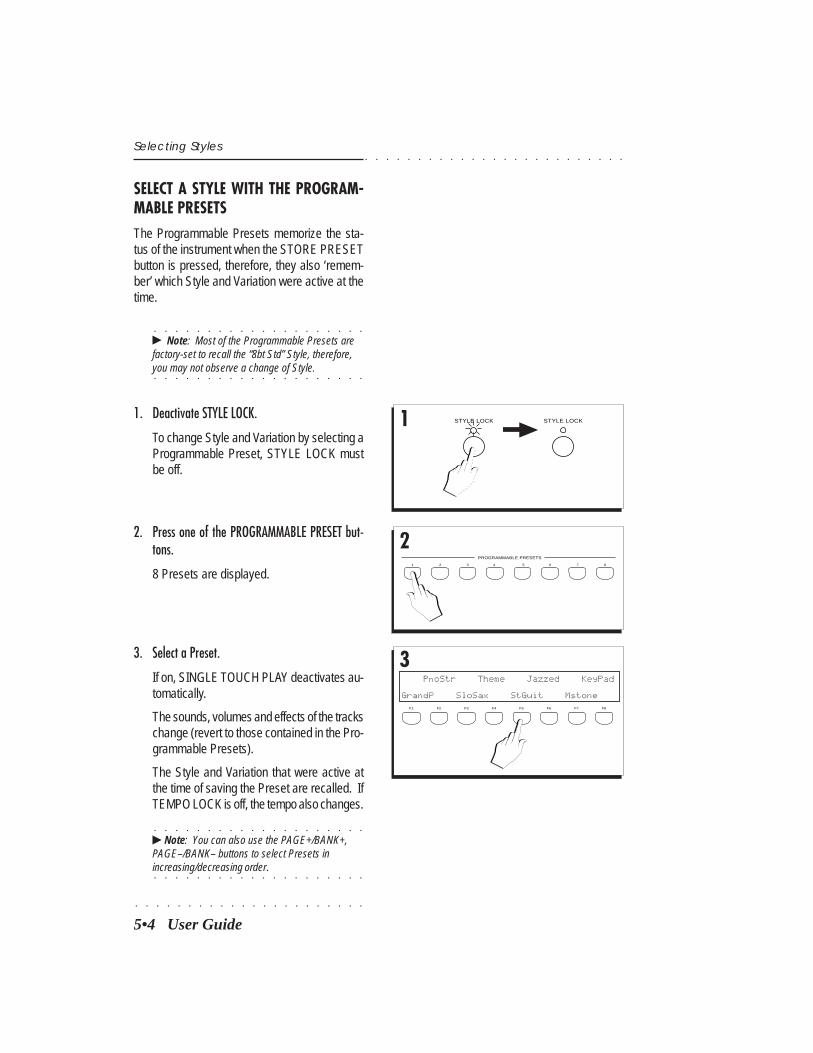
○ ○ ○ ○ ○ ○ ○ ○ ○ ○ ○ ○ ○ ○ ○ ○ ○ ○ ○ ○ ○ ○
5•4 User Guide
○ ○ ○ ○ ○ ○ ○ ○ ○ ○ ○ ○ ○ ○ ○ ○ ○ ○ ○ ○ ○ ○ ○ ○ ○
SELECT A STYLE WITH THE PROGRAM-MABLE PRESETSThe Programmable Presets memorize the sta-tus of the instrument when the STORE PRESETbutton is pressed, therefore, they also ‘remem-ber’ which Style and Variation were active at thetime.
○ ○ ○ ○ ○ ○ ○ ○ ○ ○ ○ ○ ○ ○ ○ ○ ○ ○ ○ ○
© Note: Most of the Programmable Presets arefactory-set to recall the “8bt Std” Style, therefore,
○ ○ ○ ○ ○ ○ ○ ○ ○ ○ ○ ○ ○ ○ ○ ○ ○ ○ ○ ○
you may not observe a change of Style.
1. Deactivate STYLE LOCK.
To change Style and Variation by selecting aProgrammable Preset, STYLE LOCK mustbe off.
Selecting Styles
PnoStr Theme Jazzed KeyPad
GrandP SloSax StGuit MstoneF1 F2 F3 F4 F5 F6 F7 F8
1
2
3
STYLE LOCK STYLE LOCK
1 2 3 4 5 6 7 8
PROGRAMMABLE PRESETS
2. Press one of the PROGRAMMABLE PRESET but-tons.
8 Presets are displayed.
3. Select a Preset.
If on, SINGLE TOUCH PLAY deactivates au-tomatically.
The sounds, volumes and effects of the trackschange (revert to those contained in the Pro-grammable Presets).
The Style and Variation that were active atthe time of saving the Preset are recalled. IfTEMPO LOCK is off, the tempo also changes.
○ ○ ○ ○ ○ ○ ○ ○ ○ ○ ○ ○ ○ ○ ○ ○ ○ ○ ○ ○
© Note: You can also use the PAGE+/BANK+,PAGE–/BANK– buttons to select Presets in
○ ○ ○ ○ ○ ○ ○ ○ ○ ○ ○ ○ ○ ○ ○ ○ ○ ○ ○ ○
increasing/decreasing order.
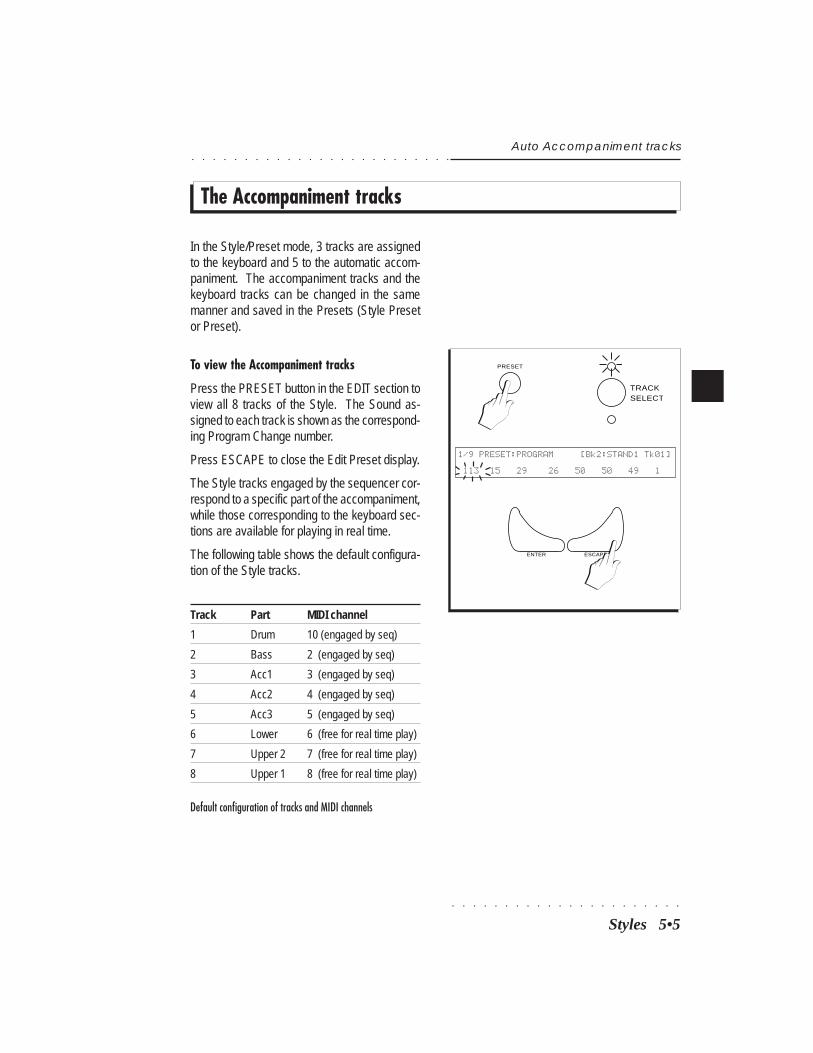
○ ○ ○ ○ ○ ○ ○ ○ ○ ○ ○ ○ ○ ○ ○ ○ ○ ○ ○ ○ ○ ○
○ ○ ○ ○ ○ ○ ○ ○ ○ ○ ○ ○ ○ ○ ○ ○ ○ ○ ○ ○ ○ ○ ○ ○ ○
Styles 5•5
The Accompaniment tracks
Auto Accompaniment tracks
In the Style/Preset mode, 3 tracks are assignedto the keyboard and 5 to the automatic accom-paniment. The accompaniment tracks and thekeyboard tracks can be changed in the samemanner and saved in the Presets (Style Presetor Preset).
To view the Accompaniment tracks
Press the PRESET button in the EDIT section toview all 8 tracks of the Style. The Sound as-signed to each track is shown as the correspond-ing Program Change number.
Press ESCAPE to close the Edit Preset display.
The Style tracks engaged by the sequencer cor-respond to a specific part of the accompaniment,while those corresponding to the keyboard sec-tions are available for playing in real time.
The following table shows the default configura-tion of the Style tracks.
Track Part MIDI channel
1 Drum 10 (engaged by seq)
2 Bass 2 (engaged by seq)
3 Acc1 3 (engaged by seq)
4 Acc2 4 (engaged by seq)
5 Acc3 5 (engaged by seq)
6 Lower 6 (free for real time play)
7 Upper 2 7 (free for real time play)
8 Upper 1 8 (free for real time play)
Default configuration of tracks and MIDI channels
PRESET
TRACKSELECT
1/9 PRESET:PROGRAM [Bk2:STAND1 Tk01]
113 15 29 26 50 50 49 1
ENTER ESCAPE
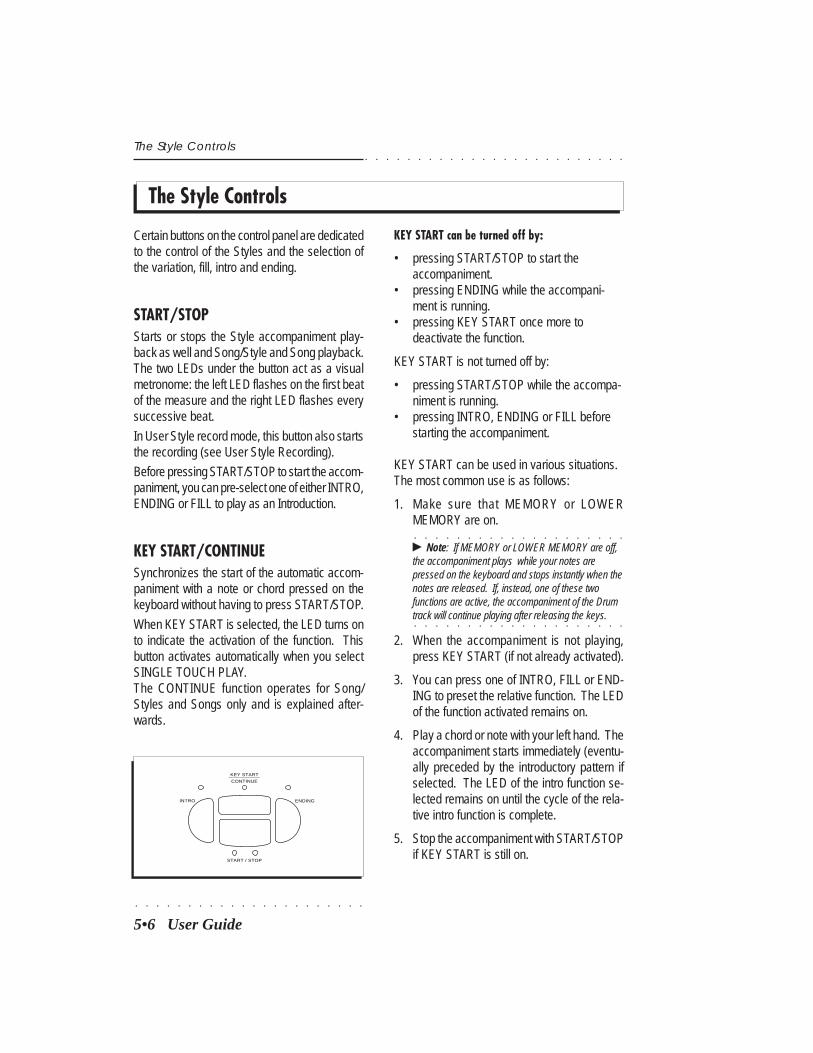
○ ○ ○ ○ ○ ○ ○ ○ ○ ○ ○ ○ ○ ○ ○ ○ ○ ○ ○ ○ ○ ○
5•6 User Guide
○ ○ ○ ○ ○ ○ ○ ○ ○ ○ ○ ○ ○ ○ ○ ○ ○ ○ ○ ○ ○ ○ ○ ○ ○
The Style Controls
KEY START can be turned off by:
• pressing START/STOP to start theaccompaniment.
• pressing ENDING while the accompani-ment is running.
• pressing KEY START once more todeactivate the function.
KEY START is not turned off by:
• pressing START/STOP while the accompa-niment is running.
• pressing INTRO, ENDING or FILL beforestarting the accompaniment.
KEY START can be used in various situations.The most common use is as follows:
1. Make sure that MEMORY or LOWERMEMORY are on.
○ ○ ○ ○ ○ ○ ○ ○ ○ ○ ○ ○ ○ ○ ○ ○ ○ ○ ○ ○
© Note: If MEMORY or LOWER MEMORY are off,the accompaniment plays while your notes arepressed on the keyboard and stops instantly when thenotes are released. If, instead, one of these twofunctions are active, the accompaniment of the Drum
○ ○ ○ ○ ○ ○ ○ ○ ○ ○ ○ ○ ○ ○ ○ ○ ○ ○ ○ ○
track will continue playing after releasing the keys.
2. When the accompaniment is not playing,press KEY START (if not already activated).
3. You can press one of INTRO, FILL or END-ING to preset the relative function. The LEDof the function activated remains on.
4. Play a chord or note with your left hand. Theaccompaniment starts immediately (eventu-ally preceded by the introductory pattern ifselected. The LED of the intro function se-lected remains on until the cycle of the rela-tive intro function is complete.
5. Stop the accompaniment with START/STOPif KEY START is still on.
The Style Controls
Certain buttons on the control panel are dedicatedto the control of the Styles and the selection ofthe variation, fill, intro and ending.
START/STOPStarts or stops the Style accompaniment play-back as well and Song/Style and Song playback.The two LEDs under the button act as a visualmetronome: the left LED flashes on the first beatof the measure and the right LED flashes everysuccessive beat.
In User Style record mode, this button also startsthe recording (see User Style Recording).
Before pressing START/STOP to start the accom-paniment, you can pre-select one of either INTRO,ENDING or FILL to play as an Introduction.
KEY START/CONTINUESynchronizes the start of the automatic accom-paniment with a note or chord pressed on thekeyboard without having to press START/STOP.
When KEY START is selected, the LED turns onto indicate the activation of the function. Thisbutton activates automatically when you selectSINGLE TOUCH PLAY.The CONTINUE function operates for Song/Styles and Songs only and is explained after-wards.
INTRO
KEY START
CONTINUE
ENDING
START / STOP
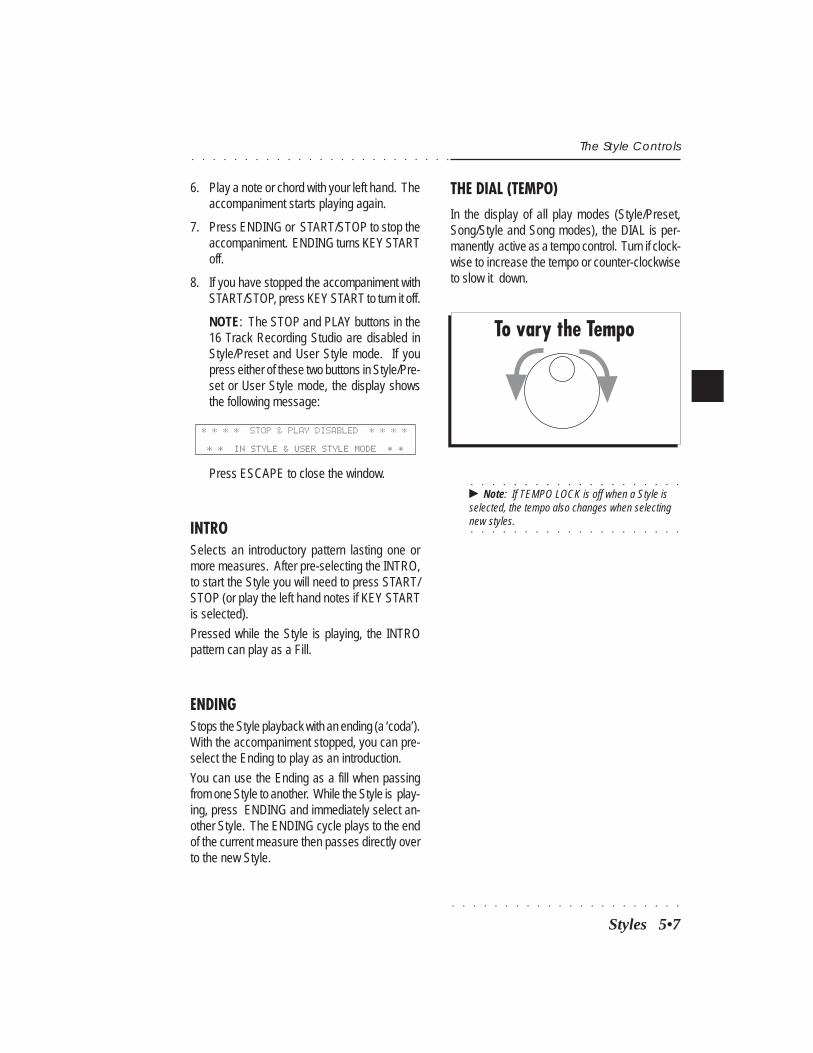
○ ○ ○ ○ ○ ○ ○ ○ ○ ○ ○ ○ ○ ○ ○ ○ ○ ○ ○ ○ ○ ○
○ ○ ○ ○ ○ ○ ○ ○ ○ ○ ○ ○ ○ ○ ○ ○ ○ ○ ○ ○ ○ ○ ○ ○ ○
Styles 5•7
6. Play a note or chord with your left hand. Theaccompaniment starts playing again.
7. Press ENDING or START/STOP to stop theaccompaniment. ENDING turns KEY STARToff.
8. If you have stopped the accompaniment withSTART/STOP, press KEY START to turn it off.
NOTE: The STOP and PLAY buttons in the16 Track Recording Studio are disabled inStyle/Preset and User Style mode. If youpress either of these two buttons in Style/Pre-set or User Style mode, the display showsthe following message:
* * * * STOP & PLAY DISABLED * * * *
* * IN STYLE & USER STYLE MODE * *
Press ESCAPE to close the window.
INTROSelects an introductory pattern lasting one ormore measures. After pre-selecting the INTRO,to start the Style you will need to press START/STOP (or play the left hand notes if KEY STARTis selected).
Pressed while the Style is playing, the INTROpattern can play as a Fill.
ENDINGStops the Style playback with an ending (a ‘coda’).With the accompaniment stopped, you can pre-select the Ending to play as an introduction.
You can use the Ending as a fill when passingfrom one Style to another. While the Style is play-ing, press ENDING and immediately select an-other Style. The ENDING cycle plays to the endof the current measure then passes directly overto the new Style.
THE DIAL (TEMPO)In the display of all play modes (Style/Preset,Song/Style and Song modes), the DIAL is per-manently active as a tempo control. Turn if clock-wise to increase the tempo or counter-clockwiseto slow it down.
○ ○ ○ ○ ○ ○ ○ ○ ○ ○ ○ ○ ○ ○ ○ ○ ○ ○ ○ ○
© Note: If TEMPO LOCK is off when a Style isselected, the tempo also changes when selecting
○ ○ ○ ○ ○ ○ ○ ○ ○ ○ ○ ○ ○ ○ ○ ○ ○ ○ ○ ○
new styles.
The Style Controls
To vary the Tempo

○ ○ ○ ○ ○ ○ ○ ○ ○ ○ ○ ○ ○ ○ ○ ○ ○ ○ ○ ○ ○ ○
5•8 User Guide
○ ○ ○ ○ ○ ○ ○ ○ ○ ○ ○ ○ ○ ○ ○ ○ ○ ○ ○ ○ ○ ○ ○ ○ ○
Variation, Fill, Style Lock
Variation, Fill, Style Lock
VARIATION 1,2,3,4These buttons control the Style Variations. Eachbutton recalls a different version of the same ac-companiment.
Each variation includes different patterns for theBasic, Intro, Fill and Ending sections.
the timing of the last two taps, the relative Tempovalue is displayed and the Style accompanimentstarts automatically.
The tempo is established according to the cur-rent Time Signature, i.e. four taps for 4/4, threefor 3/4, etc..
As an audio indication to the rest of the band, thetime is tapped out with the sound of drumsticks.
VARIATION1 2 3 4
FILL<, FILL, FILL>/TAP TEMPOFILL< plays the Fill cycle then breaks into theprevious Variation. If variation 1 is selected, Vari-ation 4 will be recalled.
FILL plays the Fill cycle then continues with thecurrent Variation. When the accompaniment isnot playing, this fill can be preset as an Intro.
FILL>[Tap Tempo] plays the Fill cycle thenbreaks into the next Variation. If variation 4 is se-lected, Variation 1 will be recalled.
Normally, the Fill cycles plays once only. If youhold the FILL button pressed, it will repeat theFill cycle continually until released.
FILLTAP TEMPO
TAP TEMPO [FILL>]This button also acts as the TAP TEMPO func-tion.
With the accompaniment off, beat time on thebutton. The tempo is established according to
STYLE LOCKThis button determines whether the current Styleaccompaniment pattern changes or rests un-changed when you select Presets from the PRO-GRAMMABLE PRESETS.
If STYLE LOCK is off, selecting Presets changesthe Style accompaniment patterns, the accom-paniment and keyboard Sounds, the effects andtrack volumes. If STYLE LOCK is on, selectingPresets changes the keyboard sounds only whilethe Style accompaniment pattern and effects restunchanged.
STYLE LOCK
TAP TEMPO
1
TAP TEMPO
2
TAP TEMPO
3
TAP TEMPO
4
Tap Tempo
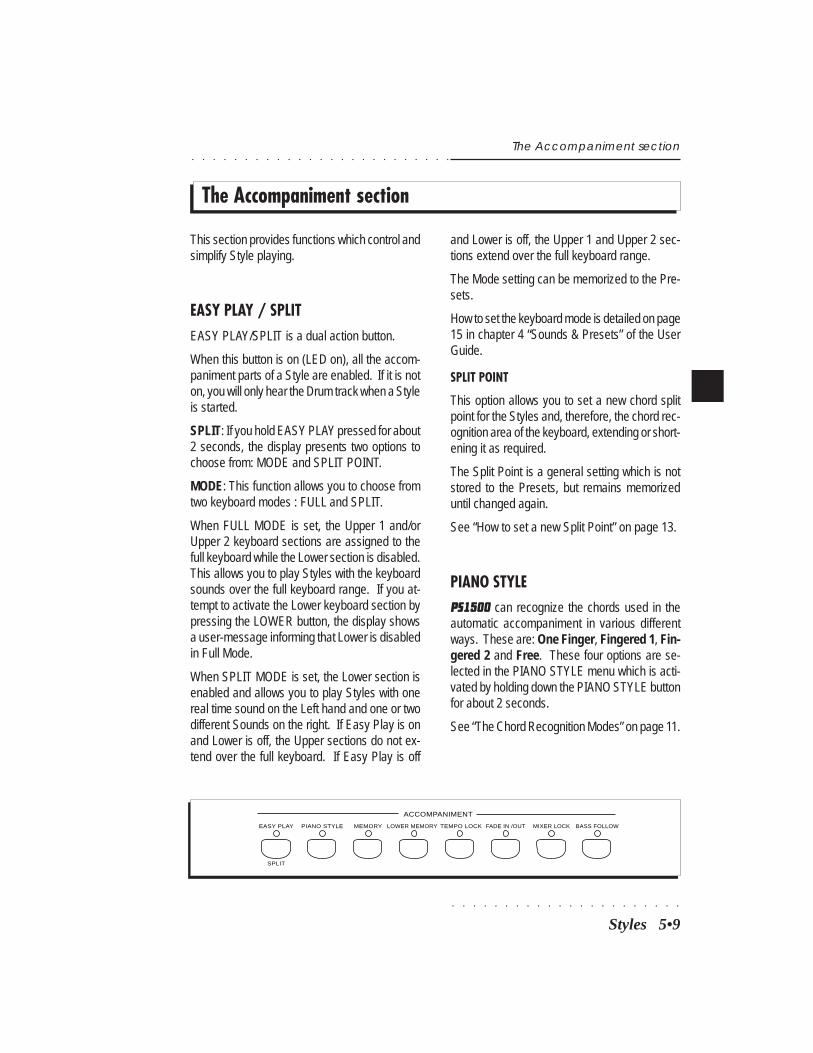
○ ○ ○ ○ ○ ○ ○ ○ ○ ○ ○ ○ ○ ○ ○ ○ ○ ○ ○ ○ ○ ○
○ ○ ○ ○ ○ ○ ○ ○ ○ ○ ○ ○ ○ ○ ○ ○ ○ ○ ○ ○ ○ ○ ○ ○ ○
Styles 5•9
The Accompaniment section
The Accompaniment section
This section provides functions which control andsimplify Style playing.
EASY PLAY / SPLITEASY PLAY/SPLIT is a dual action button.
When this button is on (LED on), all the accom-paniment parts of a Style are enabled. If it is noton, you will only hear the Drum track when a Styleis started.
SPLIT: If you hold EASY PLAY pressed for about2 seconds, the display presents two options tochoose from: MODE and SPLIT POINT.
MODE: This function allows you to choose fromtwo keyboard modes : FULL and SPLIT.
When FULL MODE is set, the Upper 1 and/orUpper 2 keyboard sections are assigned to thefull keyboard while the Lower section is disabled.This allows you to play Styles with the keyboardsounds over the full keyboard range. If you at-tempt to activate the Lower keyboard section bypressing the LOWER button, the display showsa user-message informing that Lower is disabledin Full Mode.
When SPLIT MODE is set, the Lower section isenabled and allows you to play Styles with onereal time sound on the Left hand and one or twodifferent Sounds on the right. If Easy Play is onand Lower is off, the Upper sections do not ex-tend over the full keyboard. If Easy Play is off
and Lower is off, the Upper 1 and Upper 2 sec-tions extend over the full keyboard range.
The Mode setting can be memorized to the Pre-sets.
How to set the keyboard mode is detailed on page15 in chapter 4 “Sounds & Presets” of the UserGuide.
SPLIT POINT
This option allows you to set a new chord splitpoint for the Styles and, therefore, the chord rec-ognition area of the keyboard, extending or short-ening it as required.
The Split Point is a general setting which is notstored to the Presets, but remains memorizeduntil changed again.
See “How to set a new Split Point” on page 13.
PIANO STYLEPS1500 can recognize the chords used in theautomatic accompaniment in various differentways. These are: One Finger, Fingered 1, Fin-gered 2 and Free. These four options are se-lected in the PIANO STYLE menu which is acti-vated by holding down the PIANO STYLE buttonfor about 2 seconds.
See “The Chord Recognition Modes” on page 11.
PIANO STYLE MEMORY LOWER MEMORY TEMPO LOCK FADE IN /OUT MIXER LOCK BASS FOLLOW
ACCOMPANIMENT
EASY PLAY
SPLIT
○ ○ ○ ○ ○ ○ ○ ○ ○ ○ ○ ○ ○ ○ ○ ○ ○ ○ ○ ○ ○ ○
5•10 User Guide
○ ○ ○ ○ ○ ○ ○ ○ ○ ○ ○ ○ ○ ○ ○ ○ ○ ○ ○ ○ ○ ○ ○ ○ ○
MEMORYWhen this button is on (LED on), the accompani-ment continues to play after releasing the lefthand from the keyboard. When off, releasing yourleft hand causes the accompaniment to stop.
LOWER MEMORYIf this is on (LED on), the notes of the track as-signed to the left hand (Lower) are held even ifthe left hand is taken away from the keys.
The Lower Memory function is useful for holdingon ‘background’ sounds without having to use aDamper pedal (which may be of more use withthe Upper sounds).
When off, releasing your left hand will cause theLower sound to stop playing.
TEMPO LOCKIf Tempo Lock is off, when a Style or a Preset isselected the tempo changes. If the function ison, the tempo will not change.
FADE IN/OUTFADE IN/OUT fades the accompaniment with agradual increase or decrease of volume.
Press the button before starting the accompani-ment. The Style track volumes are instantly setto zero. Use either START/STOP or KEY STARTto start the accompaniment. After the start, theaccompaniment track volumes gradually increaseand reach their programmed peak after a 2 meas-ure (bar) cycle.
Press FADE IN/OUT while the accompanimentis running; all the track volumes gradually de-crease and the accompaniment automaticallystops at the end of the Fade Out cycle.
During the Fade cycle, the relative LED flashes.
MIXER LOCKA Preset also memorizes the track volumes. IfMIXER LOCK is off, when a Style or Preset isselected the track volumes change too. If it ison, all the volumes of the tracks assigned to thekeyboard and accompaniment rest unchanged.
BASS FOLLOWIf BASS FOLLOW is on, the bass part of the autoaccompaniment of the current Style plays accord-ing to the lowest note of the current chord. If youplay a different inversion of the same chord, thelowest note also changes resulting in a differentbass note being played.
If off, the bass will follow the original programmedpattern of the Style.
Bass Follow permits real time changes to the oth-erwise fixed bass pattern of a Style, by playingdifferent chord inversions.
The Accompaniment section
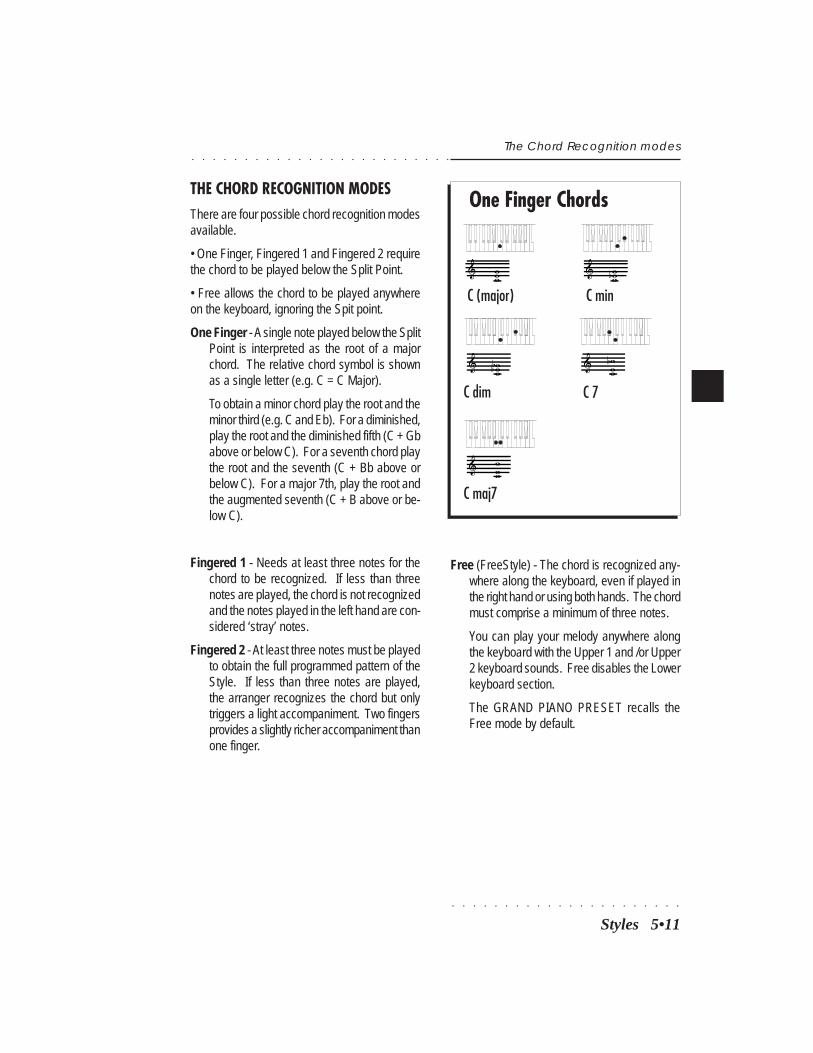
○ ○ ○ ○ ○ ○ ○ ○ ○ ○ ○ ○ ○ ○ ○ ○ ○ ○ ○ ○ ○ ○
○ ○ ○ ○ ○ ○ ○ ○ ○ ○ ○ ○ ○ ○ ○ ○ ○ ○ ○ ○ ○ ○ ○ ○ ○
Styles 5•11
The Chord Recognition modes
THE CHORD RECOGNITION MODESThere are four possible chord recognition modesavailable.
• One Finger, Fingered 1 and Fingered 2 requirethe chord to be played below the Split Point.
• Free allows the chord to be played anywhereon the keyboard, ignoring the Spit point.
One Finger - A single note played below the SplitPoint is interpreted as the root of a majorchord. The relative chord symbol is shownas a single letter (e.g. C = C Major).
To obtain a minor chord play the root and theminor third (e.g. C and Eb). For a diminished,play the root and the diminished fifth (C + Gbabove or below C). For a seventh chord playthe root and the seventh (C + Bb above orbelow C). For a major 7th, play the root andthe augmented seventh (C + B above or be-low C).
Fingered 1 - Needs at least three notes for thechord to be recognized. If less than threenotes are played, the chord is not recognizedand the notes played in the left hand are con-sidered ‘stray’ notes.
Fingered 2 - At least three notes must be playedto obtain the full programmed pattern of theStyle. If less than three notes are played,the arranger recognizes the chord but onlytriggers a light accompaniment. Two fingersprovides a slightly richer accompaniment thanone finger.
One Finger Chords
C (major) C min
C dim C 7
C maj7
Free (FreeStyle) - The chord is recognized any-where along the keyboard, even if played inthe right hand or using both hands. The chordmust comprise a minimum of three notes.
You can play your melody anywhere alongthe keyboard with the Upper 1 and /or Upper2 keyboard sounds. Free disables the Lowerkeyboard section.
The GRAND PIANO PRESET recalls theFree mode by default.
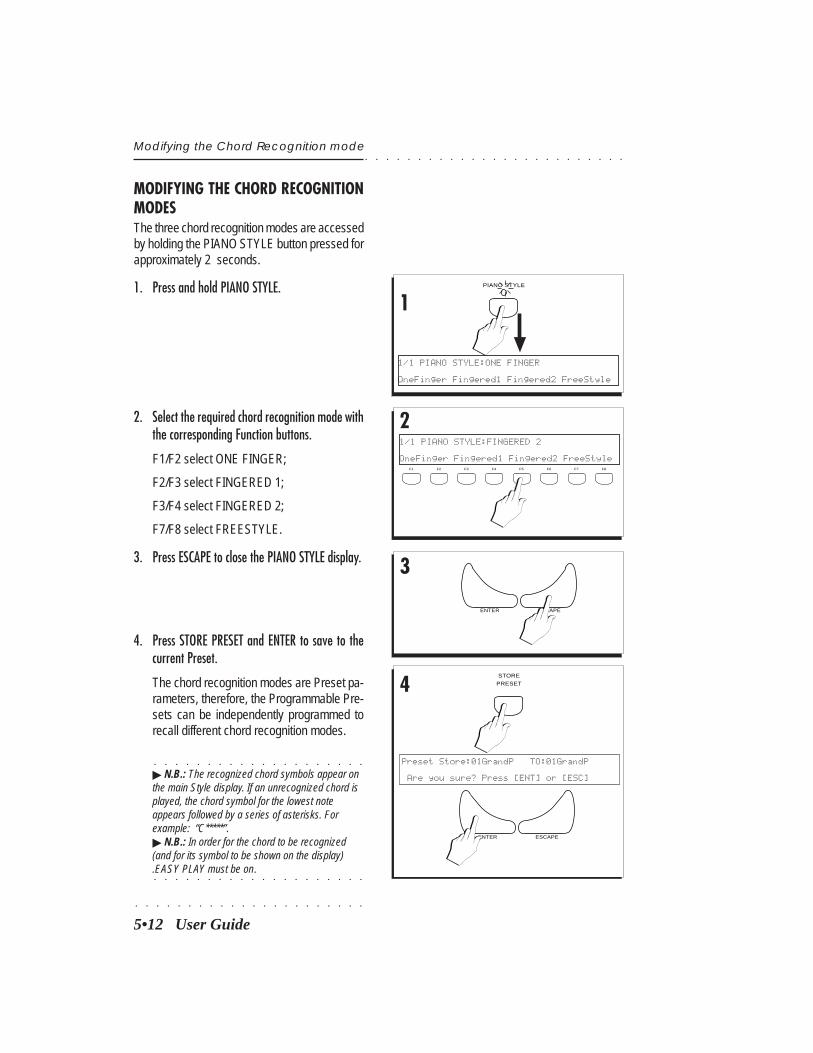
○ ○ ○ ○ ○ ○ ○ ○ ○ ○ ○ ○ ○ ○ ○ ○ ○ ○ ○ ○ ○ ○
5•12 User Guide
○ ○ ○ ○ ○ ○ ○ ○ ○ ○ ○ ○ ○ ○ ○ ○ ○ ○ ○ ○ ○ ○ ○ ○ ○
MODIFYING THE CHORD RECOGNITIONMODESThe three chord recognition modes are accessedby holding the PIANO STYLE button pressed forapproximately 2 seconds.
1. Press and hold PIANO STYLE.
2
1PIANO STYLE
1/1 PIANO STYLE:ONE FINGER
OneFinger Fingered1 Fingered2 FreeStyle
F1 F2 F3 F4 F5 F6 F7 F8
1/1 PIANO STYLE:FINGERED 2
OneFinger Fingered1 Fingered2 FreeStyle
ENTER ESCAPE
3
2. Select the required chord recognition mode withthe corresponding Function buttons.
F1/F2 select ONE FINGER;
F2/F3 select FINGERED 1;
F3/F4 select FINGERED 2;
F7/F8 select FREESTYLE.
3. Press ESCAPE to close the PIANO STYLE display.
4. Press STORE PRESET and ENTER to save to thecurrent Preset.
The chord recognition modes are Preset pa-rameters, therefore, the Programmable Pre-sets can be independently programmed torecall different chord recognition modes.
○ ○ ○ ○ ○ ○ ○ ○ ○ ○ ○ ○ ○ ○ ○ ○ ○ ○ ○ ○
© N.B.: The recognized chord symbols appear onthe main Style display. If an unrecognized chord isplayed, the chord symbol for the lowest noteappears followed by a series of asterisks. Forexample: “C*****”.© N.B.: In order for the chord to be recognized(and for its symbol to be shown on the display)
○ ○ ○ ○ ○ ○ ○ ○ ○ ○ ○ ○ ○ ○ ○ ○ ○ ○ ○ ○
.EASY PLAY must be on.
HARMONY
TYPEON OFF
4STORE
PRESET
ENTER ESCAPE
Modifying the Chord Recognition mode
Preset Store:01GrandP TO:01GrandP
Are you sure? Press [ENT] or [ESC]
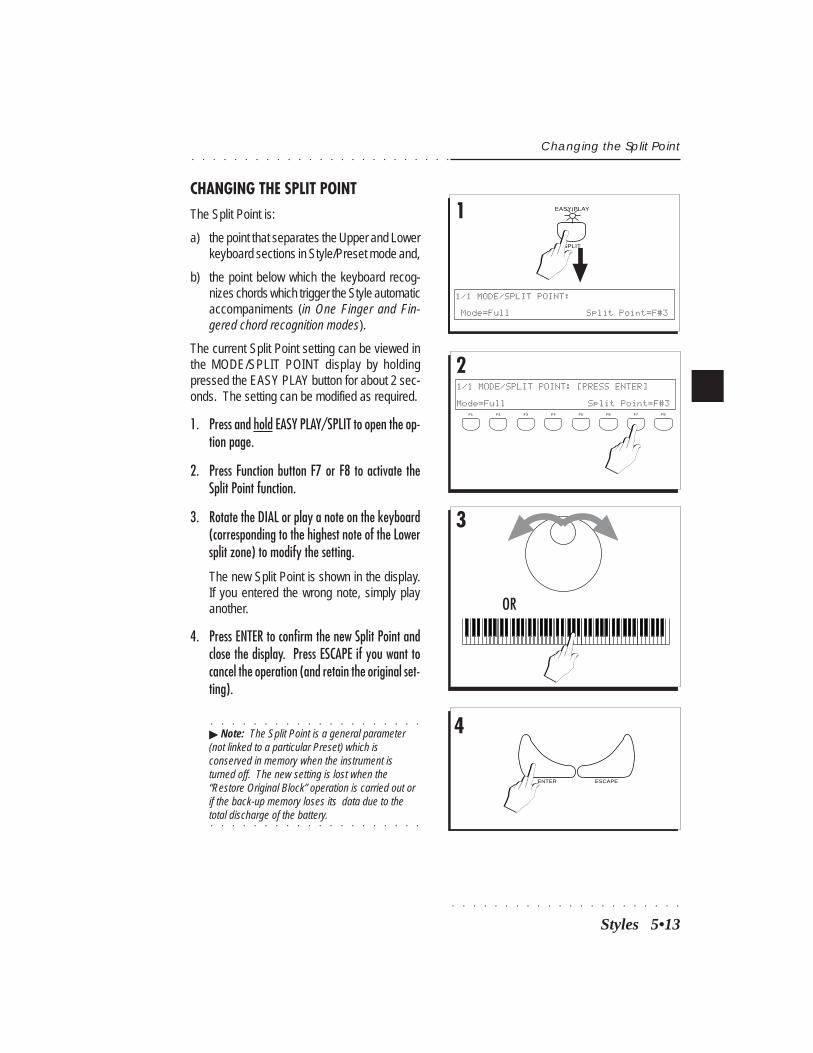
○ ○ ○ ○ ○ ○ ○ ○ ○ ○ ○ ○ ○ ○ ○ ○ ○ ○ ○ ○ ○ ○
○ ○ ○ ○ ○ ○ ○ ○ ○ ○ ○ ○ ○ ○ ○ ○ ○ ○ ○ ○ ○ ○ ○ ○ ○
Styles 5•13
CHANGING THE SPLIT POINTThe Split Point is:
a) the point that separates the Upper and Lowerkeyboard sections in Style/Preset mode and,
b) the point below which the keyboard recog-nizes chords which trigger the Style automaticaccompaniments (in One Finger and Fin-gered chord recognition modes).
The current Split Point setting can be viewed inthe MODE/SPLIT POINT display by holdingpressed the EASY PLAY button for about 2 sec-onds. The setting can be modified as required.
1. Press and hold EASY PLAY/SPLIT to open the op-tion page.
2. Press Function button F7 or F8 to activate theSplit Point function.
3. Rotate the DIAL or play a note on the keyboard(corresponding to the highest note of the Lowersplit zone) to modify the setting.
The new Split Point is shown in the display.If you entered the wrong note, simply playanother.
4. Press ENTER to confirm the new Split Point andclose the display. Press ESCAPE if you want tocancel the operation (and retain the original set-ting).
○ ○ ○ ○ ○ ○ ○ ○ ○ ○ ○ ○ ○ ○ ○ ○ ○ ○ ○ ○
© Note: The Split Point is a general parameter(not linked to a particular Preset) which isconserved in memory when the instrument isturned off. The new setting is lost when the“Restore Original Block” operation is carried out orif the back-up memory loses its data due to the
○ ○ ○ ○ ○ ○ ○ ○ ○ ○ ○ ○ ○ ○ ○ ○ ○ ○ ○ ○
total discharge of the battery.
Changing the Split Point
1 EASY PLAY
SPLIT
1/1 MODE/SPLIT POINT:
Mode=Full Split Point=F#3
2
F1 F2 F3 F4 F5 F6 F7 F8
1/1 MODE/SPLIT POINT: [PRESS ENTER]
Mode=Full Split Point=F#3
3
4
ENTER ESCAPE
OR

○ ○ ○ ○ ○ ○ ○ ○ ○ ○ ○ ○ ○ ○ ○ ○ ○ ○ ○ ○ ○ ○
5•14 User Guide
○ ○ ○ ○ ○ ○ ○ ○ ○ ○ ○ ○ ○ ○ ○ ○ ○ ○ ○ ○ ○ ○ ○ ○ ○
SINGLE TOUCH PLAYThe SINGLE TOUCH PLAY button recalls all thememorized parameters associated to the ROMStyles, including the sounds assigned to the key-board sections.
If the EASY PLAY and MEMORY buttons are off,pressing SINGLE TOUCH PLAY activates bothbuttons. Activating SINGLE TOUCH PLAY alsoturns on KEY START.
If SINGLE TOUCH PLAY is off, you can selectSTYLES from the STYLES Groups withoutchanging the keyboard sounds.
If you select Presets from the PROGRAMMABLEPRESETS, the SINGLE TOUCH PLAY buttondeactivates automatically.
Single Touch Play / Harmony
HARMONYHarmony can orchestrate your Style playing,making simple one-note melodies sound as if theyare being played by a full orchestra. This buttonis associated to the Styles and Song/Styles only.Songs cannot exploit this function.
○ ○ ○ ○ ○ ○ ○ ○ ○ ○ ○ ○ ○ ○ ○ ○ ○ ○ ○ ○
© Important: Harmony operates only when theEasy Play button is on and when the keyboard
○ ○ ○ ○ ○ ○ ○ ○ ○ ○ ○ ○ ○ ○ ○ ○ ○ ○ ○ ○
mode is set to SPLIT.
On/Off
This button enables (LED on) or disables (LEDoff) the current Harmony Type selected in the Har-mony Type options.
Harmony Type
HARMONY TYPE gains access to the 8 Harmonyoptions. The structure of the automatic harmonyis based on the current Harmony Type settingand operates in two different ways:
• A: according to the note (or chord) playedbelow the Split Point with Arrange On/Offselected.
• B: regardless of the note played or not playedbelow the Split Point.
Type A:
Close: The notes played on the left hand areadded to the melody note exactly as played. Theharmonizing chord is a closed (or tight) position(notes fall within the same octave).
Open 1: same as close but with an open chord(notes spread over 2 octaves).
Open 2: similar to Open 1 but with the notesplayed on the left hand randomly assigned to theright .
Block: transforms the melody note into a full fouror five note chord, each note in perfect harmony.
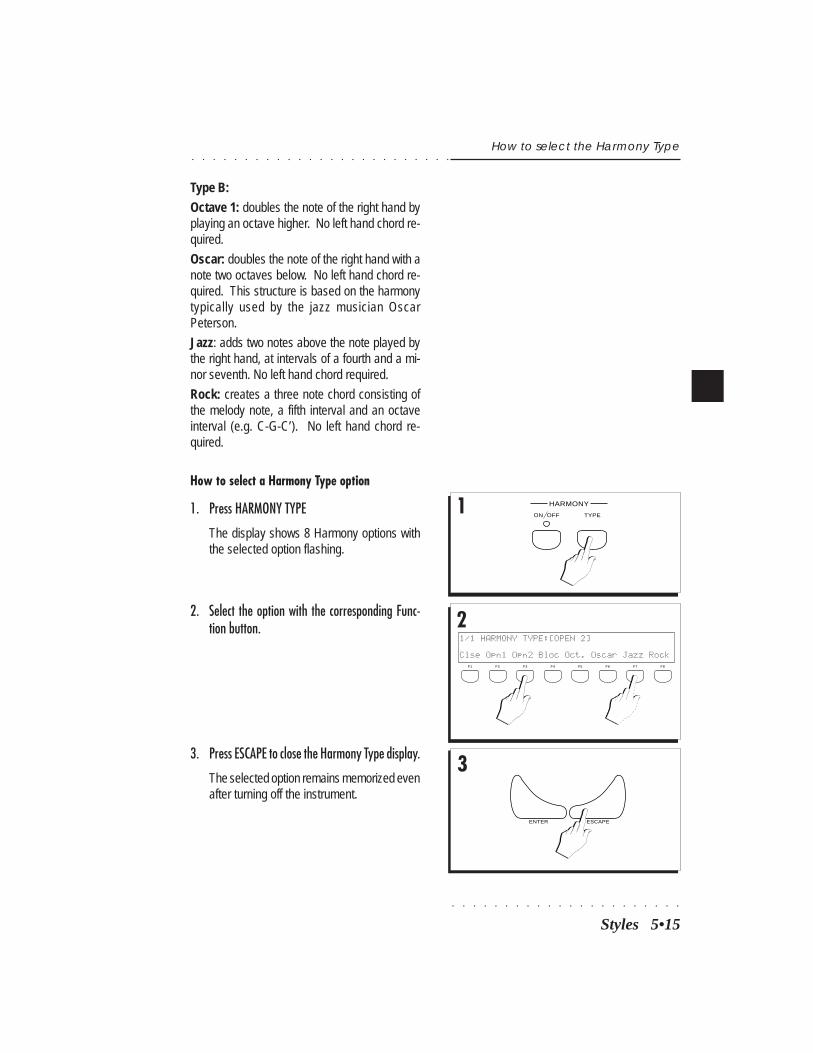
○ ○ ○ ○ ○ ○ ○ ○ ○ ○ ○ ○ ○ ○ ○ ○ ○ ○ ○ ○ ○ ○
○ ○ ○ ○ ○ ○ ○ ○ ○ ○ ○ ○ ○ ○ ○ ○ ○ ○ ○ ○ ○ ○ ○ ○ ○
Styles 5•15
How to select the Harmony Type
Type B:
Octave 1: doubles the note of the right hand byplaying an octave higher. No left hand chord re-quired.
Oscar: doubles the note of the right hand with anote two octaves below. No left hand chord re-quired. This structure is based on the harmonytypically used by the jazz musician OscarPeterson.
Jazz: adds two notes above the note played bythe right hand, at intervals of a fourth and a mi-nor seventh. No left hand chord required.
Rock: creates a three note chord consisting ofthe melody note, a fifth interval and an octaveinterval (e.g. C-G-C’). No left hand chord re-quired.
How to select a Harmony Type option
1. Press HARMONY TYPE
The display shows 8 Harmony options withthe selected option flashing.
1 HARMONY
TYPEON OFF
21/1 HARMONY TYPE:[OPEN 2]
Clse Opn1 Opn2 Bloc Oct. Oscar Jazz RockF1 F2 F3 F4 F5 F6 F7 F8
3
ENTER ESCAPE
2. Select the option with the corresponding Func-tion button.
3. Press ESCAPE to close the Harmony Type display.
The selected option remains memorized evenafter turning off the instrument.
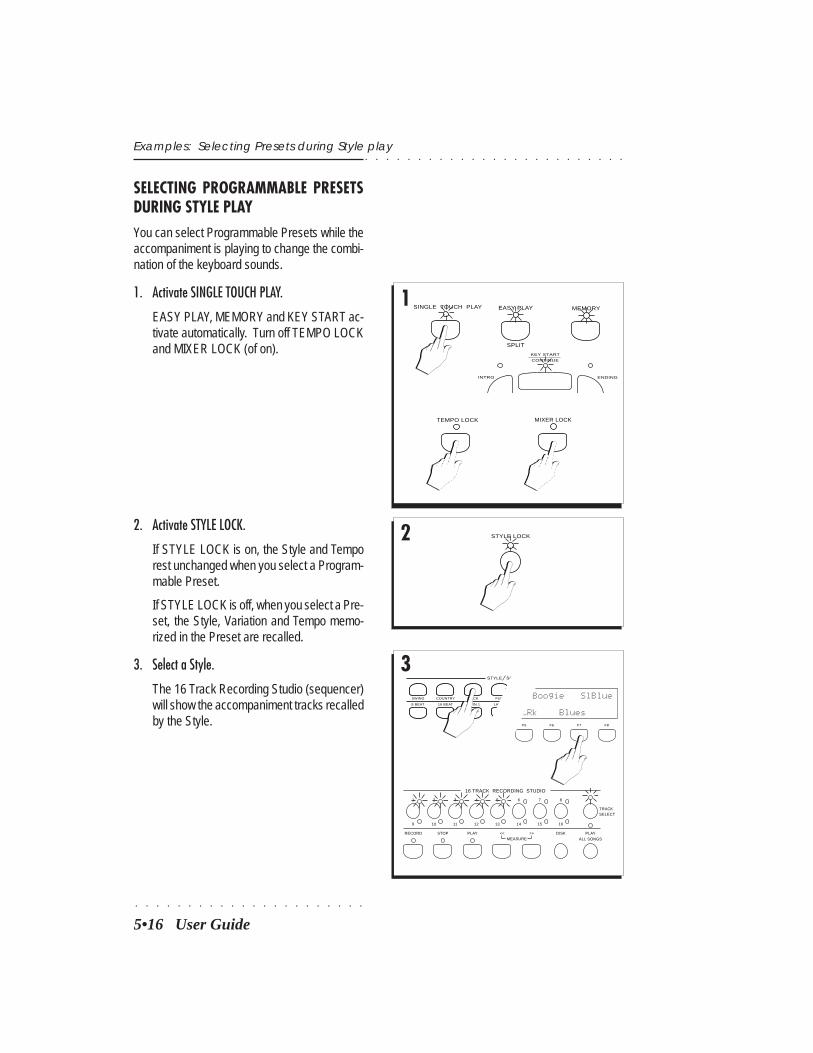
○ ○ ○ ○ ○ ○ ○ ○ ○ ○ ○ ○ ○ ○ ○ ○ ○ ○ ○ ○ ○ ○
5•16 User Guide
○ ○ ○ ○ ○ ○ ○ ○ ○ ○ ○ ○ ○ ○ ○ ○ ○ ○ ○ ○ ○ ○ ○ ○ ○
SELECTING PROGRAMMABLE PRESETSDURING STYLE PLAYYou can select Programmable Presets while theaccompaniment is playing to change the combi-nation of the keyboard sounds.
1. Activate SINGLE TOUCH PLAY.
EASY PLAY, MEMORY and KEY START ac-tivate automatically. Turn off TEMPO LOCKand MIXER LOCK (of on).
Examples: Selecting Presets during Style play
F5 F6 F7 F8
k Boogie SlBlue
SoftRk Blues8 BEAT
SWING COUNTRY
16 BEAT
ROCK
LATIN 1
FUNK
LATIN 2
STYLE SON
3
1 2 3
9 10 11 12
54
13
6
14 15
7 8
16
TRACKSELECT
16 TRACK RECORDING STUDIO
DISK PLAY
ALL SONGSMEASURE<< >>PLAYSTOPRECORD
1 SINGLE TOUCH PLAY
INTRO
KEY START
CONTINUE
ENDING
EASY PLAY
SPLIT
MEMORY
MIXER LOCK
2 STYLE LOCK
TEMPO LOCK
2. Activate STYLE LOCK.
If STYLE LOCK is on, the Style and Temporest unchanged when you select a Program-mable Preset.
If STYLE LOCK is off, when you select a Pre-set, the Style, Variation and Tempo memo-rized in the Preset are recalled.
3. Select a Style.
The 16 Track Recording Studio (sequencer)will show the accompaniment tracks recalledby the Style.

○ ○ ○ ○ ○ ○ ○ ○ ○ ○ ○ ○ ○ ○ ○ ○ ○ ○ ○ ○ ○ ○
○ ○ ○ ○ ○ ○ ○ ○ ○ ○ ○ ○ ○ ○ ○ ○ ○ ○ ○ ○ ○ ○ ○ ○ ○
Styles 5•17
Examples: Selecting Presets during Style play
4. Press INTRO, ENDING or FILL to activate the in-troduction. 4
INTRO
KEY START
CONTINUE
ENDING
START / STOP
FILLTAP TEMPO
55. Play a note or chord on the left keyboard area
(below the current split point) to start the ac-companiment running.
The Intro starts then breaks into the auto ac-companiment.
If you press START/STOP to start the accom-paniment, the KEY START function deacti-vates.
6. Play freely. 6
7. Select a Preset from the PROGRAMMABLE PRE-SETS section.
The SINGLE TOUCH PLAY button deacti-vates and the combination of keyboardsounds, the keyboard mode and effectsmemorized in the Preset are recalled. Thesounds and arrangements of the Style ac-companiment tracks rest unchanged.
8. Select other Programmable Presets.
7/81 2 3 4 5 6 7 8
PROGRAMMABLE PRESETS
PnoStr Theme Jazzed KeyPad
GrandP SloSax StGuit MstoneF1 F2 F3 F4 F5 F6 F7 F8
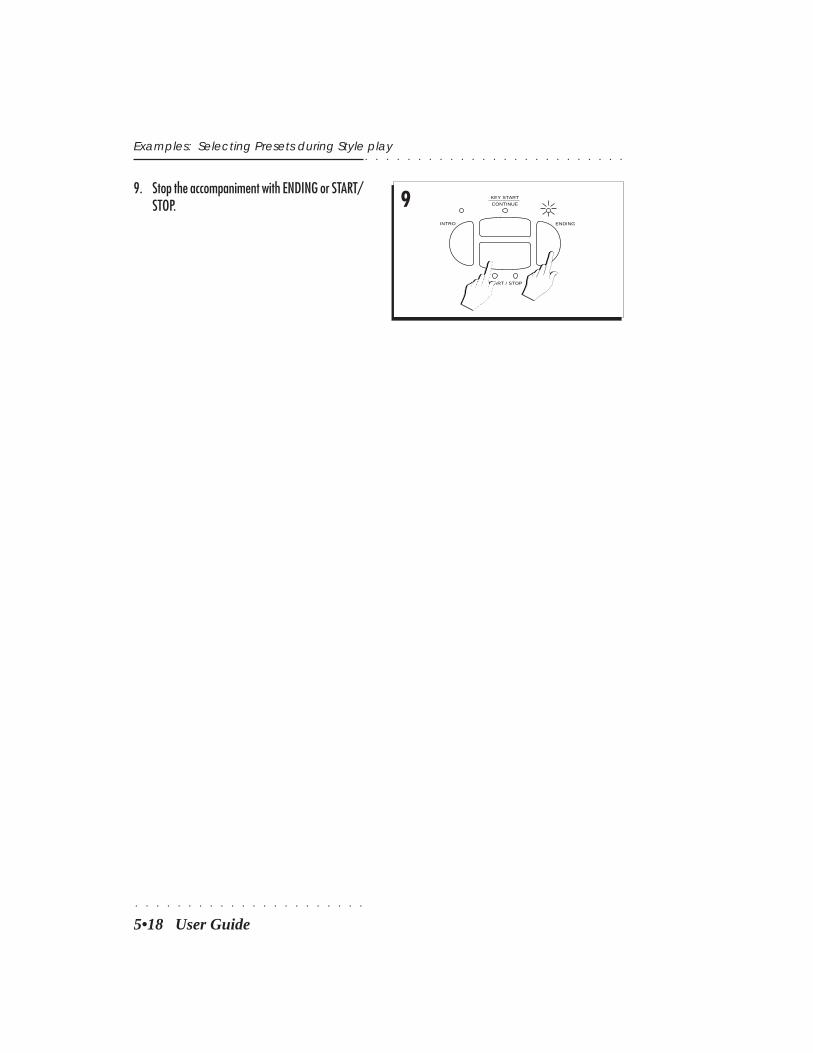
○ ○ ○ ○ ○ ○ ○ ○ ○ ○ ○ ○ ○ ○ ○ ○ ○ ○ ○ ○ ○ ○
5•18 User Guide
○ ○ ○ ○ ○ ○ ○ ○ ○ ○ ○ ○ ○ ○ ○ ○ ○ ○ ○ ○ ○ ○ ○ ○ ○
9. Stop the accompaniment with ENDING or START/STOP.
Examples: Selecting Presets during Style play
9INTRO
KEY START
CONTINUE
ENDING
START / STOP
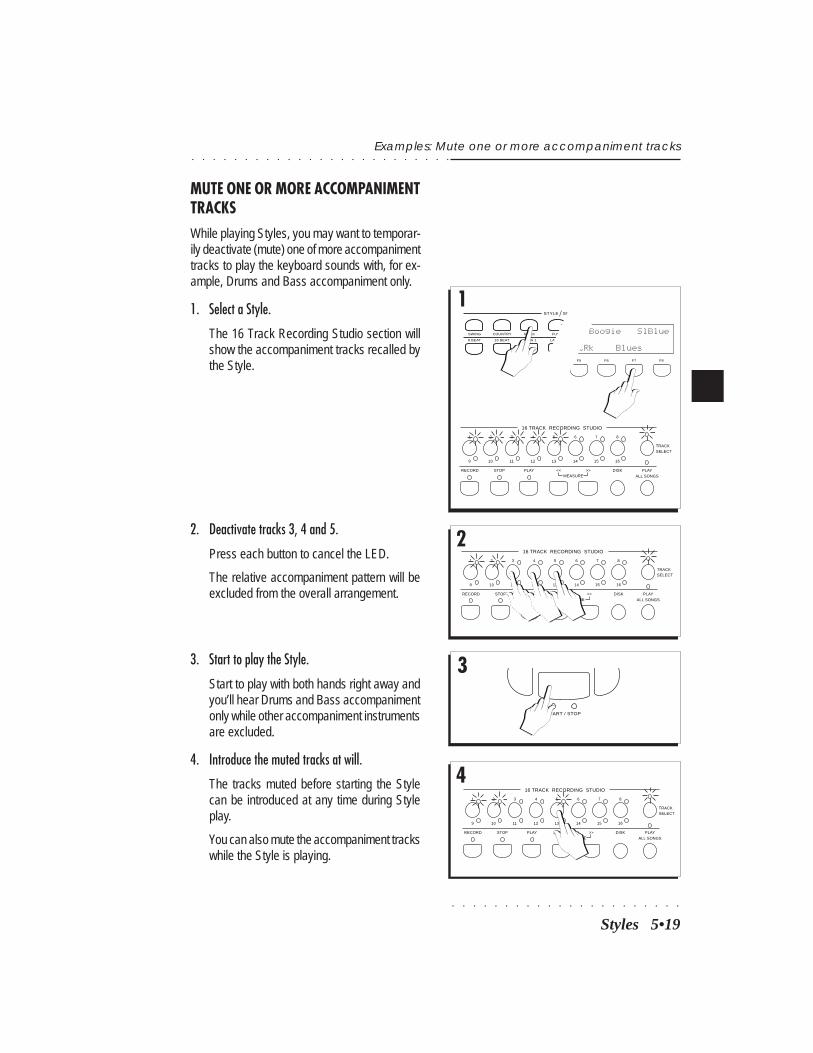
○ ○ ○ ○ ○ ○ ○ ○ ○ ○ ○ ○ ○ ○ ○ ○ ○ ○ ○ ○ ○ ○
○ ○ ○ ○ ○ ○ ○ ○ ○ ○ ○ ○ ○ ○ ○ ○ ○ ○ ○ ○ ○ ○ ○ ○ ○
Styles 5•19
MUTE ONE OR MORE ACCOMPANIMENTTRACKSWhile playing Styles, you may want to temporar-ily deactivate (mute) one of more accompanimenttracks to play the keyboard sounds with, for ex-ample, Drums and Bass accompaniment only.
1. Select a Style.
The 16 Track Recording Studio section willshow the accompaniment tracks recalled bythe Style.
Examples: Mute one or more accompaniment tracks
F5 F6 F7 F8
k Boogie SlBlue
SoftRk Blues8 BEAT
SWING COUNTRY
16 BEAT
ROCK
LATIN 1
FUNK
LATIN 2
STYLE SON
1
2
3
4
1 2 3
9 10 11 12
54
13
6
14 15
7 8
16
TRACKSELECT
16 TRACK RECORDING STUDIO
DISK PLAY
ALL SONGSMEASURE<< >>PLAYSTOPRECORD
1 2 3
9 10 11 12
54
13
6
14 15
7 8
16
TRACKSELECT
16 TRACK RECORDING STUDIO
DISK PLAY
ALL SONGSMEASURE<< >>PLAYSTOPRECORD
START / STOP
1 2 3
9 10 11 12
54
13
6
14 15
7 8
16
TRACKSELECT
16 TRACK RECORDING STUDIO
DISK PLAY
ALL SONGSMEASURE<< >>PLAYSTOPRECORD
2. Deactivate tracks 3, 4 and 5.
Press each button to cancel the LED.
The relative accompaniment pattern will beexcluded from the overall arrangement.
3. Start to play the Style.
Start to play with both hands right away andyou’ll hear Drums and Bass accompanimentonly while other accompaniment instrumentsare excluded.
4. Introduce the muted tracks at will.
The tracks muted before starting the Stylecan be introduced at any time during Styleplay.
You can also mute the accompaniment trackswhile the Style is playing.
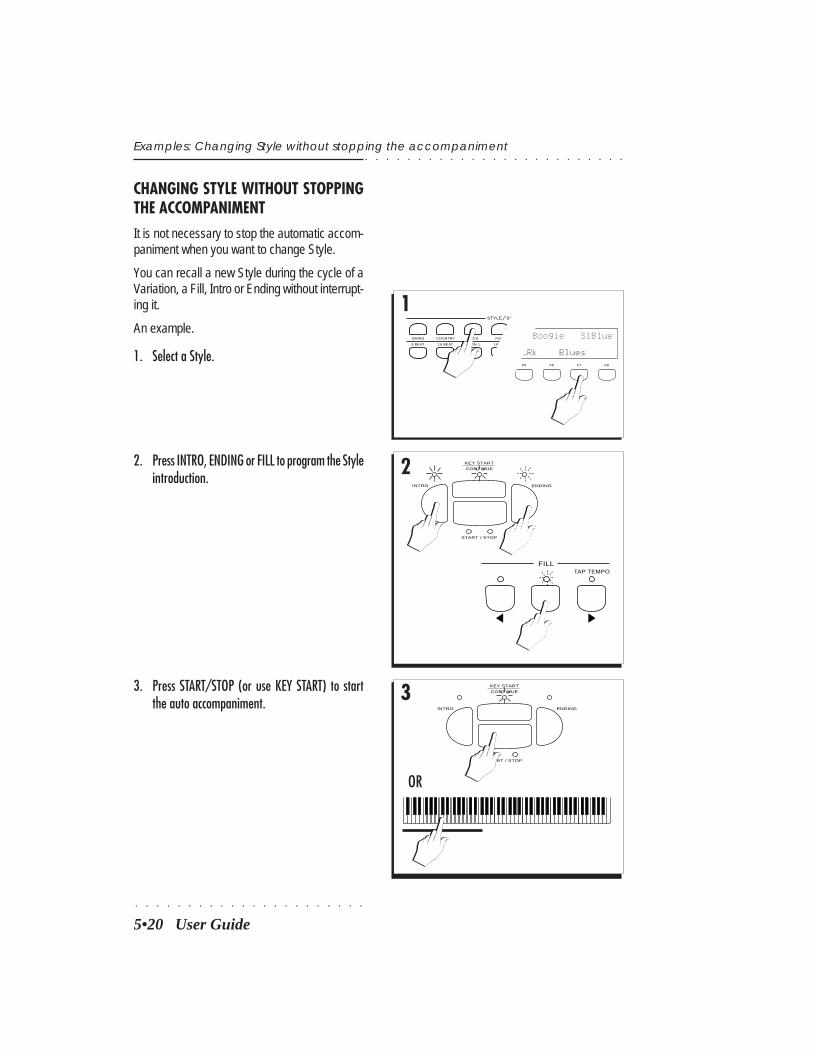
○ ○ ○ ○ ○ ○ ○ ○ ○ ○ ○ ○ ○ ○ ○ ○ ○ ○ ○ ○ ○ ○
5•20 User Guide
○ ○ ○ ○ ○ ○ ○ ○ ○ ○ ○ ○ ○ ○ ○ ○ ○ ○ ○ ○ ○ ○ ○ ○ ○
CHANGING STYLE WITHOUT STOPPINGTHE ACCOMPANIMENTIt is not necessary to stop the automatic accom-paniment when you want to change Style.
You can recall a new Style during the cycle of aVariation, a Fill, Intro or Ending without interrupt-ing it.
An example.
1. Select a Style.
Examples: Changing Style without stopping the accompaniment
F5 F6 F7 F8
k Boogie SlBlue
SoftRk Blues8 BEAT
SWING COUNTRY
16 BEAT
ROCK
LATIN 1
FUNK
LATIN 2
STYLE SON
1
2INTRO
KEY START
CONTINUE
ENDING
START / STOP
FILLTAP TEMPO
3INTRO
KEY START
CONTINUE
ENDING
START / STOP
OR
2. Press INTRO, ENDING or FILL to program the Styleintroduction.
3. Press START/STOP (or use KEY START) to startthe auto accompaniment.
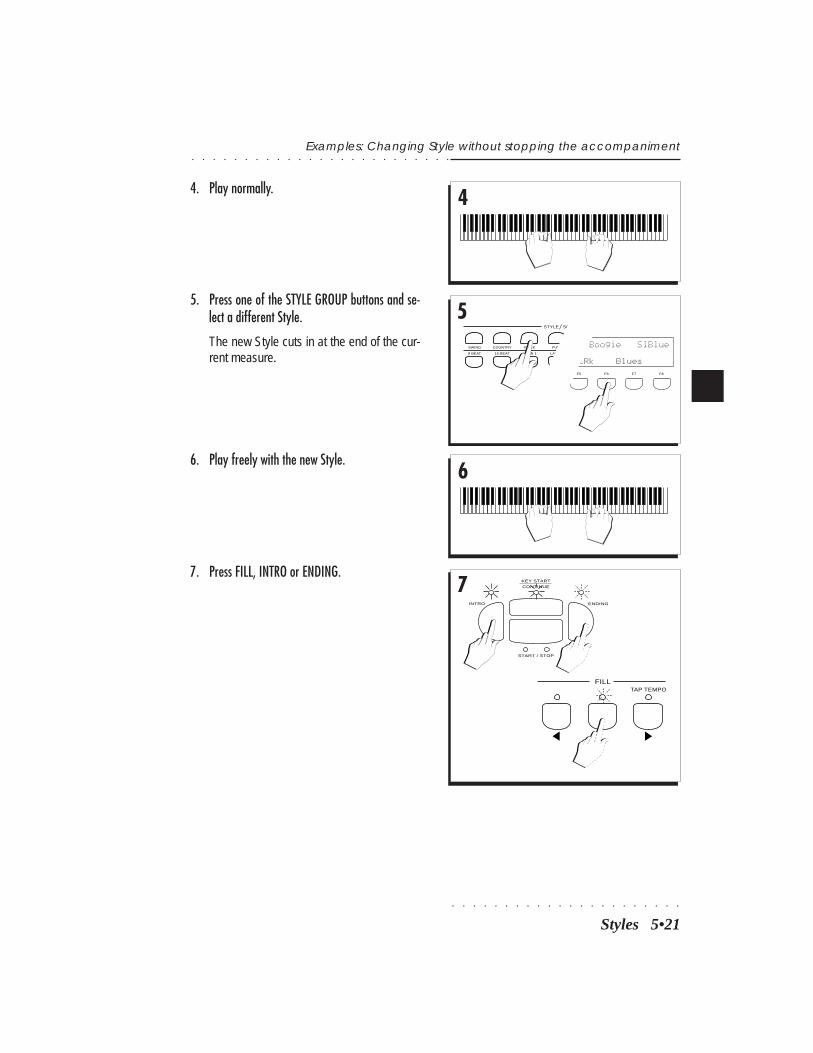
○ ○ ○ ○ ○ ○ ○ ○ ○ ○ ○ ○ ○ ○ ○ ○ ○ ○ ○ ○ ○ ○
○ ○ ○ ○ ○ ○ ○ ○ ○ ○ ○ ○ ○ ○ ○ ○ ○ ○ ○ ○ ○ ○ ○ ○ ○
Styles 5•21
4. Play normally.
Examples: Changing Style without stopping the accompaniment
4
F5 F6 F7 F8
k Boogie SlBlue
SoftRk Blues8 BEAT
SWING COUNTRY
16 BEAT
ROCK
LATIN 1
FUNK
LATIN 2
STYLE SON
5
6
7INTRO
KEY START
CONTINUE
ENDING
START / STOP
FILLTAP TEMPO
5. Press one of the STYLE GROUP buttons and se-lect a different Style.
The new Style cuts in at the end of the cur-rent measure.
6. Play freely with the new Style.
7. Press FILL, INTRO or ENDING.

○ ○ ○ ○ ○ ○ ○ ○ ○ ○ ○ ○ ○ ○ ○ ○ ○ ○ ○ ○ ○ ○
5•22 User Guide
○ ○ ○ ○ ○ ○ ○ ○ ○ ○ ○ ○ ○ ○ ○ ○ ○ ○ ○ ○ ○ ○ ○ ○ ○
11
Examples: Changing Style without stopping the accompaniment
8. Before the Fill, Intro or Ending cycle finishes, se-lect a different Style and one of its Variations.
The new Style interrupts the cycle and startsplaying at the end of the current Fill, Intro orEnding measure. The selected Variation nowstarts playing.
○ ○ ○ ○ ○ ○ ○ ○ ○ ○ ○ ○ ○ ○ ○ ○ ○ ○ ○ ○
© Hint The Fill breaks into the arrangementimmediately and the relative cycle usually plays forone measure only, unless the Fill button is heldpressed for a period. The Intro and Endingpatterns start their relative cycles at the end of thecurrent measure and can last for more than onemeasure. Therefore, when changing Styles, theIntros and Endings give you more time to select a
○ ○ ○ ○ ○ ○ ○ ○ ○ ○ ○ ○ ○ ○ ○ ○ ○ ○ ○ ○
different Style.
9. Play freely.
8 BEAT
SWING COUNTRY
16 BEAT
ROCK
LATIN 1
FUNK
LATIN 2
STYLE SON
8
VARIATION1 2 3 4
9
8 BEAT
SWING COUNTRY
16 BEAT
ROCK
LATIN 1
FUNK
LATIN 2
STYLE SON
10
VARIATION1 2 3 4
MetalR SlowRk
OpenRk HardRk SF1 F2 F3 F4
MetalR SlowRk
OpenRk HardRk SF1 F2 F3 F4
INTRO
KEY START
CONTINUE
ENDING
START / STOP
10. Select another Style and press INTRO or ENDINGimmediately.
The Intro and Ending of the new Style areplayed, then the new Style starts to play theselected Variation.
○ ○ ○ ○ ○ ○ ○ ○ ○ ○ ○ ○ ○ ○ ○ ○ ○ ○ ○ ○
© Hint: You can switch Styles quickly by activating
○ ○ ○ ○ ○ ○ ○ ○ ○ ○ ○ ○ ○ ○ ○ ○ ○ ○ ○ ○
DISPLAY HOLD to lock the Style selection window
11. Press START/STOP or ENDING to stop the accom-paniment.
○ ○ ○ ○ ○ ○ ○ ○ ○ ○ ○ ○ ○ ○ ○ ○ ○ ○ ○ ○ ○ ○
○ ○ ○ ○ ○ ○ ○ ○ ○ ○ ○ ○ ○ ○ ○ ○ ○ ○ ○ ○ ○ ○ ○ ○ ○
Styles 5•23
Tempo
Tempo
The Style Tempo, shown in the display, can beadjusted while playing by rotating the DIAL.
The current tempo setting can be saved to a Pre-set.
By saving the Tempo to a Preset, in practice youmodify the tempo setting of a ROM Style.
Thanks to the battery-backed RAM, the temposetting remains memorized after turning off theinstrument.
CHANGING THE TEMPO OF A STYLE
• Use the DIAL to change the tempo setting, eitherbefore or after starting the Style.
To recall the original tempo, select the sameStyle again.
○ ○ ○ ○ ○ ○ ○ ○ ○ ○ ○ ○ ○ ○ ○ ○ ○ ○ ○ ○
© Note: If a different tempo has been memorizedin the Preset, when a Style is recalled by selectinga Preset, the tempo will be that of the Preset and
○ ○ ○ ○ ○ ○ ○ ○ ○ ○ ○ ○ ○ ○ ○ ○ ○ ○ ○ ○
not the original Style.
SAVE THE TEMPO TO A PRESETA tempo setting that differs to the default tempodata of the ROM Style can be saved to the Pro-grammable Presets.
1. Select a Style.
2. Modify the tempo with the DIAL.
3. Press START/STOP to listen to the Style.
If the tempo needs further adjustment, rotatethe DIAL until you obtain the desired tempo.
4. Press STORE PRESET to save the Preset.
You are prompted to save to the current Pre-set or to select a different destination Preset.
5. Rotate the DIAL to select a destination Preset andpress ENTER to confirm.
To store to the current Preset, press ENTER with-out rotating the DIAL.
ESCAPE cancels the operation.
○ ○ ○ ○ ○ ○ ○ ○ ○ ○ ○ ○ ○ ○ ○ ○ ○ ○ ○ ○
© Hint: Save the Preset to disk to conserve thechanges. The Presets remain in RAM after powerdown but are cancelled when you save other
○ ○ ○ ○ ○ ○ ○ ○ ○ ○ ○ ○ ○ ○ ○ ○ ○ ○ ○ ○
Presets to the same locations.

○ ○ ○ ○ ○ ○ ○ ○ ○ ○ ○ ○ ○ ○ ○ ○ ○ ○ ○ ○ ○ ○
5•24 User Guide
○ ○ ○ ○ ○ ○ ○ ○ ○ ○ ○ ○ ○ ○ ○ ○ ○ ○ ○ ○ ○ ○ ○ ○ ○
Restore Preset
RESTORING THE ORIGINAL PRESET SET-TINGSIt is possible to cancel all modifications made tothe Presets and restore factory settings.
1. Press RESTORE in the SYSTEM section.
The RESTORE ORIGINAL BLOCK displayactivates.
2. Press F5 or F6 to select the PRESET command.
The display shows “Restore Original Preset”.
3
ENTER ESCAPE
2
F1 F2 F3 F4 F5 F6 F7 F8
1/1 RESTORE ORIGINAL BLOCK [Release]
All Seq Preset [01-09-97]
RESTORE ORIGINAL " PRESET "
Are you sure? Press [ENT] or [ESC]
1 RESTORE
1/1 RESTORE ORIGINAL BLOCK [Release]
All Seq Preset [01-09-97]
3. Press ENTER to confirm the Restore Preset pro-cedure, or ESCAPE to cancel.
All the changes stored to the PROGRAMMA-BLE PRESETS are cancelled. The originalROM settings of all the Preset parametersare restored.
○ ○ ○ ○ ○ ○ ○ ○ ○ ○ ○ ○ ○ ○ ○ ○ ○ ○ ○ ○
© Hint: If you want to cancel the entire contents ofRAM in a single operation, use the “Restore ALL”command. Be sure, however, to save all data thatyou wish to conserve to disk before confirming the
○ ○ ○ ○ ○ ○ ○ ○ ○ ○ ○ ○ ○ ○ ○ ○ ○ ○ ○ ○
operation.