Embed Size (px)
Citation preview

launaM s’renwOsiht daer esaelp ,tinu eht gnitarepo erofeB
erutuf rof ti niater dna ,ylhguoroht launam.ecnerefer
lonapsE hsilgnE ~
lanoitpO dnatS waSsleehW htiw
IDP1000JR
© 2011 Bartell Morrison (USA) LLC
Discou
nt-E
quipm
ent.c
om

Discount-Equipment.com is your online resource for quality parts & equipment.
Florida: 561-964-4949 Outside Florida TOLL FREE: 877-690-3101
Need parts? Click on this link: http://www.discount-equipment.com/category/5443-parts/ and choose one of the options to help get the right parts and equipment you are looking for. Please have the machine model and serial number available in order to help us get you the correct parts. If you don’t find the part on the website or on one of the online manuals, please fill out the request form and one of our experienced staff members will get back to you with a quote for the right part that your machine needs.
We sell worldwide for the brands: Genie, Terex, JLG, MultiQuip, Mikasa, Essick, Whiteman, Mayco, Toro Stone, Diamond Products, Generac Magnum, Airman, Haulotte, Barreto,
Power Blanket, Nifty Lift, Atlas Copco, Chicago Pneumatic, Allmand, Miller Curber, Skyjack, Lull, Skytrak, Tsurumi, Husquvarna Target, Stow, Wacker, Sakai, Mi-T-M, Sullair, Basic,
Dynapac, MBW, Weber, Bartell, Bennar Newman, Haulotte, Ditch Runner, Menegotti, Morrison, Contec, Buddy, Crown, Edco, Wyco, Bomag, Laymor, EZ Trench, Bil-Jax, F.S.
Curtis, Gehl Pavers, Heli, Honda, ICS/PowerGrit, IHI, Partner, Imer, Clipper, MMD, Koshin, Rice, CH&E, General Equipment ,Amida, Coleman, NAC, Gradall, Square Shooter, Kent,
Stanley, Tamco, Toku, Hatz, Kohler, Robin, Wisconsin, Northrock, Oztec, Toker TK, Rol-Air, APT, Wylie, Ingersoll Rand / Doosan, Innovatech, Con X, Ammann, Mecalac, Makinex, Smith
Surface Prep,Small Line, Wanco, Yanmar
Discou
nt-E
quipm
ent.c
om

3 . . . . . . . . . . . . . . . . . . . . . . . . . .weiV dedolpxE waS
5,4. . . . . . . . . . . . . . . . . . . . . . . .tsiL straP tnemecalpeR
7. . . . . . . . . . . . . . . . . . . . . . . . . . . . . . . . . .serutaeF
9 . . . . . . . . . . . . . . . . . . . . . . . . . . snoituacerP ytefaS
11 . . . . . . . . . . . . . . . . . .puteS & ,ylbmessA ,gnikcapnU
31 . . . . . . . . . . . . . . . . . . . . . . . . . . . .ylbmessA dnatS waS
51 . . . . . . . . . . . . . . . . . . . . . . . . . . .noitallatsnI edalB
71 . . . . . . . . . . . . . . . . . . .noitallatsnI gnisuoH gniraeB
91. . . . . . . . . . . . . . . . . . . .lavomeR & noitallatsnI yarT
02. . . . . . . . . . . . . . . . . . . . . .noitallatsnI pmuP retaW
12 . . . . . . . . . . . . . . . . . . . .ecnanetniaM pmuP retaW
12 . . . . . . . . . . . . . . . .snoituacerP ytefaS pmuP retaW
32. . . . . . . . . . . . . . . . . . . . . . .elbaT gnittuC eht gnisU
52 . . . . . . . . . . . . . . . . . . . . . . . . . . . . .htpeD gnittuC
92 . . . . . . . . . . . . . . . . . . . . . . . .seirosseccA lanoitpO
13 . . . . . . . . . . . . . . . . .sedalB dnomaiD rof t’noD & s’oD
52 . . . . . . . . . . . . . . . . . . . . . . . . . .tnemecalpeR tleB
72 . . . . . . . . . . . . . . . . .snoitacificepS rotoM lacirtcelE
53,33 . . . . . . . . . . . . . . . . . . . . .ecnanetniaM waS
14,93,73 . . . . . . . . . . . . . . . . . . . . . .gnitoohselbuorT
34. . . . . . . . . . . . . . . . . . . . . . . . . . . . . . . . .ytnarraW
GNIKCAPNU
STNETNOC FO ELBAT ECIDNI3 . . . . . . . . . . . . . . . . . . . . . . . .arreiS al ed amargaiD
5,4 . . . . . . . . . . . . . . . . . . .otseupeR ed setraP ed atsiL
8 . . . . . . . . . . . . . . . . . . . . . . . . . . . . .sacitsiretcaraC
01 . . . . . . . . . . . . . . . . . . . . .dadirugeS y senoicuacerP
21 . . . . . . . . . . . . . . . . . . . .elbmasnE y euqapmeseD
41 . . . . . . . . . . . . . . . . . . . . . . . . . . .esab al ed noicalatsnI
61 . . . . . . . . . . . . . . . . . . . . .allihcuC al ed noicalatsnI
81 . . . . . . . . . .etenijoC led otneimajola led noicalatsnI
91 . . . . . . . . . . . . . . . auga ed otisoped led noicalatsnI
02 . . . . . . . . . . . . . . .augA ed abmoB al ed noicalatsnI
22 . . . . . . . . . . . .augA ed abmoB al ed otneiminetnaM
22 . . . . . . . . . . . . . . . . .augA led abmoB noc sodadiuC
62. . . . . . . . . . . . . . . . . . . . . . . . .etroC ed dadinuforP
62. . . . . . . . . . . . . . . . . . . . . . .adnaB al ed ozalpmeR
03. . . . . . . . . . . . . . . . . . . . . . .selanoicpO soiroseccA
23. . . . . . . . . . . . . . . . . . . . . .sallihcuC sal rasU omoC
42. . . . . . . . . . . . . . . . . . . . . .etroC ed esaB al ed osU
82 . . . . . . . . . . . . rotoM led sacirtcele senoicacificepsE
63,43 . . . . . . . . . . . . . . .arreiS al ed otneiminetnaM
24,04,83 . . . . . . . . . . . . . . . .senoiculoS y samelborP
34. . . . . . . . . . . . . . . . . . . . . . . . . . . . . . . . .aitnaraGDiscou
nt-E
quipm
ent.c
om

-3- -4-
WEIV DEDOLPXE WAS IDP1000JRARREIS AL ED AMARGAID IDP1000JR
2.3
2.1
2.2
26
6.1
7
8
9
6.2
6.3
27
30
3834
29
31
0404
22.1
22
21
37
1010
1239
39
32
33338282
14
13
15
1.21 1.21
1617
18
19
20
23
25
45
26
24
1111
51 3 44 3434
42
36
46
41
48
49
51
50
35
lanoitpOyrosseccA
lanoitpOyrosseccA
47
44
TSIL STRAP TNEMECALPER IDP1000JR
12
1.22.23.2
345
61.62.63.6
78
9011121
1.21314151617181
910212
22
1.22
32
10-0001S20-J0001S
30-0001S4
N5
1.60-J0001S
211.21-0001S
41
6171
91
RJ220001
5030
40-008S50-008S42-008S
0-0001S0-0001S
N1.50-0001S
1.60-0001S2.60-0001S
2.60-0001S01-008S11-008S
90-J0001S01-J0001S11-J0001S
-0001S
31-0001S-0001S
S0801RC-0001S-0001S810001
-J0001SN54-0001S
120001
32-J0001S
rotcenoC elbaC /elbaC rewoProtoM lairtsudnI lacirtcelE PH 2/1-1
rednerpmE arap aniboB /roticapaC gninnuRrazepmE arap aniboB /roticapaC retratS
rotoM led ocinavA led atreibuC /revoC naF rotoModidnecnE ed rotpurretnI /hctiwS elggoT
otiucriC led rotcenoC /rekaerB tiucriC& rekaerB tiucriC ,hctiwS rewoP/W( gnisuoH hctiwS rewoP
odidnecnE ed rotpurretnI led otneimajolA /)elbaC rewoP tiucric dna hctiws rewop/W( etelpmoc lenap lortnoC
odidnecE ed rottpurretni led selortnoC ed lenaP /)rekaerbrotoM led eje led aeloP /yelluP tfahS rotoM
aelop ed orugeS/ niP kcoL yelluPallihcuC al ed eje led aeloP /yelluP tfahS edalB
aelop y aelop ed orugeS /niP kcoL yelluPadnaB al ed arotcetorP atreibuC /drauG tleB
/tekcarB drauG tleB.adnab al ed arotcetorp ateuqarB
rotoM led etropoS ejE /tfahS troppuS rotoMrotoM led etsujA ed orugeS /pilC tnemtsujdA rotoM
ejatnoM ed acalP /etalP gnitnuoMaeloP al ed sorelaB /gniraeB yelluP
roiretxE edroB led sorelaB /gniraeB egnalF rennIallihcuC al ed roslupmI ejE /tfahS edalB
allihcuC al ed roiretxE edroB /egnalF rennIetnamaiD ed allihcuC /edalB dnomaiD ”01allihcuC al ed roiretxE edroB /egnalF retuO
allihcuC al ed arodarugesA acreuT /tuN kcoL edalB/bonK tnemtsujdA drauG edalB
allihcuC al ed rotcetorP led etsujA ed allirePallihcuC al ed rotcetorP /drauG edalB
augA ed ojulF led ”L“ rodatpadA /retpadA ”L“ wolF retaW/bonK tnemtsujdA etalP gnitnuoM
ejatnoM ed acalP al ed etsujA ed allireP ed etsoP /)emarf lateM sedulcnI( tsoP troppuS raeR
oresarT etropoS /tloB kcoL tfahS troppuS rotoM
rodarugesA ollinroT noc rotoM led etropoS ejE reluR & sleehW ,taM rebbuR detcejnI/w elbaT gnittuC
algeR y sadeuR ,amoGnoc etroC ed esaB/ediuG
otseupeR ed setraP ed atsiL
Discou
nt-E
quipm
ent.c
om

-5-
PLEH LANOITIDDA taht ytluciffid gnivah era uoy nosaer yna rof fi su llac esaelP
ni dedulcni ediug gnitoohselbuort eht htiw devloser eb tonnac.pleh ot ekil dluow eW .launam siht fo kcab eht
,elbissop sa yltneidepxe sa sremotsuc ruo ecivres retteb oT laires gnirutcafunam eht evah uoy taht erus ekam esaelp
.su gnitcatnoc erofeb dnah ta rebmun
.eunitnoc TSIL STRAP TNEMECALPER
425262728292031323
33
43536373
839304
1424344454
6474
84
940515
42-J0001S52-0001S
72007182-007S
82-0001S920001
03-0001S1.03-007S
94-0001S
N03-007S
43-007S53-0001S63-0001S73-J0001S
84-0001S80-008S
33-0001S
14-0001S63111
02-0001S34-0001S83-0001S
93-0001S23-0001S
44-0001S
GM-0001S1GM-0001S2GM-0001S
)2( sodalanacA sollidoR /)2( srelloR gniraeB llaB depahS-UejadoR ed nolfeT ed arraB /relloR nolfeT
al ger ed aiuG /ediuG reluRaugA ed abmoB /pmuP retaW
auga ed sobut ed ajerP /gnilpuoC gnibuT retaW augA led otisopeD o ajednaB /yarT retaW enelyporpyloP
)2( ejadoR ed seleiR /)2( sliaR gnidilSarodarugesA areteuqarB /pilC gnirpS noitneteR
/stuN dna swercS/W )2( stekcarB eruceS gnisuoH gniraeB noc )2( adarugese ateuqarb etenijnoc led otneimajolA
sacreut y sollinrot/tekcarB noitneteR elbaT gnittuC
ratroC ed aseM al araP noicneteR ed ateuqarBselanogaiD setroC arap etropoS ed euqolB /kcolB retiM
ralugnA etroC ed aiuG°09/°54 /ediuG piR °09/°54laretal noisnetxE ed aseM /elbaT noisnetxE ediS
/)gnisuoH gniraeB delooC diuqiL( HBCL etelpmoCotelpmoC etenijoC led otneimajolA
anedaC noc ocitsalP ed nopaT /niahC/w gulP niarDamoG ed adnab 52V /tleB rebbuR 52#
sekarB & sleehw/W htiw dnatS waSsorugeS y sadeuR noc arreiS al ed etropoS
evalL elpitluM /hcnerW elpitluMallihcuC al ed ejE led rotcetorP /tfahS drauG edalB
augA ed ojulF led ”T“ rodatpadA /retpadA ”T“ wolF retaW)2( etropoS led sadeuR /)2( tiK leehW dnatS waS
noc allihcuc al ed sollipeC /)2( steviR/w hsurB edalB)2( setameR
amog ed arudaciplas ed rotcetorP /drauG hsalpS rebbuR al ed etropoS led sollinroT /)2( swercS gniW dnatS waS
)2( arreiS/drauG elgnA elbatsujdA °081 munimulA
elbatsujdA rotcetorP olugnAartseaM aiuG /ediuG elgnaitluM ediuGretsaM
esaB ed allitnalP /esaB etalpmeT ediuGretsaMelbahcateD algeR /ediuG reluR elbahcateD ediuGretsaM
© 2011 Bartell Morrison (USA) LLC
Discou
nt-E
quipm
ent.c
om

FEATURES CARACTERISTICAS1. Powerful 1-1/2 hp motor makes cuts easier and quicker.2. Automatic thermal overload protection protects your saw from power
surges and the motor from overheating.3. High fiber plastic water tray withstands even the toughest punishment
and is extremely easy to remove and install.4. Saw includes a sturdy, durable steel frame for support and stability. 15. Adjustable guide rails permit user to align saw during installation.6. Cutting alignment not affected by water tray maintenance.7. The cutting table can be secured in place by locking the spring lock on
the L-shaped transport retention.8.9 The 1000Jr Rip cut up to 20" in length and diagonal cut up to 14" tiles.
Blade capacity from 6" to 10" provides a variety of blade usages.
1. El poderoso motor de 1-1/2 hp hace los cortes rapidos y sencillos.2. La proteccion automatica termica protege su sierra del aumento de
tension en el fluido electrico, y al motor del sobrecalentamiento.3. El deposito plastico del agua de alta calidad con soportes, nivela el
riguroso manejo y es extremadamente sencillo de transportar e instalar.El deposito opcional de acero inoxidable para uso prolongado y maximaduracion.
4. La sierra incluye una fuerte armazon de acero para soporte yestabilidad. 1000Jr.
5. Los rieles guias ajustables permiten alinear la sierra durante lainstalacion.
6. El alineaminto de corte no es afectado por el mantenimiento deldeposito del agua.
7. La base de corte puede ser asegurada en su lugar con solo atornillar laperilla en la retencion de transporte con forma "L."
8.
9.
Con la capacidad de 6 a 10 pulgadas, provee una amplia variedad enel uso de sierras.Con un corte maximo de 18" de longitud y corte diagonal en mas de12" pulgadas en las lozas 1000Jr.
OptionalSaw Stand with Wheels
-7- -8-
OptionalSaw Stand with Wheels
1
2
98
4
7
3
5 & 6
Discou
nt-E
quipm
ent.c
om

-9- -01-
DADIRUGES Y SENOICUACERPSNOITUACERP YTEFAS.rennam efasnu na ni krow ro ylreporpmi enihcam eht esu reveN• nehw noitcetorp rae dna ,ksam tsud ,selggog ytefas raew syawlA•
.)1.78Z-ISNA htiw ylpmoc ot( was eht gnitarepo fo trap eht no noitnettanI .esu ni si was eht nehw trela niamer syawlA•
.yrujni suoires ot dael yam rotarepo ehtsti dna etis krow eht htiw flesruoy ezirailimaf ,gnikrow trats uoy erofeB•
gnikrow edepmi yam hcihw secnatsmucric fo eciton ekaT .sgnidnuorrusekat dna ,)ton ro gniraeb doog( snoitidnoc lios evresbo ,ciffart ro
cilbup morf skrowdaor fo gnidleihs eht .e.i( ytefas erusne ot serusaem.)ciffart
eerf-elbuort dna efas a ni si enihcam eht taht erusne ot serusaem ekaT•evitcetorp lla nehw ylno enihcam eht esU .egasu ot roirp noitidnoc
era )secived ffo-ycnegreme ,srebrosba esion ,sdraug .e.i( secived.snoitacol dednetni eht ni gnitarepo
ot tfihs a ecno tsael ta edam eb tsum enihcam eht fo kcehc lausiv A•segnahc ynA .dezingocer era stluaf ro segamad elbisiv taht erusne)enihcam eht fo roivaheb ro ecnamrofrep eht ni segnahc gnidulcni(
ta enihcam eht pots ,yrassecen fI .rosivrepus eht ot detroper eb tsum.ti eruces dna ecno
eruces dna yletaidemmi enihcam eht pots noitcnuflam a fo esac eht nI•.elbissop sa noos sa melborp eht xiF .ti
snoitcurtsni gnitarepo eht wollof enihcam eht gnippots dna gnitrats roF•.sthgil rotacidni evresbo dna
enihcam gninnur eht taht erus ekam no enihcam eht gnihctiws erofeB•.enoyna ot regnad on fo eb lliw
anu ed ejabart o aiporpmi arenam anu ed aniuqam al esu acnuN•.arugesni arenam
noiccetorp y ,ovlop le arap alliracsam ,dadiruges ed safag esu erpmeiS• noc odneilpmuc( arreis al odnarepo ertneucne es odnauc sodio sol arap
.)1.782-ISNAed atlaf aL .osu ne etse arreis al odnauc atrela erpmeis aczenamreP•
.soires soñad a ricudnoc airdop rodarepo led etrap rop noicnetaed ragul le noc omsim detsu esezirailimaf ,rajabart a razepme ed setnA•
euq saicnatsnucric sal atneuc ne odnamot ,serodederla sus y ojabartal evresbO .erbil noicalucric al o ojabart le ridepmi nareidup
arap sadidem emot y ,)on o oyopa neub( onerret led senoicidnocsol ed otneimalsia otcerroc le olpmeje rop dadiruges al razitnarag
.acilbup noicalucric al ed ojabart la soseccasenoicidnoc ne etse aniuqam al euq razitnarag arap sadidem omoT•
aniuqam al esU .alrasu ed setna samelborp ed erbil y ,saruges odnarepo netse noiccetorp ed sovitisopsid sol sodot odnauc etnemalos
y ,serodaicnelis ,satreibuc :olpmeje rop ,adacidni amrof al ne.noicavitcased ed sovitisopsid
arap onrut adac zev anu sonem la esrecah arebed lausiv noisiver anU• reiuqlauC .sadazilacol naes sallaf o selbisiv soñad sol euq rarugesael ne soibmac odneyulcni ,rosivrepus la odatroper res arebed oibmac
aleugapa oirasecen se is ;aniuqam al ed otneimatropmoc o otneimidner.alerugesa y
y etnemataidemni aniuqam al eugapa otneimanoicnuflam ed osac nE•.elbisop otnorp sam ol amelborp le elgerrA .alerugesa
y ,noicarepo ed senoiccurtsni sal agis aniuqam al ragapa y rednerp araP•.sarodacidni secul al evresbo
ed ares on amsim al euq ed oruges etse aniuqam al rednecne ed setnA•.neiugla arap ogseir nugnin
RAEWSYAWLARAEGYTEFAS
ESUYLREPORPDEDNUORGTIUCRIC
EDALB ESUDRAUGNEHWGNITAREPOWAS Disc
ount
-Equ
ipmen
t.com
-11- -12-
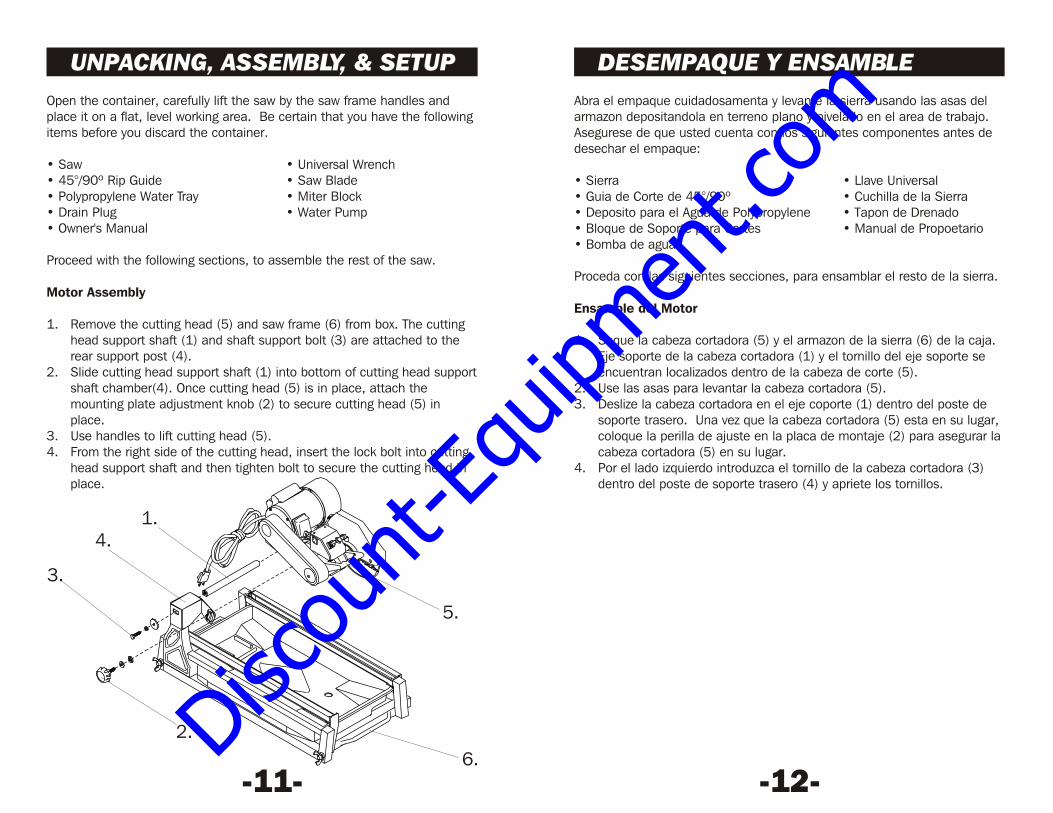
UNPACKING, ASSEMBLY, & SETUP DESEMPAQUE Y ENSAMBLEOpen the container, carefully lift the saw by the saw frame handles and place it on a flat, level working area. Be certain that you have the following items before you discard the container.
• Saw
• Polypropylene Water Tray • Miter Block• Drain Plug • Water Pump
Proceed with the following sections, to assemble the rest of the saw.
Motor Assembly
• Universal Wrench• 45°/90º Rip Guide • Saw Blade
• Owner's Manual
1. Remove the cutting head (5) and saw frame (6) from box. The cuttinghead support shaft (1) and shaft support bolt (3) are attached to therear support post (4).
2. Slide cutting head support shaft (1) into bottom of cutting head supportshaft chamber(4). Once cutting head (5) is in place, attach themounting plate adjustment knob (2) to secure cutting head (5) inplace.
3. Use handles to lift cutting head (5).4. From the right side of the cutting head, insert the lock bolt into cutting
head support shaft and then tighten bolt to secure the cutting head inplace.
Abra el empaque cuidadosamenta y levante la sierra usando las asas del armazon depositandola en terreno plano y nivelado en el area de trabajo.Asegurese de que usted cuenta con los siguientes componentes antes de desechar el empaque:
• Sierra
• Deposito para el Agua de Polypropylene ••
Proceda con las siguientes secciones, para ensamblar el resto de la sierra.
Ensamble del Motor
1. Saque la cabeza cortadora (5) y el armazon de la sierra (6) de la caja.Eje soporte de la cabeza cortadora (1) y el tornillo del eje soporte seencuentran localizados dentro de la cabeza de corte (5).
2. Use las asas para levantar la cabeza cortadora (5).3. Deslize la cabeza cortadora en el eje coporte (1) dentro del poste de
soporte trasero. Una vez que la cabeza cortadora (5) esta en su lugar,coloque la perilla de ajuste en la placa de montaje (2) para asegurar lacabeza cortadora (5) en su lugar.
4. Por el lado izquierdo introduzca el tornillo de la cabeza cortadora (3)dentro del poste de soporte trasero (4) y apriete los tornillos.
• Llave Universal• Guia de Corte de 45°/90º • Cuchilla de la Sierra
Tapon de DrenadoBloque de Soporte para Cortes • Manual de Propoetario
• Bomba de agua
1.4.
3.
2.6.
5.
Discou
nt-E
quipm
ent.c
om
-13- -14-
SAW STAND ASSEMBLY ENSAMBLAJE DEL SOPORTE DE LA SIERRA
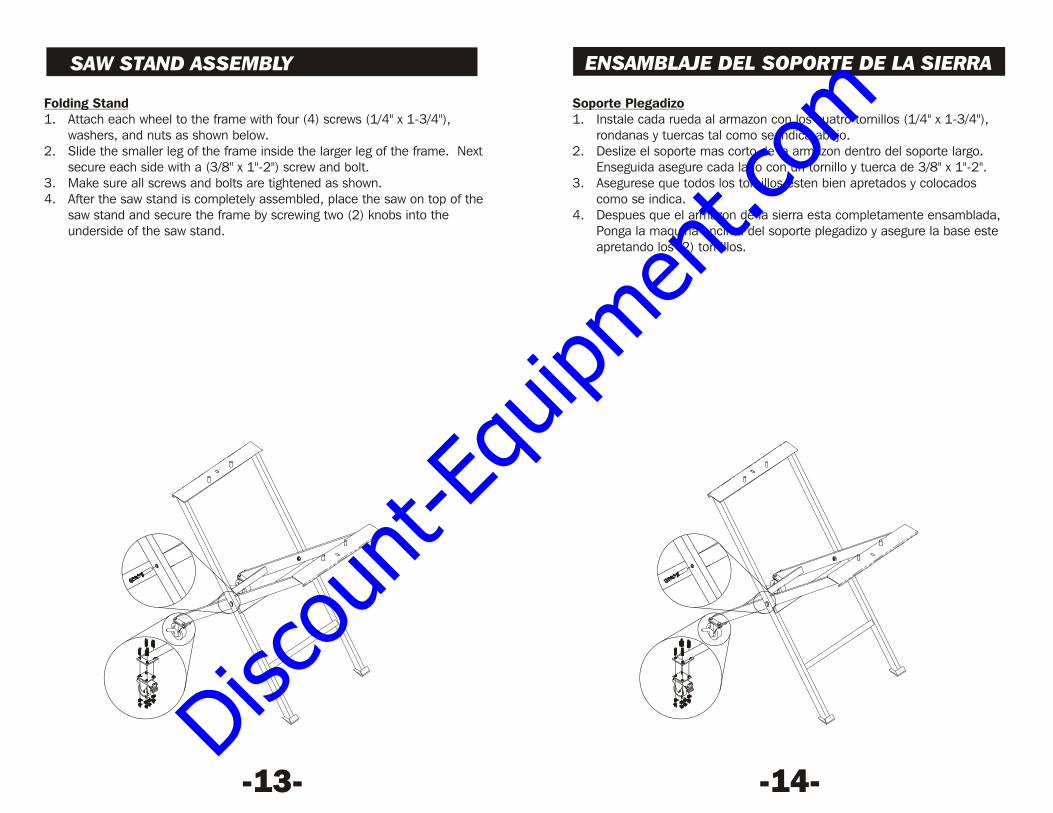
Folding Stand1. Attach each wheel to the frame with four (4) screws (1/4" x 1-3/4"),
washers, and nuts as shown below.2. Slide the smaller leg of the frame inside the larger leg of the frame. Next
secure each side with a (3/8" x 1"-2") screw and bolt.3. Make sure all screws and bolts are tightened as shown.4. After the saw stand is completely assembled, place the saw on top of the
saw stand and secure the frame by screwing two (2) knobs into theunderside of the saw stand.
Soporte Plegadizo1. Instale cada rueda al armazon con los cuatro tornillos (1/4" x 1-3/4"),
rondanas y tuercas tal como se indica abajo.2. Deslize el soporte mas corto de la armazon dentro del soporte largo.
Enseguida asegure cada lado con un tornillo y tuerca de 3. Asegurese que todos los tornillos esten bien apretados y colocados
como se indica.4. Despues que el armazon de la sierra esta completamente ensamblada,
Ponga la maquina encima del soporte plegadizo y asegure la base esteapretando los (2) tornillos.
3/8" x 1"-2".
Discou
nt-E
quipm
ent.c
om

-15- -16-
BLADE INSTALLATION INSTALACION DE LA CUCHILLA1. Carefully raise the cutting head to its highest position and secure it into
place by tightening the cutting head adjustment knob on the rearsupport.
2. Raise the blade guard to the highest position and tighten the bladeguard adjustment knob.
3. Remove the blade shaft nut and outer flange.4. Place the blade onto the shaft making sure that the directional arrows
are pointing in the direction of rotation.5. After making sure that the blade is firmly placed against the inner
flange, secure it into place with the outer flange and blade shaft nut.With one hand, tighten the blade shaft nut with your free hand. Makecertain the nut if firmly tightened with the wrench provided, but do notover-tighten!
6. Lower the blade guard and tighten the adjustment knob.7. Slightly loosen the rear support adjustment knob, lower the cutting
head so that the blade is ¼" below the surface of the cutting table, andthen tighten the adjustment knob firmly to hold the cutting head inplace.
Warning: Setting the blade too low may damage the cutting table and if set too high, the blade may grab the material being cut, causing damage and possibly injury.
1. Levante cuidadosamente la cabeza cortadora a su posicion maselevada y asegurela en su lugar apretando fuertemente la perilla deajuste en el soporte trasero.
2. Levante la cubierta protectora a su posicion mas elevada y apriete laperilla de ajuste.
3. Quite la tuerca del eje impulsor para poder quitar el reten exterior.4. Coloque la cuchilla cortadora en el eje impulsor asegurandose que la
flechas indicadoras marquen la direccion de rotacion correcta.5. Despues de asegurarse que la cuchilla este firmemente colocada
contra el reten interior y asegurela en su lugar colocando el retenexterior y apretando la tuerca en el eje impulsor. Con una mano baje elseguro de retenida y apriete la tuerca del eje impulsor con su manolibre, y asegurese que la tuerca este completamente apretada con lallave incluida en el set, pero no apriete demasiado.
6. Baje la cubierta protectora y apriete la perilla de ajuste.7. Afloje cuidadosamente la perilla de ajuste del soporte trasero, baje la
cabeza cortadora haste que la cuchilla este a ¼" bajo la superficie dela base de corte, y apriete la perilla de ajuste firmemente para retenerla cabeza de corte en su lugar.
Precaucion: Montar la cuchilla muy bajo podria dañar la base de corte y si la instalacion es muy elevada, la cuchilla podria arrebatar el material a cortar causando daño y posibles heridas.
Discou
nt-E
quipm
ent.c
om

-17- -18-
BEARING HOUSING INSTALLATION INSTALACION DEL ALOJAMIENTO DEL COJINETE
To remove the bearing housing:1. Remove the 3 screws on the belt guard.2. Remove the belt guard.3. Loosen the adjustment screw behind the mounting
plate and the 4 screws on the motor base to remove the belt.4. Remove the blade lock nut and remove the blade (if there is one
present).5. Remove the 4 screws on the mounting plate closest to the cutting
head handle to remove the bearing housing (including the attachedpulley and inner flange).
To install the new bearing housing:
2. Open the box and carefully place the flat portion of the new bearinghousing face-down on a towel situated on a flat surface.
3. Secure the cutting head in a completely horizontal position.
(but do not remove)
1. Be sure that you have completed the instructions above to remove theold bearing housing.
4. Slide the new bearing housing with the flat portion facing upwards ontothe 4 screws located below the mounting plate. Be careful not todamage the inner flange. Lock the bearing housing into place byusing brackets and nuts.
5. Pull the motor towards you, place the belt on the pulleys, and tightenthe motor position adjustment screw. Be sure to leave some slack onthe belt.
6. Align the belt by adjusting the motor pulley after loosening the hexscrew. Warning: Do not adjust the bearing housing pulley. Afteraligning the belt, tighten the hex screw.
7. Replace the belt guard and lock into place using 3 screws.
Para quitar el alojamiento del cojinete:1. Retire los tres tornillos en la cubierta de la banda.2. Quite la cubierta de la banda.3. Afloje (pero no quite) los tronillos de ajuste detras de la placa de
montaje y los cuatro tornillos en la base del motor para quitar la banda.4. Quite la tuerca de seguro y retire la cuchilla de corte (si hay alguna
presente).5. Quite los cuatro tornillos en la placa de montaje mas cercano a la asa
para quitar el alojamiento del cojinete (incluyendo la polea adjunta y elreten interno).
Para instalar el nuevo alojamiento del cojinete:
2. Abra la caja y cuidadosamente coloque la parte plana del nuevoalojamiento del cojinete con la cara hacia abajo sobre una toalla en unasuperficie plana.
3. Asegure la cabeza cortadora en una posicion completamente horizontal.
1. Asegurese de haber completado todas las instruciones arribamencionadas para quitar el viejo alojamiento del cojinete.
4. Deslize el nuevo alojamiento del cojinete con la parte plana vuelta haciaarriba sobre los cuatro tornillos situados bajo la placa de montaje.Tenga ciudado de no dañar el reten interior. Asegure el alojamientodel cojinete dentro de su lugar usando los soportes y tuercas.
5. Jale el motor hacia usted, coloque la banda en las poleas, y apriete eltornillo de ajuste de posicion del motor. Este seguro de dejar pocojuego en la banda.
6. Alinie la banda ajustando la polea del motor despues de aflojar eltornillo de dado. Precaucion: No ajuste la polea del alojamientodel cojinete. Despues de alinear la banda, apriete el tornillo de dado.
7. Coloque la cubierta de la banda y asegurela dentro de su lugar usandolos tres tornillos.
Discou
nt-E
quipm
ent.c
om

-19- -20-
WATER PUMP INSTALLATION
INSTALACION DE LA BOMBA DE AGUA
1. Remove the water pump from the box and check that it is notdamaged.
2. Place pump in the middle-rear of the water tray along its side so thatthe water outlet is positioned horizontally. Connect the water hose fromblade guard to the pump and plug the power cord into the 3-prongreceptacle.
3. Fill the water tray so that the water intake is fully immersed.
1.
2.
3. Llene la bandeja con agua asi para que la entrada de agua estecompletamente hundida.
Saque la bomba de agua de su empaque y revisela que no tenga ningun dano.Coloque la bomba en la parte central de atras de la bandeja de agua, en su costado tanto que la salida de agua este en posicion horizontal.Conecte la manguera del agua de la cubierta de la cuchilla a la bomba y conecte el cable en conector de 3 puntas.
TRAY INSTALLATION & REMOVAL
REMOVER E INSTALAR EL DEPOSITO DEL AGUA
1. Remove drain plug and drain all water in the tray.2. Lift water tray protection bracket and slide tray horizontally out from its
supporting metal frame.3. Thoroughly rinse water tray.4. Slide water tray back into its supporting metal frame and fasten
protection brackets.5. Reinstall drain plug back into the drain hole before filling the tray with
water.
1.2.
3.4.
5.
Quite el tapon y desague toda el agua de la bandeja.Levante el soporte de proteccion de la bandeja del agua y deslize horizontalmente hacia afuera de su armazon del soporte de metal.Enjuague completamente la bandeja del agua.Deslize la bandeja nuevamente a su soporte del armazon de metal y asegure con los soportes de proteccion.Vuelva a colocar el tapon en su lugar antes de llenar nuevamente la bandeja con agua. Disc
ount
-Equ
ipmen
t.com

-21- -22-
WATER PUMP MAINTENANCE
WATER PUMP SAFETY PRECAUTIONS
MANTENIMIENTO DE LA BOMBA DE AGUA
PRECAUCIONES DE SEGURIDAD CON LA BOMBA DEL AGUA
When the machine has not been used for a long period of time, hard packed dirt may build up inside the pump and block the pump wheel. If the machine is activated with the immersion pump blocked, the electric motor of the pump will be damaged within a few minutes! Please follow the steps below to clean the pump before operating the saw.
1. Unscrew the pump filter.2. Remove the immersion pump from the water container.3. Clean the immersion pump.4. Loosen the fixing screws of the pump lid.5. Take the lid off the pump (be careful not to damage the gasket inside
with a sharp object!)6. Clean the pump lid.7. Remove all dirt and incrustations from the pump wheel.8. Check whether the pump wheel can be easily turned.9. Then assemble the immersion pump correctly and check whether it
works properly.
Cuando la maquina no ha sido usada por largo periodo de tiempo, quizas la bomba y el rodete podrian estar atascados con residuos secos. Si la maquina es encendida con la bomba de immersion atascada, el motor electrico de la bomba podria danarse en pocos minutos! Por favor siga la indicaciones paso a paso para limpiar la bomba antes de usar la sierra.
Desatornille el filtro de la bomba.Quite la bomba de hundimiento de la bandeja del agua.Limpie la bomba de hundimiento.Afloje el tornillo de fijacion de la tapadera de la bomba.Retire la tapadera de la bomba (tenga cuidado) no dane el empaque de adentro con herramienta afilada.Limpie la tapa de la bomba.Quite toda la suciedad y residuos del rodete de la bomba.Compruebe que el rodete puede girar libremente.Ensamble la bomba de hundimiento correctamente y comprube que todo trabaje apropiadamente.
1.2.3.4.5.
6.7.8.9.
Nunca use la bomba sin agua en la bandeja. Llene la bandeja de agua de manera que el agujero de absorsion quede completamente hundido.
Asegurese de conectar el enchufe a un toma corriente conectado a tierra en forma apropriada para reducir el riesgo de choque electrico.
Desconecte la bomba antes de manejarla la o tratar de desmontarla o dar servicio a la bomba en cualquier forma.
Asegurese de sostener la bomba durante la instalacion para prevenir danos o fallas.
Never operate pump without water in the tray. Fill the water tray so that the water intake is fully immersed.Be sure to connect the plug to a properly grounded receptacle to reduce the risk of electric shock.Disconnect pump before handling pump or attempting to unclog or service the pump in any way.Be sure to support pump during installation to prevent pump failure or damage.
Discou
nt-E
quipm
ent.c
om
-23- -24-
USING THE CUTTING TABLE USO DE LA BASE DE CORTEFeatures:• Cutting table marked in inches and centimeters for precision cuts.•
• length cutting table provides more support during larger cutting jobs than the standard 11" cutting tables.
To use the 45º/90º rip guide, follow the steps below:1. Set the rip guide by positioning it on the desired dimension and tighten
the threaded knob. Make sure that the rip guide is firmly tightened to avoid slippage. The rip guide can be used for 45º/90º rip cuts from both the left and right side. (Note the straight slits on the bottom of the rip guide.)
2. After the rip guide is positioned for the desired cut, place material flatagainst the rip guide and the measurement rail.
3. Simply line up the material being cut with the appropriate pre-markedlines
4. Now you are ready to make your cut.
To make miter cuts, follow the steps below:1. For miter cuts, place the lip of the miter block on the measurement rail,
with the threaded knobs facing you.2. Tighten the threaded knobs to secure the miter block in place.3. Place material onto miter block and you are ready to cut.
Rubber-matted cutting table supports the material being cut in place, while resisting vibrations for smoother cuts with less chipping.14”
on top of the cutting table.
Caracteristicasase de corte marcado en pulgadas y centimetros para cortes precisos.
La cubierta de goma de la base de corte ayuda a mantener el material en su lugar mientras, es cortado resistiendo vibraciones para cortes mas suaves con menos astillas.Base de corte de provee mas apoyo durante los trabajos de cortes largos, mas que las bases de corte estandard en 11".
Para usar la guia de corte de 45º/90º siga los pasos siguientesInstale la guia de corte colocando en la medida deseada despues apriete la perilla atornillable. Asegurese que la guia de corte esta firmemente apretada para evitar que el material se resbale. La guia de corte puede ser usada para cortes de 45º/90º y cortes por los 2 lados derecho e izquierdo Despues de que la guia de corte este instalada para el corte deseado, ponga el material completamente plano contra la guia de corte y el riel de medida.Simplemente alinie el material a cortar con las lineas premarcadas en la cubierta de goma de la base de corte.Ahora ya usted esta listo para realizar su corte.
Para hacer cortes en diagonal, continue con los siguientes pasosPara cortes diagonales, coloque el borde del soporte diagonal en el riel de medicion, con las perillas atornillables de frente a usted.Apriete las perillas atornillables para asegurar el soporte de corte diagonal en su lugar.Coloque el material a cortar encima del soporte de corte diagonal y
:• B•
:1.
2.
3.
4.
:1.
2.
3.
• 14”
Discou
nt-E
quipm
ent.c
om
-25- -26-
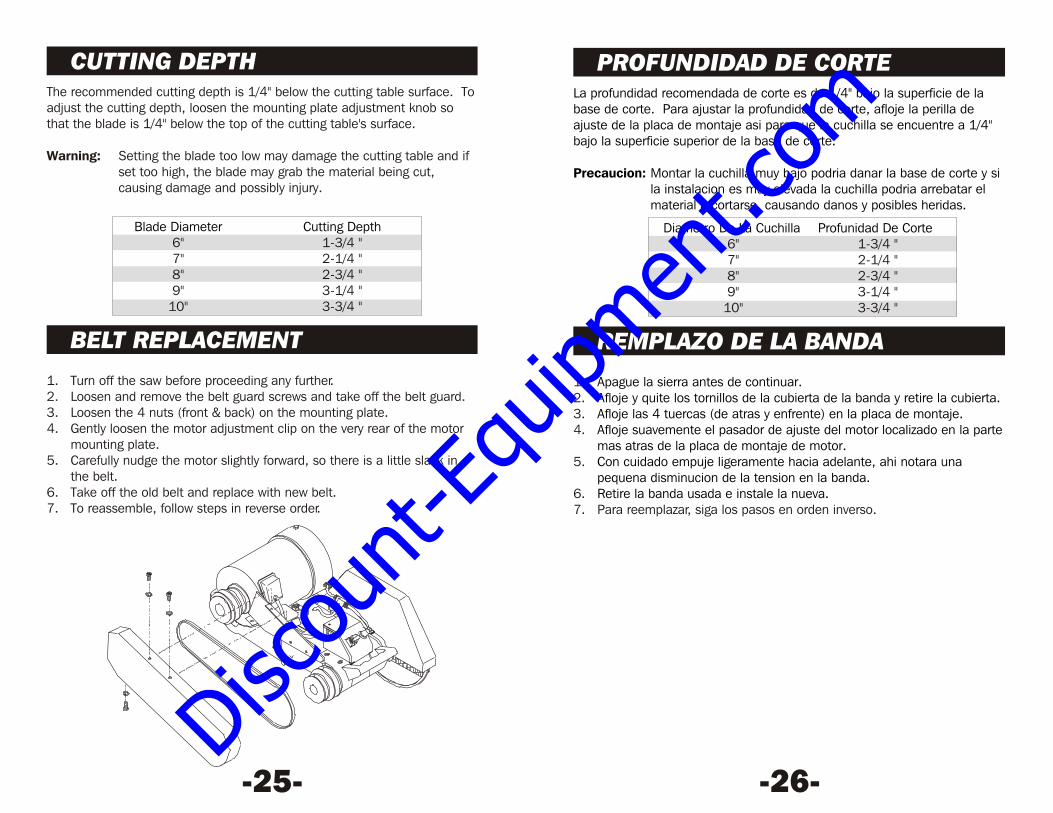
CUTTING DEPTH PROFUNDIDAD DE CORTEThe recommended cutting depth is 1/4" below the cutting table surface. To adjust the cutting depth, loosen the mounting plate adjustment knob so that the blade is 1/4" below the top of the cutting table's surface.
Warning: Setting the blade too low may damage the cutting table and if set too high, the blade may grab the material being cut, causing damage and possibly injury.
La profundidad recomendada de corte es de 1/4" bajo la superficie de la base de corte. Para ajustar la profundidad de corte, afloje la perilla de ajuste de la placa de montaje asi para que la cuchilla se encuentre a 1/4" bajo la superficie superior de la base de corte.
Precaucion Montar la cuchilla muy bajo podria danar la base de corte y si la instalacion es muy elevada la cuchilla podria arrebatar el material a cortarse, causando danos y posibles heridas.
:
Diametro De La Cuchilla6"7"8"9"10"
Profunidad De Corte1-3/4 "2-1/4 "2-3/4 "3-1/4 "3-3/4 "
Blade Diameter6"7"8"9"10"
BELT REPLACEMENT REMPLAZO DE LA BANDA1. Turn off the saw before proceeding any further.2. Loosen and remove the belt guard screws and take off the belt guard.3. Loosen the 4 nuts (front & back) on the mounting plate.4. Gently loosen the motor adjustment clip on the very rear of the motor
mounting plate.5. Carefully nudge the motor slightly forward, so there is a little slack in
the belt.6. Take off the old belt and replace with new belt.7. To reassemble, follow steps in reverse order.
1.2.3.4.
5.
Apague la sierra antes de continuar.Afloje y quite los tornillos de la cubierta de la banda y retire la cubierta.Afloje las 4 tuercas (de atras y enfrente) en la placa de montaje.Afloje suavemente el pasador de ajuste del motor localizado en la parte mas atras de la placa de montaje de motor.Con cuidado empuje ligeramente hacia adelante, ahi notara una pequena disminucion de la tension en la banda.Retire la banda usada e instale la nueva.6.
7. Para reemplazar, siga los pasos en orden inverso.
Cutting Depth1-3/4 "2-1/4 "2-3/4 "3-1/4 "3-3/4 "
Discou
nt-E
quipm
ent.c
om

-27- -28-
ELECTRICAL MOTOR SPECIFICATION ESPECIFICACIONES DEL MOTOR
WarningTo avoid permanent motor damage you must use the correct extension cord. Never use more than one extension cord at a time. Follow the chart below for proper size:
AdvertenciaPara evitar dano permanente al motor use el cable correcto de extension. Nunca use mas de una extension a la vez. Siga las indicaciones proporcionadas abajo:
Features: Horsepower 1-1/2H.P. Volts 115 V Amps 15 Amps
Motor RPM 3450 RPM Cycle 60 Phase 1 Class E
Recommendations:It is recommended that a 15 AMP CIRCUIT be used while operating this saw. This will prevent possible power interruption or loss.Always plug saw as close as possible to the power source while operating. This will allow you to receive optimum electricity.
CaracteristicasCaballajeVoltiosAmperios Amps
CiclosFaseClase
RecomendacionesEs recomendado que un circuito de 15 amps sea usado mientras la sierra esta en operacion. Esto evitara la interrupcion o perdida de potencia.Siempre conecte la sierra lo mas cerca posible a la fuente de poder mientras la sierra este en operaicon. Esto le permetira recivir la
: 1-1/2H.P. 115 V 15
Motor RPM 3450 RPM 60 1 E
:
1½ HP115V/60 Hz
25'50'75'-
WIREGAUGENo. 12No. 10No. 8
LENGTH OF CORD1½ HP
115V/60 Hz25'50'75'-
GROSORDE CABLE
No. 12No. 10No. 8
LARGO DEL CABLE
BreakerOvercurrent
Motor
Power Outlet for Water Pump
White
Black
Wiring Box
Gre
en
Switch White
Green
White
Black
Sborecargo
Motor
Salida de Corriente para la Bomba
Blanco
Negro
Caja Coneccion
Interruptor Blanco
Verde
Blanco
Nergo
Verde
Verd
e
Discou
nt-E
quipm
ent.c
om

-29- -30-
Side ExtensionTable
Guia de Corte en Angular
MasterGuideTemplate Base
Plantilla de Base
Angle Guide
OPTIONAL ACCESSORIES ACCESORIOS OPCIONALES
Guia MaestraMasterGuide
Part number:
Part name:
S1000-44
Part number:
Part name:
S1000-MG2
Part number:
Part name:
S1000-MG
Part number:
Part name:
S1000-36
Extencion de la base de corte
Nombre de parte:
Numero de parte:S1000-44
Nombre de parte:
Numero de parte:S1000-MG2
Nombre de parte:
Numero de parte:S1000-MG
Nombre de parte:
Numero de parte:S1000-36Disc
ount
-Equ
ipmen
t.com

-31- -32-
COMO USAR LAS CUCHILLASWET CUT BLADES
DO'SInspect blades daily for cracks or uneven wear.Always use appropriate blade for material being cut.Inspect arbor shaft for uneven wear before mounting blade.Always use blades with the correct arbor shaft size.Ensure that blade is mounted in the correct direction.Secure the blade to the arbor with a wrench.Use proper safety equipment when operating the saw.Periodically check the blade for cracks or bond fatigue.Always have a continuous flow of water on both sides of blade.
DON'TSDo not operate the saw without safety guards in position.Do not operate the saw with blades larger than 10".Do not cut dry with blades marked "Use Wet".Do not exceed manufacturer's recommended maximum RPM.Do not force blade into material let blade cut at its own speed.
DRY CUT BLADES
DO'SIn addition to the following, always follow wet recommendations.Use appropriate blade for material being cut.Inspect segment blades for segment cracking or loss.Do not use damaged blades.Use proper safety equipment when operating the saw.
DON'TSIn addition to the following, always follow wet recommendations.Do not make long cuts with dry blades--allow them to air cool
periodically.Do not use the edge or side of blade to cut or grind.Do not attempt to cut a radius or curve.Do not cut too deep or too fast into the material.Do not cut any material not recommended by blade manufacturer.
DO'S & DON'TS FOR BLADESCUCHILLAS DE CORTE HUMEDO
QUE HACER Revise las cuchillas diariamente por grietas o desgaste disparejo. Siempre use la cuchilla apropiada para el material que se va a cortar. Revise el eje por desgaste disparejo antes de instalar la cuchilla. Use siempre cuchilla con la medida necesaria para el eje. Asegure se que la cuchilla este montada en la direccion correcta. Asegure la cuchilla al eje con una llave. Use el equipo de seguridad apropiado cuando se encuentre operando la sierra. Periodicamente revise la cuchilla por grietas o abolladuras. Siempre tenga un constante flujo de agua en ambos lados de la cuchilla.
QUE NO HACERNo haga uso de la sierra sin las cubiertas de seguridad.No use la sierra con cuchillas mas largas de 10".No haga cortes en seco cuando la cuchilla esta disenada para uso humedo.No exeda el maximo de RPM recomendadas por el fabricante.No force la cuchilla cuando este realizando el corte deje que la cuchilla avance por si misma.
CUCHILLAS DE CORTE EN SECO
QUE HACER Ademas de lo siguiente siemple siga las recomendaciones de corte humedo. Use la cuchilla apropiada para el material a cortar. Revise la cuchilla con mucho cuidado buscando grietas o quebraduras. No use cuchillas danadas. Use el equipo de seguridad adecuado cuando use la sierra.
QUE NO HACER Ademas de lo siguiente siempre siga las recomendaciones de corte
humedo. No haga cortes largos con cuchillas para corte seco. Permita el
enfriamiento con aire periodicamente. No use el filo o los costados de la cuchilla para cortar o esmerilar. No trate de cortar en circulo o curvas. No haga cortes muy profundos o rapidos en el material. No corte cualquier material que no sea recomendado por el fabricante de la
cuchilla.Discou
nt-E
quipm
ent.c
om

-33- -34-
GENERAL RULES1. Always clean the machine before maintenance/repair.2. Before cleaning/maintenance/repair, the machine must be switched off
with the main power key.3. Clean the machine by following the steps below:
a. Please do not use aggressive cleaners (i.e. containing solvents).Do not use high-pressure water jets, aggressive detergents orsolutions and liquids with a temperature exceeding 86 F! Use afluff-free cloth only.
b. Use a cloth which may be lightly moistened only for removing dustand dirt. Hard packed dirt can be removed with a soft brush.
c. For the sake of safety, no water/cleaning liquid/vapor may penetrateinto the electric motor, connectors/plugs, switches, etc. Thereforecover all apertures, holes in the housing, connectors or plugs, etc.or seal them with adhesive tape!
d. Use a soft, low-pressure water jet and a brush to rinse dirt andincrustations away. Be particularly careful when near hazardousparts of the machine (e.g. switch, motor). Clean the motor andswitches only by wiping with a moist cloth.
e. Do not "rinse" the bearings of the drive elements to prevent themfrom running dry. The ball bearings of the machine are permanentlylubricated.
f. After cleaning, remove all covers and adhesive tape! All screws/nutswhich you may have loosened must be tightened again!
g. After wet cleaning, try the machine on a power outlet which isequipped with a power breaker (i.e. fault current circuit breaker). Ifthe fault current circuit breaker cuts the power supply, the machinemust be inspected by an authorized dealer prior to use!
°
REGLAS GENERALESSiempre limpie la maquina antes de darle mantenimiento o reparala.Antes de limpiar, darle mantenimiento o reparar, la maquina debera apagarse con el interruptor principal.Limpie la maquina siguiendo los pasos a continuacion
Por favor no use limpiadores agresivos P.E. tiner. No use agua a alta presion detergentes fuertes, o soluciones solventes exediendo la temperatura de 86°F! use trapo suave para limpiar.Use un trapo humedo para limpiar el polvo y suciedad, la suciedad estancada puede ser removida con un cepillo suave.Por razon de seguridad, no debe penetrar agua, liquido limpiador o vapor dentro del motor electrico, conectores, tomacorrientes interruptores por consiguiente cubra todas las aperturas hoyos en el alojamiento conector o tomacorriente con cinta hadesiva.Use un trapo suave y humedo y un cepillo para retirar residuos e incurstaciones. Sea particularmente cuidadoso cuando partes riesgosas se encuentren cerca de las partes delicadas de la maquina p.e. interruptores y motor. Limpie los interruptores y el motor solo con un trapo humedo y suave.No enjuage los cojinetes de las partes movibles para prevenir que se usen en seco. Los cojinetes de la maquina estan permanentemente lubricados.Despues de la limpieza, remueva todas las cubiertas y la cinta hadhesiva, todos los tornillos y tuercas que usted aflojo deberan ser apretados nuevamente!Despues de la limpieza humeda conecte la maquina a un toma correinte equipado con un interruptor de corriente p.e. corta corriente en caso de fallas. Si el interruptor corta la corriente, la maquina debera ser inspeccionada por un distribuidor autorizado antes de su uso!
1.2.
3. :a.
b.
c.
d.
e.
f.
g.
SAW MAINTENANCE MANTENIMIENTO DE LA SIERRA
Discou
nt-E
quipm
ent.c
om

-35- -36-
SAW MAINTENANCE MANTENIMIENTO DE LA SIERRAMaintenance Interval
After every use of the machine
After wet cleaning and before using the machine again
Before not using the machine for a prolonged period of time
After not using the machine for a prolonged period of time
Ambient temperature below 32 F (operation in winter)
Periodo de mantenimiento
Despues de cada uso de la sierra
Despues de limpiar y antes de usar la maquina nuevamente
Antes de no usar la maquina por un periodo prolongadro de tiempo
Despues de un prolongado periodo de tiempo sin uso
Temperatura ambiente trabajando a 32 F (El uso°
What to do for maintenance and care
Remove dirty water from container. Remove dirt and mud from the bottom of the container. Rinse the immersion pump with fresh water to prevent water pump clogging from residual dirt.
Connect the machine to an electric power outlet equipped with a "Fi" safety power breaker. If the safety power breaker cuts off the electrical power supply, do not try to operate the machine but have it checked by an authorized dealer first.
Clean and lubricate all movable parts.
Check that the legs are safely fixed. Check that all screw joints and nuts are fixed. Check that the roller table is in its guides and that it easily moves to and fro. With the saw blade removed, switch on the motor for an instant and switch it off again. If the motor does not run, have the machine inspected by a qualified electrician. Check that the immersion pump works properly. Turn on the cooling water tap and switch the machine on. If the pump does not give any water or only a little, switch the machine off at once. Clean the pump, or replace if necessary.
To prevent the water in the pump and cooling system from freezing, remove the water after using the machine or when there will be a long break. Make sure that the cooling system is entirely drained so that there is no water left inside the pump and water hose!
Como cuidar y mantener la sierra
Vacie el agua sucia del deposito. Quite la suciedad y los residuos del deposito. Enjuage la bomba de hundimiento con agua limpia para prevenir que se atasque conresiduos y basura.
Conecte la maquina a un toma corrientes equipado con un interruptor de seguridad. Si el interruptor corta la corriente. No trate de usar la maquina primero tendra que ser revisada por un distribuidor autorizado.
Limpie y lubrique todas las partes moviles.
Revise que los soportes estan seguramente fijos. Revise que todos los tornillos y tuercas estenarreglados. Revise que la base de rodetes esta en sus guias y se puede mover libremente. Con la cuchilla de la sierra desmontada, encienda el motor por un instante y vuelvala a apagar. Si el motor no trabaja, la maquinadebera ser revisada por un electricista calificado. Revise que la bomba de hundimiento trabaje demanera correcta encienda el proveeder de agua y encienda la maquina. Si la bomba no provee la sificiente agua o nada. Apague la maquina.Limpie la bomba a reemplacela si es necesario.
Para prevenir que el agua en la bomba o en el sistema de enfriamiento no se congele. No deje agua en el deposito despues de cada uso o cuando se dejara sin uso por un tiempoprolongado. Asegureze que el deposito y elsistema de enfriamiento esta completamentevacio y que no hay agua en la bomba ni en lasmangueras.Disc
ount
-Equ
ipmen
t.com

-37- -38-
TROUBLESHOOTING PROBLEMAS Y SOLUCIONES
Problem
Machine does not run when switched on
Motor stops (power cut out)
Poor machine performancelittle power
Problemas
La maquina no trabaja cuando es activada
Desativacioncontinua del motor
Pobrerendimiento o poco poder
Solution
heck that the machine is properly connected to the power supply
ave the power cord checked, replace if necessary
ave the main power switch checked and replace if necessary by a qualified electrician
C
H
H
Have the whole electric system of the machine checked by a qualified electrician Have the motor checked and replaced if necessary by a qualified technician
Exert less pressure when cutting Use a saw blade which corresponds to the material being cut Have the electric system of the saw checked by a qualified technician
Use a power cord/extension cable of the rated length, use a cable drum with cable fully extended Observe the electrical ratings of the machine and connect it only to a power network which complies with these ratings Have the motor checked by a qualified electrician and have it replaced if necessary
Solucion
Revise la maquina si esta correctamente conectado a tomacorriente Revise el cable conetor y re-emplacelo si es necesario Revise el interruptor principal y si es necesario debera ser cambiado por un electricista calificado El sistema electrico debera ser revisado completamente por un electricista calificado Revise el motor y re-emplacelo si es necesario
Ejerza menos presion cuando realize el corte
Utilize la cuchilla de sierra que corresponde al material a cortar El sistema electrico de la sierra debera ser revisado por un tecnico calificado
Use cable conector o extension de la medida indicada use la bovina con el cable completamente extendido Observe los requerimientos electricos de la maquina y conectela a la linea de corriente que cumpla con los requerimientos Haga que el motor sea revisado por un electricista calificado y remplazelo de ser necesario
Possible Cause
Power cord not properly fixed/plugged in
Power cord defective
Main power switch defective
Loose electrical connection inside the electric system
Motor defective
Too much pressure exerted while cutting Incorrect specification for saw blade
Saw has a defective electric system
Power cord/extension cable too long or cable still wound up inside cable drum Power network is insufficient
Drive motor no longer runs at rated speed (RPM)
Posible causa
Cable conector no esta fijo o conectado en la forma correcta Cable conector defectuoso Interruptor principal de fectuoso
Perdida de coneccion electrica dentro el sistema electrico Motor defectuso
Demasiada pression es aplicada mientras esta realizando el corte Especificacion incorrecta de la cuchilla de la sierra La sierra tiene sistema electrico defectuoso
Cable conector o extension demasiado largo o el cable ha sido danado dentro de la bovina Linea de corriente es insuficiente
El motor no trabaja a la velocidad de corte requeridaDiscou
nt-E
quipm
ent.c
om

-39- -40-
TROUBLESHOOTING PROBLEMAS Y SOLUCIONESProblem
Insufficient flow of cooling water or no cooling water at all
Irregular run of the saw blade
Saw blade wobbles when running
Diamondsegmentbecomes loose
Excessive wear
Cracks in or near the diamondsegment.
Problemas
Insuficiente flujo de liquido enfriafor o nada de liquido
Funcionamientoirregular de la cuchilla de la sierra
Balanceo de la cuchilla cuando esta en uso
Los segmentos de diamante se aflojan
Degaste excesivo
Cuarteadurasen, o cerca de los segmentos de diamante
Solution
Fill the container with water Clean the filter of the pump Disassemble the immersion pump and clean it
Return the saw blade to the manufacturer
Have the saw blade aligned/flattened Clean the receiving flange Solder the diamond segments of the old blade onto another saw blade or use a new blade Replace the saw blade flange Replace the electric motor
Have the diamond segment soldered on the blade again; ensure optimum flow of cooling water
Use harder saw blades Have bearings of the motor or the motor replaced Ensure optimum flow of cooling water
Use a softer blade Have the fixed flange replace Replace the bearing of the motor shaft
Solucion
Llene el deposito con agua Limpie el filtro de la bomba Desarme la bomba de imersion y limpiela
Regrese la cuchilla al fabricante
La cuchilla debera ser enderezada y alineada Limpie el borde receptor Solde los segmentos de diamante de la cuchilla vieja en otra buena o use una cuchilla nueva Reemplace el borde de la cuchilla Reemplace el motor electrico
Solde los segmentos de diamante en la cuchilla nuevamente y asegure liquido enfriador suficiente
Use una cuchilla mas fuerte
Remplace los valeros del motor o el motor completo Asegure flujo de liquido enfriador suficiente
Use una cuchilla mas suave
Remplace los bordes deajuste–Remplace los baleros deleje del motor
Possible Cause
The pump draws air Filter clogged Pump wheel of the immersion pump blocked by dirt
Poor tension in the blade material
Saw blade is damaged or bent
Flange of the saw blade is damaged Shaft of the motor is bent
Overheating of the saw blade; cooling water not sufficient
Wrongtype of saw blade Shaft of motor causes wobbling Overheating
Saw blade too hard Fixed flange is worn out
Motor shaft bearing
Posible Causa
La bomba arrastra aire Filtro tapado La rueda de la bomba de imersion esta tapada con residuos
Pobre resistencia en el material de la cuchilla
La cuchilla esta danada o doblada
Borde de la cuchilla de la navaja esta danado Eje del motor esta doblado
Sobrecalentamiento de la cuchilla e insuficiente liquido enfriador
Tipo equivocado de cuchilla El eje del motor causa balanceo Sobrecalentamiento
Cuchilla de la sierra demasiado dura Los bordes de ajuste estan desgastados Baleros del eje del motorDisc
ount
-Equ
ipmen
t.com

-41- -42-
Problem
Saw blade is blunt
Appearance of cut is not optimal
The center hole in the saw blade has become wider due to wear
Saw blade shows blooming colors
Grinding marks on the saw blade
Problemas
Cuchilladesafilada
Apariencia del corte no es buena
El centro de la cuchilla se ha desgastado
La cuchilla muestra colores brillantes
Marcas de esmerilado en la cuchilla
Solution
Use appropriate type of saw blade
Sharpen the diamond saw blade
Return the saw blade to the manufacturer Use a suitable saw blade
Sharpen the saw blade
The arbor of the saw blade must be fitted with an appropriate adaptor ring Check the receiving flange and have it replaced if necessary
Ensure an optimum flow of cooling water
The material feed is too high; proceed more slowly
Ensure that the direction of feed is absolutely parallel to the saw blade Adjust the roller table/have it adjusted Have the saw blade tensioned The material feed is too high, proceed more slowly
Solucion
Use el tipo apropiado de cuchilla
Afile la cuchilla
Regrese la cuchilla al fabricante Use la cuchilla requerida
Afile la cuchilla de la maquina
El eje de la cuchilla debera ser ajustado con un anillo adaptador apropiado Revise el borde receptor y cambielo si es necesario
Asegure la maxima cantidad de liquido enfriador
La alimentacion del material es muy rapida continue mas despacio
Asegurese de que la direccion de alimentacion es paralela a la cuchilla Ajuste la base de rodillos o mande ajustarla Use la cuchilla adecuada
El material esta siendo alimentado muy rapido continue mas despacio
Possible Cause
Saw blade type is unsuitable for the material being cut Saw blade type is unsuitable for the machine performance Saw blade too hard Diamond segments are blunt
Poor tension in the blade material Too much load placed on the saw blade Diamond segments are blunt
The saw blade has slipped on the motor shaft when running
Saw blade overheating due to a lack of cooling water Lateral friction when cutting
Material is not being fed parallel to the saw blade
Poor tension in the blade material Too much load on the saw blade
Posible Causa
El tipo de cuchilla es inhapropiado para el material a cortarse El tipo de cuchilla es inhapropiado para elrendimiento de la maquina Cuchilla demasiado d u r a Segmentos de diamante desafilados
Poca resistencia en el material de la cuchilla Demasiada presion en la cuchi l la Los segmentos de diamante desafilados
La cuchilla se ha resbalado en el eje del motor mientras funciona
Sobrecalentemiento de la cuchilla debido a la falta de liquido enfriador Rozamiento lateral cuando corta
El material no esta siendo alimentado paralelamente a la cuch i l l a
Poca resistencia en el material de la cuchilla Demasiada presion en
TROUBLESHOOTING PROBLEMAS Y SOLUCIONES
Discou
nt-E
quipm
ent.c
om
ytnarraW noitcafsitaS waS detimil raey )1( eno a yb derevoc era sloot dnomaid dna swas llA pihsnamkrow ni evitcefed si tcudorp eht fI .esahcrup fo etad eht morf ytnarraw fo eerf ti ecalper ro/dna riaper lliw Bartell Morrison (USA) LLC ,lairetam ro lanigiro sti ni relaed/rotubirtsid eht ot tcudorp eht gninruter nopu egrahc morf gnitluser egamad ro raew lamron revoc ton seod ytnarraw sihT .gnigakcap ytnarraw siht rednu snoitagilbo Bartell Morrison (USA) LLC .esuba rotarepo
Bartell .tcudorp eht fo tnemecalper ro/dna riaper eht ot detimil eb llahs gnitluser segamad laitneuqesnoc rof elbail eb ton llahsMorrison (USA) LLC
.tcudorp eht fo esu reporpmi morf
yb derutcafunam ton stnenopmoc lla sedulcxe ytnarraw ehT ,spmup ,srotom ,ot detimil ton tub ,gnidulcniBartell Morrison (USA) LLC yb detnarraw era stcudorp hcuS .seirossecca dna sgniraeb ,stleb ,sroticapac rof ytnarraw gninrevog eht eb lliw ytnarraw esohw ,rerutcafunam evitcepser rieht
.tcudorp ralucitrap taht
era stnenopmoc sti fo yna ro tcudorp eht fi diov si ytnarraw sihT seitnarraw lla fo ueil ni si ytnarraw sihT .degnahc yaw yna ni ro ,deretla ,deifidom
.deilpmi ro desserpxe
ytnarraW noitcafsitaS edalB dnomaiD dna dnob sti neewteb edalb dnomaid eht secnatsmucric yna rednU
Bartell llA ,edalb eht fo efil lufesu lamron eht gnirud sliaf eroc leets eht eetnaraug sihT .remotsuc eht ot tsoc on ta decalper eb lliw sedalb Morrison
.stcudorp desuba ro deilppasim ot ylppa ton seod
-34- -44-
YTNARRAW
PLEH LANOITIDDAPlease call us if for any reason you are having difficulty that cannot be resolved with the troubleshooting guide included in the back of this manual. We would like to help.
To better service our customers as expediently as possible, please make sure that you have the manufacturing serial number at hand before contacting us.
: GNINRAW HTLAEH
rehto esuac dna ,gnillird ,gnidnirg ,gniwas ,gnidnas rewop yb detaerc era tsud emoS rehto ro stcefed htrib ,recnac esuac ot nwonk slacimehc sniatnoc seitivitca noitcurtsnoc
:era slacimehc eseht fo selpmaxe emoS .mrah evitcudorper
Ÿ ,stniap desab dael morf daeL
Ÿ ,stcudorp yrnosam rehto dna tnemec dna skcirb morf acilis enillatsyrC
Ÿ .rebmul detaert-yllacimehc morf muimorhc dna cinesrA
oT .krow fo epyt siht od uoy netfo woh no gnidneped ,seirav serusopxe eseht morf ksir ruoY sevorppa htiw krow dna ,era detalitnev llew a ni krow :slacimehc eseht ot erusopxe ruoy ecuder
tuo retlif ot dengised yllaiceps era taht sksam tsud esoht sa hcus ,tnempiuqe ytefas.selcitrap cipocsorcim
GNINRAW :SNOITUACERP YTEFAS
ecalpeR .egamad robra dna ,skcarc eroc ,raew evissecxe rof yliad detcepsni eb dluohs edalb waS.egamad fo sngis swohs taht edalb yna
.yleruces tun gninethgit ,segnalf retuo dna robra naelc ,edalb tnuom oT
.gnitator si ti elihw edalb htiw enil ni ydob fo noitrop yna ecalp TON OD
.retaw htiw desu eb tsum sedalb gnittuc teW
.lanoisseforp deifilauq ot gnicivres refer ,kcohs lacirtcele fo ksir ecuder oT
ŸŸŸŸ
.riaper/ecnanetniam erofeb enihcam eht naelc syawlA.1 niam eht htiw ffo dehctiws eb tsum enihcam eht ,riaper/ecnanetniam/gninaelc erofeB.2
.yek rewop:woleb spets eht gniwollof yb enihcam eht naelC.3
-hgih esu ton oD .)stnevlos gniniatnoc .e.i( srenaelc evissergga esu ton od esaelP.aa htiw sdiuqil dna snoitulos ro stnegreted evissergga ,stej retaw erusserp
.ylno htolc eerf-ffulf a esU !F68 gnideecxe erutarepmet draH .trid dna tsud gnivomer rof ylno denetsiom ylthgil eb yam hcihw htolc a esU.b
.hsurb tfos a htiw devomer eb nac trid dekcapcirtcele eht otni etartenep yam ropav/diuqil gninaelc/retaw on ,ytefas fo ekas eht roF.c
eht ni seloh ,serutrepa lla revoc eroferehT .cte ,sehctiws ,sgulp/srotcennoc ,rotom!epat evisehda htiw meht laes ro .cte ,sgulp ro srotcennoc ,gnisuoh
.yawa snoitatsurcni dna trid esnir ot hsurb a dna tej retaw erusserp-wol ,tfos a esU.d,hctiws .g.e( enihcam eht fo strap suodrazah raen nehw luferac ylralucitrap eB
.htolc tsiom a htiw gnipiw yb ylno sehctiws dna rotom eht naelC .)rotom.yrd gninnur morf meht tneverp ot stnemele evird eht fo sgniraeb eht "esnir" ton oD.e
.detacirbul yltnenamrep era enihcam eht fo sgniraeb llab ehT yam uoy hcihw stun/swercs llA !epat evisehda dna srevoc lla evomer ,gninaelc retfA.f
!niaga denethgit eb tsum denesool evaha htiw deppiuqe si hcihw teltuo rewop a no enihcam eht yrt ,gninaelc tew retfA.g
rekaerb tiucric tnerruc tluaf eht fI .)rekaerb tiucric tnerruc tluaf .e.i( rekaerb rewop roirp relaed dezirohtua na yb detcepsni eb tsum enihcam eht ,ylppus rewop eht stuc
!esu ot
°
ESOPRUP LARENEG
Discou
nt-E
quipm
ent.c
om

Discount-Equipment.com is your online resource for quality parts & equipment.
Florida: 561-964-4949 Outside Florida TOLL FREE: 877-690-3101
Need parts? Click on this link: http://www.discount-equipment.com/category/5443-parts/ and choose one of the options to help get the right parts and equipment you are looking for. Please have the machine model and serial number available in order to help us get you the correct parts. If you don’t find the part on the website or on one of the online manuals, please fill out the request form and one of our experienced staff members will get back to you with a quote for the right part that your machine needs.
We sell worldwide for the brands: Genie, Terex, JLG, MultiQuip, Mikasa, Essick, Whiteman, Mayco, Toro Stone, Diamond Products, Generac Magnum, Airman, Haulotte, Barreto,
Power Blanket, Nifty Lift, Atlas Copco, Chicago Pneumatic, Allmand, Miller Curber, Skyjack, Lull, Skytrak, Tsurumi, Husquvarna Target, Stow, Wacker, Sakai, Mi-T-M, Sullair, Basic,
Dynapac, MBW, Weber, Bartell, Bennar Newman, Haulotte, Ditch Runner, Menegotti, Morrison, Contec, Buddy, Crown, Edco, Wyco, Bomag, Laymor, EZ Trench, Bil-Jax, F.S.
Curtis, Gehl Pavers, Heli, Honda, ICS/PowerGrit, IHI, Partner, Imer, Clipper, MMD, Koshin, Rice, CH&E, General Equipment ,Amida, Coleman, NAC, Gradall, Square Shooter, Kent,
Stanley, Tamco, Toku, Hatz, Kohler, Robin, Wisconsin, Northrock, Oztec, Toker TK, Rol-Air, APT, Wylie, Ingersoll Rand / Doosan, Innovatech, Con X, Ammann, Mecalac, Makinex, Smith
Surface Prep,Small Line, Wanco, Yanmar
Discou
nt-E
quipm
ent.c
om