Embed Size (px)
Citation preview

Parallels Software International, Inc.
Parallels Desktop for Mac rt Guide Quick Sta
(c) 2005-2007

Copyright © 2005-2007 by Parallels Software International, Inc. All rights reserved. Parallels, Parallels logo, Compressor, and Transporter are registered trademarks; Coherence is a trademark of
arallels Software International, Inc.
hat is the subject matter of a number of pending patent applications.
btained from the copyright holder.
, Windows NT, Windows Vista, and MS-DOS are registered trademarks of
nd Mac OS are registered trademarks of Apple Inc. Finder
ernational.
el Corporation. n.
rs.
P This product is based on a technology t Distribution of this work or derivative of this work in any form is prohibited unless prior written permission iso Microsoft, Windows, Windows ServerMicrosoft Corporation. Linux is a registered trademark of Linus Torvalds. Apple, Bonjour, Mac, MacBook, iMac, Macintosh, aand Safari are trademarks of Apple Inc. Solaris is a trademark of Sun Microsystems, Inc. eComStation is a trademark of Serenity Systems IntFreeBSD is a registered trademark of the FreeBSD Foundation. Intel and Intel Core are trademarks or registered trademarks of IntOS/2 Warp is a registered trademark of International Business Machines CorporatioVMware is a registered trademark of VMware, Inc. All other marks and names mentioned herein may be trademarks of their respective owne

Contents
Preface 4 Glossary of Terms.........................................................................................................................................4 Virtual Machine Hardware ...........................................................................................................................5
Installing Parallels Desktop 6
Launching Parallels Desktop 11
Activating Parallels Desktop 12
Creating a Virtual Machine 14 Express Installation of Windows XP or Windows Vista ............................................................................14 Troubleshooting..........................................................................................................................................20
Running the Virtual Machine 21 Toolbar........................................................................................................................................................21 Stopping and Pausing the Virtual Machine.................................................................................................23 Starting and Resuming Virtual Machine.....................................................................................................24 Switching View Modes...............................................................................................................................25
Switching to Full Screen Mode .......................................................................................................25 Switching to Coherence Mode ........................................................................................................26
Networking in the Virtual Machine ............................................................................................................26 Setting up Shared Folders in the Virtual Machine ......................................................................................26 Installing Windows Applications................................................................................................................27
Viewing or Editing the Virtual Machine Configuration 28
Usage Tips 30
Index 33

C H A P T E R 1
Preface
This Quick Start Guide contains step-by-step instructions on installing Parallels Desktop and creating a ready-to-use virtual machine with Windows XP or Windows Vista operating system installed.
This guide also provides instructions on stopping, starting, and pausing the virtual machine, switching between viewing modes, installing applications, and other helpful information.
In This Chapter Glossary of Terms................................................................................................................. 4 Virtual Machine Hardware.................................................................................................... 5
Glossary of Terms Primary Operating System (Primary OS): The operating system that is loaded when you turn on your Macintosh computer. In this case, it’s Mac OS X.
Virtual Machine (VM): Parallels Desktop emulates a computer running inside your Mac. This emulated computer is called a virtual machine. A virtual machine has its own hardware (generic sort), and its own “screen" (rather large window), and requires an operating system. Operating system and its applications are isolated within the virtual machine and share the Mac's physical hardware.
Using virtual machines enables you to:
Simultaneously run multiple operating systems (OSes) and their applications on a Mac. Switch between operating systems, without restarting your Mac. Have all the software you need on one physical machine.
Guest Operating System (Guest OS): It is another operating system on your Mac. The guest OS can be Windows XP, Windows Vista, Linux, or any other supported operating system that resides in your virtual machine.
Virtual Machine Configuration: The list of the virtual machine's options and devices. This list is displayed on Configuration Page and is available for editing in Configuration Editor.
ISO Image: A file that contains the entire contents of a CD or DVD disc, commonly used to install a guest operating system in a virtual machine.

0BPreface 5
Virtual Machine Hardware When running, a virtual machine behaves as though it is a computer with the following hardware components:
Intel Pentium processor. A generic motherboard compatible with the Intel i815 chipset. Up to 1500 MB of memory. VGA or SVGA display with VESA 3.0 support. A 1.44 MB floppy drive mapped to an image file. Up to four IDE devices. Each device may be either a virtual hard drive from 20 MB to 128
GB mapped to an image file, a Boot Camp partition or a CD/DVD-ROM drive mapped to a physical drive or to an image file.
Up to 5 network virtual interfaces, including Ethernet virtual network card compatible with RTL8029. By default, the virtual machine shares whatever network connection your Macintosh computer uses.
Up to four serial (COM) ports mapped to a socket or to an output file. Up to three parallel (LPT) ports mapped to an output file or to a printer connected to the
Macintosh computer. 8-port USB 2.0 controller and a 2-port USB 1.1 controller. AC’97-compatible sound card. Sound recording is supported. A generic PC keyboard. A PS/2 wheel mouse.

C H A P T E R 2
Installing Parallels Desktop
If you purchased a boxed copy of Parallels Desktop, insert the Parallels Desktop CD into your CD/DVD-ROM drive. In the Finder, open the Parallels Desktop CD, and open the Parallels Desktop package.
If you purchased Parallels Desktop from the Parallels Online Store, download the latest build at Parallels Download Center http://www.parallels.com/en/download/. When the download is complete, double-click the downloaded DMG file to open the Parallels Desktop Installer window. To start the installation, double-click Install Parallels Desktop.
1BInstalling Parallels Desktop 7
1 The Welcome window appears. Click the Continue button.
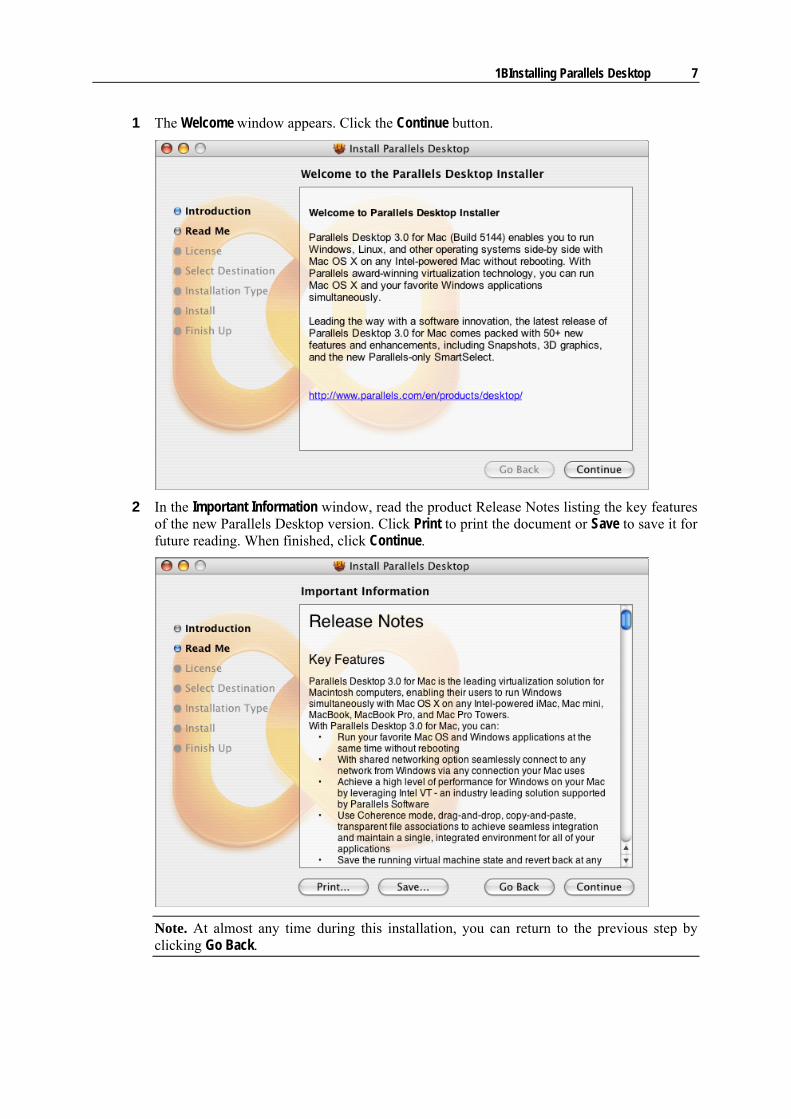
2 In the Important Information window, read the product Release Notes listing the key features
of the new Parallels Desktop version. Click Print to print the document or Save to save it for future reading. When finished, click Continue.
Note. At almost any time during this installation, you can return to the previous step by clicking Go Back.

8 Parallels Desktop for Mac Quick Start Guide
3 In the Software License Agreement window, carefully read the License Agreement. Click Print to print the agreement for your records, or click Save to save it for future reading. When ready, click Continue.
The following dialog appears. Click Agree if you agree to the terms and conditions of the Software License Agreement.
4 In the Select a Destination window, select the hard disk on which to install Parallels
Desktop.
Note. Parallels Desktop can be installed on the boot volume only, the same volume on which Mac OS X is installed. Other disks, partitions or external drives are unavailable for selection.

1BInstalling Parallels Desktop 9
Click Continue.
5 The Easy Install on "Macintosh HD" window appears. Click Install to start the Parallels
Desktop installation.
You can see the installation progress in the Installing Parallels Desktop window.

10 Parallels Desktop for Mac Quick Start Guide
6 When the Installer informs you that the installation was successful, click Close.

C H A P T E R 3
Launching Parallels Desktop
By default, Parallels Desktop is installed in the following folder: /Applications /Parallels/.
When the installation is complete, the Finder opens the Parallels folder automatically. To launch Parallels Desktop, double-click Parallels Desktop.
For easy access to Parallels Desktop, drag the Parallels Desktop icon from the Parallels folder to the Dock. This will enable you to launch Parallels Desktop by clicking the Parallels Desktop icon in the Dock.

C H A P T E R 4
Activating Parallels Desktop
You must activate your copy of Parallels Desktop. Otherwise, you will not be able to create or use your virtual machine. When you launch Parallels Desktop for the first time, the following message appears:
To activate your copy of Parallels Desktop:
1 In the Activation dialog, click Enter Activation Key.
2 In the Activation Key window, enter the activation key. You can also specify your name and you company name in the User Name and Company Name fields. These fields are optional. Click the Activate button.

3BActivating Parallels Desktop 13
3 When your copy of Parallels Desktop is activated, the Welcome to Parallels Desktop dialog appears. Click Register if you wish to register your copy of Parallels Desktop and subscribe to the Parallels newsletter. Otherwise, click either Remind me Later or Don't Ask Me Again.

C H A P T E R 5
Creating a Virtual Machine
When your copy of Parallels Desktop is activated, you can create a virtual machine.
This chapter describes the Windows Express method of creating a ready-to-use virtual machine. The Windows Express method is available only for Windows XP and Windows Vista operating systems.
You need a complete, fully licensed copy of Windows XP or Windows Vista. You may use an installation CD or an ISO image of the installation CD.
Note. If you have a printer connected to your Macintosh computer, OS Installation Assistant will connect it via parallel port to the virtual machine.
In This Chapter Express Installation of Windows XP or Windows Vista ...................................................... 14 Troubleshooting .................................................................................................................... 20
Express Installation of Windows XP or Windows Vista
1 Launch Parallels Desktop.
2 Parallels Desktop main window appears. Parallels Desktop is browsing files on your computer for existing virtual machines.
If Parallels Desktop cannot locate any virtual machine on your Macintosh computer, the Welcome window of OS Installation Assistant appears.
If Parallels Desktop locates a virtual machine on your computer, the list of virtual machines appears in the Select virtual machine dialog so that you can select and open any of them.

4BCreating a Virtual Machine 15
To create a new virtual machine, click the New button, or choose New from the File menu, and you will see the Welcome window of OS Installation Assistant.
3 In the Welcome window, select the Windows Express option and click Next.

16 Parallels Desktop for Mac Quick Start Guide
4 Select the Windows operating system to be installed and click Next.
5 Enter the Product Key for your copy of Windows and your Name. You can also enter the
name of your Organization. Click Next.

4BCreating a Virtual Machine 17
6 Specify a name for the virtual machine as you want it to appear in the list of available virtual machines on the Select virtual machine dialog. By default, the virtual machine is named by the guest operating system. Click More Options, if you want to choose other than the default location for the virtual machine.
7 Choose the preferable way of allocating the computer resources: to the virtual machine or to
Mac OS X.

18 Parallels Desktop for Mac Quick Start Guide
8 If you want to use an installation CD, insert the disc into the CD/DVD-ROM drive of your computer.
If you want to use an ISO image of the installation disc:
Сlick More Options and select the ISO image option.
The Choose button becomes enabled. Click it to locate the ISO image file.
Make sure that the Start Windows XP Installation check box is selected and click Finish.
9 The OS Installation Assistant creates the virtual machine and installs Windows XP or
Windows Vista operating system in it. This process takes approximately one hour.
Note. During the guest OS installation, the input of keyboard and mouse is captured inside the virtual machine. To release the keyboard and mouse input for Mac OS X press Control+Alt or Control+Option(Alt). To capture the input again in the virtual machine, click inside the virtual machine window (guest OS window).
10 After installing the Windows operating system, OS Installation Assistant installs Parallels Tools in the newly created virtual machine. You need to confirm Parallels Tools installation, when prompted.

4BCreating a Virtual Machine 19
During Parallels Tools installation you need to confirm the installation of so-called unsigned drivers. Always choose Install this driver software anyway.
11 When the installation is complete, either eject the installation disc or disconnect the ISO
image of the installation disc. See below for details.
12 To protect your new virtual machine, from the Actions menu choose Install Kaspersky Internet Security. This feature is available for both Windows XP and Windows Vista.
13 During the Express Installation, Parallels Desktop creates an administrator account with a blank password. To learn how to change the administrator password, open the Help menu and choose Parallels Desktop Help -> Creating a Virtual Machine -> OS Installation Assistant -> Windows Express Installation.
Ejecting CD/DVD Disc Press the Eject key on your keyboard (a triangle with a line underneath). If you are using
a keyboard that does not have an Eject key, drag the CD/DVD disc icon to the Trash to eject the disc.
In Windows, open the My Computer folder, right-click (Control-click) the CD/DVD disc icon, and choose Eject from the shortcut menu.
Disconnecting ISO Image
Right-click the CD/DVD-ROM icon located at the bottom of the Parallels Desktop window, and select Disconnect in the menu.

20 Parallels Desktop for Mac Quick Start Guide
Troubleshooting A. It may happen that your Macintosh computer cannot read the Windows XP or Windows Vista installation disc: the installation doesn't start or it goes too slow and is accompanied by errors. In this case, try to use an ISO image of the installation disc. To create an ISO image, use Disk Utility or a third-party imaging application installed on any other computer. Disk Utility can be found: /Application/Utilities Disk Utility.
B. There may be problems with localized versions of Windows used for unattended installation in a virtual machine. If your Mac OS X is set to English, but you decide to install a localized version of Windows in the virtual machine, there may problems with displaying the Windows start menu options or the All Programs list correctly.
To work around this problem set the Mac OS X regional settings to the same language the Windows is localized to. When the installation of the guest OS is complete, you can return the language and regional settings back to the original values.

C H A P T E R 6
Running the Virtual Machine
This chapter provides basic information on options available when you run the virtual machine.
In This Chapter Toolbar .................................................................................................................................. 21 Stopping and Pausing the Virtual Machine........................................................................... 23 Starting and Resuming Virtual Machine............................................................................... 24 Switching View Modes ......................................................................................................... 25 Networking in the Virtual Machine ...................................................................................... 26 Setting up Shared Folders in the Virtual Machine ................................................................ 26 Installing Windows Applications.......................................................................................... 27
Toolbar To start, stop, and pause your virtual machine you can use the toolbar buttons or the Actions menu commands.
By default, the toolbar is located to the right of Parallels Desktop Window.

22 Parallels Desktop for Mac Quick Start Guide
The toolbar has three groups of buttons:
, , - for stopping, pausing and starting the virtual machine.
, - for switching view modes of the virtual machine.
, , - for saving and managing virtual machine states (the snapshots). For more information on snapshots, open Help menu and choose Parallels Desktop Help -> Managing Virtual Machines -> Working With Snapshots and Undo Disks.
Toolbar position
If the toolbar is hidden, to display it:
Click the toolbar control button in the upper right corner of Parallels Desktop window. Choose Customize from the View menu. Click the Main Window tab, select the Show toolbar
option and click OK.
The toolbar can be positioned to the right, to the left, or at the top of the Parallels Desktop window. To change the toolbar position:
1 Choose Customize from the View menu.
2 On the Main Window tab select the appropriate option in the Toolbar placement list and click OK.

5BRunning the Virtual Machine 23
Stopping and Pausing the Virtual Machine
To stop your virtual machine, select Shut Down or Turn Off Computer from the Windows Start menu.
Warning. It is strongly recommended that you shut down your virtual machine in this manner to ensure the safety of your data.
Use the following only if you are unable to shut down your virtual machine from the Windows Start menu:
Click the Stop Virtual Machine button on the toolbar. Choose Stop from the Actions menu.
Pausing the Virtual Machine
In some cases, you may need to pause the virtual machine, for example, if you need to run a CPU-consuming process on your Mac.
Click the Pause Virtual Machine button on the toolbar. Choose Pause from the Actions menu.

24 Parallels Desktop for Mac Quick Start Guide
Starting and Resuming Virtual Machine
When you launch Parallels Desktop, it displays the Select virtual machine dialog. Select the virtual machine in the list and click the Select button.
The Configuration Page of the selected virtual machine appears.
Configuration Page displays the list of virtual machine's hardware and options. Each item listed is a link to the Configuration Editor, which can be used to add or remove hardware and to view and configure device options.
To start or resume the virtual machine:
Click the Start Virtual Machine button on the toolbar. Choose Start Virtual Machine from the Actions menu.

5BRunning the Virtual Machine 25
Switching View Modes When the virtual machine is stopped you can only view its Configuration Page in Parallels Desktop window.
When you start the virtual machine, the Parallels Desktop window transforms into the guest OS Window and displays the booting process of the guest OS.
When the virtual machine is running, Parallels Desktop allows you to switch between the following view modes.
Full Screen Single Window Coherence (only for Windows guest operating systems) Configuration Page. All links are disabled at runtime.
For switching between the view modes, use the toolbar buttons or the View menu commands.
By default, the virtual machine starts in Single Window mode, which displays Windows in a separate window on the Mac OS X desktop. Use the toolbar buttons or the View menu commands to switch between the viewing modes.
Switching to Full Screen Mode In full screen mode, the guest OS Window expands to occupy the entire screen, so that Mac OS X controls and the Dock are not visible.
To switch the guest OS Window to full screen mode:
Click the Full Screen button on the toolbar. Choose Full Screen from the View menu. Press Option(Alt)+ Return(Enter).
To view the Parallels Desktop menus and the Mac OS X Dock while in full screen mode, press Control+Option(Alt).
To return to the OS Window mode, choose OS Window from the View menu or press Option(Alt)+ Return(Enter).
To select the type of animation for switching to Full Screen mode, choose Preferences from the Parallels Desktop menu on the menu bar. Click the Animation tab, and in the Full Screen transition list select the type of animation you prefer. Click OK. For more information, open the Help menu and choose Parallels Desktop Help -> Managing Virtual Machines -> Setting Parallels Desktop Preferences -> Animation Tab.

26 Parallels Desktop for Mac Quick Start Guide
Switching to Coherence Mode In Coherence mode, you will view the Windows applications directly on your Mac's desktop instead of inside the virtual machine's window.
To switch the virtual machine to Coherence mode
Click the Coherence button on the toolbar. Choose Coherence from the View menu. Press Shift+Control+Option(Alt).
To return to the OS Window mode, choose OS Window from the View menu or press Shift+Control+Option(Alt).
To animate switching to Coherence mode and back:
1 From the Parallels Desktop menu choose Preferences.
2 Click the Animation tab.
3 Select the Animate Coherence transition option.
Networking in the Virtual Machine If your Macintosh computer is connected to the Internet, so will your virtual machine. By default, the virtual machine shares the network connection your Mac uses. In addition to the default Shared Networking (NAT) option, the following networking options are also available for the virtual machine:
Bridged Ethernet. Host-only networking
For more information on networking in virtual machines, open the Help menu and choose Parallels Desktop Help -> Configuring Virtual Machine --> Networking in a Virtual Machine.
Setting up Shared Folders in the Virtual Machine
For files exchange between Mac OS X and your Windows virtual machine, you can set up one or more shared folders that will be visible in both operating systems. For more information, open the Help menu and choose Parallels Desktop Help -> Configuring Virtual Machine -> Using Shared Folders.

5BRunning the Virtual Machine 27
Installing Windows Applications You can install your favorite Windows applications inside your running virtual machine, using the following media:
CD and DVD discs. ISO images of CD or DVD discs made with the help of third-party imaging products. Installation files placed into shared folders. Local network resources or the Internet resources.
To use installation CD/DVD discs 1 Insert the disc.
2 Do one of the following:
Click the CD-ROM icon on the status bar, and choose Default CD/DVD-ROM from the shortcut menu.
Choose CD/DVD-ROM1 > Default CD/DVD-ROM from the Devices menu.
To use ISO images 1 Do one of the following:
Click the CD-ROM icon on the status bar, and choose Connect image from the shortcut menu.
Choose CD/DVD-ROM1 > Connect image from the Devices menu.
2 Specify the image file.
Please refer to the application documentation for further installation steps.

C H A P T E R 7
Viewing or Editing the Virtual Machine Configuration
The virtual machine configuration is a list of the virtual machine's hardware and options. This list is displayed on Configuration Page and is available for editing in Configuration Editor.
To view the configuration of the running virtual machine, choose VM Configuration from the View menu. The guest OS window flips to Configuration Page where you can view the virtual machine's list of hardware and options. Because you cannot edit a running virtual machine, all of the links to the virtual machine's hardware and options are disabled.
Viewing the Configuration
To view the configuration of a running virtual machine choose VM Configuration from the View menu. The guest OS window flips to Configuration Page. You can see the list of virtual hardware and virtual machine options in the Configuration area, but all links are disabled. When the virtual machine is running, you can only view its configuration. You cannot edit it.
Note. Configuration Editor is available only when the virtual machine is stopped. The configuration of a suspended virtual machine is unavailable for editing.
Editing Configuration
Launch Parallels Desktop by clicking its icon in the Dock or its alias on the Mac OS X desktop. Choose the virtual machine from the Select virtual machine dialog and click Select. The Configuration Page of the virtual machine appears, and you can see the list of virtual hardware in the Configuration area.
To edit the virtual machine configuration:
Click the Configuration link or any device link in the list. Choose Virtual Machine from the Edit menu.
Configuration Editor appears.
The Configuration Editor window consists of two panes. The left pane contains the Resource list. Selecting the device in the list opens the device options tab in the right pane.

6BViewing or Editing the Virtual Machine Configuration 29
To add hardware or options, click Add. To remove hardware or options, click Remove. For more information, open the Help menu and choose Parallels Desktop Help -> Configuring Virtual Machine -> Adding and Removing Devices.
Troubleshooting
If your virtual machine starts up immediately when you click its alias on the Mac OS X desktop, to open Configuration Page do one of the following:
While pressing the Command key, double-click the virtual machine's alias. Start Parallels Desktop. In the Select virtual machine dialog, highlight the desired virtual
machine and, while pressing the Command key, click the Select button.

C H A P T E R 8
Usage Tips
Locating the Virtual Machine Folder
To view the complete path to your virtual machine folder, while pressing the Command key,
click the Parallels icon on the title bar of the Guest OS Window.

7BUsage Tips 31
Creating an alias for a specific virtual machine
Press Command+Option(Alt) while you drag the Parallels Desktop icon from the title bar to the desktop or to the Dock. Clicking this alias will start the virtual machine automatically.
Adding your Windows application icon to the Dock
When you launch an application in the virtual machine with Windows installed, the application's icon appears in the Dock by default. Right-click (Control-click) the application's icon in the Dock, and select Keep in Dock. Even when the virtual machine is stopped, the application icon will remain in the Dock.
Clicking the application's icon in the Dock launches the virtual machine and the Windows application in it.
Creating an alias for your favorite Windows application
Launch an application in Windows. Right-click (Control-click) the application's icon in the Dock, and select Add to Favorites from the shortcut menu. The application’s name appears in the Favorites section of the Applications menu, and an alias for the application is created on Mac OS X desktop. Double-clicking this alias launches the virtual machine and your favorite application.
To remove the application from your Favorites, right-click the application's icon in the Dock, and select Remove from Favorites.
Using the Application Switcher
When you run the virtual machine in Сoherence mode, use the Application Switcher to switch between Mac OS X and Windows running applications. While pressing the Command key, press Tab one or more times to select the application on the Applications Switcher bar. The selected application becomes active.
SmartSelect
In the virtual machine you can open Mac OS X applications. The list of Parallels Shared Applications is created during the installation of Parallels Tools. The list includes your Mac OS X applications and is available when you choose All Programs -> Parallels Shared Applications from the Windows Start menu. You can select any application from the list and start it.
Right-click your document in Mac OS X or Windows and choose any available Mac OS X or Windows application from the Open With list.
You can also choose the default application for opening files of a certain type both in Mac OS X and in Windows. When you start any Windows application for the first time you will be prompted to decide if you want to set this application as a default application for opening files (with supported extensions) in Mac OS X.
Migrating Your Real or Virtual Computer into Parallels Virtual Machine

32 Parallels Desktop for Mac Quick Start Guide
Use Parallels Transporter to migrate from a PC with a Windows operating system installed to a Parallels virtual machine. In this version, third-party virtual computers can be migrated into Parallels virtual machines with the same configuration. Parallels Transporter is installed along with Parallels Desktop. For more information about Parallels Transporter, refer to Parallels Transporter User Guide.
Exploring the Virtual Machines
Parallels Explorer allows you to view the contents of any Parallels or third-party virtual machine even when it is stopped. Open the virtual machine in Parallels Explorer and see what is inside it. Drag files from one virtual machine to another or copy files to Mac OS X. Parallels Explorer is installed along with Parallels Desktop. For details, see Parallels Explorer User Guide or open the Help menu and choose Parallels Desktop Help -> Managing Virtual Machines -> Using Parallels Explorer.

Index
A Accessing the Internet • 26 Activating Parallels Desktop • 12 Adding new devices to virtual machine • 28 Administrator password, changing • 14 Alias for virtual machine, creating • 30 Application switcher • 30
C Capturing keyboard and mouse in virtual
machine • 14 CD/DVD discs, ejecting • 14 CD/DVD image
connecting and disconnecting • 14, 27 Coherence mode, switching to • 25
D Default folder for virtual machines • 14, 30
E Editing virtual machine configuration • 28 Ejecting CD/DVD discs • 14 Exploring virtual machines • 30
F Favorite applications
aliases for, on Mac OS desktop • 30 icons for, in the Dock • 30
Folder for virtual machines • 30 Folders, sharing • 26 Full Screen mode, switching to • 25
H Hardware of virtual machine • 5
I Icons for favorite applications, creating • 30 Installation Assistant • 14 Installing
Parallels Desktop • 6 Windows applications • 27 Windows Vista • 14 Windows XP • 14
Internet access • 26
L Launching
Parallels Desktop • 11
M Migrating data from a Windows computer to a
virtual machine • 30
N Networking in virtual machine • 26
O OS Installation Assistant • 14
P Pausing virtual machine • 23
R Releasing keyboard and mouse input • 14 Running virtual machine • 21
S Shared folders • 26 Starting
Parallels Desktop • 11 virtual machine • 23
Stopping virtual machine • 23
T Toolbar • 23 Troubleshooting
Mac cannot read CD • 20 opening Configuration Page • 30 Windows localized versions • 20
V Virtual machine
creating • 14 running • 21
W Windows

34 8BIndex
favorite Windows applications, creating icons and aliases • 30
favorite Windows applications, installing • 27
Windows Vista installation • 14 Windows XP installation • 14