Embed Size (px)
Citation preview

www.luratech.com [email protected]
USA LuraTech, Inc. PMB #708 270 Redwood Shores Parkway Redwood City, CA 94065 USA +1 (650) 481 - 8156 +1 (650) 779 - 4644 (F)
UK LuraTech Ltd Swatton Barn Bradbury, Swindon Wiltshire SN4 0EU United Kingdom +44 1793 384046 +44 1793 384104 (F)
Germany LuraTech Europe GmbH Neue Kantstr. 14 14057 Berlin Germany +49 (0) 30 / 39 40 50 - 0 +49 (0) 30 / 39 40 50 - 99 (F)
LuraTech Europe GmbH Willy-Brandt-Platz 1 42853 Remscheid Germany +49 (0)2191 / 589 60 - 0 +49 (0)2191 / 589 60 - 29 (F)
PDF Compressor Enterprise Getting Started Guide
Version 7.4
LuraTech G A Foxit Software Company
PDF Compressor Enterprise – Getting Started Guide
www.luratech.com [email protected]
Table of Contents
1. About this Document .......................................................................... 3
2. Installation ......................................................................................... 4
System Requirements .............................................................................................................. 4 Requirements of the Born Digital Conversion Option ............................................................. 4
3. Getting Started ................................................................................... 5
Starting the GUI ....................................................................................................................... 5 Adding Entries to the List ......................................................................................................... 5 Running Jobs ............................................................................................................................ 6 Removing List Entries ............................................................................................................... 6
4. Setting up Job Entries ......................................................................... 7
Configuring General Job Properties ......................................................................................... 7 Configuring Input Data ............................................................................................................. 8 Configuring Data Output ........................................................................................................ 11 Configuring Post-Processing .................................................................................................. 14 Configuring OCR and Barcode Recognition ........................................................................... 15 Configuring File and Data Embedding ................................................................................... 17 Configuring Document Compression ..................................................................................... 19 Importing and Exporting Job settings .................................................................................... 20
5. Administration and Licensing ............................................................. 21
General Configuration Settings .............................................................................................. 21 Managing Licenses ................................................................................................................. 21
6. Support and Contact .......................................................................... 23
n
PDF Compressor Enterprise – Getting Started Guide
www.luratech.com [email protected] About this Document: 3
1. About this Document This document is meant as short introduction to LuraTech PDF Compressor Enterprise. Only the
most essential functions and settings are described in this abstract.
For that reason it cannot be used as substitute for the more detailed manual. Many specific
options are not explained here.
We recommend reading this abstract as introduction to the first use of LuraTech PDF
Compressor Enterprise. Answers to specific questions may be found in the manual or by
contacting technical support.
n
PDF Compressor Enterprise – Getting Started Guide
www.luratech.com [email protected] Installation: 4
2. Installation Run the self-extracting installer and follow the installer instructions. The installer should be
named LT_PDFCE_Setup_<xXX>_v<N.N.NN.NNN>.exe, where xXX corresponds to the system
architecture, either “x86” or “x64” and N.N.NN.NNN corresponds to the product’s version
number, e.g. 7.0.0.156.
Note: You need Administrator rights to install LuraTech PDF Compressor.
After installation LuraTech PDF Compressor runs in evaluation mode. This adds a visible
watermark to all output pages.
System Requirements
Windows™ 32 Bit and 64 Bit, Vista / Windows 7 / Windows 8 / Windows Server 2008 / Server
2012
CPU: Intel / AMD or compatible x86- or x64 processors, single core and multi core processors
supported
CPU Speed: Minimum 1 GHz, 2 GHz or more recommended
RAM: Minimum 1 GB per licensed processor core, 2 GB per core recommended, more than 2 GB
for conversion of very large documents on 64 bit systems
Disk space required for installation: 1 GB
Microsoft™ .NET Framework 4.0
Note: These are minimum installation requirements. Required resources for production
environments should be clarified with LuraTech.
Requirements of the Born Digital Conversion Option
The option for converting Born Digital documents has additional requirements. Please refer to
the PDF Compressor Enterprise Manual for details.
n
PDF Compressor Enterprise – Getting Started Guide
www.luratech.com [email protected] Getting Started: 5
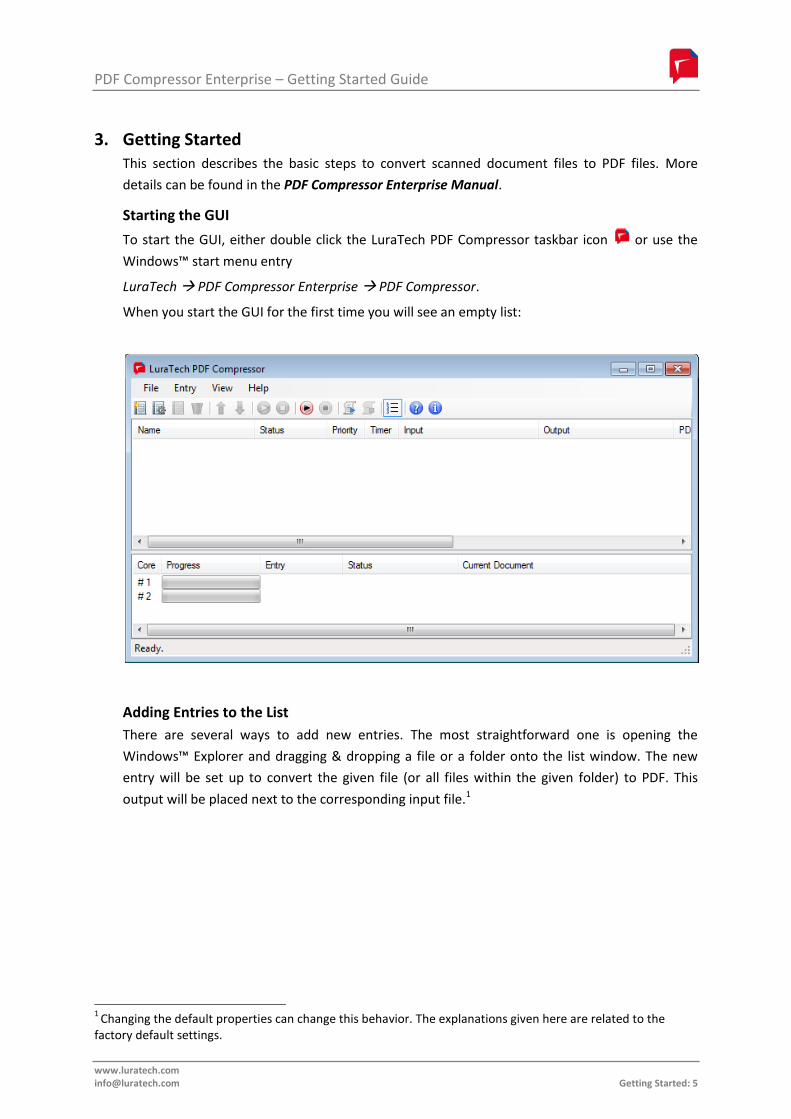
3. Getting Started This section describes the basic steps to convert scanned document files to PDF files. More
details can be found in the PDF Compressor Enterprise Manual.
Starting the GUI
To start the GUI, either double click the LuraTech PDF Compressor taskbar icon or use the
Windows™ start menu entry
LuraTech PDF Compressor Enterprise PDF Compressor.
When you start the GUI for the first time you will see an empty list:
Adding Entries to the List
There are several ways to add new entries. The most straightforward one is opening the
Windows™ Explorer and dragging & dropping a file or a folder onto the list window. The new
entry will be set up to convert the given file (or all files within the given folder) to PDF. This
output will be placed next to the corresponding input file.1
1
Changing the default properties can change this behavior. The explanations given here are related to the factory default settings.
0
PDF Compressor Enterprise – Getting Started Guide
www.luratech.com [email protected] Getting Started: 6
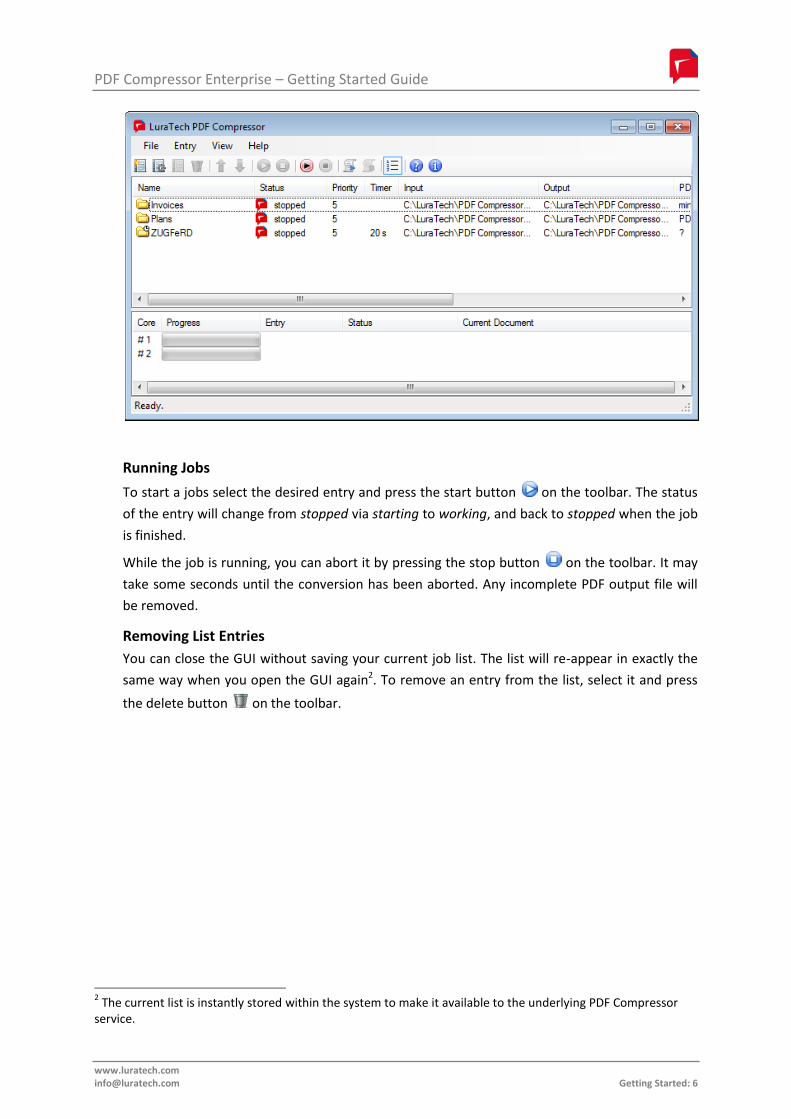
Running Jobs
To start a jobs select the desired entry and press the start button on the toolbar. The status
of the entry will change from stopped via starting to working, and back to stopped when the job
is finished.
While the job is running, you can abort it by pressing the stop button on the toolbar. It may
take some seconds until the conversion has been aborted. Any incomplete PDF output file will
be removed.
Removing List Entries
You can close the GUI without saving your current job list. The list will re-appear in exactly the
same way when you open the GUI again2. To remove an entry from the list, select it and press
the delete button on the toolbar.
2 The current list is instantly stored within the system to make it available to the underlying PDF Compressor
service.
y
y
PDF Compressor Enterprise – Getting Started Guide
www.luratech.com [email protected] Setting up Job Entries: 7
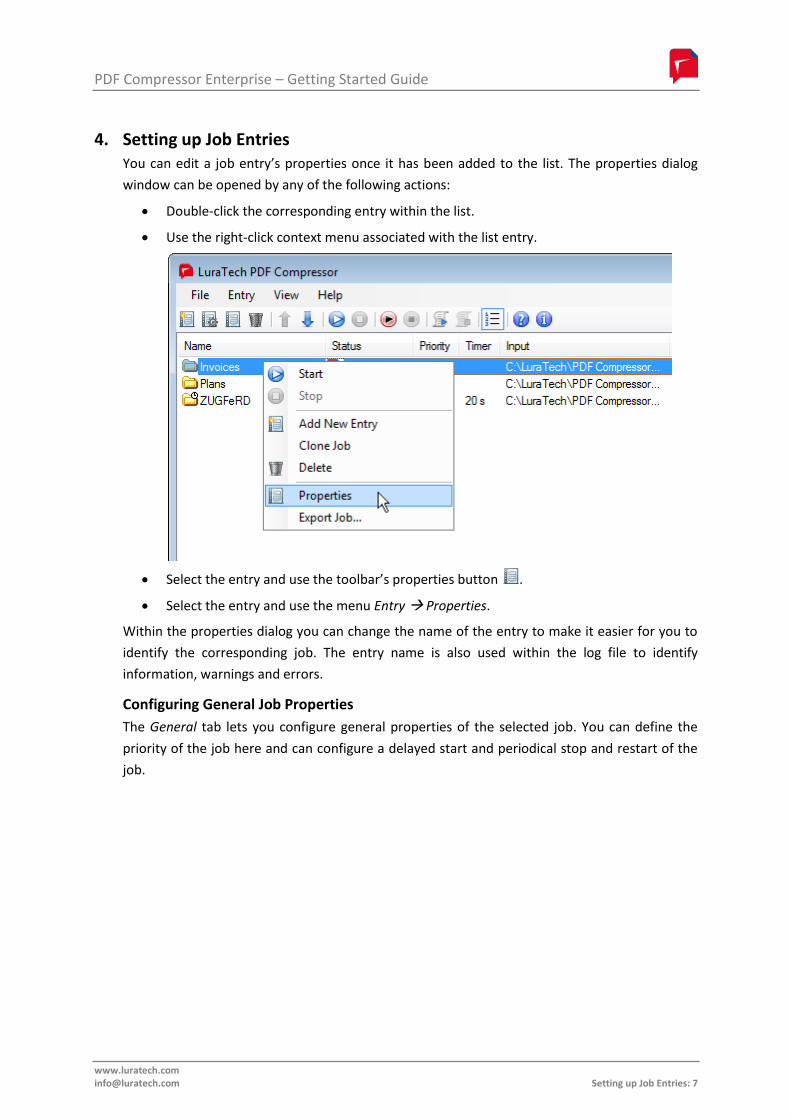
4. Setting up Job Entries You can edit a job entry’s properties once it has been added to the list. The properties dialog
window can be opened by any of the following actions:
Double-click the corresponding entry within the list.
Use the right-click context menu associated with the list entry.
Select the entry and use the toolbar’s properties button .
Select the entry and use the menu Entry Properties.
Within the properties dialog you can change the name of the entry to make it easier for you to
identify the corresponding job. The entry name is also used within the log file to identify
information, warnings and errors.
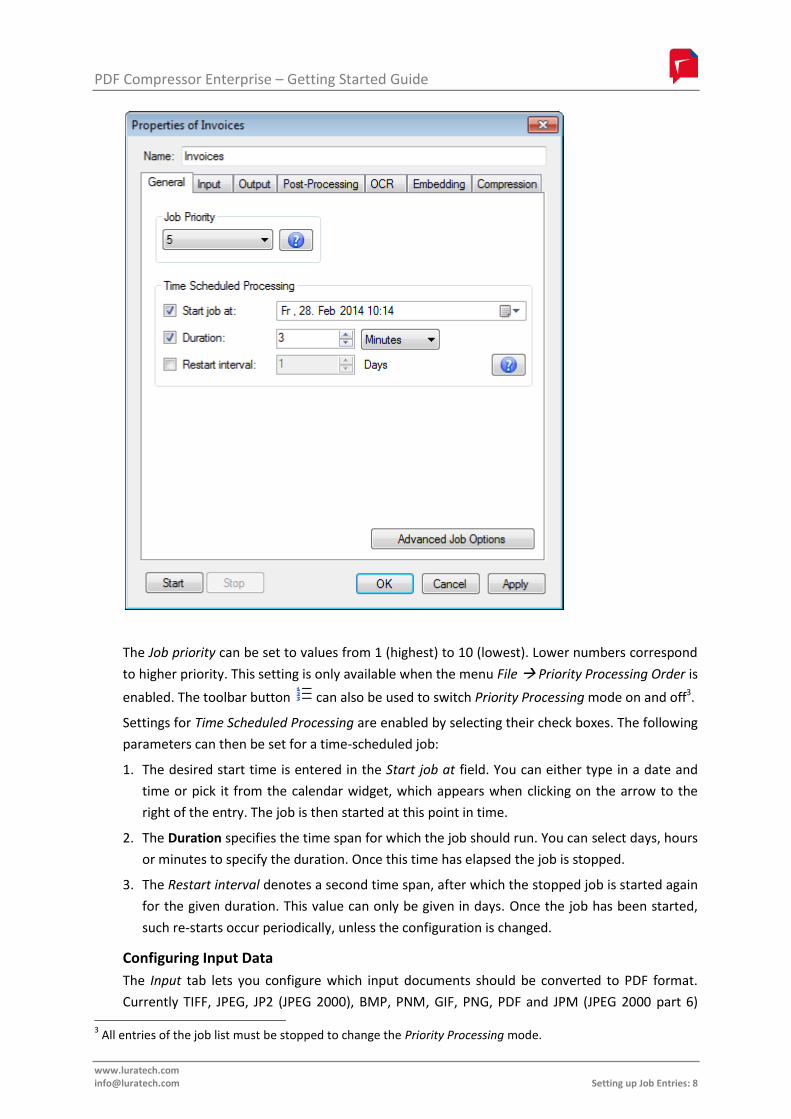
Configuring General Job Properties
The General tab lets you configure general properties of the selected job. You can define the
priority of the job here and can configure a delayed start and periodical stop and restart of the
job.
9
9 LuraTech PDF Compressor
File Entry View Help
SläliW t-i- Name Status Pnofity Timer Input
Plans
itSzUGFeRD u
M
Start
Stop
Add New Entry
Clone Job
Delete
13 Properties
Export Job...
20s
C:\LuraTech\PDF Compressor.
C:\LuraTech\PDF Compressor.
C:\LufaTech\PDF Compressor.
PDF Compressor Enterprise – Getting Started Guide
www.luratech.com [email protected] Setting up Job Entries: 8
The Job priority can be set to values from 1 (highest) to 10 (lowest). Lower numbers correspond
to higher priority. This setting is only available when the menu File Priority Processing Order is
enabled. The toolbar button can also be used to switch Priority Processing mode on and off3.
Settings for Time Scheduled Processing are enabled by selecting their check boxes. The following
parameters can then be set for a time-scheduled job:
1. The desired start time is entered in the Start job at field. You can either type in a date and
time or pick it from the calendar widget, which appears when clicking on the arrow to the
right of the entry. The job is then started at this point in time.
2. The Duration specifies the time span for which the job should run. You can select days, hours
or minutes to specify the duration. Once this time has elapsed the job is stopped.
3. The Restart interval denotes a second time span, after which the stopped job is started again
for the given duration. This value can only be given in days. Once the job has been started,
such re-starts occur periodically, unless the configuration is changed.
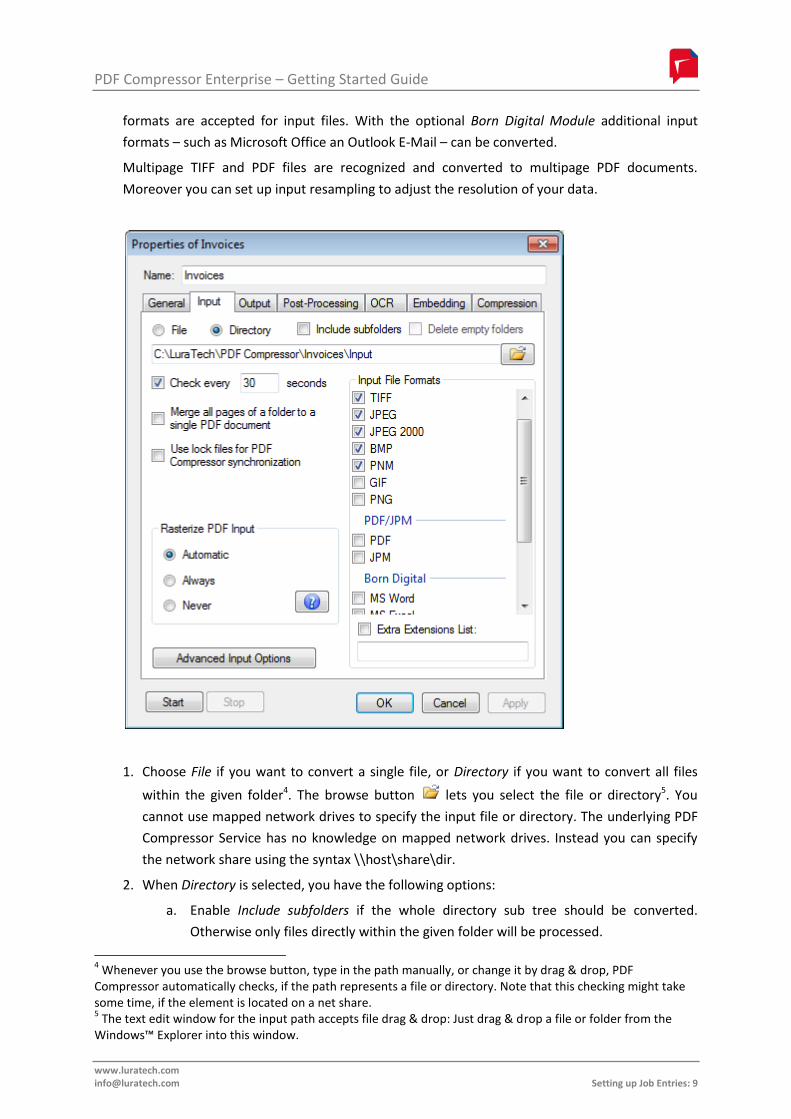
Configuring Input Data
The Input tab lets you configure which input documents should be converted to PDF format.
Currently TIFF, JPEG, JP2 (JPEG 2000), BMP, PNM, GIF, PNG, PDF and JPM (JPEG 2000 part 6) 3 All entries of the job list must be stopped to change the Priority Processing mode.
9
PDF Compressor Enterprise – Getting Started Guide
www.luratech.com [email protected] Setting up Job Entries: 9
formats are accepted for input files. With the optional Born Digital Module additional input
formats – such as Microsoft Office an Outlook E-Mail – can be converted.
Multipage TIFF and PDF files are recognized and converted to multipage PDF documents.
Moreover you can set up input resampling to adjust the resolution of your data.
1. Choose File if you want to convert a single file, or Directory if you want to convert all files
within the given folder4. The browse button lets you select the file or directory5. You
cannot use mapped network drives to specify the input file or directory. The underlying PDF
Compressor Service has no knowledge on mapped network drives. Instead you can specify
the network share using the syntax \\host\share\dir.
2. When Directory is selected, you have the following options:
a. Enable Include subfolders if the whole directory sub tree should be converted.
Otherwise only files directly within the given folder will be processed.
4 Whenever you use the browse button, type in the path manually, or change it by drag & drop, PDF
Compressor automatically checks, if the path represents a file or directory. Note that this checking might take some time, if the element is located on a net share. 5 The text edit window for the input path accepts file drag & drop: Just drag & drop a file or folder from the
Windows™ Explorer into this window.
n
\ä
PDF Compressor Enterprise – Getting Started Guide
www.luratech.com [email protected] Setting up Job Entries: 10
b. Enable Delete empty folders if you have selected Include subfolders and want to
clean up the input sub tree. This can be useful if you configure a setup that moves or
deletes all processed input files. Once all files of the given job have been processed,
the output folder will be examined and all empty subfolders will be deleted.
c. Enable Check every <number> seconds to make the given folder a hot folder, i.e. to
let the job check that folder frequently for newly generated files (e.g. by an external
scanner or capture software). A job that has this options enabled will never stop
automatically, since it keeps on monitoring the given folder. You have to stop it
manually.
d. Enable Merge all pages if all pages from all processed files of a folder should be
converted to a single PDF output document. The output file will be named
<name_of_the_input_folder>.pdf. The input files of a folder will be processed in
alphabetical, case-sensitive order. This defines the page order of the output PDF.
This option can be used to merge pages from scanners that put numbered single
page files (such as page000.tif, page001.tif, etc.) into a single folder.
e. Input file formats can be selected from the given list. The format is derived from the
file’s extension. Note that different sets of file types are displayed in the MRC
compression, PDF optimization and PDF/A conversion modes.
TIFF enables the conversion of *.tif and *.tiff files. Currently PDF Compressor
supports bilevel, grayscale and RGB images. CMYK and CIELab color as well
as palletized images are not supported yet.
JPEG enables the conversion of *.jpg files.
JP2 enables the conversion of JPEG 2000 files. The file extensions *.jp2, *.jpf,
*.jpx. *.j2k, *.jpc and *.j2c are recognized.
PDF enables the conversion of PDF files. If Always is chosen under Rasterize
PDF Input will be rasterized to the resolution specified on the Advanced tab
of the Advanced Input Options dialog before applying the LuraTech MRC
compression technique. If Automatic has been chosen for Rasterize PDF
Input, PDF files may be rasterized, e.g. if conversion not PDF/A is not possible
otherwise.
BMP enables the conversion of *.bmp files. Palletized images as well as some
exotic variants are not supported yet.
PNM enables the conversion of *.ppm and *.pgm files.
GIF enables the conversion of *.gif files.
PNG enables the conversion of *.png files.
The formats MS Word, MS Excel, MS PowerPoint, E-Mail, MS Visio,
OpenOffice Writer, OpenOffice Calc, OpenOffice Impress, MS Project, Text
Files, GIF and PNG are only available the Born Digital conversion option is
installed. Any combination of these input document types can be converted
to PDF or PDF/A. Refer to the PDF Compressor Enterprise Manual for details
on Born Digital conversion.
n
PDF Compressor Enterprise – Getting Started Guide
www.luratech.com [email protected] Setting up Job Entries: 11
Extra Extensions List serves to supply a list of additional file extensions to
process. This entry is only enabled, when Born Digital Conversion is installed.
The individual extensions entered must be separated by blank spaces.
4. The Rasterize PDF Input setting offers different modes for handling PDF input documents:
a. Automatic is the default setting. In this mode PDF Compressor will automatically
determine in which cases to convert typeset or vector contents of PDF input files into
raster graphics. It will try to avoid such conversions, but will resort to them as a
fallback option for documents that cannot be converted otherwise.
b. Always – this mode will convert all pages of all PDF input documents to raster
graphics before compressing or converting them. For PDF input this mode is
equivalent to the former MRC Compression mode.
c. With the Never setting the PDF Compressor will not try to rasterize any non-raster
input. In this way you avoid unintentional conversion of typeset or vector content
into raster graphics. On the other hand, this may result in failure to convert certain
kinds of PDF input files to PDF/A.
Please note that with the Automatic or Never setting chosen, raster graphics already present in
the input documents may still be resampled or compressed, if Color image optimization or
Bitonal image optimization are selected on the Compression tab. (Such graphics may e.g. be
scanned pages or large images inside a PDF document.)
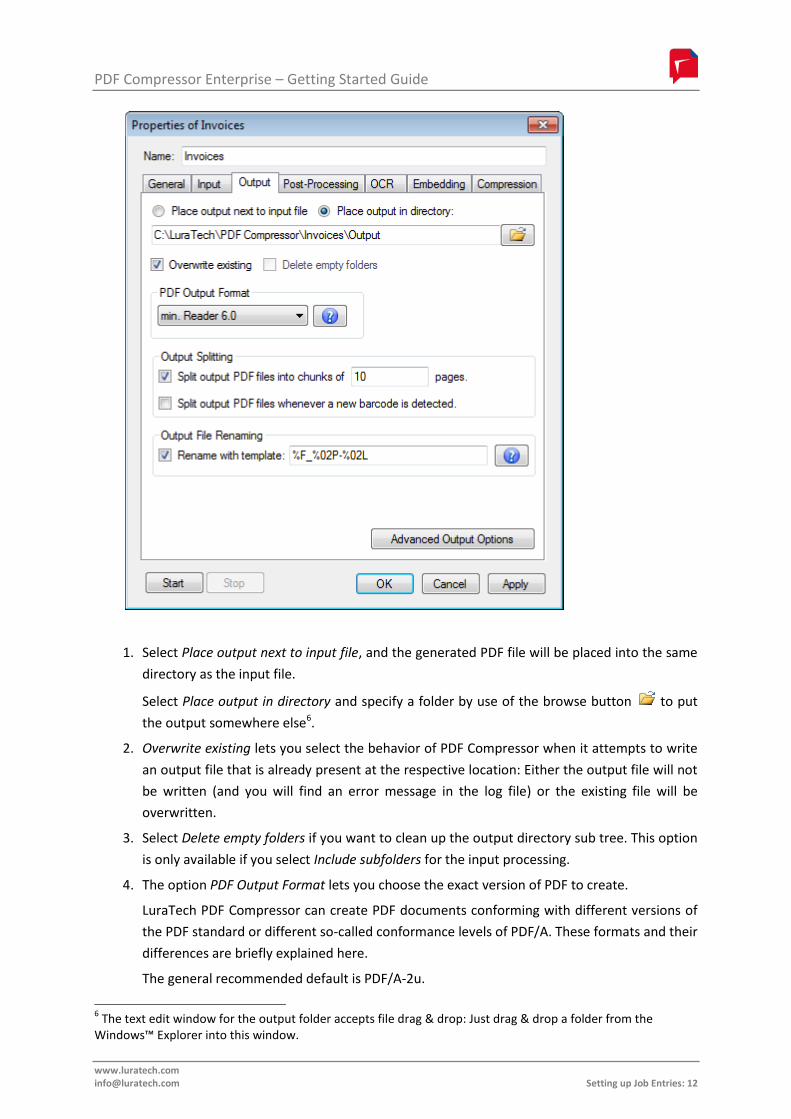
Configuring Data Output
The Output tab lets you configure PDF output options including the exact version of PDF to
generate and the location where generated PDF files are placed.
n
PDF Compressor Enterprise – Getting Started Guide
www.luratech.com [email protected] Setting up Job Entries: 12
1. Select Place output next to input file, and the generated PDF file will be placed into the same
directory as the input file.
Select Place output in directory and specify a folder by use of the browse button to put
the output somewhere else6.
2. Overwrite existing lets you select the behavior of PDF Compressor when it attempts to write
an output file that is already present at the respective location: Either the output file will not
be written (and you will find an error message in the log file) or the existing file will be
overwritten.
3. Select Delete empty folders if you want to clean up the output directory sub tree. This option
is only available if you select Include subfolders for the input processing.
4. The option PDF Output Format lets you choose the exact version of PDF to create.
LuraTech PDF Compressor can create PDF documents conforming with different versions of
the PDF standard or different so-called conformance levels of PDF/A. These formats and their
differences are briefly explained here.
The general recommended default is PDF/A-2u.
6 The text edit window for the output folder accepts file drag & drop: Just drag & drop a folder from the
Windows™ Explorer into this window.
n
PDF Compressor Enterprise – Getting Started Guide
www.luratech.com [email protected] Setting up Job Entries: 13
a. Adobe™ Reader™ 5.0 (PDF 1.4)
The decomposition of images into different layers and masks is supported in a usable
way since Adobe™ Reader™ 5.0 (PDF 1.4). PDF documents produced by PDF
Compressor require a viewer to support at least PDF 1.4 to be displayed properly.
b. Adobe™ Reader™ 6.0 (PDF 1.5)
Adobe™ Reader™ 6.0 (PDF 1.5) is able to handle JPEG 2000 image compression. If
you choose this format, foreground and text color images of MRC compressed pages
will be stored in JPEG 2000/Part1 format. This results in better image quality and
smaller file sizes. But files created in this format require a viewer to support at least
PDF 1.5 to be properly displayed.
c. Adobe™ Reader™ 7.0 (PDF 1.6)
The Adobe™ Reader™ 7.0 compatibility mode uses the same PDF features as for
Adobe™ Reader™ 6.0 with the only exception that larger page sizes are supported.
With Adobe™ Reader™ 6.0 compatibility the page size is limited to 200 by 200 inches.
With Adobe™ Reader™ 7.0 compatibility there is no such limit.
d. PDF/A-1a (ISO 19005-1)
Same as PDF/A-1b, but with automatically inserted rudimentary tagging information
to conform to basic requirements of PDF/A-1a.
e. PDF/A-1b (ISO 19005-1)
This is the basic compliance level of the original PDF/A document standard for long-
term preservation. It is based on PDF 1.5 with further restrictions regarding e.g.
metadata, encryption and transparency.
f. PDF/A-2b (ISO 19005-2)
PDF/A-2 is a revision of the original PDF/A-1 standard, allowing for some additional
types of content, such as images compressed using JPEG2000 and other PDF/A files
embedded as attachments.
g. PDF/A-2u (ISO 19005-2)
This is the general recommended default. The format is the same as PDF/A-2b with
the additional advantage that all text within the PDF must have a consistent Unicode
mapping.
h. PDF/A-3b (ISO 19005-1)
The PDF/A-3 standard is equivalent to PDF/A-2 with the only difference that it allows
files of arbitrary type to be embedded as attachment to the PDF/A-3 documents.
i. PDF/A-3u (ISO 19005-1)
Corresponds to PDF/A-3b, again with the additional requirement for text within the
PDF to have a consistent Unicode mapping.
5. Output Splitting can be activated in two ways:
a. Split output PDF files into chunks of <number> pages lets you limit the number of
pages output to a single PDF document. Instead of writing huge PDF documents with
n
PDF Compressor Enterprise – Getting Started Guide
www.luratech.com [email protected] Setting up Job Entries: 14
many pages, a series of output files can be created, each with the specified number
of pages.
b. Split output PDF files when new barcode is detected is only available when the
barcode detection is turned on at the OCR tab. If enabled, this function splits the
output into multiple documents, whenever a new barcode is detected on a page.
(The next document begins with the first page that contains a new barcode.)
2. Output File Renaming can be used to customize the naming of PDF output files. The file name
template is used to form the output file names. If Output Splitting is enabled you need to
enter escape sequences to distinguish the output names of the different chunks. A typical
example for page number based splitting is %F_%P-%L, were %F is substituted by the input
file name, %P by the first page number within the chunk, and %L by the last page number.
Press the help button next to the entry for details and more examples.
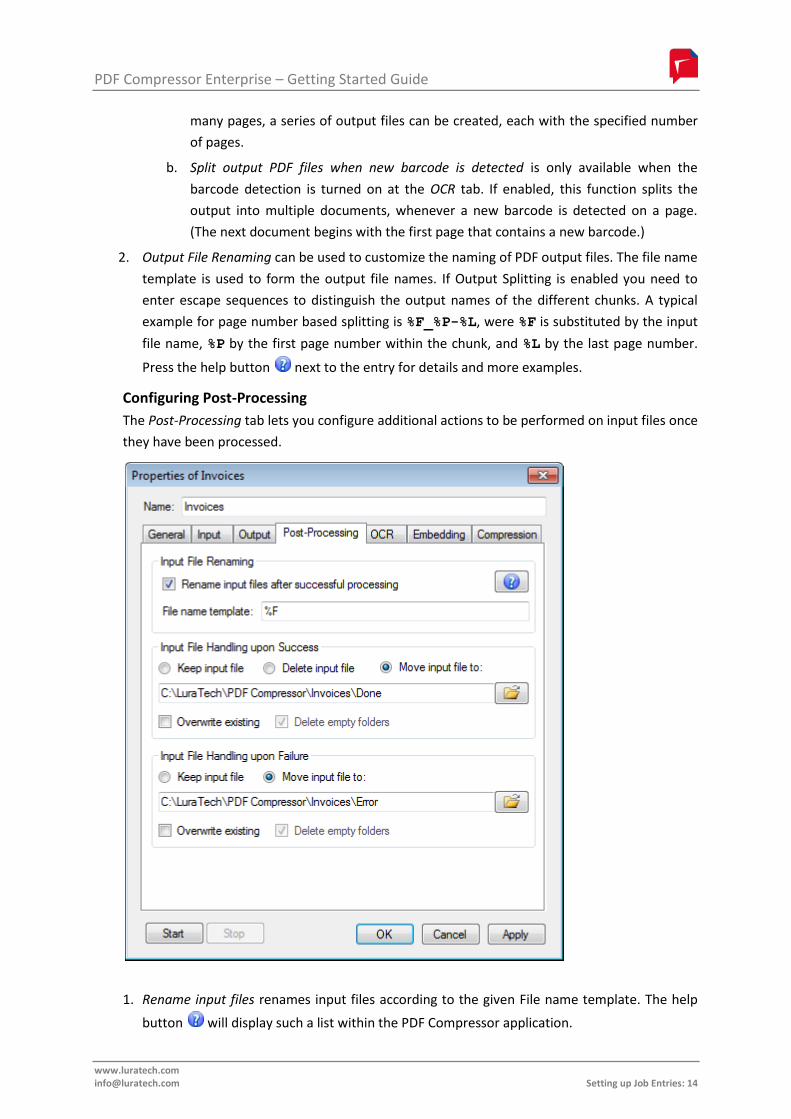
Configuring Post-Processing
The Post-Processing tab lets you configure additional actions to be performed on input files once
they have been processed.
1. Rename input files renames input files according to the given File name template. The help
button will display such a list within the PDF Compressor application.
PDF Compressor Enterprise – Getting Started Guide
www.luratech.com [email protected] Setting up Job Entries: 15
2. The next two sections define the action on an input file either if the processing of the file was
successful (a PDF document could be created), or if it failed (no PDF output). If the job has
been aborted by the user before the processing of an input file has been finished, the input
file will not be moved or deleted in any case (as a user abort is not considered a failure).
For successfully processed input files there are three options:
a. Keep input file: The file is just left at its location, but may be renamed according to
the Rename input files setting.
b. Delete input file: After the PDF file is generated, the input file is deleted. Files used as
input for embedding as file, bookmarks, metadata or hidden text are also deleted in
case the option General input directory and name modifier (%F) are used. Be careful
with this option! If you note later, that the output PDF does not fit your needs, e.g.
you need another quality, than you have lost your original data.
c. Move input file to a folder: Use the browse button to select the destination
directory where all successfully processed input files should go to7. In case the input
directory is scanned recursively, a corresponding directory sub tree will be generated
to hold the moved input files. Files used as input for embedding as file, bookmarks,
metadata or hidden text are also moved in case the option General input directory
and a name modifier (%F) are used.
Delete empty folders: This option is only available if you select Move input file
and Include subfolders for the input processing. It will clean up the directory sub
tree of the moved input files once a job has been finished (or a hot folder
becomes idle).
3. For failed input files there are two options:
a. Keep input file: The file is just left at its location (no action on input file).
b. Move input file to a folder: Use the browse button to select the destination
directory where all failed input files should go to7. If the input directory is scanned
recursively, a corresponding directory sub tree will be generated to hold the moved
input files. Files used as input for embedding as file, bookmarks, metadata or hidden
text are also moved in case the option General input directory and a name modifier
(%F) are used.
Delete empty folders: This option is only available if you select Move input file
and Include subfolders for the input processing. It will clean up the directory sub
tree of the moved input files once a job has been finished (or a hot folder
becomes idle).
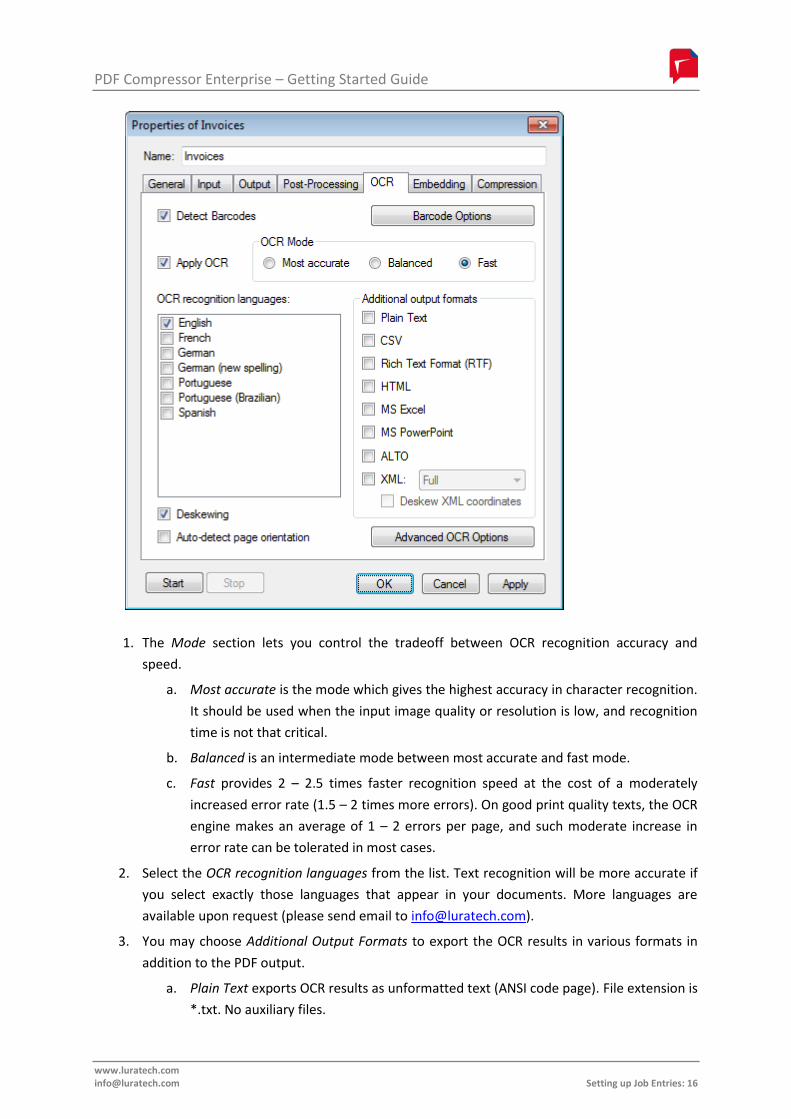
Configuring OCR and Barcode Recognition
The OCR tab contains options for configuring the optional OCR – i.e. text recognition from raster
input documents – and barcode recognition.
7 The text edit window for the move folder accepts file drag & drop: Just drag & drop a folder from the
Windows™ Explorer into this window.
9
lä
PDF Compressor Enterprise – Getting Started Guide
www.luratech.com [email protected] Setting up Job Entries: 16
1. The Mode section lets you control the tradeoff between OCR recognition accuracy and
speed.
a. Most accurate is the mode which gives the highest accuracy in character recognition.
It should be used when the input image quality or resolution is low, and recognition
time is not that critical.
b. Balanced is an intermediate mode between most accurate and fast mode.
c. Fast provides 2 – 2.5 times faster recognition speed at the cost of a moderately
increased error rate (1.5 – 2 times more errors). On good print quality texts, the OCR
engine makes an average of 1 – 2 errors per page, and such moderate increase in
error rate can be tolerated in most cases.
2. Select the OCR recognition languages from the list. Text recognition will be more accurate if
you select exactly those languages that appear in your documents. More languages are
available upon request (please send email to [email protected]).
3. You may choose Additional Output Formats to export the OCR results in various formats in
addition to the PDF output.
a. Plain Text exports OCR results as unformatted text (ANSI code page). File extension is
*.txt. No auxiliary files.
n
PDF Compressor Enterprise – Getting Started Guide
www.luratech.com [email protected] Setting up Job Entries: 17
b. CSV exports OCR results as comma separated values in plain text (ANSI code page).
This mainly makes sense when the input document contains tables that should be
imported into some other application. File extension is *.csv. No auxiliary files.
c. Rich Text Format exports OCR results in Microsoft™ RTF format (to be opened with
Microsoft™ Word™). File extension is *.rtf. No auxiliary files.
d. HTML exports OCR results in HTML format. File extension is *.htm. Embedded
images are stored as auxiliary files with naming convention <output-name>-<image-
number>.jpg.
e. MS Excel exports OCR results in Microsoft™ Excel™ format. File extension is *.xls. No
auxiliary files.
f. MS PowerPoint exports OCR results in Microsoft™ PowerPoint™ format. File
extension is *.ppt. An auxiliary directory <output-name>_files is created. It contains
various files used by the PowerPoint document.
g. ALTO exports OCR results in the open XML standard ALTO (Analyzed Layout and Text
Object).
h. XML exports OCR results in XML format. File extension is *.xml. The XML style can be
chosen from the list next to the XML option.
i. Full – all possible XML attributes will be written (large XML files)
ii. Simplified – some optional attributes will be suppressed (smaller XML files)
iii. Word-level – detailed character related information is suppressed. The
recognized text is set as direct content of the formatting element. Resulting
XML files are very small (much smaller than simplified), they are human
readable and easier to post process.
iv. Line-level plain – similar to word-level, but without any formatting infor-
mation.
v. ABBYY – corresponds to the default XML format written by the FineReader
Engine. Contents are written as lines of text surrounded by additional XML
formatting tags.
vi. ABBYY extended – corresponds to the full range of paragraph, line and
character attributes and formatting information available in the ABBYY XML
format, but without word or character recognition variants.
4. Enable Deskewing if you want the OCR engine to deskew (align) your pages.
5. Auto-detect page orientation rotates the page images in steps of 90 degrees to ensure that
the text is correctly oriented. This is a useful feature when pages have been scanned with
wrong orientation, but it only works for raster input documents or PDFs which have been
rasterized.
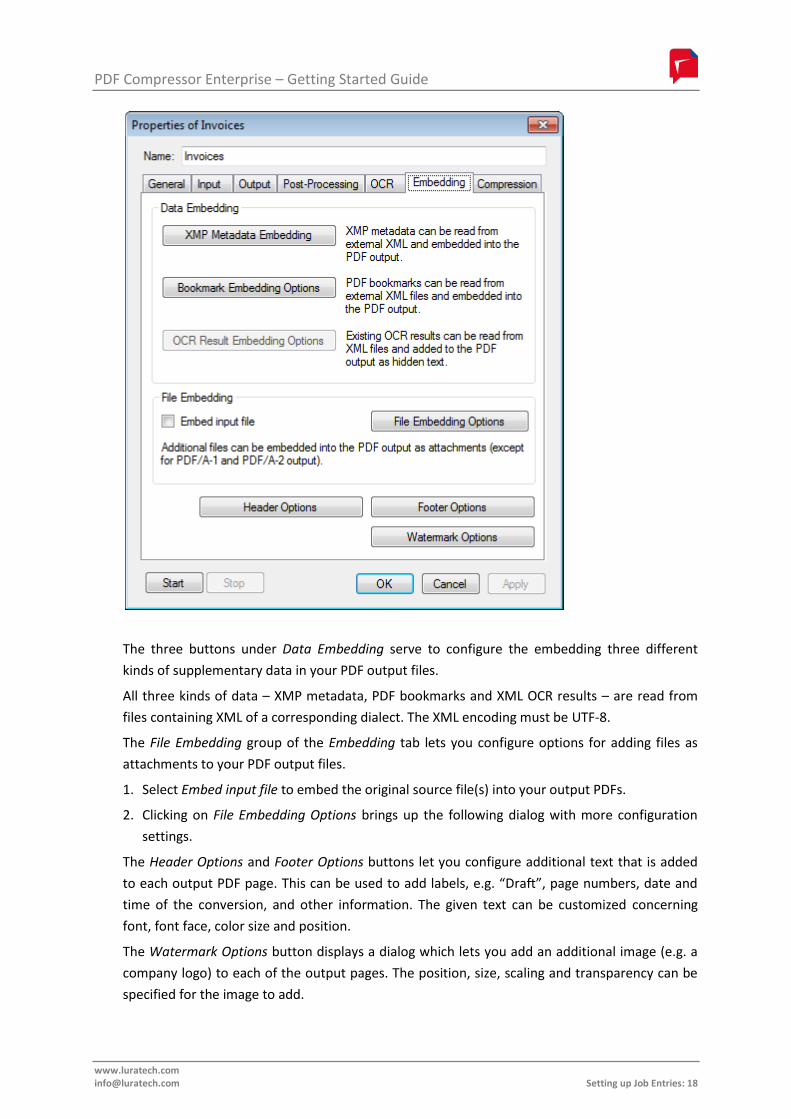
Configuring File and Data Embedding
The Embedding tab of the Properties dialog lets you configure options for several types of
embedding files or supplementary data into your PDF output files.
n
PDF Compressor Enterprise – Getting Started Guide
www.luratech.com [email protected] Setting up Job Entries: 18
The three buttons under Data Embedding serve to configure the embedding three different
kinds of supplementary data in your PDF output files.
All three kinds of data – XMP metadata, PDF bookmarks and XML OCR results – are read from
files containing XML of a corresponding dialect. The XML encoding must be UTF-8.
The File Embedding group of the Embedding tab lets you configure options for adding files as
attachments to your PDF output files.
1. Select Embed input file to embed the original source file(s) into your output PDFs.
2. Clicking on File Embedding Options brings up the following dialog with more configuration
settings.
The Header Options and Footer Options buttons let you configure additional text that is added
to each output PDF page. This can be used to add labels, e.g. “Draft”, page numbers, date and
time of the conversion, and other information. The given text can be customized concerning
font, font face, color size and position.
The Watermark Options button displays a dialog which lets you add an additional image (e.g. a
company logo) to each of the output pages. The position, size, scaling and transparency can be
specified for the image to add.
n

PDF Compressor Enterprise – Getting Started Guide
www.luratech.com [email protected] Setting up Job Entries: 19
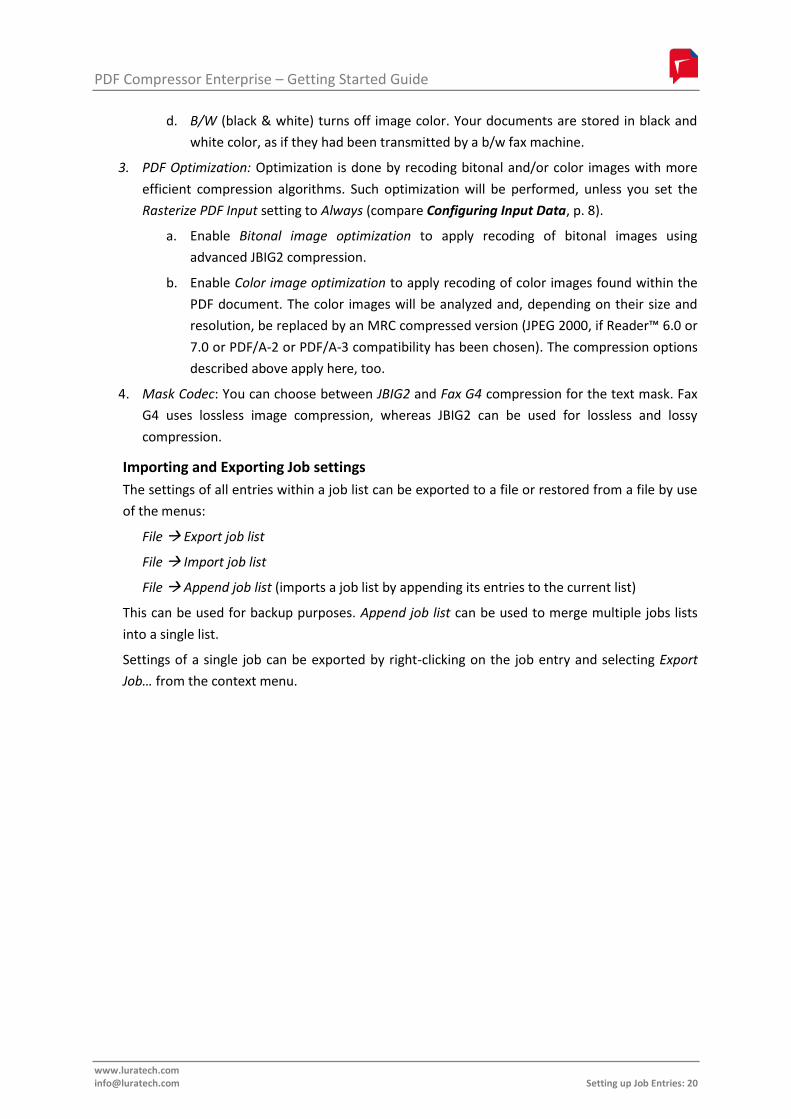
Configuring Document Compression
The Compression tab lets you configure the options for the image compression. These include
the overall quality setting, adoption to special input document types and other options.
1. Quality: A higher quality value results in higher PDF image quality, but PDF file sizes will
increase. A lower quality value corresponds to higher image compression ratios and thus to
smaller file sizes.
2. Document Class: You can use different classes to optimize the compression results for
specific input document types:
a. MRC Standard should be used for all purpose input documents. This is the default
setting.
b. MRC Check should be used to obtain better quality if the input document contains a
lot of fine structures like lines, thin graphical drawings, etc.
c. Photo turns off the segmentation into layers. Everything is put into the background
image layer. This should be only used if your input is of image type: no or only few
text and/or graphics.
n
PDF Compressor Enterprise – Getting Started Guide
www.luratech.com [email protected] Setting up Job Entries: 20
d. B/W (black & white) turns off image color. Your documents are stored in black and
white color, as if they had been transmitted by a b/w fax machine.
3. PDF Optimization: Optimization is done by recoding bitonal and/or color images with more
efficient compression algorithms. Such optimization will be performed, unless you set the
Rasterize PDF Input setting to Always (compare Configuring Input Data, p. 8).
a. Enable Bitonal image optimization to apply recoding of bitonal images using
advanced JBIG2 compression.
b. Enable Color image optimization to apply recoding of color images found within the
PDF document. The color images will be analyzed and, depending on their size and
resolution, be replaced by an MRC compressed version (JPEG 2000, if Reader™ 6.0 or
7.0 or PDF/A-2 or PDF/A-3 compatibility has been chosen). The compression options
described above apply here, too.
4. Mask Codec: You can choose between JBIG2 and Fax G4 compression for the text mask. Fax
G4 uses lossless image compression, whereas JBIG2 can be used for lossless and lossy
compression.
Importing and Exporting Job settings
The settings of all entries within a job list can be exported to a file or restored from a file by use
of the menus:
File Export job list
File Import job list
File Append job list (imports a job list by appending its entries to the current list)
This can be used for backup purposes. Append job list can be used to merge multiple jobs lists
into a single list.
Settings of a single job can be exported by right-clicking on the job entry and selecting Export
Job… from the context menu.
n
PDF Compressor Enterprise – Getting Started Guide
www.luratech.com [email protected] Administration and Licensing: 21
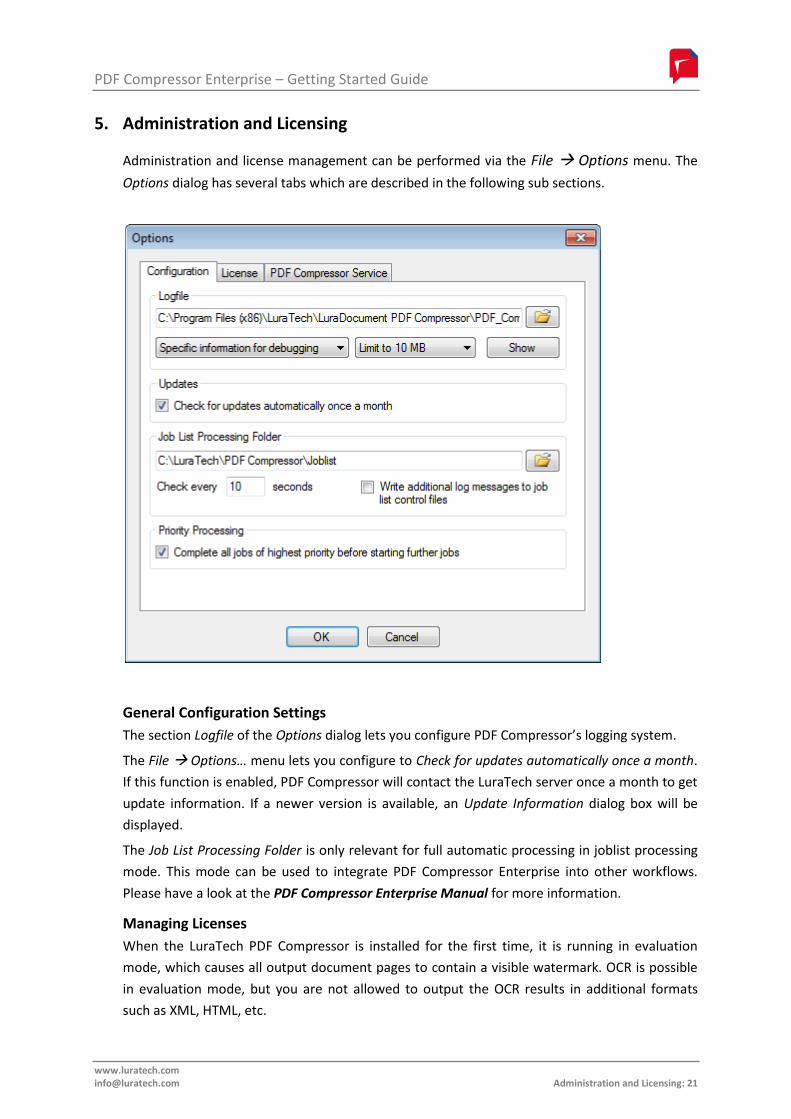
5. Administration and Licensing
Administration and license management can be performed via the File Options menu. The
Options dialog has several tabs which are described in the following sub sections.
General Configuration Settings
The section Logfile of the Options dialog lets you configure PDF Compressor’s logging system.
The File Options… menu lets you configure to Check for updates automatically once a month.
If this function is enabled, PDF Compressor will contact the LuraTech server once a month to get
update information. If a newer version is available, an Update Information dialog box will be
displayed.
The Job List Processing Folder is only relevant for full automatic processing in joblist processing
mode. This mode can be used to integrate PDF Compressor Enterprise into other workflows.
Please have a look at the PDF Compressor Enterprise Manual for more information.
Managing Licenses
When the LuraTech PDF Compressor is installed for the first time, it is running in evaluation
mode, which causes all output document pages to contain a visible watermark. OCR is possible
in evaluation mode, but you are not allowed to output the OCR results in additional formats
such as XML, HTML, etc.
n
PDF Compressor Enterprise – Getting Started Guide
www.luratech.com [email protected] Administration and Licensing: 22
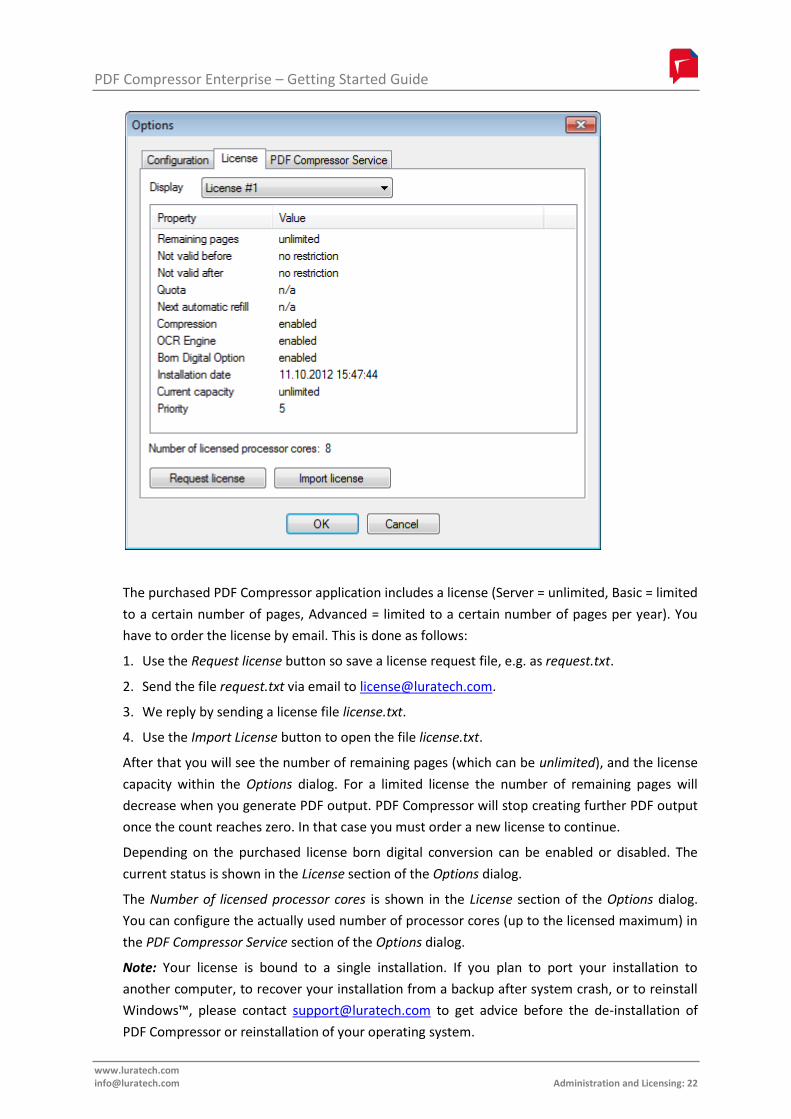
The purchased PDF Compressor application includes a license (Server = unlimited, Basic = limited
to a certain number of pages, Advanced = limited to a certain number of pages per year). You
have to order the license by email. This is done as follows:
1. Use the Request license button so save a license request file, e.g. as request.txt.
2. Send the file request.txt via email to [email protected].
3. We reply by sending a license file license.txt.
4. Use the Import License button to open the file license.txt.
After that you will see the number of remaining pages (which can be unlimited), and the license
capacity within the Options dialog. For a limited license the number of remaining pages will
decrease when you generate PDF output. PDF Compressor will stop creating further PDF output
once the count reaches zero. In that case you must order a new license to continue.
Depending on the purchased license born digital conversion can be enabled or disabled. The
current status is shown in the License section of the Options dialog.
The Number of licensed processor cores is shown in the License section of the Options dialog.
You can configure the actually used number of processor cores (up to the licensed maximum) in
the PDF Compressor Service section of the Options dialog.
Note: Your license is bound to a single installation. If you plan to port your installation to
another computer, to recover your installation from a backup after system crash, or to reinstall
Windows™, please contact [email protected] to get advice before the de-installation of
PDF Compressor or reinstallation of your operating system.
9
PDF Compressor Enterprise – Getting Started Guide
www.luratech.com [email protected] Support and Contact: 23
6. Support and Contact
If you incur any problems installing or using LuraTech PDF Compressor Enterprise you can
contact LuraTech’s support via e-mail. Please always include the following information:
1. The version number of LuraTech PDF Compressor Enterprise, e.g. 7.0.0.184. This number
is shown in the “About…“ dialog available through the button in the main window’s
toolbar.
2. The computer’s operating system, e.g. Windows 8.
3. A description of the error and the logfile as specified under File Options Log file.
Please send all support requests to: [email protected]
You can find further information and contact data on our web page: http://www.luratech.com
The specifications contained herein are subject to change without notice.
LuraTech shall not be liable for errors contained herein or for incidental or consequential
damages (including lost profits) in connection with the furnishing, performance or use of this
material whether based on warranty, contract, or other legal theory.
© 2015 LuraTech Imaging GmbH
Willy-Brandt-Platz 1
42853 Remscheid
Germany
&